CIS Help and User Guide
CIS Help and User Guide will take you through the features and settings for the Sicon CIS module for Sage 200.
Search the page by pressing Ctrl + F (windows) or CMD +F (Mac) on your keyboard.
Back to all user guidesProduct overview
Help and User Guide maintained for CIS version v221.0.26 and Upwards.
CIS is designed specifically as an additional module for Sage 200. Fully integrated with the Sage 200 financial ledgers this is a simple module to learn and to use. With on-line subcontractor verification, CIS submissions and production of payment certificates within the Sage report designer this module provides a valuable piece of additional functionality.
When a subcontractor’s (PL Supplier) invoice is paid then, in the case of a CIS subcontractor the tax is paid to HMRC by the invoice payee. To allow this, the subcontractor would need to be verified with the HMRC to ensure they are known to the HMRC and what tax rate those are on.
HMRC will supply information relating to the subcontractor that needs to be stored against the subcontractor supplier account to allow correct submission of CIS returns.
(For full information see https://www.gov.uk/government/publications/construction-industry-scheme-cis-340)
Firewall Note: Please ensure that an outbound rule is added on your firewall to allow processing via sage200desktop.exe application. If this is not set, an error (‘Illegal characters in path’) may be returned when generating HMRC submissions.
1. CIS Reverse Charge VAT
NOTE: This feature is only Available from Sage 200 Cloud Professional Summer 2019 onwards.
As of March 2021, those working in the UK’s construction industry might have to handle and pay VAT in a different way following the introduction of the new VAT reverse charge system for the Construction Industry Scheme (CIS).
For supplies of certain specified construction services, the customer will be liable to account to HMRC for the VAT for these purchases instead of the supplier. The reverse charge will include goods, where those goods are supplied with the specified services.
HMRC provided information on Reverse Charge VAT: https://www.gov.uk/government/publications/vat-reverse-charge-for-building-and-construction-services/vat-reverse-charge-for-building-and-construction-services
HMRC provided flowcharts on the application of Reverse Charge VAT:
https://www.gov.uk/guidance/vat-reverse-charge-technical-guide#flowcharts
Sage have also provided a lot of useful information on the Reverse Charge VAT: http://desktophelp.sage.co.uk/sage200/professional/Content/General/CIS%20reverse%20charge%20FAQs.htm
The main impact on this change within the Sage system is for the VAT return, however HMRC recommends that text is included on Invoices and Credit Notes that are eligible for CIS Reverse Charge VAT.
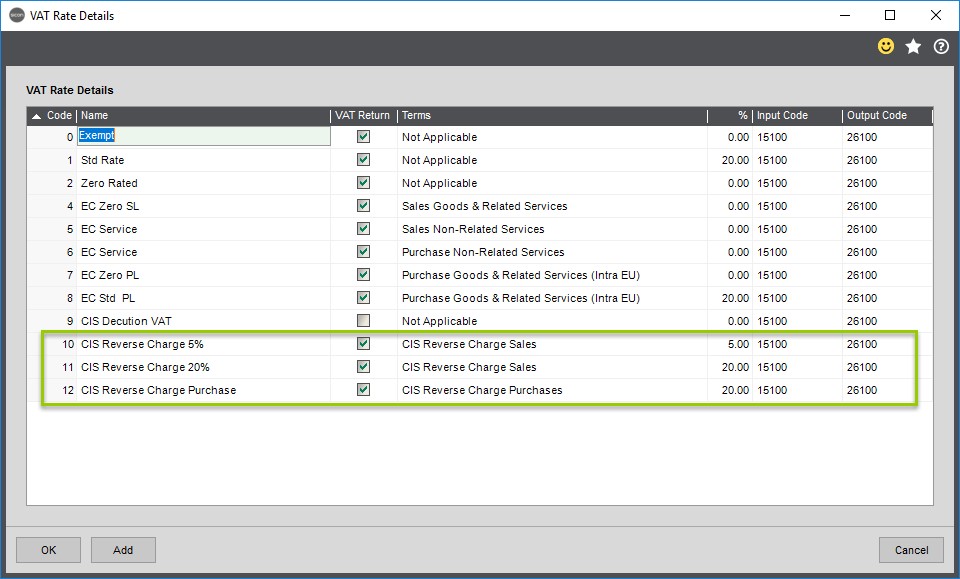
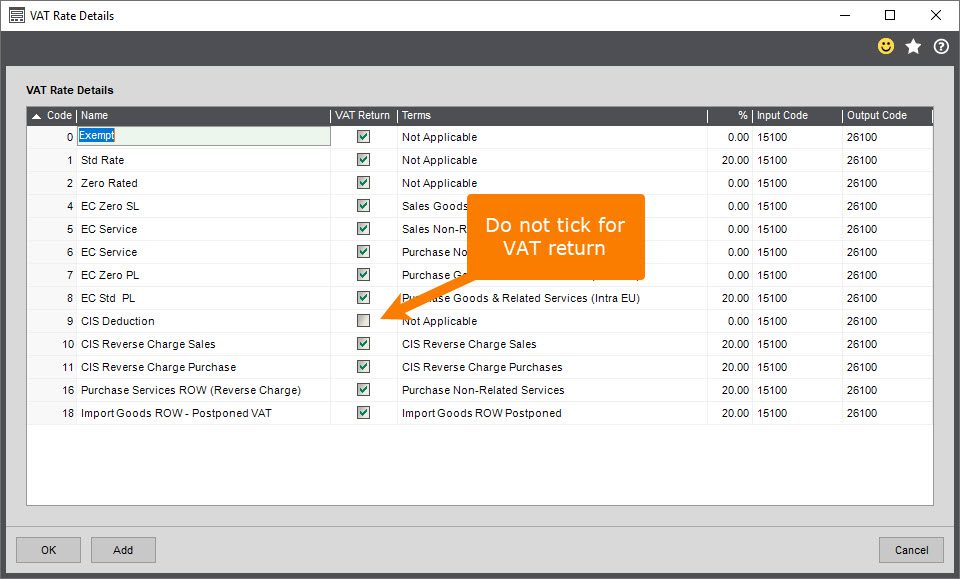
In order to setup the new VAT rates, it is recommended that you speak to your Sage Business Partner. However below is an example of the new VAT Codes in the VAT Rates found in Accounting System Manager or Configuration Settings within Sage.
1.1. CIS Reverse Charge Text on Invoice & Credit Notes
As part of the changes to Sage 200c Summer 2019 and onwards Sage have included the recommended text from HMRC within their Sales Order Processing Module. Navigating to Sales Order Processing > SOP Utilities > System Set Up > SOP Settings and the Invoice Printing Tab shows you these options:
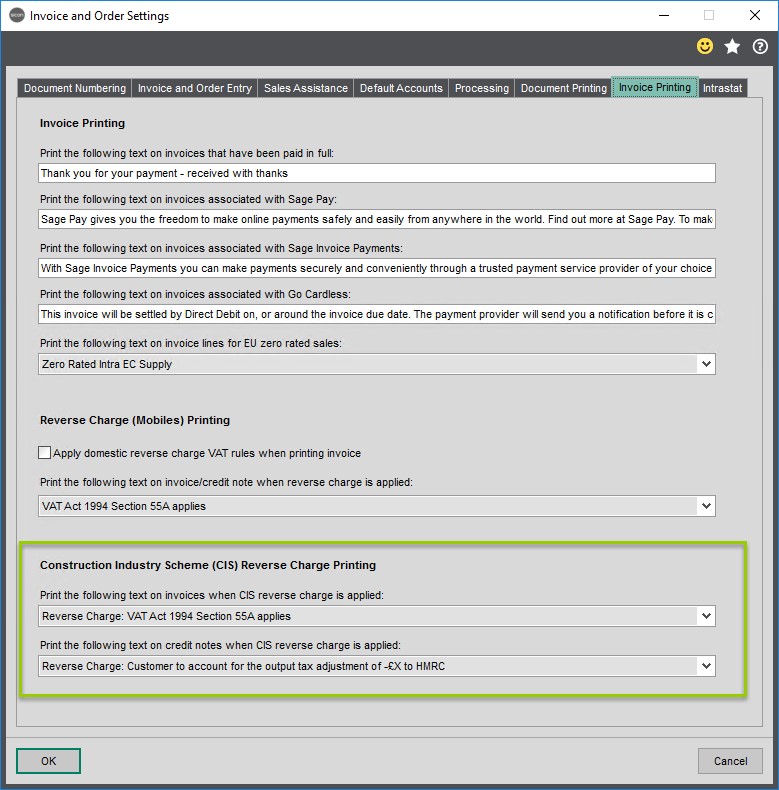
For the ‘Print the following text on invoices when CIS reverse charge is applied’ options you have:
Reverse Charge: VAT Act 1994 Section 55A applies
Reverse Charge: S55A VATA 94 applies
Reverse Charge: Customer to pay the VAT to HMRC
For the ‘Print the following text on credit notes when CIS reverse charge is applied’ option you have:
Reverse Charge: Customer to account for the output tax adjustment of -£X to HMRC
Reverse Charge: UK customer to account for the output tax adjustment of -£X to HRMC
Customer to account to HMRC for the adjustment to reverse charge output tax on the VAT exclusive price of items.
Note: the -£X is displayed with the actual VAT value for the credit note.
The Customer Valuation template that is supplied with the Construction Suit has been adapted to include the selected text on the bottom of the template in a similar fashion to the Sage SOP Invoice layout.
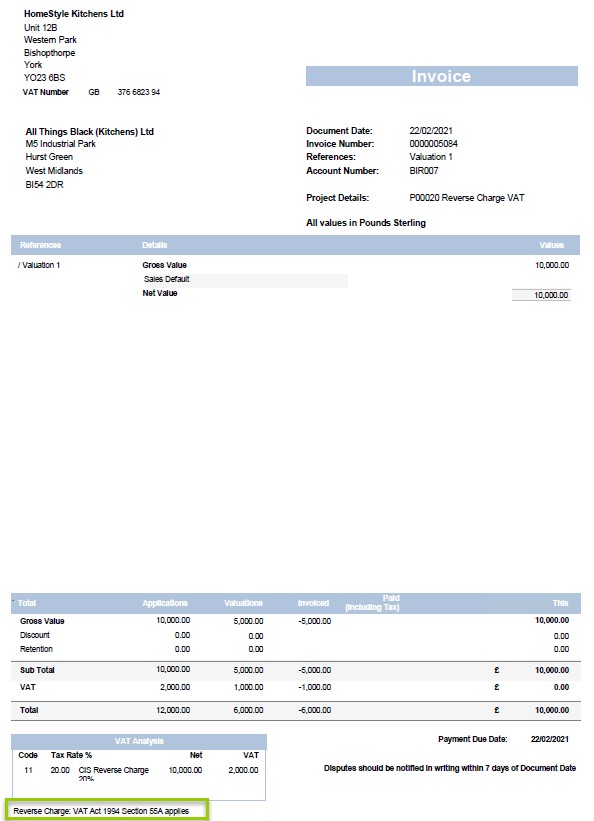
Below is the Standard Sage SOP Invoice Layout with the Reverse Charge text appearing at the bottom:

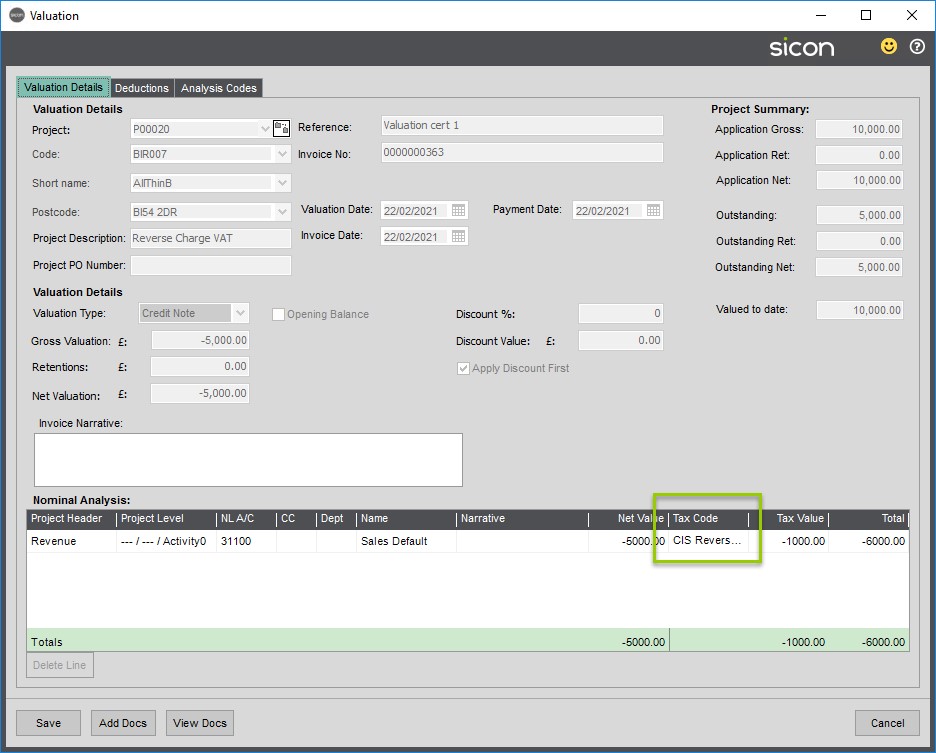
As an example of how this works with the Customer Application Ledger a certificate has been entered for £10,000 using the reverse charge VAT code:
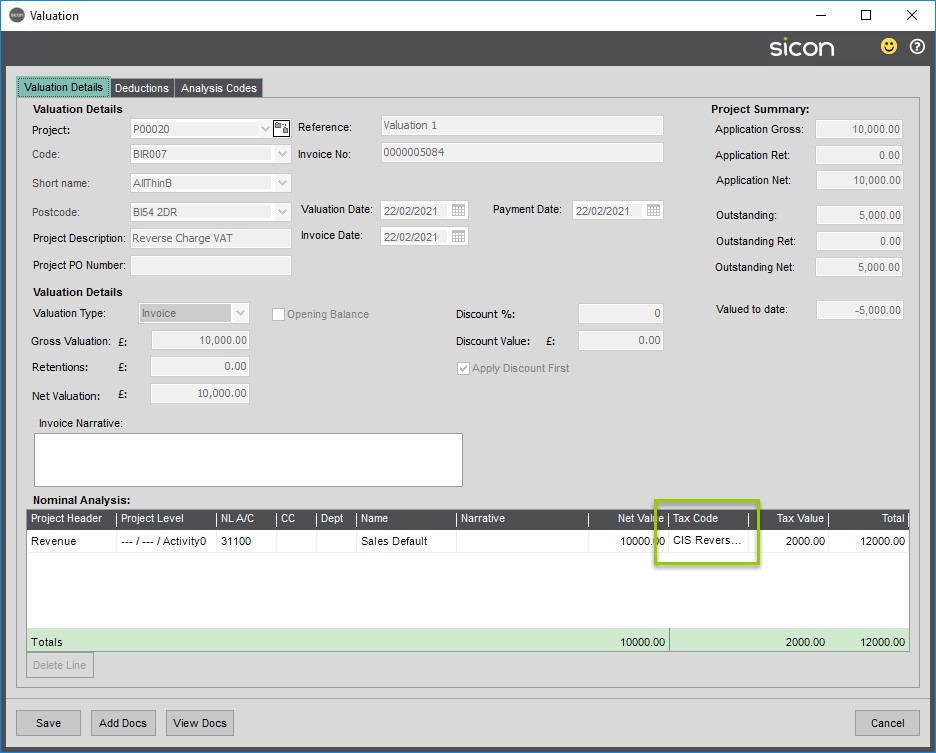
When printing this Valuation Invoice, we can see the Reverse charge VAT text at the bottom of the Layout:
When adding a Credit Note Valuation to the Applications Module the Text displayed is from the Credit Note option selected in SOP Settings:
When printing the Credit note using the Construction Invoice Layout (it is the same layout for Credit Notes and Invoices) this displays:
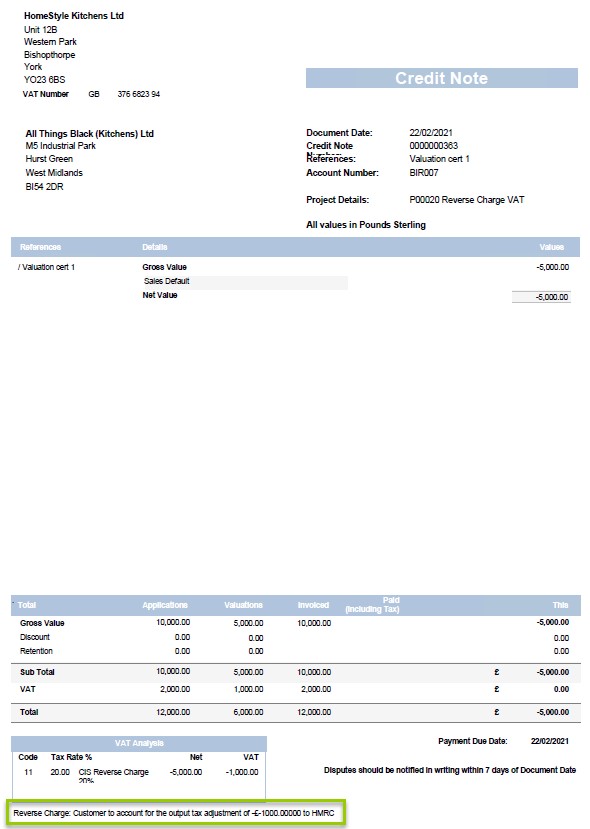
The -£X is replaced by the VAT value of the Credit Note.
2. Capturing Subcontractor Information
2.1. CIS Subcontractor Details
To capture the Construction Industry Scheme subcontractor information against a Supplier, there is a Sicon tab on the Create and Amend Supplier screens. Within this tab there is a section called CIS and RCT. From here you can select the CIS option from the Subcontractor Scheme.
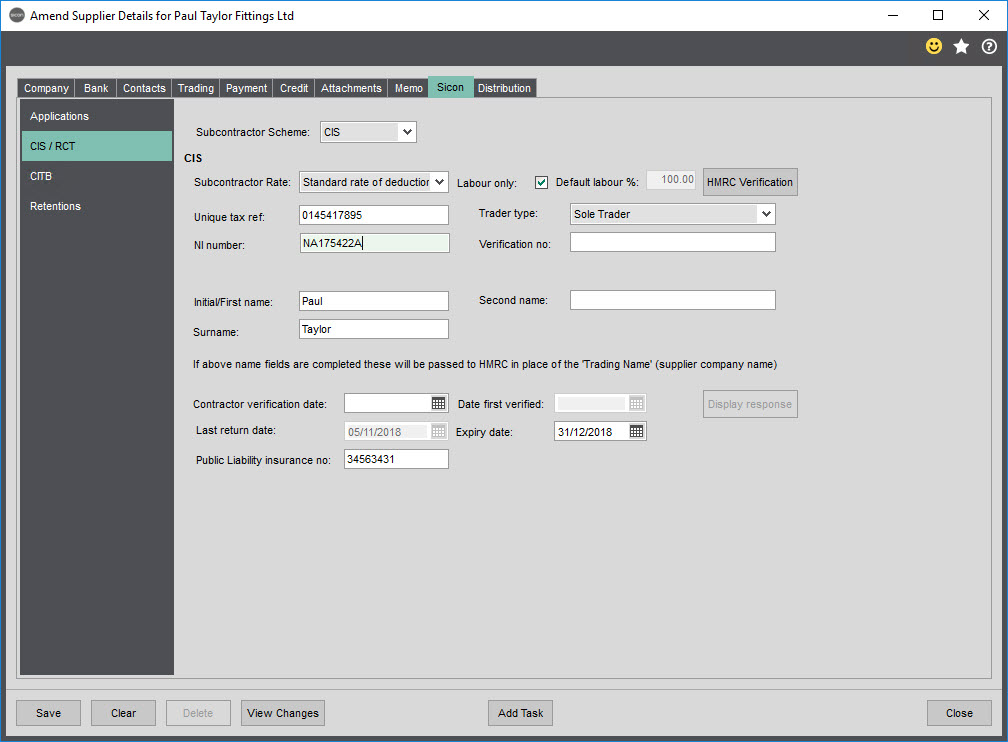
Subcontractor Scheme: Select from the drop-down the type of Scheme is relevant to the Supplier. None is used for standard Suppliers, CIS for the HMRC Constructions Industry Scheme and RCT is for Relevant Contract Tax Suppliers (Ireland).
Subcontractor Rate: Select from the drop-down menu to set the Subcontractor rate of deductions. This will be automatically set if using the online HMRC Verification and the HMRC details are stored within the CIS Settings
Labour Only: Allows the account to be flagged for labour only transactions – no materials, when this is ticked, the Default Labour % will populate with 100%.
Trader type: This is the type of business, whether Sole Trader, Company, Trust or Partnership. Selecting an option will show the required information to be entered.
Unique tax ref (UTR): used by HMRC.
Verification no: used by HMRC and will be sent at time of verification.
NI Number (NINO): National insurance number of the subcontractor. National Insurance number if they’re a sole trader – you can’t verify temporary numbers, which start with ‘TN’ or 2 digits
CRN (Company Registration Number): If the company operates as a subcontractor then they will be given a CRN.
Initial/First name: See Name Fields below for details.
Second Name: See Name Fields below for details.
Surname: See Name Fields below for details.
Contractor verification date: Date verification was last carried out.
Date first verified: The first date this subcontractor was first verified.
Display response: This button opens a window to display the response sent from the HMRC Sub-contractor Verification (see below).
Last return date: The last CIS return that this contractor was included on. The ‘contractor verification date’ and ‘last return date’ is used to establish if the contractor needs to be verified again. The current rule is that if the contractor has appeared on a CIS return in the current tax year, or previous 2 tax years, then they do not need to be re-verified.
Public Liability Insurance No: Allows you to store the public liability insurance certificate details.
Expiry Date: The date when the public liability expires – this is for reporting.
Name fields: For Sole Trader, Company or Trust this is the legal business name (or the trading name they gave when they registered with CIS). The Sage supplier name will be used as a Trading name for verification to HMRC, however, for verification purposes, a person’s name may be required instead of a trading name and these fields allow that information to be entered. If the name is completed then this will be used in place of a trading name when verifying the supplier with HMRC. For Partnerships the Partnership name will be the Sage supplier name, but this allows the entry of an individual’s name for additional information when verifying sub-contractor partnership details with HMRC.
HMRC Verification: The HMRC verification button attempts to verify the Subcontractor with HMRC based on the details that have been entered. This will always attempt to connect to the Live HMRC gateway.
Note: If you are testing this area of the software, you will receive a verification number from HMRC, this will replace any existing verification numbers you have used whether manually entering your CIS return via HMRC or another system.
2.2. RCT Subcontractor Details
To capture Relevant Control Tax information against a Supplier, there is a Sicon tab on the Create and Amend Supplier screens. Within this tab there is a section called CIS and RCT. From here you can select the RCT option from the Subcontractor Scheme.
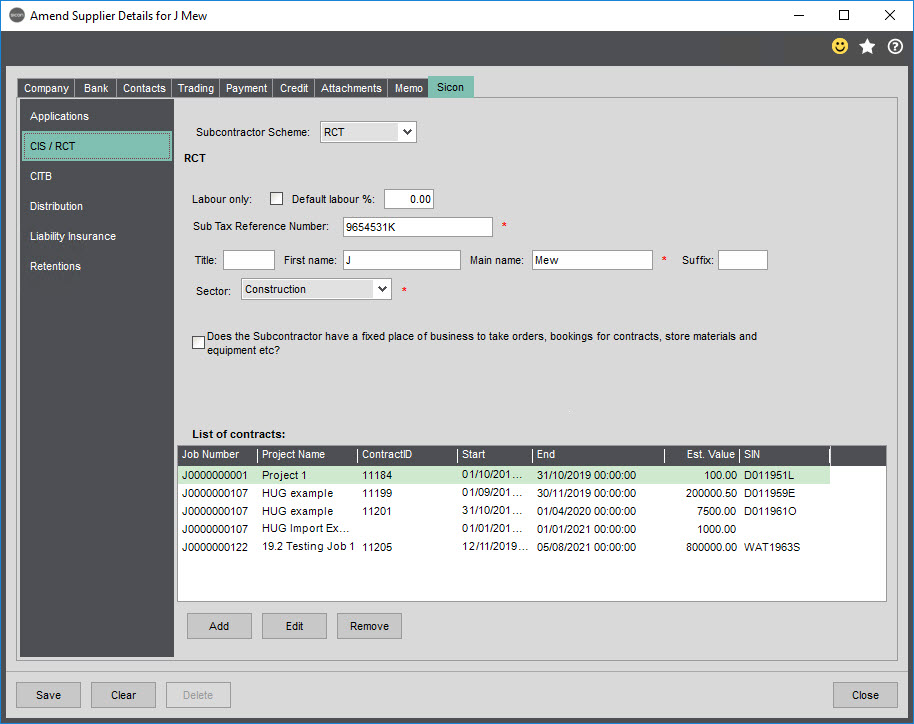
Subcontractor Scheme: Select from the drop-down the type of Scheme is relevant to the Supplier. None is used for standard Suppliers, CIS for the HMRC Constructions Industry Scheme and RCT is for Relevant Contract Tax Suppliers (Ireland).
Labour Only: Allows the account to be flagged for labour only transactions – no materials, when this is ticked, the Default Labour % will populate with 100%.
Sub Tax Reference Number: The Subcontractor Tax Reference Number must be in the correct format i.e. 7 digits followed by 1 or 2 letters. This is a mandatory field.
Title: Subcontractors Title if relevant, Miss, Mrs, Mr, etc.
First Name: Subcontractors first name.
Main Name: Subcontractors main name. This is a mandatory field.
Suffix: Used to show qualifications (e.g. BEng).
Sector: Select from the drop-down the type of Industry the Subcontractor will be working in. This will be choice of Construction, Meat, Forestry. This is a mandatory field.
In order for the RCT deduction to be made there needs to be an association between Supplier and Job. This can be done from the Supplier themselves or the Amend Job Screen.
In Order to associate a Supplier to a Job from the Amend Supplier screen click the Add Button below the ‘List of contracts.
The First piece of information that needs to be filled in, is the Job Number, once selected all the other fields become active.
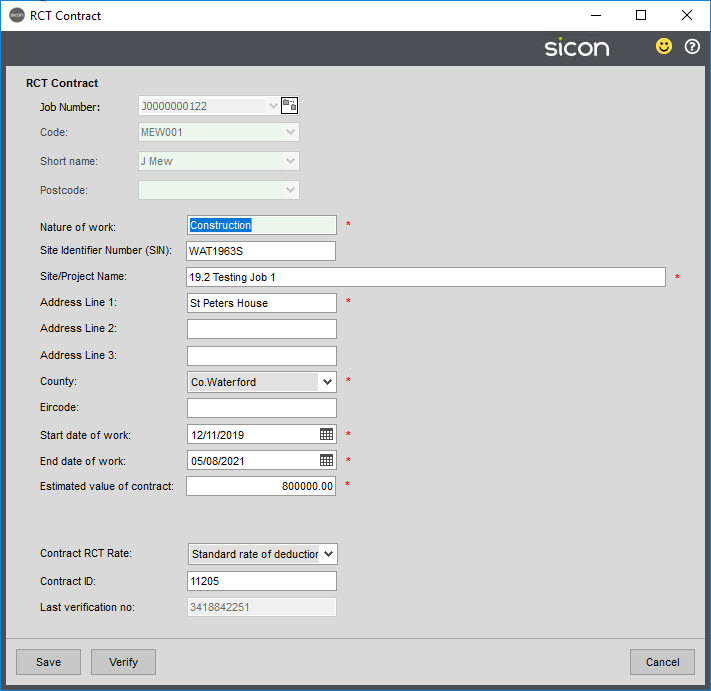
Nature of work: Brief description of the nature of the work outlined in the contract. This is a mandatory field.
Site Identifier Number (SIN): The Site Identifier Number, received from the Revenue Online Service (ROS). This is populated during the Verify processes. For more information on the SIN please see the link below to the Irish Tax and Customer website
Site/Project Name: The Site or Project Name. This is a mandatory field.
Address Line 1: Address Line 1 of the Site / Project. This is a mandatory field.
Address Line 2: Address Line 2 of the Site / Project.
Address Line 3: Address Line 3 of the Site / Project.
County: Drop down list of Ireland County Codes. This is a mandatory field.
Eircode: The Eircode of the Site or Project
Start date of work: The start date of the contract. This is a mandatory field.
End date of work: The end date of work. This is a mandatory field.
Estimate value of contract: The estimated value of the agree contract with the Subcontractor. This is a mandatory field.
Once all the required fields have been filled in, you can verify with ROS if the details have been entered in the RCT settings. Prior to Verifying the Subcontractor against the Site/Project, the system will save the details on the Supplier and Update Contract RCT Rate, Contract ID and Last Verification No. based on the details supplied.
If you are not connected to ROS the Contract RCT Rate and Contract ID can be manually entered.
3. CIS Subcontractor Verifications
3.1. Pending CIS Subcontractor Verifications
The ‘Pending Subcontractor Verifications’ menu item allows the user to see what subcontractor verifications will need renewing or first-time verifications.
Current HMRC rules on the verification process: “The rule is that a contractor does not have to verify a subcontractor if they last included that subcontractor on a return in the current or 2 previous tax years”. This is outline on the HMRC website on the following link in section 3.2: https://www.gov.uk/government/publications/construction-industry-scheme-cis-340/construction-industry-scheme-a-guide-for-contractors-and-subcontractors-cis-340#how-payments-are-made-to-subcontractors
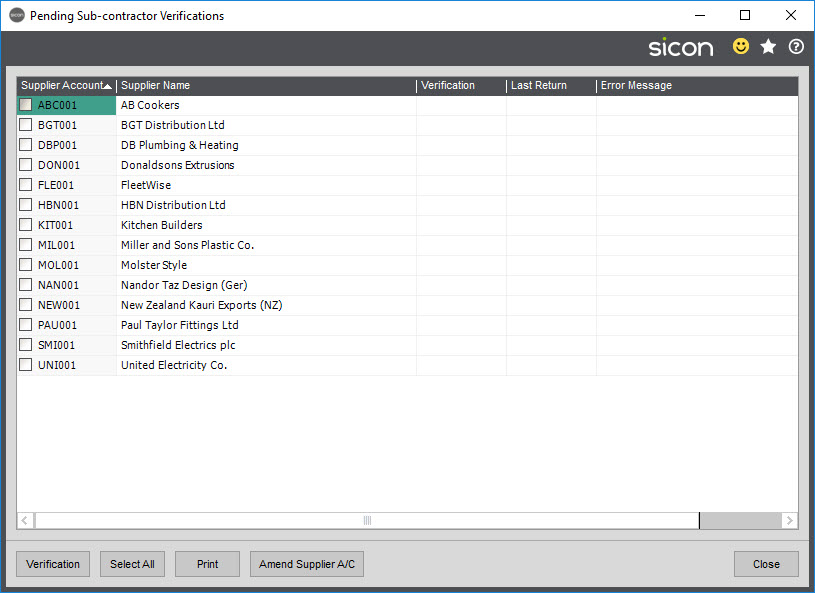
This window shows the supplier and their last verification date and last CIS return date.
The buttons shown are:
Verification: Sends the selected (the tick box next to the Supplier Code) subcontractors to the HMRC for verification. The processed information will be updated to the subcontractor records.
Select/Unselect All: Selects/Unselects all the subcontractors in the list.
Print: Prints a list of the information provided.
Amend Supplier A/c: Opens the Amend Supplier Details form, in case changes are required for the Verification to pass.
Close: Closes the screen
Verification Number: The subcontractor’s verification number provided by the HMRC will be displayed here. These numbers are important and must be recorded on subcontractor’s monthly statements. If the subcontractors cannot be matched with the HMRC records, HM Revenue and Customs will give you a special verification number unique to each “unmatched” subcontractor. You also need to provide the subcontractor’s verification number where you have made deductions at a higher rate. “Unmatched” subcontractors will need these verification reference numbers to get refunds later.
Example 1: A standard verification reference number looks like this: V0000543267.
Example 2: An “unmatched” verification reference number looks like this: V0000543267A or V0000543267BB.
3.2. CIS Subcontractor Verifications
This window shows the supplier and their last verification date and last CIS return date.
This screen allows the user to re-verify a selection, or all of the existing subcontractors. This file will be sent to the HMRC and the information returned will be updated to the subcontractor(s) record(s).
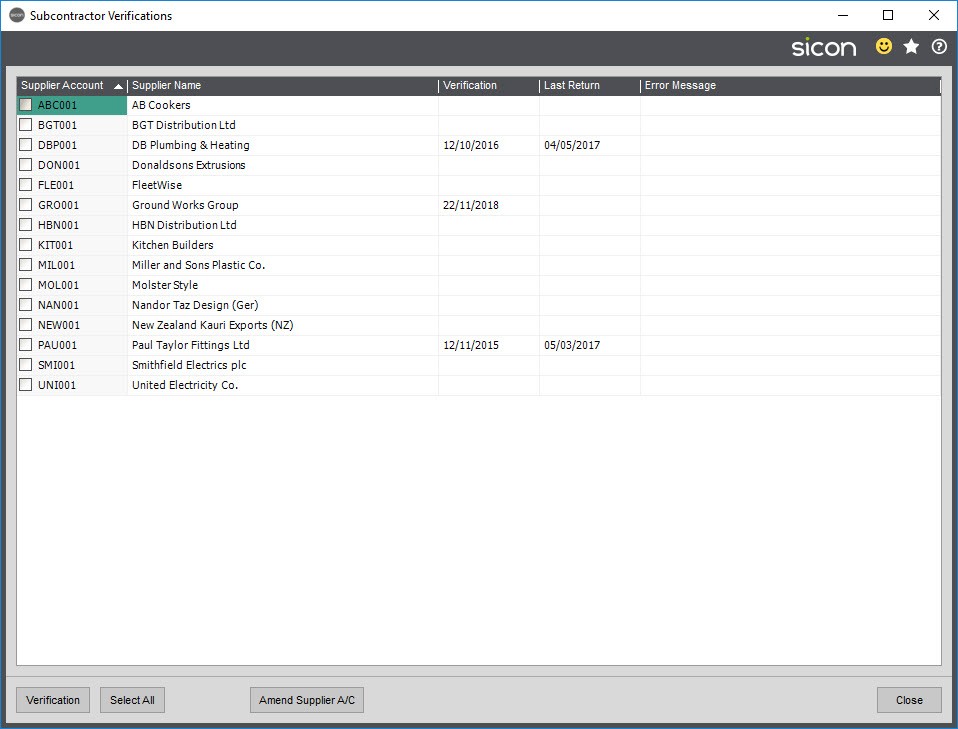
The buttons shown are:
Verification: Sends the selected subcontractors to the HMRC for verification. The processed information will be updated to the subcontractor records.
Select/Unselect All: Selects/Unselects all the subcontractors in the list.
Amend Supplier A/C: Opens the Amend Supplier Details form, in case changes are required for the Verification to pass.
Close: Closes the screen
3.3. Checking the Subcontractor Information
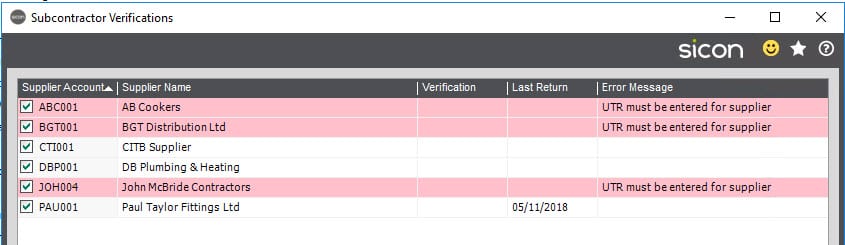
When the verification fails it is often cause by incorrect information being passed from the Supplier Details stored in Sage to HMRC. Depending on how you are verifying the Supplier the HRMC will pass back some information on why it has failed. For example, if you are using the Subcontractor Verification screen from the menu, if you try and verify a Subcontractor without a UTR, this will be prompted as an error message.
When the error returned isn’t as obvious as the above, the information fed back from HMRC isn’t always as clear. For example, you may receive the message ‘Invalid content was found starting with element ‘Subcontractor’’. In this example, HRMC is telling you that something in the information you have sent across is incorrect. This statement means that within the XML files the body of the details do not agree with HMRC. Below outline some common areas where these details maybe incorrect.
Authentication Errors – One of the most common connection errors for first time users of the online service is the HRMC account isn’t setup to use online submissions. Please contact HMRC to ensure you account is setup correctly.
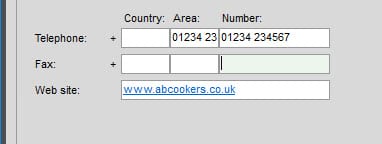
Telephone number – A common mistake is having the telephone number in the incorrect format.
Sage will automatically include a + in the Country code, so including an extra + can cause a failure.

Storing multiple telephone numbers against the main address in the Supplier Account.
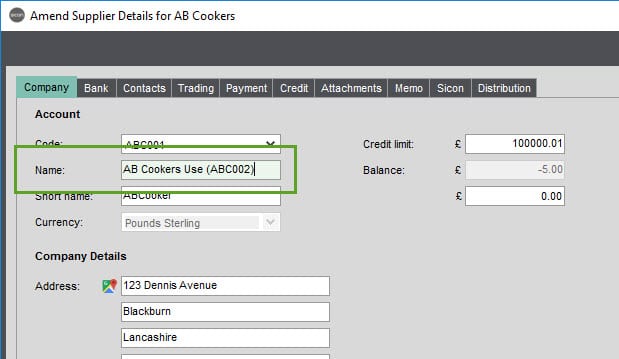
Supplier Name – Some Trader Types send the Supplier Name across, so ensuring the correct Supplier Name is stored is a requirement: In the example below, a new account for AB Cookers has been created so the accounts team have amended the name to state the new account so it can be seen on transaction entry. When a CIS Return is submitted for payments currently in the system, this Supplier Name will be used and will fail.
Post Code Format – Another common cause of a failed verification is the format of the Post Code. This could be anything from a migration populating the wrong post code field (Country has been populated in the Post Code as an example).
Incorrect Name on Partnership Trader Types – For Partnership Trader Types, you need to ensure that the correct Initial/First name and Surname stored under the Subcontractor Details
Permissions on the response file locations – If a user is submitting the CIS Return, or Verifying a Supplier, that user will require permissions on the HMRC file locations as set in the HMRC Settings.
If you have found that you are still getting verification failures, it is recommended that you check Companies House to ensure the details you have on file match what is stored with HMRC.
https://www.gov.uk/get-information-about-a-company
As part of the Verification and CIS Return process files are stored that contain all the information sent to HMRC, you can also check these files to see which details are being sent across. Please see sections 12.1, 14 and 15 for more information on where and what is contained in these files.
4. Adding Purchase Ledger Transactions with CIS/RCT Suppliers
4.1. CIS – Calculate deductions using subcontractor (supplier) account percentages
When a Purchase Transaction is entered against a CIS subcontractor with the setting ‘Calculate deductions using subcontractor (supplier) account percentages’ selected you are prompted to record how the Transaction is split between Labour and Materials.
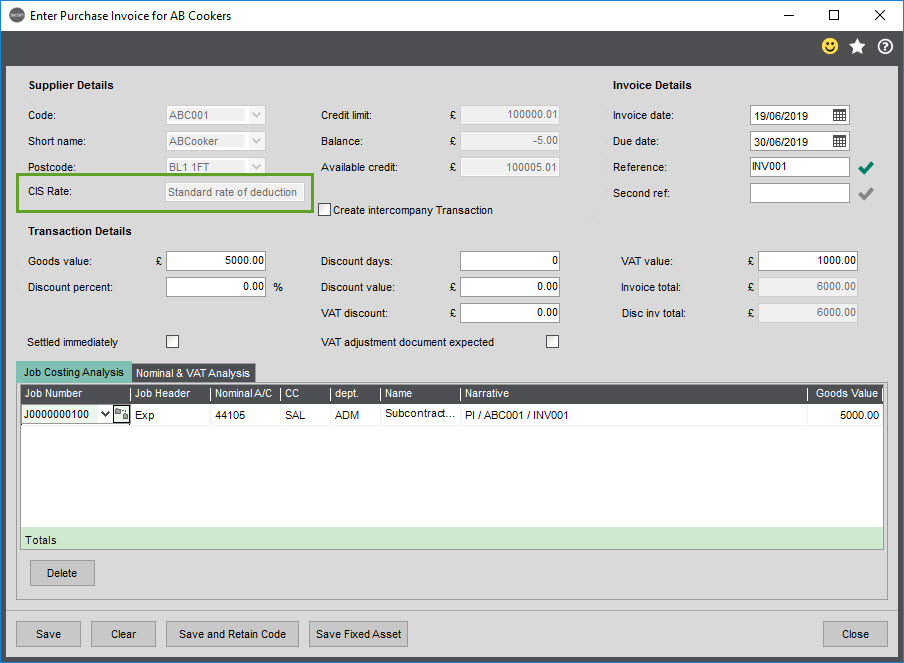
When you enter a Transaction for a subcontractor, the first sign that it is a CIS transaction is the CIS Rate shown under the Supplier Details. Other than this you can record the Transactions as you would in standard sage. The example below is also using the Sicon Job Costing module so the Transaction is being recorded against Job J000000100.
Once the ‘Save’ button is selected, you are prompted to record the split between the Labour and Materials on the invoice. If you have set a default percentage on the Supplier Account this value would be pre-populated. The screen will allow you to either enter a percentage value or the actual value which will back calculate the percentage.
The summary at the bottom of this screen will show you how much CIS deduction had been made against the transaction.
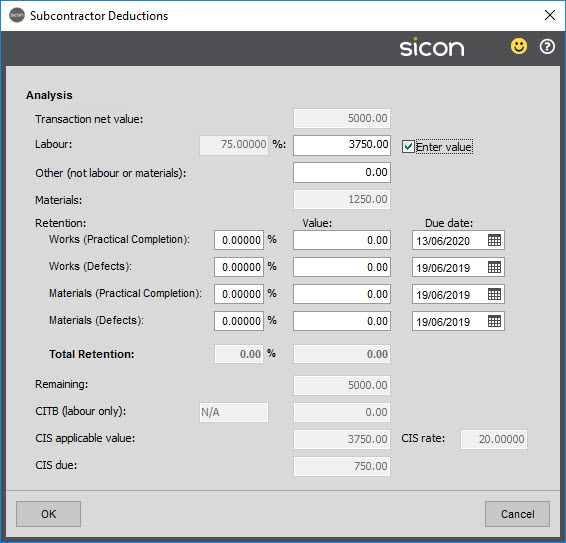
Confirming this split will then prompt you that a CIS Purchase Credit (for an Invoice) or a CIS Purchase Invoice (for a Credit Note) has been automatically been added for the subcontractor. This would have also automatically allocated itself against the original transaction, leaving £5250 remaining to be paid (£1250 + VAT for Materials plus £3750 + VAT Labour minus CIS deduction of £750).

On the Supplier Transaction enquire screen, all CIS transactions are shown with a Green Tick for transactions with a deduction or a Red Cross for transactions with no deduction (Gross). Highlighting a transaction will show a new tab on the transaction summary called CIS. This will include details on the Labour and Material splits, how much is applicable for the CIS deduction, the rate of deduction and the credit note details.
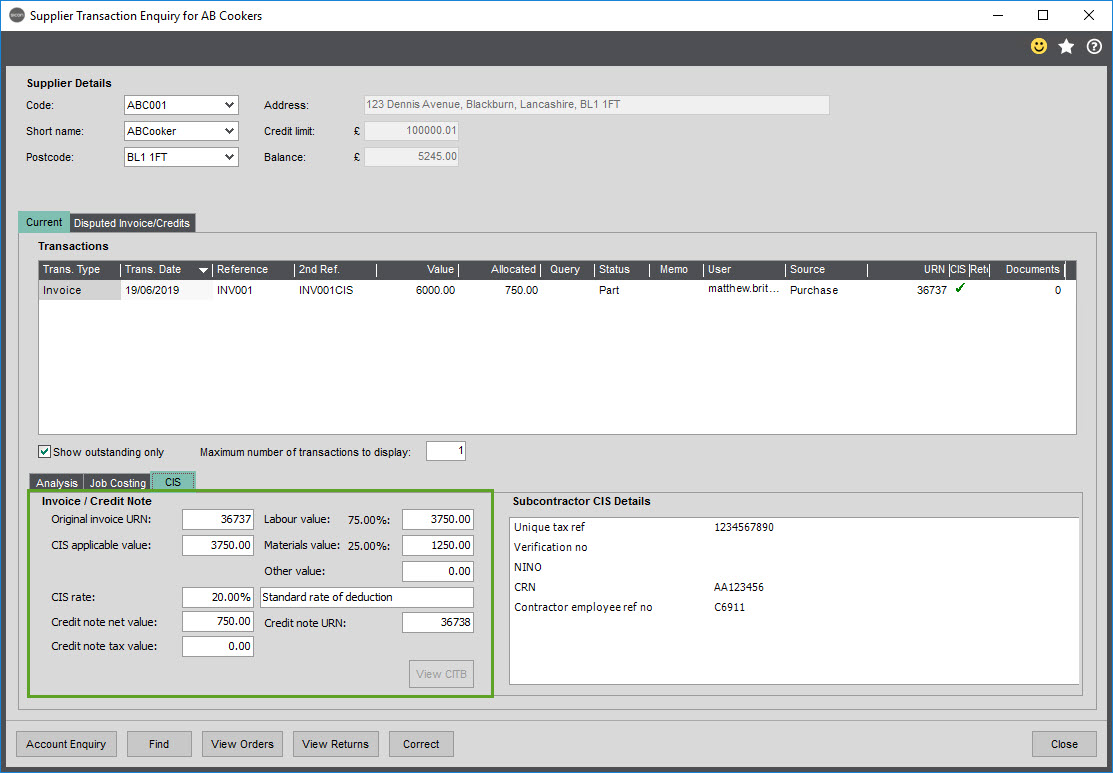
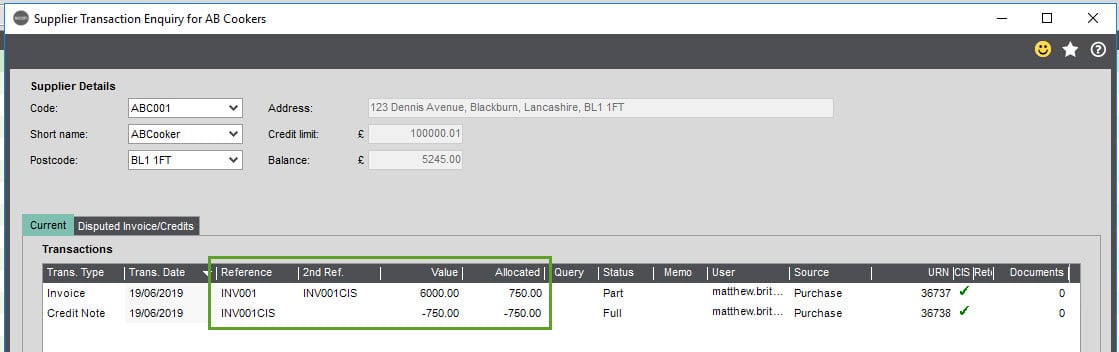
Unticking the ‘Show outstanding only’ will display the CIS credit that has been allocated against this invoice, as you can see from the Reference and 2nd Reference, it uses the same invoice number and append ‘CIS’ on the end.
4.2. CIS – Calculate deductions based on configured nominal accounts
When a Purchase Transaction is entered against a CIS subcontractor with the setting ‘Calculate deduction based on configured nominal accounts’ selected, the split between Labour and Materials will be based on the nominal code.
As with the previous section when you enter a Transaction for a subcontractor, the first sign that it is a CIS transaction is the CIS Rate shown under the Supplier Details. Other than this you can record the Transactions as you would in standard sage, however the split on materials is going to be based on the nominal codes as defined within the settings. Here two lines have been recorded against Job J0000000100, a Material line for £3400 and a Labour line for £5100.
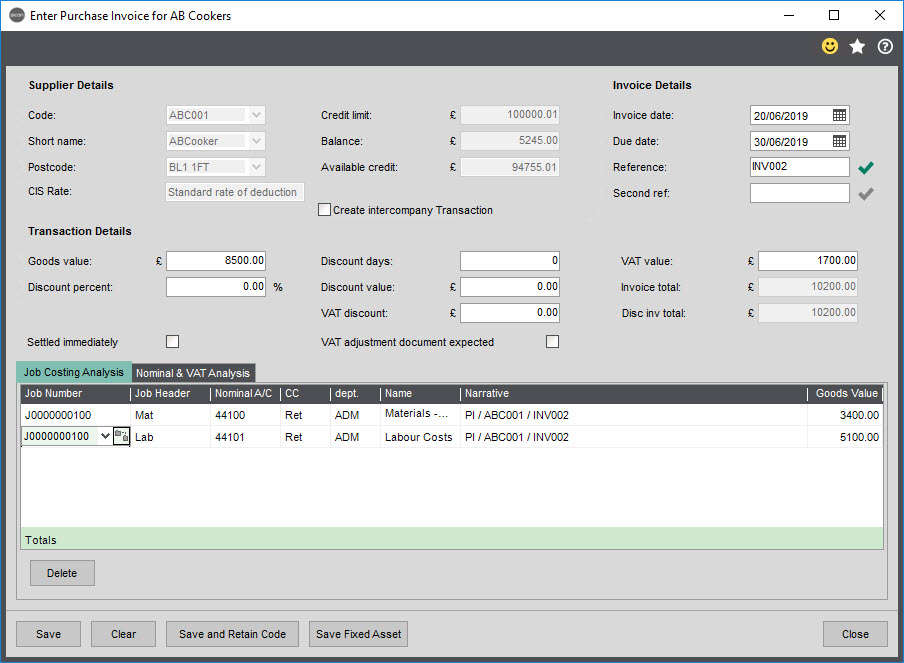
Click on the Save, will now automatically credit the deduction based on the nominal codes used on the transaction. In this instance as the Labour value was £5100 a deduction of £1020 has been created. (£3400 + VAT for Materials plus £5100 + VAT Labour minus CIS deduction of £1020).

On the Supplier Transaction enquire screen, all CIS transactions are shown with a Green Tick for transactions with a deduction or a Red Cross for transactions with no deduction (Gross). Highlighting a transaction will show a new tab on the transaction summary called CIS. This will include details on the Labour and Material splits, how much is applicable for the CIS deduction, the rate of deduction and the credit note details.
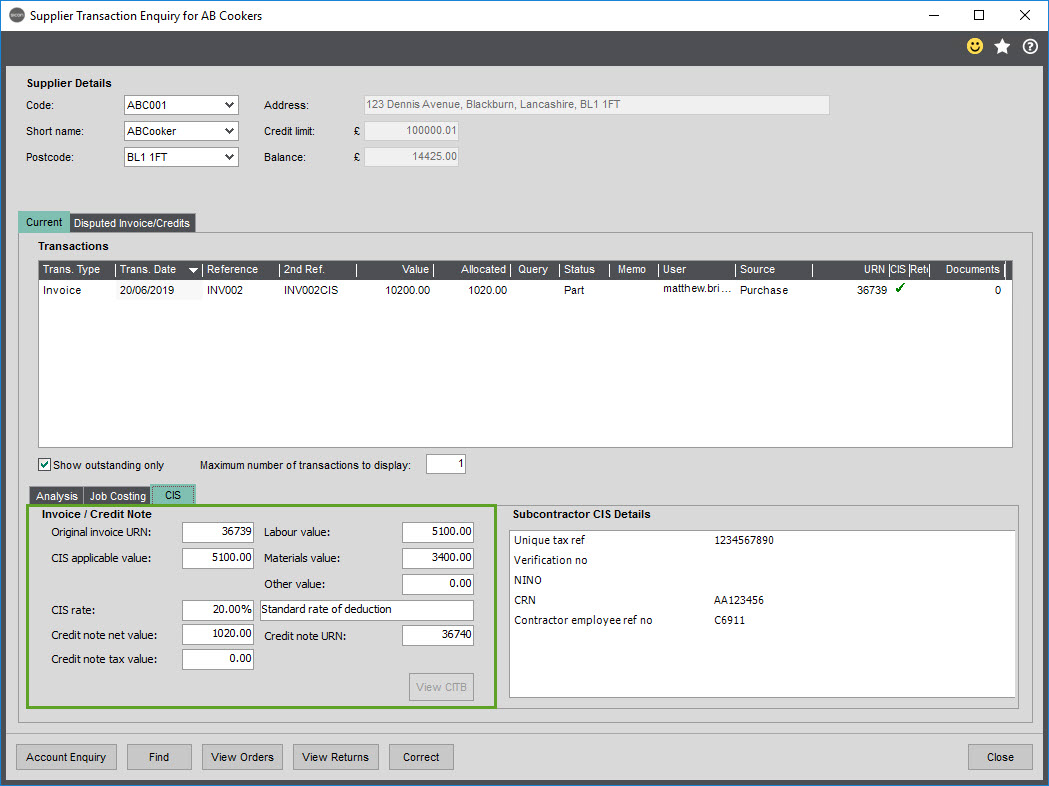
Unticking the ‘Show outstanding only’ will display the CIS credit that has been allocated against this invoice, as you can see from the Reference and 2nd Reference, it uses the same invoice number and append ‘CIS’ on the end.
4.3. CIS – Transactions with retentions
If a Supplier account is also flagged for a Retention, then an additional Credit Note will be created for the retention and adjust the amount of the CIS deduction based on the retention value.
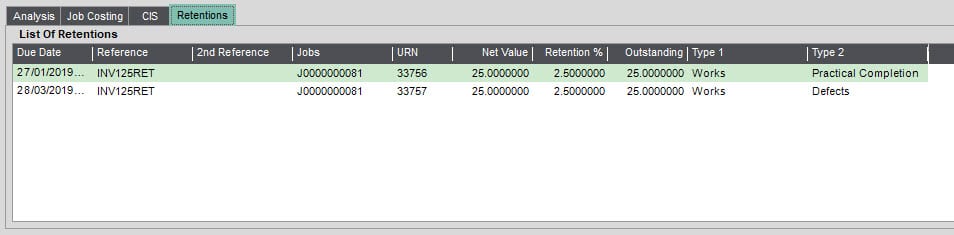
The Supplier DB Plumbing & Heating has been set to have a 2.5% retention on Works (Practical Completion) and 2.5% on Works (Defects) on their Sage Supplier Details.
A Transactions has then been entered with the CIS nominal account split setting (see section 3.2). On this transaction, £500 has been Invoiced for Labour and £500 has been Invoiced for Materials.
When the invoice is saved a Retention Information window will be displayed, these details may be amended here if required, but will default based on the Supplier Account defaults.
When you click OK you will get a confirmation to say that a credit has been raised for the value of the retention.
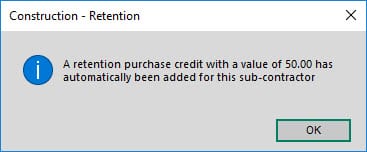
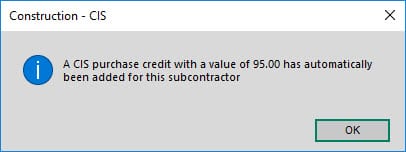
When the retention credit message is confirmed the system will the show the CIS credit Note details.
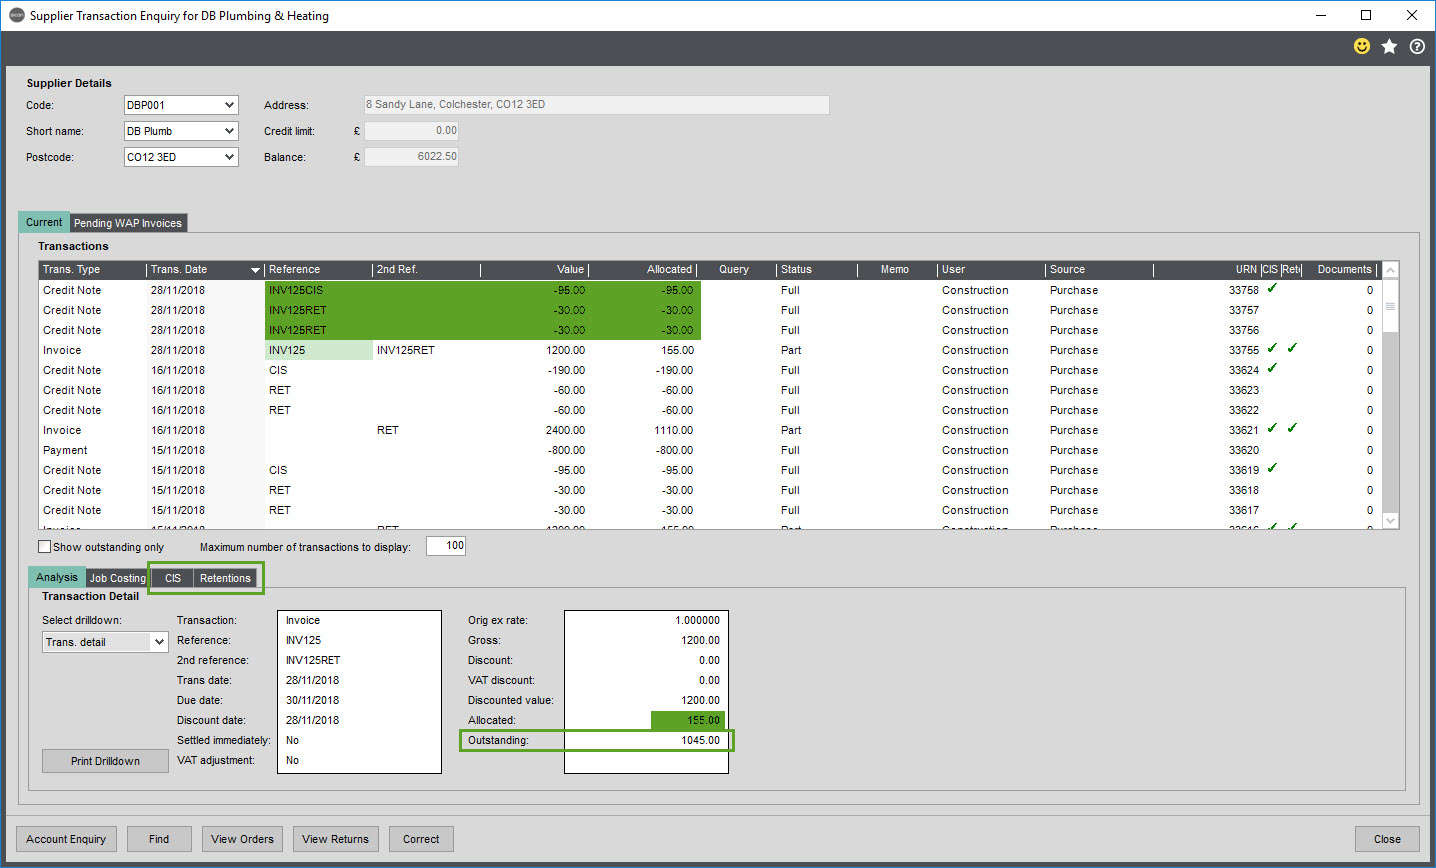
Above, you can see that the Invoice (Invoice 125) has been added with an outstanding amount of £1047.50 (boxed).
The Credit Note has been applied for the CIS amount of £95. The Credit Note also has the reference number of the invoice with an additional ‘CIS’ at the end (see highlighted value – Invoice 125CIS) denoting it to be a CIS Credit Note and a Retention Credit Note of 2x£30 – Invoice 125RET to identify this as the retention credit against Invoice 125.
Clicking the CIS Tab will bring up the CIS information for this invoice:

Click the Retentions Tab to see the retention details:
Clicking the Job Costing Tab will allow you to see which Job(s) the invoice is coded to.
NB: This tab will only be available when Job Costing is installed.

4.4. RCT
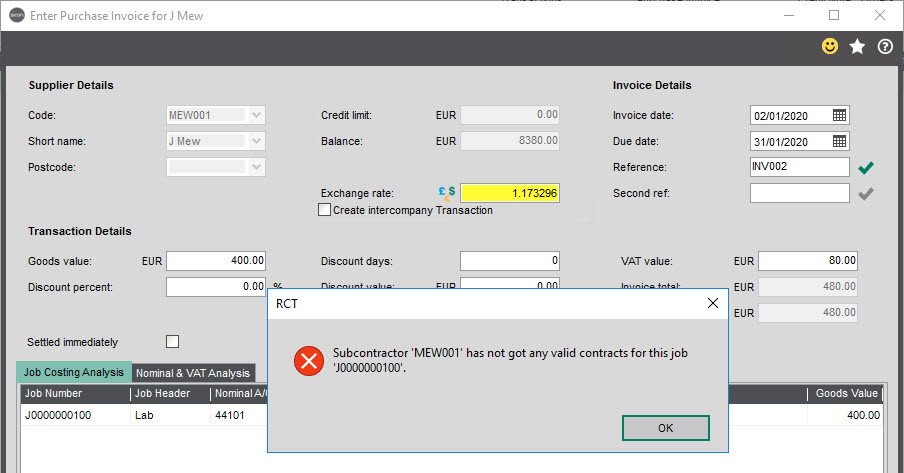
When entering a transaction for an RCT Supplier you would enter it as you would in standard sage. As this is an RCT transaction you are required to use the Sicon Job Costing module so the Transaction is being recorded against Job J000000122.

If you attempt to enter a transaction against a Job that the RCT Subcontractor hasn’t been added to (see section 1.2 RCT Subcontractor Details), the system will prompt you that they not a valid subcontractor for the job.
Unlike CIS, the RCT Transaction doesn’t have any deduction until the payment of the Invoice.
5. Payment of a CIS Subcontractor
5.1. Full Payment of an Invoice
When a payment is made against an invoice that has a CIS Credit Note, then the payment needs to consider the CIS value. If making the payment via suggested payments within Sage, this will take into consideration the Credit Note as it will already be allocated against the Invoice thus, suggested payments will only suggest to pay the outstanding amount.
If making a manual payment, you will need to consider the outstanding amount rather than the total Invoice value(s).
Subcontractor Remittance advice layouts can be linked to the remittance layout – this is done from the Cog icon at the top right of the Sage screen then select Choose Layouts.
From the Layout drop down list select the Remittance Only layout then click the … box next to the Filename field and brows to the Construction Subcontractor Remittance.layout file. Click OK to save this preference.

5.2. Part Payment of an Invoice
When part paying an invoice that has a CIS Credit Note, then the payment needs to know what part of the Invoice it is paying. If the Invoice was for 100% Labour or 100% Materials, then the system will automatically allocate the payment ratio against the Labour or Material element. If you are paying an Invoice that contains Labour and Material you will have to notify the system via CIS split on allocation screen.
Note: Part paying an CIS invoice using this method is only available through manual payment and not suggested payments
As an example, and Invoice has been entered for £10,000, which is made up of £2,000 Labour and £8,000 Material. The CIS value on the Invoice is £400, so has an outstanding amount of £9600. A Payment has been made against the Invoice of £8000
Here is the payment of £8000 being applied to the invoice which has both Labour and Materials:
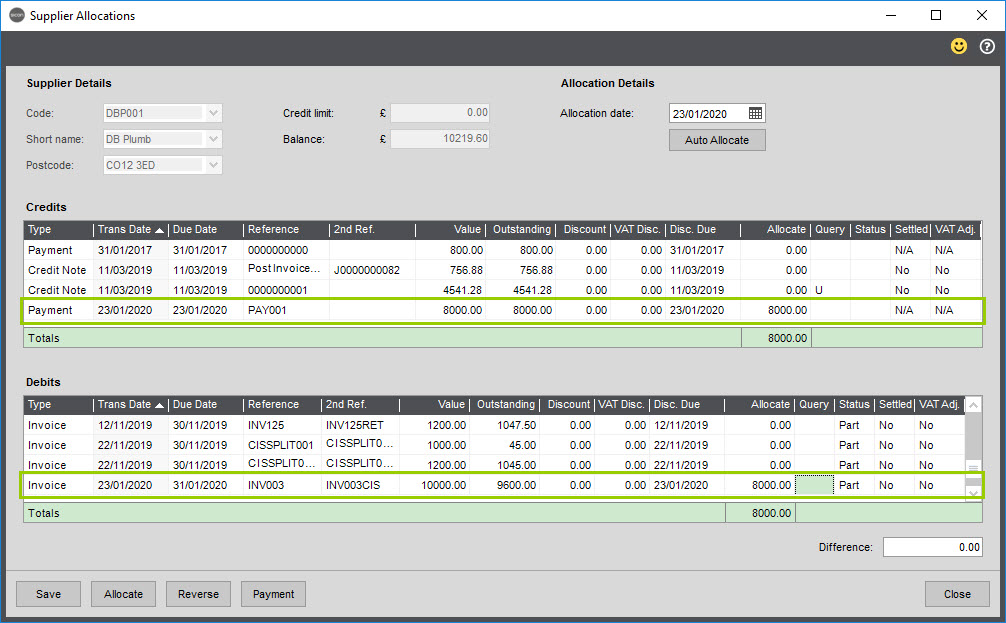
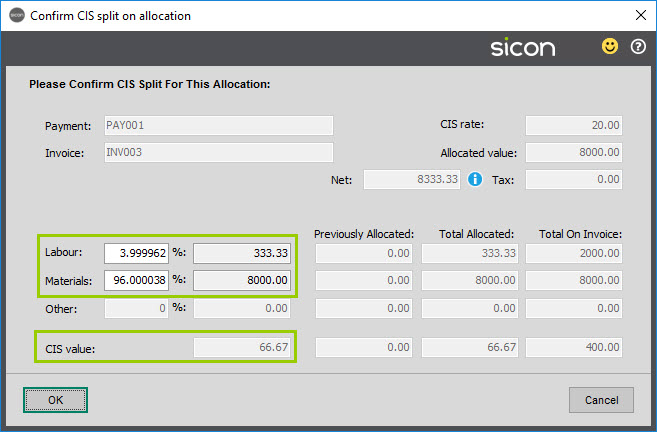
As this invoice is being Part Paid, you have the ability to say what you are allocating the payment to:
The default is for the payment to be split equally between Labour and Materials if the invoice is for both (if an ‘Other’ amount had been entered on the invoice the split would be across all 3 elements).
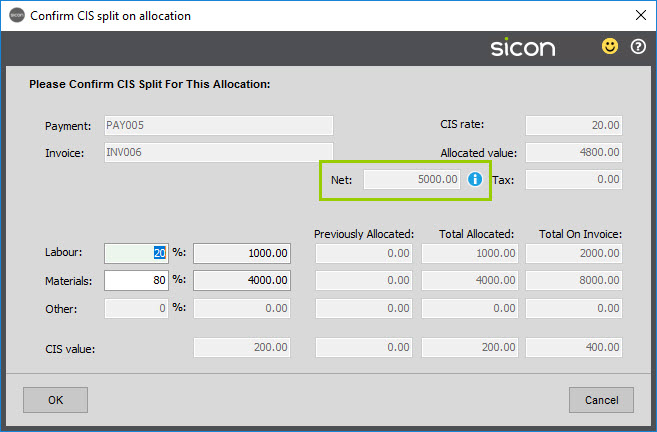
On the CIS split screen its self, the Net value shown, is the total value of the invoice you are allocating the CIS splits for (Labour and Material)
Clicking on the ‘i’ will show you the calculation, which has been outlined below:
Invoice Less Deduction = Document Gross – ((Retention Gross) + CITB + CIS)
Ratio = Allocate This Time / Invoice Less Deductions
Net = (Document Net Value – Retention Gross) * Ratio
For the example Payment of 8,000 to the 10,000 Invoice
Invoice Less Deduction = 10000 – (400+0+(0)) = 9600
Ratio = 8000 / 9600 = 0.8333333
Net = (10000-0) * 0. 8333333= 8333.33

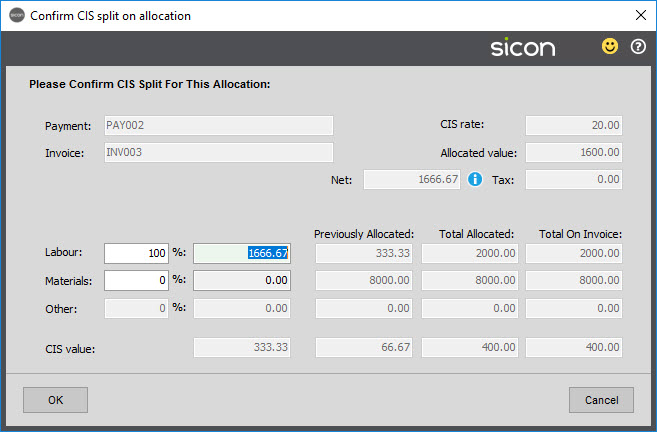
The example below is showing that the Materials are being paid in full, which has re-calculated the Labour amount to be paid. As this is less than the amount on the invoice, the CIS value has also been re-calculated as the amount to be paid to HMRC is reduced.
If you notice it seems that you are allocating more that the you are actually paying, this is because part of the Invoice has already been deducted which is the credit note. You may also may need to consider the effect on VAT, Retentions or CITB.
When paying the rest on the Invoice, you are then able to allocate the remaining outstanding values so you have matched the total payments against the total Invoice prior to any deduction.
You can then see from the image below, how the two payments appear on the CIS Return.
If the Invoices were separate Invoices, they do appear slightly differently on the CIS return. For example, the Material of the original Invoice you are paying £8,000 of a £10,000 (not £8,000 of a £9,600 Invoice) so you are paying a ratio of the Invoice. The second Invoice for the same Material value, you are paying £8000 of an £8000 Invoice thus you are paying 100%.
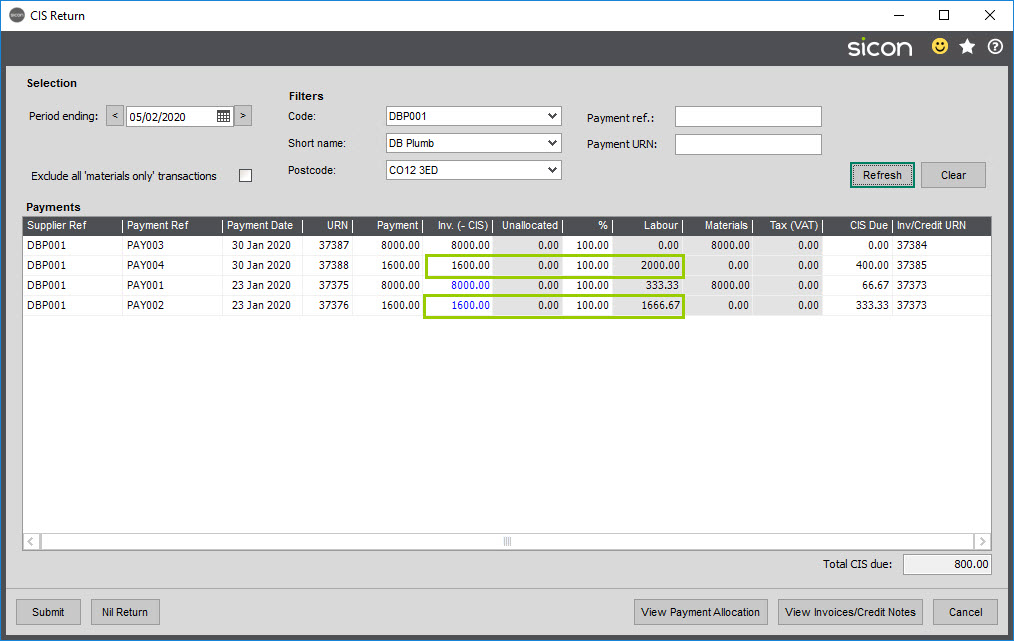
In order for the Invoices to appear like this, you would need to reverse the original Invoice and re-enters as two Invoices, one for the material value and one for the labour value.
The calculation has to take into the Net effect of the payment. If the calculation was made simpler and you were paying half the Invoice due of £4800. The Net effect of the Payment is £5000 as you are paying half the Invoice:
6. Payment of an RCT Subcontractor
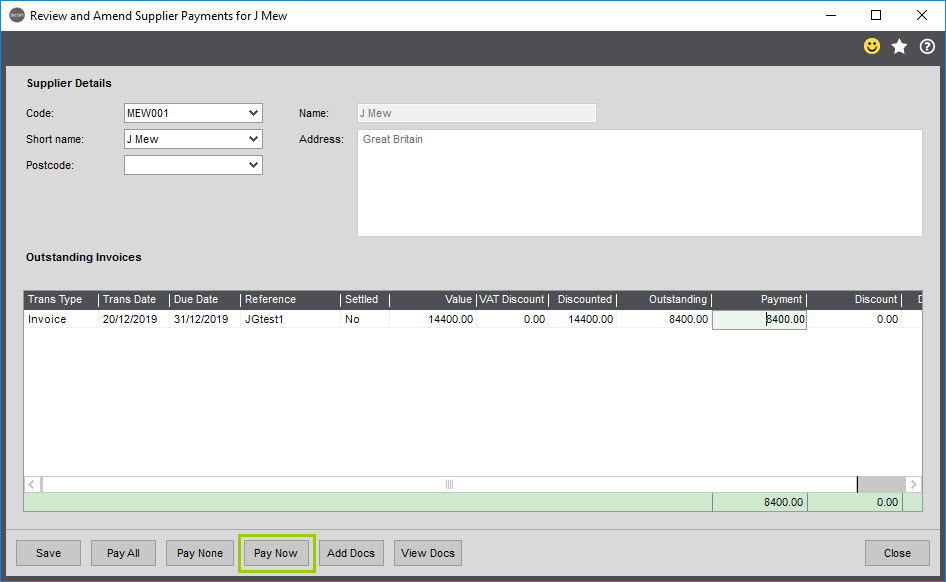
The payment of an RCT Invoice should be performed through the Suggested Payments routine within Sage. First run ‘Generate Suggested Payments’ so any new RCT Invoices are included within Suggested Payments.
You will then need to amend the suggested payments and search for your RCT Supplier. Populate the payment amount and click ‘Pay Now’
Once you have selected the bank account and entered the details, the system then contacts the ROS service to check each subcontractor and contract ID related to the Job Numbers the transactions associate to. This is to get the latest deduction percentage for that specific contract.
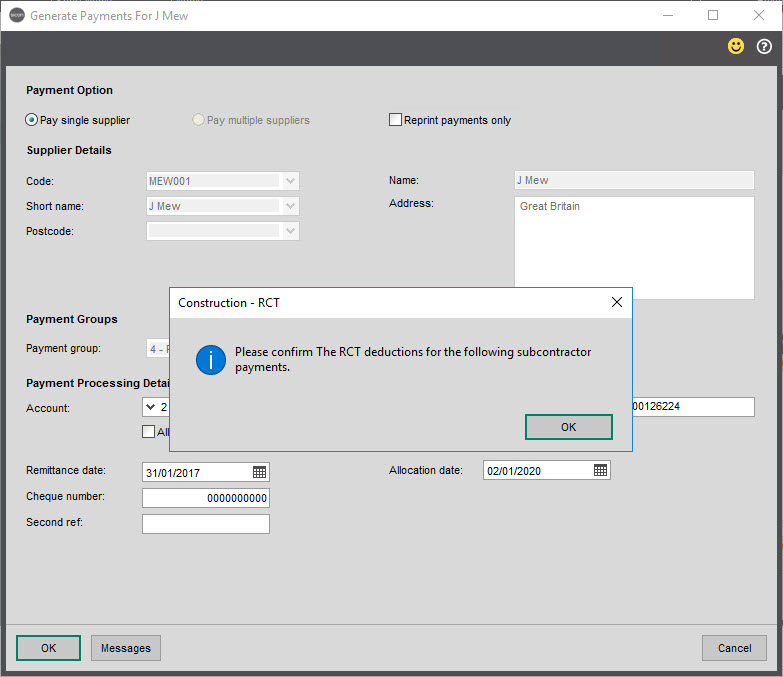
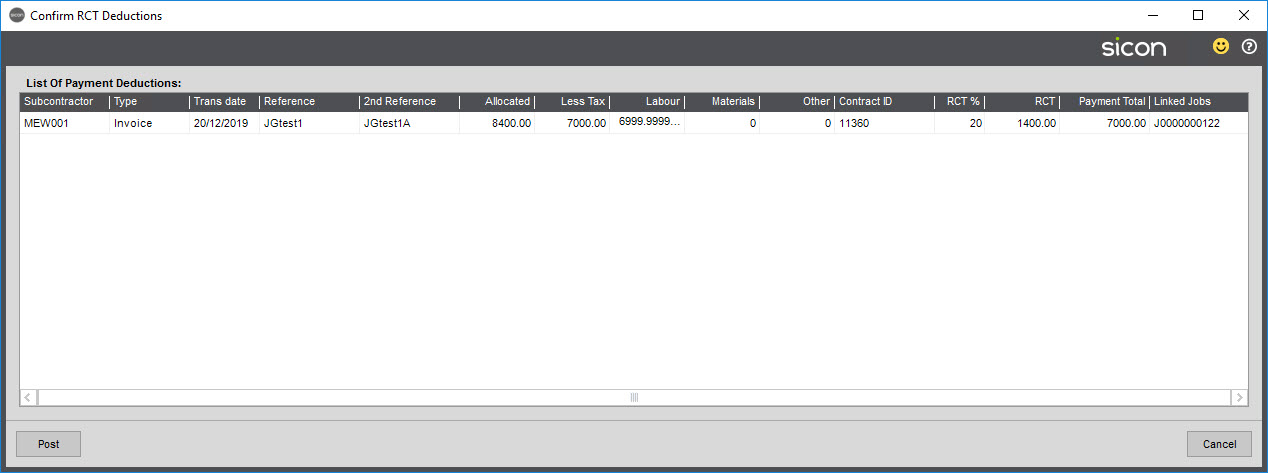
The Confirm RCT Deductions screen is displayed to show the associated Contract IDs and Rates. You are able to adjust the Contract ID’s (for running multiple contract ID’s against the same Job in Job Costing) and amending the RCT % if required (If not connected to the ROS gateway).
Once clicking Post, you are then prompted to ensure you have all the correct Contract ID’s.

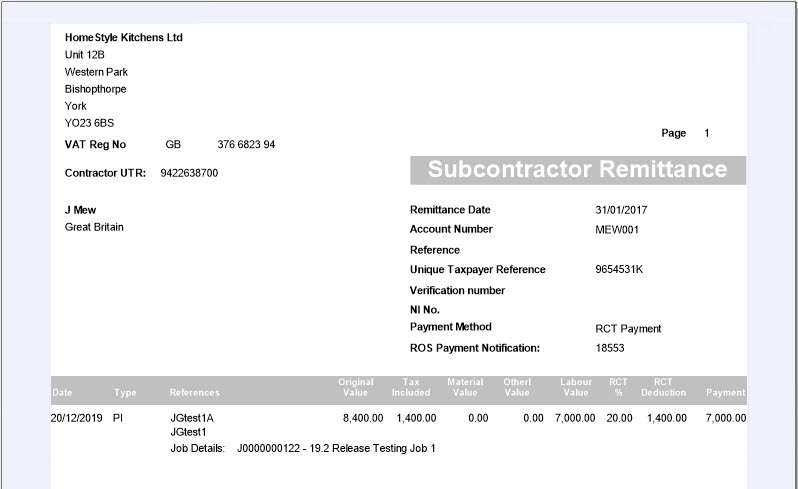
The system, will then prompt if the payment has been successful, and depending on the Sage settings, you Remittance Advice will be displayed outlining the payment including the RCT deduction.
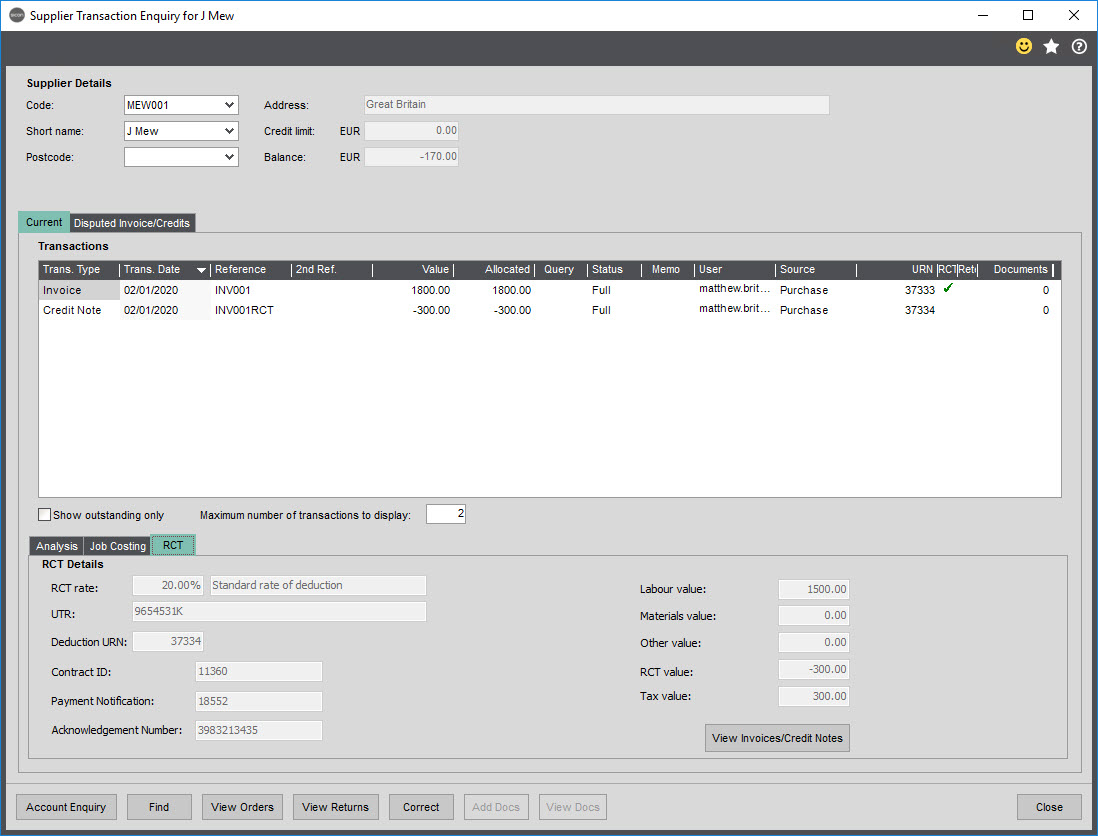
Once the Transaction has been paid it is marked on the Supplier Transaction Enquiry screen with a Green Tick, and the RCT details can be found under the RCT Tab on the Transaction Summary. This will show you the RCT Rate, UTR and the Deduction URN, as well as the Labour, Materials, RCT and Tax values. It will also show you the Contract ID, Payment Notification Number and Acknowledgment number that were gathered from the Irish Revenue Online Service.
7. CIS Credit Note
There are different methods on handling Credit Notes that are applicable to CIS Invoices, in this section we are going to cover different scenarios and how to allocate them against an Invoice or Payment.
7.1. Credit Notes included within a Payment
If part of an Invoice has been credited, it doesn’t matter if it is for a Labour element or a Material element, it will need to be included with the rest of the Invoice when it has been paid on the CIS return.
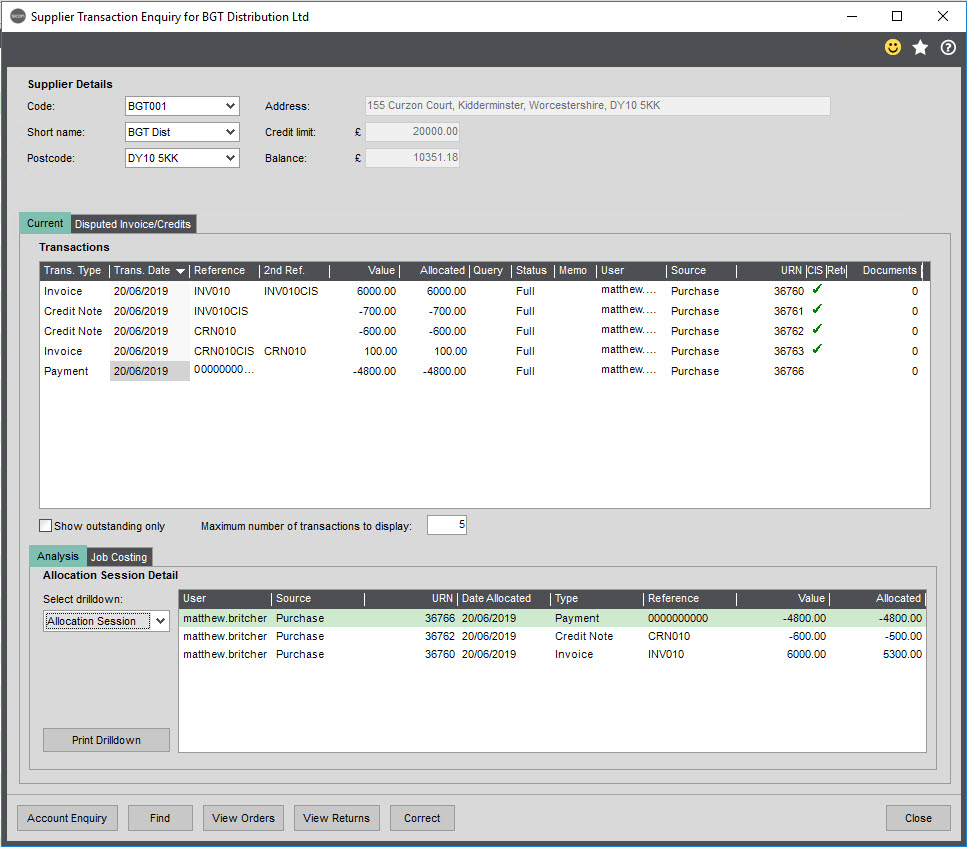
A £5000 Invoice has been added to the Subcontractor BGT Distribution for £3500+VAT of Labour and £1500+VAT of Materials, with a CIS deduction of £700.
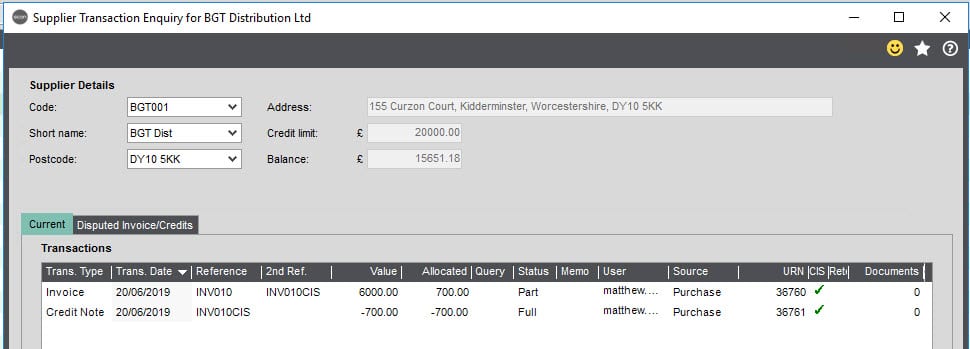
A Credit Note has been received for £500 of Labour on this Invoice. The remaining values on the Invoice still need to be paid. The £500 Credit Note has been entered on to Sage against the same Job and is coded to a Labour Job Header and Labour Nominal.
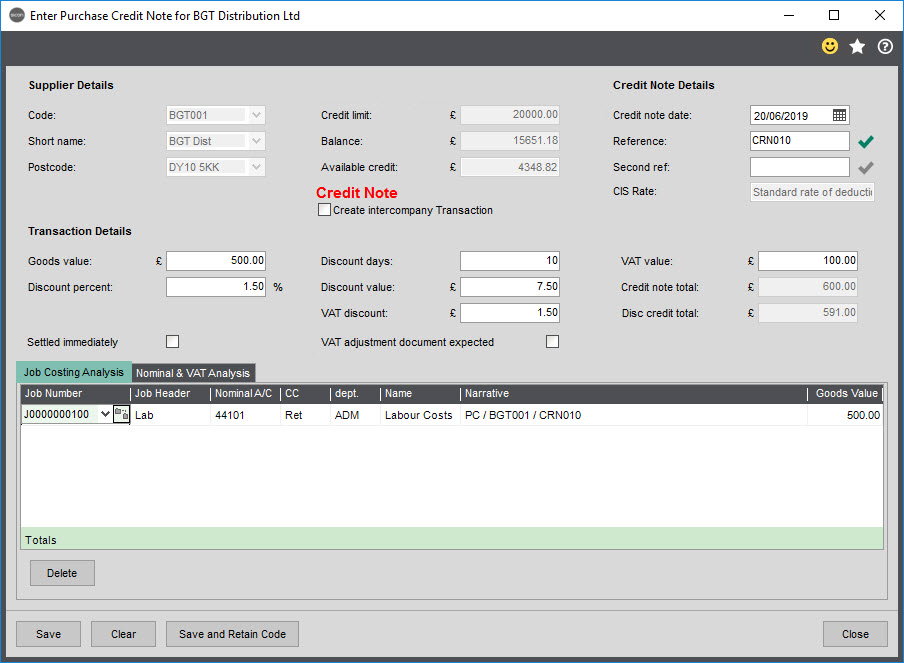
This creates a £500+VAT Credit Note on the Suppliers account with a £100 Invoice for the CIS deduction.
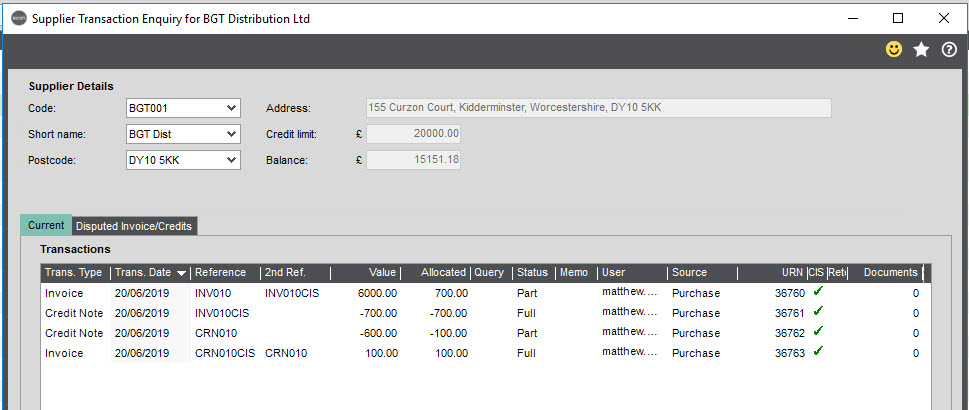
In order for this to be correctly calculated on the CIS return, the Invoice(s) and Credit Note(s) need to be part of the same allocation session of the Payment to the remaining Invoice. The Payment for the remaining value on the Invoice is going to be paid through the Suggested Payment routine, so a payment of £4800 is going to be paid to the Supplier. (£5000+VAT minus £700 CIS minus £500+VAT plus £100 CIS).
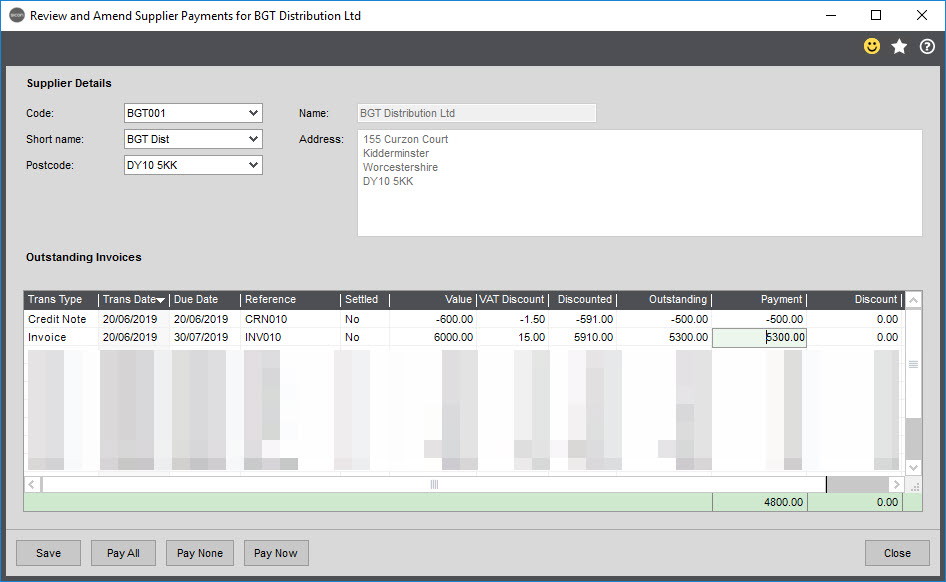
When looking at the Payment on the Supplier Transaction Enquiry screen, we can see that the Payment has an allocation against the Invoice and Credit Note and everything has been fully allocated.
On the CIS return, we can view the payment showing the correct value for the Labour and Materials and the total amount of CIS due. As the CIS due is based on the Labour values, the calculation below is based on the Labour elements only:
| Original Invoice Labour Value | 3500 |
| Original CIS Deduction Value | -700 |
| Credit Note Labour Value | -500 |
| Credit Note CIS Deduction Value | 100 |
| Total Labour on Payment | 3000 (3500-500) |
| Total CIS Due | 600 (3000*20%) |
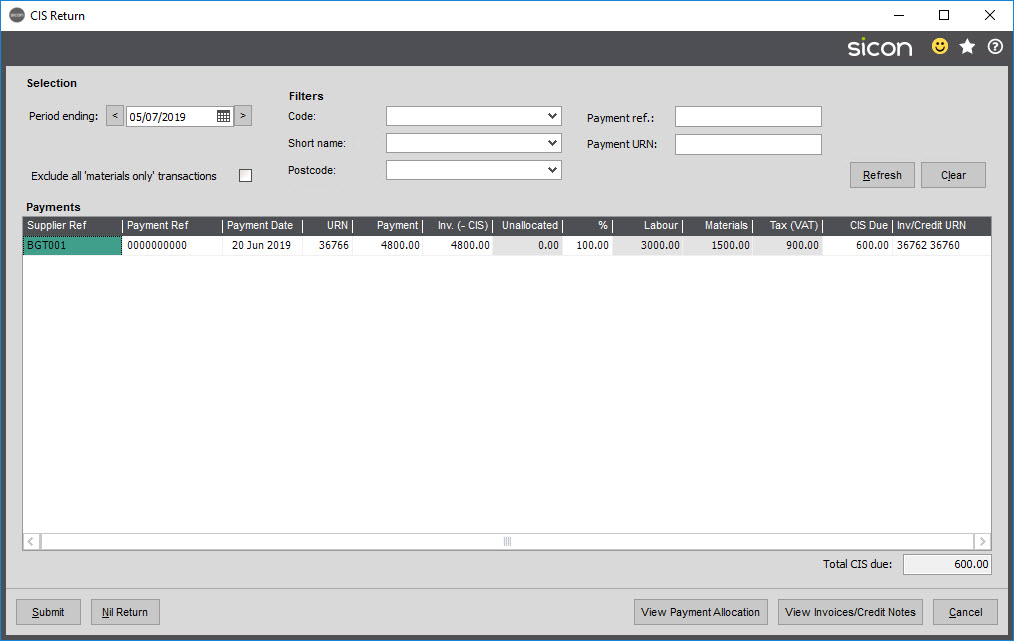
Note: The Credit Note should not be allocated against the Invoice outside of the Payment Allocation Session as it will not be included in the CIS Return and the Labour and Material splits on the Payment will be calculated incorrectly.
7.2. Reversal on an Invoice
If an Invoice has be fully refunded or has been entered into Sage incorrectly, a Credit Note will need to be entered onto the system to fully reverse the Invoice transaction.
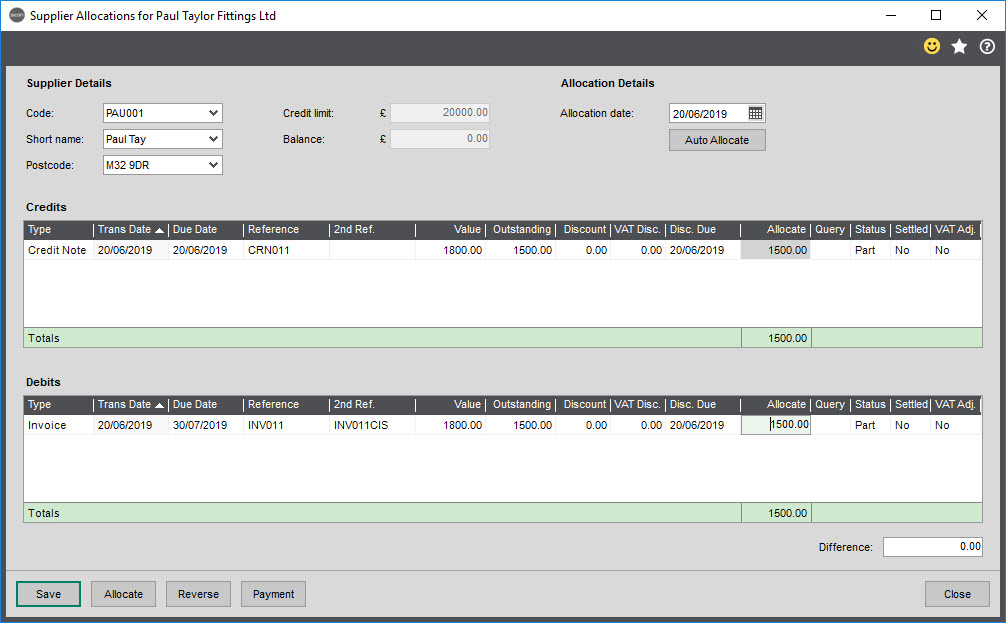
In this example a £1500 Labour Invoice has been added for Paul Taylor Fittings Ltd, which has been entered with an incorrect date. The Correct Transaction feature within Sage 200c is disabled for CIS transactions due to the transaction already having an allocation (CIS deduction) and the extra transactions that are generated in the background.
If you try and Correct or Reverse a transaction, the system will prompt you that you need to do this manually.
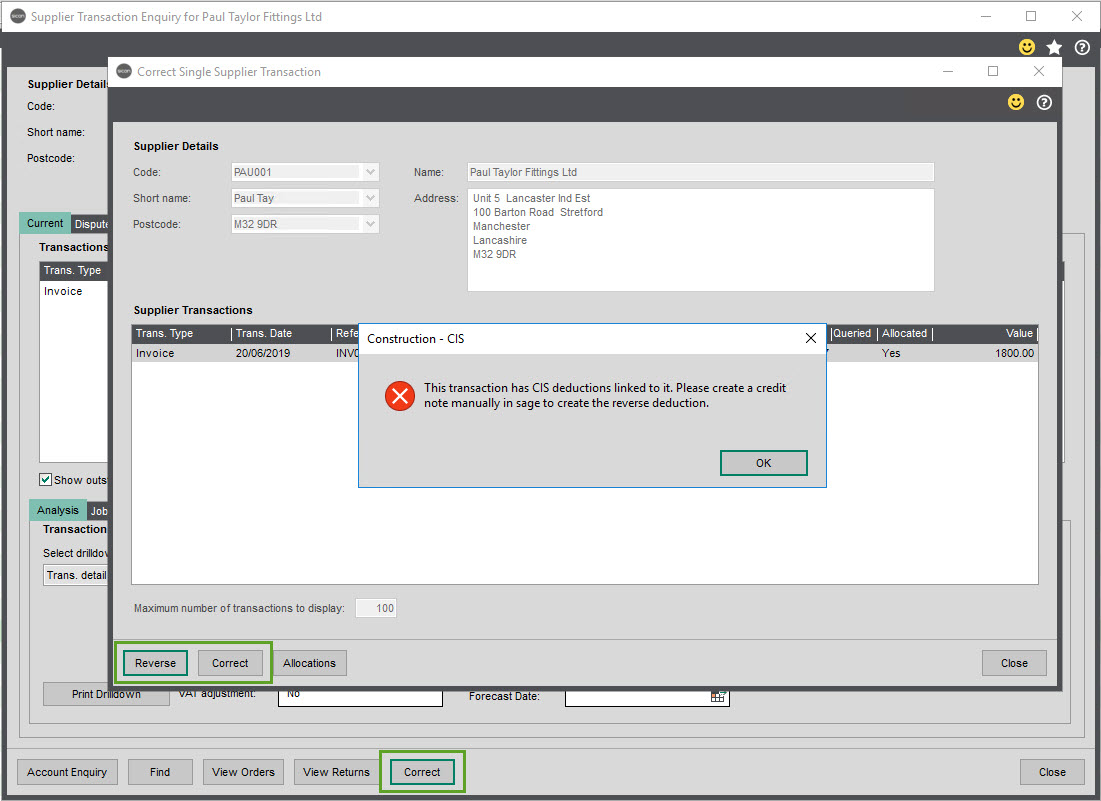
In order to correct the incorrect £1500 Labour Invoice a Credit Note needs to be entered in Sage for £1500 with the same details as the incorrect Invoice.
They would then need to be fully allocated against each other. The Invoice could then be re-entered with the correct date.
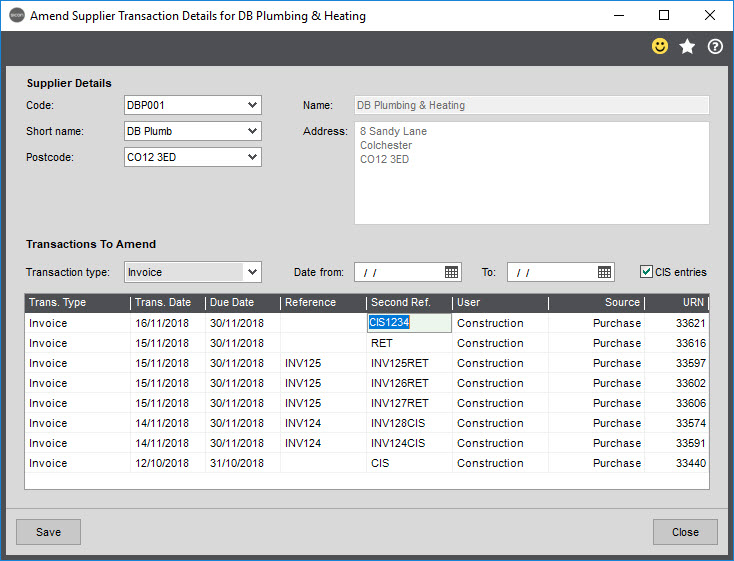
8. Amending the Second Reference for CIS Transactions
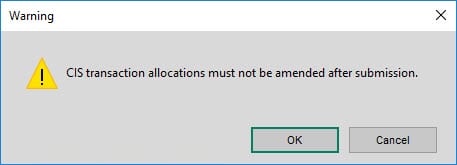
The Amend Details option within Purchase Ledger, Adjust Transactions, will not show the CIS affected invoices as these have the CIS value allocated to them through the allocation of the credit note explained above. Therefore, as there is an allocation against the invoice, Sage will not allow any changes to take place.
There is now a check box called CIS entries that when checked will display the CIS Invoices that are allowed to be changed (not fully allocated). This will only allow changes to the Second Reference details.
Note: The CIS entries check box will only be enabled if the supplier selected is a CIS sub-contractor.
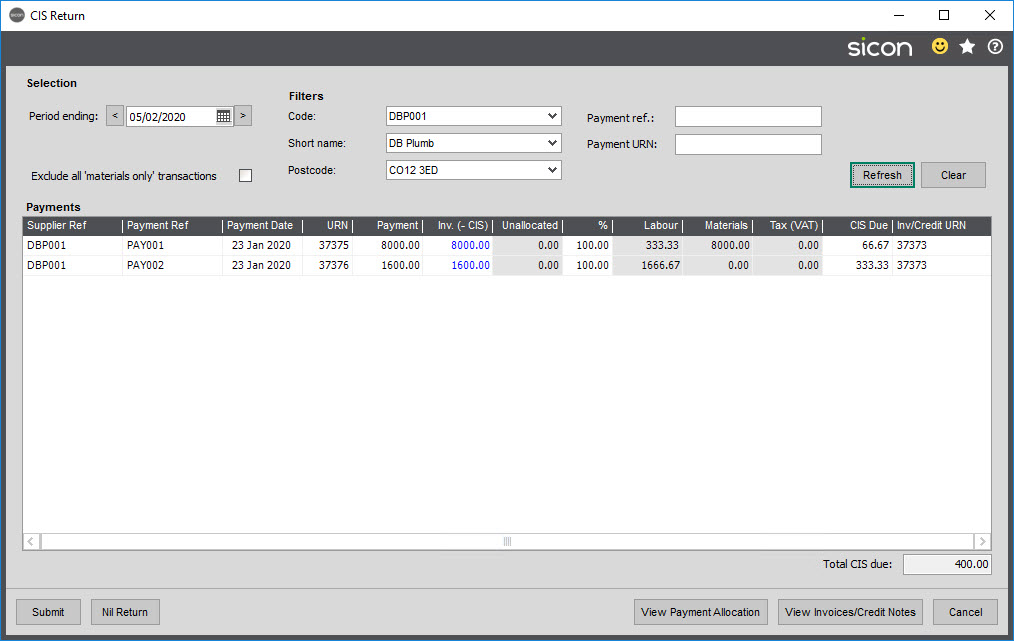
9. CIS Return
9.1. Submitting the CIS Return
When it is time for the monthly CIS return to be submitted the Submit CIS Return is used from the CIS Menu. Firstly, the transactions that are required within the CIS return are selected; in the case of the transactions shown all entries are selected. (There is a check box to Exclude all ‘materials only’ transactions which when ticked will not display any transactions that are only for materials).
NOTE: For Subcontractors who do not yet have a UTR. You can file CIS returns online though the direct HMRC portal only without a UTR number. You have to enter subcontractor’s name and surname, save the information and you will be able to make a submission. The website will ask you to double check the subcontractor’s details if you haven’t verified them before. You will receive a message on the screen asking you to double check the information, but if you click “next” you will still be able to proceed to submission. You can add or amend the information about your subcontractor at any time as well as verify them later on.
In order to complete the CIS Submission, you will need to take the Subcontractor flag off the supplier(s) that do not have a UTR and treat them separately as above before processing the return from the CIS module.
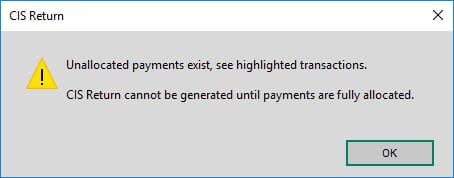
The CIS Returns will load all payments made to subcontractors within the current period. If you have unallocated payments the system will stop the submission of the CIS return and until these are resolved as the Submit button is not active.
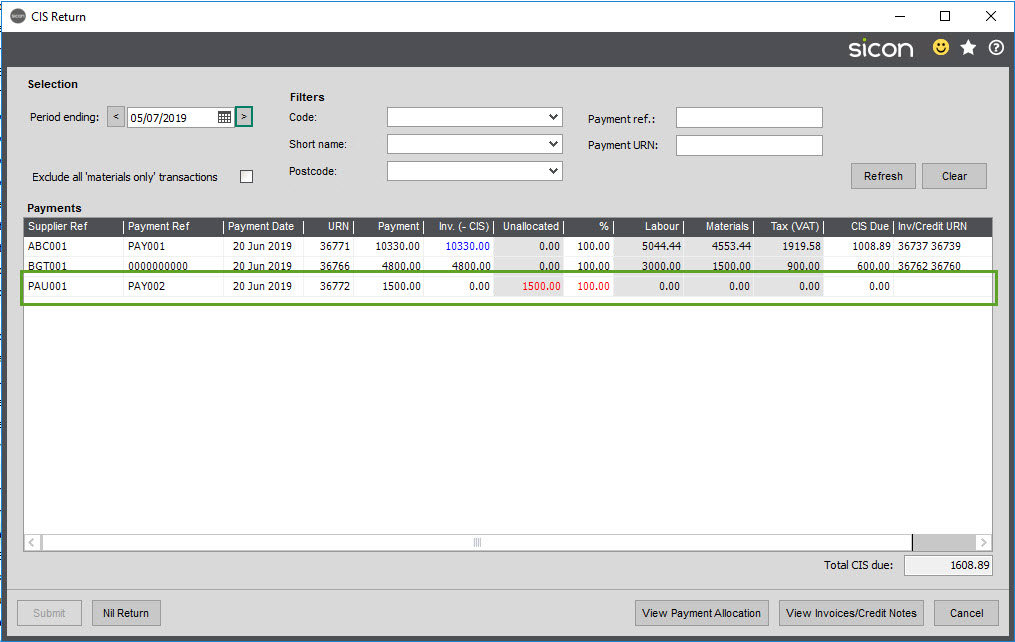
Highlighting a line and clicking ‘View Payment Allocation’ will load the allocation session for the payment and clicking ‘View Invoice/Credit Notes’ will show the Transaction Enquiry screen for all the Invoice and Credit Notes allocated to the Payment.
If the system is happy with the payment the line will show its entirety in blank text, the red text will be shown if the system cannot submit the return (a Payment without allocations) and blue if the system thinks you should check something.
The blue text in the example above is shown, because an Invoice allocated to the payment has only been partially allocated. If you hover over the blue text a tool tip will appear that outlines what the system is querying with that payment.
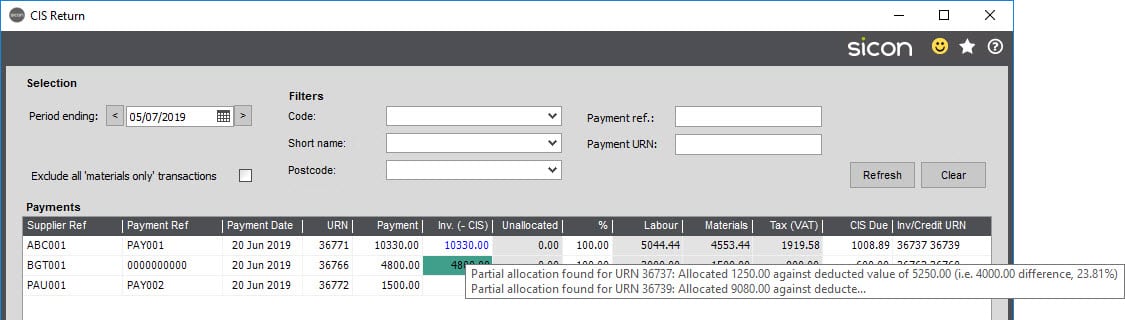
The system isn’t preventing you submitting the CIS return from this point as these may or are genuine allocations against the payment, it is just making you aware.
When the Submit button is pressed the CIS Return Summary screen is shown.
If you have a subcontractor that has not been verified this will be displayed as shown below.
This screen displays the information that will be sent on the HMRC CIS return. There will be one line per subcontractor (PL supplier) with the values totalled. On this screen are a number of options before submitting the return to HMRC. These are:
Print Statement: this should be ticked if you wish to print a statement for this subcontractor – linked with the Print Statements button
Inactivity Indicator: this should be ticked if you do not anticipate paying any subcontractors in the next six months
Employment status & subcontractor included tick boxes: these are defaulted to ‘ticked’ and should only be un-ticked if you cannot confirm the statement shown.
The functions of the buttons are:
Submit: Submit this CIS Return to HMRC
Select/Unselect All: Select/Unselect all the suppliers for ‘Print Statement’ column
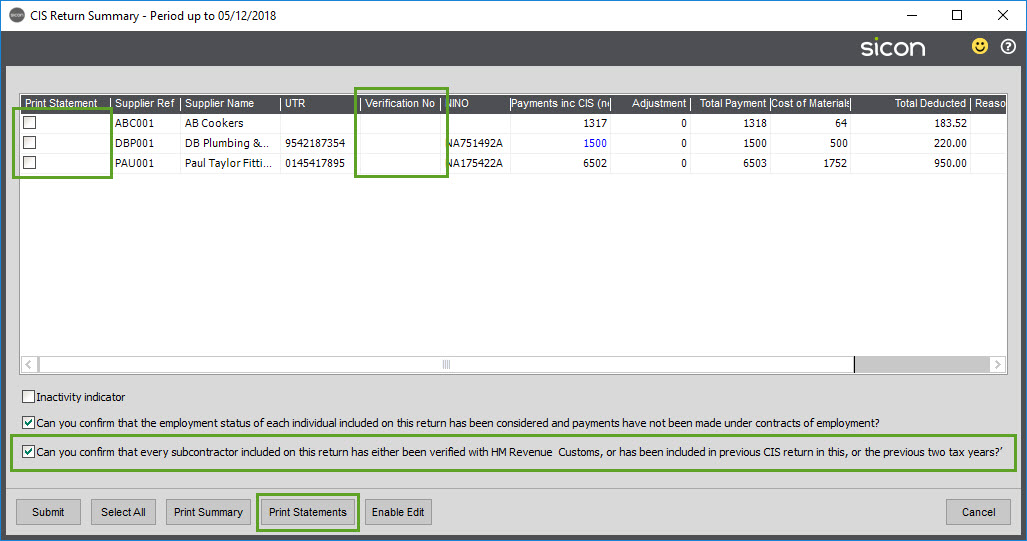
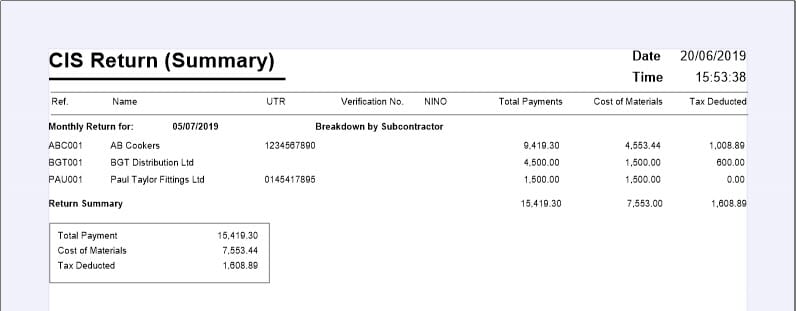
Print Summary: Print the CIS Summary – this is a paper version of the information on this screen
Print Statements: Print the CIS Statements for the suppliers ticked in the ‘Print Statement’ column

Cancel: Cancels the CIS Return submission
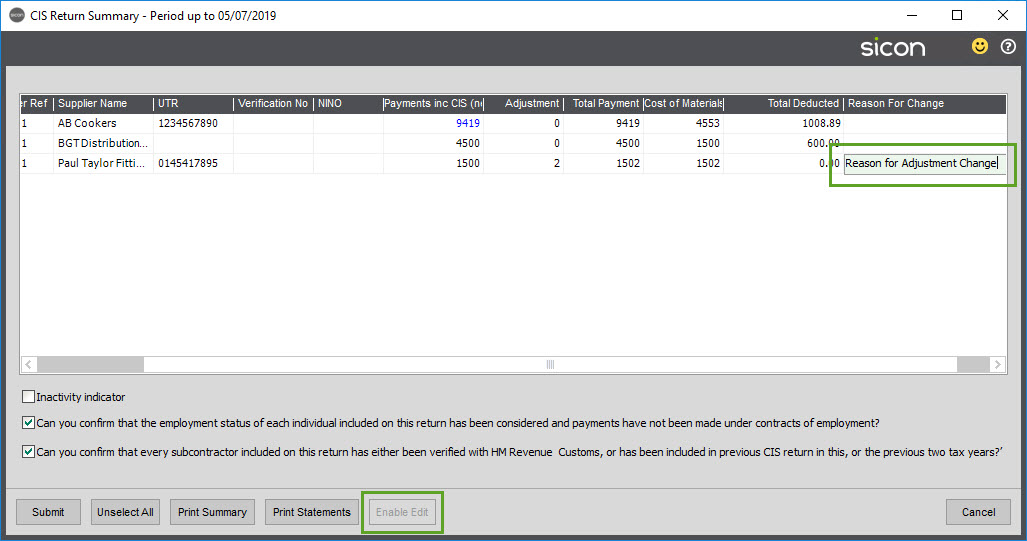
Enable Edit: Values may now be manually adjusted using the ‘Enable Edit’ button. Enter the Adjustment amount and a Reason for change before submitting to HMRC.
Note: Please use with caution as corrections may need to be made on the transactional level rather than directly on the CIS Return. This is to ensure you accounts data matches your CIS Return.
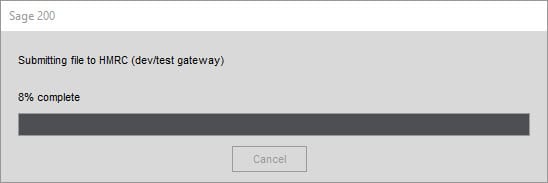
When the Submit button is pressed the user will be warned that no changes can be made once the return has been submitted. If the user then presses ‘OK’ to continue the automated CIS submission will start (if the ‘HMRC Submission Status’ is set to ‘Online’ in the settings screen – See 12.1).
Note: If the settings are for an ‘offline’ submission, then the process will treat the return information as successfully submitted and return to the CIS Return screen, but the return will NOT have been processed by HMRC and may result in a fine.
Once the user presses OK to the continue submitting window then the full automation begins and the following screen is displayed showing the current status:
Once the polling has finished submitting the CIS return to HMRC, either successfully or unsuccessfully, the screen will be populated with the status:
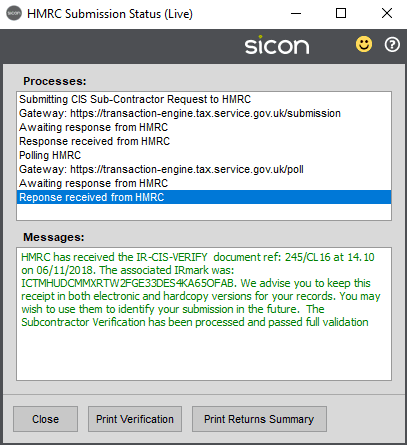
In this case, after several polling’s to HMRC (top window) a response was received from HMRC (bottom window). At this point there are two outcomes:
Pass: As shown above. The Summary report now has this message appended to the summary so that it can be printed out along with the summary information for future reference. Pressing continue will then poll HMRC once again to clean up the files sent to it. Once that is done, there will be a final set of submissions in the top window and the Continue button will change to Exit, denoting that it has completed.
Fail: This will show similar information to that above, however the bottom window will display the error and the top window will also display that an error has occurred. This could either be from a problem with the submission or a timeout whereby the submission was submitted 10 times without success. If the submission fails it is possible to go back through the CIS return steps again to reproduce and resubmit the CIS return.
Process for making a CIS Adjustment in an older period
The recommended process for dealing with an adjustment that needs to be made in an older period will be:
1. Ensure older period is still open
2. Make correction to Invoice
3. This will create a new CIS payment or Invoice if under or overpaid
4. Generate CIS Submission for the older period
5. Process submission for the older period
9.2. Resubmitting the CIS Return
As HMRC allow for the resubmission of CIS Returns, when you navigate back to a previously submitted Return you are asked if you would like to re-process the CIS Return for the period.
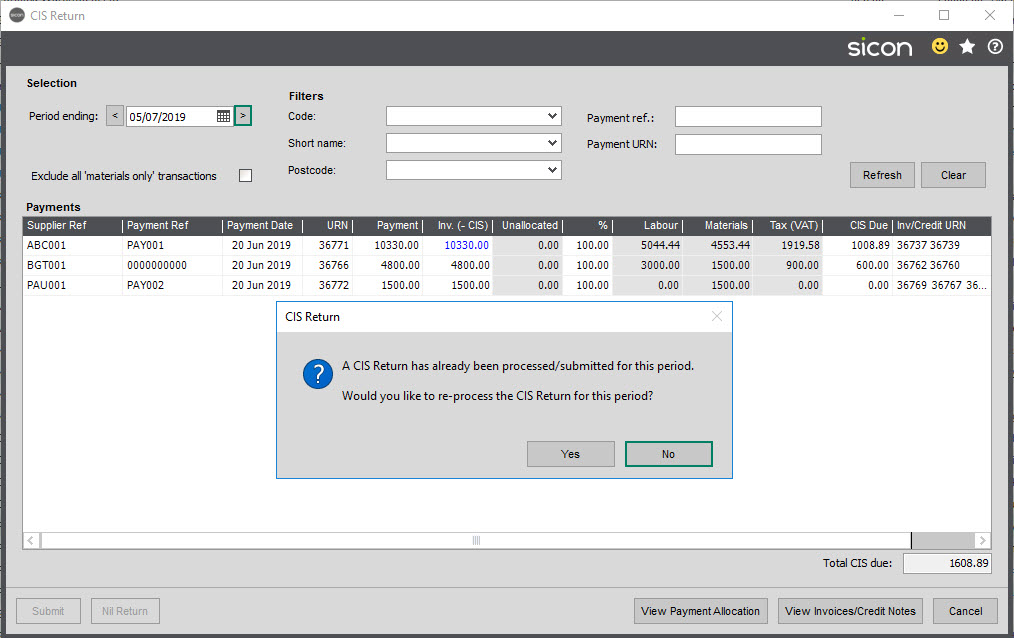
Answering ‘yes’ will warn you that is will delete all previous CIS Return data. The system requires this process so all the CIS data for that period can be recalculated.
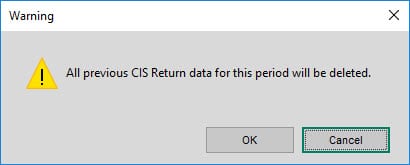
Click OK enables you to resubmit the CIS return.
9.3. Negative Values on the CIS Return
It isn’t possible to submit a negative Value to HMRC using commercial CIS software (including ours). If any entry on the CIS returns a negative value, it isn’t passed across to HMRC on the CIS return.
https://www.gov.uk/what-you-must-do-as-a-cis-contractor/file-your-monthly-returns
The system will prompt, to state the CIS Return contains negative values and will be highlighted in red in the CIS Summary.
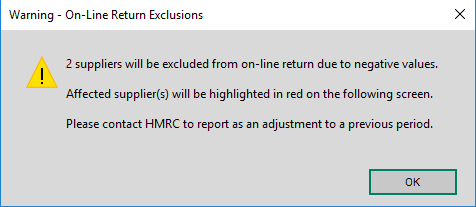
Depending on how the negative value is appearing on the CIS return, it is likely a correction or refund to a previously submitted CIS return has been issued. HRMC allow a resubmission of CIS returns, so if the correction came from a Return posted via Sicon Construction, see Section 8.2.
CIS Returns submitted outside Sicon Construction will need to be amended via HMRC.
Please contact HMRC if you have any queries on negative values on the CIS Return.
10. CITB
For more information on the CITB Levy, please use the following link:
https://www.citb.co.uk/levy-grants-and-funding/citb-levy/
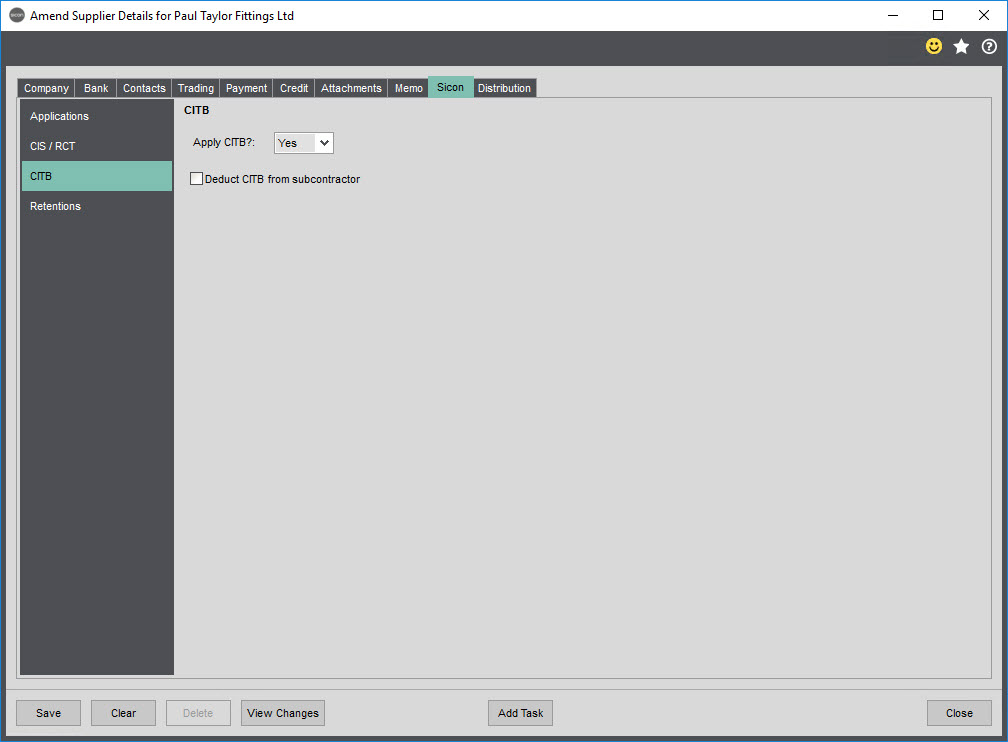
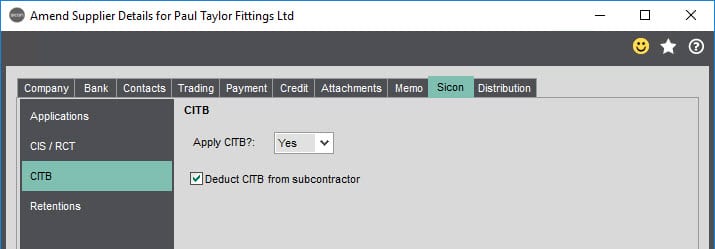
There are two methods for making a deduction for the CITB Levy, each is controlled on the Subcontractor Supplier Account under the Sicon tab and in the CITB section. The deduction can either be made by the Company or the Subcontractor.
10.1. CITB – Company contribution
If the Company is making the contribution to the CITB Levy, the Supplier Account CITB setting need to be set to ‘Yes’ as per the screenshot in Section 9.
With this applied a Journal will be post for the percentage amount of the CITB deduction.
After entering an Invoice, you are prompted with a CITB Information Window, which will show you the default CITB percentage of the CITB percentage to be taken based on the Invoice (you can overwrite this percentage if required).
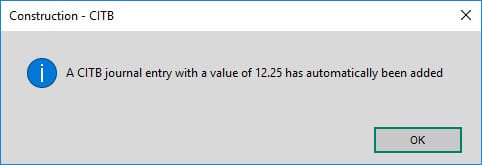
The system will then prompt to state that a CITB Journal has been automatically created.
It will then continue to make any further reductions as required.

As this Supplier is set to a Company Contribution, the CITB deduction has no affect on the Invoice and any further deductions will be calculated based on the total value of the invoice.
The Journal created for the CITB deduction is shown below and will have the same reference as the Invoice.

10.2. CITB – Subcontractor contribution
If you are recharging the CITB Levy onto a Subcontractor, the ‘Deduct CITB from subcontractor’ needs to be set on the Supplier Account. This will then deduct the CITB Levy from the Subcontractors invoice.
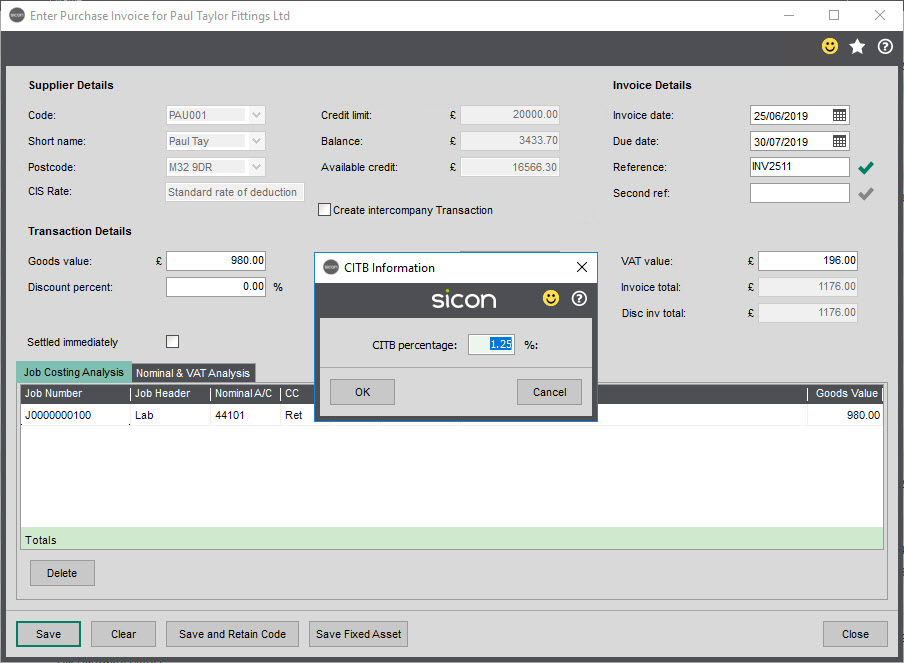
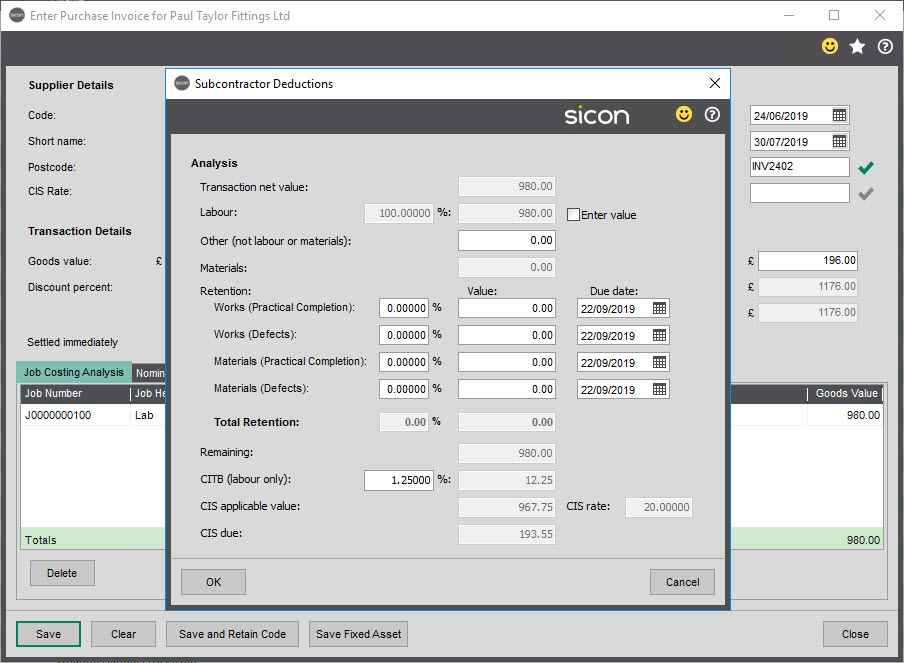
After entering a Labour Invoice, you are prompted with the Subcontractor Deductions Window, which is the same as the CIS deduction when using Supplier Account percentages. This will take the CITB Levy contribution prior to make the CIS deduction.
In the example a £980+VAT Invoice has been entered against Paul Taylor Fittings, their Supplier settings are set to deduct the CITB Levy from the Subcontractor. First the system will deduct 1.25% from £980. It will then deduct the 20% standard rate CIS deduction from the remaining £967.75 resulting in a £193.55 CIS deduction. (without the CITB deduction the CIS due would be £196).
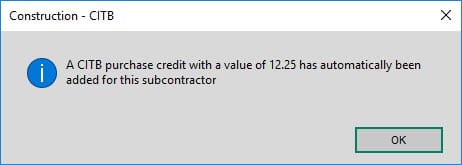
The system will then prompt to state that a CITB credit has been added against the account.
When looking at the Transaction Enquiry screen for the supplier, the Invoice and resulting CIS and CITB Credit Notes are shown. On the Invoice CIS Tab, the View CITB is active.
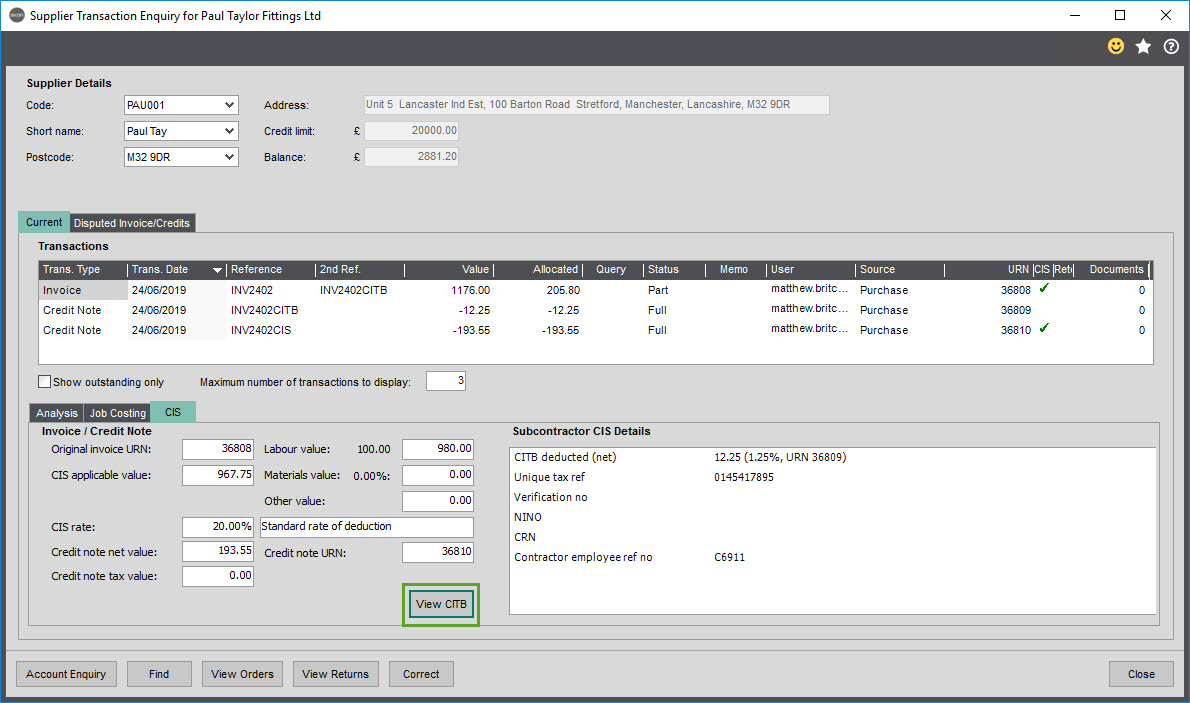
Selecting this links directly to the CITB credit note in an enquiry window.
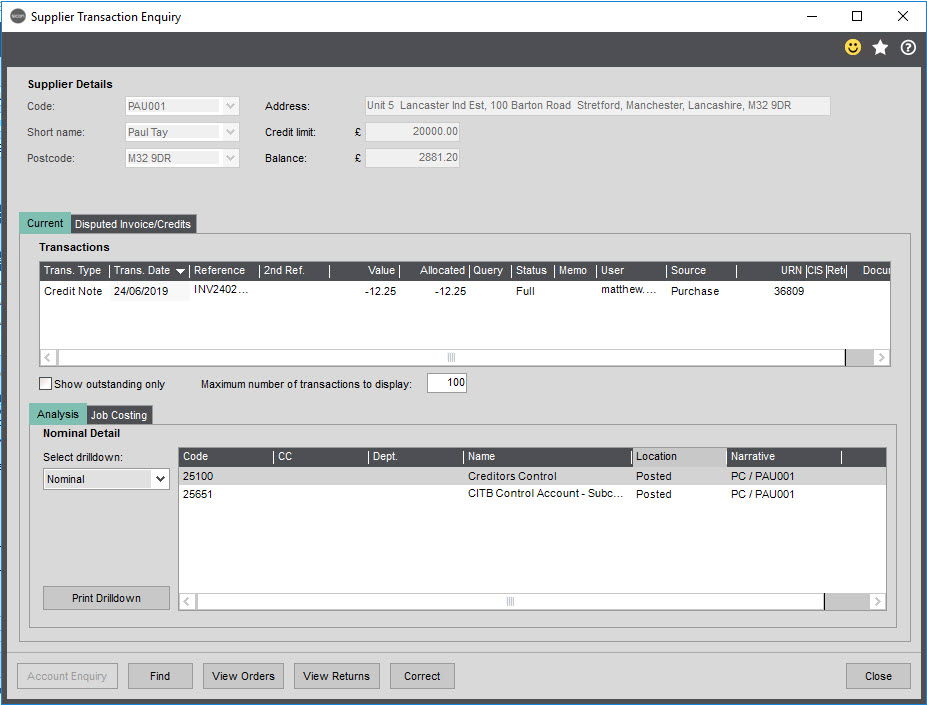
Below, shows the Nominal posting of the credit note posting to the CITB Control Account for recharging Subcontractor contributions as per the Nominal Code set in the CITB Settings.
When posting a Credit Note to a Subcontractor that is being recharged for the CITB Levy an Invoice is created for the CITB deduction. To see how to handle Credit Notes for Subcontractors, please see Section 6 for CIS Credit Notes.
11. Imports
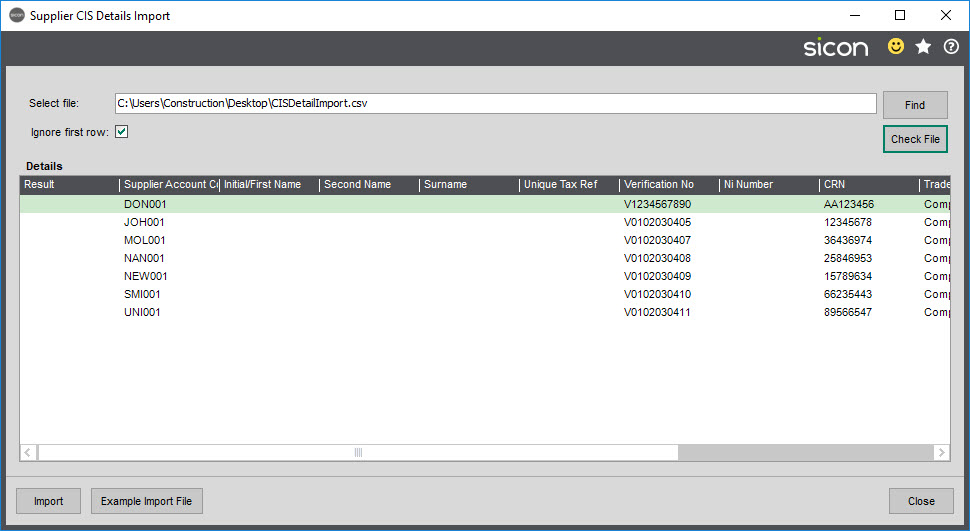
11.1. Supplier CIS Details Import
Supplier Details can be imported from a CSV file.
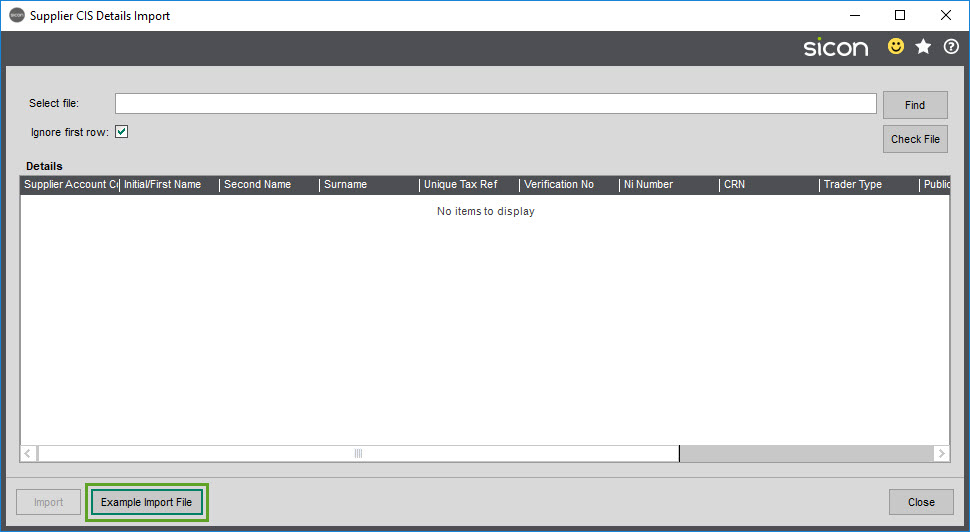
Example Import Files can be generated from clicking the ‘Example Import File’ button. This will generate an Excel file with an overview of each field and an example CSV file to be populated with the import.
Note: A Supplier must exist with Sage for the CIS details to be updated.
Click the Find button to locate the previously populated spreadsheet.
Click Check to verify the file details, any errors will be highlighted in red with the ‘problem’ area identified.
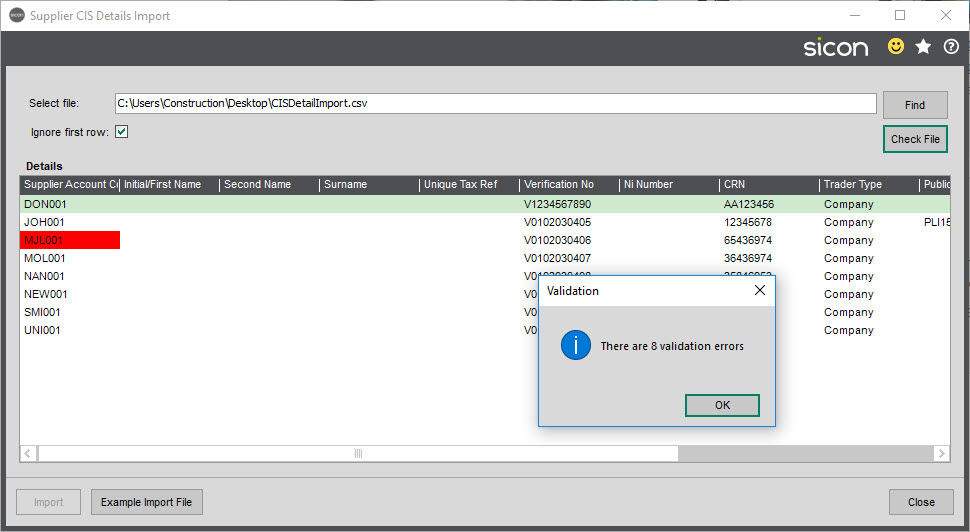
Amend the file as required, re-find and check. When there are no errors you will be able to import the details.
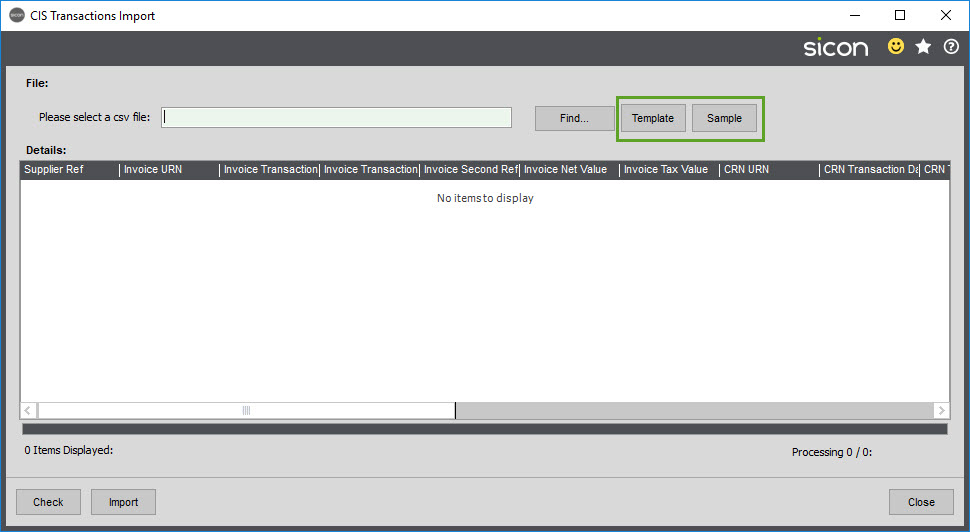
11.2. CIS Transaction Import
CIS Transaction details can be imported from a CSV file – follow the same procedure as importing Supplier Details.
The Template and Sample Import file are generated from different buttons on the CIS Transaction Import.
12. Reconciliation
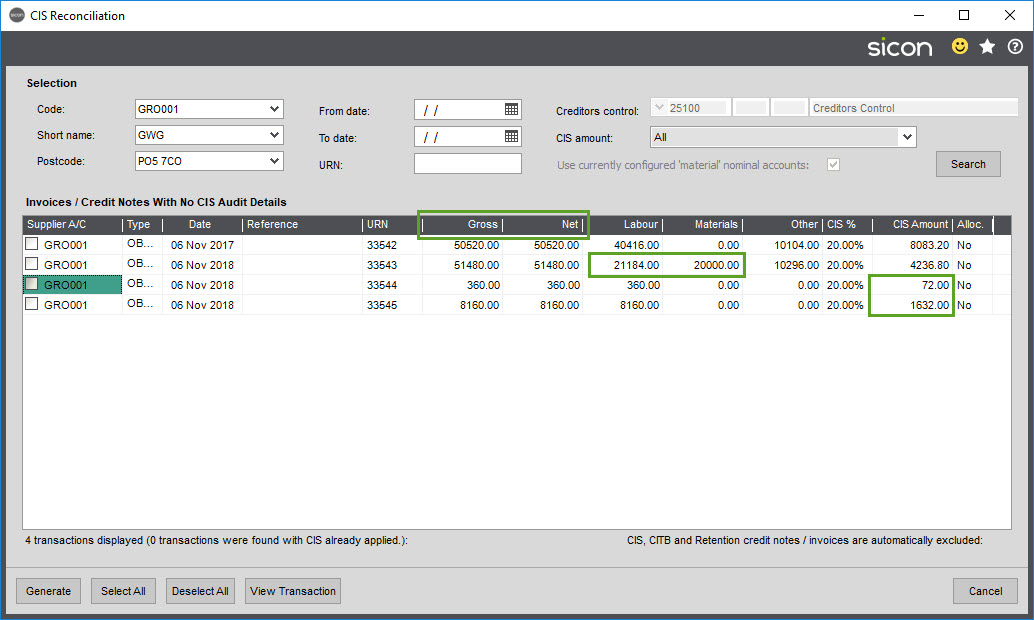
This allows generation of CIS details for existing supplier invoices and credit notes with no CIS information held against them. This screen generates ledger CIS credit notes (or invoices) for transactions which should have had a CIS amount applied.
Note: The Supplier account must be flagged as a subcontractor to show invoices/credits in the reconciliation screen.
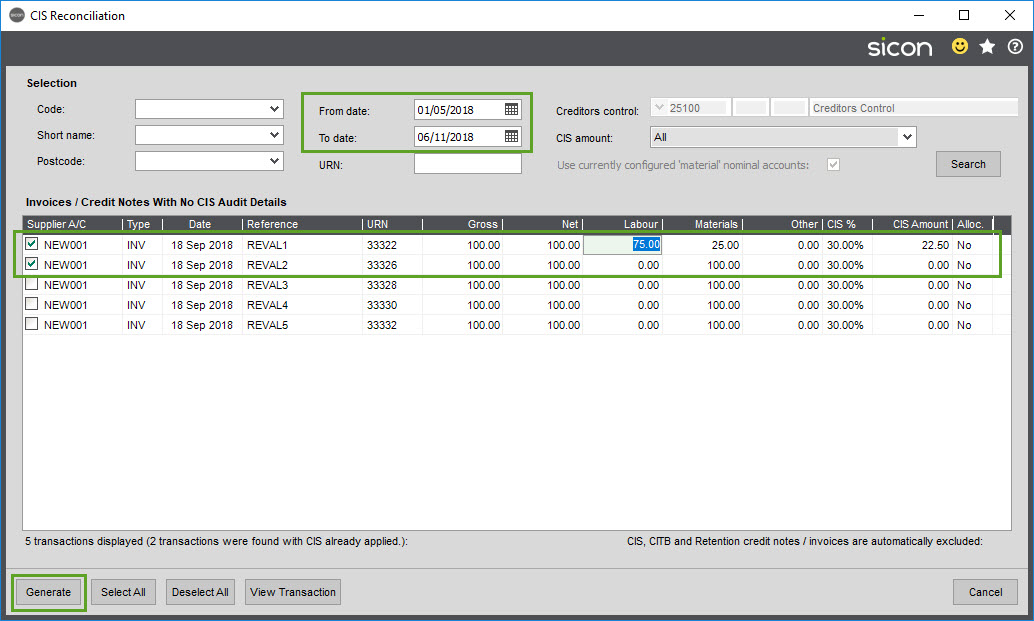
Enter From and To dates for the required period (or search for an individual account) and click Search to identify invoices that you want to apply CIS to.
Tick the lines, or Select All as appropriate. Amend any values – the example here shows the Labour figure being changed. As you tab off the field, this updates the CIS Amount.
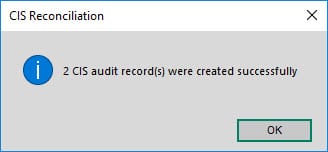
Click the Generate button, you will then get a confirmation that the CIS audit records have been created.
Note: if the invoices are set to require Authorisation, when this has been done you will need to manually allocate the Credit Note to the Invoice prior to payment being made.
Opening Balance invoices are also available in the CIS Reconciliation screen as shown below.
Note: Opening Balance Invoices are VAT Inclusive and should be dealt with slightly differently.
The Gross and Net amounts for Opening Balance Invoices are the same as they are inclusive of VAT. In order to ensure the CIS calculates correctly you will need to update the Labour and Materials columns.
In the example below, the first line was showing a CIS Amount of £10,104.00 until the Labour value was amended. This in turn updated the Other column which is the amount of VAT on the invoice, if there is a Materials amount for this invoice you would need to enter the value in this column. The CIS is Amount is re-calculated if Materials are entered.
When all values have been updated as required, click Select All (or select the individual ones to be updated), then click Generate to create the CIS Credit notes as described previously.
13. Sales CIS
Sales CIS is designed for businesses that do not have a Gross CIS status and need to add the CIS deduction to the Sales Invoice and Credit Notes. As not all transactions could be classed as deductible under the CIS scheme a Customer Account must be flagged to apply CIS to those types of transactions.
There are two methods of deduction available which follow the same rules as subcontractors. You are either break you Labour and Material down in which case require the system to produce your CIS deduction or you provide 100% Labour.
If you require a Labour and Material split, you need to use the Calculate deductions based on configured nominal accounts.
If you provide 100% then you can either use the Calculate deductions based on configured nominal accounts or Calculate deductions using trading account configured percentages.
The deduction method and percentage that is to be deducted off the Labour Revenue is configured in the CIS settings (see Settings section). For each transaction type that is available the system will produce a credit note and allocate this to the invoice.
If the Percentage is set to zero (Gross status), the system won’t do anything with Sales CIS.
Note: Sales CIS doesn’t interact with HMRC, this is for processing a deduction made on Labour transactions, the main contractor should be submitting the CIS deduction made to the business.
13.1. Customer Account
In order for the system to apply the required deduction to the Labour Element of a Sales Invoice, the Customer must first be enabled to Apply CIS. This can be done when adding a new Customer, or by editing an existing Customer. This can be done from the Sage Menu, Sales Ledger > Sales Accounts > Enter New Account or Amend Account Details. This can also be access from the Customer List. When you are in the New Customer or Amend Customer Screen, you will see Sicon Tab this will hold a section for enabling CIS for this Customer.
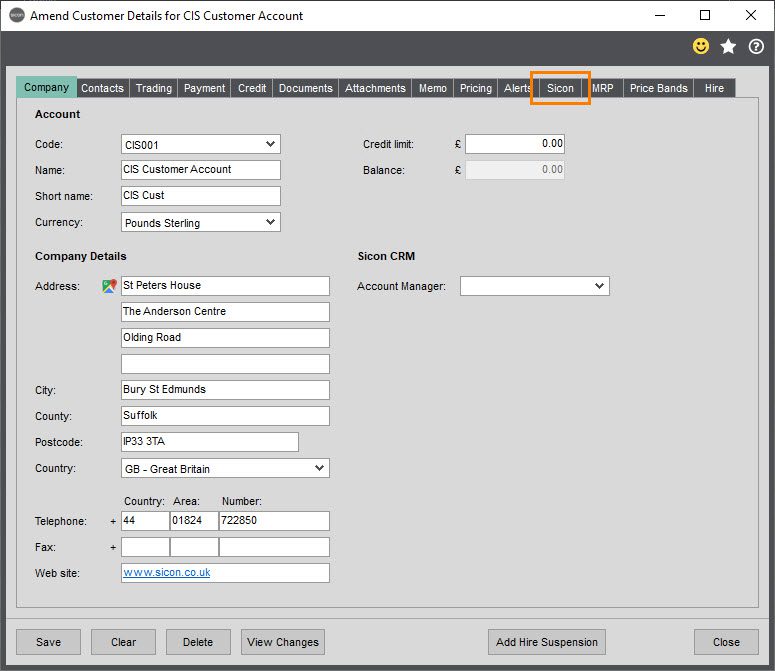
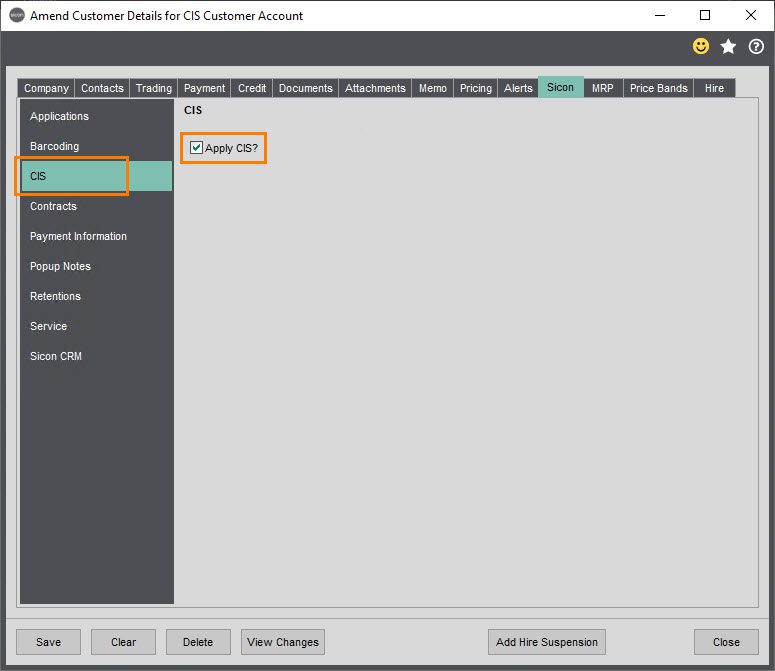
Within the Sicon Tab itself, with construction installed, there will be a CIS section down the left-hand side of the screen. Clicking this will the give you the option you see below. Ticking the ‘Apply CIS?’ tick box will enable CIS for this Customer once the record is saved.
Note: Depending on which Sicon Modules are installed, the left-hand list on the Sicon Tab appearance may vary.
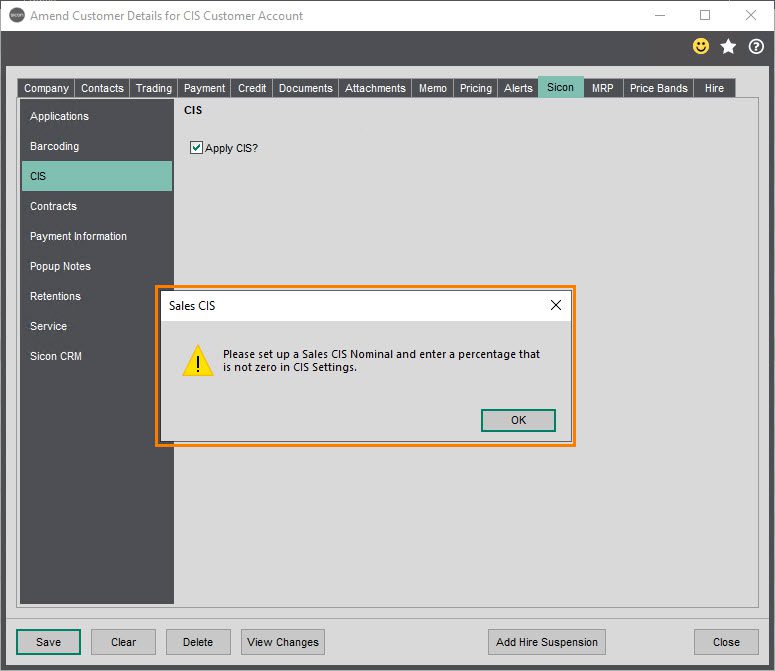
If the Sales CIS Settings haven’t been configured in CIS Settings the system will prompt you to do this first prior to allowing you to set a Customers as applicable for Sales CIS.
13.2. Sales Ledger Transactions
Sales Ledger Transactions are Transaction that are directly entered into the Sales Ledger. No supporting documents (Invoice layouts etc) are available from Sage for these documents. It is likely that if you are using the Sales Ledger Transactions, supporting Documentation is coming from a 3rd party system, including manually generated Invoices.
13.2.1. Sales Ledger Transactions based on Nominals Accounts
In this example, the system has been set to calculate deduction based on configured nominal accounts (for more information see Settings Section) and the Sales deduction set to 20% (standard rate of deduction)
Under the Labour Nominal Accounts, Nominal Account 31102 has been specified as the Labour Revenue will be coded to. This means whenever a Sales Ledger Invoice has a value coded to this Nominal Code the system will add a deduction for 20% of this value for any Customer flagged as ‘Apply CIS’.

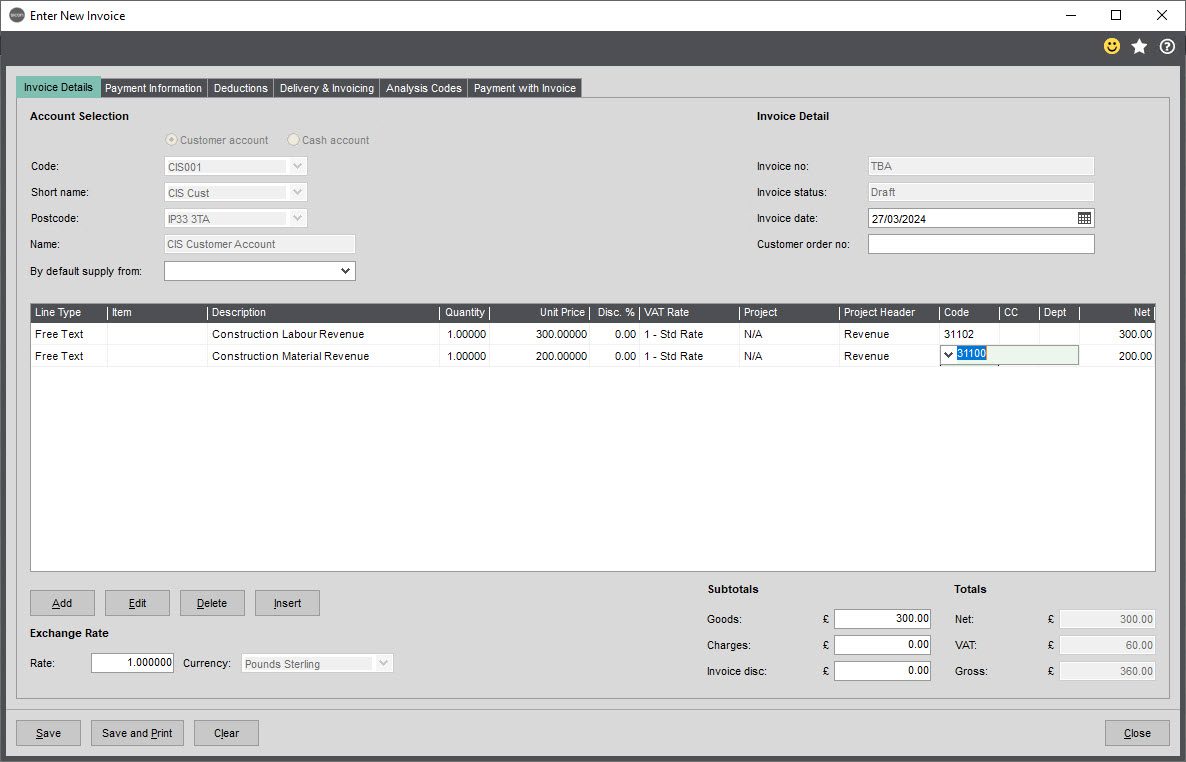
Here we are entering a £500 Invoice straight into the Sales Ledger, this has been split been two nominals. First our Construction Sales Labour code has a value of 300 and our default Sales code has a value of 200. As we are calculating deduction based on Nominal, the system will know that of the £500 Invoice, the Labour Value is equal to £300 and will make a 20% deduction off of this.
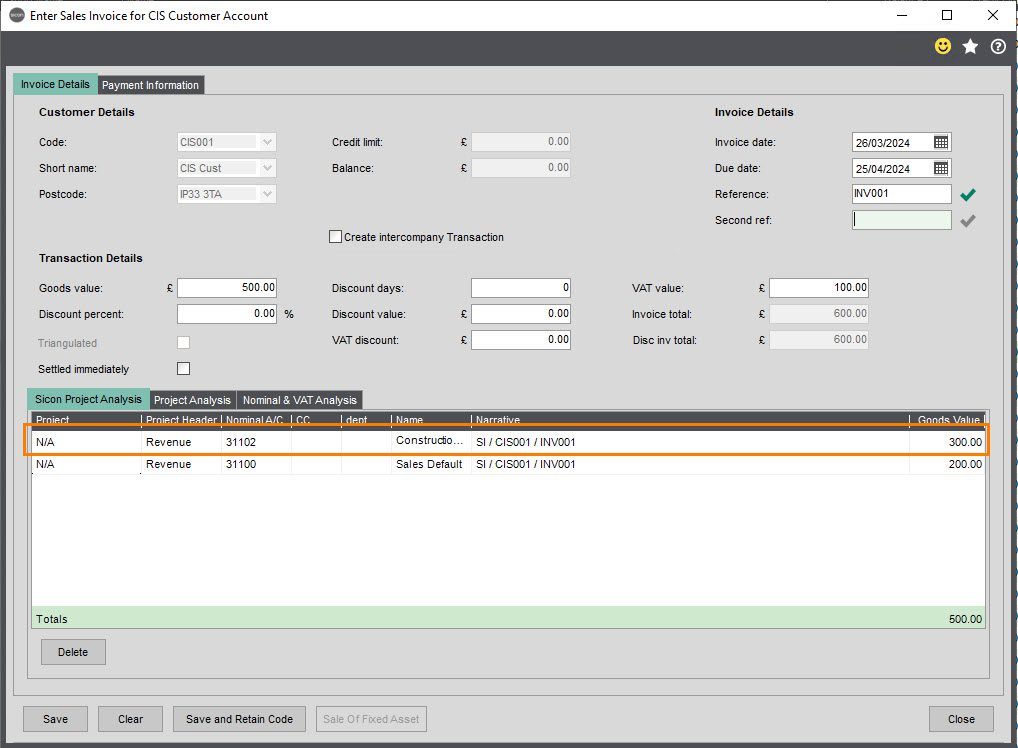
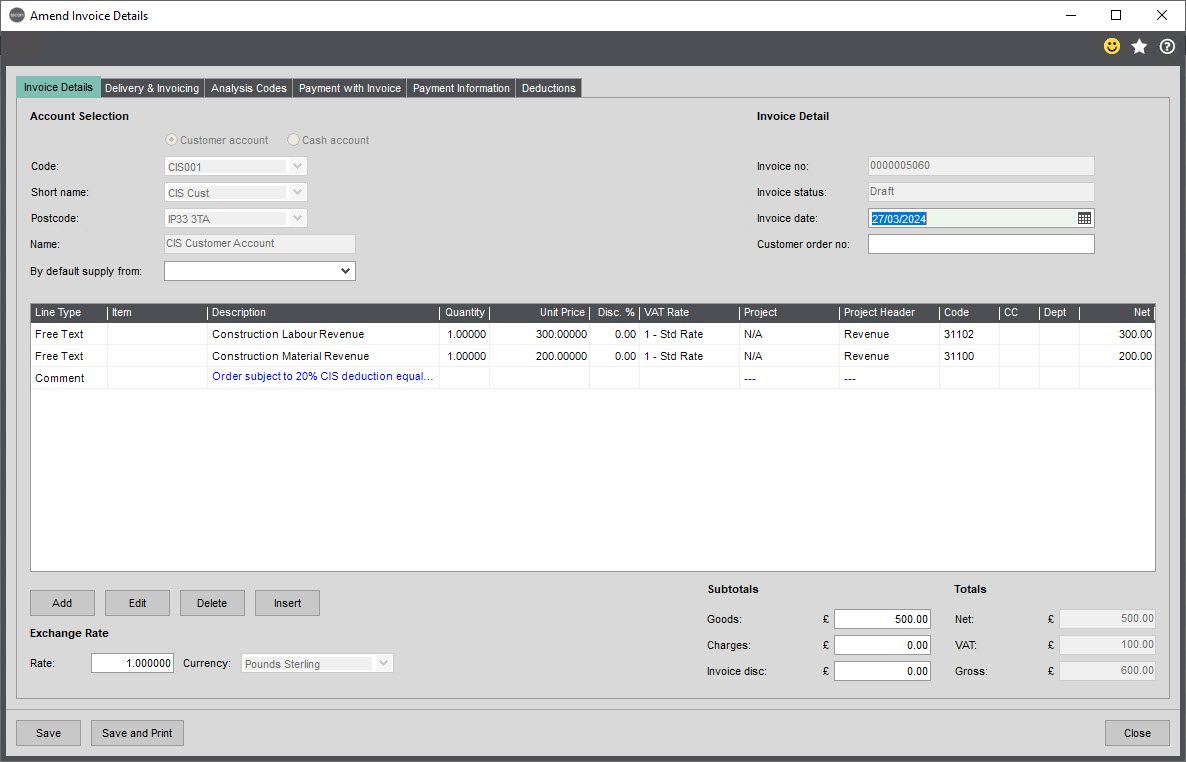
When you click Save, Sage will post the Invoice and the system will then prompt to tell you that it has created a sales credit automatically at a value based on the CIS deduction rate and the amount coded to the specified CIS Labour nominal. In this case, the system automatically created a credit for £60 and allocated that against the Invoice.

The reverse effect happens when you are entering a Credit Note. In this example we are adding a Credit Note for half of the amount, and coded £150 to the Labour Nominal. In this instance we are expecting the System to Automatically produce an Invoice for £30 to offset the Credit Note.
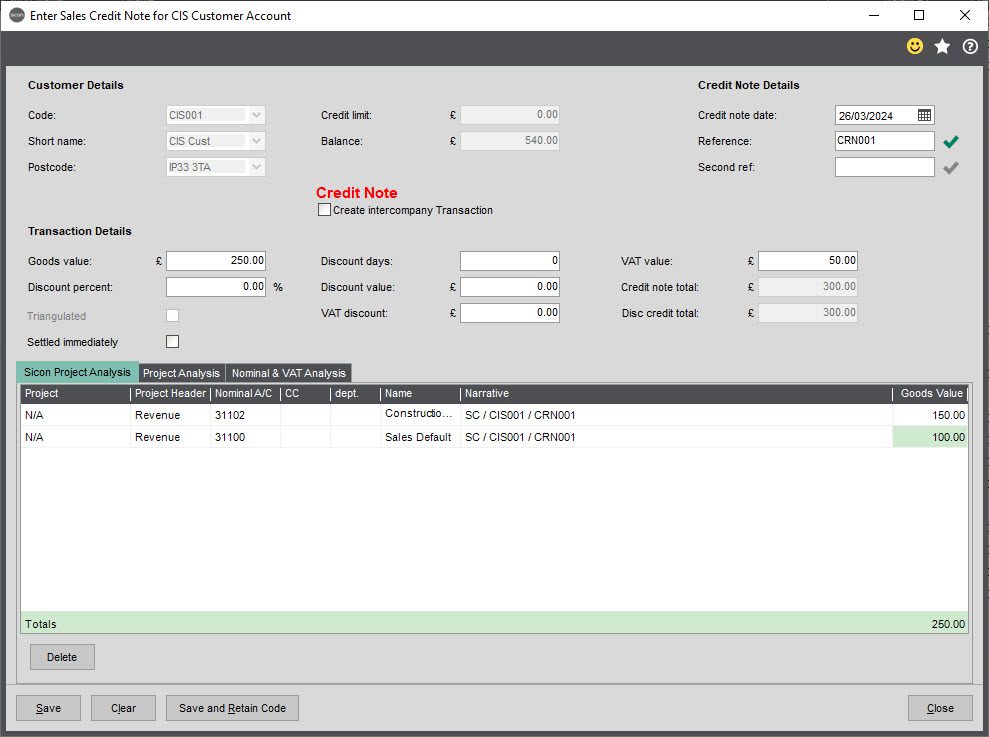
When you click save, the system again, prompts to tell you it has made a deduction, although in this instance it is an invoice against a credit note.

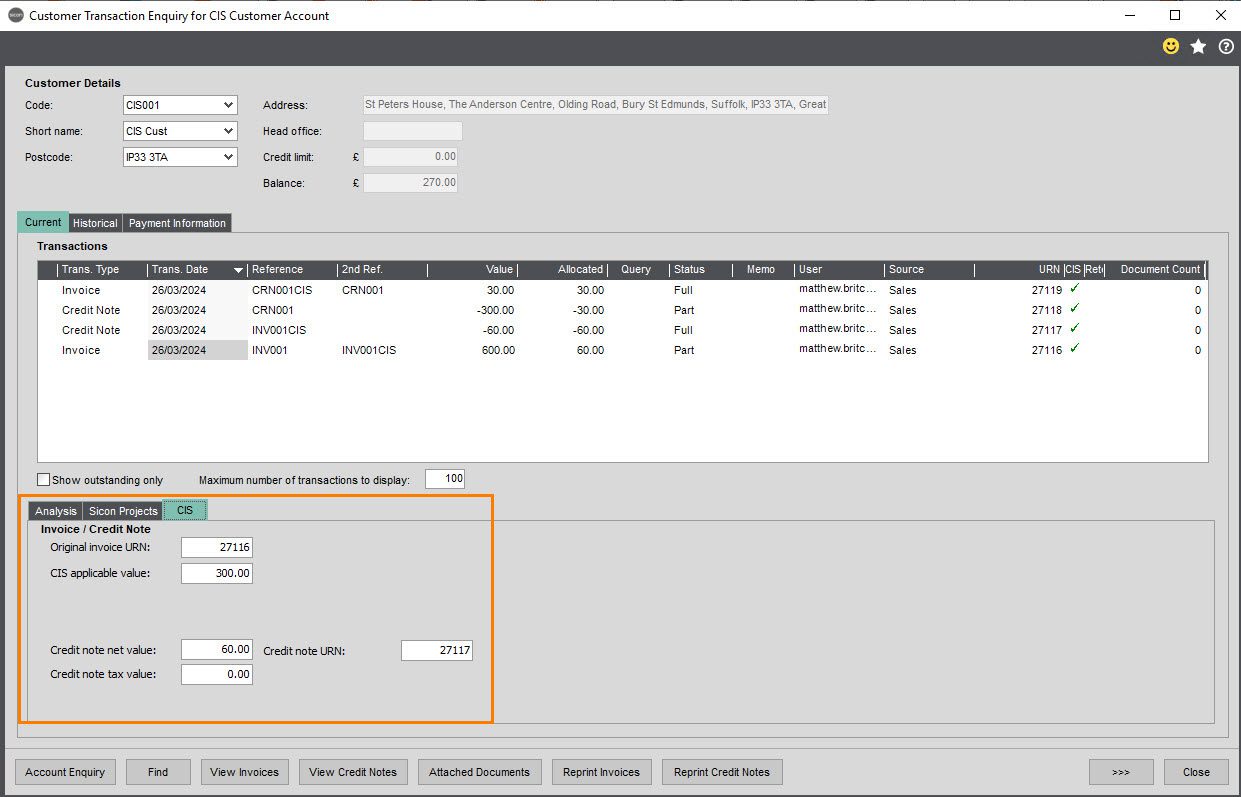
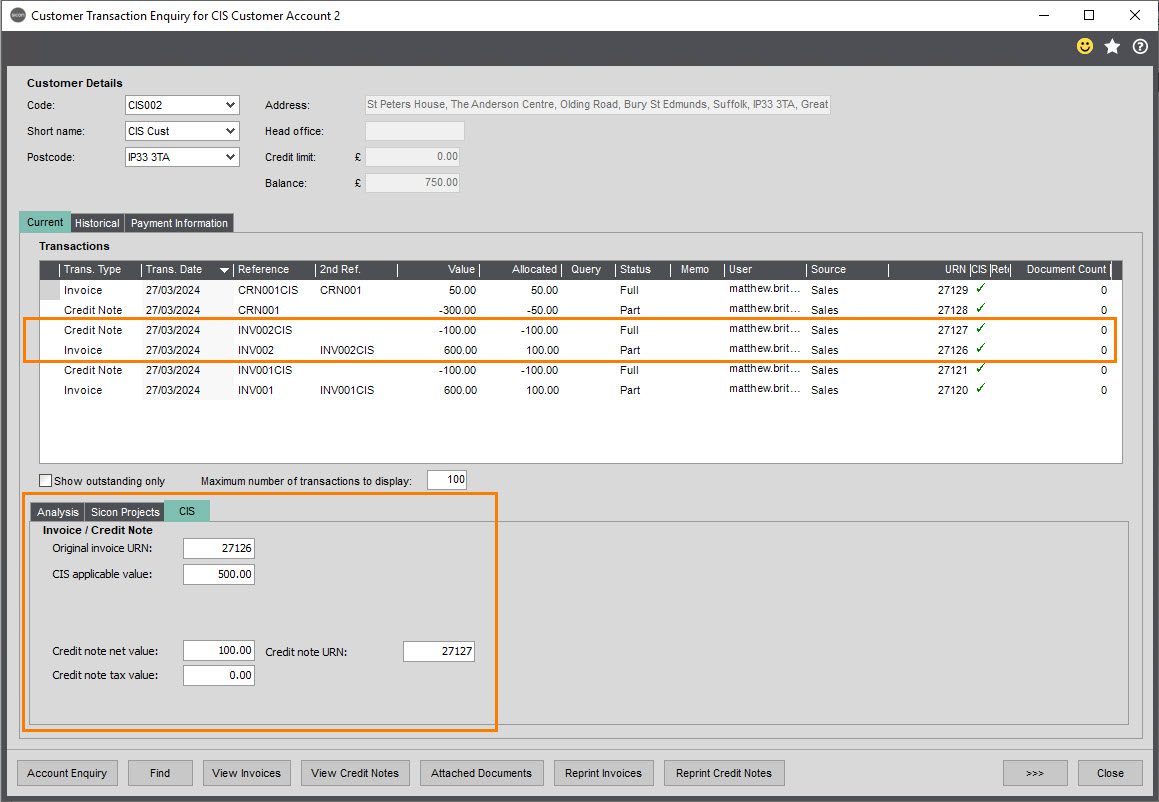
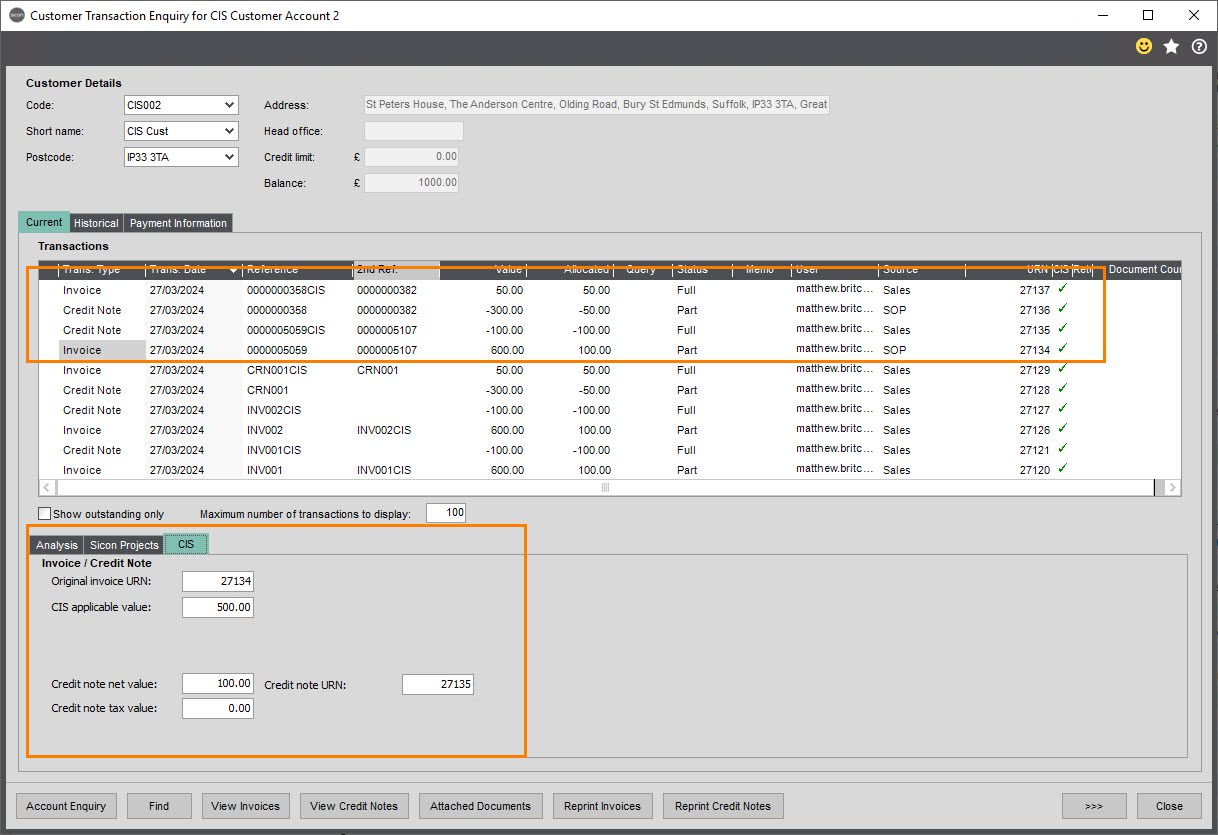
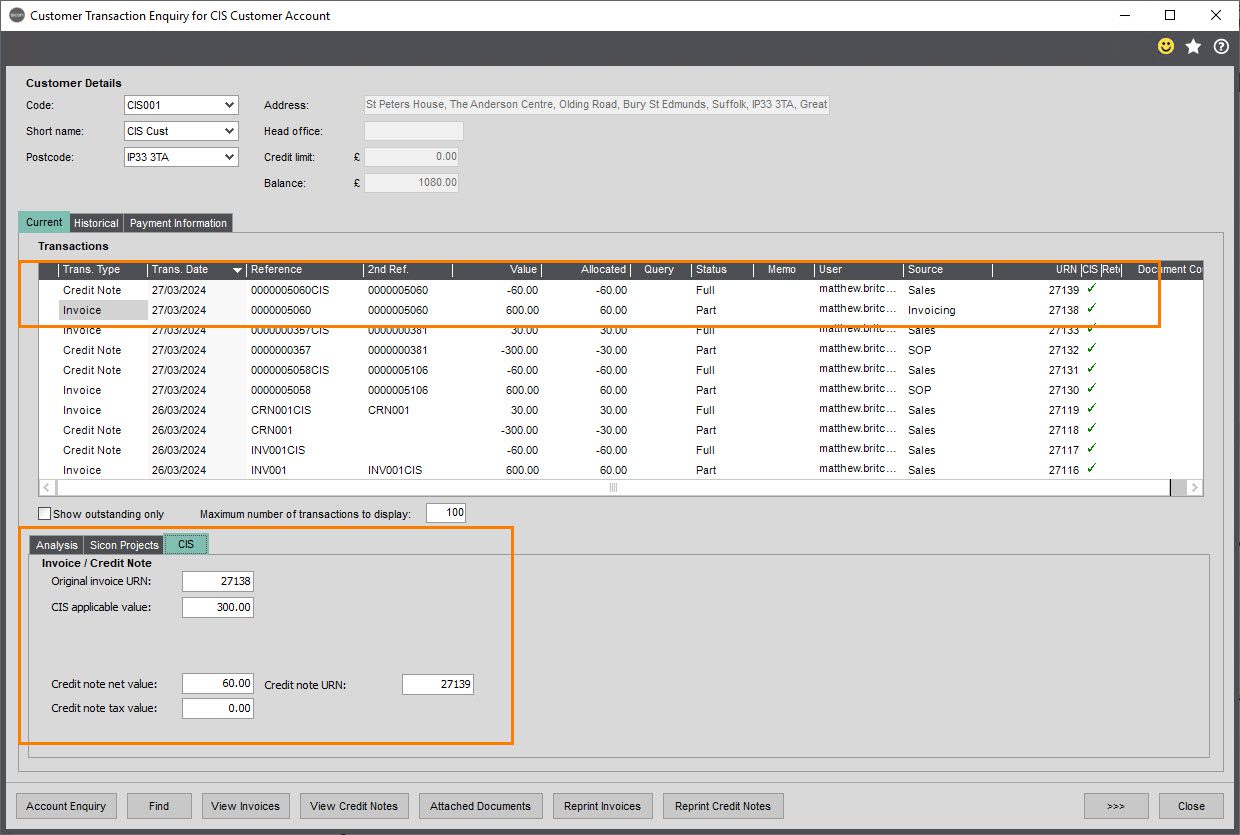
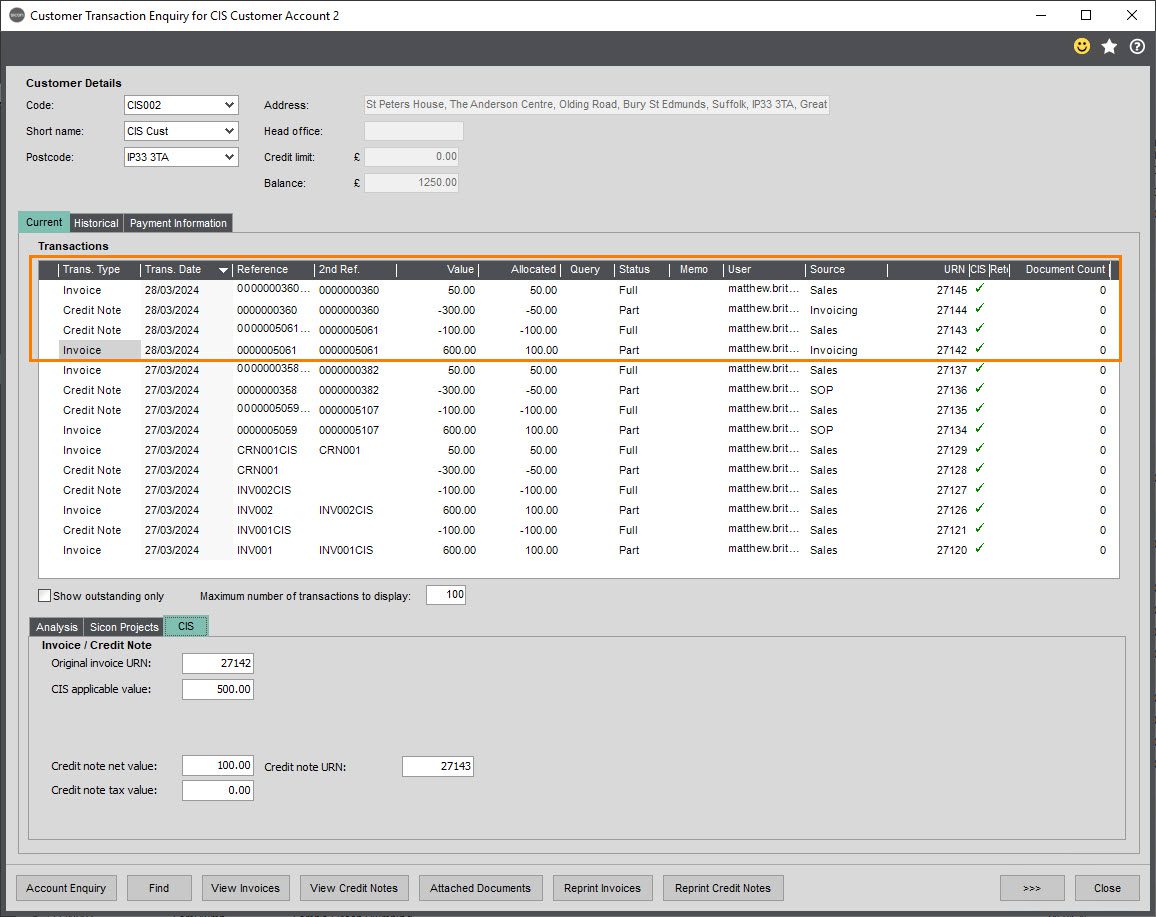
If you navigate to the Customer Transaction Enquiry, we can see a bit more information on what has happened. If we consider INV001 that was entered first, we can see the system has already allocated the £60 credit against this, with a reference of INV001CIS. The system will always take the references of the original transaction append it with ‘CIS’.
The system will also make a CIS tab available to show you information on the CIS deduction. This is similar to what you would see on the Purchase Transactions Enquiry but with less information as it isn’t required on the Sales side.
We can see:
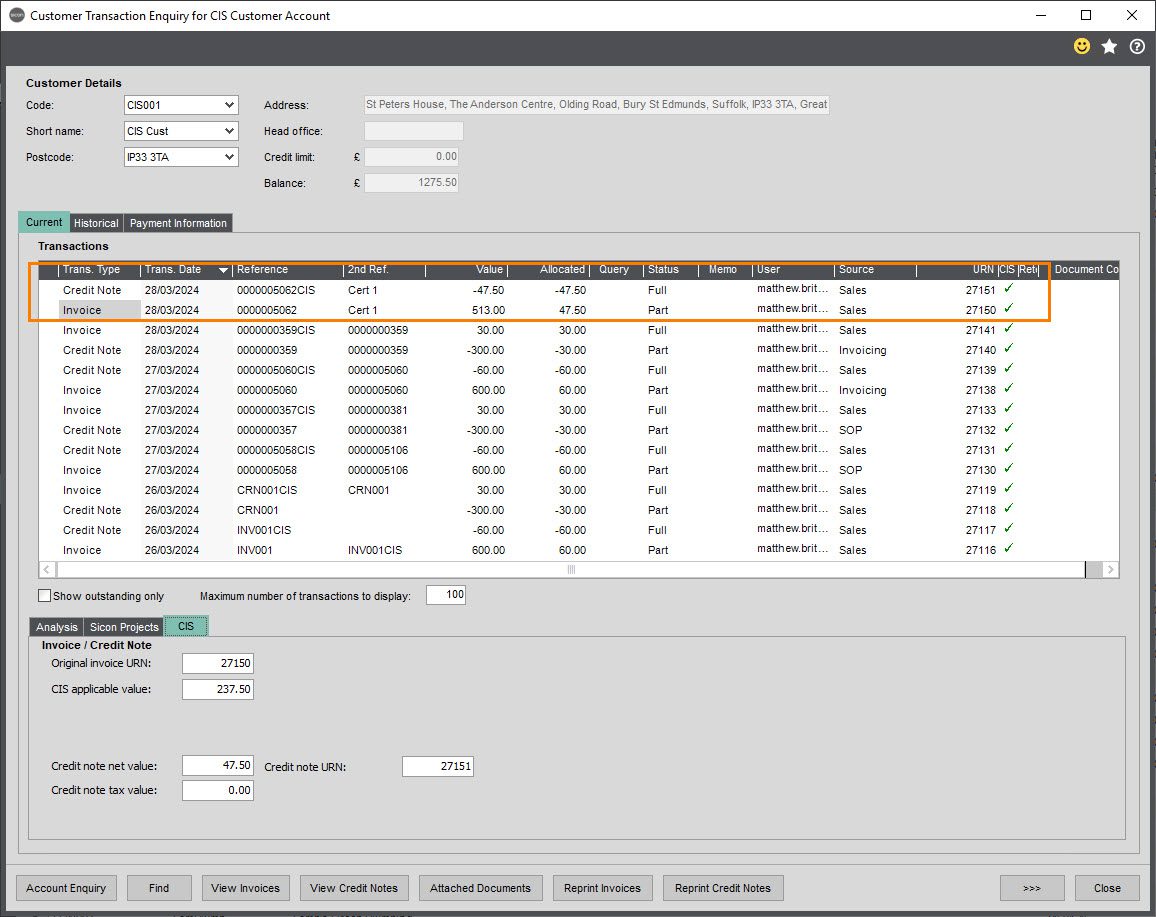
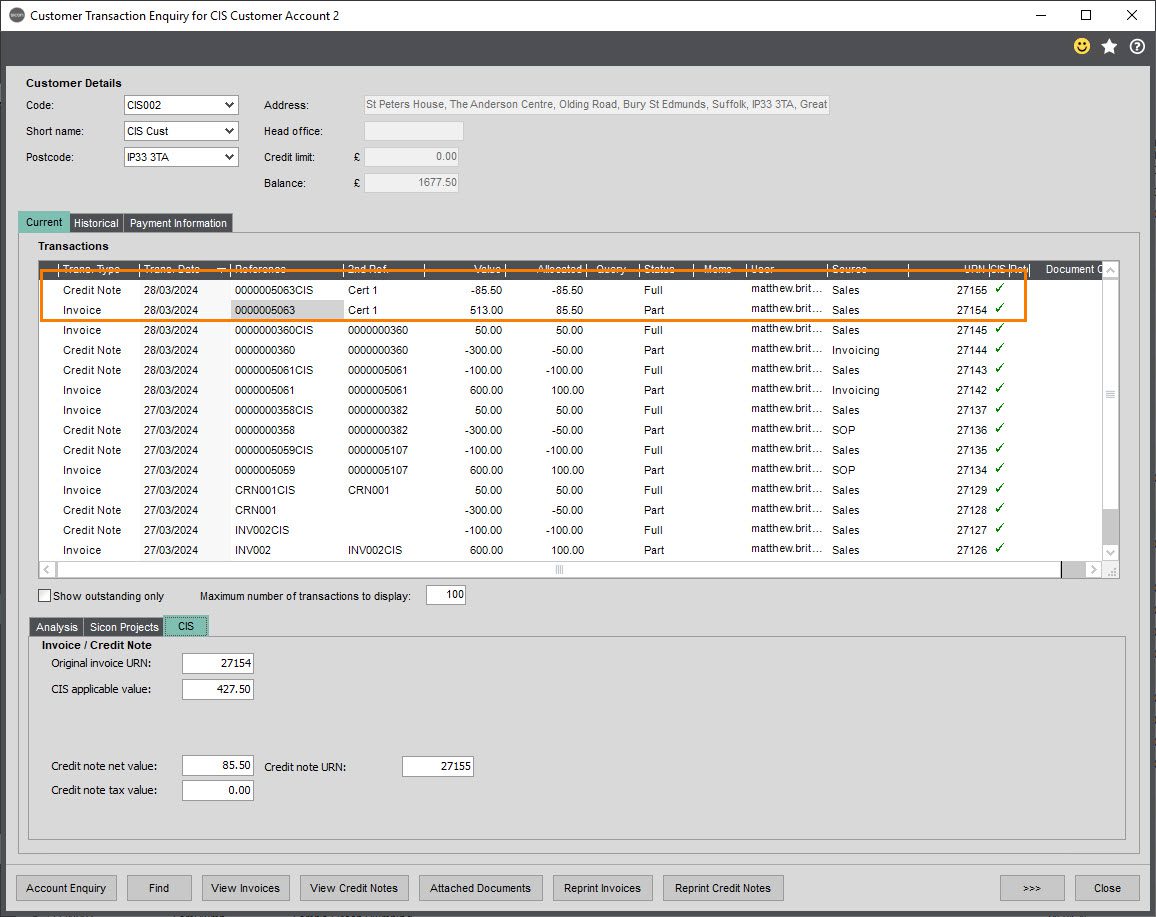
Original Invoice/Credit Note URN – This is Unique Reference of the original transaction
CIS Applicable – How much of the invoice is applicable for CIS deduction. i.e. How much Labour was on the Invoice
Credit Note / Invoice net value – Credit Note value of the deduction
Credit Note / Invoice URN – The Unique Reference of the deduction credit note
Credit Note / Invoice tax value – This will show the tax (VAT) value of the linked Credit Note / Invoice. If you have the deduction transaction highlighted, this will show you the tax value on the original invoice. If you have the original transaction highlighted this should always be zero
Anything with a CIS Audit will also show the Green Tick in the Customer transactions Enquiry under the CIS column.
13.2.2. Sales Ledger Transactions based on Percentages
In this example, the system has been set to calculate deduction based on Trader Percentages (for more information see Settings Section) and the Sales deduction set to 20% (standard rate of deduction).
When using Trader Percentages, you can code the Invoice to any Nominal code, but the system will presume that the Invoice is 100% labour and take the deduction off the whole amount.
Here we are entering a £500 Invoice straight into the Sales Ledger, this time it has been coded against a single Nominal Code.

When saving the Invoice, the system will prompt to save that it has taken a deduction off of the Invoice:

The reverse effect happens when you are entering a Credit Note. In this example we are adding a Credit Note for half of the amount.
Once the Credit Note is saved the system produces an Invoice for £50 for the CIS deduction.

If you navigate to the Customer Transaction Enquiry, we can see a bit more information on what has happened. If we consider INV002 that was entered first, we can see the system has already allocated the £100 credit against this, with a reference of INV002CIS. The system will always take the references of the original transaction append it with ‘CIS’.
The system will also make a CIS tab available to show you information on the CIS deduction. This is similar to what you would see on the Purchase Transaction Enquiry but with less information as it isn’t required on the Sales side.
We can see:
Original Invoice/Credit Note URN – This is Unique Reference of the original transaction
CIS Applicable – How much of the invoice is applicable for CIS deduction. i.e. How much Labour was on the Invoice
Credit Note / Invoice net value – Credit Note value of the deduction
Credit Note / Invoice URN – The Unique Reference of the deduction credit note
Credit Note / Invoice tax value – This will show the tax (VAT) value of the linked Credit Note / Invoice. If you have the deduction transaction highlighted, this will show you the tax value on the original invoice. If you have the original transaction highlighted this should always be zero
Anything with a CIS Audit will also show the Green Tick in the Customer transactions Enquiry under the CIS column.
13.3. Sales Orders and Returns
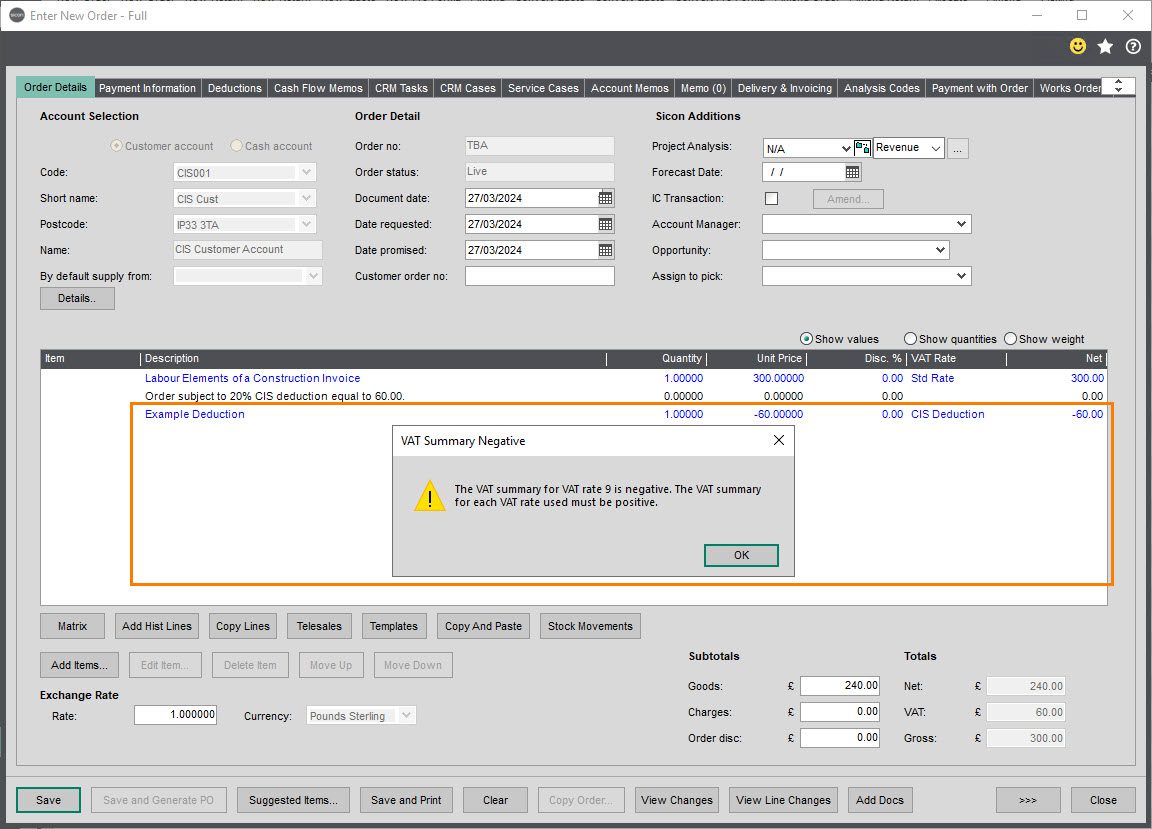
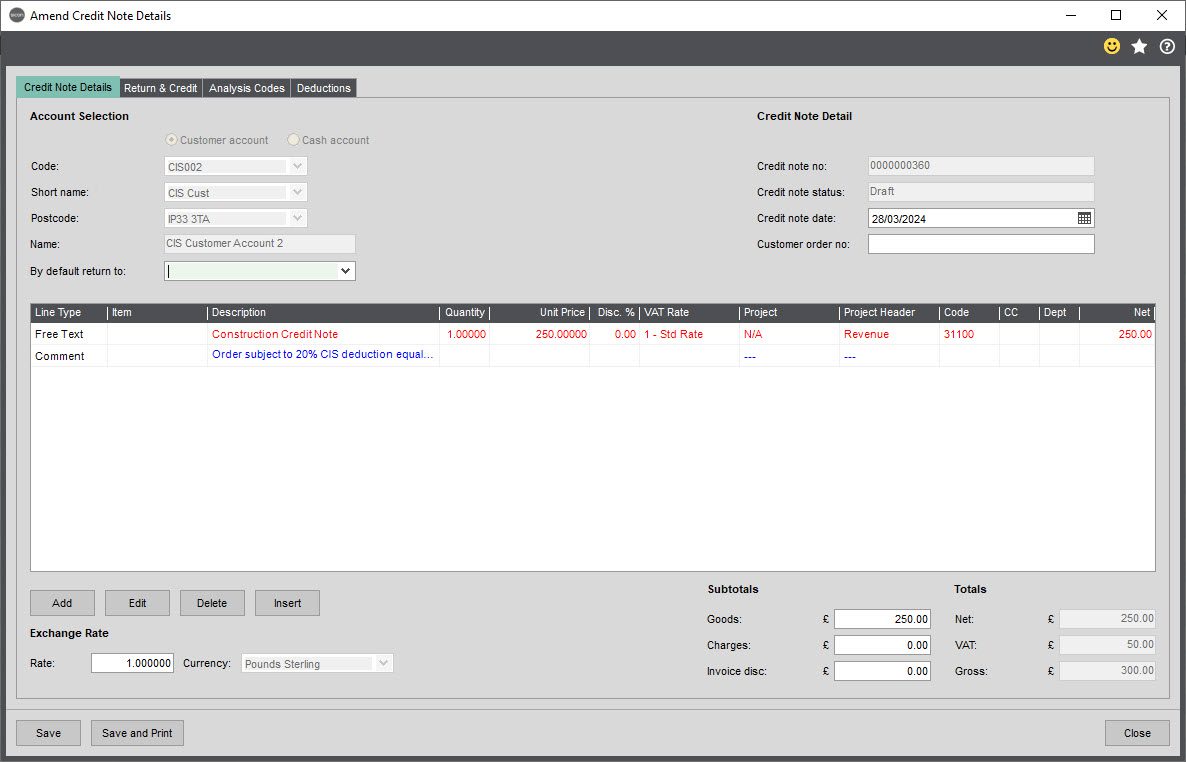
Due to a Sage restriction on Sales Orders and Returns related to a VAT summary not being negative we can’t add the deduction directly onto the Sales Order itself. The Credit deduction for a Sales Order can only be produced when the Invoices is posted, in the same way a Credit Note is raised for Sales Ledger Transaction. It is recommended that you read that section first if you haven’t.
In order to enable users to that the invoice is subject to a deduction we have added an auto generated comment line stating “Order Subject to X% CIS deduction equal to XX.XX”
The Percentage is pulled from the CIS settings so it gets the correct rate of deduction.
The Value is generated from the Order Value itself.
13.3.1. Sales Orders and Returns based on Nominal Account
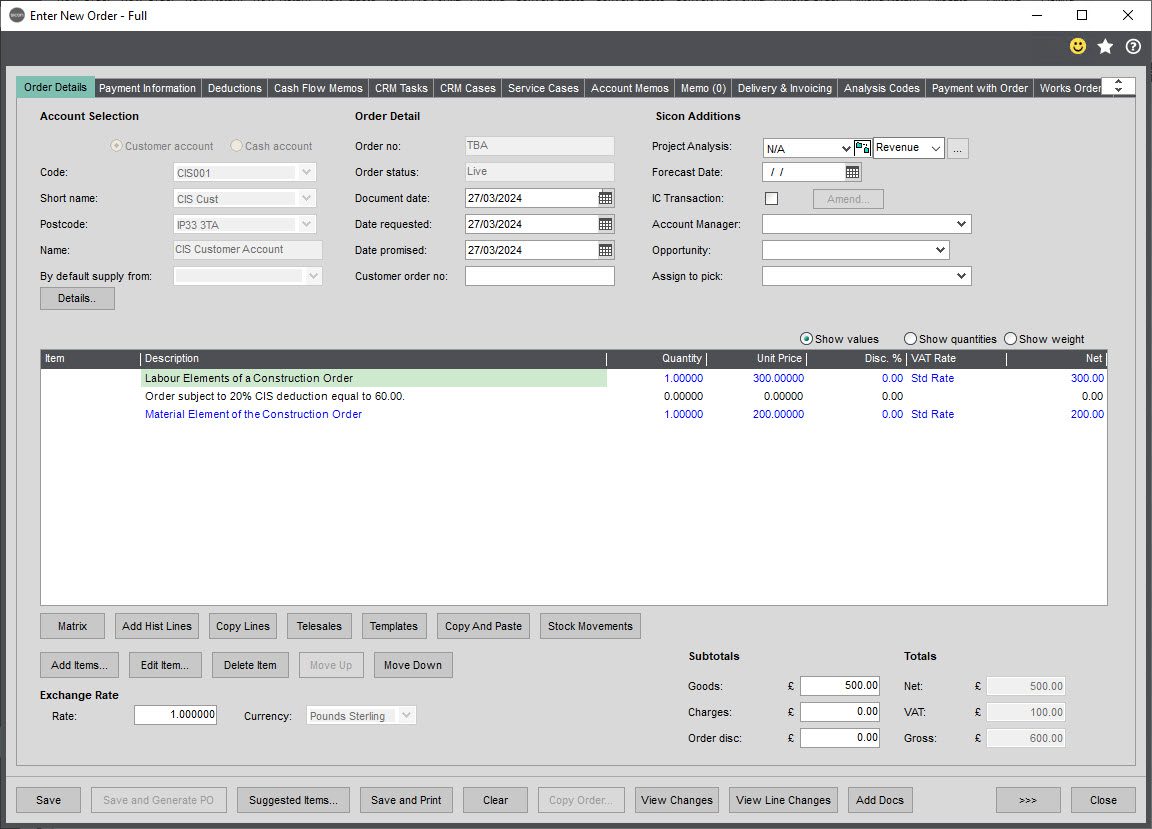
In this example, the system is set in the same settings as the Sales Ledger Transactions based on Nominals Accounts, with the Nominal Account 31102 configured as the Labour Nominal (see CIS Settings to get this setup).
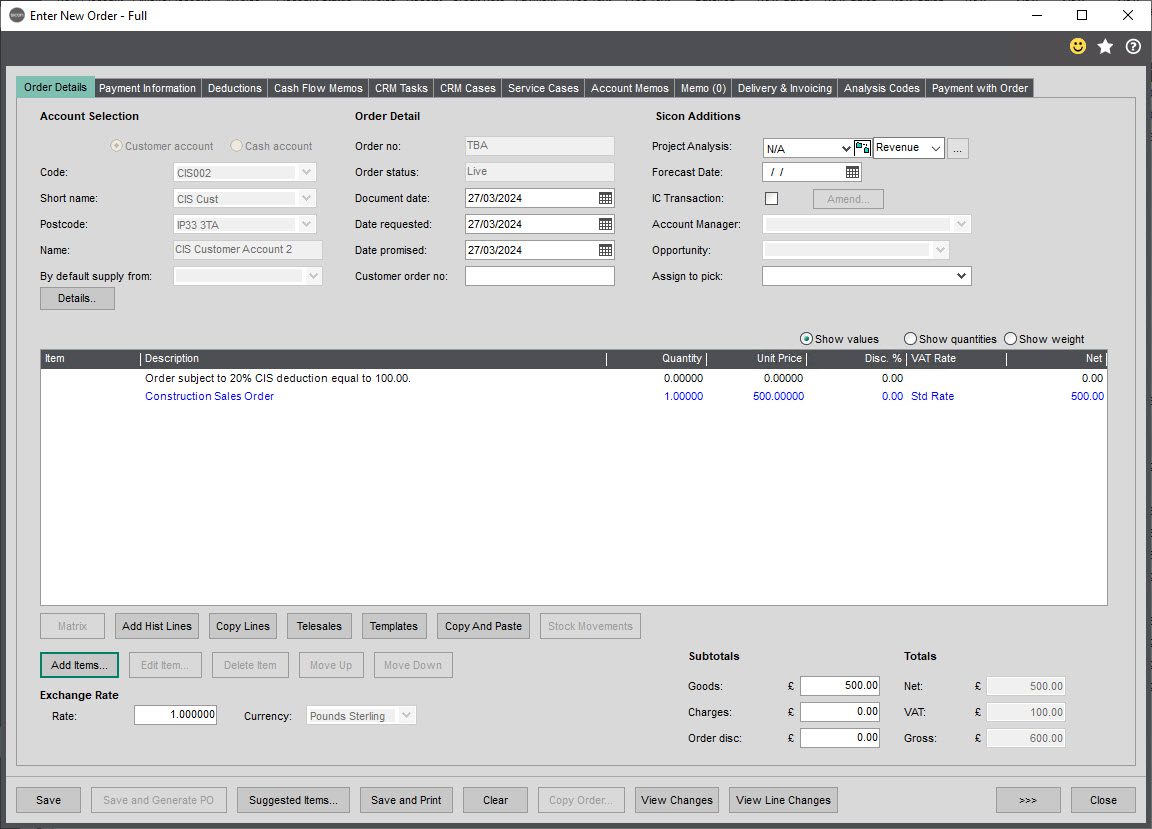
An Order has been Generated for our CIS Customer for a value of £500, this has been split between £300 posted to Nominal 31102 our CIS Labour Revenue code and £200 to 31100 which is our default Sales Account.
As 31102 is the nominated Nominal for Labour Revenue the system has added a comment line to state the Order is subject to 20% deduction equal to 60.00 so this is included on the Sales Order Document.
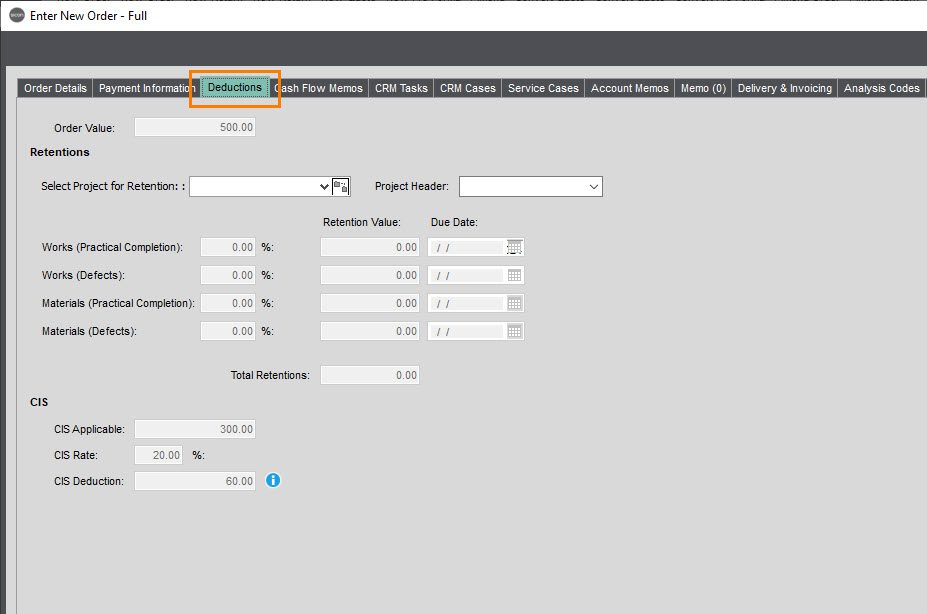
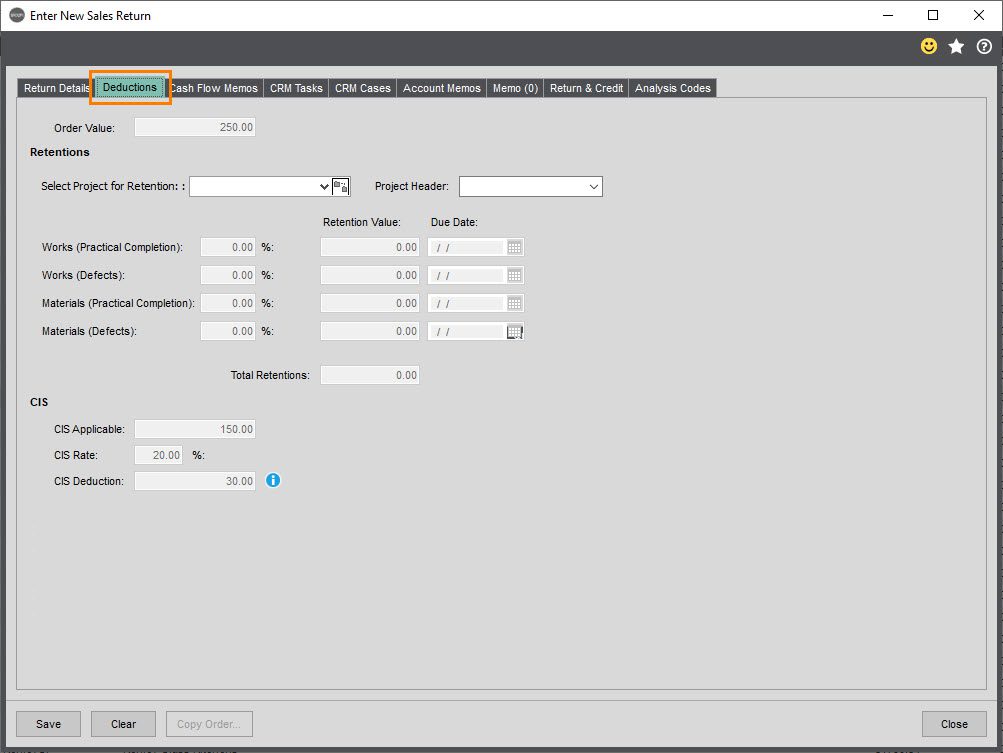
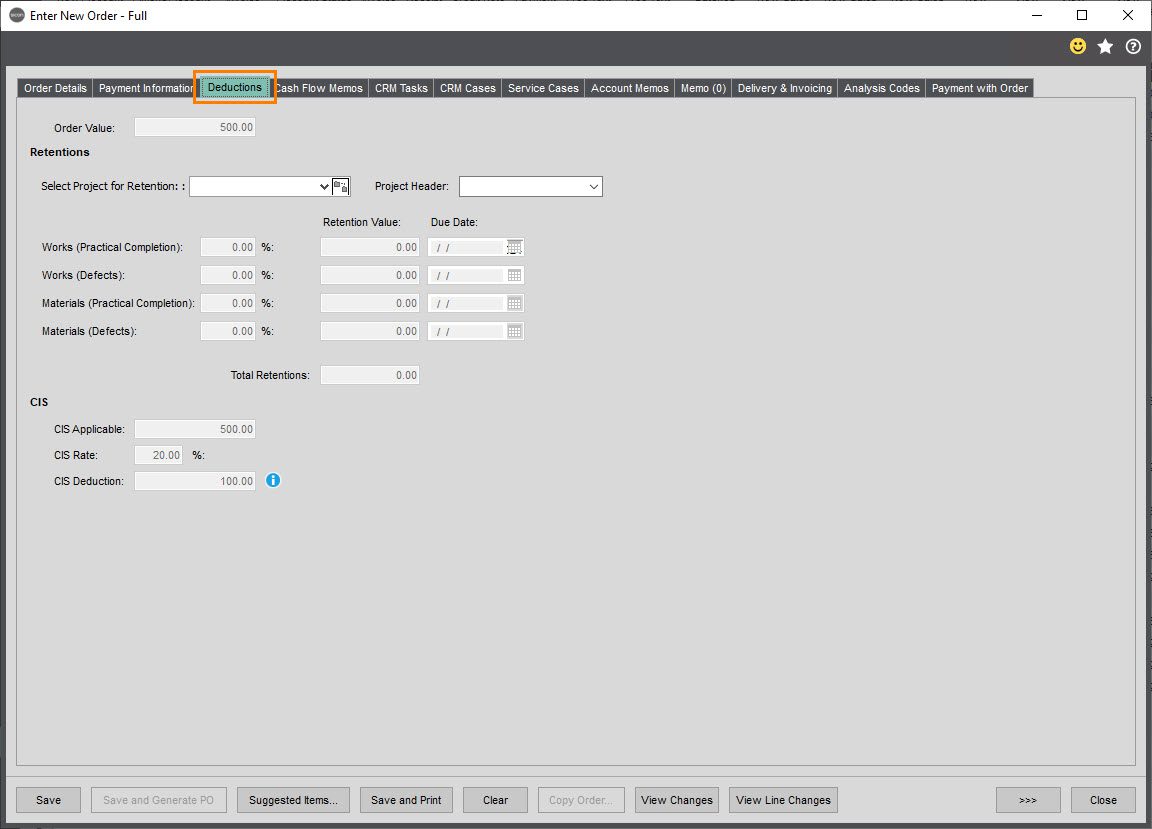
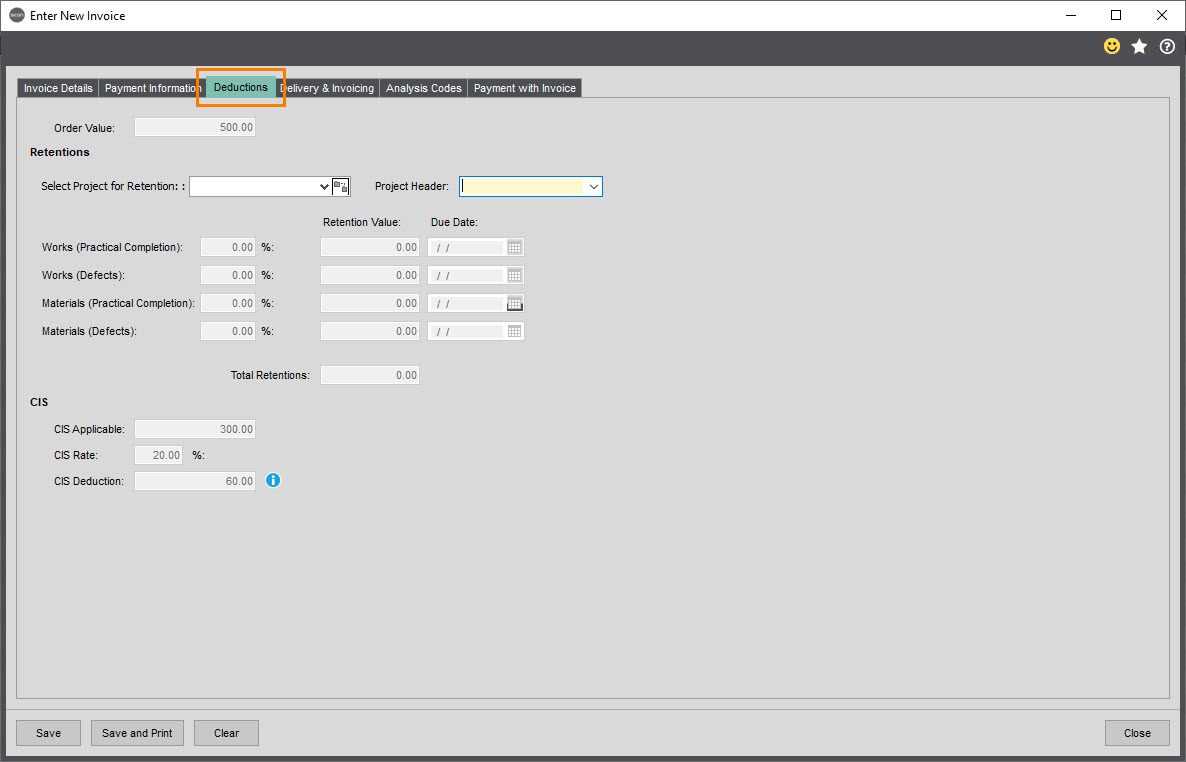
In addition to the comment line there is a ‘Deductions’ tab available. This outlines what is applicable for CIS, the CIS Rate and the total deduction. This tab also displays Sales Order Retentions which is also available in full Sicon Construction suit.
The Sales Order follows the standard Sage process for processing a Sales Order. The Sales Order can be Despatched or the Confirmation Service/Free Text Items processed and the Invoice can be printed. The part where the CIS next comes into play is posting of the Invoice. Once Sage has posted the Invoice, the system is then able to Post the deduction Credit Note against that Invoice for the Value outlined on the Sales Order Comment Line and Deduction Tab.
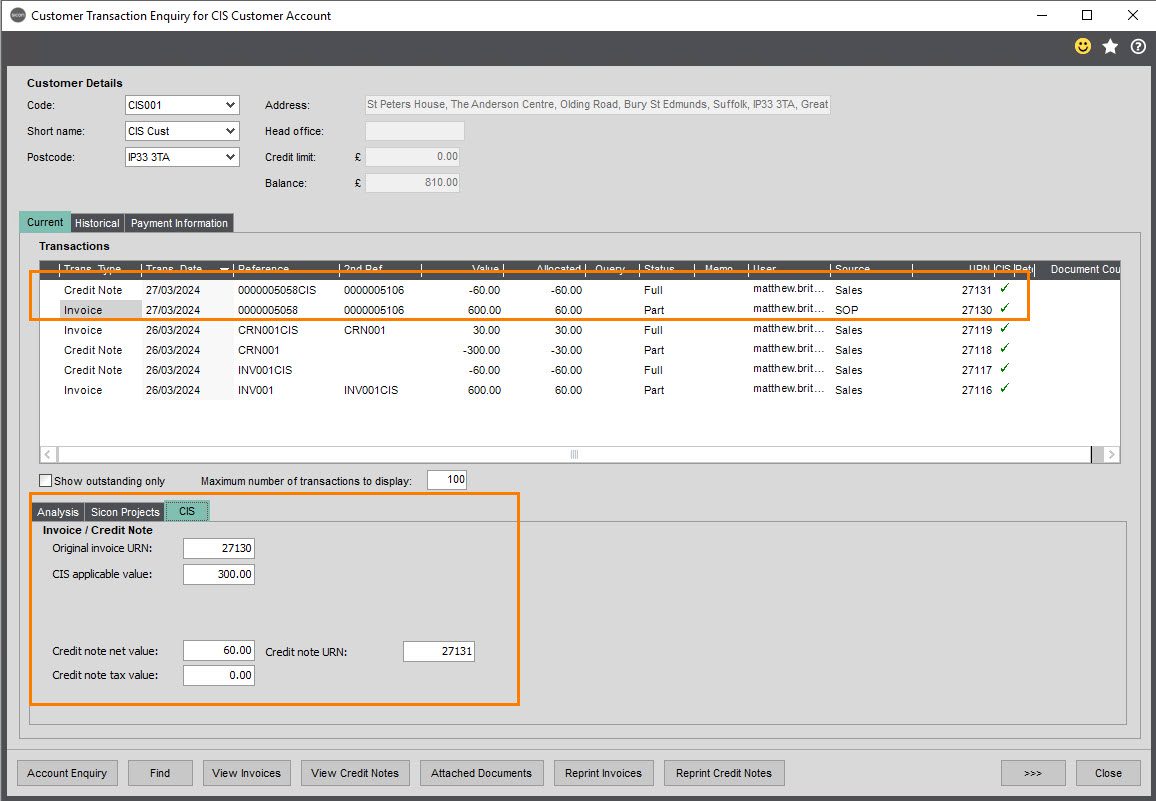
The Customer Transaction Enquiry shows the Invoice and Credit Note created presenting all the CIS information stored.
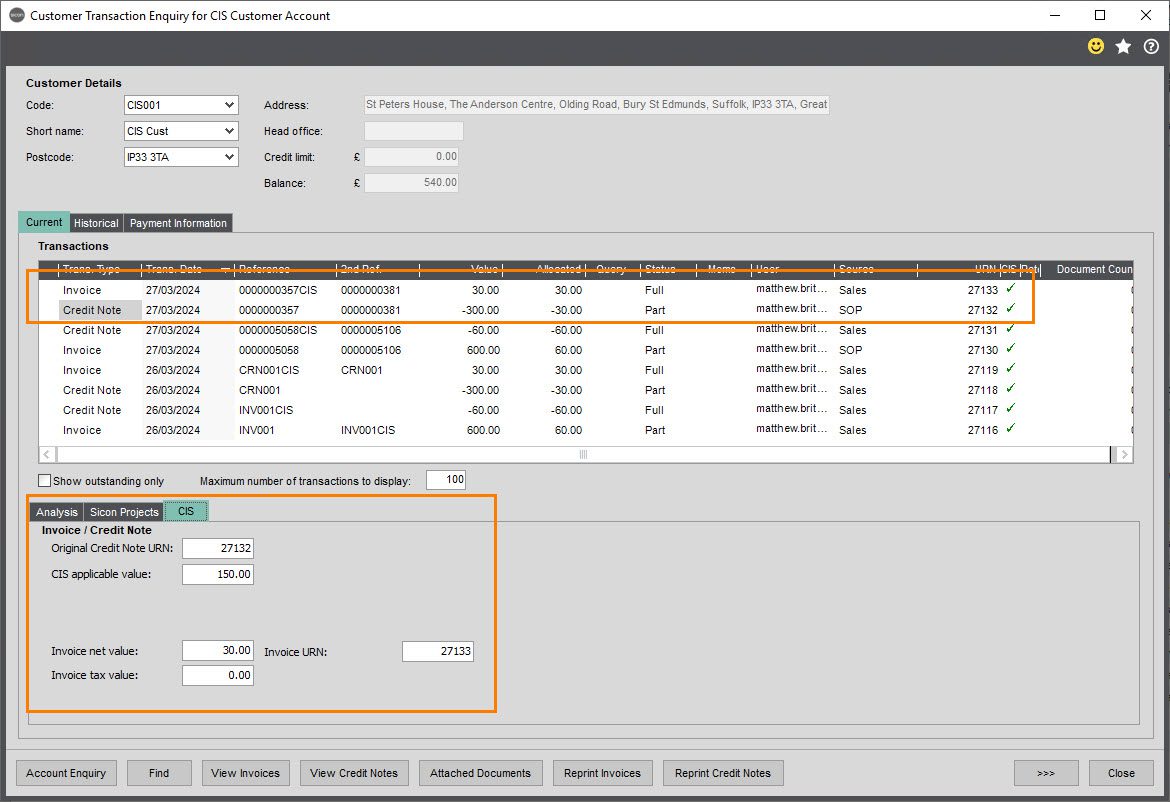
Original Invoice/Credit Note URN – This is Unique Reference of the original transaction
CIS Applicable – How much of the invoice is applicable for CIS deduction. i.e. How much Labour was on the Invoice
Credit Note / Invoice net value – Credit Note value of the deduction
Credit Note / Invoice URN – The Unique Reference of the deduction credit note
Credit Note / Invoice tax value – This will show the tax (VAT) value of the linked Credit Note / Invoice. If you have the deduction transaction highlighted, this will show you the tax value on the original invoice. If you have the original transaction highlighted this should always be zero
Anything with a CIS Audit will also show the Green Tick in the Customer transactions Enquiry under the CIS column.
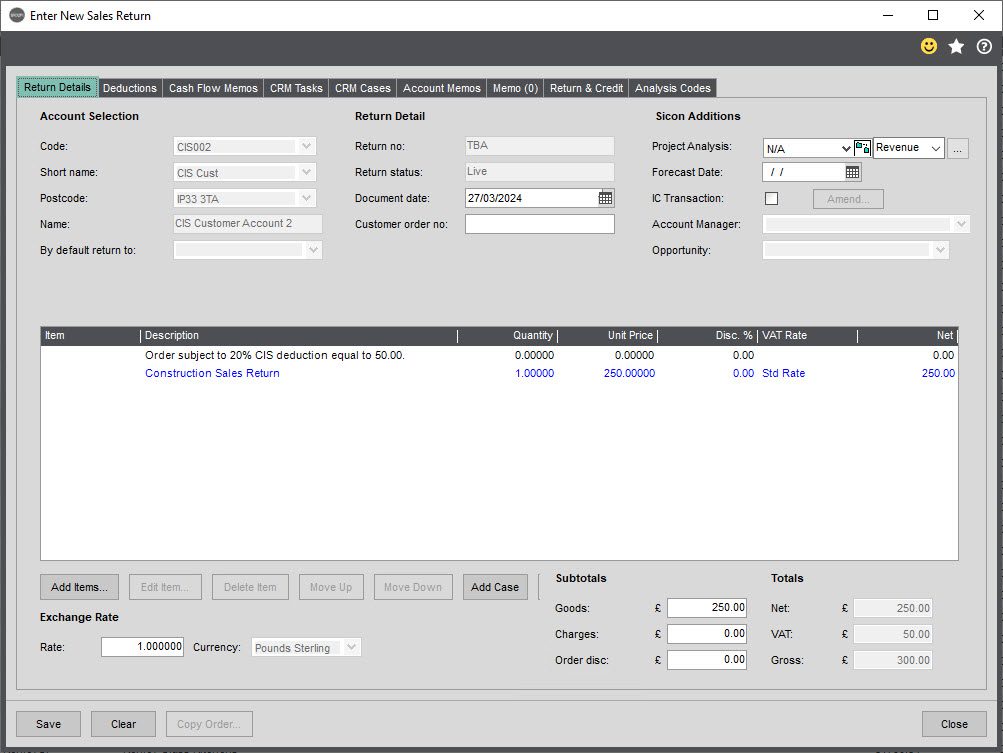
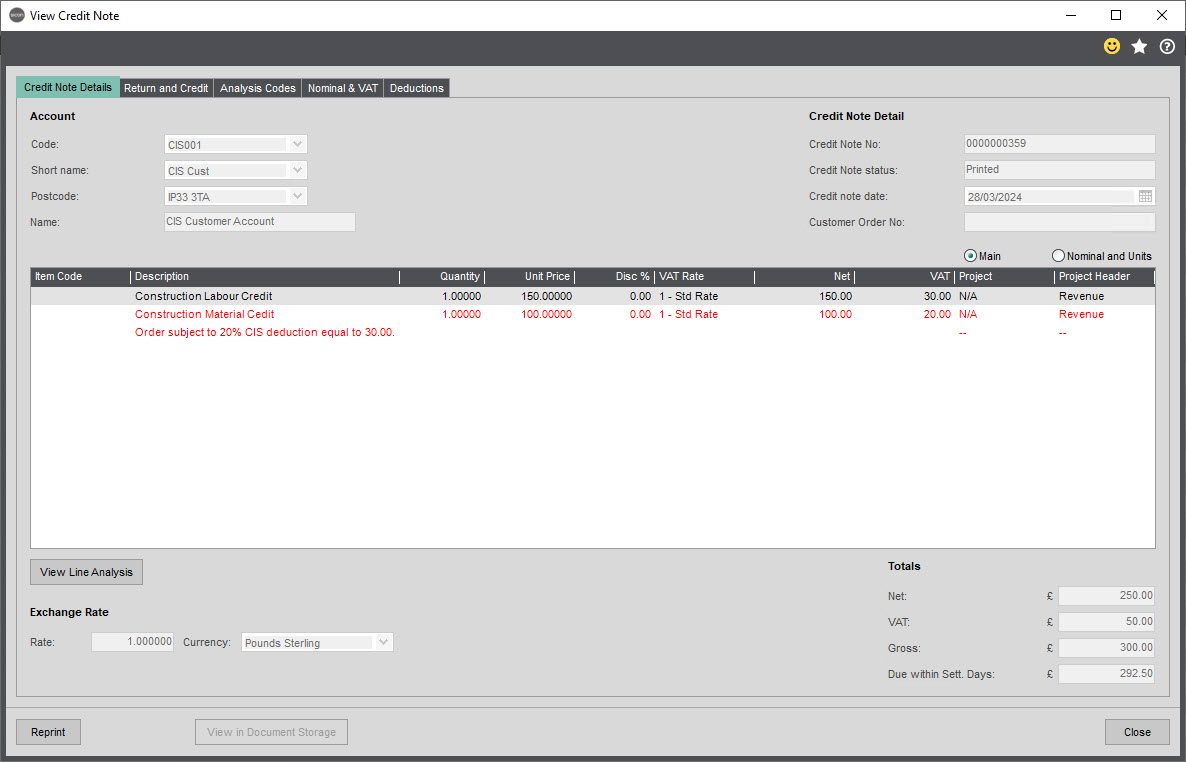
The reverse effect happens when you are entering a Sales Order Return. In this example we are adding a Return for half of the amount, and coded £150 to the Labour Nominal. In this instance we are expecting the System to Automatically produce an Invoice for £30 to offset the Credit Note.
As per the Sales Order, the system will add a Comment line “Order subject to 20% CIS deduction equal to 30.00”
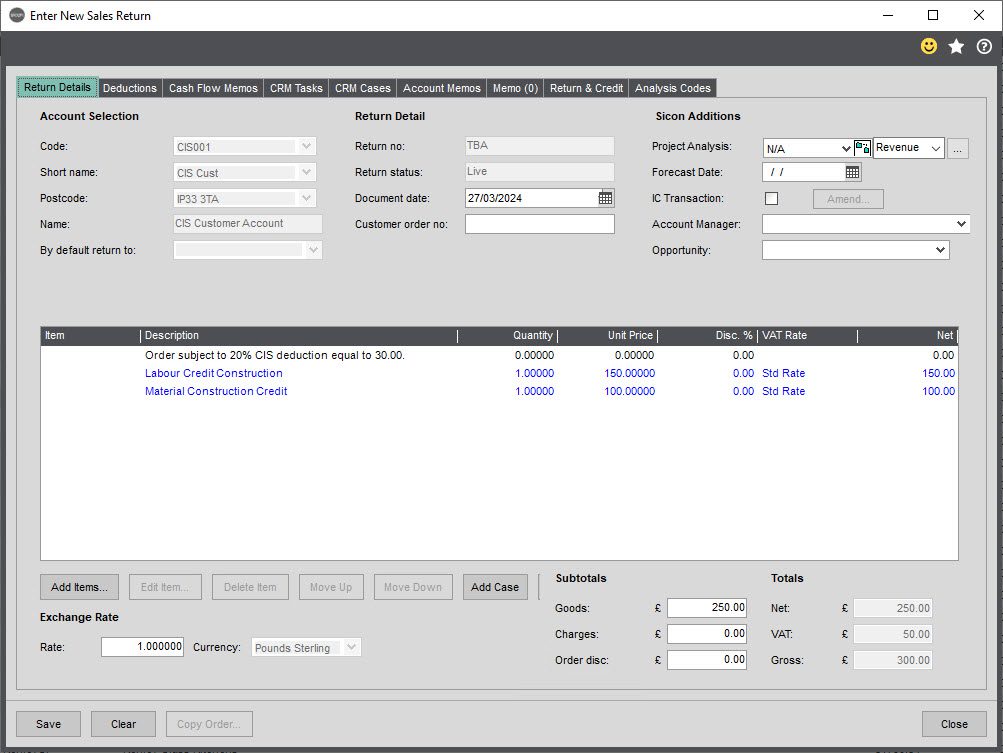
Under the Deductions tab, the Return also summaries the CIS Applicable, Rate and Deduction for the whole Return.
As per the Order posting, in the Customer Transactions Enquiry Screen, you can see all the relevant CIS deduction information on the Posted Credit Note from the Sales Order Return.
13.3.2. Sales Orders and Returns based on Percentages
In this example the system is set in the same settings as the Sales Ledger Transactions based on Percentages. If you haven’t read this section, it is recommended you read that first as this covers how Percentage based method is for processing 100% labour only Invoices.
When using Trader Percentages, you can code the Sales Order to any Nominal code, but the system will presume that the Order is 100% labour and take the deduction off the whole amount.
Here we are entering a £500 Sales Order this time it has been coded against a single Nominal Code. This could be multi line and be coded to multiple nominals code if applicable.
The system has added a comment line to state the Order is subject to 20% deduction equal to 100.00 so this is included on the Sales Order Document.
In addition to the comment line there is a ‘Deductions’ tab available. This outlines what is applicable for CIS, the CIS Rate and the total deduction. This tab also displays Sales Order Retentions which is also available in full Sicon Construction suit.
The Sales Order follows the standard Sage process for processing a Sales Order. The Sales Order can be Despatched or the Confirmation Service/Free Text Items processed and the Invoice can be printed. The part where the CIS next comes into play is posting of the Invoice. Once Sage has posted the Invoice, the system is then able to Post the deduction Credit Note against that Invoice for the Value outlined on the Sales Order Comment Line and Deduction Tab.
The reverse effect happens when you are entering a Sales Order Return. In this example we are adding a Return for half of the amount. In this instance we are expecting the System to Automatically produce an Invoice for £50 to offset the Credit Note.
As per the Sales Order, the system will add a Comment line “Order subject to 20% CIS deduction equal to 30.00”
Under the Deductions tab, the Return also summaries the CIS Applicable, Rate and Deduction for the whole Return.

The Customer Transaction Enquiry shows the Invoice and Credit Note created from both the Sales Order and Sales Order Return presenting all the CIS information stored.
Original Invoice/Credit Note URN – This is Unique Reference of the original transaction
CIS Applicable – How much of the invoice is applicable for CIS deduction. i.e. How much Labour was on the Invoice
Credit Note / Invoice net value – Credit Note value of the deduction
Credit Note / Invoice URN – The Unique Reference of the deduction credit note
Credit Note / Invoice tax value – This will show the tax (VAT) value of the linked Credit Note / Invoice. If you have the deduction transaction highlighted, this will show you the tax value on the original invoice. If you have the original transaction highlighted this should always be zero
Anything with a CIS Audit will also show the Green Tick in the Customer transactions Enquiry under the CIS column.
13.4. Invoicing Module
Sage Invoicing module is essentially a slimmed down version of Sales Order Processing. This Module allows you to create printable Invoices and Credit Notes unlike the Sales Ledge, but doesn’t include all the features of Sales Order Processing. Sales CIS interacts in the same way as Sales Order processing, but with some minor differences. It is recommended that you also review the Sales Order and Returns section.
13.4.1. Invoicing Module based on Nominal Account
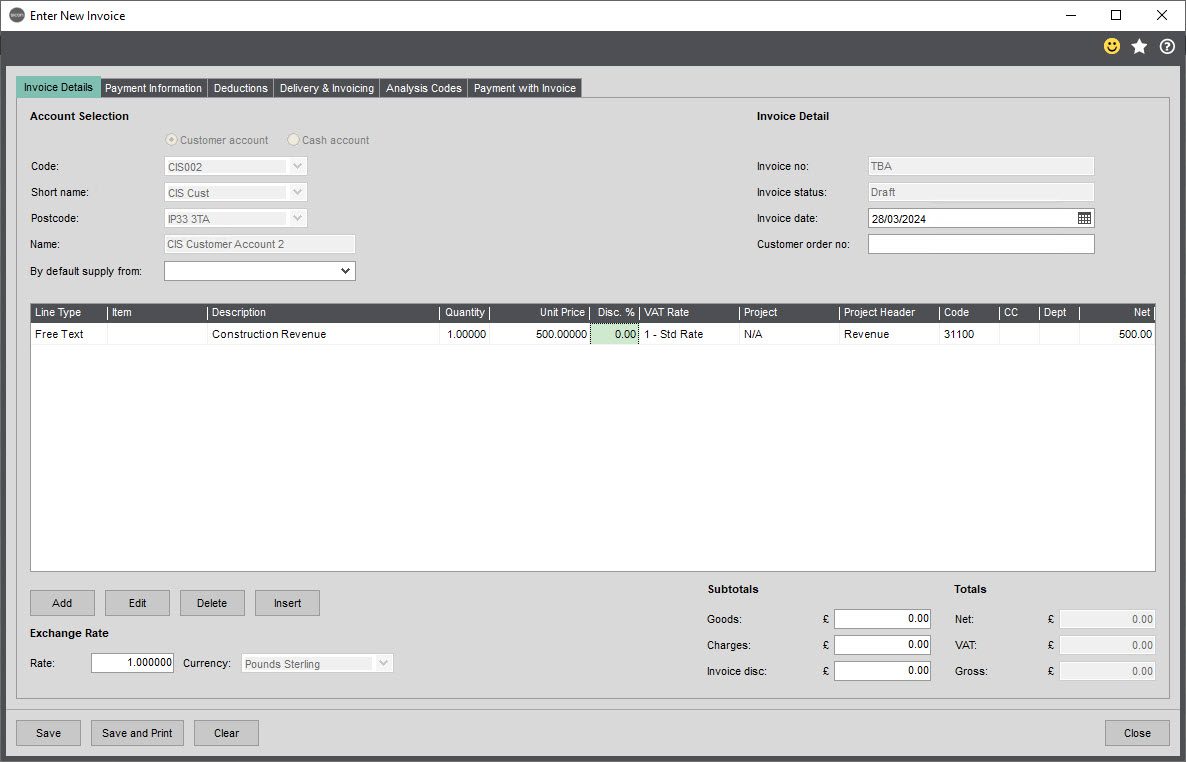
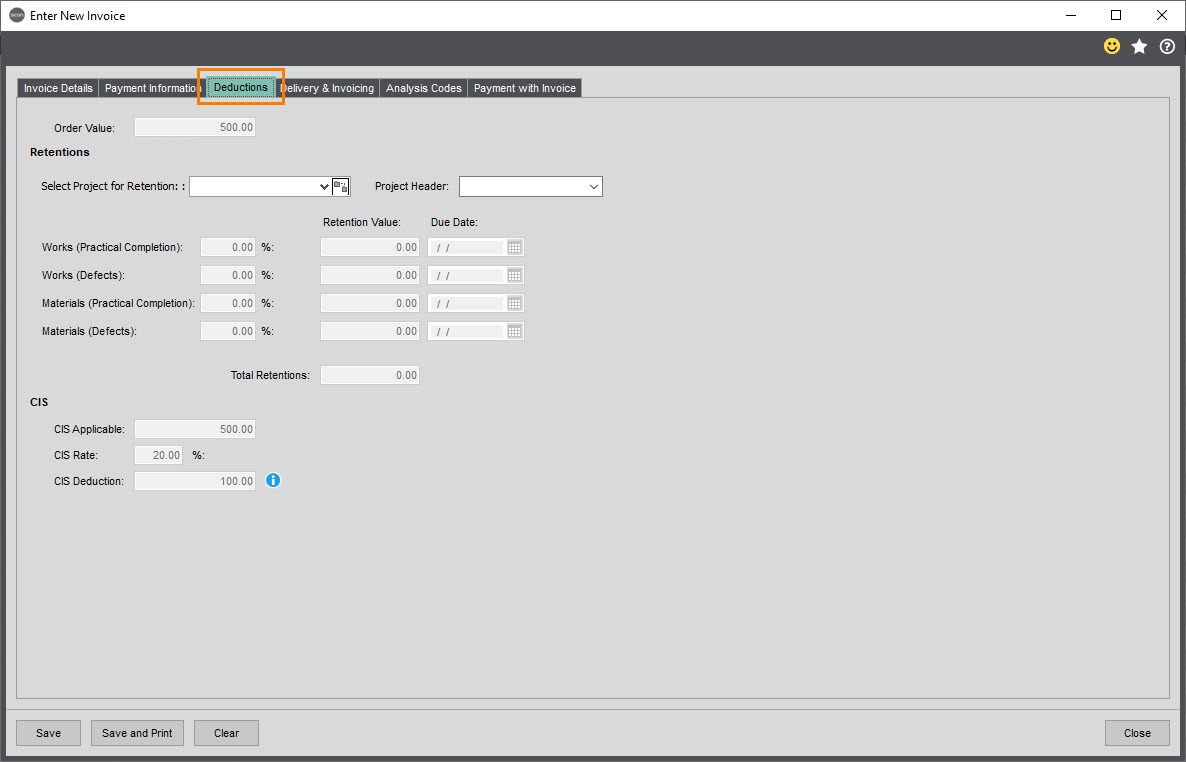
An Order has been Generated for our CIS Customer for a value of £500, this has been split between £300 posted to Nominal 31102 our CIS Labour Revenue code and £200 to 31100 which is our default Sales Account.
This is our first different between a Sales Order and an Invoice from the Invoicing module. On a Sales Order once you add a Line, the system will add a comment line. As the Invoice uses the rapid issue entry grid, we can’t add it at this point.
On entry, you can still see the CIS information under the deduction Tab.
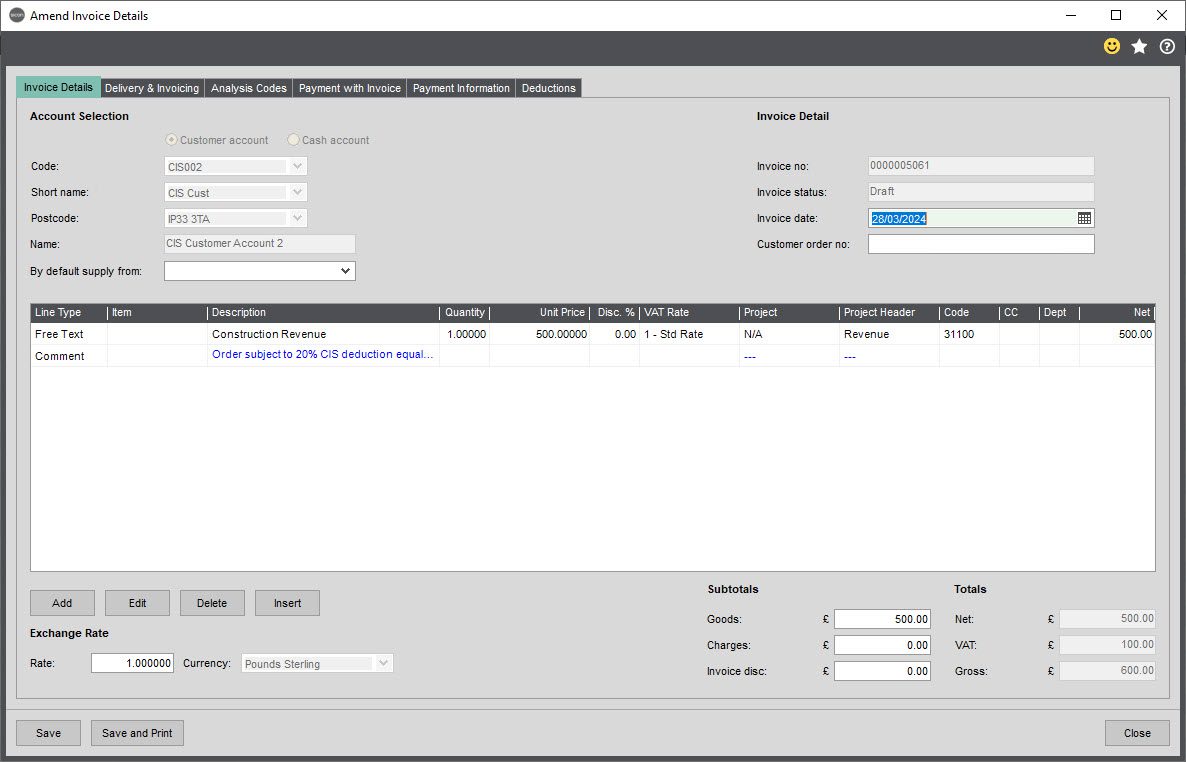
The Comment Line is added to the Invoice upon Save, if you now edit the Invoice the comment line is visible with the same text as you would see on the Sales Order, “Order subject to 20% CIS deduction equal to 60.00”. This also appears when you click Save and Print and will pass through to the documentation.
The Invoice can be printed and posted and appears in the Enquiry screen with the CIS information like all other transactions
Original Invoice/Credit Note URN – This is Unique Reference of the original transaction
CIS Applicable – How much of the invoice is applicable for CIS deduction. i.e. How much Labour was on the Invoice
Credit Note / Invoice net value – Credit Note value of the deduction
Credit Note / Invoice URN – The Unique Reference of the deduction credit note
Credit Note / Invoice tax value – This will show the tax (VAT) value of the linked Credit Note / Invoice. If you have the deduction transaction highlighted, this will show you the tax value on the original invoice. If you have the original transaction highlighted this should always be zero
Anything with a CIS Audit will also show the Green Tick in the Customer transactions Enquiry under the CIS column.
The Invoicing Module is also compatible with Credit Notes and CIS information is added to them in the same way. The CIS deduction tab is updated when the Credit Note is entered, and the Comment Line is added on Save and all the information is available in the Transaction Enquiry after Posting the Invoice:
13.4.2. Invoicing Module based on Percentages
In this example the system is set in the same settings as the Sales Ledger Transactions based on Percentages. If you haven’t read this section, it is recommended you read that first as this covers how Percentage based method is for processing 100% labour only Invoices.
When using Trader Percentages, you can code the Invoice to any Nominal code, but the system will presume that the Invoice is 100% labour and take the deduction off the whole amount.
Here we are entering a £500 Invoice this time it has been coded against a single Nominal Code. This could be multi line and be coded to multiple nominals code if applicable.
This is our first different between a Sales Order and an Invoice from the Invoicing module. On a Sales Order once you add a Line, the system will add a comment line. As the Invoice uses the rapid issue entry grid, we can’t add it at this point.
On entry, you can still see the CIS information under the deduction Tab.
But the Comment Line doesn’t get added until you Save, or Save and Print the Invoice:
The process is exactly the same for a Credit Note:
Once the Invoice or Credit Note is posted, its at that point that the System is able to process the Deductions. All the information is then available in the Customer Transaction Enquiry.
13.5. Customer Applications
Customer Applications are used when you are applying to your Customer for Payment of work completed. Similar to Sales Order and Invoices we can note the amount subject to deduction, but need to also considering how much is being certified via a valuation and retention that is being withheld. The System will only take deduction of Invoices that are created (net certified value or retention released).
Depending on the deduction method being used it is worth reading the Sales Ledger Transaction section on how deduction based on Nominal Account differs from Percentage. The main difference is that Nominal allows you to split the Labour and Material, whereas Percentage is expecting 100% Labour on all transactions.
For more information on the Customer Applications Process please check the Construction Help and User Guide.
13.5.1. Customer Applications based on Nominal Account
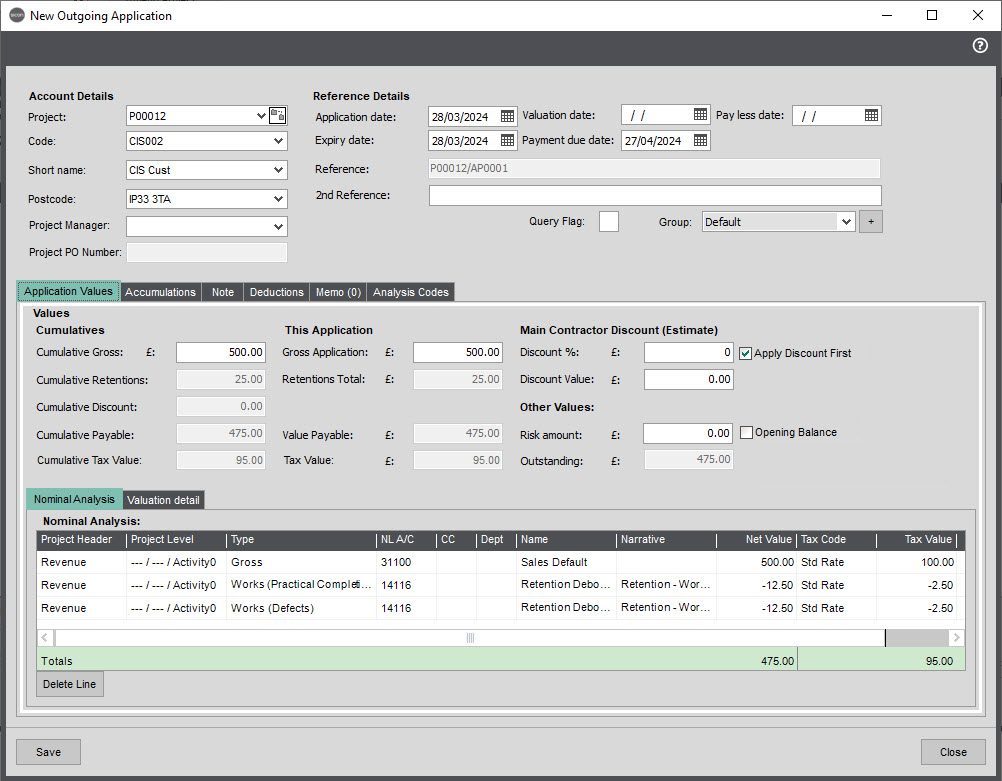
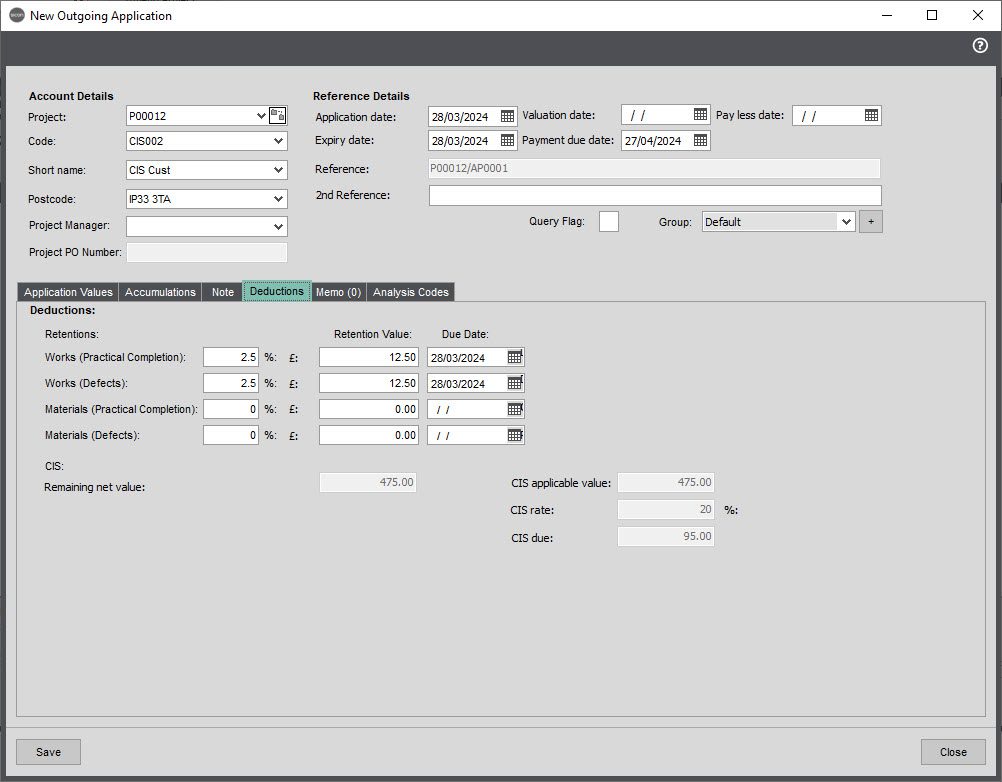
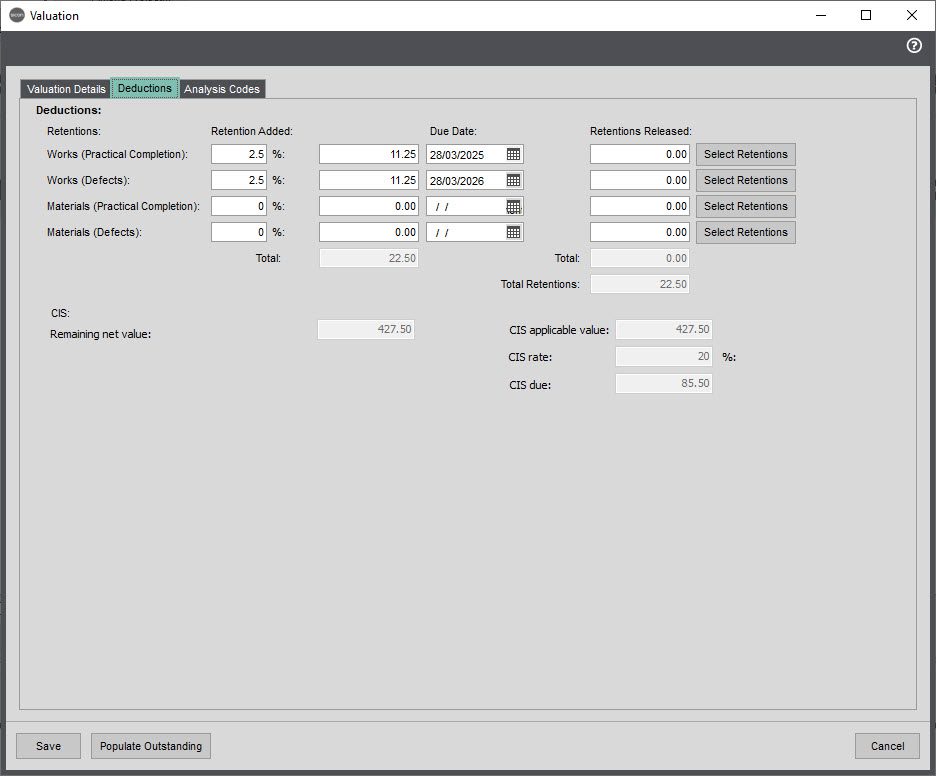
We are creating an Application for £500 with £300 worth of Labour and the rest being coded to Material. As this is a Customer Application, Retention is also being added at a rate of 5%.
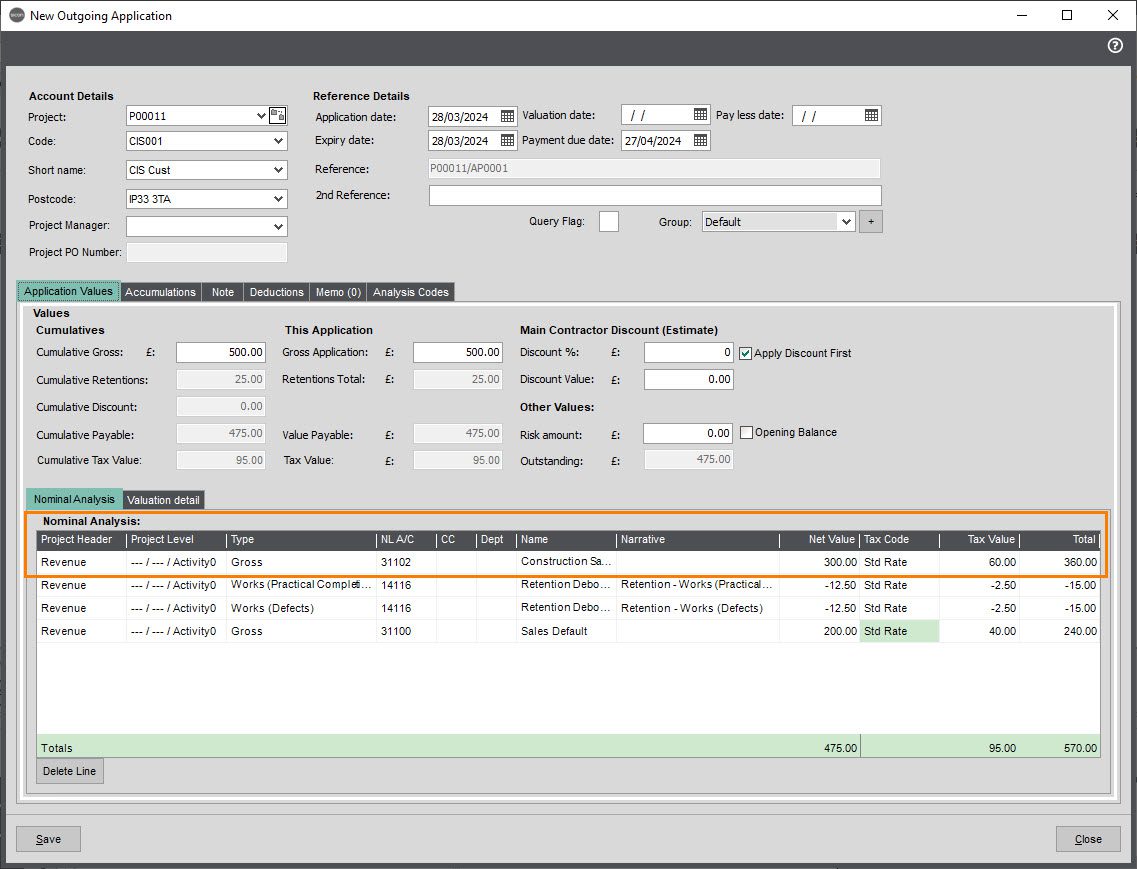
On the Deductions tab we can see the CIS applicable value of the total Application along with any Retention being held:
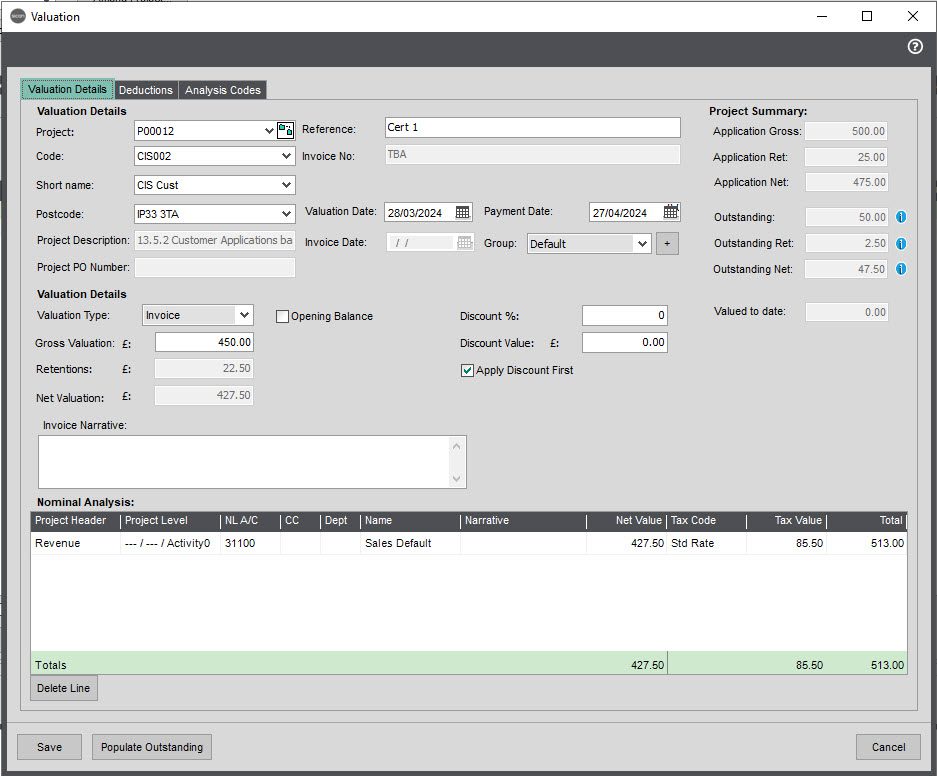
When it comes to adding a Valuation transaction, we are going to value the Application £50 less that was applied for. Rather than valuing the Labour provided at £300, we are going to add this in at £250 with £200 worth of material. To make the valuation a little easier to process line by line we are going to use the Populate Outstanding method on the Valuation.
I can allocate the £250 directly against the Labour line of the Application, and apply the 5% Retention to all lines, rather than having to manually calculate this on a line by line basis.
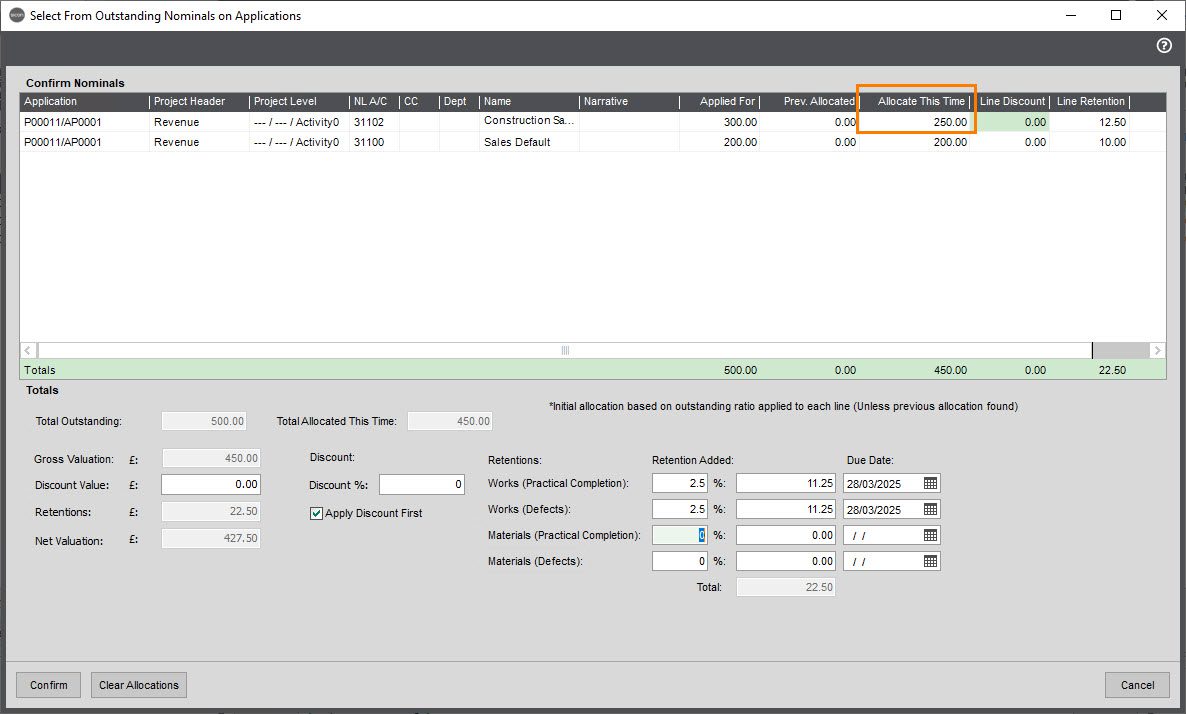
Once I confirm the valued amounts at a line level, clicking confirm will populate my valuation with the valued Net values (Gross Certified – Retention). The net value on the Construction Labour line should then be the value that is applicable for CIS deduction, as we only need to make the deduction on the Valued / to be Invoiced amount. Any Retention is dealt with when the Retention is being released.
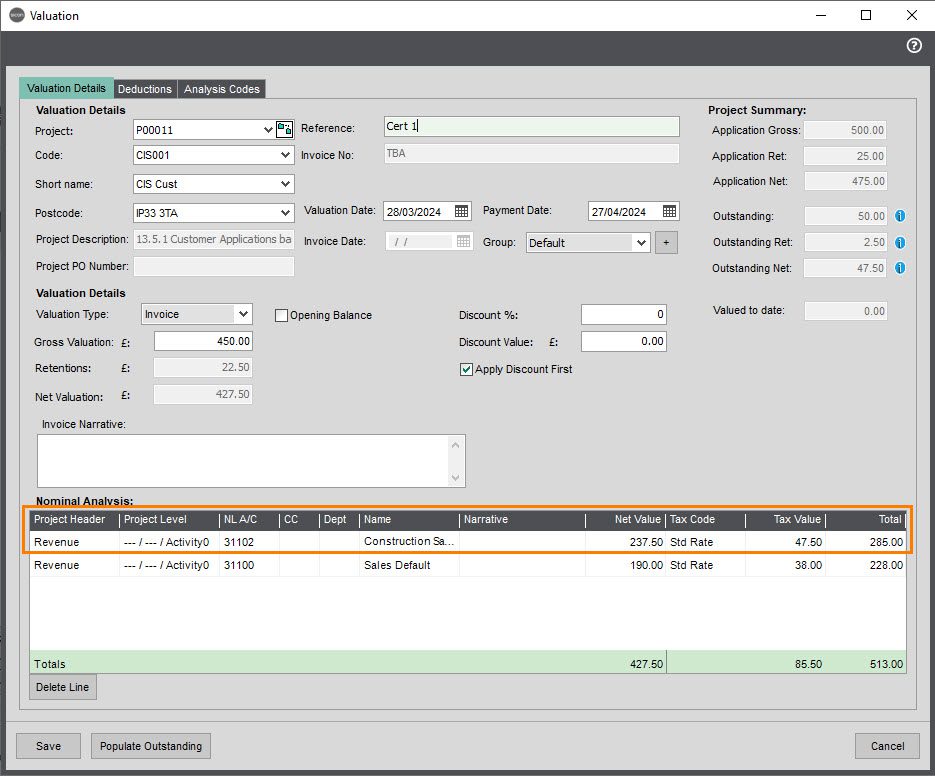
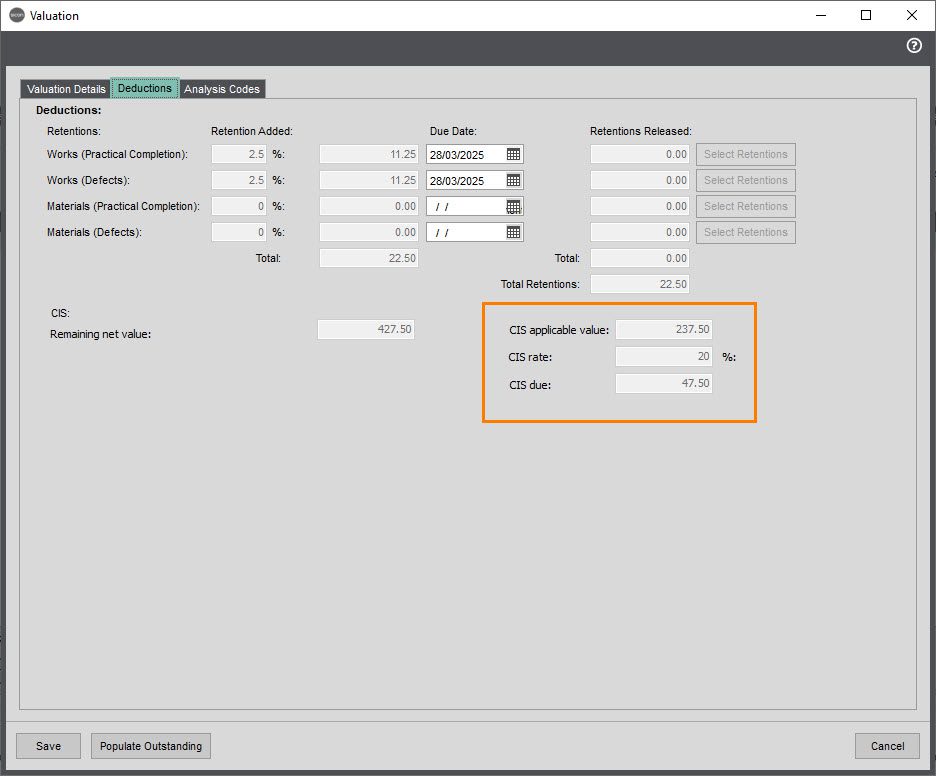
On the Deductions tab the CIS applicable value is showing the certified value – retention that is applicable for CIS deduction.
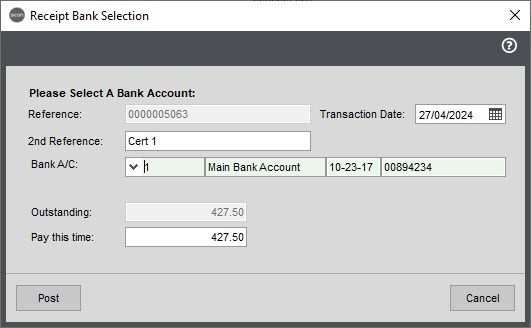
After printing the certificate, and posting the invoice the system prompts you to state that a Credit Note has been created.
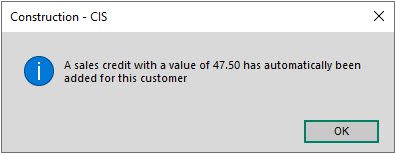
You can also see from the Applications Ledger that the Credit has already been allocated against the Invoice:

If you are also posting the Receipt through the Applications Ledger it is also showing you the deduction that has already been allocated:

When we look at the Transaction Enquiry, we can also see the Credit Note and all the CIS information related to the Invoice:
13.5.2. Customer Application based on Percentages
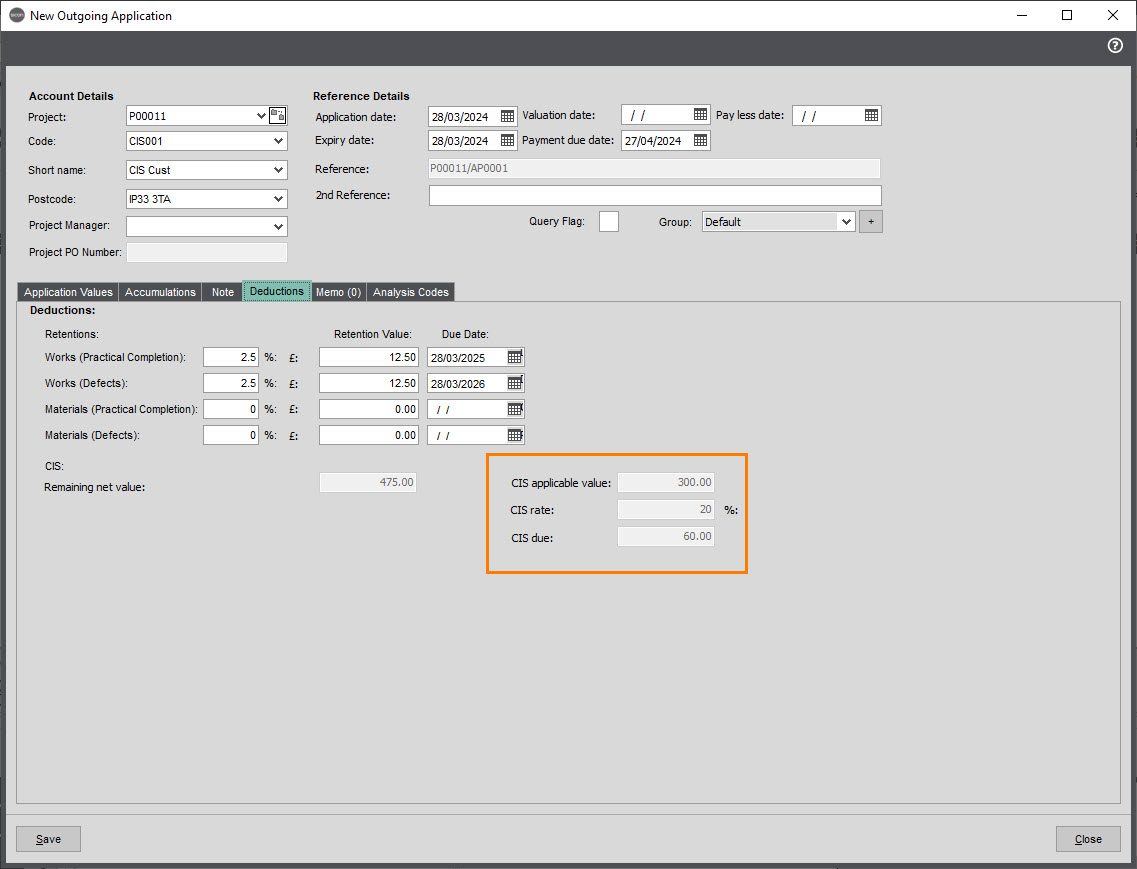
CIS on Customer Applications when using the Setting “Calculate deduction using trader account configured percentages”, like all other transactions assumes that you are providing 100% Labour, so will always take deduction from the entire Invoice.
An Application has been entered for £500 with 5% Retention.
On the Deductions Tab we can see that 100% of the Application is applicable for CIS deduction as per the setting.
When you process the Valuation, in this instance for £450 of the £500 Applied.
The deductions tab is showing the CIS that is applicable for this Valuation certificate and the deduction that is to be made when the invoice is produced.
When you come to print the Invoice the system is prompting you that it has made a deduction.

On the Application Ledger itself you can see that the credit has already been allocated against the Invoice.

If printing the Receipt through the Applications Ledger you can also see that the Credit has been taken into account here as well.
When we look at the Transaction Enquiry, we can also see the Credit Note and all the CIS information related to the Invoice:
14. Settings
14.1. CIS Settings
The settings screen has the following tabs:
General – For the set up the CIS tax rates and other general settings
Labour Nominal Accounts – For the set up the CIS nominal accounts for Labour transaction lines
Materials Nominal Accounts – For the set up of the CIS Material nominal account
HMRC Settings – HMRC online CIS submission information
Analysis – Extra analysis codes
General Tab:
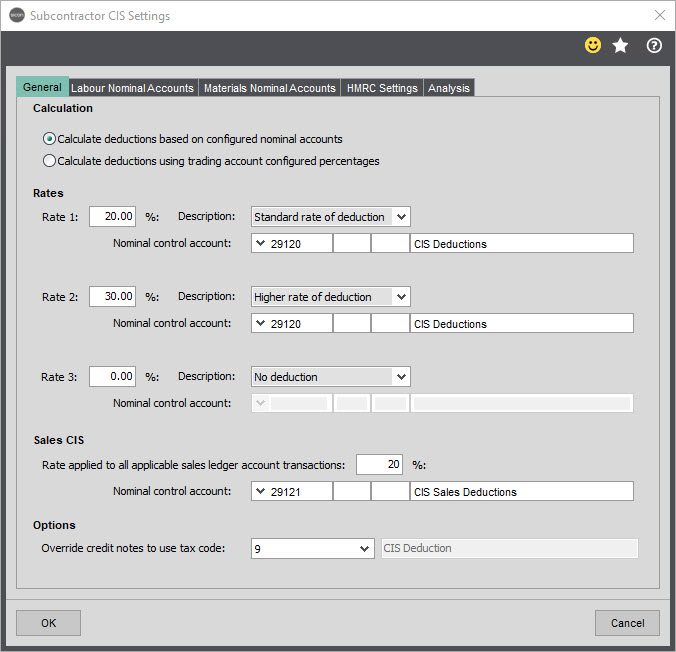
Calculate deductions based on configured nominal accounts – Setting this toggle shows the Labour Nominal Accounts and Material Nominal Accounts tab. If set, when entering a CIS eligible transaction, the Labour and Material splits will be based on the Nominal accounts stored within the Labour and Material Nominal Accounts tabs.
Calculate deductions using trader account configured percentages – If set, when entering a CIS eligible transaction, the Labour and Materials splits would be set on the Subcontractor Deductions Window, which is shown after a transaction is entered. If using Sales CIS, the system will assume you are providing 100% Labour
Rates – The three rates used by CIS that can be assigned to Subcontractors
Nominal Control account – The nominal control account used by the specified rate(s)
Rate applied to all applicable sales ledger account transactions – If this % amount is populated, you will be able to flag sales accounts as being CIS applicable and the deductions will be actioned at the rate set here.
Nominal Control account – The Nominal control account used by the specified rate(s)
Sales CIS:
Rate applied all applicable sales ledger account transaction – This is the rate applied to sales transaction and is dependant on the rate of deduction set by HMRC for the company. If set to zero, no deductions will be taken
Nominal Control Account – The nominal code account used by Sales Ledger transactions when making a deduction
Override credit notes to use tax code – This needs to be set to VAT at 0% so a tax code to show e.g. CIS Outside Scope will need to be available (setup if required) as CIS deductions are not Vatable amounts and do not need to be shown on the VAT return. Ensure this code is flagged to not show on VAT return.
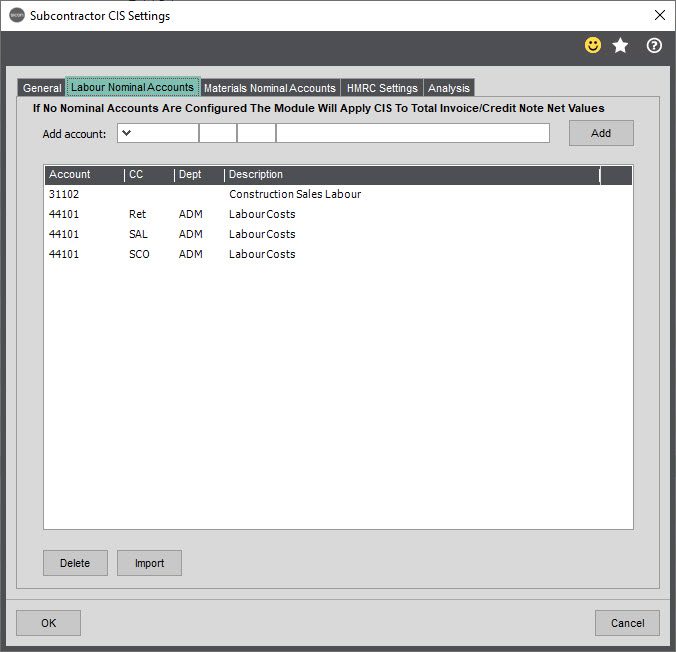
Labour Nominal Accounts:
This is a list of Labour Nominal accounts that when posted to, will be used to deduct any CIS deductions (non-CIS Supplier and Customers can still post to these accounts if required. The nominal list can be populated from the nominal lookup and clicking Add.
If you have a large number of Labour Nominal accounts, these can be imported from a CSV file. The CSV file has 4 columns, Account, Cost Centre, Department and Description.
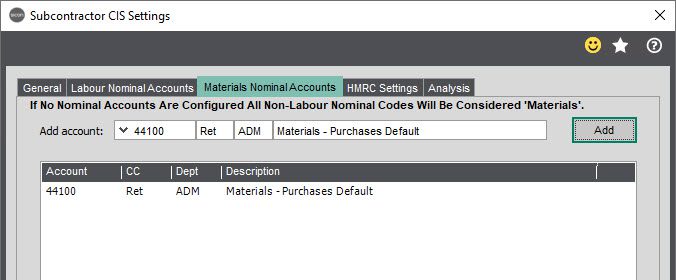
Material Nominal Accounts:
This is a list of Material Nominal Accounts, to record elements of an Invoice that are not applicable for CIS. This list can be left blank and any nominal posted to that is not specified under the Labour Nominal Account will be classed as Material.
Note: If you do specify Material Nominal codes in this list, any Nominal code that isn’t specified under Labour or Material will be classed as ‘Other’ on your CIS return.
Note: Please consult with your Accountant or HMRC if you are unsure whether a transaction is Labour, Materials or Other.
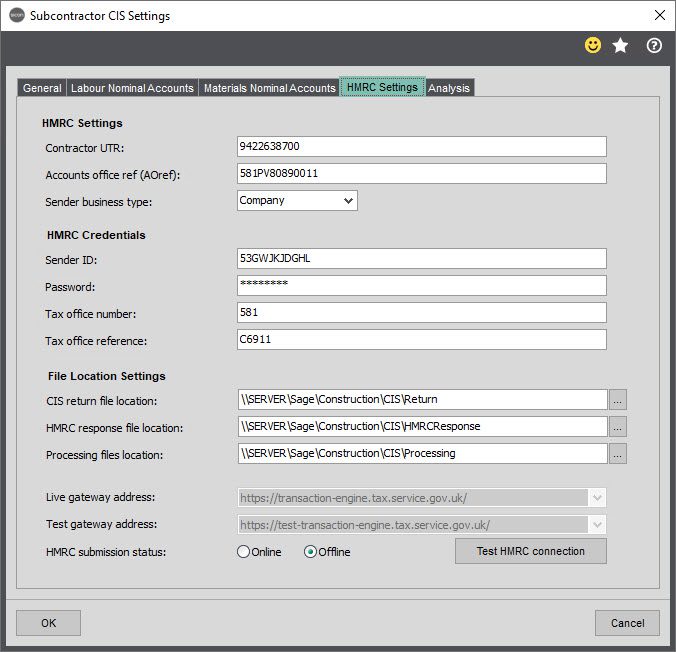
HMRC Settings:
Contractor UTR – The company Unique Tax Reference Number
Accounts office ref (AOref) – The company Accounts Office Number
Send business type – The company Business Type
Sender ID – The Sender ID is the company login User name for the HMRC Online Services gateway
Password – The password for the HMRC Online Services gateway:
To register or to test your Government Gateway details please see the link below:
https://www.gov.uk/use-construction-industry-scheme-online
Tax office number – The company Tax Office number (first 3 digits of the accounts office reference number)
Tax office reference – The company Tax Office reference (PAYE Reference Number)
File Location Settings:
These file locations are where the system stores the details sent back and forth to HRMC. The user verifying the Subcontractors or Submitting the CIS Return will need access to these file locations.
It is also recommending that a UNC path is used over mapped network drives.
It is also recommended that these network paths are backed up.
CIS return file location – Location of the CIS return ‘submission’ file sent to HMRC
HMRC response file location – Location of HMRC Response to ‘submission’ file – can be used to check if errors are returned
Processing file location – Location of the polling and deleting files sent to and received from HMRC.
Note: These file locations are required for the Online submission to work
Live gateway address – The Live HRMC Gateway Address
Test gateway address – The Test HRMC Gateway Address
HRMC submission status – Toggle to turn the Gateway between Live and Test.
Test HMRC Connection – Test the connection to ensure the HRMC details are correct and that access has been allowed through the company firewall.
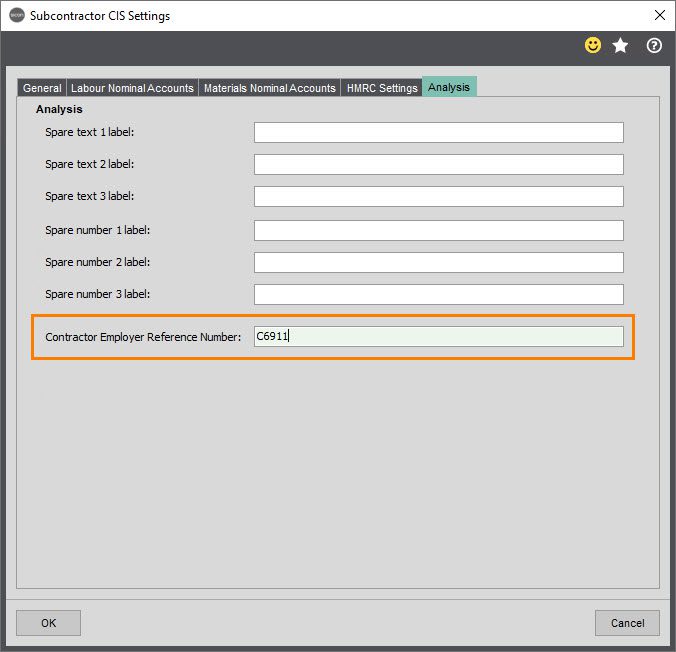
Analysis Tab
Analysis Fields – These fields are for reporting purposes only
Contractor Employer Reference Number – Needs to be collected and recorded by the company that provides your employers’ liability insurance. Also called an ‘Employer PAYE Reference’, the ERN is a unique number given to every business that registers with HMRC as an employer. This number will also appear on the Subcontractor Monthly Statement
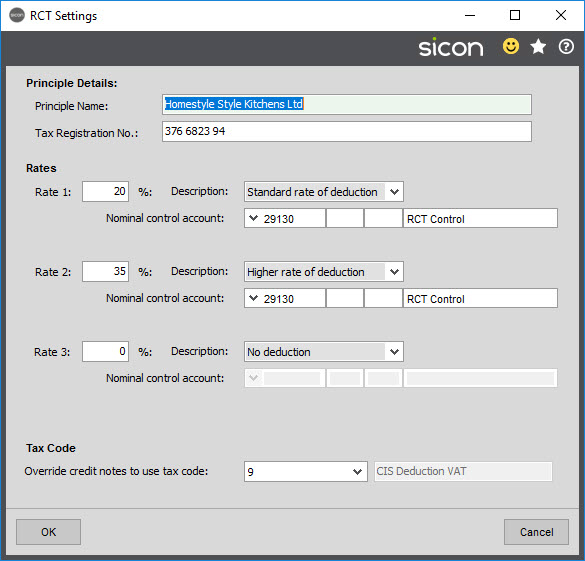
14.2. RCT Settings
Principle Details:
Principle Name – The Company Trading Name
Tax Registration No – Tax Registration Number for the Company
Rates:
Rates – The three rates used by RCT that can be assigned to Subcontractors
Nominal Control account – The nominal control account used by the specified rate(s)
Override credit notes to use tax code – This needs to be set to VAT at 0% so a tax code to show e.g. CIS/RCT Outside Scope will need to be available (setup if required) as CIS deductions are not Vatable amounts and do not need to be shown on the VAT return. Ensure this code is flagged to not show on VAT return.
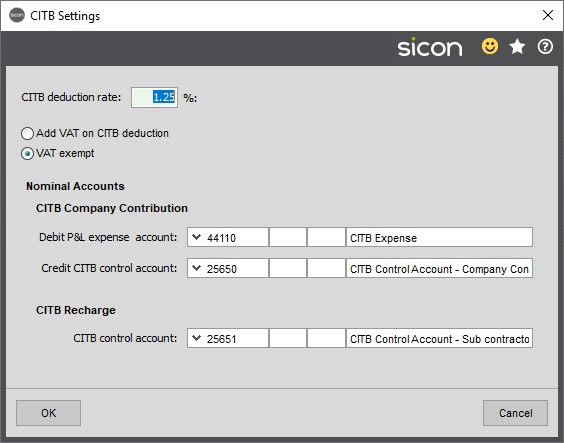
14.3. CITB Settings
CITB Deduction rate: This is the percentage of the invoice value that will be deducted for the CITB levy.
Add VAT on CITB deduction: If set allows you to add VAT on CITB deductions
VAT Exempt: If set then all CITB deductions will be exempt from VAT. This is the normal setting
CITB Company Contribution: Where the company pays the CITB levy you can specify the expense account to debit and the control account to credit when creating this journal.
CITB Recharge: Where the suppliers are to be re-charged for the deduction of a CITB levy this nominal is configured so that when the credit note is created and applied to the supplier account it will be posted to the CITB nominal control account.
The CITB functionality on this module allows a posting to be created for the CITB levy. This can happen in two ways:
The company pays the CITB levy for all the subcontractors.
The Subcontractor is recharged for the CITB levy and a deduction is made from their account.
14.4. Construction Settings
Public Liability Warning – The public liability insurance number can be stored against the Supplier with an expiry date. If you set a number of days the system will prompt on transactions entry if the Subcontractors public liability insurance is due to expire.
Note: If this is set, and a public liability isn’t stored against the Supplier with an expiry, then the system will continue to prompt until one is added.
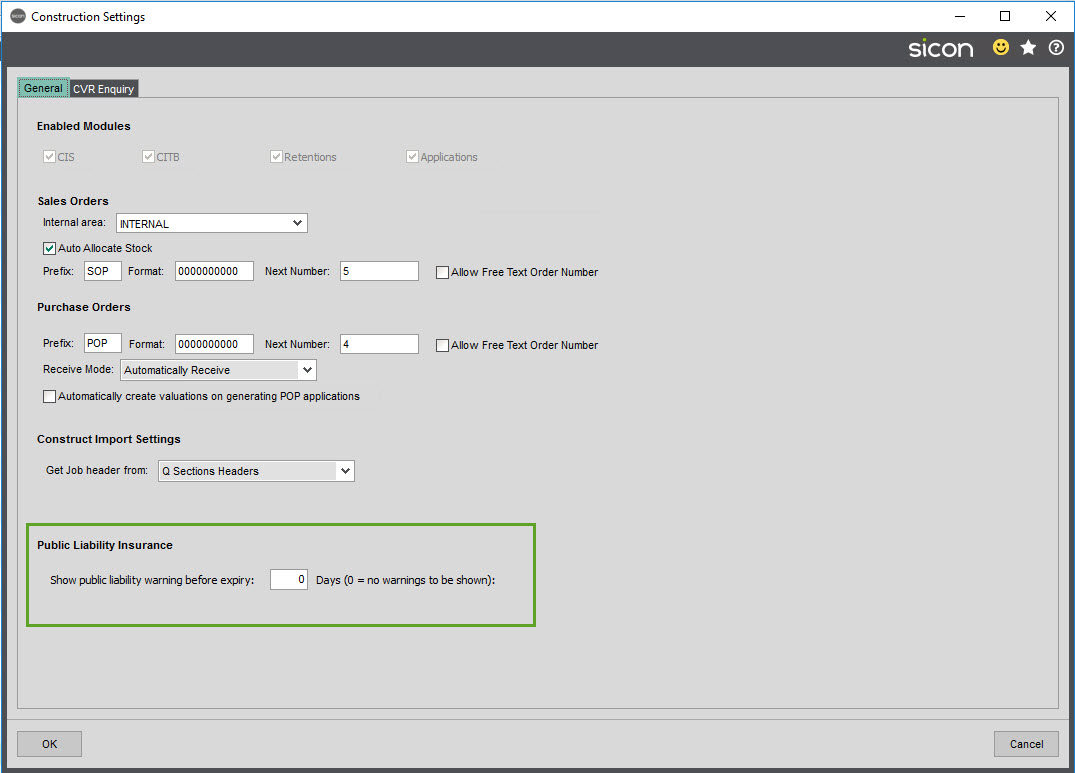
Other settings on this screen are covered under the Construction Help and User Guide.
15. Reports
Note: Where reports require a CIS Period End, the Period End won’t become available until the CIS Return for that period has been submitted.
15.1. CIS Payments Audit Report CIS Payments Audit Report
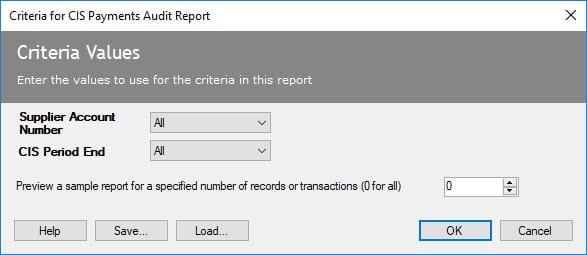

15.2. CIS Payments Detail Report
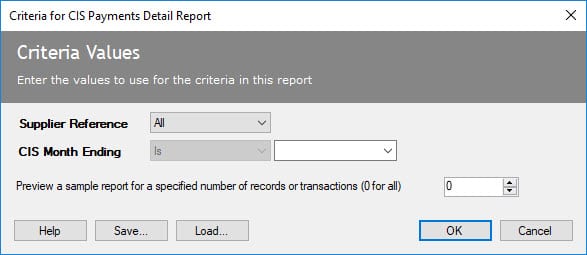
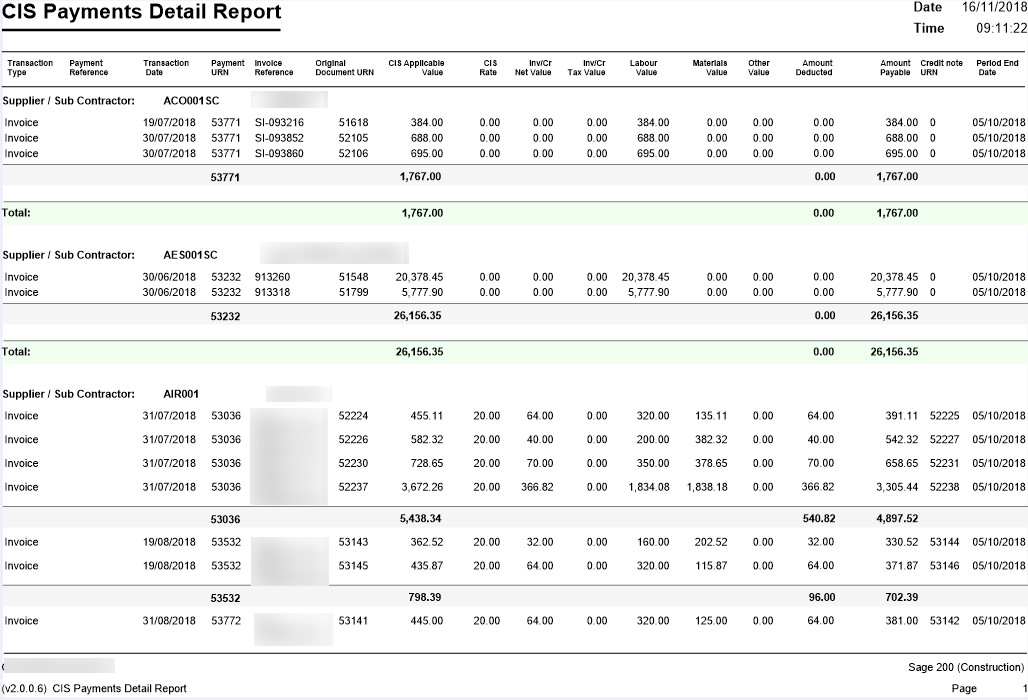
15.3. CIS Payments Detailed Report (Email)

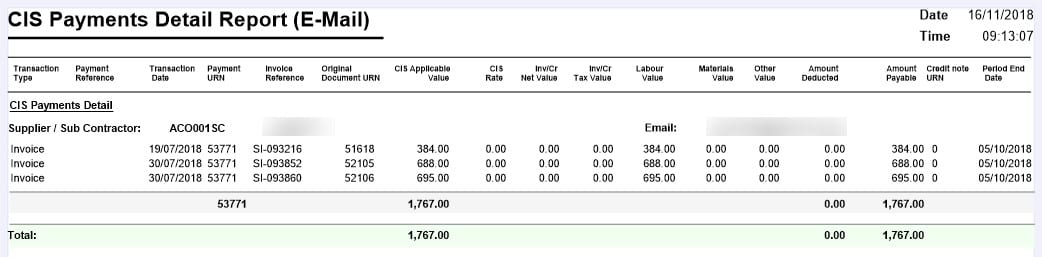
15.4. CIS Return Summary
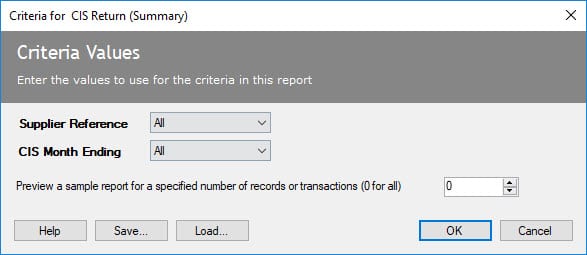
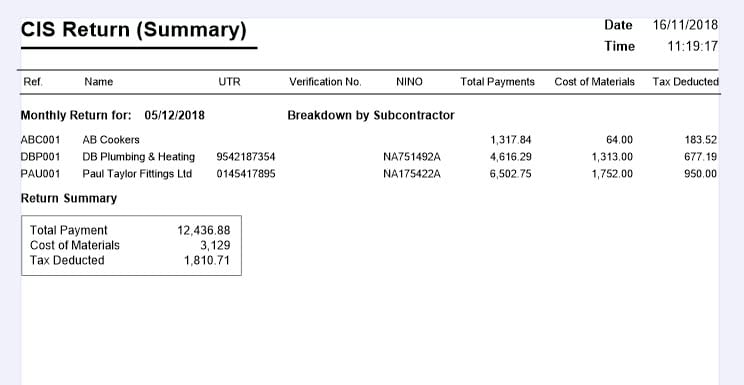
15.5. CIS Subcontractor Monthly Statement
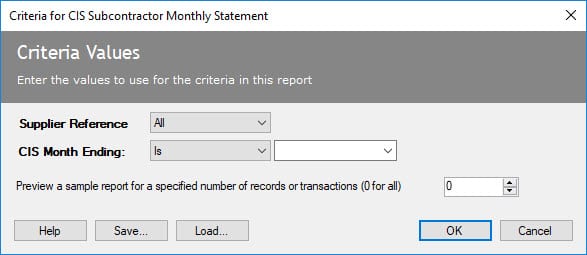
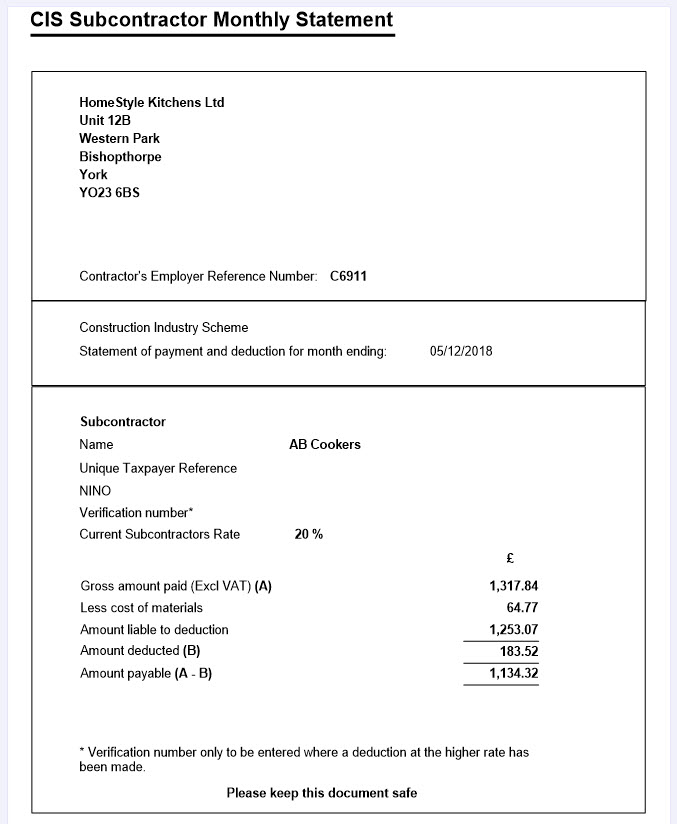
15.6. CIS Subcontractor Monthly Statement (Email)
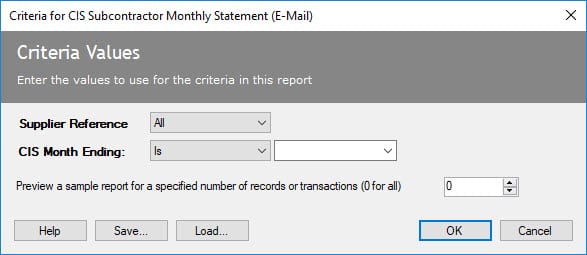
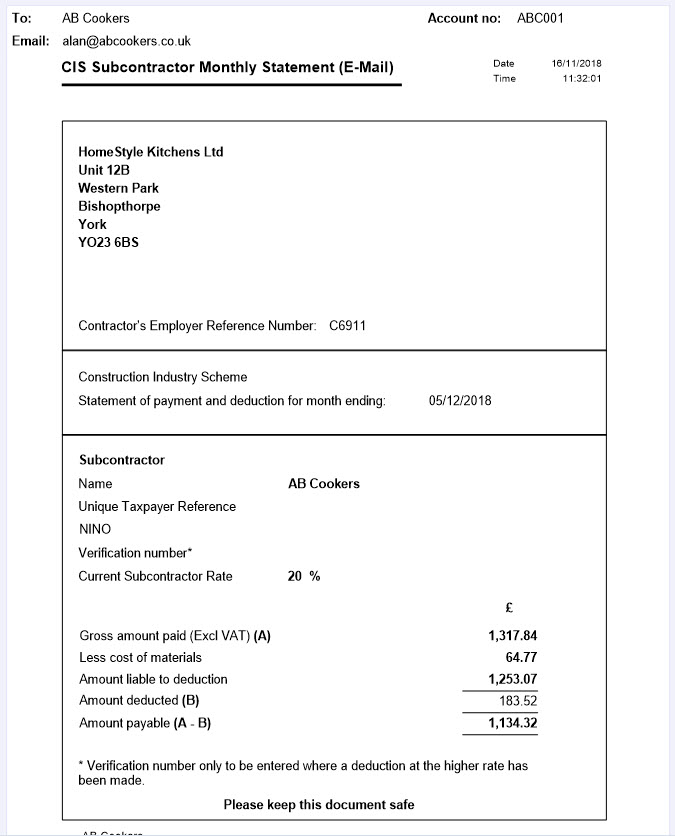
15.7. CIS Supplier List

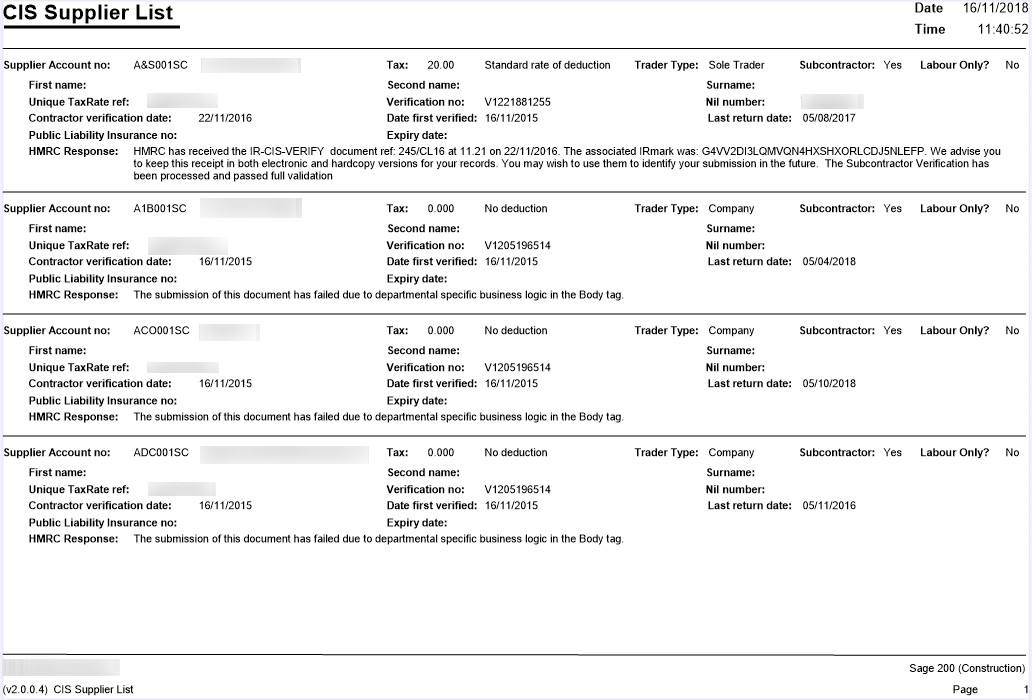
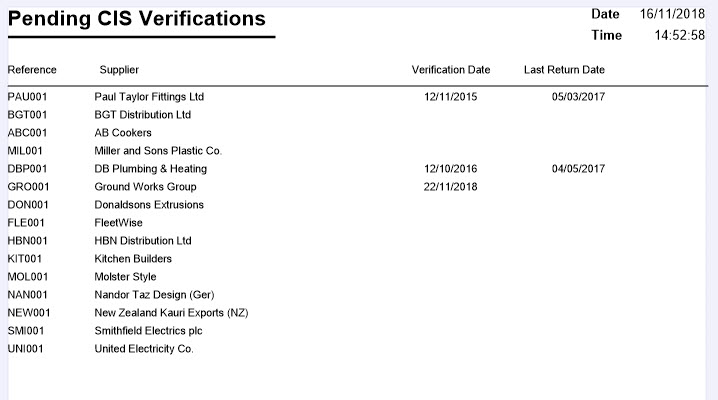
15.8. Pending CIS Verification
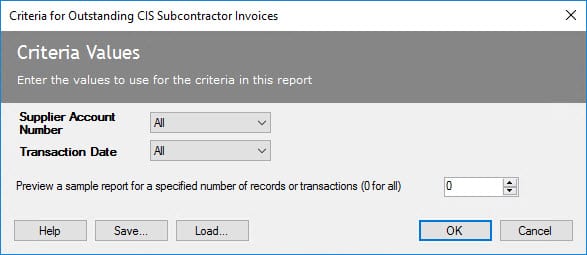
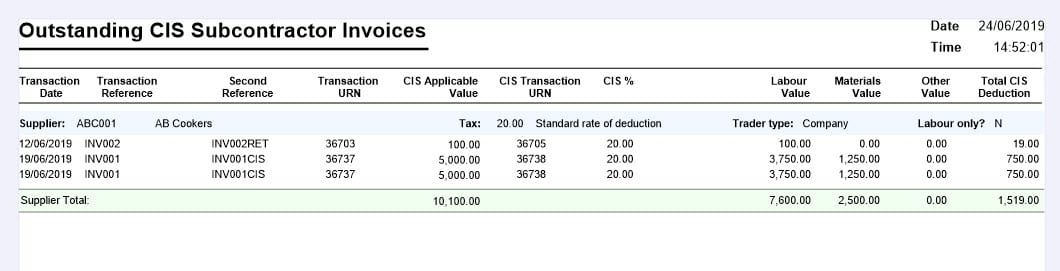
15.9. Outstanding CIS Subcontractor Credit Notes
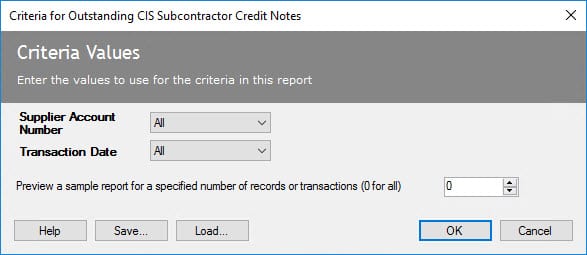
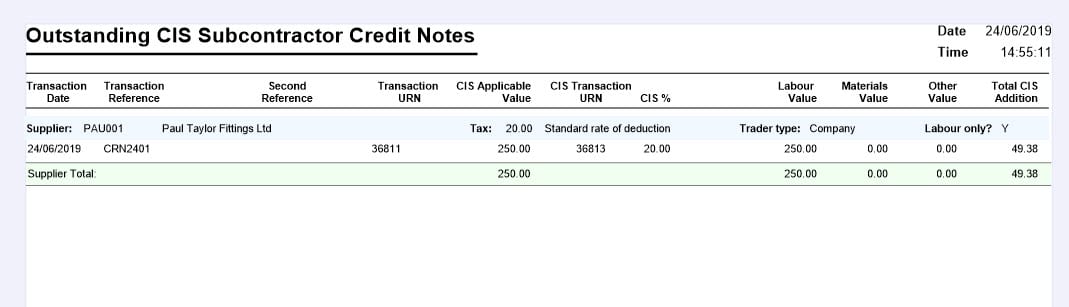
15.10. Public Liability Insurance Details
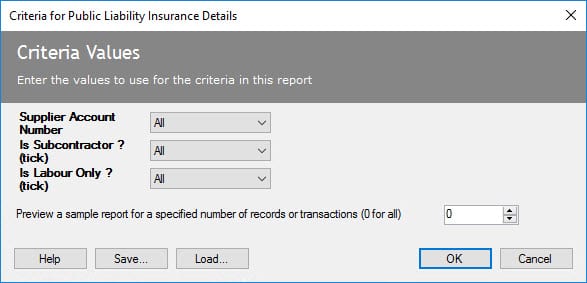
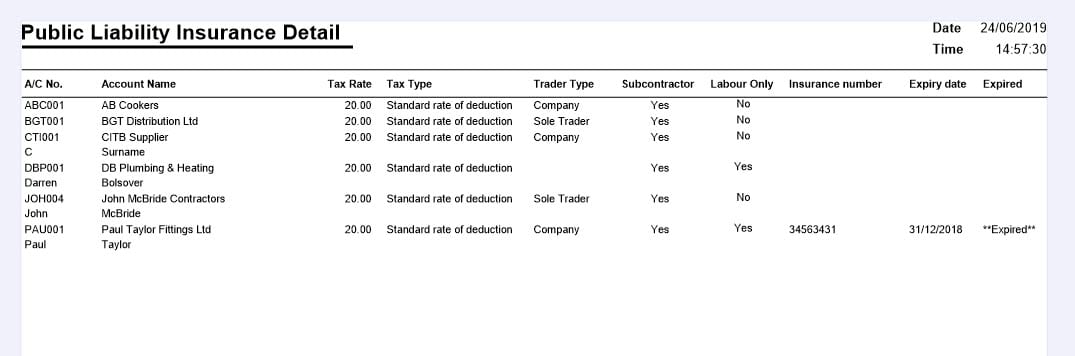
16. Appendix A – XML Naming Conventions
There are a number of XML files that are sent/received during automated CIS submission process. These, and their naming conventions, are as follows:
- Sequence (see Appendix A) Filename convention
- Submission Request CISreturn_Submission_yyyymmdd_hhmmss
- Submission Acknowledgement CISreturn_Acknowledgement_yyyymmdd_hhmmss
- Submission Poll CISreturn_Poll_yyyymmdd_hhmmss
- Submission Response CISreturn_submit_Response_yyyymmdd_hhmmss
- Delete Request CISreturn_Delete_yyyymmdd_hhmmss
- Delete Response CISreturn_delete_Response_yyyymmdd_hhmmss
Key:
- yyyymmdd – year month day (20120410) when file produced
- hhmmss – hour minute seconds (122754) when file produced
These files will be located in the directory set up in the Settings in the XML Defaults section:

The Submission Request file is found in the CIS Return File Location.
The Submission Acknowledgement file is found in the HMRC Response File Location.
All other files are found in the Processing Files Location.
17. Appendix B – XML File Layouts
Rather than print out all the XML files and go through each line, only the important areas are displayed.
Submission Request
The CISreturn_Submission_ file is the main driving file. This is created from the CIS Return information and forms the actual submission to HMRC.
There are 3 main sections:
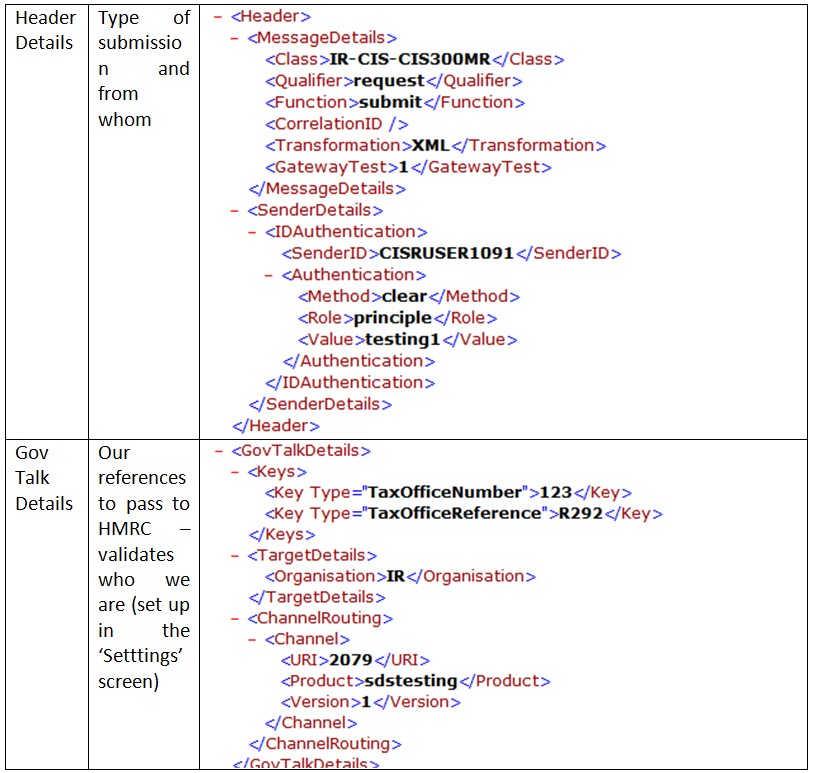
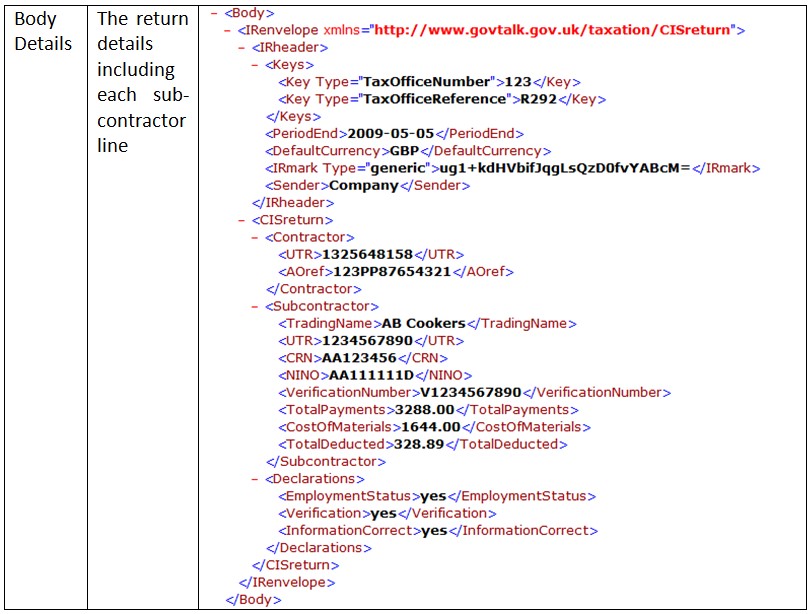
Note: this file is taken from the same example throughout the document. If there were multiple subcontractors then they would appear as extra<Subcontractor> nodes, one after another.
17.1. Submission Acknowledgement
The CISreturn_Acknowledgement_ file is returned when HMRC receive our CISreturn_Submission_ file. Essentially there is one section, and this will be duplicated throughout the rest of the files. The <Correlation ID> is the unique ID that is used throughout the rest of the files with any information displayed and the <Qualifier> and <Function> setting out the type of file.
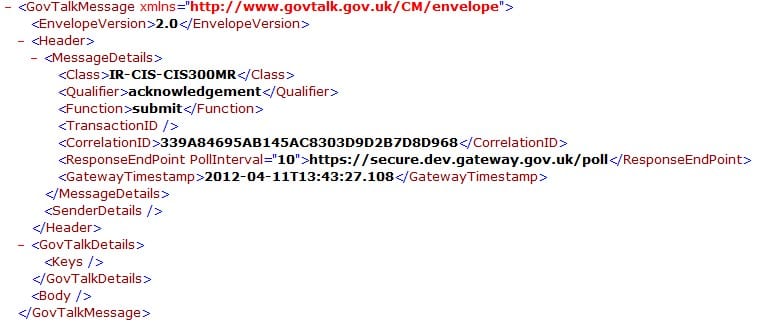
17.2. Submission Poll
The CISreturn_Poll_ file is our file polling HMRC to see if they have finished processing our CISreturn_Submission file. Essentially there is one section, and this will be duplicated throughout the rest of the files. The <Correlation ID> is the unique ID that is used throughout the rest of the files with any information displayed and the <Qualifier> and <Function> setting out the type of file.
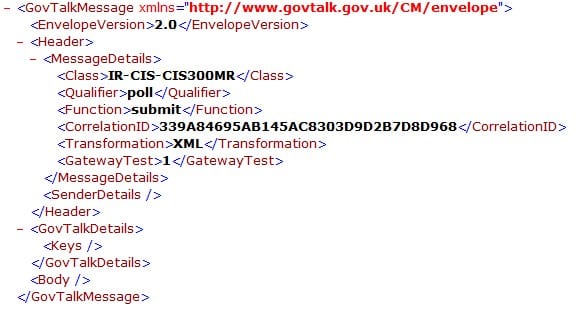
17.3. Submission Response
The CISreturn_Reponse_ file is HMRC’s response once finished processing our CISreturn_Submission file. There are two sections, the first being much like the previous file and showing the <Correlation ID> is the unique ID that is used throughout the rest of the files with any information displayed and the <Qualifier> and <Function> setting out the type of file.
The second section gives the message, whether passed or failed (this is what is passed into the HMRC Submission Status screen and displayed on the returns).
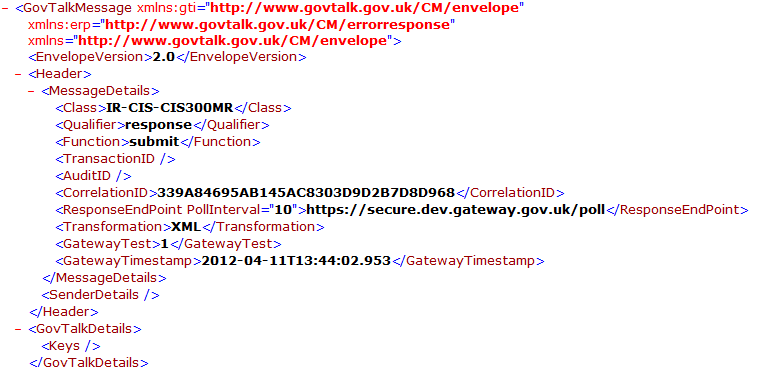
17.4. Delete Request
The CISreturn_Delete_ file is our file telling HMRC to clean up the files sent during submission. Essentially there is one section and this will be duplicated throughout the rest of the files. The <Correlation ID> is the unique ID that is used throughout the rest of the files with any information displayed and the <Qualifier> and <Function> setting out the type of file.
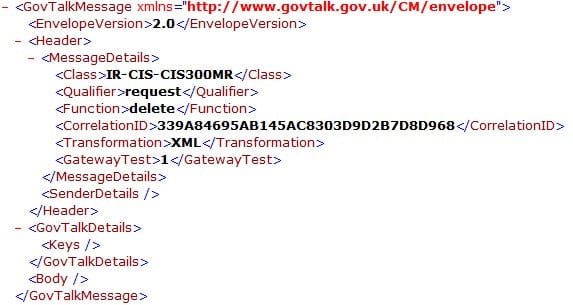
17.5. Delete Response
The CISreturn_delete_Response_ file is HMRC telling us that the cleanup is done. Essentially there is one section and this will be duplicated throughout the rest of the files. The <Correlation ID> is the unique ID that is used throughout the rest of the files with any information displayed and the <Qualifier> and <Function> setting out the type of file. It is when we receive this file that the HMRC Submission Status screen button changes to Exit and allows the end of the process.
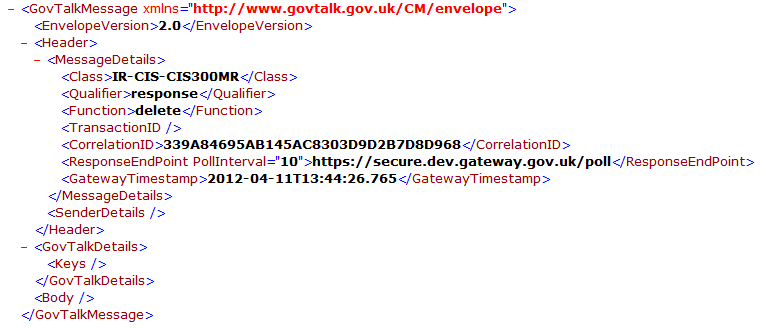
18. Enable Module
If you need to manually apply an Enable String, start the Sage 200 application and login as a user with a role which has access to all the CIS features. Click on the Enable Module. Enter the enable string as per the screen below and click Apply:
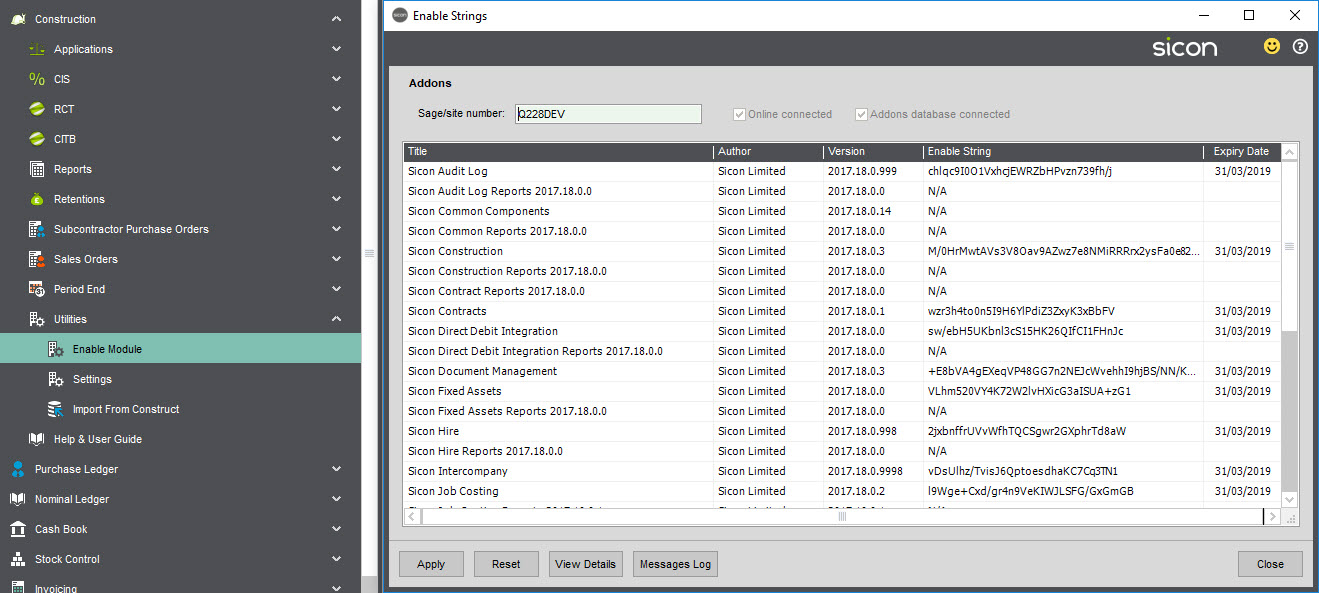
19. Release Notes
The release notes page shows which release of the system includes new features or issues resolved.
At the release of Sicon v21 we announced that going forward, we will only be supporting Sage 200c and as such we are able to drop the year from our version numbers. We moved from 201.201.0.0 to 210.0.0.
New features detailed in the Release Notes relating to Pre-Release versions will not be detailed in the current Help and User Guide until the end of development phase.
Construction & CIS Release Notes