Enhancement Pack Help and User Guide
This Help and User Guide will take you through the features and settings for the Sicon Enhancement Pack Sage 200.
Search the page by pressing Ctrl + F (windows) or CMD +F (Mac) on your keyboard.
Back to all user guidesProduct overview
Help and User Guide maintained for Sicon Enhancement Pack v221.0.0 and Upwards
This Help and User Guide will take you through the features and settings for the Sicon Enhancement Pack Sage 200. It looks like any other Sage 200 module, making it easy to use for anyone already familiar with the Sage 200 environment.
What is the Sicon Enhancement Pack?
Sicon have produced a number of small utility products and enhancements for Sage 200 that we do not qualify as a full products. These integrate with the various standard Sage 200 modules and are included in our Enhancement Pack.
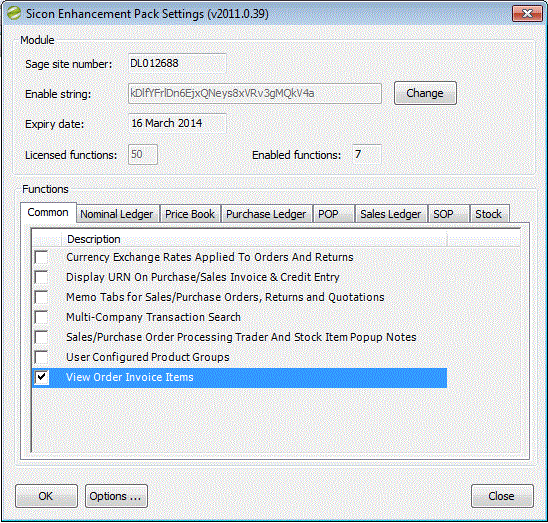
The module may be configured to enable/disable utilities (functions) as required using a series of tick-box selections on the Settings screen.
1. Common Enhancements
This section includes enhancements that are common accross multiple Sage modules.
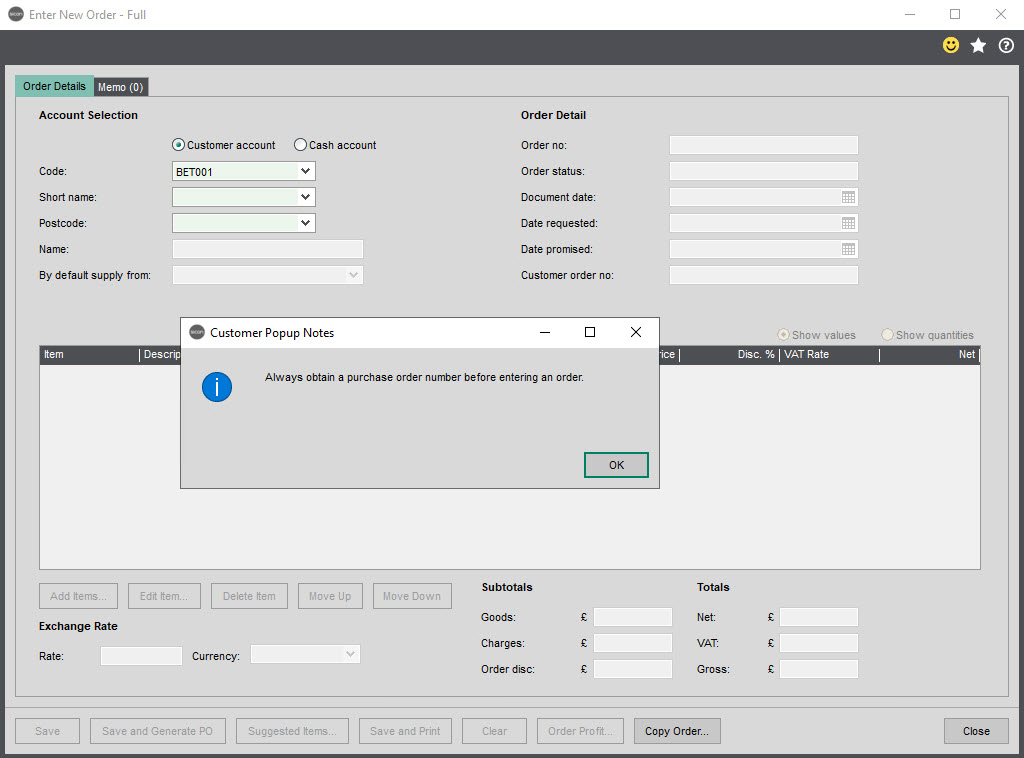
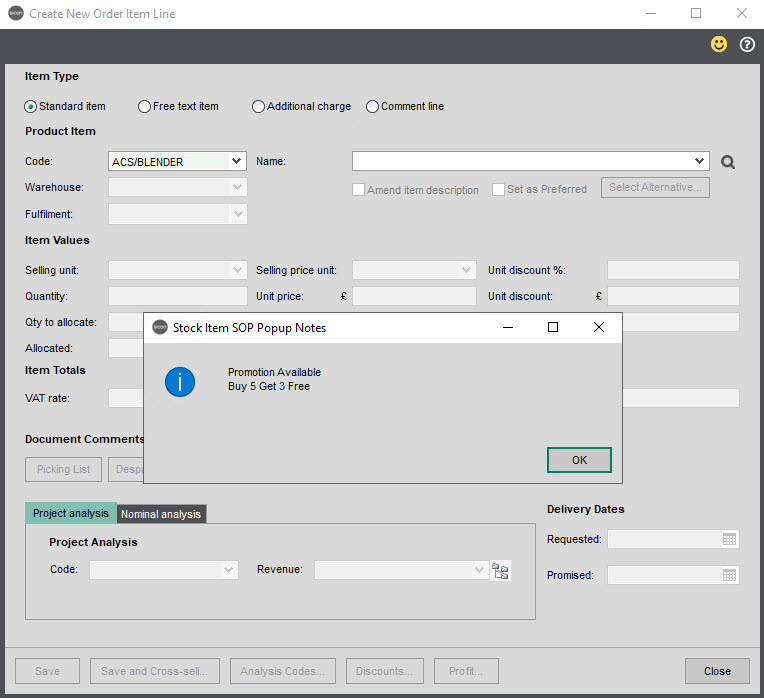
1.1. COM001: Sales/Purchase Order Processing Trader and Stock Item Popup Notes
This function allows maintenance of customer, supplier and stock item specific notes, which will be displayed as a ‘pop-up’ message when the related customer/supplier or product is selected during sales/purchase order entry or amendment. The notes also appear in numerous other screens in Sage 200, based on the customer/supplier/stock code selection control on the screen. Once you have seen the note, you will only see it again if you have selected a different customer/supplier/stock code, and then choose the previous one again. This behaviour can be changed via the Options button in the Settings screen to always show the popup notes.
These notes are maintained on a new tab shown on the customer, supplier and stock item maintenance screens.
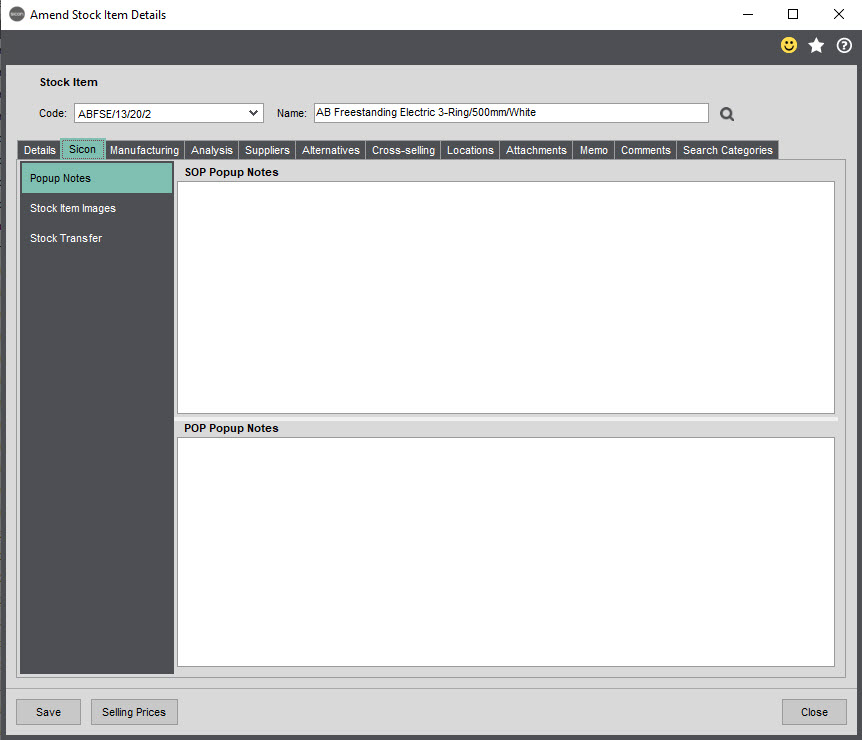
Notes may also be viewed on a new tab on the customer, sales and stock item enquiry screens.
When a customer or stock item is selected during order entry/amendment*, any pop-up notes will be displayed as informational messages.
When a supplier is selected during purchase order entry/amendment* any pop-up notes will be displayed as informational messages.
*NB: popup notes fields are limited to a maximum of 4000 characters.
1.2. COM002: Memo Tabs for Sales/Purchase Orders, Returns and Quotations
This function allows memo notes to be maintained against individual sales or purchase orders/returns.
Memos can be entered via the order/return entry, amendment and enquiry screens.
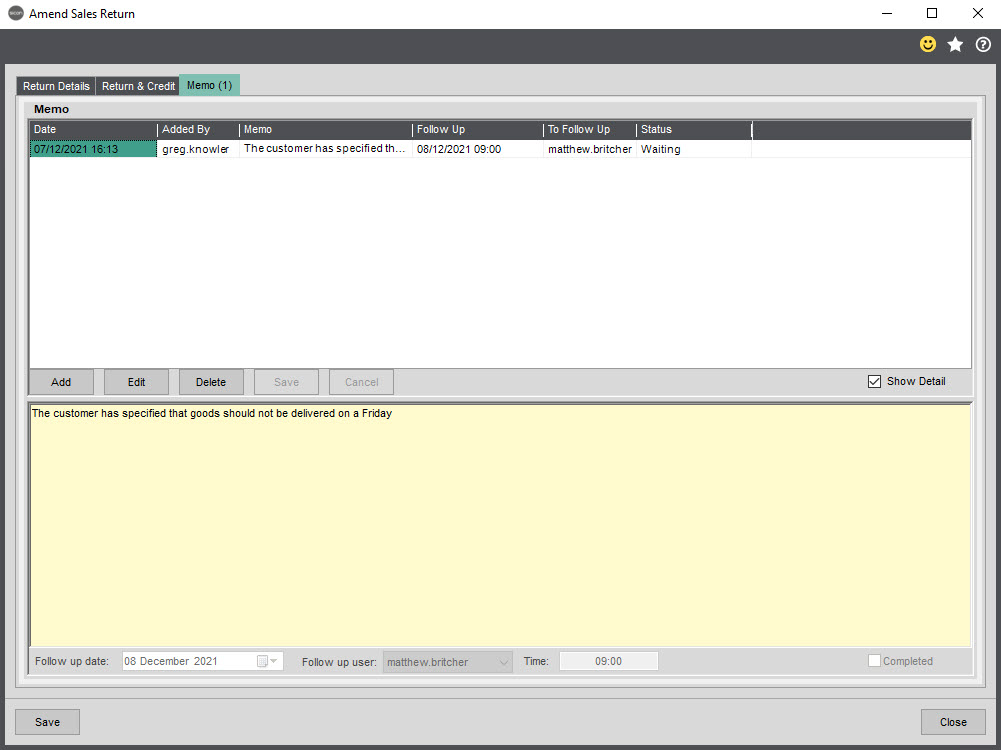
Each memo note can be flagged with a selected Follow Up user and Date/Time.
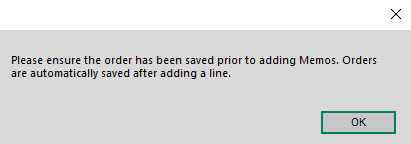
It is not possible to add a memo to an order/return before it has been saved, should the user attempt this the following message will be shown:
When memos are flagged for follow up, you can review the ones assigned to specific users via the Assigned Memos screen (found within the main Sicon Enhancement Pack folder).
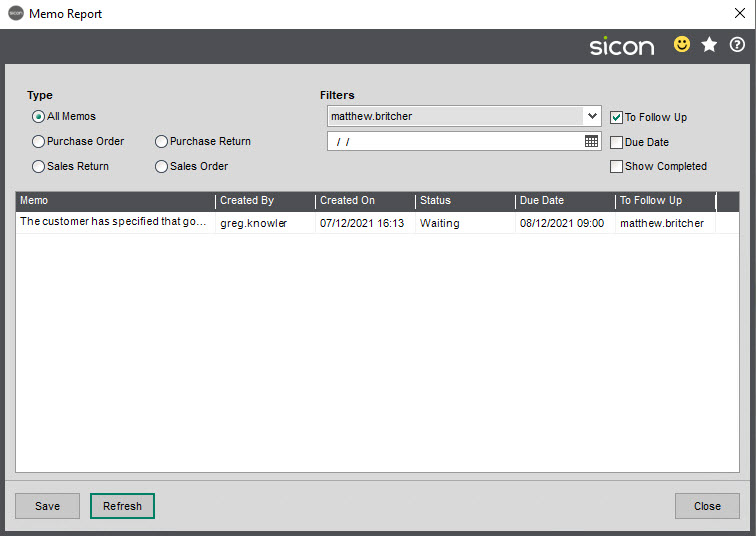
The filters at the top of the screen enable you to filter the memos by due date, the user assigned and the type of record that they are attached to.
1.3. COM003: Multi-Company Transaction Search
This function is used to search for financial transactions across multiple Sage companies.
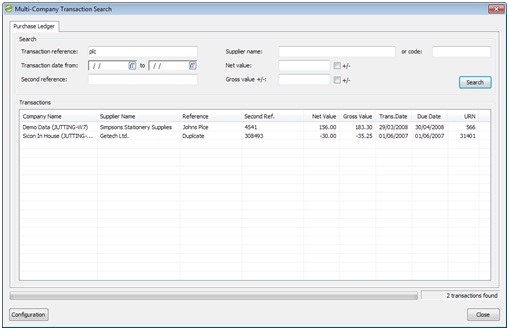
The ‘+/-’ boxes may be checked to search for both positive and negative matching net or gross values.
NB: it is not possible to ‘drill-down’ or display detailed transaction information from this screen.
Company Configuration: the Configuration button may be pressed to allow selection of which Sage companies should be searched. These company configuration selections are saved for use during further searches and are applicable to all users of the search function.
1.4. COM004: Currency Exchange Rates Applied to Orders and Returns
In this section we will cover Currency Exchange Rates applied to orders and returns.
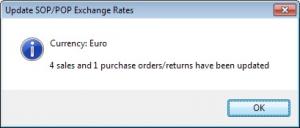
When exchange rates are changed, this feature will automatically prompt the user to apply the new rates to all current (i.e. live, on-hold or disputed) sales and purchase orders/returns.
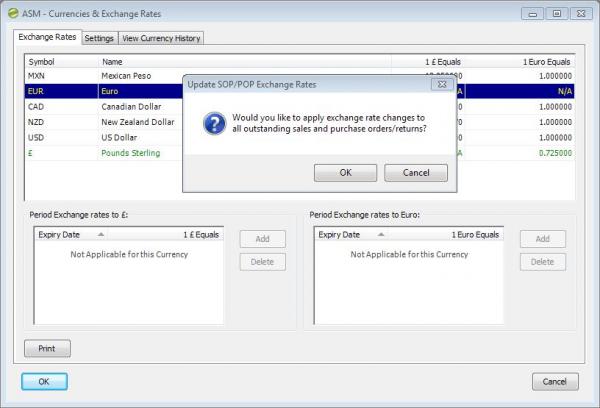
If the user clicks OK, exchange rates on all selected orders and returns will be updated with the newly entered rates. Following an update, a confirmation message will be displayed detailing the number of sales and purchase transactions updated for each currency.
If the user clicks Cancel no order or return exchange rates will be amended.
NB: Updating sales order exchange rates using this feature will not result in selling prices being re-calculated from the price book.
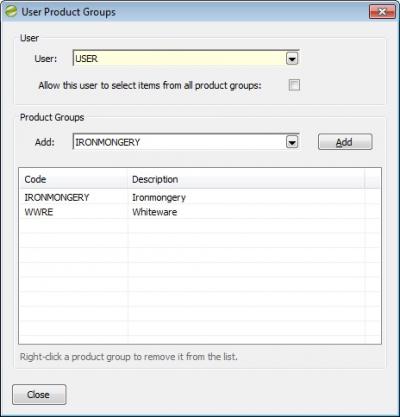
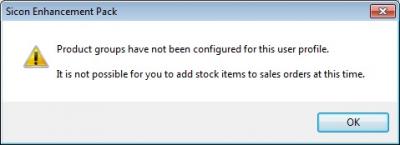
1.5. COM005: User Configured Product Groups
This function allows configuration of stock item product groups against each Sage user. Each user will then only have the ability to add stock items in the configured product groups when entering sales orders.
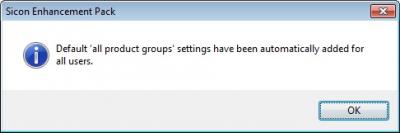
The Maintain User Product Groups screen (accessed from the Enhancement Pack, Common menu) is used to configure which product groups may be selected for each user.When this function/screen is first used, the system will automatically generate settings that allow all users access to all product groups.
Once these defaults settings have been created, user and product group setting may be amended as required.
If the Allow this user to select items from all product groups box is checked, the selected user will have the ability to select items from all existing product groups, along with any new products groups added in the future.
Specific items may be configured for the selected user using the Product Group drop-down list and Add button.
It is possible to remove product groups by right-clicking in the list and using the Delete option, which will appear in the pop-up menu.
Following configuration of user product groups, stock item filters will be applied when adding a new item to an order (or return).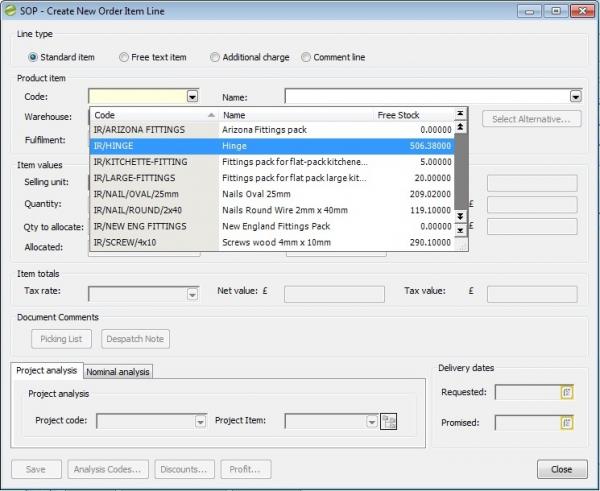
In the event that a user has no product groups configured, the following message will be displayed.
NB: this function only restricts the stock items that a user can add to an order/return.When amending an existing order/return, the user will retain the ability to amend item/lines that relate to other product group.
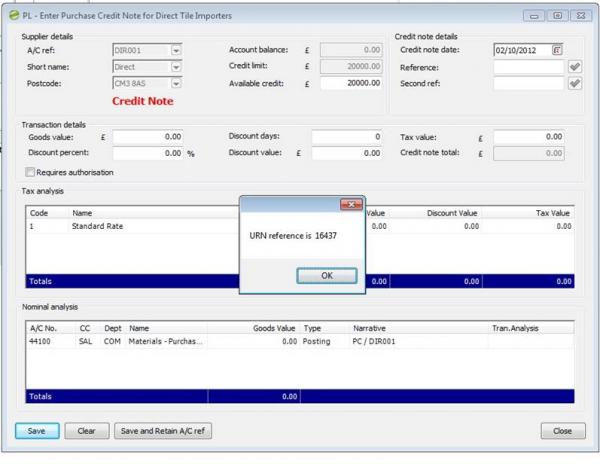
1.6. COM006: Display URN on Purchase/Sales Invoice & Credit Entry
This function automatically displays a message confirming the transaction unique reference number (URN) when a purchase/sales ledger invoice or credit note is entered.
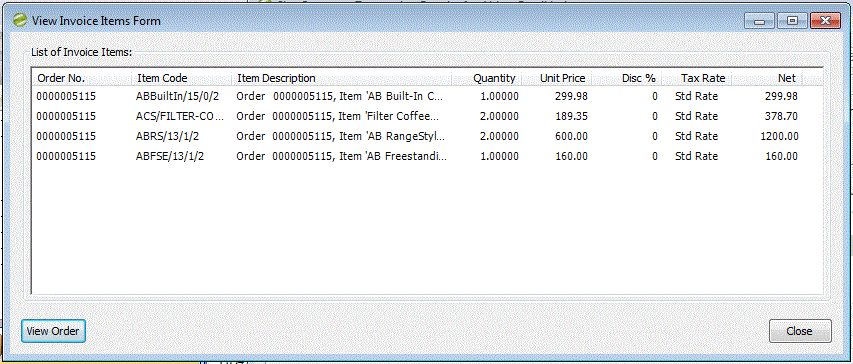
1.7. COM007: View Order Invoice Items
This function can be applied to both Purchase Ledger and Sales Ledger Transaction Enquiry screens and is used to view Invoice items for Sales or purchase orders.
View Invoice Items: when a row in the list which has a source of SOP/POP is selected, you can then open a view of all the invoice lines associated with that transaction.
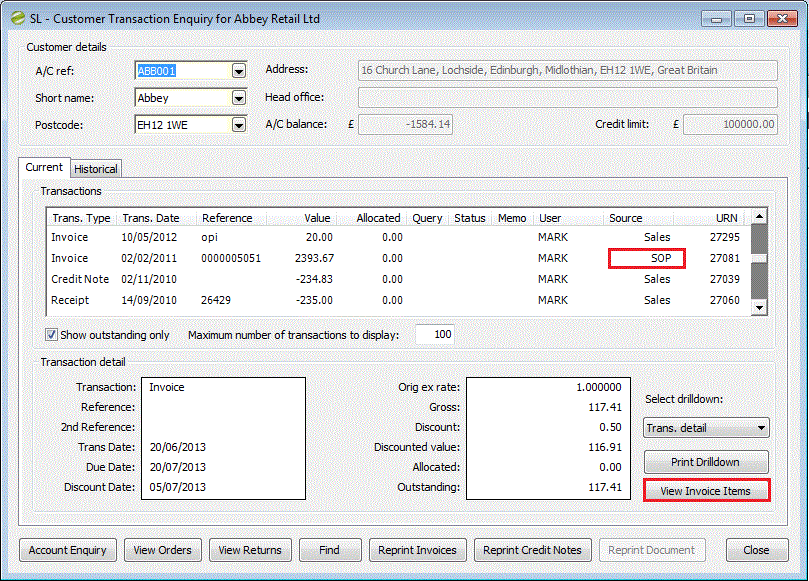
In this view you can then drill down to the actual Sales/Purchase order it relates to by double clicking the row or clicking the View Order button.
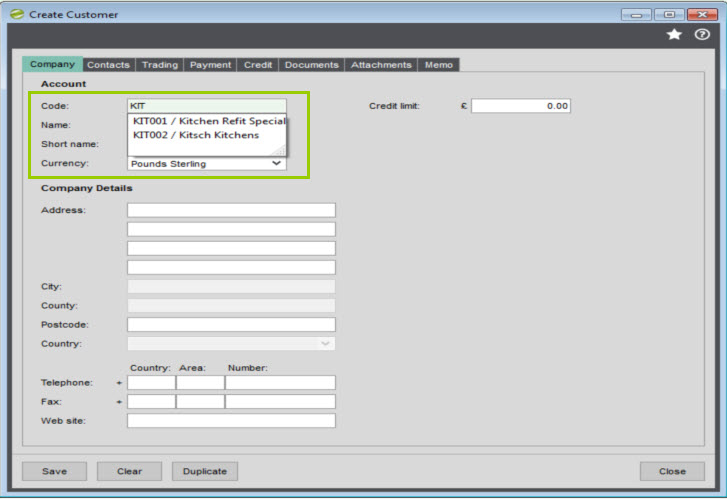
1.8. COM008: Customer, Supplier, Nominal, Cash Book and Stock Item Entry Prompt
This feature activates a prompt that will appear in the following screens:-
- Sales Ledger / Enter New Account
- Purchase Ledger / Enter New Account
- Nominal Ledger / Enter New Account
- Cash Book / Enter New Bank Account
- Stock Control / Enter New Stock Item
The purpose of this prompt is to display existing values already in the system that match the new code that you’ve entered. This will assist users to avoid entering a duplicate code, or to see what the next available reference would be.
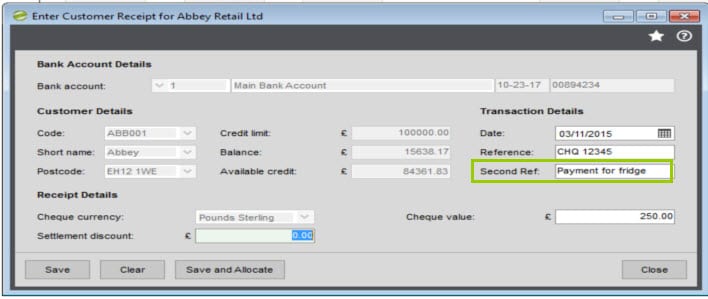
1.9. COM009: Add 2nd Reference to SOP/POP Orders
This feature enables you to add a 2nd reference field to the main order entry screen for sales orders and purchase orders. This field can be edited via either the New or Amend orders screen for both of these order types.
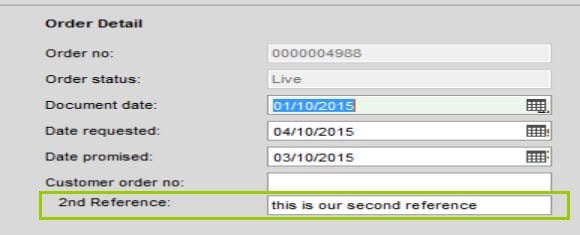
The Enhancement Pack settings screen enable you to specify which sparetext or analysis code field should store this information. Within the Settings screen, found within the main Enhancement Pack menu, there is a button labelled Options.
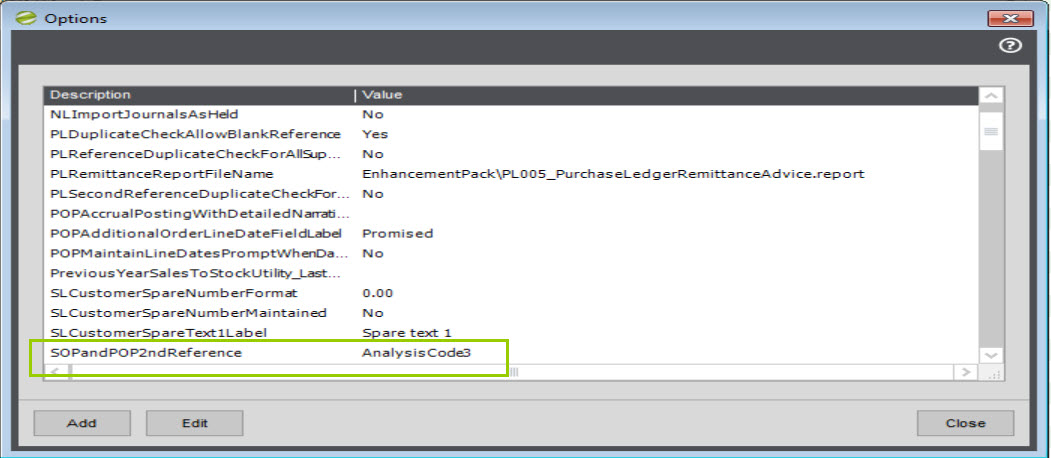
By editing this setting, you can enter either any of the AnalysisCode1-AnalysisCode20 fields, or alternatively use SpareText1-SpareText3. The same field selected will be used for both sales and purchase orders, so you need to ensure that you select a field that is currently not in use for either sales or purchase orders.
If you have not configured this setting correctly, then you will see the following message in the 2nd Reference field in sales and purchase orders:

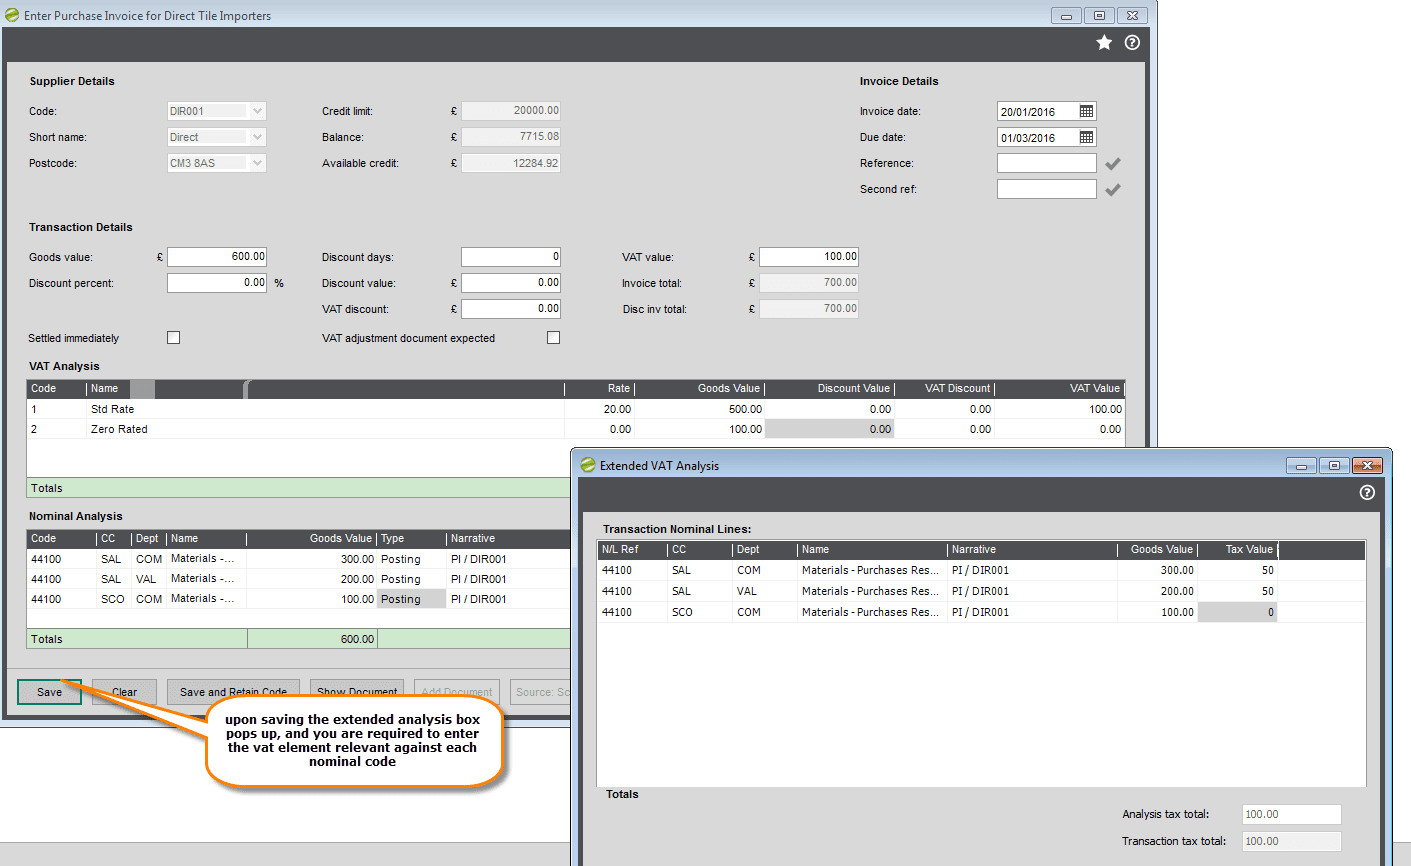
1.10. COM010: Extended VAT Analysis On Invoices, Credits & Nominal Journals
For those users not using P/L Authorisation* or Sicon WAP*, at the point of saving an invoice or credit a box will pop up and allow users to enter the breakdown of vat against each nominal code.
* In a future version we plan to make a change to this feature so the vat analysis will be entered in the first screen , which will then allow users who are using p/l authorisation or Sicon WAP top use this feature. Users will then be able to view the additional information through the ledger screen enquiry against the relevant transaction.
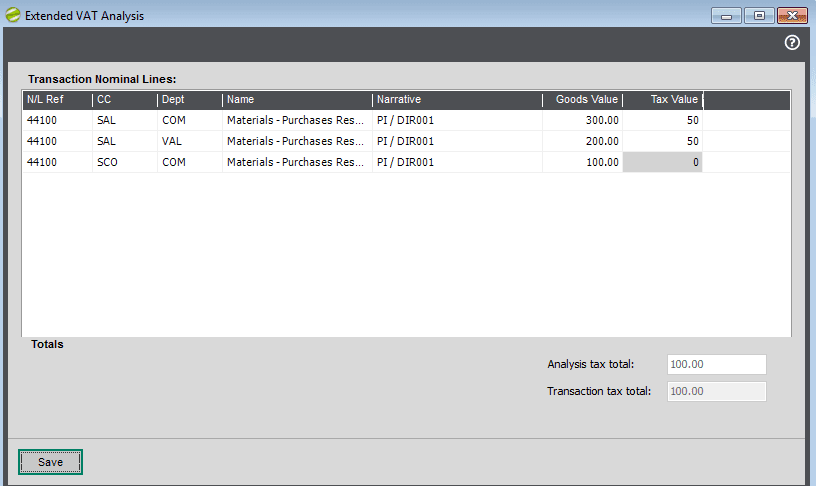
This information is populated in Sicon table ‘Sicon Vat Analysis’ for reporting
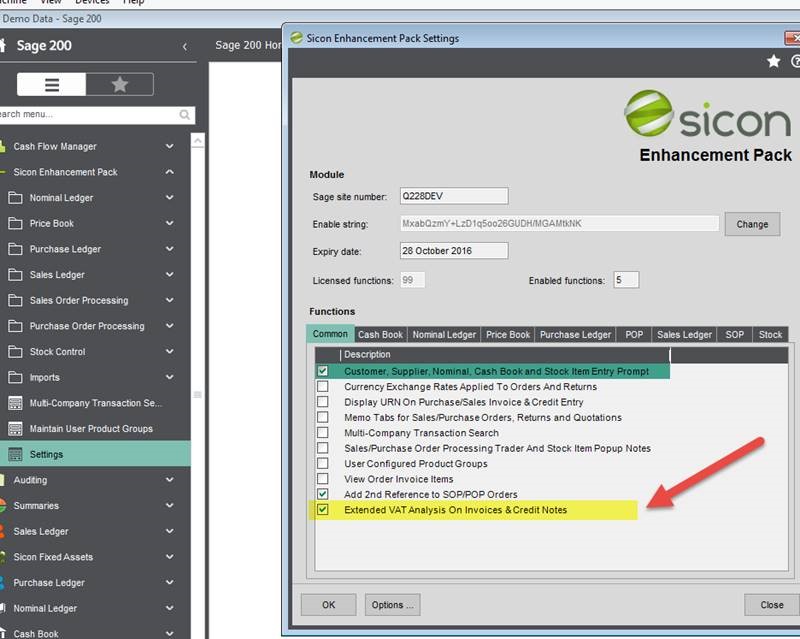
The setting to switch on is in the Common tab:
For reference only screen shot below:
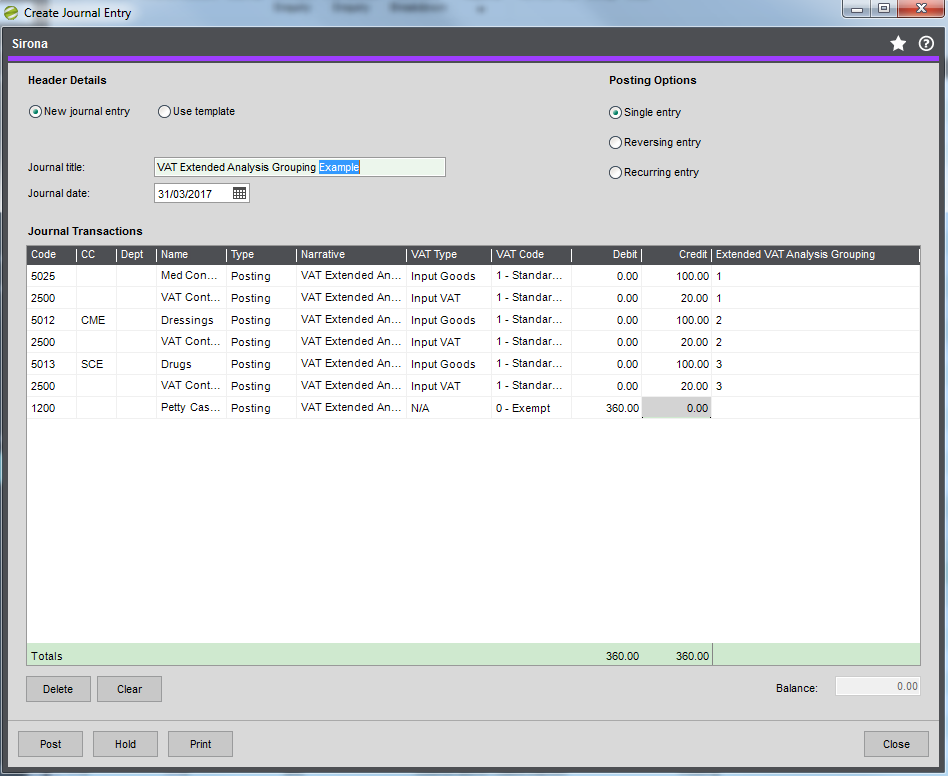
Extended VAT Analysis On Nominal Journals and Imported Nominal Journals
Nominal Journals & VAT Extended VAT Analysis – How this works
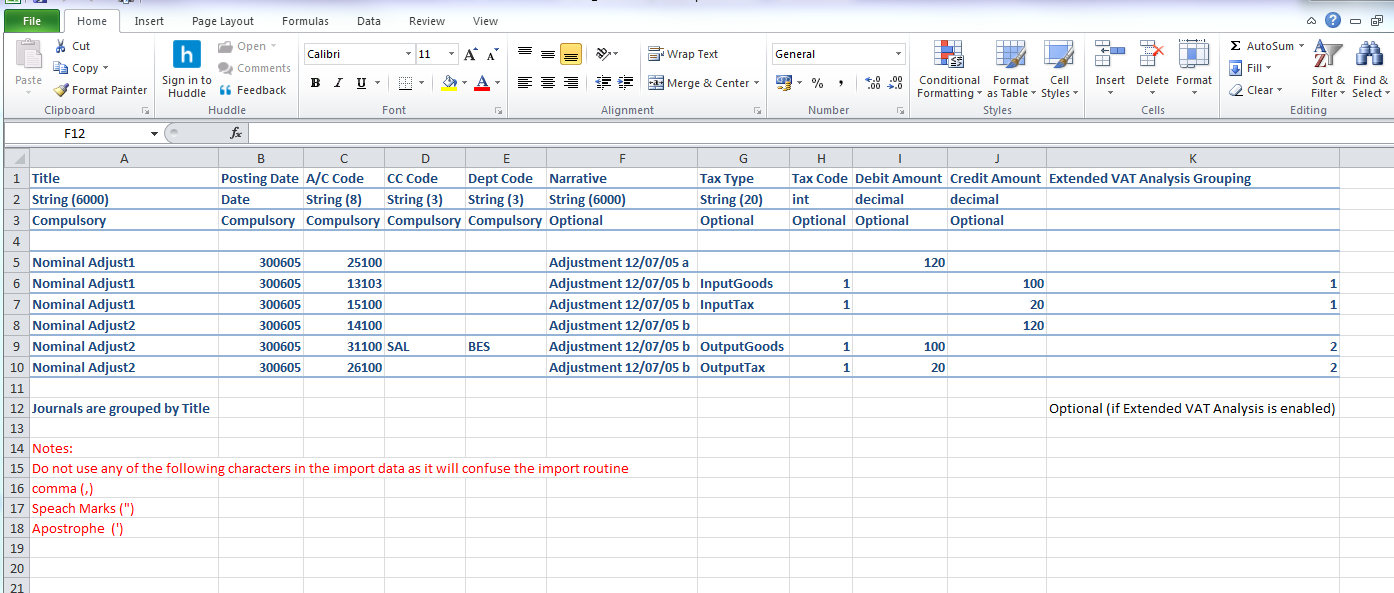
For Journal entries where you wish to record details to the ‘Sicon Vat Analysis’ table, (for custom reporting) when this feature is enabled users will see an additional column on the journal screen labelled ‘Extended Vat Analysis Grouping’
For reporting, users would want to know which vat line, goes with the relevant goods line, so there needs to be a grouping method, the way this is described as below:-
In our example we have added 6 lines in our journal , 3 P & L accounts for goods , and 3 lines of vat, which each are relevant to each of the 3 goods lines
You will see that we have used a number in each of the net goods line , and to group the individual vat line to the correct good lines enter the same number
NB: if your Journal contains no transactions that need to be written to the Sicon Vat Analysis’ table, then users should leave the column Extended Vat Analysis Grouping’ blank.
If you create your journals with tax, using the Import transactions with Tax menu option from within Sicon Enhancement pack then the template, effective release 17 has an additional column in headed ‘ Extended VAT Analysis Grouping)
As per the example template (provided within the import screen) users can see the grouping.
1.11. COM011: Loqate Address Finder
Loqate are a company who provide address capture to ensure addresses are recorded correctly. This feature provides integration with this service within Sage 200. Each address lookup has a small cost, further details on the Loqate Address Lookup functionality is available from www.loqate.com
You can sign up for Loqate from within Sage. Once this feature is enabled, then a Find Address button is added within the following screens in Sage 200: –
Sales Ledger\Create Customer
Sales Ledger\Amend Customer Details
Purchase Ledger\Create Supplier
Purchase Ledger\Amend Supplier Details
Purchase Order Processing\Supplier Addresses (if using POP003 or POP025)
Sales Order Processing\Customer Delivery Addresses
Sales Order Processing\Enter New Sales Order (Full)
Sales Order Processing\Amend Sales Order
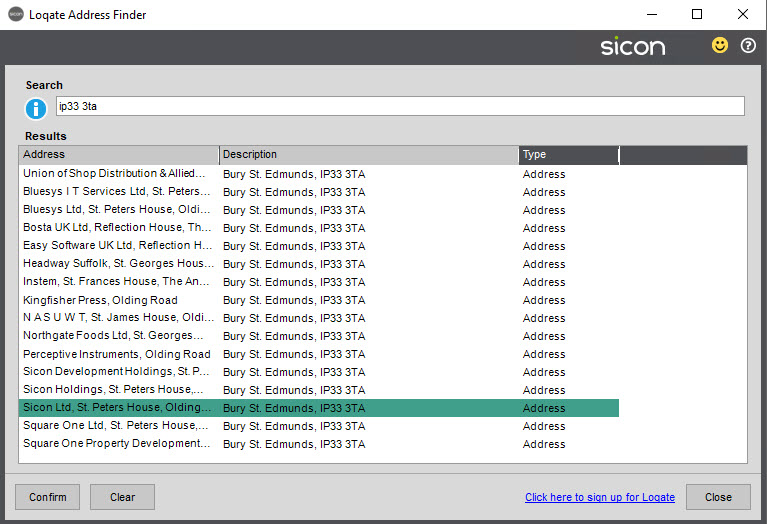
When you first click the Find Address button in any of these screens, you are presented with the following window:
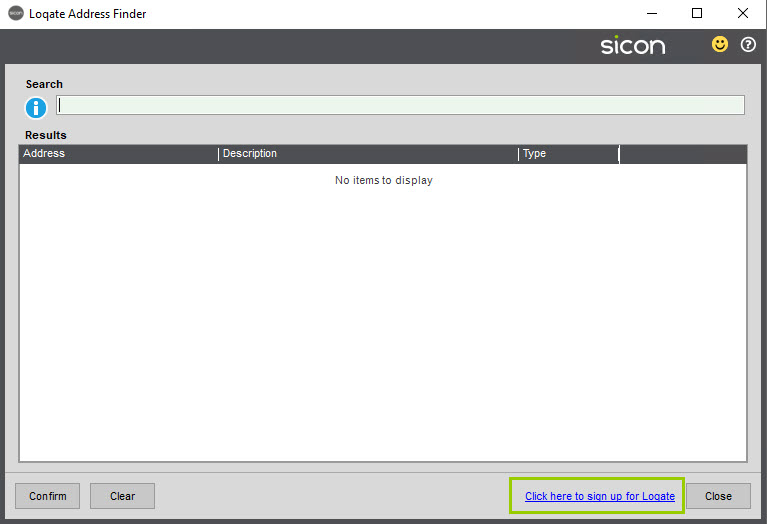
You can use the highlighted ‘Click here to sign up for Loqate’ to be redirected to the Loqate website where you will then be to register for a new account. Once you have done this, Loqate will email you an API Key which then needs to be entered into the Sicon Enhancement Pack setting screen to link your Sage system to your Loqate account.
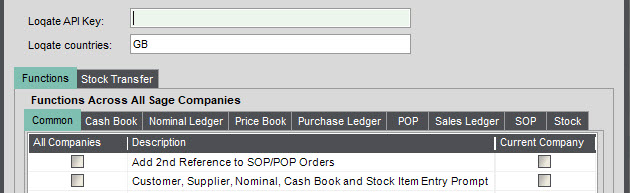
The Loqate countries field defaults to GB, indicating this is the area where the address find will interrogate. You can add more countries by adding their country codes into here, with each country separated by a comma. Country codes can be obtained from the Loqate website, Ireland is IE for example.
Once you have this setup, you can then access the Address Finder functionality in the screens mentioned above via the Find Address button.
1.12. COM012 - Dashboards
With this feature are ten General Dashboard screens that can all be configured to show different information in four different panels. There are no pre-configured dashboard panels, so these will all need configuring using SQL queries before the dashboards can be used. The panels can include information from any table within Sage200.
Configure dashboard panels
The Maintain Dashboard Panels screen is found within the Dashboards menu folder in the Enhancement Pack menu. When you first open this screen, it will display any existing dashboard panels, there could be some listed in here if you have other Sicon modules installed that also use dashboards. In this example, we also have Sicon Debtor Management installed so we also see the four dashboard panels that come pre-configured with that product.
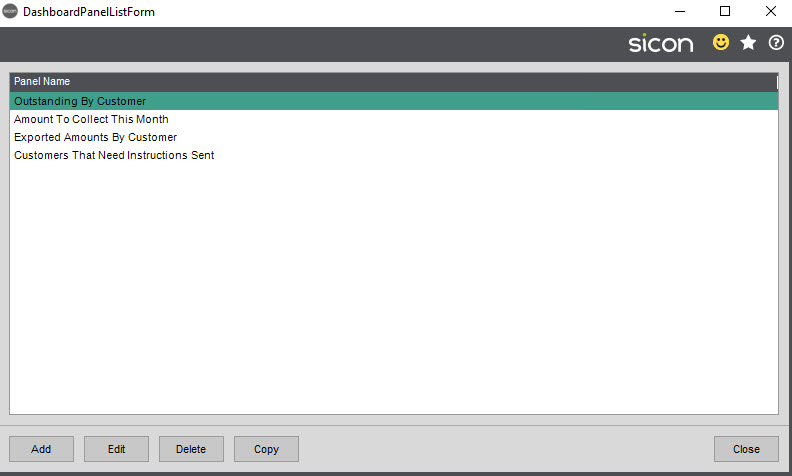
Click Add to create a new panel and you will be prompted to enter a name for your new panel.
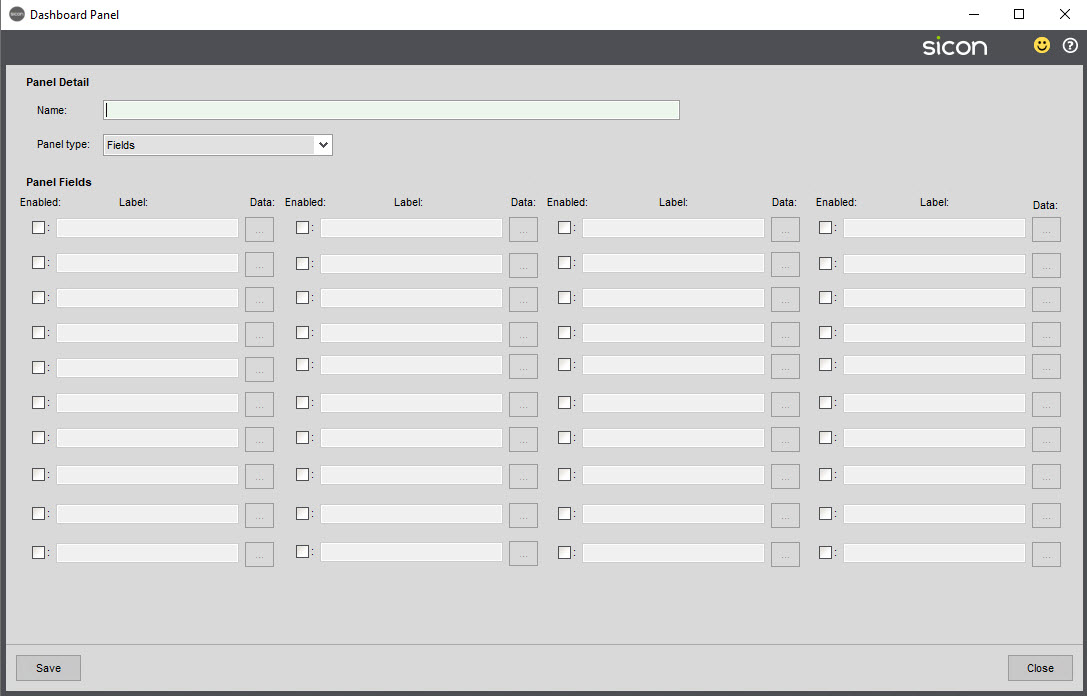
You can then select from one of four different Panel types:
- Fields (lets you specify up to 40 SQL queries that each present a single result, e.g. a count of Debtor customers)
- List (lets you specify a single SQL query that displays any returned columns into a list)
- Pie chart (lets you specify a Label field (e.g. customer name) and a value field that drives the pie chart (e.g. Amount to Collect)
- Bar chart (lets you specify a X axis column field and a Y axis column field)
Having chosen which Panel type you would like to use, you can then enter a SQL query to return the information that you are looking for. The main SQL query field (for all types except Fields) is where you would enter your SELECT SQL statement. Once you have entered your SQL query, there is a Validate button which is a test that must be passed successfully before you can Save the panel. If you SQL query has joins that are not using the NOLOCK table hint, then you will be presented with a warning message suggesting that you should use it, as we don’t need to be locking any tables in Sage that we are reading the data from.
Field panels
The Fields panel type allows you to specify separate SQL queries for each of the 40 fields. You can enable whichever fields you want to use via the Enabled checkbox, give the field a text label and then click the Data square to enter the SQL query itself. The query entry window also has options in it to display positive/negative values in either red or green.
So, for example, if you wanted the first field to contain the number of customer accounts in your Sales Ledger, you would enable the first field and then give it a label. You would then click onto the Data square to the right in order to enter the SQL query.
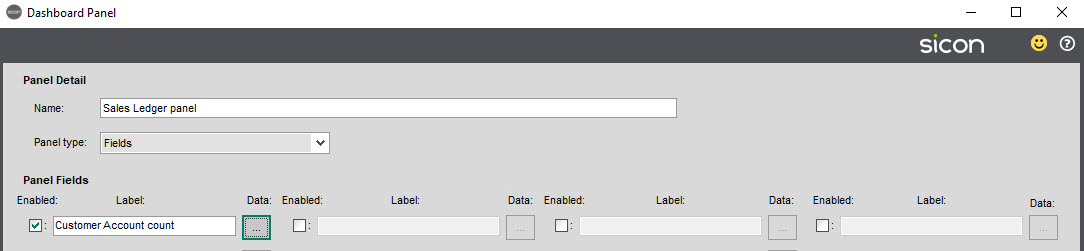
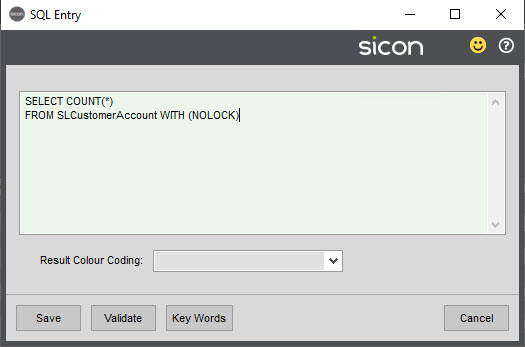
Saving this would give you a dashboard panel that then returns the number of customer accounts in your Sales Ledger. You could configure any of the remaining 49 panel fields if you want the dashboard panel to also show other values. The position of the panel fields is relevant to where they will display in the panel, so you can configure whichever ones you like. This type of panel is suited to showing single values returned by each SQL query, so counts, totals, arithmetical calculations etc.
List panels
List panels allow you to specify a single SQL query where you are probably going to return multiple fields, and then the results of that query will be displayed as a list.
In the example below, we have specified a SQL query that will return a list of customers whose balance is non-zero, and they will be organised from highest balance to lowest.
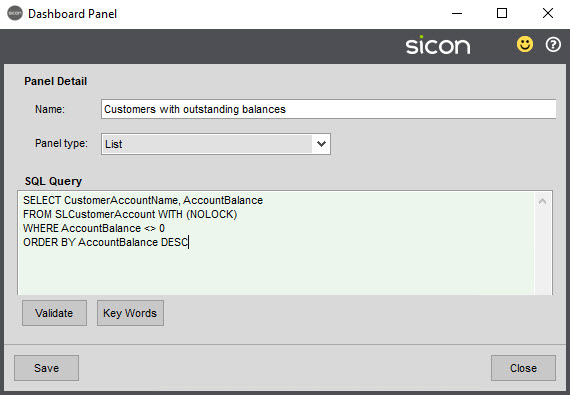
You will be prompted to validate the query before saving it.
Pie Chart
This panel will present the result of your SQL query as a pie chart. Your SQL query will need to return two values, one of which is numeric and is driving the pie chart. The other value will be the label applied.
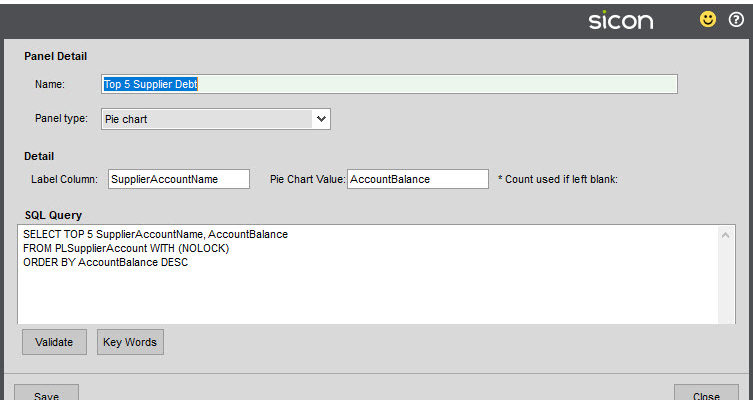
Specify which value from your query will be the label, and which numeric value is to be used for the pie chart value. If you leave the Pie Chart Value field empty, then the pie chart will display a count value instead of the query results.
In this example, I am returning outstanding supplier balances. I am using the TOP 5 option in the query in conjunction with the ORDER BY clause to only return the top 5 supplier accounts based on their balance.
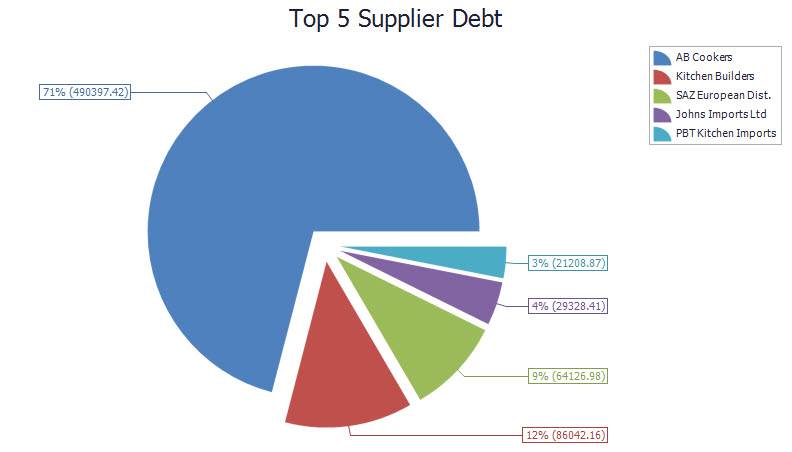
The displayed panel shows the supplier account names as the label, and automatically displays the account balance against each pie slice, with the percentage of the total balance values for the five accounts.
Bar Chart
This panel will present the result of your SQL query as a bar chart. Your SQL query will need to return two values, one of which is numeric and is driving the bar chart. The other value will be the label applied for each column.
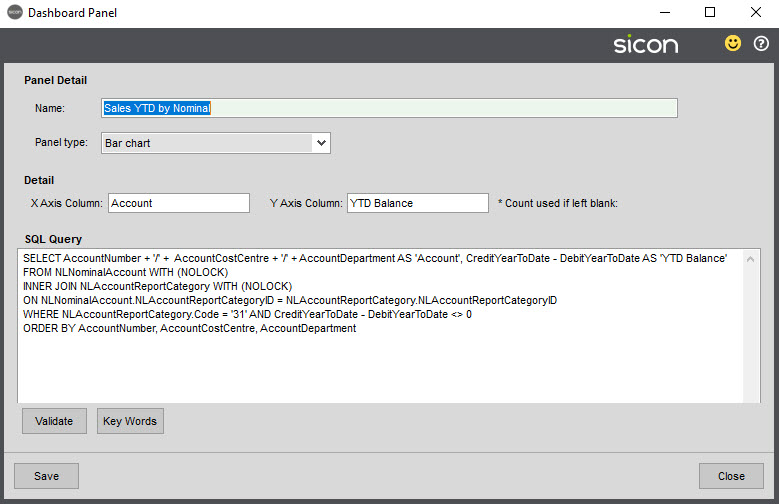
Specify which value from your query will be the X Axis (horizontal) column label, and which numeric value is to be used for the Y Axis (vertical) value. If you leave the Y Axis Value field empty, then the bar chart will display a count value instead of the query results.
In this example, I am returning nominal balances for nominal accounts in report category 31 that are non-zero. I am combining the three elements of the nominal account number (number, cost centre, department) into a single field so that I can use it as the X Axis label, and deducting the debits from the credits to give me a single YTD Balance field to use on the Y Axis.
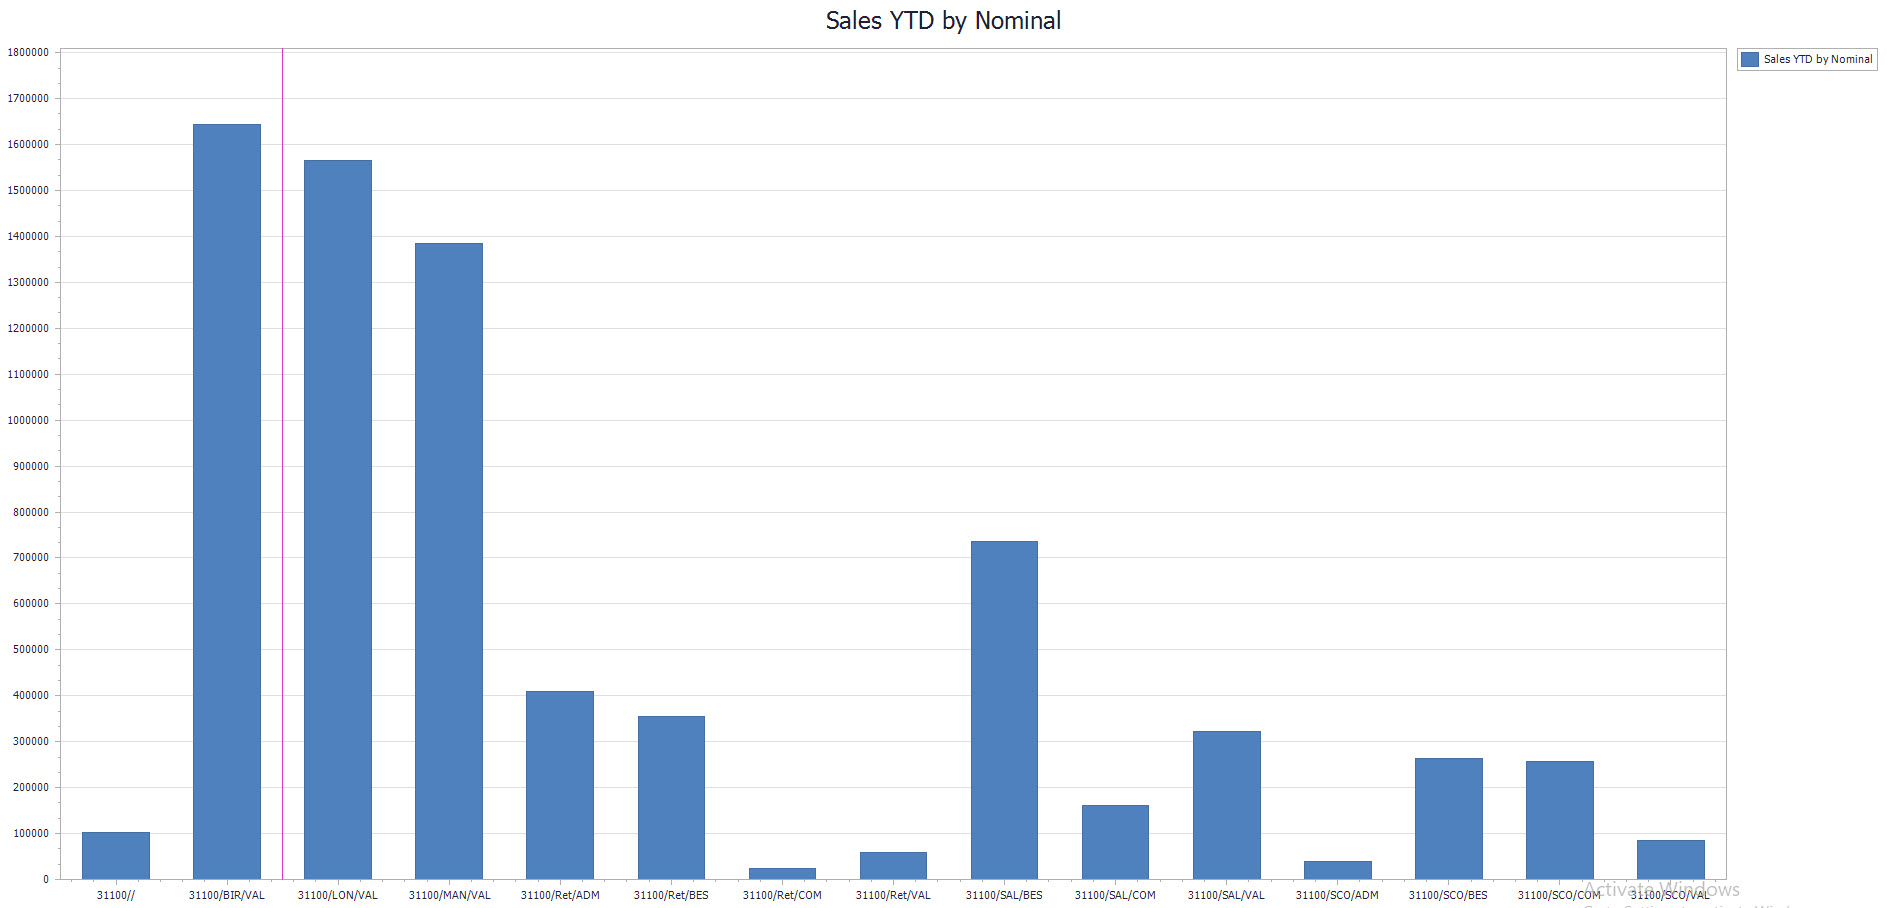
The displayed panel shows the nominal account details as the label on the X Axis, and as you hover over each bar in the chart it will display the Y Axis value for each account – which is the YTD balance in this example.
Configuring each dashboard
Once you have configured your dashboard panels, you can then configure each of the 10 General Dashboard menu options to display whichever panels you need to. Click into the relevant dashboard menu option, and then click the cogs icon in the bottom left hand corner.
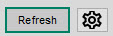
This will open the Dashboard Config window.
In here you can set the Refresh timer for the dashboard. You can then use the four panel drop downs to select which dashboard panels you would like to display in each panel. You can leave some empty if desired. These settings will then apply to all users of this dashboard in this Sage company.
Using the dashboards
When viewing the dashboards, there are some options available depending upon which type of panel you are looking at. For Field, Pie and Bar Charts, you can right click on the panel and choose the Pop Out Panel option. This will then open that panel in its own full-size window, which you could then display on a separate screen.
If the panel is a list view, then if you right click on it you can choose to either print the list or export it to Excel. These options work in the same way as they would in regular Sage transaction list screens.
Hovering over the bars on a bar chart will display the specific numerical value for that bar and the bar label.
Bear in mind that as per standard Sage functionality, you can right click on the relevant General Dashboard and choose to ‘Make this my Home Page’. This will then make the dashboard display when you first open Sage 200, and is also easily accessible via the Display Home Page icon in the toolbar in the top left hand corner.
2. Cash Book
This section includes enhancements that are specific to the Sage Cash Book modules.
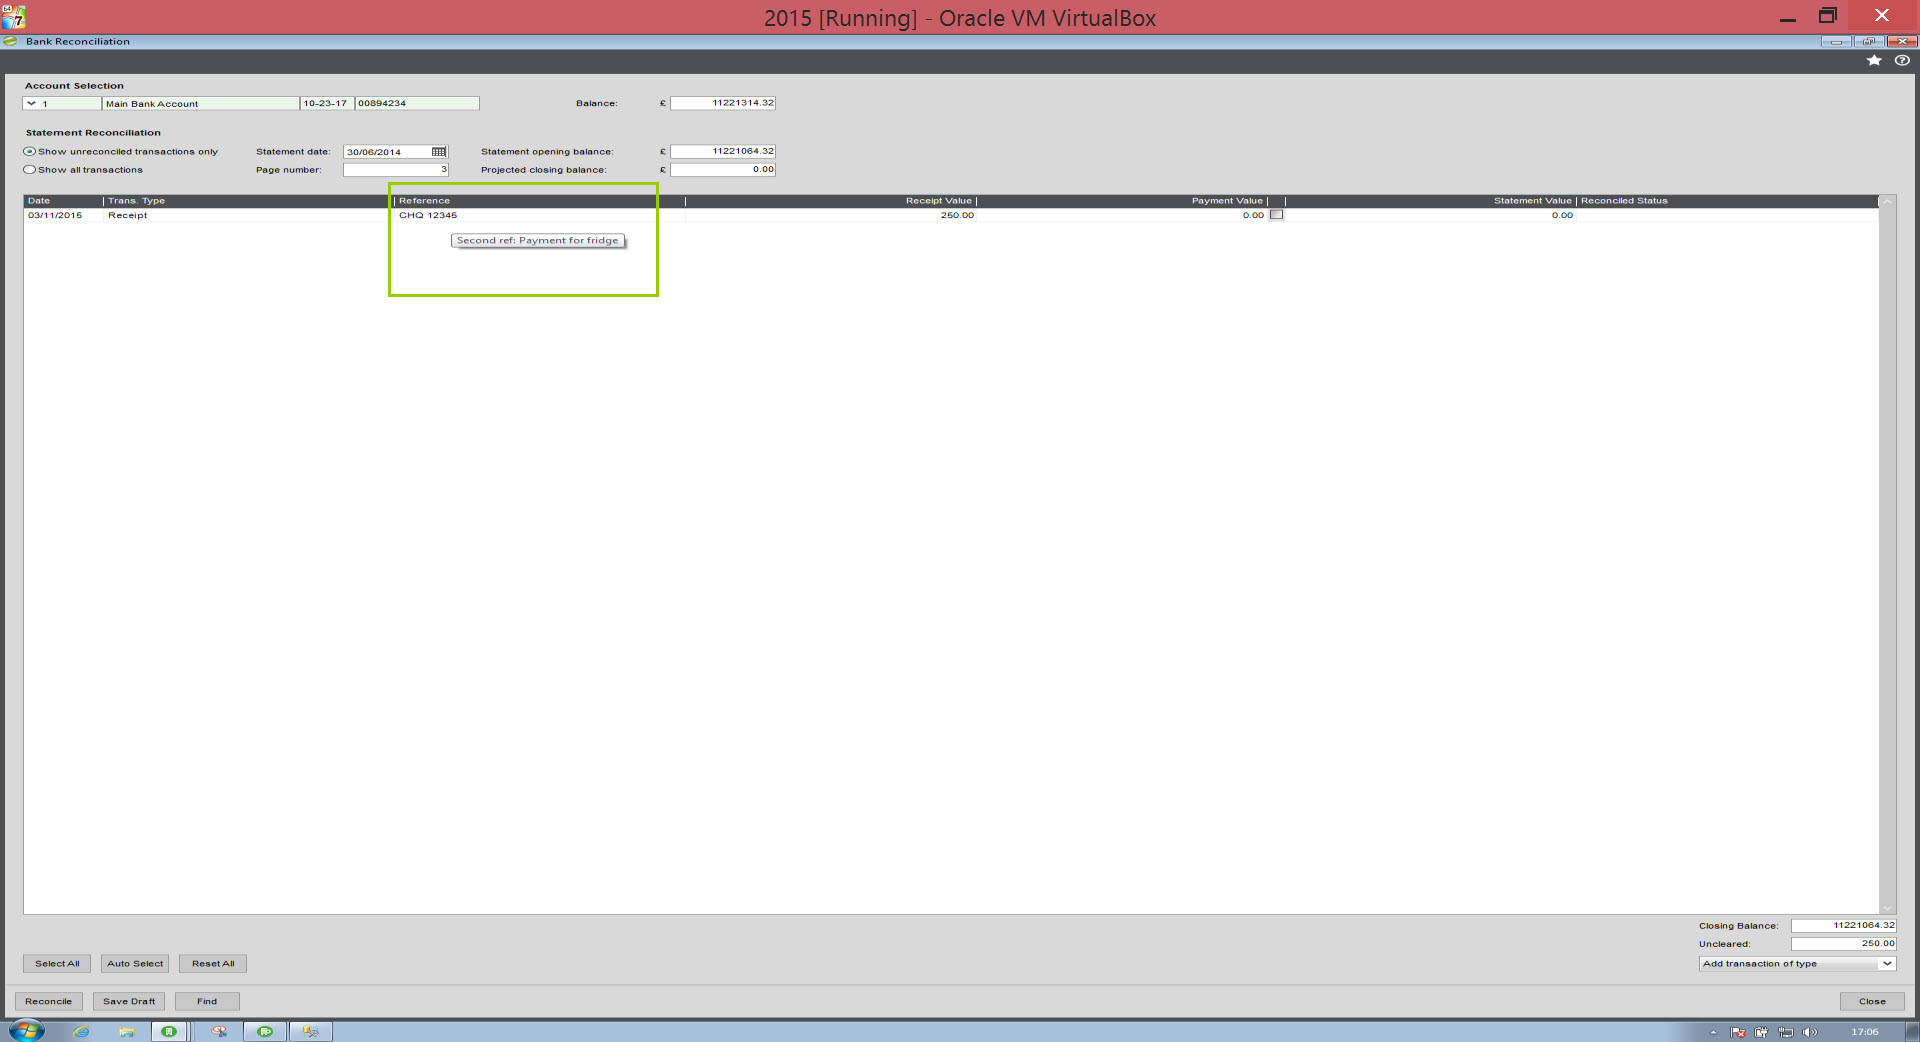
2.1. CB001: Cash Book Reconcilliation
NB: in Sage 200 v.2016, the 2nd reference is on the screen with its own column. Therefore, this feature is not required / valid for Sage 200 v.2016.
This function makes it possible to view the second reference entered on a cash book transaction whilst in the Bank Reconciliation screen.
When you are in the Bank Reconciliation screen, if you hover over the Reference field for a transaction, then the second reference appears.
3. Invoicing
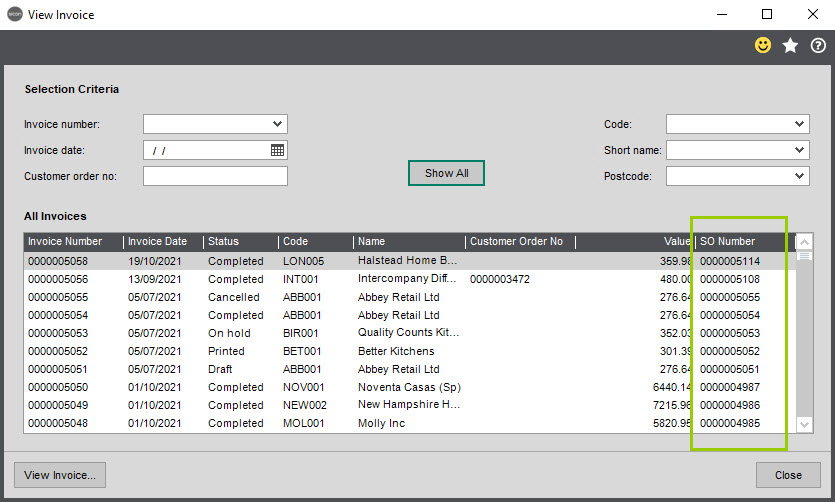
3.1. INV001: Display Order Numbers on View Invoice screen
This feature adds a Sales Order number column to the View Invoice screen, that is accessible via Invoicing/Enquiries/View Invoice.
4. Nominal Ledger
This section includes enhancements that are specific to the Sage Nominal Ledger module.
4.1. NL001: Show Nominal Ledger Transaction Enquiry View Source Button
This function adds a View Source button to the Nominal Ledger Transaction Enquiry screen.
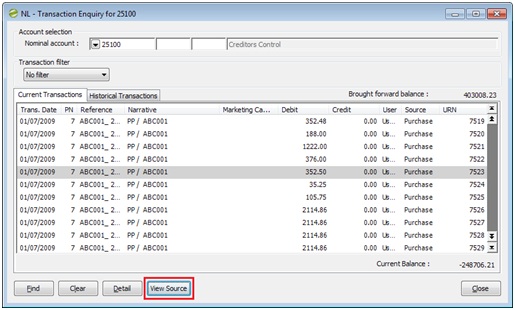
This button can be clicked to display the source details of any Purchase or Sales transaction, which is linked to a customer or supplier account.
4.2. NL002: Additional Nominal Ledger Account Future and Amended Budgets
When this function is activated, two additional (monthly) budgets will be available for maintenance when entering or amending a nominal ledger account. These additional budgets are not used by the core Sage system, but may be maintained for reporting/informational purposes.
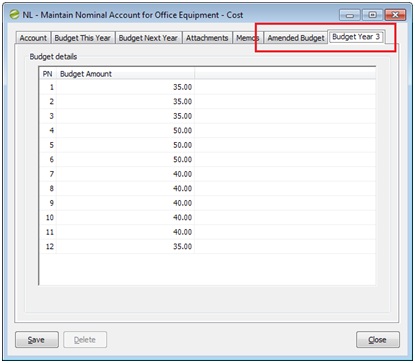
The function also includes routines to import budgets and update budgets at year-end.
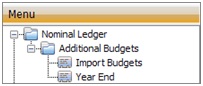
Import Budgets
This routine is used to import ‘next year’ (standard), ‘year 3’ and ‘amended’ budgets by nominal account from a .csv file in a specific format.
A sample of this .csv file format is included with the components of this module.
Year End
The additional budgets year end routine can be used (following standard Sage year-end processing) to:
- Copy all nominal account current budgets to amended budgets values.
- Copy ‘year 3’ budgets to ‘next year’ (standard) budget values.
NB: it is not possible to automatically reverse updates made by this year end routine.
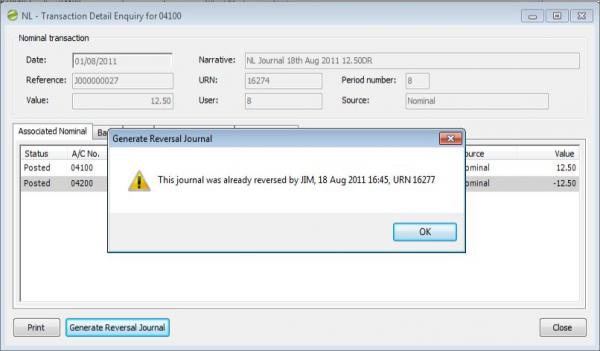
4.3. NL003: Show Generate Reversal Journal Button on Detail Transaction Enquiry
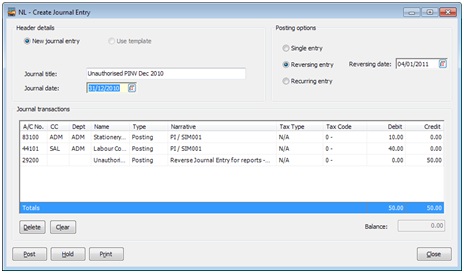
When this function is activated a button is included on the Nominal Ledger Transaction Detail Enquiry screen, which allows a reversal journal to be automatically generated.
The reversal journal will post credit/debit values to all nominal accounts in the original journal to reverse the originally posted amounts.
The original journal date, narratives, etc. will be retained in the reversal journal, but the instrument/reference number will be suffixed with ‘R’ (provided it is less than 20 characters in length).
An informational message will be displayed to confirm the reversal journal unique reference number.
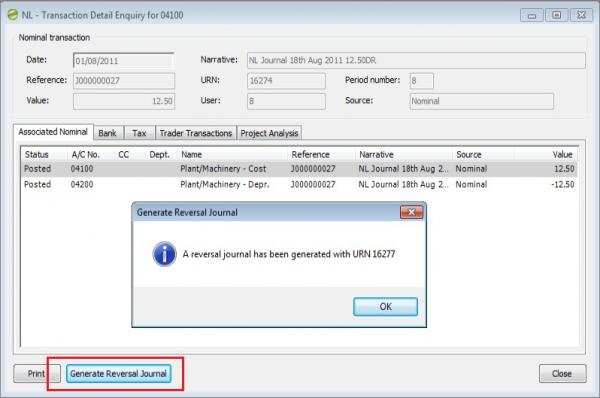
The function will not allow more than one reversal to be generated for any journal. If a user attempts to generate a reversal for a previously reversed journal an message will be displayed.
4.4. NL004: Nominal Journal Import with Tax (Import Menu)
This function allows import of Nominal Journals with associated tax items/codes. A new menu item named Import Nominal Journal Import with Tax can be found on the Sicon Enhancement Pack, Imports menu. The user will be required to select an import .csv file that must have columns formatted in the following sequence:
- Journal Title, multiple entries throughout the file will post them as different journals
- Posting Date
- Nominal account code
- Nominal account cost centre code
- Nominal account department code
- Nominal narrative
- Tax type (0=Blank, 1=Input Goods, 2=Input Tax, 3=Output Goods, 4 = Output Tax)
- Tax code (must exist in Sage)
- Debit amount
- Credit amount
- Extended VAT Grouping (Relevant for COM010 Extended VAT Analysis on Invoices, Credits & Nominal Journals feature. Can be ignored if this feature is not being used).
The import file total debit and credit values must balance.
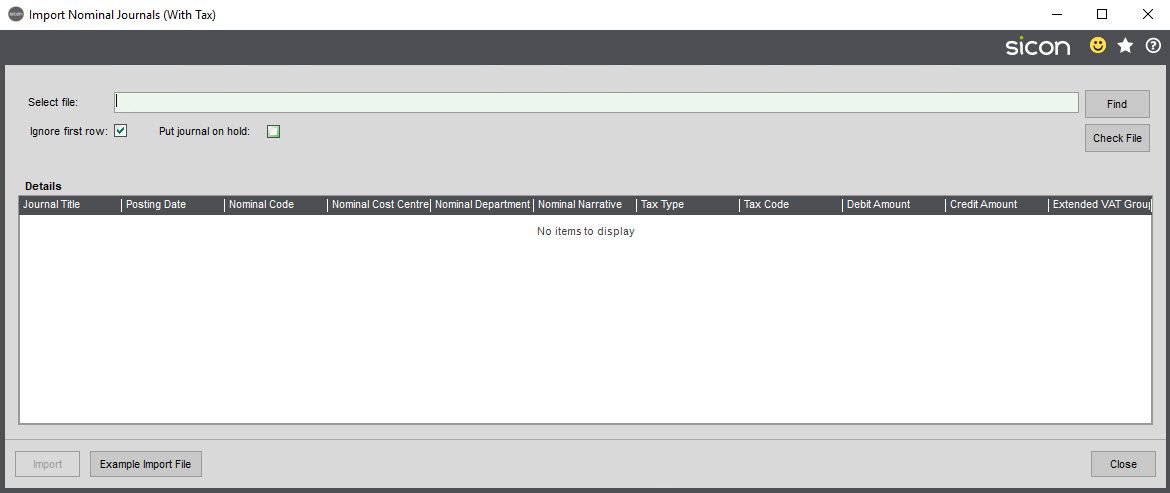
Use the Find button to browse to the import csv file that you have prepared.
When the Check File button is pressed, all transactions will be validated to ensure that nominal accounts, tax codes, etc. exist in the Sage database. If any errors are found, these must be corrected in the import file and the process re-started.
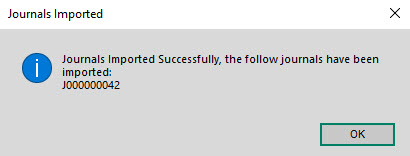
Following successful import, an informational message will be displayed confirming the journal number(s).
The imported transactions will display the source of the transactions as ‘Nominal’.
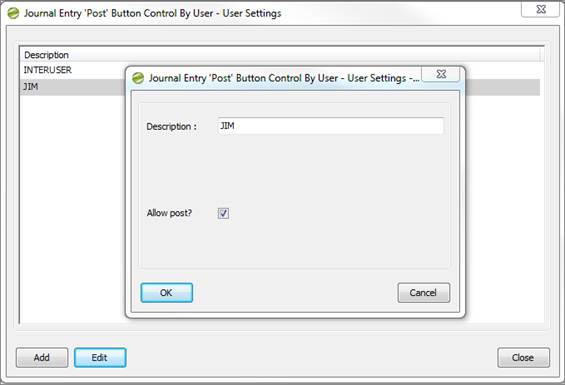
4.5. NL005: Journal Entry 'Post' Button Control by User
This function may be used to control which users are authorized to post nominal ledger journals.When this function is enabled the journal entry ‘Post’ button will be disabled (removed) for all users.
Authorised user must be configured using the Sicon Enhancement Pack, Nominal Ledger, Journal Entry Post Button Control By User, User Settings menu option.
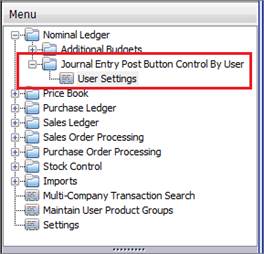
Posting of nominal journals may then be enabled for individual users by ticking the Allow post? box.
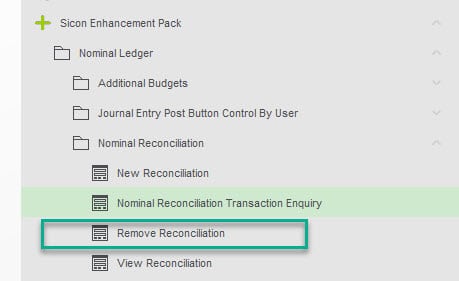
4.6. NL007: Nominal Reconcilliation
When this feature is enabled within Sicon Enhancement Pack features.
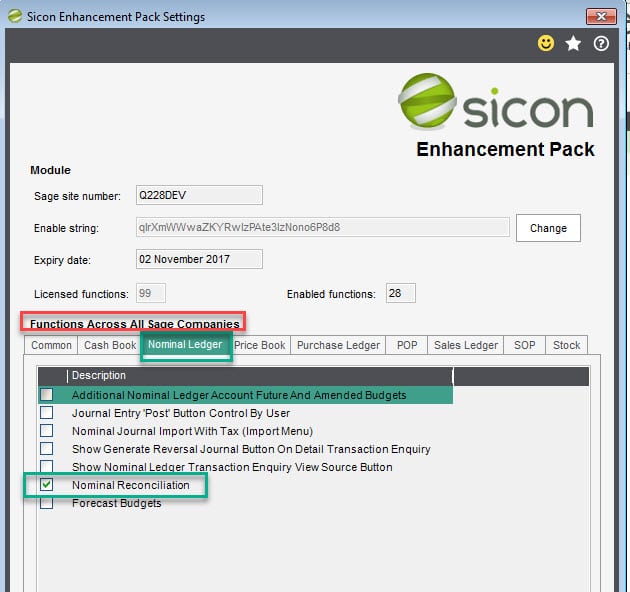
customers will be able to reconcile transactions within an nominal account (such as a control account), this is a useful feature for auditing purposes at such times as yearend .
Before you start using this feature consider the following.
If you are using this feature to match off debits and credits on an account (such as wages control) then on the nominal record the account will need to be flagged as such as shown below.
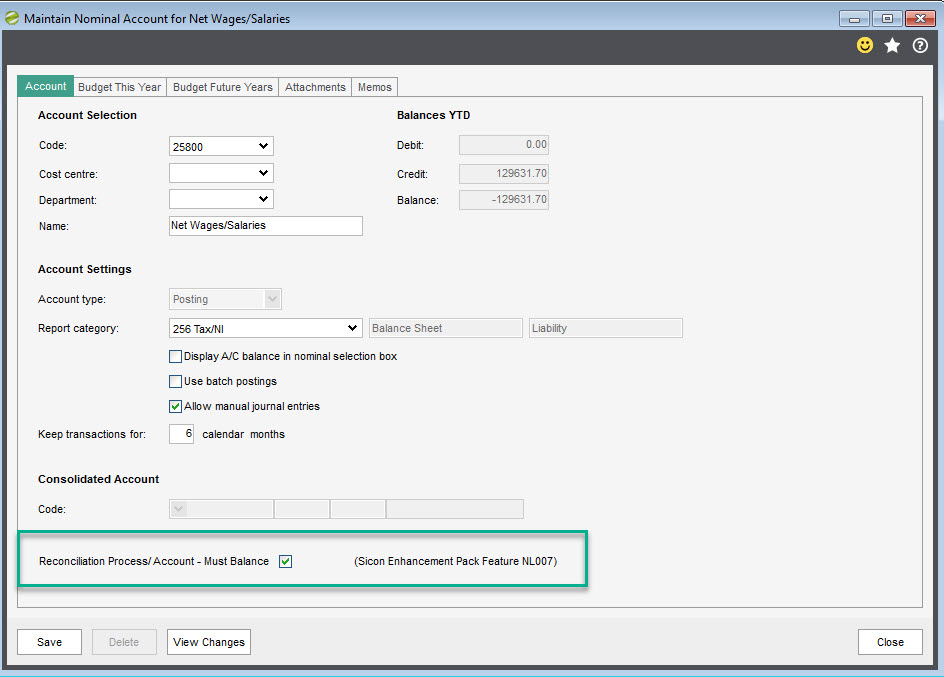
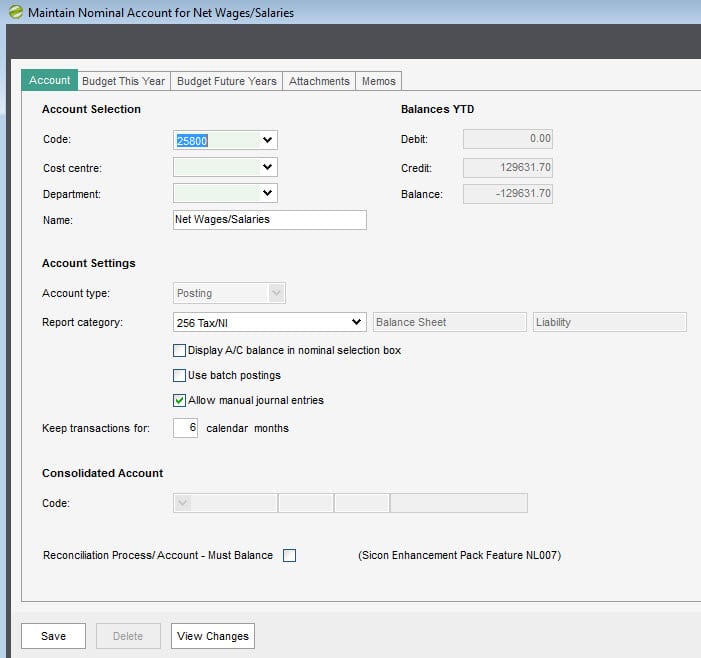
If the reconciliation is on an account where a user just wants to ‘recognise / acknowledge the transactions as being correct and posted to correct account (such as an P & L overhead account) then the reconciliation process does not need to balance, and therefore the relevant nominal account should not be flagged as ‘must balance’ (As below).
You can have a mixture of both, so some nominal ledger accounts can be flagged as ‘Must Balance’ and some others this box left un-ticked’.
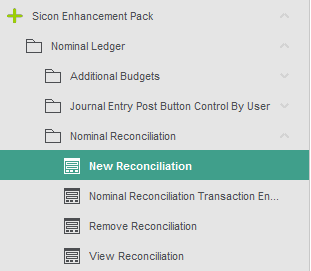
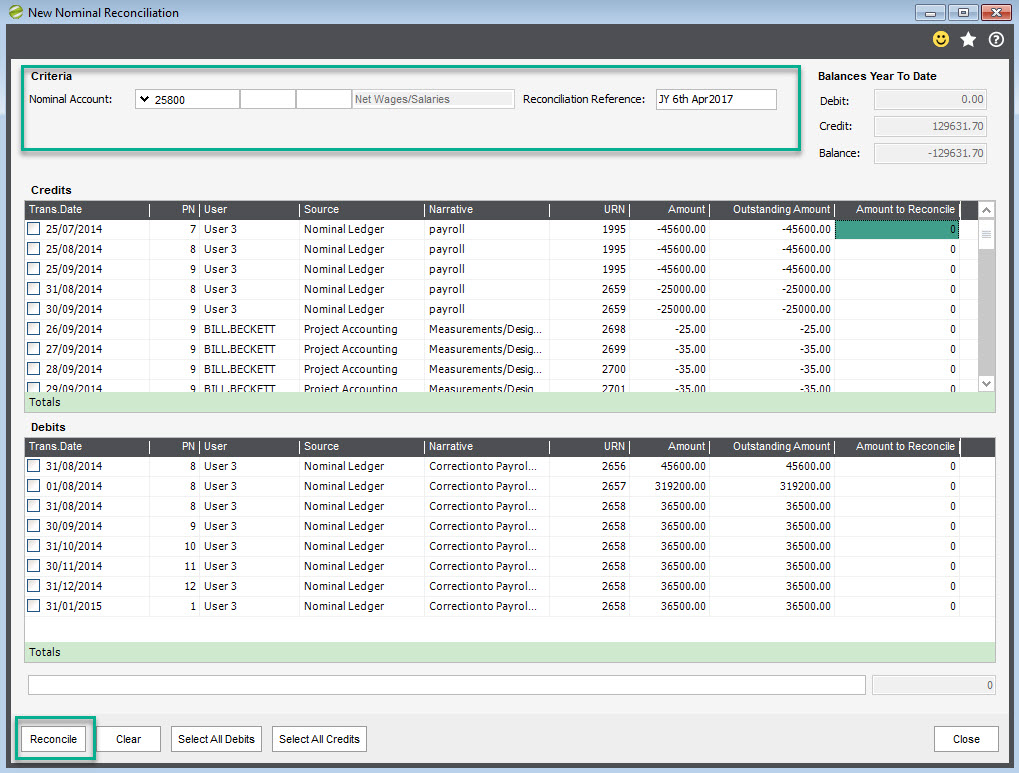
New Reconciliation Process
Once you have flagged those accounts that must balance, then he process is carried out through accessing the ‘New Reconciliation menu option within the Nominal ledger section of the enhancement pack).
Select the Nominal Account you wish to reconcile.
Enter a reference (Text) – For example, users name or date.
If the account reconciliation must balance, until it does the reconcile button will be greyed out and it will note this under the account number.
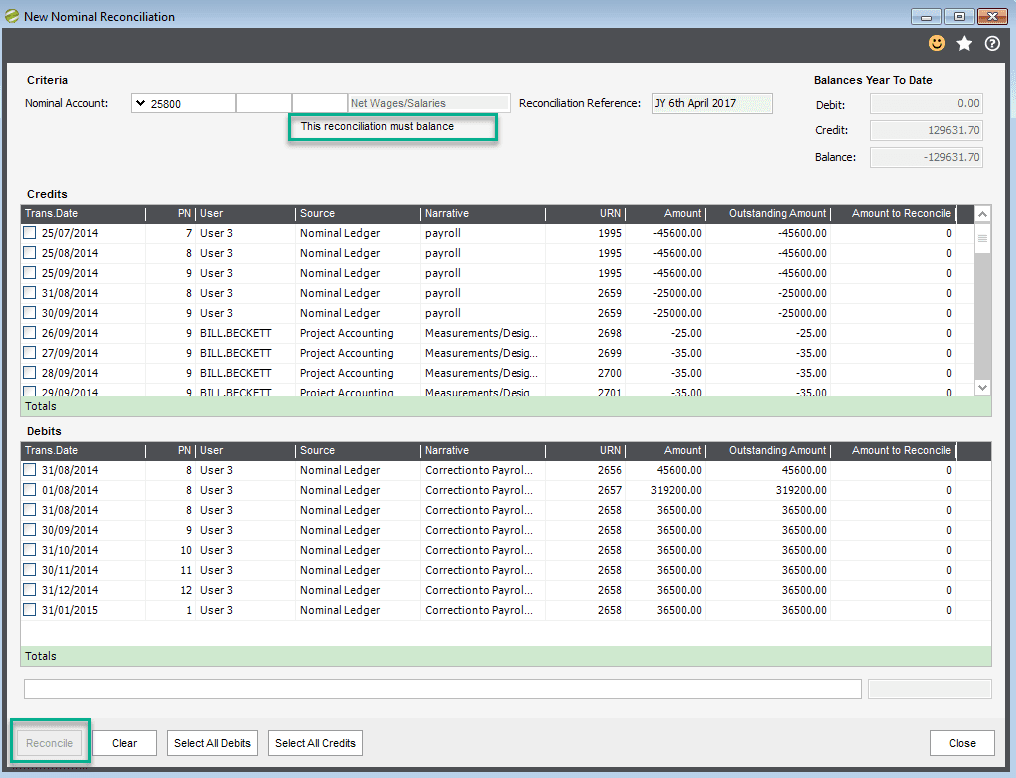
The user then can then (if all transactions are to be reconciled) select all debits / all credits, and reconcile, or select individual transactions (as screen shot below).
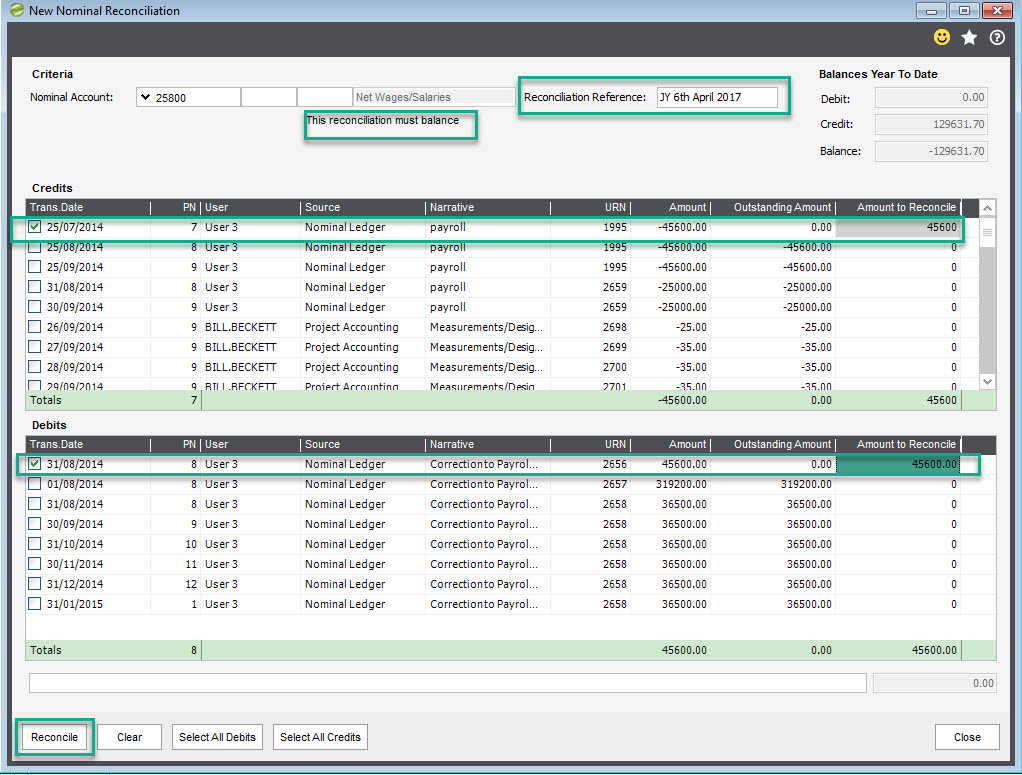
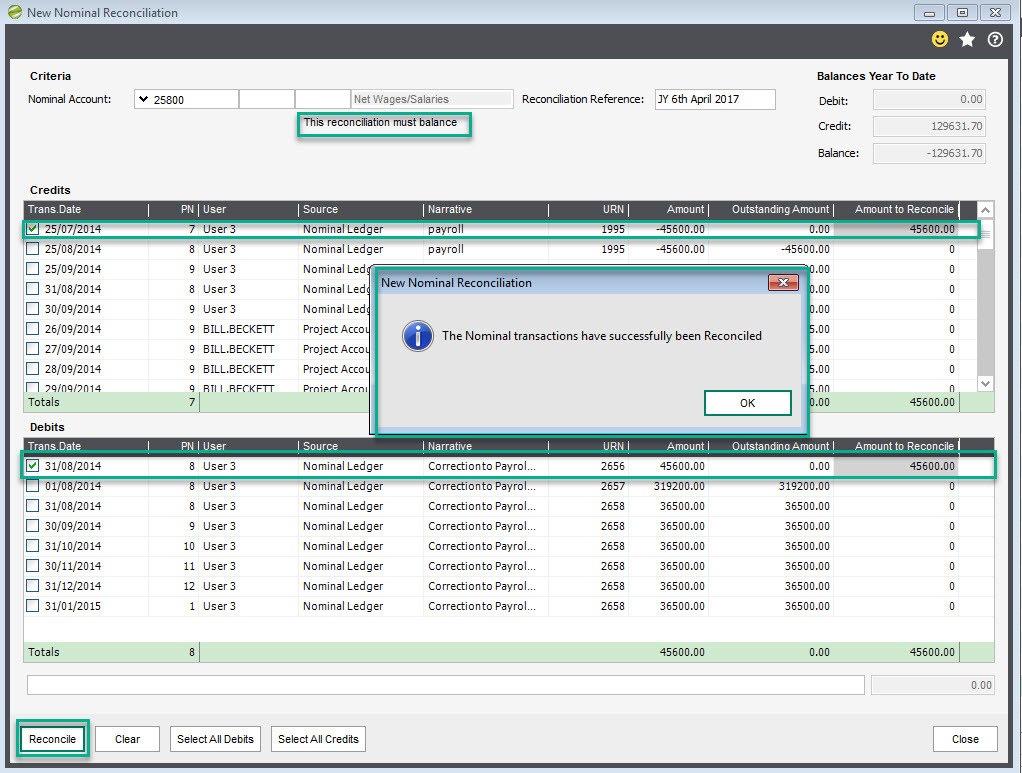
In our example above we have simply selected a Debit and credit of the same amount and selected to Reconcile, after which the system confirms.
If the account reconciliation does not needs to balance, (you are just acknowledging the transaction on this account is correct for example) there will be no message to say it must balance and you can select a single transaction if desired, without having a balancing entry and you will see even before you select any transactions the Reconcile button is available to select.
Nominal Reconciliation Transaction Enquiry
Use this menu option if you wish to View a Nominal transactions on an account, and have the option to filter by :-
All Transactions or
Non – Reconciled transactions or
Reconciled Transactions
Important Note: When selecting a nominal account, Tab to pull up the account
![]()
If you choose to simply display / select ‘Reconciled items only’ the list will filter as example below and show the Reconciliation reference and the date.
![]()
Remove a Nominal Reconciliation Transaction
If you wish to ‘un-do’ a previous reconciled transaction, select ‘Remove Reconciliation’ from the Menu.
If you select an account that is flagged ‘Must Balance’ then during this ‘removal process’ you must remove both sides, and the removal must balance and you will be warned.

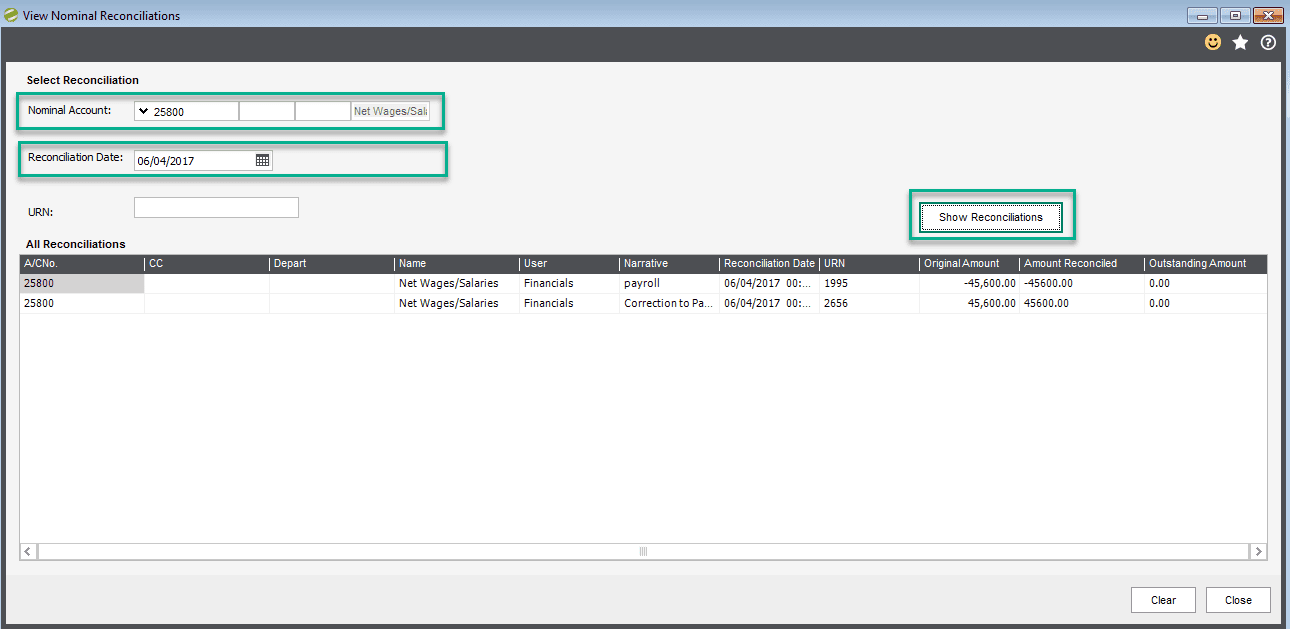
View Nominal Reconciliation
Use this option to View only previous reconciled transactions, you can select by nominal account and then either by ‘Date’ or ‘Urn’ , or simply by Nominal Account and it would show.
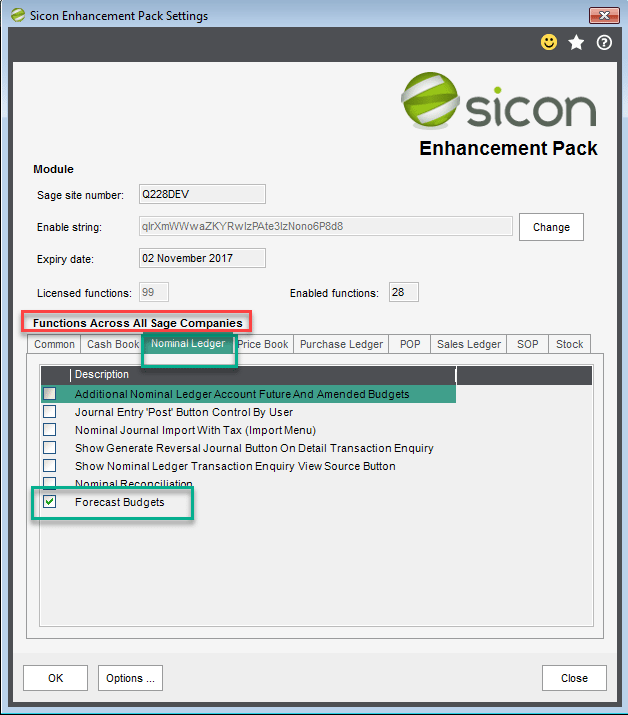
4.7. NL008: Forecast Budgets (Budget This Year)
Is a simple method, for reporting , whereby companies can enter forecast (s) of how you expect the budget to be (Manually being added against an account where annual budget exist) , or by importing.
Once added, details are recorded within a new Sicon table called SiNLForecastBudget.
This feature was written specifically for a customer who wanted to record what they thought their budget figures will be, which in turn enabled their business partner to write a custom report . (there are no reports within the package as standard).
Without this feature enable the screen for budgets are as below (Noting the screen shot below does have an extra column that sage does not have standard, that being cash budget which is showing because we have Sicon Cash flow enabled – please refer to the Sicon Cash Flow Manager Help and User Guide.
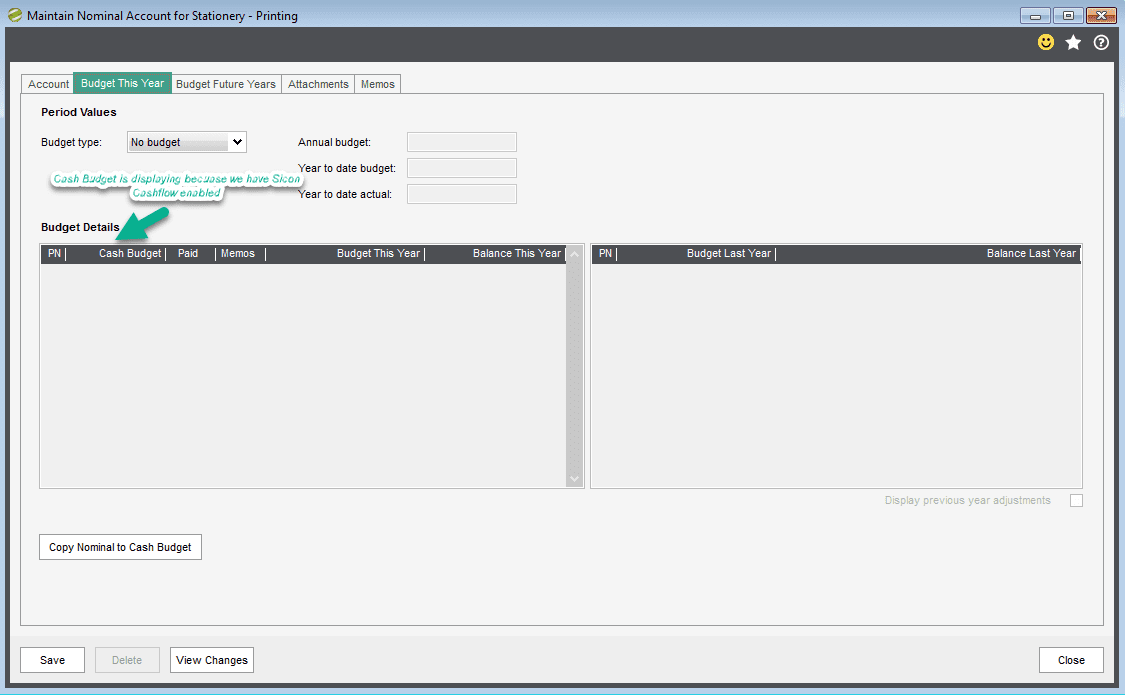
When the feature is enabled within Sicon Enhancement Pack settings, then an additional column is shown / available for data entry on the ‘Budget This Year’ tab.
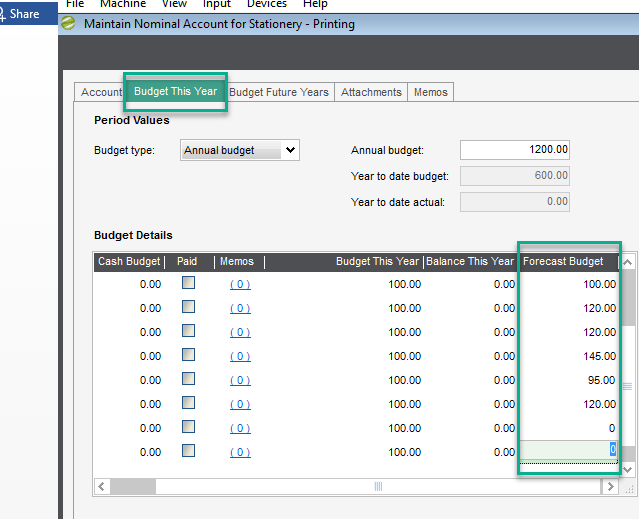
As mentioned previously , there is no standard report within the module , but the data is stored in the table SiNLForecastBudget.
5. Price Book
This section includes enhancements that are specific to the Sage Price Book module.
5.1. PB001: Price Bands by Customer Delivery Address Location
This function allows customer delivery locations to be linked to different price bands or customer discount groups. When a sales order is entered, selling prices will be calculated using the price band (or discount group) associated with the sales order customer delivery address.
The function uses the following Sage sales order (header) ‘spare’ fields.
It should NOT be enabled where other/third-party bespoke functions may also be using these fields.
- SOPOrderReturn.SpareNumber1 Used to store the price band ID associated with this order/return.
- SOPOrderReturn.SpareNumber2 Used to store the discount group ID associated with this order/return.
Price band and/or customer discount groups must be setup for each customer delivery address.
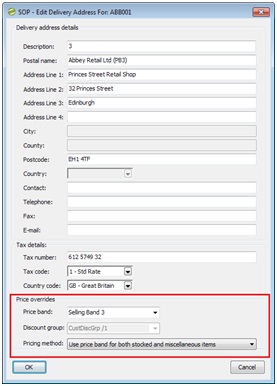
Various pricing methods can be setup for each delivery address, although usually all customer delivery locations will be setup with the same pricing method selected. Using these options, it is possible to specify if selling prices are calculated using the selected price band or discount group for both stocked and miscellaneous stock items.
- Do not override prices for this customer delivery address
- Use price band for both stocked and miscellaneous items
- Use discount group for both stocked and miscellaneous items
- Use discount group for stock items, price band for miscellaneous items
When a sales order (or return) is entered or amended, the customer location override price band and discount group is shown below the delivery address details. These may be amended for the specific order if necessary however, changes made at this point will not affect the defaults selected for the customer delivery address.
If the delivery address Pricing method does not require the use of price band or discount group, these selections will not be available. As stock items are added, the system will automatically calculate unit selling prices based on the price band or discount group shown.
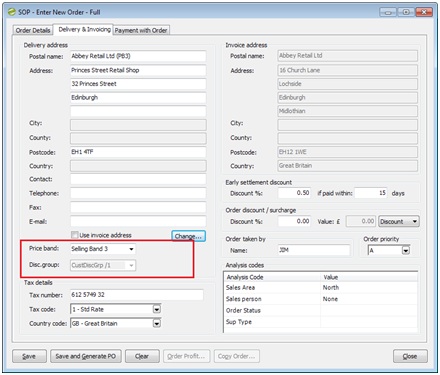
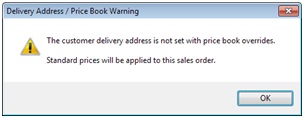
If a customer delivery address is manually entered (or amended), the system may not be able to link this to any delivery location associated with the customer. Should this occur, a warning message will be displayed as each stock item is entered or amended.
NB: Selling prices are calculated as each stock item is added to the order (or return). If the price band or discount group is changed after items have been added, selling prices will not re-calculated for these items. However, amending the quantity on any sales order/return line will result in the selling unit price being re-calculated for that item.
5.2. PB002: Update Prices and Discounts by Percentage
This function allows Price Band (selling) prices and discount prices to be updated by a percentage via two new screens, which are accessed from the Sicon Enhancement Pack, Price Book menu.
Update Prices By Percentage
Select a price band and (optionally) a product group to filter the list of stock item prices to be updated.
When the percentage increase is entered and the List Items button clicked, stock item current prices and new prices will be displayed in the list.
When the Update button is clicked, new prices will be applied to the price book.
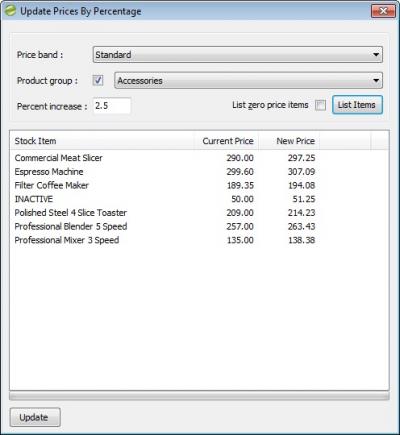
If the List zero price items box is ticked, the list will include any stock items that currently have a zero price, however no price changes will be applied to these items.
Update Discounts By Percentage
This screen is used to update discount group prices by a selected percentage.
Discount group prices can be updated for a selected stock item or for all stock items in a selected product group.
A list of stock items, discount group names and current/new prices will be listed on-screen before increased prices are applied.
5.3. PB003: Multiple Price Bands per Customer Account
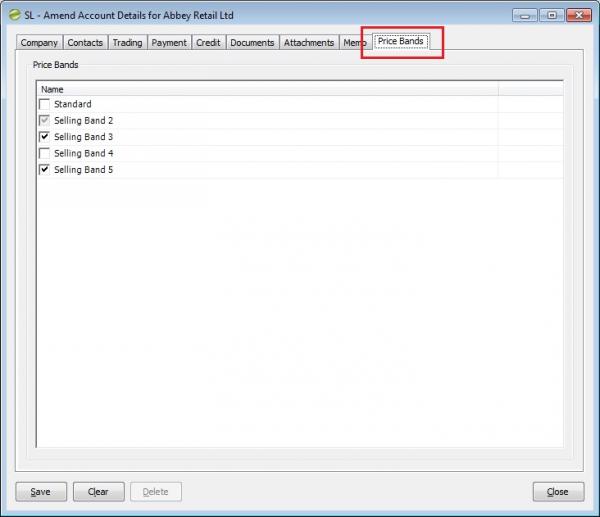
This function allows configuration of multiple selling price bands for each customer account.Customer related price bands may be maintained via the new Price Bands tab on the sales ledger customer account maintenance screens.The default customer price band cannot be de-selected.
When adding stock items to a sales order, the user may right-click on the unit price box to select the price band applicable to this item.
The unit price will be automatically calculated based on the stock item and selected price band.
If the price stored against an item does not match any of the prices currently configured for any price band, this will be indicated by the Manual selection in the pop-up selection menu.
Price bands may also be selected when amending an existing sales order item.

5.4. PB004: Maintain Customer Special Discounts
This function allows users to update customer stock item discounts via a single maintenance screen. This module follows the structure of Price Book, with regards to discount names, customer discount groups (if used) etc. So, an understanding of Price Book is required in order to make the most of this module.
From version 22.1, it can work with the Sage setting of Use Customer Discount Groups either being enabled or disabled.
The maintenance screen is accessed via the Sicon Enhancement Pack/Price Book menu.
The filter options at the top of the screen will determine the customer and stock item discounts maintained in the list/grid below. Once you have set your filters (or left empty to display all discounts), click Filter Results to populate the screen.
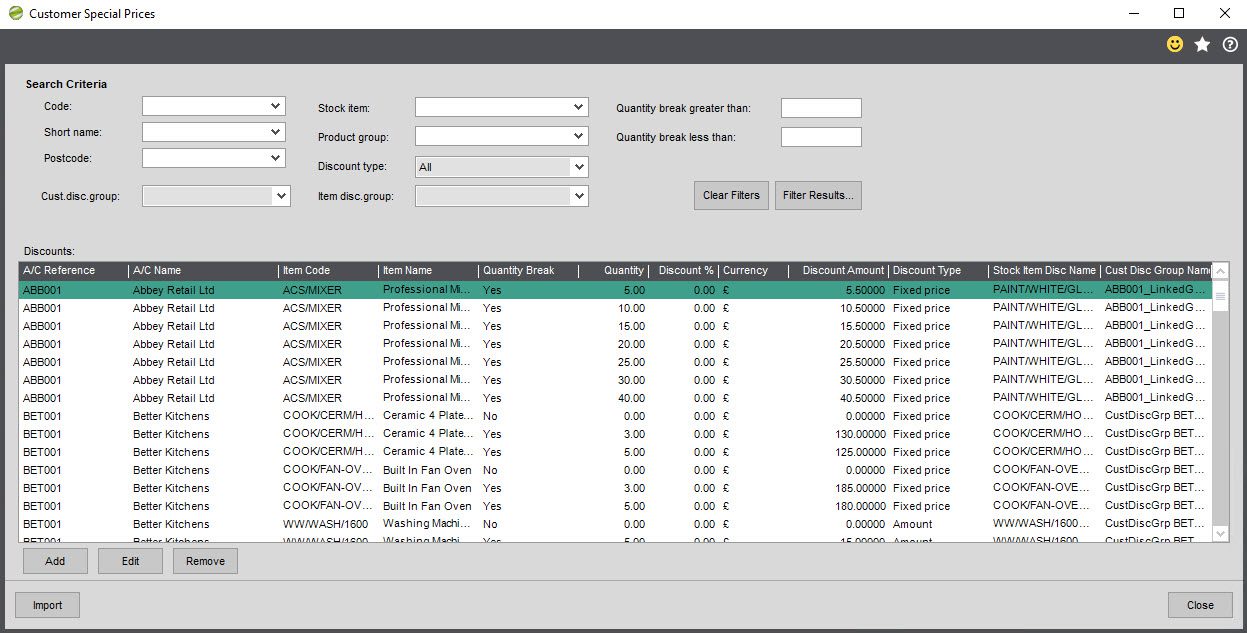
Changes can either be made via highlighting entries in the screen and then clicking the Edit button, or by Importing changes over the top of existing entries. You can also add new discounts using the Add button or also within the Import.
The following entries can be amended for each customer and stock item listed (bear in mind that if using Customer Discount Groups, then any amendments or new discounts will apply to all accounts within that Discount Group):
- Quantity: This represents the quantity break that the discount is applied.
- Discount %: If the discount type is Percentage, this value will be used to represent the discount. NB: This will be applied to all rows that represent the same stock item discount break in the discount group.
- Discount Amount: If the discount type is Amount or Fixed Price then this value will be used to represent the discount. NB: This will be applied to all rows that represent the same stock item discount break in the discount group.
- Discount Type: Selected from the following (drop-down) options: Percentage, Amount or Fixed Price. NB: This will be applied to all rows for the represented stock item.
The Add button may be used to add special prices for selected stock items and customer discount groups.
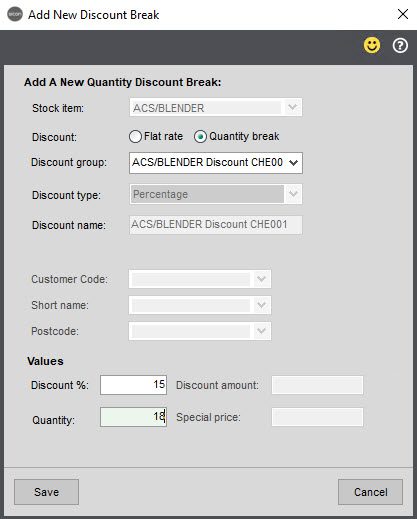
In the example above, we are using Customer Discount Groups, so the discount has been assigned to the discount name called ACS/BLENDER Discount CHE001 and the group called CustDiscGrp CHE001 (where the other quantity break discounts for this item and discount name existed). If we were not using Customer Discount Groups, then the Customer Code would activate and you would be able to select the relevant customer account for the discount instead.
The Remove button may be used to delete existing selected discount breaks.
A .csv (Microsoft Excel) spreadsheet detailing the listed customer/stock item discounts can be created by right clicking in the results and then choose the Export > All to Excel option. The export will be in the correct format for easy editing and reimporting.
The Import button can be used to update discounts without exporting first if you want to manually populate the import file. In this case, an example import file is available via that button on the Import Customer Discounts screen. This will open two files in Excel, Book1 is an example of the import file ready for updating and saving as a CSV file to be ready for importing, while Book2 goes into a bit more detail about the columns.
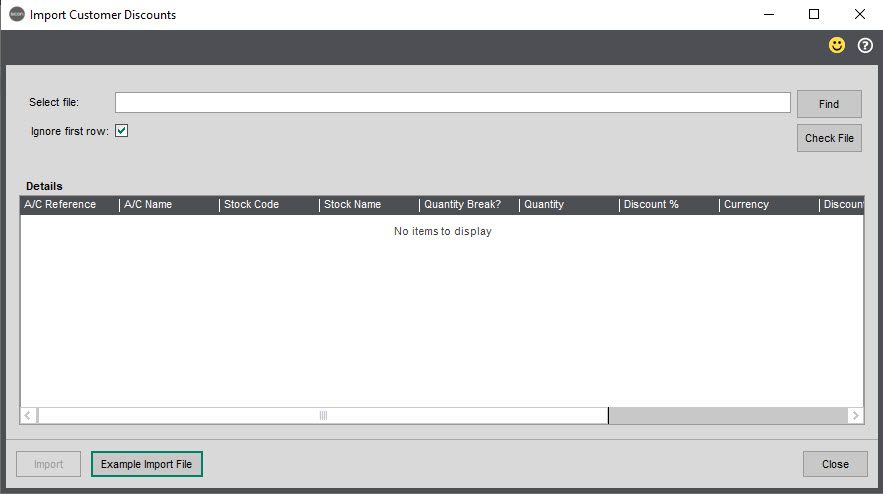
Once the import file is ready as a CSV file, select it via the Find button, and then click Check File. Once is has passed this validation, then the Import button will become available. Only entries in the file will be updated as a result of this import.
5.5. PB005: Price Book Import/Export
This module allows stock item selling prices to be export from the Sage Price Book to a .csv file and then re-imported following manual adjustment in Microsoft Excel or similar. Both import and export routines use the same file format.
Import (and Export) File Format
Price book import files must contain columns in the following sequence;
- Sage stock code
- Stock name/description (option, not used by the import process)
- Customer code or price band name (depending on which menu option is selected)
- Standard price
- Customer price
If the customer price varies from the standard price the price book ‘use standard’ flag will automatically be set ‘off’.
Example by customer code:
ACS/TOASTER,Toaster,GRE001,12.33,121.89
Example by price band name:
ACS/TOASTER,Toaster,Selling Band 2,215.50000,215.50002
ACS/TOASTER,Toaster,Selling Band 3,215.50000,215.50003
ACS/TOASTER,Toaster,Selling Band 4,260.00000,215.50004
Example for ‘standard’ price band name:
ACS/TOASTER,Toaster,Standard,209.00000,123.45678
Sample/template .csv files are provided with the installation components of this module.
Import Prices by Customer (or Price Band)
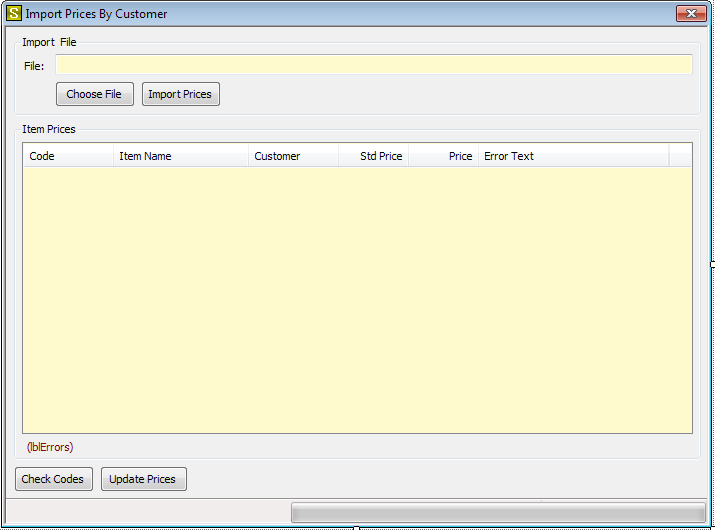
- The Choose File button is used to prompt for selection of a import .csv file.
- When the Import Prices button is pressed details are imported from the chosen file to the item prices list below.
- The Check Codes button must be used to validate stock item, customer and price book codes.
- When codes have been successfully validated the Update Prices button may be pressed to update the Price Book.
The import process will not be allowed to progress if validation errors are found at any stage.
6. Purchase Ledger
This section includes enhancements that are specific to the Sage Purchase Ledger module.
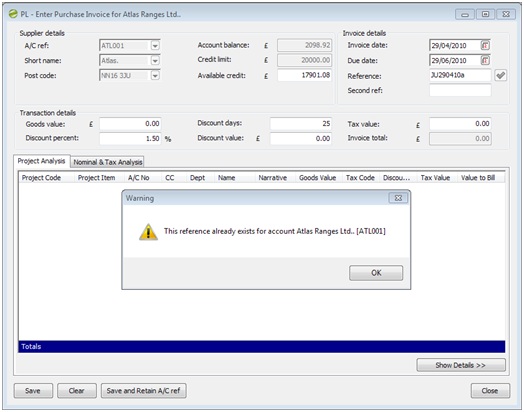
6.1. PL001: Purchase Transaction Reference Duplicate Warning
When entering a purchase invoice or credit note, the system will automatically check to see if the transaction reference exists for the selected supplier. If a transaction with this reference exists, a warning message will be displayed as shown below.
Configuration Settings
(see Settings, Function Advanced Options)
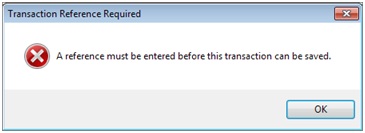
When this function is activated, if the PLDuplicateCheckAllowBlankReference value on the options screen is set to No, an error message will be displayed if the reference field is left blank when entering a purchase invoice or credit note.
6.2. PL002: Purchase Invoice Authorisee (Initials) Drop-Down (see Options)
When entering a purchase invoice, the user may select the Authorisee Code of the person responsible for authorising the invoice. The selected authorisee code is automatically stored on the invoice in the Query Flag .
NB: the invoice cannot be processed through the Purchase Ledger module until this flag is removed via the standard Sage purchase ledger enquiry screen.
The list of user authorisee codes may be maintained via the Sicon Add-ons, Purchase Ledger, User Authorisee Code Maintenance menu option as shown below.


NB: authorisee codes must be no longer than one character in length.
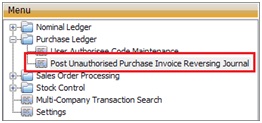
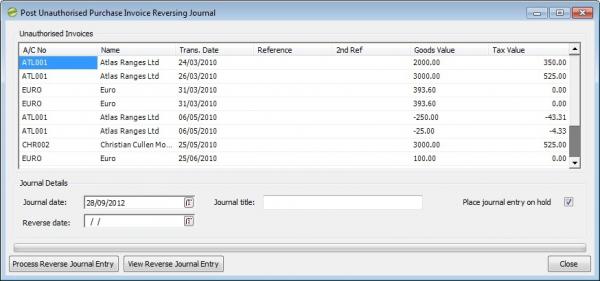
6.3. PL003: Unauthorised Invoice Reversing Journal
This function generates a nominal ledger self-reversing journal for all postings related to ‘unauthorised’ purchase ledger invoices.
A journal reversal date and title must be entered.
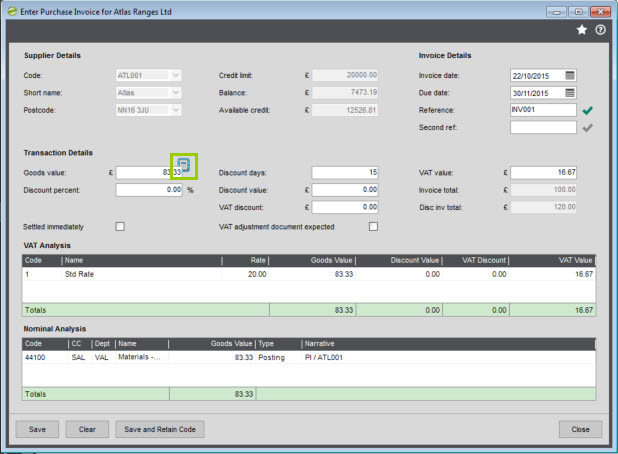
6.4. PL004: Purchase Invoice/Credit Note Tax Inclusive Calculator
When entering a purchase invoice or credit note, this function adds a calculator icon next to the Goods Value field to calculate the VAT from a gross amount. If you click this calculator, then it will recalculate the Goods value and VAT value to split out the VAT amount.
6.5. PL005: Reprint Remittance Advice from Transaction Enquiry (see Options)
This function adds a Reprint Remittance button to the Purchase Ledger Transaction Enquiry screen.
When a ‘payment’ transaction is selected, the button may be used to reprint the related remittance document.
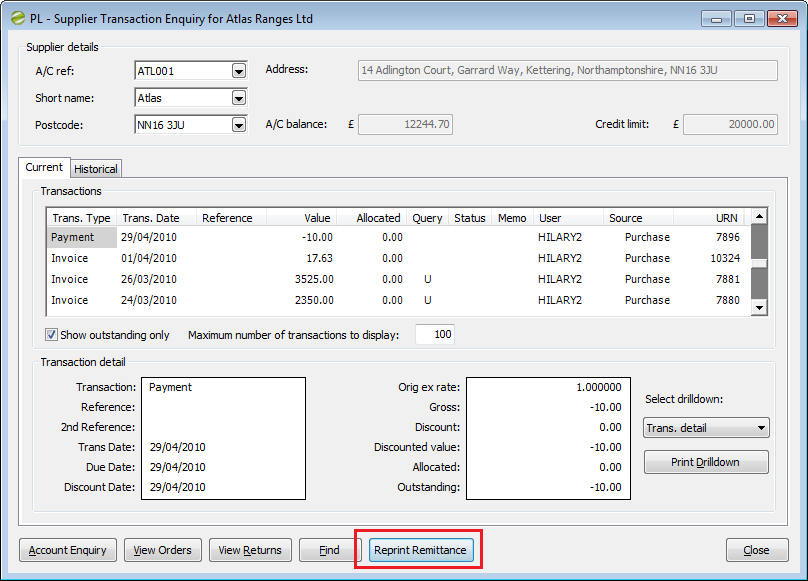
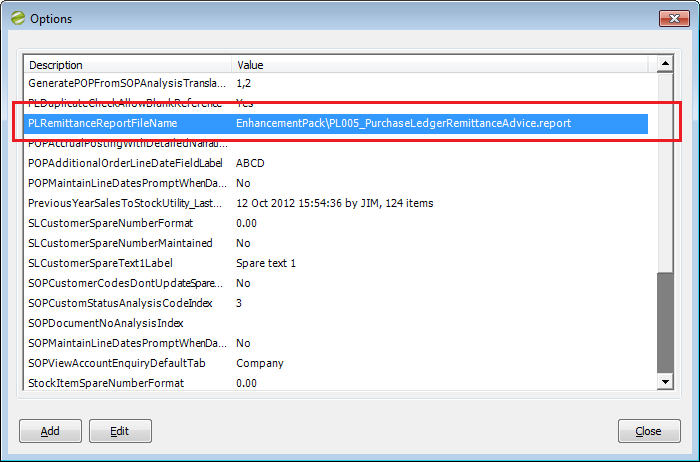
The setting/option PLRemittanceReportFileName can be amended if a customer specific version of the Remittance Advice Report is required. However, any customer specific report/layout must be based on the default/template report provided, as this function expects certain criteria to be enabled.
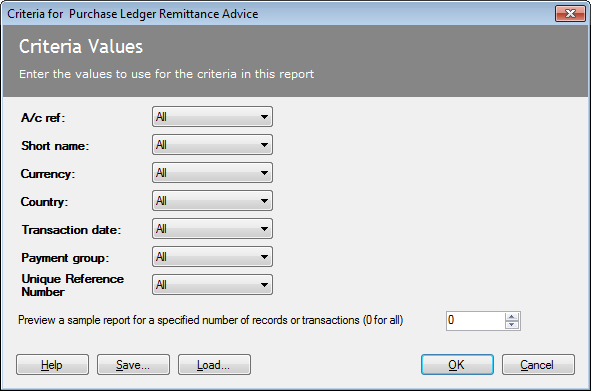
It is also possible to manually generate the reprint report from the Sicon Enhancement Pack, Purchase Ledger menu.

This menu/feature is linked to the default/template report provided as part of the standard package. If a customer specific report is created, a new feature/menu must be created to call the custom version.
6.6. PL006: Import Supplier Contact Details (Import Menu)
This function allows import of Purchase Ledger supplier account contact telephone numbers, email addresses, etc. It is accessed via the Sicon Enhancement Pack, Import menu.
If a contact already exists matching the first and last names, the contact’s details will be updated.
If no existing contact matches the first and last name a new contact will be added to the supplier.
The user will be required to select an import .csv file, which must have columns formatted in the following sequence:
- Supplier account reference (must already exist in Sage)
- Contact first name
- Contact last name
- Contact type (0 to 3 or 5, see below)
- Contact value (e.g. new phone number, e-mail address, etc.)
- Default flag/indicator (Y = Yes, N = No)
A sample/template .csv files is provided with the module installation components and you can download this directly from the product.
NB: please be aware that any old templates that you may still have will no longer work, they have to be generated using the Example Import File button within the Sicon Enhancement Pack product.
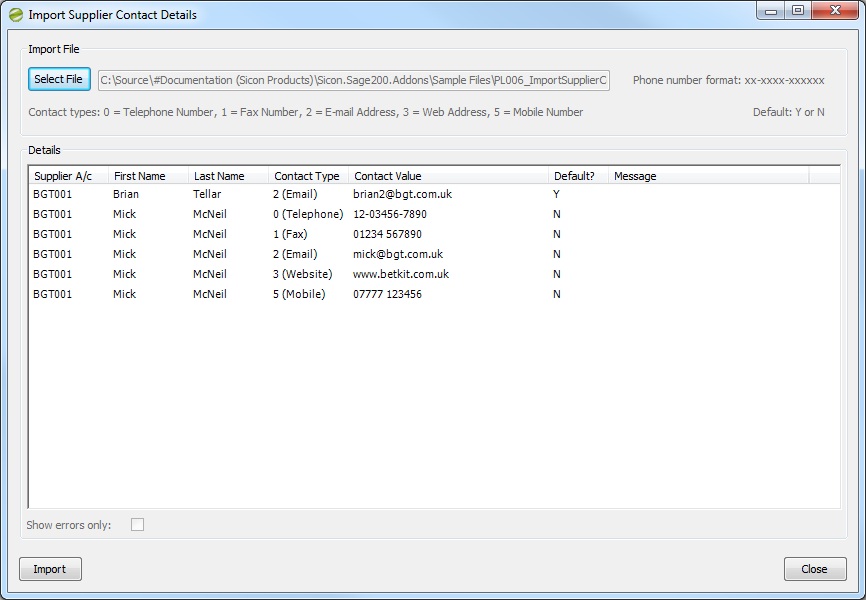
Contact Types
- 0 = Telephone number
- 1 = Fax number
- 2 = E-mail address
- 3 = Website address
- 5 = Mobile number
Telephone and Fax Numbers
Where numbers include country or area codes these should be split using space or ‘-’ characters.
For example:
- Telephone number 01-2345-678900 would be stored against the contact as;
- Country code 01, Area code 2345, Subscriber/phone number 678900
- Telephone/fax number 01234 567890 would be stored against the contact as;
- Area code 01234, Subscriber/phone number 567890
Default Flag
If this column value is set to Y this contact will be set as the account Default.
It is not possible to simply deselect an existing default contact by setting the value in this column to N as Sage requires a default contact to be set at all times. The only way to deselect an existing default contact is to include a new/existing contact in the import file, and select by setting the column value to Y.
6.7. PL007: Display Analysis codes on Invoices & Credits entry screens
This is a feature for reporting purposes only, whereby customers or BP’s could create custom Sage 200 report designer reports reporting using the Sicon Table SiPLTransactionDetail, and the fields AnalysisCode1 to AnalysisCode10
Step one would be to, from within the enhancement pack menu, the purchase ledger sub menu, create the required analysis codes (as standard sage functionality)
In our example we created a ‘drop-down list’ and created selections of either Overhead Bill or Utility Bill:
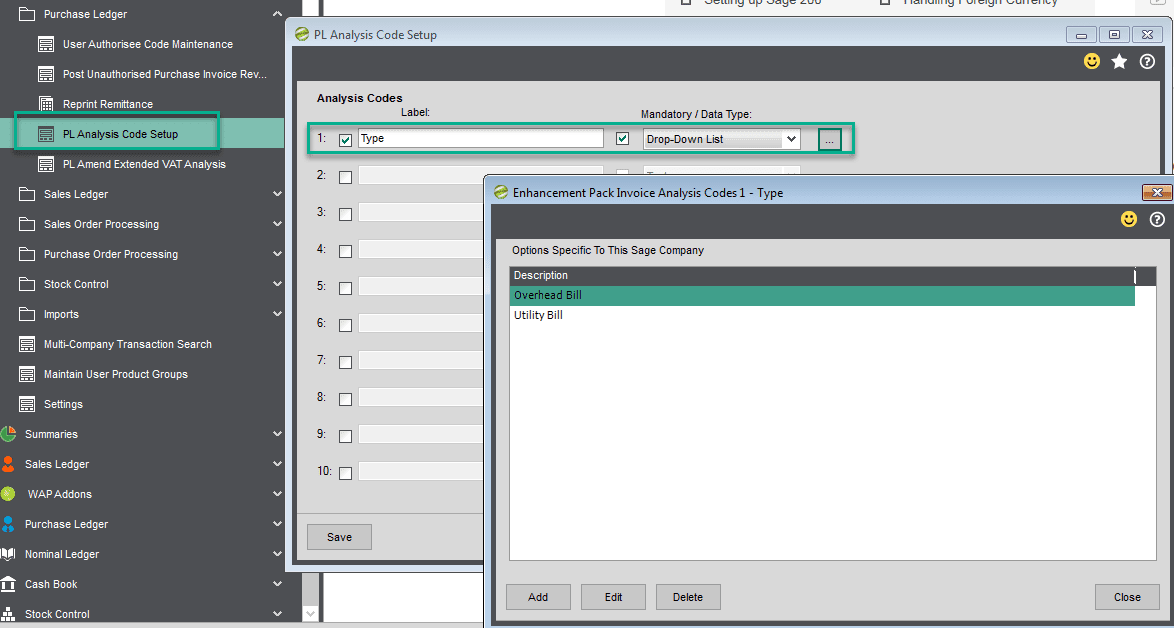
Other options, are :- Free text ; a numeric value ; a date field or a tick on / off field.
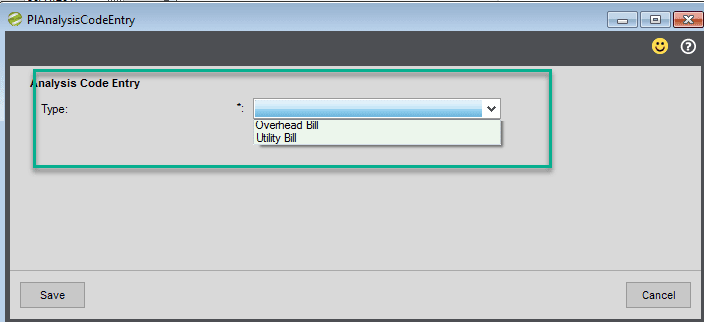
Once analysis codes are created as above when adding an invoice and/or credit note an extra analysis code button appears at the bottom of the screen:
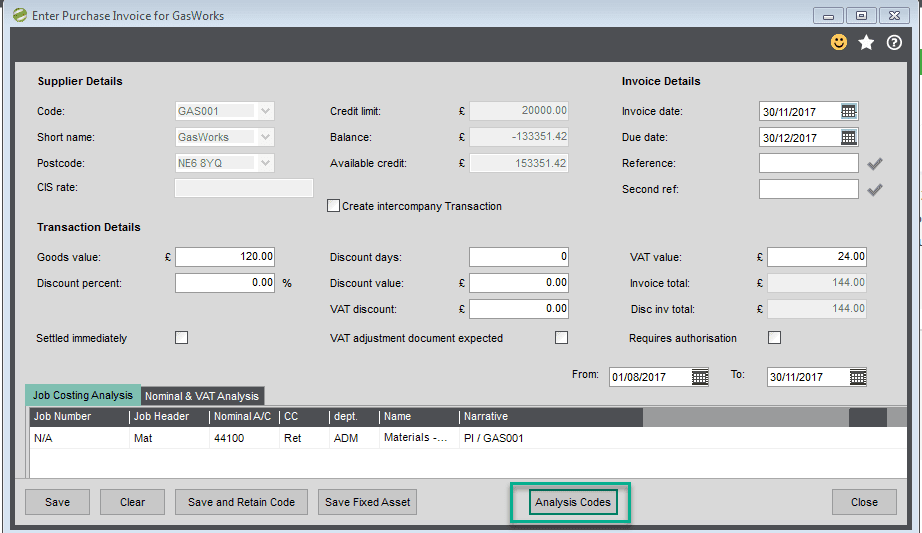
Users can then select or enter as required, the use of this feature is not mandatory, so users will need to know this feature has been enabled and it needs to be used.
In our example screen shot below it is configured as a drop down selection.
When the transaction is saved the details within these fields are recorded within the Sicon Table SiPLTransactionDetail, and the fields InvoiceDateFrom InvoiceDateTo.
Reminder that this is a feature for reporting purposes only, whereby customers or BP’s could create custom Sage 200 report designer reports.
6.8. PL008 – Invoice to and From Dates
On Purchase Invoice and Credit Note Entry Screens.
This is a feature for reporting purposes only, whereby customers or BP’s could create custom Sage 200 report designer reports reporting using the Sicon Table SiPLTransactionDetail, and the fields InvoiceDateFrom InvoiceDateTo
Customers would then look to use such a custom report to report the period of services for example that an invoice covers.
An example would be electricity or phone bill comes in, which is for the Qtr 01/08/2017 to 30/11/2017, and a company wishes to report on this, for invoices added.
Step 1 would be to enable this feature on the purchase ledger tab within enhancement pack settings.
Thereafter when adding invoices and/or credits two additional date fields are visible (Non mandatory).
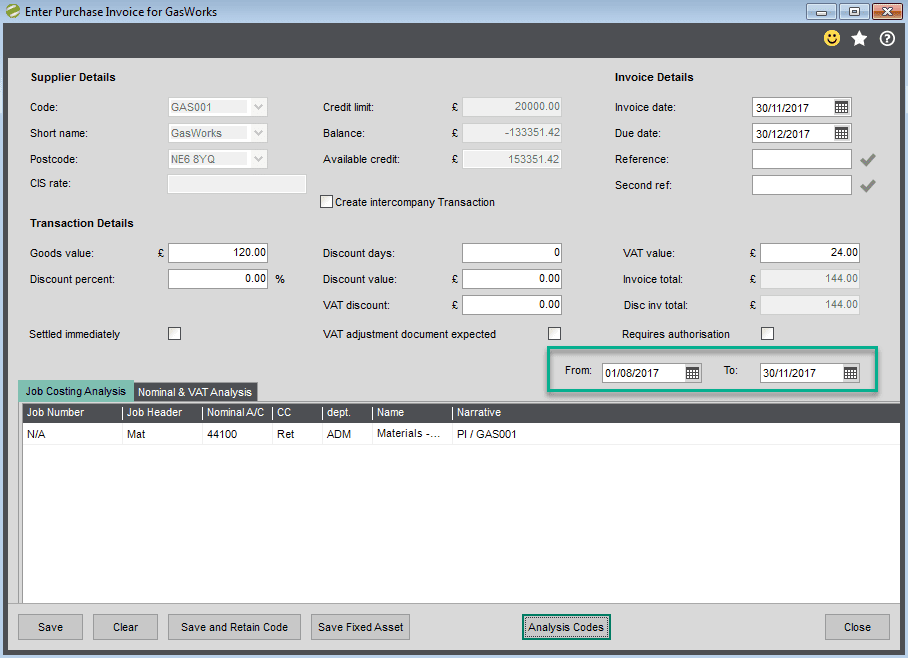
When the transaction is saved the details within these fields are recorded within the Sicon Table SiPLTransactionDetail, and the fields InvoiceDateFrom InvoiceDateTo.
Reminder that this is a feature for reporting purposes only, whereby customers or BP’s could create custom Sage 200 report designer reports reporting using.
6.9. PL010 - Disputed Invoices
This feature takes the existing Disputed Invoice Processing functionality in Sage 200, and displays it onto its own tab in the Supplier Transaction Enquiry screen. You can also add a dispute to an already posted transaction via this screen. This makes it easier to ensure sufficient notes are recorded against a disputed transaction, and also gives improved visibility of this information.
The data displayed on this tab is all held in the standard Sage POPInvCredDispute table, there are no new Sicon tables or fields used by this feature.
N.B. that this feature requires exclusive use of the value ‘D’ in the query code column, so with it enabled you will not be able to use/clear this value manually. Before enabling this feature, it is recommended that you go through existing Purchase Ledger transactions with a query code value of ‘D’ and change them to a different value. The Transaction Listing (Current) report within Purchase Ledger/Reports/Account Analysis enables you to search for all transactions with this query code value.
Transactions that have not yet been posted into Sage but have been marked as disputed during the Purchase Order Processing Record Purchase Invoice step can be viewed on the Disputed Invoice/Credits tab. In addition, if you click the Dispute button at the bottom of the transaction enquiry screen, then you can flag an existing transaction as being disputed and it will also appear on this tab. If you do this, then the invoice will automatically be updated with a ‘D’ as the entry in the Query column, which will then automatically exclude it from the Sage Payment Processing routine.
The Dispute Codes displayed are the standard Sage ones, which are maintained via the Purchase Order Processing/POP Maintenance/Disputed Invoice Codes screen (requires disputed invoice processing to be enabled in POP Settings). When flagging an invoice as being under dispute, you are also prompted to enter a comment, and this is then displayed on this tab. With this feature enabled, this comment is mandatory.
Alternatively, you can use the Disputed Invoices Codes screen within the Sicon Enhancement Pack/Purchase Ledger menu. This screen enables you to maintain the dispute codes in the same way as the standard Sage POP screen, but also in here you can specify whether comments are mandatory for any particular codes. This also enables you to use this functionality without having Use disputed invoice processing enabled within Sage POP Settings.
From the image above, the first entry is for a posted transaction that has had the Dispute button clicked against it, while the second entry is for a Record Purchase Invoice transaction against a purchase order where the Dispute button has been clicked before the invoice was posted. Note that the purchase order number is visible, and there isn’t yet an invoice reference or due date.
Clearing a dispute for a posted transaction can be done via highlighting the transaction, then using the Dispute button again. This will remove the query code of ‘D’ from this transaction and from the Disputed Invoice/Credits tab.
If the transaction has not been posted, then you should use the Disputed Invoices screen within Purchase Order Processing to clear the dispute where you can select from the standard Sage options: Accept & Post, Edit Matched Invoice, Resolve with Credit etc.
7. Purchase Order Processing
This section includes enhancements that are specific to the Sage Purchase Order Processing (POP) module.
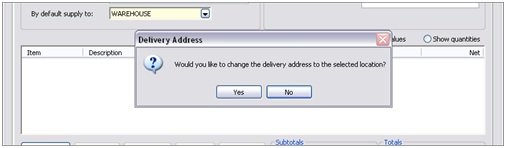
7.1. POP001: Allow Purchase Order Delivery Address Amendment
When entering or amending a purchase order (or return), this function allows the delivery address to be manually amended.
The … button can be used to select the address of any warehouse address, customer account address or sales order/return delivery address. NB: Selection of customer and sales order/return is only available in v2011.0.9 and later.This screen allows selection of the current address stored against any of these items. The purchase delivery address will not be automatically updated if the selected warehouse, customer or sales order/return address is later amended.
If a By default supply to location is selected, the delivery address will automatically be set to the selected location address.If an existing delivery address has been selected/entered the user will be prompted to confirm if the delivery address should be updated.
7.2. POP002: Purchase Order Stock Items Filter by Supplier
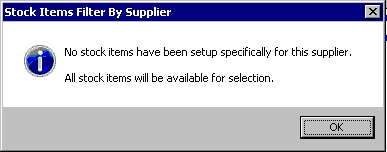
When adding a new line to a purchase order, only stock items associated with the selected supplier (on the stock item maintenance ‘suppliers’ tab) will be available for selection in the drop down list.
If a purchase order is entered for a supplier with no stock items configured, an informational message will be shown and all stock items will be available for selection.
7.3. POP003: Allow Multiple Supplier Addresses for Purchase Order
When entering or amending a purchase order, the supplier address can be selected from a list of supplier addresses with the facility to add/edit addresses as required.
When the ‘Change’ button is clicked the supplier delivery address/maintenance screen is displayed.
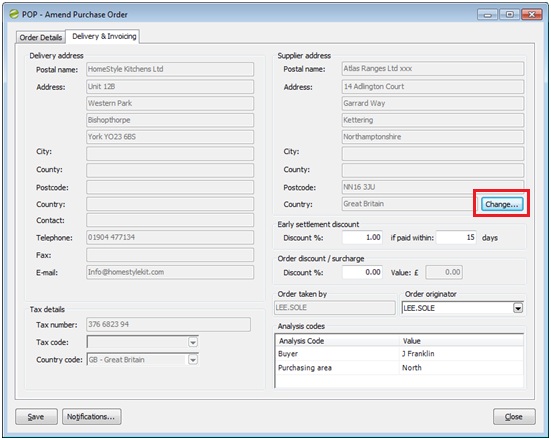
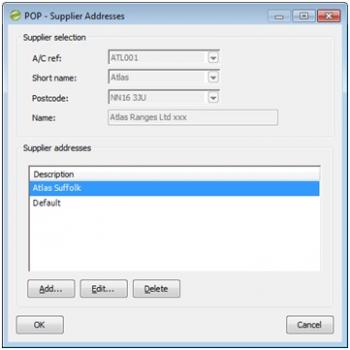
The user may Add or Edit addresses as required.It is not possible to Delete addresses that are referenced by existing purchase orders.
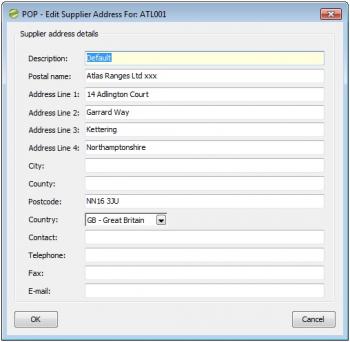
NB: For reporting purposes, supplier addresses are stored in the SiSupplierAddress and SiPOPSupplerAddress database tables.
7.4. POP004: Accrual Posting with Detailed Order/Return Narratives
When generating POP accruals, this function posts individual nominal journal transactions for each purchase order/return line, which include the POP document number, supplier code and line description.A tick box is included on the Purchase Order and Return Accruals screen, which when checked disables entry of narratives, instead posting with narratives related to each purchase order/return line.
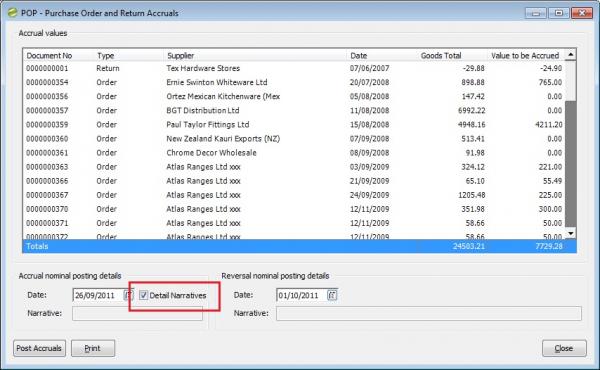
As a default, each narrative will be generated in the following format:
- Document No (space) Supplier Code (space) POP Line Description (truncated as required).
- The maximum allowable length of the nominal transaction narrative is 30 characters, therefore the POP line description will be truncated in most circumstances.[/checklist]
Configuration Options
It is possible to configure the format of accrual narratives using the configuration option named POPAccrualPostingWithDetailedNarrativeFormat.
When configuring this option the following ‘mask strings’ should be used:
- dddddddddd is used to define the position and length of the document number in the narrative.
- ssssss is used to define the position and length of the supplier code in the narrative.
- nnnnnnnnnnnnnn is used to define the position and length of the line description in the narrative.
Using a mask string that contains less characters than the expected data field will result in truncation. Document number will be truncated from the left, supplier code and narrative will be truncated from the right.
For example, entering a six character mask string for the document number (i.e. ‘dddddd’) will result in a narrative for purchase order number ’0000012345′ including the document number ’012345′.
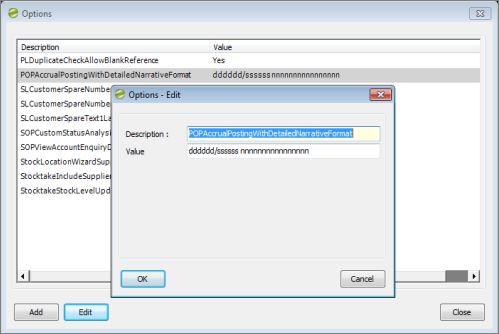
Spaces and other characters may be used between each mask strings if required.
Use of the characters ‘d’, ‘s’ and ‘n’ between mask strings may result in unpredictable results.
7.5. POP005: Show Purchase Order Line Stock Item History Button
This feature adds a new button within a purchase order line that shows the purchase order history of that item from the same supplier.
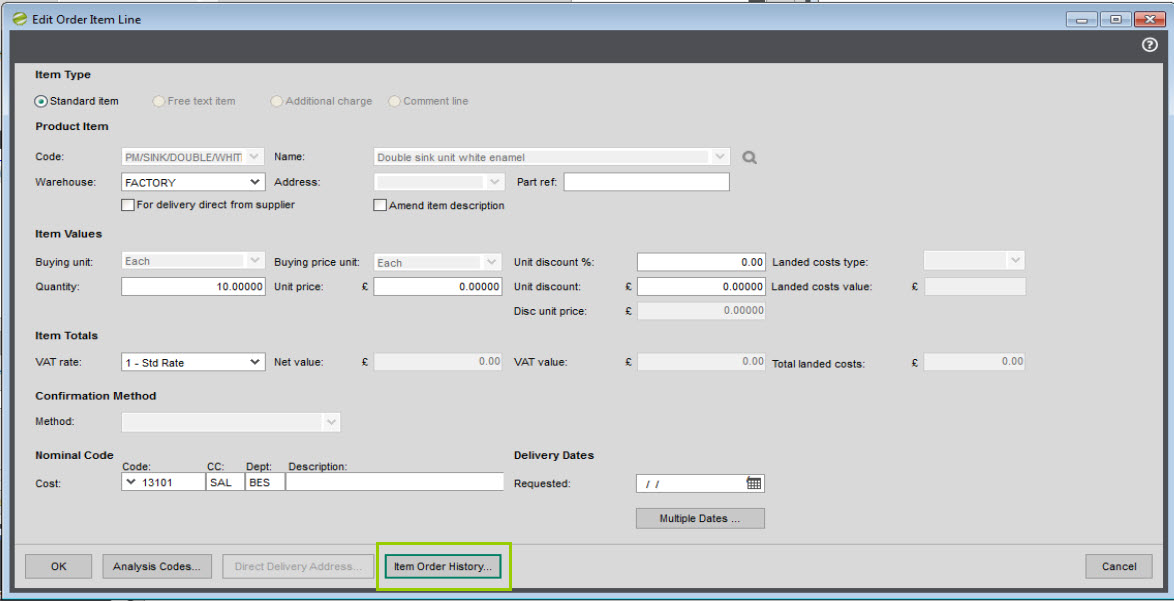
When clicking the Item Order History, you will be presented with the following screen that lists previous purchase orders for the same item from the same supplier.

You can use the View Order button to open the View Purchase Order screen for the selected order.
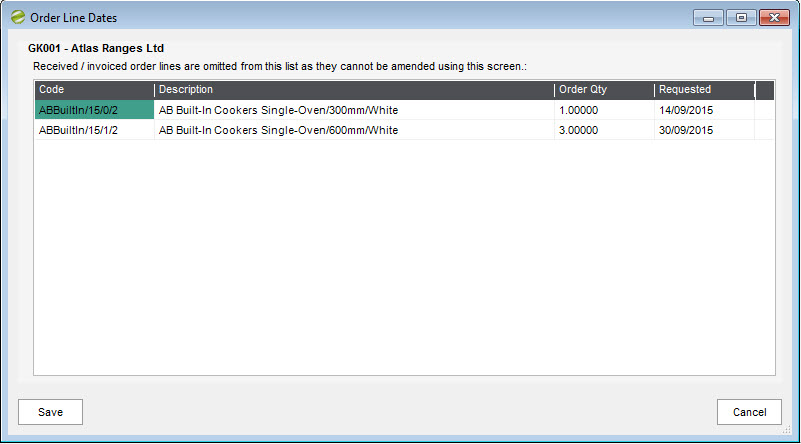
7.6. POP006: Maintain Purchase Order Line Dates on Single Screen
This feature adds an additional button to the purchase order entry/amendment screens, which can be used to maintain requested delivery dates associated with all of the order lines on single screen.
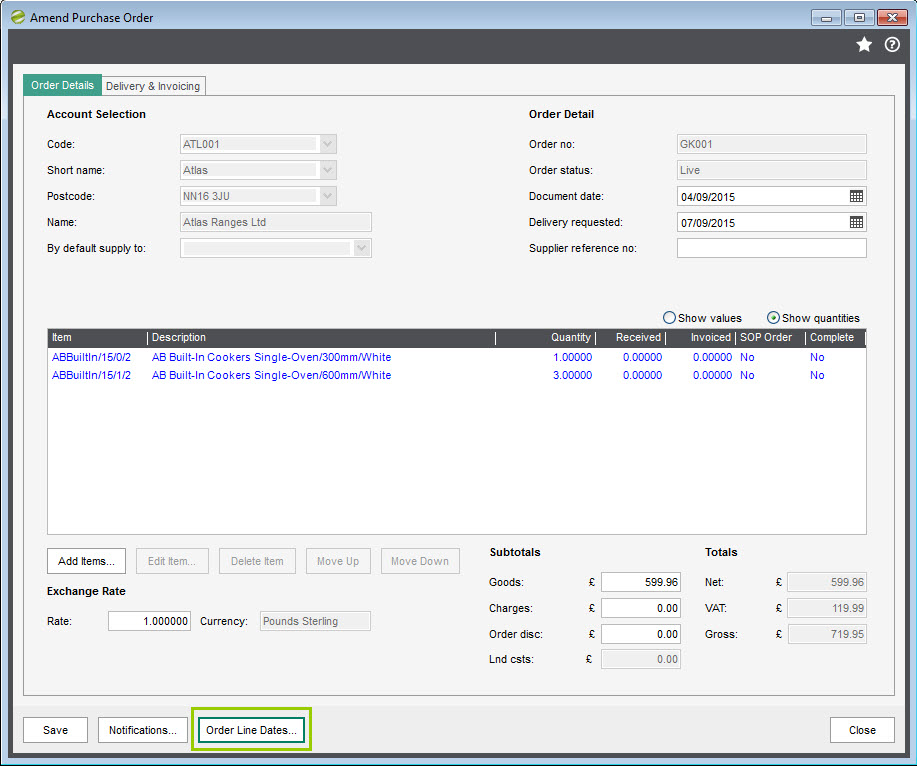
Any order lines which have been fully received will not be shown on this screen as the requested date cannot be changed once receipt is confirmed. This is a standard restriction of Sage 200.
7.7. POP007: Copy Purchase Order to a Purchase Return
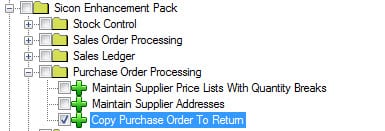
This function can be used to automatically generate a purchase return based on the details of a selected purchase order. You can search for the relevant purchase order using the selection criteria fields at the top of the window, and then use the Create Purchase Return button at the bottom to create a return based on the order highlighted.
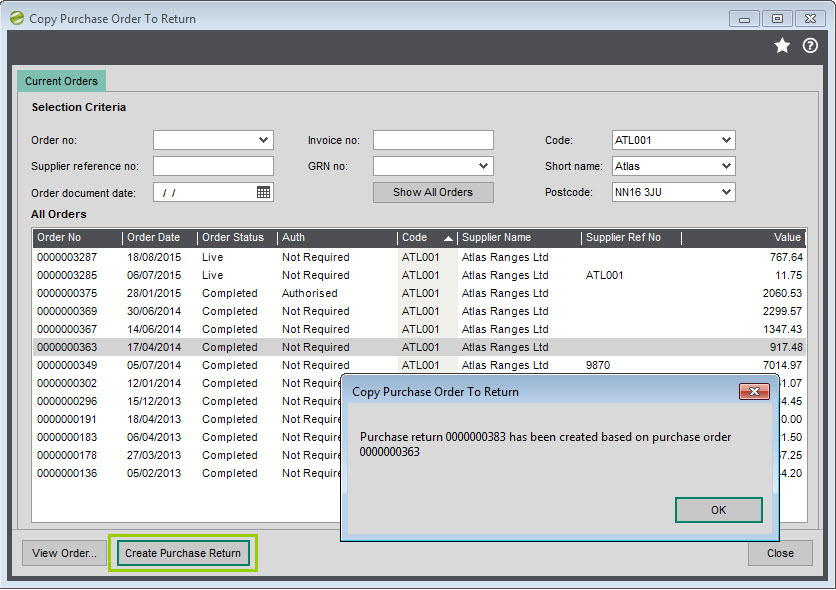
Sage users/roles must be authorised to use this feature via the Sicon Add-ons, Purchase Order Processing features group shown within Sage System Administrator. User menus may be edited using standard Sage functionality to move this item if required.
NB: This function is not linked to the Sicon Job Costing module, therefore job numbers will not be replicated between purchase orders and returns.
7.8. POP008: Supplier Price Lists with Quantity Breaks
This function allows supplier buying prices to be setup against each stock item based on multiple quantity breaks.Buying prices may be imported or maintained via the Sicon Add-ons, Purchase Order Processing, Maintain Supplier Price Lists With Quantity Breaks menu option. This feature must be enabled for each user/role via Sage System Administrator. User menus may be edited using standard Sage functionality to move this item if required.
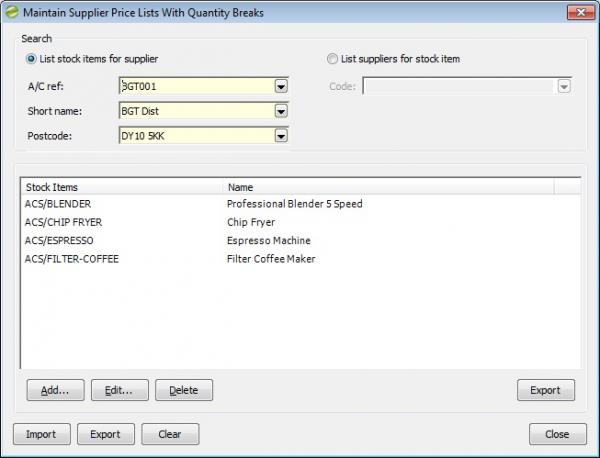
The search options at the top of the screen may be used to filter items by selected supplier or stock item. Once a supplier or stock item is selected, all items with existing buying prices set will be displayed in the list below.
The Add and Edit buttons may be used to enter buying prices for new supplier/stock item combinations or amend buying prices for existing items (see Maintenance below).
The Delete button may be used to remove all buying prices for the selected supplier and stock item.
The upper Export button may be used to generate a .csv file of existing supplier/stock item buying prices currently stored against the items shown in the list.
The lower Export button may be used to generate a .csv file of all supplier/stock item buying prices currency stored in the Sage system.
The Import button may be used to import buying prices from a .csv file. The import file must be formatted with columns in the same sequence as that generated by the export functions (see Import below).
The Clear button may be used to reset supplier and stock item selections. The list will also be cleared.
Add/Edit Buying Prices
When the Add or Edit buttons are used the buying price maintenance screen is displayed.
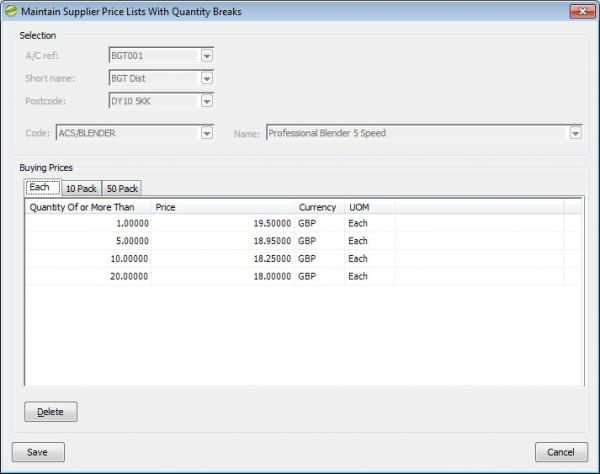
Buying prices may be entered or amended against each of the units of measure setup for the selected stock item. Individual buying prices may be removed using the Delete button. The Save button must be pressed to store the new values.
Import Buying Prices
When importing buying prices the user will be prompted to select an import (.csv) file before a screen is shown displaying the import file details along with any errors.
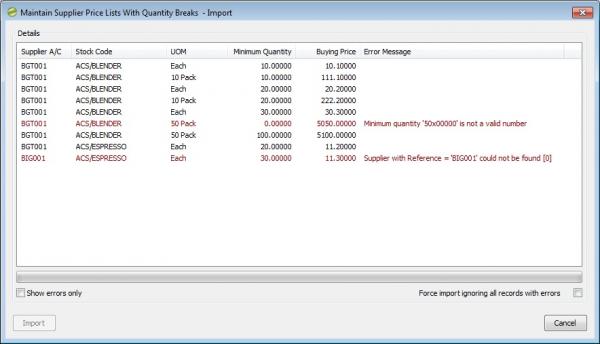
If errors are found, the import file should be corrected before being re-selected for import.
The Force import ignoring all records with errors box may be used should you wish to only import valid items. However, this option should be used with caution.
If no errors are found the Import button may be used to complete the import process.
Any existing buying prices for the same supplier, stock item and quantity will be automatically changed during the import. Supplier buying quantities, which are not included in the import file will be retained For example; Item ABC currently have four quantity breaks defined:
- Quantity of 5+ = £10.00 each
- Quantity of 10+ = £9.00 each
- Quantity of 20+ = £8.00 each
If an import file is processed that contains new prices for 5+ (£10.50) and 15+ (£8.50), this will result in the following buying prices being stored:
- Quantity of 5+ = £10.50 each
- Quantity of 10+ = £9.00 each
- Quantity of 15+ = £8.50 each
- Quantity of 20+ = £8.00 each
In this case of the 10+ and/or 20+ quantity breaks are no longer required these should be manually removed.
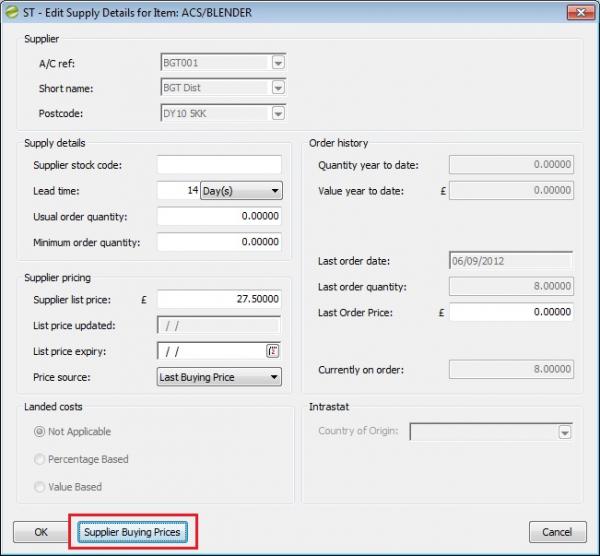
Stock Item Supplier Maintenance
It is also possible to access supplier buying prices directly from the standard Stock Item, Supplier maintenance screen using the button highlighted below:
Purchase Order Entry/Amendment
When adding/amending a stock item on a purchase order, the system will automatically calculate the order price based on the buying price setup for the supplier and stock item combination.
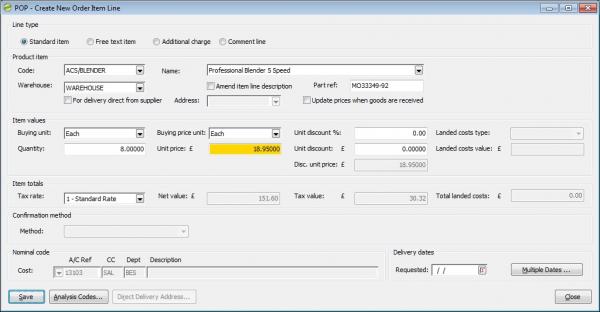
If no supplier buying price is set for the purchase order line quantity, the module will apply any supplier List Price or Last Buying Price based on the Price Source selected on the standard stock item supplier maintenance screen.
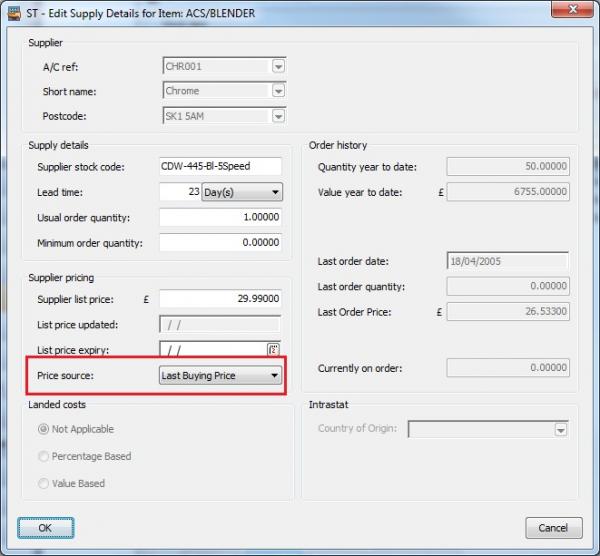
If the purchase order supplier is not setup against the stock item, the system will set the price to the stock item Average Buying Price.
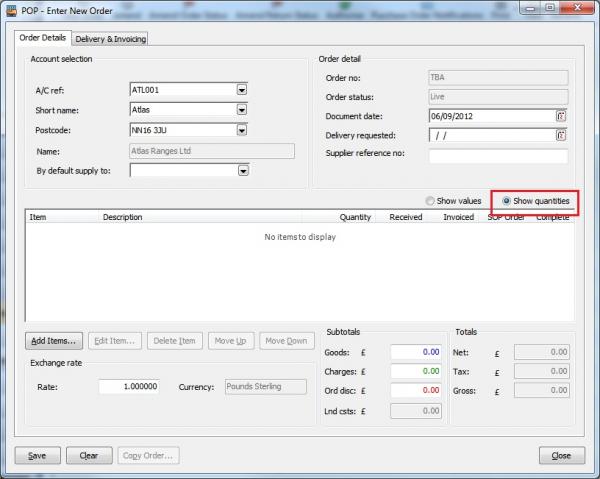
7.9. POP009: Show Quantities as Default in Maintenance/Enquiry
When the following screens are first opened, the Show quantities option will be selected as a default.
- Enter New Order
- Amend Order
- View Purchase Order
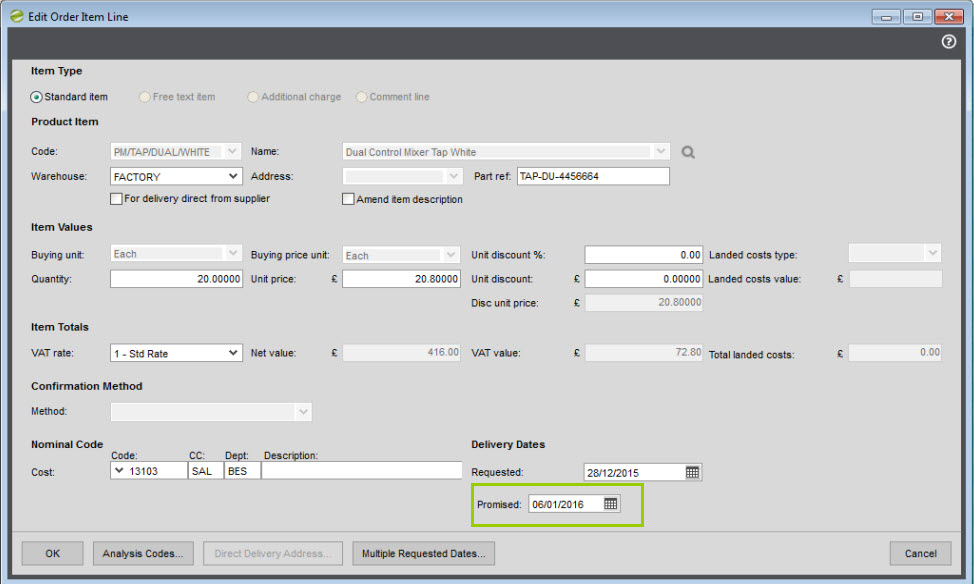
7.10. POP010: Maintain Additional Promised Date on POP Order Lines
This feature adds a Promised Date to each Purchase Order line. The new promised date value is held in the SpareDate1 field in the POPOrderReturnLine table, so can easily be utilised in reports and layouts as needed.
7.11. POP011: Default POP Goods Received Bins by Priority
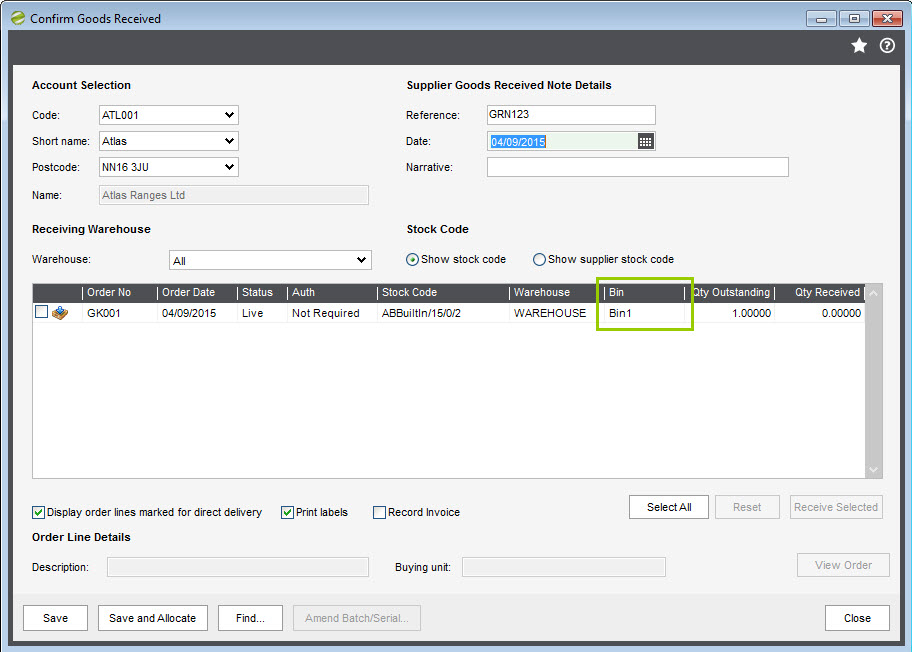
Where you have multiple bins available against a stock item and you are using the POP Confirm Goods Received screen to receive those items, ordinarily Sage will offer you the oldest bin first. With this feature enabled, the Confirm Goods Received screen will instead offer you the bin with the lowest priority number.
The priority number is set on the bin on the Locations tab of the stock item.
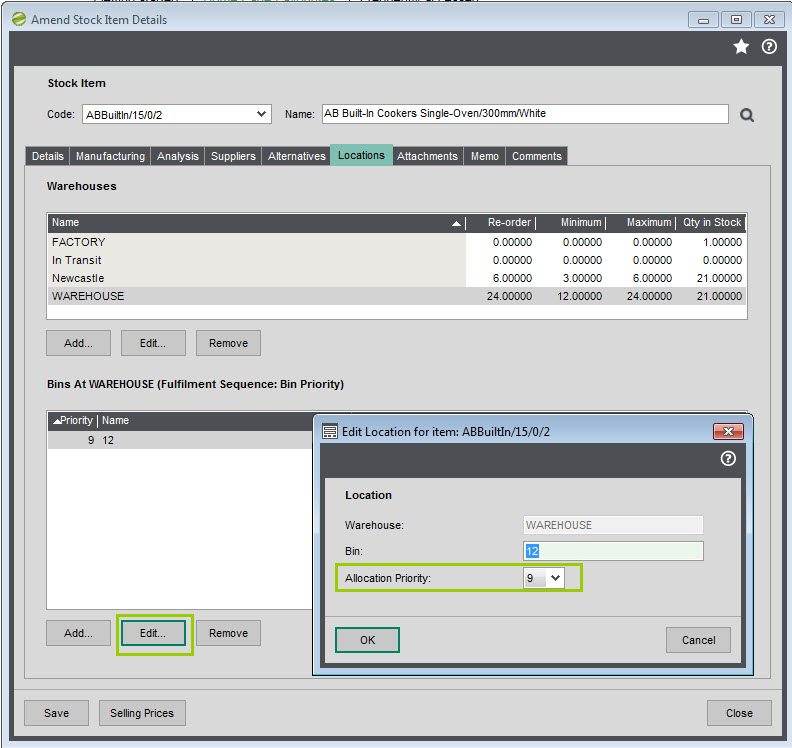
The lowest priority bin then becomes the default in the Confirm Goods Received screen.
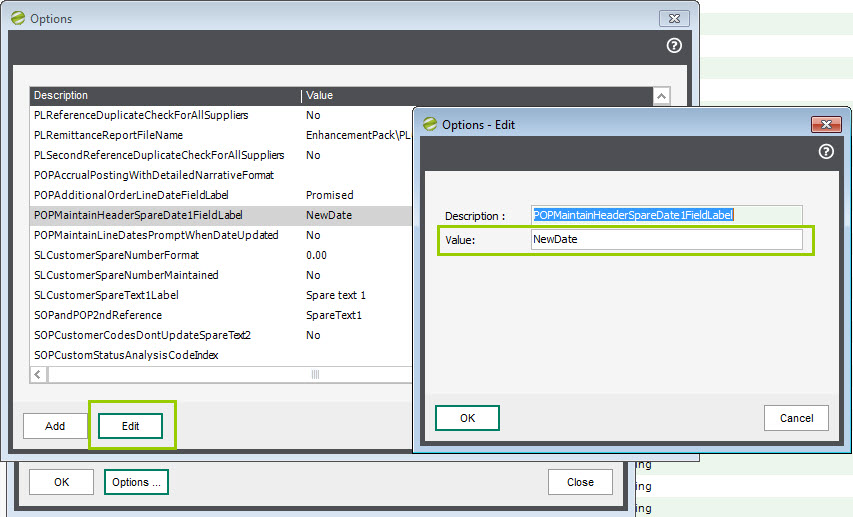
7.12. POP012: Maintain Purchase Order Header Spare Date 1
When enabled, this feature adds an additional date field to the purchase order header. This date can then be added to reports, as well as being visible in the Amend Order and View Order screens.
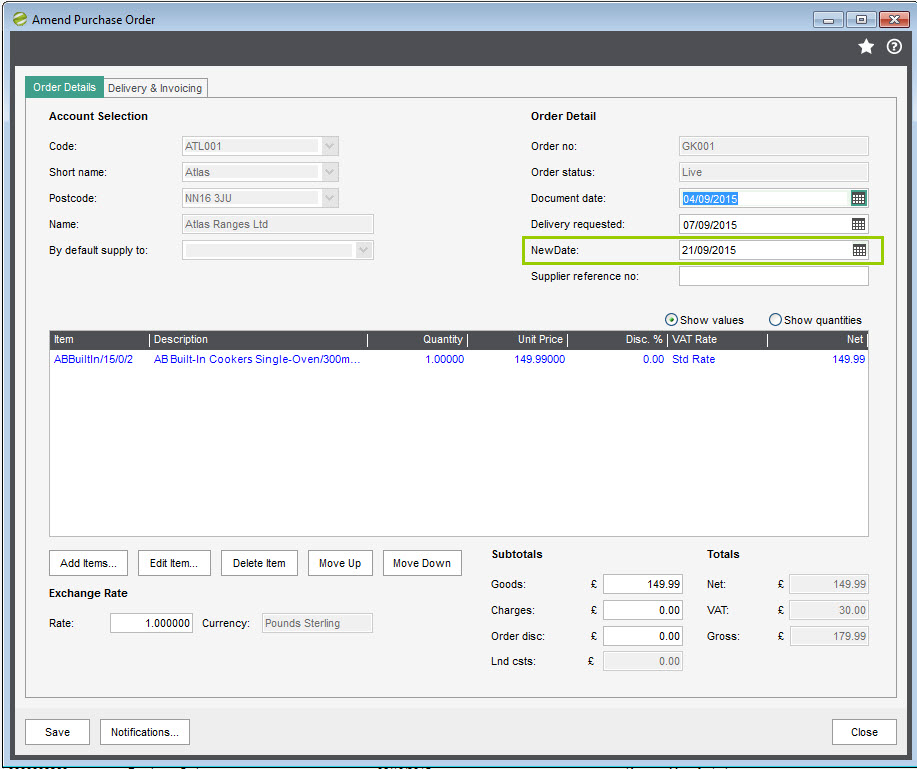
This field can be renamed via the Options button in the Settings screen from the Enhancement Pack menu. Edit the value of the option with the description of ‘POPMaintainHeaderSpareDate1FieldLabel’.
Dates entered into this date field are stored in the SpareDate1 field in the POPOrderReturn table.
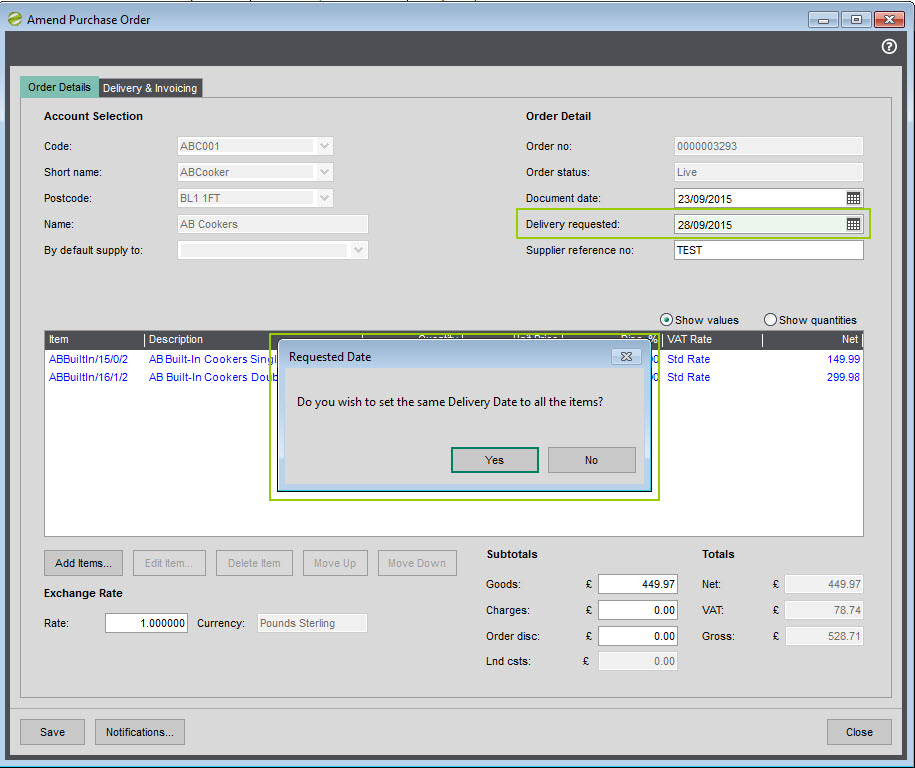
7.13. POP013: Set Purchase Order Line Dates Based on Header
This feature will display a prompt to update the Delivery Date Requested on purchase order lines when the same field is updated on the purchase order header. If you click Yes, then the header Delivery Requested date will be copied into the same field on each line, overwriting any existing dates.
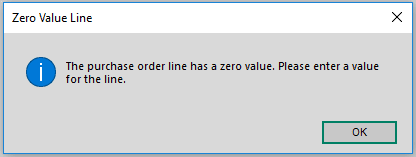
7.14. POP014 Prevent Purchase Order Lines Saving if it has a Zero Value
This function is designed to prevent users from saving lines on purchase orders lines with a zero value – both for entering new orders or amending existing orders. With this feature enabled, the user will be presented with the following warning message should they try, which will prevent them from continuing unless they enter a non-zero value as the unit price.
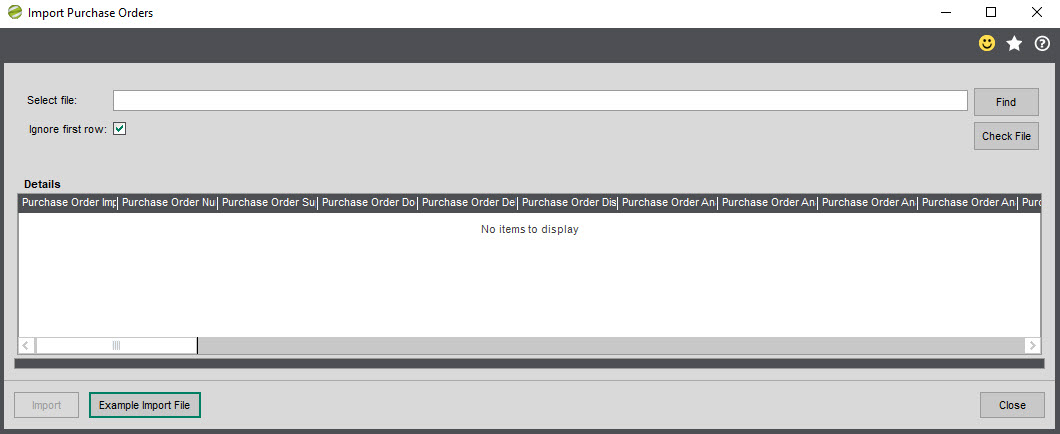
7.15. POP015 Import Purchase Orders
This function allows you to import purchase orders from a csv file, and is accessed via the Imports menu within the Sicon Enhancement Pack menu structure. This import can be used to import new purchase orders with all four of the standard line types available (Standard Items/Free Text Lines/Additional Charges/Comment Lines), and works with either auto generated purchase order numbers or manual ones. The imported purchase order will then be treated as a new order, so it is not possible to import lines that have been part received/invoiced previously. If you have orders where this is the case, then they should just be imported with the outstanding quantity on each line.
From within the Sicon Enhancement Pack\Imports menu, you are presented with the following screen to process the import. You will need to create a file in a CSV format to import.
If you are using automatically generated purchase order numbers, then of course you won’t know what these will be until you have imported the orders. To handle the identification of which items will belong on the same orders, the Purchase Order Number column in the import file should be used. Lines that have the same numbers in this column will be grouped onto the same purchase orders. The numbers here just need to be unique for each order, and will be overwritten when the order is imported into Sage, so you could use ‘1’ for the first order, ‘2’ for the second, and so on. You can leave this field empty for single line orders.
Using the Example Import File button will open two files in Excel. One of these is an example import file that has the right columns. The second file gives an explanation about each column, clarifying acceptable values for the columns and whether they are compulsory. Note that each line on a purchase order to be imported is a separate line within the import file, they are grouped together using the order number.
You can then edit the first file as normal in Excel, and when you are ready to import it, change the file format within Excel to save it as a CSV format.
Once the file is ready, you can use the Find button to browse for your import file. Then when you have the correct path and filename displayed, click the Check File button to validate if there are any problems with the import file that will cause the import to fail. Any problems will cause a window to be displayed confirming how many errors need attention, and are highlighted in red when they are displayed.
Only when the file is validated will the Import button become available to allow you to complete the import.
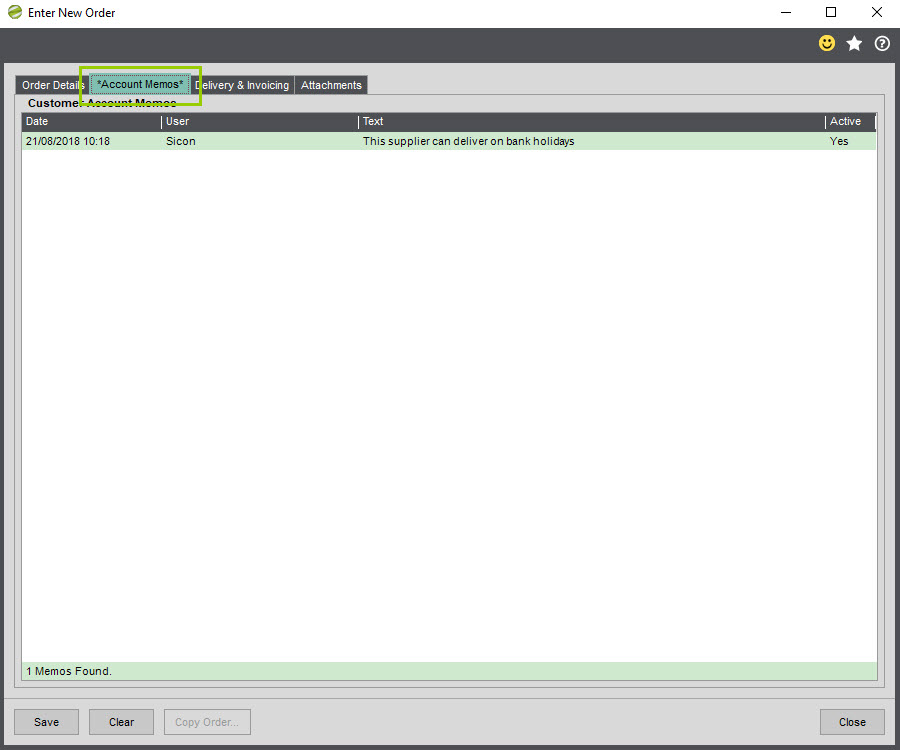
7.16. POP016: Display Supplier Memos on Purchase Order Entry/Amendment
This feature adds a new tab to purchase orders which will display any memos that have been recorded against the supplier account. This tab appears in both the Enter New Purchase Order and Amend Order screens.
7.17. POP017: ‘Final Receipt’ when confirming goods on Purchase Orders
This feature adds a new check box to the Confirm Goods Received screen that enables you to indicate that this will be the final delivery against this purchase order.
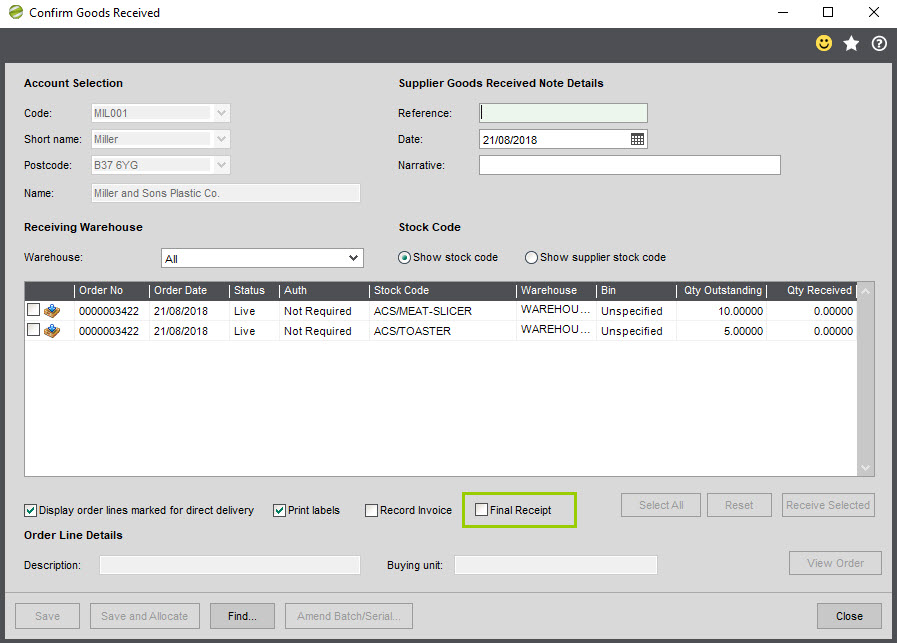
So, if you check this box, then all outstanding quantities will be reduced on the purchase order (or removed if none of an outstanding line have been received).
So, for example, you have a two-line purchase order for 10 Meat Slicers and 5 Toasters. You receive 8 Meat Slicers and no Toasters, and tick the Final Receipt checkbox. The purchase order will then be updated to change the quantity of Meat Slicers down to 8, and the line for Toasters would be removed.
7.18. POP018: Select POP Goods Received by Order Number
When this function is activated a new filter is added to the Confirm Goods Received screen.
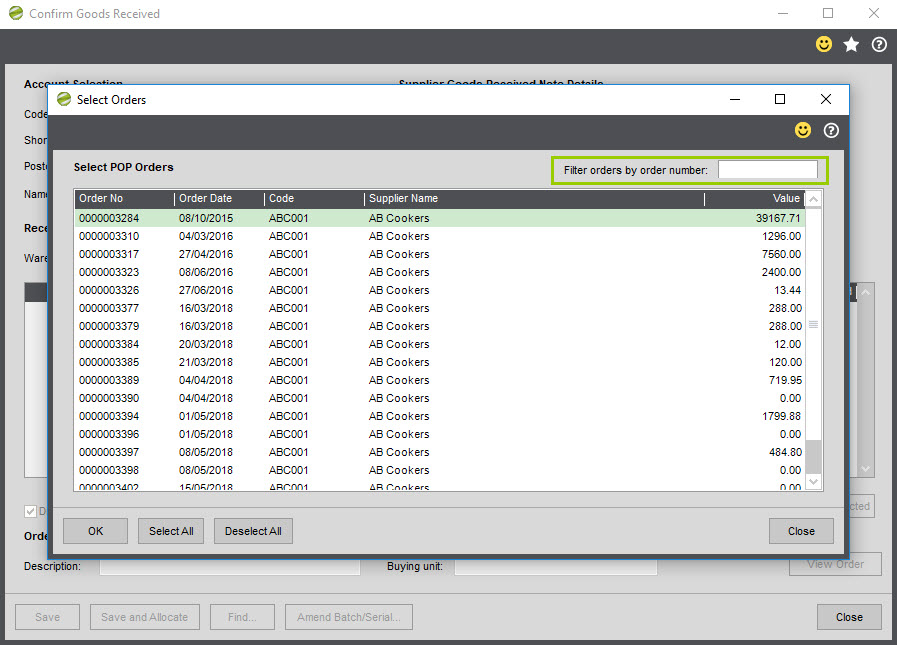
If you select a supplier account that has multiple outstanding purchase orders, then when the Select Orders screen appears, a filter has been added to the top right-hand corner enabling you to enter an order number to filter the list. As you start entering the number in this filter, the list is immediately filtered based on the entered value, so you can filter on partial order numbers.
7.19. POP019: Add New Stock Item When on a Purchase Order Line
This feature enables you to create new stock codes as required while in a purchase order.
From within the purchase order line for a standard item, click the drop down to display the list of stock codes. An Add Item button has been added to this list.
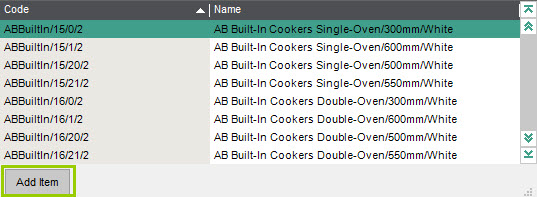
Clicking this button will open up the Enter New Stock Item window, and once you have saved the stock item you are returned back to the purchase order line where you can then select the new code.
7.20. POP020: Staged Nominal Accrual
This feature automatically generates nominal journal accruals for outstanding purchase orders. You can either have the accrual sit in a single specified nominal account, or move it into a different one when goods are received.
The Sicon Enhancement Pack\Purchase Order Processing\Staged Nominal Accrual Settings screen is user to configure the function.
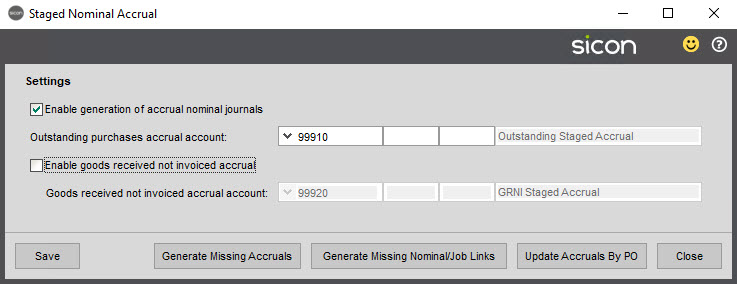
The staged accrual process is enabled/disabled and an outstanding purchase accrual account selected on this screen. Nominal accrual journals will be written to this account to the value of purchase orders which have not yet been invoiced (or possibly GRNI, below).
It’s possible to enable postings to a separate accrual account for GRNI (goods received, not invoiced) purchase order values. When this is enabled the system will generate nominal accrual journals between the outstanding purchases accrual account and the GRNI accrual account when goods are received. It is possible to just enable the second option without the first, i.e. just posted a goods received not invoiced accrual without having the first accrual on order entry.
If the Sicon Projects module is installed nominal accruals/reversals will be linked to projects selected for each purchase order line. The Project Financial Enquiry screen (and reports) will show all accrued purchase order values as ‘actual’ (not committed).
Example 1 (Enable first accrual without a separate GRNI account configured)
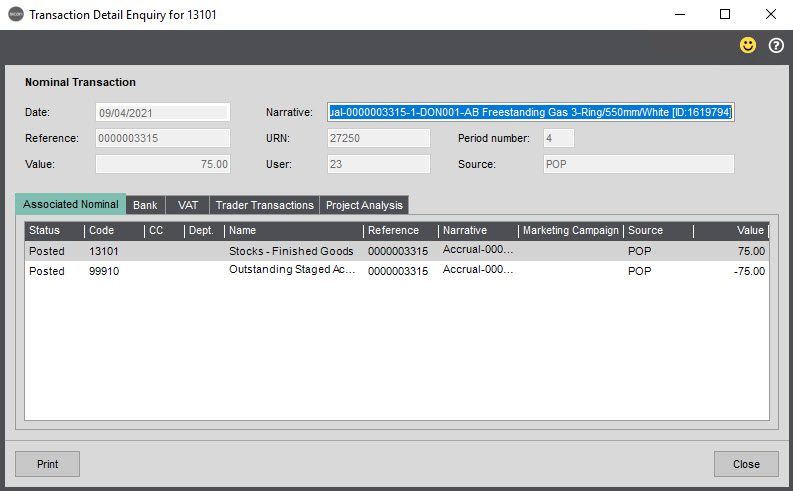
Following purchase order entry, ‘stock’ (i.e. 13101) is debited and the configured ‘outstanding’ accrual account credited.
![]()
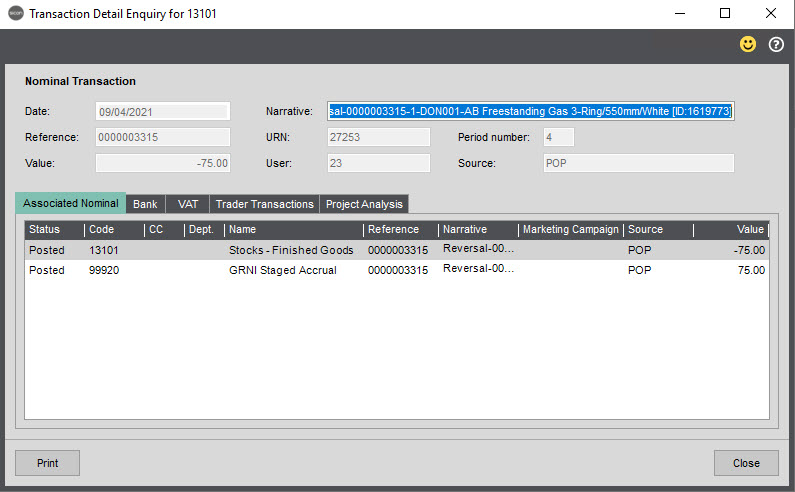
Following purchase invoice matching, stock is credited and the configured ‘outstanding’ accrual account debited.
![]()
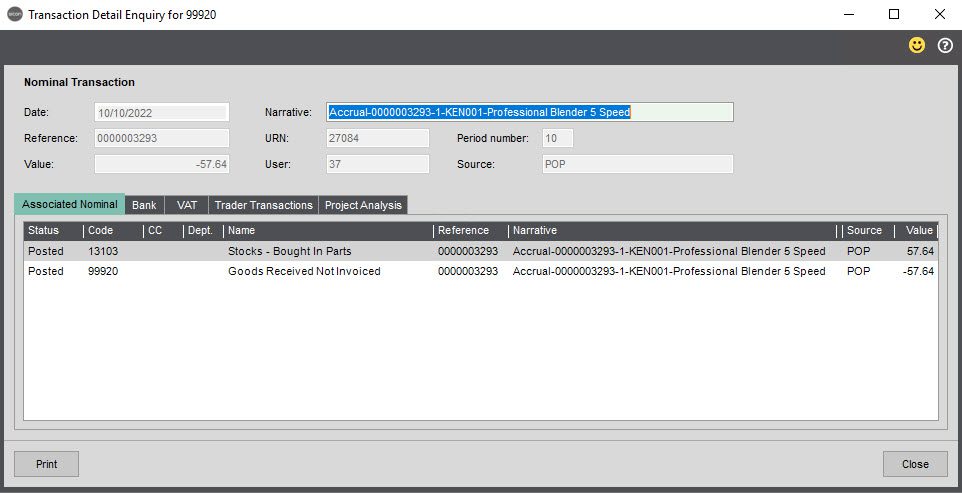
Example 2 (Both accruals enabled, with a separate GRNI account configured, i.e. 99920)
As above, following purchase order entry stock is debited and the configured ‘outstanding’ accrual account credited.
Following goods received the ‘outstanding’ accrual account debited and the GRNI accrual account credited.
(stock account postings shown for information only).
![]()
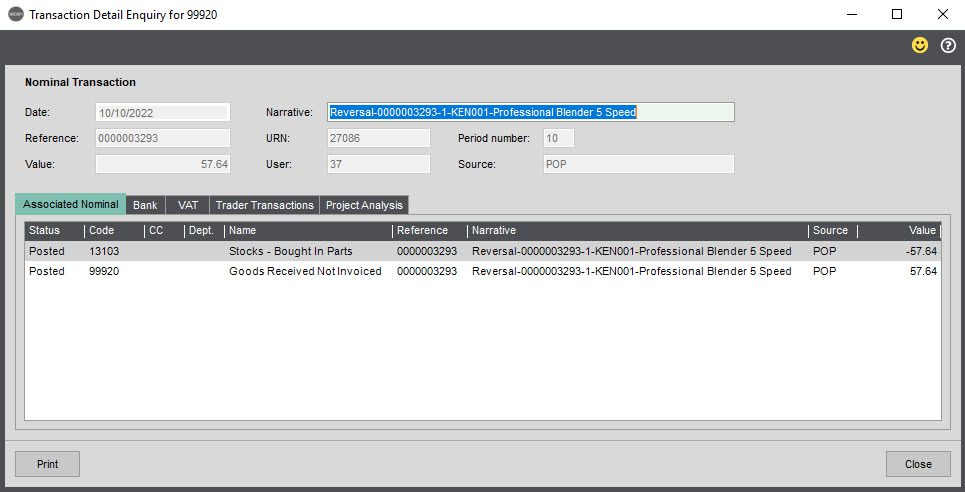
Following purchase invoice matching stock is credited and the configured GRNI account debited.
Example 3 (Just GRNI configured, i.e. 99920)
When goods are received, then the GRNI account is credited and the stock account (from the PO line) is debited.
Then when the invoice is posted, this posting is reversed in addition to the normal nominal postings made by Sage for the purchase invoice.
From within the Staged Nominal Accrual screen, three further buttons are available: –
Generate Missing Accruals: This will create Nominal accrual journals for all open purchase orders with no existing posted accruals.
Generate Missing Nominal/Project Links: You can use this for either a single purchase order or all purchase orders to link their accrual postings to the relevant project.
Update Accruals by PO: You can use this to update existing accruals/reversals for a single purchase order.
7.21. POP021: Change POP free text buying unit description to drop down selection
With this feature enabled, the Buying price unit field for free text item lines becomes a drop-down field, populating the free text field that is there otherwise.
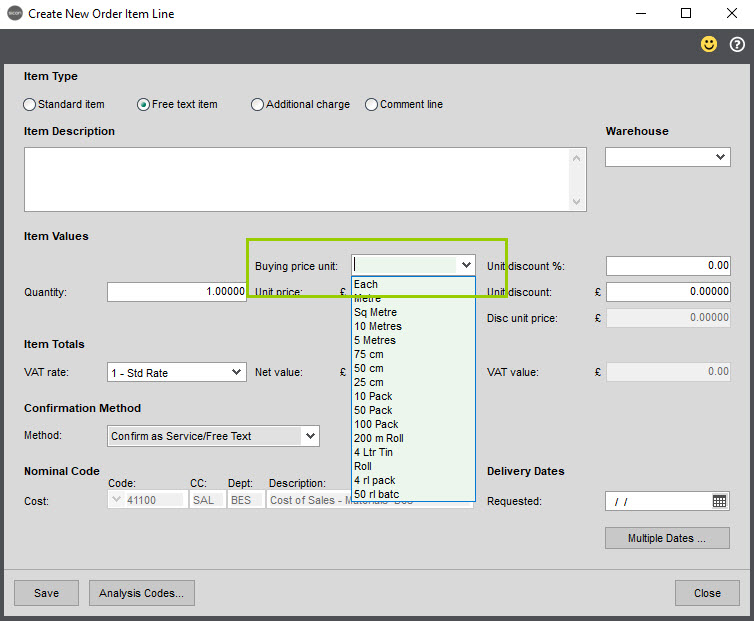
The list displayed is all units of measure defined within Stock Control.
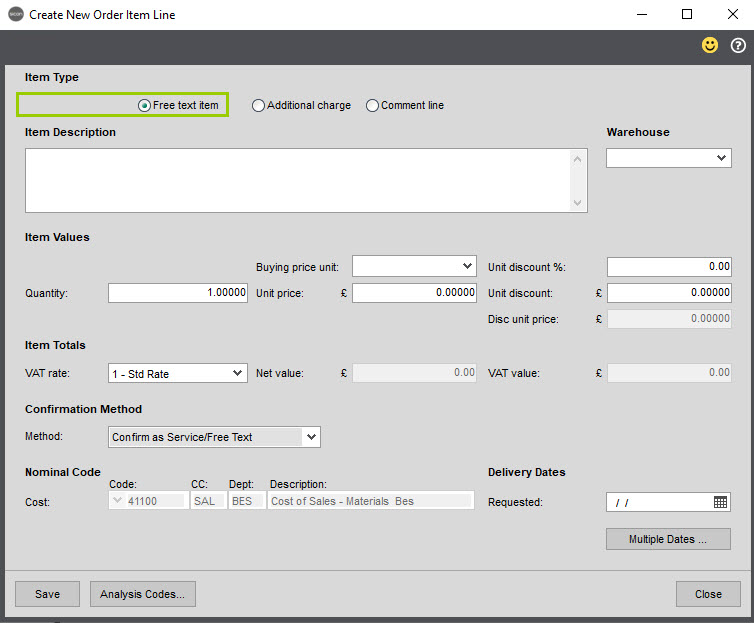
7.22. POP022: Hide Standard POP line entry
This feature will disable the standard item option when adding a line to a purchase order. This results in free text items becoming the default option.
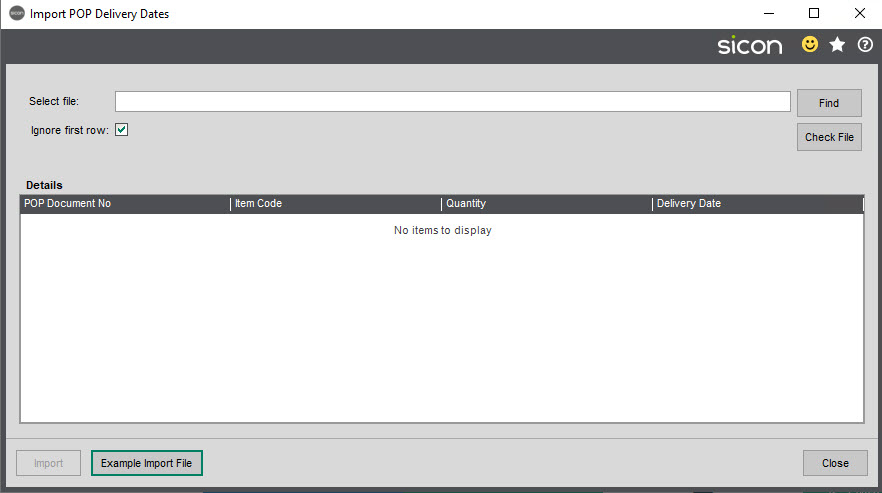
7.23. POP023: Import POP Delivery Dates
This feature is accessed via the Sicon Enhancement Pack\Imports menu folder. It can be used to update delivery dates on purchase order lines.
Lines are identified by matching the combination of order number, stock code and quantity.
An example import file can be generated by clicking the Example Import File button.
7.24. POP024: Split Order Lines when Posting POP Invoice
This feature splits the nominal postings from a Purchase Invoice linked to a Purchase Order into separate postings for each stock line on the order.
Ordinarily in Sage, multiple lines on a purchase order that are posting to the same nominal account will result in a single combined posting to that nominal account when the invoice is posted.
These examples below are for a purchase order for a blender, an espresso machine and a filter coffee maker that are all posting to the same Bought in Parts stock nominal account.
Standard Sage posting: –

With this feature enabled, the same postings would look like this: –

7.25. POP025: Add Collection Deliveries for Purchase Orders
This feature adds an additional address to purchase orders, to allow you to record a collection address if this is how you will receive the goods that you are ordering. A Collection Address tab is added to the Delivery & Invoicing tab on the purchase order.
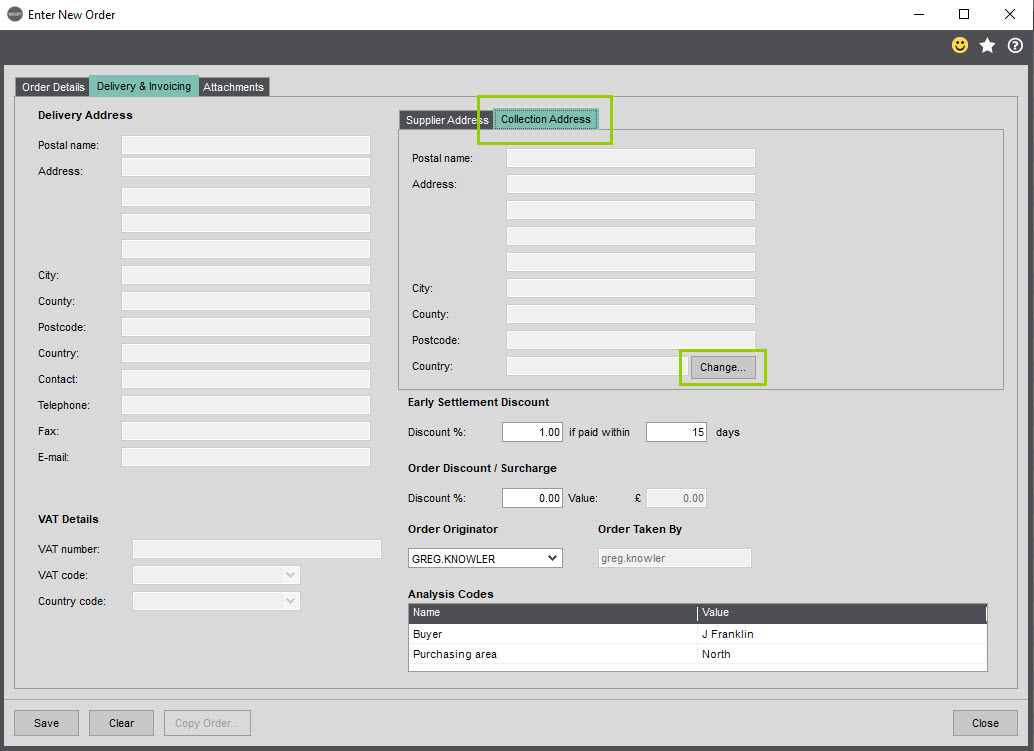
Clicking the Change button will open a Supplier Addresses window, which is the same window also used for POP003 Allow Multiple Supplier Addresses for Purchase Order.

You can use this screen to add new or edit existing addresses. You can also use COM011 Loqate Address Finder when adding/editing these addresses.
The selected collection address can be accessed by the Report Designer by joining the SiconPOPCollectionAddresses table to POPOrderReturns using POPOrderReturnID.
8. Sales Ledger
This section includes enhancements that are specific to the Sage Sales Ledger module.
8.1. SL001: Maintain Customer Spare Text 1 Field (see Options)
This function allows maintenance of an additional field on the sales ledger customer account entry and maintenance screens.
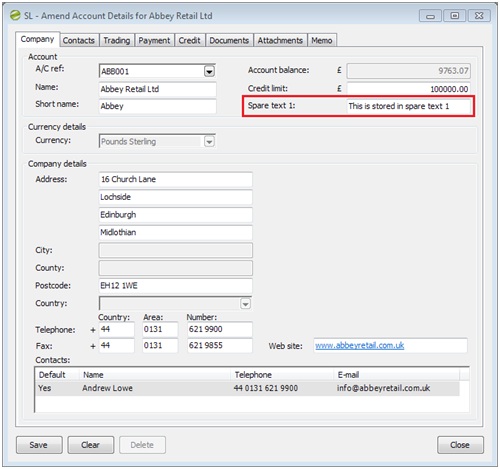
The spare text field can be up-to 100 characters in length, although field/screen size may not show the entire value for longer entries.
Configuration Options
(see Settings, Function Advanced Options)
The field name/label can be amended by changing the SLCustomerSpareText1Label value on the options screen, which is accessible from the main settings screen.
It is also possible to configure this enhancement to maintain the spare number 1 field by changing the SLCustomerSpareNumberMaintained value to Yes.
The SLCustomerSpareNumberFormat option can be adjusted to set the number of decimal places initially shown (e.g. ‘0’, ‘0.00’, ‘0.00000’, etc.)
NB: it is not possible to include both spare text 1 and spare number 1 fields for maintenance using this function.
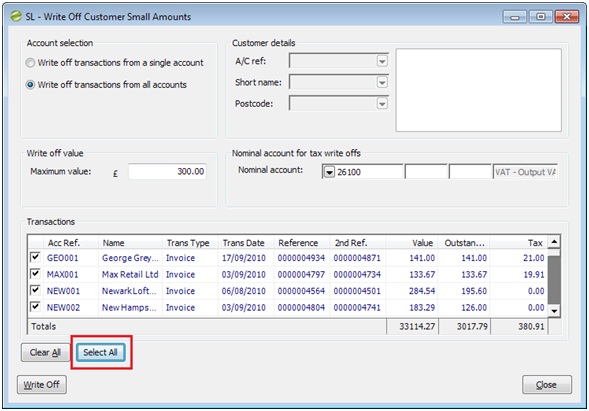
8.2. SL002: Write Off Small Amounts Select All Button
This function adds a Select All button to the sales ledger Write Off Customer Small Amounts screen.
8.3. SL003: Hold Sales Orders when Customer Account is Put on Hold
This function allows the user to hold all outstanding sales orders when a customer account is placed ‘on-hold’. When the customer account is released, the user may un-hold the related sales orders.
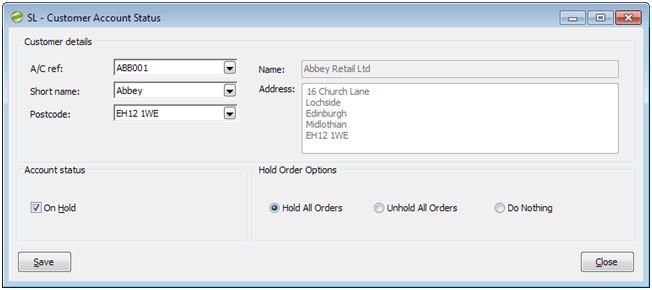
A confirmation message will be displayed before sales orders are held or released.

If no sales orders are affected by the account status change the confirmation message will not be shown.
8.4. SL004: Direct Debit Integration
Sicon’s Direct Debit Integration makes collecting funds simpler, faster and more efficient for you and your customers; for more information, please click below.
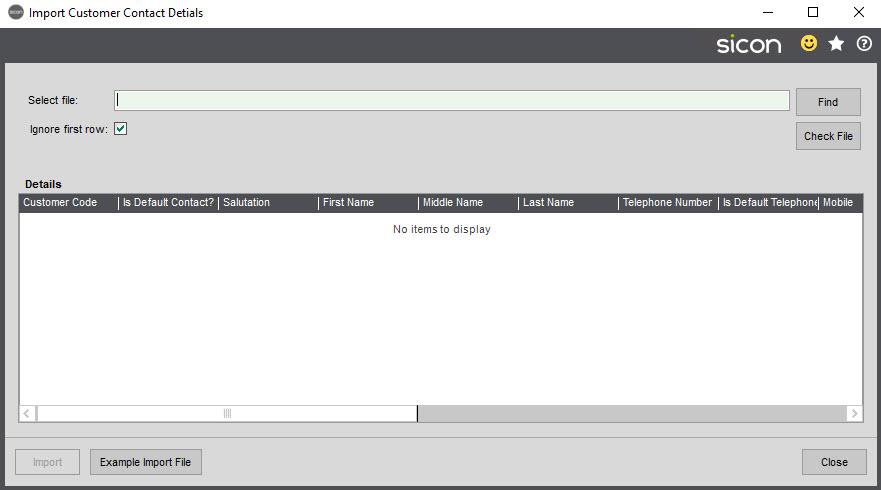
Sicon Direct Debit Integration Help and User Guide8.5. SL005: Import Customer Contact Details
This feature allows import of Sales Ledger customer account contact details. It is accessed via the Sicon Enhancement Pack\Imports menu.
If a contact already exists matching the first and last names, the contact’s details will be updated.
If no existing contact matches the first and last name, then a new contact will be added to the customer.
8.6. SL006: Customer Budgets
This feature adds a customer budgets tab to the Sales Ledger customer account.
Within this tab (accessible via Enter New Account or Amend Account Details in the Sales Ledger), it is possible to enter customer budgets by accounting period for the current and next year. These can also be imported from a csv file.
It’s possible to record a separate budget and target figure for each accounting period, and then the system will record actual sales in the final column (Invoices – Credit Notes).
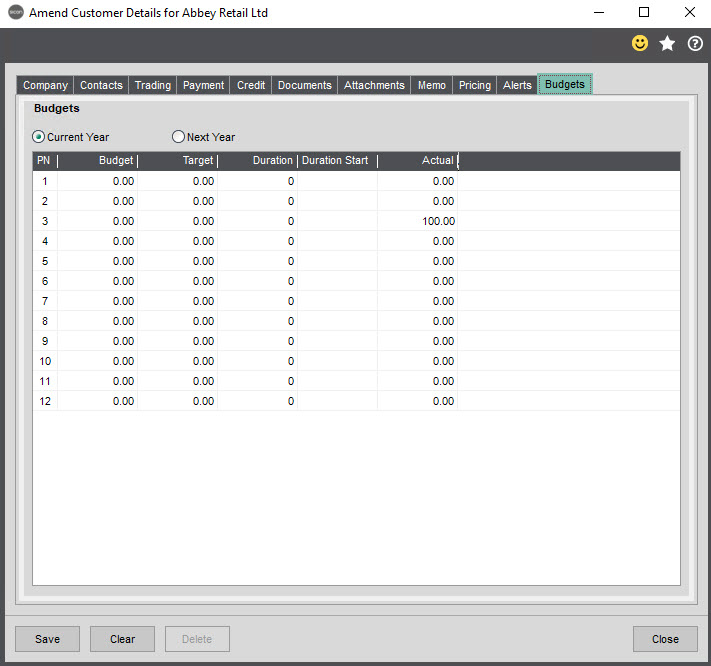
There are also columns labelled Duration and Duration Start that can be used to record any situations where you have renewing contracts that you need to consider when reviewing their budgets. The Duration field can hold a decimal value, while the duration start gives you a date field.
These values are stored in a new table called ‘SiconCustomerBudget’, which is available in report designer and can be joined to the SLCustomerAccount table using the SLCustomerAccountID field.
To import the budget values, access the import screen via Sicon Enhancement Pack\Imports\Import Customer Budgets.
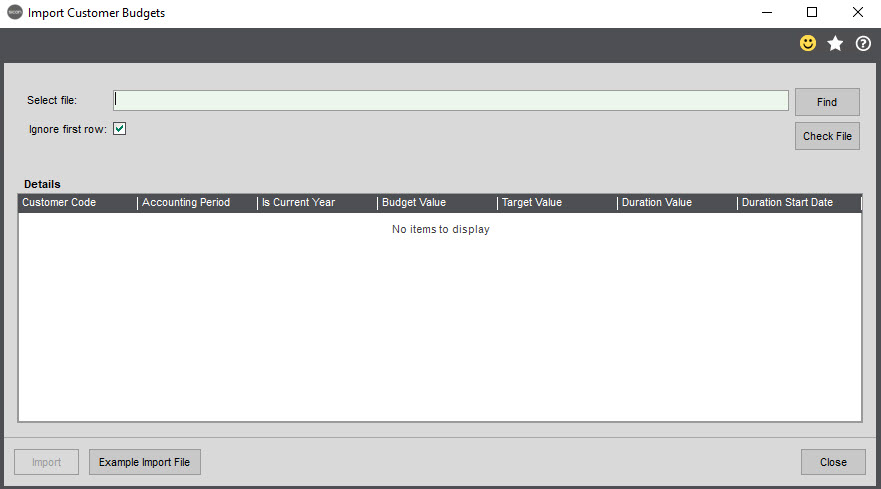
As with other Sicon import screens, you should generate an example import file using that button at the bottom of the screen. This will generate two Excel spreadsheets, the first is an example of the format while the second clarifies the format of each column and confirms which ones are compulsory.
When you have finished editing the first one and it is ready to be imported, you should save it as a CSV file. You can then use the Find button on the Import Customer Budgets screen to browse to that CSV file. You then need to use the Check File button to validate that file before the Import button becomes available in the bottom left hand corner. Once the file is successfully validated, click the Import button to finish the import.
8.7. SL007: Sales Ledger Receipt Payment Method Selection
This function adds a Payment method field to the standard Enter Customer Receipt screen.
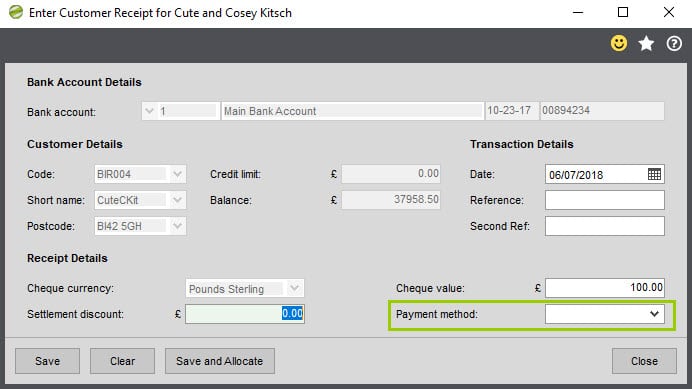
The possible values for this field are read from the options stored in the standard Sage Payment Methods screen, accessed via Sales Order Processing/SOP Maintenance/Maintain Payment Methods.
The value recorded is stored in a new table within the database that is called SiconSalesReceiptExt. The value is not currently displayed in any screens within Sage, but available within report designer so that it can be added to a relevant report. The entry against each payment can be joined to the entry within the SiconSalesReceiptExt table using the URN field.
8.8. SL008: Import Customer Analysis Code Values
This function enables you to import analysis code values against Sales Ledger accounts, and is accessed via the Imports menu within the Sicon Enhancement Pack menu structure. This import can be used to update existing analysis code values on customer accounts.
From within the Sicon Enhancement Pack\Imports menu, after selecting your import file you are presented with the following screen to process the import. You will need to create a file in a CSV format to import.
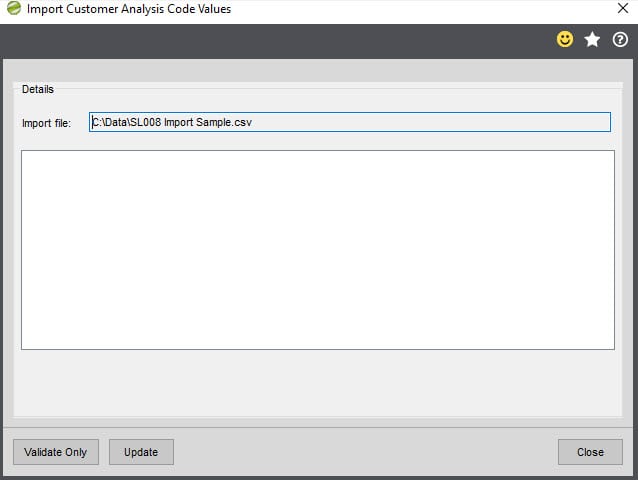
The Validate Only button will check that your file is in the correct format, and that the analysis code values correspond to possible defined values within Sage for that analysis code (if applicable), and advise you of any errors that need to be corrected. The Update button will perform the import.
The file format is a simple one, with a header row comprised of ‘Customer’ followed by the headings of which analysis code you wish to import (which need to match the names of the analysis codes used within Sales Ledger). You only need to specify the analysis codes that you are trying to update.
Then each row in the file can specify the customer account number, followed by the analysis code values that you are importing.
8.9. SL009: Import Sales Ledger Memos
This function enables you to import memos against Sales Ledger accounts, and is accessed via the Imports menu within the Sicon Enhancement Pack menu structure.
From within the Sicon Enhancement Pack\Imports menu, after selecting your import file you are presented with the following screen to process the import. You will need to create a file in a CSV format to import.
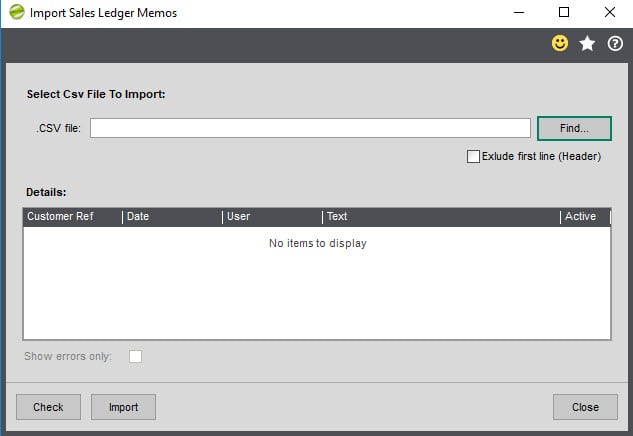
The Validate Only button will check that your file is in the correct format, and that the analysis code values correspond to possible defined values within Sage for that analysis code (if applicable), and advise you of any errors that need to be corrected. The Update button will perform the import.
The file format is a simple one, with a header row comprised of ‘Customer’ followed by the headings of which analysis code you wish to import (which need to match the names of the analysis codes used within Sales Ledger). You only need to specify the analysis codes that you are trying to update.
Then each row in the file can specify the customer account number, followed by the analysis code values that you are importing.
9. Sales Order Processing
This section includes enhancements that are specific to the Sage Sales Order Processing (SOP) module.
9.1. SOP001: Sales Order Import
This function enables you to import sales orders. The import can be used to import multiple lines onto the same new sales order(s), and all four of the standard Sage line types can be imported (Standard Items/Free Text Lines/Additional Charges/Comment Lines). The imported sales order(s) will be treated as a new order, so it is not possible to import quantities and indicate that they are already part despatched or part invoiced. If this was the case, then you would need to import the outstanding quantity on each line.
Note that this feature cannot be used to import sales returns, there is a separate feature for this (see SOP032).
From within the Sicon Enhancement Pack\Imports menu choose the Import Sales Order menu option, afterselecting your import file you are presented with the following screen to process the import. You will need to create a file in a CSV format to import.
You can use the Find button to browse to the import file.
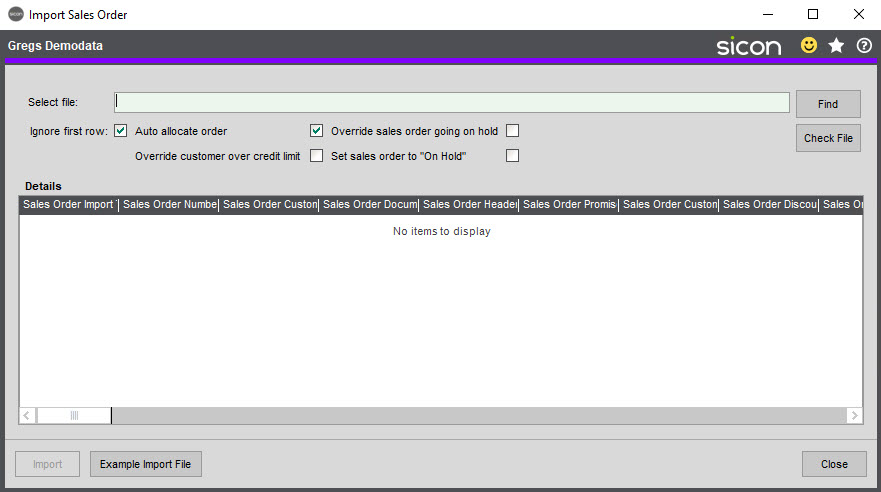
The Ignore first row checkbox will ignore the first row in the import file. This is ticked by default as if you are using the example import file, then the column headings will be in the first row.
Tick the Auto allocate order box if you would like the stock to be allocated to the order in Sage as soon as it is imported.
The Override customer over credit limit box will allow you to import sales orders for customers over their credit limit. If you don’t enable this, then you will not be able to import orders for these customers.
The Override sales order going on hold box will mean that if the customer is over their credit limit, then the order will not be imported with a status of On Hold.
The Check File button will check that your file is in the correct format, and advise you of any errors that need to be corrected. The Import button will perform the import. Only when the file is validated will the Import button become available to allow you to complete the import.
The Example Import File button will create two files that will open in Excel. One is an example import file for you that can then be saved in csv format to import. The second file provides an explanation of each column in the import file, and advises which columns are compulsory as opposed to optional.
If you have multiple sales order lines that are for the same customer account and the same delivery address, then these will be grouped together into the same sales order. You can use the Sales Order Number to override this grouping, if you want to specify which lines should be part of the same order. If you are not using the option in Sales Order Processing to automatically generate order numbers, then you will need to specify the order numbers as part of the import file using this field. But if you using automatic order numbering in Sage, then you can still use this column to specify numerical values which will then be used for grouping. You only need to ensure that the numbers entered don’t exist as sales order numbers previously, otherwise the file will fail validation.
e.g. You are using automatic order number generation, but you want to ensure that in your import file that rows 5-6 are on one order, and 7-9 are on a different order. You enter a value of 1 as the order number of rows 5-6, and a value of 2 as the order number of rows 7-9. When the file is imported, orders will be created for these rows using your desired grouping, but the orders will have Sage generated order numbers.
The columns relating to analysis codes allow you to import up to 20 analysis code values for the sales order header and begin with a header titled Sales Order AnalysisCode x (which would need to be repeated if there were multiple lines for the same order), and also up to 20 analysis code values for the lines themselves (the header for these are AnalysisCode x).
9.2. SOP002: Display Customer Memos on Sales Order Entry/Amendment
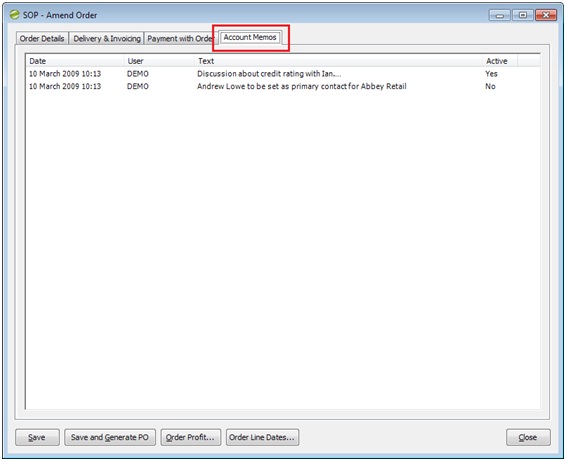
9.3. SOP003: Maintain Sales Order Line Dates on a Single Screen
This enhancement adds an additional button to the sales order entry/amendment screens, which can be used to maintain all dates associated with order lines on a single screen.
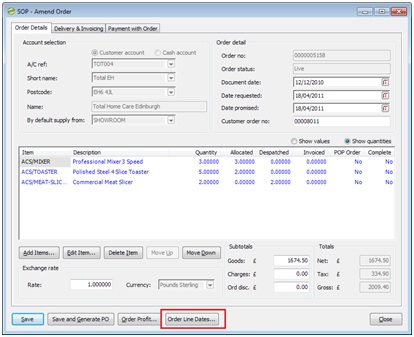
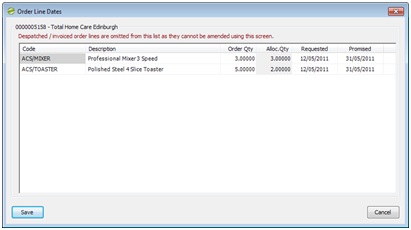
NB:
- Any order lines which have a ‘despatched’ or ‘invoiced’ quantity will not be shown on this screen as the requested/promised dates cannot be changed delivery being confirmed. This is a restriction of the standard Sage system.
- Enhancement Pack v2010.0.26 and later also allows changes to order line quantities using this screen.
9.4. SOP004: Show Sales Order Line Stock Item History Button
When this function is active a new Item Order History… button is displayed on the sales order entry, amendment and enquiry screens.When the button is clicked a screen is displayed, which shows all previous sales orders for the selected customer and stock item.
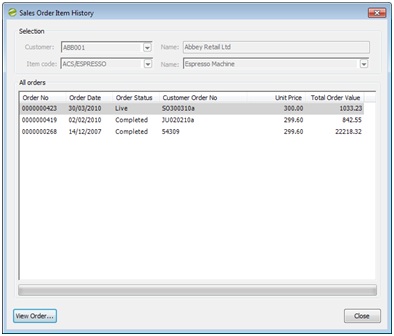
9.5. SOP005: Copy a Sales Order to a Sales Return
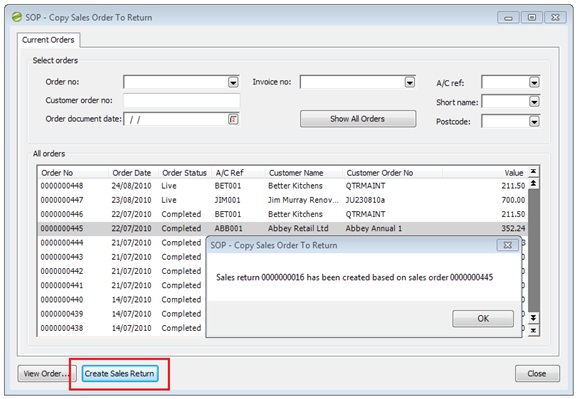
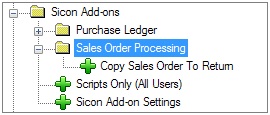
9.6. SOP006: Show Item Description on Despatch List
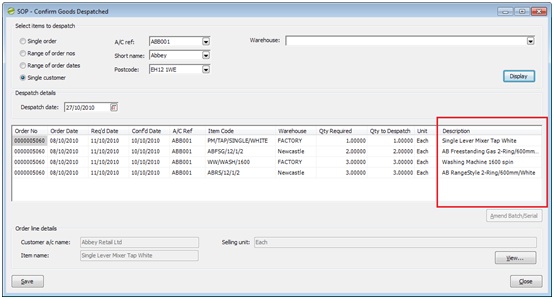
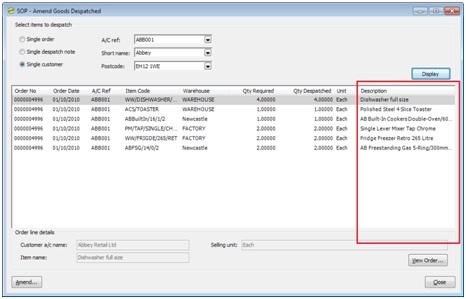
9.7. SOP007: Hold Sales Orders which Include Zero Value Lines
When enabled, this function will check if a sales order includes any standard stock item or free text lines with a zero price.If zero price lines exist, a warning message will be displayed to confirm that the order will be automatically placed ‘on-hold’. The user may accept this or return to the order to amend the zero priced order line(s).
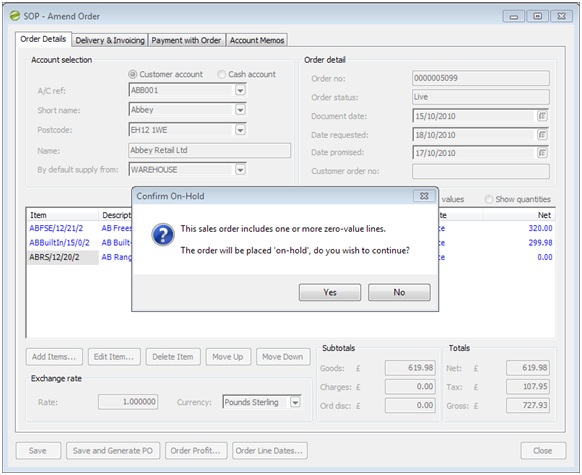
NB: the warning message will not be displayed if the status of the order is already set to ‘on-hold’.
9.8. SOP008: View Customer Account Enquiry from Order Entry/Amend (see Options)

9.9. SOP009: Customisable Sales Order Status (see Options)
When this function is active an new customisable order status drop-down selection will be added to the sales order entry and amendment screens.
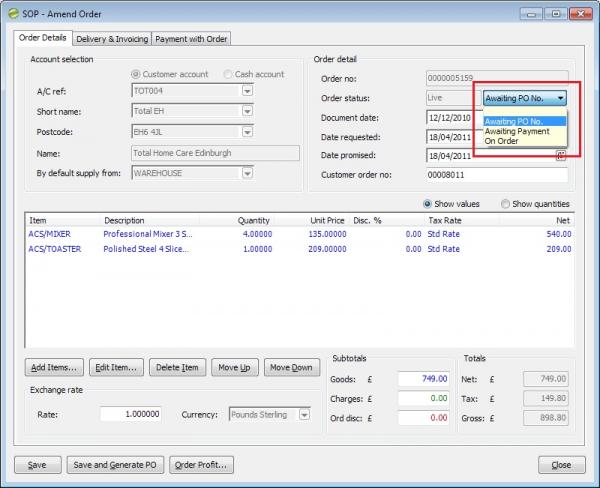
NB: this function does not utilise standard Sage analysis code drop-down values.
Configuring/Maintaining Drop-Down Selections
This list of drop-down selections are maintained using the module Sicon Enhancement Pack, Sales Order Processing, Customisable Order Status menu option.
It is also possible to set the numeric sort sequence of the drop-down entries in the list.
The order status with the lowest sort sequence will be set as the default when entering a new order.
If status selection is optional, a ‘blank’ default order status can be added with a sort sequence of zero.
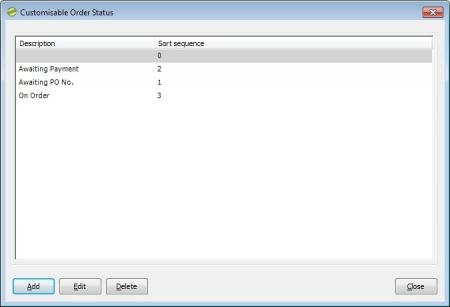
SOP Analysis Code Configuration
The selected status will automatically be stored in the sales order analysis code in a configuration option named SOPCustomStatusAnalysisCodeIndex (see the Sicon Enhancement Pack, Settings ‘Options…’ button screen).
This option must be set to a value of between 1 and 20 to indicate the analysis code to be used.
It is essential that the selected analysis code is configured in Sage Accounting System Manager, Settings, Maintain Analysis Codes screen with the Enter Free Text check-box ticked.
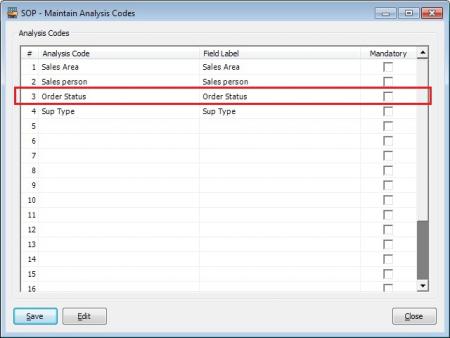
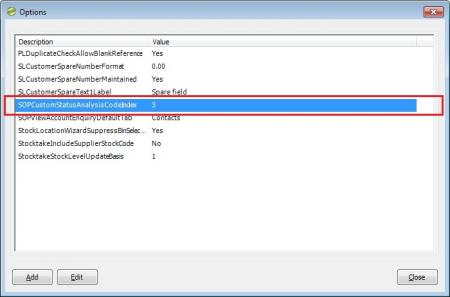
Sage desktop lists and workspaces can then be amended using standard Sage functions to include the configured analysis code.
9.10. SOP010: Enable Proforma Only Customer Accounts
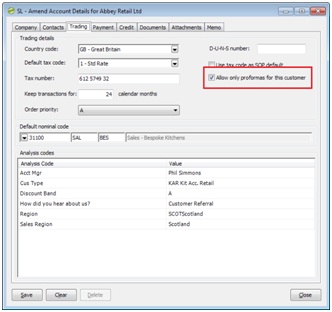
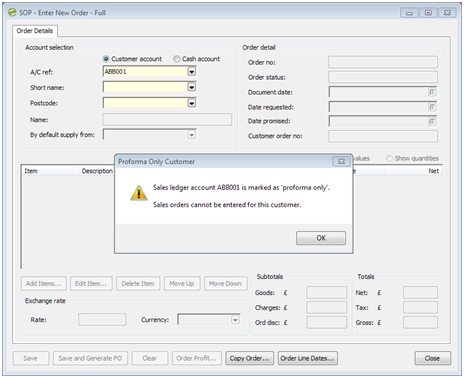
9.11. SOP011: Print Sales Order Acknowledgements from View Order Screen
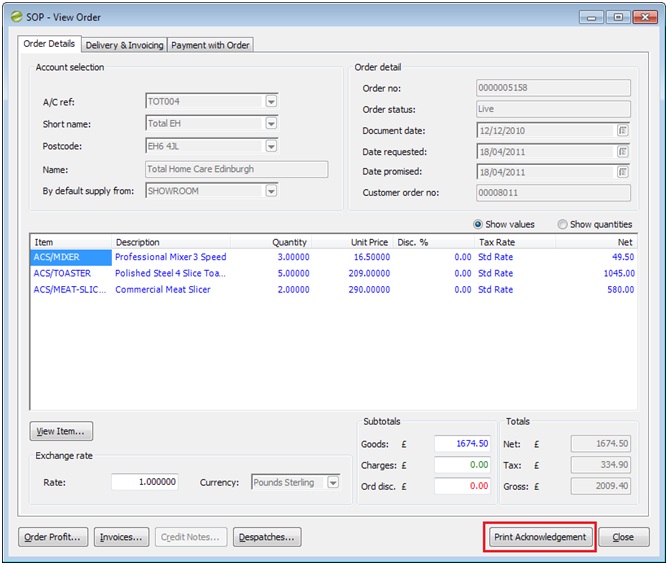
9.12. SOP012: Select Sales Return Reason for Credit
This function includes a drop-down Reason for credit selection when entering or amending a sales return.Warning – Use of Sage Sales Return Record ‘Spare’ Fields.
This function uses the following Sage sales return‘spare’ fields to store customer stock codes and descriptions. This module should NOT be installed until checks have been made to ensure that these ‘spare’ fields are not used by other/third-party bespoke functions.
SpareText1 is used to store the reason for credit text.
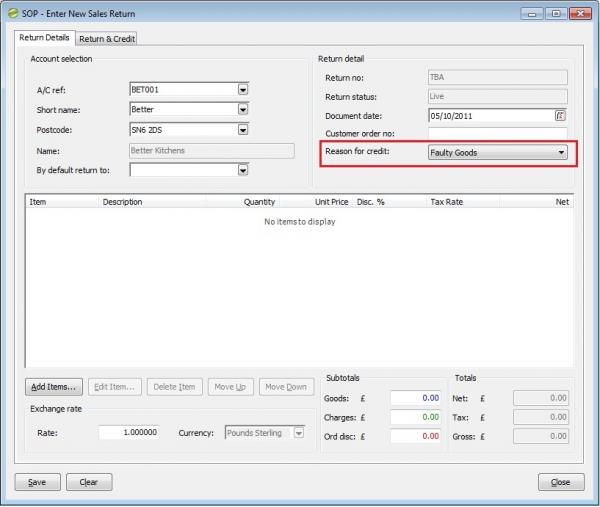
It is not possible to leave the Reason for credit selection ‘blank’ (i.e. it is a mandatory field) therefore it may be necessary to include an ‘unknown’ selection/option when setting up reason descriptions.For reporting purposes reason text is stored in the SpareText1 field of the SOPOrderReturn record.Return reasons are maintained via the module Sales Order Processing, Maintain Reason For Credit menu option.
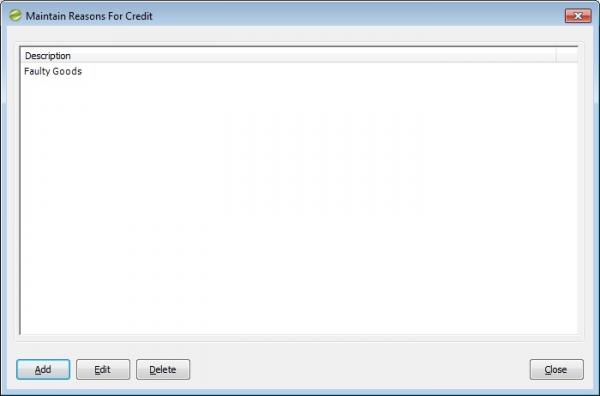
9.13. SOP013: Allow Customer Depot Addresses for Sales Orders and Quotes
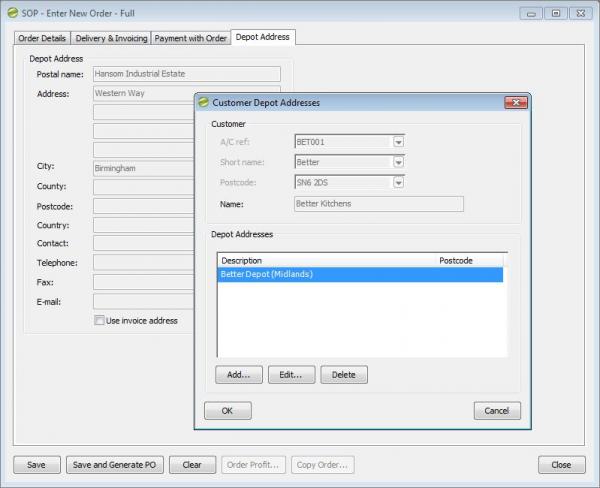
This feature is different to the sop delivery address function, that being:
- SOP delivery addresses have the function to add sub locations, Depot function does not
- Depot Function appears on a tab on the sales order, so is easily visible
- We do have an import for within our enhancement pack feature, (SOP20) an import for SOP delivery addresses
- There is no link between the 2
9.14. SOP015: Override SOP Order Line Nominal Code Using Warehouse

When a stock item is added to a sales order, the selected nominal account code will be defaulted based on the stock item nominal account and selected warehouse cost centre / department.
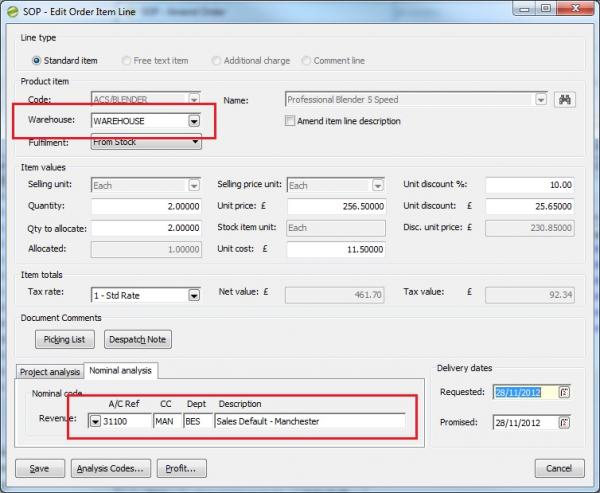
9.15. SOP016: Generate Associated Purchase Orders from Sales Order
With this feature enabled, when a new sales order is saved the user is prompted to create associated purchase order(s). There are some settings for this feature documented later which should be reviewed before you start using it.
Note that this feature requires that you are using automatic generation for your purchase order numbers. This is set in the Document Numbering tab of POP Settings in Sage.
The back to back processing in this feature only applies to when the sales order is created, so adding new lines subsequently does not result in a prompt to generate a purchase order for that line.
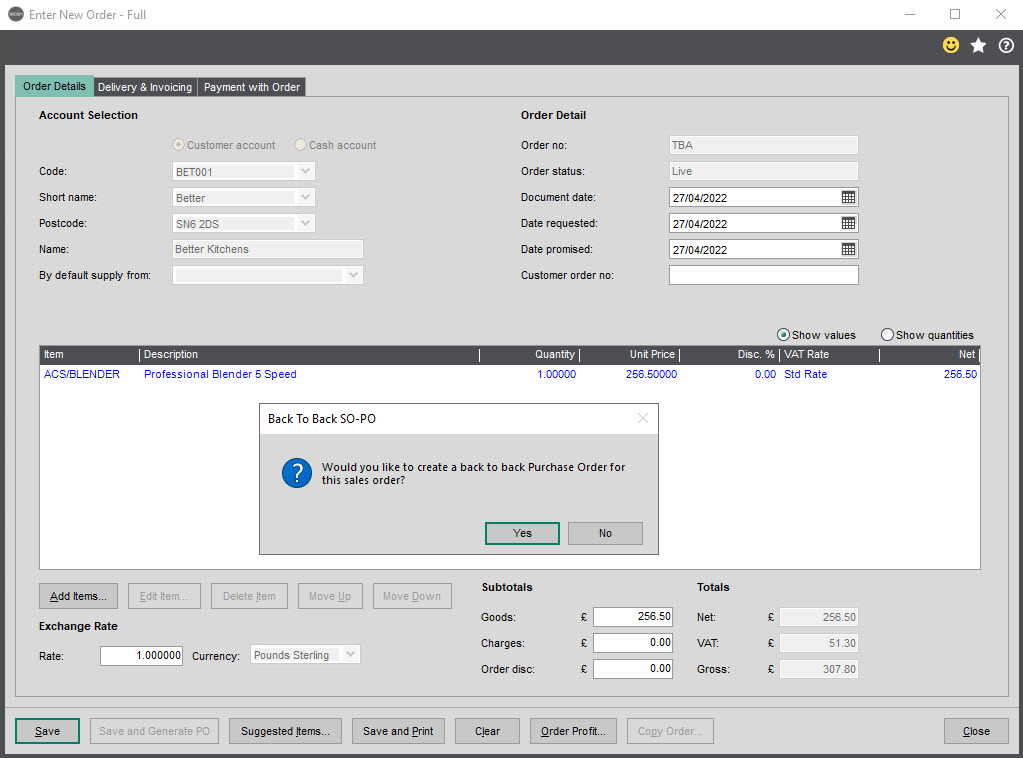
The selling price on the sales order does not set the purchase price on the generated purchase order, as you would expect as the price you are paying your supplier is hopefully different to what you are selling it to the customer for. There is also currently no connection between the dates on the orders, so these would need to be updated manually.
The purchase order generation process allows selection of the purchase order Delivery Address based on the sales order or warehouse address. This will default based on the fulfilment method of the sales order line, either to Warehouse for From Stock or to Sales Order for Direct to Customer. For Direct to Customer orders, the lines will show Direct Delivery as the warehouse in the screen below, but will actually use the warehouse selected in the Settings below.
Purchase orders are created based on the preferred supplier of each stock item, although you can change the supplier account using the drop down on the Supplier Ref field. This allows you to choose from any supplier account, not just those on the stock record.
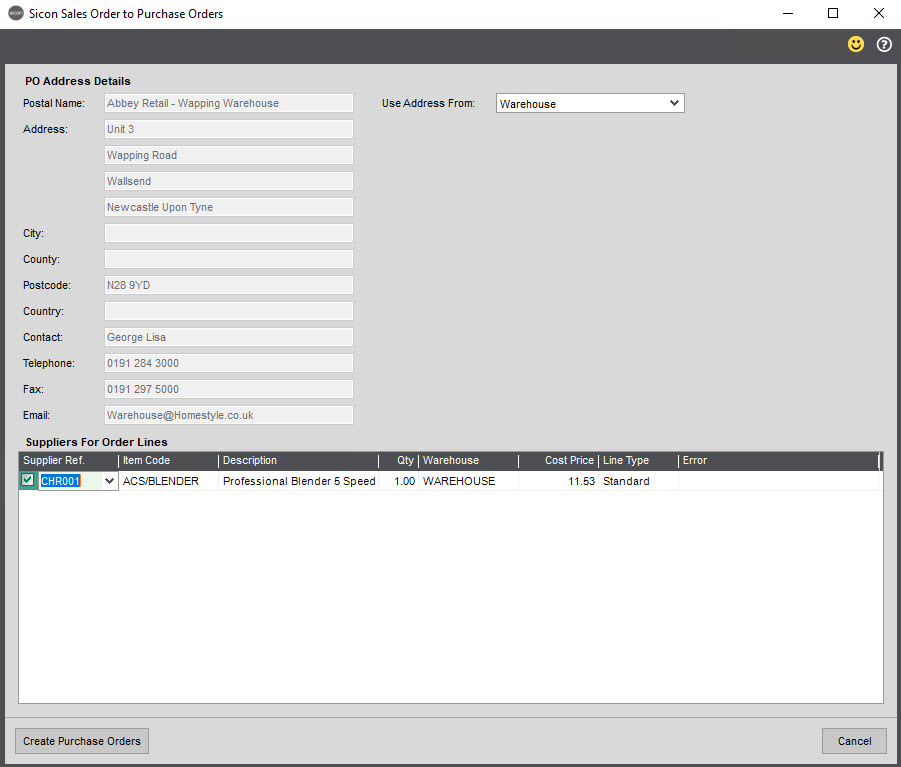
If there are multiple items on the sales order, each separate order line can be ordered from a different supplier, so your sales order could end up linked to multiple purchase orders. If any of the suppliers are over their credit limit, then the line is highlighted in red and you will see the following message and can choose the desired course of action: –
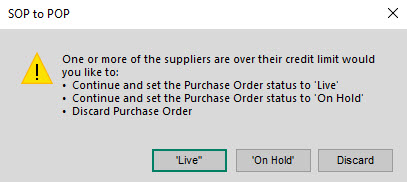
Once the orders are saved, you can see the link on the two orders via the ‘Back to Back’ tab that is added to both orders when amending them. This tab also shows despatched/received quantities, as well as invoice quantities on the orders.
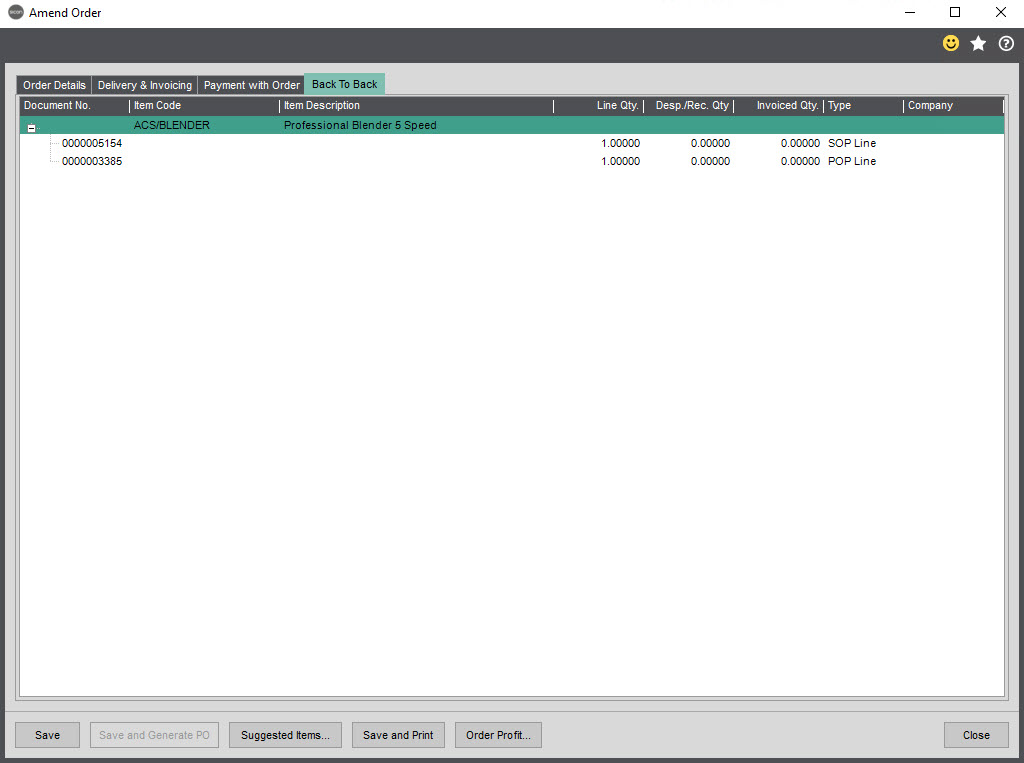
Stock items are preallocated from the purchase order(s) to the sales order, so when they are received on the purchase order (via the standard Confirm Goods Received screen), the system will prompt to fulfil this preallocation. Click Save if you want to allocate the received amount to the sales order, or Edit if you wish to adjust the amount allocated.
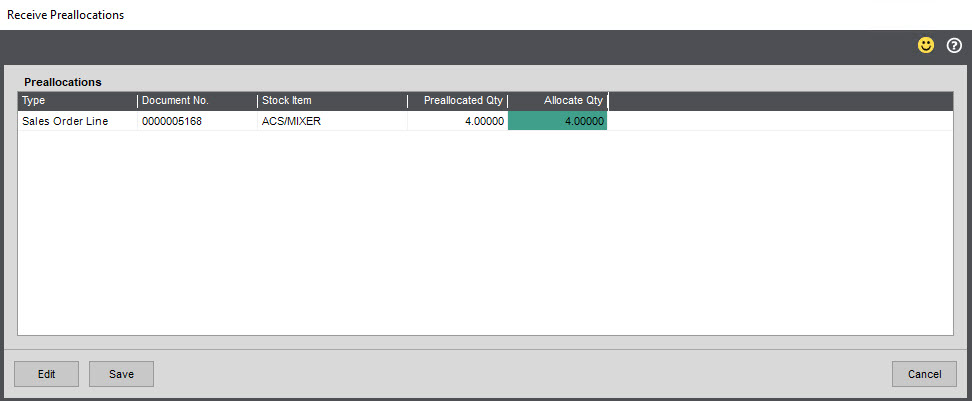
If the sales order was set for Direct Delivery to customer, then the following screen will be displayed: –

As this indicates, the sales order has now been automatically despatched. These receipts and despatches use the warehouse specified in the Settings below. Unlike standard Sage back to back processing, the use of this warehouse means that any necessary amendments can easily be made using both Amend Goods Despatched in Sales Order Processing and Amend Goods Received in Purchase Order Processing.
If the quantity received on a direct delivery purchase order is different to the quantity ordered, then this feature will update the quantity on both the purchase order and sales order lines to reflect the quantity delivered.
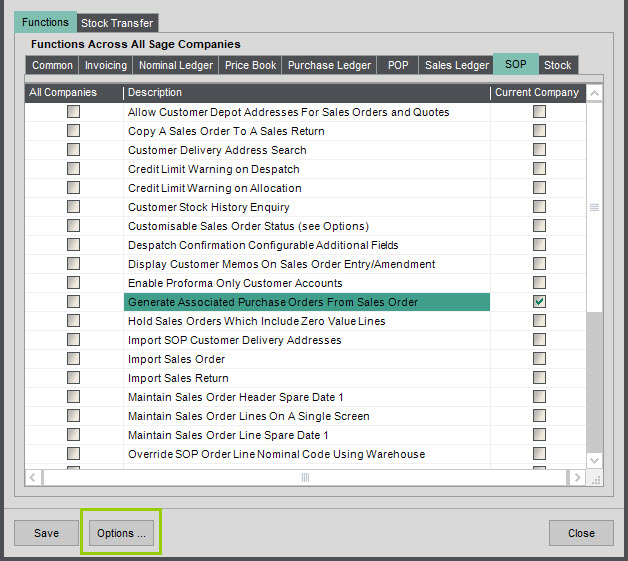
You can configure some options for this feature by clicking on the Options button with the feature highlighted in the Sicon Enhancement Pack Settings screen. These settings are all optional, although you will want to check the Direct to Customer warehouse if you are using this feature for direct deliveries.
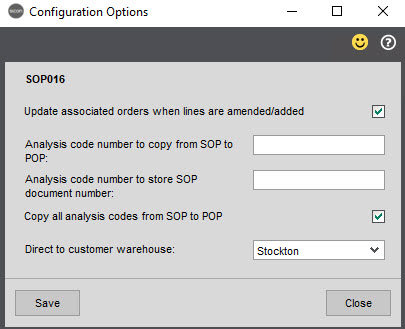
Update associated orders when lines are amended/added: This will result in changes to quantities being reflected by updating the other order. Price/date changes on either order do not impact the price/date on the other order.
Analysis code number to copy from SOP to POP: Specify an analysis code value (1-20) that you would like to copy from the sales order to the newly created purchase order. If you want to copy more than one then your other option is to copy all of them using the checkbox further down.
Analysis code number to store SOP document number: Specify an analysis code value (1-20) on the purchase order that you would like to hold the sales order number. This will still happen even if you tick the next setting.
Copy all analysis codes from SOP to POP: With this ticked, all analysis codes from the sales order are copied into analysis codes with the same numbers on the generated purchase order(s). This would be overridden for one of the analysis codes if you used the previous setting to store the sales order number in a specified analysis code on the purchase order.
Direct to customer warehouse: If the fulfilment method on the sales order line is set to Direct to Customer, which warehouse do you want to use to receive the stock into and then despatch the stock from. It is recommended that this warehouse be created for this purpose and not used as a regular warehouse in Sage.
9.16. SOP017: Customer Stock History Enquiry
A new enquiry screen is available which displays Sales Order information for all stock items ordered by a selected customer between selected dates.
This screen can be found in Sicon Enhancement Pack\Sales Order Processing\Customer Stock History Enquiry.
Items in the upper grid may be clicked to show individual order details in the lower list.
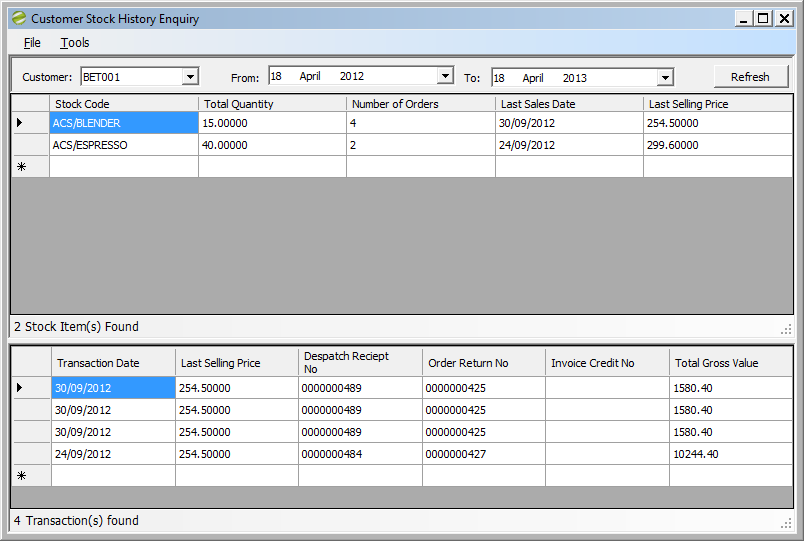
9.17. SOP018: Special Prices by Date Range
Sales order selling prices may be configured for selected stock items and date ranges.
SOP019: Print Picking Lists
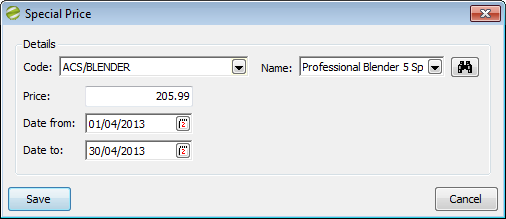
Customers may then be linked to these date-specific selling prices for:
- A specific customer
- A range of customers (i.e. from/to customer account reference/code)
- Customer accounts with a specific analysis code (e.g. customer in a specific ‘sales area’).

It is also possible to import stock item, price and date range details from a .csv file.
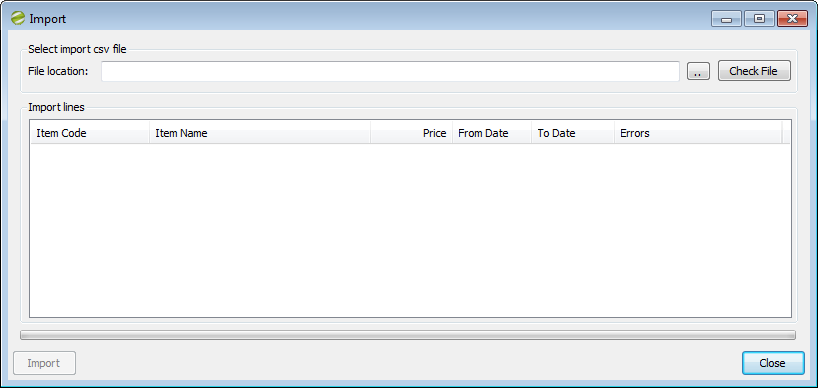
9.18. SOP019: Print Picking Lists
This is an alternative screen to the standard Sage Print Picking Lists found within Sales Order Processing. It is found within Sicon Enhancement Pack\Sales Order Processing\Print Picking Lists.
This screen differs from the standard Sage screen in the following ways
- From dates are added for order dates and confirmed delivery dates
- The Order Status feature from SOP009 is available to act as a filter
9.19. SOP020: Import SOP Customer Delivery Addresses
This function may be used to import SOP customer delivery addresses from a .csv file in the format described below. Import files must have columns formatted in the following sequence:
- Sage sales ledger customer account reference – COMPULSORY
- Delivery address description – COMPULSORY
- Postal name
- Delivery address line 1
- Delivery address line 2
- Delivery address line 3
- Delivery address line 4
- City
- County
- Country
- Post code
- Contact name
- Contact telephone number
- Contact fax number
- Contact e-mail address
- Tax number
- Set as the default delivery address (1 = yes, = no)
To use this function, select the Enhancement Pack, Imports, Import SOP Customer Delivery Addresses menu item. The Example Import File button can be clicked to generate two example import files, one of which clarifies the columns while the other is an example of an actual import file that you can update and save as a CSV file.
Use the Find button to locate the import .csv file, then click the Open button. You will then need to click the Check File button to successfully validate the import file before the Import button becomes available.
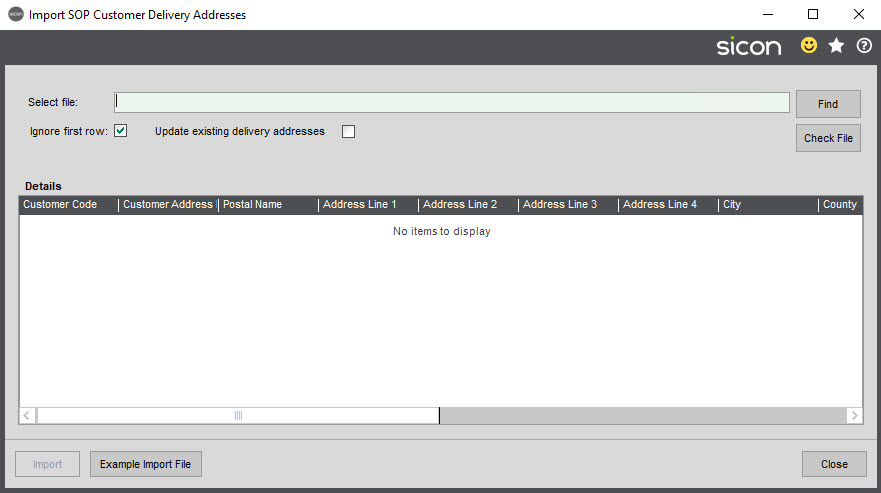
If the Update existing delivery addresses box is ticked, existing delivery addresses that match the import file customer and delivery address description will be updated. If this box is not ticked, a warning message will be shown if existing delivery addresses already exist within the system.
Click the Import button to create new delivery addresses; a message will be displayed confirming the number of address that have been imported.
9.20. SOP021: Despatch Confirmation Configurable Additional Fields
This feature enables you to configure three fields that will then appear on the Confirm Goods Despatched screen in Sales Order Processing. These fields can be configured as either text or numerical fields.
The fields are configured in the Options button, at the bottom of the Enhancement Pack settings screen where you enable the functions.

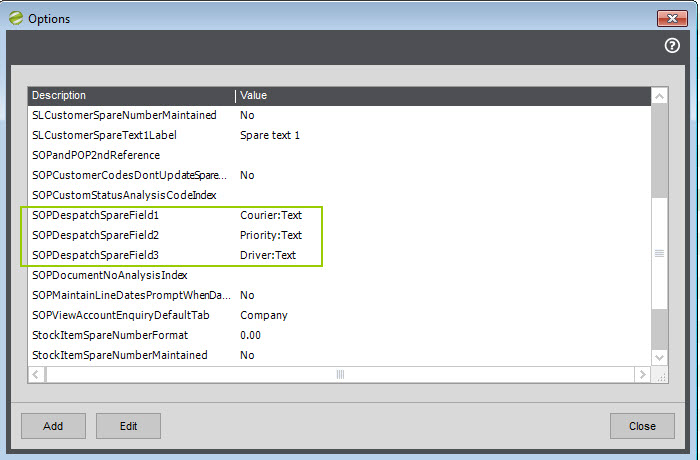
You can use the Edit button to change the values on any of the three SOPDespatchSpareField entries. The Value is made up of the field label, followed by a colon, and then the type of field (Text or Number).
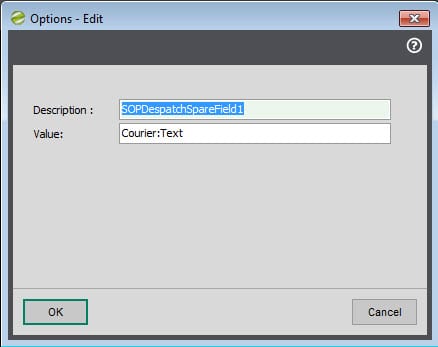
These three fields are then displayed on the SOP Confirm Goods Despatched screen where they can be edited for each despatch.

For reporting purposes, these values are stored in a table called SiSOPDespatchReceipt which is available in Sage report designer via the standard data model. This can be joined to the SOPDespatchReceipt table using SOPDespatchReceiptID. The fields used in the table will be either Text1, Text2 and Text3 or Number1, Number2 and Number3 depending upon whether the fields are configured to hold text or numbers.
i.e. if you use the first two fields for text, and the third as a number, then the fields to use in any report would be Text1, Text2 and Number3.
9.21. SOP022: Whole Order Shipping
This feature will block users from despatching a sales order if all lines on the order have not been fully allocated.
In order to use this feature, you need to enable it for the relevant customer accounts using a new checkbox added to the Amend Customer Details screen.
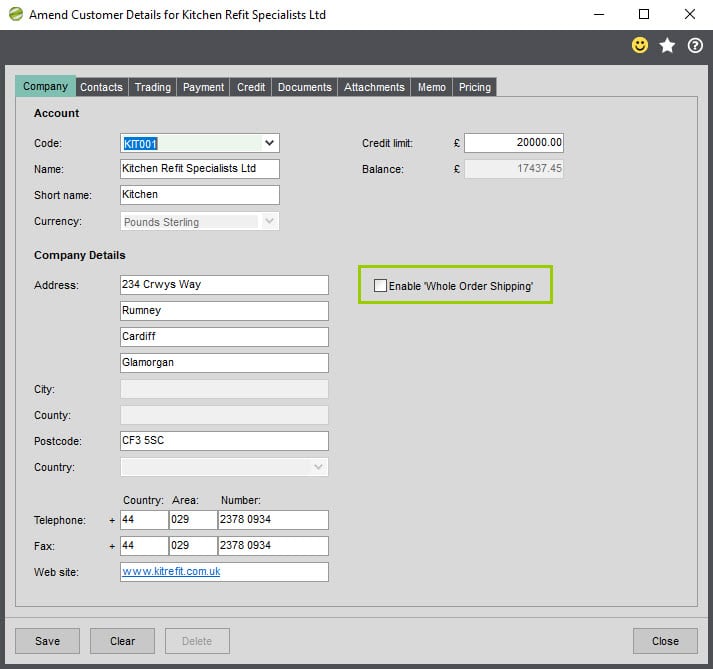
Once this is done, if you then attempt to despatch a sales order for a relevant customer account with unallocated stock items, you will receive the following message which prevents the despatch from happening.
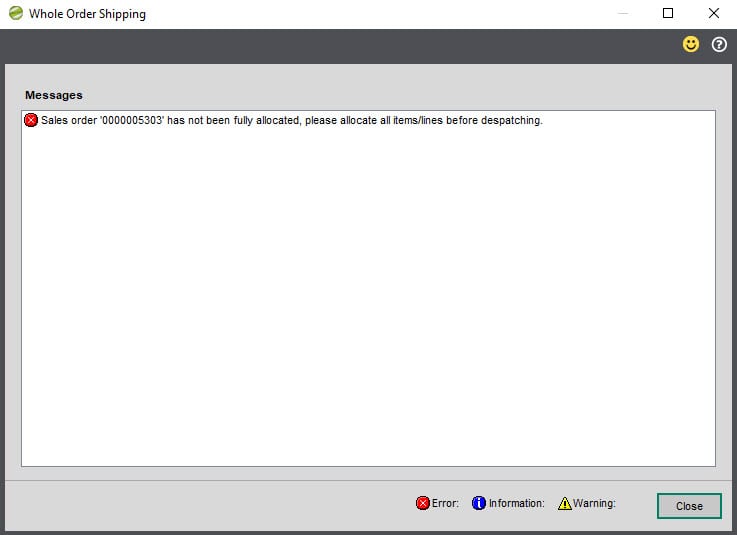
9.22. SOP023: Maintain Sales Order Header Spare Date 1
This feature enables you to configure an additional date field to appear on a Sales Order header in Sales Order Processing.
This field is configured in the Options button, at the bottom of the Enhancement Pack settings screen where you enable the functions.
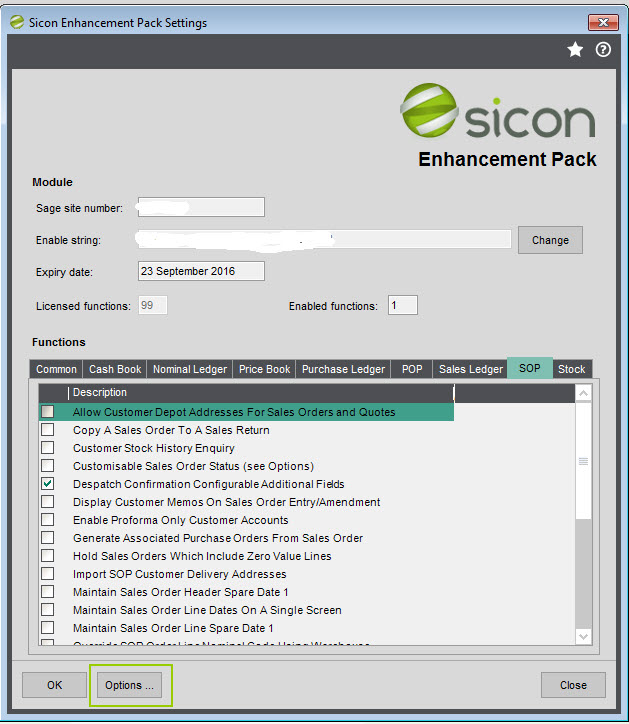
The option to edit is called SOPMaintainHeaderSpareDate1FieldLabel.

Changing the Value here will rename the date when it appears on the screen.
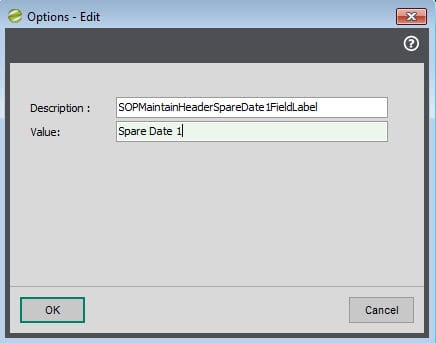

The date entered here is stored in the SpareDate1 field in the SOPOrderReturn table.
9.23. SOP024: Maintain Sales Order Line Spare Date 1
This function enables you to use a spare date field that is available for sales order lines, to give you a third date field on the sales order line.
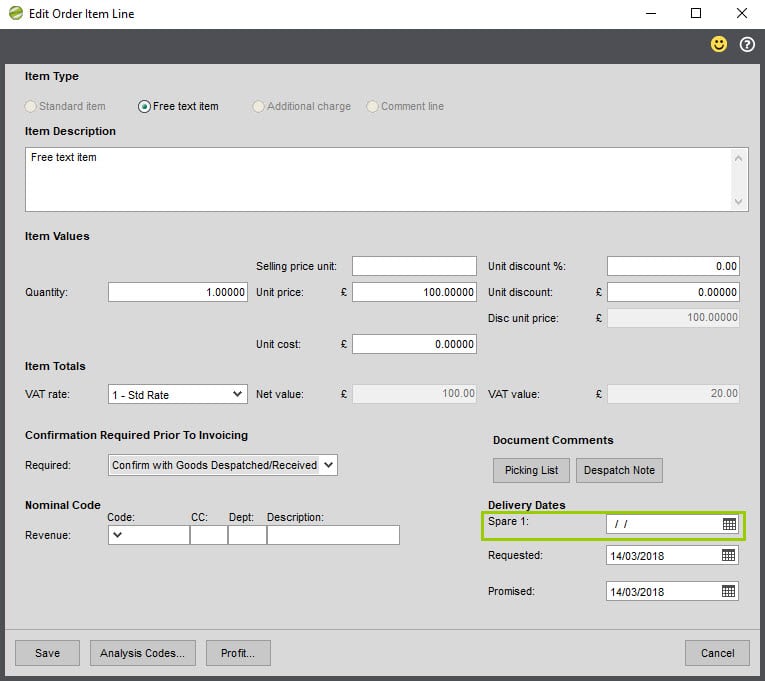
This date uses the standard Sage field SpareDate1 within the SOPOrderReturnLine table, so you should not use this feature if you have other add-ons that are already using this field.
9.24. SOP025: Set Sales Order Line Dates Based on Header
This feature will display a prompt to update the Requested Date or Promised Date on sales order lines when the same field is updated on the sales order header. If you click Yes, then the header Delivery Requested date will be copied into the same field on each line, overwriting any existing dates.
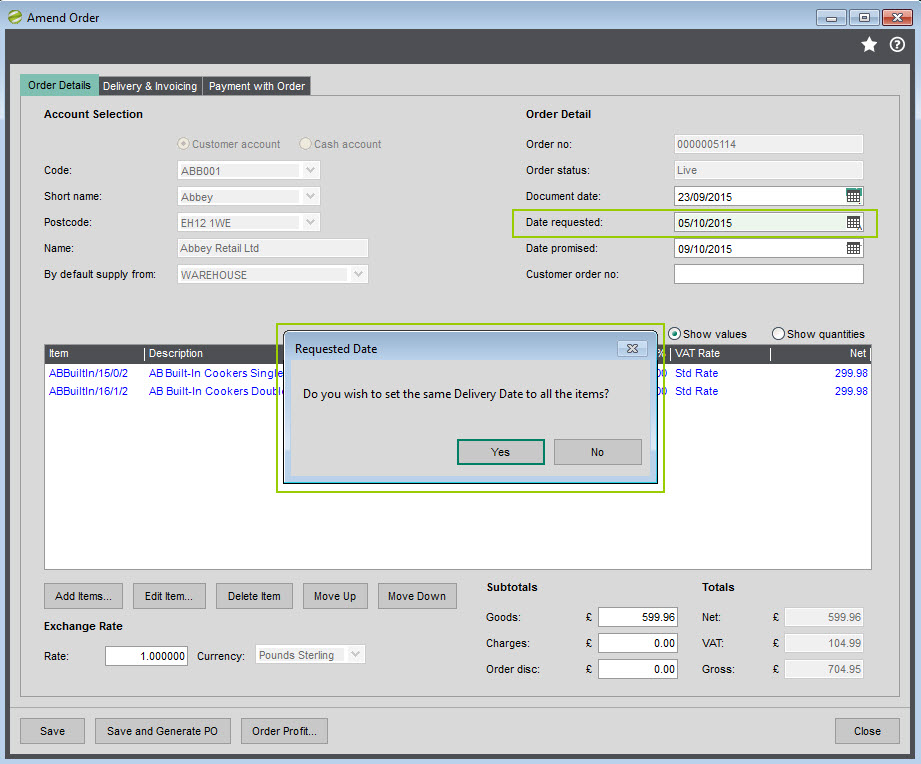
9.25. SOP026: Suppress Discount Percentage on Customer Prices
This feature enables you to put controls in place as to when a customer discount percentage should be applied.
If when entering an item on a sales order, the item selling price does not match the selling price on the standard price band, then no further discount will be applied to that selling price.
Eg. A customer account has been specified as having a 10% line discount in the Sales Ledger. The customer is also on a different price band from the standard price band. An order is then entered for two different stock codes for this customer: one of the stock codes has a non-standard selling price on the customer’s price band. For the item that does match the standard price band price the customer’s 10% line discount will be applied, but in the case of the item with the non-standard selling price then this feature would block the 10% line discount.
9.26. SOP027: Post Selected Invoices and Credit Notes
This feature enables a new screen within the Enhancement Pack menu that gives you different options for posting SOP invoices and credit notes. This new screen has the benefit of showing you what is going to be posted, before it happens.
This new screen can be found within the Sales Order Processing sub menu of the Sicon Enhancement Pack menu group.
Using the filters in this screen, you can filter the unposted invoices and credit notes by type, using the invoice/credit date in a date range or for a single customer, selectable in the drop down. You can use the Clear button to reset the filters, and the Refresh button will update the displayed list of documents if you have changed any of the filters.
You use the checkboxes to the left of the document numbers to confirm which documents you would like to post, before confirming with the Post button in the bottom left hand corner.
New Function post release 17
Post is the original function and is retained, except you can now edit the customer order number per line in-situ (it asks confirmation and reverts if you say no):
The Reprint tab allows you to do the same thing except for orders already posted, meaning you can re-print invoices with a revised order number

9.27. SOP028: Credit Limit Warning on Despatch
This feature will issue a warning screen when saving a confirm goods despatch if a customer on a despatch line is over their credit limit.
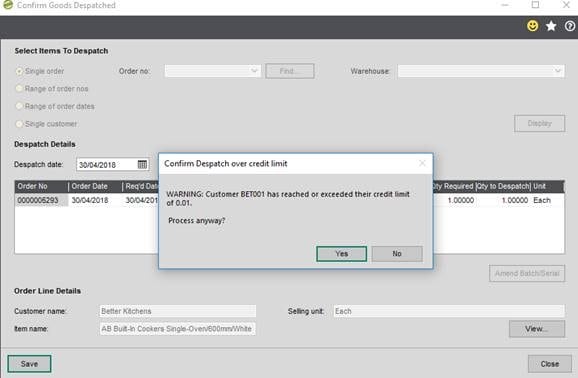
You can choose to ‘Process anyway (Continue) or Say No and ‘Close’ (Which in turn will mean you cannot despatch the goods out, and would need to wait until customer is within their limits again).
Only one warning will be issued per customer for each save.
9.28. SOP029: Save, Allocate and Despatch from Sales Order Screen
(And function to despatch & Invoice on despatch Screen)
This feature adds a button the the SOP Enter New Order screen, which chains together the Saving of the Sales order with stock allocation and finally bringing the user to the standard Sage 200 despatch screen for final confirmation or adjustment.
If automatic printing of SOP Acknowledgements and Picking Lists are enabled in sage, these reports will also be generated as part of the process.
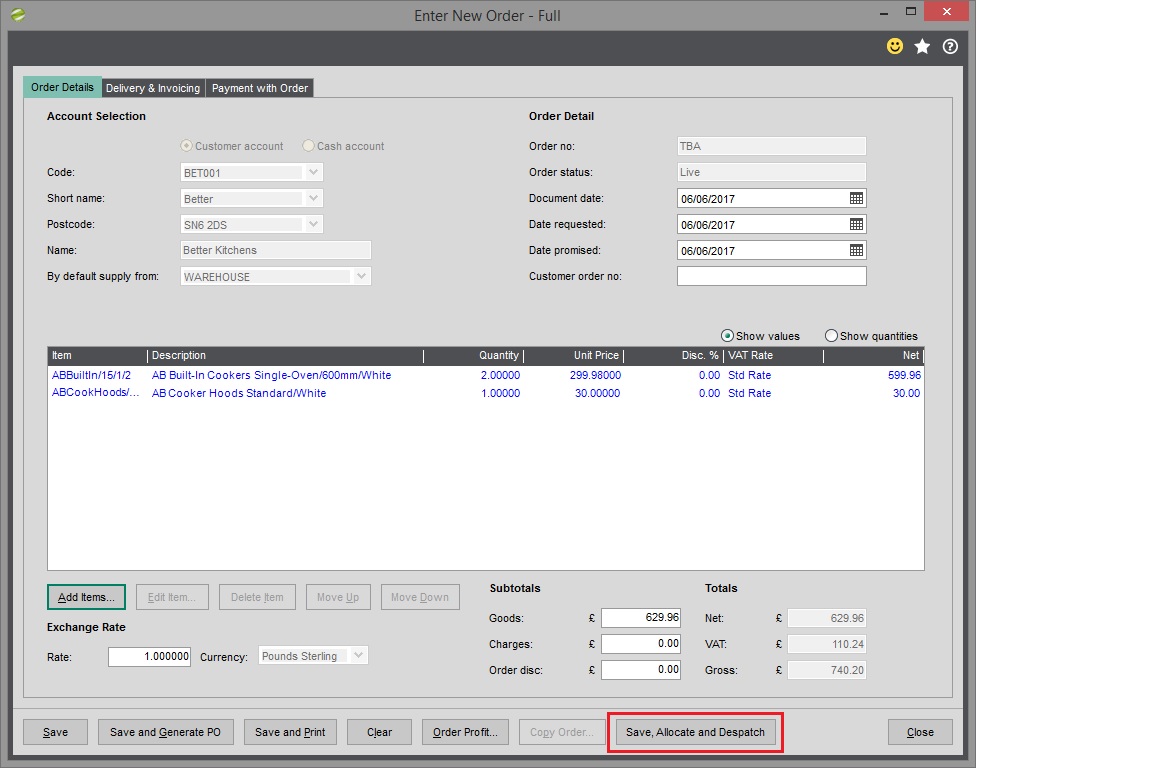
* All Sales Order lines will be fully allocated if stock is available.
* If negative stock is enabled for the Stock Item Group, then then the line will be fully allocated even if stock is not available.
* If there is no sufficient stock to fully allocate a line, then the line will not be allocated and a warning message will be displayed.
On the despatch screen users will see an additional Despatch and Invoice Screen (to be used with care)
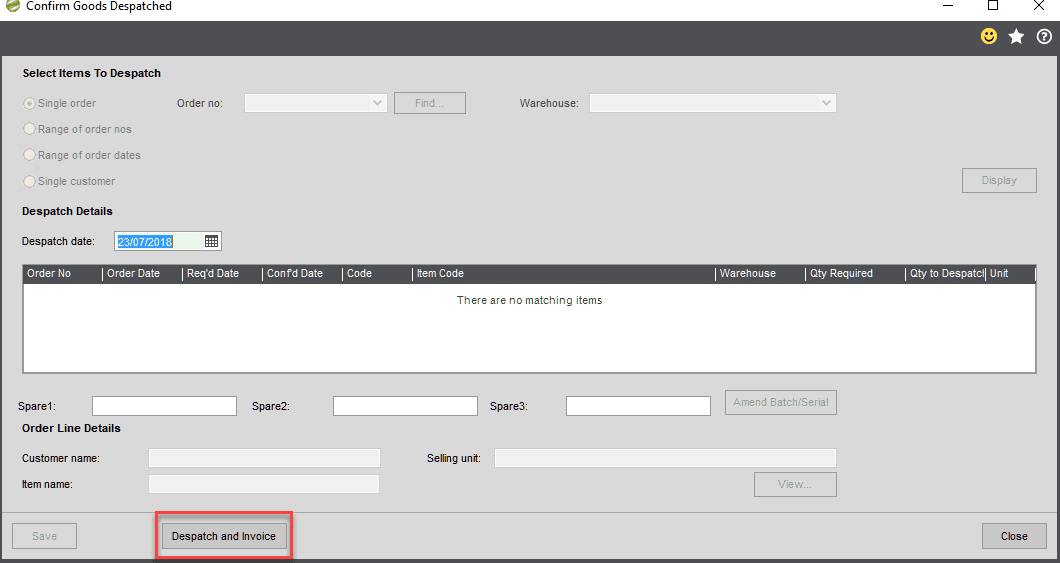
9.29. SOP030: Customer Credit Limit Warning on SOP Allocation & Edit SOP Allocation
This feature will issue a warning screen when allocating or editing an allocation if a customer on the relevant sales order is over their credit limit.
Users will see these warnings whether they select the order from the Sales order list and use the short shortcut to Amend Allocation or if they use the main Sales Order Menu Method.
This feature will work if the system is set to auto allocate or not. If users have it set to Auto allocate then, it will be when the user amends the order, they will see a warning, or when they amend allocations.
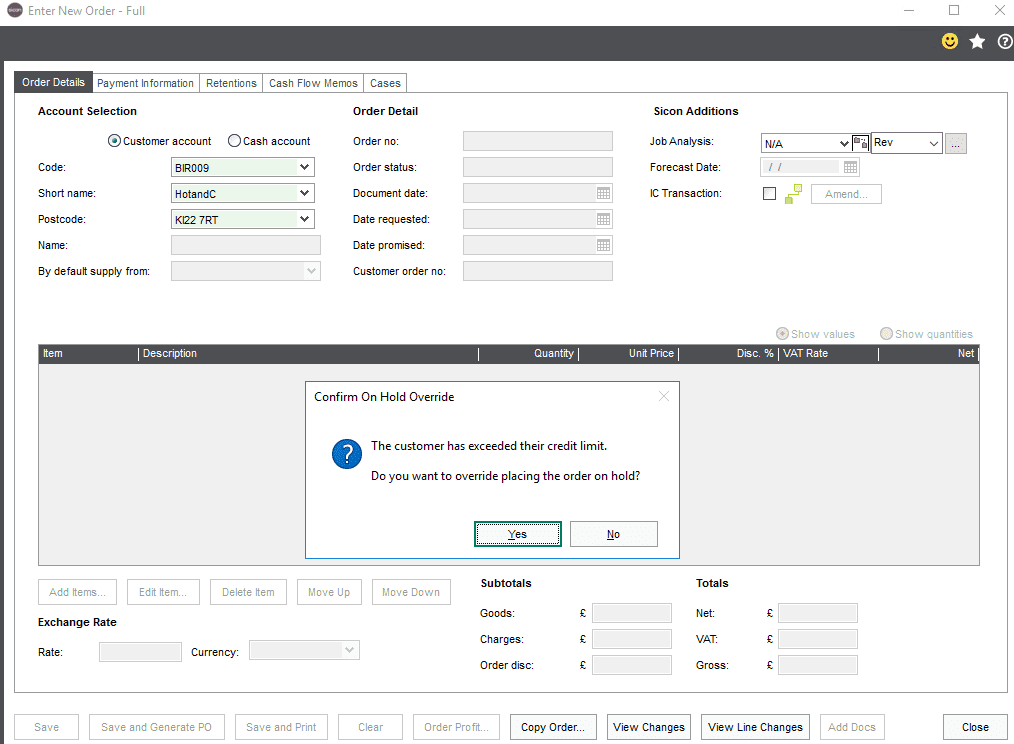
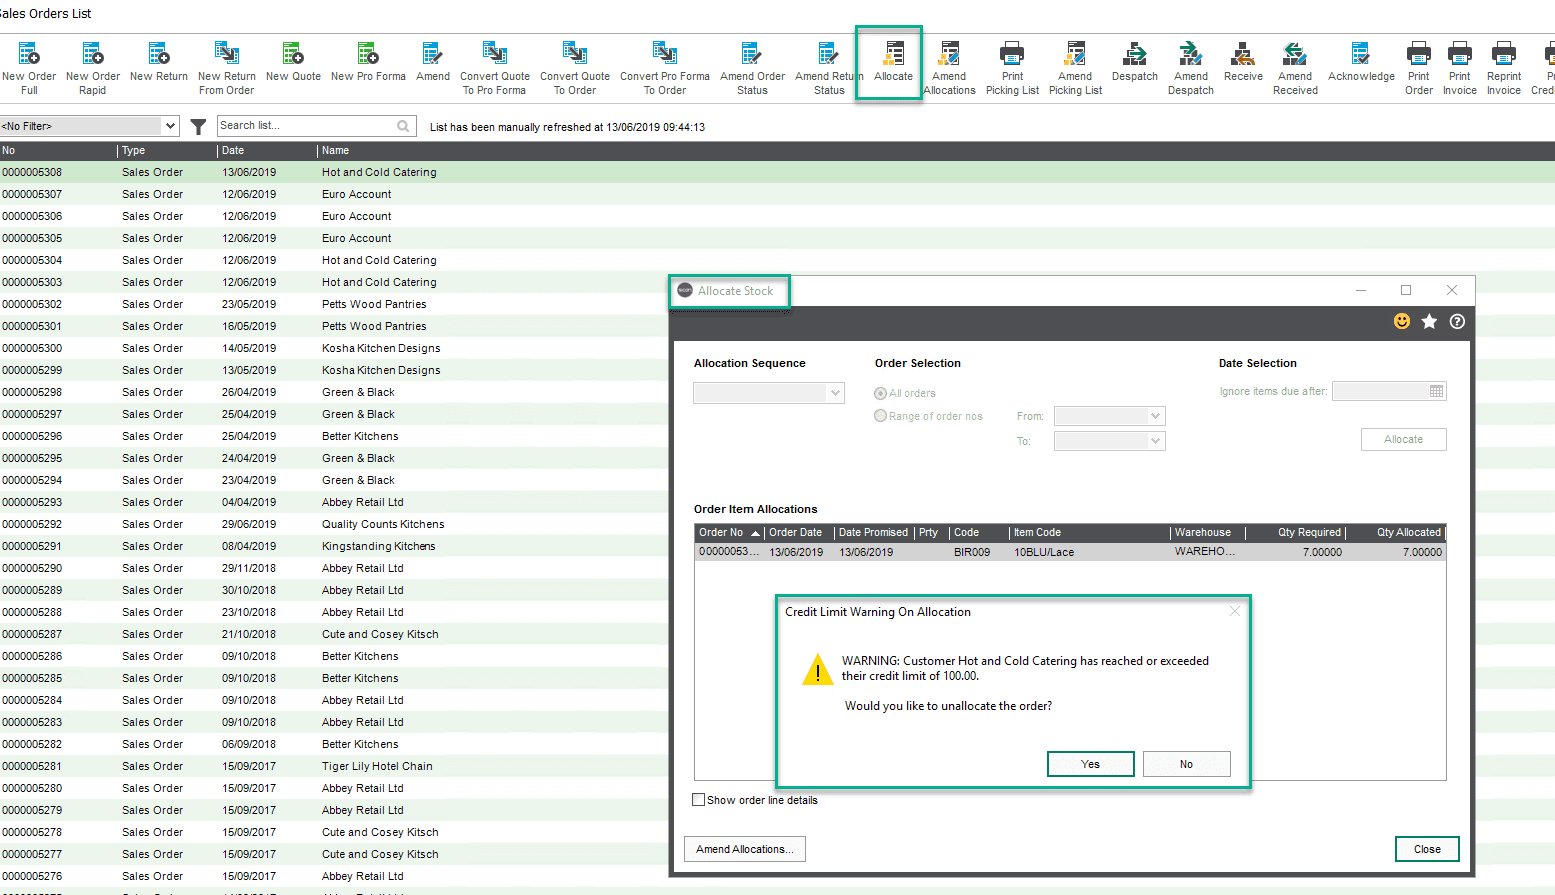
Amend allocation from shortcut
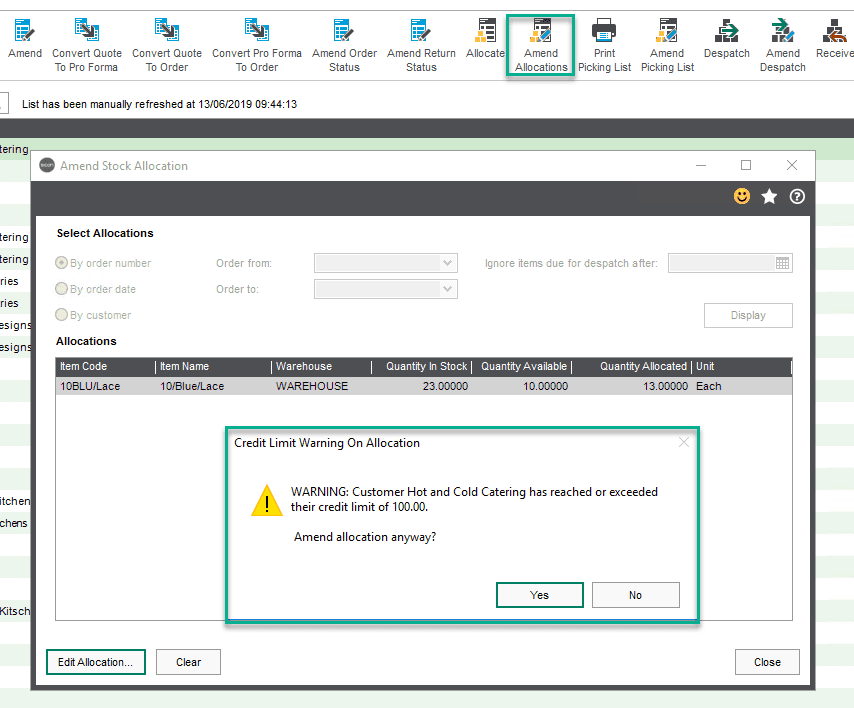
Amend allocation from menu
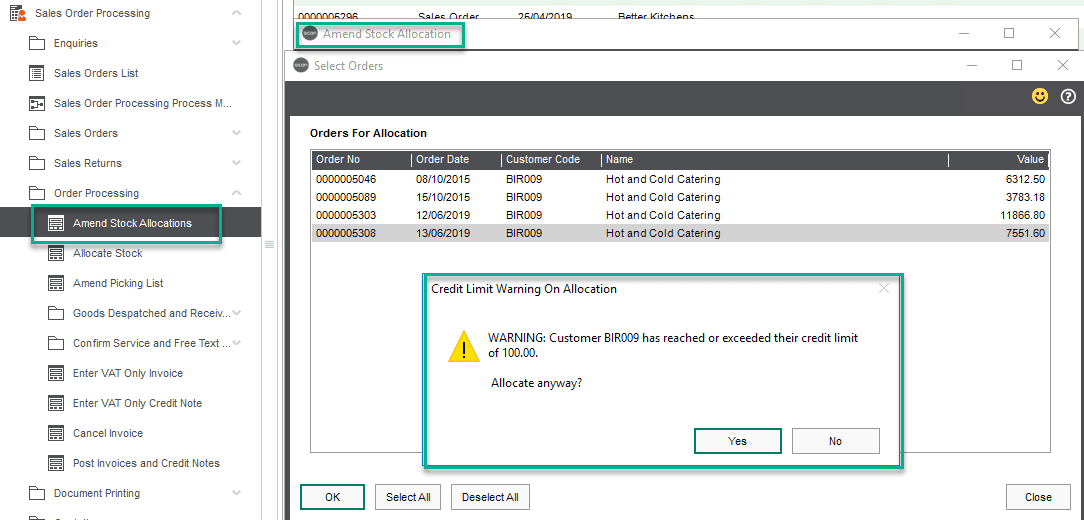
9.30. SOP031: Customer Delivery Address Search
This feature enhances the standard customer delivery address window. So when you are in a sales order and click the Change button beneath the delivery address, you’ll see this window.
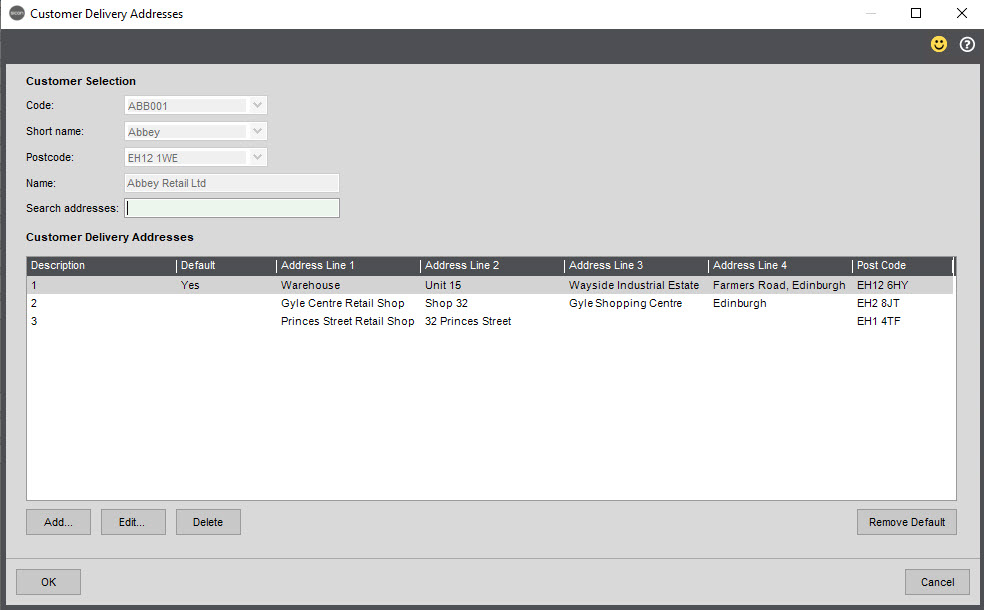
In comparison with the standard Sage Customer Delivery Addresses screen, this one adds
- The Search Addresses button
- The columns displaying the Address Line 1-4 and Post Code fields.
As you type text into the Search Addresses field, the results automatically change to only display the addresses that have your search text contained within them from the fields displayed in the window.
9.31. SOP032: Sales Return Import
This function enables you to import sales returns. The import can be used to import multiple lines onto the same new sales return(s), and all four of the standard Sage line types can be imported (Standard Items/Free Text Lines/Additional Charges/Comment Lines). The imported sales return(s) will be treated as a new order, so it is not possible to import quantities and indicate that they are already part despatched or part invoiced. If this was the case, then you would need to import the outstanding quantity on each line.
From within the Sicon Enhancement Pack\Imports menu choose the Import Sales Returns menu option, after selecting your import file you are presented with the following screen to process the import. You will need to create a file in a CSV format to import.
You can use the Find button to browse to the import file.

The Check File button will check that your file is in the correct format, and advise you of any errors that need to be corrected. The Import button will perform the import. Only when the file is validated will the Import button become available to allow you to complete the import.
The Example Import File button will create two files that will open in Excel. One is an example import file for you that can then be saved in csv format to import. The second file provides an explanation of each column in the import file, and advises which columns are compulsory as opposed to optional.
The columns relating to analysis codes allow you to import up to 20 analysis code values for the sales return header and begin with a header titled Sales Return AnalysisCode x (which would need to be repeated if there were multiple lines for the same order), and also up to 20 analysis code values for the lines themselves (the header for these are AnalysisCode x).
10. Stock
This section includes enhancements that are specific to the Sage Stock module.
10.1. STK001: Stock Item Maintenance Enable Country of Origin
This function allows the stock item Country of Origin to be maintained despite the Sage system not being set with a base currency of ‘Euros’.
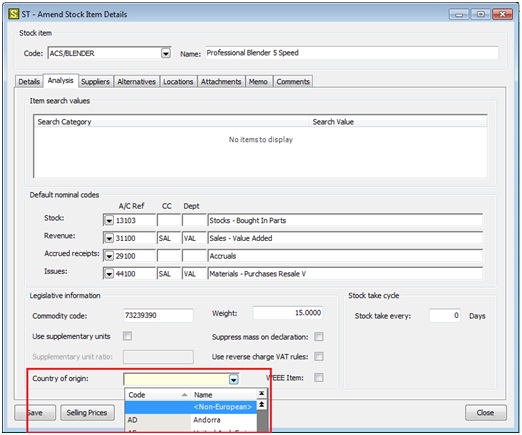
10.2. STK002: Stock Item Customer Codes
This function allows maintenance of additional customer specific codes and descriptions against stock items.Warning – Use of Sage Sales Order/Return Line Record ‘Spare’ FieldsThis function uses the following Sage sales line ‘spare’ fields to store customer stock codes and descriptions. This module should NOT be installed until checks have been made to ensure that these ‘spare’ fields are not used by other/third-party bespoke functions.
SpareText1 is used to store the stock item customer code
SpareText2 is used to store the stock item customer description (see configuration option below)
SpareNumber1 is used to store the customer stock code record ID
Customer codes and descriptions are also shown on the View Stock Item Details (enquiry) screen.
Customer code details are stored in a bespoke database table named SiStockItemCustomerCode.
The customer code and customer description entries can be up-to 256 characters in length.
Sales Order Processing
When adding a new item to a sales order a button is available to allow selection by customer codes.
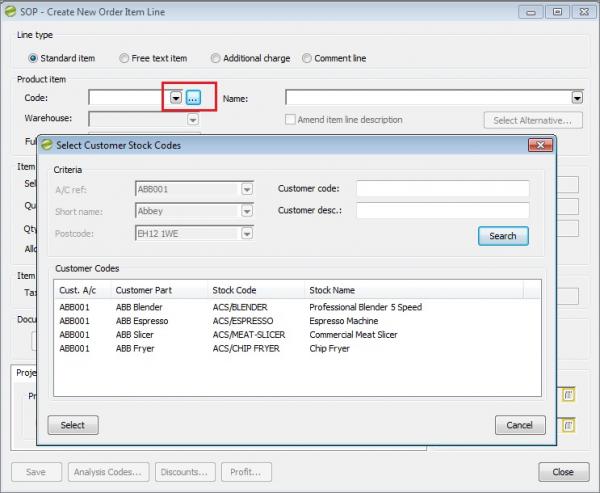
For reporting purposes, when a sales order is entered/amended, stock item related customer code and description will be automatically written to the SpareText1 and SpareText2 fields on the standard Sage database table SOPOrderReturnLine.
If a customer code or description is longer than 100 characters, it will be truncated when stored at this point.
This value is stored at the point of the sales order being saved, therefore subsequent changes to customer stock item codes/descriptions will not be applied to this sales order unless the order is edited/re-saved.
The customer code unique record ID (SiStockItemCustomerCodeID) will be stored in the sales order line SpareNumber1 field. This may be used in reports to link to current customer code data should the truncation or code/description update restrictions above cause an issue.
Configuration Option ‘SOPCustomerCodesDontUpdateSpareText2′
(added v2011.0.7)
This configuration option was added to suppress the stock item customer description being written to the SpareText2 field on the sales order/return line record. This may be useful if the SpareText2 field is used for other reasons. To suppress this field being written/updated, set the option to Yes.
Import Customer Stock Codes
(added v2011.0.2)
The Sicon Enhancement Pack, Stock, Import Customer Stock Codes can be used to import both customer codes and description from a .csv file in a specified format; i.e. Sage customer code, Sage stock item code, customer stock code, customer stock description.
A sample/template .csv files is provided with the module installation components and you can download this directly from the product.
NB: please be aware that any old templates that you may still have will no longer work, they have to be generated using the Example Import File button within the Sicon Enhancement Pack product.
You will initially be prompted to select the import .csv file and all import file records will be validated with any invalid Sage customer or stock codes shown on-screen as errors.
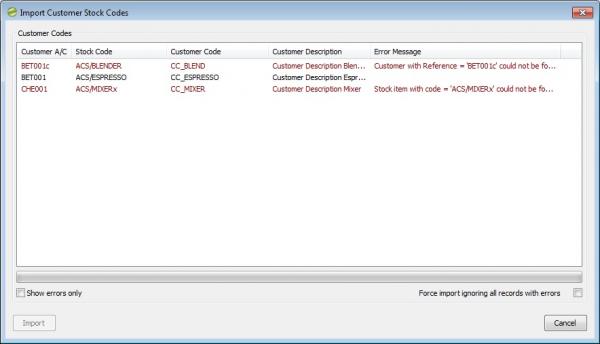
If errors have been found the Show errors only tick-box is useful in filtering the list to display only invalid records.
The import will add any new customer stock codes and update customer codes for any customer and stock item combinations which already have a code setup.
10.3. STK003: Stocktake Extended to Use .csv Files
NB: it is not possible to use this function with traceable batch/serial controlled stock items.
NB 2: this feature currently takes into consideration any stock Min. Max limits set against stock records and will not import any over / under’s ( We are looking to allow Act Qty to be higher or lower than Min. Max in a release due late 2016)
Part 1 – Stocktake Generation
Before using the extended stocktake function, a new standard stocktake should be created using the Sage Stock Control, Adjustments, Manage Stocktake screen.
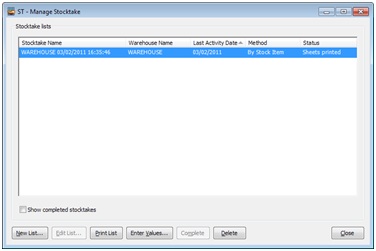
Click the New List… button to create a new stocktake list, on the following screen select a warehouse and then click Display. Choose the items to be included in the stock take using the on screen functions/buttons.
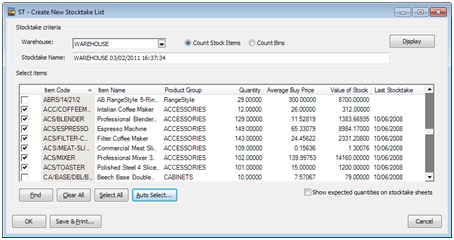
The new stocktake must be printed using either the Print List button on the Manage Stocktake screen or the Save & Print… button on the Create New Stocktake List screen.
Once generated and printed, please go to the Enhancement Pack module, sub menu Stock Control. The new stocktake will appear when the Load Stocktakes button is clicked on the Enhancement Pack Extended Stocktake screen.
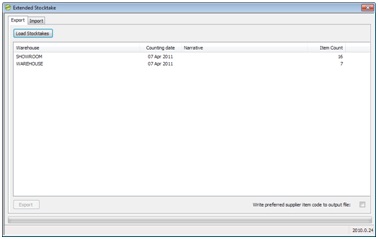
Select the required stocktake from the list of warehouses and then click the ‘Export’ button to write the details to a .csv file (which will be editable using Microsoft Excel).
If the stocktake has not been printed the message ‘No items have been selected for the stock take, ensure that sheets have been printed’ will be displayed.
Following the export the resulting .csv file may be edited (using Microsoft Excel or similar) to stock item update ‘Actual Quantities’ in stock.
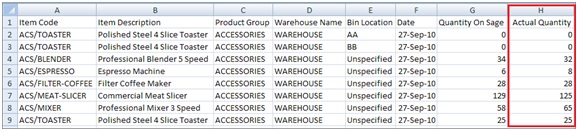
NB: It is essential that only the Actual Quantity column values are updated and columns or rows are not added, removed or re-sequenced. Any such amendments could result in the failure of the import process.
Part 2 – Stocktake Import
Once all actual stock levels have been updated on the .csv file, these values may be imported back into Sage.
Select the Stock update method (see below) and then click the Select button on the Stocktake screen Import tab, then select the updated stocktake file using the file/open screen. The screen list will import all stocktake records from the selected file.
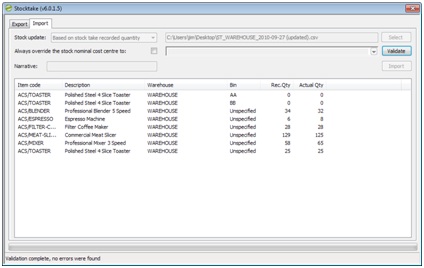
Click the Validate button. The system will check that all stock items and warehouse locations still exist in the Sage database. Once validated, text may be entered in the Narrative: field. This text will be stored against all stock movements associated with the stock take.
When the Import button is clicked, stock movements will be automatically posted to the Sage stock system to adjust stock levels based on recorded and actual stock quantities.
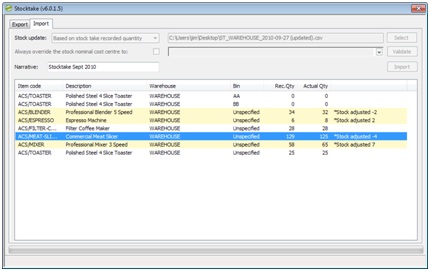
All stock adjustments will be shown on the standard View Stock Item History (enquiry) screen.
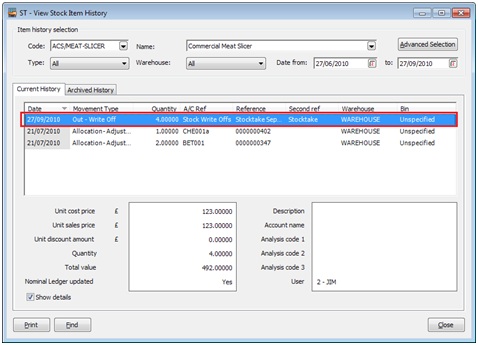
Stock Update Methods
Option 1: Based on stock take recorded quantity (default)
When using this method stock levels will be updated based on the actual stock level on the import file and the stock level at the time that the stocktake was recorded. For example:
Stocktake recorded quantity = 12
Actual quantity counted/entered = 8
Current stock level = 11
Result = The stock level will be reduced by four items (i.e. 12 8)
Option 2: Based on current stock quantity
Stock levels will be updated based on the actual stock level on the import file and the current stock level at the time of import. For example:
Stocktake recorded quantity = 12
Actual quantity counted/entered = 8
Current stock level = 11[/checklist]
Result = The stock level will be reduced by three items (i.e. 11 8)
10.4. STK004: Stock Location Wizard
This function may be used to add/remove warehouse and bin locations for single or multiple stock items. It’s a three/four-stage wizard that will lead you through this process. The menu option can be found within the Stock Control folder in the Sicon Enhancement Pack menu options.
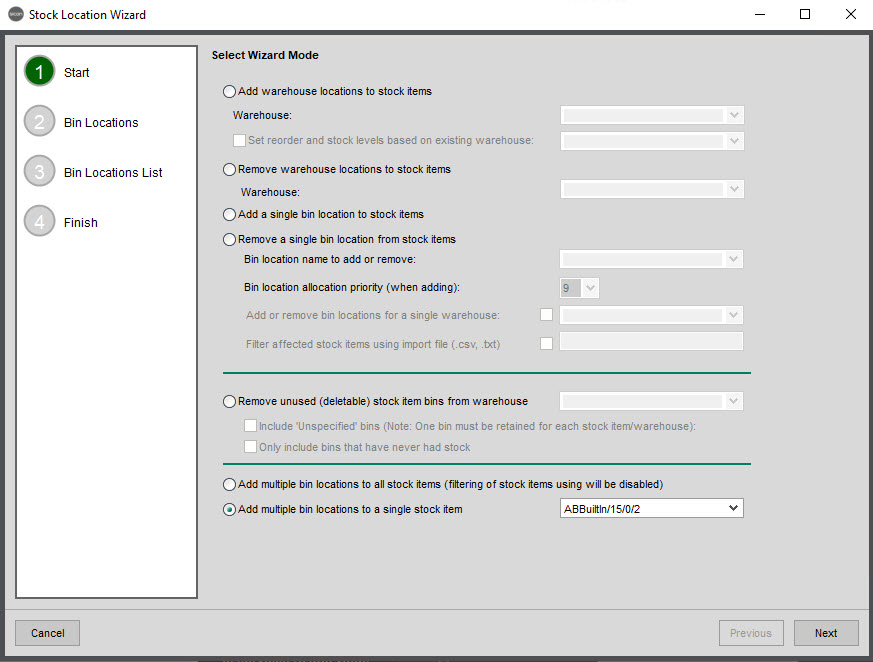
Add Warehouses Locations to Stock Items
This option allows you to add a new warehouse location to multiple stock items. The reorder, minimum and maximum level values can be copied from any existing warehouse. You would tick the appropriate checkbox in this section, and select the relevant warehouse from the dropdown.
Once you have selected the warehouse that you wish to add to the stock items and confirmed the checkbox for reorder and stock levels, then you progress to the second stage using the Next button.
The second stage is to select the desired stock codes that you wish to add the new warehouse location to. All active stock codes are displayed and ticked by default. A separate check box at the top of the screen allows you to also include inactive stock codes in the list. When you are happy that you have selected the desired stock codes, then you click Finish.
Remove Warehouse Locations from Stock Items
This option functions in an identical manner to the previous option, apart from the specified warehouse is removed from the stock code instead of being added.
Stock codes that currently have any non-zero stock level in the selected warehouse will not be displayed, as you can’t remove the location from that item if this is the case.
Add a Single Bin Location to Stock Items
This option needs you to either select an existing bin name from the Bin location name to add or remove drop-down list, or free type a new bin name into that field.
When adding bin locations, a default allocation priority can be set for the new bin.
You can also specify to just add the bin location to a single warehouse by selecting the appropriate warehouse in the Add or remove bin locations for a single warehouse field, having ticked the box to the left of the drop-down list. If you don’t do this, then the new bin will be added for all warehouses for the selected stock items.
You can also choose to filter the stock codes to be updated via a csv or txt file, see details below.
Remove a Single Bin Location from Stock Items
This option functions in an identical manner to the previous option, apart from the specified bin is removed from the stock code instead of being added.
It is not possible to remove bin locations which currently hold a non-zero stock level. You also can’t remove the only bin for a stock item in a warehouse.
Filter Affected Stock Items Using Import File
It is possible to filter the stock items that should have the selected warehouse/bin location added (or removed) using either a .csv or .txt file.
The import file must have a single column which contains a list of valid stock items to be maintained. All stock item codes will be validated against the Sage database before the filter is applied. When you tick the box to select this option, you will be prompted to browse to your .csv or .txt file. You then click Next to go to the next stage of the wizard which will confirm the stock items that will be selected.
Bear in mind that if you are not setting all of the expected stock items in the file, it may be because you are also filtering for a single warehouse, and some of the stock items may not exist in that warehouse. These stock codes would be ignored, so wouldn’t appear in the second step.
If you also wanted to include stock items that are currently inactive, you have the opportunity of checking the box in the second step at the top of the screen to include them.
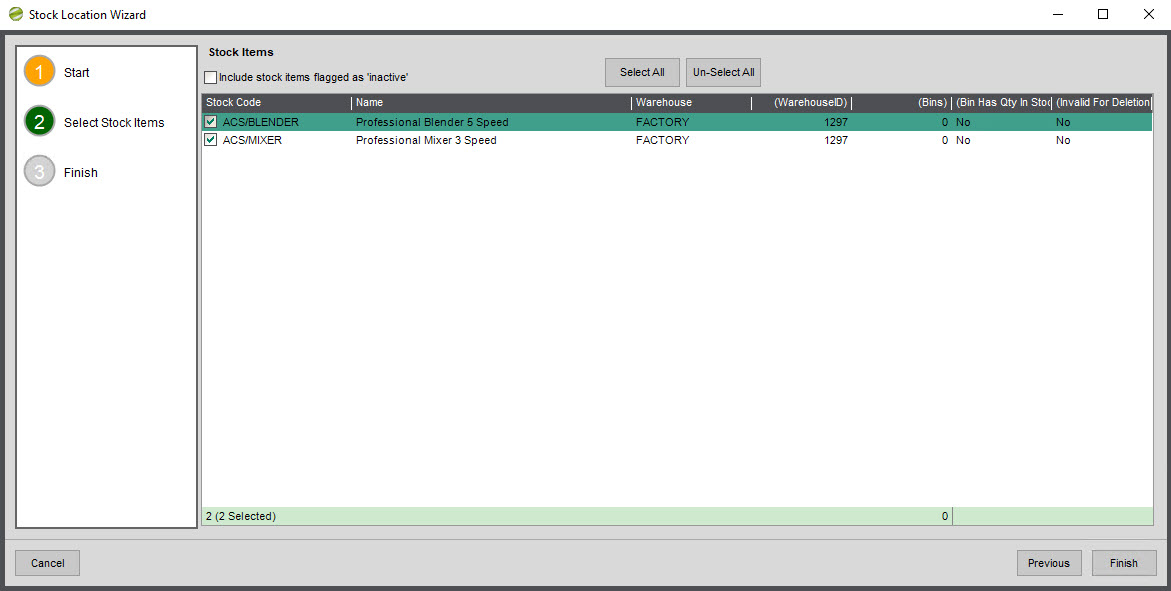
Remove Unused (Deletable) Stock Item Bins from Warehouse
Using this option, you can tidy up the bins in your warehouse location and remove any that can be deleted. You can only do this one warehouse at a time (selecting the relevant warehouse in the drop down), and have two options available to tick.
- Include ‘Unspecified’ bins
- Only include bins that have never had stock
A Deletable bin is one that doesn’t currently have any stock in it. This wizard will ensure that at least one bin remains per stock item for the selected warehouse.
Add Multiple Bin Locations to All Stock Items
You can use this routine to add one or more bins to manually selected stock items, either for a single warehouse or all warehouses.
This process currently doesn’t allow for filtering of stock items using a .csv or .txt file to select the stock items. However, manual selection/de-selection of stock items may still be made using tick-boxes.
If adding multiple bins, then in the second stage of the process you can either add the name of each bin, or import the bin names. The import file can be either a .csv or a .txt file, and just needs to contain the bin names on separate rows.
If adding more than five bins, the following warning message is displayed:
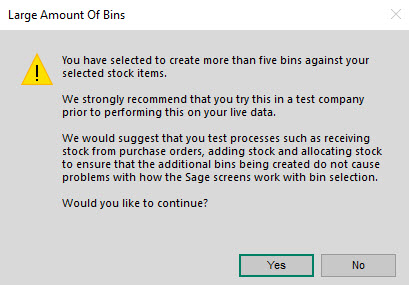
This warning message is displayed for two reasons. The first is that the time required for the process of adding bins could be a long time if you are adding multiple bins to a large amount of stock items. The second is that having a large number of bins against stock items can make some screens in Sage difficult to use. For example, having 500 bins on a stock item can make it very difficult to select the correct bin during allocations, and can make the stock balances screen difficult to use to find which bins have the stock that you are looking for.
Click the Next button to display a list of stock items that will have new bins created for them. At this point it is possible to selected/deselect the stock items.
You can also select whether you are adding the bins in all warehouse locations, or specify a single warehouse location.
The Include stock items flagged as ‘inactive’ box may be ticked if locations should be added (or removed) for inactive stock items. This tick box is not available when stock items have been filtered using a .csv file (as described above).
You can also specify an allocation priority which will be applied to all of the bins that you are about to create.
The third stage of the wizard will display a list of all stock item/warehouse/bin locations that are about to be created. This process could take some time if you are creating a large number of bins.
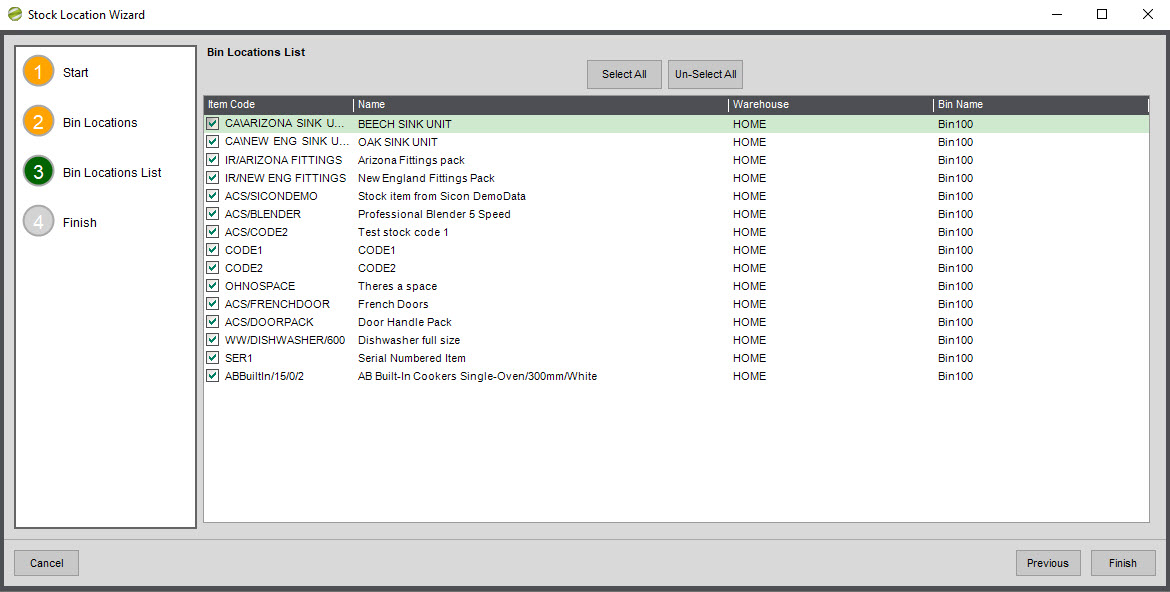
When the Finish button is clicked, locations will be added to the checked/ticked stock items and a confirmation message displayed.
Add Multiple Bin Locations to A Single Stock Item
This feature works the same as the previous feature, but only for a single stock item that is specified at the start of the wizard.
10.5. STK005: Import Stock Item Supplier Buying Prices
This feature enables an import routine that allows you to import Stock Item Supplier information from a csv file. It is possible to use this routine to import new records, and to update existing ones. There is a sample csv file provided with the installation folder for the enhancement pack.
The required columns in the import file are:
- Stock code
- Supplier Account number
- Buying Price
- Supplier Part code
- Lead Time
- Lead Time Units (Days/Weeks/Months/Years)
- Usual Supplier Order Quantity
- Minimum Supplier Order Quantity
- Pricing Source ( 0 = Last Buying Price, 1 = List Price)
The menu option to perform the import can be found in the Stock Control folder within the Sicon Enhancement Pack menu group. When opening the screen, use the Select File button to open a new window where you can browse to your csv file. Once this has been selected, the screen will refresh to the following:
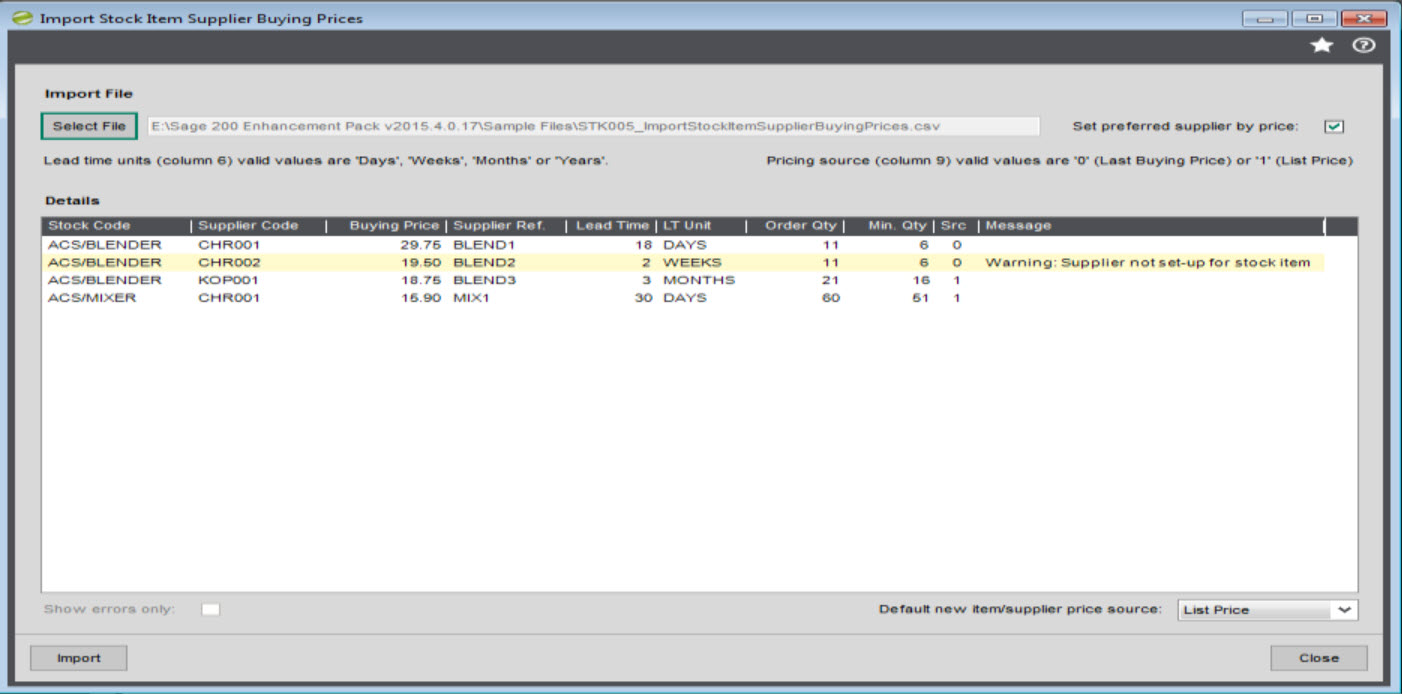
If you leave the ‘Set preferred supplier by price’ ticked, then when you import the file, any records where there is more than one supplier against that stock item will be updated so that the supplier with the cheapest buying price will then become the preferred supplier. If any errors are reported, then you can filter just onto these using the Show errors only checkbox in the bottom left hand corner.The option in the bottom right hand corner allows you to select either ‘Last Buying Price’ or ‘List Price’ as a default for the rows where this has not been populated in the csv file.
Once you have resolved any reported issues, click the Import button in the bottom left hand corner to import the file.
10.6. STK006: Stock Item Update from .csv
This function may be used to update various stock item details from a .csv file in the format described below. Select the Sicon Enhancement Pack\Stock Control menu, Stock Item Update From .csv menu item to start the function.
Within the screen you can browse for a csv file to import. If you need to generate an example file to import, then the Example Import File button at the bottom can be used for this process. This requires you to have Excel installed on the computer that you are using, and will open both an example file and then another file clarifying the columns – the field types and whether the field is optional or not. Even if you are not intending to import values into some of the columns, you should leave all of the columns in your import file.
When your import file is prepared, it will need to be saved as a csv file.
Then, you can use the Find button within the Stock Item Update screen to search for that saved file. Once you have found the file, use the Check File button to validate that the file is ready for import. If any errors are reported, they will be displayed in red in the main window. If it’s not clear what the fault is with a particular line, then we would recommend editing the csv file in Notepad as that can sometimes immediately draw attention to any unexpected issues.
Once the file has passed the Check File step, then the Import button will become available in the bottom left hand corner and this button can then be used to update the specified stock items.
The ignore first row check box is ticked by default, and instructs the import to ignore the first row where the column headings are expected.
The stock item update also has check boxes available for updating open sales and purchase orders. So, for example, if you are using this routine to update a stock code to a new value, do you want the new code to be reflected on open orders. Note that this does not update completed orders.
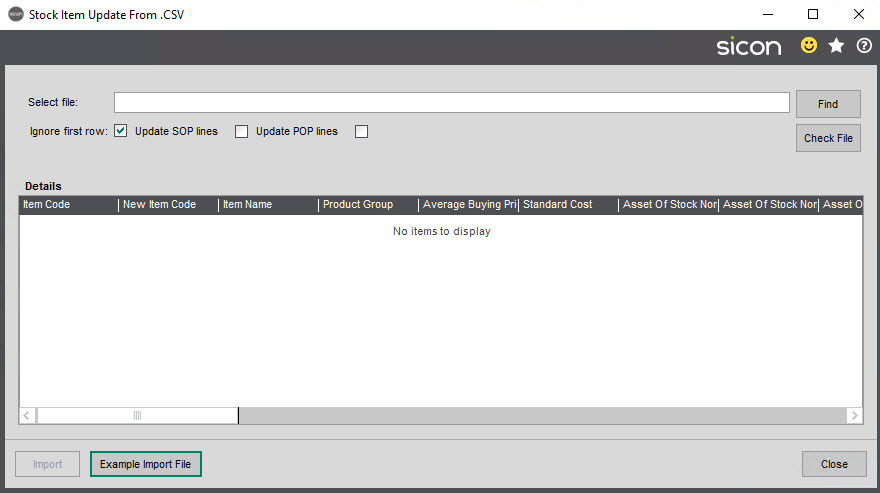
Fields That Can Be Updated Using This Feature
- Item Code
- Item Name
- Product Group (as long as traceable type or stock item type is the same)
- Average Buying Price
- Standard Cost
- Asset of Stock Nominal Account/Cost Centre/Dept
- Revenue Nominal Account/Cost Centre/Dept
- Accrued Receipt Nominal Account/Cost Centre/Dept
- Issues Nominal Account/Cost Centre/Dept
- Search Category Names/Values
- Spare Text Fields
- Spare Number Fields
- Item Status
- Manufacturer Part Number
- Commodity Code
- Country of Origin
- Weight
- Uses Supplementary Unit
- Supplementary Unit Ratio
*** WARNING – Please note that if this feature is used to update a stock item code, it doesn’t currently update the code on any BOM component lines or Sage Manufacturing works order lines. ***
*** After updating the code, we would recommend that you remove and re-add the relevant stock item from any BOMs or open Works Orders. ***
10.7. STK007: Stock Item Maintain Spare Text 1 Field (see Options and Maintain Item T)
This feature enables you to add an extra field into the Amend Stock item screen that can have a drop down list maintained for it. This field is stored in the SpareText1 field in the StockItem table.
From within the Enhancement Pack Settings screen, click the Options button.
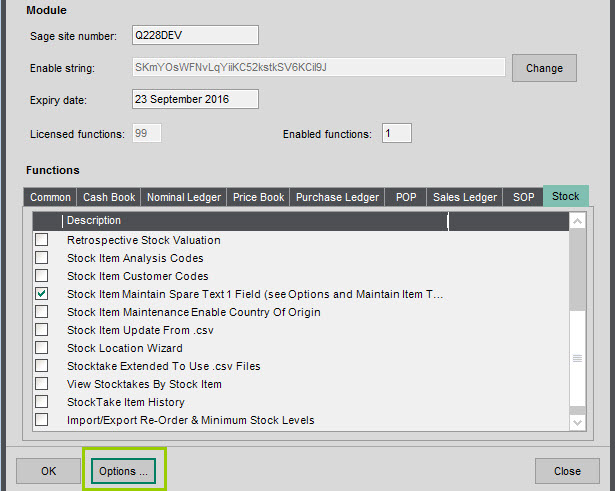
The setting to rename the field label is called StockItemSpareLabel1
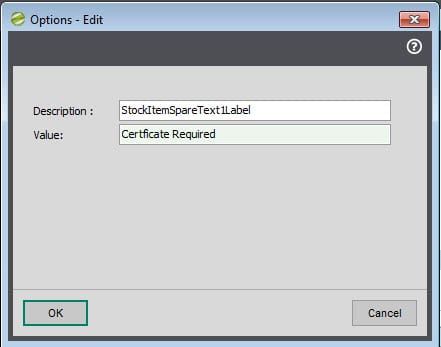
By editing the text in the value box, you can change the label that appears on the Amend Stock Item screen.
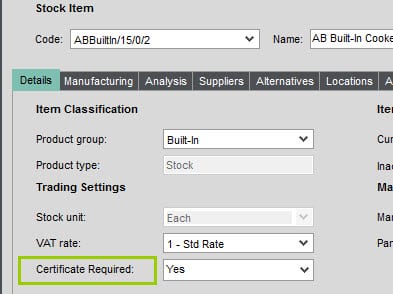
A drop-down list of values can also be stored to be selected against this field.
These are maintained via the menu option in the Enhancement Pack menu group, within the Stock Control folder in a screen called ‘Maintain Stock Types’.
10.8. STK008: Record Previous Year Sales Quantities Utility
This routine reads stock transaction history for each stock item, accumulates total sales order (and return) quantity and then writes these quantities to StockItem.SpareNumber1, thereafter which can be added to reports or included within custom workspaces and thereafter send to excel.
Once enabled, this feature is accessed via the enhancement Pack menu, Stock Control, record Previous Years Sales Utility.
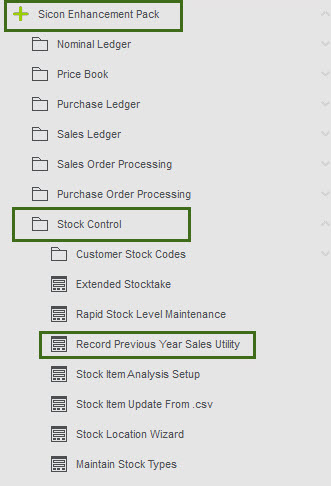
When Selected the screen will pre populate with the companies previous year’s start and end date; If this routine has previously been run , it will display in the ‘This routine was last run’ field.

Select Run, whilst preparing progress bar will display.

Once complete the system will confirm how many Stock records have been updated.
10.9. STK009: Retrospective Stock Valuation by Single Warehouse
Use this feature to display, drill down on a stock valuation report for a past date and by a single warehouse.
Please note that this feature uses the SpareNumber1, SpareNumber2 and SpareNumber3 fields in the StockItem table, so do not use this feature if you are already using these fields for another purpose.
This feature was withdrawn from the module in previous versions when Sage themselves introduced a ‘Retro Stock Valuation’ but Sage’s version does not have the feature to run by single warehouse so it has been re-introduced back into Sicon’s Enhancement Pack for this reason
Select the retrospective stock valuation screen from within the Sicon Enhancement Pack Menu.
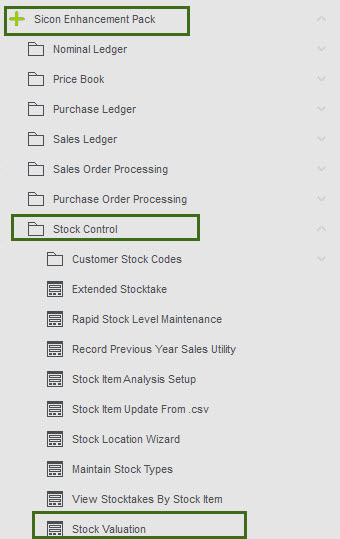
Select the previous period end that you wish to display, and the given warehouse and select ‘Display’.
If balances have remain unchanged from current stock Qty and you do not wish to display them select ‘Hide unchanged’.
Other features within this module include:
Double click on a stock code line to bring up stock transactions.
Highlight a stock code, and select View transactions to ‘View Transactions of selected stock code.
Highlight a stock code, and select Stock Item Details to bring up the Stock Record for the selected item.
10.10. STK010: New Stock Item Warehouse/Location Assignment Prompt
When a new stock item is entered, the user will be prompted to automatically assign this item to existing warehouse locations.
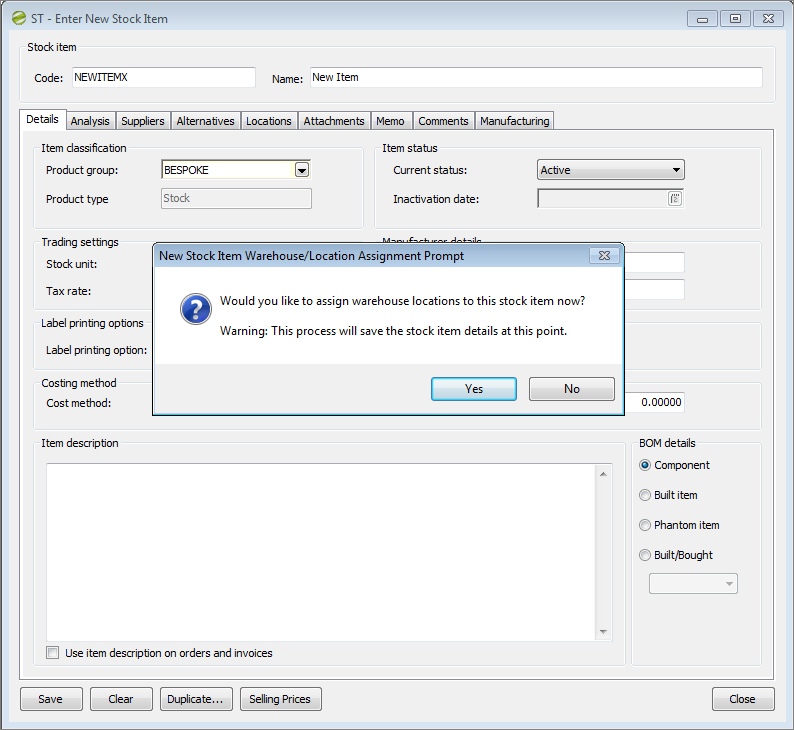
If selected the user is given the option to select which warehouse locations should be assigned.
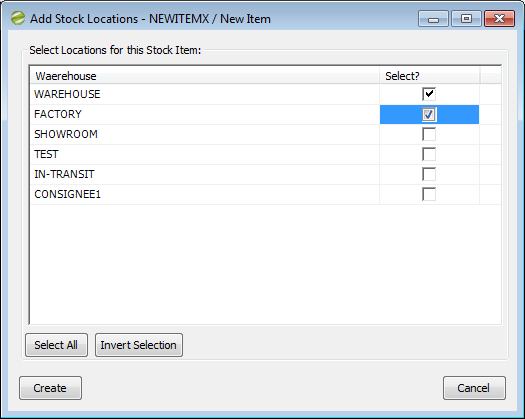
10.11. STK011: Rapid Stock Level Maintenance
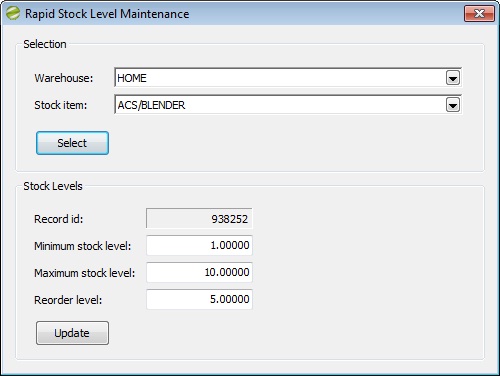
10.12. STK012: Hide Bins with No Stock (On View Stock Item Balances Screen)
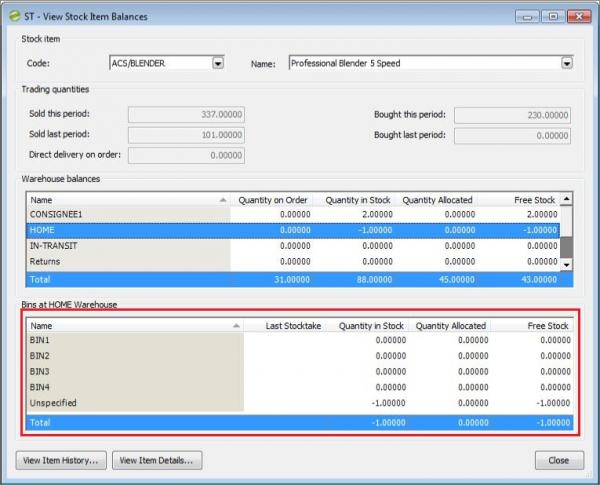
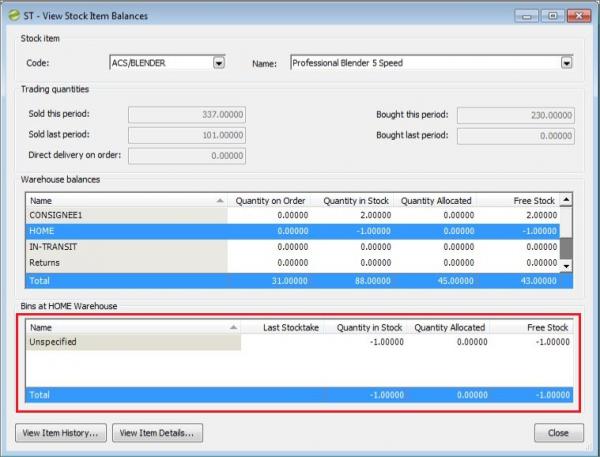
10.13. STK013: Generate Report Following Stock Transfer (see Options)
This function automatically generates a Stock Transfer Report document following entry of one or more Transfer Stock transactions.When the stock transfer screen is closed, this report will automatically be displayed on-screen.
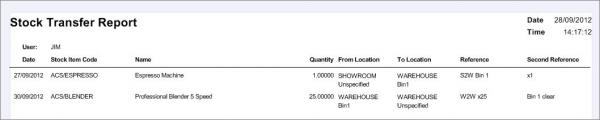
Configuration Options
(see Settings, Options)
Before using this function, it is essential that a report file is set on the Sicon Enhancement Pack, Settings, Options screen.
A sample/template .csv files is provided with the module installation components and you can download this directly from the product.
NB: please be aware that any old templates that you may still have will no longer work, they have to be generated using the Example Import File button within the Sicon Enhancement Pack product.
This report file may be amended as required and manually copied to the preferred report file location within the Sage\Reports folder. Once the file is in place, the setting below should be amended to reflect the file location and name.
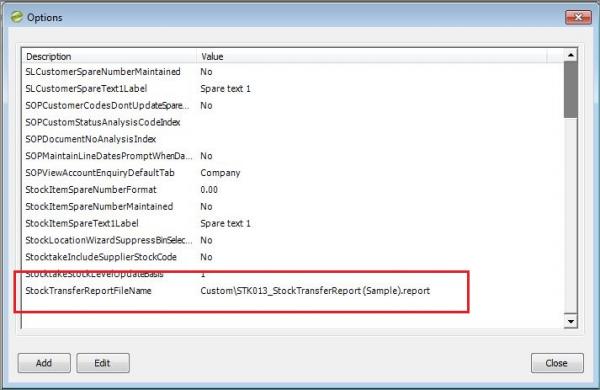
If no report file is set, a message will be displayed when the stock transfer screen is first displayed.
10.14. STK015: Stock Item Analysis Codes
Using this feature, you can assign up to 150 Analysis Codes to Stock items. These codes can be defined as being of the following types:
- Text
- Date
- Drop-Down List
- Numeric Value
- Tick Box
Each code can be marked as being mandatory when a stock code is created or amended.
The values on the stock codes are then stored in a custom table in the database called SiconStockItemAnalysis, while the field labels are stored in SiconStockItemAnalysisSetup. The stock item values are available in the data model, so can be added to reports using the Sage report designer.
The analysis codes are set up via a menu option in the Enhancement Pack menu group, in the Stock Control folder, called Stock Item Analysis Setup.
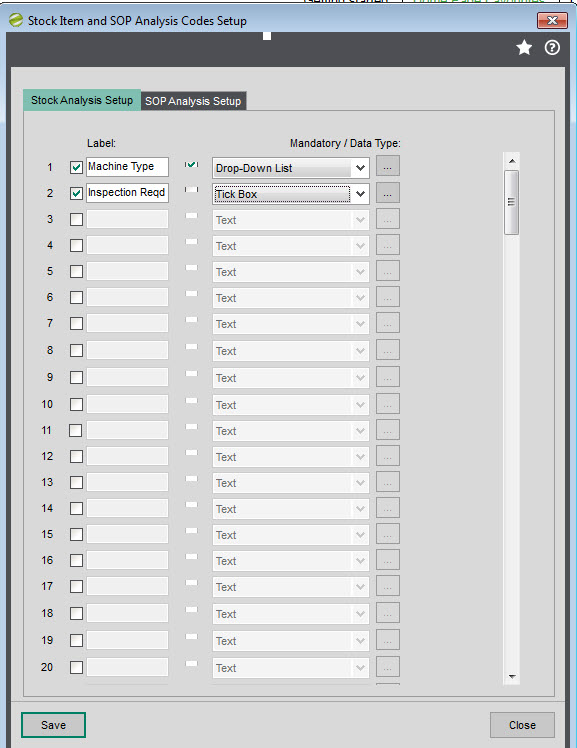
Put a tick in the first column for the fields that you want to use, then enter a label against them. The second tick box is to tag the fields that are mandatory, and the next field is a drop down where you can choose from the available data types. If you have selected a Drop-Down list, then click on the small box containing the three dots to open a new screen where you can edit the values for the list.
The fields that you have configured are then available on a new tab in the Create/Amend Stock Item screen called ‘Analysis Codes’.
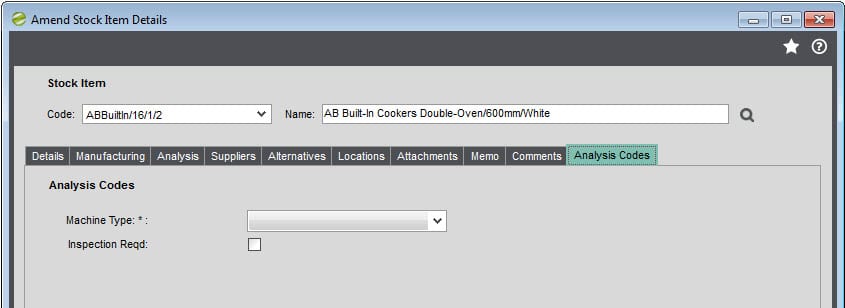
Any field that has been marked as being mandatory will have an asterisk next to the field label. If you attempt to save the stock item without populating this field, then a warning message will be displayed and it will need amending before the stock item can be saved.
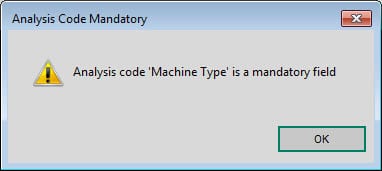
Once configured, the population of analysis codes can be imported.
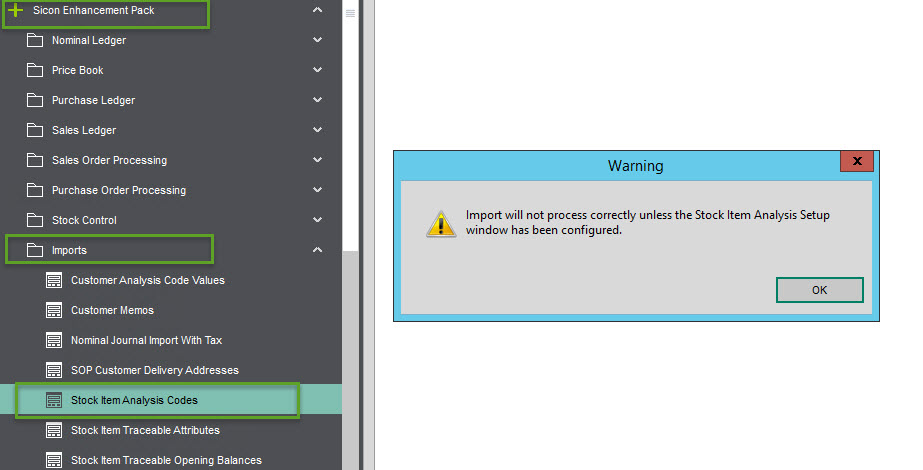
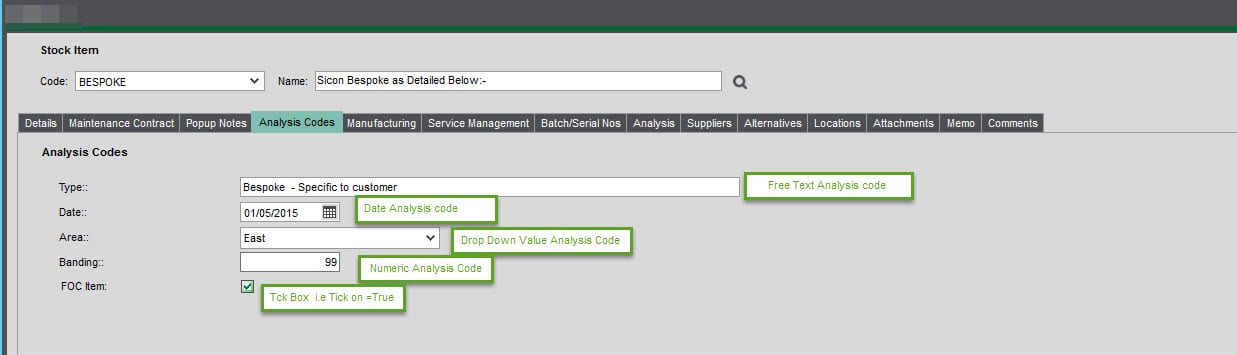
Before the import can commence, within the Enhancement Pack settings on the Stock Tab, the feature ‘Stock Item Analysis Codes’ needs to be ticked
Then within the Enhancement Pack, Stock Control , ‘Stock Item Analysis Setup’ set up the Analysis Codes required, (up to 150) and specify the Label , whether they are one of the following:
- ‘Text’
- ‘Date’
- Drop-Down List (if this option applies create the list)
- ‘Numeric Value
- ‘Tick Box’
Once created the Import template can be populated
NO headers required for this import, headers can’t be set on the import as default as Sicon would not know how you have configured the ‘Stock Analysis Setup’ and therefore cannot provide an example.
First Column will always be the Stock code.
The following columns ( up to 150 off) will be the data you wish to populate the analysis code fields with making sure that for each one it matches the type selected.
- Text – Text
- Date – Column should be formatted to a date format xx/xx/xxxx
- Drop Down List – should be one of those listed within the configured drop down list (and spelt the same otherwise import will fail)
- Numeric – UP to 20
Tick Box Enter True in Column if you want a Tick or False if no Tick
10.15. STK016: Advanced Stock Item Traceable Attributes
This feature provides the facility to import attribute values against traceable items in stock. These attributes can be added to existing traceable items already in stock, or to update them if the information in the import file is more current. The import file must have columns formatted in the following sequence:
- StockItemCode
- IdentificationNo
- AttributeTitle1
- AttributeTitle2
- AttributeTitle3 etc
The menu option to run the Import can be found in the Imports folder in the Enhancement Pack menu group. When you select the csv file to import, the file is checked and then any errors are displayed. For example, the attributes must exist on the relevant product groups, and the specified batch/serial numbers must already be in stock.
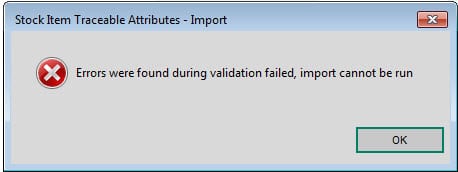
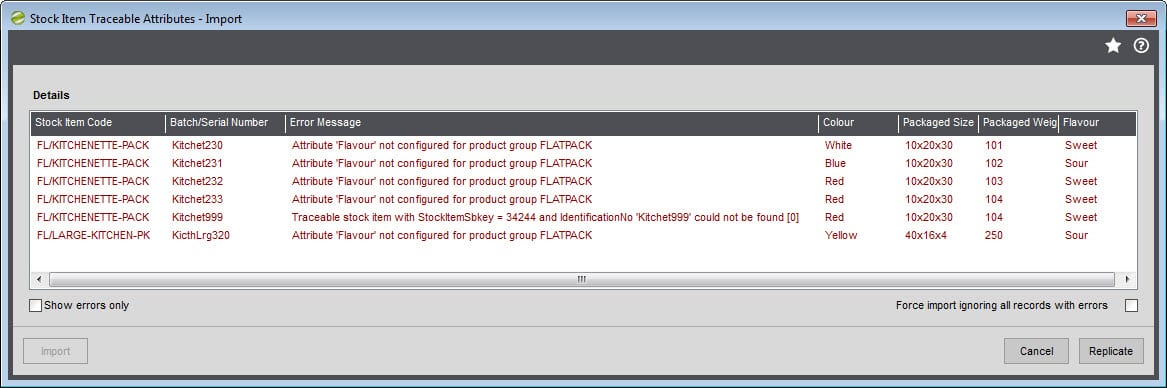
You can force the import through regardless of the errors using the tick box in the bottom right hand corner of this screen, although the rows with an error will then be ignored.
10.16. STK017: Import Stock Item Traceable Opening Balances
This feature enables you to import batch/serial numbered/Multiple batch quantities for the same stock item, warehouse/location & batch number
Unlike the standard Sage Import Batch/Serial No Opening Balances routine, you can use this routine to import additional quantities of a stock items that have had previous quantities imported.
The menu option for the import screen can be found within the Imports folder in the Sicon Enhancement Pack menu. An example .csv file is provided within the Enhancement Pack installation folder.
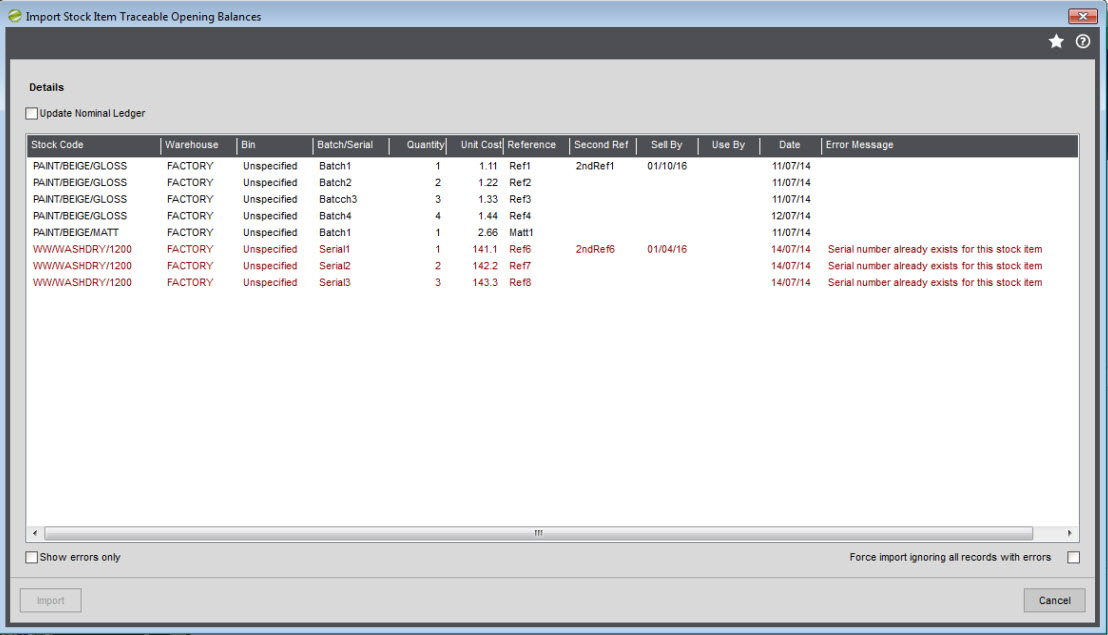
Any lines that have generated validation errors will be displayed in red. You can use the ‘Show errors only’ checkbox in the bottom left hand corner to only display the red lines if there are lots reported.
Any errors will prevent the Import button in the bottom left hand corner from being available, unless you check the ‘Force import ignoring all records with errors’ box.
As these are expected to be opening balances, there will be no nominal postings generated by this import unless you also check the ‘Update Nominal Ledger’ checkbox in the top left hand corner.
10.17. STK018: View Stocktakes By Stock Item
NB: this feature requires STK019 to be enabled.
This feature enables you to view the current stocktake situation for a particular code across all of the warehouses defined on that stock item.
The screen is accessed via the Stock Control folder in the Enhancement Pack menu group.
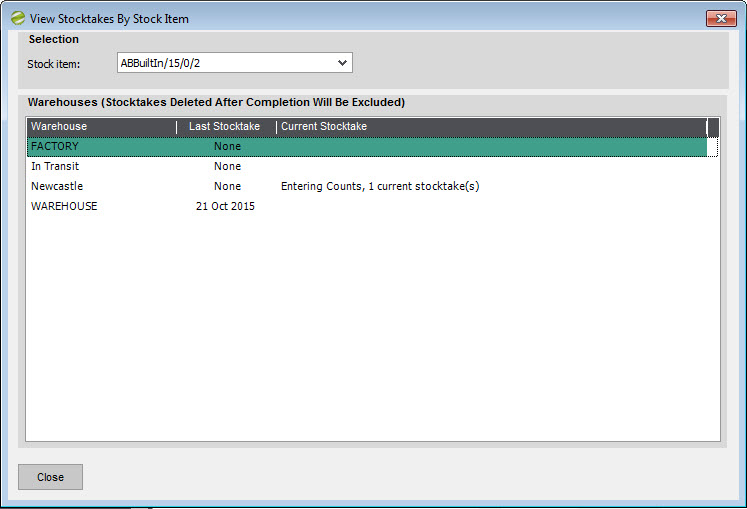
10.18. STK019: Stocktake Item History
When standard Sage 200 stock take function is used (StockControl->Adjustments->Manage Stocktake), with this feature enabled once you complete a stocktake the details will be stored within two tables, which can be used for reporting. These tables are as follows:
- SiconCountSheetItemHistory
- SiconStockTakeItemHistory
10.19. STK020: Import/Export Re-Order & Minimum Stock Levels
This enables an import routine that will update the re-order, minimum and maximum stock level figures for existing stock code and warehouse combinations. You can also use this routine to export the same information into an Excel file.
The screen can be found in the Import folder, within the Enhancement Pack menu group.
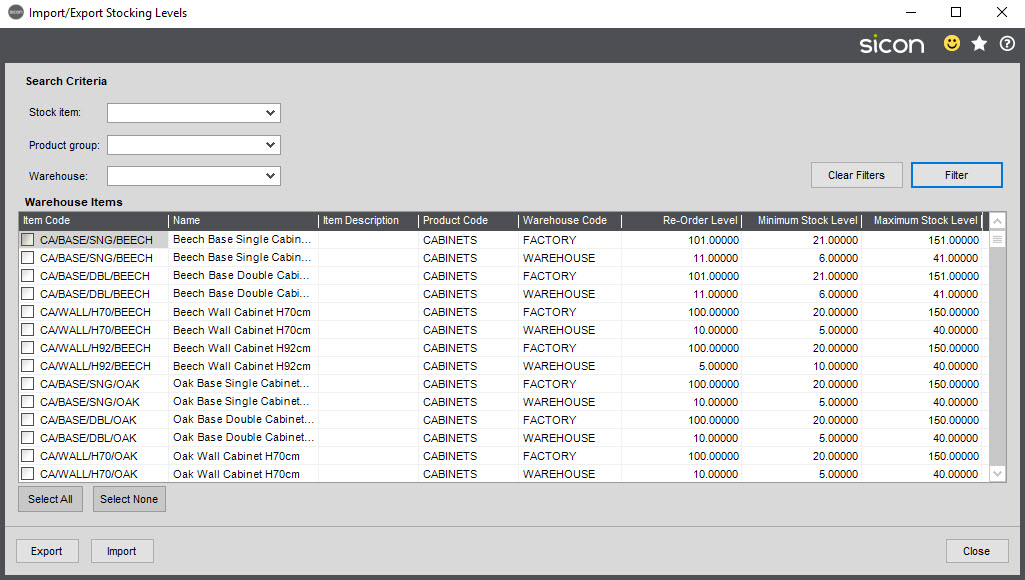
You can filter the codes displayed using the Stock Item, Product Group or Warehouse filters at the top of the screen and then clicking the Filter button. The Clear Filters button then reverts you back to the complete list.
To export, select the relevant stock items using the check boxes on the left, or use the Select All or Select None buttons to update these boxes in bulk. Then click the Export button to send the selected items to an Excel spreadsheet. This file can then be easily updated in Excel, saved as a regular Excel file (csv format not required), and then reimported.
To import, click the import button and then browse to the file. A confirmation message will be displayed that the import is complete, and then the values visible in the Stock Levels screen will update to reflect these new values (which have now been applied to those stock items and warehouses).
10.20. STK021: Allow Attribute Amendment on View Batch/Serial no Details Screen
This function adds the ability to amend any attributes recorded against traceable stock items via the standard Sage View Batch/Serial no screen.
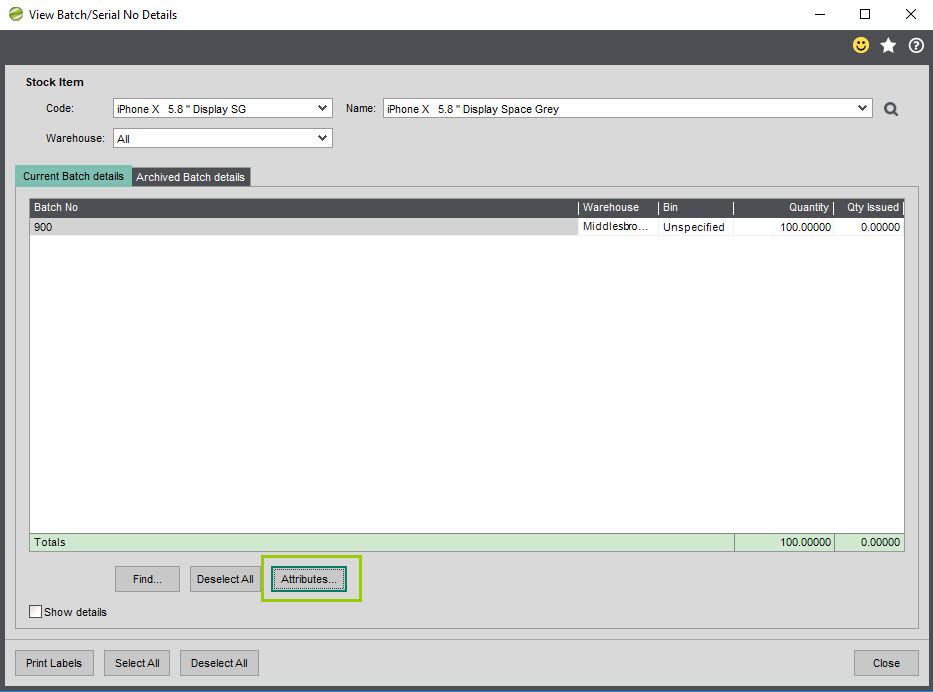
A new Attributes button is added, which then gives access to the Batch attributes screen for the highlighted batch, enabling those attributes to be updated as required.
10.21. STK022: Traceable Stocktake
This feature enables you to carry out a stocktake on traceable stock items. You still manage the stock take in the normal manner through the Manage Stocktake routine within Stock Control. Having this feature enabled simply results in stock level and nominal posting adjustments for traceable stock items, which would be left alone in standard Sage.
When entering your stocktake counts, an internal area for traceable adjustments has been added to this window. This internal area will then be used for any adjustments to the stock level, and also the nominal code on it would be used for any nominal postings. You will not be able to complete the stocktake without selecting the relevant internal area.
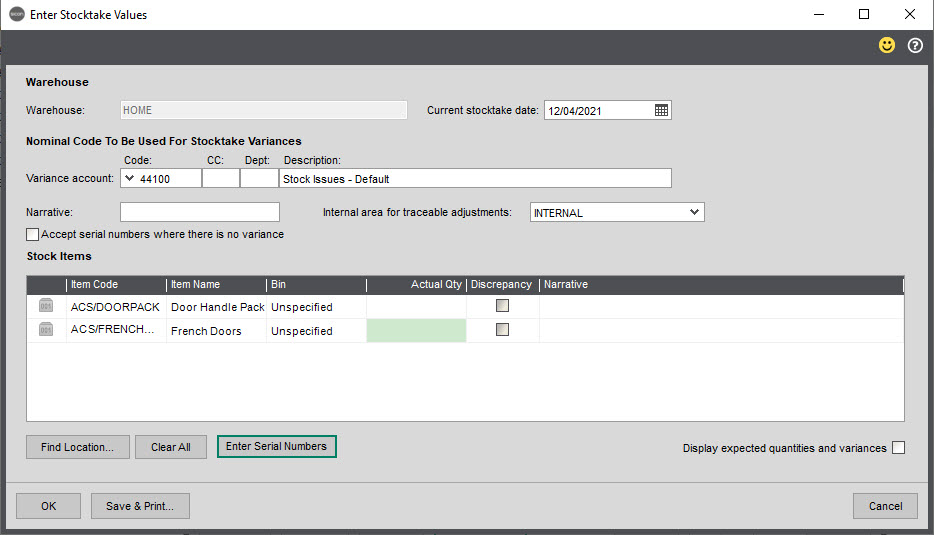
There is also a checkbox added to this screen called ‘Accept serial numbers where there is no variance’. This checkbox is only relevant if you have pre-filled your Actual Qty column, usually this would be done by saying Yes to this Sage prompt that appears the first time you click Enter Values for a particular stocktake.
If you have selected Yes to this, then the Actual quantity will be updated with the expected values. If you then check the ‘Accept serial numbers where there is no variance’ box, then you will not need to record any batch/serial numbers as the stocktake will use the existing ones. You can still change entries against required stock codes where there is a variance from this expected quantity.
Note that if you do not want to change anything against a code, saying No to the prompt above will leave the Actual Qty empty. If you don’t change anything against a stock item, then nothing will happen to the stock level of that item as a result of this stocktake.
With this feature enabled, you will not be able to enter the found quantity in the Actual Qty field for traceable items. Instead, you use the Enter Traceable Nos. button against the highlighted stock code to record these details. This will then display the following window:
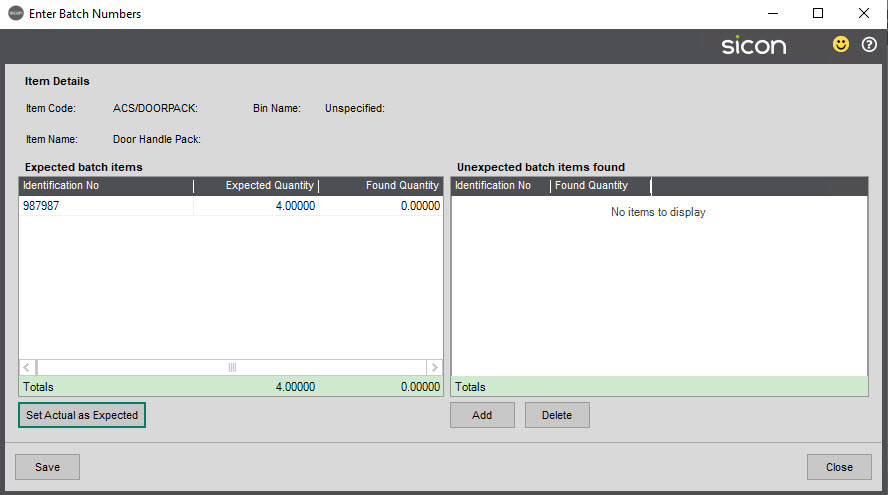
This screenshot is for a batch numbered stock code. You can amend the details against the batch numbers before the stocktake (note that existing batches all default to zero as their found quantity), although you can use the Set Actual as Expected button to confirm that expected batches have all been found with the same quantity.
You can also use the Add and Delete buttons to modify the contents of the Unexpected batch items found window to reflect some new batches being found during the stocktake.
This is the same screenshot for a serial numbered item.

You can indicate whether the previously existing serial numbers before the stocktake have been found, although you can use the Set Actual as Expected button to confirm that expected serial numbers have all been found.
You can also use the Add and Delete buttons to modify the contents of the Unexpected serial items found window to reflect some new serial numbers being found during the stocktake.
When you complete the stocktake, you are presented with the following summary screen to confirm before the traceable adjustments occur.

When you click Proceed then the stock will be adjusted and any resulting nominal postings will occur. If there is something on this screen that you wanted to review then the View/Amend Details button takes you into the relevant Enter Batch/Serial Numbers screen; the View Balances and View History buttons will take you to the relevant Sage 200 stock screen.
10.22. STK023: Sicon Stock Transfer
This feature within EP is designed for those users whom have Sicon Enhancement Pack Only.
This feature enables you to manage transferring stock to other locations.
If you are wanting to move stock between Warehouses, then this feature greatly enhances the standard Sage Transfer Stock option, to provide a means of allocating stock, print a picking list, then despatch it (with a despatch note), move it to an In Transit warehouse before receiving it I the receiving warehouse.
Please ensure that there is an address configured on the Sage 200 Stock Warehouse, this will be printed on the picking and despatch notes generate d
It is a shared feature with Sicon Job Costing, Service Manager and Barcoding & Warehousing modules as it also appears within those products, so if you have these modules installed you would use this feature within the relevant module.
Use of this feature is via a new screen within the Stock Control menu within the Sicon Enhancement Pack menu structure.
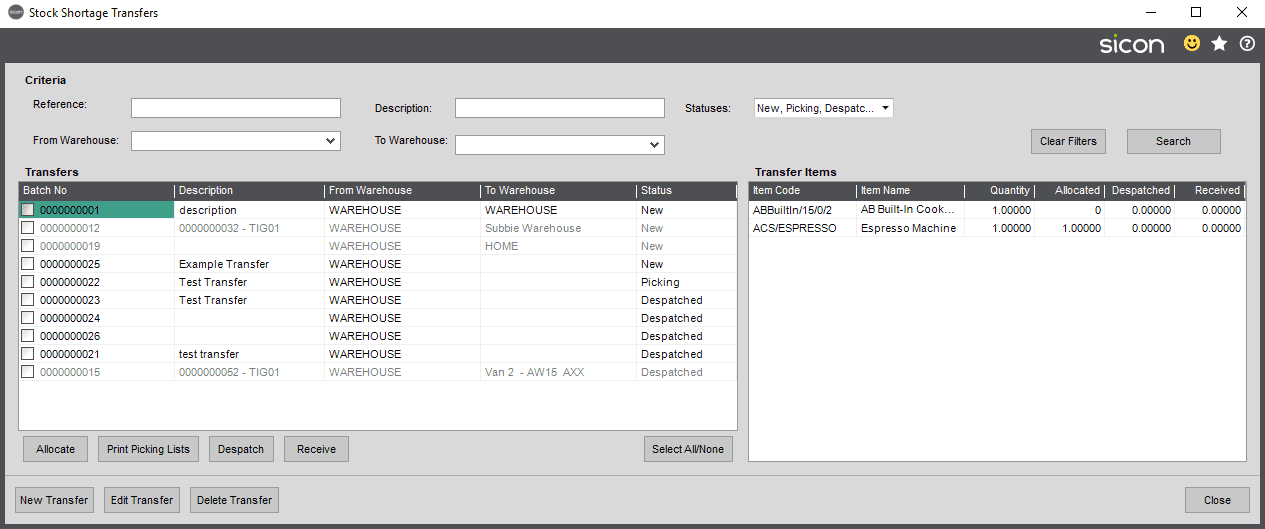
Each Stock Transfer is a separate record, with it’s own Transfer Batch No reference. A single transfer reference can contain as many different stock items as desired, but must have a single origin warehouse and a single destination. The window on the right hand side of the screen will show all of the transfer items for the selected transfer batch on the left hand side, with columns displaying the Quantity, the Allocated quantity, the Despatched Quantity and the Received Quantity.
You can filter the transfers displayed using the filters at the top; by default all transfer statuses other than Received are displayed.
A new transfer batch reference can be generated using the New Transfer button.
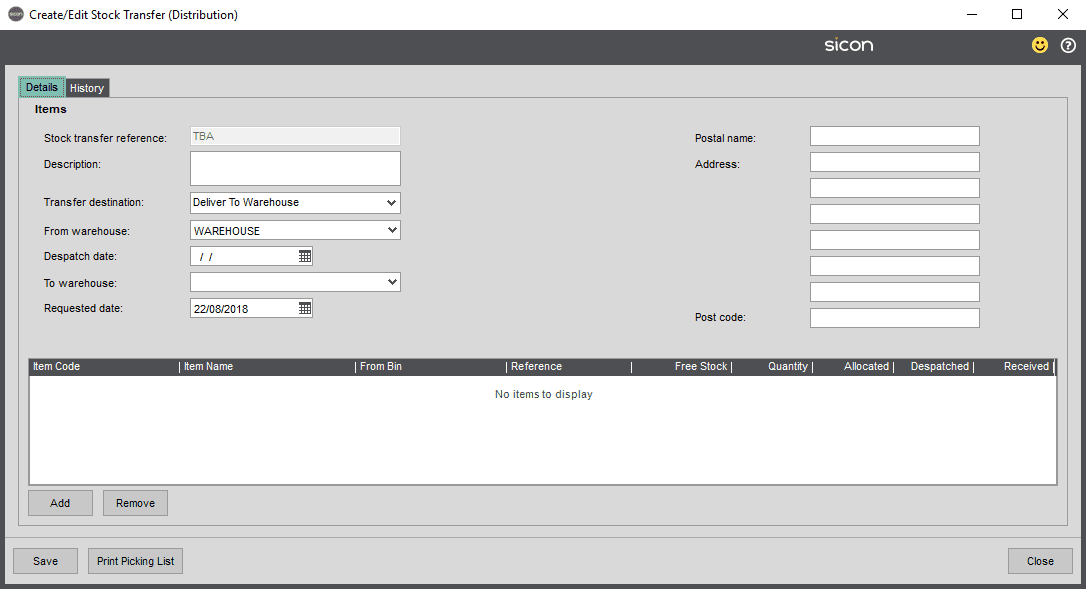
The Stock transfer reference numbers are automatically generated, and you will receive the next one. The Description field is optional.
The options available for the Transfer destination are as follows:-
| Deliver To Warehouse | If you are transferring from one warehouse to another |
| Transfer directly into Warehouse | If you are transferring from one warehouse to another and want a quicker process where despatching and receiving steps are not required |
| Free text |
10.23. STK024: Stock Type Conversion
This is an unsupported Sage change and should be used with caution and we strongly recommend you contact your Sage Business Partner to work with you on this if this is a feature you wish to make use of.
We strongly recommend before using this feature in live that you make a copy of your live company into a test company and test it through first before using on you live Sage 200 Company.
This feature enables you to change the traceable types against existing stock codes. So items that are not currently marked as serial or batch numbered can become so via the use of this utility. Alternatively, items that are serial or batch numbered can be altered to become non-traceable.
This feature works by updating an entire product group at the same time. So if you only want to update a few items, they would need moving into a new product group in order to do so. This new product group would need to match the traceable type that the stock items currently have – either using batch/serial numbers or not.
In order for the stock type to be changed, then there can’t be any outstanding allocations against the selected product group.
The utility can remove SOP allocations via a button in the next screen, but any other stock allocations (including stock allocated to Sicon Works Orders for example) will need to be removed manually first.
The standard Sage report of ‘Allocations Outstanding’ in Stock Control is useful for identifying these. Note that after the conversion, all allocations will need to be reapplied outside of this process – either SOP or other Stock allocations.
Use of this feature is via a new folder within the Stock Control menu within the Sicon Enhancement Pack menu structure.
There are two screens within this Stock Type Conversion folder:
Stock Check-Out: The first screen to use as it will book out all of the stock in the selected product group to enable the type to be changed. This screen will store the current costs against the stock items, in order to ensure that the new stock is booked back in at the same cost price.
Stock Check-In: The second screen to use which allows you to select what you would like the new stock type to be, and it will then convert the stock codes within that product group to be of the new stock type and then book them back into stock at the same cost price that they were booked out. Note that if you had several different cost prices against a particular item, then when checked back in that item will all be at the average cost for that item when checked out.
Stock Check Out
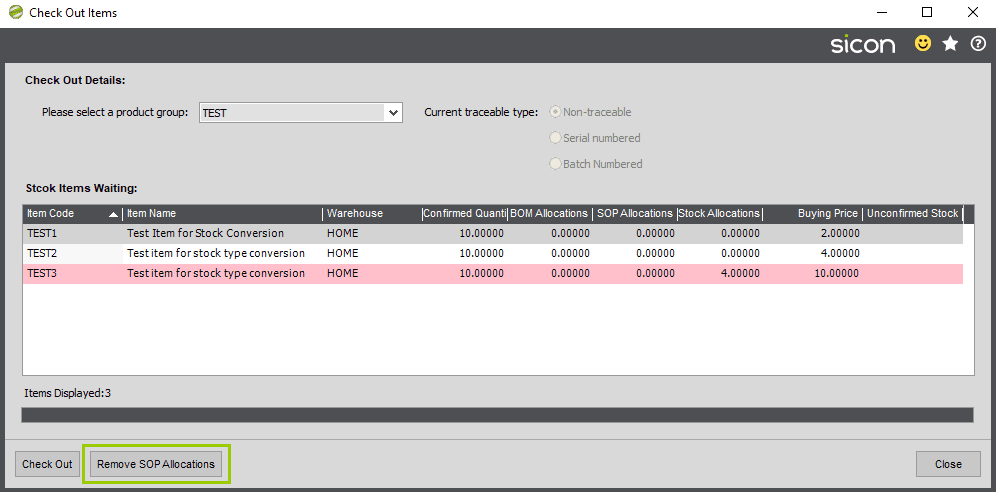
Select a product group using the drop down at the top of the window. Then all of the stock codes within that product group are displayed, with the current traceable type shown to the right of the drop down. Any items that have current allocations will be highlighted in red, and all SOP allocations for the items in this product group can be removed through the button near the bottom left corner. Any stock allocations will need be removed elsewhere in Sage (including Sicon works orders) before the Check Out process will complete. If you click the Check Out button while there are any allocations outstanding, then you will receive the following error message:
Once all of the allocations have been removed, the Check Out button will book all of the stock out of this product group, but the cost information will be stored. The stock is booked out as if written off, with the same nominal postings if applicable.
Stock Check In

This screen is where you specify whether the product group should be changed to be either non-traceable, Serial numbered or Batch numbered. Once you have made your selection, click the Check In button and all of the stock that was previously booked out will be added back into stock at the same cost price as was recorded at time of the Check Out routine. It is also possible to change the product group traceable settings without actually checking the stock back in, if instead you wanted to use a stock take to put the items back into Sage with their actual batch/serial numbers.
If you select to check the items in as Serial numbered, then the following options are made available:
As can be seen, the items will have serial numbers auto-assigned to them, and you have the option of setting the Record Numbers on goods received flag against the stock items.
If you select to check the items in as Batch numbered, then the following options are made available:
You can specify what you would like to call the opening batch numbers that will be used against each stock item, the default is Unspecified. So all of the quantity of each stock item would be added back into stock in the same batch with a batch no of ‘Unspecified’. As with the serial numbers, you have the option of setting the Record Numbers on goods received flag against the stock items.
Once you have specified your Check In Details, click the Update button. This prompt will be displayed:
Clicking No will enable you to change the traceable settings on the product group without checking any stock back in (allowing you to stocktake them in later).
The checking in of the stock will be recorded in transaction history as if it were an Add Stock transaction. If stock is integrated with the nominal ledger then this will generate the same nominal postings as if it were done manually. Note that depending upon the nominal code specified against your stock write off category, this could be a different nominal code to that used as the Issues nominal code on the stock items. In which case, you may need to do a nominal journal after checking stock out and then back in again, as although the balance of your stock nominal code in your balance sheet will remain the same, the other side of the postings will be split between the nominal codes specified for your stock write off category and the issues nominal accounts on the stock items.
Once the items are checked back in with the new traceable type, you can then move them into other product groups that match the new traceable type using the standard Sage screens. Any allocations that previously existed for these items will then need to be manually redone.
Reminder: This is an unsupported Sage change and should be used with caution and we strongly recommend you contact your Sage Business Partner to work with you on this if this is a feature you wish to make use of.
We strongly recommend before using this feature in live that you make a copy of your live company into a test company and test it through first before using on you live Sage 200 Company.
10.24. STK025: Warehouse to Bin Migration
This function enables you to convert warehouses into bins in a different warehouse. You might want to do this if you have created and been using a warehouse that you then realise could work better as one or more bins in a different warehouse (e.g. a QC warehouse). You might also want to do this if you are implementing Sicon Barcoding, and as part of that implementation have realised the benefits of having fewer warehouses with the functionality within that product.
From within the Sicon Enhancement Pack\Stock Control menu choose the Warehouse to Bin Migration menu option. This will then display the following window: –
The Migration Process Information box outlines what this process will and won’t do.
Before you can continue, you must run the Balance Ledgers routine, and a Run button has been provided so that you can run it from here. Once this process has been run, then the Stock Migration Parameters section activates so that you can select the appropriate options.
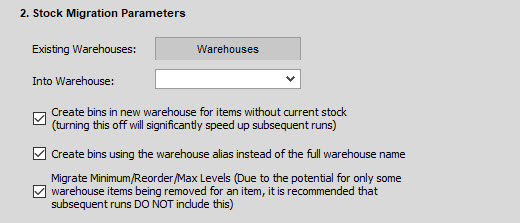
Click the Warehouses button to select which warehouse(s) you would like to migrate into becoming bins.
Then choose which warehouse these new bins will be created in.
Then choose which of the three checkboxes are appropriate for what you are doing.
If you have selected the middle of the three checkboxes, then you also need to assign an alias to each warehouse that you are migrating. When the new bins are created in the destination warehouse, they will actually use this alias as their bin name, so you could set this to be the same as the warehouse or something new if desired.
Once you have completed these options, click Run Migration to perform the actual migration. This will perform some quick validation checks and then carry out the migration.

You may receive the following message when clicking Run Migration: –
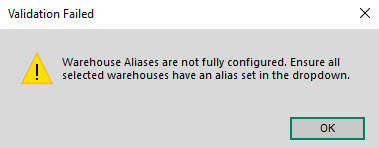
This means that when you selected the warehouses to migrate, you didn’t enter an alias against them. This will only be relevant with the middle checkbox selected previously (see above).
Once the migration is completed, any post migration issues are displayed. Then you can click the Make Unavailable button, this will mark the migrated warehouse as unavailable for sales trading.

10.25. STK026: Add Multiple Locations to a Stock Item at One Time
This feature adds a new button into the Stock Item Locations tab to speed up the process of adding multiple warehouses to a stock code.
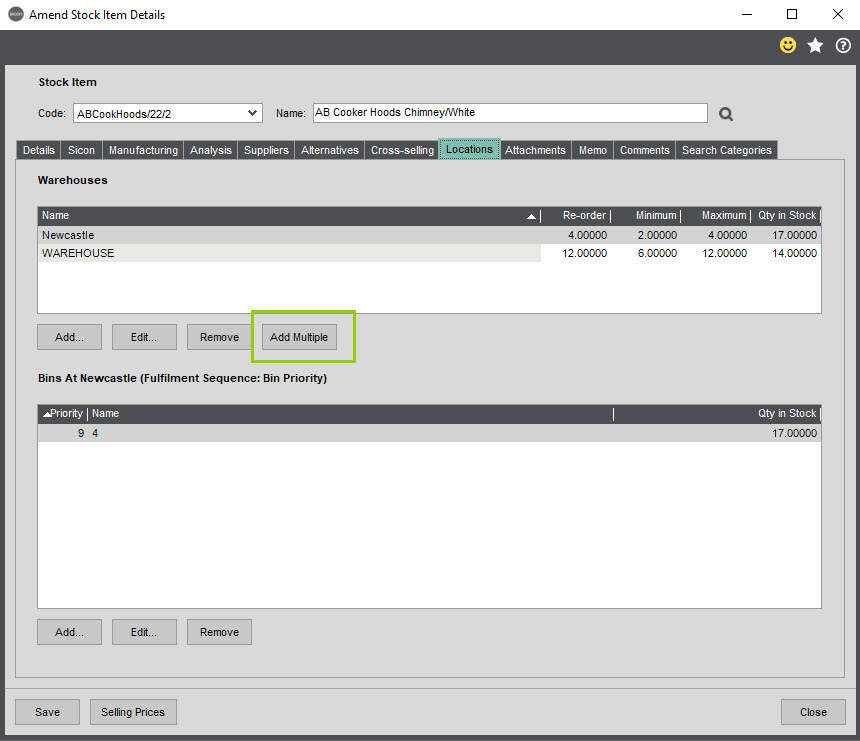
If you click the Add Multiple button, you are then presented with the following window, which will display all other warehouses not currently on this stock item: –
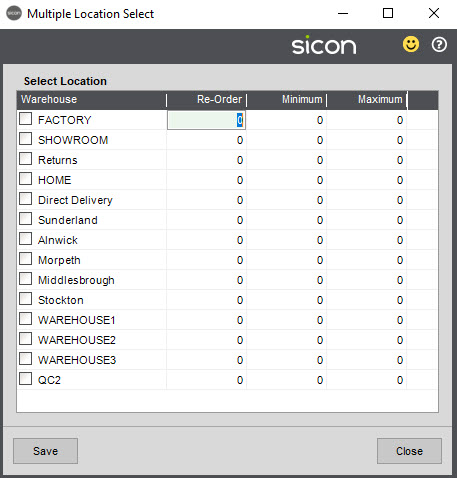
Using this window, you can tick whichever warehouses you would like to add for this stock code. You can also specify the Re-Order, Minimum and Maximum values if desired.
10.26. STK027: Add Item Code to Narrative
This feature adds extra detail into the narrative on nominal postings resulting from adding, issuing and writing off stock items. This extra detail is in the form of the stock code being written into the narrative of the nominal posting. The intention is that this will make stock nominal postings easier to reconcile.
This is what the nominal posting resulting from a stock write off in standard Sage looks like :-
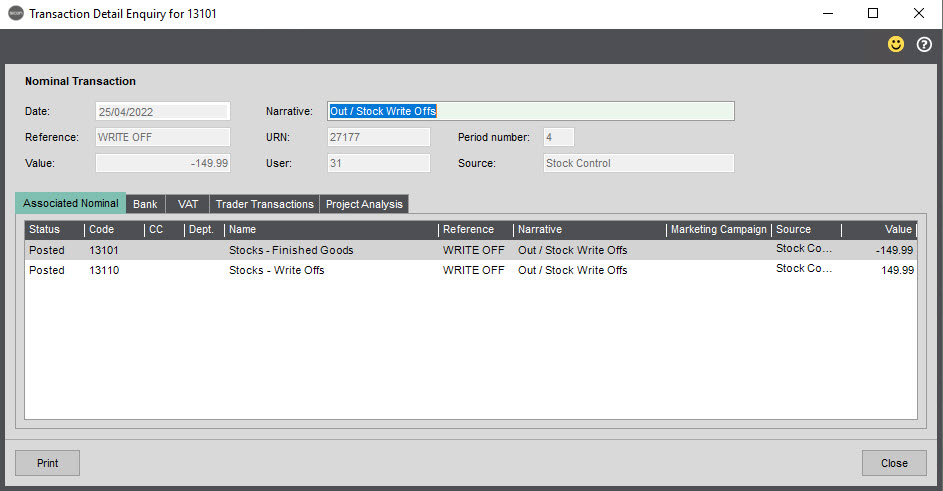
This is what the nominal posting resulting from a stock write off with this feature enabled looks like :-
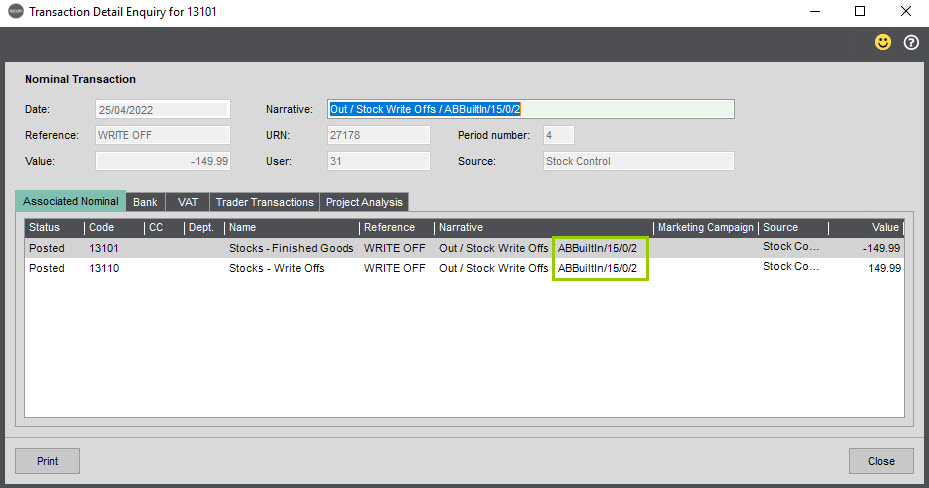
The stock code is added to the end of the Narrative.
11. Enhancement Pack Settings
In the current version of Enhancement Pack, the modules settings are collectively for all Sage 200 companies , so beware that if you change a setting within one company, it will apply to all installed Sage 200 Companies.
Sicon Enhancement pack settings are stored in an XML file , and this file (stored in C:\Sage\Logon\Sicon.Sage200.Addons.xml – C if sage was on C: Change C:\ to whichever drive or share the sage folder is) will need to be copied over from the current LIVE sage server to the test server , in order for the EP features and settings to be the same.
To Enable / disable the features detailed in full in sections 1 – 9.20 above , simply tick the relevant feature you wish to enable in each area.
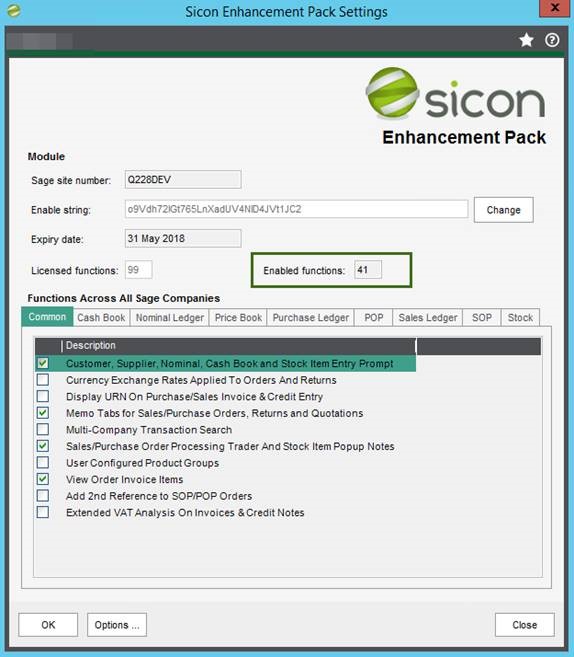
Against each feature, detailed within the help and user guide you will see a feature number such as COM001 – Which enables the Sales/Purchase Order Processing Trader and Stock Item Pop Up Notes , currently on the Settings page as shown above it does not list the feature code.
If however you double click in the ‘Enabled Functions Box’ highlighted above where in screen shot it shows 41 it details functions enabled and the feature code which is handy when you are logging a support call to your Business Partner.
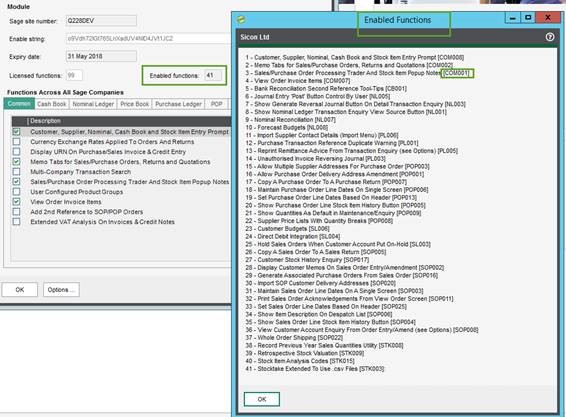
12. Enable Module
Following installation the enhancement will automatically be activated with a single function for a 30-day trial period.
If additional functions are required or this period expires will be necessary to fully activate the module using an enable string provided by the Sicon Customer Services team.
Summary of Sicon Enhancement Pack Enable Module
- Start the Sage 200 application and log-in with a user whose role has access to this feature.
- Open the Settings screen from the Sicon Enhancement Pack menu.
- Click the Change button, which is displayed to the right of the enable string field.
- Enter (or paste) the module enable string provided by Sicon, then click OK.
- Click the Apply button to save and activate the enable string, the expiry date and number of licenses functions should be displayed.
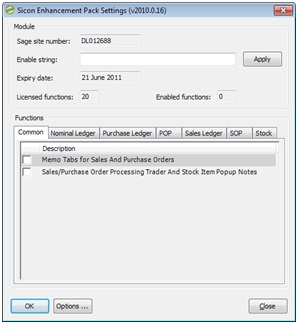
Enable String Expiry Warning Messages
When the module enable string is close to expiry, a warning message will be displayed each time a function is used. These warning messages may be suppressed by adjusting the ModuleEnableStringWarningDays setting in the ..\Logon\ Sicon.Sage200.Addons.xml file.
13. Release Notes
The release notes page shows which release of the system includes new features or issues resolved.
At the release of Sicon v21 we announced that going forward, we will only be supporting Sage 200c and as such we are able to drop the year from our version numbers. We moved from 201.201.0.0 to 210.0.0.
New features detailed in the Release Notes relating to Pre-Release versions will not be detailed in the current Help and User Guide until the end of development phase.
Enhancement Pack Release Notes