Barcoding & Warehousing Help and User Guide v20.1
Barcoding & Warehousing Help and User Guide will take you through the features and settings for the Sicon Barcoding & Warehousing module for Sage 200.
Search the page by pressing Ctrl + F (windows) or CMD +F (Mac) on your keyboard.
Back to all user guidesProduct overview
Help and User Guide maintained for Barcoding & Warehousing v201.0.0
The barcoding and warehousing solution is designed specifically for integration with Sage 200 and for the requirements of the typical Sage 200 client.
Integration with Sage 200 and the Sicon modules is in real time, with the handheld devices communicating directly with Sage 200 using Web API technology. This means there are no external databases to setup and maintain, and no data to synchronise or go out of synchronisation.
Based on an Android operating system interface, Sicon have provided all the standard functionality required in a typical Sage 200 customer warehouse in an intuitive, highly functional interface.
Being Android based you can use this application on very cheap Android based devices from phones to larger tablets, or choose a more expensive ruggedised devices with built in 1d or 2d barcode scanners, cameras, trigger grips etc.
With a high level of functionality across the Sage 200 and Sicon modules, and a great range of devices available to choose from, this solution will appeal to a very broad range of client requirements.
NB: The solution does not include the wireless network infrastructure or the hardware devices. These are up to each client to decide what they need and how best to implement it. We are happy to offer advice and recommendations where it is required. This document goes some way to suggesting some suitable options.
Why use a barcoding solution in your warehouse?
Here are the general benefits:
- Quicker and more accurate stock picking, resulting in fewer returns.
- Quicker and more accurate stock receipting, resulting in better stock accuracy.
- Real-time stock updates into Sage 200.
- Full integration with Sage 200 stock take for quick and accurate stock take, with no manual update of counts.
1. Pre-Requisites
1.1. Barcoding & Warehousing Pre-Requisites
What will I need installed to make this work?
- Sage 200 installed with the Sage 200 Commercial modules.
- The Sicon Web API installed, (this is the same Web API required for Service Manager Mobile and Task & Contact Manager Mobile). NB: this will require a single Sage 200 Web User only license regardless of the number of handheld devices.
- The Sicon Barcoding App installed on the tablet.
- The Sage 200 add-on from Sicon for Barcoding & Warehousing.
- Your choice of tablet and printer hardware.
- Minimum Android Version 5
- A wireless network to cover the required area.
What do I need to get this operational?
- You can use the tablet application immediately once you have everything installed even if you don’t have any barcodes on any of your products. It will give you real time updates directly into Sage 200 for each of the actions processed on the device. Barcoding your products will improve accuracy and speed of processing.
- If you have barcodes for your products these can be imported into the Sage 200 standard barcode field. If you don’t have specific barcodes for each product, our solution will simply use your stock item code instead. The supplied label layouts will look for barcode numbers in the barcode field, but if these are not available it will replace it with a barcode matching the stock item code.
- You can import a list of bin locations for your warehouse and print barcode labels for each one. Chose a label size to fit your bin sizes from the extensive range available from Zebra or other label printer manufacturers.
- If your products come in with supplier barcodes, then you can link these barcodes to your own stock items as you go. Alternatively, you can print your own barcode labels as you process each goods receipt or when you put away the stock items.
- You are now ready to start using the Sicon Barcoding and Warehousing solution with barcodes.
1.2. Sicon Sage 200 Web API Pre-Requisites
Requirements
- The Microsoft .NET Framework 4.5.2 must be installed on the Sage Application server.
- An appropriate Service login must be created on the domain. This is detailed in the “Create Service Account” section below.
- A Sage Web User license must be applied to the Sage instance. These must be purchased via Sage directly.
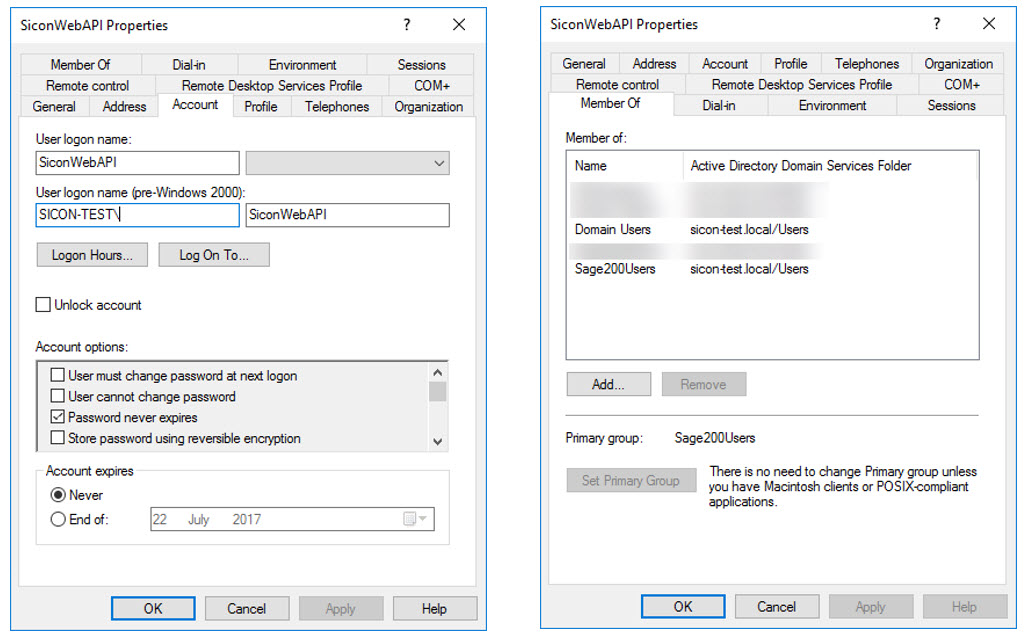
Create Service Account
Create a new Domain User that will be used to access Sage 200, such as DOMAIN\SiconWebAPI. Select the ‘password never expires’ option, and make the user a member of your Sage 200 Users Active Directory group.
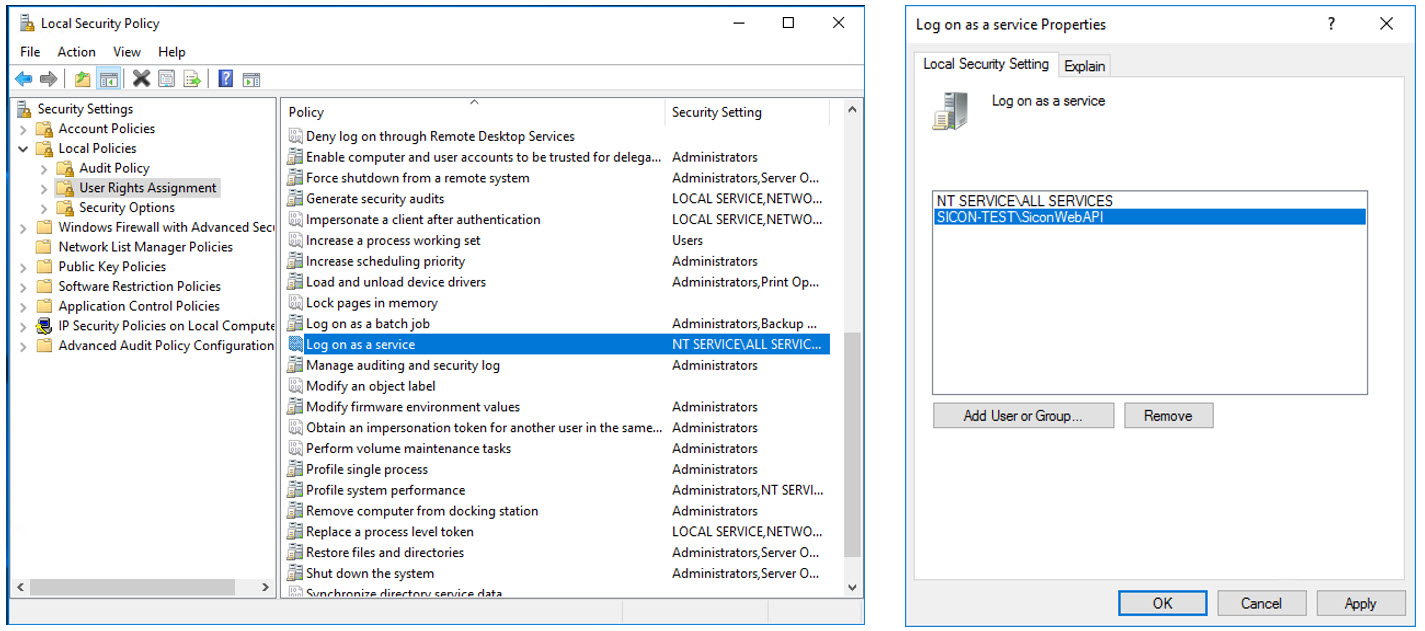
Give the account permission to log on as a service. This can be performed under the “Local Security Policy” option found on the Active Directory server.
Open Sage System Administrator.
Right-click ‘Users’ then select ‘Update Users’ from the drop-down menu. Press OK to link the new Sage User.
Right-click on the user and choose properties, then click ‘Is Web User’, then while still on the user properties screen click the ‘Company Access’ tab and select the companies you require the WebAPI to access. The more companies accessed, the higher the memory usage of the service will be, so it is recommended to keep it to a minimum. Then Click OK.
2. Downloading the Barcoding & Warehousing App
2.1. TeamViewer (Remote Access - Optional)
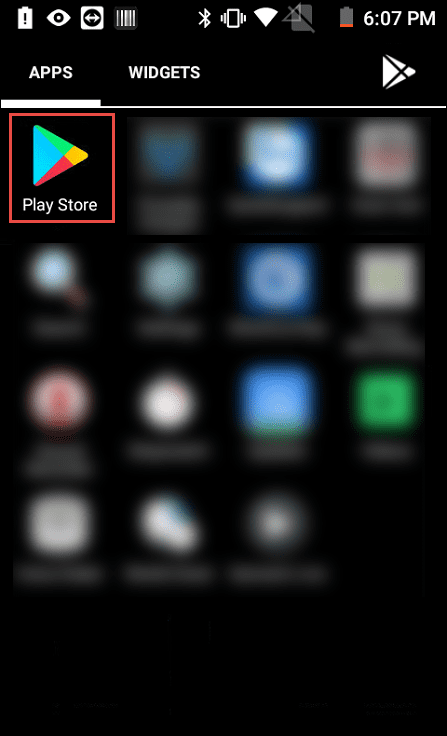
- Enter the Play Store
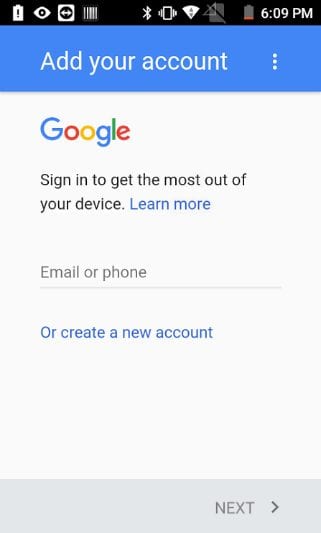
- You may be prompted to log in to a Google account if you haven’t done so already. If you don’t have one, you’ll need to create a new one. You can use the same login for all of your devices if you wish.
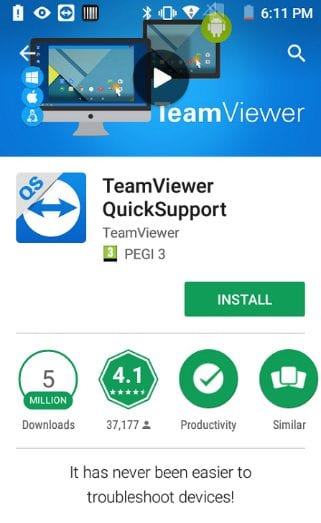
- Search for and install the “TeamViewer QuickSupport” app. Upon installation it may prompt to install an add-on to enable remote control, accept this:
2.2. Barcoding Application
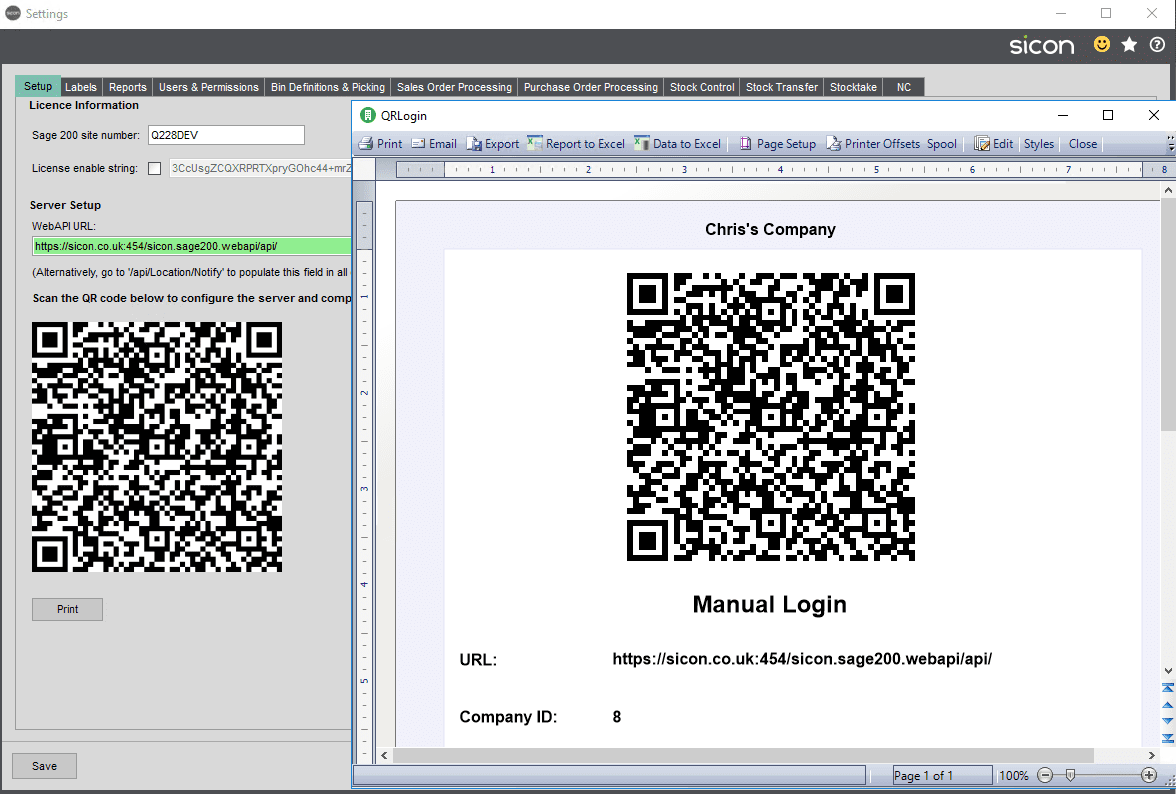
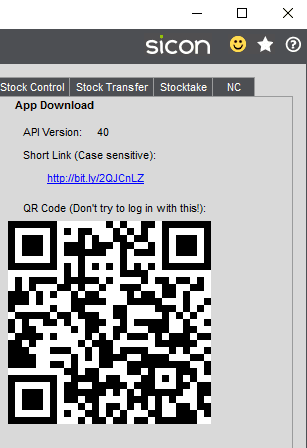
- On the Barcoding Settings screen in Sage, there is a URL field that must be provided prior to generating connection information. To populate this automatically you can navigate to the following URL “http://{Server IP/URL}/Sicon.Sage200.WebAPI/api/Location/Notify” from your mobile device, which will populate this field as well as confirm the server is accessible. Using an internal computer name will require you to be on the same network as the server and an internal ip will require you to at least be on the same vpn as the server. An external ip/name will remove this requirement.
- With the URL field populated, you can now create a QR code for the company and web API URL and physically print this out if required. This is used for populating the server details in the handheld see step 6 below.
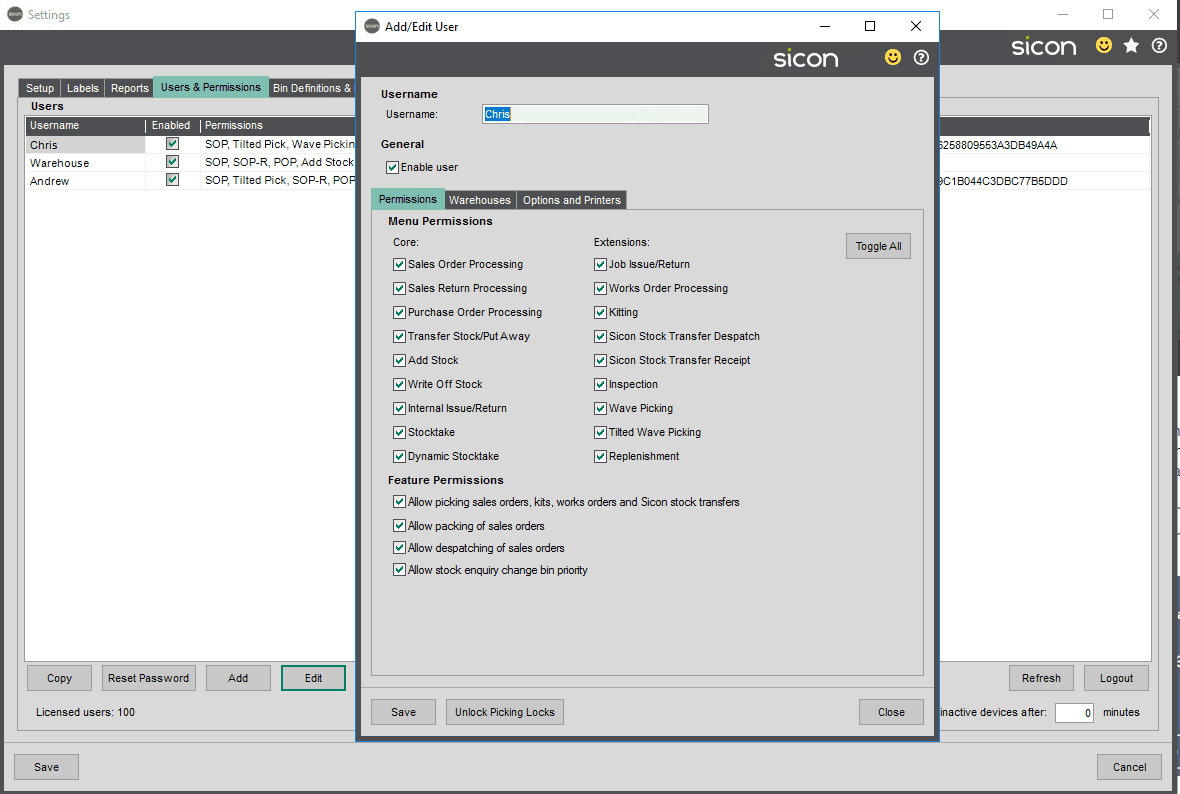
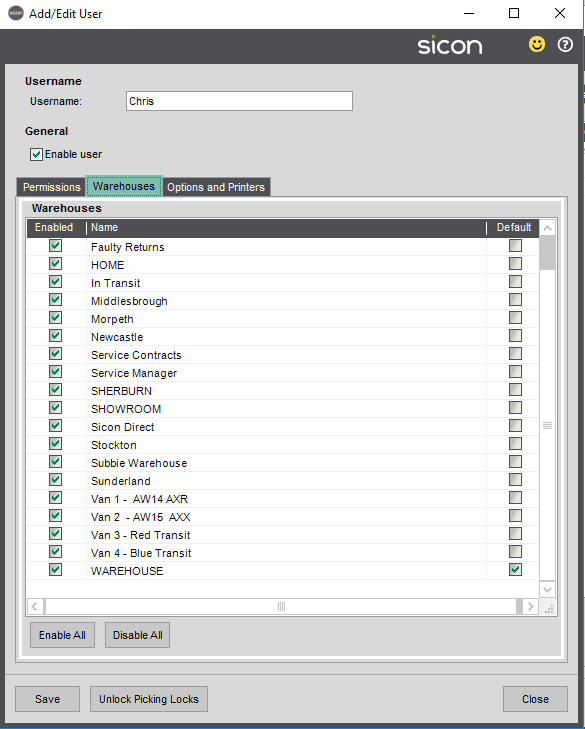
- Create at least one user account for the app from this screen, which is required to access the application after establishing a connection. Access to the warehouses and permissions need to be set against the user. You need to give access to at least one warehouse, setting a warehouse as the default will automatically use this warehouse on login.
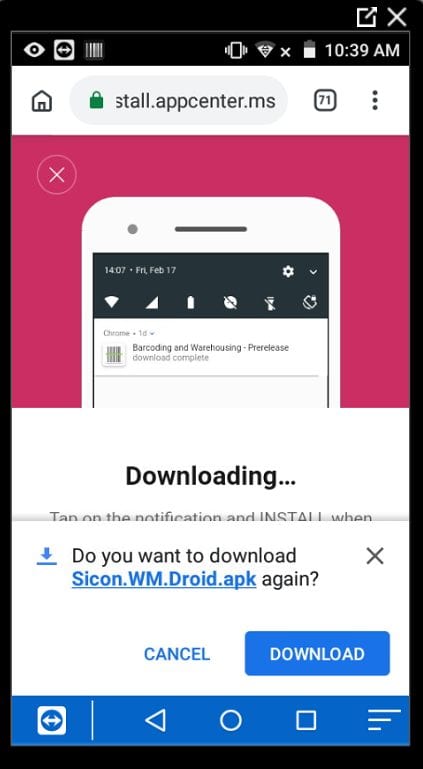
- Download and Install the Barcoding Android application on your device from the App Download web address link in Sage. Manually type in the web address for the App download in Chrome on the tablet or scan the QR code to take you to the download web page.
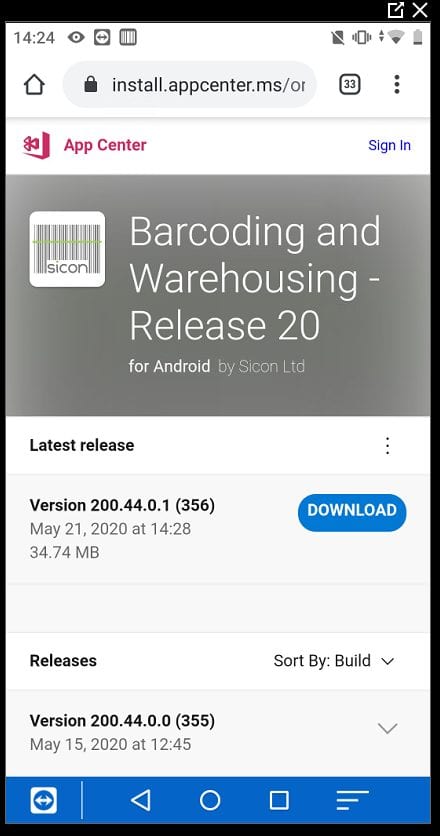
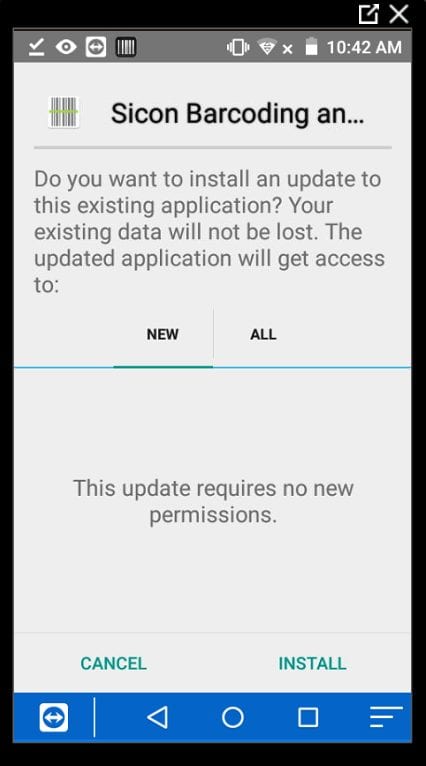
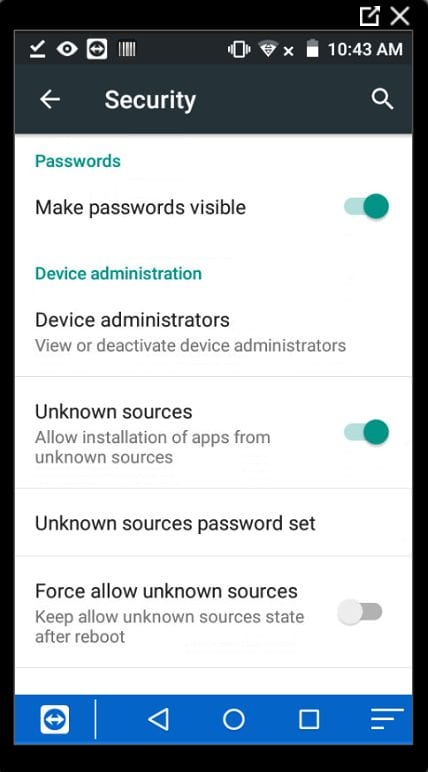
- This will require allowing installation from unknown sources, so if prompted during the installation you will need to enable it. On some devices, you’ll be prompted for a password, which by default will be “4007770876” on the Seuic devices that we recommend.
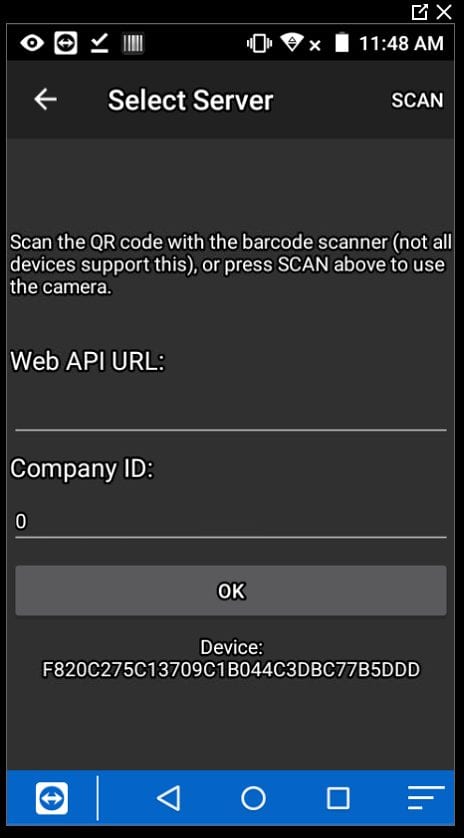
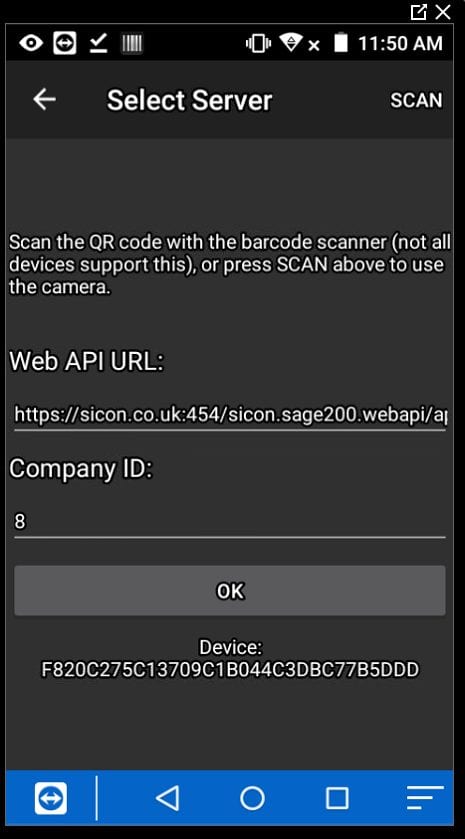
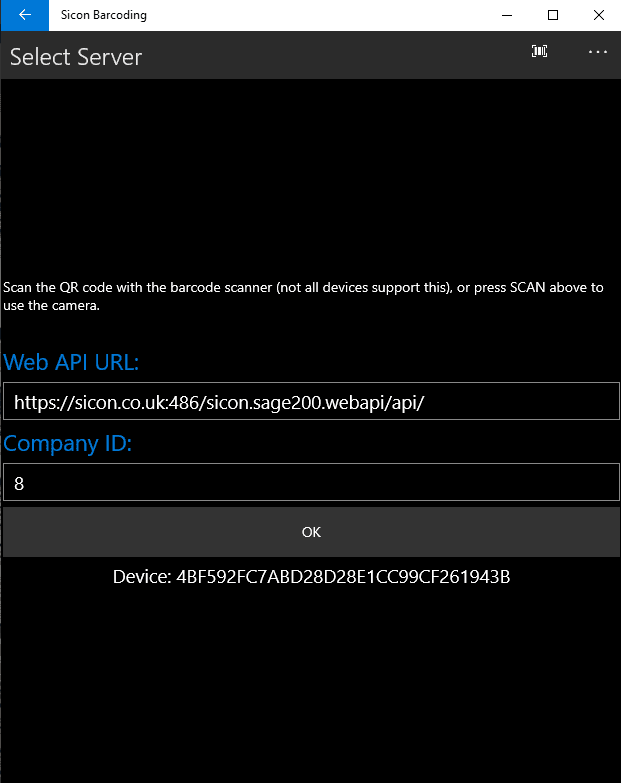
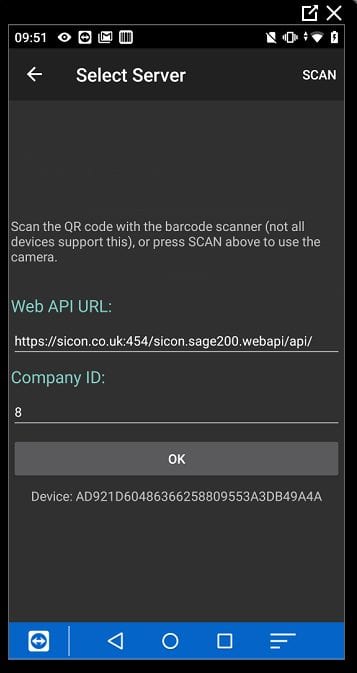
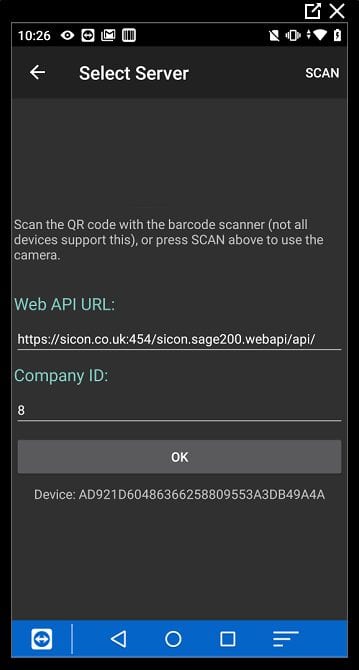
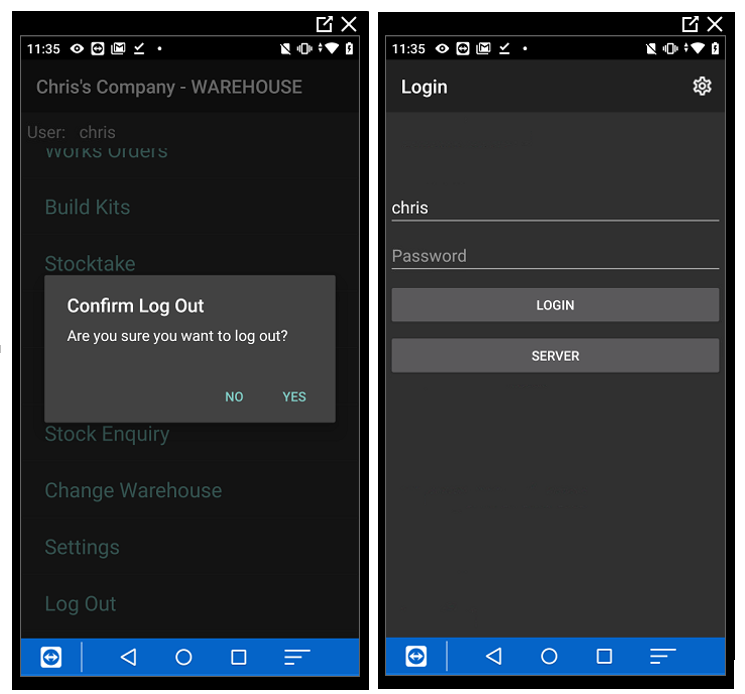
- Upon opening the app, click on server and scan the large QR code on the settings page (or printed out from step 2 above) to populate the Web API URL and company ID. Alternatively this can be entered manually if the device does not have a scanner/camera.
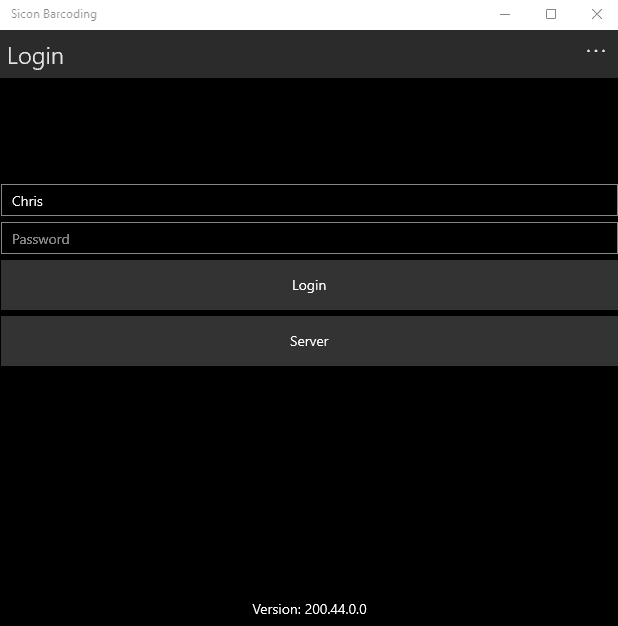
- You can then log in as the user.
- In versions 19.2 and 20.0, there is also the ability to install a windows based app on to a windows 10 machine. The windows app mirrors the android app in appearance where possible, but scanning of barcodes is currently not possible. To download the windows app, go to the Microsoft store and search for Sicon barcoding.
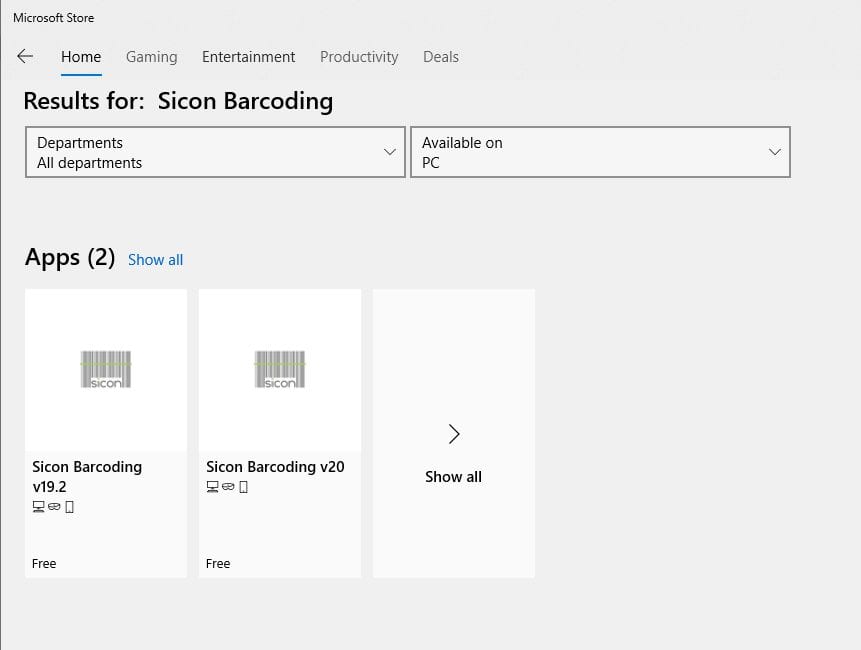
- You can then download the appropriate version on the machine and then run it. The server and company details will need to entered.
- You can the log in with a barcode user that has been set up in the Sicon barcoding settings.
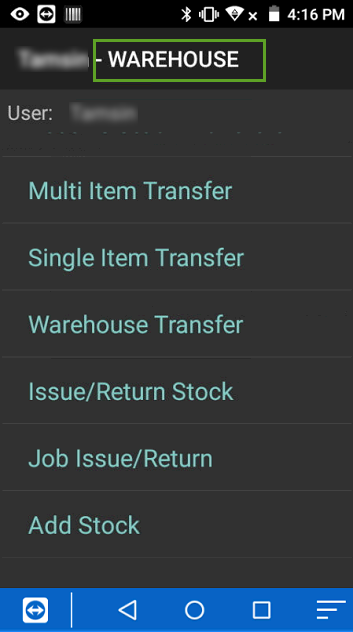
3. Sage Menu
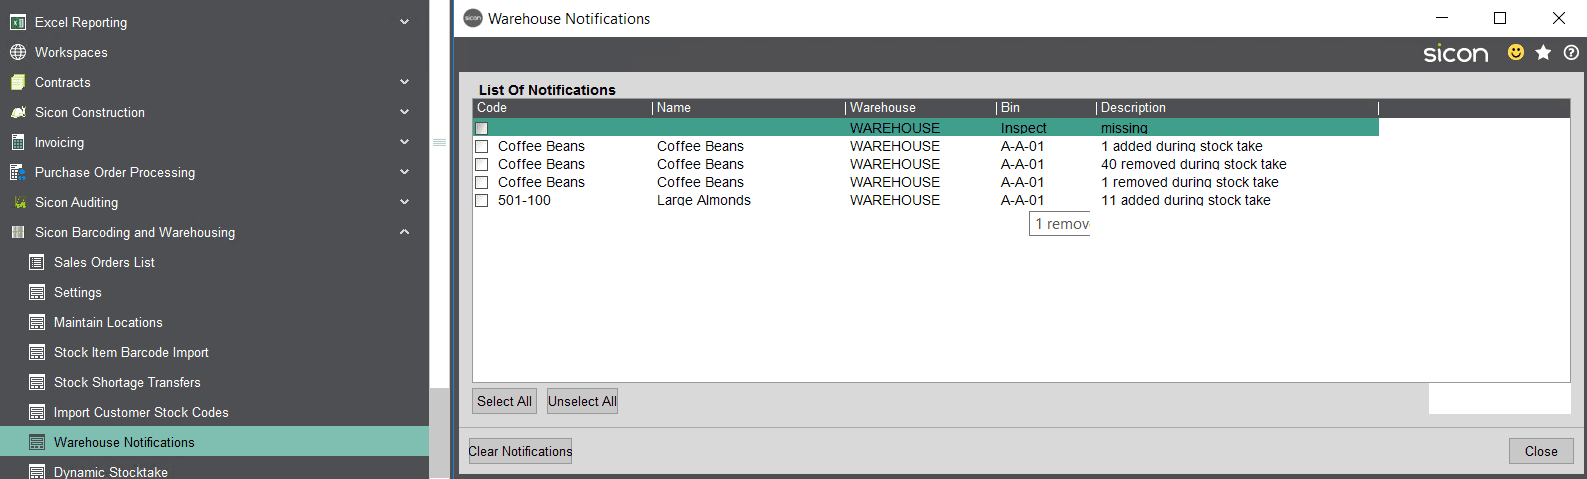
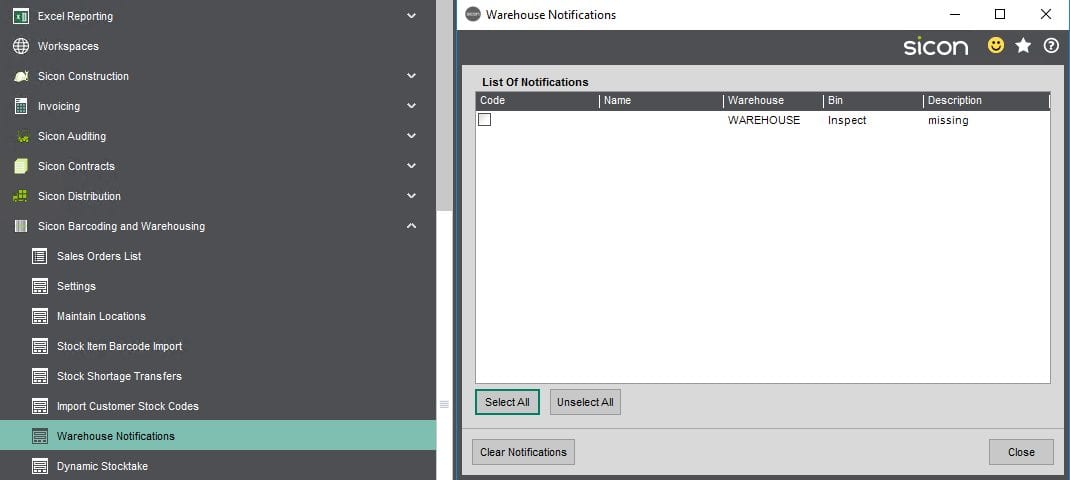
3.1. Warehouse Notifications
Stores any notifications sent from the handheld, including barcode problems, dynamic stock take results. Notifications can be cleared from the screen.
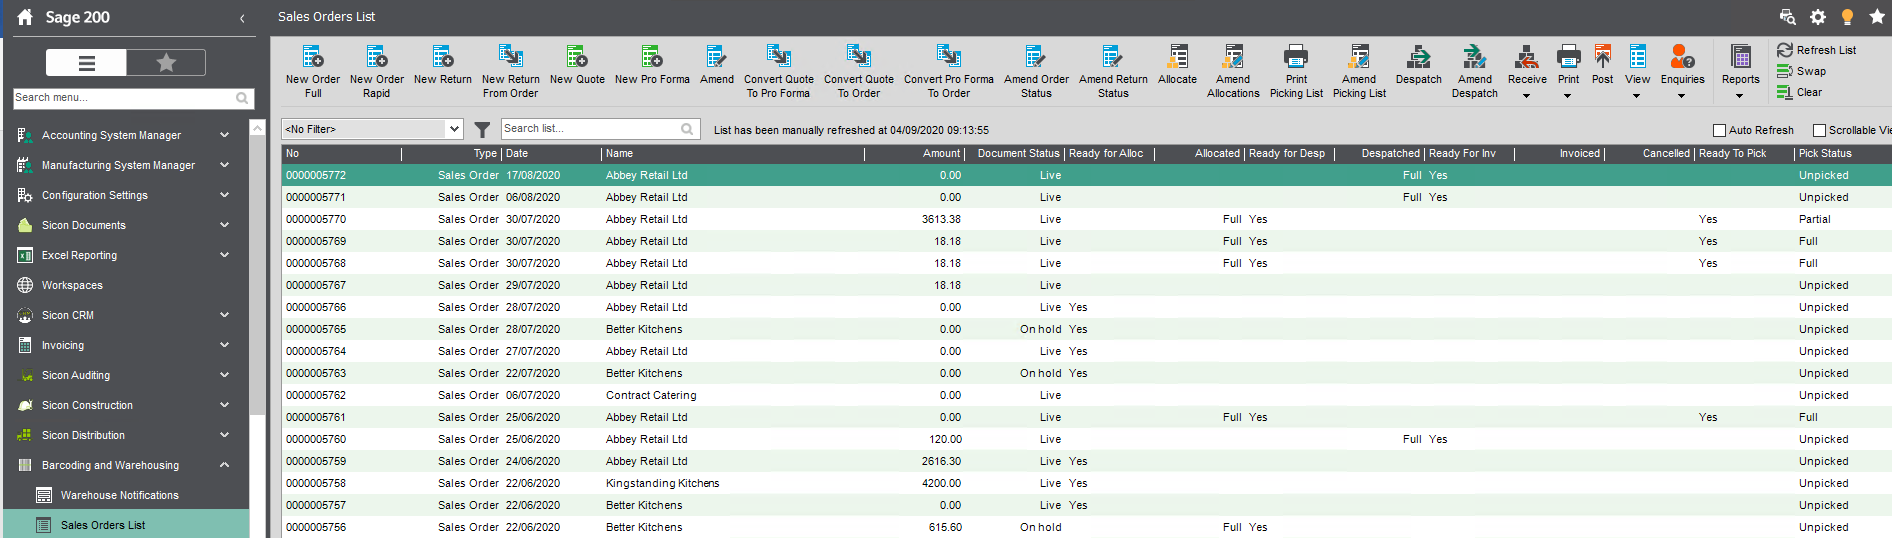
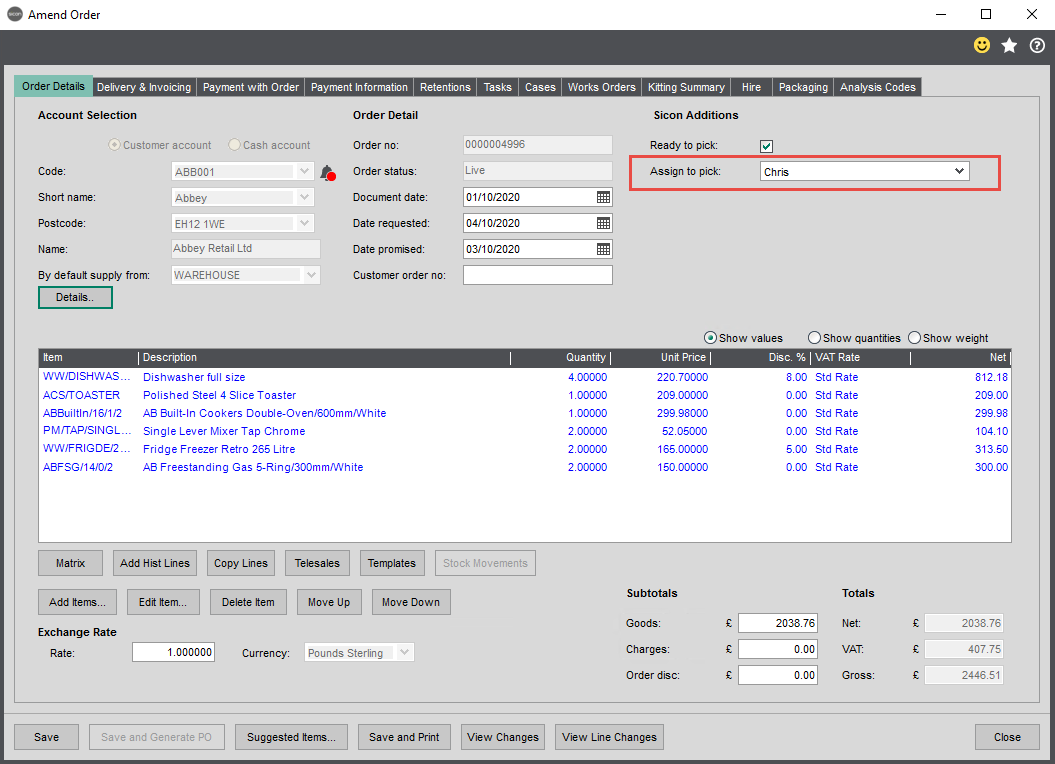
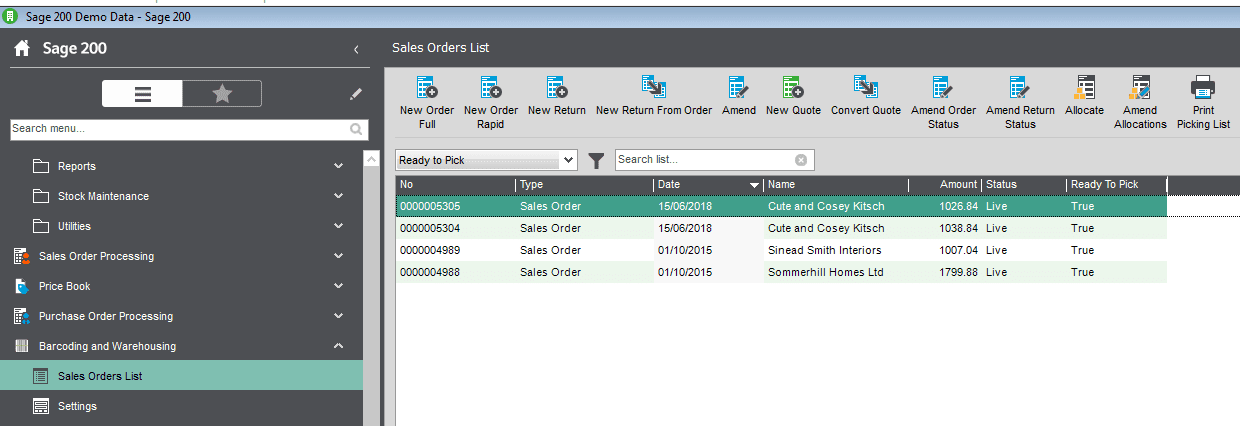
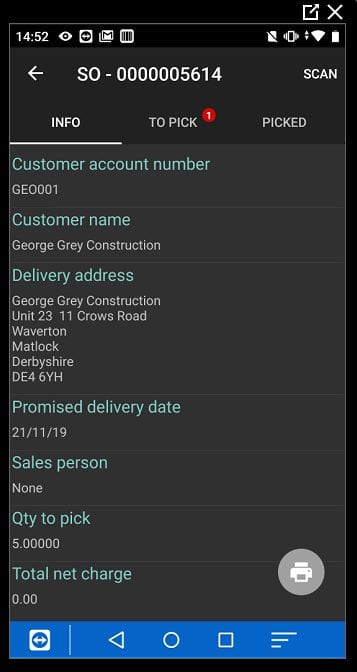
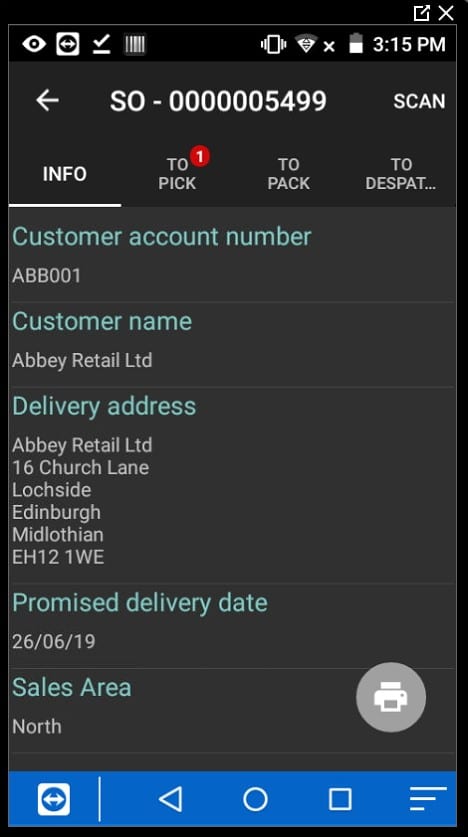
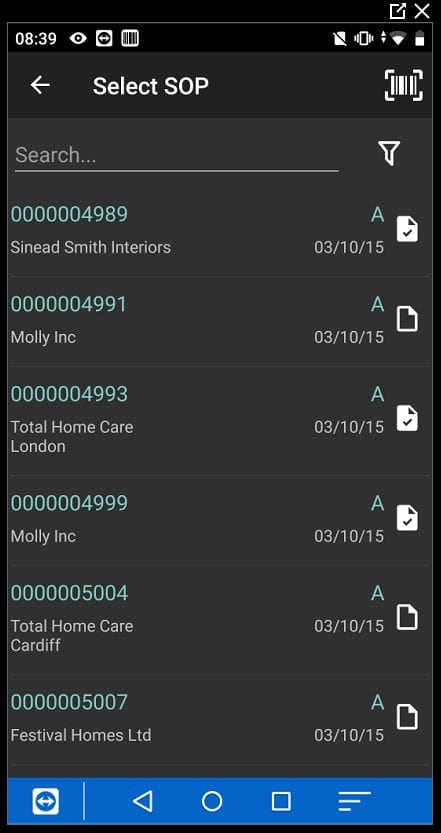
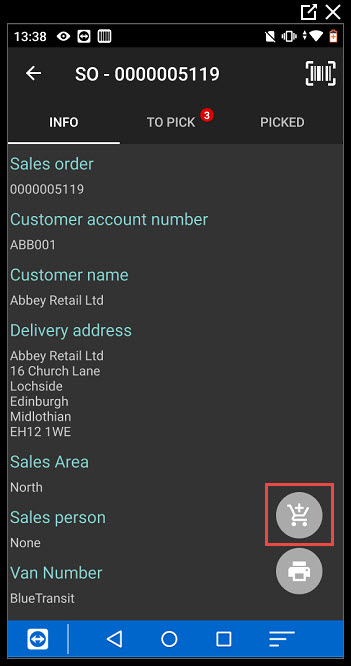
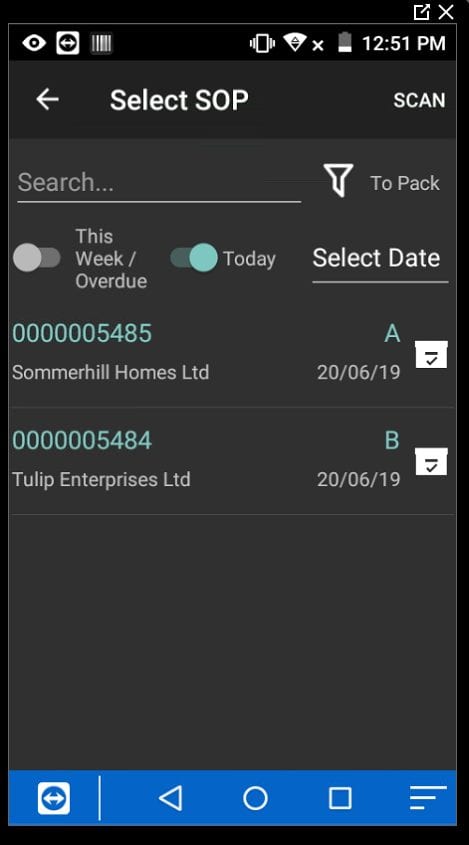
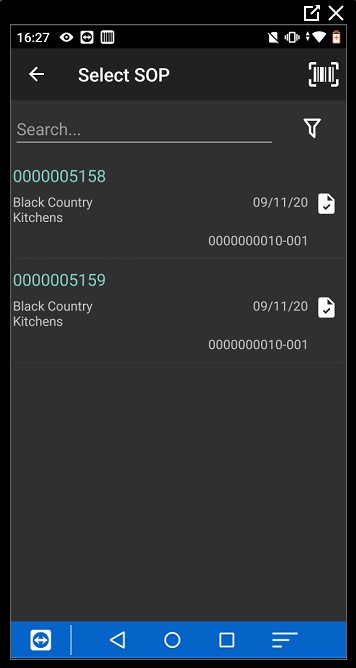
3.2. Sales Order List
A sales order list has been included so that the Sicon ready to pick flag can be displayed on the list. See further details on the ready to pick flag in the SOP settings below. The pick status of the order also shows, to highlight if the sales order has been picked in the handheld. This mirrors the pick status icons on the sales order list on the handheld.
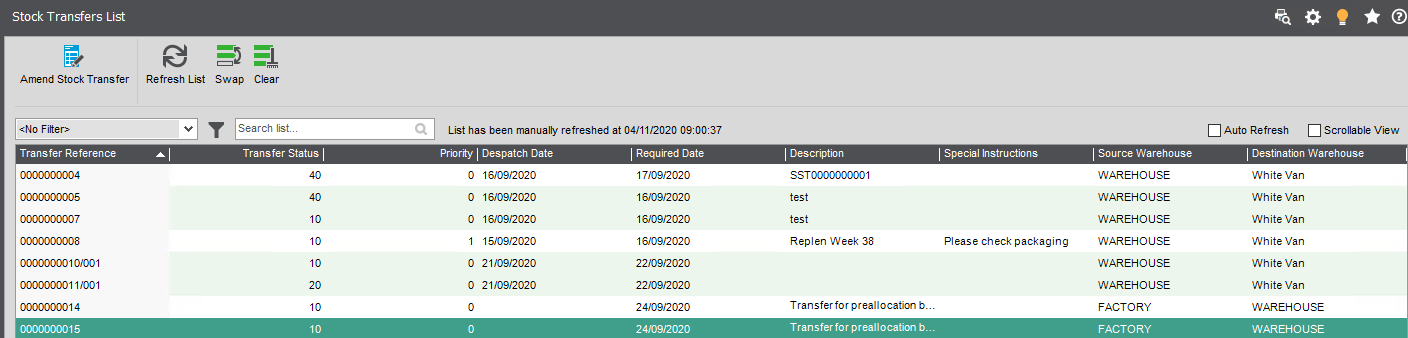
3.3. Stock Transfer Ltd
Shows a list of Sicon stock transfers, which can be accessed by highlighting a line and clicking on amend.
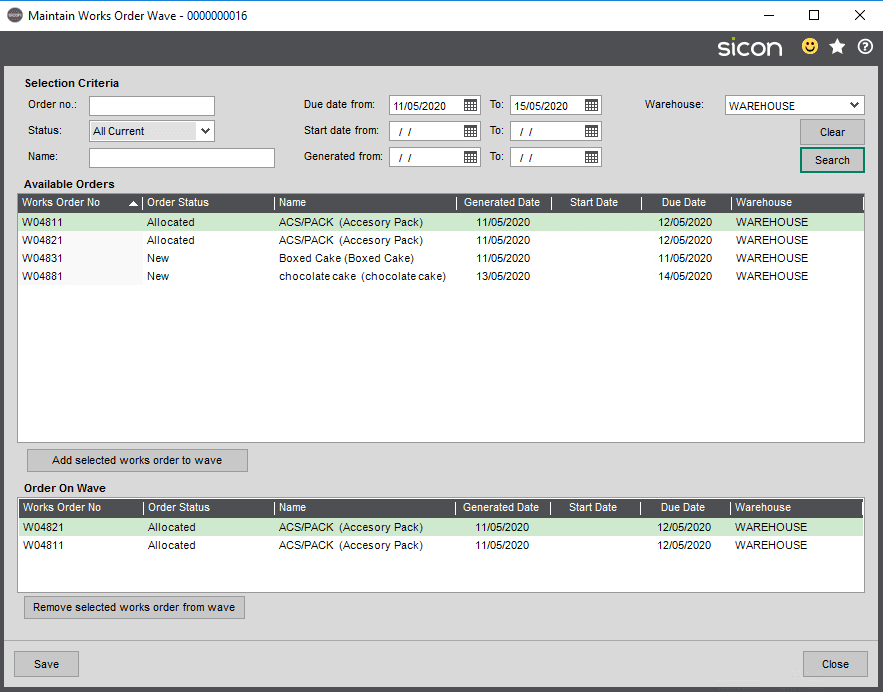
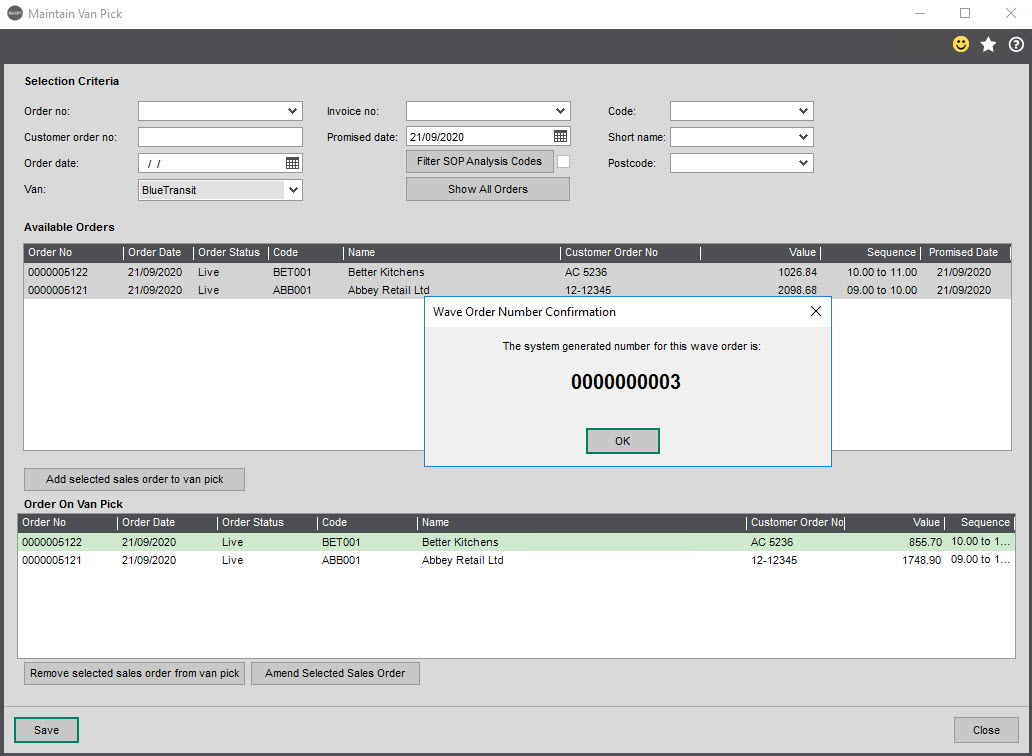
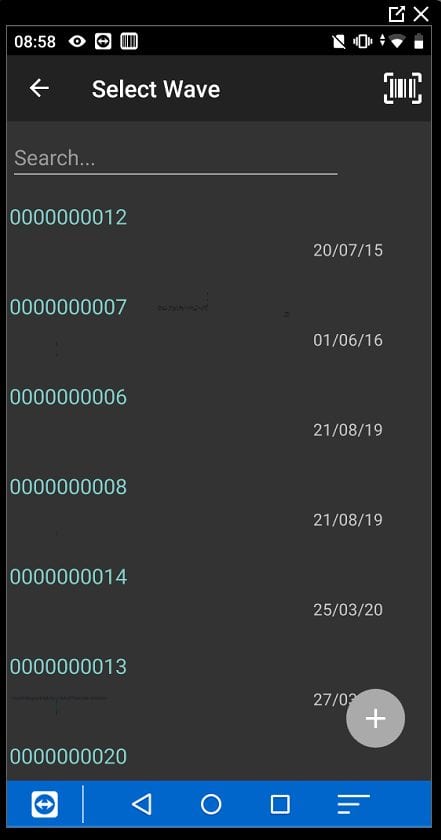
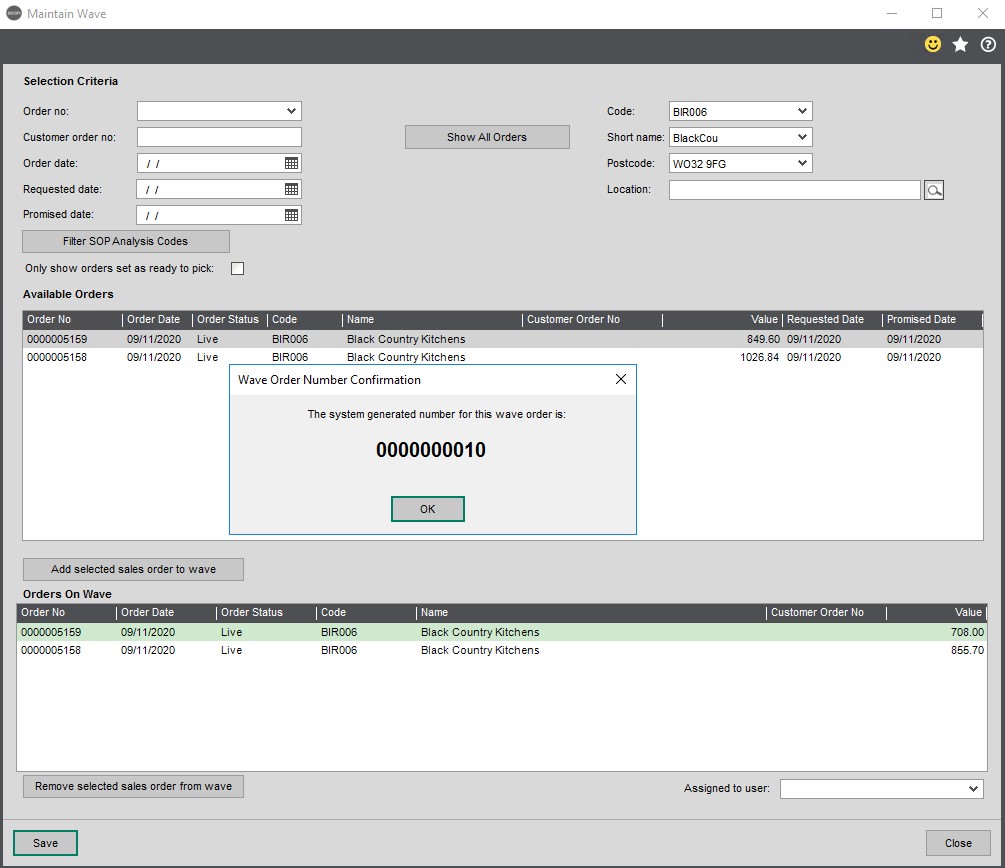
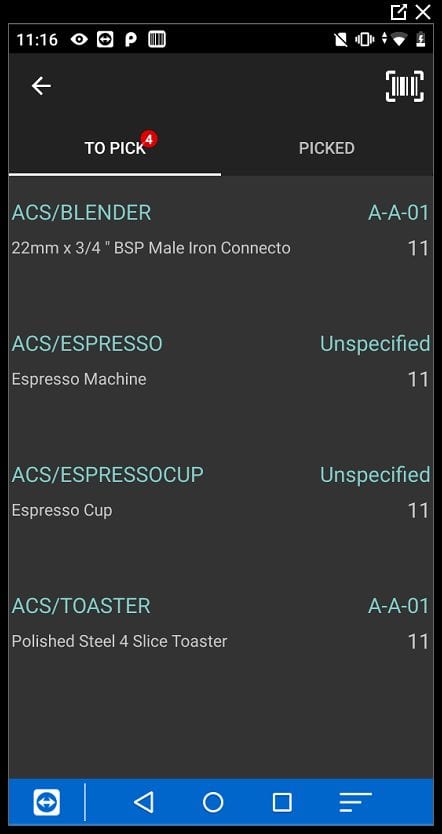
3.4. Waves
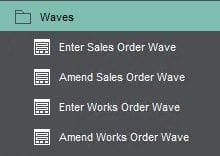
Sales Order Waves can be created and amended from within these.
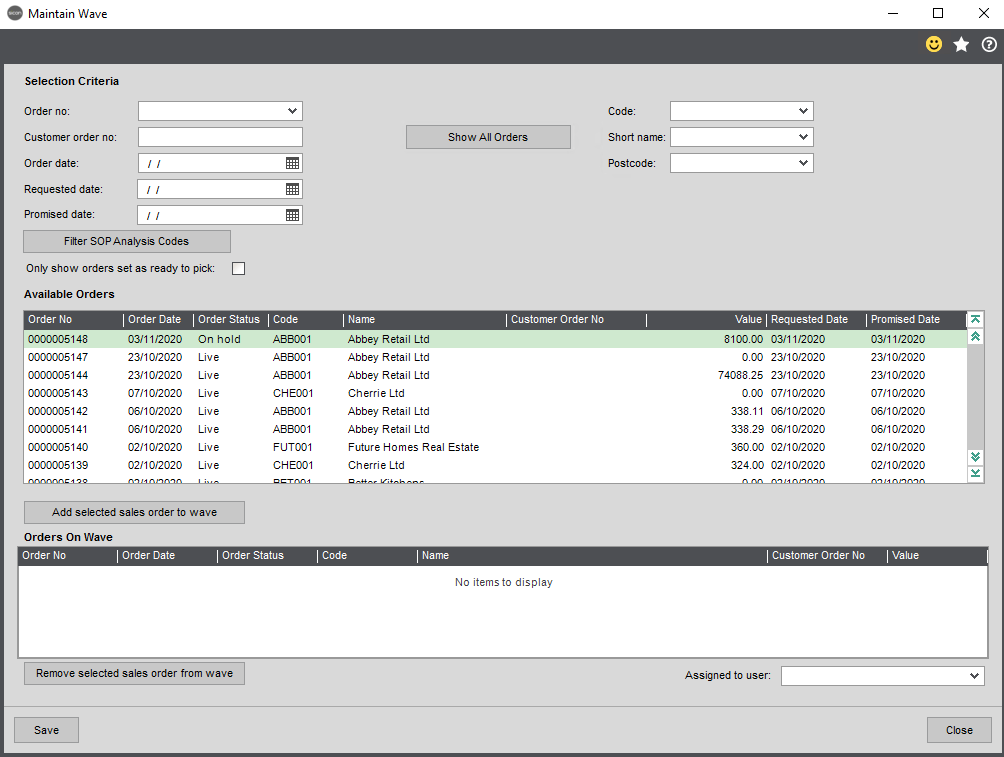
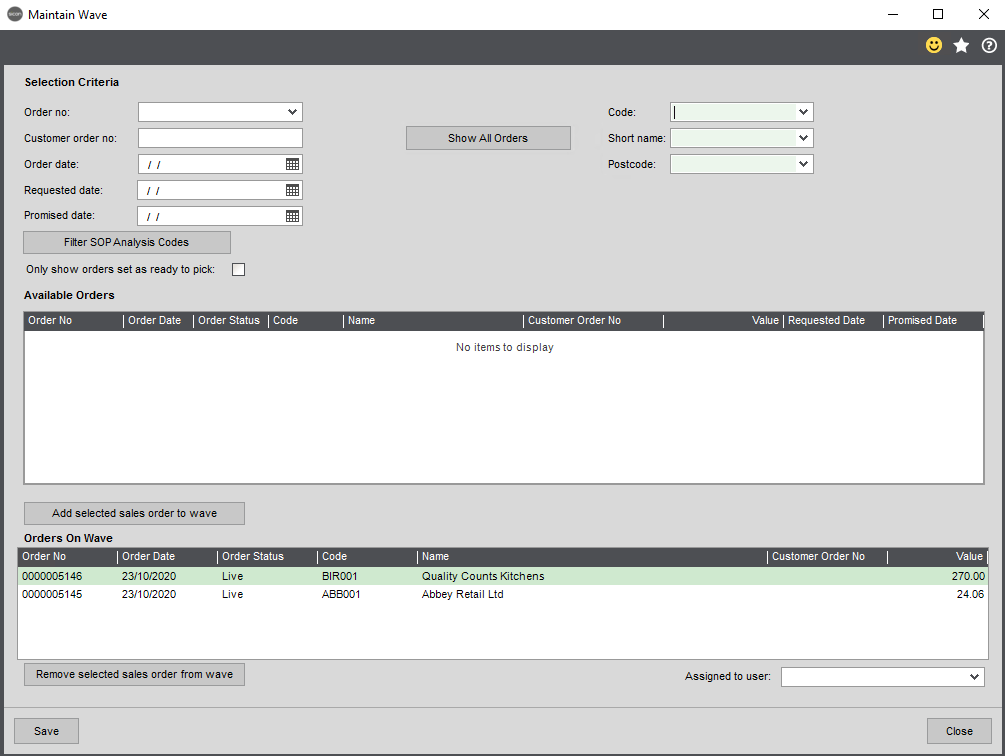
Sales orders can be found using the selection criteria or all orders can be displayed by clicking on show all orders. The orders can be added to a wave and the wave created by clicking on the save button.
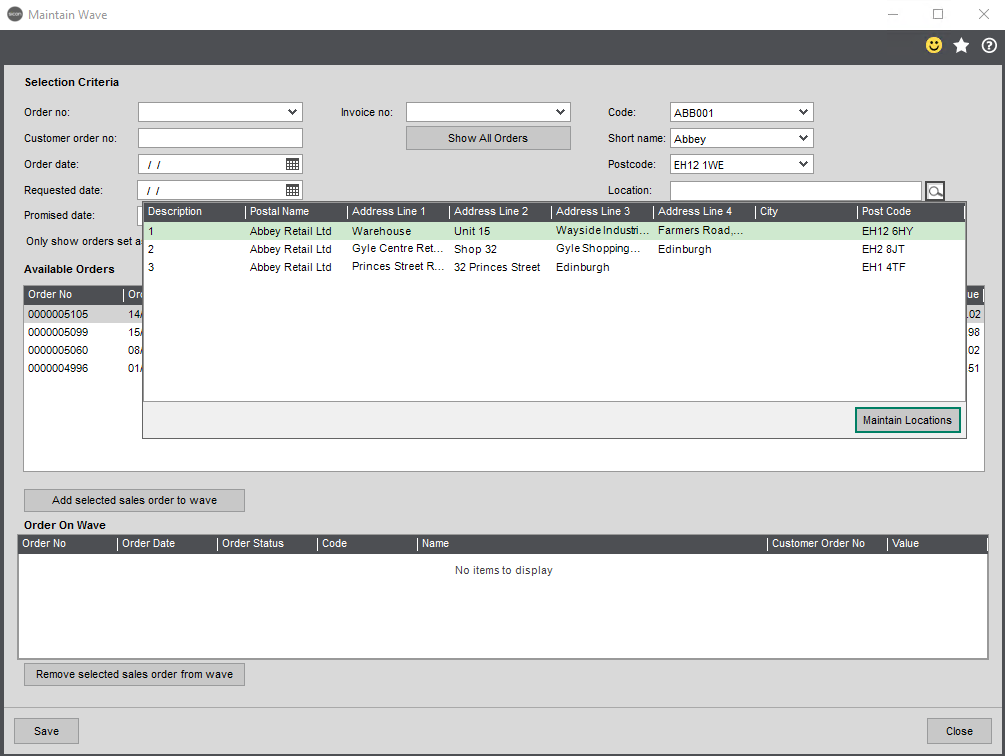
When a customer is selected, an additional field to select the sales order delivery address can be used to select orders for a particular delivery address.
Existing Sales order waves can be amended from the amend sales order wave menu.
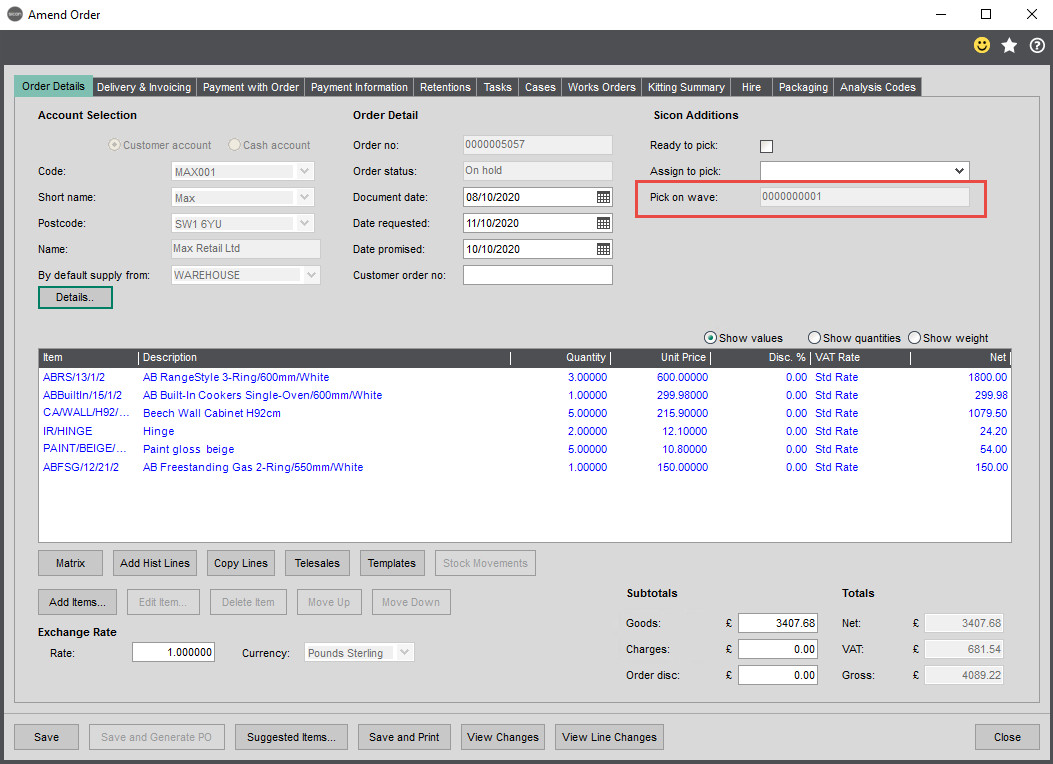
The wave number is added to the sales order in the pick on wave field.
Where the Sicon works order module is installed, Sicon works order waves can be created and amended.
3.5. Assign Pickers to Sales Orders
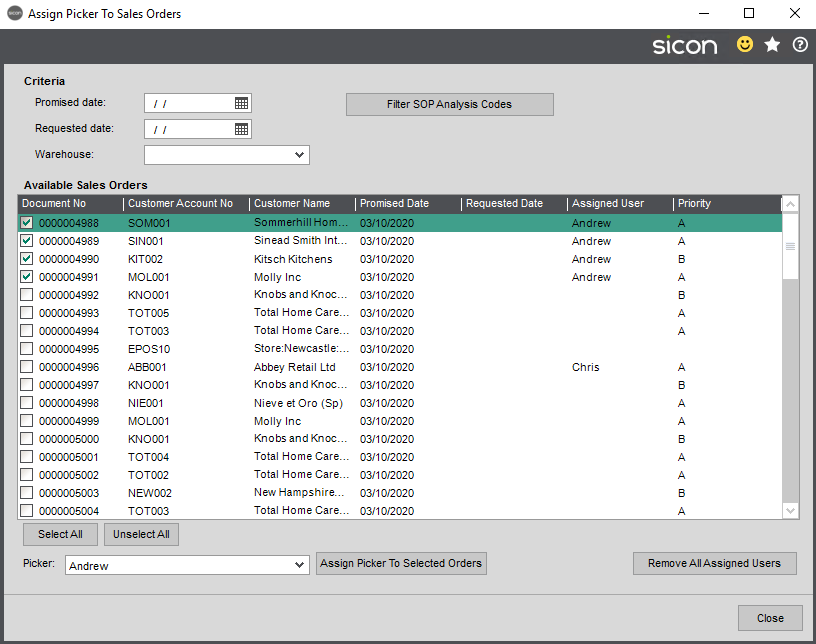
Allows sales order to be assigned to handheld users. Sales orders can be selected using a number of criteria and then assigned to a user. The handheld user will then only see orders assigned to themselves or orders that have not been assigned.
The assigned user appears on the sales order and can be added or removed individually.
3.6. Van Picks
There are a number of set requirements for using Van picks, to enable sales orders to be picked into Vans.
In Sage accounting system manager, settings, maintain analysis codes, an analysis code for Van Numbers and Drop Number can be created.
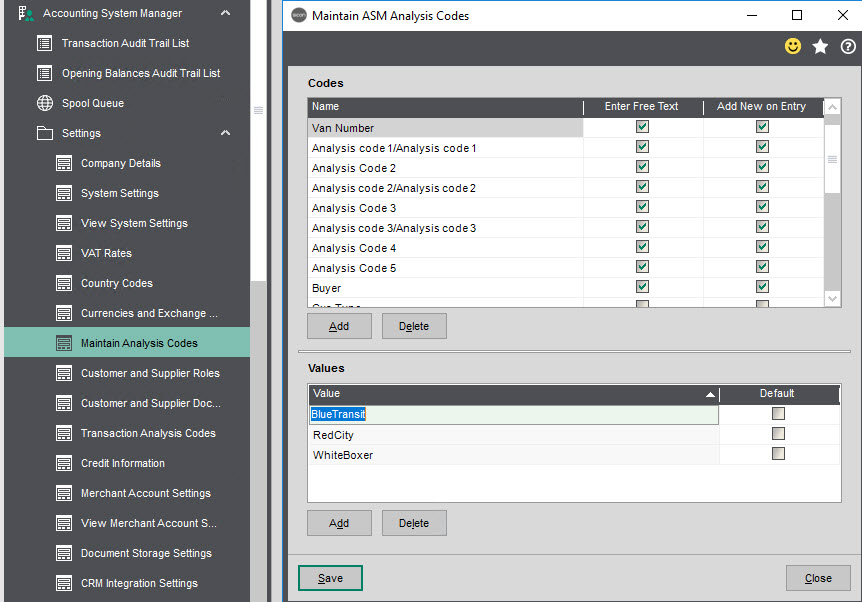
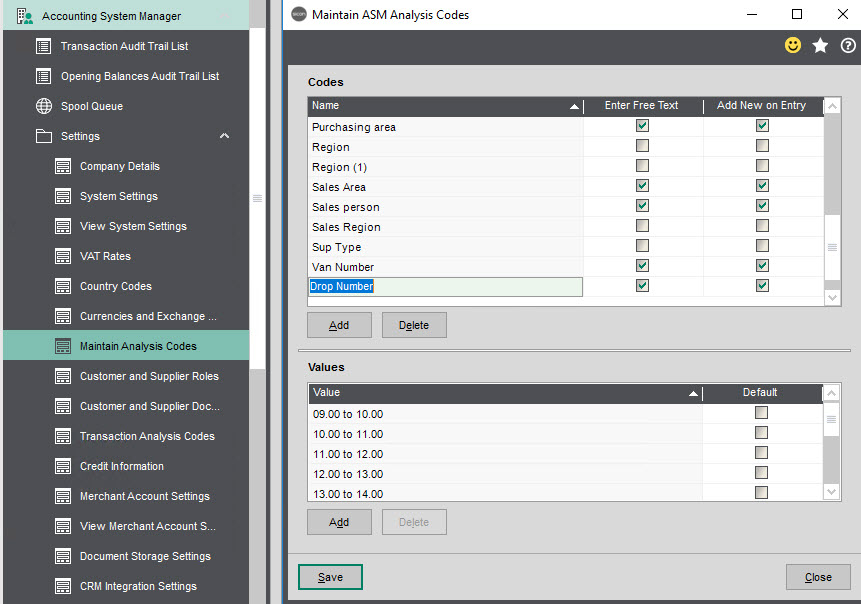
These can then linked to SOP analysis codes
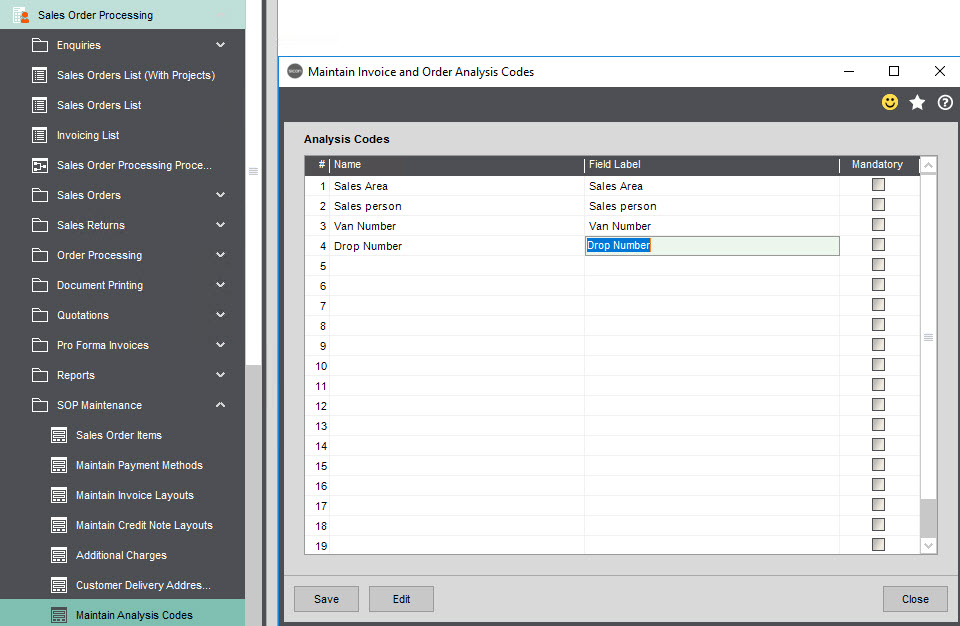
These SOP analysis codes can then be set in SOP barcoding
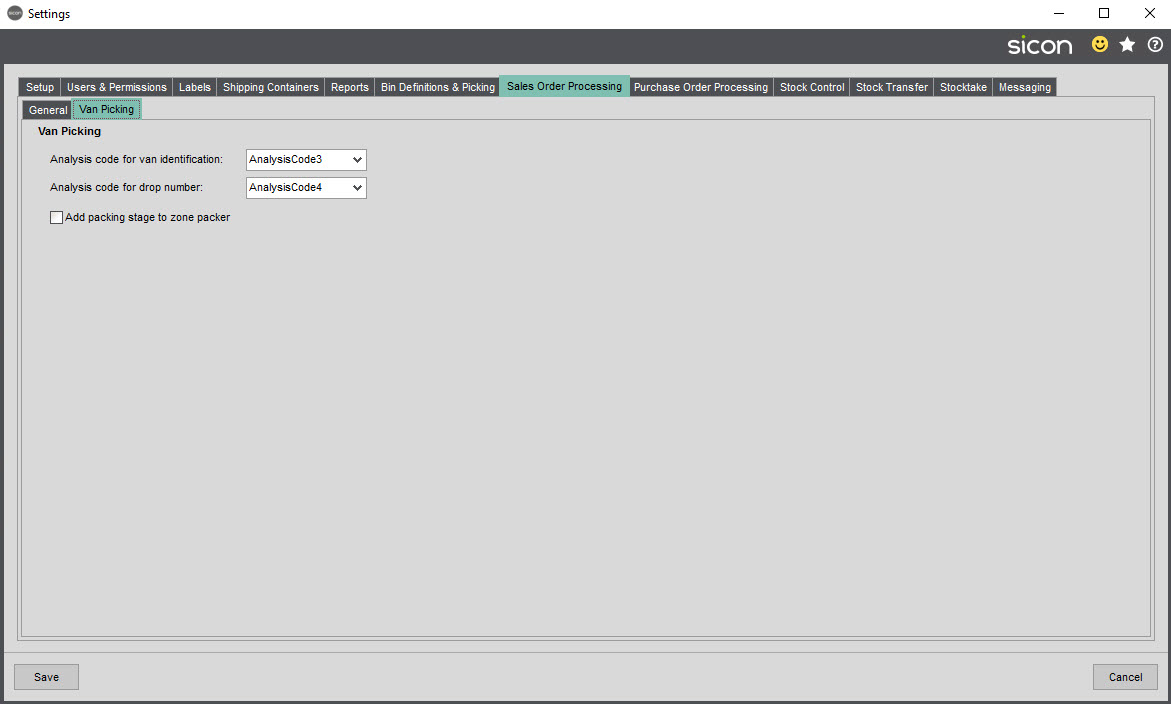
The SOP analysis codes can be pulled from the customer analysis code, which need to be set up.
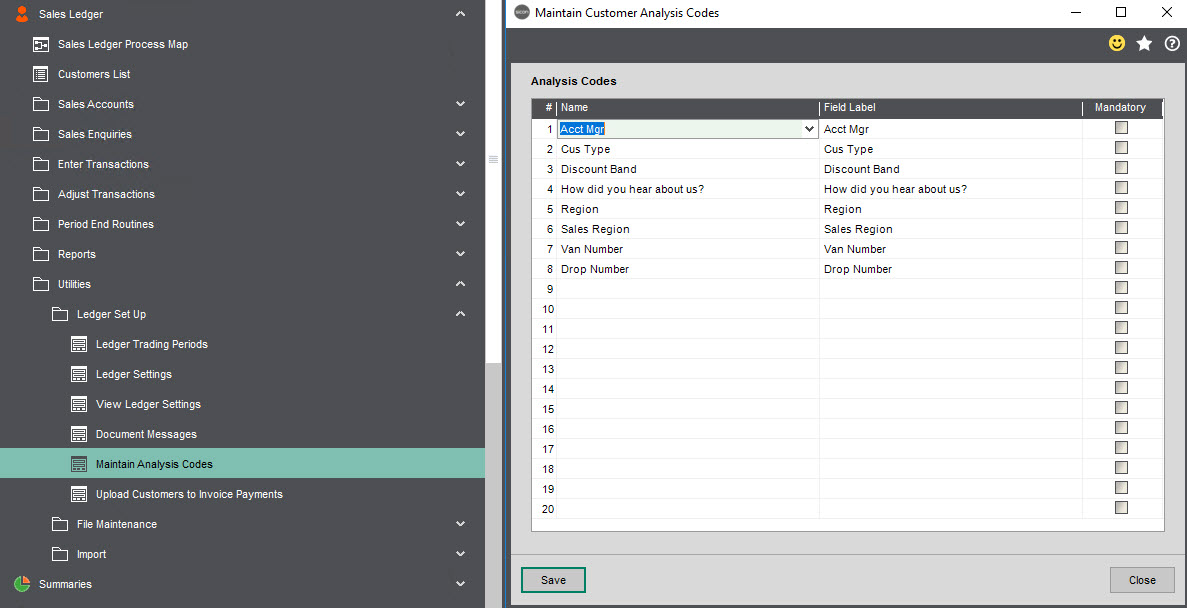
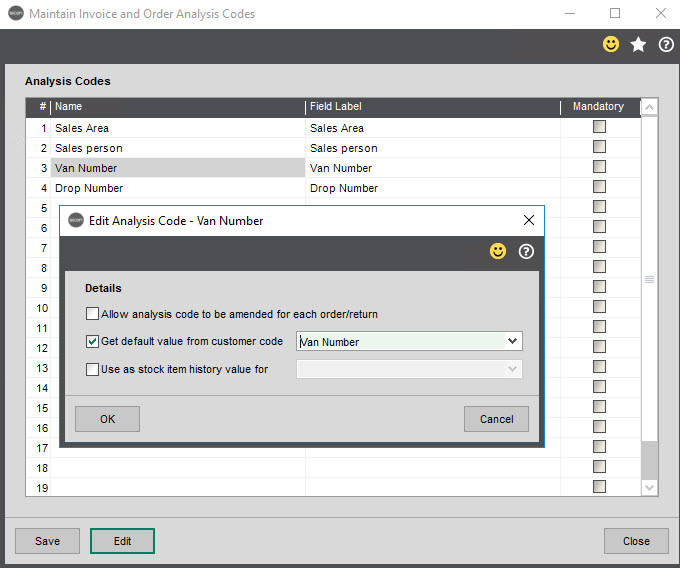
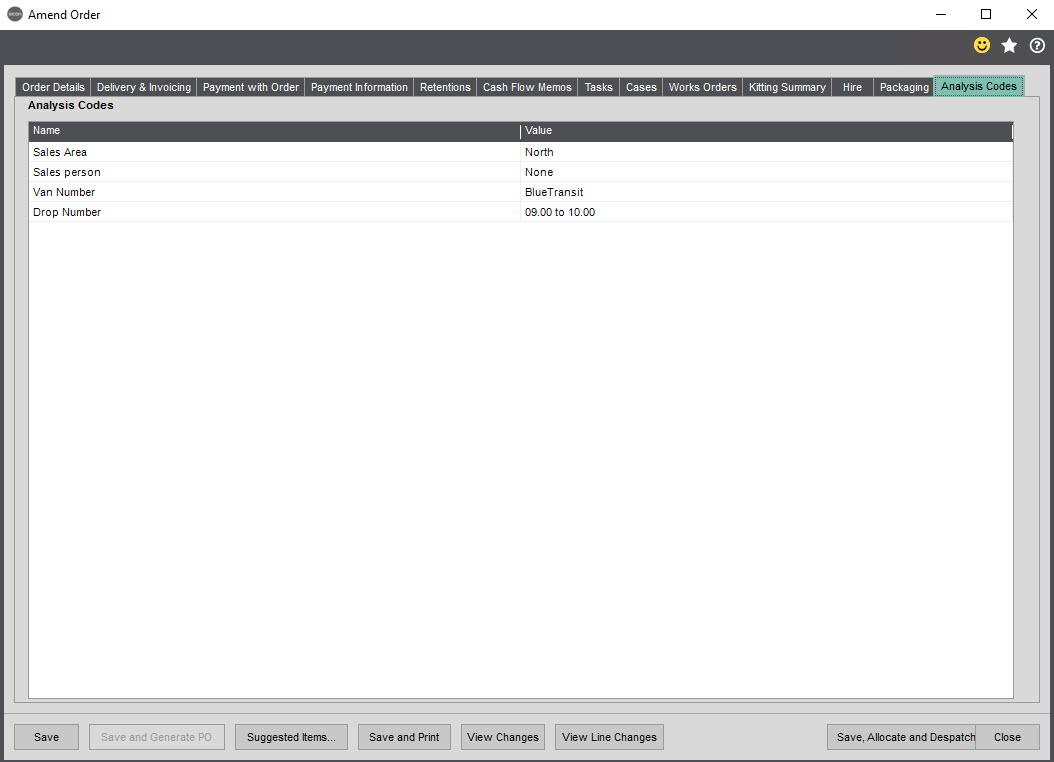
When sales orders are entered the Van and Drop number (sequence) can then be linked to the SOP.
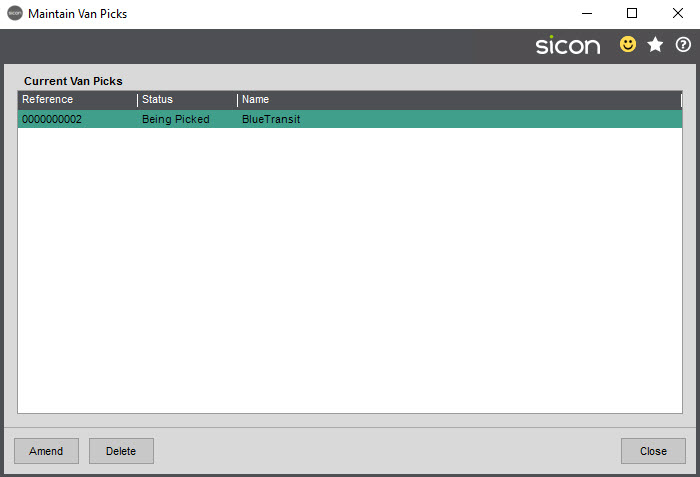
3.7. Amend Van Pick
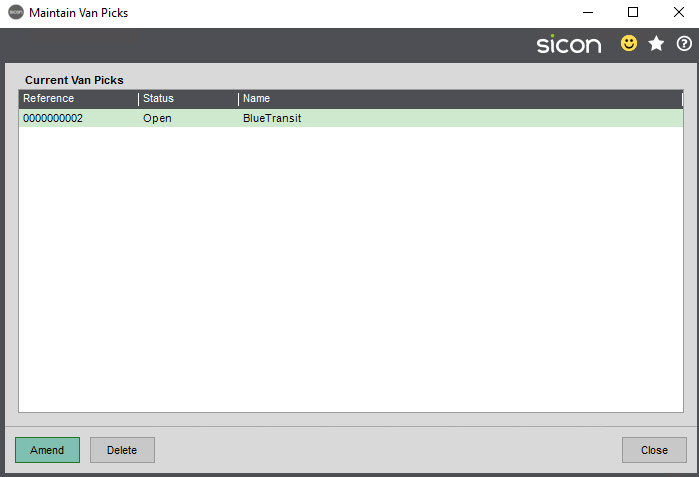
In this screen van picks can be amended or deleted.
When van pick are being worked on in the handheld, the status of the pick will be updated and the picks will be locked for editing/deleting.
3.8. Enter Van Pick
In this screen sales orders can selected and linked to a van pick. Clicking on save creates the Van wave pick
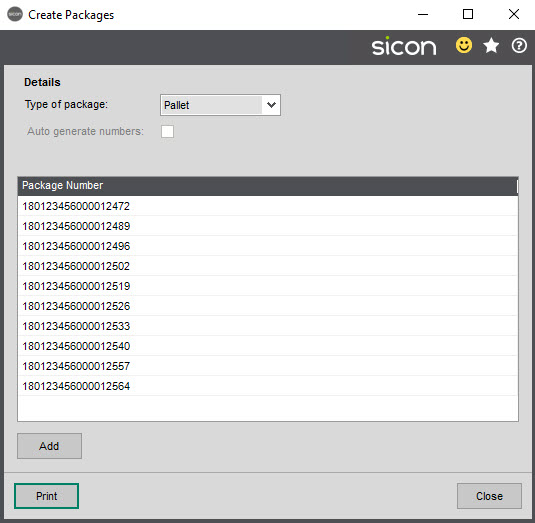
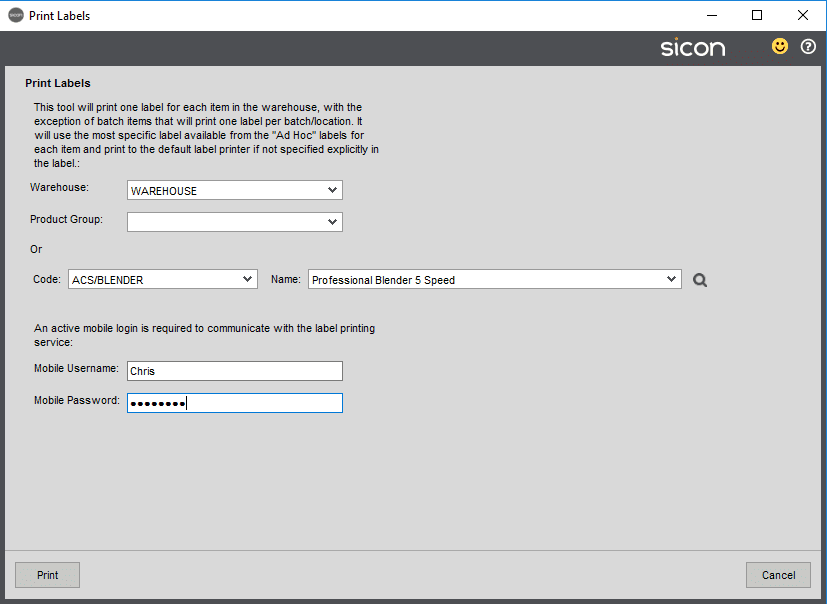
3.9. Create Package Labels
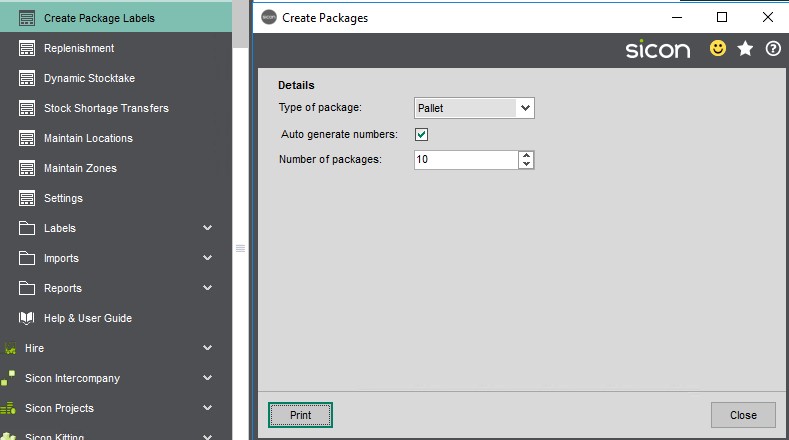
Allows packaging labels to be generated and printed.
When auto generate numbers is selected the system will use the next available number based on the container .
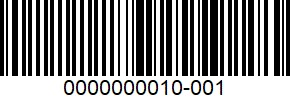
For example, when auto generating pallets. The system has combined the extension digit, company, prefix and serial reference followed by a system generated check digit to come up with the next SSCC pallet number.
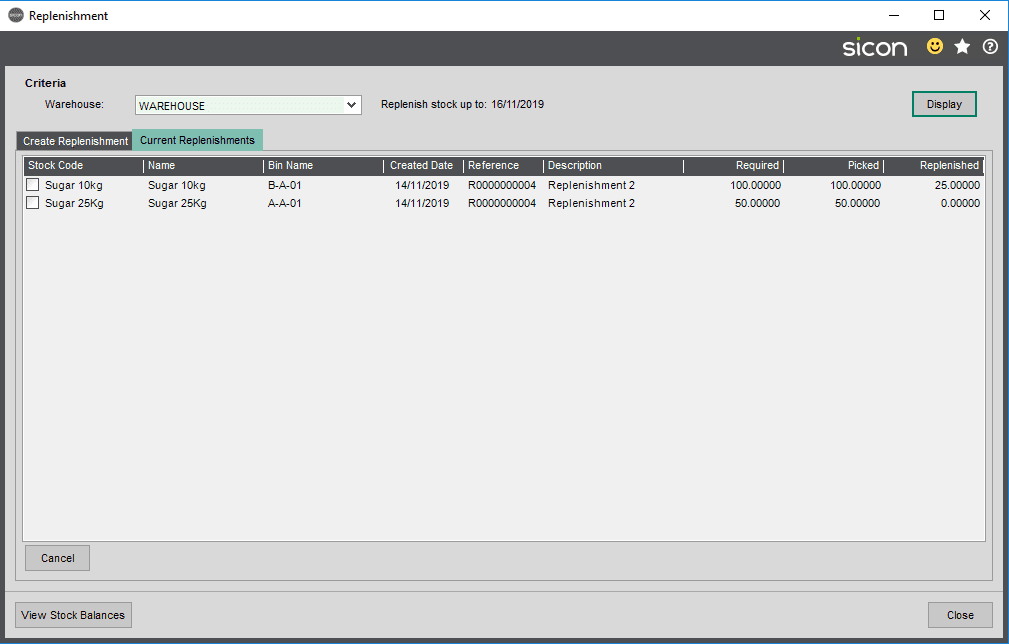
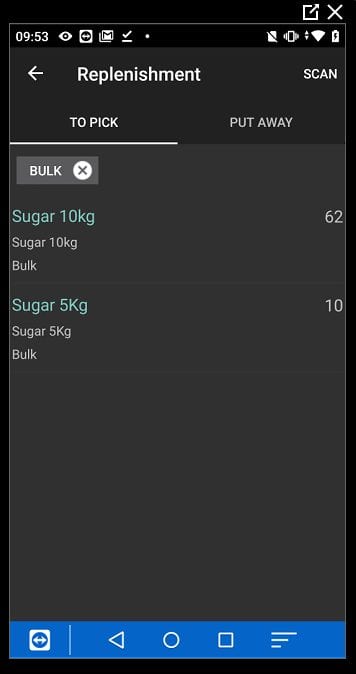
3.10. Replenishment
Stock items to replenish can be created in this screen. Clicking on display, will show any stock item bins that are below the minimum/reorder bin level (depending on the stock transfer settings to use minimum or reorder).
The replenish quantity is the difference between the pick bin stock and the maximum. The screen shows stock items on purchase orders (on order) and on sales order (future demand), the corresponding purchase order and sales orders can be viewed from the screen by highlighting a line and clicking on view item sales order or view item purchase order.
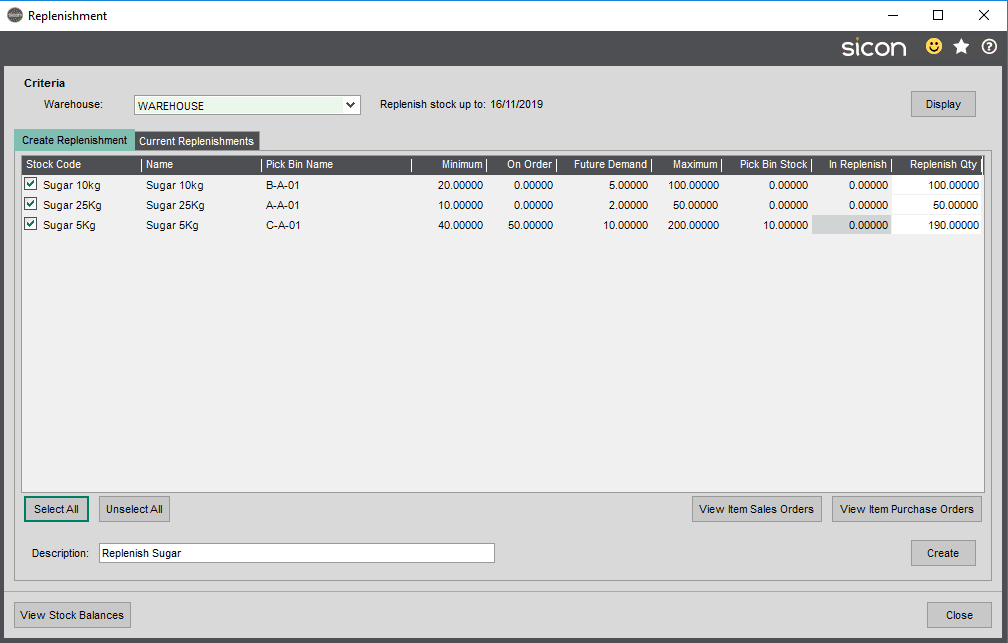
The current quantity in the pick face bin is displayed and a link to view the stock item balances is provided. The ‘in replenish’ column will show any existing replenishments created for the stock item/bin record.
The replenish stock up to date is dictated by the setting in the barcode stock transfer settings.
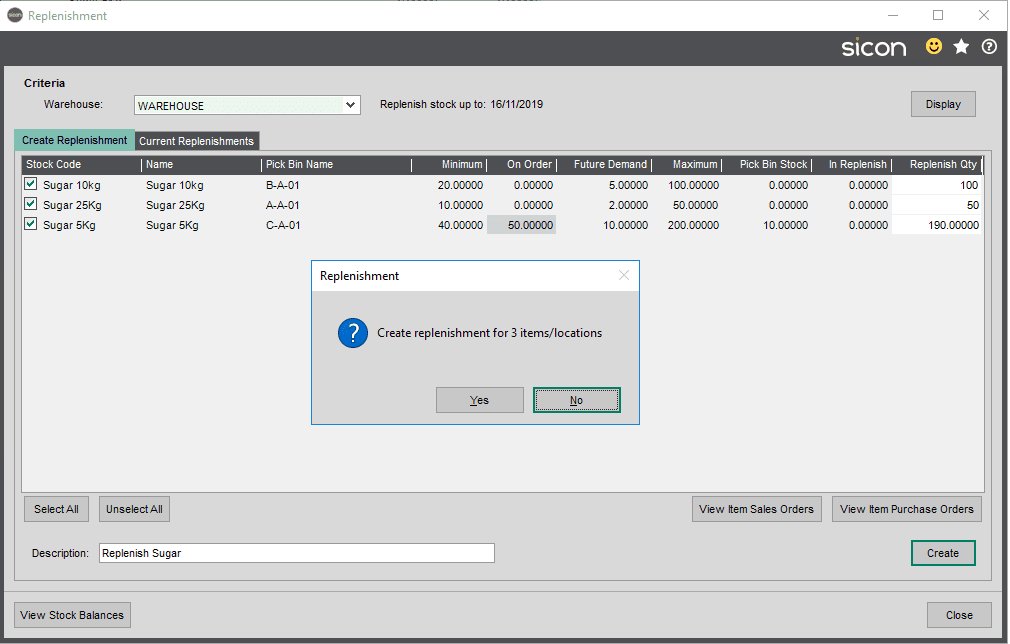
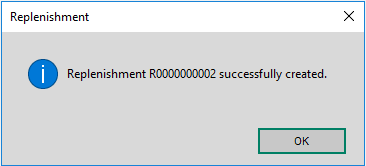
The replenishment quantity can be manually amended if required, clicking on create, then creates a replenishment record.
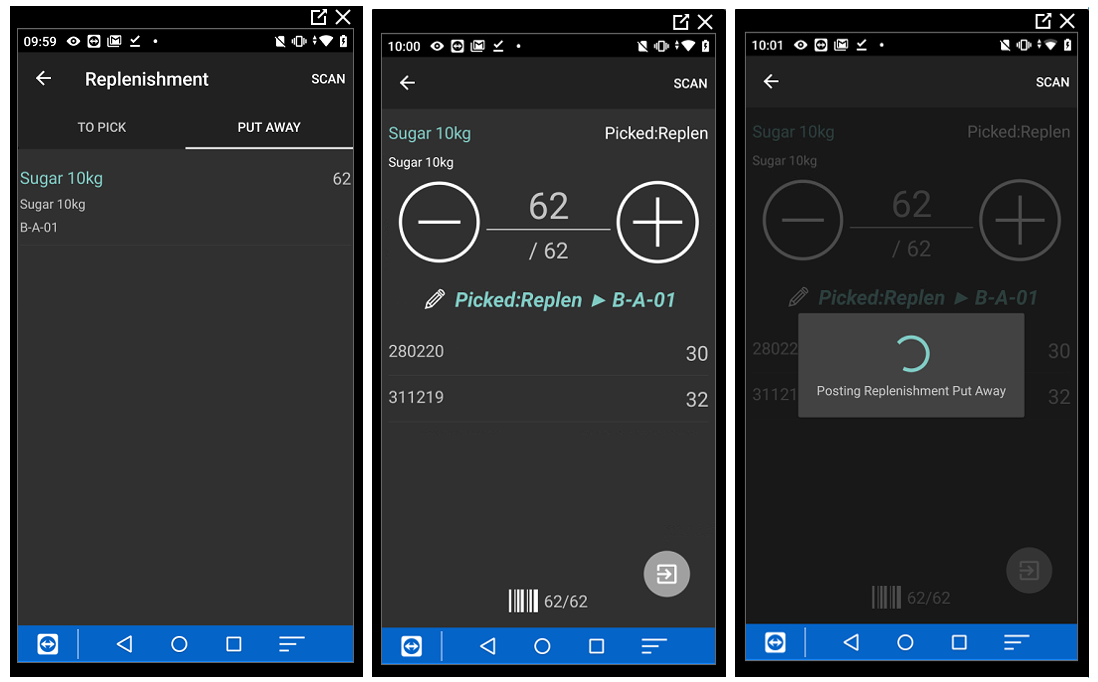
The replenishment record will then appear in the handheld for processing, see the handheld features below for further details.
The created replenishment will appear in the current replenishment screen. If the replenishment has been picked and part put away, these figures will appear in this screen in the picked and replenished screen.
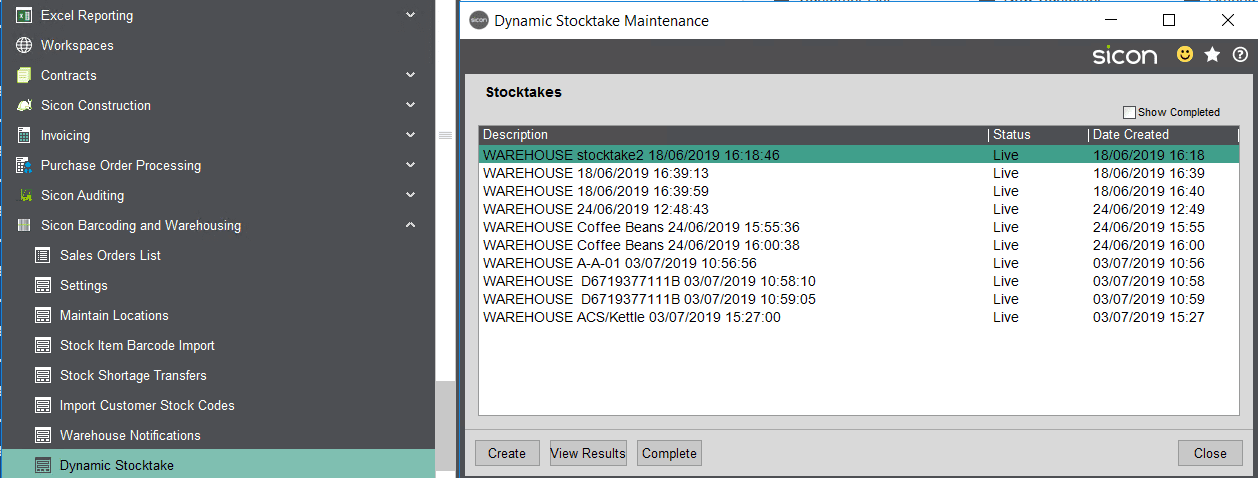
3.11. Dynamic Stock Take
Dynamic stock takes can be created, reviewed and completed from this screen.
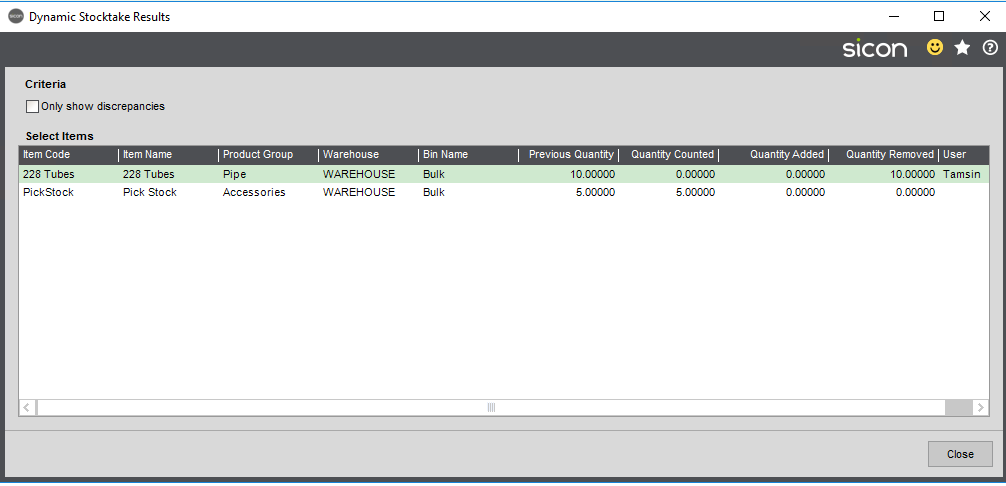
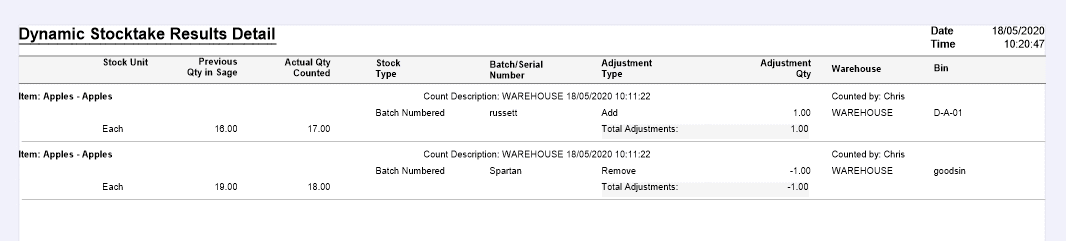
Clicking on view results shows, the items codes, the quantity counted and whether stock has been added or removed based on the previous quantity. It also shows the handheld user who has performed the count.
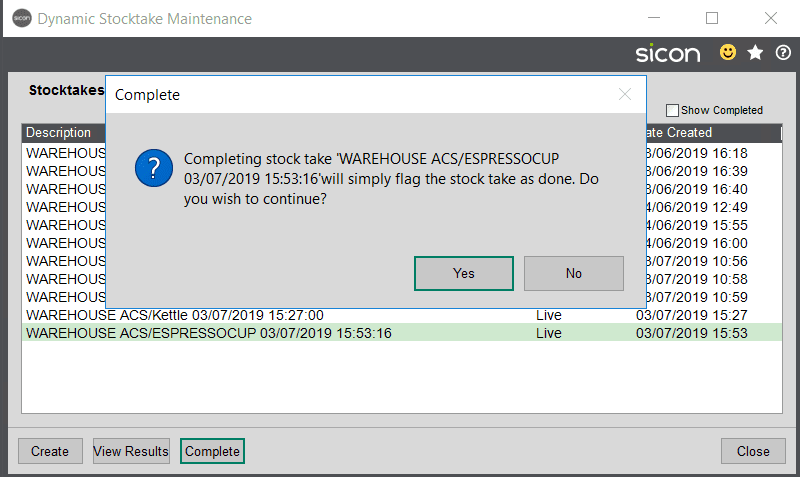
Clicking on complete, will mark the stocktake as complete
A dynamic stock take can also be created from within Sage, to count bins or stock items from a specified warehouse.
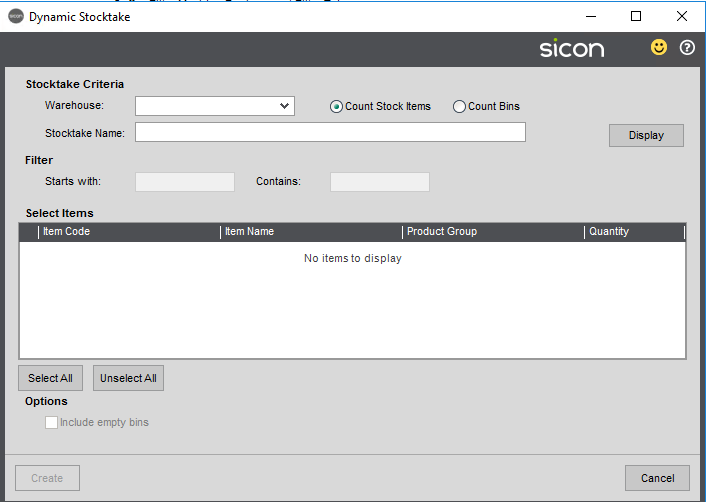
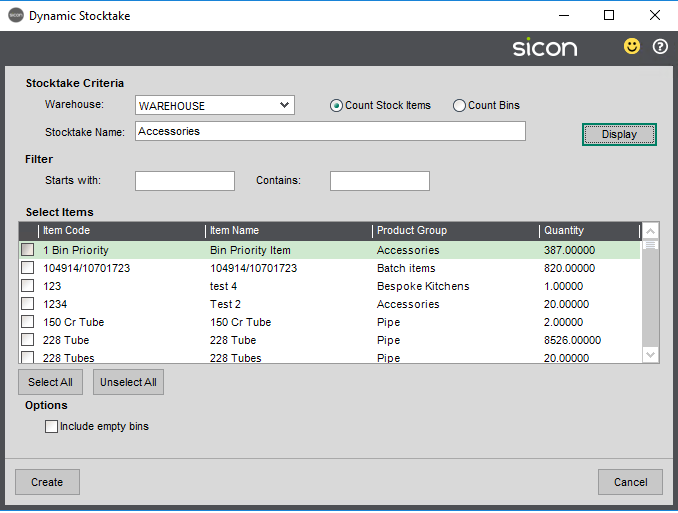
If bins that have no stock in them need to be included, then tick the include empty bins option.
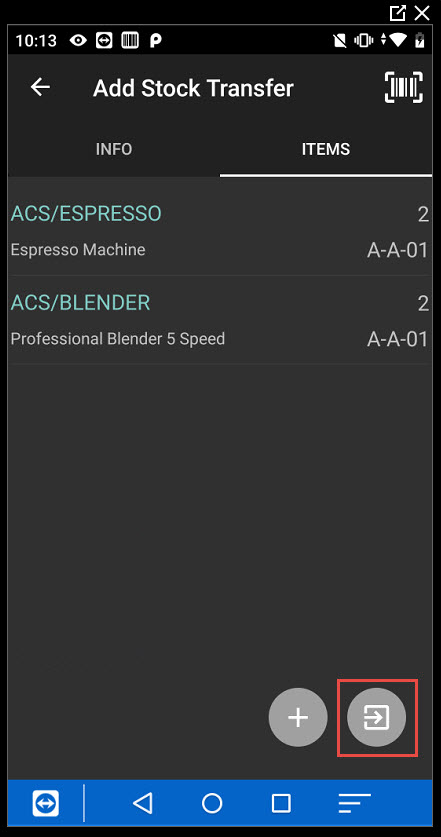
3.12. Stock Shortage Transfer
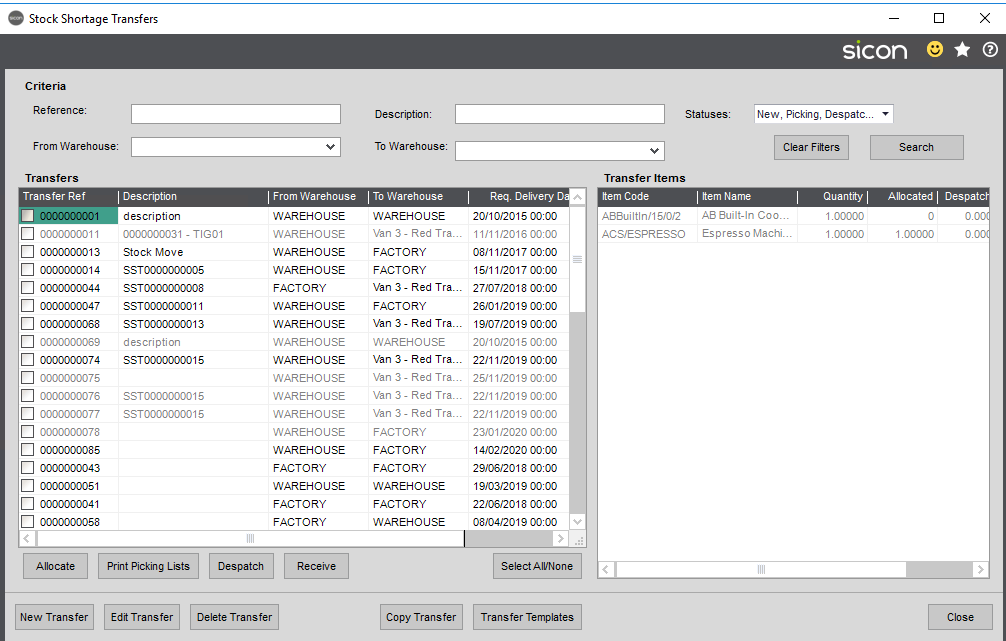
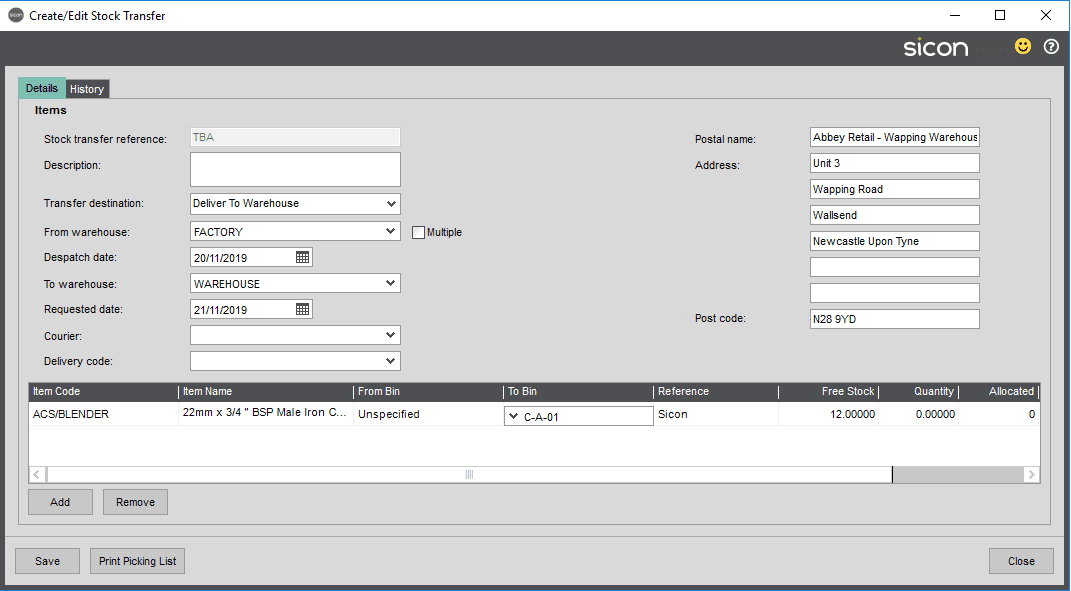
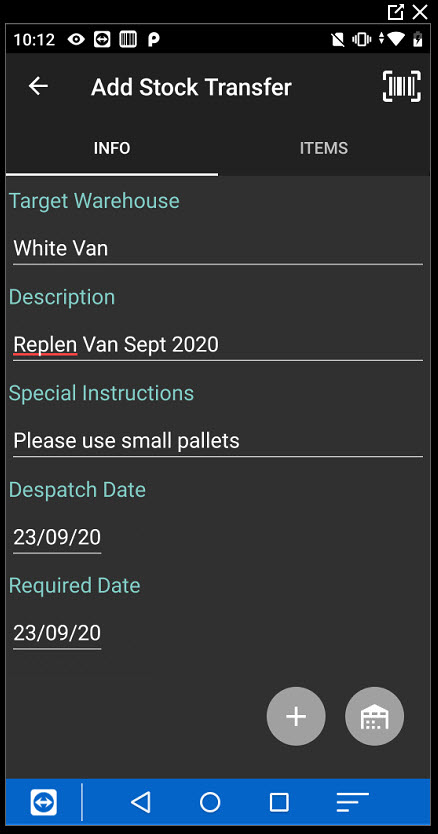
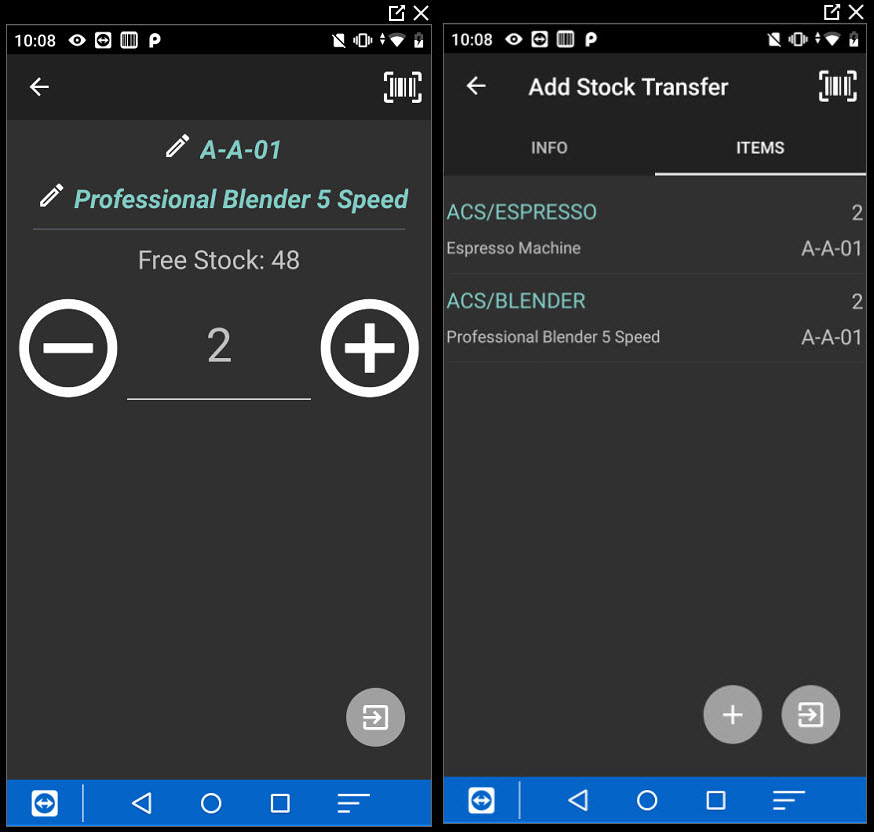
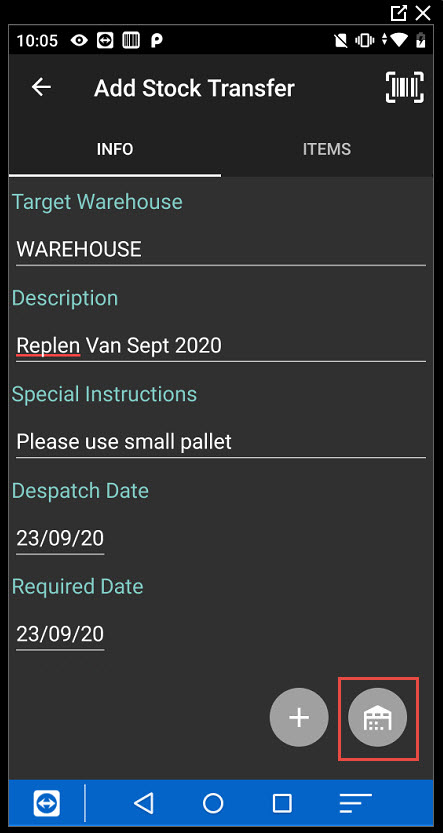
In this window, you can create a stock transfer to move stock between warehouses.
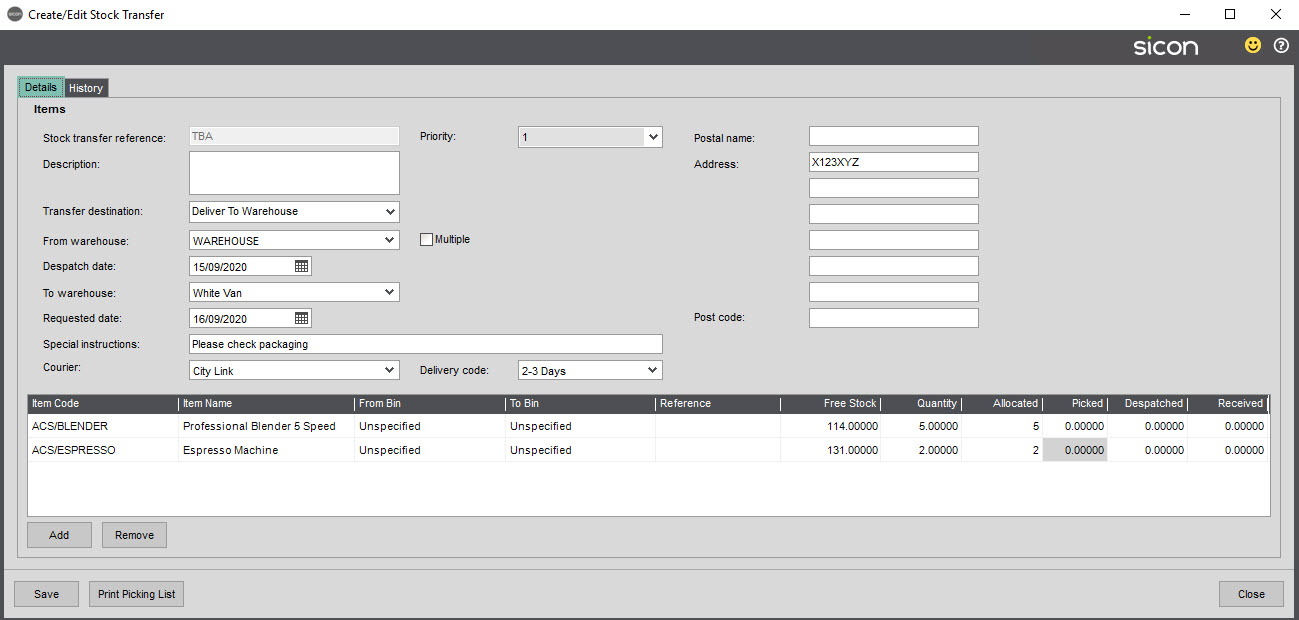
Click on New Transfer, add in item details and products to move. Once the stock items have been allocated and the transfer printed, you can then process the despatch in the handheld and print the despatch note. Transfers can also be created to transfer stock to a job and then processed in the handheld.
Previous transfers can be copied by ticking the transfer required and clicking on Copy Transfer
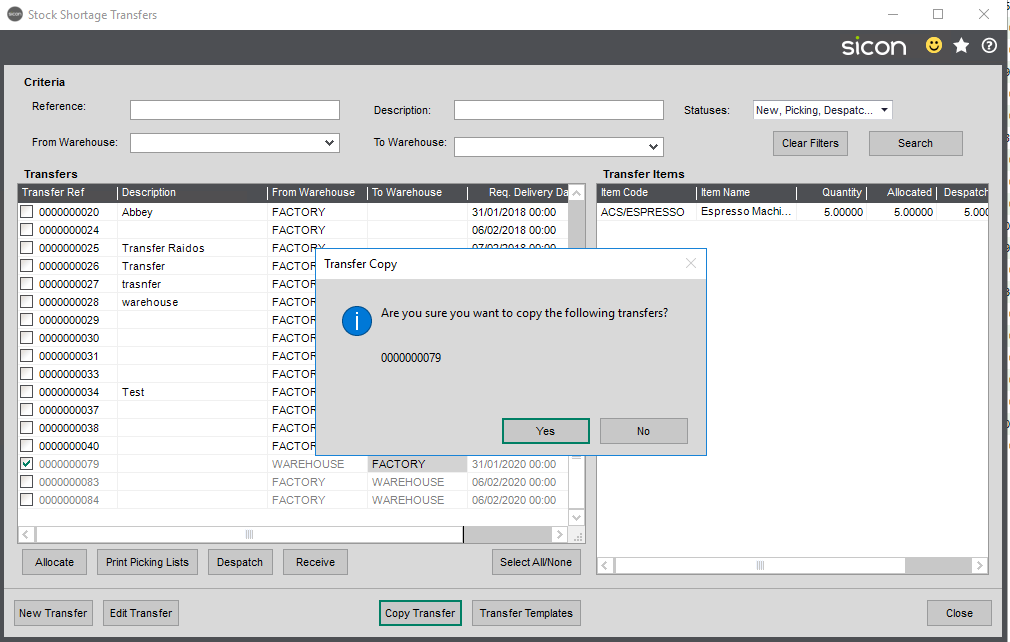
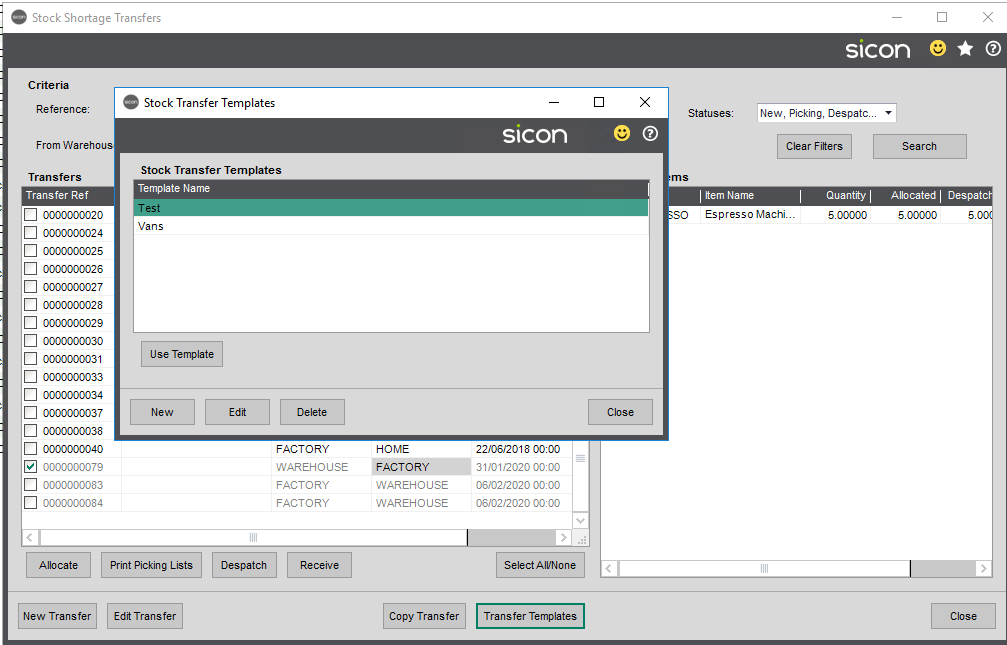
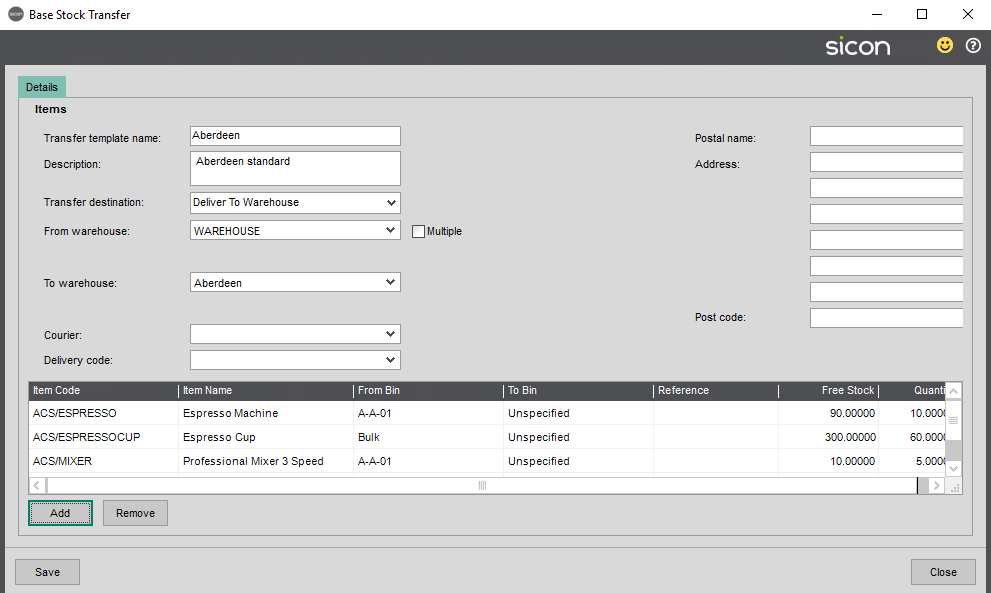
Transfer Templates can also be created for frequently used.
3.13. Maintain Locations
Within this screen, bin locations can be added/removed and sequenced and bin definitions set. The sequence dictates the order that lines will appear in the handheld for picking stock items. E.g. sales orders lines.
Where zones are being used, these can be linked to bin locations.
Bin names can be imported from the bin locations within Sage stock items using the update locations from Sage bins. Specific barcodes for the bin locations and sequences, and bin definitions can also be imported, using the Import button. The bin name, zone, barcode override and sequence can be created in excel using the template, then imported.
Bins can be exported to excel from maintain locations screen, a bin priority added and imported back. Right click on the screen and export all to excel.
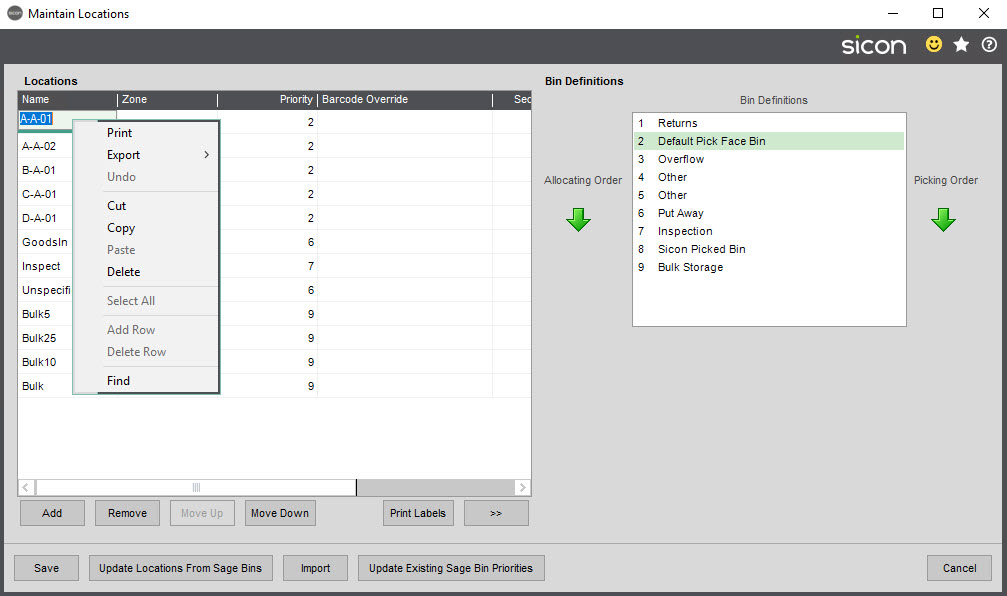
Prepare the import in excel based on the template, then save as a csv file.
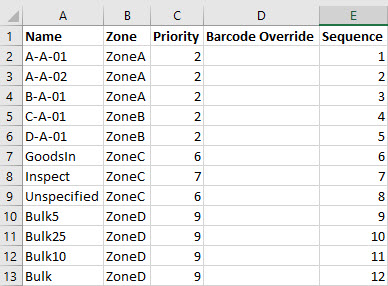
Then import the bins, using the import button.
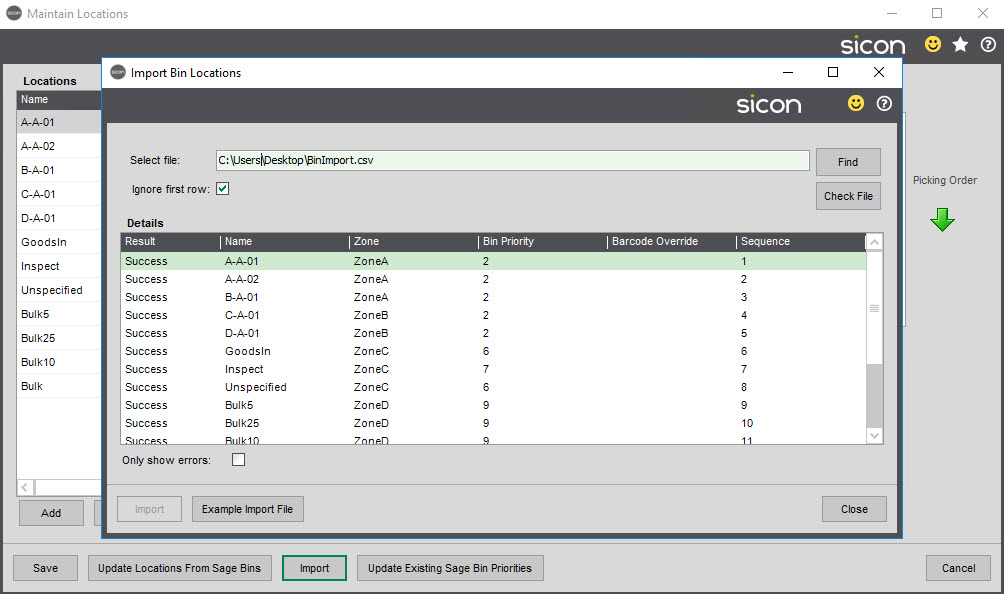
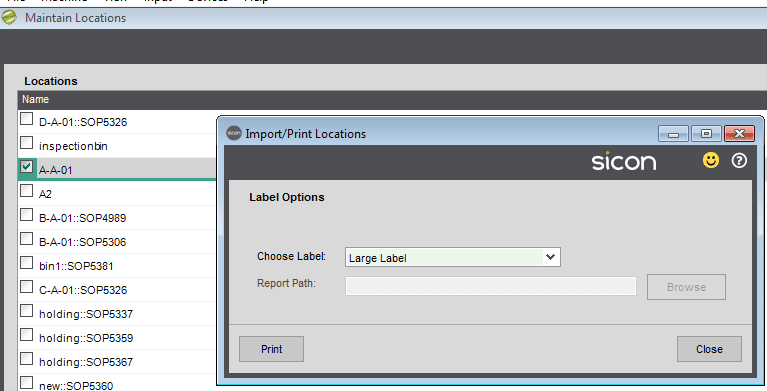
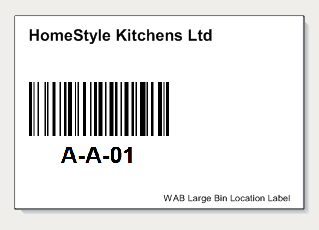
You can also print bin location barcodes for use within the warehouse.
Bin locations can be flagged as a despatch bin, so in the SOP processing window, items can be moved to this bin location.
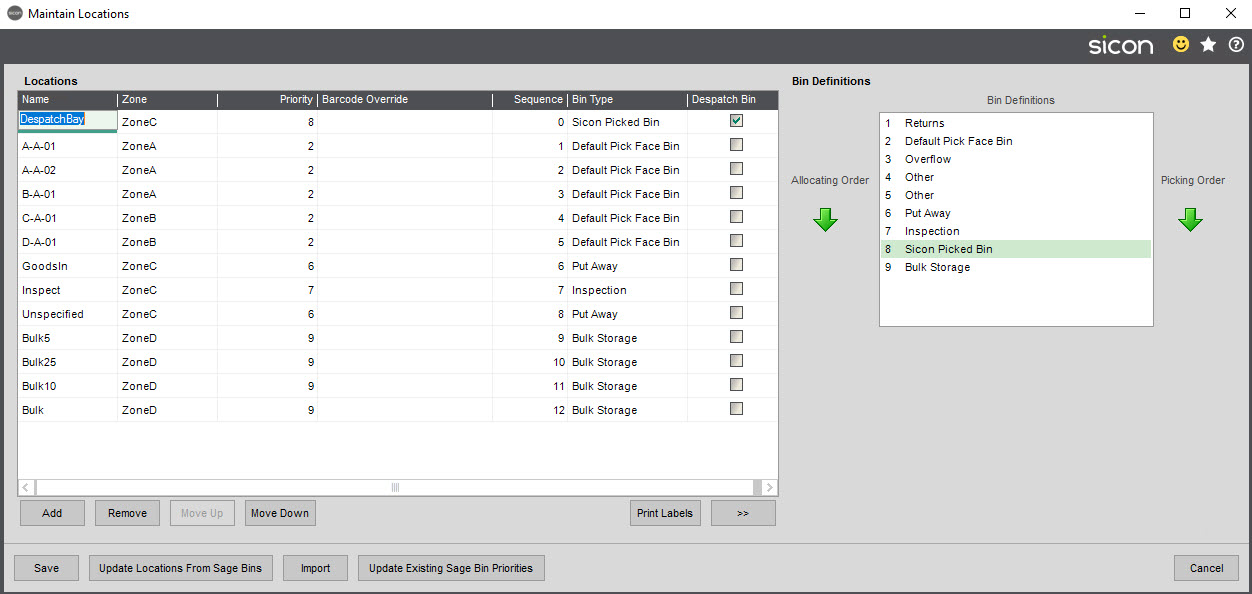
The default bin priorities can also be set in this screen, which then shows the bin type descriptions.
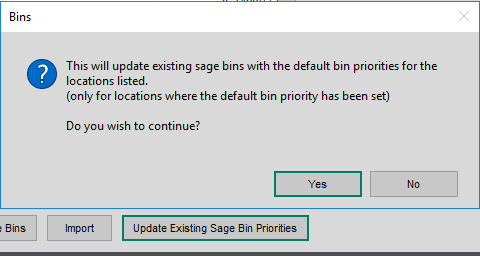
You can also update the existing Sage stock bin to have the new bin priority using the ‘update existing Sage bin priorities’ button. This routine also runs when an import is done.
3.14. Maintain Zones
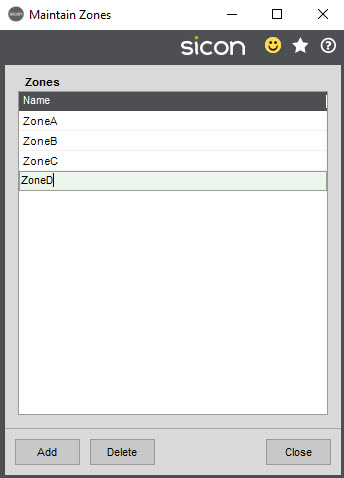
In this screen, Zones can be created and deleted.
4. Settings
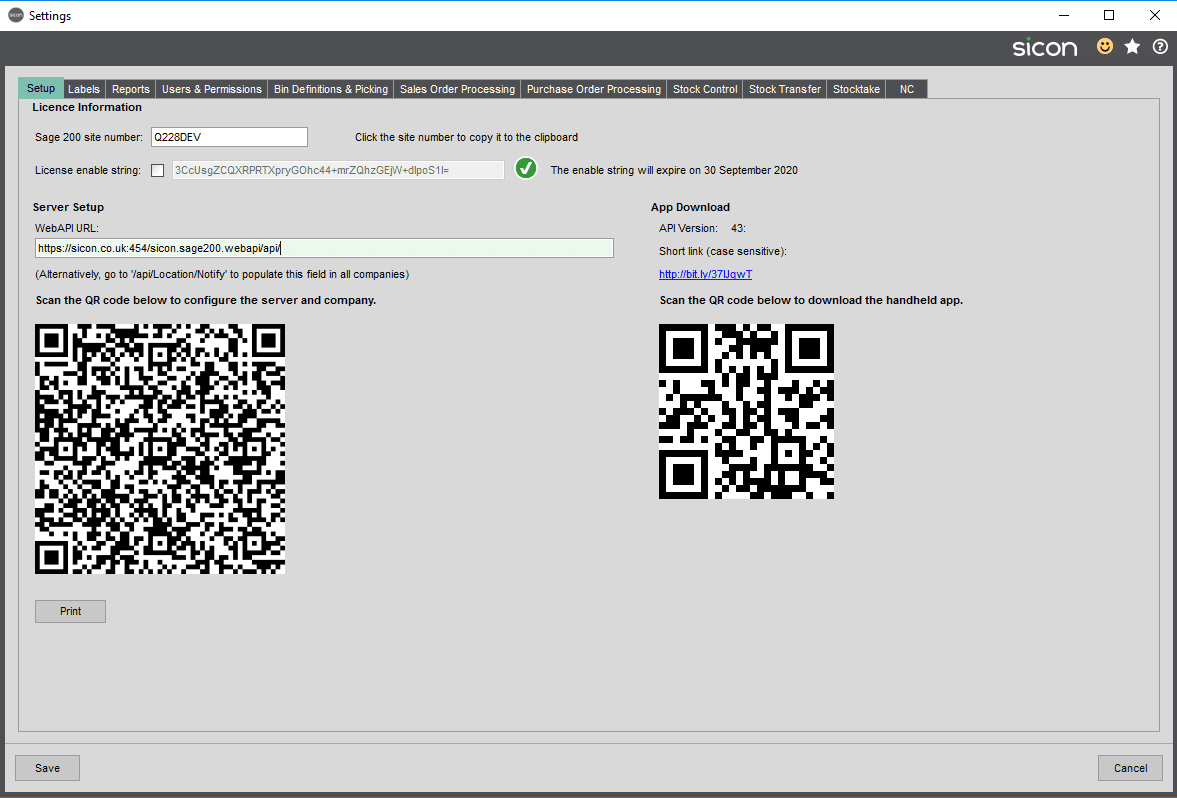
4.1. Setup
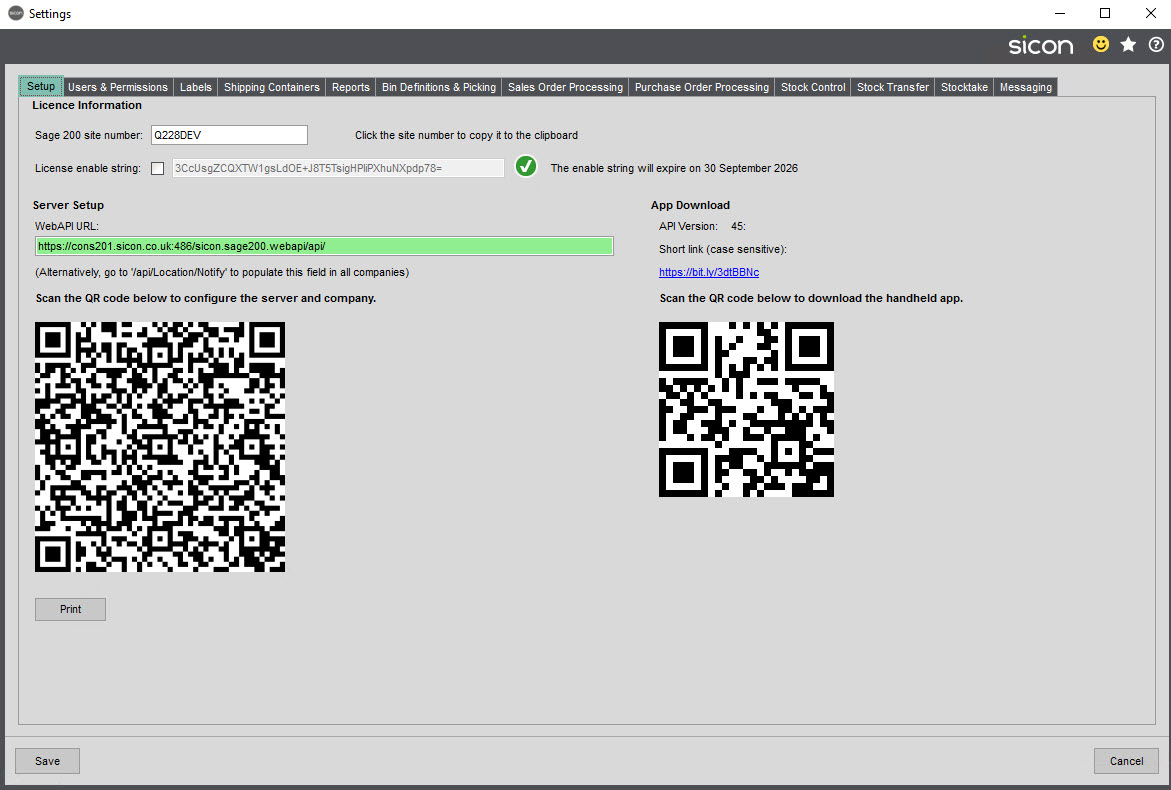
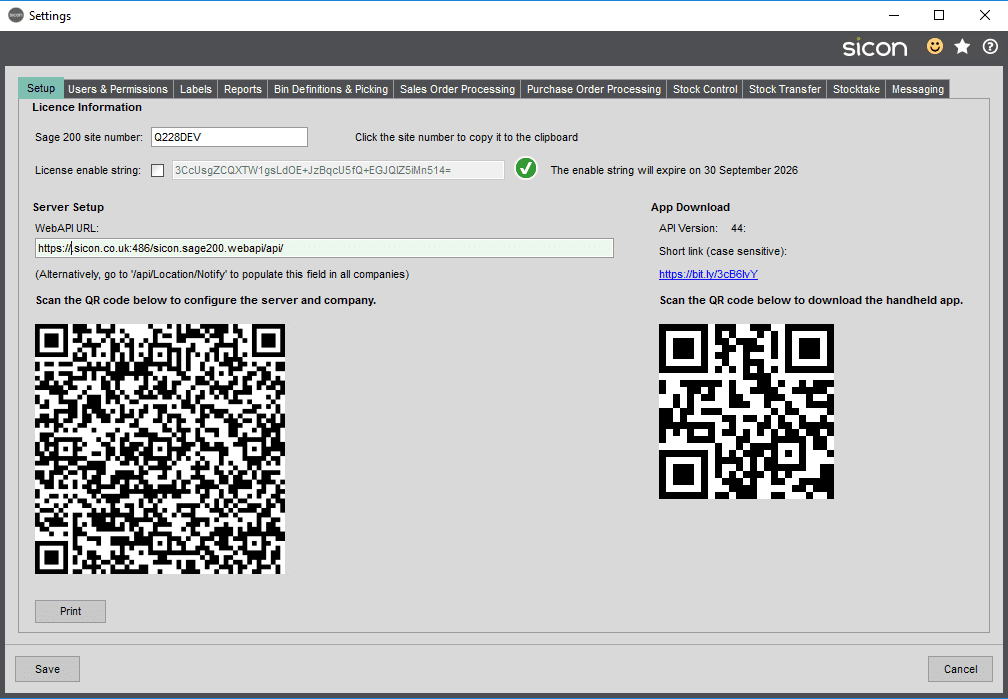
Licence enable string: Enter a Sicon enable string here to enable the module unless online enable strings are enabled.
Server Setup:
WebAPI URL: This is the Web API URL that links the handheld devices to Sage. You can navigate to the web URL (remove the /api off the URL link) You can log in to see information about the Web API.
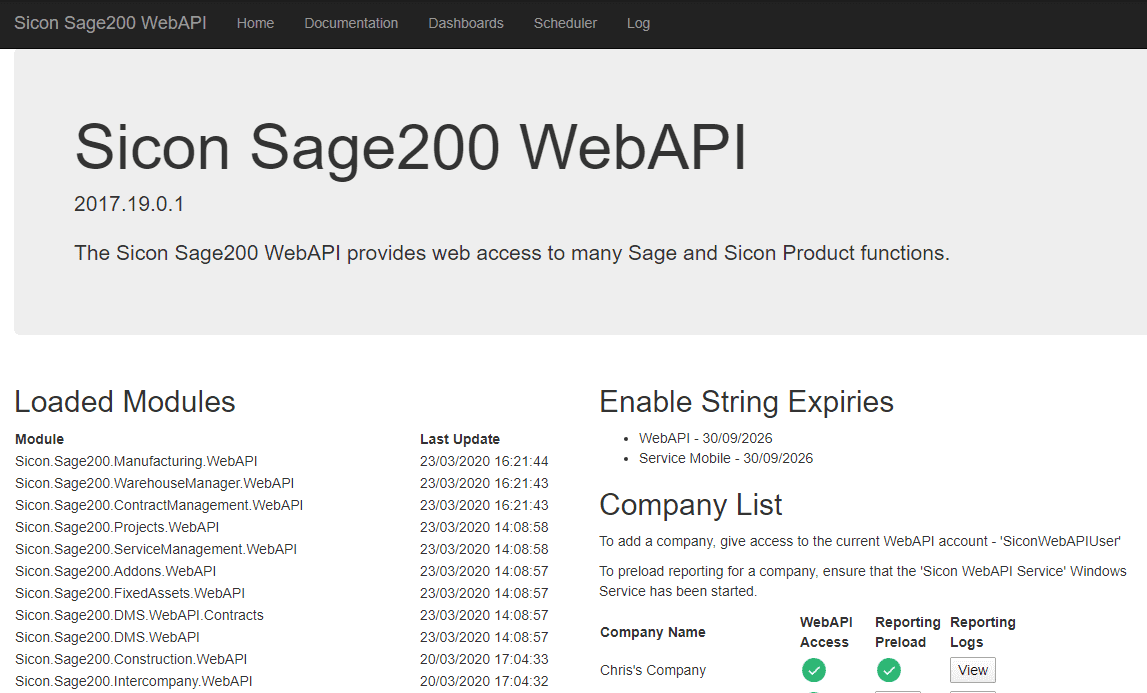
You can populate all the database WebAPI URLs, by putting in the following Web URL in a web page followed by /api/Location/Notify. E.g. http://10.0.0.139/Sicon.Sage200.WebAPI/api/Location/Notify

The larger QR code on the left of the screen is used for populating the WebAPI and company number in the server set up on the handheld. The code can be physically printed using the print button.
In the handheld, click on the server button and then scan the QR code to populate the Wep API URL and company number. This can be entered manually for devices that cannot scan QR codes.
App Download: Use the link on the right hand side of the screen for downloading the Sicon barcoding application onto the handheld devices. Or scan the smaller QR code on the device to open the web page to download the app.
4.2. Users and Permissions
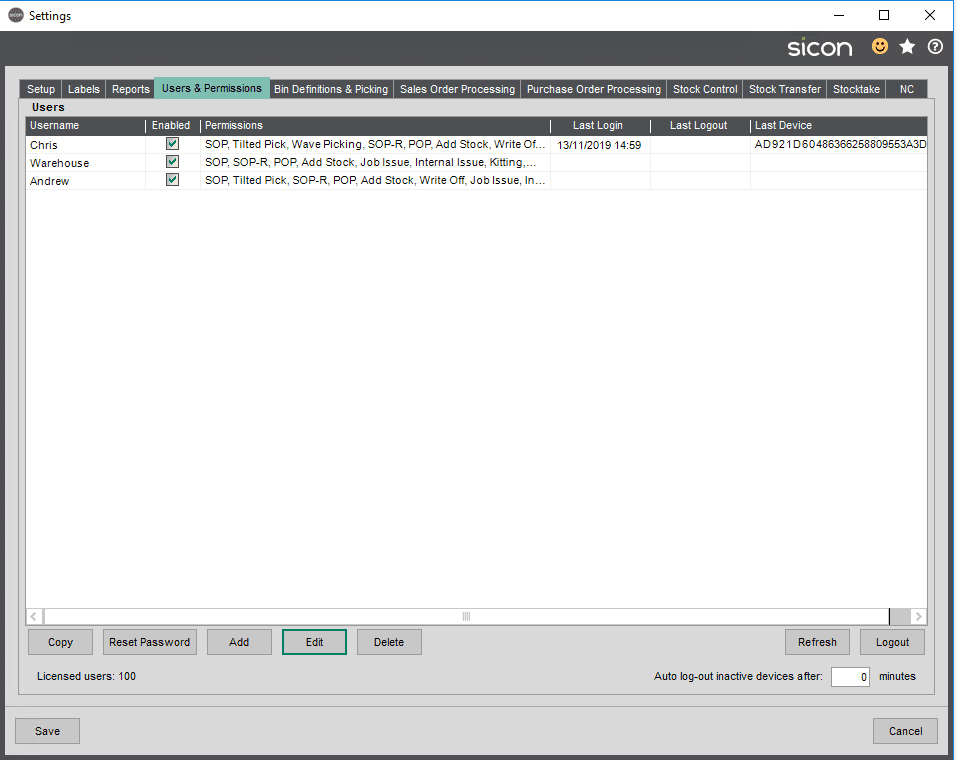
The front screen shows each of the users set up, details of their permission and last login and logout details and the device id.
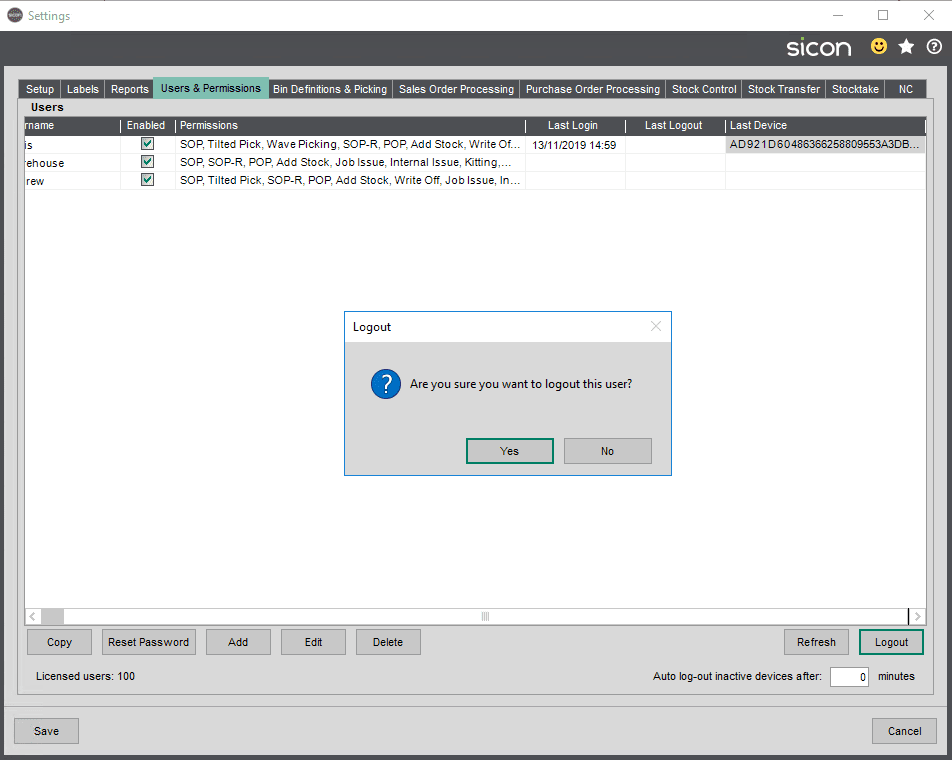
From this screen you can log users out of the app.
You can also set a time for users to be auto logged out of the device.
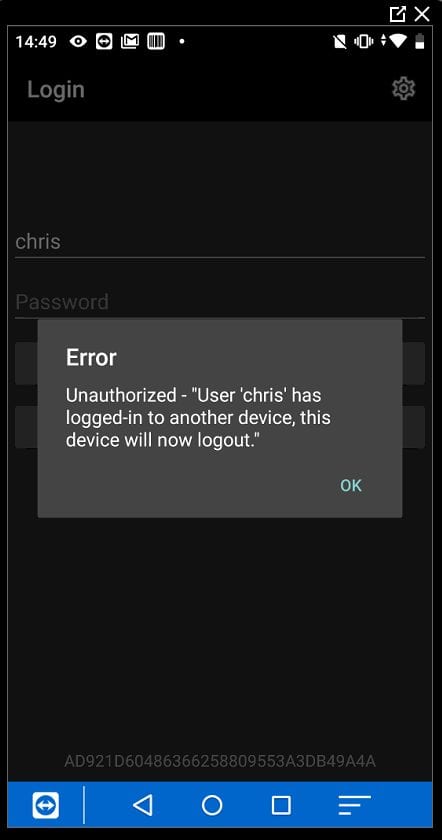
If the same user logs onto two different devices, the following message is shown on the handheld.

If the old login is forced out, they will then get the following message in their handheld.
When a user is added or edited, the follow screen opens.
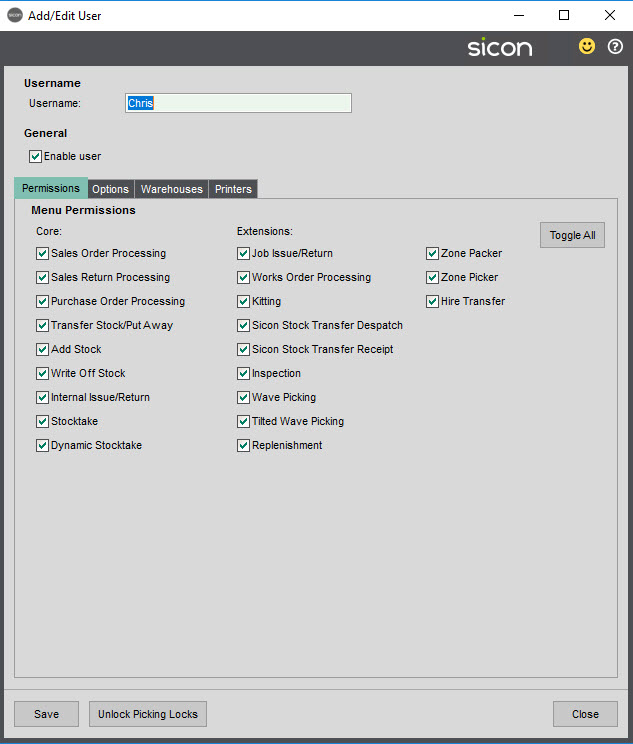
Within the permission screen, access to handheld tasks is controlled, the standard Sage ‘Core’ tasks and Sicon add on modules ‘Extensions’.
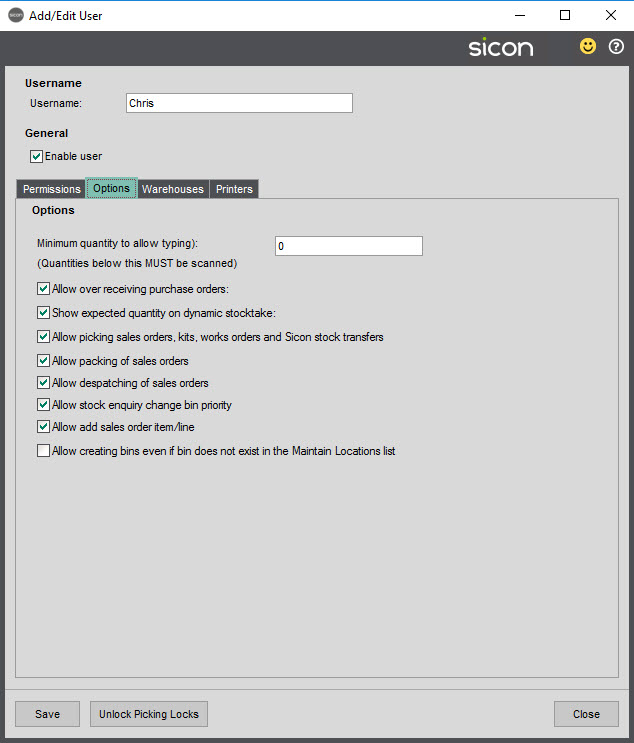
Within the options tab, additional user permissions can be set. The quantity of units that a user can manually enter rather than scan can be set here. Users can also be set to be able to over receive stock on purchase orders. The ability to show the expected quantity on dynamic stock takes for the user can be set, this shows on the right hand side of the dynamic stock take screen.
The allow picking, packing and despatching tick options dictate what SOP processes the user can perform within the sales order menu.
The allow stock enquiry change bin priority allows bin priorities to be changed in the stock enquiry screen.
The allow add sales order item/line allows lines/items to be added to a sales order in the handheld.
The allow creating bins even if bin does not exist in the Maintain Location list – allows users to add bins that have not been defined in the maintain locations screen – caution needs to taken if this setting is turned on as the bins created may not have the desired bin priority and duplicate bins with different text cases (capital and lower case) can be created.
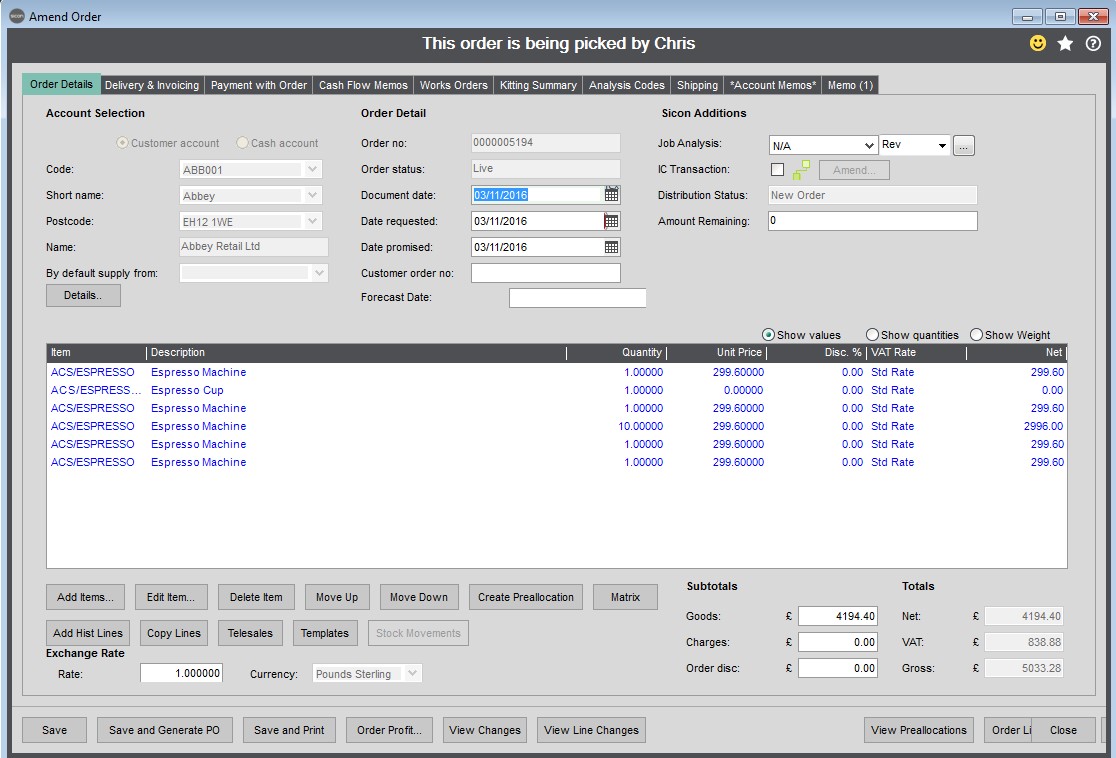
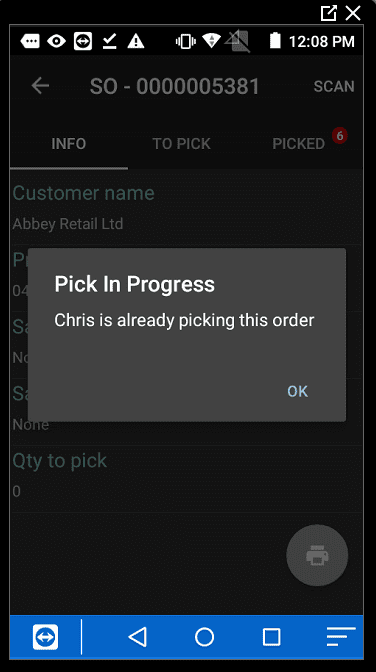
The unlock picking locks, removes any rogue picking locks on SOPs. The picking locks are being used to identify that the sales order is being picked by a user. This shows in the Sage sales order.
And also on the handheld.
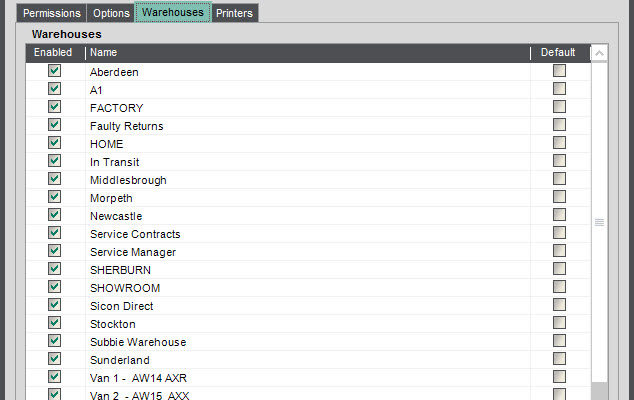
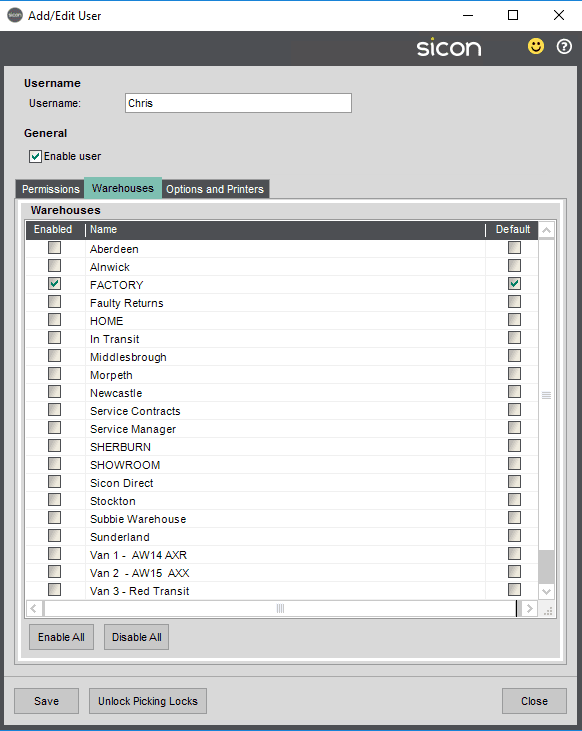
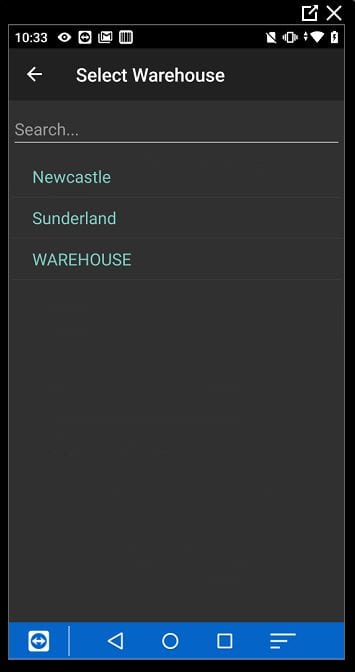
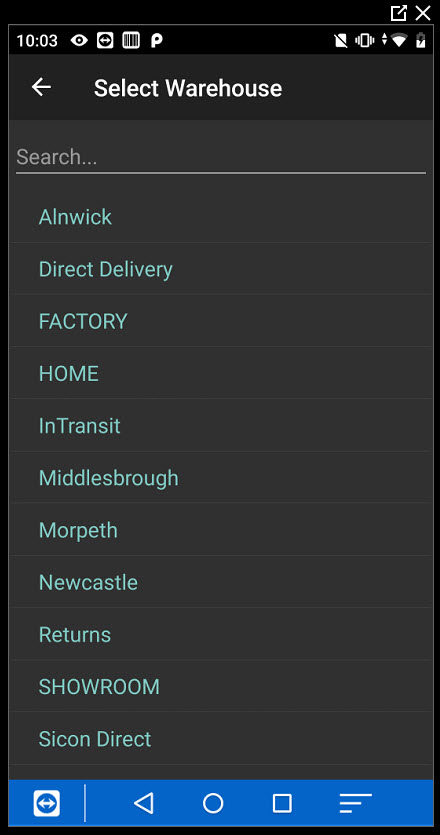
In the warehouse tab, access to warehouses for the user can be set. A default warehouse can also be selected. These will dictate what warehouses the handheld user can log into on the device.
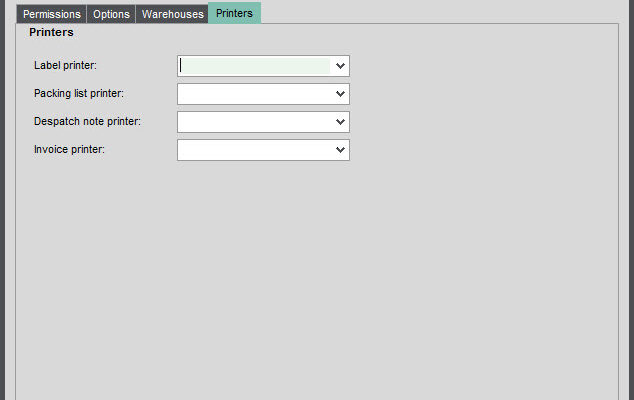
In the printers tab, printers can also set up against the users, this overrides the default printers, the printer set against the report or that selected against the warehouse. These can also be set from within the application.
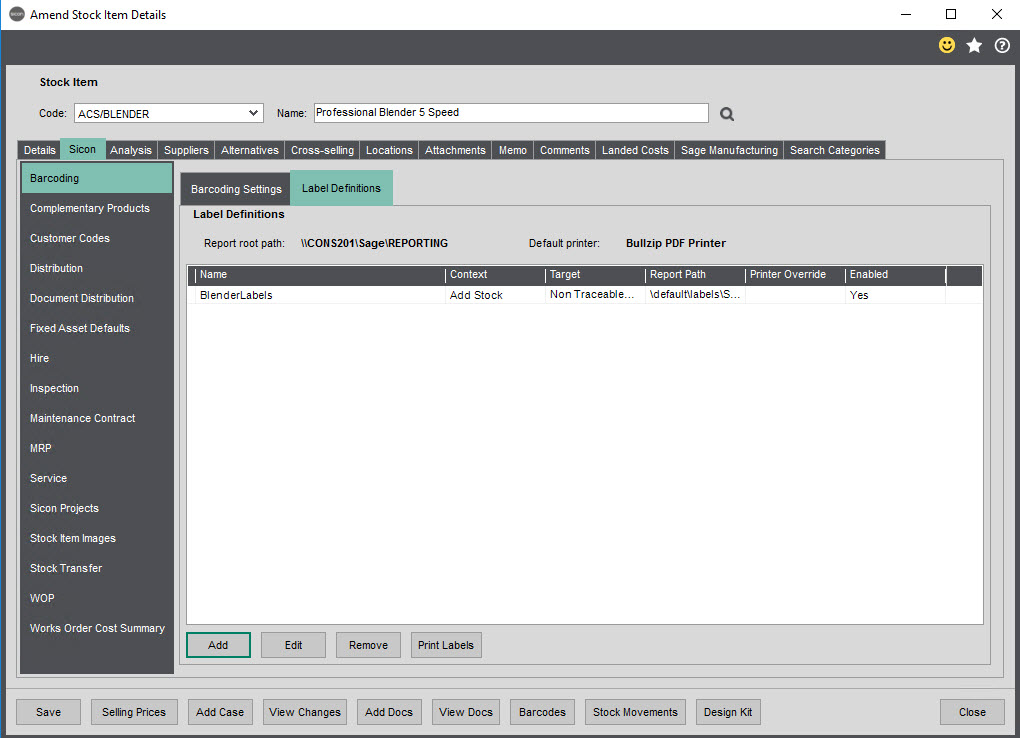
4.3. Labels

A default label printer can be set from a list of printers available on the Sage server. These printers need to be installed on the server and to be available to the SiconWebAPI user.
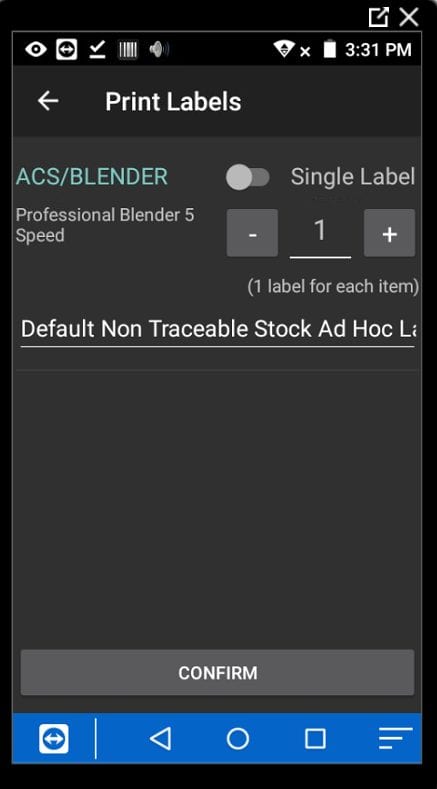
Specific label definitions can be designed that can be used to generate labels from within the handheld, printing a target report. There are standard definitions, that can be used from transactions on the handheld e.g. PO receipt. You can also create custom label definitions for example a particular customer may want their preferred labels on despatched products.
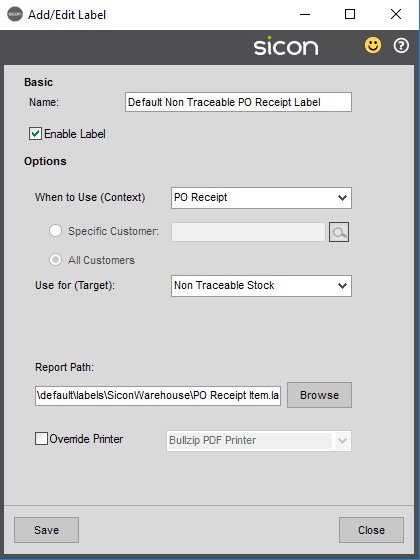
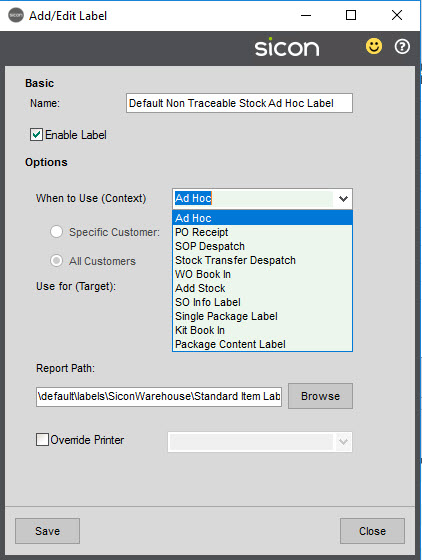
The print labels button at the bottom of the label setting screen, allows labels to test printed from within Sage, printing an ad hoc label.
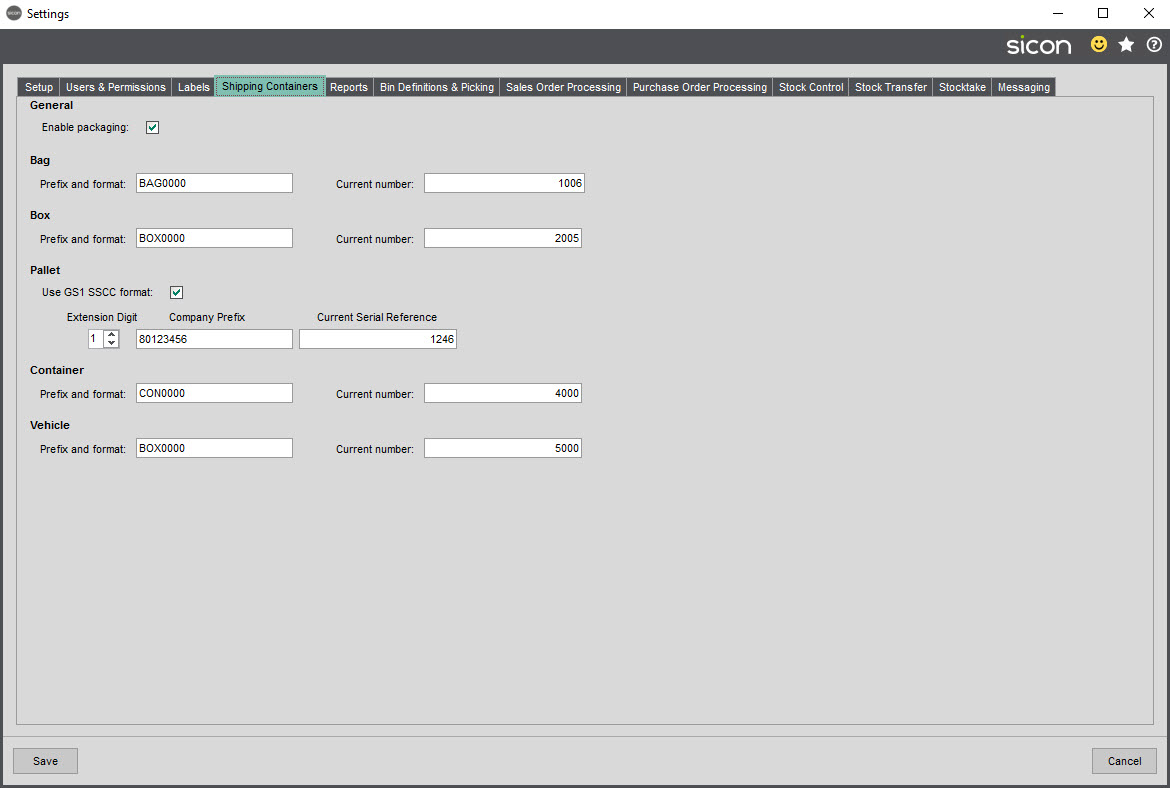
4.4. Shipping Containers
The format prefix and number of the packaging units can be set in this .
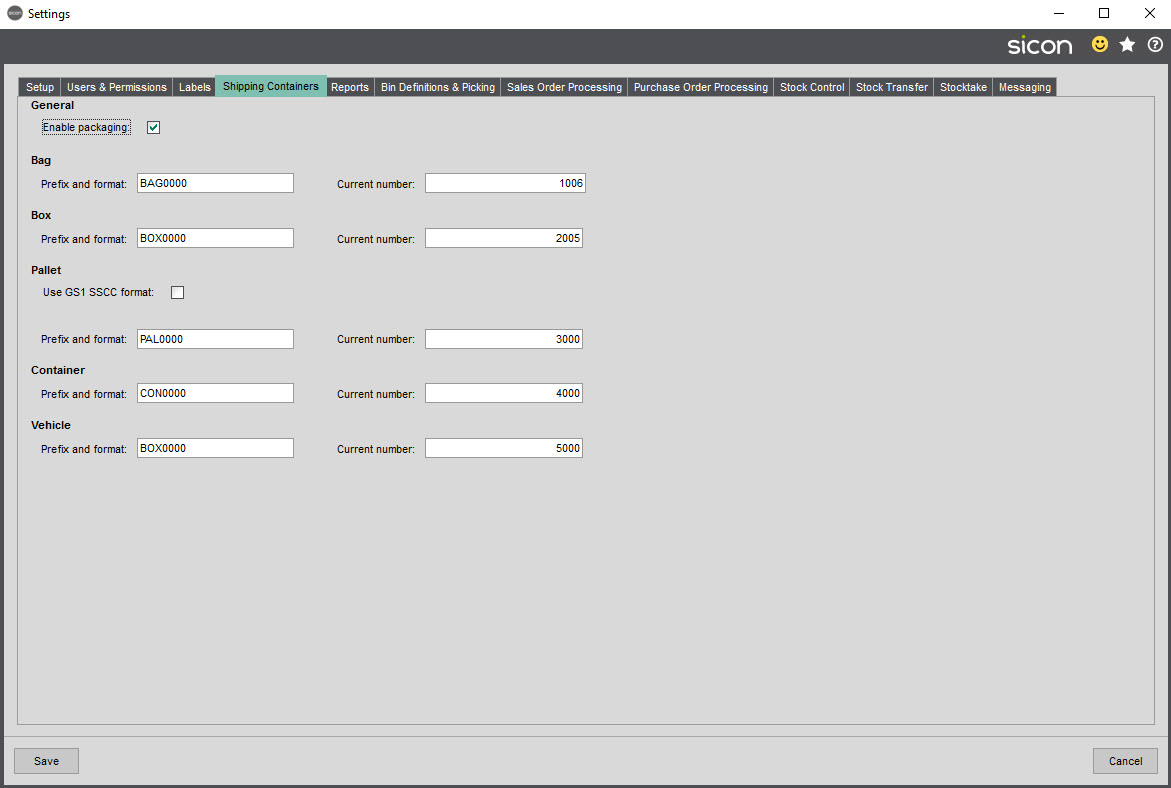
For pallets a GS1 SSCC format can used. Once the option is ticked, the extension digit, company prefix and serial number can be entered.
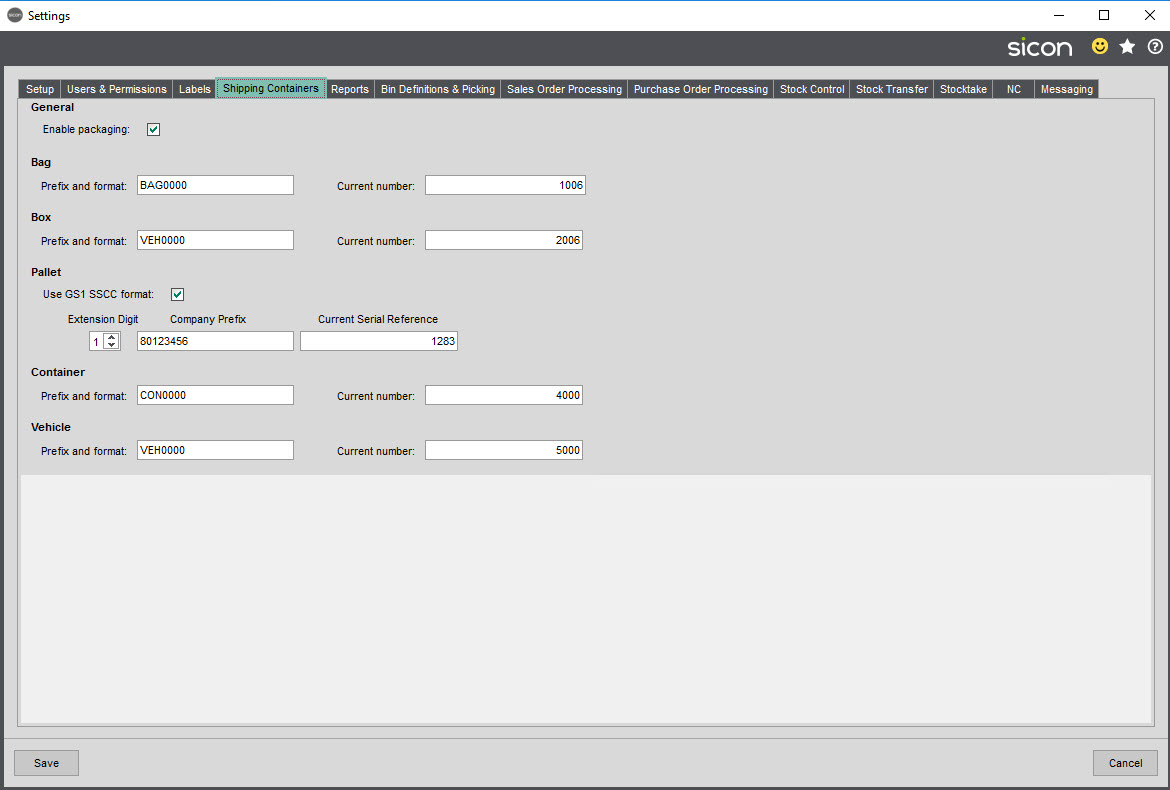
When the system creates a SSCC label using this format a check digit is added to the end of the number to create an 18 digit length number. For example when a pallet number is auto generated in SOP packing.
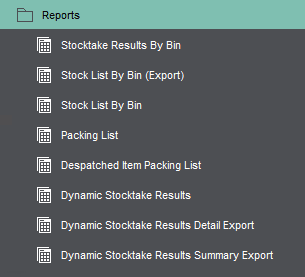
4.5. Reports
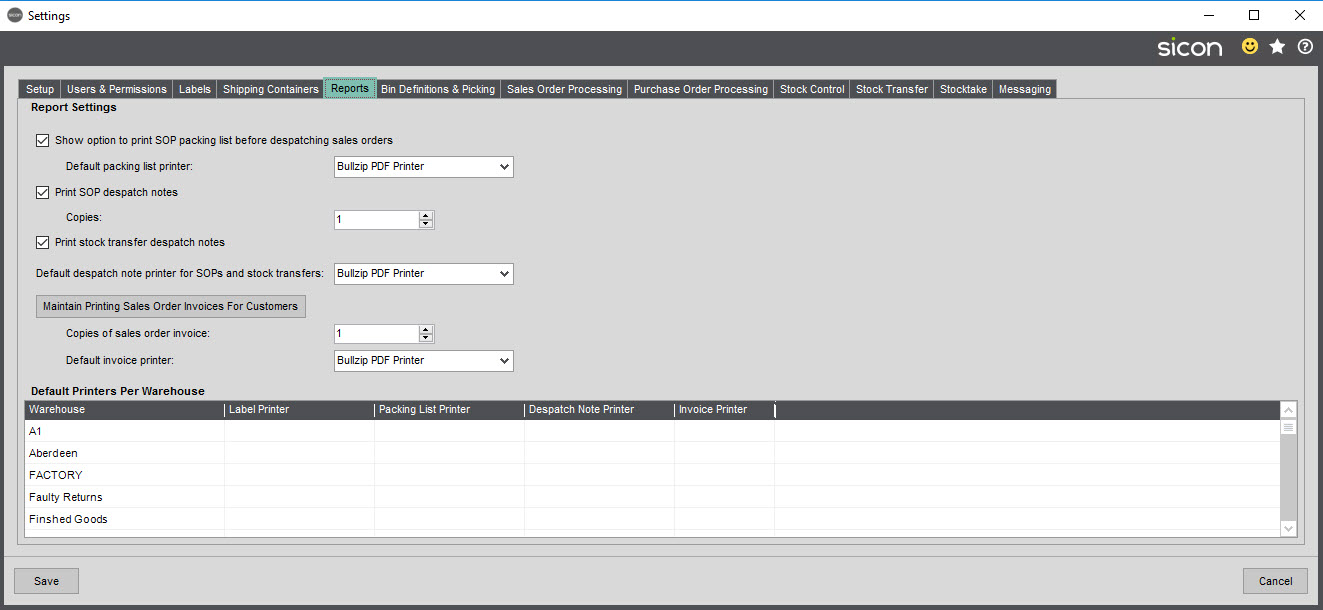
You can enable a packing list report to be printed during SOP processing and specify the printer to use.
The printer to be used for printing despatch notes and the copy quantity is configured here.
You can also set that a stock transfer despatch note needs to be printed when processing the Sicon stock shortage transfer.
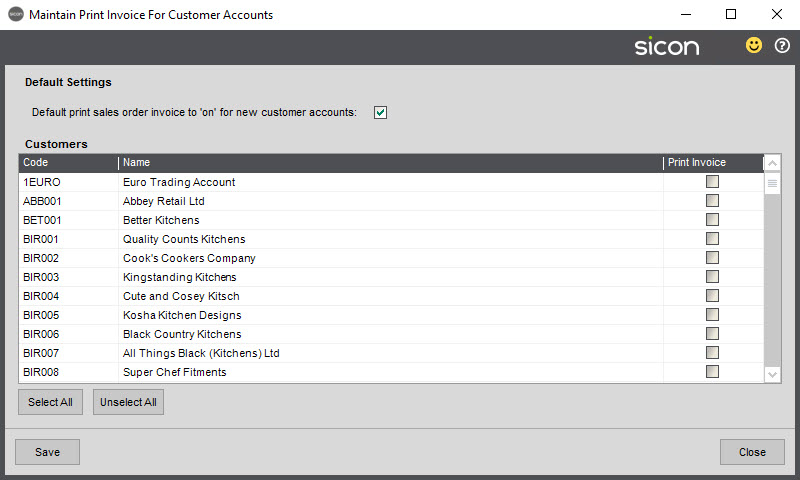
The option to maintain sales order invoices for customers, opens a window where customer invoice printing options can be maintained.
You can also state that a sales order invoice can be printed during SOP despatch and which printer to use and how many copies to print.
You can also set different printers per warehouse.
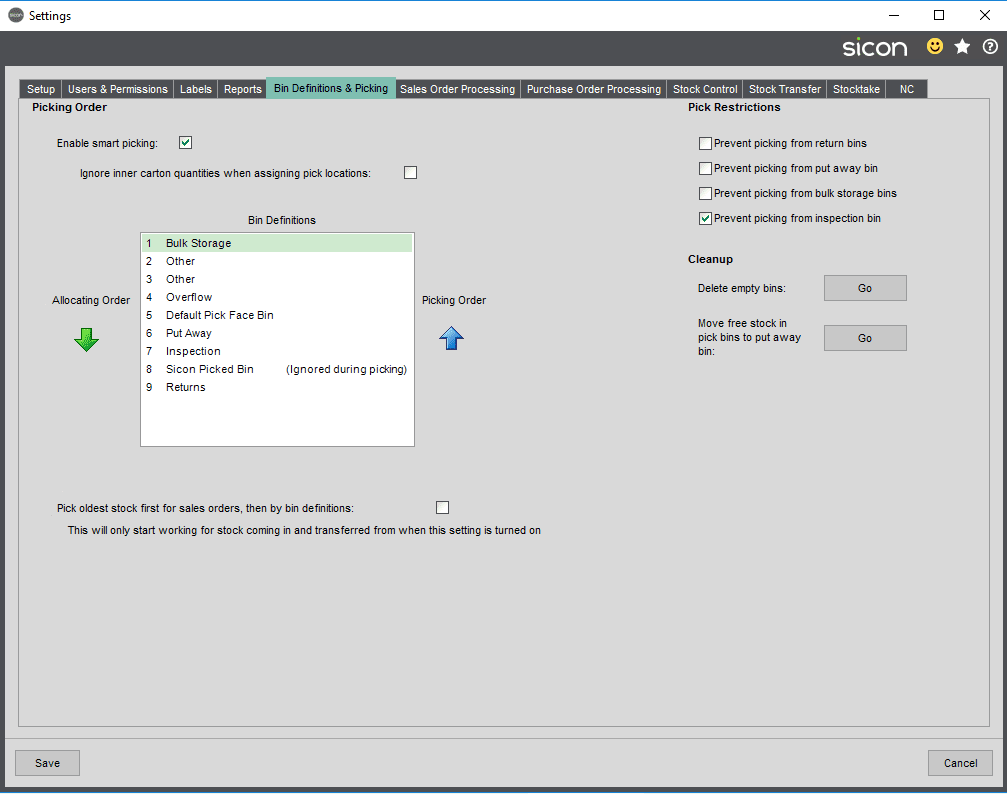
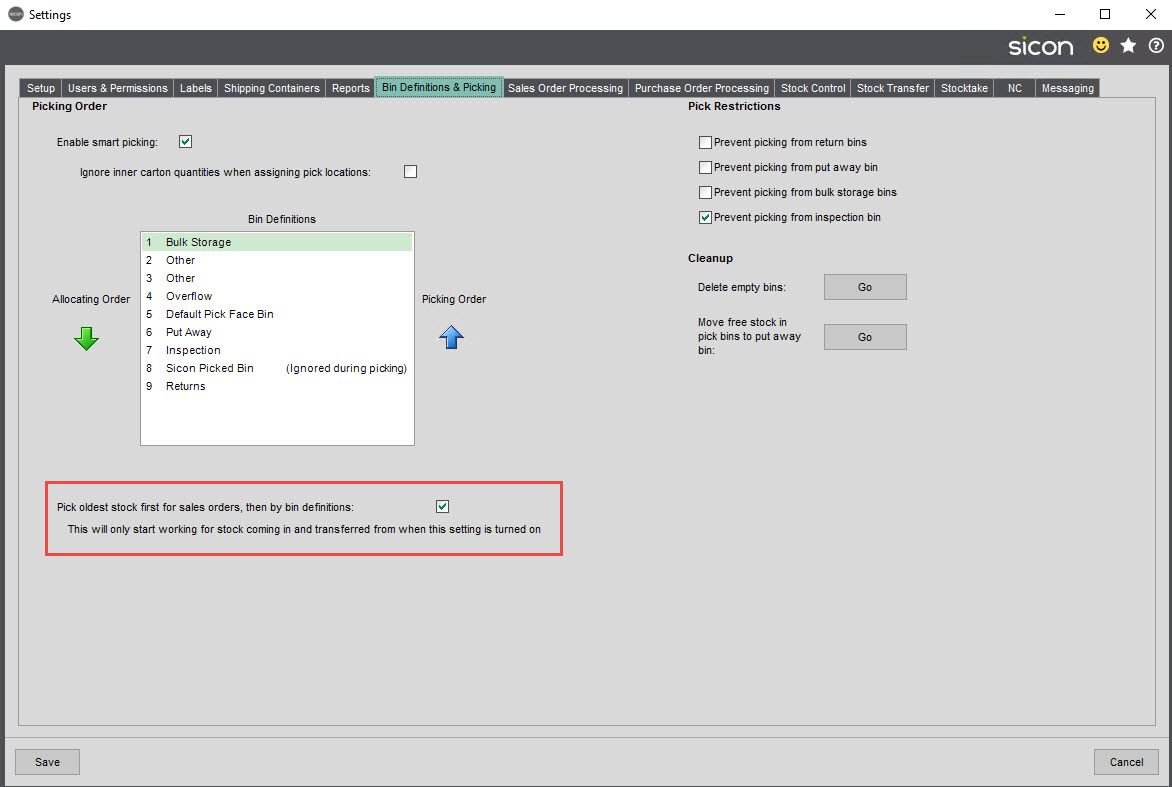
4.6. Bin Definitions & Picking
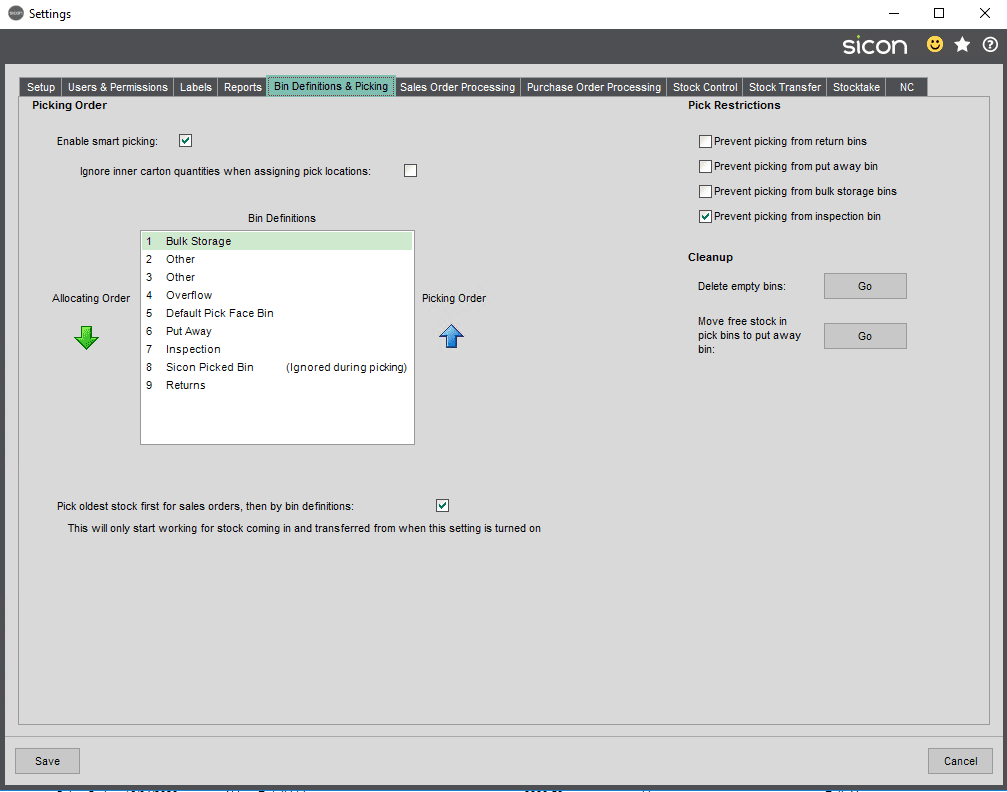
Bin definitions allow different types of bins to be created based on the Sage allocation priority set against the bin. The bin type allows the order of allocation and picking to be set and also define different bin types, such as bulk or pick face.
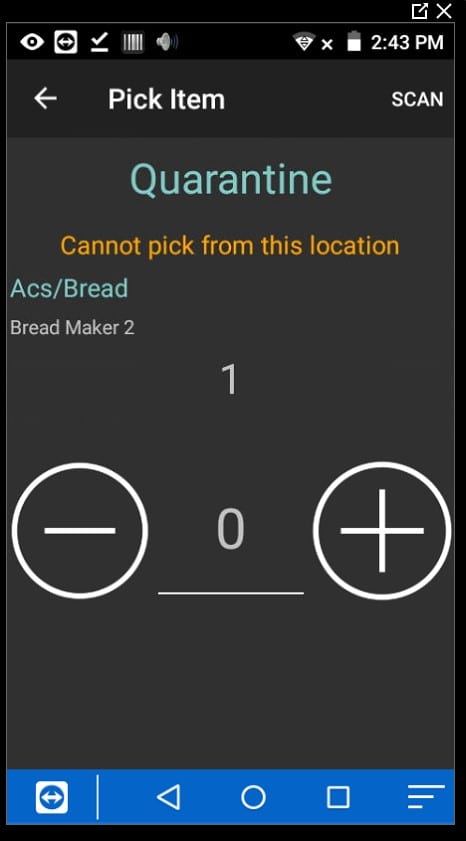
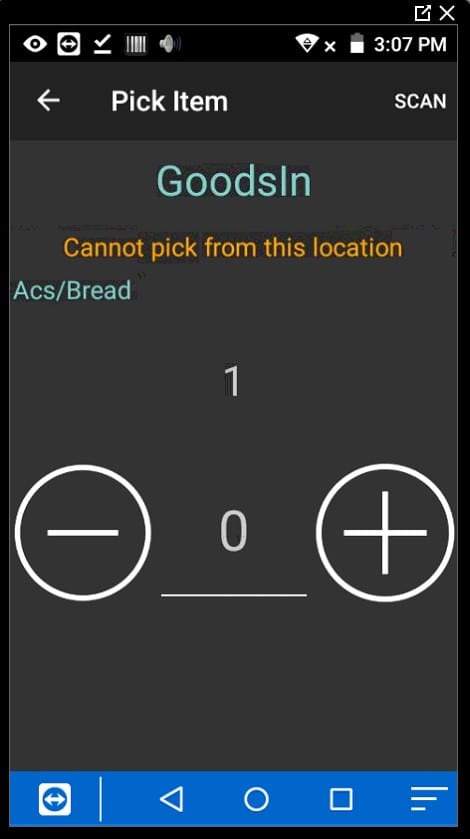
Prevent picking from put away, returns, bulk bins and inspection bins prevents users from picking stock items on SOP, works orders or Kits on the handheld. Note users will be able to pick the stock within Sage. This restriction does not prevent allocation it is purely for picking.
There is a warning message on the sales order when stock is allocated to a restricted bin.
There is also a message in the works order pick screen and kit pick screens.

4.7. Cleanup
Delete empty bins: Clicking on this opens a new window where users can choose which empty bins to delete by bin priority.
N.B. The cleanup routine will allow bins to be deleted based on the standard Sage ability. Where traceable items are being used, reprinting some documents may result in lost traceable information if the bins are deleted.
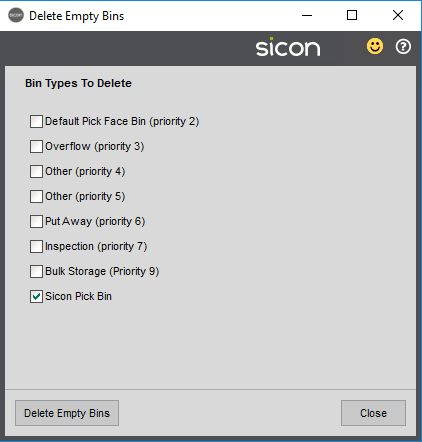
If the Sicon Pick Bin is selected the system will check for any temporary pick bins with a ‘:’ in and remove them if the confirmed and unconfirmed quantities are zero and any corresponding linked SOPs have been invoiced.
Move free stock in pick bins to put away bin: This will move all free stock in temporary pick bins to the put away bin.
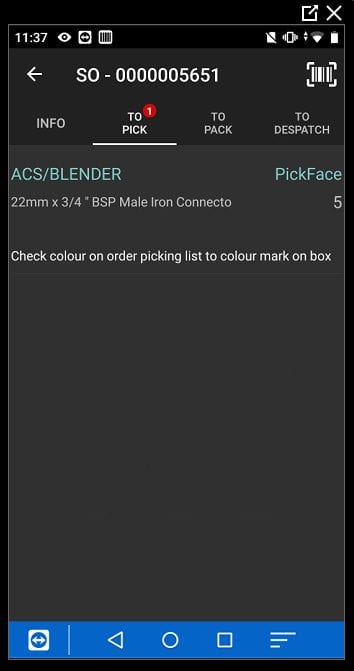
Enable Smart Picking:
When smart picking is enabled the picking order of bins is reversed , so that the picking priority will be from priority 9 bins down to 1. This setting can be used to prevent users being sent to bulk bins to pick stock. The allocations are made to the bulk bin to keep free stock in the pick face bin.
On a sales order the system will allocate to stock in the bin priority 1 to 9. For example the below sales order is allocated to the bulk (priority 1)
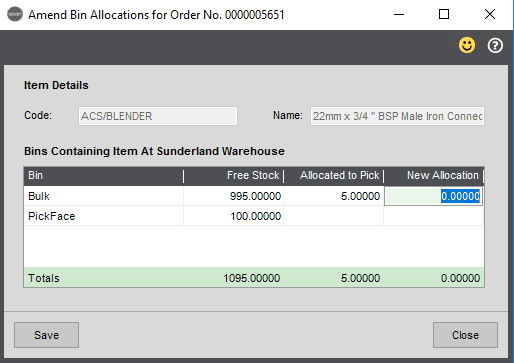
On the device, it is asking to pick from the pickface bin, even though the sales order line is allocated to the bulk bin.
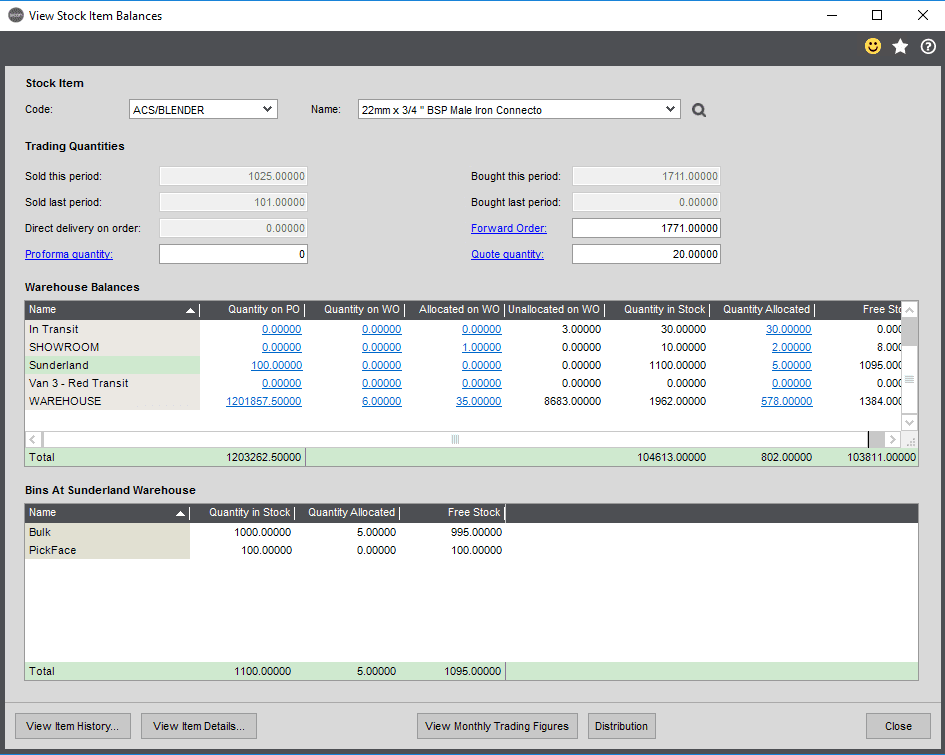
On the stock item, there is stock available in both bins:
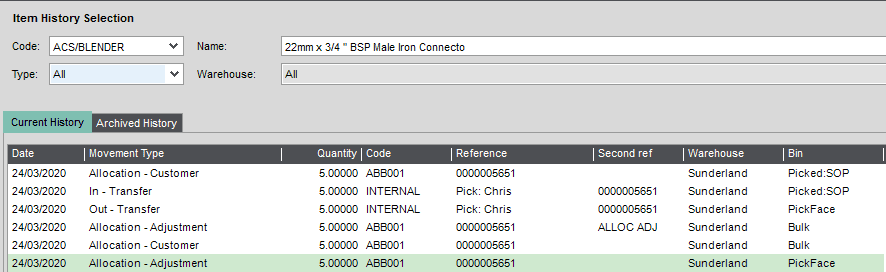
When the item is picked on the device the system amends the allocation record from the bulk bin to the pickface bin and then to the picked:SOP bin.
The setting to ignore inner carton quantities when assigning pick locations, will disregard any quantity set on the inner carton quantity, which can influence the bin the picker is sent to pick the stock. See the notes on the Sicon stock Barcoding tab settings below for further information.
The setting to pick oldest first for sales order, then by bin definition, influences which bin is shown in the handheld on a sales order line based on the stock received date.
When stock is received in the handheld, via POP or add stock, the system writes the date the stock is received to a new sql table. This record is then looked at to dictate which is the oldest stock to pick and will amend the bin shown on the device accordingly.
This setting only works with smart picking enabled.
4.8. SOP Settings
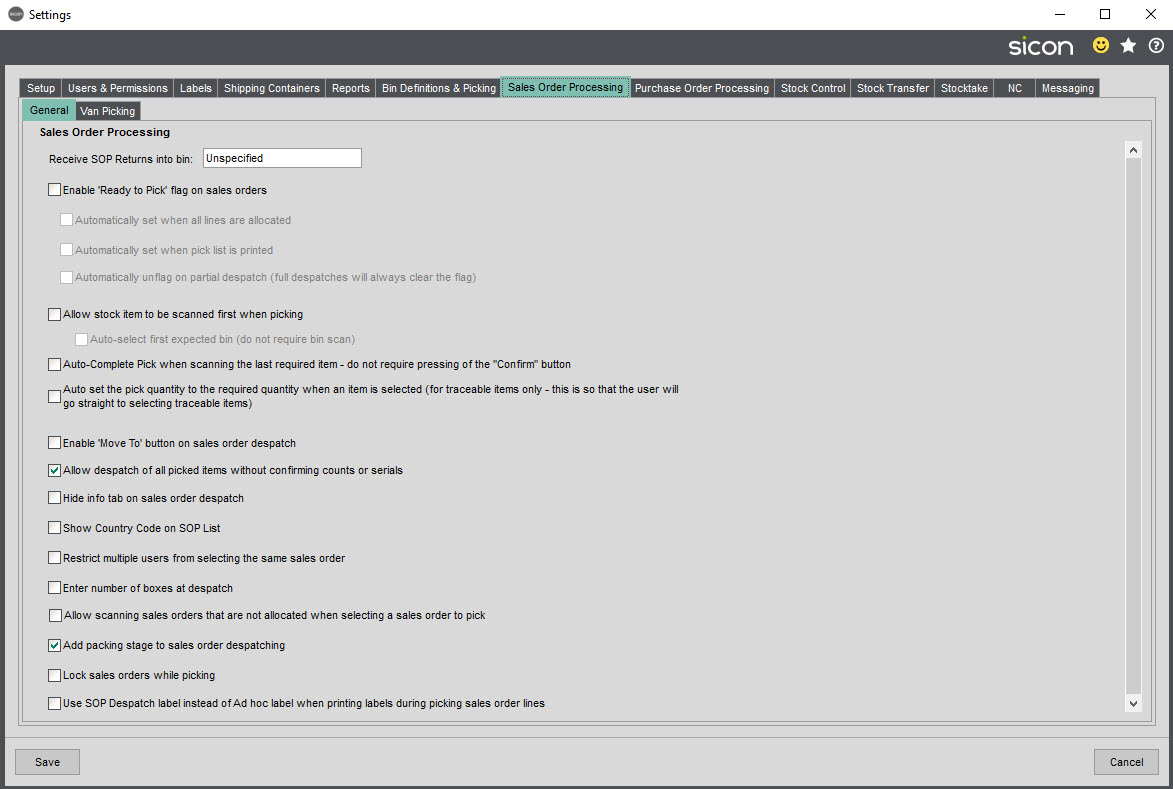
The ‘Receive SOP Returns into bin’ setting dictates what bin sales order returns go to when processing in the handheld.
The ‘Ready to Pick’ settings allows the ready to pick flag to be used within sales orders to dictate what sales orders appear in the handhelds. This can be automatically set when all lines are allocated or when a pick list is printed. It can also be automatically unset on despatch.
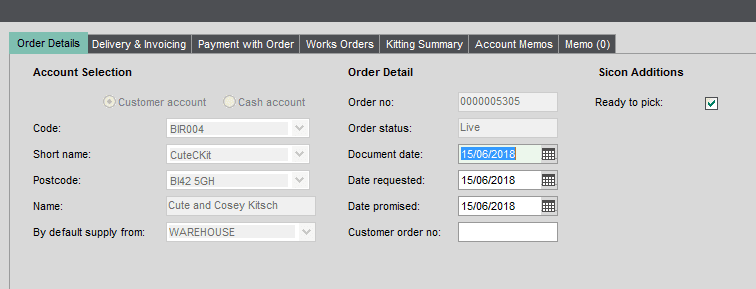
The ready to pick flag has been included in the sales order list accessed from within the barcoding module.
Allow stock items to be scanned first when picking- This allows the stock item to be scanned first during picking instead of the bin, the bin then needs to be scanned to confirm the pick. The auto select first expected bin (do not require bin scan) setting, will populate the expected bin once the product barcode has been scanned.
Auto-complete Pick when scanning the last required item – do not require pressing of the “Confirm” button. When you pick the last quantity of a SOP detail line, the system will auto confirm the pick.
Auto set the pick quantity to the required quantity when an item is selected (for traceable items only- this is so that the user will go straight to selecting traceable items). With this setting on, the user will not have to enter the qty on a SOP line for traceable items, they will just need to select the serial numbers. If batch numbers are being used, if the batch number is scanned then the full qty of the batch will also be set.
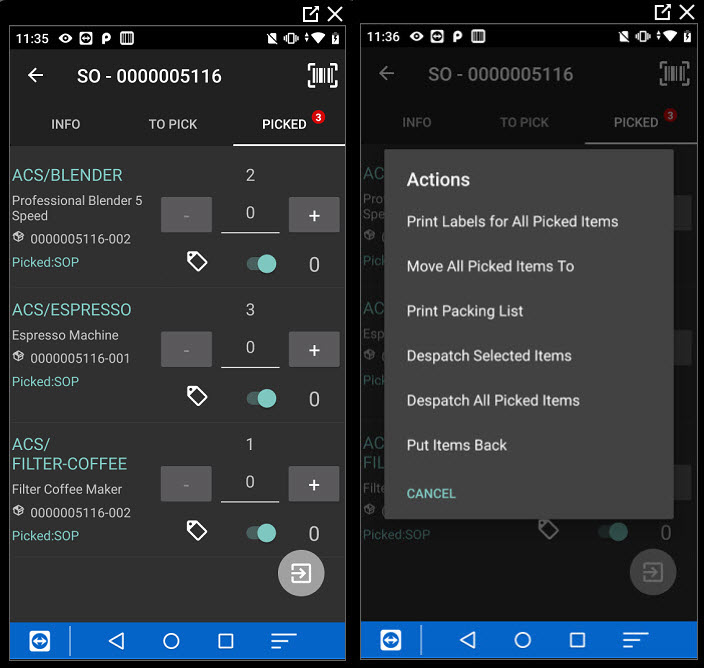
The enable move to button on sales order despatch setting allows users to move the picked items to a specified bin location within a sales order e.g. a packing despatch bin location. In the picked window, click on the action button, the user can choose to move the items to a new bin.
Allow despatch of all picked items without confirming counts or serials – This allows all items that have been picked to be easily despatched in the handheld. In the picked window, click on the action button, the user can choose to despatch all picked items.

Hide Info tab on sales order despatch – With this setting on, the info tab within the sales order despatch screen in the handheld is removed.
Show County Code on SOP List – The country code from the customer trading tab is shown on the handheld.
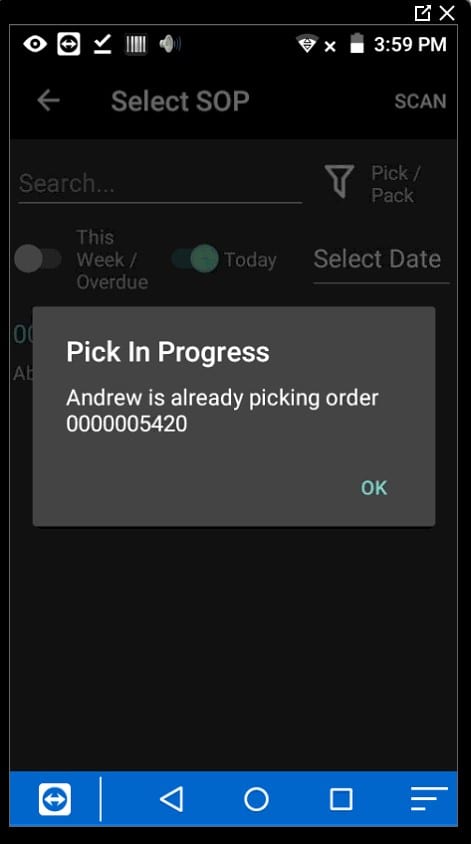
Restrict multiple users from selecting the same sales order – This prevents multiple users picking the same sales order.

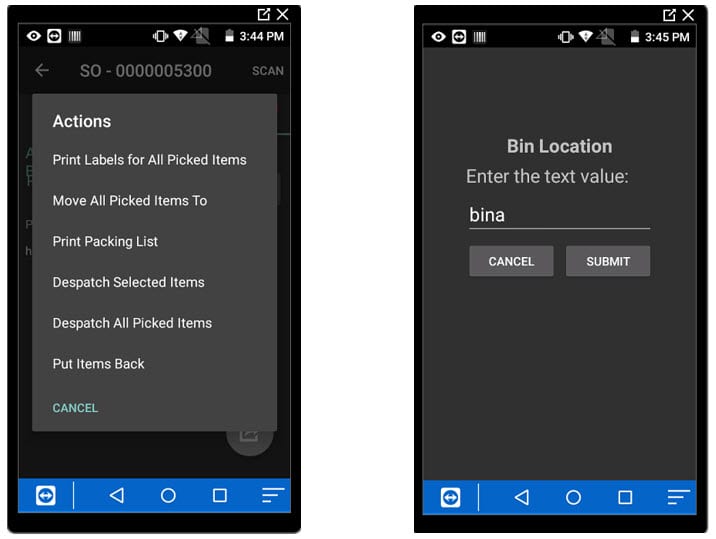
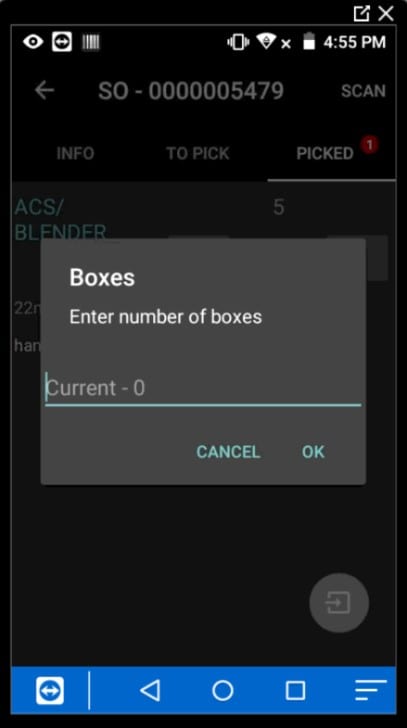
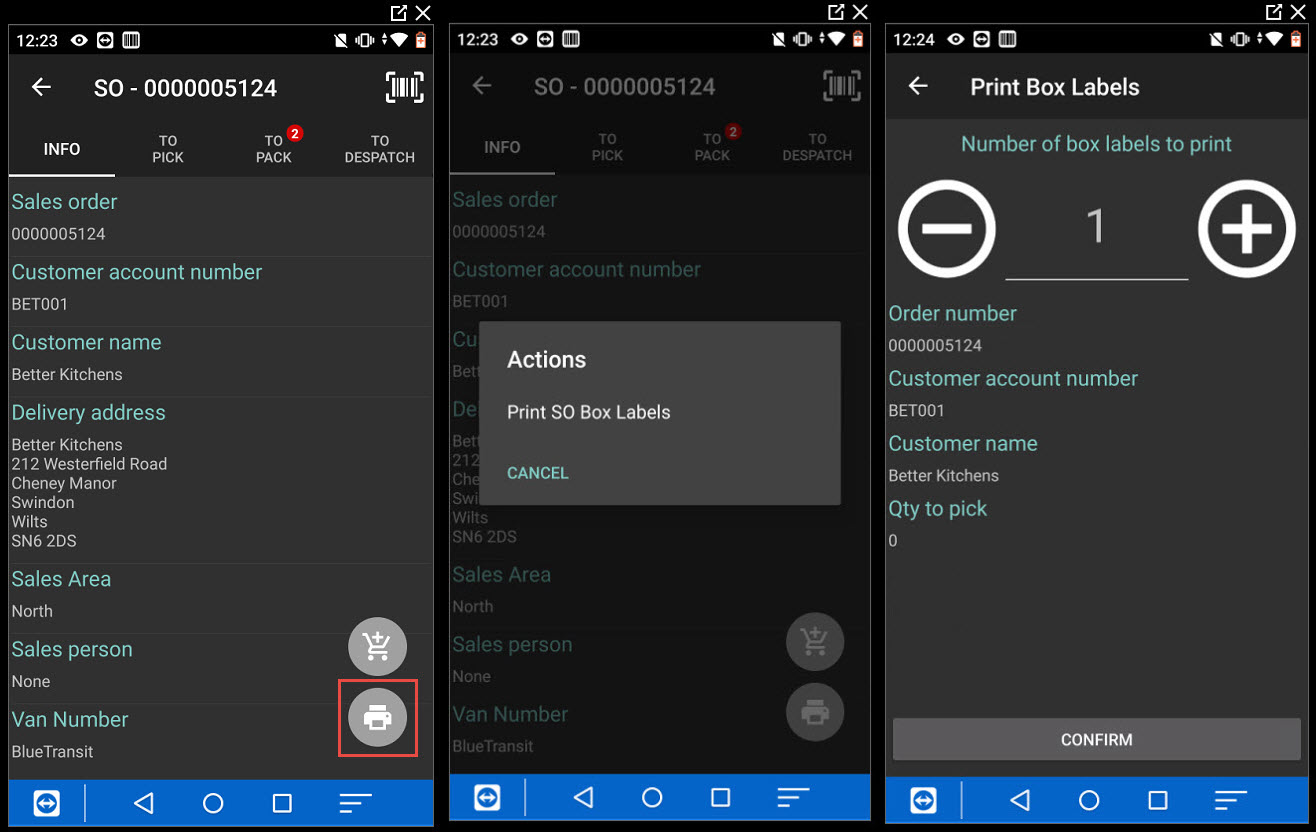
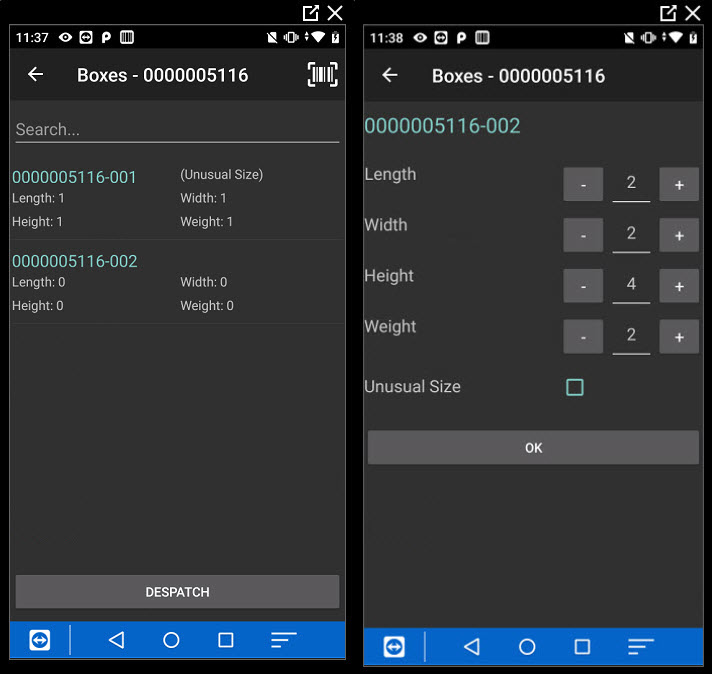
Enter number of boxes at despatch – allows the number of boxes to be entered at despatch. This is stored in a sql table and can be used for courier integration. With this setting on, the ability to print box labels and put items into boxes from the SOP screen is suppressed.
Allow scanning sales orders that are not allocated when selecting a sales order to pick. With this setting on, unallocated sales order (that do not show in the sales order list in the handheld) can be selected by scanning a barcode for the sales order number.
You can then pick the lines by scanning/tabbing the stock item and selecting the batch if required.

As the lines have not been allocated in Sage, the bin needs to be scanned to confirm where the stock is being selected from.
Add packing stage to sales order despatching: An additional stage in the SOP processing for packing orders can be created.
 Once the item has been picked, a packing list can be printed and it can then be packed.
The stock is moved to a SOP:Packed Bin
The sales order can then be despatched from the packed bin.
 When picking a sales order you can click on the action icon in the top left corner of the screen, the system will allow you to pick from another bin. The system will move the allocation on despatch.
Lock sales orders while picking- with this setting on, the sales order can not be amended in Sage, when the sales order is open in the handheld.
The sales order can also not be despatched in Sage.
The setting to use SOP despatch label instead of Ad hoc label when printing labels during picking sales order lines, allows SOP labels to be used instead of the Ad hoc label.
4.9. POP Settings

Receive PO’s into bin- The bin selected here will be used during the PO receive process and the putaway process.
Items requiring inspection go to bin – This bin is used for the inspection process.
With the setting to disable the ‘Due this week/overdue’ flag in receive purchase orders, all future purchase orders will appear.
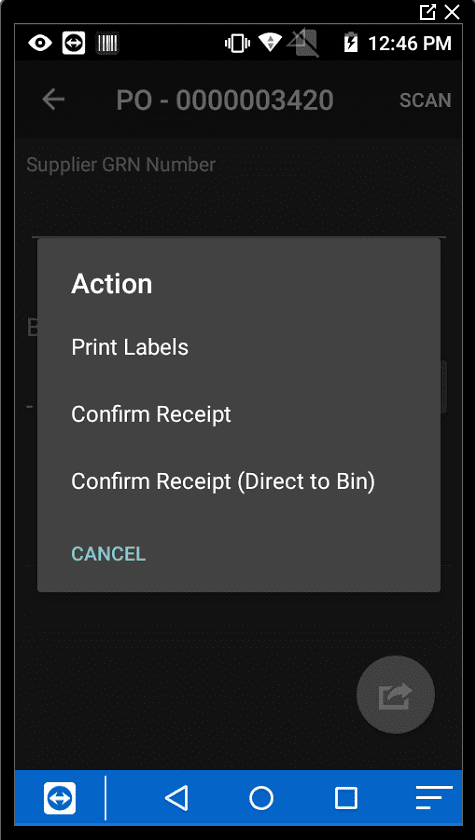
Allow receipt directly into specified bin (to skip PutAway) – With this setting on, in the action button during PO receiving, you then have the option to put the stock directly into a bin.
Allow label printing during the put away process, enables the labels to be printed during the put away process.
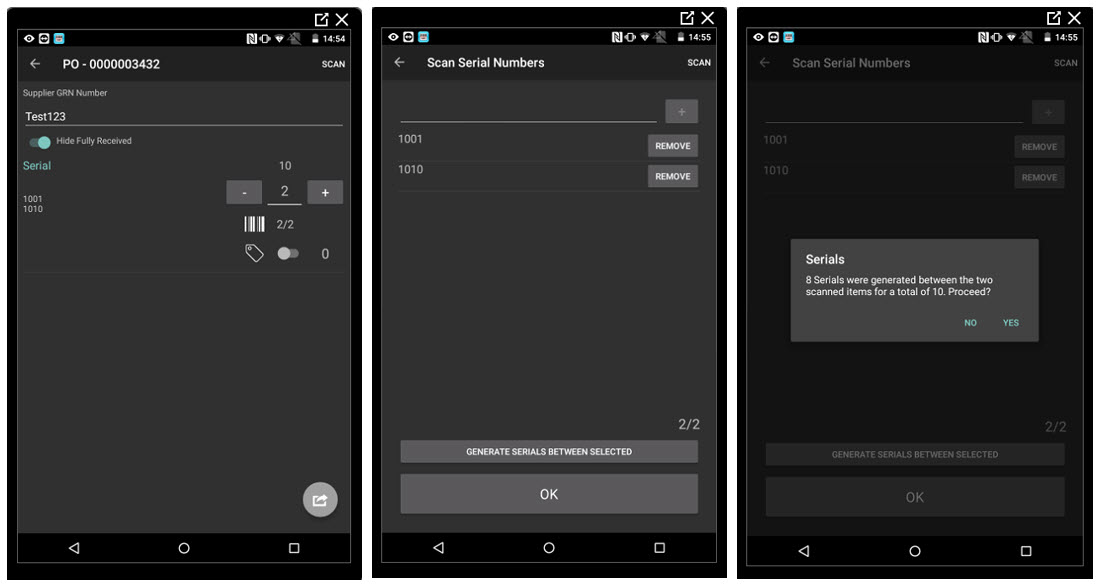
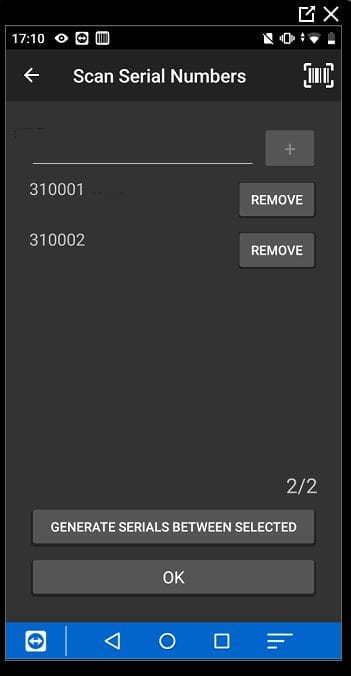
Allow sequential serial handling with first and last entry only. This allows the first and last serial numbers to be scanned, tabbing on the screen then gives an option for the system to auto populate the serial numbers in between the serials scanned.
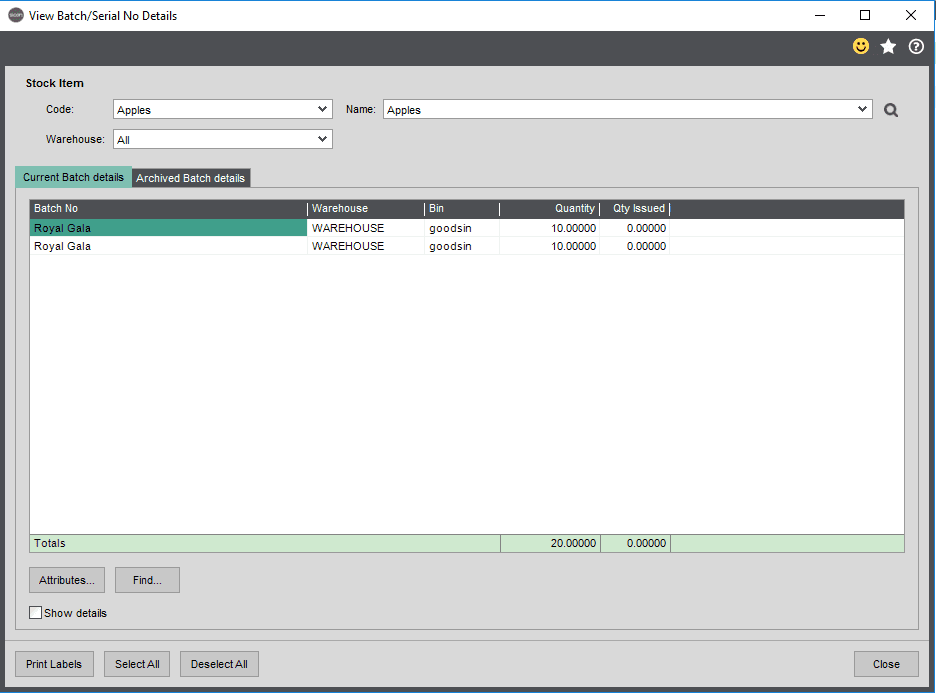
When receiving batch items, always add to existing batch if the same batch already exists- this setting dictates whether an item should be added to the existing batch or create a new batch. If separate batches are required, then the stock item also needs to be set to allow duplicates. In the below example, we have created 2 batches for the same batch number.
Inspections:
Warehouse for failed inspected items – specifies the Warehouse to put failed inspected items.
Bin for failed inspected items – specifies the Bin to put in failed inspected items
If quantity received does not match quantity expected when receiving a purchase order line, then flag items as requiring inspection – the stock will be received into the bin for items to be inspected.
4.10. Stock Settings
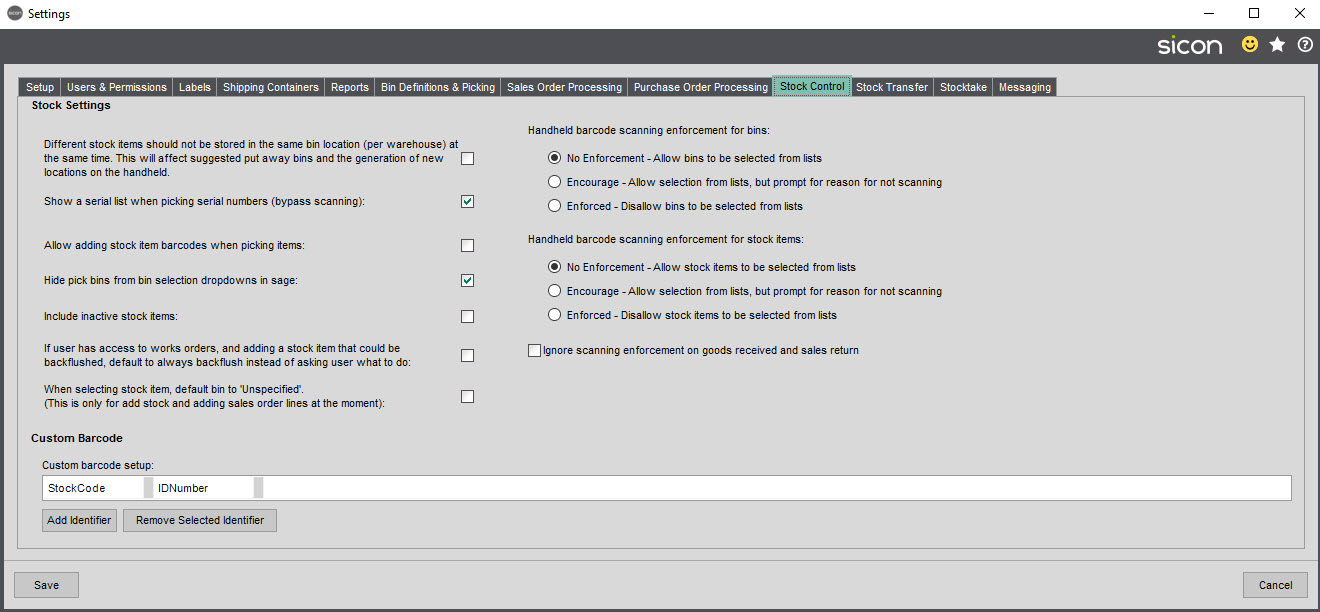
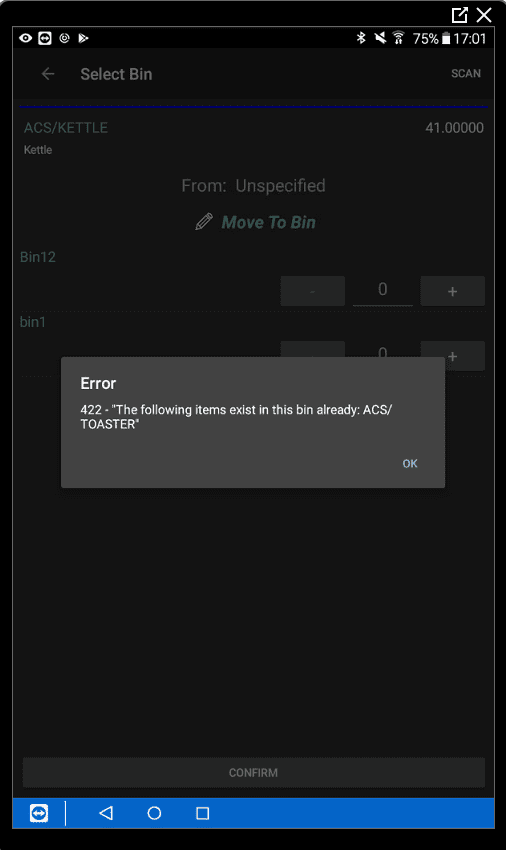
With the first stock setting ticked the handheld will prevent a stock item being put into a bin that already contains a different stock item.
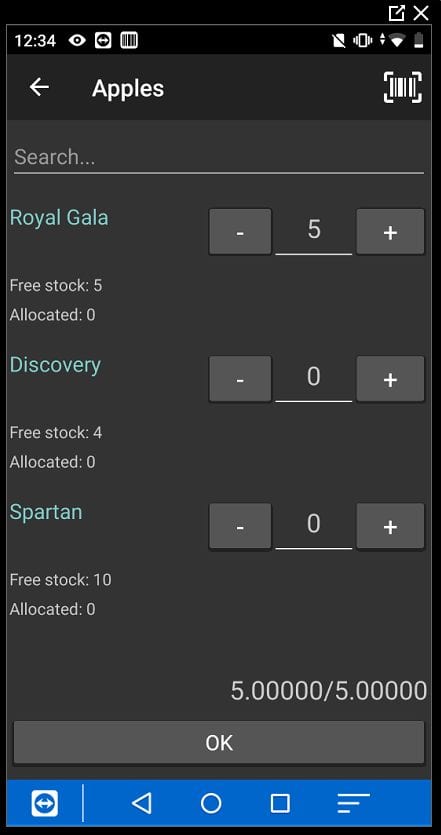
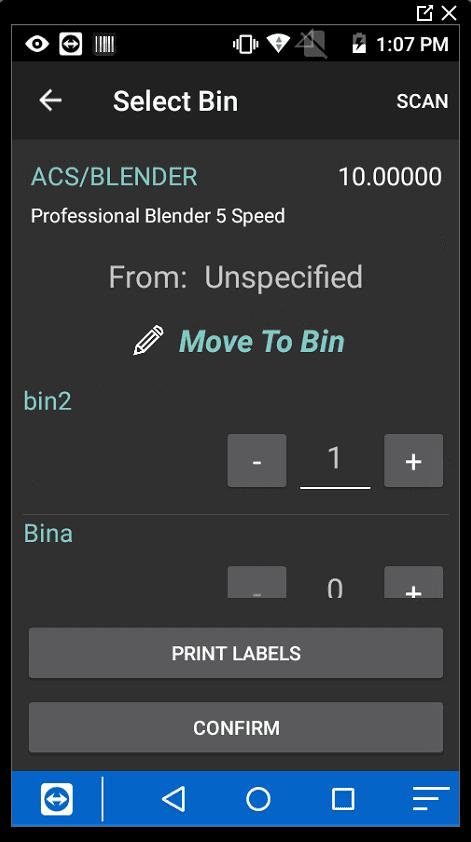
With the second setting set, when you come to pick serials numbers within the handheld on say a sales order or stock transfer the system lists out the available serials. There is also an option to select all serials. This setting only shows when the Sage stock setting to select serials at despatch is set.

Allow adding stock items barcodes when picking items, allows barcodes to scanned on the handheld and added to the stock item barcode in Sage.

The barcode gets added to the stock item and can be seen by clicking on the barcode button on the stock item.
Hide pick bins from bin selection dropdowns selection in sage: With this ticked the temporary picked bins will not appear in bin selection dropdowns in Sage.
Include inactive stock items: When enabled, this setting allows Inactive stock to be added, via the handheld, through the ‘Add Stock’ and ‘Dynamic Stocktake’ functions.
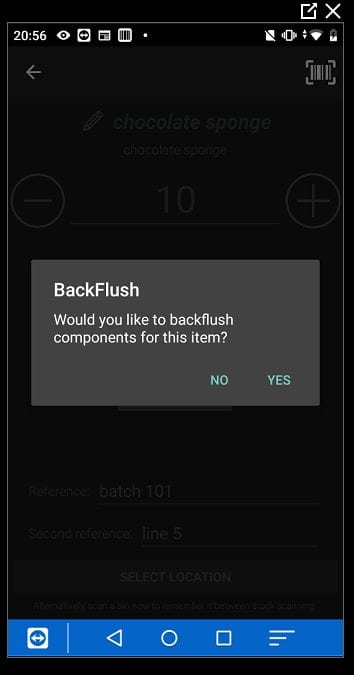
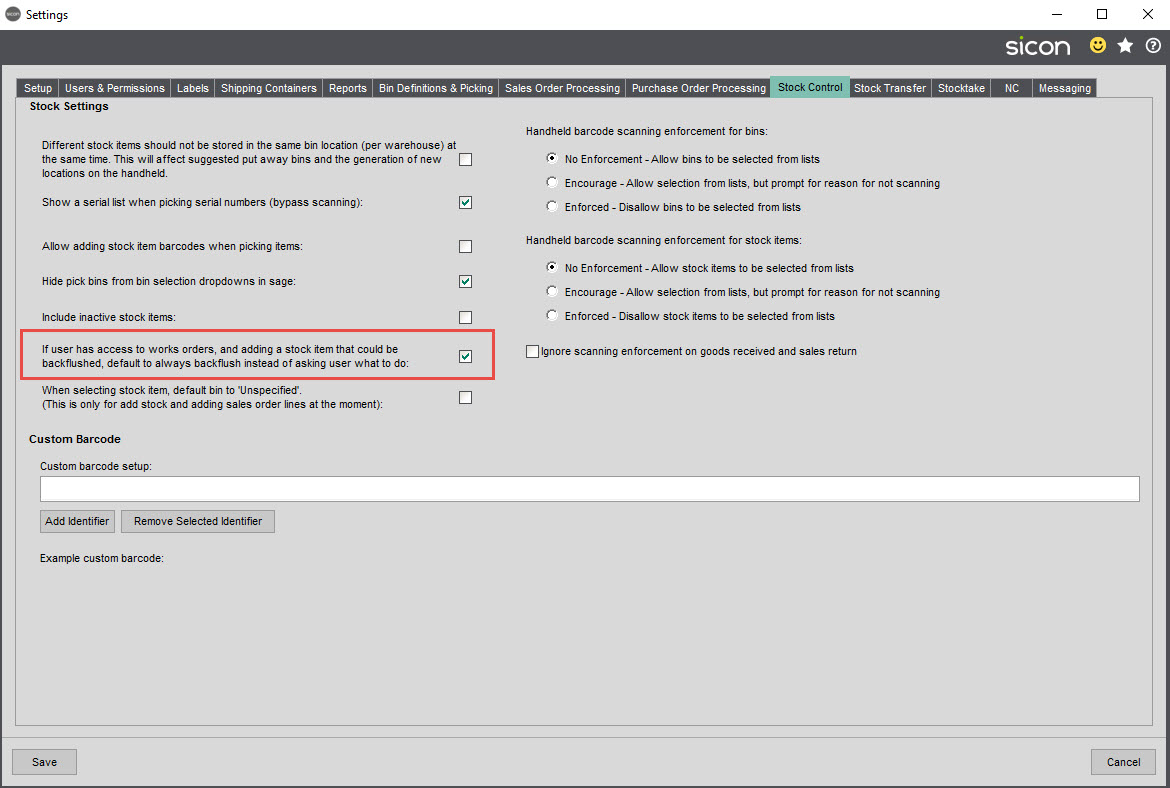
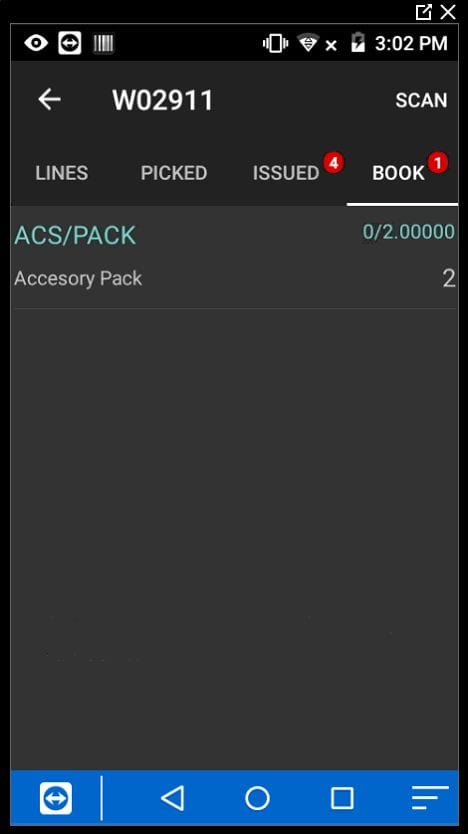
If user had access to works orders, and adding a stock item that could be backflushed, default to always backflush instead of asking user what to do. This setting dictates what to do when adding a built stock item (via add stock) on the handheld (when Sicon works orders are installed).
With the setting on, the above message is not shown, the system creates and backflushes the work order.
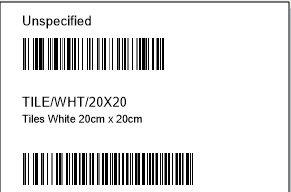
The following setting, will default the unspecified bin, as the bin to use when adding stock or adding a sales order line.
When selecting stock item, default bin to ‘Unspecified’. (This is only for add stock and adding sales order lines at the moment).
The custom barcode feature allows for non-standard barcodes to be defined, so that the Sicon barcode solution can identify the relevant parts of the barcode.
The handheld barcode scanning enforcement for bins and stock items: dictates whether a user has to scan a bin or stock item or tap on it to select it.
When the enforcement is set to encourage, the user gets the following message, if they do not scan the barcode.
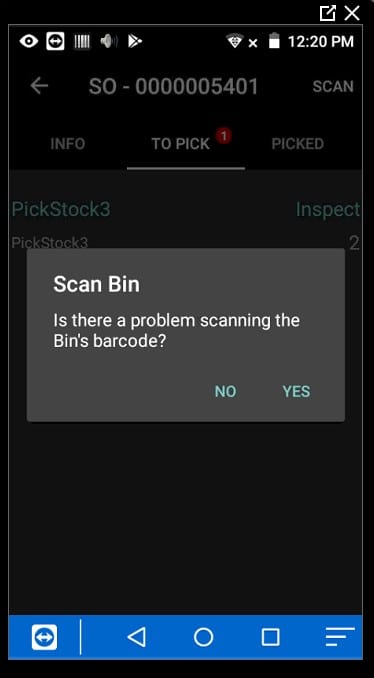
If they select yes, they are then prompted to put in a reason.
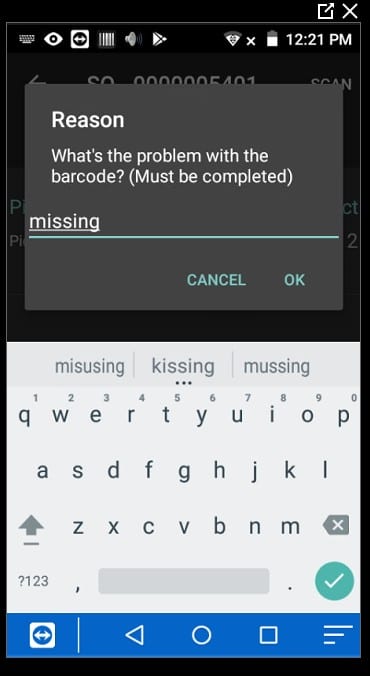
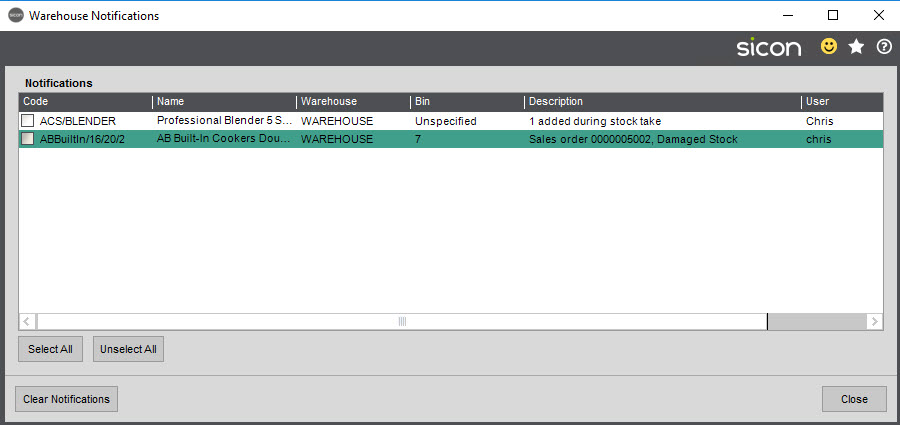
The reason is recorded in the warehouse notifications section in Sage
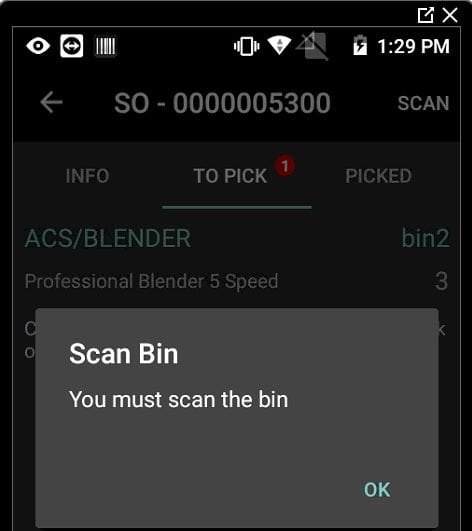
With the setting to be enforced, the user has to scan the barcode of the stock item or bin.
Once the stock item barcode has been scanned, the quantity can then be manually adjusted (without scanning).
The ignore scanning enforcement on goods received and sales returns, will discard the enforcement required when receiving a purchase order or sales order return.
4.11. Stock Transfer
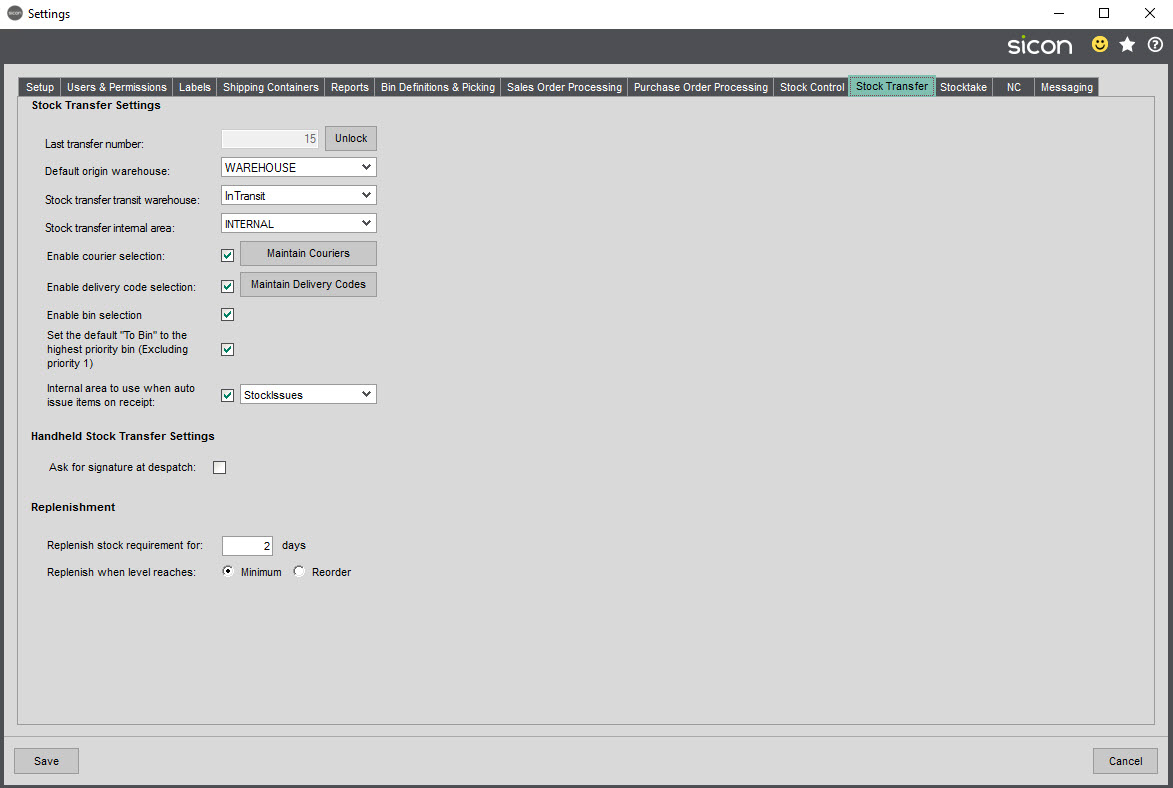
The stock transfer tab in the settings allows the configuration of stock transfers between warehouses.
The last transfer number is used to generate the next stock transfer sequence number. You can set the default origin and transit warehouses. It is important that an in-transit is selected here rather than a standard warehouse as the warehouse set here is hidden within the standard Sage stock transfer screen.
You can set the internal area, which then dictates nominal postings. You can also enable courier and delivery code selection and maintain the lists of these. The enable bin selection, allows the bins to be selected during the creation of the stock transfer.
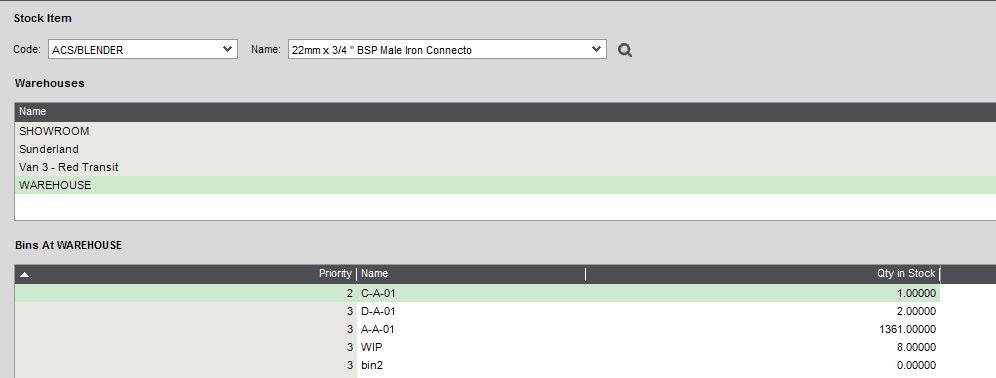
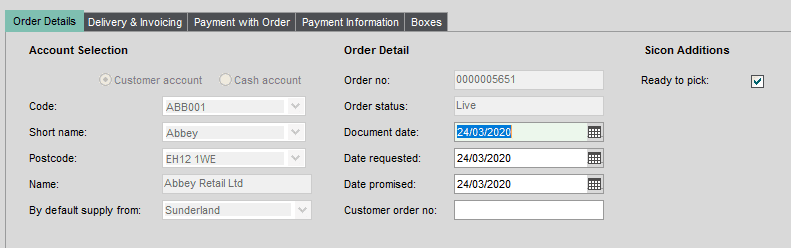
Set the default ‘’To Bin” to the highest priority bin (excluding priority 1), this will dictate which bin to default into the ‘To bin’ when creating a stock transfer. In the screen shot below, the bin C-A-01 has been defaulted in as this has bin priority of 2
The internal area to use when auto issue items on receipt, dictates which internal area to use when stock items are auto issued when receiving a stock transfer. This requires the stock item to be set to auto issue on receipt.
The setting to ask for signature at despatch controls whether a signature is required when despatching a stock transfer.
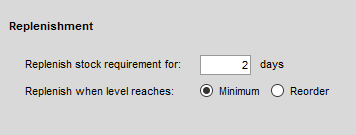
Replenishment
Replenishment stock requirement for: The number of days populated in this screen dictates what allocations the system will attempt to move when performing a replenishment movement.
Replenish when level reaches minimum/reorder- You can decide on wether to replenish stock based on the minimum or reorder level set against the bin.
4.12. Stocktake
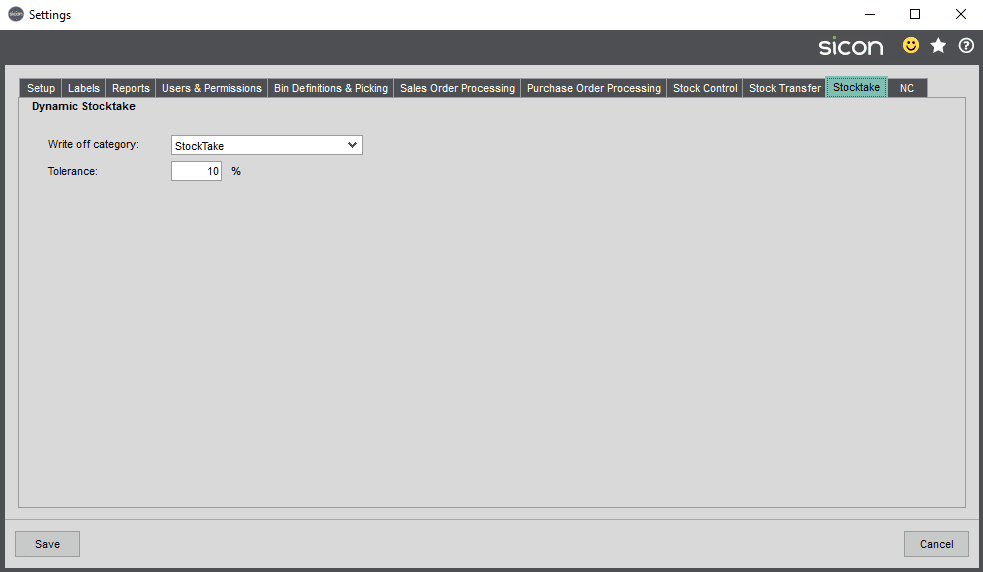
Write off category: This is used to dictate the nominal postings when stock is removed by the Sicon dynamic stock take. When adding stock, the issues nominal set against the stock item is used.
Tolerance: A tolerance can be set to prevent users in the handheld processing transactions that are above this tolerance level.
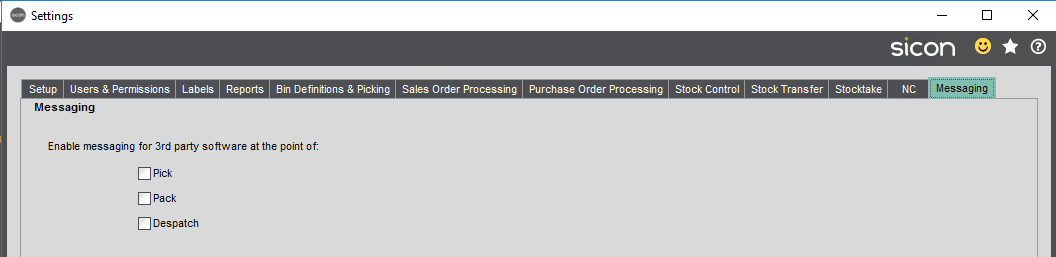
4.13. Messaging
Allows developers to hook into a message service in the web api at the point of pick, pack and despatch. E.g. to allow printing of courier labels.
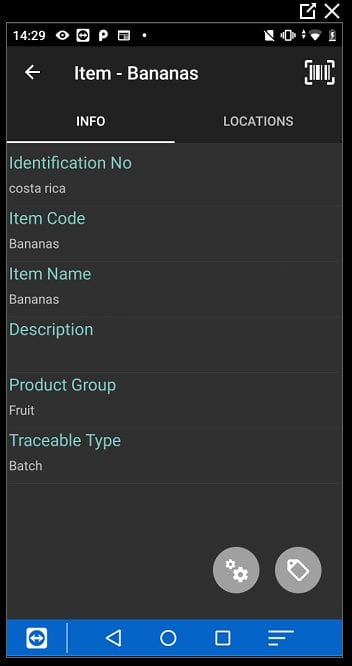
4.14. Settings on the Stock Item relevant to Barcoding
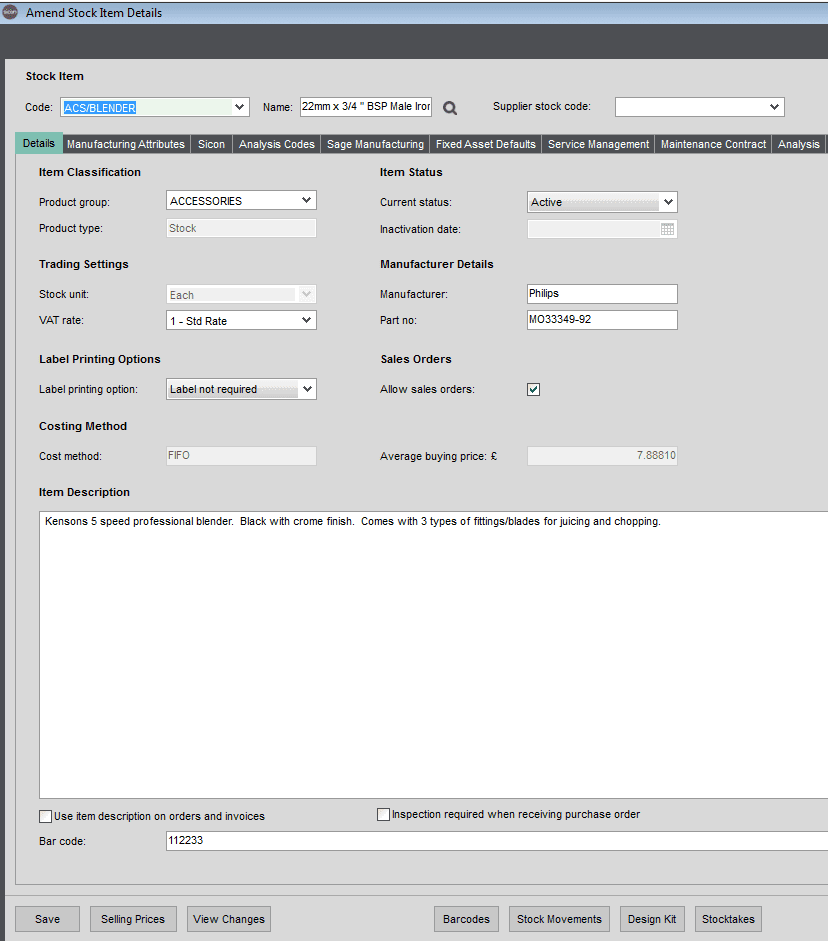
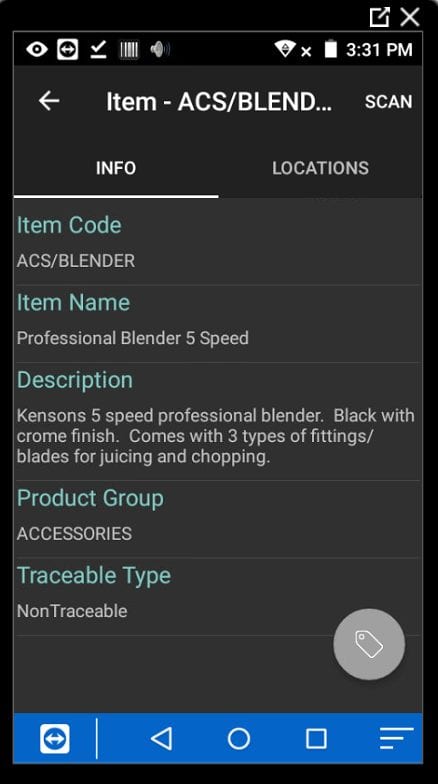
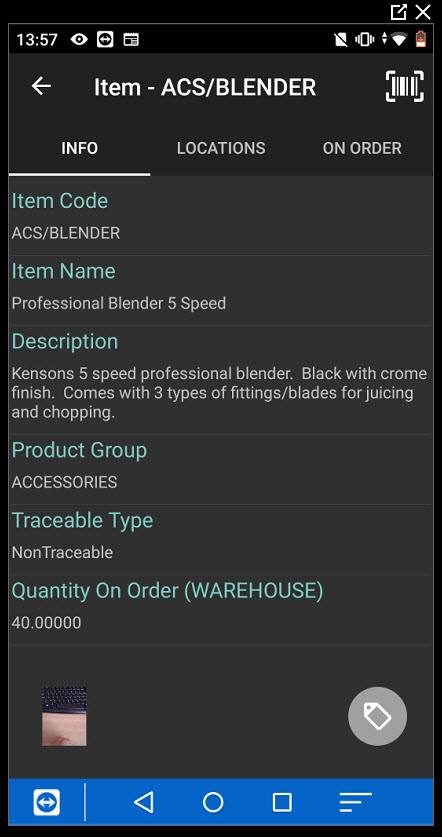
Barcode: with this populated the handheld will recognise the barcode based on this barcode field. If this is blank, then the stock code will be used instead.
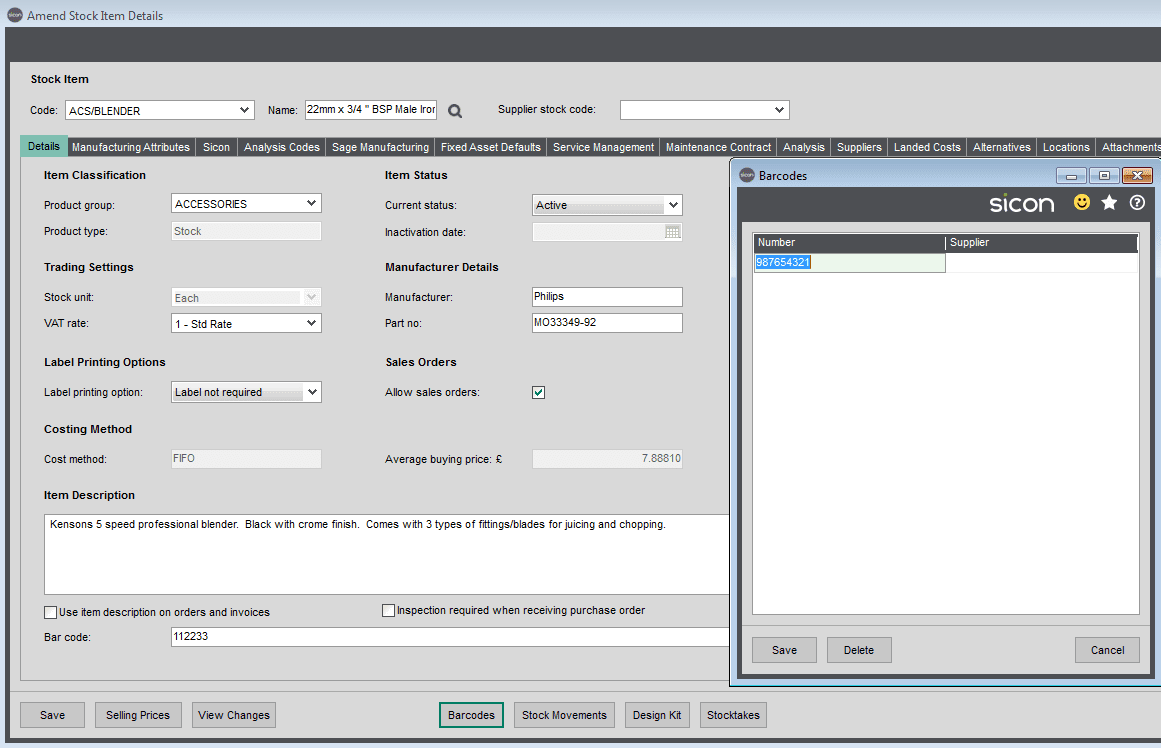
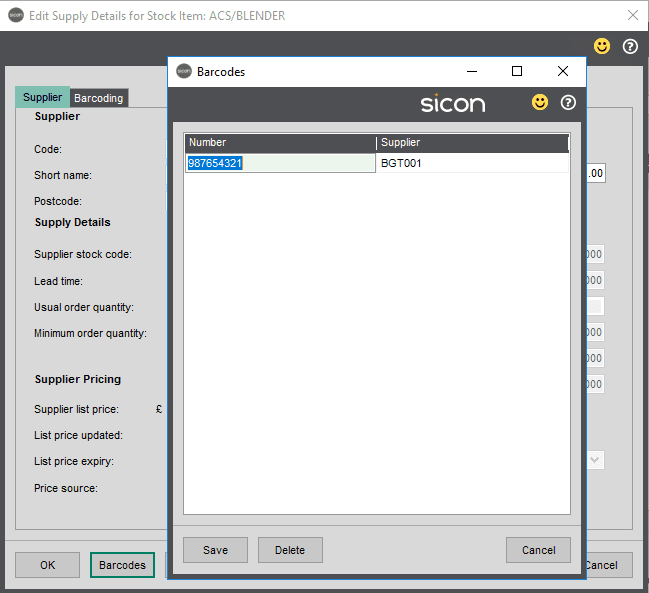
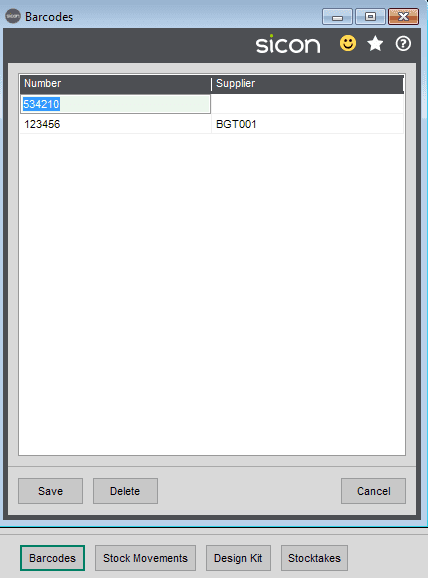
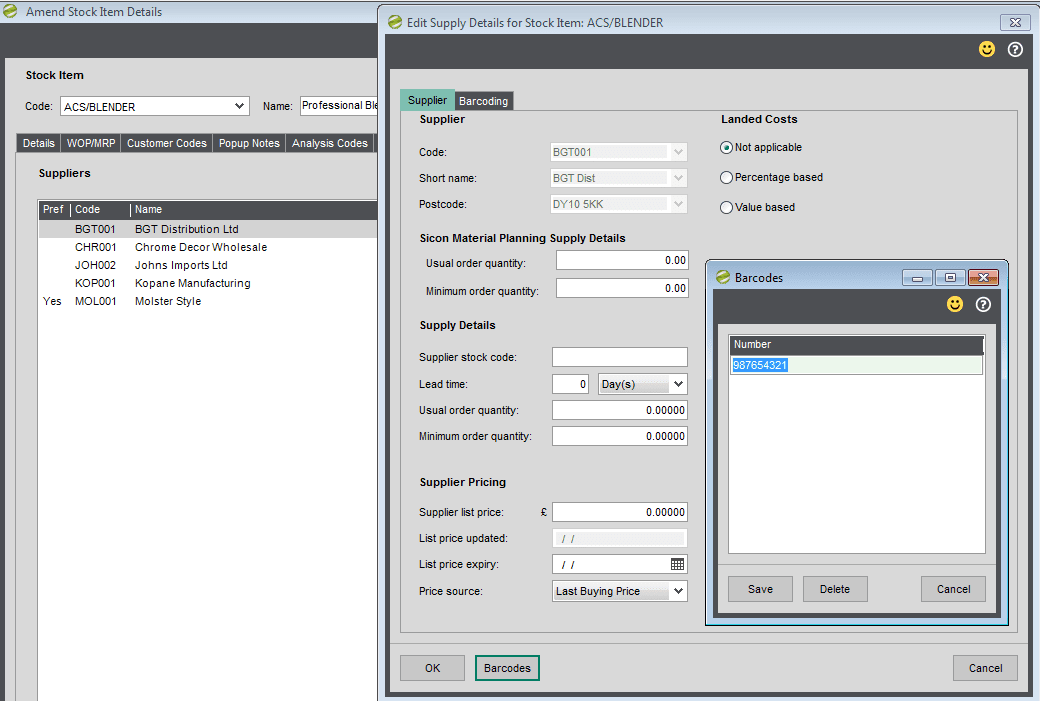
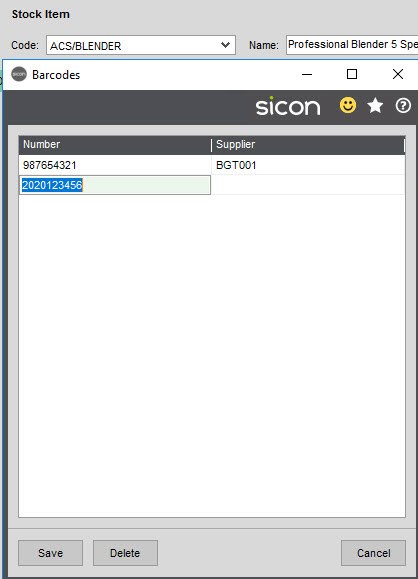
Barcodes button
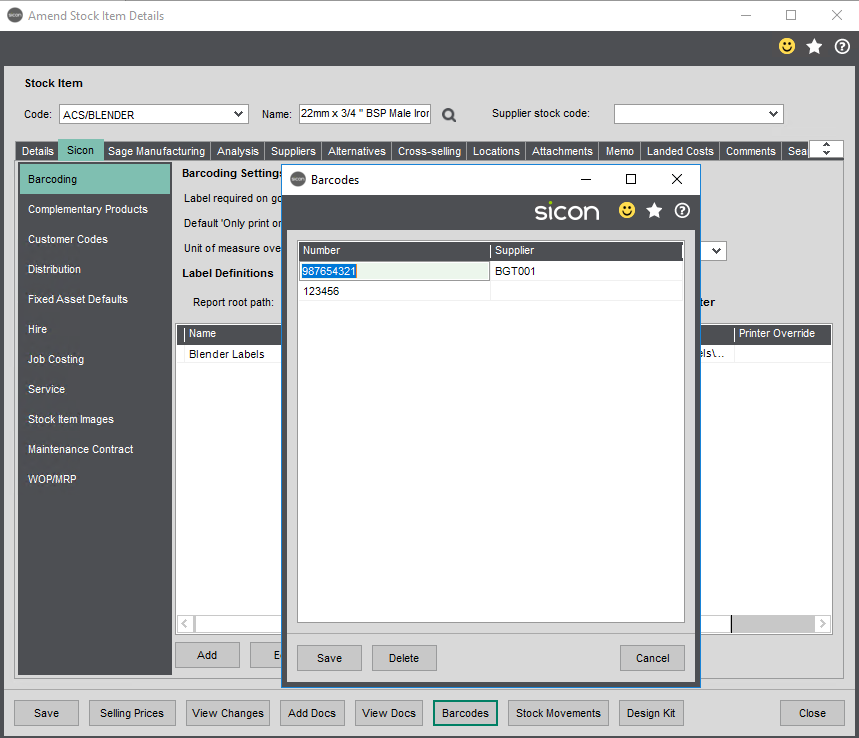
Additional barcodes can be linked to the stock item within the barcodes button. These can also be associated with a supplier, so will also appear on the supplier barcode tab.
Inspection required when receiving purchase order: When you bring this stock item in on a purchase order, the inspection symbol appears.
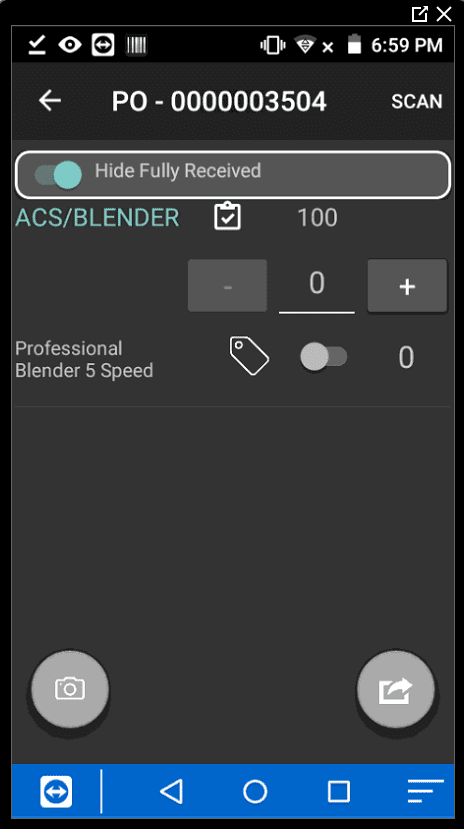
When you receive in the stock it is put to the inspection required bin set in settings e.g. inspecitonreq bin. When putting this stock away, the system will move the stock from the inspectionreq bin to an inspection bin. See further notes below on the inspection process.
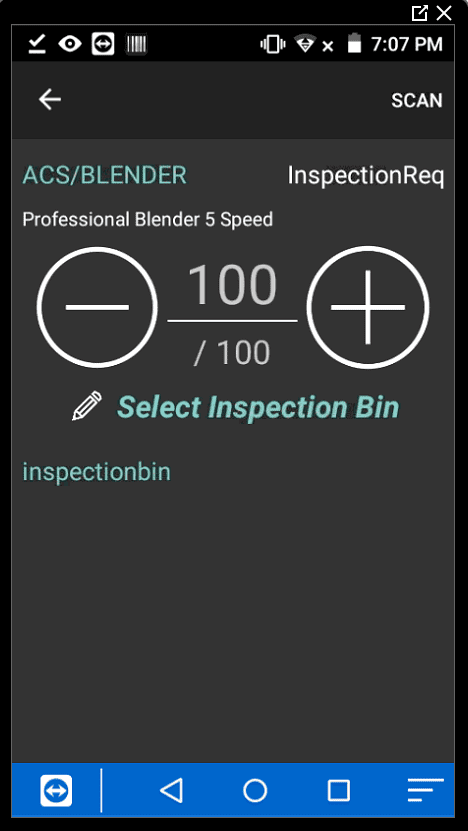
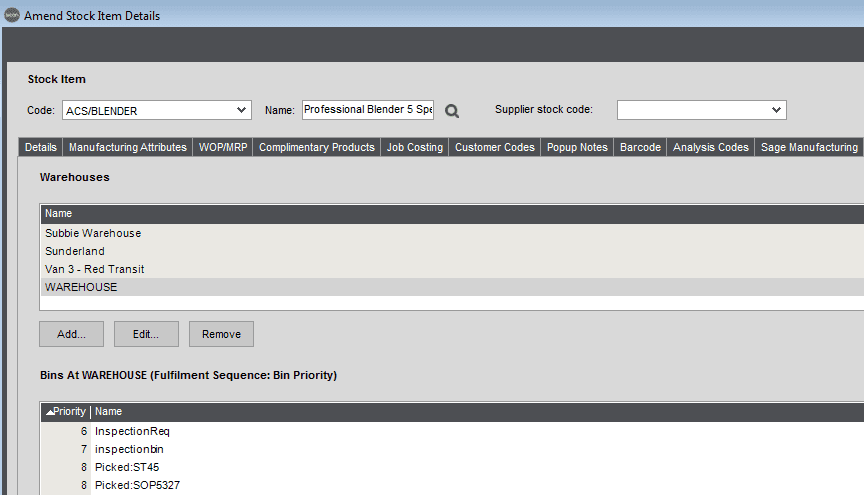
The inspection required bin is created with a bin priority of 6 and the inspectionbin with a priority of 7.
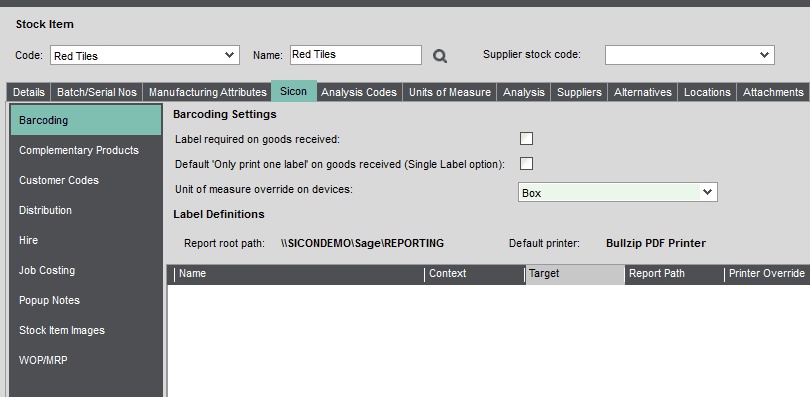
Sicon stock Barcoding tab settings:
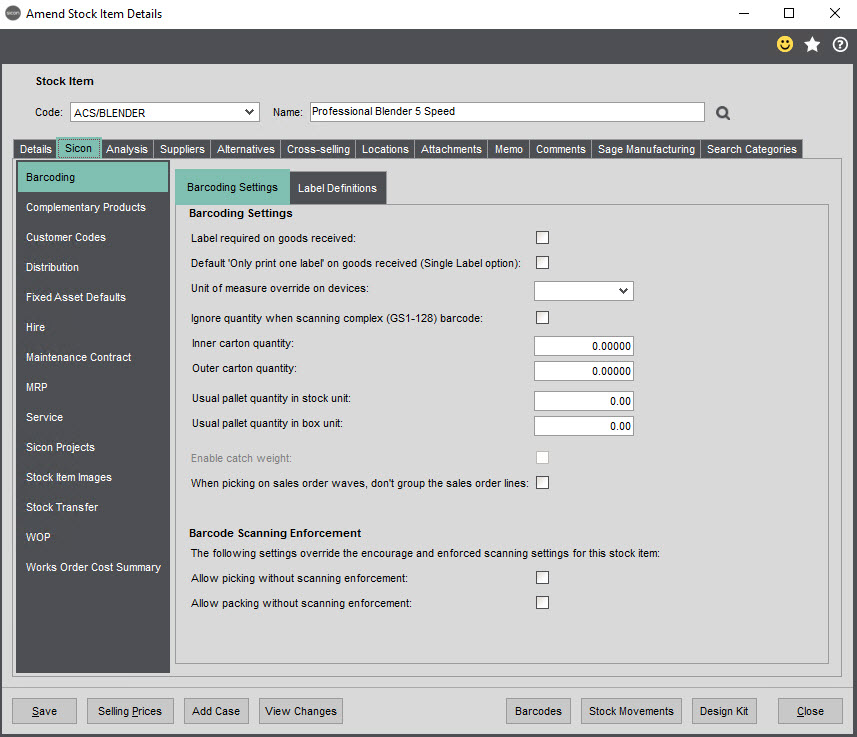
Label required on goods received: With this setting on, in the PO on the handheld, the flag to state the item requires a label is defaulted on.
With the default ‘only print one label’ on goods received. The label quantity will show as one. You can also configure labels that are specfic to the stock item.
Unit of measure override on devices: This allows a unit to be selected to show on the handheld in the POP, SOP and transfer screens, even though the unit on the transaction may be in a different unit.
On the example below, the stock unit is Sq metre, but handheld users pick in boxes.
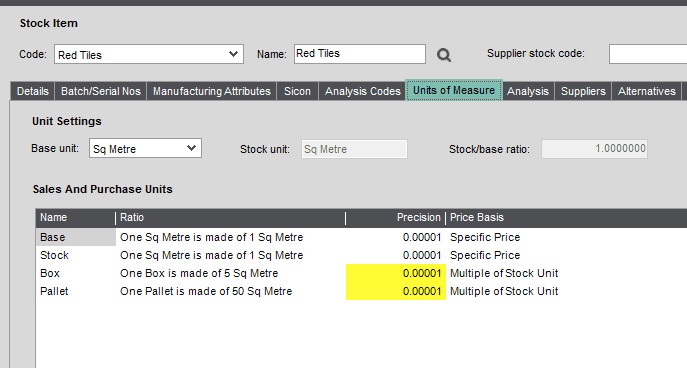
If a sales order is put on to sell the stock in Sq metres, the handheld will show this in boxes using the unit of measure to convert the Sq metres to boxes.
On the handheld the user is asked to pick 4 boxes. Once processed in the handheld, the system updates the stock history records in Sage in the stock unit.

Ignore quantity when scanning complex (GS1-128) bacode: With this setting, on the quantity stored in a complex barocde (identifier 30) will be ignored when scanning the barcode, the quantity will be uplift by 1 only.
Inner carton quantity/Outer carton quantity: These can be populated in order to direct the handheld user to Pickface, Overflow and Bulk bins for a single stock item, depending on the quanitity required. Quantities divisable by each carton quantity will be used to decide whether an Outer, Inner or ‘Each’ is required. Please note, this is only available when Smart Picking is enabled.
Example
Inner Carton Qty 25
Outer Carton Qty 50
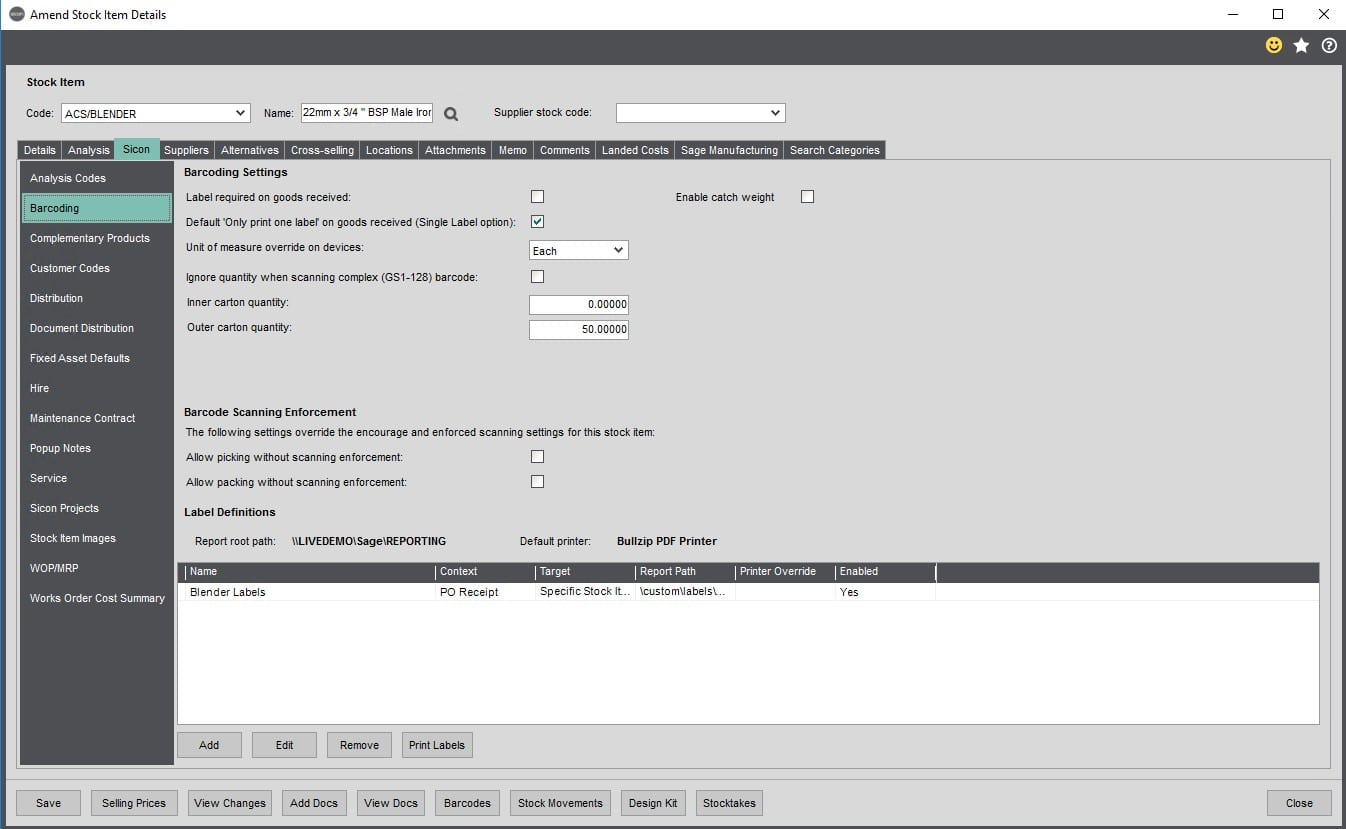
Stock Balances
Pick Face bin 100
Overflow 100
Bulk 300
Order Quantity 330
Pick Allocation
Pick Face 5 (each)
Overflow 25 (1 x inner)
Bulk 300 (6 x outer)
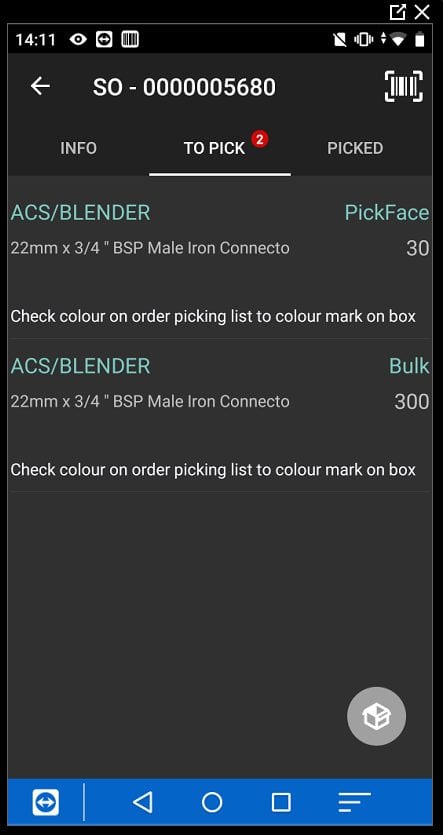
The handheld has stated for the picker to pick 30 from the pick face bin as this is less than 50 and then to pick the remaining items from the bulk bin (in packs of 50).
Where both the inner and outer carton quantity are set, then the inner caton quantity will be used. If the outer carton quantity is less than the inner carton, then the outer carton quantity is used. If the setting to ignore inner cartons is set, then the system doesn’t use inner cartons, only the outer carton quantities.
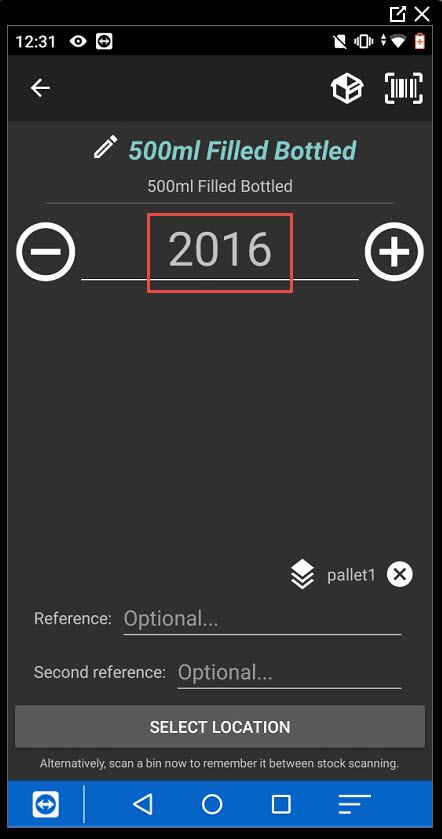
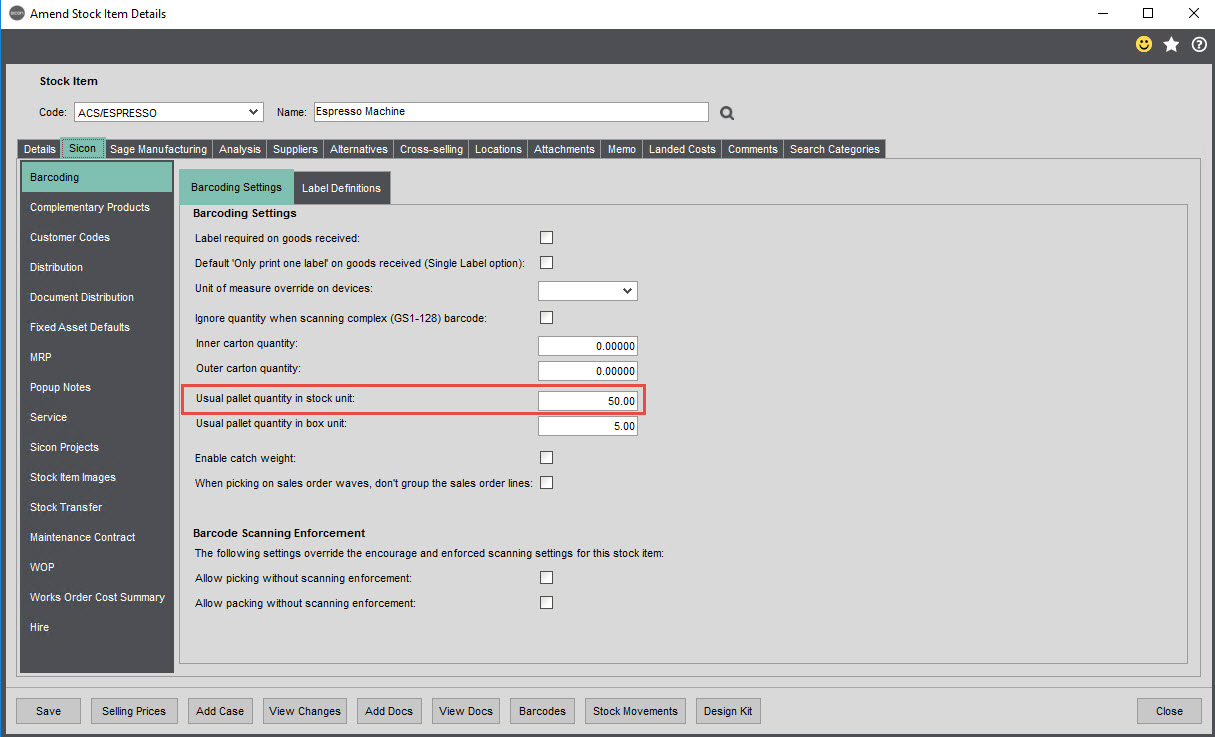
The usual pallet in stock unit is used by the system to know how many stock units make up a pallet. For example when adding stock on the handheld, if the stock item is scanned and then a pallet label scanned, the system will populate the qty based on the pallet .
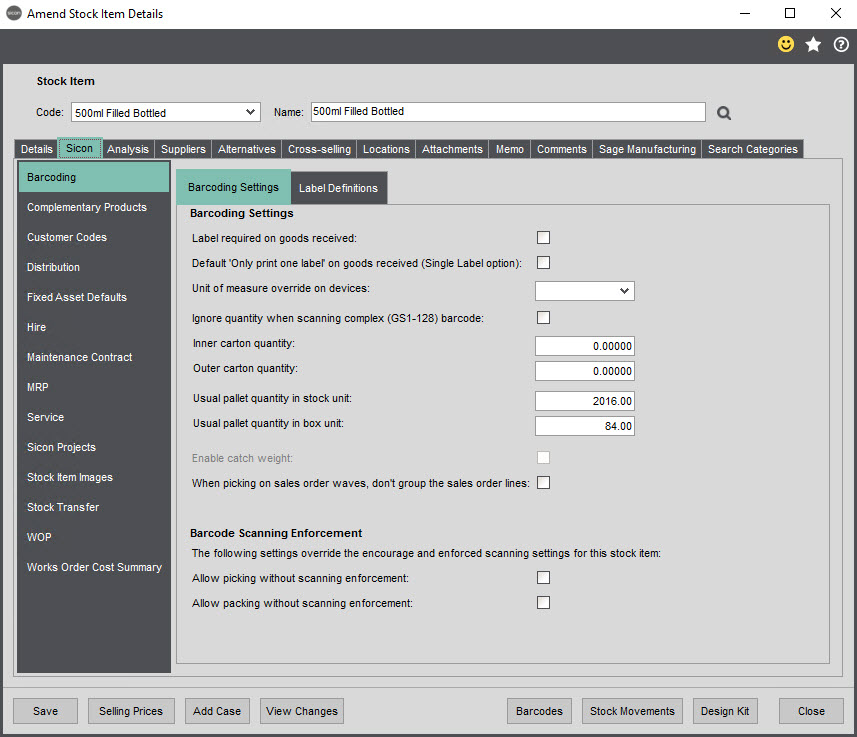
The usual pallet quanity in box unit has been created to dictate how many box units fit on a pallet- currently this is not being used.
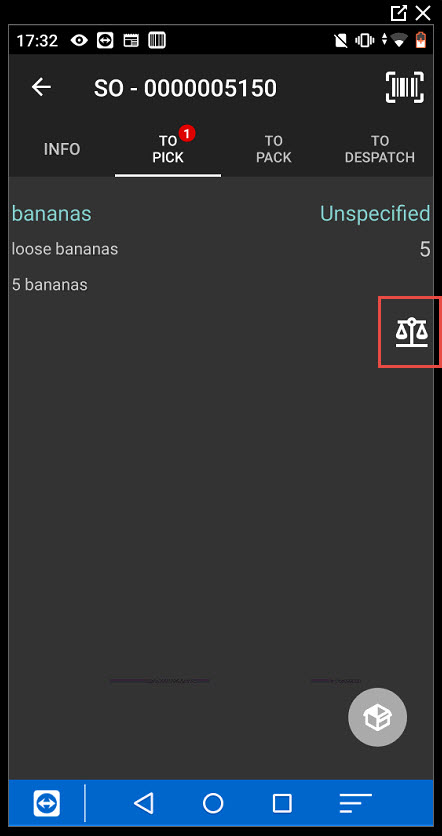
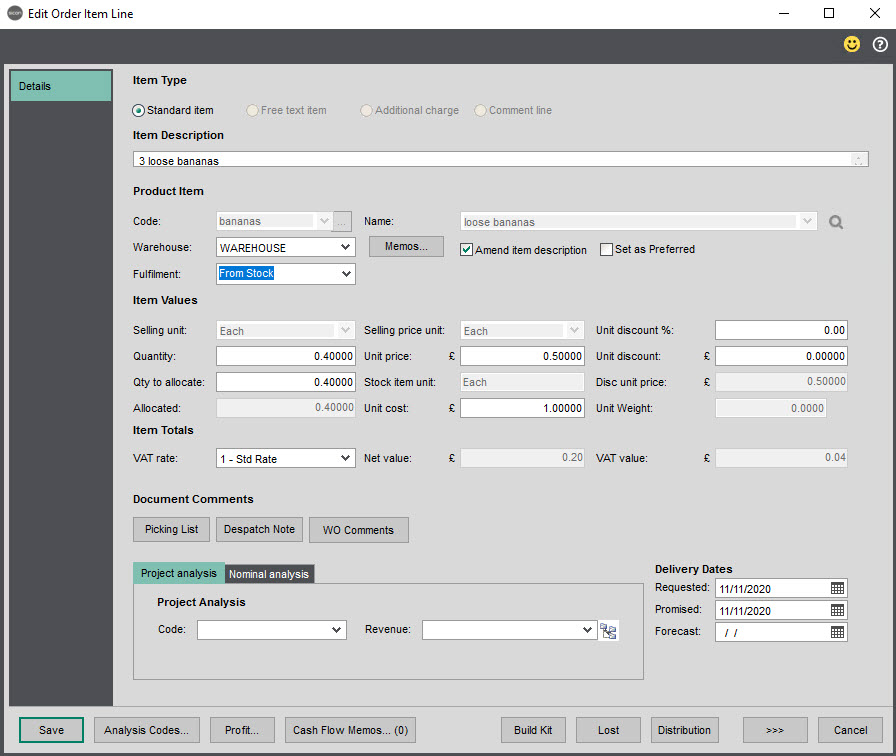
Enable catch weight, with this setting if this stock items is put on a sales order, the qty picked on the order can be greater that the qty specified on the order. The sales order line quantity is updated to reflected the picked quantity. In version 20 we moved the catch weigh setting from a global setting to be product specific. This setting is only available when the Sage stock setting to select serials at despatch is set.
The weigh scales icon show for the stock item in the handheld to highlight the item is catchweighted.
When picking on sales order waves, don’t group the sales order lines: With the setting on when multipe sales order lines are put onto a SOP wave, the lines will not be consolidated together. So each SOP line will show separately.
Auto set the pick quantity to the required quantity when an item is selected. This is the same setting as that set within the SOP settings, but has been made stock item specific. With this setting on, the user will not have to enter the qty on a SOP line for traceable items, they will just need to select the serial numbers. If batch numbers are being used, if the batch number is scanned then the full qty of the batch will also be set.
Barcode Setting Enforcement: These options will overide the Encourage and Enforce settings, within the main Barcoding Settings, for this stock item only.
The label defintions will show any labels that have been configured for the stock item.
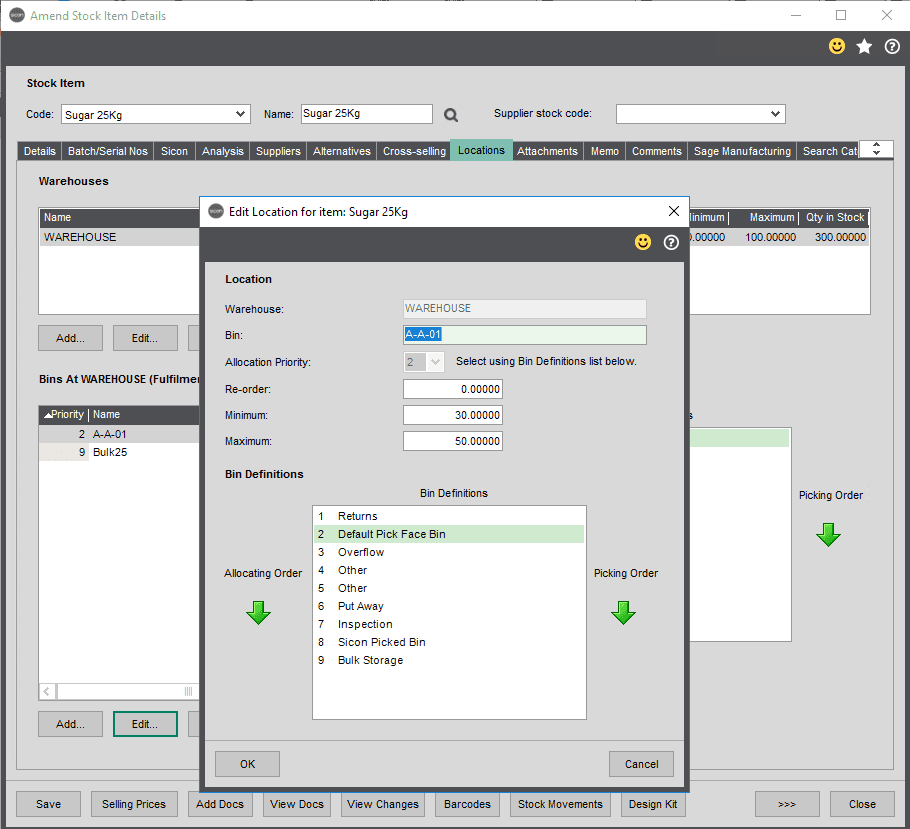
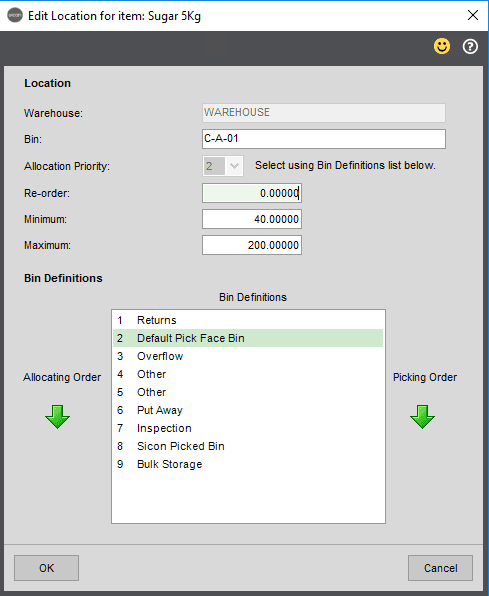
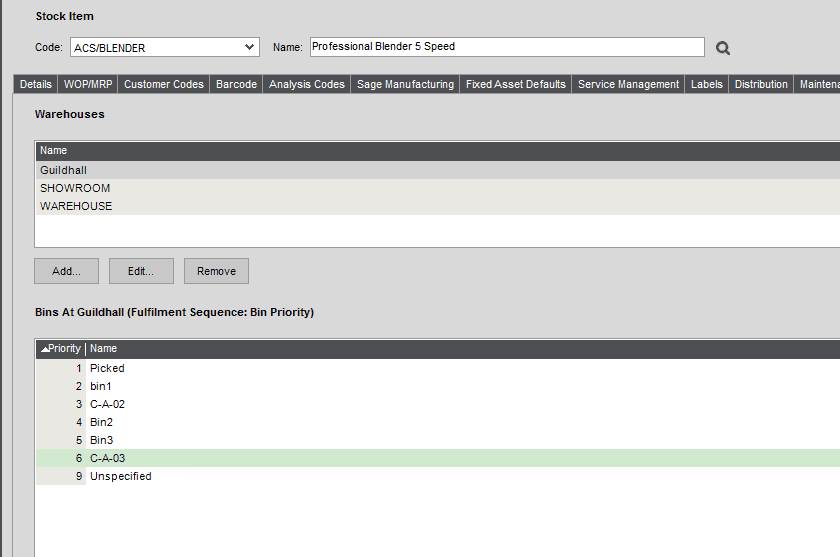
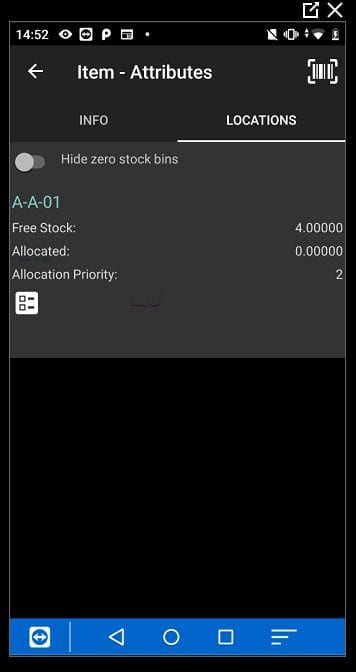
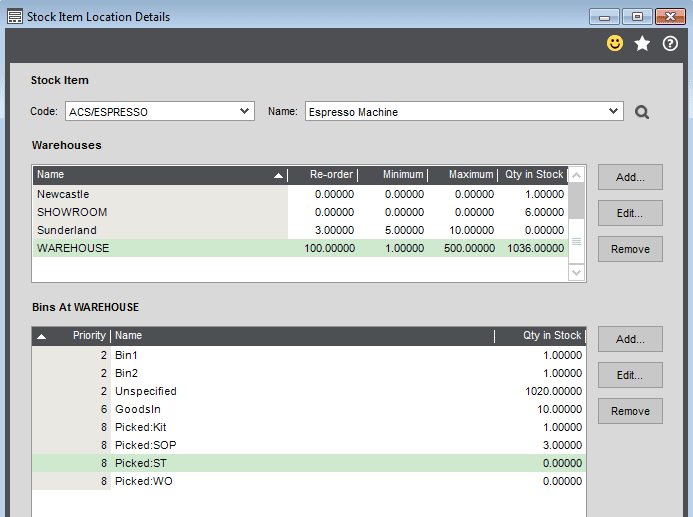
Locations:
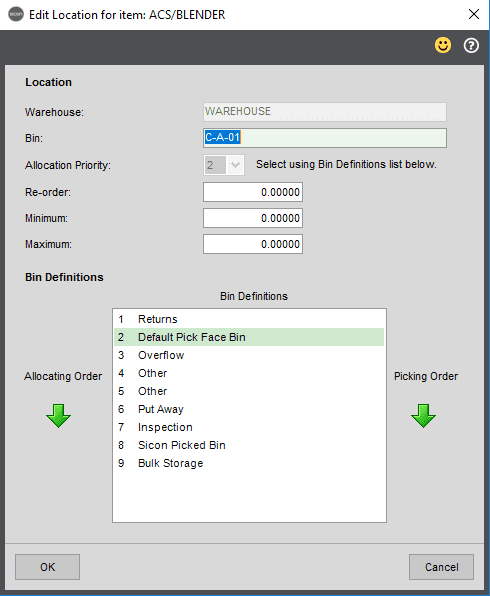
In the locations tab of the stock item, the bins linked to the stock item can be viewed/amended. The bin definition details have been added. When adding a new bin in Sage, the allocation priority can be selected from the list. This screen is also used to store the bin re-order, minimum and maximum quantities.
Against the bins you can also specify the re-order, minimum and maximum quantities used for bin replenishment, see notes below.
Stock item Images
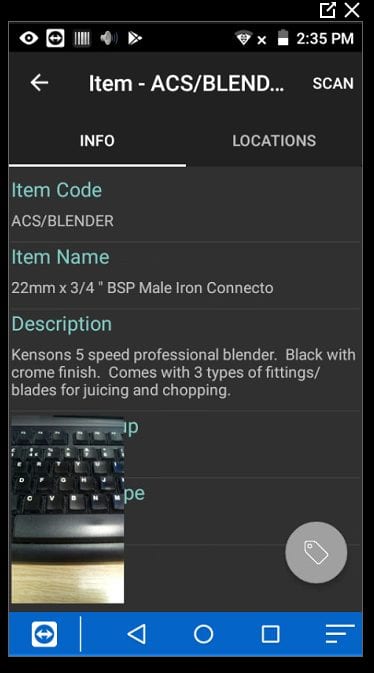
Images photographed on the handheld in the stock enquiry screen can be saved to to the Sicon stockitem images
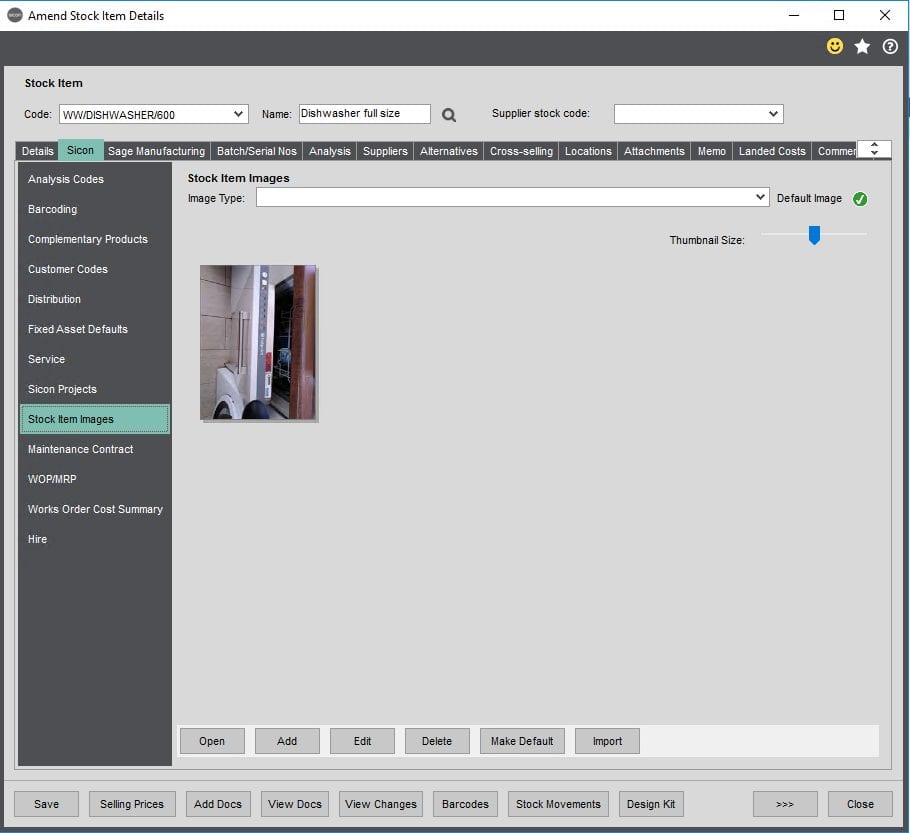
The images are saved within the Sage attachments folder.
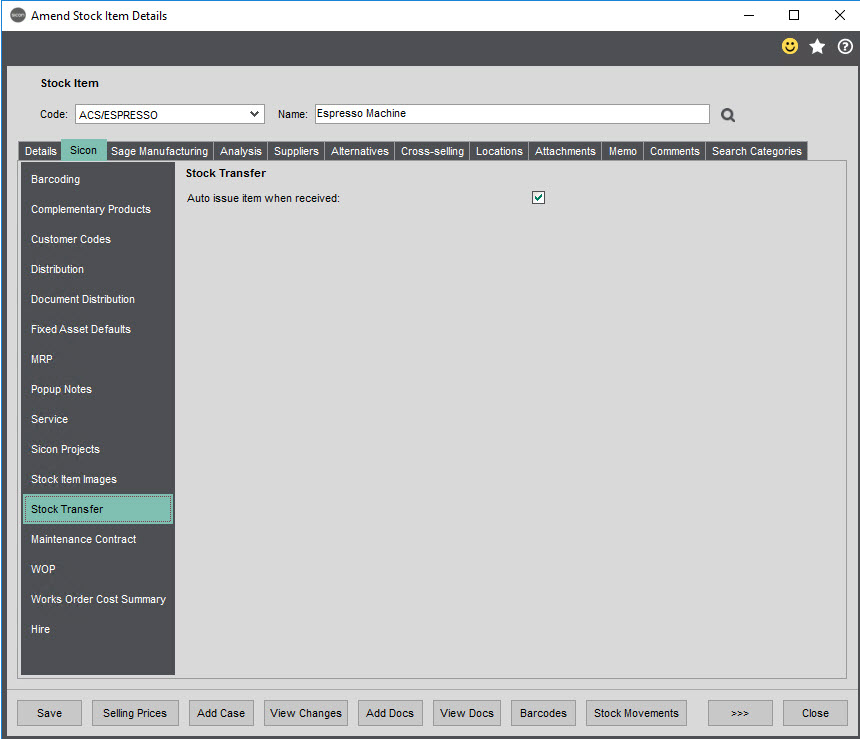
Stock Transfer
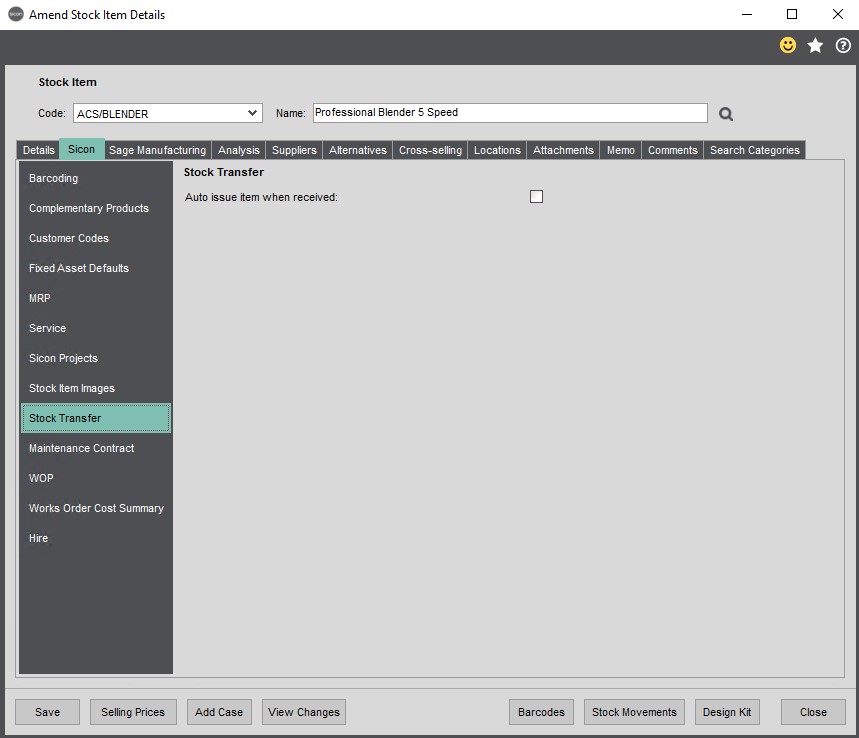
The auto issue item when received setting will cause the stock item to be auto issued when a stock transfer is received.
5. Labels
Labels can be created from within the Sage menu labels folder.
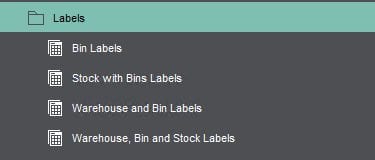
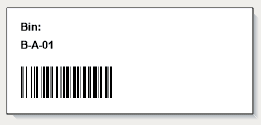
The bin labels report, can be used to print labels for all Sage bins.
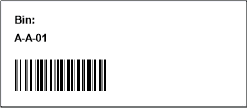
The bin labels (SiconWABlocation), can be used to print labels for any bins created in the maintain locations screen. These bins are held in a separate table namely SiconWABlocation.
The stock with bin labels, will print a label for each stock item in each bin, with a barcode for the stock item and bin.
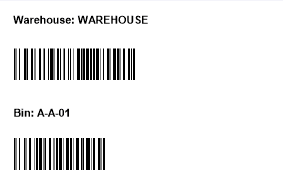
Warehouse and Bin Labels: Can be used to print bins labels in a warehouse .
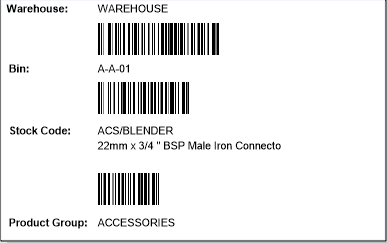
Warehouse, Bin and Stock Labels: Can be used to print a label containing a barcode for the warehouse, bin and stock code .
6. Imports
6.1. Import Stock Item Barcodes
This import can be used to update the Sage stock item barcode field and/or the supplier barcodes. Create an import file in excel and save as csv format.
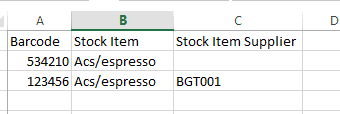
Select the file and click on check file, then import.
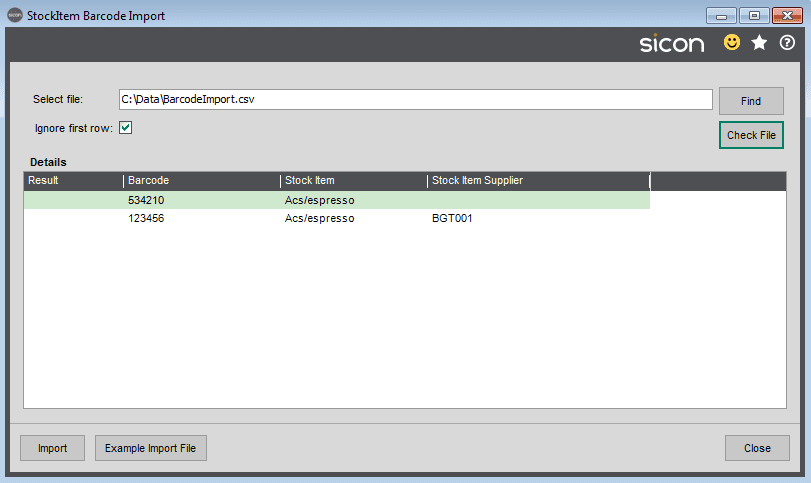
This updates the barcodes within the barcode button on the stock item and also the main stock item barcode field, if a supplier record is not specified. When the supplier code is entered, then the supplier barcode is created/updated.
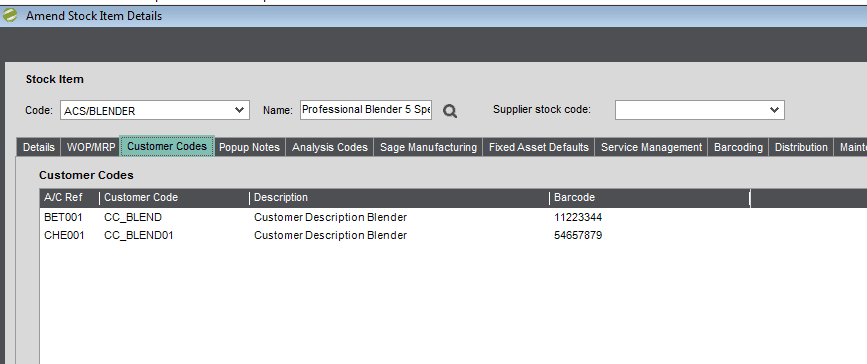
6.2. Import Customer Stock Codes
Allows customer barcodes to be imported against stock items using an excel import file. Create an excel CSV file using the template provided (exclude the headers when saving).
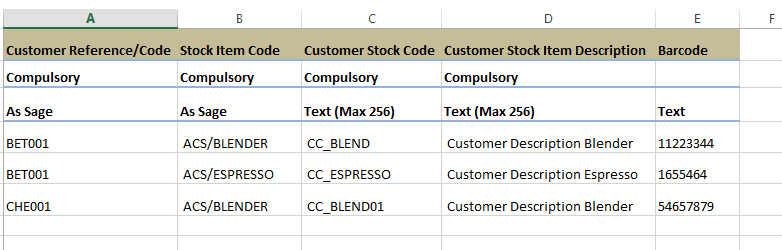
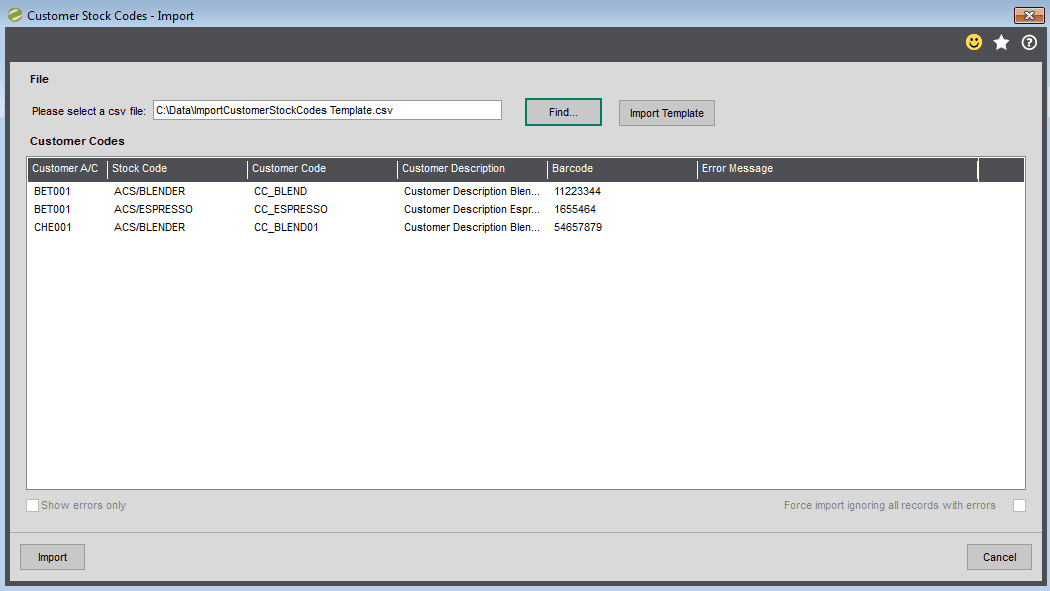
Import the file, the customer barcodes are visible against the stock item in the customer codes tab.
6.3. Import Bin Max Min Reorder Levels
This import is used to import the bin minimum, maximum and reorder levels for use with replenishment. An import file can be prepared using the example import file. The file can then be saved as a csv file and then imported.
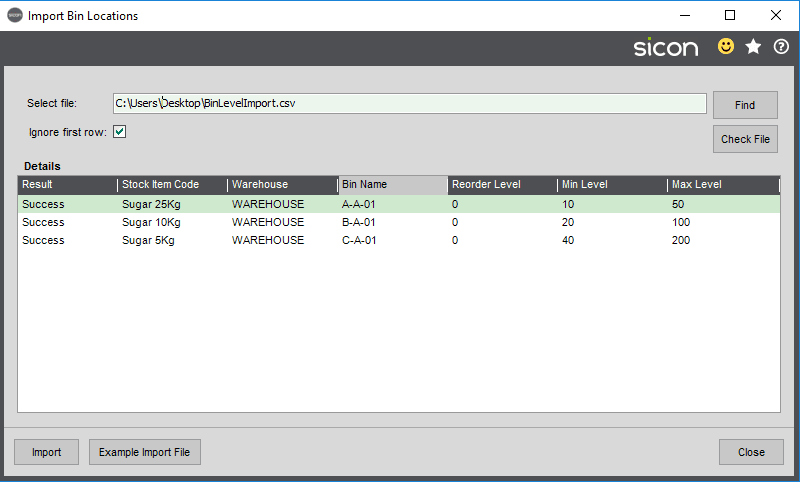
The imported values can be seen against the bin.
7. Reports
The stocktake results by bin can be used to generate a report from a Sage stock take ordered by the bin.
The stock list by bin (export) and the stock list by bin can used to find all stock items within bins.
The packing list can be printed to show items that have been packed onto a sales order, showing the box they have been put into.
The despatched items packing list details items, will allow a packing list to be printed for despatched sales order.
The dynamic stocktake results reports can be used for displaying/printing out the results of a dynamic stock and exporting the results to excel if required.
The stock transfer detail and summary reports can be used to report on the stock transfers, showing what has been picked, despatched and received.
The stock list with barcodes can be used to report on what stock items have or do not have the Sage barcode populated.
The stock ageing by bin report relies on the following setting being set.
The report then shows the ageing of the stock, based on then when the stock was received. N.B this only works for stock items received after the setting has been enabled.

8. Handheld Features
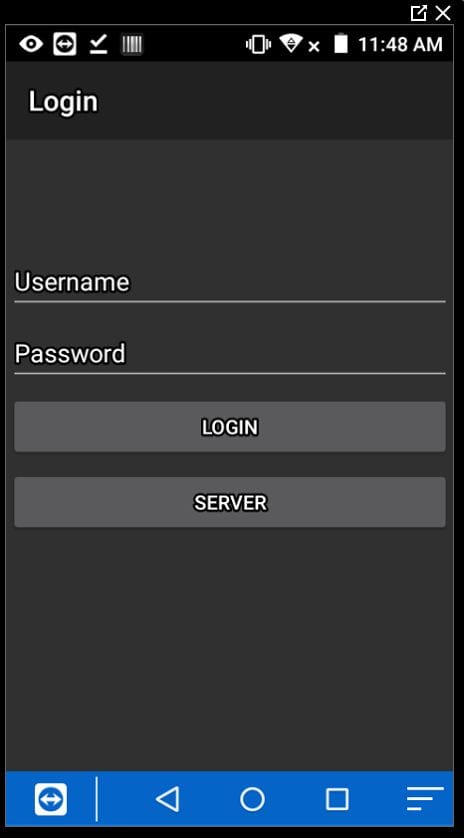
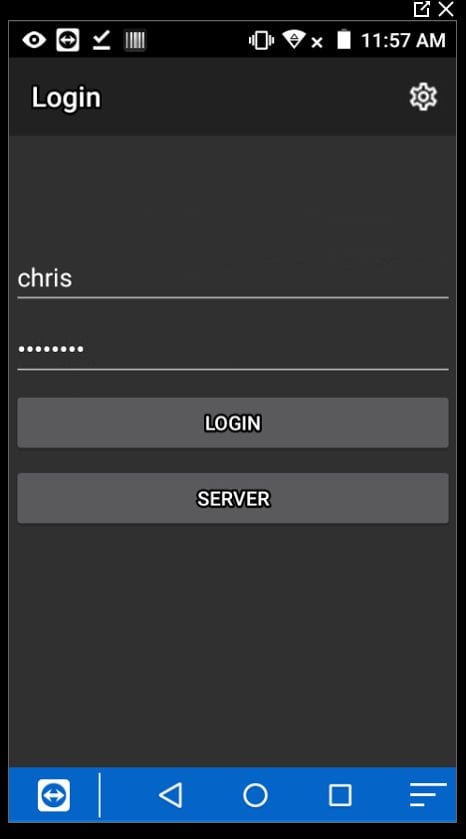
8.1. Logging in
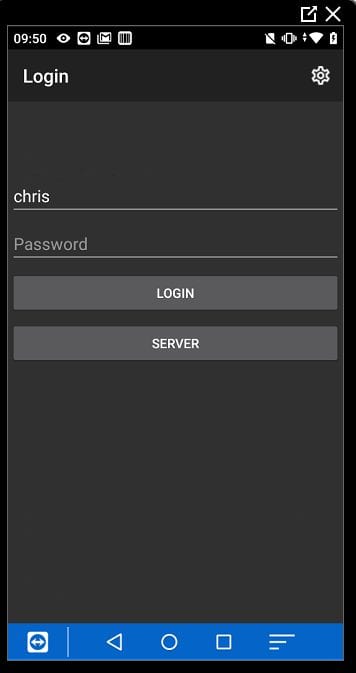
To log into the app tap on the Sicon barcoding app:
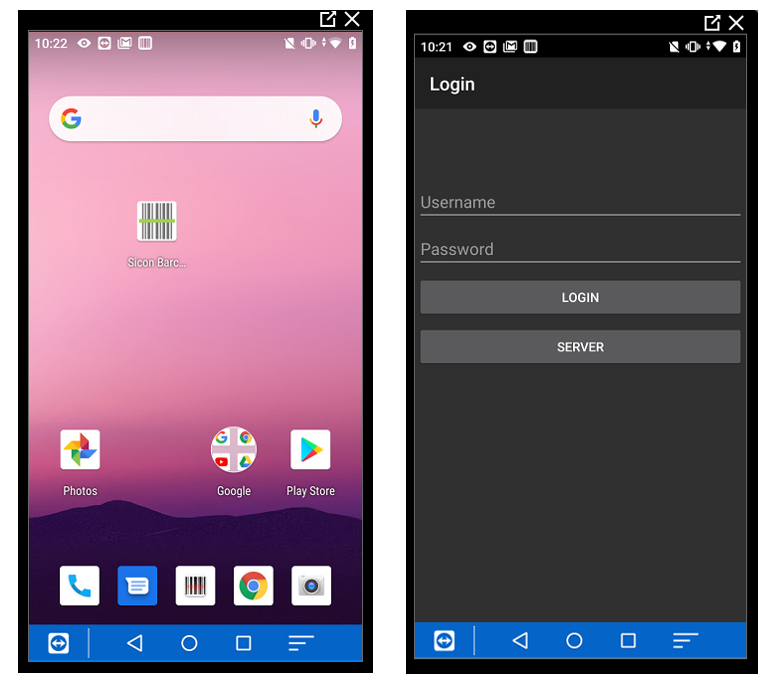
Click on the server button, then scan the QR code from Sage setting screen to populate the server details and company number (these can be manually entered for the barcoding setting page in Sage if required).
The user name and password as set up in Sage can then be entered.
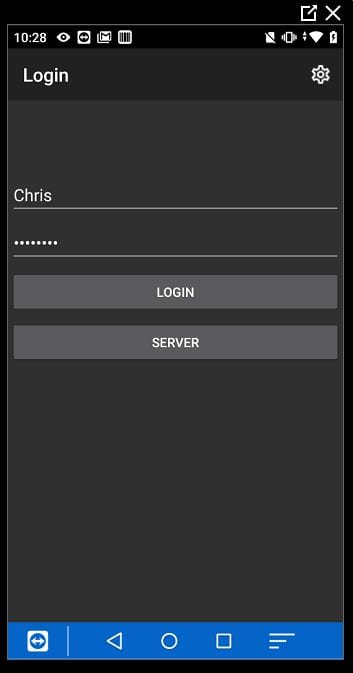
When the user has been set with a default warehouse, the user will then be logged into this warehouse.
Where the is no default warehouse set, the user will need to select the warehouse.
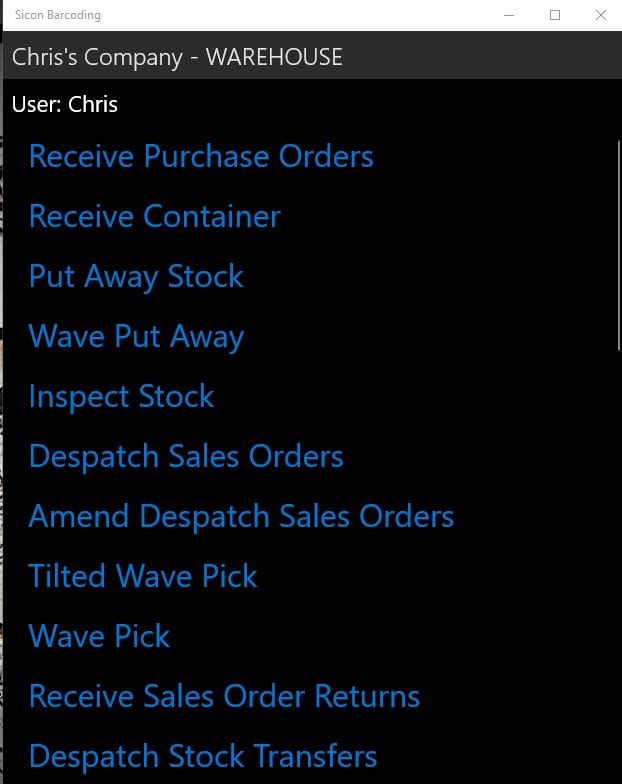
The features available in the handheld are controlled by the user permissions.
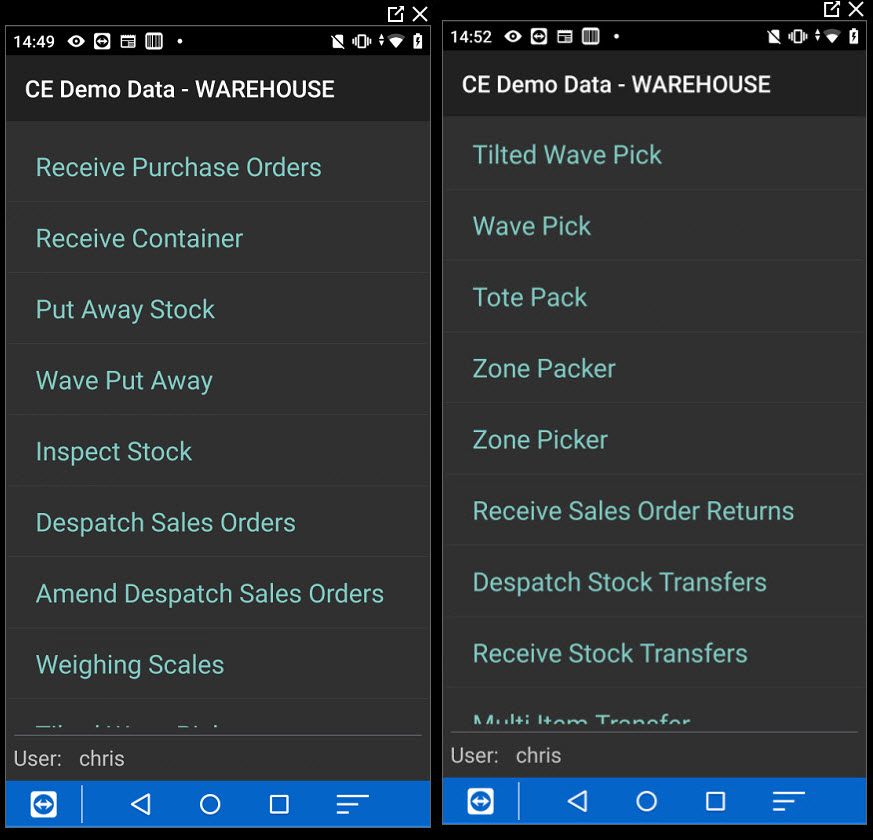
8.2. Receive Purchase Orders
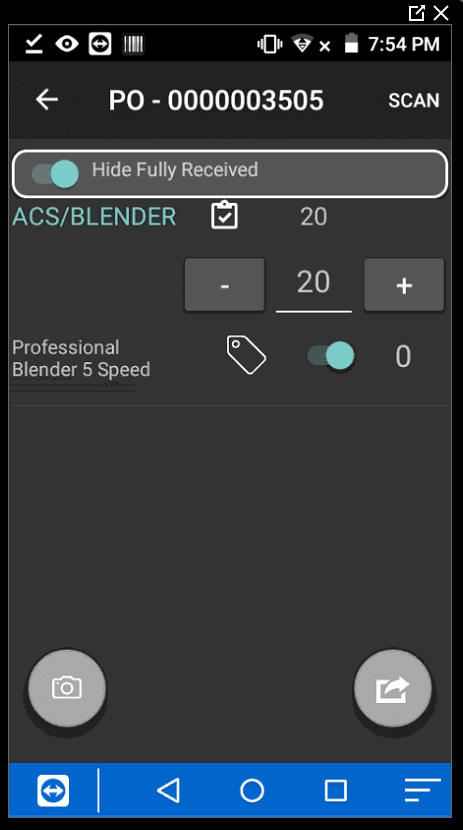
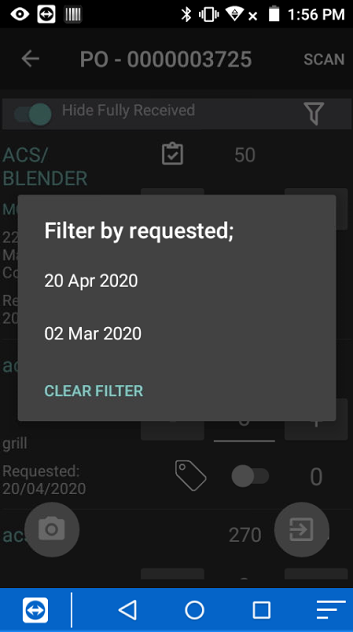
In this screen, purchase orders that are ready to receive will show. You can decide to see orders due this week or to see all orders, by clicking on the due this week/overdue. You can also see/hide fully received orders, by clicking on the hide fully received orders.
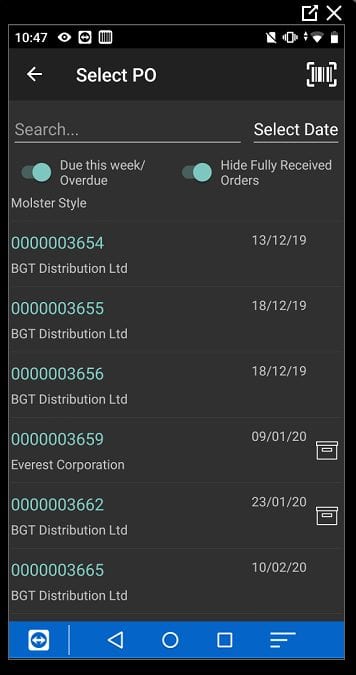
Orders can be searched for by the number, supplier details or by date.
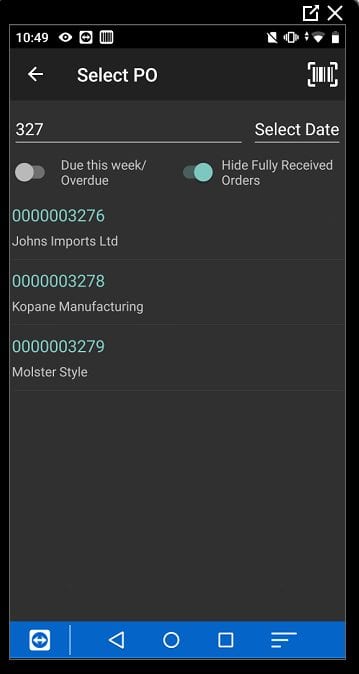
Once an order is selected, the order details then show.
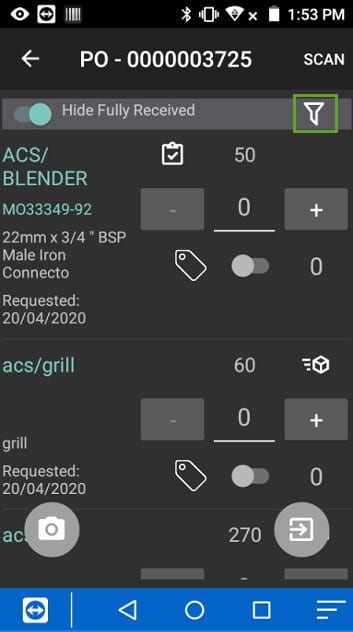
Once an order is selected, the order details then show, the stock code, the POP part reference, stock item description, and requested line date (if populated).
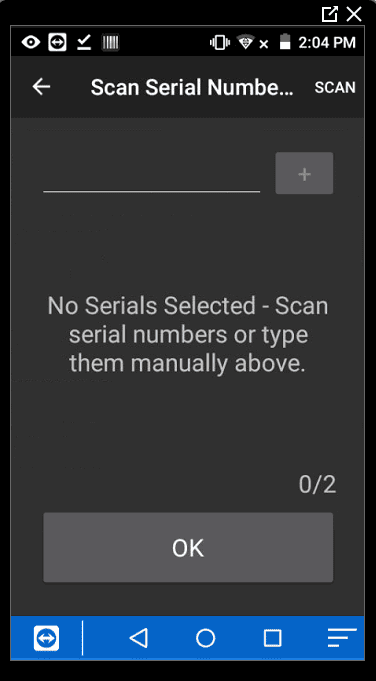
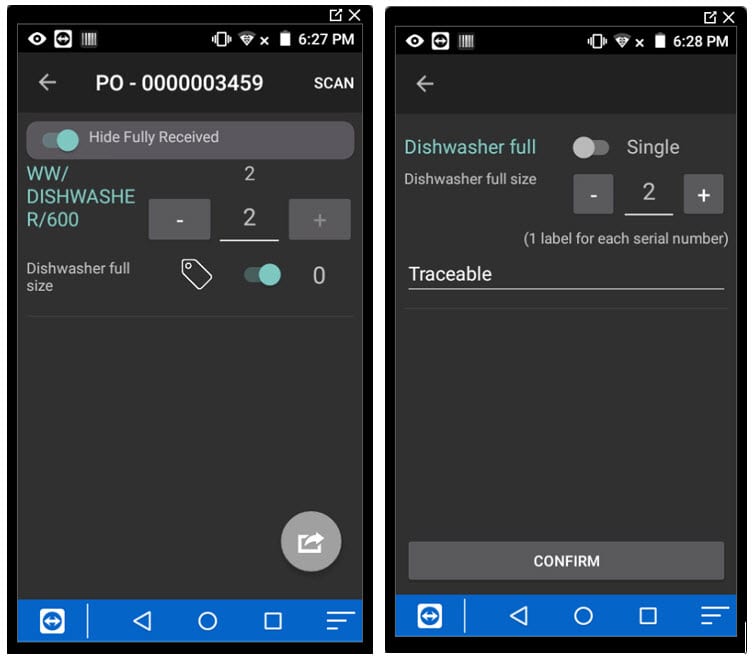
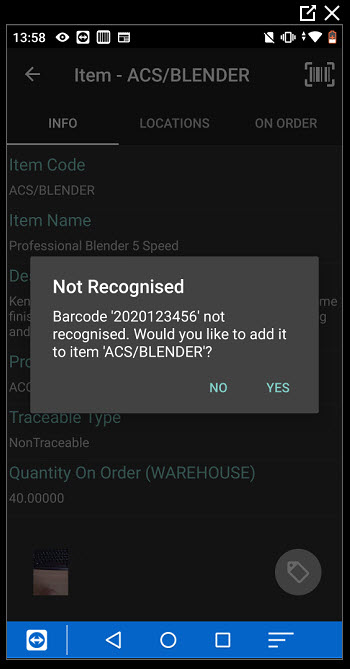
Product barcodes can be scanned to update the quantity to receive or quantities can be entered manually. Where items are traceable products the serial numbers also need to be scanned/entered.
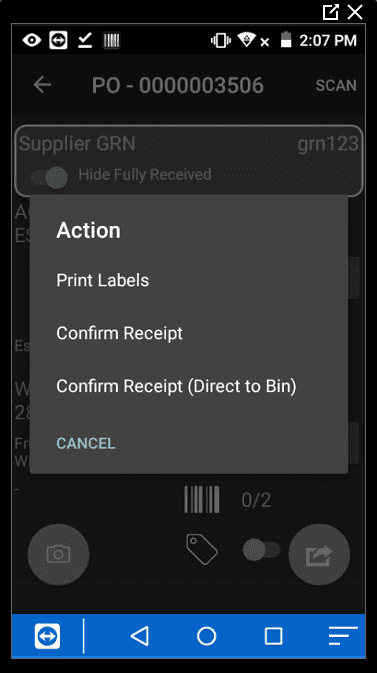
Once the items have been scanned/entered, the action button can be used to confirm the receipt, at this point a supplier GRN number is required. The stock can either be put to the putaway bin or direct to a chosen bin (assuming the PO setting to allow this has been ticked).
Where supplier barcodes are being used, if a barcode is scanned and the system does not match it, the system will prompt you to add the barcode to a supplier barcode.
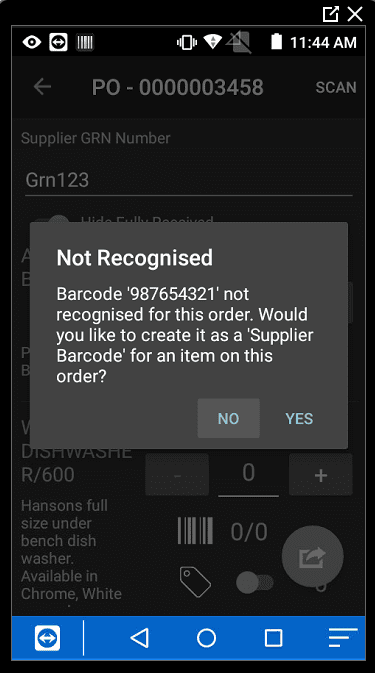
The barcode is added to stock item supplier barcode field.
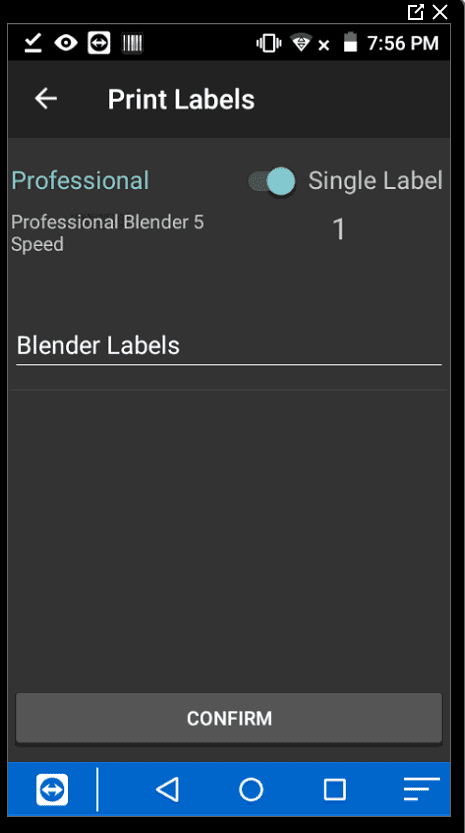
You can also print labels at this point using the action button, so that barcode can be attached to the products when own barcodes are being used.
Where stock items are set to be traceable and the system auto-generates the number. When the stock is received the labels can then be printed with the serial/batch number created by Sage.
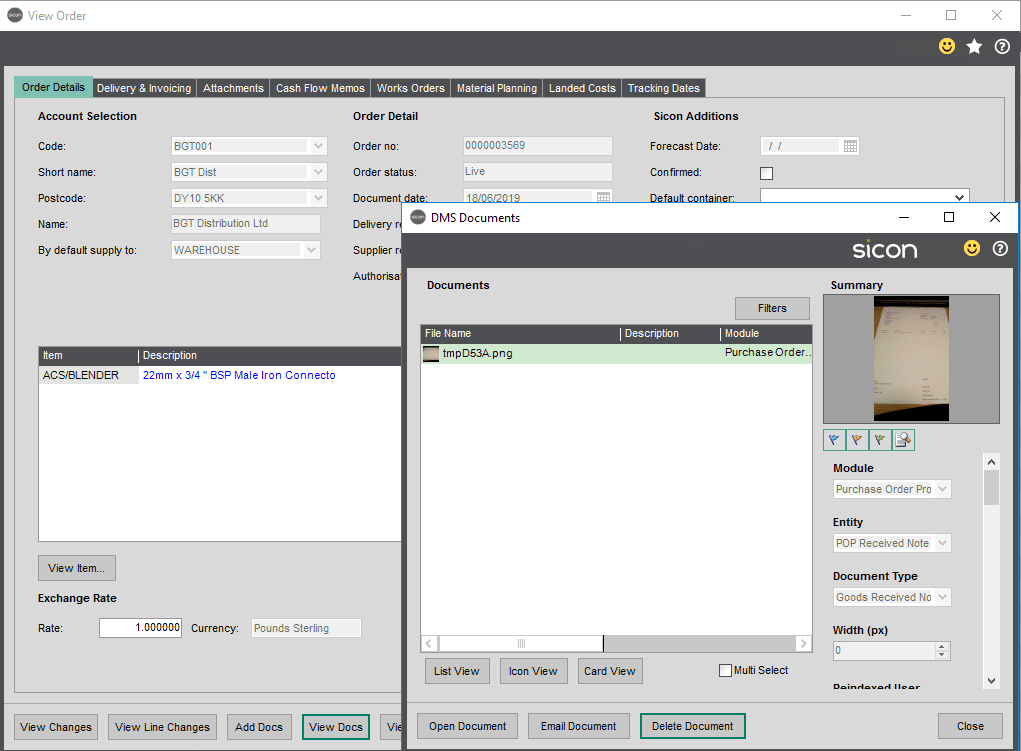
If the Sicon DMS module is installed, then the user can also take a picture using the camera icon at the goods receive stage of say the delivery note. The image is saved against the goods receipt within Sage.

8.3. Receive Container
If the Sicon Distribution module has been installed, and the setting to use container loading management has been set, the option to Receive Containers will show on the handheld.
Please note: The Purchase Order supplier must be listed on the Stock Item, Suppliers tab, in order for the item to be displayed on the handheld device.
A list of containers is displayed.

Either scan or tap on the container number required.
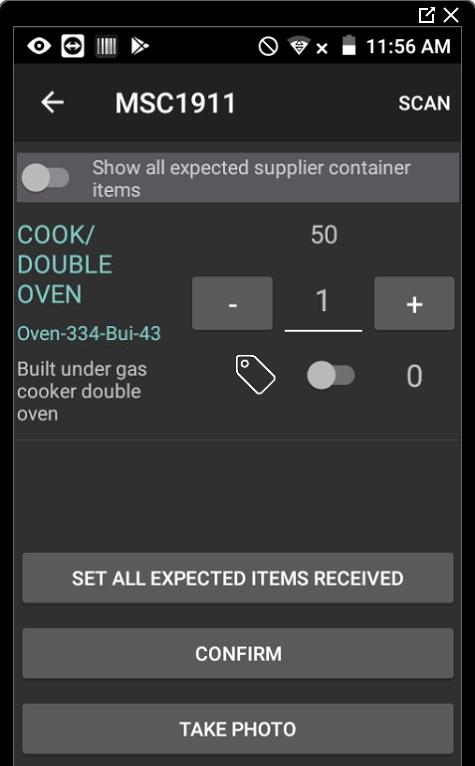
With the ‘Show all expected supplier container items’ button on, all container items for a specific Supplier will be displayed.
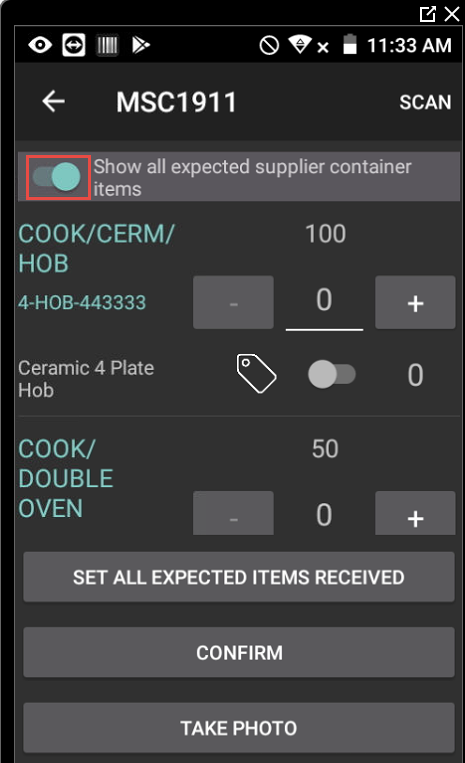
With this button disabled, each item will appear as it’s scanned .
Tapping on the ‘Set all expected items received’ will populate the receipt quantity with the Purchase Order quantity .
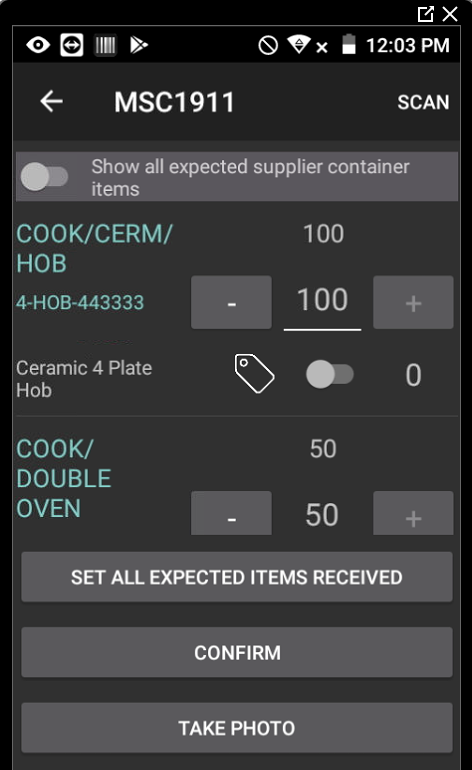
Once all quantities have been entered, tap ‘Confirm’ to continue. The booking in procedure laid out in section 3.1, can then be followed.
If ‘Take Photo’ is tapped, the device will change to camera mode and a photo of say the goods received note can be taken. If the Sicon documents module is installed, then the image will be saved to the purchase orders linked to the container. The image can be seen on the purchase order by going to view purchase order, view docs.
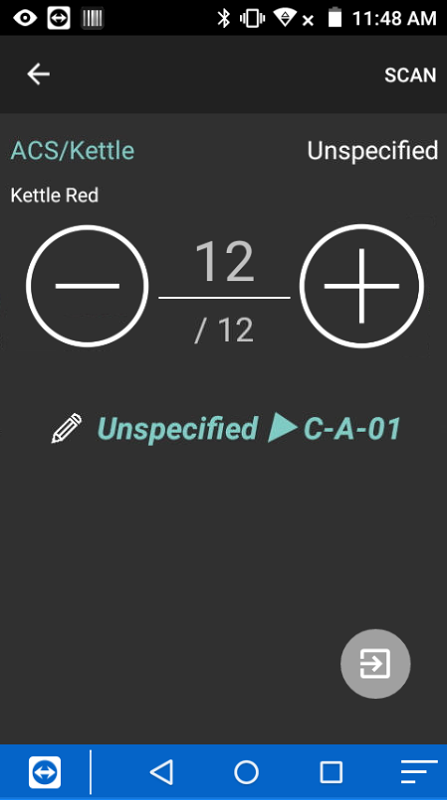
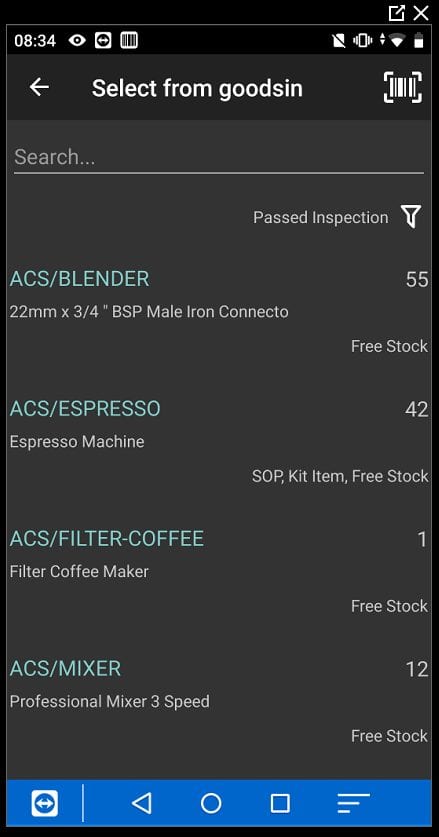
8.4. Put Away Stock
In this screen, products in the Receive POs bin (e.g. unspecified or goodsin), will show.
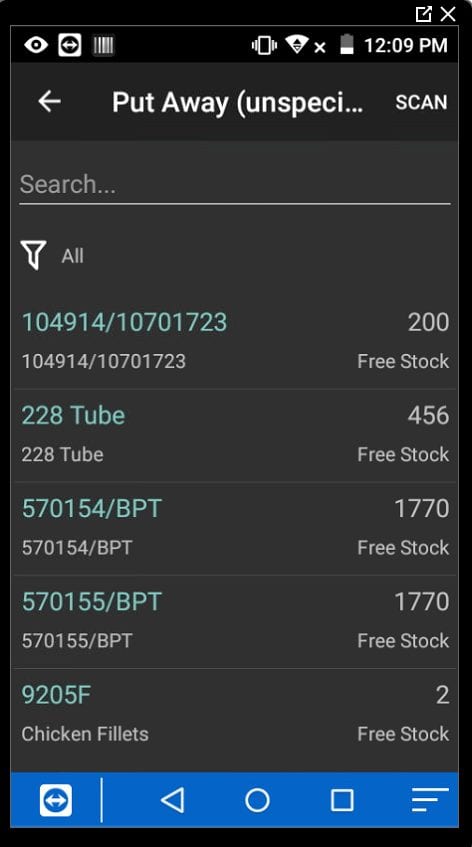
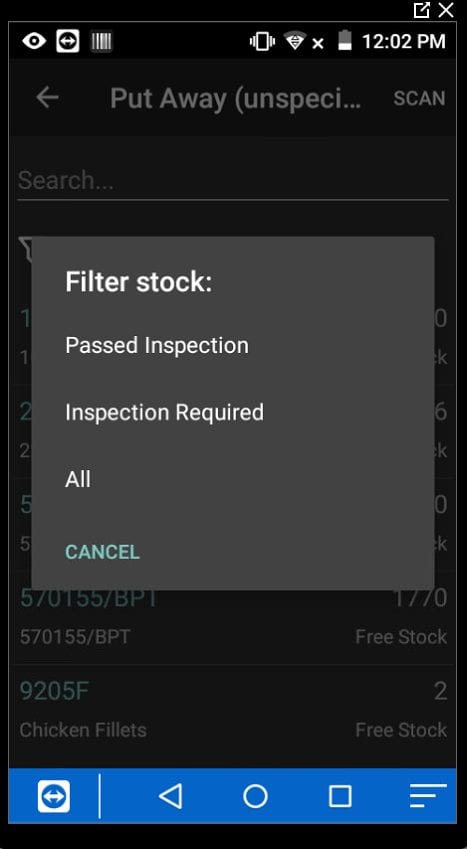
Tapping the filter icon allows you to filter the list, to see items that have passed inspection or items requiring inspection.
You can then scan the product and a bin location to move the stock to the chosen location. The quantity of items in the bin show as does the maximum set against the bin.
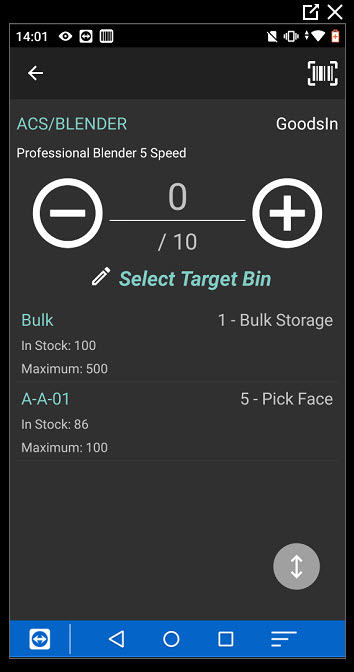
If the product is scanned only, the system will give you a choice of where to put the stock based on the bin locations priority assigned to the product.
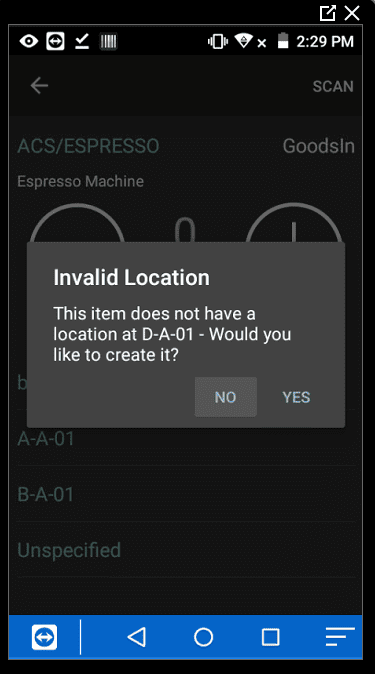
If a new bin (not assigned to the stock item) is scanned, then this can be added to the stock item and the stock moved to the new bin.
There are two options for putting items into packing units during the putaway process.
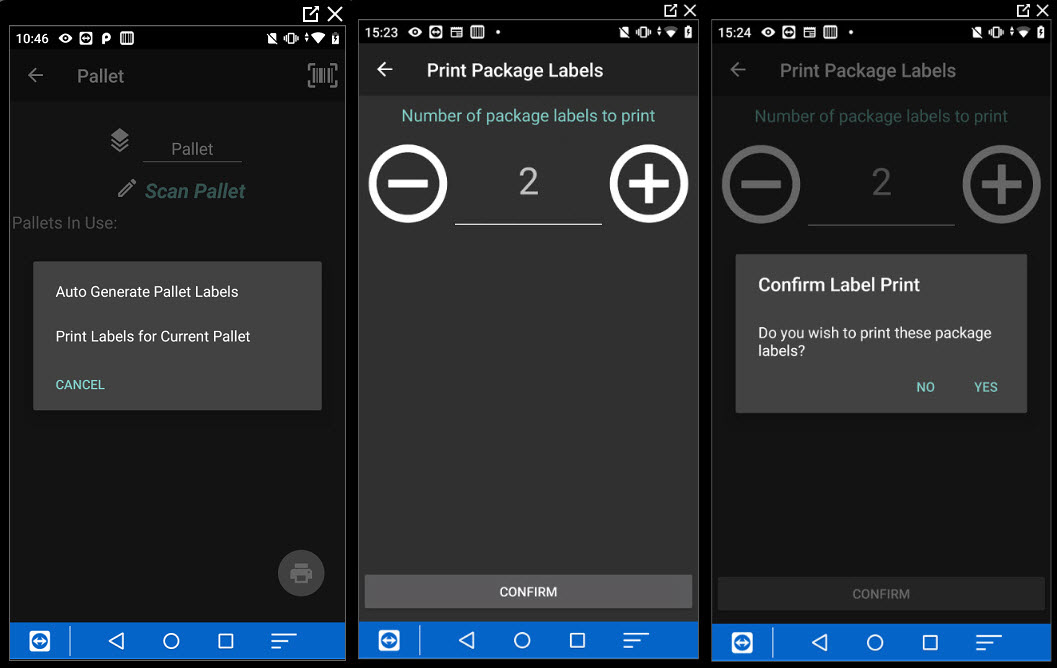
8.5. Splitting One Item Across Multiple Packaging Units
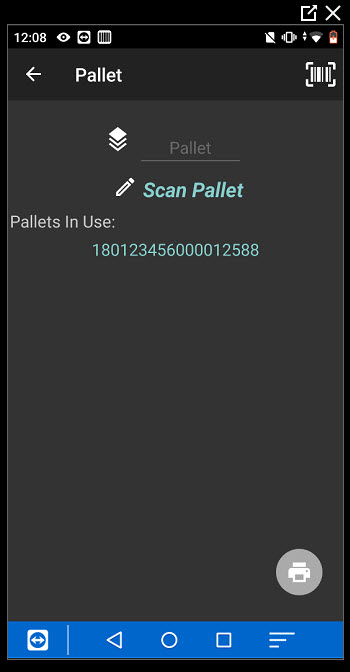
In the putaway screen, select the packing unit the item is to be put into.
Clicking on the plus icon and then select/scan a stock item.
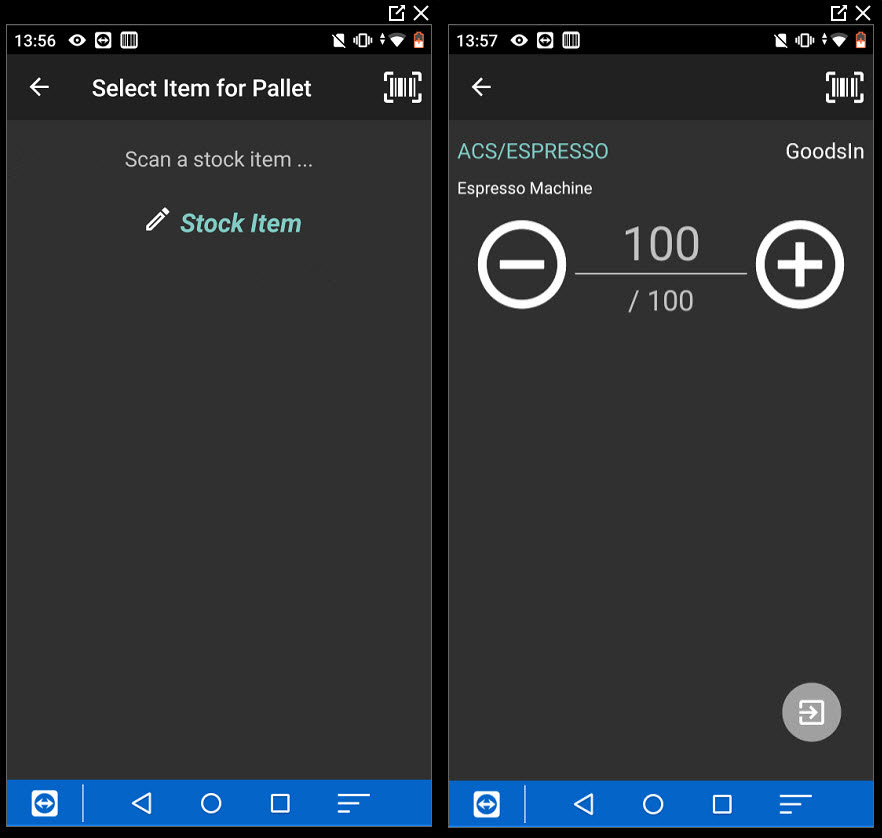
Clicking on the action button, will then split the quantity selected by the pallet qty set on the stock item.
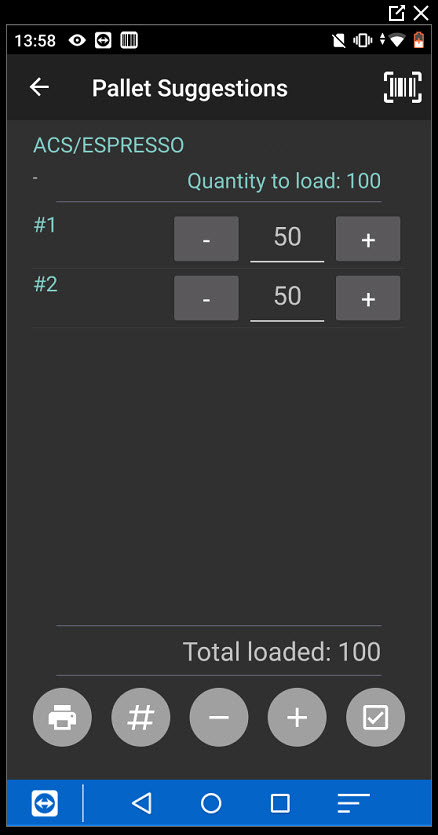
Pallet numbers can then be entered via scanning.
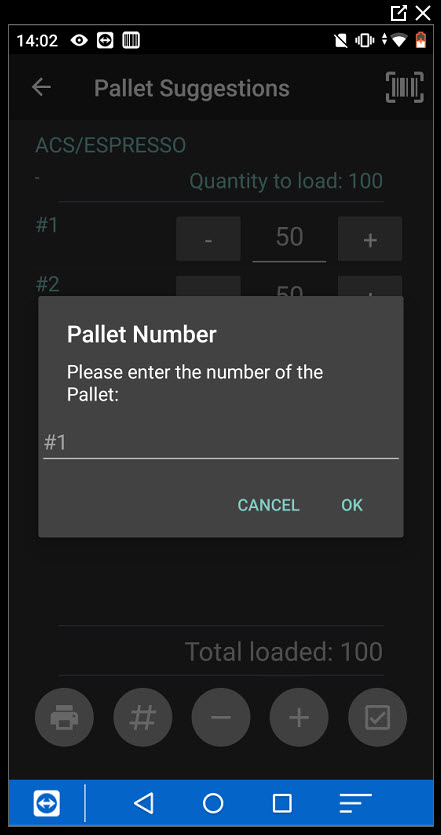
Or by auto generating
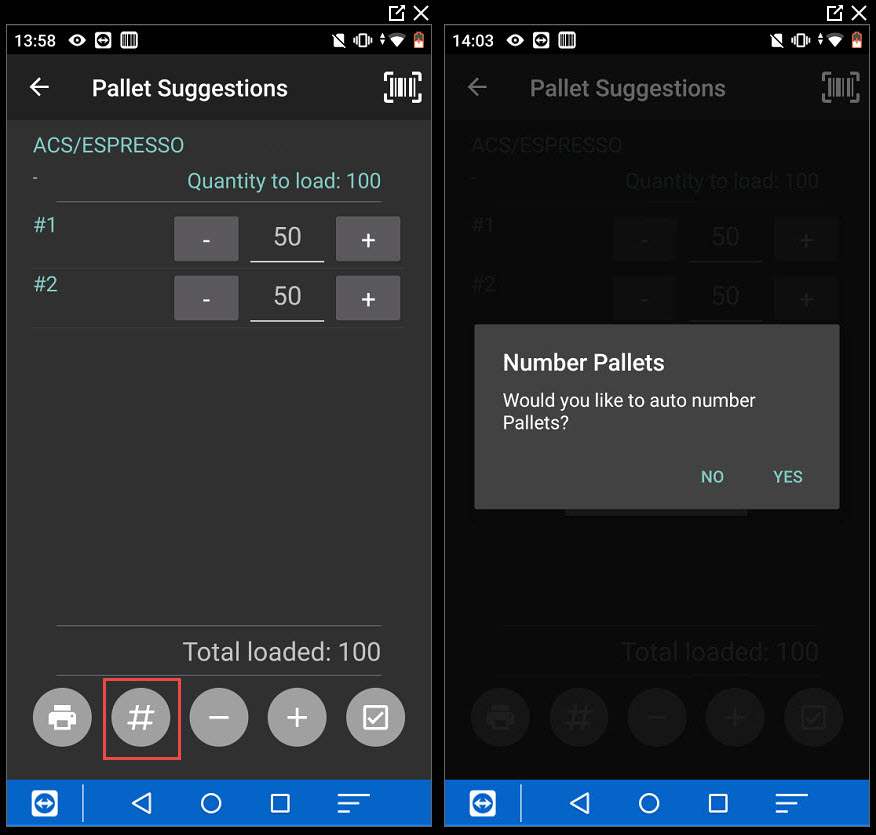
Clicking on the tick, then saves the pallets
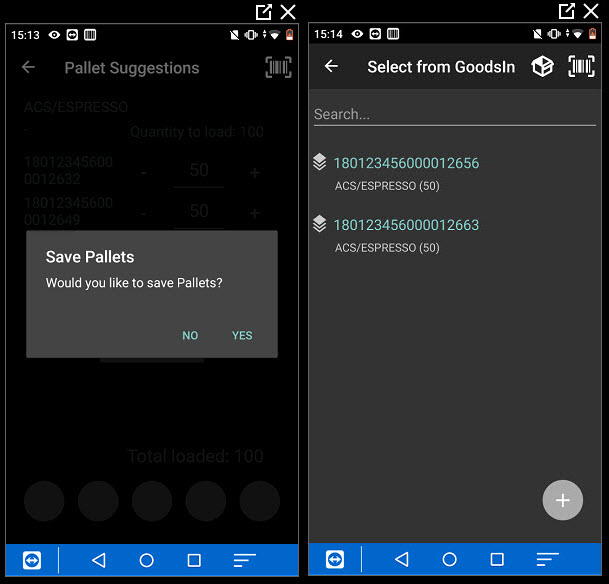
8.6. Putting Multiple Different Items onto the Same Pallet
In the putaway screen select the stock item that is to be put away
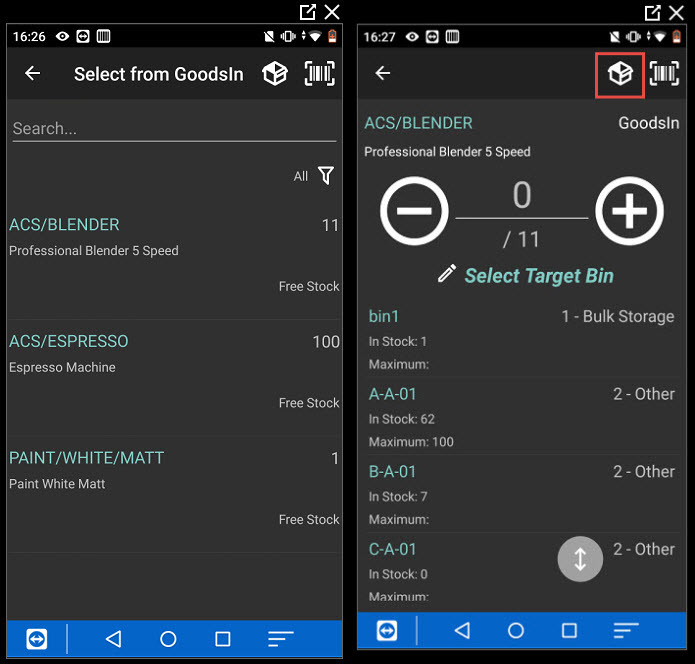
Clicking on the packaging icon enables a packaging type to be selected.
The packing number can then be scanned or entered.
The pallet can then be selected and the item quantity can then be entered to put the items into the packing unit.
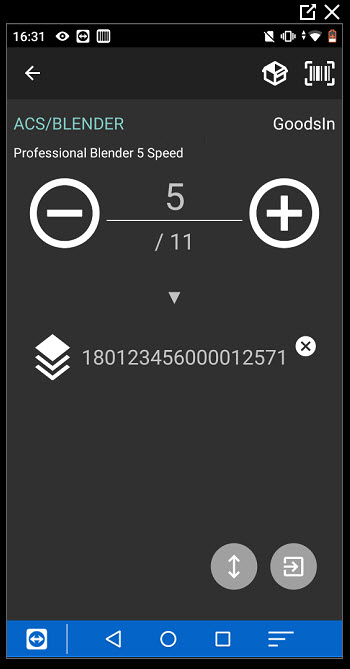
Other items can also be added to the same package.

The selected items are then recorded as being on the package unit, in this example on a pallet.
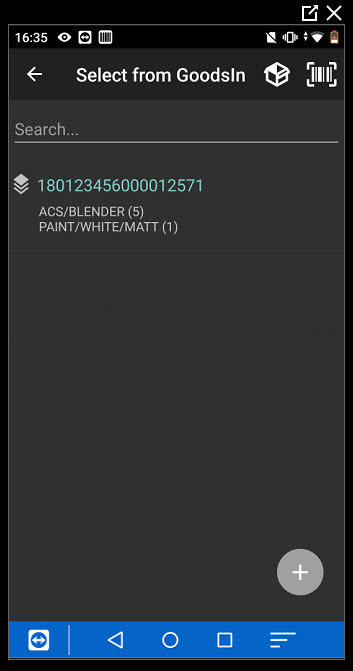
The pallet can be selected and all its contents put away together to a new bin.
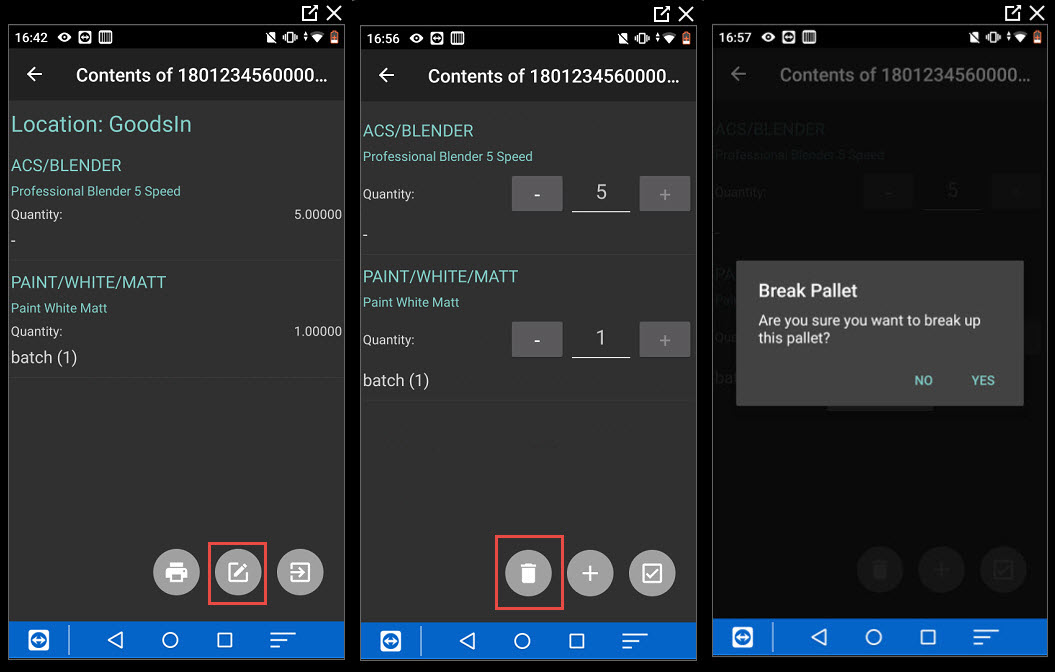
Clicking on the following icon, lets the user amend the pallets or break it up.
8.7. Wave Put Away
This allows multiple items in the Receive POs bin (e.g. unspecified or goodsin), to be combined into a Wave.
Clicking on the plus button allows items to be added into a new wave.
Scanning the item barcode takes the user to the item on the list, entering a quantity of 1.
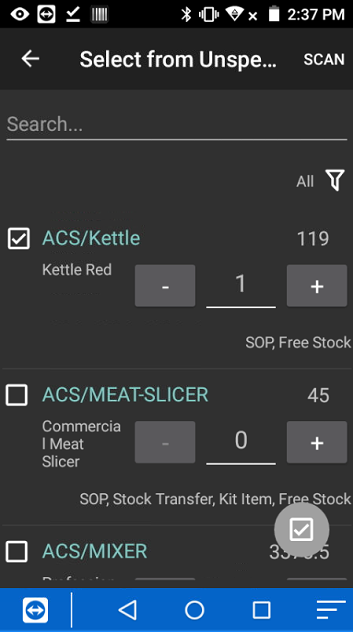
The quantity required can then be entered. This process is repeated until the user has scanned all items required. On clicking the tick button the user is asked if they wish to create a Wave. The Wave number is then system generated.
On selecting the Wave number from the list, the user can scan the item and enter the required quantity for the bin.
The bin shown is the default pick bin for the item. This can be changed by scanning an alternative bin.

8.8. Inspect Stock
This routine is used to handle stock items that are flagged as requiring inspection (against the stock item). When they are bought in on a PO, they are received into the inspection bin (specified in the barcode settings). When the stock is put away, the system will prompt the user to put the stock into an inspection bin. If there is no inspection bin for the stock item you can create one.
Once in the inspection bin, the inspect stock option is used to inspect the stock and either pass or fail the stock.

If you pass the inspection the stock is moved to the goods received bin to then be put away. If you fail the inspection, the stock is moved to the failed inspection warehouse and bin specified in the barcode settings.
On the Put Away screen the filter can be used to only show items that have passed inspection.
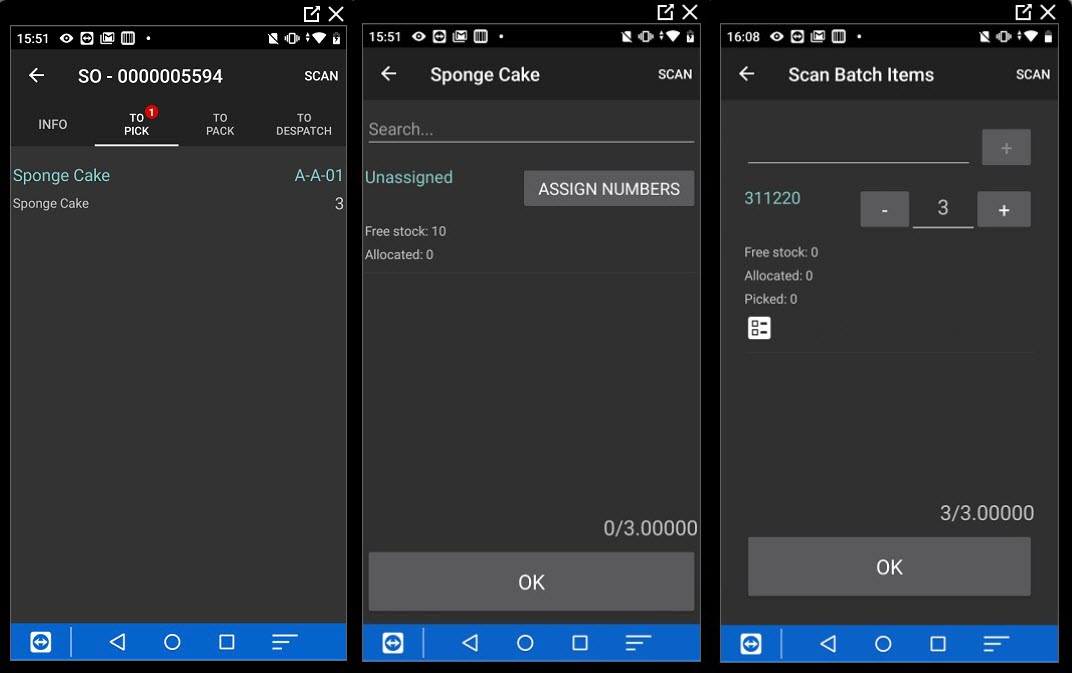
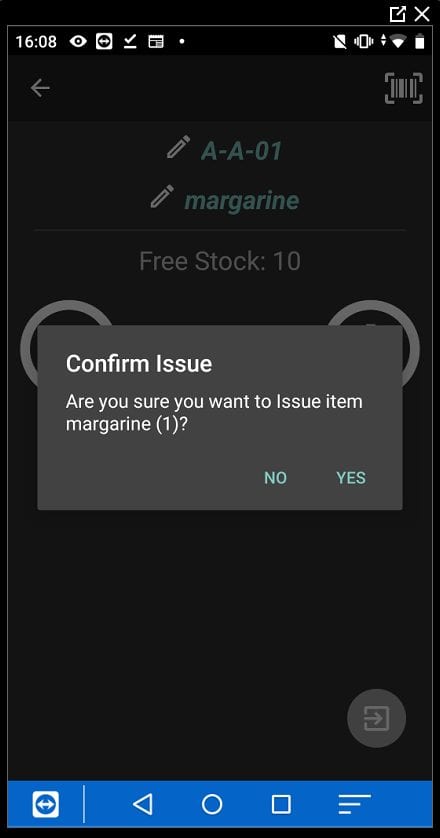
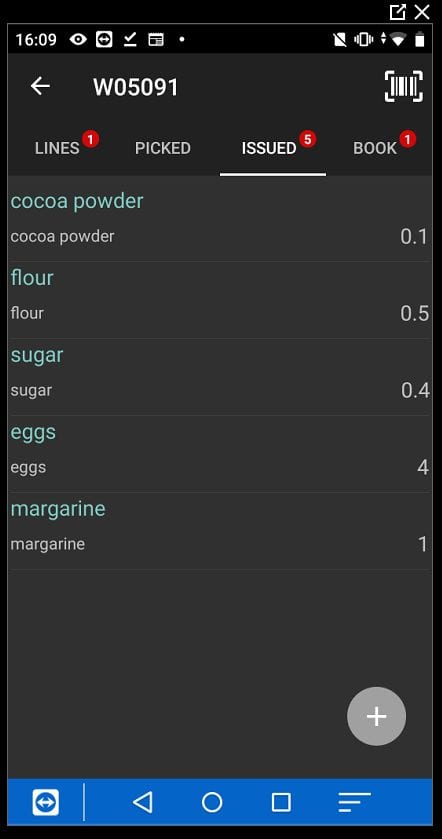
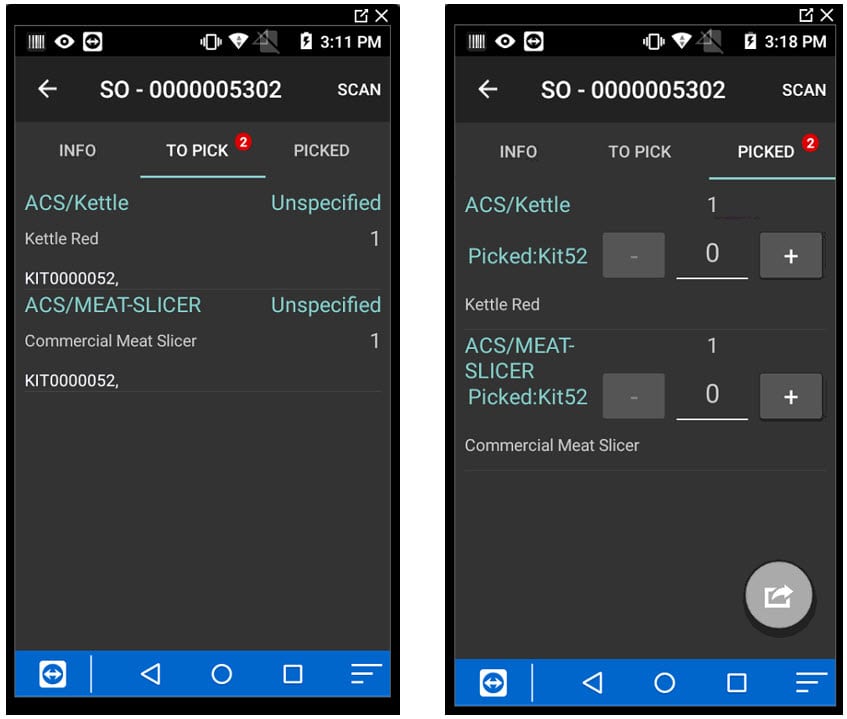
8.9. Despatch Sales Orders
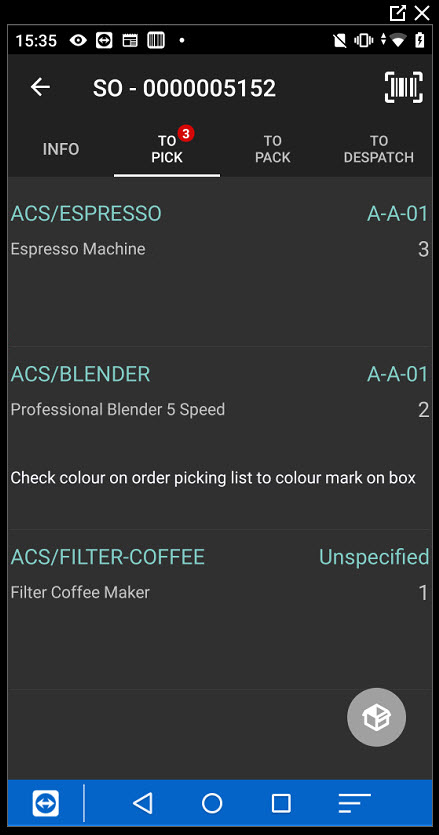
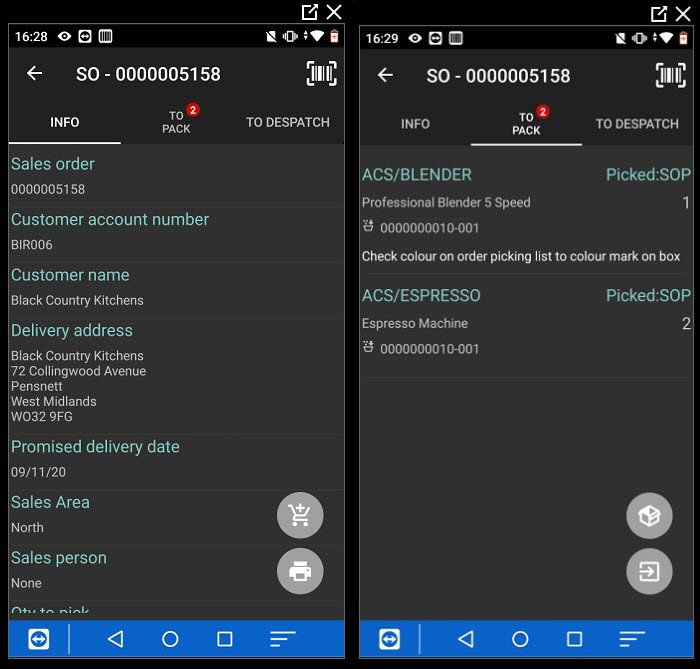
This feature allows you to pick, pack and despatch sales orders.
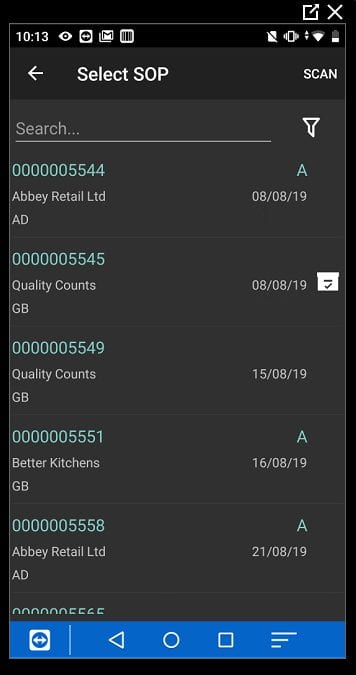
You can search for orders, by number or customer, the orders appear in date order and then order priority. The orders that appear in the handheld can also be controlled by a SOP ready to pick flag on the SOP.
This can be set manually on the sales order or can be set when the pick list is printed (see the sales order processing tab in the Sicon barcoding warehouse settings in Sage).
The order of the lines on the sales order can be set by setting the bin sequence in the maintain locations settings of the system. This can be used to control the picking sequence of the order.
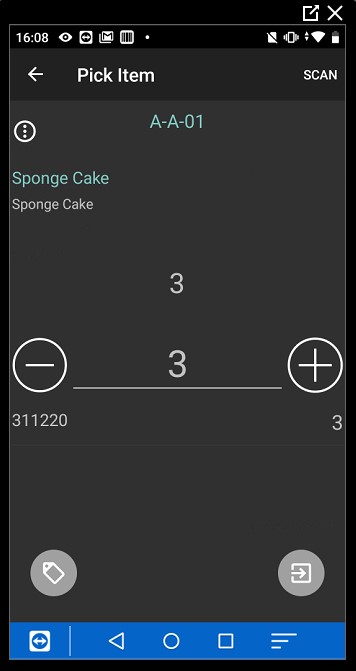
In the handheld a product is then selected or scanned (or bin scanned) the quantity to pick is confirmed.
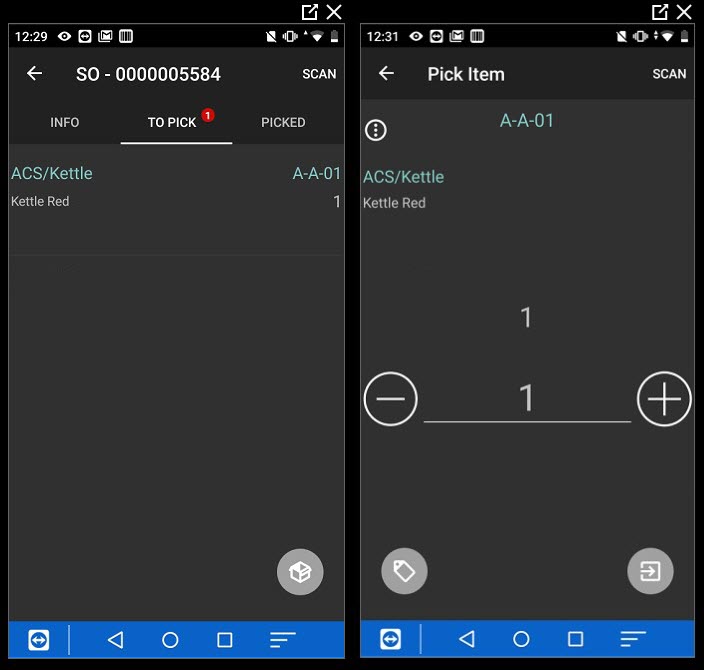
The item then moves to the picked stage.
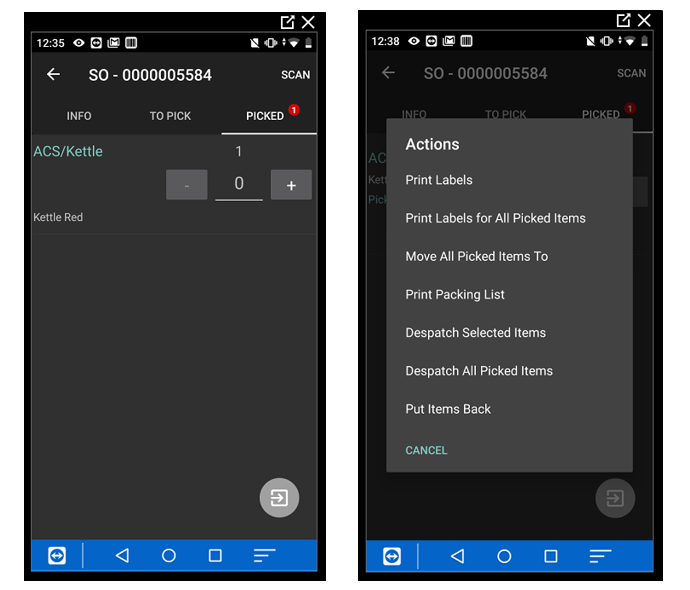
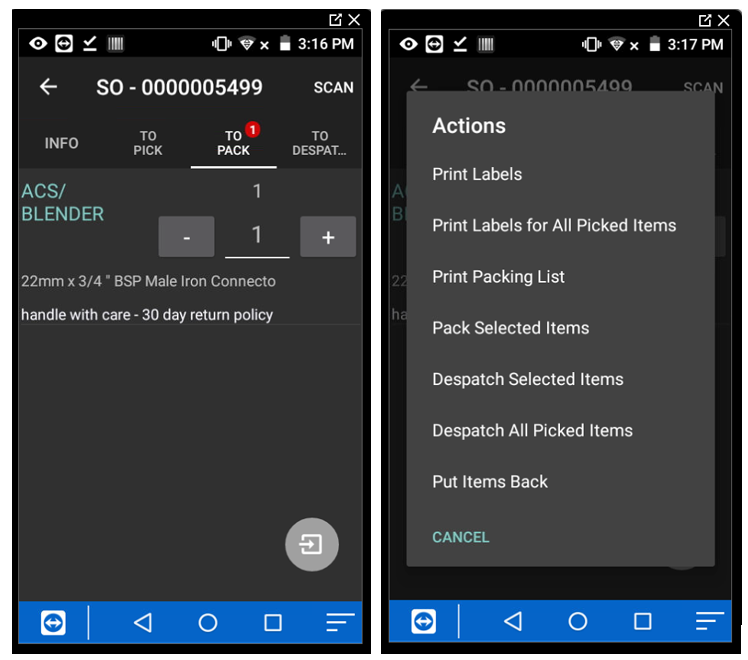
You can then have a number of actions to print despatch labels if required, this can be for the lines with quantities populated or all picked items. Or move the items to a new bin location (if the SOP enable move to setting has been turned on), print a packing list, despatching the items with quantities selected or all items, or put the items back.
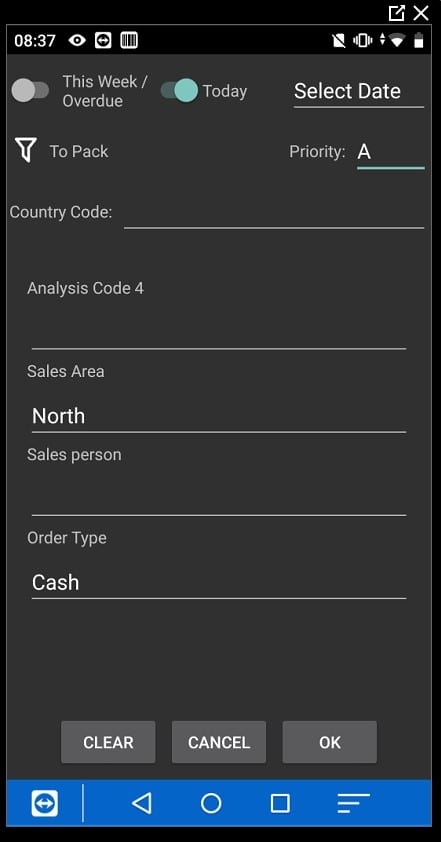
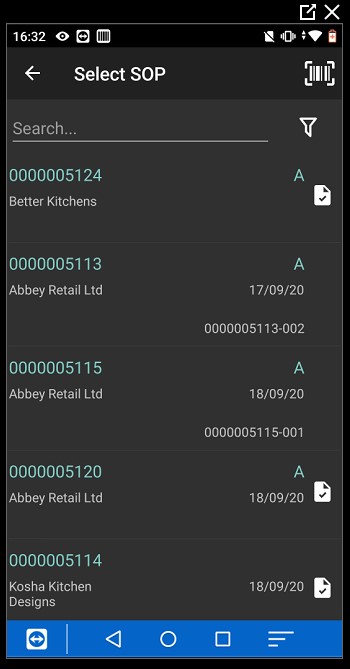
8.10. Filtering Sales Orders
The sales order list can be filtered using the filter symbol at the top right of the screen. You can then filter by whether orders need to be picked or packed or by analysis or sales order priority and by country code.
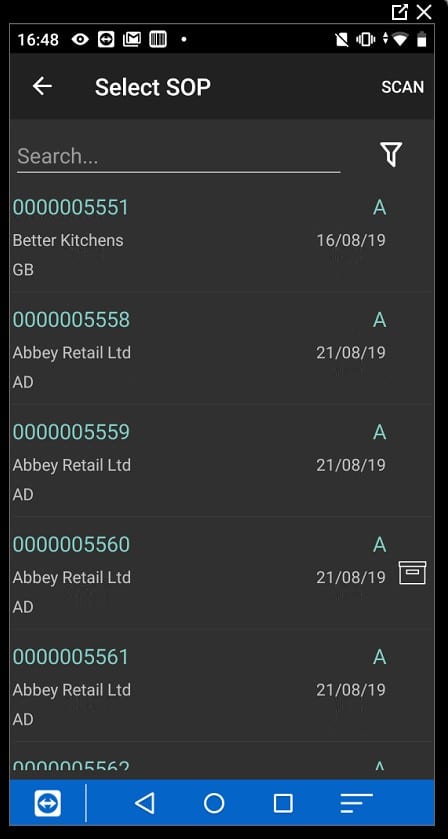
The box symbols to the right of the sales orders dictate whether the order the order has been part or fully picked. A part picked order shows the black box, a fully picked order shows a white box with a tick on it.
8.11. Printing SOP box Labels
From the SOP info screen, there is an option to print SOP box labels. This prints the SOP Box Label report to the default printer of the user/warehouse.
You can temporarily hide SOP lines in the handheld by long holding on the SOP line and selecting to hide the line.
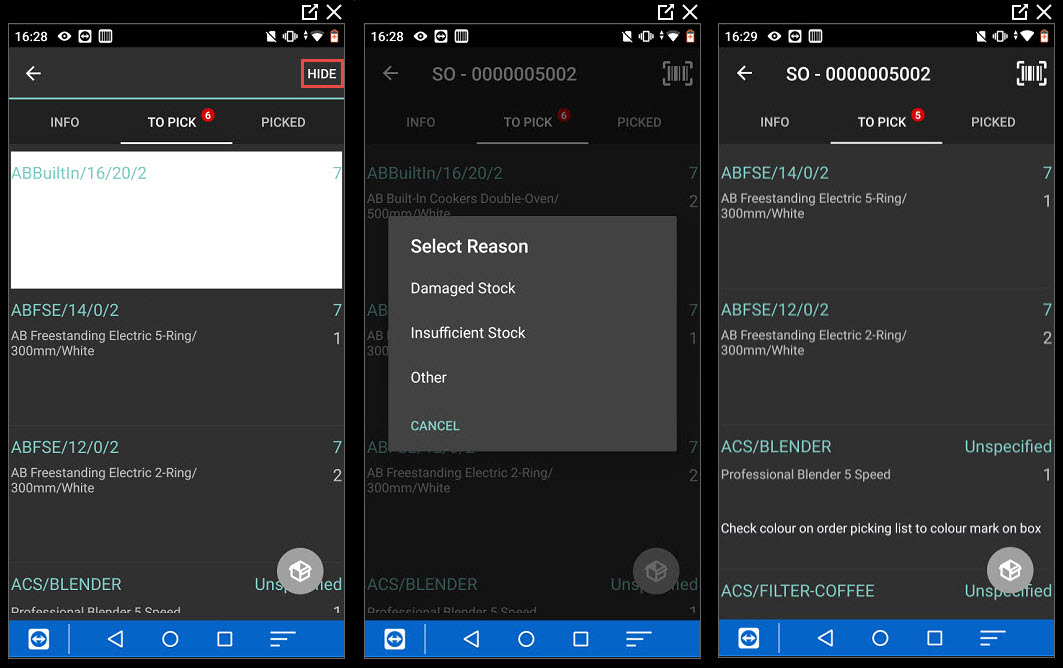
A reason can be selected, which then gets recorded in the warehouse notifications screen.
8.12. Picking into Boxes or other Packaging Items
In a sales order there is the ability to put items into packaging units e.g. boxes, pallets etc.
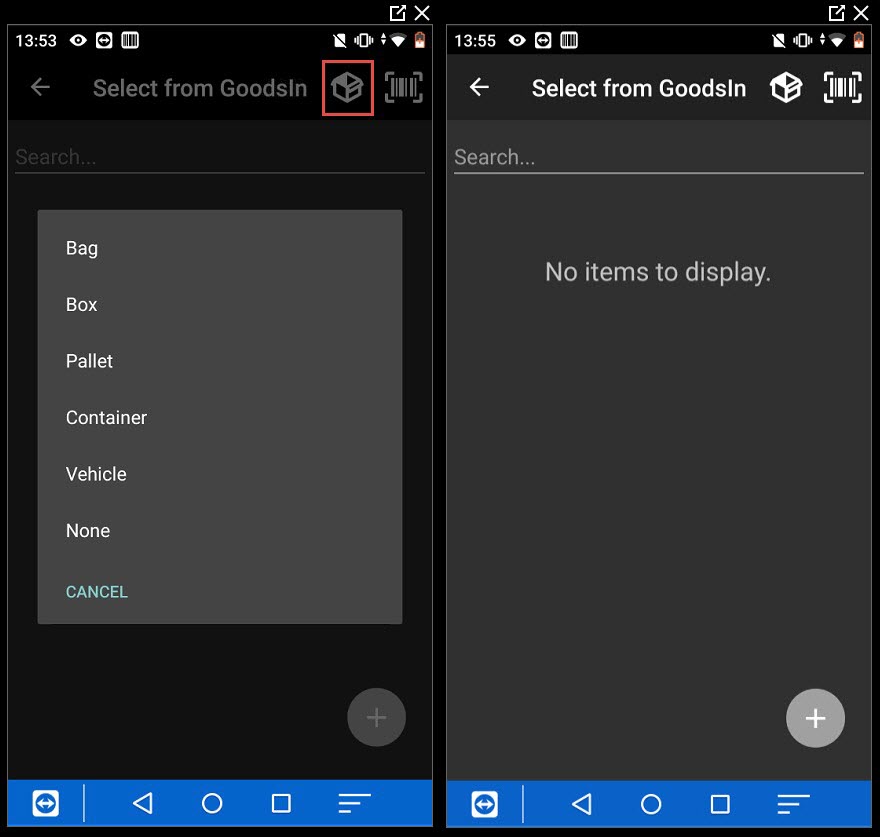
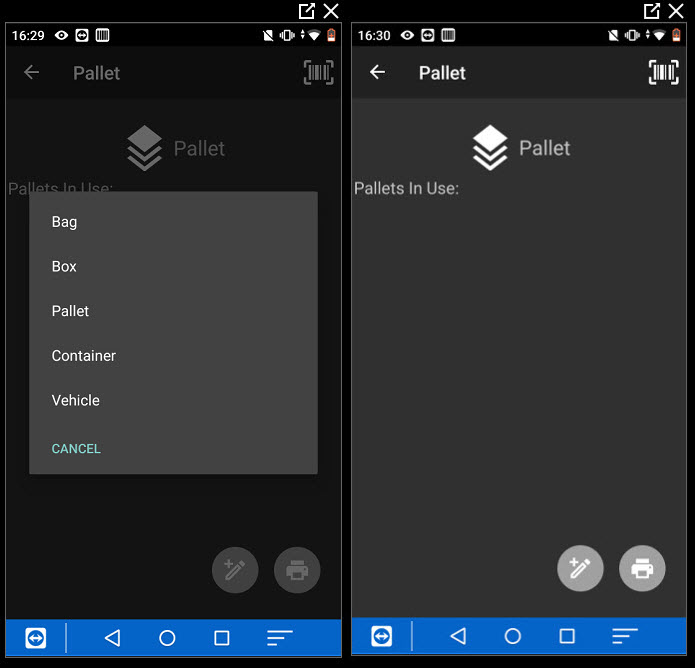
Tapping on the box symbol, then opens a screen where you can decide what type of packaging type to use: bag, box, pallets, container, vehicle or none.
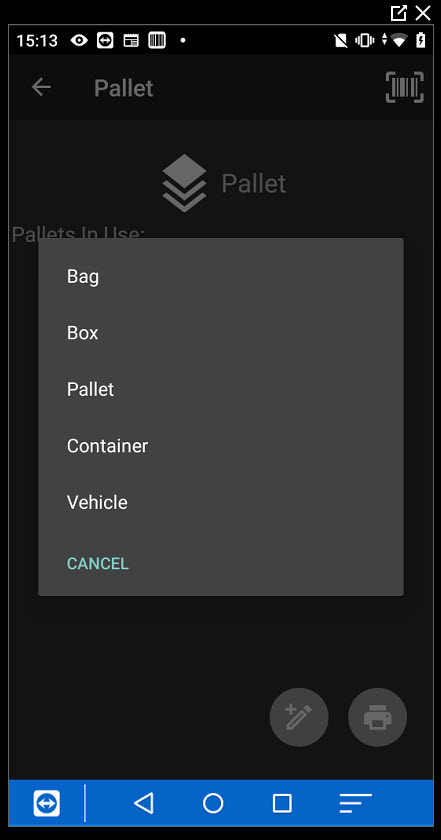
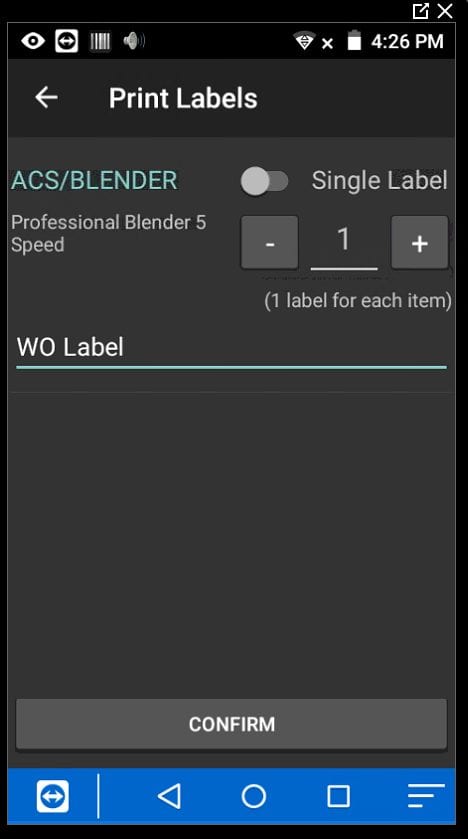
You then scan a barcode to populate the packaging number or get the system to autogenerate a number based on the label number and prefixes set in the label settings and print the label.
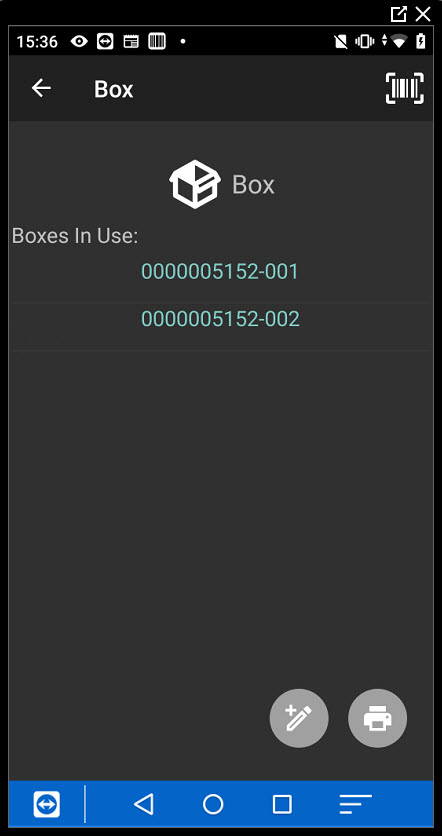
You can then pick the sales orders into this packaging unit.
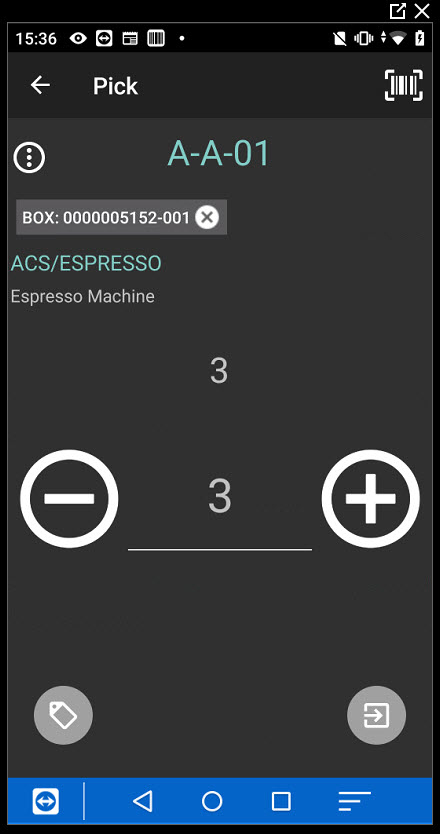
This process can be repeated for each packaging unit required e.g. the other box can be selected, until everything is picked.
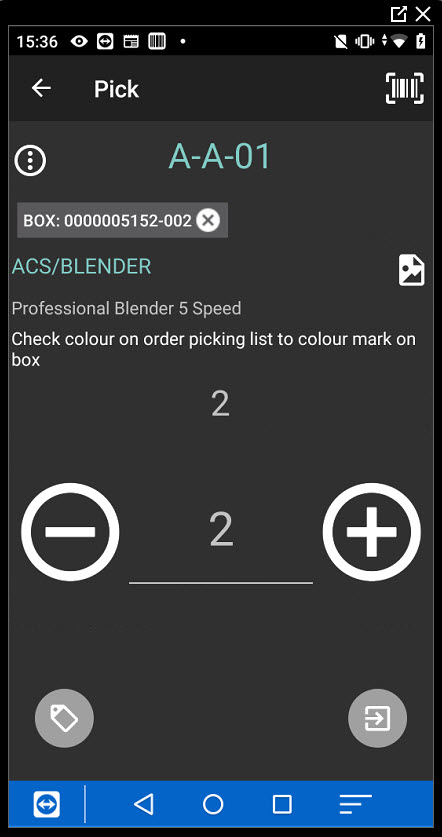
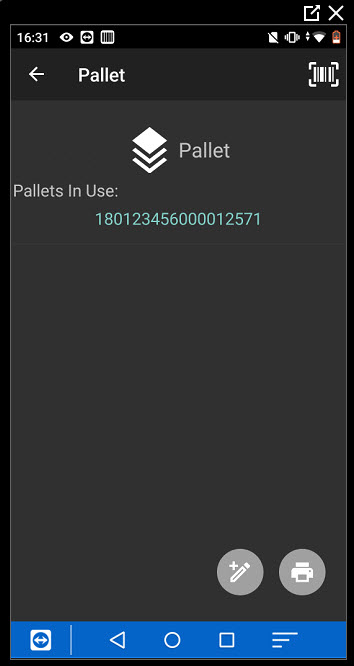
When the packing stage is enabled, an additional packaging unit can be selected e.g. the boxes can then be packed onto a pallet.
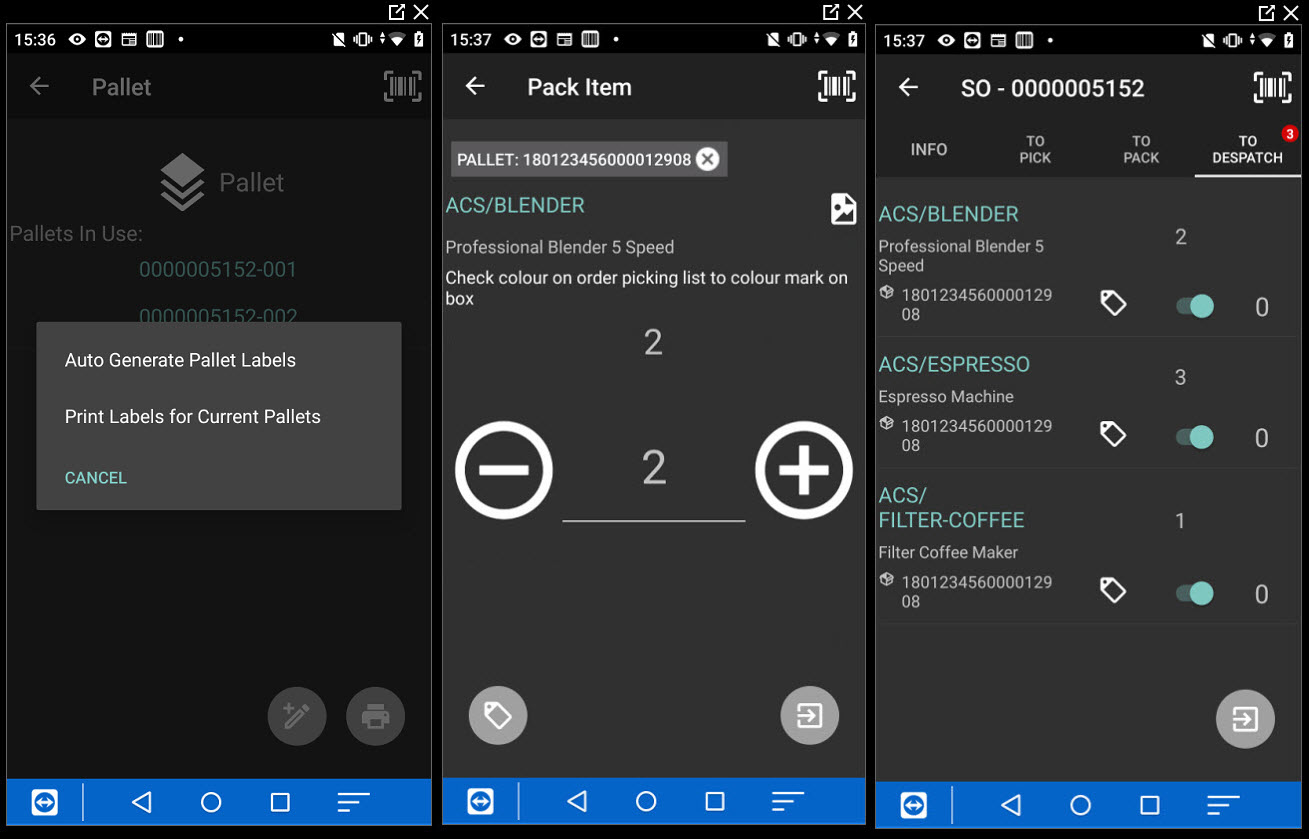
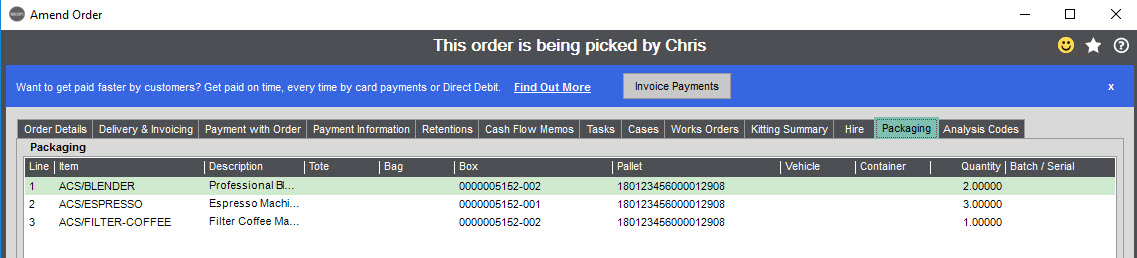
The packaging units are then linked to the sales order line and are shown in the packaging tab. Both the boxes and pallet show in the example below.
8.13. Despatching the SOP in the Handheld
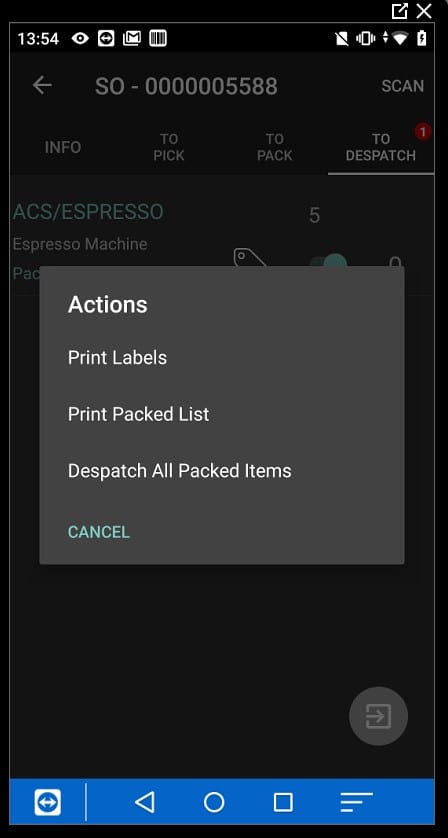
If the Barcoding Setting ‘Allow despatch of all picked items without confirming counts’ has been set, the picked items can then either have the quantities re-entered for despatch or the values can be left zero and the ‘Despatch All Picked Items’ can be selected when confirming despatch.
On completing the despatch, the screen shows the boxes used. Tapping on the line will allow the packaging dimensions and weights to be entered, if required.
The items can then be despatched.
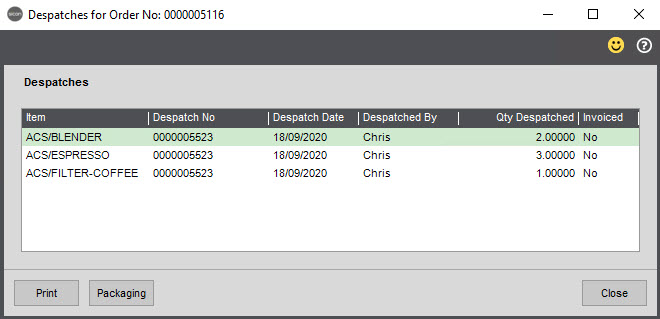
The packaging dimensions and weights can found in View Order, and selecting Despatches.
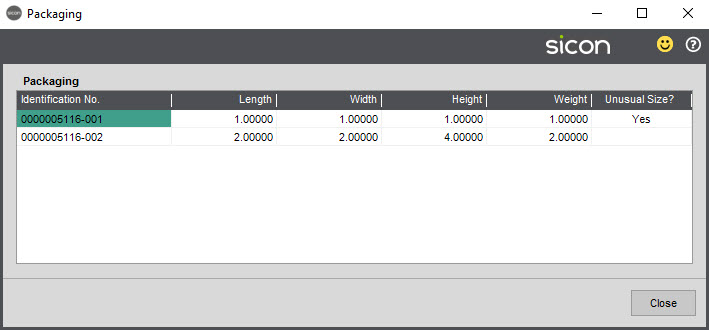
On selecting Packaging, the details entered at Despatch will be displayed.
8.14. Assigned batches/serials during SOP processing
Batch/serial stock items that are not set to record batch and serial numbers when the goods are received, can have their numbers assigned during SOP picking.
The Sage setting to select serials at despatch needs to be set and the barcoding stock control setting to show a list of serials also needs to be set.
8.15. Adding Sales Order lines from the Handheld
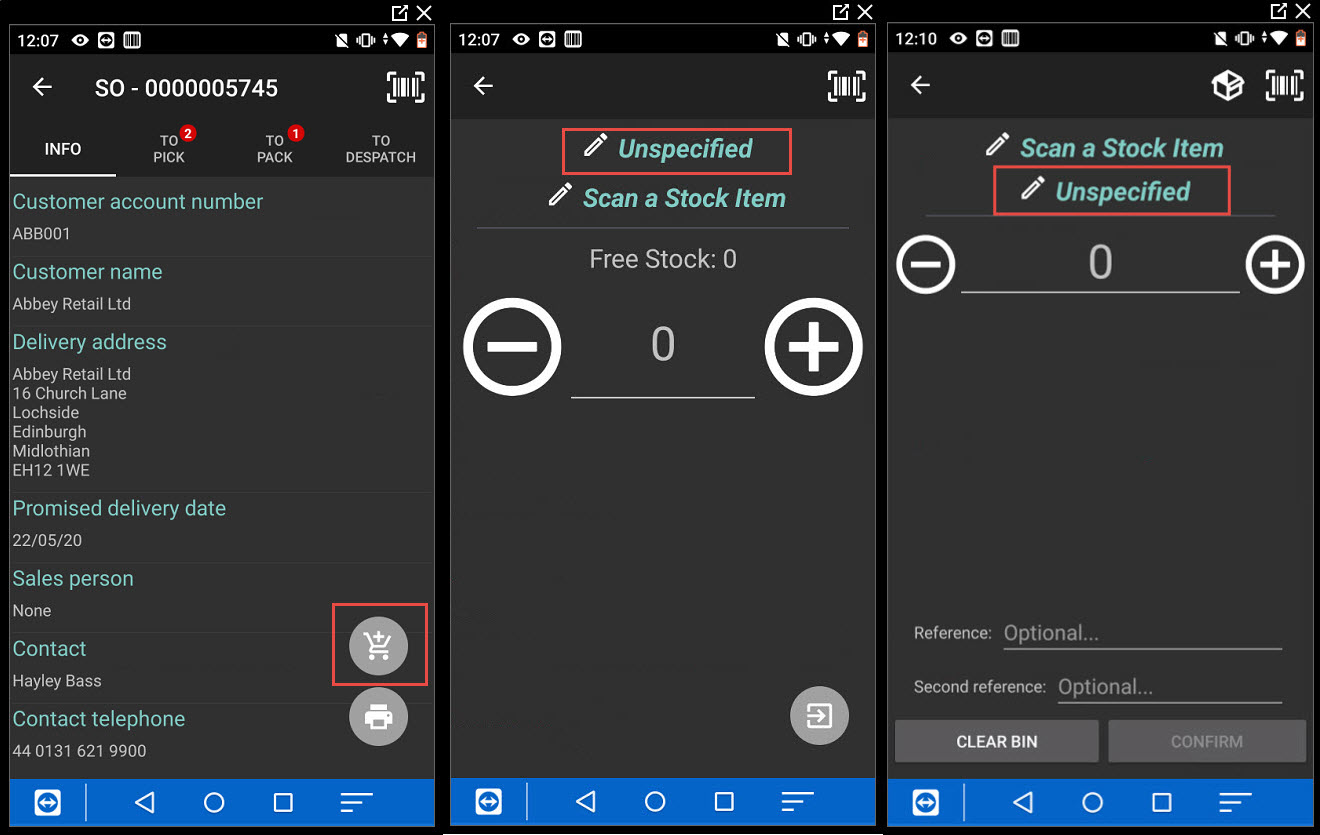
With the user setting enabled allow add sales order item/line, on the information tab of the sales order an add to trolley button appears.
Clicking on this icon, then opens the following screen, where bins and stock items can be scanned or selected and added to the sales order.
The item is added to the sales order and picked
8.16. Action button on SOP Pick screen
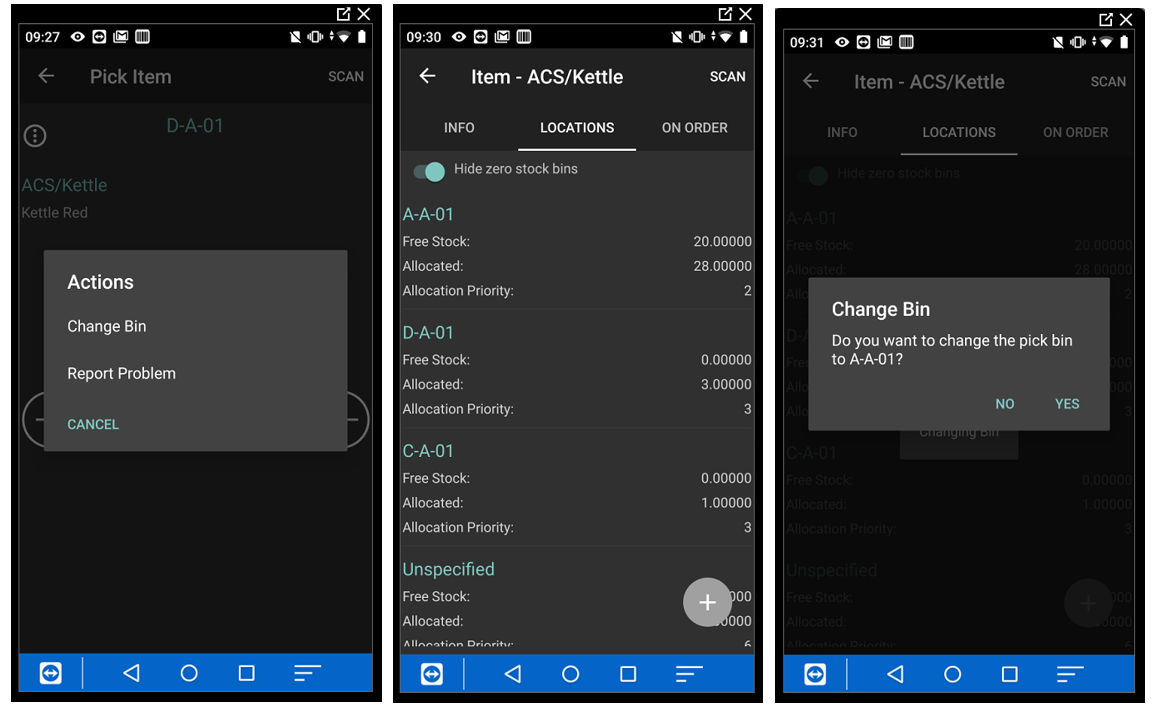
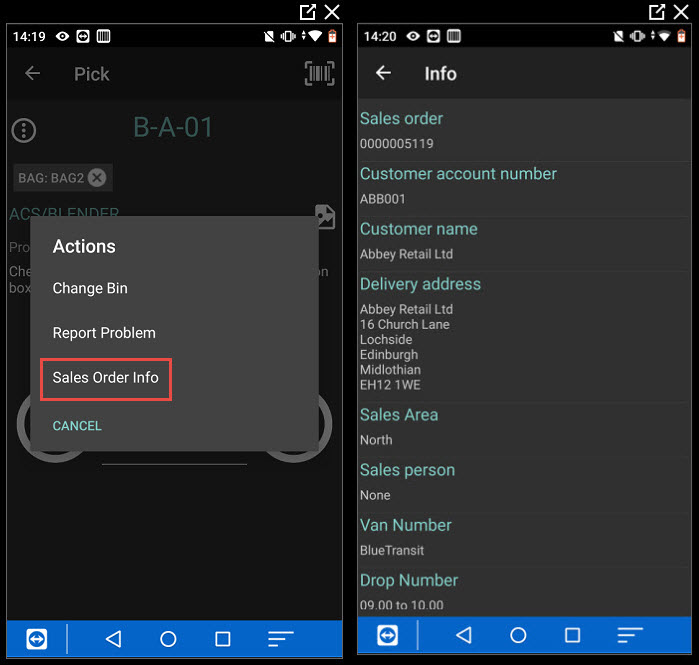
When picking a SOP if there is a problem with the bin barcode it can be recorded into the warehouse notifications. When picking from this bin the system will then show the hazard symbol to state there is a problem with the bin barcode.
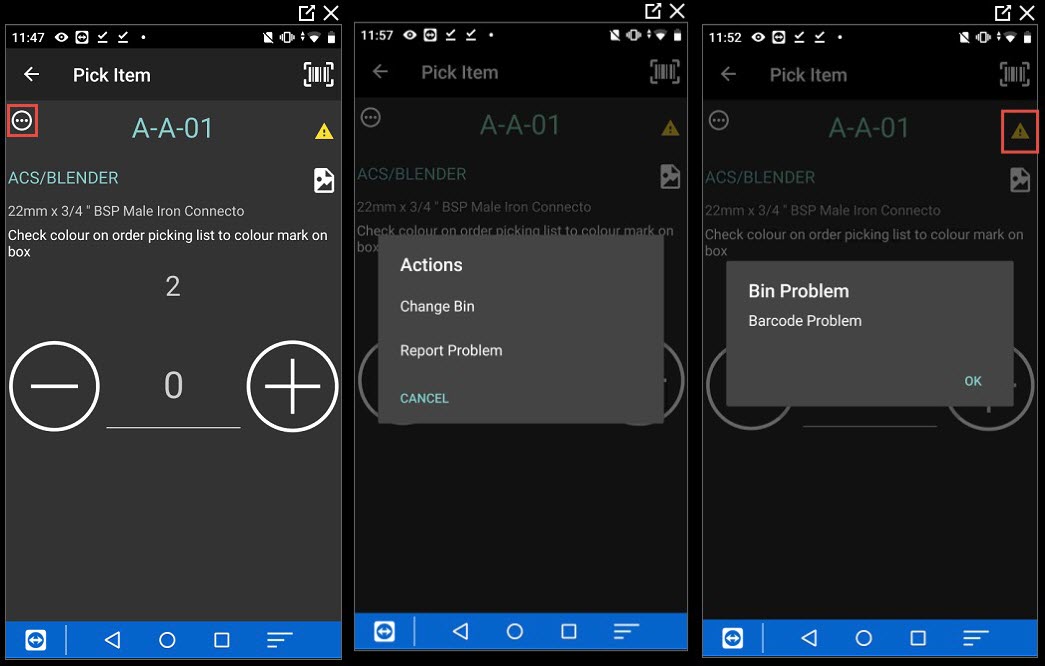
Selecting change bin in the actions allows stock to be picked from another bin.
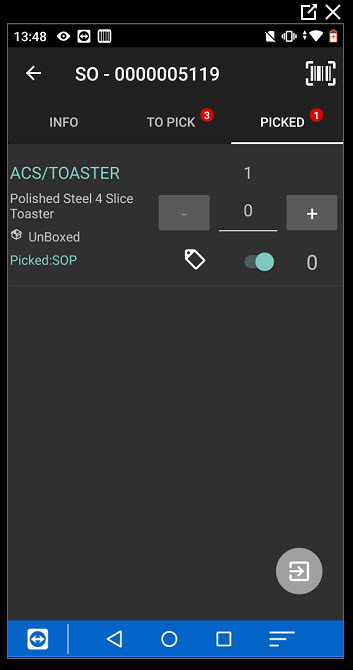
The action to show sales order info, shows the sales information for the order.
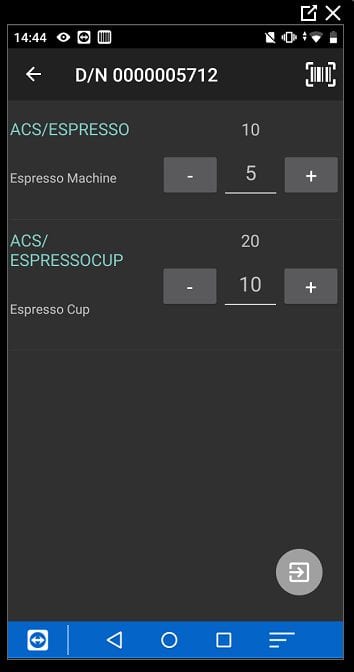
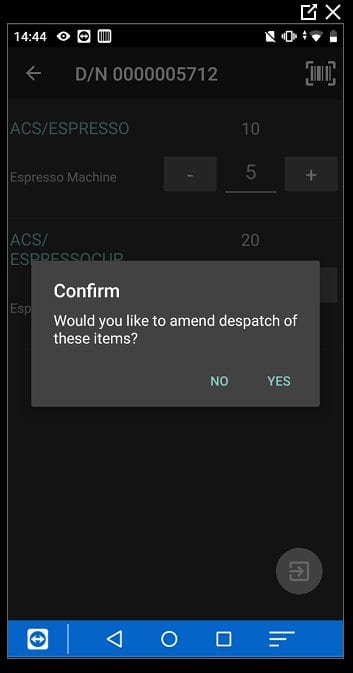
8.17. Amend Despatch Sales Order
A list of despatched notes and the corresponding sales order can be seen in this screen.
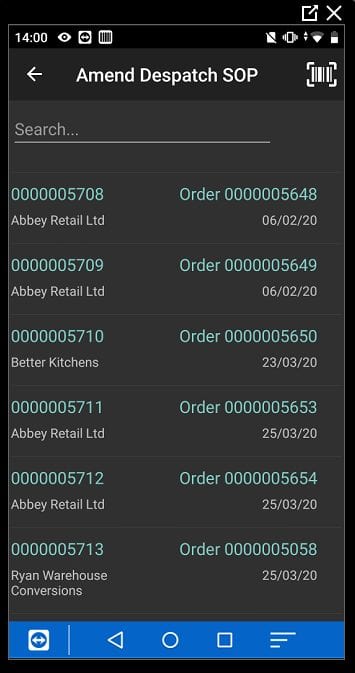
Once a delivery is selected the quantities can then be amended, which then updates the despatched quantities in Sage. The amended lines are returned to the goods in bin and the lines remained allocated on the sales orders.
8.18. Weighing Scales
Integration with weighing scales can be configured. To achieve this an android device with a USB import linked to an Adam weigh scales need to be set up. The Sicon barcoding app can then be installed on the device.
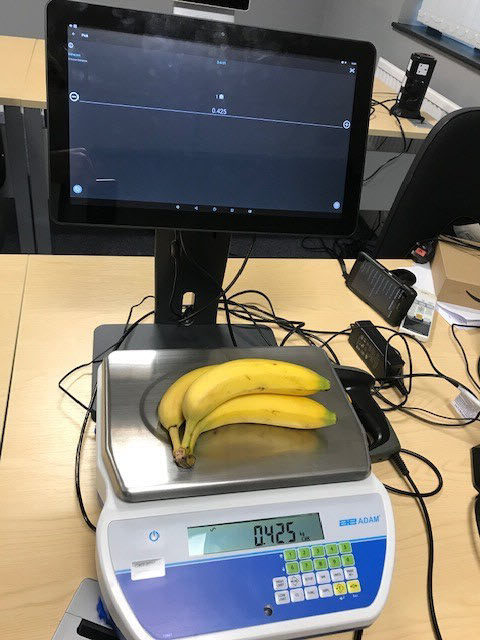
Sales orders for catch weighted stock items, can then be processed on the terminal. During sales order entry the sales order description can be amended to assist with picking
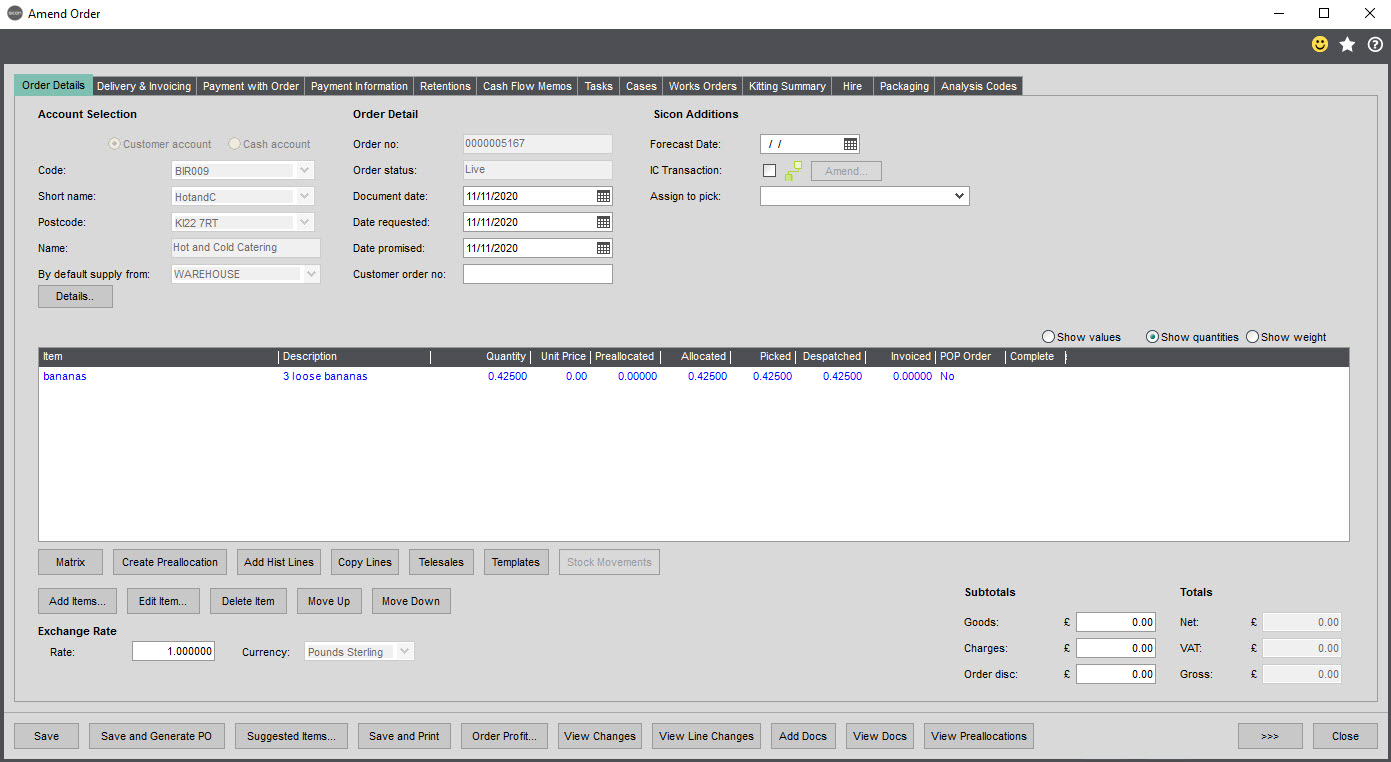
The sales order can be selected on the terminal and the stock item selected, as the items are placed on the weighing scales, the quantity on the sales order line gets updated.
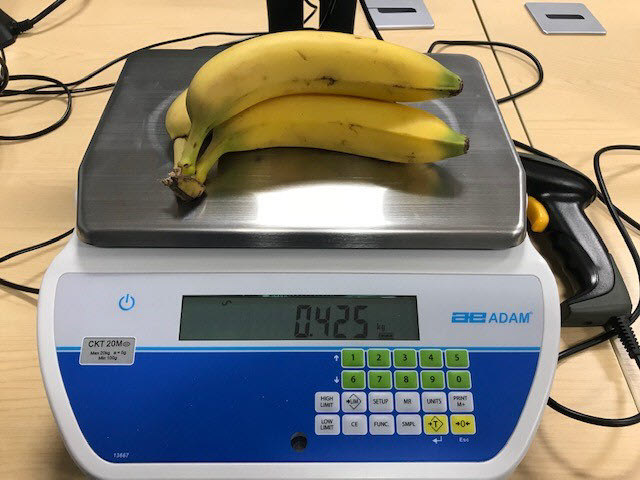
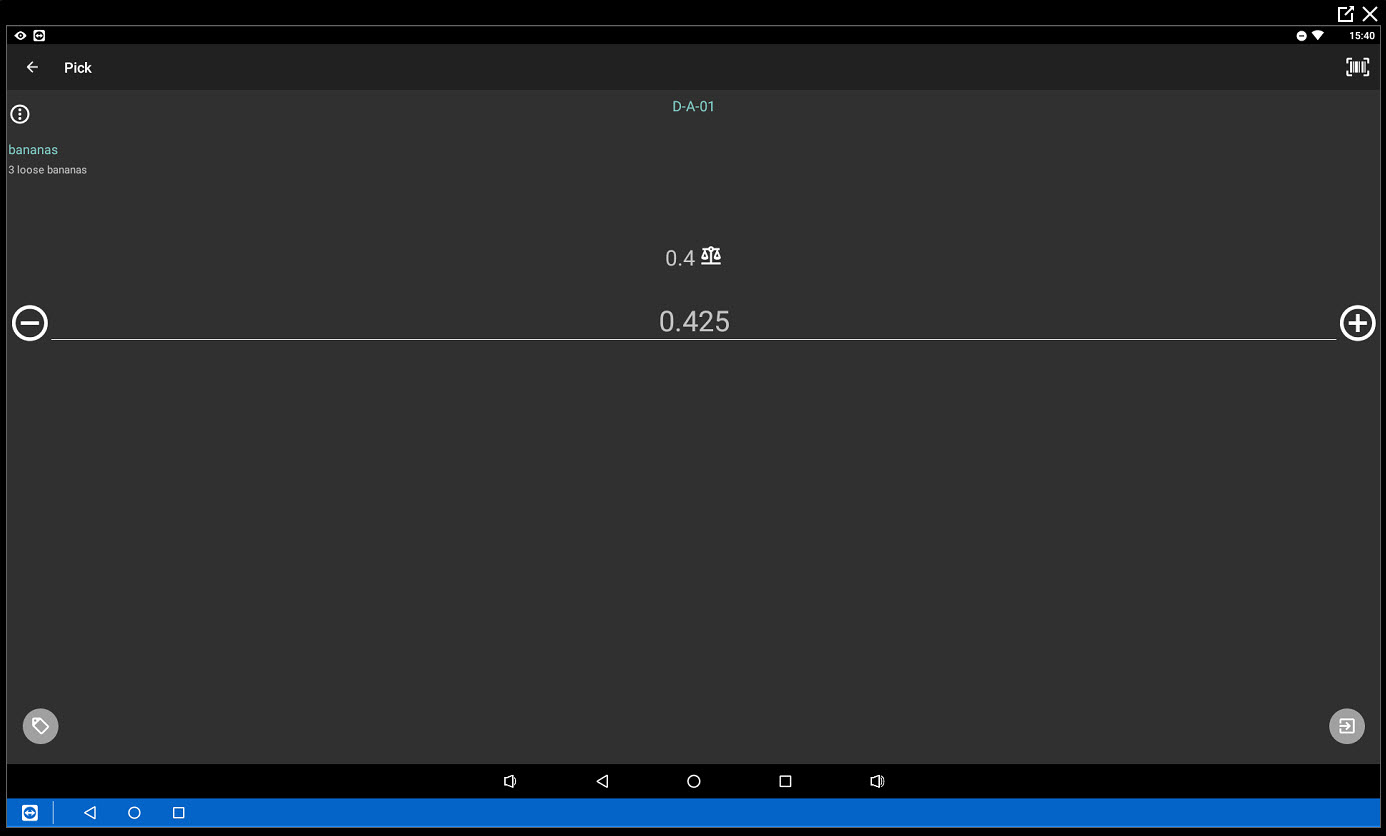
The sales order can then be picked, packed and despatched. The quantity on the sales order in Sage gets updated.
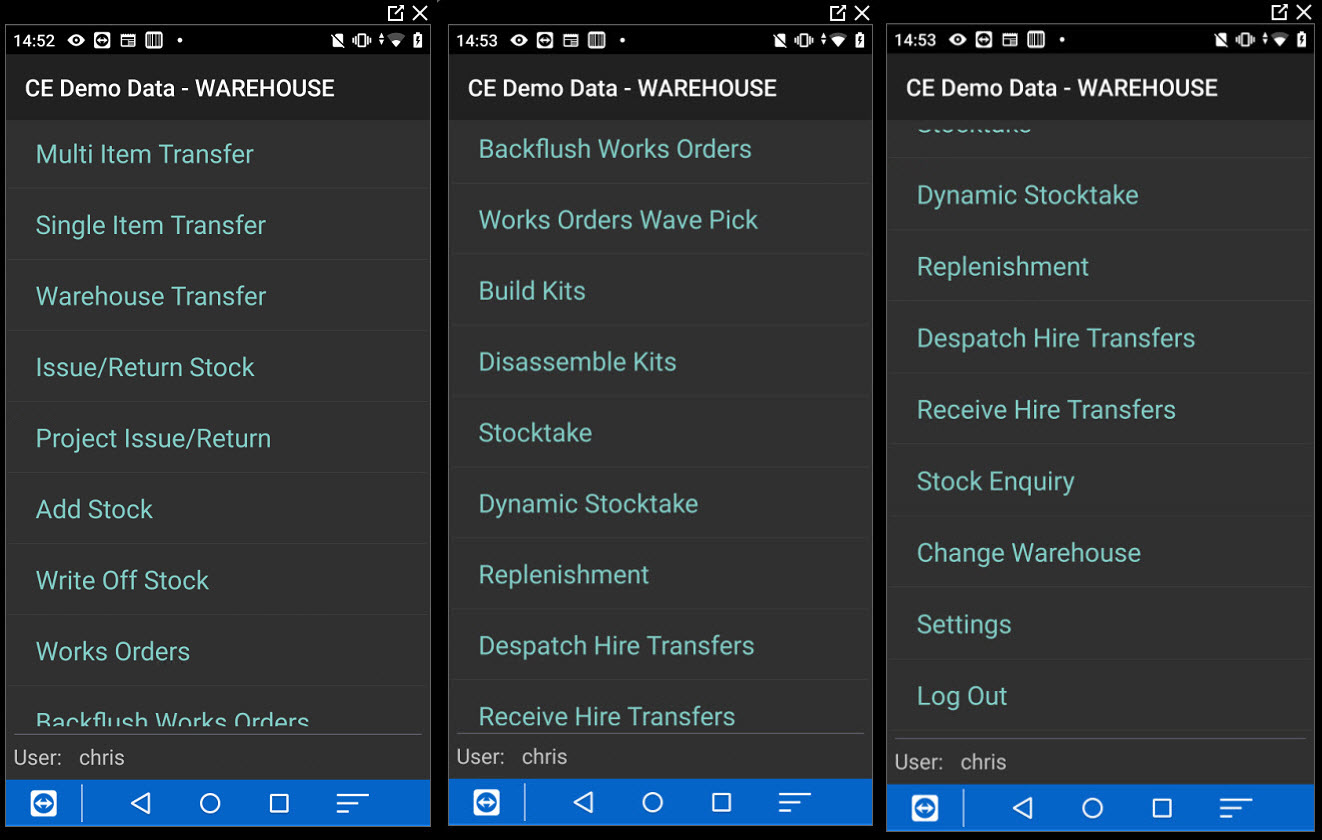
8.19. Tilted Wave Pick
When combined with the tilted picking software, http://www.tilted.co.uk/services/ sales orders can be grouped together, so that one combined sales order is sent for picking in the handheld.
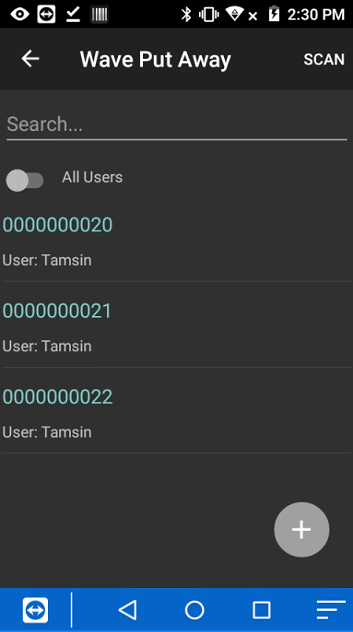
8.20. Wave Pick
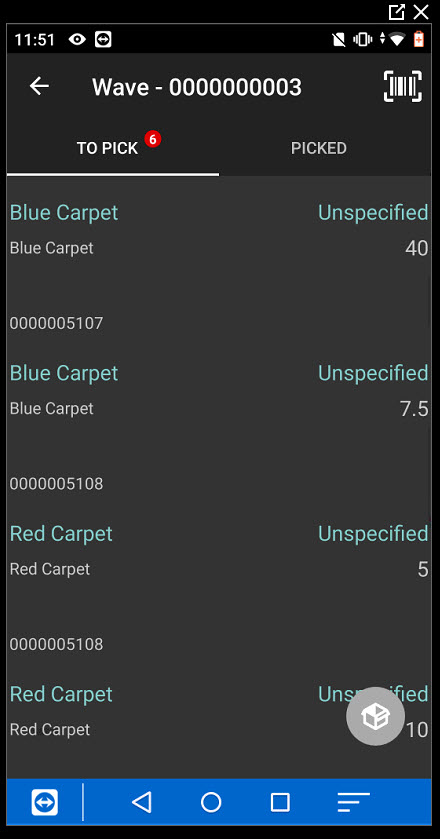
This allows multiple sales orders to be combined into one pick.
Clicking on the plus button allows sales order to be added into a new wave pick. The wave number can be system generated or a barcode for the wave number can be scanned.
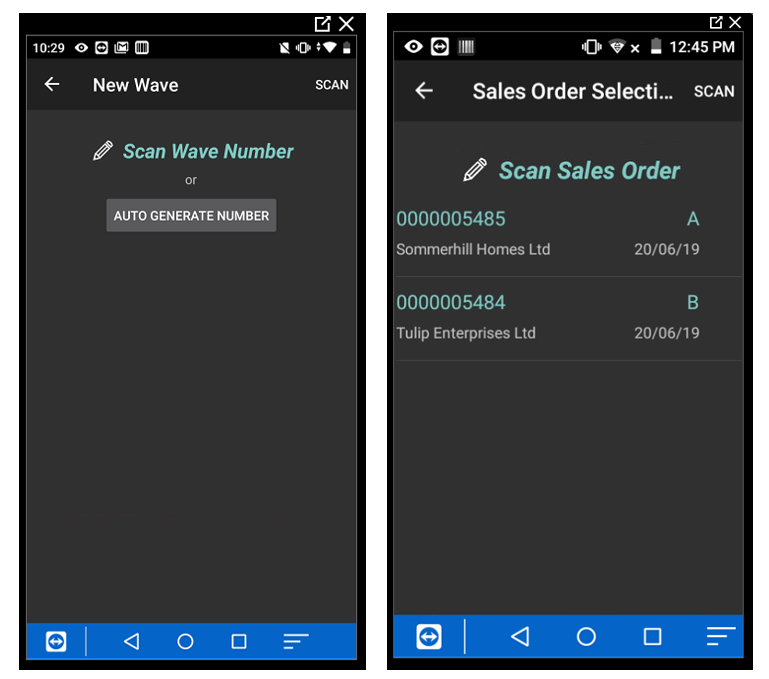
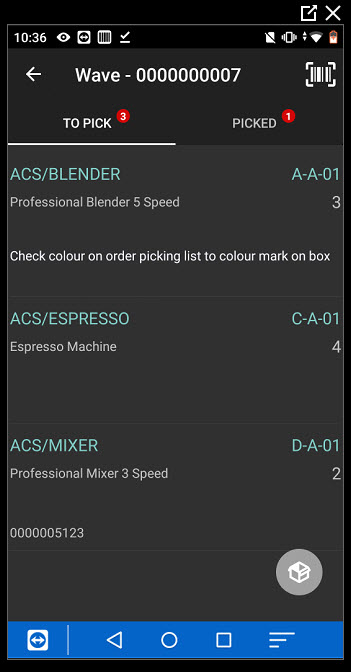
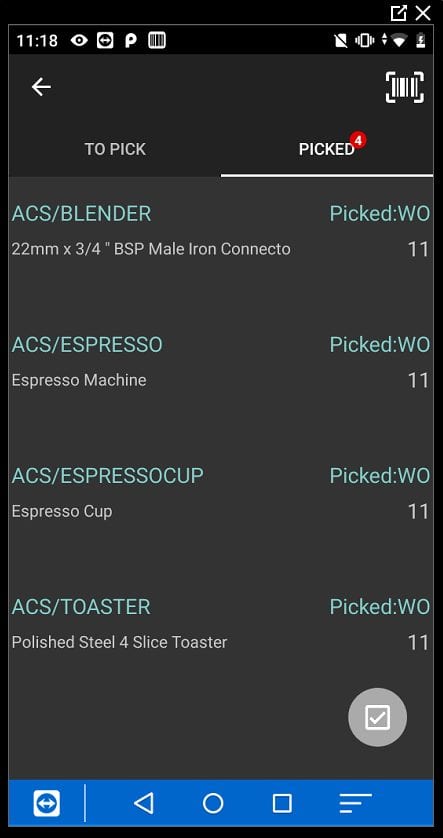
Multiple orders can be added to the Wave, when picking the Wave the combined quantities of the sales order lines are shown for picking.
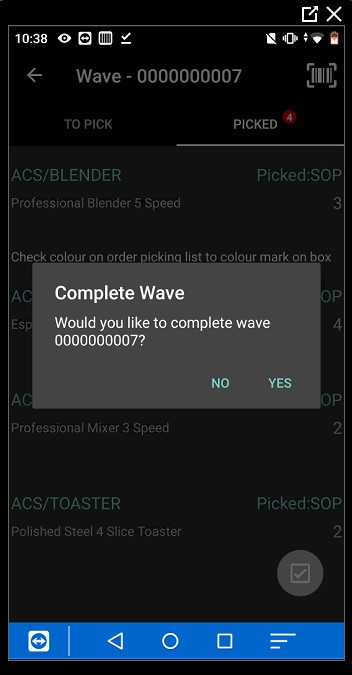
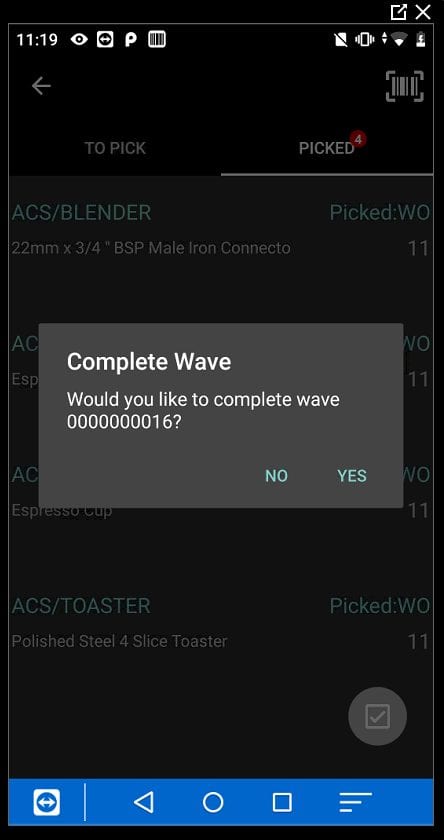
Once the wave has been picked, the wave can be marked as completed.
The individual sales order should be packed in the SOP packing screen.
8.21. Tote Pick
This combined with tote picking, allows collated sales orders to be process using tote boxes.
Sales orders can be combined onto a wave using the SOP wave functionality.
In the handheld, during SOP wave picking, the items can be picked into a tote.
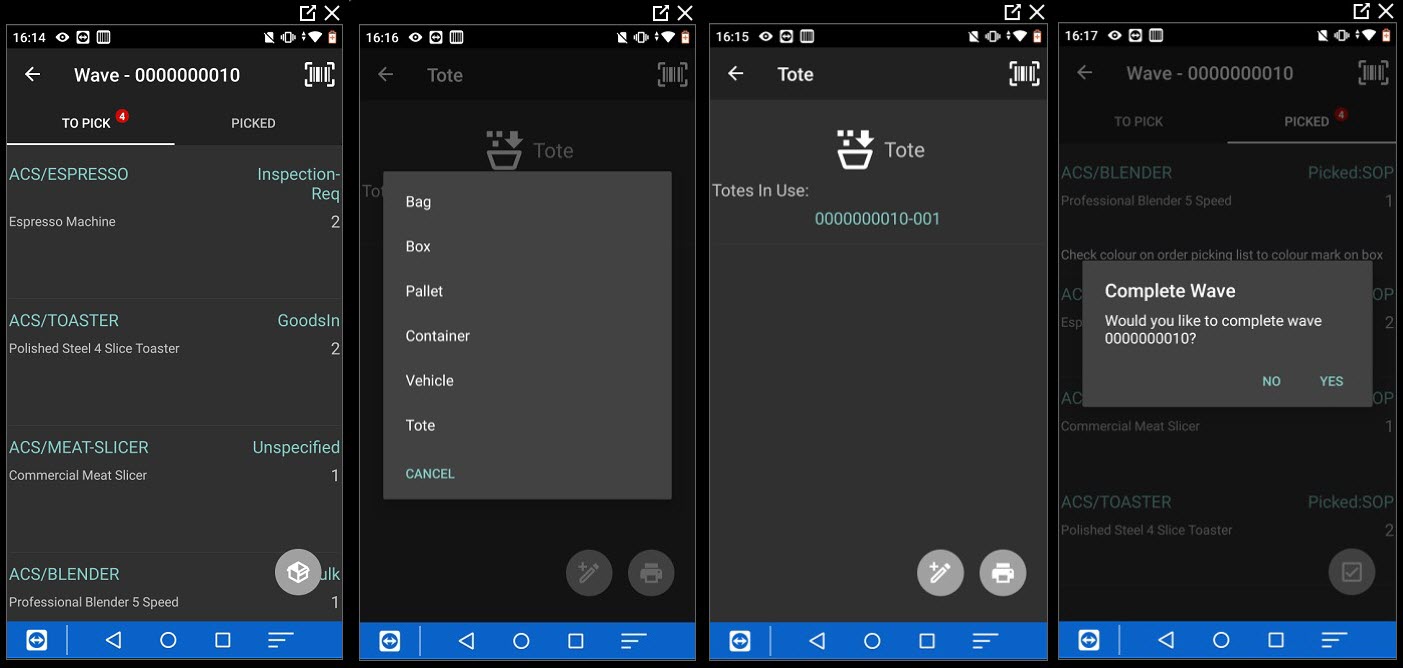
In the Tote Pack in the handheld the tote barcode can be scanned to show the sales orders linked to the tote.
The orders can then be packed and despatched.
8.22. Zone Packer
Where sales orders have been combined onto a van pick these can be selected in this screen.
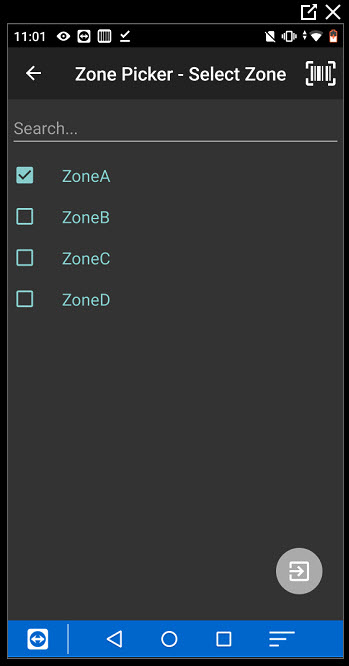
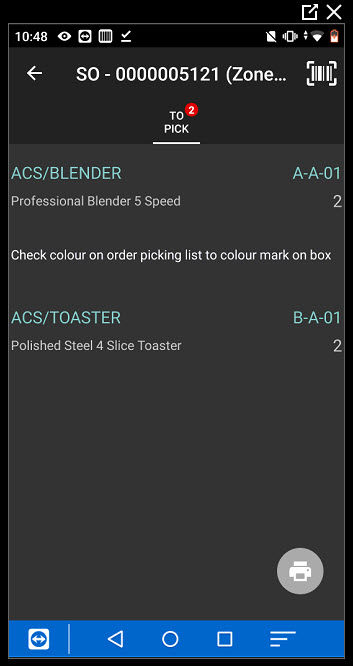
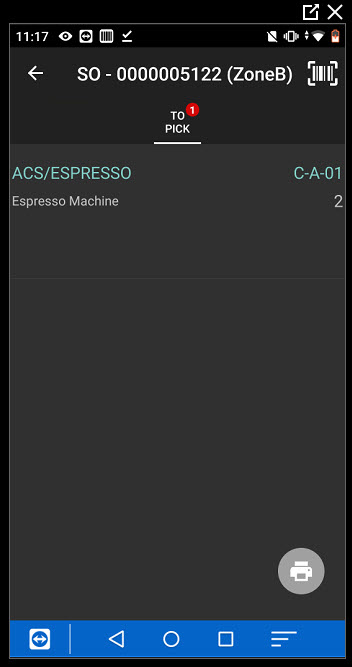
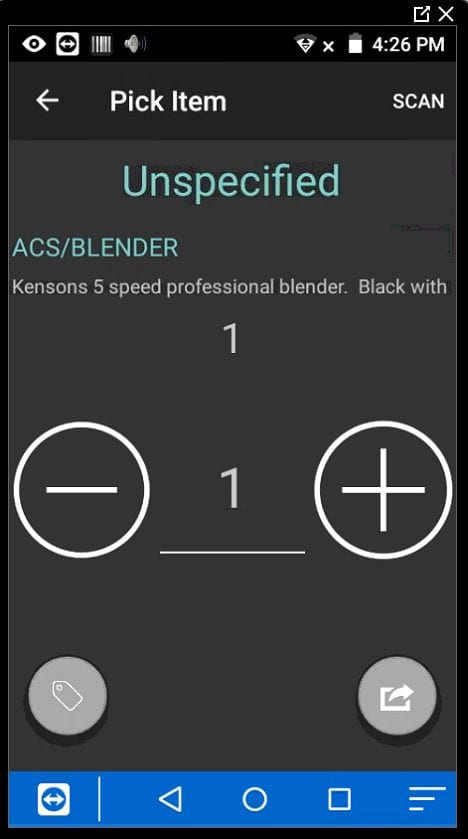
The handheld will then show any orders lines from the van wave being worked on that relates to this zone. In the examples below for SOP 0000005121, the blender and toaster are being picked from bins in zone A
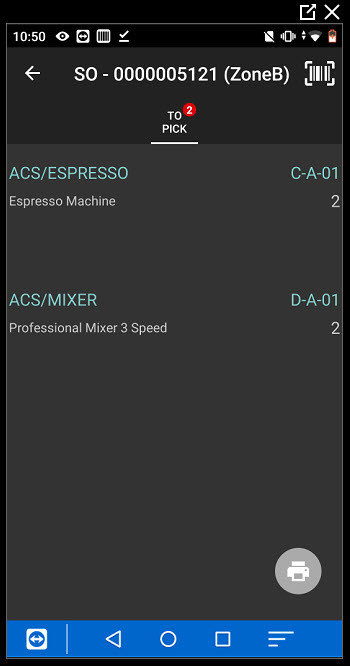
Whereas the espresso and mixer are in bins in Zone B
This feature allows multiple handheld users to pick the same sales order from different zones and only show the lines that each user needs to pick.
Once the lines have been picked, the zone packer can then pack the sales order.
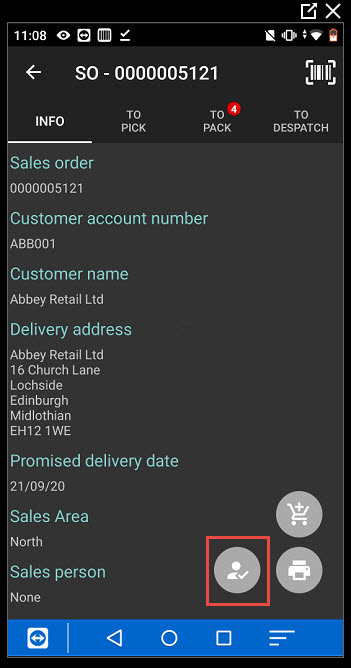
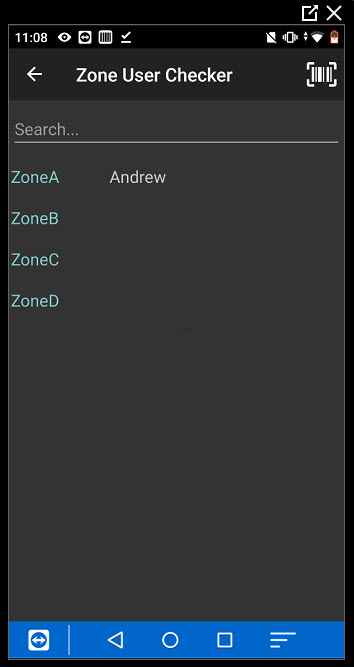
Clicking on the icon highlighted, shows which users are logged into the zones picking.
The Sales order can be processed as required (packed and despatched).
Where multiple orders are being packed onto the van, the next order can be selected.

Once the next order is selected by the packer, the pickers then see the next lines that need picking for the order.
8.23. Receive Sales Order Returns
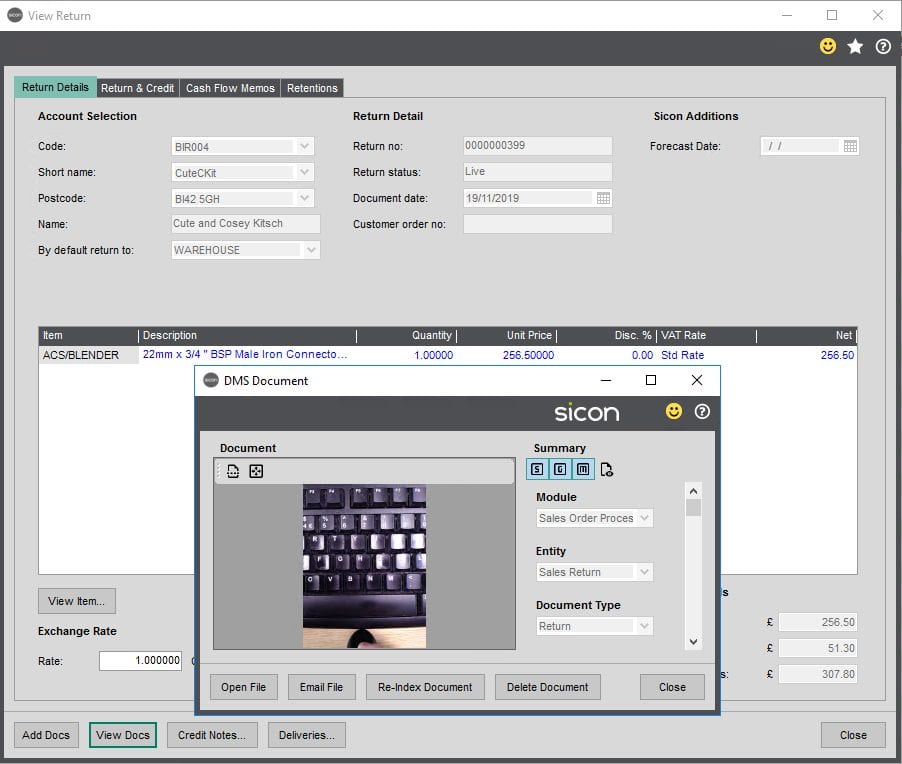
Allows sales order returns to be processed and bought back into stock. Clicking on the camera icon, allows a photo to be taken and stored against the sales order return (the Sicon Documents add on is required).
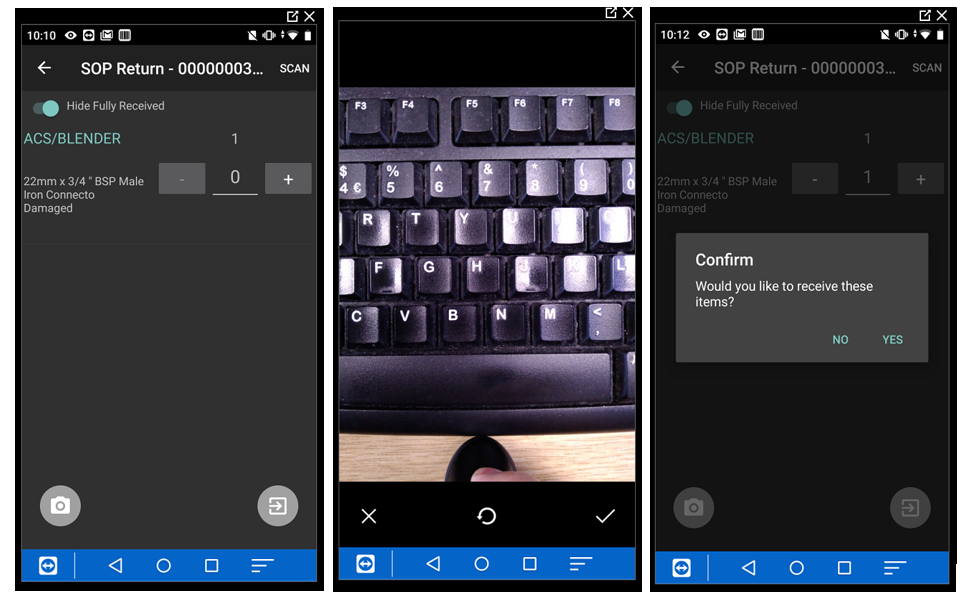
The image can be viewed in Sage against the sales order return.
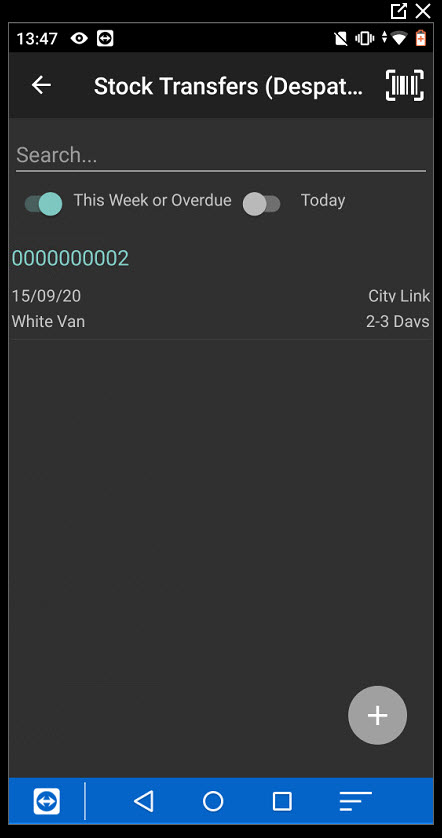
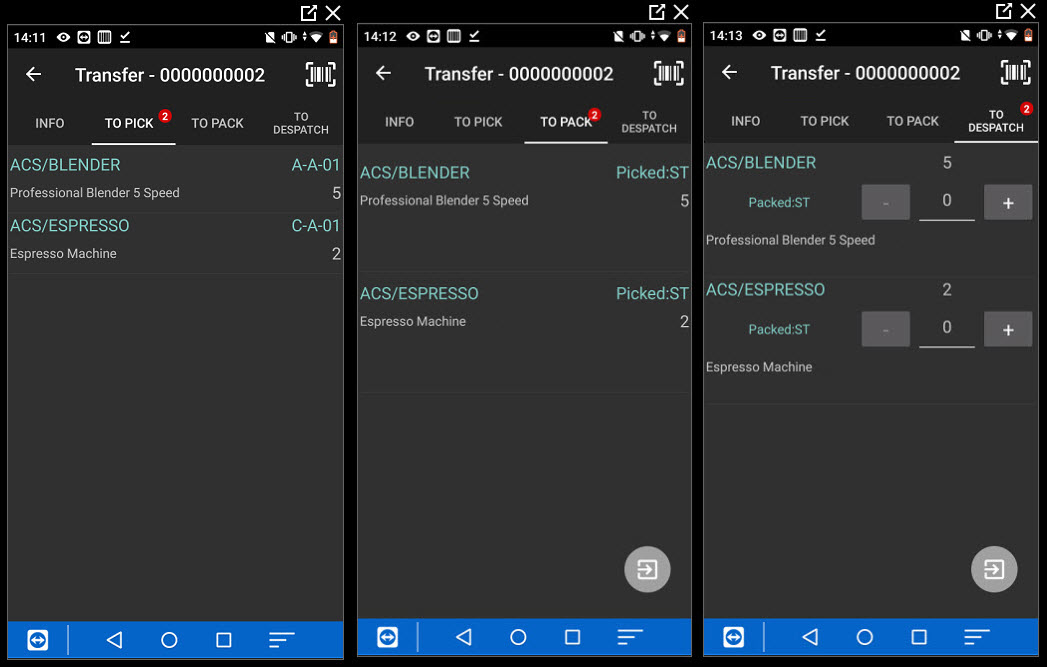
8.24. Despatch Stock Transfers
This feature is used to process stock shortage transfers created in Sage. Once the stock shortage transfer has been created and printed in Sage, it can be despatched from the handheld.
Once the stock transfer has been selected, there is an info tab to show the details about the transfer.
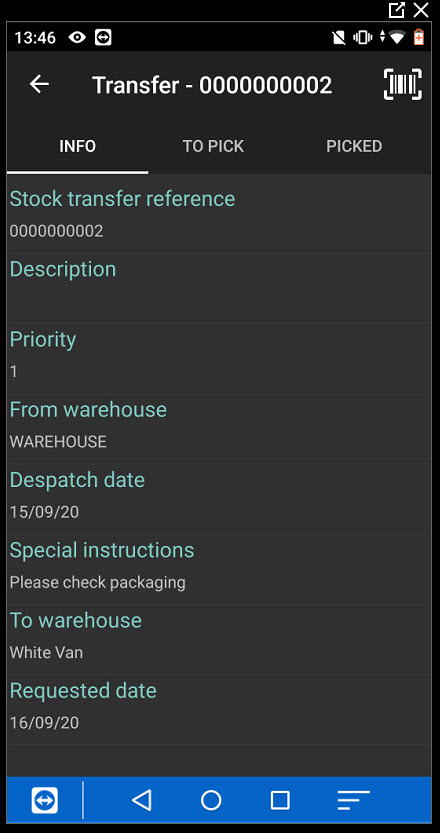
Items can be picked, packed (if enabled) and despatched from the sending warehouse and a despatch note printed. The stock items are moved into the in transit warehouse.
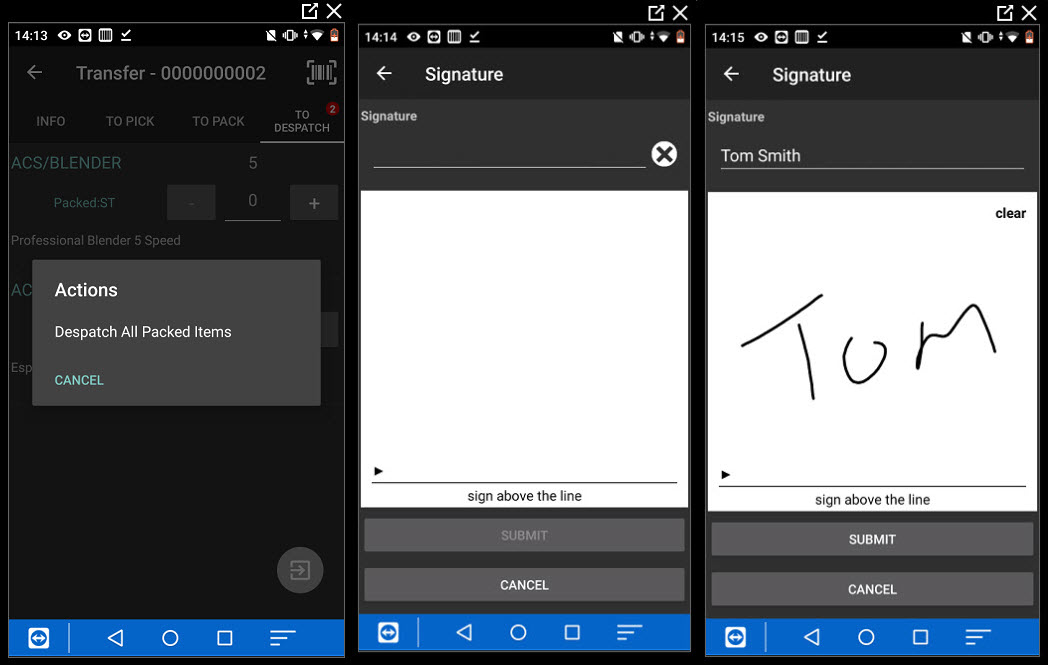
A signature can be linked to the despatch. This is controlled by the barcoding stock transfer setting to ‘ask for signature at despatch’.
Transfer can also be created from within the handheld, by clicking on the + button on the transfer screen.
The sending warehouse can be selected.
And then details and items added to the transfer.
Stock items can be added in the items tab, by scanning/selecting the bin and stock item and the pressing the action button to add them to the transfer.
The receiving warehouse can be amended by tapping on the warehouse icon and selecting a different warehouse.
Once the transfer has been created it can be despatched using the action button on the items tab.
If stock transfers are part despatched then the remaining items to be despatch are created onto a new transfer.
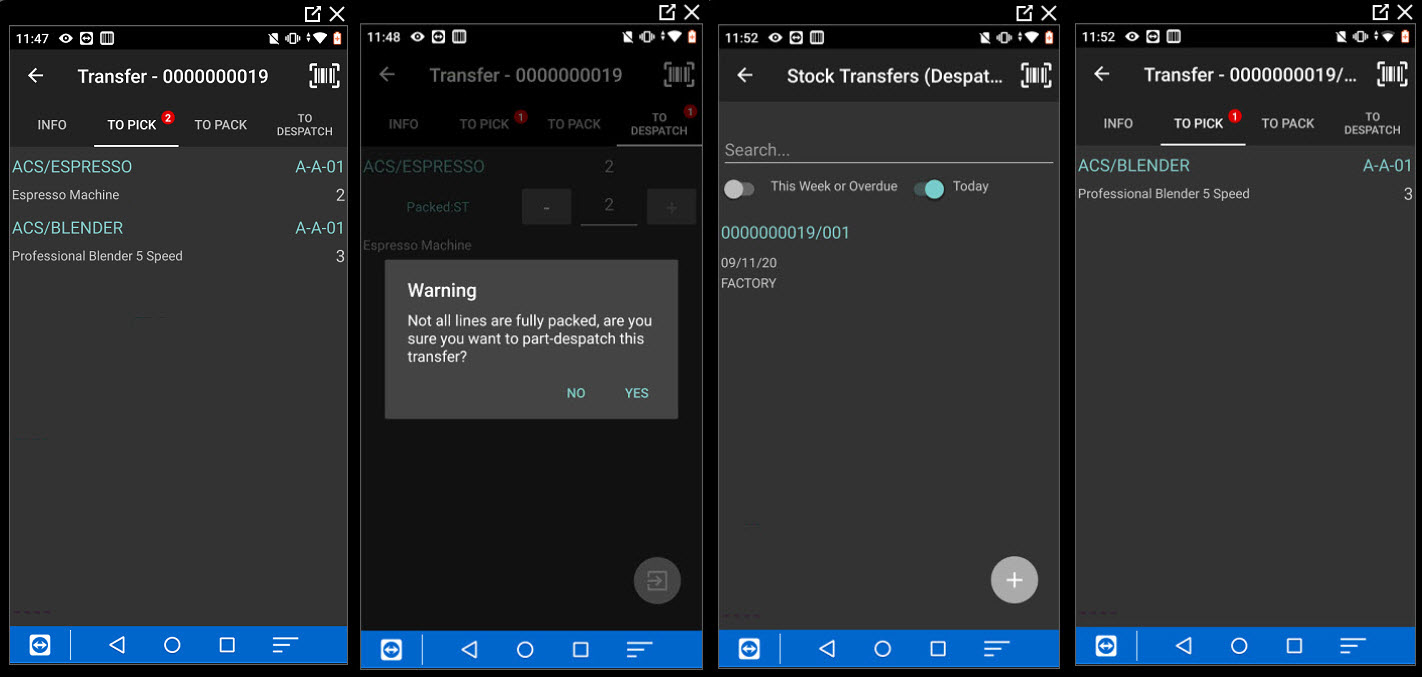
In the example above transfer 0000000019/001 has been created off the back of transfer 0000000019 for the undespatched acs/blender.
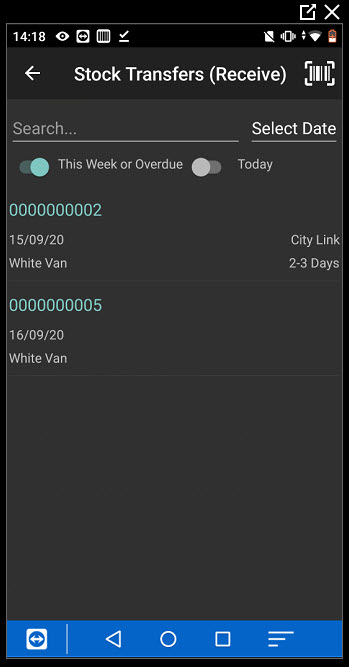
8.25. Receive Stock Transfers
Stock shortage transfers can be received in the handheld, the transfer can be found and then selected when the handheld user is logged into the receiving warehouse.
An information tab is provided. The items can then be received in the receive tab.
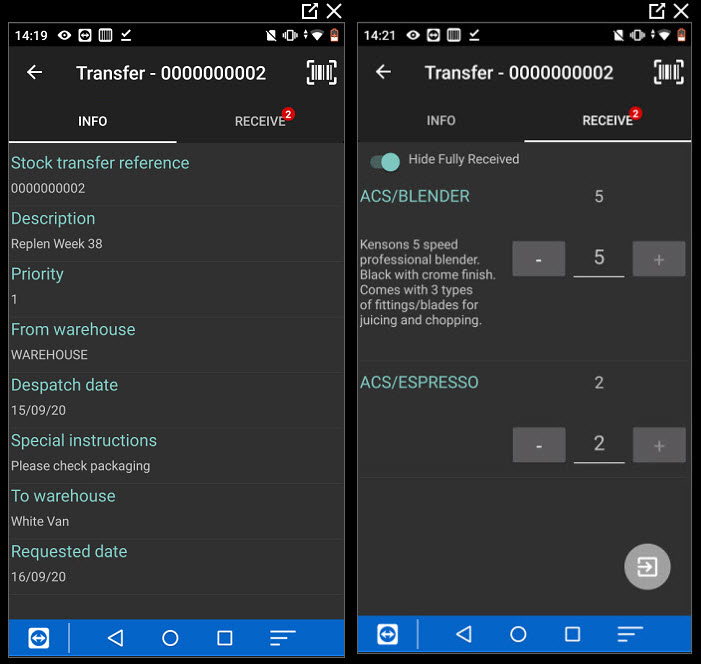
Where stock items are set to auto issue when the stock item is received, the system will automatically issue the stock out of stock.

8.26. Multi Item Transfer
This feature can be used to move multi stock items between bins in the same warehouse. A transfer is first created by clicking on the plus button, then a bin is scanned/selected, the stock items in the bin can then be scanned/ selected.
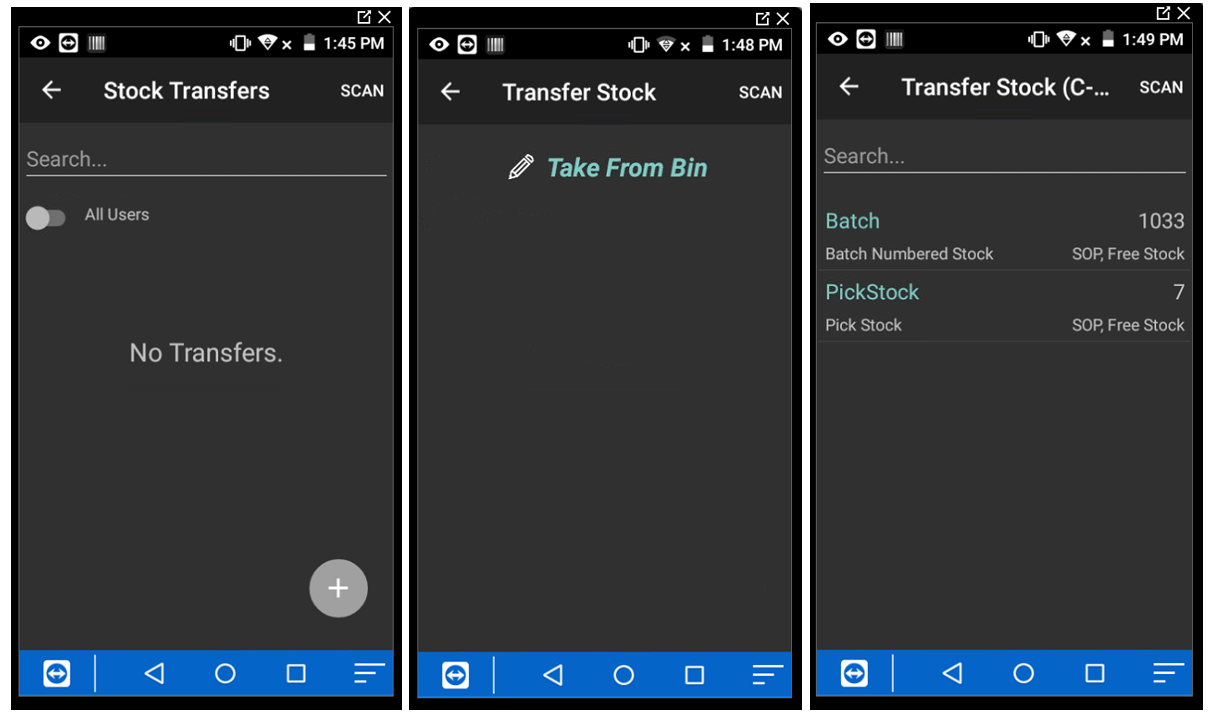
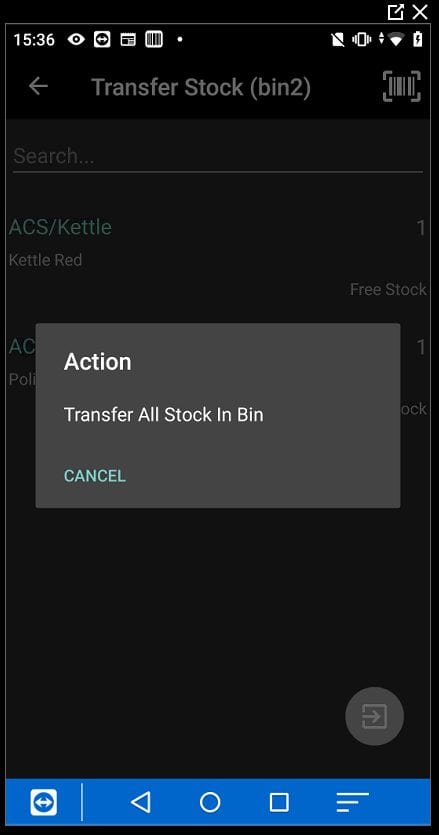
All stock in the bin can be selected by tapping the action button and selecting transfer all stock in bin.
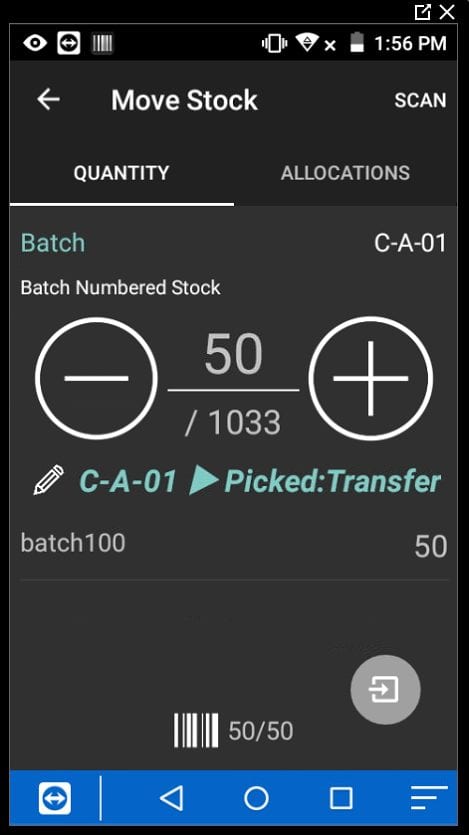
The stock can then be moved to a picked:transfer bin
Other stock from the same or different bins can be added to the transfer to build up a number of items to transfer, creating a stock transfer.
Once an item is selected or scanned, then the system will suggest a bin to move the stock to. If you scan an alternative bin, the system will add this bin to the stock item.
You can then select the bin and confirm the transfer.
Alternatively, you can move all stock in the transfer to the same bin.
8.27. Single Item Transfer
Allows a user to scan/select a bin, scan/select a single stock item and then move it to a new bin bypassing the picked:transfer bin
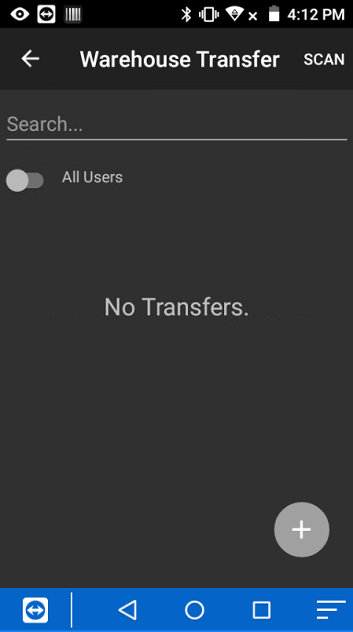
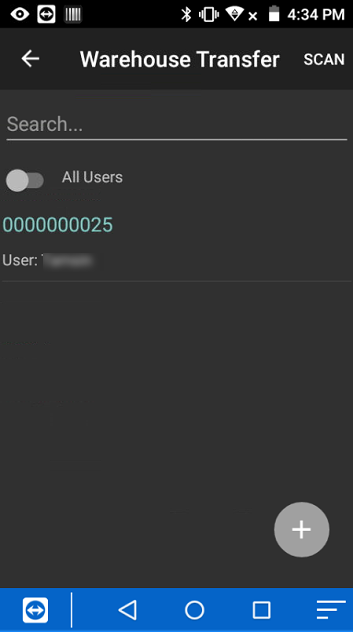
8.28. Warehouse Transfer
This feature can be used to move free stock (not allocated) stock items between Warehouse locations. The originating warehouse is defined by which warehouse location the handheld is logged into.
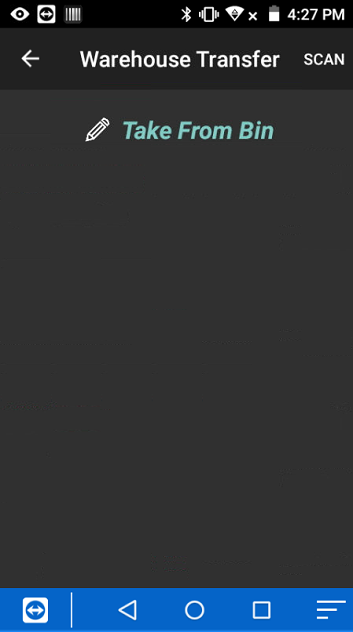
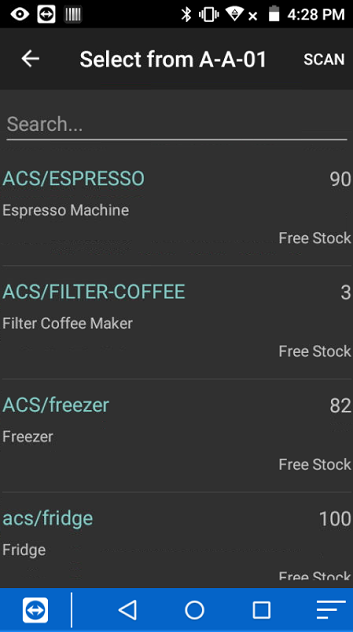
Transfers can be created by tapping the plus button and scanning the relevant bin.
Once all items have been entered, return to the main Warehouse Transfer screen. This will show the transfer number created.
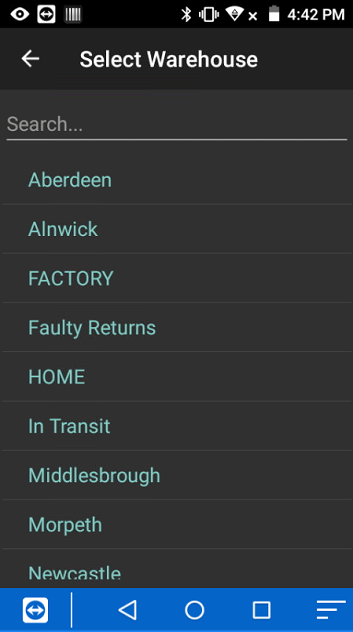
To finish the transfer, tap on the number required and either tap on the current location at the top of the screen or the warehouse icon at the bottom. This will display a list of available transfer locations.
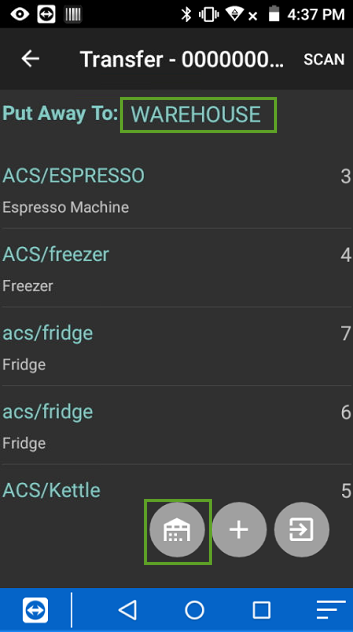
Select the correct location. More items can be added using the plus icon
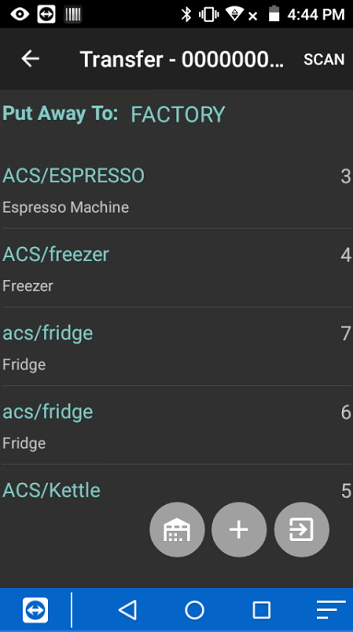
If all items are going to the same target bin, the proceed icon can be tapped. However, if different bins will be used, tap the required stock item and enter the quantity and target bin. Tap proceed to complete the transaction.
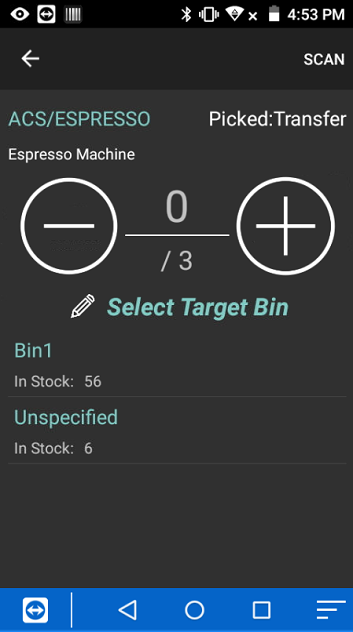

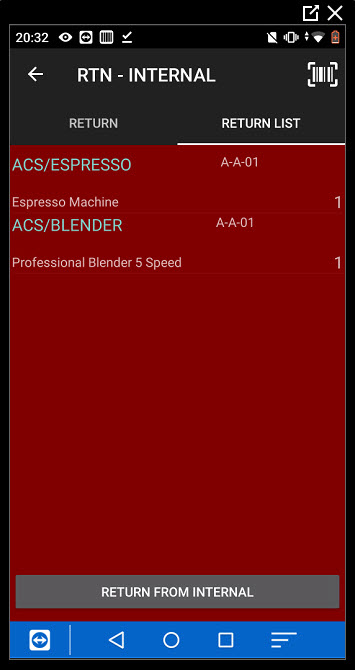
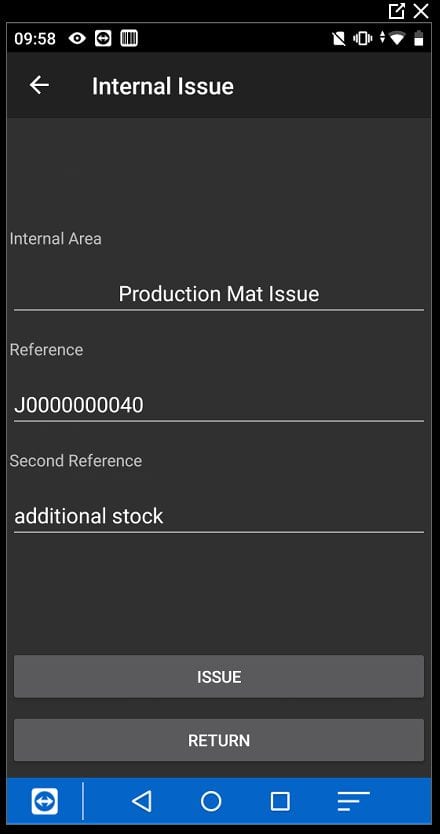
8.29. Issue/Return Stock
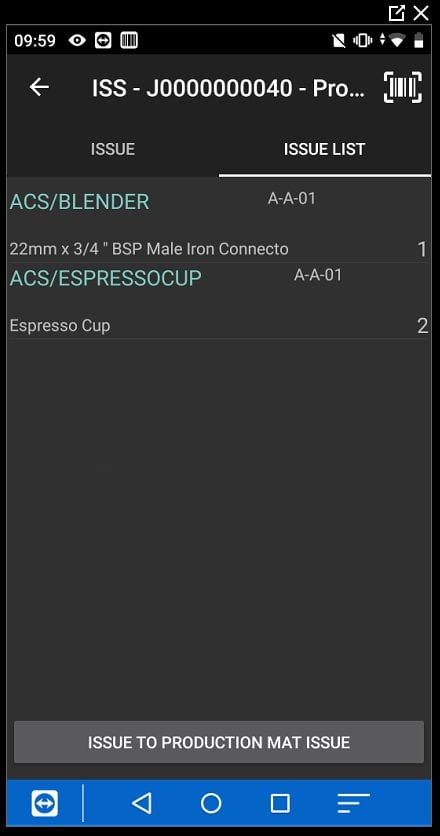
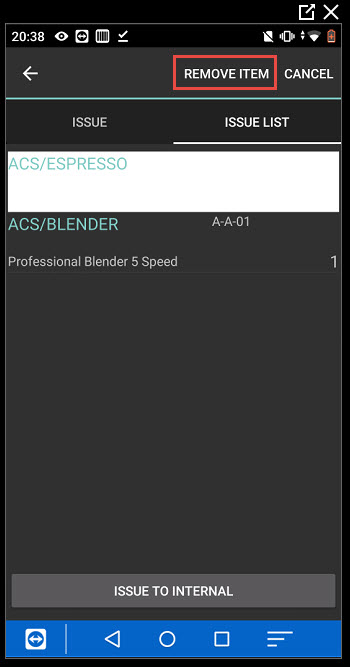
A stock issue/return in the handheld can be created.
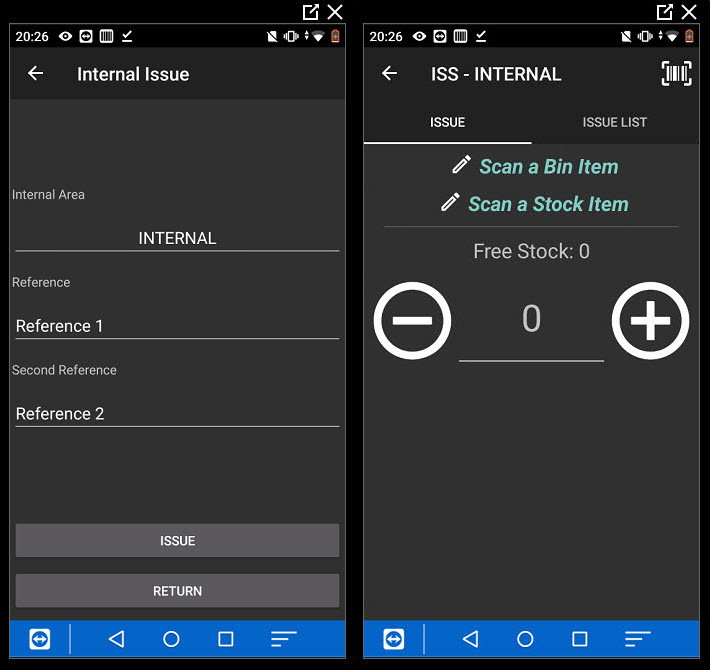
A list of items to issue can be built up by scanning bins and products which then appear in the issue list.
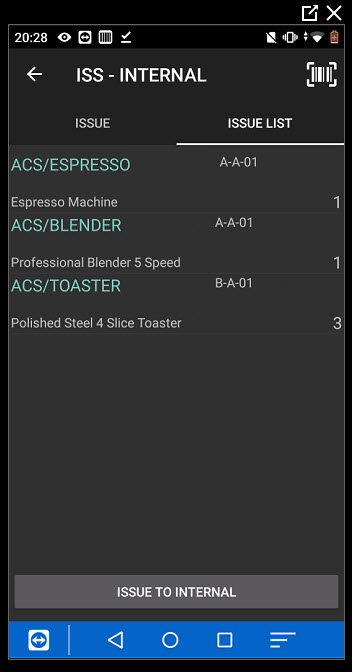
You can then issue the items. If an item needs to be removed from the list, press and hold the line to remove and then click on remove item.
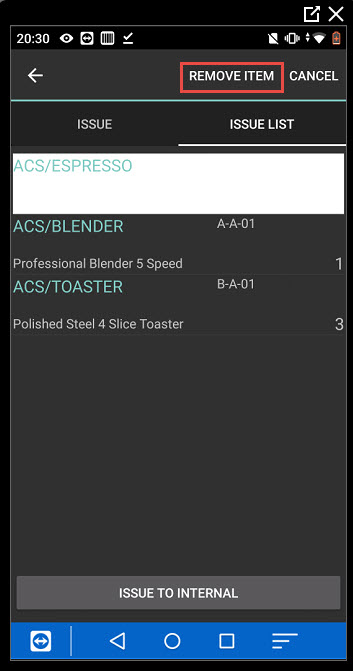
In a similar way you can return items to stock, using the return from internal option.
8.30. Project Issue/Return
You can use this feature to select and issue stock items to and from a Sicon Project.
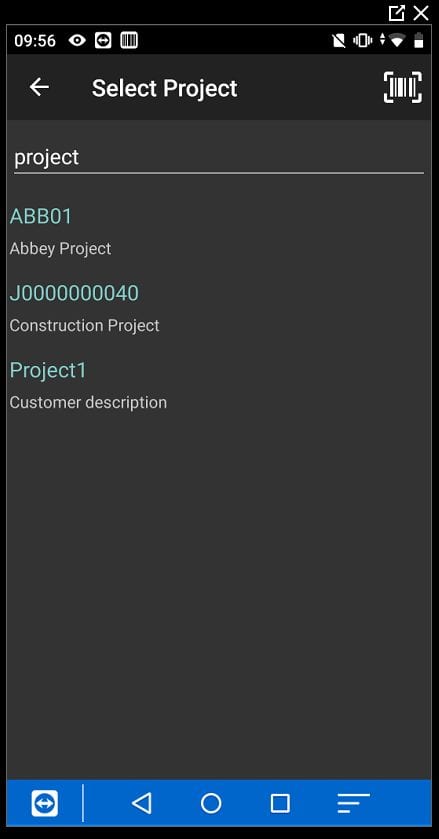
You can also select phases, stages and activities where these have been set up for the project.
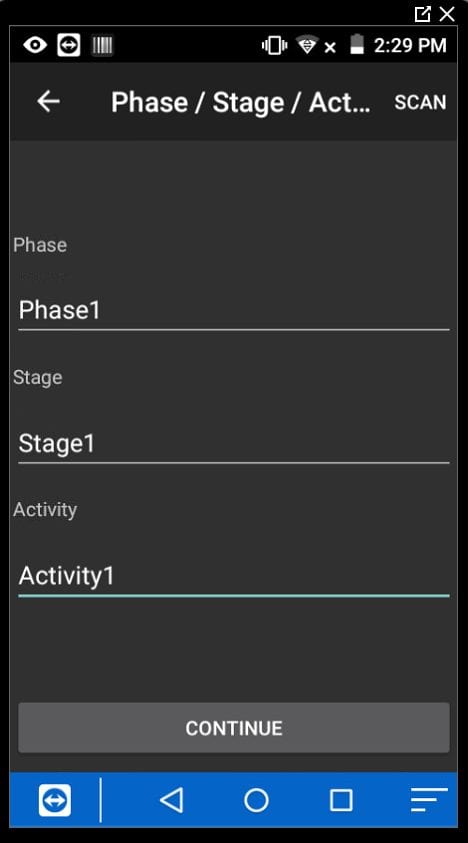
A list of stock items to issue to the project can be built up and then issued to the project.
Items can be removed from the list if required.
8.31. Add Stock
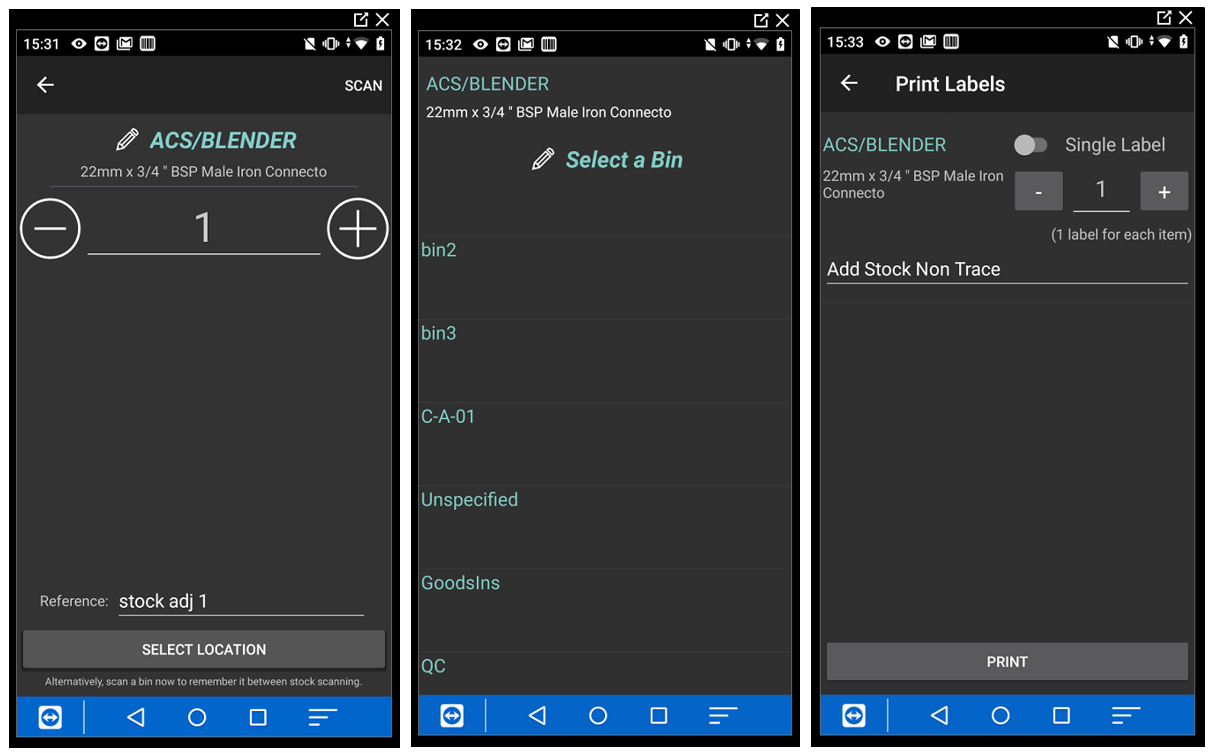
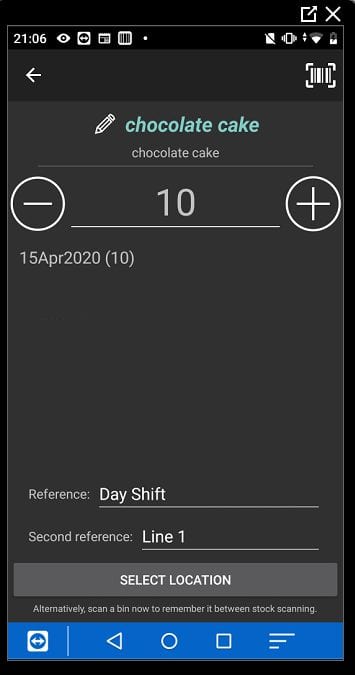
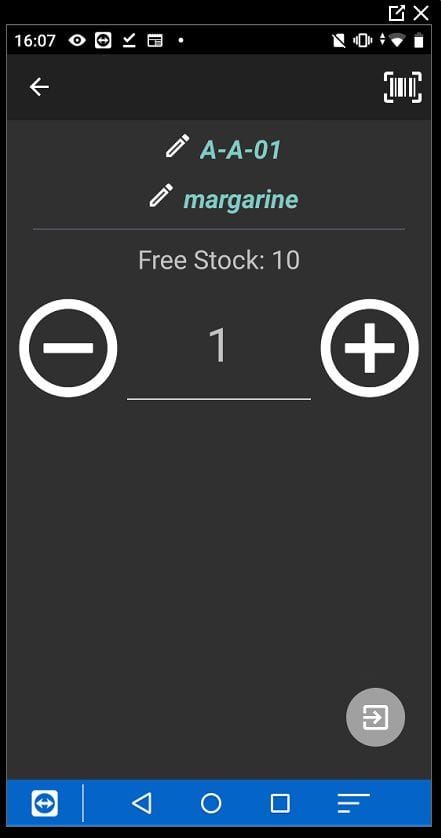
This feature can be used to add stock to the system, by scanning products, then selecting or scanning a location. An optional reference and second reference can be added, and the system can prompt to print a label (if an add stock label has been set up in the label settings).
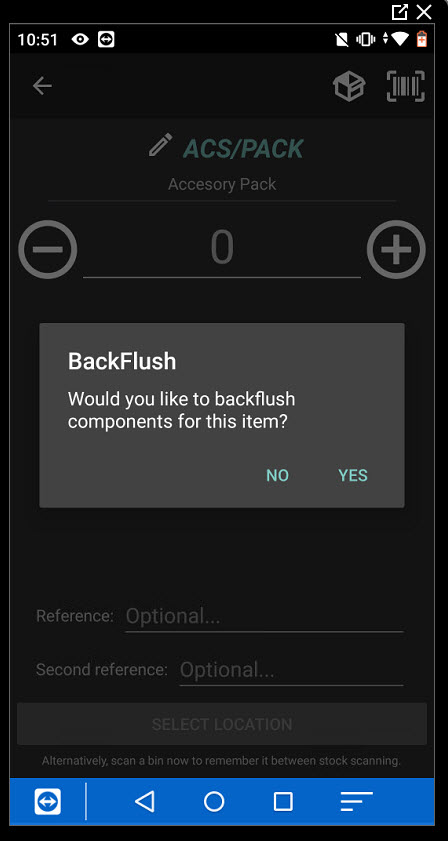
If stock is added for a built item and the barcode user has permission to the Sicon works order features in the user settings, the following screens will show.

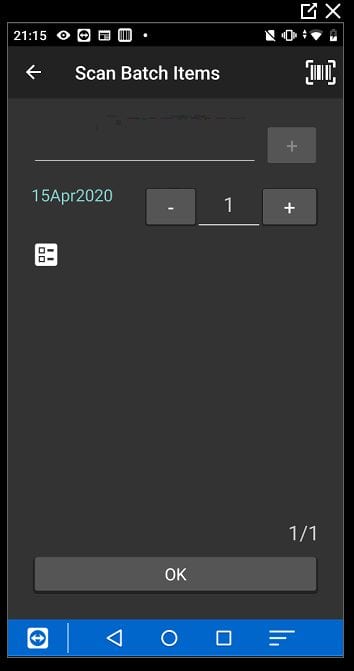
Clicking on yes to backflush the item will create a Sicon works order in Sage and process the works order to create the built item. In the barcode stock control settings, there is a setting to default this to always backflush and not ask.
Where the finished item is a batch item that is not set to auto generate the batch record, the user will be prompted for the batch number during the add stock process.
This feature only supports works orders where the component lines are non-traceable.
8.32. Write Off Stock
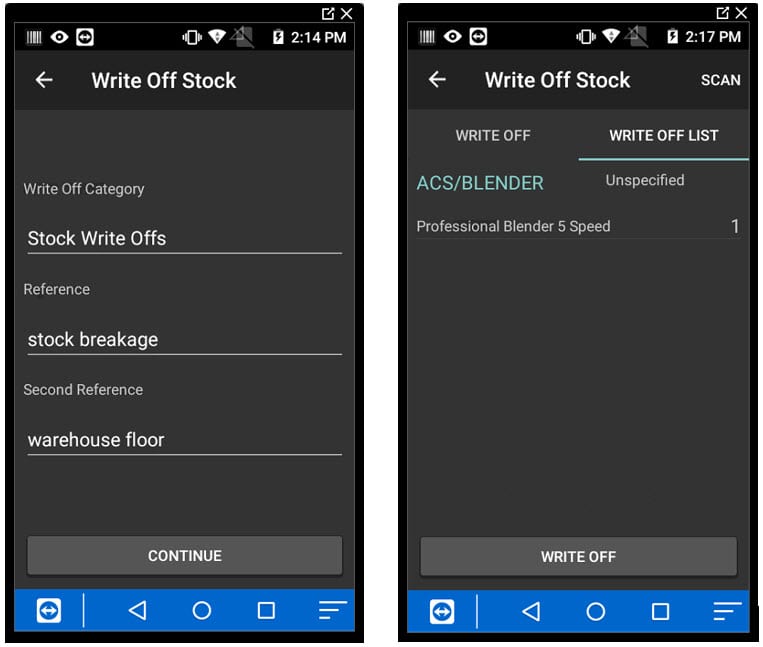
This enables you to build a list of stock items to write off.
8.33. Works Order
Allocated works order component lines can be picked and issued in the handheld.
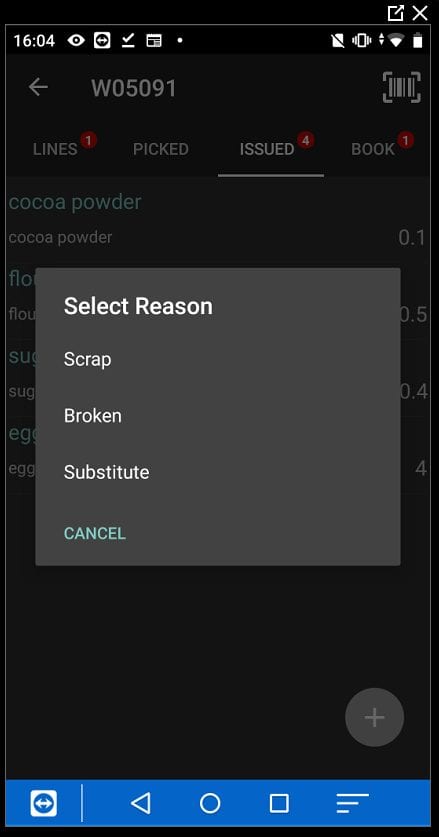
Clicking on the + button in the issued tab, then gives the ability to select a reason and then scan additional stock to add to the works order.
These additional items are added to the works order in Sage.
When picking the item, a label can be printed if required.
The finished item can then be booked in.
A works order label can also be printed at this point if a works order label has been configured in the label settings.

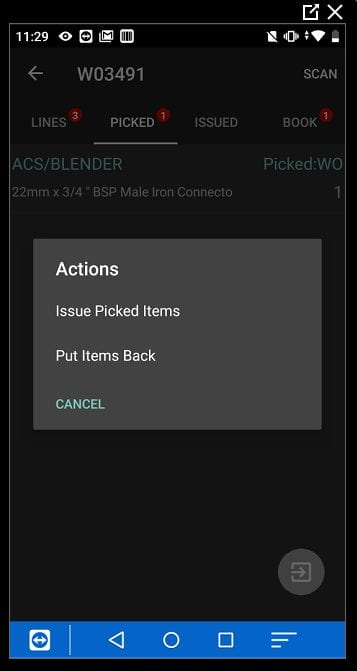
Works lines can also be unpicked in the handled, using the action button and put items back option.
8.34. Backflush Works Orders
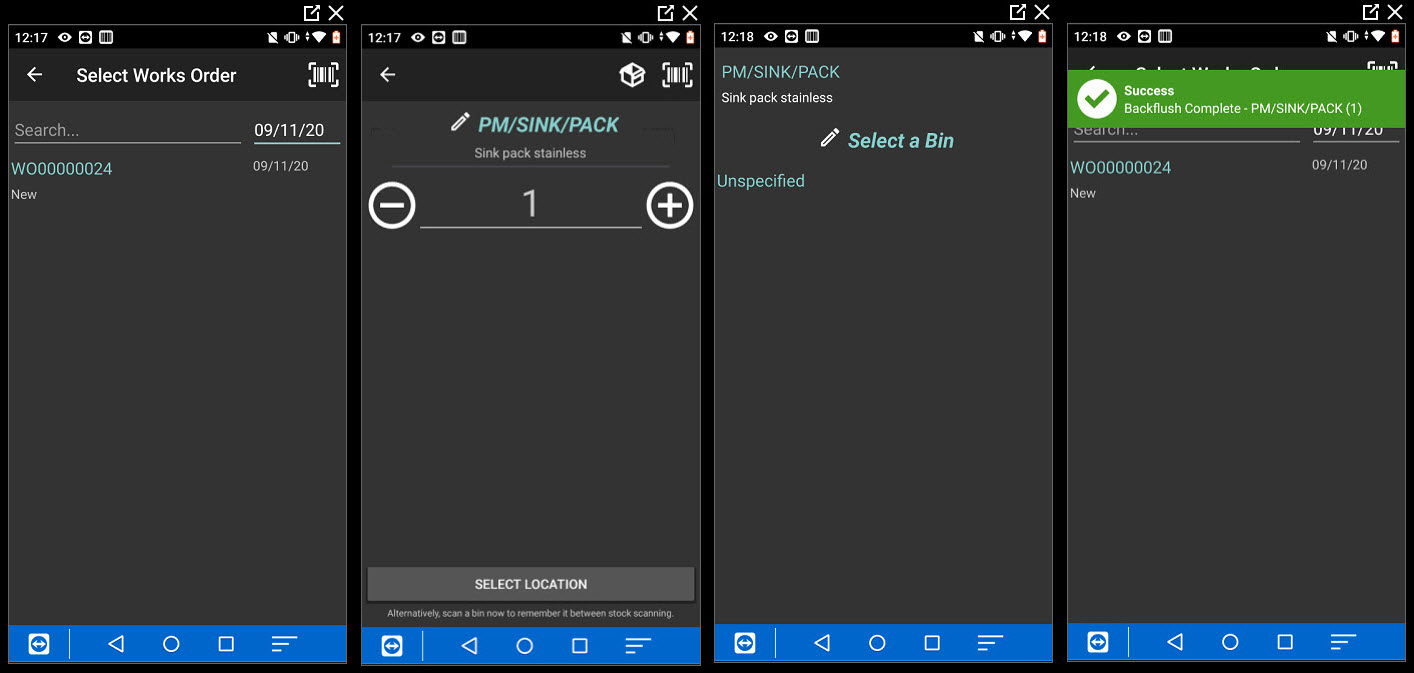
Works order can be backflushed from within the handheld. A works order can be selected and then processed e.g. WO00000024 has been backflushed in the example below. There needs to be available component stock for the backflush to process.
8.35. Works Orders Wave Pick
Allows Sicon works order waves to be picked in the handheld.
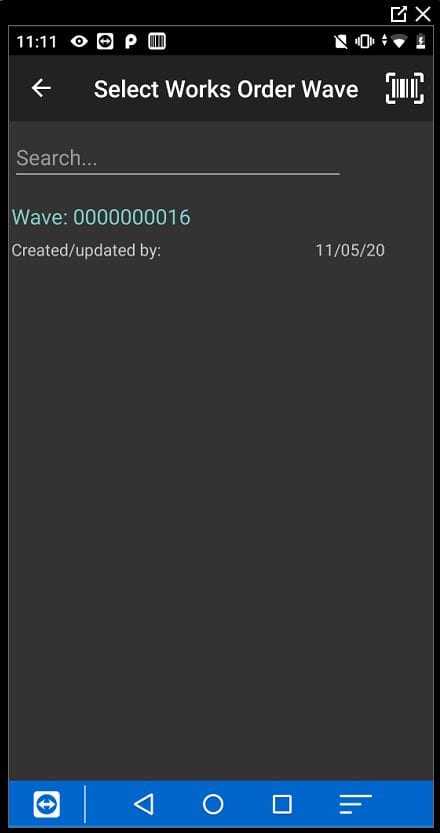
Once the lines have been picked, the wave can then be completed.
The picked works order could then be issued using the works order feature in the handheld.
8.36. Build Kits
Allocated kit items can be picked and built in the handheld.
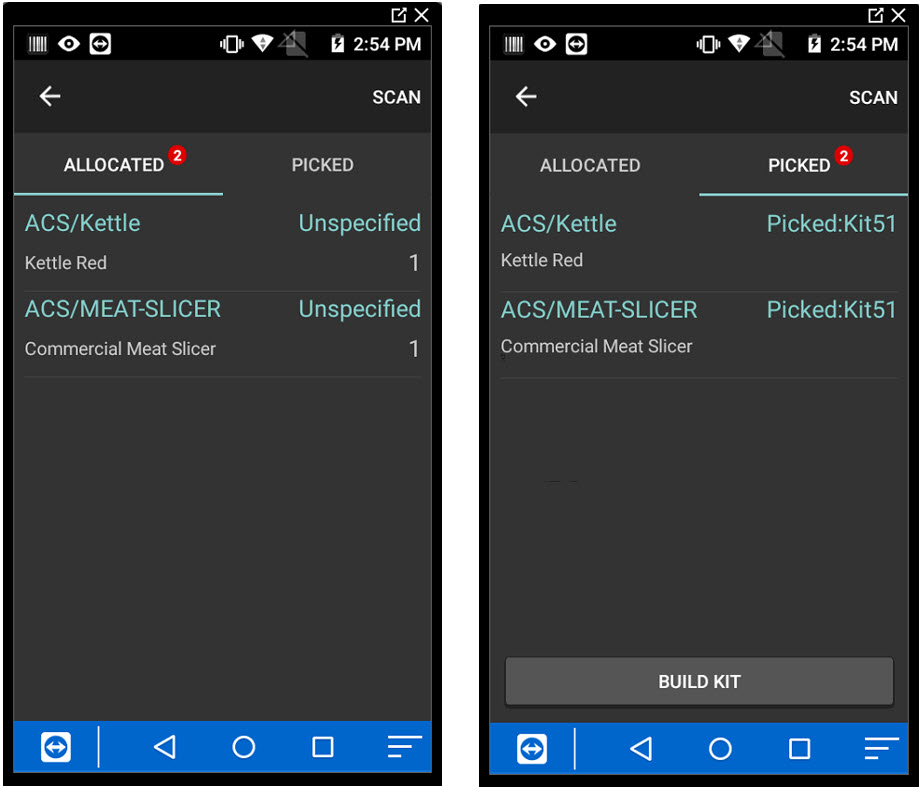
If the kit item has been created on a sales order and the kit created. You can process the kit during SOP despatch, with the system despatching out the kitted item. The WebAPI user needs to be given access to the Sicon Kitting features for this to work.
8.37. Disassemble Kits
Allows kits to be disassembled on the device and the kit components returned to stock. Stock item that are linked to kits that have been previously built will show and items in stock that have kit template set up.
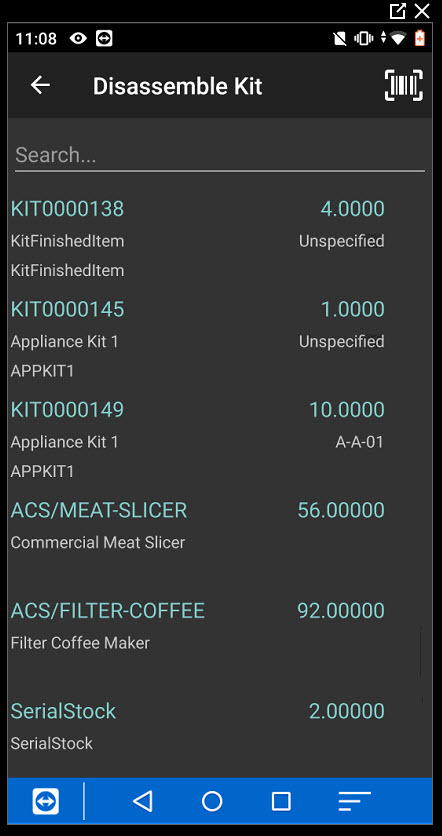
If a kit item is selected then the following screen is displayed.
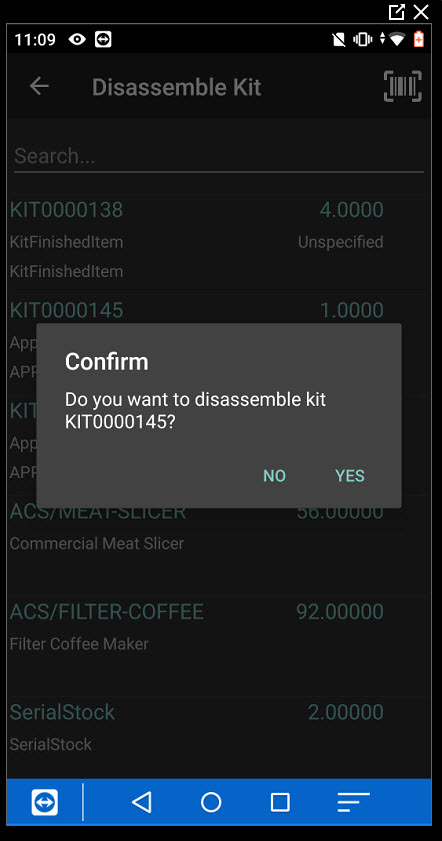
Clicking on yes will disassemble the kit and return the kit components to stock.
When a stock item not linked to a kit is selected, the following screen is shown.
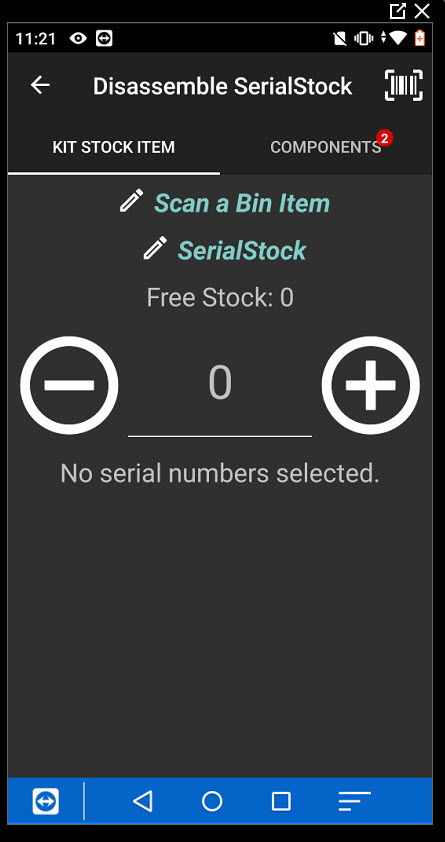
The bin that the finished item stock is located needs to be scanned/selected and if the item is batch traceable the traceable record needs to scanned/selected.
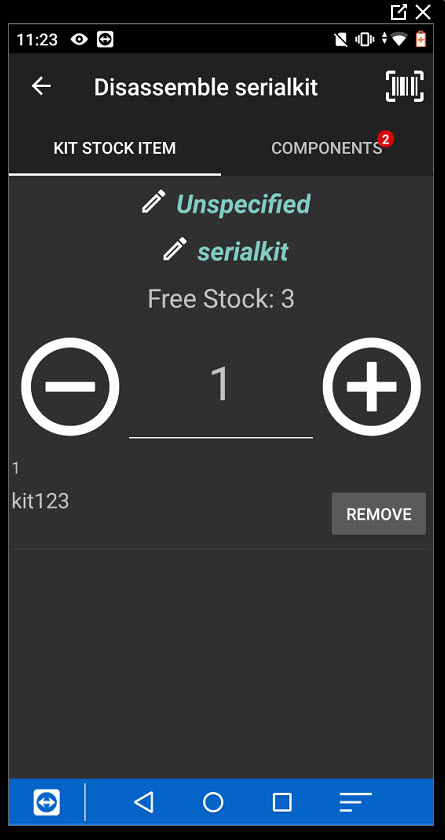
In the components tab, the component from the kit template will show.


The quantities of the kit components can be set (and batch information entered if required).
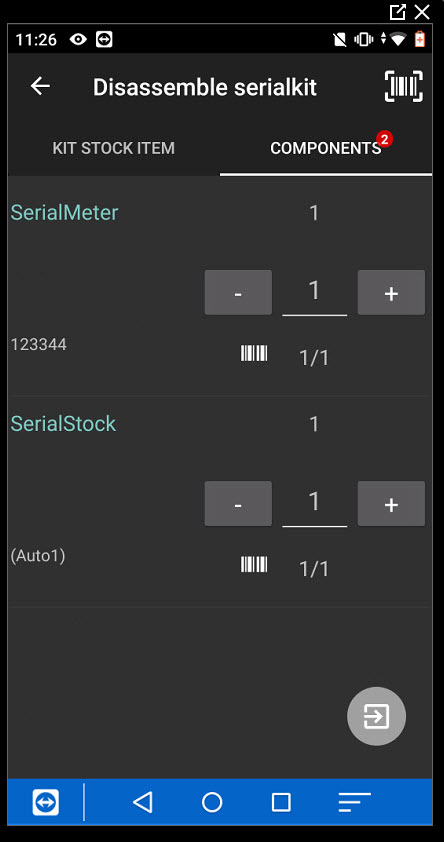
Clicking on the action button, then disassembles the kit.
8.38. Stocktake
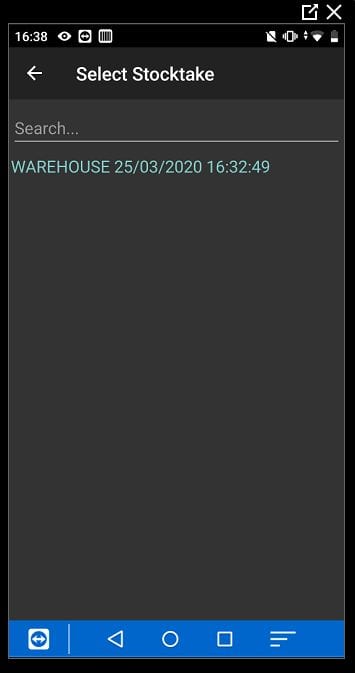
A Sage stock take is created and saved and printed in Sage.
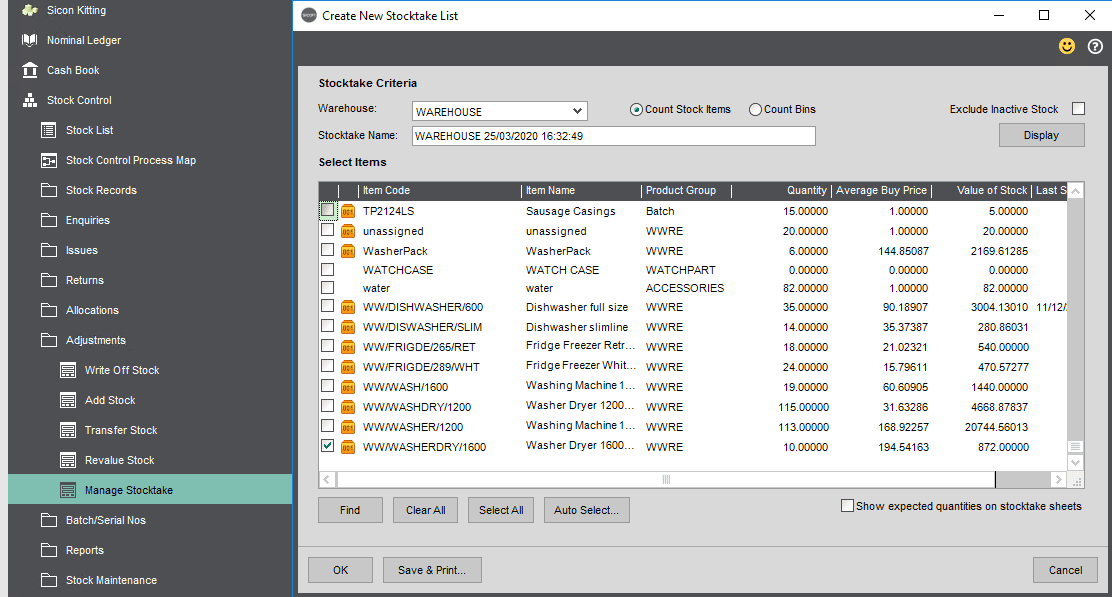
The stocktake will then appear in the handheld and can be selected.
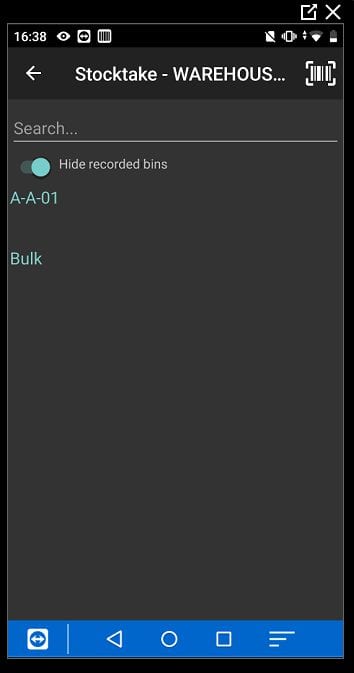
Bins can then be scanned or selected and the items in these bins counted. Where the stock item is a batch or serial item, the batches or serials need to be recorded.
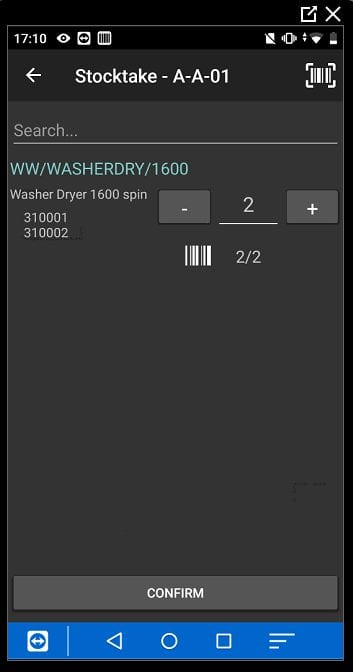
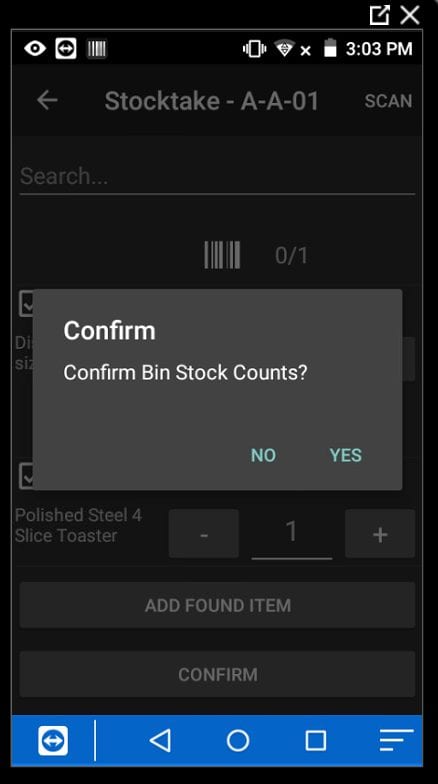
Confirming the counts, updates the actual quantities into Sage.
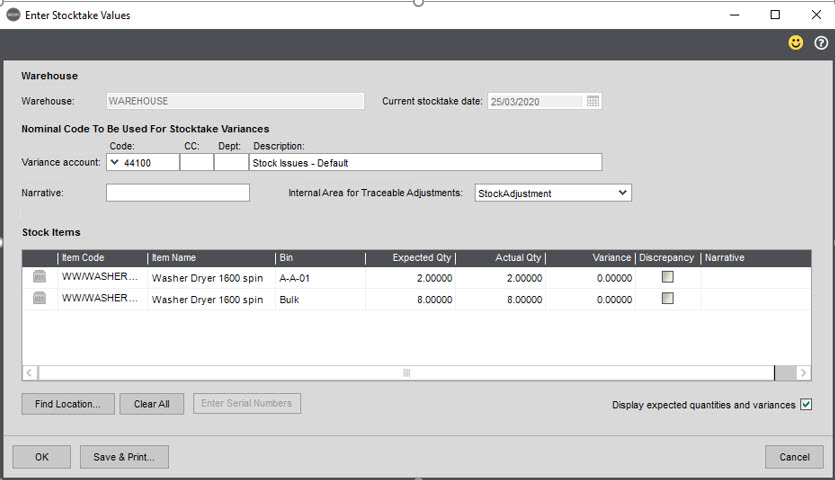
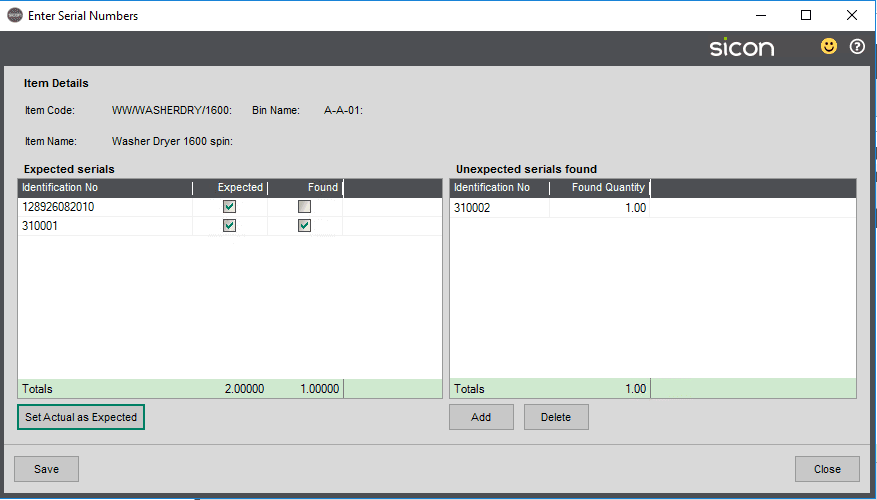
An enter serial numbers, and an internal area for traceable adjustments to dictate where to post nominal adjustments has been added to the above standard Sage screen.
For serial numbered items, when completing the stocktake in Sage, the system displays the serial numbers to add/write off.
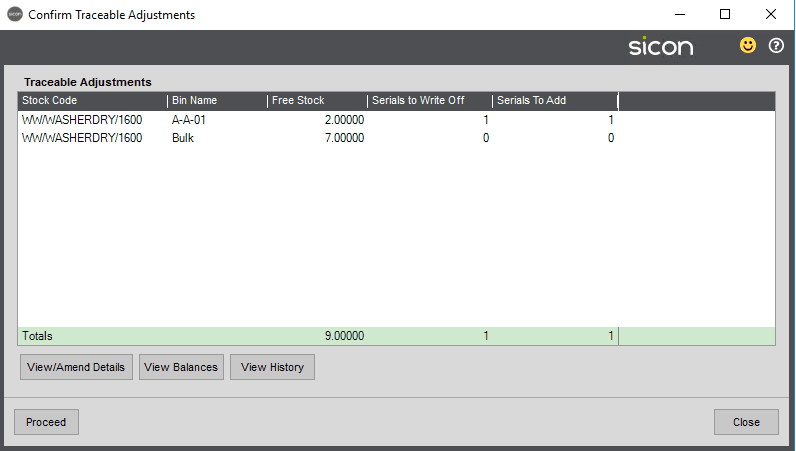
You can then view the details in each bin of the items to add/remove. You can also access this screen from the enter serial numbers button in the Sage enter stock values screen.
You can then complete the stock take and the system will adjust in/out the traceable stock as required using the nominal set against the internal area to post journals where the nominal is integrated to the nominal.
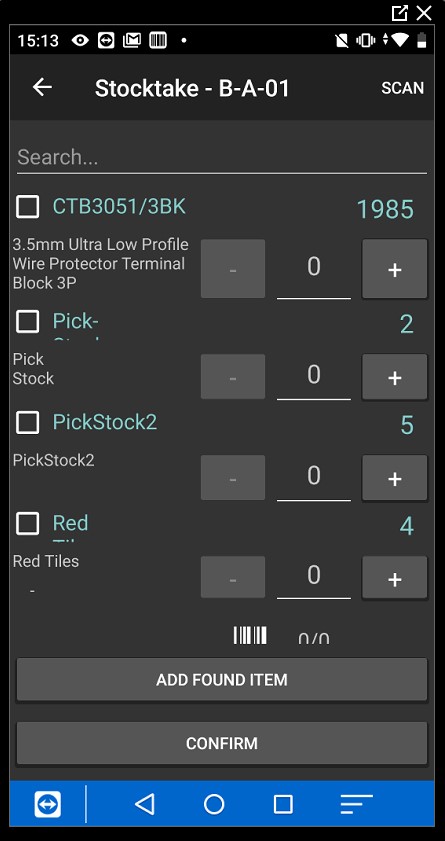
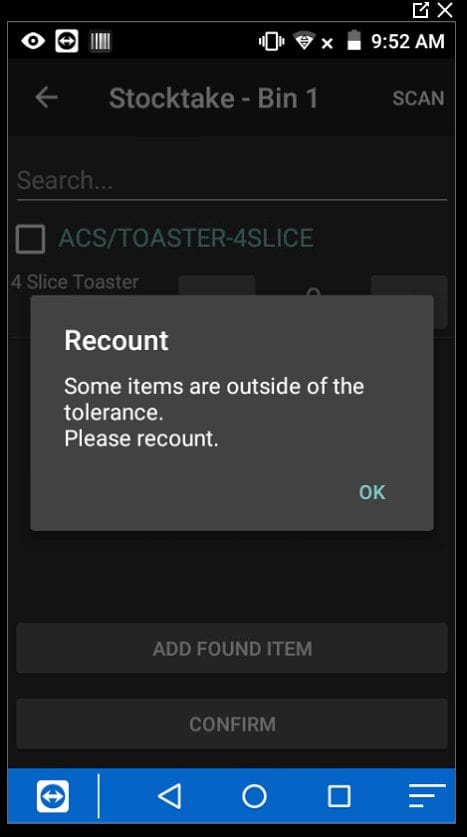
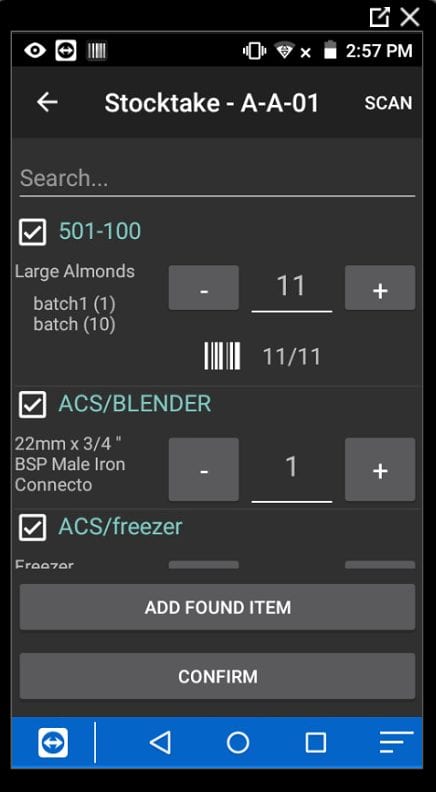
8.39. Dynamic Stock Take
Allows Sicon dynamic stock takes to be created from within the handheld. Clicking on dynamic stocktake, will display any open dynamic stock takes that can be selected. Clicking on the Plus button allows a new dynamic stock take to be created. Clicking on the plus button allows a new dynamic stock take to be created.
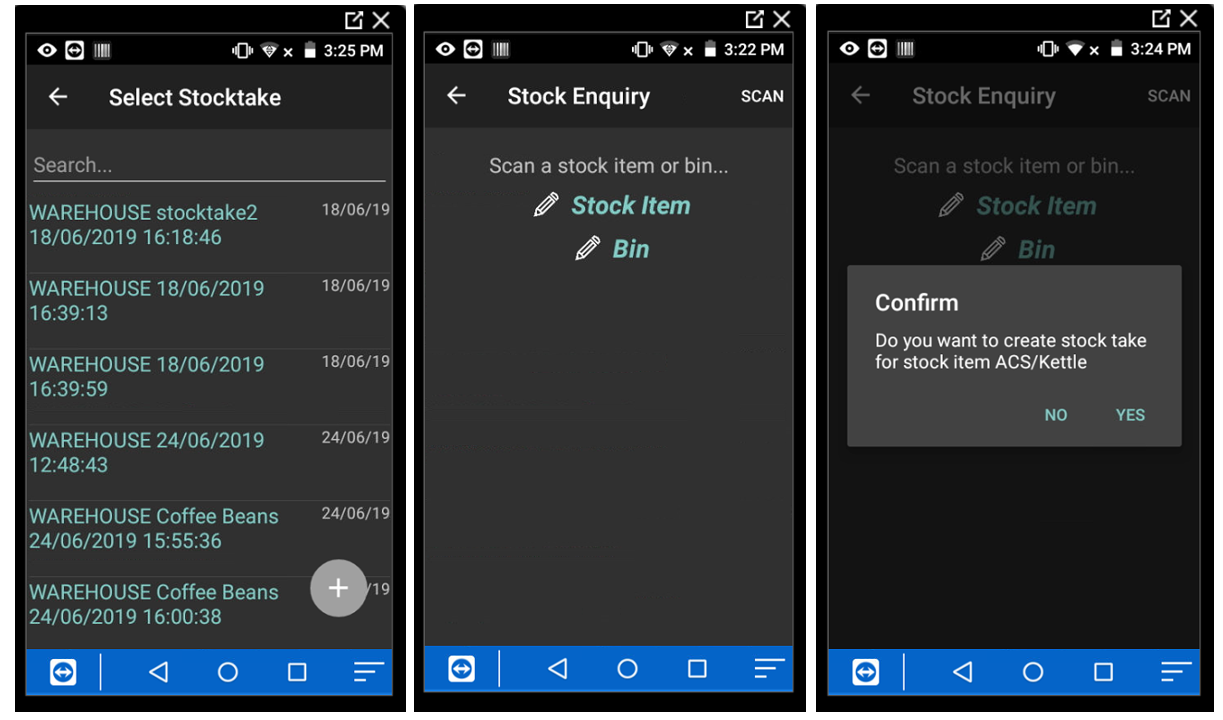
Selecting a dynamic stock take from the list, then prompts the user to select the bin to count.
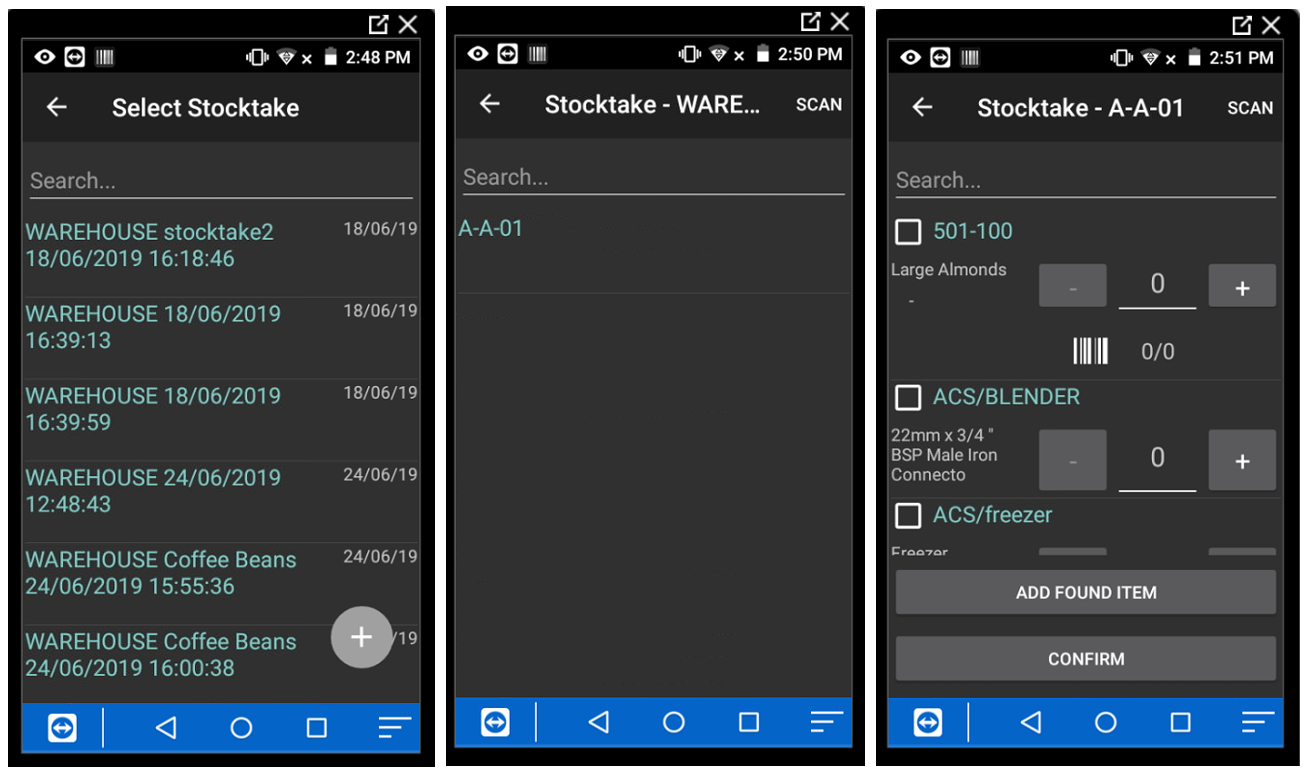
If items are found in the bin that are not expected, these can be added using the add found item button, scanning the found item and confirming.
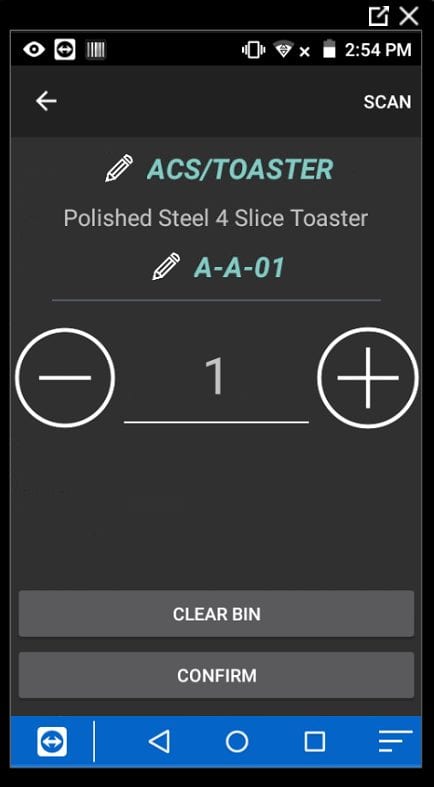
Once the items have been counted a tick appears to confirm they have been counted.
If an item has a zero quantity, the line can be set as confirmed by long holding the line and selecting confirm in the top right hand corner of the handheld.
N.B. return bins that have a priority of 1 or 9 (with smart picking on), will not show lines with a zero quantity if the dynamic stock take has been created on the app.

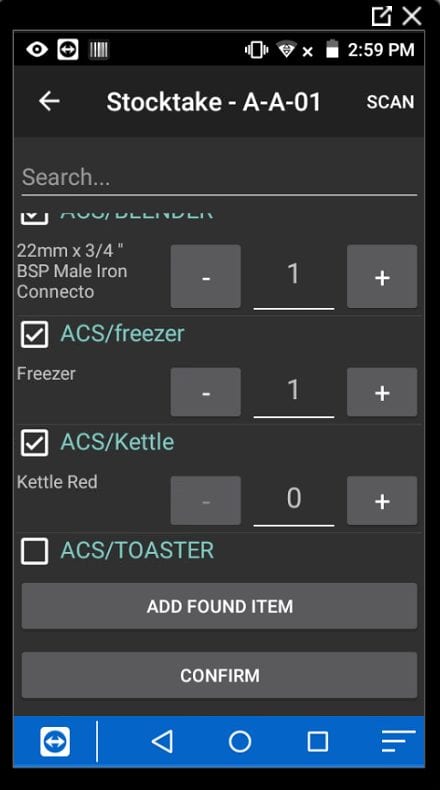
Once all the items in the bin have been counted, clicking on the main confirm button updates the quantities to the Sicon stock take.
The dynamic stock takes can be reviewed in Sage in the dynamic stock take results window.
8.40. Replenishment
Replenishment records that have been created in Sage can be selected in this screen.


The replenishment bin/bins are displayed in the screen, scanning a bin, then opens the screen to select the stock items.
The stock quantity can be scanned or entered, the movement can then be confirmed to move the stock from the bulk bin to the picked:replen bin.
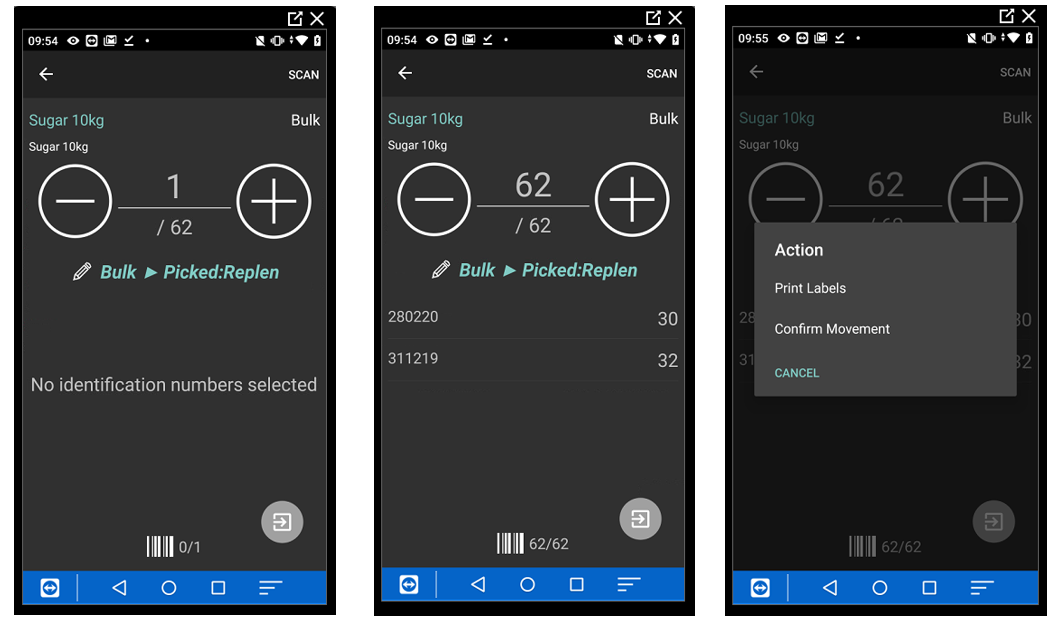
The stock can then be put away into the desired pick face bin.
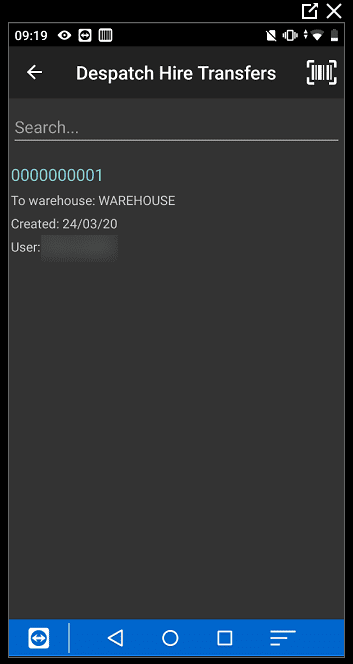
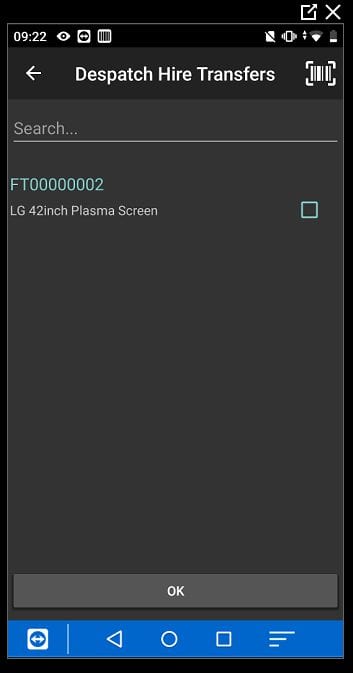
8.41. Despatch Hire Transfers
Allows transfer of fixed assets set for hire between warehouses.
Assets to transfer between hire warehouses are first created in Sage within the Sicon hire module.
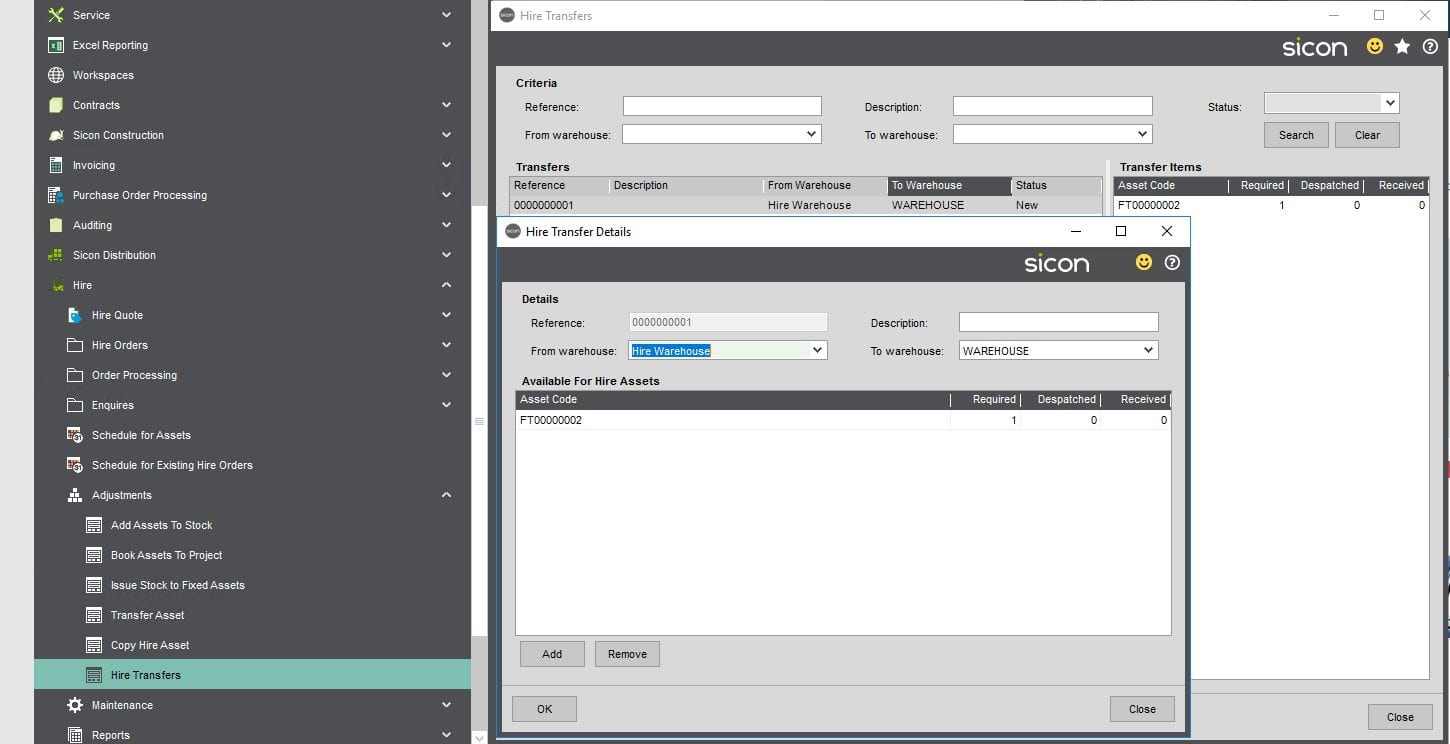
The transfer then appears in the handheld and the asset can then be selected. Clicking on ok moves the stock into the in transit warehouse (as set in the Sicon Hire settings, fixed assets tab).
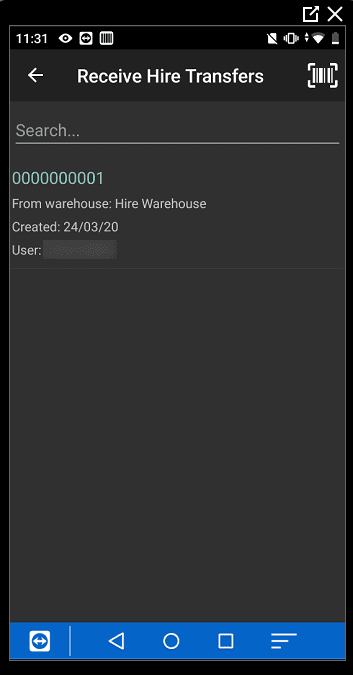
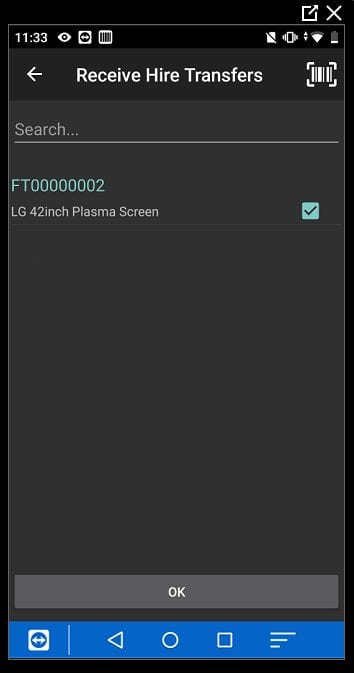
8.42. Receive Hire Transfers
The user can then log into the receiving warehouse and receive the hire transfer.
8.43. Stock Enquiry
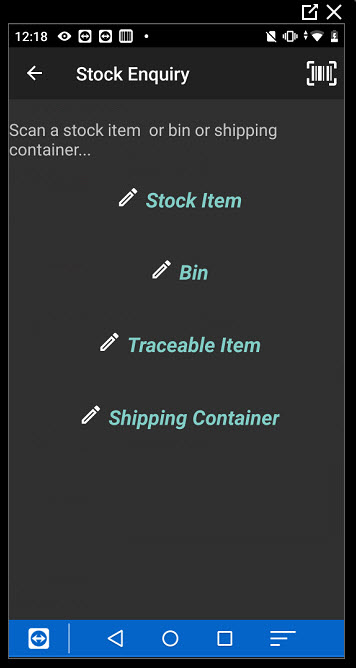
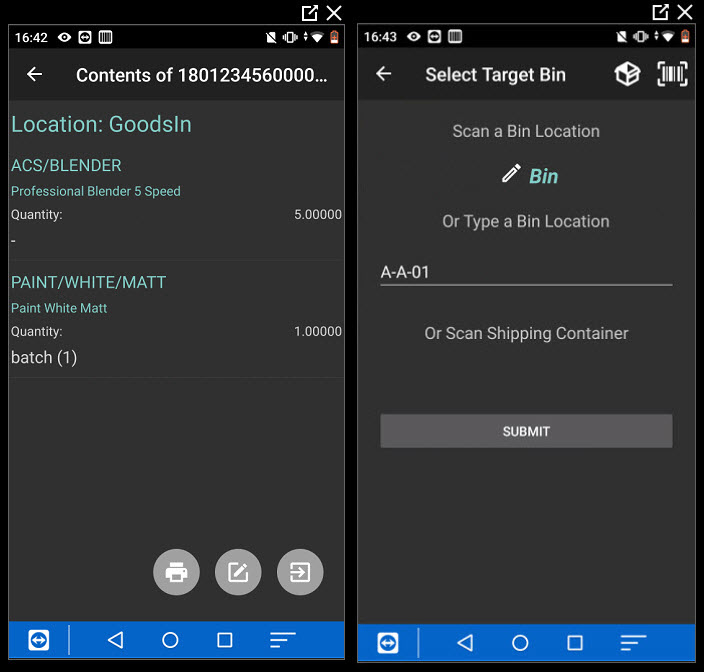
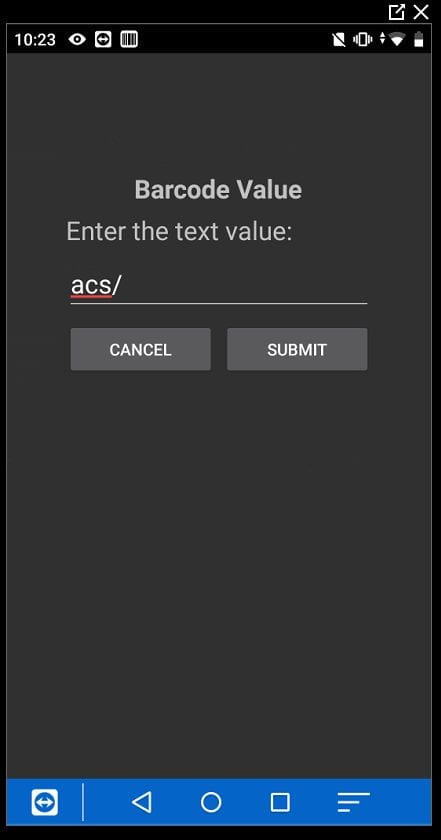
Allows you to scan/enter a bin or stock item or batch/serial number or shipping container (when enabled) to enquire on the item. When entering the stock item manually you can enter part of the stock code and then select submit, the system will then show a list of matching stock items.

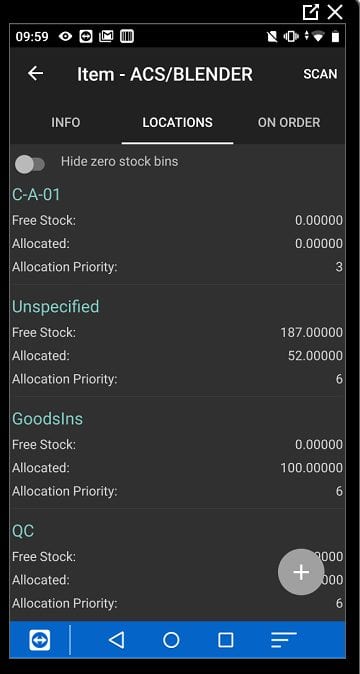
When entering a bin, the system then shows the stock items in the bin. The quantities of the stock and also whether the stock is free stock or allocated to a transaction such as a SOP or Sicon transaction.

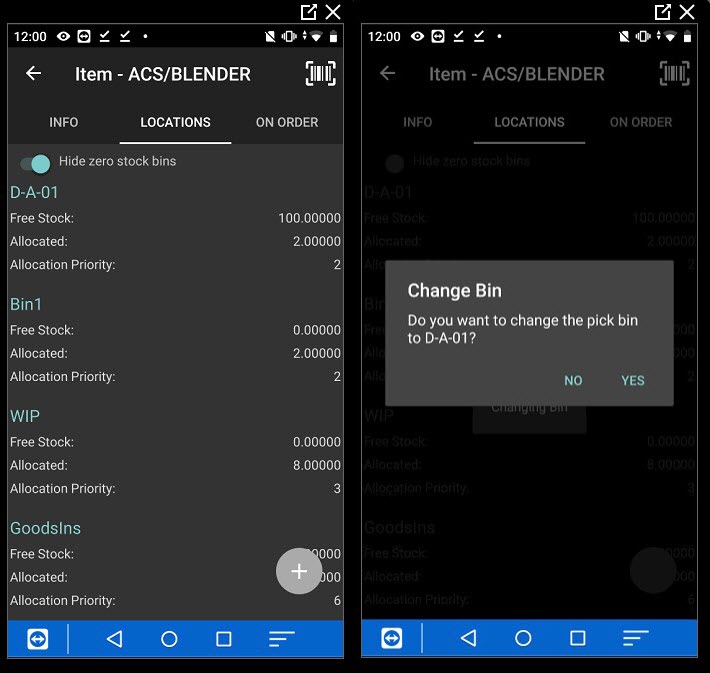
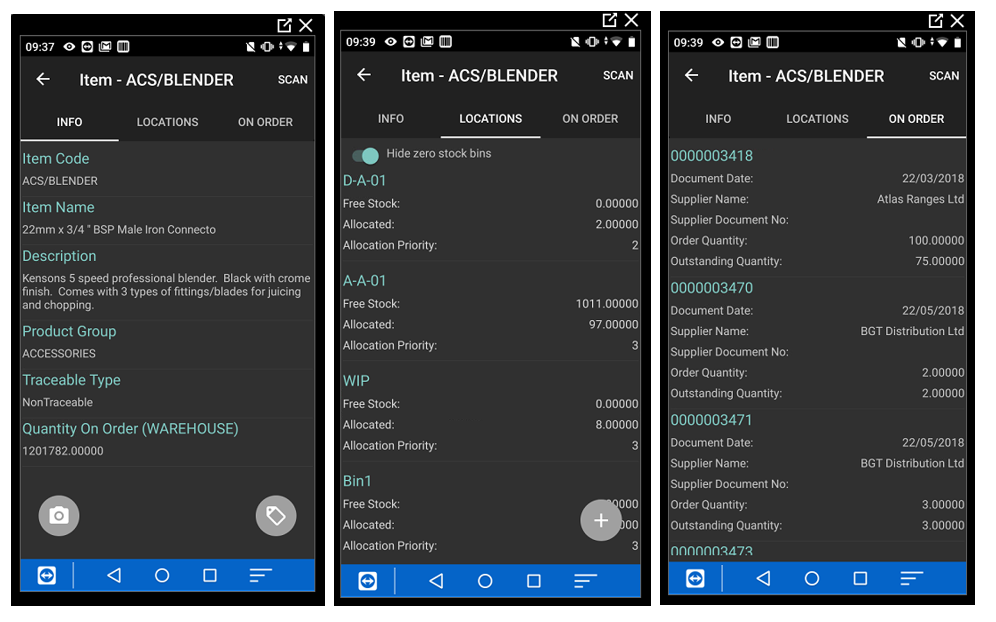
If a stock item is entered/scanned, the system displays information about the stock item and where they are located.
The locations screen, shows the bins set against the stock item, the allocation priority, and whether the stock is free stock or allocated. Highlighting a bin, the gives the option to change the bin priority, when setting a new priority, the system pops up a message to ask if the bin priority on all stock items in the bin should be changed.
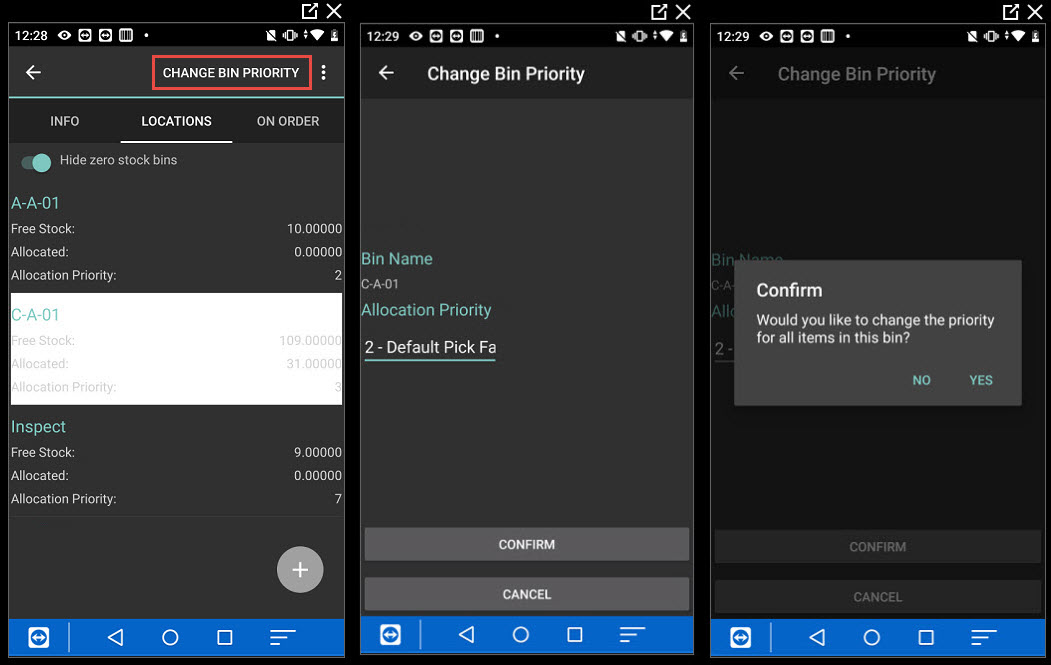
In the example, above bin A-A-01 has been changed to the main pick face bin (priority 2). By changing this bin to priority 2, the system has then change all other pick face bins (priority 2) to overflow bins (priority 3).
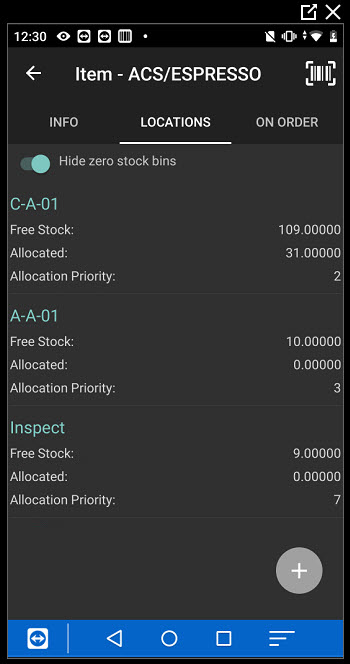
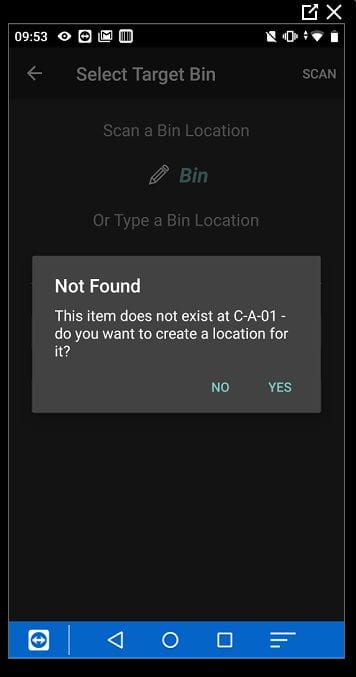
You are able to add bin to the stock item by using tapping on the plus icon. You can the scan or enter a bin to add it to the stock item to create the bin against the stock item (the bin must exist in the maintain locations screen to be added -if the user setting to allow creating bins even if bin does not exist in the maintain location list has not be set). The new bin can be seen, if the option to hide zero stock bins is disabled.
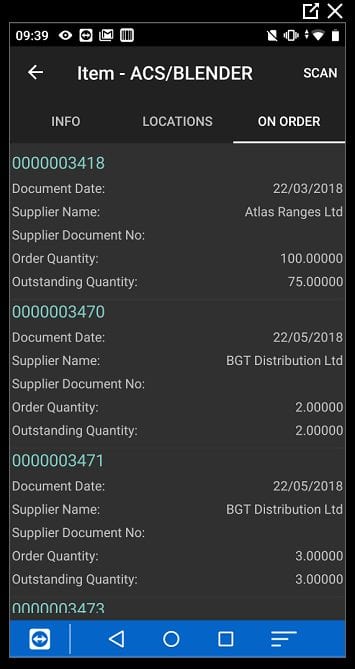
The on order screen, shows a list of purchase orders when the stock is due in, and the order and outstanding quantity.
When a batch or serial number is scanned/entered, the system will identify the stock item and show details.
Where the stock item has attributes, these can be seen and amended from the locations tab.

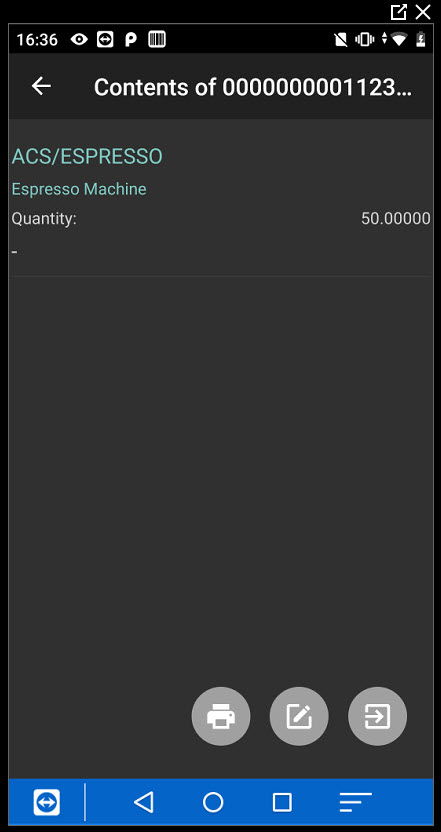
If enable shipping container has been set. A shipping containers barcode can be scanned.
This will then show the contents of the shipping container.
When an ad hoc label has been configured in the barcode label settings within Sage, a print label icon will appear in the stock info screen.
 You can then print a label for the item.
You can also take a picture of the stock from the stock enquiry screen, by clicking on the camera button in the bottom left corner. Saving the picture, replaces the camera icon with the photo.
The stock image has been saved to the stock image on the stock item.

The image can also be viewed when picking the stock item, by clicking on the image icon to the right of the product code.
Barcodes can also be added to stock items from the stock enquiry screen. To do this select a stock item by entering it manually.
A barcode can then be scanned from this screen and linked to the stock item.
8.44. Change Warehouse
Allows a user to switch between warehouses depending on the users access to these companies in the barcode settings .

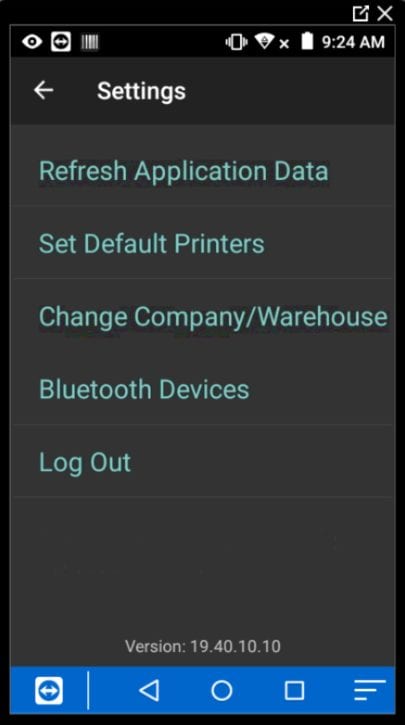
8.45. Settings
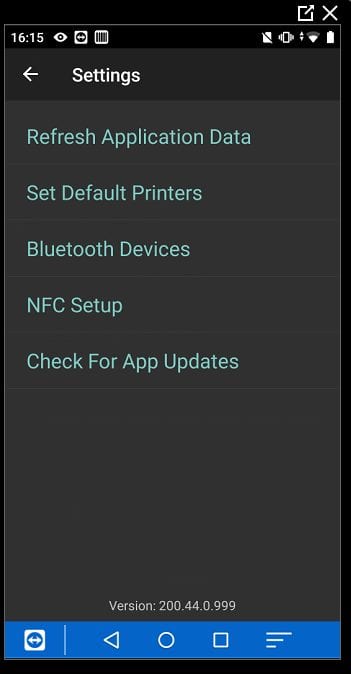
Refresh application data, will update the data on the handheld.
Set Default Printers | allows printers to be selected against the user logged into the handheld.

Change company/warehouse, allows a user to switch between companies/warehouse. Previously logged into warehouses will show.
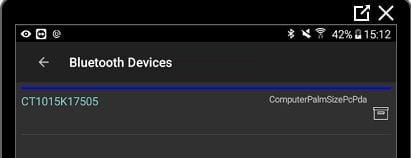
Bluetooth devices, is used to link devices to the handheld. A blue line shows when a device is connected.
NFC Setup: Allows NFC tags to be configured so that they can be used to log in users.
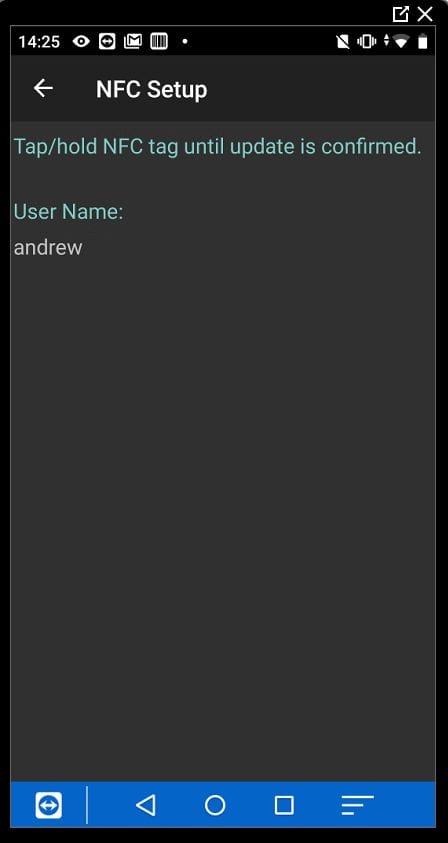
For NFC compatible devices, linked the tag to use user in this screen

You can then use the NFC for logging into the device from the login screen.
Check for App Updates
This will check for any app updates and return a message where the app needs updating. When no update is required no message is returned.
The version number of the app is displayed at the bottom of the settings screen. This should match the Sage version number seen in the settings page.
8.46. Log Out
Logs the user out and takes the user to the login screen.
8.47. General Points
During the picking process a SOP/WO/KIT/ST/Transfer temporary pick bin is created. These are deleted once the transaction has been processed.
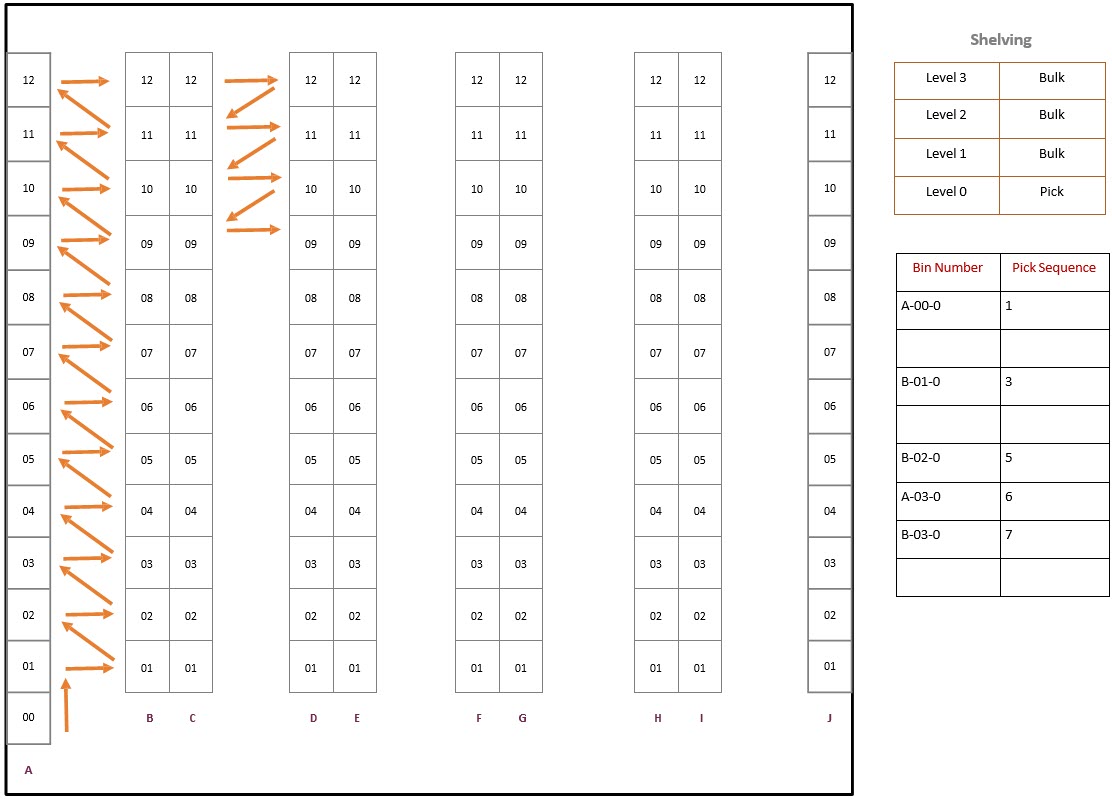
9. Warehouse Layout and Bin Numbering for Sicon Barcoding & Warehousing Projects
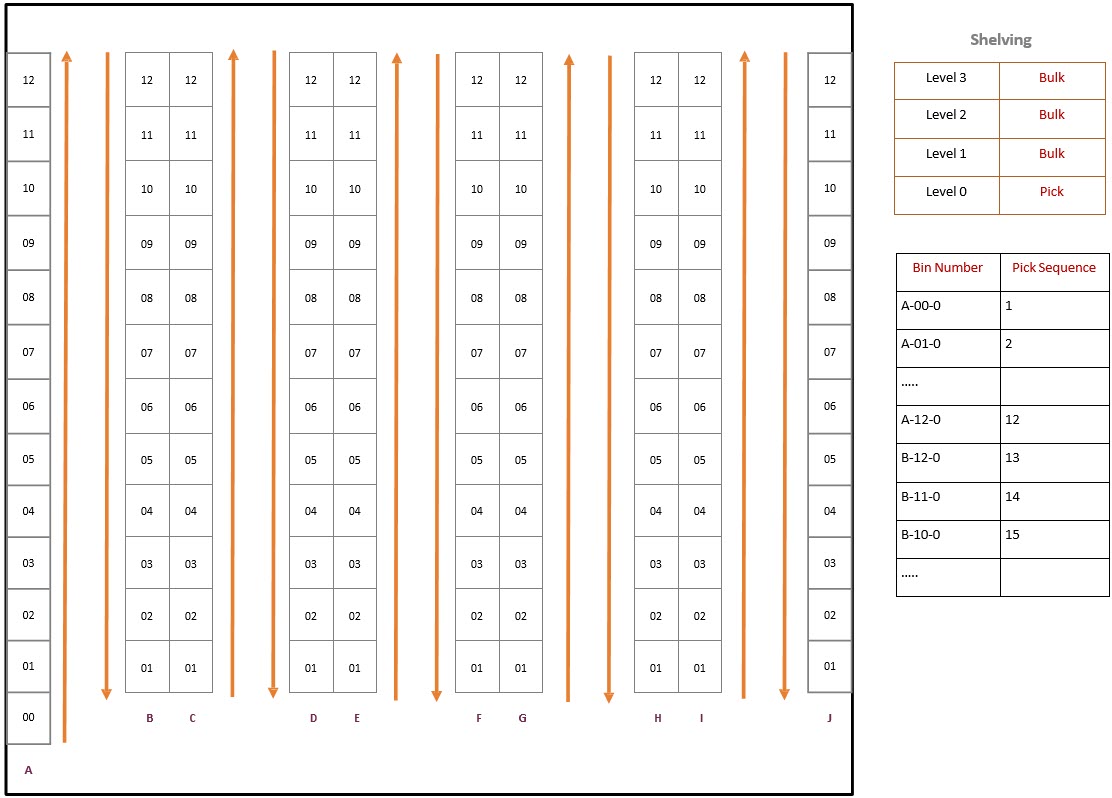
The warehouse will usually have Isles, Bays and Shelves and the logical way to define these would be in this order. It makes it easy for new staff or those unfamiliar with the warehouse to quickly locate a specific bin location.
The Barcoding App will guide the users to put away or pick using the bin loca- tion sequence (alpha numeric) which may not be the most efficient order in which to move around the warehouse and pick or put away.
For example some sites will travel down one side of an Isle and then back up the other. Others may choose to move across the Isles and pick from bins on both sides as they move down the Isle. This is typical when the Isle’s are not very wide and there is not room for people to move both up and down and pass each other in an Isle.
In order to allow for maximum flexibility we allow a ‘Pick Sequence’ to be added to each bin location. If this is populated then the barcoding App will follow the pick sequence and not the bin location sequence.
Our recommendation would be to keep the layout logical, as in the examples below, and change the pick sequence via the import until you achieve the most optimum warehouse movements.
10. Barcode Scanner
You can either use an External Bluetooth Scanner (e.g. JM Prime S700-CCD-BT) or a Built-In-Scanner (e.g. Seuic devices) with the Sicon Barcoding & Warehousing module. This section explains how to connect both types of scanner.
10.1. External Bluetooth Scanner (e.g. JM Prime S700-CCD-BT)
- Ensure your handheld scanner is turned on, this is usually done by holding down the trigger until it beeps and a light turns on.
- Turn on Bluetooth on your handheld device and pair it with the scanner using the pairing code found in the scanner instruction manual. It will then be paired.
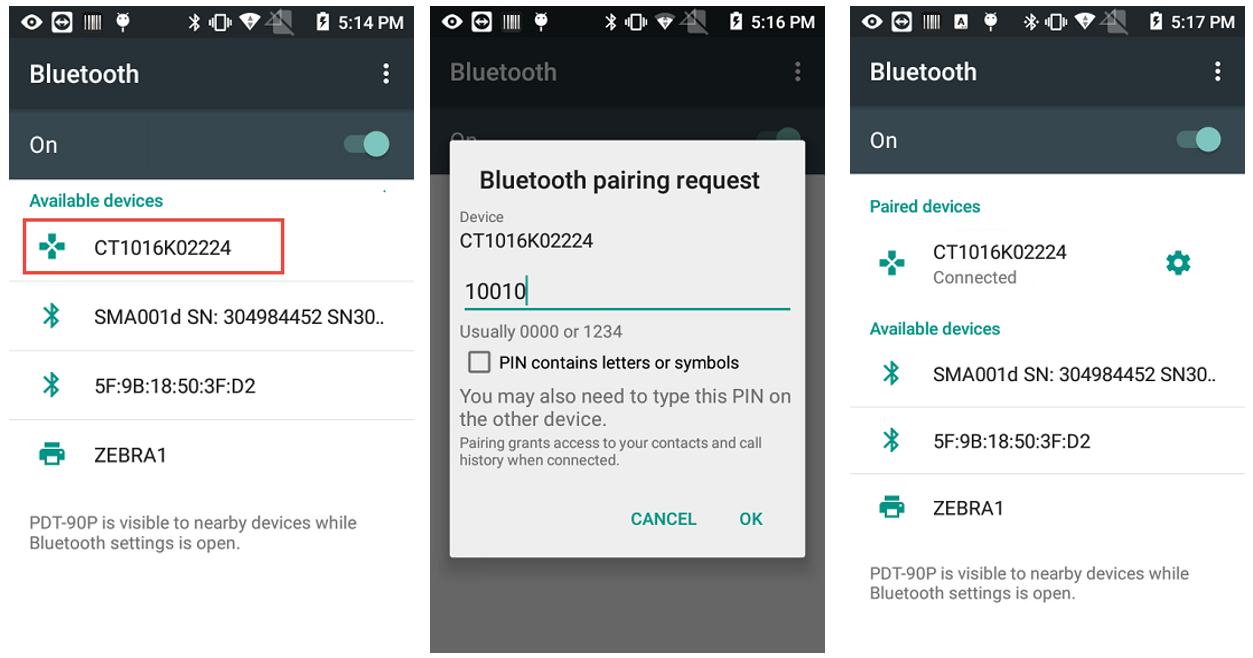
- Depending on the scanner configuration, you may notice a keyboard icon in the notification bar. This means the scanner is acting like a keyboard, which will disable the on-screen keyboard. If your scanner has a “Serial” or “SPP” mode, this may be preferable as it will not disable the on-screen keyboard. The following steps will configure this mode. If your scanner does not have this mode, configuration is complete.
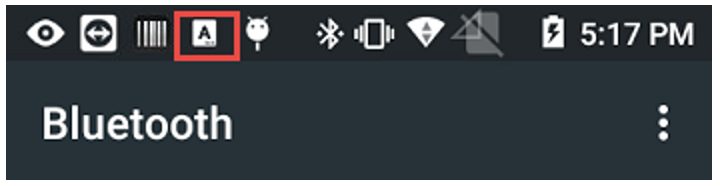
- Enable SPP/Serial mode on the scanner, this is usually done by scanning a combination of barcodes found in the instruction manual. You will find that the keyboard icon in the previous image has gone.
- Inside the Barcoding application, navigate from the Main Menu to “Settings” and then “Bluetooth Devices”. It will show a list of paired devices. Tap the list item for the scanner and the scanner will beep as it connects. There will now be a blue line at the top of the screen, which means the scanner is connected to the application.
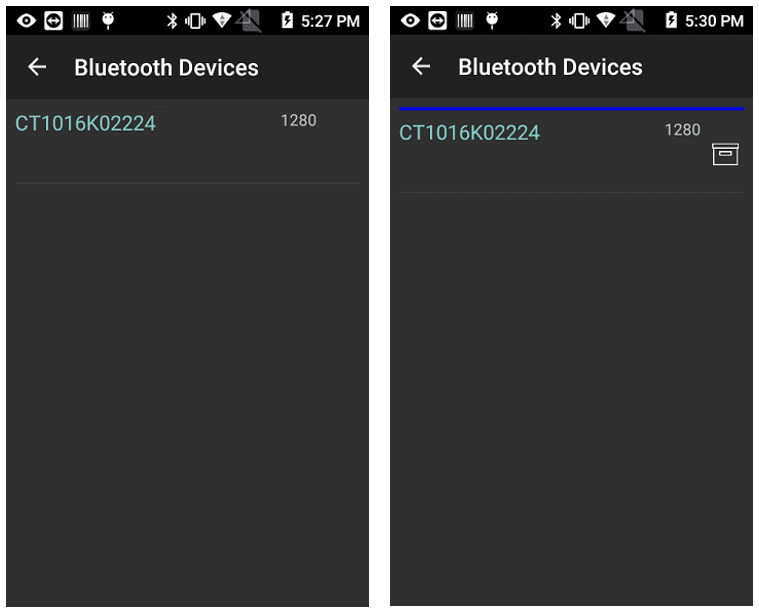
- From now on, when the application starts or wakes from sleep, it will try to connect to that scanner automatically. If the scanner is not turned on at that time, it will fail to connect. If you wish to reconnect the scanner while the application is running, you can tap the “Scan” button on any screen that accepts barcode.
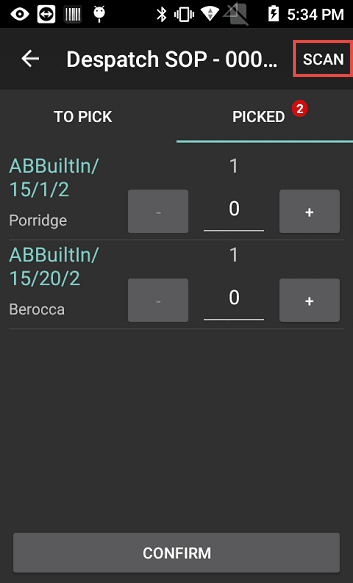
10.2. Built-In Scanners (e.g. Seuic devices)
Being built-in, the scanner itself will not need configuring, but there are some software settings to consider.
- Open the “Scan tool” application.
- Ensure the ‘Barcode Send Model’ is set to ‘Broadcast’.
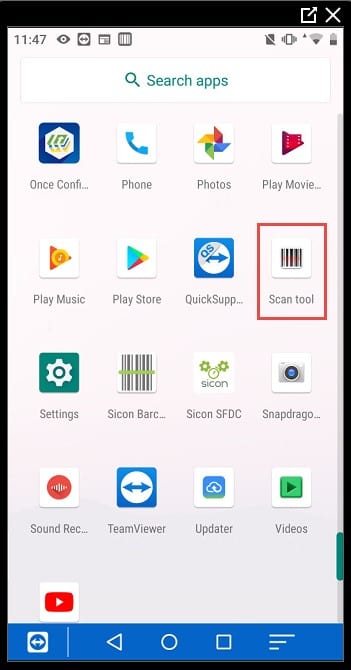
In the scan tool, you can also check which types of barcodes the device is set up to use e.g. if QR codes are to be used, then the device needs to have QR codes turned on.

11. Printing Methods & Recommended Equipment
There are two thermal printing methods that we would recommend when setting up your system, each technology can produce one and two dimensional barcode symbologies, graphics and text at the same print resolutions and speeds.
WHAT IS THE DIFFERENCE BETWEEN DIRECT THERMAL AND THERMAL TRANSFER PRINTING?
In the simplest terms, thermal transfer printing utilises a thermal ribbon and direct thermal printing does not.
Each method uses a thermal printhead that applies heat to the surface being marked. Thermal transfer printing uses a heated ribbon to produce durable, long-lasting images on a wide variety of materials. No ribbon is used in direct thermal printing, which creates the image directly on the printed material. Direct thermal media is more sensitive to light, heat and abrasion, which reduces the life of the printed material.
WHY DIRECT THERMAL AND THERMAL TRANSFER ARE THE BEST TECHNOLOGIES FOR PRINTING BARCODES?
Thermal label printers are ideal for barcode printing because they produce accurate, high-quality images with excellent edge definition. Thermal printers are engineered to print within tight tolerances and to produce the exact bar widths that successful barcode printing and scanning require. Each technology can produce one and two dimensional barcode symbologies, graphics and text at the same print resolutions and speeds.
11.1. Direct Thermal Printing
NB: this requires a Thermal Label
- This method of printing requires a heat sensitive label material. The print head elements come into direct contact with the heat sensitive material where the heat from the elements causes a colour change in the material to create the printed image.
- Direct thermal printing uses chemically treated, heat-sensitive media that blackens when it passes under the thermal printhead.
- Direct thermal printers have no ink, toner or ribbon.
- Their simple design makes thermal printers durable and easy to use.
- Because there is no ribbon, direct thermal printers cost less to operate than inkjet, laser, impact and thermal transfer printers. Most mobile printers use direct thermal technology.
- Thermal media images may fade over time. If the label is overexposed to heat, light or other catalysts, the material will darken and make the text or barcode unreadable. For these reasons, direct thermal printing is not used for lifetime identification applications. The readability of direct thermal labels, wristbands and receipt papers varies greatly depending on the usage conditions. However, the technology provides ample lifespan for many common barcode printing applications including shipping labels, patient and visitor identification, receipts and ticket printing.
- Direct thermal labels can easily remain scannable after spending six months in storage in a distribution centre.
- Common thermal printing applications include: shipping labels, including compliance labels; receipts; pick tickets; coupons; event tickets; citations and parking tickets; name tags; visitor passes; ….and more.
11.2. Thermal Transfer Printing
NB: this requires a Thermal Ribbon
- This method involves the thermal print head elements (dots) heating the backside of a thermal transfer ribbon to melt and transfer the compounds on the front side of the ribbon to the label material, thus creating the printed image.
- A thermal printhead applies heat to a ribbon, which melts ink onto the material to form the image. The ink is absorbed so that the image becomes part of the media. This technique provides image quality and durability that is unmatched by other on-demand printing technologies.
- Thermal transfer printers can accept a wider variety of media than direct thermal models, including paper, polyester and polypropylene materials. Thermal transfer printers can create extremely durable wristbands, asset tags and certification labels, in addition to common labels, tags and tickets.
NB: The specific label material and ribbon must be carefully matched to ensure print performance and durability.
- By selecting the right media-ribbon combination, as well as speciality adhesives, users can create archival-quality labels to withstand temperature extremes, ultraviolet exposure, chemicals, sterilisation and more.
- Typical thermal transfer applications include: product identification; circuit board tracking; permanent identification; sample and file tracking; asset tagging; inventory identification; certification labels such as UL/CSA; laboratory specimens; cold storage and freezers; and outdoor applications.
Source:https://www.zebra.com/gb/en/research-library/getting-started/direct-thermal-thermal-transfer/direct-thermal-faq.html
11.3. Recommended Printing Equipment
We recommend GSM Printer & Label Systems Ltd, who have kindly provided us with some very basic information regarding typical printing solutions for the ZD420.
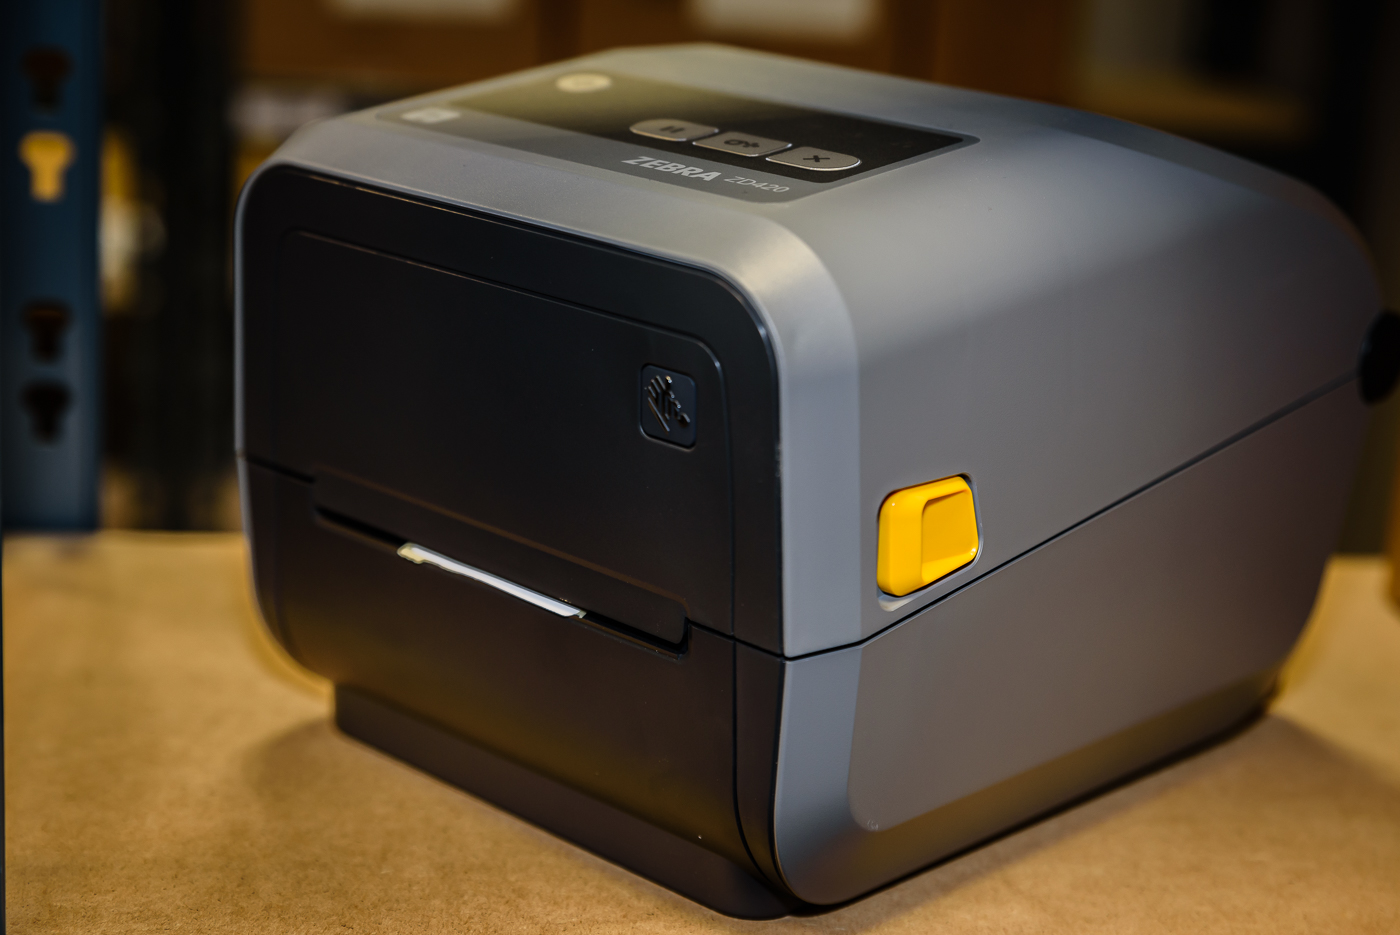
| Description | Approx. Guide Price* | |
| PRINTER | Zebra ZD420 Desktop Printer, 4” Thermal Transfer, 200 dpi, with USB, USB Host, BTLE, WLAN (802.11ac) & Bluetooth v4.1. | Approx. starting price: £337.00 |
| Zebra ZD420 Desktop Printer, 4” Thermal Transfer, 300 dpi, with USB, USB Host, BTLE, WLAN (802.11ac) & Bluetooth v4.1. | Approx. starting price: £374.00 | |
| LABELS | Topcoated direct thermal paper label for short term indoor labelling. | Approx. starting price: £40.00 |
| Economy thermal transfer paper labels for short term indoor labelling. | Approx. starting price: £70.00 | |
| Topcoated thermal transfer paper labels for short term indoor labelling. | Approx. starting price: £76.00 | |
| White/Silver Polyester label for indoor and outdoor use with good chemical resistance and superior resistance to scratching and smearing. | Approx. starting price: £245.00 | |
| Polypropylene labels with extreme low temperature permanent adhesive. | Approx. starting price: £420.00 | |
| RIBBONS | 2000: Economy wax ribbon cartridge (for ZD420 Desktop printers) / Black / 110mm x 74Mtr [Box of 6]. | Approx. starting price: £24.60 |
*Zebra stock labels are supplied with permanent adhesive as standard. **Pricing is excl. VAT and is dependent on exchange rate, size and quantity. BOX qtys vary.
To request an accurate quote based on your sites requirements, please contact:
GSM Printer & Label Systems Ltd
e: sales@gsmgroup.co.uk
When contacting GMS Barcoding, please confirm that this is a Sicon Project to ensure you get the best possible deal.
NB: this is merely an introductory guide to the typical applications GSM Printer & Label Systems Ltd can cater for, there are many different combinations available. The pricing included is a rough estimate based on the smallest label size from each category.
11.4. Installing the Zebra Label Printer ZD420
This section is to assist you in setting up Zebra ZD420 Series Desktop Label Printers, which we recommend using with the Sicon Barcoding & Warehousing module for Sage 200.
Install the Zebra Setup utilities (from CD):
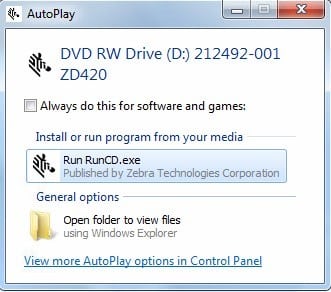
Go through Wizard to install:
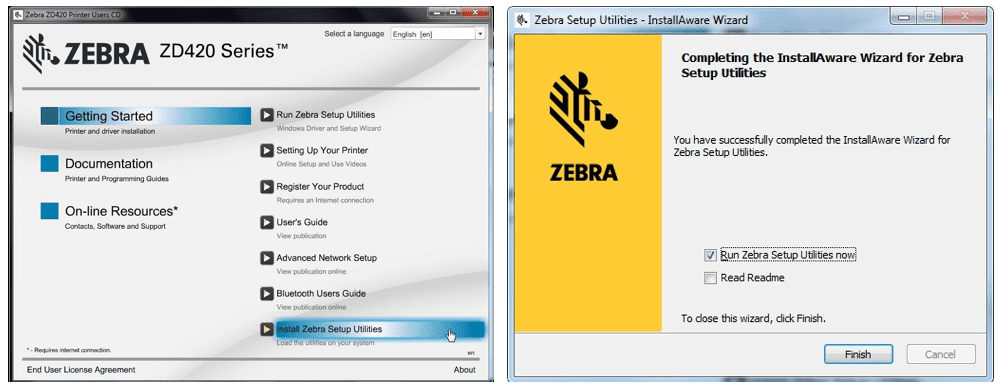
Run the Zebra Setup Utilities from Desktop or Program Files:
The below should open:
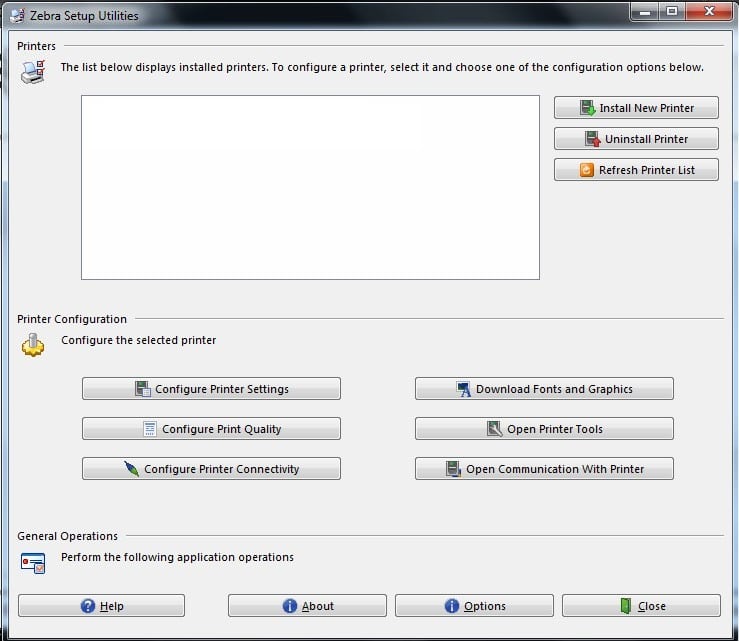
Connect the Printer Via USB and install. (Sometimes they will Automatically install and appear) Once installed the Printer(s) will be listed in the white box:
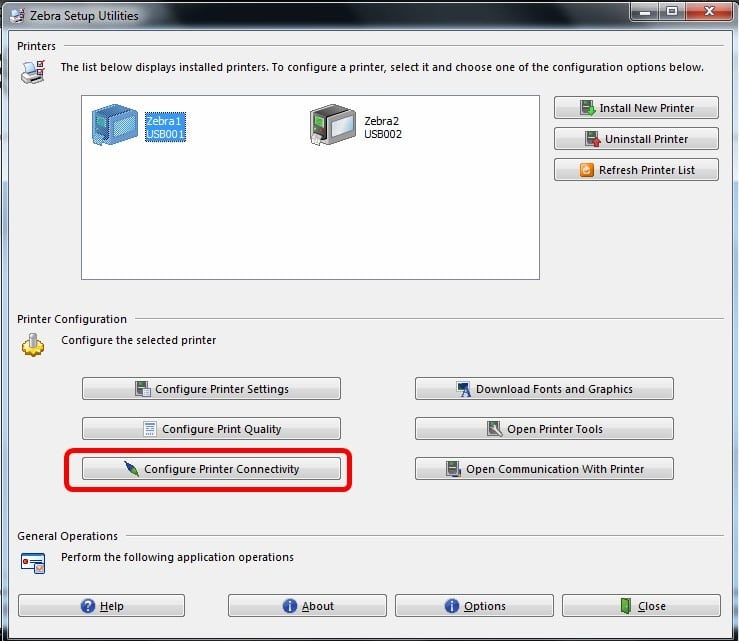
Click on Configure Printer Connectivity and select your connectivity type:
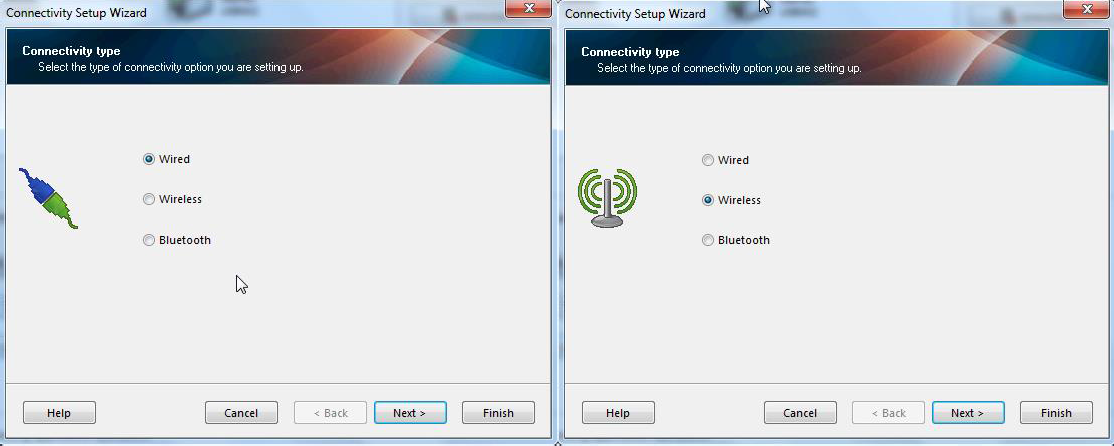
Printers are usually installed with a Static IP.
Select Static and enter IP Configuration. (Please acquire Wi-Fi and IP Info from your IT Dept):
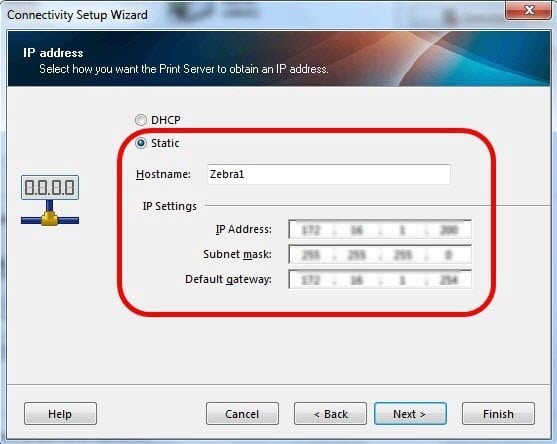
If you chose Wireless then select your band:
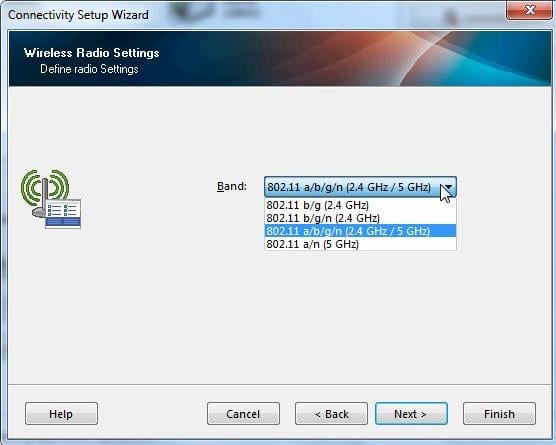
Choose Country and enter Wi-Fi Channels.
Enter ESSID and your wireless mode:
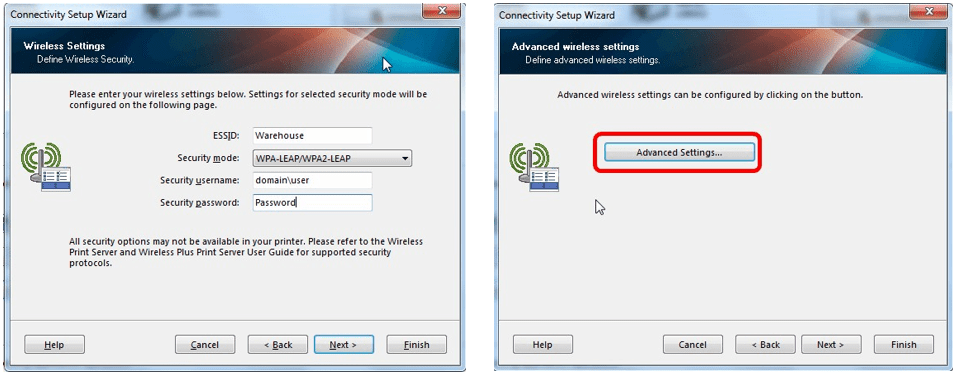
Make sure the operating mode is set to Infrastructure:
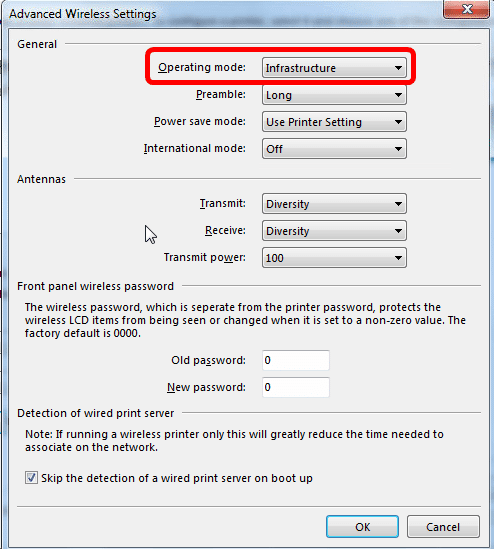
Ok the above, then click Next:
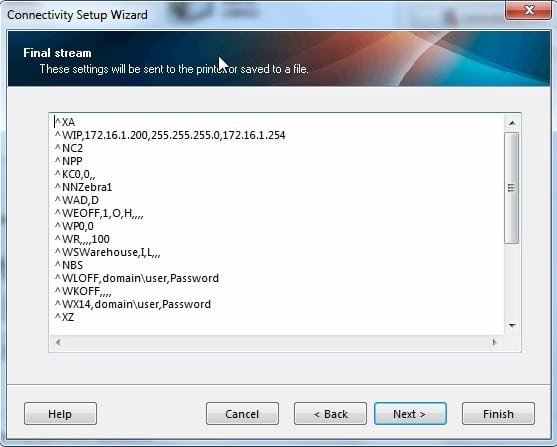
Make sure Printer is selected below:
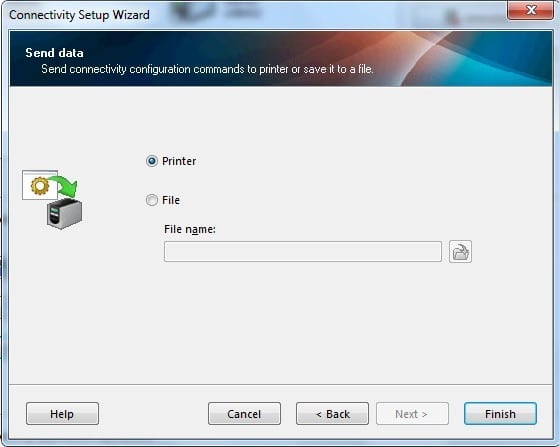
After you press Finish the settings will be sent to the Printer Via USB and it will restart itself. Repeat for another printer calling it something different with a new IP address.
12. WIFI Requirements & Specifications
Why do I Need a Good Quality Wireless Network?
With our Barcoding & Warehousing solution your warehouse staff will be moving around your warehouse areas with racking, walls and boxes full of various materials that will endeavour to obstruct the Wi-Fi signal strength. Basic wireless network infrastructures do not allow the wireless devices to jump from access point to access point without any loss of data, causing them to reload data or interfere with the use of the application. To avoid this, it is important to put in a suitable wireless network infrastructure.
For small warehouses, a single wireless router or access point located centrally may be sufficient to provide good coverage throughout the entire area, so please get advice and a survey before spending more than you need to.
We have put together two examples for Warehouse Wifi setup below.
Interference, Data Tunneling and Seamless Roaming are the biggest factors to consider and both of the below solutions manage it all. The biggest difference is that Cisco is all Cloud Managed and Subscription based, whereas Ruckus is perpetual.
NB: Sicon do not provide any barcoding hardware or wireless network infrastructure, but we can offer advice and recommend suppliers who are experts in this field if you require assistance.
12.1. Ruckus Wireless Infrastructure for Warehouse Barcode Systems
 There are a few things to consider when you want mobility with wireless and even more so when you need it in a warehouse.
Ruckus’ Zoneflex – Making WiFi Work in Hostile RF Environments: In warehouses, getting wireless to function as it’s supposed to can be difficult. Between huge areas filled with metal racks, a myriad of handheld WiFi devices, moving vehicles, constantly-changing environmental conditions and no pervasive Ethernet network, connectivity is an enormous challenge.
Ruckus offers users:
- MOBILITY! All clients connected to access points are bridged to the Zone Director for seamless roaming, (Data Tunneling).
- Industrial-strength WiFi that provides longer-range signals that can be steered around obstacles and interference.
- More flexible deployment options with Smart Mesh Networking that eliminates the requirement to run Ethernet cable to connect wireless access points.
- Ubiquitous WiFi coverage with fewer wireless access points, for lower CAPEX.
- Indoor and outdoor Smart WiFi wireless access points that are managed as a unified system.
- Centralized control of ZoneFlex Smart WiFi wireless access points.
- Powerful, yet simple controlled guest networking capabilities.
- Automatic interference avoidance with BeamFlex.
- Integrated into every Smart WiFi wireless access point is a sophisticated high-gain directional antenna system, which constantly focuses and directs WiFi.
Source: http://micro.ruckuswireless.com/enterprises/warehousing
12.2. Meraki Wireless Infrastructure for Warehouse Barcode Systems
 Cisco Meraki’s powerful, automated RF optimisation system delivers high performance in high density environments and under challenging interference conditions.
Meraki offers users:
- A fully cloud managed dashboard.
- Seamless Mobility: the ability to roam seamlessly within an environment is fundamental to today’s collaborative spaces.
- RF Optimisation: high performance in high density environments and under challenging interference conditions.
- Mesh networking, included in every Cisco Meraki AP, extends coverage too hard to wire areas and creates a self-healing network that is resilient to cable and switch failures. Cisco Meraki pioneered high performance mesh routing, with technologies such as multi-radio routing and per-flow analysis that optimise Cisco Meraki’s mesh for performance and reliability.
- Cisco Meraki’s location analytics and engagement solution displays real-time location statistics to improve customer engagement and loyalty across sites. Data collected by intelligent Meraki APs is synced with the Meraki cloud, automatically reported in the dashboard and exported to third-party applications via the Cisco Meraki Location Analytics API.
- Rapid Saleable Deployment: APs self-configure via the cloud for turnkey site installation. Manage deployments and set granular user, device and application policies using a feature-rich network management system. The flexibility and scalability of the Cisco Meraki cloud-based architecture eliminates investment in complex multi-tiered hardware and software systems.
- Cloud architecture with carrier-grade SLA – Geographically redundant data centers and seamless failover provide operators with a 99.99% carrier-grade SLA. Firmware updates are delivered seamlessly via the cloud, keeping large operator deployments up to date with the latest features and eliminating end-of-life and controller-interoperability issues.
- Concentrator based Layer 3 Roaming: any client that is connected to a layer 3 roaming enabled SSID is automatically bridged to the Meraki Mobility Concentrator. The Mobility Concentrator acts as a focal point to which all client traffic will be tunnelled and anchored when the client moves between VLANs. In this fashion, any communication data directed towards a client by third party clients or servers will appear to originate at this central anchor.
Source: http://meraki.cisco.com
13. Barcodes - The Basics
For information on what barcodes are, how they work and how to set them up, we find this site really useful:
What is a Barcode?13.1. Barcode Numbers
There are a couple of options when it comes to the numbering of your barcodes. You can simply use the stock item as your barcode reference if it is only for your internal use. However, if you need your products to be recognised by a unique code that can be used by your customers or identified globally, you will need to register them with GS1.
13.2. GS1 Barcodes
GS1 are a global, neutral, non-profit standards organisation that brings efficiency and transparency to the supply chain. Their barcode and technology tools create a common foundation, enabling you to identify, capture and share vital information about products, locations and assets. GS1 provides a common language to share information with customers, partners and suppliers using barcodes to store information such as product numbers, serial numbers and batch numbers. Barcodes play a key role in supply chains, enabling parties like retailers, manufacturers, transport providers and hospitals to automatically identify and track products as they move through the supply chain.
GS1 manages several types of barcodes. Each is designed for use in a different situation:
- EAN/UPC family: Instantly recognisable 1D barcodes used in retail all over the world.
- DataBar family: Compact 1D barcodes that can hold additional product attributes such as the weight of fresh foods.
- One-dimensional (1D) barcodes: Used exclusively in general distribution and logistics: Versatile 1D barcodes used to represent ID keys and attributes in a distribution environment.
- Two-dimensional (2D) barcodes: Compact, high-capacity 2D symbols suitable for representing all GS1 keys and attributes.
For more information, please visit http://www.gs1.org/barcodes
13.3. GS1 Costs
The following table is a guide to the GS1 Membership Fees and can be found on the GS1 website along with details of the benefits of the membership package: https://www.gs1uk.org/get-a-barcode/membership-benefits.
For more information or to calculate membership costs based on your site requirements, please visit https://www.gs1uk.org/join-us.
| Turnover | Annual License Fee | Allocation (barcode numbers) |
| up to £0.50m | £119 | Up to 1,000 numbers |
| £0.5m to £1m | £131 | Up to 1,000 numbers |
| £1m to £10m | £ 203 | Up to 1,000 numbers |
| £10m to £50m | £318 | Up to 10,000 numbers |
| £50m to £100m | £1,333 | Up to 10,000 numbers |
| £100m to £250m | £1,743 | Up to 10,000 numbers |
| £250m to £500m | £2,255 | Up to 100,000 numbers |
| £500m to £1bn | £2,768 | Up to 100,000 numbers |
| Over £1bn | £3,280 | Up to 100,000 numbers |
All prices exclude VAT
Information correct as of November 2018 – please check the GS1 website for updates
Source: http://www.gs1.org/
14. Barcodes and Zebra Label & Printer Settings
This information aims to illustrate the settings that may require to be changed dependent on the size and format of the label. It may not be necessary to visit and adjust all these settings, however in our experience we have found that these are the settings that we have needed to visit in order to get the label to print successfully.
14.1. Zebra Setup Utilities
NB: the examples given below are for Zebra labels (1 across) with a label size measuring 2” by 1”.

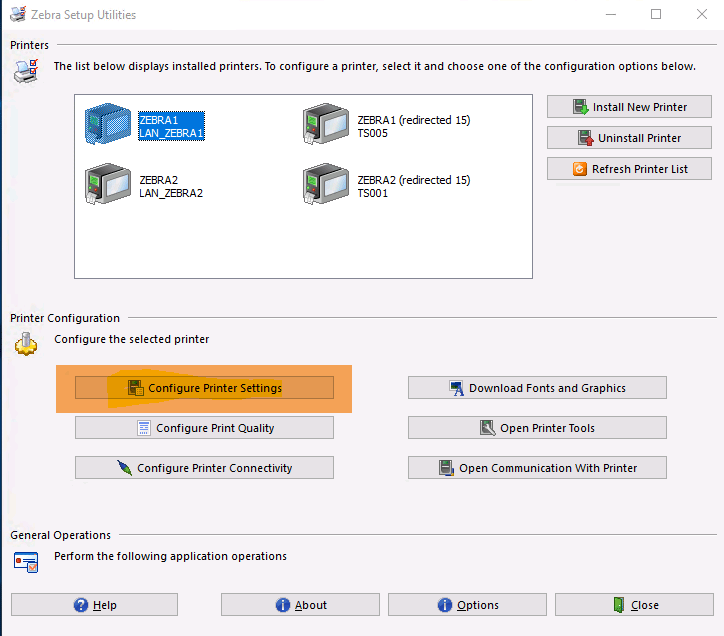
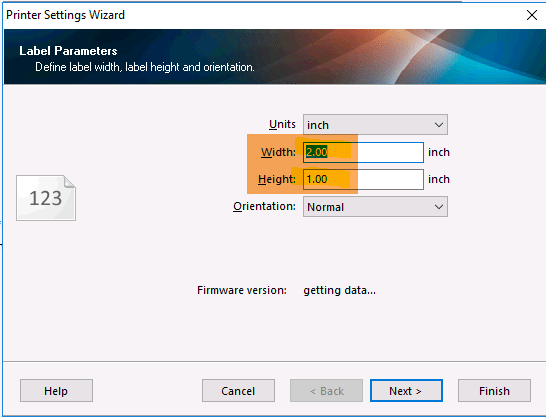
N.B. Speed and Darkness settings may be OK, however these settings work well.

14.2. Sage 200 Report Designer
File; Page Setup; Printer
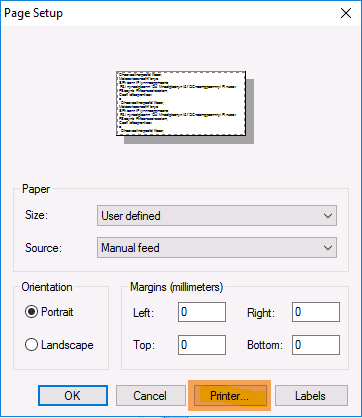
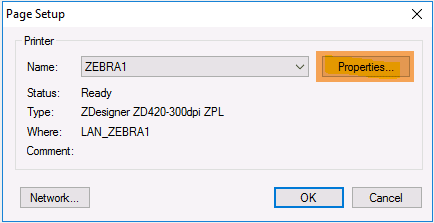
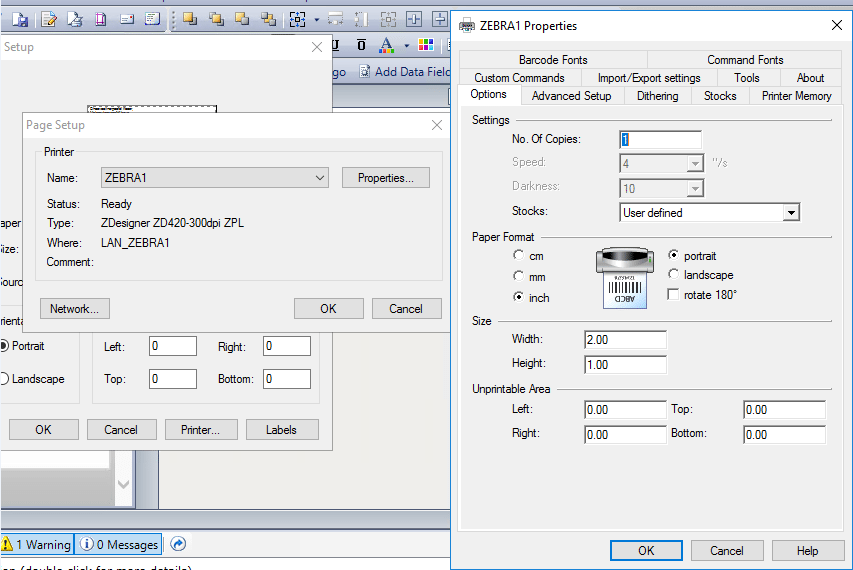
Try using ‘Calibrate media’ to resolve issues with labels not printing correctly or blank labels appearing between the printed ones.
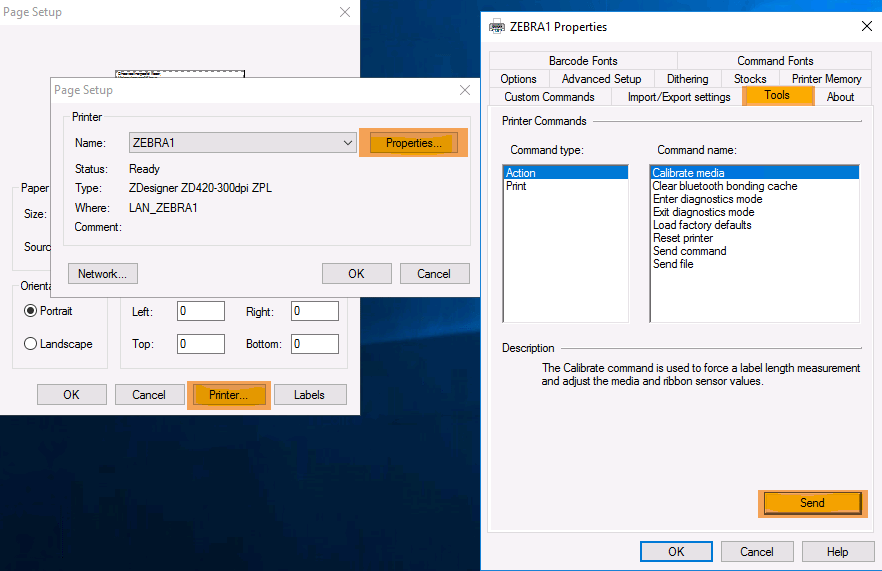
File; Page Setup; Labels
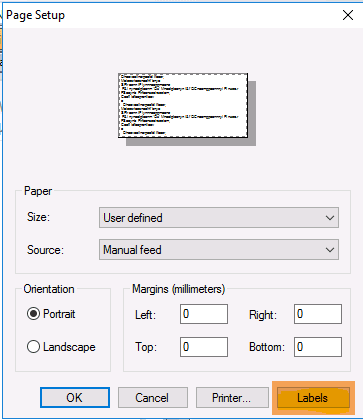
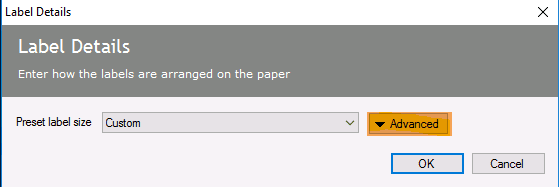
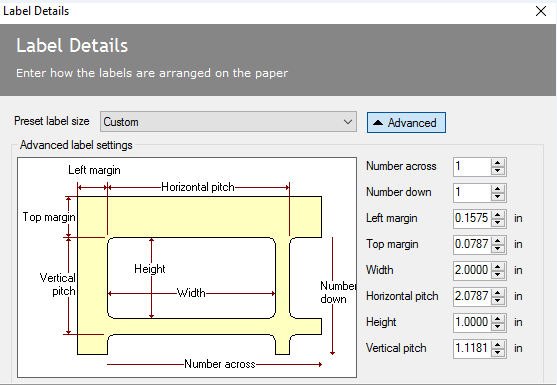
Highlight the barcode; Properties;
Barcode Format – Code 128
Select … to Edit Barcode Format
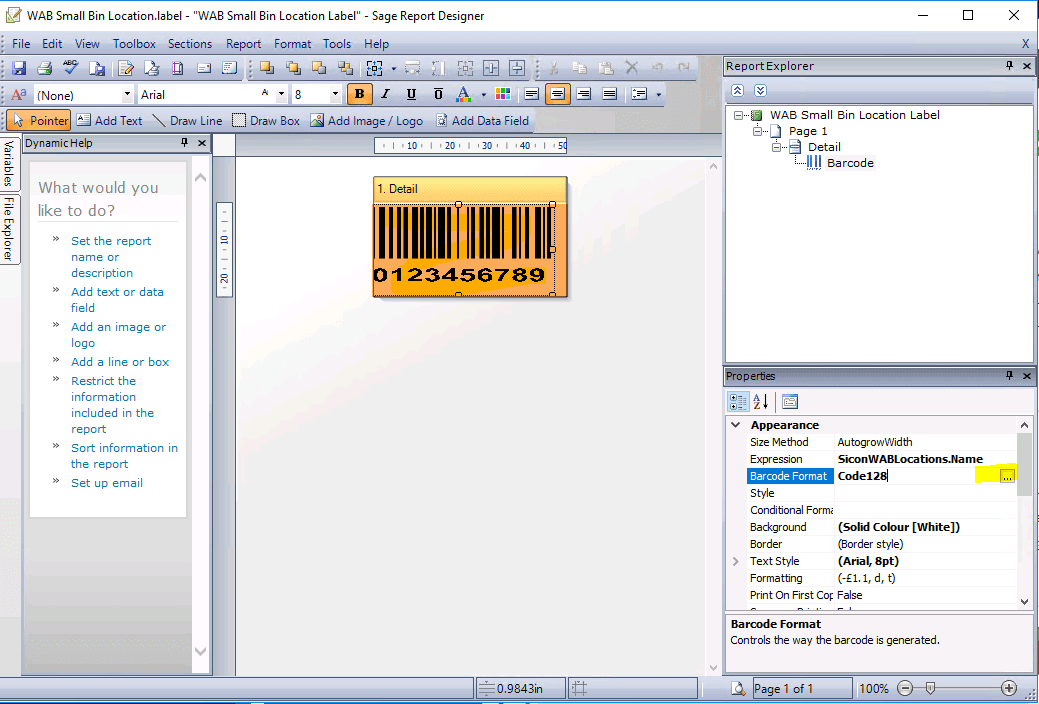
15. Trouble Shooting
Company Service Administrators would be able to assist mobile users with their app by using a remote connection such as Quick Support/TeamViewer: Remote Control which offers iPhone Support, the service administrator would be able to use this remote software to connect in with the mobile user (as if they were using it).
This may be beneficial if the mobile user is new and needs some assistance on the use of the app.
Any trouble shooting for synchronisation issues between the App/Sicon’s Web Api/Sage 200 would be something the companies system admin person carries out or the company’s Business partner support team.
This is not something that users should be looking to investigate.
When troubleshooting our mobile apps, there are a few steps to follow that can help resolve the issue or assist with gathering information to speed up the diagnosis by our support team.
Step 1
Our mobile apps use our WebAPI to retrieve data from Sage, so ensuring this is running and accessible is the first step. It’s likely to have been exposed as one of the following and it will be necessary to find out this URL or access the Sage Server.
- http://{Sage_Server_Name}/Sicon.Sage200.WebAPI
- https://{Identifier}.{CompanyName}/Sicon.Sage200.WebAPI
Step 2
You should be able to access this URL from the device you’re having trouble with. If you cannot, you may be on the wrong network, be using the wrong URL or you may be having network problems.
Step 3
If the URL prompts for a username and password, this is a good sign. An administrator should be aware of a “Servicing” password that will grant access to this portal, it will have been configured during the installation process. The username is always “admin”, the default servicing password is also “admin”.
Step 4
If successful, the following page should appear:

There are 6 areas within the WebAPI portal that can help with troubleshooting that have been labelled above:
- Enable String Expiries – If an enable string has expired, that product will no longer function in Sage and as such the associated mobile apps will no longer work either. Expired strings will be shown in red. An exception to this is that the “SM Mobile” enable string will also activate the WebAPI.
- Loaded Modules – This section will show the loaded Sicon Modules in the WebAPI and in later builds it will also show the last updated date. Is it important that after an update to Sage Modules that the WebAPI can obtain these updates – instructions for this are provided in the “Module Upgrade Process” section on the portal.
- Company List – The company list shows the companies that are accessible to the Web User that the WebAPI is running as. To add companies, give your selected Web User access to that company in Sage Administration. If you’re using Sage 2011, only one company is accessible so this is not shown. In newer versions, you can also “pre-load” reporting services for each company if you wish, which will ensure they can run and reduce the time it takes to generate the first label/report requested. If they do not start, the log can be viewed.
- Service Status – There are 2 services that are now installed with the WebAPI, a Reporting Service and an Update Service. The Reporting Service may not be necessary depending on the products you’re using, but the Update Service is important in simplifying the process of updating the WebAPI when Sage Modules are updated. Both can be started from the WebAPI portal if required.
- Log – This is the main log for the WebAPI, which will contain any errors that occurred when sending/requesting data from the mobile apps or from other third party software. Errors are highlighted in red to make them easier to find and will often have a matching request entry before them that may also be useful when diagnosing issues. The error log entry and matching request entry together are invaluable for diagnosing problems.
If the above trouble shooting points have been investigated, and an issue still occurs then the systems administrator should contact their first line support this may be the Business Partner or Sicon directly which ever has been agreed between the customer and their Business Partner.
16. Release Notes
The release notes page shows which release of the system includes new features or issues resolved.
With the release of the Sicon v19, our version numbering has changed slightly. Previously our add-on versions were numbered in the format 201x.18.0.1. From Sicon v19, our modules will be numbered in the format 201x.190.0.1 This is because we have three Sicon releases planned per year and we will use the second group of digits to reflect these as xx1 and xx2. We use the third set of digits to reflect whether it is a release or a pre-release build and the fourth set then give the build number.
New features detailed in the Release Notes relating to Pre-Release versions will not be detailed in the current Help and User Guide until the end of development phase.
Barcoding & Warehousing Release Notes