Debtor Management Help and User Guide v21
Debtor Managememt Help and User Guide will take you through the features and settings for the Sicon Debtor Management module for Sage 200.
Search the page by pressing Ctrl + F (windows) or CMD +F (Mac) on your keyboard.
Back to all user guidesProduct overview
Help and User Guide maintained for Debtor Management 210.0.0 and upwards
The Sicon Debtor Management module makes direct debit collections, failed collections and much more, simpler, faster and more efficient for you and your customers. Customer preferred payment method specified as default on the customers Sales Ledger Account or at transaction level during either Sales Order Entry, Sales Ledger Invoice Entry or Sicon Contract Line Level based on user Permissions. Installments/Payment Information for each transaction can be seen within the Sales Ledger Transaction Enquiry. Functionality includes the ability to change, amend payment method after the invoice has been raised and flag an installment as failed with prompts to specify how to collect the failed installment.
1. Pre-Requisites & Important Information
- Sicon Debtor Management does not itself send the output file directly to the bank, it is saved (by the user as a csv file) and picked up from within the 3rdparty solution (such as BottomLine PT-X or eCollect or the relevant Banks own solution).
- When Debtor Management is installed pre-existing outstanding Sales Invoices are not flagged as being ones to be included in a collection process, (if you wish to include these then you will need to ‘Add Payment details to Outstanding Sales invoices’ which is within Sicon Debtor Management\Payments\Outstanding Sales Invoices).
Prior to going live, during / post Install, training and testing ensure you allow sufficient time to:
Obtain from your customer’s their bank details, and approval for you to collect by direct debit and once obtained they can either be added manually on to the customers sales ledger account or imported.
Configure CSV File Format (as specified by your bank/3rd party solution provider).
Review the Direct debit Collection Note Layout during testing and ask your business partner to amend/customise to suit your requirements, ensuring the standard layout is not copied over, but instead saved in a custom folder so it is not over written during any report package upgrades in the future.
Create a test company and test the whole process through to the point of generating a csv file to ensure you are happy before going live with the module.
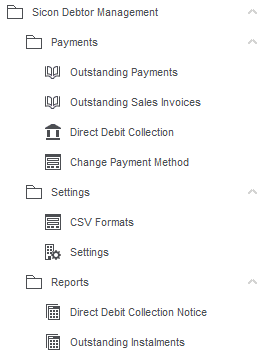
2. Role features & Menu Structure
Within Sage 200 System Administration enable relevant features for the relevant user groups.
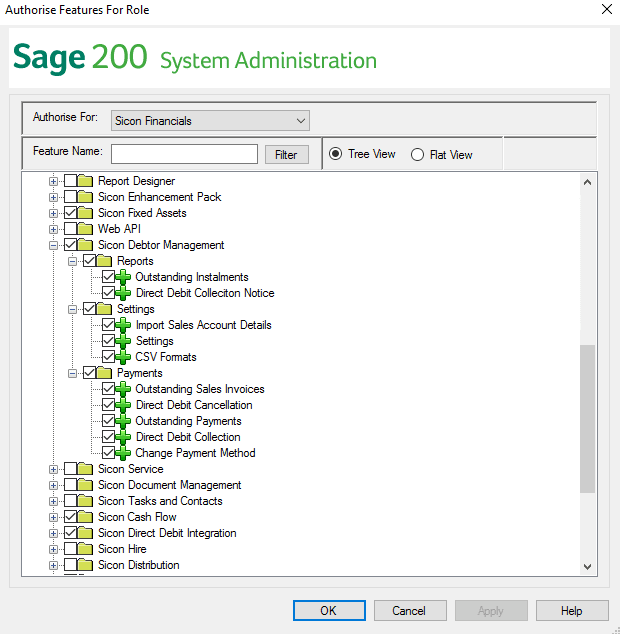
Menu Structure, if the role logged in had all features enabled:
3. Configuration & Settings
3.1. Licence Tab
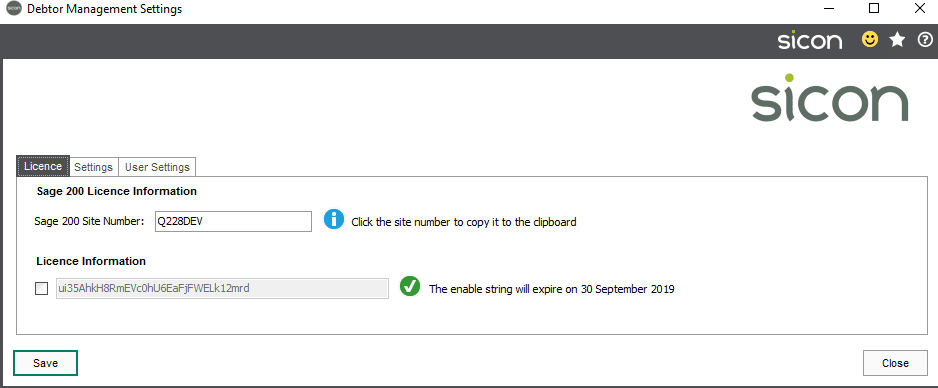
Sage 200 Site Number : The area where the system stores the systems site number, which is required in order to enable / licence the module
Licence Information : Annually when the modules licence is renewed, enter the new enable string provided here. If the company is on Sicon Release 18 or later of the Debtors Management Module and your internal i.t. system allows this will be automatic updated once the renewal invoice is received and allocated by the software vendor Sicon.
3.2. Settings - Integration with other Modules
Payment Integration Options: Sales, Sales Order Processing and Sicon Contracts
Select which source modules you will be using to enter payment information against transactions i.e. Sales invoices, sales orders and/or Sicon Contract Module
Collections: Used to determine during the collections process which sage 200 bank account within the cashbook module to use, and how to group receipts.
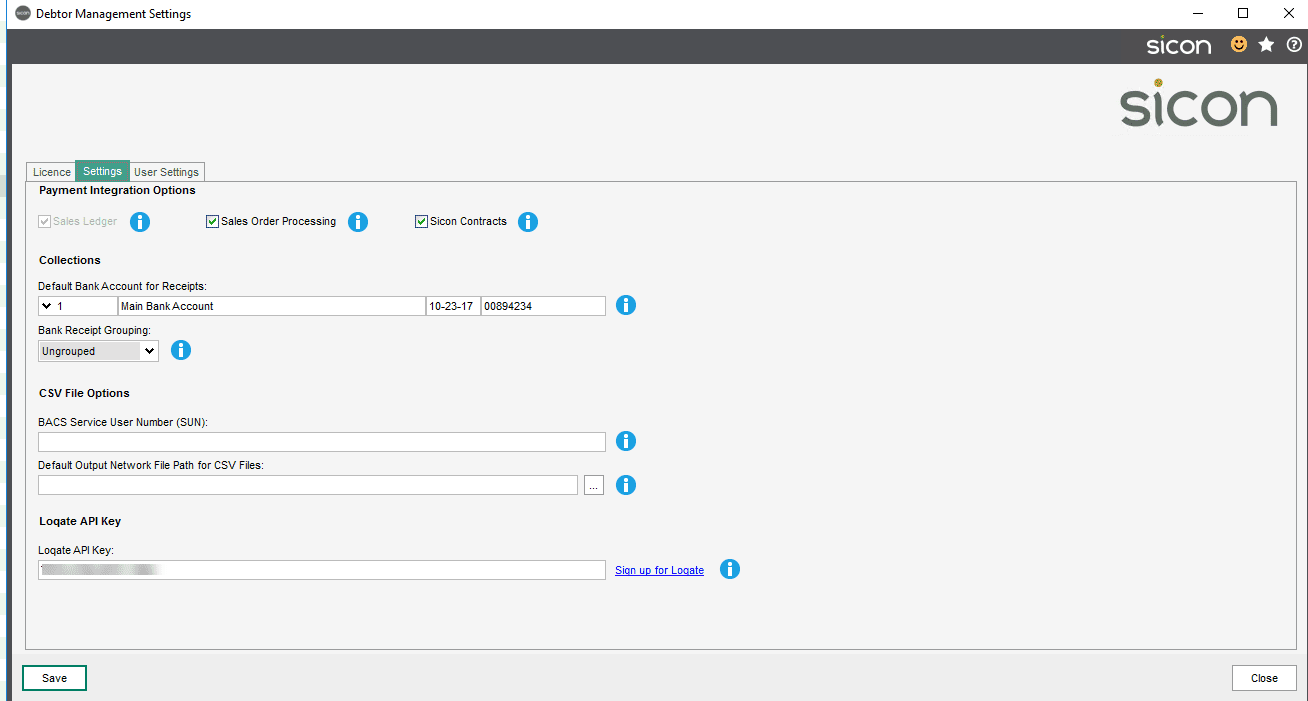
- Default Bank Account for Receipts – This is the back account that Sales Receipts are paid into when collecting Installments. This can be overridden per Sales Ledger Account
- Bank Receipt Grouping – This setting determines how receipts are posted to the cash book account.
- Ungrouped – Individual Receipts are posted
- By Account – receipts are grouped by Sales Ledger Account and one receipt is posted for each account.
- By Bank – Receipts are grouped by the bank they will be paid into. One receipt is posted per bank.
CSV File Options:
Bacs Service User Number (SUN) : Where you have been issued with a Bacs Service User Number (SUN) and you have been instructed by your bank or solutions provide to include in the csv file format enter here.
Default Output Network File Path for CSV Files: Set your default Network Path to save the exported transactions/csv file. This must be a network path, not a local C:
Loqate API Key – Only relevant to customers who are existing Loqate Bank validation customers
For further details on this 3rd party plug in visit https://www.loqate.com/en-gb/bank-verification/
When enabled, when adding customer bank details on to a sales ledger account or against a transaction, select the green tick to validate either the account no/sort code or the Iban Number
To Check the Account and Sort Code.
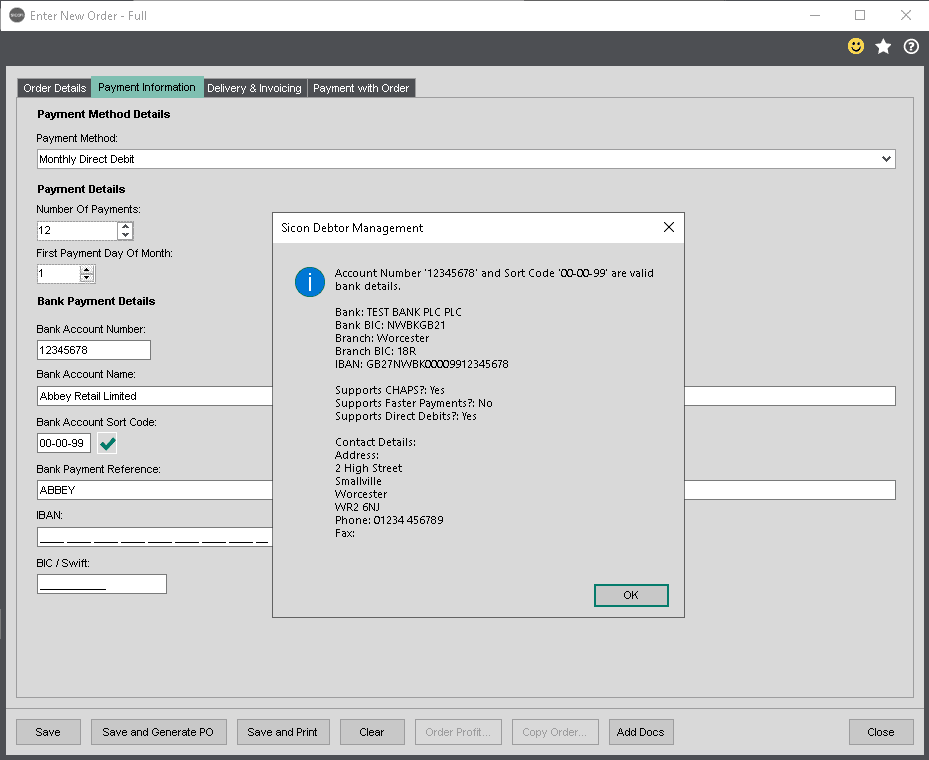
To check the IBAN Number

If the results entered are not valid you will see the following message

Note: Some settings may be disabled if there are outstanding payments/collections in progress for the specified module. To view information about each setting, hover the mouse cursor over the information icons.
3.3. Default Collection Bank Settings
Collections: Used to determine during the collections process which sage 200 bank account within the cashbook module to use, and how to group receipts.

- Default Bank Account for Receipts – This is the back account that Sales Receipts are paid into when collecting Installments. This can be overridden per Sales Ledger Account
- Bank Receipt Grouping – This setting determines how receipts are posted to the cash book account.
- Ungrouped – Individual Receipts are posted
- By Account – receipts are grouped by Sales Ledger Account and one receipt is posted for each account.
- By Bank – Receipts are grouped by the bank they will be paid into. One receipt is posted per bank.
Note: Some settings may be disabled if there are outstanding payments/collections in progress for the specified module. To view information about each setting, hover the mouse cursor over the information icons.
3.4. User Settings & Permissions
The user settings tab is used to configure permissions for each Sage user account using the Debtors System. Options can be selected for each check box in the grid, or alternatively one user can be selected and the options selected on the right hand of the screen to allow quicker configuration.
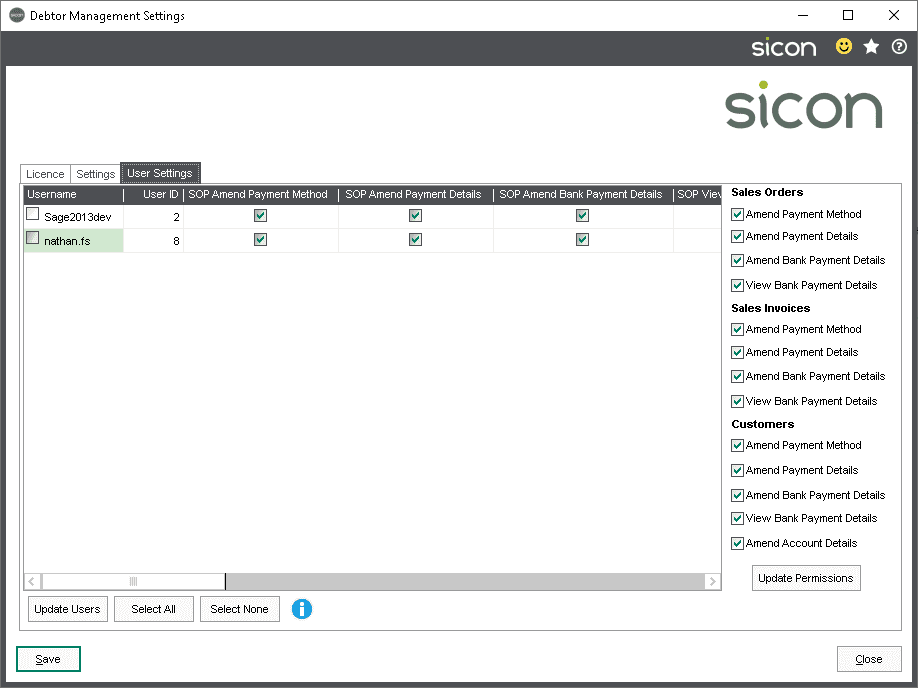
Important Notes
Update Users: When you first start using the module, or when new Sage 200 users are added within Sage 200 ASM, use ‘Update Users’ to populate the table with all Sage users.
When used this will either ‘Create’ ‘Update ‘or ‘Remove’ Users based on their Access to the Sage 200 Company you are in configuring the module for use of.
Update Permissions: Must be clicked to update the permissions for the currently selected user when using the right-hand panel.
These settings are Sage 200 company specific, so if you are using the module in multiple Sage 200 companies this process needs to be actioned for each company.
Where you only wish for certain users to amend payment information at sales order level, but they do not have the authority to change the customers default preferred payment method, then you should be using standard sage functionality with Sage 200 System Administrator and Disable Create customer or amend Customer from the ‘Role’ that the specific user is assigned to
4. Setting up CSV Format for Collection Export File
A pre-requisite to the system being used as required to generate the payment csv file for exporting.
Within the system we have some templates for you to use or to expand on depending on your banks requirements, or you can choose to create a new one from a blank template
NB: Sicon Debtor Management Module, although prepares the file for exporting to be used as part of your direct debit collections the module itself does not send the output file directly to the bank. The exported csv file is saved within the Sicon solution and would be picked up from within the 3rd party solution (such as BottomLine PT-X or eCollect or the relevant Banks own solution).
4.1. Default CSV Formats
To create a new csv file format, select ‘New’, Give it a name, and if using one of the templates select from the list and click OK
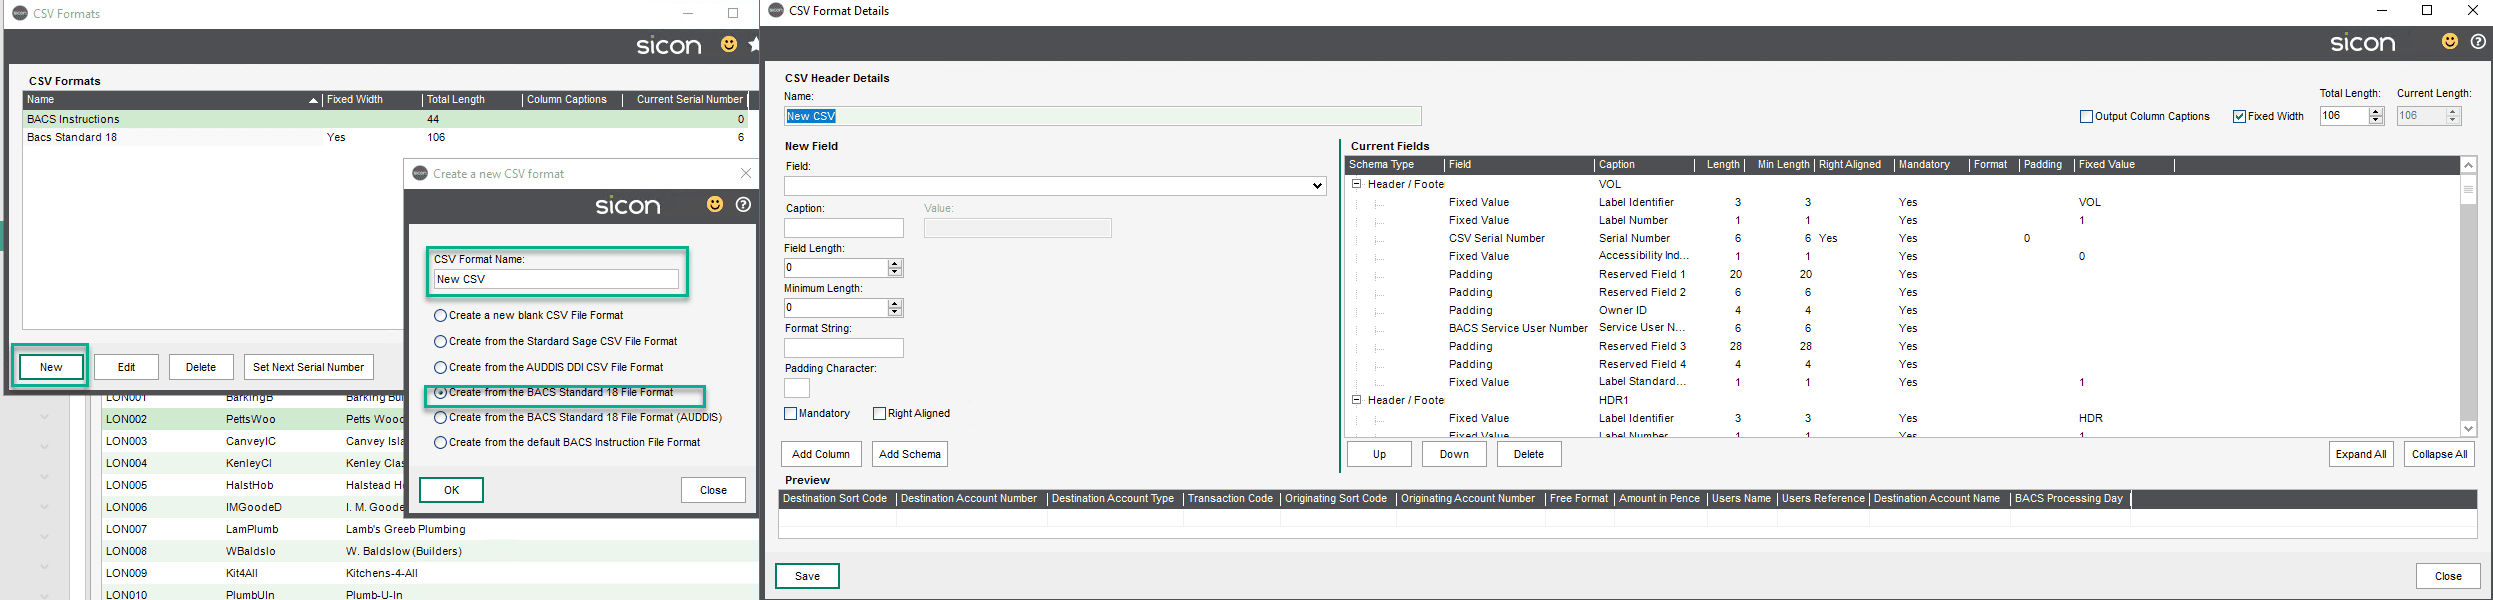
4.2. CSV Field Options
CSV Schemas (Requirement if using BACS Standard 18 CSV file formats)
CSV schemas can be used for CSV files that have different fields per row within the CSV file.
One example of this is the BACS Standard 18 format which has header and footer sections as well as data rows.
A CSV Format Header will contain one or more Schemas, at minimum the CSV header must contain one ‘Data’ type schema.
This will contain all columns required for each data row in the CSV file.
One or more Header / Footer schemas can also be added to specify columns for special rows that are inserted before or after the data records for specifying additional information such as Serial Numbers, BACS Service user numbers and dates.
Schema Types
- Header / Footer – A row that has columns which are not directly related to the instalment data that is being exported
- Data – A row with fields that is related to the instalment being exported
Example of a BACS Standard 18 output using multiple schemas
VOL10000090 123456 1
HDR1A123456S 12345600000900010001 19184 19184 000000
HDR2F0200000100 00
UHL1 19184999999 000000001 DAILY 009
1023170089423401811223312311231 00000009792Abbey Retail Ltd ABBEY HomeStyle Kitchens 19184
1023170089423401711223312311231 00000009792Abbey Retail Ltd ABBEY HomeStyle Kitchens 19184
EOF1A123456S 12345600000900010001 19184 19184 000000
EOF2F0200000100 00
UTL10000000019584000000000000000000020000000 0000002
CSV Field Options
Where your bank format does not require schemes below are just some example fields used in CSV files are: – These options apply to adding new fields to an existing or new CSV File
- Field – The field from which to take the data to put into the CSV file
- Amount – The Installment amount
- Amount in Pence – The instalment amount in pence
- BACS Instruction Type – The BACS Instruction Type
- BACS Service User Number – your BACS issued User Number
- BACS Value Type – The BACS Value Type
- BIC / Swift Number – The customer BIC / Swift Number
- Company Bank Account Name – The name of the Cash Book account to pay into
- Company Bank Account Number – The account number of the Cash Book account to pay into
- Company Bank Sort Code – The sort code of the Cash Book account to pay into
- Company Name – The name of the current Sage 200 Company
- Count of Credits – The total number of credits in the CSV file
- Count of Debits – The total number of debits in the CSV file
- Count of Debits and Credits – The total number of debits and credits in the CSV file
- Current Date – The Current Date
- Customer Account Name – The customer name
- Customer Account Number – The customer account reference
- Customer Bank Account Name – The customers bank account name
- Customer Bank Account Number – The customers bank account number
- Customer Bank Payment Reference – The reference to use for Customer Payments
- Customer Bank Sort Code – The customers bank sort code
- CSV Serial Number – a unique number that is generated each time a CSV file is generated for the particular CSV format
- Expiration Date – The expiration date of the direct debit
- IBAN – The customers IBAN
- Padding – A column that is padding only, used for fixed width CSV Files (See Note 2)
- Processing Date – The date of processing
- Sum of Credits – The sum of credits in the CSV file
- Sum of Credits in Pence – The sum of the credits in pence in the CSV file
- Sum of Debits – The sum of the debits in the CSV file
- Sum of Debits in Pence – The sum of the debits in pence in the CSV file
- Transaction Reference – The transaction reference
- Username – the current Sage 200 username
- Caption – The Field Caption (See Note 3)
- Field Length – The maximum length of the field (When the data for the field exceeds the maximum length the data in the field will be truncated) (See Note 1)
- Minimum Length – The minimum length of the field (when the data for the field is less than the minimum length, the padding character will be used to fill the remaining length)
- Format String – This is a standard .net style format string to apply to the field. E.g. {0:n2} will show a number with two decimal places. This can be left blank to just use the field valueFormat String: Only used when required as notified by 3rd party bank, or solution provider. When values are being formatted when exported to CSV the last thing that will happen to them is to be formatted using the format string. This will not be used most of the time but in the event there are some special cases required for export a ‘.net’ format string can be entered to further customise the valueg. {0:0.00} will format the value to a number with 2 decimal places
- Padding Character – This is used for fields with a minimum length. See Minimum Length.
- Mandatory – This is a mandatory field in the CSV File
- Right Aligned – This is a right aligned field in the CSV file. Useful for amounts in fixed width files. It can be combined with a minimum length and padding character of 0.
Note 1. Length / Min Length Explained
These would normally be the same, but in the instance for example sort code, some bank formats require the dashes in the column, some do not.
So in our example below we have set the length to be 8, therefore allowing the dashes to be included 10-45-68, for the min length to be 6, so if a user entered 104568 the file would still be acceptable (Noting if your bank or 3rd party payment provider specifies the dashes should be included you would need to make both the length and Min Length 8).
Note 2: Padding Explained
Padding – for fields with a minimum length. If the min length is 8, and the value of the field is only 3 characters then the rest of the field will be filled with the padding character (either right or left padding depending on whether the field is right aligned)
This is useful for files like the Audis DDI file which is a fixed length file and each column is a certain number of characters.
The ‘Amount’ field is 11 characters long, if the amount is £100 then the field will be output to CSV as:
00000000100
If the padding character is ‘0’.
Note 3 Caption:
The caption field is a non-mandatory field, and is used / or not used to determine the csv file column headings the options are
If populated, then the caption column will be populated with chosen text, and that text will be seen within the csv file as the column header.
If no caption used than the column header will be the name as the ‘field in question’.
Also on the left hand side, you can choose to add additional columns/ fields to an existing import csv file format.
5. Setting Customers Default Bank/Payment Details
5.1. Importing Customers Default Bank/Payment Details on to S/L Acc
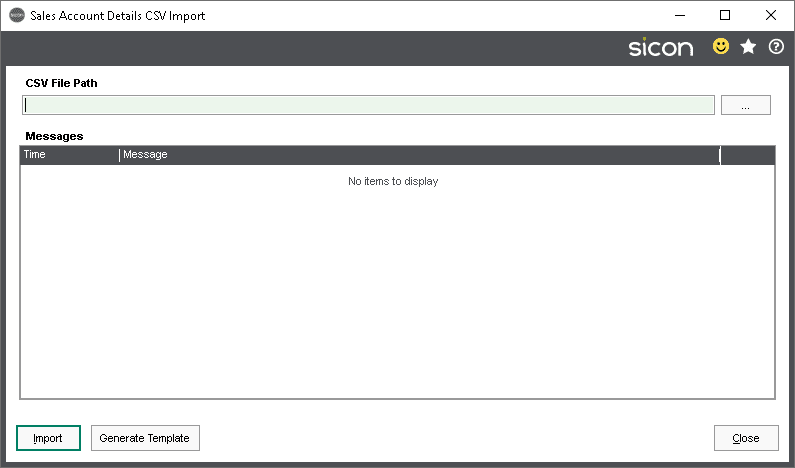
Customers Bank/Preferred payment method details can be imported after the module is first installed. To import, browse to the file to import and click the ‘Import’ button.
To generate a CSV template to prepare for import click the ‘Generate Template’ button to download the template.
The sales Account Details CSV Import screen
The standard Import template will look as follows:
Standard Sales Account Details CSV Import Template Example
MetaData, CustomerAccountReference, OverrideCustomerAccountReference, PaymentMethod, PaymentDayOfMonth, BankAccountNumber, BankAccountName, BankAccountSortCode, BankPaymentReference, OverrideBankCode, FirstDirectDebitGenerated, IBAN, BICSwift
Description, Customer Account Reference, Override Customer Account Reference, Payment Method, Payment Day of Month, Bank Account Number, Bank Account Name, Bank Account Sort Code, Bank Payment Reference, Override Bank Code, Customer has First Direct Debit Generated, International Bank Account Number, BIC / Swift Number
Mandatory, Yes,, Yes,,,,,,,,,
Acceptable Values,,,”Standard, MonthlyDirectDebit, QuarterlyDirectDebit, Cheque”,”1, 2, 3, 4, 5, 6, 7, 8, 9, 10, 11, 12, 13, 14, 15, 16, 17, 18, 19, 20, 21, 22, 23, 24, 25, 26, 27, 28″,,,,,,”True, False”,,
Default Value,,,,1,,,,,,False,,
Sample Data,ABB001,,MonthlyDirectDebit,1,12345678,Abbey Retail Limited,11-22-33,ABBEY,,False,,
Sample Data,NOV001,,MonthlyDirectDebit,1,87654321,Noventa Casas (Sp),44-55-66,NOVENTA,,False,ES91 2100 0418 4502 0005 1332,
Sample Data,BET001,,StandardTerms,,,,,,,False,,
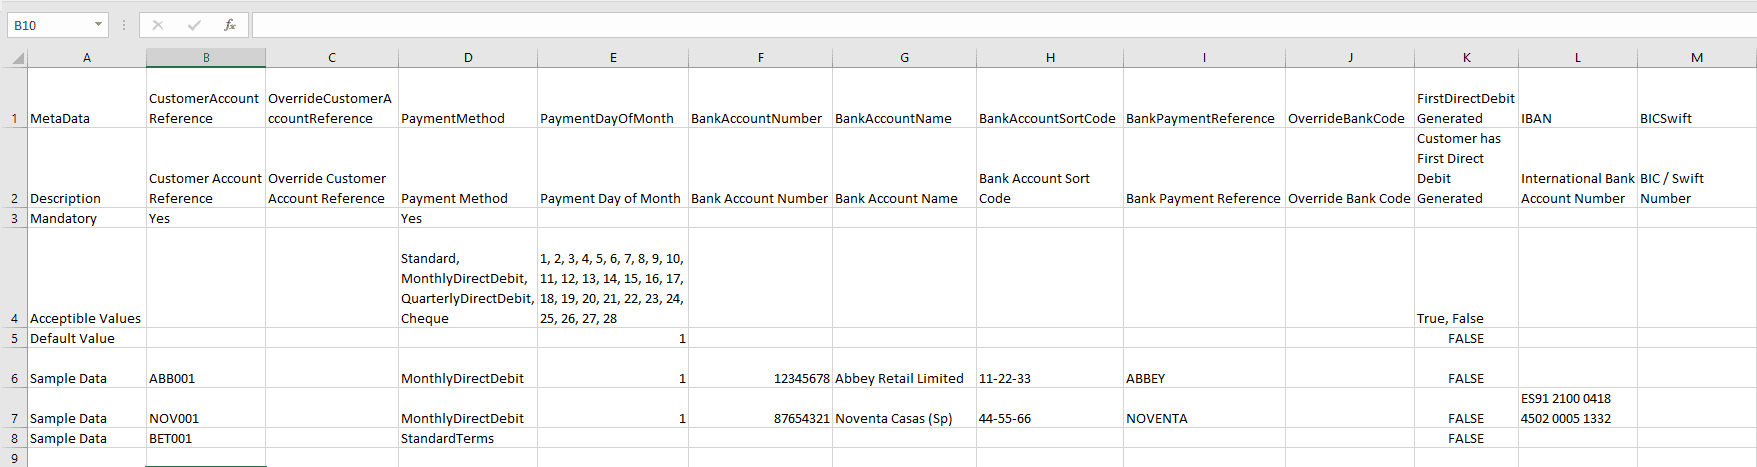
Any data in the first column of the CSV file will be ignored by the import, so data can be imported can be added after the last row, ensuring nothing is put into the first column.
5.2. Bank/Payment CSV Import Template Fields
The import template will contain the following rows:
5. MetaData – This row shows the column headings
6. Description – This row shows a description of what the column is used for
7. Mandatory – The row shows whether the column is mandatory or optional
8. Acceptable Values – This row will show any acceptable values for the field, if blank all values are acceptable.
9. Default Value – This row will show the default value that will be used if no value is provided
10. Sample Data – This row represents sample data and will be ignored on import
5.3. Manually Adding Default Bank/Payment Details on to S/L Acc
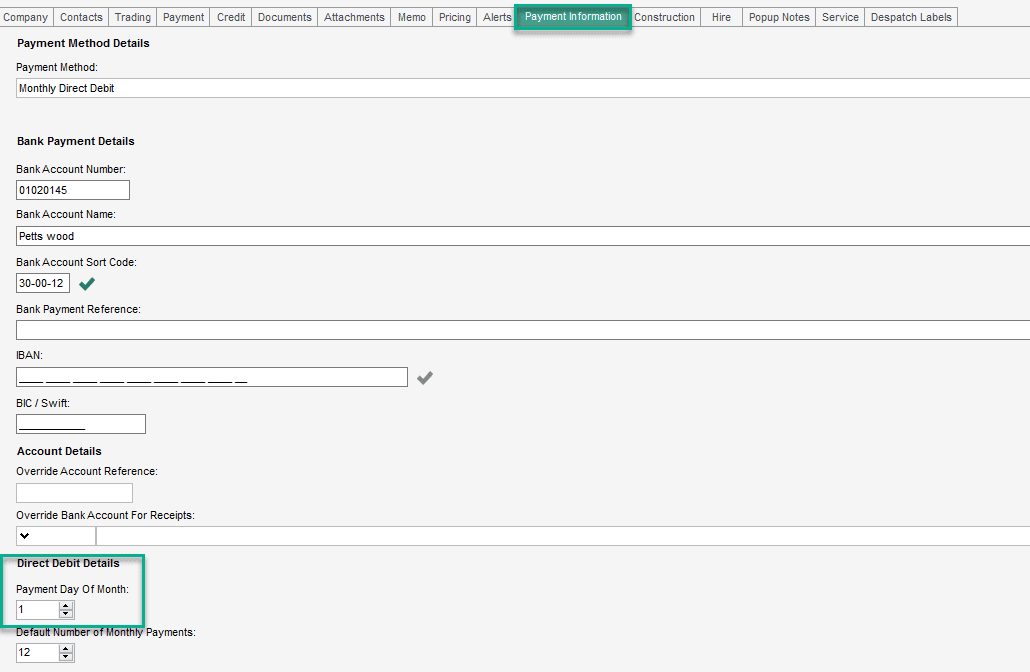
Although payment details can be added to individual Sales Invoices, Sales Orders and Sicon Contracts default payment details can be added to the Sales Ledger Account so these are automatically added to the document while its being processed.
You will need to ensure the Sage 200 User adding these manually has had their permissions set accordingly within settings.
The Payment information tab on a Sales Ledger Account.
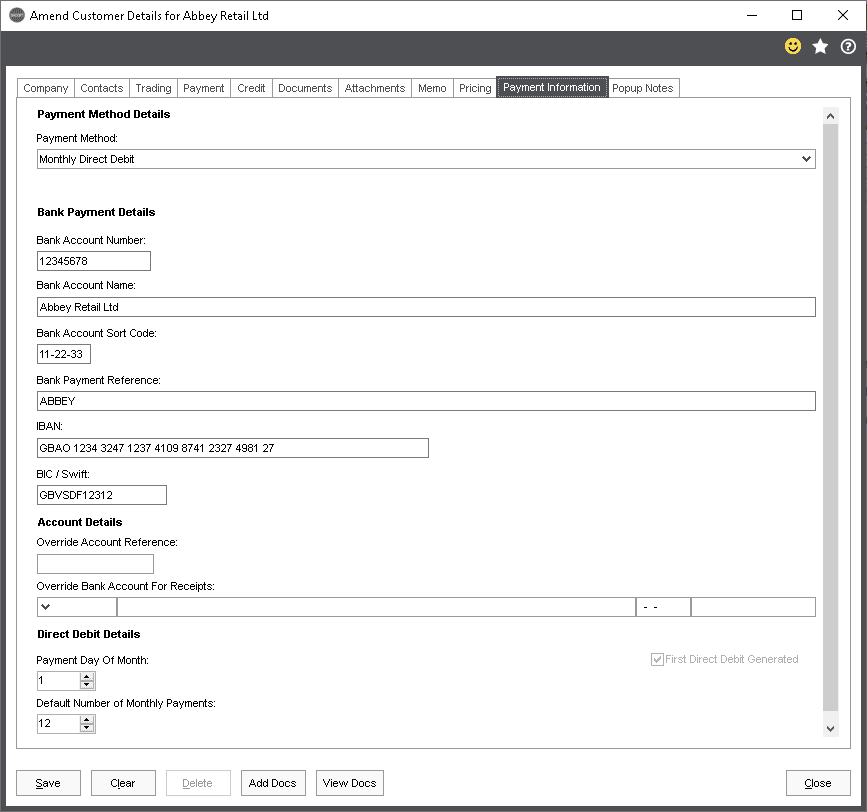
Payment Information Fields
- Payment Method – The default payment method to use for the current customer
- Standard Terms – The amount will be collected via standard Sage 200 features outside of the debtor system
- Monthly Direct Debit – The amount will be collected via monthly direct debit
- Quarterly Direct Debit – The amount will be collected via quarterly direct debit
- Bank Account Number – The customer bank account number
- Bank Account Name – The customer bank account name
- Bank Account Sort Code – The customer bank sort code
- Bank Payment Reference – The reference to use for the bank payments
- IBAN – The customer IBAN
- BIC / Swift – The customer BIC / Swift number
- Override Account Reference – Any preferred reference to use in place of the Customer Account Reference
- Override Bank for Receipts – If a different bank is required for the receipts to be posted into this can be specified here, if not specified the default bank from Debtor System Settings will be used.
- Payment Day of Month – This is the default payment day of the month for Installments
- Default Number of Payments – This is the default number of payments for Monthly Direct Debits
- First Direct Debit Generated – This flag is set when the first direct debit has been generated for a customer
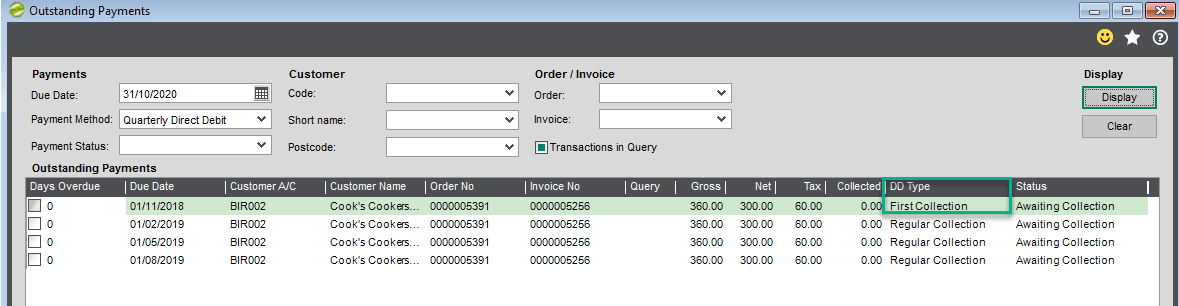
This feature (notification that it’s a customer first collection) is visible within the outstanding payments process where relevant and one time only.
BACS Instruction Sent – This flag is set after the BACS Instruction CSV file is exported for a customer
BACS Cancellation Requested – This flag is set after the BACS Instruction Cancellation CSV file is exported for a customer
5.4. Adding payment details to existing Sales Invoices already on the system
As well as adding payment details to new Sales Invoices/Sales Orders, payment details can also be added to existing sales invoices that are outstanding on Sage 200 where there are no related details configured for those invoices. (Something you would need to consider doing when you first start using the module or moving over from Sicon Direct Debit Integration).
As standard when Debtor Management is installed all sales ledger account payment terms will be blank, not assuming a preferred payment method, as you probably would have already agreed with the customer payment terms for those already raised invoices
However, if you do agree with your customer(s) that they should pay their outstanding invoices by direct debit you can choose to flag them accordingly here
The Screen will first open with no transactions showing.
Alternatively, you could choose to select a single customer by using the filters at the top of the screen , or where you have present the default payment methods on the sales ledger accounts you can use the ‘Payment Method’ Filter’
To show all transactions simply hit display as we have done in our example below
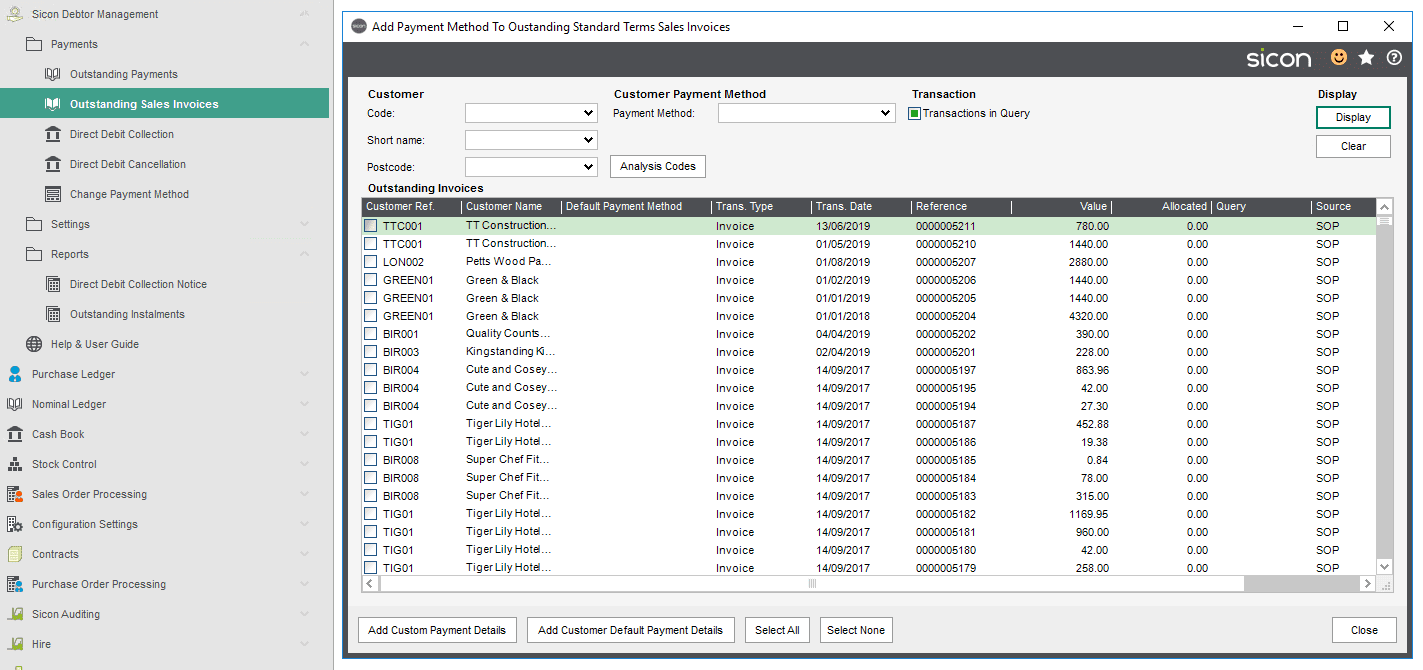
You can choose to select a single or multiple transaction and add custom payment details against individual transaction (s)
To use this method, select the transaction(s) in the list and click ‘Add Custom Payment Details’
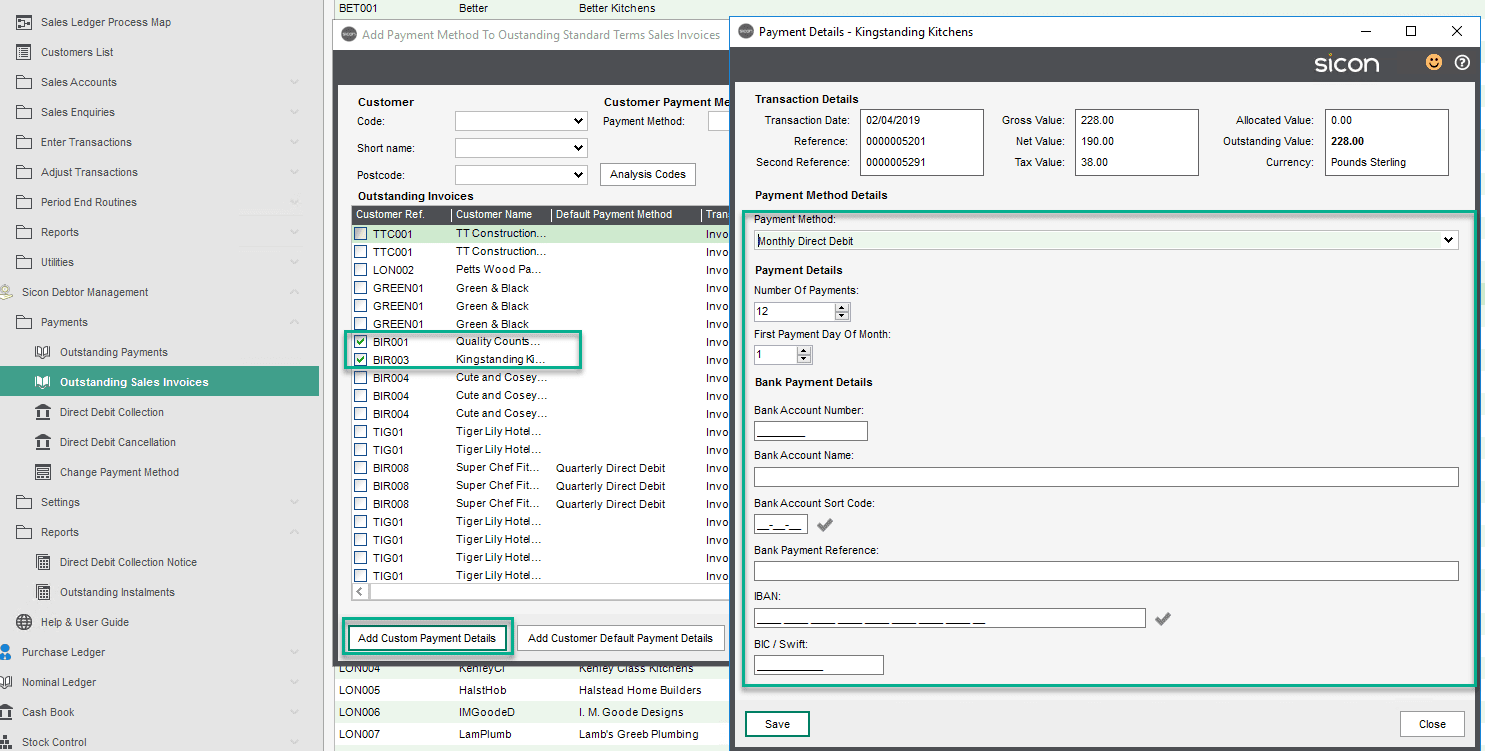
The top of the screen will show the Outstanding Value on the transaction, Installments will be created for the remaining amount on the invoice only.
If some of the fields are greyed out you will need to check user permissions within Debtor Management Settings, as it may be the user trying to add payment information only has permission to view certain fields or indeed see none
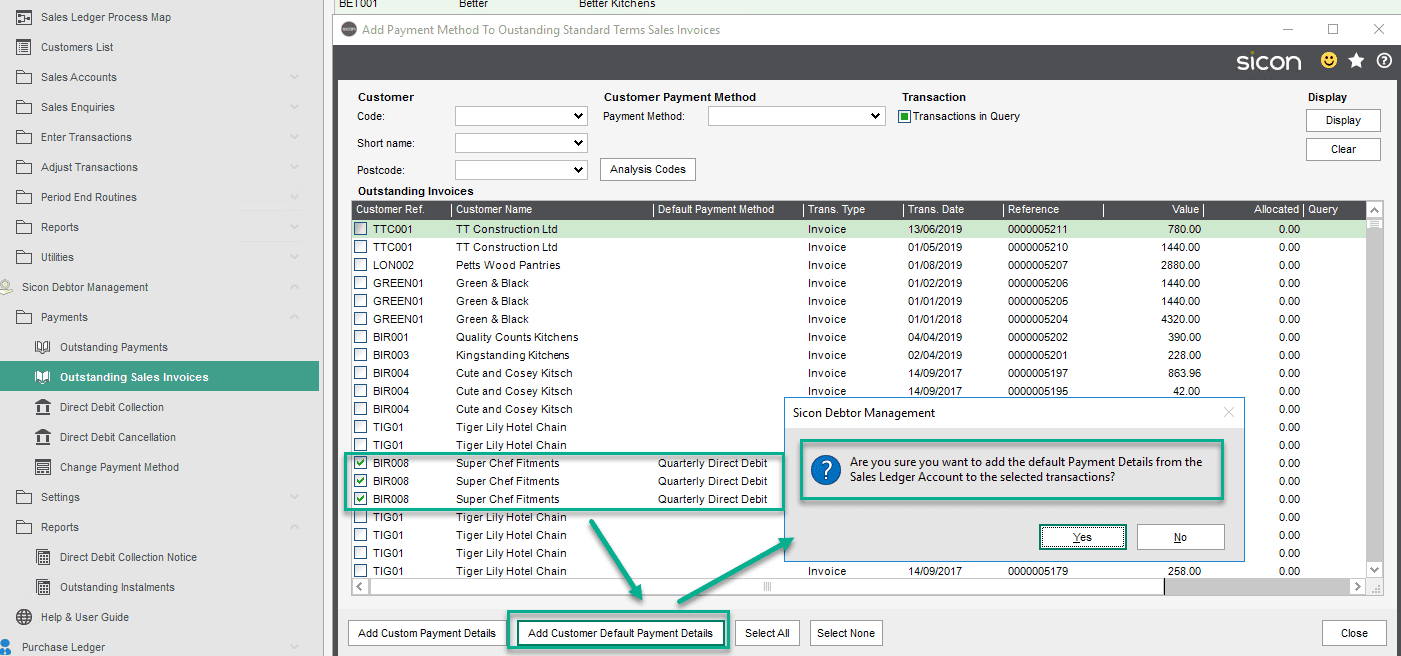
Alternatively, where you have already set a customer’s default payment on their sales ledger account (in our example we had on Super Chef Fitments the Payment Method of Quarterly Direct Debit) you can select multiple transactions and select ‘Add Customer Default Payment Details.
5.5. Submit New Customer Bank details for Direct debit Collection – 0N Instruction
When you first agree with a customer that they pay all or some transactions by direct debit, you need to give your bank instructions to do so
Some banks ask for up to 10 days, so please refer to them for clarification on this point , if you submit to late and try to included in a direct debit run to your 3rd party solution provider (such as bottom line) they will reject the file and report back to you that ‘Instructions are not confirmed’
When You have added the customers bank details on to their account , then you should use the Sicon Debtor Management process ‘Submit Direct Debit Instructions’, a menu item in its own right).
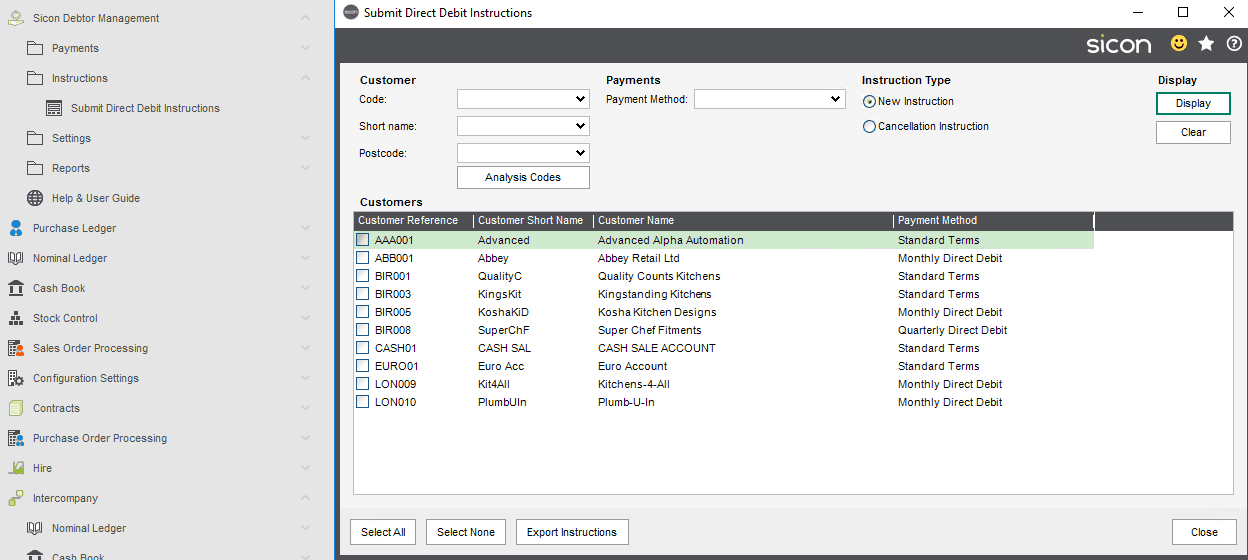
You can filter for one customer, or one payment method, or to display all new direct debit instructions select display
Only those accounts that have had bank details added to their sales ledger account, and have not yet had any transactions processed through for collection by direct debit will be shown for export
The customers default preferred payment method will show, this may be standard (no direct debit), but within debtor management payment methods are set at transaction level
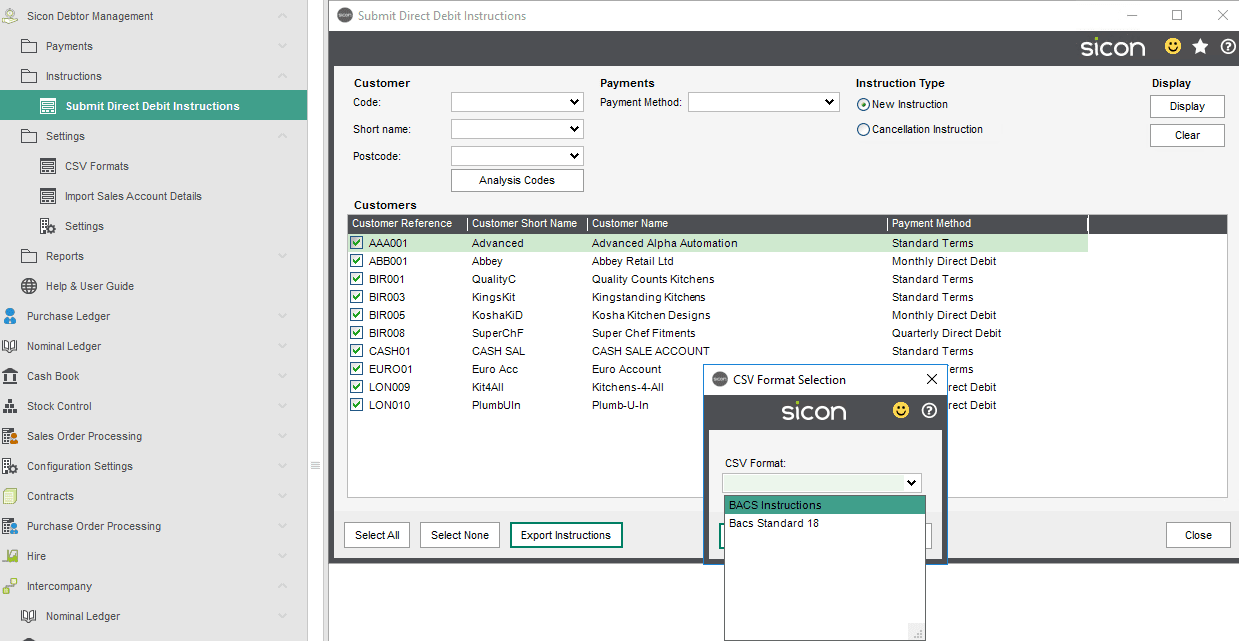
Select the ones you wish to process through and create a csv file for [ there is the option to create a default csv file from a pre loaded format ]
You will be promoted to confirm that you wish to export the New Instructions, once confirmed you would select your Bacs Instruction csv file .
You will then be prompted to save your file after which you would pick up in either your banking software or your 3rd party solution in order to send to the bank.
6. Entering Sales Invoices / Orders
6.1. Adding a New Sales Invoice + payment Information
If enabled, payment details can be added directly onto a Sales invoice as it is entered into Sage 200 from within the Sales Ledger Menu or via a shortcut on the Customer List View, the payment information tab will appear.
Note: Debtor Management does not currently support Free Text Invoices.
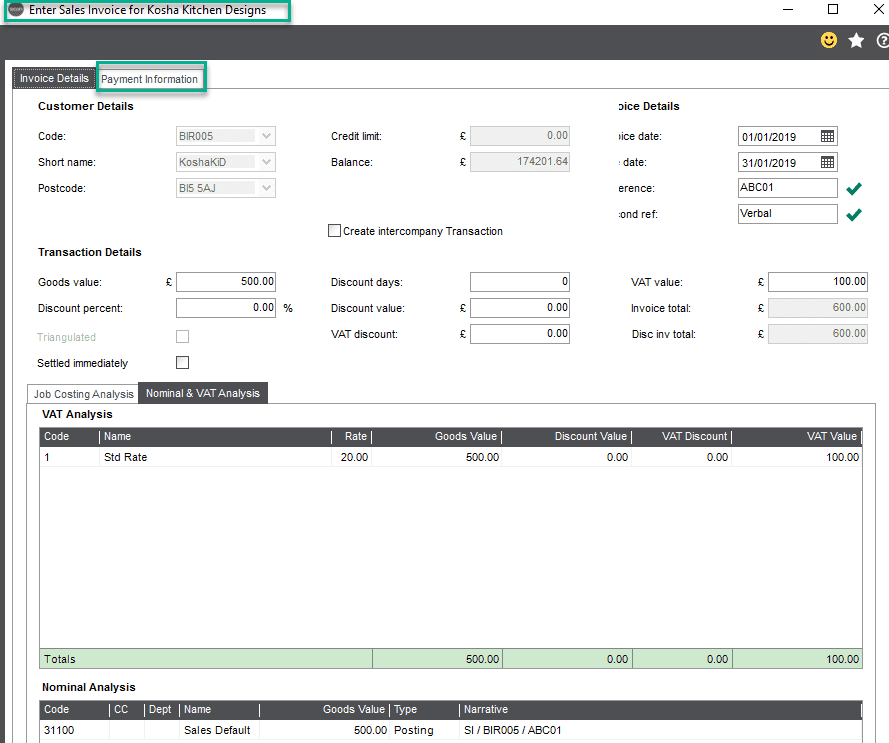
The default payment information will be automatically populated based on the information configured on the Sales Ledger account. Depending on user permissions the Payment Method, Payment Details can be changed before the invoice is saved.
Once the Sales Invoice has been saved, the ‘Payment Header’ and ‘Installments’ will be generated at a stage of ‘Awaiting Collection’.
These will be visible in Sales Ledger Transaction Enquiry and will be ready for processing in the Outstanding Payments Screen.
Users could choose to use the standard Sage functionality within this ‘Installments Pane’ and right mouse click, send to excel.
6.2. Adding a New Sales Order + Customers Payment Information
Our Help & User Guide shows the module working with a Full Sales Order but Trade and Rapid also supported
When a Sales Order is added payment details can also be added during Sales Order entry if enabled in settings. Payment details can be added and amended up to the point the Sales Order is ‘printed.’
The default payment information will be automatically populated based on the information configured on the Sales Ledger account.
In our example below the user entering the sales order has view only permissions, but for everything including the customers bank account details (If you do not want your users to see the customers bank account details this is possible by changing their permissions within Settings\User Settings.
Our screen shots are based on a Full Sales Order but Trade and Rapid also supported.
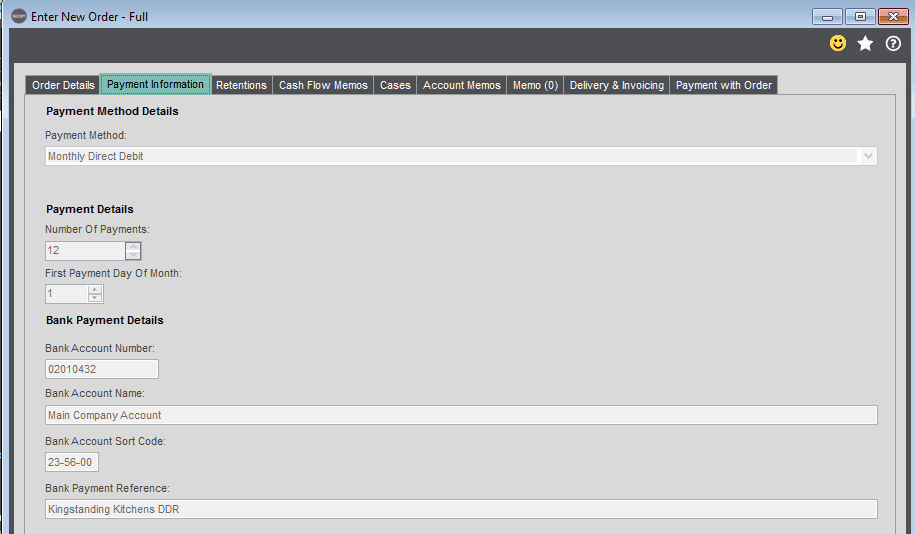
If the User does have permission then the fields are editable as per our example below,
SOP Amend Payment Method: Change the Payment Method, options being Standard, Monthly Direct Debit or Quarterly Direct Debit
SOP Amend Payment Details: Change how frequently the direct debit collection should be; either Monthly or Quarterly and thereafter what day of the month the First Payment should be Due
SOP Amend Bank Payment Details: Change all or some of the customer’s bank details relating to this specific sales order, including the Bank Account Number, Name, Sort Code, IBAN, BIC/Swift and Bank Payment reference
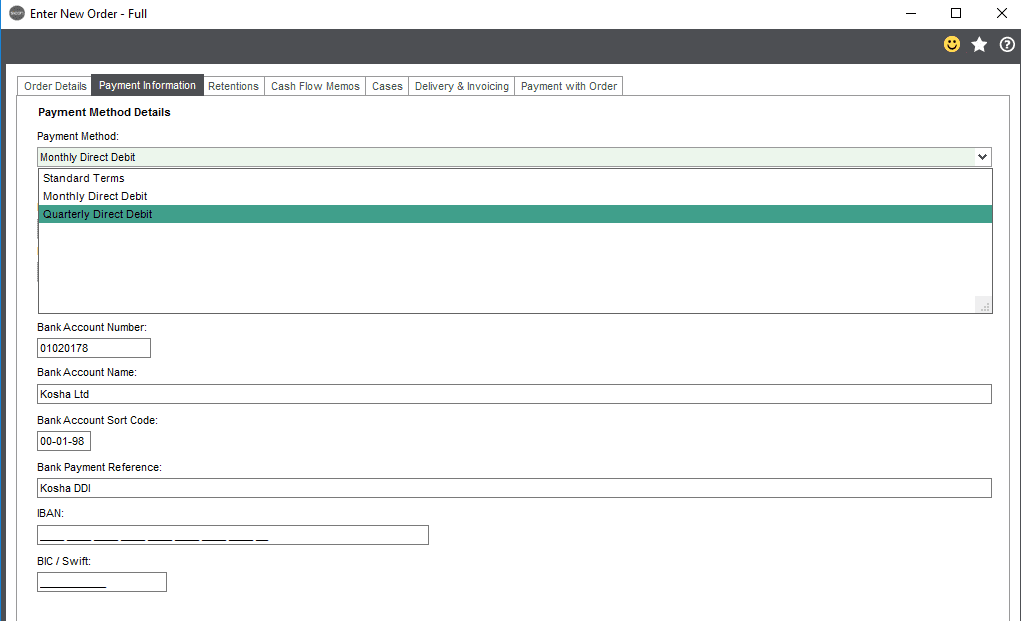
Note: Once the Sales Order has been printed the payment details can no longer be changed on this screen, see below for various actions /steps
Sales Order Process – Allowable Actions for Payment Information
- Enter New Order – Payment details can be entered
- Amend Order – Payment details can be amended
- Despatch Order – Payment details can be amended
- Print Invoice – The ‘Payment header’ is generated as this point and visible in transaction enquiry, payment details can no longer be edited on the order
- Post Invoice – Installments are generated at the point of posting and are visible under the payment header in transaction enquiry. Payment details can no longer be edited
6.3. Sicon Contract Line Level Payment Preferred Method Options
Debtor Management and Sicon Contract Integration
Where both modules are installed by default when a Contract is added, at header level the customers sales ledger payment information will be pulled through. Depending on user permissions within the debtor management module, settings users will be able to either view only, amend, partially view, or partially amend certain payment details
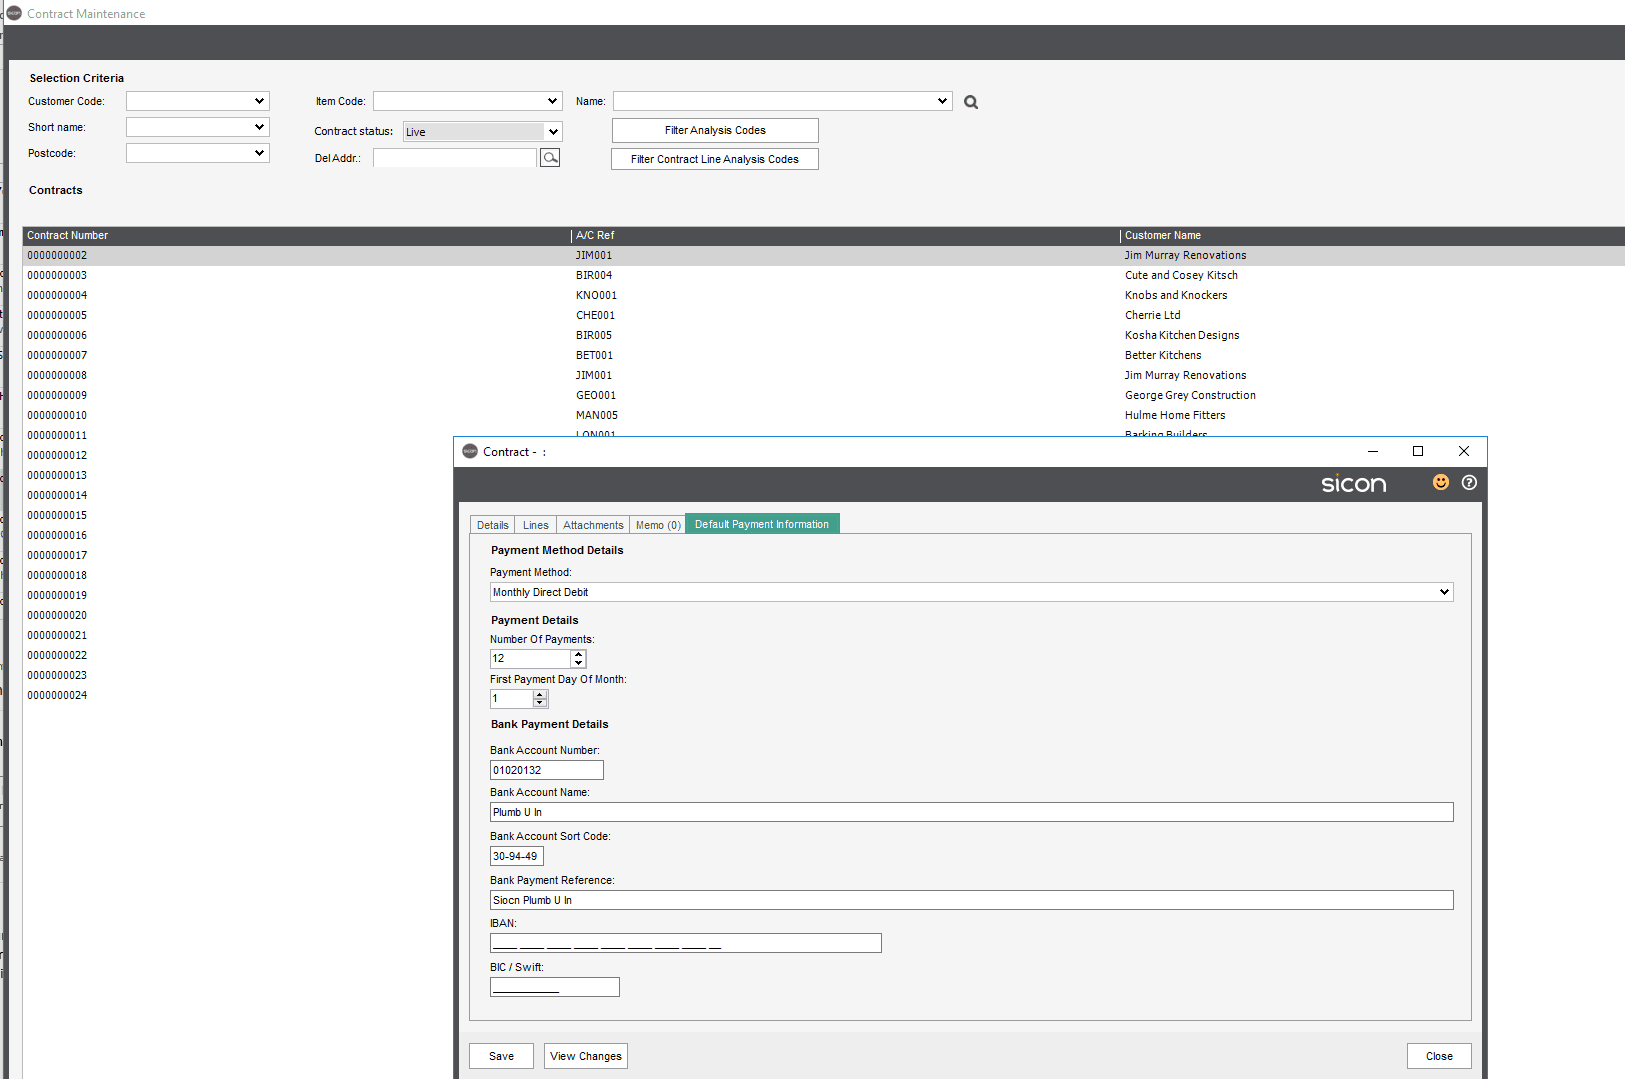
When adding contract lines users can (based on permissions) can change the payment method information per line to a different method overriding the contract header.
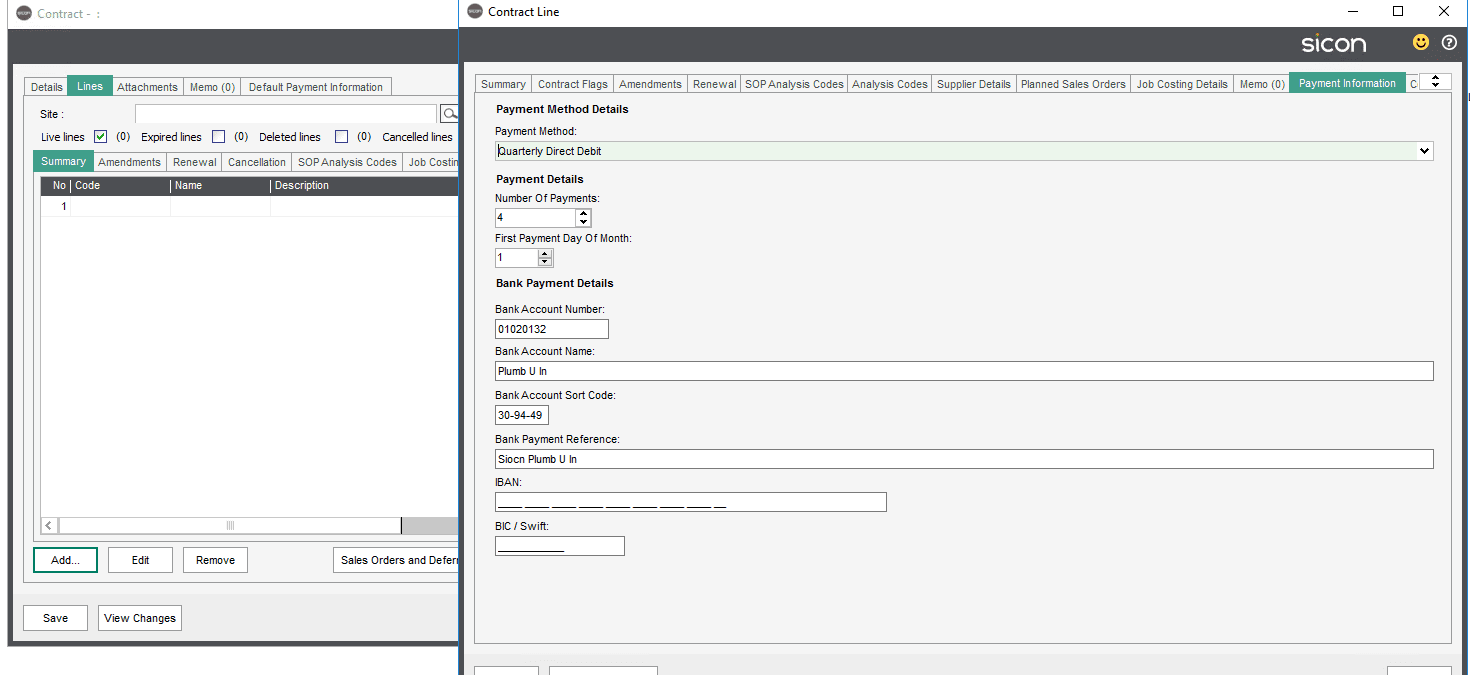
When generating sales orders from within Contracts through to SOP, users can only generate / group sales orders to be invoiced where the contract line payment information is of the same type.
For example: If you have a contract line that is set to collect monthly by direct debit, and a contract line for same customer to be collected quarterly by direct debit, you would have to generate 2 individual sales orders and thereafter invoices, as you cannot have a single sales invoice containing different payment methods).
7. Customer Payment Information Enquiries
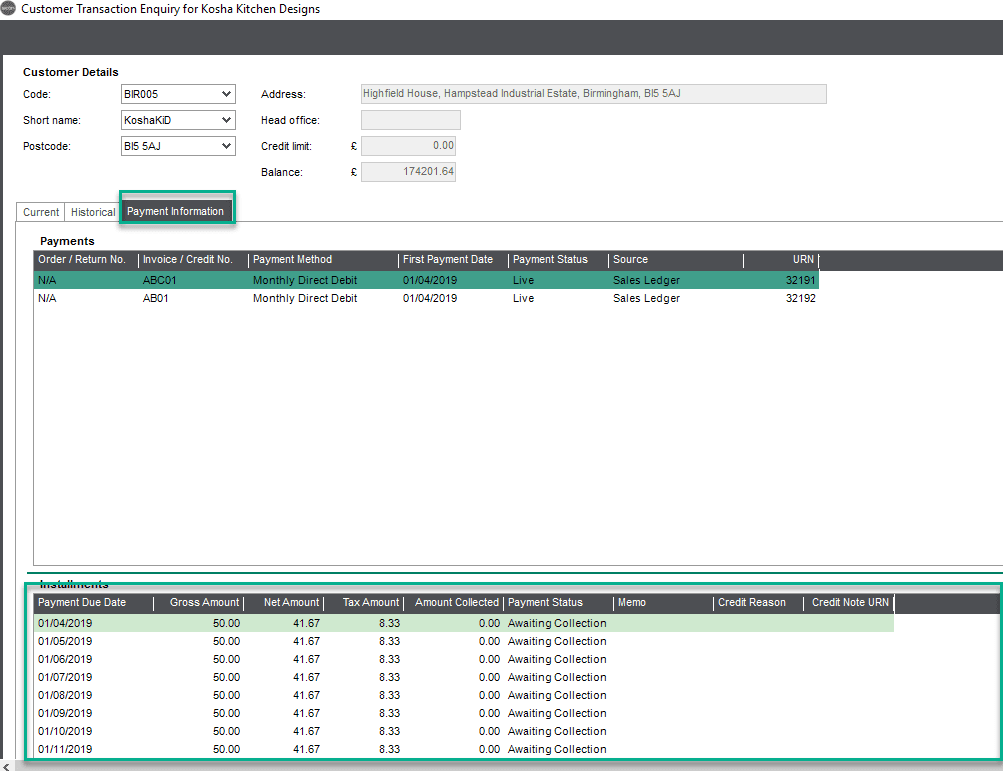
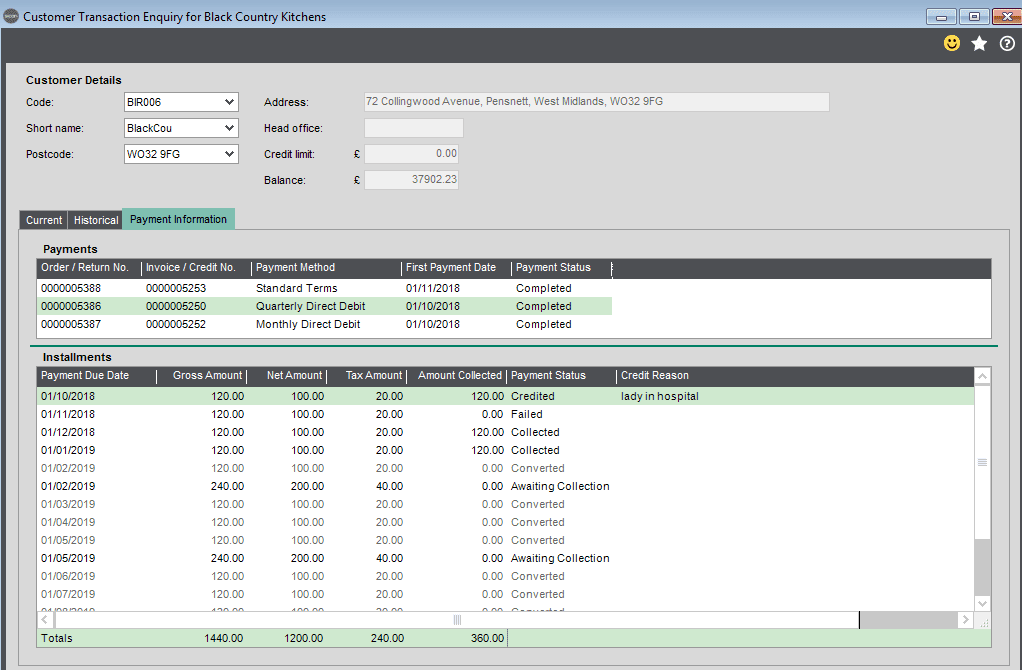
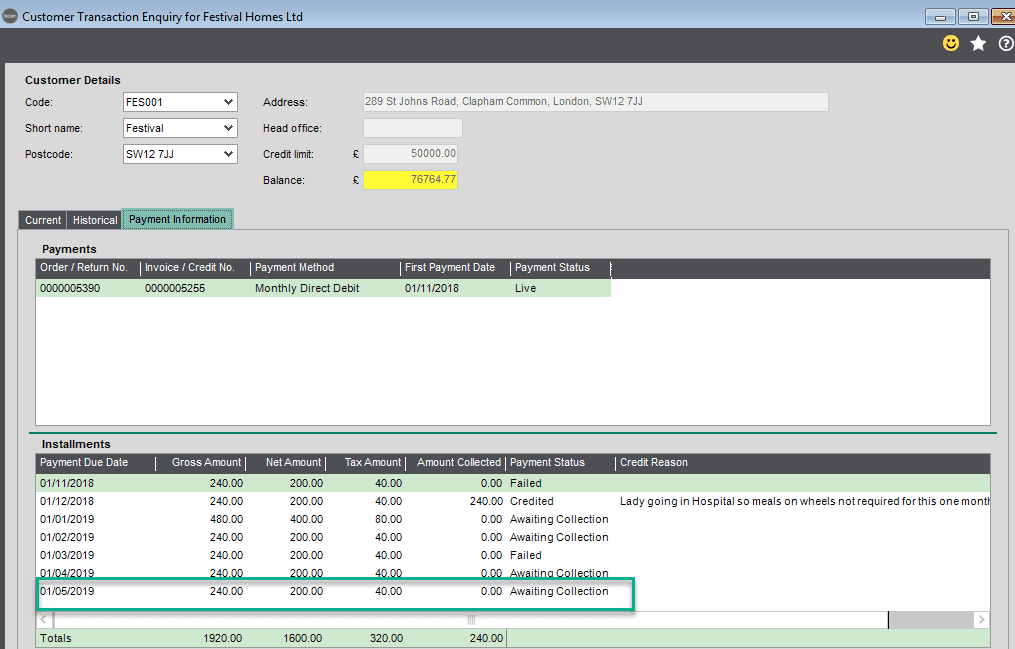
7.1. Sales Ledger Transaction Enquiry/Payment Information Tab
Existing payment details can be seen in the Sales Ledger transaction enquiry screen on the Payment Information tab.
Payment information on Sales Ledger Transaction Enquiry screen.
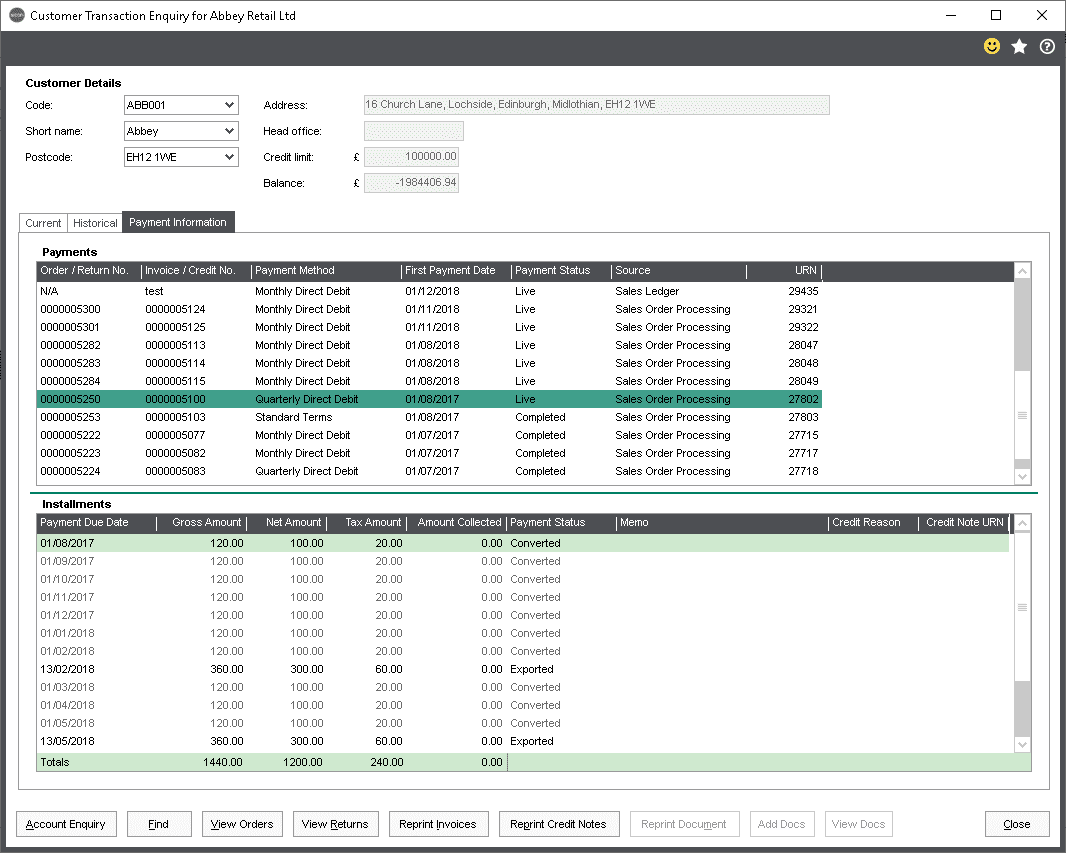
All previously generated payment information for the Sales account can be seen on the payment information tab.
7.2. Transaction Payment Header Status/Definition
The topmost list / Top Pane shows the ‘payment headers’ which represent a single order / invoice. The source column shows from which module the payment header was generated. E.g. Sales Ledger, or Sales Order Processing.
- Awaiting Processing – The Payment header has been created when a Sales order has been printed, but Installment have not yet been generated by posting the invoice
- Live – The Installments have been generated as these Installments are now considered ‘live’
- Completed – All Installments have been, collected, credited or converted to another payment method
7.3. Transaction Installments Status/Definition
The lower half of this pane shows the Installments that have been generated for the selected payment header. There are some additional columns on this list to show a memo, and credit reason. The Memo column is used to display what has been done to rectify a failed payment, and the Credit Note Reason column is used to display the reason entered when recording a Credit Note for an Installment.
- Awaiting Collection – This is the default status for an Installment, it has not yet been exported for collection
- Collected – Successful collection of Installment
- Exported – The Installment has been exported to CSV and is now ready for collection
- Failed – The Installment has previously been exported for collection but the collection has been marked as failed during the collection routine
- Credit* – The Installment has been credited
If an SOP Invoice is flagged as being collected over an agreed period of time for example monthly for 12 months, but whereby the service is suspended for 1 month, you can choose to credit one installment
An example being: You have invoiced a customer for meals on wheels for the whole year, but the customer was in hospital for 1 month, and you have agreed to credit back one month
When Credit process is run, the system will enter automatically an internal credit note on to the customer’s ledger, part allocating against original Invoice. The system will use the original Invoice number as a reference followed by a -1 (For example original Invoice was number 5384, the credit note would be 5384-1)
The reason for the credit (entered when crediting) will be shown and the same nominal codes as the original Invoice will be used
Converted – The Installment has been converted to an alternate payment method. e.g. from Monthly Direct Debit to Standard Terms
- Re-Presentation: If an installment transaction remains with a status of exported for any reason (i.e. customer has not paid, or the Invoice is not allocated to a receipt), then during the next export routine for the next lot of collections the o/s exported transaction will show with a status of ‘Representation’
Note: If Sicon Job Costing is installed, the credit note will be posted to the same job as the original Invoice.
8. Changing Payment Method on an Existing Transaction/Method
Use this function to change the set payment method on an ‘awaiting collection invoice’
The payment method can be changed for existing payment details that have already been generated where there is still an outstanding amount to be collected.
Note : You can only change between payment methods, you cannot retain the same payment method and simply change the dates to be collected
It’s important to note that the change applies to all Installments scheduled and/or remaining against the relevant invoice , you cannot change a payment method for one installment ( If you wanted to change just one installment you should flag the installment as failed with a follow up action)
Where an Invoice has been raised and posted to the ledger the relevant payment method set examples being:
Customer had originally said they wished to pay monthly direct debit over 3 months, but then ask and you agree to spread over 12 months
Where originally they were going to pay by cheque/bacs but have cash flow issues and you have agreed they pay by direct debit quarterly
With this screen you are looking at an individual customer.
Show all transactions outstanding for one specific customer: Filter by customer which in turn shows all relevant Invoices assigned to direct debit payment methods as example below
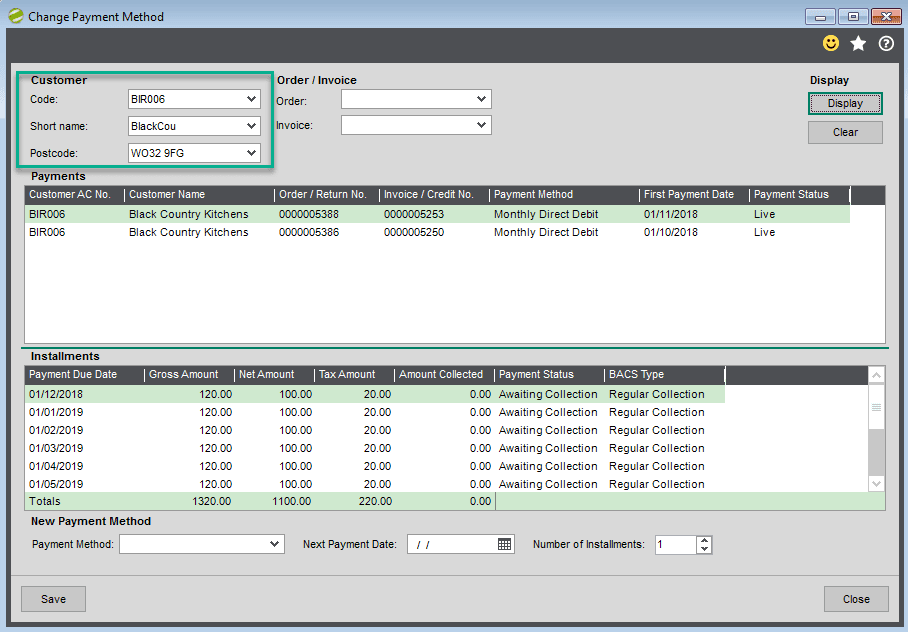
The topmost list will show the currently live Payment Headers where the Installments are at a status of ‘Awaiting Collection’.
The filters at the top of this screen can be used to filter down the current live Payment Headers to make it easier to find the data you are looking for.
Filter by Order or Invoice Number: or if they are only talking about 1 specific invoice (may be a high value one) you can filter by order number or Invoice number.
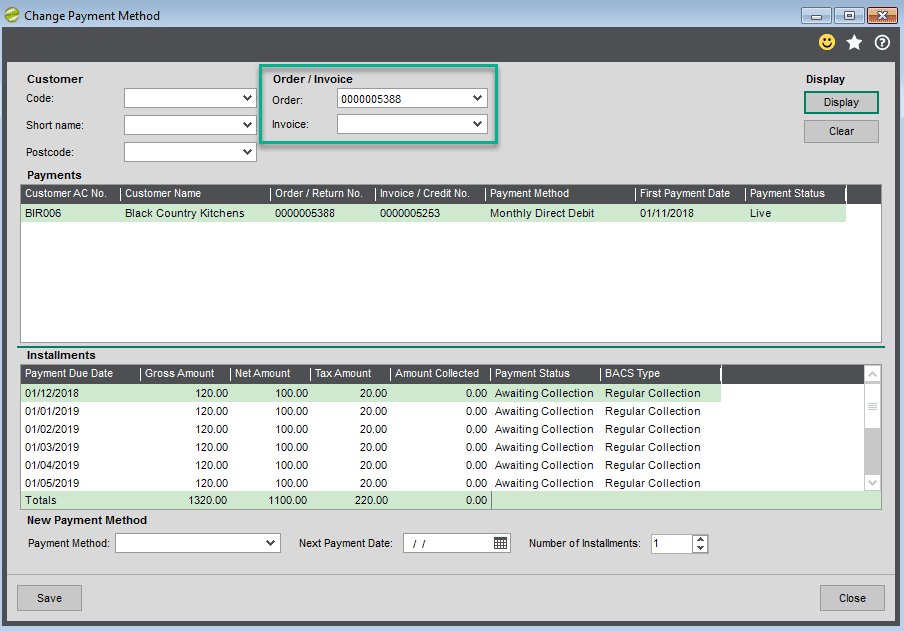
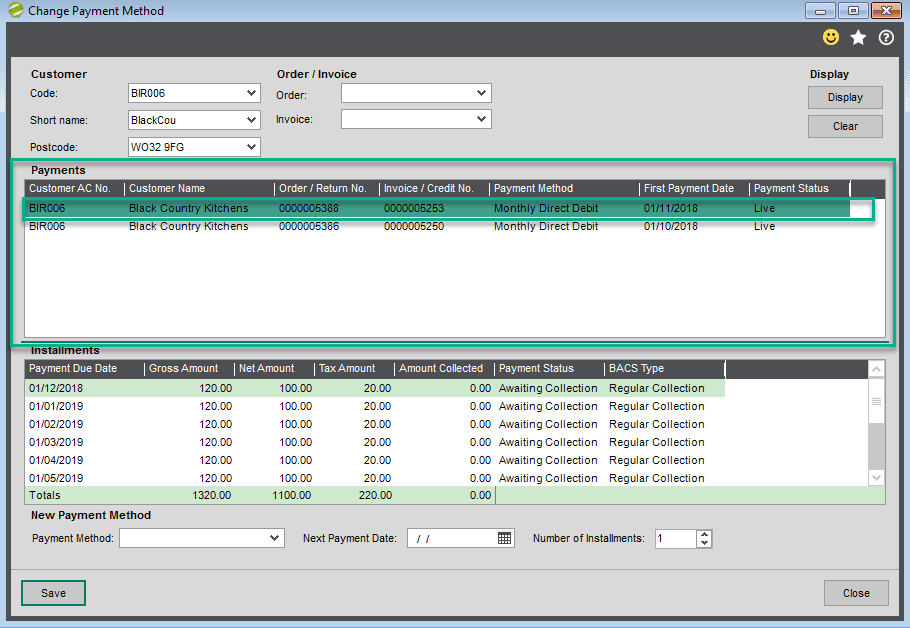
In the top payments panel once you have identified the Invoice for which you wish to change the payment method highlight it.
The Installments panel will show the Installments due, relating to the select invoice from the top payments panel.
When ready to do so select your revised payment method from either:
Standard Terms:

The Next Payment Date and Number of Installments are greyed out.
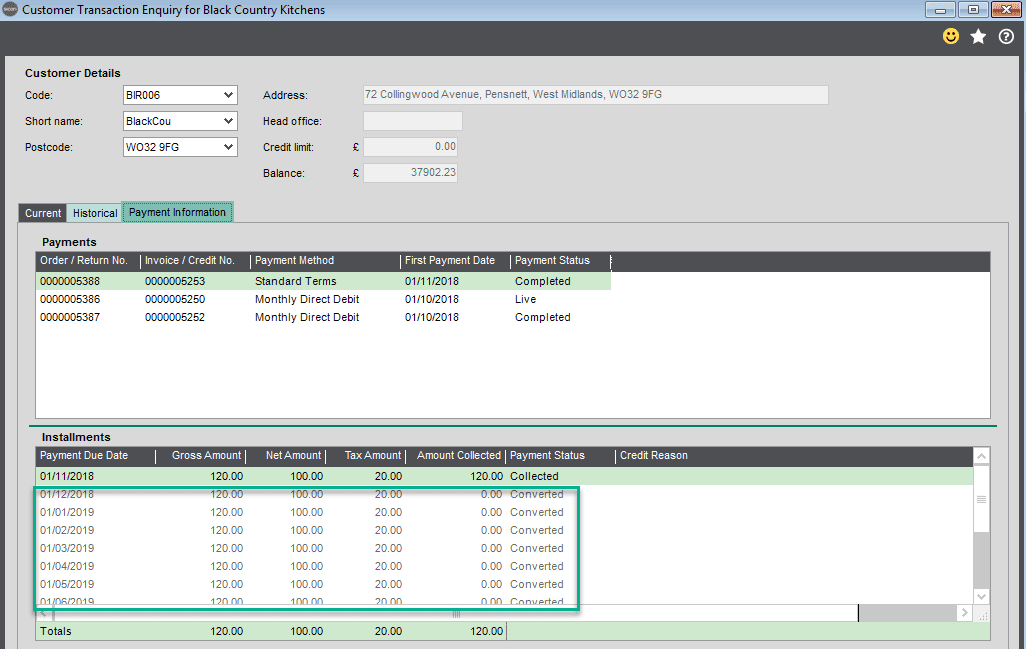
Whilst looking at the payment information tab on the customer’s transaction enquiry the installment will be shown as ‘Converted’.
In other words, the value of the failed installment will be due by manual methods / standard Sage terms i.e. Cheque or Bacs and once monies have been received would need to manually part allocate to the relevant invoice.
Changing from Monthly to Quarterly Direct Debit
In this screen shot originally Invoice 5250 was set to Monthly Direct Debit over 12 months starting 01/02/2019
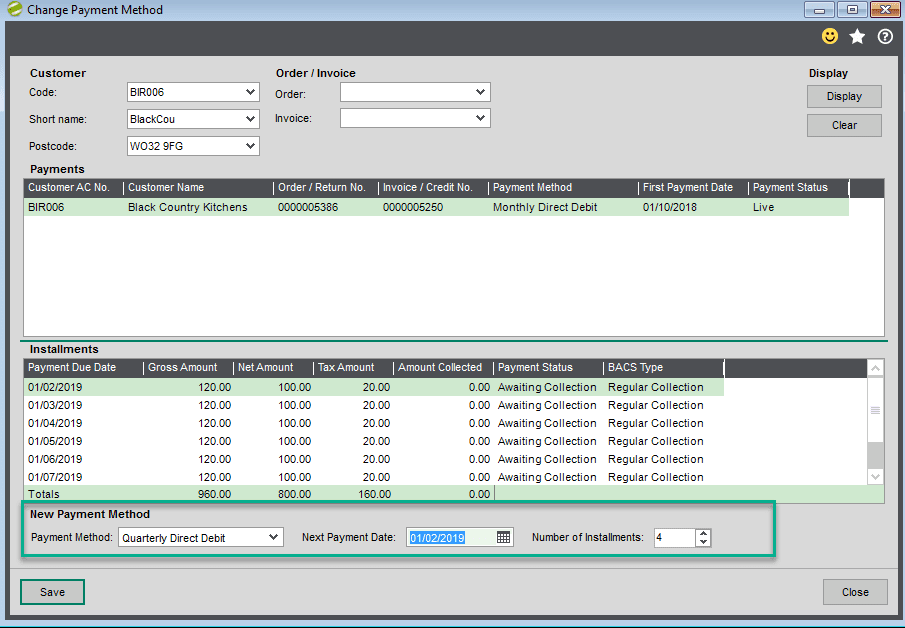
In this example we have changed payment to quarterly Direct Debit, still starting 01/02/2019.
When selecting the relevant invoice from the top panel and after save you will see by the screen shot below the Installments have converted to quarterly.
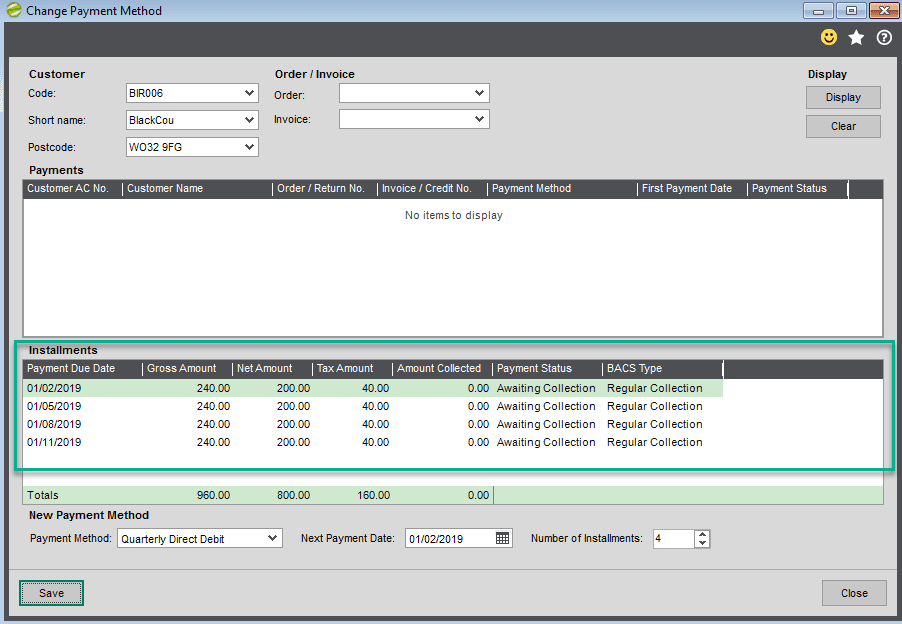
Whilst looking at the payment information tab on the customer’s transaction enquiry the previous Installments are shown as ‘Converted’ and the new ‘4 Installments are flagged as ‘Awaiting Collection’.
9. Processing Collection of Outstanding Payments Due
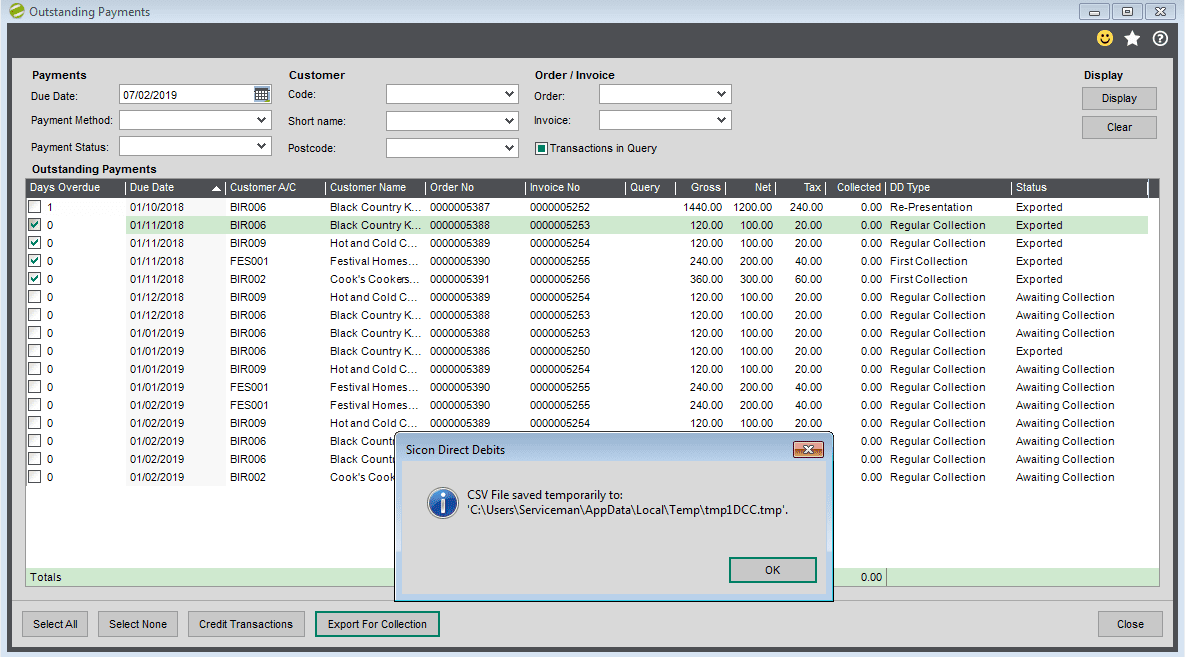
Any Installments that are ‘Awaiting Collection’ or ‘Exported’ will need to be exported to CSV before they can later be collected.
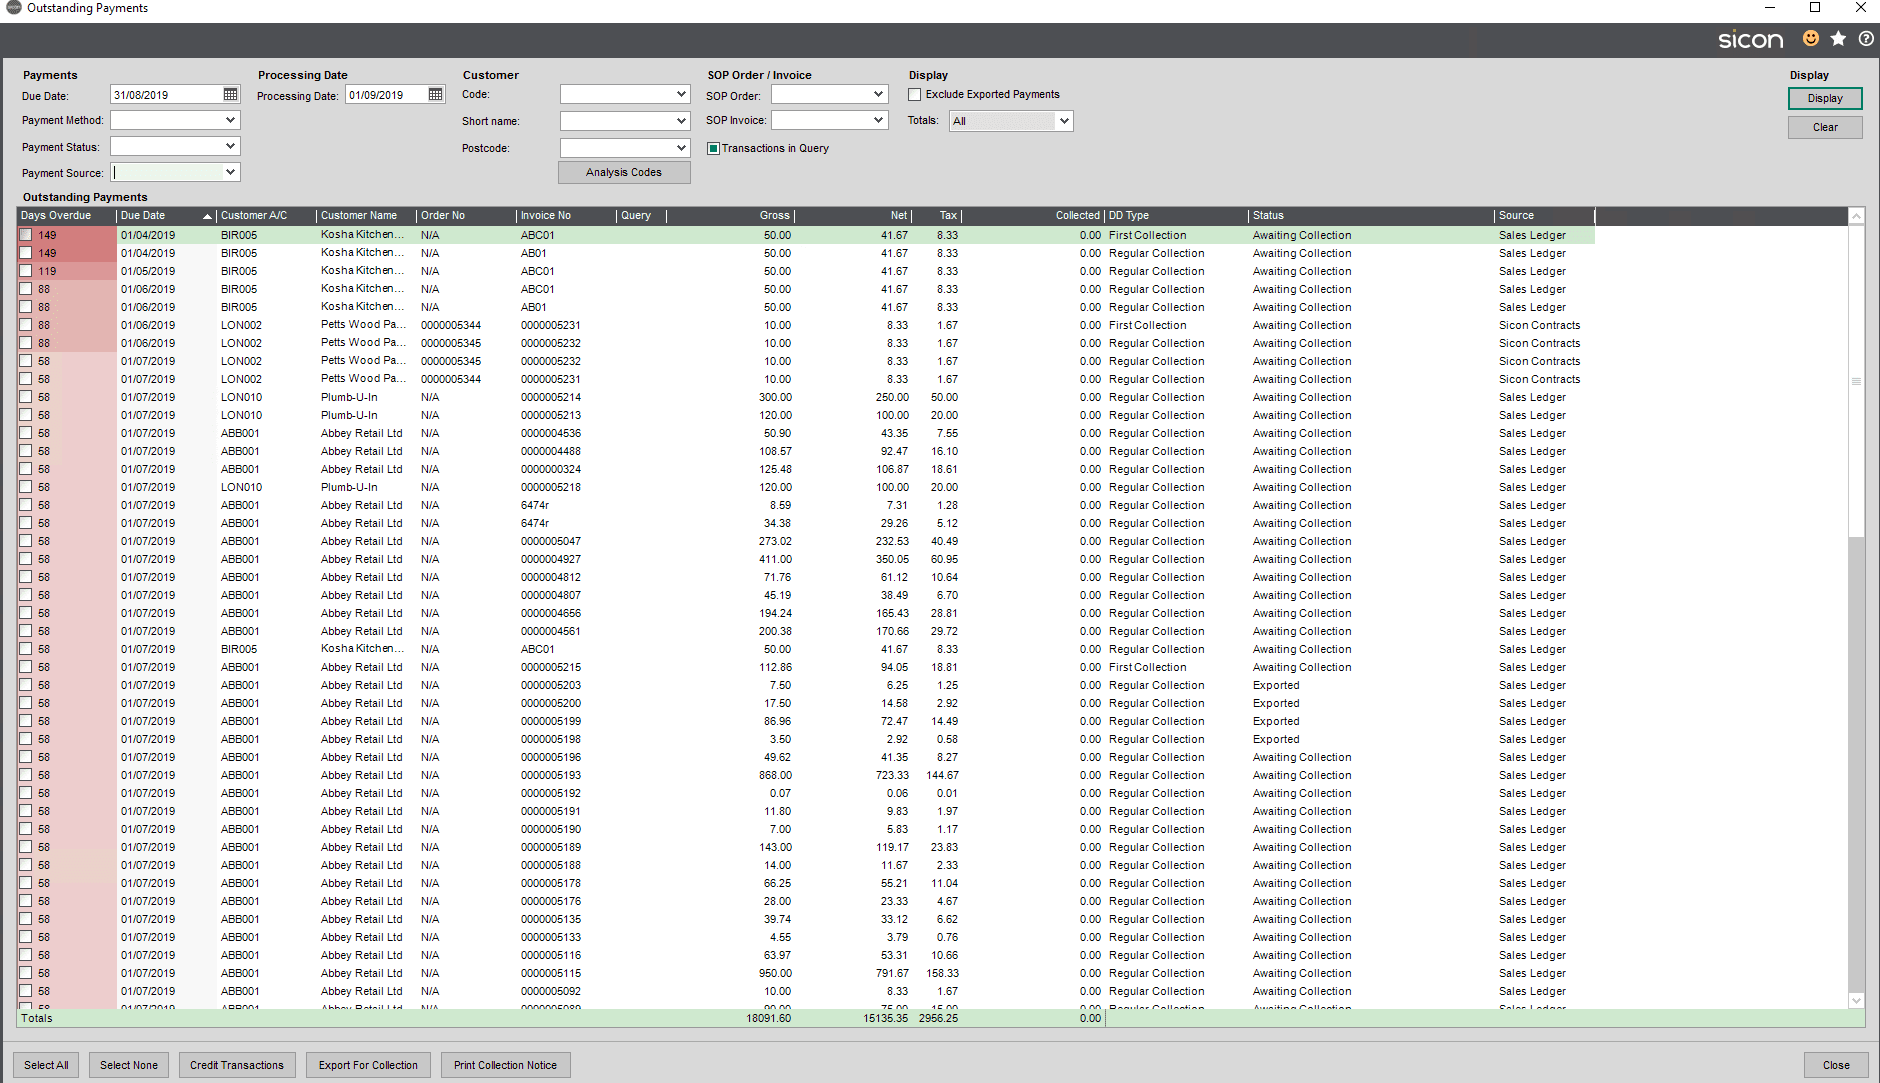
The Outstanding Payments screen can be used to see which Installments are currently due and therefore this is the first screen users will go to prepare a csv file for exporting.
By default, when this screen is open, the Due Date will be showing as the last day of the current month.
The days overdue column will highlight based on how many days overdue the Installment is, the darkest deep red represents the most overdue Installments, whereas white Installments are not overdue.
By default, when this screen is open, the Due Date will be showing as the last day of the current month.
The processing date is mandatory, and this is the date that you will be collecting from the customers bank account, and will be printed on the Collection Notice
This screen shows you all the installments due (based on due date entered) and based on the criteria set either at account and/or sales order level.
Important Note: Sicon Debtor Management creates installments, each with an installment due date, so when a payment method of direct debit is assigned to a transaction, the system will look at the customers record and the field ‘’Payment Day of the Month’ and set the first installment due date equal to that ‘payment day of the month’ in the following month after the transaction date, but taking into consideration the Invoice terms/Due Date as well
Example : On a customer record you have the Payment Day of Month set to 1, as in our example below:
You add a transaction on Sales orders and the transaction (invoice date) is the 14th June 2019.
Sicon Debtor Management will set the 1st Installment date of 1st July 2019, if customer has no payment terms set, if customer for example is on 30 days terms and invoice would normally be paid as a while 14th July, then instead the 1st direct debit installment will be due 1st August 2019.
If any previously exported transactions have not been previously flagged as collected, failed or credit they will show as exported, but can be included in another export if required (or excluded).
The filters at the top of the form can be used to find Installments for specific criteria
To show totals use the totals filter, options, none checked (those selected & ticked) and selected (meaning highlighted). Note we use Sage’s total controls here so cannot change the terminology
You can also filter by
- Which direct debit payment method: monthly or quarterly
- A specific customer
- A specific order or Invoice number
- Payment Status: Awaiting Collection, Exported, Failed, Part Collected (Original collection failed and user chose to add to remaining Installments over a period of time), Credited
- Payment source, this is useful for example if you are using the module in conjunction with Sicon Contracts and you are looking to run this process just for contract transactions
If you have set some filters and wish to clear, select clear.
The first column ‘Days Overdue’ is a calculated date in the view days overdue based on the current date on the SQL server.
You can choose to Select some or all in preparation for ‘export for collection’, or clear selection by clicking ‘Select None’.
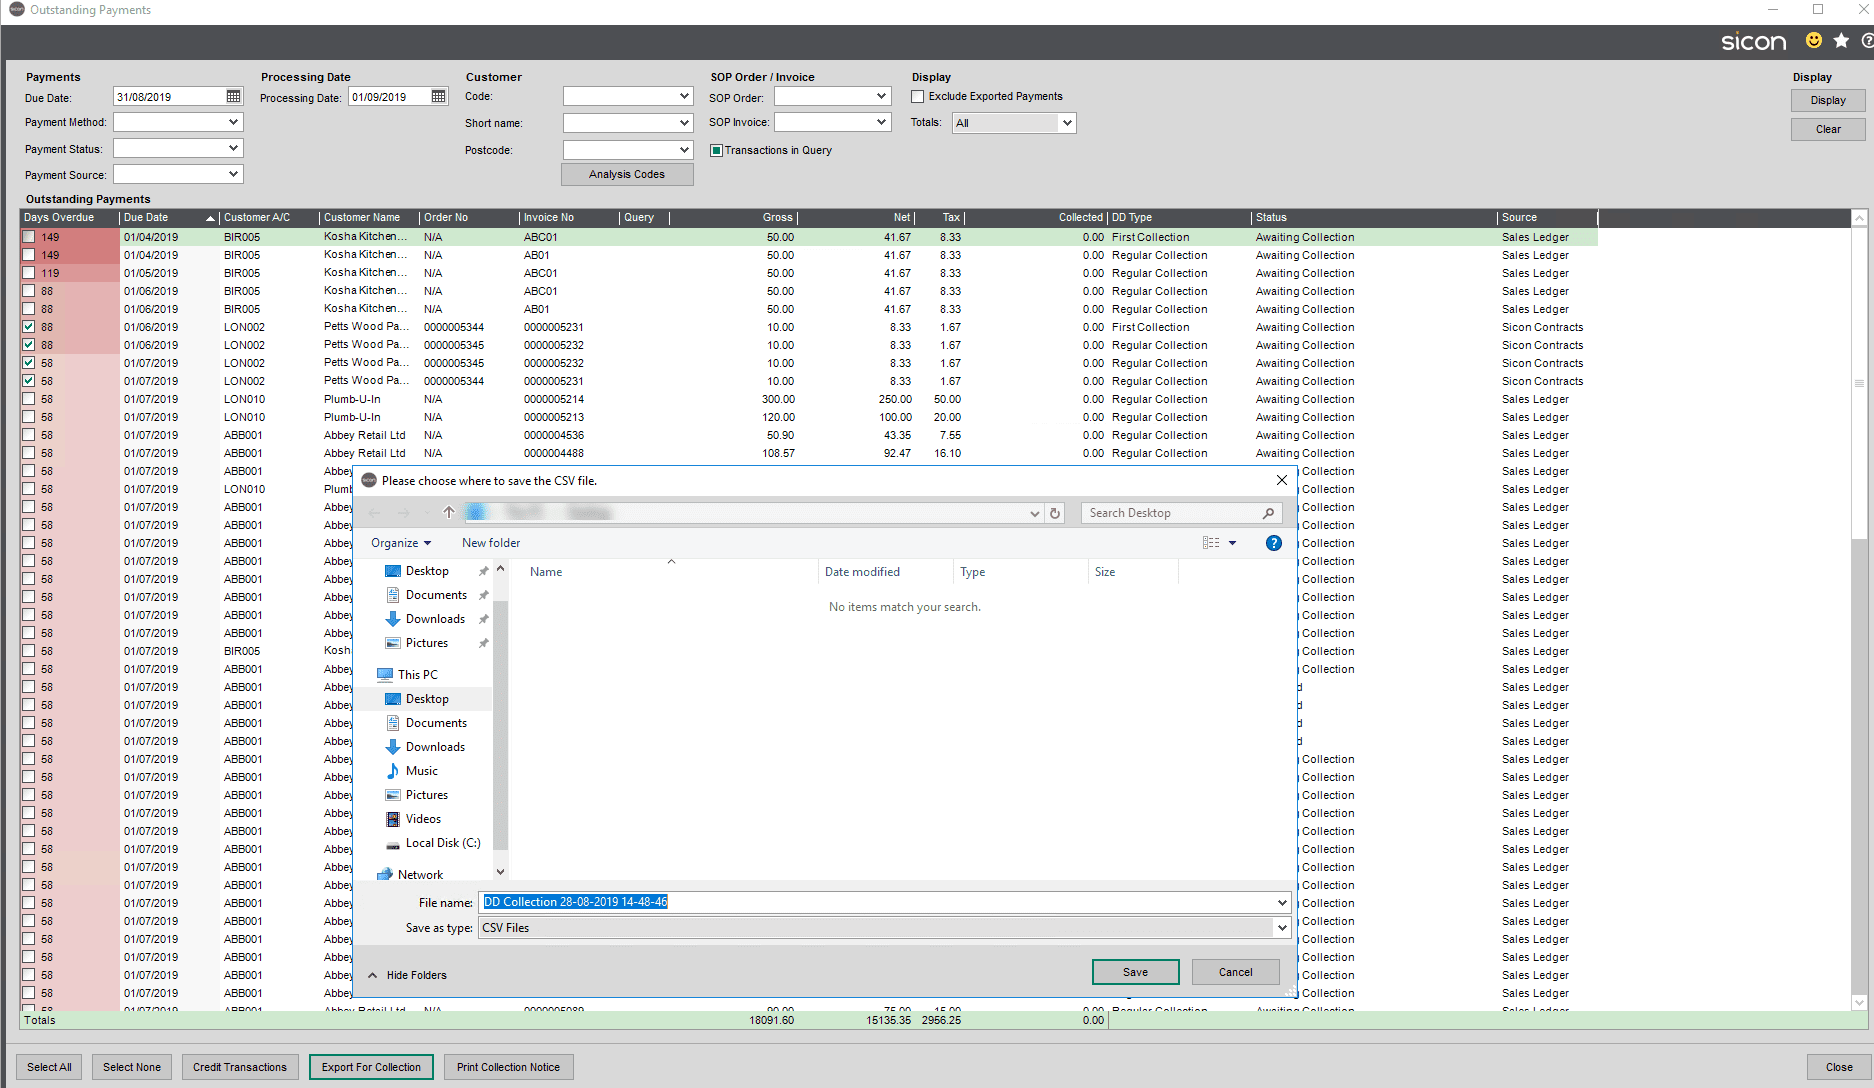
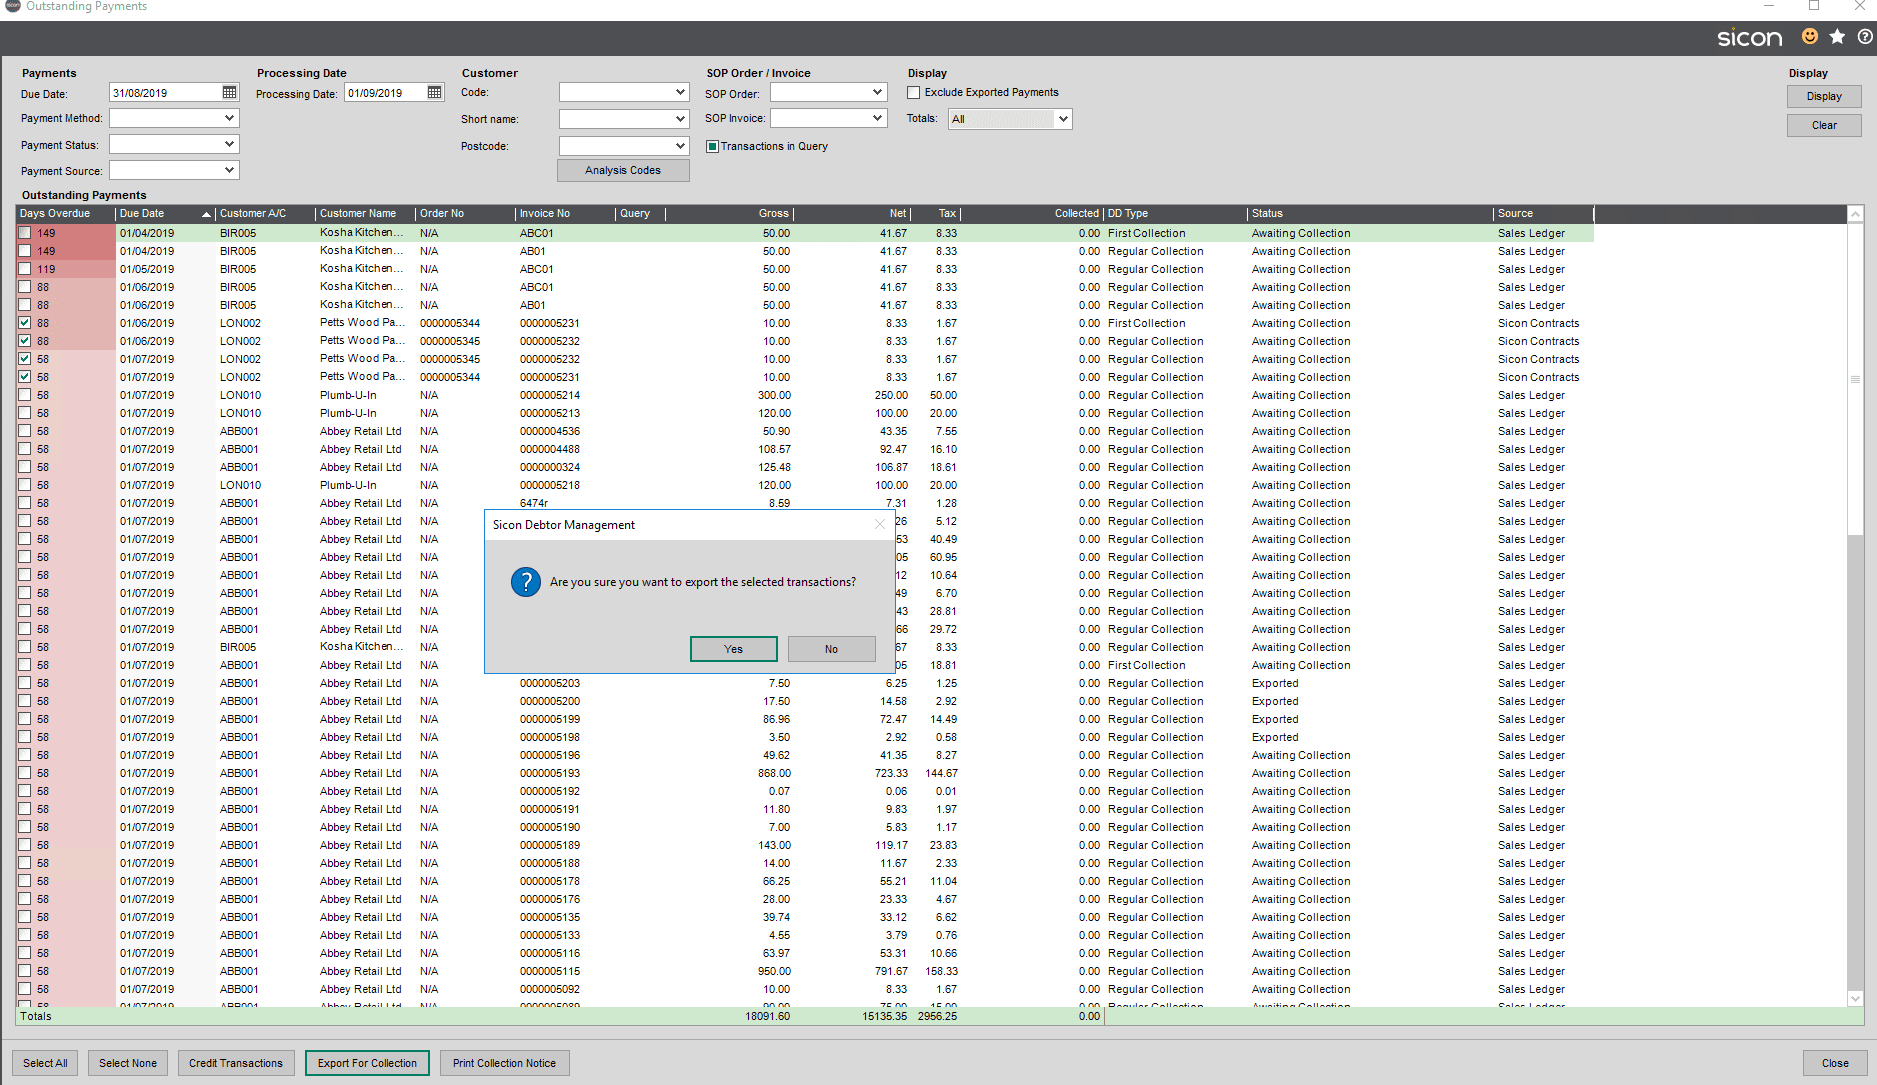 When you have confirmed those items for export the system will prompt you to save the csv file.
The file destination is set as default within settings and it must be a network path, not a local one. By default, the file name is DD Collection+ Current Date+ Current Time.
Collection Notes
Transactions will need to be exported before the user can print a collection note.
After the transactions have been ‘exported for collected’ the user will have prompted to run / print off the collection notes.
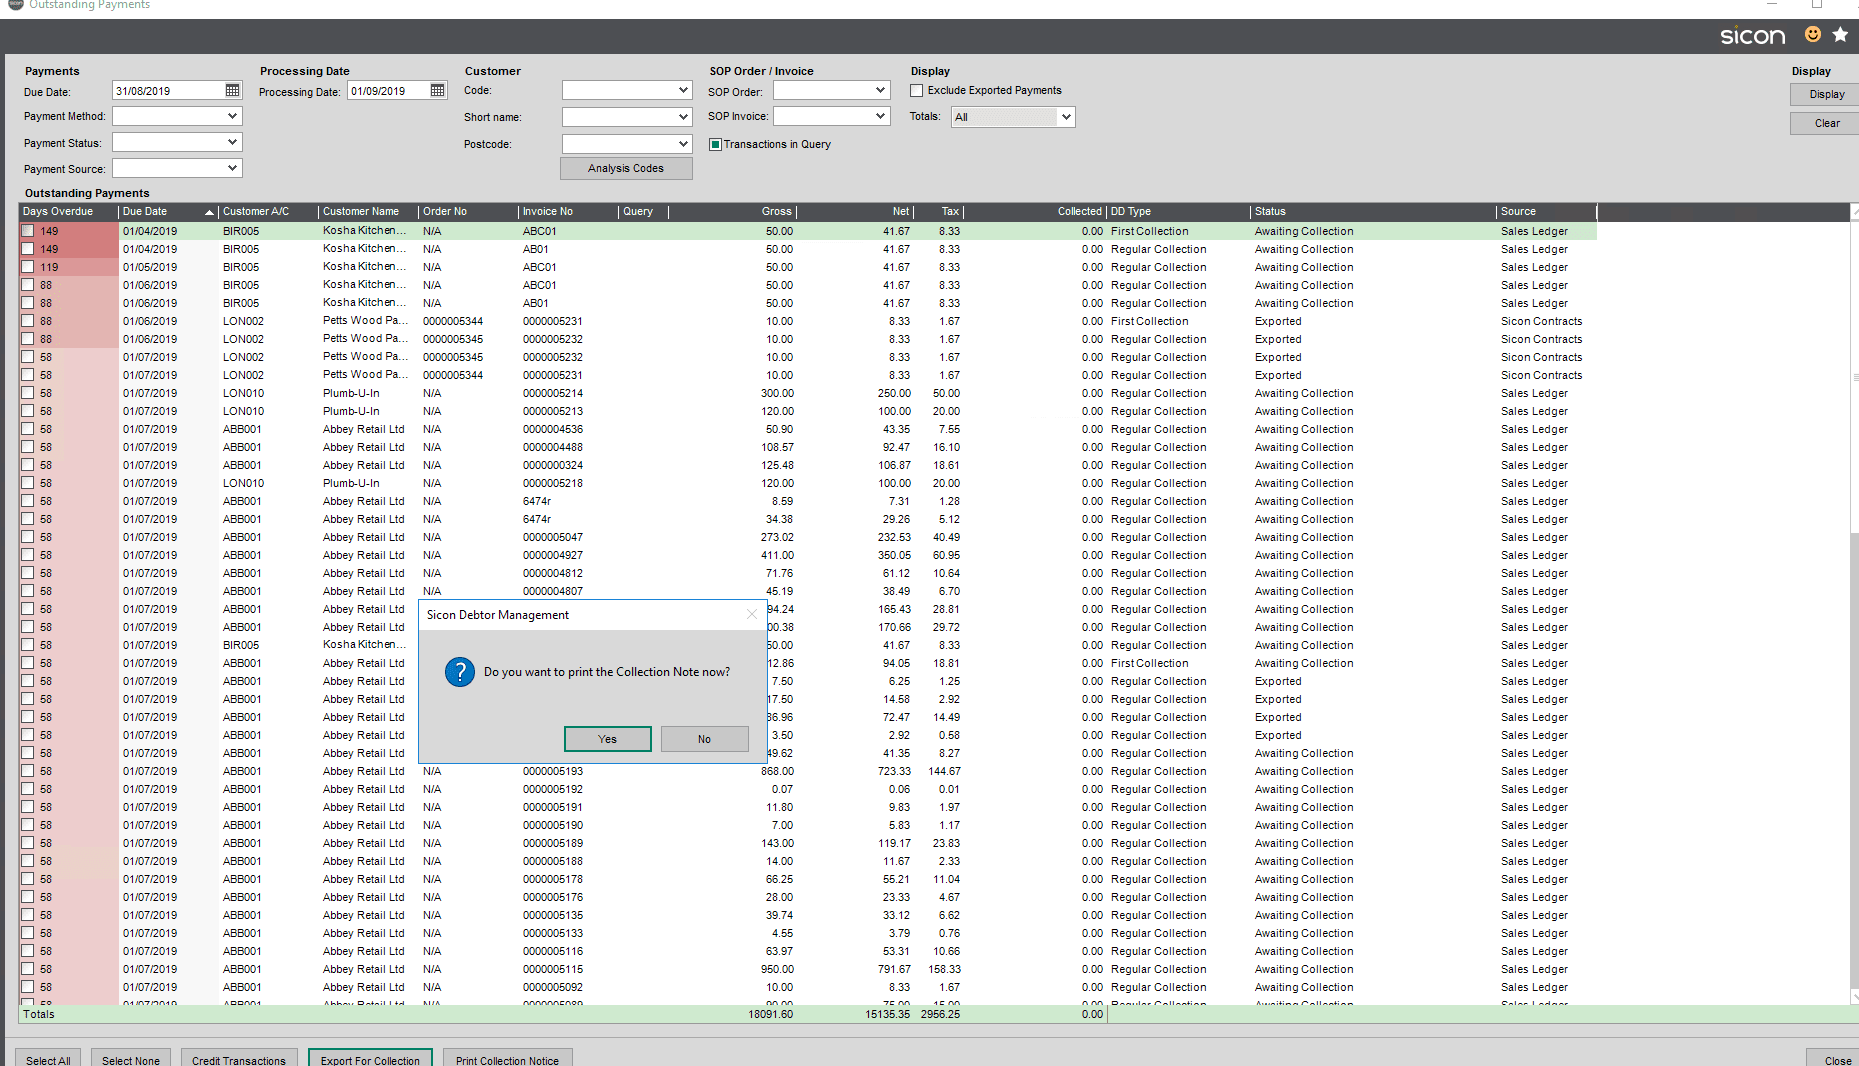
If the user says no, then up until the point the user runs the process to confirm the customer has paid monies into your bank by direct debit ‘the direct debit collection process’ users can print collection notes from this screen.
Alternatively, the user can print collection notes from within the report’s menu.
If a user tries to Print collection notes before the export of transactions the users will see the following message.

Otherwise the collection notes will print using Standard Sage 200 Report designer.
Important Note: If using ‘Print Collection Note’ from this screen, it would print collection notes for all transactions with a status of Exported, even if exported previously. Until the status of a transaction is ‘Collected’ the collection notes will be available from this process to print.
If you try using this Print Collections Button on this screen, after ticking transactions that have not yet been exported, the system will not print a collection note for those.
9.1. Raising an internal credit against an ‘awaiting processing’ Installment
If for any reason Installments need to be credited, select each Installment to be credited by ticking the check box next to each one before clicking the ‘Credit Transactions’ button.
An example being: You have invoiced a customer for meals on wheels for the whole year, but the customer was in hospital for 1 month, and you have agreed to credit back one month.
The Reason for Credit Screen
Before the transactions are credited, the system will ask for a reason to be recorded for crediting the transaction. This reason, along with the associated Credit Note URN will be visible in Sales Ledger Transaction Enquiry.
The status of each Installment credited will be changed to ‘Credited’.
When crediting an Installment, a Credit Note will be created on the Sales Ledger account with the Same Reference as the original Invoice plus an additional ‘-C’ to indicate it was a credit. The newly created Credit Note will be automatically allocated against the Invoice.
Example original Invoice was number 5384, the credit note would be 5384-1
The reason for the credit (entered when crediting) will be shown.
When looking at the standard Sage enquiry screen the credit note allocated to the original Invoice is visible.
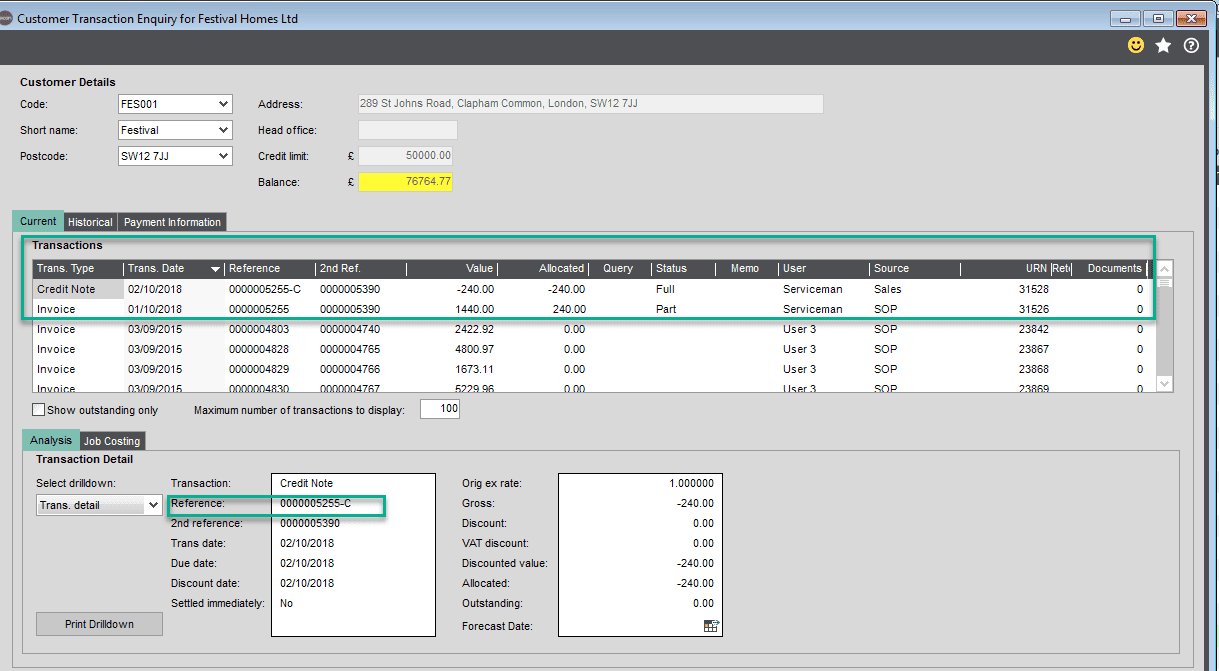
The same nominal codes as the original Invoice will be used.
Note: If Sicon Job Costing is installed, the credit note will be posted to the same job as the original Invoice.
9.2. Preparing the CSV for Export
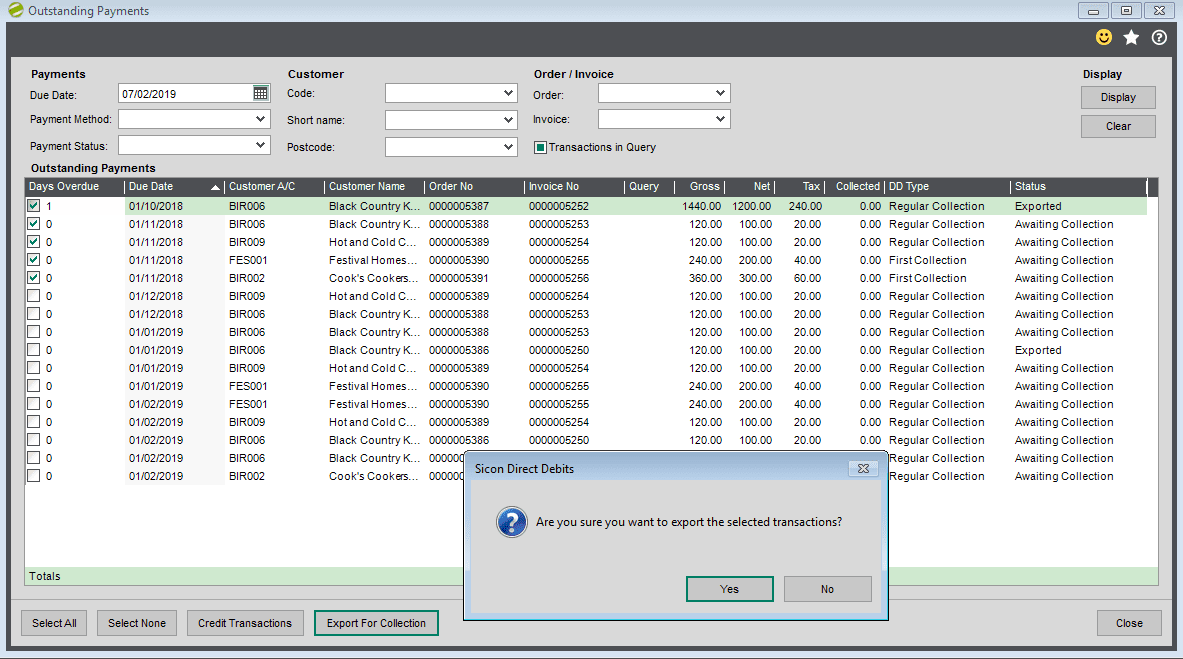
To export Installments for collection, tick the check box against each Installment to be exported and click the ‘Export for Collection’ button.
Note: Any Installments that have previously been exported using this routine and are exported again will update the BACS value type to ‘Re-Presented’ (Instead of First / Regular).
When exporting for collection, the system will ask which CSV format to use.
Select which csv file format to use and click OK.
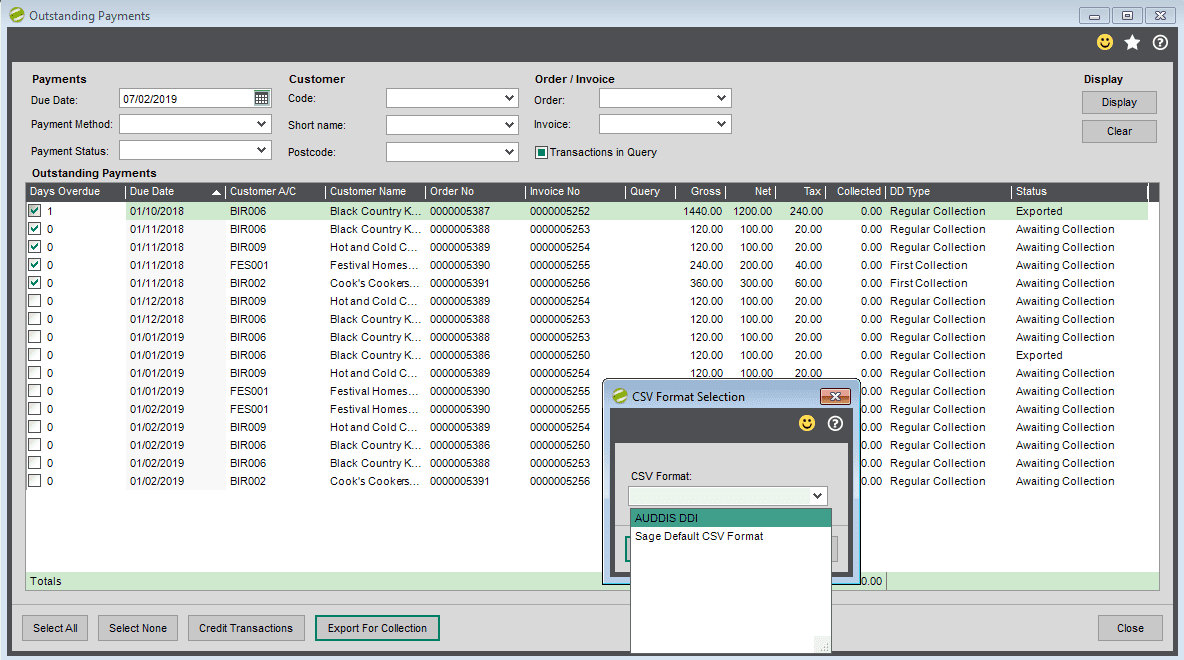
The CSV format selection Screen
Select the CSV format to use, and specify a location to save the file. When saved, the status of all previously selected Installments will change to ‘Exported’.
As an example, exporting to Sage CSV format would look like the below:
226655,12345453,Quality Counts Kit,0000005095,96.00
226655,12345453,Quality Counts Kit,0000005101,400.00
447788,98765432,Better kitchens,0000005093,60.00
226655,12345453,Quality Counts Kit,0000005101,100.00
226655,12345453,Quality Counts Kit,0000005095,24.00
Select a secure and backed up location to save the csv file to.
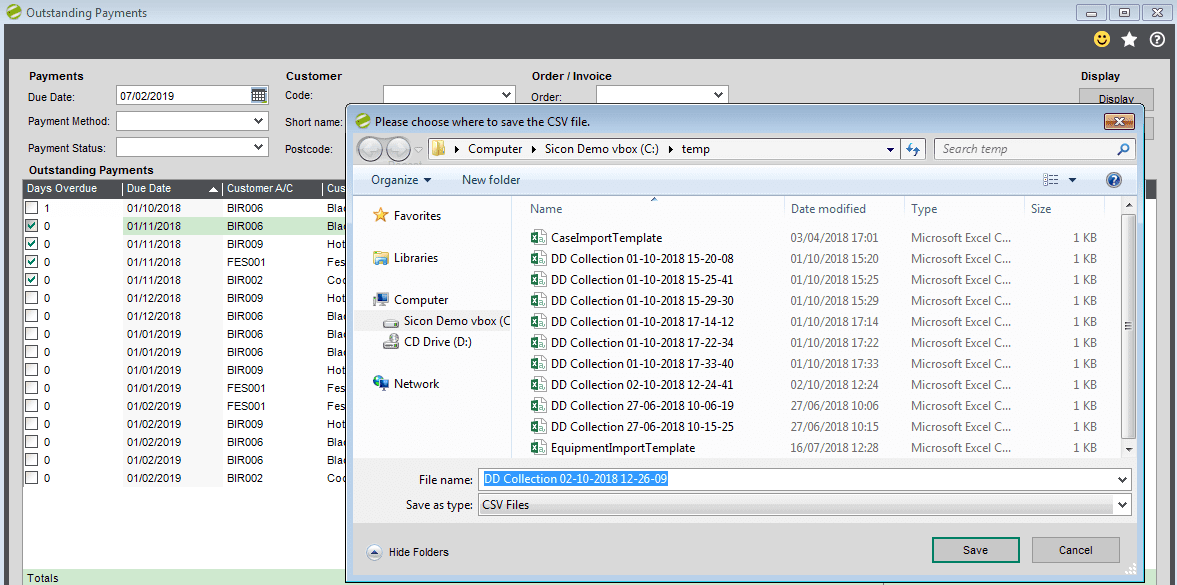
If you cancelled at this stage in error the system does auto save (example below).
The DD Type / Column data is changed to Re-Presentation.
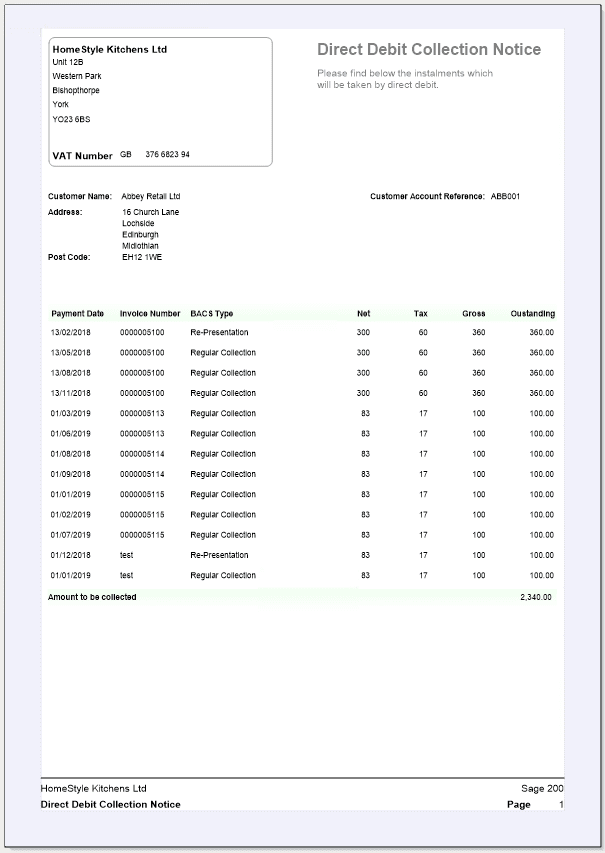
9.3. Direct Debit Collection Notice
The direct debit collection notice can be printed after exporting Installments or manually from the main Debtors System menu.
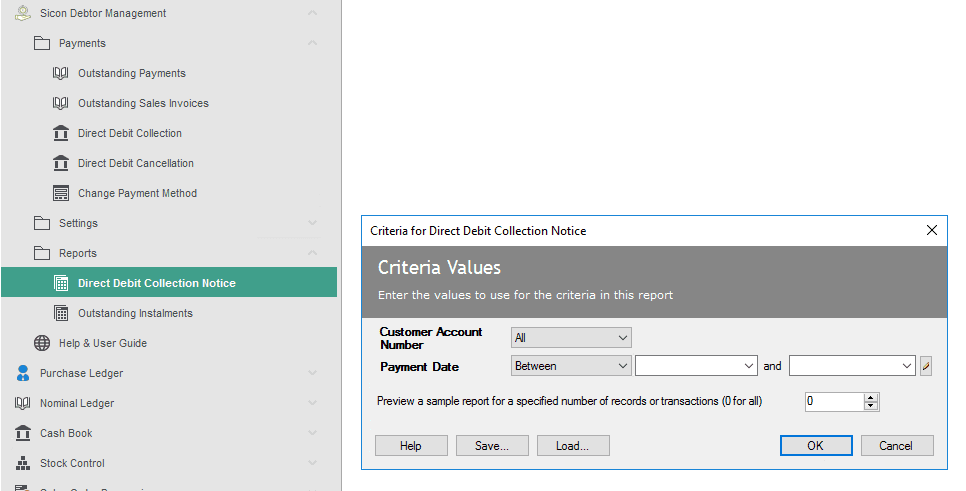
Criteria for the Direct Debit Collection Notice Report Screen.

When running the collection notice report manually it is possible to specify filters for the customer account(s), and the Payment Date(s) to include in the report.
Example Direct Debit Collection Notice Report.
9.4. Cancelling Exported Installments
If installments have been exported already and it is necessary to cancel one or more of these Installments then the Direct Debit Cancellation screen can be used.
This works in much the same way as the Outstanding Payments screen, but will list only the currently exported transactions.
The Direct Debit Cancellation Screen
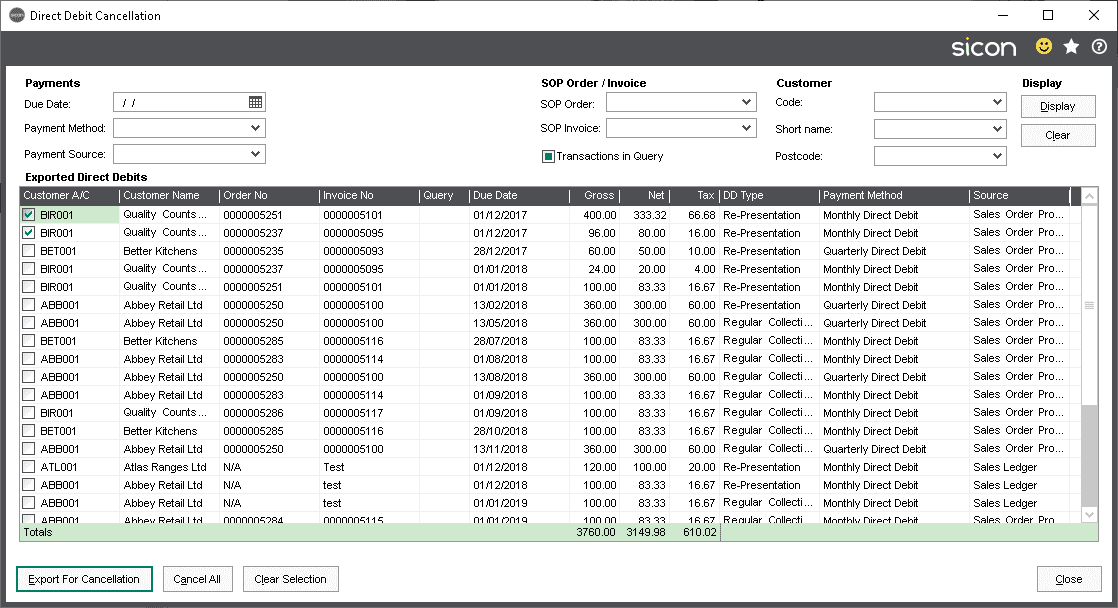
The filters at the top of the screen can be used to find specific transactions that need to be cancelled. To export transactions for cancellation, tick the check box next to each transaction and click the ‘Export for Cancellation’ button.
Note: Please Consider whether you need to re print and send a customer a revised direct debit collection note after making changes , this would be done via the Menu see help and user guide section 10 Reports – Direct Debit Collection Notice
The CSV Format Selection
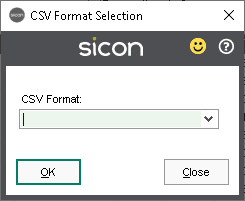
In the same way as transactions are exported for collection, a CSV Format must be selected and a path to save the exported file. For each Installment cancelled the status will be changed back to ‘Awaiting Collection’.
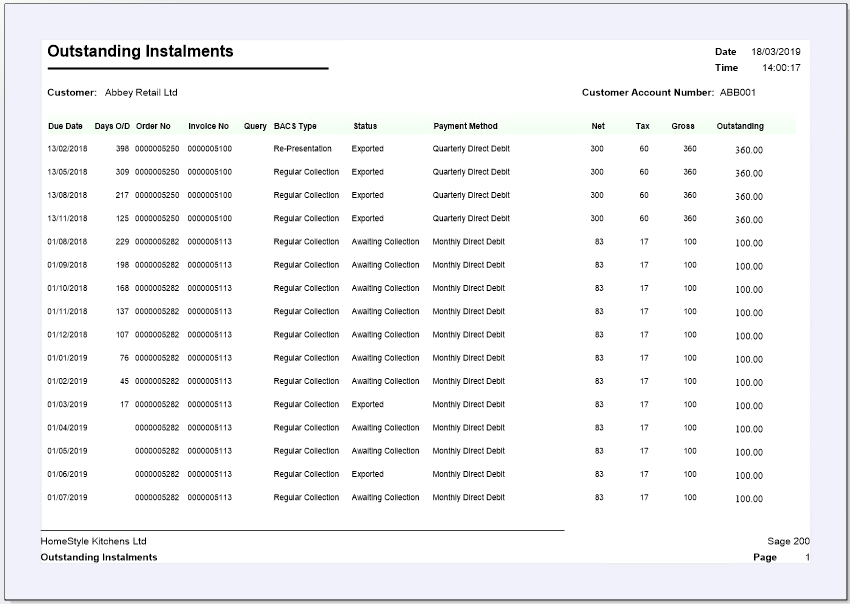
9.5. Outstanding ‘Awaiting Collection and/or Exported’ Report
The Outstanding Installments Report can be used to report on all Installments that are currently ‘Awaiting Collection’ or ‘Exported’

Criteria for the Outstanding Installments Report.
When running the Outstanding Installments report its possible to filter on the below fields:
Outstanding Installments Report Filters
- Customer Account Number – The Sales Ledger Account Reference
- Payment Due Date – The Payment Due Date
- Days Overdue – The number of days the payment is overdue
- Order / Return No – The Sales Order Number
- Invoice / Credit No – The Invoice Number
- Query Code – The Transaction Query Code
- BACS Value Type Name – The BACs Value Type
- First – The First Direct Debit
- Regular – Regular Direct Debit after the first has been generated
- Re-Presented – A previously exported direct debit has been exported again
- Final – The Final direct debit
- Status – The status of the Installment. See Installment Statuses
- Payment Method – The Payment Method. See Payment Information Fields

The Outstanding Installments Report
9.6. Direct Debit Collection
Confirming Successful receipt of funds into bank: After Installments have been exported, and when you have visibility in your bank that the direct debits have been deposited you will use the ‘Direct Debit Collection’ process to enter the details of the date received into your bank, any batch reference and description you chose to enter and then selected which previously exported installment transactions have been received.
Date picker Control: In addition to the filters are the top of the screen that are used to find exported Installments that match the specified criteria, there is a date picker control to allow selection of a date to use for the receipts that are posted for the Installments that are marked as received.
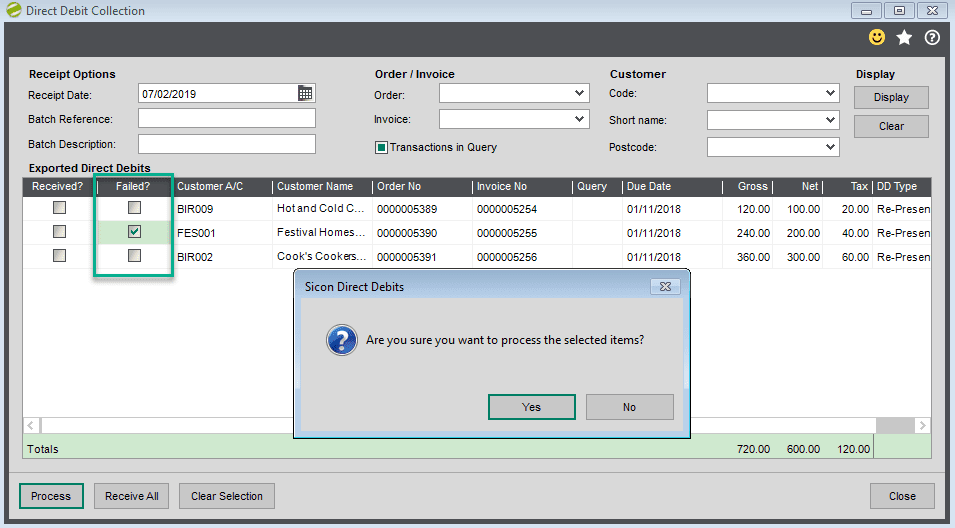
When reconciling a statement, each transaction that appears on the statement can be marked as ‘Received’ by ticking the check box next to the Installment. For any Installments that are missing or failed, these can be marked as failed by ticking the ‘Failed’ check box next to the Installment.
The receipt for the full value of each Installment will be automatically allocated to the invoice the Installment relates to, and the status of the Installment will be updated to ‘Collected’.
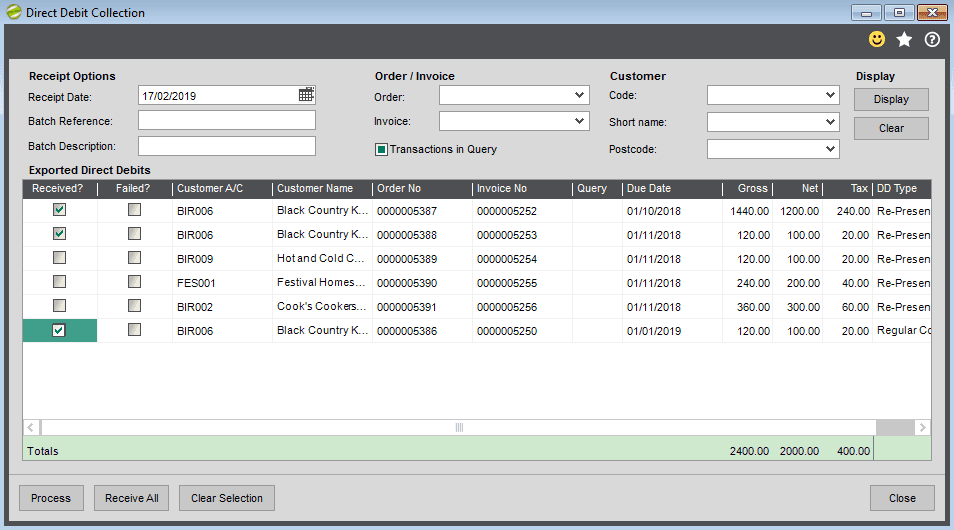
Select the relevant transactions individually, or select Receive All’ or if selected in error, ‘Clear Selection’.
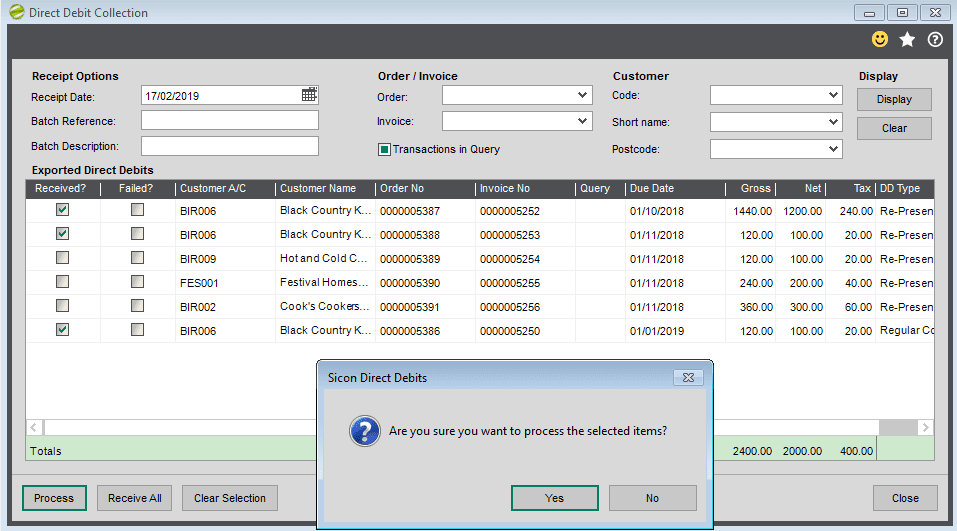
When happy click the ‘Process’ button.
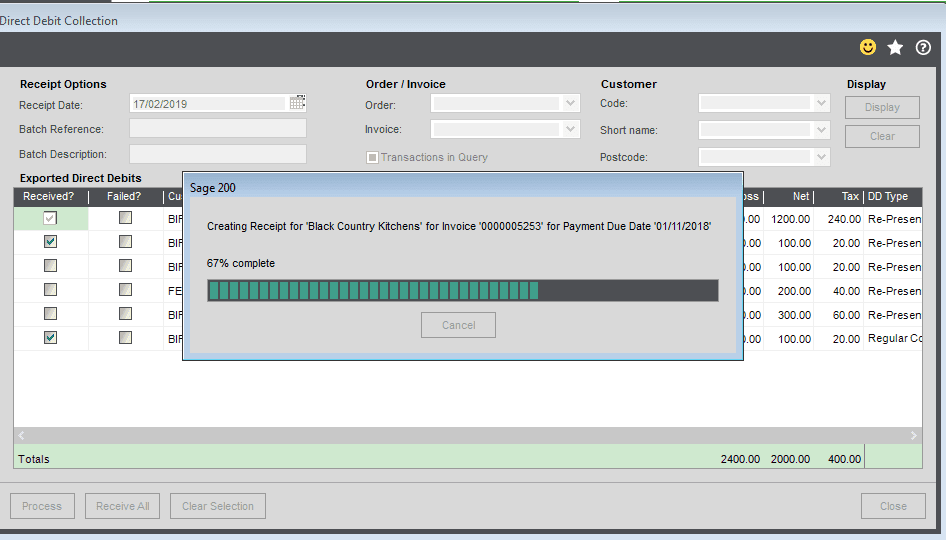
This will post receipt(s) for each transaction marked as ‘Received’.
Depending on the ‘Bank Receipt Grouping’ setting this will post one receipt per Installment, one receipt per Sales Account or one receipt per Cash book account.
Once you select yes, the following processing screen will display.
The screen is left open as it may be you are entering them in batches of date received
Alternatively, to close, use the close screen button.
9.7. Processing a ‘Failed Collection’
When you aware that a direct debit has failed from within the ‘Direct Debit Collection’, you would select the relevant transaction (s) as failed and select process.
The query column visible on this screen pulls through from the SL Invoice. It is not an editable field but will show whatever they have entered.
Users can filter these, by (transactions with a query code, or no query code also).
For any Installment that has been marked as failed, a popup screen will be displayed for each Installment.
Once you select process you will see a new screen showing future Installments for this customer (if there are not any, the remaining Installments panel will be empty).
The process here is to select how you wish to handle the failed direct debit collection.
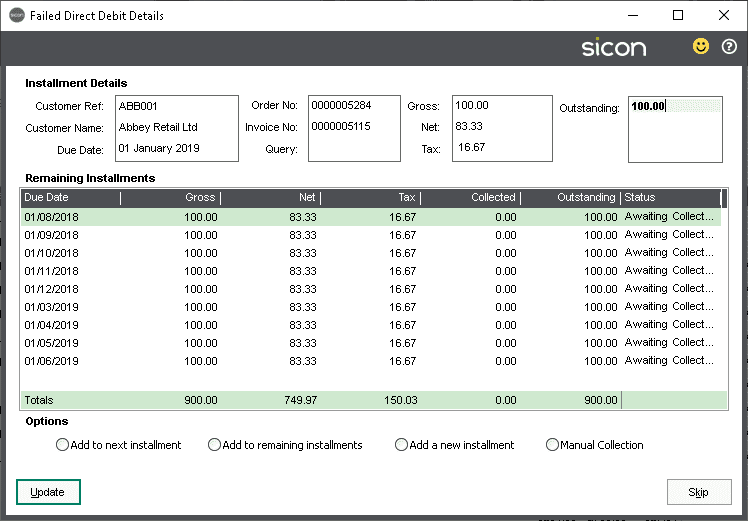
The Skip button, visible bottom right is meant as a way of you skipping the process of deciding what to do at this point, if selected it does not update any transaction, it leaves it in the previous screen as exported ready for the next run.
It might be you need to call the customer to discuss and agree what the next action is, if so you would then come back to the same Direct Debit collection screen, select again and then confirm the follow up action.
The topmost section of this screen will show the details and outstanding value of the failed Installment. The list in the middle of the screen will show any remaining Installments with a status of ‘Awaiting Collection’.
At the bottom of the screen are the options available for the failed Installment. Depending on the number of remaining Installments, some options may be disabled.
For all failed Installments, the status of the Installment will be updated to ‘Failed’ and the option selected for the failed Installment will be written to the ‘Memo’ field on the Installment. See Viewing Payment Details for more information.
Failed Direct Debit Options Being:
- Add to next Installment – The outstanding value of the failed Installment will be added to the next Installment awaiting collection
- Add to remaining Installments – The outstanding value of the failed Installment will be divided equally over the remaining Installments
- Add a new Installment – An additional Installment for the outstanding value will be added at the end of the current schedule
- Manual Collection – The Installment will be manually processed in Sage 200
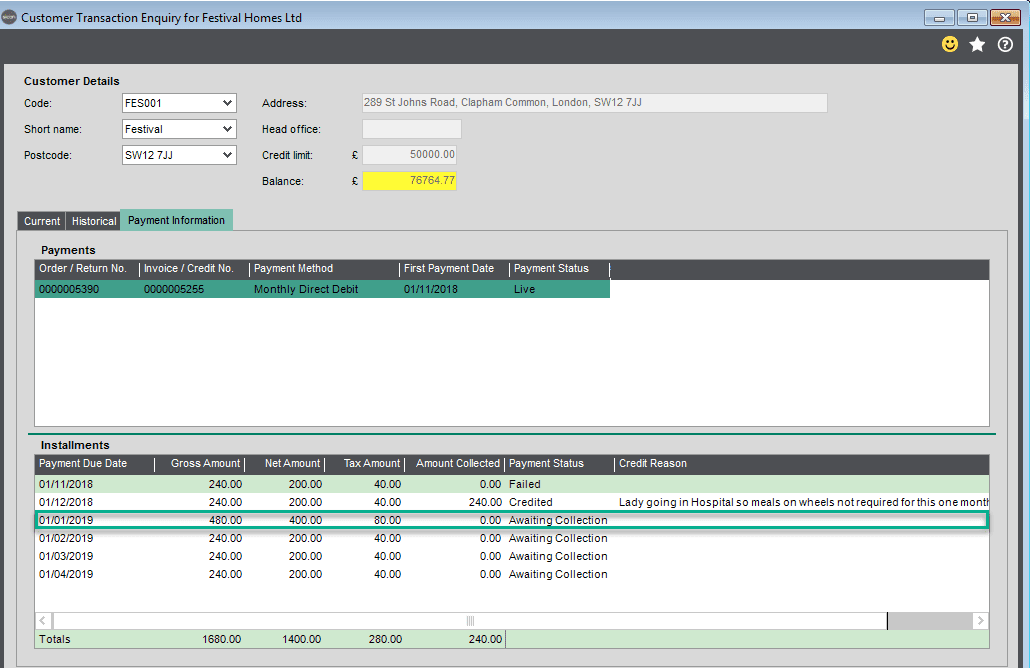
Add to Next Installment: If this is the agreed action select and click update.
This would be visible on the customer enquiry screen on the payment information tab against the relevant Invoice.
In this example the direct debit due January 2019 has increased from £240 (the value of the failed installment) to £480.
Add to Remaining Installments: If this is the agreed action, once selected and updated, the value of the failed collection will be spread over the remaining Installments.
This would be visible on the customer enquiry screen on the payment information tab against the relevant Invoice.
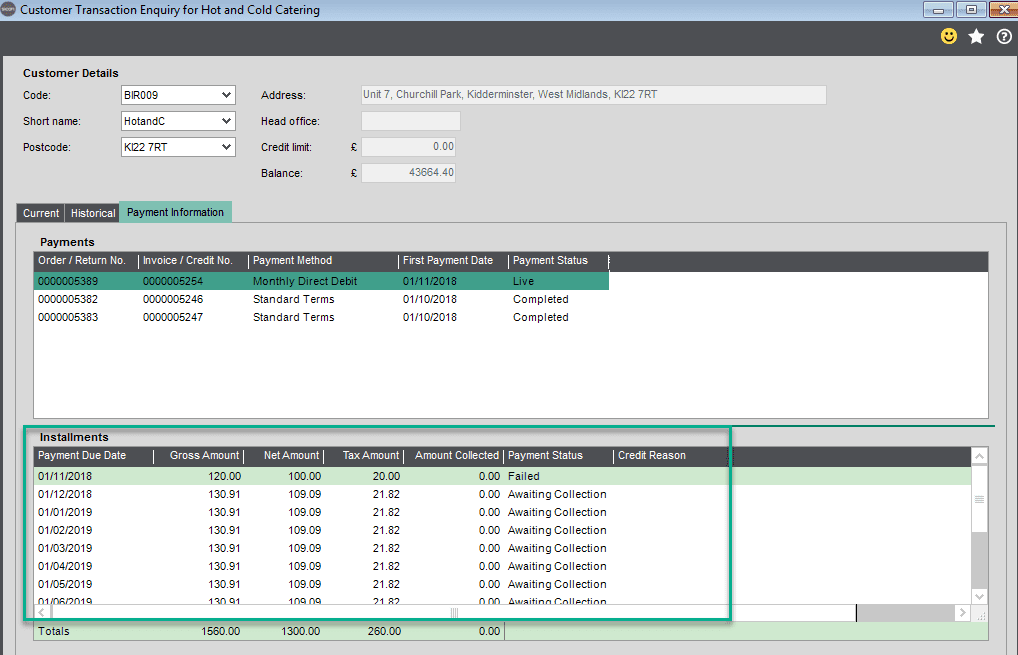
In this example the direct debit due Dec18 onwards has increased in total by the amount that failed.
Add a New Installment: If this is the agreed action, once selected and updated, this would be visible on the customer enquiry screen on the payment information tab against the relevant Invoice.
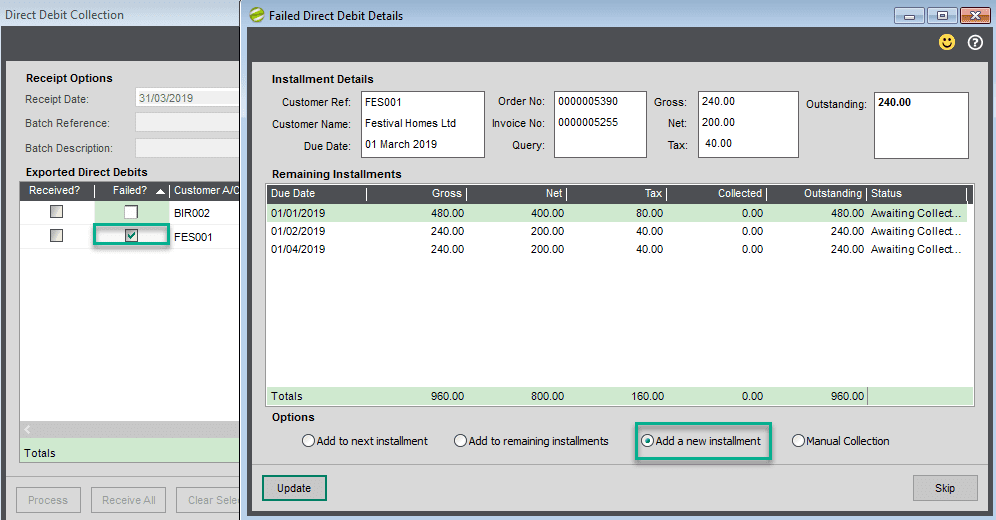
In the above screen shot you can see the last one done was April, in the screen shot below there is now an additional one in May.
Manual Collection: If this is the agreed action and once selected and updated.
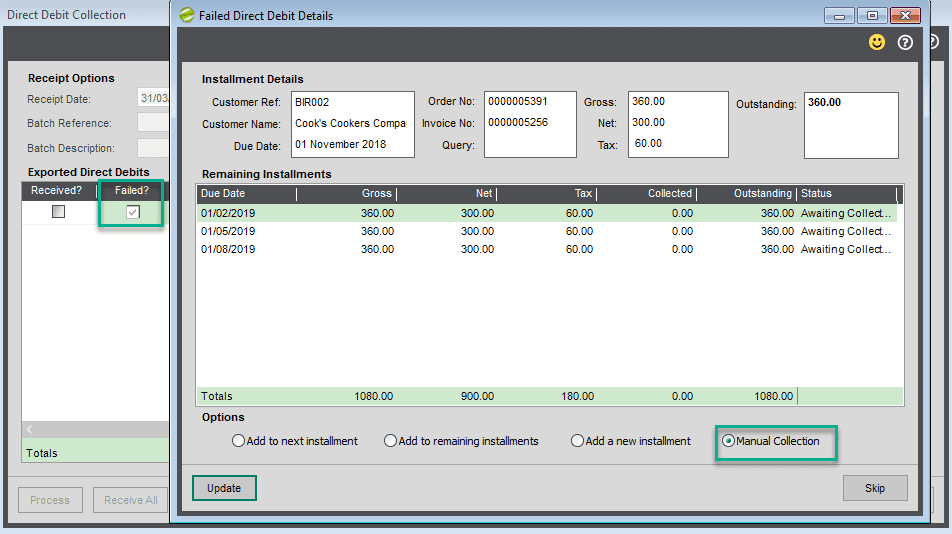
Looking at the payment information tab on the customer’s transaction enquiry the installment will be shown as failed, with no increased future or additional Installments, in other words the value of the failed installment will be due by manual methods / standard Sage terms i.e. Cheque or Bacs and once monies have been received would need to manually part allocated to the relevant Invoice.
9.8. Allocation and Amending Allocation of Invoices with Installments
The system also supports manually allocating receipts to invoices that are being paid in Installments, or amending allocations for Installments that have already been allocated.
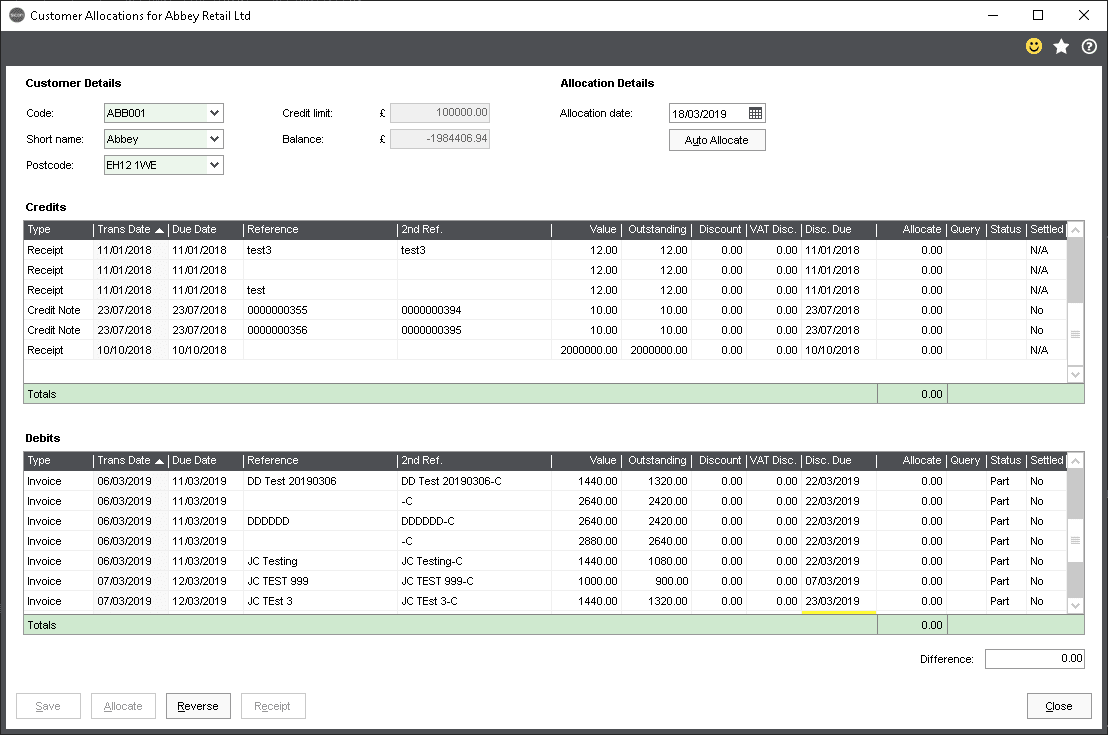
The Customer Allocation Entry Screen
When allocating against invoices, the system will allocate the value against the Installments that have a status of ‘Awaiting Collection’ or ‘Part Collected’. Depending on whether the Receipt covers the whole value of the Installments, the status of the Installments will be updated to ‘Collected’ or ‘Part Collected’.
When amending Allocations for an existing invoice, the system will find any Installments that are ‘Collected’ or ‘Part Collected’ and un-allocate the collected value on the Installment. This will leave the Installment at a status of ‘Part Collected’ or ‘Awaiting Collection’ based on the amount unallocated.
10. Debtor System Reports
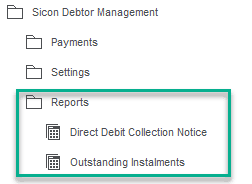
10.1. Direct Debit Collection Notice
The direct debit collection notice can be printed after exporting Installments
or
manually from the main Debtors System menu.
Criteria for the Direct Debit Collection Notice Report

When running the collection notice report manually it is possible to specify filters for the customer account(s), and the Payment Date(s) to include in the report.

The Direct Debit Collection Notice Report
10.2. Outstanding Installments Report
The Outstanding Installments Report can be used to report on all Installments that are currently ‘Awaiting Collection’ or ‘Exported’

Criteria for the Outstanding Installments Report
When running the Outstanding Installments report its possible to filter on the below fields:
Outstanding Installments Report Filters
- Customer Account Number – The Sales Ledger Account Reference
- Payment Due Date – The Payment Due Date
- Days Overdue – The number of days the payment is overdue
- Order / Return No – The Sales Order Number
- Invoice / Credit No – The Invoice Number
- Query Code – The Transaction Query Code
- BACS Value Type Name – The BACs Value Type
- First – The First Direct Debit
- Regular – Regular Direct Debit after the first has been generated
- Re-Presented – A previously exported direct debit has been exported again
- Final – The Final direct debit
- Status – The status of the Installment. See Installment Statuses
- Payment Method – The Payment Method. See Payment Information Fields
The Outstanding Installments Report
11. Enable Module
This screen is used to show all configured Sicon Add-ons and allows the entry of enable strings to allow use of a module. When a new module enable string is provided, copy into the ‘Enable string’ field and then click Apply to save the changes.
If online enable strings have been activated these will self-populate.

12. Release Notes
The release notes page shows which release of the system includes new features or issues resolved.
At the release of Sicon v21 we announced that going forward, we will only be supporting Sage 200c and as such we are able to drop the year from our version numbers. We moved from 201.201.0.0 to 210.0.0.
New features detailed in the Release Notes relating to Pre-Release versions will not be detailed in the current Help and User Guide until the end of development phase.
Debtor Management Release Notes13. New Features & Important Information
13.1. Sicon v21.1
Sicon Debtor Management v21.1 New Features & Important Information13.2. Sicon v21
Sicon Debtor Management v21 New Features & Important Information13.3. Sicon v20.1
There are no new features in Sicon v20.1 for Debtor Management.
13.4. Sicon v20
Sicon Debtor Management v20 New Features & Important Information13.5. Sicon v19.2
Sicon Debtor Management v19.2 New Features & Important Information13.6. Sicon v19.1
There are no new features in Sicon v19.1 for Debtor Management.
13.7. Sicon v19
New module released for Sicon v19
13.8. Sicon v18
N/A – Debtor Management is a new module released for Sicon v19 and upwards