Distribution Help and User Guide | Reserves & Call Offs
The Reserves And Call Offs module allows the User to create Sales and Purchase Contracts/Call Offs, and Stock Reserves.
Search the page by pressing Ctrl + F (windows) or CMD +F (Mac) on your keyboard.
Back to all user guidesProduct overview
Back to Sicon Distribution Help & User Guide Summary PageHelp and User Guide maintained for Sicon Distribution | Reserves & Call Offs version 221.0.26 and Upwards
The Reserves and Call Offs module allows the User to create Sales and Purchase Contracts/Call Offs, and Stock Reserves.
Contracts can be linked to Sales/Purchase Orders and reduced down at Order Entry, pulling through the Contract price to the Order. Where Sicon MRP is installed, there is an option to include. Contracts when running MRP and Suggested Purchase Orders can use the Contract price.
Reserves can allocate stock for a Customer without the need of a Sales Order, or simply allocate stock as a Stock Item Reserve. Where Sicon MRP is installed, if a Reserve has been created but no Free Stock is available for allocation, a Purchase Order Suggestion will be created or, where Sicon WOP is also installed, a Suggested Works Order will be created if the stock is built item.
1. Changes to Standard Sage screens
In addition to the new menu options described later in this help and user guide, there are also changes to standard Sage screens, which are detailed in this section.
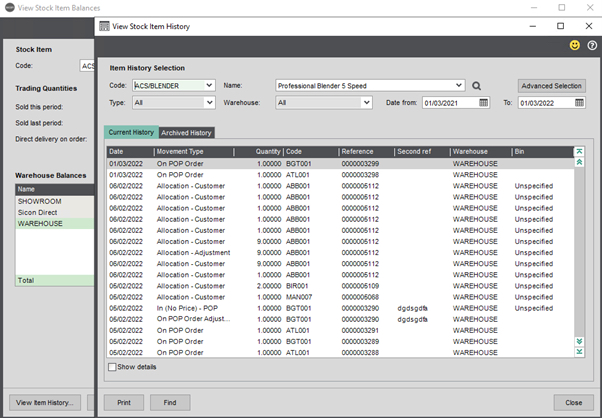
1.1. SC – View Stock Item Balances
A distribution button has been added to the view stock item balances screen, when clicking on the button the view stock history screen, can be opened.
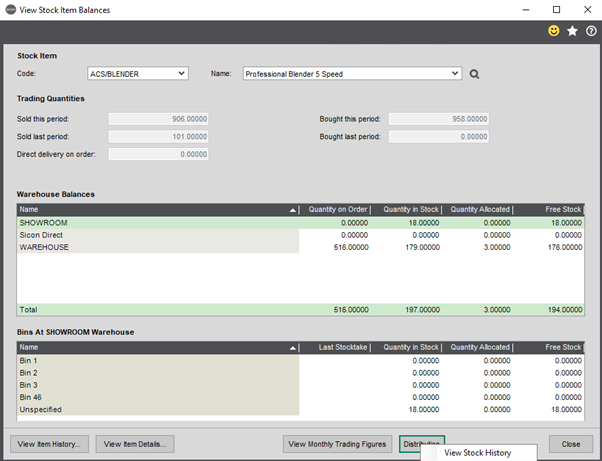
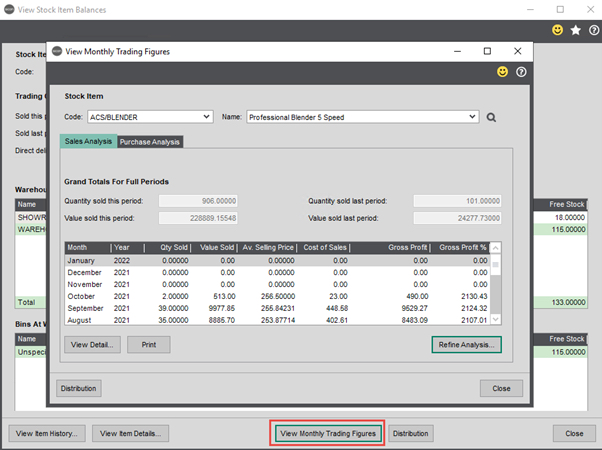
A view monthly trading figures button has been added to the screen, so the Sage sales and purchases figures for the stock item can be accessed easily.
2. Dashboards
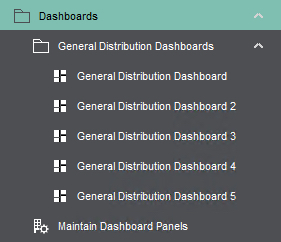
Provides 5 empty dashboards that can be used to create relevant dashboards.
3. Reserves and Call Offs Menu
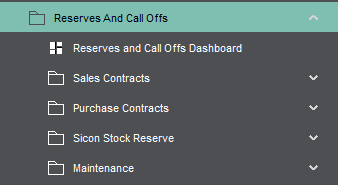
3.1. Reserves and Call Offs Dashboard
A dashboard for sales, purchase and reserves shows data for each of the contracts and reserves.
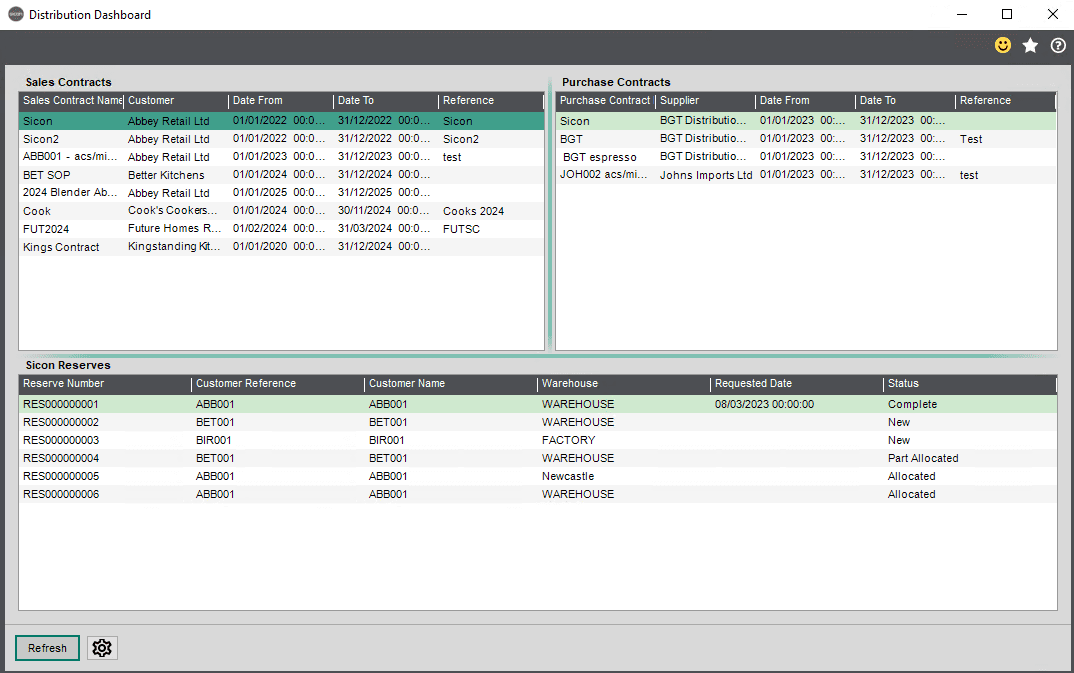
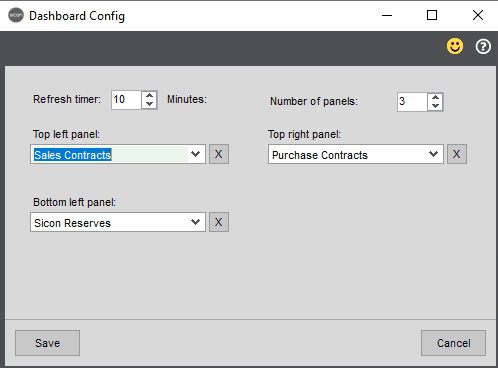
The dashboard set up can be amended by clicking on the cog icon.
3.2. Sales Contracts
Sales Contracts can be generated against a Customer Account, detailing the date range for the contract, quantities and prices. On entering a Sales Order, if the customer has a contract raised for the Stock Item, and the requested for date of the order falls within the contract date, the user will be prompted to use the contract price and reduce the balance remaining on the contract.
NB: In order for the contract prompt screen to appear, the user must have permission to override prices, as set in Sage Sales Order Processing>SOP Utilities>System Set Up>User Permissions, and also the Reserves and Contracts Setting of ‘Prompt to use contract prices when adding SOP and POP lines’ must be set.
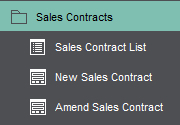
3.2.1. Sales Contract List
The Sales Contracts List displays any previously created contracts. You can create new contracts and amend existing ones from this screen. A contract can also be created and amended via the Sales Contract menu.

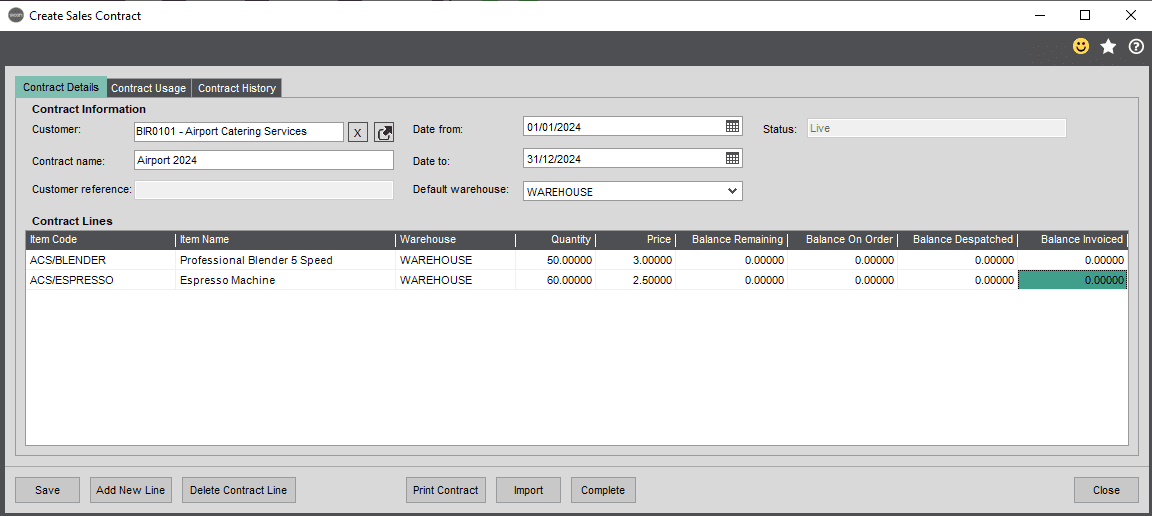
3.2.2. New Sales Contract
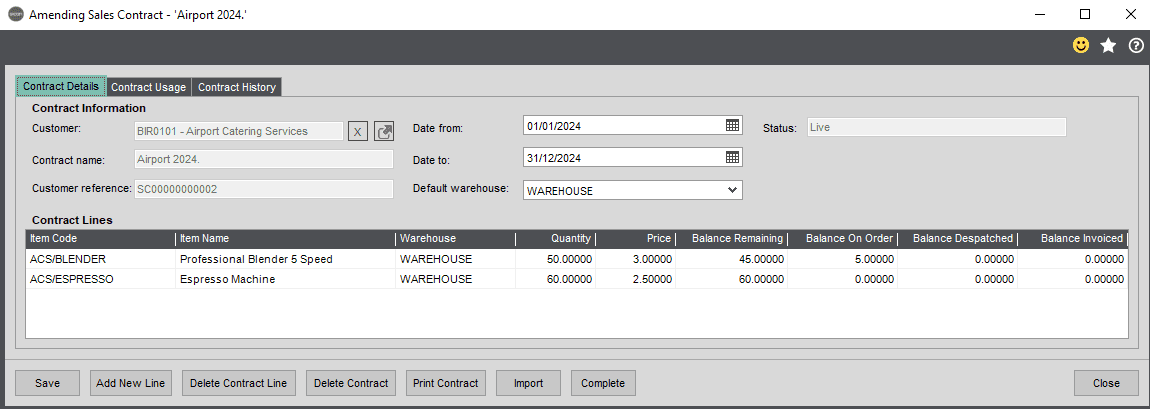
There are three tabs on the contract screen, contract details, contract usage and contract history.
On the Contract Details Tab when creating a new sales contract, the following information is entered:
- Customer – The Customer Account can be selected.
- Contract Name – A Contract Name can be manually added in this field.
- Customer Reference – If the Reserves And Contracts Setting of ‘Enable auto generated reference number on contracts’ is set, this field will be greyed out and a reference number with a prefix of ‘SC000000000’ will be automatically created on saving the contract. If this is not set, the user can manually input a Customer reference.
- Date from/to – The date range for the contract is entered here. If a Sales Order is raised with a Requested Delivery Date that is outside of this range, the user will not be prompted to use the contract and the balance will not be reduced.
- Default Warehouse – A default Warehouse for the contract can be selected from a drop-down list.
- Status – On creation this is set as Live.
- Save – Saves the contract. When contact history reason tracking has been set as required (within settings), then on saving the new contract, the following screen will show. A reason can be entered for each line separately or for all lines together.
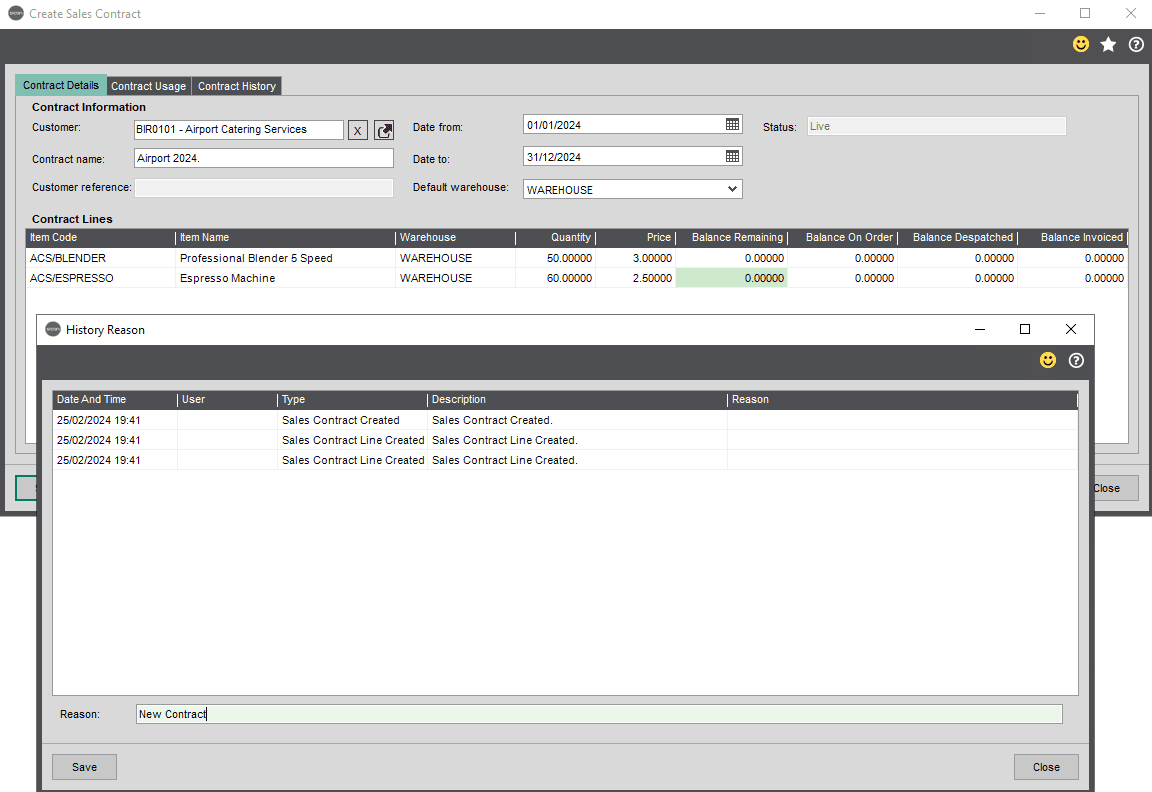
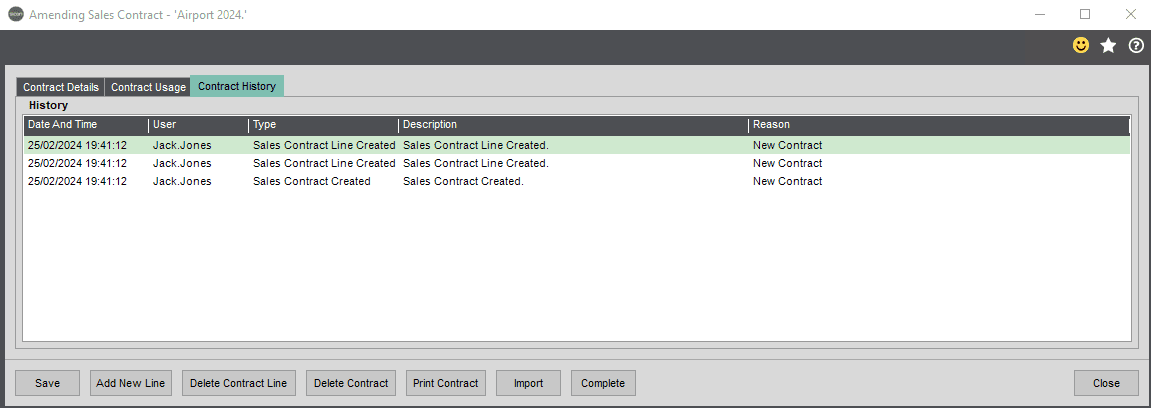
This information can then be seen on the contract history tab.
- Add New Line – The stock items can then be added, with the contract price and quantity.
- Delete Contract Line – Delete the current highlighted line.
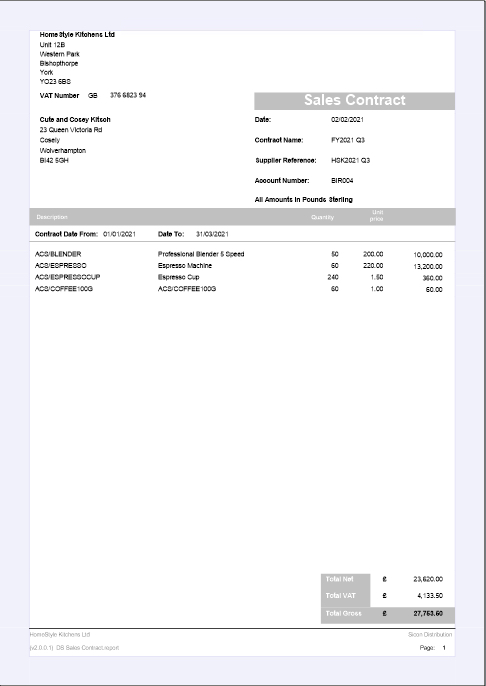
- Print Contract – You can also print the contract from this screen.
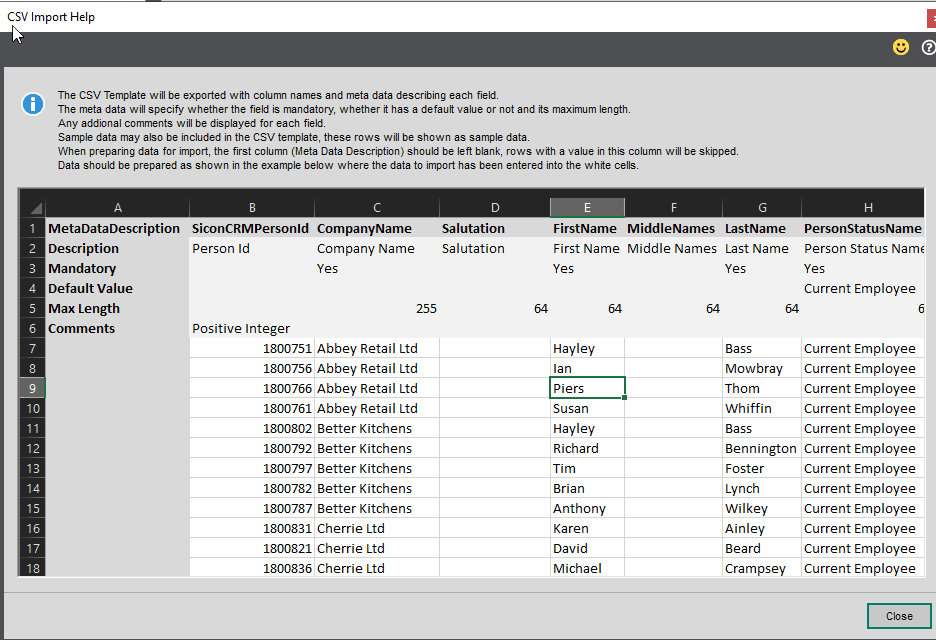
- Import – Sales Contracts can be imported via a .csv file. Clicking on the Example Import File button provides the user with the Excel sheet to populate, and subsequently save as a .csv file, along with a second sheet explaining each Field type, Max length, and if the Field is compulsory.
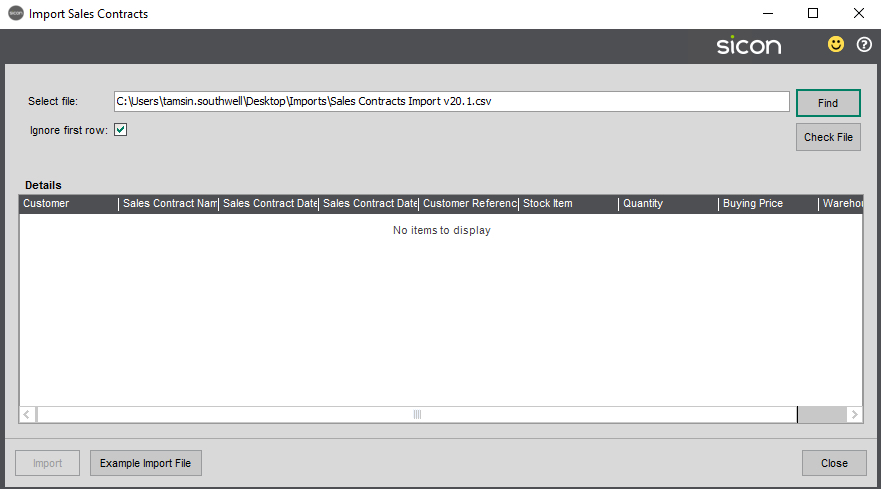
Check File button – This will check the data for any errors. Lines with errors will be highlighted in red, with the reason displayed in the Result column.
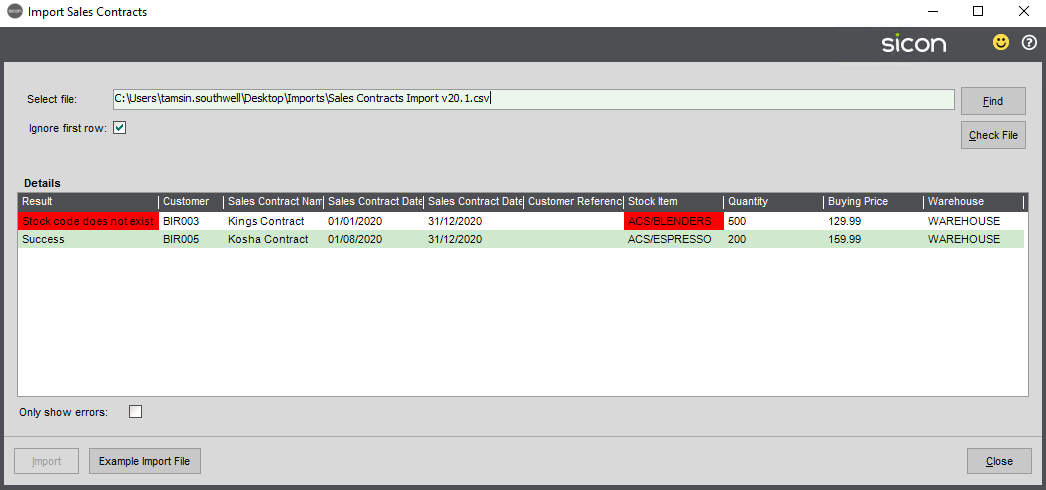
Once all the data is correct, the Import button will no longer be greyed out and the data can be imported.
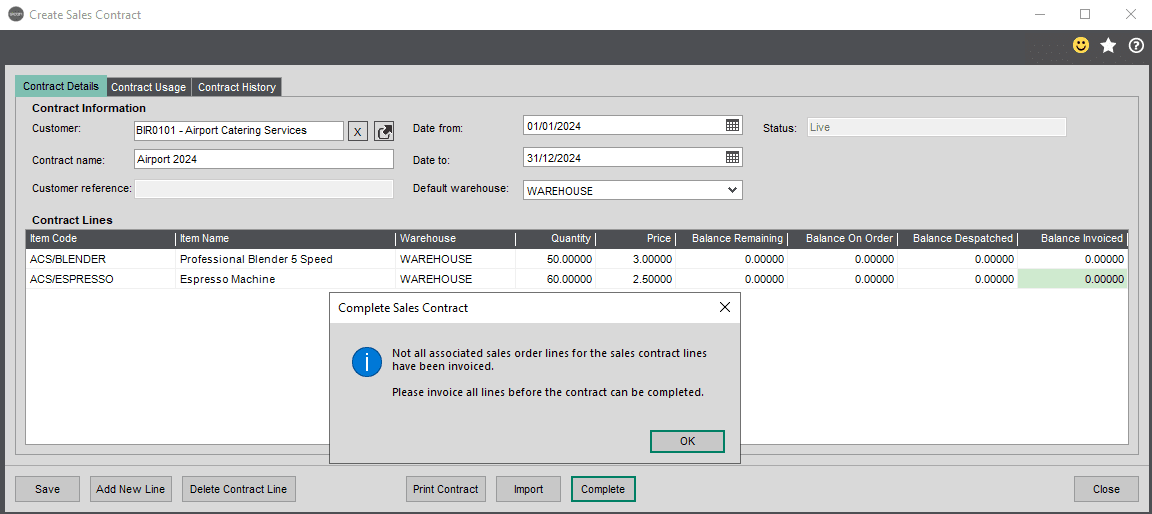
- Complete – The contract can be completed (with the status updated) once all lines on the contact have been invoiced. If lines have not been fully invoiced the below message is returned.
As Sales Orders are entered for the Stock Item for the customer, if the line Requested Delivery Date falls within the contract date range, the user will be asked if they want to use the contract price for this order line on saving the line.
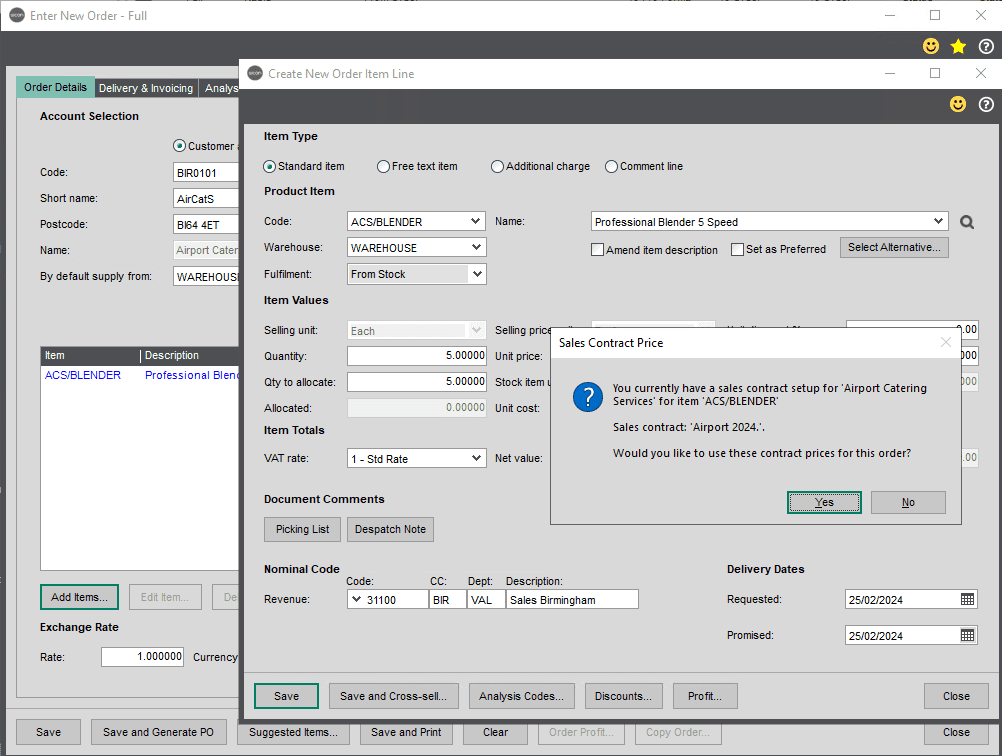
Click on Yes to use the contract price.
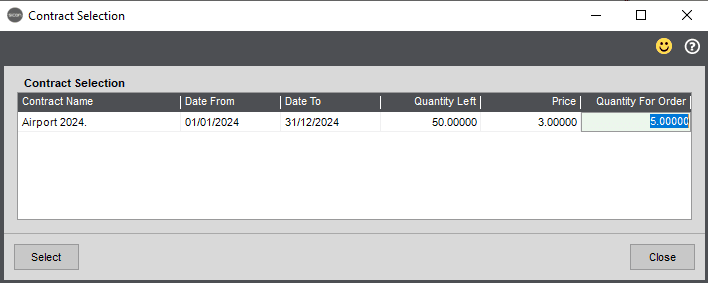
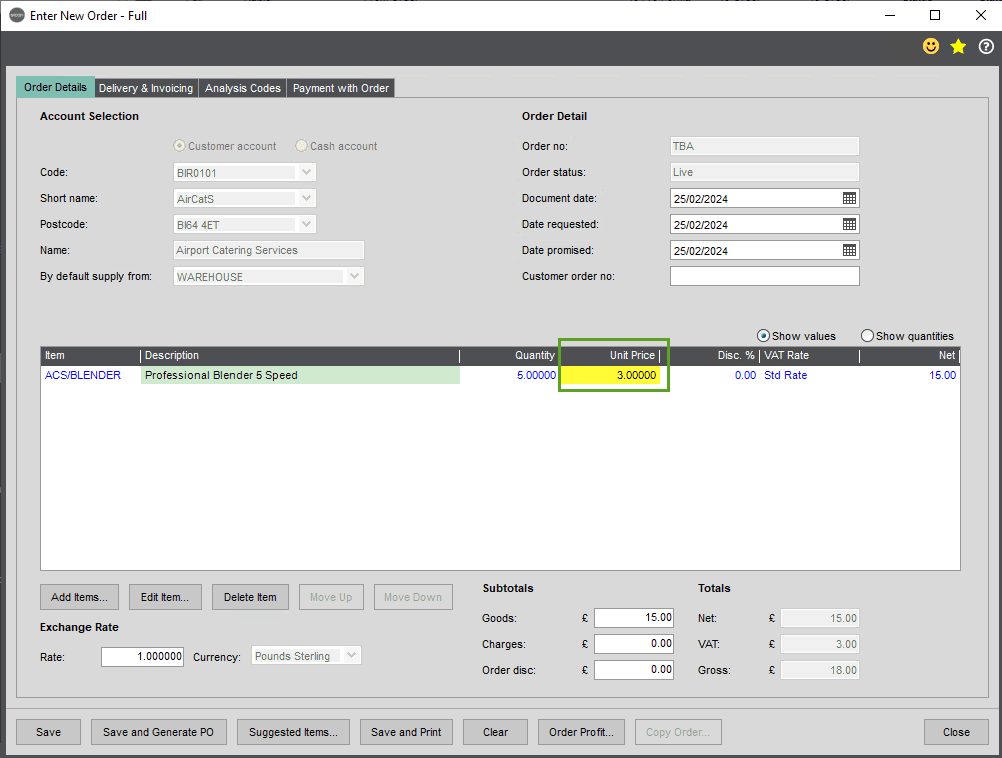
The Quantity For Order on this screen will default to the line quantity. On clicking ‘Select’, the Unit Price on the order line will be replaced by the contract price.
NB: In order for the contract prompt screen to appear, the user must have permission to override prices, as set in Sage Sales Order Processing>SOP Utilities>System Set Up>User Permissions, and also the Reserves and Contracts Setting of ‘Prompt to use contract prices when adding SOP and POP lines’ must be set.
Going into Amend the Sales Contract and entering the contract number.
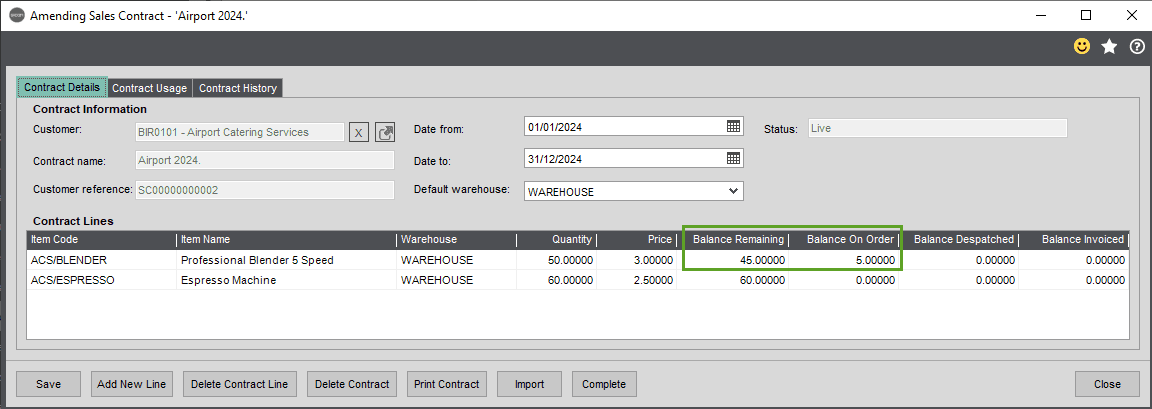
The Balance Remaining on contract line 1 is now 45, due to the 5 on the above Sales Order. This is shown in the Balance On Order column. As the order is progressed, the quantity will move through to the final Balance Invoiced column.
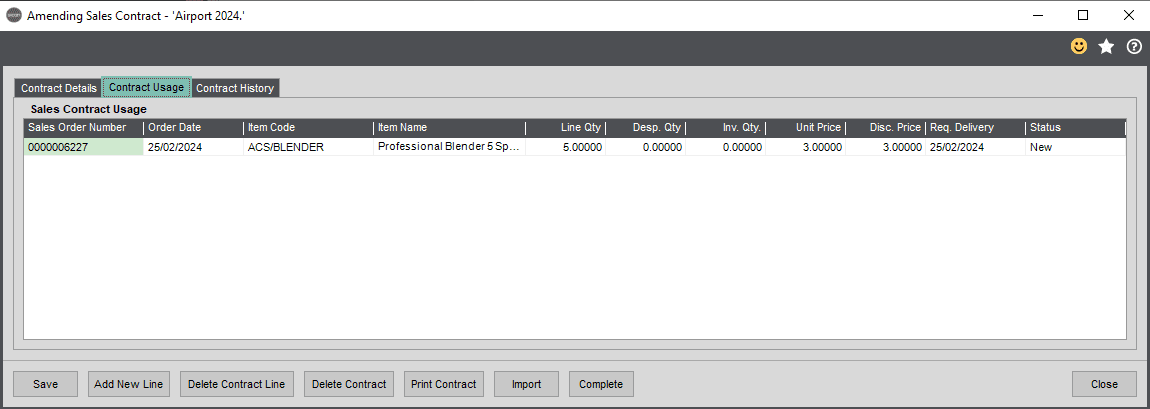
The Contract Usage tab lists all Sales Orders associated with the contract, including the quantities, dates and status.
NB: Sales Contracts cannot be used for Direct To Customer Sales Orders.
3.2.3. Amend Sales Contract
When amending a sales contract you can filter by Customer Code to display only one Customers’ Sales Contract or leave this blank to display all contracts.
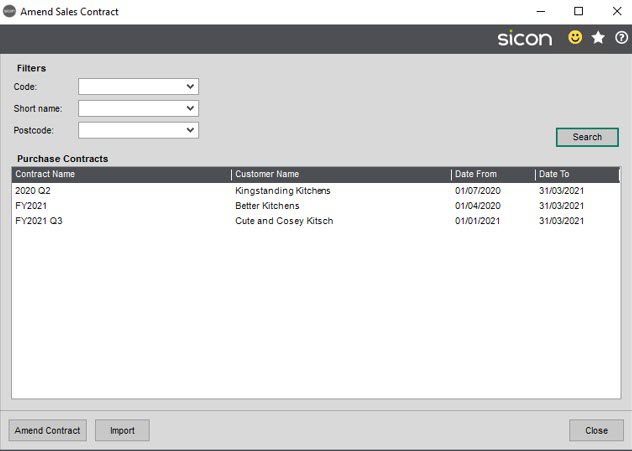
- Amend Contract – This will take you to the ‘Amending Sales Contract’ screen.
In addition to the options in new sales contract there is also a button to Delete Contract.
- Import – Sales Contracts can be imported via a .csv file. See above.
- Close – Close the Contract.
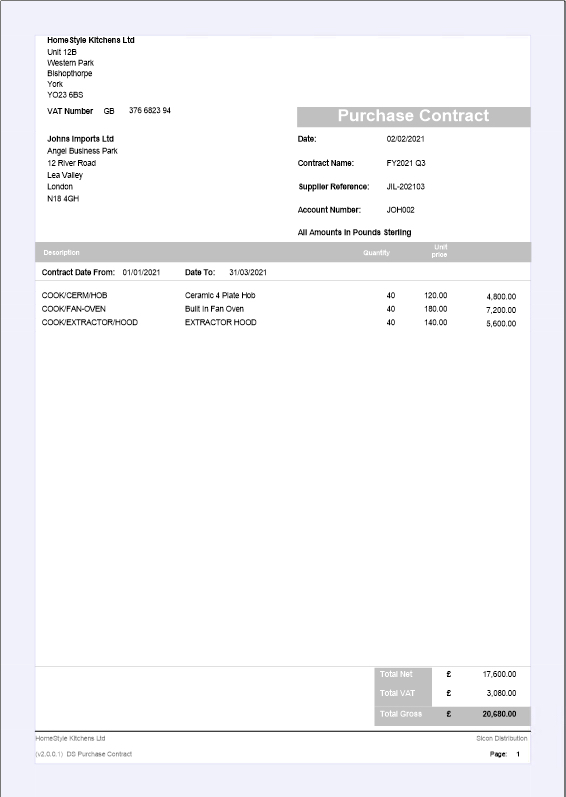
3.3. Purchase Contracts
Purchase Contracts can be generated against a Supplier Account, detailing the date range for the contract, quantities and prices. On entering a Purchase Order, if the supplier has a contract raised for the Stock Item, the user will be prompted to use the contract price and reduce the balance remaining on the contract.
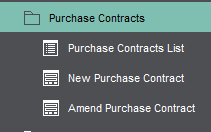
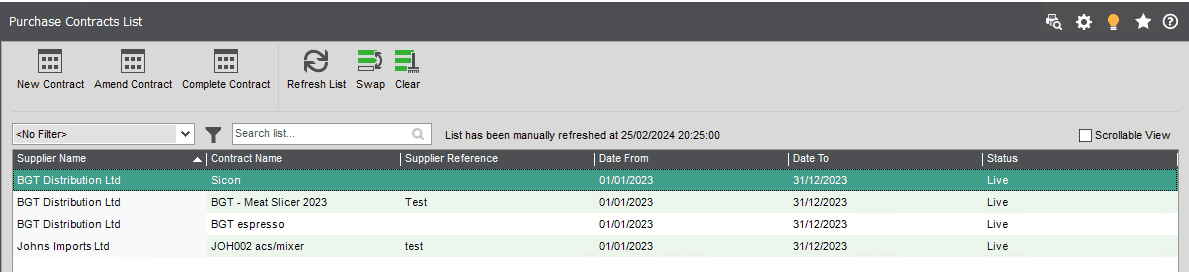
Purchase Contracts List
This displays any previously created contracts. You can create new contracts and amend existing ones from this screen. A contract can also be created and amended via the Purchase Contract menu.
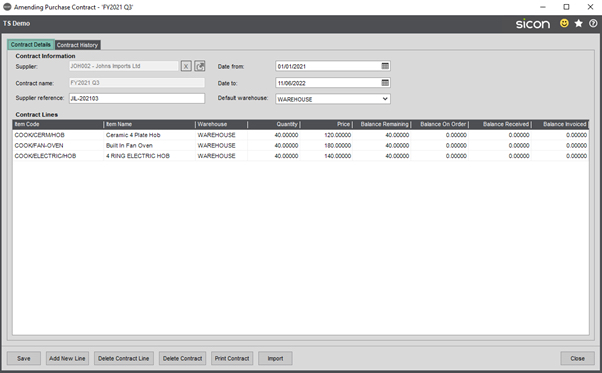
New Purchase Contract
When creating a new purchase contract, the following information is entered:
- Supplier – The Supplier Account can be selected.
- Contract Name – A Contract Name can be manually added in this field.
- Supplier Reference – If the Reserves and Contracts Setting of ‘Enable auto generated reference number on contracts’ is set, this field will be greyed out and a reference number with a prefix of ‘PC000000000’ will be automatically created on saving the contract. If this is not set, the user can manually input a Supplier reference.
- Date from/to – The date range for the contract is entered here. If a Purchase Order is raised that is outside of this range, the user will not be prompted to use the contract and the balance will not be reduced.
- Default Warehouse – A default Warehouse for the contract can be selected from a drop-down list.
- Status – On creation this is set as Live.

- Save – Save the contract.
- Add New Line – The stock items can then be added, with the contract price and quantity.
- Delete Contract Line – Delete the current highlighted line.
- Print Contract – You can also print the contract from this screen.
Import – Purchase Contracts can be imported via a .csv file. Clicking on the Example Import File button provides the user with the Excel sheet to populate, and subsequently save as a .csv file.

The Check File button will check the data for any errors. Lines with errors will be highlighted in red, with the reason displayed in the Result column.
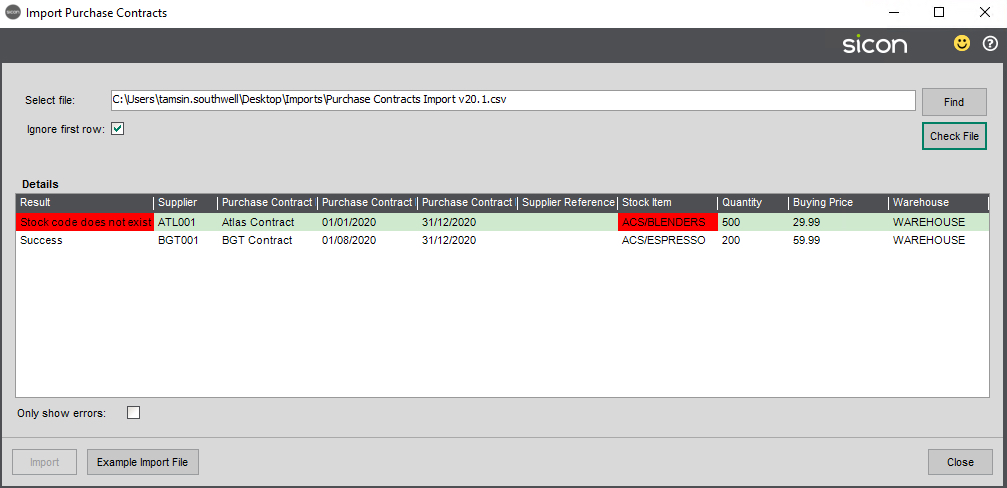
Once all the data is correct, the Import button will no longer be greyed out and the data can be imported.
Complete – Allows the contract status to be set as complete once purchase contract lines on the contract have been invoiced.
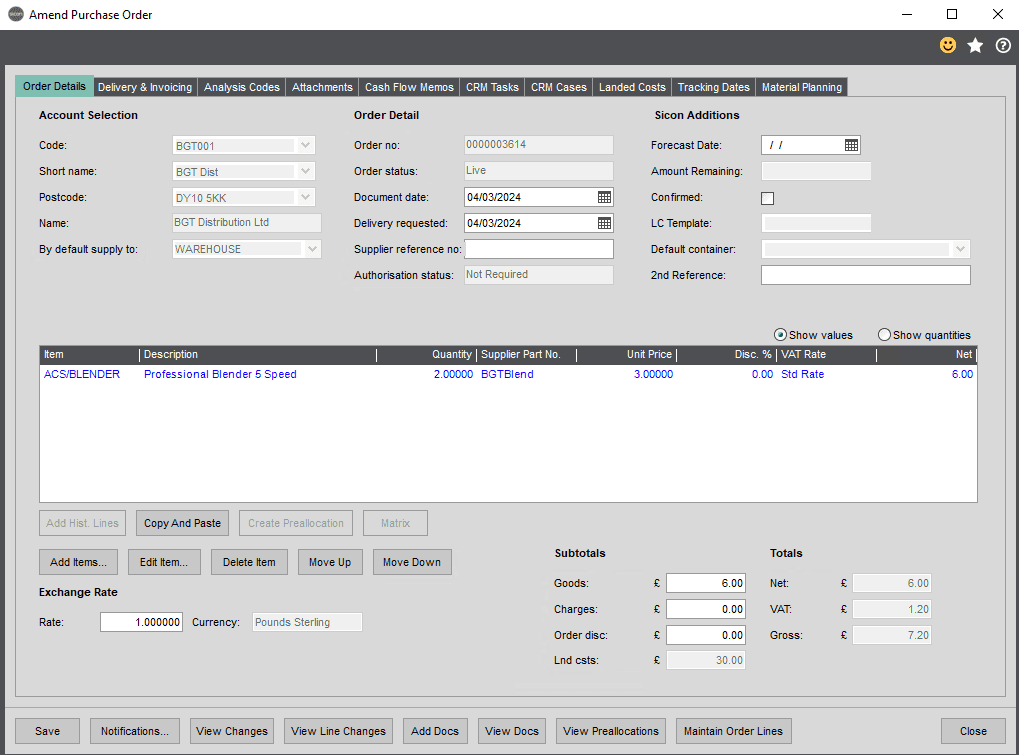
As Purchase Orders are entered for the Stock Item for the supplier, if the Delivery Requested date falls within the contract date range, the user will be asked if they want to use the contract price for this order line.
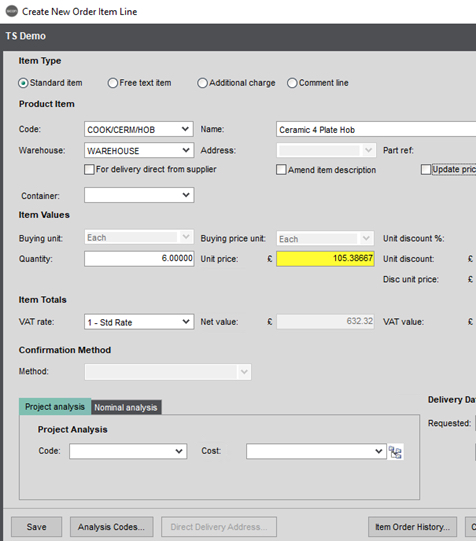
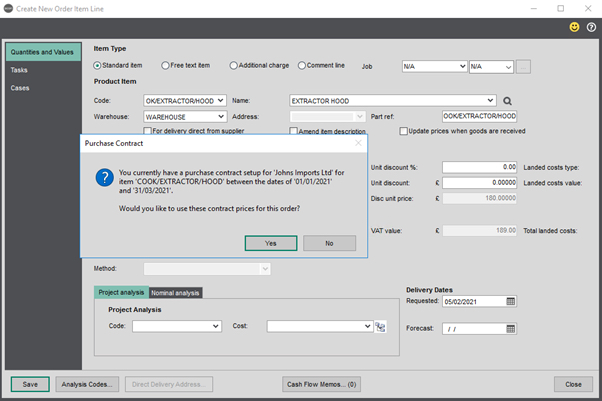
The Quantity For Order on this screen will default to the line quantity. On clicking ‘Select’, the Unit Price on the order line will be replaced by the contract price.
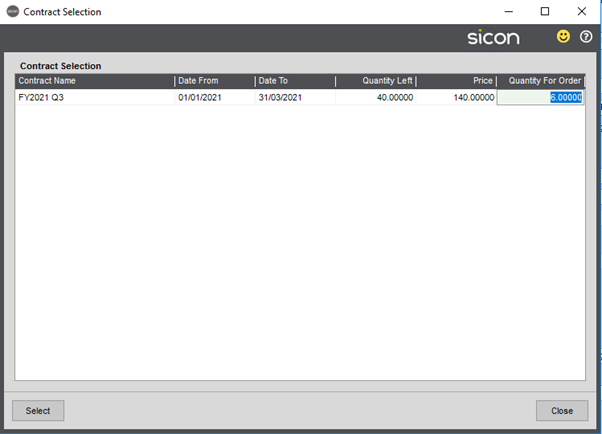
The Balance Remaining on the contract lines are now 34, due to the 6 on the above Purchase Order. This is shown in the Balance On Order column. As the order is progressed, the quantity will move through to the final Balance Invoiced column.

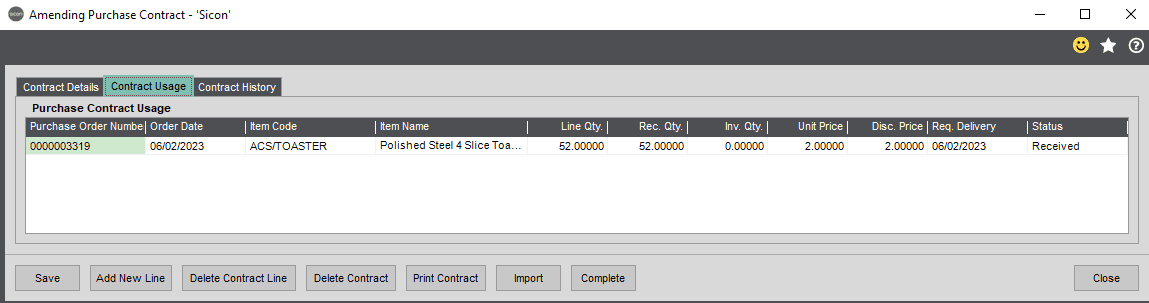
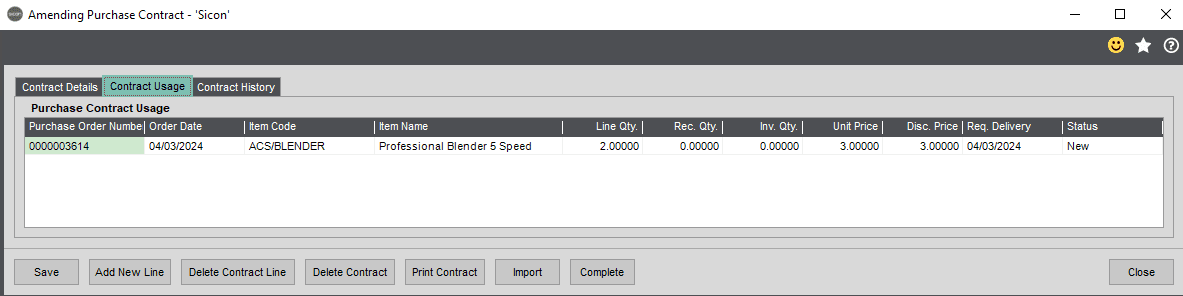
The Contract Usage tab lists all purchase orders associated with the contract, including the quantities, dates and status.
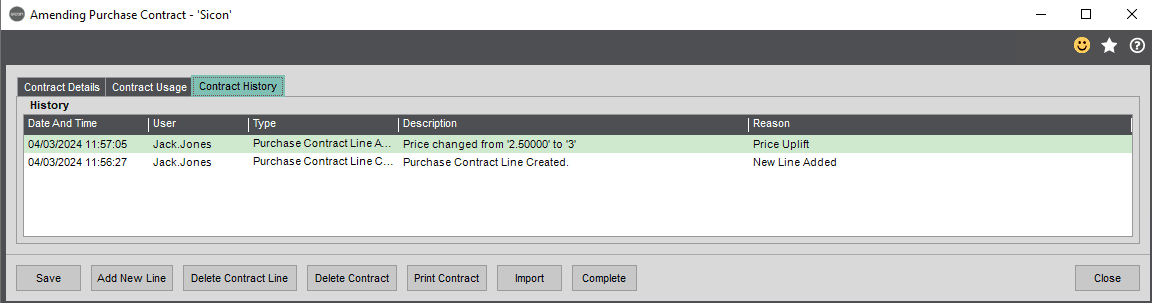
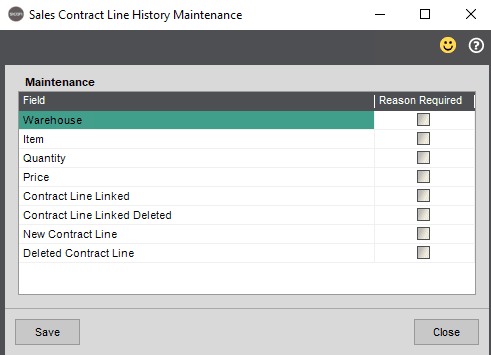
The Contract History tab shows changes to the contract or contract lines. When the distribution setting to require reasons have been set, reasons will then be required when making changes and these will appear in the reason column.
Where Sicon MRP is installed, Purchase Orders created from Suggested Purchase Orders can be linked to existing Purchase Order Contracts, and the price from these contracts will be used.
MRP results for Suggested Purchase Orders can be actioned in the MRP screen by selecting a line and clicking on Create Purchase Order.

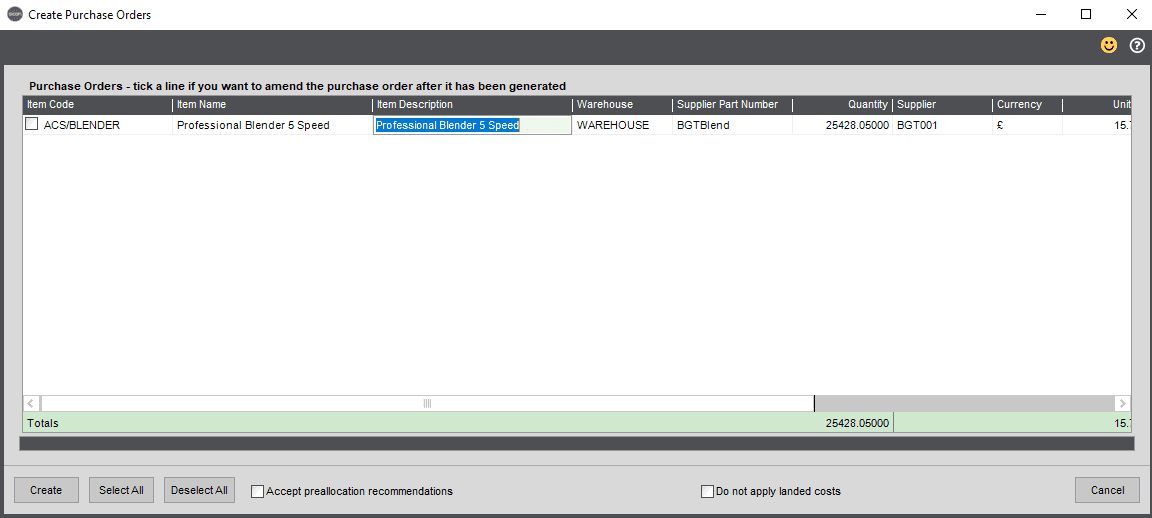
At this point the system checks to see if there is a Purchase Contract for the Supplier stock code combination in the required date range. If one is found, the system will open the following window, where the Purchase Contract can be selected and the quantity set.
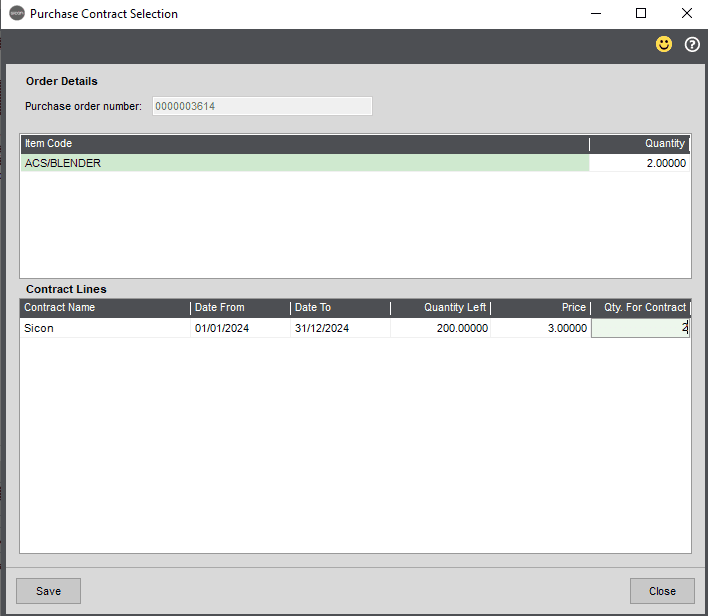
The Purchase Order is then created, with the price from the contract.
The contract usage is updated to reflect that the contract has been used on the purchase order.
Amend Purchase Contract
You can filter by Supplier Code to display only one Suppliers’ Purchase Contract or leave this blank to display all contracts.
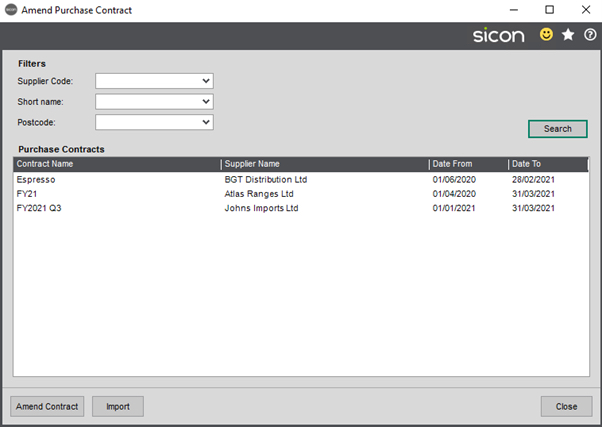
Amend Contract – This will take you to the ‘Amending Purchase Contract’ screen.
In addition to the new purchase contract screen there is also a button to Delete Contract
- Import – Purchase Contracts can be imported via a .csv file. See above
- Close – Close purchase contract
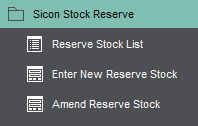
3.4. Sicon Stock Reserve
This allows stock to be reserved and allocated against a customer before a Sales Order has been processed. A Sales Order can also be generated from the Reserve Stock screen. Where Sicon MRP is installed, any requirement for a Stock Reserve will be calculated.
Please note that any reserved stock will continue to show as free stock until it is allocated.
3.4.1. Reserve Stock List
This displays all Reserve stocks created. Reserves can be created, amended, viewed and imported, from this screen. A reserve can also be created from New Reserve Stock in the menu.

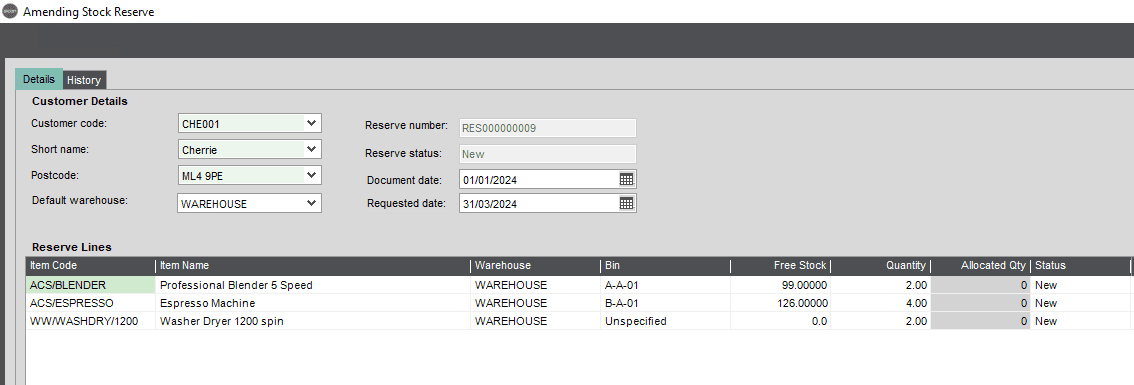
3.4.2. Enter New Stock Reserve
When creating a new reserve, the following information is entered:
- Customer Code – The Customer Account can be selected from a drop-down list.
- Default Warehouse – A default Warehouse for the reserve can be selected from a drop-down list. This must be the same Warehouse that the Sales Order will be raised on.
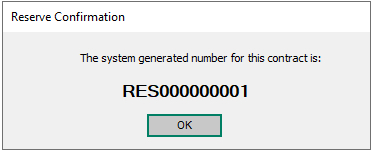
- Reserve Number – A reserve number with a prefix of ‘RES0000000’ will be automatically created on saving the reserve.
- Document Date – Date entered on the system.
- Requested Date – Date the reserve will be used. This is also used for the calculation within Sicon MRP.
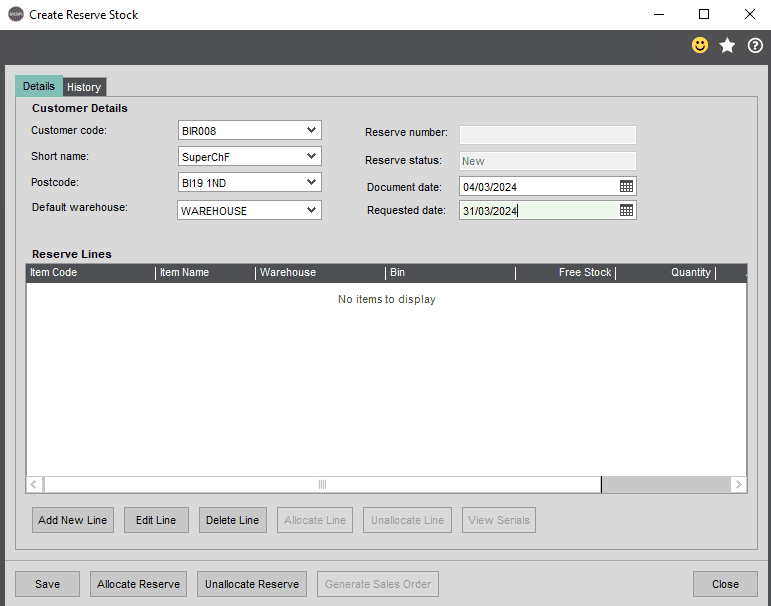
- Add New Line – The following screen is displayed where the Stock Item details can be entered.
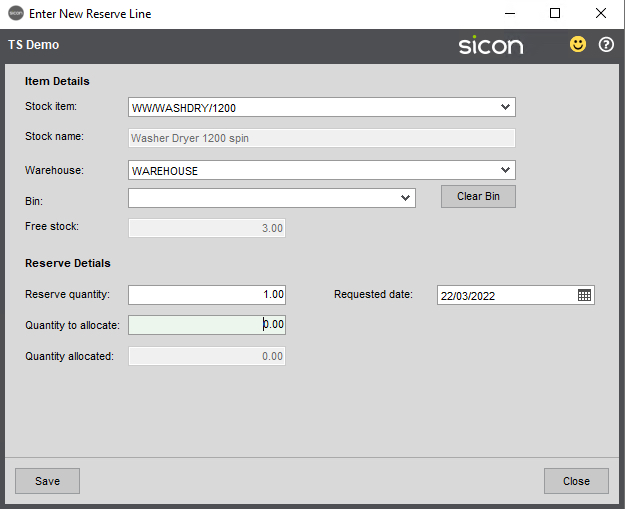
Where stock is available, the Bin and Quantity To Allocate fields can be populated. If stock is not available, these can be left blank and allocated to Free Stock at a later date. If a requirement is created from Sicon MRP, the stock will automatically be allocated on build/purchase.
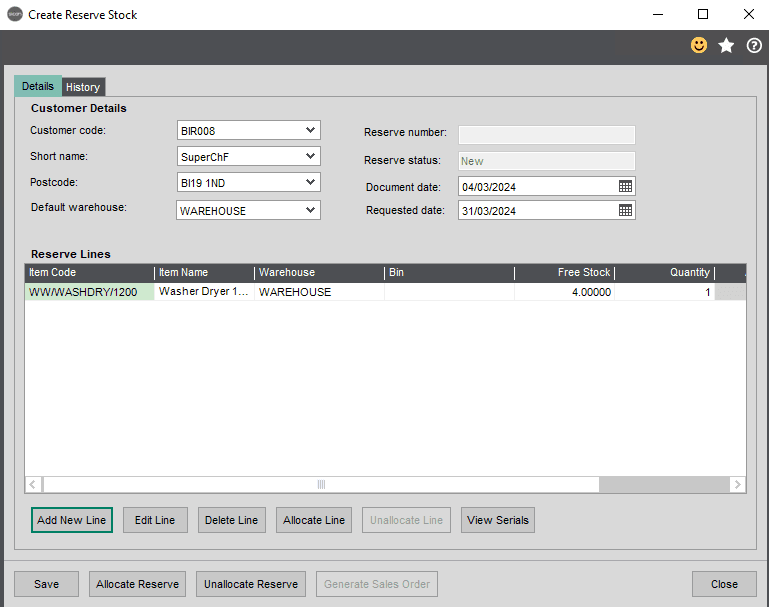
At this point you can Allocate individual lines, Allocate all items or simply Save the Reserve Stock. If allocating before saving, the following screen will appear.
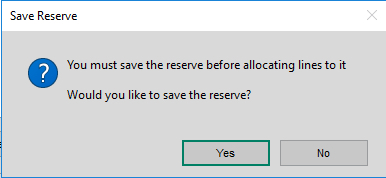
Click Yes and the allocation will be made and the reservation number created.
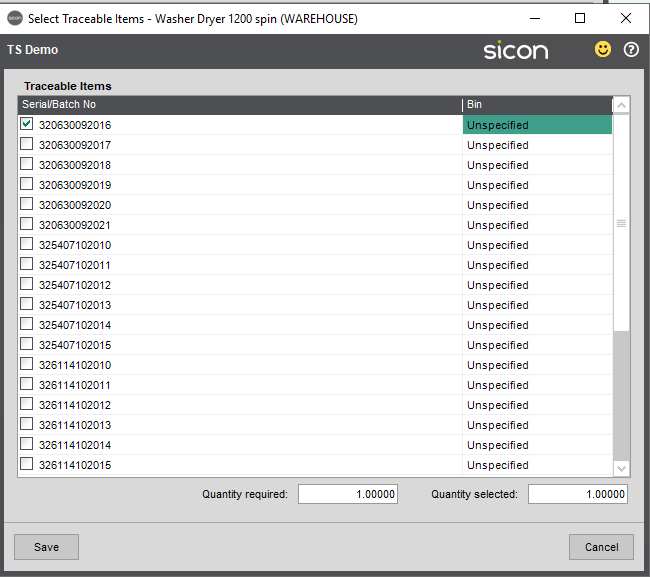
If the stock is traceable then you will be prompted to select the batch or serial.
Clicking Save will create the allocation.
Where the stock has been allocated, the ‘Generate Sales Order’ button is available. This can be used to create a Sales Order from the Reserve Stock.
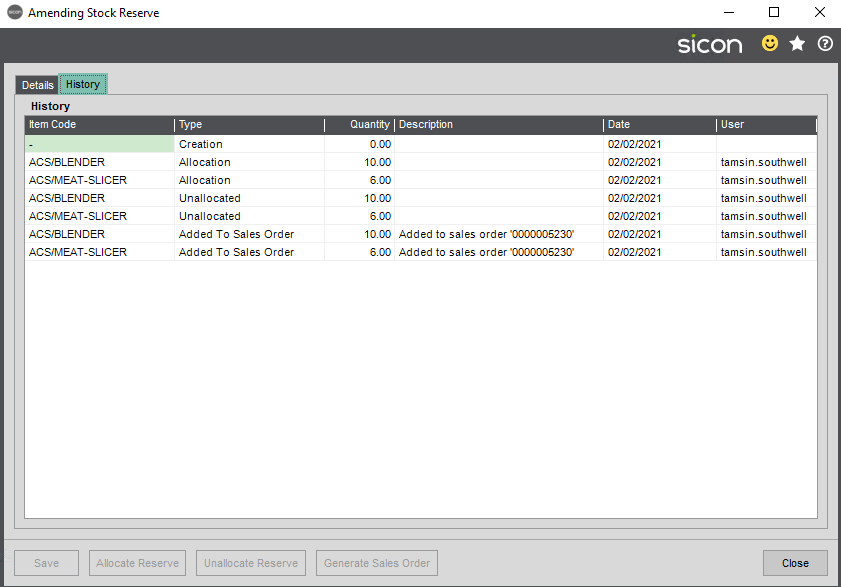
The Sales Order details can be viewed in the History tab.
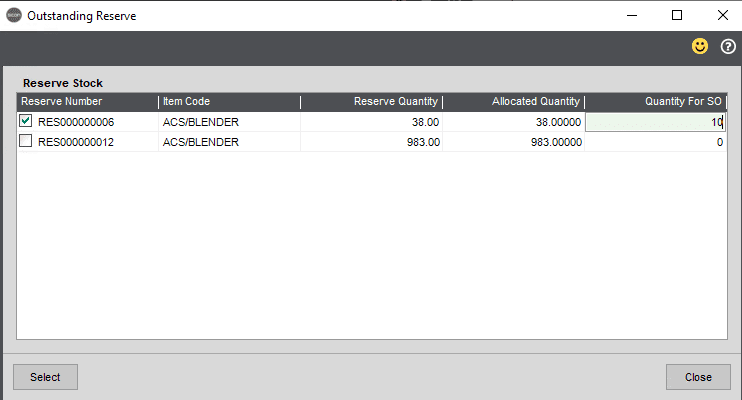
If a Customer Reserve Stock has been created, on entering a Sales Order for that item a pop up screen will appear. This will only appear if the Reserve has been created on the same Warehouse as the Sales Order.
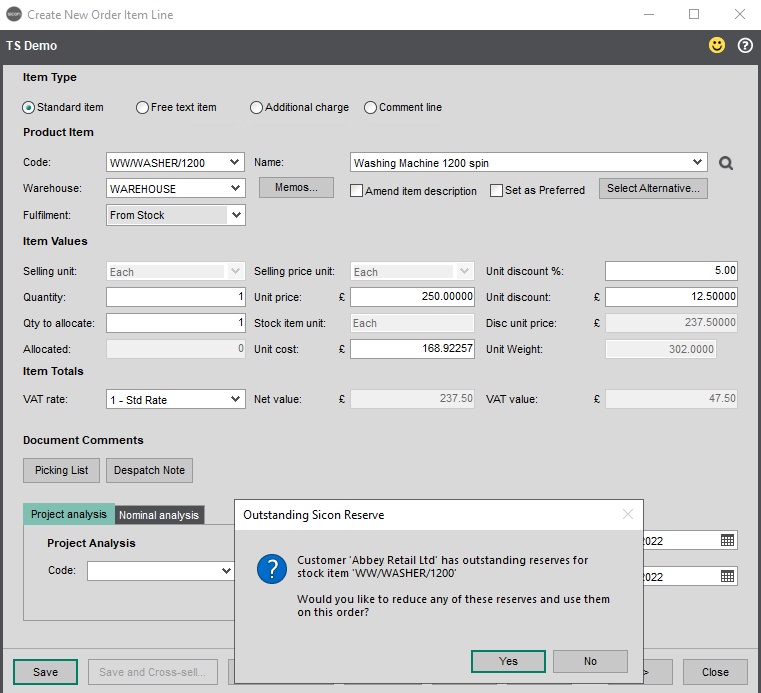
On clicking Yes, a list of Customer Outstanding Reserves will display all available reserves for that stock item.
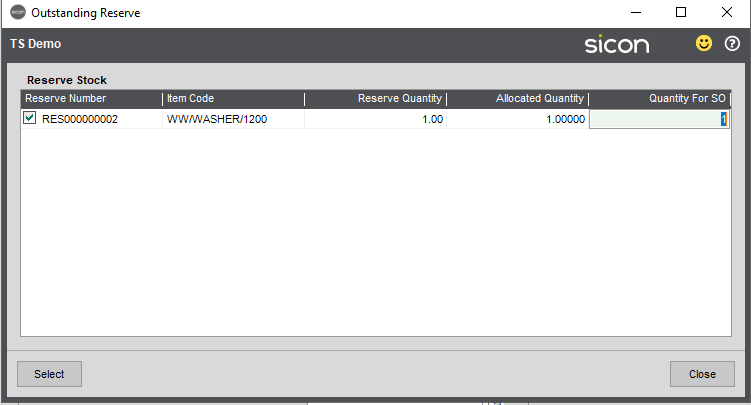
If the line has an allocated quantity against it, the Sales Order line status will change to Allocated.
On selecting the line required, the Reserve Stock quantity will be reduced.
If a sales order is generated from the Sage repeat order template, the system will also check if there are applicable reserves for the customer.
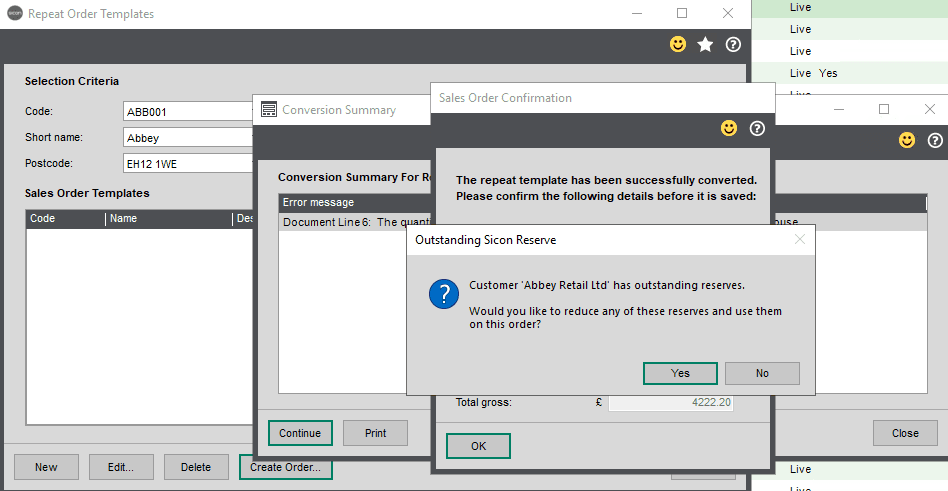
The following screen is then displayed, so the user can select a line and use reserves for the sales order lines.
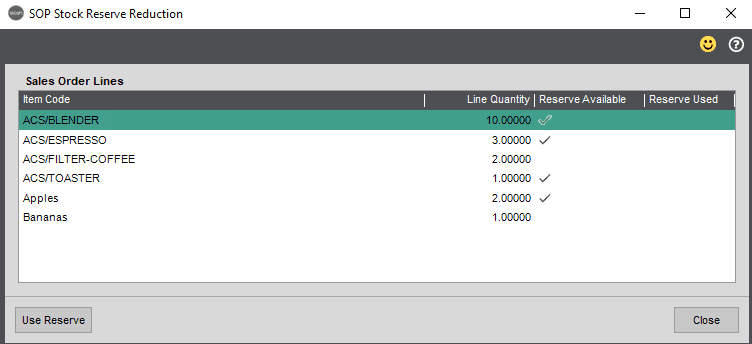
Once a reserve has been selected the reserve used column is updated.
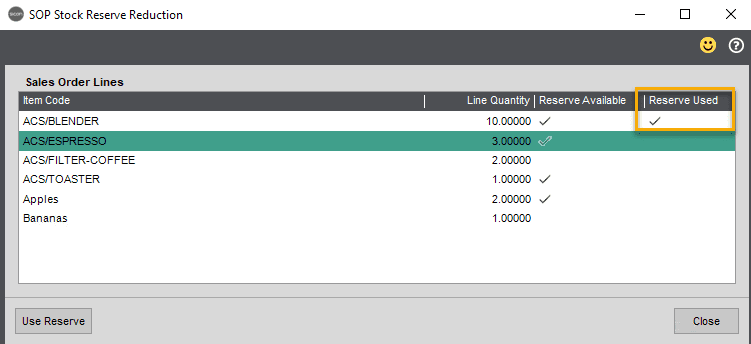
Closing the screen will then, create the sales order and update the sales order line to use the reserve and update the reserve history.
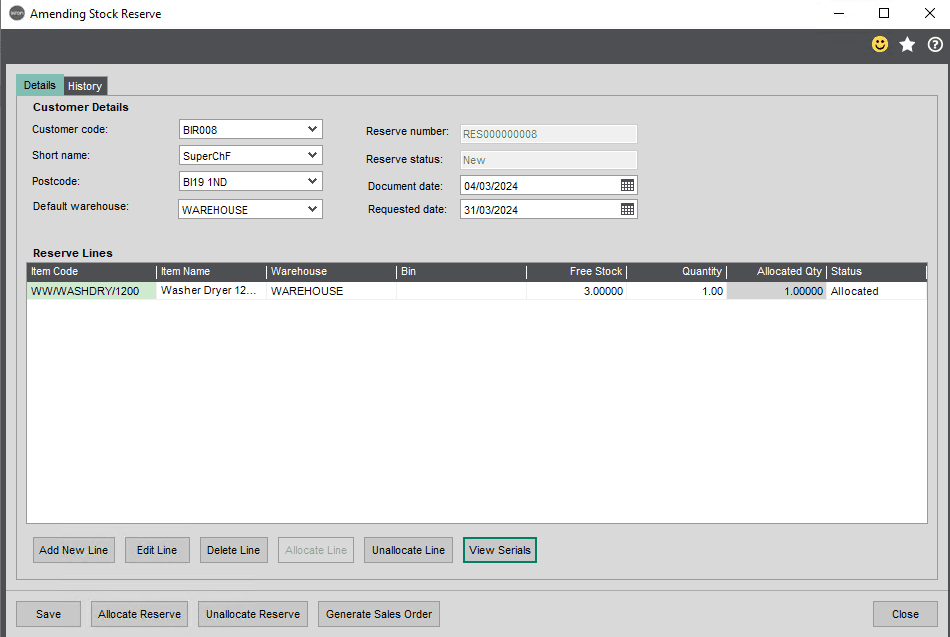
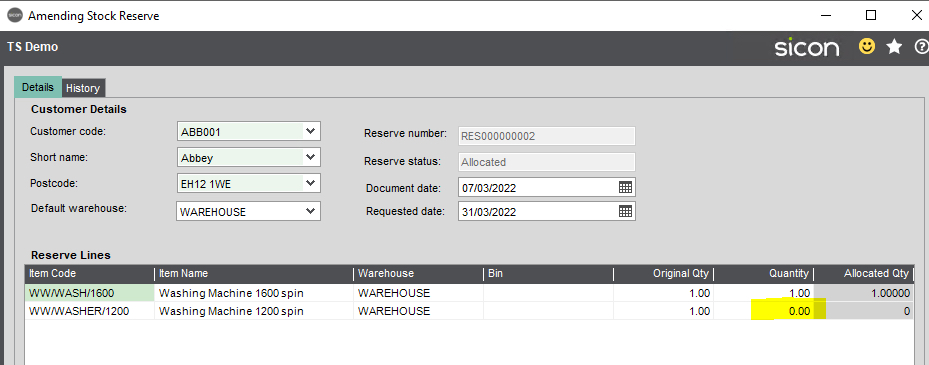
3.4.3. Amend Reserve Stock
You can filter by Customer Code to display only one accounts’ Stock Reserves or leave this blank to display all Reserves.
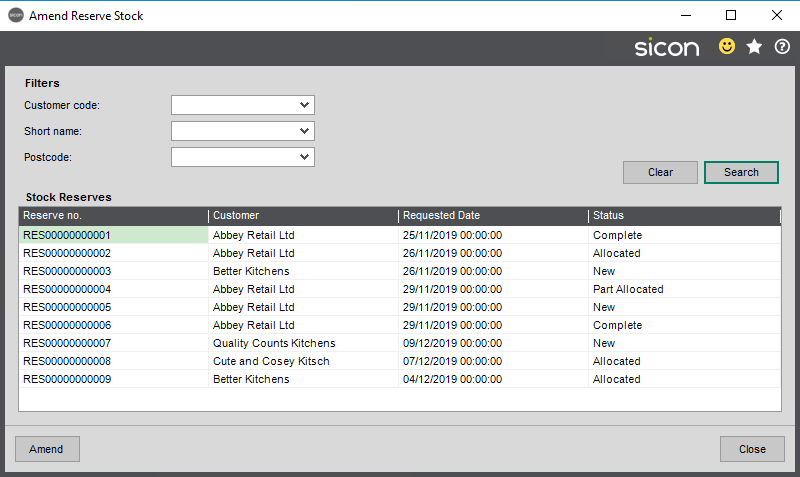
This also shows the status of each of the Reserves. Highlighting a line and clicking amend will take you to the Amend Stock Reserve screen.
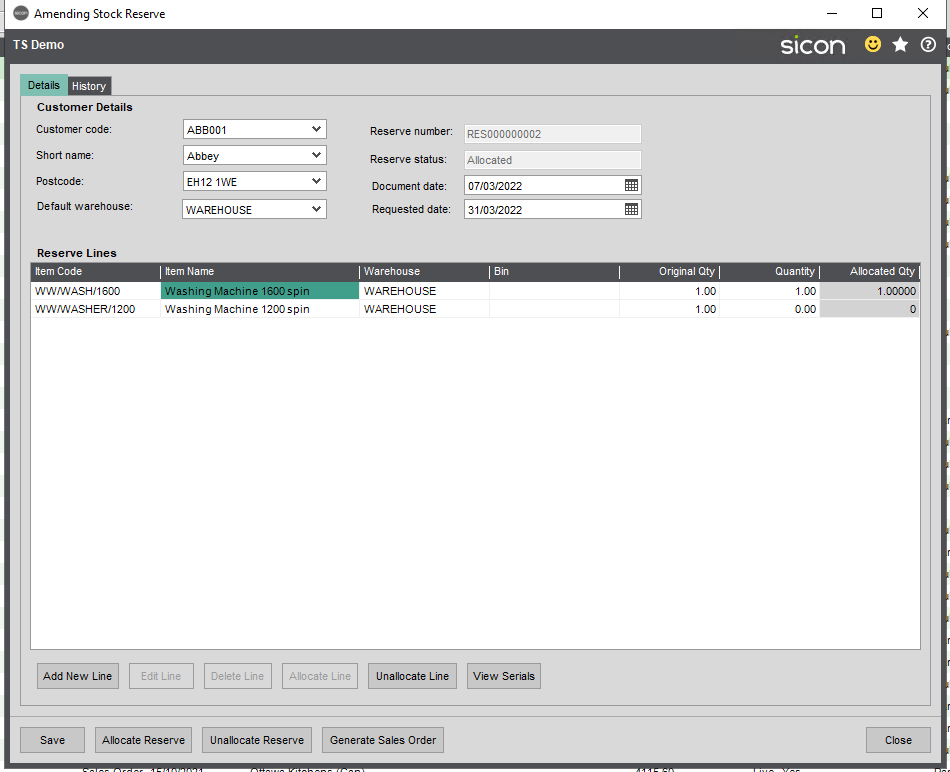
Here lines can be added, amended, deleted, allocated and unallocated. Where stock has been fully allocated, a Sales Order for the Reserve Stock items can also be generated from this screen. You can also view the serial numbers allocated to a stock item.
3.5. Maintenance
3.5.1. Import Reserves – allows reserve to be created from an import file.
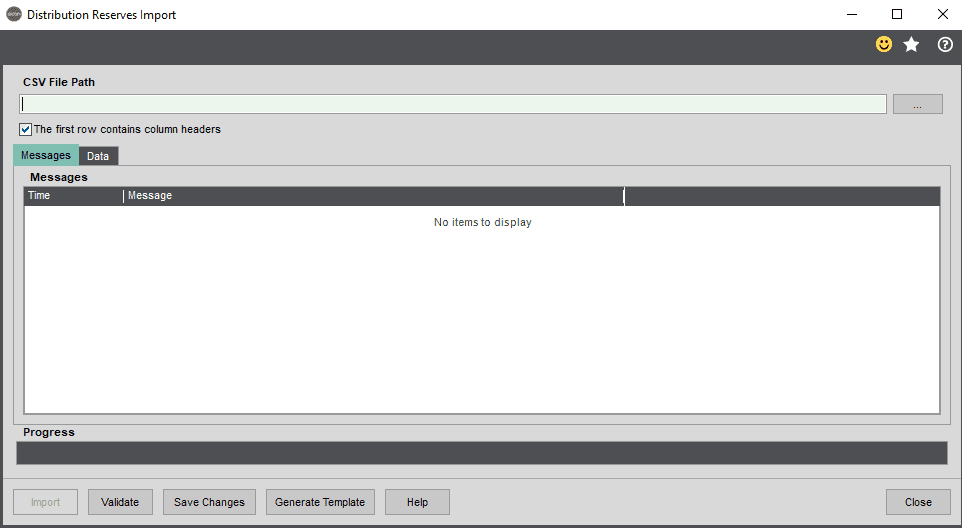
Clicking on generate template, allows a template to be saved to a network location.
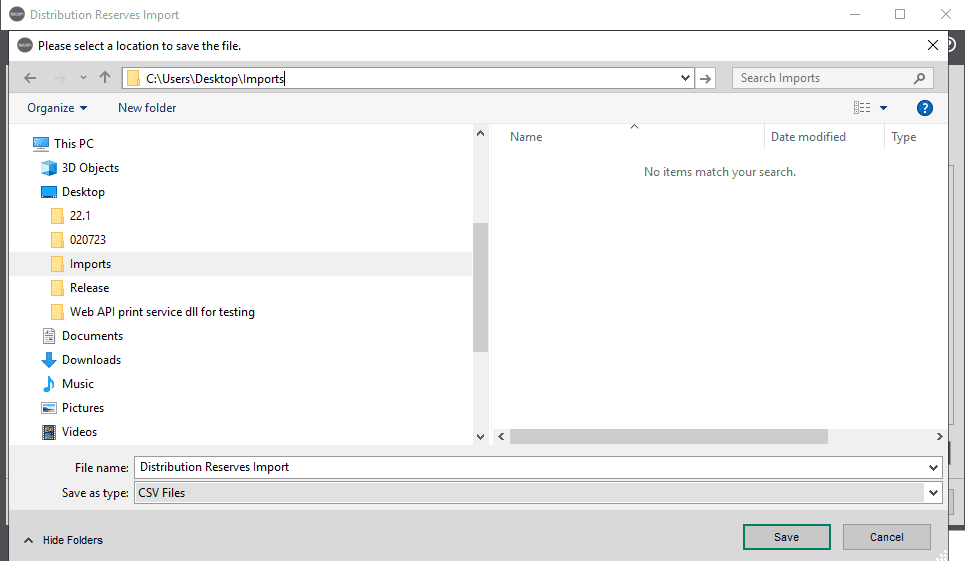
Saving the file, then opens the file.
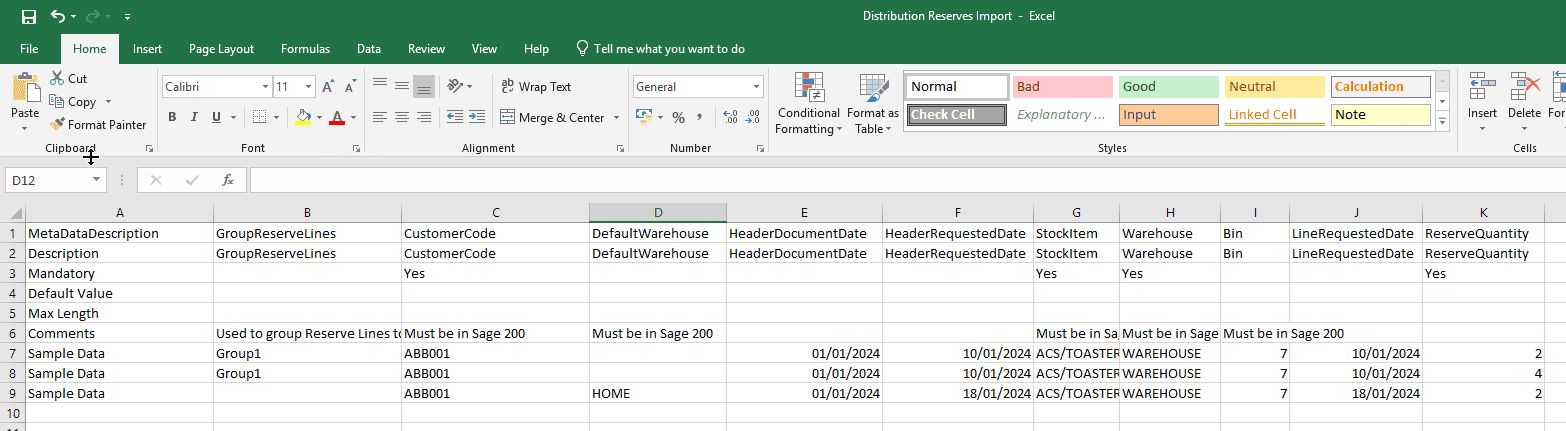
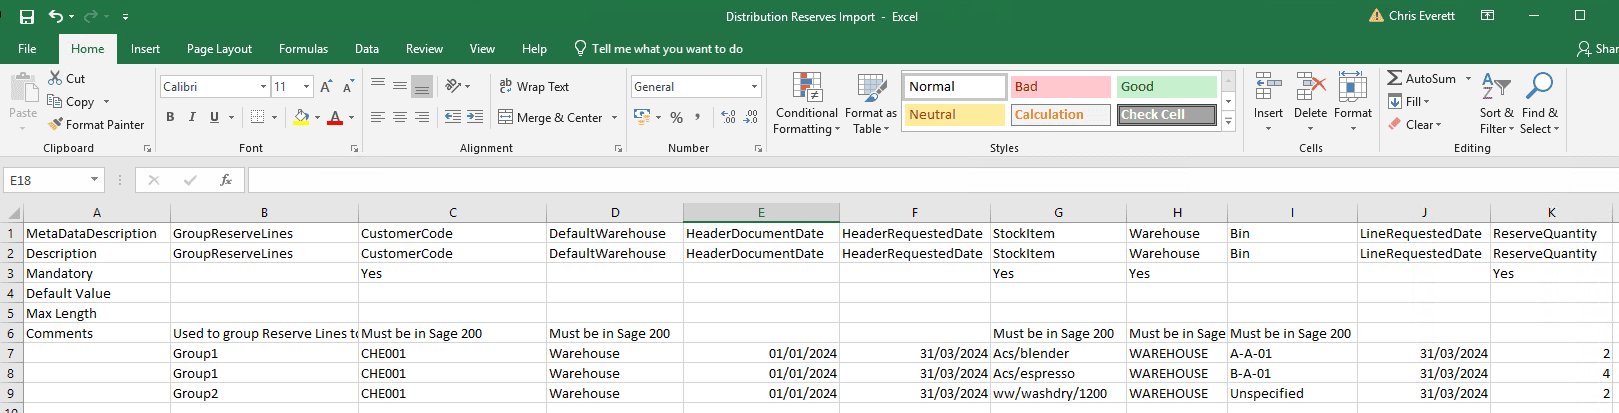
The file can be prepared and then saved. Where data is entered, column A need to be left blank for the lines to be imported. If the same value is entered in column B this can be used to group multiple lines onto one reserve.
The file can be selected in the import screen and validated.

If changes are required, these can be amended from the import screen e.g.
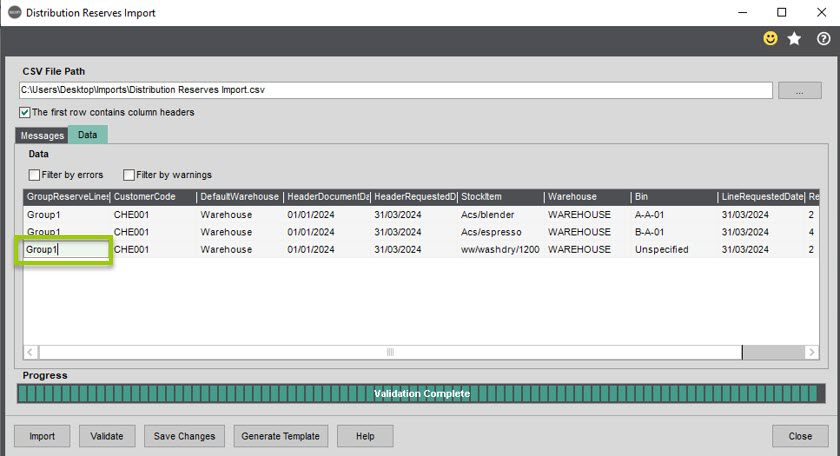
The changes can be updated to the import file, by clicking on save changes.
The help button opens a screen to give information on how the file needs to be prepared.
Clicking on import, then imports the data.

4. Reports Menu
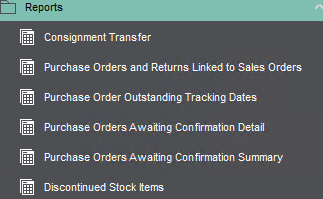
- Consignment Transfer – Only available with Warehouse Replenishment.
- Purchase Orders and Returns Linked to Sales Orders – Only available with POP Management module.
- Purchase Orders Outstanding Tracking Dates – Only available with Container Manager.
- Purchase Orders Awaiting Confirmation Detail – Only available with POP Management.
- Purchase Orders Awaiting Confirmation Summary – Only available with POP Management.
- Discontinued Stock Items – Only available with SOP Management.
5. Utilities Menu
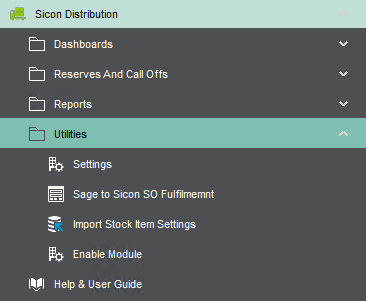
5.1. Settings
In Distribution Settings the Reserves and Call Off’s tab shows the relevant settings.
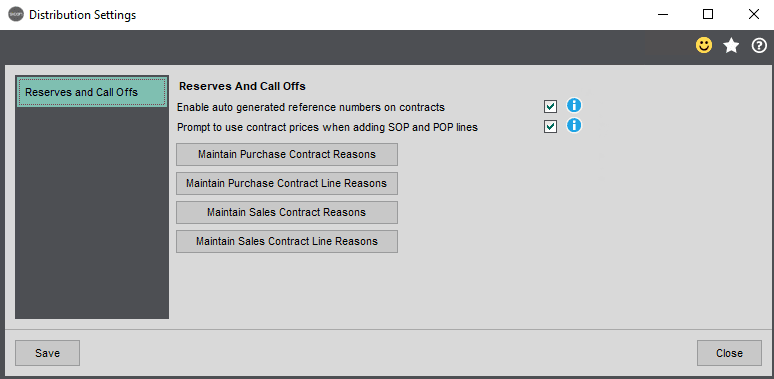
Enable auto generated reference numbers on contracts – If this is enabled, the Supplier Reference field will be greyed out and a reference number with a prefix of ‘PC/SC000000000’ will be automatically created on saving the contract. If this is not set, the user can manually input a Supplier reference.
Prompt to use contract prices when adding SOP and POP lines – Where this is enabled, the user will be prompted to change the price when they are entering PO or SO lines, if there is a contract setup for this Customer/Supplier and item, and where the Requested Delivery Date falls within the contract dates. This will also allow the contract balance to be reduced.
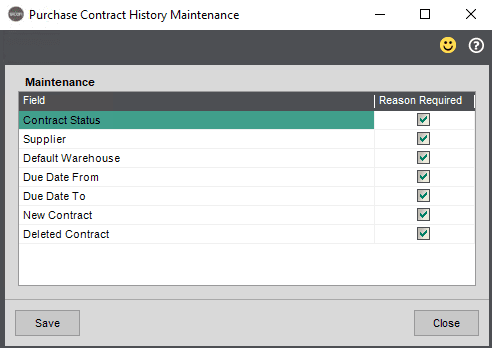
Maintain Purchase Contract Reasons – Controls whether reasons need to be entered when purchase contract header changes are made.
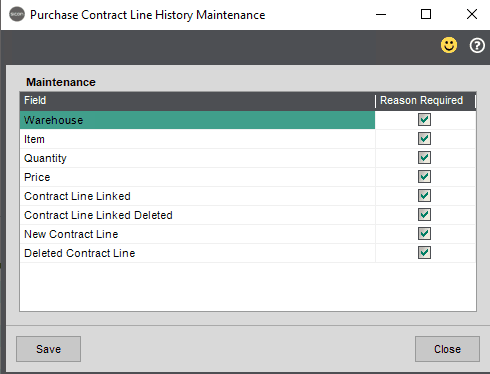
Maintain Purchase Contract Line Reasons – Controls whether reasons need to be entered when purchase contract line changes are made.
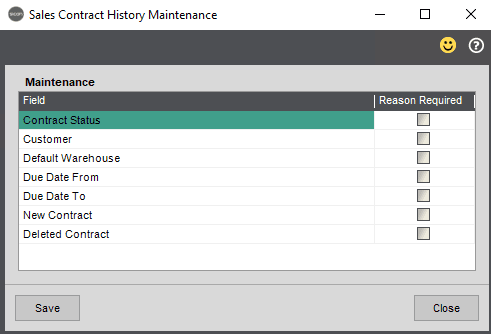
Maintain Sales Contract Reasons – Controls whether reasons need to be entered when sales contract header changes are made.
Maintain Sales Contract Line Reasons – Controls whether reasons need to be entered when sales contract line changes are made.
5.2. Import Stock Item Settings
Not applicable as there are no relevant stock settings associated with the reserves and calls off module.
5.3. Enable Module
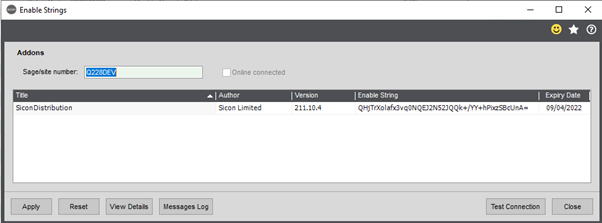
The Enable Strings supplied by Sicon are displayed here.
6. Help & User Guide Menu Option
This menu option provides access to this Help & User Guide.
7. Release Notes
The release notes page shows which release of the system includes new features or issues resolved.
At the release of Sicon v21 we announced that going forward, we will only be supporting Sage 200c and as such we are able to drop the year from our version numbers. We moved from 201.201.0.0 to 210.0.0.
New features detailed in the Release Notes relating to Pre-Release versions will not be detailed in the current Help and User Guide until the end of development phase.
Sicon Distribution Release Notes