Documents Help and User Guide
Sicon Documents for Sage 200 is designed to enable users to attach/index documents (Scans or Files) to transactions, accounts, orders & stock items while working in Sage 200.
Search the page by pressing Ctrl + F (windows) or CMD +F (Mac) on your keyboard.
Back to all user guidesProduct overview
Help and User Guide maintained for Sicon Documents version 220.0.0 and Upwards.
The Sicon Documents Help and User Guide will take you through the features and settings for this module. Sicon Documents for Sage 200 is designed to enable users to attach (index) documents to transactions, accounts, orders and stock items while working in Sage 200. Additional documents can be added later through the transaction and order enquiry functions. Documents are automatically referenced using attributes to facilitate search options.
1. Overview
Sicon Documents allows users to attach documents, emails, orders and transactions in Sage, either by using a desktop scanner, browsing from a network location or dragging and dropping from an email. There is no need to re-index a document after scanning; by attaching documents directly into Sage then relevant attributes are applied to each document automatically as each order, ledger or transaction etc. is saved.
Document Automation can be used if you would like to have your suppliers emailing you their invoices in, and you want the invoices to be scanned so that they can be processed into Sage with the minimum effort.
Document Distribution can be used to make the emailing of documents to customers or suppliers as efficient as possible while automatically archiving them at the same time.
Page Size Warning: when scanning directly into Sage, a warning will appear if the size is greater than allowed, but the document can still be scanned in. Our advice would be that an A4 page scan should be between 35 and 75 Kbytes and if there are scanned images much larger than this, to check the scanner settings.
Black & White or Colour: HMRC are happy to see a black and white copy of the original invoice and so there is generally no need to scan images in full colour. However, with modern scanners and image compression software, the colour scan and black and white scans should not be too dissimilar in size.
Drag and Drop: drag and drop a file from a location, e.g. an email attachment – email is Outlook and Gmail, not web based email clients such as Gmail. It is also possible to drag and drop from Windows Explorer.
Scanner Recommendations: our recommendation would be the Fujitsu fi-7160 as a fast, reliable and robust scanner for use as a personal desktop scanner. This is the most efficient way to work for high volume users that receive a lot of paper invoices; low volume users can use a shared scanner or network copier to scan images and attach via the file attachment method.
2. HM Revenue & Customs – Document Storage
The HMRC guidelines state that you must be able to guarantee the authenticity and the integrity of the content of your source documents throughout the storage period by either electronic or procedural means. Store all the data related to your invoices, including such evidence as is required to demonstrate that authenticity and integrity has been ensured, be able to recreate the invoice data as at the time of its original transmission or receipt, and present the invoice data in a readable format. You must keep history files so that the appropriate details from any particular time can be provided if one of HMRC’s visiting officers asks you to do so. The same rules apply to the storage of electronic invoices as to paper invoices; you must normally keep copies of all the invoices you issue and receive for six years.
Sicon Documents can assist with complying with these regulations; please ensure you adhere to HMRC guidelines when using this product.
Source – Electronic invoicing (VAT Notice 700/63) Published 19th May 2015.
https://www.gov.uk/guidance/electronic-invoicing-notice-70063#conditions-for-electronic-storage
For further HMRC Document Retentions Guidelines, please refer to:
https://lgw.cnsonline.net/web/content/helpdesk/hmrcbestpracticeguides.jsp
3. Sage Admin Features
For users to be able to access Documents Settings and other features, users will require permissions detailed below; these will need enabling as required for each organisation.

Enquiries – POP Receipts and Despatches with No Documents: this permission will allow users to be able to find all receipts and despatches that have not had documents added.
Enquiries – POP Orders and Returns with No Documents: this permission will allow users to be able to find all orders and returns that have not had documents attached.
Enquiries – Document Search: this will give users the ability to be able to search to find specific attachments within Sage. Users will only be able to view documents as per their permissions set within Documents Settings.
Enquiries – PL Transactions with No Documents: this permission will allow users to be able to find all PL transactions that have not had documents attached.
Settings: configure to allow users the ability to access Documents settings. As this will allow for users to allocate licences and switch on or off other settings, this would usually just be an Administrator permission. There is also a separate feature to give access to creating or editing Email Templates for use with Document Distribution. The feature for User Settings is likely only needed as a result of a support issue if the user needs to clear their caches, or if the user wants to reset the tips. The Enable Module screen allows you to review or update enable strings for any installed Sicon modules.
Tools – Split PDF: this permission will allow users to be able to split multi-page PDF documents into single page documents.
Document Automation – Process Invoices/ Upload Suppliers: These permissions will allow users to access the Process Invoices screen where the document automation occurs or send all supplier information to Cogidocs (if using Document Automation).
Help & User Guide: this will give users the ability to view the Help and User Guide from within Sage.
4. Settings
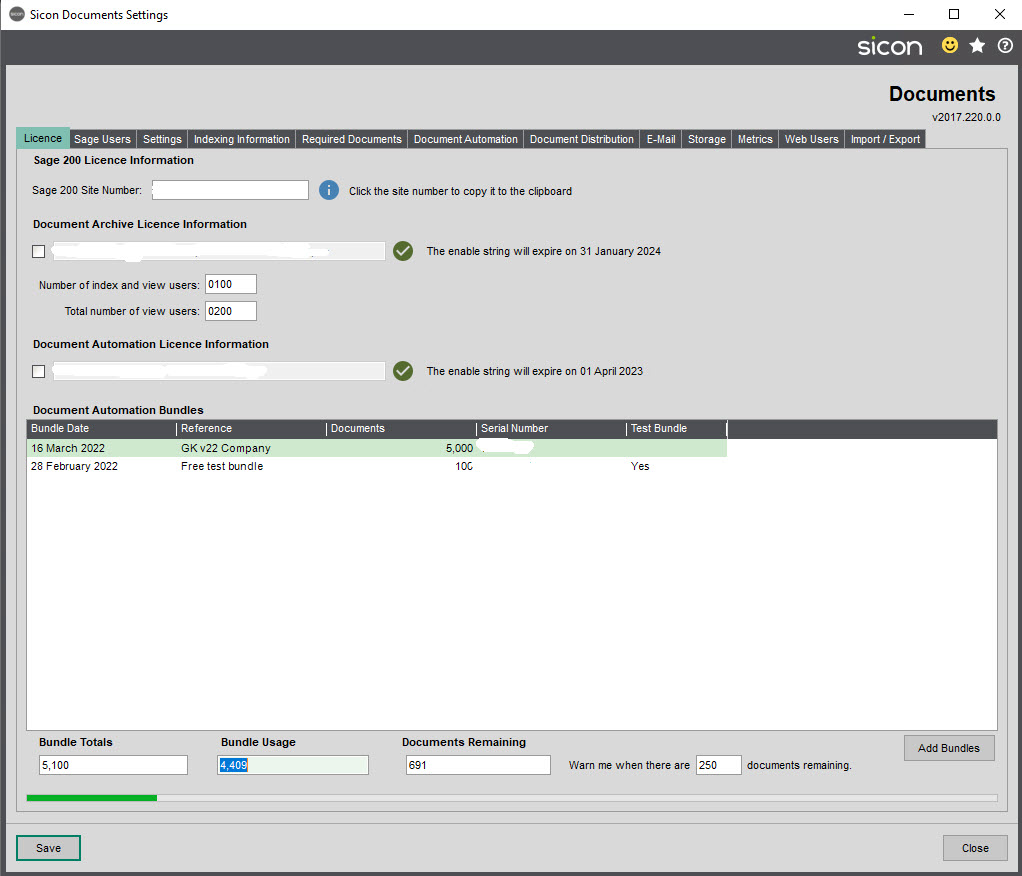
4.1. Licence Tab
A licence string will be supplied in accordance with how many ‘Index and View’ and ‘View only’ licences have been purchased. This will need to be updated on a yearly basis or if the number of licences has changed.
If using Sicon Document Automation there is an additional enable string once you have proceeded beyond using the initial test bundle. You can add the Licence Bundles which have been purchased using the ‘Add Bundles’ button.
The bundles will be displayed outlining how many documents are available on that bundle and below will show how many are available in total, how many used and how many remaining (across all of your Sage companies). If you are using Document Automation in multiple Sage companies, then you can double click on the Bundle Usage figure to see this broken down across each of your companies.
4.2. Sage Users Tab
Once the Documents Licence has been applied, allocate the ‘Full’ and ‘View Only’ licences to the Sage users as required. Note that a Full user licence will take up one of both of your Full and View Only licence counts. Clicking ‘Update Users’ will add in any users from Sage System Admin that have access to the current Sage Company.
Full licence rights: whether the user is able to add documents into Sage; either by scanning, dragging and dropping or browsing. This permission is required if the user intends to process invoices using Document Automation.
Can Re-Index: whether the user will be able to re-index a document once it has been added.
Can Delete: whether the user is able to delete documents added into Sage. This is usually just an Administrator permission.
Delete on Indexing: selecting this option will delete documents from the location once uploaded; this is useful if documents are being scanned in using a network scanner and then uploaded into Sage from this folder. This is dependent on Windows users file permissions. Usually this would not be switched on initially but can be turned on once the users are confident with the system.
View Rights: determine whether the user is able to view all indexed documents, only those they have indexed themselves, or documents that have been indexed by other users in their Sage Role.
Default Indexing Option: if a particular option is specified, the default option will be performed as soon as the add document screen is opened. This can be set as No Default, Scan, Scan with Options or Attach.
Default Attachment Path: enter a file path if documents will always be added from a specific location – this will remove the need for the user to always browse to a particular location.

4.3. Setting Tab

Scanning Options
Scanned File Type: when scanning in documents, to either scan as a PDF or Tiff file.
Default Scan Resolution: this sets the default DPI; increasing this will mean the document size will be greater when stored.
Page Size Warning: when scanning directly into Sage, a warning will appear if the size will be greater than set here, but the document will still be scanned in.
Test Scan Driver: select the driver configured, either Twain or WIA.
Test Scan Source: select from the drop down list the scanner to run the test scan on.
Attaching Options
Default Attachment Location: if a location is entered here, then when all users go to add a document, this will be the default location to pick up the attachment from. Make sure that this location is able to be accessed by all users.
Logging Options
Log to File: by default, these settings are off but can be enabled if tracking down a problem with Documents. If on, this setting will record events in the Log File.
Log to Windows Event Log (on premise): by default, these settings are off but can be enabled if tracking down a problem with Documents. If on, this setting will record events in the Windows Event Log.
Functionality
Enable Add and View button context menus: by default, this will be on and will allow the user to right click on the Add Document button and add a different Document Type; i.e. when adding a document against Sales Order, the default document added would be an Order but another document type can be selected from the list if required.

Convert Tiff files to PDF when opened: this is a work around for a limitation of Windows photo viewer which does not have an option to print a single page of a multi-page file. By converting to PDF, all of the features of the PDF viewer can be used, including printing specific pages.
Enable Document Count Columns: by default, this is enabled and will show a count of documents added, e.g. see Supplier Transaction screen against a PL Supplier below. Documents can be added or viewed against an invoice here too by clicking the Add Document or View Document buttons at the bottom of the screen.

Disable Sage Scan and Attach functionality: This removes the buttons added by Sage in later versions of Sage 200c that enable you to add documents to transactions.
Enable Document Count column in Cashbook Transaction Enquiry
Enable Document Count column in Batch/Serial Entry
Enable Document Count column in Nominal Transaction Enquiry
If you start experiencing any performance issues in these screens (typically only when you are viewing large numbers of transactions), then you can tick these settings to disable the document count column in these screens.
Render PDF Files with Direct X (instead of GDI+): A new setting to determine whether PDF files are rendered with Direct X or not (otherwise rendered with GDI+). This setting was introduced as a result of a support issue where the font was unreadable on scanned documents.
4.4. Indexing Information
This tab can be used to show how Modules, Entities, Document Types and Attributes are linked together and what attributes are available under a particular document type.
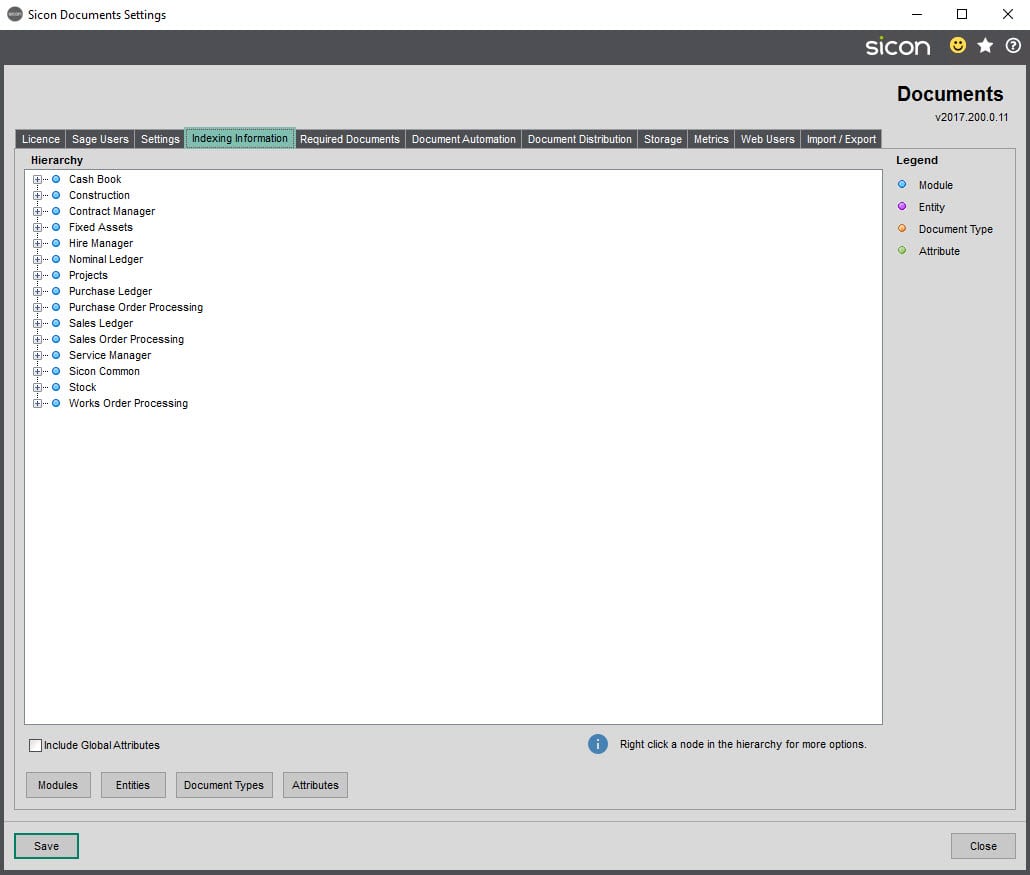
Modules: Sage and Sicon Add-on modules where Documents can be used to index and view documents. The System modules cannot be edited but additional modules can be added as needed.

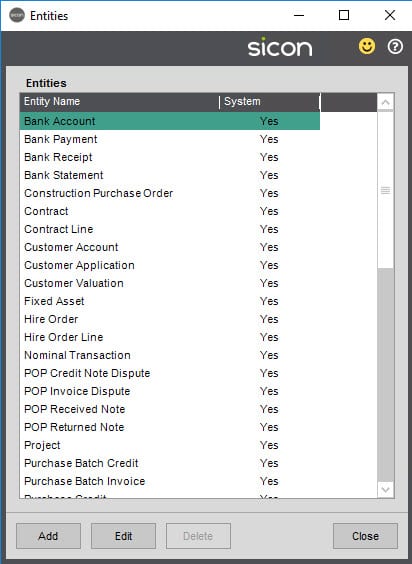
Entities: this is a list of entities against which document types can be stored. System entities cannot be edited but additional entities can be added if required.
Document Types: the classification of documents when added to Sage via Documents against a particular entity. System document types cannot be edited but new document types can be added if required; there is a wizard for adding new document types.


Attributes: these are used to automatically reference the documents added to Sage via Documents. System attributes cannot be deleted or edited (apart from the Description attribute which can be marked as mandatory if required), but additional attributes can be added if required.

Adding a New Document Type: it is possible to either use the wizard to create a new document type, or right click on an Entity and click ‘Add New Document Type’.
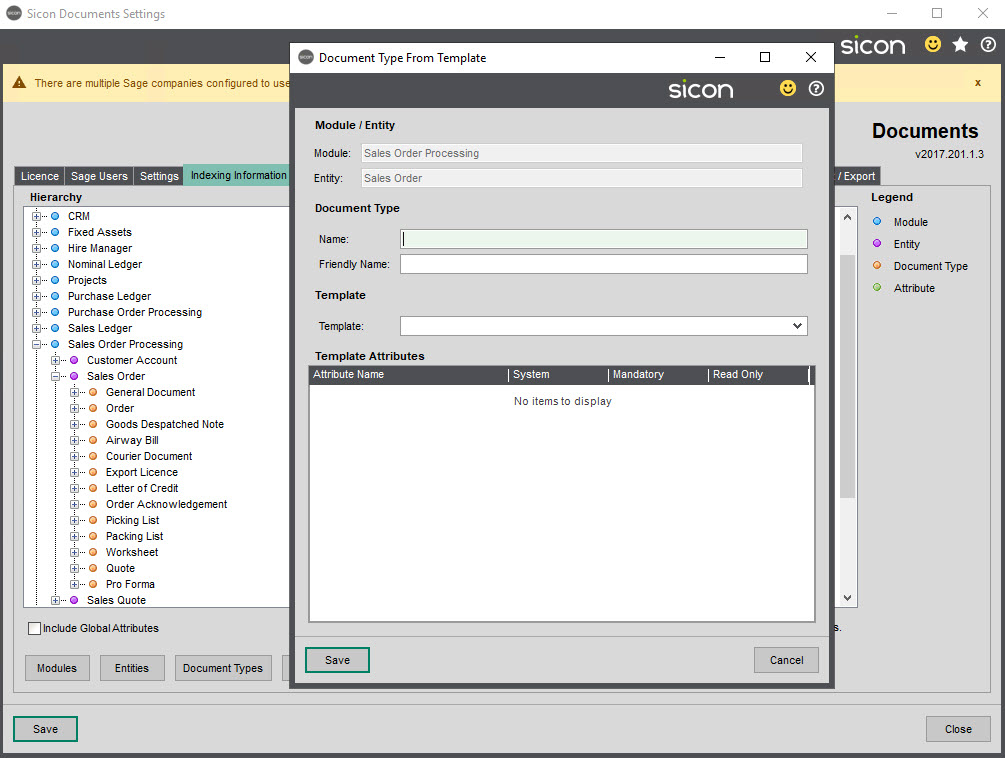
Enter a name and a friendly name; the name cannot contain spaces but the friendly name can. Pick a template to copy the attributes from and click Save. This new document type will then be visible against the chosen entity when right clicking on Add Docs.

4.5. Required Documents
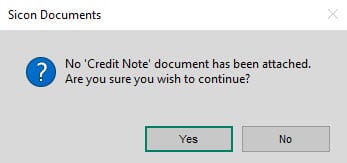
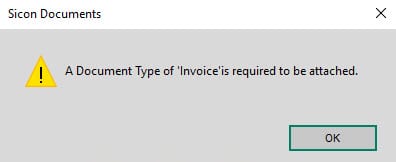
It is possible to configure certain transaction types to require a document to be attached; for example, Purchase Invoices can be configured to require an attachment while a Purchase Credit can warn if no document has been attached but can be saved without.
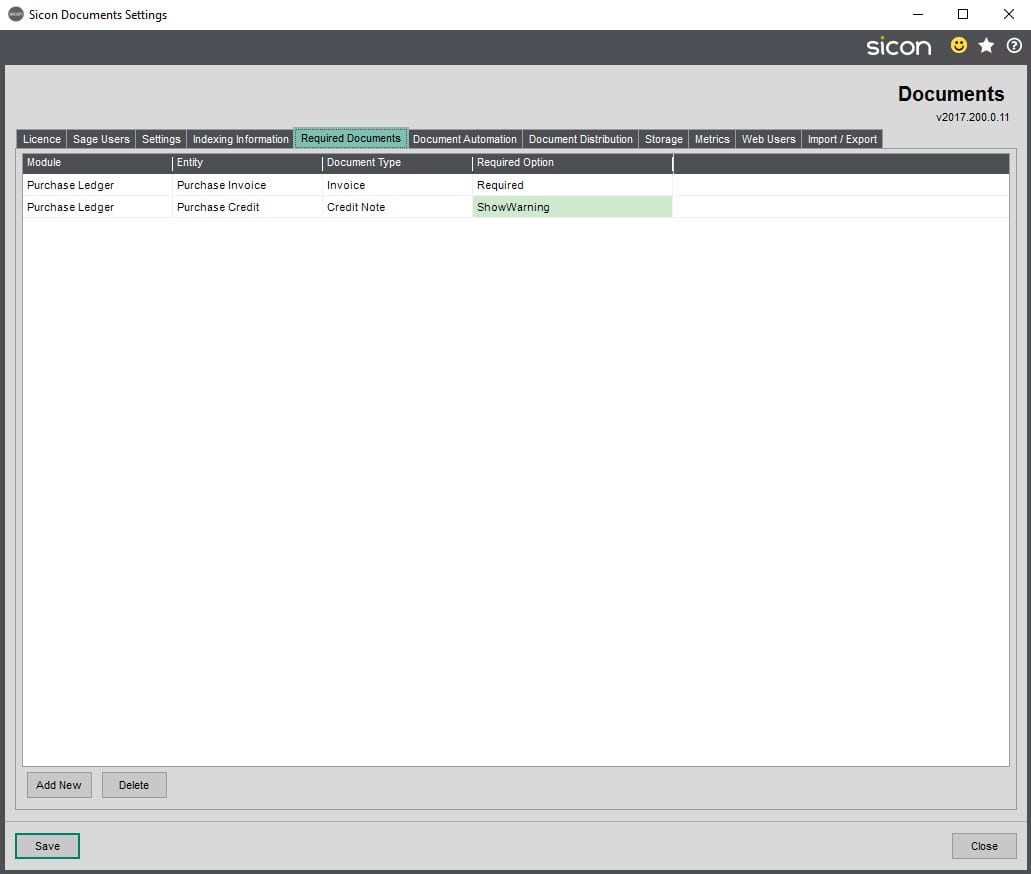
Various pop up messages will show to the user depending on the required option if no document has been attached.
Warning prompt but the user is able to continue saving the transaction without adding a document.
Warning prompt and the user is not able to save without attaching a document.
4.6. Document Automation
Before you can start using Document Automation you need to register an account and email address that will be used to process your invoices. This email address can either be given to a Supplier or Invoices can be passed through from a company’s internal email address (e.g. Invoices@yourcompany.com). Invoices sent to this email address would need to be separate attachments, i.e. it can’t process a single PDF that contains multiple invoices. But there can be multiple PDFs on the same email, each being a separate invoice.
When you haven’t yet registered for an account, you will see two tabs within the Document Automation tab – the Customer tab and the Application tab. The Customer tab has details that are shared between all of your Sage companies and these details are editable up to the moment where you register one of the Sage companies. From that point onwards, these fields are then greyed out.
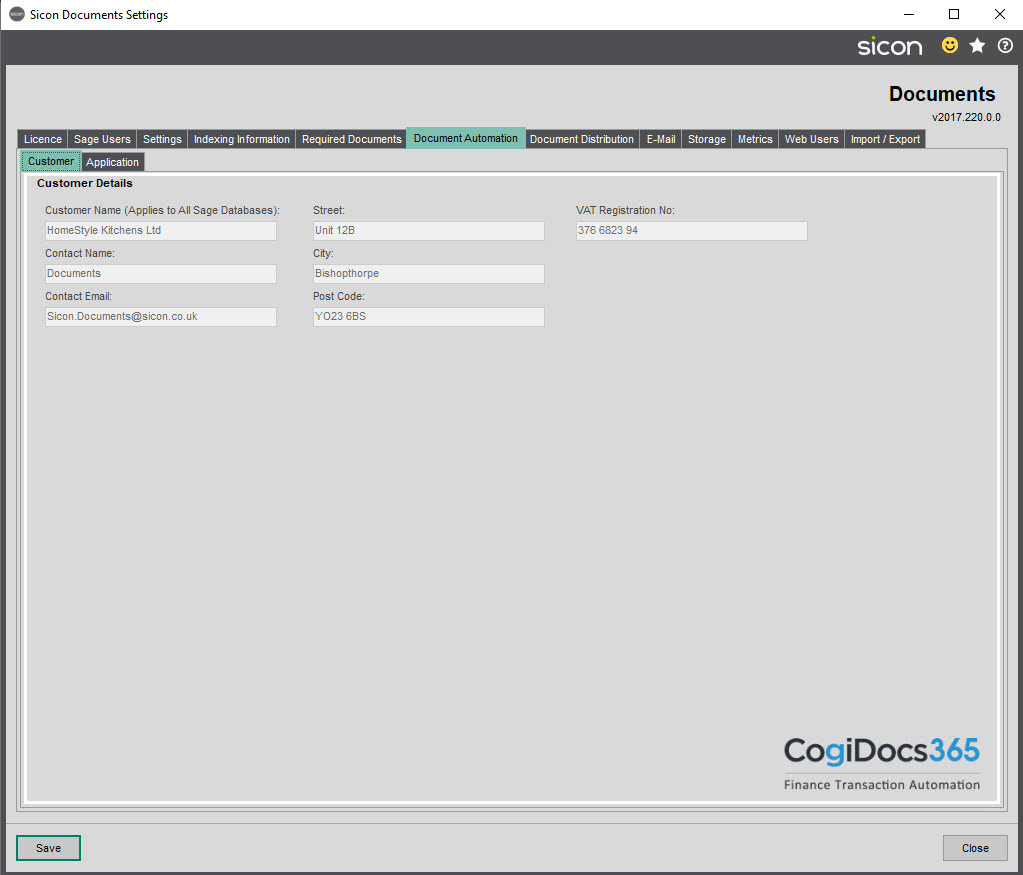
All these details are required when signing up a new database / email source.
Customer Name: Company Name prepopulated from Sage
Contact Name: Main contact from process invoices
Contact Email: Main email address for the company contact (generic email address preferred)
Street: Street address prepopulated from Sage
City: City prepopulated from Sage
Post Code: Company postcode, prepopulated from Sage
VAT Registration No: Company VAT number, prepopulated from Sage
In order to register for an account, the Sign Up button is on the Application tab:
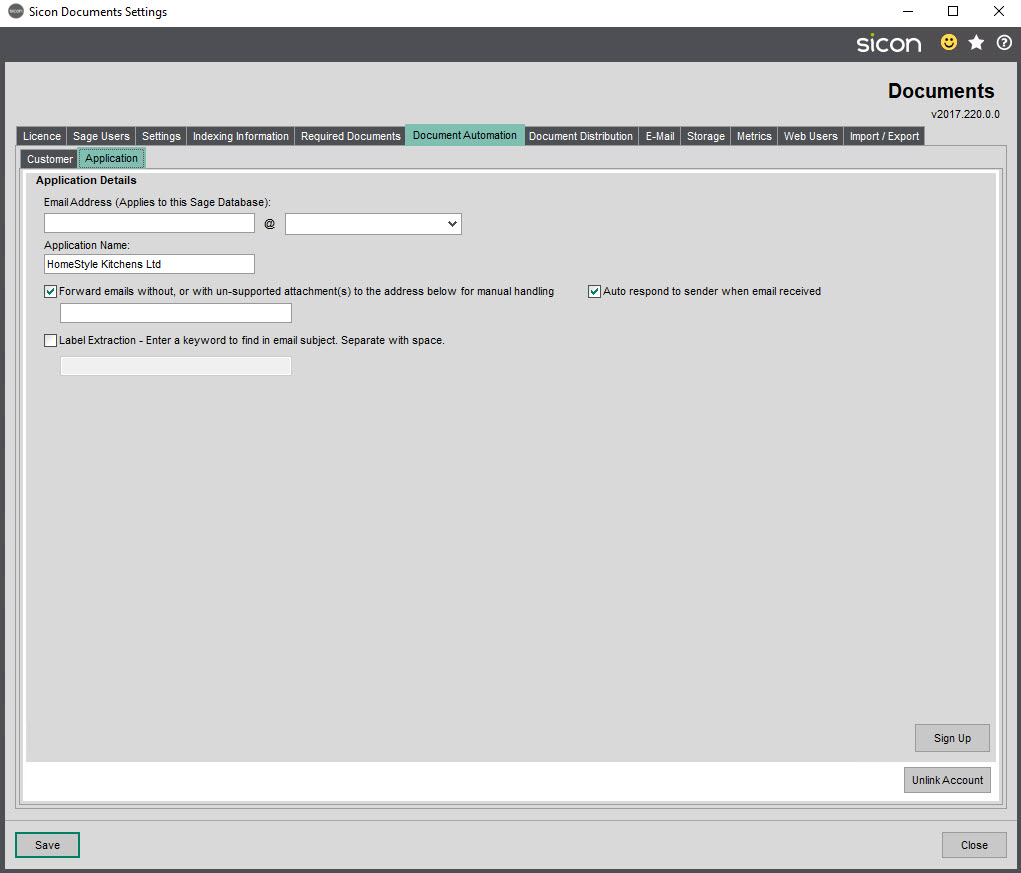
Email Address: The email address you intend to use to send Invoices to, to be processed by Sicon Document Automation. You will also need to select the domain for the email address from the drop-down menu. The domains in the drop down are pre-set to point to the Cogidocs server.
Application Name: This is what will identify the use of Document Automation for this specific Sage database, so should be the Sage company name.
Forward emails without, or with un-supported attachment(s) to the address below for manual handling: This option, when selected, will notify the specified email address if an email is received that isn’t supported, so it can be processed manually.
Auto Respond to sender when email received: This option will respond to the sender when an email has been received to inform them that their email/invoice is being processed
Label Extraction – Enter a keyword to find in email subject. Separate with space: Extracting a keyword from the email subject to store in an OCR field
Sign Up: This button will then generate your account based on the information provided. The system will prompt if any details are incorrect. E.g. Contact Name is missing
Once you have registered an email address the Setting screen changes to show additional sub-tabs. The Application tab can always be referred to if you need a reminder of the registered email address.
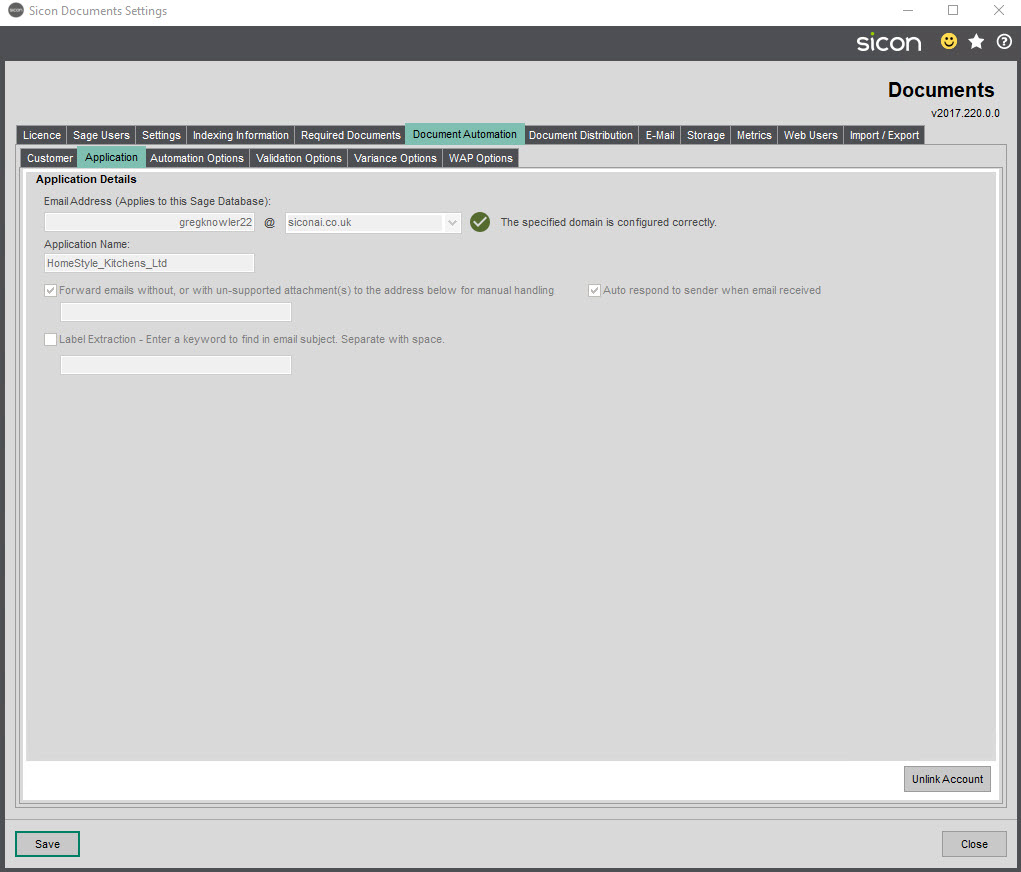
Unlink Account: This will unlink the account from the database. This is designed for unlinking accounts when overwriting a Test database with a copy of a Live database. Only use this option if absolutely sure as it is not possible to re-use the same email address when signing back up with Cogidocs.
Automation Options
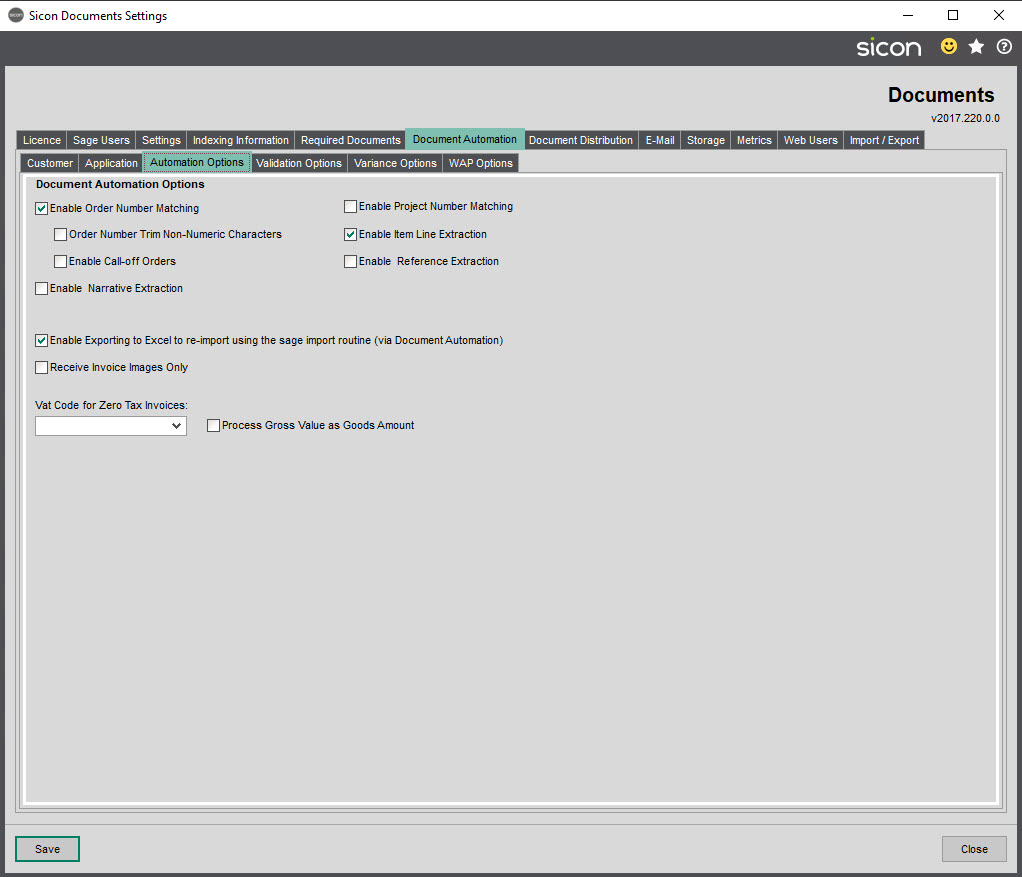
These options are the default for Sicon Document Automation. They can be overridden per Supplier as required
Enable Order Number Matching: This will attempt to match the Invoice against an existing order within Sage. The order number must appear on the Invoice
Enable Project Number Matching: This will attempt to match the Invoice against an existing Sicon Project within Sage. The Project number must appear on the Invoice
Order Number Trim Non-Numeric Characters: Tick this box if you would like the data matched as the PO number to only pass through the numerical digits.
Enable Item Line Extraction: Sicon Document Automation will read each line on the Invoice and these will be generated when processing the Invoices to attempt to match them to the lines on the purchase order.
Enable Call-off Orders: Enabling this will activate a tick box on purchase orders, where you can then indicate that they will be call off orders. This will then mean that partial receipts against that purchase order are not considered invalid when matching invoices to them.
Enable Reference Extraction: coming soon
Enable Narrative Extraction: This will enable the training of a narrative field on the invoice, which can then be posted into the nominal narrative when the invoice is posted into Sage.
Enable Exporting to Excel to re-import using the Sage import routine (via Document Automation): This setting allows to you export invoices via the Process Invoice screen, and then re-import them back in again before processing them. With this setting ticked, a new Exported queue appears in the Process Invoices screen.
Receive Invoice Images Only: With this setting enabled, then no transactions would be created from Document Automation. Instead, the scanned invoices are matched to transactions already posted into Sage. So, you are using Document Automation just to add the images to the already posted transactions.
Vat Code for Zero Tax Invoices: Invoices in the Process Invoices screen would ordinarily have the default tax rate from the supplier account applied to them. If the invoice is found to have zero VAT, then the tax code specified here would be used instead, to enable to you to select Exempt or Zero Rated (or another similar tax code). This can be overridden by the same setting on a supplier account.
Process Gross Value as Goods Amount: This is to disassociate VAT from the scanned Invoices for companies that don’t record VAT, so the total Invoice Value will be recorded as the goods amount
Validation Options
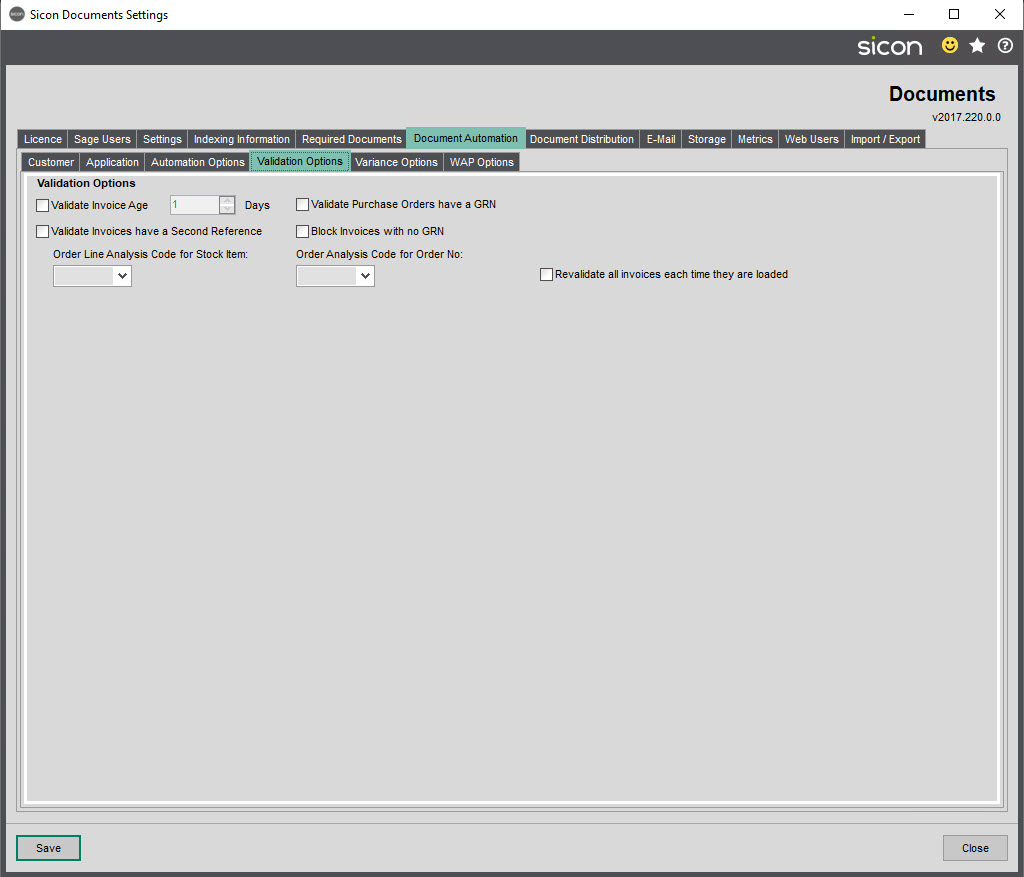
Validate Invoice Age: Enable validation on the Invoice Age and set the number of days i.e. do not process any Invoices that are dated more than 60 Days old.
Validate Purchase Orders have a GRN: Available if order number matching is enabled. Will validate that the Purchase Order has been GRN’d in Sage, and flag them as invalid but they could still be processed.
Validate Invoices have a Second Reference: If this option is enabled, then all invoices will be validated to ensure they have a second reference field identified. Any that don’t will appear on the Needing Attention list in the Process Invoices screen where they could still be processed if desired.
Block Invoices with no GRN:
Vat Code for Zero Tax Invoices: Invoices in the Process Invoices screen would ordinarily have the default tax rate from the supplier account applied to them. If the invoice is found to have zero VAT, then the tax code specified here would be used instead, to enable to you to select Exempt or Zero Rated (or another similar tax code). This can be overridden by the same setting on a supplier account.
Process Gross Value as Goods Amount: This is to disassociate VAT from the scanned Invoices for companies that don’t record VAT, so the total Invoice Value will be recorded as the goods amount
Order Line Analysis Code for Stock Item: This enables you to specify an analysis code on a purchase order line that Document Automation will use to match the invoice line to the PO line.
Order Analysis Code for Order No: This enables you to specify an analysis code on a purchase order that Document Automation will use to match the order number to.
Receive Invoice Images Only: With this setting enabled, then no transactions would be created from Document Automation. Instead, the scanned invoices are matched to transactions already posted into Sage. So, you are using Document Automation just to add the images to the already posted transactions.
Revalidate all invoices each time they are loaded: By default, the Process Invoices screen requires users to manually revalidate invoices in order to assist with performance. If you enable this setting, then the Process Invoices screen will revalidate the invoices every time the screen is opened, or the Retrieve Invoices button is clicked. If you have a large volume of invoices in the Process Invoices screen then you may not want to enable this, as it could cause performance issues.
Variance Options
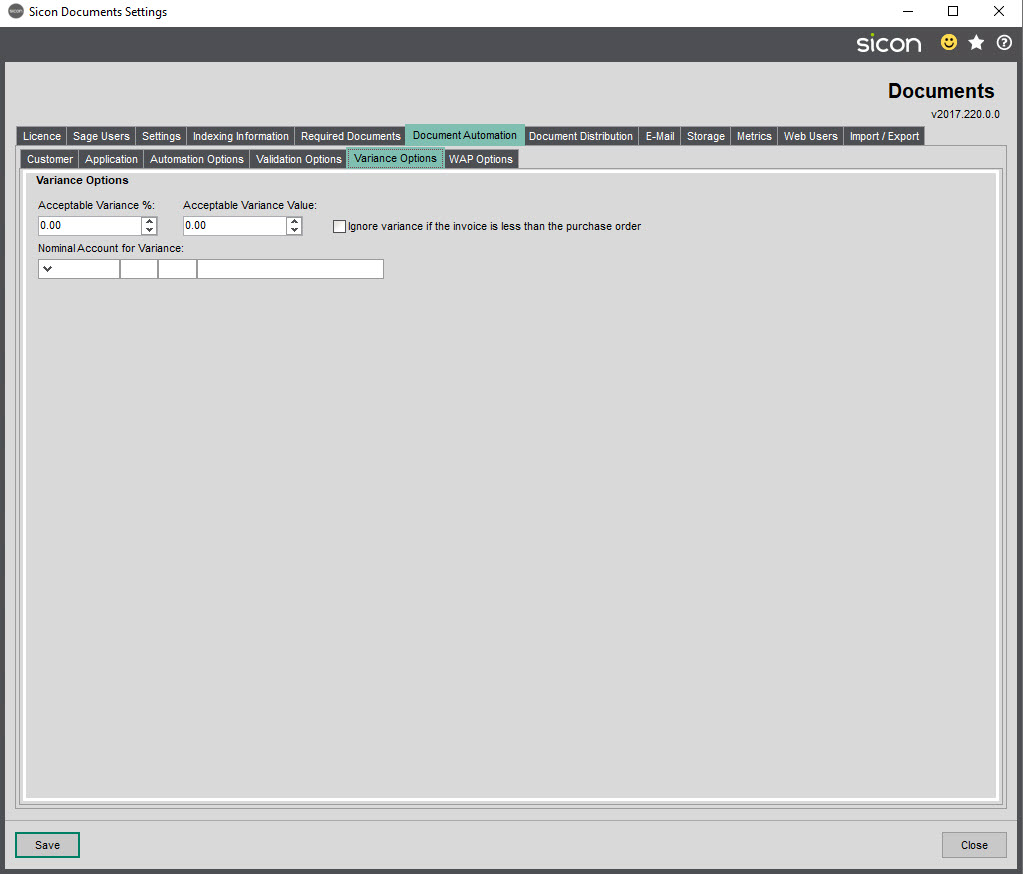
Acceptable Variance %: Specify an acceptable variance percentage, if the invoice matches the value of the purchase order within this percentage, then it will be considered as valid in the Process Invoice screen.
Acceptable Variance Value: Specify an acceptable variance value, if the invoice matches the value of the purchase order within this difference, then it will be considered as valid in the Process Invoice screen.
Ignore variance if the invoice is less than the purchase order: Do not use either of the above settings if the invoice is less than the purchase order. This would be relevant where either the invoice is only a part invoice of the purchase order, or the supplier is invoicing you less than you were expecting.
Nominal Account for Variance: This enables you to specify a nominal account where any variance should be posted to. So, if you receive an invoice that differs from a purchase order by a value that falls within the acceptable options above, then you will see an extra nominal line when the invoice is posted using the nominal code set here for the variance.
WAP Options:
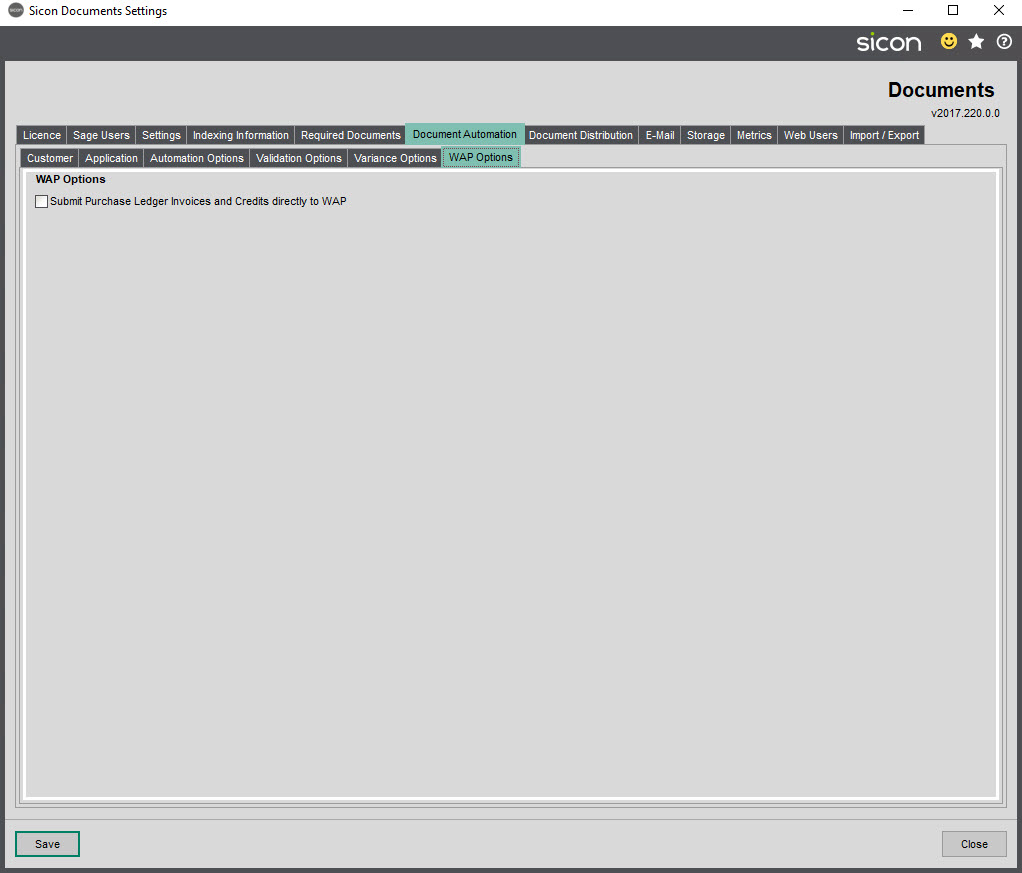
Submit Purchase Ledger Invoices and Credits directly to WAP: With this setting enabled, then any invoices processed through the Process Invoices screen will be sent to Sicon WAP, instead of being posted into Sage. This would then enable you to authorise them in WAP, and only then would they be posted into Sage.
4.7. Document Distribution Tab
This tab is used to set defaults against the different document types that you will be emailing direct from Sage using the Document Distribution functionality.
The E-Mail Settings field at the top are only relevant if you are using the Sicon Courier Integration module, and enable you to specify both the From email address and the From name that will be used on emails sent alongside Courier despatches. Also see the next section relating to the SMTP settings used for this.

The Disable standard Sage print button can be enabled if you want to prevent your users from using the standard Sage print buttons for the document types. The intention behind enabling this would be to force users to instead use the Email and Archive button to ensure that the generated document uses the correct email template and formatting, as well as being archived.
The first three columns display the Module, Entity and each Document Type that can be used with Document Distribution. You can use the next five columns to see which settings have been applied to each of these document types. If you wish to use the same header pages/backgrounds/terms and conditions across multiple document types, you’ll need to add them separately to each document type.
Header Pages:
It is possible to select a PDF letterhead document that will be merged in as previous pages to the Sage document when it is sent via Document Distribution. If you have already selected a letterhead, then it will be displayed in the preview window in the bottom left hand corner of the screen. If you wish to select a new PDF document, then click on the following button: –

This will then enable you to browse for a PDF file. The file is then copied into your Documents folder location (within the relevant Sage company attachment path), and is stored in a LetterHead folder within the relevant document type. The file name is then stored in the Letterhead column of the main window and you will then see your PDF previewed in the preview window. You can view the PDF in its entirety by clicking the following button: –

The final button allows you to delete the Letterhead from the selected document type: –

This will then delete the PDF from the folder within the Sage Documents folder location.
Background:
In the same way as with header pages, it is possible to select a PDF document to merge in with the Sage document as a background.
Terms and Conditions:
In the same way as with header pages, it is possible to select a PDF document to add the terms and conditions to the bottom of the document that is emailed through Document Distribution.
Contact Role for Email:
Contacts held within Sage against customer and supplier accounts can be assigned one or more roles. These are created within the standard Sage Customer and Supplier Roles screen within the Accounting System Manager\Settings menu. Within each account, there can only be one preferred contact for each of these roles. In this column you can specify which role should be used in Document Distribution to ascertain which contact on the account should be the recipient of this email.
Outlook Options:
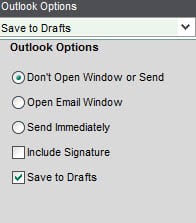
These options let you specify against each of the document types what you would like to happen when you click the Email & Archive button. You can either send the email immediately, open the email window in Outlook or do neither (if you want it to go to the drafts folder). The Include Signature option will add the selected signature in your Outlook options.
The Save to Drafts option is not available if you have chosen the Send Immediately option.
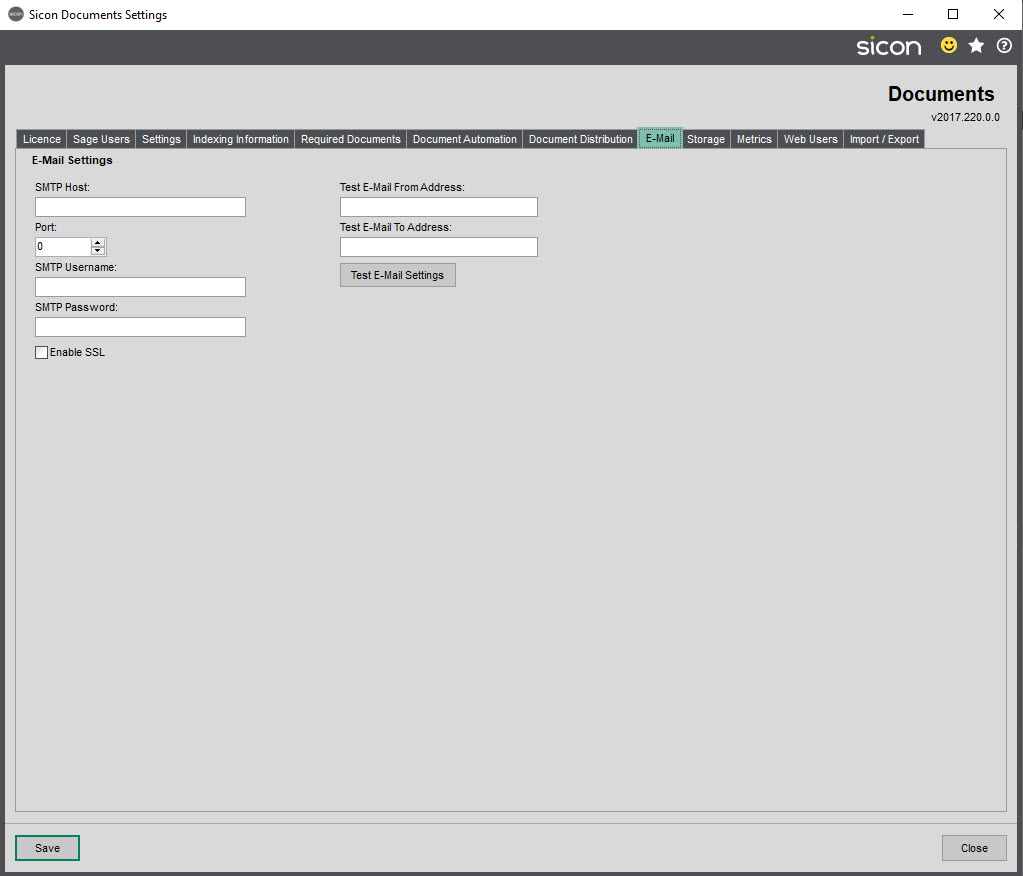
4.8. E-Mail Tab
This tab is only required if you are using the Sicon Courier Integration module, and need to specify your SMTP email settings so that despatch emails can be generated from that module. If you are using Document Distribution, you do not need to configure this tab, as emails sent from there will go directly through your Outlook client.
4.9. Storage Tab
This tab will show a breakdown of total documents in the Documents folder stored on the server by clicking on the Calculate Documents Folder Size button. You can expand the folders to drill into the size calculations.
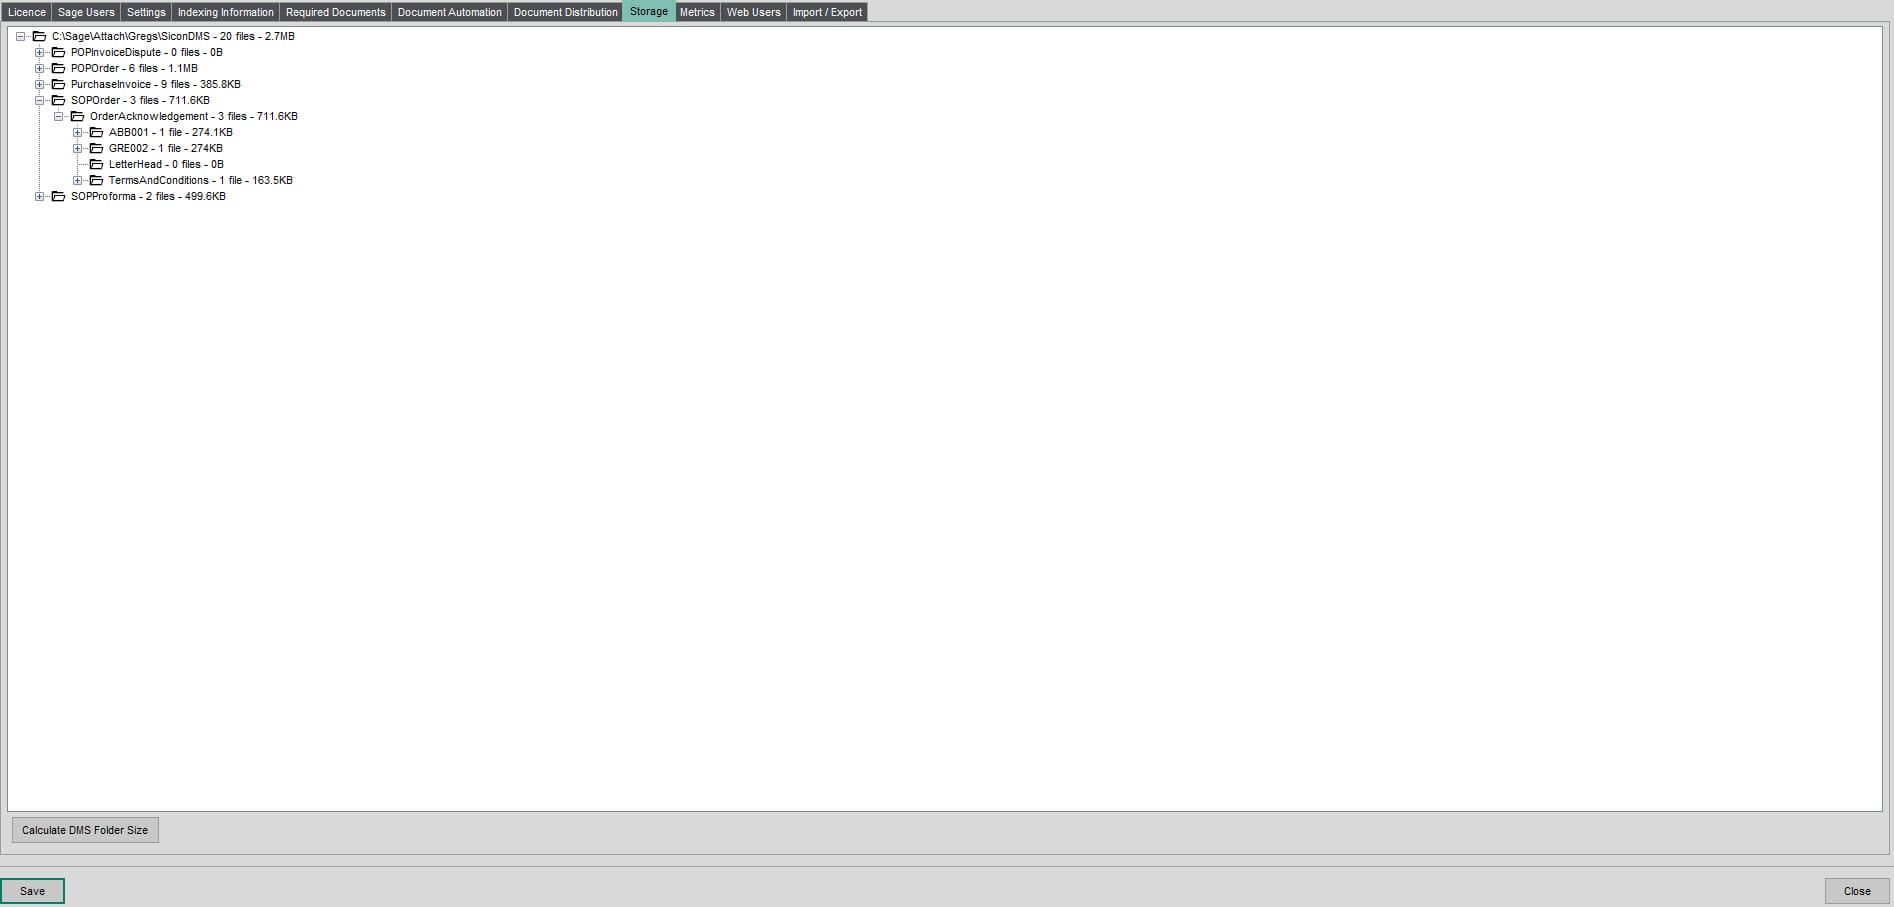
Documents are stored in the attachments folder per company as assigned against the company within the Sage 200 System Administrator.
4.10. Metrics
This tab can be used to show the number of documents added per Module, Entity and Document Type to ascertain where documents are mainly being added to the Sage module.
N.B. as this feature requires .net Framework 4.0 or above, this functionality is only available for Sage 200 2015 and above.
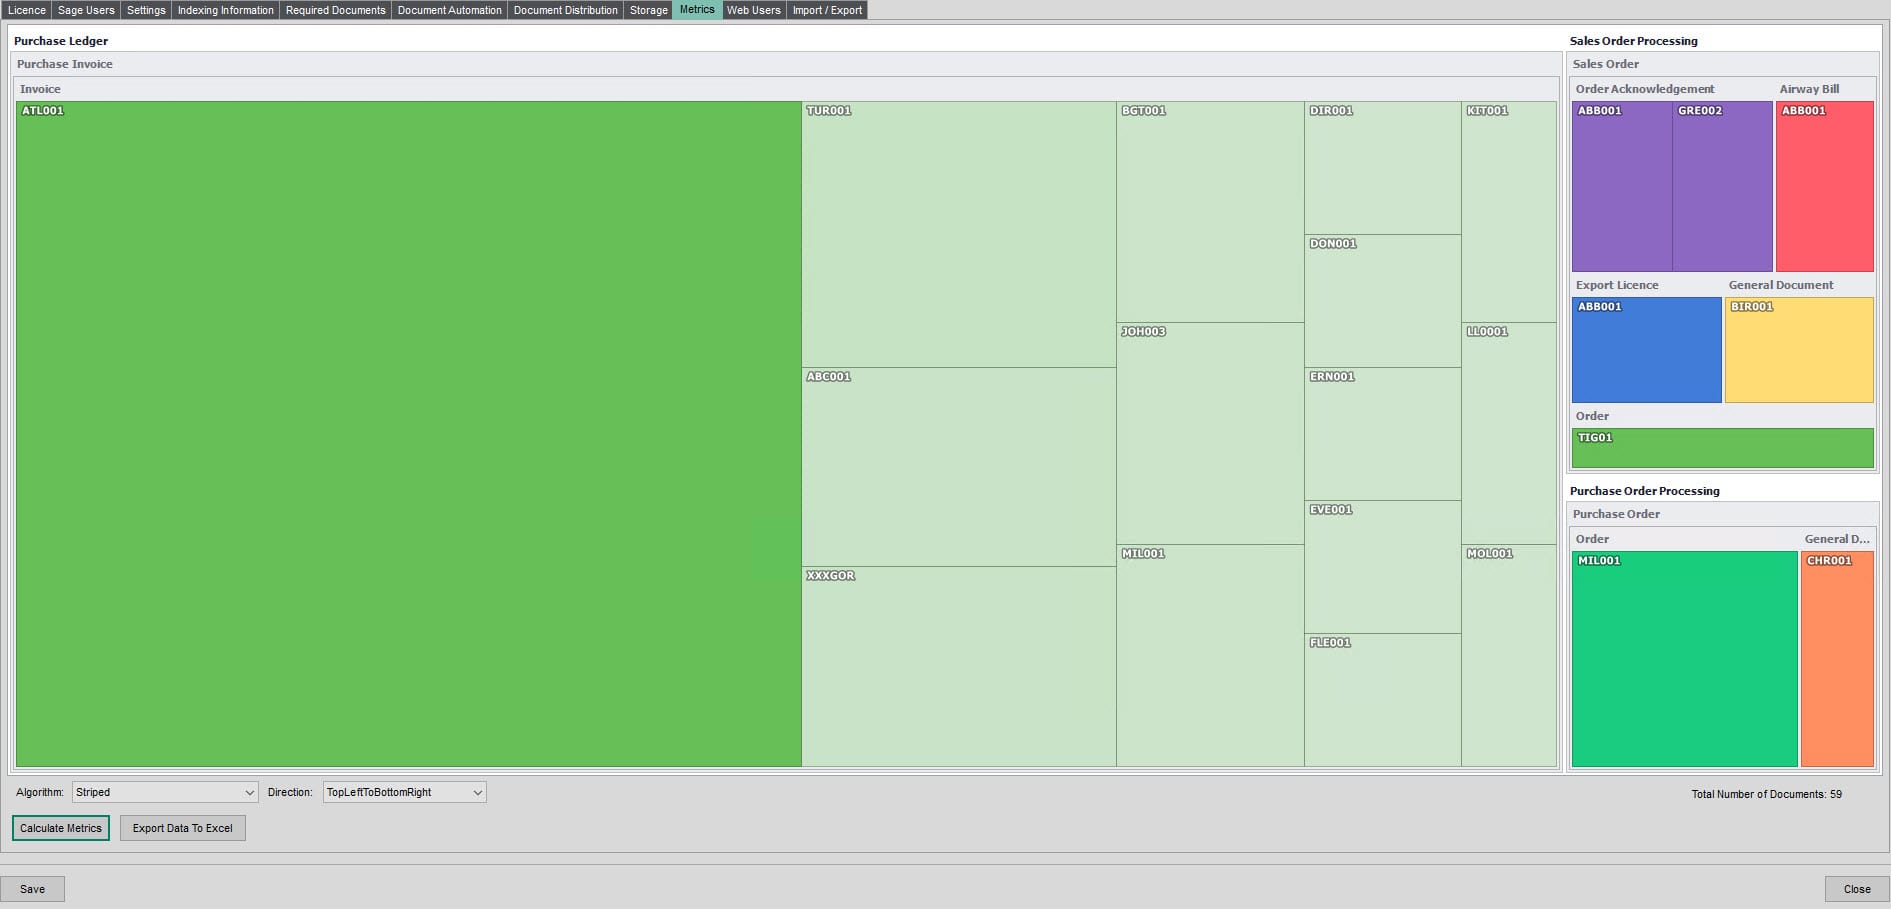
Hovering over each section will cause a pop-up window that summarises the number of documents within each box. There are three algorithm options available to display the information in different formats, and you can change the direction that the sections run in. You can also export the graphical information into Excel via the Export Data to Excel button, where the counts of each combination of account and document type will be summarised.
4.11. Web Users Tab
These tabs are for Business Partners working with Sicon on Documents integration.
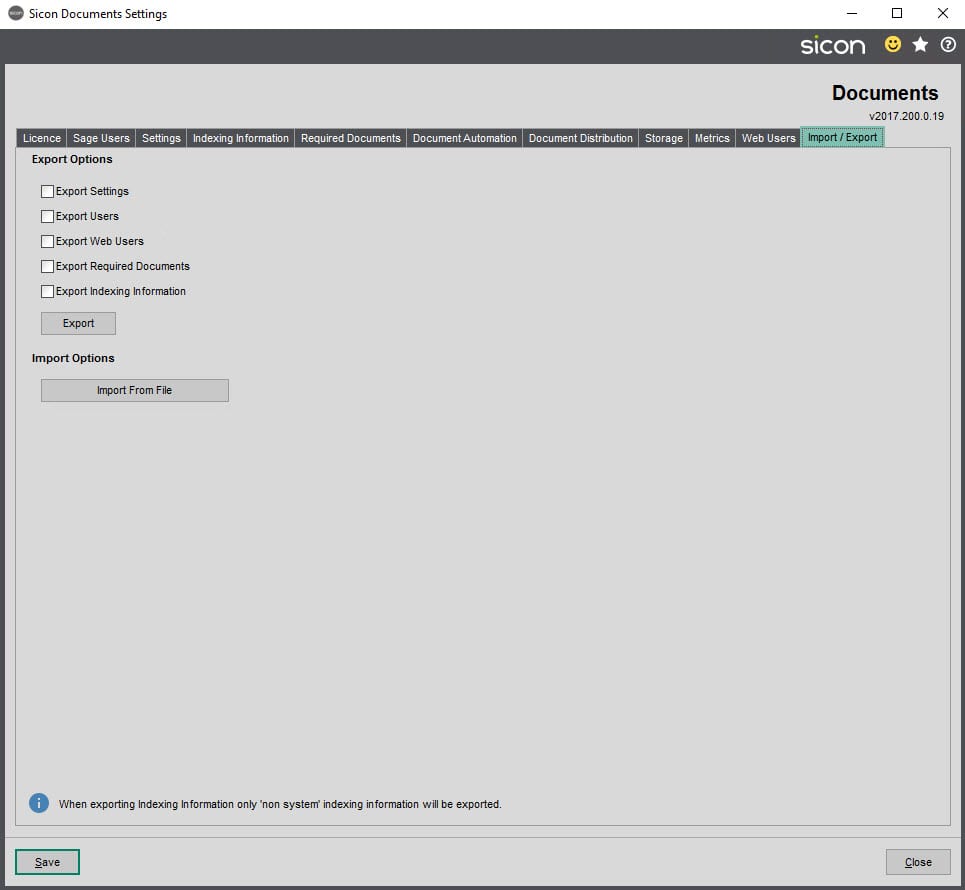
4.12. Import/Export Tab
This tab will allow for Documents settings to be exported from one company and then imported into another. When exporting, an XML file will be produced which can then be imported into another company.
NB: any new document types created will not be exported for reimport, these would need to be set up again.
4.13. Warning within Settings
When editing/viewing the Documents settings, the below message may appear as a warning. This is stating that there are multiple Companies configured in Sage System Admin to use the same attachments folder. It is advised that all Companies in Sage System Admin are configured to store documents in individual folders.

4.14. User Settings
This screen gives access to two functions that affect the currently logged in user.

Clear Company and Roles cache: if a user’s company access or role permission (as set in Sage System Admin) has not changed the user’s Sage interface, clear the cache here to pull through the new permissions.
Reset Tips: this will reset any tips shown so users will see any new tips for new features and hot fix enhancements along with any previously selected to not show.
4.15. Email Templates
In this screen you can maintain email templates for each document type that you would use with Documents Distribution.
You can also add email templates for additional document types – this doesn’t mean you can then use these for Document Distribution, they are only used if you are viewing a document and click the Email button available in that screen.

This screen lists all of the entities and document types that can be used with Document Distribution. You can create a template for the email that the document will be sent out with. Click the Edit button to open the Email Template editor.
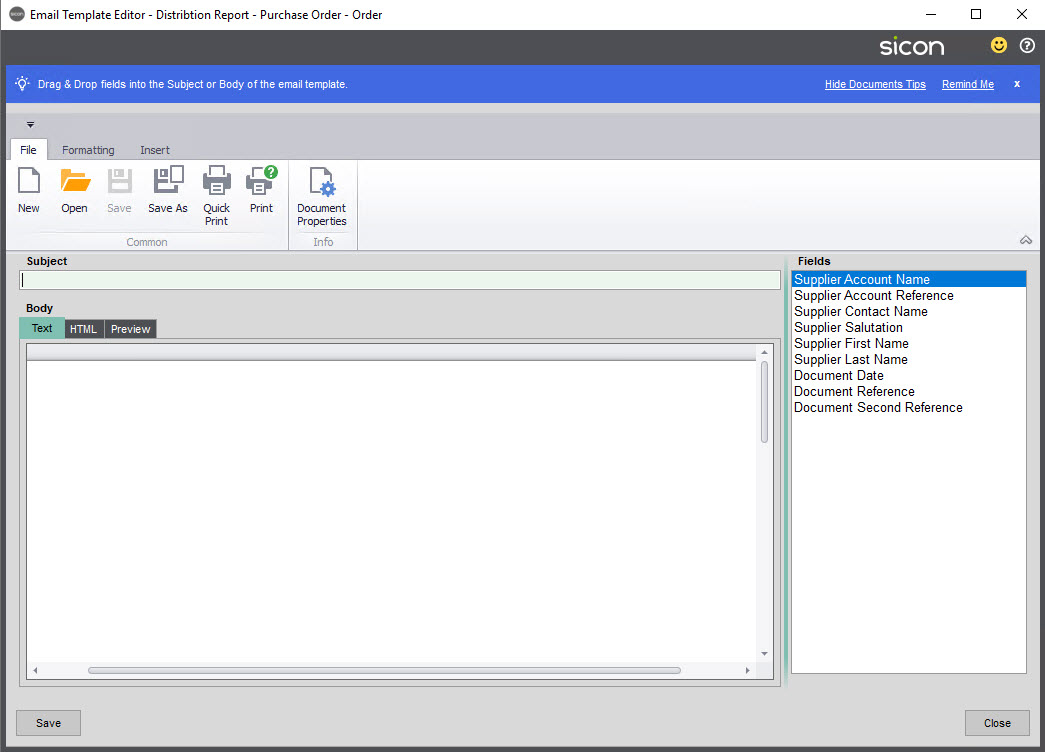
You can enter desired text into the subject and body fields. The Fields window on the right-hand side will show you which fields are available for merging in your template. You can drag these into both the subject and body of the email template. You can copy and paste any HTML into the HTML tab, and then use the Preview tab to see how this will display.
5. Adding a Document
If the Sage user has been given a full user licence, when entering a transaction or using the transaction/order enquiry functionality within Sage and Sicon Add-on modules (locations as defined in Documents Settings), there will be an option available to ‘Add Docs’.
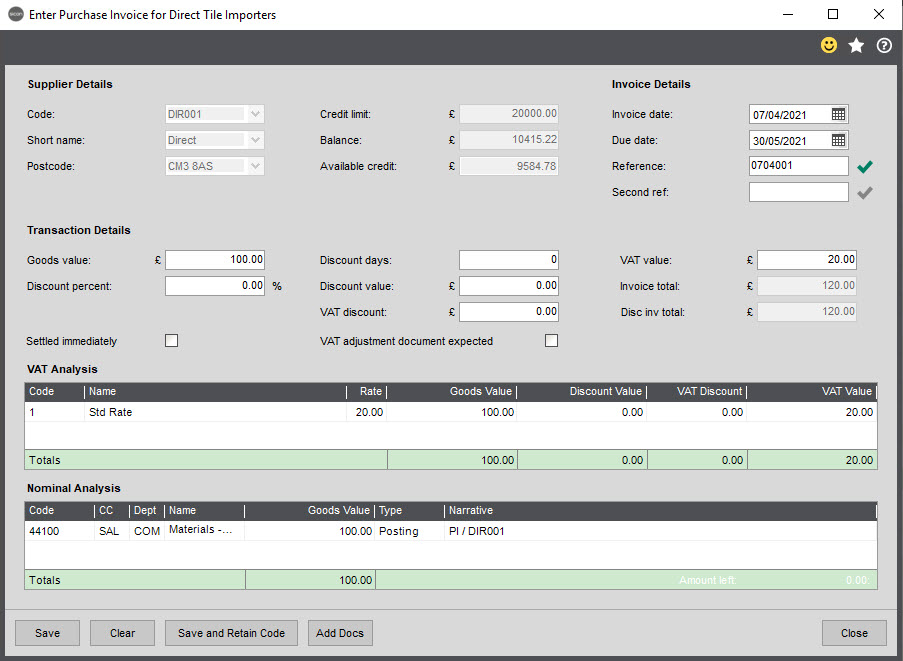
For example, entering a Purchase Invoice within the Purchase Ledger:

Either drag and drop a file directly onto the ‘Add Docs’ button; i.e. a PDF from an email or click ‘Add Docs’ to open the main indexing screen. This will allow you to either:
Scan/Scan with Options: this will scan a document directly from a Desktop Scanner (must have a Twain driver installed).
Attach File: add a document directly from a file source.
Drag and Drop: drag and drop a file directly from a location onto the page from an email or other file source.

Once the document has been added, the options are to:
Save and Close.
Or
Add Security options, Save and Close; this will give the ability to specify which roles have access to view this document as per the user’s permissions (see Settings – Licence).
Or
Tools; if a multi-page PDF has been added, this tools option can split the document into single pages.
Or
Add New to add an additional document to this transaction or enquiry.
Once documents have been added the number of attachments will be displayed.

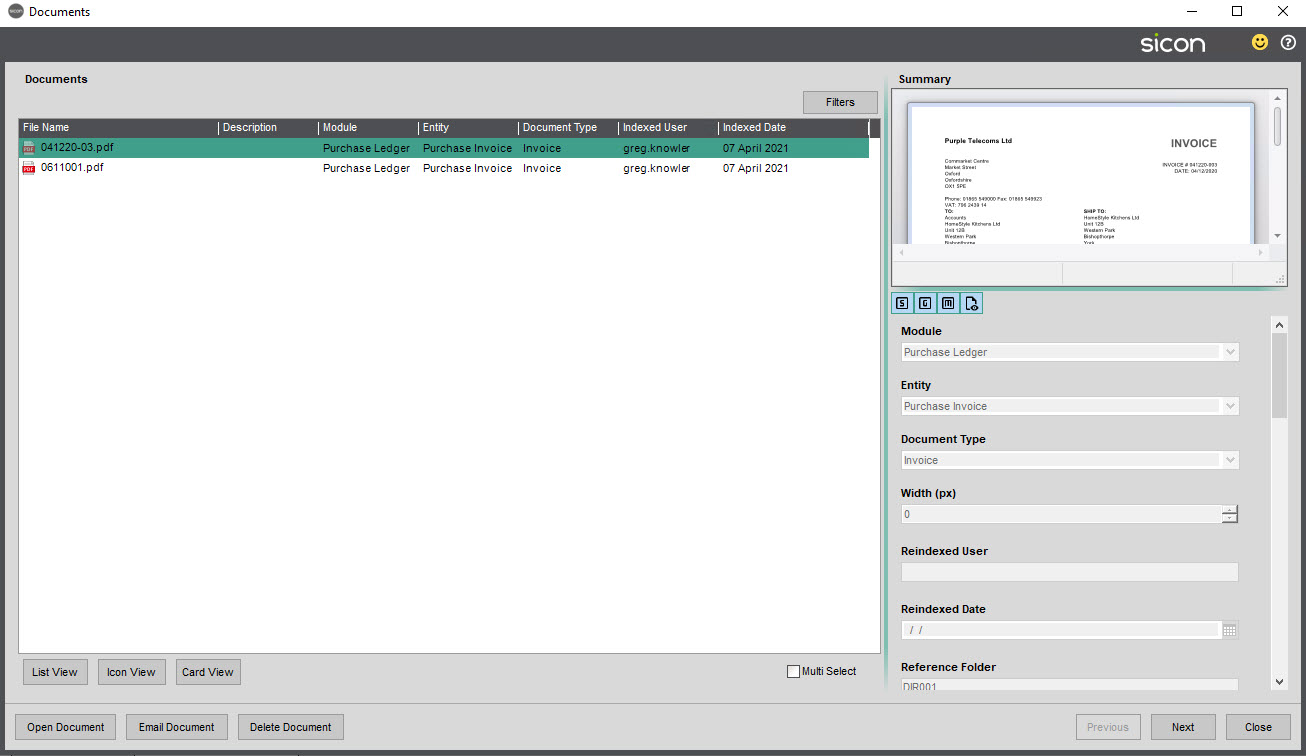
6. Viewing a Document
Once a transaction has a document indexed against it, select ‘View Docs’.
From here the document can be opened (a PDF could be printed) and if required, it can be emailed from here (which could use an Email template if one has been configured for this document type). Depending on user permissions, they may also be able to Re-Index the document or Delete the document.
If viewing a transaction in Sales/Purchase/Nominal Ledger Transaction Enquiry, and the transaction relates to a Sales/Purchase Order, then you can also view the other documents that are linked to that order.
If multiple documents have been attached against a single transaction or enquiry, these are displayed in either a list, as icons or in card form.
The Next and Previous buttons can be used to move between documents.
‘Multi Select’ can be ticked if multiple documents need to be opened or emailed out at once; it is possible to either hold down the Ctrl or Shift key to select multiple documents. When in multi select view, the summary window will not be able to be shown.
7. Re-indexing a Document
If a user has permission they will be able to re-index a document already attached; for example, if there is a description that needs to be entered when the document is indexed but this was not done, a user can re-index, enter the description and Save and Close. The majority of the fields cannot be edited as these are System fields and therefore read only.
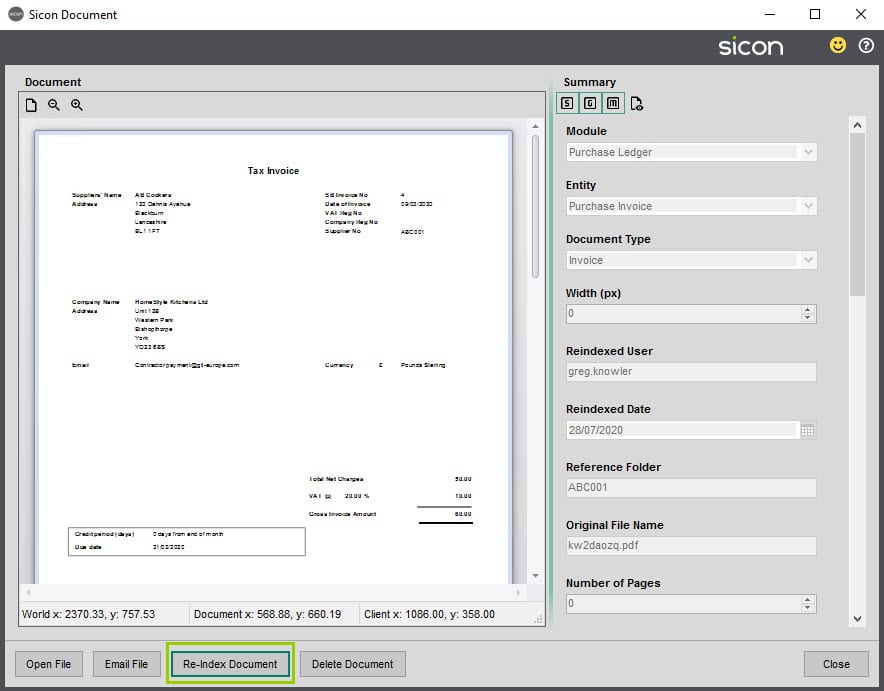
It is possible to edit the security of a document when re-indexing, for example to restrict what roles have access to view this document. Once changes have been made, click Save.

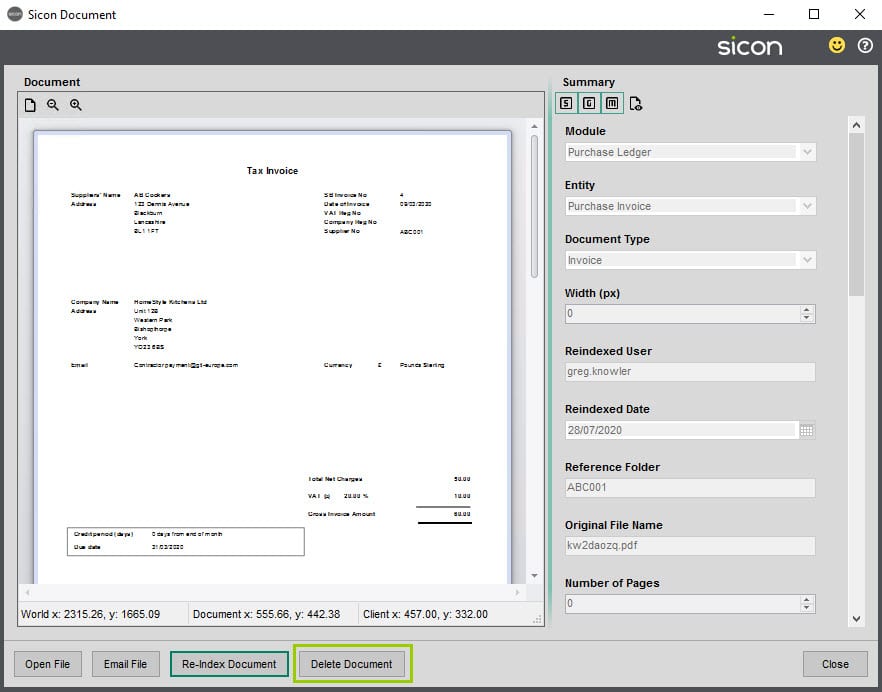
8. Deleting a Document
If a user has permission, they will be able to delete documents attached onto the system. When viewing a document, the Delete button will be visible. Usually this permission is just given to Documents Admin users to delete a document that has been added incorrectly.
9. Enquiries
Various enquiries can be run from Sicon Documents.
9.1. Document Search
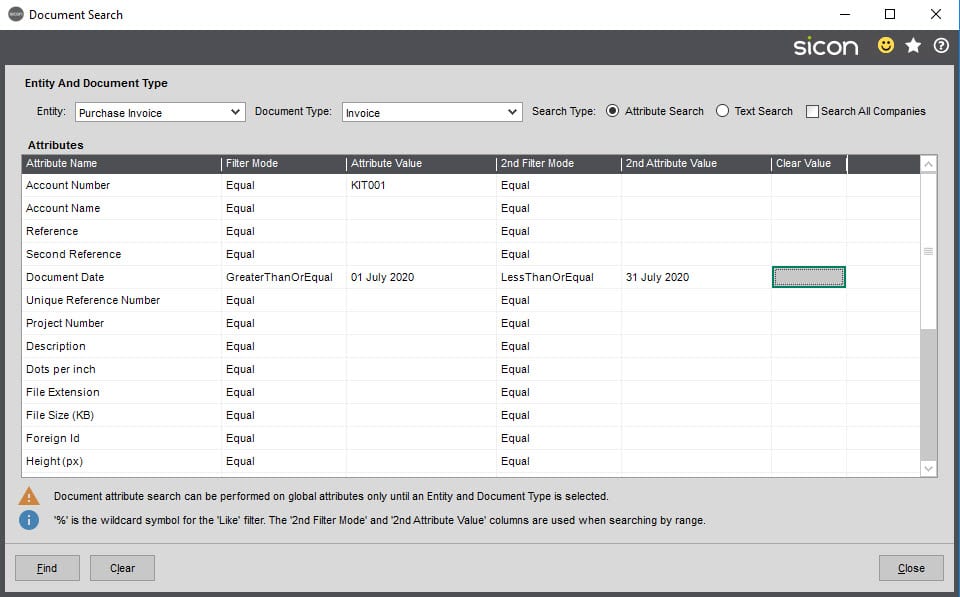
Select the Entity and if applicable, the Document Type form the drop-down list. It is possible to search either against a particular Attribute, e.g. Supplier Account code, or change to Text search and then start typing, e.g. a supplier name. Clicking Find without entering a value against an attribute will return all documents indexed; this could result in a long search time once many documents have been added onto the system. Multiple search filters can be used, for example in the search below all Purchase Invoices for Kitchen Builders with a document date between 1st July 2020 and 31st July 2020 will be returned.
It is also possible to perform the search across all of your Sage companies (via the check box in the top right-hand corner), if you are unsure which database holds the document that you are looking for.

9.2. PL Transactions with No Documents
Select ‘Enquiries’ and then ‘PL Transactions with No Documents’ from the side Sicon Documents menu.
It is possible here to select a particular supplier, transaction type (e.g. invoice or credit note) and date range to show all transactions where no document has been attached.

Once transactions are listed, it is possible to add documents directly onto the invoice; once added, the document can then be viewed. If the search is run again, the invoice which has had a document attached will no longer be visible.
9.3. POP Orders and Returns with No Documents

It is possible here to select a particular supplier, transaction type (e.g. purchase order or purchase return) and the date range to show all orders or returns where no document has been attached.

Once transactions are listed, it is possible to add documents directly onto the purchase order; once added, the document can then be viewed. If the search is run again, the order which has had a document attached will no longer be visible.
9.4. POP Receipts and Despatches with No Documents

It is possible here to select a particular supplier, transaction type (e.g. Purchase Order or Purchase Return) and date range to show all receipts or despatches where no document has been attached.

Once transactions are listed, it is possible to add documents directly onto the receipt; once added, the document can then be viewed. If the search is run again, the receipt which has had a document attached will no longer be visible.
10. Document Automation
Please Note: This is additional functionality at an additional cost. For more information, please contact your Business Partner or refer to our price list.
With Sicon Document Automation, you can take a document that you have electronically, and scan it within Sage so that information is extracted automatically, saving you having to key in the information manually when posting. This saves time and reduces the risk of human errors in the input process.
For more information on Sicon Document Automation please see the Help and User Guide versions below.
Sicon Document Automation v2 Help and User Guide Sicon Document Automation v1 Help and User Guide11. Tools
11.1. Split PDF

This tool will split a multi-page PDF document into single PDF files per page. This can be useful if a supplier sends one PDF containing multiple invoices. If a PDF has 10 pages, then once split, 10 individual PDF documents will be created once split.
Select a PDF file to split and then with the Output file, enter the location for where the documents will be created once split. Use the Browse buttons to find the correct location.

12. Document Distribution
With this feature, you can create email templates to facilitate efficient emailing of documents using Outlook from Sage to the relevant customer/supplier contacts. Using the existing functions in Documents, these documents can be automatically archived against the relevant order/document type.
The standard document types where this can be configured are:
- Customer Statements
- Purchase Orders
- Purchase Returns
- Sales Credit Notes
- Sales Invoices
- Sales Order Acknowledgements
- Sales Order Goods Despatched Notes
- Sales Orders
- Sales Proformas
- Sales Quotations
- Supplier Remittances
- Customer Debtor Collection Notices (requires Sicon Debtor Management)
- Contract Renewal Reminders (requires Sicon Contracts)
12.1. Distribution Setup
In order to configure this functionality, there are two screens that require configuration. You can also configure information against a stock record if you would like additional documents to be added to emails that relate to orders containing that stock item.
Within the Documents Settings screen, there is a Document Distribution tab. In here you can configure whether you want to merge letterheads and terms and conditions with each of the relevant document types. You can also configure which contact role should be used to determine the recipient of the email, and whether the email will be sent immediately or created in your Outlook drafts folder.
The second step is then to customise the email templates associated with each document type. This is done via the Email Templates screen.
Once you have configured these two screens, then you are ready to use this functionality for the relevant document types.
If you wish to attach additional documents relating to particular stock items that are on the order in question, then you can configure additional documents to be attached to the email templates against the specific document type. In the screenshot below, you can see that there is a product specification document available on this stock item, this was added to the stock item in the normal way via the Add Docs button.
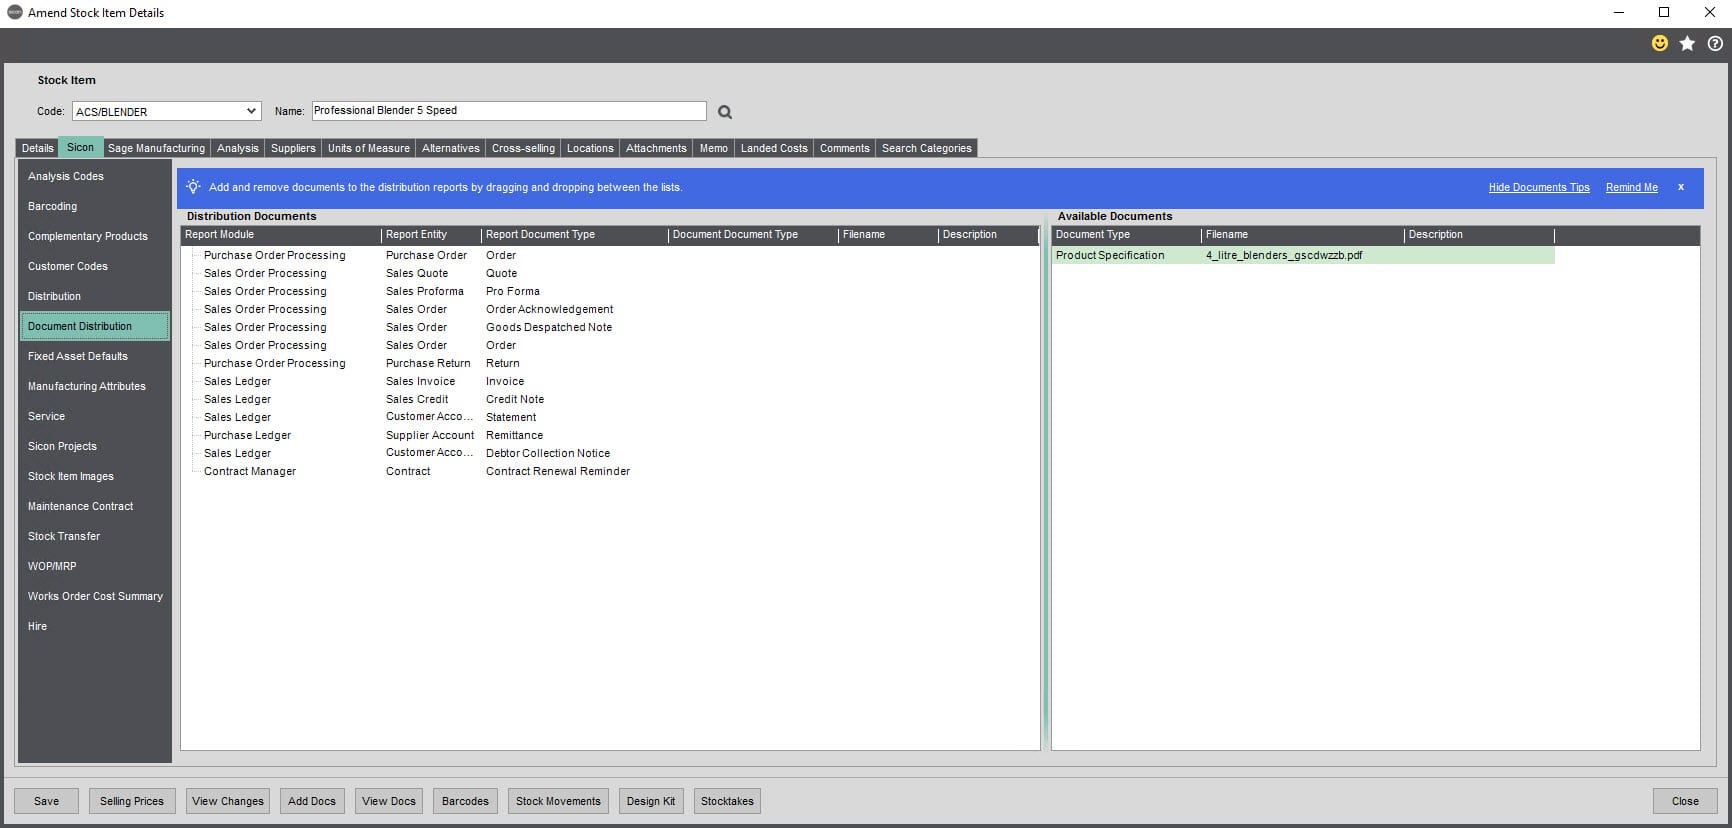
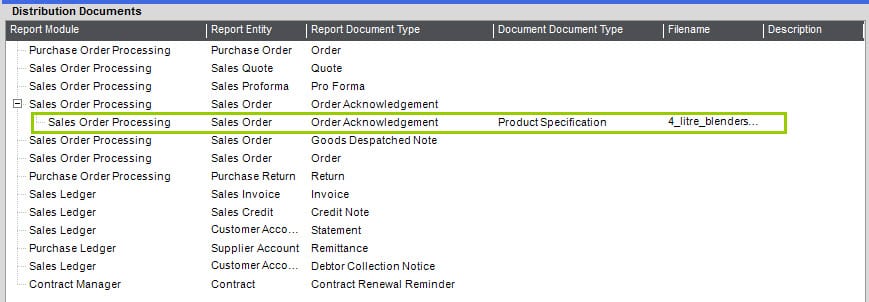
If you then wanted this document added as an attachment to all emailed Order Acknowledgements, then you would just drag this across into the window on the left and drop it onto the order acknowledgement line. This would then create an expanded line that would display this information in the window on the left. In this way, you can drop the document onto different document types, as well as being able to drop multiple documents onto the same document type.
12.2. Sending emails using Distribution
For the document types mentioned previously, a new Email & Archive button has been added to the relevant screens where this document type would be printed.
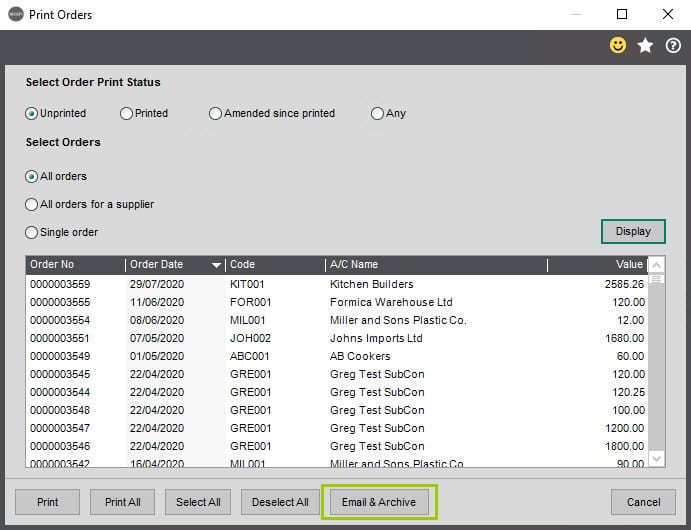
Using this button instead of the regular Print button will then merge the generated document with the email template (including any letterhead and terms and conditions document), and also archive the document against the relevant entity as if you had added the document yourself.
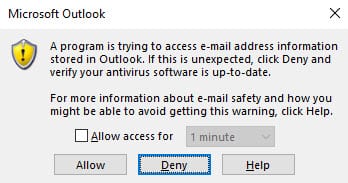
Depending upon the configuration of your Outlook client, you may see the following warning message. You can click Allow access for up to 10 minutes using this window. If you would like to prevent this message from appearing, then guidance can be found here: –
13. Documents with Disputed Invoices
Sicon Documents adds some enhancements to the standard Sage 200 Disputed Invoices processing. This enables you to add documents to invoices that are currently under dispute, but to also flag existing posted transactions as being under dispute. This enhances the standard Sage functionality by allowing you to record the dispute code and enter a comment against this.
Note that Sicon Documents uses a query code of ‘D’ against purchase invoices to reflect that they are under dispute. It is strongly recommended that you do not have any existing invoices under this same dispute code when you first install/upgrade Sicon Documents. Please speak to Sicon Support if you want to discuss this further.
13.1. Adding a Document while Disputing Invoice at Time of Recording
If an invoice is being marked as disputed when recorded (i.e. with the Sage setting enabled to use disputed invoice processing), it is possible to add a document when entering dispute details.

Against the Purchase Ledger Supplier account a new tab will show ‘Disputed Invoices/Credits’ where individual invoices will be listed and show any attachments; if the user has permission they will be able to view the document or attach new documents.

It is also possible to view these documents through the Disputed Invoices screen.

If the disputed invoice is accepted, the document attached originally will post through to the invoice.

14. Documents with Sicon Construction
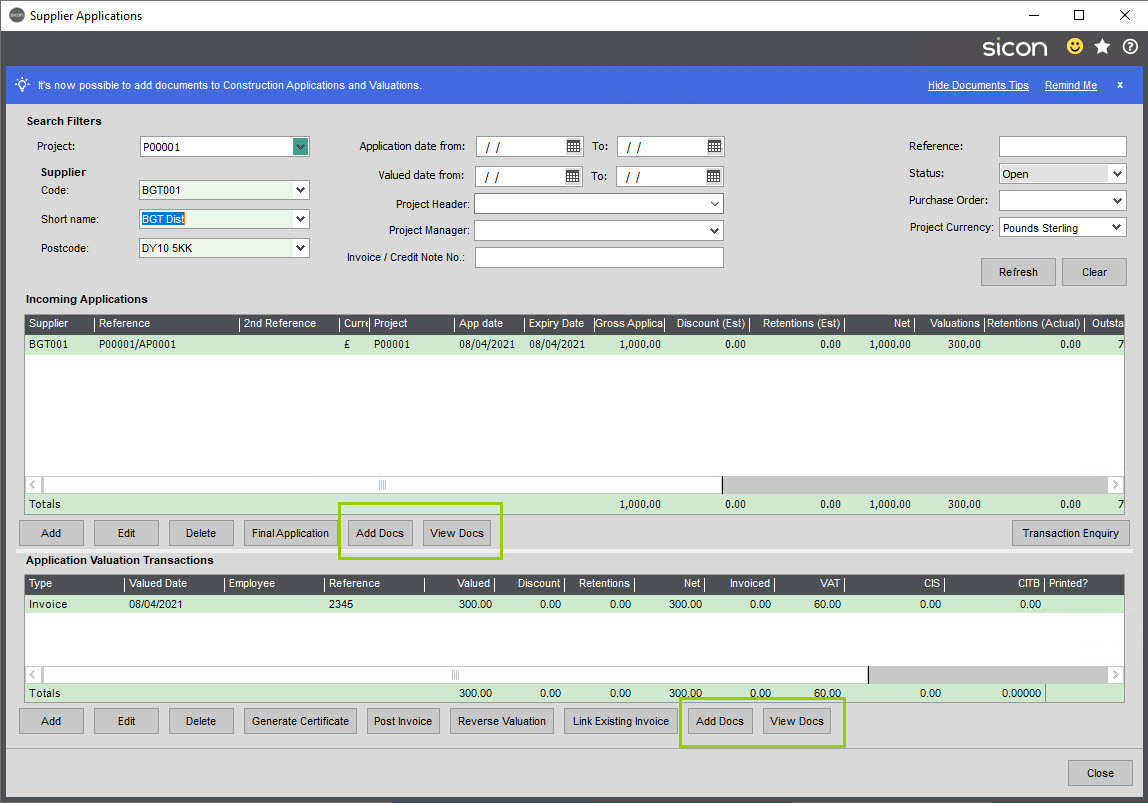
Documents can be added on both supplier and customer applications, valuations and retentions and also Construction Purchase Orders.


15. Documents with Sicon Contracts
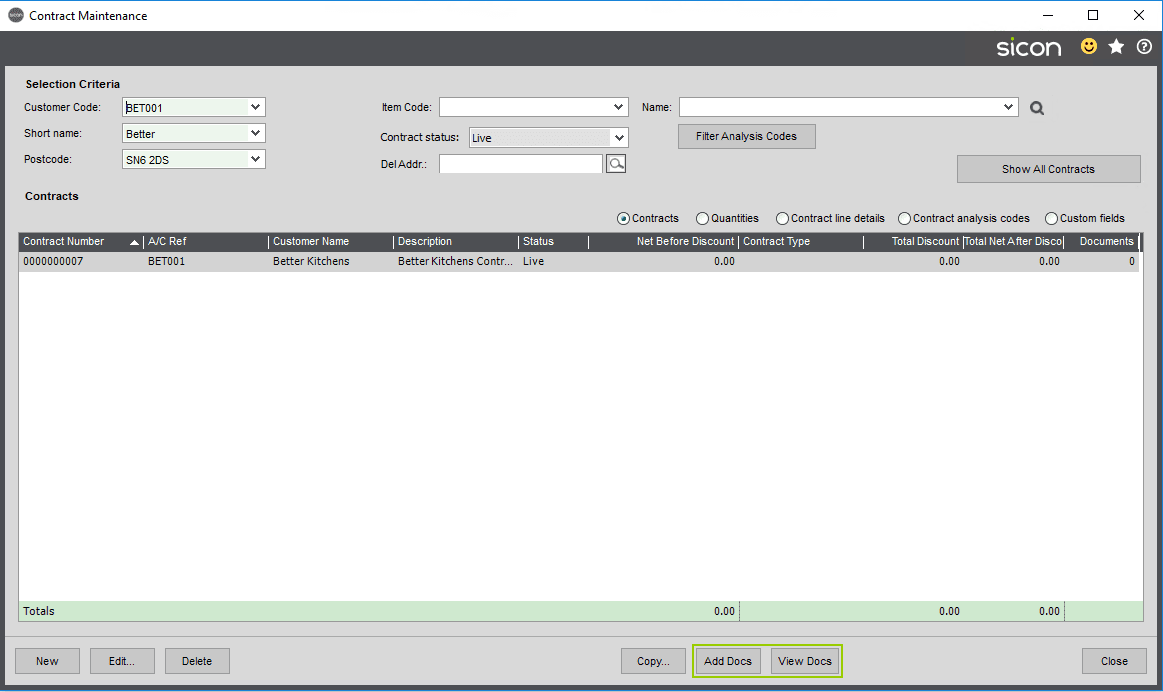
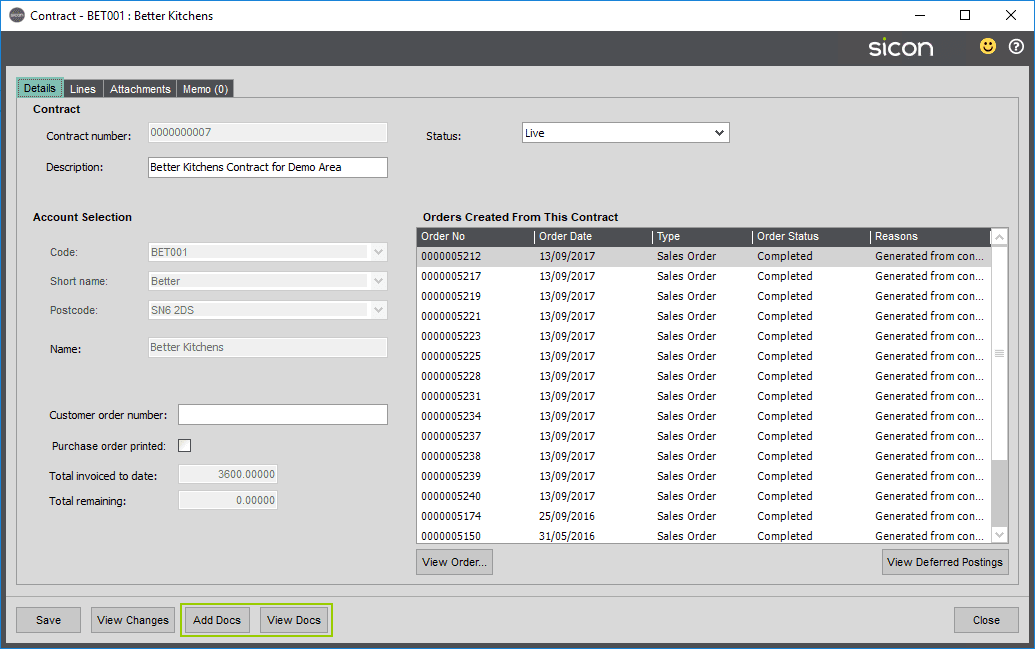
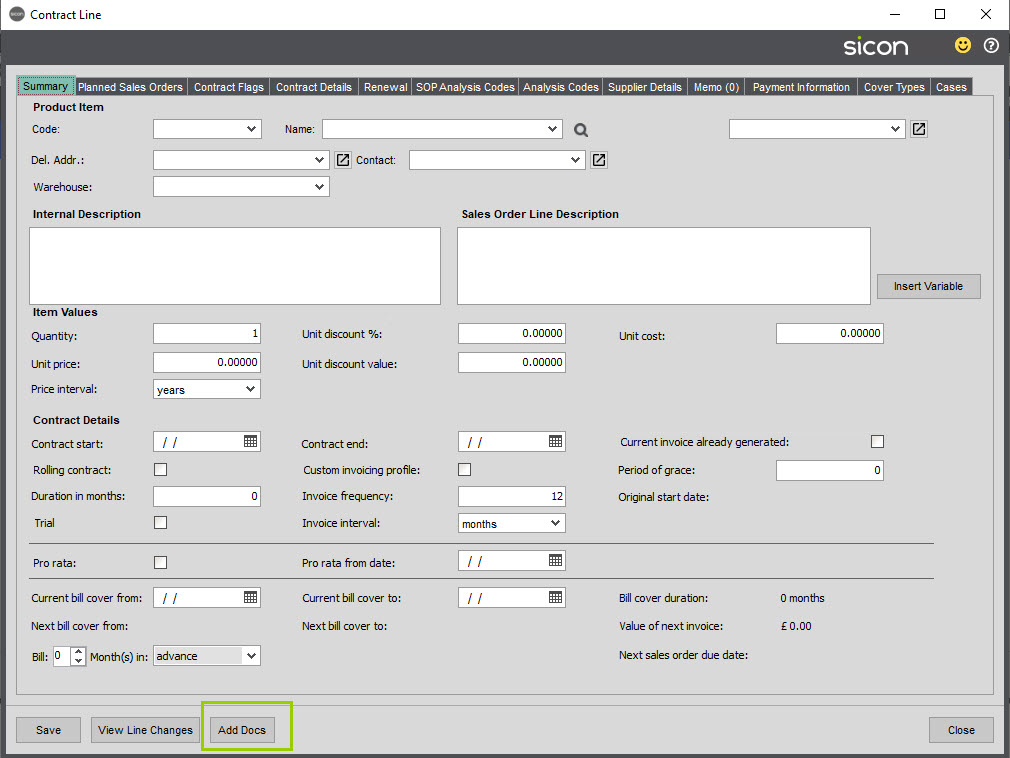
Documents can be added against contracts and contract lines.
16. Documents with Sicon CRM
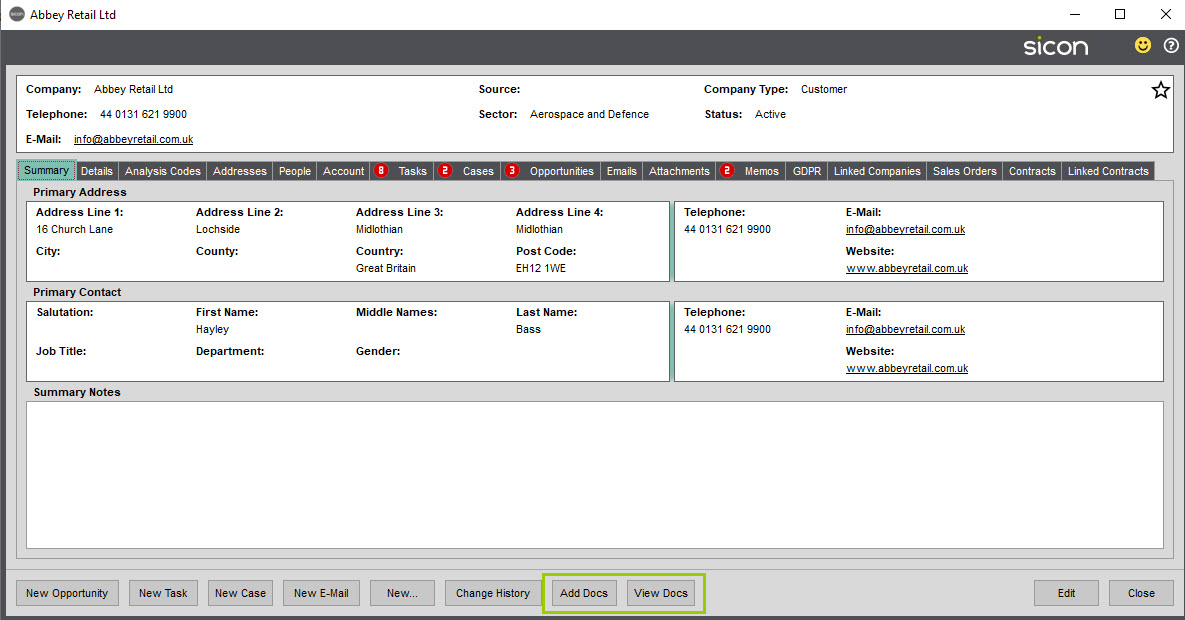
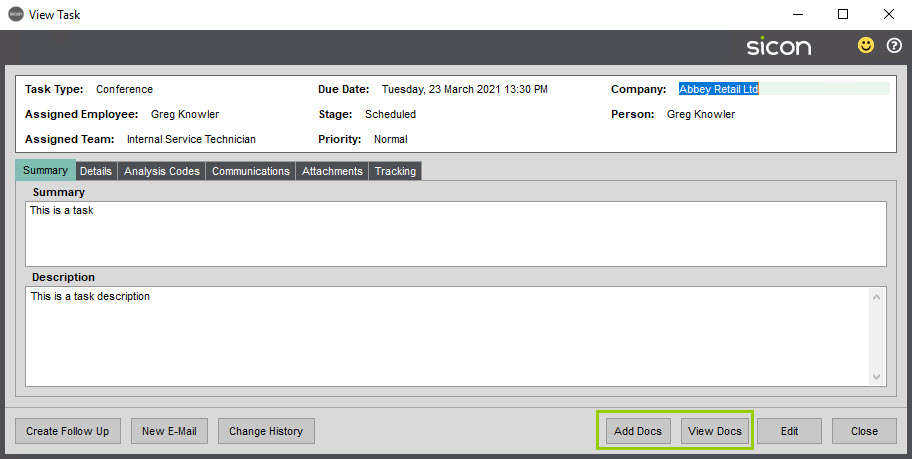
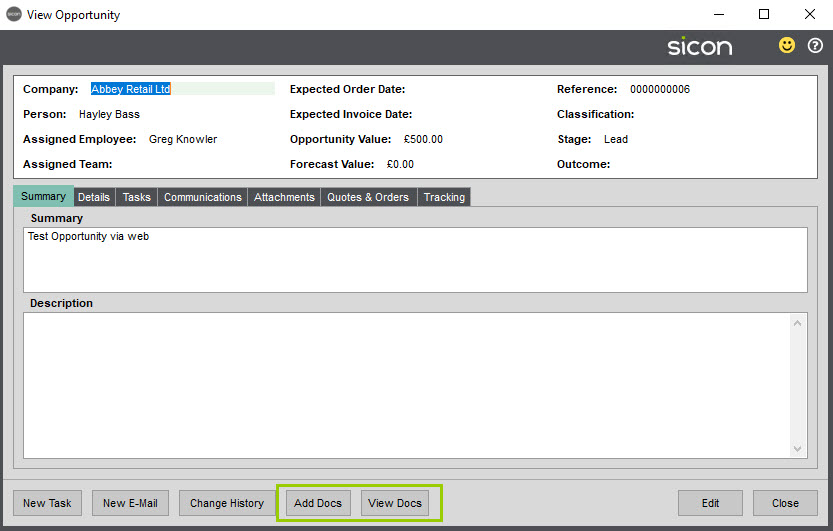
Documents can be added to Company, Person, Task, Opportunity or Tender records.


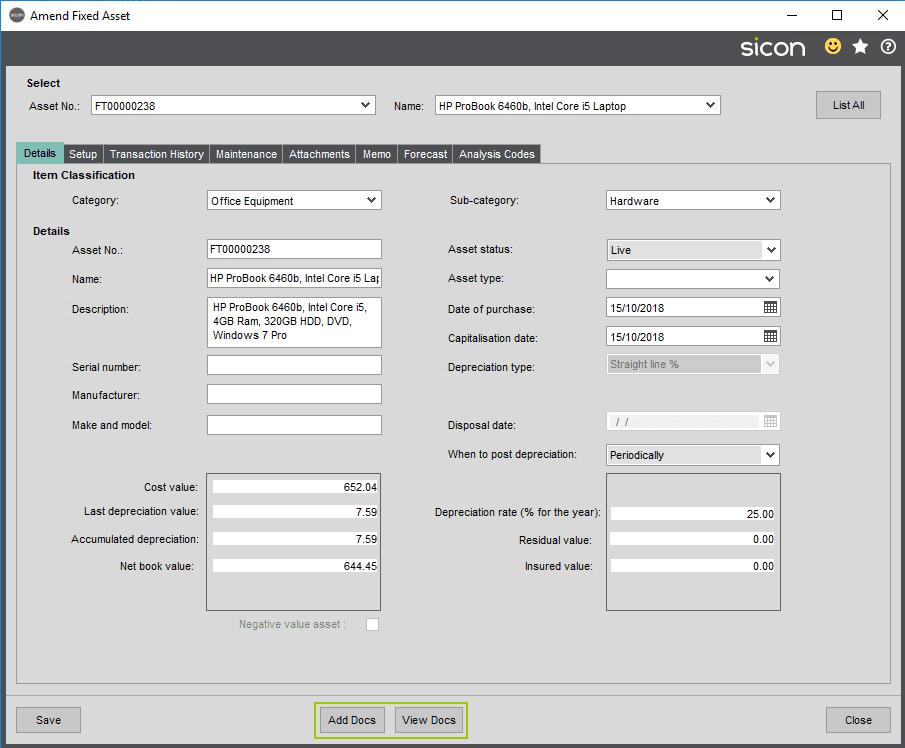
17. Documents with Sicon Fixed Assets
Documents can be added against a fixed asset, either when initially adding or when amending an asset.
18. Documents with Sicon Hire
Documents can be added against a hire order, or against lines on the hire order.


19. Documents with Sicon Projects
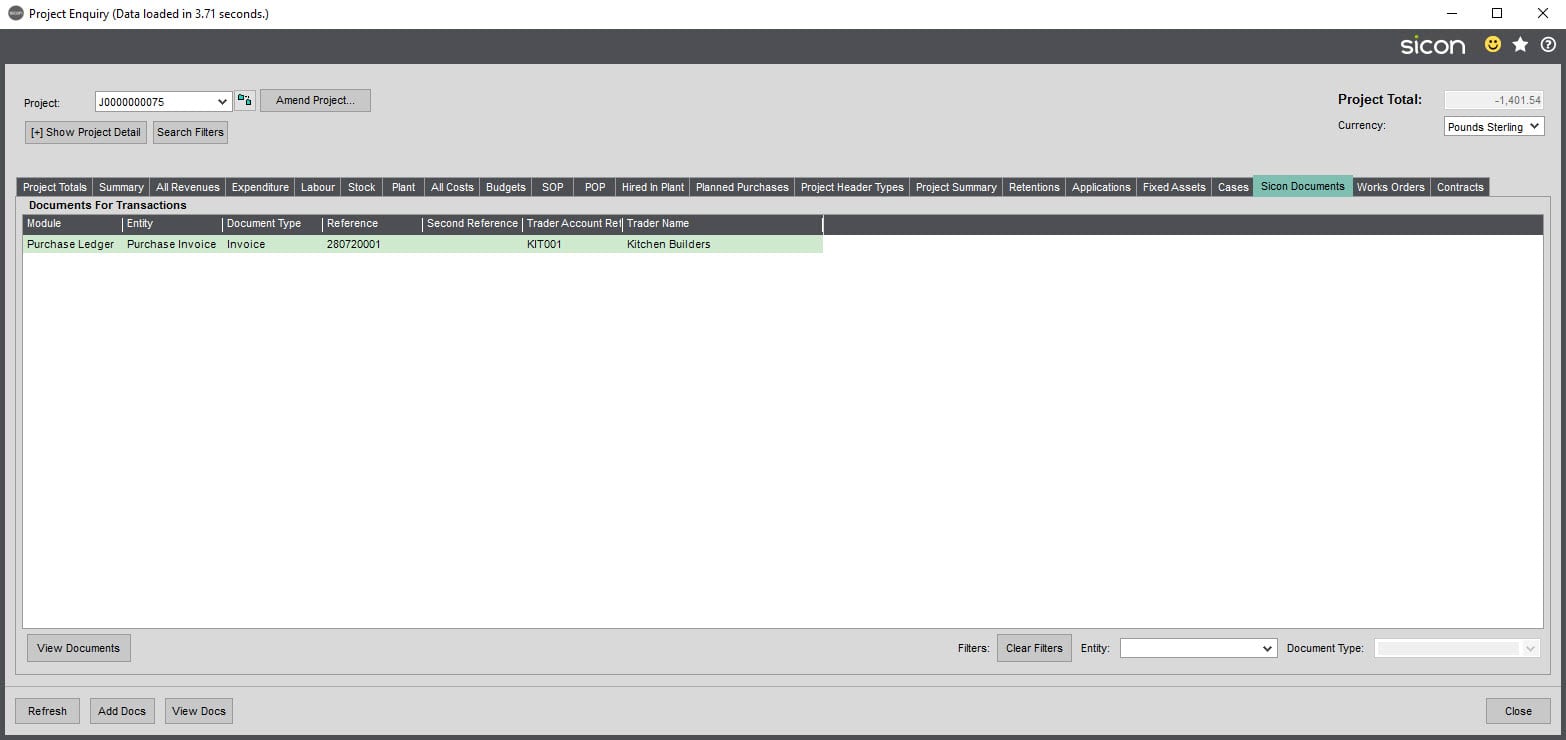
Documents can be added against a project; NB documents can only be added against the project once it has been initially created.
Documents can be viewed against a project by using the option to view the Project Enquiry and then the Sicon Documents tab.
20. Documents with Sicon Service
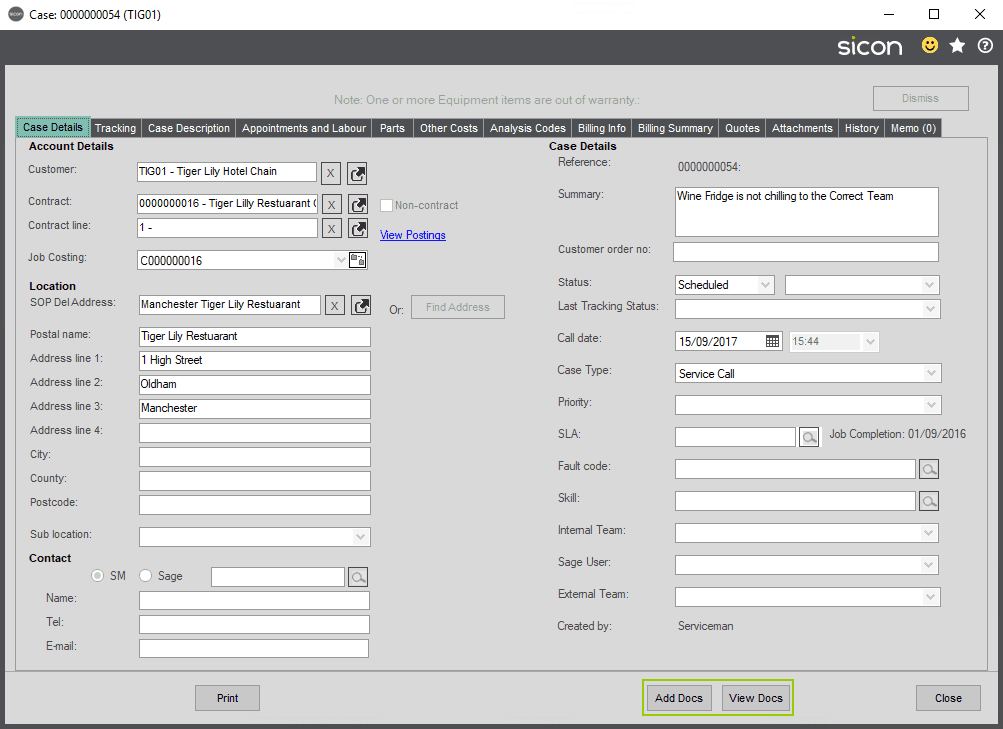
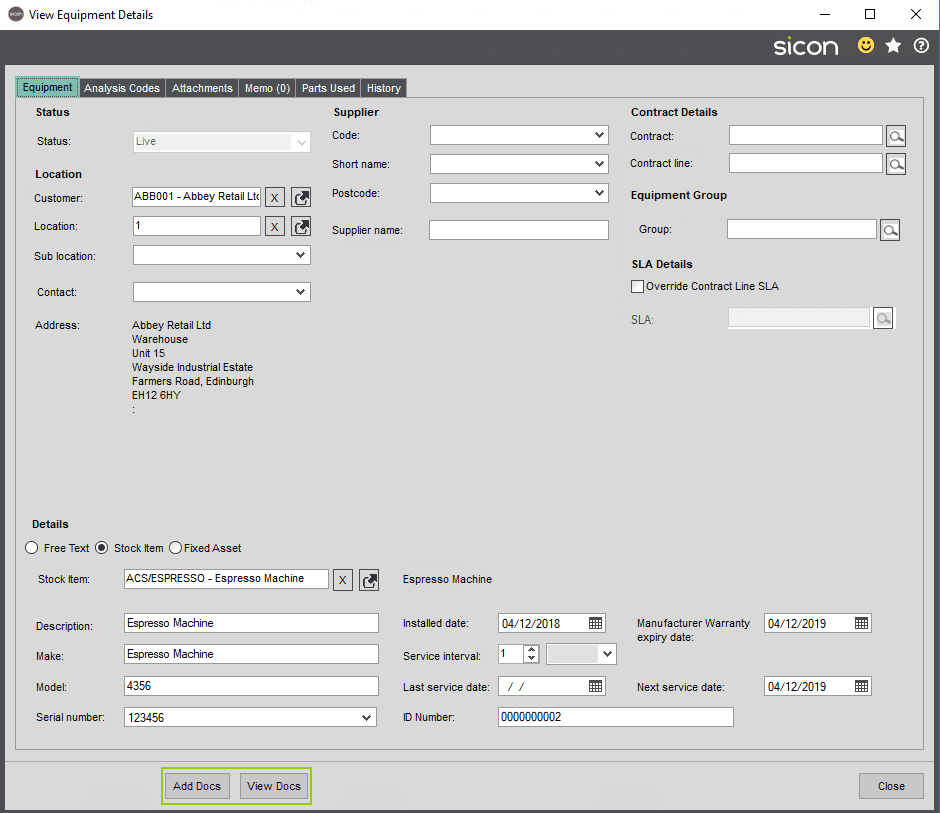
Documents can be added against a service case; either when viewing or amending, or against equipment.
21. Documents with Sicon Common Components
Documents can be added against a Sicon Employee record; either when creating a new employee or amending an existing one.

22. Documents with Sicon Works Order Processing
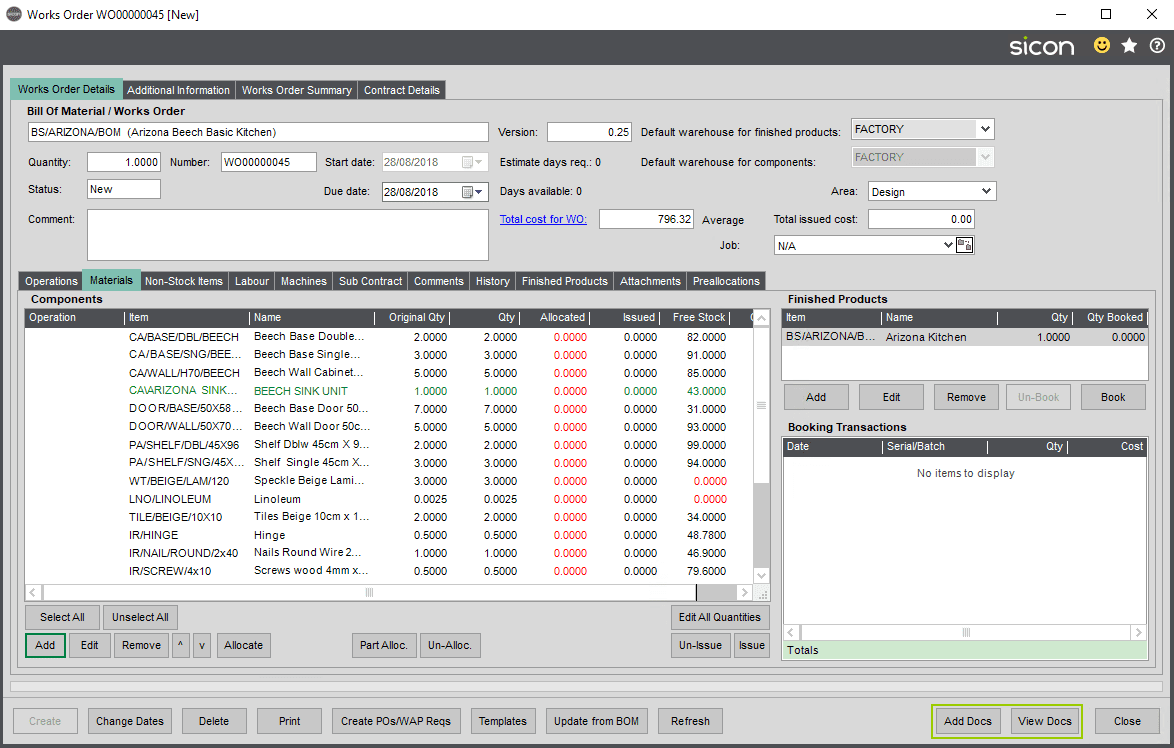
Documents can be added or viewed when amending a works order.
23. Documents Location
Documents can be added or viewed (permission dependant) in the below locations.

Cash Book
Bank Account
Bank Statement
Bank Payment
Bank Receipt
Construction
Customer Application
Customer Valuation
Supplier Application
Supplier Valuation
Construction Purchase Order
Construction Customer Retention
Construction Supplier Retention
Contract Manager
Contract
Contract Line
CRM
Company
Person
Task
Opportunity
Tender
Fixed Assets
Fixed Asset
Hire
Hire Order
Hire Order Line
Nominal Ledger
Bank Payment
Bank Receipt
Nominal Transaction
Projects
Project
Purchase Ledger
Purchase Invoice
Purchase Credit
Purchase Payment
Purchase Receipt
Supplier Account
Purchase Batch Invoice
Purchase Batch Credit
Purchase Rapid Invoice
Purchase Order Processing
Supplier Account
Purchase Order
Purchase Return
POP Received Notes
POP Returned Note
POP Invoice Dispute
POP Credit Note Dispute
Sales Ledger
Sales Invoice
Sales Credit
Sales Receipt
Sales Payment
Customer Account
Sales Batch Invoice
Sales Batch Credit
Sales Order Processing
Customer Account
Sales Order
Sales Quote
Sales Proforma
Sales Return
SOP Despatched Note
SOP Returned Note
SOP Tax Only Invoice
SOP Tax Only Credit Note
Service Manager
Service Manager Case
Service Manager Equipment
Sicon Common
Sicon Employee
Stock
Stock Item
Traceable Item
Works Order Processing
Works Order
24. Enable Module
This module will automatically be enabled for a 30-day trial period from the date of installation. After this period, a new module enable string must be entered for continued use of the module.
To enter a new enable string, open the Settings screen from the Sage Documents menu. Select the Licence tab and paste the module enable string provided by Sicon Customer Services, then click the Save button.
A separate enable string can be entered for Document Automation, but this is not required if you are using a Test bundle.

25. Release Notes
The release notes page shows which release of the system includes new features or issues resolved.
At the release of Sicon v21 we announced that going forward, we will only be supporting Sage 200c and as such we are able to drop the year from our version numbers. We moved from 201.201.0.0 to 210.0.0.
New features detailed in the Release Notes relating to Pre-Release versions will not be detailed in the current Help and User Guide until the end of development phase.
Sicon Documents Release Notes