Hire Help and User Guide v17
Hire Help and User Guide will take you through the features and settings for the Sicon Hire module for Sage 200.
Search the page by pressing Ctrl + F (windows) or CMD +F (Mac) on your keyboard.
Back to all user guidesProduct overview
Help and User Guide maintained for Hire version 201x.17.0.0 up to 17.0.32
The Sicon Hire Help and User Guide will take you through the features and settings for the Sicon Hire module for Sage 200.
Integrated with Sicon Fixed Assets, Sage 200 Stock and Order Processing Modules. Designed to manage the requirements of hire organisations needing to create hire documentation, schedule equipment, control pricing and generate one off or periodic invoices for the items on hire
1. Pre Requisitions
The Sicon Fixed Assets module will need to be enabled on relevant user’s roles, and at a minimum Hire Asset Categories and sub categories along with associated default nominal codes should be created before you can start using Sicon Hire, as the hire items added to hire orders, are hire items associated with a Sicon Fixed Asset Categories and sub categories Hire
If you buy in equipment (stock items) to Hire out, or if you manufacture/build the items to hire out you will need to also need to ensure that those items are either in Stock, (standard sage 200) ready for you to (from within Sicon Hire) Issue Stock to Fixed Assets , which in turn will make them available to Hire OR if you do not buy in or manufacture/build that you have manually added Fixed Items, flagged them as a Hire Item and flagged as available hire.
2. Configuration and Settings
The Next step (s) are
Review , configure and set various options / defaults within Configurations & Setting ( As with Sage 200 there are very few that cannot be changed after initial set up, if during testing and usage its deemed necessary to change)
Review , configure and set various options / defaults within Maintenance for elements that are used during the Sicon Hire order processing such as:
– Hire Order Types (for analysis)
– Customer Specific Contacts
– Locations
– Examination Types (for when assets are received back after hire and need to be checked
before going back out on hire)
– Additional Charges (Such as carriage / delivery, these can be unique to Sicon Hire or can be
linked using Sop additional charges)
– Bank Holidays (Required if your company does not charge for hire for bank holidays)
– Price Bands (if pricing is depending on Qty of hire units)
– Price Bands specific to customers
– Sub category defaults and Nominal (overrides for revenue where you would like sales to be posted
to different nominal accounts/cc & dept.’s based on stock warehouse )
- Within SOP settings ensure Auto Numbering is switched on
- Service Items are set as ‘confirmation not required’ and
- Within SOP/User Permissions users have ‘override default confirmation not required for service items ticked’
- Within ASM a designated Analysis code field for SOP orders which Sicon Hire will use to transfer the Hire Order number on the Sales Order
One the above steps have been taken you can then begin to add hire quotes, orders and start to process through the system
The next few sections will take you through the configurations, settings and maintenance as above.
3. Configurations & Utilities - IMPORT(s)
Using the templates provided by Sicon you can import
Hire Orders and / or Sub Categories, Price Bands, Price Bands for Customers and if you are wishing to mark existing Fixed Assets as Hire Assets there is a ‘Hire Assets Import Details Import’ which is used to flag assets as Hire Items.
To create your data in the correct format, select the ‘Example Import File button’ which will provide you with to create the correct formatted spreadsheet (also an example csv). Once the templates are prepared and saved as a .csv, the import routine can be run.
Select your prepared .csv file from your saved location by clicking on the ‘…’button, then click ‘Check File’
The file will be then validating for any errors, display the lines to be imported, with any lines containing errors highlighted in red, with details explaining the problem.
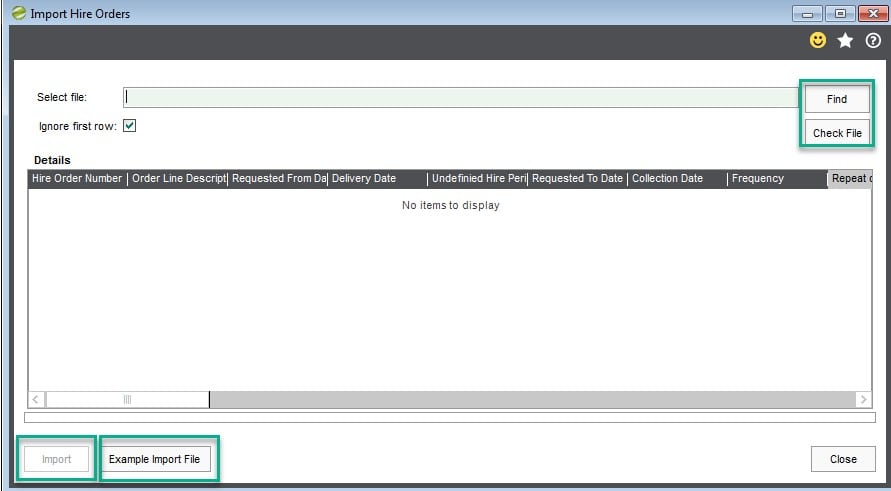
Any errors should be corrected on the original template or within Sage if error is within Sage (for example nominal code does not exist), saved as a new .csv and import routine run again.
As long as there are no errors, click Import (bottom left of screen). The relevant import records will then import
It’s important to note that going forward when upgrades take place if you wish to use the import routine to Import Hire Orders that you should always use the ‘Example Import File’ within the module being used, not a keep one from previous versions, as it’s possible that the format of the file may be different
4. Configuration & Utilities - ENABLE MODULE
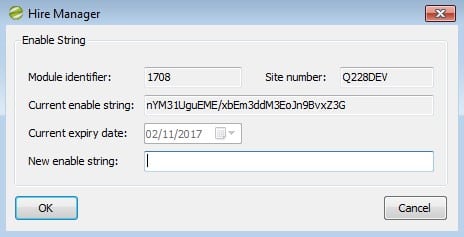
When the module is first installed it will be installed with a temporary enable string, the enable string includes encrypted information including your sage licence number (specific to customers site/Sage 200 system), expiry date as to when the module/licence will expire.
To enter the extended licence, enable string, go to Utilities; Enable Module. Copy and paste into the blank New Enable string field, click Ok and the Current expiry date would have been incremented by the period encrypted within the new enables string issued.
5. Configuration & Utilities - SETTINGS
One of the key areas of the module and one of the first steps for review, discussion and completing is the Settings. This is where you set the rules which in turn determine how the module works in certain areas. There are nine tabs all of which should be reviewed, but not all require changes from the defaults. Each Tab is explained in detail below:
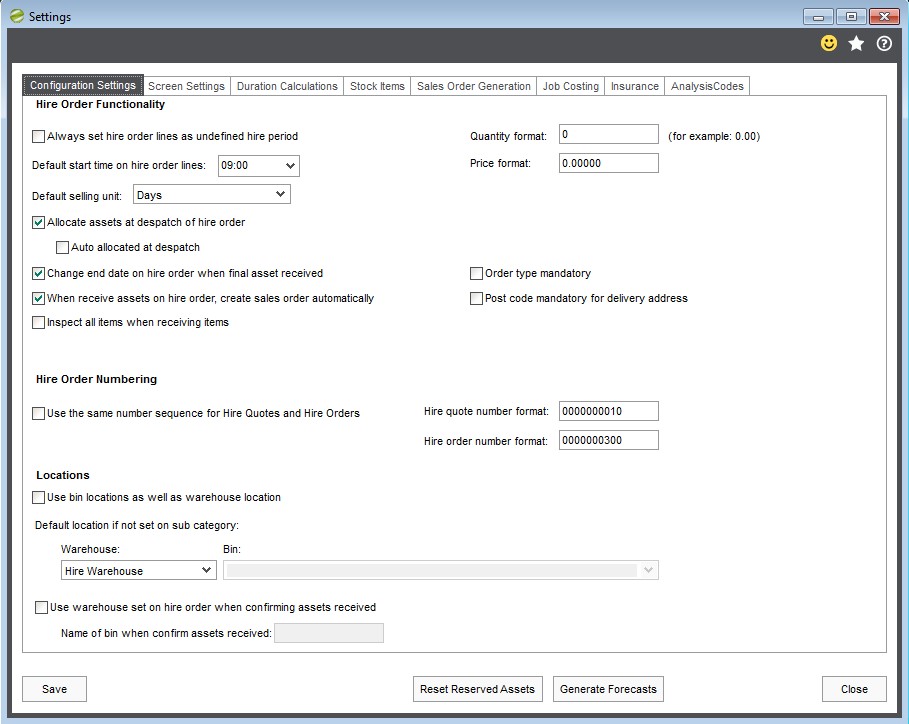
5.1. Configuration Settings TAB
Always set the sales order lines as undefined hire periods: Tick if your Hire Quotes/orders periods are ‘undefined’ with no known end date (If set then when adding a hire order when entering a start date, there will be no end date field, but a box with a tick in confirming undefined end date, this can be unticked at point of entry)
Quantity Format: Specify your quantity format for example if you only use whole quantities, enter 0 (as per screen shot above)
Price Format: Specify your price formatting from a decimal point perspective
Default start times: If you have a default start times for a day’s hire, enter defaults here to save users entering the same info every time
Default Selling Unit: Linked to Duration Calculations, set a default if you the majority of the time if you hire by Hours; Days; Weeks etc. – this save users entering the same info every time
Allocate assets at despatch of hire order: Tick if Yes. The alternative is for the system to automatically allocate at time of entering the order (not advised if using serial numbers or if you need control of which Hire Fixed Assets you are hiring out)
Auto allocated at despatch: If the above option is ticked , you can choose for the system to automatically allocate at time of despatch, not advised if using serial numbers or if you need control of which Hire Fixed Assets you are hiring out)
If ‘Allocate assets at despatch of hire order is left un-ticked’ then this 2nd option is greyed out
Change end date on hire order when final asset received: When entering a quote/order you have the option of entering a hire end date. If the goods are received back off hire earlier than the original set ‘off hire date, then by ticking this option, the system will change the ‘end date on hire order’ automatically
Order type mandatory: If within the Maintenance section of set up, you have created Hire Order Types , then you may wish to force your users to always select . If this is your preference tick this ‘Order type mandatory box. (Order types could be used for example to analysis the types of company ordering)
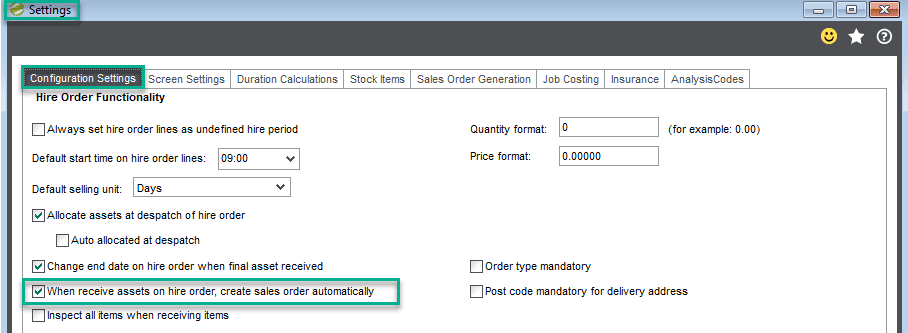
When receive Assets on Hire Order, create sales order automatically: When assets are received back off hire with this feature enabled you will be prompted to generate the sales order at the point in time. If not enabled sales orders are generated from within the ‘Generate Sales Orders’ menu from within the ‘Order Processing’ menu option
Post Code Mandatory for delivery address: If for layouts and reporting you wish to ensure users always enter a post code into the ‘Postcode’ designated field, then tick this box
Inspect all items when receiving items: Enable if as standard all items when received back are to be inspected before becoming available for hire again. Against each sub category when created defaults can be un ticked for that individual sub category if required
Hire Ordering Numbering: Tick if your hire quotes and hire Orders numbering are to run in sequence, if un ticked
Use Bin Numbers as well as Warehouse Location: If you as a company use Bin Locations, and wish to also for hire assets, enable this feature
Default Locations if not set on category: Preferably you would set the location of the hire asset at sub category level (rather than using the warehouse location of the stock item), use this feature to default which Location (warehouse) to use if no default has been set on a Sub category
Use Warehouse Set on Order when confirming assets received; If enabled when receiving hire items back, it will allocate them to the same Location (warehouse) used on the hire order line
Name of Bin when confirming assets received: When receiving hire items back, it will allocate them to the default Bin as stated here.
Reset Reserved Assets: When selecting assets on order entry (allocate assets when entering order, not at despatch), then when an asset has been selected but the order has not been saved, then the asset is reserved first. When the order is saved, the reserved flag is reset and the asset allocated. If something happens, i.e.: sage crashes, then there will be assets reserved but not allocated.
Using this button/feature will clear these reserved assets
Note: The reason that we reserve assets is so that the assets do not get taken by other users.
Generate Forecasts: Only to be used when upgrading from an older version of Sicon Hire and therefore there are no forecasts for the hire order lines
Using this button/feature will generate forecasts on order lines where no forecast exist.
Note: Can also be generated individually on a hire order line
5.2. Screen Settings Tab
Configurations set on this tab determine if certain fields appear on the screen when adding a hire quite / hire order.
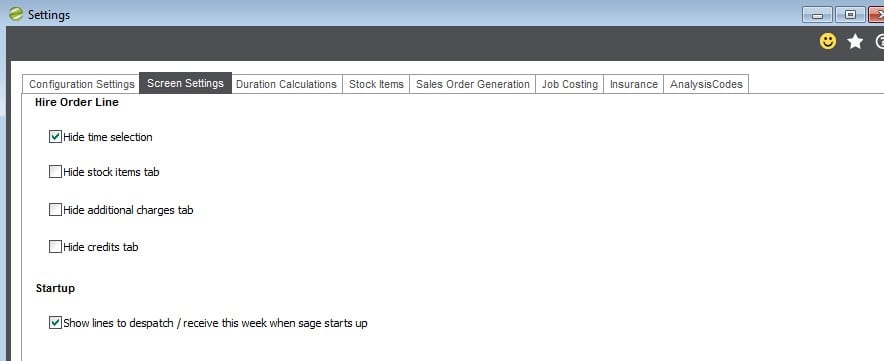
Hide time selection: If you do not wish to record a Hire day start time, enable to hide
Hide stock items Tab: If you do not add stock items on to hire orders, enable to hide / If however, you for example hire out carpet cleaners, and you sell the customer carpet cleaner liquid to go with the hire, you can add the carpet cleaner liquid stock code on to the order and charge out on the sales order along with the hire period itself.
Hide additional charges Tab: If you as a company do not charge for additional items such as carriage, or charge for additional items then enable this feature.
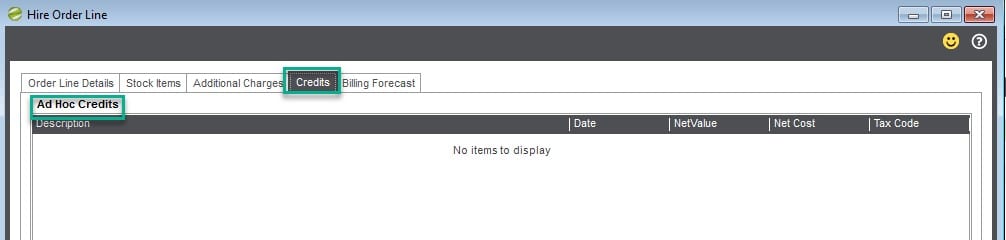
Hide Credits Tab: Within Sicon Hire there is the function to create an ad-hoc credit against a hire order line, this may be useful if over charged, and would prefer to have the credit note linked on the hire order, rather than raise a manual SOP sales return. If you do not wish to use this function and would prefer users to also raise credits from within standard sop sales return functionality, tick this box, and the Credits Tab, as shown below will be hidden.
Start-up: Show Lines to despatch / receive this week when sage starts up: (This feature is available only for Sage 200 2016 onwards). If enabled, and if the user opening Sage 200, at start-up of Sage 200 itself a ‘Visual only’ / warning screen will automatically appear.
This is just to remind you that there are either lines that need receiving back, this week or despatching this week.
The user would then use the red ‘X’ in top right hand corner to close the screen, and then use either the ‘Confirm Hire Order Despatched’ or ‘Confirm Assets Received’ process from within Order processing.
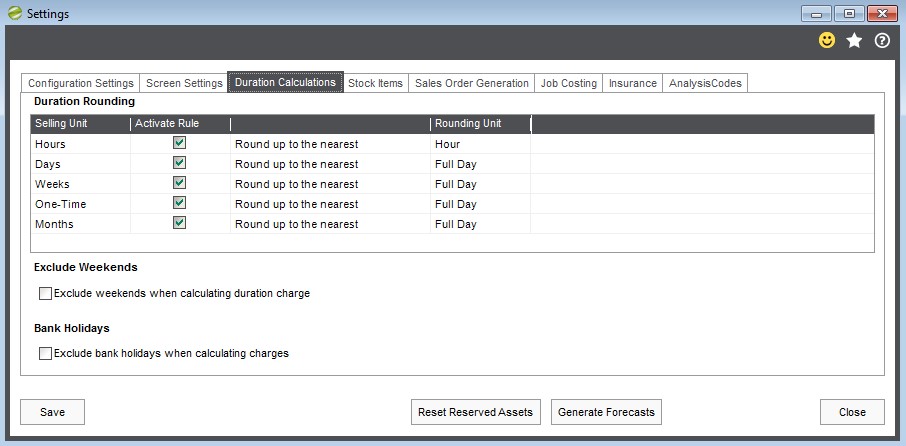
5.3. Duration Calculations TAB
Where you set the frequency of your hire period.
As default the system is set with Hours, Days and Weeks, but in this example we only use Days and Weeks, you can also configure rounding Units with regards to hire period rounding up.
5.4. Stock Item TAB
Specify your default Sage 200 standard Internal Area to be used.
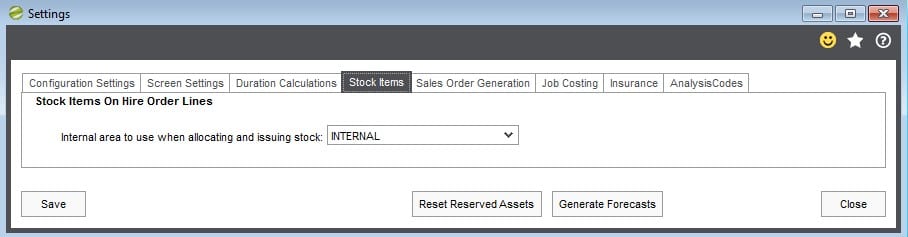
This is used for when using the option to add standard stock items to a Hire Order/Quote. Nominal postings (where applicable) will be made using the nominal codes associated with the standard sage 200 Internal Area defaulted here.
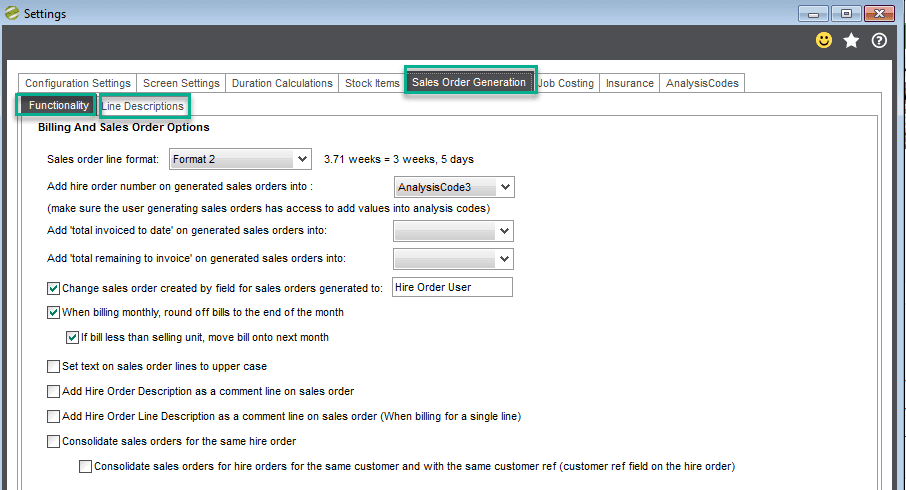
5.5. Sales Order Generation TAB
Settings here determine amongst other things which analysis codes/fields to use to store information when pushing through to standard sage 200 SOP; Billing formats:
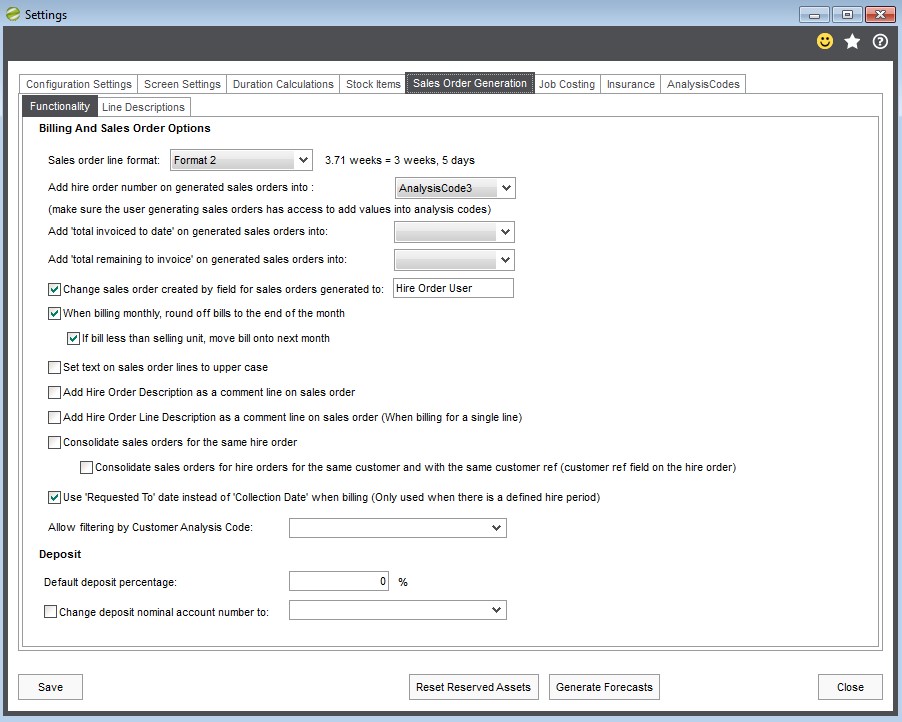
Sales order line format: Selecting from the options on the drop down choose how on the Sales Order/Invoice you would like the Hire period to be displayed. In this example we have selected Format 3/Weeks and Days (example 3 weeks and 5 days) other options include Days (example 26 days), Weeks with Decimal places (example 3.71 weeks= 3 weeks and 5 days) and Initial Weeks hire plus days (example 1 week and 19 days)
Add hire order number on generated sales order lines: Select / Specify which SOP Analysis Code for which to populate the Hire Order Number
If using SOP Analysis codes to push through from the Hire Order line certain information so it appears on documentation such as invoices, customer sop reports, visible within sop list views, or simply to be stored on the sales order you will need to set within ASM and SOP Maintenance the relevant Analysis code fields and make sure user permissions are set.
Add ‘total remaining to invoice’ on generated sales orders into: Select / Specify which SOP Analysis Code for which to populate the ‘total net hire value remaining to invoice’ for this hire order line – This information is only available if you have used the ‘Billing Forecast’ function on a sales order line, as its only when the forecast is run that forecast total values are populated
Add ‘total Invoiced to date’ on generated sales orders into: Select / Specify which SOP Analysis Code for which to populate the ‘total net hire value invoiced to date’ for this hire order line – This information is only available if you have used the ‘Billing Forecast’ function on a sales order line, as its only when the forecast is run that forecast total values are populated
Change sales order created by field: As Standard, when an order is generated in SOP, the order is stamped in the Order Taken by field with the name of the person entering the order. If you prefer the Order Taken by to be specific to Sicon Hire, then you may prefer to tick and give them a name (in our example Hire Order). If un-ticked the Order Taken by on the Sales Order will be populated with the Sage Users Name that Created the Hire Order through to a Sales order
When billing monthly: Tick if you would like the system to round up invoicing to the end of the month (Billing only once a month). If ticked further option regarding ‘less than selling unit’.
If bill less than selling unit: e.g. If billing Monthly and charging weekly and the start date is the 28th, then rather than charge for just 3 days, we roll those 3 days over to the next month on to the next month’s order/invoice
Set Text on Sales Order Lines to Upper Case: This setting is to determine whether the information that’s possible to be pulled through to the Sales order (see 2 options below) from the Hire Order summary and the hire order line is added as UPPER CASE TEXT
Add the Hire Order description as a comment Line on to the Sales Order raised: If enabled the Hire Order Description, (from the front page on the Hire order)
Add the Hire Order Line description as a comment Line on to the Sales Order raised If enabled the Hire Order Line Description, (as screen shot below)
Consolidate Sales order for the same sales order: Where a Hire Order has multiple lines, and you wish to invoice hire periods due to be invoiced, enable this option if you wish to consolidate all hire order lines due on one hire order into one sales order, rather than produce separate sales orders
Consolidate Sales orders for hire orders for the same customer and with the same customer reference (customer ref field on hire order header): This question/setting is greyed out if the previous ‘consolidate sales order question’ is left unticked. But if enabled, then the next setting is to say whether you wish multiple hire orders with the same customer reference to be consolidated on to a sales order when invoicing. If Yes – then enable this feature
Use ‘Requested to Date’ instead of ‘collection Date’ when billing: On a hire order line it may be the hire period for example ends 24th February 2017 (a Friday) but because you cannot collect the hire item until Monday 27th February, then on the hire order line the collection date is 27th February (this meaning the items is unavailable to hire out to anyone else until at least the 27th)
From a billing perspective, regardless of you not being able to collect / it not being available for anyone else until Monday 27th, you will be ONLY invoicing them up to the Friday 24th February (The requested date) enable this setting
Note: This is only applicable if you are entering a start and end date for a hire period on a line, NOT if using ‘undefined hire periods;
Allow Filtering by customer analysis code: When generating sales orders for Hire Order Lines, specify if required which Customer Analysis code is default
Deposit: Only applicable where the hire order lines have been setup as one-off charge lines (known on drop down as One-Time). This is a different way of billing hire orders. Sales orders would be generated from the deposit tab on the hire order. The first sales order is the deposit, the second is the balance of the total hire order value
Important Note: Generate Sales Orders for these types cannot be generated via the generate sales orders screen, they are invoiced from the deposit tab at hire order header level.
Default deposit percentage: Specify if you wish to record a default % rate for calculations, this is on the deposit tab on the hire order
Change deposit nominal account number to: Specify if you wish to record the deposit value to a different nominal code
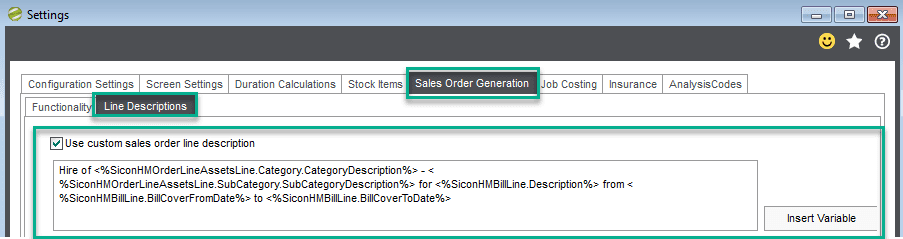
Line Description Tab: Use this feature to default the descriptions that will appear on the sales order lines, there are 3 different options default description options (2nd & 3rd one relates to where you are using the deposit function as described above)
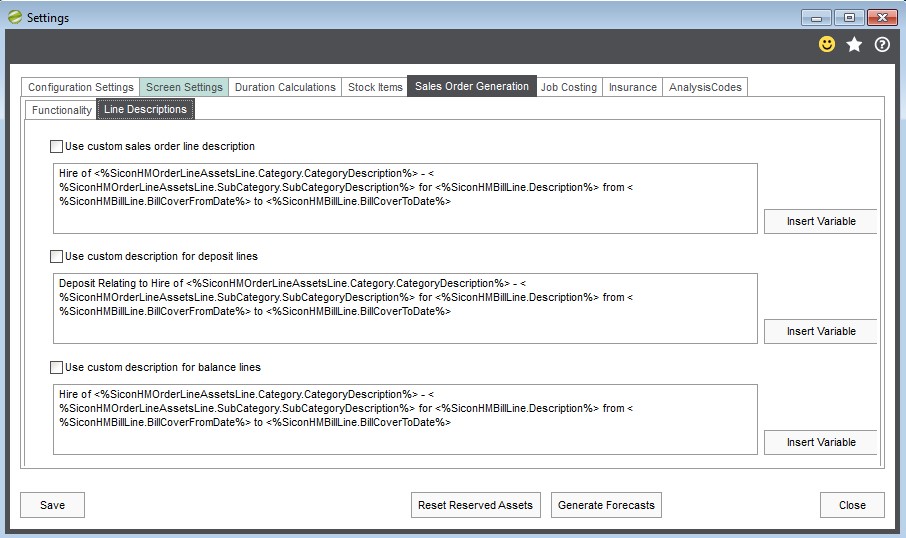
1st Custom description relating to standard Hire Sales orders
Enter Text, and use the insert variables ( which lists up fields from within Sicon Hire which can be populated automatically and where values will change throughout the life of the hire order line, i.e. dates, values)
2nd Custom description relating to deposit Invoice
Enter Text, and use the insert variables ( which lists up fields from within Sicon Hire which can be populated automatically and where values will change throughout the life of the hire order line, i.e. dates, values)
3rd Custom description relating to deposit Invoice balance lines:
Enter Text, and use the insert variables ( which lists up fields from within Sicon Hire which can be populated automatically and where values will change throughout the life of the hire order line, i.e. dates, values)
5.6. Job Costing TAB
If to be used/integrated please consult the Sicon Job Costing Help and User Guide for further information and assistance with setup & configuration.
Enable Job Costing: Sicon Job Costing is installed as part of Sicon Hire, if this ‘enable integration is selected’ once a Hire order has been entered a Job will be created unless the ‘Manually select job for hire order option is selected’
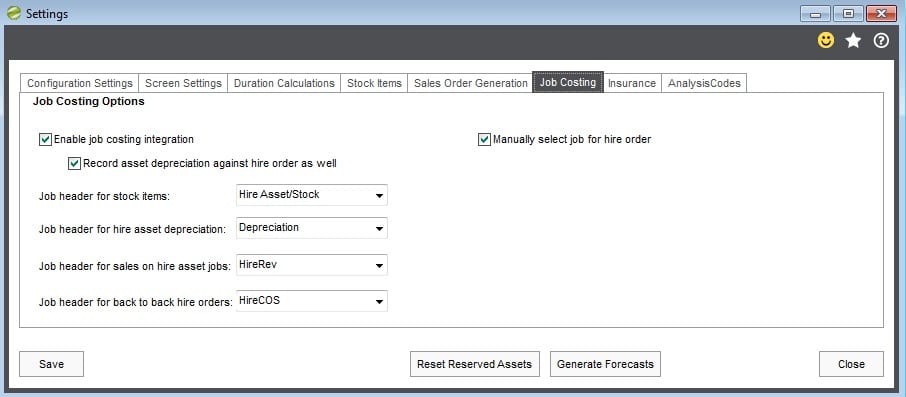
Record Asset depreciation: If ticked then the depreciation generated within Sicon Fixed Asset for your Hire Asset will be shown on the Hire Job Costing Record, if not standard Fixed Asset depreciation will apply, within FA/Nominal with no details being posted to Job Costing
Revenues on the hire will show on the Job, costs can also be allocated to the ‘Hire Job’ direct on to the Job itself or through other integrated Sage Modules, such as POP, Stock, P/L.
Cost Headings: Cost (Job Headers) are set up within Job costing itself, and when transactions are posted from other modules, and the Job is selected, you then select a cost/Job header which determines where the transaction value sits within the job itself / displays within enquiry screens and sits on various reports.
If you are unsure of what is meant by Cost/Job headers then think if them as the same as cost centres against a nominal code, therefore a sub level against a job and used for reporting purposes.
5.7. Insurance TAB
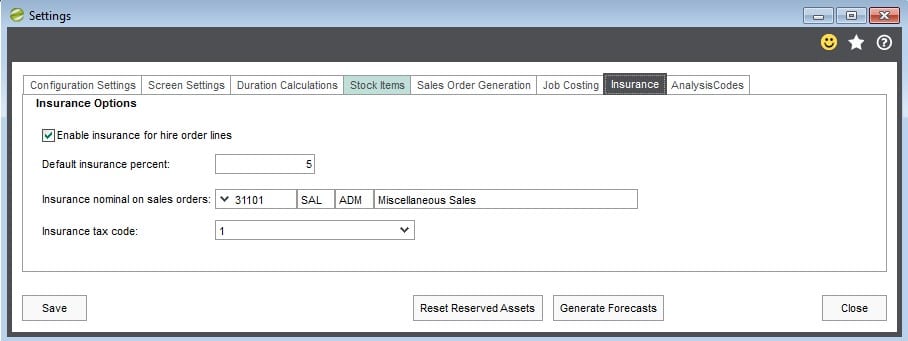
Enable Insurance: If you charge customers a percentage of the hire order line value , for insurance premiums to cover for damage / loss etc. , then enable this feature which in turn will enable an additional tab on the hire order line
Default Insurance percent: In relation to the above, and if you have a default % , enter here . It can be overridden on each hire order line if needed
Insurance nominal: In relation to the above two options , enter the relevant sales nominal / cc / dept. revenue code for the Insurance element on the Sales Order, as a result your Hire Quote/Order
Insurance tax code: In relation to the above three options , select the relevant Tax (VAT) Code associated with Insurance charged.
5.8. Analysis Codes
Function to allow additional analysis at Hire order header level, these are useful as from a visual aspect and reporting.

If configured, and used on at Hire Order Header Level, and can be added to custom layouts / reports. If configured as mandatory they will be identified by the * symbol.
6. Maintenance Set Up
6.1. Hire Order Types
Use this maintenance set up, to create and set defaults against where you wish to set a ‘Hire Type’ to analysis different types, examples above.
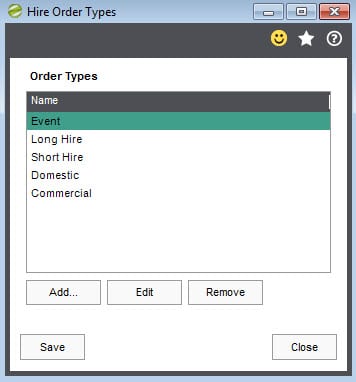
Order types could be used for example to analysis the types of Hire, the types of companies using your services. Order Types can be flagged in settings as a mandatory requirement
Against each time you can then choose to set some overrides.
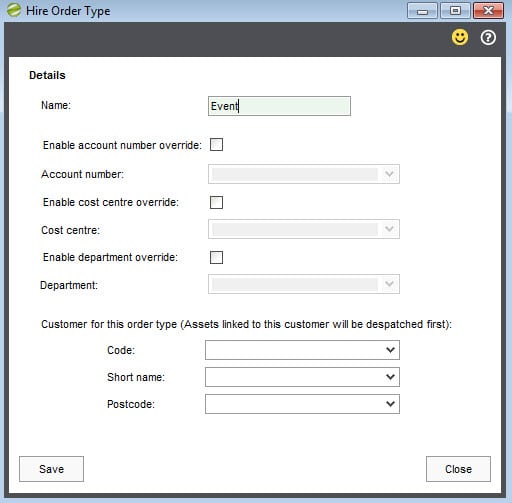
You can: Specify, based on event type to which nominal / cc / dept. the revenue is posted to and link a sales Ledger customer to a Hire Order Type, so the system knows when created a hire order type to select, this is a one to one relationship, so if you do have a customer specific type, we recommend you enter their name in the Hire Order Type Name field as well, as you can only link one customer to a type, not multiple.
These customers are treated as priority hire order customers and therefore hire order line assets will be treated as priority.
6.2. Maintain Contacts
The Maintain Contact section is an area where you can build up contact details for the customer in relation to Sicon Hire.
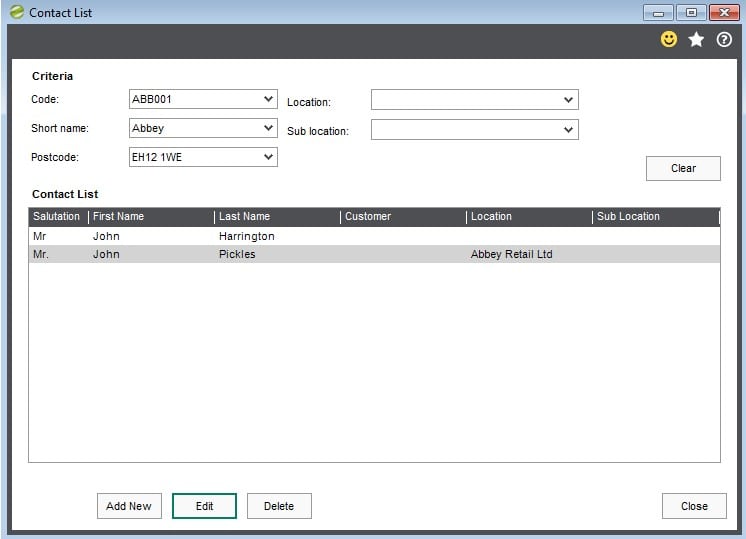
Note: This is separate to the contacts on the customer’s sales ledger account and stores the information for future Hire Quotes/Orders.
6.3. Maintain Locations (Hire Orders) default and additional delivery addresses
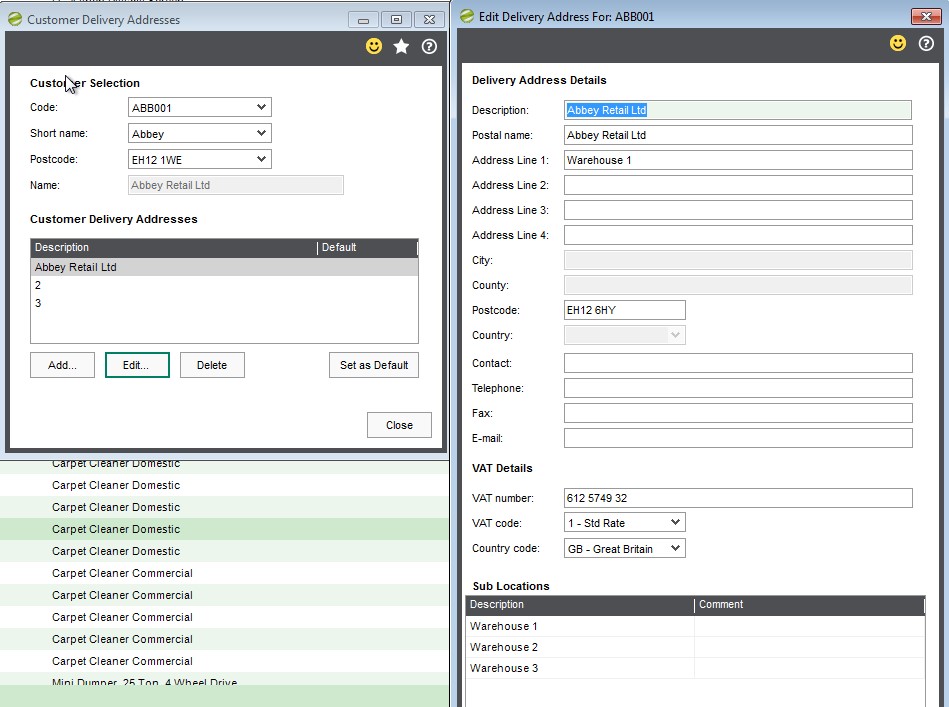
Use this function where you wish to add a default and additional locations/delivery addresses for your customers to be selected on a Hire Orders (At Hire order level, NOT line level)
Sub Locations at the created addresses can also be set , but noting that the sub location fields are comment fields, not report writer fields in the true sense.
6.4. Maintain Examination Types (inspection after hire)
If you are going to use the facility to inspect hire items when receiving back from hire, then you can set up different Inspection Types.

In the example above we created an examination type for Testing, Inspection and Calibration.
To add a new type, click underneath the last one in the list as example below:
When Assets are received back from a hire customer, and have been flagged as requiring Inspection (Examination), and the inspection results are entered, you select the Examination Type within the process.
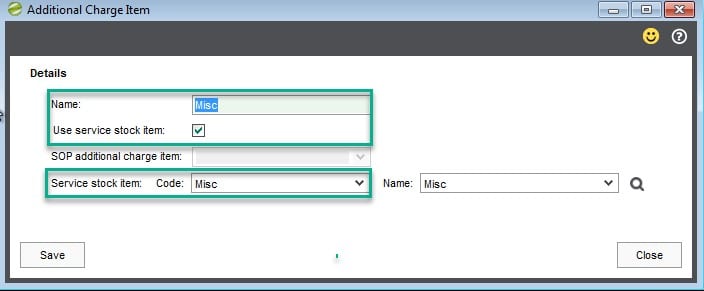
6.5. Maintain Additional Charges
This is where you record that you may wish to add additional charges such as Delivery or Insurance onto your Hire Quotes or Orders.
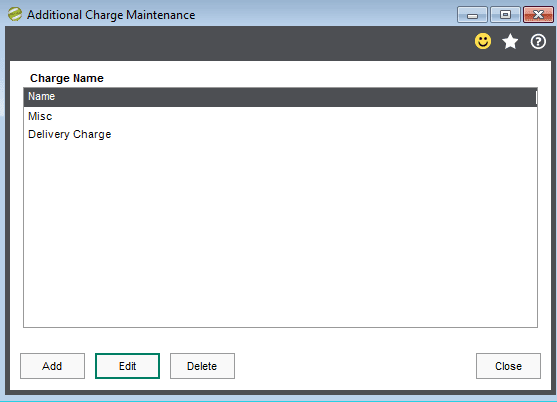
Against each type you can either:
Option 1. Set to be a SOP additional charge already set up in standard Sage 200 as the example below for ‘delivery charge’ In the example below you can see that for Sicon Hire Purposes Additional Charges may have different terminology. In Sicon Hire we have labelled It Delivery Charge (and as far as Sicon Hire is concerned that’s what it will be known as) but it’s actually picking up settings / defaults as set/created against the SOP Additional Charge which in this example is labelled ‘Express delivery’.
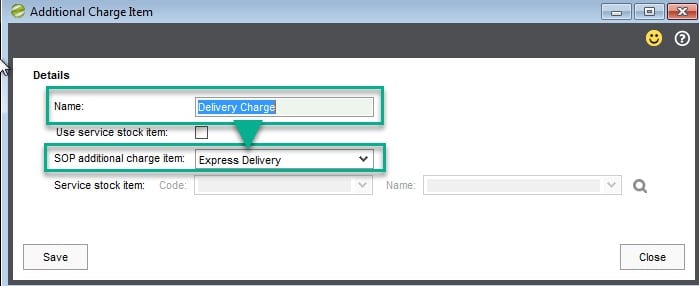
Option 2. Set the Hire Additional charge to be linked to a sage service stock item you have created for this purpose, therefore nominal codes on the service stock item will be used for revenue purposes where invoiced.
6.6. Maintain Bank Holidays
This area of the system only needs to be used if, as a company you do not charge for hire items on the days within the hire order line hire period falls on bank.

To Add simply click on Line, select the date and enter a description as in the example above.
This will need to be maintained annually, there is no automation.
6.7. Price Bands
Using Price Bands: You can set up price bands against a Sub Category against each of the Duration Types you have set up within utilities.
In this example we have:
Labelled / Named them Hours, days, Weeks
We have then assigned to the relevant Time Unit (Selling Unit which is set up within utilities), and a
From and To Quantity and the relevant default pricing.
When you are entering a Hire Order or Hire Quote and you select this Sub Category, the relevant pricing will come through.
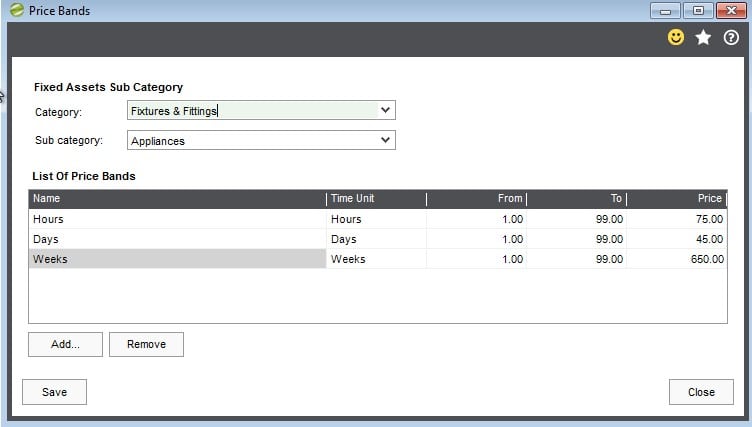
Note: If you have Price Band per Customer set up, Price Bands for customer overrides any standard price bands.
6.8. Price Bands for Customers
Using Price Bands for Customers you can link price bands to customers. These are assigned against a Sub Category against each of the Duration Types you have set up within utilities.
In this example we have labelled/named them Hourly Hire Price, Day Hire Price and Week Hire Price – We have then assigned to the relevant Time Unit (Selling Unit which is set up within utilities), and a From and To Quantity and the relevant default pricing.
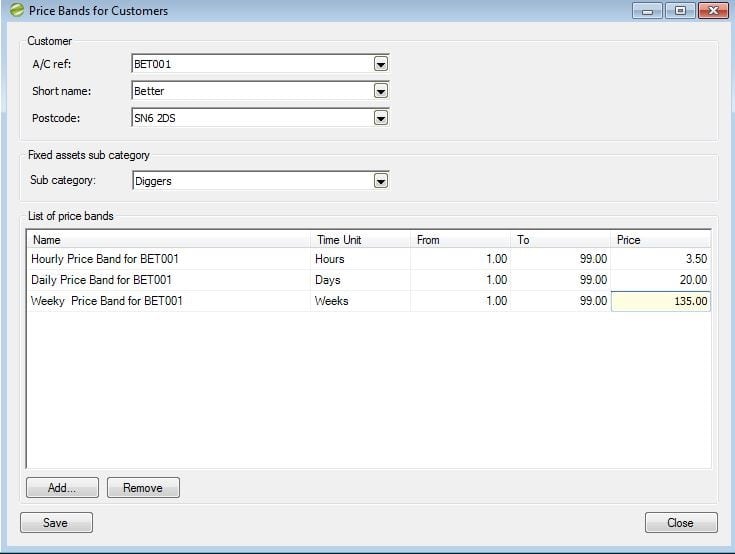
Note: Price Bands for customer overrides any standard price bands.
6.9. Sub Category Defaults
Fixed (Hire Asserts) Assets when created manually or created via the Stock to Issue to Fixed Assets are associated with Categories and sub categories. And it is against the category that certain defaults are set.
In our example on our new sales order we picked the Category of Hire Equipment-Cleaning & Flooring and Sub category ‘Floor Cleaners’.
So within Sub Category default set up (Example screen below).
We can set defaults for:
Suggested Delivery Time: Used to show how long a hire item is going to take to be delivered and therefore unavailable to hire for that delivery time span
Default Tax Rate: Default is zero, but can be changed to select any of the Tax Rates set within your Sage System Global setting
Insurance Percentage: If you have Insurance percentage set and used as an additional charge, the system will calculate the percentage based on quote/order net value
Inspection Period: Used to show how long a hire item is going to be set aside upon return and therefore unavailable to hire for that delivery time span
Minimum Charge: If set and the Quote/Order lines are set to less than, the Minimum Charge will apply
Inspection Required when items received: Default is Not Set, but can be changed to Yes or No for default
6.10. Warehouse Maintenance
When raising sales orders from Hire orders the revenue is posted to the nominal code specified against the Fixed Asset Sub Category.
If you wish to post to different nominal codes / cc / depts. based on warehouse/location using this feature you can select a warehouse, edit and enable account number / cc dept. override and select alternative ones.
If this is used, then these will override the sub category nominal codes.
7. Hire Manager Menu

A reminder that there are a number of items within the maintenance and settings section with Sicon Hire and within Sicon Fixed Assets that you will need to configure before you can add your first Quote or/and Order including: –
- Price Bands
- Sub Category Defaults
- Configuration Settings
- Contacts and Locations
- Hire Categories Sub Categories along with defaults set up within the Sicon Sage 200 Fixed Assets Module
- Issue Stock items to be hired to Fixed assets, in order for them to be available for Hire, or if your hire items are not stock items then you wold manually add Fixed asset items and mark as Hire Assets
- Assign the Hire Fixed Assets to the relevant Category & Sub Category
Once these are completed you can start to you the system.
8. Add, Amend and Convert Hire Quote
8.1. Hire Quote List
List view facility where by default all quotes will be listed but using the standard Sage 200 creation of filter progress you could create user specific or public filters.
From the List View you can also Add (create), select a quote and amend, convert to hire order, copy or mark as lost quote, and add columns to display useful information such as Hire Status, If it’s a converted quote, the Hire Order Number.

8.2. Adding a New Hire Quote
As any order screen within Sage 200, the first step is to select the customer, then tab through filling in other relevant fields / data.
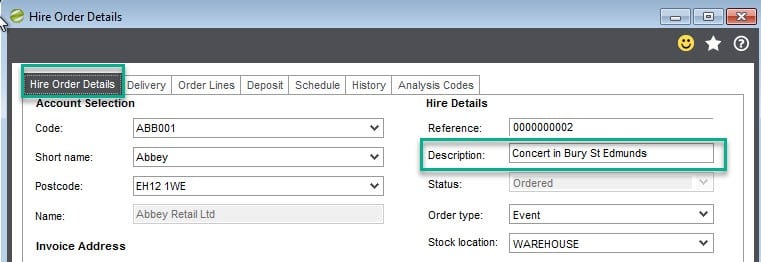
Description is not a mandatory field, but if populated this will be shown on the quote lines and can be printed on sales order documents if required.
Select the relevant Location (where the hire equipment is stored/being hired out from), enter a delivery date and time (which pulls through on to the lines as a default), and enter (if applicable the order number)
The Contact Section, is used to specify the contact for this hire Quote, this can be a Hire specific contact or a Sage 200 sales ledger contact
HM selection contact section is an area where you can build up contact details for the customer in relation to Sicon Hire only (this is separate to the contacts on the customer’s sales ledger account).
Or you can select or create a Sage 200 sales ledger contact, and potentially assign to a role type pf Hire order contact on the s/l record if this is your preferred route.
Delivery TAB
Use this section to select a delivery address, if different to the customer’s main address. The alternative delivery addresses are set up within Maintenance and Maintain Locations or can whilst in a hire quote and/or order.
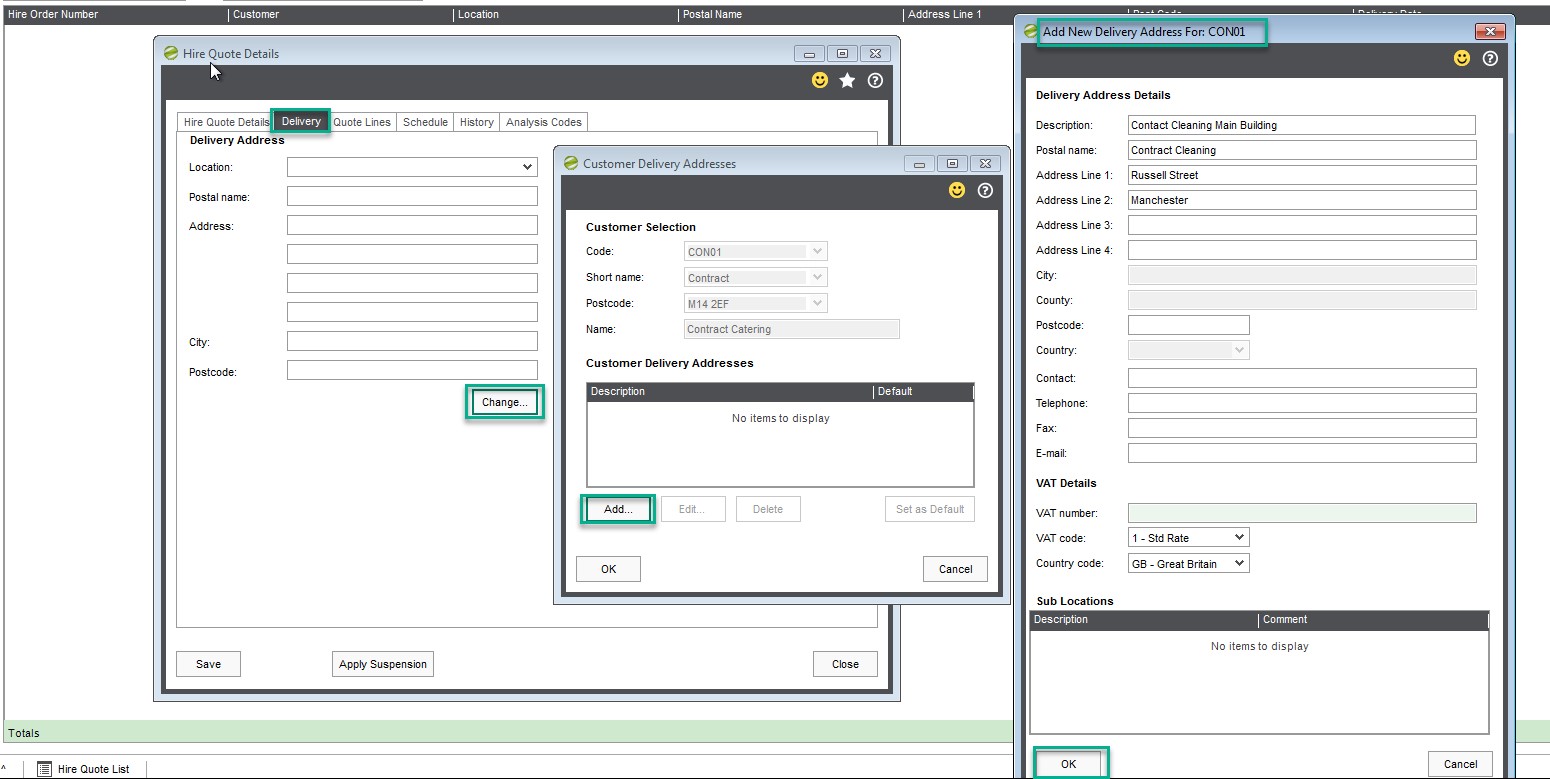
If delivery addresses for the customer do not already exist, then these can be added as per the example above.
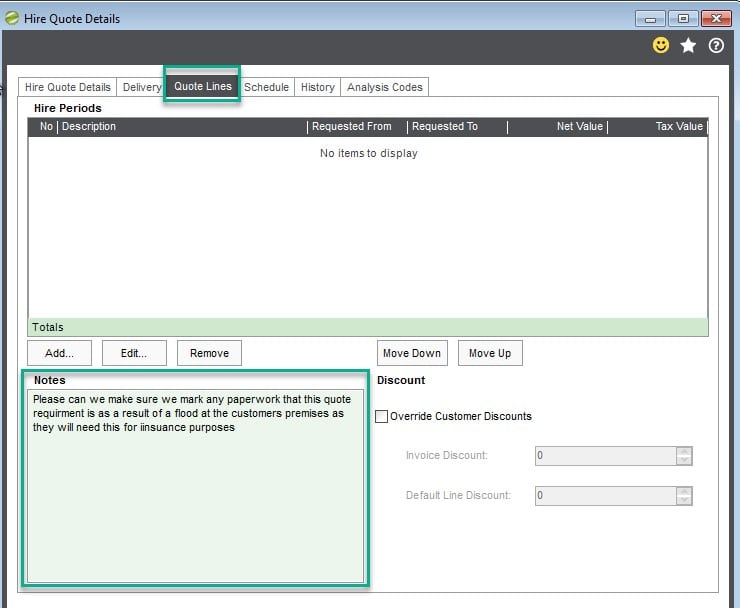
Quote Lines Details
The Quote Lines tab is where the you enter the details of what equipment is being quoted for hire, the duration, delivery and prices (if they are defined in customer price bands, relevant pricing will pull through)
Following which you add the hire lines.
You can add notes specific to this quotes, example below:
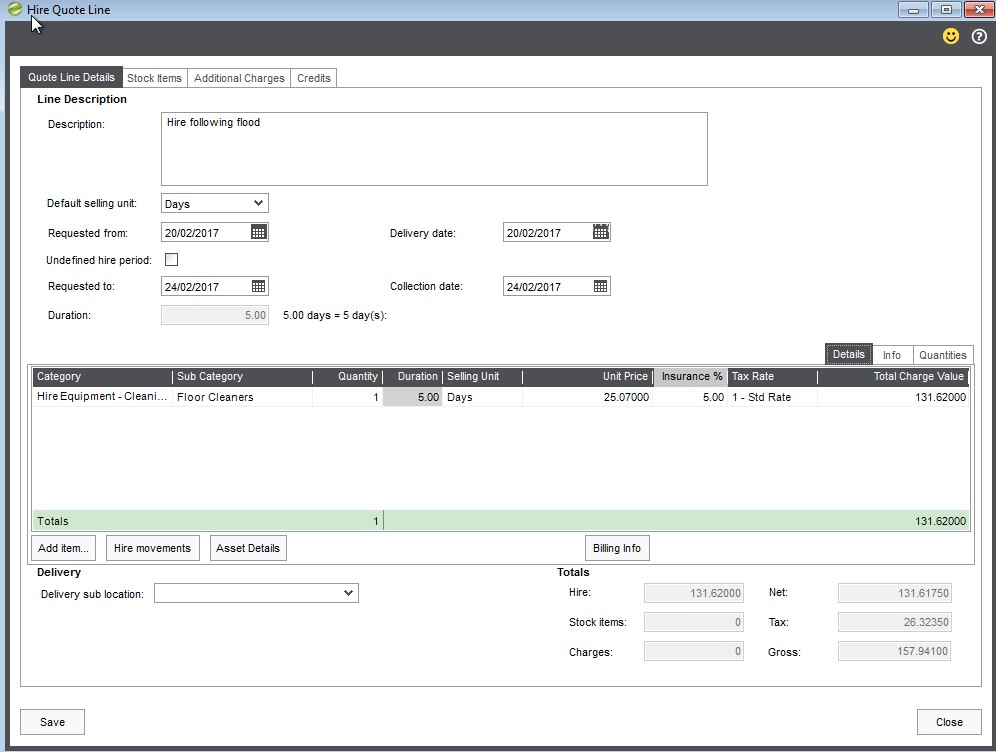
After which you would Add item (s): Select the Category and Sub Category that the Hire item belongs to
– The Qty being quoted
– The duration
– The unit price (if price bands not set up) and the tax rate ( default tax rates can be set up on the sub
categories).
If there are availability issues, the lines will be highlight in red.
Within this screen you can toggle to view different information on the Details/Info/Quantities Tab.
You can also view the hire movements for current, future or history.
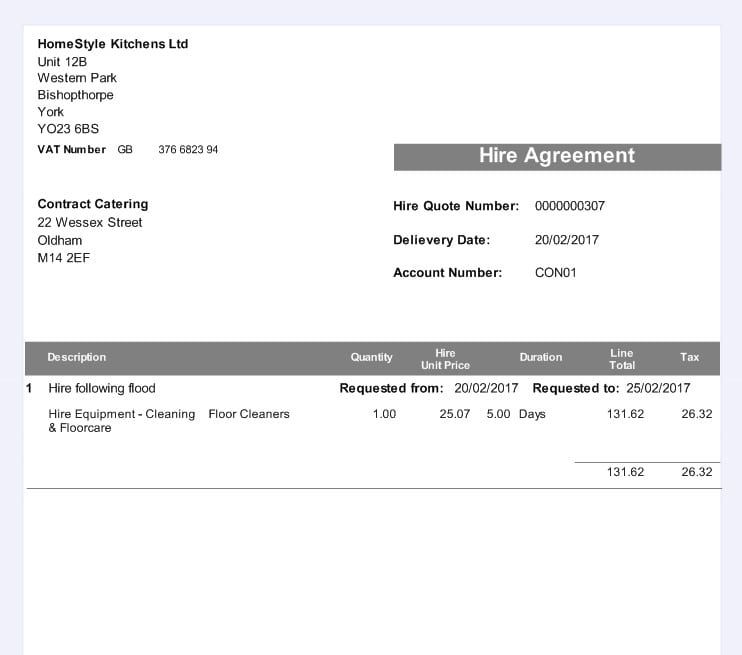
Once the quote has been saved, you can print the Hire Quote from the Reports menu.
The quote can be amended at any time up to the point of either marking the quote as ‘lost’ which is done within the amend quote screen or by converting the quote to a Hire Order.
You can also add standard Stock Items or additional charges (such as delivery or insurance) to your Hire Quote.
To add these items, select the relevant tab within the Hire Quote Screen.
Default insurance rates (along with tax rates and other information) can be set up against the Hire Fixed Asset Sub Categories, which are within Sicon Hire utilities and Sicon Fixed Assets, Maintenance, Categories and Sub Categories on the Hire Defaults Tab.
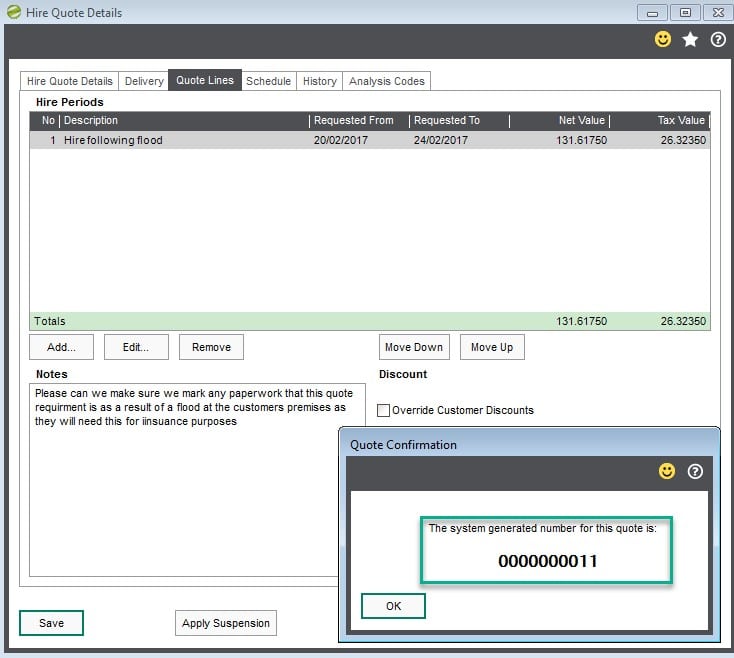
Once Line (s) are added select Save. The quote number will be displayed on the screen, press Ok to close.
Once the quote has been saved you can print the Hire Quote from the Reports menu.
8.3. Amend to Mark as Lost, or to Amend and Edit Details Within
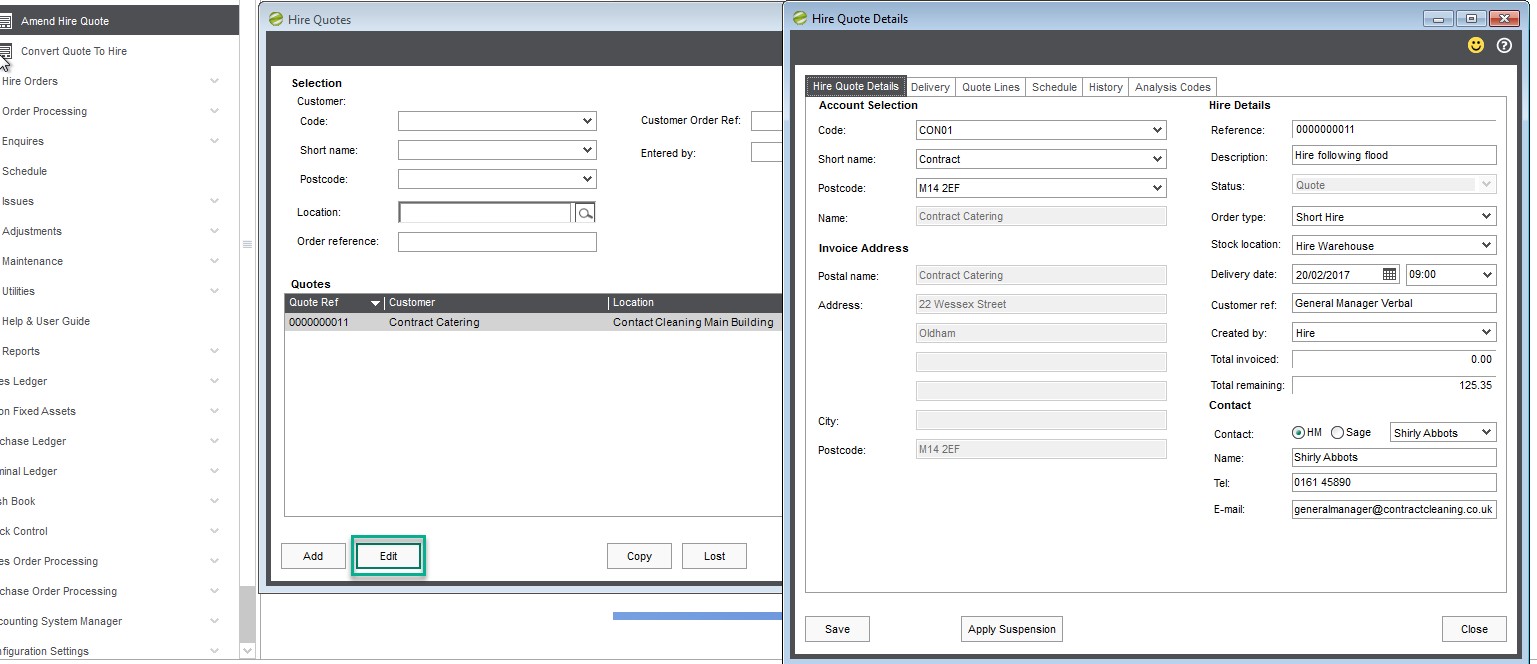
A quote can be marked as ‘lost’, which is done within the Amend Quote screen (or from the list view).
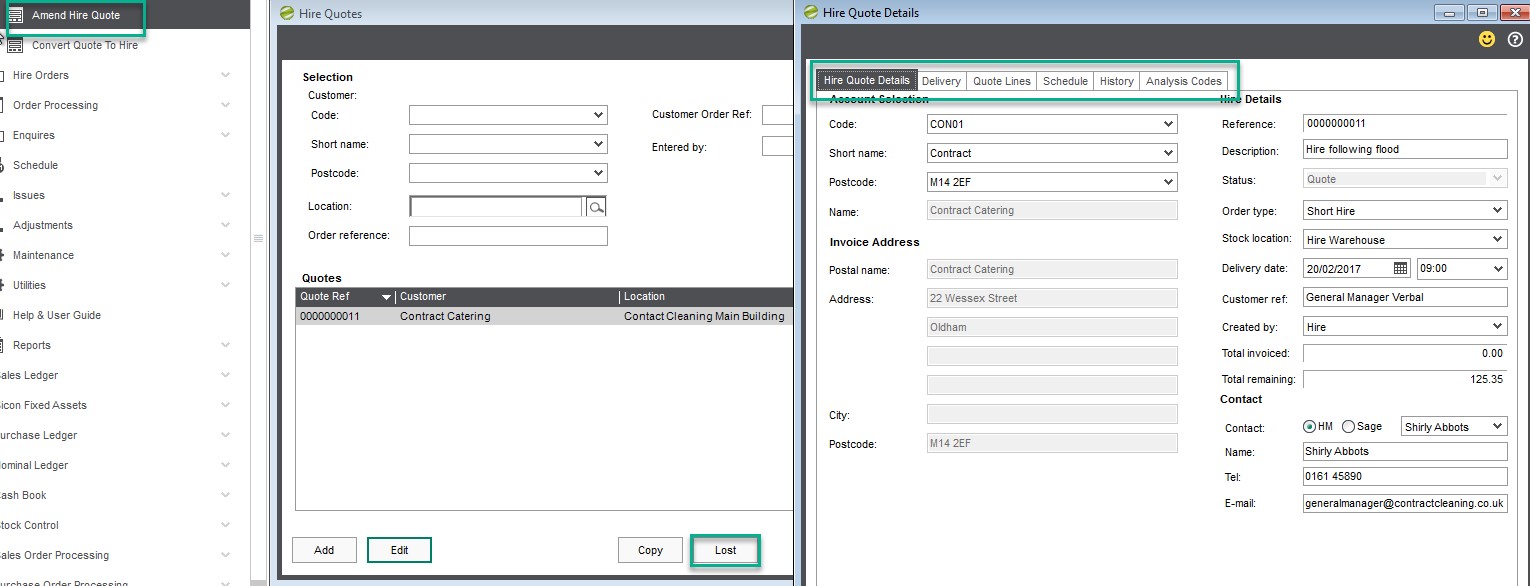
Or if simply amending, Edit using button as below, allowing users to change / amend the quote as required.
8.4. Convert Quote to Hire
There are various ways you can select which quote/quotations to convert, in this example we chose to select by ‘Showing All Orders’, highlighting the quote and Convert Quote to Order.
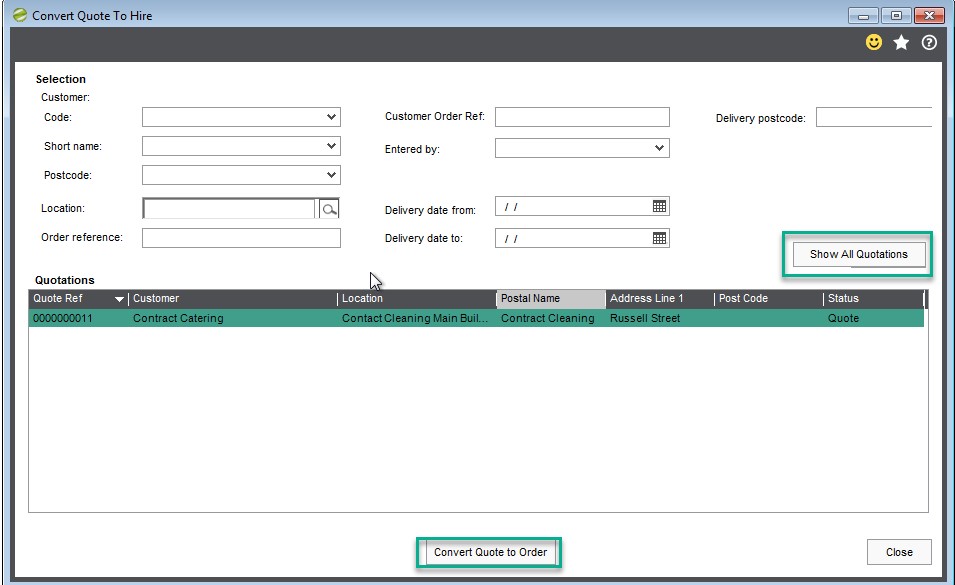
You can also choose to select by customer; the customer’s order number; location; postcode, delivery date or entered by.
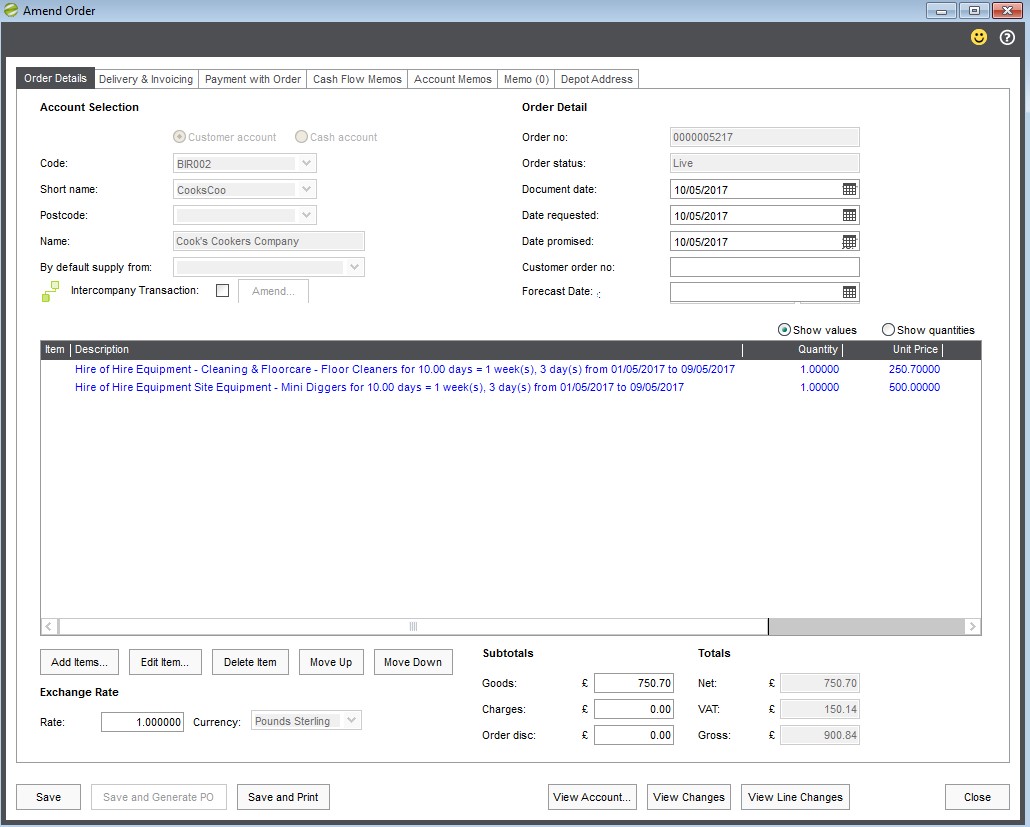
9. Hire Orders
The Hire Order menu area is where you can create new hire orders, edit and amend an existing hire order and or line, access a previously converted hire quote to order, cancel a hire order (amend hire order status) and change prices on a hire order, within a rapid screen entry.
9.1. Hire Order List
List view facility where by default all orders will be listed but using the standard Sage 200 creation of filter progress you could create user specific or public filters.
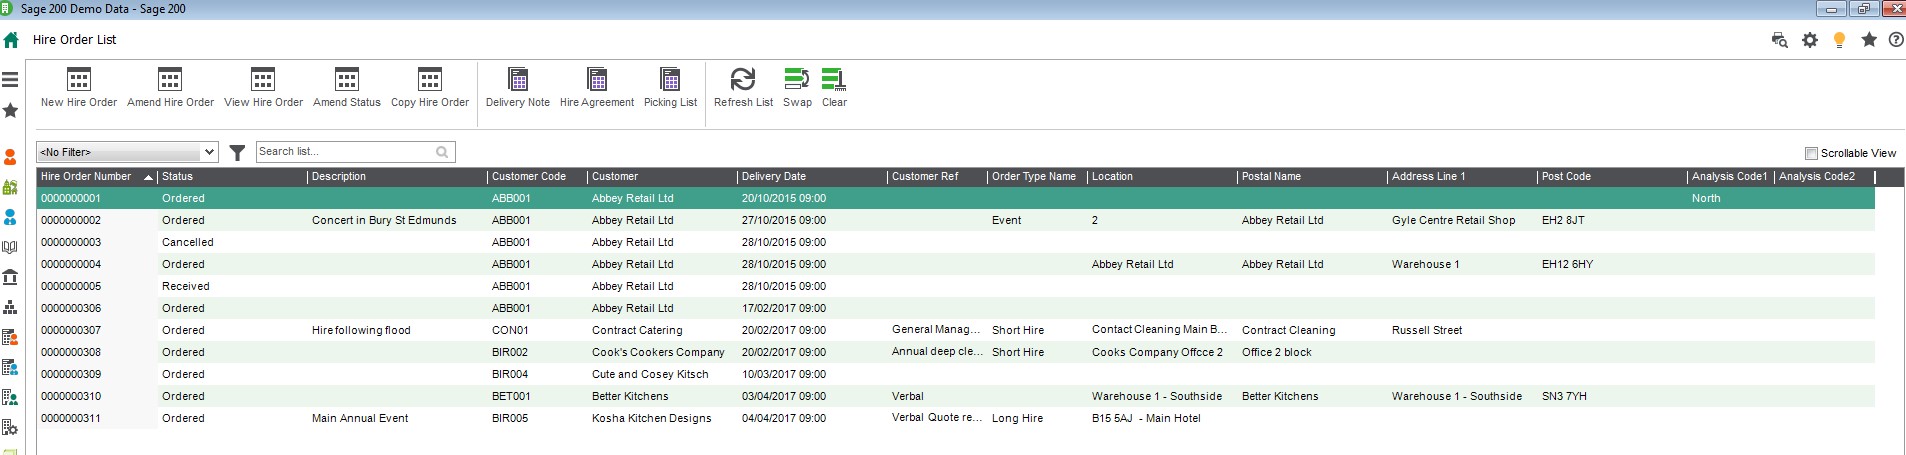
Users can add additional columns to display additional Hire Order information, such as Customer Ref; Status; Order Type;
From the List View, using the ‘Sage List View Action Icons you can also Add (create), select an order from the list to amend, amend the status of the order, copy an order.
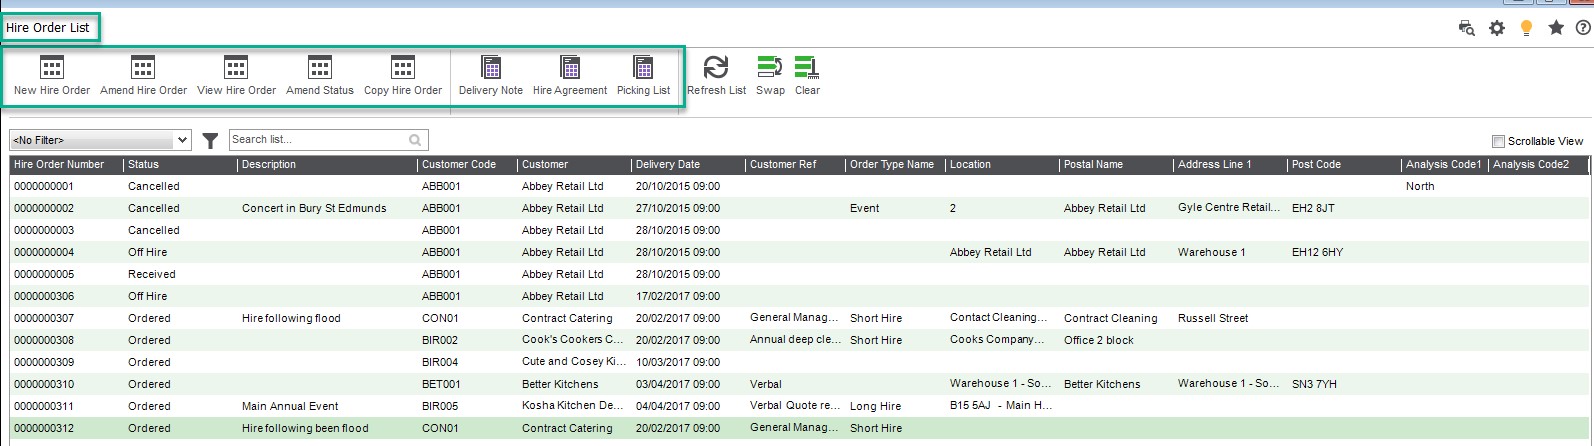
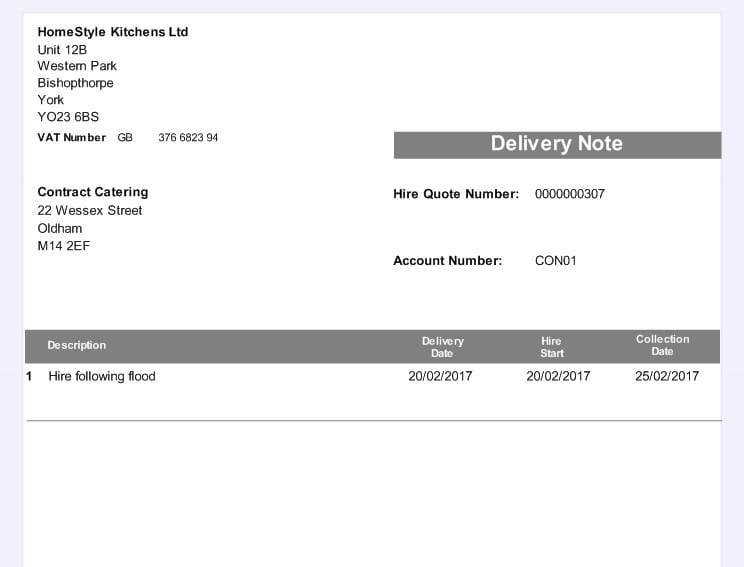
Users can also to select an order, and print various documents relating to that order such as an ‘delivery note’; ‘Hire Agreements’ and/or a ‘Picking List’.
Sicon layouts and reports are installed within separate reports package Layouts and are standard sage 200 report designer layouts which can be amended to suit your own personal needs.
Note: If you to wish to create your owing using the Sicon default ones as a starting point, please copy the layout giving it a different name, and save in a custom folder, this will ensure they are not over written when the reports package is upgraded at any point.
As standard Sage 200 functionality any Reports can either be sent to the Sage 200 spooler, to preview or direct to printer.
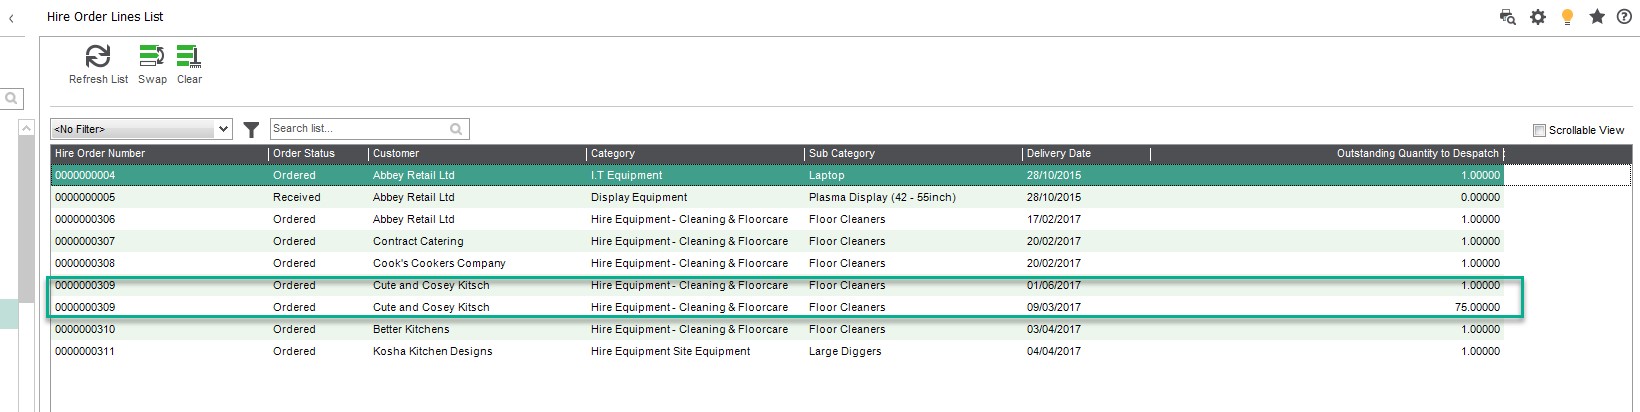
9.2. Hire Order Lines List
List view facility where by default all orders Line will be listed separately (example below Hire Order 309, showing 2 lines) but using the standard Sage 200 creation of filter progress you could create user specific or public filters.
9.3. Adding a New Hire Order
Select New Hire order to create a new hire order, as any order screen within Sage 200, the first step is to select the customer, then tab through filling in other relevant fields/data.
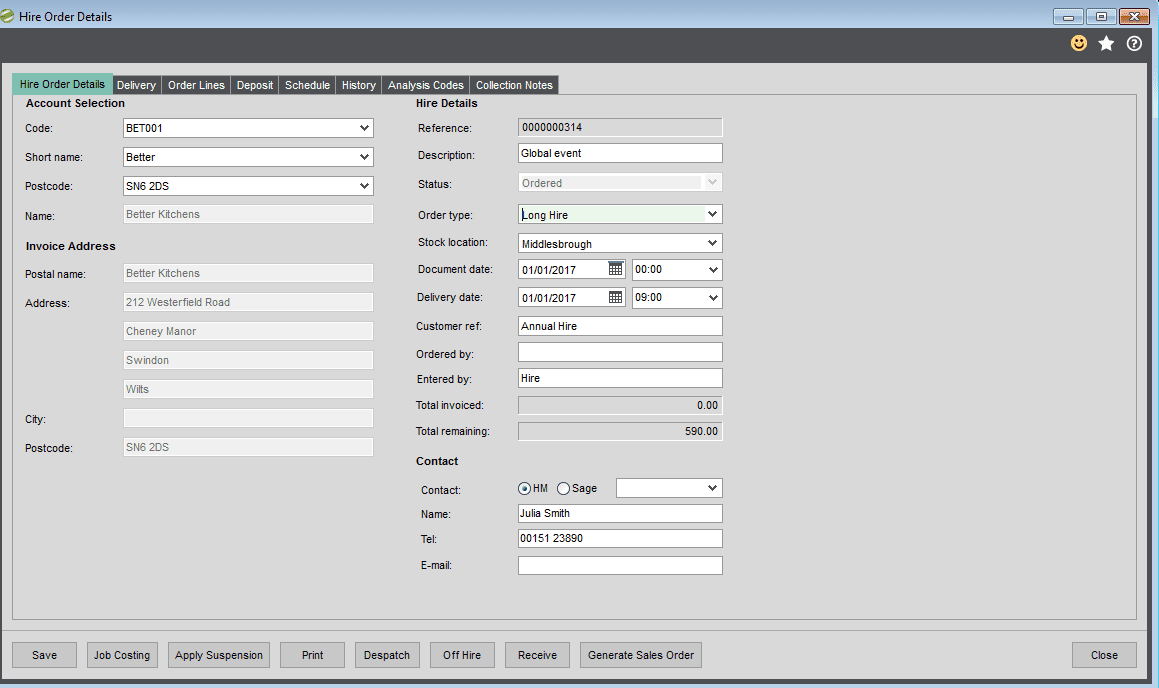
Description is not a mandatory field, but if populated this will be shown on the order lines and can be pulled through/printed on sales order documents if required and also pulled through to the hire order lines, at that stage it can be extended/expanded on .
Select the relevant Location (where the hire equipment is stored/being hired out from), enter a delivery date and time (which pulls through on to the lines as a default), and enter (if applicable) the order number.
The Total Invoiced and Total Remaining fields are populated/updated throughout the life of an order based on the information updated on each hire order line and the Billing Forecast Tab.
These two fields are for a visual reference only, although some customers show these details on their sales order(s) using a configured SOP analysis code(s), set within Sicon Hire, utilities and Settings on the Sales Order Generation tab.
These fields are particularly useful if you add multiple lines onto a Hire Order.
The Contact section, is used to specify the contact for this hire Quote and can be a Hire specific contact or a Sage 200 Sales Ledger contact.
HM selection contact section is an area where you can build up contact details for the customer in relation to Sicon Hire only (this is separate to the contacts on the customer’s Sales Ledger account). Or you can select (as in the screen shot example above) a Sage 200 sales ledger contact and potentially assign to a role type pf Hire order contact on the Sales Ledger record if this is your preferred route.
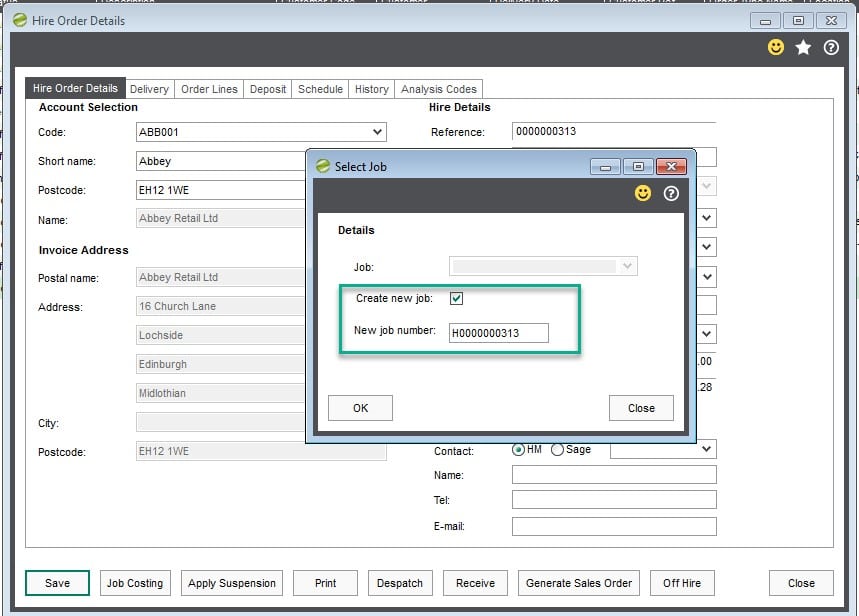
Also on this screen are additional buttons that apply once an order has been added, such as link to the Job Costing job relating to this Hire Order and apply a suspension, which is used to suspend billing for a date range entered at the time of selecting ‘Apply Suspension’.
You can also choose to print either a picking list, hire agreement and/or reprint a previously printed despatch or collection note by selecting the ‘print’ button, at which time a menu appears. Where multiple despatch or collection notes have previously been printed, a criteria box will appear to choose the relevant one.
You can Despatch, which is the same process as ‘Confirm Hire Order Despatched’ menu item process.
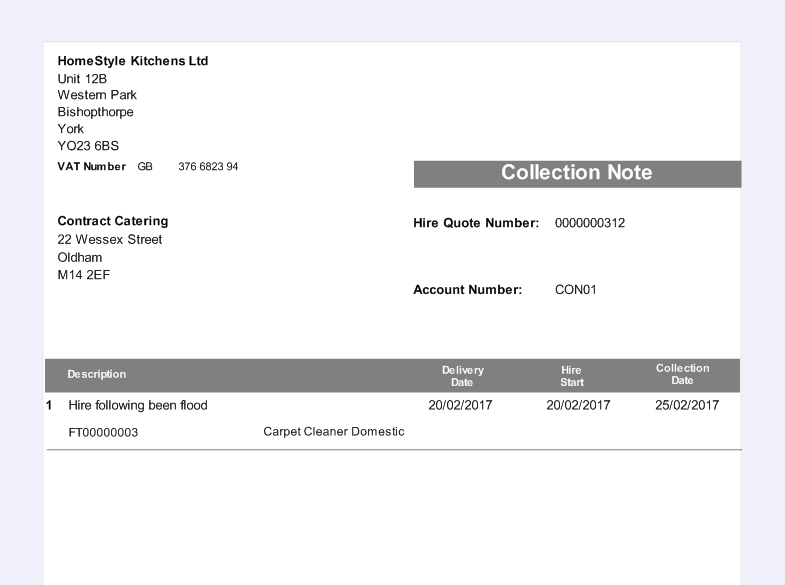
You can flag items as being Off Hire (the terminology hire customers use when they notify you that they wish to end the hire and ask you to collect the hire items). When used this Off Hire process stops the clock from a billing perspective, so it is important to note that if you ‘off hire’ and there is a gap between ‘off hire’ and physically collecting the hire items from the customer and receiving them back via ‘confirm goods received’, you will have a period where a) you are not billing and b) the hire asset is not available for hire. Off Hire will also generate you a collection note (with a collection note number).
When you then confirm ‘assets received back,’ you will need to match to the relevant collection note (this is recorded in the History tab and on the Collection Notes tab).
You can choose to enter an ‘off hire’ Qty equal to the ‘whole line Qty’ or ‘part line Qty’.
When selecting ‘Off Hire’ the screen, as shown below, will display. This allows you to select which line(s) on the orders to ‘off hire’, enter the quantity to off hire, the off hire date (which is the date the billing stops) and the planned collection date (the date you are planning to physically going to go and collect the hire items).
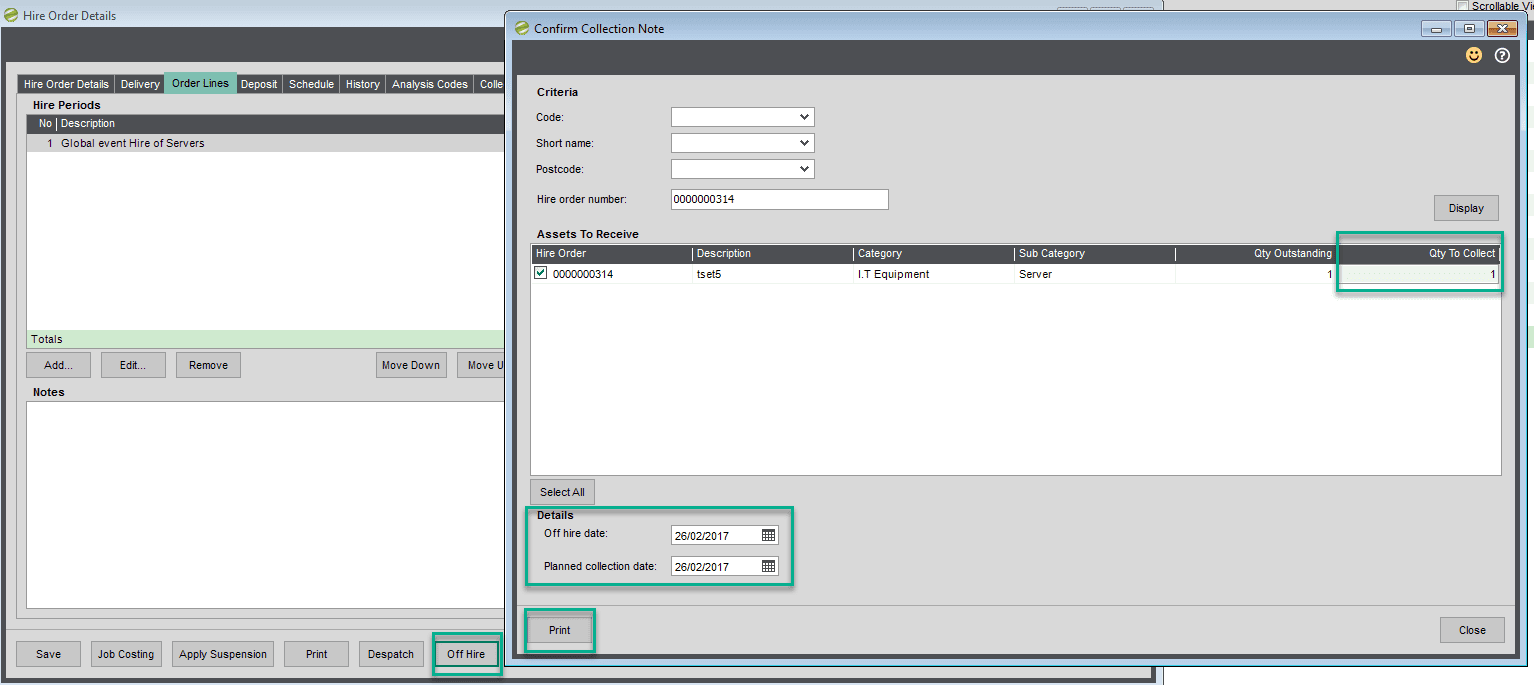
Select ‘Print’ to print a collection note.
When you physically receive the items back and ‘confirm assets received’, you need to enter a ‘receive date back’ (this is the date the system will use to show as being available for hire again, if no inspection period applies).
And you will need to match the received items back to the collection note as per the screen below:
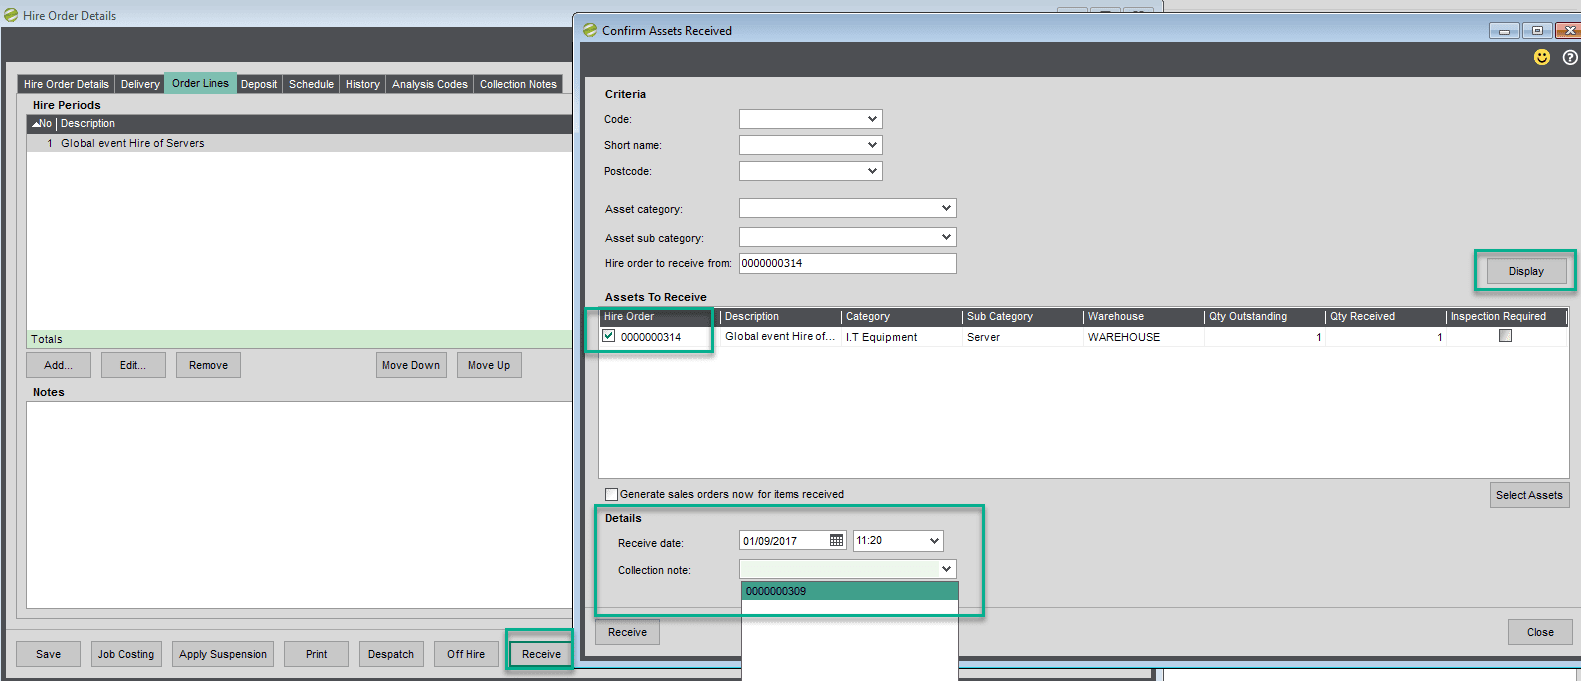
Important Note: if you have previously raised multiple ‘off hire notifications’ and printed multiple ‘collection notes’ against a hire order line, you MUST ‘receive back’ multiple times, in quantities matching each collection note quantity.
On the Hire Order there is a ‘Collection Notes’ Tab, which when selected will show you details of the collection notes from this hire order and they will be flagged as ‘Complete’ if the hire items have been received back in and matched to a collection note.
Delivery TAB
Use this section to select a delivery address, if different to the customer’s main address. The alternative delivery addresses are set up within Maintenance and Maintain Locations or can whilst in Hire Order by selecting change from the Reports menu.
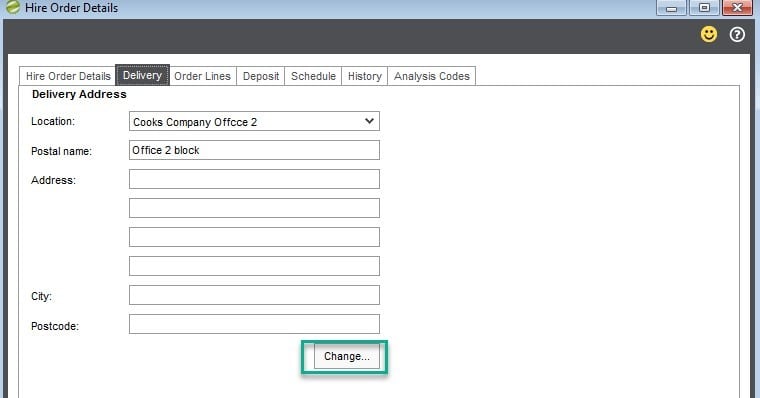
The alternative delivery addresses are set up within Maintenance and Maintain Locations or can be accessed whilst in Hire Order by selecting ‘change’.
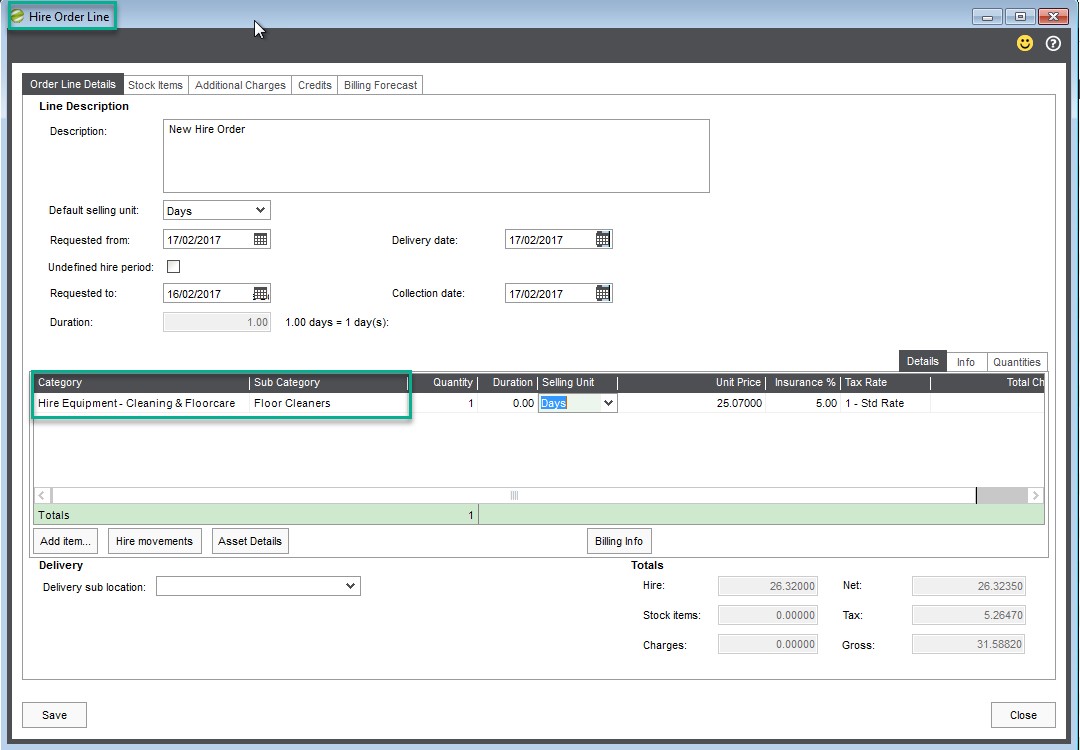
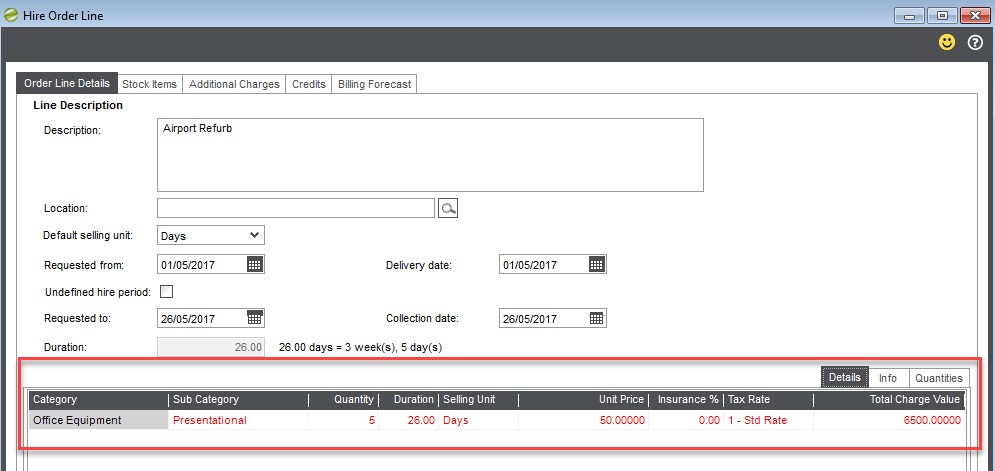
Hire Order Lines Details
The Hire Order Lines tab is where the you enter the details of what equipment is being sent out on hire.
You can add notes specific to an order, example below:
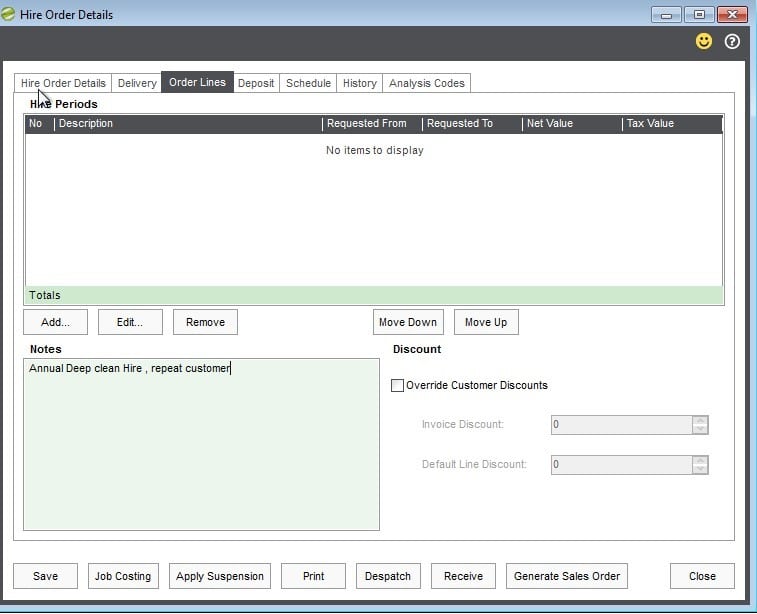
After which you would select ‘Add item’.
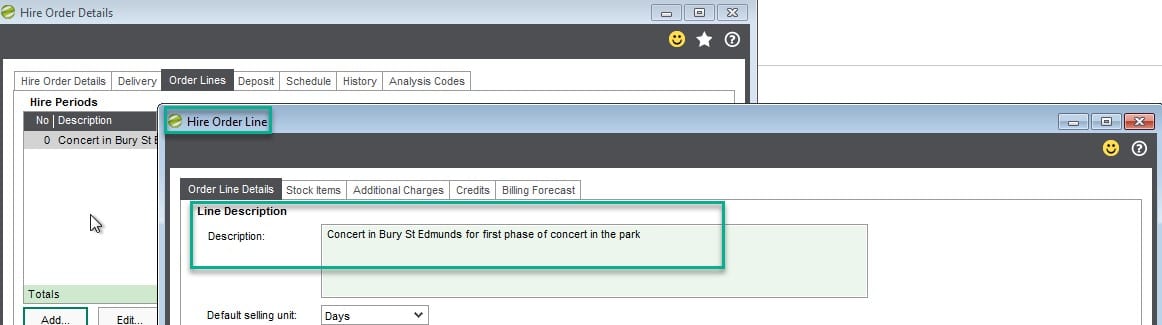
The description will have pulled through from the front hire order screen, but there is the option to add more detail within the large text box.
Based on the settings and how the system is configured with regards to defaults, the next section shows the ‘default selling unit’.
Requested from date (pulled through from front page of order): Delivery date (if your default is set that you need xx number of days to delivery prior to the hire Requested from date (hire start date), the system will populate the correct Delivery date, if not it will populate the same date as ‘Requested from’.
Undefined hire period: If your default is that all of your hire order periods are ‘undefined’, this will be ticked by default, but can be unticked and if users do so the ‘requested to’ and ‘collection dates’ will be displayed and required to be populated.
Requested to: The date for which the customer wishes to end the hire.
Collection date: If your default is set that you need xx number of days to collect post to the hire Requested to date (hire end date) the system will populate the correct collection date, if not it will populate the same date as ‘Requested from’.
Duration: The system calculates the total duration of hire. How it is displayed is based on settings within Utilities and the defaults on the Sales order Generation Tab. These defaults determine how the hire period is explained/shown on the Sales order and therefore on the Invoice when it goes out to the customer.
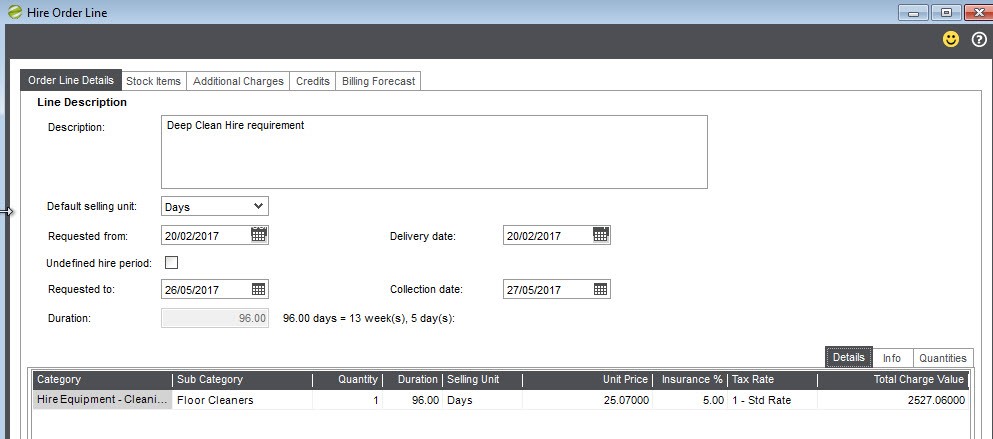
On the line itself you :
– Select the Category and Sub Category that the Hire item belongs to
– Select the the Qty being quoted- The duration
– Select the the unit price (if price bands not set up) and the tax rate ( default tax rates can be set up on the sub categories).
Within this screen you can toggle to view different information on the Details/Info/Quantities Tab.
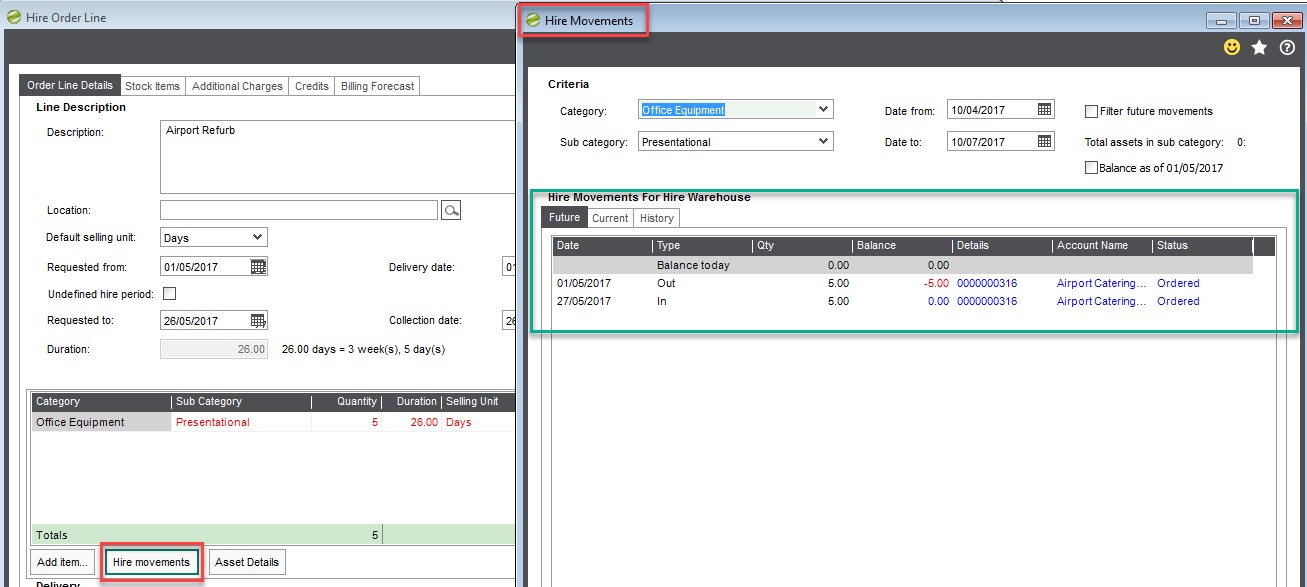
If there are availability issues, the lines will be highlighted in red. If this occurs then it indicates that you do not have, according to the Sicon Hire module, enough hire assets in this category to hire out, this may be because;
- Although they have been physically received back, they have not been received back in off hire, via the ‘Confirm Assets received’ routine.
- Or that there are enough hire assets, but they are held/located in a different warehouse (location) then has been set on this hire order.
To help users understand why the system believes there is none available, users should use the hire movements function (noting its loading up Hire Movements for the Category/Sub Category within the selected Warehouse/location).
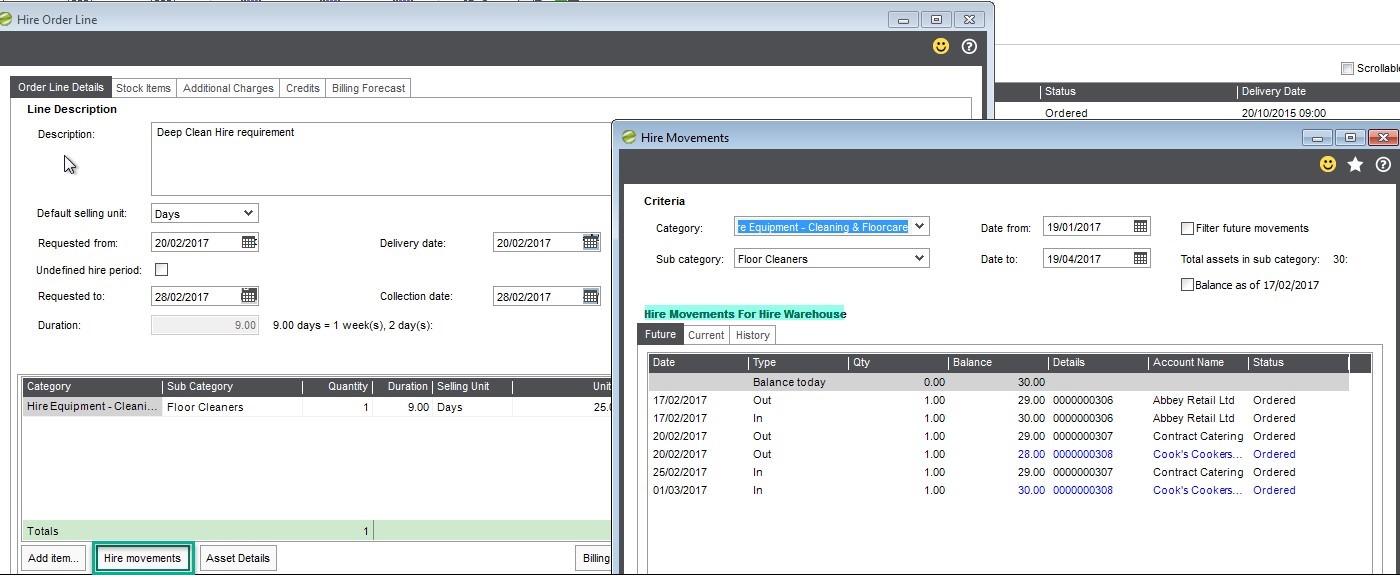
By default it displays Balance as of this point in time (today, when viewing and then going forward showing In’s / Out’s running balance).
You can also view the hire movements for future or history and if required filter out balance today by selecting ‘Filter Future Movements’.
If you are not seeing availability then it is best to come out of the order and further investigate as to where the Hire Assets are (different sub category ?? different warehouse/Location) / the Sub Category balances in other areas of the module, such as ‘View Sub Category Balances’ accessible through the menu option enquiries and ‘View Sub Category Balances’.
This screen is slightly different as it shows where the hire assets are and therefore indicates why they are not available. This screen shows balances in the different warehouse(s)/Location(s) and whether any are in ‘inspection’ (and therefore not available for hire) and if you have any on back to back order (cross hire) with suppliers.
9.4. Adding Stock Items
You can also add standard Stock Items to be sold as a part of the ire Order (in our example we added Floor cleaner liquid) as the floor cleaner is to be sold in conjunction with the Hire of a Floor cleaner machine .
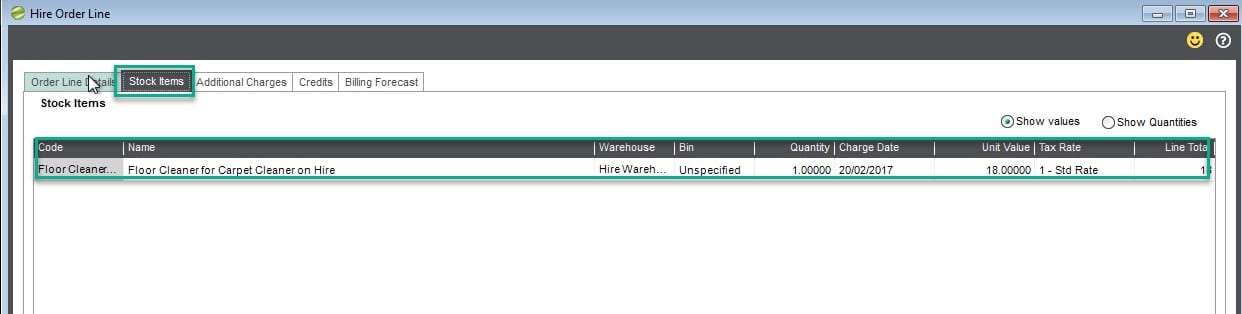
To add these items, select the Stock Items tab on the Hire Order line.
9.5. Adding Additional Charges
You can also add additional charges such as delivery charges or Admin Fee.
To add these items, select the additional charge tab on the Hire Order line.
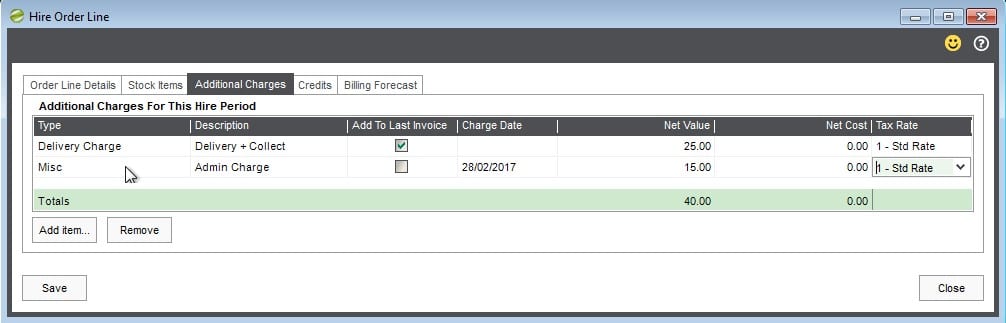
When adding you can choose to , invoice the charge on a specific date or, on the last sales order raised from the Hire order Line , add a Sales Net Value , and for any custom reporting , a net cost.
Although you select a pre-configured additional charge type, for this hire order line you can enter a description which will could appear on documentation (in our example ‘Delivery + Collect’ rather than using the default Delivery Charge and ‘Admin Fee’ rather than the Misc.
Tax rates if configured will pull through from any defaults created, otherwise can be added or changed manually.
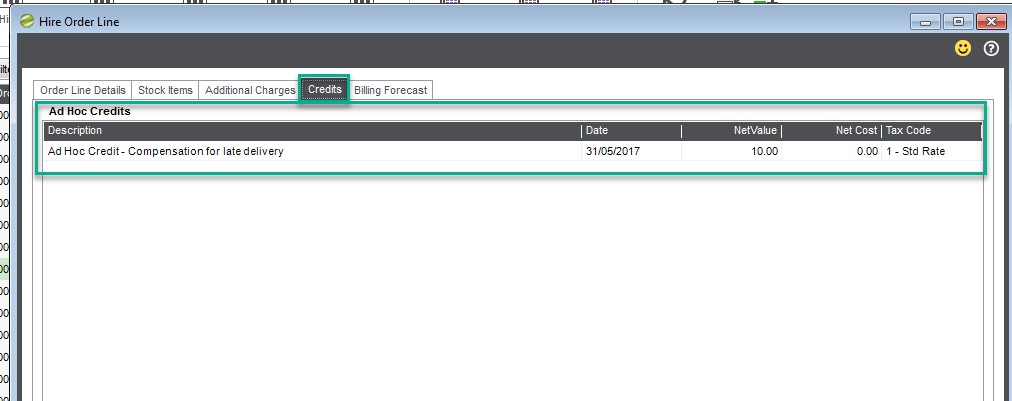
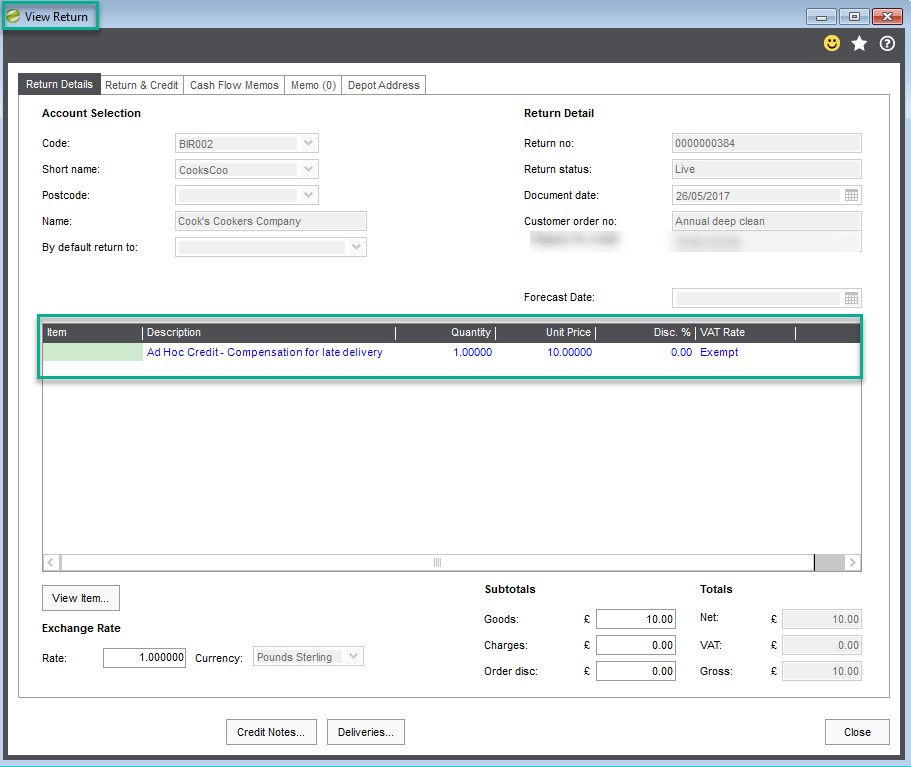
9.6. Adding an 'Ad-Hoc' Credit
If for any reason against a Hire Order Line you wish to raise a credit note, you can do so by adding a ‘Ad Hoc Credit’.

In our example screen shot above we wanted to compensate the Hire Order Customer for late delivery.
This is free text; you would select a date the credit note is to be raised (which in turn will be seen in the ‘Billing Forecast’ Tab.
The Credit Note (which in turn becomes a SOP return) will appear (based on date) within the in the ‘Generate Sales Orders’ process.
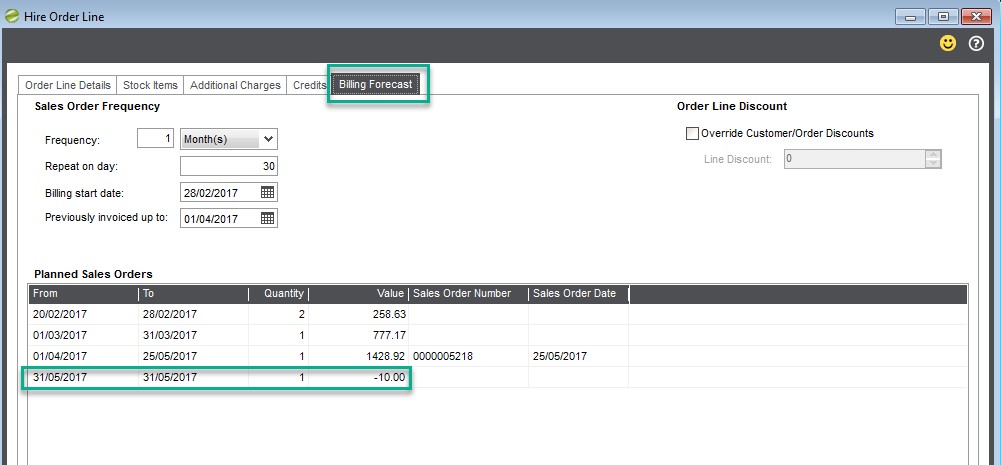
9.7. Hire Order Line Billing Forecast
This area is where you specify how often you wish to invoice the Hire Order Customer for the Hire Period and to generate a forecast of ‘Billing’ (Sales orders that will be generated)
The Options of which are configured within Utilities, Settings, and on within the ‘Duration Calculations tab’
You also set what day of the month the billing is to occur, the billing start date (see important note)
Important Note: if you have prior to using Sicon Hire been using another system, and have been invoicing for the Hire period on that other system (or manually), and you are adding what in affect are opening balance Hire orders and where you wish to record the original start date of the Hire Period you must add a ‘Previously Invoiced up to date’
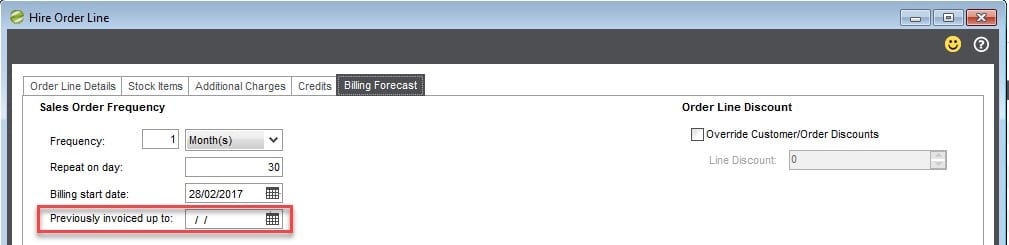
If you do not, and you add the original Hire start date ‘Requested from’ , the system when billing will look to invoice from that original date/requested date.
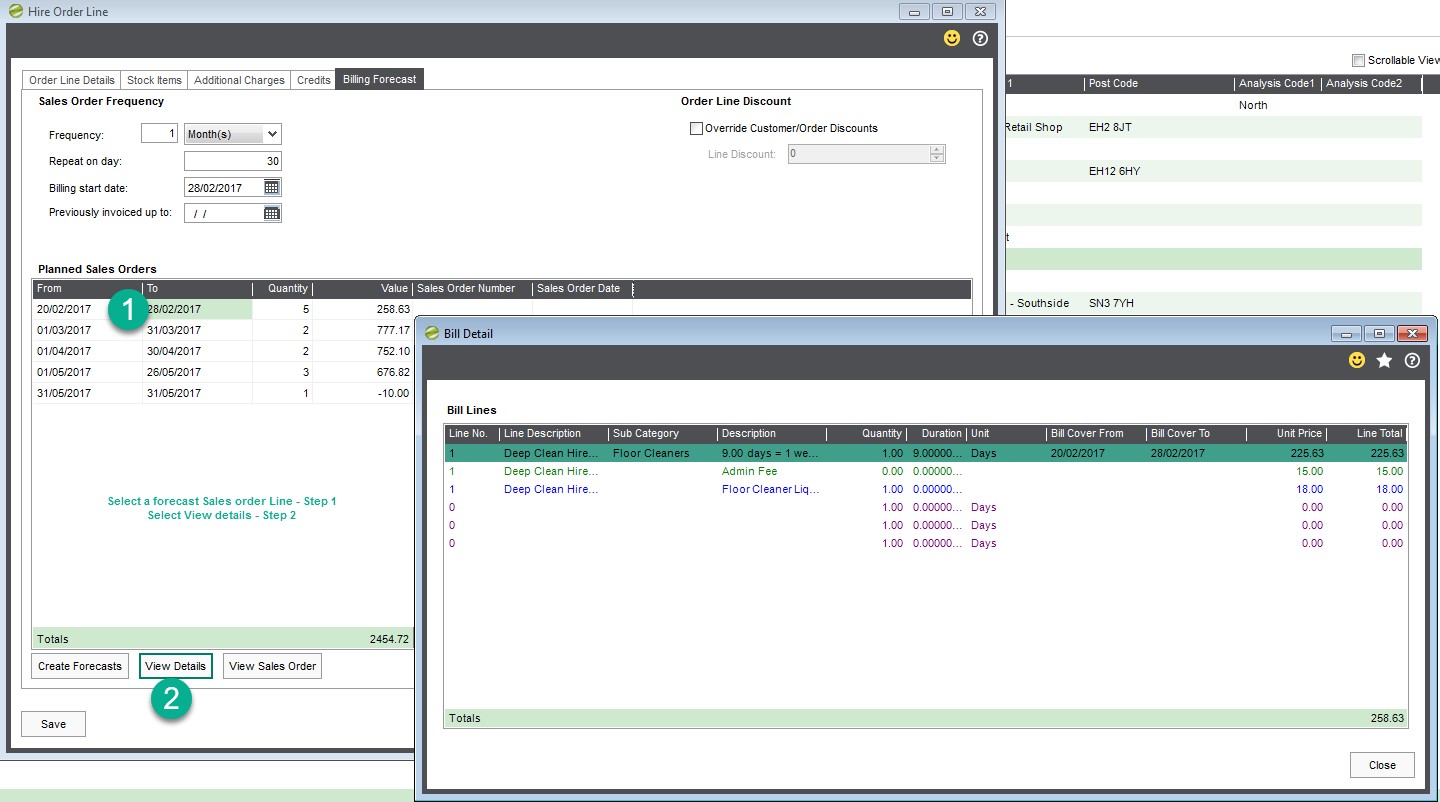
Use the ‘Create Forecasts’ button (Screen shot below) to generate (based on data entered) a forecast of expected sales orders (and ad hoc credits).
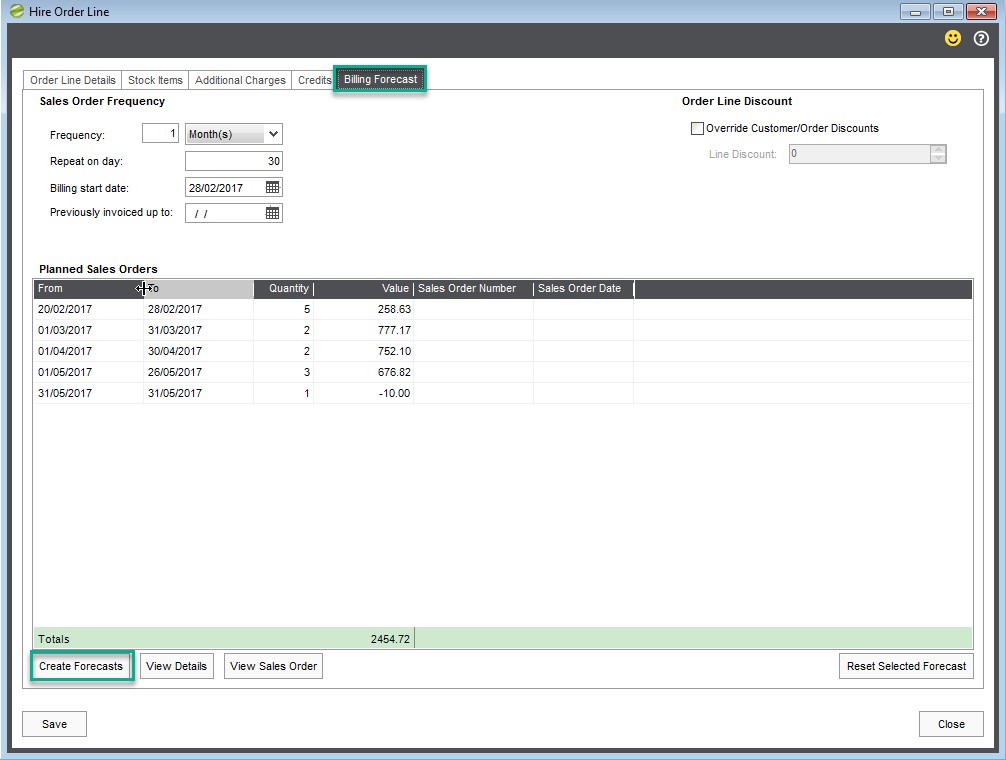
From this screen you can see how the system is calculating the sales order.
After a Forecast has been created on each line, and as sales orders are generated within the life of the Hire Order Line (s), the two fields on the Main Hire Order Details Tab are updated to show ‘Total Invoiced’ and ‘Total Remaining’.

As Sales Orders are generated the system retains the sales order number and the date generated for history purposes, and you can highlight a line and view the generated sales order from within this screen.
If you change a Hire Order line, you should re generate the forecast, by selecting the ‘Create Forecasts’ again.
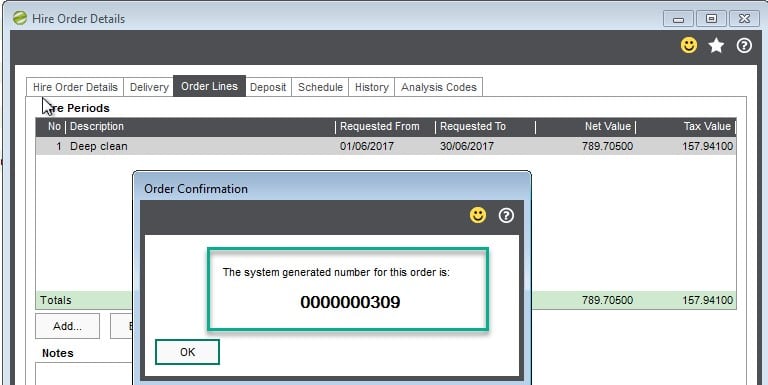
One all relevant data has been added to your Hire order you can select Save at which time the Order number will be displayed on the screen.
In example below we have chosen to create a new job, which will be prefixed with a ‘H’.
Press Ok to close and return to Hire Order List.
9.8. Deposit Tab / Deposit Hire Order(s)
This functionality is only to be used when the sales order / invoicing method is different to a normal hire order, and it’s a ‘One-Time’ Hire Order (Fixed Price).
Normal being:-On a hire order line, you specify how often you will invoice the customer during the hire period , i.e. Daily, Weekly, Monthly or Yearly monthly , when to start billing, and if an opening hire order ( if during go live you are bringing in opening hire orders) , a ‘Previously invoiced up to date’ .
Also with what we class as normal hire orders, you can use the Billing forecast to see planned sales orders and the Sales Order forecast enquiry function.
Deposit Hire Order (set at header level):
This type of order, o/s to be used where you need to raise a deposit invoice for the Hire Order, and then instead of raising sales orders at a set frequency until the end of the hire period you raise, you going to be generating a single ‘Balance sales order’ , so for the while life of the total hire order there would only be two sales orders raised.
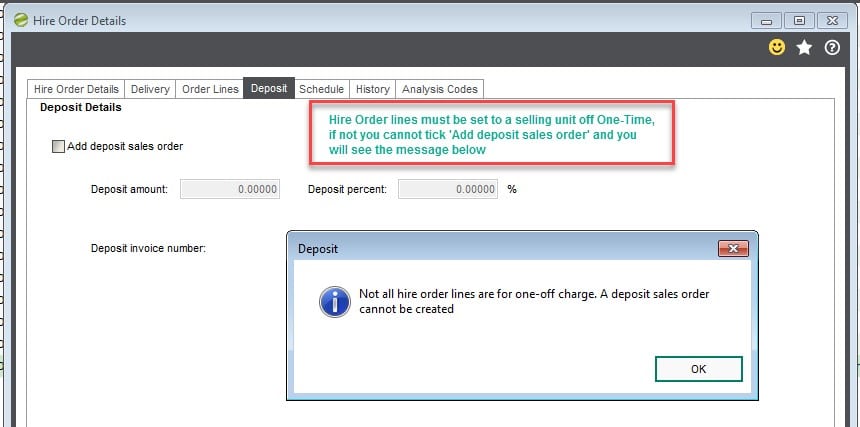
When adding lines to this type of order you MUST set the ‘Selling Unit as One-Time*.
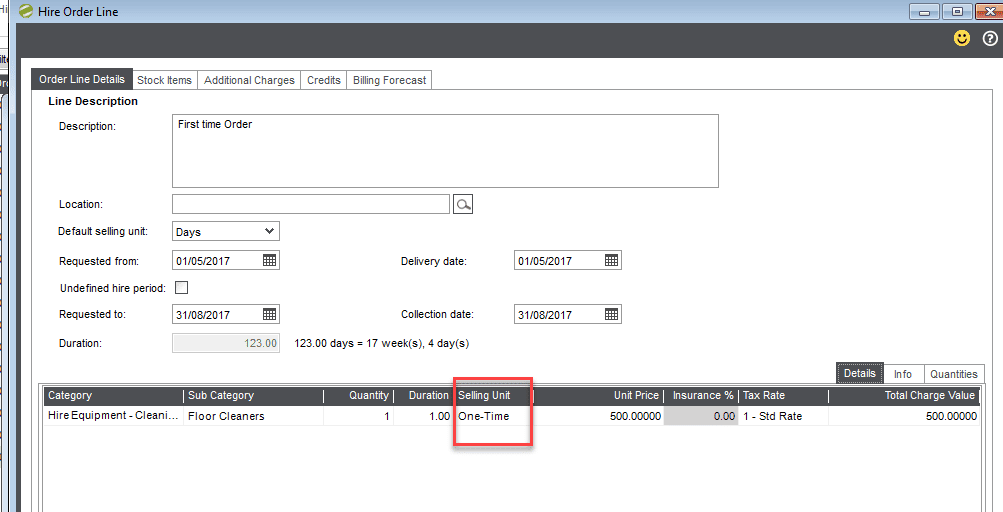
If you don’t select One-Time as a selling unit (as per screen shot above) when on the deposit tab at header level, if you tick ‘Add Deposit sales order’ you will see the message below, and it will not allow you to continue.
If you are looking to use this functionality then there are a couple of areas within settings you need to review, and consider / set up
1. Default Deposit Percentage: If you as a company have a default percentage of the Hire Order value that needs to be invoiced as a deposit you can set within the Sales Order Tab within Settings
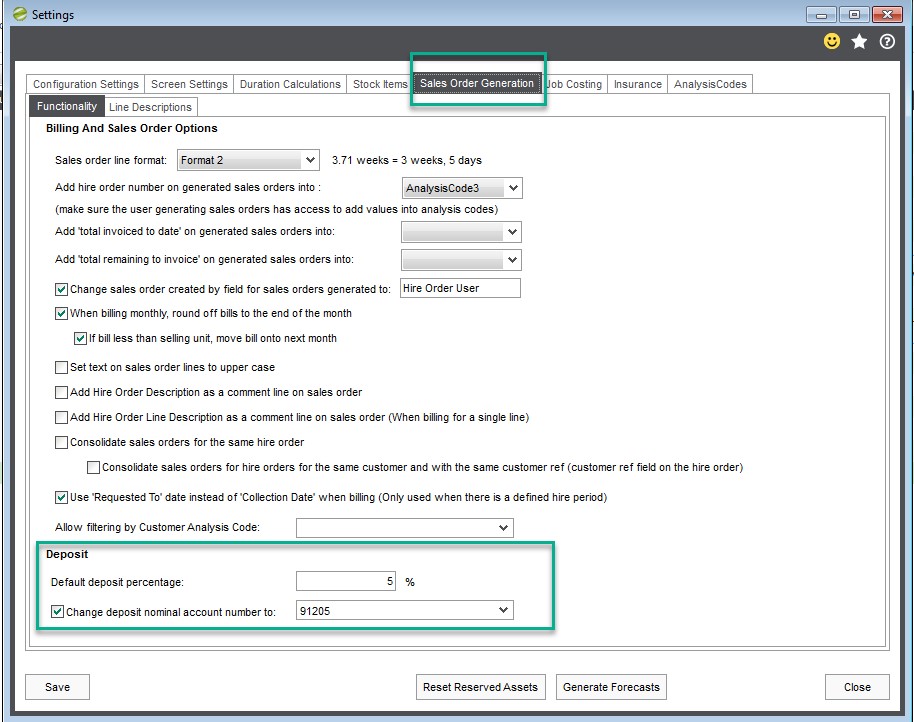
Different nominal code for deposit revenue? If so you can specify the nominal code.
2. The second setting to consider is the information pulled through on to the deposit sales order generated, if you wish to add additional information you can select additional fields from the Sicon Hire Table.
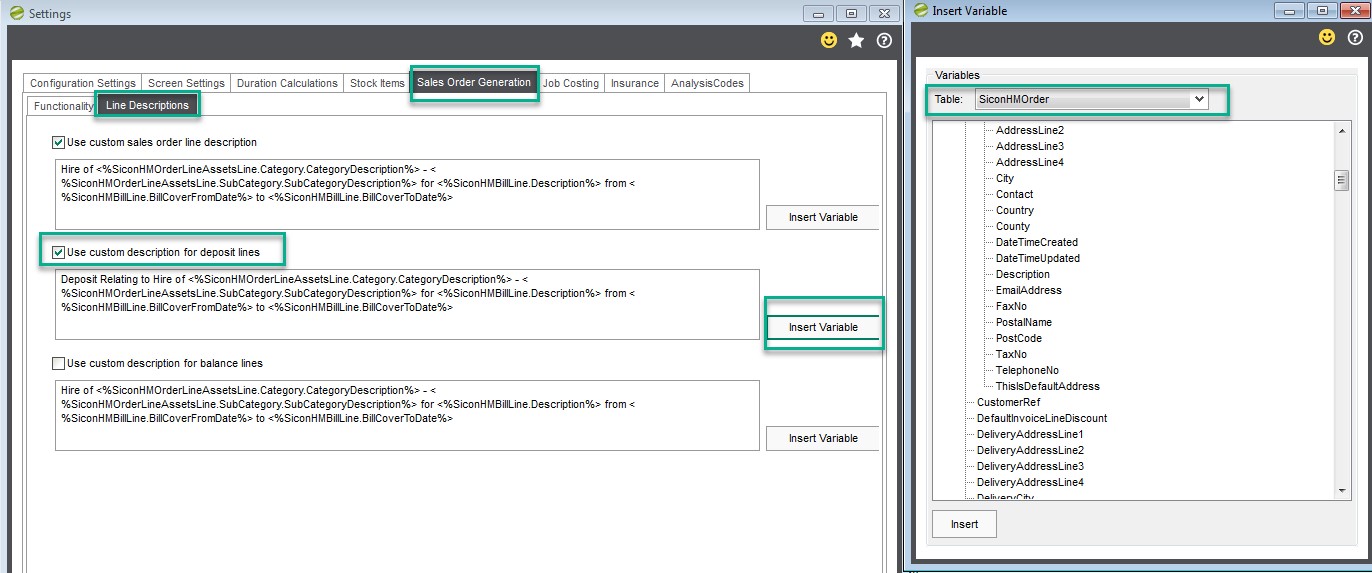
This can be achieved by:
Ticking the ‘Use Custom description for deposit lines’;
Click in the Box where the default text / variables are pre-configured (It’s a good idea to take a copy of this text , and keep safe , in case you need it before you start adding new fields / deleting what’s there as default).
Use the ‘Insert variable’ function button which will load the fields available to choose from, click on the field you wish to use, and click ‘Insert’.
And a reminder that Hire Lines must be set to a selling unit of one-time.
9.9. To Process a Deposit Hire Order Deposit Sales Order
Action as follows:
Add your Hire order in the normal way, adding lines first, marking them as a One-Time Selling Unit
- Click on the deposit tab
- Tick the Add deposit sales order
- Enter the deposit amount, it will calculate for reference the %
- And select ‘Create Deposit Sales Order’
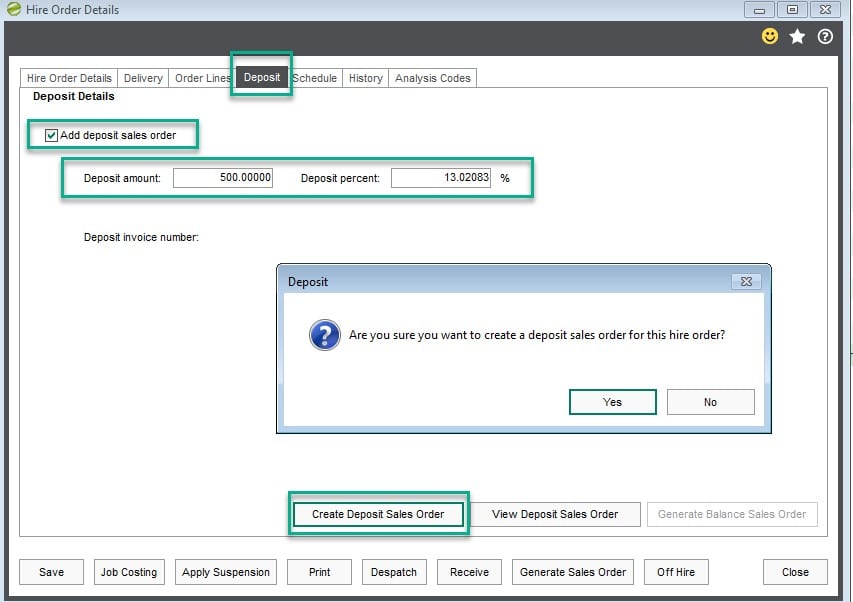
You will be prompted to confirm you wish to raise a sales order, and once confirmed the system will confirm a sales order has been raised.
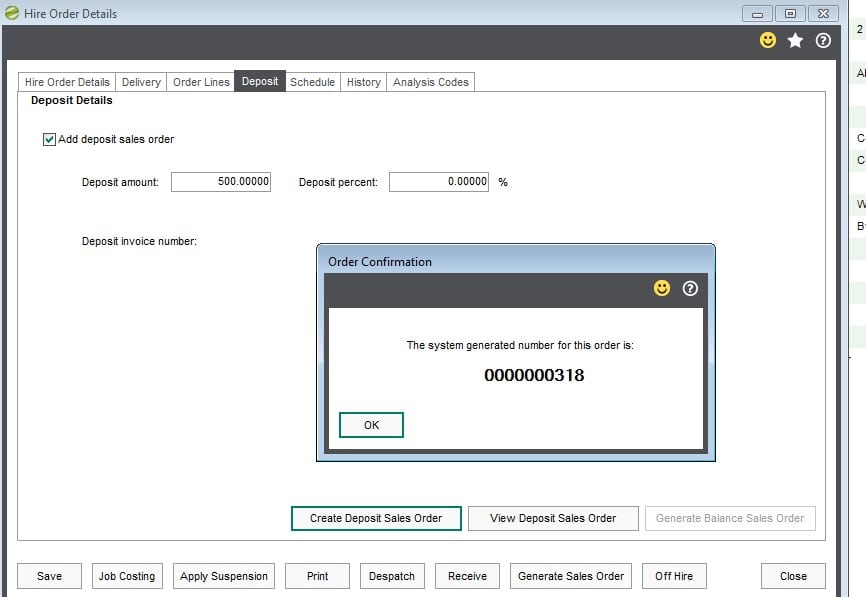
You would despatch, and receive back as normal at which time you would then come back on to this tab and ‘Generate Balance Sales Order’.
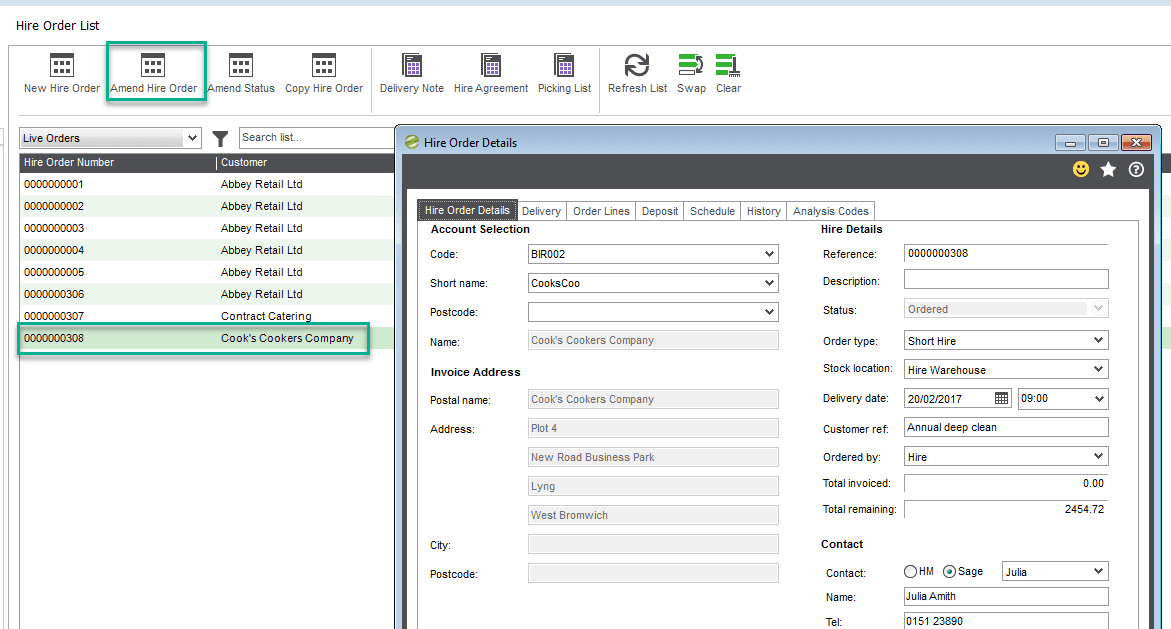
9.10. Amend Hire Order / Hire Order Lines
There are two ways to select a Hire Order to amend and make relevant changes as required (or simply to look at the order, with a view to making changes)
The first is by selecting the order from the Hire order list, and use the short cut icon (as below screen shot).
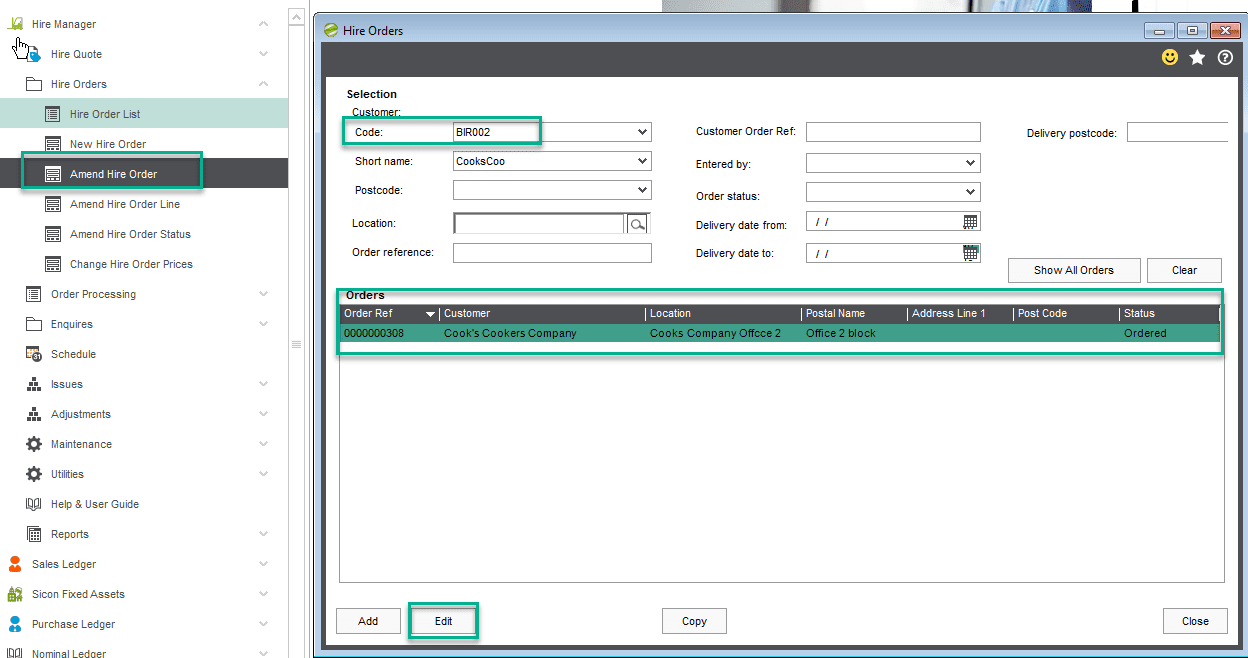
The alternative way is to use the ‘Amend Hire Order Menu Option.
When users choose this route, then the Hire Order can be found by entering various details including data such as ‘Customer Account Code’; ‘Short Name’; ‘Postcode’; ‘Location’; ‘Customer Order Ref’; ‘Entered by’ and then.
When relevant Hire order is listed select ‘Edit’ (as below screen shot).
Once any changes are made, and where billing details changed, forecast regenerated, upon save changes will be made.
9.11. Amend Hire Order Status (Cancel a Whole Hire Order)
When an order is first entered the status is ‘Ordered’.
As it’s possible to have multiple lines on an order, all at different stages, you would need to go in to the order, and order lines to remove a single line.
But if you are looking to cancel the ‘whole order’ and there are no further actions required on lines (i.e. they have been despatched, but not yet received back, they have been received back but not yet invoiced) you can by using ‘Amend Hire Order Status’ to change the status of an order from Ordered to cancel.
You will be asked to confirm that you wish to cancel.
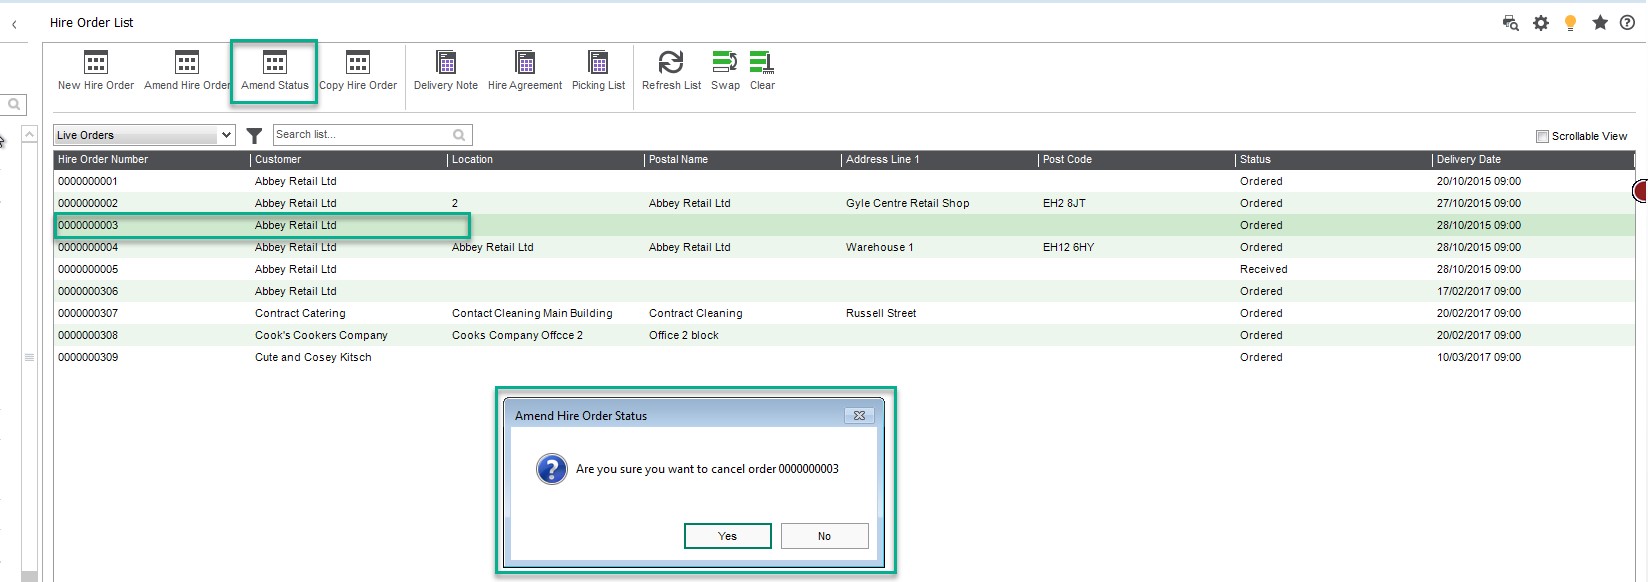
Once cancelled the Order Status becomes ‘Cancelled’ (as per screen shot below).

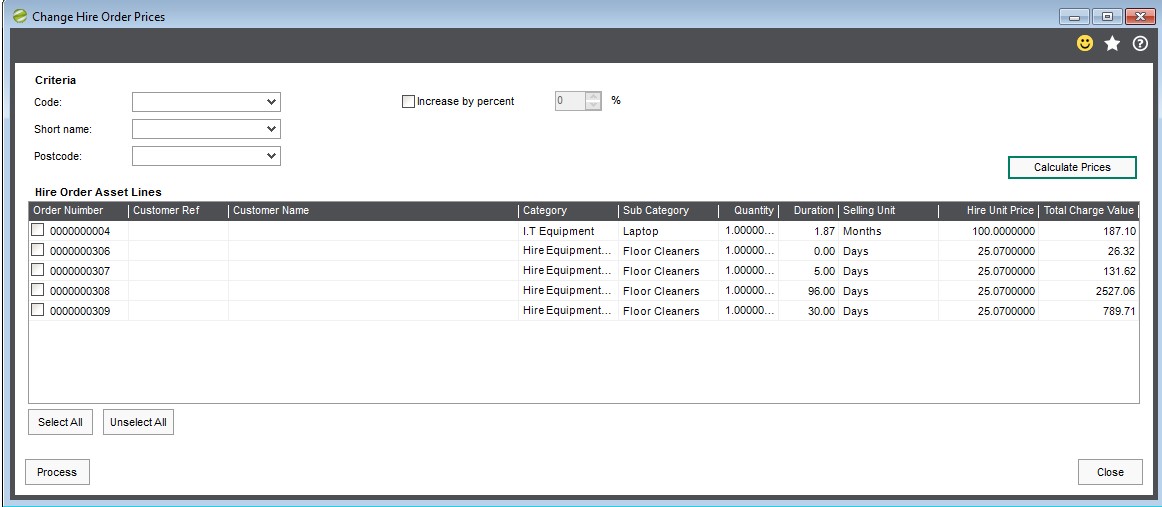
9.12. Change Hire Order Prices
This Grid form, is useful when you wish to increase prices on current / live hire order lines. You can Increase by a % (selecting calculate Prices after entering a %).
Before:
In our example we have chosen to increase all Hire Unit Prices by 10%, and you can see from the screen shot above to the one below, prices have increased by 10%.
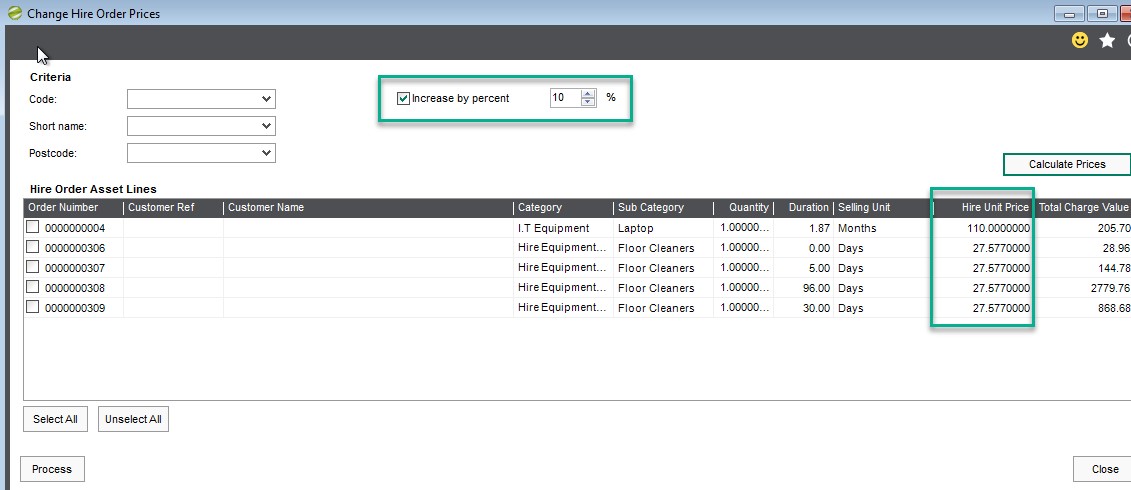
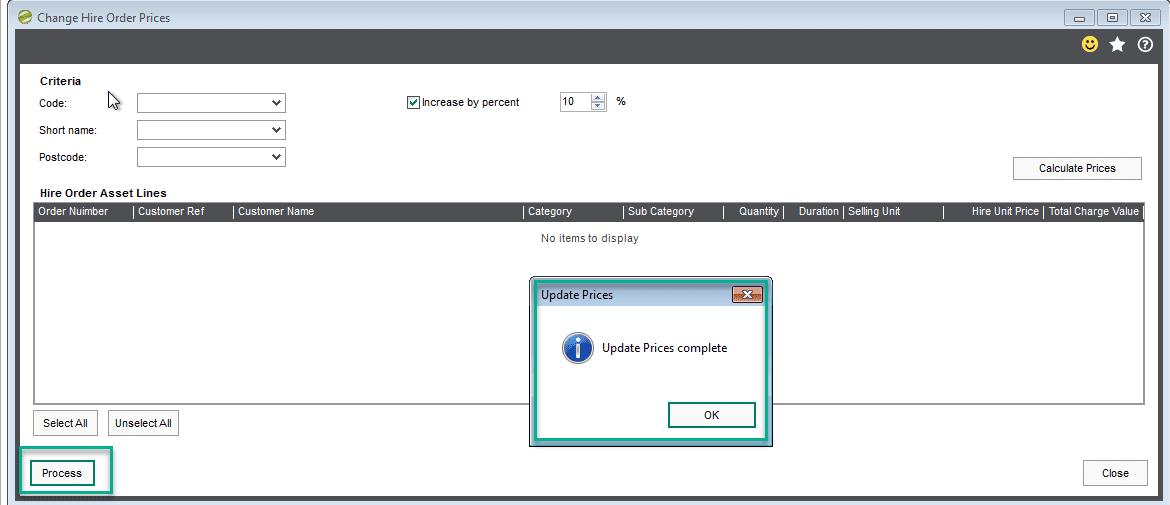
You then select ‘Process’ and then the system will update relevant Hire Order Lines with updated Hire Unit Pricing.
or you can manually select which Hire Order and click in the ‘Hire Unit Price’ field and change, again selecting ‘Process’ to update the Hire Orders.
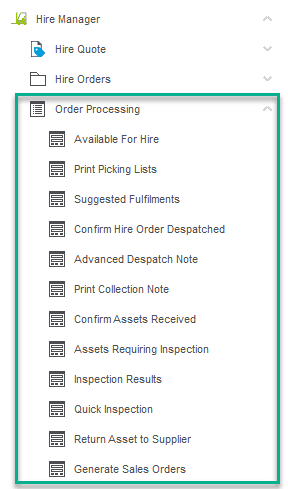
10. Order Processing
Within this section / area of the module you can run various processes as shown below.
10.1. Available for Hire
Individual Hire Assets are not added to a Hire order line directly, Hire Assets sit within The Sicon Fixed Asset Module, flagged with an Asset Type set to ‘Hire’
In order for them to be used on a Hire order, they have to also be flagged with a Hire Status of ‘Available for Hire’.
If you use, from within the Sicon Hire Module the ‘Issue Stock to Fixed Assets’ then this process will flag the Hire Asset as a ‘Hire Type’ and also flag it as ‘Available for Hire’.
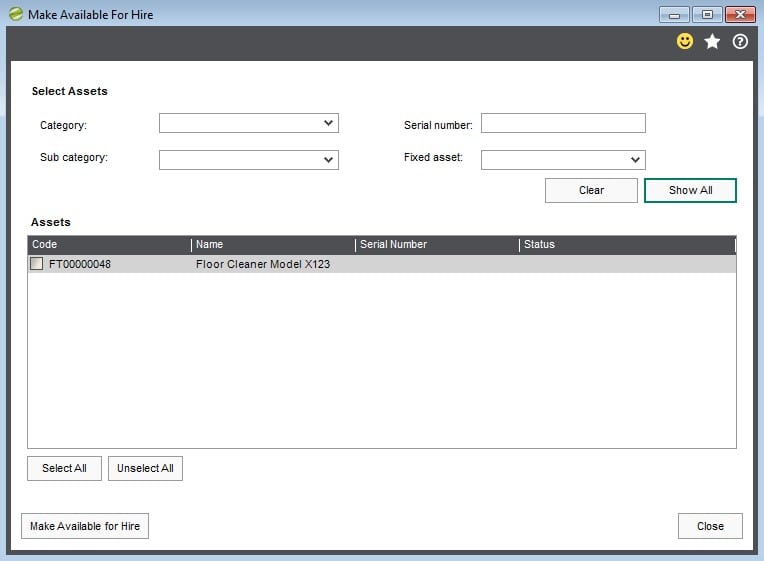
If, however the Hire Asset was originally set up, and not flagged as Available for Hire then by using ‘Available for Hire’ screen (as above screen shot) they can be flagged afterwards.
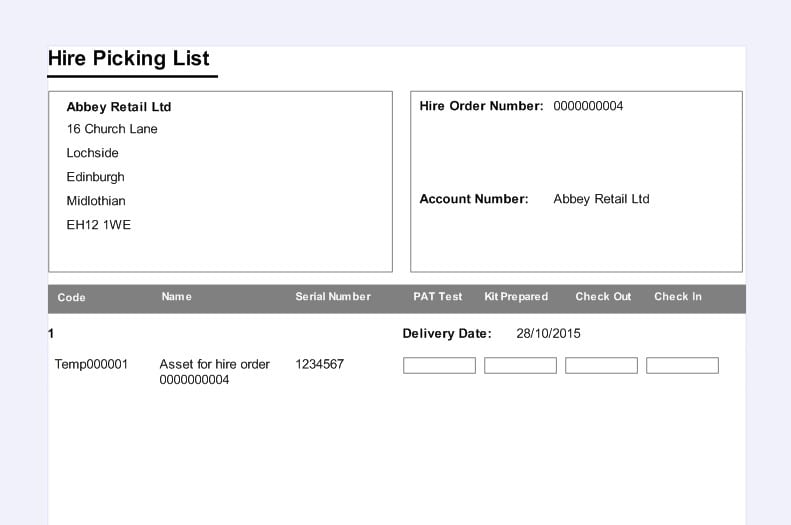
10.2. Print Picking Lists
Use this process, for example for stores for example needs paperwork to know what / which hire assets to prepare to send out for delivery / on hire. There are several ways from where you can print a pricking list, either by:
Selecting the Hire Order itself, a user can click on the Hire order line and select to print a ‘picking list’ (as well as a Hire Agreement, Delivery Note or a Collection Note).
Layouts are standard Sage 200 Report designer layout.

10.3. Suggested Fulfilments
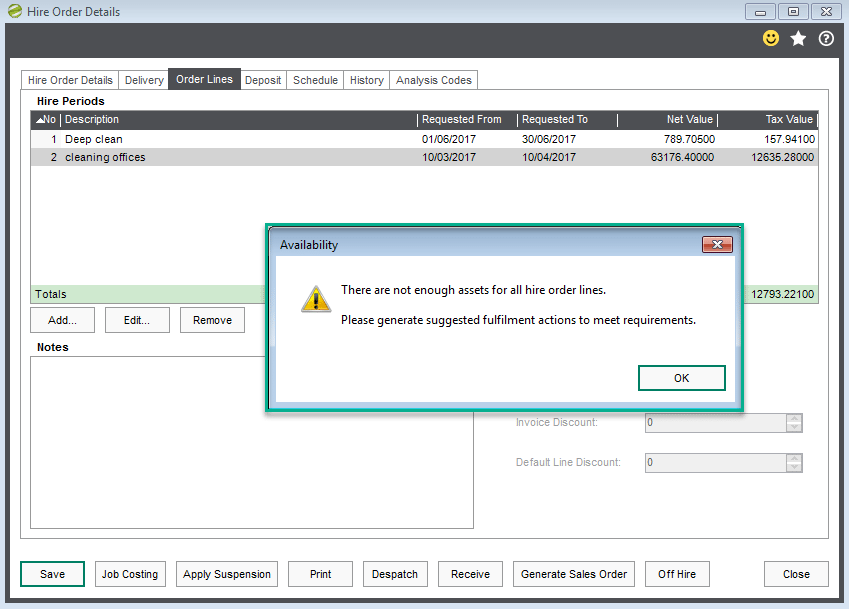
If it’s the case that you have the situation where you on occasion you do not have enough Hire Asset’s to fulfil your customers’ requirements, it may be that you as a company ‘Cross Hires’, i.e. hires equipment ‘In’ from 3rd parties/a supplier in order for you to Hire Out’, you can use the Suggested Fulfilment’s function.
This comes into effect when adding a Hire Order line, and where there are not enough hire assets, the line will go red.
To understand why you can click on the Hire Movements to see the movements of that Category/Sub Category for the warehouse selected on the Hire order line.
If on the hire order you had selected the wrong warehouse, and you would need to change the warehouse on the main order tab. If it’s a case that the hire assets are in the warehouse you selected, but the hire assets had been allocated in correctly to a different warehouse then you would need to do a transfer of assets.
On saving the order the system will suggest that you that you run the ‘Suggested Fulfilments’ process’ as you save the order.
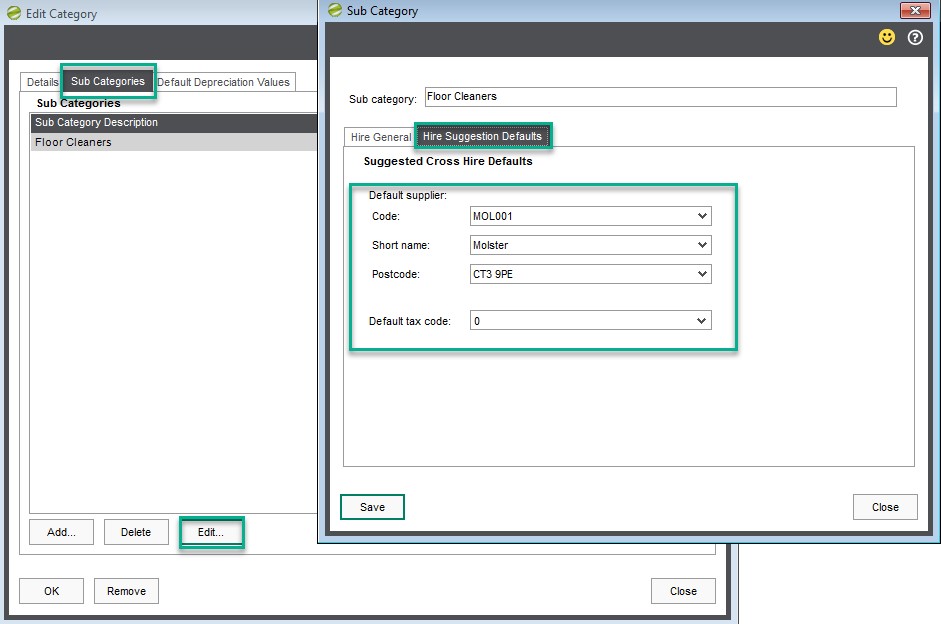
Defaults for cross hire are set up within the Fixed Asset Module, and on the Sub Category default screen (On the Category). You can set a preferred supplier. In the example below we have set CDA as our supplier for any items to be Ordered in to Hire, which fall under our Sub category ‘Diggers’:
Users can access ‘Suggested Fulfilments’ process/routine from within ‘Order Processing’ menu item, at which time the following screen will open.
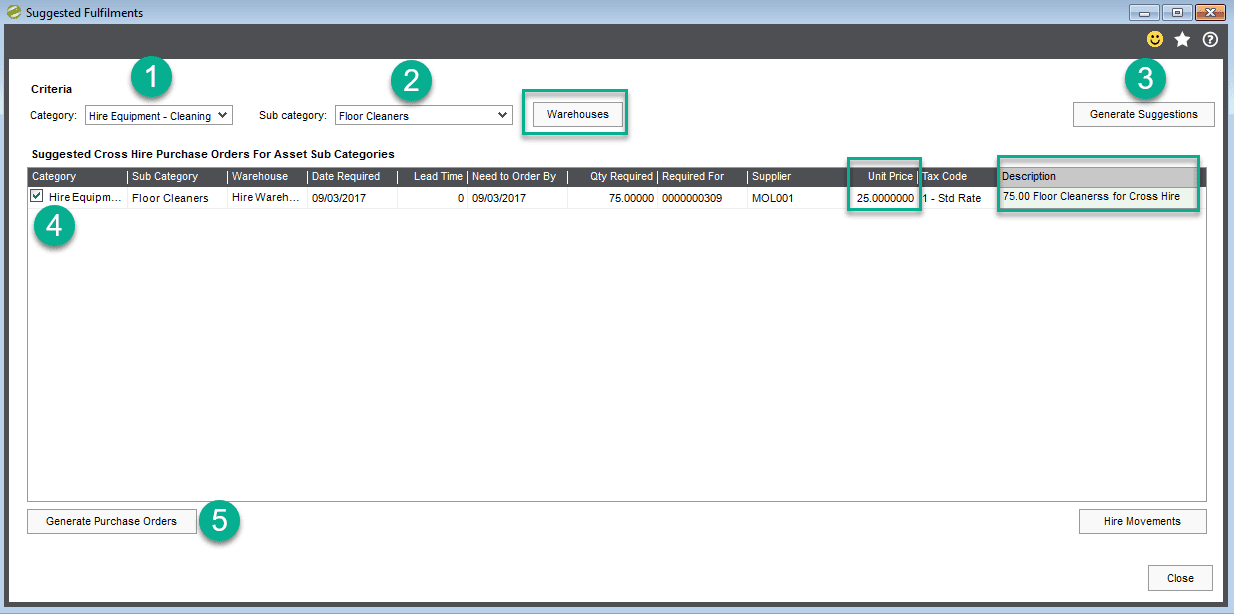
Select the Category & Sub category (steps 1 + 2 as above), then filter by warehouse if relevant, and then as step 3 select ‘Generate Suggestions’.
Your shortfall (s) will be listed, and you should then review, add the:
Cost price you are going to be paying your supplier (per unit) and a ‘Description’ for the purchase order text with price line , and where necessary increase the Qty to be ordered.
When happy with details shown / entered select ‘Generate Purchase Orders’ (step 5 above).
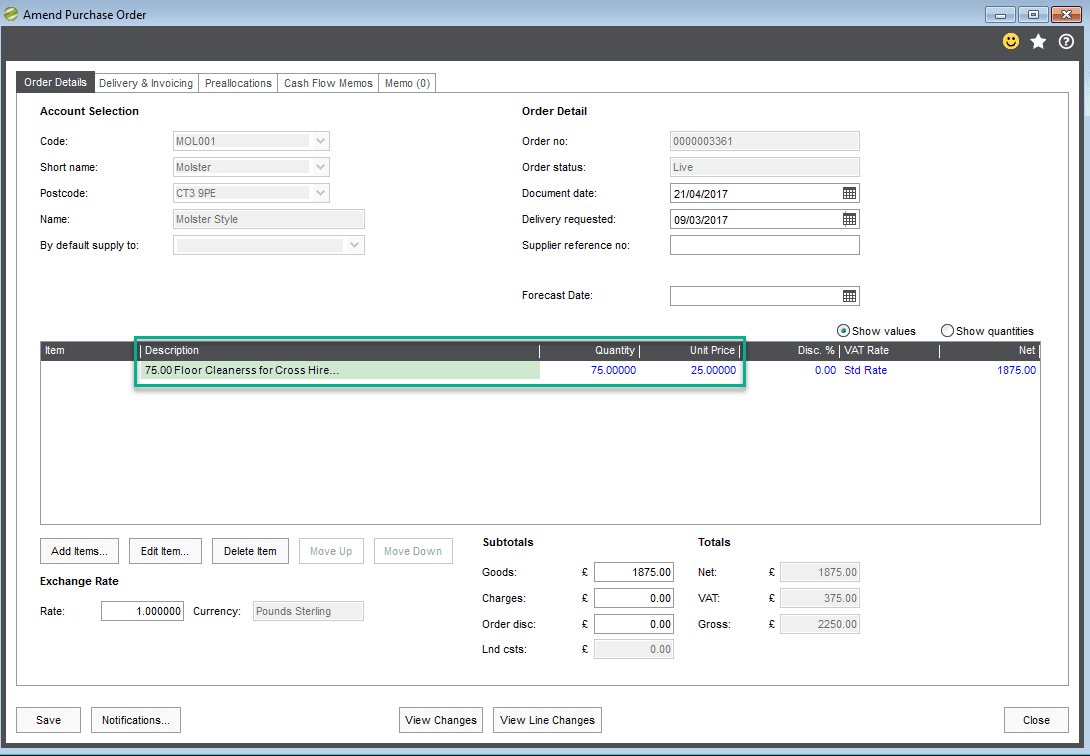
A PO will be raised, and can then be sent to the supplier.
When the POP is received, temporary assets are created, in order to fulfil the Hire Order.
Select the Category & Sub category (steps 1 + 2 as above), then filter by warehouse if relevant, and then as step 3 select ‘Generate Suggestions.
Your shortfall (s) will be listed, and you should then review, add the:
Cost price you are going to be paying your supplier (per unit) and a ‘Description’ for the purchase order text with price line , and where necessary increase the Qty to be ordered.
When happy with details shown / entered select ‘Generate Purchase Orders’ (step 5 above).
A PO will be raised, using the standard Sage 200 methods you can amend the lines, print and send to your supplier.
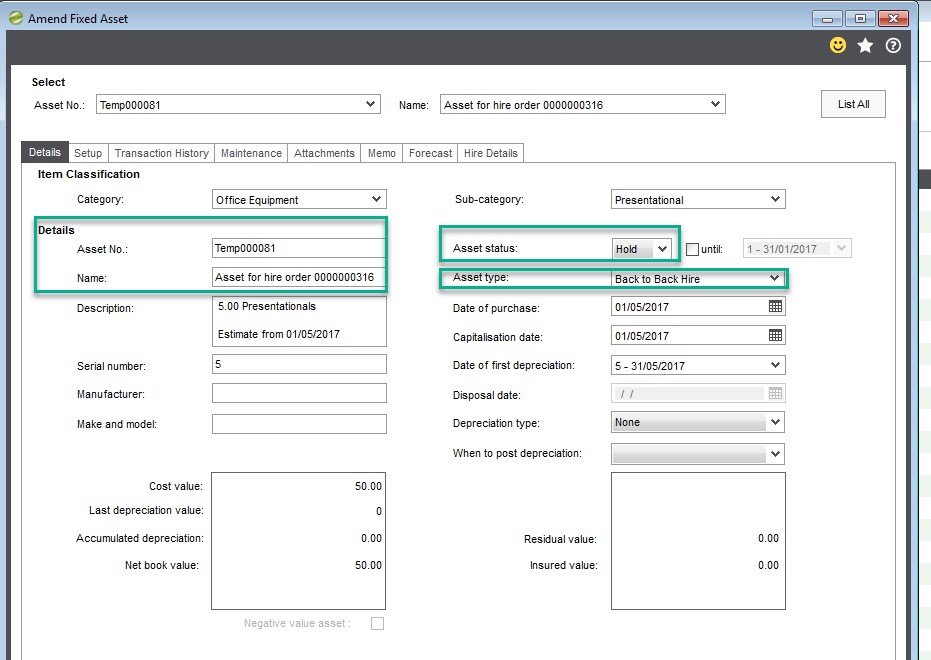
When the POP is received, temporary assets prefixed with Temp are created as per the example below.
The screen displays which hire order the items are required for and the required warehouse. Once booked in the items will be available for Hire for the linked Hire Order.
Standard routine applies thereafter for the purchase order, i.e. receiving the Invoice.
Within Fixed Assets the relevant Hire Order details are visible, and the asset is automatically put on hold, so no depreciation takes place, and the type is displayed as ‘Back to Back Hire’.
10.4. Confirm Hire Order Despatch
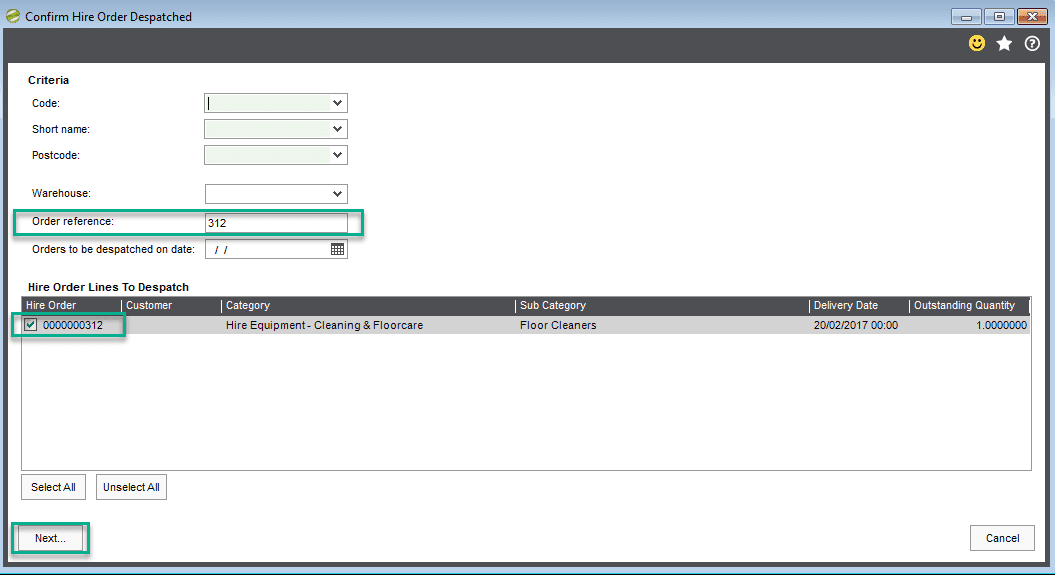
When you are ready to despatch the Hire Assets, use ‘Confirm Hire Order Despatch Routine’. You can select a single order, order(s) for a single customer, select by warehouse, by order reference, or by entering a single despatch date (which when used looks for hire orders with status of ‘Ordered’ with a ‘Delivery Date’ of the entered date.
If you filter by ‘Code’, ‘Short Name’, ‘Postcode’, ‘Warehouse’, or ‘Order reference’ you do not need to enter the despatch date, as the system, will show all those relevant to your selection
If you are looking only to display a certain date, then simply filter by ‘Orders to be despatch on date ‘and enter chosen date
Depending on the filter selected, different assets will be display, examples below
Filter by Hire Order Number only (will show Hire Order lines all orders for selected hire order
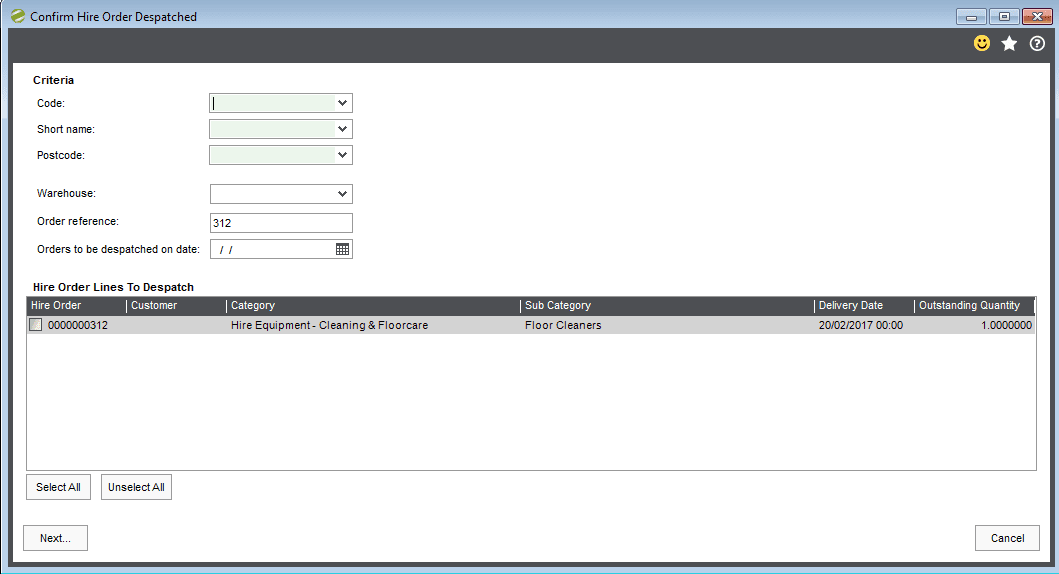
Filter by Customer Code /or Short Name or Postcode (will show all orders for selected customer regardless of delivery date).
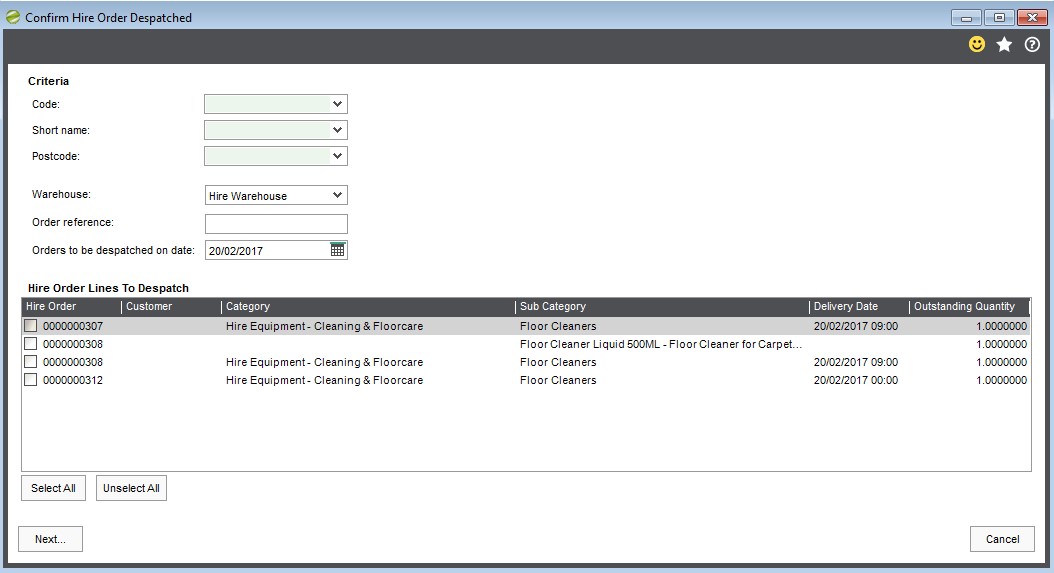
When you have decided which lines are to be despatched and your method for filtering (in example below a single hire order).
Where you have set your settings to allocate on despatch, you will be asked to select the individual asset to hire.
It would on this screen you can change which individual asset (s) are selected, if within settings you have the system set to automatically allocate serial numbers on order entry
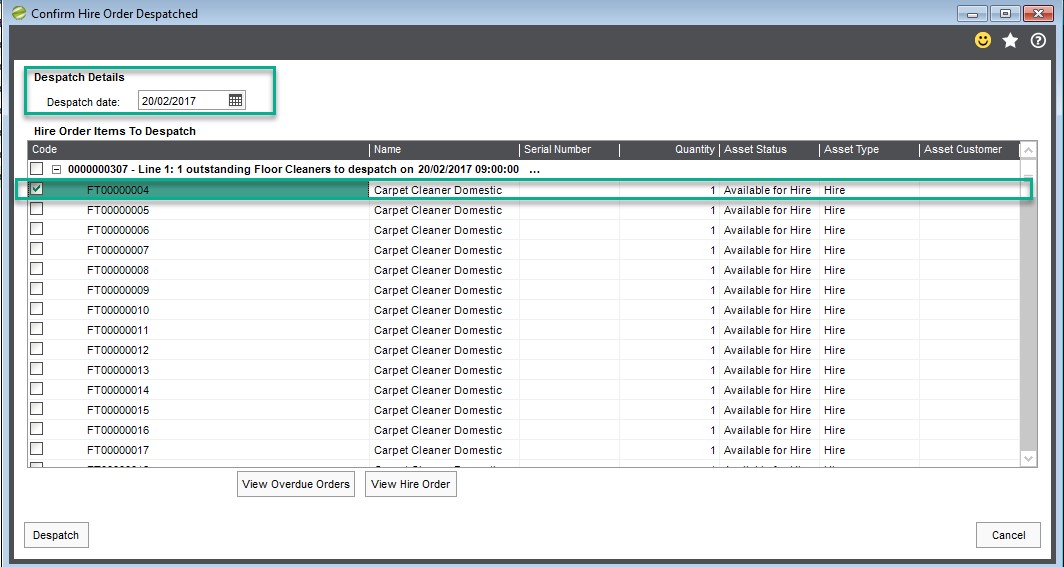
Note (s) : If allocation is at the point of despatch, items will not appear in the schedule diary view within enquiries until despatched.
If you are using serial numbers we would recommend Allocate on Despatch, this will enable you to pick the correct Hire Assets, otherwise the system will auto allocate, which may not suit your processes.
When selected, click Despatch; enter the despatch date which shows on the delivery document produced at despatch.
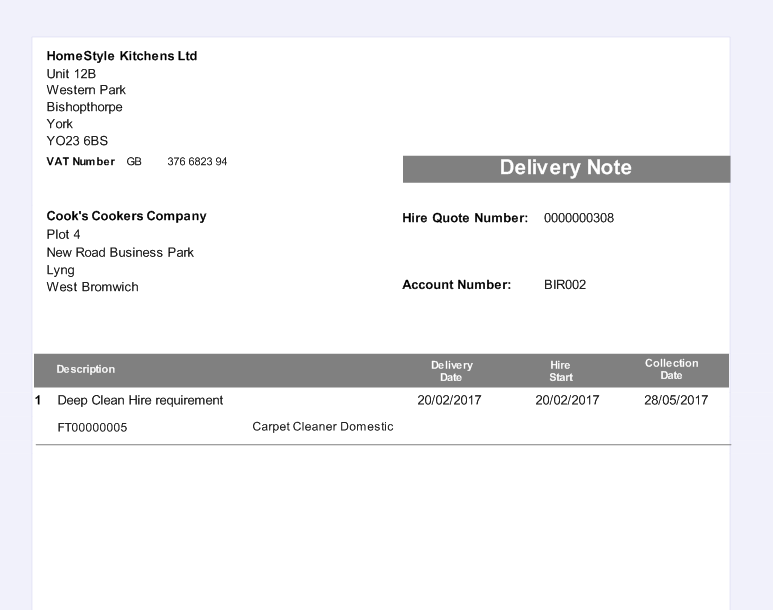
Once you have despatched your order, your delivery note is produced and you will be able to see in the diary schedule that the asset number is on for the hire period; you can double click on the diary entry and view the order.
10.5. Advanced Despatch Note (use with care)
This feature was added for a particular customer, who needed to prepare despatch notes in advance for the Hire Items going out on delivery on a Saturday afternoon, after being collected by delivery /couriers on a Friday night from the previous hire order customer but not being returned to stores until Saturday AM.
In their case their admin team does not work Saturday, so would not be there when the previous hire order items came back when in normal circumstances users would then process the return via ‘Confirm Assets Received’, and thereafter despatch out using the ‘Confirmed Hire Order Despatched’.
So by adding this function the admin team on a Friday afternoon could use the function ‘Advance Despatch Note’ which in one process, books in the asset from where it was previously, using the ‘collection date’ as the date booking it back in, and at the same time despatches out on the hire order line you are advance despatching. Hire movements / history is recorded as standard.
The ‘use with care’ warning is of course, that when used, the previous hire order asset item, is physically not back with you, when the despatch note for the ‘future hire order’ is printed, but has been received back in, so the system thinks it is physically back with you so there is no longer visibility of which ‘assets’ are due back.
10.6. Print Collection Note
A simple method to print collection notes to issue to your drivers for example to know where, when and what hire assets they are collecting.
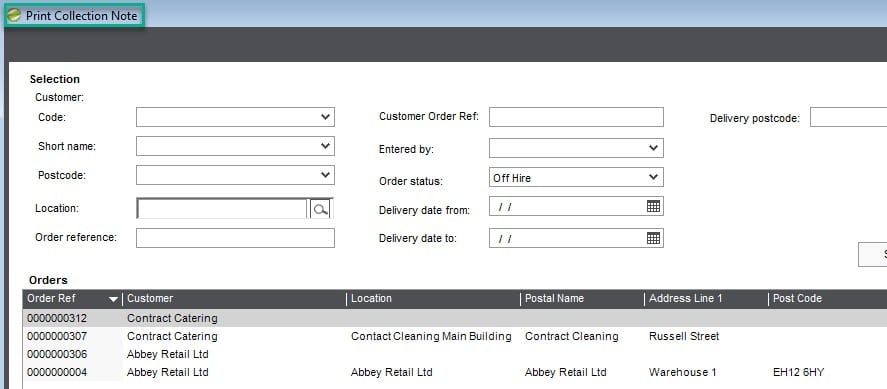
Select the Hire Order (s) and Print.
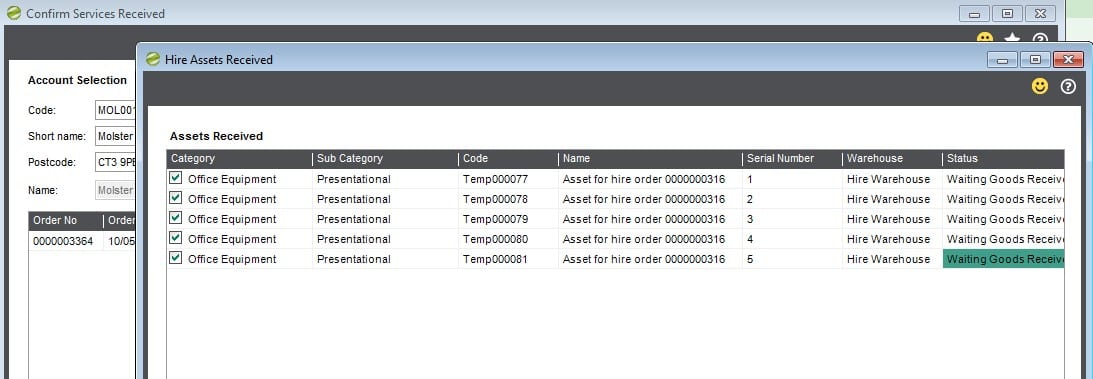
10.7. Confirm Assets Received
To access this function, select Sicon Hire; Order Processing; Confirm Assets Received, in order to process the receipt of the asset back into to the required location/warehouse for inspection (if inspection required) or to make available for hire for a different hire order.
Ensure you enter the correct ‘date’ for which you are receiving back, if you are running this process after the event, and you leave the ‘receive date’ as todays date, you will be changing the ‘requested to date’.
On example below there is only one asset, but if on the hire order there was multiple assets on hire, but you are receiving some back you would use the ‘Select Assets Button’ (highlighted in red below) to flag which individual assets are being returned.
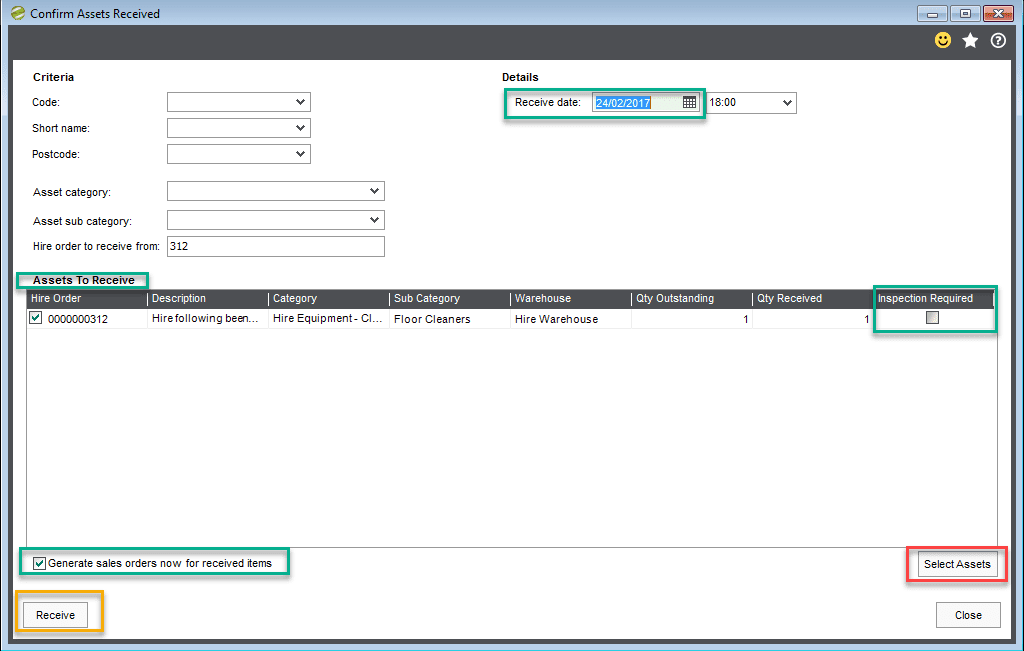
Depending on your default settings the ‘Generate sales orders now for received items’ will either be ticked or left unticked, you can choose to untick, and generate a sales order at a later date through ‘generate sales orders’, or if un-ticked, you can choose to tick, so after confirming ‘received back’ by selecting the ‘Receive’ button (highlighted in orange).
Depending again on default settings the ‘Inspection Required may be ticked or un-ticked, if ticked, and left ticked, after receiving back users will need to go into ‘Assets Requiring Inspection’ to confirm inspected, and release to make asset ‘available for Hire again’. If un-ticked the asset will be ‘available for hire again’.
If ticked on this screen once you click ‘receive’ an inspection document is printed , as per the example below.
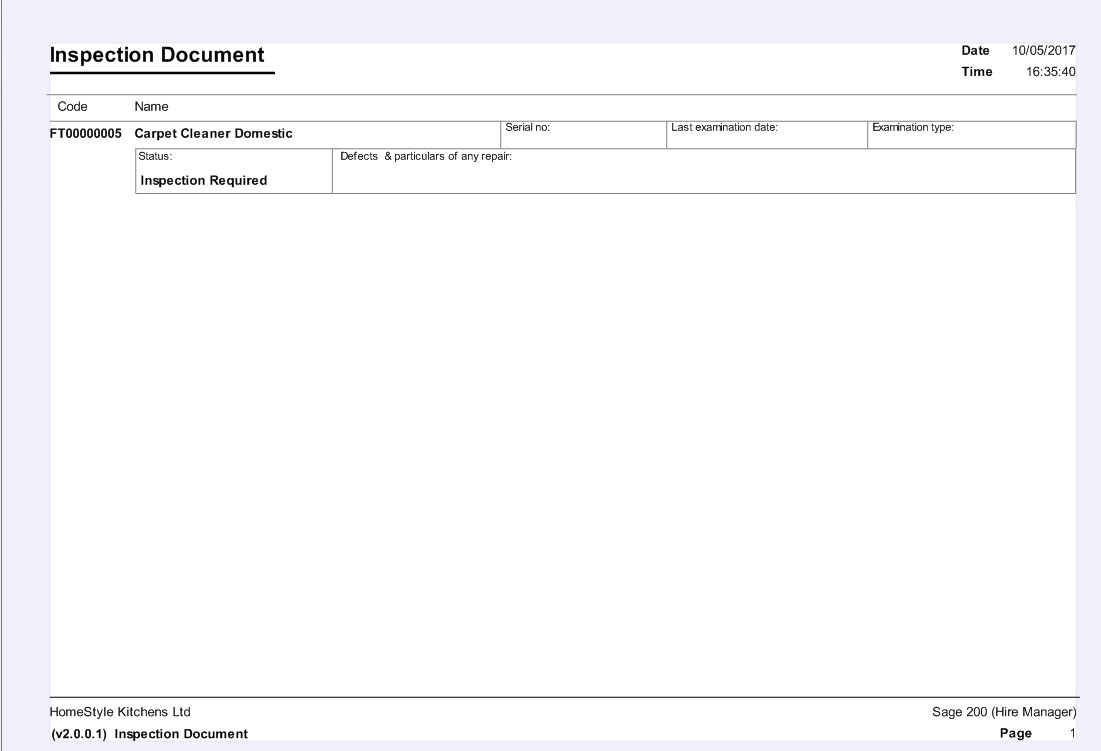
Users can use this document ahead of entering the ‘inspection results, via the menu item ‘Assets Requiring Inspection’.
If during the ‘Confirm Assets Received’ process, you have either left the ‘Generate Sales Orders now for received items’ ticked (a default setting), or if you have ticked during the ‘receiving back process’ you will after the inspection document is produced see a message as below, advising you that a sales order has been generated, and asks you if you would like to open the sales order.
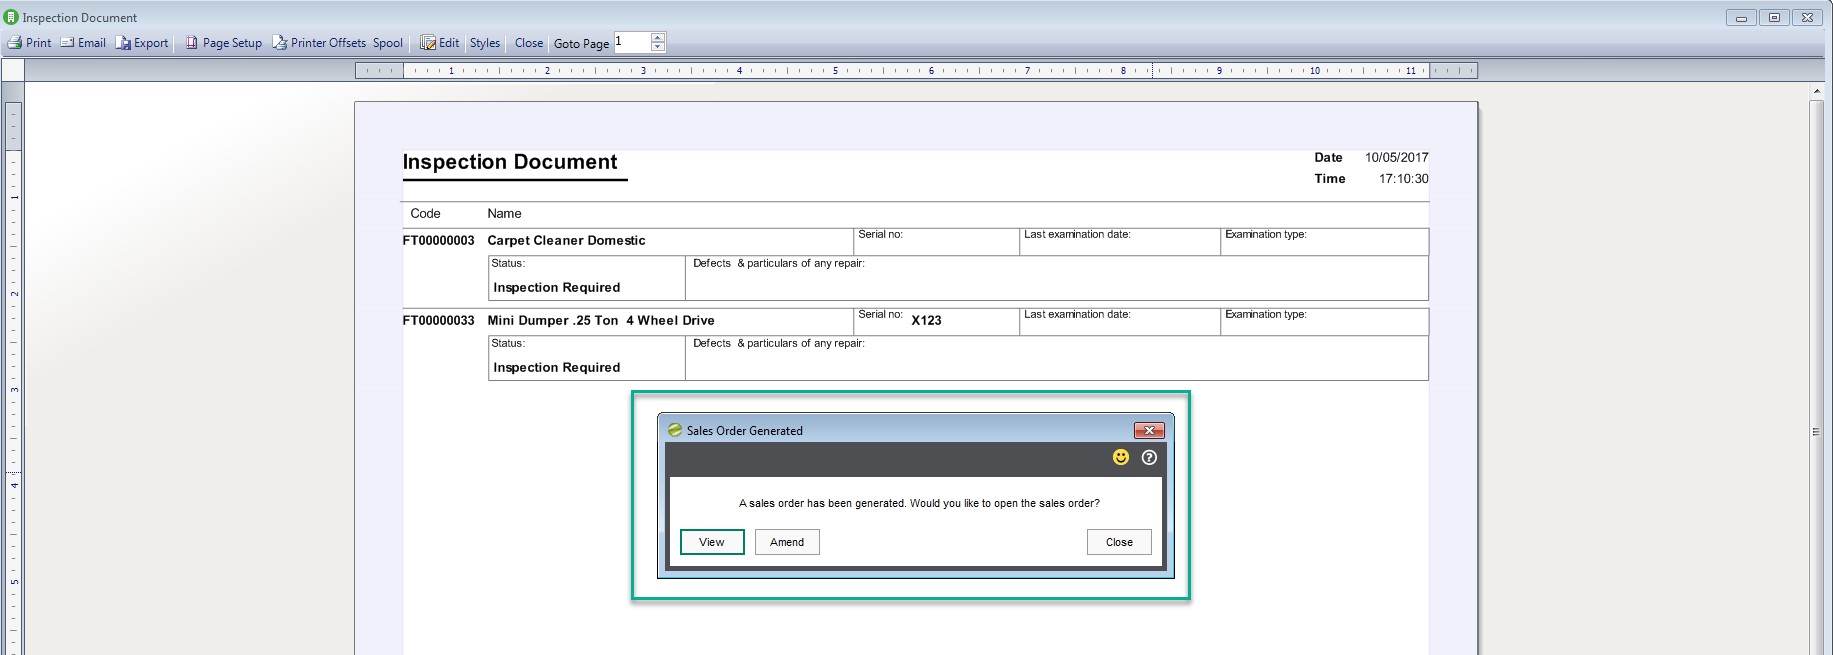
You have the option to open in ‘View Only’ mode or ‘Amend mode’.
The example below is ‘Amend mode’; You can see that the information regarding the Hire Order is pulled though.
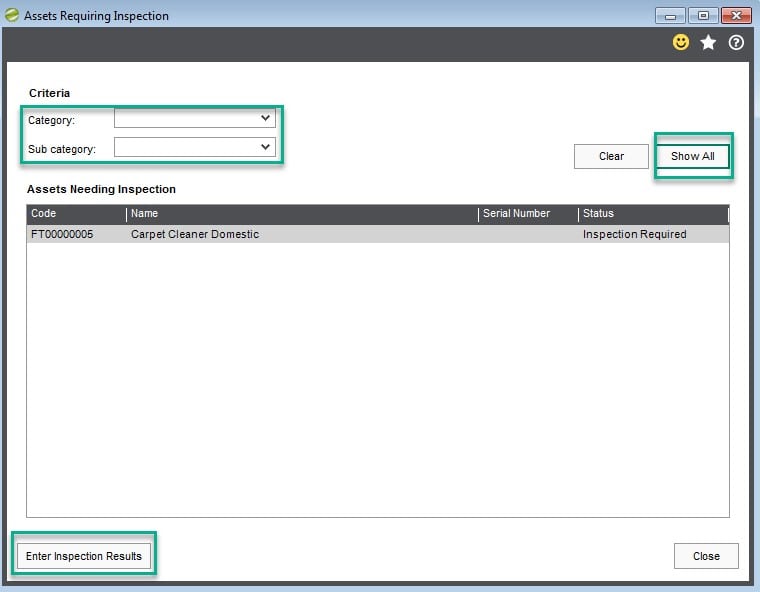
10.8. Assets Requiring Inspection
If you have your settings as such or you selected on an individual Asset Received entry screen, (Or on during the ‘received assets back’ routine you flagged as requiring ‘inspection’ you will need to complete the function Assets Requiring Inspection.
To access this function, select Hire Manager; Order Processing; Suggested Fulfilment. You can select either by Category, Sub Category or combination of both. Alternatively, you can select Show All.
10.9. Inspection Results
Highlight the Hire Asset you are entering Inspection Results for, click on Enter Inspection Results.
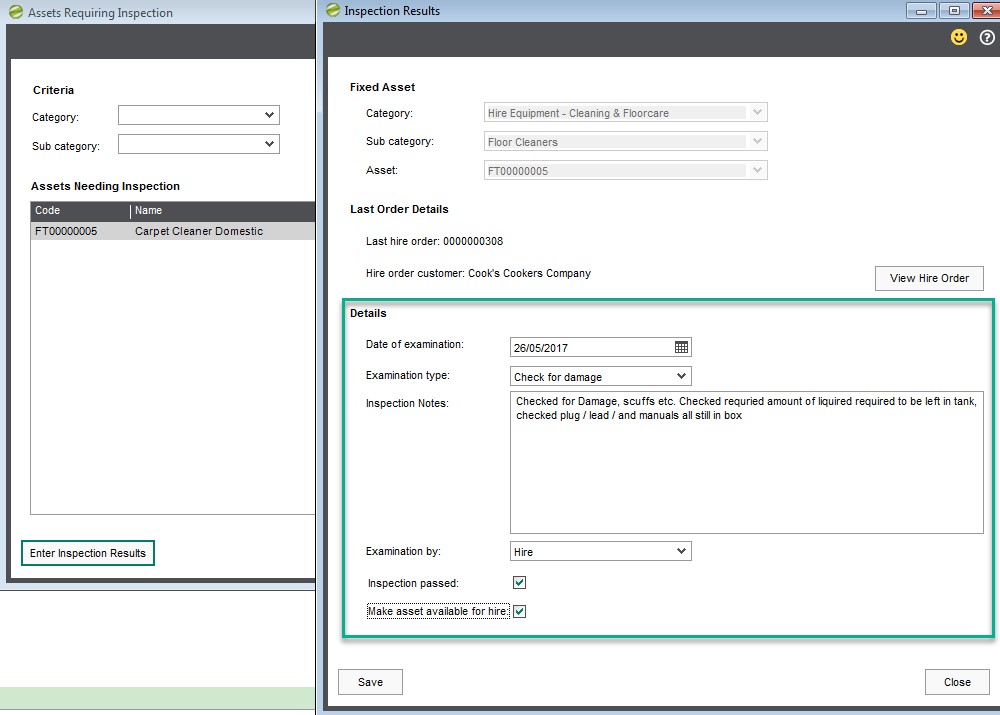
You are then prompted to:
Enter date of examination, Select the Examination type (from a pre-defined list) , Inspection Notes, confirm which sage 200 user whom carried out the examination by (, tick to confirm inspection passed, and tick if you wish to now make the asset available for hire.
If you do not confirm the hire asset has passed its inspection, the status of inspection will be ‘Failed Inspection’ – At which time the asset will not be available for Hire.
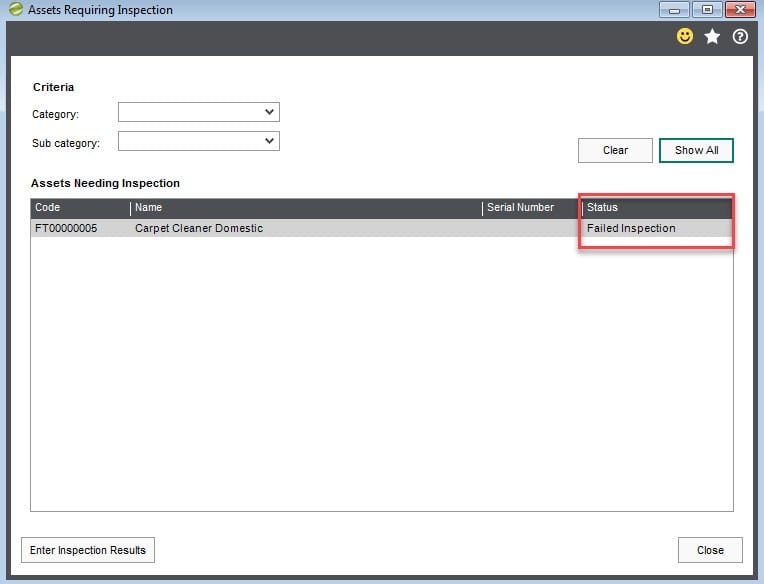
The Asset will remain in the state of ‘Inspection required’, until the Assets is available for inspection again, and hopefully ‘pass inspection’.
10.10. Quick Inspection
Use this option as a quick method to add inspection results for multiple hire assets, noting that when choosing to use this quick method there is no ‘inspection note’ entry.
You can search / filter by Catergory/Sub Catergory or Select ‘Search’ to show all.
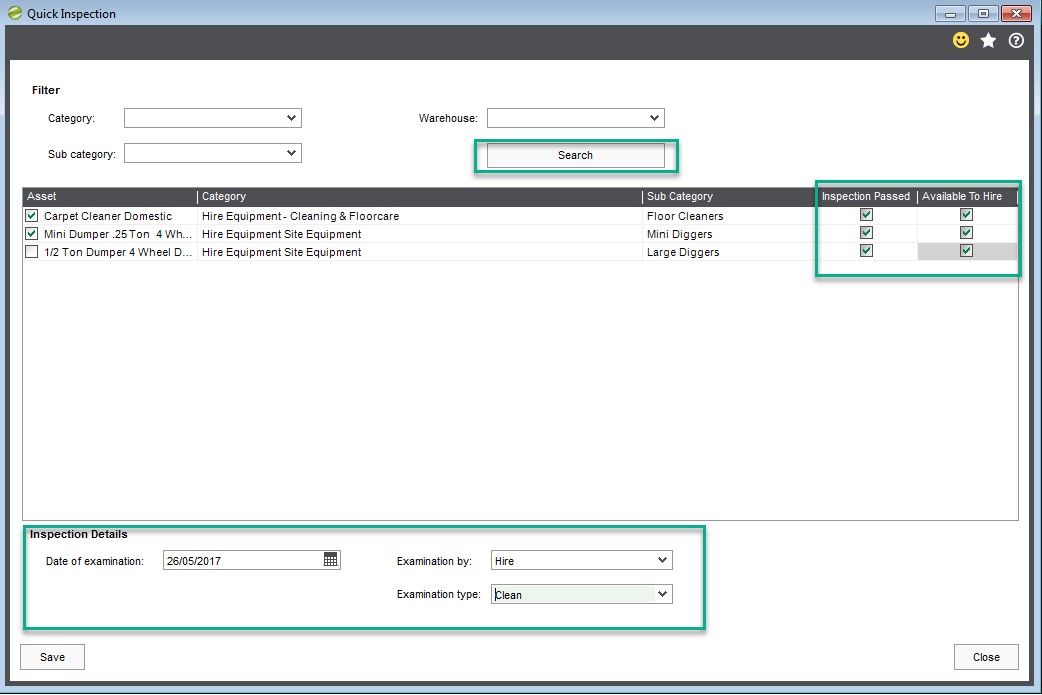
Users would simply tick the assets, tick to confirm inspection passed, and available for hire, enter the date inspected, select the sage 200 user who inspected and the type before saving.
10.11. Return Asset to Supplier (Cross Hire / Back to Back Orders)
Use this routine to return cross hire (temporary assets ordered in to fulfil a customer’s hire order). When the screen opens you can filter by Category/Sub Category, by serial number or an individual asset number, or simply ‘Show All’.
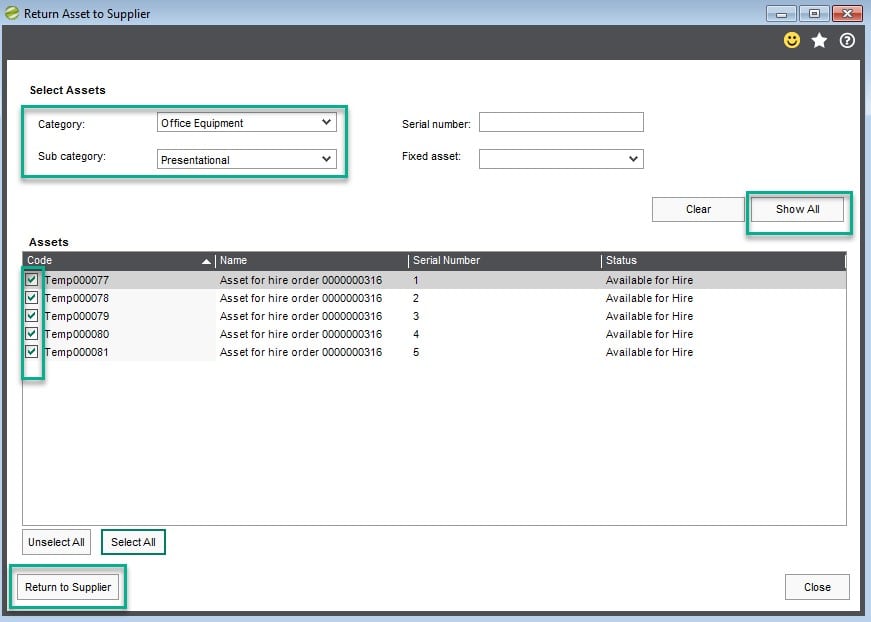
Select the temporary hire assets you wish to return, and select ‘Return to Supplier’.
This function does not raise a POP return, this is by design, and this is because the reason n standard Sage 200 you would raise a POP return, is because you are expecting a credit note, and in this case you would not be, so this process within Sicon Hire is simply to record that this temporary asset is being returned to the supplier, and no longer required as a cross hire/temporary hire asset and therefore not available for hire.
10.12. Generate Sales Orders
Pre Requisites for Sales Orders being generated as a result of Hire orders:
- Within Sales Order Processing settings please ensure that Auto Generation or Order Numbers is switched on.
- Hire items are deemed as service items for invoicing purposes, so please ensure that ‘Order Line despatching within Sales Order Processing settings for Text and Service/Labour order lines are set to ‘Confirmation Not Required.
- Within Sales Order Processing User Permissions that the relevant users have ‘Override Default Confirmation method on Order Lines Ticked.
- Within the Sicon Hire Settings there are options to select which Sales Order Analysis Fields your Hire Order Number will appear/filter through to (which in turn can be displayed on your invoice). You will need to ensure that within Sage 200 standard ASM & SOP settings that analysis fields are configured accordingly.
- Review, Configure and set as required the relevant default settings / options within the Functionality & Line descriptions tabs within the Sales Order Generation Tab, within Sicon Hire Setting area of the module.
If you have configured your setting so that sales orders are automatically generated when receiving hire assets back (Screen shot below):
At the point assets are received back, the ‘Generate sales order for this item now’ box will be ticked, and upon conforming the system will automatically raise a sales order and give you the opportunity to ‘View’ or ‘Amend’ the sales order.
At the point assets are received back, if you do not wish to generate a sales order at this time you can un-tick the box, choosing to generate the sales order(s) at a later date as described below
Process through to Sales Orders Processing for invoicing by selecting Generate Sales Orders.
To access this function, select Hire Manager; Order Processing; Generate Sales Orders.
There are several options available to obtain the list of orders that require a sales order to be raised.
- You can select a specific customer, or a specific Hire Order number
- Select by Invoice frequency (Invoice frequency is set against a hire order line, on the billing forecast tab)
- Select a month (for which the system would display orders due to be invoiced in that month)
- Include (by ticking) orders that should have had sales orders generated before the day this process is being run
or - Simply hit display to show all due for generating (as in screen shot below)
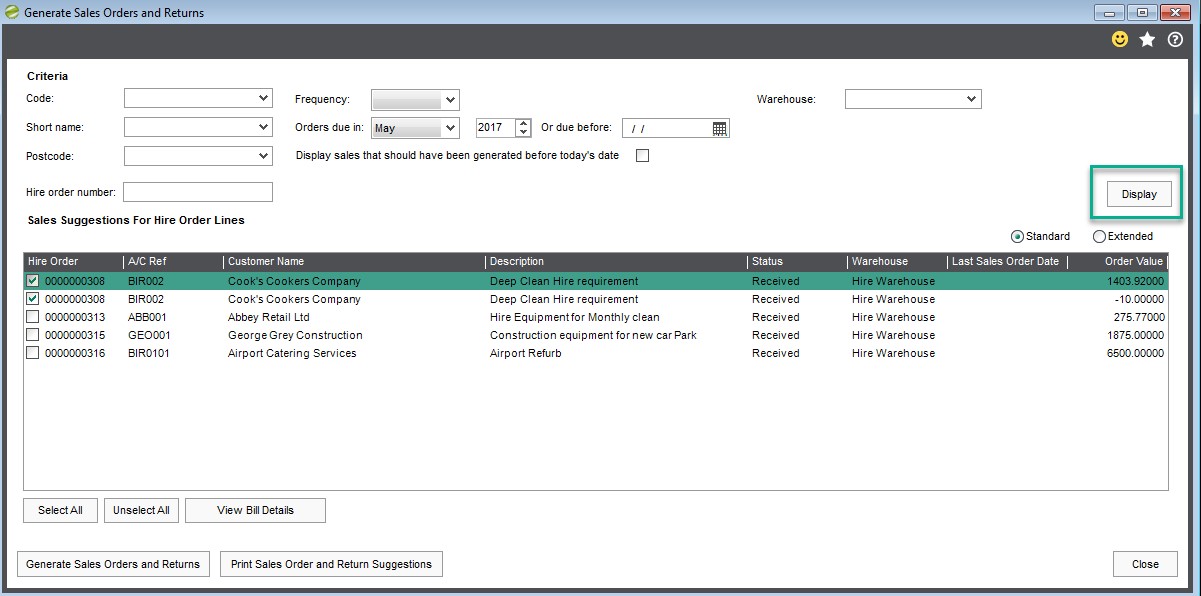
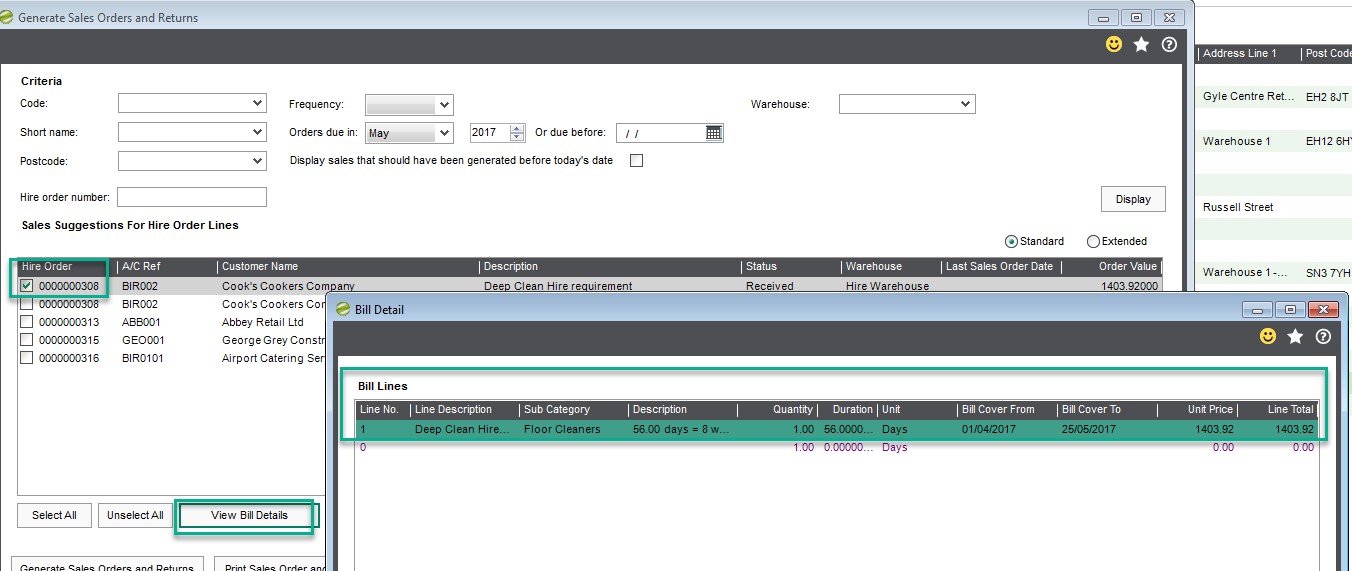
From this screen, on highlighting an order line you can also ‘View Bill Details’, which when selected will bring up a ‘Bill detail’ screen showing you how the bill due is calculated (screen shot below).
You can also from this main Generate Sales orders & Returns Screen, Right mouse click and send to excel (standard sage list view function).
When you are ready, and have selected those orders you wish to generate sales orders for, press the ‘Generate Sales Orders and Returns’. In screen shot below we have selected just one.
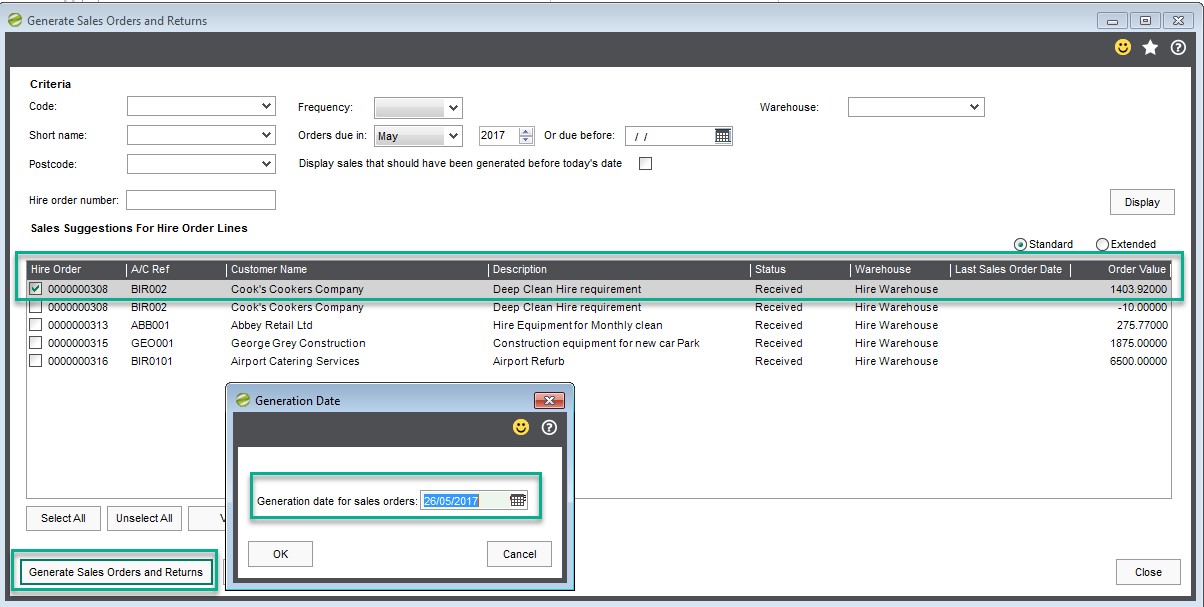
You will be prompted to enter a date for the sales order (which will in turn populate the document date; requested date & promised date on the sales order)
The information populated on the sales order will depend on the preferred defaults. options set on the sales order generation tab within Sicon Hire settings as described in section 5.5.
On our example above there is the Hire charge itself, an additional charge (delivery), but no insurance or additional stock items
Sales Returns / Credits
On a Hire Order it’s possible, as described in section 9.6 to add an ‘Ad-Hoc’ Credit on to / against a Hire Order Line , example below:
These credits will also be seen on the billing forecast tab as a minus figure.
Sales Return credit notes are processed within the ‘Generate Sales Orders and Returns ‘process and are displayed as a minus figure.
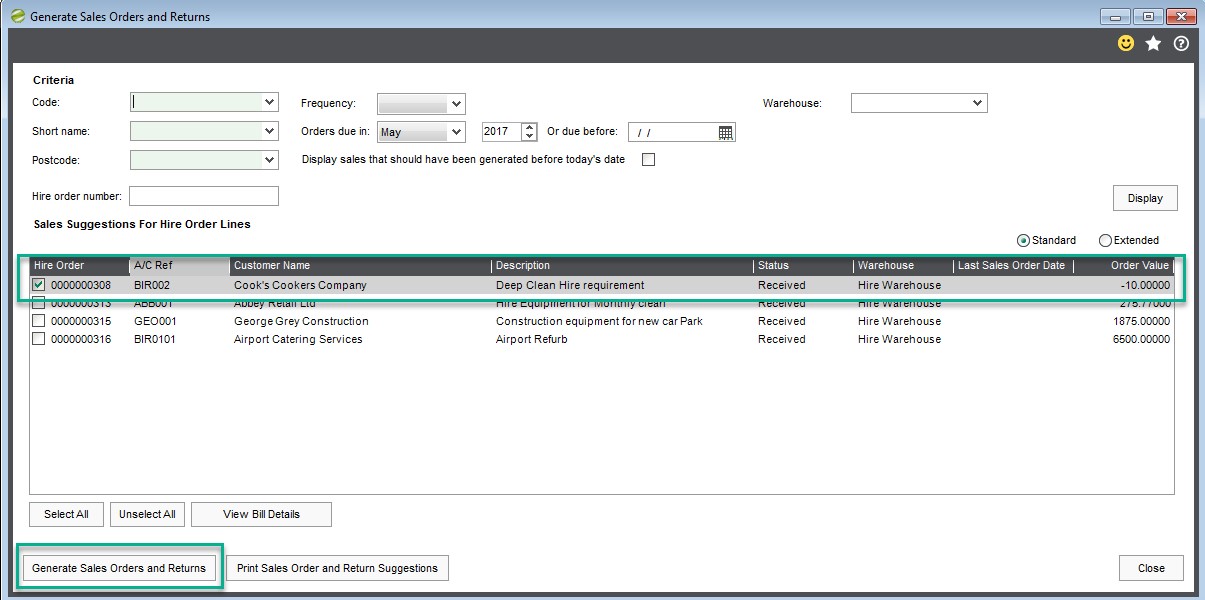
When you are ready, and have selected those orders you wish to generate sales orders returns for, press the ‘Generate Sales Orders and Returns’.
As with orders, you will be prompted for a date, and a message will be shown on screen to confirm an order/return has been generated.
The details brought over to the sales order return as far as description is concerned, is the free text description entered when adding the ad-hoc credit on to the hire order line.
11. Enquiries
There are number of enquiry options, no amendments / processes are allowed when using the enquiry screens, like standard sage 200 process, enquiry screens are useful where you allow sage 200 users to view orders, but do not want them to make any changes / amendments.
11.1. Asset Register List
A simple list of Hire Assets, showing status, category, Sub Category by default, but by adding additional columns on the list view (right mouse click, columns, users can tick additional fields).
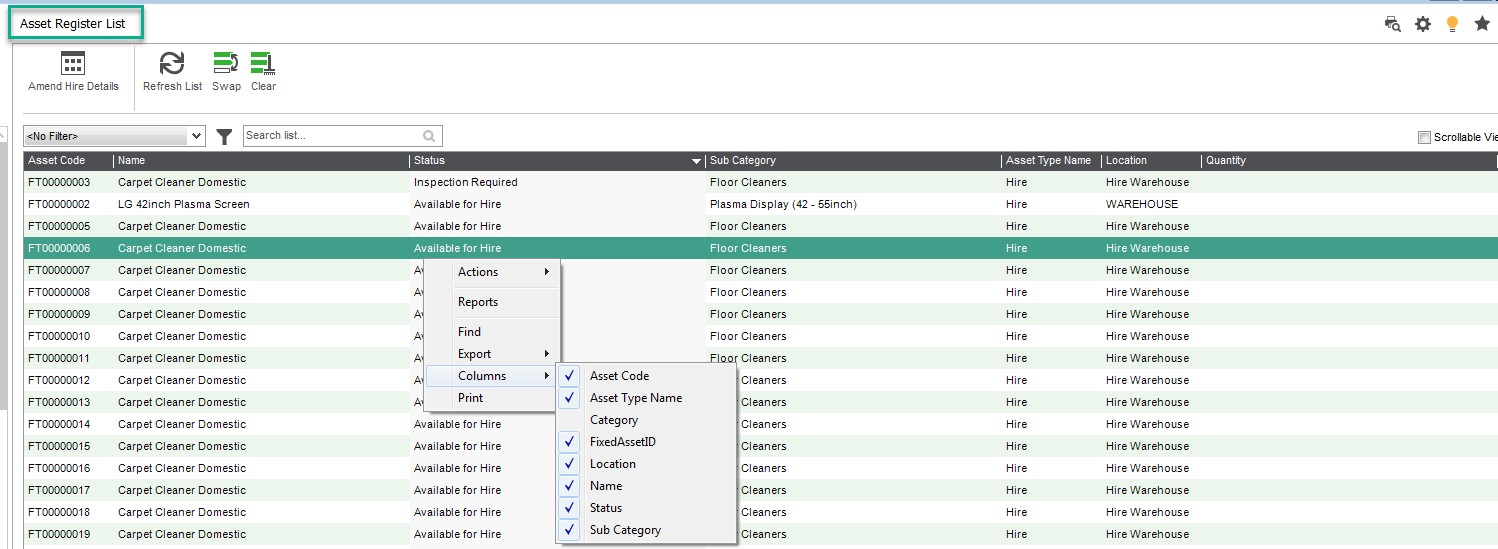
Using sage standard filter functions, you can create user specific filters, or allow them to be public.
11.2. View Hire Quotes
Enquiry screen to view the details of the Hire Quote, but you are unable to amend, add or delete any details.
You can select the quote to view by various methods including A/C Ref, Short Name, Postcode, Location, Order Reference (The Hire Quote Number), Entered by, Order Status or as in this example by selecting Show All Quotes; this brings up all Hire Quotes. Highlight the Quote you wish to view and click View.
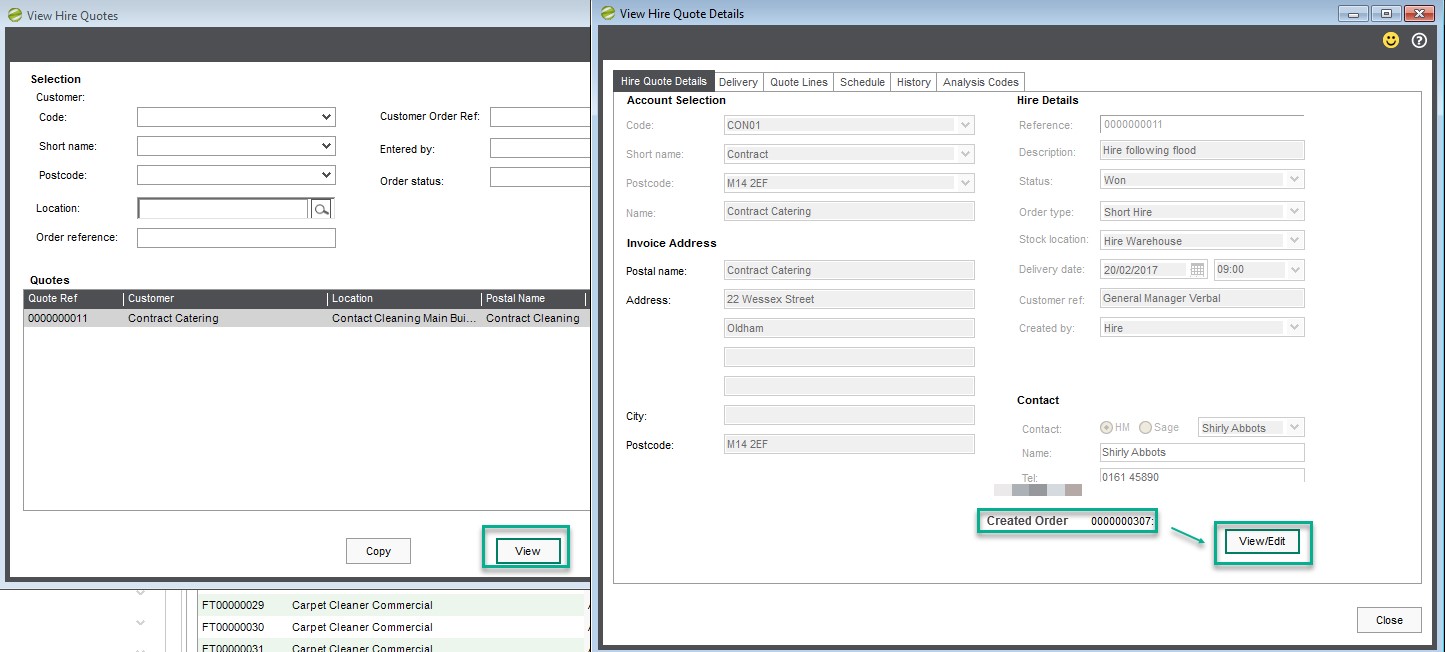
If a quote has been converted to a Hire Order, the Hire order number is visible on the front page of the quote, bottom right hand corner and there is also a link to the hire order button next to the hire order number.
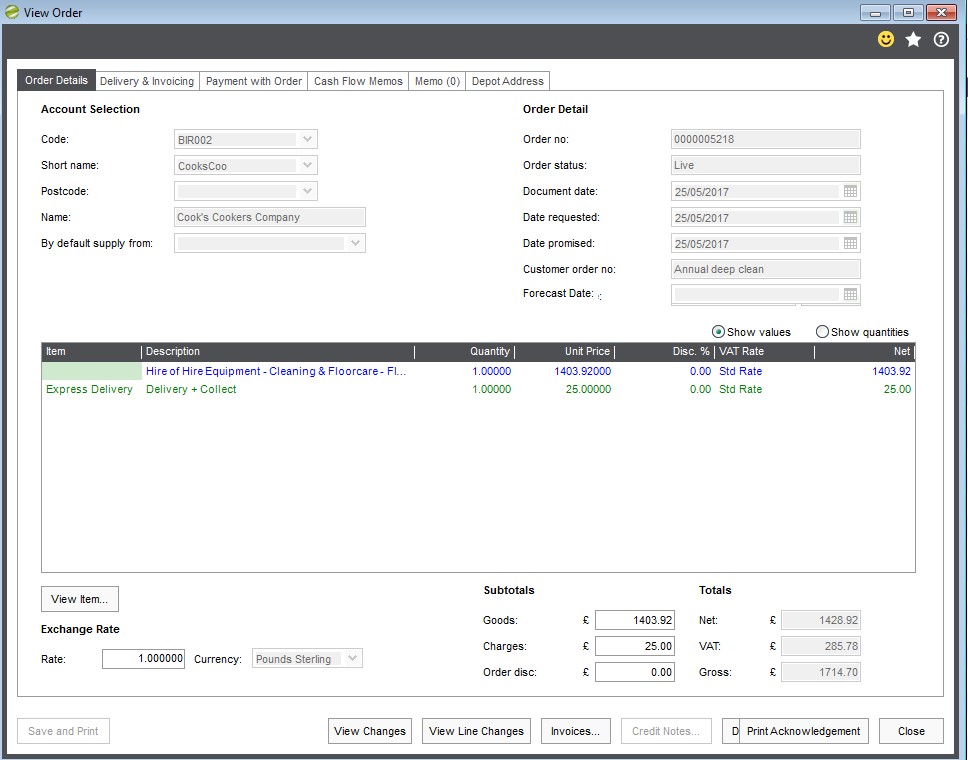
11.3. View Hire Order
Enquiry screen to view the details of either the Hire Order but you are unable to amend, add or delete any details.
If Sicon Job Costing is integrated, from the ‘View Order Details’ you can also link to the relevant linked job.
You can select the order to view by various methods including A/C Ref, Short Name, Postcode, Location, Order Reference (The Hire Order Number), Entered by, Order Status, Delivery dates or as in this example by clicking Show All Orders (this brings up all Hire Orders). Highlight the orders you wish to view, and click View.
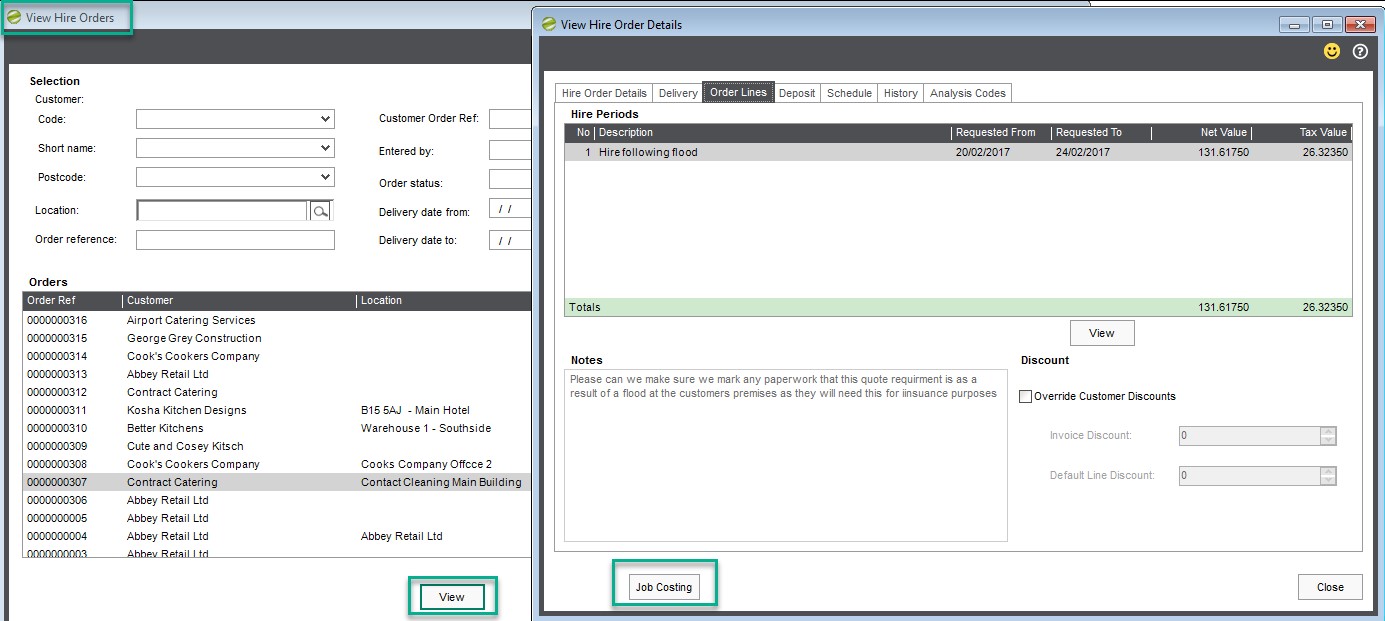
You can view hire order details, delivery details, the Lines on the Order, History or as in this example the Line and relevant notes.
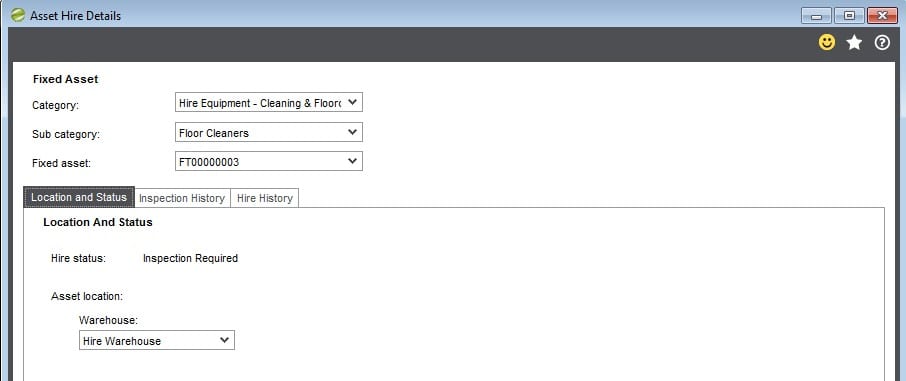
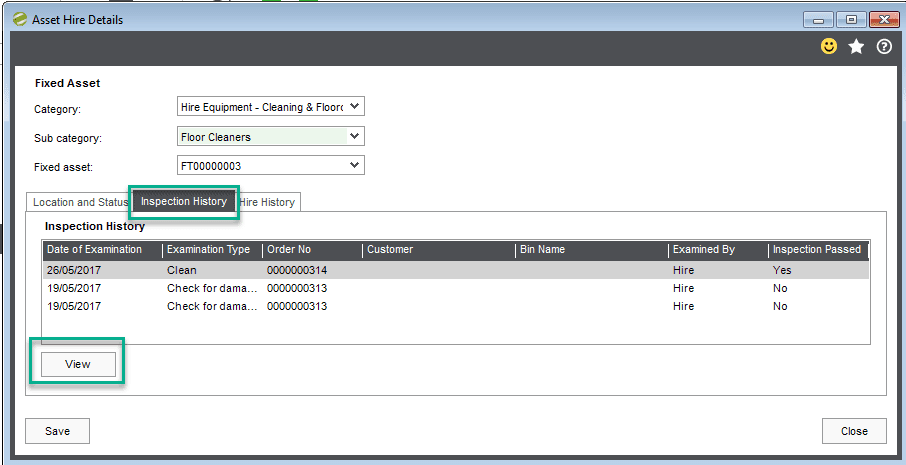
11.4. View Asset Register
By entering the Asset, you wish to make an enquiry on you can view its:
Location & Status
The Inspection history, and you can view the inspection record, by clicking on a line, and selecting the ‘view button’.
Hire History

In these view only screen (s) you are unable to amend, add or delete any details.
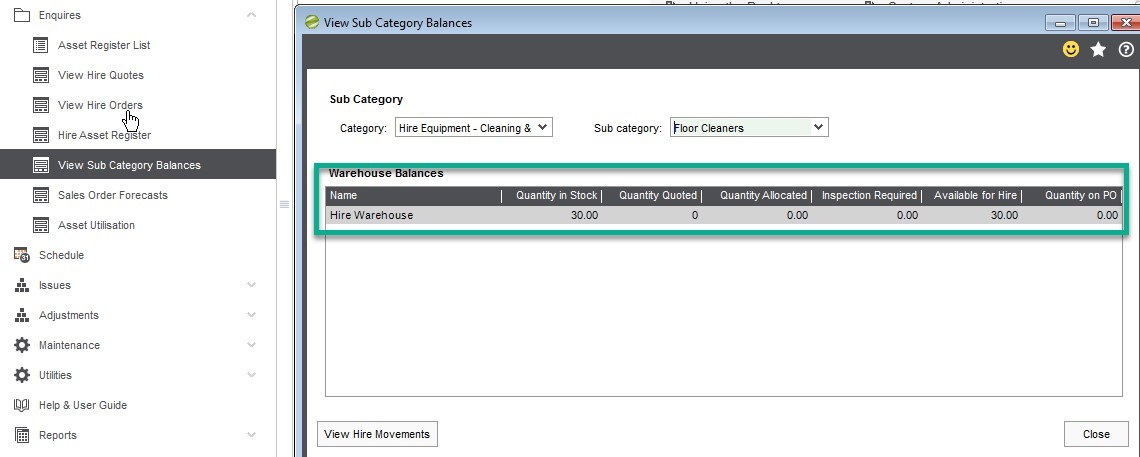
11.5. View Sub Category Balances
On this enquiry Screen you can view balances on the selected Category and Sub Category.
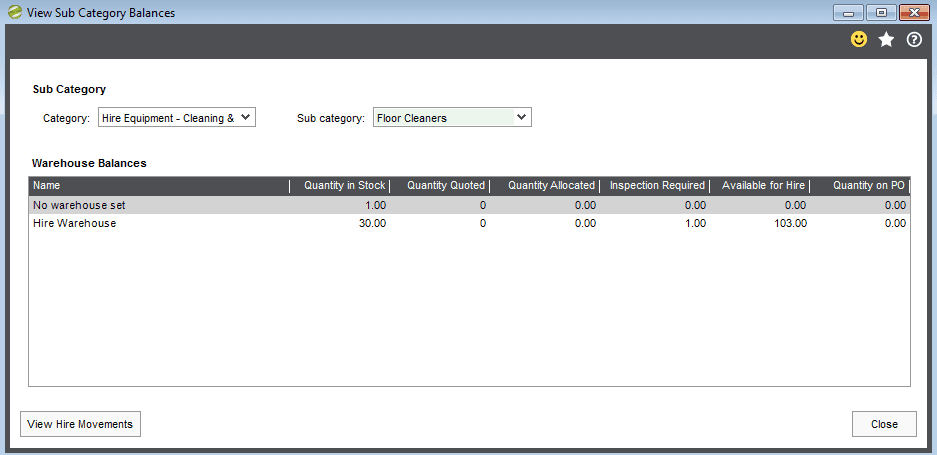
In this view only screen you are unable to amend, add or delete any details.
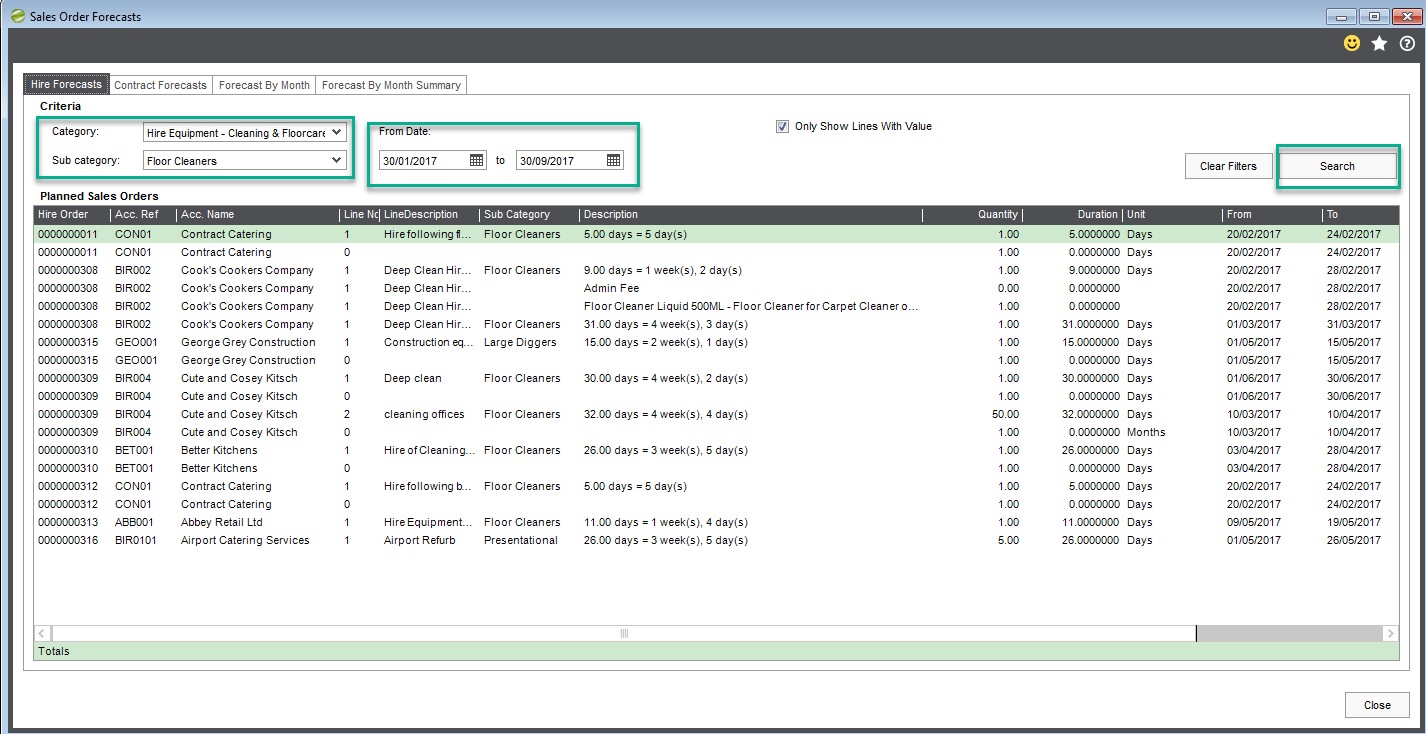
12. Sales Order Forecasts
Ran for a single category / sub category at any one time, this is a useful enquiry screen, with tabs with views of forecast sales order / sales order values. There are different tabs, which when selected shows the information in a different format.
12.1. Hire Forecasts TAB
Once a Category and sub category is selected and the search button used, a list of planned sales orders for all hire orders, where lines are yet to have any sales orders generated for the hire period.
12.2. Contract Forecasts (Only visible if Sicon Contract Manager installed)
Only visible is Scion Contract Manager is installed and shows any contracts for that customer (Sicon Contracts and Sicon Hire are not integrated, this is purely for reference).
12.3. Forecast by Month
Shows forecast of Sales orders month by month, along with other additional useful information, noting that this view is a combination of Hire Orders planned Sales Orders and Sales Orders in its own right.
12.4. Forecast by Month Summary
As ‘Forecast by month’ but consolidated to type’ Orders relating to ‘Hire Orders’; ‘Sales Orders’ and if installed ‘Contract Orders’.

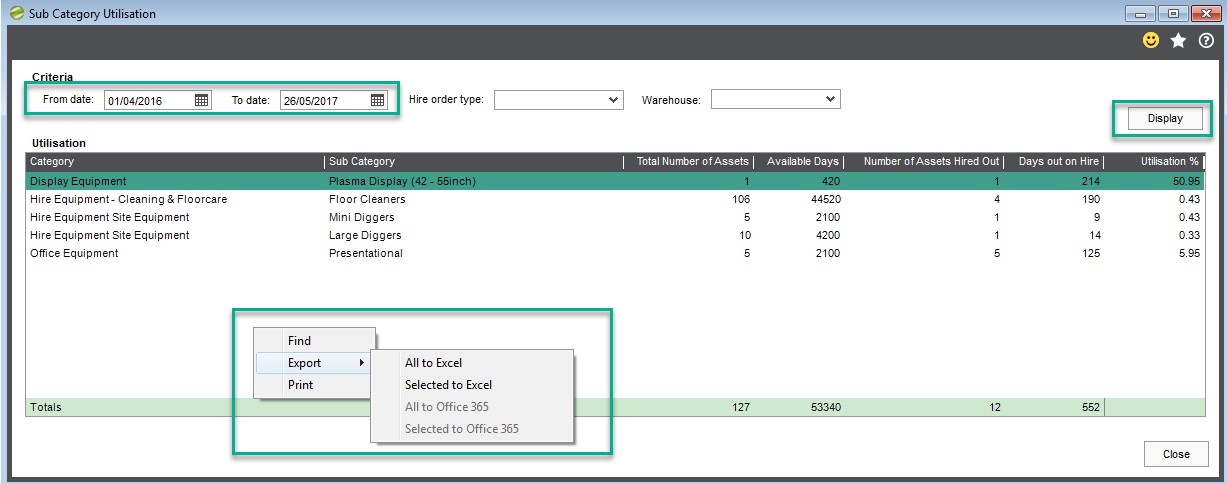
13. Asset Utilisation
A Very quick and useful view of the utilisation of your Hire Assets, by category / sub category giving you (for a date range):
- Total number of assets per category
- Available Days in the selected period
- Number of Assets Hired out in that period
- Days Out on Hire
- Utilisation in a % calculation
This information can be sent to excel for reporting by using the sage standard function, right mouse click and export.
You can also choose to filter by Hire Order type / Warehouse (if configured to use hire order types).
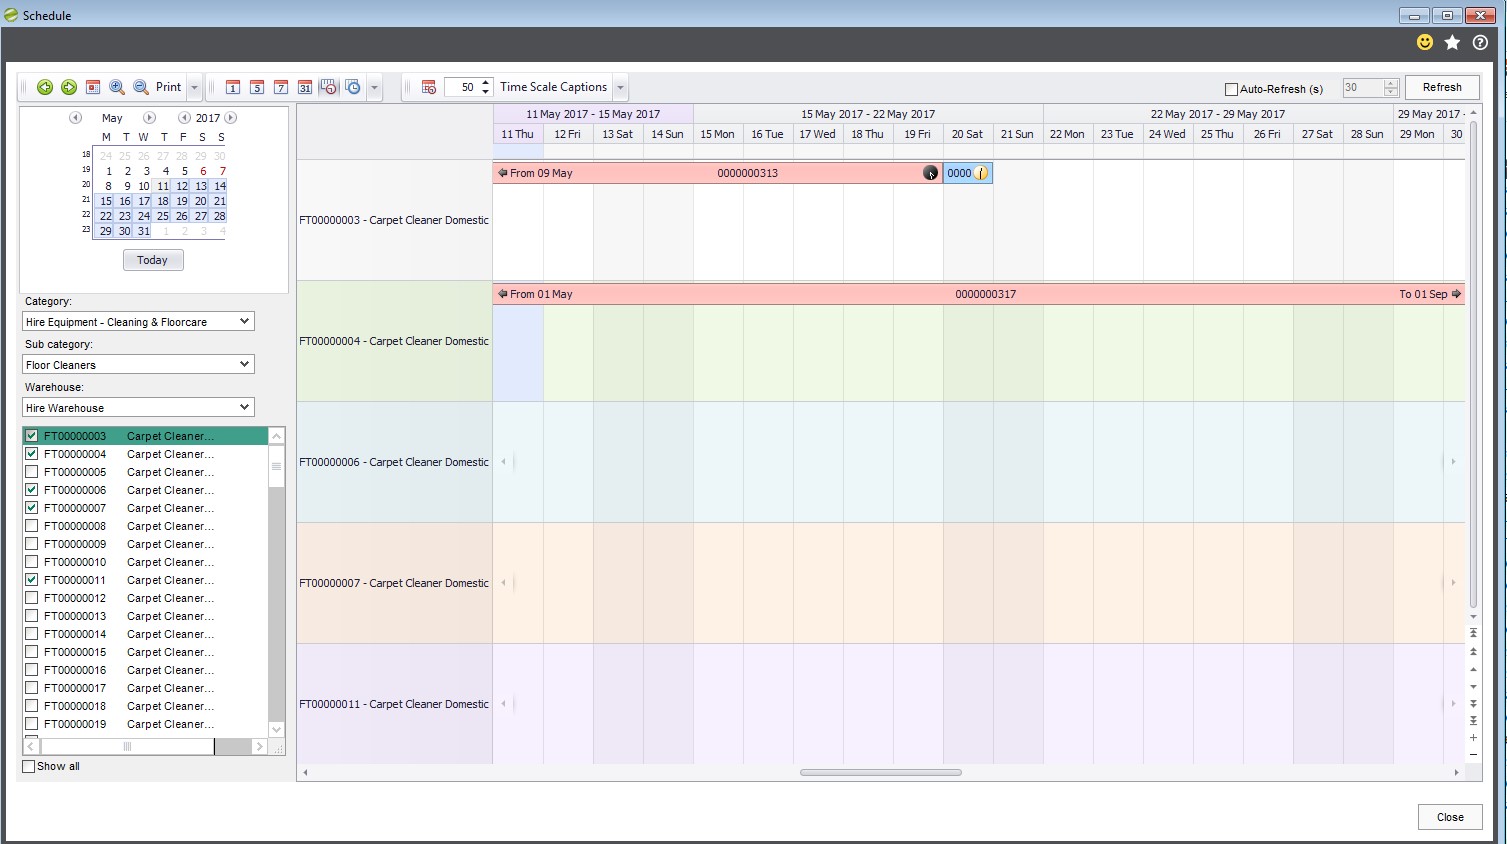
14. Diary: Scheduler
Schedule: On this enquiry Screen, once Hire Assets are allocated you can view the schedule for selected allocated Hire Assets. You can select a day, 5 days, 7 days, 31 days, a time line or Gantt View. By selecting a Category, the associated Hire Assets will display underneath the Sub Category; select all or some of the associated Hire Assets. From within the diary schedule you can advance forward in time and can go back, select Go to today, Zoom in and Zoom out.
In this view only screen you are unable to amend, add or delete any details, but you can drill down on the details (Hire Order Number) on the diary to display the Hire Order details.
15. Issues/Hire Assets
- The Sicon Hire Module is integrated with the Sicon Fixed Asset Module. The Hire Assets within your Fixed Assets Register will need to be marked as Hire Items.
- Standard Fixed Assets are associated with a category and it is on the category you assign a Sub Category; this is used within Hire Manager.
- Hire Assets can either be zero value assets with no depreciation or as standard Fixed Assets with depreciation methods and rates set; default depreciation method, rates and percentages are set up on the category defaults.
- In order for you to hire out your Hire Assets there has to be sufficient quantities of Hire Assets within Fixed Assets.
NB: Auto Generate Fixed Asset Numbers MUST be ticked on for this function to work (within Fixed assets, utilities & settings).
There are several ways you can add Hire Fixed Assets:
- You can import via the Import routine within Utilities, using the relevant csv import template (s)
- If your Hire Items are not stock items held within Sage 20 Stock Control you can from within Sicon Fixed Assets manually add Fixed Assets ensuring you mark the Asset as a Hire item, allocating a category, sub category and if applicable a serial number
- If the items being hired out, have been purchased in, are your company’s assets, or have been manufactured and are your assets you the easiest way to Issue stock to Fixed assets, and ensure the relevant fields are set for Hire / ensure they are flagged as ‘Available for Hire’ is through Hire / Issue Stock to Fixed Assets

As with standard Sage 200 issues, stock has to be available to issue. When using to Issue Stock to Fixed Assets it reduces the quantity held within Stock Control and increases the Quantity in Fixed Assets.
The stock for hire will not be counted in stock takes or valuations, but will be part of your Company’s assets if costs are assigned.
If transferred with no Asset cost, they will still be part of your Fixed Asset register but no depreciation will be made.
In our example below we have added 10 Beer Fridges, assigned to Fixed Asset Category Hire Equipment – Kitchen Equipment and the Sub Category Appliances, with a status of Live (so deprecation takes places during the normal Sicon fixed asset modules depreciation routine).
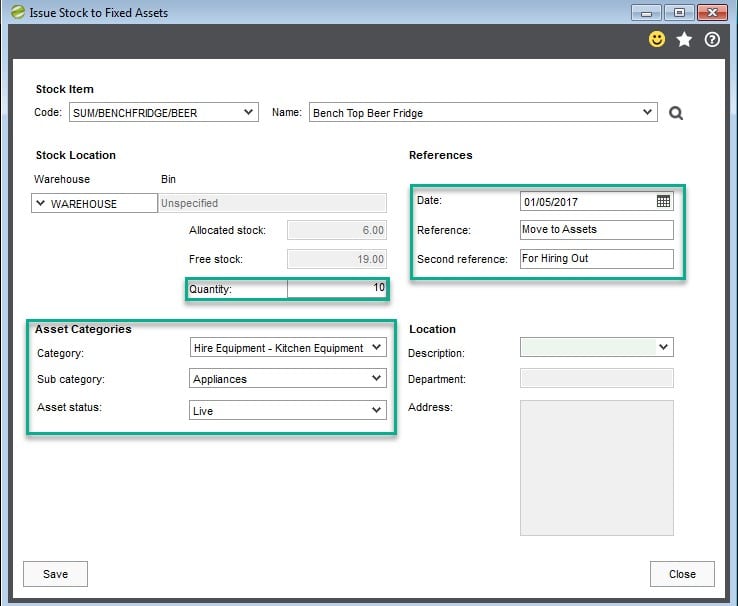
Once you have selected your stock item to Issue to Fixed Assets as a hire item, you will select the warehouse where the Stock is held before transferring, the Asset Category, Sub Category, date of Issue, reference and second reference (reference fields not mandatory), and if you wish to assign an asset location*, you can select from the drop down box.
The defaults for depreciation method / percentages are stored against the category and the cost price for the asset is based on your costing method of the stock item
NB: Asset locations (Where Hire Asset is held in preparation to hire out) are set up within Fixed Assets and some customers prefer to have an asset location called Hire just so they can report on the Hire assets separately to the Company’s assets.
Upon saving, the system will confirm the Fixed Asset Numbers that have been created.
If your chosen stock item is serialised, you will be prompted to select the relevant serial number. The serial number would populate the serial number field on the Fixed Asset Record.
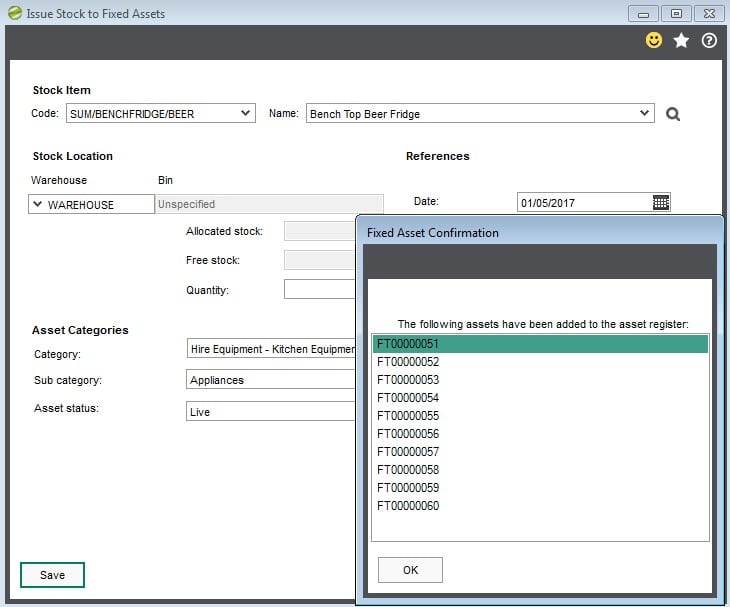
NB: if you issue Stock to Fixed Assets , then the Hire Fixed Asset Name will be as the Stock Code Descption; and the Descripition will be Stock Code + Description
The system will display the Fixed Asset Number allocated and if you view the Fixed Asset record after you have Issued Stock to Fixed Assets you will see that it has been assigned the Asset Type as Hire (underneath the Asset Status field) and that an extra tab has been created on the Fixed Asset Record, that being Hire Details.
An Example of the details recorded on the Fixed Asset are as per the screen shot below:
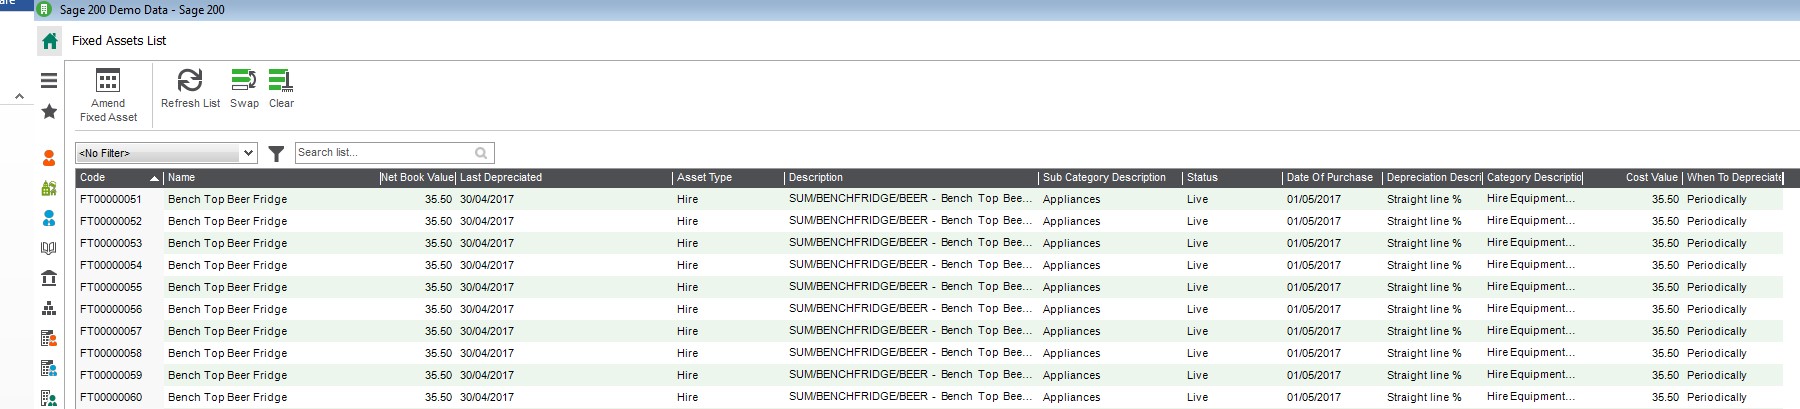
On an individial assets , where Sicon Hire is installed on the record there is an extra tab to record Hire Details.
When the tab is selected, users will see three additional sub-tabs each showing different information.
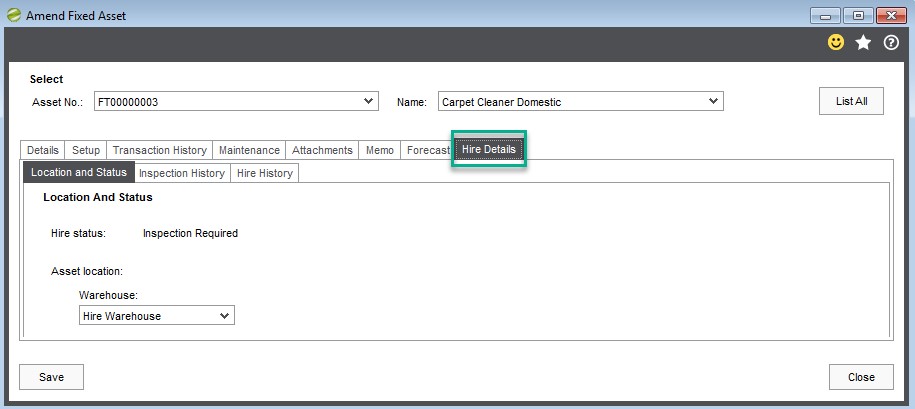
Location and Status (as per the screen shot above)
Showing the current status of the Asset, in our example the asset has been out on hire, received back, and is now waiting Inspection
Inspection History
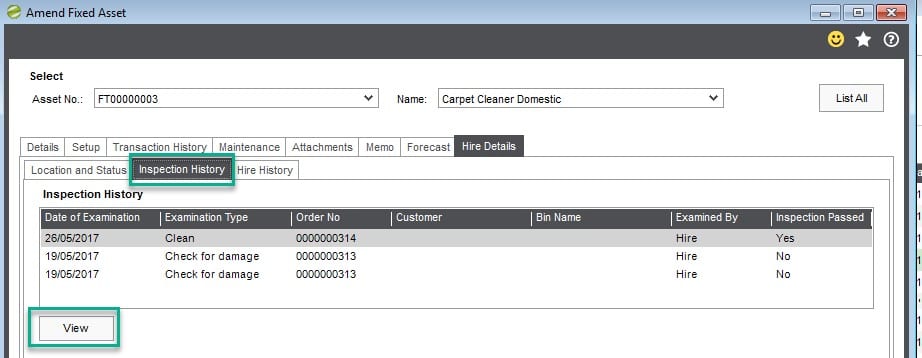
Inspection History, with the option to select a line, and View the Inspection Notes (unless rapid inspection routine was used, in which case there is no option to record inspection notes)
Hire History
History of the Hire history, and different Stages/Actions i.e. Despatch, allocated, scheduled, Inspection, Asset set available for hire. All transactions are dated/timed Stamped.
Where the Action is relevant to a Hire Order, the Hire order number is shown, and against all transactions the Sage 200 user name displayed.
16. Adjustments
A simple routine to transfer a Hire Asset from one Hire Warehouse to another Warehouse.
Firstly, selecting the Category & Sub Category, then the warehouse the hire asset currently resides, selecting the warehouse you wish to move the hire asset to.
The Screen will show how many available to move (in our case 10).
You enter the number of units you wish to move and confirm Date & Time (Defaults to the date time of the process being carried out).
Once happy select proceed at which time you will be prompted to select which individual assets to move.
Once happy select okay, at which time an Asset Transfer History report will be produced.
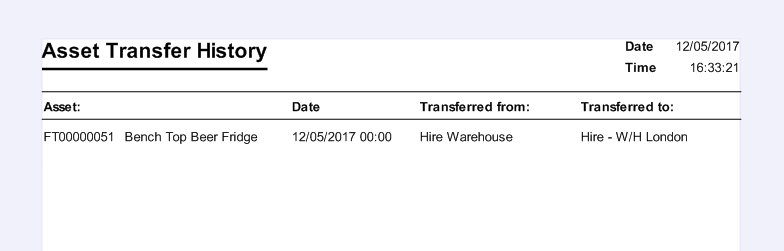
17. Reports
All Reports are available within the Sage 200 report designer, so they can be amended to suit specific requirements. Using additional fields within report designer users can write further reports to meet their specific requirements.
Standard in product reports broken down into three sub menus as shown below:
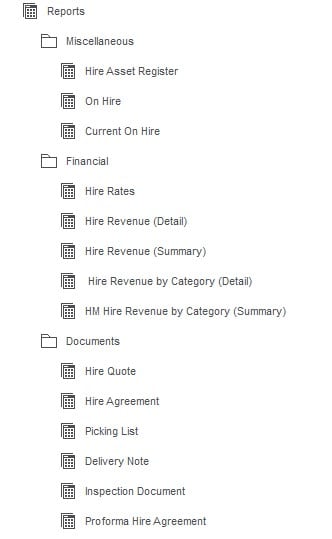
When accessing the reports menu for any/all of the above you can select via the Criteria Value either a single document Is, a range of documents Between, documents from a certain number from, documents to a certain number to.
17.1. Miscellaneous - Hire Asset Register
Grouped by category, shows Asset Code, Description, Hire Status, Warehouse, and total number of Assets in each Category.


17.2. Miscellaneous - On Hire
Detailed report showing each ‘On Hire Order Line’, and the details from within the Hire Order/Line.
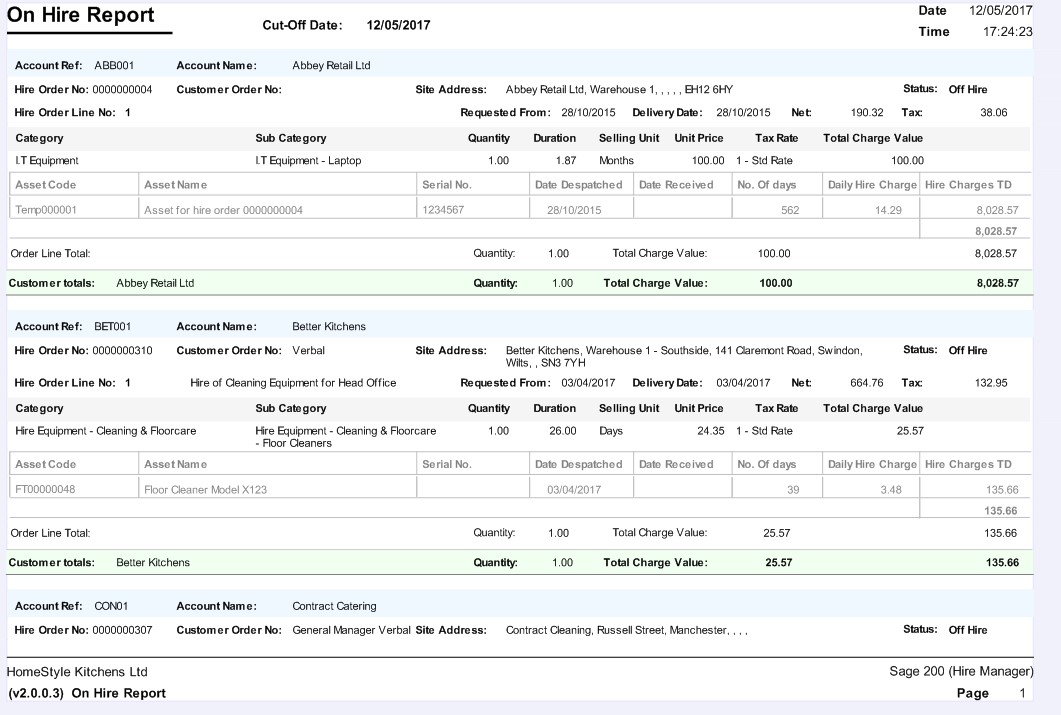
Pre requisite for this report is that the criteria, must have a date entered.

17.3. Miscellaneous - Current On Hire
Simple Summary of Assets on Hire showing date; Asset Description, Type (Sub Category), Hire Order Number and Customer Name.
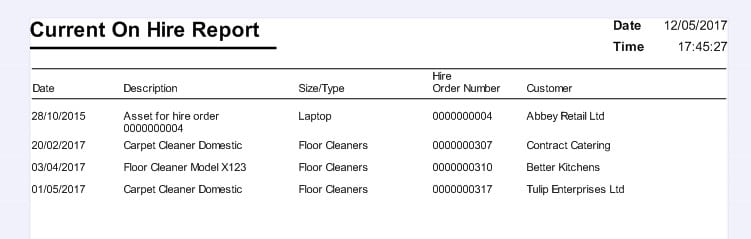
17.4. Financial – Hire Rates
It’s possible to set Price Bands and Price Bands for customers . This reports shows the details set.
If no price bands, price bands per customer have been set then the report will show ‘No data to report as per screen shot below (This applies to all reports within Sage 200 / Sicon Modules).
17.5. Financial – Hire Revenue (Detail)
Content is currently being updated.
17.6. Financial – Hire Revenue (Summary)
Content is currently being updated.
17.7. Financial – Hire Revenue by Category (Detail)
Content is currently being updated.
17.8. Financial – Hire Revenue by Category (Summary)
Content is currently being updated.
17.9. Documents - Hire Quote
When run, users can select which quote (s) they wish to print.
In our example below we have chosen a single quote.

Standard Layout below, but can be tailored to suit your requirements from within Sage 200 report designer.
17.10. Documents - Hire Agreement
When run, users can select which Hire Order (s) they wish to print a Hire Agreement for. The drop down list shows the Hire Order Number and Hire Order Description (if one was entered at Header Level).
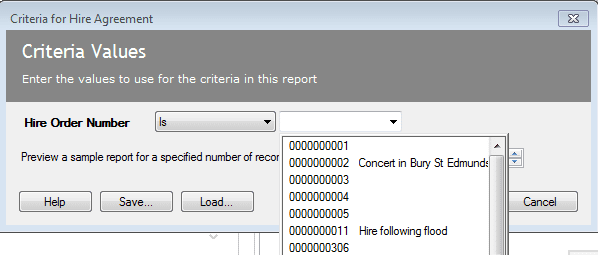
The Description is pulled through the main Hire Order Details tab as shown below.
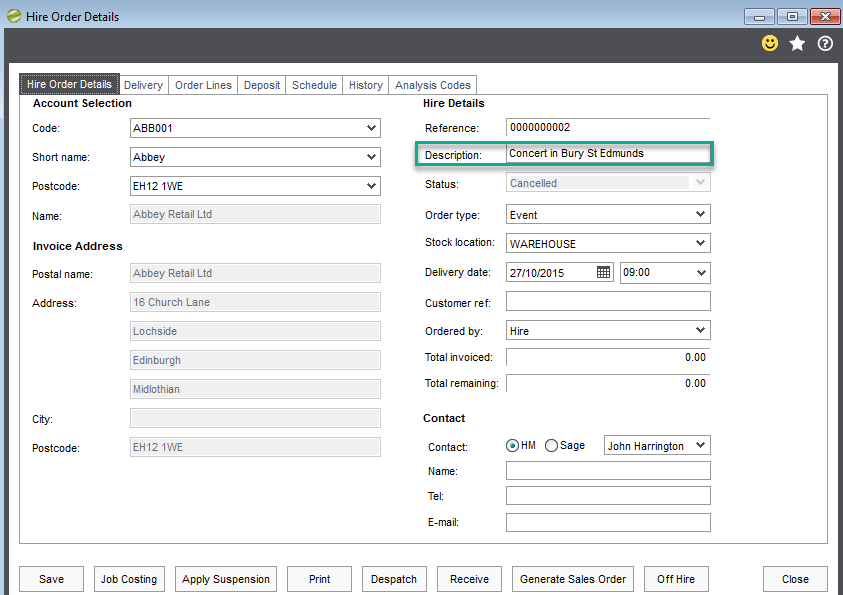
17.11. Documents - Picking List
This picking list report shows how it possible to tailor a layout to suit individual company’s requirements.
In this example company, when stores are picking assets, they are required to tick to say the hire equipment has been past tested, the kit is prepared, and it’s been checked out/In.
Also on our example also, you will see that the code is a Tempxxxx code, and the description is ‘Asset for Hire Order Number’. This is because when we entered the order line on hire order number 4, there was no available assets to hire, so we used the ‘suggested fulfilments’ process to hire in from a supplier the item, so we in turn could hire out. When the goods hired in were received against the automatic purchase order, a temporary asset was automatically created and given the name ‘Asset for Hire order number 4’.
Normally, if you have sufficient hire assets, then the picking list would show your fixed asset code / name / description Serial Number (if applicable) and a required delivery/shipment date.
17.12. Documents - Delivery Note
Once the Hire item(s) are ready to be delivered users can choose to print a delivery note, in our example the layout also has a suggested collection (return) date.
Screen shot coming soon.
17.13. Documents – Inspection Document
Content is currently being updated.
17.14. Documents - Pro Forma Agreement
Content is currently being updated.
18. Release Notes
The release notes page shows which release of the system includes new features or issues resolved.
At the release of Sicon v21 we announced that going forward, we will only be supporting Sage 200c and as such we are able to drop the year from our version numbers. We moved from 201.201.0.0 to 210.0.0.
New features detailed in the Release Notes relating to Pre-Release versions will not be detailed in the current Help and User Guide until the end of development phase.
Hire Release Notes19. New Features & Important Information
19.1. Sicon v21.1
Sicon Hire v21.1 New Features & Important Information19.2. Sicon v21
Sicon Hire v21 New Features & Important Information19.3. Sicon v20.1
Sicon Hire v20.1 New Features & Important Information19.4. Sicon v20
Sicon Hire v20 New Features & Important Information19.5. Sicon v19.2
Sicon Hire v19.2 New Features & Important Information19.6. Sicon v19.1
Sicon Hire v19.1 New Features & Important Information19.7. Sicon v19
Sicon Hire v19 New Features & Important Information19.8. Sicon v18
New Features
- Added a due before date on the generate sales orders screen.
- Added if post code should be mandatory on the hire order.
- Added an off hire option on the hire order.
- Added a customer delivery address onto the hire order line.
- Made sure buttons don’t overlap on the hire order screen.
- Added validation of collection date when setting order off hire. The collection date will not be before the off hire date. Can also now set the collection date.
- Can now print collection notes for order that are on hire.
- When hire orders are opened from the desktop list, there was an issue with selecting some buttons at the bottom of the hire order screen. For example, the generate sales order screen would open and then close straight away. This is now fixed.
- Able to view hire order from the desktop list.
- Can now receive assets on hire orders set as off hire.
- Credits tab is now hidden on quotes.
- Suspension option is now hidden on quotes.
- Improved imports for asset hire details, sub category detail.
New settings
- Automatically open rapid amend order screen when a desktop list order is double-clicked.
- Suppress ‘availability’ messages on rapid entry/amend save.
- Automatic invoicing following hire sales order generation (excludes printing).
- Final charge comment text may be configured to be shown on the final invoice for an asset.
- New customer specific ‘exclude bank holidays’ setting added to customer maintenance. This is only used when the global system setting is not selected.
Rapid Entry/Amendment
- Allow user to switch between stock, asset and charge line item types.
- New ‘Remove’ and ‘Hire Movements’ buttons added to first/main tab.
- Remove ‘Add Assets’ button.
- Automatically display the rapid order amend screen after copying an order.
Recommended Items
- Screen will not be shown automatically if no associated items are available for selection.
- Now allows selection of a specific asset if quantity is one.
- Off-hire (Print Collection Note) screen ‘Amend Order’ button added and dates defaulted to current if a requested date is not selected for order lines.
- Add hire order attachments and memos.
- Add despatch screen select/deselect buttons.
- Lock hire orders during Confirm Despatch so that user cannot open the despatch hire order twice.
- When generating sales orders don’t allow processing if previous periods have not been generated.
- Allow deposit nominal account to be configured, on the Settings screen, with a cost centre and department.
- Add button to allow user to change hire manager job from amend/rapid amend ‘Job Costing’ button/enquiry screen.
- Add progress bar to Suggested Fulfilment screen.
- Add new ‘Book Assets to Job’ screen.
- Add new ‘Add Assets to Stock’ screen.
- The ‘Amend Selected Assets’ screen now allows user to select multiple assets, from either list, to be added/removed.
- The system will now prompt to allocate batch/serial items if a hire order is despatched without batch/serial numbers being selected when the order was saved.
- New ‘Sell Asset’ tick-boxes added to Confirm Asset Received asset selection screen/list to allow generation of sales order for assets sold to hire customer.
- Confirm Assets Received screen now includes a new Collection Note filter criteria.
- Scheduler changed so resources are only shown when they are ticked/checked in the assets list.
- ‘Select All’ check-box also replaced with ‘Select All and ‘Un-Select All’ buttons to simplify selection/de-selection.
- Allow stock items to be added to hire orders with no warehosue/bin location selected, then prompt at the point of despatch to select location and allocate stock (for RDT project).
- Default hire order delivery/collection dates when required from/to dates are selected.
- Settings screen tooltips added.
- Allow multiple (two) ‘weekly’ durations rounded differently, for example Week/Day & Week/Week.
- Add hire order number to filters and ‘Select All’ button to Quick Inspection screen and move check-boxes to start of each list/grid line to make extra ‘inspection passed’ check-box obsolete.
- Add filters by warehouse, serial number and hire order number to Single Asset Inspection screen
- New ‘Amend Hire Order – Rapid’ screen/menu item added.
- Show asset codes (only for single assets) on Off Hire screen.
- Add asset code column to equipment amend/view screen lists.
- Add off-hire date to receive screen list.
- Add current meter reading to receipt meter readings entry screen list.
- Add ‘close’ button to Rapid Entry/Amend customer location selection screen.
- Don’t allow save hire order without entering all tax codes.
- Add 4 new quantity and ‘exclude weekends’ fields to SiconHMOrderLinesView for reporting.
- Add hire status to Fixed Asset drop-down list control.Highlight overdue (i.e. not yet delivered) orders in Hire Order List.
- Add off-hire quantity to Hire Order Lines List. Add batch (multi-quantity) asset allocation.
- Add asset quantity to View Asset Details screen.
- Open rapid amend screen if order is double-clicked from new rapid screen
- Add price bands by asset, including customer specific prices by asset.
- Add recommended/associated items ‘mandatory’ and ‘user quantity entry’ flags.
- Show new Hire Price Enquiry screen when unit price is double-clicked in hire order maintenance. Add recommended/associated items ‘mandatory’ and ‘user quantity entry’ flags.
- Show new Hire Price Enquiry screen when unit price is double-clicked in hire order maintenance.
- Add new recommended items import function by sub-category or individual fixed asset.
- Add collection note filter to Print Collection Notes screen.
- Inspection and advanced despatch note screens order reference drop-down controls now allow partial entries.
- Add a new ‘View Asset Appointments’ button to the ‘Assets for Hire Order Line’ screen
- Change ‘Hire Manager’ references in add-on package, features, menus, messages/code to ‘Hire’ (Dropped the word Manager)
- When booking assets to Sicon Job hire daily unit costs are read from the price band of a customer (internal) configured in the settings screen
Important Information
- The Print Collection Note screen/menu has been renamed ‘Off Hire’.
- A separate Print Collection Notes screen/menu item is now included to allow printing after off hire.
- The Inspection Result screen/menu has been renamed ‘Single Asset Inspection’.
- Software dependancies: Fixed Assets xxxx.17.22.15 or later