WAP Help and User Guide – Approval Routes v17
Help and User Guide for Sicon WAP Approval Routes
Search the page by pressing Ctrl + F (windows) or CMD +F (Mac) on your keyboard.
Back to all user guidesProduct overview
Help and User Guide maintained for WAP version v201x.17.0.87 up to 17.0.297
WAP Approval Routes allows separate approval routes to be created for each type of document within the system, e.g. Purchase Requisition, Sales Order, Invoice, Expense, Timesheet, Holiday Requests, new supplier, customer or stock requests and Project Requisitions. Approval routes can be based on Nominal Code, Requesting User, Job or Job Header, Project or Project Item, Document Value or Supplier. Approval routes can be built on a combination of these options; e.g. nominal account and requesting users, but it is advised to keep routes as simple as possible to allow for easier administration within the live environment. When the system is set-up you need to select the options you will use within the approval routes for each document type (see System Settings Options). The most common approval route for requisitions and invoices is by nominal codes; which refers to a unique combination of Nominal, Cost Centre and Department from Sage 200. All other modules e.g. Expenses, timesheets, holiday or supplier requests are usually by requesting user.
Approval routes can be created with one or more people in the route; an approval step could contain one User, a User Type or a User List.
The route (from top to bottom) is the order in which the documents will be processed.
When a user with sufficient value approves an item, the route will stop, the item is authorised and if applicable, posted to Sage.
It is possible to include Mandatory users in an approval route as well as User Types. If budgets are in use, you can include specific people to approve over budget documents.
NB: remember to click Save at the bottom of each page before progressing otherwise all changes will be lost.
1. Approval Settings Tab
The WAP Approval Routes system provides a number of options that you can use to create approval routes for your business documents and these need to be configured within System Setup – System Settings – Approval tab.
1.1. Display

View PDF Attachments Inline: if this option is checked any expense or invoice documents attached during approval will be displayed initially when going to approve a document.
Hide Budgets tab on approval pages: this will hide the Budget tab on approval pages if this information is not relevant.
1.2. Approval Functionality
Various parameters can be turned on and off to create the required approval route settings per document within the WAP system. These settings are configured per WAP install rather than per Company. Once routes have been created, these settings cannot be changed without deleting routes.
N.B. combinations of functionality are possible (for example requisitions can be approved by both requesting user and nominal account) but we would strongly advise keeping the routes as simple as possible to allow for easier administration within the live environment.
All applicable document types are listed; e.g. Requisitions, Sales Orders, Invoice, Project Requisition etc. – approval route functionality is set per document type.
- Requisitions – if no costing module is configured, usually approval will either be based on nominal account or requesting user. If a costing module is configured, approval would usually be by job.
- Sales Orders – usually these would be approved based on who the requesting user is.
- Invoices – if invoice approval is used in conjunction with requisition module, the invoice approval routes will usually mirror requisition approval routes. N.B. requesting user can only be selected if invoices are entered directly into WAP (i.e. when Commercials are not configured in Sage).
- Project requisitions (please refer to the WAP Requisition Help and User Guide – Point 10. Business Case), these are a pre-requisition stage document and approval is usually always to the same users; i.e. a procurement team. Approval routes can be configured individually based on requesting user
- Expenses – usually these would be approved based either on requesting user, or on the nominal code.
- Timesheets – usually these would be approved based either on requesting user, or on job/project selected.
- Holidays – these can only be approved based on requesting user.
- Construction Applications – if this functionality is to be used; approval will be based either on supplier or job.
- Customers (please refer to the WAP System Settings HUG – Point 26. Sage Admin) – if new customer requests are being entered into WAP for approval prior to posting into Sage, these can only be approved based on requesting user. Usually a default approval route for this document type will be created to either a Finance user or set of users.
- Supplier (please refer to the WAP System Settings HUG – Point 26. Sage Admin) – if new supplier requests are being entered into WAP for approval prior to posting into Sage, these can only be approved based on requesting user. Usually a default approval route for this document type will be created to either a Finance user or set of users.
- Stock Item (please refer to the WAP System Settings HUG – Point 26. Sage Admin) – if new stock item requests are being entered into WAP for approval prior to posting into Sage, these can only be approved based on requesting user. Usually a default approval route for this document type will be created to a Procurement team.
- Expense Supplier (please refer to the WAP System Settings HUG – Point 26. Sage Admin) – if new expense supplier requests are being entered into WAP for approval prior to posting into Sage, these can only be approved based on requesting user. Usually a default approval route for this document type will be created to either a Finance user or set of users.
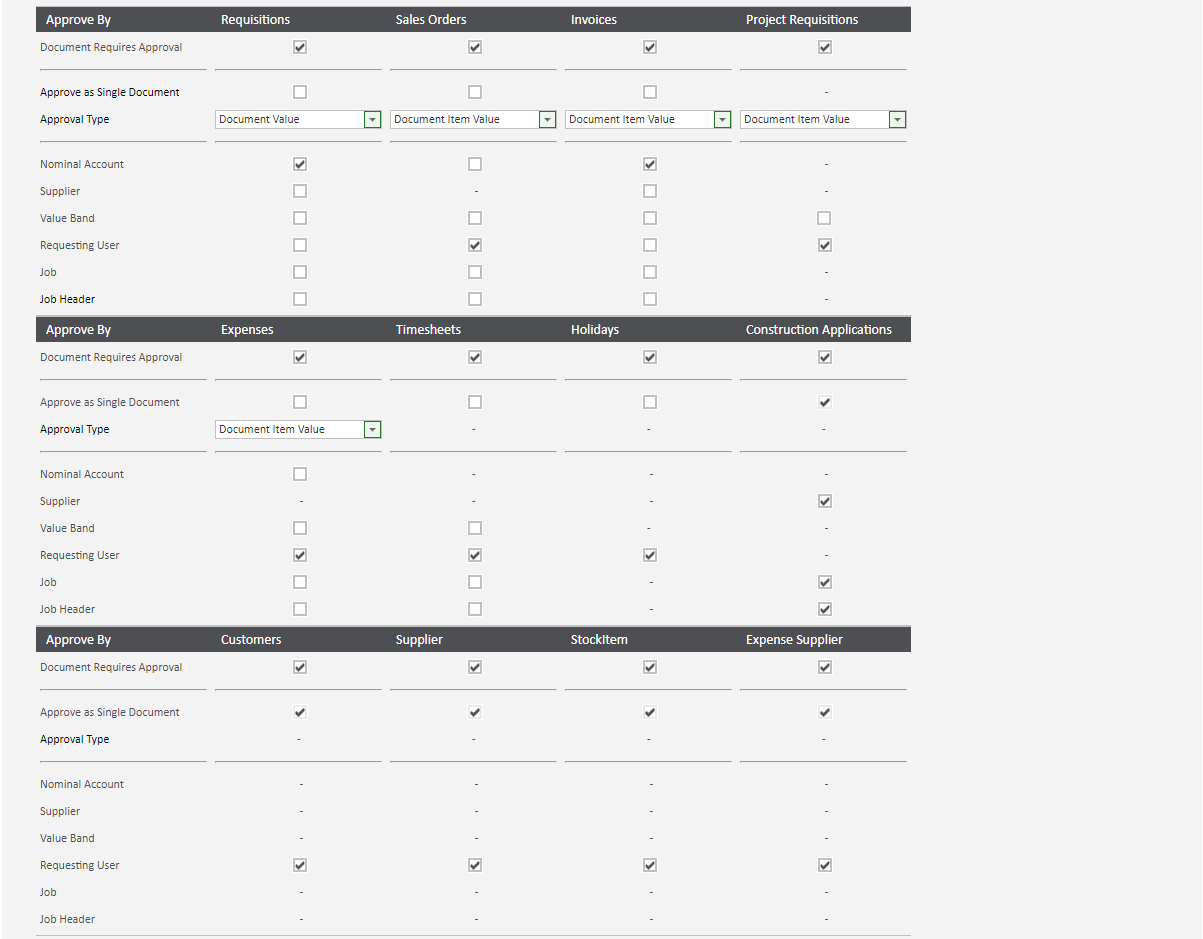
- Document Requires Approval: tick to configure functionality for each enabled module.
- Approve as Single Document: documents are approved per line/item but can be approved as a single document if required. Note; this would require all lines on the document to be routed by the same route; i.e. all lines must have the same nominal account. We would recommend leaving unticked as per the default settings.
- Approval Type: Document Item Value will instruct the system to look at each line/item’s value in combination with the user’s authorisation value – if multiple lines with the same nominal account, these will be totalled together. Document Value will instruct the system to look at the entire document value when comparing with the user’s authorisation value.
- Nominal Account: refers to the combination of account number/cost centre and department.
- Supplier: if applicable, a document can be routed for approval based on the Supplier selected; this would only be relevant potentially for requisition or invoice approvals.
- Value Band: documents are routed based on value bands set up by the organisation).
- Requesting User: routes are based on the user submitting the document for approval.
- Job/Project/Contract: routes are based on the job/project/contract selected by the user when submitting a document. A costing module must be enabled for these options to appear.
- Job Header/Project Item/Contract Item: routes are based on the Job Header/Project Item/Contract Item selected by the user when submitting a document. A costing module must be enabled for these options to appear.
1.3. Deleting Approval Routes
Once an approval route option has been configured above and approval routes have been created, it is not possible to change the approval configuration for that document type without clearing down all the existing routes; i.e. changing Requisition approval from being based on nominal account to requesting user. Within Approval Route Deletion Options, buttons have been provided to clear down all approval routes for each document type allowing new options to be selected and new routes configured.
NB: deleting all routes will stop the WAP system being able to be used until there is a default approval route (all menu options on the left will disappear). A global default approval route will need to be created; we would advise these to be an Admin user who does not appear in other routes.

1.4. Approval Route Functionality Options

Approval Routes for a document are restarted on changes made to a document by any user (not just the requester): by default any changes made to a document by the requester will cause the document to restart the approval route, but checking this option will mean changes made to the document by any user will restart the route.
All Document Approval Routes are restarted when an approval route is changed: if an approval route is changed during the approval process, this option will cause the document to start the approval route from the beginning rather than carrying on from the current stage.
Prompt for confirmation before approval when using “Approve All” option: this option will cause a pop up to appear to ask the user for confirmation when they are approving a document.
Prompt for confirmation for individual item lines before completing approval (Only when Single Document Approval is disabled): this option will cause a pop up to appear to ask the user for confirmation when they are approving a document item/line.
Approval history display type for report grids: this affects how approval progress is displayed in all reports with Approval details. Combined – all details are combined into a single column per step. Discrete – all the details are separated into multiple columns per step. All – shows all columns from combined and discrete. None – approval step columns are hidden.
1.5. Invoice Approval
These settings are only applicable if using WAP Invoice Approval.

There are three options for approving invoices entered against POs; only one of these options can be selected.
Option 1 – Automatically approve invoices that are linked to POs. This setting will mean an invoice linked to a related requisition will be automatically approved but variance checking can be enabled using the below options. The recommended settings are shown above, but these can be configured per install as required; the values may change per install, i.e. some companies will set the variance values as zero – any difference of any amount means the invoice will require approval.
Check the invoiced quantity matches the goods received quantity: if three way matching is enabled, the invoiced quantity will be checked against the goods received quantity.
Check the invoice line values compared to the purchase order line: this setting will check line totals on the purchase order against line totals on the invoice. If this setting is enabled, a line that has been part received and part invoiced would still require approval because the invoice line total doesn’t match the order line total.
Check the invoice line unit prices compare to the purchase order line: this setting will check unit prices on the invoice line against the unit prices on the order line. If this setting is enabled, a line that has been part received and part invoiced would not require approval unless the invoice unit value was different to the unit value on the purchase order.
Check invoice variance by percent/invoice line total value variance percentage with purchase order line: to check variance by a percentage, tick and then enter applicable percentage, e.g. 2%. The by percent and by value checks can be used in conjunction; i.e. to approve if under 2% and under £50 but to require approval if under £50 but over 2%.
Check invoice variance by value/invoice line total value variance value with purchase order line in WAP base currency: to check variance by a value, tick and then enter applicable value, e.g. £50. The by percent and by value checks can be used in conjunction; i.e. to approve if under £50 and under 2% but to require approval if under 2% but over £50.
Automatically approve if invoice line is less than the purchase order line: if it is company policy that if an invoice arrives and is less than the purchase order it doesn’t require approval, enable this setting.
N.B. a default approval route can be created for all invoices that have a variance (under Global Default approval routes); this will send all variance invoices to one user (or user type or list depending on how the route has been configured) to approve.
Option 2 – invoices linked to requisitions should be approved by the requisition requester: this option generates a custom approval route for each invoice that is linked to a requisition and the route will only contain the user account that raised the requisition in WAP. This means the user who raised the requisition will also require unlimited invoice approval value. N.B. this setting is for invoices entered into Sage 200 only.
Option 3 – all invoices require approval: if this option is chosen, all invoices entered into Sage 200 and picked up by WAP, or entered directly into WAP, will use the standard configured approval routes created for invoices.
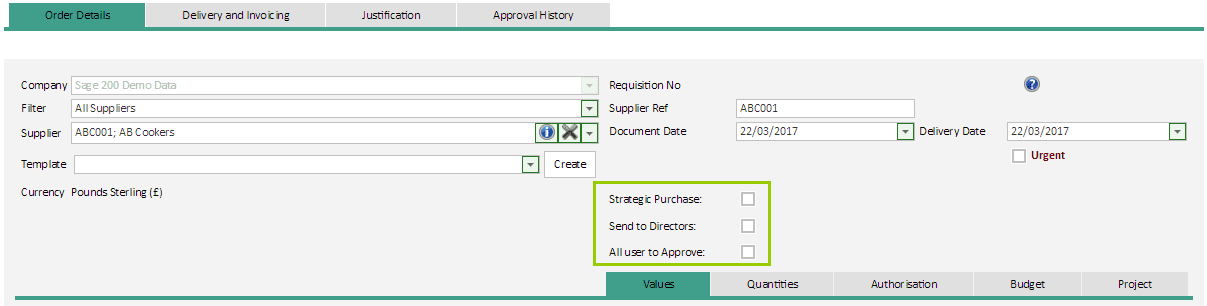
1.6. Mandatory Approval - Custom Fields
This feature allows up to three additional mandatory approval labels to be included in approval routes and have a custom label so they can be personalised per installation. If enabled, the label is displayed when submitting either a requisition or an invoice for a user to select. When adding or amending an approval route, any custom fields that have been enabled will appear as selectable options, similar to the standard mandatory flags, see below.


1.7. Self Approval
Each WAP user can be set up with a self-approval value (User Setup – Users – Account Options) per document type. There are three options available for configuring self-approval when a requester is also in the approval route. One of these options must be selected; by default the first option is checked. N.B. self-approval will override mandatory routes, except if the nominal or job is over budget.

Use the requesters self-approval value instead of the document approval value: as a general rule self-approval value is usually less than the user’s document approval value and this will accommodate the scenario where a user can approve other user’s documents at one value but they can only approve documents submitted by themselves at a lower value or at 0.00, forcing the document through the approval routes.
Use the approvers alternate user account where available, or remove the requester from the approval route for that document when there is no alternate user available: the alternate user is set on the WAP user’s profile; if there is no user configured here, the document will go to the next stage of the approval route.
Use the normal approval value that would be used if approving a document requested by another user: the user’s document approval value or specific nominal approval value will be used rather than their self-approval value. Use this option if different nominal codes have different approval values.
2. Approval Route Reports
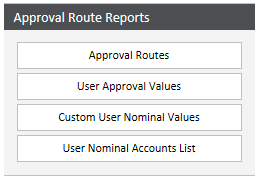
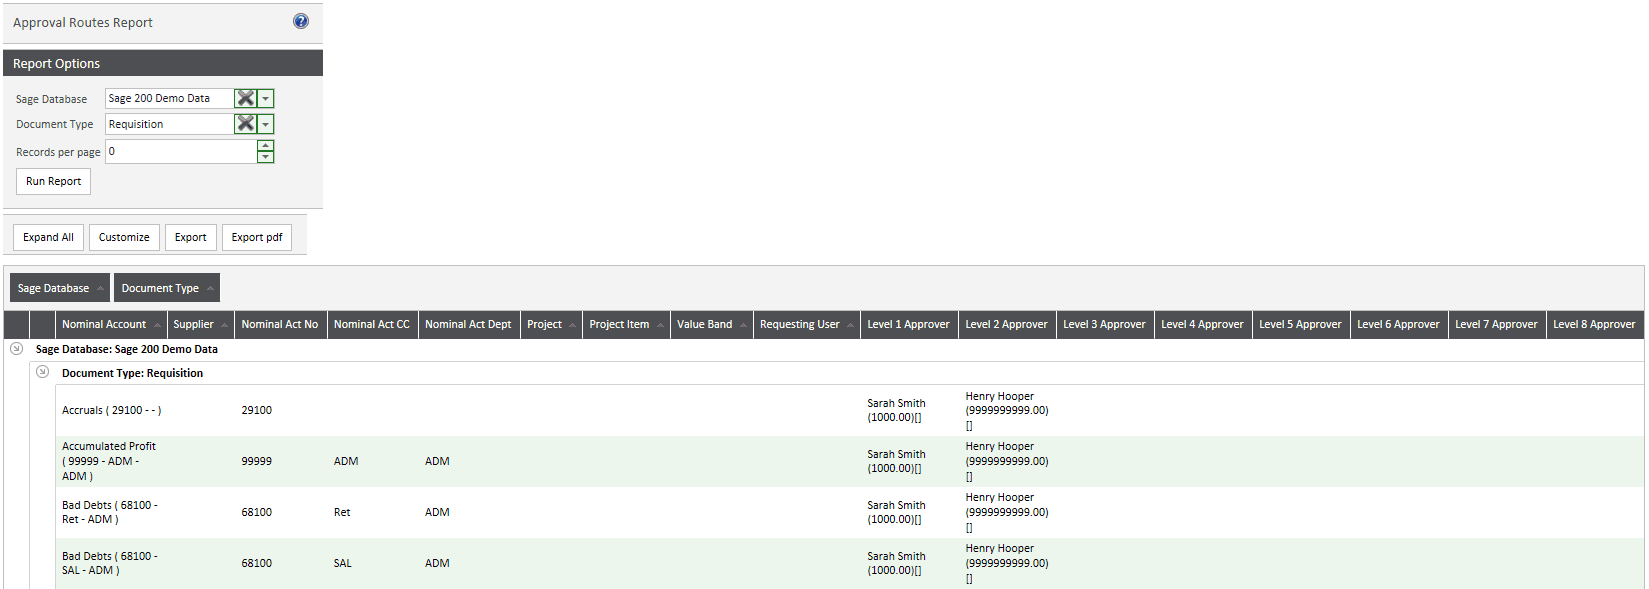
Approval Routes: choose the Sage Database and Document Type to show a breakdown of all approval routes that have been created in the system.
User Approval Values: choose a User to see their default item and approval values as well as item and approval values per document. If Run Report is clicked with the User selection blank, all users will be shown with their item and approval values.
Custom User Nominal Values: choose the Sage Database and the User to show a breakdown of nominal codes they have been assigned as well as item and approval values set.
User Nominal Accounts List: choose the Sage Database and the User to show which nominal codes have been assigned to the user.
N.B. all reports can be exported to Excel for further manipulation and analysis, or PDF to see a snapshot of routes at a particular time. Reports can also be customised by clicking the ‘Customize’ button which will allow for columns to be removed, added or moved around as required. Cookies are used to retain these layouts so if Cookies are cleared, the layouts will revert to standard format.
3. Approval Routes
Once the initial functionality set up has been completed, approval routes can be created. By selecting the System Settings cogs icon and choosing the Approval Routes option from under the Approval Route Setup banner, the WAP Approval Routes menu will be displayed as shown below.
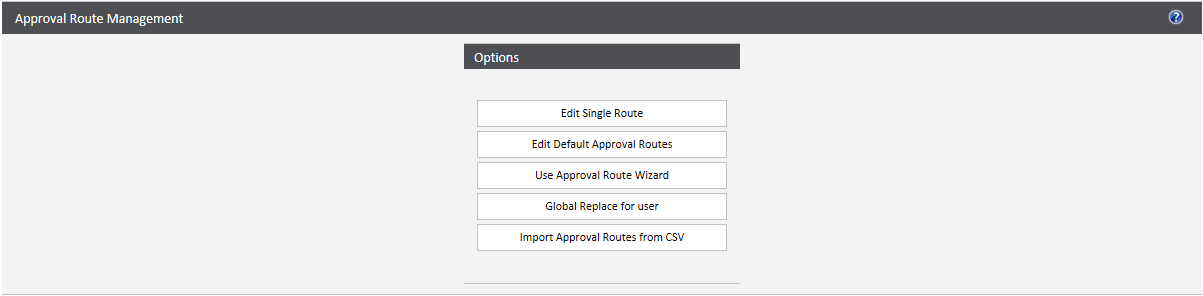
Edit single route: create or edit a single approval route based on the enabled approval options for the selected document type. When a route is chosen, the existing route will be shown and amendments can be made or a new route can be built.
Edit default approval routes: edit the System default approval routes; there is a global default route as well as default routes for specific documents. A global default route must exist before the system can be used; at installation this will be set to go to the Admin user account. Note; if all routes including defaults are deleted, the system will not be able to be used – all menu options on the left will disappear.
Use approval route wizard: set up approval routes for multiple approval options at once.
Global replace for user: use this function if an approver is leaving the company and the routes should be updated with a replacement user.
Import approval routes from CSV: import routes from a CSV template; these templates are generated from here.
3.1. Editing a Single Route
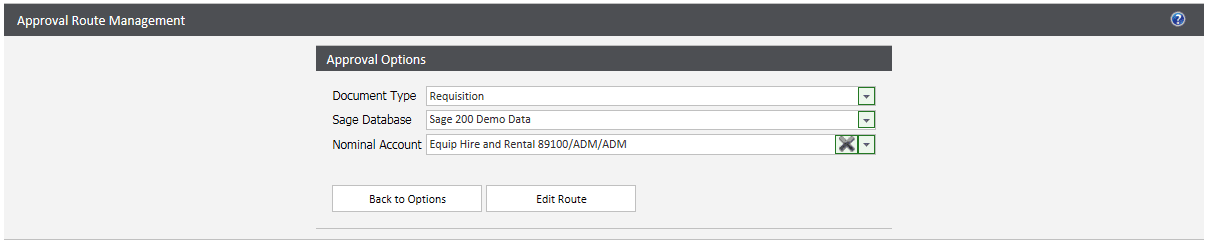
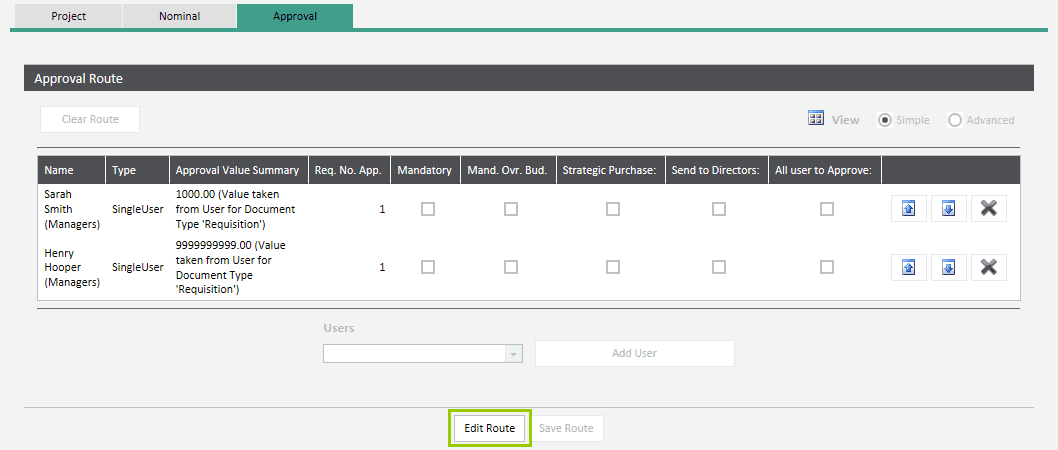
Click to create or edit a single route and select the document type from the drop down menu. Based on the document type chosen and the approval route options configured in the System Settings, a number of drop down lists will be displayed. In the following example an approval route is being created/edited for a requisition raised for the Demo Data Company based on a particular nominal code.
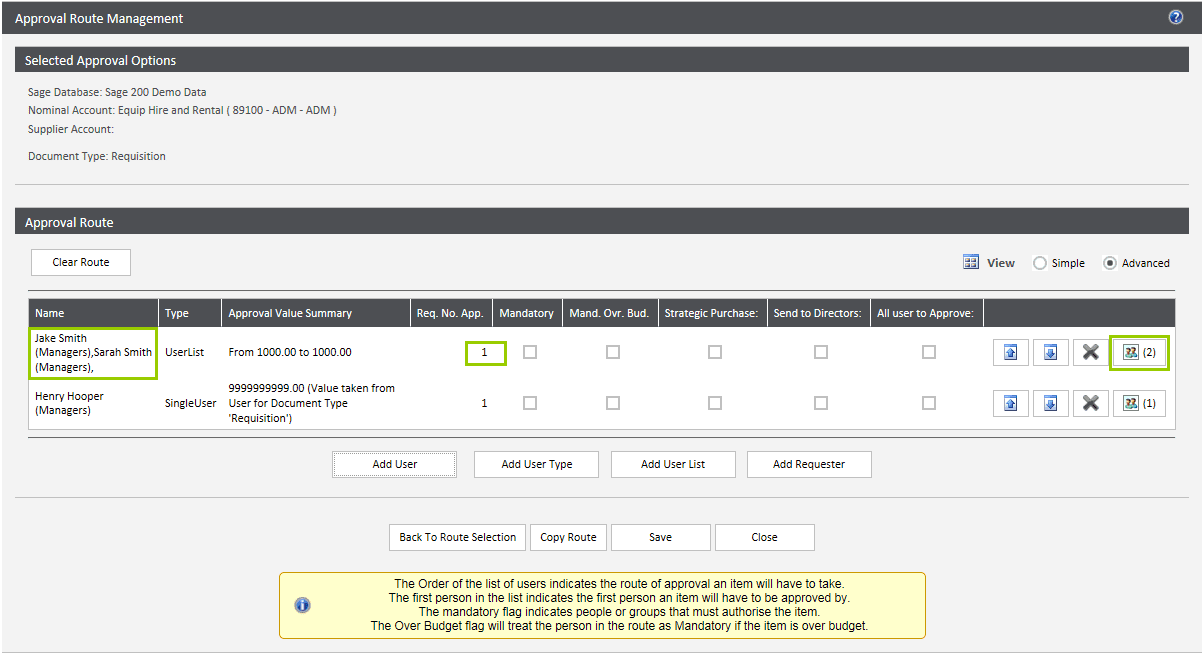
Once the route components have been selected, click Edit Route and the screen below will default to Simple mode and display the current approval route. To add users to the route, select the user from the drop down list and click Add User. The order can be changed by clicking on the blue arrows or a user taken out of the route by clicking the black cross. The Mandatory and the Mandatory over Budget options indicate users who must authorise the document even if a user earlier in the route has sufficient authorisation value; either every time or only if the document is over budget.
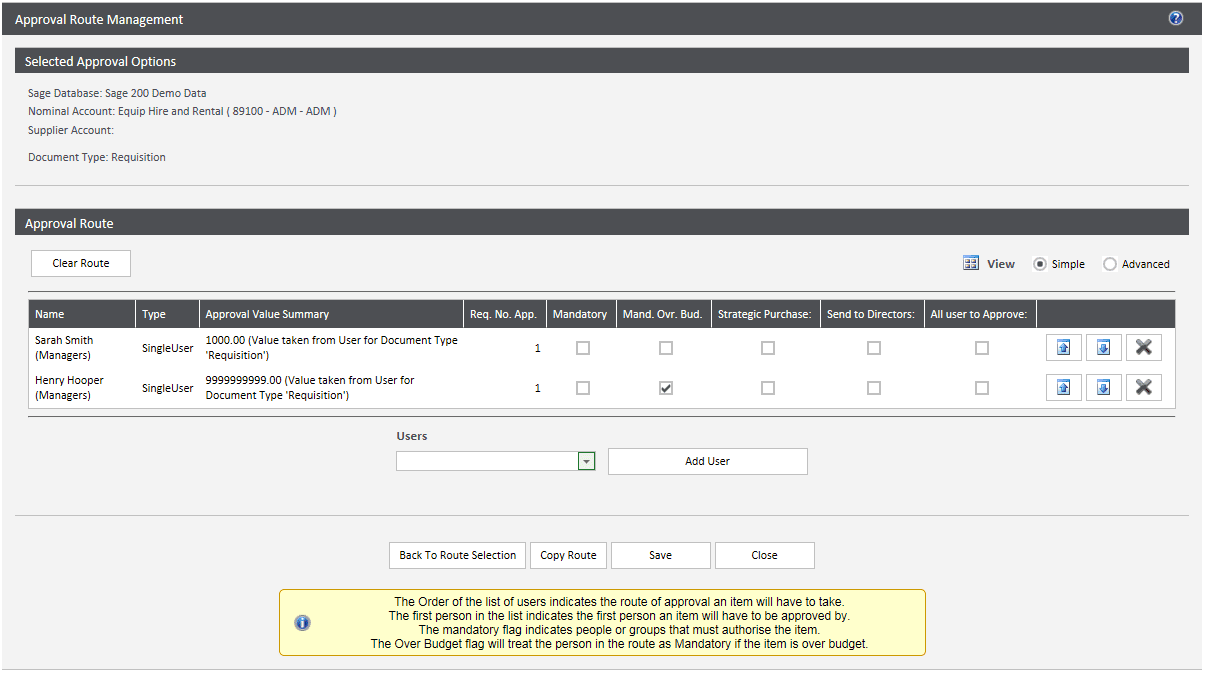
The example above shows that if a requisition is raised for £800 the document will first be approved by Sarah Smith as she appears first in the list. Although Sarah can approve up to £1,000, the document will also go to Henry Hooper if the nominal is over budget. Once the document has been through the approval process the requisition is authorised, the requester will be notified by email and the PO can be sent to the supplier.
The Advanced mode provides further options:
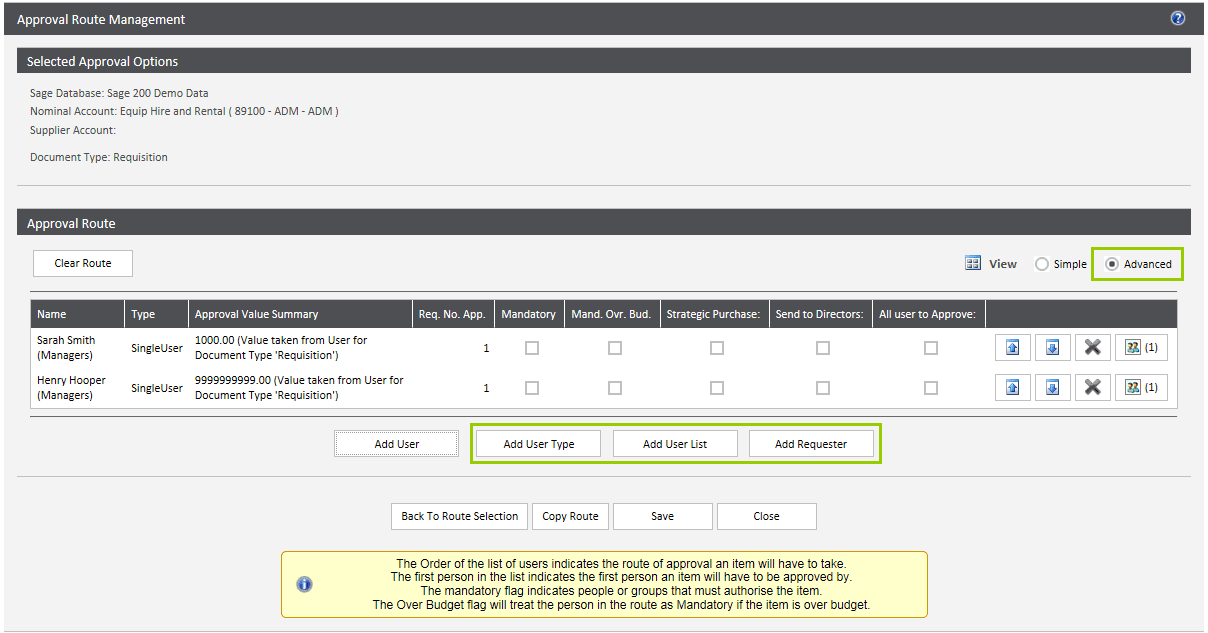
Add User Type: instead of adding individual users to the approval route, a User Type can be added and the document can be approved by any users in this User Type. When a new user is added to this User Type, they will automatically be sent documents to approve. For example, this can be used when sending a requisition to a Purchasing Team to approve, or when sending an expense to a Finance team to approve.
Add User List: if within the organisation there is a group of people with the same approval limit, they can be built into an approval route list. Enter the total number of users required to authorise the document in the ‘Required Number of Approvers for this step’ and click on Add Approvers. Select the users and click Add selected users, then Save and close. The option to allow previous approvers to approve this step is required if a user should appear in multiple steps of the approval route. An example of needing this would be if a user was in the first step as part of a user list but then also needed to view all documents prior to the POs being sent out. This user would also need to be the final step, marked as mandatory and able to approve this step.
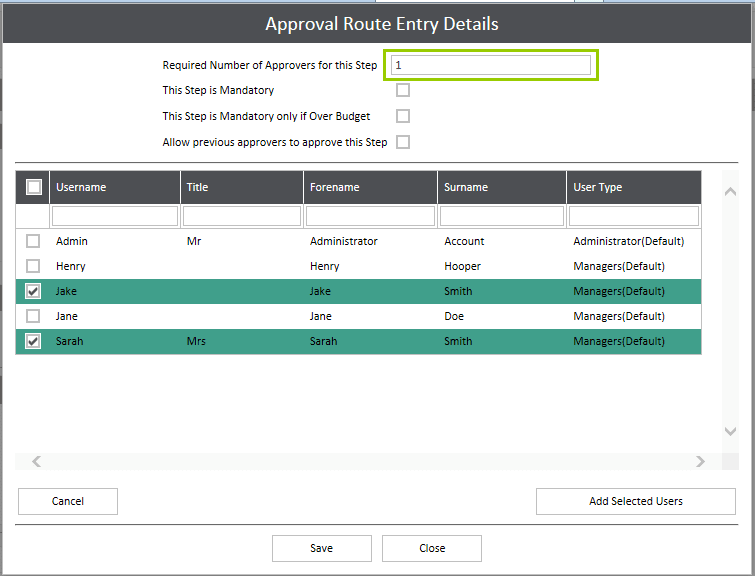
In the below example either Jake Smith or Sarah Smith can approve the requisition; it will be sent to both but only one needs to approve it. For final step approvals, it might be that the document is sent to four directors and will require approval from any two.
3.2. Editing Default Approval Routes
The default approval routes are used when a document is processed and there is no route configured for it. There is a default route for each document type and a global default that is used if a default route has not been set for the document.
N.B. by default on a new WAP install, the Global Default route is configured as the default Admin account. If this route is deleted, all the module menu options will be disabled until this is rectified. If the invoice approval module is enabled, it is necessary to set up a default route for rejected invoices/credit notes; usually this is either one Finance User or a Finance User Type who would edit the nominal code and resend for approval.
The first route to configure within this section is the Global Default which is used when no approval route exists for the selected nominal code, user or project and should be used as a ‘catch all’ for these situations.
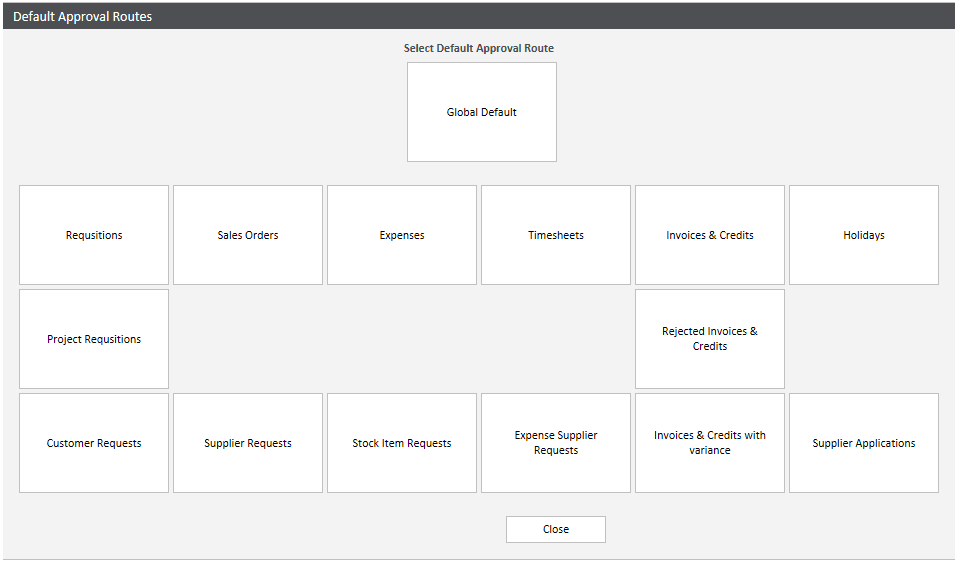
Approval routes are built in the usual way. For some document types, i.e. Customer, Supplier, Stock, Expense Supplier requests, a default route may be created rather than individual routes, if the requests will always require approval from the same user or group of users. Default routes for each document type are created in the same way by clicking on the relevant button from the default approval routes section above.
3.3. Approval Route Wizard
The approval route wizard can make configuration much quicker and simpler; multiple routes can be created and maintained at once. In the below example routes will be created for requisitions based on nominal codes. Multiple document types can be selected so long as the approval route configuration is the same; i.e. based on nominal account.
N.B. the wizard will not display any existing route; either edit a single route or use the approval route reports to view current routes.
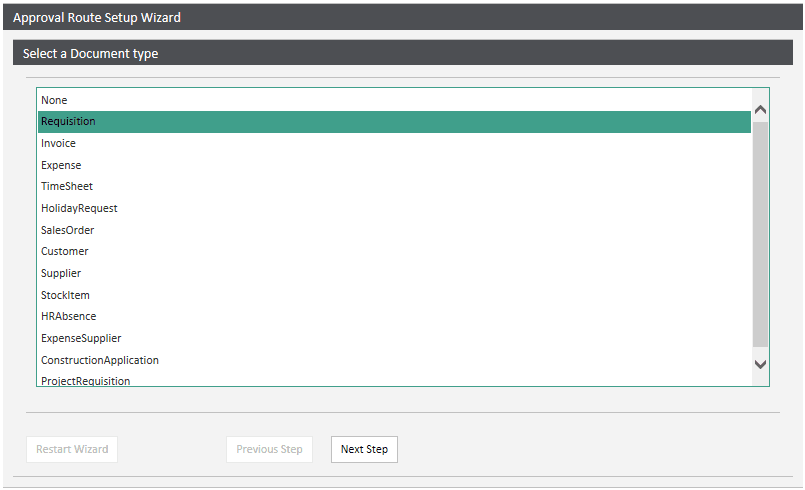
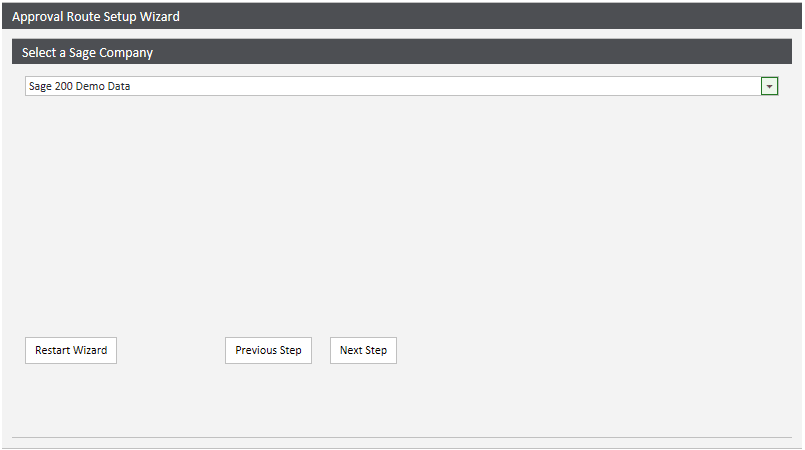
Select the Sage database the routes will be applied to – Next Step.
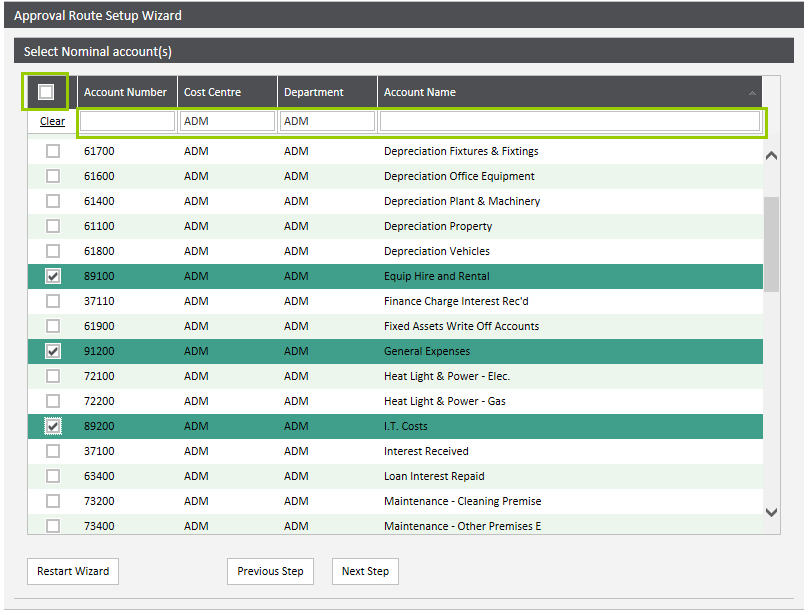
The next step is to choose the nominal codes the approval routes should be assigned to. In the example below the cost centre and department ADM have been entered in the top search bars. Once listed, click the nominal codes required or the tick box at the top to select all. Once nominal codes have been selected, different cost centres or departments can be entered in the search bar; previous selections will be retained. Once all required nominal codes have been chosen, go onto the next step.
Build the approval route as required adding users/user types/user lists as applicable (see further explanation above).

Once the route has been configured correctly, move onto the next step.
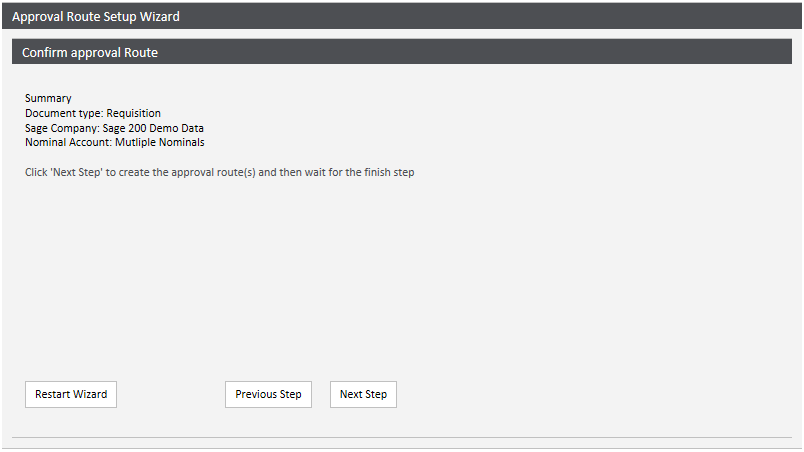
The final step will show a summary of what is to be created, click through the next step to finish the wizard.
3.4. Global Replace for User
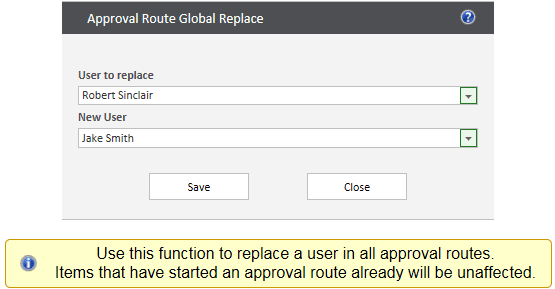
As changes occur in the organisation such as promotions, users leaving etc. amendments will need to be made to the approval route to reflect such changes. Users can be flagged as leavers in their user profile and will not take up a licence, while their user history will remain. However, a user cannot be marked as a leaver while they appear in an approval route. In order to replace a leaver with another user in all the approval routes, first make sure the new user is set up with the appropriate user permissions; nominal codes, jobs, approval values etc. (using the copy user functionality in the various sections will speed these tasks up). When the new user is set up correctly, click the Global replace user button.
Choose the user to replace from the User to replace menu box and the new user from the second menu box. Once the save button is clicked, this will replace the old user with the new user wherever they appeared in approval routes in the WAP system.
N.B. items that have already started an approval route will not be affected; these documents should have their approval routes restarted to be sent to the new user for approval.
3.5. Import Approval Routes from CSV
Import templates can be generated from within WAP, completed and then imported into the system to allow multiple routes across multiple documents to be created at once. When a template has been generated, please ensure the file name ends with the version number; if it doesn’t, the file will fail validation.
4. Restrict Nominal Accounts
This function allows for a list of nominal accounts to be configured that cannot be authorised within the WAP system, e.g. if a set of nominal codes are not to be used. To add a nominal to this list, choose the Company and the Nominal Account from the drop down menus and click Add Nominal Account. A list will appear below with all the nominals that are currently restricted. If a nominal code can at a later date be approved, click Remove to take the nominal off the list and allow documents to be approved.
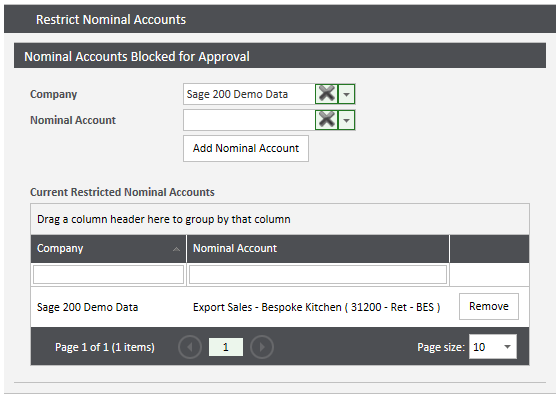
If a document has been entered using a nominal on the restricted list, the approver will see the below message as they try to approve the document. The approver could either reject the line or document with an instruction to the requester to change the nominal, or speak with the WAP Superuser about unblocking the nominal so the document can be approved.

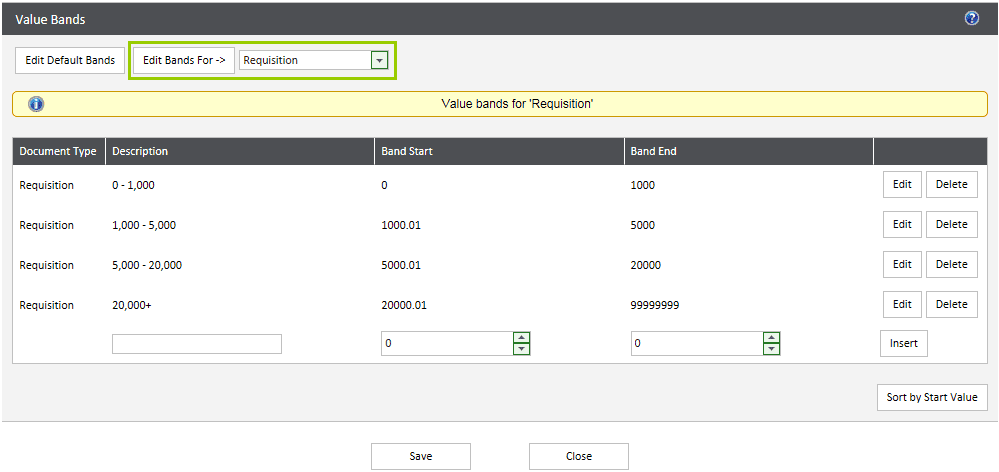
5. Value Bands
Value bands are a way to separate approval routes depending on the value of the document. If, for example, a company was making large scale purchases with high values, it may be that the usual group of approvers are not required and new set of approval routes would apply. In this instance, a value band is created that matches this criteria. You do not require value bands to be set up for general approval values as this is basic functionality that WAP provides in all cases. Value bands are configured in the Approval Route Setup under System Settings.
5.1. Editing Value Bands
Default value bands are used when a value band for a particular document cannot be found. For example, if a requisition with an item for £1,000 was entered onto the system, it would first check the requisition value band for a record where the value of the item falls between the Band Start value and Band End value. In the event a value band cannot be found for requisitions, the same search will be applied to the default value bands.
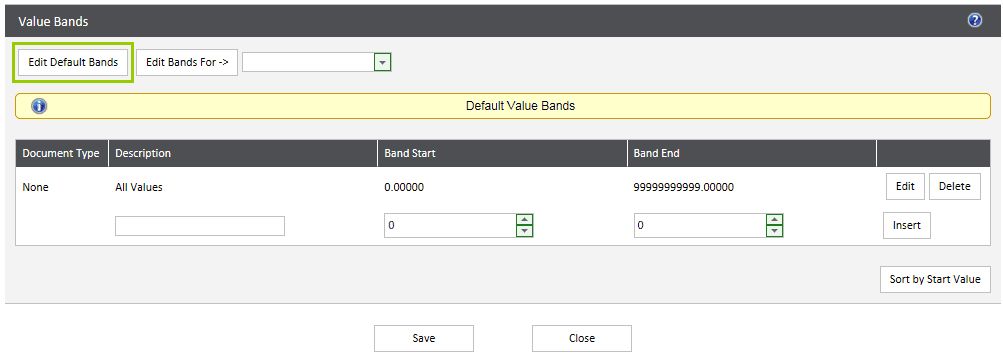
NB: make sure when the value bands are created to click the Save button before moving to a different screen.
6. User Type Approval Permissions
There are a couple of User Type permissions relating to the Approval Process:
Create ad-hoc approval routes: the ability to create a bespoke route to override the set approval route. This can be done either prior to the document being submitted or during the approval process. Either while the item line is being added or edited, click the Approval tab to show the default route created and then click Edit Route to make changes.
Changes can be made and new users added in using the standard method to build routes. If there are multiple lines on the document and this new approval route is for all lines, click the ‘Copy changes to other lines’ box. Once the new route is correct, click Save Route and then save the line as normal and submit the document.

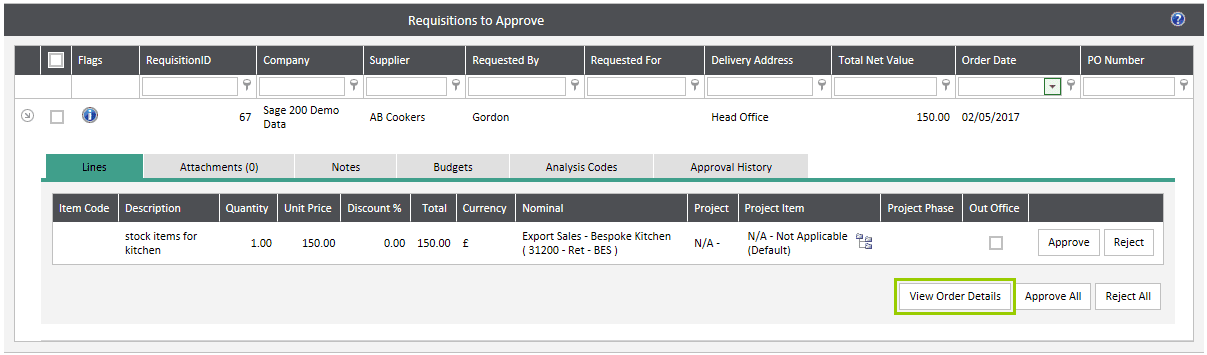
To make changes during the approval process, click View Order Details and then edit the line in the same way as above.
The document will need to be resubmitted in order for the new approval route to be used.
Use ‘Approve Selected’ option on approval pages: this is the ability to select multiple documents to approve at once, rather than approving each document individually. It would be recommended that this functionality is only provided to users at the final stages of the approval process as it is the role of the earlier approvers to check the document is correct while the final approvers may just be needed to provide final sign off.
