WAP Help and User Guide – Expenses Module v19.2
This WAP Help and User Guide Expenses Module will take you through the settings and features of the Sicon WAP Module.
Search the page by pressing Ctrl + F (windows) or CMD +F (Mac) on your keyboard.
Back to all user guidesProduct overview
Help and User Guide maintained for WAP version 192.0.0
The WAP Expenses Help and User Guide will take you through all the settings and features of the Expense module. The module is designed to allow users to create, submit and approve expense and mileage claims. Each user is linked to a designated Purchase Ledger account in each associated company that they may claim form and once an expense claim has been approved it will post through to this linked PL account. If VAT is relevant to an expense claim being processed, the VAT handling is covered as part of the invoice processing, without any additional journals. It is recommended that a new payment group for expense type Purchase Ledger accounts is created in Sage; all the associated expense supplier accounts can be put into this group so all expenses are paid in one PL payment run. These can be linked to cheque or BACS payment methods.
Document Management Users
Expense receipts can be attached to the expense claim which if WAP is used in conjunction with Sicon Documents will be filed if Sage when the expense is approved and posted to Sage 200.
Multi-Currency
The WAP Expense module supports processing of expenses in other currencies with conversion based on the Sage system exchange rates.
1. Pre-requisites
1.1. Linking Sage Purchase Ledger Account to WAP User
When setting up each user it is required to specify which Sage companies they have access to. Within each company they are able to make an expense claim in, an expense Purchase Ledger account will need to be linked through to the user. Once the Purchase Ledger accounts are setup in Sage, link the WAP users to their PL accounts by accessing either through User Setup – Company Access or User Setup – Users – Company Access tab. Users will not be able to submit an expense claim until they have been linked to a PL account.
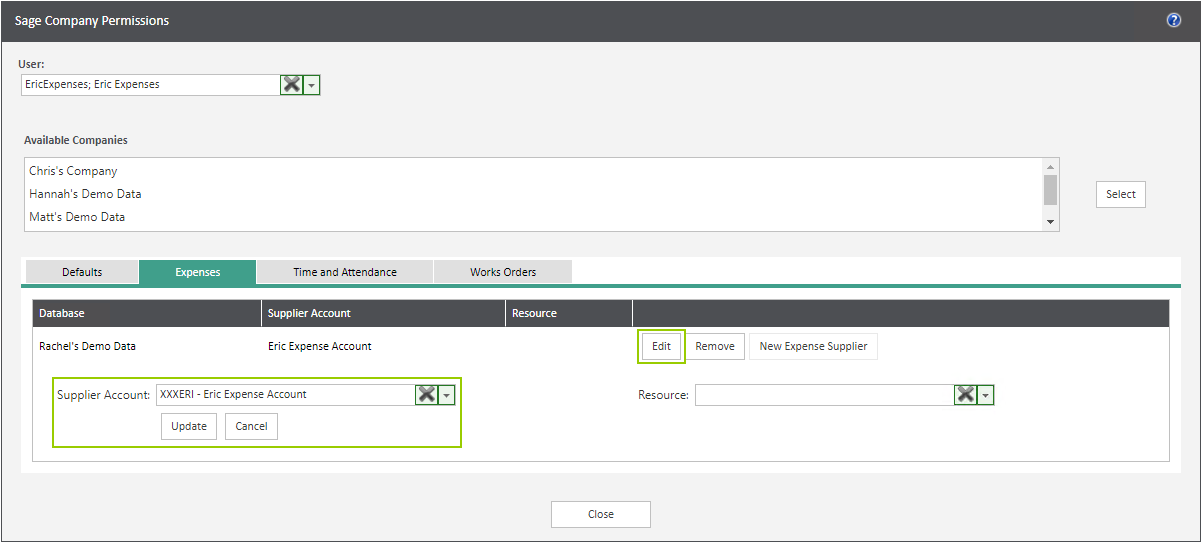
Select the Expenses tab and click Edit for the required company to configure user accounts for, search and choose the appropriate supplier account to use for personal expense claims. If a PL account has not been setup in Sage, it is possible to create an account directly in WAP that once approved, will be posted into Sage and linked to the user’s account in WAP. It is important to click Update to retain the information before closing the screen. For further instructions on this, please follow the link – See System Settings HUG Section 43.6.
If Sicon Job Costing or Sage Project Accounting is configured in System Settings, the user will need to be setup in Sage 200 as either a Resource or Employee and their name selected in the Resource box within this screen.
1.2. Google API key
If wanting to use Google Maps to calculate mileage distances, a Google API key is required. Please refer to the Google API web page for information on Sicon Module Usage, Pricing and Obtaining a Google API Key.
Sicon Module Usage Explained, Pricing & Obtaining a Google API Key
1.3. Creating and configuring Google API key
If your organisation is using Google Business Apps, the Administrator will need to enable API access first. To do this, open the Admin console, click the Security icon (this may be located in the more controls section at the bottom of the screen). Click on API reference and check the box next to Enable API Access and save changes. At this point it is possible to enable the required APIs through the developer console; please find Google notes on generating API keys – https://developers.google.com/maps/documentation/javascript/get-api-key#key
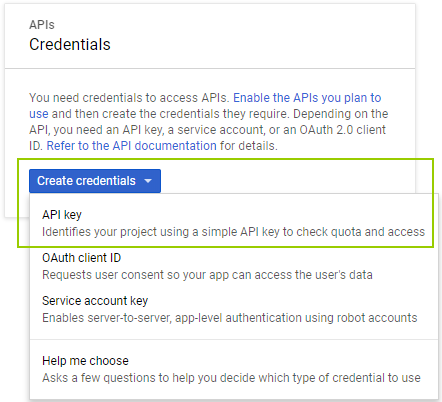
Log into the Google API console using the created Google Account and a prompt will appear to create a new Project – enter a suitable project name (e.g. your organisation name) – this can be changed at a later stage if required. There will be a prompt to enter credentials, select the correct credential required:
Once created, the text string of the API key will be shown; take note of this as this key will need to be configured in WAP.

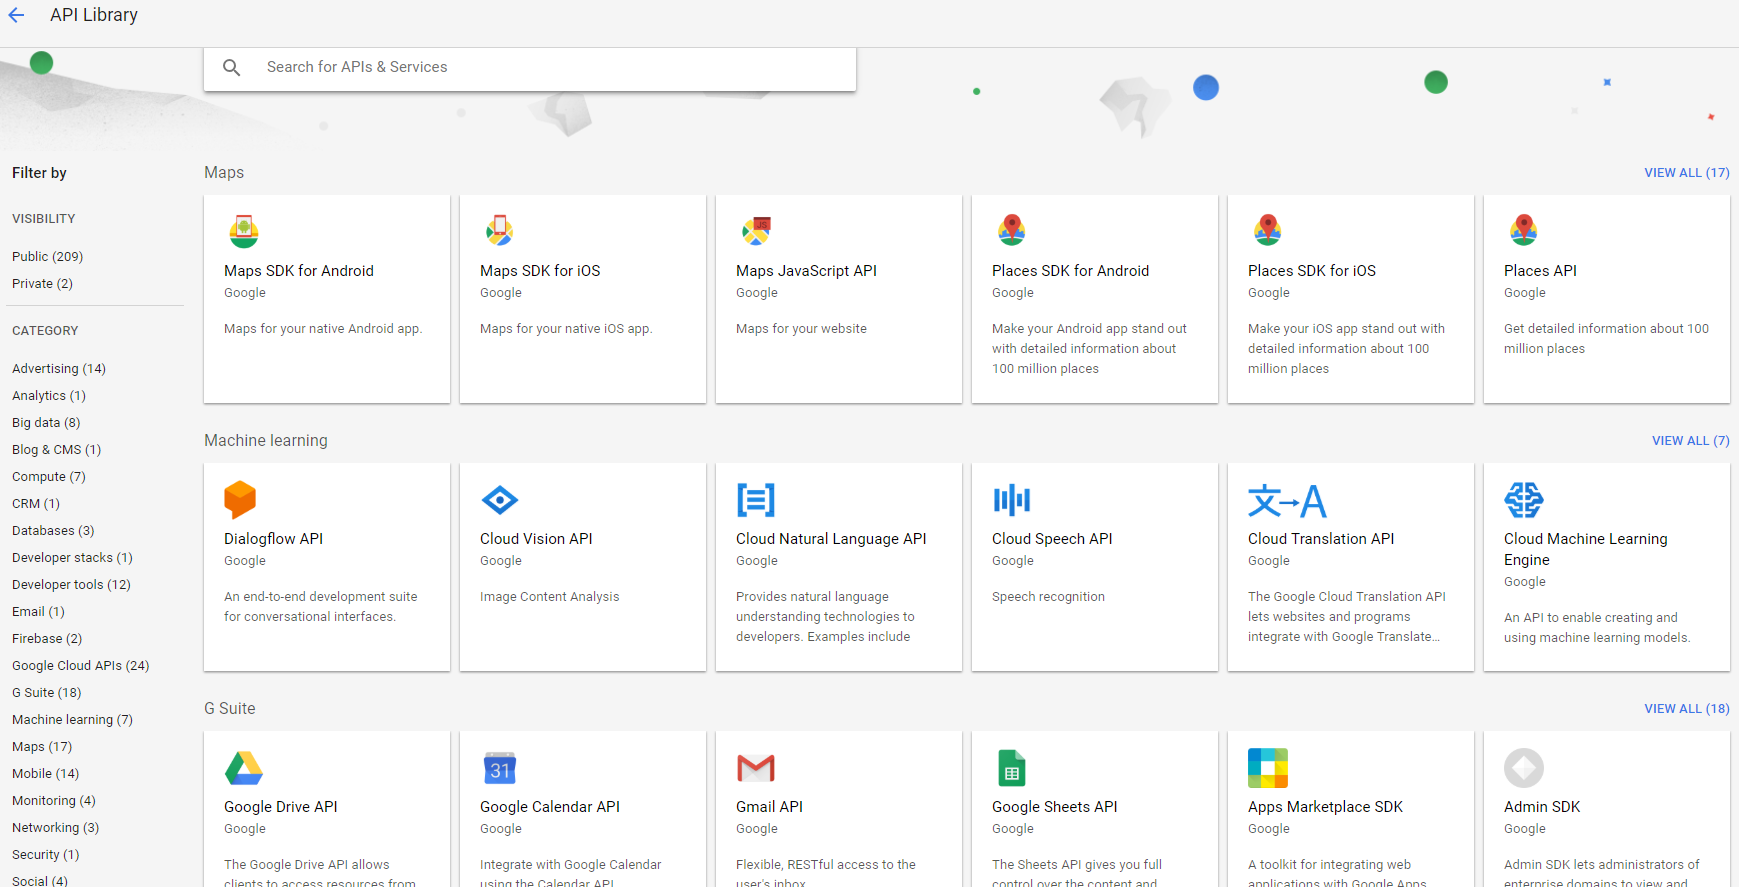
Specific APIs will need to be enabled from the Google API library. WAP requires the following to be enabled:
- Google Maps Direction API
- Google Places API Web Service
- Google Maps JavaScript API
- Google Maps Geocoding API
- Google Maps Distance Matrix API
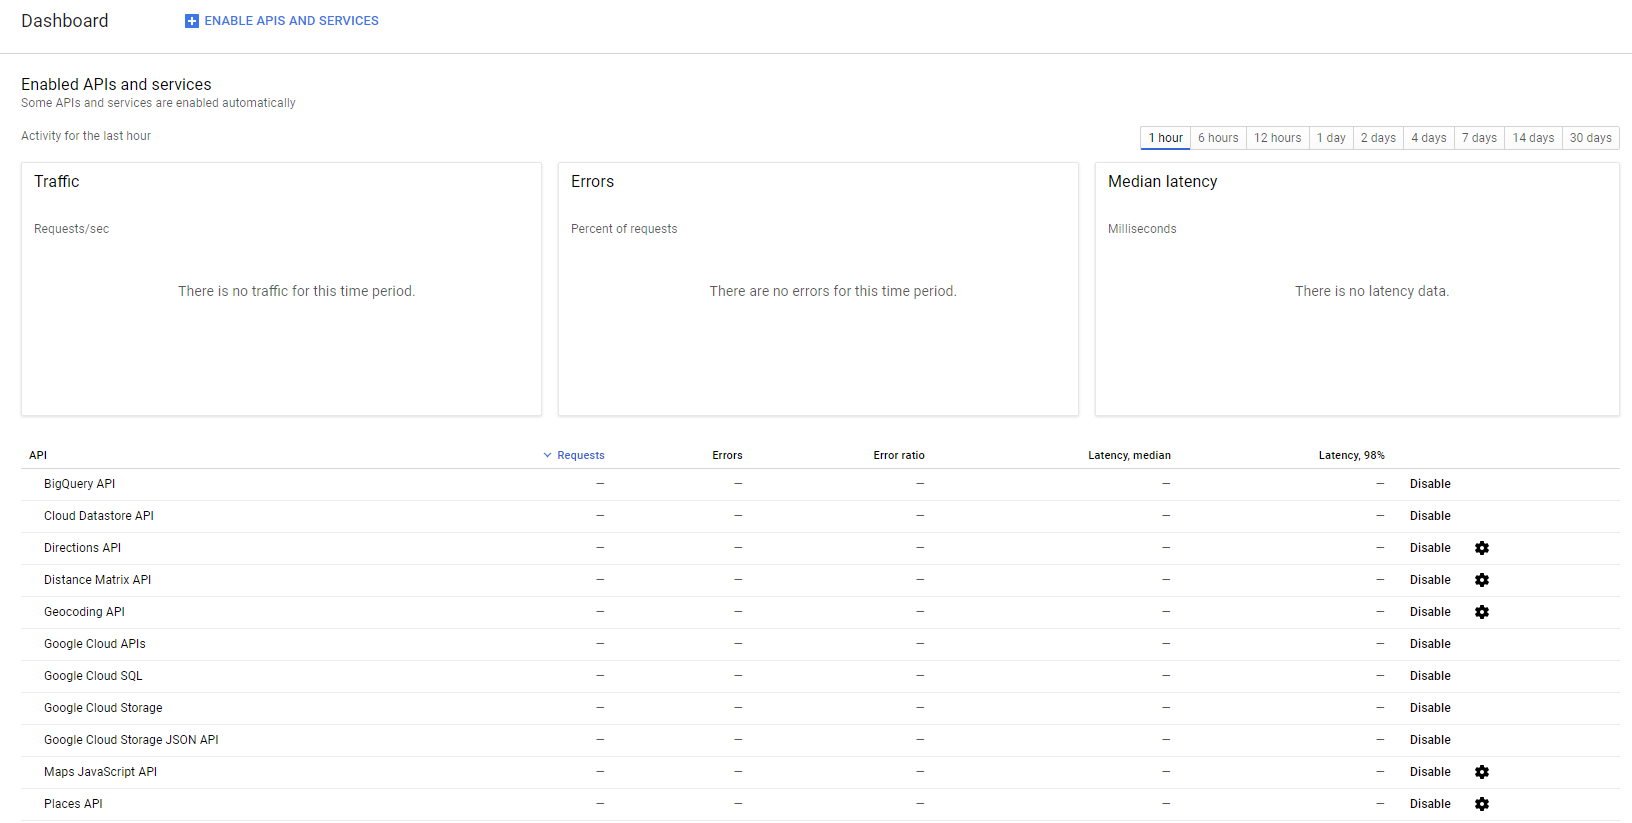
Usage can be monitored to see if the quotas are being exceeded by viewing the dashboard.
1.4. Linking Google API key and WAP
The API key will need to be entered into WAP System Settings – Miscellaneous – Functionality Banner – Google Maps API key.
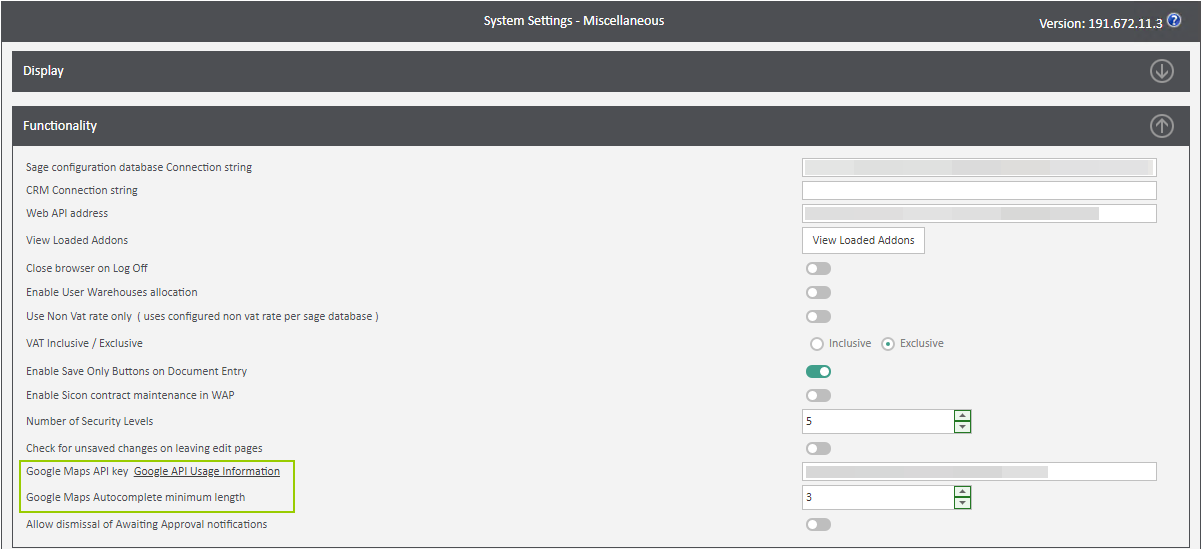
It is also possible to state after how many characters have been entered on the maps function should Google start searching; i.e. in the above example this has been configured as 3, so a search will begin once three characters have been entered in the search bar.
2. Expense Enable Configuration
For the Expenses module to be available the enable module must have Expenses module ticked. Once this is configured, Expense options will then be visible within the system.
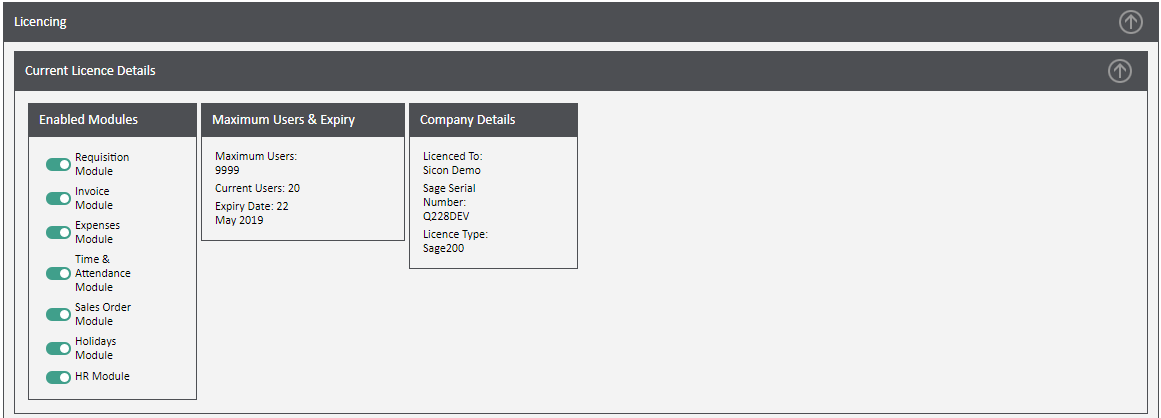
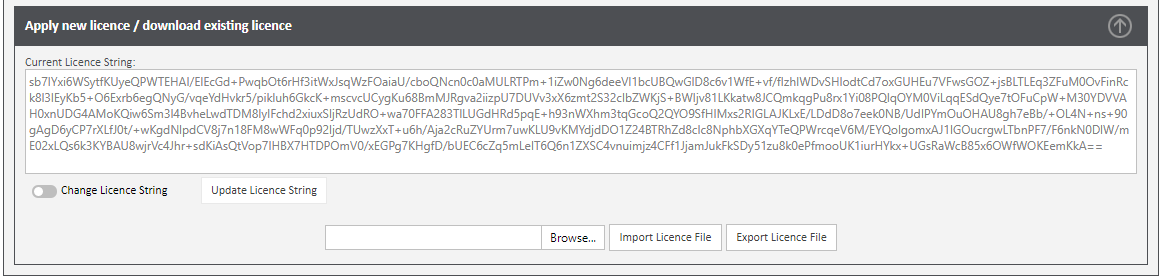
Each year WAP will require a new enable string to continue working. When a new one has been issued, select System Settings – Miscellaneous – Licencing – Apply new licence – Browse and Upload.
3. Expense Item Types Configuration
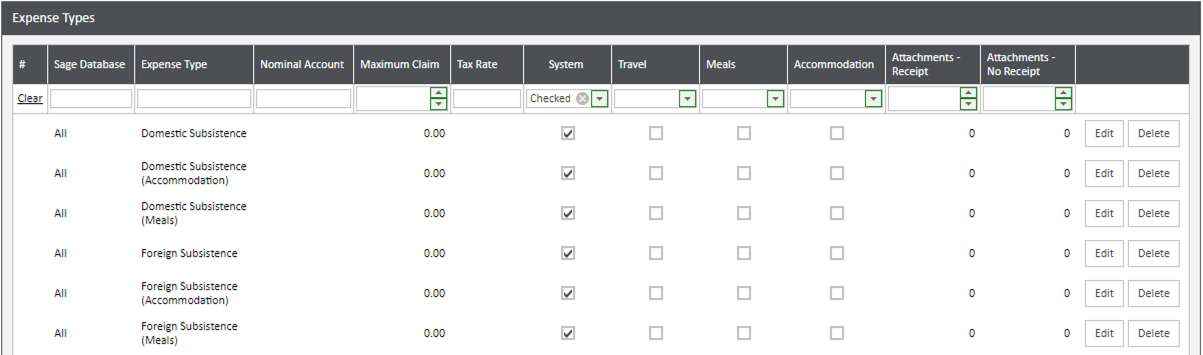
Expense types need to be configured in System Setup – Expense Item Types before expense claims can be created. There are a number of pre-defined System Expense Types (‘Mileage’, ‘Domestic Subsistence’, ‘Domestic Subsistence (Accommodation)’, ‘Domestic Subsistence (Meals)’, ‘Foreign Subsistence’, ‘Foreign Subsistence (Accommodation)’ and ‘Foreign Subsistence (Meals)’) that cannot be edited or deleted. If a Subsistence scheme is not being used, the subsistence expense types will be hidden. There is no limit to the number of expense types that can be added; expense types can either be linked to a Sage Company or unlinked and therefore available across all Sage Companies linked to WAP.
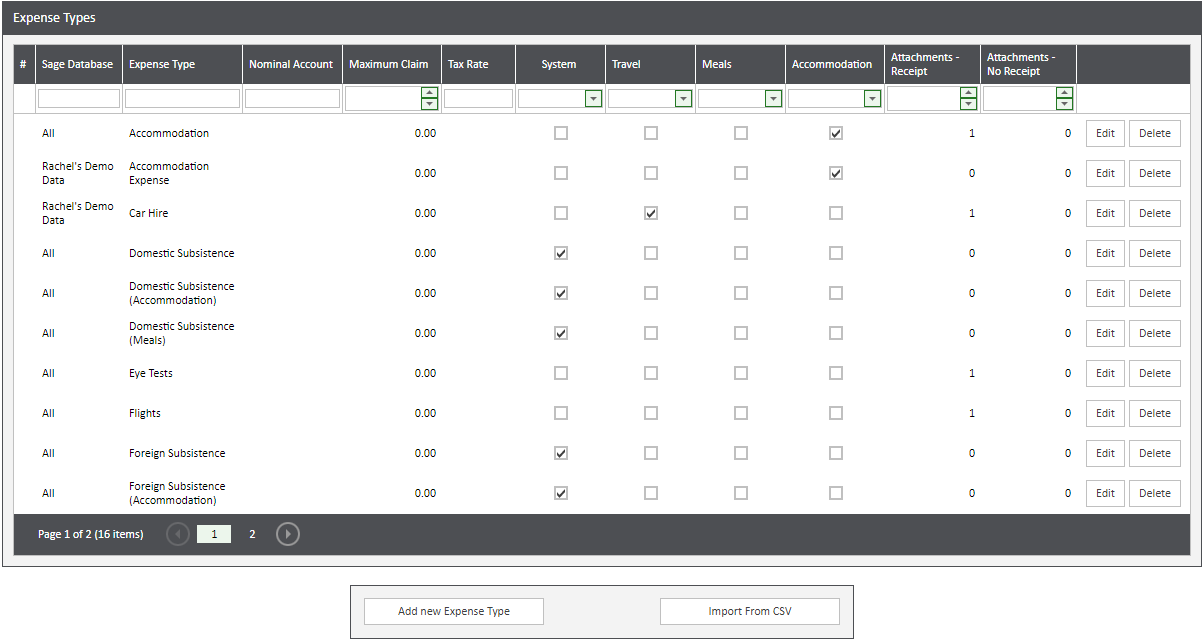
3.1. System Expense Item Types
To add an expense type, click ‘Add new Expense Type’ and enter fields as required.
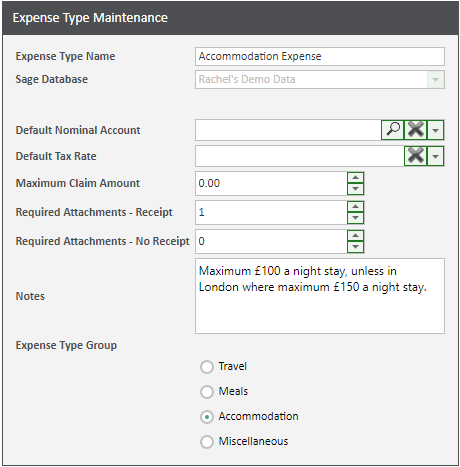
Expense Type Name: enter a name for the expense type that the user will see when entering their expense claim.
Sage Database: either pick a specific Sage Company for the expense to be available in, or leave as available across all Sage Companies. If linking with a Sage Company, the nominal and tax fields will be available for selection.
Default Nominal Account: if linked through to a Sage Company, it is possible to select a default nominal account. If no nominal account is entered here, one will need to be linked through when assigning the expense type through to the user.
Default Tax Rate: if linked through to a Sage Company, it is possible to select a default tax rate. If no tax rate is entered here, one will need to be linked through when assigning the expense type to the user.
Maximum Claim Amount: if applicable, enter a maximum claim amount here to restrict the value of an expense claim a user can enter. If there is no limit, leave this value as 0.00. This restriction is at a line level rather than an expense level.
Required Attachments – Receipt: if users must enter an attachment when saving an expense claim, enter the number of required attachments. This option is specifically linked with if a user has marked there is a receipt on the expense line.
Required Attachments – No Receipts: if users must enter an attachment when saving an expense claim, enter the number of required attachments. This option is specifically linked with if a user has marked there is no receipt on the expense line. Some companies will force a document to be attached even if there is no receipt – this may be a justification document explaining why the user has no receipt.
Notes: any notes entered will be visible to all users when submitting an expense claim. If notes should be targeted to specific users, notes can also be added when linking the expense type through to the user.
Expense Type Group: expense types can be put into a relevant group so when an expense voucher is generated, expense lines are grouped together into their relevant expense type.
Expense types can also be imported if large numbers of expense types are being created; templates are generated from within WAP and once completed, will need to be validated and can be imported when the file contains no errors.
3.2. User Expense Item Types
Once expense types have been created they need to be assigned to users along with the default nominal code and tax rate to use. Users can be assigned multiple nominal codes per expense type if required. There are four ways to allocate expense types to users.
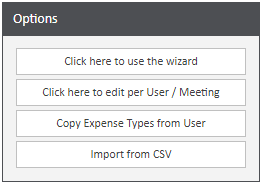
3.3. User Setup - Expense Item Types - Use the Wizard
Use this wizard to pick an expense type, select user(s) and select the correct Sage Database, Tax Rate, Cost Item (if applicable), maximum claim (if applicable), a memo (if applicable) and whether the expense type is selectable. Nominal codes are also allocated; multiple nominal codes can be allocated if required with one set as a default. The user will then be able to select from these nominal codes when entering an expense claim.
Only expense types should be selected on the first stage of this report if they will be linked through to users with the same nominal codes and tax codes; i.e. do not select Hotels and Flights as the expense types if these are to link through to a user with different nominal codes and tax rates.
3.4. User Setup - Expense Item Types - Edit per User
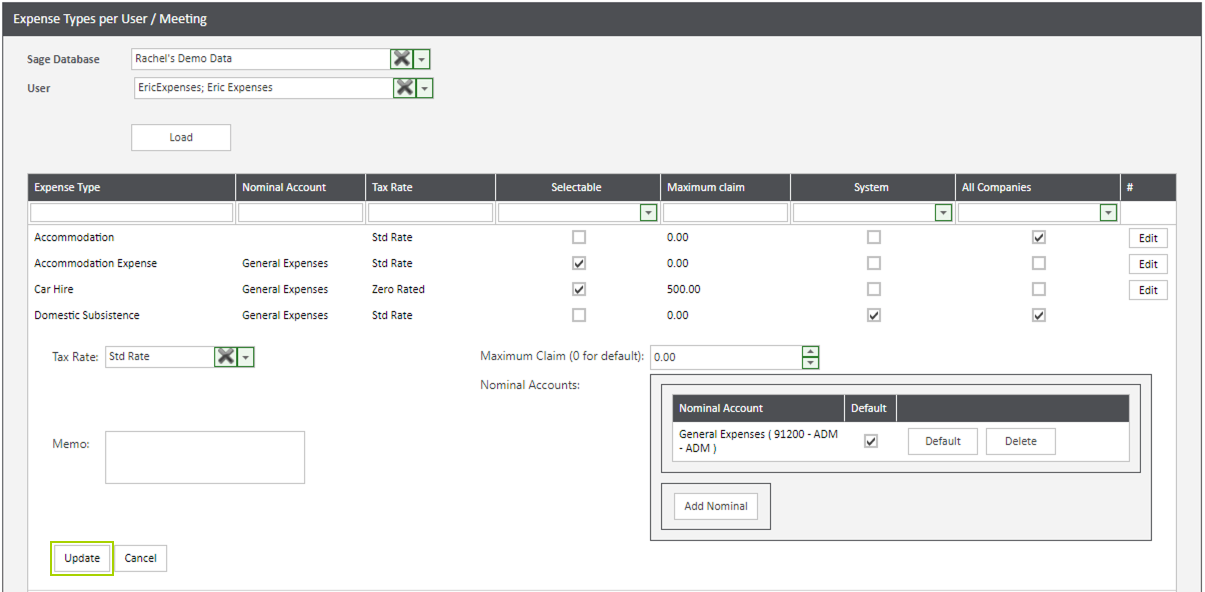
This option can be used to see what expense item types have been allocated to a user, to add, edit or remove an expense type against a user. Mileage is a system expense type so must be allocated to a use with a default nominal code and tax rate before the user is able to enter any mileage claims.
Choose a Sage Database and User and then click Load. Each expense type will be listed, click Edit to change the information against the expense type. In the below example the Flights expense is being edited.
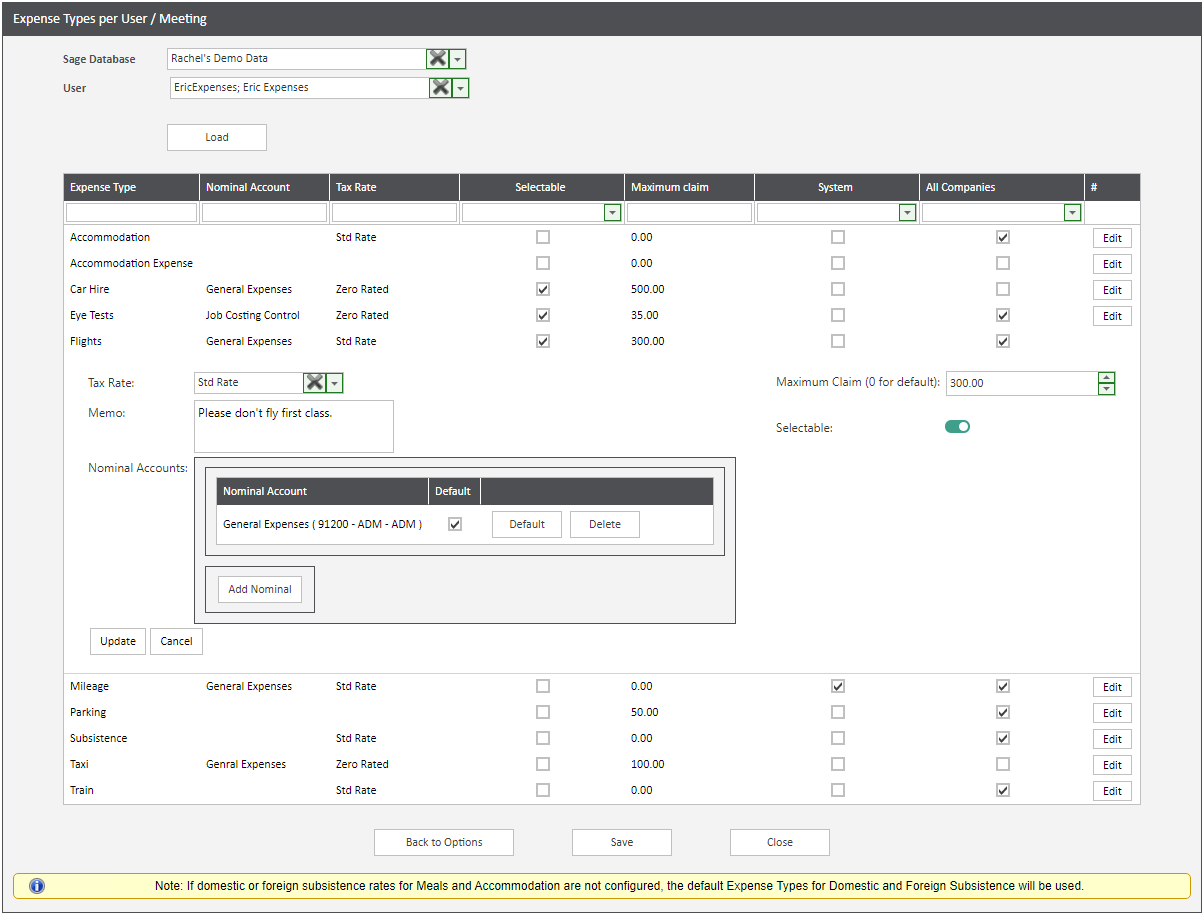
Tax Rate: choose the correct tax code from the list – the tax codes will be pulled through from Sage.
Maximum Claim (0 for default): if applicable, enter a maximum claim for this user and the expense type. If the user does not have a limit, leave this value as zero. This maximum is per expense line.
Memo: if applicable, enter a memo that will appear to the user when they select the expense type. If notes should be visible to all users, enter these against the expense type.
Selectable: tick this option so the user is able to enter an expense claim against this expense type; if this is not ticked, the expense type will not be available to the user when they go to claim an expense type.
Nominal Accounts – Add Nominal: click to add a nominal code through to this user and expense type; multiple nominal codes can be added if required and one set as a default.
If the expense type does not have a default Tax Rate or Nominal Account on the main Expense Type, these will be required at a user level to ensure a claim can be submitted.
Once the expense type has all the information entered correctly, click to ‘Update’ the expense type and then once all expense types have been set up, click Save at the bottom of the page.
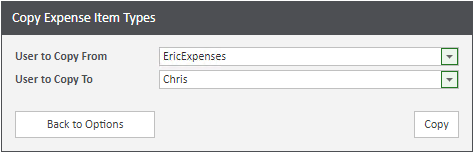
3.5. User Setup - Expense Item Types - Copy Expense Types
Select the user to copy from and the user to copy to from the drop down menu boxes and click Copy. This will copy all expense types across all companies the first user has access to. This option is really useful when a new starter needs to be setup who matches an existing user in the organisation.
Only users who are not marked as leavers and allowed the ability to login will appear in the drop down lists.
3.6. User Setup - Expense Item Types - Import from CSV
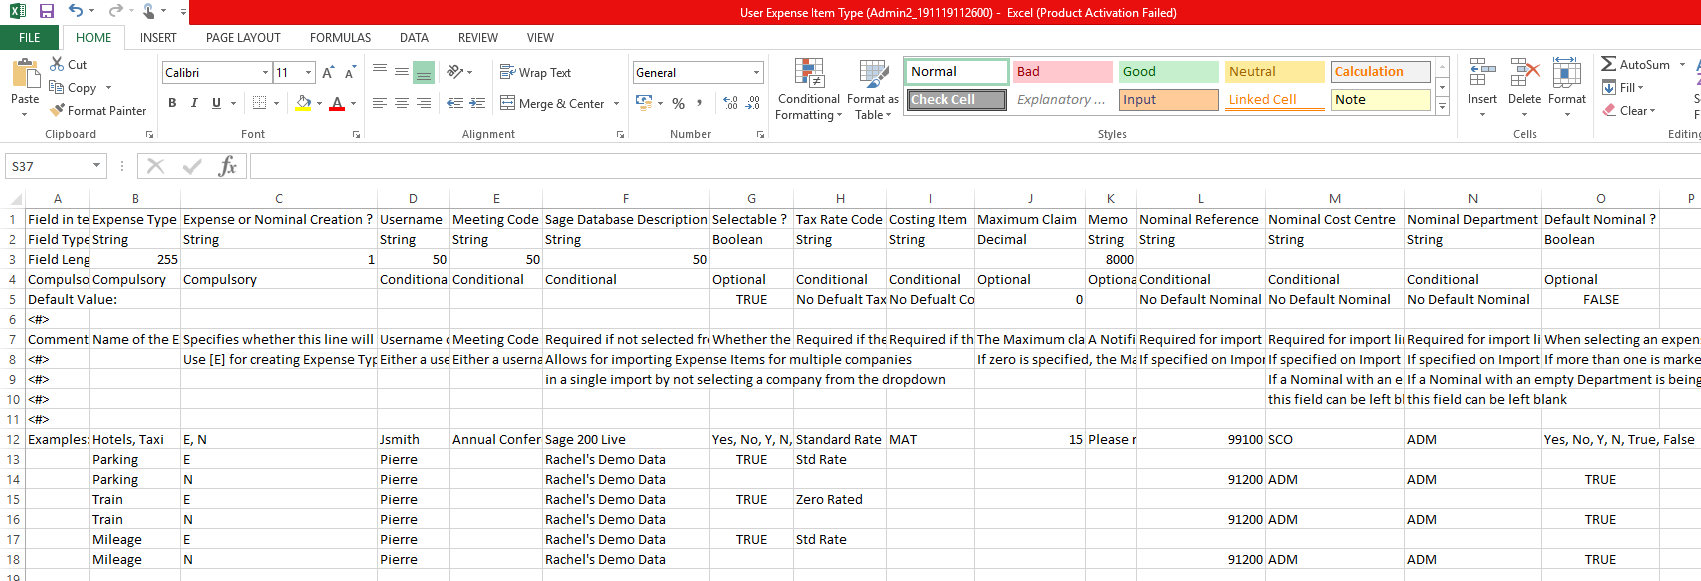
A CSV template can be generated, completed and imported to allocate expense types to users with the correct nominal codes, tax rates, maximum claim amounts and memos. Import templates are generated from within WAP and will contain sample text to assist with completing the import. For each user and expense type, two lines will be required; ‘E’ line to assign the expense type to the user with a default tax code, memo etc. and an ‘N’ line to assign the nominal code to the expense type to the user.
When importing there are a couple of options for how to proceed if there is already expense types or nominal codes allocated to user.
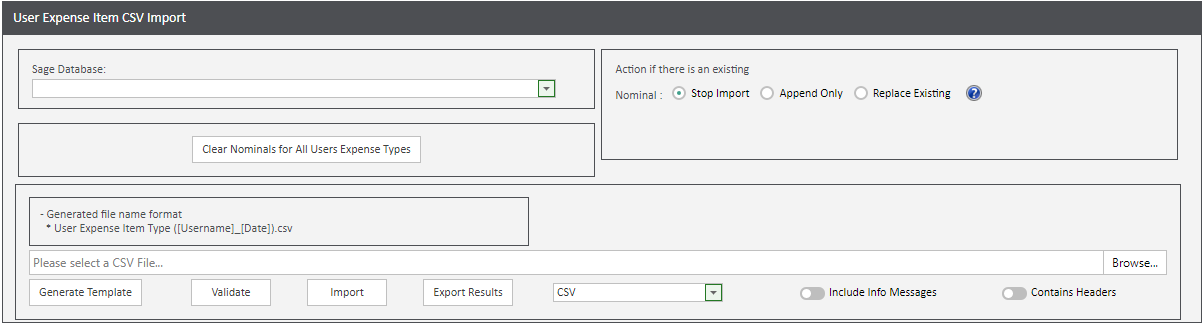
Clear Nominal for All Users Expense Types: if this is selected, all nominal allocations will be removed for all users and all expense items prior to the import. The access to expense types will not be cleared.
Action if there is an existing nominal:
Stop Import: validation will fail for the import to be corrected to remove any duplicated data.
Append Only: if nominal codes are found in the import that aren’t already allocated, they will be added. Existing nominal codes won’t be removed. The default nominal code will be changed if one is specified in the import.
Replace Existing: if one or more nominal codes are found in the import file for a User Expense Item, all nominal codes for that item not found in the import will be removed and the ones specified in the import for the given item will be created.
4. Mileage Configuration
Prior to mileage claims being submitted, configuration on fuel rates, vehicles and default mileage nominal codes will need to be completed.
4.1. Fuel Rates
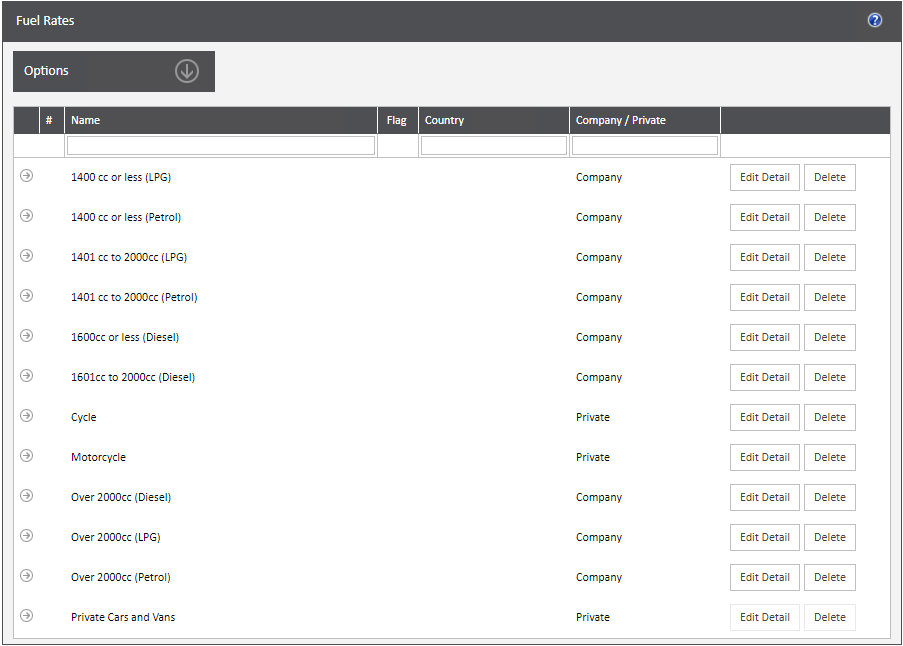
Fuel rates are configured in System Setup – Fuel Rates. A pre-configured list of rates will be created at install and these will reflect the current rates as defined by HMRC. These rates can be edited in accordance with your organisation’s policy or new rates added as required. It is not possible to delete the Private Cars and Vans Rate. These rates are not automatically updated if changed by HMRC.
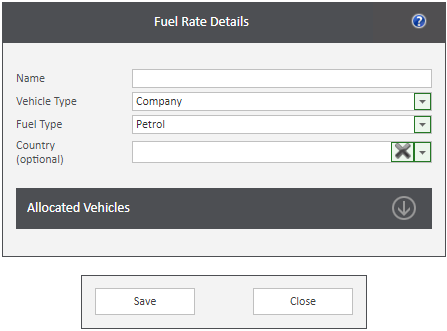
To add a new fuel rate, expand the Options banner and click Add New Fuel Rate. Enter a name for the rate, select a vehicle type, fuel type and country (if applicable). Once the details have been confirmed, click Save. If editing an existing fuel rate, click to drop down on the Allocated Vehicles to view any vehicles that have been linked with the fuel rate. If vehicles have been linked and claims submitted, limited fields will be able to be edited.
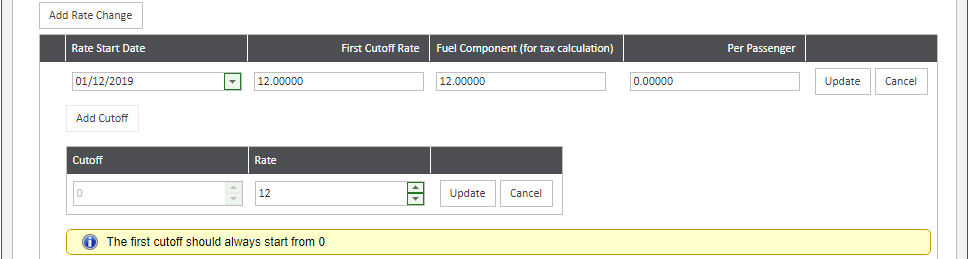
Once a rate has been created, if the rate change or cut off needs amending; e.g. if the amount to be paid is changing (i.e. if from 01.12.2019 12p per mile is to be paid rather than 11p per mile), expand the applicable fuel rate by clicking the arrow to the left of the rate and click ‘Add Rate Change’.
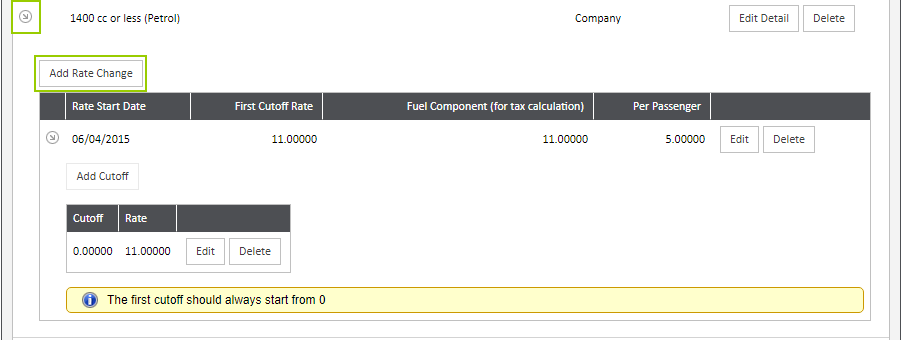
Select from the calendar the correct start date, enter the first cut-off rate, fuel component and a passenger figure (if applicable) and click Update. N.B. 12p a mile is entered as 12.00 rather than 0.12.
The fuel component value is used to calculate VAT if a receipt has been attached to a mileage claim, rather than the cut off rate. These fuel rates are set by HMRC and are updated on a quarterly basis, please ensure these rates are correct – https://www.gov.uk/government/publications/advisory-fuel-rates/advisory-fuel-rates-from-1-march-2016
If the amount per mile will reduce after a certain number of miles, a new cut-off will need to be added. Click the arrow to expand the new rate and click Add Cut-Off. The rate entered when creating the rate change will be applied from zero miles but more can be added as required. The rate mileage will be paid at will be calculated at the point mileage is approved. If users are close to the cut off at point of submitting a mileage claim, the mileage rate may change at the point the expense is approved.
N.B. Company vehicles can only have one fuel rate cut-off – it is the private rate that would reduce in pence per mile, e.g. 45p for the first 10,000 miles dropping to 25p for every mile after.

4.2. Vehicles
Company vehicles are added onto the system under the System Setup banner – Vehicles; if required, private vehicles can also be added here if tracking individual’s private cars. By default, there is always a Private System car available to users. Once mileage claims have been made against a vehicle, it cannot be deleted but limited fields can be edited.
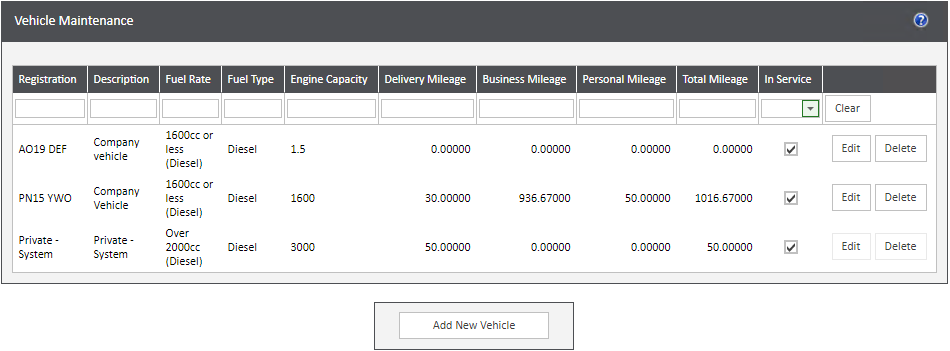
Click to ‘Add New Vehicle’.
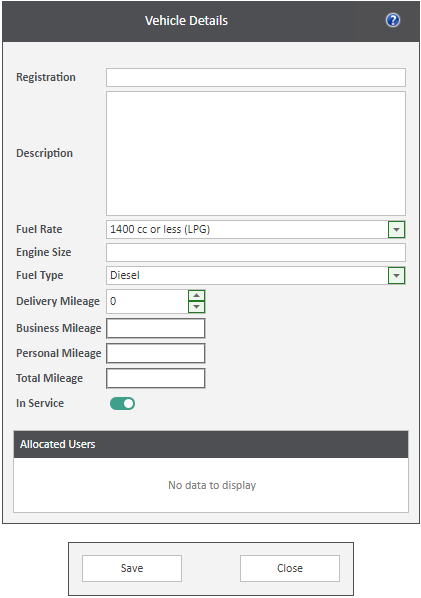
Registration: enter the registration of the vehicle; this is used throughout the system to identify the vehicle. This is a mandatory field.
Description: if required, enter any extra information about the vehicle – such as make, model and colour. Users will be able to view the description when selecting a vehicle to enter a mileage claim against.
Fuel Rate: the rate is selectable from a drop down list of preconfigured rates. Once mileage has been claimed for a vehicle, the fuel rate cannot be amended.
Engine Size: free text field to enter vehicle’s engine size.
Fuel Type: choose from the drop down box the correct fuel type. Although ‘Any’ is a valid option, it is recommended that the correct fuel type is selected.
Delivery Mileage: a free text field to enter the total mileage the vehicle has done at the point of creation.
Business Mileage: this field is automatically calculated based on mileage claims submitted against the vehicle through WAP.
Personal Mileage: this field is automatically calculated based on mileage claims submitted against the vehicle through WAP, if ‘Record Personal Mileage’ is enabled within System Settings.
Total Mileage: this field is automatically calculated by combining the total business, personal and delivery mileage.
In Service: this can be used to stop a vehicle being selected for mileage claims. Once claims have been entered against a vehicle, it cannot be deleted.
Allocated Users: if users have been linked with this vehicle, they will be listed here.
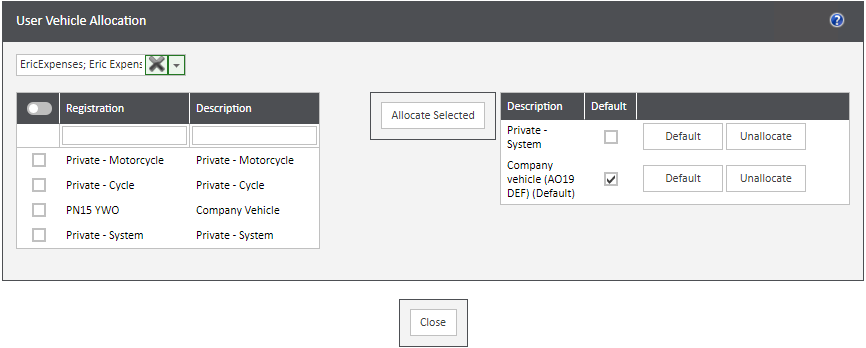
4.3. User Vehicle Allocation
All users will have access to a private car to put mileage claims against; if company cars have been created, these will need to be assigned to the relevant user through User Setup – User Vehicles. Users can have access to more than one vehicle and one be set as their default.
Select the user from the drop down box and then tick to select the required vehicle and click Allocate Selected to assign the vehicle to the user. Once a vehicle has been assigned to a user, it can either be marked as their default or unallocated. Users will always have access to the Private System vehicle.
4.4. User Mileage Configuration
Against the user’s WAP profile, configure any unclaimed business or personal mileage claimed in the current financial year but not through WAP (this is to ensure that the 10,000 business mileage limit on private vehicles is adhered to), there are also options to enter the user’s typical work place and calculate their regular commute distance.
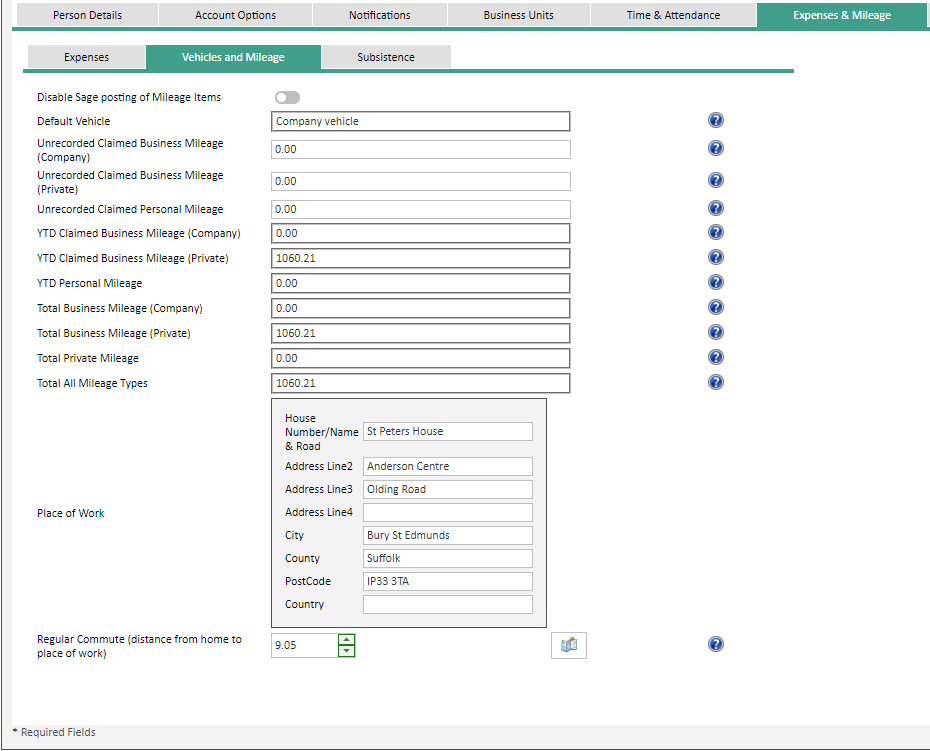
Disable Sage posting of Mileage Items: if the user’s mileage claims submitted in WAP should not post through to Sage, tick this option. By default, a user’s mileage claims will post through to Sage.
Default Vehicle: this will display the vehicle set as the default on User Setup – User Vehicles.
Unrecorded Claimed Business Mileage (Company): use when first setting up a new user to record any business miles already claimed on a company car but not recorded through WAP.
Unrecorded Claimed Business Mileage (Private): use when first setting up a new user to record any business miles already claimed on a private car but not recorded through WAP.
Unrecorded Claimed Personal Mileage: if tracking personal mileage, use when first setting up a new user to record any personal miles already claimed but not recorded through WAP.
YTD Claimed Business Mileage (Company): this is a calculated field that will show opening business mileage balance plus any business mileage claims submitted on a company vehicle.
YTD Claimed Business Mileage (Private): this is a calculated field that will show opening business mileage balance plus any business mileage claims submitted on a private vehicle.
YTD Personal Mileage: this is a calculated field that will show opening personal mileage balance plus any personal mileage claims submitted.
Total Claimed Business Mileage (Company): this is a calculated field showing all claimed and unclaimed business mileage submitted against company vehicles.
Total Claimed Business Mileage (Private): this is a calculated field showing all claimed and unclaimed business mileage submitted against personal vehicles.
Total Private Mileage: this is a calculated field that shows all claimed and unclaimed personal mileage.
Total All Mileage Types: this is a calculated field that shows all claimed and unclaimed mileage of any type.
Place of Work: enter the user’s typical place of work; this will then appear as a Favourite when the user enters a mileage claim.
Regular Commute (distance from home to place of work): if the user does not have a place of work and home address configured, use this to calculate regular commute distance which can be deducted if required from a mileage claim. If a Google Maps API key has been entered, the Google Maps icon can be used to calculate the distance.
4.5. VAT Calculations for mileage claims within WAP
As described within section 4.1, when fuel rates are configured they may also include a fuel component. This is the part that the company can claim VAT back from. In the example below, the user has a rate of 45p a mile, with a fuel component of 16p:
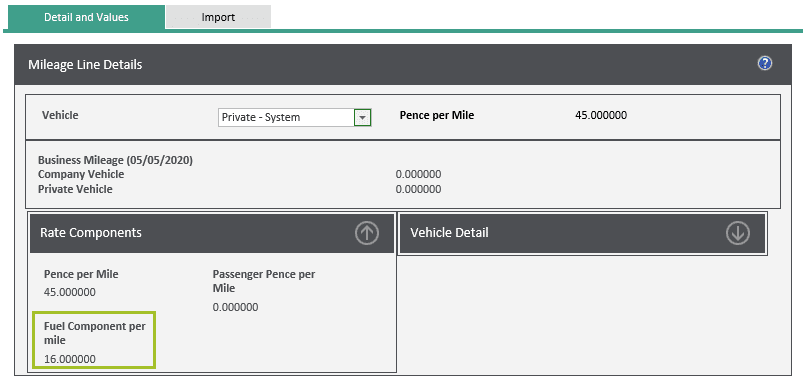
The 16p is VAT inclusive so WAP works backwards from this to calculate the VAT that can be claimed.
16p represents 120% (100% plus 20% VAT). The VAT element is 16/120*20 = 2.67p. So for every business mile claimed at this rate of 45p, the company can reclaim 2.67p.
If this user were to submit a claim for 100 miles, the VAT element is 2.67:
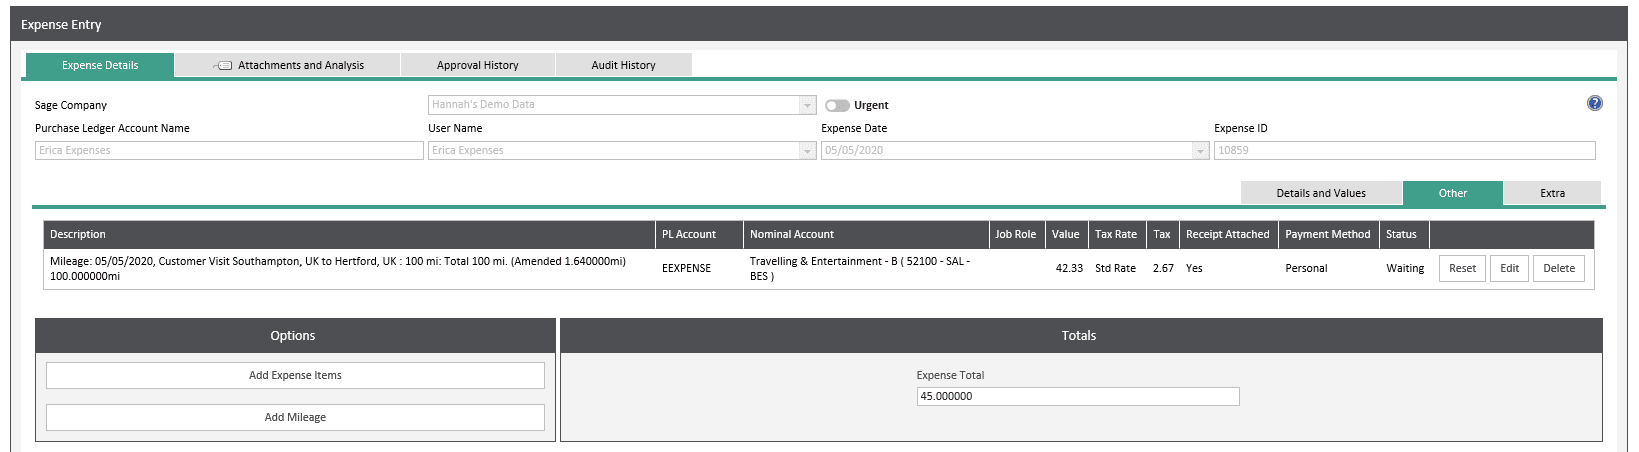
So for the claim above, the total claim payable to the user is £45 (100 miles at 45p).
For the company, the petrol element is £16 (100 miles at 16p) and the VAT claimable on that petrol element would be £2.67 (100 miles at 2.67).
If the user were to enter a claim using the same rate for 150 miles:
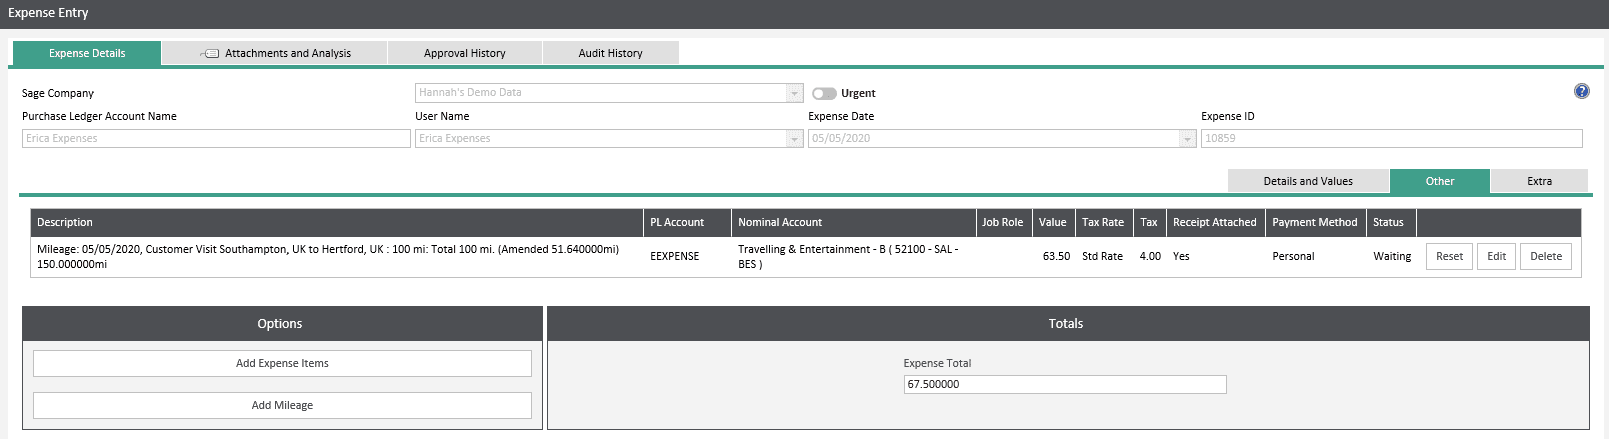
Then for the claim above, the total claim payable to the user is £67.50 (150 miles at 45p).
For the company, the petrol element is £24 (150 miles at 16p) and the VAT claimable on that petrol element would be £4 (150 miles at 2.67).
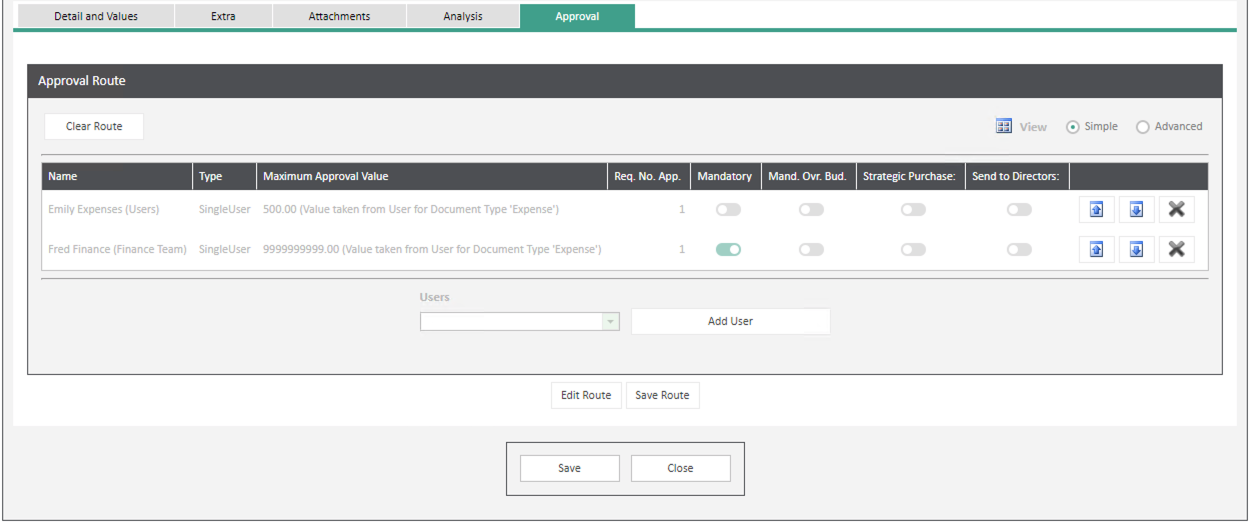
5. Configuration of Expense Approval Routes
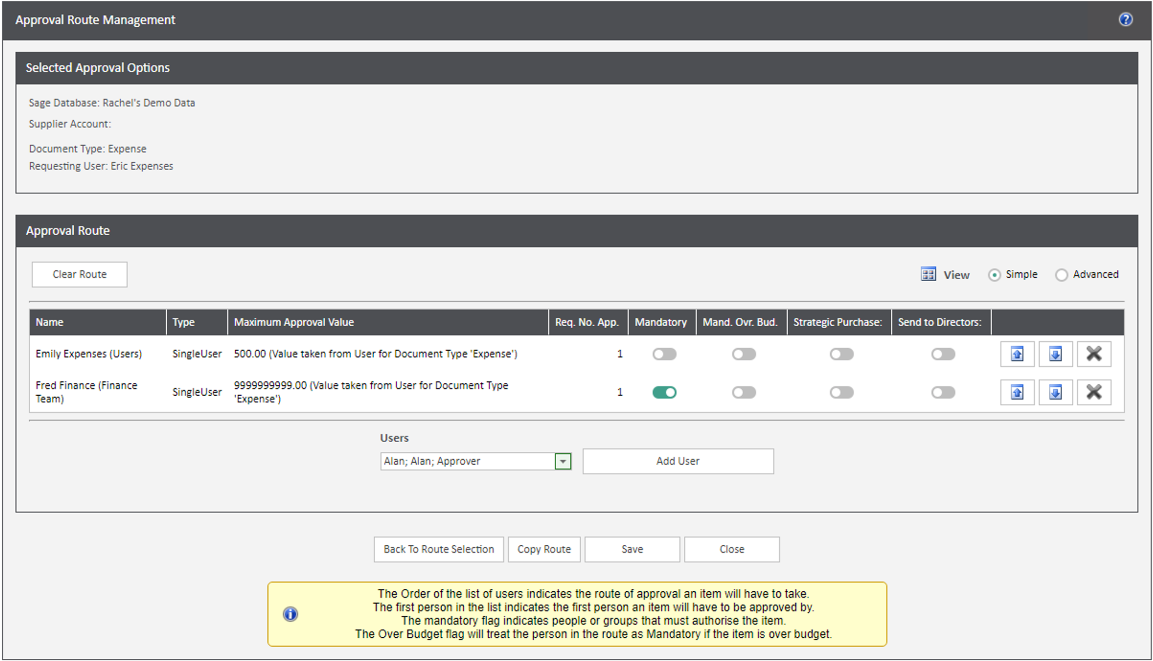
Before a user submits an expense claim, ensure approval routes have been setup correctly. Approval routes can be configured in a number of ways (i.e. based on the nominal account, requesting user, job etc.) but the recommended configuration would be based on requesting user. Approval would go to the user’s line manager and may require additional approval if the expense is over the line manager’s approval limit. A Finance check would be recommended before the expense can be posted through to Sage; this can either be the first or final approval check. N.B. if the Finance check is the final approval step, they must be marked as Mandatory and have unlimited approval value, see below.
This Finance user would also be given access to all nominal codes so if they need to change any coding, they have access to do this. Some organisations will set up an Expense Type called ‘Other’ as a catch all for expense claims that do not fit into a defined expense type and then the Finance user check will amend the nominal code to the correct code based on the spend.
6. New Expense (WAP Desktop Website)
To begin a new expense claim, select New Expense from the Expenses side menu and the screen will open to enter new expense lines.
Sage Company: the user’s default Sage Company will be displayed but if the user has access to more than one Company, they will be able to select from the drop down list the correct Company.
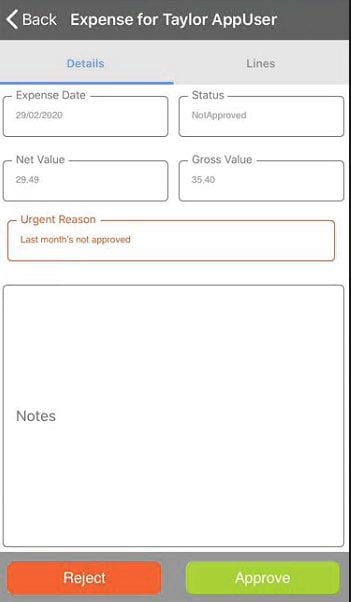
Urgent: if the expense claim is urgent the user can tick and then enter an urgent reason. Once the expense is submitted, a message will be sent through to approvers as soon as the expense is awaiting their approval.
Purchase Ledger Account Name: this will show the PL supplier linked through to the user that any personal expense claims will be posted through to. If there is no supplier showing here, the user will not be able to enter an expense claim.
User Name: this will default to the user who is logged in and entering the expense claim. If the user has access to delegates, they will be able to change the user selected here and enter an expense claim on behalf one of their delegates. This functionality is used if a user is entering an expense claim on behalf of another user; e.g. a PA entering a Director’s expense claim or a Team Leader entering a Team Member’s expense claim.
Expense Date: depending on settings within System Settings, this will either default to the date the expense claim is entered, or the last date on the expense lines.
Expense ID: once a line has been entered against the expense claim an ID will be generated which will allow for users to search and identify the claim.
Save Only: clicking this will allow the user to save the expense before submitting; i.e. if extra lines need to be added before the expense is submitted.
Save and Submit: this will send the expense claim for approval.
Expense Voucher: once the expense has been approved, an expense voucher can be printed and emailed from the system, or if configured within System Settings, it can only be emailed. Expense Vouchers are most commonly used if needing to recharge an expense claim to list out all the lines on the claim.
Reset Lines: if the expense has been submitted but the approval routes need resetting part way through approval, this option can be used to reset all lines rather than resetting lines individually.
Close: this will close the expense screen without saving any changes. N.B. if the expense has been previously saved, the expense will remain on the system even if the page is closed. If there are no lines on the expense claim and a user closes, they will see an option to delete the claim.
6.1. Add Expense Item
Once the user clicks to add an expense line, they will see the below screen.
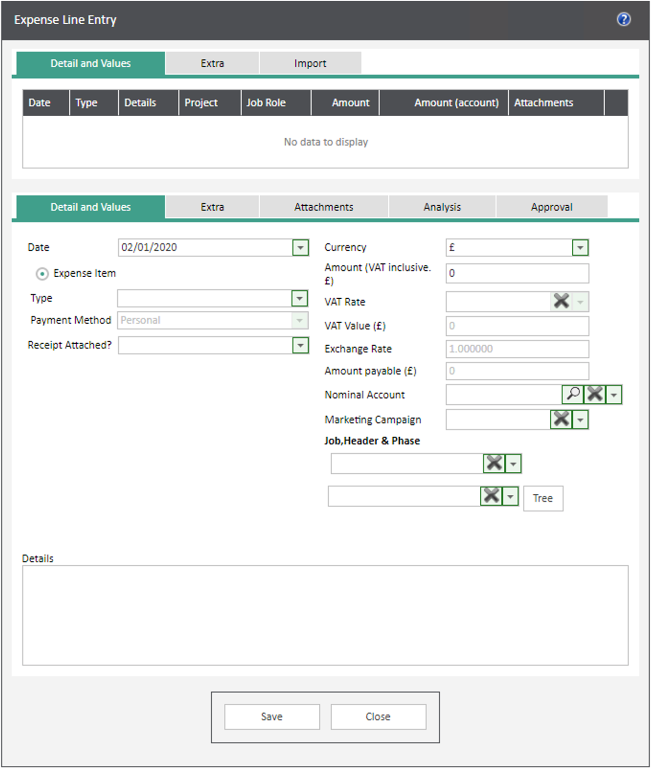
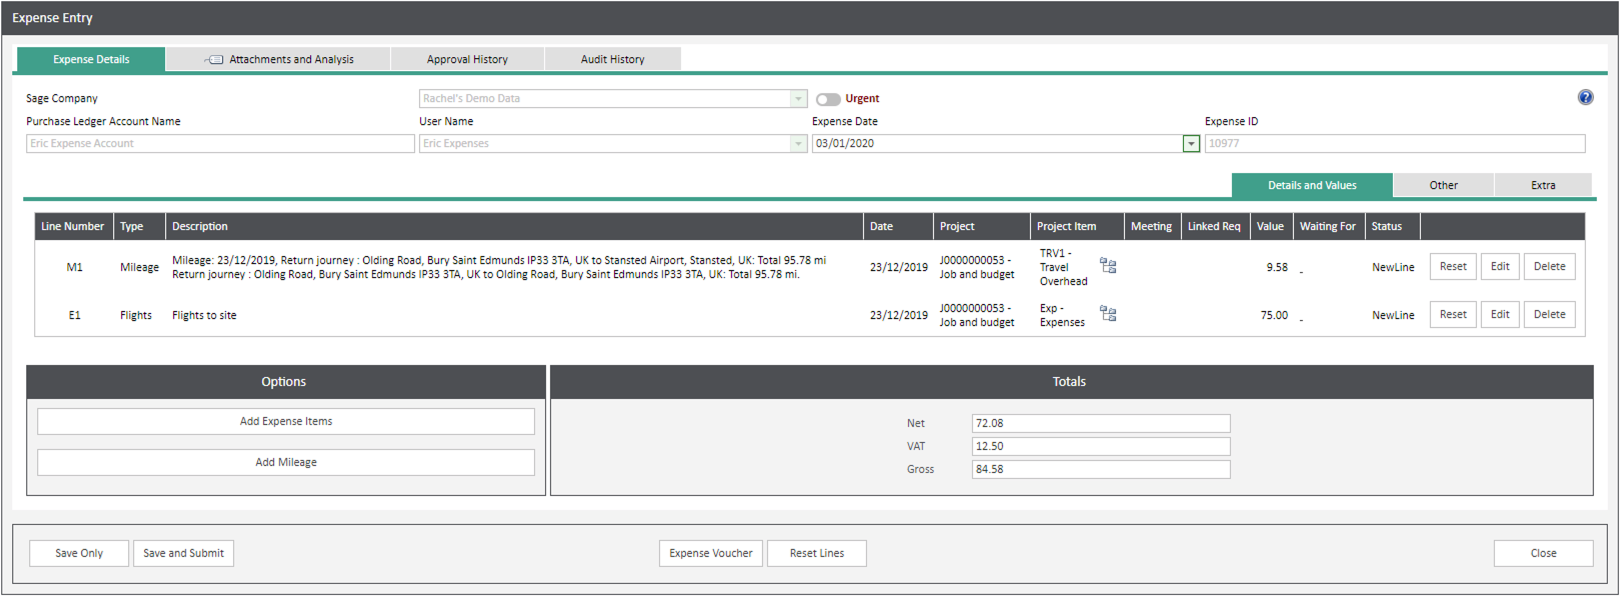
Details and Values tab
Date: using the calendar field, enter the date the expense occurred. Depending on configuration within System Settings, users may be restricted as to what date can be picked; by default users will not be able to select a date more than 30 days in the past.
Type: select the Expense Item Type from the drop down list. Users must be allocated expense types before they will appear in this drop down list.
Job Role: this option will only appear if using WAP HR module and nominal codes should be overridden based on the user’s job role when entering a mileage or expense claim. Select the correct job role; the nominal code will alter depending on the job role selected. This is here for the instances where a user may spend a couple of days working e.g. as a Support consultant and some days as an Implementation consultant.
Payment Method: Personal will post the claim to the user’s PL expense account and if enabled, Company will post to the user’s credit card account. Users will only see a Company payment method if they are linked through to a credit card and company expenses are not being imported.
Receipt Attached? Company policy will usually require a receipt to be attached and this can be attached electronically against the expense claim. If No is chosen from the list, then the VAT rate will default to the non-tax rate configured in Sage Connections against the Sage Company and cannot be changed.
Currency: this can be locked to the user’s Sage PL account currency if required, or the user will be allowed to select currencies as setup in Sage.
Amount (VAT inclusive £): enter here the full value of the expense claim. The currency symbol will change depending on the currency selected.
VAT Rate: this will default to the VAT rate specified either against the Expense Type (System Setup tab – Expense Item Type) or the default allocated to the User and Expense Item Type (User Setup tab – Expense Item Type). If the user has the User Type permissions enabled, the user will be able to change the VAT rate and the VAT value.
VAT Value (£): this will be calculated automatically depending on the amount entered and the VAT rate; this can only be changed if the user has the appropriate User Type permission enabled. The currency symbol will change depending on the currency selected.
Exchange Rate: this is pulled through from Sage but the user will be able to overwrite if entering an expense claim in a currency different from their PL account.
Amount payable (£): this is the amount the user will be paid once any foreign currency has been converted to base currency. The currency symbol will always show based from the user’s PL currency.
Nominal Account: depending on System Settings configuration, the nominal account will either be defaulted to either the nominal account allocated to the user (on their WAP Company Access tab), the nominal account allocated to the expense type (System Setup tab – Expense Item Type), the default nominal account allocated to that user and expense type (User Setup tab – Expense Item Type) or the nominal account allocated to the job header. If a user has permission to, they can change the nominal account and be able to select either nominal accounts allocated to that user against the expense type (User Setup tab – Expense Item Type), or all nominal accounts the user has access to (User Setup – Nominal Accounts).
Marketing Campaign: if Transaction Analysis Codes have been configured in Sage to appear, these can be reflected to show when entering an expense line.
Job & Header: if Job Costing or Project Accounting has been enabled, the user will need to enter a Job or Project as applicable.
Details: this is a mandatory free text field where details of the expense should be entered. These details will post through to Sage to form part of the narrative against the nominal, unless the setting is enabled to consolidate nominal postings into Sage (System Setup tab – System Settings – Expenses). It is possible to auto populate the Details box with the expense type name (System Setup tab – System Settings – Expenses).
Save: once all the details have been entered, click Save to save the line. There will be the option to add more lines or close and return to the expense entry page.
Extra Tab
This tab can be switched on if required (System Setup tab – System Settings – Expenses) and can be used to report on additional information if required.
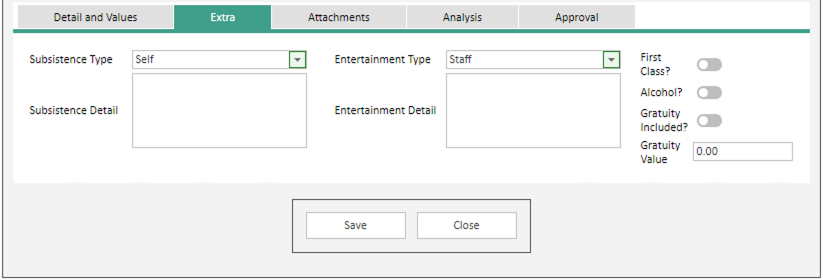
Subsistence Type: choose the subsistence type from the drop down menu (Self or Group) and enter further detail if required in the free text box below.
Entertainment Type: choose the entertainment type from the drop down menu (Staff or Business) and enter further detail if required in the free text box below.
First Class? If there was a first class element to a journey (i.e. for train tickets), check the box.
Alcohol? If there was alcohol on the expense claim, check the box.
Gratuity Included? If a gratuity was included in the expense claim, check the box.
Gratuity Value: enter the amount of the gratuity; depending on the configuration (System Setup tab – System Settings – Expenses), a user will not be able to save the line if this value is higher than the percentage configured.
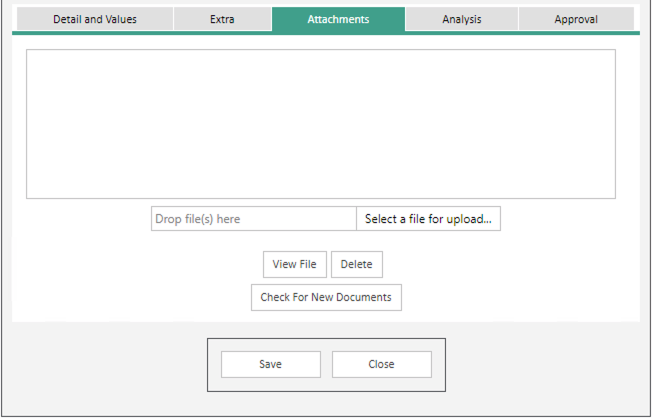
Attachments Tab
Attachments can either be entered at a line level or expense header level. On a line, either drop the file onto attachment box or click to browse and then upload a file. Files can be viewed or deleted once uploaded and multiple attachments can be added per line. When creating an expense type it can be configured for an attachment to be mandatory if the receipt attached value is set as yes. Some companies will force an attachment when the receipt attached value is set as no; it may be that an explanation document must be attached.
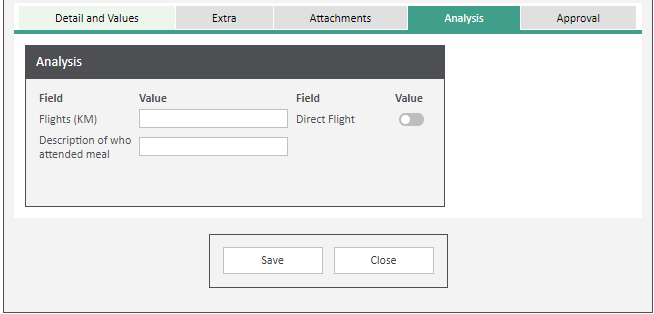
Analysis Tab
Additional WAP Analysis Labels can be added (System Setup tab – Analysis Labels) and these will appear in this tab. These Analysis fields will not post through to Sage but can be set to appear in WAP reports.
Approval Tab
This tab will be populated with details of the configured approval route. If the user has the applicable User Type permissions, they will be able to edit this approval route.
6.2. New Expense (WAP Mobile App)
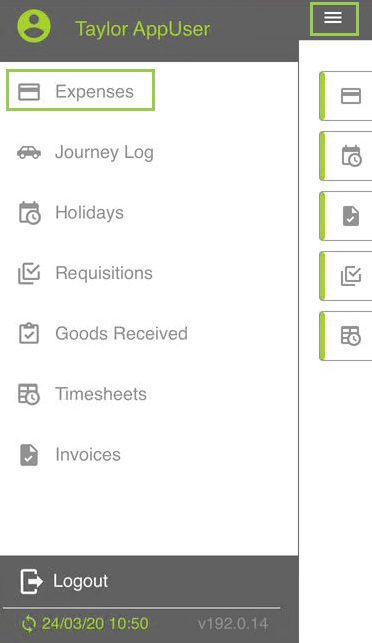
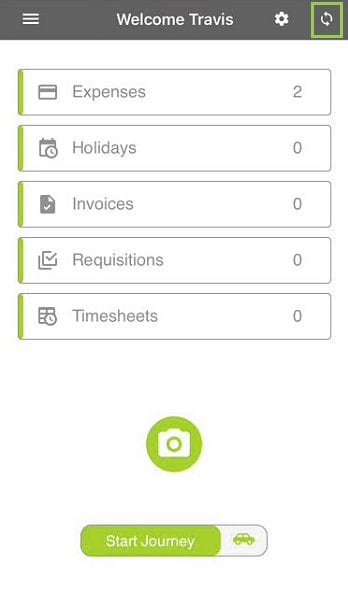
To enter an expense in the app, once the user has logged in and completed a full sync, they will be able to use their hamburger menu to navigate to enter a new expense:
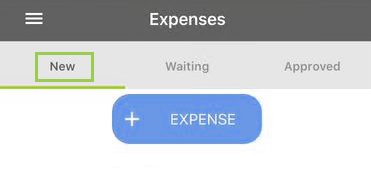
From the New tab within this screen, click on the blue +Expense button to open the expense detail tab:
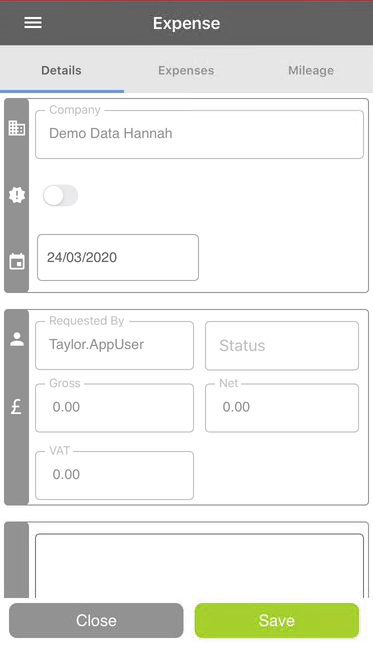
Details:
Enter the detail as required (see below for icon explanations):
 | Company – this will be the users’ default company assigned to them within the WAP website user settings, and cannot be amended in the App. |
 | Urgent – click this to indicate if the expense should be treated as urgent. A reason will need to be entered and this will send an immediate notification to the approver once the expense has been synced. |
 | Date of the overall expense claim |
 | User – this will show who is raising the claim, and cannot be amended in the app. The status will populate once the expense has progressed further |
 | Amounts – these fields will update as the expense has more detail entered |
 | Notes – if the user wishes to include any overall notes for the approver to see, these can be added here. |
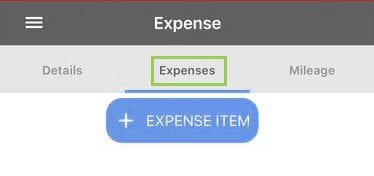
Navigate onto the Expenses tab and click on the +Expense Item button to start adding expense lines:
Expense Line:
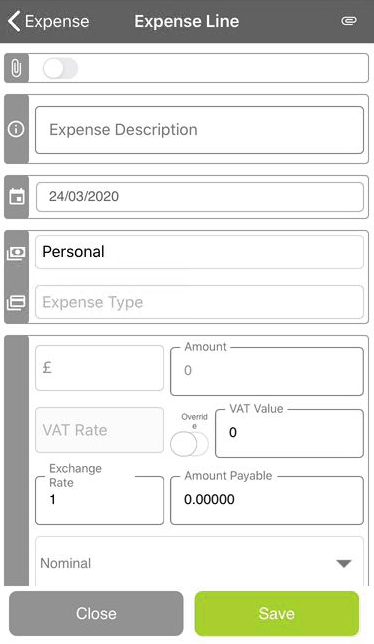
Enter the detail as required (see below for icon explanations):
 | The paperclip at the top right allows the user to add attachments (this will take the user to a photo screen where they can either navigate to a previous picture of a receipt, or take a new picture of their receipt to upload to the expense) |
 | Has a receipt been attached? Click the slider toggle if so |
 | Enter the description of this expense line |
 | Enter the date of this expense line |
 | Identifies whether this is a personal or company card claim |
 | Enter the expense type required |
In the bottom half of the screen, the user will need to enter:
Amount: Enter the amount of the expense in this field.
VAT Rate: Enter the VAT rate (if this is not populated or needs to be changed)
If the user has permission, they will also be able to amend the currency, VAT value and exchange rate.
Nominal: The nominal will default to what has been set under the Expense Item type for the user, and this can be changed if the user has permission.
Job: If using a costing module, the project or job should be selected here
Job Header: If using a costing module, the project item or job header should be entered here
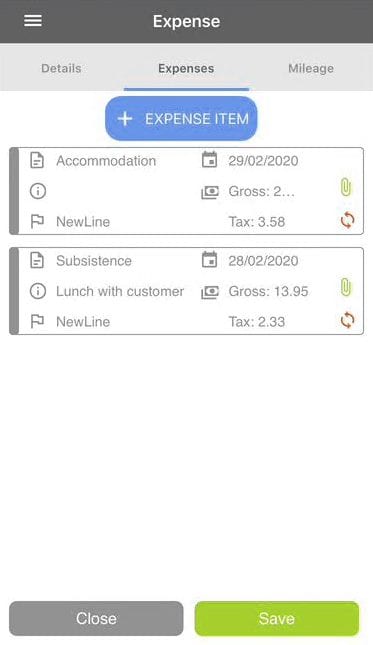
Once the detail of the line has been entered, click Save to be returned to the expense, where a summary of the expense line entered is displayed. Further lines can be added using the blue +Expense Item if required:
Once any further expense lines have been added click Save and choose to either Save, or Save and Submit:
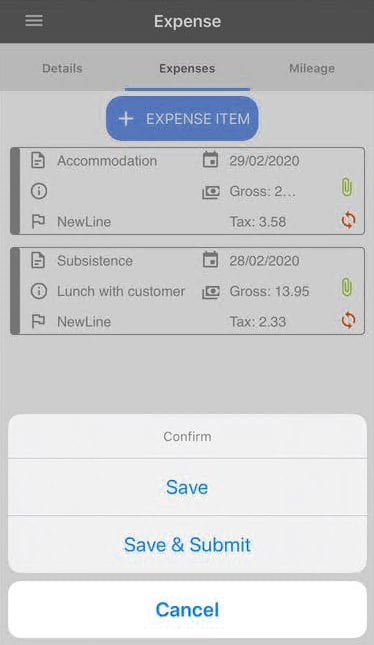
Save: clicking this will allow the user to save the expense before submitting; i.e. if extra lines need to be added before the expense is submitted.
Save and Submit: this will set the expense claim ready for approval. The expense will need to be synced before the expense will be ready for approval.
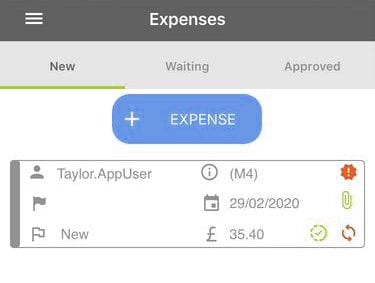
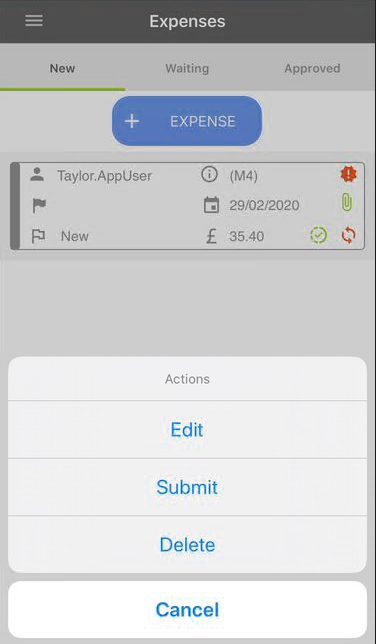
Tap on the expense line to edit, submit or delete the expense:
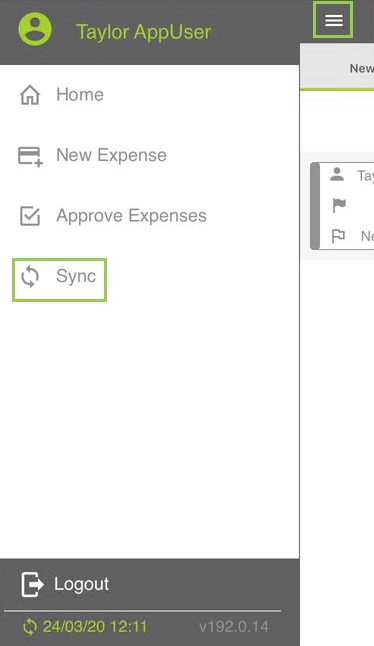
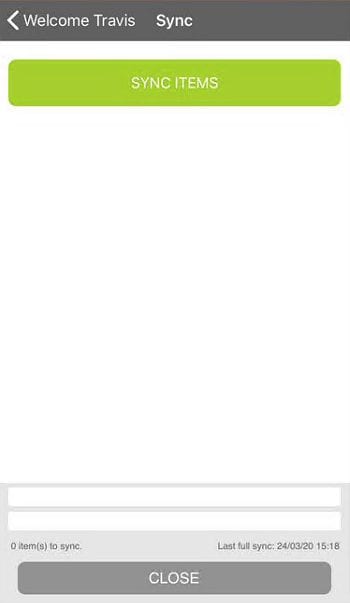
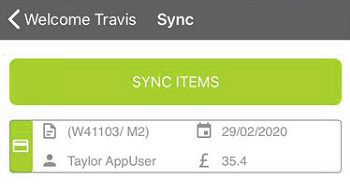
When all expenses have been entered, they will have a mobile ID beginning with M (M4 in the above example). To upload them to WAP for approval, users will need to sync waiting items by clicking on the Hamburger menu in the top left and clicking on Sync:
This will bring the user to a list of items waiting to be synced and from here, click on ‘Sync Items’ and select Sync Waiting items to upload the expense to WAP:
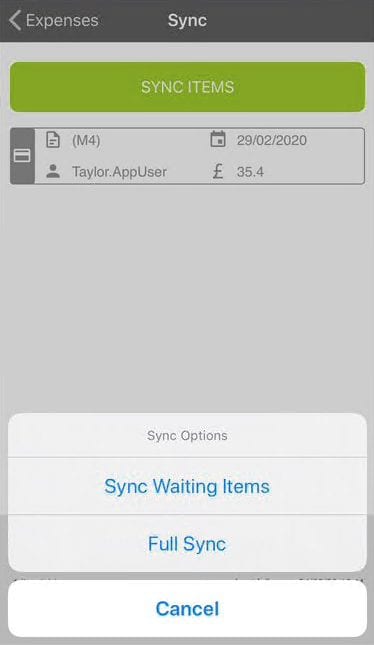
Once the sync has completed, the waiting items will disappear from this view. Click Expenses at the top of the screen to go back to the expense entry screen. From there click on the Waiting tab and the submitted and synced expense(s) will show with a new WAP ID (in the example below, W41103) which would be visible in the WAP website or for an approving user within the WAP App:

Please see below for a further explanation of the summary icons within the WAP App:
 | Requester |
 | Mobile / WAP ID |
 | Urgent |
 | Payment status (this will be updated as the expense progresses) |
 | Expense Date |
 | Expense includes attachments |
 | The current status of the expense |
 | The value of the expense |
 | Expense has been submitted but needs syncing |
 | Expense requires Syncing |
 | Expense is synced |
6.3. Add Mileage (WAP Desktop Website)
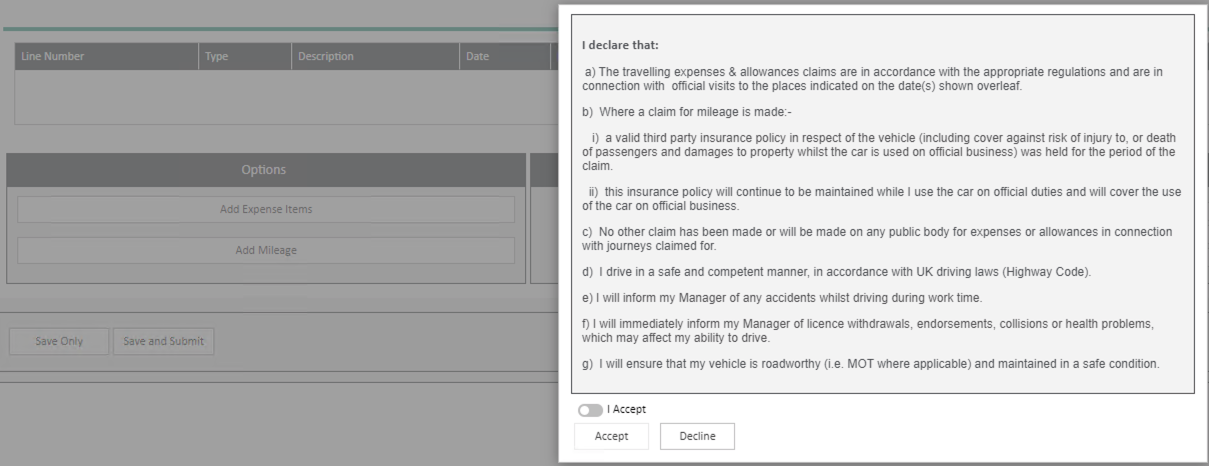
Mileage Declaration
It is possible to add a mileage declaration onto the system (System Settings – Expenses – Mileage) so that before a user can enter a mileage claim, the user has to agree to certain conditions.
Once the declaration has been accepted, the user can add new mileage claim lines. Details of the user’s default vehicle, fuel rates and total mileage claimed by the user to date are shown at the top of the page. The user can select an alternative vehicle if they have the permission to do so, or have been allocated both a company and private vehicle.
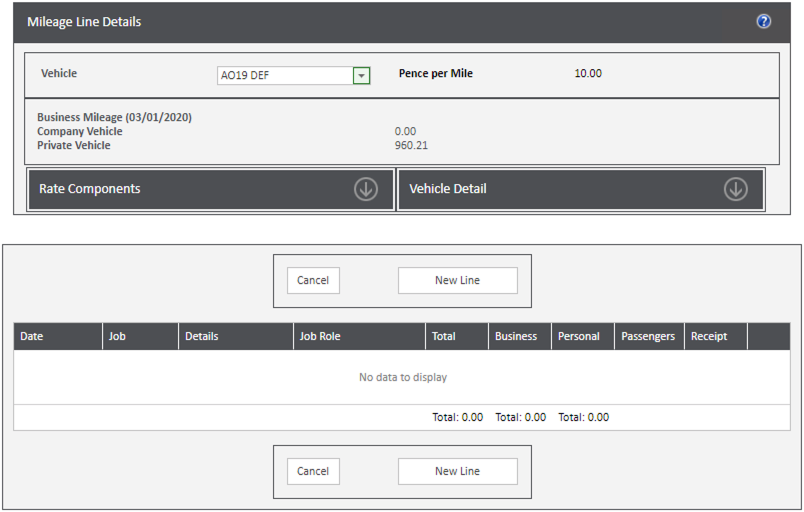
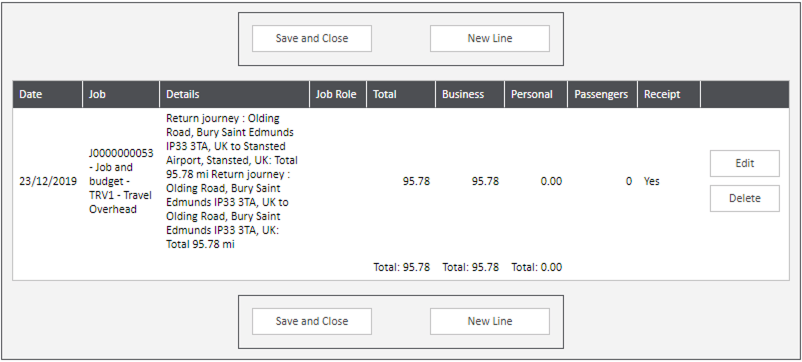
Select New Line to add a new mileage line.
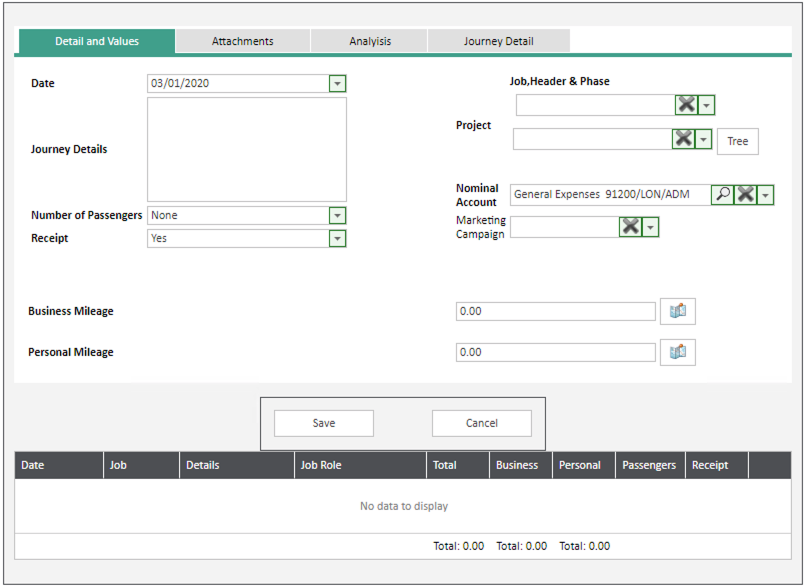
Date: enter the date the expense occurred.
Journey Details: this is a free text box the user can complete with details of the journey, or this will get automatically populated with details generated if using the Mileage Calculator.
Number of Passengers: if passenger mileage claiming is enabled (System Settings – Expense – Mileage), select the number of passengers on the trip.
Receipt: as per company policy, select whether a receipt has been added; receipts can be attached electronically. The receipt attached value can be defaulted in System Settings (either Yes, No, or leave for the user to choose).
Job & Header: if Job Costing or Project Accounting has been enabled, the user will need to enter a Job or Project as applicable. Nominal codes can be set to be pulled through from the Job Header or Project Item.
Nominal Account: depending on the configuration in System Settings – Expenses, the nominal will be defaulted to either the nominal account allocated to the user (on their WAP Company Access tab), the default nominal account allocated to the user and expense type (User Setup tab – Expense Item Type) or the nominal account configured against the job and job header. The nominal account can only be changed if the user has the User Type permission to do so.
Marketing Campaign: if Transaction Analysis Codes have been configured in Sage to appear, these can be reflected to show when entering an expense line.
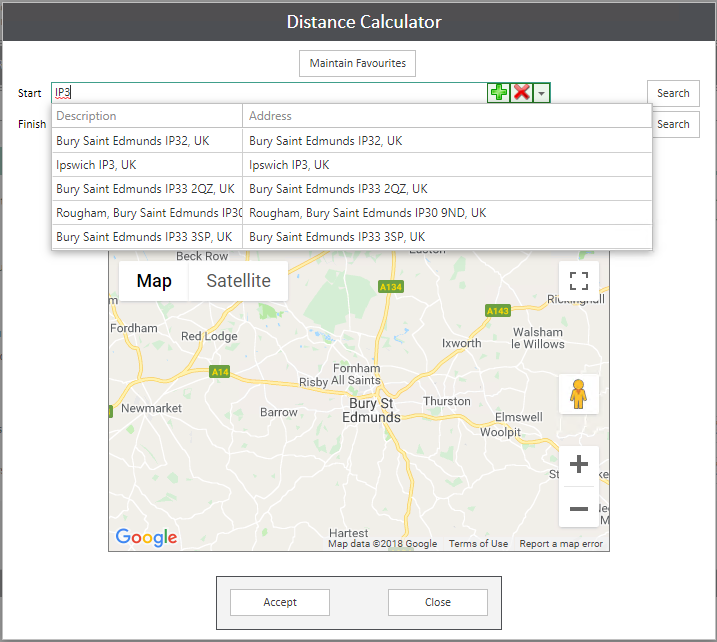
Business/Personal Mileage: mileage needs to be entered manually if there is no Google API key configured. Alternatively, select the map icon to use the distance calculator. Users are able to add destinations as their favourites and can have Home and Office locations configured to enable quicker mileage entry. Clicking on the green addition sign will allow for via points to be added; i.e. if the user has stopped off at a different site on the way to a client visit. If applicable, regular commute distance (configured on the user’s WAP profile) can be deducted from this mileage claim. Once the distance has been calculated correctly, click Accept to close. The option to record personal mileage will only be available if the system has been configured as such and the user is entering a mileage claim against a Company vehicle.
Amend: if configured (System Settings – Expenses – Mileage) that users should not make amendments to the mileage figure suggested by the distance calculator, the business mileage box is greyed out. Users will need to enter a positive or negative figure in the amendment box and enter a justification reason for the amendment.
Distance calculator

Maintain Favourites: users can add addresses as favourite locations. To add a new favourite, click Maintain Favourites, enter a description, address and click Add.

When entering a mileage claim, the user can click on the drop down option to select an address from their favourites.
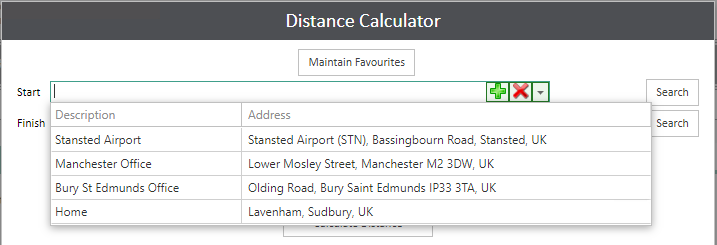
If the site has many WAP users and is going over the current Google monthly credit allowance, using favourites can reduce the number of look ups recorded by the API key.
Once the distance has been accepted and other fields have been completed, save the line details. If additional lines need to be added, click New Line or if mileage lines have all been added, click Save and Close to return to the main expense claim screen.
If the claim is complete, the user can submit the expense for approval.
Save Only: clicking this will allow the user to save the expense before submitting; i.e. if extra lines need to be added before the expense is submitted.
Save and Submit: this will send the expense claim for approval.
Expense Voucher: once the expense has been approved, an expense voucher can be printed and emailed from the system, or if configured within System Settings, it can only be emailed. Expense Vouchers are most commonly used if needing to recharge an expense claim to list out all the lines on the claim.
Reset Lines: if the expense has been submitted but the approval routes need resetting part way through approval, this option can be used to reset all lines rather than resetting lines individually.
Close: this will close the expense screen without saving any changes. N.B. if the expense has been previously saved, the expense will remain on the system even if the page is closed. If there are no lines on the expense claim and a user closes, they will see an option to delete the claim.
6.4. Expense Details
Once all expense lines have been approved the expense claim can be viewed and saved to add more lines later or submitted for approval.
Details and Values Tab
This tab will show a breakdown of the lines on the order with the type, description, date, gross amount and if applicable, job and job header information. These lines can be edited or deleted if needed. Once the expense has been submitted for approval, the status will change and the Waiting For column will be populated.
Other Tab
This tab shows further information about the expense lines, including net and tax values, the PL Supplier account code, whether a receipt has been attached and the payment method.

Extra Tab
If the Extra tab has been enabled during expense entry and has been populated by the user, details will appear on this tab.

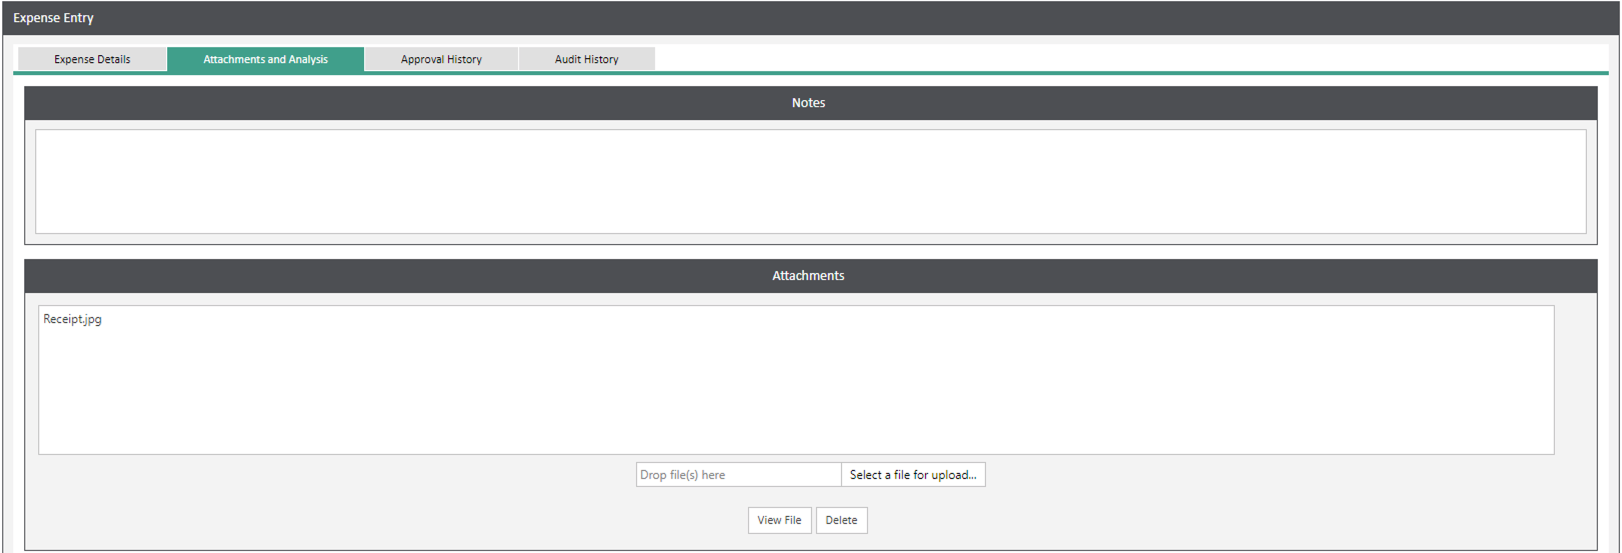
Attachments and Analysis Tab
Attachments added to an expense line will show here and further documentation can be added if needed. Free text notes can be added by the user; these will be visible during the approval process but won’t post through to Sage.
Approval History Tab
Once the expense has been submitted and is progressing through the approval route, this tab will become populated. If the expense has been marked as Urgent, the reason given will show here.
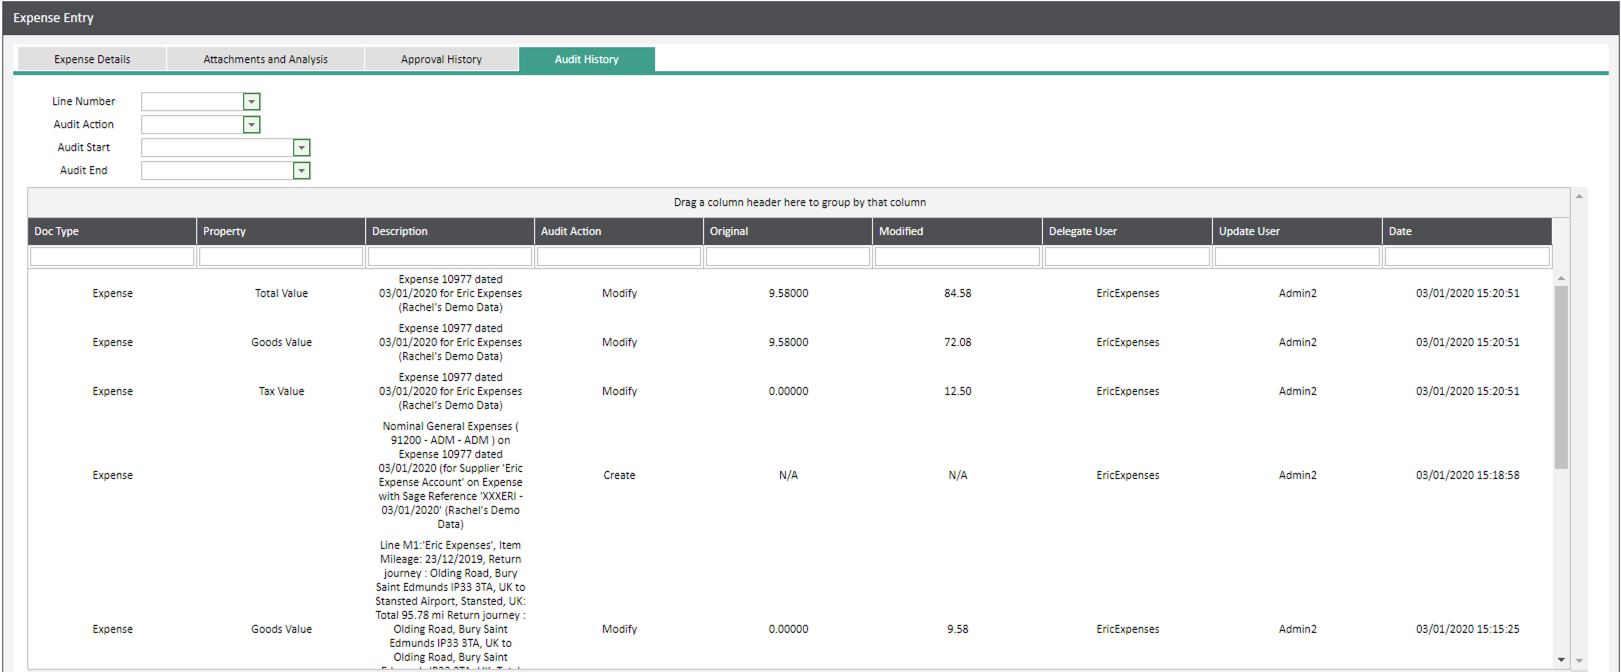
Audit History Tab
If enabled in System Settings, the Audit History tab will be visible and will show information on line entry, amendments and any deleted items.
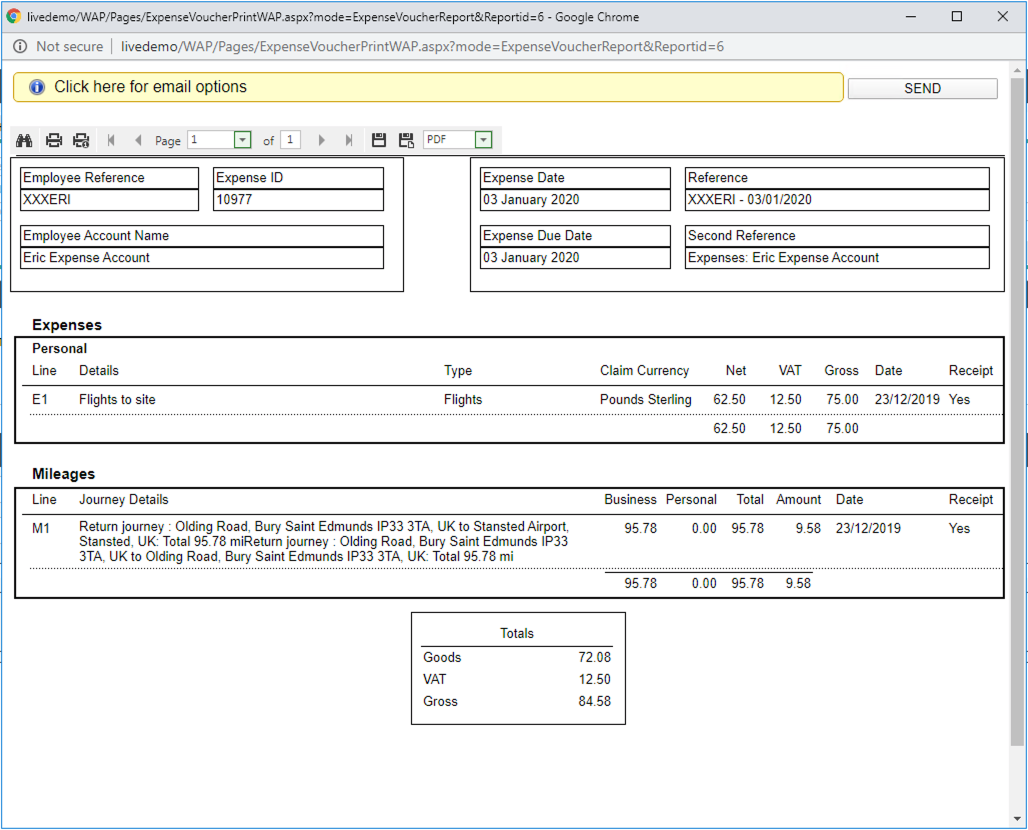
6.5. Expense Vouchers
In the event that the user needs to submit hard copies of receipts or if an expense is to be recharged, it is possible to print an Expense Voucher to attach receipts to or to email out. If required, the expense voucher can be configured to not allow users to print, but only to email (System Settings – Expenses – Functionality – “Disable printing Expense Vouchers (Send Email Only)”).
6.6. Submitted Expense
Once an expense has been submitted it will appear under the Existing Expenses menu option; the claim will stay in the Submitted tab until it has been fully approved. If a line or the whole expense has been rejected, the expense will show in the Rejected tab. Hover over the blue information flag to show the line breakdown detail and who the expense is awaiting approval from. A paperclip icon will mean that there is an attachment on the expense, two paperclips means there are multiple attachments. Once fully approved, the expense will move to the Approved tab and then once posted through to Sage, will show in the Completed tab. To view a completed expense, make sure to tick the ‘Include Completed’ option before clicking to view their expenses.
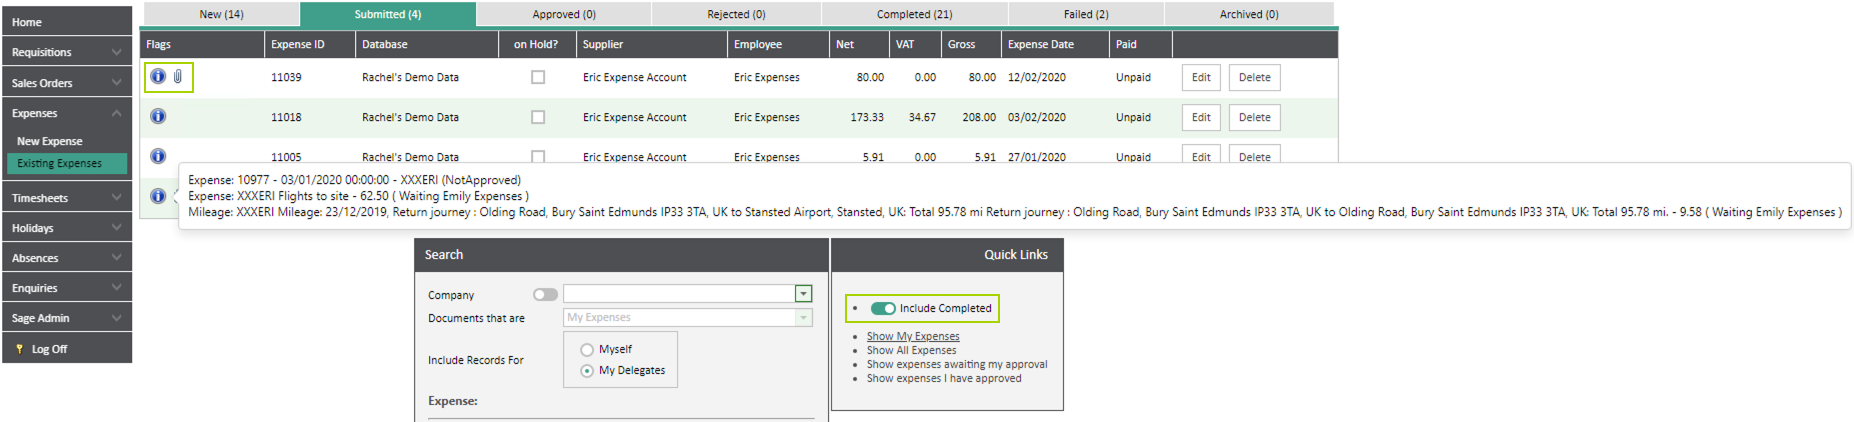
7. Existing Expenses
Select Existing Expenses from the side menu. The current expenses in the system will be sorted by their document status and appear in one of the tabs. Hovering over the blue information icon will show a summary of the items on the expense claim and its current approval status.
A user is able to edit their expense while it is awaiting approval; new lines can be added or existing items can be edited or removed. The expense claim will need to be resubmit for approval for the changes to be picked up by the approver.
Include Completed: this will show expenses that have already been posted to Sage. By default, these expenses will not show when searching for an existing expense.
Show My Expenses: this will refresh the search and list all expenses entered by that user.
Show All Expenses: depending on User Type permissions, all users’ expenses will show.
Show expenses awaiting my approval: this will be available to users with permission to approve expenses.
Show expenses I have approved: this will be available to users with permission to approve expenses.
7.1. Expense Approval Header Status
New: the expense request has not yet been submitted.
Submitted: the expense request has been submitted for approval.
Approved: the expense request has been approved but not yet posted through to Sage. Expense claims should only appear here temporarily while they are waiting to post to Sage. N.B. Payroll expenses are the exception which will remain as Approved until they have been processed in WAP.
Rejected: one or more lines on the expense request have been rejected. N.B. a rejected line must be edited and saved before being submitted again for the reject flag to be cleared; a rejected expense simply submitted again will not clear the reject flag. An expense will not post through to Sage if there is a rejected line on the expense.
Completed: the expense request has posted through to Sage. N.B. to view completed expense claims, make sure the ‘Include Completed’ box is ticked.
Failed: if an expense has failed to post to Sage it will appear here. Most likely reasons for the expense to fail are if a costing module is enabled but the project or job has been closed or set to not allow costs entered against it. Please check the Project and then clear the error and repost the expense (these are usually Superusers permissions).
Archived: this status is not currently used for expense request.
7.2. Expense Approval Line Status
New Line: the line has not yet been submitted.
Waiting: the line is awaiting approval from an authoriser.
Authorised: the line has been approved.
Rejected: the line has been rejected; all lines must be authorised before the expense will post to Sage.
No Authorisers: there are no authorisers for the line; the line will need to be reset and the expense claim submitted for the correct approval route to be used.
8. Approve Expense (WAP Desktop Website)
When a user has an expense to approve a notification will show on their homepage; it is these notifications that will be the basis of reminder emails.
To view the expense for approval, either click the blue notification link, the Expense link under the Items Awaiting Your Approval banner or click Approve Expenses from the menu on the left.
Once within the approve expense page, the approver will see the expense ID, Sage Company, Employee name, Net and Gross values and Expense Date. The arrow on the left is used to expand the expense and show all the line detail that the user has to approve (if there are additional lines on the expense that have gone to another approver, these lines will not be visible to the first approver).
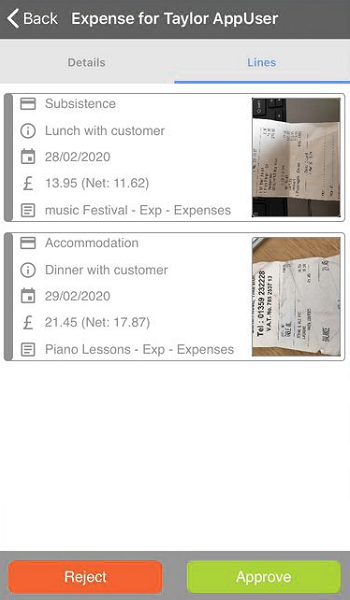
Lines tab: this tab will show further breakdown of expense type, description, line values, currencies and job or project information if applicable. If Analysis Labels have been configured on the expense entry, these will also be visible under this tab. If an attachment has been added on a line, this will show under the Attachments column and can be hovered over or clicked to show the attachment. Individual lines can be approved or rejected, or all lines approved or rejected. N.B. a reason needs to be entered if an approver rejects either the expense or a line and an expense will not post through to Sage until all lines have been fully approved.
Attachments tab: this will collate all attachments added and individual documents can be downloaded if required.
Details tab: this tab shows the nominal account, tax rates and payment methods. If the approver has the appropriate User Type permissions, they can edit the nominal code, tax rate or mileage amounts.
Currencies tab: this will show the currency of each line and if applicable, the exchange rate used will be visible.
Extra tab: if the Extra tab was populated during expense input, this information will be shown on this tab.
Notes tab: any notes added by the user during expense input will be displayed here. Approvers are able to add notes here which can show to further approvers.
Budgets tab: if budgets are being used this tab will show whether the nominal or job budget has been exceeded or spend is within budget.
Approval History tab: as the expense is approved, approval history will be built up on this tab per line. If the delegate function was used to approve an expense, this will be recorded on the Approval History tab as “User X has approved on behalf of User Y”.
Subsistence tab: if subsistence has been configured, this tab will show a breakdown of subsistence lines to show start date and times and end date and times with any deductions for lunch or dinner etc.

Hold Expense: enter a reason in the box below and then hold the expense; this will prevent any other user from approving this expense. It might be that the approver needs to find out more information from the end user before they are able to approve.
Notify Additional Users: when putting the expense on hold, this can be used to let other users know that the expense is now on hold; additional approvers or the expense requesting user may need to be informed.
View Expense Details: clicking this will take the approver through to the main expense entry screen. Depending on User Type permissions, the approver may be able to edit the expense, i.e. changing the expense type, the job, description, etc.
Approve All: click to approve all lines.
Reject All: click to reject all lines.
Once an expense has been fully approved, it will post through to Sage and move to the user’s Completed tab. To view Completed expenses, make sure the ‘Include Completed’ box is ticked under the Quick Links filter. Once an expense has had a payment allocated in Sage, the Paid column will show this to the user.

The approved expense will post through to the user’s PL Supplier Account; if DMS is configured the expense documents will post through also and can be viewed directly in Sage.
8.1. Approve Expense (WAP App)
To approve an expense in the WAP app log in and complete a Full Sync to ensure all items for approval have been pulled through:
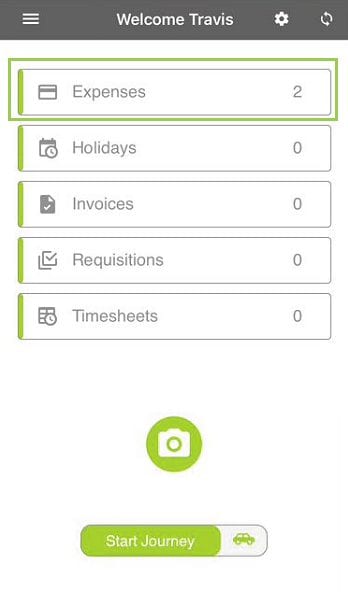
Once items have synced, from the home screen click on Expenses to view expenses for approval (in this example there are 2):
Tap on the tickbox next to the expense to either approve or reject the expense;
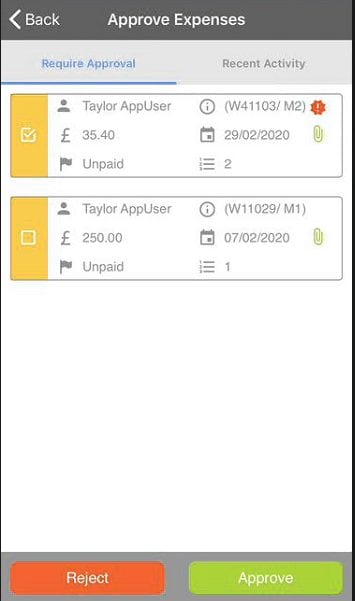
Or alternatively, tap on the expense itself to be brought into more detail:
The expense can be approved or rejected from any of these screens.
Once the required expenses have been approved, the approver will need to sync waiting items for these to feed back to WAP.
From the home screen, click on the Sync button:

Sync items:
Once it is complete, it will either move onto the next approver, if applicable, or show in the users’ Complete section of the WAP Website and post to Sage in the PL Supplier account:

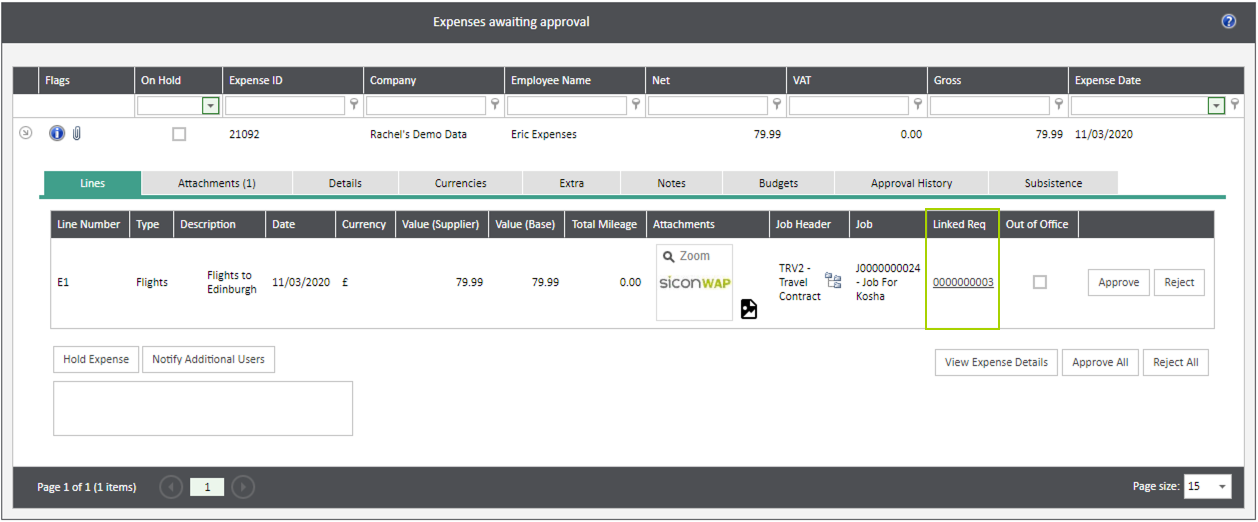
9. Linking an Expense Claim to a Requisition
If expense spends need to be approved prior to the expense claim being submitted, users who will be claiming the expense must raise a requisition for the claim against their PL Supplier account which will require approval as per the requisition approval routes. Once approved, this order is then marked as an Internal Order which means it won’t post through to Sage and will be visible for the user to select when entering an expense claim. The System Setting that allows for requisitions to be linked to an expense claim will need to be configured to enable the below option on expense line entry.
N.B. the user must raise the requisition against their Purchase Ledger Supplier account that their personal expense claims post through to for the requisition to be visible when linking on an expense.
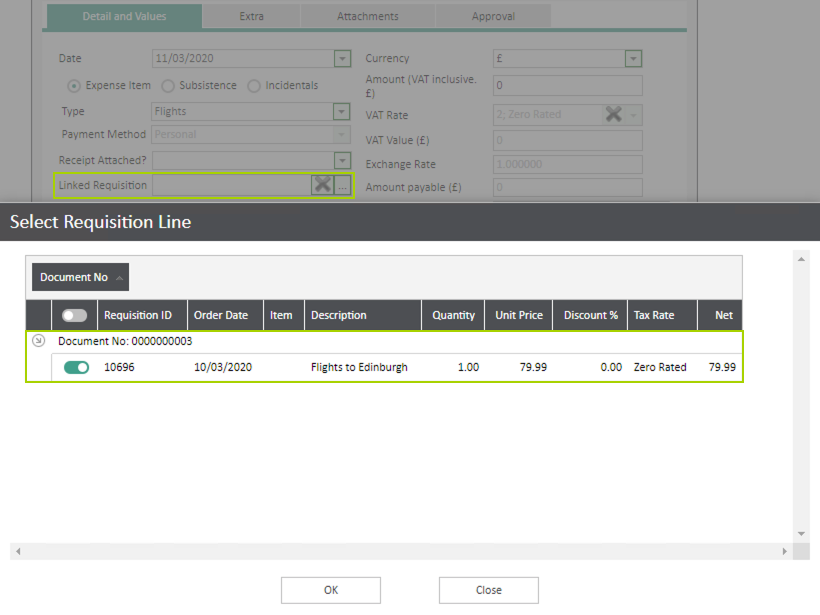
The approver will see this expense has been linked to a requisition; clicking on the link will open the existing requisition to allow for additional details, approval history etc. to be viewed.
10. Credit Cards
Credit cards can be added onto the system and allocated to specific users. When entering Company expenses, these will post through to the PL Supplier account linked with the Credit Card account.
10.1. Credit Card Setup
Create the Company Credit cards within System Setup – Credit Cards. Cards on the system will be listed here and to add a new one, click Add New Card and enter details.
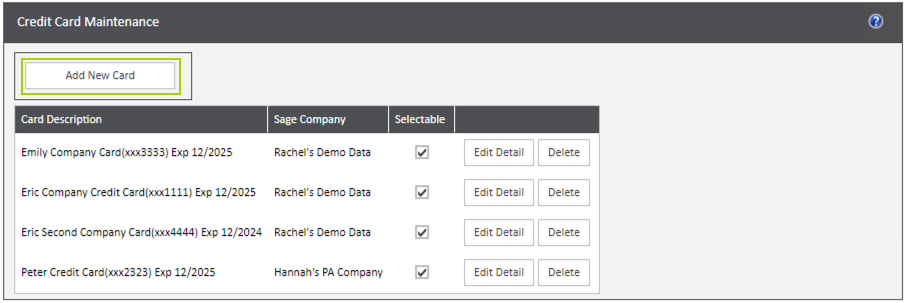
Once a card has claims against it, it cannot be deleted. If it should no longer be used, click Edit Detail and then untick the Selectable option.
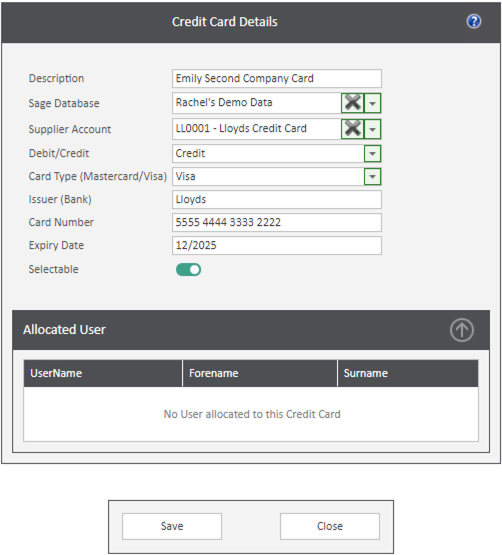
Description: enter a reference for the card to allow it to be recognised throughout the system.
Sage Database: the card will need to be linked to a Sage Company; choose from the drop down list.
Supplier Account: link the card to the correct Supplier Account as listed within the Sage Company. There can either be one supplier account per company card, or one supplier account for all company cards.
Debit/Credit: by default this is set to Credit but can be changed if required.
Card Type (MasterCard/Visa): choose the card type from the drop down list.
Issuer (Bank): enter a bank here; this is not a mandatory field.
Card Number: enter the card number; the user will be able to see the last four digits when entering their expense and this will also be visible during reporting. The actual 16-digit card number doesn’t need to be entered but it must be a unique 16-digit number per credit card.
Expiry Date: enter the card expiry date in the format MM/YYYY. The card’s actual expiry date doesn’t need to be entered but an expense claim will not be able to be entered if the date of the expense is after the card’s expiry date.
Selectable: tick to allow the card to be allocated to a user. If this card is no longer available to use, it will not be able to be deleted but the selectable box should be unticked.
Allocated User: once a card has been allocated to a user, their name will appear in this box; one user can have multiple cards but a card can only be assigned to one user.
10.2. Allocating Cards to Users
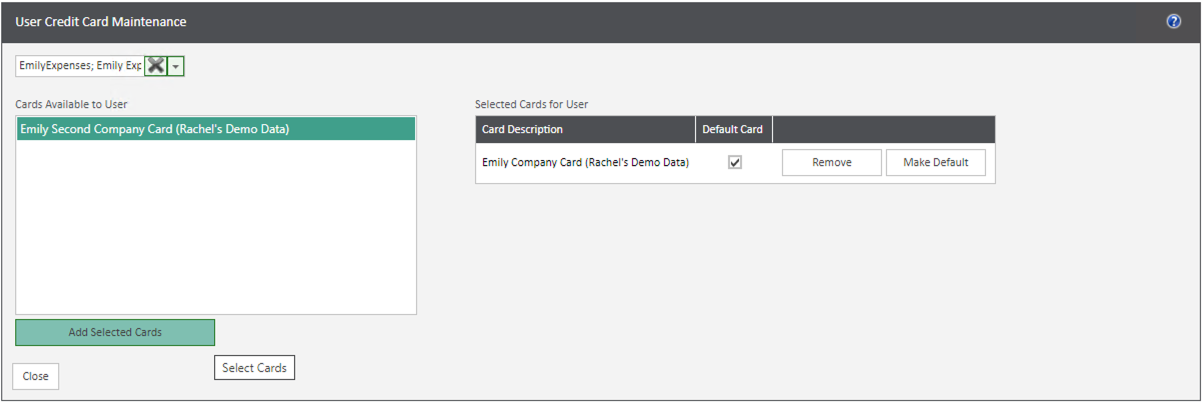
Once cards have been created they must be allocated to users; this is done through User Setup – User Credit Cards.
Choose a user from the drop down list and then select an available card to assign to them. Cards already allocated to the user will show on the right. A user can be allocated multiple cards and one marked as their default user.
Description: enter a reference for the card to allow it to be recognised throughout the system.
Sage Database: the card will need to be linked to a Sage Company; choose from the drop down list.
Supplier Account: link the card to the correct Supplier Account as listed within the Sage Company. There can either be one supplier account per company card, or one supplier account for all company cards.
Debit/Credit: by default this is set to Credit but can be changed if required.
Card Type (MasterCard/Visa): choose the card type from the drop down list.
Issuer (Bank): enter a bank here; this is not a mandatory field.
Card Number: enter the card number; the user will be able to see the last four digits when entering their expense and this will also be visible during reporting. The actual 16-digit card number doesn’t need to be entered but it must be a unique 16-digit number per credit card.
Expiry Date: enter the card expiry date in the format MM/YYYY. The card’s actual expiry date doesn’t need to be entered but an expense claim will not be able to be entered if the date of the expense is after the card’s expiry date.
Selectable: tick to allow the card to be allocated to a user. If this card is no longer available to use, it will not be able to be deleted but the selectable box should be unticked.
Allocated User: once a card has been allocated to a user, their name will appear in this box; one user can have multiple cards but a card can only be assigned to one user.
11. Manual Credit Card Claim
With this configuration users will manually enter any spends they have made with their company credit card. This allows for users to enter claims as they happen but does potentially increase the risk of the user forgetting a transaction or entering the details wrong.
With this method of credit card expense entry, users are able to enter a mix of personal and company lines on one expense – company credit cards lines will post an invoice to the PL account linked to the card while personal (and mileage) lines will post an invoice to the user’s personal PL account.
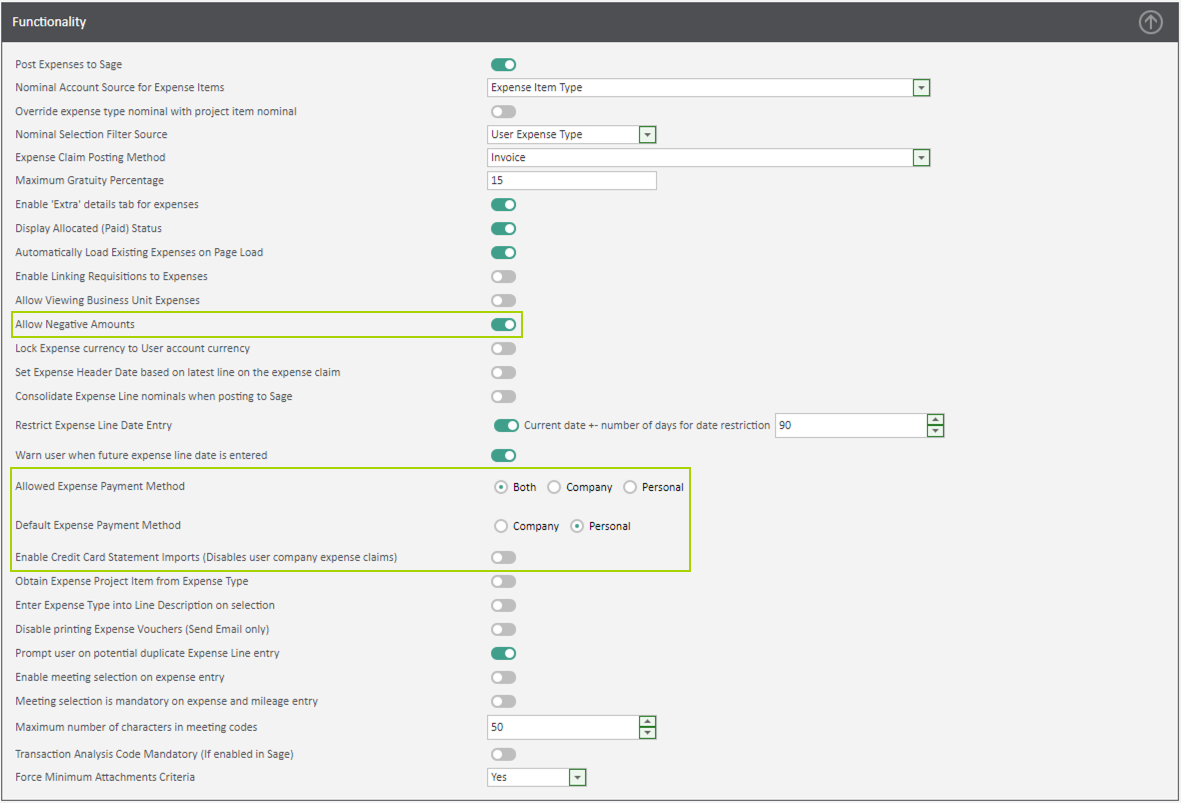
Allow Negative Amounts: this must be ticked so any refunds that may occur on the user’s company card can be processed in the system.
Allowed Expense Payment Method: this must be set to ‘Both’ (or just ‘Company’ if personal expense claims are not allowed).
Default Expense Payment Method: choose whether to default a user’s expense claim to either personal or company.
Enable Credit Card Statement Imports: this must not be ticked – users are to manually enter their credit card spends.
11.1. Entering a Credit Card Claim Manually
When entering a manual claim, the user enters their expense claim and chooses the payment method to be Company – their default credit card will automatically be selected. If the user has other cards linked to them, a different card can be chosen from the drop down box. Depending on system configuration, the expense line will either default to be Personal or Company.
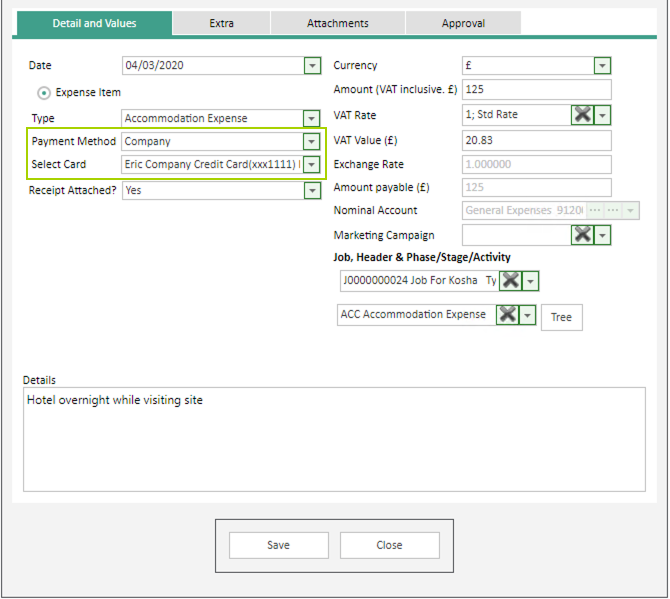
The expense claim can then be completed and submitted as normal.
12. Importing Credit Card Transactions from Statement CSV
To assist both Finance Teams and Expense Users, there is functionality to import credit card transactions which will automatically create an Expense Claim the user would then complete, e.g. select a Job/Project, add attachments and provide further detail prior to submitting.
Once the credit cards have been set up and allocated to users, the following setup is required.
12.1. CSV Template Configuration
A default template can be generated into which data from the statement can be entered; certain information must be provided, detailed below. Four columns below are mandatory, the fifth is optional. No commas should be included in this file; please ensure any are removed prior to the import being uploaded. There should also be no payment line included to be imported.
If required, a bespoke template can be linked to WAP. A monthly statement should be generated to ensure the correct information is contained within and then sent through to the Sicon Project Admin team who can arrange for this to be configured.
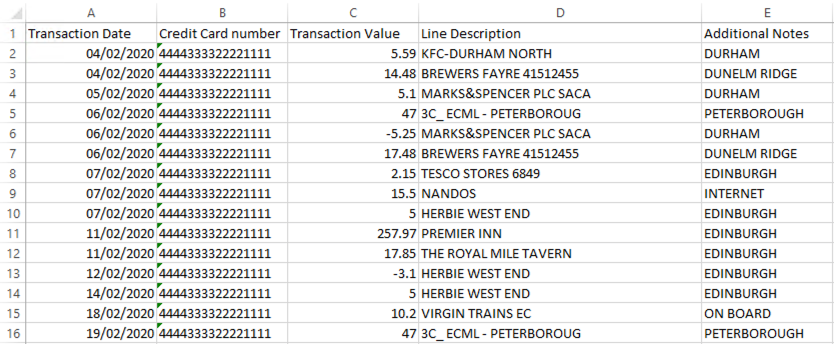
Transaction date: this is a mandatory column and is the date the expense occurred on; in the example above, this is column A.
Credit Card number: this is a mandatory column; this is the card number the expense is linked to and must be the full 16-digit card number that matches how the card was entered in WAP. There must be no * icons replacing numbers. In the example above, this is column B.
Transaction amount: this is a mandatory column and is the amount of the expense claim and must be the settlement amount (so any foreign currency conversions are calculated); in the example above, this is column C.
Transaction description: this is a mandatory column and is the details of the expense claim that will assist the end user with completing the expense line; in the example above, this is column D.
Transaction notes: this is an optional column and will be for any further information that can be included to assist the end user; in the example above, column E could be used for notes.
12.2. System Settings for using Credit Card Import Functionality
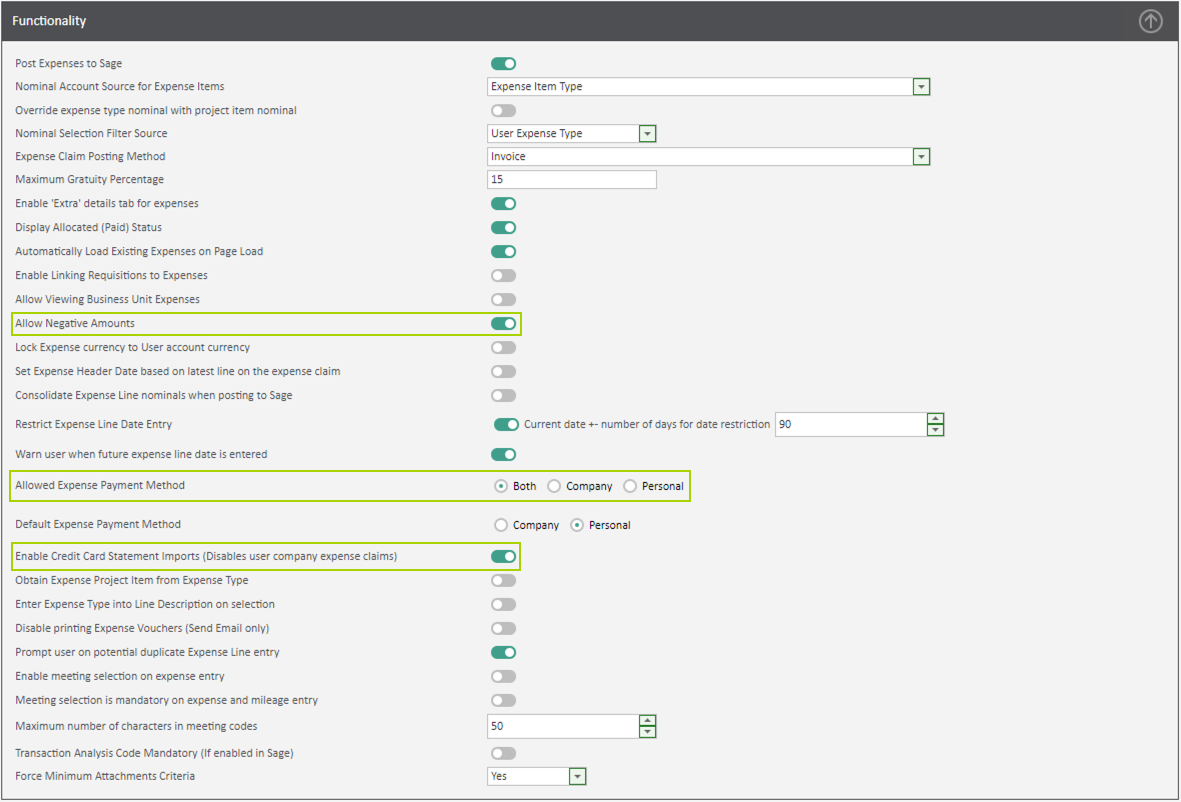
Allow Negative Amounts: this must be ticked so any refunds that may occur on the user’s company card can be processed in the system.
Allowed Expense Payment Method: this must be set to ‘Both’ (or just ‘Company’ if personal expense claims are not allowed).
Enable Credit Card Statement Imports: this must be ticked. As soon as this option is enabled, users are not allowed to manually enter company credit card expense lines. This is to prevent duplicate claims being entered.
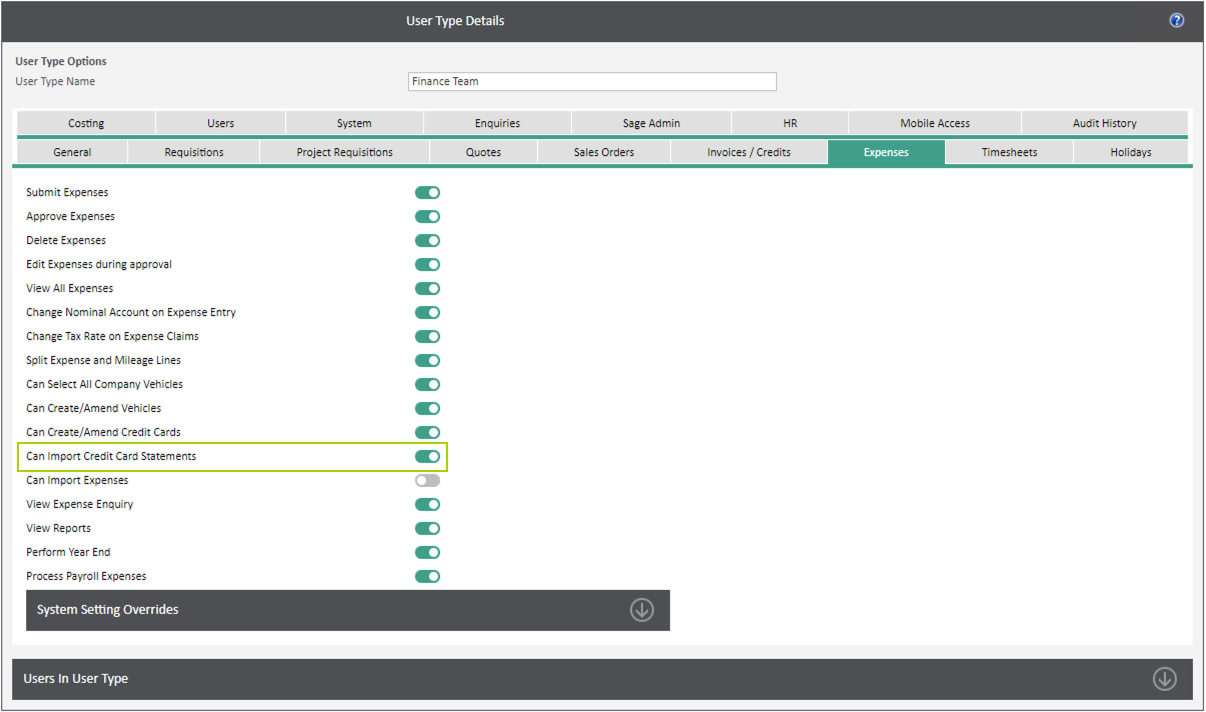
12.3. User Type Configuration for Importing Credit Card Statement
At least one User Type needs the ability to import credit card statements; usually it is a Finance role that will be downloading and then importing the statements into WAP.
12.4. Importing Credit Card Statement
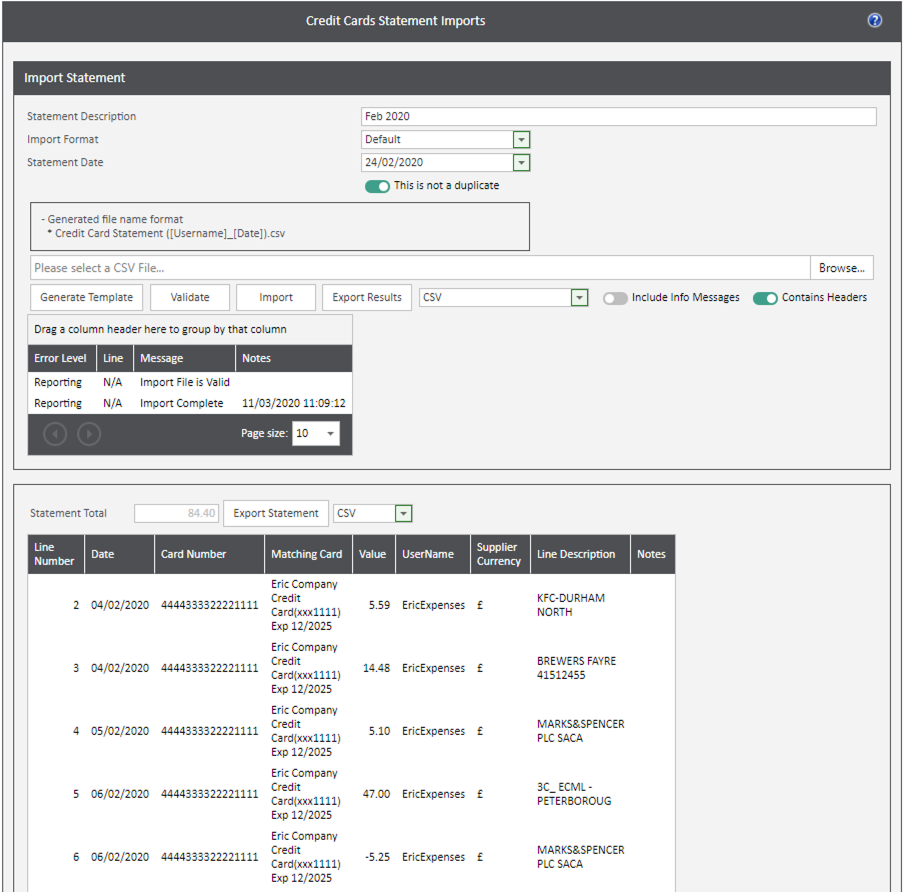
Under the Expenses menu option on the left – Statement Imports.
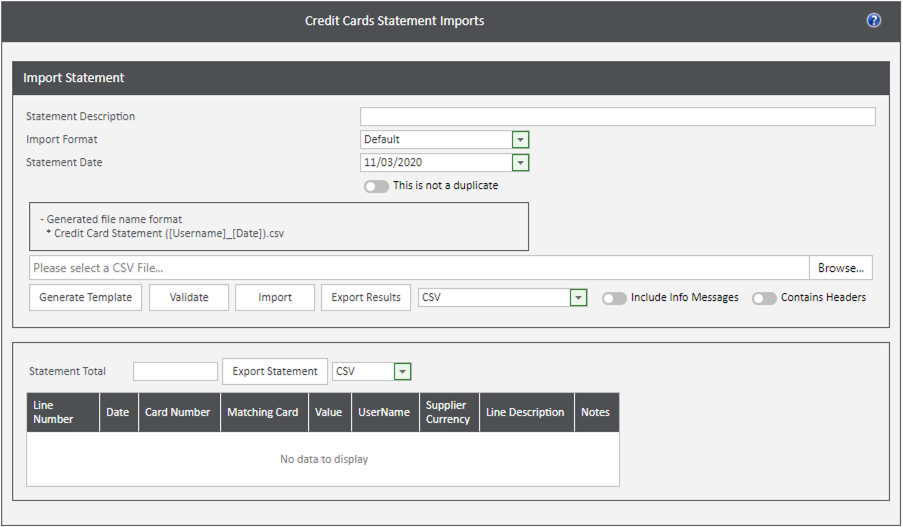
Statement Description: enter a name of the import, e.g. February 2020.
Import Format: if using the sample template, leave this as ‘Default’, otherwise this will be the configuration for the bespoke statement; usually this will be in the format of the Company Name and Credit Card provider; e.g. Sicon Barclaycard.
Statement Date: choose from the calendar the statement date; if there are dates on the import after the statement date the file will fail validation.
This is not a duplicate: a check will be done on description, date and format to prevent against duplicates being entered; if this file is not a duplicate tick this box.
Browse: browse and select the statement file provided by the credit card provider with no payment line, no commas, the full 16-digit card number and columns correct as per the original configuration.
Generate Template: use this option to generate a sample template which can be completed. When saving, make sure to save in the file name format as the file was deleted. Remove any additional columns or rows which contain sample text leaving only the column headers (as per screenshot in section 12.1).
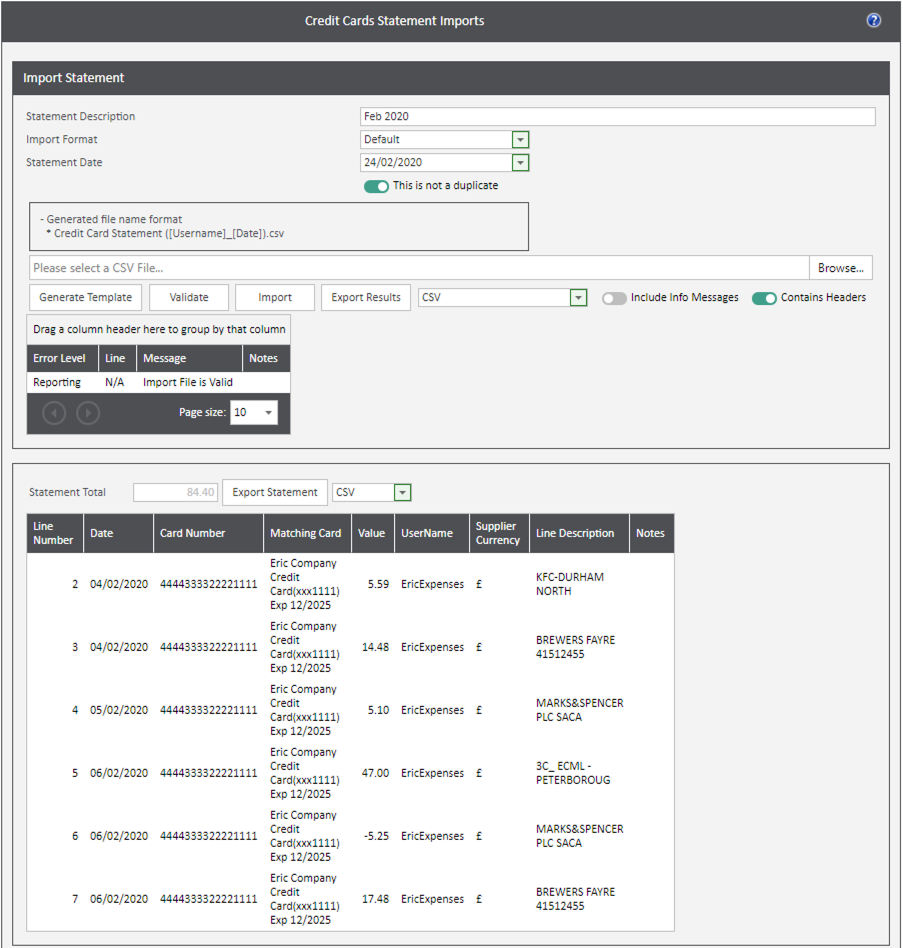
Validate: once the file has been selected, validate the file; expense lines will be created below and the Statement Total will be shown; make sure this matches the total of the statement downloaded from the Credit Card provider. The expense lines shown will be how they will appear to the users once imported.
Import: once the file has passed validation, browse for the file again and import.
Export Results: if the file has failed validation and a number of error lines have been produced, click to export these lines. This can be helpful if needing to move around WAP to resolve problems (e.g. to check credit card numbers or to make sure a card has been linked to a user). Choose the format of the results to be exported, either CSV, Excel or PDF.
Include Info Messages: tick to view during validation any info messages generated, not just any error lines.
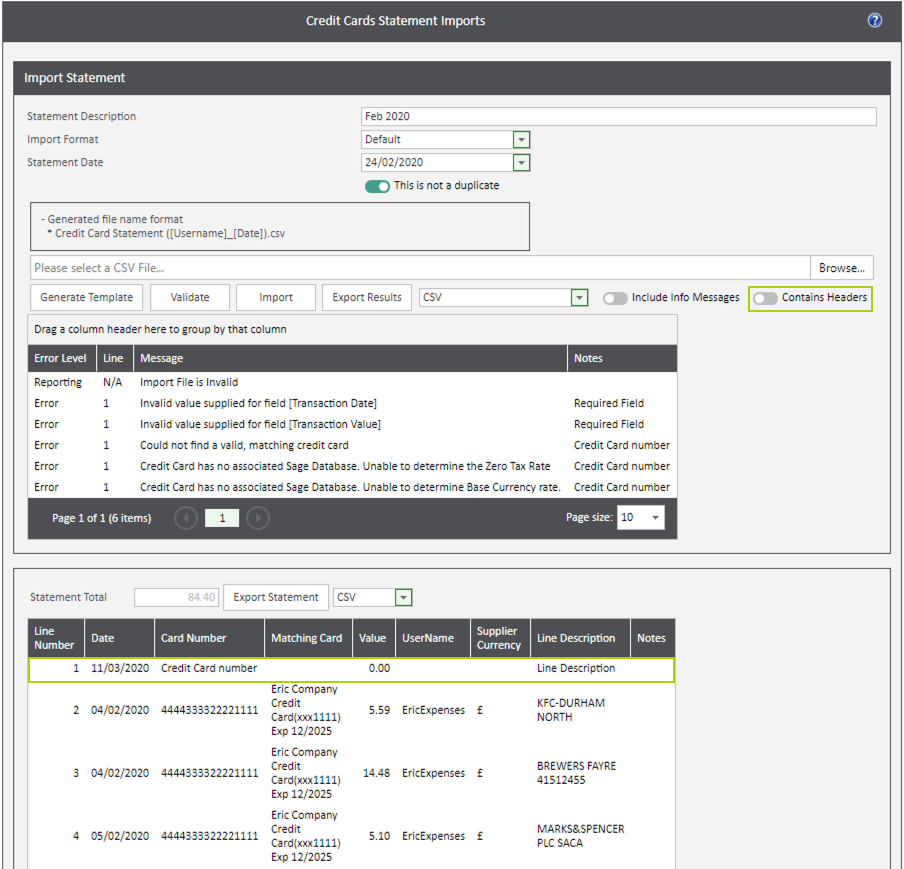
Contains Headers: tick to confirm the file importing has a row of column headers.
If the file does not pass validation, the reasons will be listed, see example below. With this example, the file did not pass validation as there was a header line on the statement and this header line does not contain the correct information to link the line through to a user. To avoid this error, either tick the ‘Contains Headers’ tick box or remove the header line from the import.
Once the file has passed validation, browse again and import.
12.5. User Completing Imported Credit Card Transactions
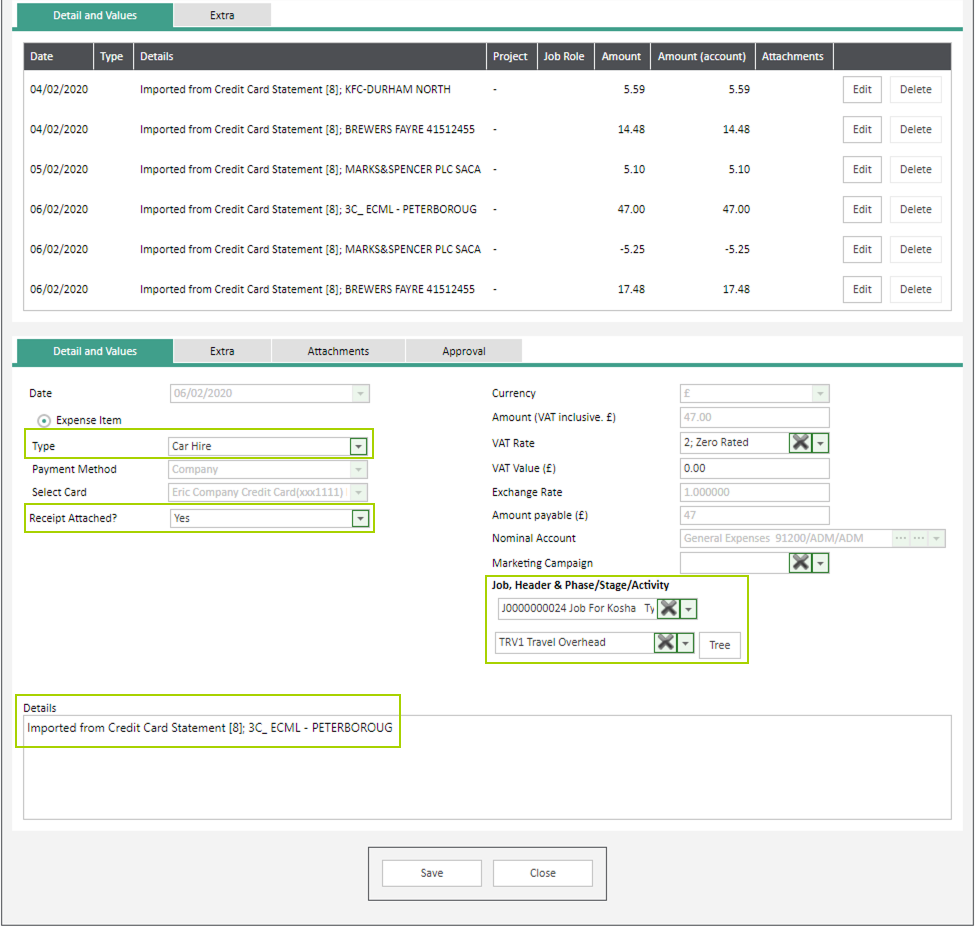
Once imported, an expense claim will have been created for the user(s); this expense claim will be under Existing Expenses – New tab and will show a note to the user stating it was created via an import. The user is not able to delete this expense or expense lines or add any other lines.

The user will click Edit to open the expense, edit each line to enter the expense type, attach a receipt, ensure VAT values are correct, link to a Job or Project (if a costing module is enabled) and amend the description if required. The expense claim cannot be submitted for approval until all lines have been completed.
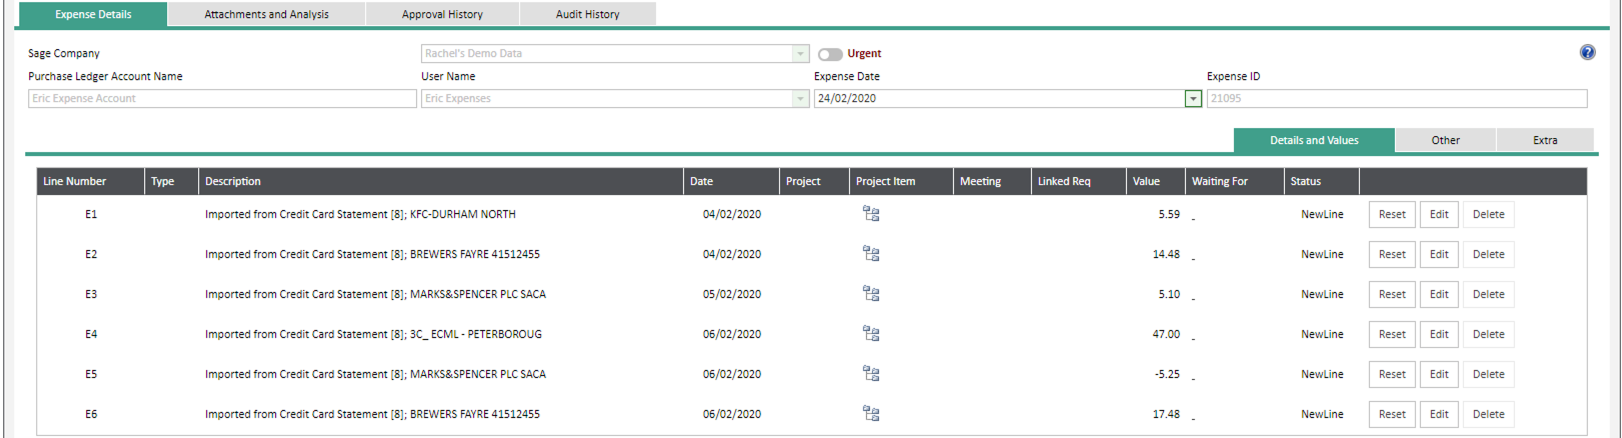
Once all lines have had all information completed, the expense can be submitted and sent for approval. The standard approval routes configured for expenses will be used.
13. Subsistence
WAP Subsistence claim functionality is based on predefined allowances, dependant on time spent away from the workplace. When Subsistence is claimed there is usually no option for hotels, meals, refreshments etc. as these are covered by the allowable Subsistence amount. Other expense types, e.g. Taxi, Parking, and Tolls etc. will still need to be setup as Expense Item Types for the user to select.
The Subsistence function within WAP can be enabled to take into account the country, and if necessary, the city, where the expense was incurred, the user’s company grade and the number of hours or nights of the claim.
13.1. System Subsistence Settings
To enable the Subsistence function, select within System Settings Banner – Expenses – Subsistence. The system Rate Days will only appear once subsistence claims have been enabled. The Rate Days are the number of days incrementally that a rate applied, by default this is set to 14, 14 and 28 but can be edited in accordance with the organisation’s policy. In the below example, a user claiming subsistence when away for 21 days would get the Overnight rate for the first 14 days and the Conference rate for the next 7 days.
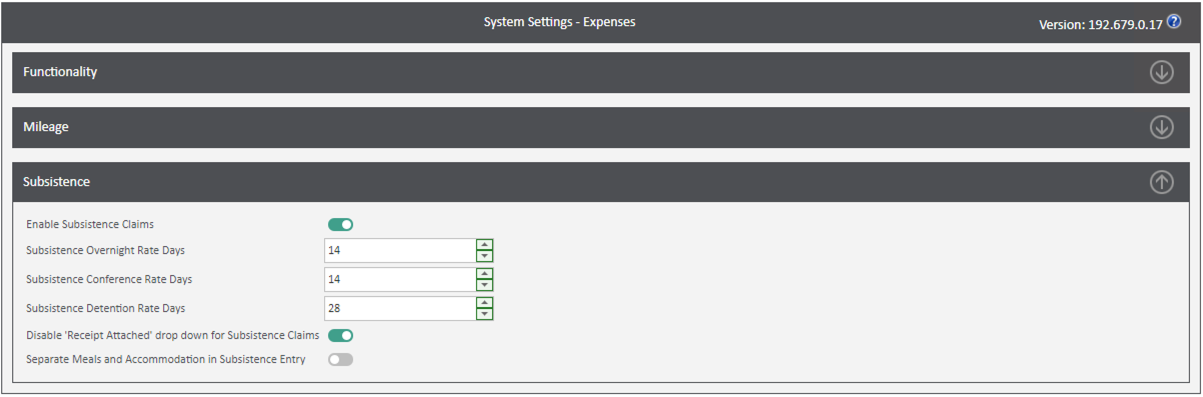
Disable ‘Receipt Attached’ drop down for Subsistence Claims: switch off if users are not expected to attach a receipt when submitting a subsistence claim.
Separate Meals and Accommodation in Subsistence Entry: by default, subsistence claims will post through to one nominal code; if different codes should be used for meals and accommodation, enable this setting.
13.2. User Subsistence Settings
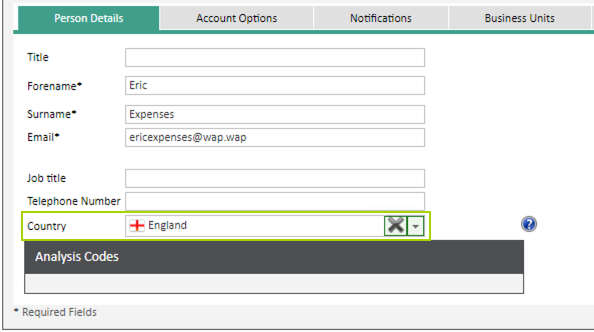
On each WAP user profile, under the Expenses & Mileage tab, the user can be set to enter subsistence claims and which subsistence grade they will claim.

Within each user’s profile also allocate the correct country on the Person Details tab. When new users are created they are automatically allocated the Country that has been set as the default Country but this can be overridden as required.
13.3. Enabling Subsistence Expense Types
Default subsistence expense types are created at install which cannot be amended.
Please ensure these expense types are allocated as required to a user with a default nominal code and tax rate; either by editing per user or using the wizard found under the User Setup tab – Expense Item Types. This will need to be done for each user prior to them being able to submit a subsistence expense claim. If editing per user, make sure to click ‘Update’ when editing an expense type and to then click ‘Save’ at the bottom of the screen.
If subsistence claims are to be split between Meals and Accommodation, please ensure both expense item types are allocated to the users, with different nominal codes allocated to accommodation and meals.

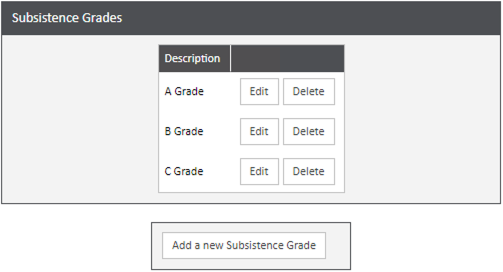
13.4. Subsistence Grades
To be able to submit Subsistence expense claims, users need to be allocated a Grade (even if these are not a factor within the organisation). Subsistence Grades are set within System Setup – Subsistence Grades. If the organisation does not use a graded system, all users and rates can be based on a single grade, e.g. Grade A. By default, two grades will be pre-configured, A Grade and B Grade. Further Subsistence Grades can be added as required.
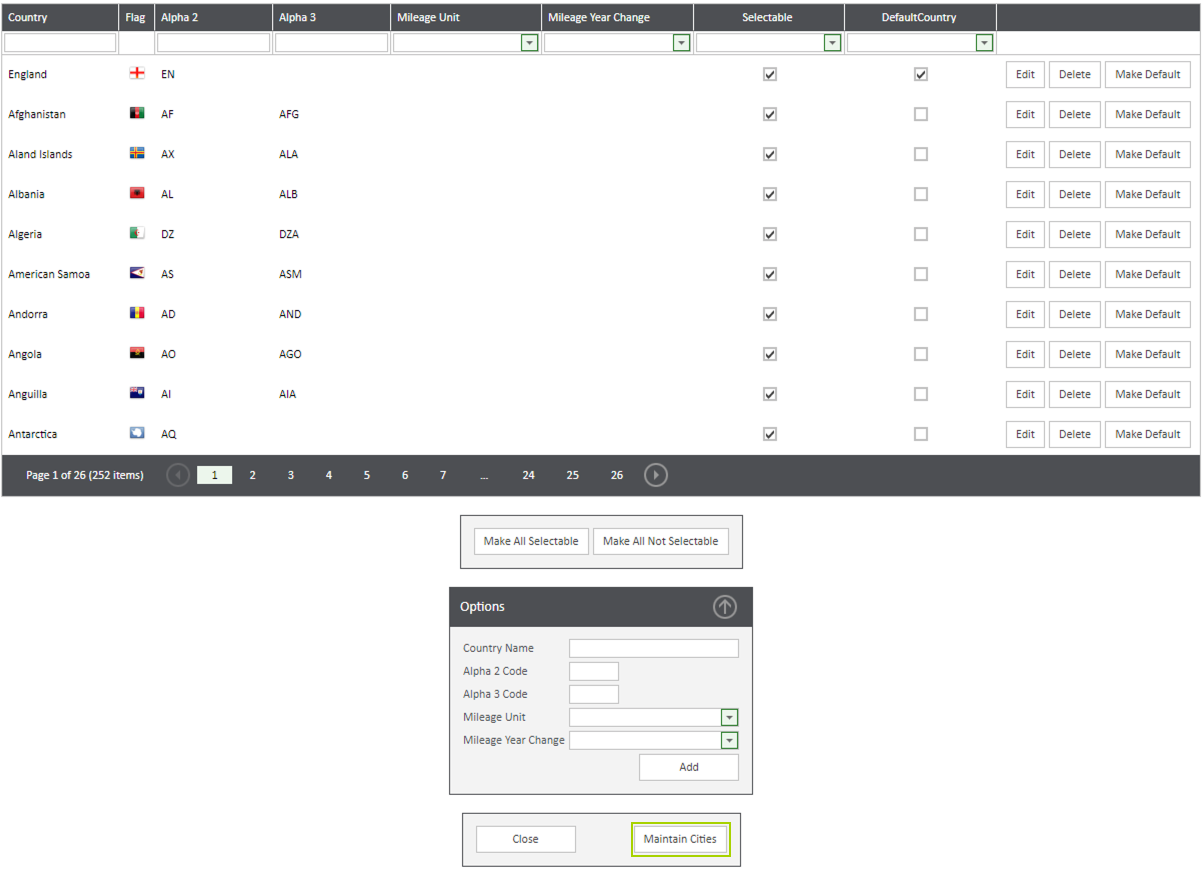
13.5. Subsistence Countries
Users will also need to be allocated a default Country to enter subsistence claims. By default, countries are already created within the system but if cities are also a factor in Subsistence claims, these will need to be added as required – System Setup – Countries & Cities. Additional countries can be added as needed. If required, a country can be assigned the mileage unit and mileage year change date if this is different to the default country and users will be submitting mileage claims in different countries.
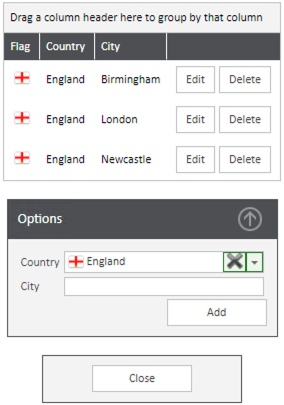
To add cities –
13.6. Subsistence Rates
Subsistence Rates are based on time spent away from the workplace and are setup within System Setup – Subsistence Rates. Enter the rates in accordance with the organisation’s policy. If the city is not a factor, leave this blank. A country must have a city marked as ‘Default’ if there is not a specific city entered. Once configured, these will then be available to all users when entering a subsistence claim, depending on their Grade.
N.B. the Overnight, Conference and Detention Rate timescales are set within System Settings – Expenses – Subsistence.
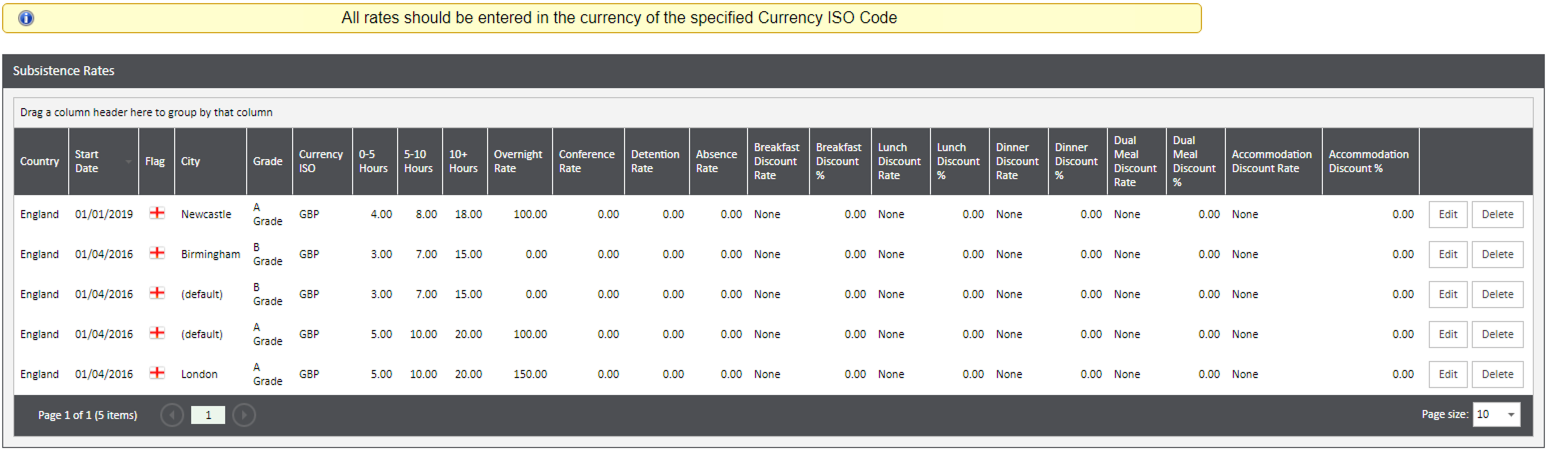
New rates can be added as applicable (i.e. if the rate changes, don’t edit the individual rate, but add a new rate with the appropriate start date); expand the option to ‘Add a new rate’.
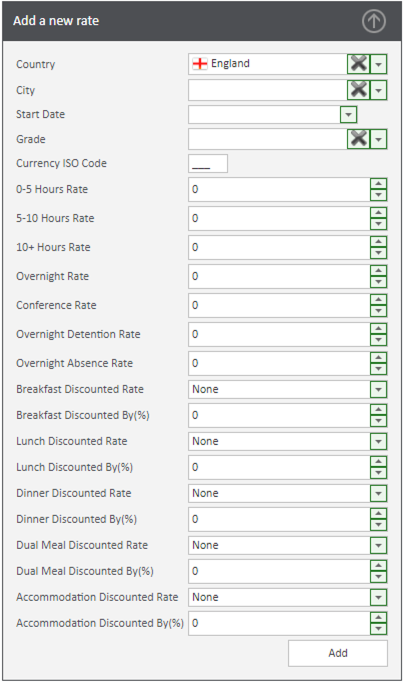
Country: the rate being created will apply to Subsistence claims incurred in the country selected.
City: if applicable, rate being created will apply to Subsistence claims incurred in the city selected – this can be left blank if cities are not being recorded.
Start Date: select an appropriate start date. If a rate has been updated, create a new rate, do not edit an existing one.
Grade: select as required (rates are set in System Setup – Subsistence Grades).
Currency ISO Grade: enter the appropriate currency ISO code, e.g. GBP.
0-5 Hours Rate: enter the correct value in accordance with the organisation’s policy.
5-10 Hours Rate: enter the correct value in accordance with the organisation’s policy.
10+ Hours Rate: enter the correct value in accordance with the organisation’s policy.
Overnight Rate: enter the correct value in accordance with the organisation’s policy.
Conference Rate: enter the correct value in accordance with the organisation’s policy.
Overnight Detention Rate: enter the correct value in accordance with the organisation’s policy.
Overnight Absence Rate: enter the correct value in accordance with the organisation’s policy.
Breakfast Discounted Rate: if breakfast has been provided, choose the rate to discount.
Breakfast Discounted By (%): enter how much to deduct if breakfast has been provided; i.e. reduce the 0-5 hour rate by 50%.
Lunch Discounted Rate: if lunch has been provided, choose the rate to discount.
Lunch Discounted By (%): enter how much to deduct if lunch has been provided; i.e. reduce the 5-10 hour rate by 50%.
Dinner Discounted Rate: if dinner has been provided, choose the rate to discount.
Dinner Discounted By (%): enter how much to deduct if dinner has been provided; i.e. reduce the 10+ hour rate by 50%.
Dual Meal Discount Rate: if two meals have been provided, choose the rate to discount.
Dual Meal Discount By (%): enter how much to deduct if two meals are provided; i.e. reduce the 10+ hour rate by 100%.
Accommodation Discount Rate: if accommodation has been provided, choose the rate to discount.
Accommodation Discount By (%): enter how much to deduct if accommodation has been provided; i.e. reduce the Overnight rate by 50%.
N.B.: the discounts are to say how much of the hours or days should not be paid due to the user having lunch, dinner, accommodation etc. provided. The system will not allow the user to claim a negative subsistence claim; if the amount to deduct is more than being paid, the claim will show as £0.
13.7. Enter Subsistence Expense Claim
Select New Expense from the side menu and click on Add Expense Items. Click the Subsistence radio box and the date and time fields will appear. For a single day claim, enter the start and end date to be the same, and enter a start and end time. The rate will be calculated in accordance with the System Subsistence Rates; the country will default to the User’s country but can be changed if required.
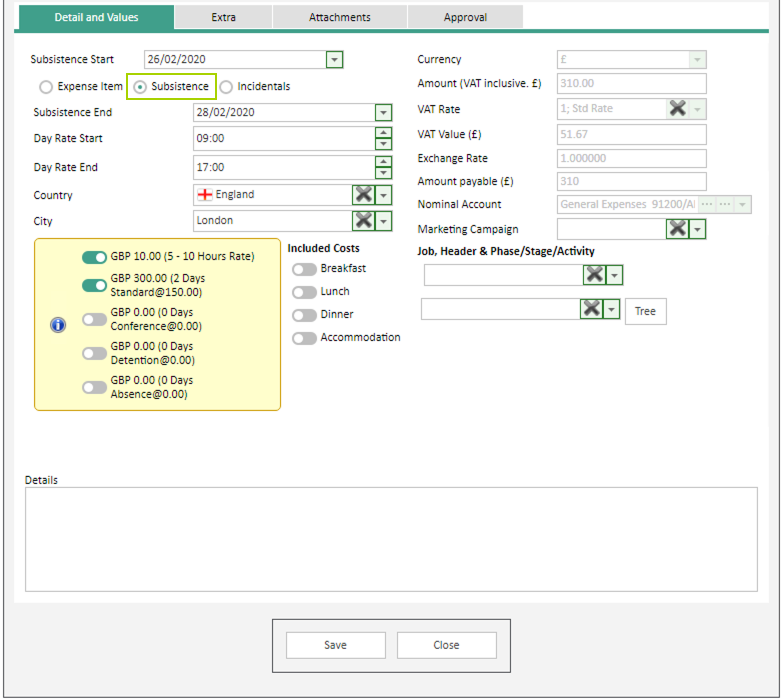
For overnight claims, enter the start and end dates and the overnight rate will be calculated in accordance with the System Subsistence Rates. However, as day rates are calculated separately from overnight rates, it is necessary to enter the hours for the final day to calculate the subsistence allowance for that day. If applicable, a costing header will need to be selected and expense details entered. In the example above, a subsistence claim is being entered for two overnights plus 5-10 hours on 28.02.20; the calculations are visible but cannot be edited. This line can be saved once complete and additional lines added to the claim (including standard Expense Item and Mileage lines). Once the expense is fully complete, it can be submitted for approval.
14. Subsistence Incidentals
Incidentals can be added and claimed when Subsistence is enabled (System Settings – Expenses – Subsistence). Subsistence incidentals can be added onto the system and allocated to users; for example, these can be fixed monthly payments owed to a user to cover phone / broadband / other costs. These incidental costs should be added onto the expense claim by the user as another expense line which will require approval before posting through to their PL account. The example set up below will be a fixed monthly payment to a user to cover a Phone Allowance.
14.1. System Setup of Subsistence Incidentals
Incidentals are added onto the system under System Setup – Subsistence Incidentals. Each incidental must be given a name, currency code, rate (amount), whether there is a maximum claim amount per month or per year and whether attachments are required.
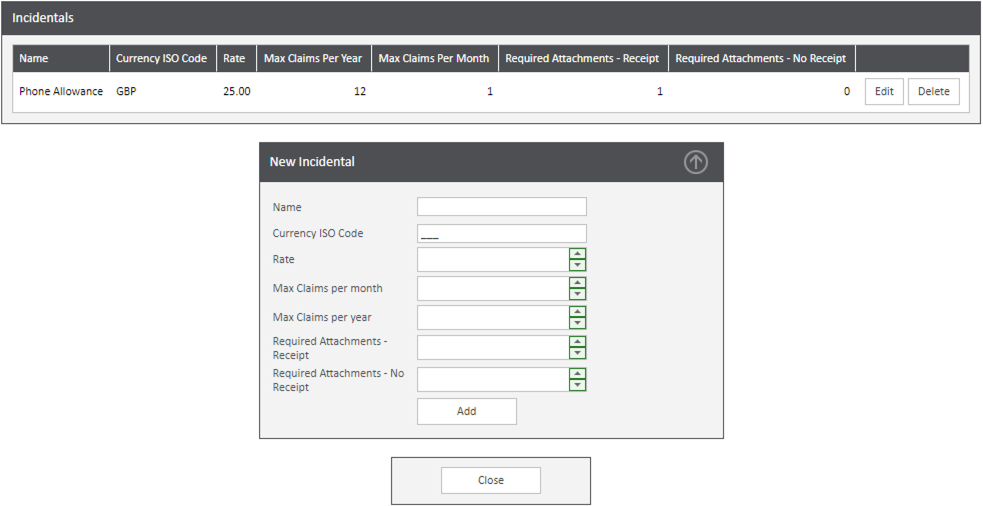
Name: enter a name for the incidental – users will see this name when entering an expense line.
Currency ISO code: enter the appropriate currency ISO code, e.g. GBP.
Rate: enter the value of the incidental payment.
Max Claims per month: enter the maximum number of claims the user can enter per month.
Max Claims per year: enter the maximum number of claims the user can enter per year.
Required Attachments – Receipt: if users must enter an attachment when saving an incidental line, enter the number of required attachments. This option is specifically linked with if a user has marked there is a receipt on the incidental line.
Required Attachments – No Receipts: if users must enter an attachment when saving an incidental line, enter the number of required attachments. This option is specifically linked with if a user has marked there is no receipt on the incidental line. Some companies will force a document to be attached even if there is no receipt – this may be a justification document explaining why the user has no receipt.
14.2. User Allocation of Subsistence Incidentals
Incidentals are allocated to users under User Setup – User Subsistence Incidentals. Select a user to either view the incidentals that have been allocated to that user, or to link a new incidental. When assigning an incidental to a user, it must be linked to a Sage Database with a default nominal account and tax rate.
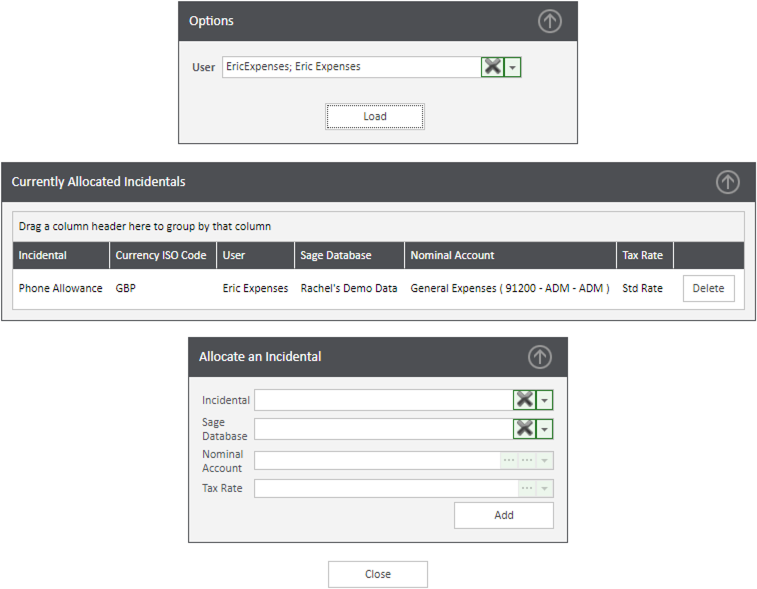
User: select the user to link the incidental with.
Incidental: select the incidental to link to the user.
Sage Database: select from the drop down list the correct Sage database.
Nominal Account: choose the correct nominal account the expense should post through to.
Tax Rate: choose the correct tax code to link to the incidental.
14.3. User Claiming Subsistence Incidentals
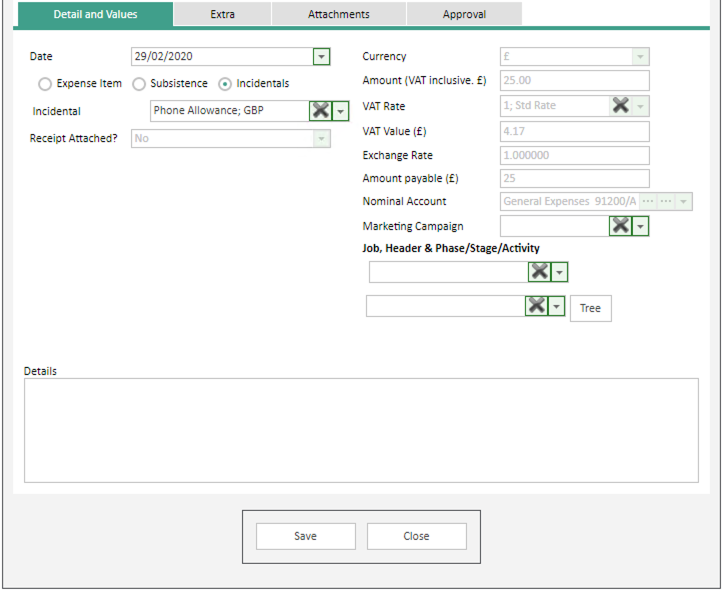
An expense claim is added in the standard way but the user would select the option for Incidental and then choose the relevant incidental from the drop down box. The amount would then be populated and the user is not able to change this. If applicable, a job or project would need to be chosen, a date selected, details entered and an attachment uploaded. Once filled out correctly, the expense line can be saved and submitted.
If a maximum monthly figure has been set on the incidental and the user tries to submit a further incidental claim in the same month, the below message will appear to the user when they try to submit the expense claim.

15. Expense Meetings
Meetings can be configured in the system (System Setup – Expenses); these have been added to allow for tracking of spends against different meetings and to limit occurrence of meetings; nominal codes are allocated to an expense type per meeting rather than nominal codes to an expense type per user.
15.1. Meetings System Settings
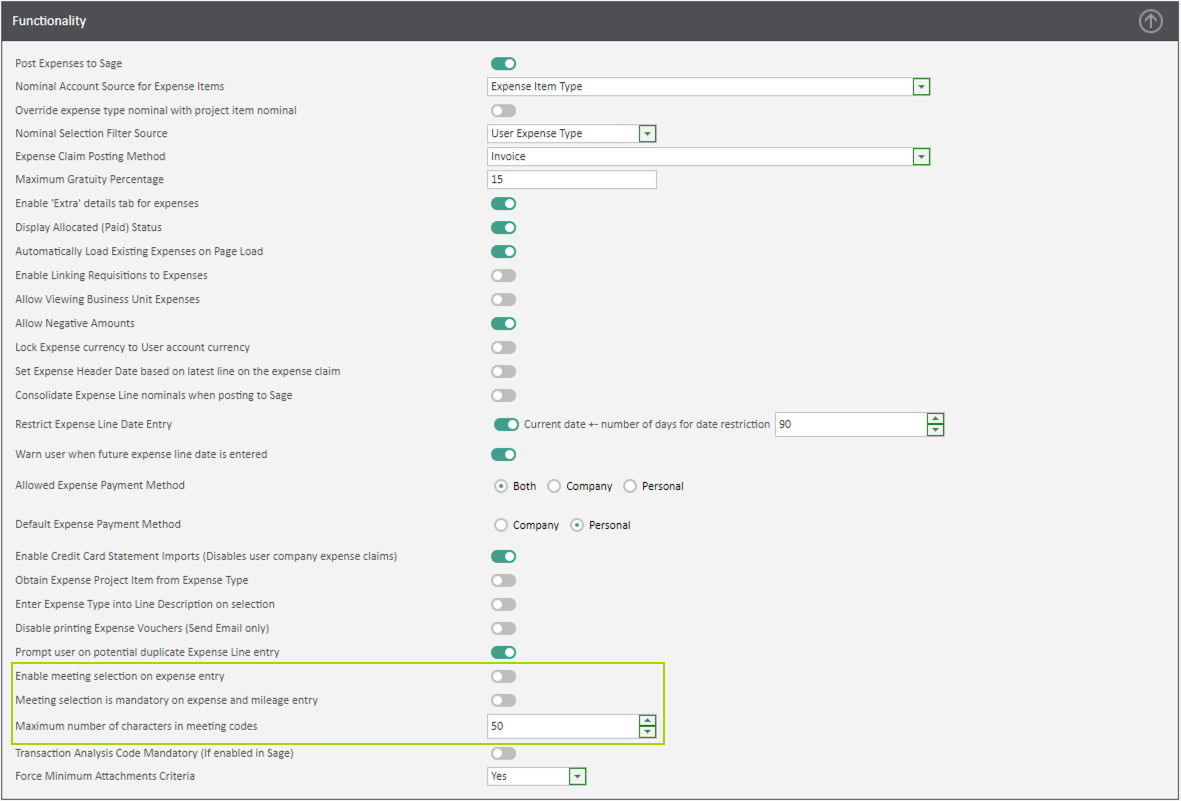
Enable meeting selection on expense entry: tick if meetings are to be configured in the system against expense claims.
Meeting selection is mandatory on expense and mileage entry: if all expense claims (i.e. subsistence and incidental claims, mileage and general expense entry) should be allocated to a meeting, ensure this is ticked.
Maximum number of characters in meeting codes: if applicable, enter a maximum value for the meeting codes.
15.2. Setup of Meetings
Expense meetings are set up under System Setup – Expense Meetings. Meetings must be given a code, name and description. If applicable, an analysis code can be entered to group meetings together, although this is not a mandatory field. This would be visible to users when they select the meeting on expense entry and will also be visible on expense reporting (these fields will be under the Customise option when running reports). Maximum claims per month or per year can be entered if required.
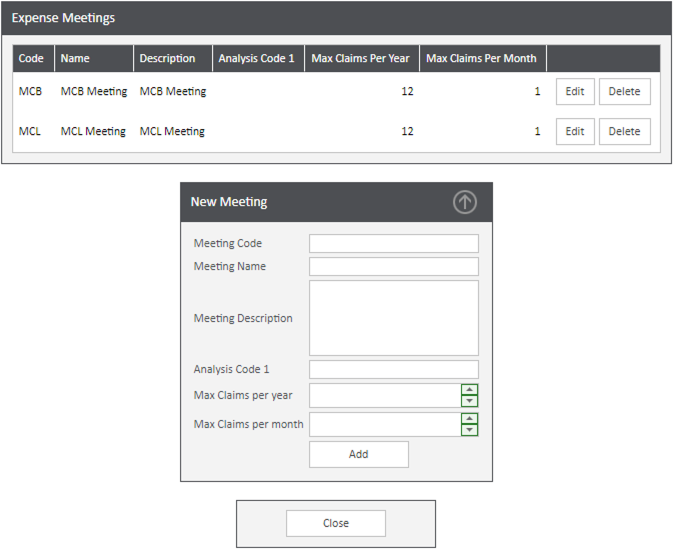
15.3. User Allocation of Meetings
Meetings can either be allocated to a user through their WAP User Profile (Expenses & Mileage tab – Expense Meeting Access sub tab) or through User Setup – Expense Meetings (as shown below). If applicable, a user can be given access to all meetings; as new meetings are added onto the system they will automatically be available to users with access all permissions. Meetings can then be selected and moved across to either allocate or remove from the user as required.
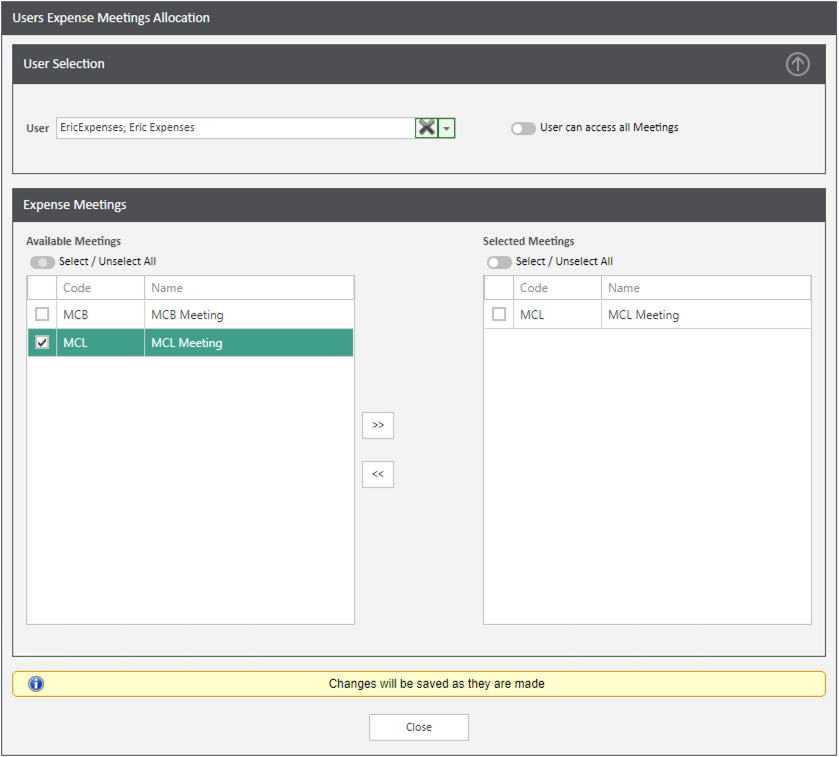
15.4. Linking Expense Types to Meetings
Expense types must be linked to meetings with a default nominal code and tax rate. This is done through User Setup – Expense Item Types – Edit per User/Meeting – select the Sage Database and Meeting and click Load. Edit the relevant expense type and set a tax rate and nominal account. Make sure to save these changes before moving away from this screen.
N.B. it is not possible to select both a user and a meeting.
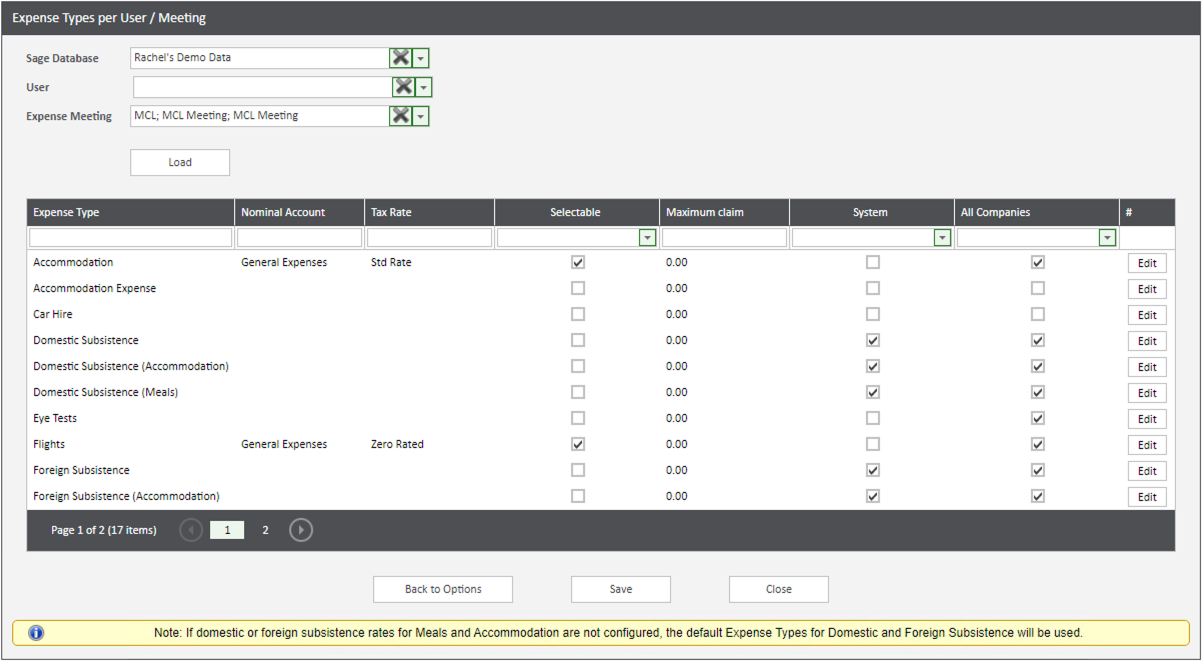
15.5. User Claiming Meeting Expense
In the below example the user is claiming a hotel stay and a mileage claim and will be allocating these to a meeting. Subsistence claims and Subsistence Incidentals can also be claimed and allocated to a meeting.
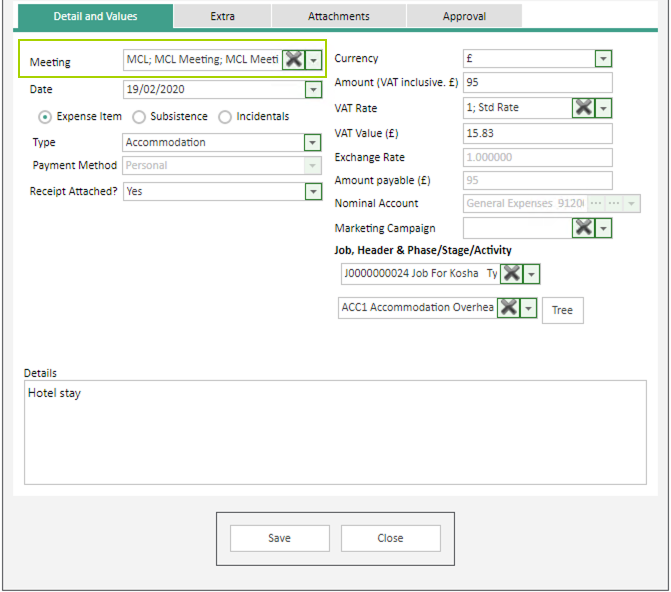
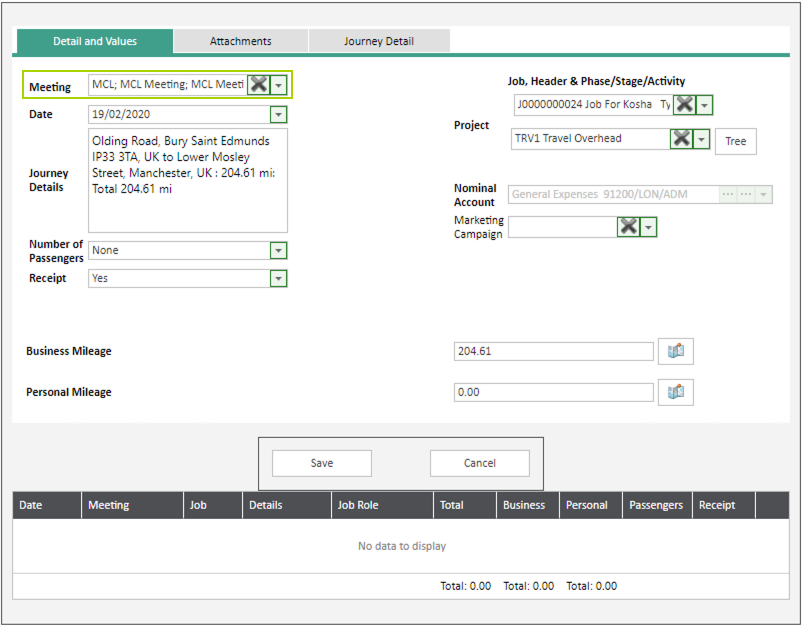
Expense claims are completed, submitted and approved as normal.
16. How to Manage Fuel Cards
This section will describe how WAP can be configured to allow for users to enter fuel card expenditure, all mileage claims – both business and personal miles, and the reports in WAP that can be used for any deduction of personal mileage costs.
16.1. Setup of Fuel Cards
A new credit card will need to be created in WAP and assigned to the user; this will be their fuel card. It may be that a user is assigned a couple of credit cards – one being their standard card for general expenses and one being their fuel card. The fuel card in WAP will be linked through to a PL supplier account.

16.2. Setup of Fuel Rates
A new fuel rate will need to be created with a zero value rate; this is done through System Setup – Fuel Rates. Under the Options banner, click to ‘Add New Fuel Rate’.
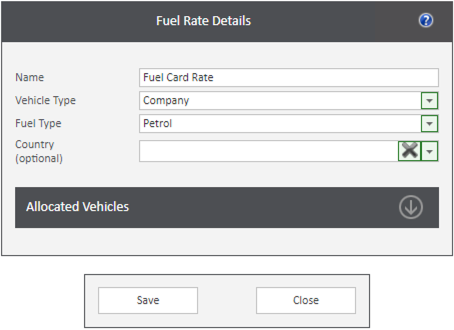
Once added, then add a ‘Rate Change’ and set the first cut-off rate as zero.
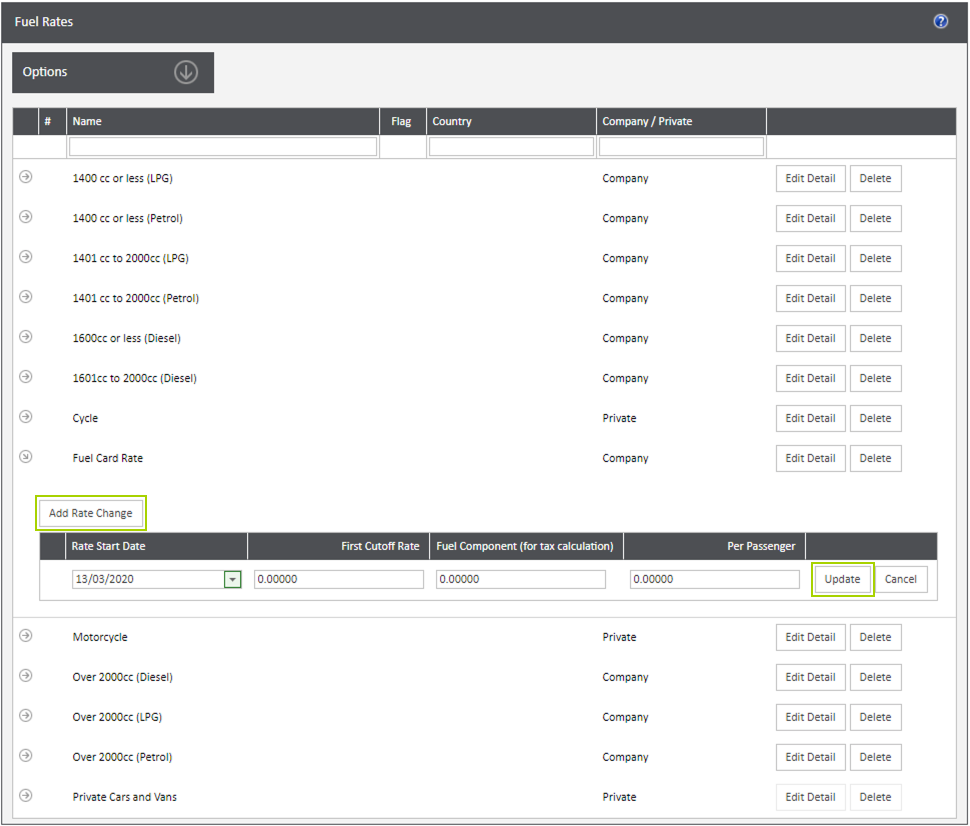
An information message will show asking for confirmation a zero value rate is intended to be created.

16.3. Setup of Vehicle
Create a new vehicle and link it to the Fuel Card fuel rate; this is done through System Setup – Vehicles.
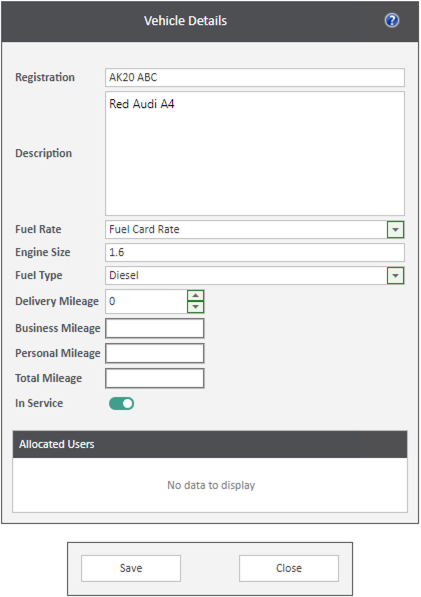
Link the vehicle through to the user as required; this is done through User Setup – User Vehicles.
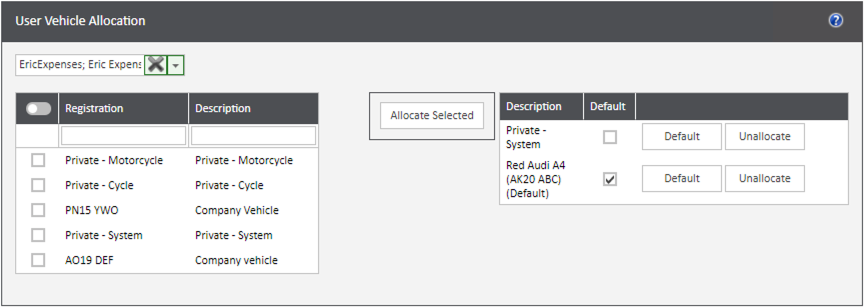
16.4. Setup of System
Ensure mileage settings allow for personal mileage to be recorded against company vehicles (System Settings – Expenses – Mileage).
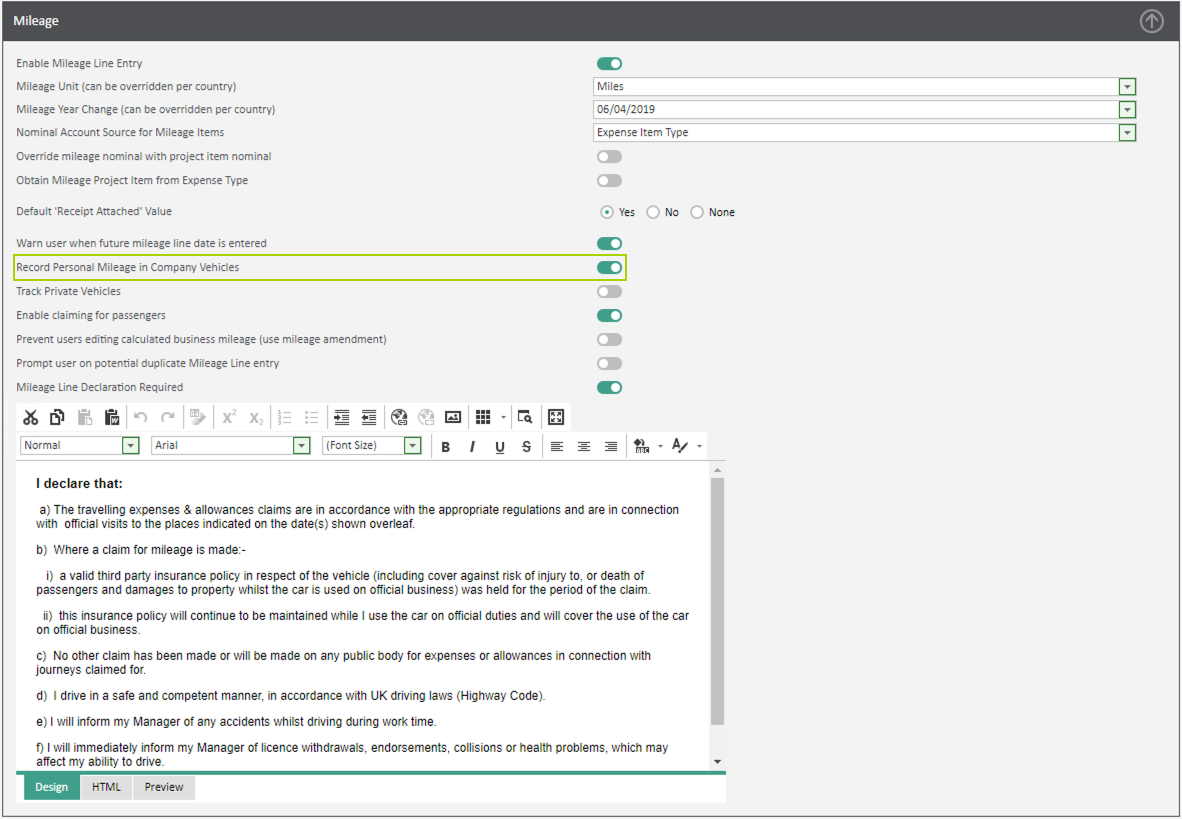
16.5. User Entry of Fuel Card Claims
When a user fills up their vehicle with fuel using their fuel card, they will need to enter an expense claim for fuel, against their fuel card.
N.B.: a new expense type may need to be created for Fuel and linked to the user with a default nominal code.

The user will need to record all mileage undertaken, both personal and business miles against their company vehicle.
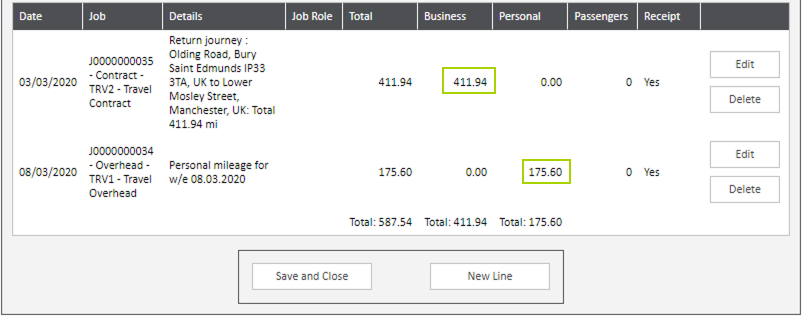
As the vehicle has been configured with zero value fuel rates, the expense lines will have zero gross value.
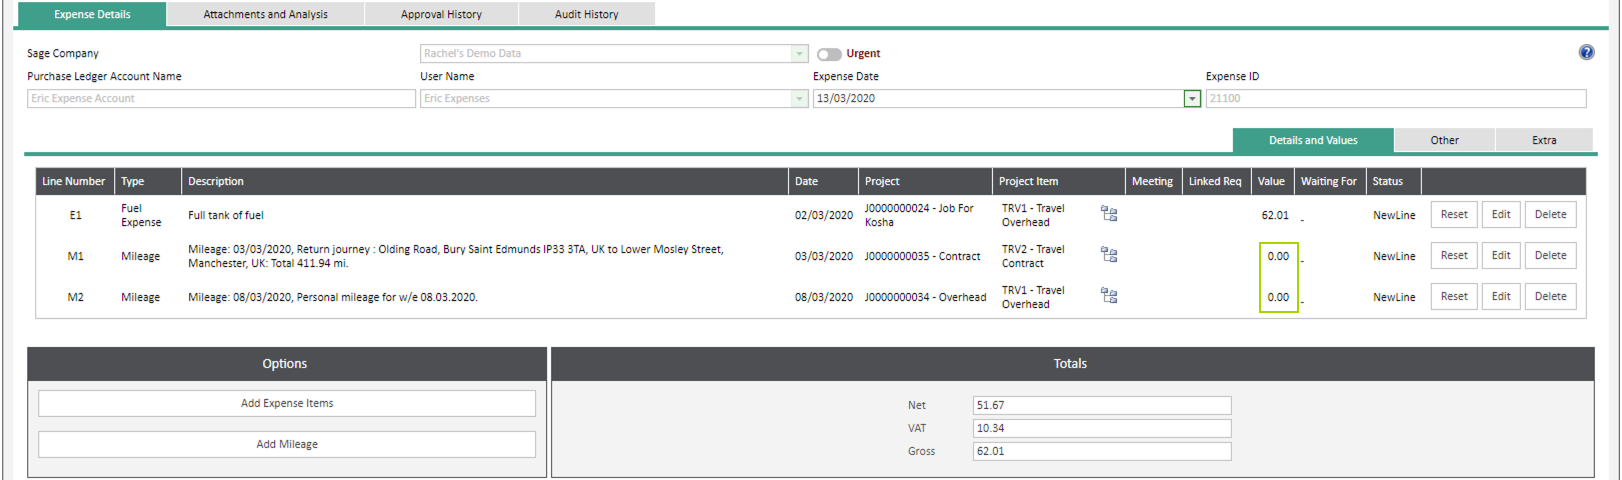
Once the expense claim is completed, this can be submitted for approval and the pre-configured approval routes will be followed. Once fully approved, any lines with a value will post through to Sage but any zero value lines will not post through to Sage. Claims entered against the Fuel Card will post through to the PL supplier account linked to the credit card.
N.B.: in this example both the fuel claim and the mileage claims are on one expense entry, but this could be split across multiple entries or multiple users if required. For example, one user fills up a Company Pool car with fuel but multiple users make both personal and business trips on this car.
16.6. Reporting of Mileage Claims
The mileage report can be run to find out the total personal mileage submitted by the user in a given period; this total can then be used to work out the correct amount to deduct from the user when running Payroll.
N.B.: this is a manual process; there is no automatic link between WAP and Payroll.
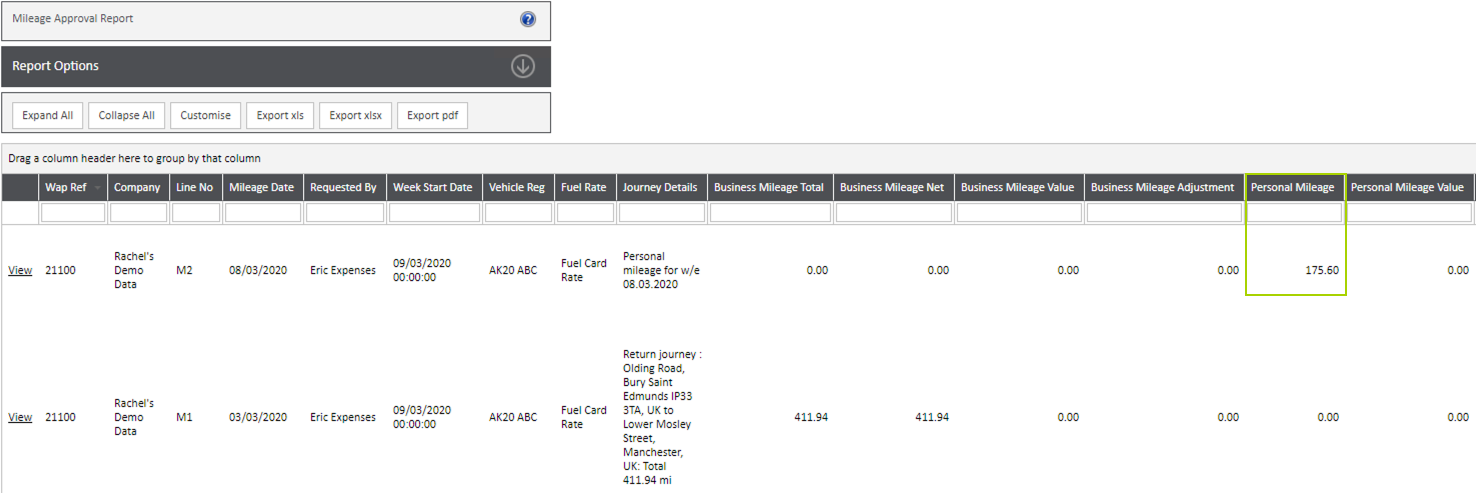
17. Reports
Select Reports from the Expenses side menu. A report can either be run on Mileage claims or Expense claims. The ability to run these reports is a User Type permission.
Report filter Options
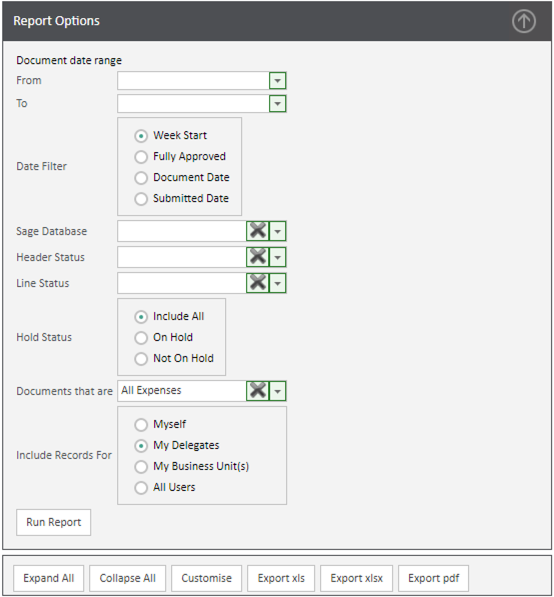
From: select date to run the report from.
To: select date to run the report to.
Date Filter: choose whether the date should be on the week start date, fully approved date, document date or submitted date.
Sage Database: select the database to run the report in.
Header Status: this can be left blank to show all expense lines or select the preferred status from the list (choose from New, Approved, Submitted, Rejected, Completed, Failed or Archived).
Line Status: this can be left blank to show all expense lines or select the preferred status from the list (choose from New Line, Approved, Rejected, No Authorisers, Awaiting Approval or Draft).
Hold Status: select whether to show all expenses or those that are either on or off hold.
Documents that are: select whether to show either user’s own expenses, expenses awaiting the user to approve, expenses the user has approved or all expenses. There are User Type permissions as to what users have permission to see when running reports.
Include Records For: select whether to show either the user’s own expenses, expenses submitted by their Delegates, expenses submitted by users in their business unit or all expenses. There are User Type permissions as to what users have permission to see when running reports.
Both reports are generated on a grid based system and incorporate all the expense fields relating to Expense Item or Mileage Line claims. Columns can be customised as required using the Field Chooser option under the Customise option. In addition, all reports can be exported to Excel or PDF.
18. Payroll Expense Claim
If users are to put expense claims through WAP which should not post through to Sage, for example if expenses are to be paid with the user’s salary, it can be configured on their WAP profile for their expense claims to not post to Sage.
18.1. User Setup of Payroll Expense Claims
On the user’s profile, set under the Expenses and Vehicles and Mileage sub tabs for Expense and Mileage claims to not post through to Sage.

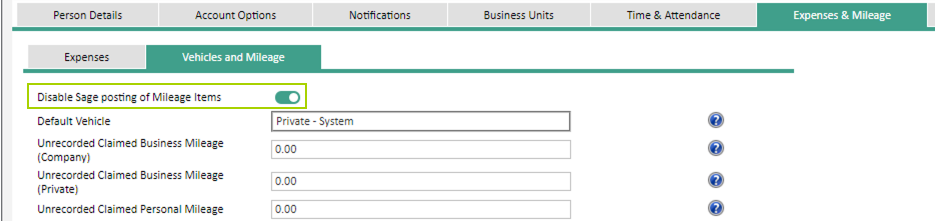
18.2. User Submission of Expenses
Users will complete and submit their expense claims as per standard expense claim entry but once approved, these will not post through to their PL account in Sage. Until the approved expenses have been completed by a Payroll Admin user, the expense will remain in the Approved tab.

18.3. Expense Payroll Process
An Admin or Finance user will complete the Payroll Process, either on a weekly or monthly basis. There will be a menu option under Expenses – Payroll Process (this is a User Type permission); select either Mileage or Expenses.
Unallocated Expense Line Items
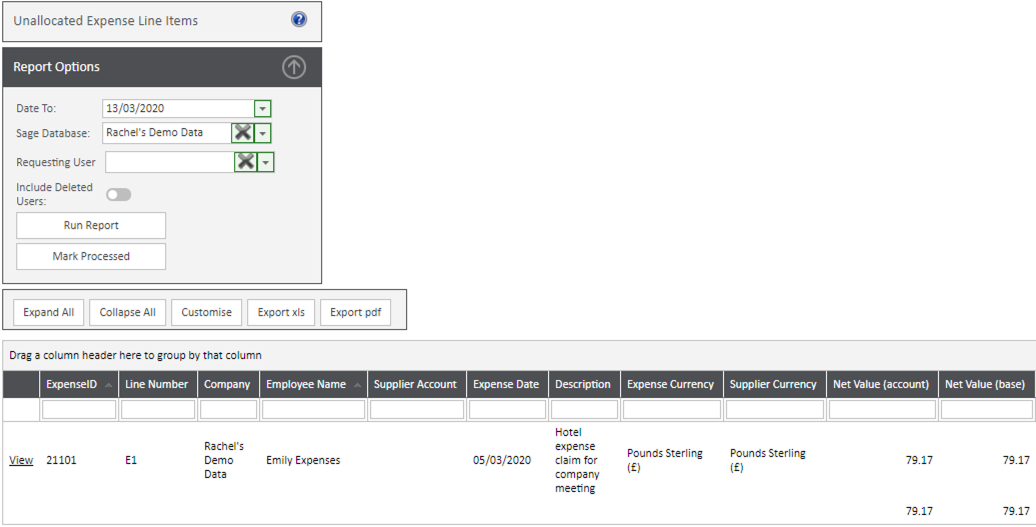
Date To: select the date to run the payroll process up to.
Sage Database: select the database to run the payroll process on.
Requesting User: either pick the user to run the payroll process for, or leave blank to select all users.
Include Deleted Users: tick to include users that are no longer active on the system.
Run Report: click to run the report. Once run, the data will be generated below; this can either be exported to Excel or PDF as required. All expense lines will be listed for users that are set for expenses to not post through to Sage.
Mark Processed: click to mark the expense lines as processed. Once both mileage and expense lines have been processed, the users’ expense claims will move through to the Completed tab. N.B. the expenses cannot be marked as processed until the report has been exported.
Unallocated Mileage Line Items
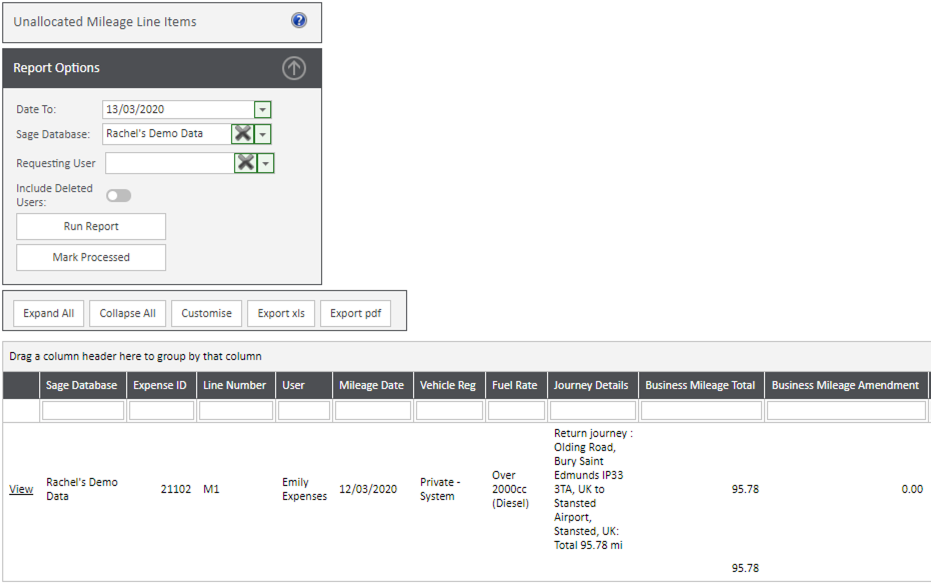
Date To: select the date to run the payroll process up to.
Sage Database: select the database to run the payroll process on.
Requesting User: either pick the user to run the payroll process for, or leave blank to select all users.
Include Deleted Users: tick to include users that are no longer active on the system.
Run Report: click to run the report. Once run, the data will be generated below; this can either be exported to Excel or PDF as required. All mileage lines will be listed for users that are set for mileage items to not post through to Sage.
Mark Processed: click to mark the mileage lines as processed. Once both mileage and expense lines have been processed, the users’ mileage claims will move through to the Completed tab. N.B. the expenses cannot be marked as processed until the report has been exported.
18.4. User Completed Expense
Once both mileage and expense lines have been processed, the expense will move to the Completed tab; to view, tick ‘Include Completed’ and then ‘Show My Expenses’. The Paid status will also change to show that the expense has had a payment allocated.
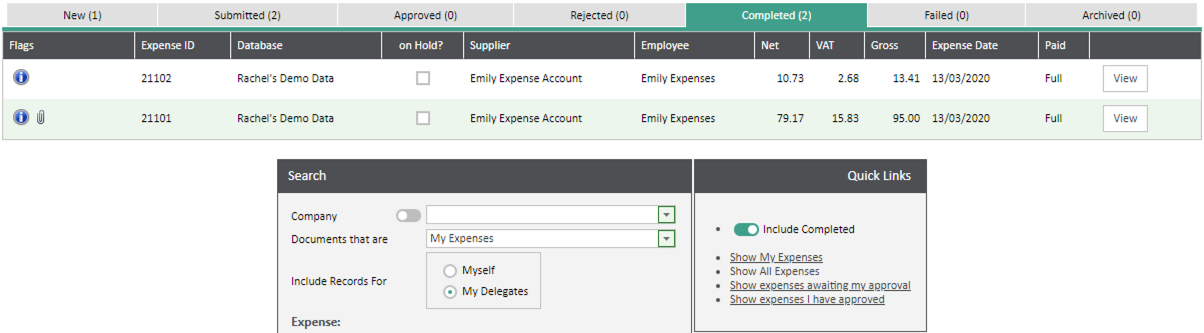
19. Configuration Email Reminders
A reminder email should be set up to send an email to users submitting expenses that there may be credit card expenses for them to complete and submit. A reminder email could also be created to go to all users at a certain date to remind about submitting expenses before the cut-off date. Email reminders are set up under System Settings cogs – System Setup – Document Type Reminders.
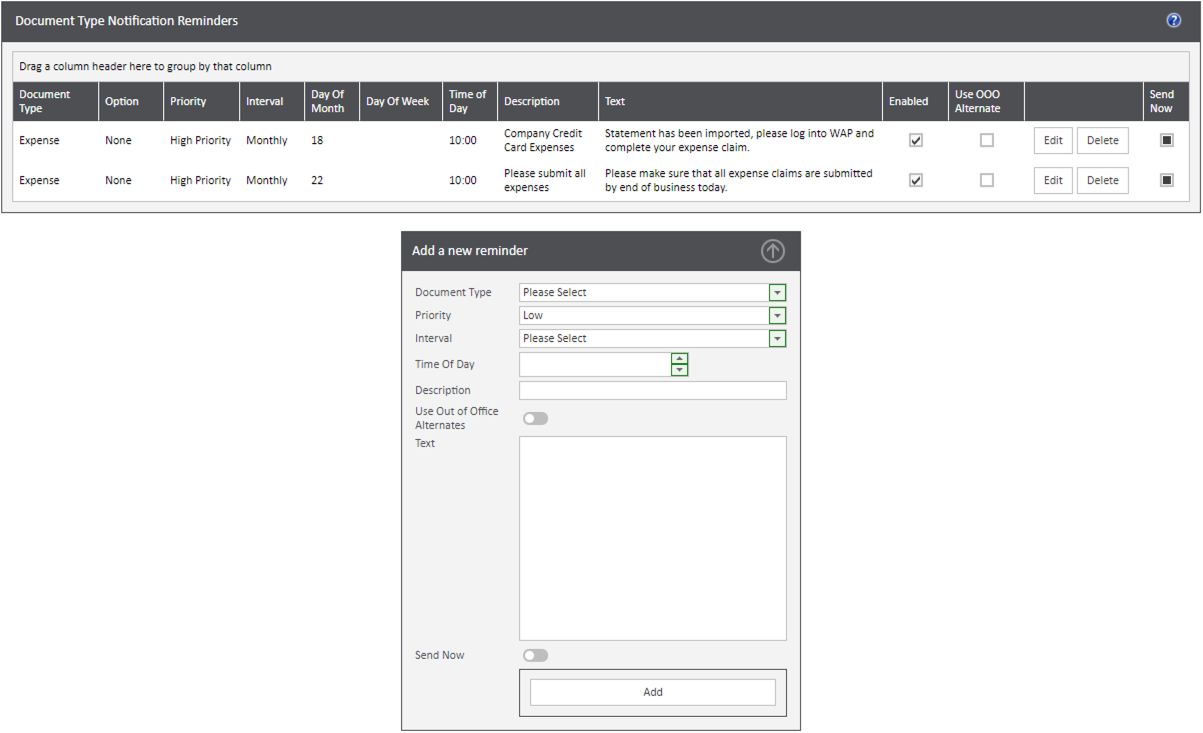
Document Type: choose the required document type from the drop down list.
Priority: select from the drop down list the appropriate priority, either Low, Normal, High or Urgent.
Interval: choose either weekly or monthly; depending on the interval selected, another option will appear to either pick the day or the date to send the reminder on. If choosing a monthly date, no date further than the 28th can be selected.
Time of Day: set the time the reminder should be sent out.
Description: enter as required; this description will be the subject of the email sent.
Use Out of Office Alternates: if a user has marked themselves as out of office in WAP, whether to send the reminder to their out of office alternate users.
Text: enter as required; this text will be the body of the email sent.
Please make sure that the WAP service is restarted following any changes to email reminders.
20. System Settings
System Settings relating to the Expense module are accessed in System Settings – Expenses.
20.1. Functionality Tab
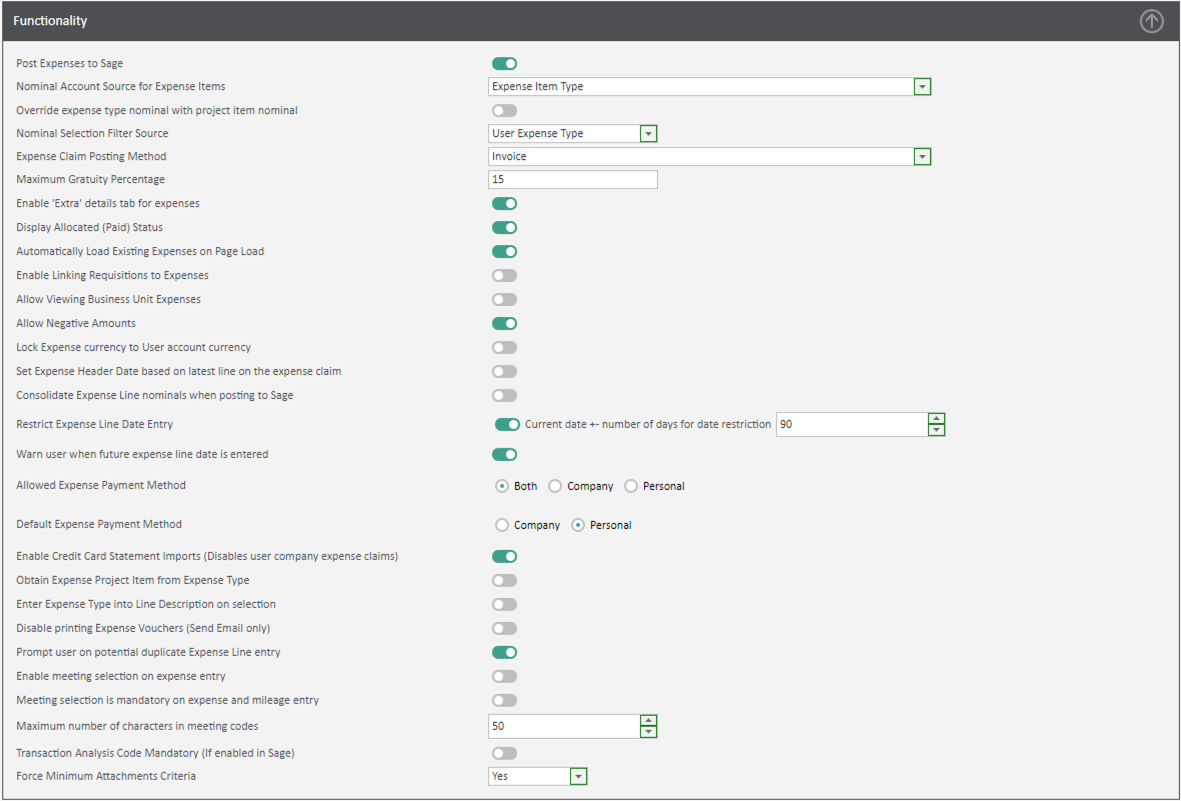
Post Expenses to Sage: untick if all expense claims should not post through to Sage.
Nominal Account Source for Expense Items: the expense item nominal can be set to default from either the user’s default nominal code (set on their WAP profile), to the Expense Item Type nominal or to the Project Item nominal code. Users can only change the nominal if they have the User Type permission to do so.
Override expense type nominal with Project Item Nominal: for example if the nominal code is being driven from the user’s expense item type but the Cost Centre or Department should be overridden from the job selected, tick this box. Once ticked, options to override the account number, cost centre or department will be available. N.B. this option is only applicable if using Job Costing.
Nominal Selection Filter Source: if the user has permission to change the nominal code on expense entry, whether to allow the user to choose from all nominal accounts they have access to, or just nominal codes that have been assigned to that expense type.
Expense Claim Posting Method: expenses can either be posted as a claim through to Sage Project Accounting or an invoice through to the user’s Purchase Ledger account.
Maximum Gratuity Percentage: set as required to restrict the gratuity amount a user can claim. A user will not be able to enter an expense claim with a gratuity amount higher than the percentage entered here.
Enable ‘Extra’ details tab for expenses: this will enable the Extra tab on an expense claim where additional information (such as gratuity amounts, 1st class travel etc.) can be recorded if required.
Display Allocated (Paid) Status: this will show to users when a payment has been allocated to their expense claim in Sage; only new expenses put onto the system after this setting is configured will show payment status.
Automatically Load Existing Expenses on Page Load: choose whether to automatically load expense claims when the Existing Expense page is loaded, or whether the user needs to click to show their expenses. This can prevent speed issues when loading if there are large numbers of expense claims. N.B. by default completed expenses will not show; the Include Completed box will need to be ticked.
Enable Linking Requisitions to Expenses: configure here if users will need to link a PO approved through the Requisition module to an expense claim. N.B. the requisition must be raised by the user against their Purchase Ledger account; this will keep the PO within WAP (it won’t post through to Sage) and can then be linked to an expense claim. See Section 9 of the WAP Expense.
Allow Viewing Business Unit Expenses: tick if users should be able to view expense claims submitted by other users within their business unit.
Allow Negative Amounts: this feature may be required to cope with refunds through Company credit card expense claims or against a user’s personal expense claim; e.g. prepayment of a hotel room booking which was not used.
Lock Expense currency to User account currency: configure this setting if the user is to be restricted to only enter expense claims in the currency of their Purchase Ledger supplier account. If disabled, currencies set up in Sage will appear in a dropdown selection.
Set Expense Header Date based on latest line on the expense claim: if disabled, the expense header will default to the date the expense was initially entered.
Consolidate Expense Line nominal when posting to Sage: if enabled, lines with the same nominal code on a user’s expense claim will be consolidated to one line when posting to Sage.
Restrict Expense Line Date Entry/Current date +- number of days for date restriction: this will restrict the time period when an expense claim can be submitted and can be configured as per the organisation’s policy. By default, this date is set to 31 days.
Warn user when future expense line date is entered: if the user selects a future date on an expense, a pop up warning will appear to the user.
Allowed Expense Payment Method: select whether users are able to enter either Personal, Company expense claims, or both.
Default Expense Payment Method: choose the default expense payment method that will be selected when a user goes to enter an expense claim.
Enable Credit Card Statement Imports (Disables user company expense claims): switch on if using an import to bring in company credit card statements; this will stop users from being able to manually enter company credit card expense claims.
Obtain Expense Project Item from Expense Type: if using a Costing Module, choose if the costing header should be selected from the Expense Type, rather than the user choosing manually.
Enter Expense Type into Line Description on selection: this will populate the expense type name into the Description field; this can speed up expense line entry for users.
Disable printing Expense Vouchers (Send Email only): if this is enabled, the user will not be able to print the expense voucher but will be able to email directly from WAP.
Prompt user on potential duplicate Expense Line entry: if this is checked and the user enters an expense claim with the same expense item type, date and value, they will need to enter a reason for why this is not a duplicate claim. Potential duplicate expense claims are highlighted as such to the approver.
Enable meeting selection on expense entry: tick here if meetings are to be configured in the system against expense claims.
Meeting selection is mandatory on expense and mileage entry: if all expense claims (i.e. subsistence claims, incidental claims, mileage and general expense entry) should be allocated to a meeting, ensure this setting is ticked.
Maximum number of characters in meeting codes: if applicable, enter a maximum value for the meeting code.
Transaction Analysis Code Mandatory (if enabled in Sage): if using transaction codes in Sage, these can be populated against an expense claim in WAP. If it is mandatory for these codes to be entered in WAP, configure here.
Force Minimum Attachments Criteria: if setting against an expense type the number of attachments that must be uploaded, configure here to either force attachments to be uploaded, prompt a user if no attachments but allow for users to not upload a receipt, or allow for users to save without an attachment.
20.2. Mileage Tab
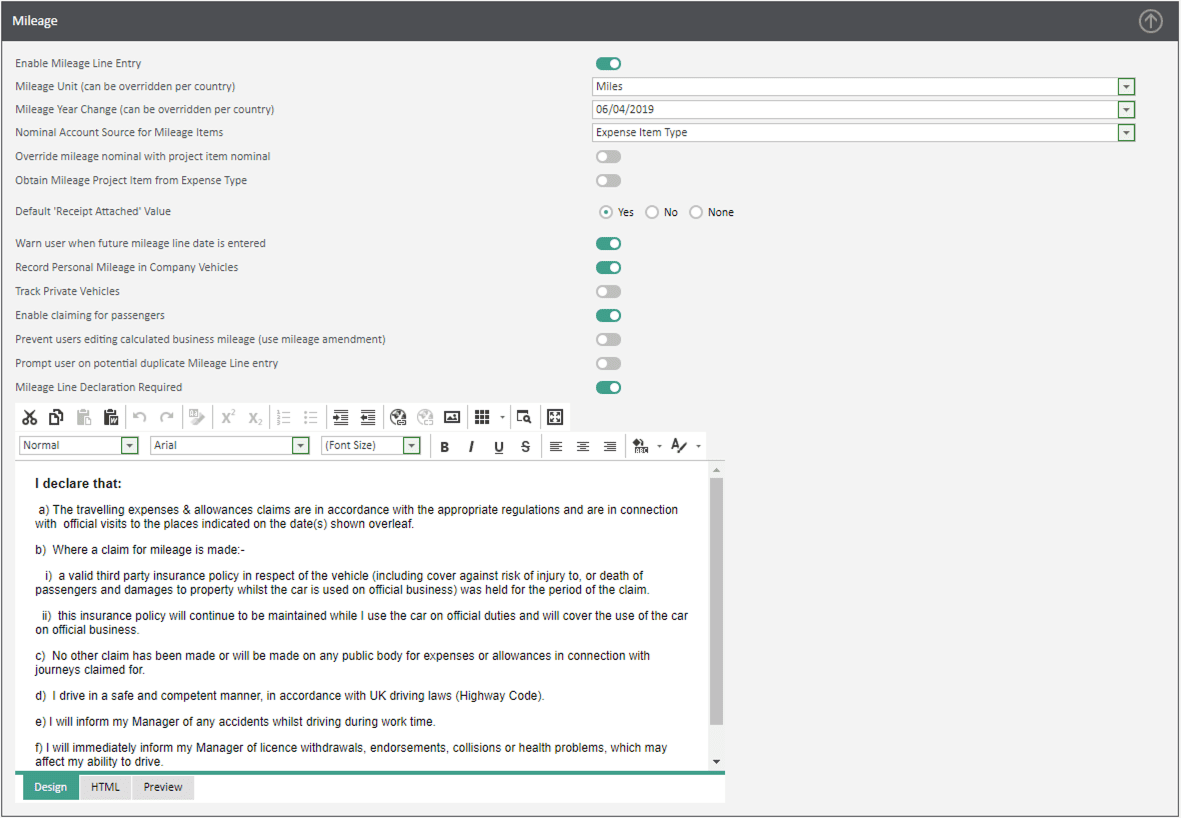
Enable Mileage Line Entry: untick here if the organisation does not permit mileage claims to be entered.
Mileage Unit (can be overridden per country): select either Miles or Kilometres. If required, this can be overridden per country (System Setup – Countries & Cities).
Mileage Year Change (can be overridden per country): this is the date that the mileage values will be reset; i.e. the calculation of business miles recorded on a private vehicle. If required, this can be overridden per country (System Setup – Countries & Cities).
Nominal Account Source for Mileage Items: the mileage item nominal can be set to default to either the user’s default nominal code (set on their WAP profile), to the Expense Item Type, the Category Component or the Project Item nominal. Users can only change the nominal code if they have the User Type permission to do so.
Obtain Mileage Project Item from Expense Type: if Job Costing is being used, the default costing header can be set per Sage Company to automatically populate the job header when a user is submitting a mileage claim, rather than the user choosing manually. The nominal can be driven by the job header if required.
Default ‘Receipt Attached’ Value: for mileage claims it is possible to default the receipt attached value; if the receipt value is Yes, VAT will be calculated on the fuel component on the rate selected; if the receipt value is No, no VAT will be calculated.
Warn user when future mileage line date is entered: if a user selects a future date on a mileage line, a pop up warning will appear to the user.
Record Personal Mileage in Company Vehicles: this enables the user to enter personal mileage as well as business mileage against a company car. This may be required for some company car schemes.
Track Private Vehicles: by default there will be a system Private vehicle that all users will have access to; only select this option is users’ private cars must be listed individually. The majority of organisations will not require tracking of private vehicles.
Enable claiming for passengers: if the organisation allows for users to claim an extra passenger rate, configure this setting.
Prevent users editing calculated business mileage (use mileage amendment): if the user is not allowed to manually enter mileage figures or edit the figure provided by Google, the user must use an amendment field and provide an explanation for why they are making an amendment.
Prompt user on potential duplicate Mileage Line entry: if this is checked and the user enters a mileage claim with the same date and mileage figures, they will need to enter a reason for why this is not a duplicate claim. Potential duplicate mileage claims are highlighted as such to the approver.
Mileage Line Declaration Required: by default this setting is on with the below text. When a user goes to enter a mileage claim, they must accept the below. If they do not accept, they will not be able to submit a mileage claim. This text can be edited to match the organisation’s required declaration text or can be turned off if required.

20.3. Subsistence Tab

Enable Subsistence Claims: check if the organisation allows for subsistence claims; once checked, additional options will become visible.
Subsistence Overnight/Conference/Detention Rate Days: the number of days incrementally that a rate applies; defaults are entered at install but can be edited in accordance with the organisation’s policy.
Disable ‘Receipt Attached’ drop down for Subsistence Claims: if receipts are not required for subsistence claims, this setting should be configured.
Separate Meals and Accommodation in Subsistence Entry: if required, the subsistence overnight and meal claims can be broken down to post to different nominal codes. If configured, the Domestic and Foreign subsistence expense types will require nominal codes to be entered per Subsistence (Meals) and Subsistence (Accommodation).
21. User Type Settings

Submit Expenses: the ability for a user to submit an expense claim.
Approve Expenses: the ability for a user to approve an expense claim.
Delete Expenses: the ability to delete an expense. N.B. once an expense has been fully approved it cannot be deleted.
Edit Expenses during approval: the ability for an approver to make changes during approval, e.g. changing a nominal code.
View All Expenses: the ability for the user to see all expenses within the system, rather than just their own or those they have approved. This is usually a permission just given to System Administrators or Finance users.
Change Nominal Account on Expense Entry: the ability for a user to select a different nominal account than the one defaulted.
Change Tax Rate on Expense Claims: the ability for a user to amend the tax rate or VAT value on expense entry. N.B. a tax rate can only be changed if the receipt attached value is set to Yes; if no, the VAT value will default to the Non-Tax rate configured in Sage Connections.
Split Expense and Mileage Lines: the ability to split a line; this would be applicable if using a costing module and a line needs to be split across multiple jobs or projects.
Can Select All Company Vehicles: the ability for a user to select from any company vehicles; by default, a user can only select a company car that has been assigned to their profile and the default private vehicle.
Can Create/Amend Vehicles: the ability to add, assign or amend vehicles and fuel rates. This is usually a permission just given to System Administrators or Finance users.
Can Create/Amend Credit Cards: the ability to add, amend or assign credit cards. This is usually a permission just given to System Administrators or Finance users.
Can Import Credit Card Statements: if credit card import statements have been configured, a user type will need the permission to import statements; this is usually a permission just given to System Administrators or Finance users.
Can Import Expenses: the ability to import expenses.
View Expense Enquiry: the ability to view expense and mileage reports in WAP.
View Reports: the ability to view expense and mileage reports in WAP.
Perform Year End: the ability for a user to reset all users’ mileage claims back to zero. This is usually a permission just given to System Administrators or Finance users.
Process Payroll Expenses: the ability to process expense claims that do not post through to Sage. This is usually a permission just given to System Administrators or Finance users.
System Setting Overrides
Allow Viewing Business Unit Expenses: if this user type should be able to view expenses submitted by other members of their business unit, switch this on here. It might be that for managers they will be allowed to view their team members’ expenses but for most User Types they should only be able to view their own.
22. User Profile Settings
Against a user profile there are a number of tabs to configure expense, mileage and subsistence settings at a user level.
22.1. Account Options Tab
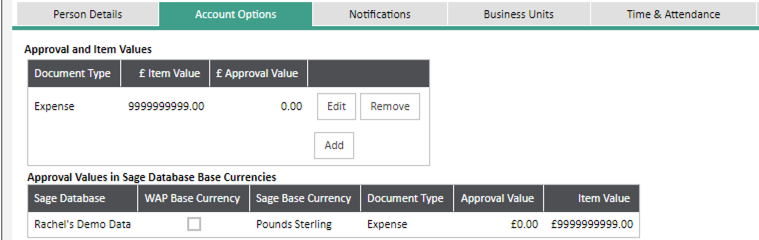
Against a user set their Expense Item and Approval values; item value is the amount the user is able to enter an expense for and approval value is the amount a user is able to approve an expense for. If a user is not allowed to approve an expense, leave the approval value as zero. If a user has unlimited approval value (i.e. for users at the end of an approval route), set the approval value as 999,999,999.
22.2. Business Units Tab
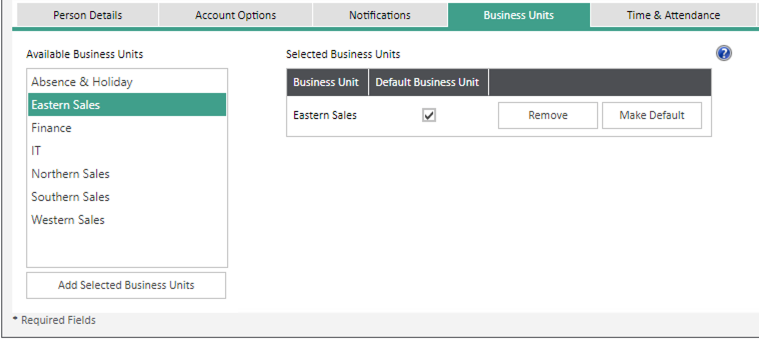
If the user belongs to a business unit they can have permission to view other expense claims from users within the business unit.
22.3. Expenses Sub Tab

Disable Sage posting of Expense Items: if ticked, the user’s expenses will not post through to Sage.
22.4. Vehicle and Mileage Sub Tab
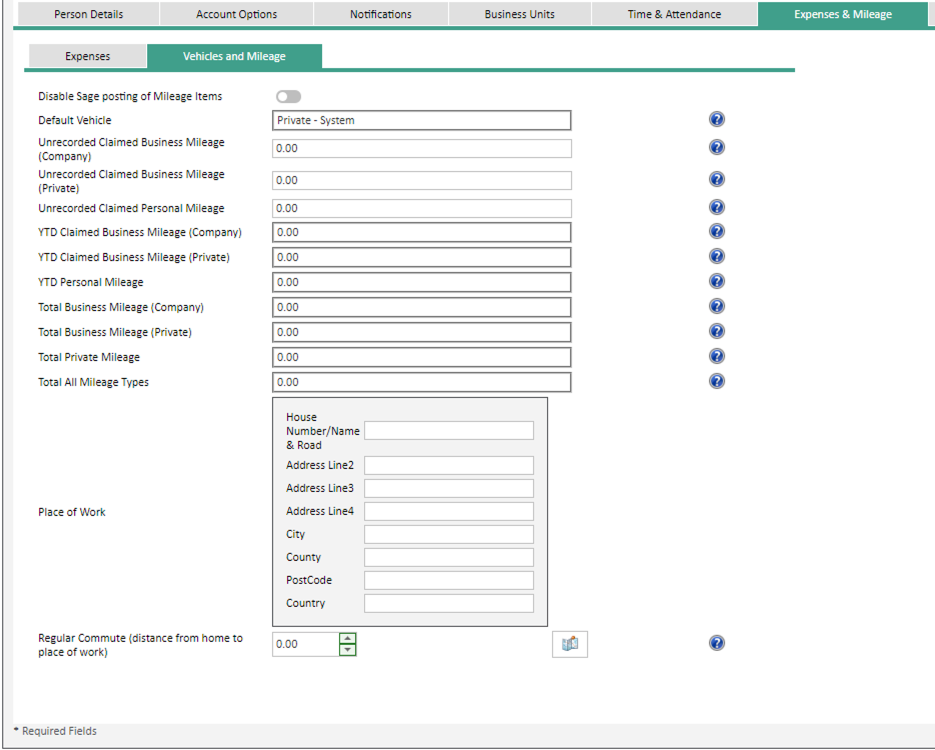
Disable Sage posting of Mileage Items: if the user’s mileage claims submitted in WAP should not post through to Sage, tick this option. By default, a user’s mileage claims will post through to Sage.
Default Vehicle: this will display the vehicle set as the default on User Setup – User Vehicles.
Unrecorded Claimed Business Mileage (Company): use when first setting up a new user to record any business miles already claimed on a company car but not recorded through WAP.
Unrecorded Claimed Business Mileage (Private): use when first setting up a new user to record any business miles already claimed on a private car but not recorded through WAP.
Unrecorded Claimed Personal Mileage: if tracking personal mileage, use when first setting up a new user to record any personal miles already claimed but not recorded through WAP.
YTD Claimed Business Mileage (Company): this is a calculated field that will show opening business mileage balance plus any business mileage claims submitted on a company vehicle.
YTD Claimed Business Mileage (Private): this is a calculated field that will show opening business mileage balance plus any business mileage claims submitted on a private vehicle.
YTD Claimed Personal Mileage: this is a calculated field that will show opening personal mileage balance plus any personal mileage claims submitted.
YTD Claimed Mileage: this is a calculated field that shows opening balance plus any mileage claims submitted.
Total Business Mileage (Company): this is a calculated field which shows all claimed and unclaimed business mileage submitted for a company vehicle.
Total Business Mileage (Private): this is a calculated field which shows all claimed and unclaimed business mileage submitted for a private vehicle.
Total Private Mileage: this is a calculated field which shows all claimed and unclaimed personal mileage.
Total All Mileage Types: this is a calculated field which shows all claimed and unclaimed mileage of all types.
Place of Work: enter the user’s typical place of work; this will then appear as a Favourite when the user enters a mileage claim.
Regular Commute (distance from home to place of work): if the user does not have a place of work and home address configured, use this to calculate regular commute distance which can be deducted if required from a mileage claim. If a Google Maps API key has been entered, the Google Maps icon can be used to calculate the distance.
22.5. Subsistence Sub Tab

Enable Subsistence Claims: tick to allow this user to enter subsistence claims within the system.
Subsistence Grade: select from the drop down list the appropriate grade for the user; these grades are created under System Setup – Subsistence Grades.
22.6. Jobs/ Projects Tab
If a costing module has been configured, this tab can be used to view jobs or job headers the user has been given access to, or to set that the user is to have access to all jobs or job headers. These jobs and job headers will then be visible to the user when entering a new expense.

22.7. Company Access Tab
This tab will show what companies the user has been given access to and what Purchase Ledger Supplier Account has been linked to the user. This account will be used for personal and mileage claims to post through to in Sage. If the user doesn’t have an account linked here, they will not be able to submit an expense claim.

23. Enable Module
Each year the WAP system will require a new enable string to continue working. When the new string has been issued, select System Settings – Miscellaneous – Licencing – Apply New Licence – and then ‘Browse’ and Upload the licence string. The module expiry date is shown along with the modules that have been enabled and the maximum number of users.
