WAP Help and User Guide – Invoices Module v18
This WAP Help and User Guide Invoices Module will take you through the features and settings for the Sicon WAP Invoices Approval Module.
Search the page by pressing Ctrl + F (windows) or CMD +F (Mac) on your keyboard.
Back to all user guidesProduct overview
Help and User Guide maintained for WAP version 18.638.0.18 up to 18.0.38
This WAP Invoice Help and User Guide will take you through the features and settings for the Sicon WAP Invoice Approval Module. The module is designed to allow users of the WAP system to approve Invoices. For Sage 200 it is recommended that you enter invoices either into the Sage 200 Purchase Ledger or Sage 200 Purchase Order Processing. Invoices in Sage 200 are automatically picked up by WAP and processed through pre-configured approval routes. For customers using Sage 200 without Commercials, invoices can be entered directly into the WAP system. Once fully approved, they will automatically post to the Purchase Ledger.
Costing Module Integration
WAP Invoice Approval Module is fully compatible with Sicon Job Costing and Sage Project Accounting. N.B. Sage Commercials must be installed if using Sicon Job Costing and so invoices will be entered into Sage directly, either in the Purchase Ledger or through Purchase Order Processing.
Document Management
Invoices added into Sage 200 either using Sicon Document Management or Spindle Capture will be available to view in WAP during invoice approval.
Multi-Currency
The WAP Invoice module supports full multi-currency relevant to the supplier’s invoices being approved.
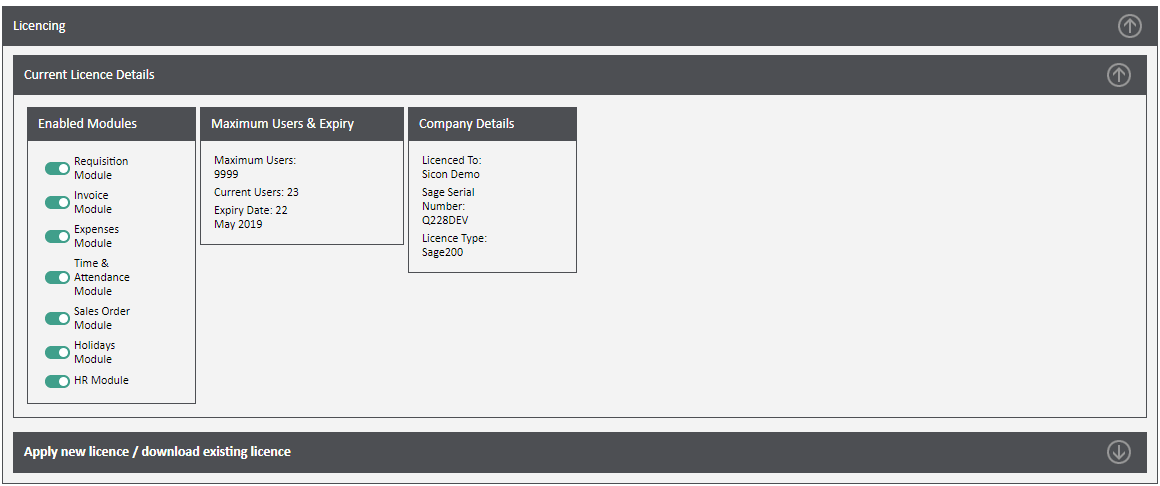
1. Invoice Enable Configuration
For the Invoice module to be available the enable module must have the Invoice module ticked. Once this is configured, Invoice options will then be visible within the system.
Each year WAP will require a new enable string to continue working. When a new one has been issued, select System Settings – Misc – Licencing – Apply new licence – Browse and Upload.
2. Pre-requisites in Sage 200
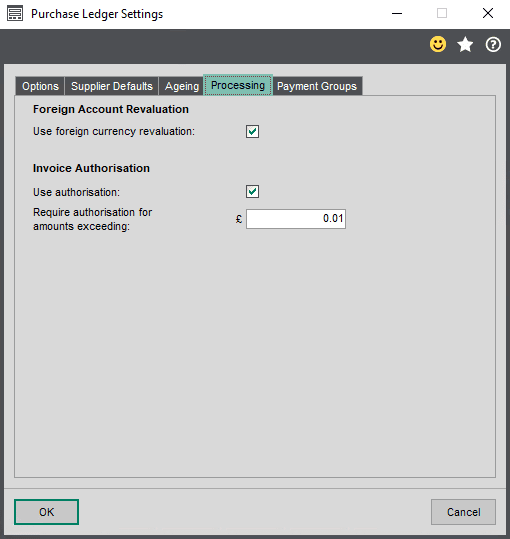
2.1. Purchase Ledger Invoice Authorisation Required
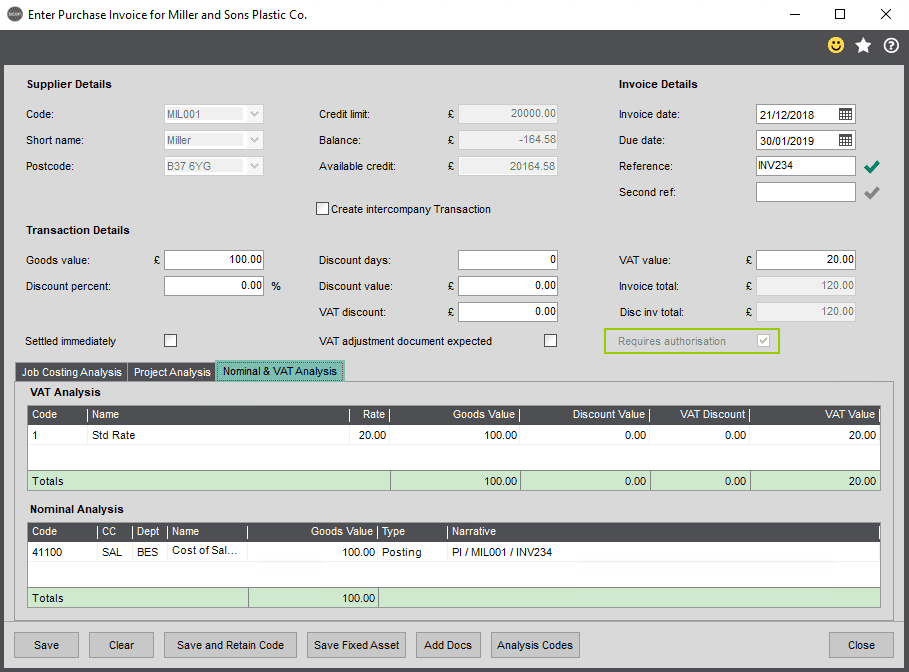
In Sage 200 Purchase Ledger Settings, enable Purchase Invoice ‘Authorisation Required’ (Sage – Purchase Ledger – Utilities – Ledger Set Up – Ledger Settings – Processing Tab) and set a value at which purchase invoices require approval; this value would usually be set at 0.01. As soon as this is ticked, any invoice entered will be pulled through to WAP for approval.
When an invoice is entered into Sage (either directly onto the Purchase Ledger or via Purchase Order Processing) that is over this value, the tick box is set so the invoice requires authorisation. WAP will then pick this invoice up for approval and will replace the need to use the basic invoice authorisation in Sage 200. This functionality in Sage is still available if enabled on a user’s role; it is advised that users don’t have permission to approve in Sage if approval is to be done in WAP.
2.2. Default Unauthorised Purchases Nominal Account
While an invoice requires authorisation, a query status ‘U’ will be applied to the transaction and the value will not post to the associated nominal code(s). An Unauthorised Payments Balance Sheet Code should be created and listed in the Default Nominal Accounts (Sage – Nominal Ledger – Utilities – Ledger Set Up – Default Nominal Accounts – Balance Sheet). The invoice value will post to this balance sheet code until the invoice is authorised at which point it will move from this code and post to the appropriate nominal code(s). The transaction date will be taken from the Invoice date but the invoice will post to the next available open accounting period.
NB: if this default account is not set up, the value will initially post to the Suspense Account.


If required, a Reverse Journal can be run from within WAP Add-ons at month end to post the values of any outstanding unauthorised invoices to the appropriate nominal code, allow for month end reports to be run and the journal will then automatically reverse to put these unauthorised invoices back to the unauthorised nominal code.
https://www.sicon.co.uk/user-guide/wap-add-on-for-sage-200-help-and-user-guide/
3. Configuration of Invoice Approval Routes
Before invoices are configured in Sage to require authorisation, ensure approval routes have been setup correctly. Approval routes can be configured in a number of ways (i.e. based on nominal account, job or supplier) but the recommended configuration would be based on nominal account.
3.1. Standard Invoice Approval Routes
Use the approval route wizard or import to configure approval routes for invoices based on configuration; e.g. either based on nominal account, job, supplier etc. Ensure when building routes that there is a user in the route who can approve high value invoices; routes should start with an approver with the smallest approval value and end with a user with unlimited approval value.
https://www.sicon.co.uk/user-guide/wap-help-and-user-guide-approval-routes/
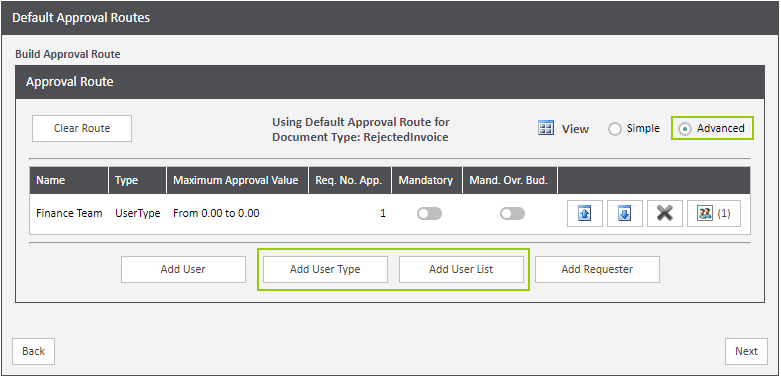
3.2. Rejected Invoice Approval Routes
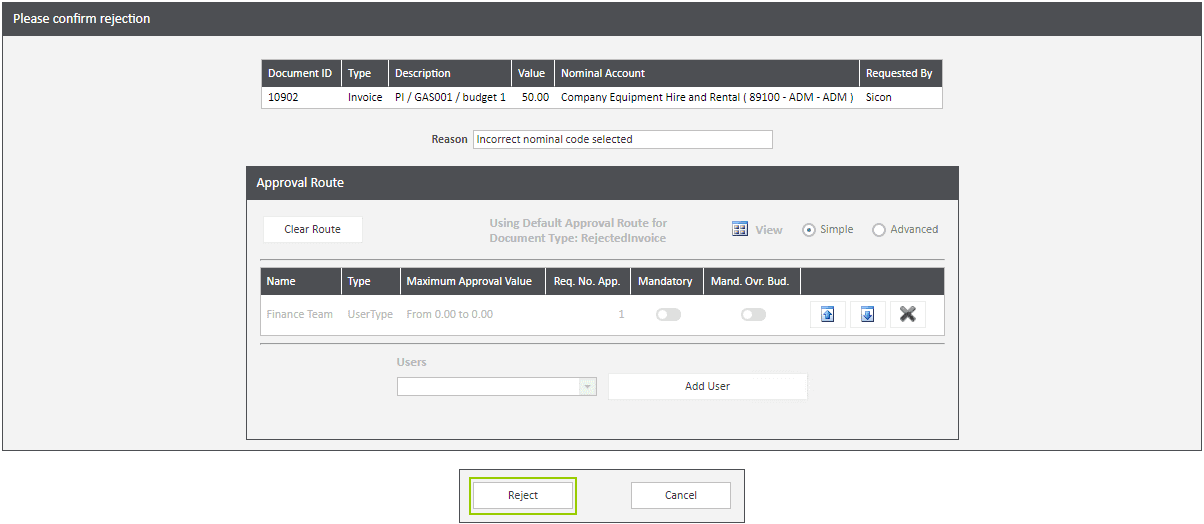
Before an invoice can be rejected the default reject invoice approval route will need to be configured – WAP System Settings cogs – Approval Route Setup – Approval Routes – Edit Default Approval Route – Rejected Invoices & Credits. It is advised to configure this route to either one member of the Finance Team or a list of users within the Finance Team; it will be their responsibility to recode an invoice and resubmit for approval, they will not be doing any approval of invoices. These users require permission to approval an invoice (so they can be put into the rejected invoices approval route), would be given zero invoice approval value and would also require access to all nominal codes.
Either use the ‘Simple’ option to add one user into the approval route or use the ‘Advanced’ option to add a User List or User Type to the route.
4. Approve Invoices
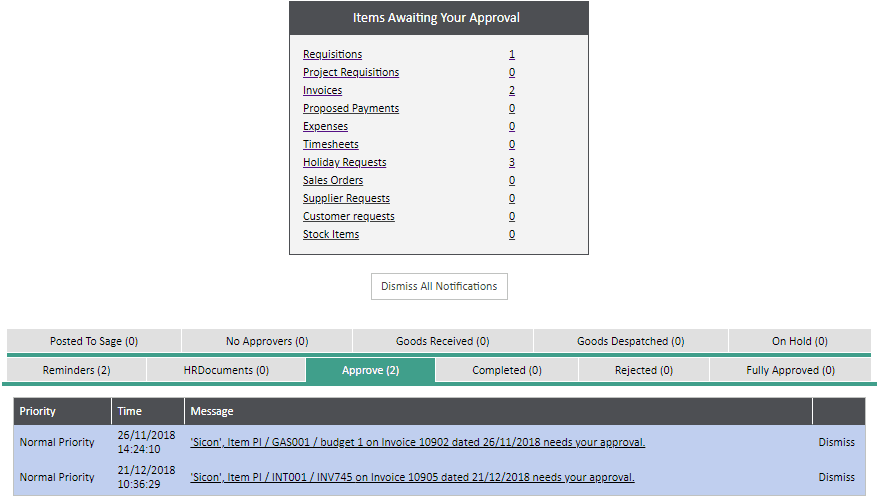
Once an invoice has been entered into Sage, pulled through to WAP and is awaiting a user’s approval, a notification will be displayed on their homepage; it is these notifications that will be the basis of reminder emails.
4.1. Approving Invoices
To view the invoice for approval, either click the blue notification link, the Invoice link under the Items Awaiting Your Approval banner or click Approve Invoices from the menu on the left.
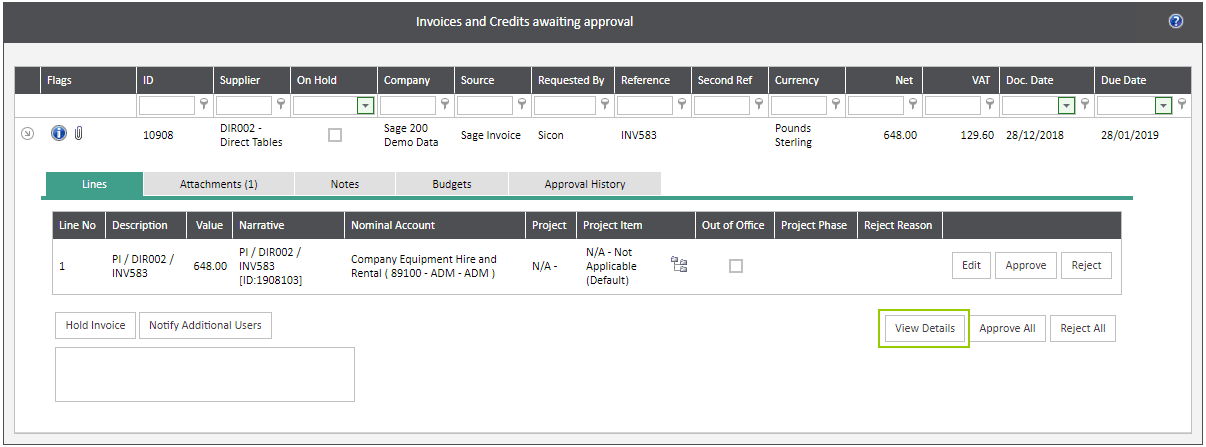
Once within the approve invoice page, the approver will be able to see the invoice ID and References, Sage Company, Supplier, Net and VAT values and Invoice Dates. The arrow on the left is used to expand the invoice and show all the line detail that the user has to approve (if there are additional lines on the invoice that have gone to another approver, these lines will not be visible to the first approver).
If a scanned document has been electronically attached to the invoice in Sage 200 either using Sicon DMS or Draycir Spindle, the first screen to appear will be the Attachments tab showing the approver the copy of the invoice.

To see further details on the invoice or to approve or reject, click on the Lines tab.
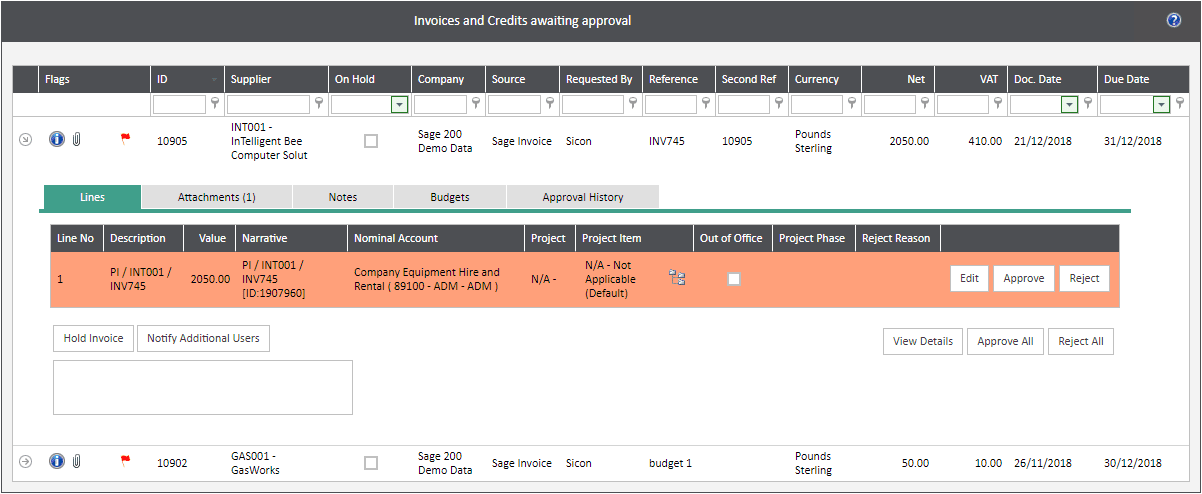
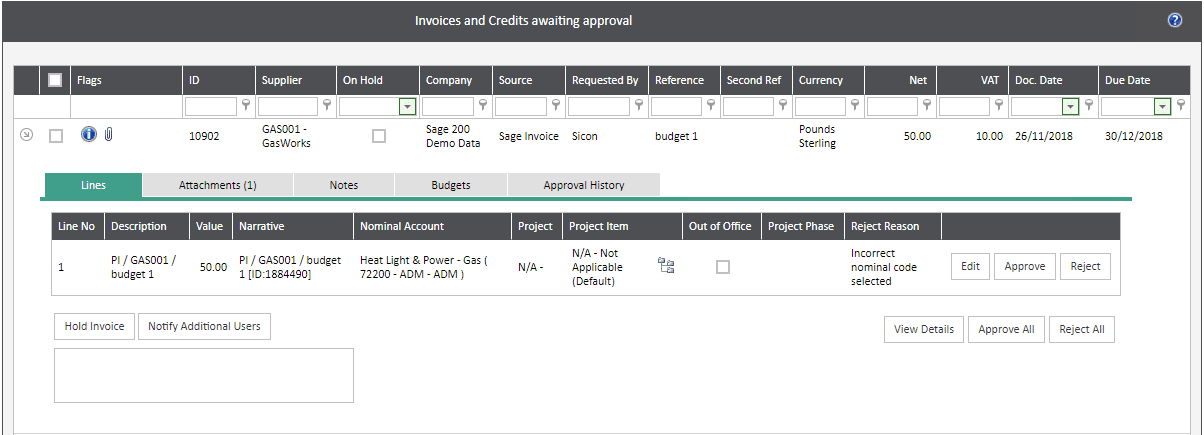
Lines tab: this tab will show further breakdown of invoice lines, description, narrative, line values and job or project information if applicable. Individual lines can be approved or rejected, or all lines approved or rejected. N.B. a reason needs to be entered if an approver rejects either a line or the invoice as a whole and the invoice will not post back through to Sage until all lines have been fully approved. If a user has the User Type permission, they may be able to Edit an invoice line here; they would be able to change the nominal code to another code within their nominal allocation. If a nominal code is changed it may be that the line will then move to another approver, depending on approval route configuration.
Attachments tab: this will collate all attachments added and allow for approvers to review documents as needed.
Notes tab: any notes added to the invoice during approval will be visible here and if the approver has permission, they will be able to add additional notes.
Budgets tab: if budgets have been configured, either the nominal, job or project budget can be viewed here and drilled down into.
Approval History tab: as the invoice is approved, approval history will be built up on this tab per line. If the delegate function was used to approve an invoice, this will be recorded on the Approval History tab as “User X has approved on behalf of User Y”.
Hold Invoice: enter a reason in the box below and then hold the invoice; this will prevent another user from approving this invoice. It might be that the approver is querying the invoice with the supplier before they are able to approve.
Notify Additional Users: when putting the invoice on hold, this can be used to let other users know that the invoice is now on hold; additional approvers or the Finance Team may need to be informed.
View Details: clicking on this will take the approver through to the main invoice entry screen. Depending on User Type permissions, the approver may be able to edit the expense, i.e. changing the nominal code, splitting the line or restarting the approval route.
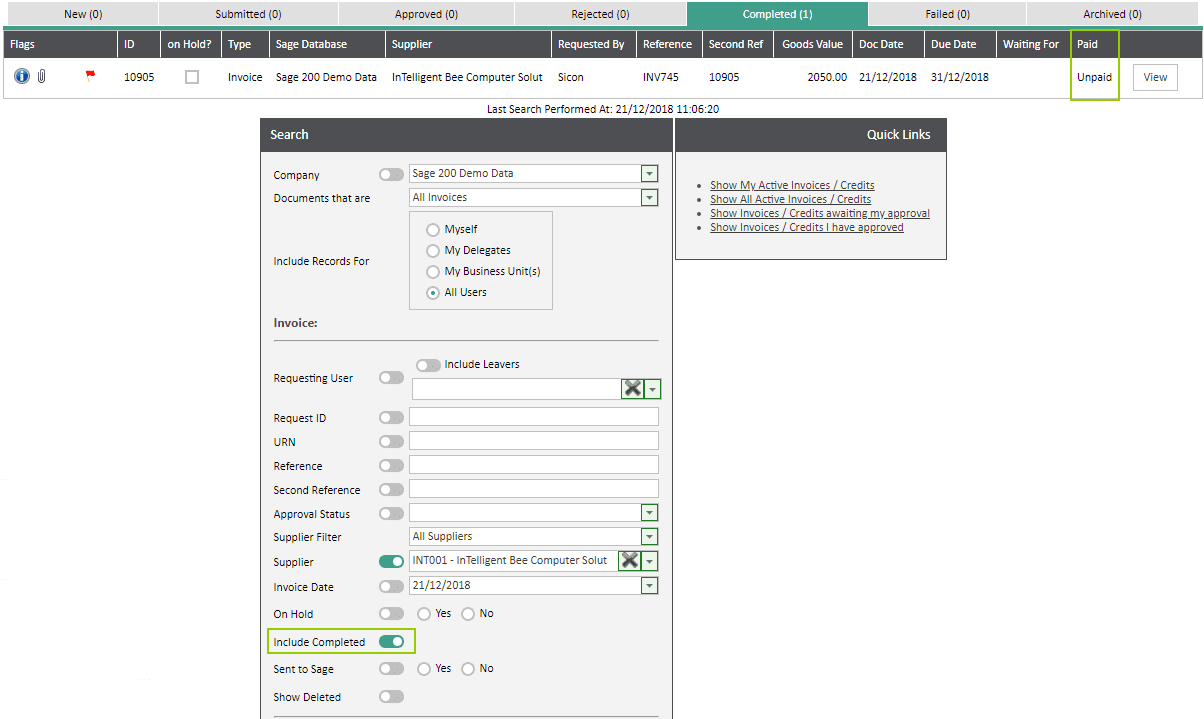
Once an invoice has been fully approved, it will post through to Sage and be visible under Existing Invoices under the Completed tab. To view Completed invoices, make sure the option to ‘Include Completed’ is ticked under the Search filters. Once an invoice has had a payment allocated in Sage, the Paid column will show this.
4.2. Rejecting Invoices
This functionality is to be used when the responsibility for the invoice is not with the approver and they need to send the invoice back to the Finance Team, e.g. if the invoice was coded incorrectly. A default reject invoices approval route needs to be set up before an invoice can be rejected; it is advised to configure this route to either one member of the Finance Team or a list of users within the Finance Team; it will be their responsibility to recode an invoice and resubmit for approval, they will not be doing any approval of invoices. These users require permission to approval an invoice (so they can be put into the rejected invoices approval route), would be given zero invoice approval value and would also require access to all nominal codes.
Please refer to: https://www.sicon.co.uk/user-guide/wap-help-and-user-guide-invoices-module/#3-2
When an approver rejects either an invoice line or the whole invoice, a reason for the rejection needs to be entered before selecting the Reject button; the invoice will then go to the user(s) in the Reject route. Users will not be able to make any changes to the reject route.
The approver in the reject route will receive a notification there is an invoice for their attention and they should complete as required, e.g. change the nominal code and resubmit for approval by editing the correct line.

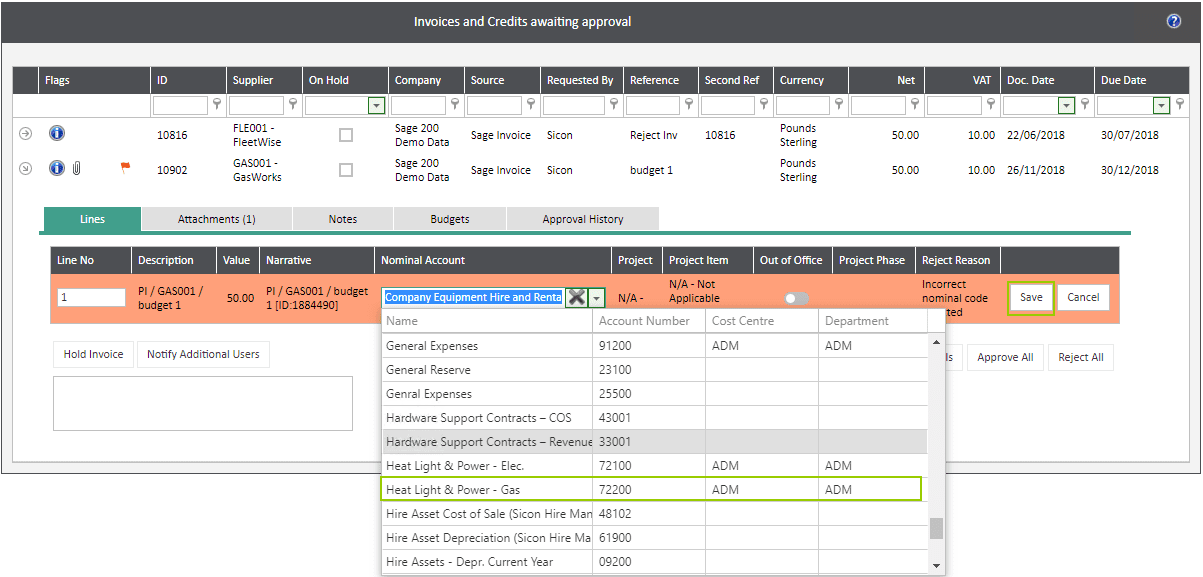
Once the new nominal code has been saved, the invoice will go to approval based on the configuration e.g. nominal code. The rejected reason will show to the new approver to make them aware the invoice was rejected initially. Once fully approved, the invoice will post through to Sage as standard.
4.3. Holding an Invoice
This functionality can be used when the responsibility for the invoice approval remains with the approver but there may be a query, e.g. with the price, quantity or service received. By placing the invoice on hold, the document cannot be approved but is visible to Finance Teams in the Existing Invoices screen and reports.
To place an invoice on hold, the approver will need to enter a reason in the free text box and click Hold Invoice.
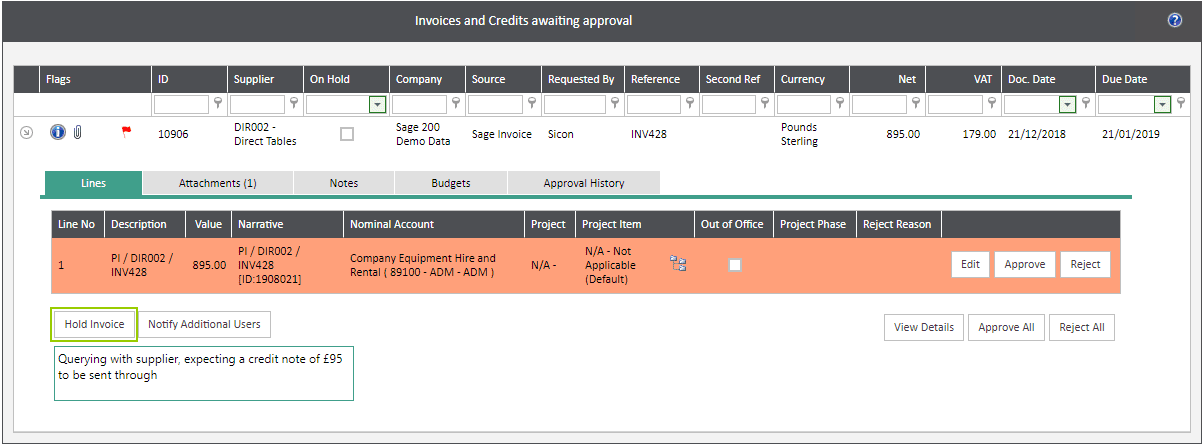
The invoice will now show as On Hold in the Existing Invoices screen and the reason will be visible by hovering on the blue information icon. If placing the invoice on hold due to a query, once this has been answered and the invoice is accepted, the Approver can take the invoice off hold by selecting the invoice, clicking on the Lines tab, selecting to Unhold Invoice and then approve.

If a credit note is requested, once it arrives it should be entered into Sage and will be pulled through to WAP as awaiting approval; the Source will show that this is a credit note rather than invoice. When approving a credit note an extra tab is available, ‘Invoices on Hold’; this will show any invoices that are currently on hold in WAP for that supplier. Tick the select box to choose the related invoice, select the appropriate action required from the drop down box and click to approve the credit note and action the invoice.
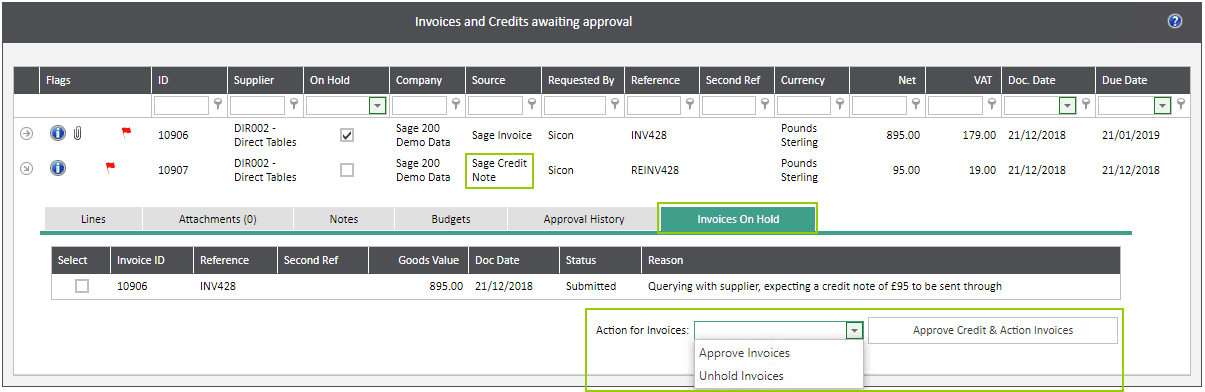
Approve Invoice: the invoice will be approved as well as the credit note; if additional approval is required the invoice will then go to further approvers.
Unhold Invoices: the credit note will be approved and the invoice will be taken off hold to be approved separately.
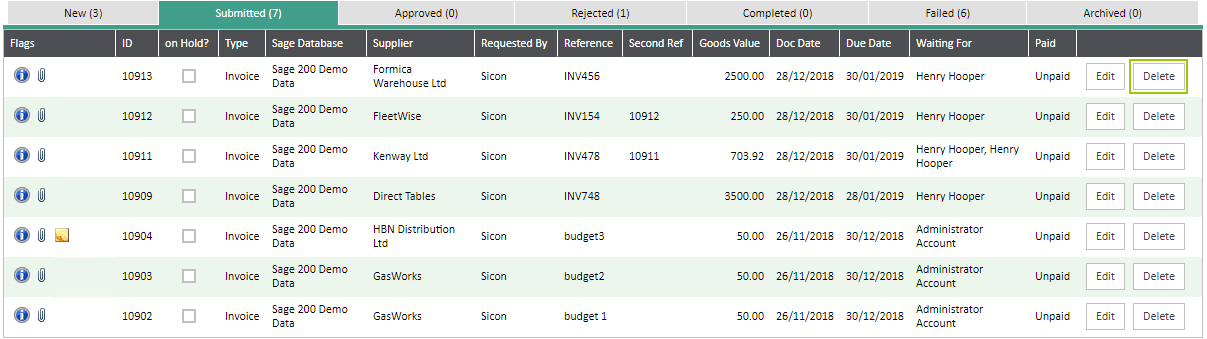
5. Existing Invoices
Select Existing Invoices from the side menu to display the invoices under various tab headings. Additional icons will appear in the Flags column to show if the invoice is over budget, has notes, has attachments etc.

New: invoices that have not yet been submitted for approval; only invoices which are entered directly into WAP and only saved should appear here.
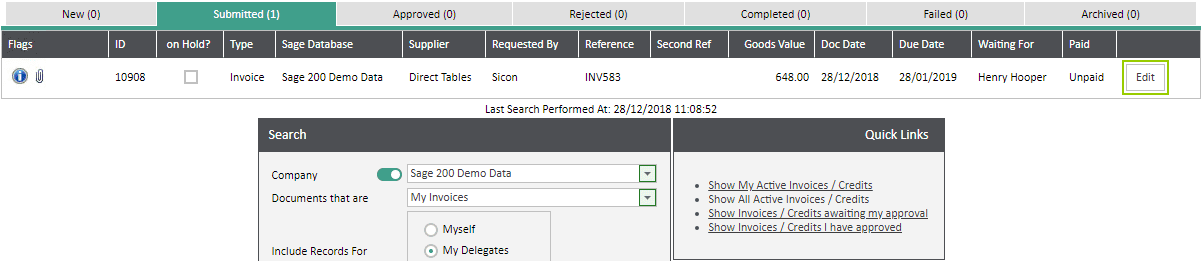
Submitted: invoices that have been submitted and are awaiting approval. By hovering over the blue information icon on the left, the lines will be displayed showing who they are awaiting approval from.
Approved: invoices that have been approved but not yet posted to Sage. Invoices should only appear in the approved tab momentarily between being approved in WAP and posting to Sage.
Rejected: invoices that have been rejected during the approval process will show under this tab. The users in the rejected approval route will edit and resubmit for approval.
Completed: once the invoice has been posted to Sage it will move to this tab. By default, completed invoices will not show when searching, unless the Include Completed option is ticked.
Failed: if an invoice fails to post through to Sage it will appear in this tab and will need the error flag removing before it can be posted again. The permission to clear errors and repost invoices is usually just given to Administrators or Finance users. Common reasons for an invoice failing are due to a job or project being closed or an incorrect nominal code selected. More details on any error flags can be viewed through the Event Viewer.
Archived: this tab is not currently used for invoices.
5.1. Viewing Invoices
By default, users will always be able to see invoices that are awaiting their approval or that they have approved. If permission is given, users may also be able to view all invoices within the system or invoices approved by users within the same business unit.
There are two options to search for an existing invoice; either use the Search filters or the Quick Links.

Search Filters: depending on configuration, the user will either be able to search for their own, within their business unit, delegates or all users’ invoices. Search filters can be used to find an invoice with a particular ID, Reference, Supplier or if using a costing module, Job or Project. Use the Show Deleted option to show any invoices that have been deleted or the Include Completed option to show invoices that have posted through to Sage.
Quick Links: click ‘Show invoices / credits awaiting my approval’ to update the grid and retrieve the most recent invoices. If a user has permission, they will be able to click to view all active invoices and credits.
6. Editing Invoices
Amending an invoice, whether the invoice was entered into Sage or WAP, is a User Type permission. Users can click to edit an invoice on the Existing Invoices screen.
In addition, if an approver has permission to edit or amend an invoice, select View Details on the invoice approval screen to open the invoice for editing.
The invoice can then be edited as required.
6.1. Editing a Job or Project
When the invoice is recorded in Sage a job or project will be selected; either from the PO if linking an invoice to an PO, or chosen when entering the invoice directly onto the PL. Once the invoice is in WAP for approval, it is not possible to change the job or project, or the job header or project item, as this would lead to issues with the purchasing commitment not matching correctly to the actual purchasing costs already recorded on the job or project. The selected job and job header will be greyed out.

If the invoice has been recorded against the N/A job and job header, the job can then be changed in WAP if the user has appropriate permission.
When an invoice is being viewed to edit, click on the line to be changed; this will bring up the option to change the job underneath the Project tab.

Once the new job and job header have been selected, save the changes and then close. Reset the line (if only an individual line has been changed) or reset all lines at the bottom of the page (if all lines should be sent for re-approval), and Submit the invoice for approval.
Once fully approved, the invoice will post through to Sage with the costs allocated to the job selected.
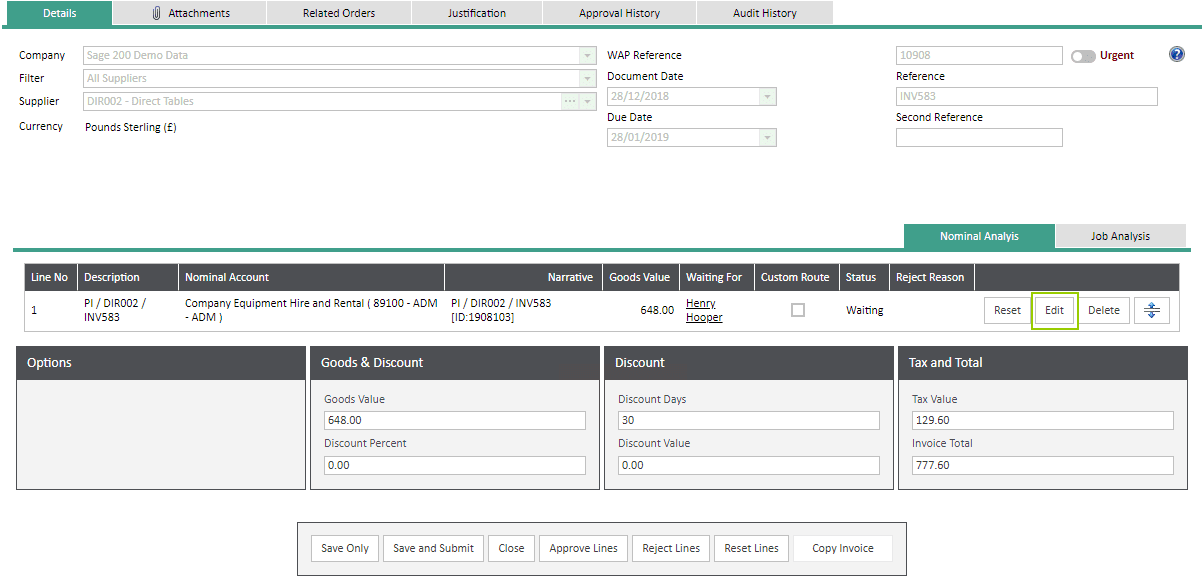
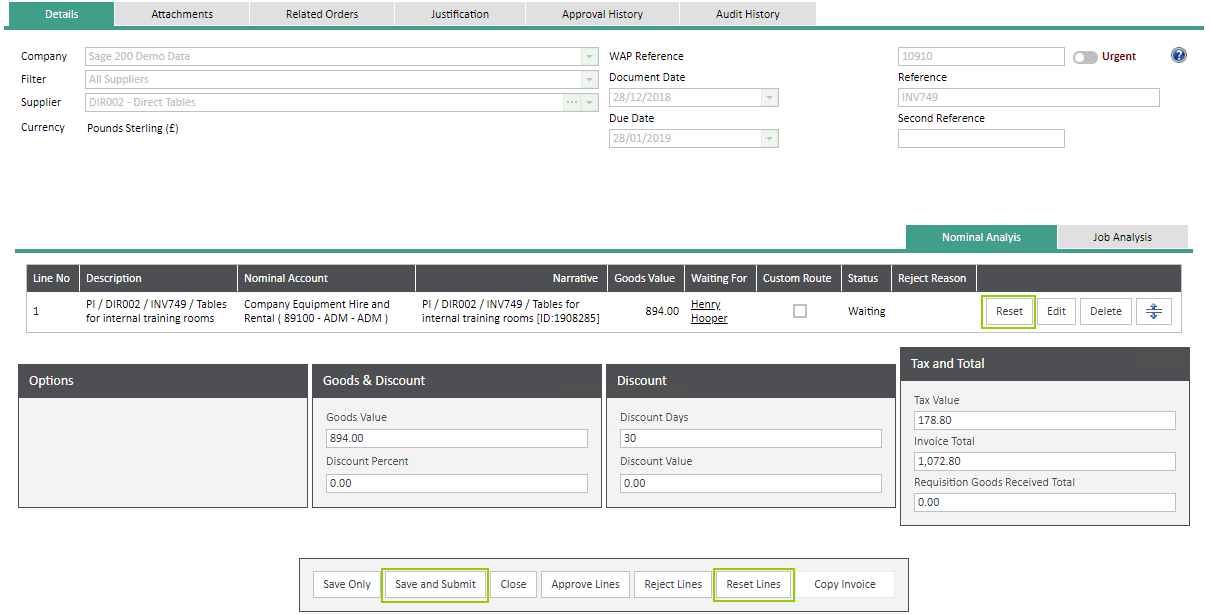
6.2. Editing a Nominal
If a costing module is not enabled, or the Job and Job Header selected on the invoice are N/A, the nominal code can be changed during approval in WAP, if the user has appropriate permission.
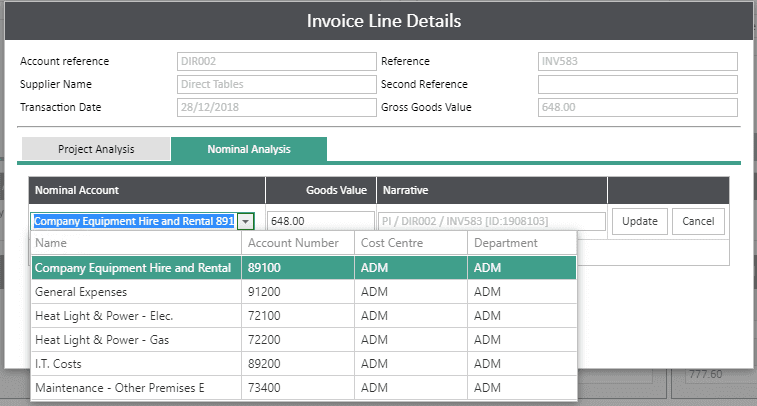
When an invoice is being viewed to edit, click on the line to be changed; this will bring up the option to change the nominal under the Nominal Analysis tab. Click on the pencil icon to edit the nominal.

The nominal code can then be changed; only nominal codes the user has been given access to will be able to be selected here. Once the new nominal has been picked, click Update and then Close.
Reset the line (if only an individual line has been changed) or reset all lines at the bottom of the page (if all lines should be sent for re-approval), and Submit the invoice for approval.
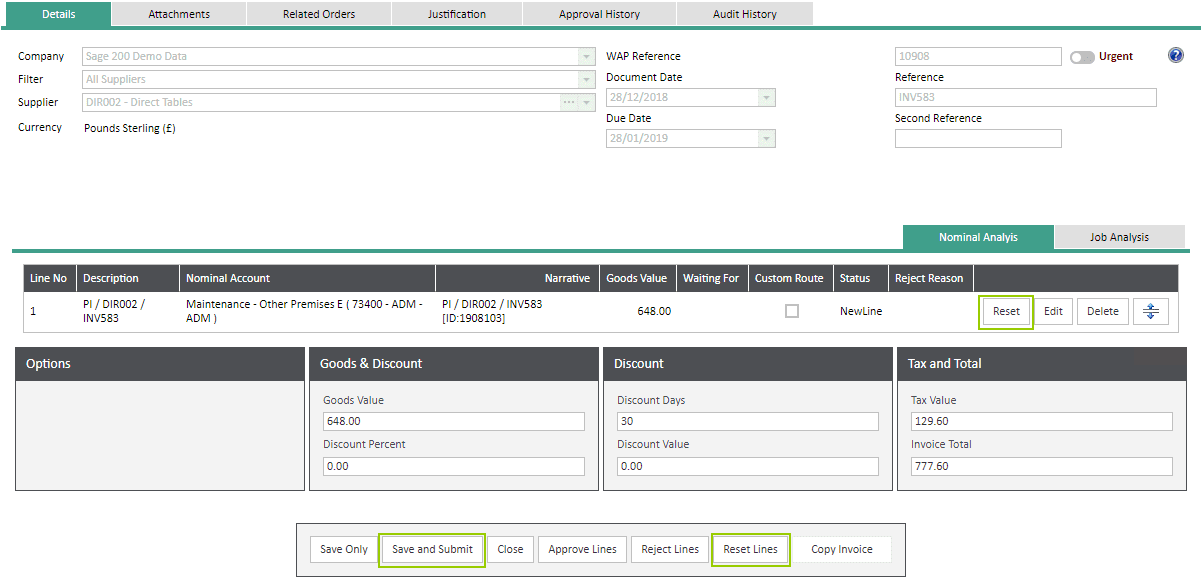
Once fully approved, the invoice will post through to Sage with the costs allocated to the nominal selected.
6.3. Split Lines on an Invoice
If an invoice line is to be split so the value is spread across different nominal codes, when an invoice is being viewed to edit, click the split lines icon on the line to be changed. This will split the line into two of equal value; these lines can then be edited to change nominal codes or job; only if the original line was entered against the N/A Job and Job Header.
Once the lines have been edited, submit the invoice for approval. Once fully approved, the invoice will post through to Sage with the costs allocated to the nominal codes selected.
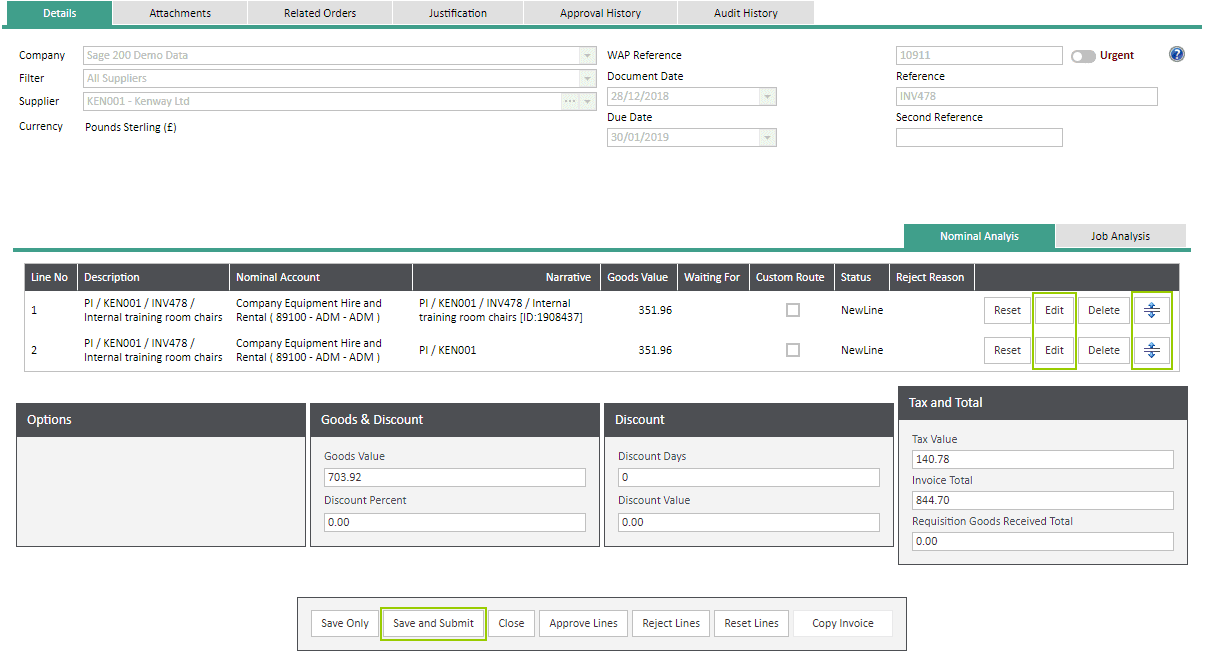
6.4. Re-routing an Invoice for Approval
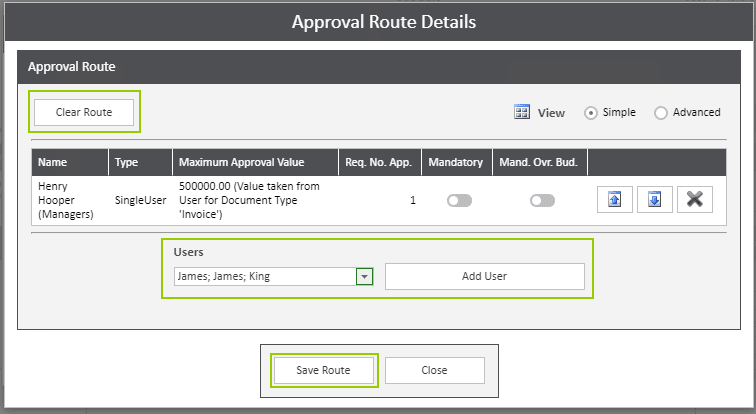
If an invoice should be re-routed to a different approver, the approval route can be edited per line, if the user the user type permission to do so. When an invoice is being viewed to edit, click edit on the line that is to be changed and click the ‘Edit the Approval Route for this item’ icon.

The current route will be visible and then edited as required; either use the option to clear the entire route or add and remove approval steps. Only users that have permission to approve an invoice will be listed in the drop down user list. Once the new route has been created, click to save the route and then close to return to the main invoice screen.
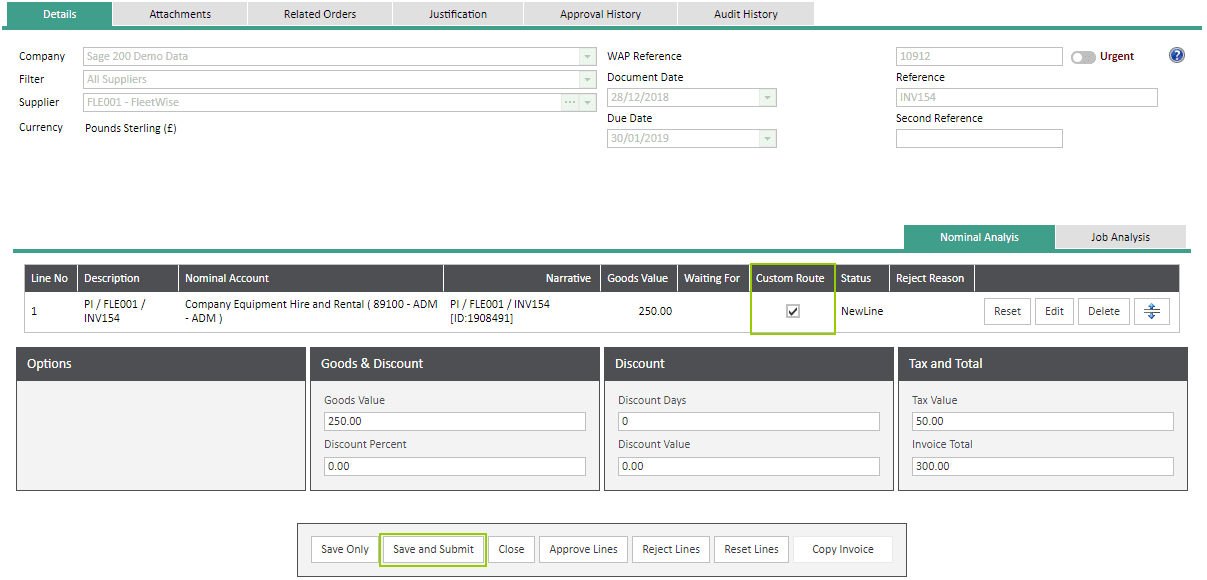
The invoice line will be shown to be using a custom route with a status of new line. The invoice will need to be submitted to use the new approval route.
6.5. Deleting an Invoice
If a user has appropriate permissions, they will be able to delete an invoice from WAP. If the invoice was entered into Sage, deleting the invoice in WAP will only delete the document from WAP; the WAP service will pick up the unauthorised invoice again from Sage and post into WAP for approval with a different WAP reference. If an invoice was entered in WAP it can be deleted and entered again, if entered incorrectly. However, if this was a PO invoice, the PO would be marked as invoiced and further invoices could not be recorded against it.
7. Automatic Invoice Approval
WAP has been developed with three settings regarding approving invoices that are linked to purchase orders. Only one of the below settings can be chosen. If these settings are changed, please restart the WAP service once saved to ensure the service uses new configuration.
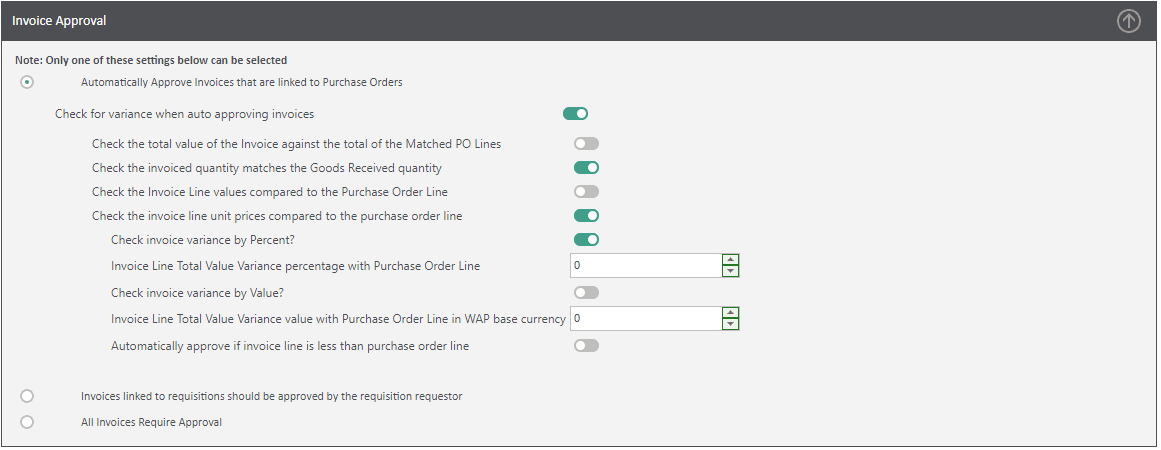
7.1. Automatically approve invoices that are linked to Purchase Orders
This option allows for the auto approval of an invoice that is linked to a related requisition and will be used in conjunction with the variance checking options. If an invoice fails the variance check, it will not be automatically approved but will be pulled through into WAP and will follow the pre-configured invoice approval routes. The approver will see a post-it note against the invoice on the approval screen which will show the variance detail.
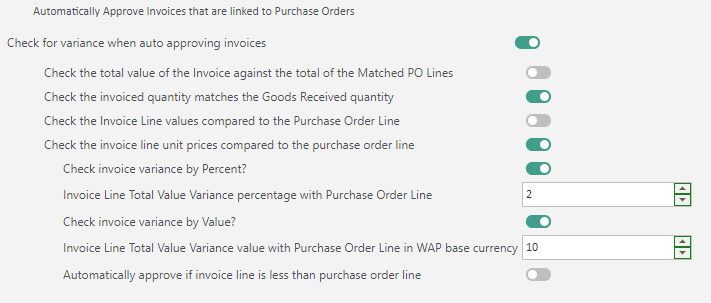
Check the total value of the Invoice against the total of the Matched PO Lines: this setting will check the total value of the invoice against the total of the matched PO lines.
Check the invoiced quantity matches the Goods Received quantity: this setting will check the invoice quantity against the total goods received quantity.
Check the Invoice line values compared to the Purchase order line: this setting will check the total of the invoice lines against the total of the purchase order lines. If a line has been part goods received and part invoiced, the invoice will still require approval in WAP as the invoice line total does not match the original order line total. This setting should only be used if not matching against goods received or orders are invoiced in full.
Check the invoice line unit prices compared to the purchase order line: this setting will check the invoice unit price against the purchase order unit price. If a line has been part goods received and part invoiced, the invoice would not require approval in WAP unless the invoice unit value was different to the purchase order unit value.
Check invoice variance by percent? Configure to check variance by percentage and enter an appropriate percentage value, e.g. 2%. Percentage and value checks can be used together; i.e. to approve if under 2% and under £10 but if under £10 and over 2%, the invoice will require approval in WAP.
Check invoice variance by value? Configure to check variance by value and enter an appropriate value, e.g. £10. Percentage and value checks can be used together; i.e. to approve if under 2% and under £10 but if under 2% but over £10, the invoice will require approval in WAP.
Automatically approve if invoice line is less than purchase order line: this option can be configured if company policy is to approve automatically an invoice that is received less than the purchase order.
When an invoice is entered in Sage against a PO, certain information must be recorded on the first Record Purchase Invoice screen. Enter an invoice date and reference number. If the values (either the price or quantity) on the invoice differs from the value on the purchase order, this must be changed on the order line (as highlighted below). When the invoice is pulled into WAP, the WAP service will check the invoice values on this screen against the PO; if there is no invoice reference number or the values match the order and goods received quantities, the invoice will not require approval in WAP.
In the below example, the original purchase order unit price was £750; this has been changed on invoice to be for £800.
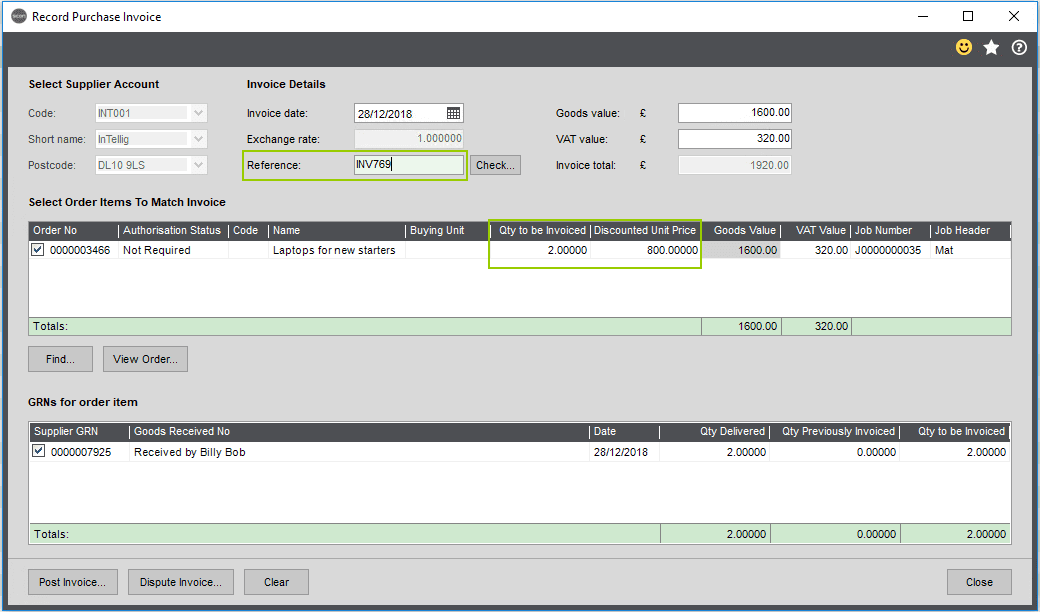
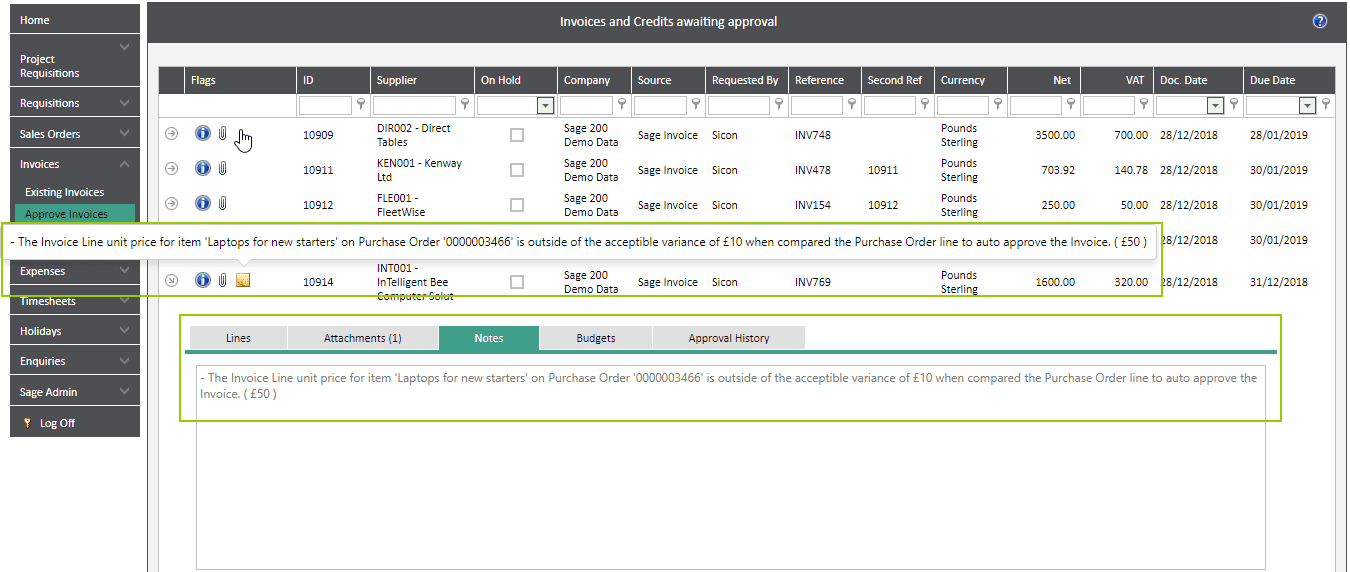
Once the invoice has been posted in Sage it will be pulled through to WAP for approval as the values are outside the acceptable variance amounts; this is detailed to the approver on the post-it note icon and also on the Notes tab.
7.2. Invoices linked to requisitions should be approved by the requisition requester
This option generates a custom approval route for each invoice that is linked to a requisition; the route will contain only the user who raised the requisition in WAP and will not follow the pre-configured standard approval route or any budget checking options. If this option is required, each user who could raise a requisition would need to also be given permission to approve an invoice with unlimited invoice approval value.
7.3. All invoices require approval
This setting can be enabled if no auto approval is permitted and all invoices should require authorisation through the standard configured approval routes.
NB: if these settings are changed please ensure the WAP service is restarted for changes to be picked up.
8. Approving Suggested Payments
If suggested payments should be approved in WAP prior to having payments allocated in Sage, configure in WAP for approval of suggested payments.
8.1. Suggested Payments Configuration Settings
Prior to payments being approved in WAP, switch on in WAP System Settings – Invoices – to pick up suggested payments from Sage. Once this setting has been saved, please ensure the WAP service is restarted for this change to be picked up.
User Types will need to be configured to allow certain users to be able to approve, amend or delete proposed payments. User Types will need to be configured before approval routes can be built. Only Finance or key approvers should be given these permissions.

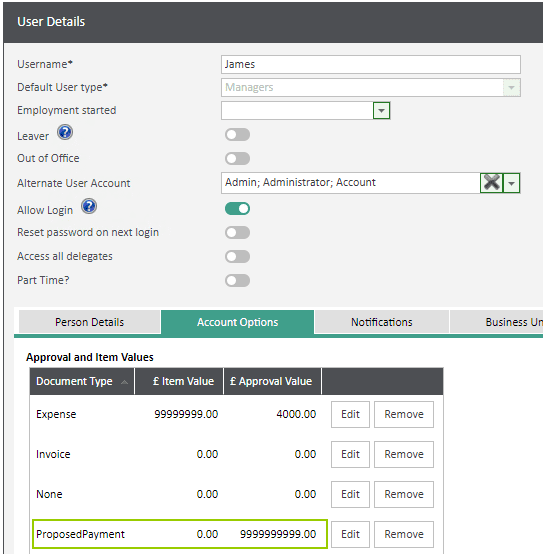
Users who will be approving proposed payments will need approval values for this document type. This is configured on their User profile – Account Options tab.
8.2. Suggested Payment Approval Routes
If required, approval routes for proposed payments can be configured based on supplier or value band; however, if only one user is to be approving payments, build the default approval route only.
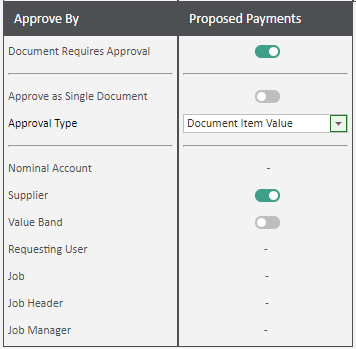
Default approval routes are built under Approval Route Setup – Approval Routes – Default Approval Routes. Users will only appear on the drop down list if they have permission to approve proposed payments.
8.3. Approving Suggested Payments
Once the suggested payments have been generated within Sage, the proposed payments will be pulled through to WAP awaiting the approver. Within the approval screen, click the arrow to the left of the blue information icon to view invoice details.
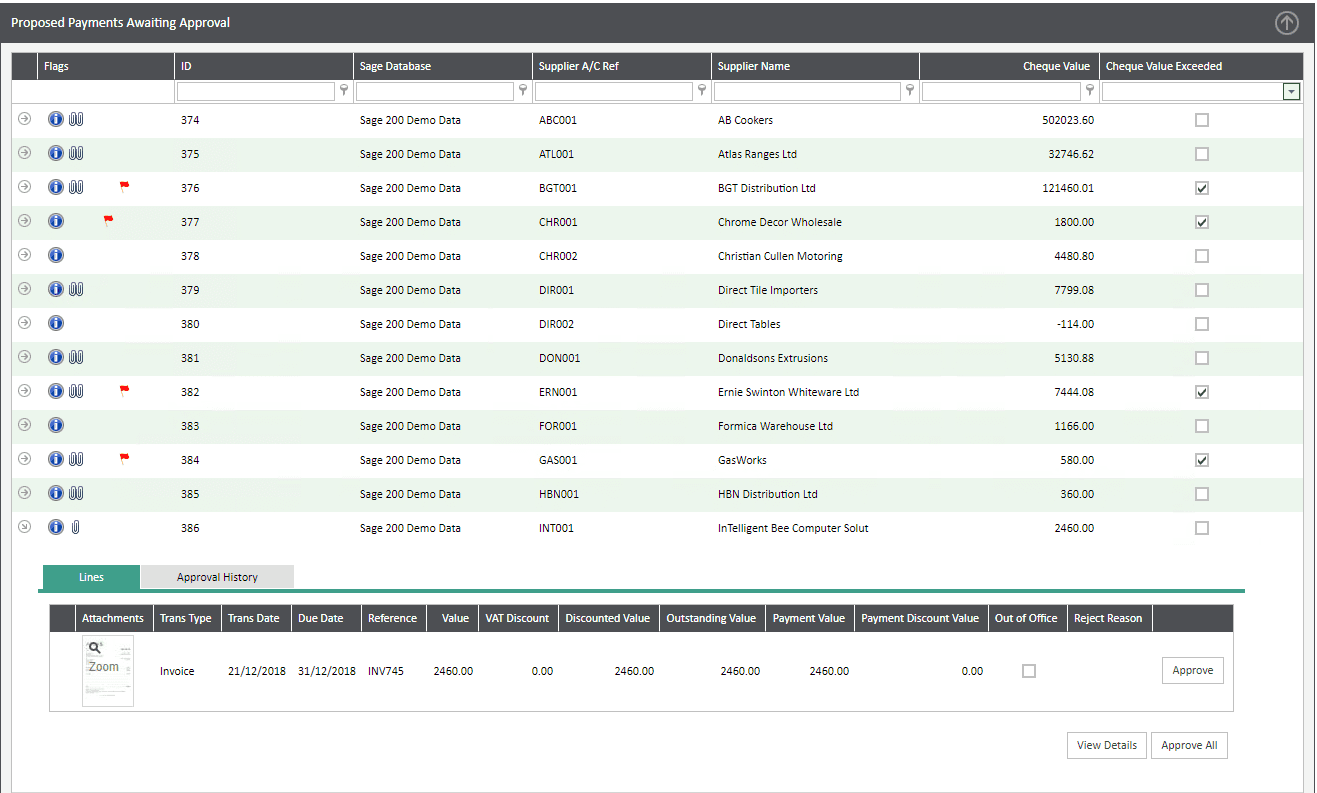
If the payment value is correct, the payment can be approved either using the Approve button, or if there are multiple payments against a supplier, use the Approve All button. If an invoice attachment had been entered in Sage, the attachment can be viewed by hovering over the icon or click to view the entire attachment in a pop up. Please note, this feature is only supported with Sicon Documents. Invoice documents added using Spindle Capture will not be visible on the Suggested Payments screen in WAP.
If the payment is not to be approved, click View Details to go into the payment lines and make any changes as needed. There are options to Pay All, Pay None or type the correct payment value in the Payment Value box. Attachments can be viewed by clicking the left arrow to expand. Once all lines are correct, click Save. Once all lines have been saved, click back on ‘Approve Payments’ on the left menu option to approve.
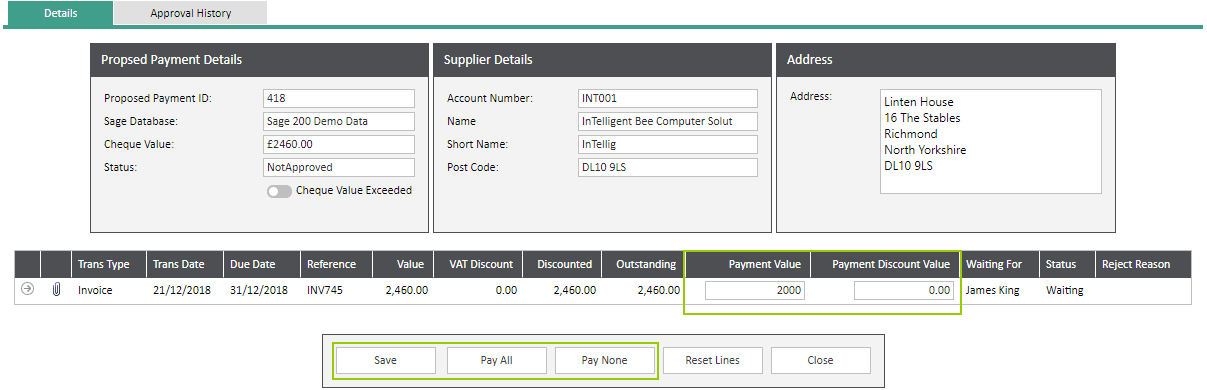
Once approved, the payment in Sage will reflect the approved payment values.
Payments cannot be generated in Sage if the suggested payment is awaiting approval in WAP.

8.4. Existing Suggested Payments
Select Existing Payments from the side menu to display the payments under various tab headings. Additional icons will appear in the Flags column to show if the payment is over budget or has attachments etc.

New: this tab is not currently used for existing payments.
Submitted: payments that are currently awaiting approval will show under this tab. Hovering over the blue information icon on the left will show all payment lines and who they are awaiting approval from.
Approved: payments that have been approved but not yet posted to Sage. Payments should only appear in the approved tab momentarily between being approved in WAP and posting to Sage.
Rejected: this tab is not currently used for existing payments.
Completed: once the payment has posted to Sage it will move to this tab.
Failed: if a payment has failed to post through to Sage it will appear in this tab and will need the error flag removing before it can be posted again. The permission to clear errors and repost payments is usually just given to Administrators or Finance users. More details on any error flags can be viewed through the Event Viewer.
Archived: this tab is not currently used for existing payments.
8.5. Viewing Suggested Payments
By default, users will be able to view payments either awaiting their approval or that they have approved. There are two options to search for an existing payment; either use the Search filters or the Quick Links.
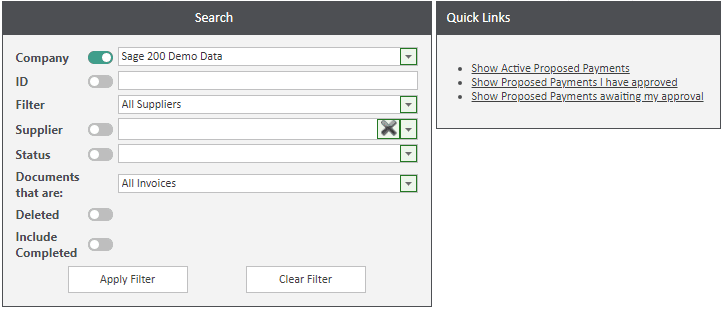
Search Filters: these can be used to find a payment with a particular ID, Supplier or status. Use the Show Deleted option to show any payments that have been deleted or the Include Completed option to show payments that have been approved and posted through to Sage.
Quick Links: click ‘Show active proposed payments’ to update the grid and retrieve the most recent payments or the links to either show payments awaiting approval or that have been approved.
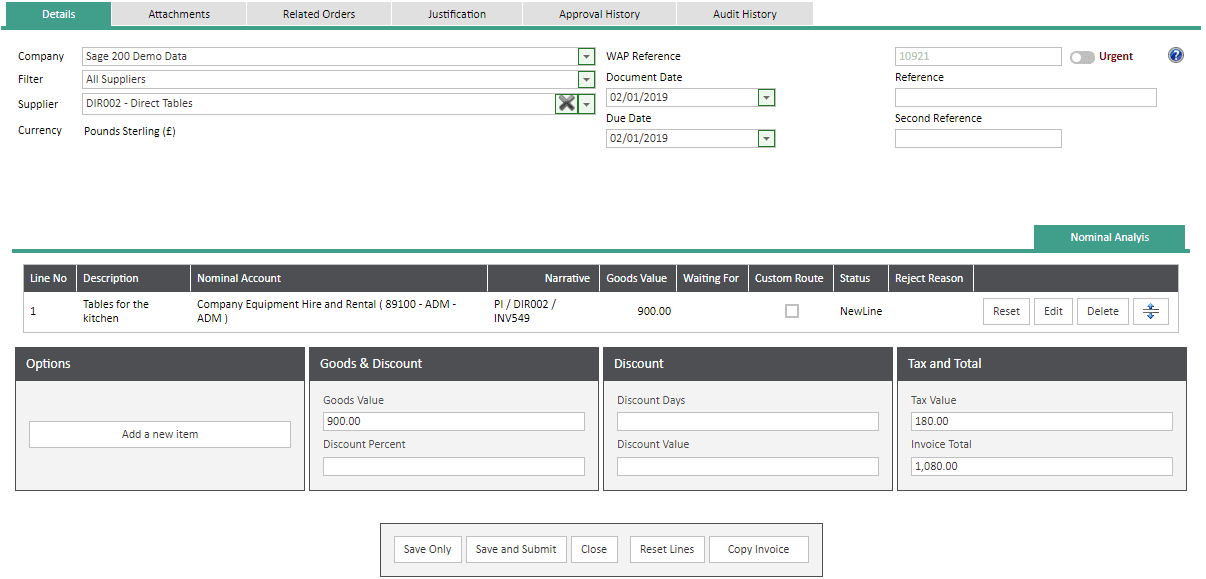
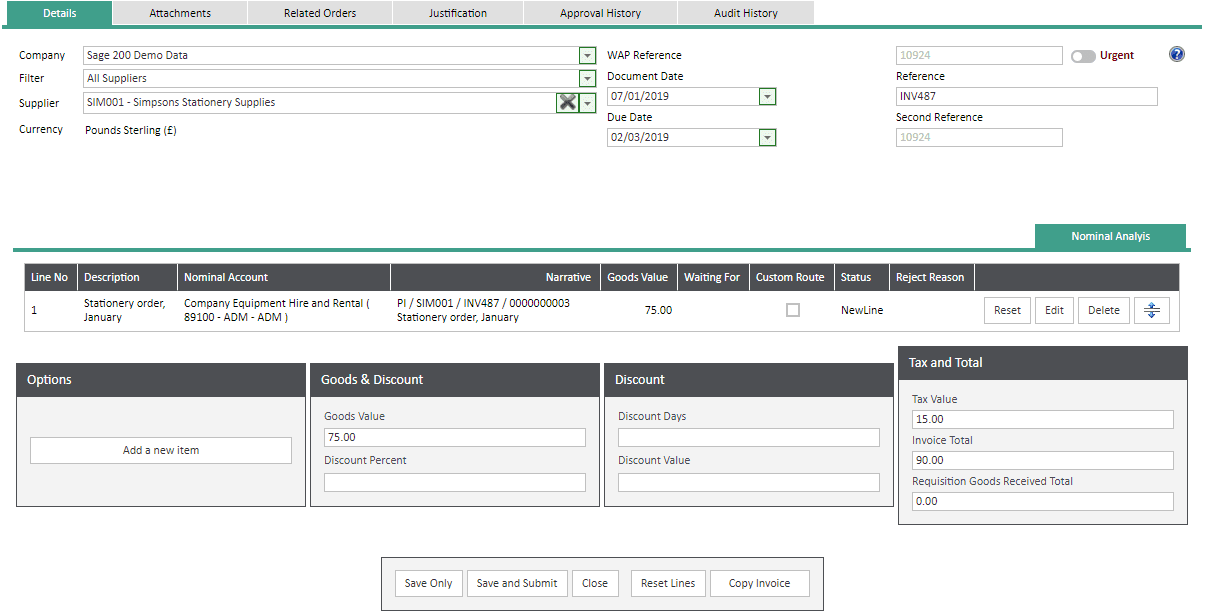
9. WAP – New Invoice Entry
If a site is not using Sage Commercials, invoices can be entered into WAP that once approved, will post into Sage Purchase Ledger.
From the side Invoices menu, select New Invoice.
NB: Options on this screen will be dependent on the functionality and options enabled or disabled within the System Settings.
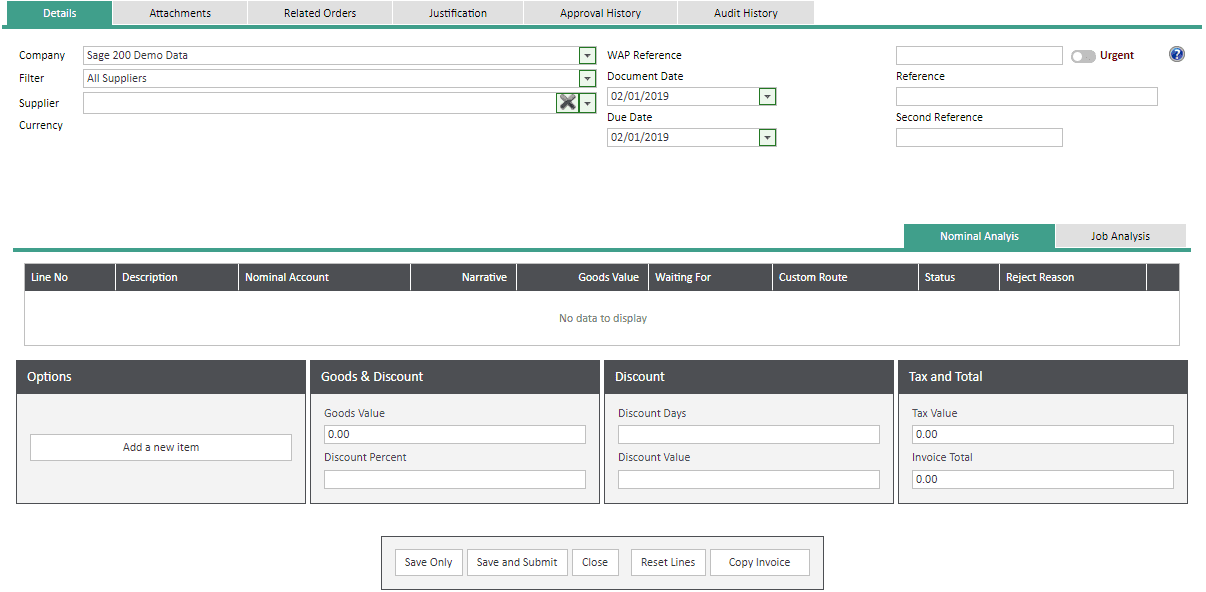
Company: the user’s default company will be selected here and greyed out if the user only has access to one. If the user has access to multiple companies, they can select a different company here.
Supplier: select the correct supplier from the drop down list either by typing the supplier name or code. All suppliers will be pulled through from Sage; if a supplier is on hold in Purchase Ledger it will not appear on the list. If required, the supplier list may be restricted to show only Approved Suppliers as defined in Sage 200.
Currency: once a supplier has been selected, their currency will be shown.
WAP Reference: this will be auto populated by WAP once the invoice is saved.
Urgent: if the user marks an invoice as urgent they will need to enter a reason for the urgency in the Urgent pop up box. Once the invoice is then submitted, an email will be sent instantly to approvers advising them there is an invoice awaiting approval.
Document Date: this will auto populate to the current date but can changed as required.
Due Date: this will auto populate in accordance with the supplier’s payment terms as configured on their Purchase Ledger account.
Reference: free text box to enter the invoice number.
Second reference: free text box which can be used to enter an additional reference. Alternatively, a system setting can be configured to automatically populate the second reference with the WAP reference once the invoice is saved.
Save Only: clicking this will allow the user to save the invoice before submitting; i.e. if extra lines or attachments need to be added before the invoice is submitted.
Save and Submit: this will send the invoice for approval.
Close: this will close the screen without saving any changes.
Reset Lines: this option will reset the approval route for all lines back to the beginning of the approval route.
Copy Invoice: this will allow the use to select a previously approved invoice to copy and create a new invoice for approval. Please refer to: https://www.sicon.co.uk/user-guide/wap-help-and-user-guide-invoices-module/#9-7
9.1. Add a New Item
Select Add a New Item and complete as required. N.B. certain fields or boxes may not be visible as below, depending on the System Setup.
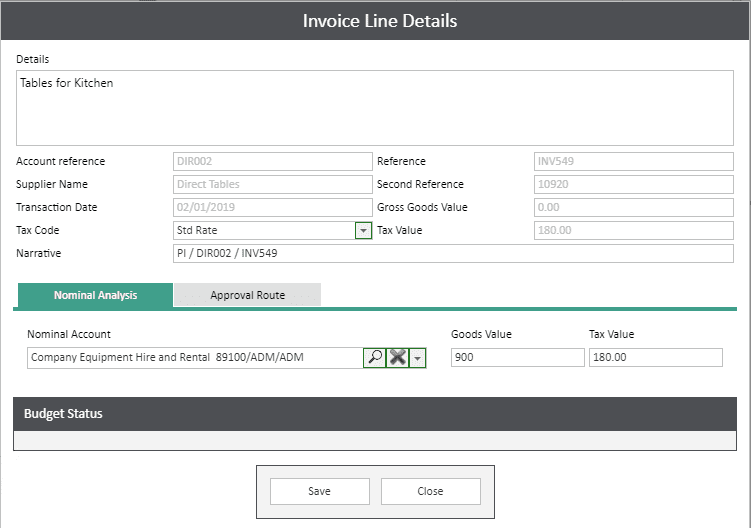
Details: free text field to enter the description of the invoiced items.
Account reference: this will show the supplier code as selected on the original invoice entry screen.
Reference: this will show the invoice reference as selected on the original invoice entry screen.
Supplier Name: this will show the supplier account name as selected on the original invoice entry screen.
Second Reference: depending on configuration, this will either show the second reference as selected on the original invoice entry screen or the WAP invoice reference.
Transaction Date: this will show the date as selected on the original invoice entry screen.
Gross Goods Value: once lines have been saved, this will show the total gross goods value.
Tax Code: this will default to the tax code as configured on the supplier account in Sage but can be overridden if required.
Tax Value: this will show the total tax value.
Narrative: by default this will contain the supplier code and invoice reference; additional text can be added as required.
Save: click to save the line to the invoice. Once saved, the invoice line details box remains on the screen ready to add further lines if required. By default, the nominal code will remain but can be changed.
Close: when no further lines are required on the invoice, click Close to return to the invoice header page.
Nominal Analysis Tab
The user will need to select a nominal code for the line item. Nominal codes can be searched for either by typing an account number or name. Users can be given permission on their User profile to ‘Access All Nominal Codes’ but it is advised to restrict user nominal access so they see a limited list of codes.
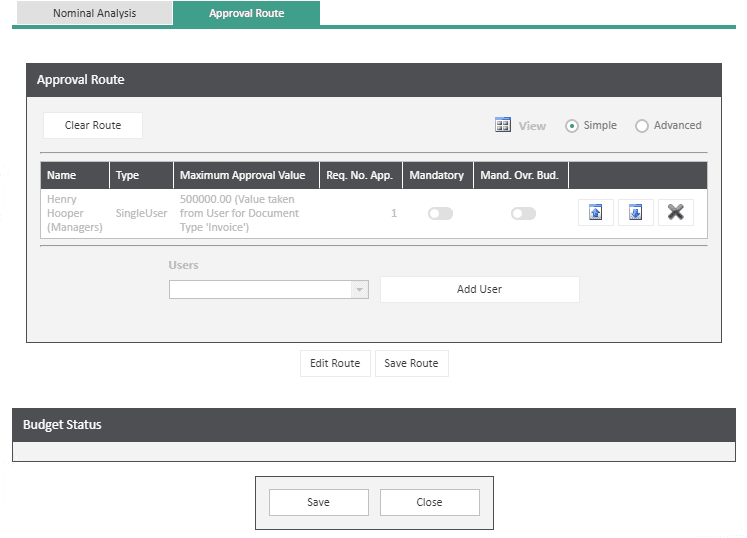
Approval Tab
The approval tab will display the route configured for this line item. Users will not be able to make any changes to the route, unless they have the user type permission to ‘Create ad-hoc Approval Routes’ – this is recommended for Finance or Admin users only.
Budget Status
If budget checking has been enabled, the details will be shown under this banner and a detailed drilldown can be viewed by clicking on the budget link.
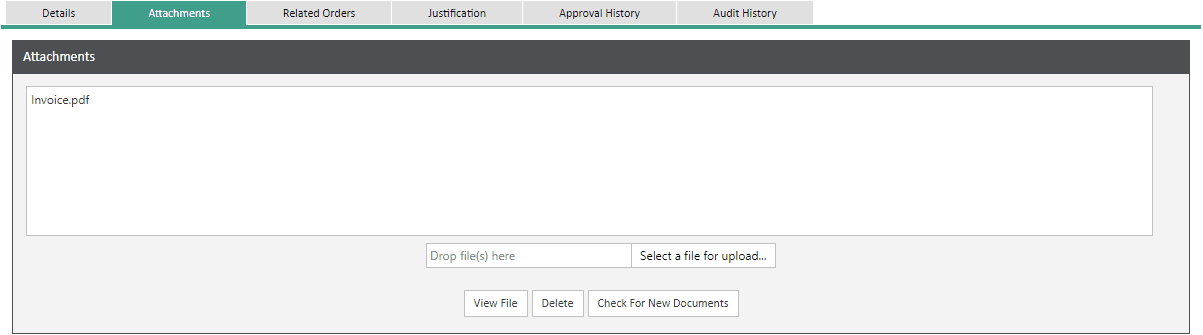
9.2. Attachments Tab
This tab is used to add file attachments to be viewed during the approval process. If Sicon DMS is configured, invoice attachments will post through from WAP to Sage. Documents can either be dropped on the file box as indicated, or use the button to browse for a file as required. If one document is attached, a single paperclip will appear in the Flag column on the invoice summary grid tables and approval grid page, if further documents are attached, two paperclips will show.
9.3. Related Orders Tab
If the invoice has been entered into WAP linked to a PO in WAP, this tab will show order and order line information.

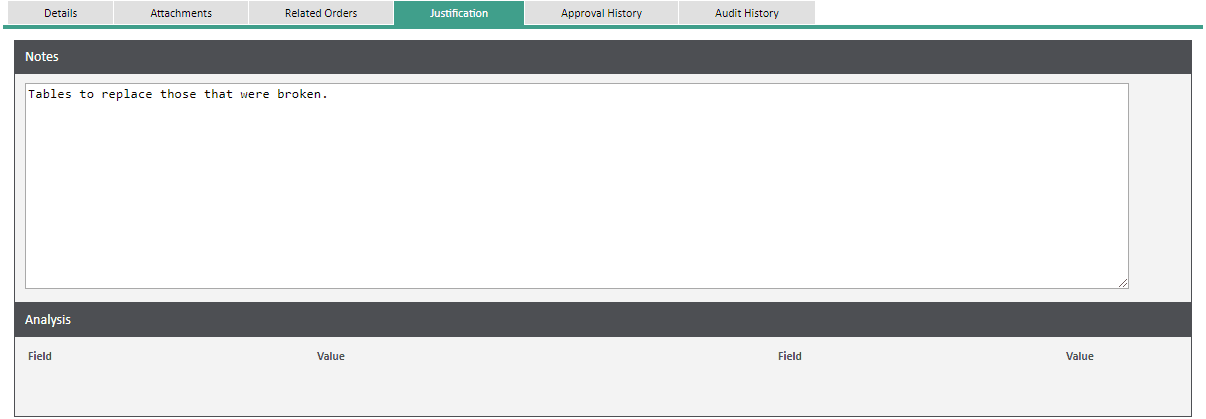
9.4. Justification Tab
This tab is used to provide additional notes and information regarding the invoice that would be visible to the approver. These additional notes are for internal use only; they will not post through to Sage. If WAP Analysis Fields have been set up, these will be displayed and can be completed as required. If notes have been added a post-it note icon will appear in the Flag column on the invoice summary grid tables and approval grid pages.
9.5. Approval History Tab
This tab will start to be populated once the invoice has been submitted and starts through the approval process.
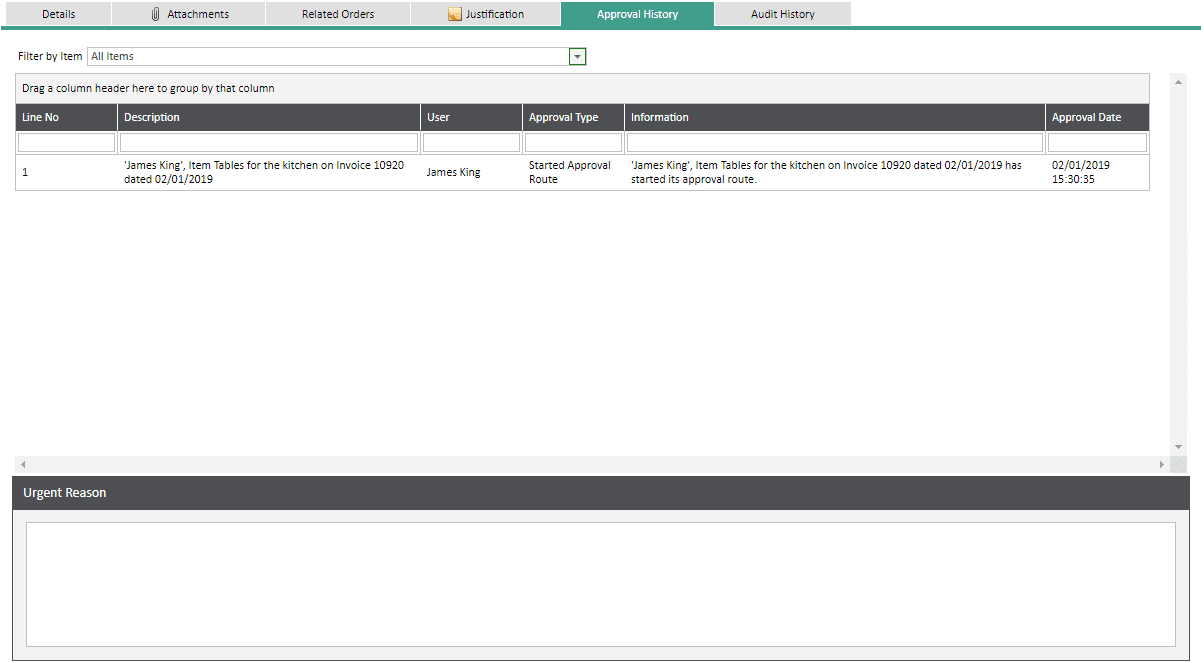
Filter By Item: by default all invoice liens will show, use this drop down box to filter to view history of one specific line.
Urgent Reason: if the user ticked the option to mark the invoice as urgent, the reason given will be displayed here.
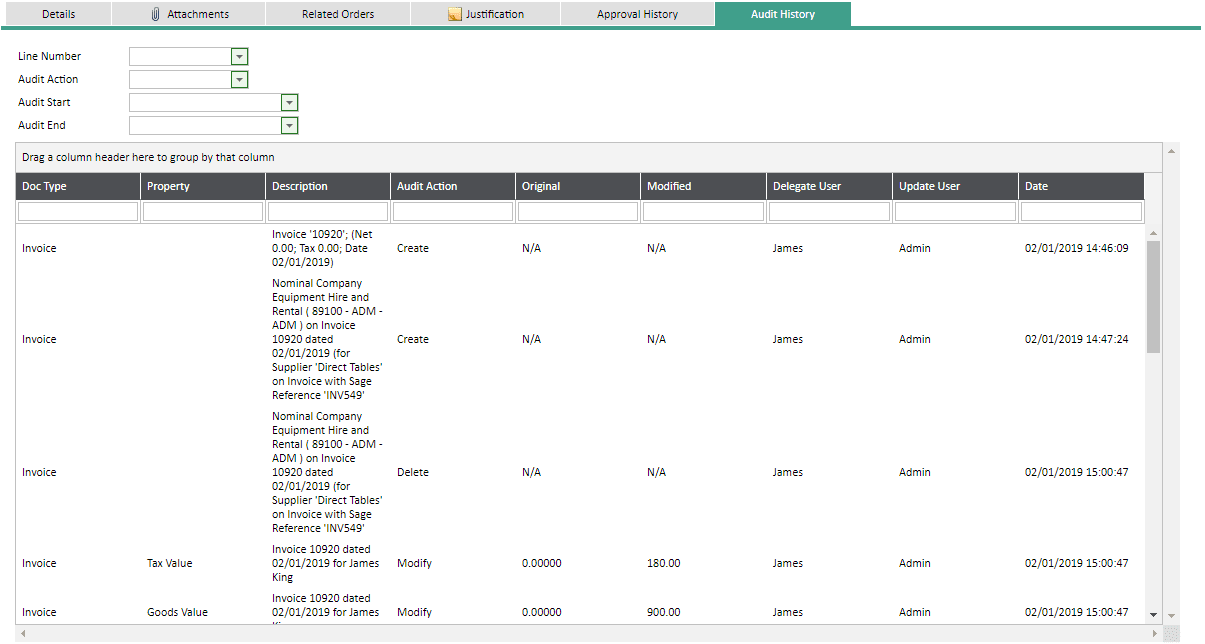
9.6. Audit History Tab
If configured, this tab will be populated with information on the invoice lines; when they were created, amended or deleted and by which user. By default, all invoice lines will show but the filters can be used to only show specific lines, audit actions (e.g. create, edit, delete etc.) or a date range when the action occurred.
Auditing is switched on in System Settings – Auditing.
9.7. Copy Existing Invoice
Once an invoice has been fully approved it can be copied to create a new invoice. This functionality is useful if repeat invoices are being placed regularly, or invoices with many lines. The user should find the correct invoice to copy using the search functionality and click to View. Once the invoice is open, click the Copy Invoice button at the bottom of the screen.
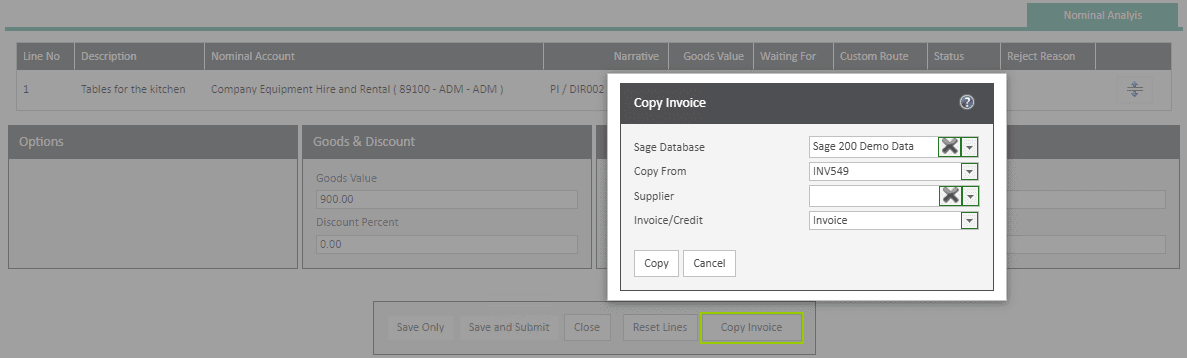
Sage Database: select the correct Sage company for the new invoice to be raised in. Only companies the user has access to will be visible.
Copy From: this is the invoice that will be copied; the invoice number need to be entered on the new invoice once it has been created.
Supplier: choose the correct supplier the new invoice should be raised for; start typing either the supplier name or account number to find.
Invoice/Credit: select whether the new invoice is to be an invoice or a credit.
Copy: click here to create the new invoice, or cancel out to avoid completing this.
Once copied, a new invoice is created. This new invoice can then be edited if required; i.e. if lines need to be added or deleted, or changes to quantities etc. need to be made. Once the invoice is correct, this can then be submitted for approval.
10. WAP – New Credit Entry
Credit notes can be entered into WAP following the same process as for new invoice entry as detailed above. The ability to enter credit notes is a User Type permission so if required, users may be able to enter invoices but not credit notes.

11. WAP – Batch Invoice Entry
Select Batch Entry from the side menu and complete the fields as required. Use Update to save each batch line. The ability to enter batch invoices is a User Type permission so if required, users may be able to enter invoices but not invoices in batches.
Choose the correct Sage Database and enter lines as appropriate.
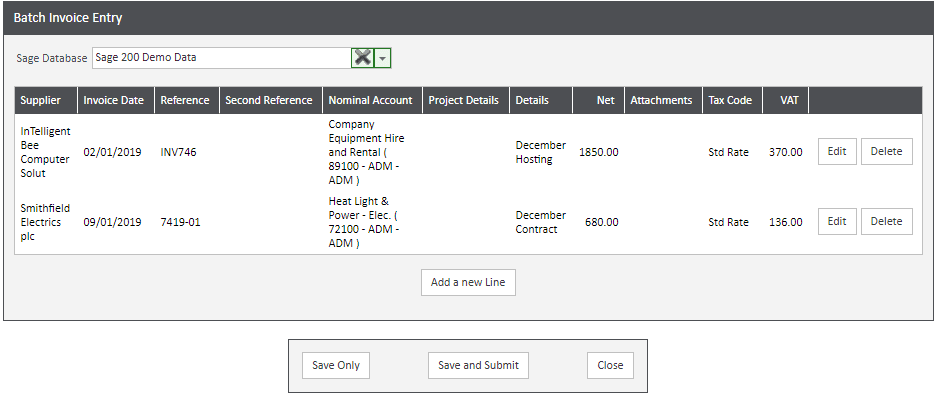
Add a new line: click to add additional invoice lines.
Save Only: save and open the invoices; this will allow users to add attachments or notes as required before submitting the invoice for approval.
Save and Submit: save and submit the invoices for approval.
Close: close the screen without any changes.
Once submitted, the invoices will follow the configured approval routes and appear in the Submitted tab until the invoice has been approved.

12. WAP – PO Invoice Entry
An invoice can be entered for a single supplier and either one or many POs raised and approved within WAP. PO invoices should only be recorded in WAP if using Sage 200 with no Commercials.
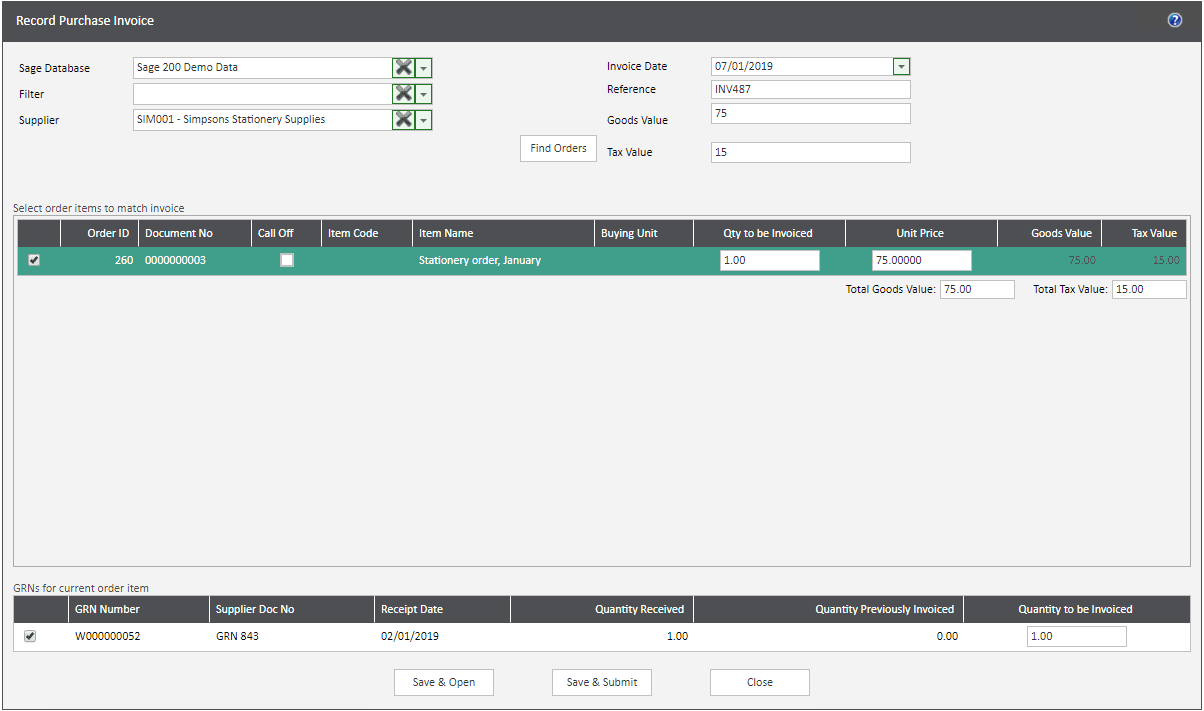
Select the correct supplier, enter the invoice date, reference and goods and tax value. Click Find Orders to display all approved and outstanding POs from the chosen supplier.
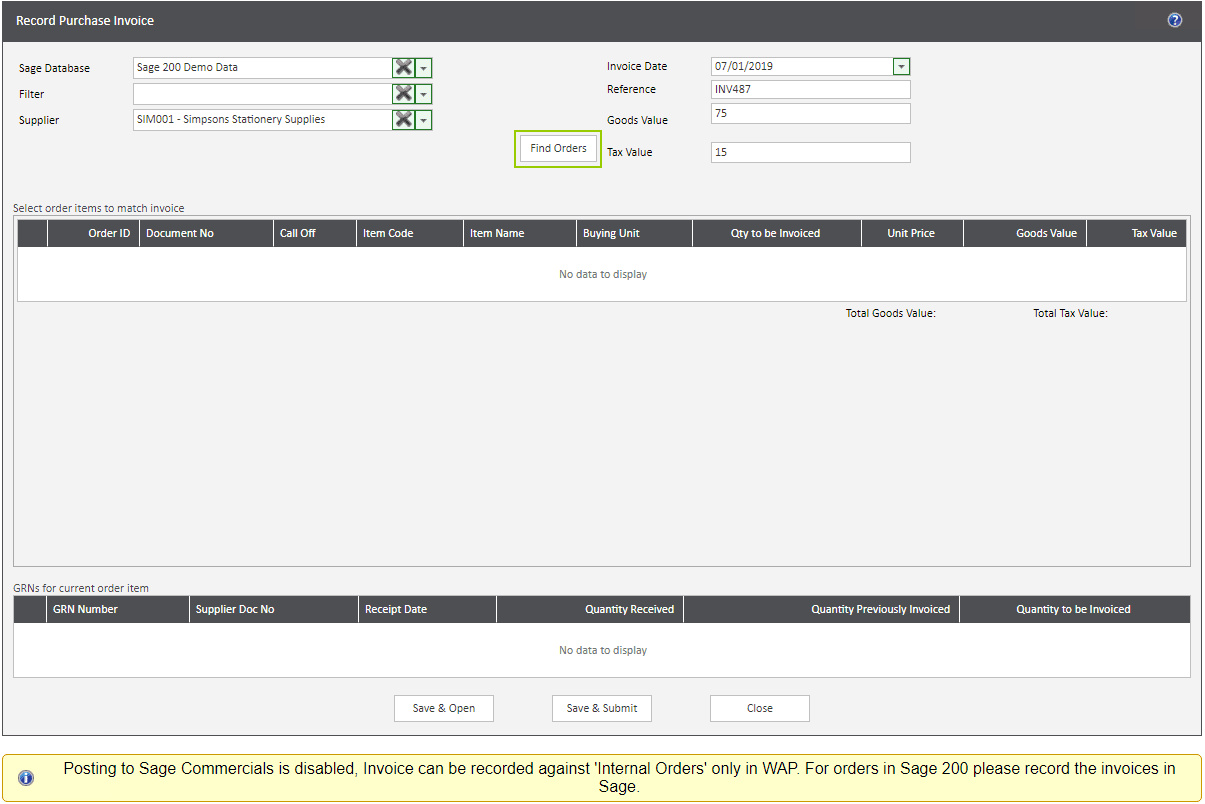
From the list displayed, choose the appropriate PO(s) that the invoice matches to and click OK.

Select the PO lines and goods received lines to which the invoice relates to.
NB: if the invoice differs from the PO line, edit the Quantity to be invoiced or the Unit Price on the appropriate lines. The quantity to be invoiced figure will be pulled through from the quantity received.
Save & Open: save the current screen and open the invoice; this will allow users to add attachments or notes as required before submitting the invoice for approval.
Save & Submit: save the current screen and submit the invoice straight for approval.
Close: if the invoice should not be recorded, untick the lines selected and click close to return to invoice entry screen.
Once an invoice has been saved, the original purchase order will be updated as invoiced.
13. Reports
There is one report available within the Invoice module.
13.1. Invoice Approval Report
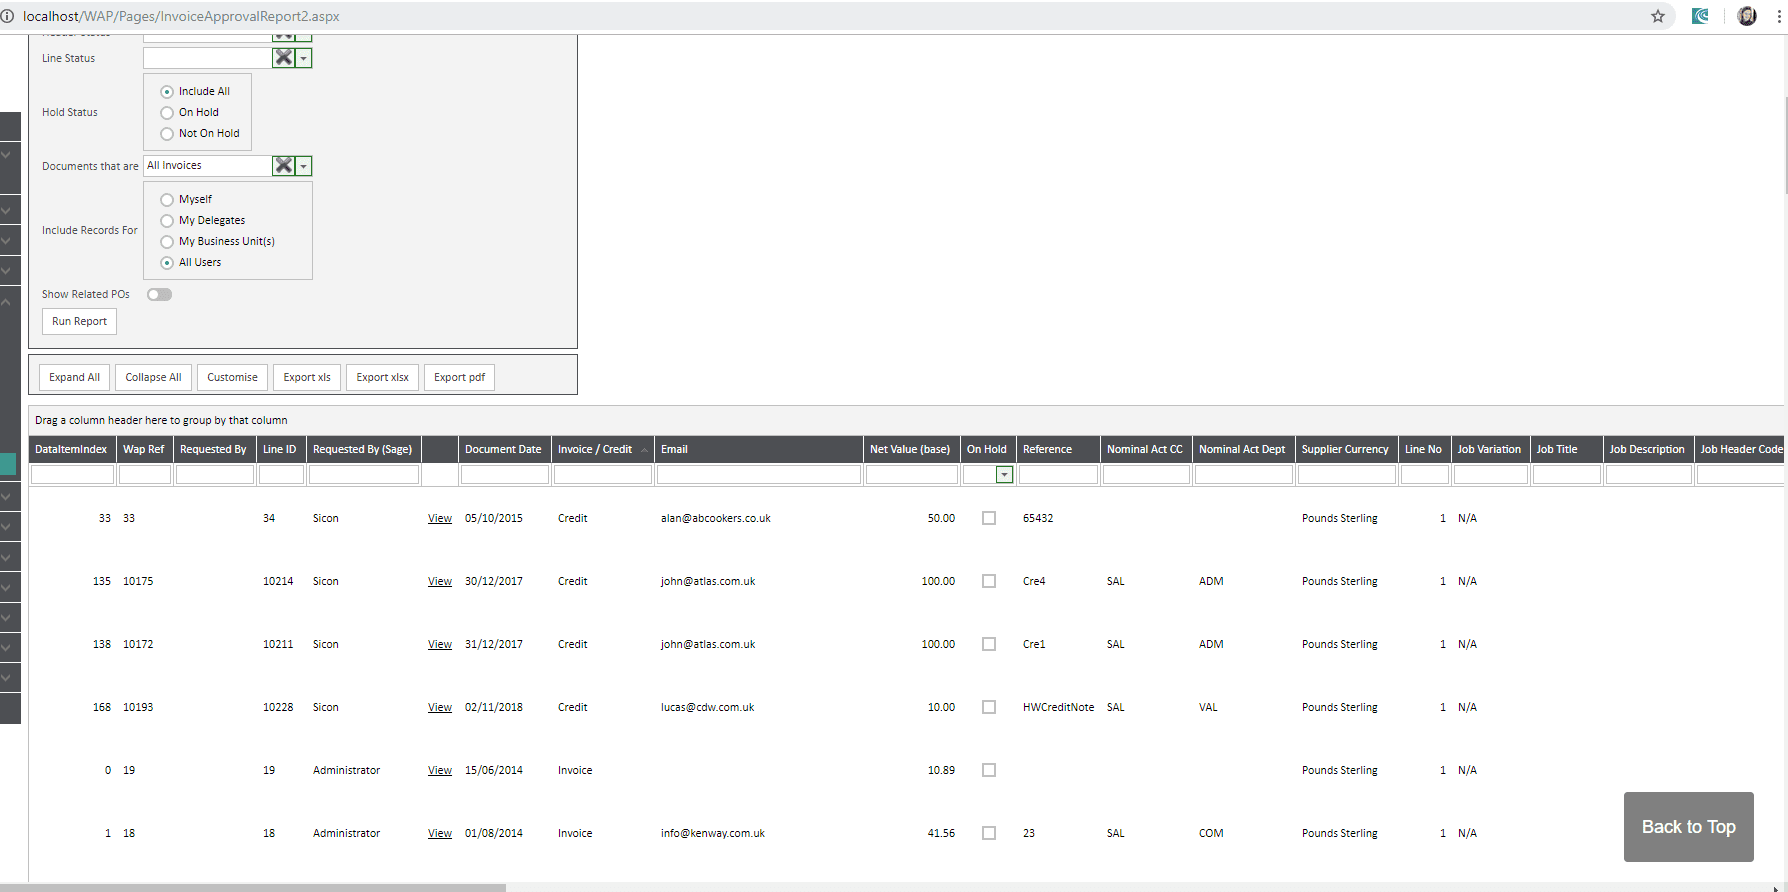
This report will show a breakdown of all invoices with their line detail, quantities, approval status and approval history.
Depending on User Type and User configuration, users will be able to see either information relating to invoices they have approved, their delegate or business unit invoices or all invoices on the system. Use the date range, database filter, header and line status, hold status and invoice options to filter data as required.
All reports can be exported to Excel, some reports can be exported to PDF and can be adapted either by dragging column headers to change the order or group data by a particular header. Click the ‘Customise’ button for the Field Chooser to appear which will allow for additional headers to be added or existing headers to be removed. N.B. reports are cookie based so to allow for this customisation, ensure the browser settings allow cookies from the WAP website. Customised columns may return to the standard configuration following a WAP or browser upgrade as cookies may be cleared.
14. Invoice System Settings
System Settings relating to the Invoice module are accessed in System Settings – Invoices Tab.
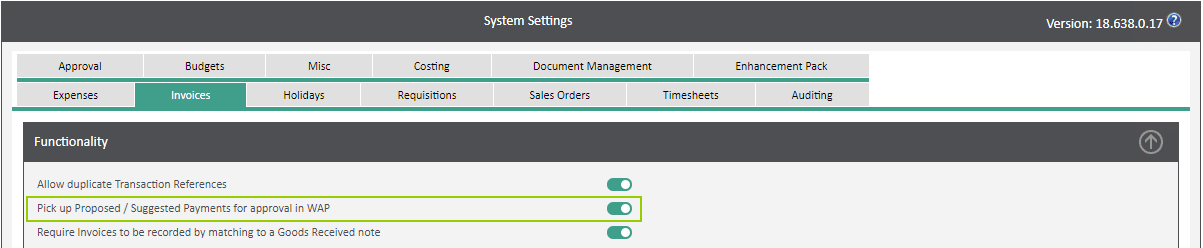
14.1. Invoice Tab – Functionality Banner
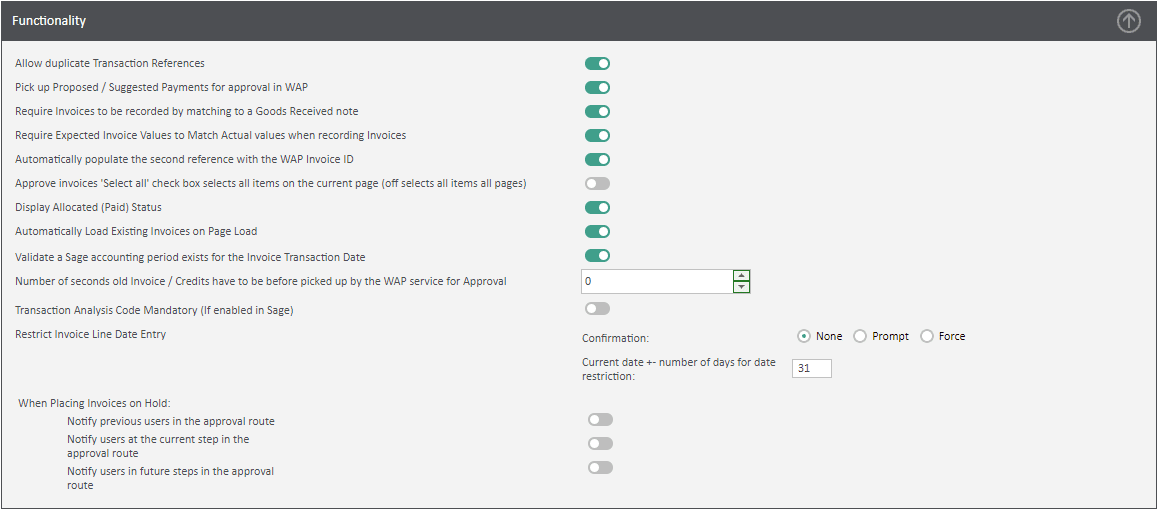
Allow duplicate Transaction References: if invoices require editing once they are in the WAP system, e.g. nominal code to be changed, this setting will need to be enabled.
Pick up Proposed / Suggested Payments for approval in WAP: if suggested payments should be approved in WAP, enable this setting. If not ticked, suggested payments would not require approval in WAP before being paid in Sage.
Require Invoices to be recorded by matching to a Goods Received note: applicable to invoices entered directly into WAP only.
Require Expected Invoice Values to Match Actual values when recording invoices: applicable to invoices entered directly into WAP only.
Automatically populate the second reference with the WAP Invoice ID: for invoices entered directly into WAP; automatically populate the second reference with the WAP document ID.
Approve invoices ‘Select all’ check box selects all items on the current page (off selects all items all pages): if users have the User Type permission to select and approve multiple invoices at a time and if this setting is enabled, only invoices on the current page will be approved, preventing users from accidentally approving all items on all pages without checking the invoices on subsequent pages.
Display Allocated (Paid) Status: whether to show the payment allocation status of an invoice; once a payment has been allocated to an invoice this will update in WAP to show either Unpaid, Allocated or Paid.
Automatically Load Existing Invoices on Page Load: if ticked, all current invoices will be loaded automatically. If not ticked, use the Search filters and Quick Links to display invoices required. N.B. by default Completed invoices will not show unless the option to include completed is ticked.
Validate a Sage accounting period exists for the Invoice Transaction Date: when ticked, the system will validate whether the accounting period exists when saving or submitting an invoice. This setting is applicable only to invoices entered directly into WAP.
Number of seconds old Invoices / Credits have to be before picked up by the WAP service for approval: by default this is set to zero so invoices will be picked up by the WAP service as soon as they are saved in Sage. If other third party software must be run in Sage once an invoice has been saved prior to WAP picking the invoice up, enter a value here, e.g. 60 seconds.
Transaction Analysis Code Mandatory (if enabled in Sage): applicable to invoices entered directly into WAP only; if transaction analysis codes have been configured in Sage, these must be completed in WAP.
Restrict Invoice Line Date Entry: applicable to invoices entered directly into WAP only; this can restrict the time period an invoice can be entered.
When Placing Invoices on Hold: notifications can be sent to previous/current/future approvers to advise the invoice has been placed on hold. If this setting is changed, please ensure the WAP service is restarted as this relates to email notifications.
14.2. Invoice User Type Permissions
Permissions for whether a user is able to approve, amend or view reports are set at a User Type level, under the Invoices/Credits tab.
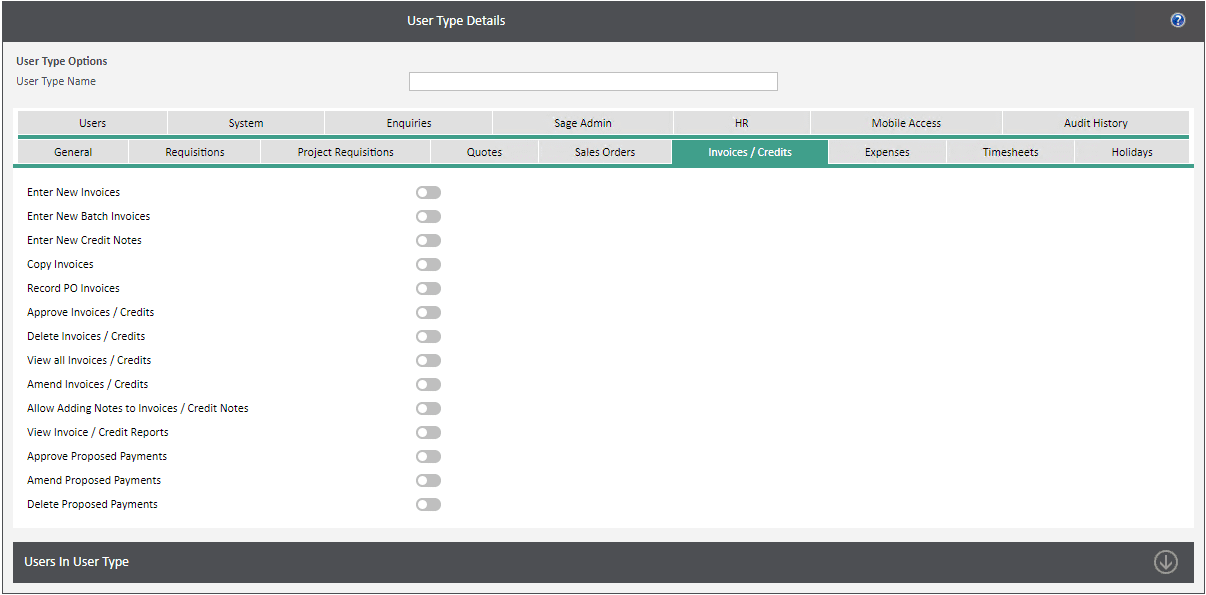
Enter New Invoices: applicable to invoices entered directly into WAP only – the ability to enter new invoices.
Enter New Batch Invoices: applicable to invoices entered directly into WAP only – the ability to enter invoices in a batch.
Enter New Credit Notes: applicable to invoices entered directly into WAP only – the ability to enter new credit notes.
Copy Invoices: applicable to invoices entered directly into WAP only – the ability to create new invoices by coping existing invoices.
Record PO Invoices: applicable to invoices entered directly into WAP only – the ability to record invoices against approved Purchase Orders.
Approve Invoices / Credits: the ability to approve an invoice. If a user does not have this permission, they cannot be selected when building an approval route.
Delete Invoices / Credits: the ability to delete an invoice. If an invoice has been pulled through to WAP from Sage and then deleted in WAP, it will be pulled through to WAP again for approval as the invoice in Sage still has the ‘U’ query flag.
View all Invoices / Credits: the ability to view all invoices in WAP. Usually only Admin or Finance users would be given this permission.
Amend Invoices / Credits: the permission to edit an invoice or credit note, i.e. to change a nominal code or split lines. Depending on Costing module configuration, it may not be possible to change the invoice.
Allow Adding Notes to Invoices / Credit Notes: the ability to add notes to an invoice during the approval process; these notes are only visible in WAP and will not post through to Sage. If an invoice is edited or re-routed it can be useful to add notes to pass information onto other approvers.
View Invoice / Credit Reports: permission to run the invoice report showing all invoices, their values, status, approval history etc.
Approve Proposed Payments: the ability to approve suggested payments. If a user does not have this permission, they cannot be selected when building an approval route.
Amend Proposed Payments: the ability to make any changes to suggested payments.
Delete Proposed Payments: the ability to delete a proposed payment within WAP; the suggested payment routine would need to be run within Sage to pull through payments for approval.
15. Invoice User Permissions
A number of permissions can be set on the user profile relating to viewing or approving invoices.
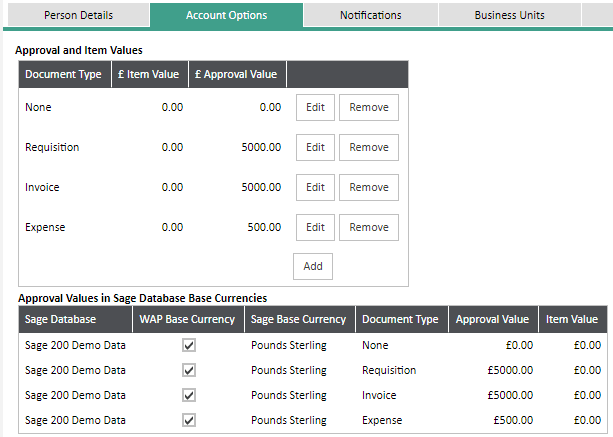
15.1. Account Options Tab
Against a user set their Invoice Item and Approval values; item value is the amount the user is able to enter an invoice for and approval value is the amount a user is able to approve an invoice for. If invoices are to be entered in Sage, the item value can be left at zero while if a user is not allowed to approve an invoice (i.e. Finance Users to be included only in the Reject Invoice approval route), leave the approval value as zero. If a user has unlimited approval value (i.e. for users at the end of an approval route), set the approval value as 999,999,999.
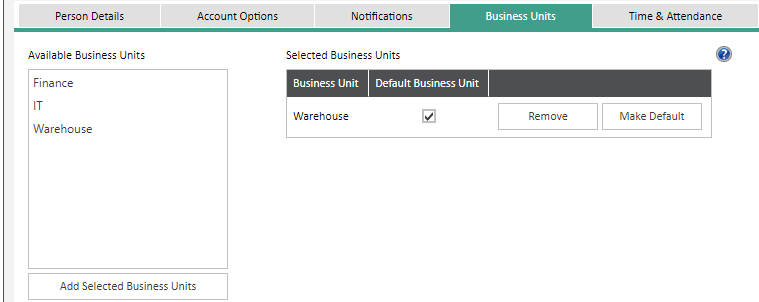
15.2. Business Units Tab
If the user belongs to a business unit they will be able to view any invoices awaiting approval or approved by other users within the business unit.
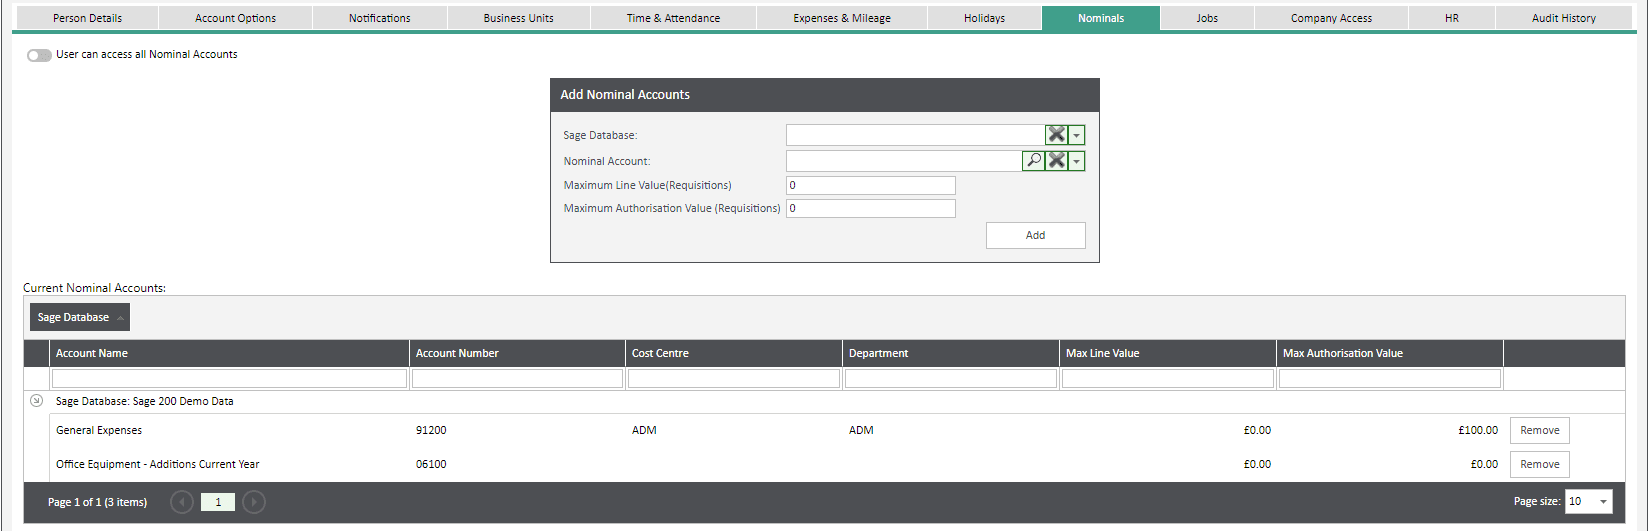
15.3. Nominal Tab
This tab can be used to view nominal codes the user has been given access to, or to set that the user is to have access to all nominal codes. These codes will be visible to the user if amending a nominal code.
15.4. Jobs/Projects Tab
If a costing module has been configured, this tab can be used to view jobs or job headers the user has been given access to, or to set that the user is to have access to all jobs or job headers. These jobs and job headers will be visible to the user if amending an invoice.

15.5. Company Access Tab
This tab will show what companies the user has been given access to along with their default delivery and invoice addresses. Users will require access to a company to be able to approve an invoice or run reports.

16. Invoice Approval Stages
16.1. Invoice Header Status
New: the invoice has been saved but not yet submitted; this would only apply to invoices entered directly into WAP.
Submitted: the invoice has been submitted for approval but not yet fully approved.
Approved: the invoice has been submitted and will post through to Sage. Approved invoices should only appear here temporarily while they are waiting to post to Sage.
Rejected: one or more lines on the invoice have been rejected. N.B. a rejected line must be edited and resubmitted for approval for the reject flag to be cleared. An invoice will not post through to Sage if there is a rejected line on the invoice.
Completed: the invoice has posted through to Sage. Ensure to tick the search option to include completed to view these invoices.
Failed: if an invoice has failed to post to Sage it will appear here. Most likely reasons for the invoice to fail are if the supplier has been put on hold or if a costing module is enabled but the project or job has been closed or set to not allow costs entered against it. Please check the Project and then clear the error and repost the invoice (these are usually Superusers permissions).
Archived: this status is not currently used for invoices.
16.2. Invoice Line Status
New Line: the line has not yet been submitted; this will only apply to invoices entered directly into WAP.
Waiting: the line is awaiting approval from an authoriser.
Authorised: the line has been approved.
Rejected: the line has been rejected; all lines must be authorised before the invoice will post to Sage.
No Authorisers: there are no authorisers for the line; the line will need to be reset and the invoice submitted for the correct approval route to be used.
17. WAP Add-ons
The WAP Add-on provides additional features for Sage 200, particularly with regard to additional analysis and processing for invoices and month end routines in Sage 200. Please see the WAP Add-on HUG for an overview of all settings:
https://www.sicon.co.uk/user-guide/wap-add-on-for-sage-200-help-and-user-guide/
18. Enable Module
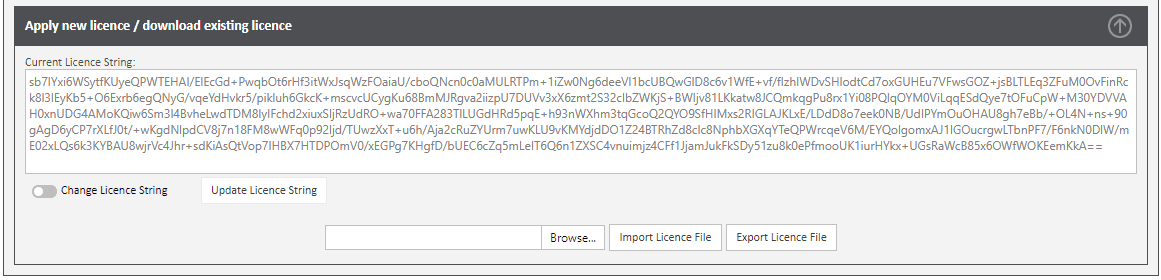
Each year the WAP system will require a new enable string to continue working. When the new string has been issued, select System Settings – Misc – Licencing – Apply New Licence and then Browse and Upload the licence string.
NB: the module expiry date is shown along with the modules that have been enabled and the maximum number of users.