WAP Help and User Guide – Requisitions Module v18
This WAP Requisitions Help and User Guide will take you through the features and settings for the Sicon WAP Requisitions Module.
Search the page by pressing Ctrl + F (windows) or CMD +F (Mac) on your keyboard.
Back to all user guidesProduct overview
Help and User Guide maintained for WAP version 18.638.0.18 up to 18.0.39
This WAP Requisition Help and User Guide will take you through the features and settings for the Sicon WAP Requisition Module. This module is designed to allow users of the WAP system to create, submit and approve Purchase Requisitions, enabling a PO to be raised and posted to the Purchase Order Processing module within Sage 200. Goods can then be received via the WAP Requisition module which will then update the values on the Sage Purchase Order.
If used in conjunction with the WAP Invoice Approval module with auto approval functionality (in accordance with variance checking), PO Invoices can be linked in Sage 200 against a PO and not require approval, thus negating the need for a matching invoice to be sent for approval.
1. Requisition Enable Configuration
For the Requisition module to be available the enable module must have Requisition module ticked. Once this is configured, Requisition options will then be visible with the system.
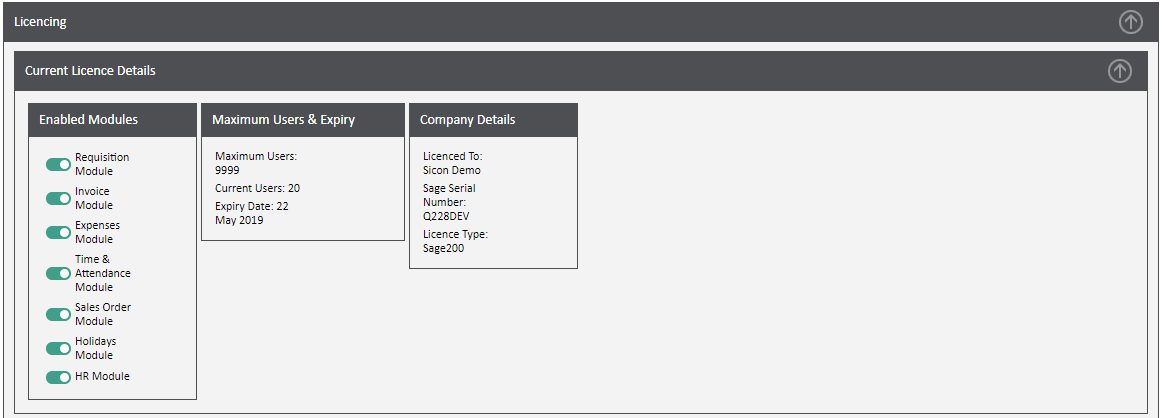
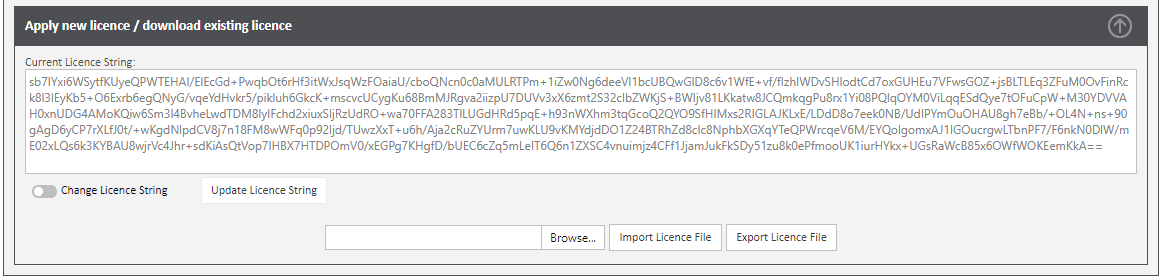
Each year WAP will require a new enable string to continue working. When a new one has been issued, select System Settings – Misc – Licencing – Apply new licence – Browse and Upload.
2. New Requisition
From the side Requisitions menu, select New Requisition. N.B. Options on this screen will be dependent on the functionality and options enabled or disabled within the System Settings.

Company: the user’s default company will be selected here and greyed out if the user only has access to one. If the user has access to multiple companies, they can select a different company here.
Supplier: select the correct supplier from the drop down list either by typing the supplier name or code. All suppliers will be pulled through from Sage; if a supplier is on hold in Purchase Ledger, it will not appear on the list. The blue information dot can be clicked to provide more information on the supplier such as address, contact and payment information. If required, the supplier list may be restricted to show only Approved Suppliers as defined in Sage 200. Please refer to: https://www.sicon.co.uk/user-guide/wap-help-and-user-guide-requisitions-module/#12
Supplier Ref: this will be automatically populated with the supplier reference from Sage 200 once a supplier has been selected.
Document Date: this will be automatically populated with the current date but can be overridden as needed. By default, it is not possible to enter a requisition in the past although this can be allowed if needed. This is the date that is used for budget checking purposes so if a spend is to hit a future month’s budget, this date can be moved to a future date.
Delivery Date: this can either be automatically populated to match the document date or can be left empty to force the users to pick a delivery date. This is a mandatory field and will be used to generate Goods Received notification reminders if configured. Individual delivery dates can also be set per stock item or free text line if required.
Urgent: if the user marks a requisition as urgent they will need to enter a reason for the urgency in the Urgent pop up box. Once the requisition is then submitted an email will be sent instantly to approvers advising them there is a requisition awaiting approval.
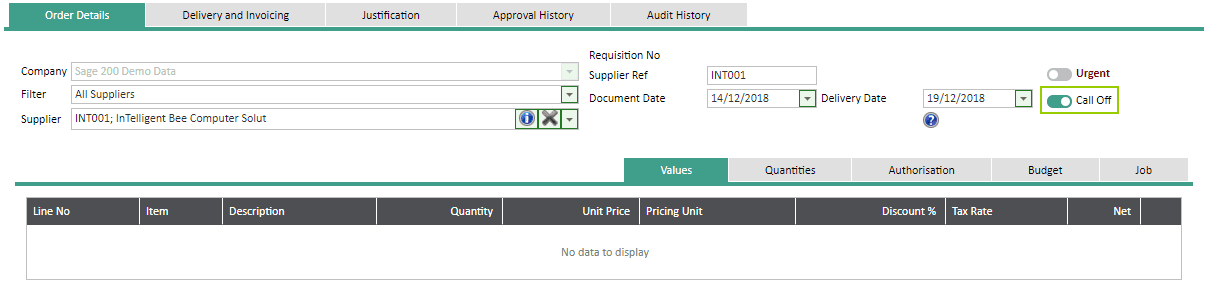
Call Off: call off orders can be created for free text lines only; this will switch the value and quantity fields on the entry screen to enable calling off orders by value rather than quantities. Please refer to: https://www.sicon.co.uk/user-guide/wap-help-and-user-guide-requisitions-module/#3
Save Only: clicking this will allow the user to save the requisition before submitting; i.e. if extra lines need to be added before the requisition is submitted.
Save & Submit: this will send the requisition for approval.
Close: this will close the screen without saving any changes.
Print Summary: this option is not possible until a requisition has been fully approved; it will open a pop up that would allow the PO to be emailed to the supplier.
Copy Order: this will allow the user to select a previously approved order to copy and create a new requisition for approval. Please refer to: https://www.sicon.co.uk/user-guide/wap-help-and-user-guide-requisitions-module/#4-4
Show Related Project Requisitions: this option is not possible until the requisition has been fully approved; it will open a pop up showing the project requisition the requisition was created from.
Show Goods Received: this option is not possible until the requisition is approved and has had goods received against; a pop up will open showing goods received.
Reset Lines: this option will reset the approval route for all lines back to the beginning of the approval route.
2.1. Add a Free Text Line
Select Add a Free Text Line and complete as required. N.B. certain fields or boxes may not be visible as below, depending on the System Setup.
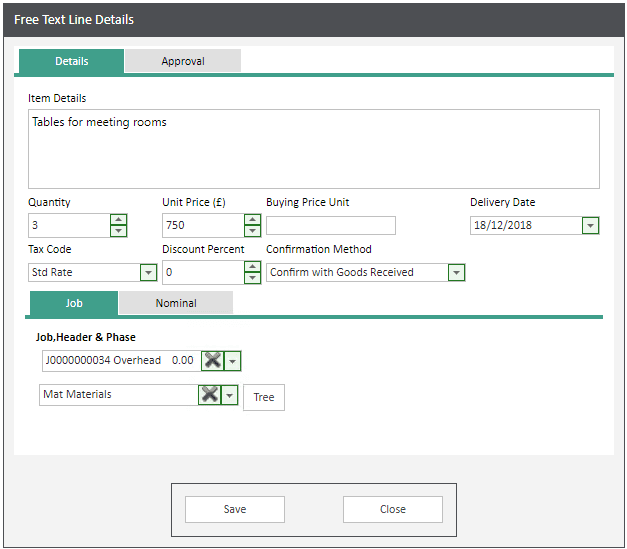
Item Details: free text field to enter the description of the item required. There is a maximum of 65,500 characters in this field.
Quantity: free text box, enter the quantity required.
Unit Price (£): free text box, enter the price per unit as required. The symbol in the bracket field is pulled through from the currency set against the supplier in Sage PL.
Buying Price Unit: free text field to enter further details of the item, e.g. box of 12 or pack of 6. This field can be configured to show on the PO layout to the supplier, or hidden from view when entering requisitions if not needed.
Delivery Date: this will pull through the delivery date as selected on the front page but can be overridden as needed. This is particularly useful if expecting staggered delivery or part invoicing an order.
Tax Code: this can be configured to pull through the tax rate configured against the supplier in the PL or the standard tax rate against the Sage Company in Sage Connections. This field can be hidden from view if required.
Discount Percent: if applicable, enter a discount percentage to apply to this line. This field can be hidden from view if required.
Confirmation Method: this will pull through from the standard configuration in Sage but can be overridden per line if required. This field can also be hidden if needed.
Save: click to save the order line to the requisition. Once saved, the free text line details box remains on the screen ready to add further lines if required. By default, the previously selected job or nominal code will remain but can be changed.
Close: when no further lines are required on the order, click Close to return to the requisition header page.
Job Tab
This tab will only appear if Sicon Job Costing, Sage Project Accounting or WAP Projects has been configured as the Costing Module. If the Requisition is linked to a Job/Project, select the correct Job/Project and Job Header/Project Item from the drop down menus. Note; if activities are being used in the Job structure, these will be available for selection and the Tree option should be used to ensure the correct Job Activity and Header are chosen.
If a user has ‘Access all Jobs/Projects’ ticked on their User profile, all live Jobs/Projects will appear in the dropdown list. Alternatively, users can be given access to specific Jobs/Projects and Job Headers/Project Items.
Nominal Tab
If a Job/Project and Job Header/Project Item have been selected, the nominal code will be automatically populated based on the selection and by default, users will not be able to change this code. This can be configured if required.

If a costing module is not integrated with WAP, the user will need to select a nominal code for this line item. Nominal codes can be searched for either by typing an account number or name. Users can be given permission on their User profile to ‘Access All Nominal Codes’ but it is advised to restrict user nominal access so they see a limited list of codes.
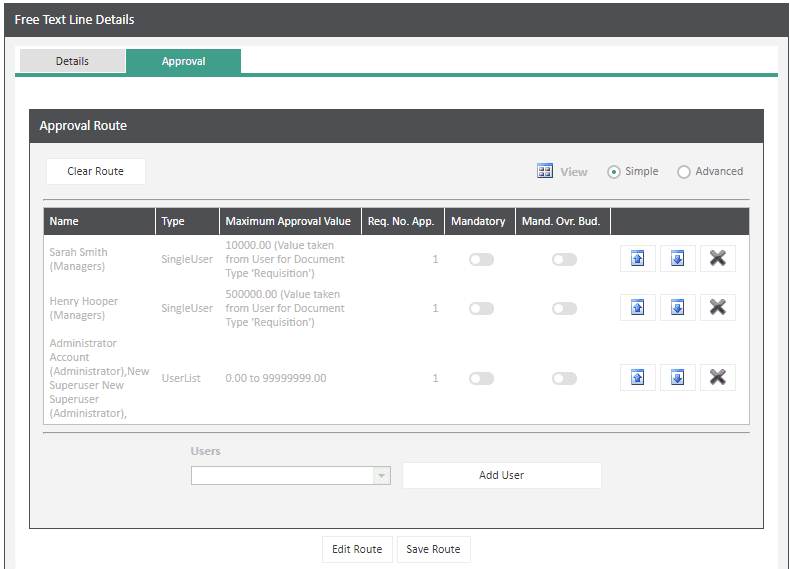
Approval Tab
The approval tab will display the route configured for this line item. Users will not be able to make any changes to the route, unless they have the user type permission to ‘Create ad-hoc Approval Routes’ – this is recommended for Finance or Admin users only.
2.2. Add a Stock Item Line
Select Add a Stock Item Line and complete as required. Stock items will pull through from Sage and will either use the associated nominal code on the stock item or the nominal code against the Job Header/Project Item, if using a costing module.
Filter Items By Supplier: this will be ticked to only show products linked to the supplier selected; untick this to show all stock items set up in Sage. This setting can be hidden if required.
Product Group: by default all product groups will be selected but stock items can be filtered by a product group to show only relevant stock items.
Stock Item: select either by typing a stock name or item code. Supplier part and free stock numbers will be visible on stock item selection.
Warehouse: select the correct warehouse for the stock item. If required, users can be restricted as to the warehouses they can see.
Amend Line Description: users are able to tick this to amend the line description on the stock item; this would then change the description on the PO to the supplier but would not update the stock item in Sage.
Confirmation Method: the confirmation as set in Sage will be displayed.
Quantity: selection box, enter the quantity required.
Buying Unit: select the correct buying unit from the drop down menu, as configured from Sage.
Buying Price Unit: choose the correct buying price unit from the drop down menu, as configured in Sage 200.
Unit Price (£): the price will be pulled through from Sage but can be overridden if needed. The symbol in the bracket field is pulled through from the currency set against the supplier in Sage PL.
Tax Code: this can be configured to pull through the tax rate configured against the supplier in the PL or the standard tax rate against the Sage Company in Sage Connections. This field can be hidden from view if required.
Delivery Date: this will pull through the delivery date as selected on the front page but can be overridden as needed. This is particularly useful if expecting staggered delivery or part invoicing an order.
Job Tab
This tab will only appear if Sicon Job Costing, Sage Project Accounting or WAP Projects has been configured as the Costing Module. If the Requisition is linked to a Job/Project, select the correct Job/Project and Job Header/Project Item from the drop down menus. Note; if activities are being used in the Job structure, these will be available for selection and the Tree option should be used to ensure the correct Job Activity and Header are chosen.
If a user has ‘Access all Jobs/Projects’ ticked on their User profile, all live Jobs/Projects will appear in the dropdown list. Alternatively, users can be given access to specific Jobs/Projects and Job Headers/Project Items.
Nominal Tab
If a Job/Project and Job Header/Project Item have been selected, the nominal code will be automatically populated based on the selection and by default, users will not be able to change this code. This can be configured if required.

If a costing module is not integrated with WAP, the nominal will be pulled through from the default set against the stock item. If configured as such, users can search for a nominal code either by typing an account number or name. Users can be given permission on their User profile to ‘Access All Nominal Codes’ but it is advised to restrict user nominal access so they see a limited list of codes.
Stock Movement
This tab will show the stock movements against the stock item and Warehouse selected, if there is free stock in that warehouse.
Approval Tab
The approval tab will display the route configured for this line item. Users will not be able to make any changes to the route, unless they have the user type permission to ‘Create ad-hoc Approval Routes’ – this is recommended for Finance or Admin users only.

2.3. Add a Comment Line
Any additional comments that need to appear on the requisition as a line item can be added here and can be marked to show on supplier documentation. By default, the comment will not be set to appear on supplier documents.
2.4. Add a Charge Line
When adding a charge line the charge code will be pulled through from Sage 200, as configured in POP – POP Maintenance – Additional Charges). Choose the appropriate charge code and the corresponding name, value and nominal code will auto populate. Values can be overwritten if different to the default.
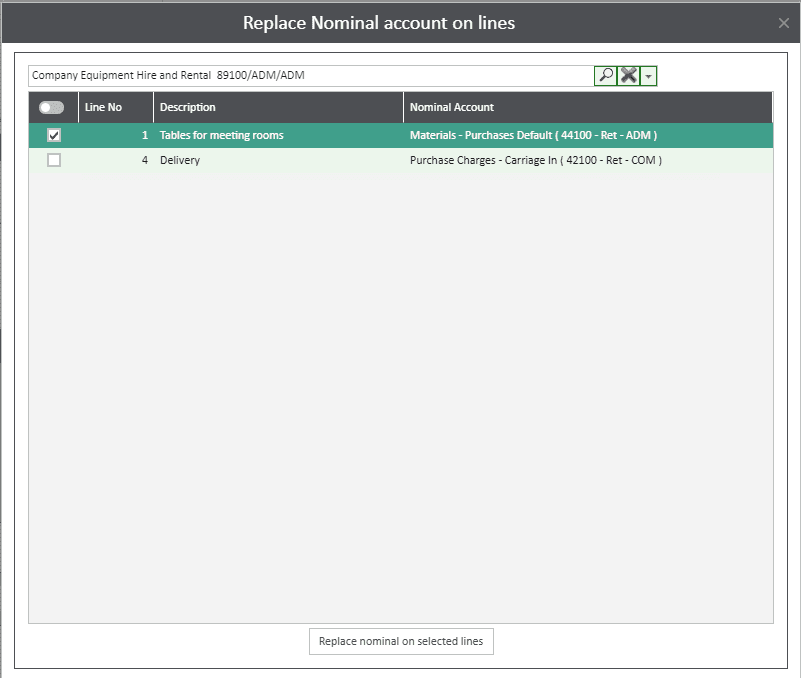
2.5. Update Nominals
This screen can be used to update nominal codes on multiple lines at a time; a nominal code can be chosen from the top drop down box, tick to select the appropriate lines and then click to replace nominal codes on the selected lines.
Access to this option is a User Type permission and would usually only be given to Admin or Finance users. It can be beneficial if there is a requisition with many lines that need the nominal code changing, rather than editing each line individually.
2.6. Line Values Tab
This tab will show a breakdown of the lines on the order with the quantities, unit prices, discount percentage, tax rate and net value. These lines can be edited or deleted, depending on Approval status and User Type permissions.

2.7. Line Quantities Tab
This tab will show a breakdown of the order lines with the Buying Unit description and the quantities that have been ordered, received and invoiced with individual line delivery dates. Lines can be edited or deleted, depending on Approval status and User Type permissions. As the requisition has goods received against or invoiced quantities, these figures will be automatically updated.

2.8. Authorisation Tab
Once the requisition has been submitted, the lines will be updated to show who is needed to approve the line and the status of the document. The document will not be fully approved until all lines have been approved. Clicking Restart will cause the line to be sent back to the beginning of the approval route.

2.9. Budget Tab
If budget checking has been enabled, budget information will be populated on the budget tab on the item line. Double click on the budget line to see the drilldown. If a line is over budget, the requisition and the line will be flagged as over budget.

2.10. Job Tab
If Sicon Job Costing, Sage Project Accounting or WAP Projects are enabled and the line is linked to a Job or Project, the details will be shown on this tab.

2.11. Delivery and Invoicing Tab
This tab will show information on supplier, delivery and invoice addresses, order discount percentages and Sage analysis codes.
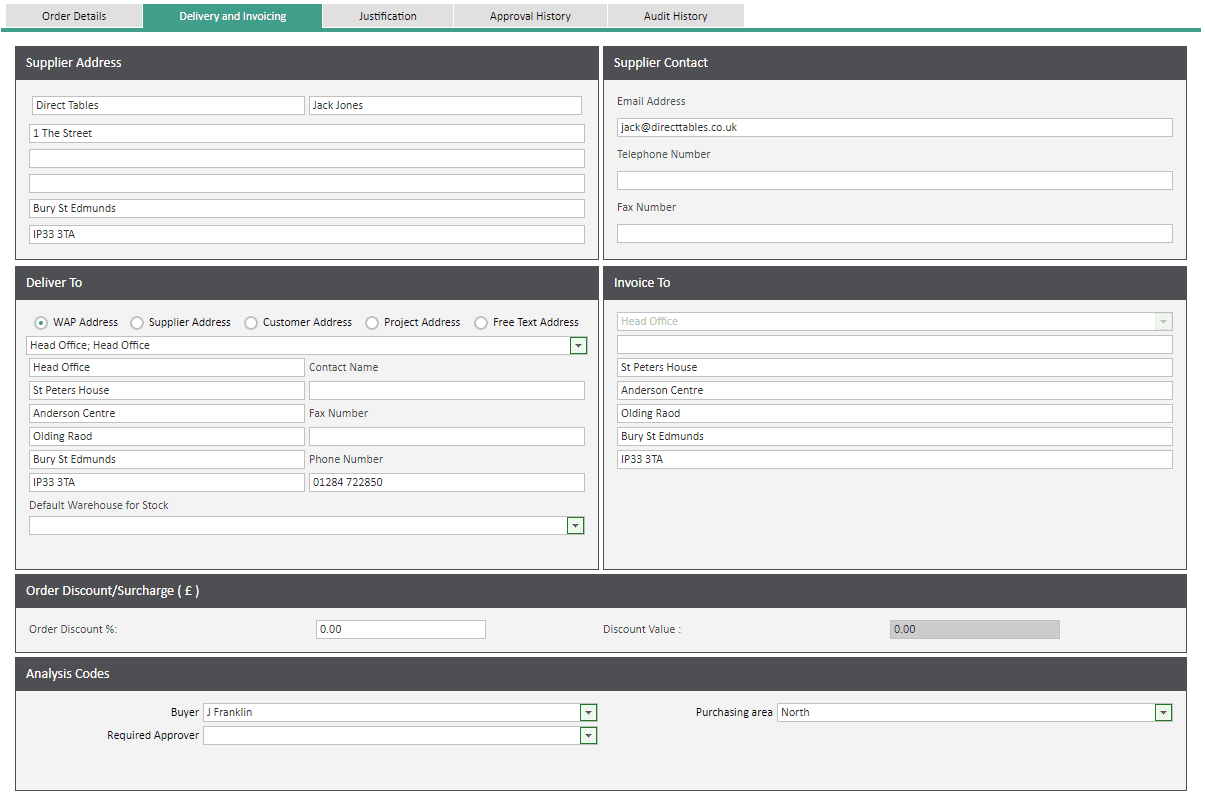
Supplier Address: this will be automatically populated from the Sage PL Account once a supplier has been selected.
Supplier Contact: supplier contact information will be automatically populated from the Sage PL Account default contact. This will usually be a finance contact but Supplier Roles can be created in Sage to allocate a purchasing contact to a supplier which WAP will then use. To create a Purchase contact, create a role title ‘SendPLOrderTo’ (Accounting System Manager – Settings – Customer and Supplier Roles) and then when creating a contact against the supplier account, link the contact through to this role. WAP will then pick up this contact to use for delivery details.
Deliver To: this address must be populated before lines can be added to a requisition and a default delivery address is linked through to a user on their WAP User profile. Delivery and invoice addresses are added in via System Settings – Delivery Addresses. If a user has permission to do so they may be able to change the delivery address. Alternative addresses such as Supplier/Customer/Project or Free Text Addresses can be made available within WAP System Settings if needed. The option to select a Warehouse only relates to purchases of stock items and the warehouse these items would be booked into when they are received in.
Invoice To: this address must be populated before lines can be added to a requisition and a default invoice address is linked through to a user on their WAP User profile. Delivery and invoice addresses are added in via System Settings – Delivery Addresses. If a user has permission to do so, they may be able to change the invoice address but this is not usually allowed.
Order Discount/Surcharge (£): an overall discount percentage can be applied to all lines on the requisition if required; enter the order discount percent and the discount value will be calculated and applied automatically. Users will not be able to change the discount value.
Analysis Codes: analysis codes set up and configured in Sage POP – POP Maintenance – Maintain Analysis Codes, will be drawn through to select.
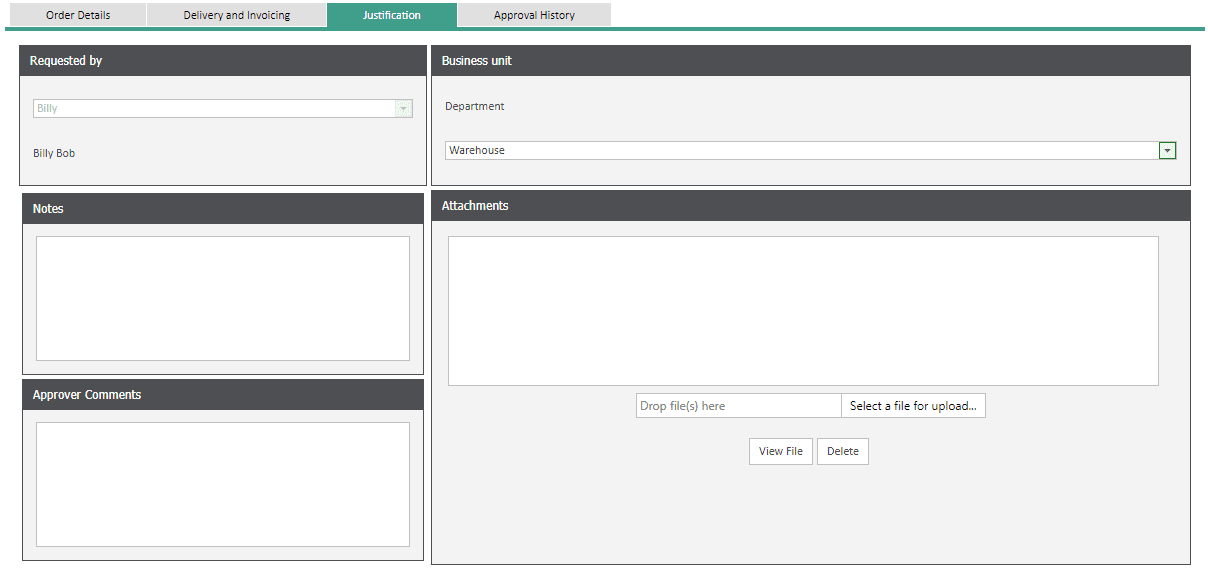
2.12. Justification Tab
This tab is used to provide a narrative and add file attachments to clarify or support why the items have been requested. These documents are for internal use only; they will not post through to Sage or appear to the Supplier.
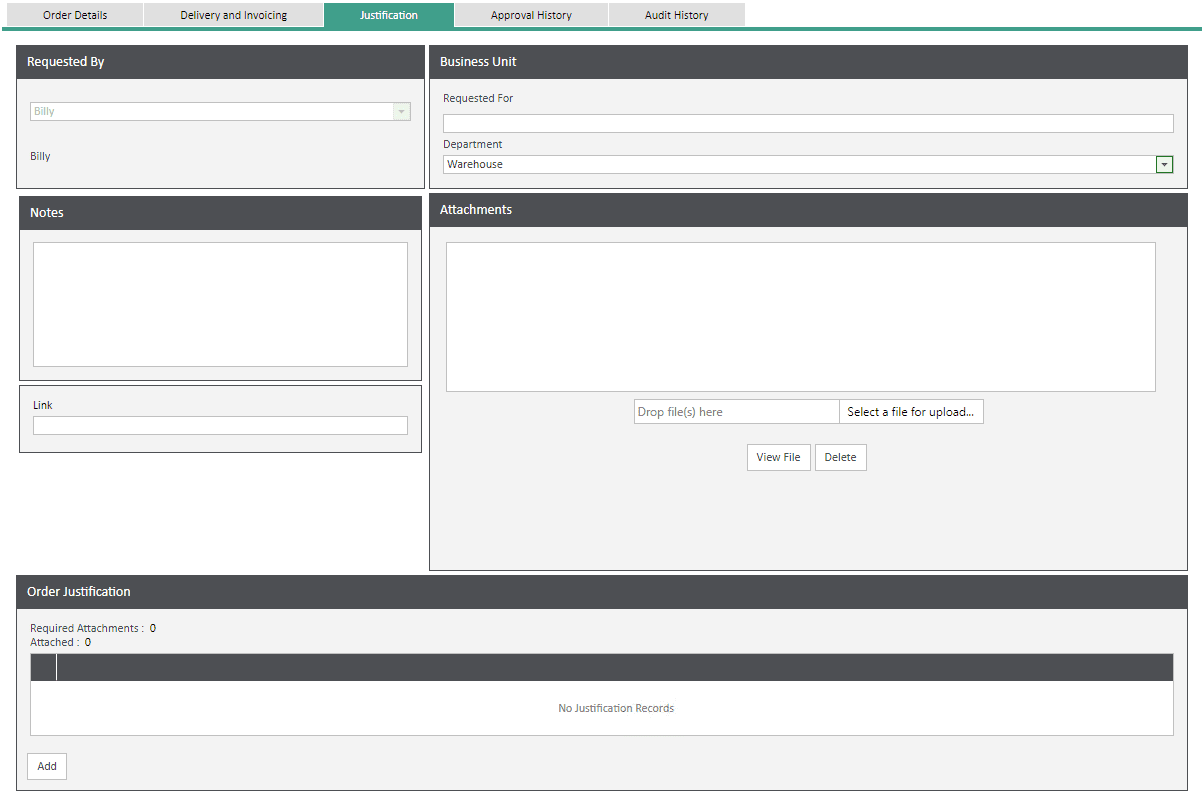
Requested By: this is automatically populated with the user’s name but can be changed to another user, if the permissions have been configured (User Setup – Users – Account Options). If approval routes are based on Requesting User, the system will pick up the user from here.
Business Unit: the ‘Requested For’ box is a free text field that can be completed as required and the ‘Department’ will be a drop down box for the user to select the business unit. The user’s default business unit will be populated initially but if the user has access to other business units they will appear to be chosen.
Notes: free text notes can be added here, once added a yellow post-it note icon will appear in the Flag column on the requisition summary grid tables and approval grid page.
Link: if configured, a hyperlink (e.g. https://www.www.sicon.co.uk) can be added here; once a hyperlink has been added, a globe icon will appear in the Flag column on the requisition summary grid tables and approval grid page. If a user clicks on this icon a new window will open through to hyperlink.
Attachments: supporting documents can be uploaded and attached to the requisition using the drop files or browse option; if one document is attached, a single paperclip will appear in the Flag column on the requisition summary grid tables and approval grid page, if further documents are attached, two paperclips will show.
Order Justification: justification bands can be configured (System Settings – Requisitions) so based on the value of the requisition a specific number of quotes need to be attached; e.g. up to £5,000 must have 1 quote, up to £10,000 must have two quotes and over £10,000 would require three quotes. If configured, this will show the user how many attachments are required and allow for quotes to be added.
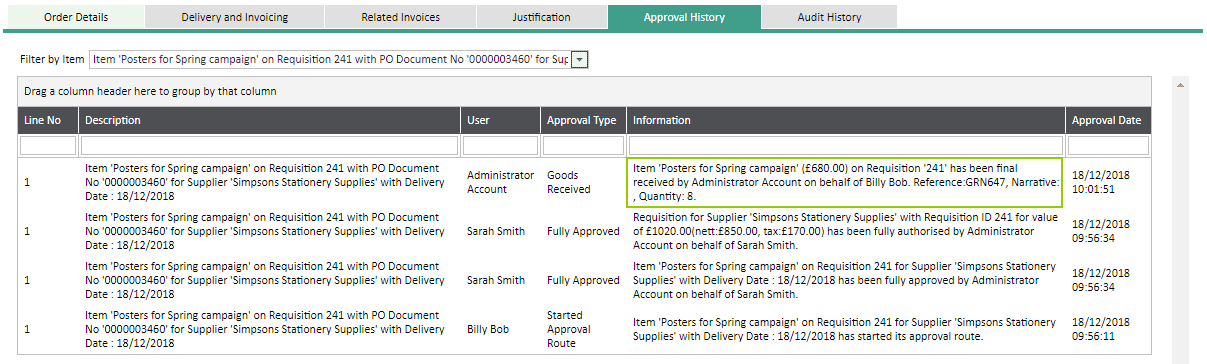
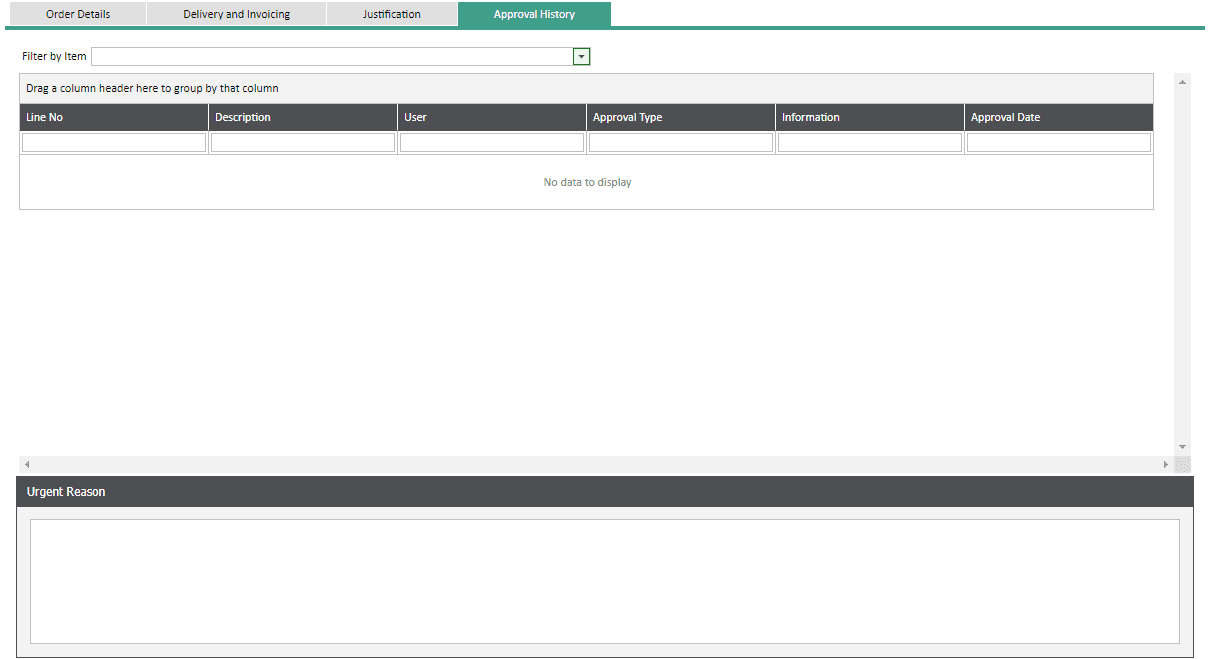
2.13. Approval History Tab
This tab will start to be populated once the requisition has been submitted and starts through the approval process. Only lines that require approval will be displayed, i.e. comment lines will not show.
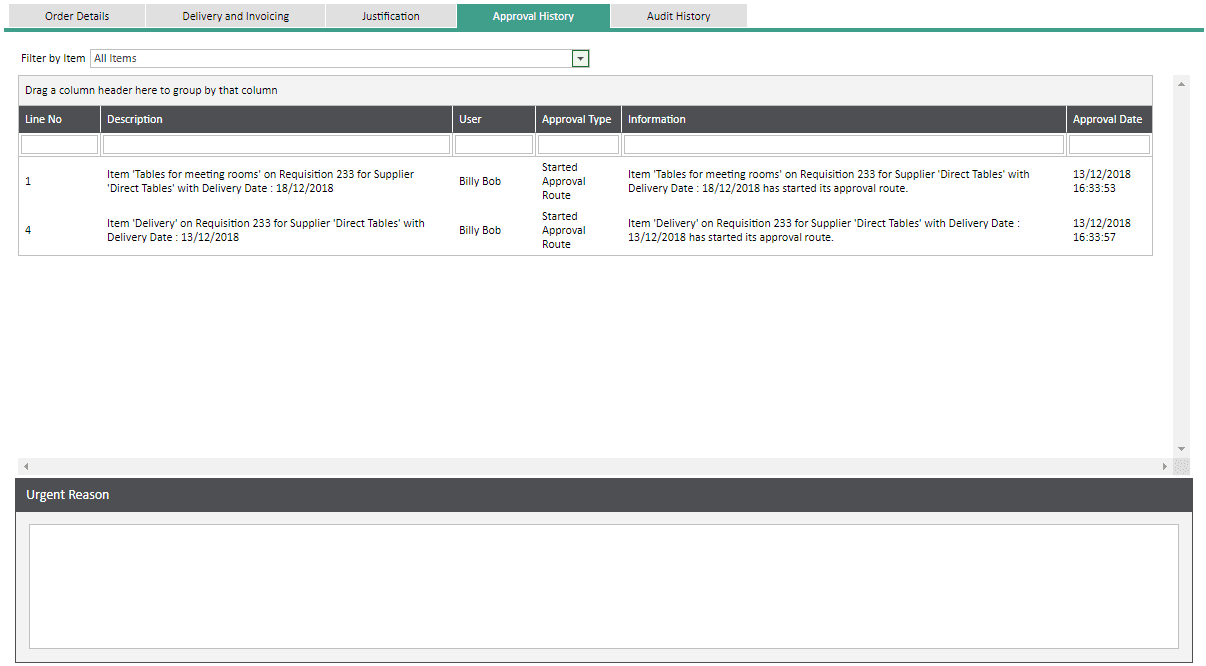
Filter by Item: by default all requisition lines will show, use this drop down box to filter to view history of one specific line.
Urgent Reason: if the user ticked the option to mark the requisition as urgent, the reason given will be displayed here.
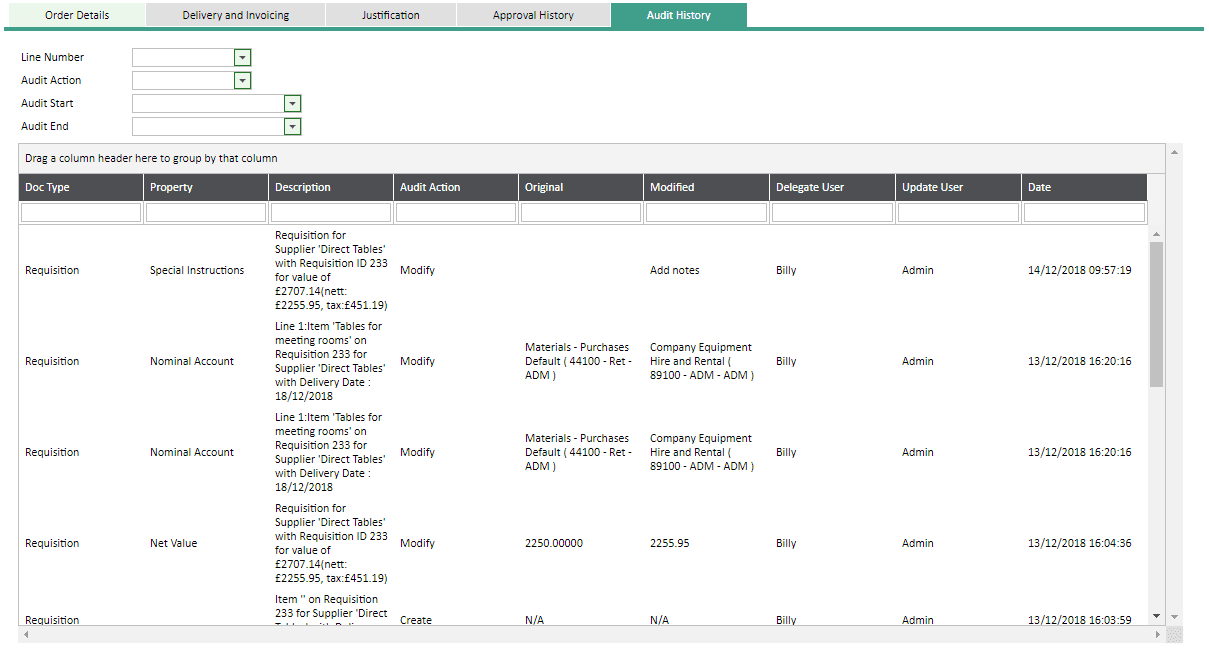
2.14. Audit History Tab
If configured, this tab will be populated with information on the order lines; when they were created, amended or deleted and by which user. By default, all requisition lines will show but the filters can be used to only show specific lines, audit actions (e.g. create, edit, delete etc.) or a date range when the action occurred.
Auditing is switched on in System Settings – Auditing.
3. Call Off / Service Requisitions
Call off orders will allow free text line orders to be goods received (or ‘called off’) by value rather than quantity by automatically switching the value and quantity fields around. To use this functionality, make sure Call off orders have been enabled (System Settings – Requisitions). The name of this functionality can be changed within System Settings if required.
If call off orders are enabled, a check box appears on the order header.
3.1. Call Off Requisition - Entry
If this check box is selected, when a free text line is added the unit price and quantity fields will be swapped – the unit price field will be showing as 1 and cannot be changed. The order line will need to be completed as standard; i.e. enter a description, select either a job, project or nominal code.
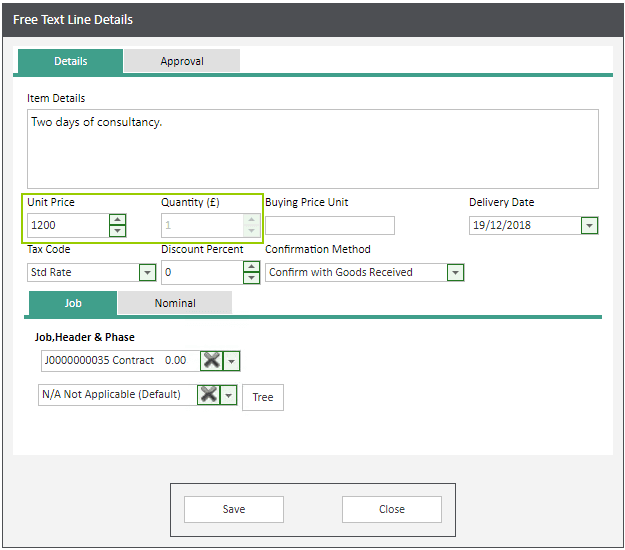
Additional free text lines can be added to complete the requisition but no stock items should be added onto a call off order; the Unit Price and Quantity columns are also swapped on the requisition lines grid pages to match the free text entry page and on the PO to the supplier.


3.2. Call Off Requisition – Approval
Once the requisition entry has been completed, it will need to be submitted and approved as standard. During approval the order is marked as a Call Off order in grids to highlight to the approvers as such.

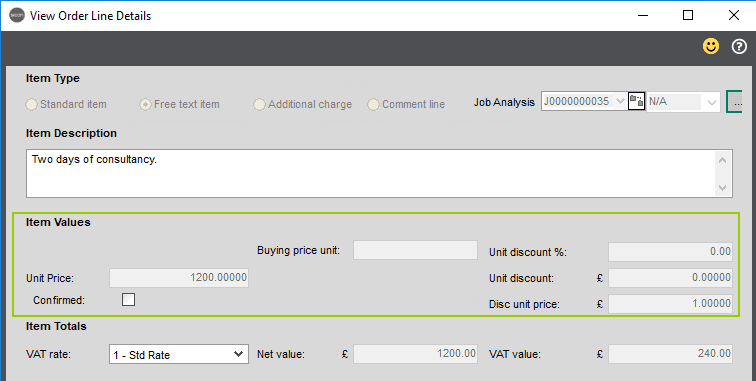
3.3. Call Off Requisition – Goods Received
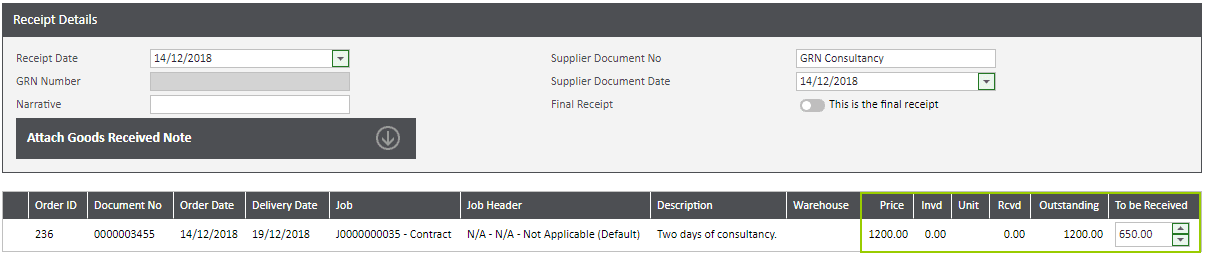
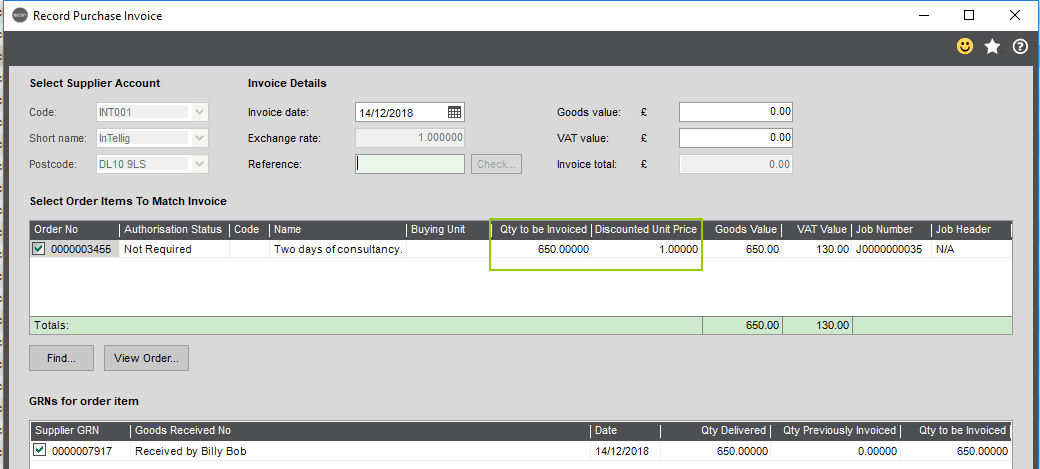
When goods receiving a call off order, the ‘Quantity’ field has been updated to show the ‘Price’. Enter in the ‘To Be Received’ field the value of the order that has been received, e.g. in the example below, £650 of a £1200 order has been received.
NB: standard free text lines and call off orders cannot be goods received together on the same goods received note, these lines would need to be received separately.
Within Sage POP the free text line has been amended in the same way to switch the quantity and unit price field on the call off order. The unit price field will be hidden and locked to 1 to show in the same way as within WAP.
An additional tab has been added onto the order within Sage to show the order has been created from WAP and is a call off order. N.B. this tab will only appear if the Sicon WAP Addon pack has been installed.

3.4. Call Off Requisition – Invoicing
When invoicing within Sage, the quantity to be invoiced will show the value that has been received within WAP.
4. Existing Requisitions
Select Existing Requisitions from the side menu to display the requisitions under various tab headings. Additional icons will appear in the Flags column to show if the order is over budget, has notes, has attachments or a hyperlink etc.

New: requisitions that have been saved but not yet submitted for approval.
Submitted: requisitions that have been submitted and are awaiting approval. By hovering over the blue information icon on the left, the lines will be displayed showing who they are awaiting approval from.
Approved: requisitions that have been approved, posted through to Sage and now show a Sage POP Order Number and are ready to be emailed to the supplier. Once printed, a printer icon will appear and if emailed, an envelope icon will appear. Approved orders will remain in this tab until they have been fully goods received and invoiced.
Rejected: requisitions that have been rejected during the approval process will show under this tab. It is up to the user who submitted the requisition to either delete or edit and resubmit for approval.
Completed: once an order has been fully goods received and invoiced it will move through to Completed, mirroring the process within Sage.
Failed: if a requisition fails to post through to Sage it will appear in this tab and will need the error flag removing before it can be posted again. The permission to clear errors and repost orders is usually just given to Administrators or Finance users. Common reasons for a requisition failing are due to the supplier being placed on hold within Sage once the requisition has been submitted, lines being entered with a negative value or the job or project being closed. More details on any error flags can be viewed through the Event Viewer.
Archived: users can archive their completed orders. If there are a large number of completed orders, it is recommended users do this on a regular basis to avoid potential speed issues.
4.1. Viewing Requisitions
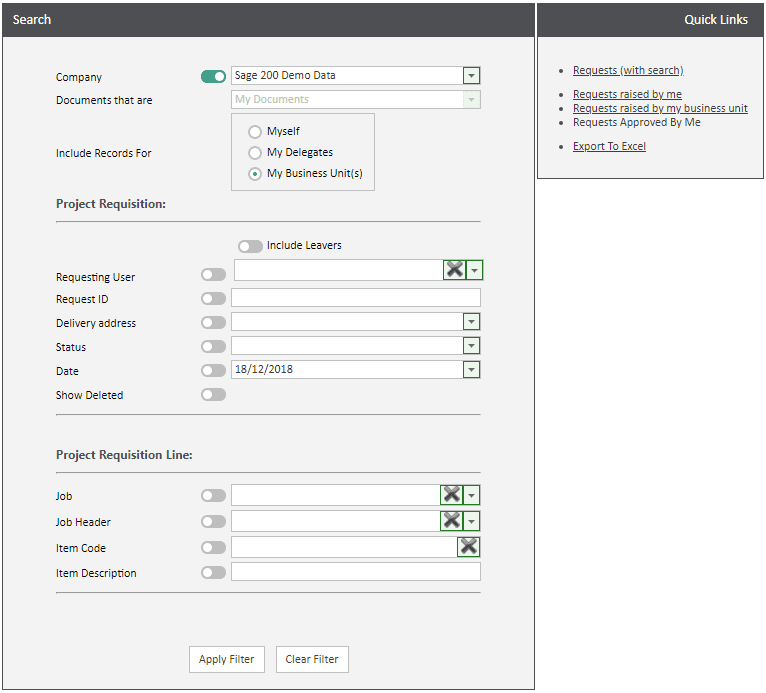
By default, users will always be able to see requisitions they have raised or approved. If permission is given, users may also be able to view all requisitions within the system or all raised by users in the same business unit.
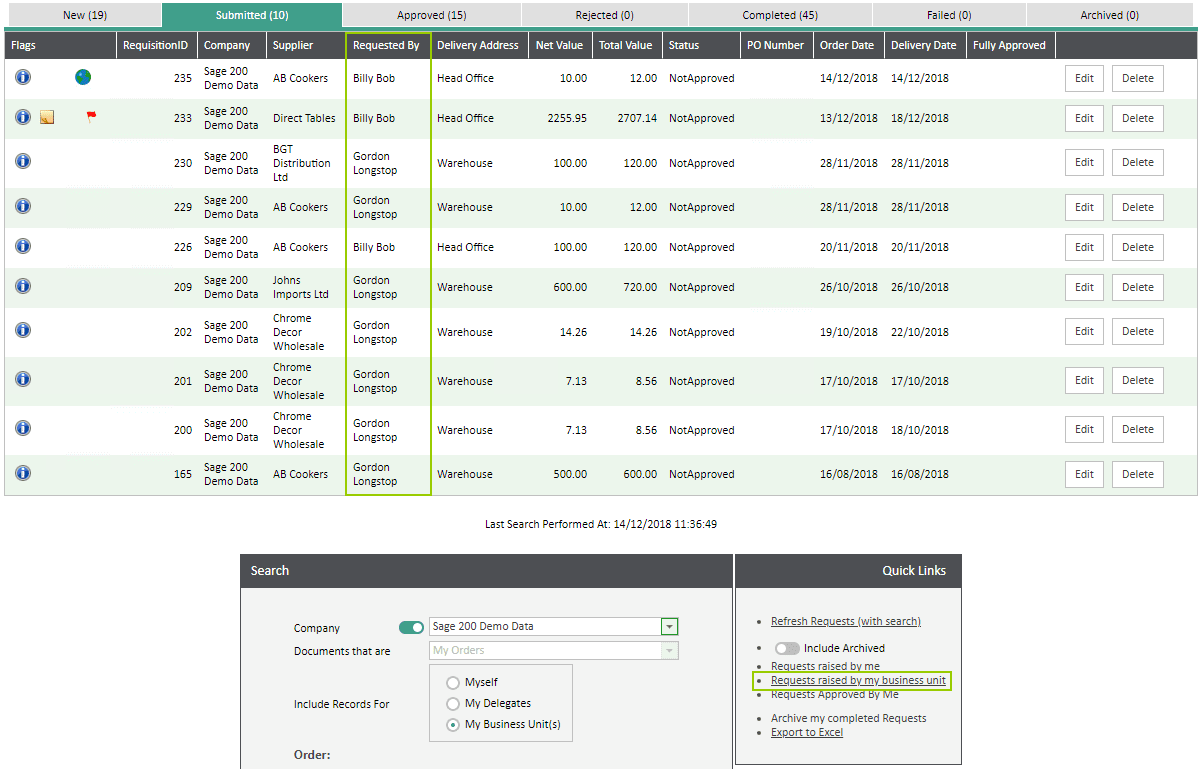
There are two options to search for an existing requisition; either use the Search filters or the Quick Links.
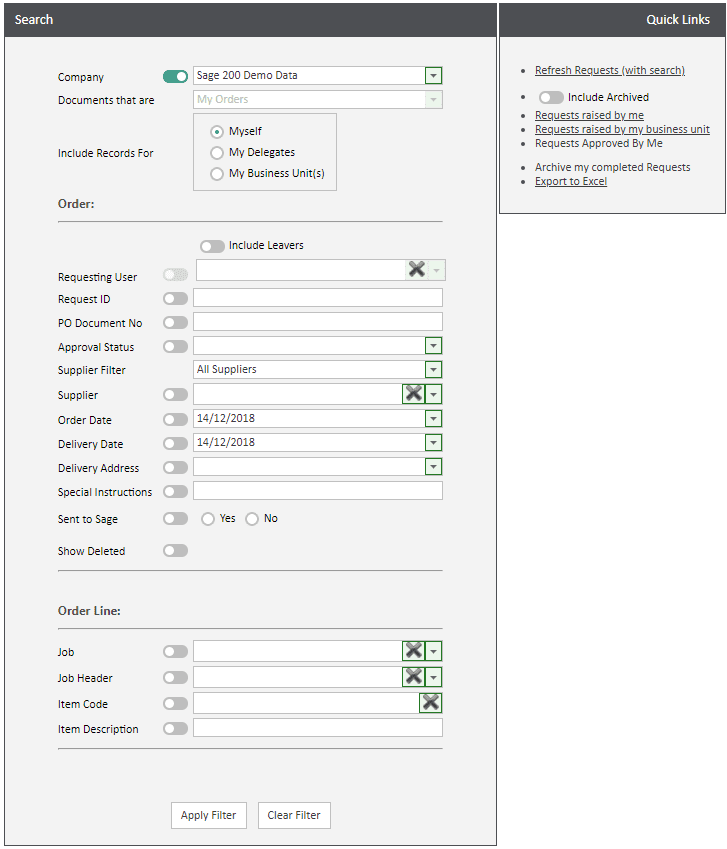
Search filters: depending on configuration, the user will either be able to search for their own, within their business unit, delegates or all users’ requisitions. Search filters can be used to find orders with a particular WAP ID, Sage PO number, supplier and if using a costing module, Job or Project. Use the Show Deleted option to show any requisitions or orders that have been deleted.
Quick Links: either click ‘Refresh Requests’ to update the grid and retrieve the most recent status of orders or other specific links to show particular orders. If users have permission, they will be able to archive their completed orders. All orders within the current grid can also be exported to Excel.
4.2. Viewing Requisitions raised by Colleagues
If users belong to a business unit and they click the Quick Link to view requests raised by my business unit, they will be able to view their own requisitions and any raised by users within their business unit(s).
4.3. Editing Existing Requisitions
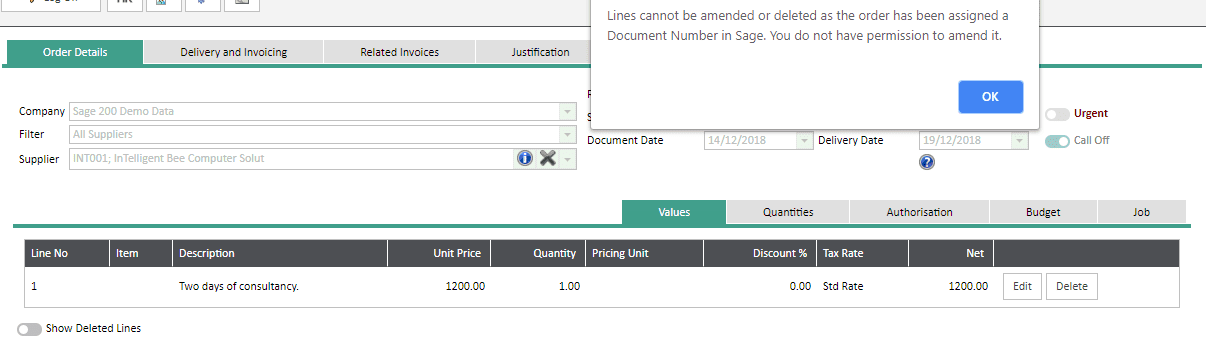
By clicking Edit on an existing requisition, this will open up to allow for viewing of order lines, delivery information, quantities received etc. Depending on User Type permissions, the user may be able to make changes on an order once it has been approved, up until the order has been goods received or invoiced. Any changes would need to be submitted for re-approval. Alternatively, users may not be allowed to make any changes to an order once it has been approved and a Sage PO number has been generated.
It is recommended that the only users who could change an order once it has been approved would be Administrators or Finance users.
4.4. Copying Existing Requisitions
Once an order has been fully approved it can be copied to create a new requisition. This functionality is useful if repeat orders are being placed regularly, or orders with many lines. The user should find the correct order to copy using the search functionality and click to Edit. Once the order is open, click the Copy Order button at the bottom of the screen.
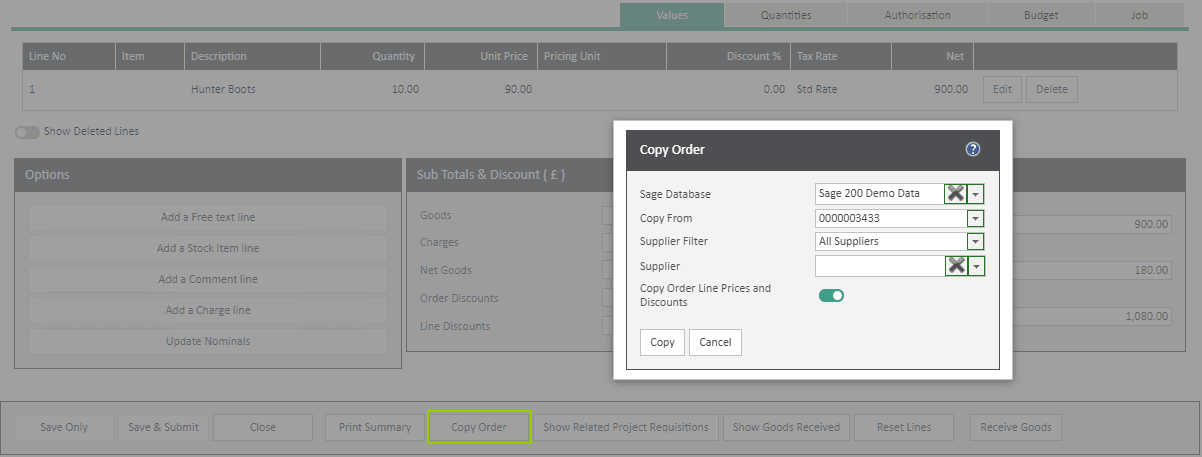
Sage Database: select the correct Sage company for the new order to be raised in. Only companies the user has access to will be visible.
Copy From: this is the order that will be copied; the order number will be automatically populated based on the order that was found but can be changed if required.
Supplier Filter: if analysis codes are being used to filter and group suppliers, select the correct group here, or leave as the default to show all suppliers.
Supplier: choose the correct supplier the new order should be raised for; start typing either the supplier name or account number to find.
Copy Order Line Prices and Discounts: this is ticked by default but untick if prices should not be entered on the new requisition from the existing order.
Copy: click here to create the new requisition, or cancel out to avoid completing this.
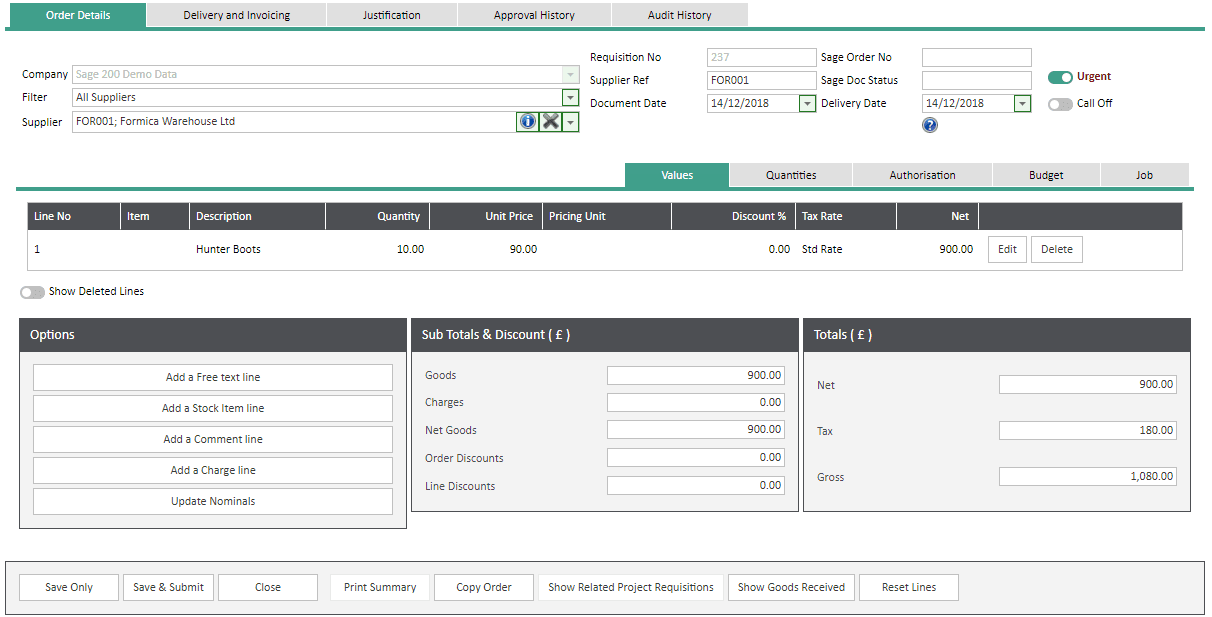
Once copied, a new requisition is created. This new requisition can then be edited if required; i.e. if lines need to be added or deleted, or changes to quantities etc. need to be made. Once the requisition is correct, this can then be submitted for approval.
4.5. Deleting Existing Requisitions
If the user has permission to do so, they will be able to delete a requisition using the ‘Delete’ button. An order can be deleted once it has been approved unless goods have been received or an invoice has been entered. If an order has been approved and posted through to Sage but is then deleted, it will show in Sage as Completed with a zero order value. If a user does not have permission to delete requisitions, they will see a message advising this.

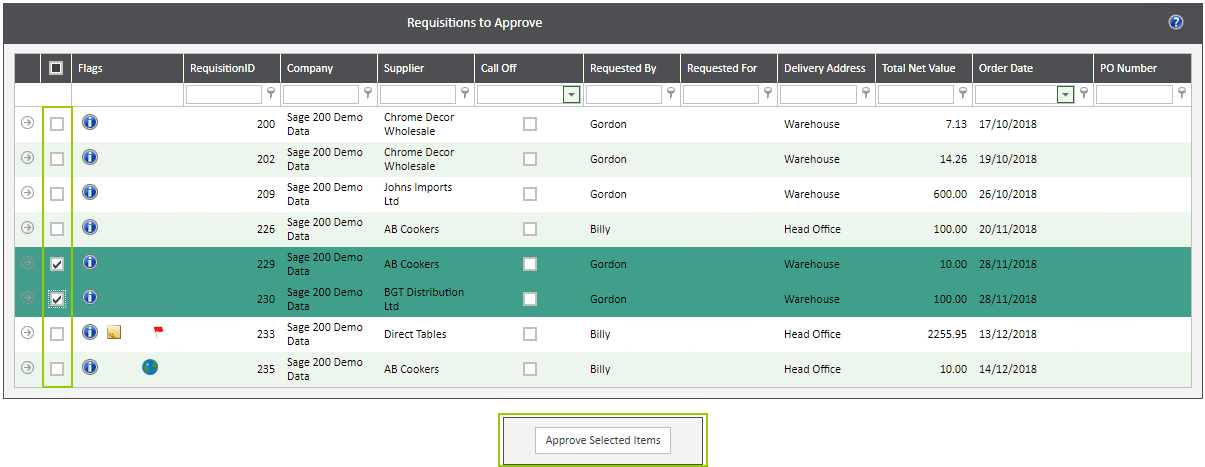
5. Approve Requisitions
To approve a requisition, either click on a hyperlink notification on the user’s WAP homepage, or navigate to the Approve Requisitions page from the side menu.
5.1. Requisitions to Approve - Approval
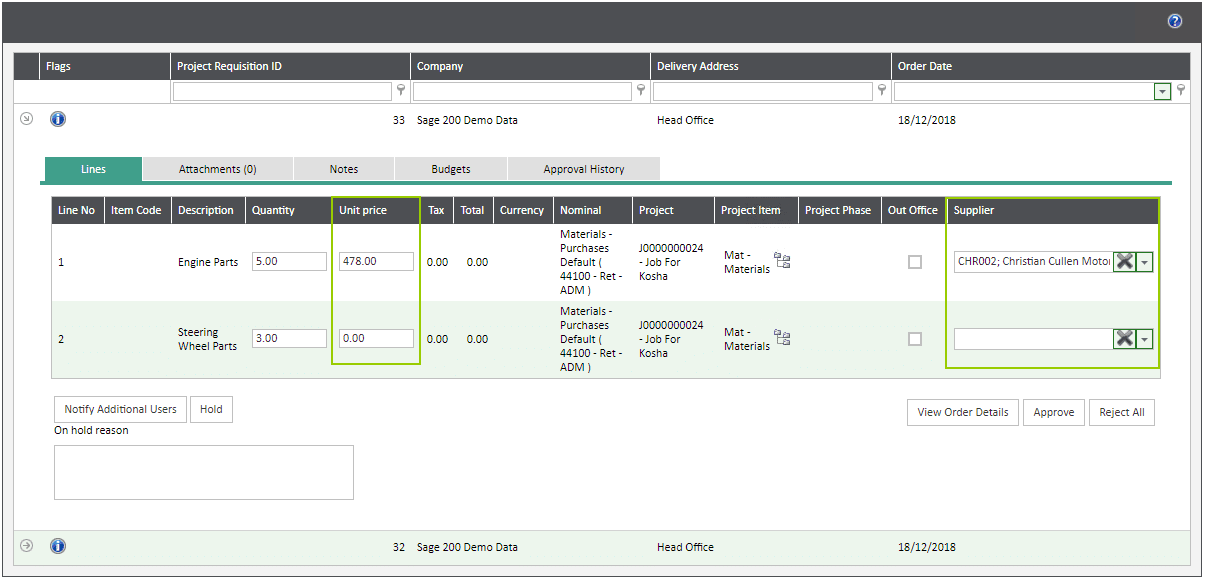
All requisitions awaiting the user to approve will be listed; click on the arrow on the left to expand and view the requisition line details. Only lines awaiting the current user for approval will be visible.

Lines: this tab will show all lines awaiting approval from the user with information on quantity, price, nominal and job or project. The View Order Details button will take the approver through to the main requisition page to view the requisition fully or to make any amendments, see below for further information on viewing order details. Individual lines can either be approved or rejected, or the whole order can be approved or rejected. See below for further information on Rejecting Requisitions.
Attachments: this tab will allow for any attachments added to be viewed. The number of attachments will be shown in brackets on the tab.
Order Justification: this tab will allow for any quotes added to be viewed. The number of quotes will be shown in brackets on the tab.
Notes: if any notes were added during creation of the requisition, these will be visible here. Notes can also be viewed by hovering over the post-it note icon under the Flags column.
Budgets: if configured, budget information can be viewed here showing further information on whether the nominal, job or project is within or over budget. If a line is over budget it will be highlighted on the Lines tab in red and there will be a red flag under the Flags column.
Analysis Codes: if analysis codes have been configured in Sage and completed during requisition entry, these will be visible here. Approvers are not able to change values selected on this tab.
Approval History: each line requiring approval will be displayed showing approval history.
If the approver has permission to approve multiple orders at a time, they will be able to select multiple requisitions to approve without needing to open to view individual lines. It is recommended that the only users who could approve multiple orders at once would be Administrators or Finance users.
5.2. Requisitions to Approve – Reject
If an approver wishes to reject one or all lines, they can click either Reject or Reject All; they will then need to enter a reason for rejecting before choosing to reject.
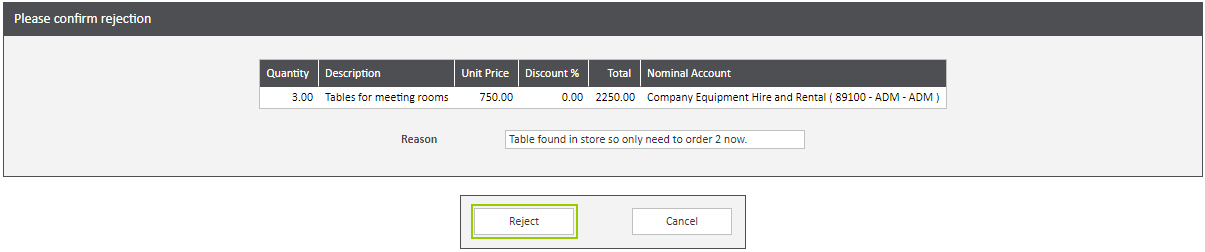
The user who raised the requisition initially will be sent a notification containing the rejection reason and the requisition will appear under the Rejected tab under Existing Requisitions.

The user who submitted the requisition can now:
- Delete the requisition if the approver has not allowed the purchase to be made (if the user has permission to delete a requisition).
- If the requisition has multiple lines, one which has been rejected and other lines which have been approved, delete the rejected line and resubmit the requisition. This will cause the requisition to move through as Approved and will post through to Sage.
- Edit the requisition to correct the rejected line and resubmit for approval.
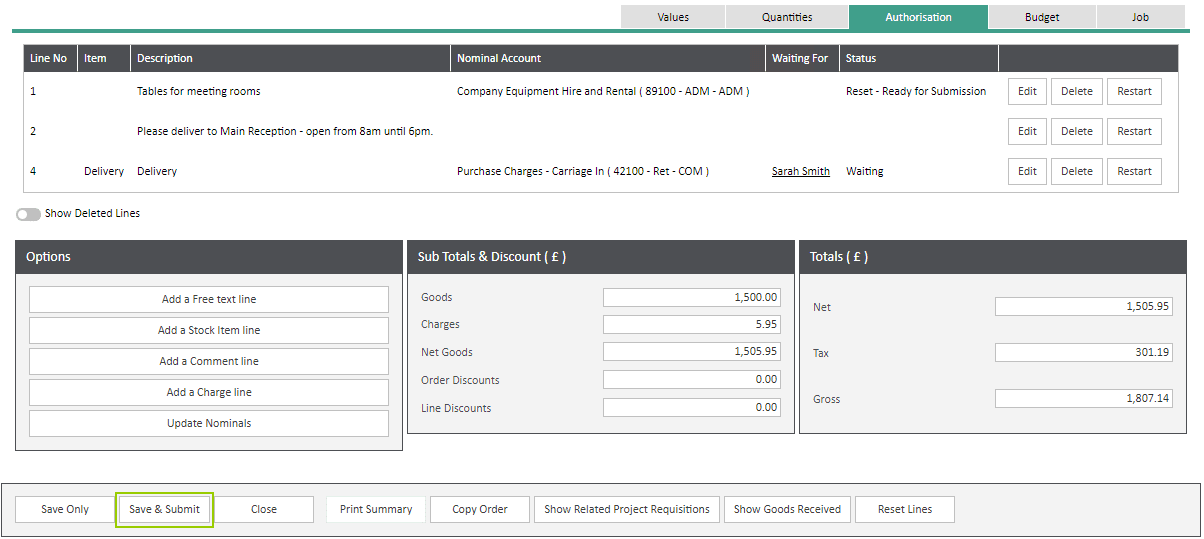
To correct the rejected line (option 3); Edit the requisition, edit the rejected line, make the correct change and save the line. In this example the quantity is being reduced from three to two. Once the change has been made, click the Authorisation tab and Restart the approval route. This is necessary to clear the rejected flag and allow for the requisition to be resubmitted for approval.

Once the line has been reset, save and submit the requisition for approval; this will start the approval process again.
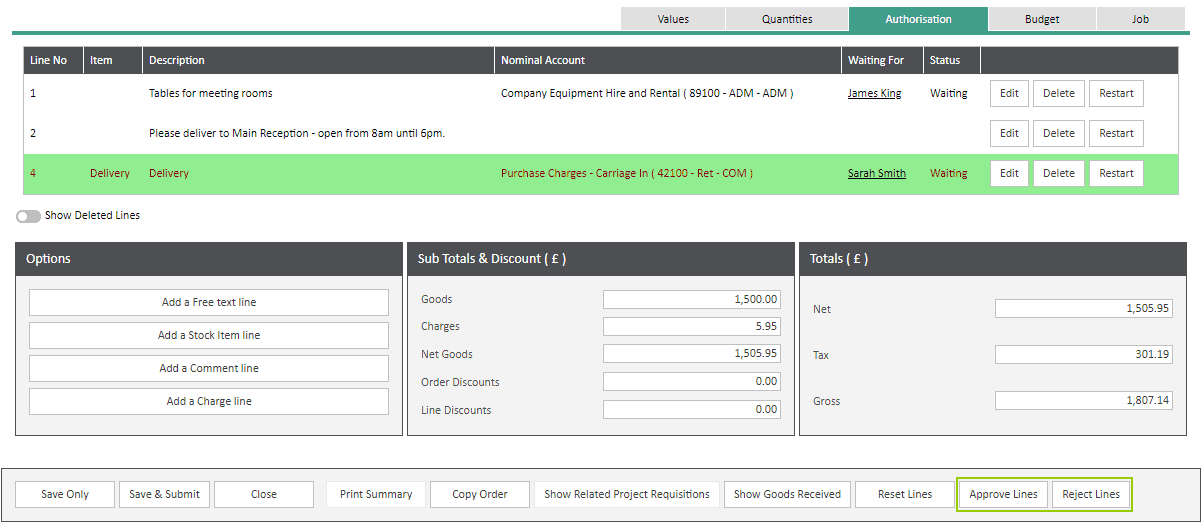
5.3. Requisitions to Approve – View Order Details
If during approval the approver wishes to see the original requisitions, they should click the ‘View Order Details’ button. If approval routes are configured based on nominal code, job or project, lines could be sent to other users to approve; when viewing the requisition as an approver, their lines to approve are highlighted for visibility – green if the line is within budget or red if the line is over budget. Approvers are able to make changes to lines; by default, this would not cause the document to restart its approval route although the system can be configured so changes made by approvers will cause the document to restart the approval process.
The approver will have options at the bottom of the requisition screen to either approve or reject lines without need to go back to the existing Approve Requisitions page. This will only approve or reject lines waiting for the current approver, it will not approve or reject lines waiting other users to approve.
5.4. Fully Approved Requisitions
Once approved, the requisition will move through the configured approval route until approved by an approver with sufficient approval value rights and any mandatory checks have been completed; at this point the requisition is posted into Sage as a PO and a Purchase Order number is generated within WAP. The user who submitted the requisition would get a notification advising them it has been fully approved.

6. Printing and Emailing Purchase Orders
Once a requisition has been fully approved and generated a PO number, it can be printed then emailed to the supplier from within WAP. Once the order has been found under the Approved tab, click on the Print Summary option and a preview will be generated – see below for details on configuring and linking PO layouts.
NB: as the print PO preview screen is a pop-up, the Sicon WAP website must be configured to allow pop-ups.

The PO can be printed if required, exported as a PDF document or emailed directly to the supplier by clicking the ‘Click here for email options’ banner.
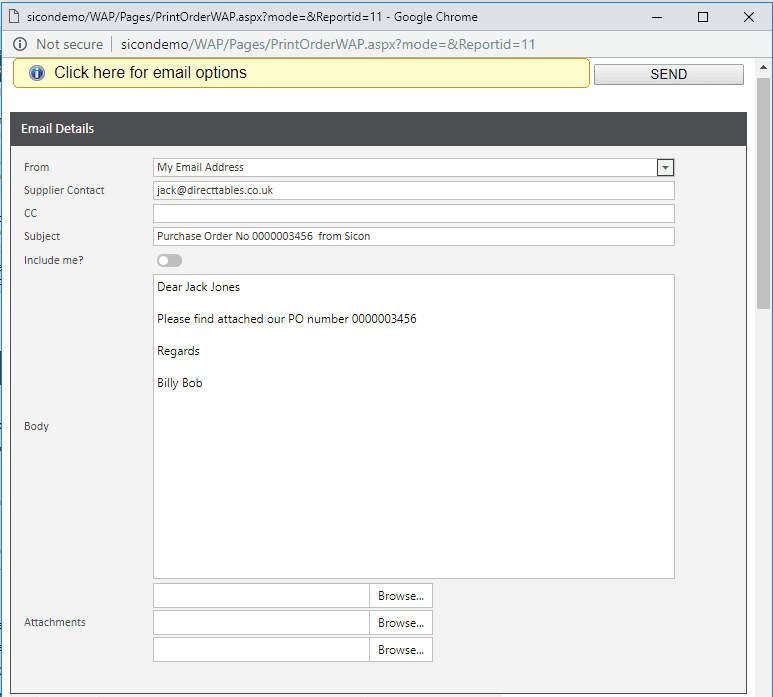
From: by default the option to send from the user’s email address will be selected but can be changed so the email is sent from the system email address as configured in System Settings – Email.
Supplier Contact: this email is pulled through from the supplier contact field on the requisition but the user is able to override if needed.
CC: enter an email address here if someone else should receive the email.
Subject: this text can be configured within System Setup – Sage Connections.
Include me: tick this box if the user should receive a copy of the email as well as the supplier.
Body: this text can be configured within System Settings – Sage Connections although users are able to override to include any other information required when sending through to the supplier.
Attachments: up to three attachments can be uploaded to be emailed out to the supplier along with the PO.
Once the order has been sent through to the supplier, an envelope icon will appear in the Flags column against the order, under the Approved Requisitions. If printed, a printer icon will show.

6.1. Purchase Order Layouts
PO Layouts are stored within System Settings – Reports. A number of layouts are pre-configured at install; hover over the thumbnail image to view the layout. A report can be renamed by clicking Edit but to make any changes to the layout, click Design. Layouts can also be Exported and then imported if changes are to be made.
NB: the reports are designed using DevExpress and we strongly advise only experienced report writers make changes to a design layout. Please ensure a backup is taken before any changes are made by exporting the layout as a .xml file. Any issues resulting from making changes may incur chargeable consultancy to resolve.
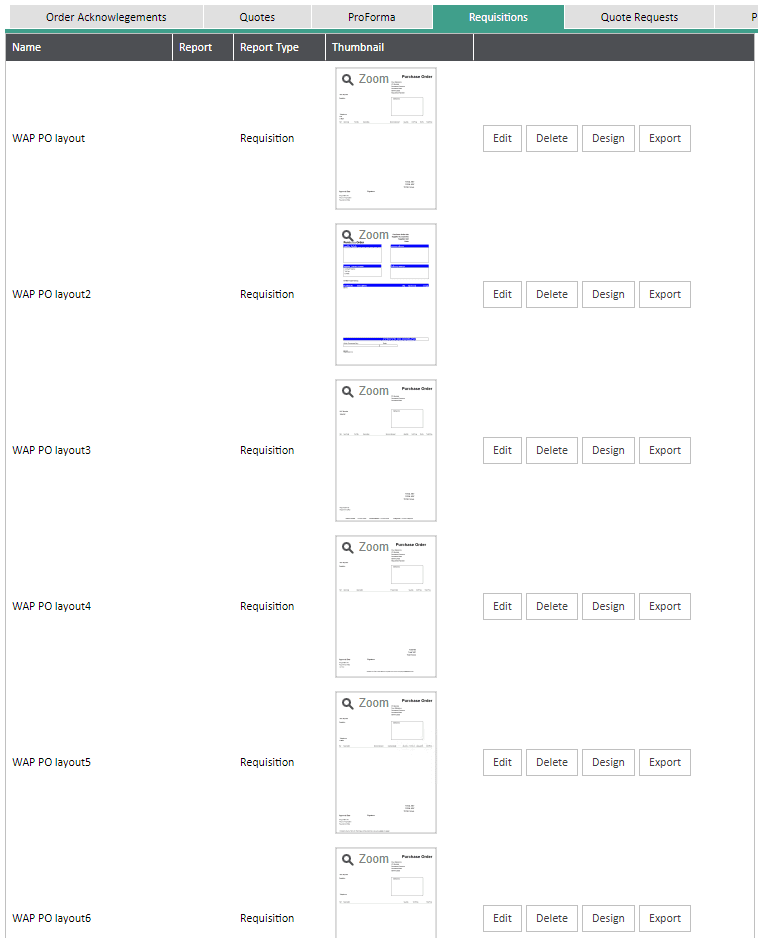
Up to two layouts can be used per Sage Company; these are configured in Sage Connections – Company Details – Purchase Order – Purchase Order Report. There is an option within Sage Connections to upload Terms and Conditions which would be emailed to the supplier along with the Purchase Order. However, many companies now prefer to include standard text on the PO layout or email body text stating e.g. “For full Terms & Conditions please visit www.companyname.co.uk/terms-and-conditions”. If Terms and Conditions are to be emailed along with the PO, there is an option to print them in a landscape format.

7. Goods Received
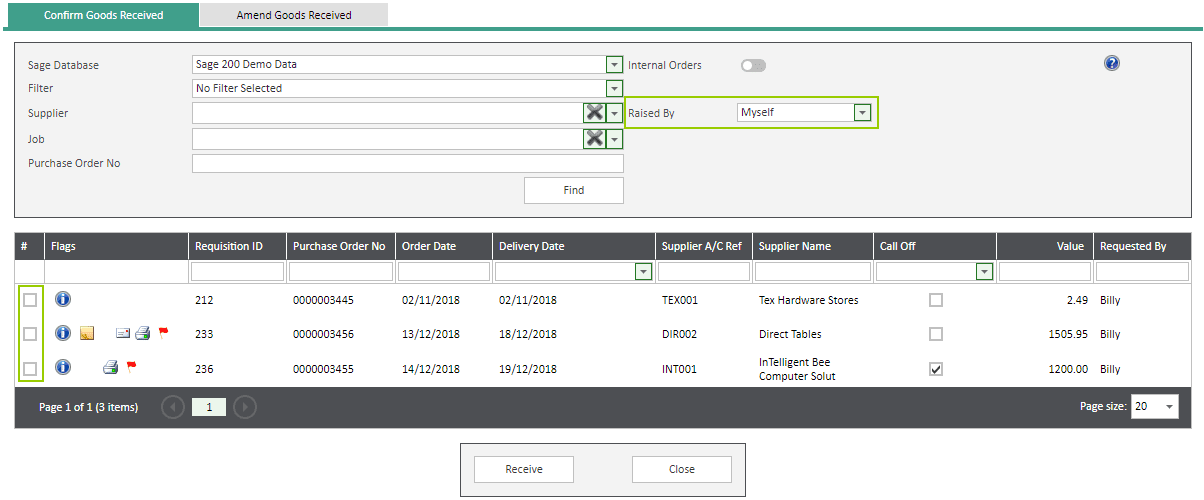
To goods receive an order, click on the Goods Receive option on the side menu. Once goods have been received in WAP against a PO, the quantities will update through on the Sage PO in Sage POP.
By default, the list displayed will show approved orders raised by that user only, that have not been fully received. Depending on configuration, the user may also be able to see orders raised by other users within their business unit(s) or all orders raised in the system. Specific orders can be found using the filters at the top of the screen to search by supplier, job or a PO number. There are also filter boxes on each column header.
To receive goods, select an order using the tick box and click Receive. If required, multiple orders can be received against the same supplier.
7.1. Receiving Goods or Services
Once an order has been selected, the individual lines requiring goods to be receipted will be displayed.
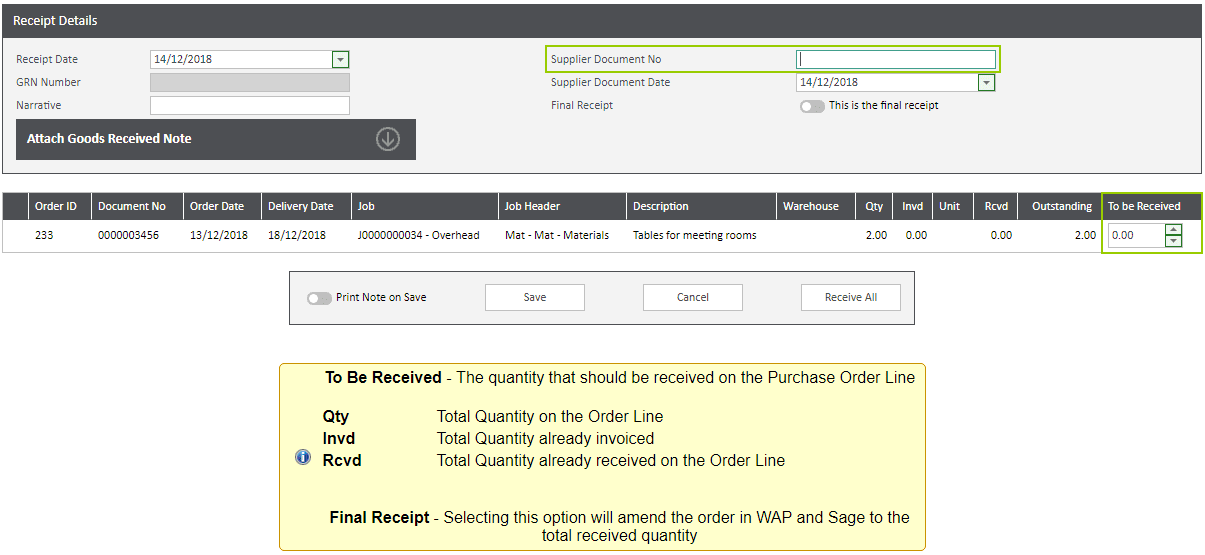
Receipt Date: this will default to the current date.
Supplier Document No: this is a mandatory field and will either be the delivery note number (if applicable) or an agreed text for all users to enter, e.g. their initials and the date.
GRN Number: the system will populate this automatically when the goods received screen is saved.
Supplier Document Date: this will default to the current date but can be changed if needed.
Narrative: free text field to allow the user to record any additional information if required.
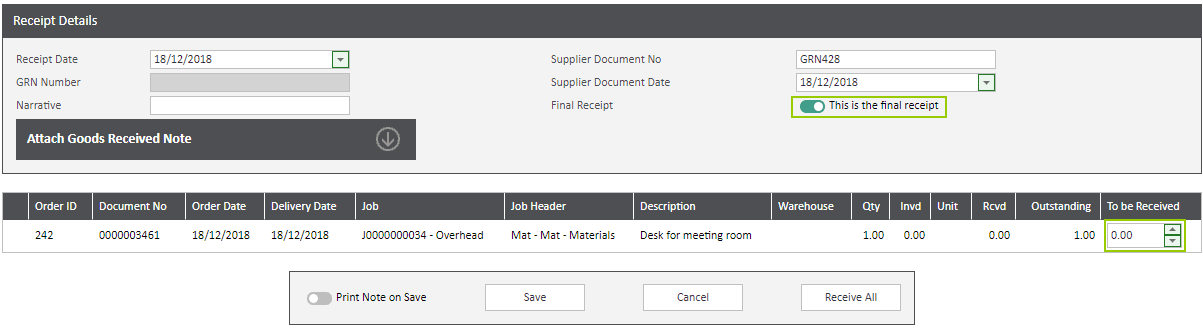
Final Receipt: if recording a final, part delivery, this button can be ticked to amend the PO in WAP and Sage. Please see below for more information on using the Final Receipt Functionality.
Attach Goods Received Note: goods received documentation can be uploaded through this banner using the drop files or browse option. If Sicon Document Management is enabled, this document can be viewed in Sage POP by users with a DMS view licence, either by viewing the delivery history of the order line, through the Sage Amend Goods Received screen or by using the Search functionality within the Sicon Document Management menu option.
To be Received: enter the quantity that has been received against each line. By default, the system will not allow over receipt of goods but will allow for a part delivery to be recorded. If a part delivery has been received, the remaining items will stay on the PO as to be received at a later date, the order will stay as an approved requisition and will remain as a live PO in Sage until all items have been delivered.
Print Note on Save: tick to allow for a popup to appear on Save which can then send an email confirming goods have been received; this email can either be sent to the supplier or to a WAP user.
Save: once goods received quantities have been entered, click Save to confirm.
Cancel: click to close out of this screen without saving any changes.
Receive All: click to populate all lines with the outstanding order line quantities.
If lines on the requisition have different confirmation intents (as configured in Sage), these lines must be receipted separately; this is done to ensure that all good receipts are posted correctly through to Sage. If lines have different confirmation intents; i.e. if there is a stock line and a free text line with confirmation not required, the below message will be shown. One receipt per confirmation intent will need to be done.

7.2. Receiving Batch or Serial Number Goods
When goods receiving stock items which belong to a product group where ‘Items use Batch or Serial Numbers’, an option will appear to select the Batch/Serial field. Click the arrow to expand the line and enter the batch or serial number and the appropriate goods received quantity. If each item needs a separate batch or serial number, click the ‘Add new Batch/Serial button’. Once all lines have been allocated the correct numbers and quantities, click to save.
7.3. Amending Goods Received
If an error has been made when goods receiving, the option to amend goods received will allow users to change the quantity received. Under the tab to amend, find the correct order using the filter options and click to edit.
NB: this option is not possible if a user has marked a goods received as ‘Final Receipt’.
In the below example, the original quantity received was ten but on checking the delivery it was found to actually be nine. The ‘Amended Received’ quantity is changed to 9 and saved; this will then update the PO in Sage to show the correct quantity.
7.4. Final Receipts
If an order has been part delivered and it is known that outstanding quantities will not be received, tick the ‘This is the Final Receipt’ button; this will update the PO in WAP and Sage so the order quantity will be the same as the goods received quantity. N.B. if this is done it will mean the order can no longer be edited or the goods received quantity amended so should therefore be used with caution.
In the below example the original order was for 10, 8 are being final goods receipted so this will change the order in WAP and Sage to be for 8. This means that when an invoice is entered for 8, the order will then move to Complete. If the remaining two were to be delivered at a later date they cannot be goods received on this order; a new PO would need to be raised, approved and then goods receipted against.

The Approval History will show that the goods were final receipted.
7.5. Zero Value Final Receipts
If a final receipt leads to an order having no lines with a quantity greater than zero, the order will be deleted in WAP and cancelled in Sage; the system is being told the order is no longer to be received or required. In the example below, one desk was ordered but the order cannot be fulfilled so the user final receipts this line at zero; this will then cancel the order which moves it to Complete in both WAP and Sage.
The order can be found in WAP using the search filters and including the option to view deleted orders. Once the order is found, it is possible to then view the deleted lines and use the Approval History tab to see which user goods receipted the order which caused it to be deleted and set to completed within WAP and Sage.


8. Reports
There are three reports within the Requisition module.

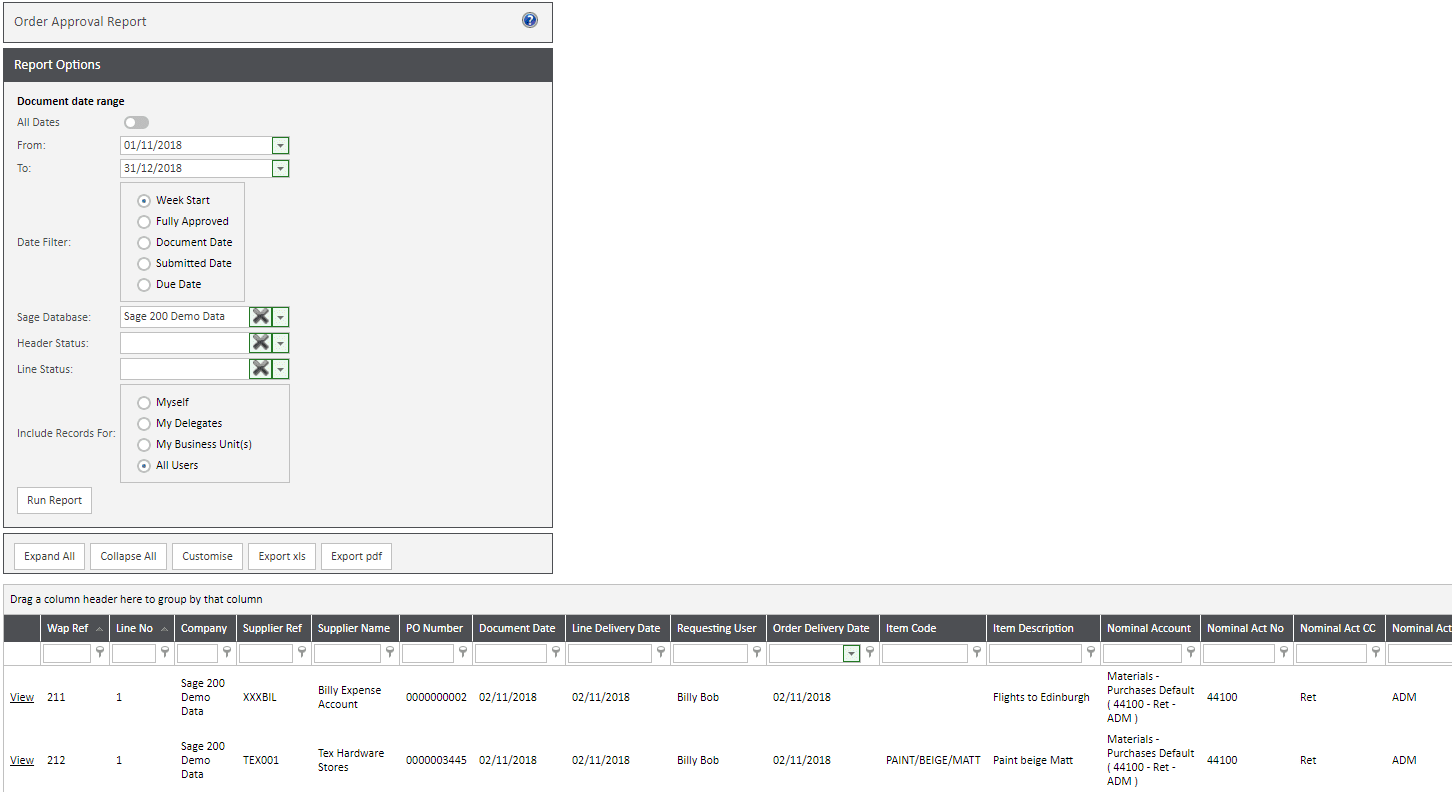
8.1. All Order Lines Report
This report will show a breakdown of all requisitions with their line detail, quantities, approval status and approval history.
Depending on User Type and User configuration, users will be able to see either information relating to their orders, their delegate or business unit orders or all orders on the system. Use the date range, database filter, header and line status options to filter data as required.
All reports can be exported to Excel, some reports can be exported to PDF and can be adapted either by dragging column headers to change the order or group data by a particular header. Click the ‘Customise’ button for the Field Chooser to appear which will allow for additional headers to be added or existing headers to be removed. N.B. reports are cookie based so to allow for this customisation, ensure the browser settings allow cookies from the WAP website. Customised columns may return to the standard configuration following a WAP or browser upgrade as cookies may be cleared.
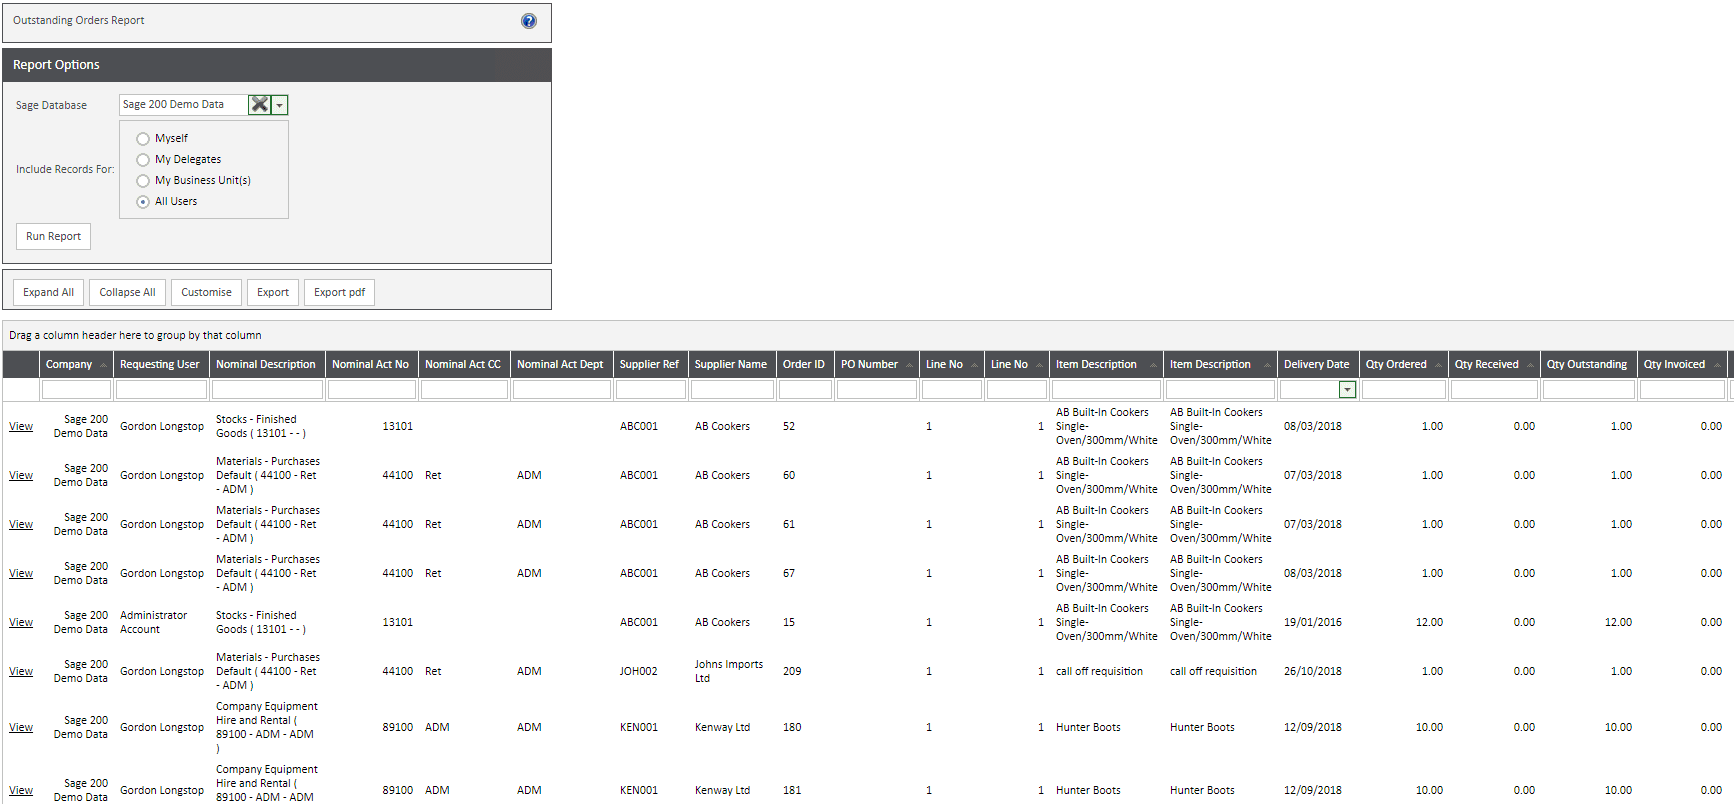
8.2. Outstanding Orders Report
This report will show orders which have not yet been fully goods received or invoiced. Quantities outstanding as well as value and quantity to accrue will be listed against each line.
Depending on User Type and User configuration, users will be able to see either information relating to their orders, their delegate or business unit orders or all orders on the system. Use the database filter option to filter data as required.
All reports can be exported to Excel, some reports can be exported to PDF and can be adapted either by dragging column headers to change the order or group data by a particular header. Click the ‘Customise’ button for the Field Chooser to appear which will allow for additional headers to be added or existing headers to be removed. N.B. reports are cookie based so to allow for this customisation, ensure the browser settings allow cookies from the WAP website. Customised columns may return to the standard configuration following a WAP or browser upgrade as cookies may be cleared.
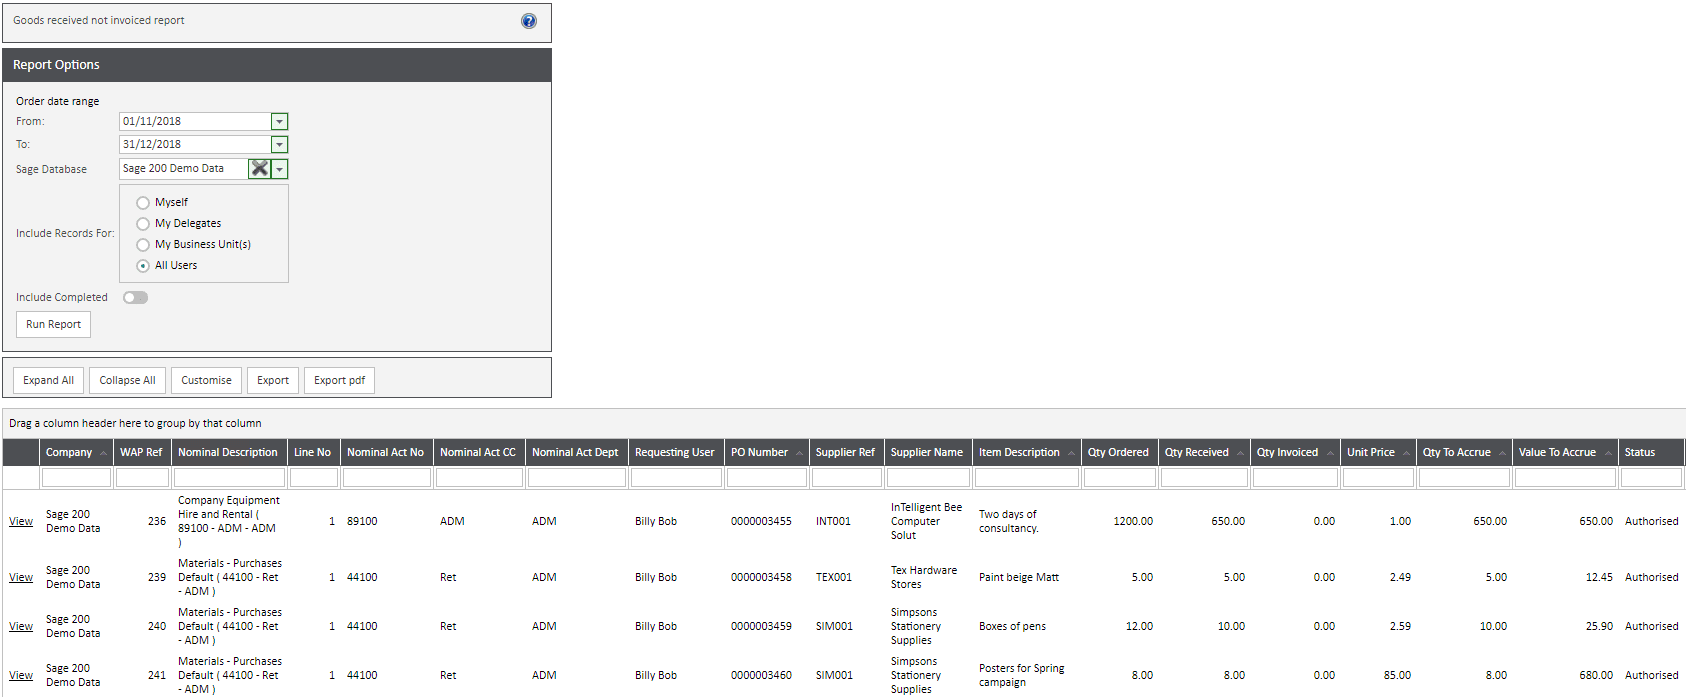
8.3. Goods Received Not Invoiced Report
This report will show orders which have been goods received but not yet invoiced against. Quantities requiring invoicing will be shown against each line as well as quantity and value to accrue.
Depending on User Type and User configuration, users will be able to see either information relating to their orders, their delegate or business unit orders or all orders on the system. Use the date range and database filter option to filter data as required.
All reports can be exported to Excel, some reports can be exported to PDF and can be adapted either by dragging column headers to change the order or group data by a particular header. Click the ‘Customise’ button for the Field Chooser to appear which will allow for additional headers to be added or existing headers to be removed. N.B. reports are cookie based so to allow for this customisation, ensure the browser settings allow cookies from the WAP website. Customised columns may return to the standard configuration following a WAP or browser upgrade as cookies may be cleared.
9. Import Requisitions
If a user has permission to import requisitions, there is a side menu option for ‘Import Requisitions’. Templates can be generated here, completed and then imported. This functionality is useful if a site is regularly creating unique requisitions with many lines as this can speed up requisition entry. Once an import has been completed and validated, it can be imported. There is an option to either import as a New Requisition which will require submission, or to submit when importing so the requisition will be sent down the approval route straight away.
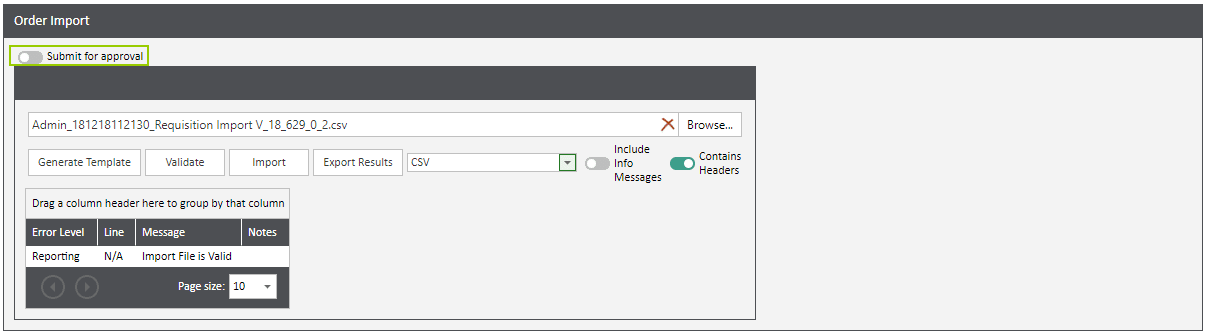
If the order was set to submit, it will be showing to the user under the Submitted tab.

If the order was not set to submit, it will be showing to the user under the New tab.

Standard pre-configured approval routes will be used, either based on nominal, job, requesting user etc. and if configured, budgets are checked either against the nominal code or the job, as configured.
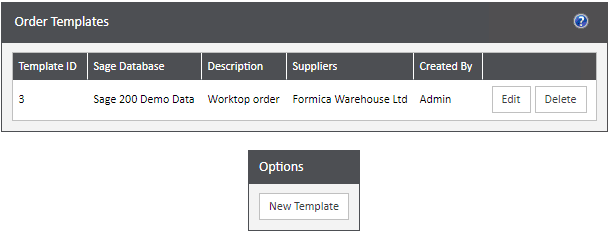
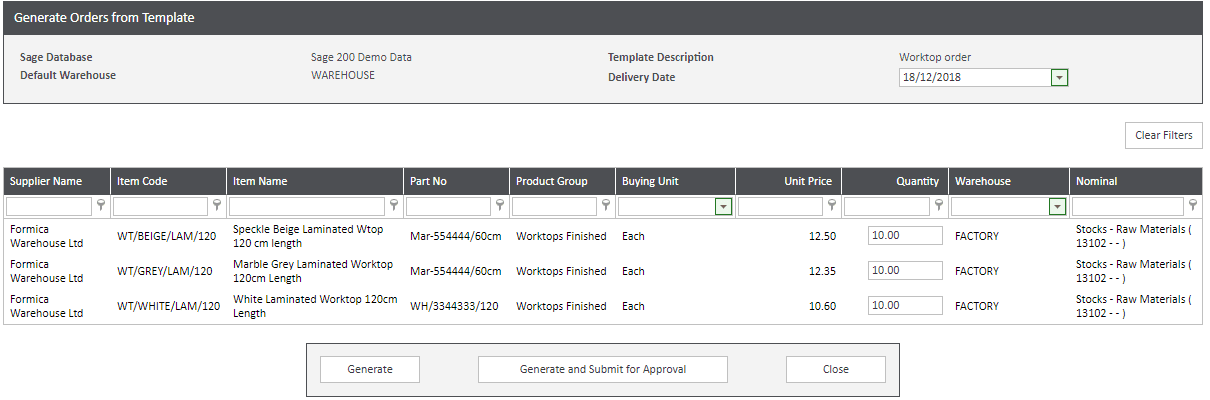
10. Templates (for use with Sage 200 Stock)
If a site is using Stock within Sage 200 it is possible to create templates in WAP that can then be used for repeat stock requisitions. If a user has permission to create or amend templates, there is a side menu option for ‘Templates’. Any templates previously created will show here and can be edited, or new templates can be created.
10.1. New Templates
To create a new stock template, click the New Template option.
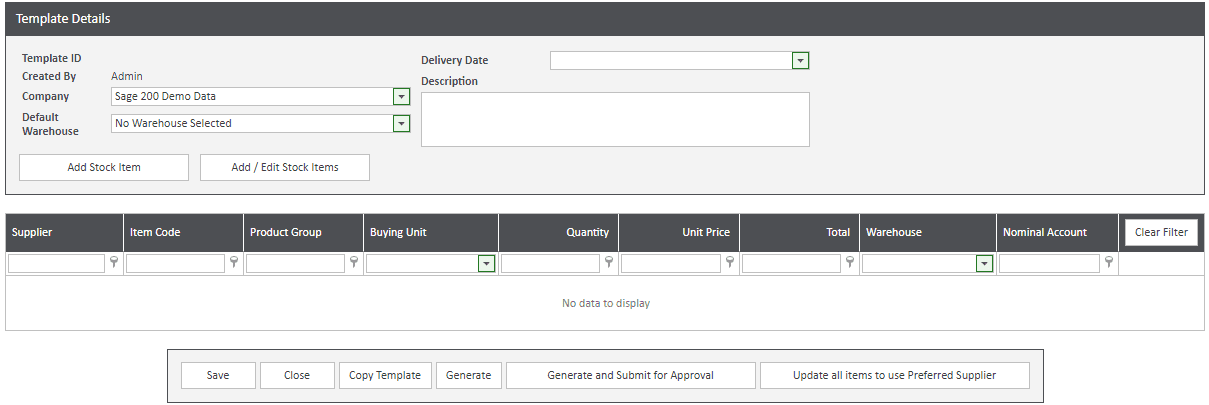
Company: pick the correct Sage Company from the drop down list.
Default Warehouse: pick the correct Warehouse from the drop down list.
Delivery Date: if the template is to be generated, enter the required header delivery date.
Description: enter a description for this template; users will see this to enable them to pick the correct template.
Add Stock Item: click to add individual stock items to the template; once the stock item has been added, enter the quantities, amend the price if not correct, choose the nominal code and save. Additional stock items can be added as needed.
Add / Edit Stock Items: this option can be used to select multiple items to appear on the template for one supplier. All stock items provided by the supplier will be listed and can either be selected individually or by ticking ‘Auto Add Items with Quantities’ and editing the quantity accordingly; the complete list will be added to the template once saved.
Once the correct stock items have been added to the template, the template can either be saved or used to create a new requisition.
Save: use this to save the template so it is available to other users when entering a requisition.
Close: use to close the screen without saving any changes.
Copy Template: use this option to copy template and make changes if required.
Generate: create a requisition based on the template; this will not be submitted for approval by appear on the New tab so edits can be made before the requisition is submitted.
Generate and Submit for Approval: create a requisition based on the template that is submitted for approval. Standard pre-configured approval routes will be used, either based on nominal, job, requesting user etc. and if configured, budgets are checked either against the nominal code or the job, as configured.
Update all items to use Preferred Supplier: if the template was created and the supplier was not the preferred supplier (as set in Sage 200), this will update the template so the preferred supplier is used.
10.2. Editing Existing Templates
Once a template has been created, it is possible to edit by clicking the Edit button and deleting or making changes to existing lines or adding new lines.
10.3. Creating a Requisition from a Template
If a user is configured to be able to use a template, there will be the option to create a new requisition based on a template from the New Requisition screen.
Select the required template from the drop down box and click to create. The delivery date and quantities can be edited if needed and then either choose to generate or generate and submit for approval.
Generate: create a requisition based on the template; this will not be submitted for approval by appear on the New tab so edits can be made before the requisition is submitted.
Generate and Submit for Approval: create a requisition based on the template that is submitted for approval. Standard pre-configured approval routes will be used, either based on nominal, job, requesting user etc. and if configured, budgets are checked either against the nominal code or the job, as configured.
Close: use to close the screen without saving any changes.
NB: if a costing module is configured, a template cannot be submitted for approval until all lines have a job and job header allocated. The template will need to be generated, all lines allocated a job and job header and then submitted for approval.
11. Project Requisitions
Project Requisitions allow a user to create a ‘shopping list’ of items they require where they do not know the supplier or price. Project requisitions will then require approval from a member of a Procurement Team who will add in prices and suppliers; once all lines have been completed, the project requisition will become a requisition that will go for approval based on pre-configured approval routes. Once the requisition has been fully approved it will become a PO ready to be sent to the supplier and will post through to Sage. If the project requisition has multiple lines and multiple suppliers are allocated, multiple requisitions will be created.
11.1. Project Requisition Approval Route Options
Approval routes can only be configured based on requesting user; it could be that only one default approval route needs to be created that will work for all project requisitions; for example, if any user submits a project requisition it will require approval from a member of the Procurement Team. When building the route either use the User List or User Type option to allow for the requisition to be sent to multiple users but require only one user to complete. This is detailed further in our WAP Approval Routes Help and User Guide.
11.2. Project Requisition User Type Permissions
Permissions for whether a user is able to submit, approve or view project requisitions are set at a User Type level, under the Project Requisition tab.

Submit Project Requisitions: the ability to submit a project requisition.
Set Supplier on new Project Requisitions: whether a user is able to choose a supplier when entering a project requisition.
View all Project Requisitions: the ability to view all project requisitions entered by all users in the system.
Approve Project Requisitions: the ability to approve project requisitions. If a user does not have this permission, they cannot be selected when building an approval route.
View Approval comments on Project Requisitions: the ability to view any comments made during the approval process.
Enter Approval comments on Project Requisitions: the ability to enter comments during the approval process.
View Project Requisition Report: the ability to run a report on project requisitions.
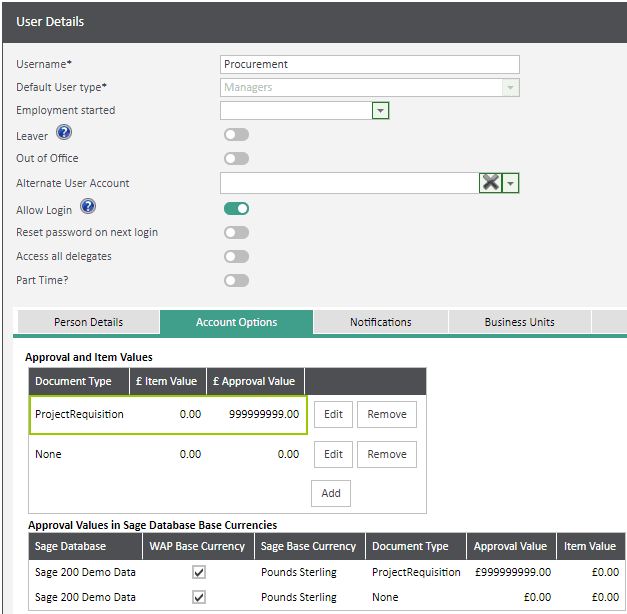
11.3. Project Requisition User Approval Values
If a user is to be approving a project requisition, they must be given an approval value on their user profile. Members of the Procurement Team should be given unlimited approval value to ensure that all project requisitions can be fully approved. N.B. this approval is separate to requisition approval value; i.e. a procurement team member may approve project requisitions but not requisitions.
11.4. New Project Requisition
Select the option to add a new project requisition under the Project Requisition menu option.
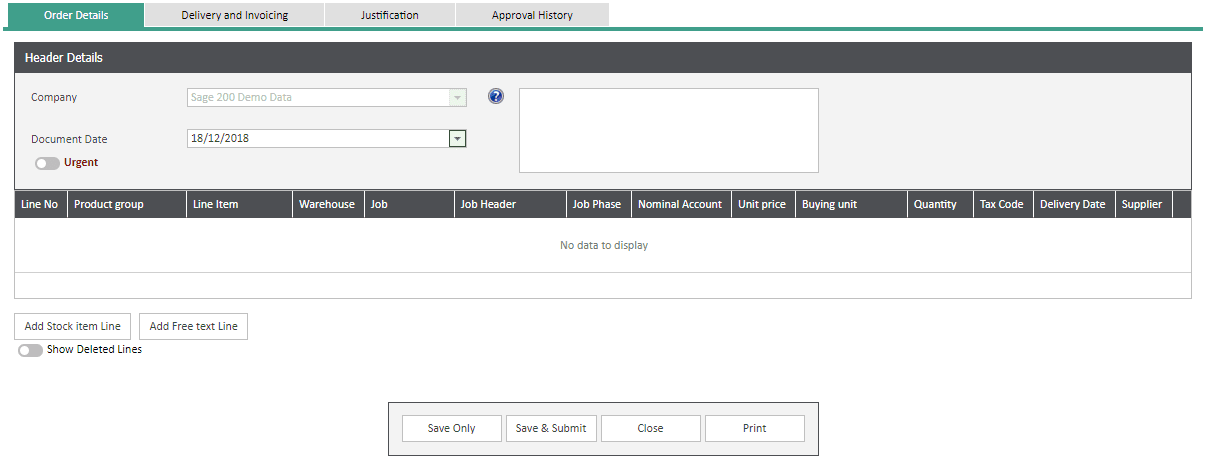
Company: if the user has access to more than one company, select the correct Sage Company from the drop down list. If the user only has access to one company, this will be defaulted, greyed out and cannot be changed.
Document Date: by default the current date is selected; a future date can be added but it is not possible to back date a project requisition.
Urgent: if the project requisition is urgent, tick the box and enter the reason. Once submitted, an email is sent to the approvers immediately. The urgent reason will appear on the Approval History tab and be visible to approvers.
Save Only: click to save the project requisition; this will not be sent for approval but can be edited for additional lines to be added or changes to be made before the requisition is submitted.
Save & Submit: click to send the project requisition for approval.
Close: click to close without saving changes.
Print: click to open a popup to allow the project requisition to be printed. This would not be sent to a supplier but could be emailed to another WAP user for visibility.
11.5. Adding a Stock Item Line
Click to add a stock item line; if stock is not being used, this option can be hidden.

Select a product group, stock item and warehouse from the drop down options available. If a costing module has been configured, a Job and Job Header will need to be selected which would determine the nominal code. If no costing module has been configured, a nominal code must be selected. A unit price can be added if known but can be left blank if not but a quantity would need to be added. The tax code will be pulled through from Sage 200 configuration and the delivery date based on the document date, although these can both be overridden. If the user has permission to do so they can select a supplier, or this is left blank for the approvers to select. To add more lines, click either the Stock or Free Text Line option.
11.6. Adding a Free Text Line
Click to add a free text line.

Enter a description on the line item line of the item that is required. If a costing module has been configured, a Job and Job Header will need to be selected which would determine the nominal code. If no costing module has been configured, a nominal code must be selected. A unit price can be added if known but can be left blank if not but a quantity would need to be added. The tax code will be pulled through from Sage 200 configuration and the delivery date based on the document date, although these can both be overridden. If the user has permission to do so they can select a supplier, or this is left blank for the approvers to select. To add more lines, click either the Stock or Free Text Line option.
11.7. Delivery and Invoicing Tab
This tab will show information on delivery and invoice addresses and Sage analysis codes.
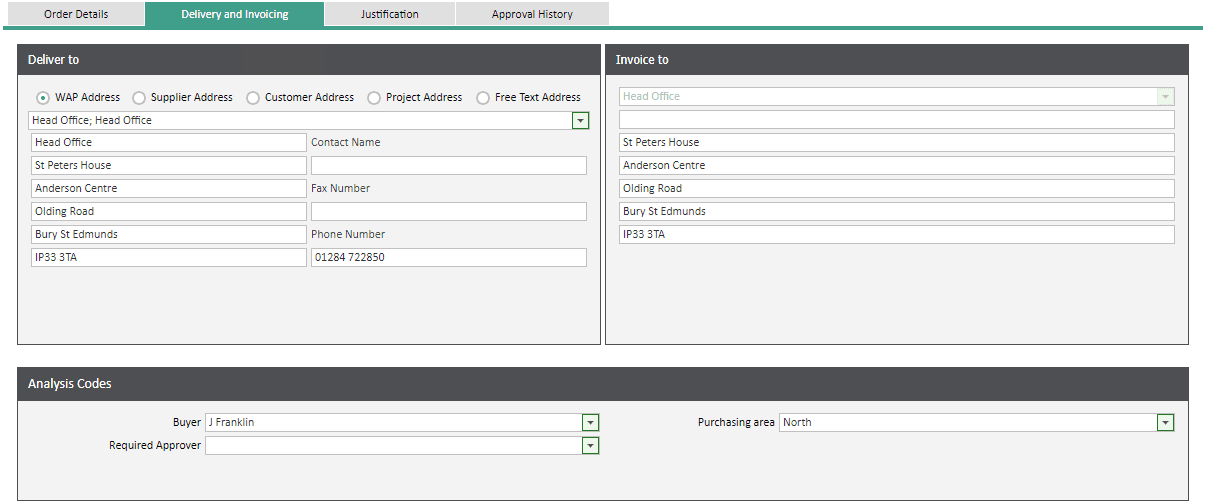
Deliver To: this address must be populated before lines can be added to a project requisition and a default delivery address is linked through to a user on their WAP User profile. Delivery and invoice addresses are added in via System Settings – Delivery Addresses. If a user has permission to do so they may be able to change the delivery address. Alternative addresses such as Supplier/Customer/Project or Free Text Addresses can be made available within WAP System Settings if needed.
Invoice To: this address must be populated before lines can be added to a project requisition and a default invoice address is linked through to a user on their WAP User profile. Delivery and invoice addresses are added in via System Settings – Delivery Addresses. If a user has permission to do so, they may be able to change the invoice address but this is not usually allowed.
Analysis Codes: analysis codes set up and configured in Sage POP – POP Maintenance – Maintain Analysis Codes, will be drawn through to select.
11.8. Justification Tab
This tab is used to provide a narrative and add file attachments to clarify or support why the items are being requested. These documents are for internal use only; they will not post through to Sage or appear to the Supplier.
Requested By: this is automatically populated with the user’s name but can be changed to another user, if the permissions have been configured (User Setup – Users – Account Options).
Business Unit: the ‘Department’ will be a drop down box for the user to select the business unit. The user’s default business unit will be populated initially but if the user has access to other business units they will appear to be chosen.
Notes: free text notes can be added here, once added a yellow post-it note icon will appear in the Flag column on the project requisition summary grid tables and approval grid page.
Attachments: supporting documents can be uploaded and attached to the project requisition using the drop files or browse option; if one document is attached, a single paperclip will appear in the Flag column on the project requisition summary grid tables and approval grid page, if further documents are attached, two paperclips will show.
Approver Comments: if comments have been made during approval, these will show here.
11.9. Approval History Tab
This tab will start to be populated once the requisition has been submitted and starts through the approval process. Only lines that require approval will be displayed, i.e. comment lines will not show.
Filter by Item: by default all requisition lines will show, use this drop down box to filter to view history of one specific line.
Urgent Reason: if the user ticked the option to mark the requisition as urgent, the reason given will be displayed here.
11.10. Existing Project Requisitions
Select Existing Project Requisitions from the side menu to display the project requisitions under various tab headings. Additional icons will appear in the Flags column to show if the requisition is over budget, has notes or attachments etc.

New: project requisitions that have been saved but not yet submitted for approval.
Submitted: project requisitions that have been submitted and are awaiting approval. By hovering over the blue information icon, the lines will display and show who they are awaiting approval from.
Approved: once a project requisition has been fully approved and turned into a requisition, it will move though to this tab.
Other tabs are not currently used with Project Requisitions.
11.11. View Project Requisitions
By default, users will always be able to see project requisitions they have raised or approved. If permission is given, users may also be able to view project requisitions raised by other business unit members or all project requisitions raised in the system.
There are two options to search for an existing project requisition; either use the Search filters or the Quick Links.
Search filters: depending on configuration, the user will either be able to search for their own, within their business unit, delegates or all project requisitions. Search filters can be used to find requisitions with a particular WAP ID, status and if using a costing module, Job or Project. Use the Show Deleted option to show any project requisitions that have been deleted.
Quick Links: either click ‘Refresh (with search)’ to update the grid and retrieve the most recent status of project requisitions or other specific links to show particular project requisitions. All project requisitions within the current grid can also be exported to Excel.
11.12. Edit Project Requisition
By clicking Edit on an existing project requisition, this will open up to allow for viewing of requisition lines, delivery information, justification documents etc. A user is able to edit and make changes to a project requisition until it is approved; any changes would need to be resubmitted for approval. Once the project requisition has been fully approved, the user is unable to make any amendments.
11.13. Delete Project Requisition
If a user has permission to delete a requisition, they will be able to delete a project requisition once it has been saved. If they do not have permission, they will see a message advising this if the delete button is clicked.

11.14. Approve Project Requisition
To approve a project requisition, either click on a hyperlink notification on the user’s WAP homepage, or navigate to the Approve Project Requisitions page from the side menu. All project requisitions awaiting the user to approve will be listed; click on the arrow on the left to expand and view the project requisition line details.
Lines: this tab will show all lines awaiting approval from the user with information on line details, quantities, and nominal and job. Against each line a unit price and supplier must be allocated before the project requisition can be approved. The View Order Details will take the approver through to the main project requisition page to view the project requisition fully or to add any Approver Comments under the Justification tab.
Attachments: this tab will allow for any attachments added to be viewed. The number of attachments will be shown in brackets on the tab.
Notes: if any notes were added during creation of the project requisition, these will be visible here. Notes can also be viewed by hovering over the post-it note icon under the Flags column.
Budgets: if configured, budget information can be viewed here showing further information on whether the nominal, job or project is within or over budget.
Approval History: each line requiring approval will be displayed showing approval history.
On Hold Reason: if the project requisition is to be put on hold, enter a reason in the box and click Hold. It is possible to notify other users that the project requisition is on hold’ it might be that the user who submitted the project requisition should be informed, or other members of the Procurement Team.
Once the project requisition has been completed and approved, it will move to become an existing requisition submitted by the same user that submitted the project requisition. For the user who submitted the project requisition, this will show under the Approved tab under Existing Project Requisitions and they will also see either one or multiple project requisitions under the Submitted tab; depending on whether there was one or multiple suppliers allocated during approval. Standard pre-configured approval routes will be used, either based on nominal, job, requesting user etc. and if configured, budgets are checked either against the nominal code or the job, as configured.
N.B. if the user creating the project requisition has a requisition self-approval value, this will be taken into account when the requisition is created.
Approved Project Requisition:

Submitted Requisition:

11.15. Project Requisition Reports
This report will show a breakdown of all project requisitions with their line detail, quantities, approval status and approval history.
Depending on User Type and User configuration, users will be able to see either information relating to their project requisitions, their delegate or business unit orders or all orders on the system. Use the date range, database filter and status options to filter data as required.
All reports can be exported to Excel, some reports can be exported to PDF and can be adapted either by dragging column headers to change the order or group data by a particular header. Click the ‘Customise’ button for the Field Chooser to appear which will allow for additional headers to be added or existing headers to be removed.
NB: reports are cookie based so to allow for this customisation, ensure the browser settings allow cookies from the WAP website. Customised columns may return to the standard configuration following a WAP or browser upgrade as cookies may be cleared.
12. Approved Suppliers
To restrict which suppliers are visible in WAP for use when creating a requisition, configuration is required in Sage. Create an analysis code called ‘PRS’ in Sage 200 (Accounting System Manager – Settings – Maintain Analysis Codes) with the appropriate supplier groups as values.
Add the PRS analysis code to the Purchase Ledger analysis code setup (Purchase Ledger – Utilities – Ledger Setup – Maintain Analysis Codes). The Field label can be edited to give an appropriate description.
Each Sage 200 Supplier account can then be configured to a specific PRS analysis code. If the supplier should not appear in the list available when entering a requisition in WAP, do not select a code from the drop down box but instead leave it blank.

Within WAP when raising a new requisition, the supplier can then be selected based on the Approved Suppliers or by Approved Suppliers category.
If required, Approved Suppliers can be enforced by enabling or disabling the Supplier Filter options within WAP System Settings – Requisitions.

13. Requisition System Settings
System Settings relating to the Purchase Requisition module are accessed in System Settings – Requisitions Tab.
13.1. General Tab – Display Banner
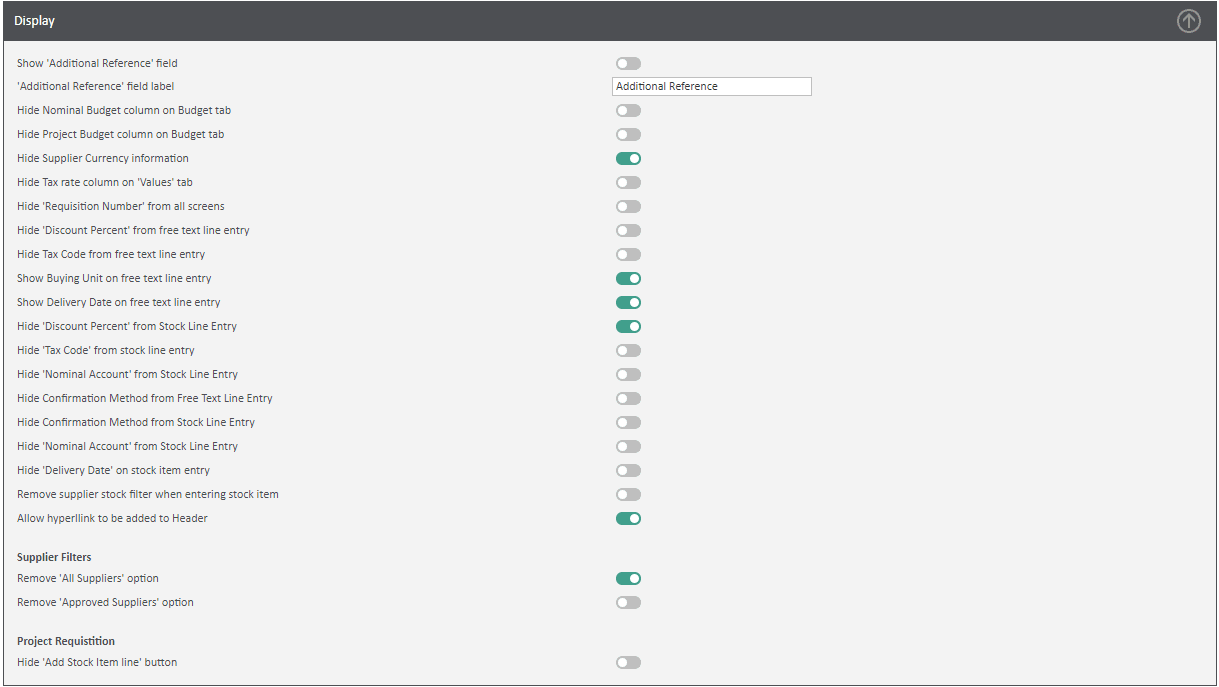
Show ‘Additional Reference’ field: if configured, an additional free text field will show on the requisition header which can be populated as required; this column will also show on the Existing Requisitions page.
‘Additional Reference’ field label: the additional reference field can be renamed as required.
Hide Nominal Budget column on Budget tab: if nominal budgets are not to be shown, this setting will hide the nominal column on the budget tab.
Hide Project Budget column on Budget tab: if project budgets are not to be shown, this setting will hide the nominal column on the budget tab.
Hide Supplier Currency information: if configured, this setting will not show the supplier currency information on the requisition header page.
Hide Tax rate column on ‘Values’ tab: if configured, this setting will not show the tax rate column on the values tab.
Hide ‘Requisition Number’ from all screens: this setting will hide requisition IDs from the Existing Requisitions and Approval pages.
Hide ‘Discount Percent’ from free text line entry: this setting will hide the option for users to enter a discount percentage on a free text line.
Hide Tax Code from free text line entry: this option will hide the tax code selection box on the free text entry screen. If hidden, the standard tax rate as configured against the Supplier in Sage will be used.
Show Buying Unit on free text line entry: this option will show the buying unit free text field on a free text line for users to provide detail as required; i.e. to say it was a Pack of 6 or Box of 12 being ordered.
Show Delivery Date on free text line entry: this setting can be used to hide the delivery date on a free text line if there should only be one delivery date on a requisition.
Hide ‘Discount Percent’ from Stock Line Entry: this setting will hide the discount percent field on a stock line entry.
Hide ‘Tax Code’ from stock line entry: if required, this setting can be used to hide the tax code when entering a stock line.
Hide ‘Nominal Account’ from Stock Line Entry: this setting can hide the nominal account selection box when adding a stock line entry. If hidden, the default nominal code on the stock item will be used.
Hide Confirmation Method from Free Text Line Entry: if the default confirmation method should be used when entering a free text line, use this setting to hide the confirmation entry box.
Hide Confirmation Method from Stock Line Entry: if the default confirmation method should be used when entering a stock item line, use this setting to hide the confirmation entry box.
Hide ‘Nominal Account’ from Stock Line Entry: if the default nominal code set on a stock item should be used when entering a stock item line, use this setting to hide the nominal selection box.
Hide ‘Delivery Date’ on stock item entry: this setting can be used to hide the delivery date on a stock item line if there should only be one delivery date on a requisition.
Remove supplier stock filter when entering stock item: this setting will remove the option to filter items by other suppliers when entering a stock line. If hidden, all stock items for the relevant supplier and group will be shown.
Supplier Filters – Remove ‘All Suppliers’ option: this setting will stop all suppliers being available to select from when raising a requisition; only suppliers marked as approved in Sage can be chosen from. Please refer to: https://www.sicon.co.uk/user-guide/wap-help-and-user-guide-requisitions-module/#12
Supplier Filters – Remove ‘Approved Suppliers’ option: this setting will remove the option to see approved suppliers when choosing from the supplier list; all suppliers in Sage will be visible (unless a supplier is on hold).
Project Requisition – Hide ‘Add Stock Item line’ button: this option will remove the ability for a user to enter a stock item line on a project requisition; only free text lines can be added.
13.2. General Tab – Functionality Banner
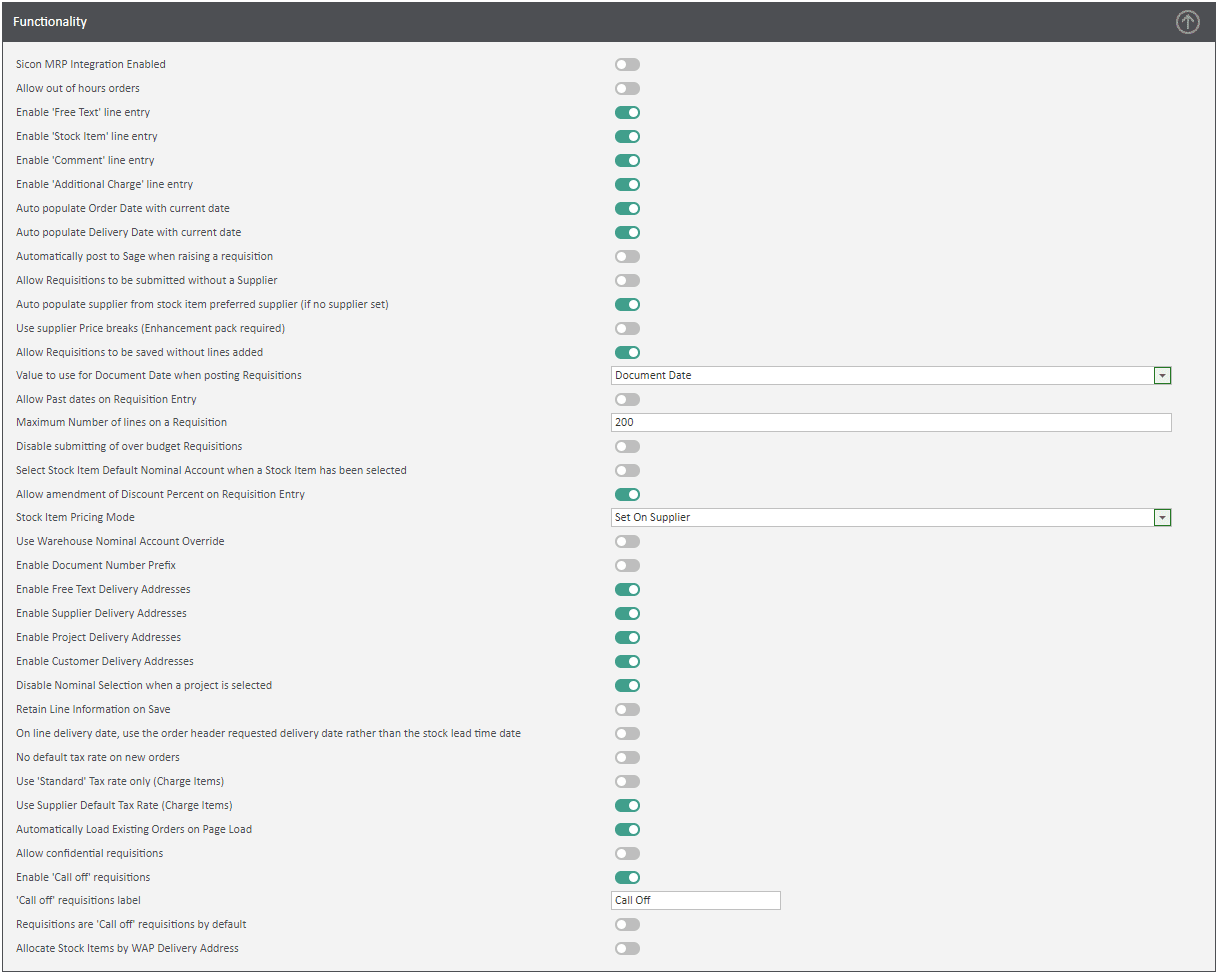
Sicon MRP Integration Enabled: this will only be switched on if orders generated via MRP should be pulled through to WAP for approval.
Allow out of hours’ orders: if enabled, out of hours’ requisitions can be raised that will post straight through to Sage and create a PO number, but will need to be approved retrospectively.
Enable ‘Free Text’ line entry: untick this setting if users should not be able to enter a free text line.
Enable ‘Stock Item’ line entry: untick this setting if users should not be able to enter a stock item line.
Enable ‘Comment’ line entry: untick this setting if users should not be able to add comment lines on a requisition.
Enable ‘Additional Charge’ line entry: untick this setting if users should not be able to add additional charge lines on a requisition; it may be that postage or carriage costs should be added as either a free text or stock item line.
Auto populate Order Date with current date: by default this setting is on but can be unticked if the user should select the required order date.
Auto populate Delivery Date with current date: untick this setting if users should be forced to select the correct delivery date rather than the date being automatically populated with the order date.
Automatically post to Sage when raising a requisition: this setting should only be used where a PO can be created and a PO number raised before the requisition is approved. This setting is not commonly used; a requisition should be fully approved before a PO is created.
Allow requisitions to be submitted without a Supplier: this setting will allow users to enter lines on a requisition without selecting a supplier; a supplier must be selected prior to the requisition posting through to Sage.
Auto populate supplier from stock item preferred supplier (if no supplier set): this setting would be used in conjunction with the setting above so when a stock item is selected, the preferred supplier will populate the supplier field on the requisition header page.
Use supplier price breaks (Enhancement pack required): if Sicon Enhancement pack is configured in Sage and a stock item has been configured to use supplier price breaks, these can be read by WAP.
Allow requisitions to be saved without lines added: by default, if a requisition is added with no lines, the system will prompt users to allow for the requisition to be saved but if this shouldn’t be possible, this setting can be configured to not allow this.
Value to use for Document Date when posting Requisitions: this can either be set to use the requisition document date or the current date; i.e. the date when the requisition is approved and posts through to Sage.
Allow Past dates on Requisition Entry: by default the system won’t allow requisitions to be raised in the past but if this is required, this box can be ticked.
Maximum Number of lines on a requisition: by default this is configured to allow no more than 200 lines on a requisition but this can be amended accordingly to match company requirements.
Disable submitting of over budget requisitions: if required, users can be prevented from saving a requisition if the line has a nominal or job that is over budget. If configured, it can cause users to select another nominal code or job that is within budget but may not be the correct one.
Select Stock Item Default Nominal Account when a Stock Item has been selected: if configured, the nominal code will be populated from the stock item selected, rather than the user having to select manually.
Allow amendment of Discount Percent on Requisition Entry: this will allow users to make changes to any discount percent against an item.
Stock Item Pricing Mode: select from the drop down list the appropriate stock pricing mode; by default, this is configured as set on supplier.
Use Warehouse Nominal Account Override: if configured, the nominal cost centre or department can be overridden based on the warehouse selected on the stock item line.
Enable Document Number Prefix: this setting can allow a prefix to the PO number; the prefix is pulled from Sage Connections against the specific company.
Enable Free Text Delivery Addresses: this option will allow users to free type a delivery address on a requisition; this is usually not recommended as the preferred option is to allow users to select an address from a drop down box.
Enable Supplier Delivery Addresses: this option allows users to select the supplier’s address as configured in Sage.
Enable Project Delivery Addresses: if a costing module is configured, addresses from projects can be selected.
Enable Customer Delivery Addresses: if applicable, the customer’s address from the costing module project can be selected.
Disable Nominal Selection when a project is selected: if enabled, the nominal code will pull through from the Job Header/Project Item on the requisition line, instead of the user having to select the nominal code.
Retain Line Information on Save: with this ticked information such as the nominal code or job will be held when the line is saved. This can speed up the requisition entry process for users who input requisitions with lots of lines where the nominal code or job is not changed.
On line delivery date, use the order header requested delivery date rather than the stock lead time date: by default, if a stock item has a lead time set against it in Sage, the line delivery date will be changed to reflect this. If this setting is configured, the line delivery date will remain as the delivery date set on the order header page.
No default tax rate on new orders: if enabled, users will need to select the appropriate tax rate for that line on the requisition. If disabled, the default tax rate will be pulled through from how the company has been configured in Sage PL.
Use ‘Standard’ tax rate only (Charge Items): configure so only the standard tax rate can be used on charge lines.
Use Supplier Default Tax Rate (Charge Items): configure so the tax rate set against the supplier in Sage PL is used; if not configured, the standard tax rate set against the company in Sage Connections will be used.
Automatically Load Existing Orders on Page Load: by default, this will be on and if a user clicks on Existing Requisitions, orders they have raised will be loaded automatically. If this is causing speed issued, this can be turned off to force users to search for specific orders.
Allow confidential requisitions: if enabled, a check box will appear on the requisition header page for the user to flag the requisition as confidential. This means the requisition will only be seen by the requester, required approver and any users with the View All Requisition User Type permission.
Enable ‘Call off’ Requisitions: if enabled, a check box will appear on the requisition header page for the user to flag the requisition as a call off order.
‘Call off’ requisitions label: the call off field can be renamed as required.
Requisitions are ‘Call off’ requisitions by default: if all, or the majority of orders are call off orders, this can be ticked. Users are still able to untick the box is a non-call off order is being raised.
Allocate Stock Items by WAP Delivery Address: configure if stock items should be allocated based on the delivery address entered when the requisition is raised.
13.3. General Tab – Goods Received Banner

Enable Receive All button on Goods Received: if enabled, a Receive All option on the goods received process will automatically populate the quantity to be received from the outstanding quantity values.
Allow over receipt of goods: if enabled, users will be allowed to over receipt goods. By default, this is not configured.
Goods Received Reference Source: the reference recorded in Sage can either be the Goods Received Supplier Document Number (Reference), the WAP Username, or both.
Enable editing Free Text line description when partially received/invoiced: if allowed, free text line descriptions can be edited when the line has been partly goods received or invoiced.
13.4. General Tab – Order Templates Banner

Auto Populate Delivery Date: if ticked, the delivery date will auto populate to the current date. If unticked, the user must select a specific delivery date.
Override Warehouses based on User: the warehouse selected on templates can be defaulted to that set per user (User Setup – Warehouses).
Enable All Supplier Stock Items Template: if enabled, this template will be available to users when raising a stock requisition.
Enable User Order Template Allocation: if enabled, multiple templates can be crated and users allocated to them as required (User Setup – Requisition Templates).
13.5. General Tab – Justification Banner
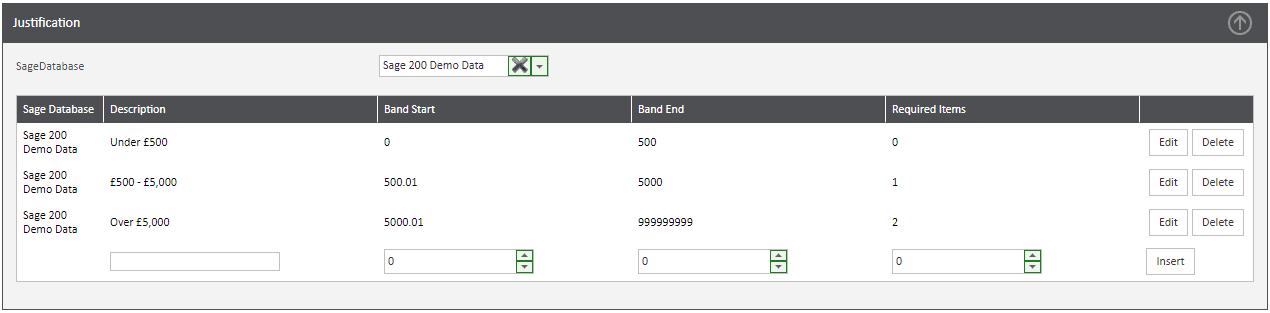
Sage Database: select whether the justification bands are for one specific database or valid across all Sage Companies.
Enter Justification bands as required; in the example above, documents under £500 do not require a quote to be attached, documents between £500 and £5,000 must have one quote attached and documents over £5,000 must have two quotes attached. When creating the justification bands there cannot be any overlapping; e.g. £0 – £500 band and also £200 – £400.
13.6. Printing Tab
These settings are legacy settings relating to versions prior to v18; any changes made here will not affect the PO Layouts configured in Sage Connections.

13.7. Analysis Codes Tab
WAP Requisitions can pull through up to 20 Sage POP Analysis Codes as required; these are configured in Sage (Accounting System Manager and POP Maintenance). Selecting Default will populate the requisition with the corresponding code from Sage POP. If the WAP settings are configured to ‘Populate from Order’, the analysis codes will appear at the bottom of the requisitions Delivery and Invoicing tab, but if the setting is changed to ‘Validate on Line’, the codes can be selected at the time of entering each line and therefore can be different per line.
The codes can be marked as Mandatory and if they need to appear on the Existing Requisitions or Approve Requisitions grids in WAP, check the ‘Include in Grids’ option. If the code labelling needs to be changed to make it more user friendly, tick the custom label box and enter the new narrative as required.
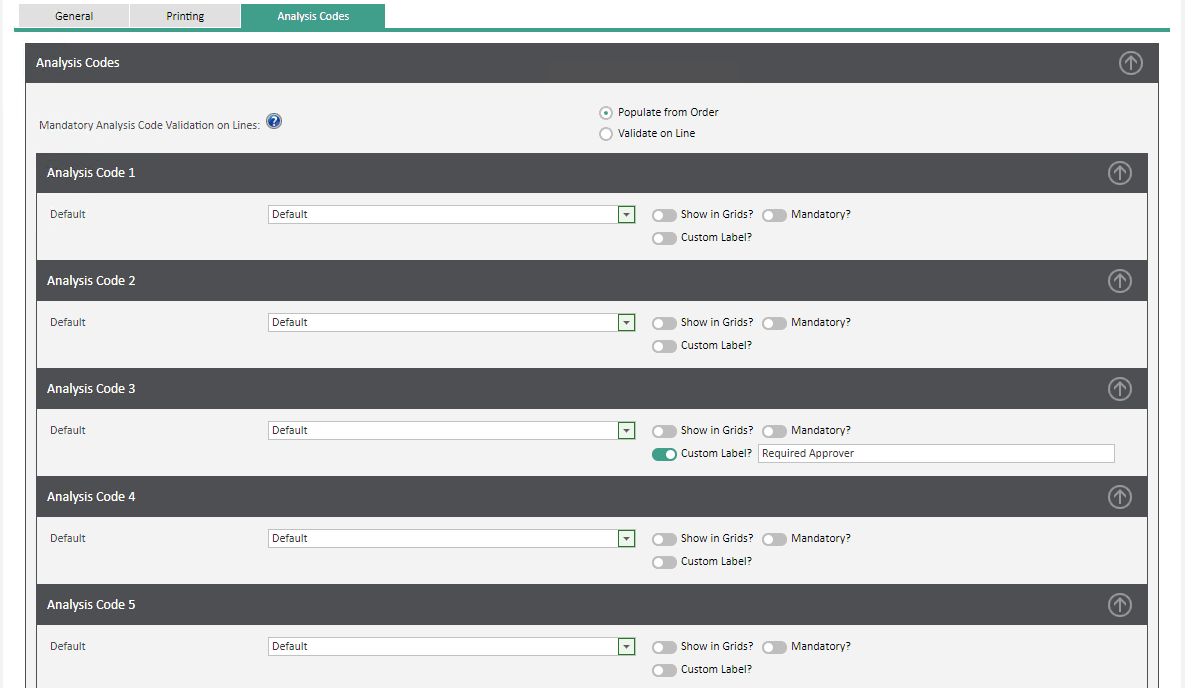
It is also possible to populate the Sage POP Analysis Codes with particular WAP fields. Check in Sage the number of the next free analysis code in Sage POP and then within WAP select from the drop down list available. In the example below, the POP Analysis Code 4 will be populated with the Requisitioner Name.
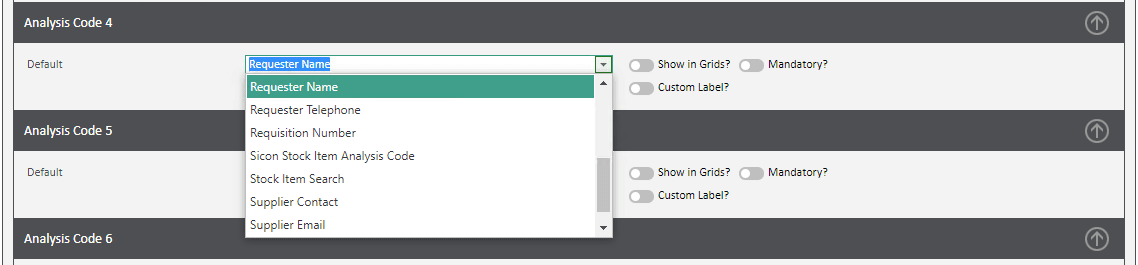
14. Requisition User Type Permissions
Permissions for whether a user is able to submit, approve, print or view requisitions are set at a User Type level, under the Requisitions tab.
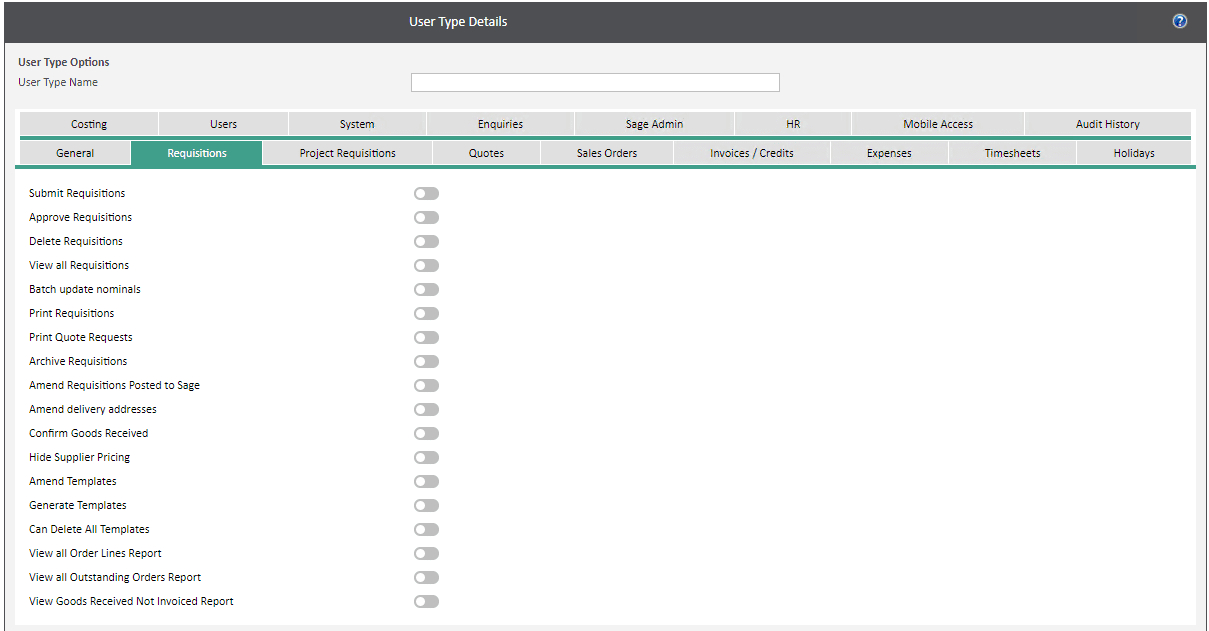
Submit Requisitions: the ability to create and submit requisitions.
Approve Requisitions: the ability to approve a requisition. If a user does not have this permission, they cannot be selected when building an approval route.
Delete Requisitions: the ability to delete a requisition. A requisition cannot be deleted if goods have been received or invoiced against. If an approved order is deleted, it will show in Sage with 0.00 value and a status of Completed.
View all Requisitions: the ability to view all requisitions in the system.
Batch update nominal: the ability to update nominal codes across multiple lines on a requisition.
Print Requisitions: the ability to open the print popups to email an approved order to a supplier.
Print Quote Requests: the ability to open and print or email quotes attached to an order.
Archive Requisitions: the ability to archive completed orders; i.e. orders that have been fully goods received and invoiced against. Completed requisitions should be archived regularly for speed and performance benefits – these requisitions can still be searched for using the search filters.
Amend Requisitions Posted to Sage: the ability to amend a requisition in WAP once fully approved and posted to Sage. This is usually a permission only given to Finance or Administrator user types.
Amend delivery addresses: this is the permission to be able to add or edit delivery addresses in WAP; this is access to the setting under System Setup – Delivery Addresses, rather than the ability to pick different delivery addresses on the requisition entry screen.
Confirm Goods Received: whether the user is able to goods receive.
Hide Supplier Pricing: if configured, whether a user should not be able to see pricing on a stock item.
Amend Templates: the ability to make changes to a generated template.
Generate Templates: the ability to create new templates.
Can Delete All Templates: the ability to delete templates.
View all Order Lines Report: permission to run the all order lines report which will list all orders, their values, status, approval history etc.
View all Outstanding Orders Report: permission to run the outstanding orders report showing all orders that have goods outstanding.
View Goods Received Not Invoiced Report: permission to run the goods received not invoiced report showing all orders that have been goods received but not invoiced.
15. Requisition User Permissions
A number of permissions can be set on the user profile relating to entering, viewing or approving requisitions.
15.1. Account Options Tab
Against a user set their Requisition Item and Approval values; item value is the amount the user is able to enter a requisition for and approval value is the amount a user is able to approve a requisition for. If a user is not allowed to approve a requisition, leave the approval value as zero. If a user has unlimited approval value (i.e. for users at the end of an approval route), set the approval value as 999,999,999.
A user can also be given a self-approval value; any requisitions raised up to the self-approval value will automatically post through to Sage without going down an approval route.
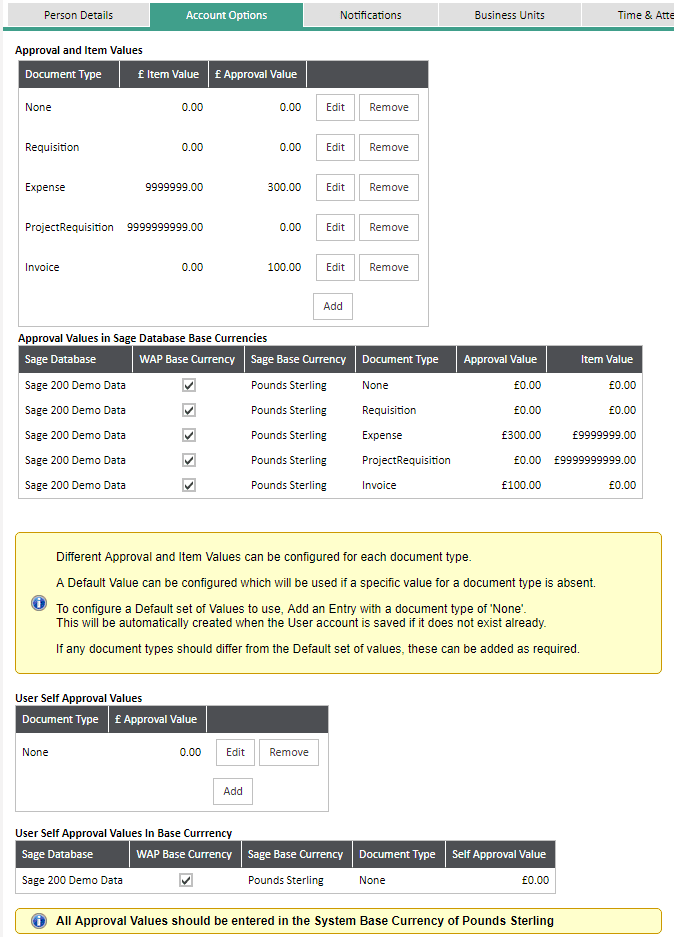
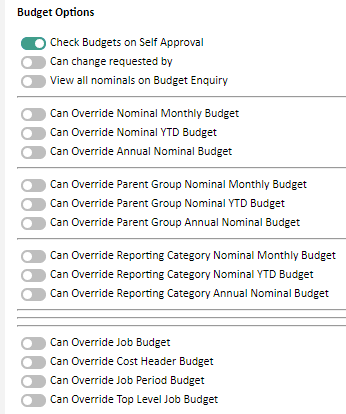
Check Budgets on Self-Approval: if a user has a self-approval value, all requisitions raised up to that value will automatically approve. However, if this is ticked and a requisition is raised that is over-budget, the requisition will require approval. If this setting is not ticked, any requisitions raised up to the user’s self-approval value will automatically post to Sage, even if the nominal or job is over-budget.
Can change requested by: if ticked, the user is able to change the user raising the requisition – as set on the Justification tab when entering a new requisition.
View all Nominals on Budget Enquiry: if the user has permission to view the budget enquiry they will be able to view budgets against nominal codes they have access to; if this is ticked they will be able to view all nominal codes.
Can Override Budgets: various options for users to be able to override nominal or job budgets when entering a requisition. If a user has permission to override a budget, the requisition will not be flagged as over-budget and therefore not require additional approval – if approval routes have been configured as such.
15.2. Business Units Tab
If the user belongs to a business unit they will be able to view any requisitions raised by other users within the business unit. If a user has access to multiple business units, they can change the business unit on the Justification tab when entering a new requisition.
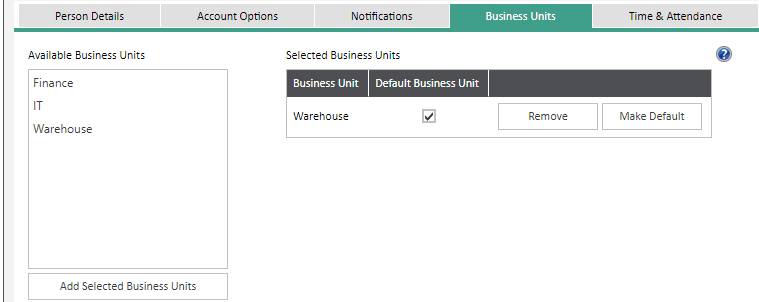
15.3. Nominal Tab
This tab can be used to view nominal codes the user has been given access to, or to set that the user is to have access to all nominal codes. These codes will be visible to the user when entering a new requisition or if the user has permission to, to view the budget information against. Different approval values can be set against a nominal code that would be used during requisition approval.
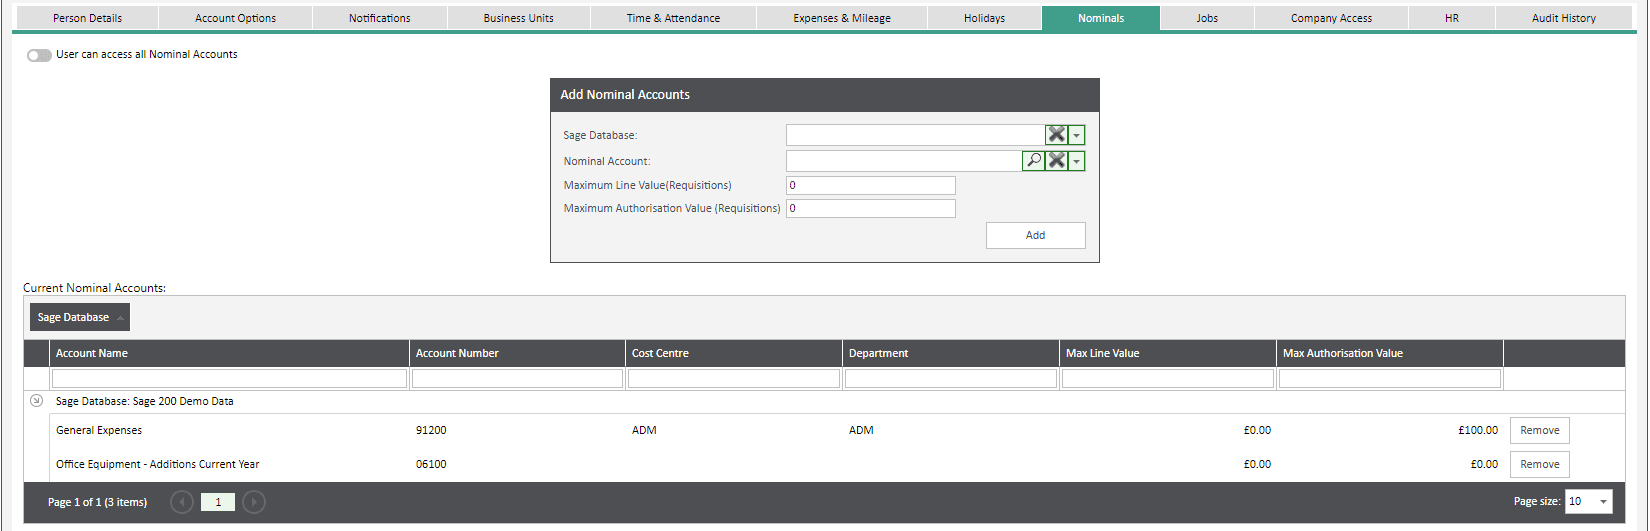
15.4. Jobs / Projects Tab
If a costing module has been configured, this tab can be used to view jobs or job headers the user has been given access to, or to set that the user is to have access to all jobs or job headers. These jobs and job headers will be visible to the user when entering a new requisition.

15.5. Company Access Tab
This tab will show what companies the user has been given access to along with their default delivery and invoice addresses. Generally, users will be able to change the delivery address when entering a requisition but wouldn’t be able to change the invoice address. A nominal code can be set against a company which can be used when entering a requisition; e.g. if a user only raises requisitions against one nominal code, this can be defaulted.

16. Requisition Approval Stages
16.1. Requisition Header Status
New: the requisition has been saved but not yet submitted.
Submitted: the requisition has been submitted for approval but not yet fully approved.
Approved: the requisition has been approved and would have posted through to Sage. Once a requisition has been approved it will be able to be emailed to a supplier.
Rejected: one or more lines on the requisition have been rejected. N.B. a rejected line must be edited and saved before being submitted again for the reject flag to be cleared; a rejected requisition simply submitted again will not clear the reject flag. A requisition will not post through to Sage if there is a rejected line on the requisition.
Completed: the requisition has been fully goods received and fully invoiced.
Failed: if a requisition has failed to post to Sage it will appear here. Most likely reasons for the requisition to fail are if a costing module is enabled but the project or job has been closed or set to not allow costs entered against it. Please check the Project and then clear the error and repost the requisition (these are usually Superuser permissions).
Archived: any completed requisitions the user has archived will show on here; archived requisitions will not appear in search results unless searched for specifically.
16.2. Requisition Line Status
New: the line has not yet been submitted.
Waiting: the line is awaiting approval from an authoriser.
Authorised: the line has been fully approved.
Rejected: the line has been rejected; all lines must be authorised before the requisition will post to Sage.
No Authorisers: there are no authorisers for the line; the line will need to be reset and the requisition submitted for the correct approval route to be used.
17. Enable Module
Each year the WAP system will require a new enable string to continue working. When the new string has been issued, select System Settings – Misc – Licencing – Apply New Licence – and then Browse and Upload the licence string. N.B. the module expiry date is shown along with the modules that have been enabled and the maximum number of users.

18. Sicon WAP Help and User Guide Requisitions Module V17
19. New Features & Important Information
19.1. Sicon v21.1
Sicon WAP v21.1 New Features & Important Information19.2. Sicon v21
Sicon WAP v21 New Features & Important Information19.3. Sicon v20.1
Sicon WAP v20.1 New Features & Important Information19.4. Sicon v20
Sicon WAP v20 New Features & Important Information19.5. Sicon v19.2
Sicon WAP v19.2 New Features & Important Information19.6. Sicon v19.1
Sicon WAP v19.1 New Features & Important Information19.7. Sicon v19
Sicon WAP v19 New Features & Important Information19.8. Sicon V18
New Features:
- A Redesigned Default Expense Voucher and Default Categorised Expense Voucher Report to include Pay Code as a column. To view these, you may need to delete your existing report and refresh (if there are no report customisations or you do not need to keep the customisations) or add the field manually in design view.
- Added ability to disable posting of Mileage- or Expense Item Lines on a per user These lines need to be processed separately using the Expense Payroll Posting functionality. This is a User Type permission.
- Added ability to book off jobs on time and attendance screens by scanning a
- Added popup to TA screen for quantity complete (works orders) when booking off a
- Booking off all jobs on TA screen asks if you want to set all the Qty completed to the total amount for any works orders in the
- Logging out of TA screen will warn if there are any works orders that need a Qty set before logging off.
- Initial list of Job costing headers are filtered by a setting on the Job (in)
- Quantity complete and operation ID posting to works
- Added Goods received approval A new entry will be created each time goods are received against an item.
- Added Goods fully received approval A new entry will be created each time an item is fully received. The entry will indicate whether it was part of a final receipt.
- Added Order Goods Fully Received approval A new entry will be created once an entire Order is fully received. o Added a Goods Fully received notification. A new notification will be generated when an Order has been fully received. o Added a Goods Received Amended approval history. A new entry will be created each time a receipt line is amended. o Added Job costing user import page.
- Added new costing popup to rapid timesheet Allow selection of job, variation, item, phases and stages from a single control.
- Allow invoice lines to be split by invoice editors as well as
- Added the ability to split expense lines that were created by Credit Card Statement Once a line is split, it can only be submitted if the total for the statement line still matches up. If a split line is deleted the value will be added back to the original line regardless of changes to the expense line such as expense type or nominal
- Added ability to configure a Nominal per line on Order Setting this nominal will override the default nominal set from the Stock/Warehouse.
- Added ability to export the imported statement result grid of Credit Card Statement
- Added Line Numbers to all document types, reports and approval history
- Added a popup keypad to the book off works order quantity control to allow easier editing of
- Changed standard timesheet entry to allow editing of JC and WO time that has been posted to sage when the timesheet is submitted.
- New user popup to collect initial details and validate before Existing user can be used as a template to create new users.
- Added a new feature to determine whether machine time appears on the Book on job control for operations
- Added a new popup keypad control on TA
- Added the ability to pick the finished works order quantity by
- The operation name will be shown in addition to the operation description on the touch screen terminals
- Works Order transactions posted to sage will now have the start and end date set.
- Added new theme ‘R18Dark’
- Added button to show cleared system messages
- Added Quotes User type settings
- Added Quotes menu
- Added Quote screens and approval
- If default supplier contact doesn’t exist or the contact has no telephone or fax number, it will be populated from the supplier
- Added a column to invoice approval report for Sage user name for invoices generated in
- Added a new approval history type for when items restart an approval route to distinguish from items that are sent for approval the first
- Added User Self Approval Values to User Approval Values
- Added Setting to include Sage Company in The setting is off by default and can be found in the Misc Tab of System Settings under the Notifications section.
- Added “Allow previous approvers” columns to approval route import
- When selecting a stock item on an order line it will now drop down the warehouse comobox if there is not a value selected
- Added the ability to specify the first cut-off rate when adding a rate change for fuel rates
- Added ability to record low level auditing of database field changes to Order and Order Line The setting is enabled by default and can be disabled in the Misc Settings logging section
- Added an Audit History Tab to Order
- Added Line summary text to existing holiday request
- Added ability to record low level auditing of database field changes to Timesheet and Timesheet Line
- Added setting to hide “Remember Me” option on the Log in
- Auditing of new document and document item creation added.
- Added Date filter to Audit History
- Added Audit History to User
- Added Separate Audit Tab to System
- Added the ability to export approval routes to
- Added the ability to export user nominal values on the import user nominals
- Added option to set default tax rate of order line free text and charge item to be set from the Supplier’s default rate on page
- Added option to set default tax rate of sales order line free text and charge item to be set from the Customer’s default rate on page
- Added Audit Log type to record when an order gets a PO Number allocated from
- Added option to nominal allocations import to maintain or delete existing records.
- Added the ability to see stock item images on sales and purchase order stock line
- Added Business Units column to Timesheet Projects
- Changed all instances of report user selection filters to read “My Delegates” and “My Business Unit(s)” rather than “Delegates” and “Business Unit”.
- Moved the job / barcode search text box on the time and attendance dashboard to the top of the page, it’s now used to book on and book off
- Added an additional popup when booking on to a job to show the job / works order / operation
- Added the ability to view the works order finished item image when booking onto a job from the touch screen
- Added a hover over on the description for stock lines on requisition entry to show the amended
- Load thumbnail for attachment and use zoomable image control to view on approve expenses
- Added the ability to reset the route for all lines on Expense
- Added the ability to reset the route for all lines on Sales Order
- Added the ability to reset the route for all lines on Proposed Payment Entry.
- Added the ability to reset the route for all lines on Timesheet
- Added a status flag to the operation details popup to show if the operation is complete or
- Changed the job and item selection control to load the job analysis labels from JC
- Operation Comments are now scrollable on the time and attendance
- Added a warning to the book off job control if the entered quantity is more than the outstanding qty.
- Added a warning to the book off job control if the entered finished item quantity is more than the Works order
- Added the ability to specify the finished item quantity to book into stock on the final
- Changed the TA login screen to not show the keypad if it’s not a touch screen
- Changed the TA dashboard page to not show popup keyboards when not at a touch screen location.
- Order Line entry now supports selecting Confirmation
- Majority of reports will now have a link on the report lines to redirect a user directly to the relevant document entry
- Users will now be given a notification when booking time on the same day as time already approved as holiday on the current timesheet.
- Added ability to include leavers in Search page user
- The Time and attendance dashboard screen will now always focus on the project code / barcode box when the page loads (even after post )
- Changed WAP to check the quantity outstanding in WAP on operations that have not been sent to sage
- Added Job Manager to the job costing selection control.
- Added a banner at the bottom of the settings page as a note the WAP service may need a restart after changing
- Changed the book off job control to focus the cursor on the quantity box when it
- Added Proposed Payments functionality
- (WAP Add-on) Changed the Generate payments screen to check whether there is an unapproved proposed payment in WAP and stop generation if it’s not
- Added the ability in the WAP add-on to use the WAP objects
- Improved the readability of Audit History page by displaying user friendly properly values when auditing only record related IDs, such as costing Header
- Proposed payments generated in sage will now complete the payment in
- Added ability to submit holiday requests from time and attendance o Added ability to submit holiday requests from time and attendance screens. o Added All Sales Order Lines Report.
- Implemented Analysis code support for Sales Analysis codes can now have custom labels and be configured to display or hide in approval reports and Sales Order search page and be searchable in Sales Order page.
- Added Audit History for User Type Edit
- Added ability to add Justification Value bands to This allows specification of a minimum amount of attachments required to submit a requisition based on requisition value. This functionality can be configured by a System Account user through the System Settings page under the Requisitions tab.
- When MRP orders are now picked up by WAP the nominal account will be taken from the job Header if
- Added a file viewer to the view proposed payment
- Added the ability to view DMS attachments from the invoices on the approve proposed payments
- Added Requisition Quote
- Setting added to determine whether to show the Book In finished item quantity box on the book off job control
- Added ability to import Requisitions from User Types need to be granted permission to import Requisitions. Contact your Business Partner/Sicon if you wish to enable this feature
- Sales Order attachments will now be added to DMS if integration is enabled
- Requisition attachments will now be added to DMS if integration is enabled
- Requisition Justification documents will now be added to DMS if integration is enabled
- Added a “Justification” tab to sales order and moved the file attachment control to the tab so users won’t have to enable viewing additional information to perform file attachments
- Made it clearer on Expense Line entry which lines are split from an original line with row highlighting
- Users will no longer be able to select nominal accounts that aren’t posting accounts on order line entry
Important Information
v17.534.0.10
- Added an analysis code to the Expense Meeting Entity for reporting purposes.
- Added the ability to determine whether subsistence can be claimed per user. v17.558.0.126
- Added a setting to determine whether client files are synchronised in the service configuration. v17.571.0.168
- After this upgrade, existing PO reports will have to be deleted and refreshed to get the new call-off orders reports. If there are customisations to original reports, these will be lost through this process so is optional.
v17.588.0.256 Database changes
- SiWorksOrderLineID added to TimesheetLine Table
- SiWorksOrderLineID added to JobActivity Table
v17.601.25.0
- All taken, Submitted and Booked holiday hours will now be calculated dynamically rather than stored in the database, this way it will be impossible to get out of sync with the totals for holiday requests in the database.
- Added SQL server client tools as a pre-requisite on the installer for sites that force TLS 1.2 security due to windows update.
v17.605.28.5
- Latest version of Job Costing will be required to address an issue with changing jobs for lines that already have receipts recorded.
v17.607.30.0
- ‘Rework’ column added to JobActivity table.
- Rework column added to TimesheetLine table. v17.590.0.270
- Changed the WAP service and installers to no longer deploy sage assemblies and instead copy them from the sage server folder when it starts.
- Database change: Added SOPMandatoryAnalysisBehaviour setting.
- The SOP analysis codes and mandatory analysis behaviour need to be configured in WAP system settings to validate the analysis codes as required.
v17.608.31.1
- WOFinishedItemQuantity added to JobActivity table.
- WOFinishedItemQuantity added to TimesheetLineTable table. v17.609.32.1
- Changed the WAP service and installers to no longer deploy sage assemblies and instead copy them from the sage server folder when it starts.
v17.611.33.0
- The SOP analysis codes and mandatory analysis behaviour need to be configured in WAP system settings to validate the analysis codes as required.
v17.613.34.1
- To view the Sales Order Lines report, the user type needs to be allocated the View Sales Order Reports permission.
V17.618.36.0
- InvoiceID Added to ProposedPaymentLine table.
V17.618.37.0
- In order to use Quote Requests, the report needs to be configured for each Sage Connection and the user type needs permission to print quotes.
- Added Columns [QuoteRequestPrinted] and [QuoteRequestEmailed] columns to Order table.
- Added [QuoteRequestReport] column to SageDatabase table.
- Added [CanPrintQuoteRequests] column to UserType table.
V17.590.0.275
- The exchange rate between the two currencies need to be configured in both the base currency database and the document database. Differences between these two could lead to issues with approval value conversion.
[Last Important Information August 20, 2018.]
Sicon WAP v18 New Features & Important Information