WAP Help and User Guide – Sales Orders v21
This WAP Sales Order Help and User Guide will take you through the features and settings for the Sicon WAP Sales Order Module. This module is designed to allow users of the WAP system to create, submit and approve Sales Orders, enabling a Sales Order to be raised and posted to the Sales Order Processing module within Sage 200. Goods can also be despatched via the WAP Sales Order module which will then update the values on the Sage Sales Order.
Search the page by pressing Ctrl + F (windows) or CMD +F (Mac) on your keyboard.
Back to all user guidesProduct overview
Help and User Guide maintained for WAP version 210.0.0
This WAP Sales Order Help and User Guide will take you through the features and settings for the Sicon WAP Sales Order Module. This module is designed to allow users of the WAP system to create, submit and approve Sales Orders, enabling a Sales Order to be raised and posted to the Sales Order Processing module within Sage 200. Goods can also be despatched via the WAP Sales Order module which will then update the values on the Sage Sales Order (requires auto allocation for stock items).
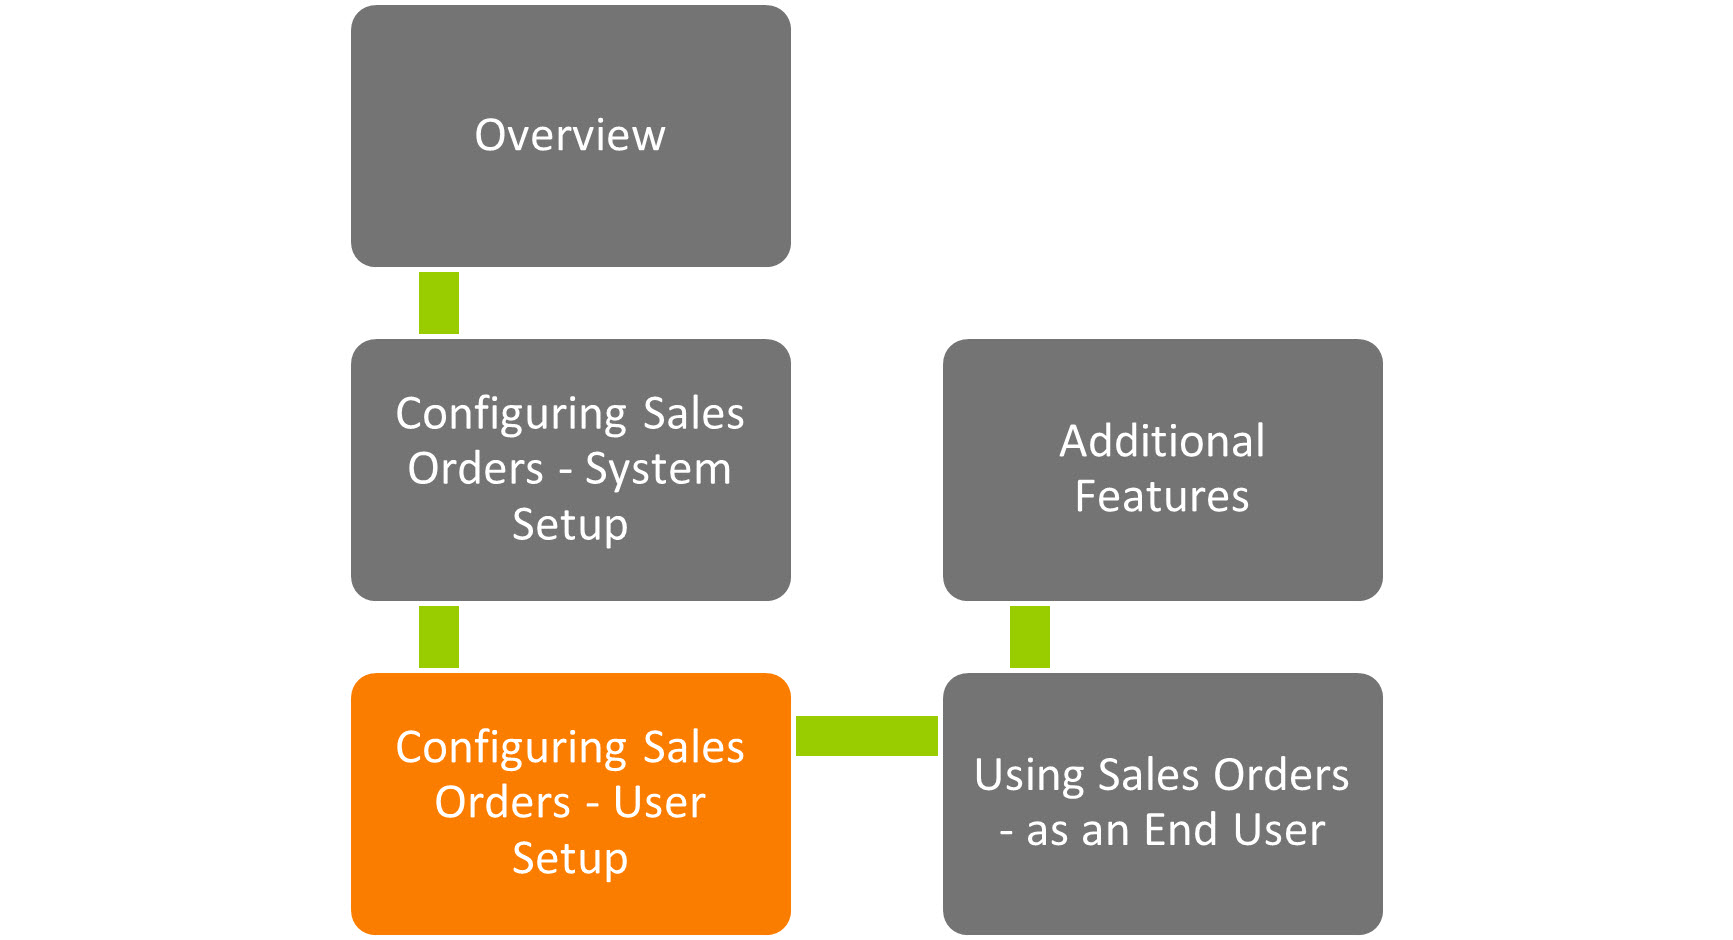
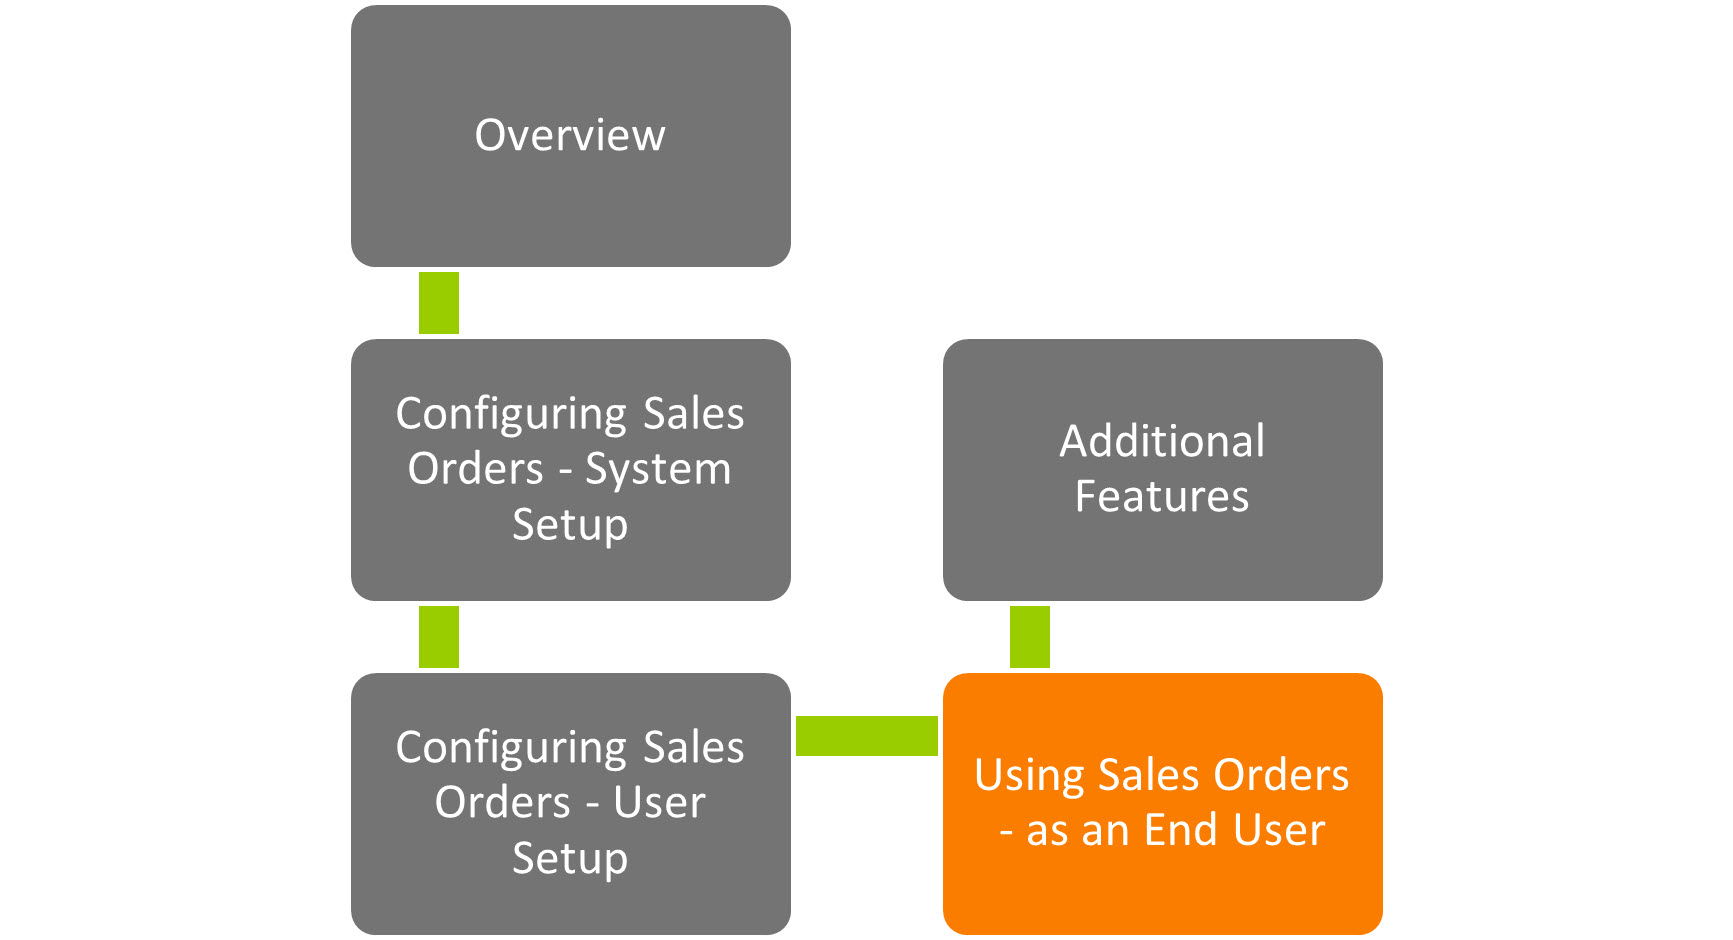
This Help and User Guide is set out into the below main areas:
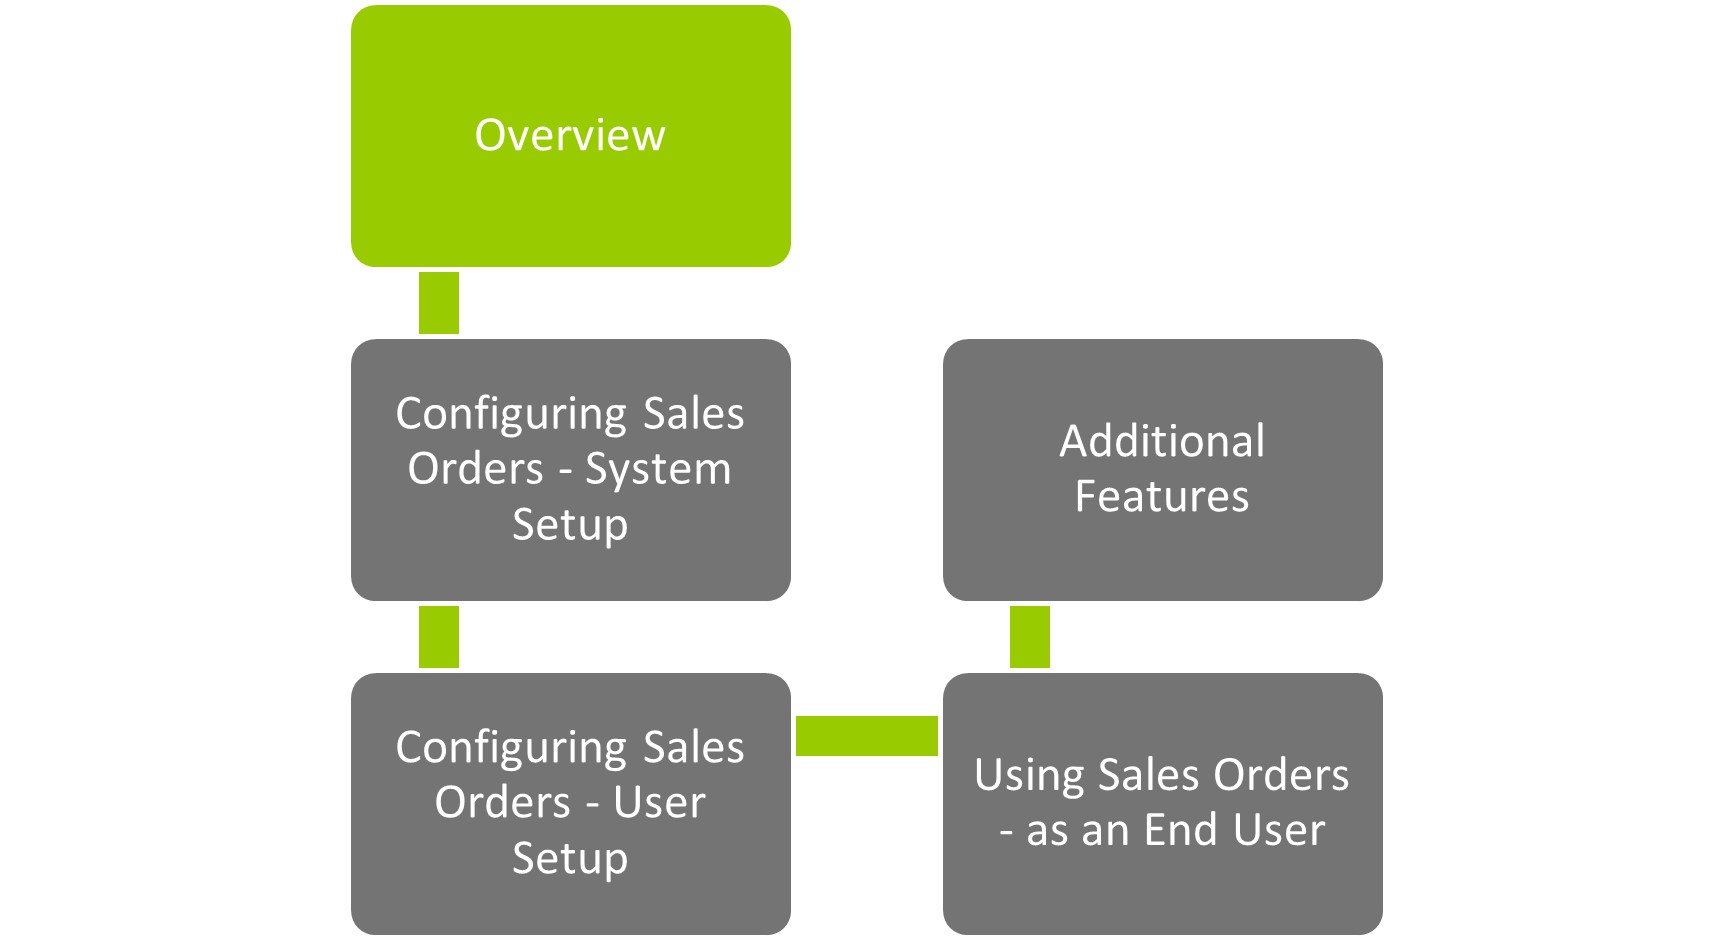
Overview: aimed to provide a summary of the Sales Order Module, and some basic pre-requisite configuration information
Configuring Sales Orders – System Setup: aimed at Consultants and WAP super users or administrators looking to set WAP up for the first time. This would be covered in initial consultancy with your Sage Business Partner or Sicon WAP Consultant, in conjunction with the WAP System Settings Help and User Guide.
Configuring Sales Orders – User Setup: aimed at Consultants and WAP super users or administrators looking to set WAP Users up for the first time. This would be covered in initial consultancy with your Sage Business Partner or Sicon WAP Consultant, in conjunction with the WAP User Settings Help and User Guide.
Using Sales Orders – as an End User: aimed at the WAP End User who will be entering and approving Sales Orders, covering the features they may use in their day-to-day role.
Additional Features: predominantly aimed at WAP Super Users, covering additional features and additional setup that some companies may wish to use.
1. WAP Sales Order Navigation
In v20.1, the look and feel of WAP has changed and screens within WAP may look different to the screenshots contained in this HUG. We are working to update the HUGs with new screenshots and other new features however in the meantime, the main functionality outlined in this User guide remains the same.
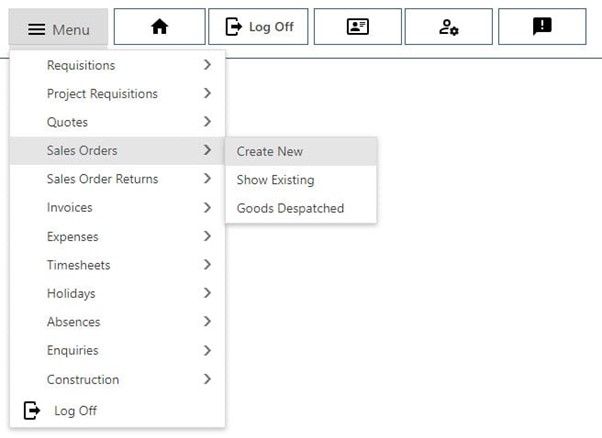
The main difference is the navigation throughout WAP. The existing side menu has been replaced with a drop-down menu. To navigate to quotes, sales orders or sales order Returns, hover over the menu in the top left, then guide the mouse to the required sub-menus and click the relevant one to select. For example, to create a new sales order, hover over Menu, then Sales Orders, then click on Create New in the menu below:
2. Configuring Sales Orders – System Setup

The next sections are aimed at WAP consultants and WAP super users looking to set WAP up for the first time. This would be covered in initial consultancy with your Sage Business Partner or Sicon WAP Consultant, and the WAP System Settings Help and User Guide is also useful to reference in addition to the information contained in this guide.
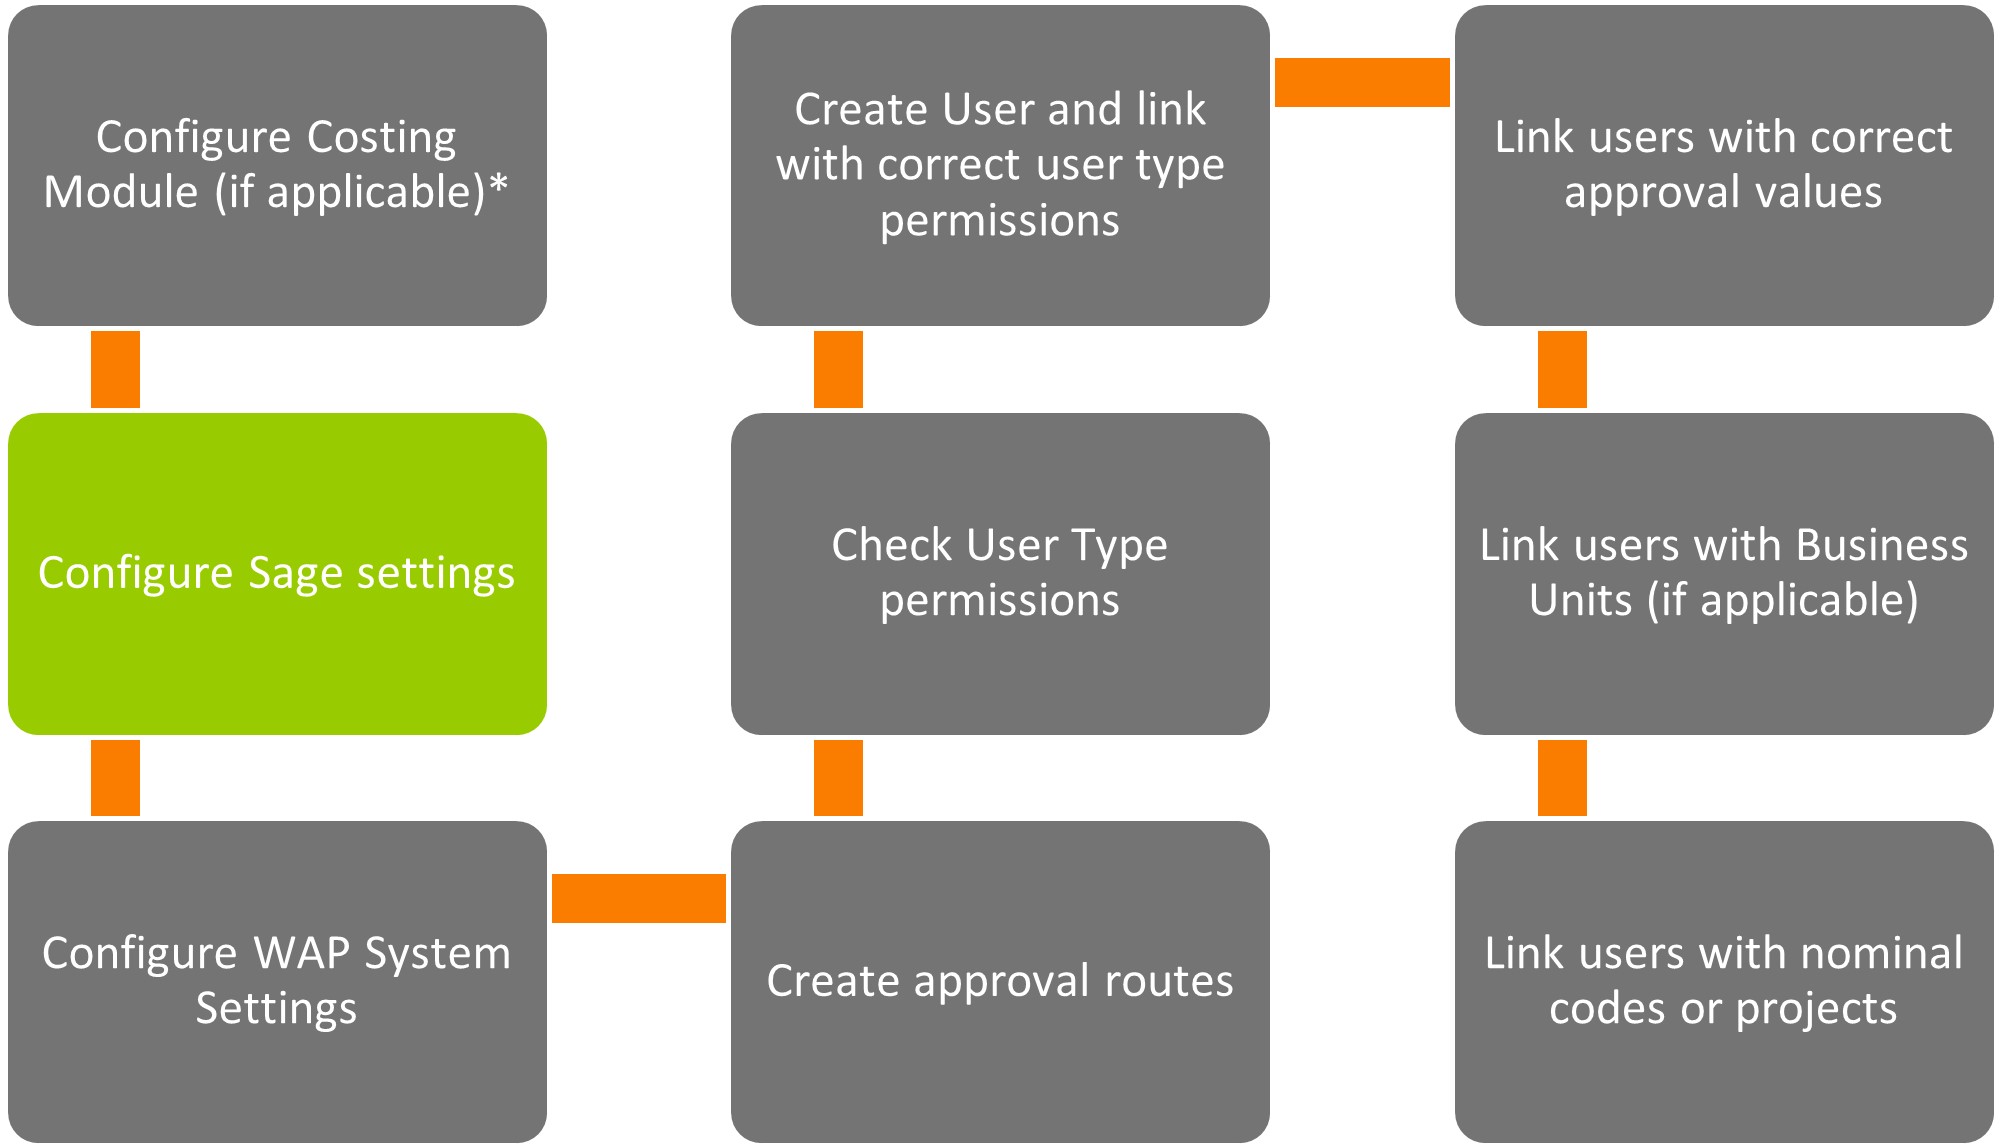
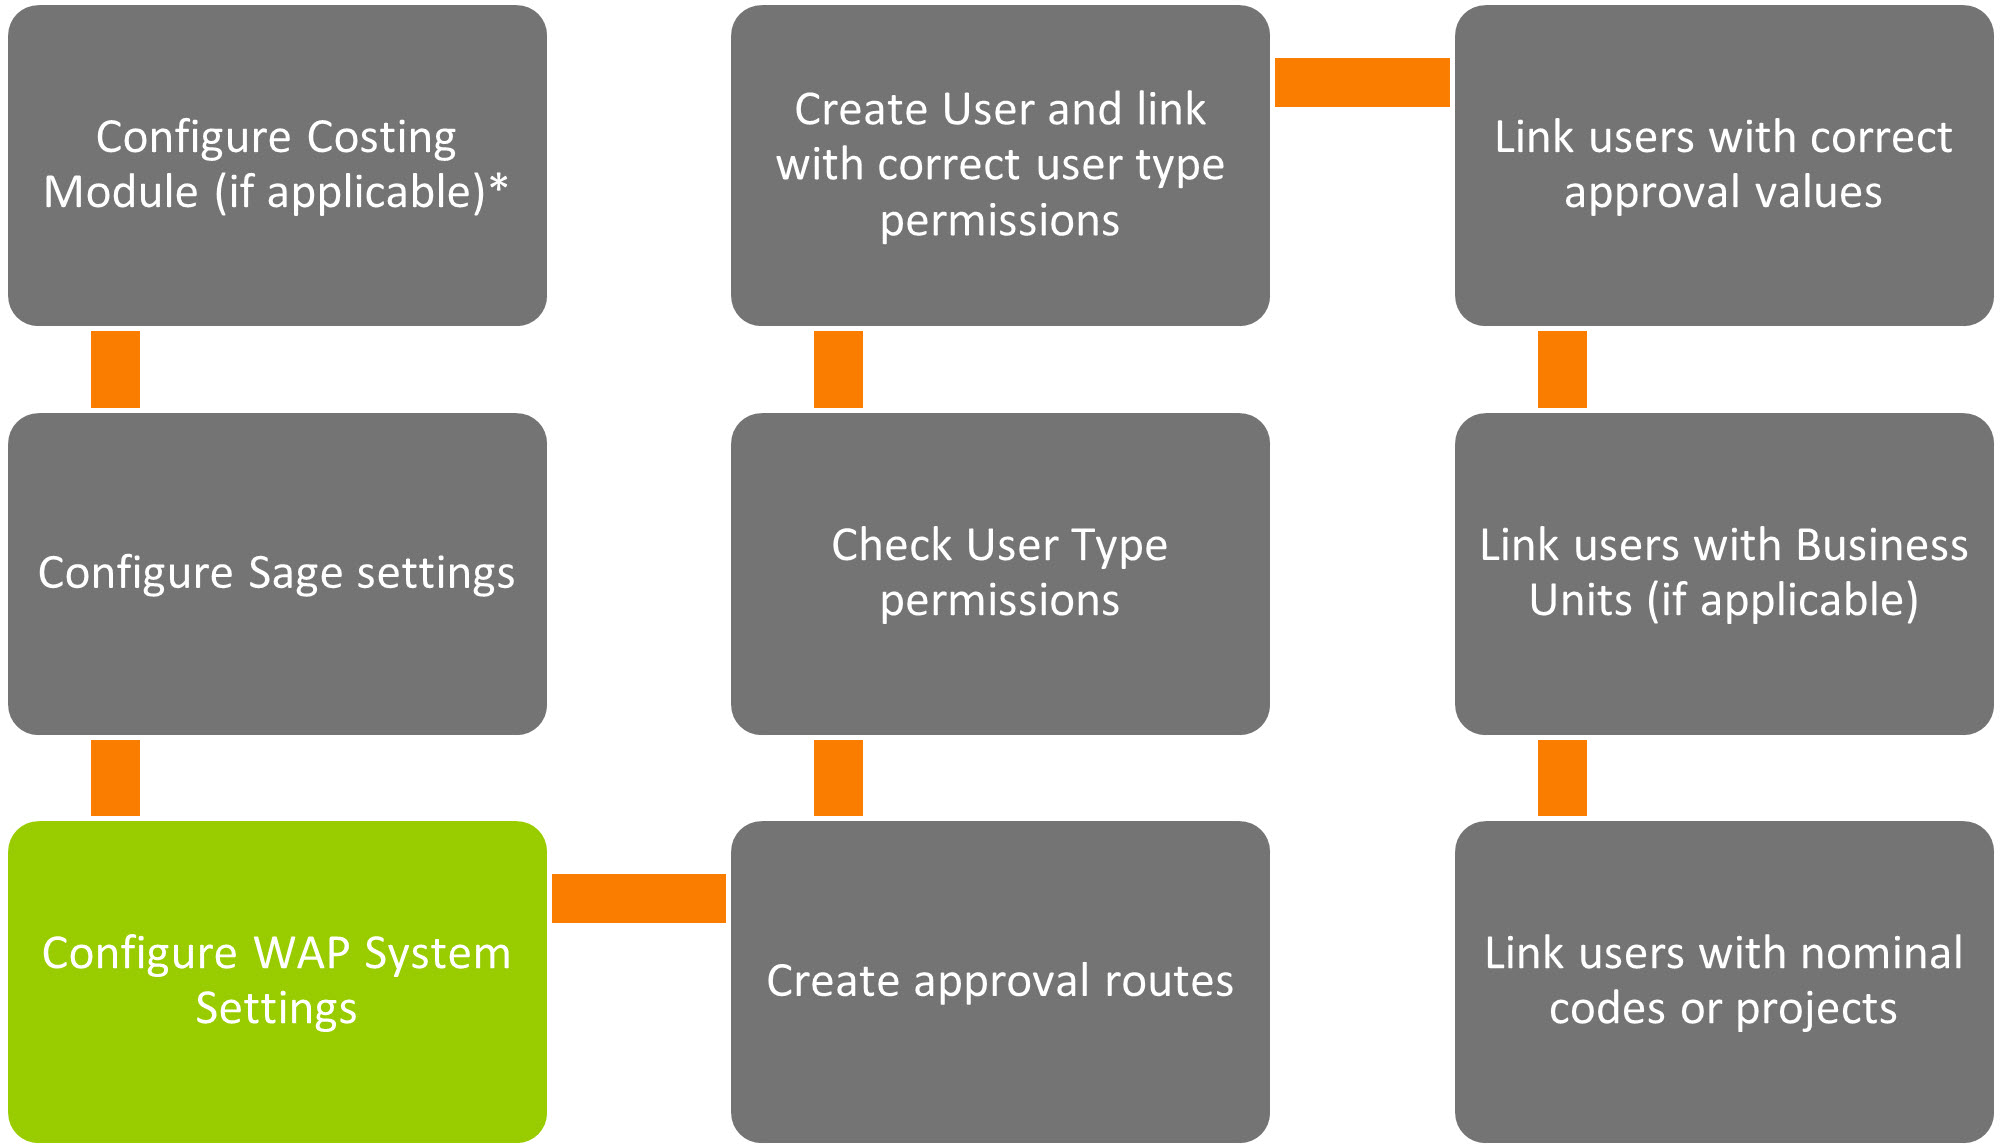
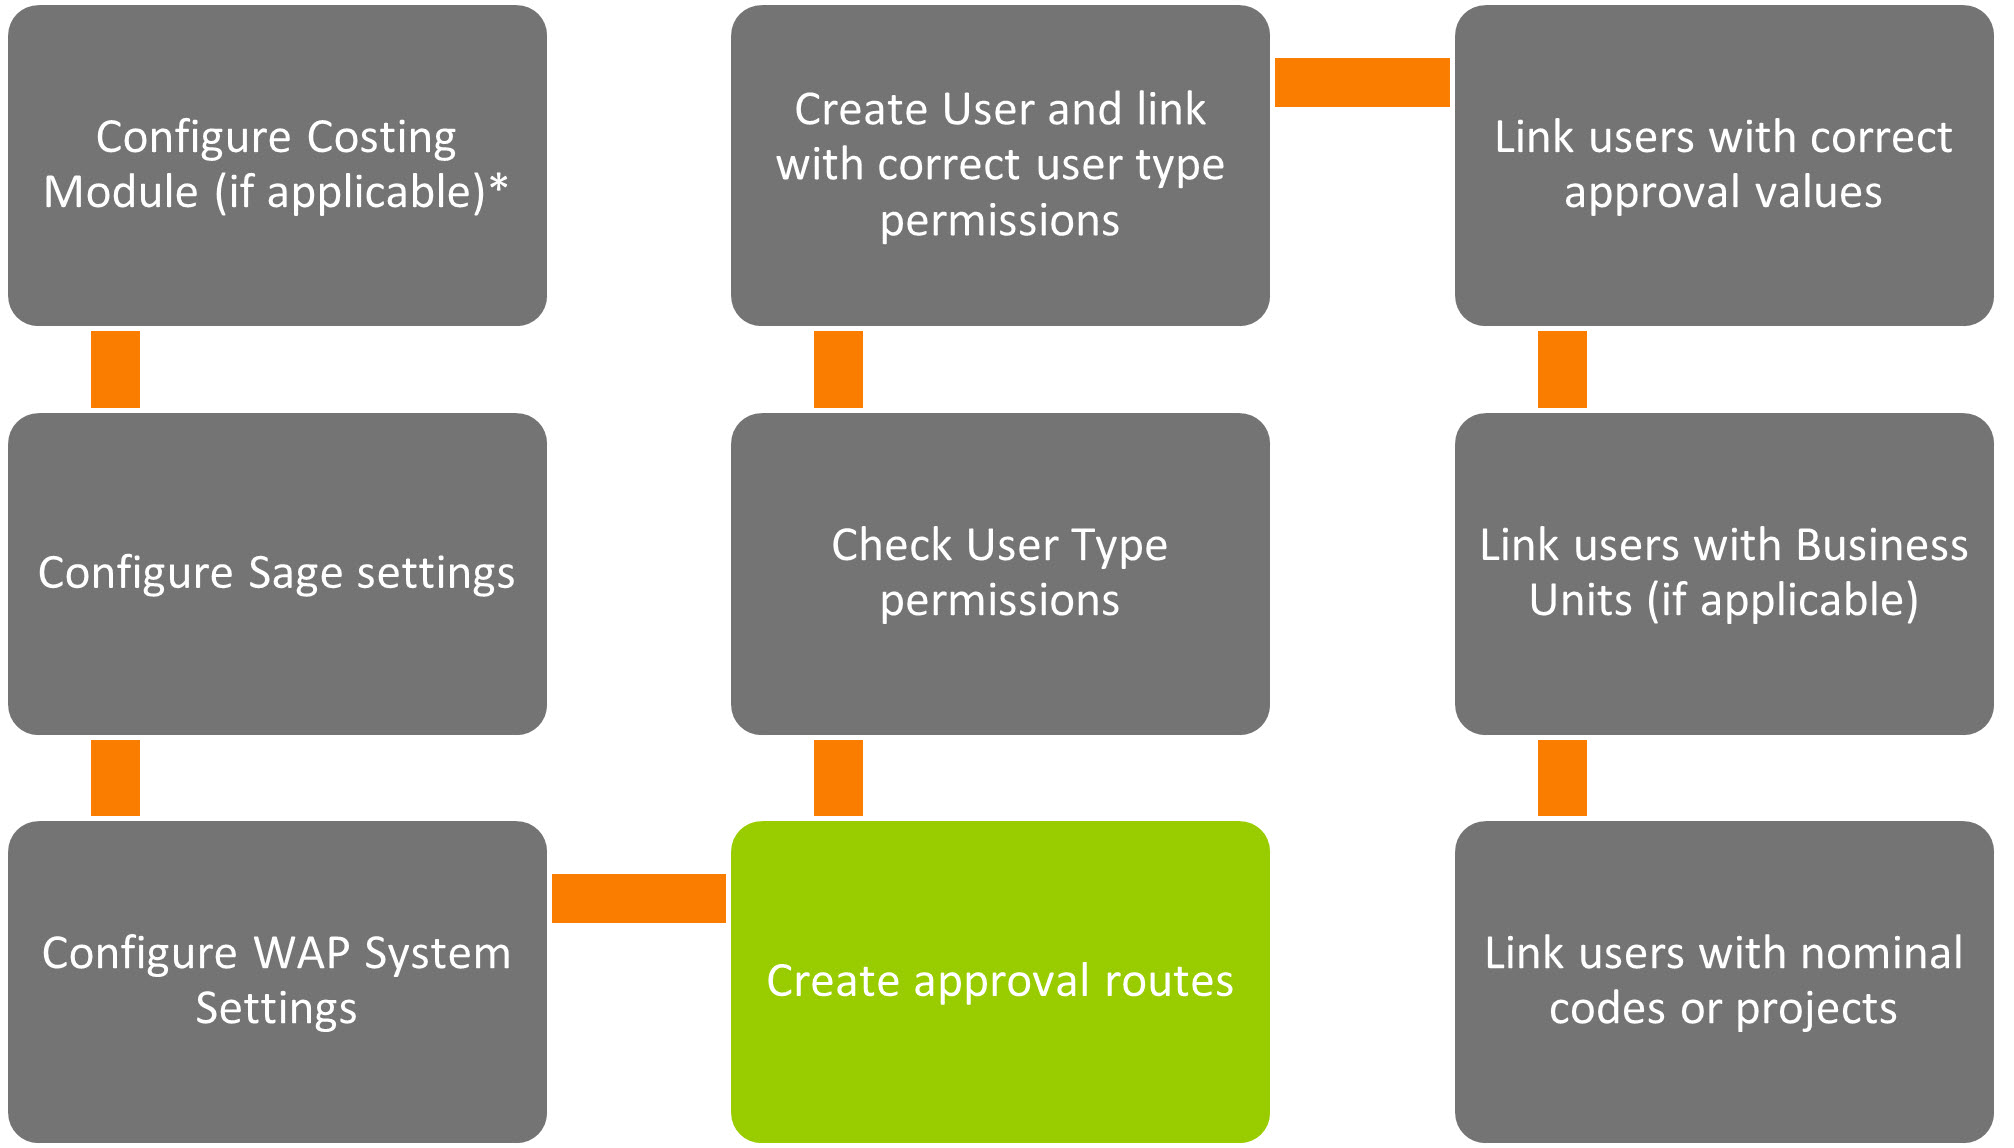
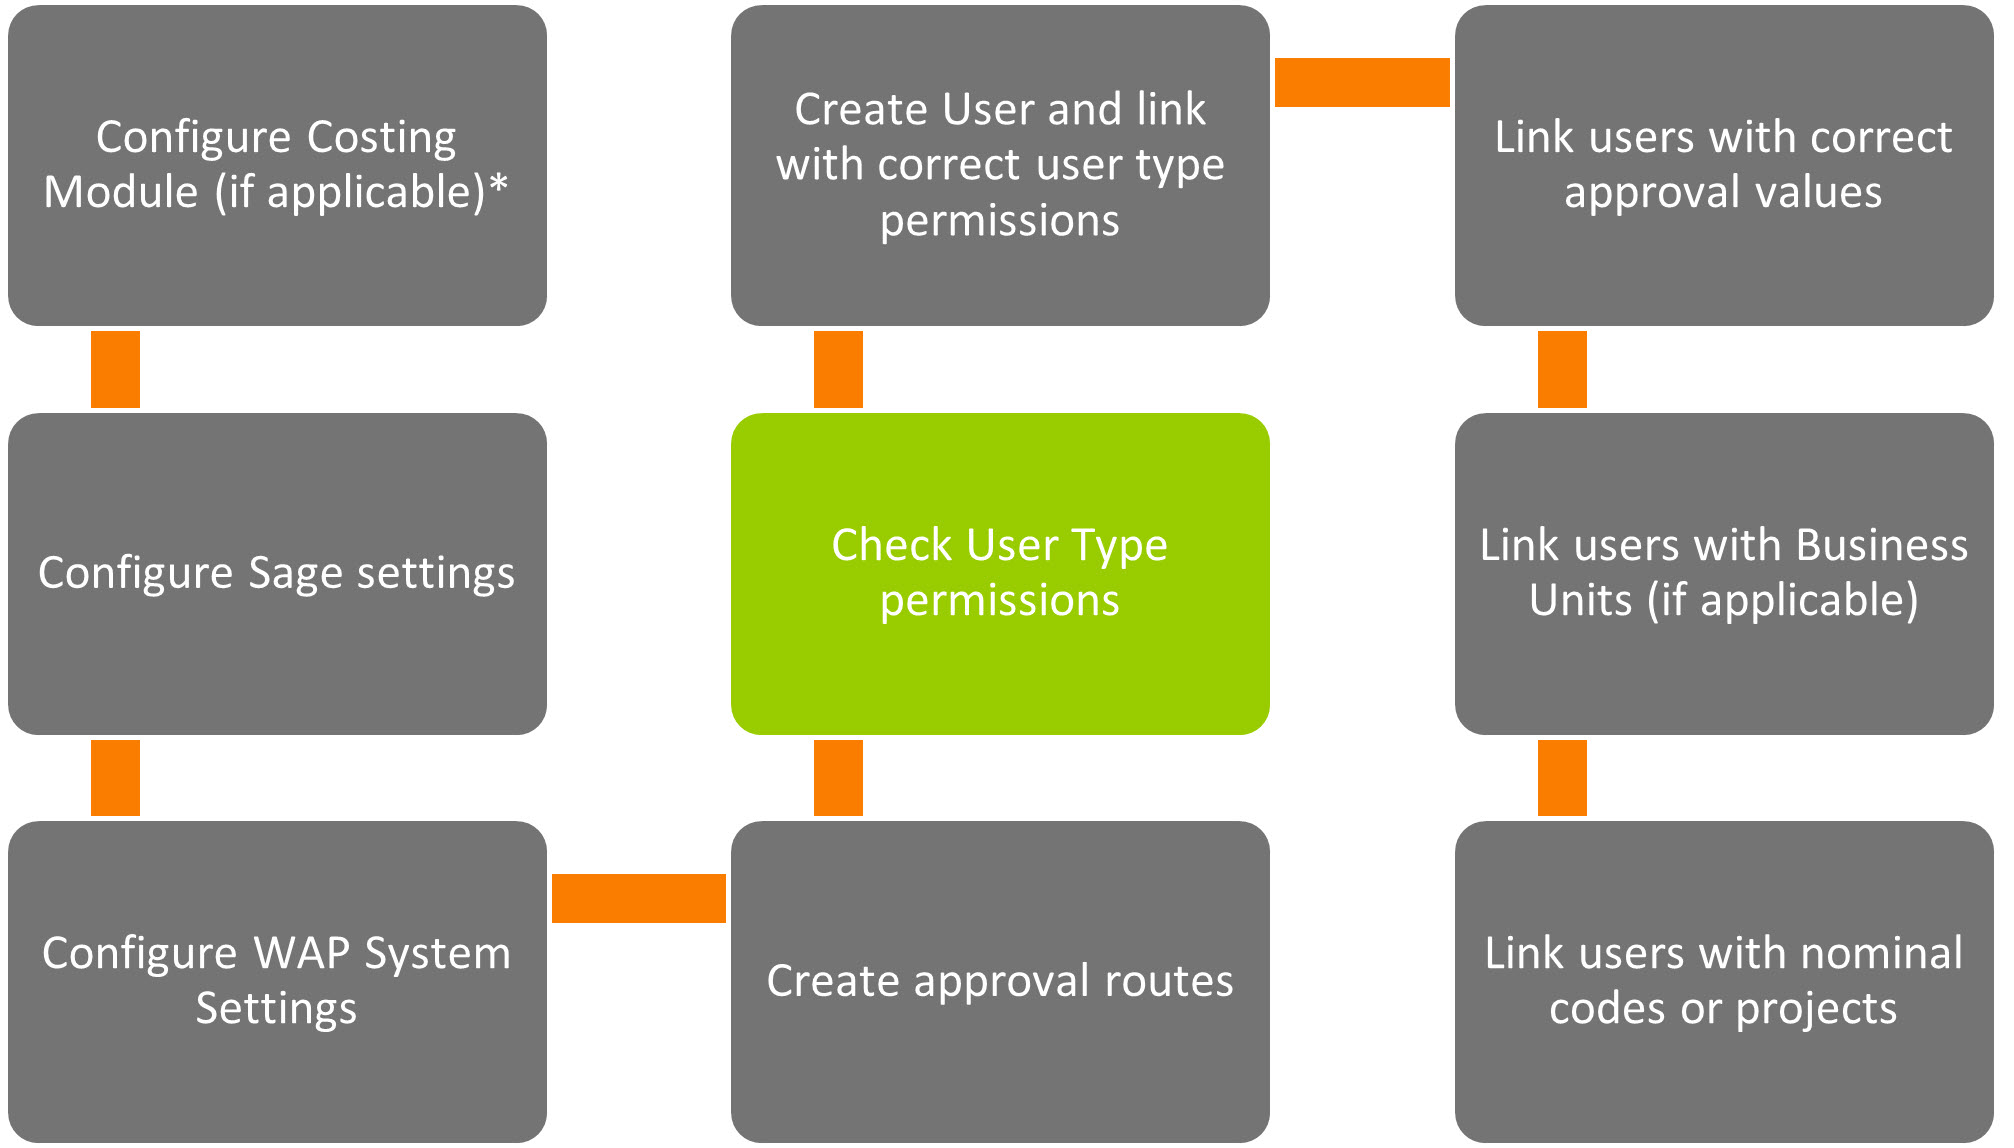
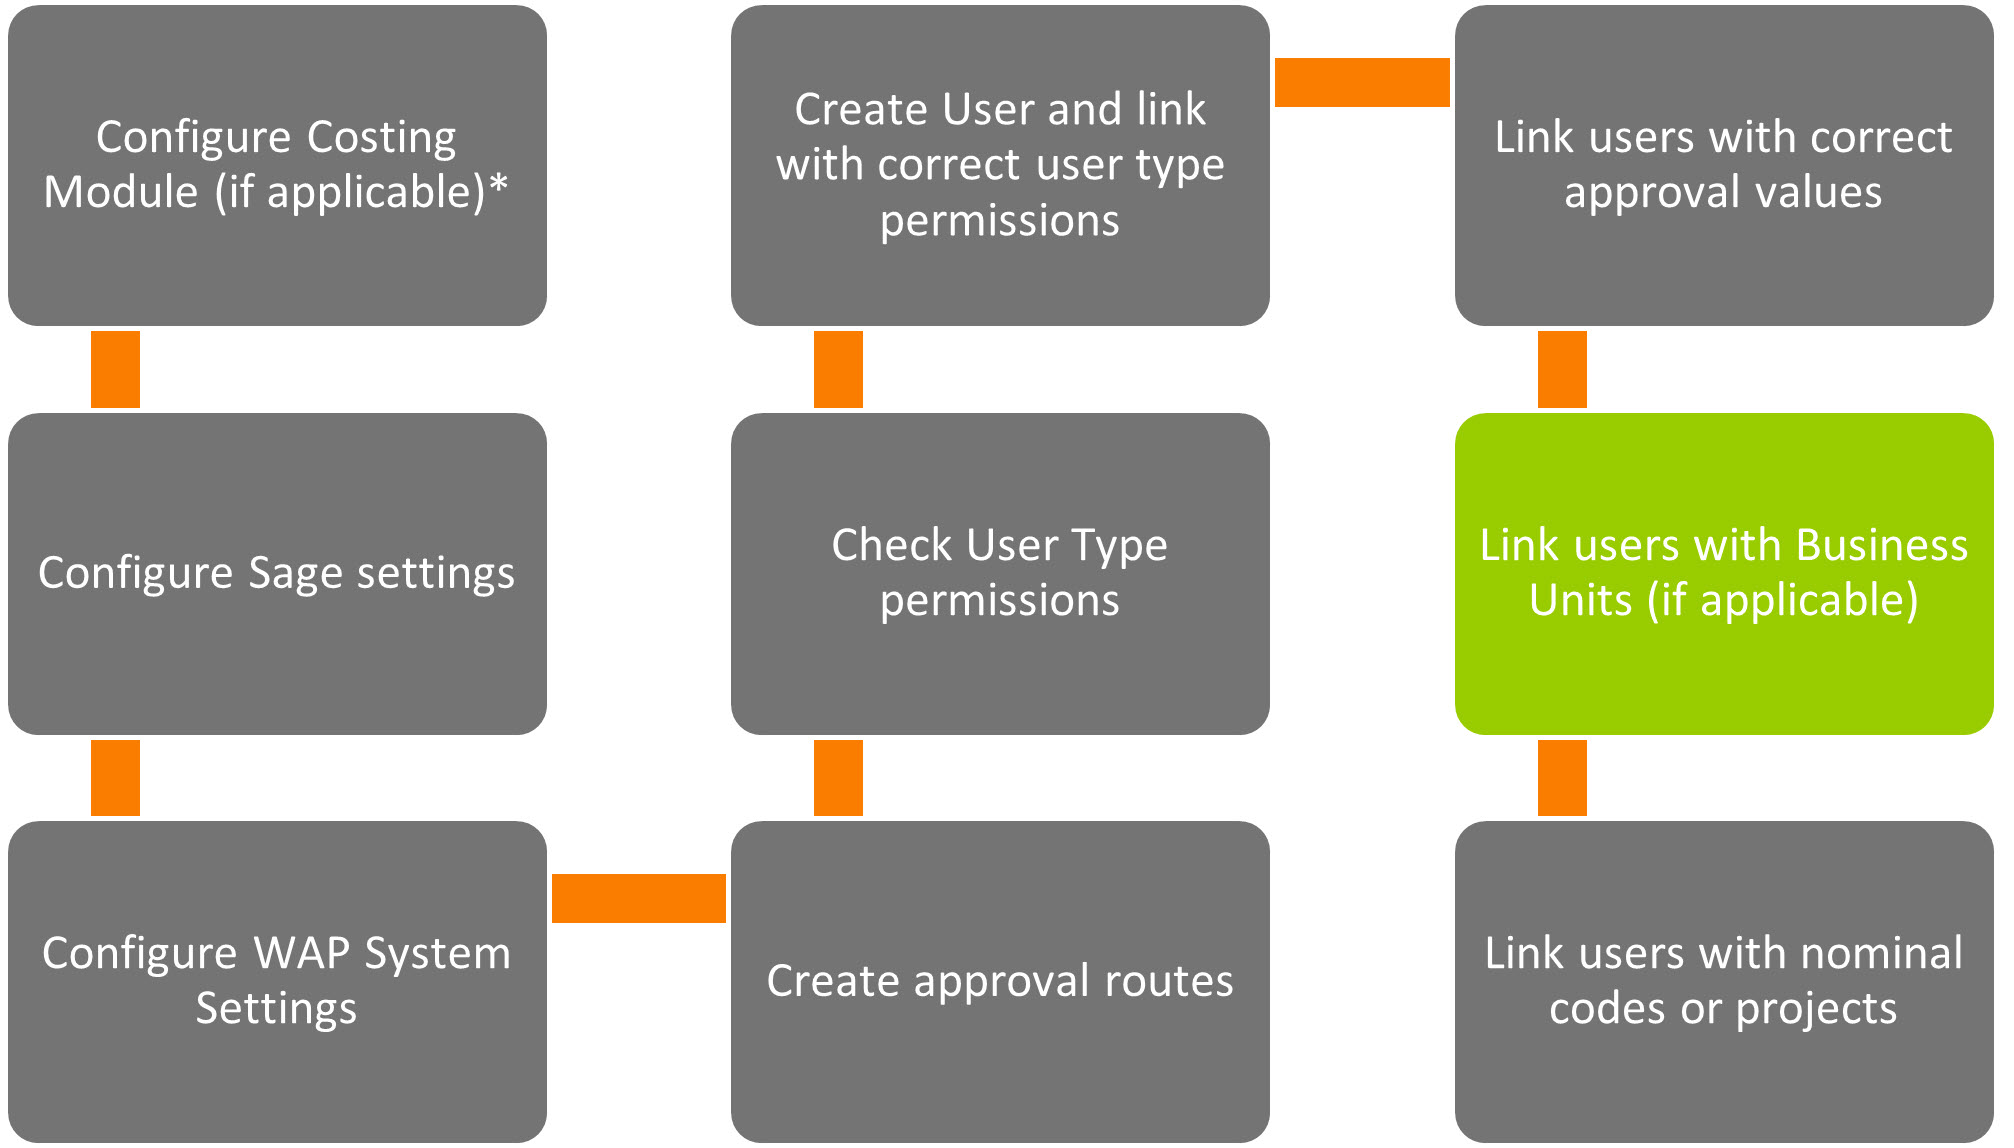
3. WAP Sales Order Prerequisites and Setup Steps
Before adding sales orders onto the system, the below steps will need to be followed; these steps may not all be relevant depending on whether a costing module is being used and how the system is to be configured.
Further information on these sections can be found throughout this Help and User Guide.
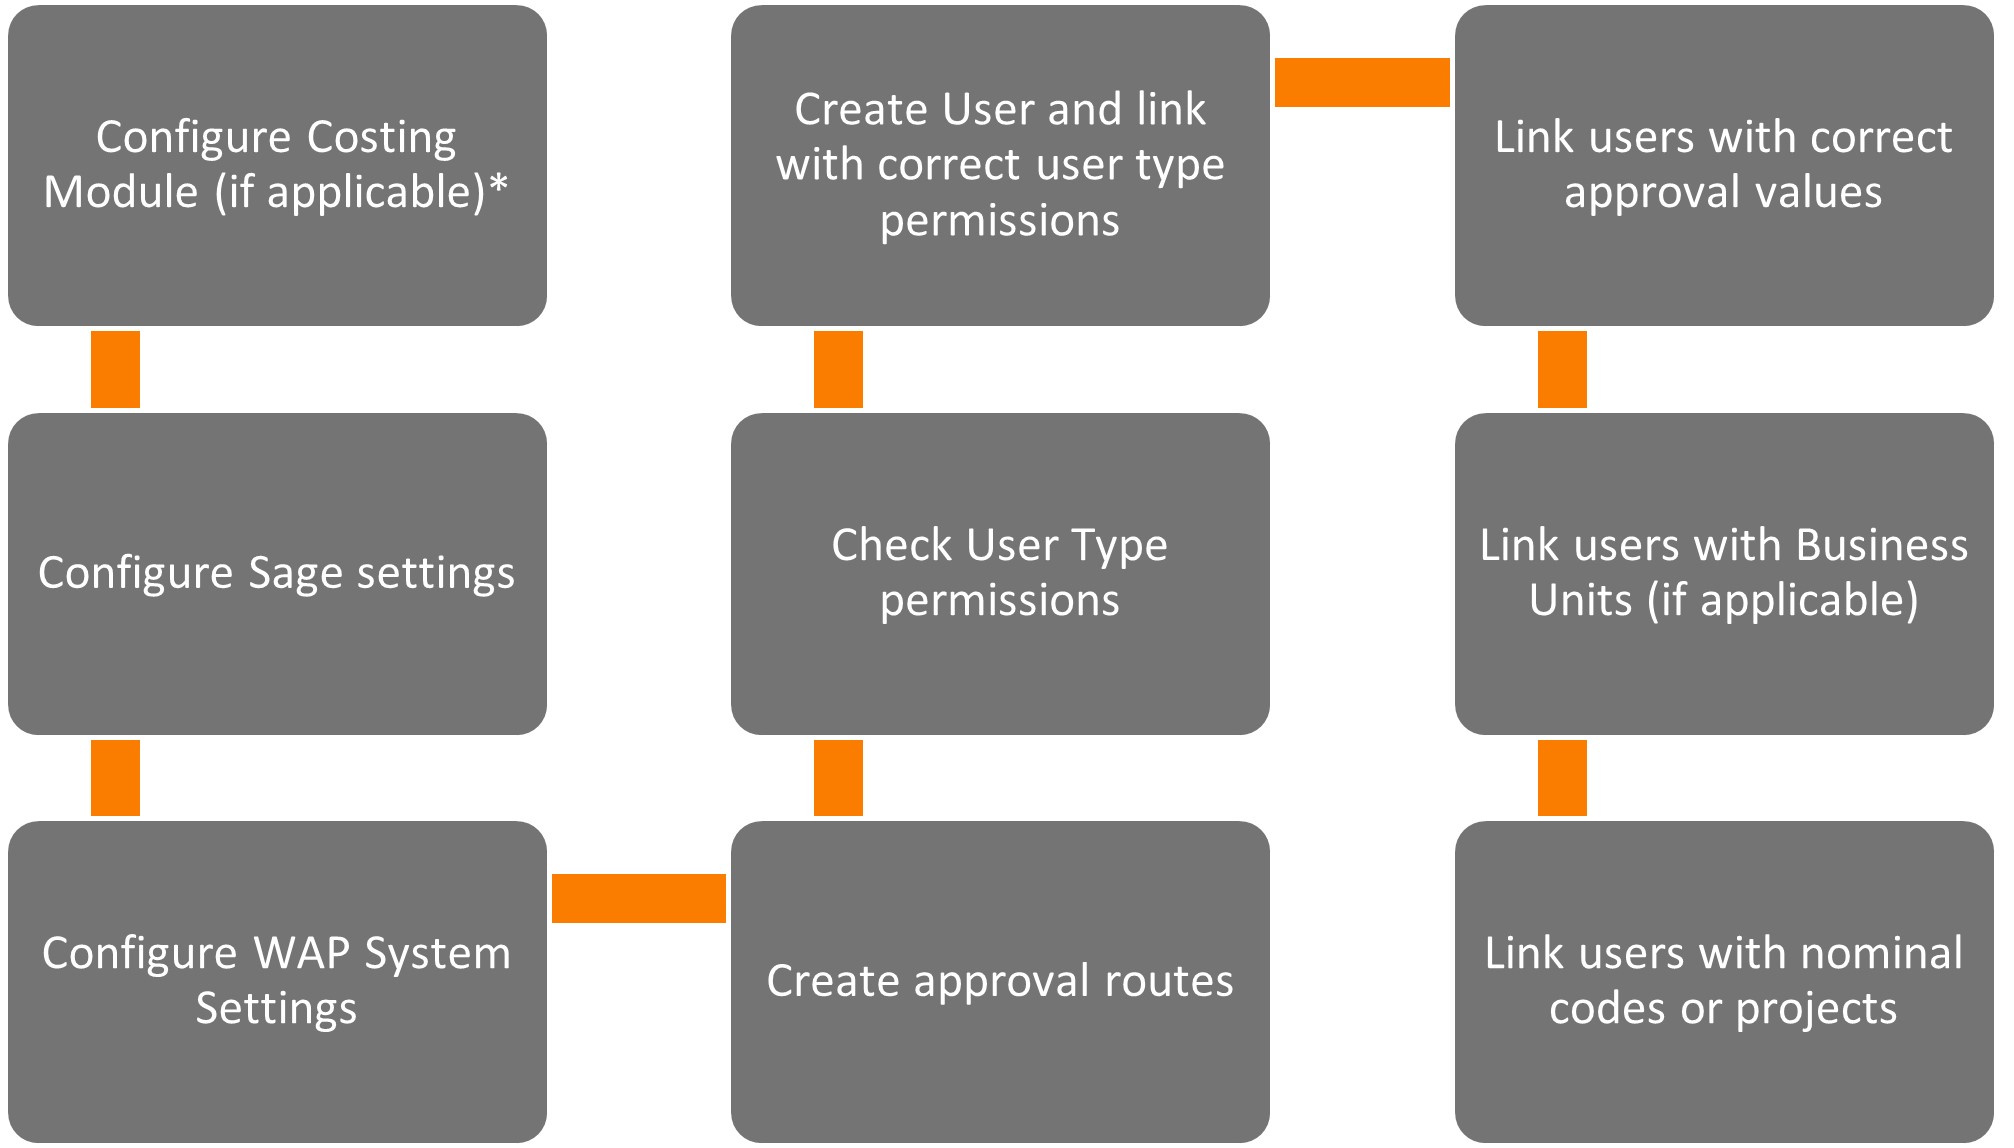
* Please make sure the WAP Service is restarted following any changes.
4. Sales Order Enable Configuration
For the Sales Order module to be available the enable module must have the Sales Order module ticked. Once this is configured, Sales Order options will then be visible within the system.

For further information on licencing, please speak with your Business Partner in the first instance.
5. Costing Module Integration Pre-Requisites
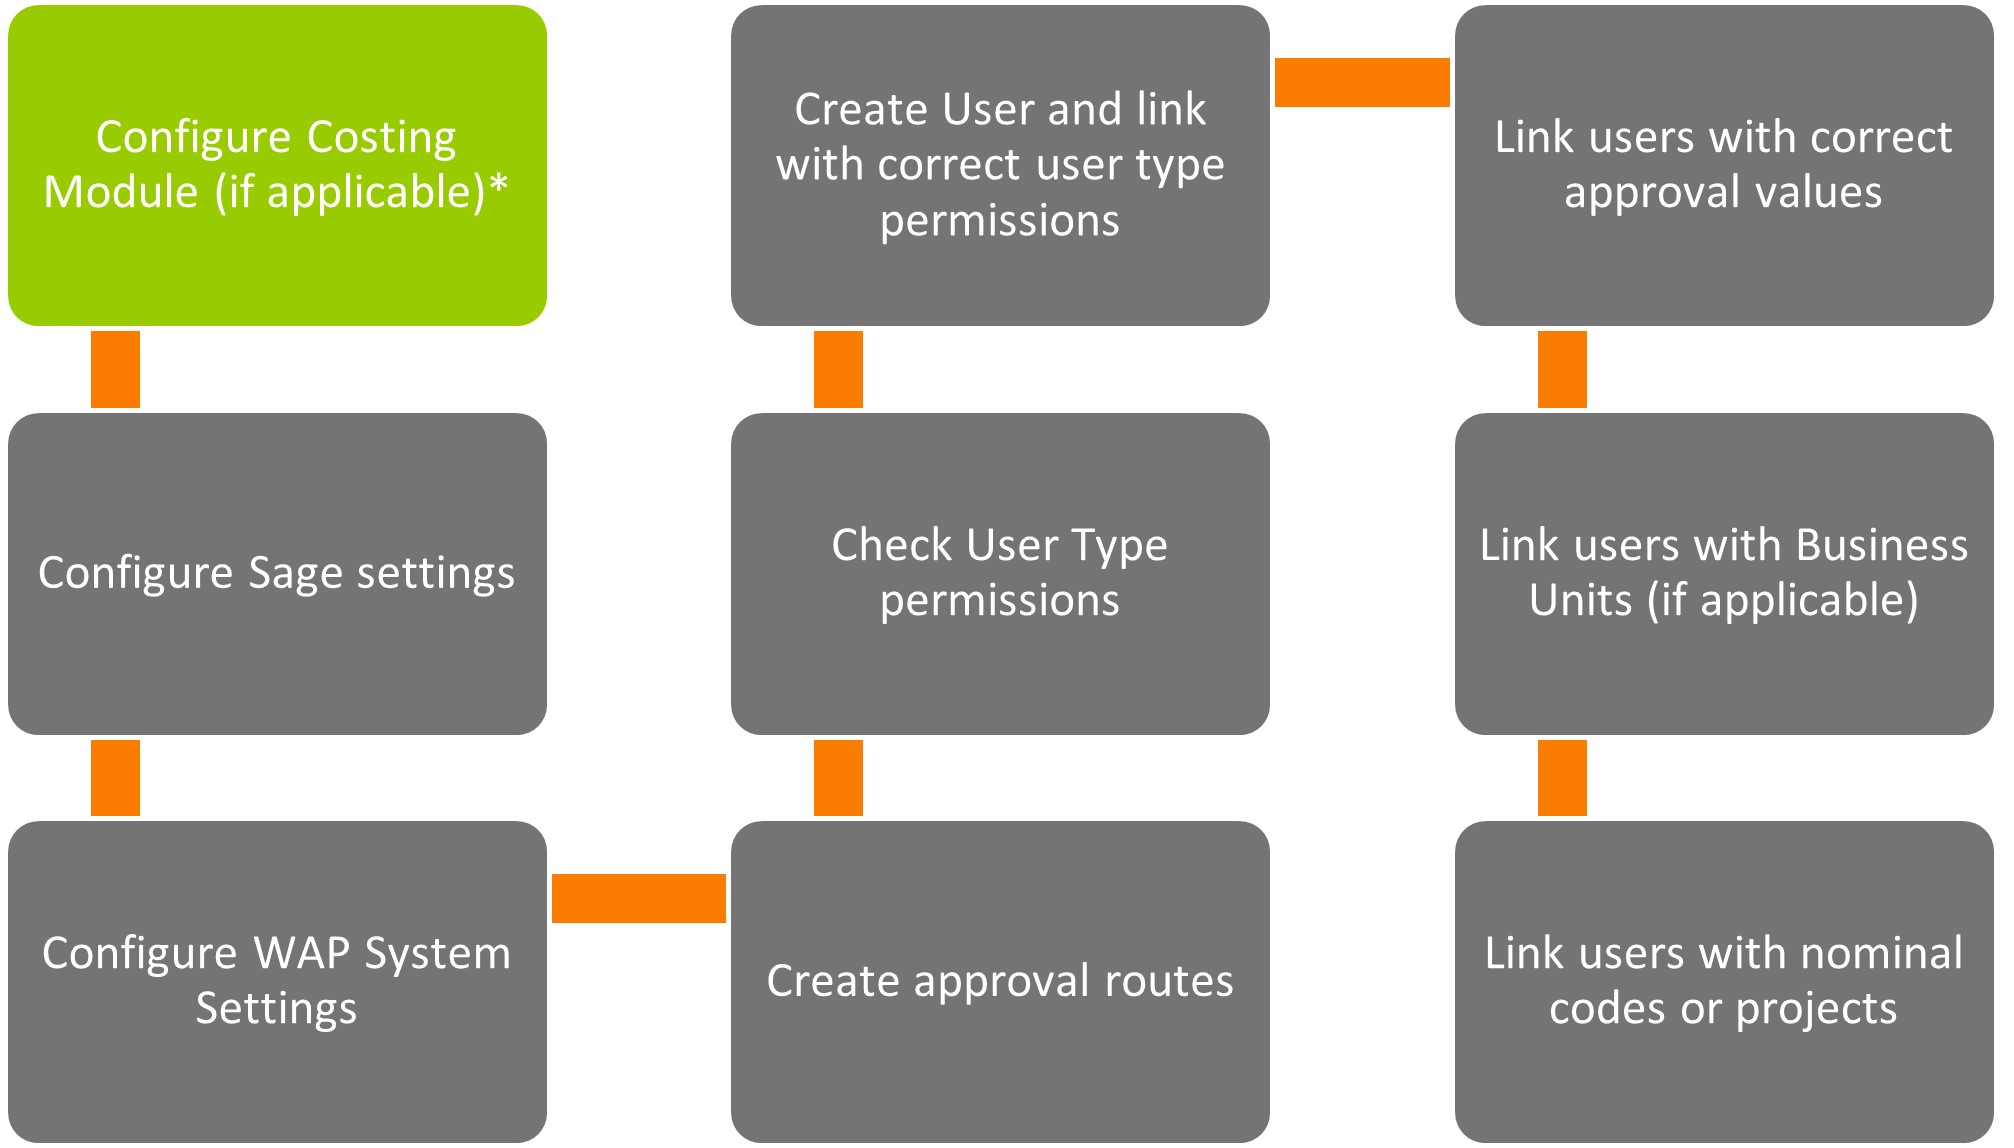
The WAP system can be configured to integrate with Sicon Projects or Sage Project Accounting. Select accordingly within System Settings – Costing.

Ensure the WAP Service is restarted after setting the costing module.
5.1. Sicon Projects
Sicon Projects in Sage should be configured prior to setting up WAP. Below are a number of things to consider when setting up Projects to be linked with WAP. For more information on any of these points or other aspects of configuring Sicon Projects, please refer to the Projects Help and User Guide.
Project Headers
Make sure Project Headers have been created that correspond with how sales are to be costed; default nominal codes can be set against each header.
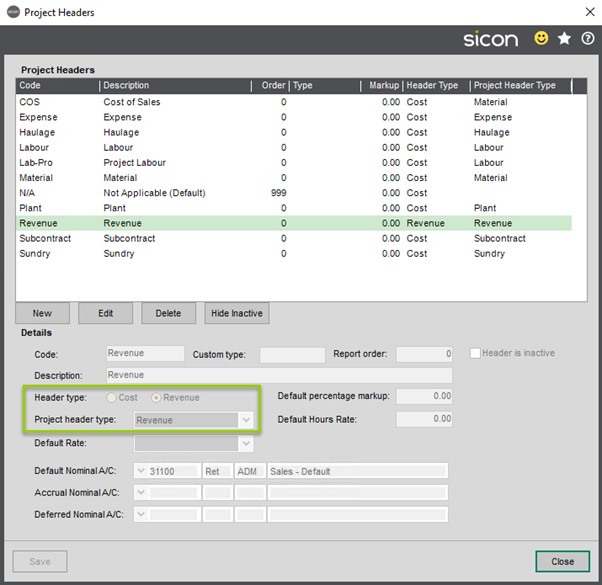
Headers need to be linked to a Header Type with a WAP type ‘S’ for them to be visible when users raise sales orders.
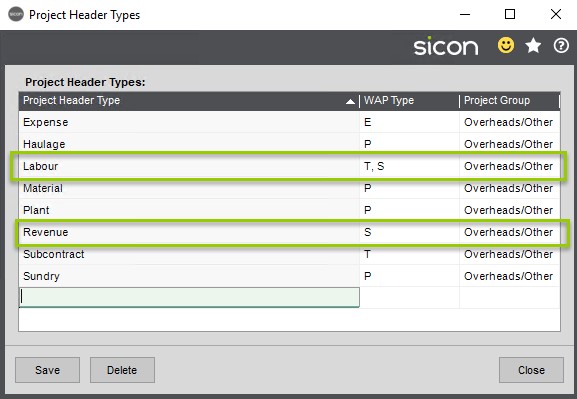
It is possible to insert a comma to allow for the header to be available in multiple WAP modules, e.g. Timesheets and Sales Orders as the Labour header example above shows. For reporting purposes though, it may be more effective to configure additional project header types for each module.
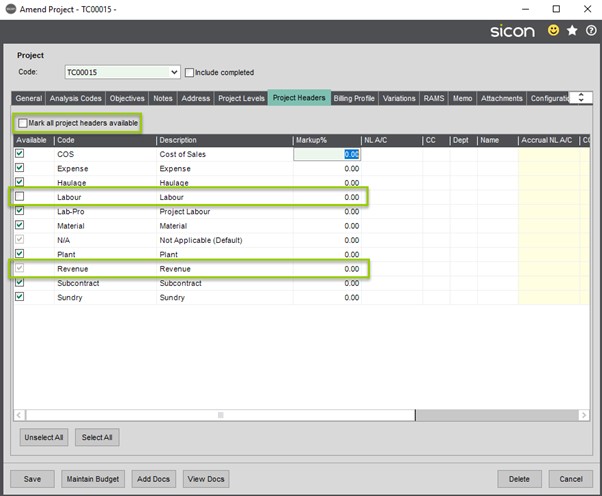
The project can be configured so that headers can be prevented from being available on a specific project. If headers have been marked as unavailable, this will feed through to WAP regardless of a user’s WAP permissions to view the header.
Project Defaults
Default projects and project headers can be set in Projects settings which will get picked up by WAP when entering a sales order.

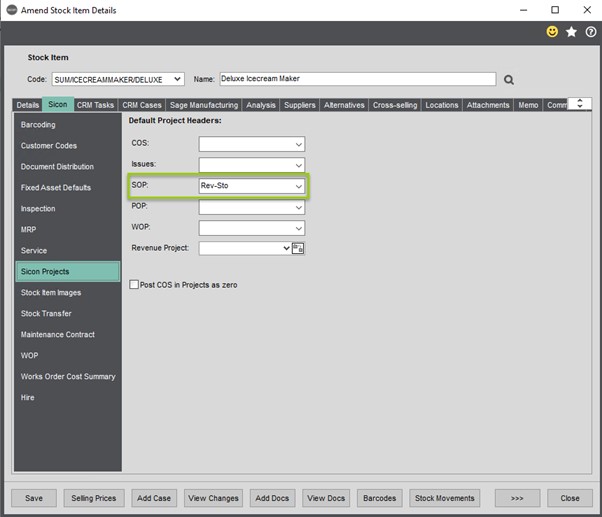
If using Stock in Sage, it is possible to set a default project header per stock item – this will get configured in WAP if raising a sales order against the stock item.
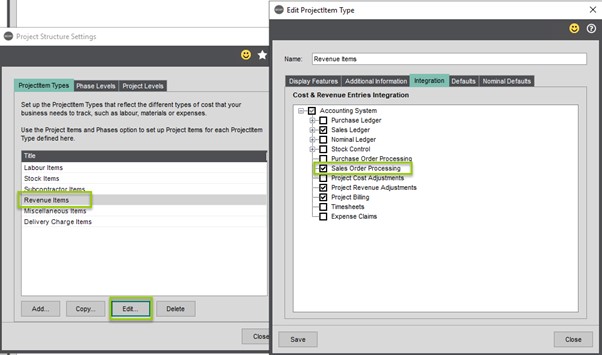
5.2. Sage Project Accounting
Project Accounting in Sage should be configured prior to setting up WAP. For full information on configuring the Project Accounting Module please speak with your Business Partner. Below are a few things to consider specific to integrating Project Accounting with sales orders.
Configuration
Enable Sage Project Accounting integration with Sales Order Processing.
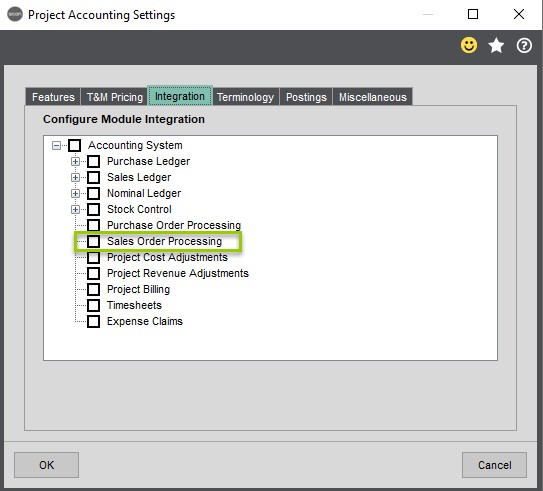
If required, enable or disable which Project Accounting Project Item Types to integrate with Sales Order Processing.
Resources
Ensure one of the Resources within Project Accounting is linked to the WAP user created in Sage. It is advised to create a new resource called e.g. ‘WAP’, link to the Sage 200 WAP user and enable all permissions for the new resource.
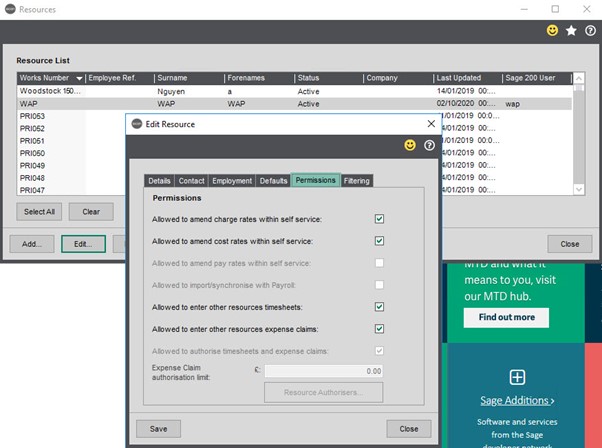
This user should have access to all projects and not be filtered to view only certain projects.
6. Sage pre-requisites
6.1. SOP Utilities – User Permissions
Within Sage the user running the WAP service will need permissions to post to Sage (Sales Order Processing – SOP Utilities – User Permissions). If these are not enabled, certain changes in WAP, such as unit price changes, will not feed through to Sage:

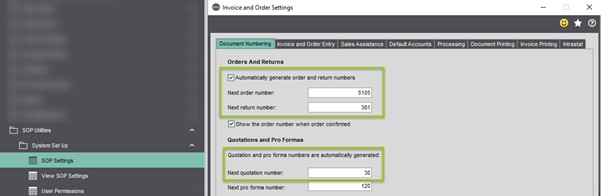
6.2. SOP Utilities – SOP Settings
Automatically generate order and return (numbers also needs to be turned on in Sage (Sales Order Processing – SOP Utilities – SOP Settings), and quotations if WAP is to be used to create these:
7. Sales Order System Settings
7.1. General Tab - Display Banner

Hide D.U.N.S Number from Customer Creation: The ability to hide D.U.N.S Number on the Customer Creation (either when creating a customer from a Prospect Account sales order, or within Sage Admin – New Customer – Trading tab).
Hide Keep Transactions For from customer creation: The ability to hide ‘Keep Transactions For’ (either when creating a customer from a Prospect Account sales order, or within Sage Admin – New Customer – Trading tab).
Hide Order Priority from customer creation: The ability to hide Order Priority from Customer (either when creating a customer from a Prospect Account sales order, or within Sage Admin – New Customer – Trading tab).
Hide Nominal Account from customer creation: The ability to hide the default nominal code from the customer (either when creating a customer from a Prospect Account sales order, or within Sage Admin – New Customer – Trading tab).
Hide Use Tax Code as SOP Default from customer creation: The ability to hide the setting that allows users to Use tax code as SOP default (either when creating a customer from a Prospect Account sales order, or within Sage Admin – New Customer – Trading tab).
Hide Supplier part number on Stock item dropdown selection: Turning this setting on will remove the Supplier Part No from the users’ view in the drop down when choosing a stock item on a sales order.
Hide Free stock quantity on Stock item dropdown selection: Turning this setting on will remove the Free Stock quantity from the users’ view in the drop down when choosing a stock item on a sales order.
Show Customer Stock Item Codes: If using this feature in Sicon Enhancement pack, this setting enables the column in the stock item dropdown when choosing a stock item on a sales order.
Show Additional information tab on Sales Orders: Displays an Additional Information tab where users can view ‘Requested By’, Notes and Department if using Business Units within WAP.
Show Markup Margin %: This setting can be configured depending on your company preference to use Margin or Markup. Turn on to show Markup Margin% rather than Gross Margin %.
Show Gross Margin%: This setting can be configured depending on your company preference to use Gross Margin % or Markup Margin %. Turn off to show Markup Margin% rather than Gross Margin % (usually either Markup Margin % or Gross Margin % are used, not both. The default is to use Gross Margin %).
Show Sales order Shipping Tab: If Distribution is enabled, this tab can be enabled for the user to enter the information as required when entering their sales order (Shipping type, required by, collect date, parcel carrier, service and any special instructions).
Hide delivery date on line: this setting can be used to hide the delivery date on a line if there should only be one delivery date on a sales order.
Hide Unit cost field: This setting can hide the Unit Cost from the user inputting a sales order, so they will only see Unit Price.
Hide Margin: This setting can be used to hide the information so the end user does not see this detail when entering a quote, sales order or SOP Return.
Hide Warehouse dropdown: This setting can be used to hide the Warehouse so the end user does not see this detail when entering a quote, sales order or SOP Return.
Hide base currency on order header: if configured, this setting will not show the customer currency information on the sales order header page.
Hide quantity tab: if configured, this will hide the quantities tab on the sales order header page (the quantities tab provides summary information on what has been ordered, allocated, despatched and invoiced for all lines).
Hide stock quantity tab: if configured, this will hide the stock quantities tab on the sales order header page (the stock quantities tab provides summary information on stock lines for what is free stock, in stock and allocated stock).
7.2. General Tab - Functionality
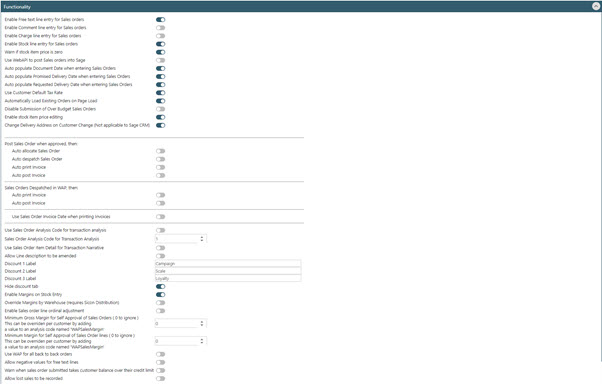
General Functionality Settings
Enable Free text line entry for Sales orders: untick this setting if users should not be able to enter a free text line on a SOP quote, sales order or SOP Return.
Enable Comment line entry for Sales orders: untick this setting if users should not be able to enter a comment line on a SOP quote, sales order or SOP Return.
Enable Charge line entry for Sales orders: untick this setting if users should not be able to enter a charge line on a SOP quote, sales order or SOP Return.
Enable Stock line entry for Sales orders: untick this setting if users should not be able to enter a stock line on a SOP quote, sales order or SOP Return.
Warn if stock item price is zero: If users select a stock item that hasn’t had any pricing set up in Sage, a warning will display to show “Pricebook = 0”. Prices can still be overwritten by the user and will be posted to Sage if this permission has been granted in Sage SOP settings.
Use WebAPI to post Sales orders into Sage: only relevant for sites using CRM for WAP sales orders.
Auto populate Document Date when entering Sales Orders: if this setting is on it will populate the document with today’s date for SOP quotes, sales orders and SOP Returns, and can be overridden by the user. The setting can be unticked if the user should select the required order date.
Auto populate Promised Delivery Date when entering sales orders: if this setting is on it will populate the Promised Date with today’s date for SOP quotes, sales orders and SOP Returns, and can be overridden by the user. It is possible to submit a sales order without a delivery date or promised date however, prior to approval a Promised Delivery date must be added. The setting can be unticked if the user or approver should select the required order date.
Auto populate Requested Delivery Date when entering sales orders: if this setting is on it will populate the Requested Delivery date with today’s date for SOP quotes, sales orders and SOP Returns, and can be overridden by the user. The setting can be unticked if the user should select the required order date.
Use Customer Default Tax Rate: if this setting is on, SOP quotes, sales orders and SOP Returns will use the default tax rate from the customer.
Automatically Load Existing Orders on Page Load: if ticked, when clicking Existing quotes, Existing sales orders or Existing SOP Returns, all orders for the user logged in will be displayed (with the exception of deleted or archived orders). To improve performance, it is possible to turn this setting off so nothing is displayed automatically and the user can instead use the search filters to find what they require.
Disable Submission of Over Budget Sales Orders: If the setting to check nominal budgets during approval is on, then every sales order line that has nominals has its nominal budget calculated on submission. With this setting turned on, if the line nominal is over budget then it cannot be submitted. This is the same for quotes and SOP returns as well.
Use Sales Order Analysis Code for transaction analysis: select this if a specific sales order analysis code is to be used to populate the transaction analysis code when posting to Sage.
Sales Order Analysis Code for Transaction Analysis: If the setting above is turned on, pick which analysis code (1 though to 6) WAP should use. When the sales order is posted, NLPend/NLDeferred or NLPosted transaction analysis will be updated with this analysis code.
Allow Line description to be amended: When entering a stock item, the description will be pulled through from Sage. If this setting is turned on an additional tab will display allowing users to amend the description here and the new description will post through to Sage for this order only.
Discount 1 Label: Free text to specify Discount Name/Label
Discount 2 Label: Free text to specify Discount Name/Label
Discount 3 Label: Free text to specify Discount Name/Label
Hide discount tab: by default this setting is hidden. If displayed, this shows a discount tab on the stock item entry page which will allow a single discount amount to be calculated and applied using up to 3 custom discount lines (by percent or value). The labels for the 3 discount lines are defaulted to ‘Campaign’, ‘Scale’ and ‘Loyalty’ but can be customised to suit the business need.
Enable Margins on Stock Entry: with this setting turned on, an additional Margins tab is displayed when entering a stock item on an order to display margin information.
Override Margins by Warehouse (requires Sicon Distribution): When calculating and displaying the margin details, if this setting is turned on WAP checks to see if the landed costs are overridden by the warehouse. This is a Distribution setting (whether the warehouse is a landed costs warehouse). If landed costs are used and this setting is off then it will use the stock item landed costs or if there is one, the stock item preferred supplier.
Enable Sales order line ordinal adjustment: This allows the order of the rows to be changed. If selected, an additional icon will appear at the end of the order line to allow rows to be moved up or down as required.
Minimum Gross Margin for Self Approval of Sales Orders (0 to ignore): Sales orders can be set to automatically if over the tolerance set here. If all the lines have a Gross Margin over the value entered here, the order will self-approve, regardless of any self-approval values. If any line is under the tolerance set here, the order will follow the standard approval route (even if the overall gross margin is over the figure).
Minimum Margin for Self Approval of Sales Order lines (0 to ignore): Sales orders can be set to automatically if over the tolerance set here. If all the lines have a Markup Margin% over the value entered here, the order will self-approve, regardless of any self-approval value. If any line is under the tolerance set here, the order will follow the standard approval route (even if the overall markup margin % is over the figure).
Use WAP for all back to back orders: If required, back to back Purchase Orders can be created for stock items in Sage once a sales order has been approved. There are pre-requisites for this setting to work; the stock item must have a preferred supplier and that supplier must have a specific analysis code to create purchase orders from sales order lines. The supplier needs to have an analysis code called ‘WAPSOPB2B’ set to ‘YES’ and the line has to have the fulfilment method of ‘Direct to customer’.
Allow negative values for free text lines: this feature should only be enabled if negative values are to be entered on free text items.
Warn when sales order submitted takes customer balance over their credit limit: If this is ticked, at the point of submitting an order a warning message will appear to warn that the order will take the customer over their credit limit. It is a warning only and the order can still be submitted.
Allow lost sales to be recorded: This functionality is only available with the Distribution module and allows orders to be recorded as lost. The lost order details page will be opened with the line details filled in. Once the reason code (maintained in the Distribution module) has been entered and saved, it will post it to the lost order table in Sage.
7.3. General Tab - Sales Orders Columns
By default the below settings are hidden, but can be unticked to provide more information when entering a sales order or SOP Return:
Hide New Unit price column: If ticked, an additional column displaying the unit price (gross) will be shown. This will be converted to base currency, so will be different if the sales order is in a different currency from the system base currency.

Hide net base column: If ticked, an additional column displaying the base currency (net) will be shown.
Hide unit price base column: this will show the price in the base currency so if the order is in dollars and the base currency is sterling they may show different amounts.
Hide tax rate column: hides the tax rate on the quote, sales order or SOP Return
Hide discounted price column: If the discount tab has been enabled, this will show any discounted price entered on each line.
7.4. General Tab - Spare Fields
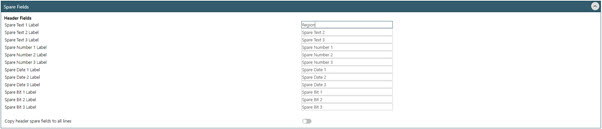
If another application is using Spare Fields in the database for additional analysis options, these can be configured in WAP to appear on Sales order entry. Values will then post through to Sage (but will not be visible to the end user as this is linked to the database only). Rename each field within here if appropriate to assist end users with populating the data in the correct location in the database.
7.5. Pricing Tab - Payments
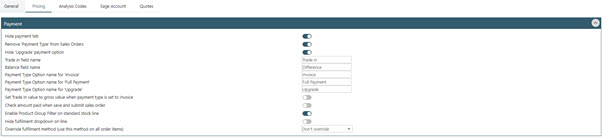
Hide Payment Tab: By default this setting is hidden. By showing the setting, a payment tab on the sales order will be shown allowing the user to enter a value that has been paid with the order, which posts through to Sage once the order is approved.
Remove ‘payment type’ from Sales Orders: By default this setting is hidden. By showing the setting, a Payment Type dropdown on the sales order will be shown allowing the user to select whether payment has already been received or is to be invoiced.
Hide ‘Upgrade’ payment option: This setting works in conjunction with the Payment Type setting above and is an additional field that can be selected in the ‘Payment Type’ dropdown.
Trade in field name: This customisable field works in conjunction with the Payment Tab setting above and will be displayed there, with the description chosen here.
Balance field name: This customisable field works in conjunction with the Payment Tab setting above and will be displayed there, with the description chosen here.
Payment Type Option name for ‘Invoice’: This setting works in conjunction with the Payment Type setting above and is a customisable field that can be selected in the ‘Payment Type’ dropdown.
Payment Type Option name for ‘Full Payment’: This setting works in conjunction with the Payment Type setting above and is a customisable field that can be selected in the ‘Payment Type’ dropdown.
Payment Type Option name for ‘Upgrade’: This setting works in conjunction with the settings above and is a customisable field that can be selected in the ‘Payment Type’ dropdown, if enabled.
Set Trade in value to gross value when payment type is set to Invoice: if enabled and using payment options, at point of loading the sales order or changing the payment type to invoice, the Sales order’s trade in value will automatically be set to the gross value.
Check amount paid when save and submit sales order: If using Trade in values, these figures will be checked at point of submitting a sales order. If the trade in value is greater than the gross, a warning will be displayed and the sales order cannot be submitted.
Hide fulfilment dropdown on line: This will prevent the user seeing or amending the fulfilment method on a sales order (e.g. whether this is to be sold from stock, direct to customer, or via Supplier).
Override fulfilment method (use this method on all order items): Legacy setting no longer used.
7.6. Pricing Tab - Customer Price Band Overrides
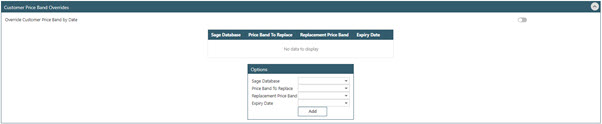
If enabled, WAP will look up the price band for the customers, then check for an override price band based on that price band.
If there is an override configured here, then it will get the item prices for the alternate price band instead of the customer default. This can be useful if doing a limited-time discount. For example, where a price band could be configured for 10% less, with an expiry date on it. Then it would use those prices until that date then revert back to standard prices for the customer.
If there is nothing configured here, WAP will use the best price for an item based on the same logic as Sage 200.
7.7. Analysis Codes Tab
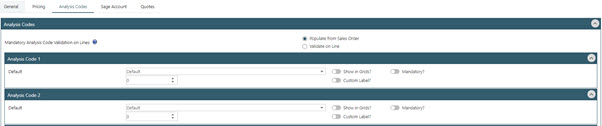
WAP sales orders can pull through up to 20 Sage SOP Analysis Codes as required; these are configured in Sage (Accounting System Manager and SOP Maintenance). Selecting Default will populate the sales order with the corresponding code from Sage SOP.
The codes can be marked as Mandatory and if they need to appear on the Existing sales orders or Approve sales orders grids in WAP, check the ‘Include in Grids’ option. If the code labelling needs to be changed to make it more user friendly, tick the custom label box and enter the new narrative as required.
7.8. Sage Account Tab
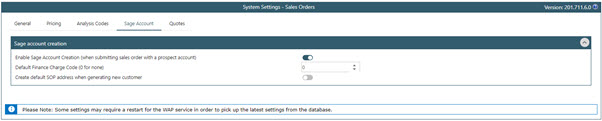
Enable Sage Account Creation (when submitting sales order with a prospect account): allows WAP to follow Sage functionality or allow a new account to be created from a prospect account order. With this setting turned on, at point of submitting the sales order an additional pop-up displays for the user to create the customer before the order posts to Sage. If this setting is turned off, orders raised for the Prospect account will post to the Prospect account in Sage.
Default Finance Charge Code (0 for none): if a percentage of the value is to be kept back for financing, enter the percentage here. For most sites this will not be applicable and will remain as 0.
Create default SOP address when generating new customer: legacy setting only relevant for CRM orders. Most sites will not use this. If the setting is selected, when creating a customer, a field shows for the address if the CRM setting for account reference generation is “cap”.
7.9. Quotes Tab – Display Banner
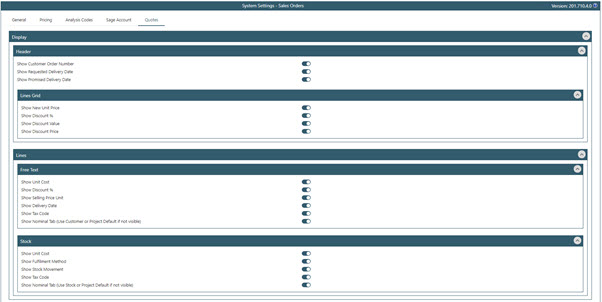
Display – Header subtab
Show Customer Order Number: Displays the Customer Order No. field on the main header screen when entering a new quote in WAP. This is an optional free text field.
Show Requested Delivery Date: Displays the Requested Delivery Date field on the main header screen when entering a new quote in WAP. If hidden, the document date will be used.
Show Promised Delivery Date: Displays the Promised Delivery Date field on the main header screen when entering a new quote in WAP. If hidden, the document date will be used.
Display – Lines Grid subtab
Show New Unit Price: Displays a column for New Unit Price when viewing a quote, in the grid under the Values Tab.
Show Discount %: Displays a column for Discount % when viewing a quote, in the grid under the Values Tab.
Show Discount Value: Displays a column for Discount Value when viewing a quote, in the grid under the Values Tab.
Show Discount Price: Displays a column for Discount Price when viewing a quote, in the grid under the Values Tab.
Display – Lines – Free Text subtab
Show Unit Cost: Displays a field for users to enter the Unit Cost in the Free Text Line entry on a quote.
Show Discount %: Displays a field for users to enter a Discount Percent in the Free Text Line entry on a quote.
Show Selling Price Unit: Displays a field for users to enter the Selling Price Unit in the Free Text Line entry on a quote.
Show Delivery Date: Displays the Delivery Date on when entering a Free Text Line on a quote. This will be pulled through from the header and can be overridden if displayed.
Show Tax Code: Displays the Tax Code when entering a Free Text Line on a quote. This will be pulled through from the Sales Ledger Account in Sage and can be overridden if displayed.
Show Nominal Tab (Use Customer or Project Default if not visible): Displays the Tax Code when entering a Free Text Line on a quote. This will be pulled through from the default on either the Project and Project Header, or from the Sales Ledger Account in Sage, and can be overridden if displayed, depending on User permissions and access.
Display – Lines – Stock subtab
Show Unit Cost: Displays a field for users to enter the Unit Cost in the Free Text Line entry on a quote.
Show Fulfilment Method: Displays Fulfilment which can be overridden if displayed.
Show Stock Movement: Displays the stock movement tab. The Stock Movement tab allows the user to view the Sage availability and movement of the stock item selected.
Show Tax Code: Displays the Tax Code when entering a Free Text Line on a quote. This will be pulled through from the Sales Ledger Account in Sage and can be overridden if displayed.
Show Nominal Tab (Use Stock or Project Default if not visible): Displays the Tax Code when entering a Free Text Line on a quote. This will be pulled through from the default on either the Project and Project Header, or from the Sales Ledger Account in Sage, and can be overridden if displayed, depending on User permissions and access.
7.10. Quotes Tab – Functionality Banner

Allow Edit of Historic Versions (Sage CRM Only): only relevant for sites using CRM for WAP sales orders. With this setting turned on, any old quotes against the same Case ID will have editing disabled. You can still convert Old versions of a quote can still be converted to a sales order.
Allow existing quote details to be copied: allows users to copy an existing quote to create a new quote.
Retain quote dates when converting to Sales Order: if ticked, the dates used on the quote will be pulled through at the point of converting a quote to a sales order.
Enable Submission: If quotes are only to be recorded but do not need to be submitted for approval or sent to customers, disabling submission will mean that quotes will remain in the ‘New’ tab within WAP only once saved. They cannot be printed and sent to customers or converted into sales orders.
8. Configuration of Sales Order Approval Routes
Before sales orders are entered in WAP, ensure approval routes have been setup correctly. Approval routes can be configured in a number of ways as outlined in the next sections. For further information on configuring Approval Routes, please refer to the WAP Approval Routes Help and User Guide.
8.1. Sales Order Approval Route Options
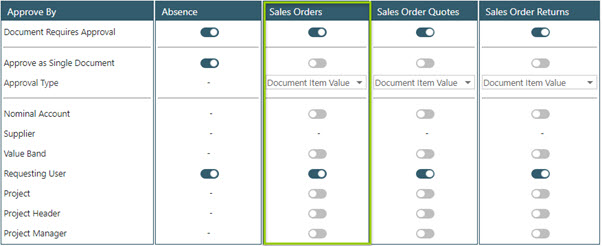
The approval route for sales order quotes can be driven by Nominal account, Requesting User and if using Sicon Projects, by Project, Project Header or Project Manager. The default is usually set to Requesting User.
If there are to be multiple approvers in the approval route it is recommended to make them all mandatory with unlimited approval values for sales orders:
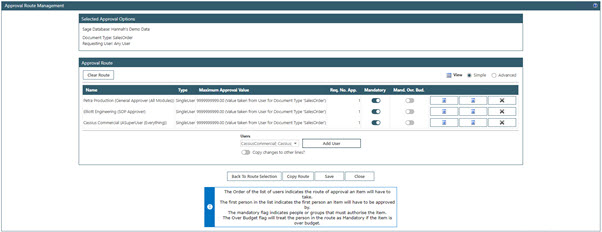
The above is an example of how a multiple-layer approval route might work. In the example above when a sales order is submitted it will first come to Production for approval who will check the promised delivery date is possible or enter the correct one before approving.
Once Production have approved the sales order it moves onto Engineering who will check the part numbers of the stock items are correct before approving.
For the final step it will come to Commercial who will check the pricing is correct before approving.
Within sales orders, users should be given unlimited approval values so all documents can be approved.
Only once all three approvers have approved the sales order will it be approved.
8.2. Quotes Approval Route Options
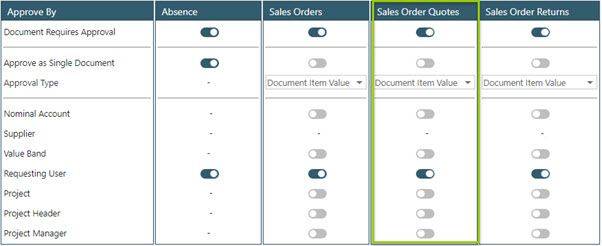
If companies wish to use quotes with the sales orders module, the approval route can be driven by Nominal account, Requesting User and if using Sicon Projects, by Project, Project Header or Project Manager. The default is usually set to Requesting User.
8.3. Sales Order Return Approval Route Options
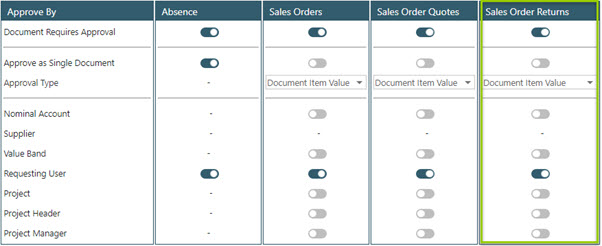
If companies wish to use sales order returns with the sales orders module, the approval route can be driven by Nominal account, Requesting User and if using Sicon Projects, by Project, Project Header or Project Manager. The default is usually set to Requesting User.
9. Configuring Sales Orders – User Setup
The next sections are aimed at Consultants and WAP super users or administrators looking to set WAP Users up to work with quotes, sales orders or SOP returns for the first time. This would be covered in initial consultancy with your Sage Business Partner or Sicon WAP Consultant, in conjunction with the WAP User Settings Help and User Guide.
10. User Type Permissions
User Type permissions determine whether a user is able to submit, approve, print or view quotes, Sales orders or SOP Returns are set at a User level under the User Setup Banner – User Types.
10.1. Sales Orders User Type Permissions
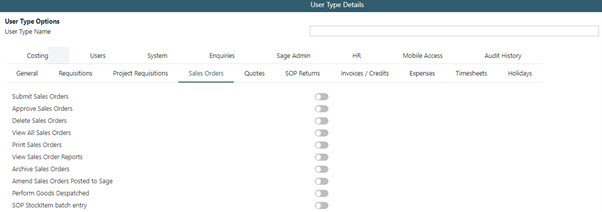
Submit Sales Orders: the ability to create and submit sales orders
Approve Sales Orders: the ability to approve a sales order. If a user does not have this permission, they cannot be selected when building an approval route.
Delete Sales Orders: the ability to delete a sales order. A sales order cannot be deleted if goods have been despatched or invoiced. If an approved order is deleted, it will show in Sage with 0.00 value and a status of Completed.
View All Sales Orders: the ability to view all sales orders in the system. By default users will only see their own.
Print Sales Orders: the ability to open the print popups to email an approved order to a customer.
View Sales Order Reports: the ability to run the all order lines report which will list all orders, their values, status, approval history etc.
Archive Sales Orders: the ability to archive completed orders; i.e. orders that have been fully despatched and invoiced against. Completed sales orders can be archived for speed and performance benefits – these sales orders can still be searched for using the search filters.
Amend Sales Orders Posted to Sage: the ability to amend a sales order in WAP once fully approved and posted to Sage. This is usually a permission only given to Administrator user types.
Perform Goods Despatched: whether the user is able to goods receive. NB. The WAP System setting to automatically allocate sales orders needs to be switched on to enable despatched goods to post across to Sage.
SOP StockItem batch entry: the ability for to enter multiple items of stock at once.
10.2. Quotes User Type Permissions
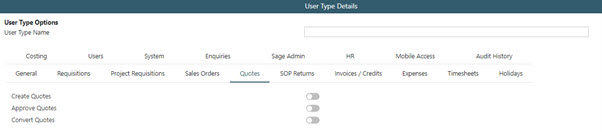
Create Quotes: the ability to create and submit quotes.
Approve Quotes: the ability to approve a quote. If a user does not have this permission, they cannot be selected when building an approval route.
Convert Quotes: the ability to convert a quote into a sales order.
10.3. SOP Returns User Type Permissions
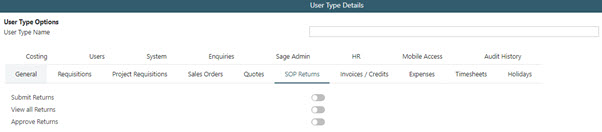
Submit Returns: the ability to create and submit SOP Returns.
View All Returns: the ability to view all SOP Returns in the system. By default, users will only see their own SOP Returns.
Approve Returns: the ability to approve a SOP Return. If a user does not have this permission, they cannot be selected when building an approval route.
11. User Permissions
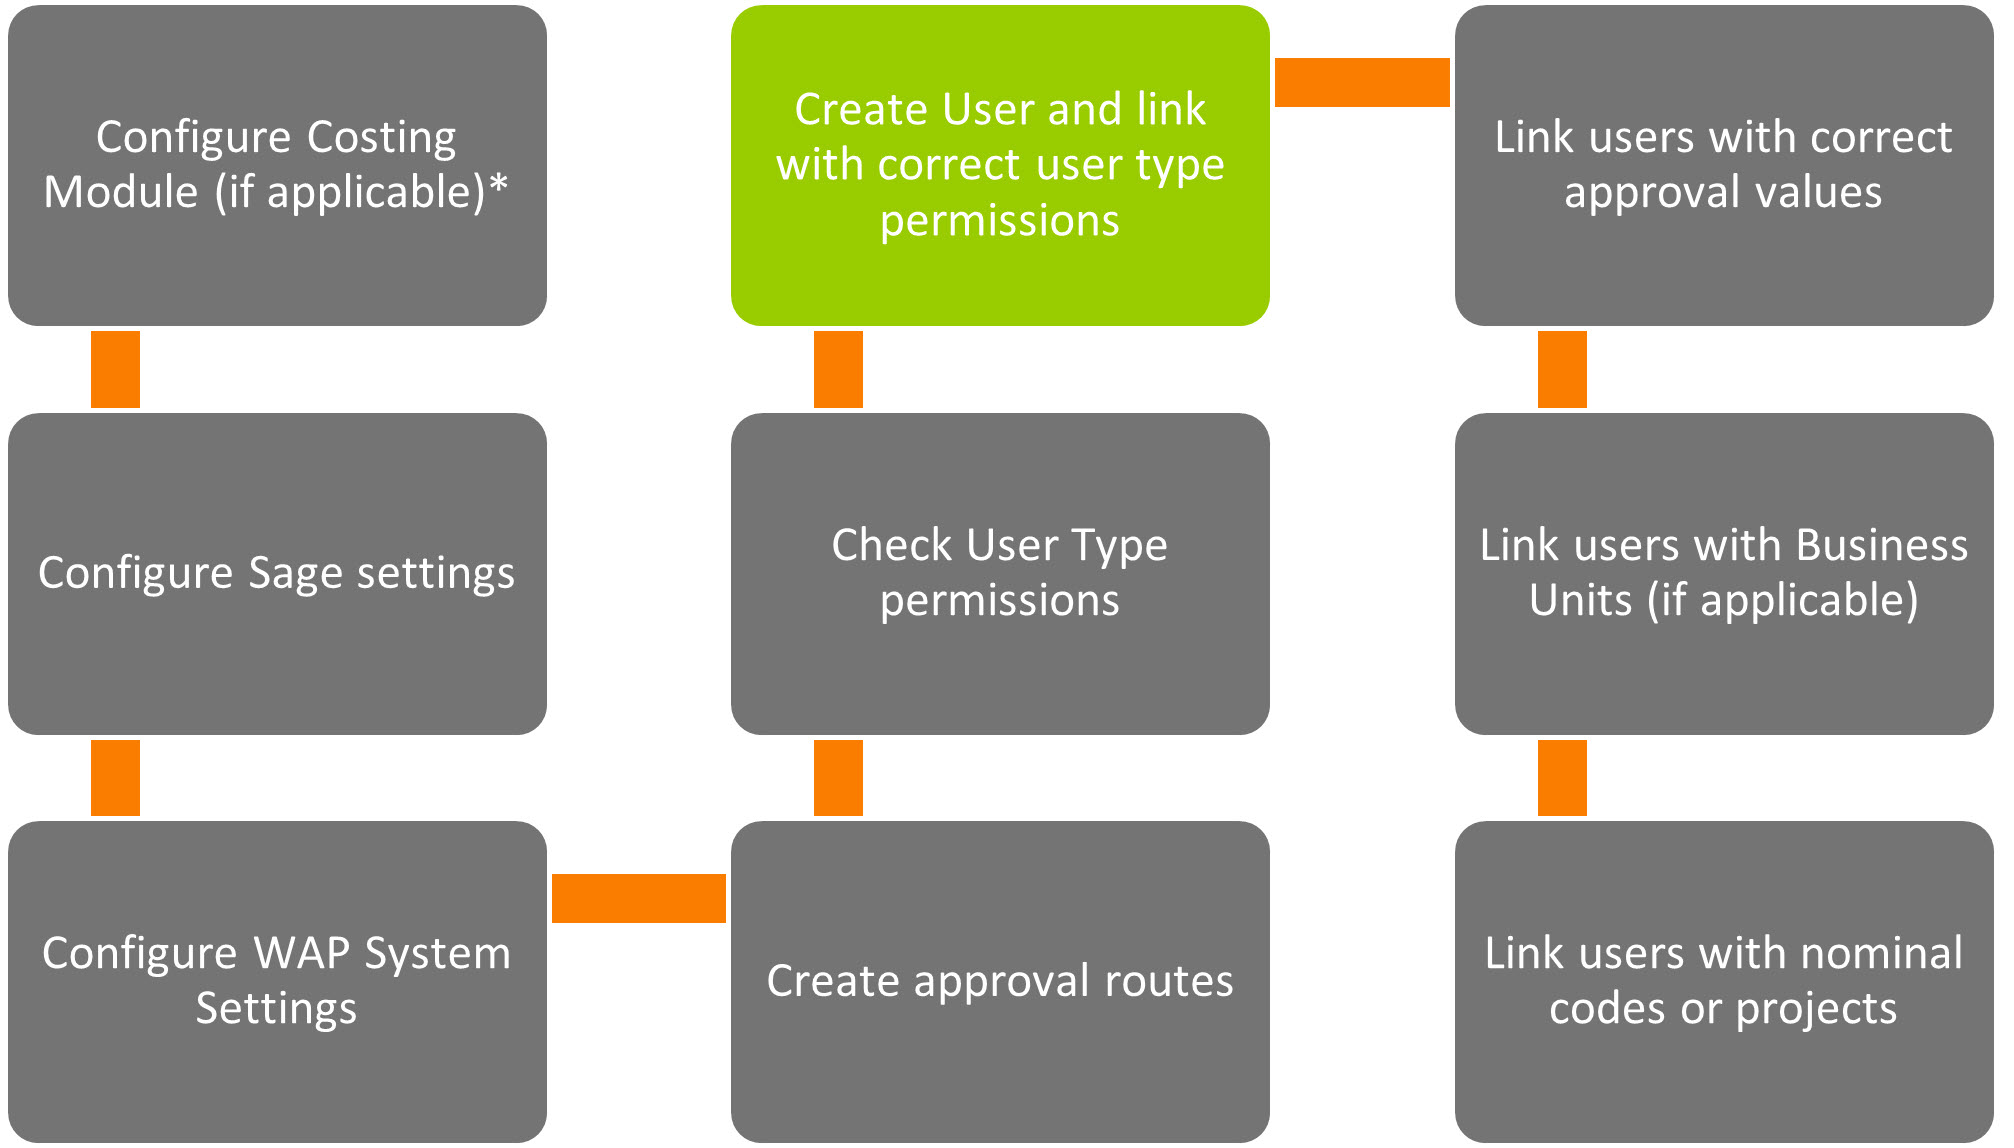
A number of permissions can also be set on the user profile relating to entering, viewing or approving quotes, sales orders or SOP Returns.
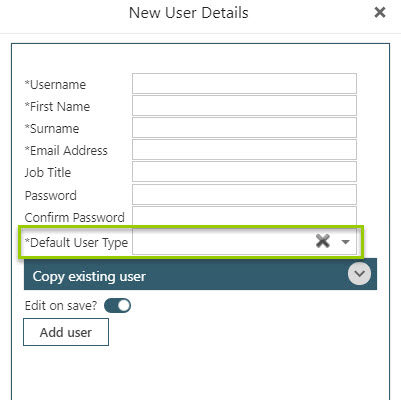
When creating the user, ensure they are allocated to a User Type with appropriate permissions:
Alternatively these can be allocated to existing users through the User Setup banner – Allocate User Types:
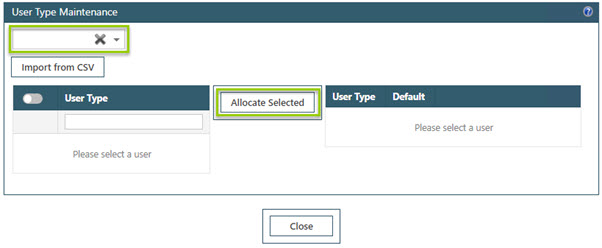
For further detail on setting up a new user, please refer to the User Settings Help and User Guide.
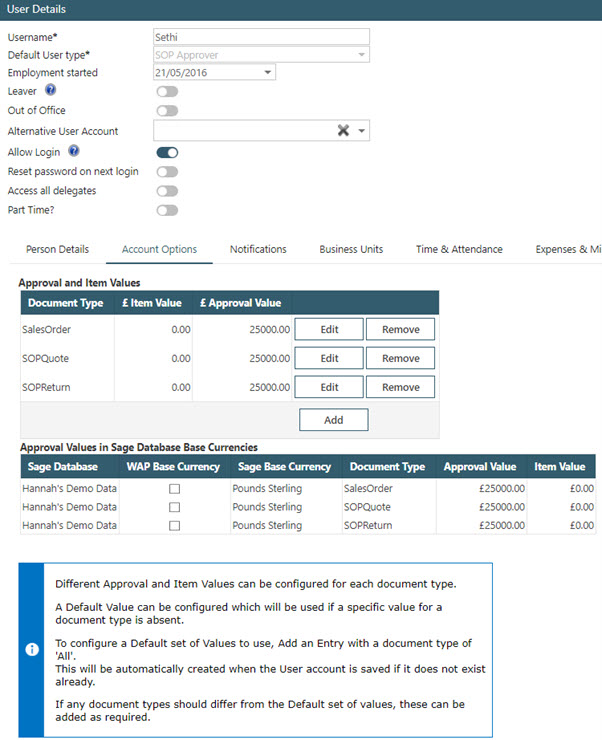
11.1. Account Options Tab
Against a user set their SOP quote, sales order or SOP Return Item and Approval values; item value is the amount the user is able to enter and approval value for is the amount a user is able to approve for. If a user is not allowed to approve these documents, leave the approval value as zero. If a user has unlimited approval value (i.e. for users at the end of an approval route), set the approval value as 999,999,999.
A user can also be given a self-approval value; any sales orders raised up to the self-approval value will automatically post through to Sage without going down an approval route, providing it exceeds any margin settings configured within System Settings.
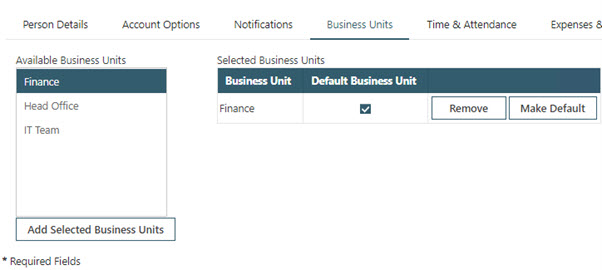
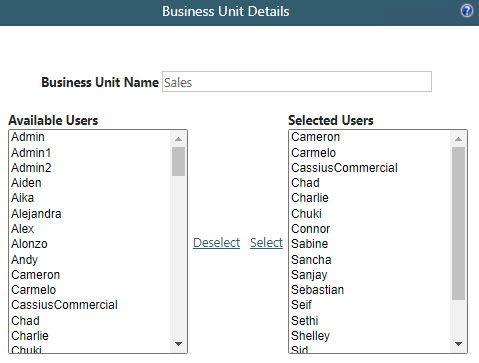
11.2. Business Units Tab
If the user belongs to a business unit they will be able to view any sales orders raised by other users within the business unit. If a user has access to multiple business units, they can change the business unit on the Justification tab when entering a new sales order.
11.3. Nominal Tab

This tab can be used to view nominal codes the user has been given access to, or to set that the user is to have access to all nominal codes. These codes will be visible to the user when entering a new sales order.
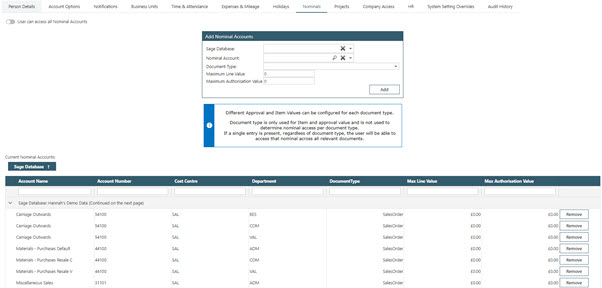
Unless a user has access to one or all nominals, it is recommended to use the nominal wizards within user setup menus to allocate multiple nominals at once to users.
11.4. Projects Tab

If a costing module has been configured, this tab can be used to view projects or project headers / project items the user has been given access to, or to set that the user is to have access to all projects or project headers / items. These projects and project headers / items will be visible to the user when entering a new sales order.

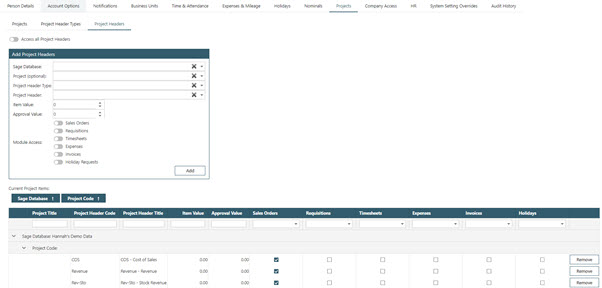
Unless a user has access to one or all projects/project headers/items, it is recommended to use the project wizards within user setup menus to allocate multiple projects/project headers/items at once to users.
11.5. Company Access Tab
This tab will show what companies the user has been given access to. The delivery and invoice addresses are linked to Sicon’s Requisitions module. For sales orders, the default invoice address set against the customer in Sage is typically used.

12. Using Sales Orders – as an End User
The next sections are aimed at users who will be entering and approving quotes, sales orders and SOP returns, covering the features available that they may use in their day-to-day role.
13. Sales Order Module Flow
Sales orders will generally follow the same flow through the system, see below. Not all steps are required. Although it is possible to despatch goods in WAP, it is recommended that this is done in Sage. Therefore many sites choose to stop processing in WAP after the sales order has been generated in Sage and pick up the remainder of processing in Sage.
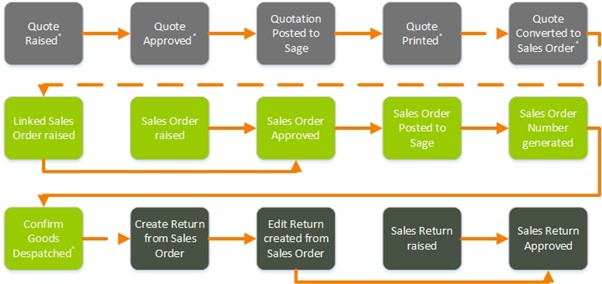
*Denotes optional steps within WAP
14. Quotes
Prior to submitting a sales order, some sites may wish to make use of SOP quotes within WAP.
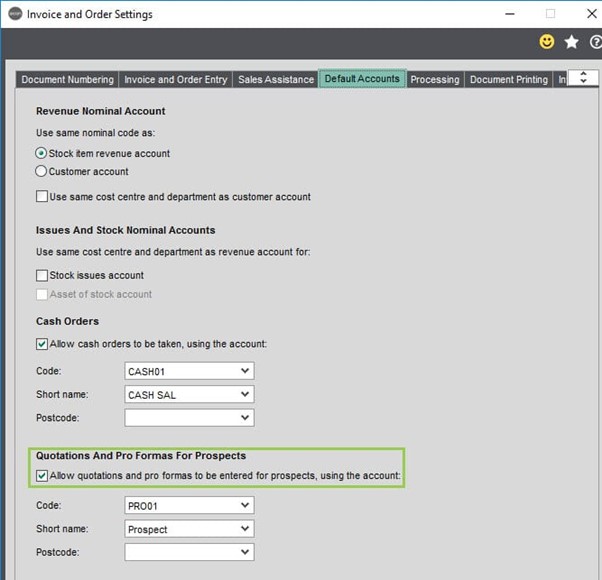
This is a way for users to enter an estimate of costs for goods or services offered to customers in the hope of gaining a sale. It has its own menu item within the WAP navigation screens, if users have been given the User Type permissions to view these. Quotes for can be created for customers (who have accounts in the Sales Ledger) and for prospects (who do not have an account set up in the Sales Ledger). If a Prospect Account is to be used in WAP it must first be configured in Sage SOP settings:
For further information regarding setting up new accounts, please speak with your Sage Business Partner.
Within WAP, quotes will ordinarily require approval and once approved, will sit in both WAP and Sage. It is then possible to convert them into a sales order, once they have been printed.
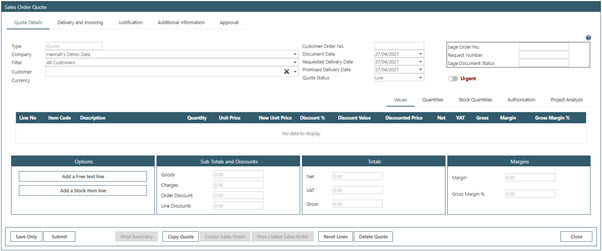
14.1. Creating a Quote
From the navigation menu select Quotes – Create New and enter the header information as required:
14.2. Adding a Free Text Line to a Quote
Select Add a Free Text line and complete as required. Note: certain fields/boxes may not be visible as below, depending on the System Setup.
Item Details: free text box, enter the description of the item/s as required.
Quantity: free text box, enter the quantity required.
Unit Price: free text box, enter the price per unit of the item/s being sold.
Selling Price Unit: free text box, enter description of the item being requested; e.g. box of 12, pack of 6.
Delivery Date: this will pull through the delivery date as selected on the front page if configured, but can be overridden if required, and can be left blank until the point of a linked sales order being approved.
Tax Code: the default standard tax rate will be pulled through from how the Sage Company has been configured in Sage Connections but this can be overridden with another rate from Sage if required.
Discount Percent: if applicable, enter a discount percentage to apply to this line.
Analysis Codes: if configured in Sage and within system settings, these will be available to choose on this screen.
Project Tab: This tab will only appear if Sicon Projects, Sage Project Accounting or WAP Projects has been configured as the Costing Module. If the sales order is linked to a Project, select the correct Project and Project Header/Project Item from the drop-down menus. Note; if activities are being used in the Project structure, these will be available for selection and the Tree option should be used to ensure the correct Project Activity and Header are chosen.
If a user has ‘Access all Projects/Projects’ ticked on their User profile, all live Projects will appear in the drop-down list. Alternatively, users can be given access to specific Projects and Project Headers/Project Items.
With Sicon Projects, only Project headers that belong to a Project Header Type with a WAP type of ‘S’ will be shown. If the default Stock or SOP project header isn’t showing, check the Project Header Type is setup correctly.
NB, if prices are to be overridden when the quote is converted to a sales order, the user running the WAP service will need appropriate permissions in Sage to update prices (SOP Utilities – System Set Up – User Permissions) – please speak to your Business Partner or your IT if help is required to identify the user running the WAP service.
Nominal Tab: Select the nominal required. If a costing module is enabled, this will take the nominal from the costing header set-up.
14.3. Adding a Stock Item Line to a Quote
Stock items pull through from Sage and depending on the System Setup, will use the associated nominal code either from the stock item or the costing module if enabled. If using a costing module, the default project header will be pulled through from one configured against the stock item.
NB. It is not possible to restrict stock for individual WAP users.
Product Group: by default, all product groups will be selected but stock items can be filtered by a product group to show only stock items within that product group.
Stock Item: select either by typing a stock name or item code.
Warehouse: select the correct warehouse for the stock item. If required, users can be restricted as to the warehouses they can see.
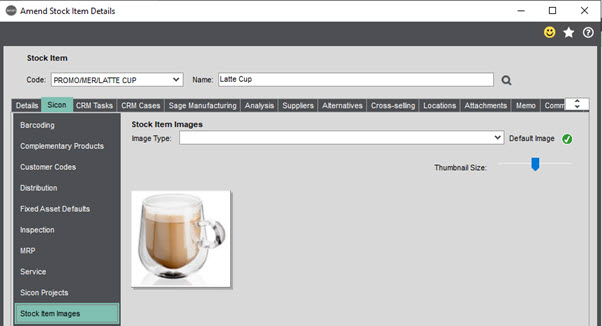
Image: if an image has been added onto the stock item in Sage, this will be visible within WAP. To add an image against the stock item, amend the item in Sage, click on the Sicon tab and the ‘Stock Item Images’ and add an image. Multiple images can be added against an item but only the Default image will show in WAP. Images will only show if the WebAPI has been configured.
Quantity: selection box, enter the quantity required.
Selling Unit: select the correct selling unit from the drop-down menu, as configured from Sage 200.
Unit Price: the price will be pulled through from Sage but can be overridden if needed.
Tax Code: this will pull through the tax code configured against the stock item in Sage but the users can override.
Delivery Date: this will pull through the delivery date from the lead time as set on the stock item but can be overridden as needed.
The Project, Nominal and Approval tabs operate in the same way as with Free Text Line entry.
Margins tab
If enabled in system settings, the margin information from Sage associated with the selected stock item is visible in this tab and it is also possible to select to use the Landed Costs (costs associated with the item being transported).
Stock Movement tab
The Stock Movement tab allows the user to view the Sage availability and movement of the stock item selected, to see what stock is available, and other orders it has already been used for.
Description tab
The Description tab shows the description of the selected item if enabled. If enabled in the sales order system settings, a user could override the description within this tab (for example, to highlight that the item is an ex-display model).
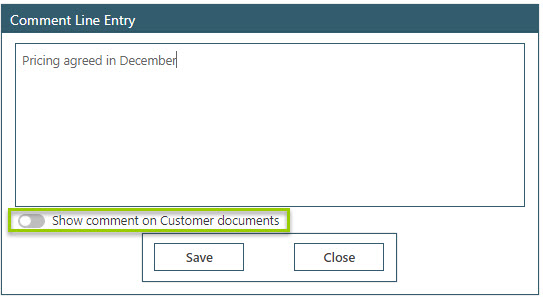
14.4. Add a Comment Line to a Quote
This setting is configurable in System Settings to be on or off as required (under sales orders). If turned on, any additional comments needed to appear on the quote as a line item can be added and marked to show on the quote document if required. By default the comment will not be set to appear on Customer documents.
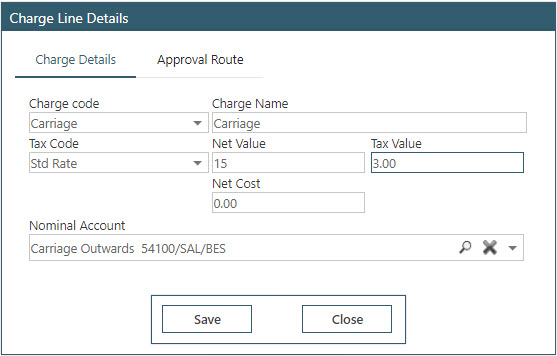
14.5. Add a Charge Line to a Quote
Any additional charges configured in Sage can be entered for items such as delivery or insurance.
14.6. Values Tab on Quotes
This tab will show a breakdown of the lines on the quote with the Quantities, Unit Prices, Discount Percentages, Tax Rate, the Net value and Margin details. Not all columns may be visible, depending on how the system has been configured. These lines can be edited or deleted if needed, depending on User Type permissions.

14.7. Quantities Tab on Quotes
This tab will show a breakdown of the lines with the Item code, Description, and if using WAP to despatch, the Quantities that have been Ordered, Allocated, Despatched and Invoiced. Again, lines can be edited or deleted if needed, depending on User Type permissions.

14.8. Stock Quantities Tab on Quotes
For any stock lines, a snapshot of available and allocated stock is displayed.

14.9. Authorisation Tab on Quotes

Once the quote has been submitted these lines will get populated to show who is needed to approve the lines and the status of the document. The document will not be fully approved until all lines have been approved. Clicking Reset will cause the line to be sent back to the beginning of the approval route; i.e. if a new approval route is built while a document is part way through the approval route, the lines would need to be reset to pick up the new approval route.
14.10. Project Analysis Tab on Quotes
If Sicon Projects, Sage Project Accounting or WAP Projects are enabled and the line is linked to a Project, the details will be shown on this tab. If Phases, Stages and Activities are enabled with Sicon Projects, hover over the ‘hiarchy’ icon in the Project Item column to see where the line has been coded to.

14.11. Delivery and Invoicing Tab on Quotes
This tab will show information on delivery and invoice addresses and Sage analysis codes if applicable.
The Invoice address cannot be changed. By default the Invoice Address will be used for the Delivery Address too, but this can be overridden by the user if required.
14.12. Justification Tab on Quote
This tab is used to add file attachments to support the sale of the items.
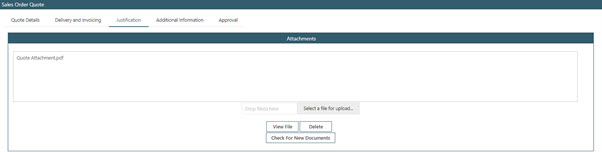
Users can select a file to upload, or drag and drop a file directly in to the ‘Drop file(s) here’ section. Files can also be viewed and deleted from here.
14.13. Additional Information on Quotes
This tab is used to provide any further narrative to clarify or support why the items have been requested.
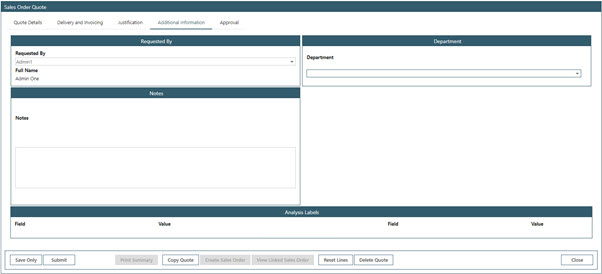
Requested By: this is automatically populated with the user’s name but can be changed to another user, if the permissions have been configured (User Setup – Users – Account Options). If approval routes are based on Requesting User, the system will pick up the user from here.
Department: the ‘Department’ will be a drop down box for the user to select the business unit. The user’s default business unit will be populated initially but if the user has access to other business units they will appear to be chosen.
Notes: free text notes can be added here, once added a yellow post-it note icon will appear in the Flag column on the sales order summary grid tables and approval grid page. If approvers add notes during approval, these will appear here too.
Analysis Labels: If analysis labels have been configured, these can be chosen here.
14.14. Approval History Tab on Quotes
This tab will start to be populated once the quote has been submitted and starts through the approval process. Only lines that require approval will be displayed, i.e. comment lines will not show.
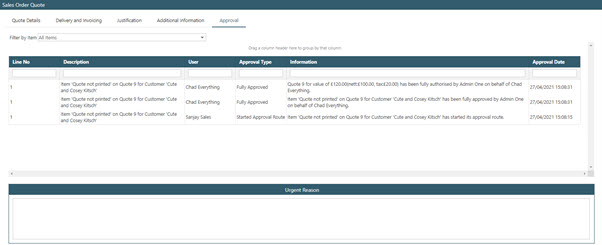
Filter by Item: by default all quote lines will show, use this drop down box to filter to view history of one specific line.
Urgent Reason: if the user ticked the option to mark the quote as urgent, the reason given will be displayed here.
14.15. Existing Quotes
From the navigation menu, select quotes and Show Existing to display the quotes under various tab headings. Additional icons will appear in the Flags column to show if the order has notes, has attachments or has been printed etc. It is also possible to add a quote from this screen by clicking ‘Add New’ at the top.

14.16. Viewing Quotes
By default, users will always be able to see quotes they have raised. If permission is given, users may also be able to view all quotes within the system or all quotes raised by users in the same business unit.

There are two options to search for an existing quote; either use the Search filters or the Quick Links.
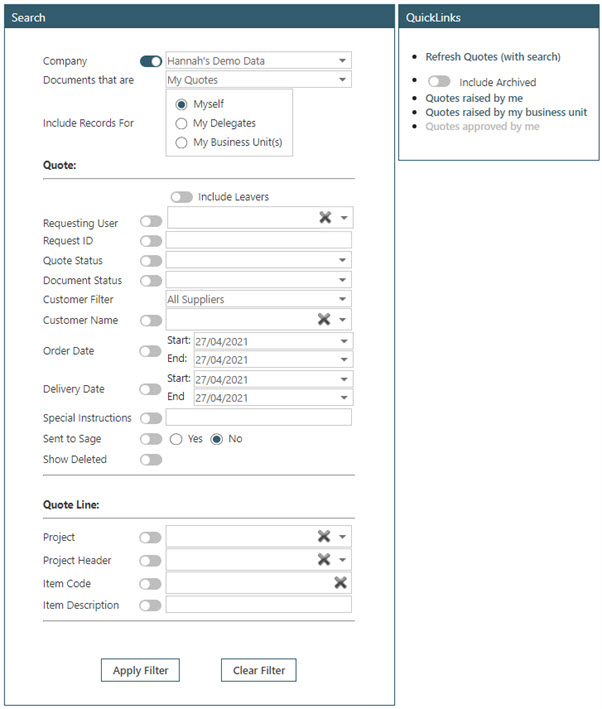
Search filters: depending on configuration, the user will either be able to search for their own, within their business unit, delegates or all users’ quotes. Search filters can be used to find quotes with a particular WAP ID, customer and item description. Use the Show Deleted option to show any quotes that have been deleted.
Quick Links: either click ‘Refresh Quotes’ to update the grid and retrieve the most recent status of quotes or other specific links to show particular quotes.
14.17. Editing Existing Quotes

By clicking Edit on an existing quote, this will open up to allow for viewing of quote lines, delivery information, quantities etc. Depending on User Type permissions, the user may be able to make changes on an order once it has been approved, up until the order has been goods despatched or invoiced. Any changes would need to be submitted for re-approval.
It is recommended that the only users who could change an order once it has been approved would be Administrators or Finance users. If permissions allow for Lost Orders to be recorded, this can be done on a line level by clicking Edit on the line to record the lost line.
14.18. Deleting Existing Quotes
If the user has permission to do so, they will be able to delete a quote using the ‘Delete’ button. A quote can be deleted once it has been approved until the point it is Won and converted to a sales order. Then the Edit and Delete buttons will be greyed out and the quote will move to Completed.

15. Quote Approval Stages
15.1. Quote Header Status
New: Quotes that have been saved but not yet submitted for approval.
Submitted: Quotes that have been submitted and are awaiting approval. By hovering over the blue information icon on the left, the lines will be displayed showing who they are awaiting approval from.
Approved: Quotes that have been approved are ready to be emailed to the customer if required. Once printed, a printer icon will appear and if emailed, an envelope icon will appear. A column to identify whether the quote has been won (converted to a sales order) or is still live is also visible.
Rejected: Quotes that have been rejected during the approval process will show under this tab. It is up to the user who submitted the quote to either delete or edit and resubmit for approval.
Completed: When the quote has been converted to a sales order it will move to Completed.
Failed: if a quote fails to post through to Sage it will appear in this tab and will need the error flag removing before it can be posted again. The permission to clear errors and repost is usually just given to Administrators or Finance users. More details on any error flags can be viewed through the Event Viewer.
Archived: Not relevant for quotes.
15.2. Quote Line Status
New: the line has not yet been submitted.
Waiting: the line is awaiting approval from an authoriser.
Authorised: the line has been fully approved.
Rejected: the line has been rejected; all lines must be authorised before the quote will post to Sage.
No Authorisers: there are no authorisers for the line; the line will need to be reset and the quote submitted for the correct approval route to be used.
16. Approve Quotes
Once a quote is submitted for approval, requesting user will receive a notification on their WAP homescreen to say who the quote has been sent to for approval. The approver will also receive a notification on their homescreen:

From here they can either click on the SOP quotes link under ‘Items Awaiting Your Approval’, or click on the item notification to be taken to the Approval screen. Alternatively, they can also select ‘Approve’ from the Quotes menu in the navigation menu.
16.1. Approving Quotes
All quotes awaiting the user to approve will be listed; click on the arrow on the left to expand and view the quote line details. Only lines awaiting the current user for approval will be visible.
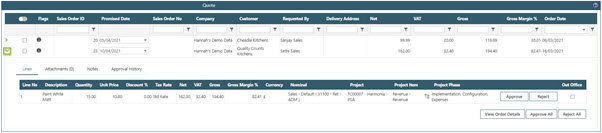
Lines: this tab will show all lines awaiting approval from the user with information on quantity, price, nominal and job or project. The View Order Details button will take the approver through to the main quote page to view the quote fully or to make any amendments. Individual lines can either be approved or rejected, or the whole quote can be approved or rejected. See below for further information on Rejecting Quotes.
Attachments: this tab will allow for any attachments added to be viewed. The number of attachments will be shown in brackets on the tab.
Notes: if any notes were added during creation of the quote, these will be visible here. Notes can also be viewed by hovering over the post-it note icon under the Flags column. Additional notes can be added by the approver in this tab too.
Approval History: each line requiring approval will be displayed showing approval history.
If the approver has permission to approve multiple orders at a time, they will be able to select multiple quotes to approve without needing to open to view individual lines. It is recommended that the only users who could approve multiple orders at once would be Administrators or Finance users.
16.2. Rejecting Quotes
If an approver wishes to reject one or all lines, they can click either Reject or Reject All; they will then need to enter a reason for rejecting before choosing to reject.

The user who raised the quote initially will be sent a notification containing the rejection reason and the quote will appear under the Rejected tab under Existing Quotes.

The user who submitted the quote can now:
- Delete the quote if the approver has not allowed the sale to be made (if the user has permission to delete a quote).
- If the quote has multiple lines, one which has been rejected and other lines which have been approved, delete the rejected line and resubmit the quote. This will cause the quote to move through to approval.
- Edit the quote to correct the rejected line and resubmit for approval.
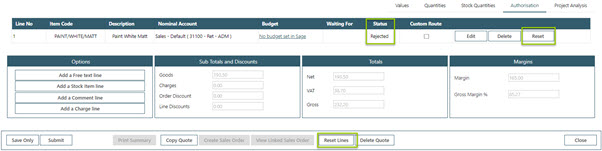
To correct the rejected line (option 3); Edit the quote, edit the rejected line, make the correct change and save the line. In this example the price is being increased from 10.80 to 12.90. Once the change has been made, click the Authorisation tab and Reset the approval route. This is necessary to clear the rejected flag and allow for the quote to be resubmitted for approval. If there are multiple lines to be reset, using ‘Reset Lines’ will reset all lines back to the beginning of the approval route.
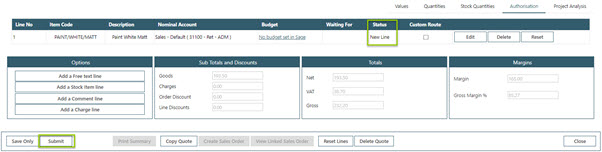
Once the line has been reset, the status will change to NewLine. Submit the quote for approval; this will start the approval process again.
16.3. View Quote details during Approval
If during approval the approver wishes to see the original quote, they should click the ‘View Order Details’ button. If approval routes are configured based on nominal code or project manager, lines could be sent to other users to approve; when viewing the quote as an approver, their lines to approve are highlighted for visibility. Approvers are able to make changes to lines; by default, this would not cause the document to restart its approval route although the system can be configured so changes made by approvers will cause the document to restart the approval process.
16.4. Fully Approve Quotes
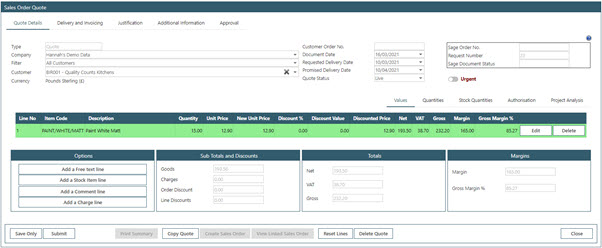
Once approved, the quotes will move through the configured approval route until approved by an approver with sufficient approval value rights and any mandatory checks have been completed; at this point the quote stays in Approved within WAP:

And can also be viewed within Sage:
The user who submitted the quote would get a notification advising them it has been fully approved and can then print the quote.

16.5. Converting a Quote to a Sales Order
Once a quote has been won, if the user has the user type permission to convert quotes to sales orders they can do this from within the quote any time after the quote has been printed as indicated by the printer flag.
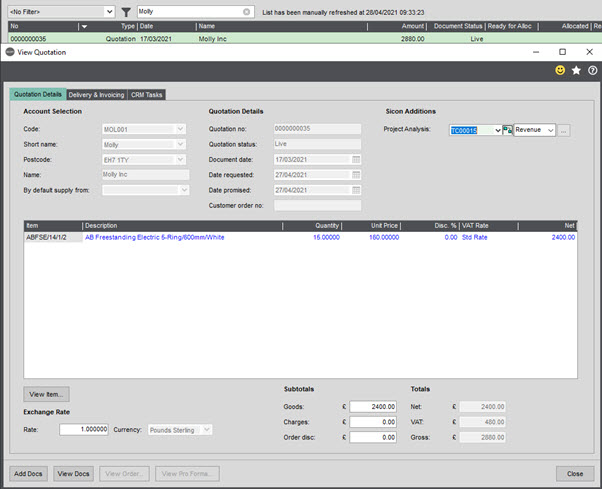
From within the Existing quotes menu items on the left, click Edit on the quote that has been won and is ready to convert to a sales order:

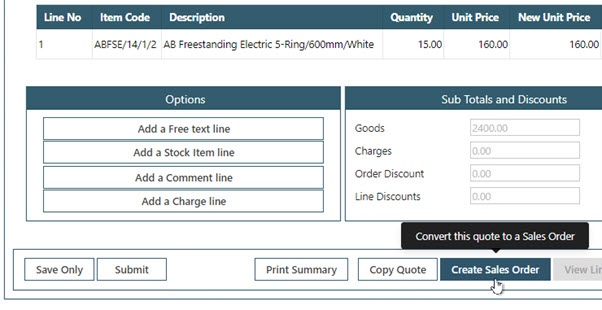
From within the quote, click ‘Create Sales Order’ to convert the quote into a sales order:
The sales order will open ready for editing or submitting as required, with a reference to the linked quote in the top left, and a note of the new sales order ID in the bottom right:
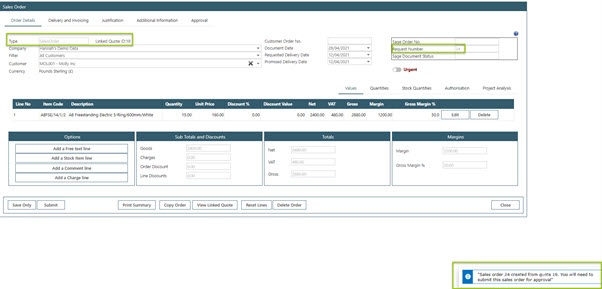
From this point, the information can be edited as required and saved and submitted when ready for approval.
16.6. Converting a Prospect Account Quote to a Sales Order
If the quote has been requested for a Prospect Account, the quote can be converted to a sales order as in the above Section.

For a Prospect account however, if the system setting to ‘Enable Sage Account Creation (when submitting sales order with a prospect account)’ is turned on the process will be slightly different. At the point of clicking Submit on the resulting sales order, the user will be prompted to enter the customer information to create the Customer and submit the sales order for approval. If this setting is not turned on, the Prospect Account will be used to post the sales order to Sage.
Therefore, it is usually recommended that only users who know the Sage structure should convert Prospect Accounts to sales orders.
The fields displayed will depend on what has been configured in the sales order settings, and will post into Sage on the new customer once submitted. If entering a customer from within WAP, please check with the Sage administrator what information should be entered in the tabs below.
Company tab
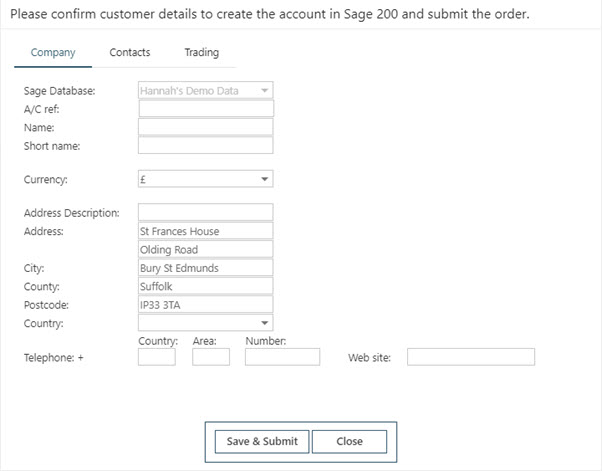
A/C Ref: enter the code that should be displayed when this customer is created in Sage (limited to 8 characters)
Name: enter the name that should be displayed when this customer is created in Sage
Short Name: enter the shortcode that should be displayed when this customer is created in Sage (limited to 8 characters)
Currency: Enter the currency for this customer
Address Description: Optional field for a description of the customer’s address (e.g. Head Office)
Address: Enter the first line of the address (mandatory)
City: Enter the city of the address (mandatory)
County: Enter the county of the address (optional)
Postcode: Enter the postcode of the address (mandatory)
Country: Enter the country of the address (mandatory)
Telephone: Enter the telephone number for the customer (optional)
Contacts Tab
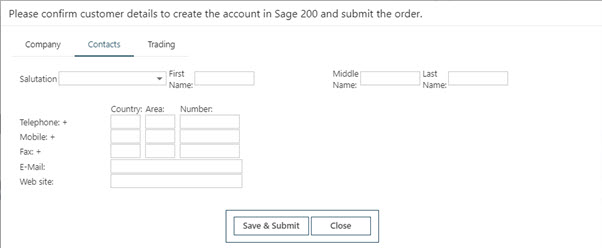
Salutation: Enter the salutation of the main contact for this customer (optional)
First name: Enter the forename of the main contact for this customer (mandatory)
Middle Name: Enter the middle of the main contact for this customer (optional)
Last Name: Enter the surname of the main contact for this customer (mandatory)
Telephone: Enter the customer contact telephone number (optional)
Mobile: Enter the customer contact mobile telephone number (optional)
Fax: Enter the customer contact fax number (optional)
Email: Enter the customer contact email address (mandatory)
Website: Enter the customer website (optional)
Trading Tab
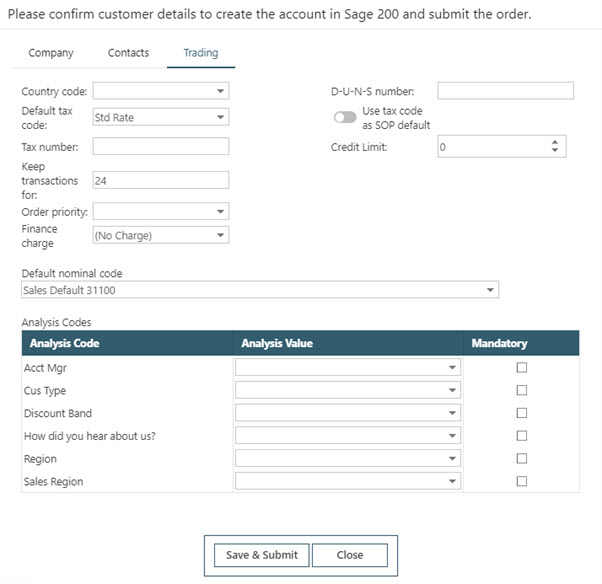
Country code: Choose the country code for this customer from the drop down (mandatory)
Default tax code: Enter the tax code (mandatory)
Tax number: Enter the customer tax number (optional)
Credit limit: Enter the credit limit for this customer (optional)
Keep transaction for: Enter the length of time to keep transactions for this customer (optional)
Order priority: Enter the order priority (optional)
Finance charge: Enter the finance charge (optional)
Default nominal code: Enter the default nominal code (the defaults from Sage will pull through)
Analysis codes: If any analysis codes are configured in Sage, enter the relevant detail here (optional)
D-U-N-S number: Enter the D-U-N-S Number (optional)
Use tax code as SOP default: Tick if applicable (optional)
Credit limit: Enter as applicable (optional)
When all customer information has been entered, click Save and Submit to proceed with the order and customer creation. A prompt will pop up to ensure this is desired.

The customer will be updated on the sales order and created in Sage, and once the order is approved will post through to Sage with the new customer created.

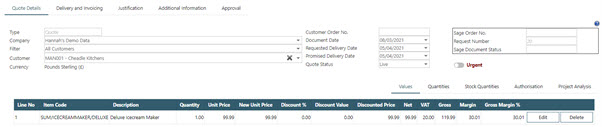
17. New Sales Order
From the navigation menu select SalesOrders – Create New and enter the header information as required. Options on this screen will depend on the functionality enabled/disabled within the system settings (System Settings banner –Sales Orders Menu) and on User Type permissions (User Setup banner – User Types – Sales Orders).
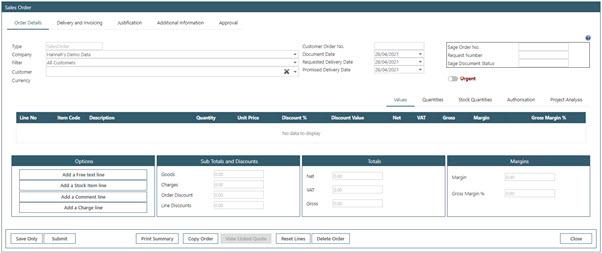
Company: this will default to the User’s default Company as detailed in their User setup.
Filter: This will pick up categories from PRS filter in Sage (see Customer below).
Customer: If required, the customer list may be restricted to show only Approved Customers as defined in Sage 200. Please refer to Approved Customers section.
Please note that it is not possible to restrict customers for individual WAP users.
Currency: as defined by the Sage Sales Ledger account.
Customer Order No: Free format text box for a reference to be added if required.
Document Date: this will be automatically populated with the current date but can be overridden as needed.
Requested Delivery Date: This is an optional field, usually the date the customer has requested delivery. If required, the system settings can be configured for the date entered here to populate to the sales order lines.
Promised Delivery Date: This is usually the date the warehouse team or equivalent have confirmed the item can be delivered. It is possible to submit a sales order without a delivery date or promised date. However, prior to approval a Promised Delivery date must be added, so this will need completing at approval stage if the date is still blank at this stage.
Sage Order No: Once the order has been approved and the order posted to Sage, this field will be populated with the Sage order number.
Request Number: This will be populated with the WAP Document ID once details have been entered on the line or the order saved.
Sage Document Status: Once the order has been approved and the order posted to Sage, this field will be populated as the document progresses in Sage.
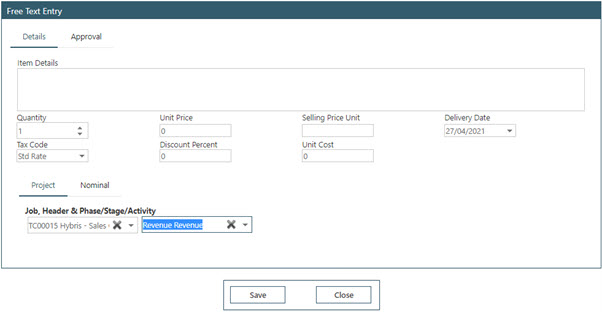
17.1. Add a Free Text Line
Select Add a Free Text line and complete as required. Note: certain fields/boxes may not be visible as below, depending on the System Setup.
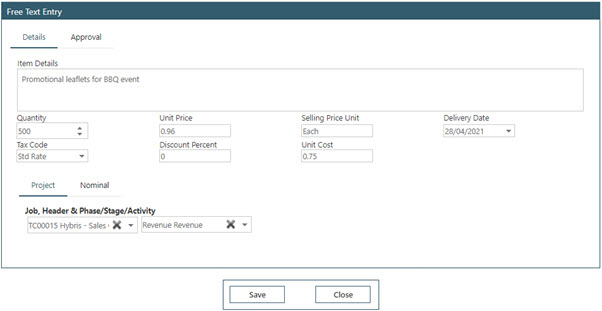
Item Details: free text box, enter the description of the item/s as required.
Quantity: free text box, enter the quantity required.
Unit Price: free text box, enter the price per unit of the item/s being sold.
Selling Price Unit: free text box, enter description of the item being requested; e.g. box of 12, pack of 6.
Delivery Date: this will pull through the delivery date as selected on the front page if configured, but can be overridden if required.
Tax Code: the default standard tax rate will be pulled through from how the Sage Company has been configured in Sage Connections but this can be overridden with another rate from Sage if required.
Discount Percent: if applicable, enter a discount percentage to apply to this line.
Unit Cost: if applicable, enter the cost price of the item being sold (this will be used to calculate the margin on the order).
Nominal: enter the nominal this item should be coded to. If Sicon Projects is being used, the nominal will be taken from the header.
Project tab: If a costing module is enabled, an additional tab is displayed for Costing information to be entered. If defaults have been configured in Sage, these will pull through here but can be overridden by the user if required.
Approval tab: clicking on this will show the user the approval route for this line. Users with user type permission to create ad-hoc approval routes could edit the route here. It is recommended that only Finance or WAP Superusers have this permission.
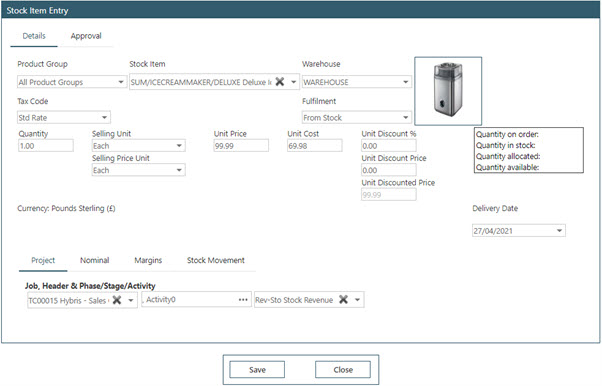
17.2. Add a Stock Item Line
Stock items pull through from Sage and depending on the System Setup, will use the associated nominal code either from the stock item or the costing module if enabled. If using a costing module, the default project header will be pulled through from one configured against the stock item. NB. It is not possible to restrict stock for individual WAP users.
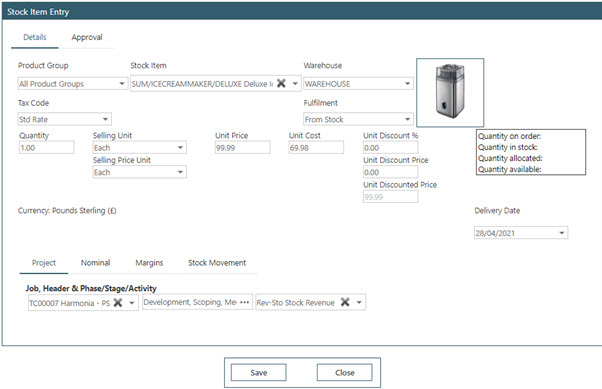
Product Group: by default, all product groups will be selected but stock items can be filtered by a product group to show only stock items within that product group.
Stock Item: select either by typing a stock name or item code.
Warehouse: select the correct warehouse for the stock item. If required, users can be restricted as to the warehouses they can see.
Image: if an image has been added onto the stock item in Sage, this will be visible within WAP. To add an image against the stock item, amend the item in Sage, click on the Sicon tab and the ‘Stock Item Images’ and add an image. Multiple images can be added against an item but only the Default image will show in WAP. Images will only show if the WebAPI has been configured.

Quantity: selection box, enter the quantity required.
Selling Unit: select the correct selling unit from the drop-down menu, as configured from Sage 200.
Unit Price: the price will be pulled through from Sage but can be overridden if needed.
Tax Code: this will pull through the tax code configured against the stock item in Sage but the users can override.
Delivery Date: this will pull through the delivery date from the lead time as set on the stock item but can be overridden as needed.
The Project, Nominal and Approval tabs operate in the same way as with Free Text Line entry.
Margins tab
If enabled in system settings, the margin information from Sage associated with the selected stock item is visible in this tab and it is also possible to select to use the Landed Costs (costs associated with the item being transported).
Description tab
The Description tab shows the description of the selected item. If enabled in the sales order system settings, a user could override the description within this tab (for example, to highlight that the item is an ex-display model).
Margins Tab
If enabled in system settings, the margin information is visible in this tab and figures will update with any price amendments made on this screen. It is also possible to select to use Landed Costs (costs associated with the item being transported) if required.
Stock Movement
This tab will show the stock movements against the stock item and Warehouse selected, if there is free stock in that warehouse. This can be helpful if any automatic allocation settings are turned on – if there is not enough stock WAP will not be able to allocate the stock item. See the Goods Despatched section in this guide for information around automatic allocation.
Discount tab
If enabled in System Settings, it is possible to view and edit any additional discounts set up here.
Description Tab
If configured in sales order System Settings, users can amend the description here. The stock item description will be pulled through from Sage. The updated description will also post through to Sage when the order is fully approved.
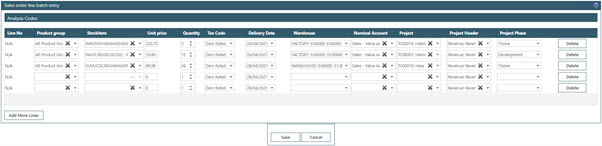
17.3. Stock Item Line Batch Entry
This feature enables users to rapidly enter multiple items of stock on one screen (note, any stock already added via the Add Stock feature also appear here). Much of the same information is available although any project defaults configured in Sage will not be pulled through and pricing information is not as easily visible so it is recommended that the standard Stock Item Line option discussed in the last section is used instead. This is a User Type setting which by default is turned off.
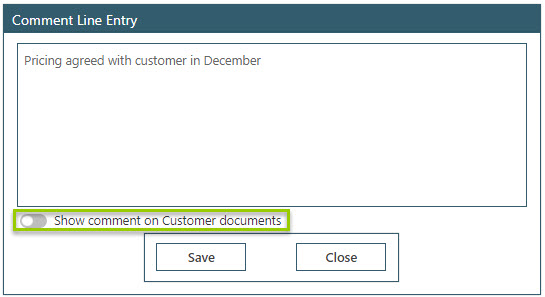
17.4. Add a Comment Line
This setting is configurable in System Settings to be on or off as required. If turned on, any additional comments needed to appear on the sales order as a line item can be added and marked to show on the sales order document if required. By default the comment will not be set to appear on Customer documents.
17.5. Add a Charge Line
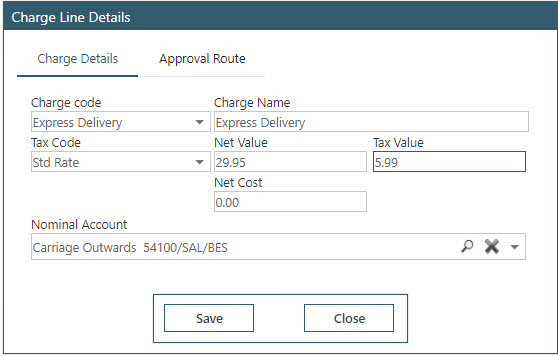
This setting is configurable in System Settings to be on or off as required. If turned on, any additional charges configured in Sage can be entered for items such as delivery or insurance.
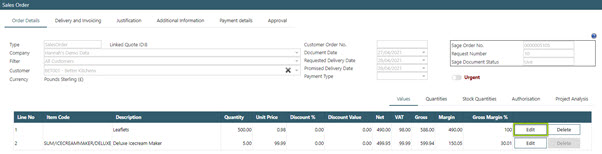
17.6. Line Values Tab
This tab will show a breakdown of the lines on the order with the Quantities, Unit Prices, Discount Percentages, Tax Rate, Net value and Margin details. These lines can be edited or deleted if needed, depending on System and User Type permissions.

17.7. Line Quantities Tab
This tab will show a breakdown of the order lines with the Description and the Quantities that have been Ordered, Allocated, Despatched and Invoiced. Lines can be edited or deleted if needed, depending on User Type permissions. As the sales order progresses (i.e. has its goods allocated and despatched), these figures will be automatically updated.
17.8. Line Stock Quantities Tab
For any stock lines, a snapshot of available and allocated stock is displayed.]

17.9. Use Authorisation Tab
Once the Sales order has been submitted these lines will get populated to show who is needed to approve the lines and the status of the document. The document will not be fully approved until all lines have been approved.

Clicking Reset will cause the line to be sent back to the beginning of the approval route; i.e. if a new approval route is built while a document is part way through the approval route, or the order is rejected and requires amendment, the lines would need to be reset to pick up the new approval route.
17.10. Line Project Tab
When Sicon Projects, Sage Project Accounting or WAP projects are integrated, and the line is linked to a Project, the details will be displayed here.

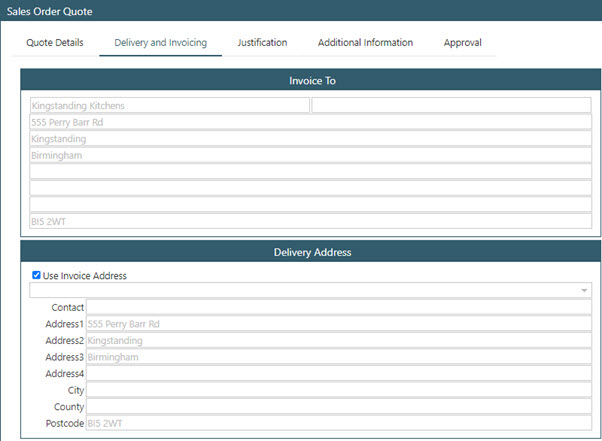
17.11. Delivery and Invoicing Tab
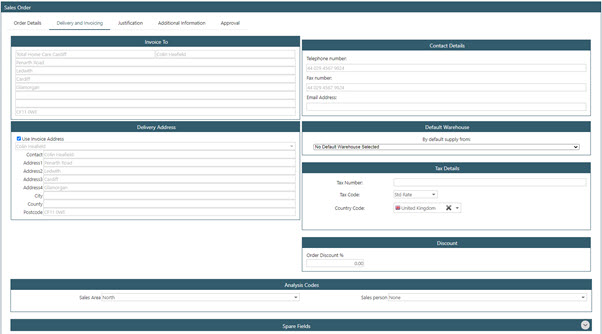
Invoice To: this will be auto populated from the Sage SL Account once a Customer has been selected.
Contact Details: this will be auto populated from the Sage SL Account default contact.
Delivery Address: this will be auto populated from the Sage SL Account. It can be overwritten by unticking the ‘Use Invoice Address’ option.
Default Warehouse: Where stock items will be taken from as default on the order. This can be changed on the individual line.
Tax Details: Pulled through from the Sage SL Account once a Customer has been selected.
Analysis Codes: Analysis codes set up and configured in Sage SOP – SOP Maintenance – Maintain Analysis Codes, will be drawn through to select.
Spare Fields: if another application is using Spare Fields in the database for additional analysis options, these can be configured in WAP system settings to appear on sales order entry. Any values entered will then post through to Sage (but will not be visible to the end user as this is linked to the database only).
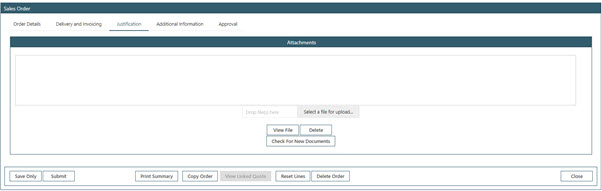
17.12. Justification Tab
Supporting documents can be uploaded and attached to the sales order using the Browse and Upload buttons – a single paperclip icon will appear in the Flag column in the sales order summary grid tables and on the User’s sales order Approval grid page (two paperclips will show for multiple attachments) and if DMS is enabled, this will post through to the order when it’s in Sage.
17.13. Additional Information
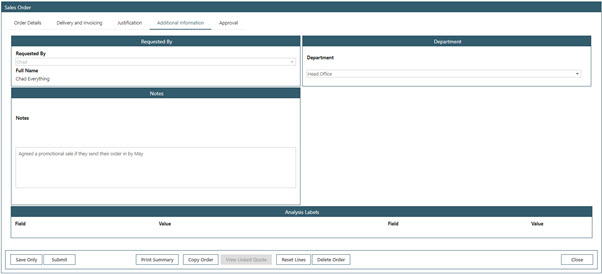
Additional notes can be entered if required, business unit changed (Department) and the requesting user is stored here. This tab can be hidden if none of the fields are required.
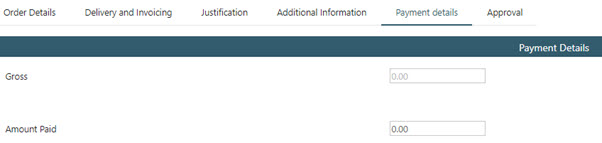
17.14. Payment Details
By default, payment information is hidden as this is usually handled within Sage if required. If enabled, a summary of the gross payment from the order is displayed in this screen.
17.15. Approval History Tab
This tab will only be populated once the Sales order has been submitted and progressed through the approval route. Only lines that require approval will be displayed i.e. not comment lines.

17.16. Submitting a Sales Order created from a Prospect Account
It is possible to raise a sales order against a Prospect account. If the Sage Account Setting is configured to enable Sage Account creation (when submitting sales order with a prospect account), at the point of submitting the sales order the user will be prompted to create the Customer information. It is therefore recommended that sales orders are not entered against the Prospect Account and instead, a quote is entered first which can then be converted to a sales order. Refer to the earlier section on converting a prospect account quote to a sales order for further information on this process and the Customer creation fields.
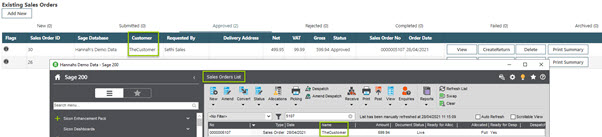
18. Existing Sales Order
From the main navigation menu, Sales Orders – Show Existing from the menu to display the sales orders under the tab headings. Additional icons will appear in the Flags column to show if the order is urgent, has been printed or has attachments etc.

New: sales orders that have been saved but not yet submitted for approval.
Submitted: sales orders that have been submitted and are awaiting approval. By hovering over the blue information icon on the left, the lines will be displayed showing who they are awaiting approval from.
Approved: sales orders that have been approved, posted through to Sage and now show a Sage POP Order Number and are ready to be emailed to the supplier. Once printed, a printer icon will appear and if emailed, an envelope icon will appear. Approved orders will remain in this tab until they have been fully goods received and invoiced.
Rejected: sales orders that have been rejected during the approval process will show under this tab. It is up to the user who submitted the sales order to either delete or edit and resubmit for approval.
Completed: once an order has been fully goods despatched and invoiced it will move through to Completed, mirroring the process within Sage.
Failed: if a sales order fails to post through to Sage it will appear in this tab and will need the error flag removing before it can be posted again. The permission to clear errors and repost orders is usually just given to Administrators or Finance users. Common reasons for a sales order failing are due to the customer being placed on hold within Sage once the sales order has been submitted, or the job or project being closed. More details on any error flags can be viewed through the Sicon Event Viewer (available on the server – usually IT or first line support can offer assistance if this is required).
Archived: users can archive their completed orders. If there are a large number of completed orders, it is recommended users do this on a regular basis to avoid potential speed issues. This does not impact Sage.
18.1. Viewing Sales Orders
Users will always be able to see sales orders they have raised or approved. If permission is given, users may also be able to view all sales orders within the system or all raised by users in the same business unit:

There are two options to search for an existing sales order; either use the Search filters or the Quick Links.
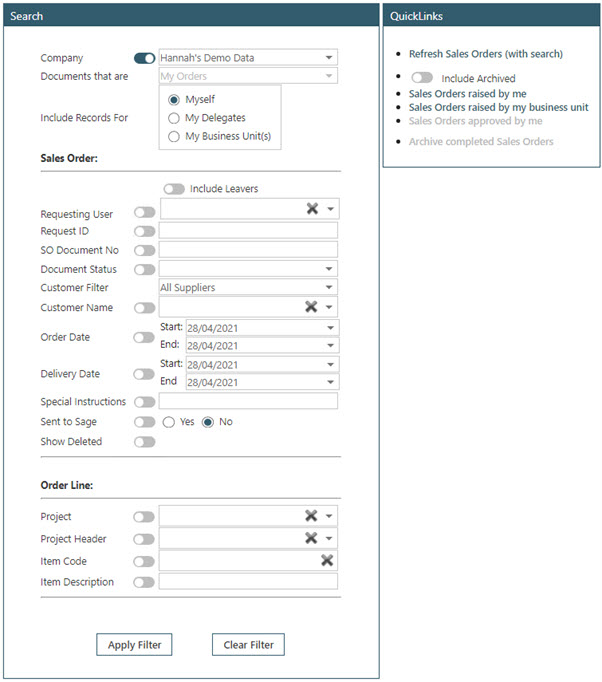
Search filters: depending on configuration, the user will either be able to search for their own, within their business unit, delegates or all users’ sales orders. Search filters can be used to find orders with a particular WAP ID, Sage Document number, customer and if using a costing module, Job or Project. Use the Show Deleted option to show any sales orders or orders that have been deleted.
Quick Links: either click ‘Refresh Requests’ to update the grid and retrieve the most recent status of orders or other specific links to show particular orders. If users have permission, they will be able to archive their completed orders.
18.2. Viewing Sales Orders raised by Colleagues
If users belong to a business unit and they click the Quick Link to view requests raised by my business unit, they will be able to view their own sales orders and any raised by users within their business unit(s).

18.3. Editing Existing Sales Orders
By clicking Edit on an existing sales order, this will open up to allow for viewing of order lines, delivery information, quantities received etc. Depending on User Type permissions, the user may be able to make changes on an order once it has been approved, up until the order has been despatched or invoiced. Any changes would need to be submitted for re-approval. Alternatively, users may not be allowed to make any changes to an order once it has been approved and a Sage SO number has been generated.
It is recommended that the only users who could change an order once it has been approved would be Administrators or Finance users.
18.4. Copying Existing Sales Orders
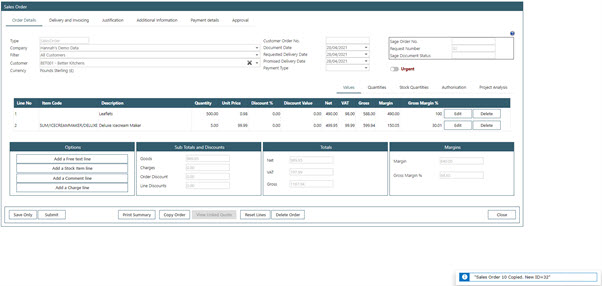
Once a sales order has been fully approved it can be copied to create a new sales order. This functionality is useful if repeat orders are being placed regularly, or orders with many lines. The user should find the correct order to copy using the search functionality and click to Edit. Once the sales order is open, click the Copy Order button at the bottom of the screen.

Once copied, a new sales order is created. This new sales order can then be edited if required; i.e. if lines need to be added or deleted, or changes to quantities etc. need to be made. Once the sales order is correct, this can then be submitted for approval.
18.5. Deleting Existing Sales Orders
If the user has permission to do so, they will be able to delete a sales order using the ‘Delete’ button. A sales order can be deleted once it has been approved unless goods have been despatched or an invoice has been entered. If a sales order has been approved and posted through to Sage but is then deleted, it will show in Sage as Completed with a zero order value. If a user does not have permission to delete sales orders, they will see a message advising this.

19. Approve Sales Orders
To approve a sales order, either click on a hyperlink notification on the user’s WAP homepage, or navigate to the Approve sales order page from the navigation menu.
19.1. Sales Orders to Approve - Approval
All sales orders waiting for the User to approve will be listed; click on the arrow to expand the sales order line details. Only lines which are for this user to approve will be visible on this page.
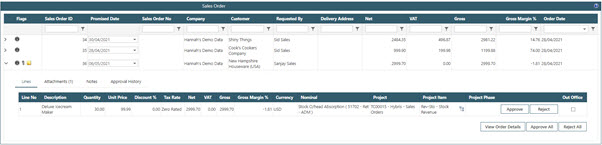
Lines tab: this tab will show all lines awaiting approval from the user with information on quantity, price, discount, tax, nominal and job or project. The View Order Details button will take the approver through to sales order to view the sales order fully or to make any amendments. Individual lines can either be approved or rejected, or the whole order can be approved or rejected. See below for further information on Rejecting sales orders.
Attachments tab: this tab will allow for any attachments added to be viewed. The number of attachments will be shown in brackets on the tab, and a paperclip icon indicates an attachment is present.
Notes tab: if any notes were added during creation of the sales order, these will be visible here and can be edited here. Notes can also be viewed by hovering over the post-it note icon under the Flags column.
Approval History: each line requiring approval will be displayed showing approval history.
If the User has the User Type permission ‘Use Approve Selected option on approval pages’ which applies to all modules, they could select multiple sales orders and approve them together without opening each sales order. We advise this for Finance and Senior Management users only:
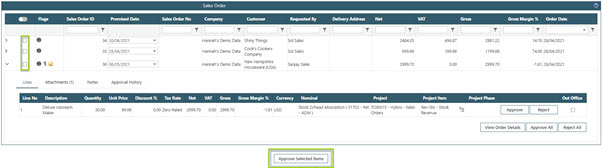
19.2. Sales Orders to Approve - Reject
If an approver wishes to reject one or all lines, they can click either Reject or Reject All; a reason for rejecting will then need to be entered before choosing to reject.

The user who raised the sales order initially will be sent a notification containing the rejection reason and the sales order will appear under the Rejected tab under Existing Sales orders.

The user who submitted the sales order can now:
- Delete the sales order if the approver has not allowed the purchase to be made (if the user has permission to delete a sales order).
- If the sales order has multiple lines, one which has been rejected and other lines which have been approved, delete the rejected line and resubmit the sales order. This will cause the sales order to move through as Approved and will post through to Sage.
- Edit the sales order to correct the rejected line and resubmit for approval.
To correct the rejected line (option 3); Edit the sales order, edit the rejected line, make the correct change and save the line. In this example the price has been adjusted. Once the change has been made, click the Authorisation tab and reset the approval route. Alternatively, if multiple lines need to be reset then use Reset Lines at the bottom of the screen. This is necessary to clear the rejected flag and allow for the sales order to be resubmitted for approval.

Once the line has been reset, submit the sales order for approval; this will start the approval process again.
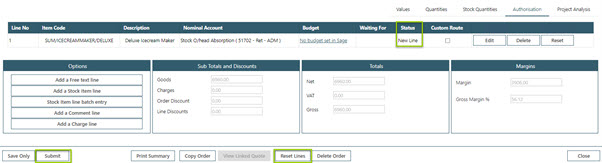
19.3. Sales Orders to Approve - View Order Details
If during approval the approver wishes to see the original sales order, they can click the ‘View Order Details’ button. If approval routes are configured based on nominal code, project, lines could be sent to other users to approve; when viewing the sales order as an approver, all lines are displayed but their lines to approve are highlighted for visibility.
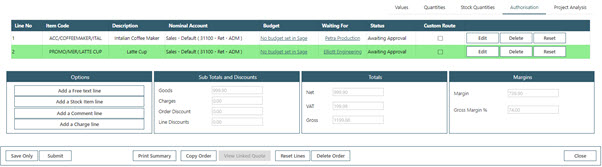
The approver will need to return to the Approve sales order screen to then approve or reject the order.
19.4. Fully Approved Sales Orders
Once approved, the sales order will move through the configured approval route until approved by an approver with sufficient approval value rights and any mandatory checks have been completed; at this point the order is posted into Sage as a sales order and a sales order number is generated within WAP. The user who submitted the sales order will also receive a notification advising them it has been fully approved (if approval notifications are switched on).

20. Sales Order Approval Stages
20.1. Sales Order Header Status
New: the sales order has been saved but not yet submitted.
Submitted: the sales order has been submitted for approval but not yet fully approved.
Approved: the sales order has been approved and would have posted through to Sage. Once a sales order has been approved it will be able to be emailed to a supplier.
Rejected: one or more lines on the sales order have been rejected. N.B. a rejected line must be edited and saved before being submitted again for the reject flag to be cleared; a rejected sales order simply submitted again will not clear the reject flag. A sales order will not post through to Sage if there is a rejected line on the sales order.
Completed: the sales order has been fully goods despatched and fully invoiced.
Failed: if a sales order has failed to post to Sage it will appear here. Most likely reasons for the sales order to fail are if a costing module is enabled but the project or job has been closed or set to not allow costs entered against it. Please check the Project and then clear the error and repost the sales order (these are usually Superuser permissions).
Archived: any completed sales orders the user has archived will show on here; archived sales orders will not appear in search results unless searched for specifically.
20.2. Sales Order Line Status
New: the line has not yet been submitted.
Waiting: the line is awaiting approval from an authoriser.
Authorised: the line has been fully approved.
Rejected: the line has been rejected; all lines must be authorised before the sales order will post to Sage.
No Authorisers: there are no authorisers for the line; the line will need to be reset and the sales order submitted for the correct approval route to be used.
21. Additional Features
These remaining sections cover the additional features available within WAP. They are predominantly aimed at WAP Super Users to explain what the features are and how to configure them. If utilised, end users may also find some of these sections useful to explain the additional features.
22. Printing and Emailing SOP Quotes, Sales Orders and SOP Returns
By default, once a sales order quote, sales order or SOP return has been fully approved and generated a number in Sage, printing is usually completed in Sage using the standard Sage functionality. However, it is also possible to print and email reports to send to the customer within WAP.
Once the quote, order or return has been found under the Approved tab, click on the Print option and a preview will be generated – see the below Section for details on configuring and linking layouts.
The print preview screen is a popup and therefore the browser must be configured to allow popups for Sicon WAP.
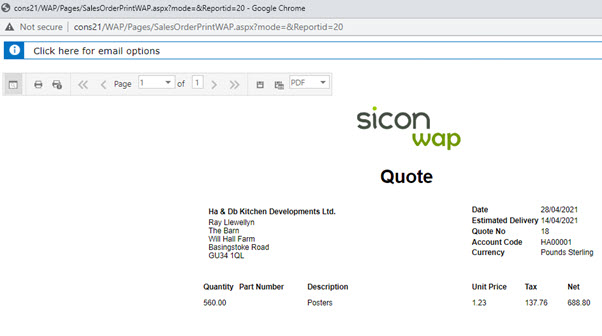
The quote, sales order or return can be printed if required, exported as a PDF document or emailed directly to the customer by clicking the ‘Click here for email options’ banner.
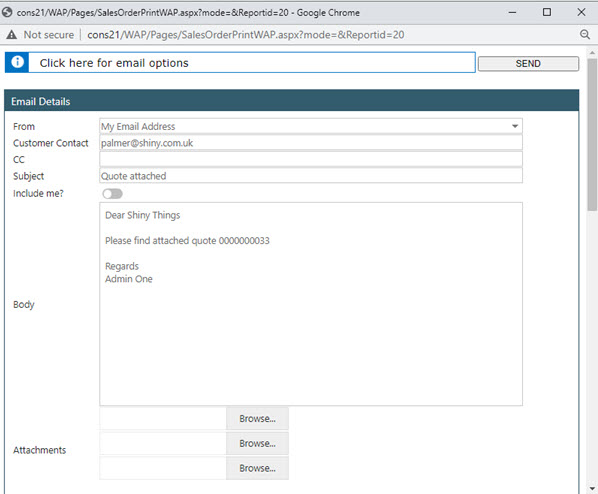
From: by default the option to send from the user’s email address will be selected but can be changed so the email is sent from the system email address as configured in System Settings – Email.
Customer Contact: this email is pulled through from the customer contact field on the sales order but the user is able to override if needed.
CC: enter an email address here if someone else should receive the email.
Subject: this text can be configured within System Setup – Sage Connections.
Include me: tick this box if the user should receive a copy of the email as well as the customer.
Body: this text can be configured within System Settings – Sage Connections although users are able to override to include any other information required when sending through to the customer.
Attachments: up to three attachments can be uploaded to be emailed out to the customer along with the sales order.
Once the order has been printed or emailed, a printer icon will appear in the Flags column against the order, under the Approved sales order.

22.1. Printing Layouts
Layouts are pre-configured at install; hover over the thumbnail image to view the layout. A report can be renamed by clicking Edit but to make any changes to the layout, click Design. Layouts can also be Exported and then imported if changes are to be made.
Pre-configured layouts for quotes, sales orders and SOP returns are stored within System Settings – Reports – ‘Add/Edit Reports’.
NB: the reports are designed using DevExpress and we strongly advise only experienced report writers make changes to a design layout. Please ensure a backup is taken before any changes are made by exporting the layout as a .xml file. Any issues resulting from making changes may incur chargeable consultancy to resolve.
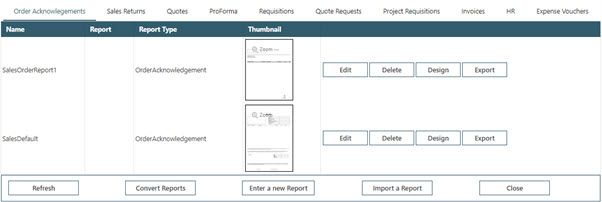
Order Acknowledgements: These are the standard pre-configured reports for sending out on approved sales orders.
Sales Returns: These are the standard pre-configured reports for sending out on approved SOP Returns.
Quotes: These are the standard pre-configured reports for sending out on approved SOP quotes.
Up to three layouts (Summary, Detailed or Internal) can be used per Sage Company; these are configured in Sage Connections – Company Details. From there navigate to the sub-tabs to choose the relevant reports:
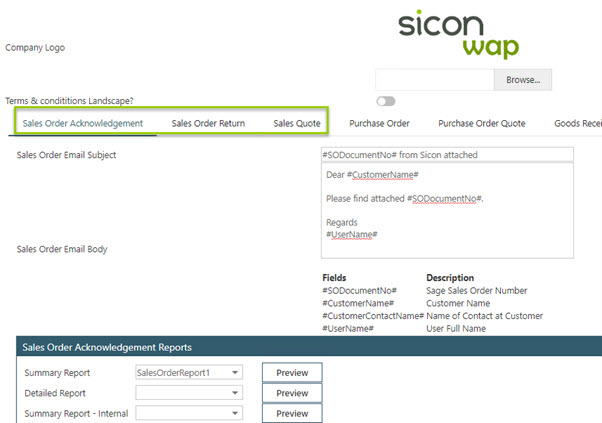
Sales Order Acknowledgement subtab – if applicable, choose the relevant report(s) for sales orders.
Sales Order Return subtab – if applicable, choose the relevant report(s) for SOP returns.
Sales quote subtab – if applicable, choose the relevant report(s) for quotes.
23. Goods Despatched
It is recommended despatching goods is carried out in Sage where full functionality for picking and allocation can be reviewed accordingly. The option within WAP can only be used in WAP if items do not require allocation, or are being automatically allocated, and offers a very simplified option for despatching goods from WAP.
Automatically allocating items can be enabled either the WAP System setting to automatically allocate sales orders once posted, or the Sage SOP settings to allocate stock on order entry:
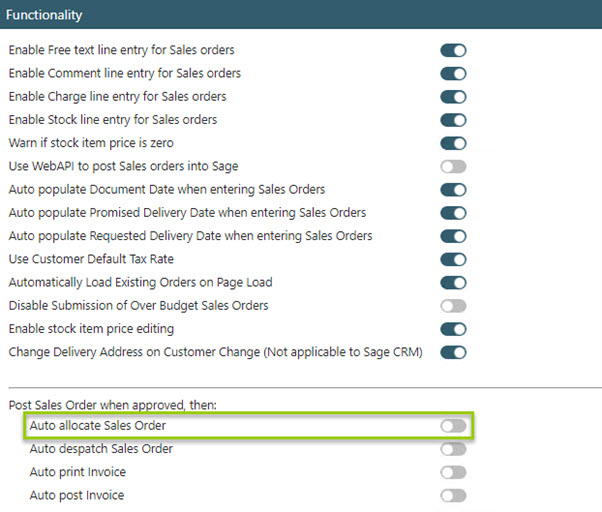
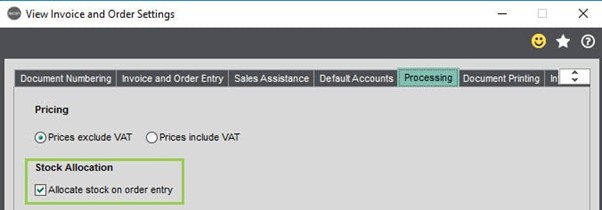
Items cannot be manually allocated in WAP and therefore any items that require manual allocation prior to despatching must be completed in Sage and not WAP.
23.1. Despatching Goods Received or Services
To despatch an order (with goods that have been allocated), use the navigation menu to navigate to Sales Orders – Despatch. Once goods have been despatched in WAP against a sales order, the quantities will update through on the Sage sales order in Sage SOP.
By default, the list displayed will show approved orders raised by that user only, that have not been fully despatched. Depending on configuration, the user may also be able to see orders raised by other users within their business unit(s) or all orders raised in the system. Specific orders can be found using the filters at the top of the screen to search by Customer, or a sales order number.
To despatch goods, select an order using the slider switch and click Despatch. If required, multiple orders can be despatched against the same customer.
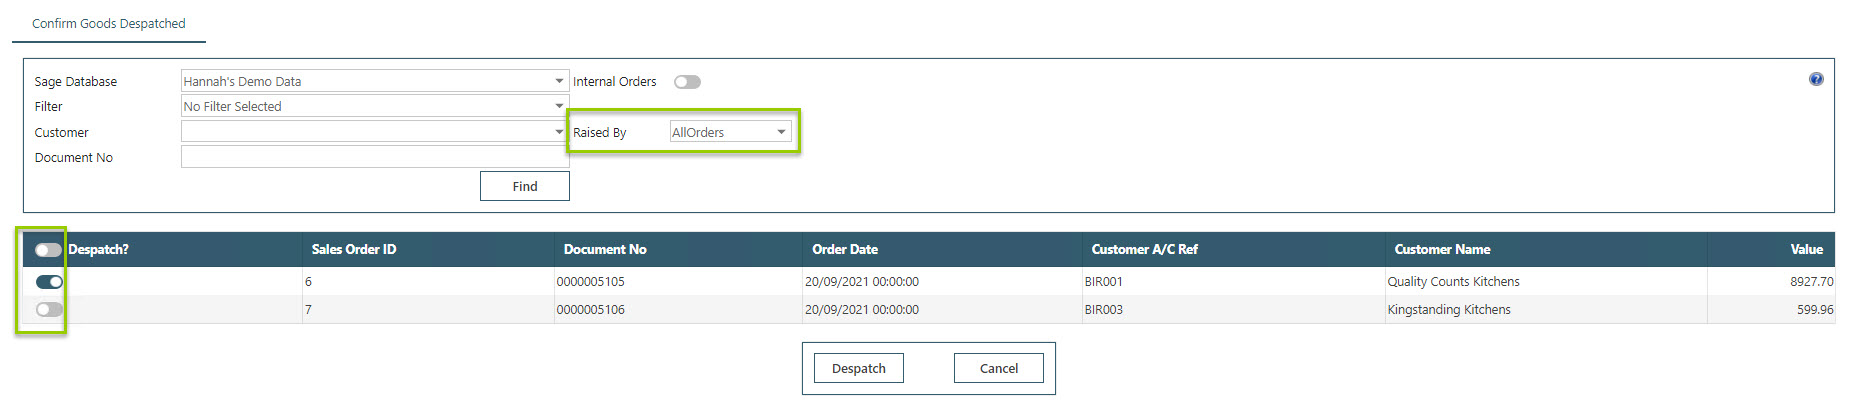
Once an order has been selected, the individual lines requiring goods to be despatched will be displayed. In the below example, only the top line can be despatched in WAP. Hovering over the red line indicates that this line hasn’t been allocated, and this line will therefore need despatching through Sage:
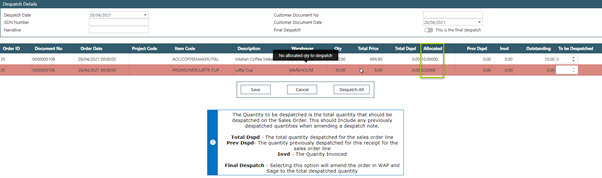
Despatch Date: this will default to the current date.
Customer Document No: this could be the delivery note number or an agreed text for all users to enter, e.g. their initials and the date the item has been despatched.
GDN Number: the system will populate this automatically when the goods despatched screen is saved.
Customer Document Date: this will default to the current date but can be changed if needed.
Narrative: free text field to allow the user to record any additional information if required.
Final Despatch: if recording a final, part despatch, this button can be ticked to amend the sales order in WAP and Sage. Please see below for more information on using the Final Despatch Functionality.
To be Despatched: enter the quantity that has been despatched against each line. If part of an order has been despatched, the remaining items will stay on the sales order to be despatched at a later date, the order will stay as an approved sales order and will remain as a live sales order in Sage until all items have been despatched.
Save: once goods despatched quantities have been entered, click Save to confirm.
Cancel: click to close out of this screen without saving any changes.
Despatch All: click to populate all lines with the outstanding order line quantities.
Once the item has been despatched, and the screen Saved, this will be visible in Sage as well. In the below example, 5 of 10 items have been despatched:


23.2. Final Despatch
If an order has been part despatched and it is known that outstanding quantities will not be despatched, ‘This is the Final Despatch’ can be used to update the order; this will update the sales order in WAP and Sage so the order quantity will be the same as the goods despatched quantity.
N.B. if this is done it will mean the order can no longer be edited so should therefore be used with caution.

In the example above the original order was for a total of 10 and 5 have already been despatched. However, at the point of this despatch, only 2 more will be despatched, with no further goods to be despatched. Because ‘This is the Final Despatch’ has been ticked, saving this screen will change the order in WAP and Sage to be for a total of 7. This also means that when an invoice Qty of 7 is printed and posted, the line will be updated to a status of Complete.
24. SOP Returns
Following sales orders being approved and despatched, some sites may wish to make use of SOP returns within WAP. Orders that are cancelled need to be recorded. For example, if the customer no longer wants to buy some (or all) of the goods or services supplied, perhaps because of damage of goods during delivery, incorrect shipment, or provision of the wrong services.
WAP allows users to create a SOP return that can be approved and then post into Sage ready to follow standard Sage processing of confirming receipt, printing the credit note and posting the credit note on the system.
24.1. New SOP Return
Select Create New from the navigation menu within the SOP Returns menu. Note: Options on this screen will depend on the functionality enabled/disabled within the system settings (System settings – System Settings Banner – Sales Orders) and on User Type permissions (System Settings – User Setup banner – User Types – SOP Returns).
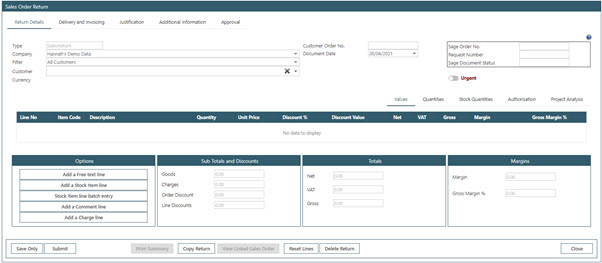
Company: will default to the User’s default Company as detailed in their User setup.
Filter: This will pick up categories from PRS filter in Sage (see Customer below).
Customer: If required, the customer list may be restricted to show only Approved Customers as defined in Sage 200. Please refer to: Approved Customers. It is not possible to restrict customers for individual WAP users.
Currency: as defined by the Sage SL account.
Document Date: this will be automatically populated with the current date but can be overridden as needed.
24.2. Add a Free Text Line on a SOP Return
Select Add a Free Text line and complete as required. Note: certain fields/boxes may not be visible as below, depending on the System Setup.
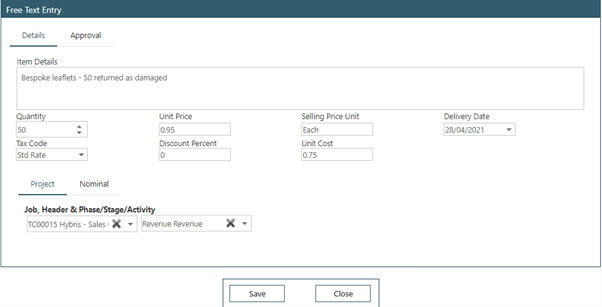
Item Details: free text box, enter the description of the item/s as required.
Quantity: free text box, enter the quantity required.
Unit Price: free text box, enter the price per unit of the item/s being sold.
Selling Price Unit: free text box, enter description of the item being requested; e.g. box of 12, pack of 6.
Delivery Date: this will pull through the delivery date as selected on the front page if configured, but can be overridden if required.
Tax Code: the default standard tax rate will be pulled through from how the Sage Company has been configured in Sage Connections but this can be overridden with another rate from Sage if required.
Discount Percent: if applicable, enter a discount percentage to apply to this line.
Project Tab: If a costing module is being used, the costing information is entered here, and will depend on what has been made available for the user to pick.
Nominal Tab: The user can change the nominal here.
Approval Tab: The user can view the standard approval route here. If they had the user type permission to create ad-hoc approval routes, they would also be able to override the standard approval route on this tab and choose a new route for the SOP return.
24.3. Add a Stock Item Line on a SOP Return
Stock items pull through from Sage and depending on the System Setup, will use the associated nominal code. Note; it is not possible to restrict stock for individual WAP users.
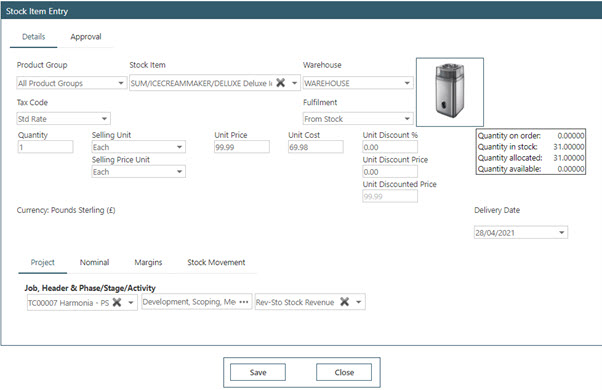
The information for the stock item will pull through from Sage and can be overridden if required.
NB, if prices are to be overridden, the WAPUser running the WAP service will need appropriate permissions to update prices in Sage (SOP Utilities – System Set Up – User Permissions).
Project Tab: If a costing module is being used, the costing information is entered here, and will depend on what has been made available for the user to pick.
Nominal Tab: The user can change the nominal here.
Margins Tab: This will pick up the margins based on the prices held within Sage. If prices have been overridden in WAP, the margin will update accordingly.
Stock Movement Tab: This will show a summary of stock item history within Sage.
Description Tab: This tab shows the description of the item as per Sage, and if the user has permission this can be amended on this screen.
Approval Tab: The user can view the standard approval route here. If they had the user type permission to create ad-hoc approval routes, they would also be able to override the standard approval route on this tab and choose a new route for the SOP return.
24.4. Submit a SOP Return
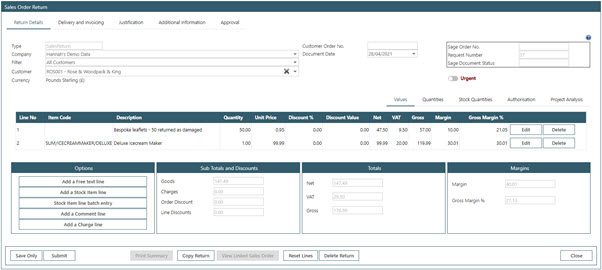
Once the lines have been added as desired (Comment Lines and Charge Lines, if configured, can also be added), the sales order Return will need to be Submitted for approval, and approved by the relevant users, at which point it will post to Sage as a SOP return.


24.5. New Return (from Sales Order)
Creating a return from the sales order works in a very similar way to creating one straight into WAP, but will contain the information from the original order.
Select Show Existing from the navigation menu within the sales orders section and find the relevant order to create the return for.

Click Create Return to generate the return from the order:
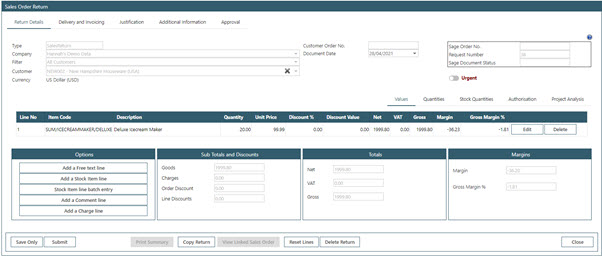
From within here, the details of the original order are displayed can be amended as required, depending on why the items are being returned.
In the example above, all items on the order are being returned as they are deemed to be faulty.
Once the lines have been edited or added as desired, the sales order Return will need to be Submitted for approval.
After submission, a SOP Return will be created and visible within Existing Returns:

Once approved, the Return will post to Sage and generate a new sales order Number to identify it in the Sales Order Processing list within Sage:
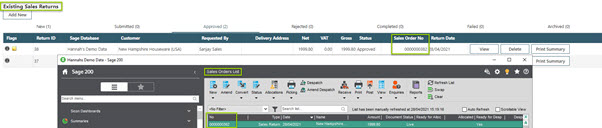
Please note that specific approval steps for SOP Returns have not been noted here in the guide, but follow the same logic as set out earlier in the guide under quotes and sales orders.
Quotes, sale orders and SOP returns can all have a different approval route if required.
25. Approved Customers
Some sites may wish to restrict users from selecting certain types of customer for sales orders. This can be done at a system level, but it is not possible to restrict customers per individual users.
To restrict which customers are visible in WAP for use when creating a sales order, configuration is required in Sage. Create an analysis code called ‘PRS’ in Sage 200 (Accounting System Manager – Settings – Maintain Analysis Codes) with the appropriate customer groups as values.
Add the PRS analysis code to the Sales Ledger analysis code setup (Sales Ledger – Utilities – Ledger Setup – Maintain Analysis Codes). The Field label can be edited to give an appropriate description.
Each Sage 200 Customer account can then be configured to a specific PRS analysis code. If the Customer should not appear in the list available when entering a sales order in WAP, do not select a code from the drop down box but instead leave it blank.
Within WAP when raising a new sales order, the customer can then be selected based on the Approved Customers or by category.
26. Reports
There is one report available within the sales order module.
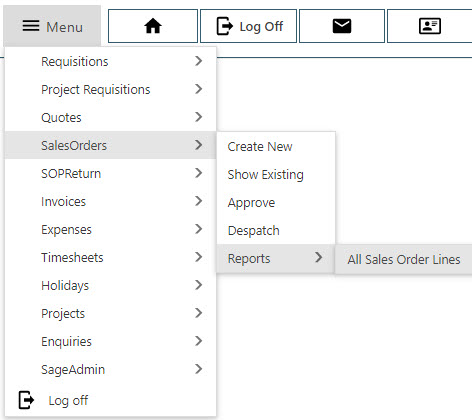
26.1. All Sales Order Lines
This report will show a breakdown of all sales orders with their line detail, quantities, approval status and approval history.
Depending on User Type and User configuration, users will be able to see either information relating to their orders, their delegate or business unit orders or all orders on the system. Use the date range, database filter, header and line status options to filter data as required.
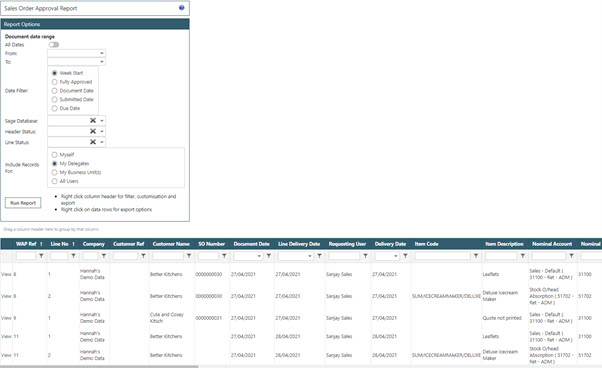
Once the report has been run, right-click in the header row to see the options for exporting and editing the information displayed on the screen. This report can be exported to Excel, some reports can be exported to PDF and can be adapted either by dragging column headers to change the order or group data by a particular header.
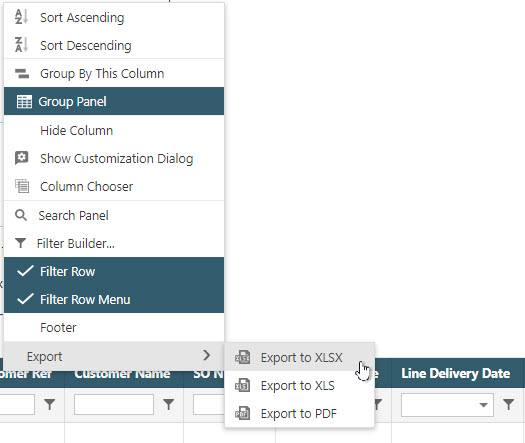
Click the ‘Column Chooser’ menu item for the Column Chooser to appear which will allow for additional headers to be added or existing headers to be removed. N.B. reports are cookie based so to allow for this customisation, ensure the browser settings allow cookies from the WAP website. Customised columns may return to the standard configuration following a WAP or browser upgrade as cookies may be cleared.