WAP Help and User Guide – System Settings v21
This WAP System Settings Help and User Guide will take you through the system settings which require configuration when implementing the WAP software.
Search the page by pressing Ctrl + F (windows) or CMD +F (Mac) on your keyboard.
Back to all user guidesProduct overview
Help and User Guide maintained for WAP version 210.0.0
This WAP System Settings Help and User Guide (HUG) will take you through the system settings which require configuration when implementing the WAP software.
By clicking on the System Settings cogs at the top of the screen the System Setup homepage will be shown as below. Only users with Administrator permissions should be given access to the system settings cogs.
Options available within these WAP System Settings will change depending on the WAP version installed and modules configured.
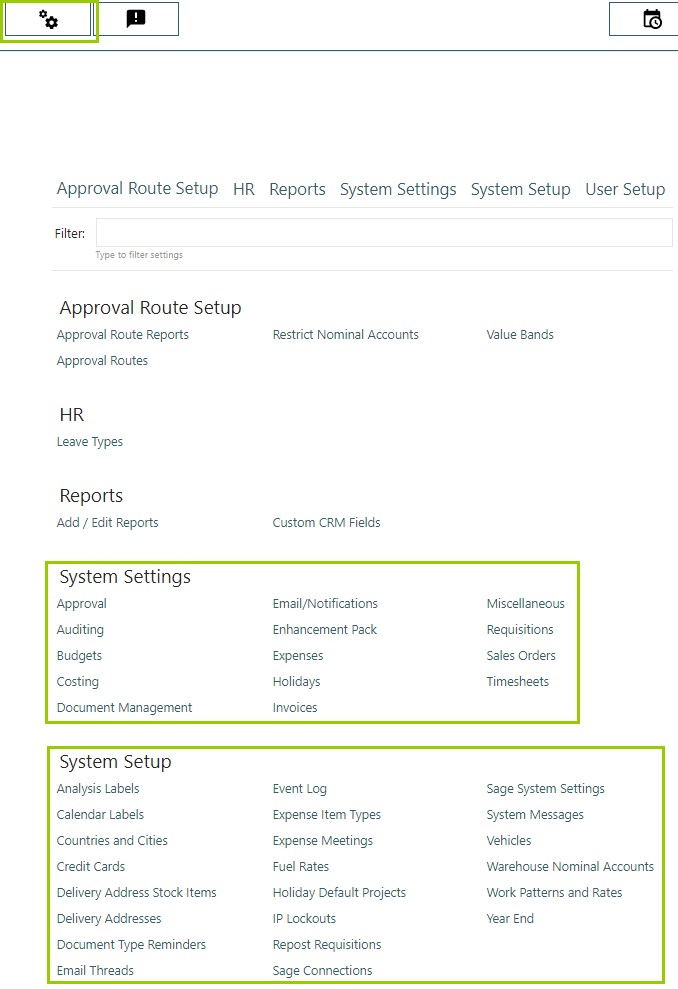
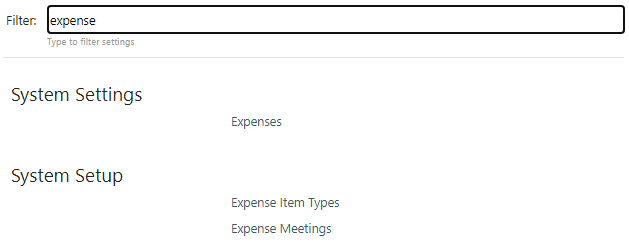
The filter at the top right of the screen can be used to limit the number of options; e.g. typing in ‘Expense’ will only show menu options relating to expense setup choices.
1. Initial System Setup
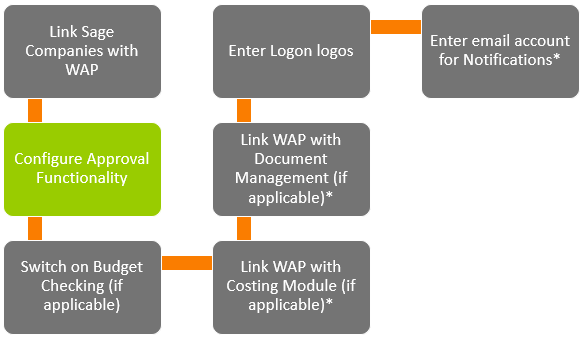
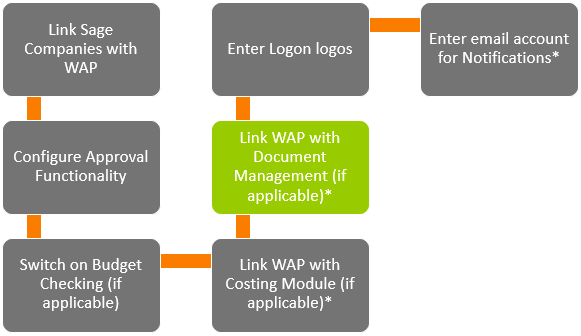
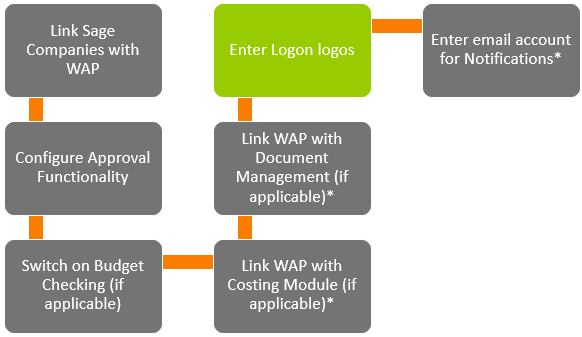
When WAP is first installed there are a number of system settings to configure, detailed below. These are documented further throughout this HUG and other WAP HUGS.
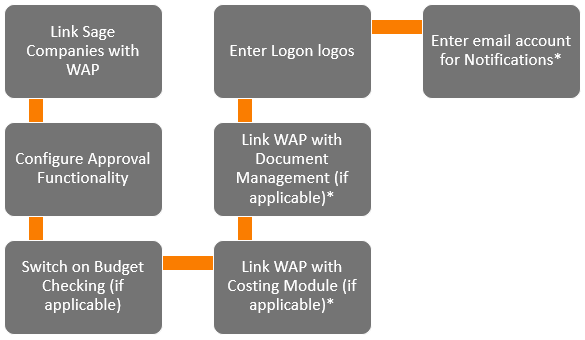
*Please make sure the WAP Service is restarted following any changes.
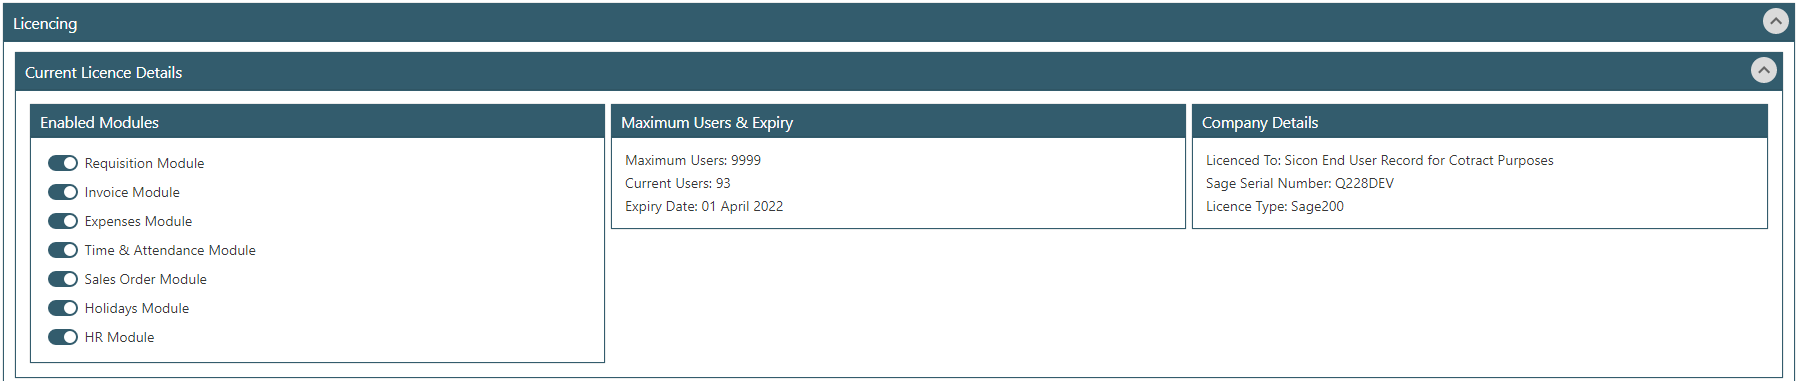
For the WAP system to be available the licence string must be valid with the right modules enabled, number of users and linked to the correct Sage serial number. Once this is configured, menu options will then be visible within the system.
For further information on licencing, please speak with your Business Partner in the first instance.
2. System Settings - Approval
The Approval tab is used to turn configure various parameters used to create approval routes within the system.

2.1. Display Banner

View PDF Attachments Inline: this must be enabled if using a document management system within the Invoice module; this setting will allow the attached invoice to be viewed during the approval process.
Use Acrobat Viewer for inline PDFs: if Adobe is installed on client machines it will use this to open the attachment; if not enabled, the WAP viewer will be used.
Hide Budgets tab on approval pages: this setting will hide the budget tab on all approval pages.
2.2. Functionality Banner
Various parameters can be turned on and off to create the required approval route settings per document within the WAP system. These settings are configured per WAP install rather than per Company. Once routes have been created or there are documents awaiting approval these settings cannot be changed without deleting routes and ensure there are no documents awaiting approval. Combinations of approval options are possible (for example Requisitions could be approved by both requesting user and nominal account) but it is recommended to keep the routes as simple as possible to allow for easier administration.
Based on modules enabled, all applicable document types are listed, e.g. Requisitions, Sales Orders, Invoices, Project Requisitions etc. and approval route functionality is set per document type. Some document types may not have all approval options available; e.g. Holiday Requests can only be approved by requesting user.
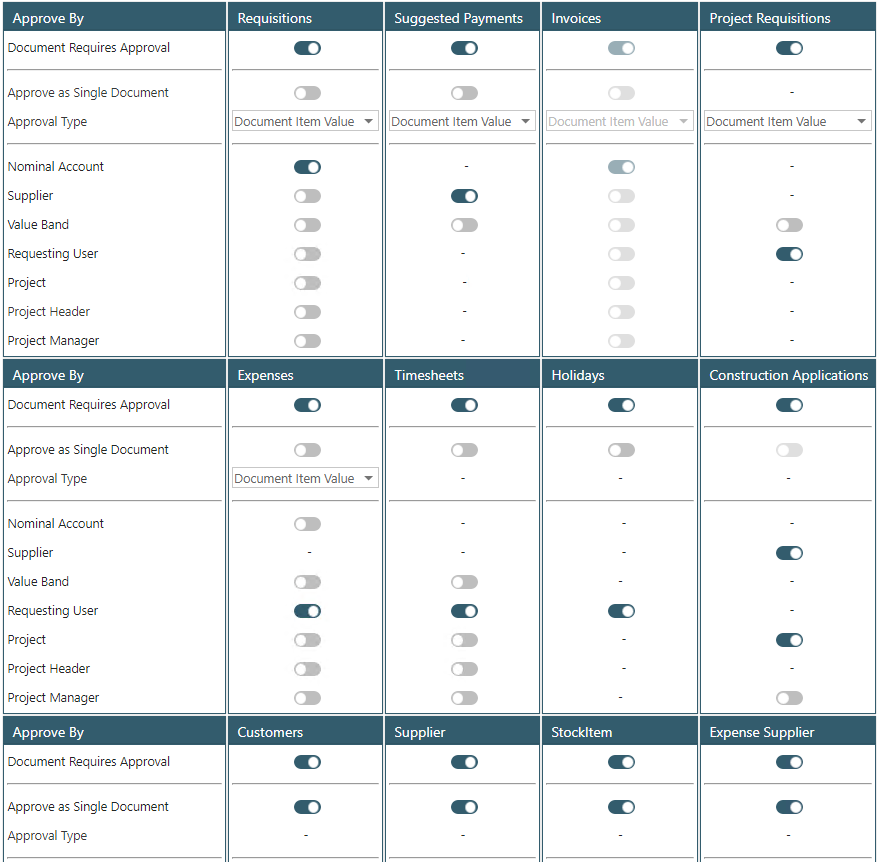
Document Requires Approval: by default, this will be on, but if documents do not require approval, this can be unticked.
Approve as Single Document: if this is ticked it would mean that only one nominal account can be set per document; usually more than one nominal code would be needed on a document so this wouldn’t need to be switched on.
Approval Type: set at either document item value or document value; document value will use the total value of the document for approval while document item value will total the lines with the same nominal code for approval.
Nominal Account: approval to be based on nominal account (combination of account number, cost centre and department); if a new nominal account is added in Sage, corresponding approval routes would need to be created in WAP.
Supplier: approval to be based on the Purchase Ledger supplier account; if a new supplier account is added in Sage, corresponding approval routes would need to be created in WAP.
Value Band: value bands would need to be created to either allow for documents to skip approvers or for more targeted approval; for example, if documents over a certain value should go straight to a Director for approval rather than going through line managers before reaching the Director. Value bands are usually used in conjunction with another functionality option, e.g. nominal account or requesting user.
Requesting User: approval to be based on the user who submitted the document; if new users are added in WAP, corresponding approval routes would need to be created. Some document types cannot be set on Requesting User as there is none – this is where the document has originated outside of WAP, e.g. invoices entered in Sage or suggested payments.
Project: approval to be based on the project selected; if new projects are created in Sage, corresponding approval routes would need to be created. This will only show as an option if WAP is linked with a Costing Module.
Project Header: approval to be based on the project header (or project item) selected; if new project headers or project items are created in Sage, corresponding approval routes would need to be created in WAP. This will only show as an option if WAP is linked with a Costing Module.
Project Manager: this can only be used in conjunction with Sicon Projects; approval would be based on the Project Manager linked to the project selected. If new Project Managers are created in Sage, corresponding approval routes in WAP would need to be created. If projects are being created in Sage regularly, it is advisable to have approval in WAP based on Project Manager (rather than Project) as this would mean less maintenance in WAP; approval routes only need configuration if new project managers are created, rather than every time a new project is entered.
Approval Configuration examples per Document Type
Requisitions: if no costing module is configured, approval would usually either be based on nominal account or requesting user; if a costing module is configured, approval may be based on project or project manager.
Suggested Payments: these can only be approved either based on value or supplier. A default approval route for this document type may be sufficient to the Company’s MD or FD.
Invoices: if invoice approval is used in conjunction with the requisition module, the invoice approval routes will usually mirror requisition approval routes. Requesting user can only be selected if invoices are entered directly into WAP (i.e. when Commercials are not configured in Sage).
Project Requisitions: approval is usually always to the same set of users, i.e. the Procurement Team, so a default approval route is usually sufficient. Approval routes can also be configured based on requesting user or value band.
Expenses: usually these would be approved based either on requesting user or on the nominal code. If WAP is linked with a Costing Module, the Project Manager may have an impact.
Timesheets: usually these would be approved based either on requesting user or on project manager.
Holidays: these can only be approved based on requesting user.
Construction Applications: if this functionality is to be used; approval will be based either on supplier, project or project manager.
Customers: these can only be approved based on requesting user. Usually a default approval route for this document type will be created to either a Finance user or set of users.
Supplier: these can only be approved based on requesting user. Usually a default approval route for this document type will be created to either a Finance user or set of users.
Stock Item: these can only be approved based on requesting user. Usually a default approval route for this document type will be created to a Procurement user or set of users.
Expense Supplier: these can only be approved based on requesting user. Usually a default approval route for this document type will be created to a Finance user or set of users.
Absence: these can only be approved based on requesting user.
Sales Orders: usually approval would be based on requesting user, although other approval options are available to be configured as required.
Sales Order Quotes: usually approval would be based on requesting user, although other approval options are available to be configured as required.
Sales Order Returns: usually approval would be based on requesting user, although other approval options are available to be configured as required.
Deleting Approval Routes
Once an approval route option has been configured above and approval routes have been created, it is not possible to change the approval configuration for that document type without clearing down all the existing routes and making sure no documents are awaiting approval; i.e. changing Requisition approval from being based on nominal account to requesting user.
Clicking on Approval Route Deletion Options will show buttons provided to remove all approval route for each document type allowing new options to be selected and new routes configured. Routes can be deleted per Sage database and per module type. It is recommended to export existing approval routes before deleting routes in this screen.
Deleting all routes will stop the WAP system being able to be used until there is a default approval route (all menu options on the left will disappear). A global default approval route will need to be created; we would advise this to be an Administrator user who does not appear in other routes.
It is not possible to recover approval routes once they have been deleted – please ensure routes are exported prior to deletion to allow for them to be reimported if needed. Warnings will show prior to routes being deleted.

The below settings can be changed while approval routes are configured in the system.

Auto escalate approval to next approver if not approved within number of hours: if this setting is configured it will automatically send a document to the next approval step if it has not been approved or rejected within the allocated time period. The approval history of the document will be updated to show it has moved to the next approval stage due to it not being approved within the time limit. If the document reaches the final step of the approval route, it will not escalate any further. It is recommended this setting is set at a minimum of 48 hours to cover for weekend dates. Suggested Payments and Project Requisitions will not move to the next approver as these documents can require action from approvers.
Approval Routes for a document are restarted on changes made to a document by any user (not just the requestor): by default, any changes made to a document by the requester will cause the document to restart the approval route, but checking this option will mean changes made to the document by any user will restart the route.
All Document Approval Routes are restarted when an approval route is changed: if an approval route is changed while a document is awaiting approval, this option will cause the document to start the approval route from the beginning, rather than carrying on from the current stage.
Prompt for confirmation before approval when using ‘Approve All’ option: this option will cause a pop-up to appear to ask the user for confirmation when they are approving documents using the multi select option.
Prompt for confirmation for individual item lines before completing approval (only when single document approval is disabled): this option will cause a pop-up to appear to ask the user for confirmation when they are approving a single document item or line.
When single document approval is enabled, compare the actual approval routes for the items rather than the approval options (e.g. the routes are the same instead of the nominal accounts being the same): this will mean the routes are checked during document entry; i.e. items can only be entered if the approval route is the same, rather than only checking nominal accounts (i.e. if document approval is based on another option other than nominal account). All lines on the document will be approved or rejected at the same time.
Approval history display type for report grids: this affects how approval progress is displayed in all reports with approval details. Combined – all details are combined into a single column per step. Discrete – all the details are separated into multiple columns per step. All – shows all columns from combined and discrete. None – approval step columns are hidden.
2.3. Invoice Approval
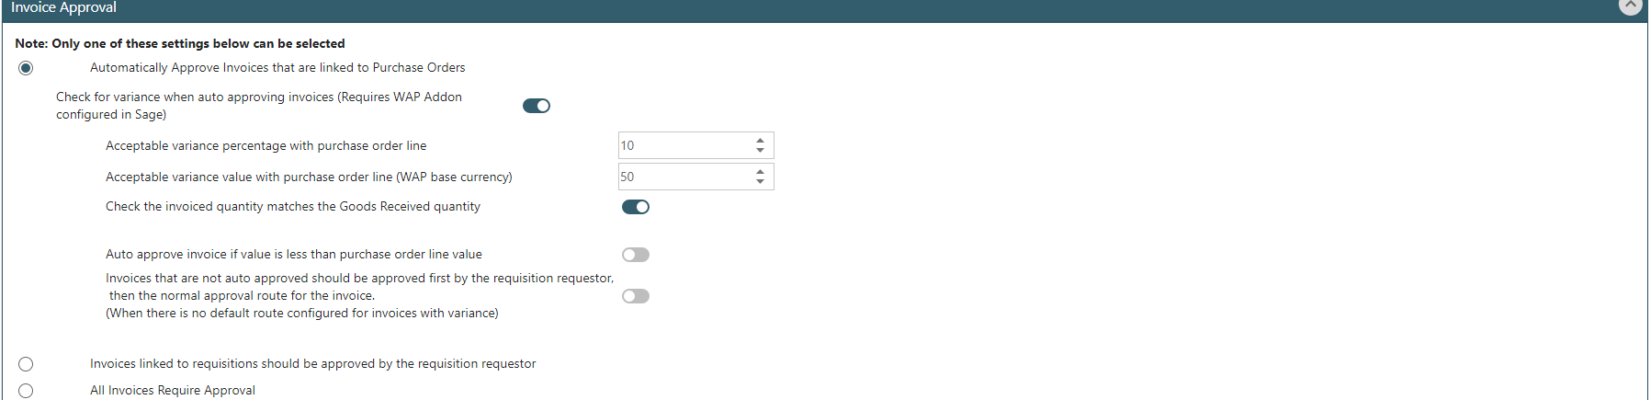
WAP has been developed with three settings regarding approving invoices that are linked to purchase orders. Only one of the below settings can be chosen. If these settings are changed, please restart the WAP service once saved to ensure the WAP Service uses new configuration.
Option 1
Automatically approve invoices that are linked to Purchase Orders.
This option allows for the auto approval of an invoice that is linked to a related purchase order and will be used in conjunction with the variance checking options. If an invoice fails the variance check, it will not be automatically approved but will be pulled through into WAP and will follow the pre-configured invoice approval routes. The approver will see a post-it note against the invoice on the approval screen which will show the variance detail.
Check for variance when auto approving invoices (Requires WAP Addon configured in Sage): Using the WAP Addon in Sage, this setting will check for any variance in conjunction with the other settings configured on this screen.
Acceptable variance percentage with purchase order line: This setting will check the value of the invoiced line(s) against the total of the matched PO lines with the figure here.
Acceptable variance value with purchase order line (WAP base currency): This setting will check the value of the invoiced line against the total value of the matched PO lines with the figure here. If the invoice falls outside of this acceptable monetary value it will require additional comments to explain the discrepancy (if it is within the variance, comments are not mandatory), and will then be sent for approval.
If the invoice falls within this variance, the invoice will be automatically approved in WAP.
Note; these top two settings work together so if there is any variance outside of either acceptable value or percentage, the invoice will require approval in WAP.
Check the invoiced quantity matches the Goods Received quantity: this setting will check the invoice quantity against the total goods received quantity. It requires three-way matching to be turned on in Sage Purchase Order Settings.
If the order is part-received and invoiced, this will not be counted as a variance that requires approval, but an additional comment will be displayed for the user keying the invoice to explain that the Invoiced Quantity doesn’t match so this can be queried prior to approval. If there is no GRN at all, a warning will be displayed to the user to explain that “Order X has been invoiced for X items but no items have been delivered.” The user will then need to enter a reason for this variance (or close the screen if this is a mistake and query with the user who raised the requisition).
Further information with examples of all these variance settings can be found in the WAP Addon HUG.
Automatically approve if invoice line is less than purchase order line: this option can be configured if company policy is to approve automatically an invoice that is received less than the purchase order. If an invoice falls outside of the acceptable variance in Sage it will require additional comments from the person inputting the invoice to explain the variance, and will then be sent for approval in WAP.
Invoices that are not auto approved should be approved first by the requisition requestor, then the normal approval route for the invoice (when there is no default route configured for invoices with variance): this setting will mean that if an invoice has a variance to either the PO or GRN, the first approver must be the user who raised the requisition, then the standard approval route will be used. For this to work, there must be no default approval route for variance invoices.
Option 2
Invoices linked to requisitions should be approved by the requisition requestor.
This option generates a custom approval route for each invoice that is linked to a requisition; the route will contain only the user who raised the requisition in WAP and will not follow the pre-configured standard approval route or any budget checking options. If this option is required, each user who could raise a requisition would need to also be given permission to approve an invoice with unlimited invoice approval value.
Option 3
All invoices require approval
If this option is chosen, all invoices entered into Sage 200 and picked up by WAP for approval will use the standard configured invoice approval routes.
2.4. Mandatory Approval - Custom Fields
This feature allows up to three additional mandatory approval labels to be included in approval routes and have a custom label so they can be personalised per installation. An example of this being used is the CAPEX Spend option below; it might be that when the user is raising a requisition this is identified as cap-ex and so additional approval would be required.

When adding or amending an approval route, any custom fields that have been enabled will appear as selectable options, similar to the standard mandatory flags, see below.

If enabled, the label is displayed when submitting either a requisition, invoices or a sales order for a user to select.

2.5. Self-Approval
Each WAP user can be set with a self-approval value per document type (User Setup – Users – Account Options). There are three options available for configuring self-approval when the user submitting the document is also in the approval route. One of these options must be selected; by default, the first option is checked at install.
Self-approval will override mandatory approval routes, expect if the nominal or project is over budget.

Use the requestor self-approval value instead of the document approval value: as a general rule, self-approval value is usually less than the user’s document approval value; this will accommodate the scenario where a user can approve other user’s documents at one value but they can only approve documents submitted by themselves at a lower value or at 0.00, forcing the document through the approval routes.
Use the approvers alternate user account where available, or remove the requester from the approval route for that document when there is no alternate user available: the alternate user is set on the WAP user’s profile; if there is no user configured here, the document will go to the next stage of the approval route.
Use the normal approval value that would be used if approving a document requested by another user: the user’s document approval value or specific nominal approval value will be used rather than their self-approval value. Use this option if different nominal codes have different requisition approval values.
3. System Settings - Auditing
This tab is used for switching on WAP Auditing.

Audit Log Enabled: switch on to record changes being made within the WAP system. Not all fields within WAP are currently audited.
4. System Settings - Budgets

These settings are used to configure appropriate options for checking budgets when submitting or approving documents within WAP. Budgets will always be set in Sage, either against the nominal code or the project.
4.1. Display

Supress ‘Over Budget’ warnings: this setting determines whether or not users are shown a warning when they enter a request that exceeds the budget for the nominal or project selected.
Budget Reporting Mode: by default, this is set to Detailed but can be changed to Simple if required.
4.2. Functionality
Budget Calculation Mode: by default, this is set to ‘Standard’ but can be changed to ‘Actual plus approved invoiced lines’ if required.
Filter outstanding transactions by financial year start / period start: by default, budget checking and budget enquiry will only include outstanding transactions for the current period, switch this off if all outstanding transactions from previous periods or years should be included.
Filter outstanding transactions by financial year end / period end: by default, budget checking and budget enquiry will only include outstanding transactions for the current period, switch this off if all outstanding transactions for future periods or years should be included.
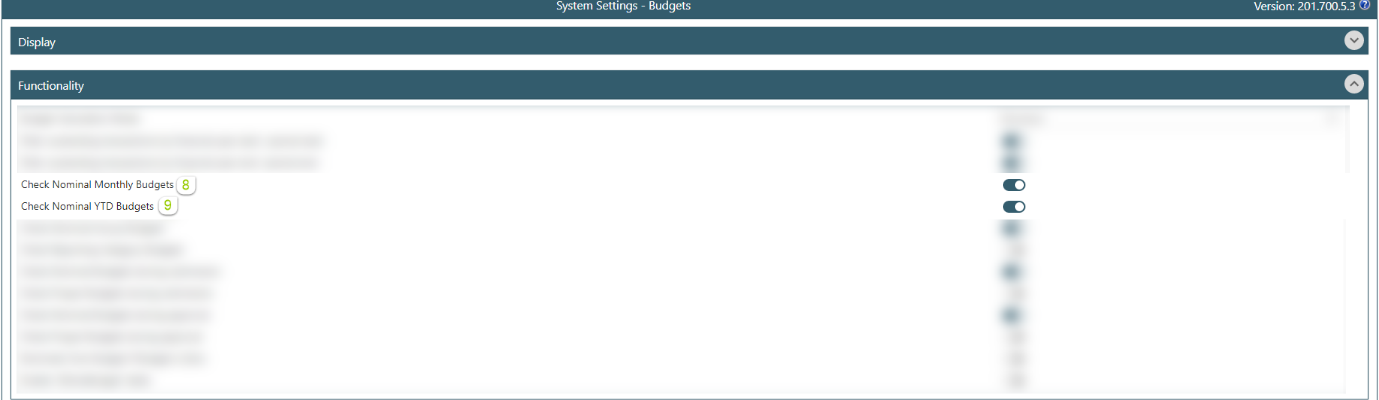
Check Nominal Monthly Budgets: tick to check nominal monthly budget, as configured in Sage.
Check Nominal YTD Budgets: tick to check nominal year to date budget, as configured in Sage.
Check Nominal Group Budgets: tick to check nominal group budgets, as configured in Sage.
Check Reporting Category Budgets: tick to check reporting group category budgets, as configured in Sage.
Check Nominal Budgets during submission: tick to check budgets when a document is submitted. Some organisations may only require budgets to be checked during approval.
Check Project Budgets during submission: tick to check budgets when a document is submitted. Some organisations may only require budgets to be checked during approval.
Check Nominal Budgets during approval: tick to check budgets when a document is approved.
Check Project Budgets during approval: tick to check budgets when a document is approved.
Nominal over Budget if Budget is Zero: if enabled, nominal codes with no budgets set in Sage will be treated as over budget.
Projects over budget if budget is zero: if enabled, projects with no budgets set in Sage will be treated as over budget.
Enable ‘SiExtraBudget’ table: a custom table that can provide additional years of nominal budget in addition to the standard Sage 200 ‘Next Year’ budget.
4.3. Requisition with Nominal Budget Example
In this example, we will look at the nominal budget set in Sage and show how WAP reads this depending on what settings have been configured in WAP.
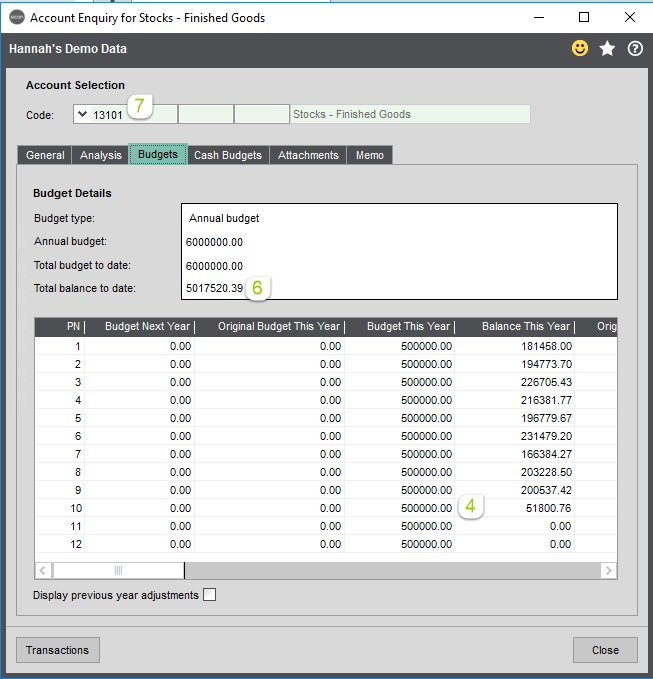
Sage Nominal Budget Configuration
In Sage, the budget for this account has been set as 6,000,000 which gives a monthly budget of 500,000:
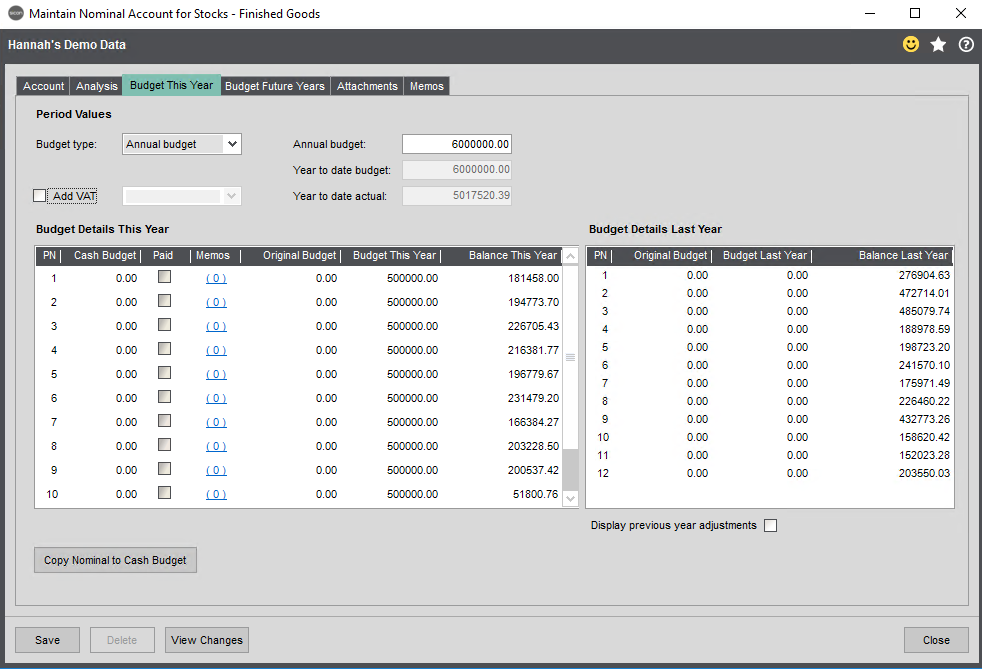
In the example above, many transactions have already occurred, so the current YTD actual is 5,017,520.39.
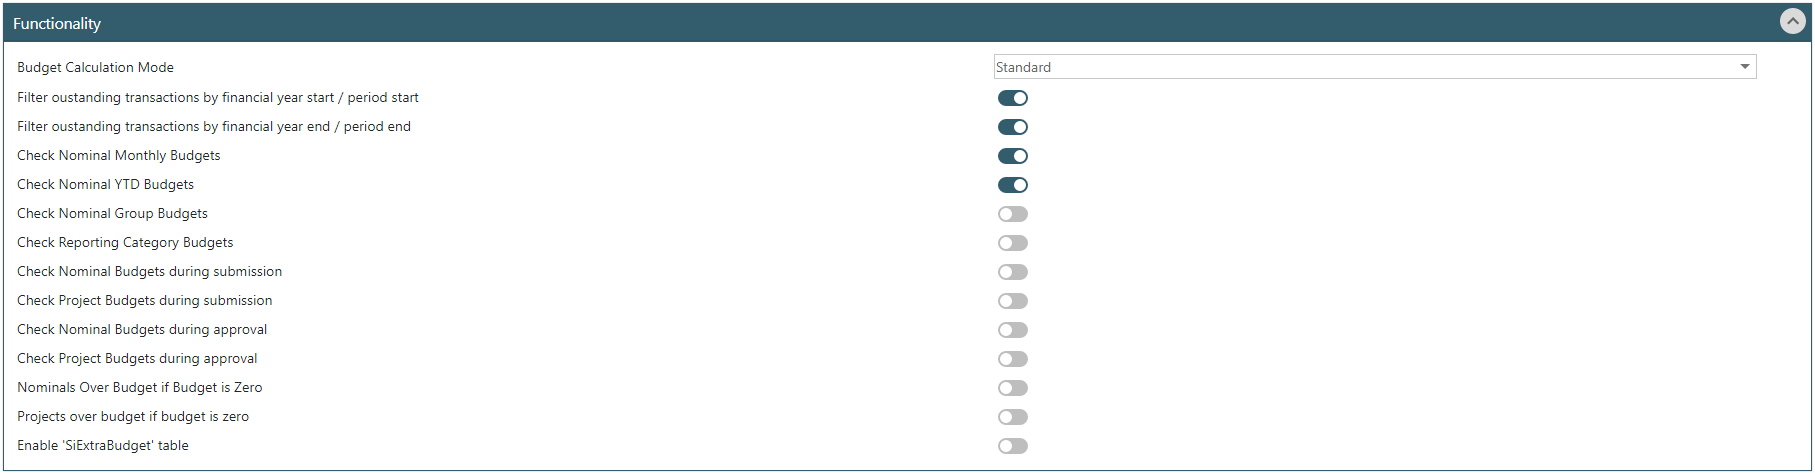
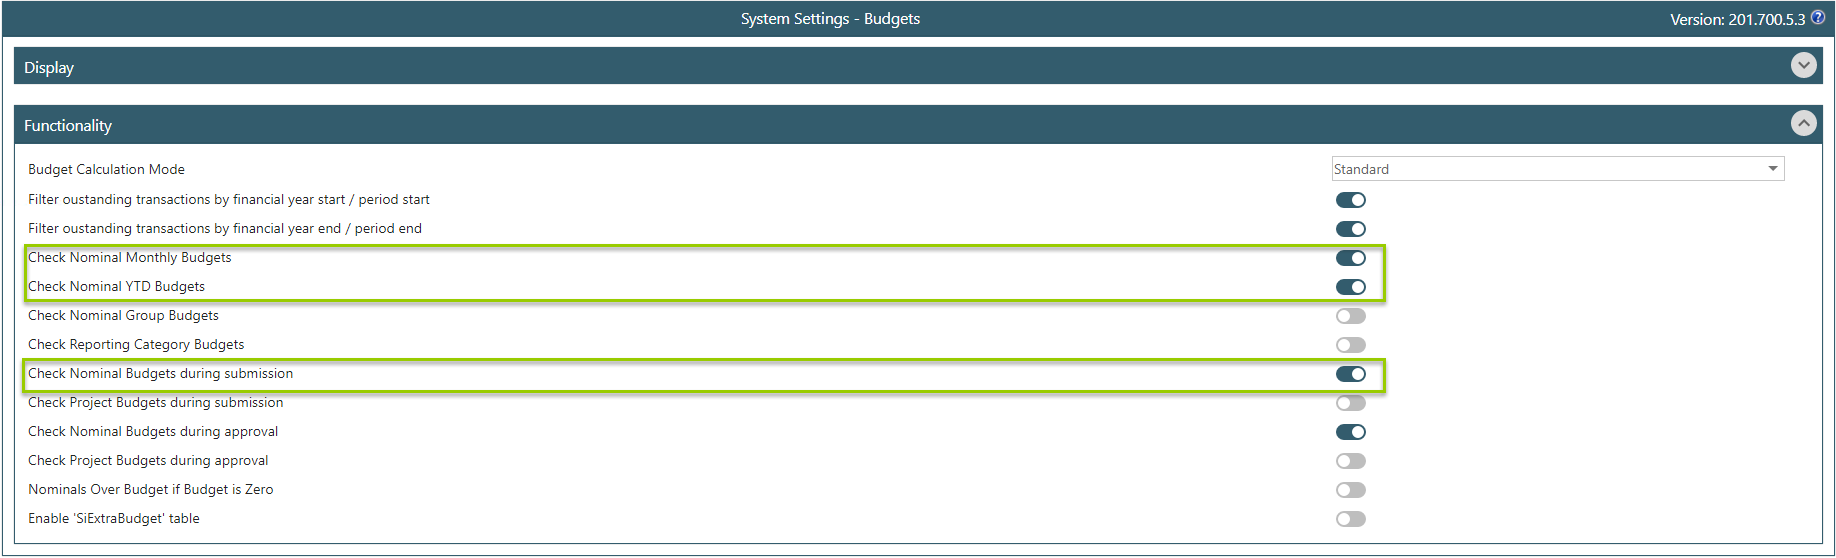
WAP Budget Configuration
In WAP – System Settings Cogs – System Settings Banner – Budgets – Functionality banner, the below budget settings have been configured so that Monthly, YTD and Annual budgets will all be checked during submission (there’s no specific setting for Annual, these are always checked if budget checking is enabled):
Example 1 – Requisition checking Nominal Budget
In the example we are going to work through, it’s currently Period 10. When a user enters a requisition against this nominal during that period, they will see a picture of the Monthly, YTD and Annual Budget for that period. By turning on the setting to ‘Check Nominal Budgets during submission’, an additional Budget tab is displayed with a summary of whether the item is within budget or not:
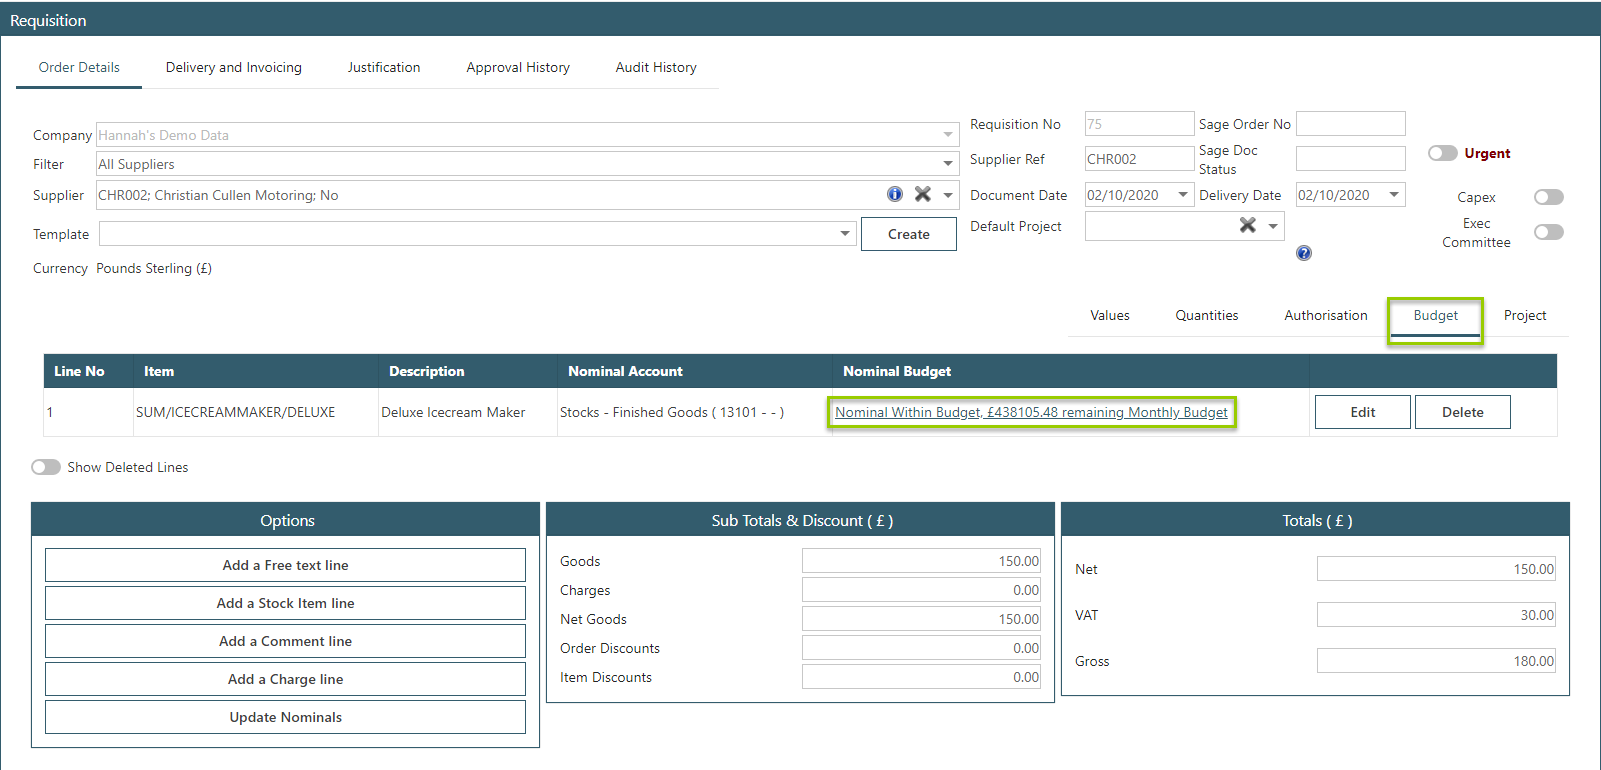
By drilling into the hyperlink, further information can be gained.
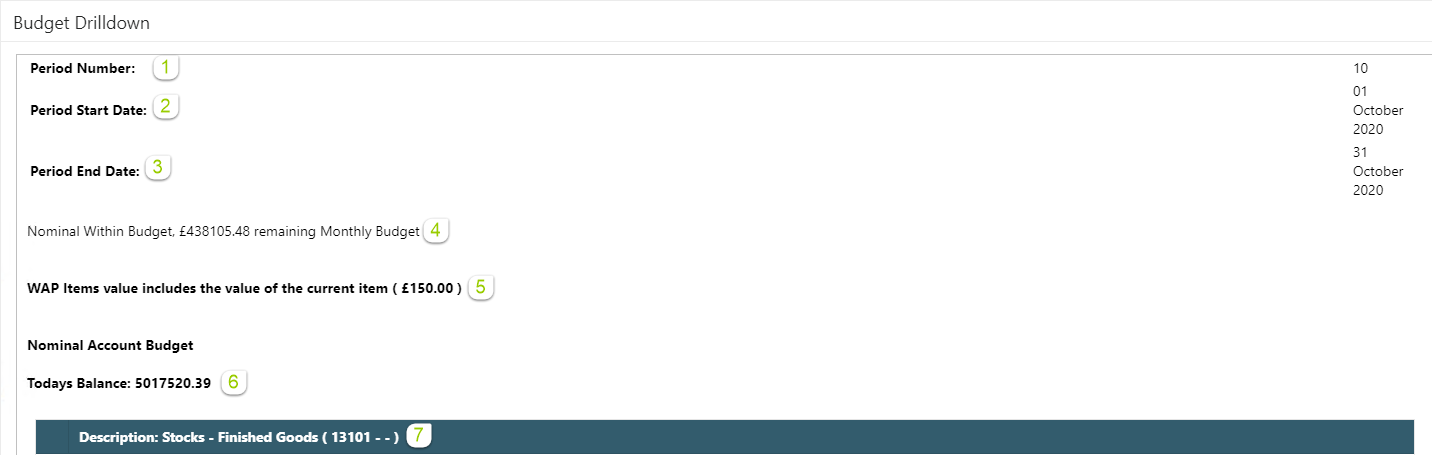
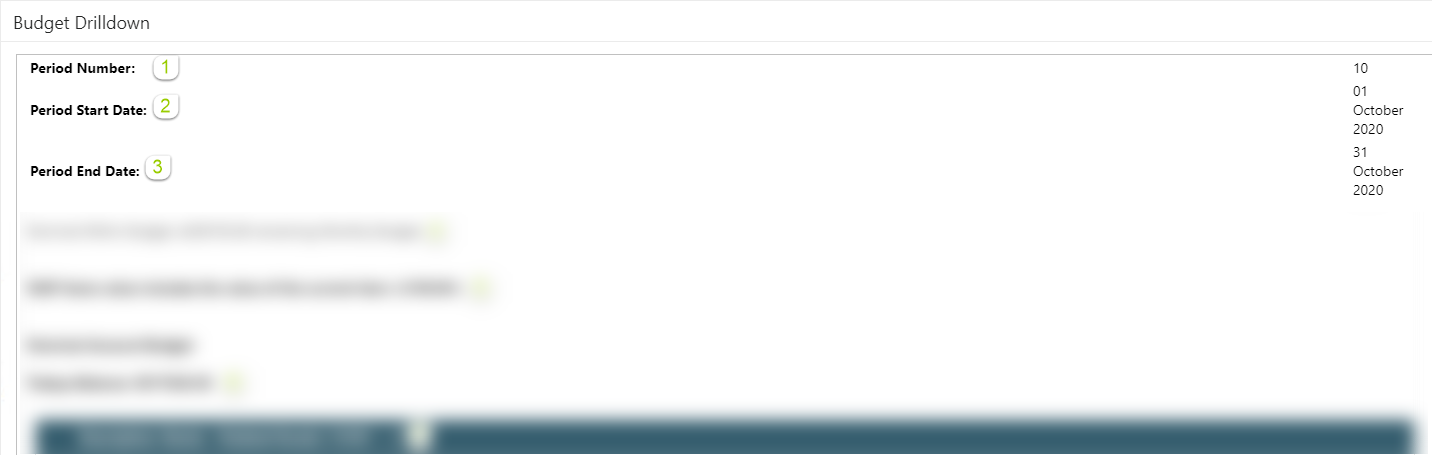
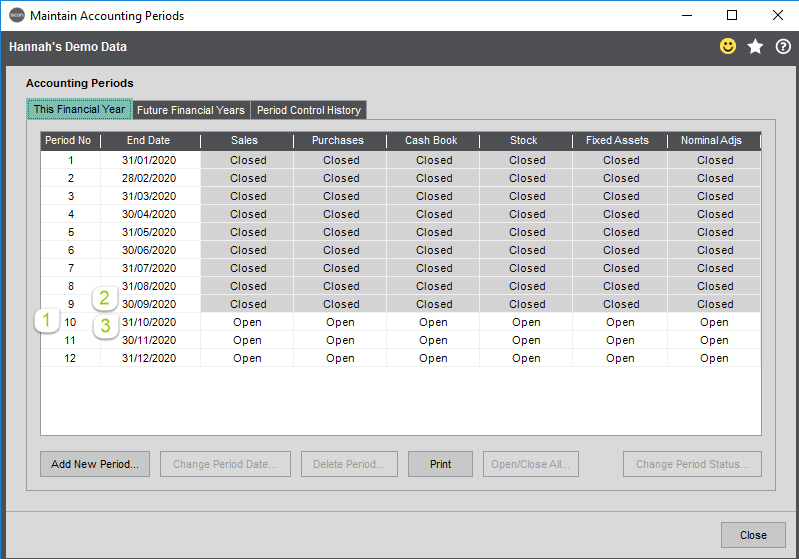
Current Period
1 – 3: Current period details, as per the accounting periods in Sage (Accounting System Manager – Accounting Periods – Maintain Accounting Periods):
Nominal Transactions
4, 6 and 7 are taken from the budget and transactions against the nominal in Sage (Nominal Ledger – Nominal Enquiries – Account Enquiry):
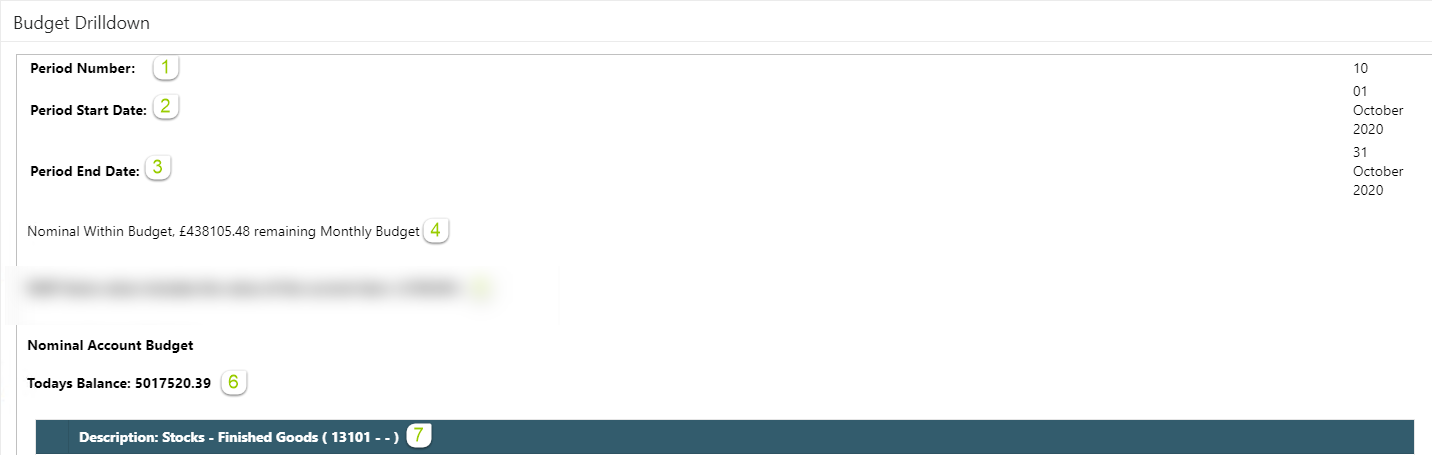
Part 4 is also considering existing items and will be explained in more detail by the second half of this WAP budget drilldown screen.
Current WAP document
Part 5 is the value of the current WAP requisition in WAP:


Current Month, YTD and Annual Budget summary
In the bottom half of the WAP screen, more specific detail about each budget is displayed, depending on what settings have been set:

The value within the pending WAP document columns includes all orders in WAP that are not completed, deleted, rejected or sent to Sage. It will also include approved orders that haven’t posted to Sage (e.g. orders that have failed to post or haven’t posted yet).
Note, the annual budget will always be shown if budgets are being checked in WAP, there is no setting to ignore this.
Remaining Budget Summary
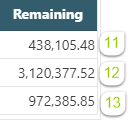
Value 11: Remaining Monthly budget – actual/pending budget spend. E.g. 500,000 – (51,800.76 + 9,943.76 + 150) = 438,105.48
Value 12: Remaining YTD budget – actual/pending budget spend. E.g. 5,000,000 – (1,869,528.72 + 9,943.76 + 150) = 3,120,377.52
Value 13: Remaining Annual budget – actual/pending budget spend. E.g. 6,000,000 – (5,017,520.39 + 9,943.76 + 150) = 972,385.85
4.4. Requisition with Project Budget Examples
In these examples we will work with budgets against Sicon Projects.
Sicon Projects Budget Configuration
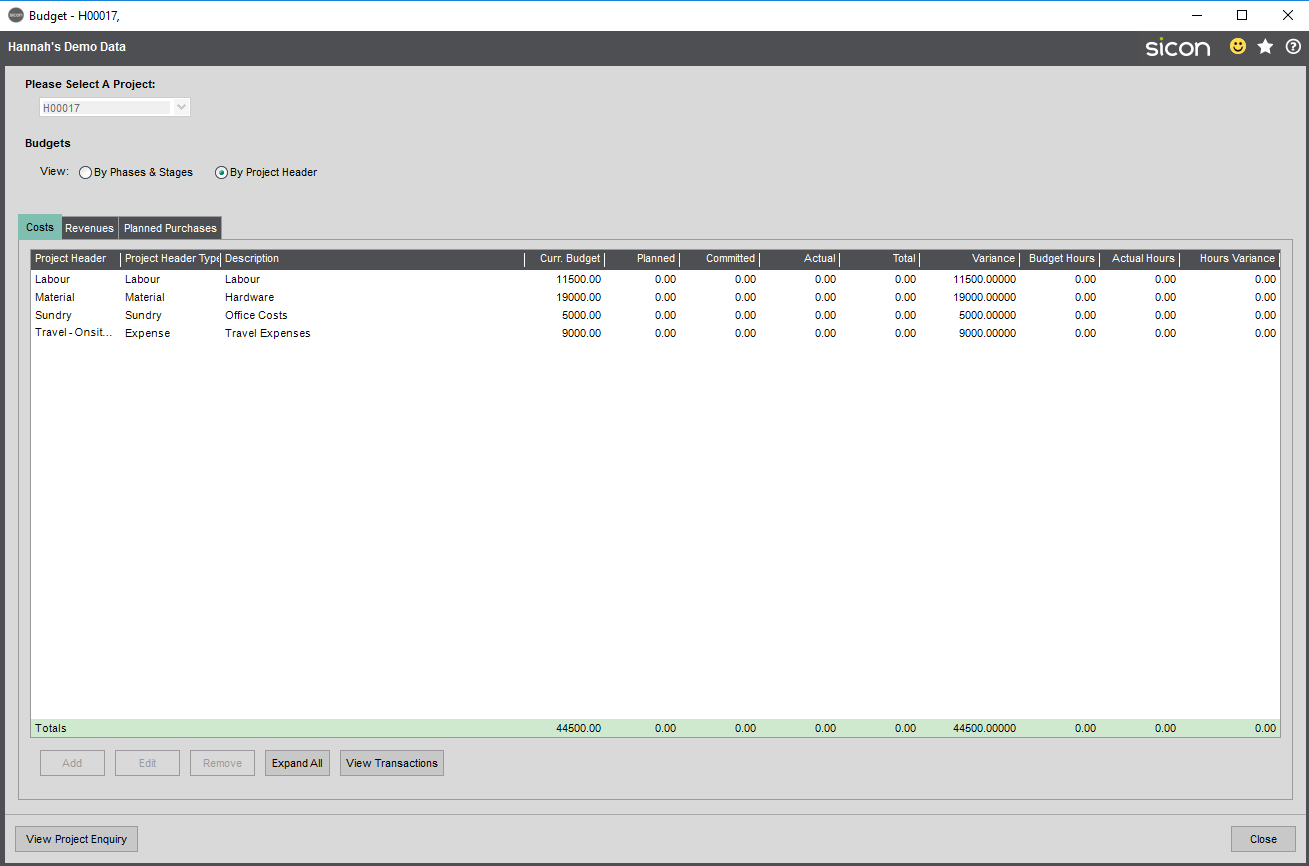
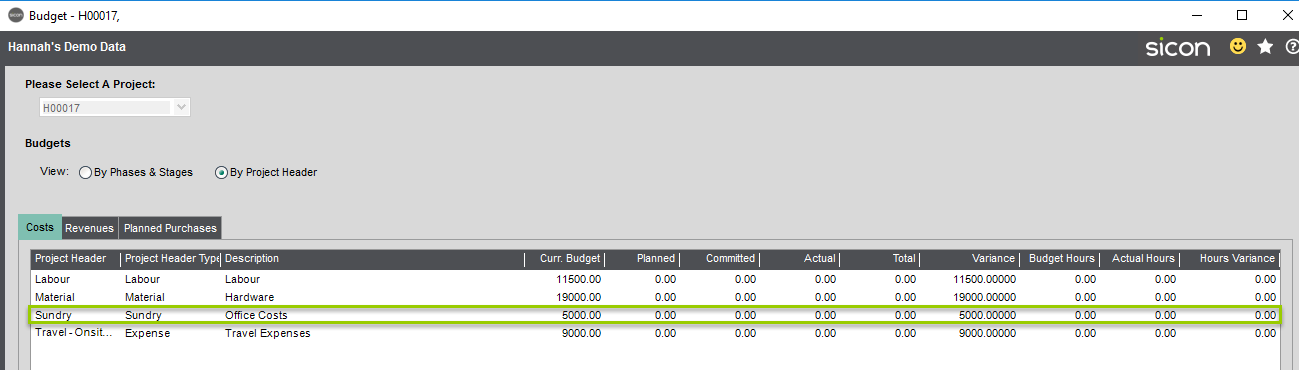
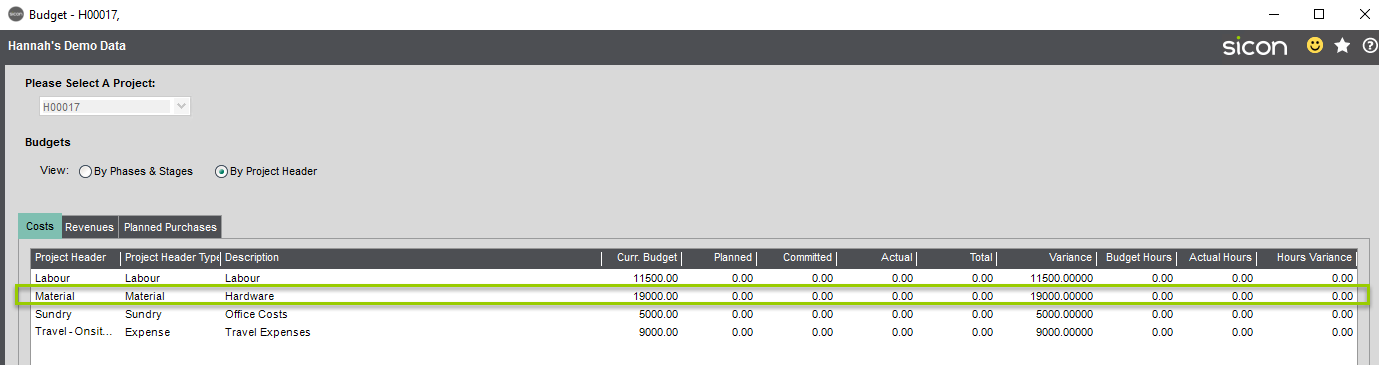
In Sage, a budget has been configured against the project and when viewed By Project Header looks like this:
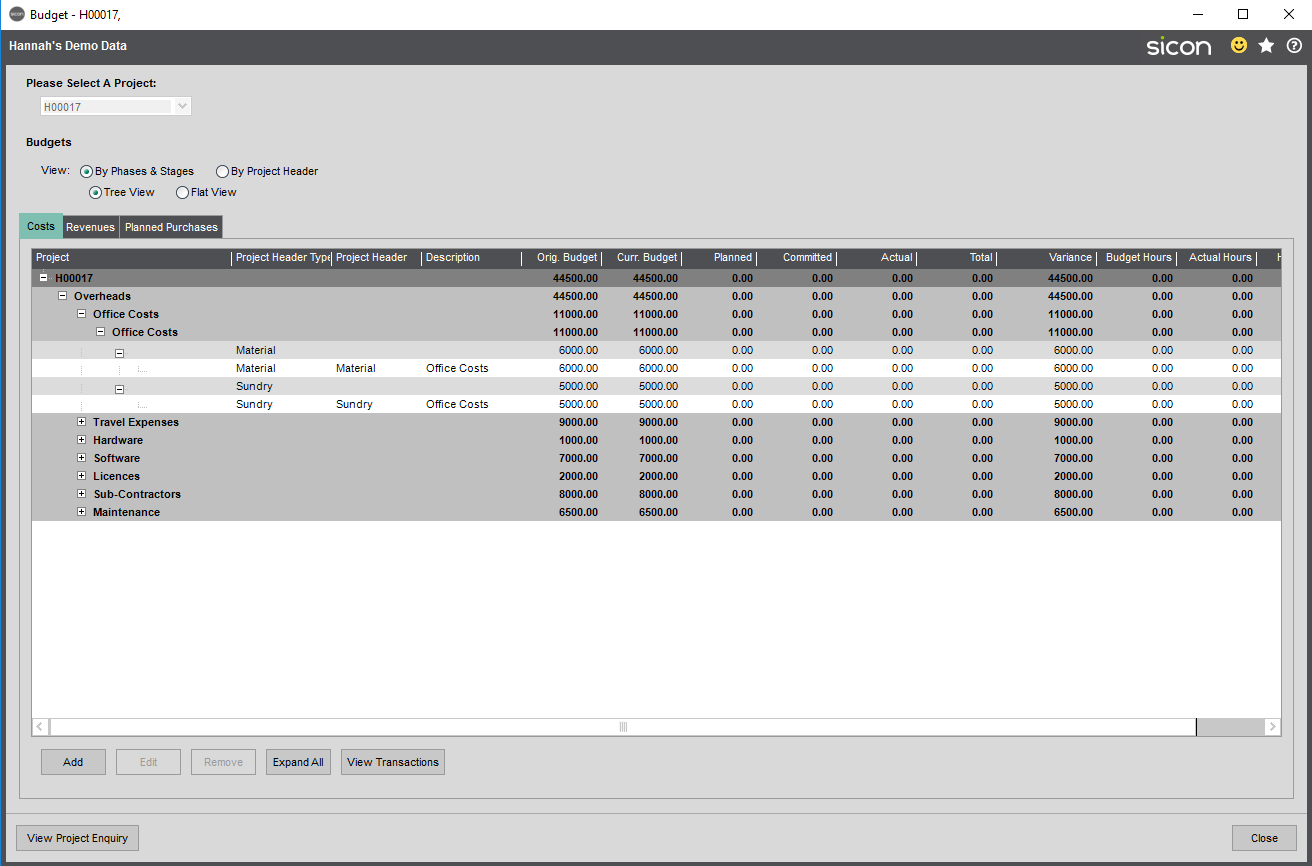
These are further broken down into the phases, stages and activities across the project, which can be seen in detail by selecting the ‘By Phases & Stages’ view and expanding the individual lines as required:
Within Sicon Projects, the system allows maintenance of budgets by project, with budgets being split at a project header level. Further information on Project budget setting is available in the Projects Help and User Guide.
WAP Budget Configuration
Once the budget is set up in Projects, within WAP, System Settings cogs > System Settings Banner > Budgets > Functionality banner, project budgets can be checked during submission, during approval or both:
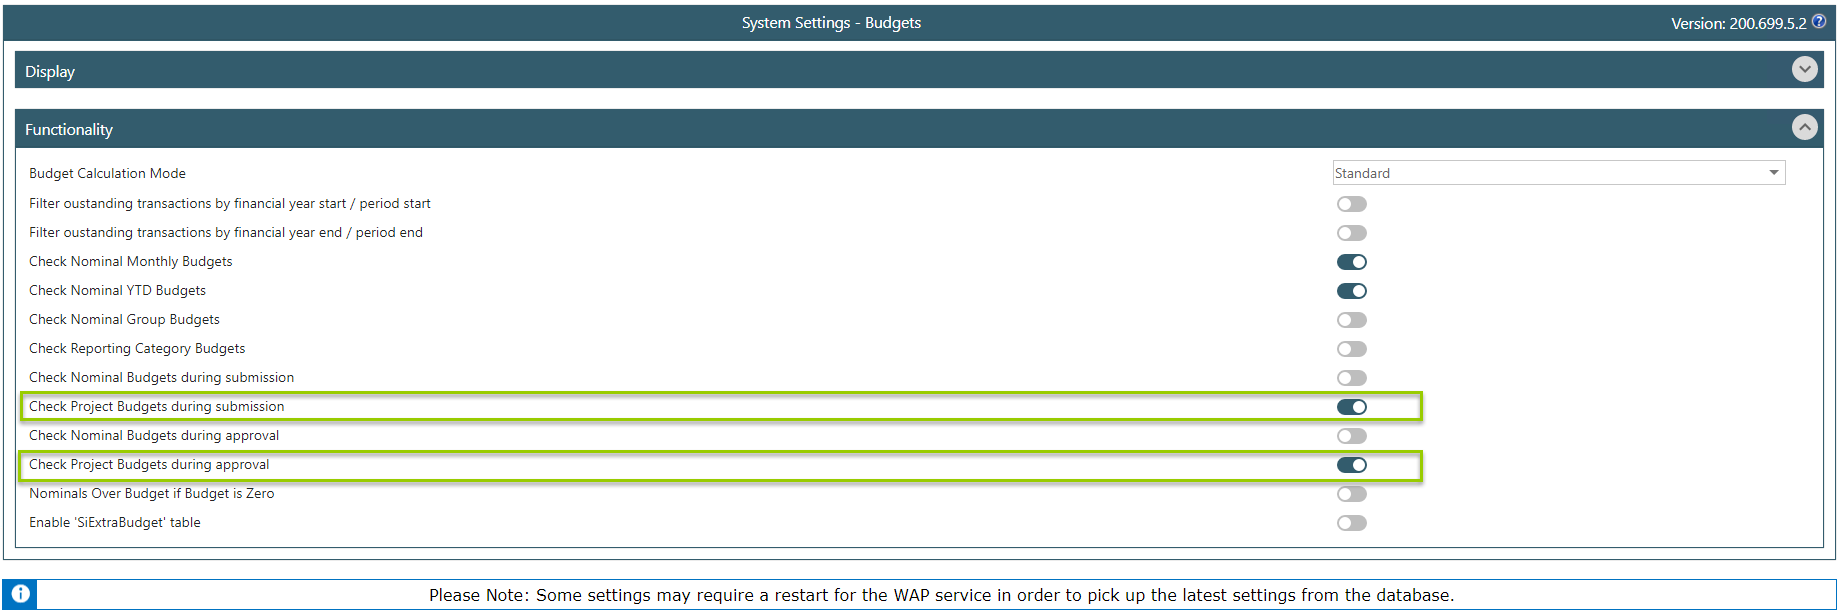
In the example, both settings will be applied.
Example 1 – within budget, one activity within the Project Header
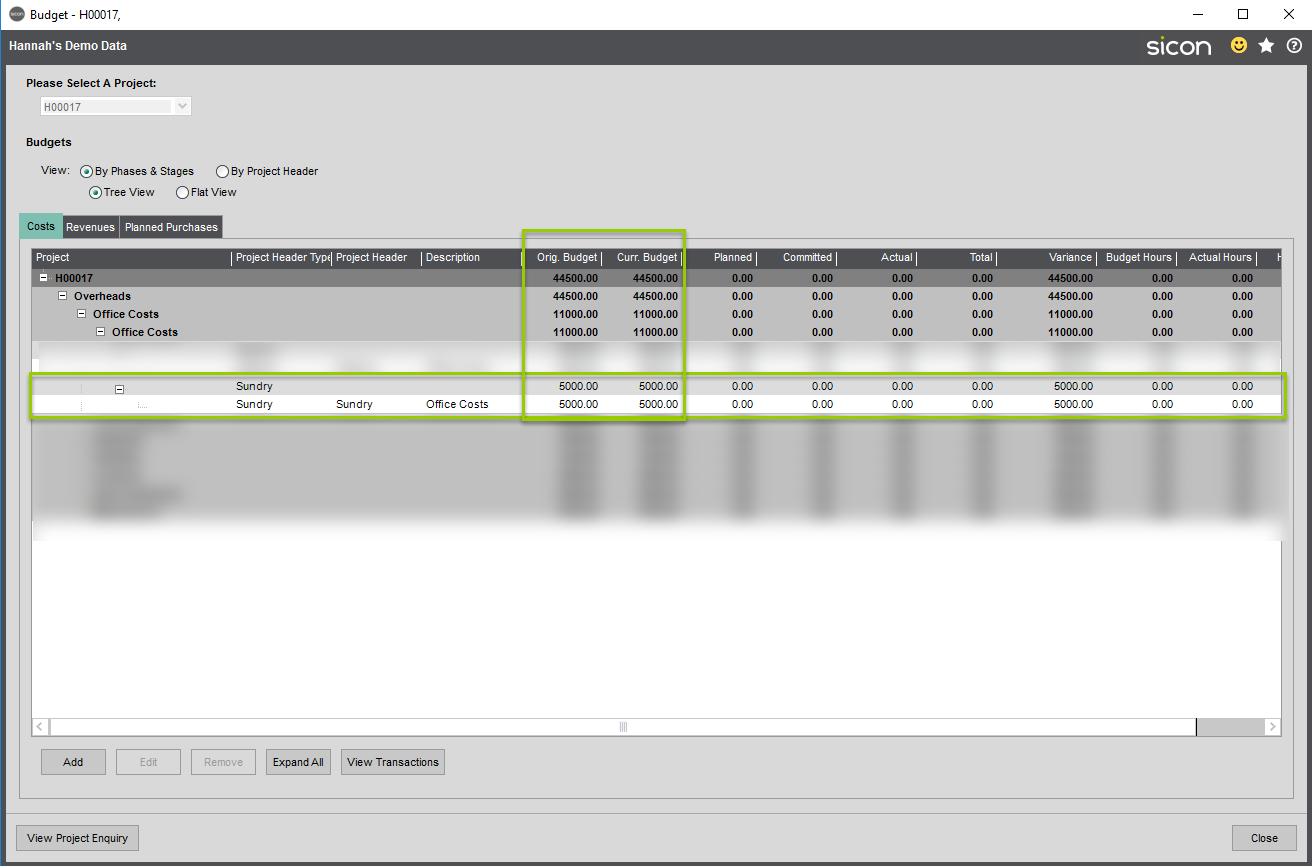
Taking the example of Overheads (Phase) – Office Costs (Stage) – and Office Costs (Activity), and Sundry (Project Header), a 5,000 budget has been set:

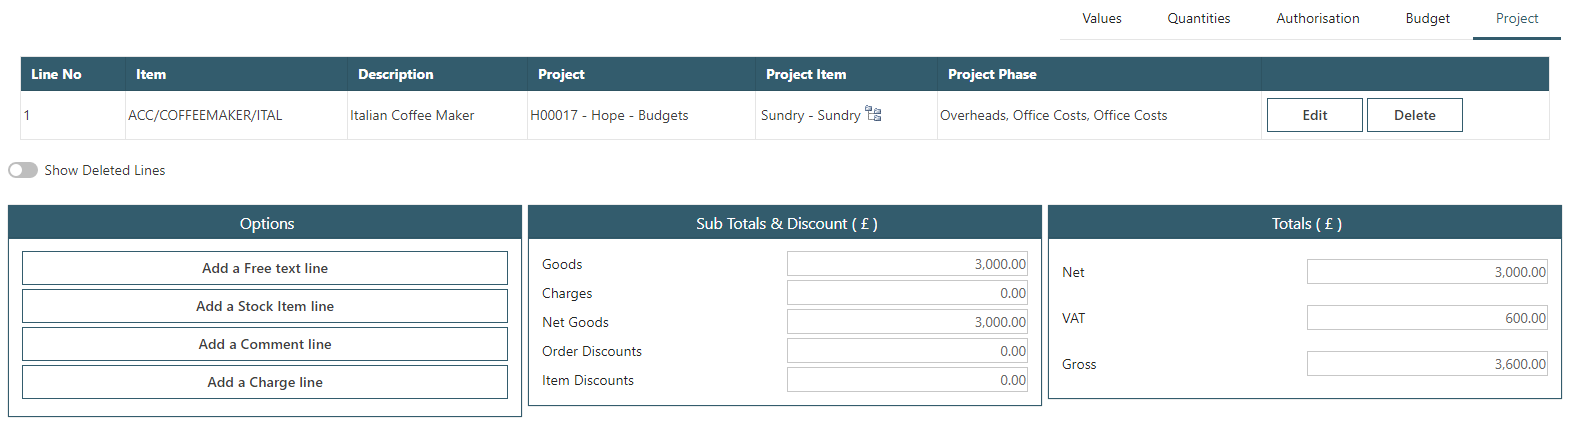
In WAP, costs are entered against this combination in WAP on a requisition:
Navigating to the Budget tab within WAP shows the user a snapshot of whether the line is in budget or not:

In the example above, because this is within budget, it is showing the overall Sundry budget here, minus the net value of the requisition (5000 – 3000):
By clicking on the link in WAP, the specific budget levels can be viewed:
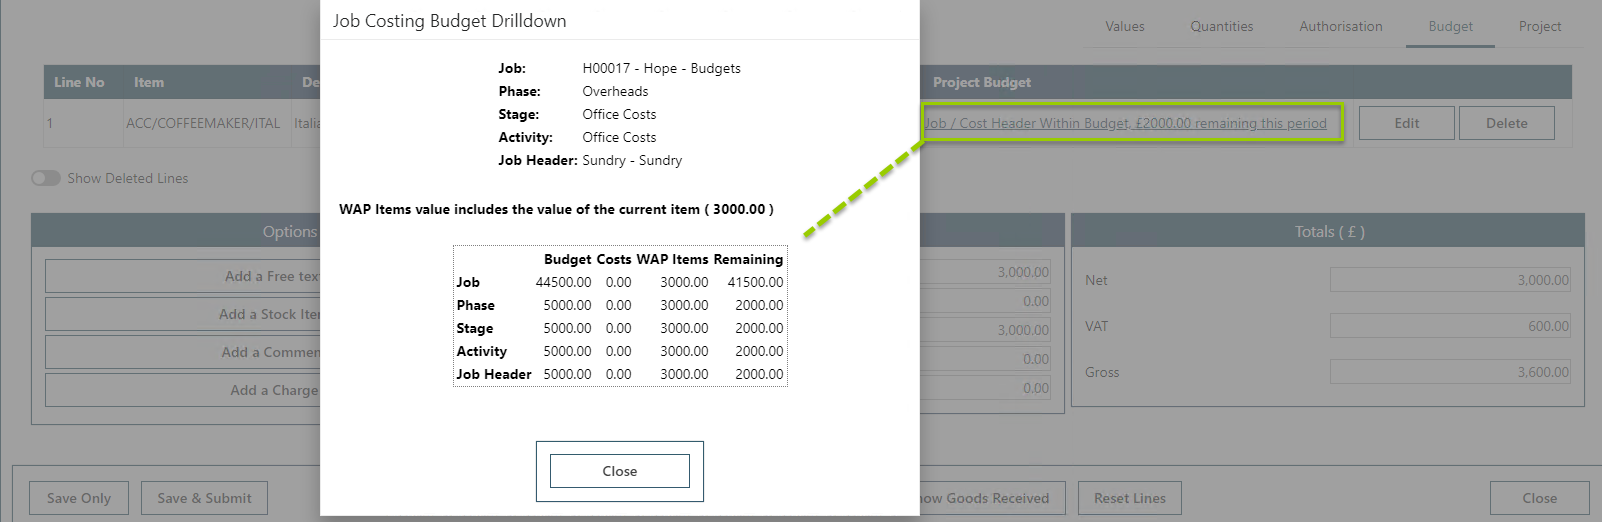
At the top of this pop-up, WAP displays the Project, Phase, Stage, Activity and Project Header that the line refers to.
In the bottom half of the pop-up, each relevant budget is listed out:
Job: overall project budget
Phase: The phase budget this line applies to
Stage: The stage budget this line applies to (within this phase)
Activity: The activity budget this line applies to
Job Header: The project header budget this line applies to
The value within the WAP Items column includes all orders in WAP that are not completed, deleted, rejected or sent to Sage. It will also include approved orders that haven’t posted to Sage (e.g. orders that have failed to post or haven’t posted yet).
Example 2 – within budget, multiple activities within the Project Header
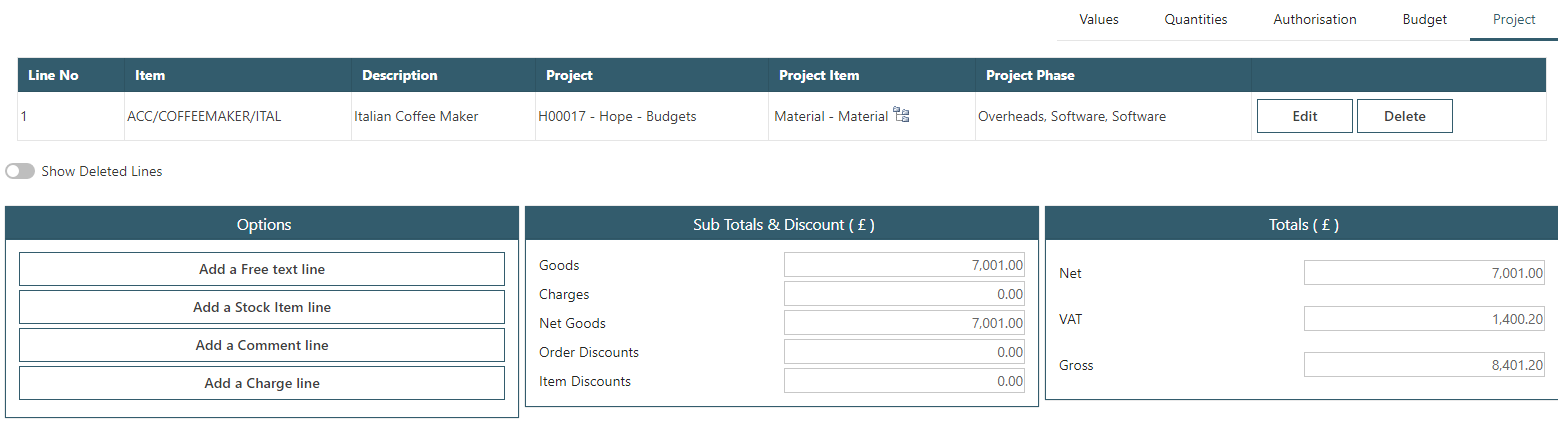
Taking the example of Overheads (Phase) – Software (Stage) – Software (Activity), and Material (Project Header), a 7,000 budget has been set at this level:

However, as the Material header also has budgets set in other stages, these are collated to give an overall Header budget of 19,000:

In WAP, costs are entered against this combination in WAP on a requisition:
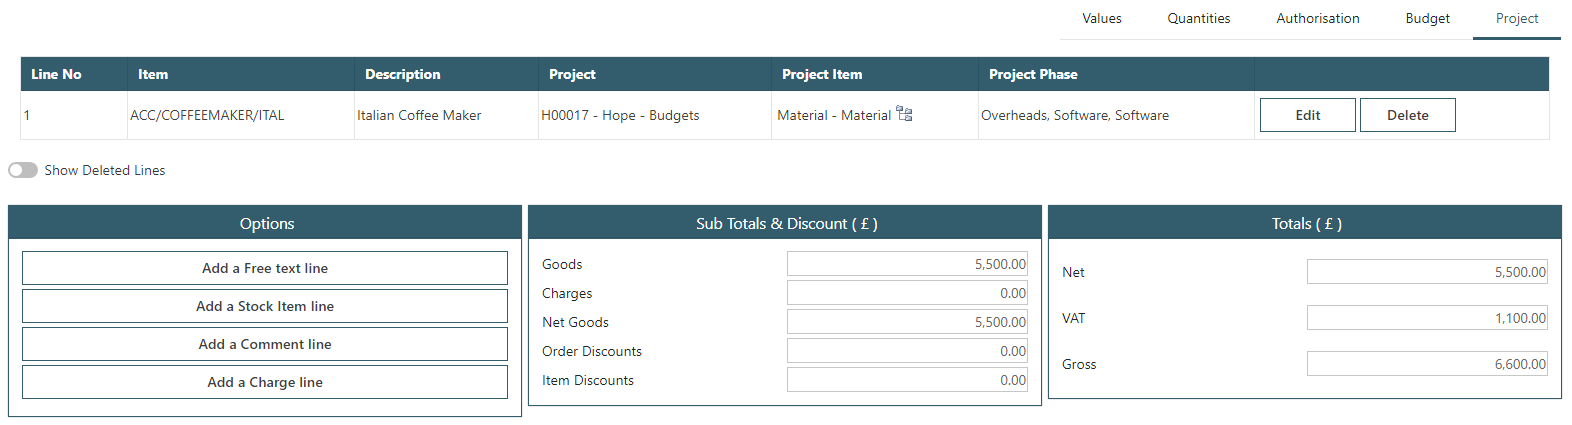
Navigating to the Budget tab within WAP shows the user a snapshot of whether the line is in budget or not:

In the example above, because this is within budget, it is showing the collated Material Header budget here, minus the net value of the requisition (19,000 – 5,500):

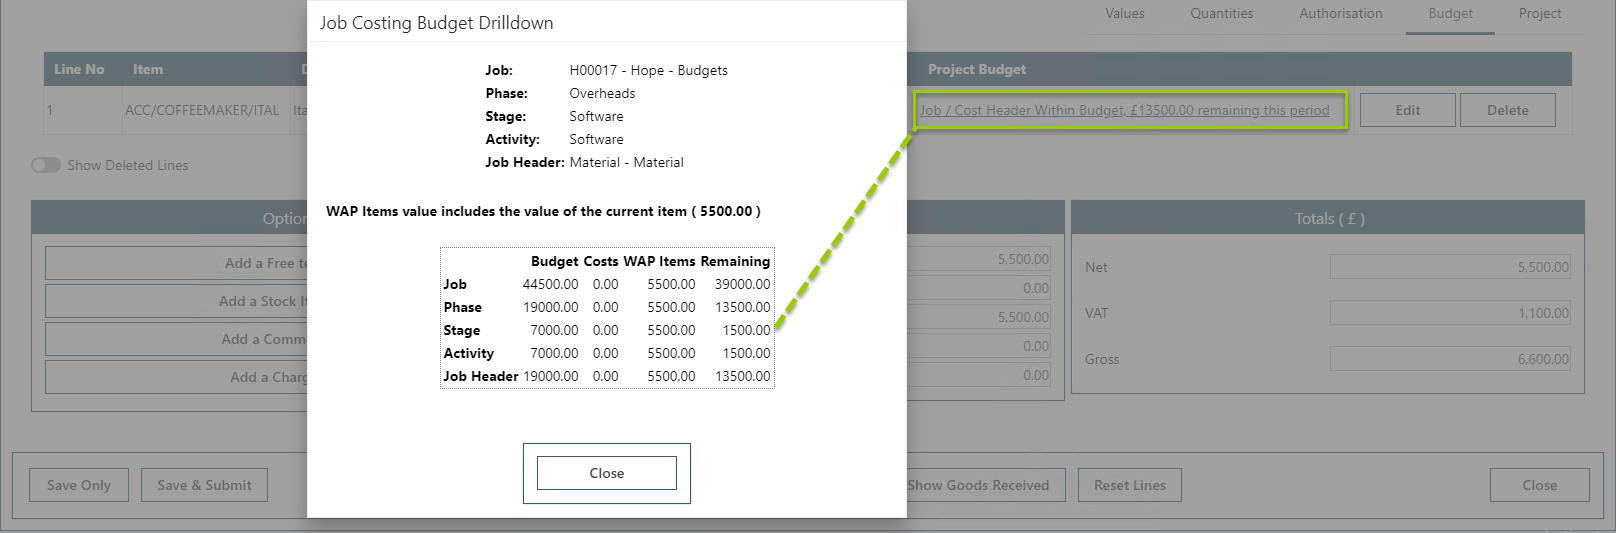
At the top of this pop-up, WAP displays the Project, Phase, Stage, Activity and Project Header that the line refers to.
In the bottom half of the pop-up, each relevant budget is listed out:
Job: overall project budget
Phase: The phase budget this line applies to
Stage: The stage budget this line applies to (within this phase)
Activity: The activity budget this line applies to
Job Header: The project header budget this line applies to
The value within the WAP Items column includes all orders in WAP that are not completed, deleted, rejected or sent to Sage. It will also include approved orders that haven’t posted to Sage (e.g. orders that have failed to post or haven’t posted yet).
Example 3 – over budget, only one activity within the Project Header
Taking the example of Overheads (Phase) – Office Costs (Stage) – and Office Costs (Activity), and Sundry (Project Header), a 5,000 budget has been set:
In WAP, costs are entered against this combination in WAP on a requisition:
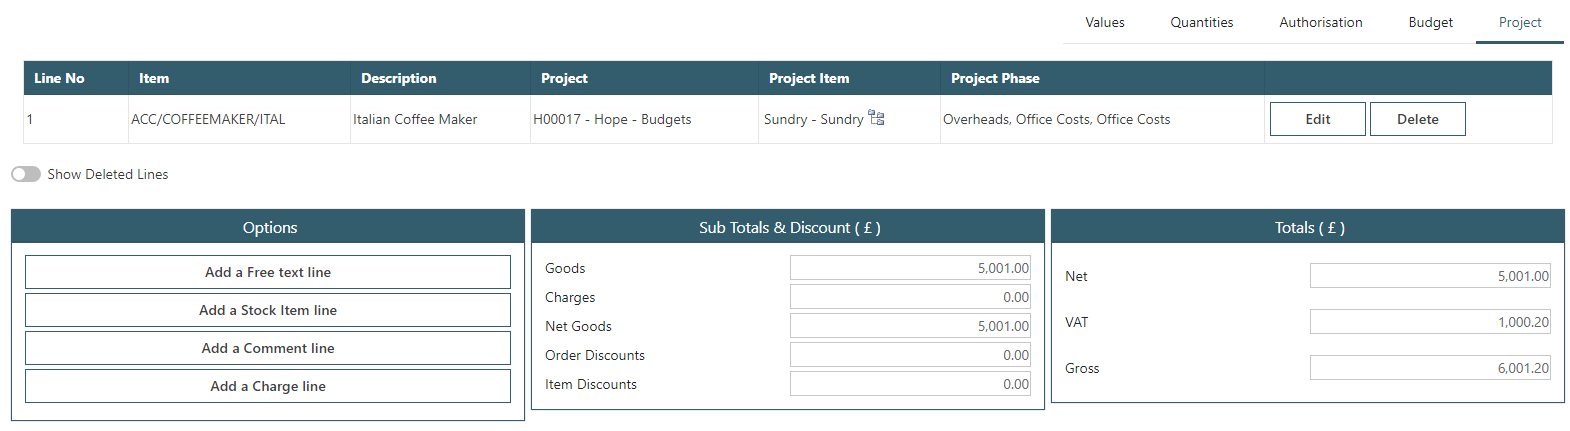
Navigating to the Budget tab within WAP shows the user a snapshot of whether the line is in budget or not. In the example here, because this is outside of budget, the view changes to show what budget has been exceeded. WAP shows the relevant exceeded Sundry budget, minus the net value of the requisition (5000 – 5001):


By clicking on the link in WAP, the specific budget levels can be viewed, and the over budget area is highlighted:

At the top of this pop-up, WAP displays the Project, Phase, Stage, Activity and Project Header that the line refers to.
In the bottom half of the pop-up, each relevant budget is listed out and the over budget line highlighted:
Job: overall project budget
Phase: The phase budget this line applies to
Stage: The stage budget this line applies to (within this phase)
Activity: The activity budget this line applies to
Job Header: The project header budget this line applies to
The value within the WAP Items column includes all orders in WAP that are not completed, deleted, rejected or sent to Sage. It will also include approved orders that haven’t posted to Sage (e.g. orders that have failed to post or haven’t posted yet).
Example 4 – over budget, multiple activities within the Project Header
Taking the example of Overheads (Phase) – Software (Stage) – Software (Activity), and Material (Project Header), a 7,000 budget has been set at this level:
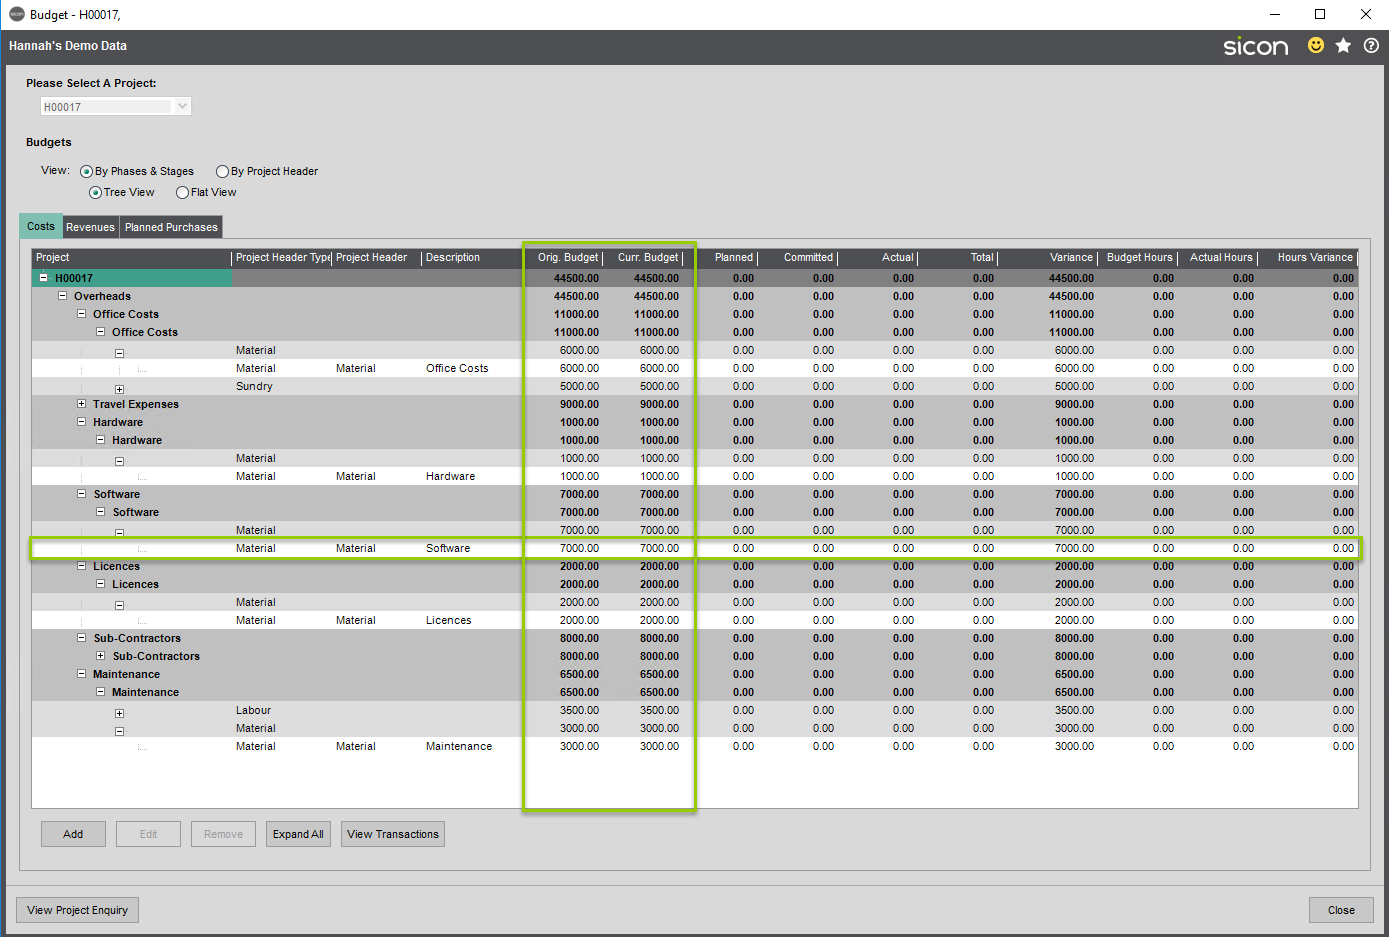
However, as the Material header also has budgets set in other stages, these are collated to give an overall Header budget of 19,000:
In WAP, costs are entered against this combination in WAP on a requisition:
Navigating to the Budget tab within WAP shows the user a snapshot of whether the line is in budget or not. In the example here, because this is outside of budget, the view changes to show what budget has been exceeded. WAP shows the relevant exceeded Sundry budget, minus the net value of the requisition (7000 – 7001):

By clicking on the link in WAP, the specific budget levels can be viewed, and the over budget area is highlighted:
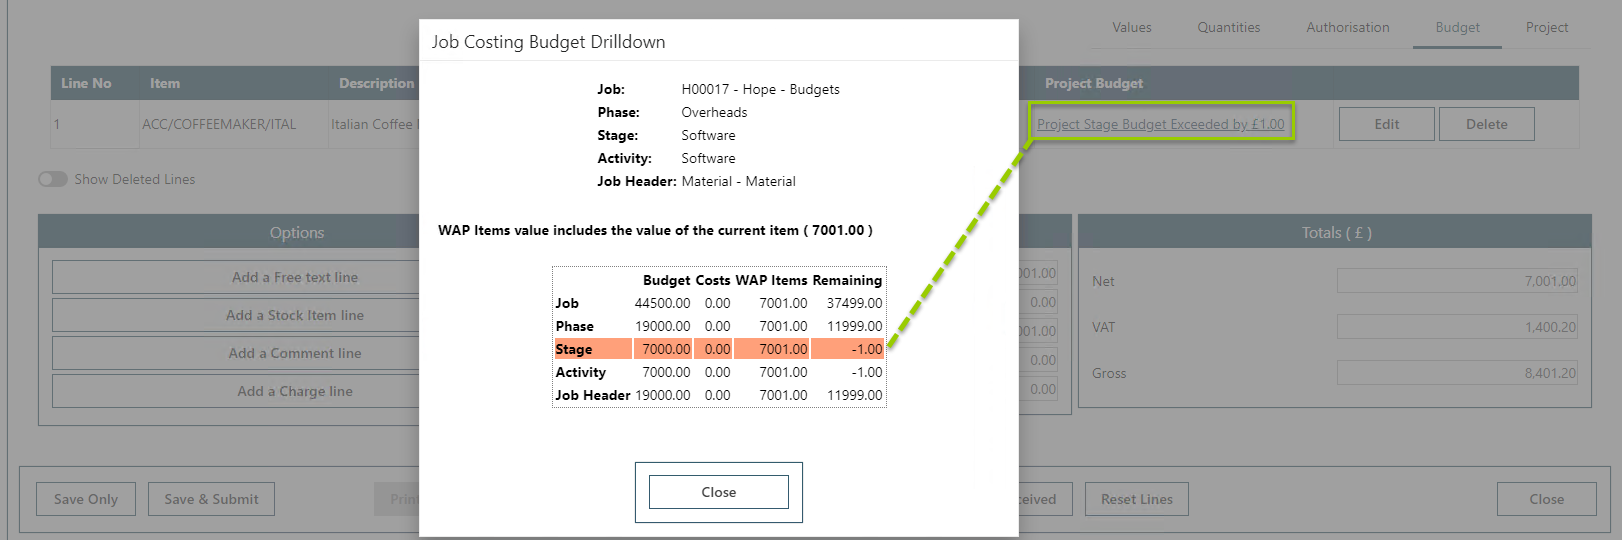
At the top of this pop-up, WAP displays the Project, Phase, Stage, Activity and Project Header that the line refers to.
In the bottom half of the pop-up, each relevant budget is listed out:
Job: overall project budget
Phase: The phase budget this line applies to
Stage: The stage budget this line applies to (within this phase)
Activity: The activity budget this line applies to
Job Header: The project header budget this line applies to
The value within the WAP Items column includes all orders in WAP that are not completed, deleted, rejected or sent to Sage. It will also include approved orders that haven’t posted to Sage (e.g. orders that have failed to post or haven’t posted yet).
5. System Settings - Costing
The Costing tab is used to link WAP through to a particular costing module or to stop posting to Sage Commercials.
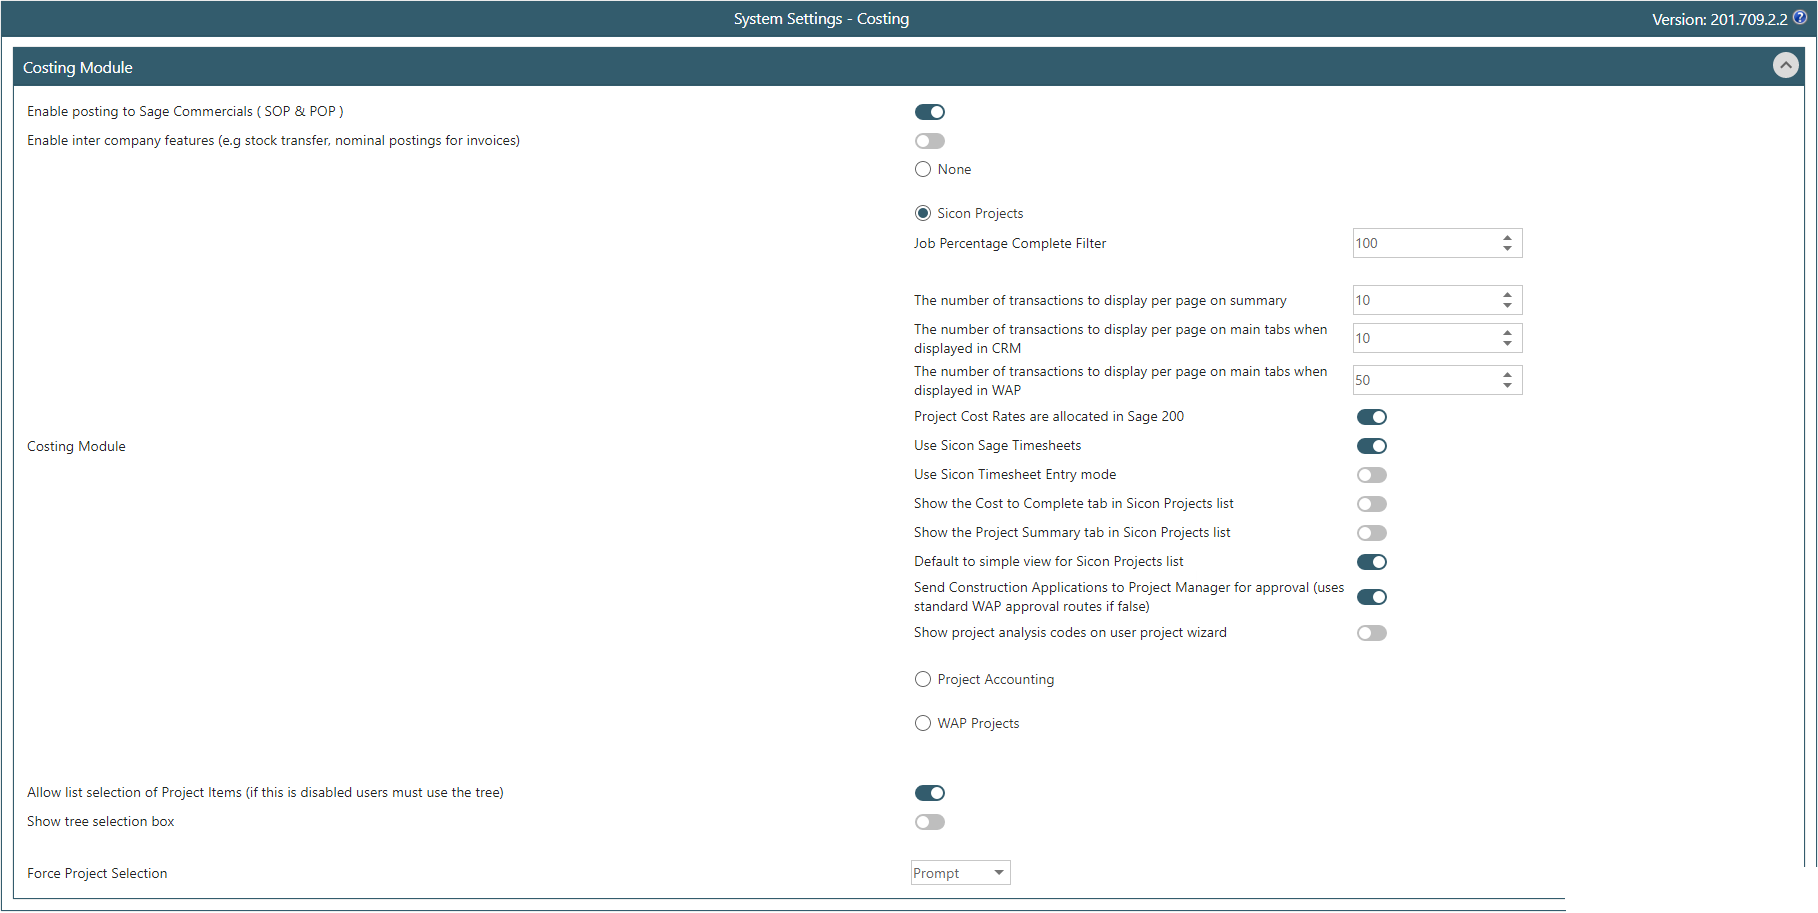
Enable posting to Sage Commercials (SOP & POP): only untick this setting if the Sage install does not use Commercials’ this will mean that approved requisitions are not posted to Sage and invoices will be entered directly into WAP. If this setting is disabled, a costing module cannot be selected.
Enable Intercompany features (e.g. stock transfer, nominal postings for invoices): only tick this if linking WAP with Sicon Intercompany for invoices to post to mirrored nominal codes.
None: check if this is no costing module is to be enabled; this option is the default.
Sicon Projects: select if WAP is to be linked with Sicon Projects; additional menu options will then appear.
Job Percentage Complete Filter: any projects with a percentage complete figure greater than the figure entered here will not be pulled through to WAP.
The number of transactions to display per page on summary: this will determine on the Sicon Projects enquiry screen in WAP, how many transactions to display on the summary page.
The number of transactions to display per page on main tabs when displayed in CRM: if using Sage CRM integration, this will determine on the Sicon Projects enquiry screen, how many transactions to display on the main tabs.
The number of transactions to display per page on main tabs when displayed in WAP: this will determine on the Sicon Projects enquiry screen in WAP, how many transactions to display on the main tabs.
Project Cost Rates are allocated in Sage 200: set against each employee in Sicon Projects which cost rates should be available in WAP to choose from when entering timesheets.
Show the Cost to Complete tab in Sicon Projects list: tick to show the cost to complete tab; if this shouldn’t be shown in WAP, untick.
Show the Project Summary tab in Sicon Projects list: tick to show the project summary tab; if this shouldn’t be shown in WAP, untick.
Default to simple view for Sicon Projects list: tick to default to the simple view for Sicon Projects list; if the advanced view should show, untick.
Send Construction Applications to Project Manager for approval (uses standard WAP approval routes if false): tick if any construction applications will just require approval from the project manager. If more complex approval routes are required, do not tick this option and build approval routes accordingly.
Show project analysis codes on user project wizard: if switched on, any analysis codes set against the Project in Sage will show when using the wizard to allocate projects to user. This can be helpful when searching for projects to only show those linked with an analysis code.
Project Accounting: select if linking WAP to Sage Project Accounting, an additional menu option will appear.
Show Description in Project Item Drop Down: by default, this is ticked; untick if the user should not see the project description, only the project code.
WAP Projects: select if linking to WAP Projects, an additional menu option will appear. WAP project information will not post through to Sage.
Auto Generate WAP Project Numbers: tick if project numbers should be auto generated or untick if project numbers should be entered manually.
Allow list selection of Project Items (if this is disabled users must use the tree): by default, this is selected and will allow users to select a project and project header from the drop-down list rather than using the tree structure.
Show tree selection box: select this to allow the user to select a project header or project item using the tree structure; this can make it easier for users if projects have many layers of project items. N.B. some screens (Rapid Timesheet Entry screen) do not allow for tree selection, users can only pick a project item from the drop-down list.
Force Project Selection: set to either Yes, No or Prompt to specify whether users should enter a project against each item line within WAP. If Sicon Projects is configured, this should be set as Yes. Yes, will force across all modules all lines to be entered against a Project and Project Header; Prompt will allow the user to not select a project but they will see a pop-up asking if they should select a project, and No will allow the line to be saved with no project selected.
6. System Settings - Document Management
The Document Management tab is used to link WAP through to a document management system with some common settings regarding image location and size. Only one document management system can be selected; please restart the WAP service if any changes are made to these settings.
6.1. Common Settings
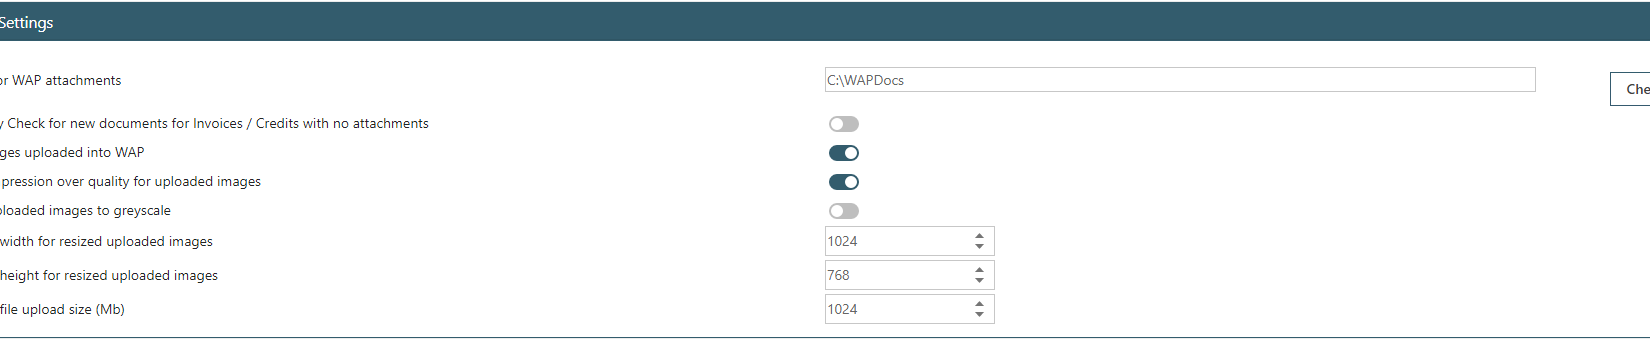
File path for WAP attachments: an existing local folder where WAP can save documents to. Please ensure the file path does not end with ‘\’. Use the ‘Check path’ option to make sure the file path exists and passes read/write tests. A file path must be added before transactions can be entered into WAP.
Continually check for new documents for Invoices/Credits with no attachments: this can be ticked so any invoice or credit in Sage with a U query will be checked for new images entered into Sage to ensure these are pulled through to WAP.
Resize images uploaded into WAP: this will resize any images uploaded to prevent large images taking a long time to load. These settings relate only to images, not other file types.
Prefer compression over quality for uploaded images: if ticked, this will try to make the file as small as possible while still being readable.
Convert uploaded images to greyscale: this will turn all images uploaded to greyscale, again to improve loading times.
Maximum width for resized uploaded images: values entered here are defaults but can be changed as required per install.
Maximum height for resized uploaded images: values entered here are defaults but can be changed as required per install.
Maximum file upload size (MB): values entered here are defaults but can be changed as required per install.
6.2. Sicon Documents

Tick to link WAP with Sicon Documents.
6.3. Legacy Sicon Documents

Tick to link WAP with Legacy Sicon Documents and if the port number should be added to the document path.
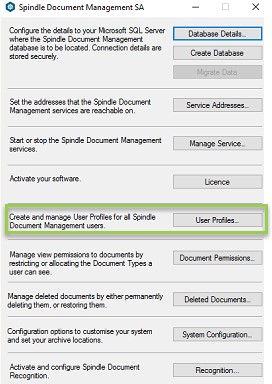
6.4. Draycir Spindle Document Capture

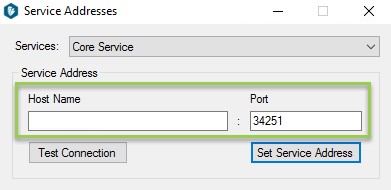
Tick to link WAP with Spindle and enter Hostnames and port numbers.
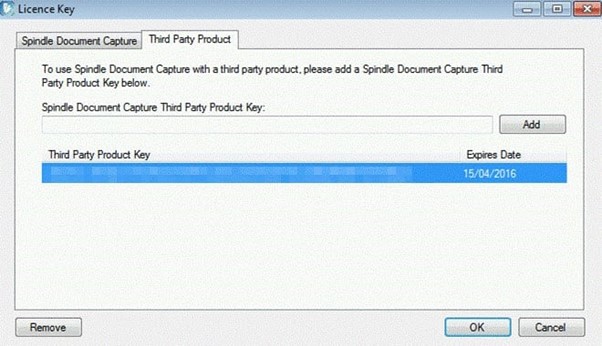
To integrate Spindle with WAP, a valid Third-Party Product Key will need to be obtained from Spindle and entered on the Spindle licence key settings as shown below.
The user running the WAP service will require permission to view documents to allow for documents added against an invoice in Sage to be viewed in WAP.
If not already configured, the user running the WAP Service will also require read/write access to the folder where Spindle Documents are stored.
Please speak with your Spindle Administrator or Business Partner in the first instance for any queries with Spindle integration.
7. System Settings - Email / Notifications
7.1. Email
If any email settings are changed, please ensure the WAP service is restarted to pick up the changes.
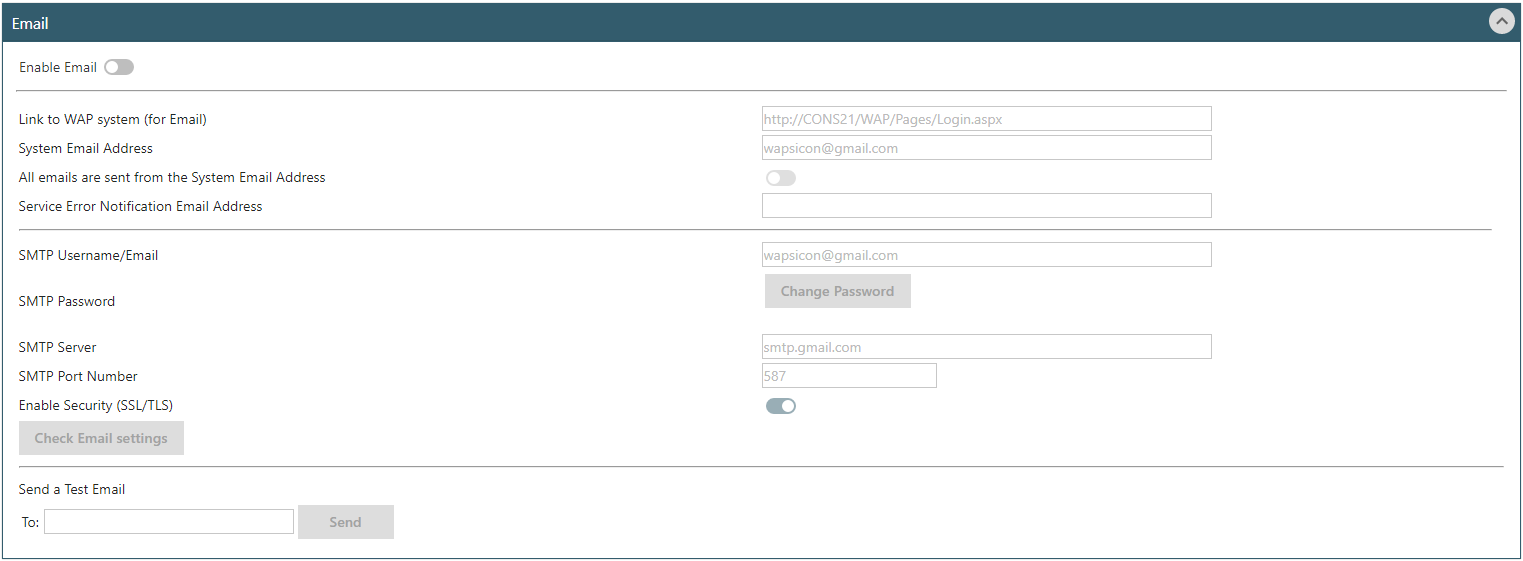
Enable Email: check this box to enable emails to be sent out from WAP. It can be useful during initial implementation to uncheck this setting so when creating new users and testing the system emails are not sent out which could cause confusion. If this is not configured during testing and then switched on, please make sure once the settings have been saved, the WAP service is restarted.
Link to WAP system (for Email): this is the hyperlink that will appear on the bottom of notification emails to take users directly into WAP. If the URL is changed or the server is moved, this link will need to be updated.
System Email Address: enter the email address that has been created for WAP to use; this is usually wap@companyname.co.uk. This is a mandatory field if email integration is to be used.
All emails are sent from the System Email Address: configure if all notification and supplier emails should be sent from the system email address. By default, this is not ticked to allow POs to be emailed to suppliers from the user email account. All notification emails will be sent from the system email address.
Service Error Notification Email Address: enter an email address here if error notifications are required to be emailed to a particular user. Any notification recorded in the Event Log will be sent to this email address. It is advised an email address is entered here only when investigating if there is an issue with documents posting between WAP and Sage.
SMTP Username/Email/Password/Server/Port Number/Enable SSL: an account must be entered for WAP to use to send emails out. An IT contact who configured the email account will be able to provide the information required here.
Send a Test Email: enter an email account and click send to ensure the email account settings have been configured correctly; any errors received should be reported back to the IT contact who initially configured the email account. When testing it is advised to try sending an email to both an internal and external email address.
7.2. Notifications

Notification Options:
Waiting approval, approval or rejected notifications will be sent based on Document Item (one notification line per line on document). Posted to Sage notifications will be based on Document (one notification per document). Below is an example of how a notification would be displayed for each notification option –
- Document Item example notification – “Item ‘X’ on Requisition Z with Delivery Date DD/MM/YYYY needs your approval”.
- Document example notification – “Requisition for Supplier ‘ABC’ with ID Z for value £X has been fully authorised by X”.
This area can also be used to set whether reminders should be generated. Requisition Reminders is used to generate reminders when goods are due to be received (see further explanation below).
Timesheet Reminders are used to generate reminders when timesheets have not been submitted (please include link to Timesheet HUG).
Use requisition line date to generate goods received reminder: this is used in conjunction with the ‘Generate Reminders’ option against Document Type ‘Requisition’. If this is ticked the requester will be sent a reminder each day past the delivery date if no goods have been received.
Automatically dismiss notifications after X days: by default, this is set to 14 days but can be amended if needed. All notifications will be dismissed.
Generate Notifications for Out of Office users: if this setting is on then notifications will be sent to any users marked as out of office and also their alternate users. If this setting is not on, only the alternate users will get the notification, not the user who is marked as out of the office.
Include Company name in notifications: this can be useful to switch on if users will receive notification emails across multiple companies to assist with identification of notifications.
8. System Settings - Enhancement Pack
If Sicon Enhancement Pack is enabled within Sage, various settings can be replicated within WAP.

Show Supplier Popup Notes: if Pop-up Notes have been entered against a supplier, these will be shown in WAP when a user is entering a requisition in WAP and selects the supplier.
Show Customer Popup Notes: if Pop-up Notes have been entered against a customer, these will be shown in WAP when a user is entering a sales order in WAP and selects the customer.
Show POP Stock Item Popup Notes: if Pop-up Notes have been entered against a stock item, these will be shown in WAP when a user is entering a requisition in WAP and selects the stock item.
Show SOP Stock Item Popup Notes: if Pop-up Notes have been entered against a stock item, these will be shown in WAP when a user is entering a sales order in WAP and selects the stock item.
9. System Settings - Expenses
System Settings relating to the Expense module are accessed under System Settings banner – Expenses.
9.1. Functionality Tab
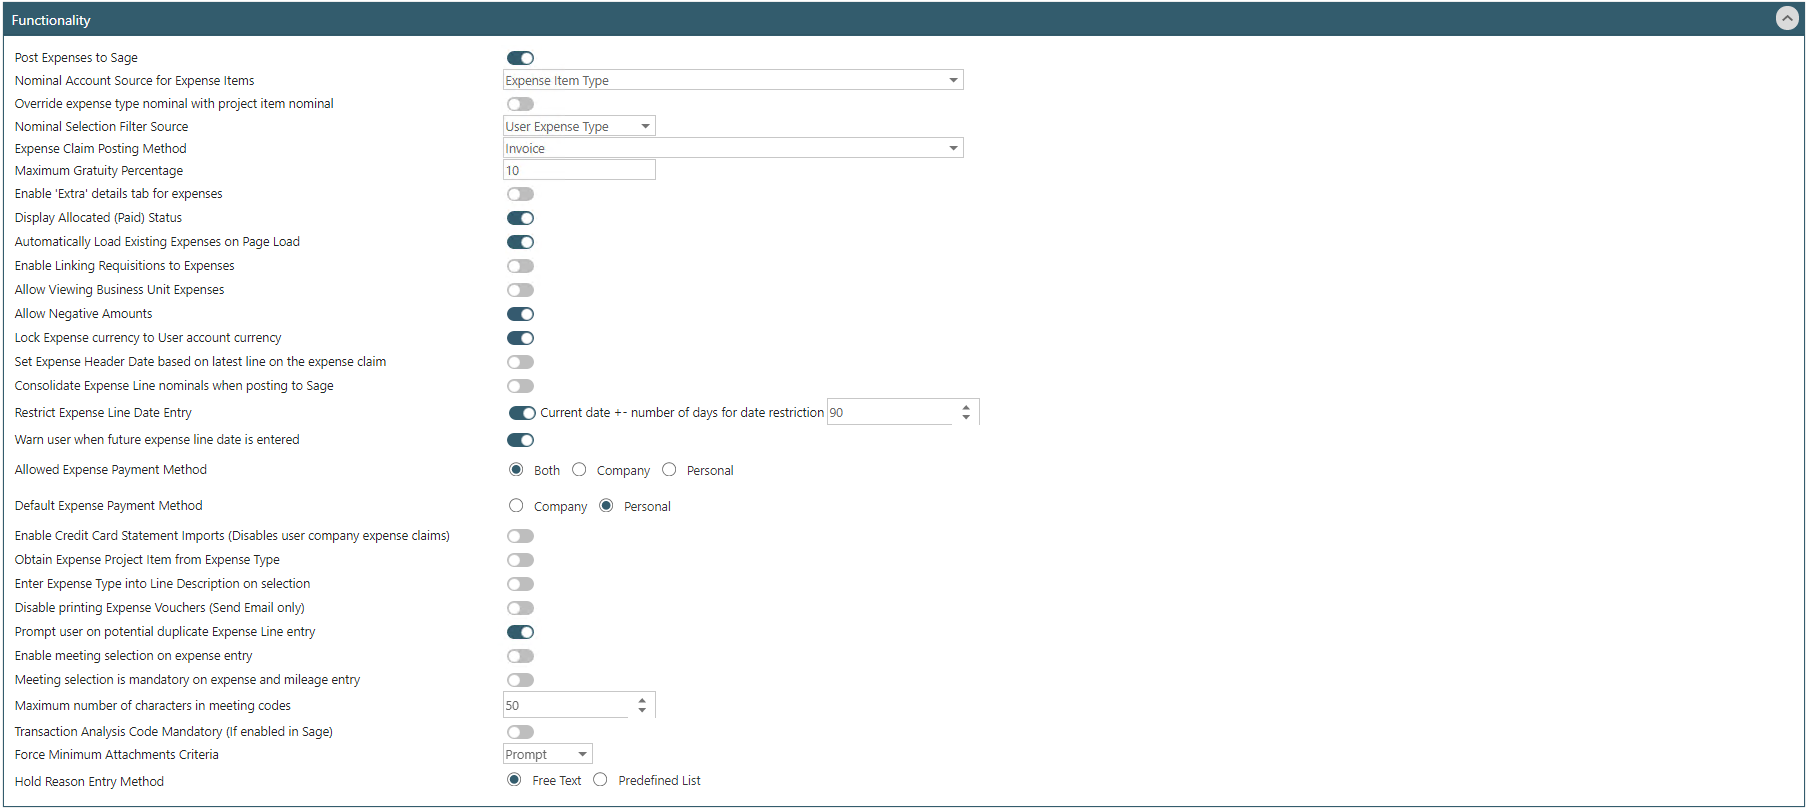
Post Expenses to Sage: untick if all expense claims should not post through to Sage.
Nominal Account Source for Expense Items: the expense item nominal can be set to default from either the user’s default nominal code (set on their WAP profile), to the Expense Item Type nominal or to the Project Item nominal code. Users can only change the nominal if they have the User Type permission to do so.
Override expense type nominal with Project Item Nominal: for example, if the nominal code is being driven from the user’s expense item type but the Cost Centre or Department should be overridden based on the job selected, tick this box. Once ticked, options to override the account number, cost centre or department will be available. This option is only applicable if using Sicon Projects.
Nominal Selection Filter Source: if the user has permission to change the nominal code on expense entry, this is whether to allow the user to choose from all nominal accounts they have access to, or just nominal codes that have been assigned to that expense type.
Expense Claim Posting Method: expenses can either be posted as a claim through to Sage Project Accounting or an invoice through to the user’s Purchase Ledger account.
Maximum Gratuity Percentage: set as required to restrict the gratuity amount a user can claim. A user will not be able to enter an expense claim with a gratuity amount higher than the percentage entered here. This setting is used in conjunction with the below setting.
Enable ‘Extra’ details tab for expenses: this will enable the Extra tab on an expense claim where additional information (such as gratuity amounts, 1st class travel etc.) can be recorded if required.
Display Allocated (Paid) Status: this will show to users when a payment has been allocated to their expense claim in Sage; only new expenses put onto the system after this setting is configured will show payment status.
Automatically Load Existing Expenses on Page Load: choose whether to automatically load expense claims when the Existing Expense page is loaded, or whether the user needs to click to show their expenses. This can prevent speed issues when loading if there are large numbers of expense claims. By design completed expenses will not show; the Include Completed box will need to be ticked.
Enable Linking Requisitions to Expenses: configure here if users will need to link a PO approved through the Requisition module to an expense claim. The requisition must be raised by the user against their own Purchase Ledger account; this will keep the PO within WAP (it won’t post through to Sage) and can then be linked to an expense claim.
Allow Viewing Business Unit Expenses: tick if users should be able to view expense claims submitted by other users within their business unit.
Allow Negative Amounts: this feature may be required to cope with refunds through Company credit card expense claims or against a user’s personal expense claim; e.g. prepayment of a hotel room booking which was not used.
Lock Expense currency to User account currency: configure this setting if the user is to be restricted to only enter expense claims in the currency of their Purchase Ledger supplier account. If disabled, currencies set up in Sage will appear in a drop-down selection from the user to select from.
Set Expense Header Date based on latest line on the expense claim: if disabled, the expense header date will default to the date the expense was initially entered.
Consolidate Expense Line nominal when posting to Sage: if enabled, lines with the same nominal code on a user’s expense claim will be consolidated to one line when posting to Sage. This can be useful to reduce the number of lines on nominal posting screens within Sage.
Restrict Expense Line Date Entry/Current date +- number of days for date restriction: this will restrict the time period when an expense claim can be submitted and approved and can be configured as per the organisation’s policy. By default, this date is set to 31 days.
Warn user when future expense line date is entered: if the user selects a future date on an expense, a pop-up warning will appear to the user. Users can still choose a future date if the warning is dismissed.
Allowed Expense Payment Method: select whether users are able to enter either Personal, Company expense claims, or both.
Default Expense Payment Method: choose the default expense payment method that will be selected when a user goes to enter an expense claim. If the setting is configured to import credit card statements, users will no longer be able to manually enter a credit card claim.
Enable Credit Card Statement Imports (Disables user company expense claims): switch on if using an import to bring in company credit card statements; this will stop users from being able to manually enter company credit card expense claims.
Obtain Expense Project Item from Expense Type: if using a Costing Module, choose if the costing header should be selected from the Expense Type, rather than the user choosing manually.
Enter Expense Type into Line Description on selection: this will populate the expense type name into the Description field; this can speed up expense line entry for users.
Disable printing Expense Vouchers (Send Email only): if this is enabled, the user will not be able to print the expense voucher but will be able to email directly from WAP.
Prompt user on potential duplicate Expense Line entry: if this is checked and the user enters an expense claim with the same expense item type, date and value, they will need to enter a reason for why this is not a duplicate claim. Potential duplicate expense claims are highlighted as such to the approver.
Enable meeting selection on expense entry: tick here if meetings are to be configured in the system against expense claims.
Meeting selection is mandatory on expense and mileage entry: if all expense claims (i.e. subsistence claims, incidental claims, mileage and general expense entry) should be allocated to a meeting, ensure this setting is ticked.
Maximum number of characters in meeting codes: if applicable, enter a maximum value for the meeting code.
Transaction Analysis Code Mandatory (if enabled in Sage): if using transaction codes in Sage, these can be populated against an expense claim in WAP. If it is mandatory for these codes to be entered in WAP, configure here.
Force Minimum Attachments Criteria: this works in conjunction with the setting against an expense type to specify the number of attachments that must be uploaded with (or without) a receipt. Configure here to either force attachments to be uploaded, prompt a user if no attachments but allow for users to not upload a receipt, or allow for users to save without an attachment.
Hold Reason Entry Method: set whether if an approver puts an expense on hold they should be able to free text a hold reason or whether they should pick from a predefined list.
9.2. Mileage Tab
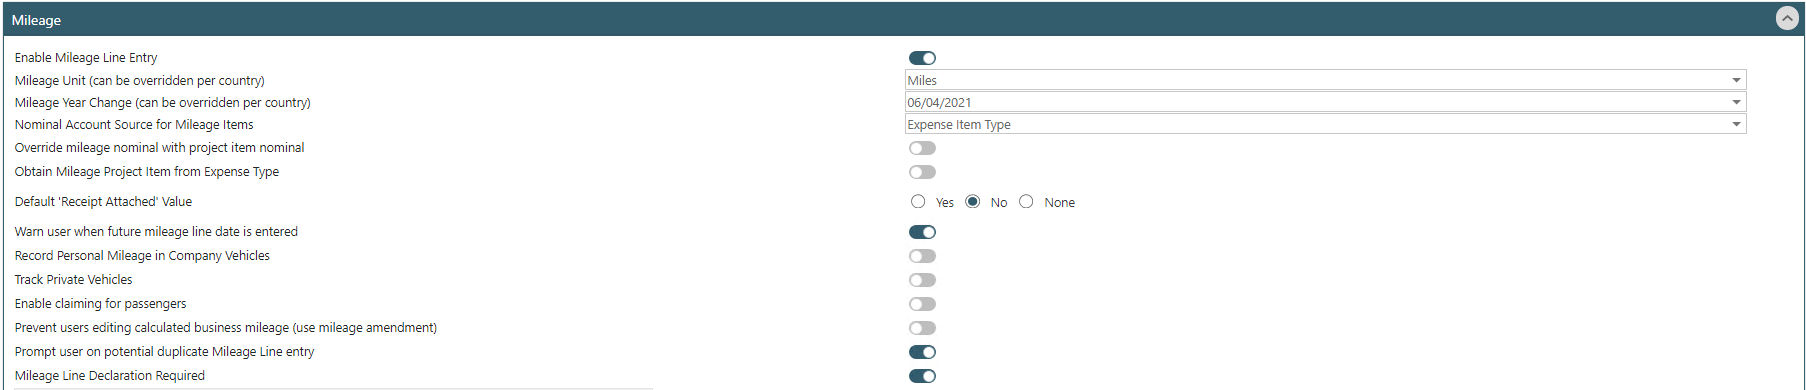
Enable Mileage Line Entry: untick here if the organisation does not permit mileage claims to be entered.
Mileage Unit (can be overridden per country): select either Miles or Kilometres. If required, this can be overridden per country (System Setup – Countries & Cities).
Mileage Year Change (can be overridden per country): this is the date that the mileage values will be reset; i.e. the calculation of business miles recorded on a private vehicle. If required, this can be overridden per country (System Setup – Countries & Cities).
Nominal Account Source for Mileage Items: the mileage item nominal can be set to default to either the user’s default nominal code (set on their WAP profile), to the Expense Item Type, the Category Component or the Project Item nominal. Users can only change the nominal code if they have the User Type permission to do so.
Obtain Mileage Project Item from Expense Type: if Sicon Projects is being used, the default costing header can be set per Sage Company to automatically populate the job header when a user is submitting a mileage claim, rather than the user choosing manually. The nominal can be driven by the job header if required.
Default ‘Receipt Attached’ Value: for mileage claims it is possible to default the receipt attached value; if the receipt value is Yes, VAT will be calculated on the fuel component on the rate selected; if the receipt value is No, no VAT will be calculated.
Warn user when future mileage line date is entered: if a user selects a future date on a mileage line, a pop-up warning will appear to the user.
Record Personal Mileage in Company Vehicles: this enables the user to enter personal mileage as well as business mileage against a company car. This may be required for some company car schemes.
Track Private Vehicles: by default, there will be a system Private vehicle that all users will have access to; only select this option is users’ private cars must be listed individually.
Enable claiming for passengers: if the organisation allows for users to claim an extra passenger rate, configure this setting.
Prevent users editing calculated business mileage (use mileage amendment): if the user is not allowed to manually enter mileage figures or edit the figure provided by Google, the user must use an amendment field and provide an explanation for why they are making an amendment.
Prompt user on potential duplicate Mileage Line entry: if this is checked and the user enters a mileage claim with the same date and mileage figures, they will need to enter a reason for why this is not a duplicate claim. Potential duplicate mileage claims are highlighted as such to the approver.
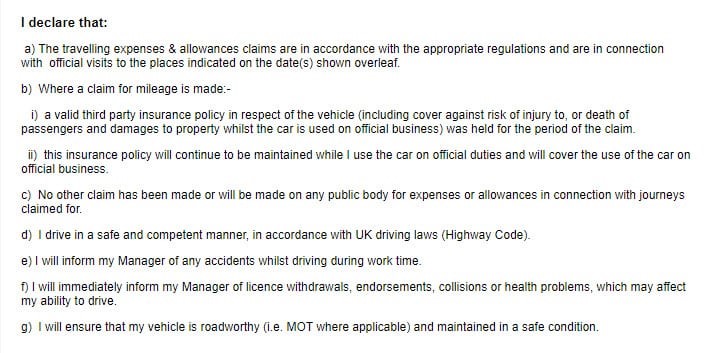
Mileage Line Declaration Required: by default, this setting is on with the below text. When a user goes to enter a mileage claim, they must accept the below. If they do not accept, they will not be able to submit a mileage claim. This text can be edited to match the organisation’s required declaration text or can be turned off if required.
9.3. Subsistence Tab

Enable Subsistence Claims: check if the organisation allows for subsistence claims; once checked, additional options will become visible.
Subsistence Overnight/Conference/Detention Rate Days: the number of days incrementally that a rate applies; defaults are entered at install but can be edited in accordance with the organisation’s policy.
Disable ‘Receipt Attached’ drop down for Subsistence Claims: if receipts are not required for subsistence claims, this setting should be configured.
Separate Meals and Accommodation in Subsistence Entry: if required, the subsistence overnight and meal claims can be broken down to post to different nominal codes. If configured, the Domestic and Foreign subsistence expense types will require nominal codes to be entered per Subsistence (Meals) and Subsistence (Accommodation).
10. System Settings - Holidays
System Settings relating to the Holiday module are accessed under System Settings banner – Holidays. This menu item will also show if using Timesheets to allow for configuration of Bank Holidays.
10.1. General
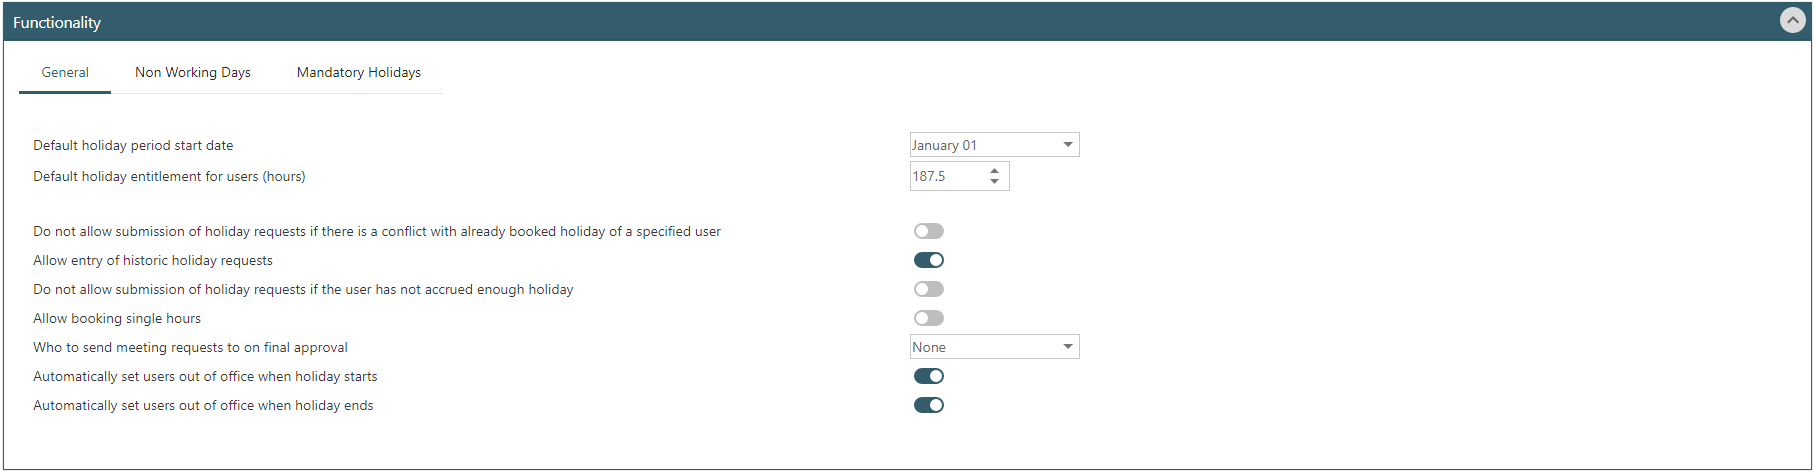
Note, this tab will only display if the Holiday Module is in use.
Default holiday period start date: set as per the organisation’s holiday period start date; the default will be configured as January 1st. Each user can have a different holiday start date if required, this is set on their user profile (User Setup – Users – Holidays); i.e. if their holiday year starts on a different date.
Default holiday entitlement for users (hours): enter the standard number of holiday entitlement in hours, again, this can be overridden per user on their user profile. The default entitlement will be the number of working hours in a day multiplied by the default holiday days; e.g. 7.5 x 28 to give 210 as the default.
Do not allow submission of holiday requests if there is a conflict with already booked holiday of a specified user: if enabled, conflicting users will not be able to submit holiday for the same date(s). If not configured, conflicting users can submit holiday requests for the same date(s) and the requesting user and approver will be notified of the conflict at the point of submitting the request and when approving the request.
Allow entry of historic holiday requests: this allows pre-dated holiday requests, within the same holiday entitlement year – a user cannot claim holiday in a date if they do not have entitlement that covers that year. This may be required if the Holiday module is implemented part way through the holiday year and already taken holiday needs to be entered onto the system.
Do not allow submission of holiday requests if the user has not accrued enough holiday: accrued entitlement will be calculated based either on the holiday year start date, or the employee’s start date (entered on their user profile), if this date is after the holiday year start date. If this setting is ticked, the user cannot submit a holiday request if it is greater than their accrued holiday.
Allow booking single hours: the system will by default allow users to book holiday in days or half day amount; enabling this setting will allow single hours on a day to be booked.
Who to send meeting requests to on final approval: this setting will automatically email meeting requests to add approved holiday to relevant users’ Outlook calendars. N.B. the meeting invite will be sent to the email address linked to the user on their WAP profile, will be sent from the system email address (as configured in System Settings – Email) and will contain details of the holiday request in the body of the email. On final approval of a holiday request, a meeting invite can be sent to different users depending on configuration:
None – no meeting invites are sent.
Requestor – a meeting invite is sent to the user who submitted the holiday request.
Default Business Unit – if the user who submitted the holiday request has a default business unit allocated, the meeting invite is sent to all users who are part of that business unit.
All Business Units – the meeting invite will be sent to all users of all business units the user who submitted the holiday request belongs to.
All Users – the meeting invite will be sent to all active WAP users.
Automatically set users out of office when holiday starts: if enabled, when a user enters a holiday request they can select an alternate user to cover their holiday period. When the holiday starts, the requesting user’s WAP out of office is automatically switched on and any documents requiring approval will also be sent to the chosen alternate user.
Automatically set users out of office when holiday ends: if enabled, when a user enters a holiday request they can select an alternate user to cover their holiday period. When the holiday has ended, the requesting user’s WAP out of office is automatically switched off.
10.2. Non-Working Days

WAP is installed with the default country’s bank holidays as standard and are referred to as Non-Working days which will not be deducted from a user’s annual entitlement. At install, the default country is England but this can be changed if required (System Setup – Countries and Cities). Additional non-working days can be added as required; either for the whole year by selecting the year and clicking ‘Add bank holidays to selected country for year (GB only)’ or through ‘Add Non-Working Day’. This tab will not show if linked with Sicon Projects and Sicon Sage Timesheets are used (Bank Holidays will then be managed within Sage).
Add bank holidays to selected country for year (GB only): adds all of the GB bank holidays for the country and year that has been selected in these fields (if ‘All’ is selected as a country, these bank holidays will be added to all countries). When users are linked with a country that has a bank holiday, the GB bank holidays will show on their timesheets.
Add Non-Working Day: If there are other bank holidays for other countries, these can be added here by selecting the country, a description and the relevant date. When users are linked with a country that has a non-working day, this will show on their timesheets.
It is possible to add and remove bank holidays and non-working days from specific users’ timesheets using the bank holiday tool. See the WAP Holidays Help and User Guide for further information.
Other Options: Reprocess Timesheets will remove current non-working days already posted to timesheets and re-post per dates on the screen and will need to be run if new days are added. This is usually reserved for use during implementation and testing. The bank holiday tool would be recommended for most sites.
10.3. Mandatory Holidays
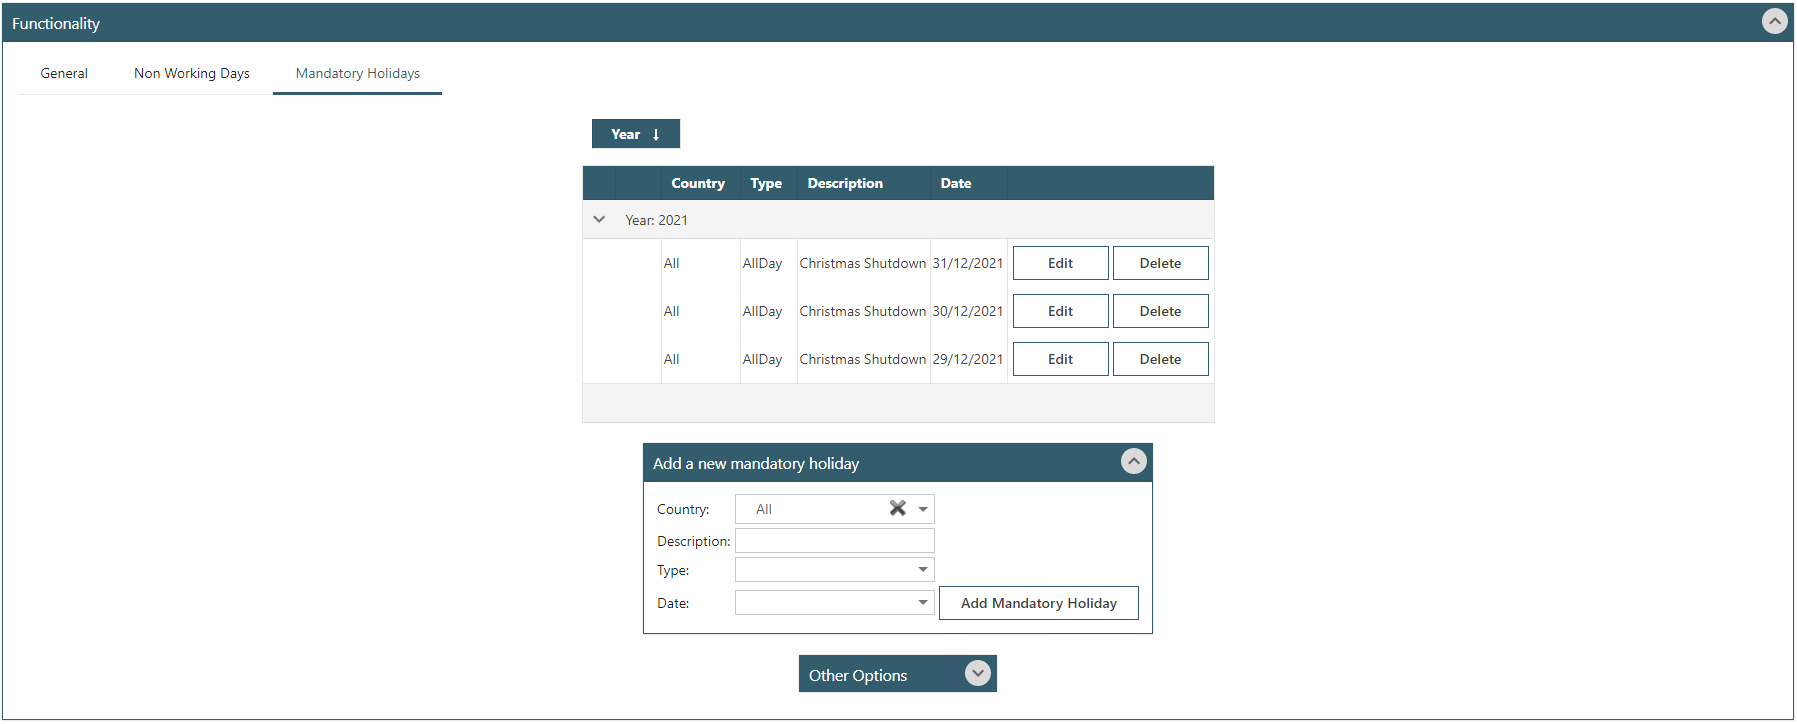
This function enforces mandatory holiday which will be taken from the user’s entitlement. These mandatory holidays can be added as per the organisation’s requirements; i.e. Christmas Shutdown.
Other Options: Reprocess Timesheets will remove current mandatory holidays already posted to timesheets and re-post per dates on the screen and will need to be run if new days are added. This is usually reserved for use during implementation and testing. It is also possible to add or remove mandatory holiday using the Mandatory Holiday tool, and this would be recommended for most sites.
11. System Settings - Invoices
System Settings relating to the Invoice module are accessed under System Settings banner – Invoices.
11.1. Display

Display Allocated (Paid) Status: whether to show the payment allocation status of an invoice; once a payment has been allocated to an invoice this will update in WAP to show either Unpaid, Allocated or Paid. Only new invoices paid since the setting is enabled will show the paid status.
Supplier Filters – Remove ‘All Suppliers’ option: if entering invoices in WAP, switch this on to remove the option to view all suppliers and only see suppliers that have been marked as approved in Sage.
Supplier Filters – Remove ‘Approved Suppliers’ option: if entering invoices in WAP, switch this on to remove the option to view approved suppliers and see all suppliers entered in Sage.
11.2. Functionality
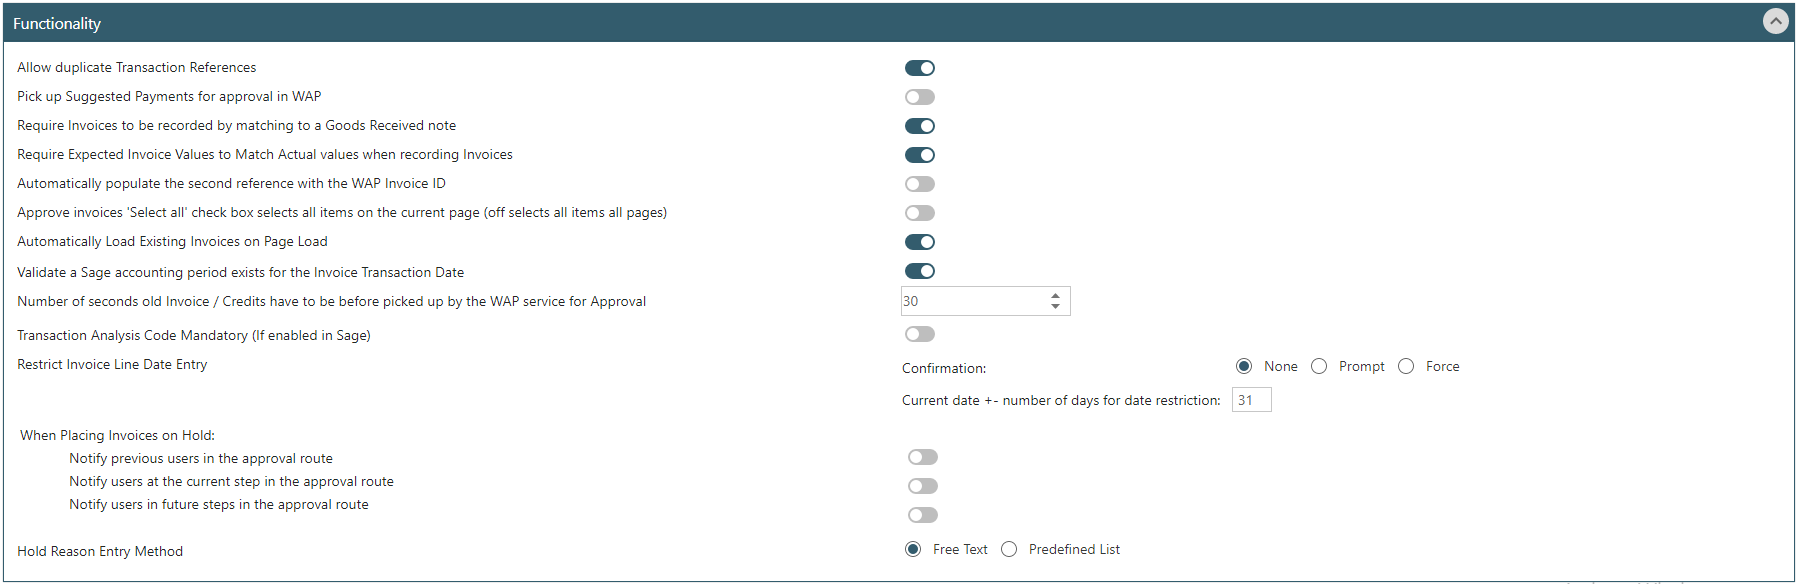
Allow duplicate Transaction References: if invoices require editing once they are in the WAP system, e.g. nominal code to be changed, this setting will need to be enabled.
Pick up Suggested Payments for approval in WAP: if suggested payments should be approved in WAP, enable this setting. If not ticked, suggested payments would not require approval in WAP before being paid in Sage. If switching this setting on or off, restart the WAP service.
Require Invoices to be recorded by matching to a Goods Received note: applicable to invoices entered directly into WAP only.
Require Expected Invoice Values to Match Actual values when recording invoices: applicable to invoices entered directly into WAP only.
Automatically populate the second reference with the WAP Invoice ID: for invoices entered directly into WAP; automatically populate the second reference with the WAP document ID.
Approve invoices ‘Select all’ check box selects all items on the current page (off selects all items all pages): if users have the User Type permission to select and approve multiple invoices at a time and if this setting is enabled, only invoices on the current page will be approved, preventing users from accidentally approving all items on all pages without checking the invoices on subsequent pages.
Automatically Load Existing Invoices on Page Load: if ticked, all current invoices will be loaded automatically. If not ticked, use the Search filters and Quick Links to display invoices required. N.B. by default Completed invoices will not show unless the option to include completed is ticked.
Validate a Sage accounting period exists for the Invoice Transaction Date: when ticked, the system will validate whether the accounting period exists when saving or submitting an invoice. This setting is applicable only to invoices entered directly into WAP.
Number of seconds old Invoices / Credits have to be before picked up by the WAP service for approval: by default, this is set to zero so invoices will be picked up by the WAP service as soon as they are saved in Sage. If other third-party software must be run in Sage once an invoice has been saved prior to WAP picking the invoice up, enter a value here, e.g. 60 seconds.
Transaction Analysis Code Mandatory (if enabled in Sage): applicable to invoices entered directly into WAP only; if transaction analysis codes have been configured in Sage, these must be completed in WAP.
Restrict Invoice Line Date Entry: applicable to invoices entered directly into WAP only; this can restrict the time period an invoice can be entered.
When Placing Invoices on Hold: notifications can be sent to previous/current/future approvers to advise the invoice has been placed on hold. If this setting is changed, please ensure the WAP service is restarted as this relates to email notifications.
Hold Reason Entry Method: when approvers put an invoice on hold, they will either use a free text entry method, or a pre-defined list can also be created. To set up a predefined list, this is done under System Setup banner – Approval Hold Reasons. It is a User Type permission to Maintain Hold Reasons.
12. System Settings - Miscellaneous
The Miscellaneous tab provides global system settings that affect information displayed to users, WAP licences, email configuration and security requirements. The majority of these settings will be configured during initial implementation and should not require amendment.
12.1. Display

System Culture: this allows each system to have headings, tabs and labels amended for specific installs. At present there is not yet a user facility to manage this but where specific organisation terminology is required, this can be provided at additional cost.
Sort order of supplier lists: set whether supplier account listings are sorted by account number or account name. By default, account number is selected.
Sort order of Nominal Account lists: set whether nominal account listings are sorted by account number, account name, cost centre, department and account number. By default, account number is selected.
Show Cost Centre and Department Names in Nominal Selection: tick if users should be able to see cost centre and department names when selecting a nominal code.
Number of Items to show on each grid page: defaulted to 15 but can be set to a higher value so the user does not need to click through so many pages to find information.
Decimal Format: by default, this is set to 0.00 but can be changed if required.
Show deleted lines by default: if ticked, any deleted lines on a document will be shown. By default, this is not ticked so a user must select that they want to view any deleted lines when viewing a document.
Display Detailed Error Messages (Includes the stack trace of any errors encountered): If ticked, in the event of an error within WAP, full error message details with a stack trace will be displayed in WAP. By default, this will be ticked. If unticked, the message displays but the extended stack trace will not show.
12.2. Functionality
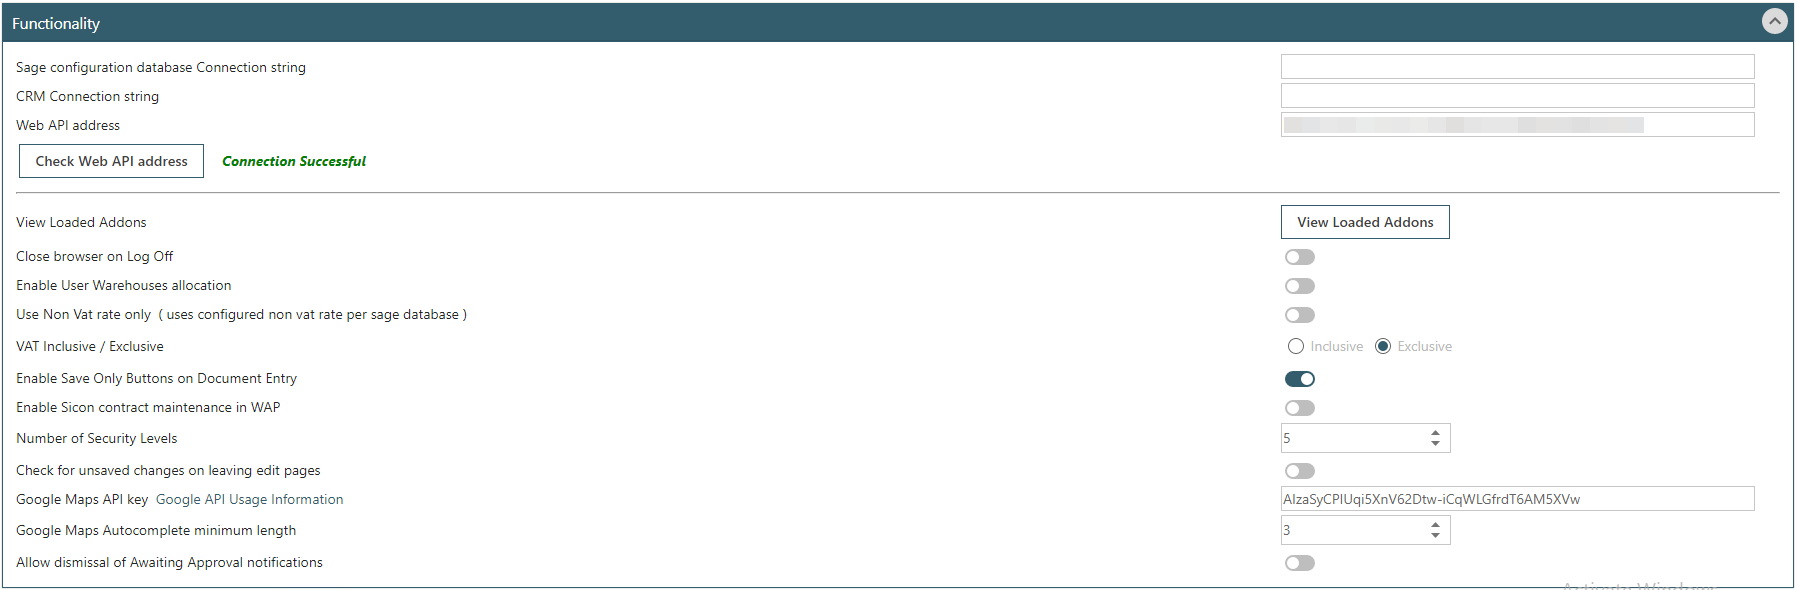
Sage configuration database string: a connection string to the Sage Configuration database to allow for viewing attachments within the Projects Project enquiry screen and Budget Enquiry Screen. The connection string will follow the format e.g. “server=MYSQLSERVER; Initial Catalog=Sage200Configuration; UID=MYSQLUSER; PWD=MYSQLPWD” (sections underlined will be unique depending on individual site configuration).
CRM Connection string: a string will only need to be entered here if WAP is being connected with a CRM system – there is no link between Sicon WAP and Sicon CRM.
Web API address: this will need to be configured if using WAP with Projects, Sales Orders and Contracts (contracts will be posted directly through to Sage prior to approval), sub-contractor orders, supplier applications or planned purchases. Click Check WebAPI address to ensure the connection is successful.
View Loaded Add-ons: any loaded add-ons will be shown if applicable. Most companies will not have loaded add-ons.
Close browser on Log Off: if selected, when a user logs out of WAP the browser will close automatically. Some companies require this as an additional security feature, particularly when single sign on is enabled.
Enable User Warehouses allocation: this enables the functionality to allocate users to specific warehouses.
Use Non-VAT rate only (uses configured non-VAT rate per Sage database): some Not-for-Profit or Charitable Organisations may require this setting to be checked if they cannot reclaim VAT or want to use a VAT inclusive or exclusive pricing module for requisition entry processing.
VAT Inclusive/Exclusive: this setting is used in conjunction with the above setting; by default, this is set to be exclusive.
Enable Save Only Buttons on Document Entry: if required, this setting can be enabled so users are only allowed to submit documents rather than save only.
Enable Sicon contract maintenance in WAP: this only needs to be configured if Sales Orders and Contracts are being used.
Number of Security levels: this relates to reporting abilities within the HR module.
Check for unsaved changes on leaving edit pages: if enabled, a pop-up will appear to users if they have made changes to a page and are moving away without clicking Save. This is most noticeable when editing a user’s WAP profile.
Google Maps API key: to use Google Maps functionality within the Expense module, enter an API key here. For more information on Google API key requirements, see our WAP Expenses Help and User Guide.
Google Maps Autocomplete minimum length: enter how many characters are required before Google will start searching for a postcode or place; e.g. 3 or 4 – IP3 or IP33. It can be useful to enter a value here to reduce the number of searches Google undertakes when users are entering a postcode.
Allow dismissal of Awaiting Approval notifications: by default, users won’t be able to dismiss notifications that are awaiting an action but if this is required, enable this setting.
12.3. Licencing
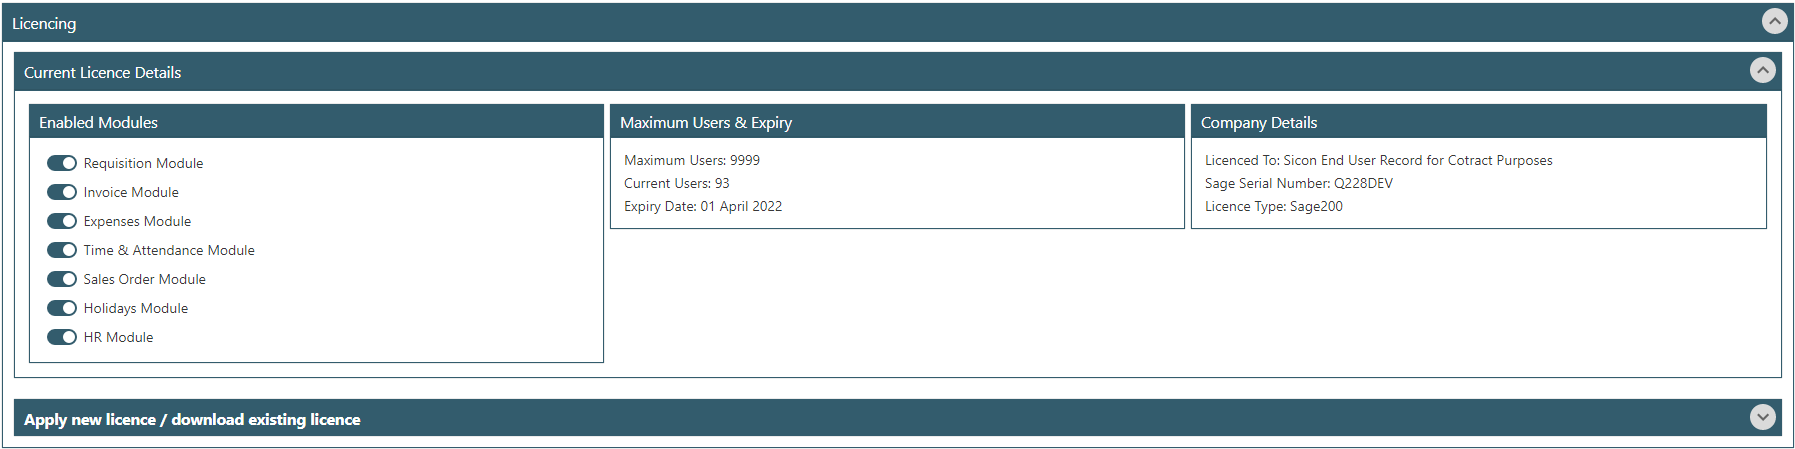
The module expiry date is shown along with the modules that have been enabled and the maximum number of users. For further information on licencing, please speak with your Business Partner in the first instance.
12.4. Default Company Details
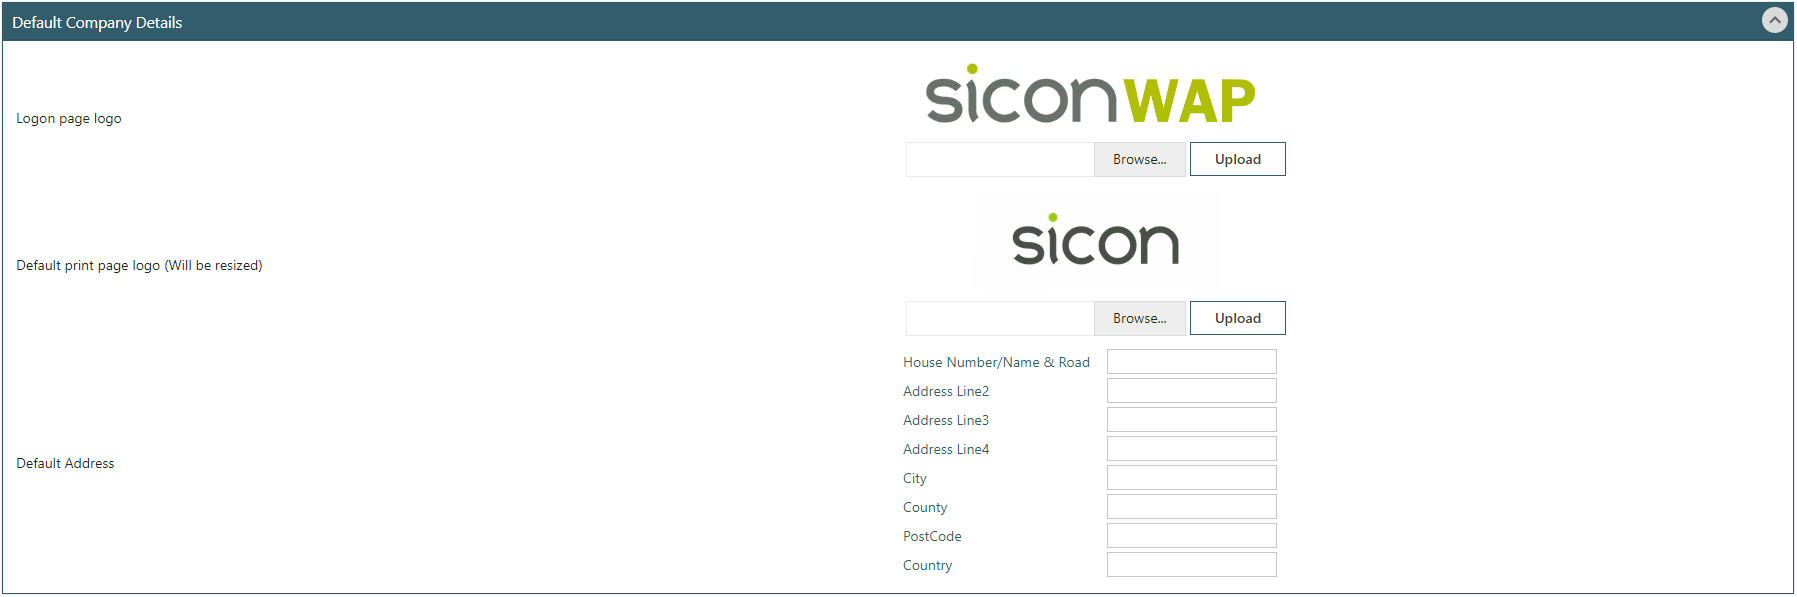
If you change the logon page logo but once saved, the new logo does not appear on the WAP homepage, please clear your any cached images in your internet browser history.
Logon page logo: this is the logo that will show on the homepage to the user when they log into WAP. This must be a .gif format, should be max 100dpi, and no more than 7-10cm wide and 5-7cm high. N.B. only one logo can appear on the login page.
Default print page logo (will be resized): this is the default logo that will appear on PO layouts and should be a .gif format and max 100dpi. Individual logos can be uploaded against each company in Sage Connections if different logos should appear for each company.
Default Address: enter the main Head Office address here; this can be used by the Expenses module to allow for users to select an office address when entering mileage claims
12.5. Password / Security
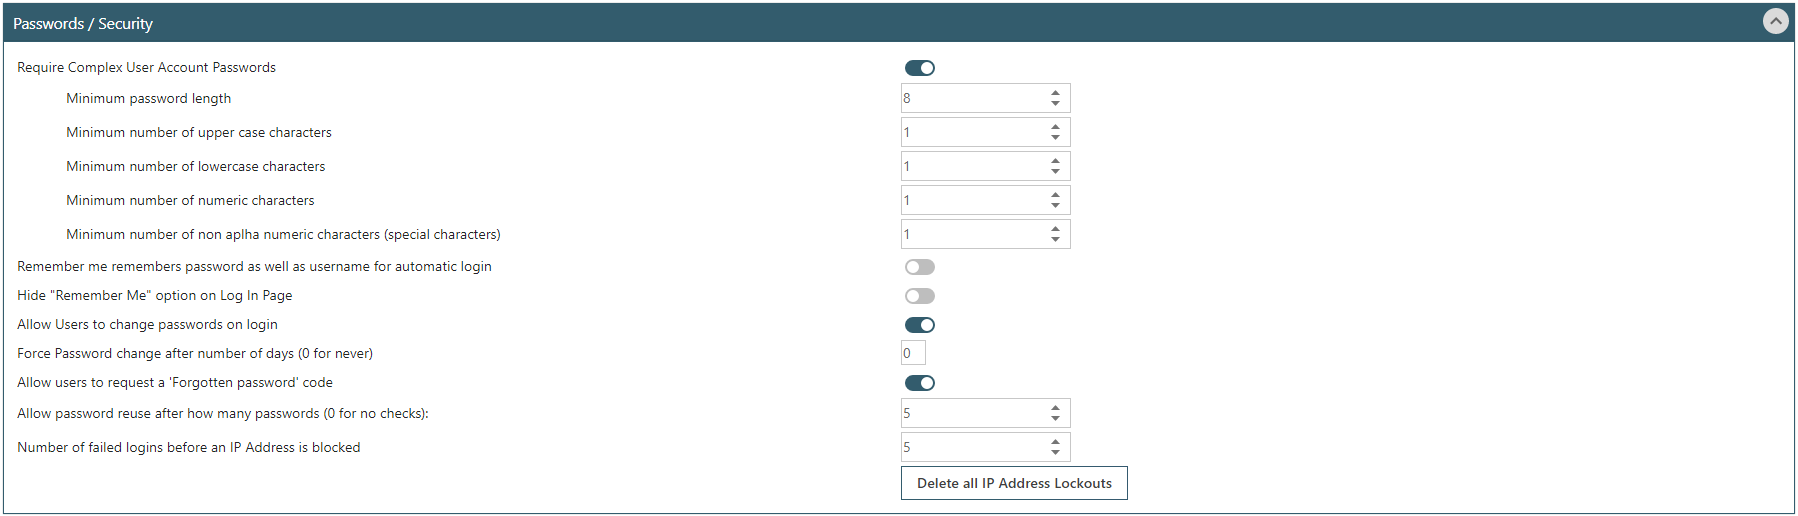
Require Complex User Account Passwords: by default, this is enabled with certain complexity requirements but these can be changed as needed to match company policy.
Remember me remembers password as well as username for automatic login: if unchecked, this will only remember the user’s username, if the remember me option is ticked on the login page.
Hide ‘Remember Me’ option on Login page: tick here if users should not be able to configure the WAP login screen to remember their username or password.
Allow users to change passwords on login: if ticked this will allow users to change their password when they login. If unchecked, the only way to change a user’s password is for an administrator to change on the user’s WAP profile.
Force Password change after number of days (0 for never): if company policy is for users to change their password regularly, set the specified number of days here.
Allow users to request a ‘Forgotten password’ code: tick to allow users the option on the login screen to enter their username and request a reset code be sent via email allowing them to access WAP and enter a new password.
Allow password reuse after how many passwords (0 for no checks): if passwords should not be reused within a certain number of new passwords, enter a value here.
Number of failed logins before an IP Address is blocked: the IP address will be blocked if a certain number of incorrect login attempts are made from the same IP address. The IP address blocked will be that of the machine on the internal network, unless accessing WAP externally where the external IP address will be blocked. Depending on which is blocked, it will either stop just the user trying to login or multiple users. These IP blocks can be cleared using the ‘Delete all IP Address Lockouts’ button.
Please be aware when creating passwords not to add the ‘<’ character preceding text as this can cause WAP to throw a ‘potentially dangerous request’ error. This is due to a web browser limitation designed to stop hackers entering code into your site to steal/destroy data (injection attack) – the < and > symbols are code delimiters
https://crm.www.sicon.co.uk/KnowledgeBase/wap-requitisions-potentially-dangerous-request/
12.6. WAP Services

Requisition service ‘Posting Interval’ (Seconds): this is defaulted to 15 seconds, please contact your Sage Business Partner if any queries arise with this.
Disable Timesheets updating Sage: switch on if no timesheets should not post through to Sage once fully approved. If this setting is switched on, once saved please make sure the WAP service is restarted.
Disable Requisitions updating Sage: switch on if no requisitions should not post through to Sage once fully approved. If this setting is switched on, once saved please make sure the WAP service is restarted.
Disable Sales Orders updating Sage: switch on if no sales orders should not post through to Sage once fully approved. If this setting is switched on, once saved please make sure the WAP service is restarted.
Disable Invoices updating Sage: switch on if no invoices should not post through to Sage once fully approved. If this setting is switched on, once saved please make sure the WAP service is restarted.
Disable Expenses updating Sage: switch on if no expenses should not post through to Sage once fully approved. If this setting is switched on, once saved please make sure the WAP service is restarted.
Service Host: this stores the server name the WAP service was last marked as running on. It is used as confirmation that the server has not changed due to a server move. If this setting does not match with the service’s current server, the service and application will be disabled to avoid potential posting to incorrect databases.
12.7. Cache / Memory

Occasionally the cache (temporarily stored information from webpages) can prevent updated content being displayed or cause functionality problems; e.g. changes made in Sage not pulling through to WAP or a new logo not showing on the logon page. These can be resolved by clearing the cache.
12.8. Logging

Verbose Logging Enabled: switch on to allow page access and memory to be recorded in the Sicon application within Event Viewer; by default, this is not enabled. Verbose logging should only be enabled for a short period of time if diagnosing a particular WAP service issue. If enabled, more detailed information will be recorded but this can result in large log files which can slow performance.
12.9. Sage 50 Payroll

Add in ODBC details for Sage 50 Payroll to allow for importing of employees and HR data into WAP.
12.10. Mobile Access
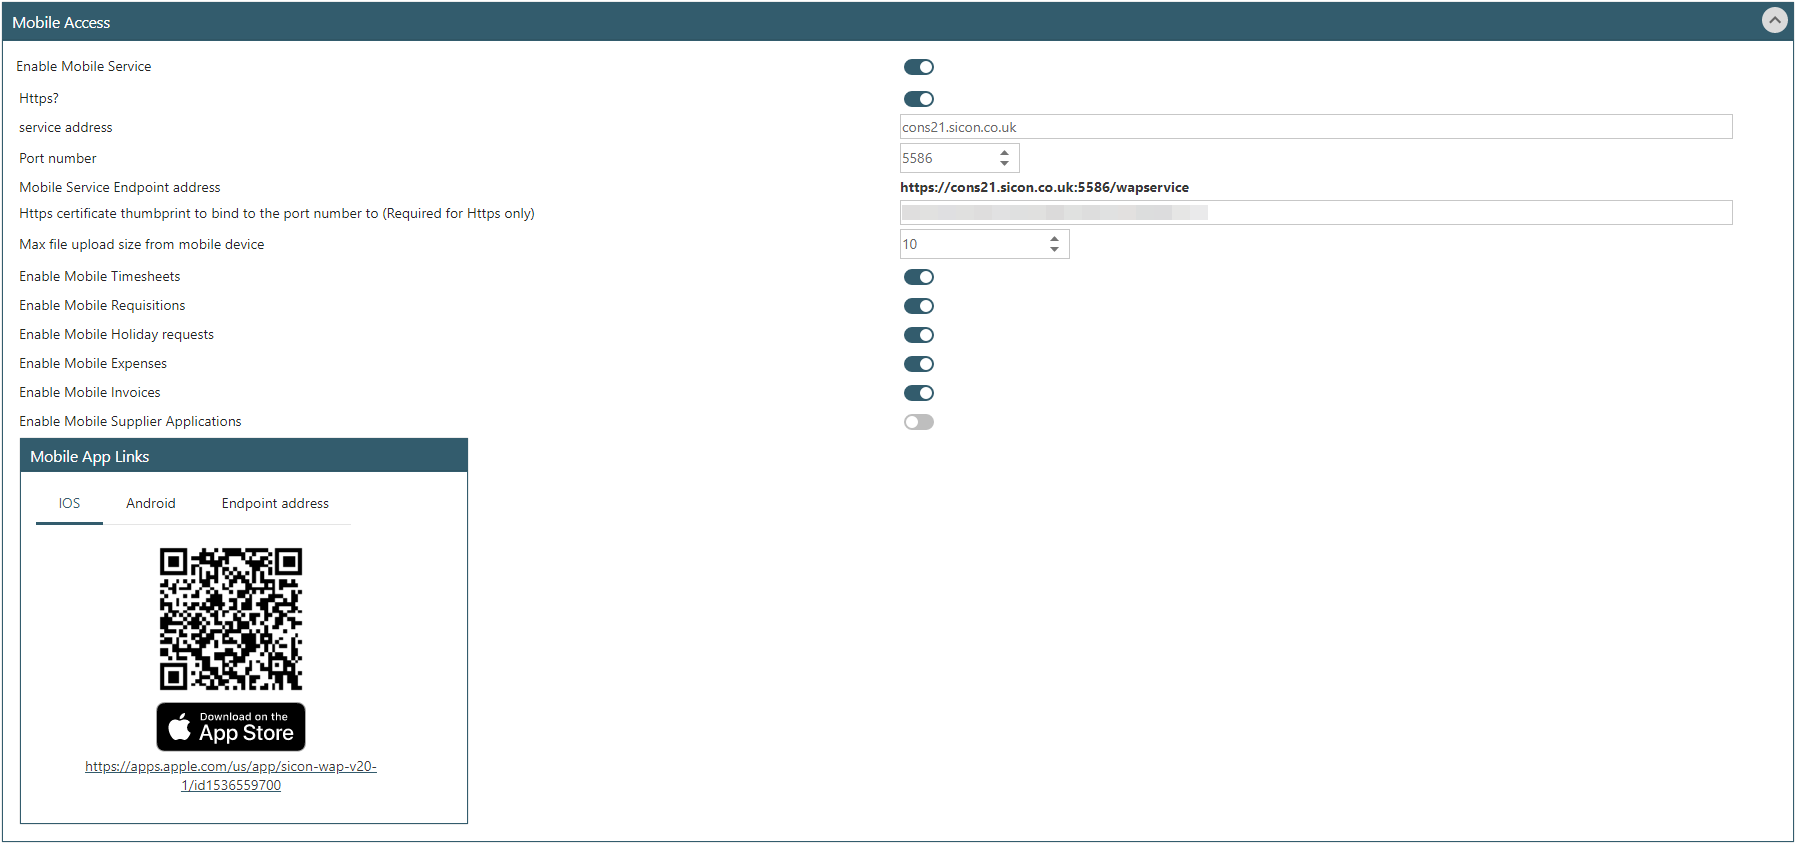
Enable Mobile Service: this will enable the WAP system to allow access from mobile devices connected via the WAP Mobile app.
Https? Tick this if site requires a secure connection.
Port number: enter port number opened for WAP app to use.
Mobile Service endpoint address: this will be generated automatically; e.g. “http://[Web address Domain]:[Port Number]/WAPService”.
Https certificate thumbprint to bind the port number to (required for https only): required for users that require a secure connection.
Max file upload size from mobile device: if a maximum upload limit for attachments (in MBs) is required, enter the maximum size here.
Enable Mobile Timesheets: tick to allow for timesheet configuration with the WAP Mobile app.
Enable Mobile Requisitions: tick to allow for requisition configuration with the WAP Mobile app.
Enable Mobile Holiday Requests: tick to allow for holiday request configuration with the WAP Mobile app.
Enable Mobile Expenses: tick to allow for expense configuration with the WAP Mobile app.
Enable Mobile Invoices: tick to allow for invoice configuration with the WAP Mobile app.
Mobile App Links
IOS: scan the QR code to be taken through to the correct location to download the WAP app.
Android: scan the QR code to be taken through to the correct location to download the WAP app.
Endpoint Address: scan the QR code to populate the end point address from System Settings into the app settings.
Please refer to the WAP App Help and User Guide for further information.
13. System Settings - Requisitions
System Settings relating to the Purchase Requisition module are accessed under System Settings banner – Requisitions.
13.1. General Tab - Display Banner
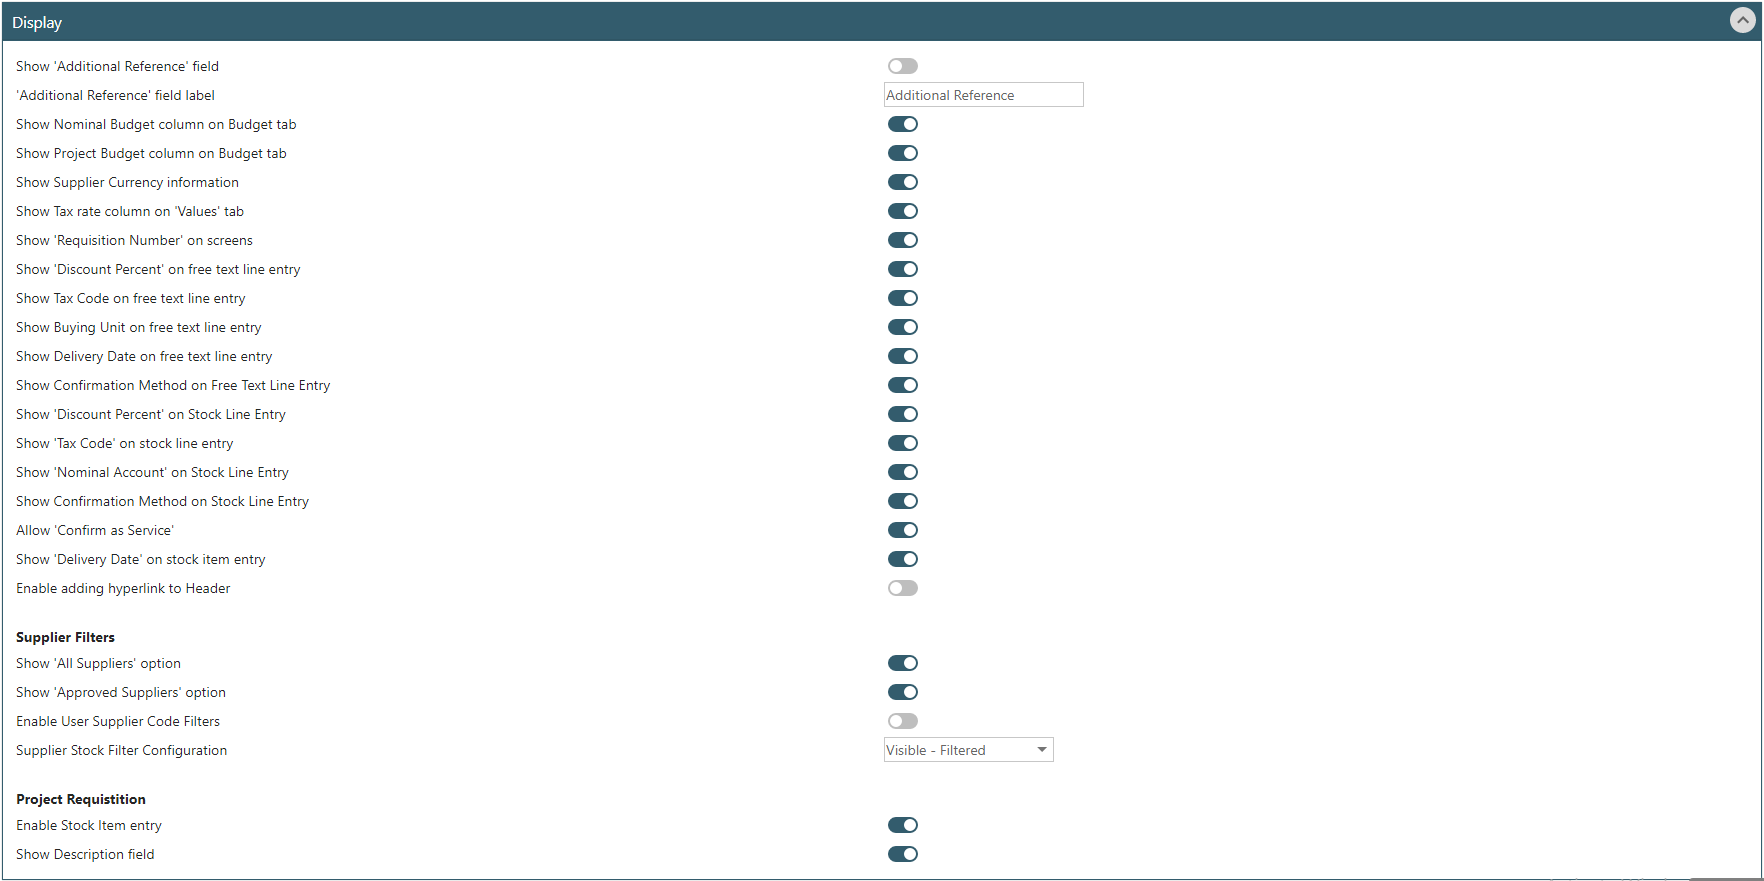
Show ‘Additional Reference’ field: if configured, an additional free text field will show on the requisition header which can be populated as required; this column will also show on the Existing Requisitions page.
‘Additional Reference’ field label: the additional reference field can be renamed as required.
Show Nominal Budget column on Budget tab: if nominal budgets are not to be shown, this setting will hide the nominal column on the budget tab.
Show Project Budget column on Budget tab: if project budgets are not to be shown, this setting will hide the nominal column on the budget tab.
Show Supplier Currency information: if configured, this setting will not show the supplier currency information on the requisition header page.
Show Tax rate column on ‘Values’ tab: if configured, this setting will not show the tax rate column on the values tab.
Show ‘Requisition Number’ on screens: this setting will hide requisition IDs from the Existing Requisitions and Approval pages.
Show ‘Discount Percent’ on free text line entry: this setting will hide the option for users to enter a discount percentage on a free text line.
Show Tax Code on free text line entry: this option will hide the tax code selection box on the free text entry screen. If hidden, the standard tax rate as configured against the Supplier in Sage will be used.
Show Buying Unit on free text line entry: this option will show the buying unit free text field on a free text line for users to provide detail as required; i.e. to say it was a Pack of 6 or Box of 12 being ordered.
Show Delivery Date on free text line entry: this setting can be used to hide the delivery date on a free text line if there should only be one delivery date on a requisition.
Show Confirmation Method on Free Text Line Entry: this option will make the confirmation options visible when entering a free text line. The default will be populated based on configuration within Sage POP.
Show ‘Discount Percent’ on Stock Line Entry: this setting will hide the discount percent field on a stock line entry.
Show ‘Tax Code’ from stock line entry: if required, this setting can be used to hide the tax code when entering a stock line. If hidden, the default tax code from the stock item will be used.
Show ‘Nominal Account’ on Stock Line Entry: this setting can hide the nominal account selection box when adding a stock line entry. If hidden, the default nominal code on the stock item will be used.
Show Confirmation Method on Stock Line Entry: if the default confirmation method should be used when entering a stock item line, use this setting to hide the confirmation entry box.
Allow ‘Confirm as Service’: if users should not be able to pick this option as a confirmation method, hide here.
Show ‘Delivery Date’ on stock item entry: this setting can be used to hide the delivery date on a stock item line if there should only be one delivery date on a requisition.
Enable adding hyperlink to Header: if the user is to be able to add a hyperlink to the requisition header, allow here. If added, a flag will show under Existing Requisitions.
Supplier Filters – Show ‘All Suppliers’ option: this setting will stop all suppliers being available to select from when raising a requisition; only suppliers marked as approved in Sage can be chosen from.
Supplier Filters – Show ‘Approved Suppliers’ option: this setting will remove the option to see approved suppliers when choosing from the supplier list; all suppliers in Sage will be visible (if the Supplier is on hold, this will show to the user).
Supplier Filters – Enable User Supplier Code Filters: if configured, this will allow users to be restricted to only be able to raise requisitions against suppliers linked with particular supplier groups. See Requisition HUG.
Supplier Filters – Supplier Stock Filter Configuration: choose whether the supplier stock filter option should be visible or hidden, and then either filtered or not filtered (e.g. whether a user should be able to select stock marked against a different preferred supplier).
Project Requisition – Enable ‘Add Stock Item line’ button: this option will remove the ability for a user to enter a stock item line on a project requisition; only free text lines can be added.
Project Requisition – Show Description field: if users should not see or be able to update the header description, hide this here.
13.2. General Tab - Functionality Banner
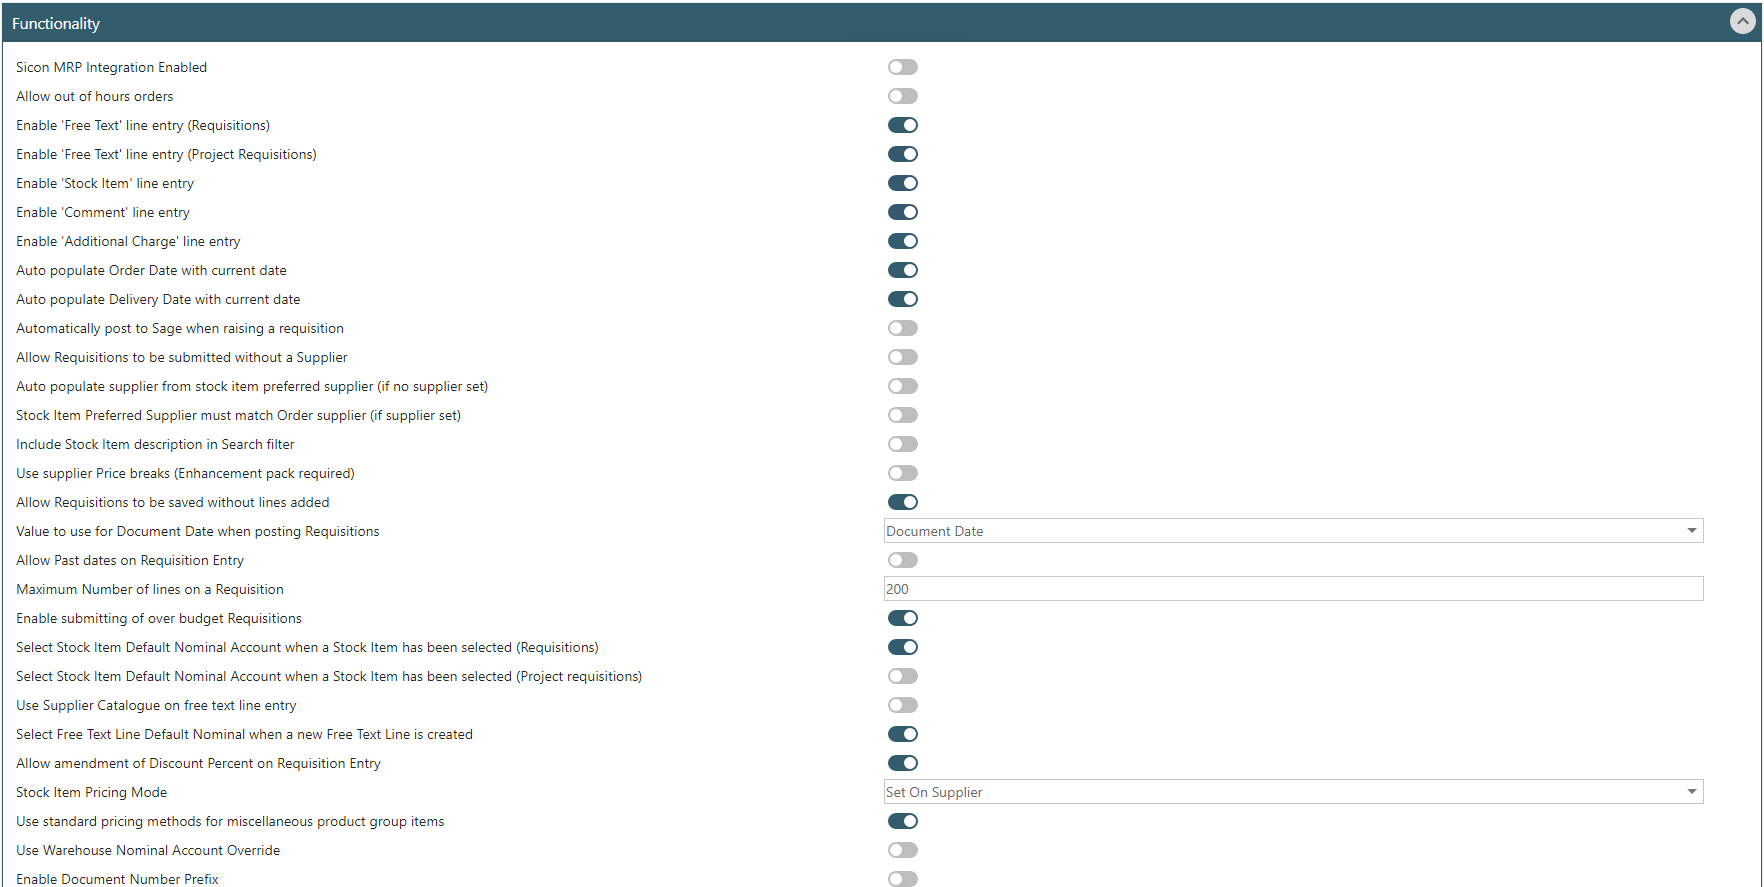
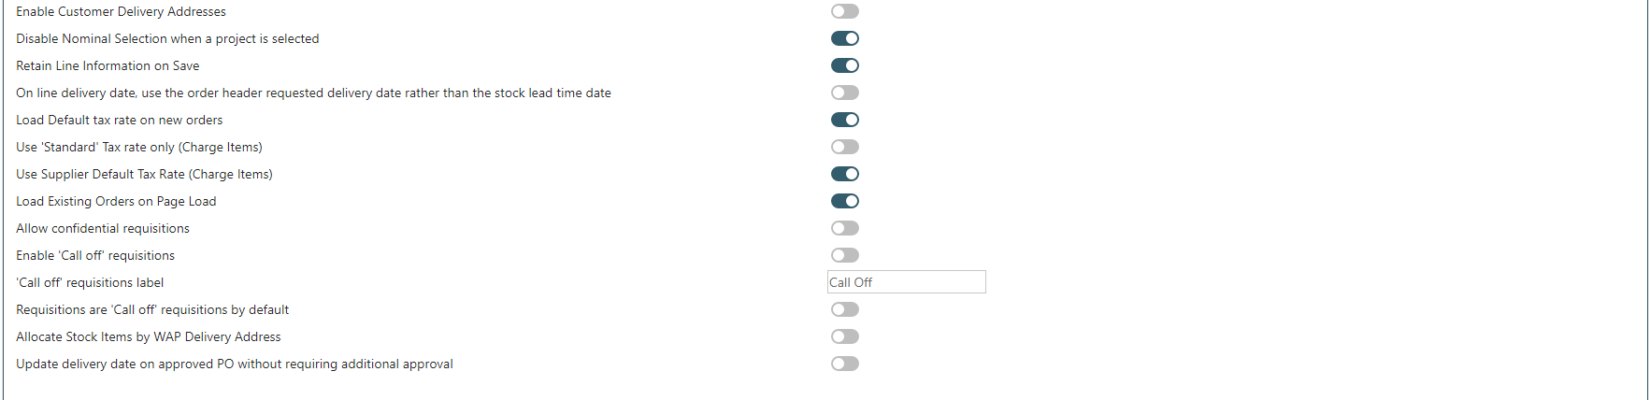
Sicon MRP Integration Enabled: this will only be switched on if orders generated via MRP should be pulled through to WAP for approval.
Allow out of hours’ orders: if enabled, out of hours’ requisitions can be raised that will post straight through to Sage and create a PO number, but will need to be approved retrospectively.
Enable ‘Free Text’ line entry (Requisitions): untick this setting if users should not be able to enter a free text line on a requisition.
Enable ‘Free Text’ line entry (Project Requisitions): untick this setting if users should not be able to enter a free text line on a project requisition.
Enable ‘Stock Item’ line entry: untick this setting if users should not be able to enter a stock item line.
Enable ‘Comment’ line entry: untick this setting if users should not be able to add comment lines on a requisition.
Enable ‘Additional Charge’ line entry: untick this setting if users should not be able to add additional charge lines on a requisition; it may be that postage or carriage costs should be added as either a free text or stock item line.
Auto populate Order Date with current date: by default, this setting is on but can be unticked if the user should select the required order date.
Auto populate Delivery Date with current date: untick this setting if users should be forced to select the correct delivery date rather than the date being automatically populated with the order date.
Automatically post to Sage when raising a requisition: this setting should only be used where a PO can be created and a PO number raised before the requisition is approved. This setting is not commonly used; a requisition should be fully approved before a PO is created.
Allow requisitions to be submitted without a Supplier: this setting will allow users to enter lines on a requisition without selecting a supplier – a supplier must be selected prior to the requisition posting through to Sage.
Auto populate supplier from stock item preferred supplier (if no supplier set): this setting would be used in conjunction with the setting above so when a stock item is selected, the preferred supplier will populate the supplier field on the requisition header page.
Stock Item Preferred Supplier must match Order supplier (if supplier set): if this is configured and a user selects a supplier on a requisition and then picks a stock item that is not linked with that supplier, a warning will show stating that the supplier chosen is not the preferred supplier and so the line cannot be saved. The preferred supplier will be shown to allow users to change the supplier selected on the requisition header page.
Include Stock Item description in Search filter: tick this option to view the stock item description when searching for an item.
Use supplier price breaks (Enhancement pack required): if Sicon Enhancement pack is configured in Sage and a stock item has been configured to use supplier price breaks, these can be read by WAP.
Allow requisitions to be saved without lines added: by default, if a requisition is added with no lines, the system will prompt users to allow for the requisition to be saved but if this shouldn’t be possible, this setting can be configured to not allow this.
Value to use for Document Date when posting Requisitions: this can either be set to use the requisition document date or the current date; i.e. the date when the requisition is approved and posts through to Sage.
Allow Past dates on Requisition Entry: by default, the system won’t allow requisitions to be raised in the past but if this is required, this box can be ticked.
Maximum Number of lines on a requisition: by default, this is configured to allow no more than 200 lines on a requisition but this can be amended accordingly to match company requirements.
Enable submitting of over budget requisitions: if required, users can be prevented from saving a requisition if the line has a nominal or project that is over budget. If users are prevented, it can cause users to select another nominal code or project that is within budget but may not be the correct one.
Select Stock Item Default Nominal Account when a Stock Item has been selected (Requisitions): if configured, when entering a stock line on a requisition, the nominal code will be populated from the stock item selected, rather than the user having to select manually.
Select Stock Item Default Nominal Account when a Stock Item has been selected (Project Requisitions): if configured, when entering a stock line on a project requisition, the nominal code will be populated from the stock item selected, rather than the user having to select manually.
Use Supplier Catalogue on free text line entry: Only relevant to users of Sicon Distribution. If this setting is switched on, users can pick items from the Sicon Distribution supplier catalogue. Further information is available in the Distribution Help and User Guide. See Distribution Help and User Guide.
Select Free Text line Default Nominal when a new Free Text Line is created: if this setting is switched on, the default nominal code set against the supplier will be used on the line.
Allow amendment of Discount Percent on Requisition Entry: this will allow users to make changes to any discount percent against an item.
Stock Item Pricing Mode: select from the drop-down list the appropriate stock pricing mode; by default, this is configured as set on supplier.
Use standard pricing methods for miscellaneous product group items: miscellaneous items will use the stock item standard cost unless this setting is on, in which case it will get the pricing the same as it does for standard items.
Use Warehouse Nominal Account Override: if configured, the nominal cost centre or department can be overridden based on the warehouse selected on the stock item line.
Enable Document Number Prefix: this setting can allow a prefix to the PO number; the prefix is pulled from Sage Connections against the specific company. This prefix will only show in WAP, it will not post into Sage POP.
Enable Free Text Delivery Addresses: this option will allow users to free type a delivery address on a requisition; this is usually not recommended as the preferred option is to allow users to select an address from a drop-down box.
Enable Supplier Delivery Addresses: this option allows users to select the supplier’s address as configured in Sage.
Enable Project Delivery Addresses: if a costing module is configured, addresses from Sicon Projects can be selected.
Enable Customer Delivery Addresses: if applicable, the customer’s address from the costing module project can be selected.
Disable Nominal Selection when a project is selected: if enabled, the nominal code will pull through from the Project Header/Project Item on the requisition line, instead of the user having to select the nominal code.
Retain Line Information on Save: with this ticked information such as the nominal code or Project will be held when the line is saved. This can speed up the requisition entry process for users who input requisitions with lots of lines where the nominal code or Project is not changed.
On line delivery date, use the order header requested delivery date rather than the stock lead time date: by default, if a stock item has a lead time set against it in Sage, the line delivery date will be changed to reflect this. If this setting is configured, the line delivery date will remain as the delivery date set on the order header page.
Load default tax rate on new orders: if enabled, the default tax rate will be pulled through from how the company has been configured in Sage PL. If disabled, users will need to select the appropriate tax rate for that line on the requisition.
Use ‘Standard’ tax rate only (Charge Items): configure so only the standard tax rate can be used on charge lines.
Use Supplier Default Tax Rate (Charge Items): configure so the tax rate set against the supplier in Sage PL is used; if not configured, the standard tax rate set against the company in Sage Connections will be used.
Load Existing Orders on Page Load: by default, this will be on and if a user clicks on Existing Requisitions, orders they have raised will be loaded automatically. If this is causing speed issued, this can be turned off to force users to search for specific orders.
Allow confidential requisitions: if enabled, a check box will appear on the requisition header page for the user to flag the requisition as confidential. This means the requisition will only be seen by the requester, required approver(s) and any users with the View All Requisition User Type permission.
Enable ‘Call off’ Requisitions: if enabled, a check box will appear on the requisition header page for the user to flag the requisition as a call off order.
‘Call off’ requisitions label: the call off field can be renamed as required.
Requisitions are ‘Call off’ requisitions by default: if all, or the majority of orders are call off orders, this can be ticked. Users are still able to untick the box is a non-call off order is being raised.
Allocate Stock Items by WAP Delivery Address: configure if stock items should be allocated based on the delivery address entered when the requisition is raised.
Update delivery date on approved PO without requiring additional approval: if the delivery date field can be changed on an approved order and this update through to Sage without the PO requiring additional approval, configure here. On an approved order if the date is being changed, the order will not need to be submitted again, once the change has been made, save the order and the date will update through to Sage. If any changes require approval before posting to Sage, leave this setting unticked.
Automatic printing – Automatically print Requisition and email to Supplier on Posting to Sage: if configured, once a requisition has been fully approved it will email the PO to the supplier straight away. This will only send an email if an email address has been set against the PL supplier account.
Automatic printing – Email address to copy automatic requisition prints to: if sending a PO once the requisition has been fully approved, a copy email can be sent to an email address if required. For example, it might be that a ‘procurement@companyname.co.uk’ address should have visibility of all POs sent to suppliers.
13.3. General Tab - Goods Received Banner

Enable Receive All button on Goods Received: if enabled, a Receive All option on the goods received process will automatically populate the quantity to be received from the outstanding quantity values.
Allow over receipt of goods: if enabled, users will be allowed to over receipt goods. By default, this is not configured.
Goods Received Reference Source: the reference recorded in Sage can either be the Goods Received Supplier Document Number (Reference), the WAP Username, or both.
Goods Received Attachment is mandatory: if users must upload a GRN document when goods receiving, tick here for an attachment to be mandatory. This may be used mostly by sites ordering in goods rather than service or free text items.
Enable editing Free Text line description when partially received/invoiced: if allowed, free text line descriptions can be edited when the line has been partly goods received or invoiced.
Allow duplicate Supplier document number entry: if GRN document numbers should not be duplicated for individual suppliers, configure here. This setting may be used mostly by sites ordering in goods rather than service or free text items.
13.4. General Tab - Order Templates Banner

Auto Populate Delivery Date: if ticked, the delivery date will auto populate to the current date. If unticked, the user must select a specific delivery date.
Override Warehouses based on User: the warehouse selected on templates can be defaulted to that set per user (User Setup – Warehouses).
Enable All Supplier Stock Items Template: if enabled, this template will be available to users when raising a stock requisition.
Enable User Order Template Allocation: if enabled, multiple templates can be crated and users allocated to them as required (User Setup – Requisition Templates).
13.5. General Tab - Justification Banner
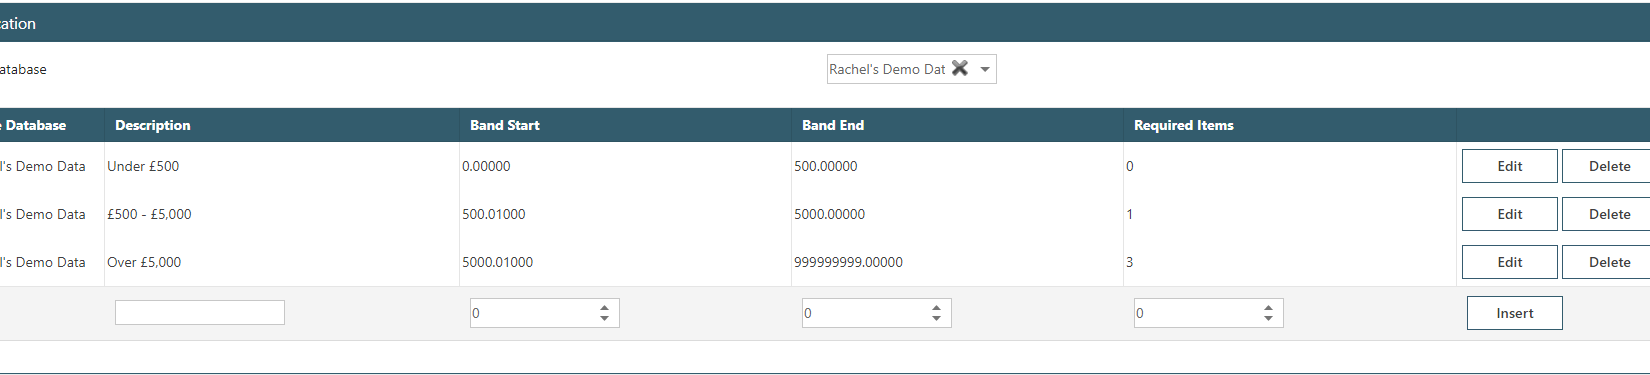
Sage Database: select whether the justification bands are for one specific database or valid across all Sage Companies.
Enter Justification bands as required; in the example above, documents under £500 do not require a quote to be attached, documents between £500 and £5,000 must have one quote attached and documents over £5,000 must have three quotes attached. When creating the justification bands there cannot be any overlapping; e.g. £0 – £500 band and also £200 – £400. See Requisition HUG.
13.6. General Tab - Spare Fields Banner
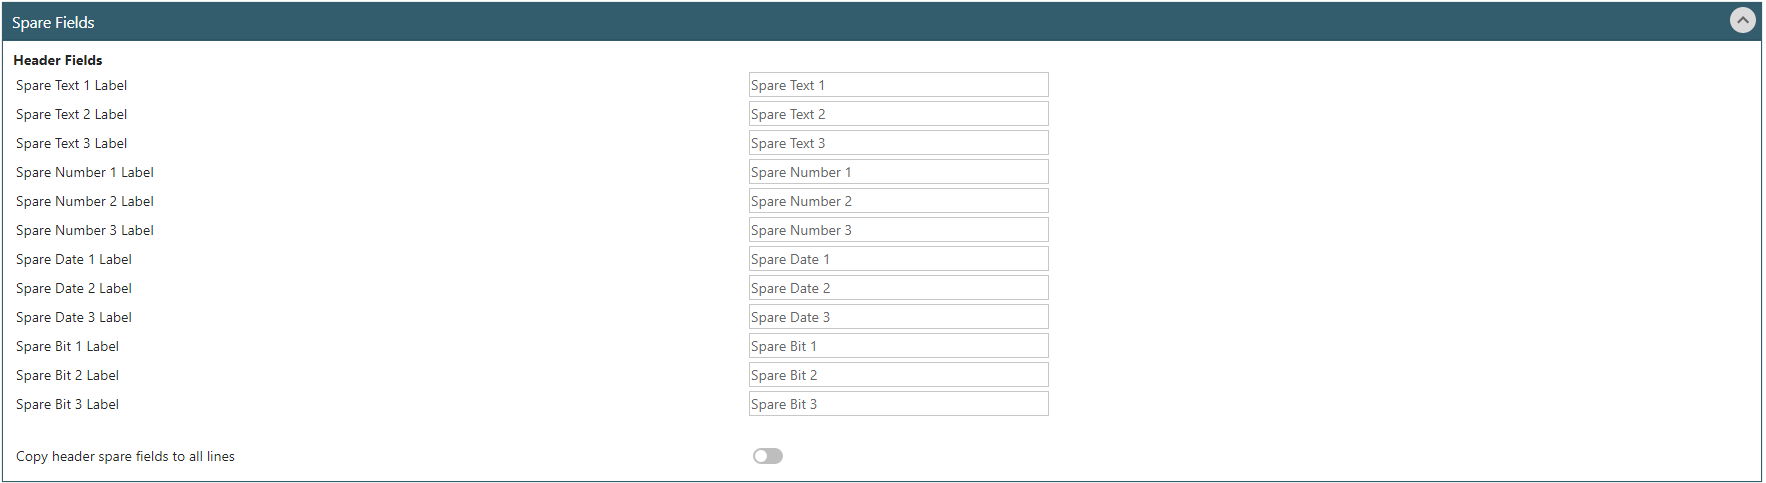
If another application is using Spare Fields in the database for additional analysis options, these can be configured in WAP to appear on requisition order entry. Values will then post through to Sage (but will not be visible to the end user as this is linked to the database only). Rename each field within here if appropriate to assist end users from populating the data in the correct location in the database.
13.7. Analysis Codes Tab
WAP Requisitions can pull through up to 20 Sage POP Analysis Codes as required; these are configured in Sage (Accounting System Manager and POP Maintenance). Selecting Default will populate the requisition with the corresponding code from Sage POP. If the WAP settings are configured to ‘Populate from Order’, the analysis codes will appear at the bottom of the requisitions Delivery and Invoicing tab, but if the setting is changed to ‘Validate on Line’, the codes can be selected at the time of entering each line and therefore can be different per line.
The codes can be marked as Mandatory and if they need to appear on the Existing Requisitions or Approve Requisitions grids in WAP, check the ‘Include in Grids’ option. If the code labelling needs to be changed to make it more user friendly, tick the custom label box and enter the new narrative as required.
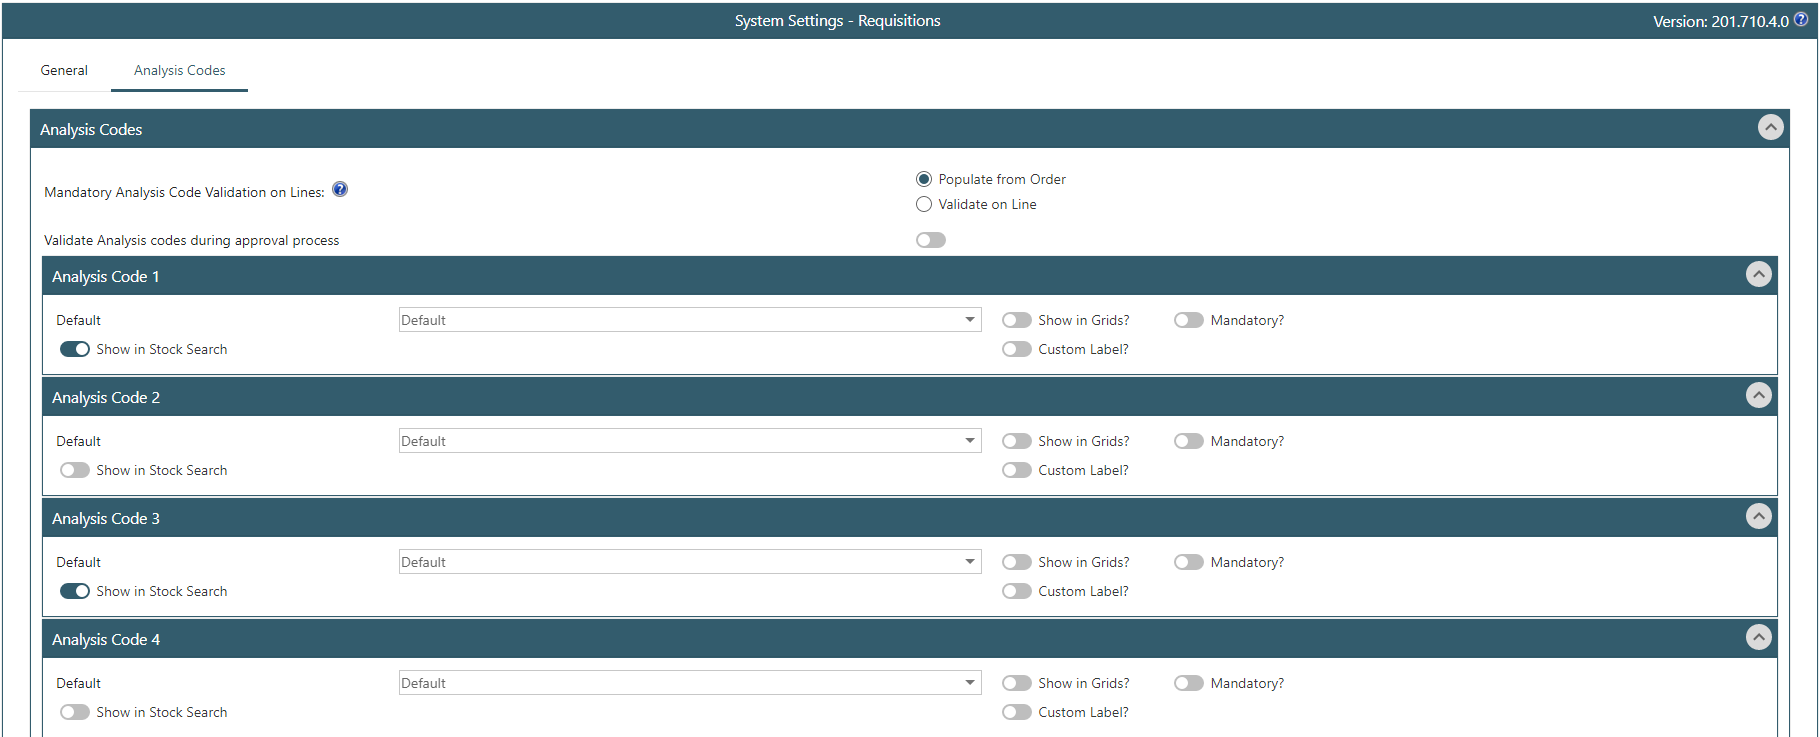
It is also possible to populate the Sage POP Analysis Codes with particular WAP fields. Check in Sage the number of the next free analysis code in Sage POP and then within WAP select from the drop-down list available. In the example below, the POP Analysis Code 2 will be populated with the WAP Requisitioner Name.
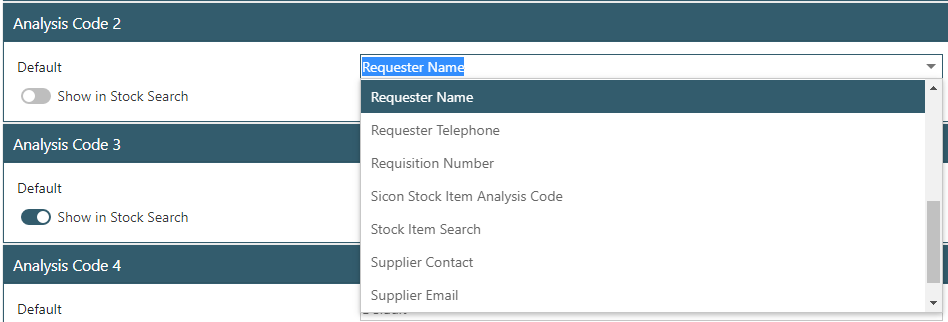
14. System Settings - Sales Orders
System Settings relating to the Sales Order module are accessed under System Settings banner – Sales Orders.
14.1. General Tab – Display Banner
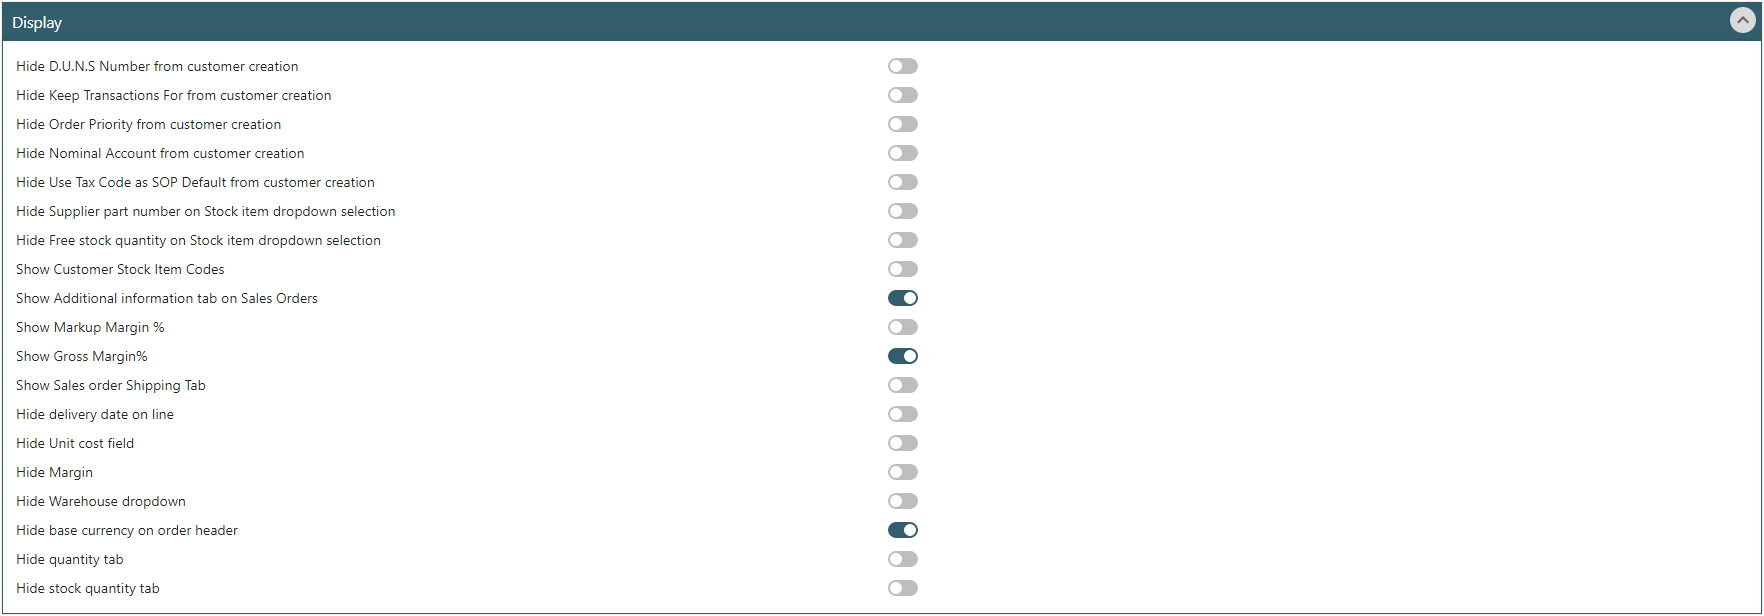
Hide D.U.N.S Number from Customer Creation: The ability to hide D.U.N.S Number on the Customer Creation (either when creating a customer from a Prospect Account Sales Order, or within Sage Admin – New Customer – Trading tab).
Hide Keep Transactions For from customer creation: The ability to hide ‘Keep Transactions For’ (either when creating a customer from a Prospect Account Sales Order, or within Sage Admin – New Customer – Trading tab).
Hide Order Priority from customer creation: The ability to hide Order Priority from Customer (either when creating a customer from a Prospect Account Sales Order, or within Sage Admin – New Customer – Trading tab).
Hide Nominal Account from customer creation: The ability to hide the default nominal code from the customer (either when creating a customer from a Prospect Account Sales Order, or within Sage Admin – New Customer – Trading tab).
Hide Use Tax Code as SOP Default from customer creation: The ability to hide the setting that allows users to Use tax code as SOP default (either when creating a customer from a Prospect Account Sales Order, or within Sage Admin – New Customer – Trading tab).
Hide Supplier part number on Stock item dropdown selection: Turning this setting on will remove the Supplier Part No from the users’ view in the drop-down when choosing a stock item on a sales order.
Hide Free stock quantity on Stock item dropdown selection: Turning this setting on will remove the Free Stock quantity from the users’ view in the drop-down when choosing a stock item on a sales order.
Show Customer Stock Item Codes: If using this feature in Sicon Enhancement pack, this setting enables the column in the stock item drop-down when choosing a stock item on a sales order.
Show Additional information tab on Sales Orders: Displays an Additional Information tab where users can view ‘Requested By’, Notes and Department if using Business Units within WAP.
Show Mark-up Margin %: This setting can be configured depending on your company preference to use Margin or Mark-up. Turn on to show Mark-up Margin% rather than Gross Margin %.
Show Gross Margin%: This setting can be configured depending on your company preference to use Gross Margin % or Mark-up Margin %. Turn off to show Mark-up Margin% rather than Gross Margin % (usually either Mark-up Margin % or Gross Margin % are used, not both. The default is to use Gross Margin %).
Show Sales order Shipping Tab: If Distribution is enabled, this tab can be enabled for the user to enter the information as required when entering their Sales Order (Shipping type, required by, collect date, parcel carrier, service and any special instructions).
Hide delivery date on line: this setting can be used to hide the delivery date on a line if there should only be one delivery date on a sales order.
Hide Unit cost field: This setting can hide the Unit Cost from the user inputting a Sales Order, so they will only see Unit Price.
Hide Margin: This setting can be used to hide the information so the end user does not see this detail when entering a Quote, Sales Order or SOP Return.
Hide Warehouse dropdown: This setting can be used to hide the Warehouse so the end user does not see this detail when entering a Quote, Sales Order or SOP Return.
Hide base currency on order header: if configured, this setting will not show the customer currency information on the sales order header page.
Hide quantity tab: if configured, this will hide the quantities tab on the sales order header page (the quantities tab provides summary information on what has been ordered, allocated, despatched and invoiced for all lines).
Hide stock quantity tab: if configured, this will hide the stock quantities tab on the sales order header page (the stock quantities tab provides summary information on stock lines for what is free stock, in stock and allocated stock).
14.2. General Tab – Functionality Banner
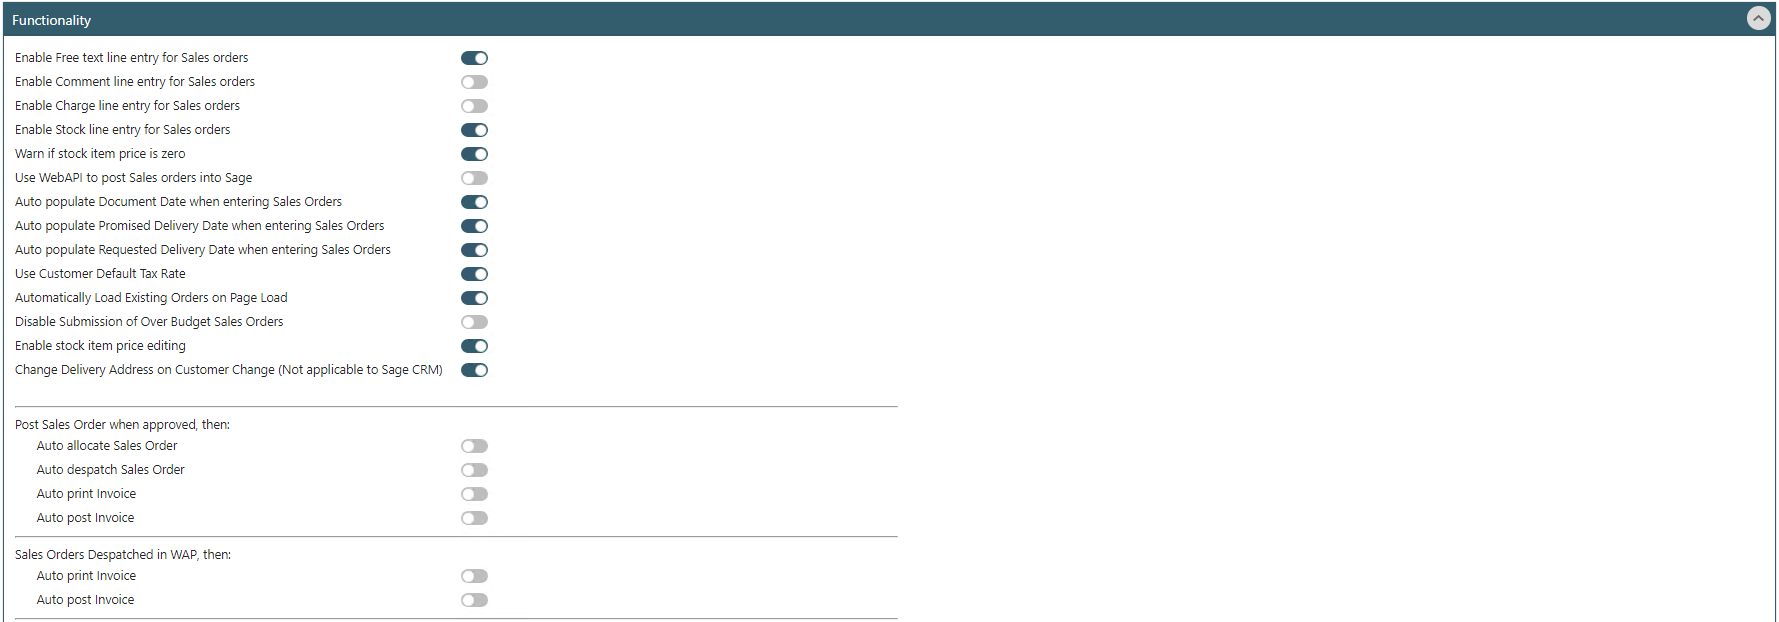
Enable Free text line entry for Sales orders: untick this setting if users should not be able to enter a free text line on a SOP Quote, Sales Order or SOP Return.
Enable Comment line entry for Sales orders: untick this setting if users should not be able to enter a comment line on a SOP Quote, Sales Order or SOP Return.
Enable Charge line entry for Sales orders: untick this setting if users should not be able to enter a charge line on a SOP Quote, Sales Order or SOP Return.
Enable Stock line entry for Sales orders: untick this setting if users should not be able to enter a stock line on a SOP Quote, Sales Order or SOP Return.
Warn if stock item price is zero: If users select a stock item that hasn’t had any pricing set up in Sage, a warning will display to show “Pricebook = 0”. Prices can still be overwritten by the user and will be posted to Sage if this permission has been granted in Sage SOP settings.
Use WebAPI to post Sales orders into Sage: only relevant for sites using CRM for WAP Sales Orders.
Auto populate Document Date when entering Sales Orders: if this setting is on it will populate the document with today’s date for SOP Quotes, Sales Orders and SOP Returns, and can be overridden by the user. The setting can be unticked if the user should select the required order date.
Auto populate Promised Delivery Date when entering Sales Orders: if this setting is on it will populate the Promised Date with today’s date for SOP Quotes, Sales Orders and SOP Returns, and can be overridden by the user. It is possible to submit a sales order without a delivery date or promised date however, prior to approval a Promised Delivery date must be added. The setting can be unticked if the user or approver should select the required order date.
Auto populate Requested Delivery Date when entering Sales Orders: if this setting is on it will populate the Requested Delivery date with today’s date for SOP Quotes, Sales Orders and SOP Returns, and can be overridden by the user. The setting can be unticked if the user should select the required order date.
Use Customer Default Tax Rate: if this setting is on, SOP Quotes, Sales Orders and SOP Returns will use the default tax rate from the customer.
Automatically Load Existing Orders on Page Load: if ticked, when clicking Existing Quotes, Existing Sales Orders or Existing SOP Returns, all orders for the user logged in will be displayed (with the exception of deleted or archived orders). To improve performance, it is possible to turn this setting off so nothing is displayed automatically and the user can instead use the search filters to find what they require.
Disable Submission of Over Budget Sales Orders: If the setting to check nominal budgets during approval is on, then every sales order line that has nominals has its nominal budget calculated on submission. With this setting turned on, if the line nominal is over budget then it cannot be submitted. This is the same for quotes and SOP returns as well.
Enable Stock Item Price Editing: this setting will prevent users being able to amend the unit price within a Sales Order and the price from Sage will be pulled through for the item.
Change Delivery Address on Customer Change: if an order is started for one customer, their delivery address is picked up. This setting will amend the address if the customer is changed.
Post Sales Order when approved then: select whether anything should automatically happen when the order has been fully approver – allocate, despatch, print or post invoice.
Sales Order Despatched in WAP then: select whether anything should automatically happen when the order has been despatched in WAP – print or post invoice.
Use Sales Order Invoice Date when printing invoice: select if should be using the sales order invoice date.
Use Sales Order Analysis Code for transaction analysis: select this if a specific sales order analysis code is to be used to populate the transaction analysis code when posting to Sage
Sales Order Analysis Code for Transaction Analysis: if the setting above is turned on, pick which analysis code (1 though to 6) WAP should use. When the sales order is posted, NLPend/NLDeferred or NLPosted transaction analysis will be updated with this analysis code.
Use Sales Order Item Detail for Transaction Narrative: if the sales order item detail should be put onto the sales invoice narrative, enable this setting.
Allow Line description to be amended: When entering a stock item, the description will be pulled through from Sage. If this setting is turned on an additional tab will display allowing users to amend the description here and the new description will post through to Sage for this order only.
Discount 1 Label: Free text to specify Discount Name/Label
Discount 2 Label: Free text to specify Discount Name/Label
Discount 3 Label: Free text to specify Discount Name/Label
Hide discount tab: by default, this setting is hidden. If displayed, this shows a discount tab on the stock item entry page which will allow a single discount amount to be calculated and applied using up to 3 custom discount lines (by percent or value). The labels for the 3 discount lines are defaulted to ‘Campaign’, ‘Scale’ and ‘Loyalty’ but can be customised to suit the business need.
Enable Margins on Stock Entry: with this setting turned on, an additional Margins tab is displayed when entering a stock item on an order to display margin information.
Override Margins by Warehouse (requires Sicon Distribution): When calculating and displaying the margin details, if this setting is turned on WAP checks to see if the landed costs are overridden by the warehouse. This is a Distribution setting (whether the warehouse is a landed cost warehouse). If landed costs are used and this setting is off then it will use the stock item landed costs or if there is one, the stock item preferred supplier.
Enable Sales order line ordinal adjustment: This allows the order of the rows to be changed. If selected, an additional icon will appear at the end of the order line to allow rows to be moved up or down as required.
Minimum Gross Margin for Self-Approval of Sales Orders (0 to ignore): Sales orders can be set to automatically if over the tolerance set here. If all the lines have a Gross Margin over the value entered here, the order will self-approve, regardless of any self-approval values. If any line is under the tolerance set here, the order will follow the standard approval route (even if the overall gross margin is over the figure).
Minimum Margin for Self-Approval of Sales Order lines (0 to ignore): Sales orders can be set to automatically if over the tolerance set here. If all the lines have a Mark-up Margin% over the value entered here, the order will self-approve, regardless of any self-approval value. If any line is under the tolerance set here, the order will follow the standard approval route (even if the overall mark-up margin % is over the figure).
Use WAP for all back to back orders: If required, back to back Purchase Orders can be created for stock items in Sage once a sales order has been approved. There are pre-requisites for this setting to work; the stock item must have a preferred supplier and that supplier must have a specific analysis code to create purchase orders from sales order lines. The supplier needs to have an analysis code called ‘WAPSOPB2B’ set to ‘YES’ and the line has to have the fulfilment method of ‘Direct to customer’.
Allow negative values for free text lines: this feature should only be enabled if negative values are to be entered on free text items.
Warn when sales order submitted takes customer balance over their credit limit: If this is ticked, at the point of submitting an order a warning message will appear to warn that the order will take the customer over their credit limit. It is a warning only and the order can still be submitted.
Allow lost sales to be recorded: This functionality is only available with the Distribution module and allows orders to be recorded as lost. The lost order details page will be opened with the line details filled in. Once the reason code (maintained in the Distribution module) has been entered and saved, it will post it to the lost order table in Sage.
14.3. General Tab – Sales Order Columns Banner

Hide New Unit price column: If ticked, an additional column displaying the unit price (gross) will be shown. This will be converted to base currency, so will be different if the sales order is in a different currency from the system base currency.
Hide net base column: If ticked, an additional column displaying the base currency (net) will be shown.
Hide unit price base column: this will show the price in the base currency so if the order is in dollars and the base currency is sterling they may show different amounts.
Hide tax rate column: hides the tax rate on the Sales Order.
Hide discounted price column: If the discount tab has been enabled, this will show any discounted price entered on each line.
14.4. General Tab – Spare Fields Banner

If another application is using Spare Fields in the database for additional analysis options, these can be configured in WAP to appear on Sales order entry. Values will then post through to Sage (but will not be visible to the end user as this is linked to the database only). Rename each field within here if appropriate to assist end users with populating the data in the correct location in the database.
14.5. Pricing Tab – Payment Banner
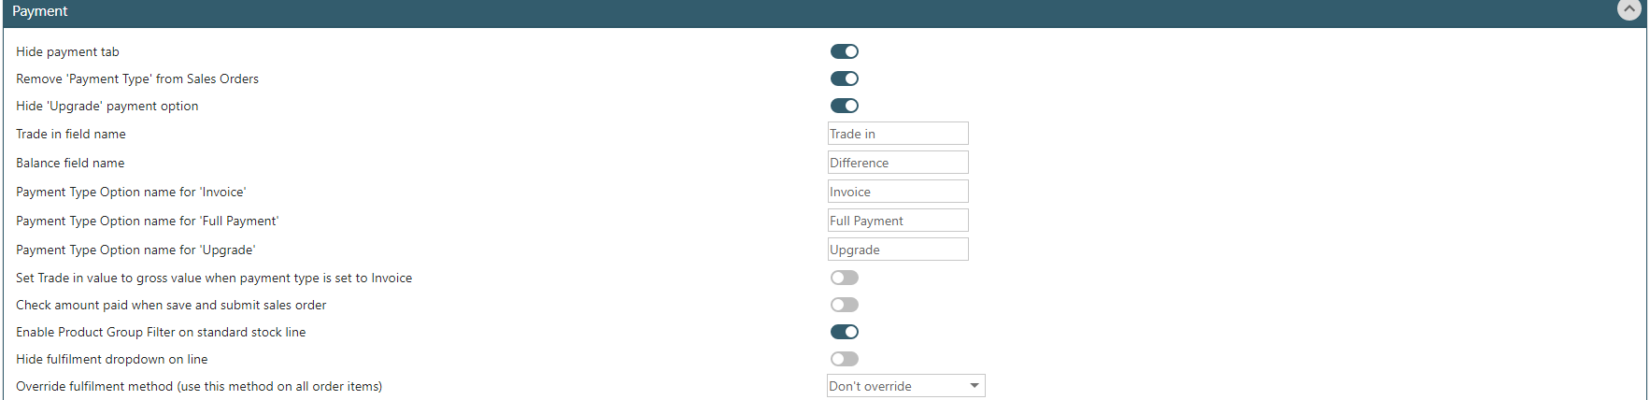
Hide Payment Tab: By default, this setting is hidden. By showing the setting, a payment tab on the sales order will be shown allowing the user to enter a value that has been paid with the order, which posts through to Sage once the order is approved.
Remove ‘payment type’ from Sales Orders: By default, this setting is hidden. By showing the setting, a Payment Type drop-down on the sales order will be shown allowing the user to select whether payment has already been received or is to be invoiced.
Hide ‘Upgrade’ payment option: This setting works in conjunction with the Payment Type setting above and is an additional field that can be selected in the ‘Payment Type’ drop-down.
Trade in field name: This customisable field works in conjunction with the Payment Tab setting above and will be displayed there, with the description chosen here.
Balance field name: This customisable field works in conjunction with the Payment Tab setting above and will be displayed there, with the description chosen here.
Payment Type Option name for ‘Invoice’: This setting works in conjunction with the Payment Type setting above and is a customisable field that can be selected in the ‘Payment Type’ drop-down.
Payment Type Option name for ‘Full Payment’: This setting works in conjunction with the Payment Type setting above and is a customisable field that can be selected in the ‘Payment Type’ drop-down.
Payment Type Option name for ‘Upgrade’: This setting works in conjunction with the settings above and is a customisable field that can be selected in the ‘Payment Type’ drop-down, if enabled.
Set Trade in value to gross value when payment type is set to Invoice: if enabled and using payment options, at point of loading the sales order or changing the payment type to invoice, the Sales order’s trade in value will automatically be set to the gross value.
Check amount paid when save and submit sales order: If using Trade in values, these figures will be checked at point of submitting a sales order. If the trade in value is greater than the gross, a warning will be displayed and the Sales Order cannot be submitted.
14.6. Pricing Tab – Customer Price Band Overrides Banner
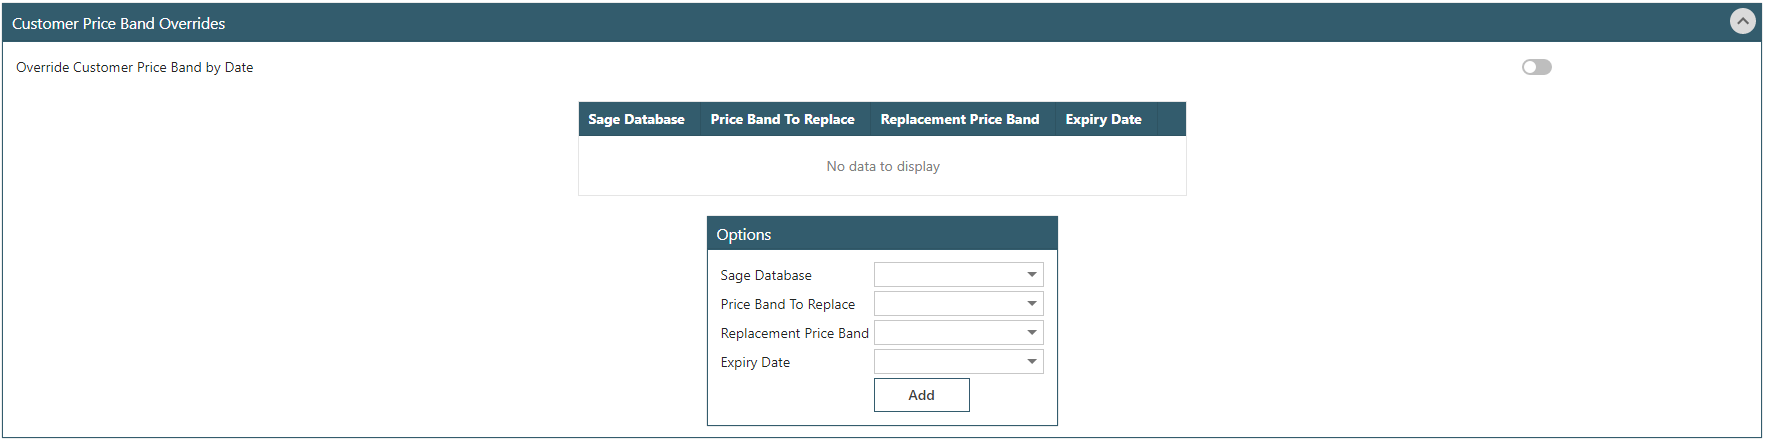
If enabled, WAP will look up the price band for the customers, then check for an override price band based on that price band.
If there is an override configured here, then it will get the item prices for the alternate price band instead of the customer default. This can be useful if doing a limited-time discount. For example, where a price band could be configured for 10% less, with an expiry date on it. Then it would use those prices until that date then revert back to standard prices for the customer.
If there is nothing configured here, WAP will use the best price for an item based on the same logic as Sage 200.
14.7. Analysis Codes Tab
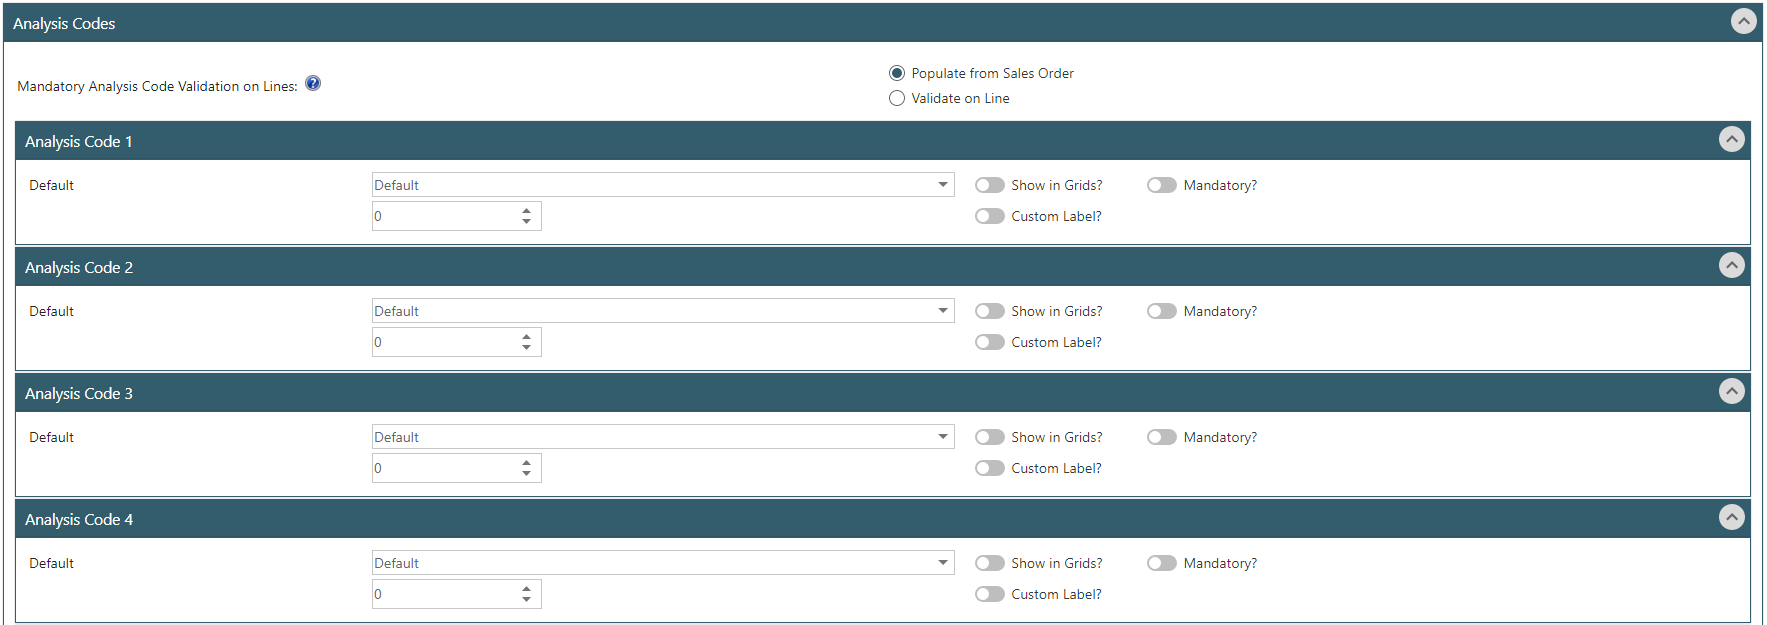
WAP Sales Orders can pull through up to 20 Sage SOP Analysis Codes as required; these are configured in Sage (Accounting System Manager and SOP Maintenance). Selecting Default will populate the sales order with the corresponding code from Sage SOP.
The codes can be marked as Mandatory and if they need to appear on the Existing Sales Orders or Approve Sales Orders grids in WAP, check the ‘Include in Grids’ option. If the code labelling needs to be changed to make it more user friendly, tick the custom label box and enter the new narrative as required.
14.8. Sage Account Tab

Enable Sage Account Creation (when submitting sales order with a prospect account): allows WAP to follow Sage functionality or allow a new account to be created from a prospect account order. With this setting turned on, at point of submitting the sales order an additional pop-up displays for the user to create the customer before the order posts to Sage. If this setting is turned off, orders raised for the Prospect account will post to the Prospect account in Sage.
Default Finance Charge Code (0 for none): if a percentage of the value is to be kept back for financing, enter the percentage here. For most sites this will not be applicable and will remain as 0.
Create default SOP address when generating new customer: legacy setting only relevant for Sage CRM orders. Most sites will not use this. If the setting is selected, when creating a customer, a field shows for the address if the Sage CRM setting for account reference generation is “cap”.
Hide Create Proforma button for quotes: Legacy setting no longer in use.
14.9. Quotes Tab – Display Banner

Display – Header
Show Customer Order Number: Displays the Customer Order No. field on the main header screen when entering a new quote in WAP. This is an optional free text field.
Show Requested Delivery Date: Displays the Requested Delivery Date field on the main header screen when entering a new quote in WAP. If hidden, the document date will be used.
Show Promised Delivery Date: Displays the Promised Delivery Date field on the main header screen when entering a new quote in WAP. If hidden, the document date will be used.
Display – Lines Grid
Show New Unit Price: Displays a column for New Unit Price when viewing a quote, in the grid under the Values Tab.
Show Discount %: Displays a column for Discount % when viewing a quote, in the grid under the Values Tab.
Show Discount Value: Displays a column for Discount Value when viewing a quote, in the grid under the Values Tab.
Show Discount Price: Displays a column for Discount Price when viewing a quote, in the grid under the Values Tab.
Display – Lines – Free Text
Show Unit Cost: Displays a field for users to enter the Unit Cost in the Free Text Line entry on a quote.
Show Discount %: Displays a field for users to enter a Discount Percent in the Free Text Line entry on a quote.
Show Selling Price Unit: Displays a field for users to enter the Selling Price Unit in the Free Text Line entry on a quote.
Show Delivery Date: Displays the Delivery Date on when entering a Free Text Line on a quote. This will be pulled through from the header and can be overridden if displayed.
Show Tax Code: Displays the Tax Code when entering a Free Text Line on a quote. This will be pulled through from the Sales Ledger Account in Sage and can be overridden if displayed.
Show Nominal Tab (Use Customer or Project Default if not visible): Displays the Tax Code when entering a Free Text Line on a quote. This will be pulled through from the default on either the Project and Project Header, or from the Sales Ledger Account in Sage, and can be overridden if displayed, depending on User permissions and access.
Display – Lines – Stock
Show Unit Cost: Displays a field for users to enter the Unit Cost in the Free Text Line entry on a quote.
Show Fulfilment Method: Displays Fulfilment which can be overridden if displayed.
Show Stock Movement: Displays the stock movement tab. The Stock Movement tab allows the user to view the Sage availability and movement of the stock item selected.
Show Tax Code: Displays the Tax Code when entering a Free Text Line on a quote. This will be pulled through from the Sales Ledger Account in Sage and can be overridden if displayed.
Show Nominal Tab (Use Stock or Project Default if not visible): Displays the Tax Code when entering a Free Text Line on a quote. This will be pulled through from the default on either the Project and Project Header, or from the Sales Ledger Account in Sage, and can be overridden if displayed, depending on User permissions and access.
14.10. Quotes Tab – Functionality Banner

Allow Edit of Historic Versions (Sage CRM Only): only relevant for sites using CRM for WAP Sales Orders. With this setting turned on, any old quotes against the same Case ID will have editing disabled. You can still convert Old versions of a quote can still be converted to a sales order.
Allow existing Quote details to be copied: allow users to copy an existing quote to create a new quote.
Retain quote dates when converting to Sales Order: if ticked, the dates used on the quote will be pulled through at the point of converting a Quote to a Sales Order.
Enable Submission: if quotes are only to be recorded but do not need to be submitted for approval or sent to customers, disabling Save and Submit will mean that quotes will remain in the ‘New’ tab within WAP only once saved. They cannot be printed and sent to customers or converted into Sales Orders.
15. System Settings - Timesheets
System Settings relating to the Timesheet module are accessed under System Settings banner – Timesheets.
15.1. General Tab – Display Banner
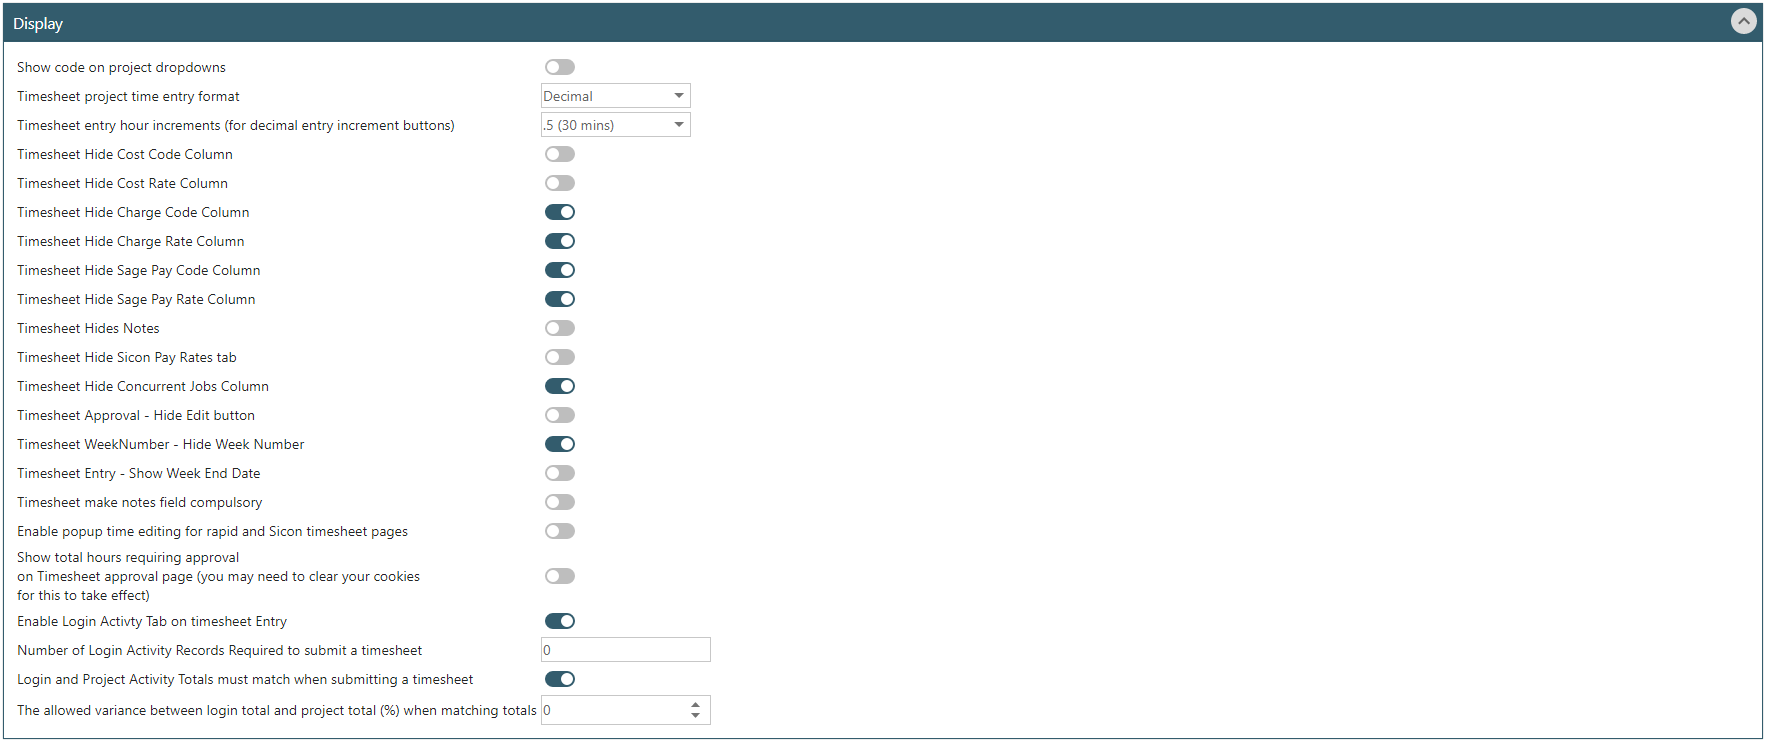
Show code on project dropdowns: untick if the project code should not be visible to the user when selecting a project on a timesheet line.
Timesheet project time entry format: hours recorded against a project on a timesheet line can either be logged as decimal (e.g. two and a half hours recorded as 2.5), start/end time (e.g. two and a half hours recorded as 10:00 – 12:30) or hours/minutes (e.g. two and a half hours recorded as 2.30).
Timesheet entry hour increments (for decimal entry increment buttons): if entering time in decimal formats, this will be the amount the time is increased or decreased using the buttons on entry.
Timesheet Hide Cost Code column: this will show or hide the cost code column; if shown, the user will be able to see cost rates assigned to the user, e.g. Normal/Overtime.
Timesheet Hide Cost Rate Column: this will show or hide the cost rate column; this will display cost figures to the user. This will be hidden for the majority of sites.
Timesheet Hide Charge Code Column: this will show or hide the charge code column; if shown, the user will be able to see charge rates, e.g. Normal/Overtime. This will be hidden for the majority of sites.
Timesheet Hide Charge Rate Column: this will show or hide the charge rate column; this will display charge rates to the user. This will be hidden for the majority of sites.
Timesheet Hide Sage Pay Code Column: this will show or hide the pay code column; this will display pay codes to the user, e.g. Normal/Overtime. This will be hidden for the majority of sites.
Timesheet Hide Sage Pay Rate Column: this will show or hide the pay rate column; this will display pay rates to the user. This will be hidden for the majority of sites.
Timesheet Hide Notes: configure if the notes tab should be hidden on timesheet entry.
Timesheet Hide Sicon Pay Rates tab: configure if the Sicon pay rates tab should be hidden on timesheet entry.
Timesheet Hide Concurrent Jobs Column: if unticked, a column will show on the timesheet entry page that will show the number of concurrent jobs booked onto at the same time. This will be for users recording activity on jobs through the T&A terminals.
Timesheet Approval – Hide Edit button: this will remove the option to allow approvers to edit a timesheet while waiting their approval.
Timesheet Week Number – Hide Week Number: if the week numbers should not show to a user when they are inputting their timesheet, tick this option.
Timesheet Entry – Show week end date: if the week end date should show to a user when they are inputting their timesheets, tick this option. By default, the user will always be able to see the week start date.
Timesheet make notes field compulsory: if this is ticked, the user must enter notes when entering a timesheet line.
Enable popup time editing for Rapid and Sicon timesheet pages: if configured, users can click the time entry to open pop-up and change hours or notes. If users shouldn’t be able to do this and should make changes but editing the line, disable here.
Show total hours requiring approval on Timesheet approval page: this will add an extra column on the Approval page showing the total hours requiring approval. By default, this setting is not configured.
Enable Login Activity Tab on timesheet entry: enable this tab if users are expected to record their log in and out time.
Number of Login Activity Records requires to submit a timesheet: if required, set how many login lines must be recorded before a user can submit their timesheet.
Login and Project Activity totals must match when submitting a timesheet: configure this if it is mandatory for the user’s login times to match their time recorded against a job/project.
The allowed variance between login total and project total (%) when matching totals: if a variance is allowed between total login time and job/project time, enter this percentage figure here.
15.2. Functionality – General Banner
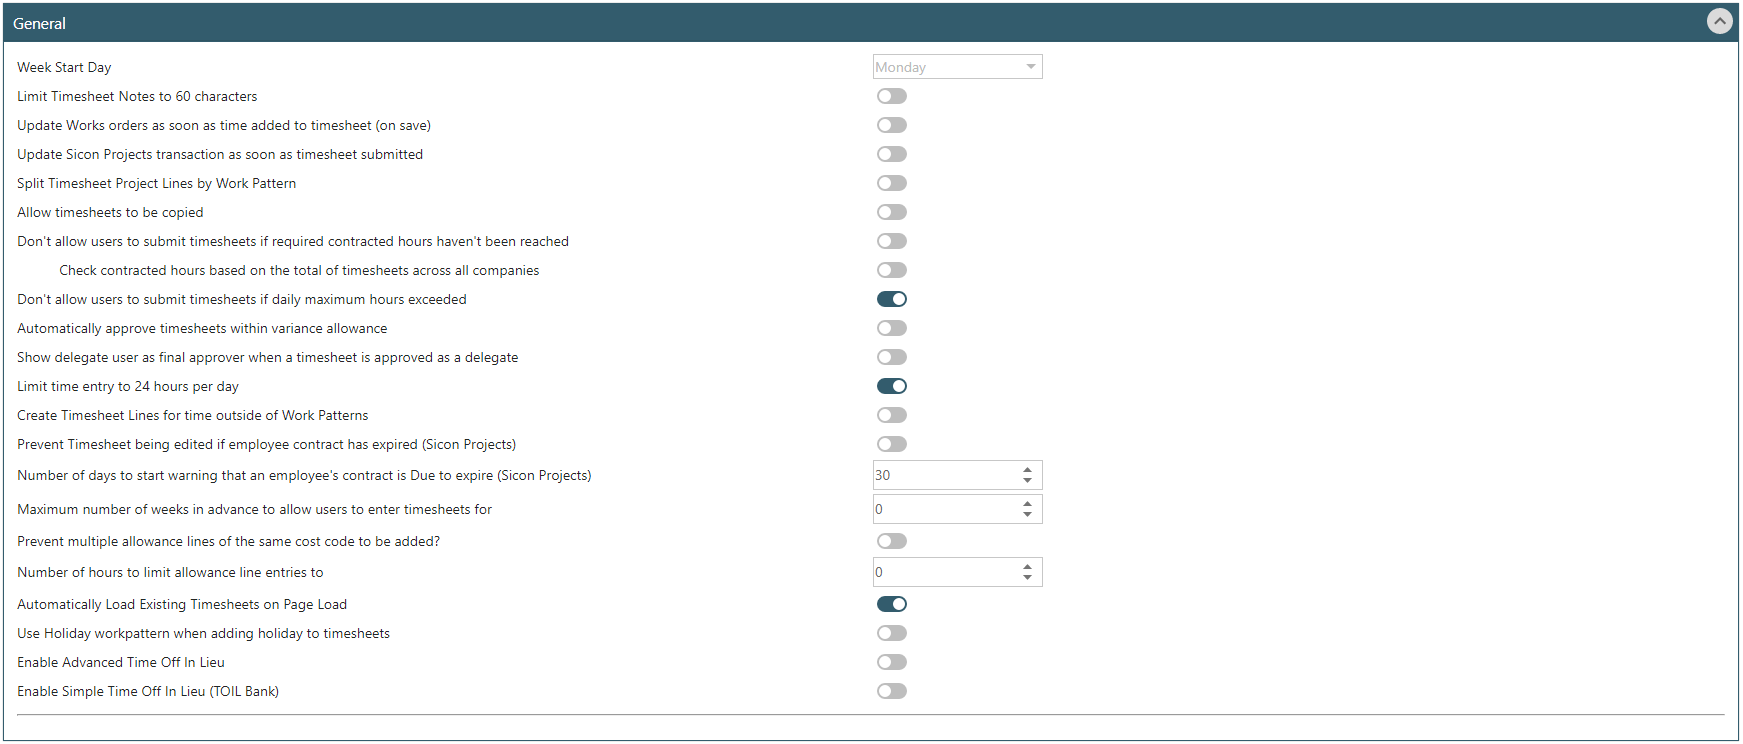
Week Start Day: this denotes which day the timesheet should start on. N.B. this setting cannot be changed if work patterns have been created.
Limit Timesheet notes to 60 characters: configure this if the notes field should be limited.
Update Works orders as soon as time added to timesheet (on save): the hours will post through to the appropriate Works Order as soon as the user saves the timesheet.
Update Sicon Projects transaction as soon as timesheet submitted: if enabled, the labour transactions will appear as committed costs when the timesheet is submitted for approval and update to an actual cost when fully approved.
Split Timesheet Project Lines by Work Pattern: this setting should be enabled if ‘Automatic selection of cost rate based on standard timesheet work pattern’ functionality is required.
Allow timesheets to be copied: if enabled, this will allow users to copy an approved timesheet from one week to another.
Don’t allow users to submit timesheets if required contracted hours haven’t been reached: a user’s contracted hours are set on their WAP user profile; if this setting is configured, they won’t be able to submit their timesheet until these hours have been reached.
Check contracted hours based on the total of timesheets across all companies: if users are submitting timesheets across multiple Sage companies, check this setting if the contacted hours check is to be done across multiple companies.
Don’t allow users to submit timesheets if daily maximum hours exceeded: daily maximum hours can be entered on their WAP user profile; if this setting is configured, a user cannot submit their timesheet if their daily hours have gone over their maximum allowance.
Automatically approve timesheets within variance allowance: an allowed variance can be setup to allow timesheets to be processed if the time logged on the ‘Login Activity’ tab compared to the time logged against a project is within a certain percentage. If the setting ‘Login and Project activity totals must match when submitting a timesheet’ is checked, the variance allowance is used to check if a timesheet can be manually submitted. If ‘Auto Submit Timesheets’ is being used, this setting is overridden and timesheet lines that are not within the allowed variance can be set to go to different approval routes to allow a moderator or team leader to adjust the times against the project.
Show delegate user as final approver when a timesheet is approved as a delegate: if a delegate is used to approve a timesheet, the final approver will change to show the delegate user instead of the standard approver.
Limit time entry to 24 hours per day: if this is configured, users won’t be able to enter more than 24 hours on a day.
Create Timesheet lines for times outside of work patterns: additional lines will be created for hours logged that are not picked up by a work pattern.
Prevent Timesheet being edited if employee contract has expired (Sicon Projects): a contract expiry date can be recorded on the Employee details in Sicon Projects so that within WAP the timesheet cannot be edited if their contract has expired.
Number of days to start warning that an employee’s contract is due to expire (Sicon Projects): if a contract expiry date has been recorded on the Employee details in Sicon Projects, a warning banner can appear when a user creates or submits a timesheet in WAP a certain number of days prior to their contract expiry date.
Maximum number of weeks in advance to allow users to enter timesheets for: a value can be set here if users should not be allowed to enter their timesheets far in advance.
Prevent multiple allowance lines of the same cost code to be added: this can be enabled if users are only allowed to add one allowance line at a certain allowance cost code per timesheet; i.e. if users can only claim one overnight allowance per day.
Number of hours to limit allowance line entries to: the number of allowance hours entered on a timesheet can be limited as required.
Automatically load existing timesheets on page load: for speed reasons this can be disabled; i.e. if the existing timesheets page is taking a long time to load up all timesheets.
Use Holiday work pattern when adding holiday to timesheets: by default, the holiday hours approved through WAP holiday module will post to users’ timesheets based on their timesheet work pattern, but if required, this setting can be enabled to pick up the hours from the holiday work pattern. For example, if a user’s standard timesheet work pattern is for Monday 5 hours, Tuesday 4 hours and Wednesday 5 hours, and the user books a Monday – Wednesday holiday, their holiday work pattern can be set as 4.25 hours on each day to average the hours accordingly.
Enable Advanced Time off In Lieu: switch on if a site is to be using Advanced TOIL (please see TOIL section for more information on Advanced vs Simple TOIL).
Enable Simple Time Off in Lieu (TOIL Bank): switch on if a site is to be using Simple TOIL (please see TOIL section for more information on Advanced vs Simple TOIL).
15.3. Functionality – Automation Banner

Day of the week to process automatic timesheet functions: the day required for timesheets to be automatically submitted or for automatic notifications to be emailed out.
Time of day to process automatic timesheet functions: the time of the day for timesheets to be automatically submitted or for automatic notifications to be emailed out.
Auto submit timesheets: once enabled, configure the day and time to auto submit timesheets.
Automatically notify users that haven’t submitted a timesheet: tick to notify users that haven’t submitted a timesheet.
Number of weeks previous to current date to check for unsubmitted timesheets: enter the number of previous weeks to remind users about unsubmitted timesheets.
Earliest date to check for unsubmitted timesheets: enter the earliest date to check for unsubmitted timesheets.
15.4. Functionality - Time & Attendance Banner
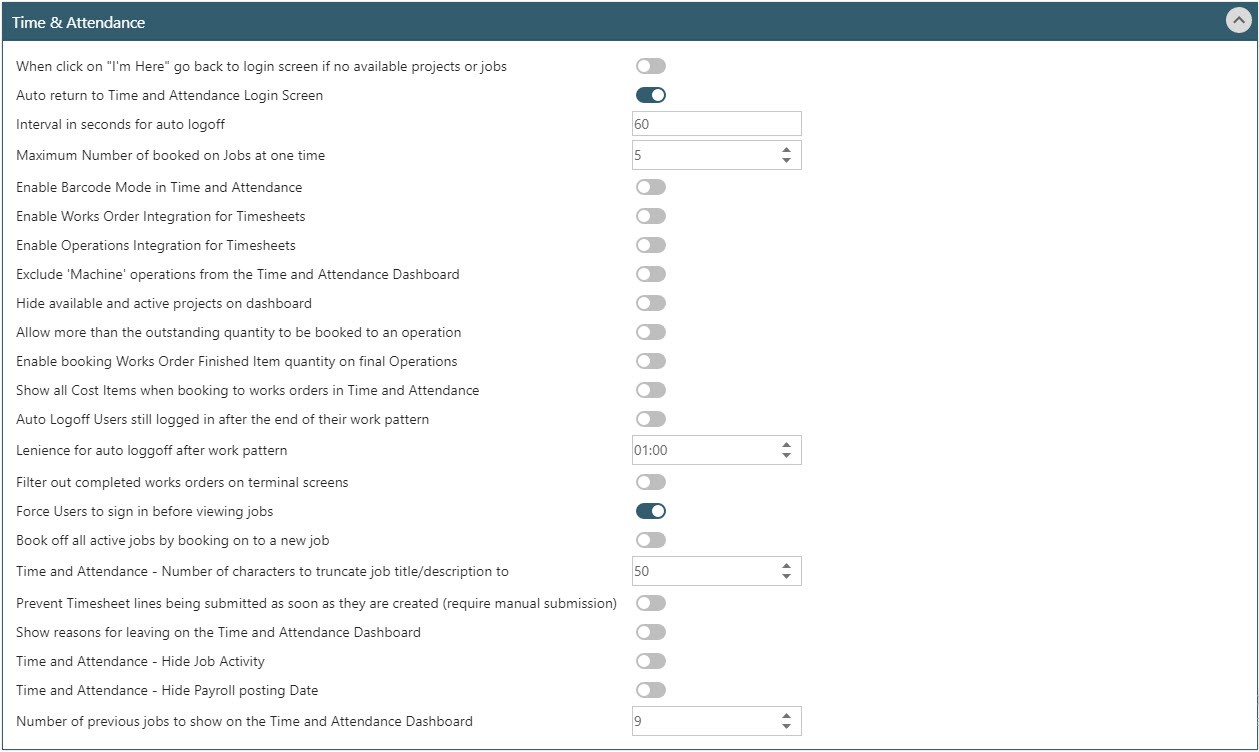
When click on “I’m here” go back to the login screen if no available projects or jobs: if required, this can be configured for users to be taken back to the login screen if no jobs are available to select once logged in.
Auto return to Time & Attendance Login screen: if a user does not select a job within set time period after login, the screen will return to the login screen.
Interval in seconds for auto logoff: set as required the auto logoff duration.
Maximum number of booked on jobs at one time: set if required the number of jobs that a user can book onto at one time.
Enable Barcode mode in Time & Attendance: if required, users can log onto a job by scanning a barcode.
Enable Works Order Integration for timesheets: set if required to link WAP to Works Orders within Sage.
Enable Operations Integration for timesheets: enable to allow user to view all operations when selecting a works order.
Exclude ‘Machine’ operations from the Time & Attendance dashboard: if enabled, only labour operations will be visible to the user.
Allow more than the outstanding quantity to be booked to an operation: by default, users are not allowed to book a quantity greater than the quantity outstanding, configure this if this functionality is required.
Enable booking Works Order finished item quantity on final operations: by default, a user can’t enter the Works Order finished item quantity; if this setting is enabled, an additional pop-up is shown to the user when booking off a final operation on a Works Order to record the quantity. Works Orders will not be booked in via Time & Attendance.
Show all cost items when booking to works orders in Time & Attendance: if not enabled, users can be limited as to what cost items they can see.
Auto Logoff users still logged in after the end of their work pattern: if required, users can be automatically logged off if still logged in once their work pattern has finished.
Lenience for auto logoff after work pattern: used in conjunction with the above setting; set in hours the time to automatically log off a user still logged in once their work pattern has finished.
Filter out completed works orders on terminal screens: if required, only works orders that have not been completed will be shown.
Force users to sign in before viewing jobs: users must log in before being able to view available jobs.
Book off all active jobs by booking onto a new job: the user will automatically be signed off a job when logging onto a new job.
Time & Attendance – number of characters to truncate job title/description to: use this setting if there are jobs with long titles or descriptions.
Prevent Timesheet lines being submitted as soon as they are created: if not configured, the timesheet will need to be manually submitted.
Show reasons for leaving on the Time & Attendance dashboard: configure to show to the user the configured reasons for leaving.
Time & Attendance – hide job activity: configure to hide the job activity from the time and attendance screen.
Time & Attendance – hide payroll posting date: configure to hide the payroll posting date from the time and attendance screen.
Number of previous jobs to show on the Time & Attendance dashboard: configure the number of previously logged on jobs the user can see on their dashboard once logged in.
15.5. Functionality – Costing Banner
These settings are only visible if linking WAP with Sicon Projects.

Use ‘TimesheetHours’ work pattern to split timesheet lines by cost rate: this setting should be enabled if ‘Automatic selection of cost rate based on a timesheet hour work pattern’ functionality is required.
For Sicon Projects, divide time of jobs if booked at the same time: total time logged against multiple projects will be split out and posted to the projects. This is only applicable if booking time through the T&A terminals and users are allowed to book onto multiple projects at a time.
Use Sicon Projects Work Patterns for Timesheet entry: if configured, work patterns should be created in Job Costing that are used by employees.
Timesheets entered by a Sicon Projects team leader create transactions for the whole team: if a user who is marked as a Team Leader submits a timesheet in WAP, this can automatically create timesheets for each member of their team.
Process missing holiday timesheet lines from past timesheets: if added additional bank holidays, if this setting is configured the new holiday lines will be added to the users’ timesheets.
15.6. Reasons for Leaving Tab
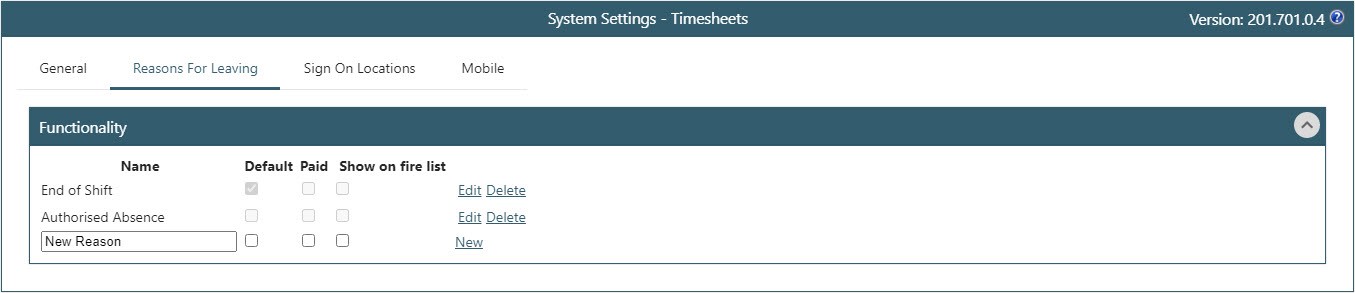
Create reasons for leaving that will be visible to users when logging out at the end of their shift; this is only required if recording time through the T&A terminals.
15.7. Sign on Locations Tab
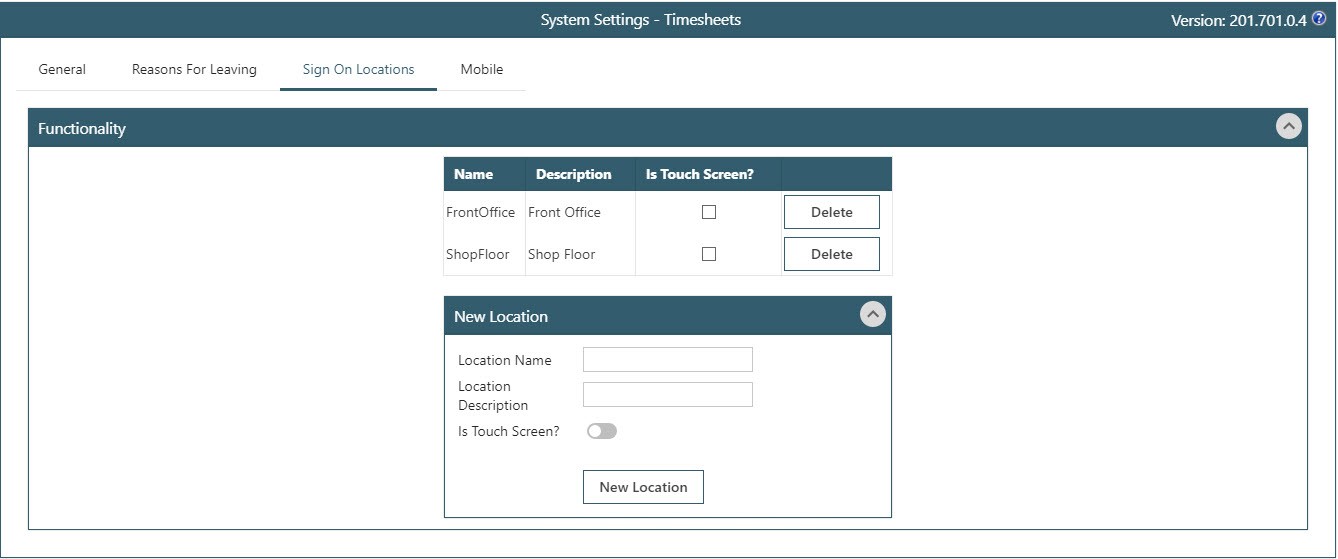
Create locations to be used for the T&A terminals. The location name must contain no spaces (i.e. “FrontOffice”) but the location description can (i.e. “Front Office”). Click New Location to save the location prior to saving the main System Settings.
15.8. Mobile

If required, a signature can be entered before a timesheet is submitted for approval on the app which will then show as an Attachment to the approver.
16. System Setup - Analysis Labels
WAP Analysis labels sit within WAP and if linked to a document type, will not post through to Sage 200. WAP analysis labels provide additional reporting fields and can be set per document type and if applicable, at either a parent or item level. These analysis labels can be set to show on reports if required. Text labels will allow the user to enter free text into the box and check box labels will allow the user to tick a check box. Some document types may only allow either text or check box labels, not both.
Example 1 – Analysis Labels on Requisitions
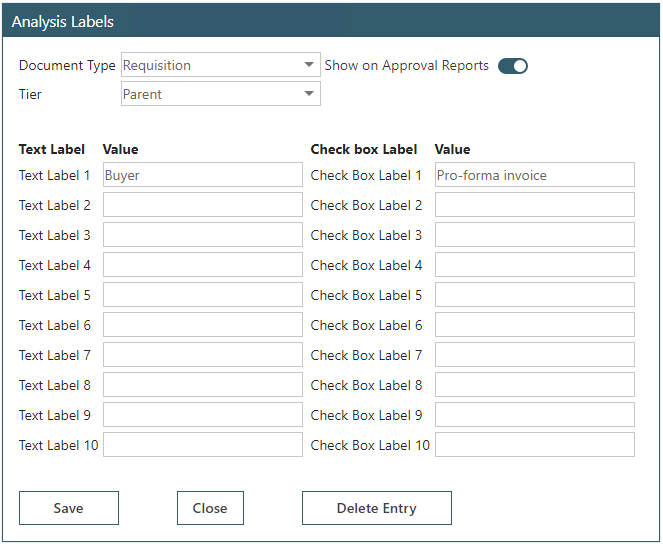
The above example will appear on the Justification tab when entering a requisition.

If a requisition has an additional analysis field applied, an icon will appear in the Flags column on the summary grid tables and approval grid pages.

Example 2 – Analysis Labels on Users
These can be used to keep a record of users’ leave dates, whether a user is a first aider or an internal team the user belongs to.
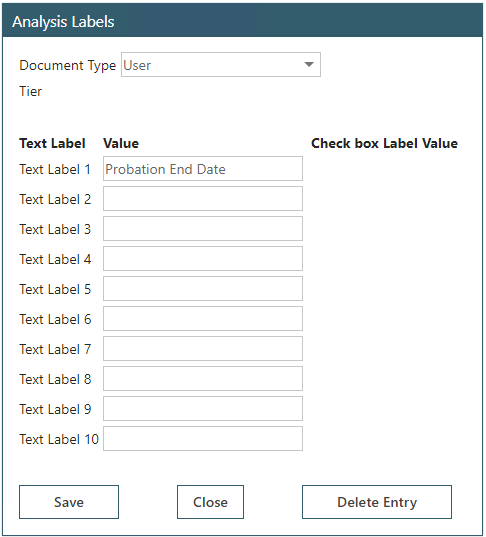
These analysis codes will be visible under the Person Details tab on the user profile; only free text fields can be configured against the User.
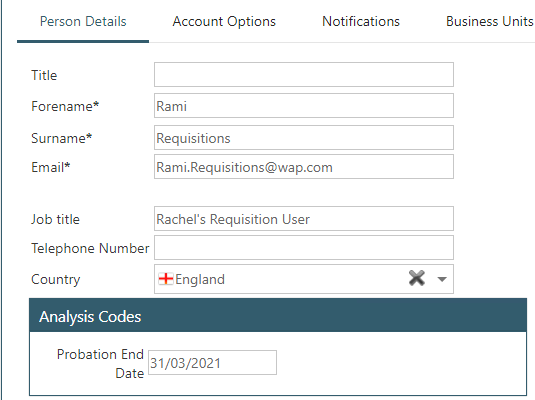
If a user has an analysis code configured, these will show on the user grid which can then be exported if required. Although 10 analysis codes can be configured against a User profile, only the first two will show on the user grid.

Example 3 – Analysis Labels on Timesheets
These can be used for users to record additional information on users’ timesheets that only requires tracking within WAP. For example, if the country a user has completed work for on the line, an analysis label can be created for this:
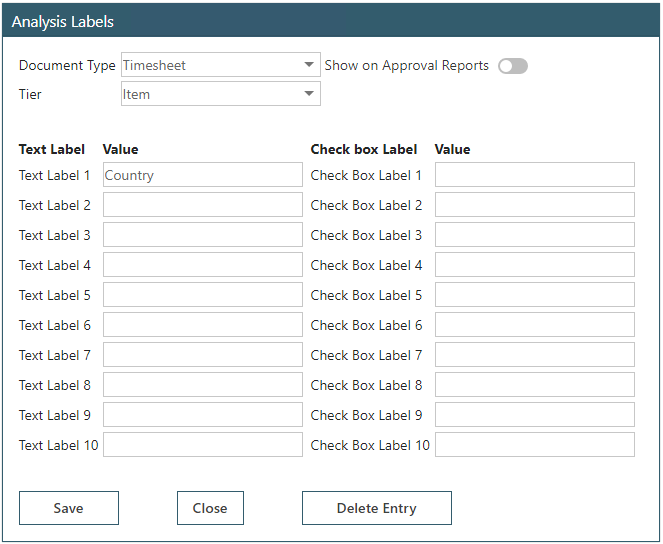
This will then be visible for users to enter as free text when users enter their Timesheets (this will only show on standard timesheet entry screens, not rapid timesheet entry screen):
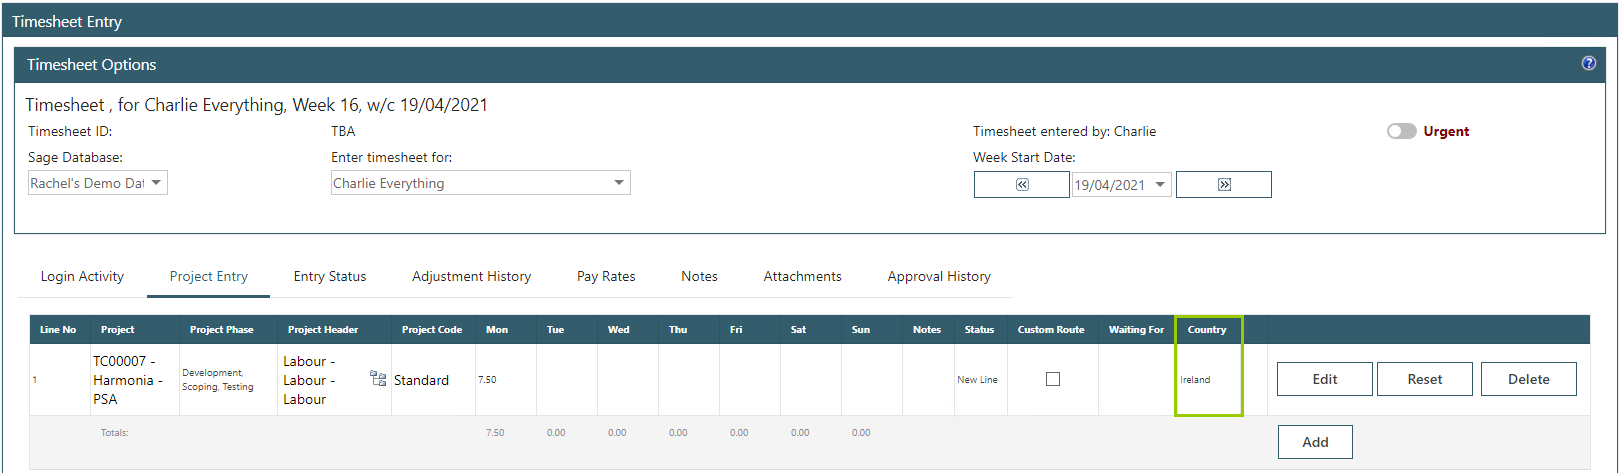
17. System Setup - Calendar Labels
If the HR module has been enabled, this option will appear relating to the HR calendar; various events will be shown with default colours assigned to each but these can be changed if needed.
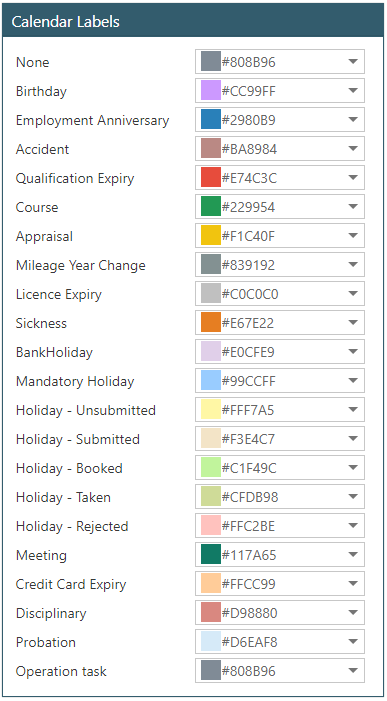
18. System Setup - Countries and Cities
These are used by the Expenses module if Subsistence grades and rates are to be enabled, or countries used by the Holidays module to configure bank holidays.
See our WAP Expenses Help and User Guide and our WAP Timesheets Help and User Guide.
19. System Setup - Credit Cards
This is where credit cards would be configured used by the Expenses module.
20. System Setup - Delivery Address Stock Items
Delivery addresses for specific stock items can be set here; when a requisition is raised against a set delivery address, only applicable stock items will be available for the user to select from. This works in conjunction with the Requisition System Setting ‘Allocate stock items by WAP delivery address’.
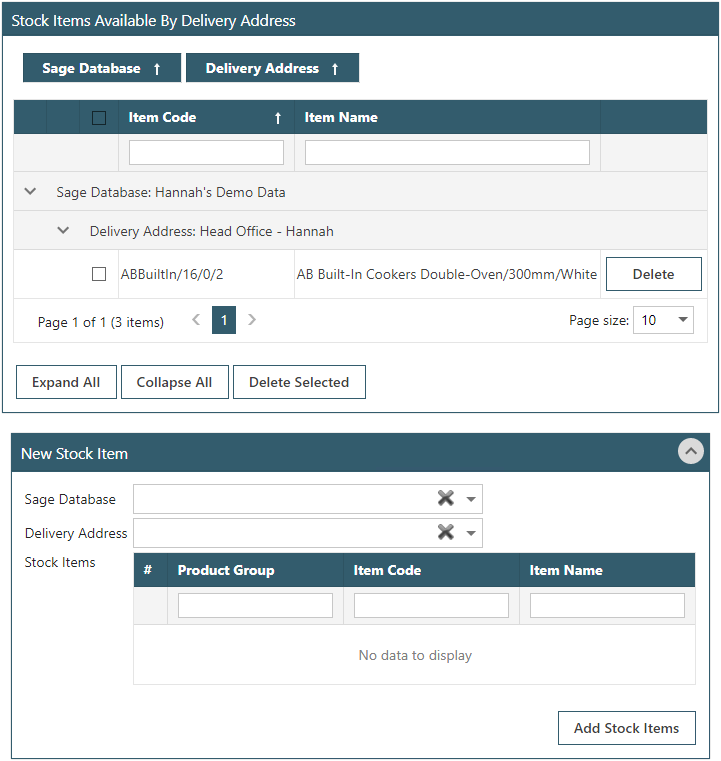
21. System Setup - Delivery Addresses
Delivery and invoice addresses need to be created for users raising requisitions within WAP. Configure default addresses before linking a Sage Company through to a user to ensure the default delivery and invoice address is associated with that user. Users will not be able to enter a requisition until a delivery and invoice address is selected.
Addresses which are ‘Not Sage Database Related’ will be available to use against all requisitions that are raised in the system, across all Sage Companies. Addresses can be linked to a particular Sage Company if they should not be available across all Sage Companies or have specific company names per Sage company.
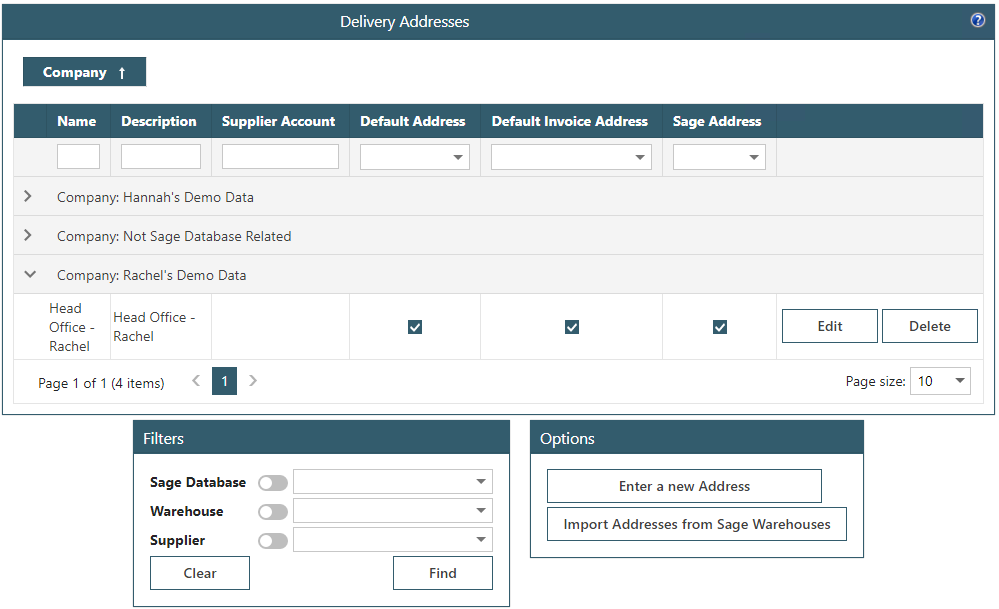
Enter a new Address: click to add a new address.
Import addresses from Sage warehouses: addresses or locations can be imported for each Sage 200 Company. If used in conjunction with the filters on the left hand-side, this setting can also be used to update existing warehouse addresses if these have been changed in Sage since being imported to WAP. Select the Sage Database and Warehouse to be updated, then click the import button to update that specific warehouse address.
Free text delivery addresses are also an option for users if configured within System Settings – Requisitions.
When adding a new address:
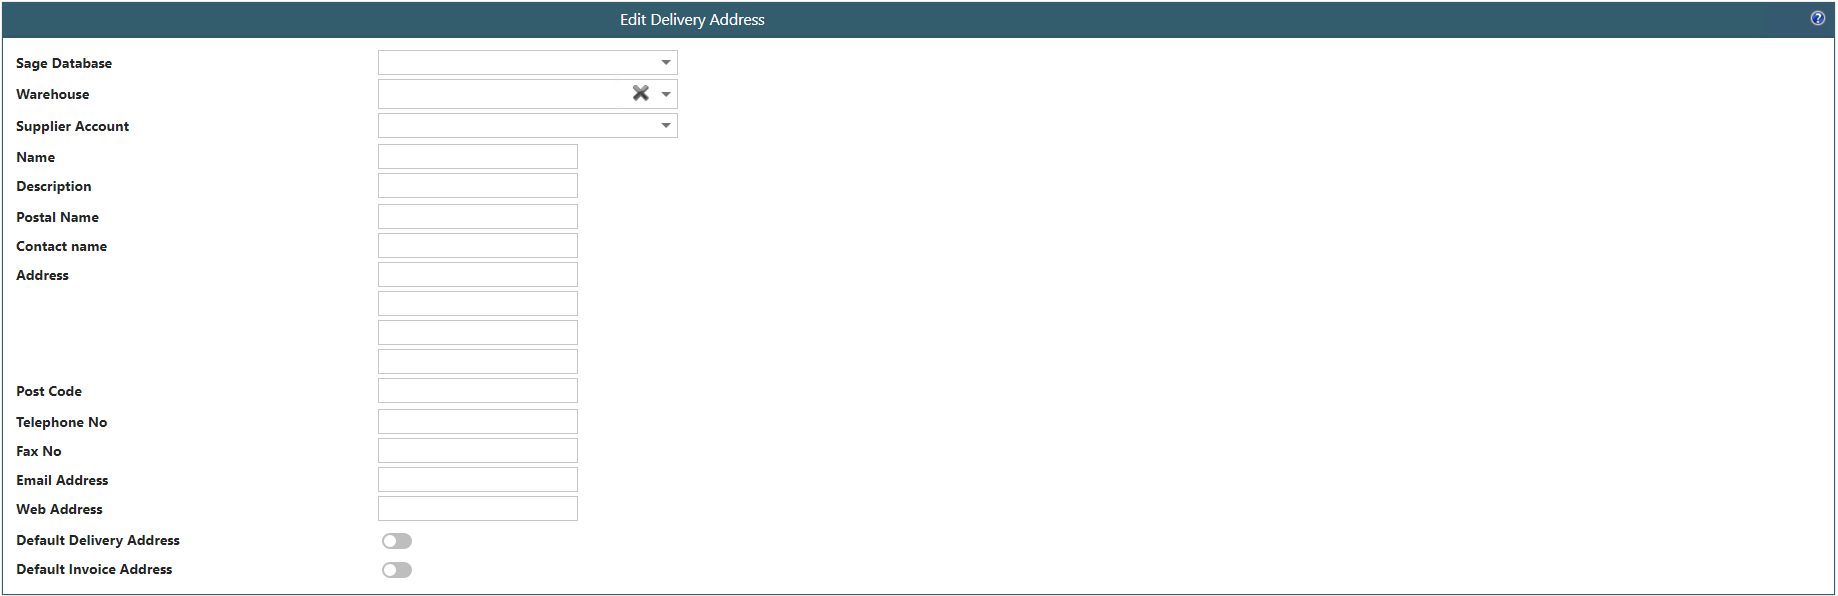
Sage Database: choose to link the address either to a specific Sage Company or set that the address is not related to a company.
Warehouse: if the address should only be linked to a particular warehouse, select from the drop-down list. Leave blank if the address is available regardless of the warehouse on the requisition. A warehouse can only be picked if linked to a particular Sage Company.
Supplier Account: if the address should only be linked to a particular supplier, select from the drop-down list. Leave blank if the address is available regardless of the supplier on the requisition. A supplier can only be picked if linked to a particular Sage Company.
Name: enter the name of this address; this would usually be the Company name. This is a mandatory field.
Description: enter a description of this address; this will be visible when entering a requisition so ensure the description will allow the user to pick the correct delivery address. This is a mandatory field.
Postal Name: enter the Postal Name; this will be configured to appear on the PO to the supplier so ensure the correct Company name is entered.
Contact Name: if applicable, enter a contact name that should appear on the PO to the supplier. This can be left blank if not required.
Address: use the four free text boxes to enter the correct address. At least one line must be entered per address.
Post Code: enter the post code; this is a mandatory field.
Telephone No: if applicable, enter a telephone number. This can be configured to show on the PO to the supplier but is not a mandatory field.
Fax No: if applicable, enter a fax number. This can be configured to show on the PO to the supplier but is not a mandatory field.
Email Address: if applicable, enter an email address. This can be configured to show on the PO to the supplier but is not a mandatory field.
Web Address: if applicable, enter a web address. This can be configured to show on the PO to the supplier but is not a mandatory field.
Default Delivery Address: tick if this should be the default delivery address either for the Sage Company selected or across all Companies. There should be one default invoice address per Company or across all Companies.
Default Invoice Address: tick if this should be the default invoice address either for the Sage Company selected or across all Companies. There should be one default invoice address per Company or across all Companies.
22. System Setup - Document Type Reminders
Reminders can be set to be sent to users linked to a particular document type; users will receive the reminder if they have the permission to be able to submit that document type.

To add a new reminder, choose configuration and click to ‘Add’.
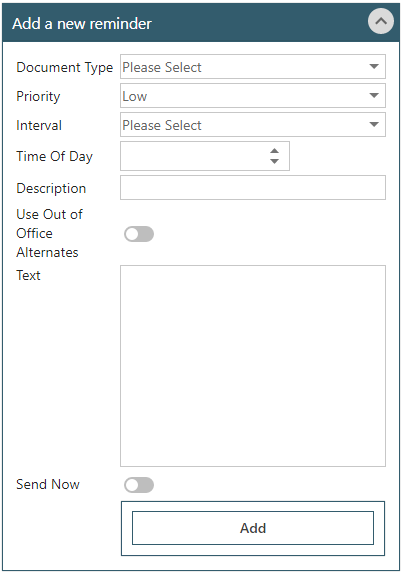
Document Type: select from the drop-down list the correct document type; e.g. invoice, expense, timesheet etc.
Priority: select the priority level that should show on the WAP homepage; either Low, Normal, High or Urgent. High or Urgent priorities will be shown in red on the user’s homepage.
Interval: select the correct interval, either weekly or monthly. Depending on interval selected, either the day of the week or day of the month will then need to be selected.
Day of Month/Day of Week: depending on interval chosen, either the day or week will need to be selected. If the interval is set as monthly, the day cannot be set as further than the 28th day of the month.
Time of Day: enter the time of day the email should be sent.
Description: enter a description; this will be the email subject.
Use Out of Office Alternates: if configured and a user has their Out of Office switched on in WAP, the document reminder will be sent to their out of office alternate user.
Text: enter text as required; this will be the email text.
Send Now: tick to send the notification email straight away. If not ticked, the email reminder will be sent based on the interval and time configured.
Depending on document type selected, users will receive an email when specified and also see a reminder on their WAP homepage.
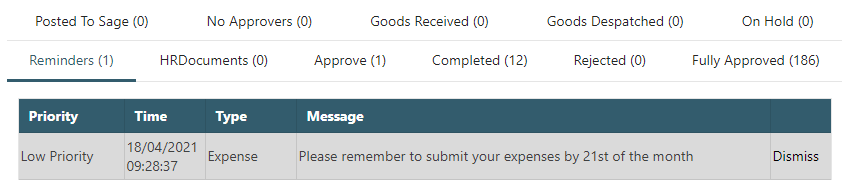
Examples of document reminders being set up:
- Weekly reminder to submit timesheets; one could be configured to be sent on Friday afternoon and also another configured on Monday morning.
- Weekly or monthly reminder to ensure expense claims are completed and submitted prior to the expense cut off.
- Weekly or monthly reminder if credit card statements have been imported.
- Monthly reminders to ensure invoices are approved prior to month end.
23. System Setup - Email Threads
System email threads dictate how often notifications are emailed to users. Please ensure that the Sicon WAP Service is restarted following any changes being made to the threads. By default, there will be three threads created on initial WAP install; Daily, Hourly and URGENT.
- The Daily thread is intended as a daily reminder to users containing all notifications – the option to send previously sent items is ticked.
- The Hourly thread is intended to show the user any new documents that are either awaiting approval or have been approved – the option to send previously sent items is not ticked.
- The Urgent thread is a system thread used when a user marks a document as urgent and cannot be deleted. The Welcome Email thread uses the Urgent Email thread so if users have not received a welcome email, make sure the Urgent Email thread has been configured correctly.
To make changes to a thread, click Edit or click to add a new email thread. Ensure there are no threads configured with no notification options ticked as this can prevent emails being sent out.

23.1. Interval Tab
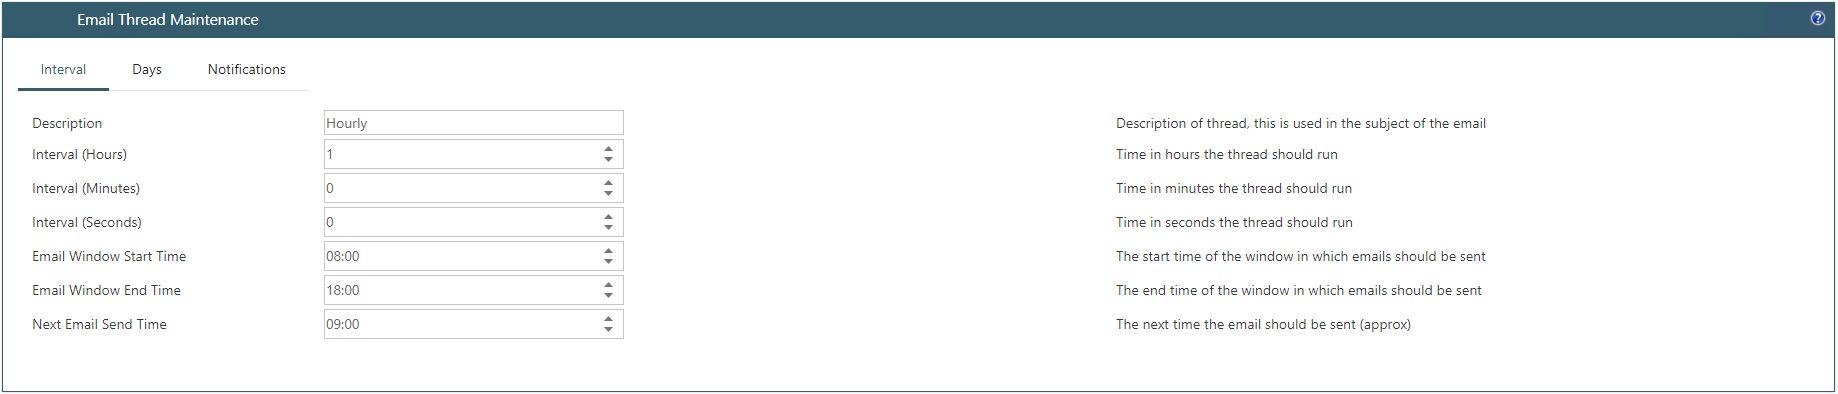
The interval is determined by the ‘Interval’ and the ‘Next Email Send Time’. In the example above the service will try and send emails every hour after 09:00, as that time falls within the Email Window Start Time (08:00) and the Email Window End Time (18:00); if there are new notifications for the user, the email will be sent.
If the interval was set at 30 minutes (rather than one hour), the service would try and send the email every 30 minutes after the Next Email Send Time. If that time falls within the Email Window Start and End Time, emails will be sent. If the setting for ‘Send Previously Sent Items’ is on (as configured under the Notifications tab), the user could potentially receive the email twice in a window of one hour.
If the interval is configured to be either minutes or seconds, the system will keep trying to send the email at that interval but will only send emails when that time overlaps with the Window Start and End time. The next send time gets updated after an email is sent, which is done by the service’s email process. The first time the email process runs after the next send time, but within the window, the thread’s next send time gets updated (by adding the thread’s interval to the current next send time).
If ‘Send Previously Sent Items’ is on, users will get emails until the notification is dismissed in WAP or the action is completed.
23.2. Days Tab

Configure the days the notification emails should be sent on.
23.3. Notification Tab
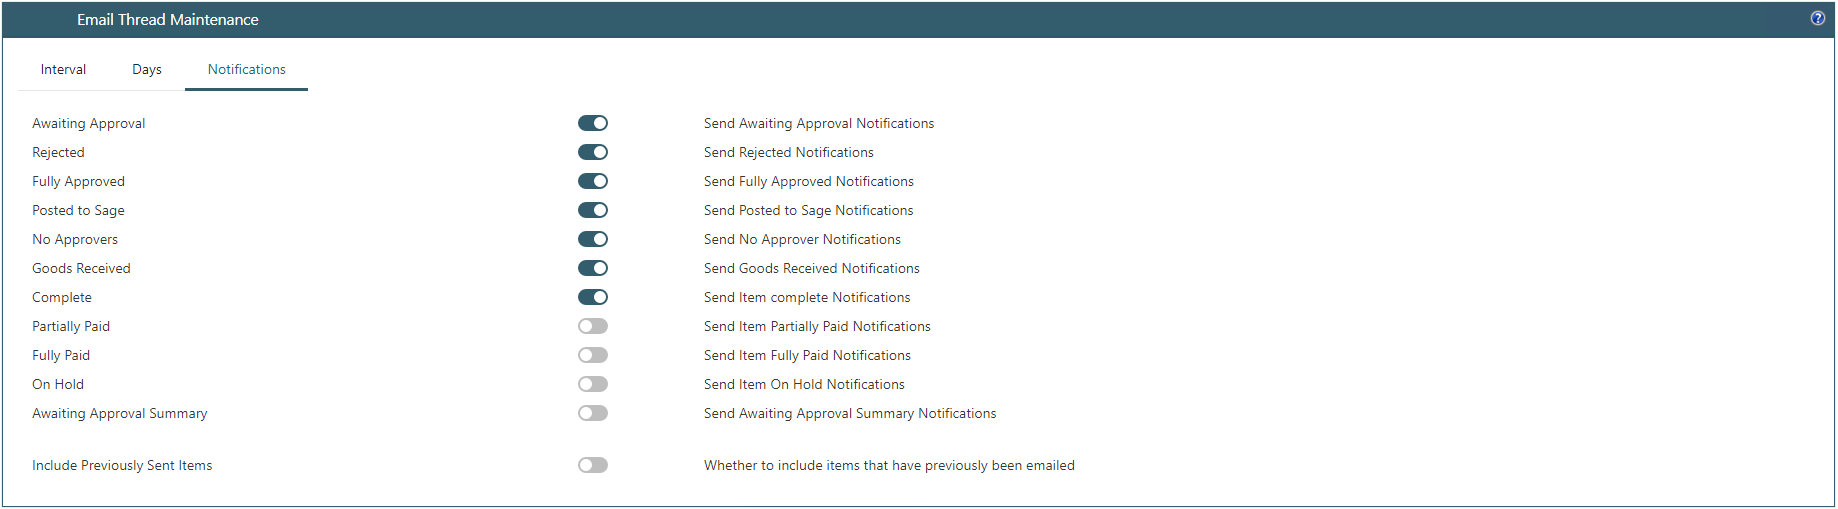
Configure what notifications are sent on the thread; different notification options would be chosen on different email threads.
23.4. Notification Examples
| Notification | Requesting User | Approver |
| Awaiting Approval |
|
|
| Rejected |
| N/A |
| Fully Approved |
| N/A |
| Complete |
|
|
| On Hold | · ‘Taylor AppUser’, ON HOLD (Querying mileage with supervisor) Item Hotel for customer visit on Expense 41537 dated 24/08/2020 (Hannah’s Demo Data) on Invoice ‘ ON HOLD (Querying mileage with supervisor) Expense 41537 dated 24/08/2020 for Taylor AppUser (Hannah’s Demo Data)’ has been placed On Hold (Querying mileage with supervisor). • ‘Taylor AppUser’, ON HOLD (Querying mileage with supervisor) Item Train fare to customer site on Expense 41537 dated 24/08/2020 (Hannah’s Demo Data) on Invoice ‘ ON HOLD (Querying mileage with supervisor) Expense 41537 dated 24/08/2020 for Taylor AppUser (Hannah’s Demo Data)’ has been placed On Hold (Querying mileage with supervisor). • ‘Taylor AppUser’, ON HOLD (Querying mileage with supervisor) Item Mileage: 24/08/2020, Return journey: Olding Road, Bury Saint Edmunds IP33 3TA, UK to Cambridge CB4 0WZ, UK: Total 53.40 mi. on Expense 41537 dated 24/08/2020 (Hannah’s Demo Data) on Invoice ‘ ON HOLD (Querying mileage with supervisor) Expense 41537 dated 24/08/2020 for Taylor AppUser (Hannah’s Demo Data)’ has been placed On Hold (Querying mileage with supervisor). | |
| Include Previously Sent Items | Any notifications that have not been dismissed on the user’s homepage will be re-sent in exactly the same format as above. | Any notifications that have not been dismissed on the user’s homepage will be re-sent in exactly the same format as above. |
24. System Setup - Event Log
The Event Log will show messages recorded by the WAP Service or WAP site; these can be useful to Superusers who are investigating if a document has failed to post. More information can be found in the main Event Viewer on the server under the Sicon application (IT will usually have access to this). Errors recorded with the event source as ‘WAP Service’ will be important if diagnosing why documents are not posting between WAP and Sage.
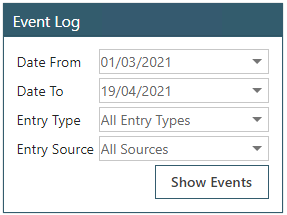
25. System Setup - Expense Item Types
If the Expense module has been enabled, this is where the expense types are setup initially.
See our WAP Expenses Help and User Guide.
26. System Setup - Expense Meetings
If the Expense module has been configured, this is where expense meetings can be created if required.
27. System Setup - Fuel Rates
If the Expense module has been configured, set up or edit fuel rates as required.
28. System Setup - Holiday Default Projects
If using both the WAP Timesheet module with Holidays and/or the HR module (to record absence), it is necessary to define a default holiday project within WAP. Timesheets will be populated with users’ approved holiday requests, bank holidays and mandatory holidays, as configured, and these lines will need to be associated to a Project and Project Header/Project Item. It is recommended to set one default holiday project for all users per Company but it is also possible to define specific projects at an individual user level.
Each absence type will need to be linked to a project; these can either be the same projects or different projects if required. The separate absence types are –
- Bank Holidays
- Mandatory Holidays
- Holiday (only used with Holiday module)
- Unpaid Holiday (only used with Holiday module)
- Absence (only used with HR module)
It is advised that default holiday and absence projects are configured at initial implementation and not changed. However, if a change does become necessary, once the default project has been amended timesheets will need to be reprocessed; under System Settings – Holidays. This will remove the existing holidays associated with the current project and re-populate them with the new holiday/absence project.
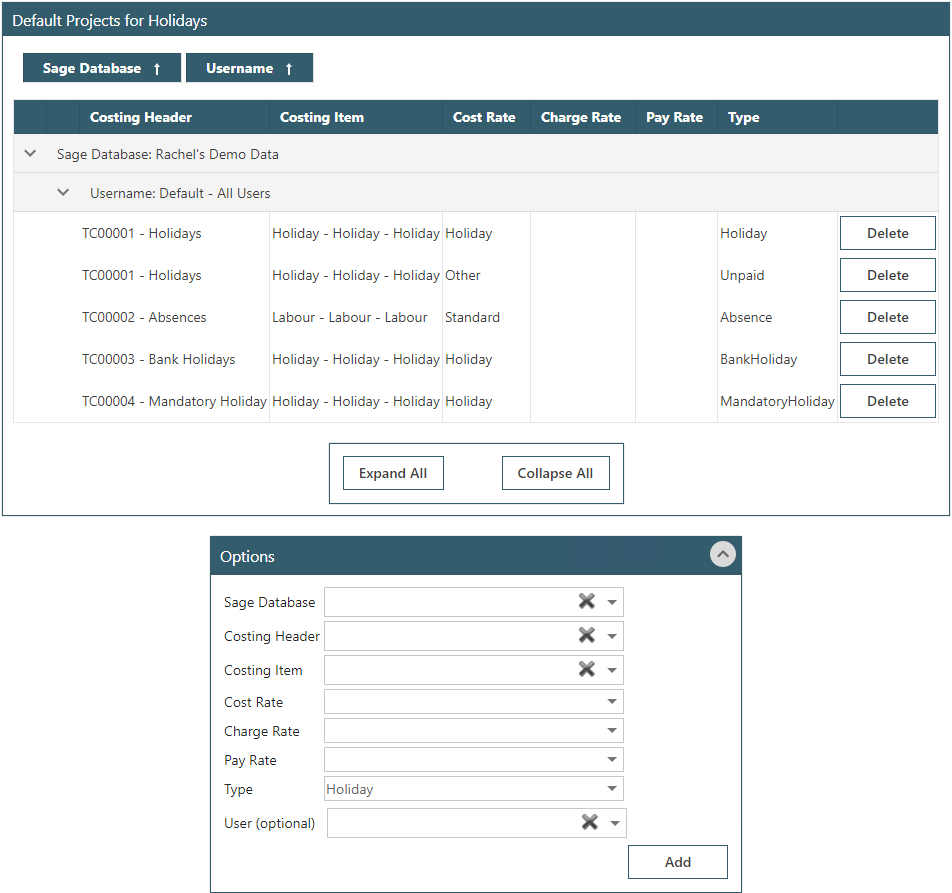
29. System Setup - IP Lockouts
If a login attempt is tried incorrectly more than five times the IP address will be blocked and the user(s) on that IP address will be unable to log in to WAP – the number of failed attempts can be configured within WAP System Settings. Within this screen any IP addresses with a failed login attempt will be shown with the number of failed attempts. IP addresses with more than five attempts will be blocked; it is possible here to either clear a single IP address or clear all lockouts. It is a User Type permission to be able to access this screen.
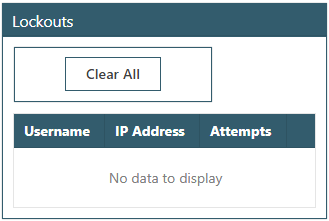
30. System Setup - Repost Requisitions
This function is provided as an advanced recovery option should the Sage 200 system need restoring. Select the Sage Database and follow the instructions on the screen for the system to recreate any missing purchase orders in Sage 200. Auto generate order return numbers must be switched off in Sage POP before running this function and re-enabled after the process is run.
It is advised to discuss with your Sage BP or with Sicon before running this routine.
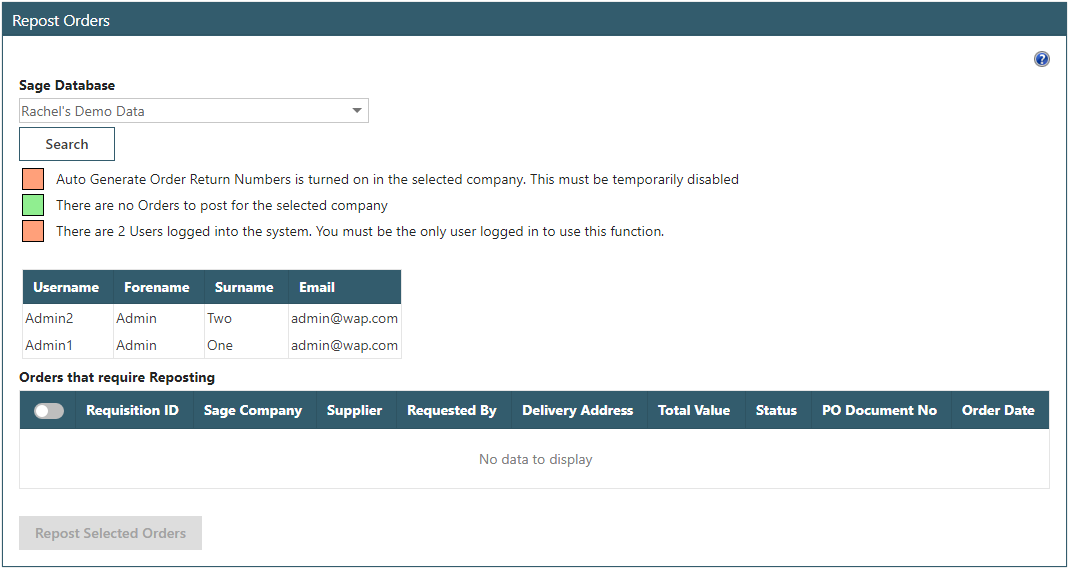
31. System Setup - Sage Connections
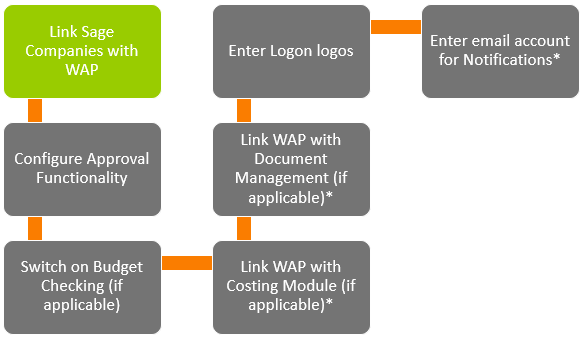
The Sage Connections screen provides the settings required to link WAP to a Sage company and will list the Sage Companies linked through to WAP. There is no limit to the number of Sage 200 companies that can be linked.

Is Valid: this will be ticked if the connection to Sage passes validation; if a Sage Connection is not valid the System cannot be used and the menu options on the left of the screen will be hidden.
Edit: click to open up and view connection details, update PO layouts, logos and terms and conditions.
Delete: use to remove a Sage company from WAP; it might be that a test company has been added in temporarily.
Make Base Currency: if multiple companies have been linked to WAP with multiple currencies, mark one as the base currency. This will be used to calculate approval values; other currencies will be converted to the base currency.
Suspend Posting: if required, posting can be suspended temporarily for a particular company which will prevent any approved documents posting through to Sage.
31.1. Connection Details
Once editing a company, the connection details will be visible. Some information required here can be found in Sage System Administration but it is recommended to speak with your Sage Business Partner and/or IT contact for further assistance. The Sage Company Description must match in WAP how the Company is named in Sage System Administration.
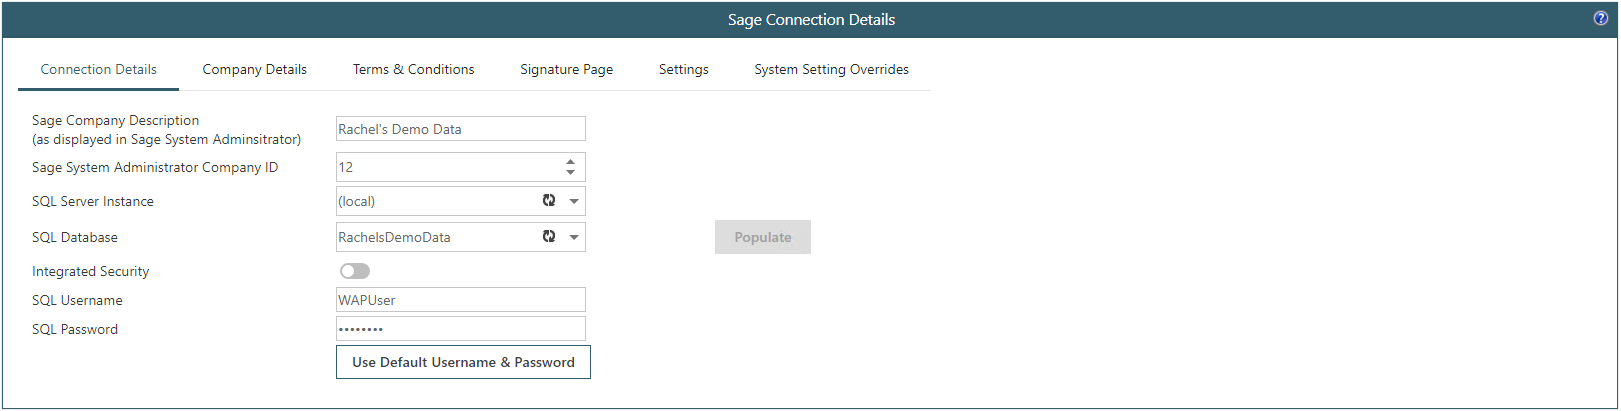
IMPORTANT NOTE: it is strongly advised that throughout WAP only one instance is open at a time (e.g. only one tab of WAP per browser). This is particularly important on the Sage Connections screen to avoid inadvertently overwriting any existing company information which can result in WAP becoming inaccessible.
31.2. Company Details
Information on this tab will be used when sending out approved purchase orders from WAP to suppliers or approved sales orders to customers. Enter Company registration details as applicable; these can be found in Sage under System Settings. Upload a company logo per company; ensure the format is .gif.
Under the Purchase Order sub tab enter the email subject and body text using the fields underneath. Choose a purchase order report from the drop-down list; it is possible to preview the report before selection. If required, two different reports can be configured.
Under the Sales Order sub tab enter the email subject and body text using the fields underneath. Choose a sales order report from the drop-down list; it is possible to preview the report before selection. If required, three different reports can be configured.
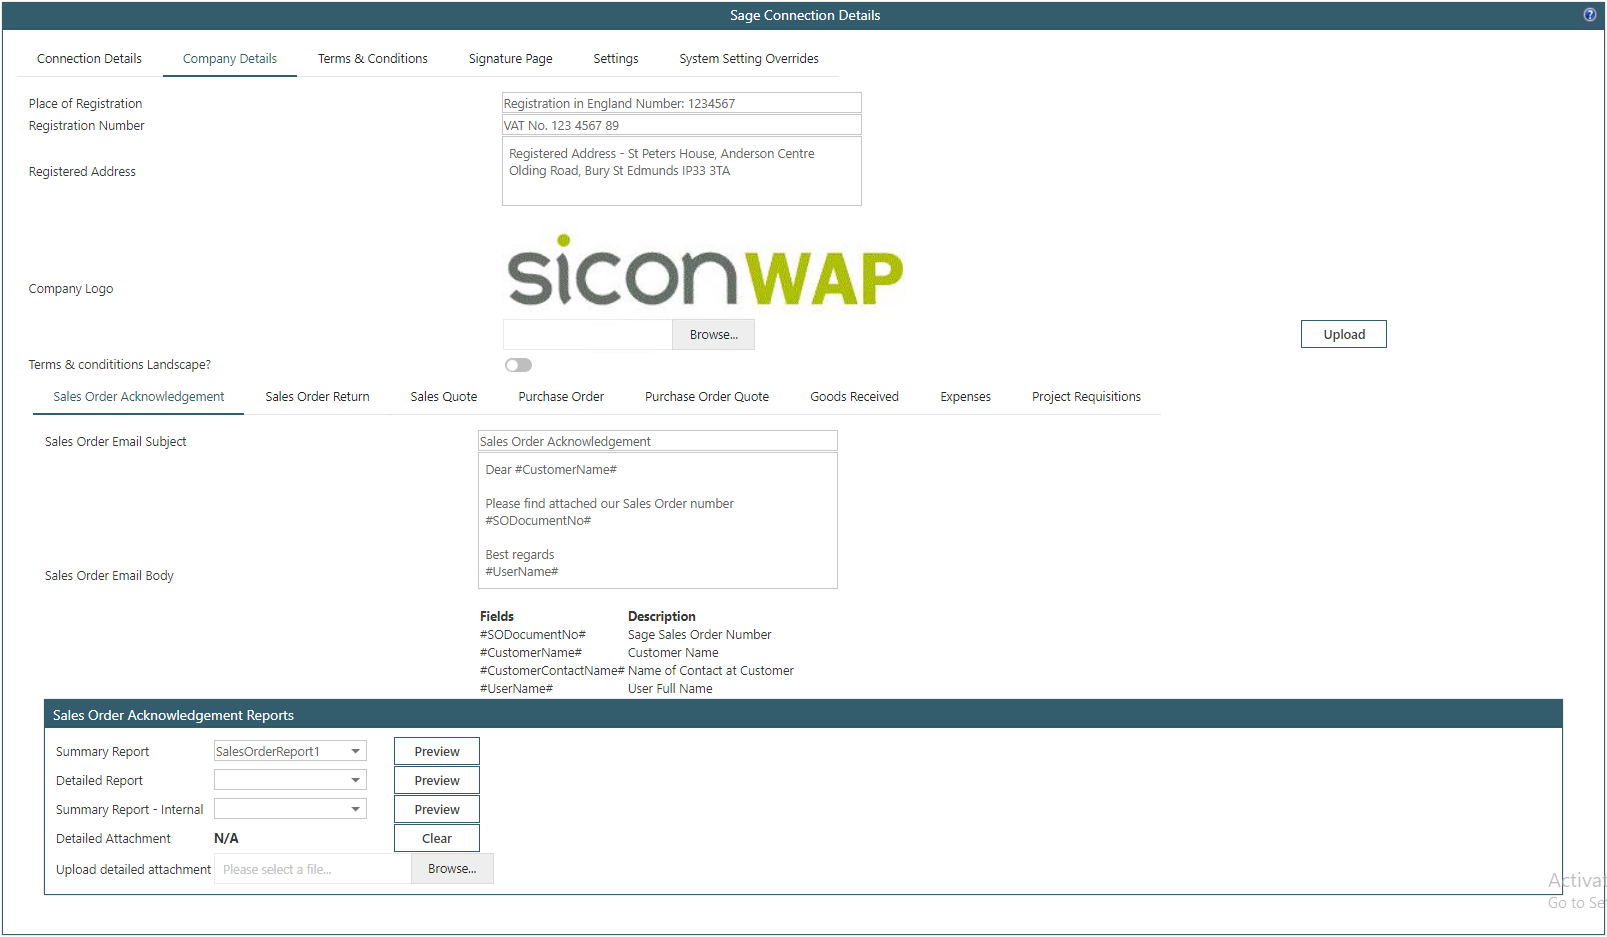
31.3. Terms & Conditions
Terms and conditions can be entered which will be attached to either a sales or purchase order when emailing to customers or suppliers. Use the tabs at the bottom of the screen to preview how the text will appear when sent out.
31.4. Signature Page
This page is only applicable if using Sales Order module; use the fields to enter a signature as required.
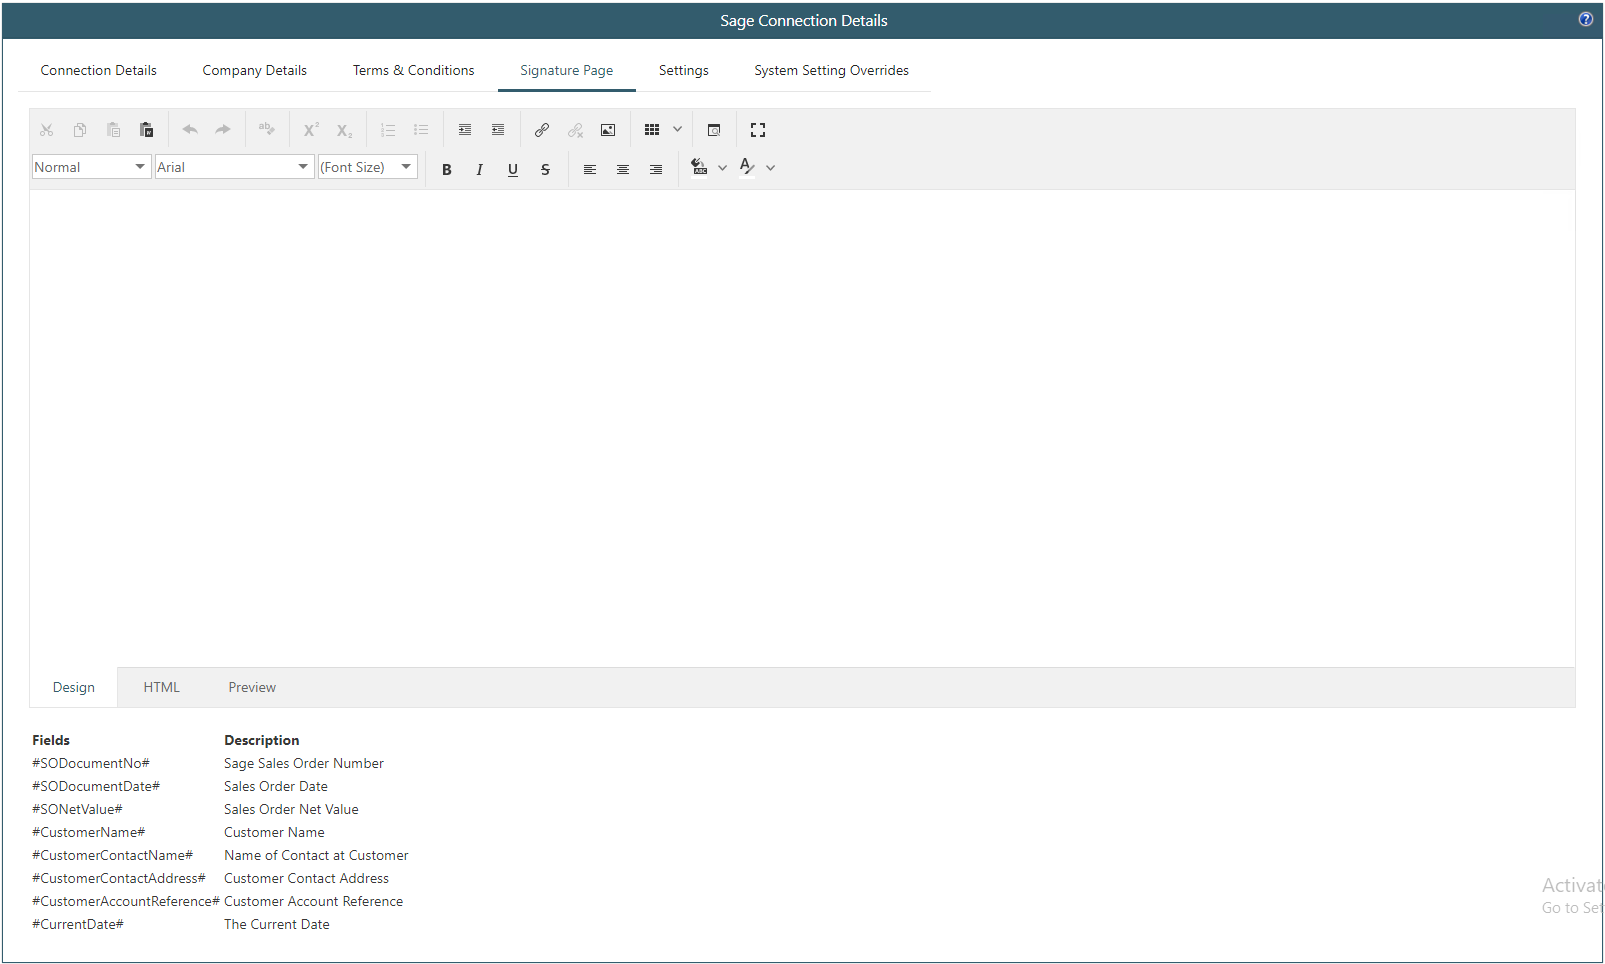
This page is only applicable if using Sales Order module and printing the Sales Order from within WAP; use the fields to enter a signature as required. This will then add an additional page to the layout with the signature details included.
31.5. Settings
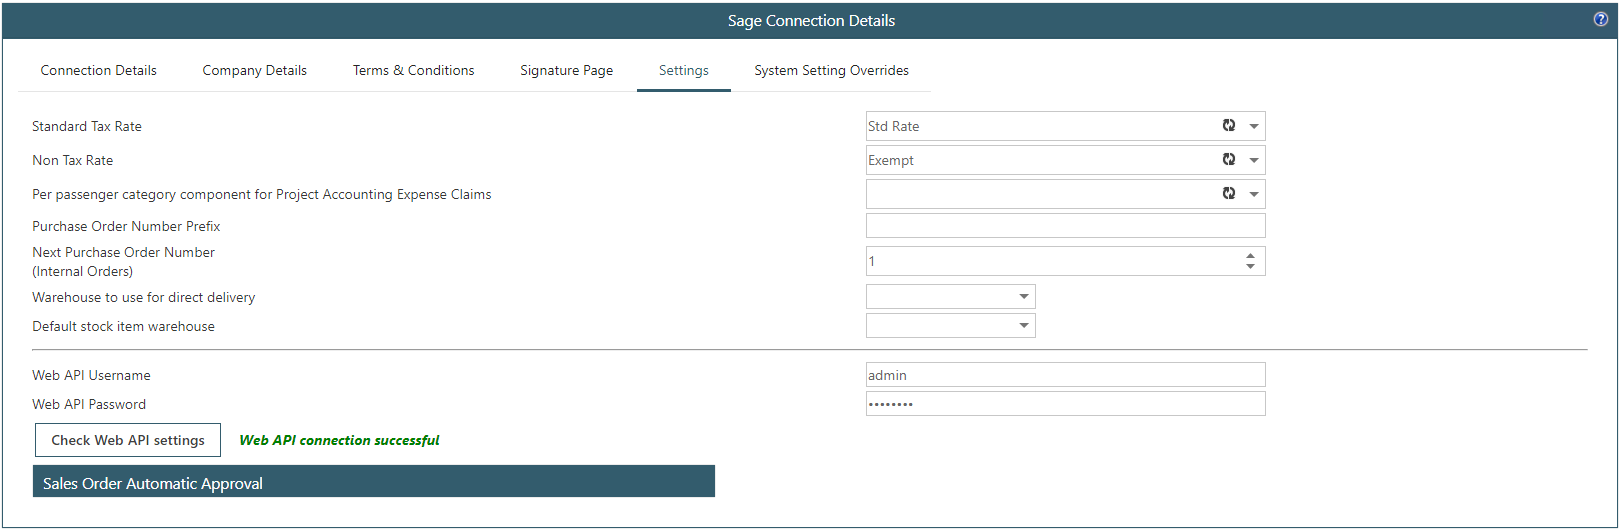
Standard Tax Rate: configure the standard tax rate; this is used by the Expense module when users enter an expense claim and depending on configuration, also by the Requisition module. This is a mandatory field.
Non-Tax Rate: configure the non-tax rate; this is used by the Expense module when users enter an expense claim and depending on configuration, also by the Requisition module. This is a mandatory field.
Per passenger category component for Project Accounting Expense Claims: if using Project Accounting, select the component for passenger mileage claims.
Purchase Order Number Prefix: if required, enter a prefix per company, e.g. SICON. This will show before the PO number on the PO sent to the supplier but will not post through to Sage.
Next Purchase Order Number (Internal Orders): used for when raising Internal Orders or if Sage Commercials are not configured; enter the next PO number to be used.
Warehouse to use for direct delivery: to be used with the Sales Order module if direct delivery is used.
Default stock item warehouse: if entering stock lines on a requisition and a default warehouse is to be used, select here from the drop-down box. If the stock item in Sage is linked to this warehouse, when entered on a requisition in WAP this warehouse will default.
WebAPI Username and Password: if using Sicon WebAPI (if linking WAP with Sicon Projects), enter the WebAPI username and password here. Use the Check button to validate the settings.
Sales order Automatic Approval
Automatically approve sales orders if not under price book price: Enable as required.
Minimum Gross Margin for Automatic Approval of Sales Order: enter as required; if no automatic approval should happen, leave as zero.
Minimum Margin for Self-Approval of Sales Order lines: enter as required; if no self-approval should happen, leave as zero.
31.6. System Settings Overrides
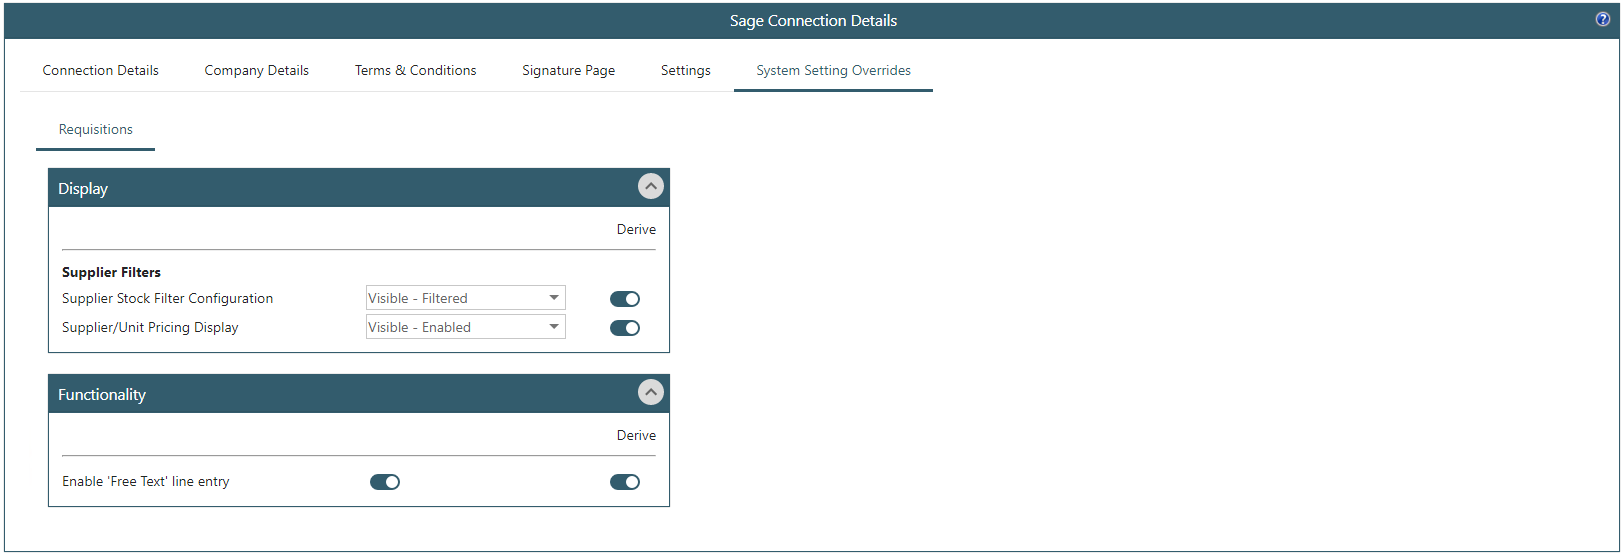
If using WAP with requisitions, it is possible to override a number of system settings per company. This can be useful if different companies have different uses of the requisition modules.
Supplier Filters – Supplier Stock Filter Configuration: the default from System Settings will be used initially but if required can be changed; for example, it might be for one Company stock items can only be ordered from the preferred supplier while for another Company stock can be purchased from any supplier. In the above example, as this setting has the ‘Derive’ option selected, this setting is the same for this Company as the system setting.
Supplier Filters – Supplier/Unit Pricing Display: the default from System Settings will be used initially but if required it can be changed; for example, it might be that for one Company the pricing will be visible per supplier but for another Company it shouldn’t be visible.
Enable ‘Free Text’ line entry: the default from System Settings will be used initially but if required it can be changed; for example, it might be that for one Company free text lines can be entered on a requisition but for another Company, they should only be able to raise stock lines.
32. System Setup - Sage System Settings
If using WAP with requisitions, it is possible to override a number of system settings per company. This can be useful if different companies have different uses of the requisition modules. Select the required database from the top drop-down box and configure the settings accordingly.
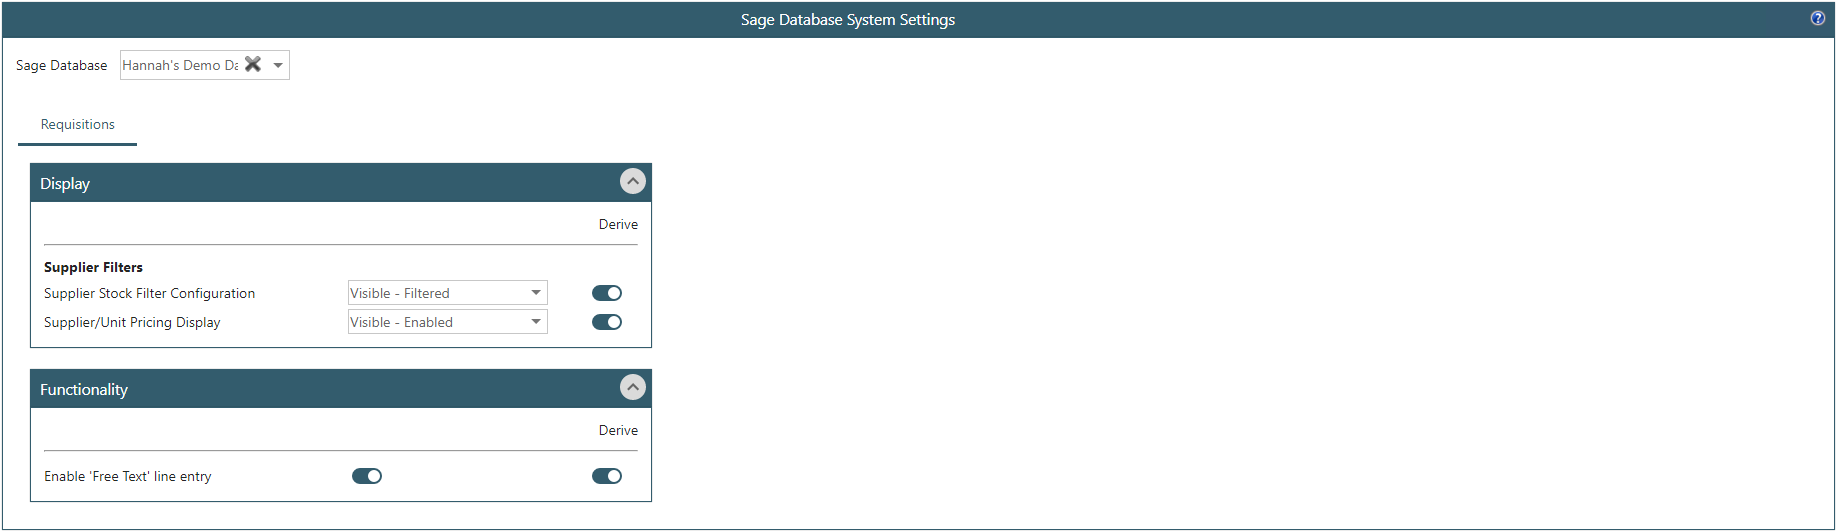
Supplier Filters – Supplier Stock Filter Configuration: the default from System Settings will be used initially but if required can be changed; for example, it might be for one Company stock items can only be ordered from the preferred supplier while for another Company stock can be purchased from any supplier. In the above example, as this setting has the ‘Derive’ option selected, this setting is the same for this Company as the system setting.
Supplier Filters – Supplier/Unit Pricing Display: the default from System Settings will be used initially but if required it can be changed; for example, it might be that for one Company the pricing will be visible per supplier but for another Company it shouldn’t be visible.
Enable ‘Free Text’ line entry: the default from System Settings will be used initially but if required it can be changed; for example, it might be that for one Company free text lines can be entered on a requisition but for another Company, they should only be able to raise stock lines.
33. System Setup - Subsistence Grades
If within the Expense module configuration, Subsistence has been enabled, this is where subsistence grades are setup.
34. System Setup - Subsistence Incidentals
If within the Expense module configuration, subsistence has been enabled, this is where subsistence incidentals are configured.
35. System Setup - Subsistence Rates
If within the Expense module configuration, subsistence has been enabled, this is where the subsistence rates are configured.
36. System Setup - System Messages
Messages can be configured to appear in a yellow pop-up to all users when they log into WAP; each message can have a unique text with a date and time to display until. The message can prevent users from logging into WAP; this can be useful if needing to stop users logging into WAP while system configuration is taking place.

The message configured within system messages will appear on the users’ homepage following login and can be dismissed by clicking anywhere on the yellow banner.

If the message has been removed but the user would like to view it again, click on the note icon at the top of the page to bring the message back.

37. System Setup - Vehicles
This is where vehicles would be configured used by the Expenses module.
38. System Settings - WAP Project Items and Types
WAP Project Items and Types are set up in conjunction with WAP Projects to create a range of cost headers to assign transactions to. WAP Projects provides a simple costing module which sits within WAP and does not post to Sage.
38.1. Project Item Types
When setting up WAP Project Item Types, enter a code, title and specify which document types to make the project item available on; e.g. labour should only appear on timesheets. Project Item Types must be set up prior to Project Items being created.
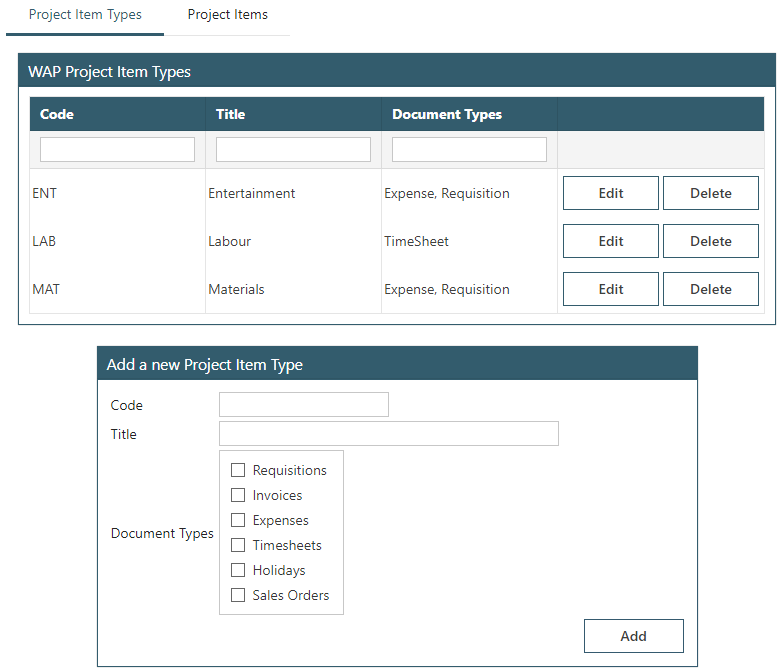
38.2. Project Items
When creating WAP Project Items, select the Type, enter a code and title. Codes must be unique across each project item.
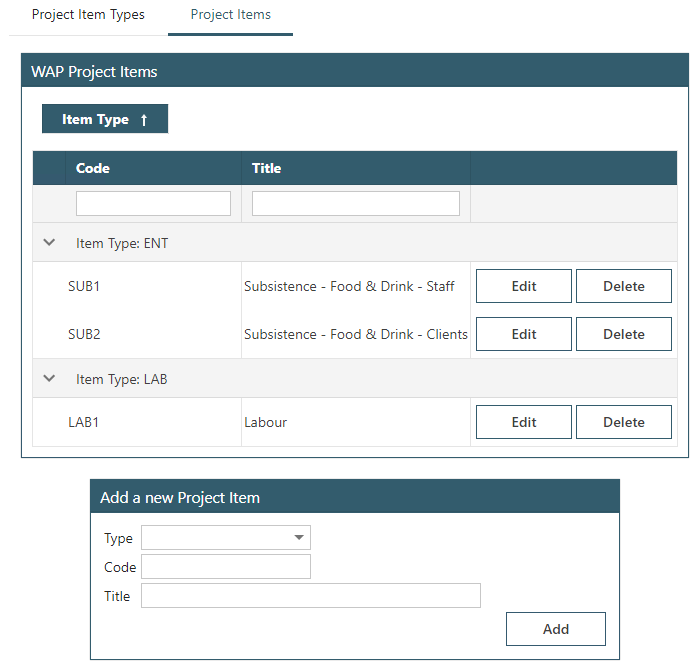
39. System Setup - WAP Projects
WAP Projects provides a simple costing module which sits within WAP and does not post to Sage. It can only be used if no other costing module is in use and needs to be activated within System Settings before Projects and Project Items can be created. Depending on configuration, project codes can either be generated automatically or users will need to enter a unique code when creating the project. Enter a title, select a status and add the project. Once a project has completed, it is possible to edit the project and change the status to Closed. Users will only be able to select open projects when entering a transaction within WAP.
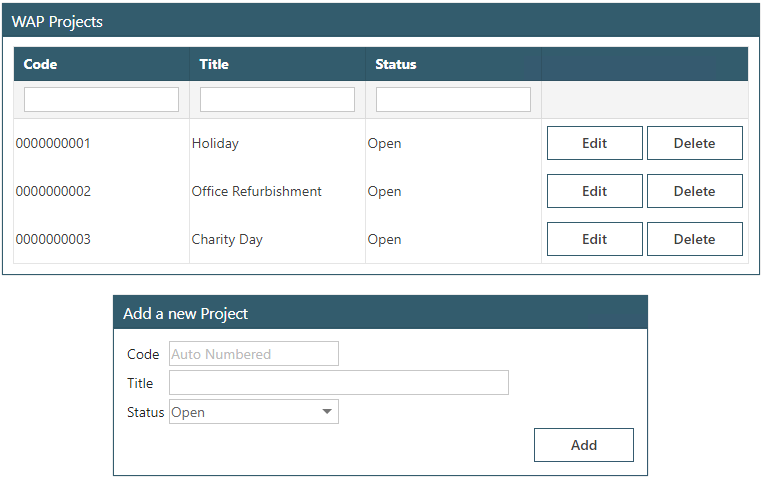
40. System Setup - Warehouse Nominal Accounts
This function allows the ability to override the cost centre and/or department of a nominal code on the requisition line based on the warehouse selected. Ensure the setting ‘Use Warehouse Nominal Account Override’ is enabled in System Settings. For more information on using this, please see the Requisition HUG.
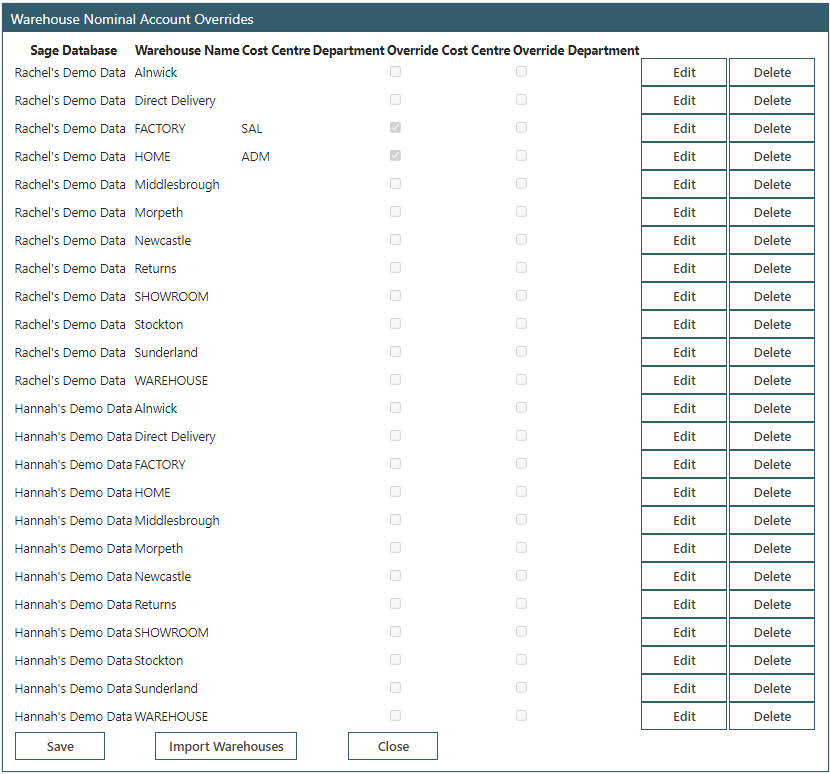
41. System Setup - Year End
This function provides a routine to reset the users’ mileage at the end of each year and will also create bank holidays for the next year. You may only need to run this year end if using WAP Expenses, Timesheets or Holidays module. This functionality has no impact on Sage Year End routines.

There is no other Year End process required in WAP, this takes place within Sage only. For queries on the year end process, please speak with your Sage BP in the first instance.
42. WAP Email
Basic email functionality exists within WAP to allow for users to email either other WAP users or external contacts. It can be useful to use this functionality during initial implementation to check emails can be sent from WAP and received both internally and externally. It is a User Type permission to be able to access the Email icon at the top of the screen so can be configured as per organisation requirements.
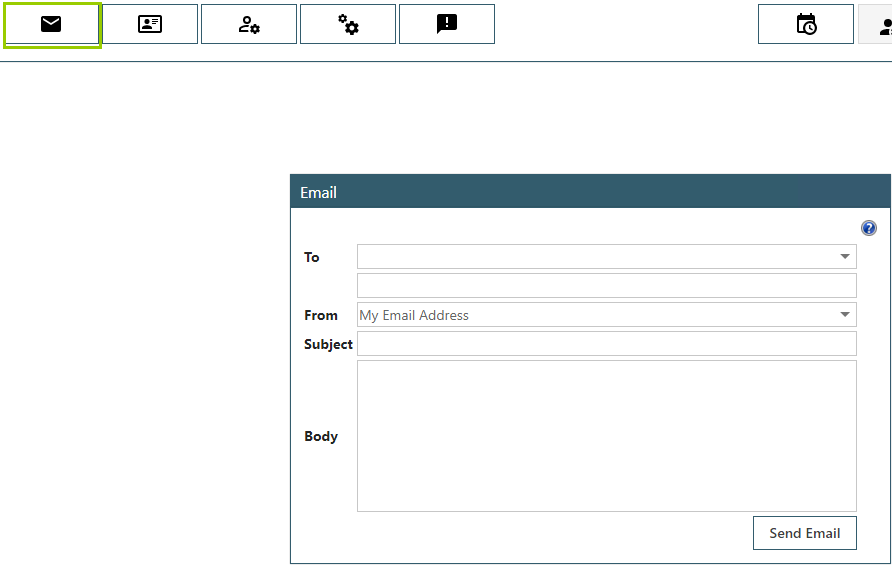
To: either select from the drop-down list a WAP user or enter an email address in the box below.
From: choose whether to email from the email address configured against the logged in WAP user, or from, the System Email address – as configured in System Settings.
Subject: enter the email subject.
Body: enter the email body.
Send Email: click to send the email.
43. My WAP Settings
All users will have access to their own WAP Settings by clicking on the icon at the top of the screen with the ID card and single cog.
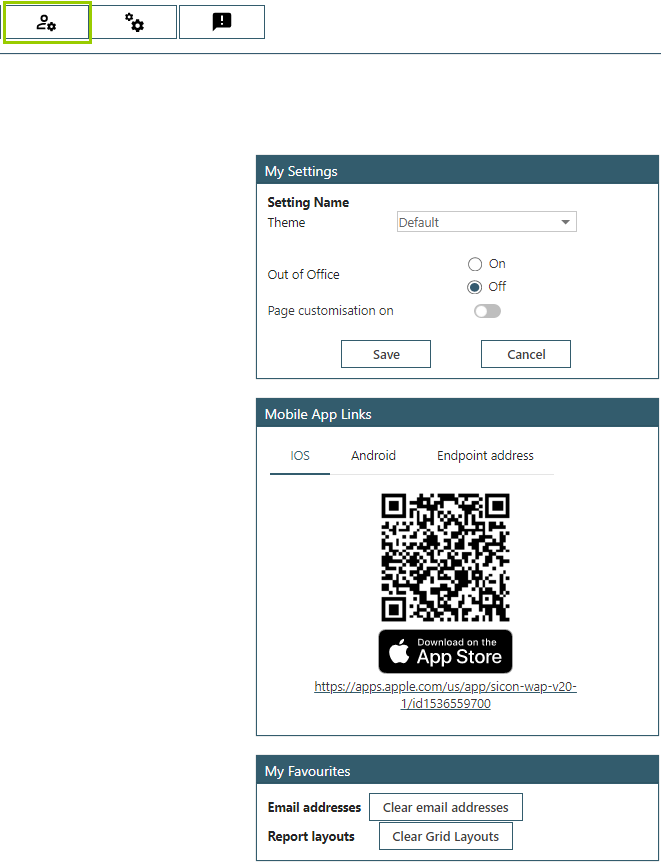
Theme: different screen and menu colours are possible within WAP; the default will always be configured at install and may be reverted back to default during a WAP upgrade.
Out of Office: if a user is an approver, while they are away from WAP they should switch on their out of office to direct approvals to another user. Once the out of office has been set as on, the user will see a list of other users to select from; it is only possible to select one alternate. When the user logs into WAP when they return, a pop-up will show asking whether to switch off out of office. If a user has delegate access to another user, they are able to switch on their out of office using this screen.
Mobile App Links: if a user has been flagged in their User Type as a mobile user they will see these links here.
IOS: scan the QR code to be taken through to the correct location to download the WAP app for Apple Devices.
Android: scan the QR code to be taken through to the correct location to download the WAP app for Android Devices.
Endpoint Address: scan the QR code to populate the end point address from System Settings into the app settings, once the app has been downloaded.
My Favourites – Email Addresses: use this option to clear your custom email list (these are addresses that have been entered when emailing Purchases Orders etc.)
My Favourites – Report Layouts: use this option to clear any customisations made on reports (column grouping, positioning etc.).
44. Enquiries
This are various menu options under the Enquires option – these are User Type permissions so can be assigned accordingly.
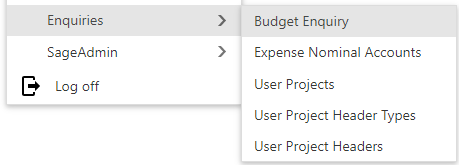
44.1. Budget Enquiry
Users will be able to view nominal budget information for any nominal codes they have been given permission to. Some users may be given permission to view all nominal accounts in the budget enquiry; this is a permission allocated on their WAP user profile and is usually only given to Finance members or Administrators. This enquiry will show a breakdown of Annual and YTD budgets set against a nominal code and data can be exported to Excel for further analysis if required.
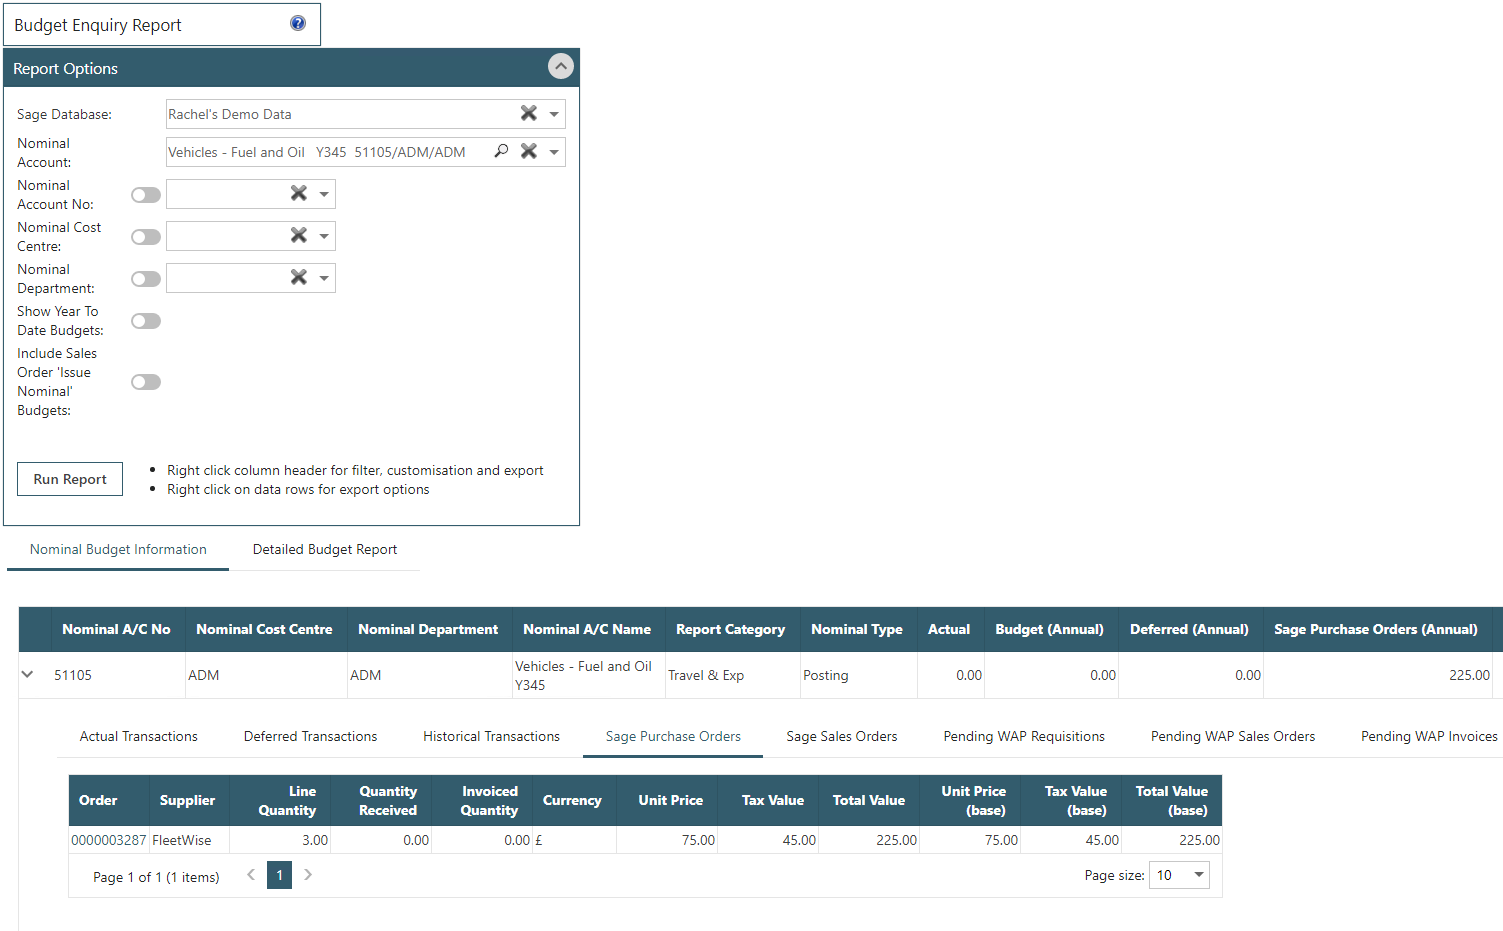
Budget information is pulled through from Sage; monthly and annual budgets are set against the nominal account and YTD (if ticked on the filters to show), will show the combined total of the monthly budgets up to the current period.
Actual Transactions: invoiced costs that are in open accounting periods.
Deferred Transactions: invoiced costs that are in closed accounting periods.
Historical Transactions: historical costs.
Sage Purchase Orders: purchase orders that have posted to Sage that have not yet been invoiced.
Sage Sales Orders: sales orders that have posted to Sage against the Issues nominal that have not yet been invoiced. These will not be removed from the budget totals, unless running an enquiry specifically on an Issues nominal.
Pending WAP Requisitions: requisitions in WAP that have not been approved and therefore not posted to Sage.
Pending WAP Sales Orders: sales orders in WAP that have not been approved and therefore not posted to Sage.
Pending WAP Invoices: invoices that have been entered into WAP directly.
Pending WAP Expenses: expenses in WAP that have not been approved and therefore not posted to Sage.
If documents have been added against an invoice using Sicon Documents, the attachment can be viewed in WAP through this screen; the document count column will show against the transactions and if there is an attachment, click on the number to open the Document pop-up and then click to view the attachment. To be able to view attachments, a Sage Configuration string needs to be entered in System Settings – Miscellaneous.
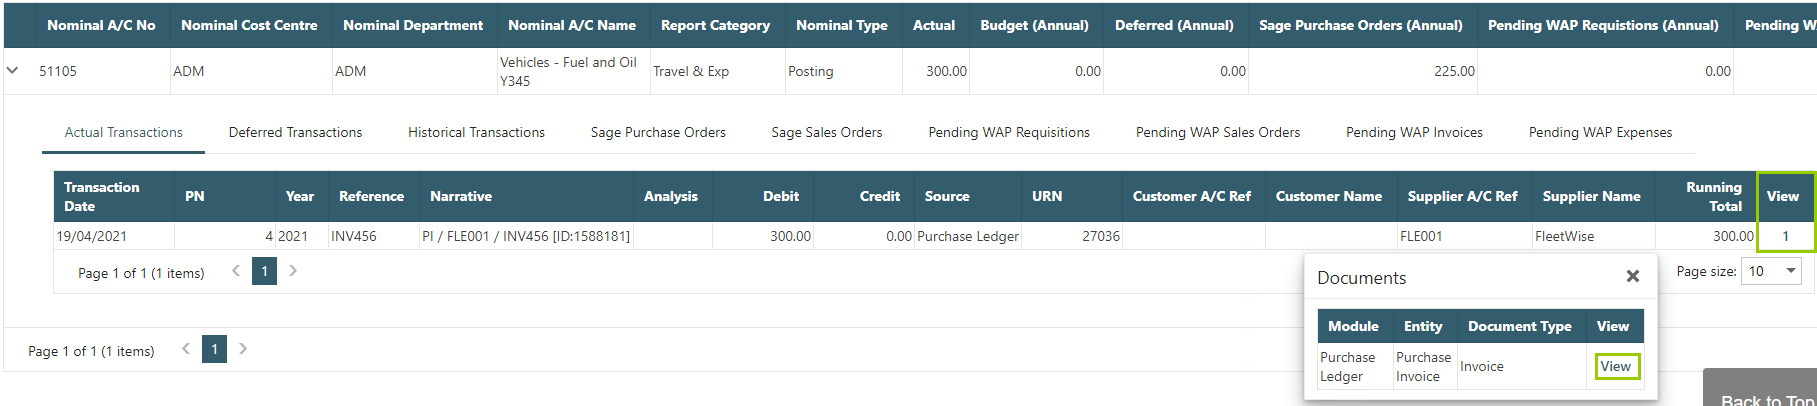
44.2. Expense Nominal Account
This report will show the total expense claims against individual nominal codes for expense claims entered in WAP. It is possible to show only mileage or expense claims, or all. Data can be exported to Excel or PDF as required by right-clicking the column headers for filtering and exporting options.
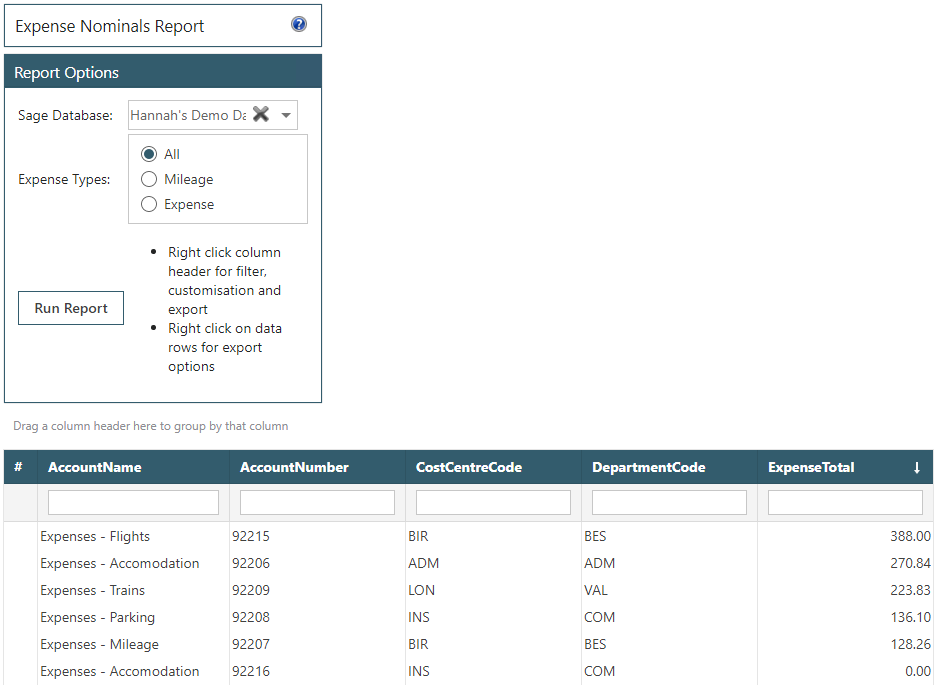
44.3. User Projects
If a costing module is configured, this enquiry will list out each project that a user has been granted access to. This report can be exported to Excel or customised on the WAP screen if required by right-clicking the column headers for filtering and exporting options.
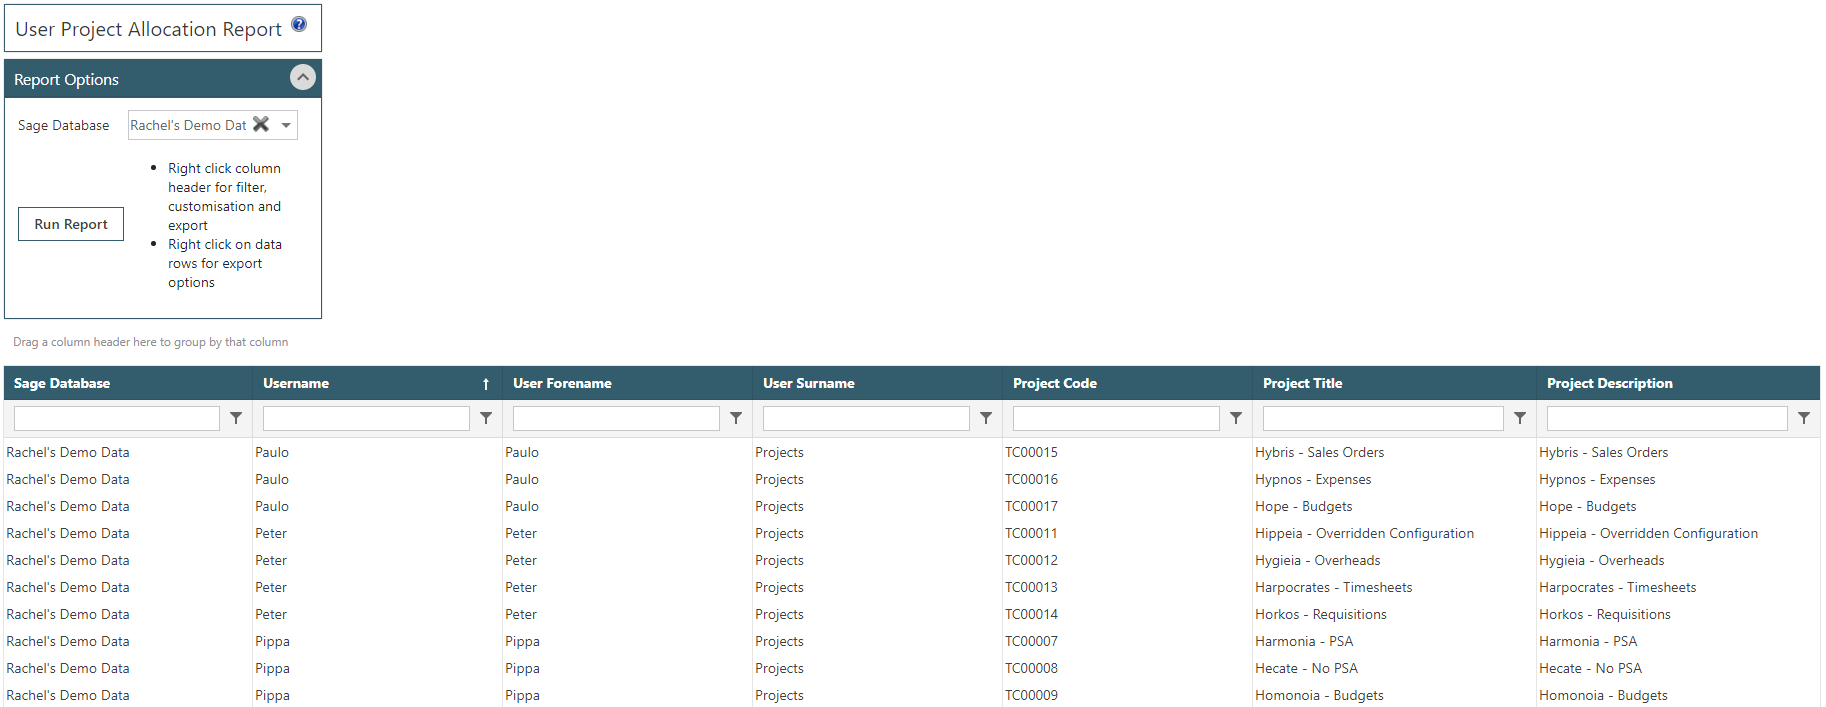
44.4. User Project Header Types
If a costing module is configured, this enquiry will list out by user each project header type they have access to. If a user has access to all Project Header Types, they will not appear on the report. This report can be exported to Excel or customised on the WAP screen if required by right-clicking the column headers for filtering and exporting options.
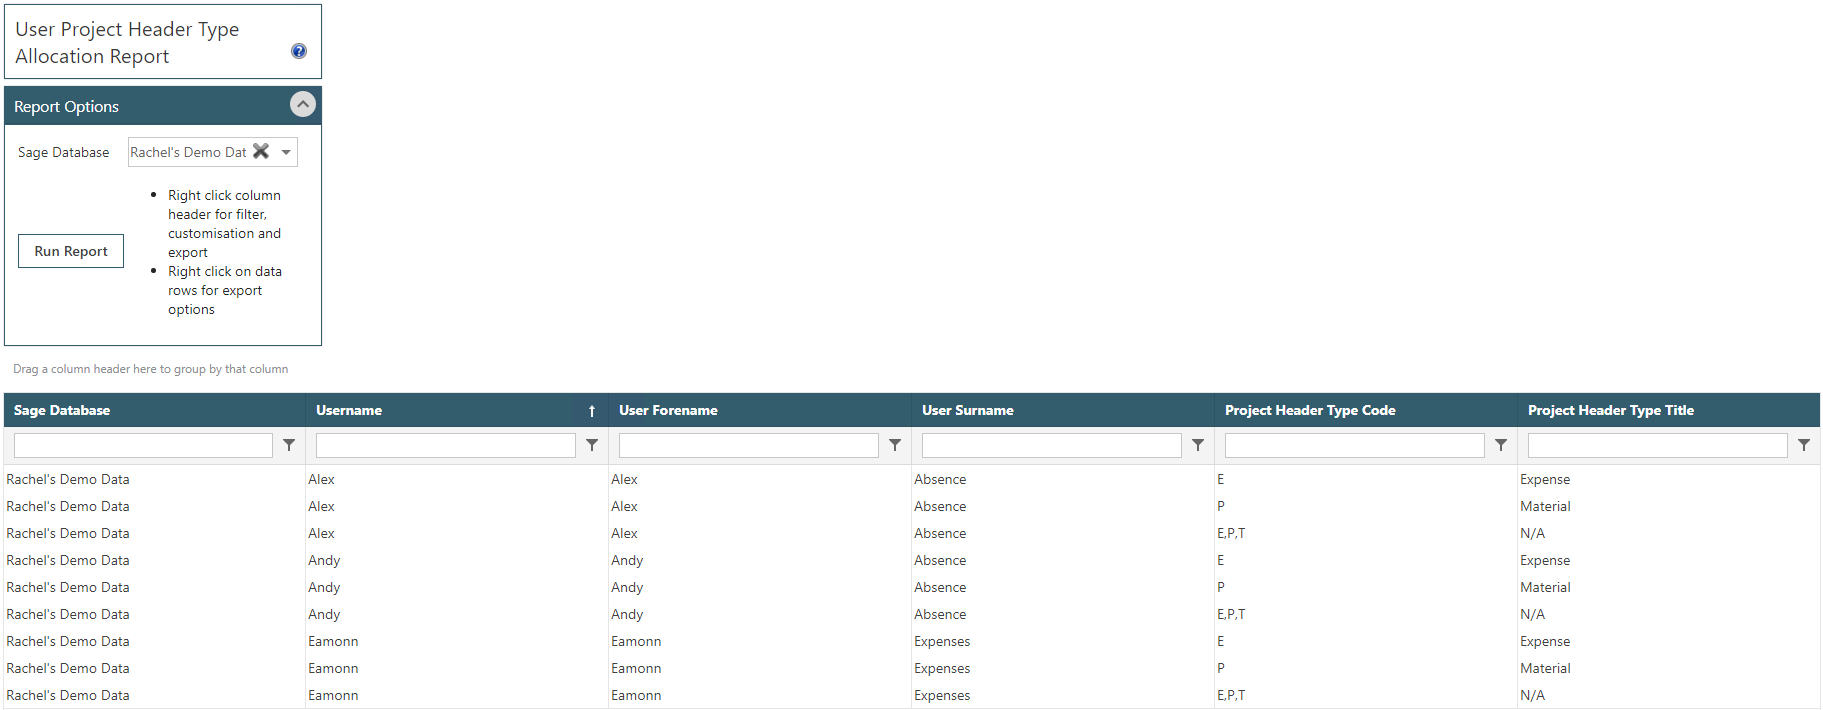
44.5. User Project Headers
If a costing module is configured, this enquiry will list out by user which project headers they have access to and whether a specific item or approval value is being used rather than the user’s default. If a user has access to all Project Headers, they will not appear on the report. This report can be exported to Excel or customised on the WAP screen if required by right-clicking the column headers for filtering and exporting options.
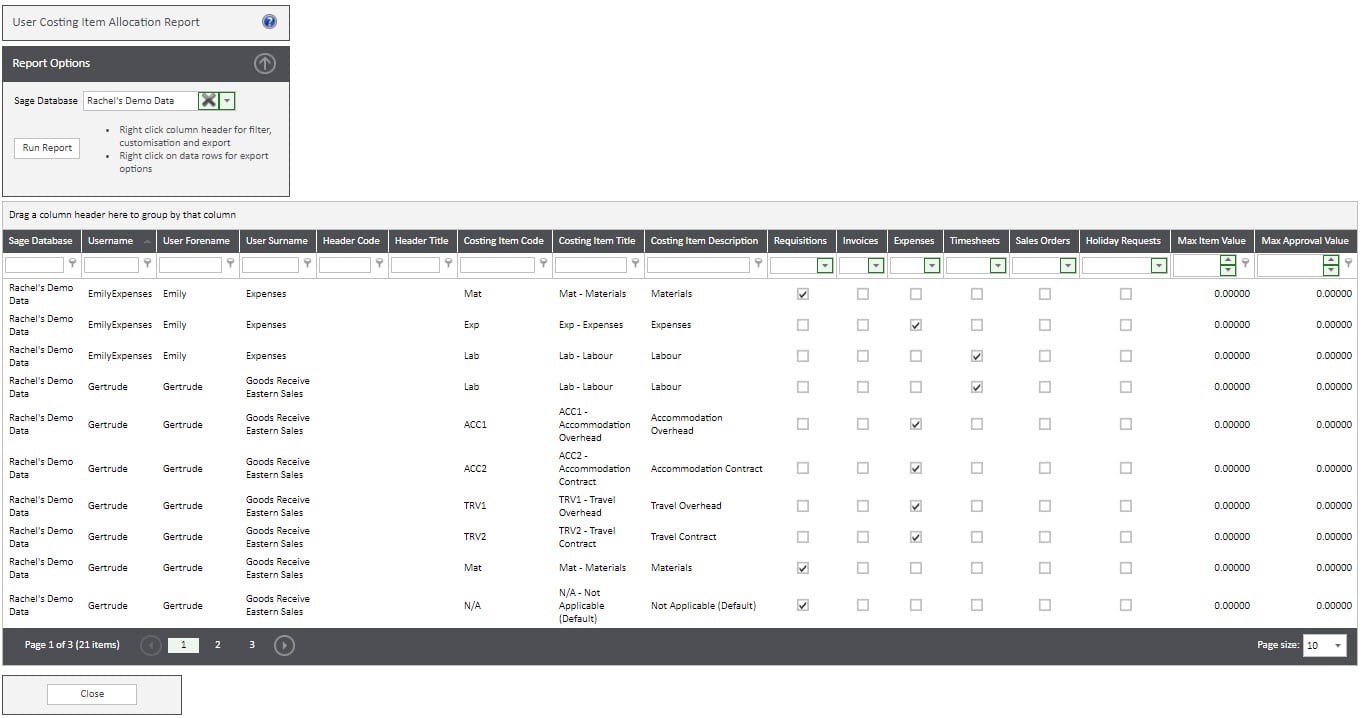
45. Sage Admin
Sage Admin functionality allows users to request new suppliers, customers and stock items in WAP which once approved, will post through to Sage and then be available to use in WAP. This functionality is not module specific so will be available with all WAP installs.
45.1. Enabling Sage Admin
User Type permissions need to be enabled to allow users to either request suppliers, expense supplier, customers or stock items, view all requests and approve requests. These permissions can be found under the Sage Admin tab in the User Type settings.
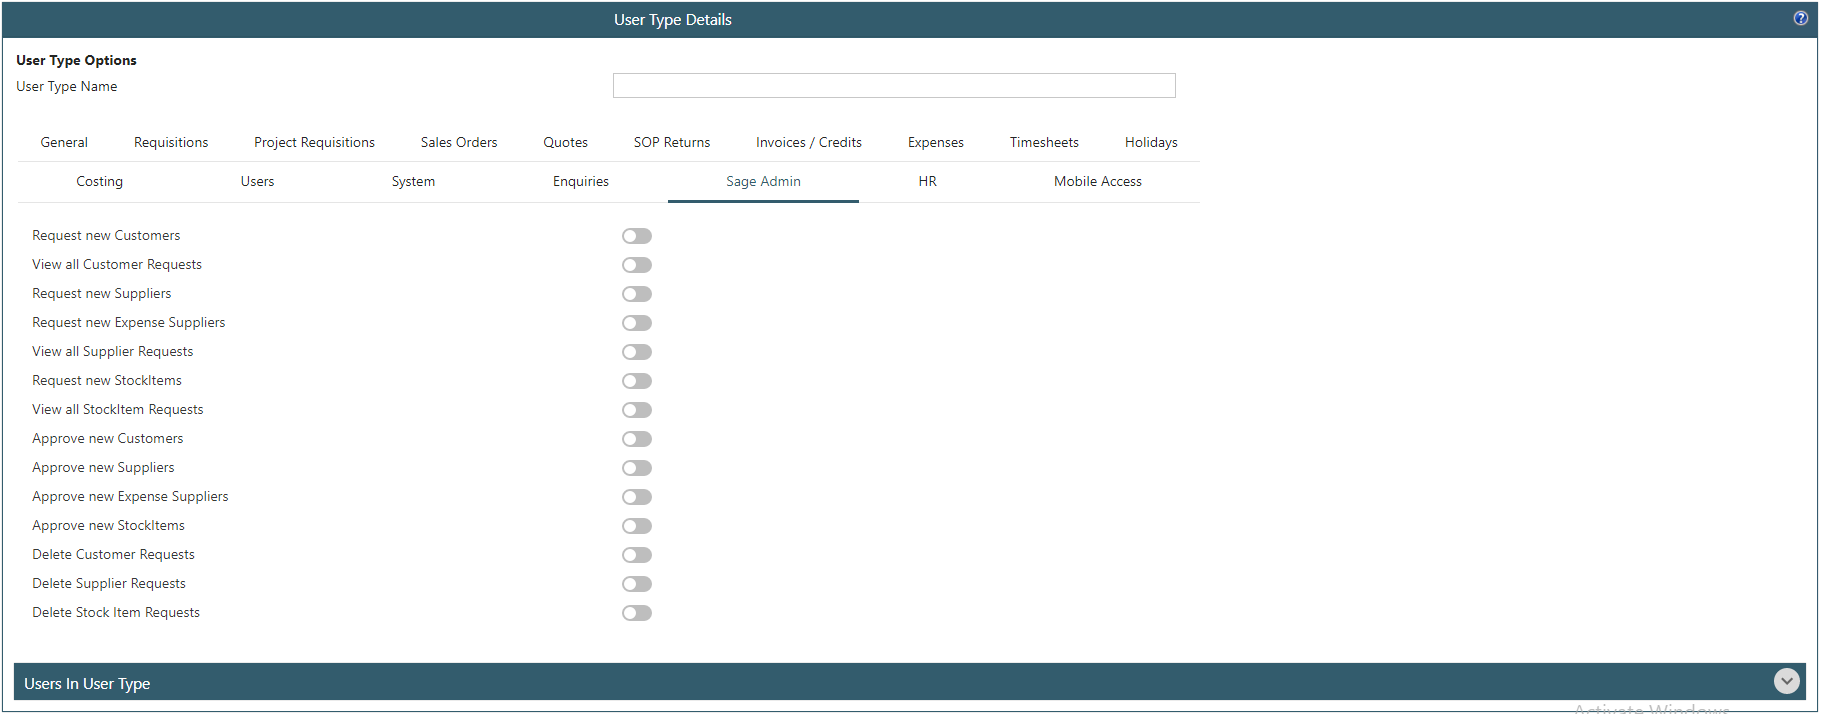
Request new Customers: the ability for a user to request a new customer.
View all Customer Requests: the ability for users to view all customer requests entered through WAP.
Request new Suppliers: the ability for a user to request a new supplier.
Request new Expense Suppliers: the ability for a user to request a new expense supplier; this option appears when linking a user through to a PL supplier account. Usually this permission is only given to Finance or Administrators who will be creating new users in WAP.
View all Supplier Requests: the ability for users to view all supplier requests entered through WAP.
Request new Stock Items: the ability for a user to request a new stock item.
View all Stock Item Requests: the ability for users to view all stock requests entered through WAP.
Approve new Customers: the ability to approve new customer requests.
Approve new Suppliers: the ability to approve new supplier requests.
Approve new Expense Suppliers: the ability to approve new expense supplier requests.
Approve new Stock Items: the ability to approve new stock item requests.
Delete Customer Requests: the ability to delete customer requests; it is not possible to delete a request once it has been approved.
Delete Supplier Requests: the ability to delete supplier requests; it is not possible to delete a request once it has been approved.
Delete Stock Item Requests: the ability to delete stock item requests; it is not possible to delete a request once it has been approved.
Once a user has relevant permissions, a new menu option will appear on the left titled ‘Sage Admin’ with various menu options underneath, depending on permissions enabled.
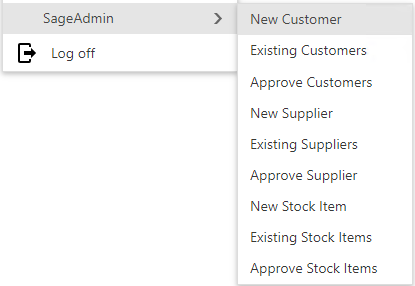
45.2. Sage Admin Approval Routes
All Sage Admin approval routes are based on requesting user and built using the standard approval route wizard functionality. If routes will not be different based on user requesting the item, it would only be necessary to set a default approval route per document type.
For supplier or customer requests, these would usually go to a Finance team member, for stock items these would usually require approval from someone in the Warehouse team.

45.3. New Customer Requests
Click on New Customer and enter details as applicable. All the below details are mandatory except the telephone and website fields. A check is done on the account reference to ensure it does not exist in Sage already.
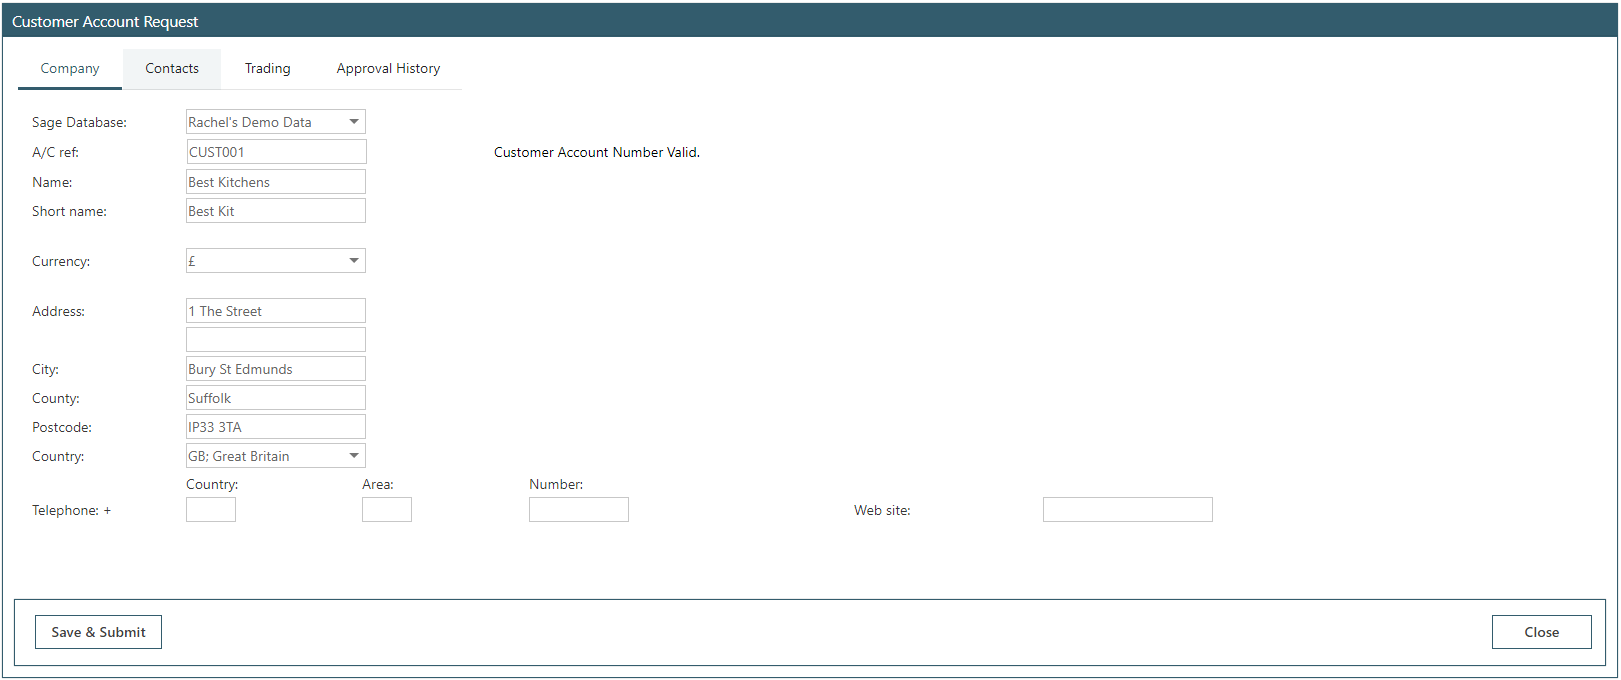
Under the Contacts tab, complete as applicable. The first name, last name and email fields are mandatory.
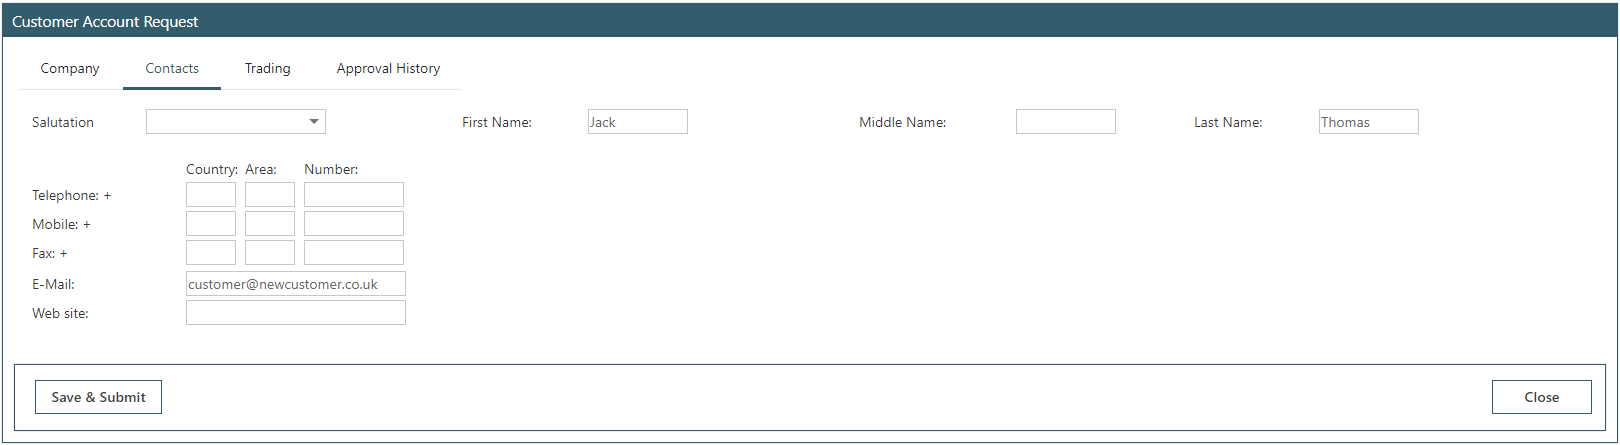
Under the Trading tab, complete as applicable. The Country code is the only mandatory field; analysis codes will be pulled through as configured in Sage.
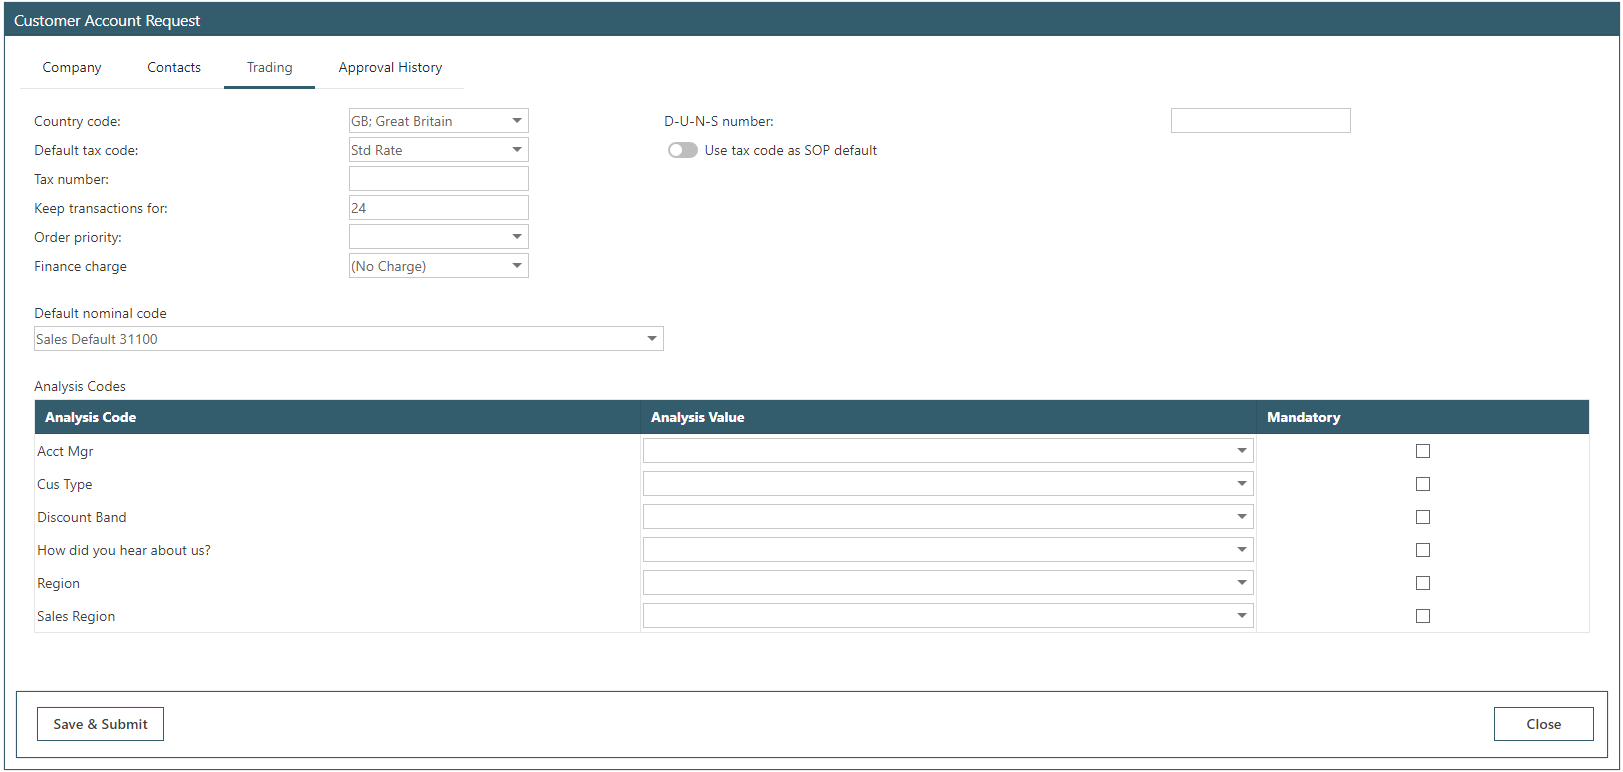
The Approval History tab will be populated once the request is submitted and approved. Once all fields have been completed, click Save & Submit. The request will go down the pre-configured approval route and show to the approver as awaiting approval. The request can be approved or rejected and clicking view request details will open the customer request to allow for amendments to the fields before being approved.

Once fully approved, the customer will move to the Completed tab, appear in Sage and be available for selection in WAP.
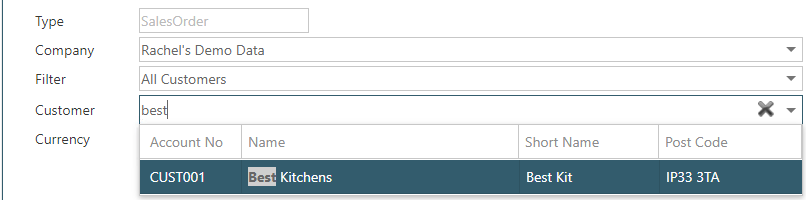
45.4. New Supplier Requests
Click on New Supplier and enter details as applicable. All the below fields are mandatory except for the telephone and website fields. A check is done on the account reference to ensure it does not exist in Sage already.
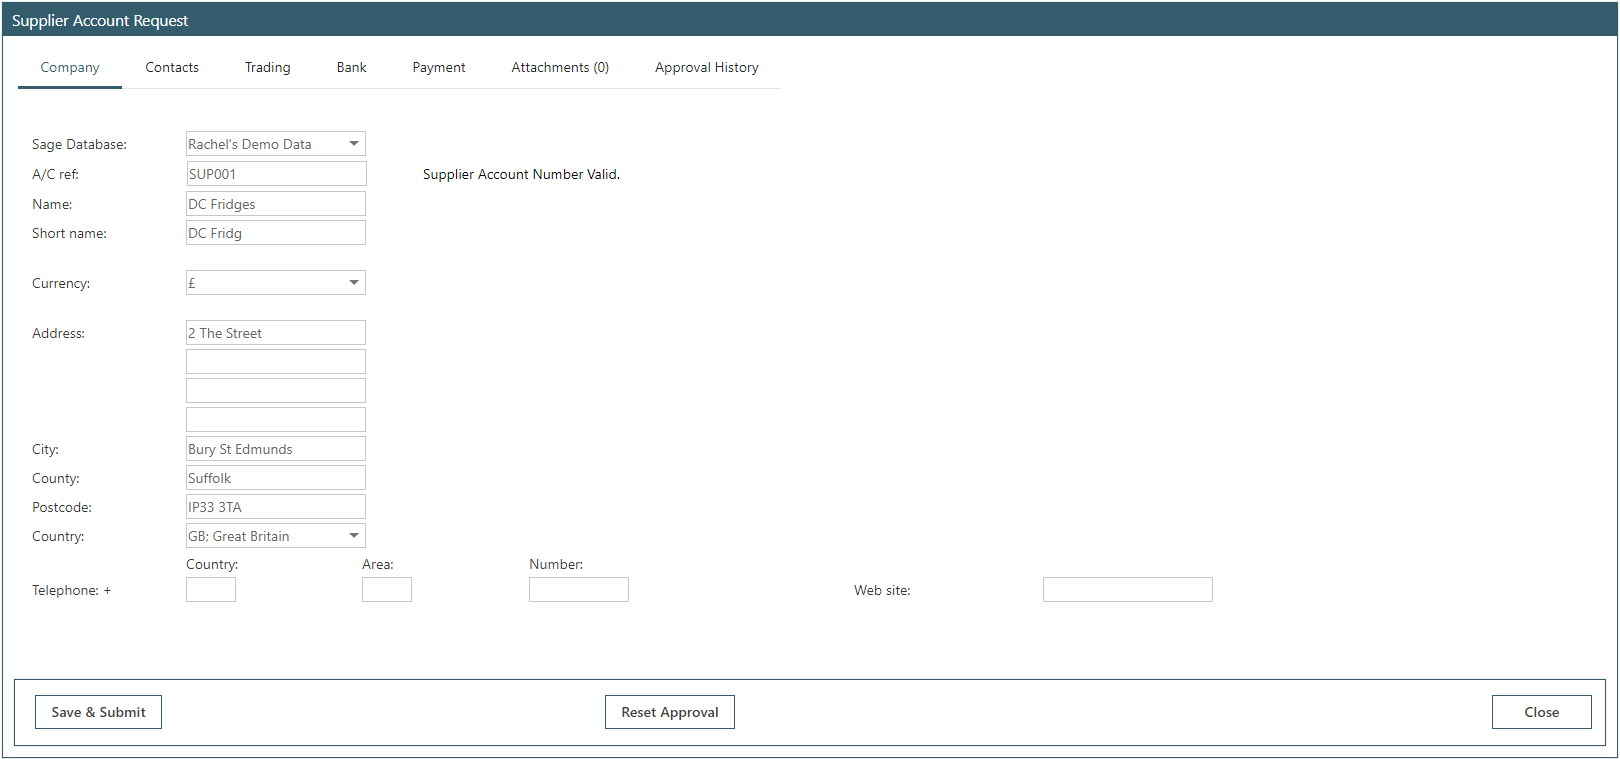
Under the Contacts tab, complete as applicable. The first name, last name and email fields are mandatory.
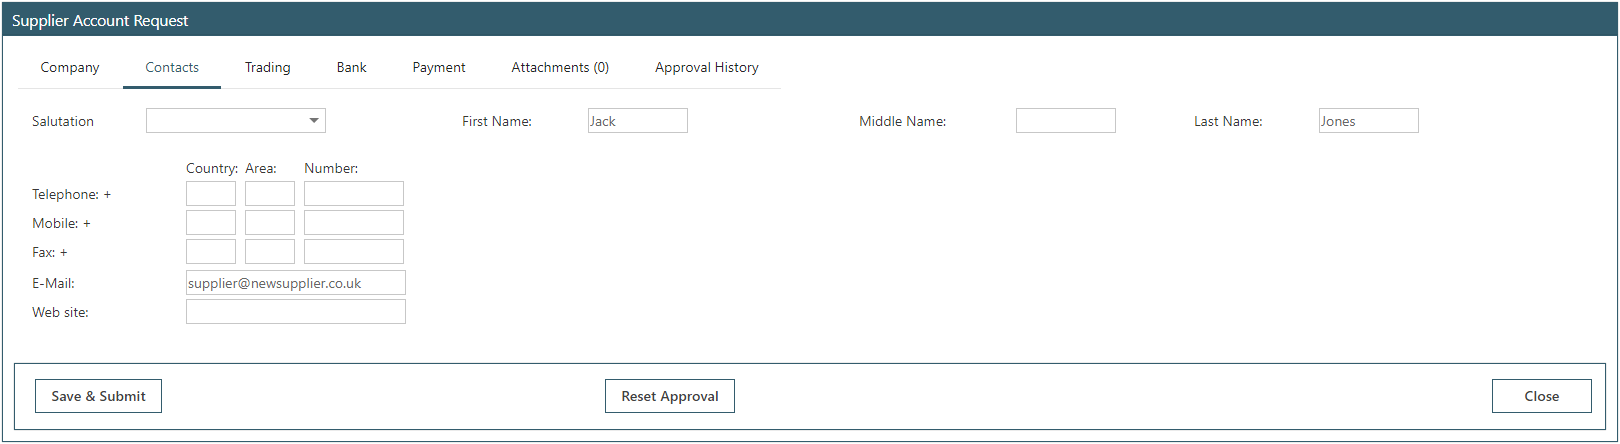
Under the Trading tab, complete as applicable. The Country code, default tax code and duration to keep transactions for are mandatory fields. Analysis codes will be pulled through as configured in Sage.
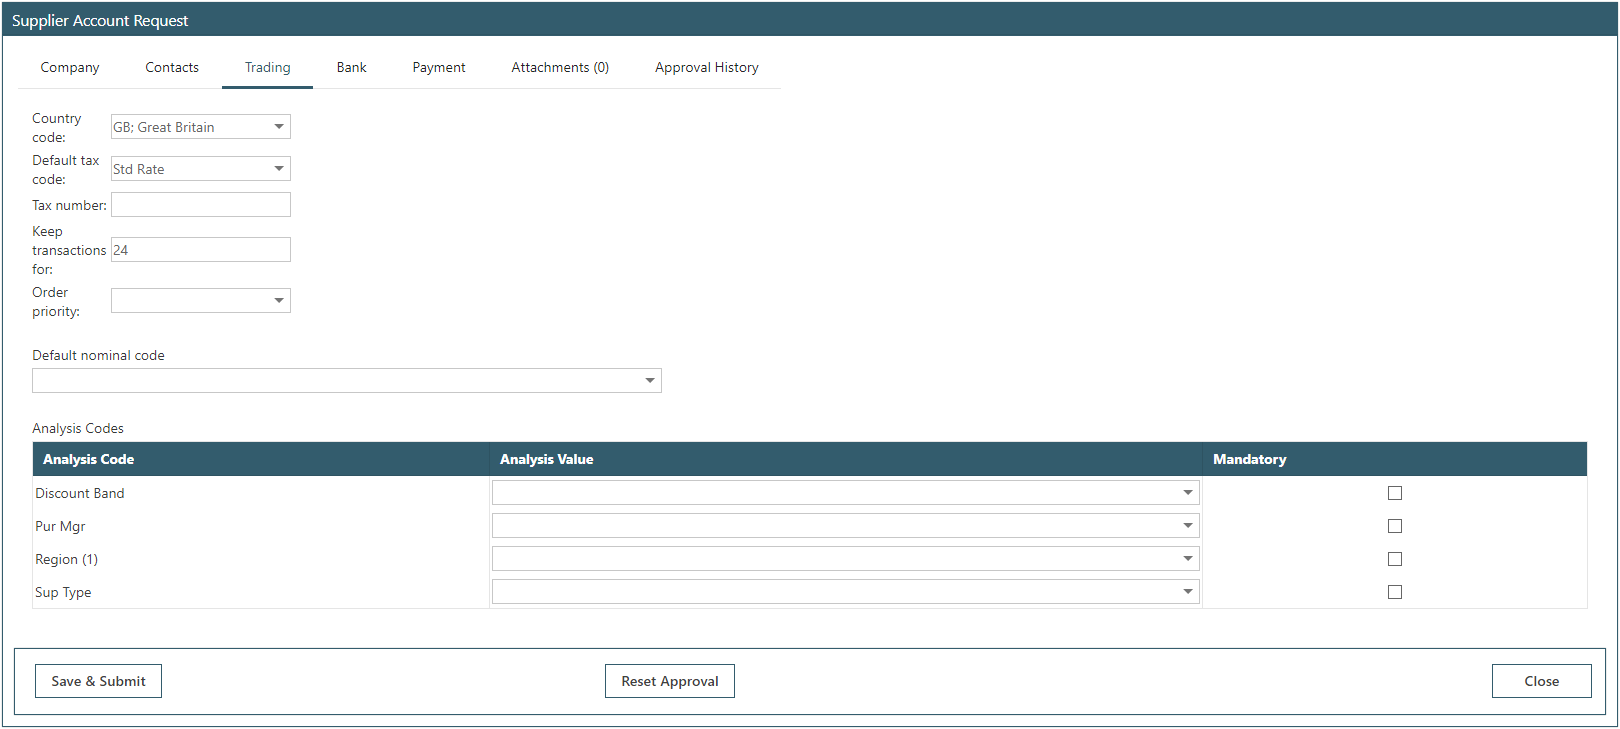
Under the Bank tab, complete if known.
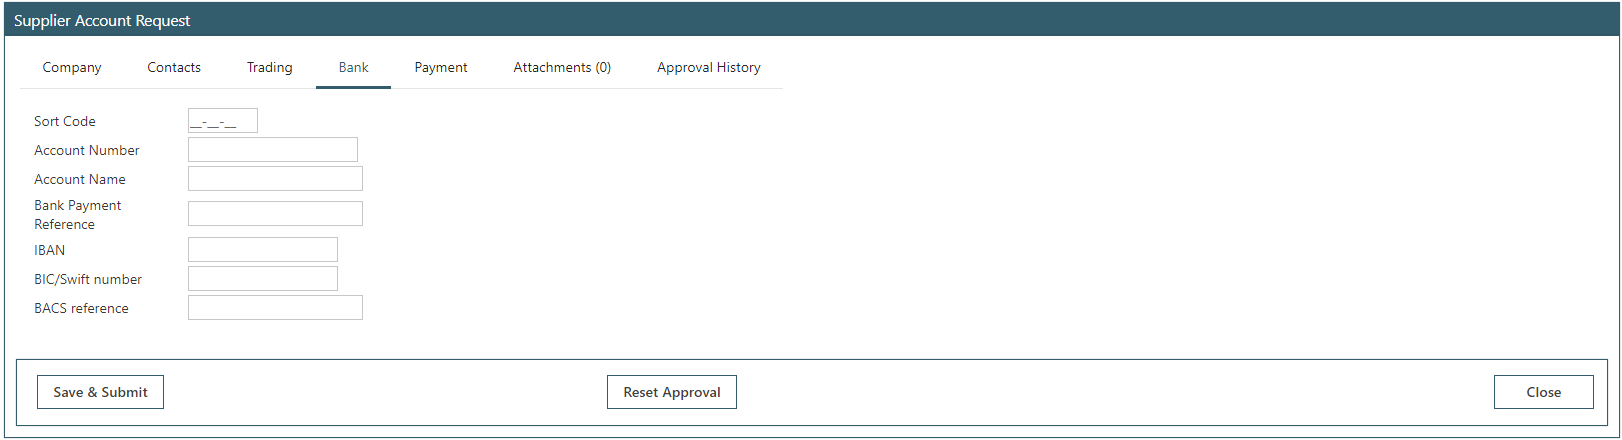
Under the Payment tab, complete as applicable. The Payment Group is the only mandatory field.
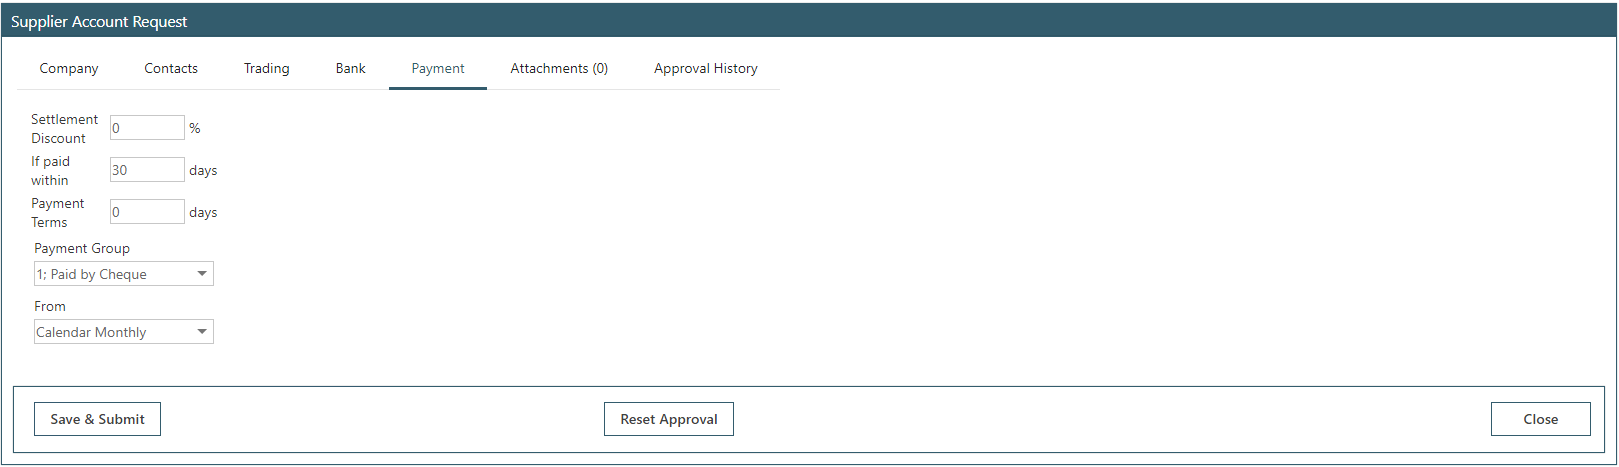
Under the Attachments tab, enter a document providing additional justification for the new supplier, it might be that headed paper is required; either attach using the drop files or browse option. If Sicon Documents is enabled, once the supplier is approved this documentation will post through to Sage.
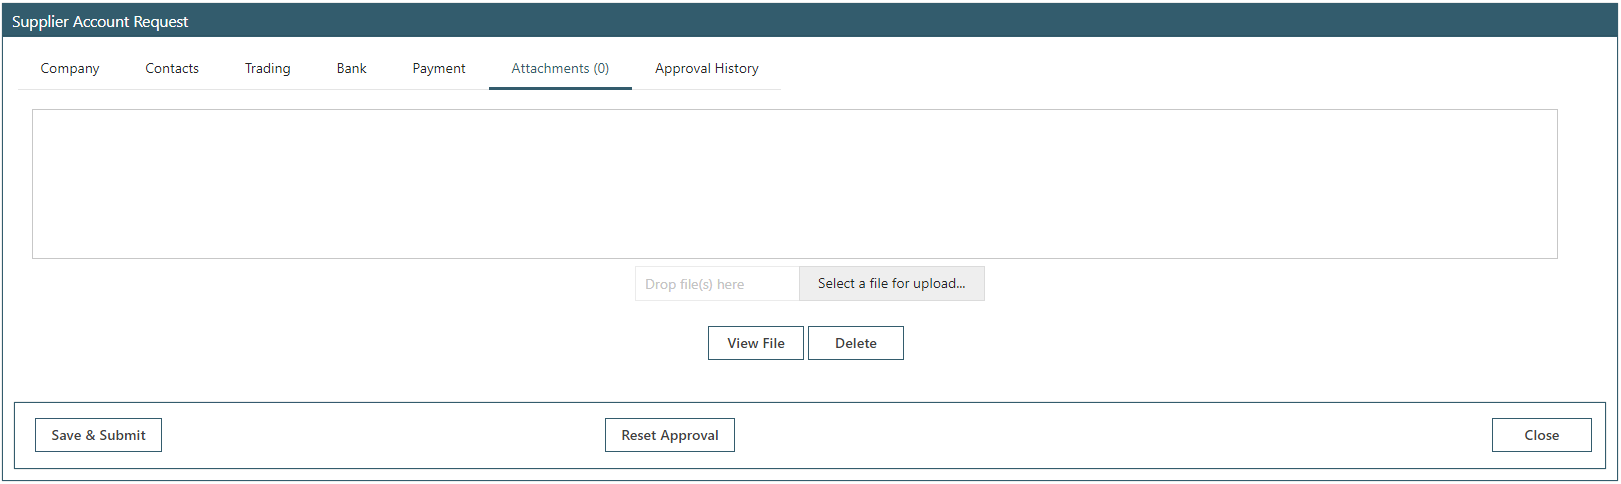
The Approval History tab will be populated once the request is submitted and approved. Once all fields have been completed, click Save & Submit. The request will go down the pre-configured approval route and show to the approver as awaiting approval. The request can be approved or rejected and clicking view request details will open the supplier request to allow for amendments to the fields before being approved. If bank details have not been added by the user entering the supplier request, these will need to be added directly into Sage.

Once fully approved, the supplier will move to the Completed tab, appear in Sage and be available for selection in WAP.
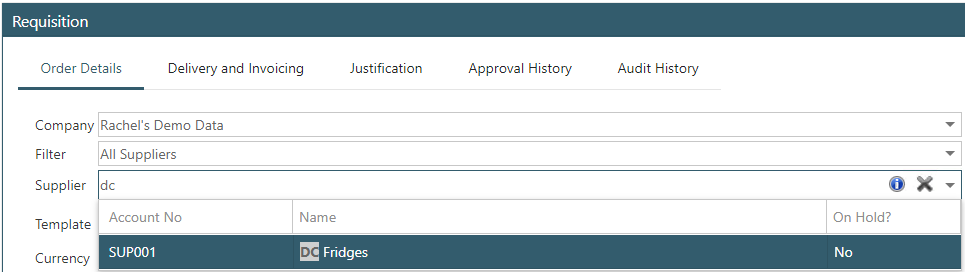
45.5. New Stock Item Requests
Click on New Stock Item and enter stock details as applicable. All the below fields are mandatory.
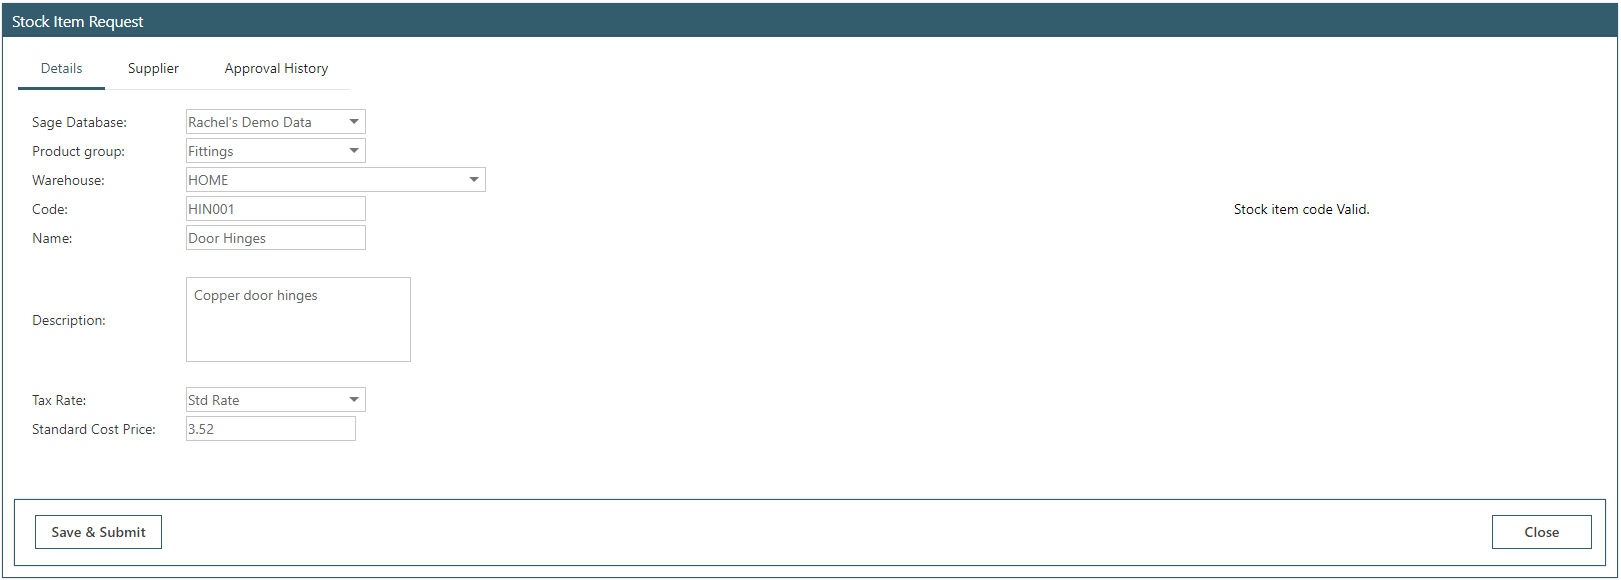
Under the Supplier tab, complete as applicable; none of these fields are mandatory.
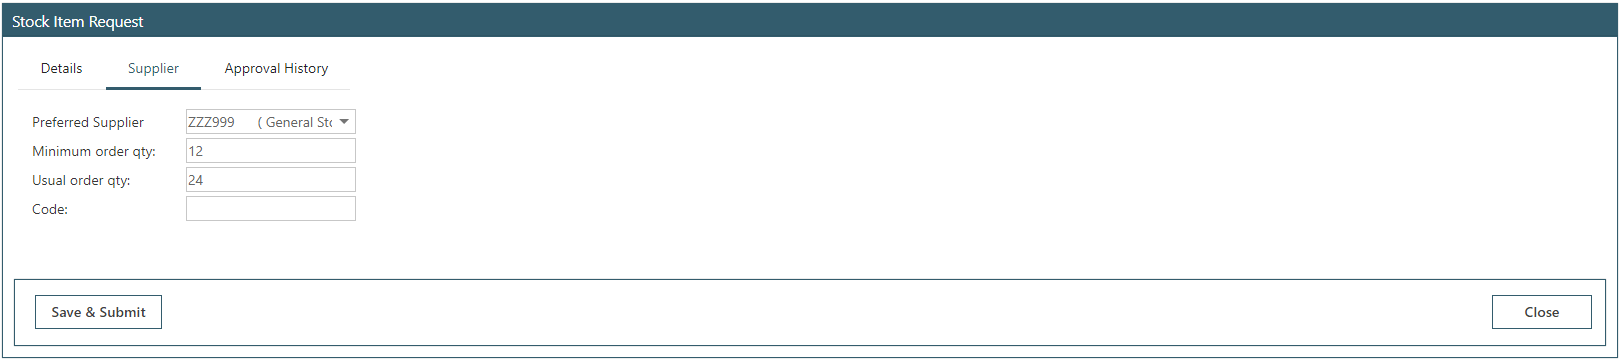
The Approval History tab will be populated once the request is submitted and approved. Once all fields have been completed, click Save & Submit. The request will go down the pre-configured approval route and show to the approver as awaiting approval. The request can be approved or rejected and clicking view request details will open the stock item request to allow for amendments to the fields before being approved.

Once fully approved, the stock item will move to the Completed tab, appear in Sage and be available for selection in WAP.
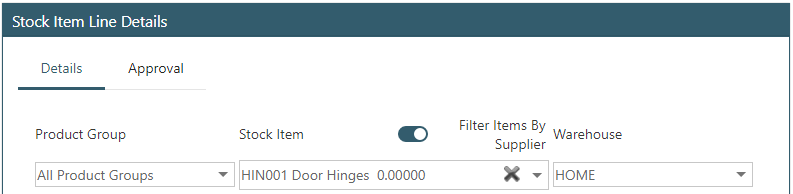
45.6. New Expense Supplier Requests
New expense supplier requests are made through a user profile, usually when a new user is added onto the WAP system and if there is no PL supplier account already set in Sage for the user.
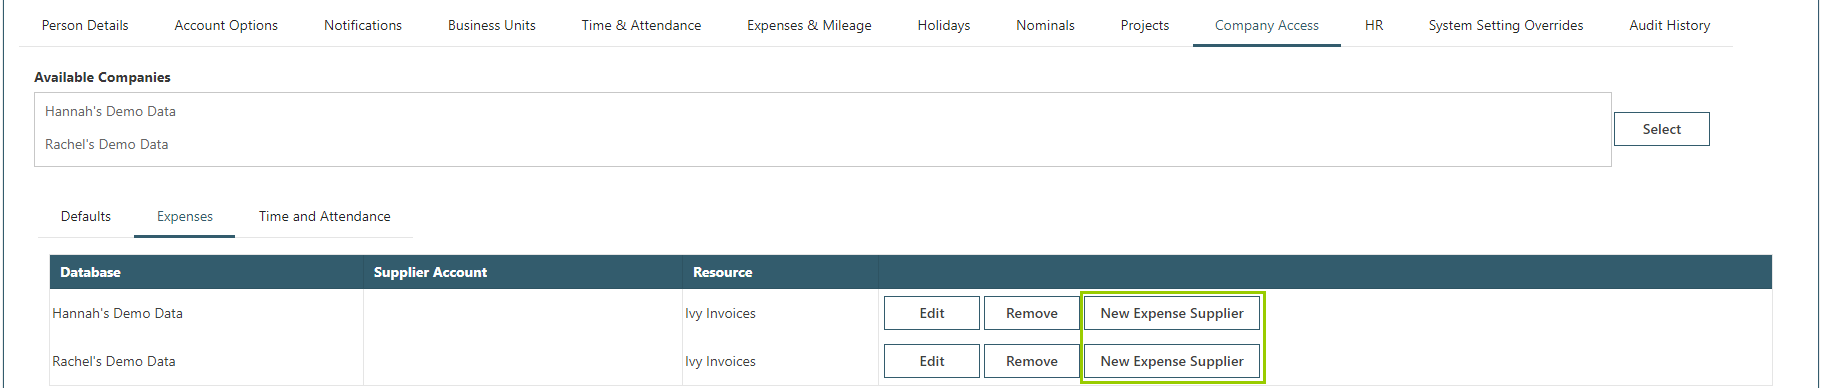
On a user’s WAP profile, under the Company Access tab – Expenses sub tab, click New Expense Supplier to be taken to the new supplier pages; some fields will already be populated with data from the user’s WAP profile but can be overridden if required.
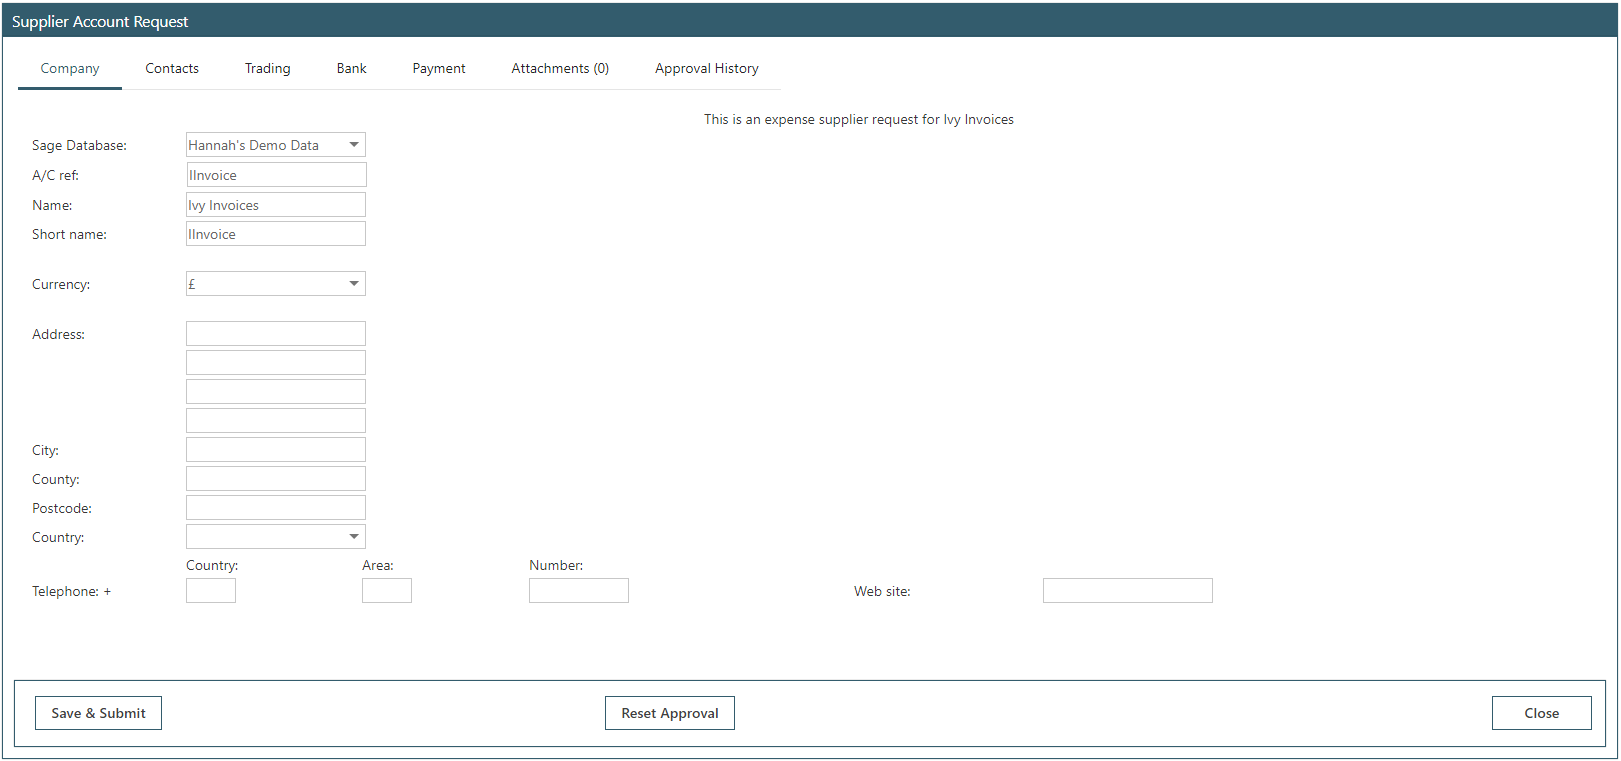
Complete all mandatory fields as per the standard new supplier request screen and submit for approval. Once submitted, this request will follow the pre-configured approval route for new expense supplier requests. Once approved, the supplier account will be linked to the user’s WAP profile.
46. Sicon Projects Screens within WAP
If Sicon Projects has been configured as the costing module, it is possible to link the project list through to WAP to allow users to complete analysis on their projects, edit certain fields or create new projects. It is designed as a quick access option for users who may not have Sage licences. It does not carry the full functionality available within Sicon Projects within Sage and as such, some sites may wish to restrict what access users are given within WAP.
46.1. Sicon Projects User Type Permissions
If Projects has been configured as the costing module, there are User Type permissions to allow for Projects screens to be viewed in WAP with limited fields being able to be edited in WAP.
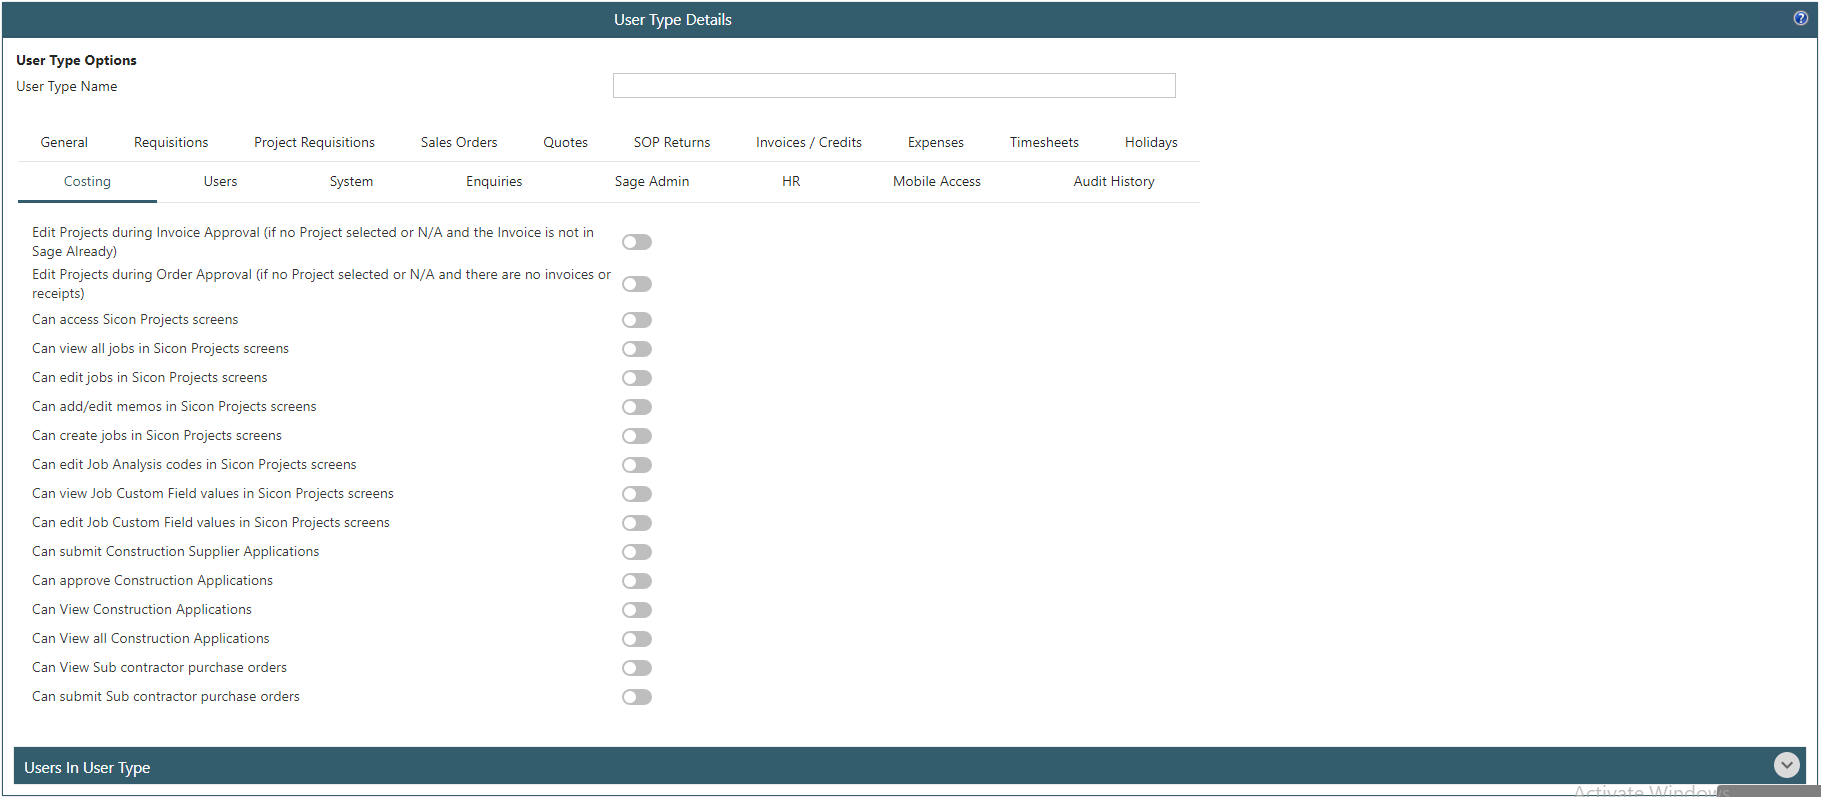
Edit Projects during Invoice Approval (if no Project selected or N/A and the Invoice is not in Sage Already): the project entered on an invoice can only be changed if it was entered in Sage as a direct purchase ledger invoice. If it is a PO Invoice, the project can only be changed if recorded in Sage against the N/A Project and N/A Project Header.
Edit Projects during Order Approval (if no Project selected or N/A and the Invoice is not in Sage Already): the project can only be changed on the approval page if the line has not been goods received or invoiced.
Can access Sicon Projects screens: whether the Sicon Projects screen menu options are visible on the menu options on the left of the screen.
Can view all jobs in Sicon Projects screens: if this is ticked, the users will be able to see all projects, if unticked, users can only view projects where they have been set as the project manager (the resource must be allocated to their user profile) or, have had projects allocated to them within their user profile.
Can edit jobs in Sicon Projects screens: if this is ticked, the users will be able to amend a project and edit the percentage complete figure and the actual completion date. Once saved, these will then update the project within Sage.
Can add/edit memos in Sicon Projects screens: if this is ticked, users will be able to add notes or memos onto the project in WAP which once saved, will post through to the project within Sage.
Can create jobs in Sicon Projects screens: the ability for a user to create a project within WAP that will save through to the Project list within Sage.
Can edit job analysis codes in Sicon Projects screens: if this is ticked, users will be able to edit analysis codes as configured from Sicon Projects settings within Sage. Once an update has been saved it will post through to the project within Sage.
Can view Job Custom Field values in Sicon Projects screens: the ability for a user to view additional custom analysis tabs, as configured from Sicon Projects settings within Sage.
Can edit Job Custom Field values in Sicon Projects screens: this setting is used in conjunction with the setting above; the ability for a user to edit additional custom analysis tabs, as configured from Sicon Projects settings within Sage. Once updates have been saved, these will post through to the project within Sage.
Can submit Construction Supplier Applications: if Sicon Construction is installed, the ability for the user to be able to submit supplier applications.
Can approve Construction Applications: if Sicon Construction is installed, applications can require approval in WAP. This permission allows the user to approve such applications; either ones that have been entered in Sage or WAP.
Can View Construction Applications: the user will be able to view applications that are awaiting their approval or they have approved.
Can View all Construction Applications: the user will be able to view all applications in WAP.
Can View Sub Contractor Purchase Orders: the ability for the user to view these purchase orders; either ones that have been entered in Sage or WAP.
Can submit Sub Contractor Purchase Orders: the ability for the user to enter these purchase orders in WAP.
46.2. Project List
If a user has permission to access the Sicon Projects screen, the Project List will display projects as configured within Sage; screens and views may change depending on User Type permissions. Project managers who are also users in WAP should have their Sicon Project resource allocated to them within their user profile.
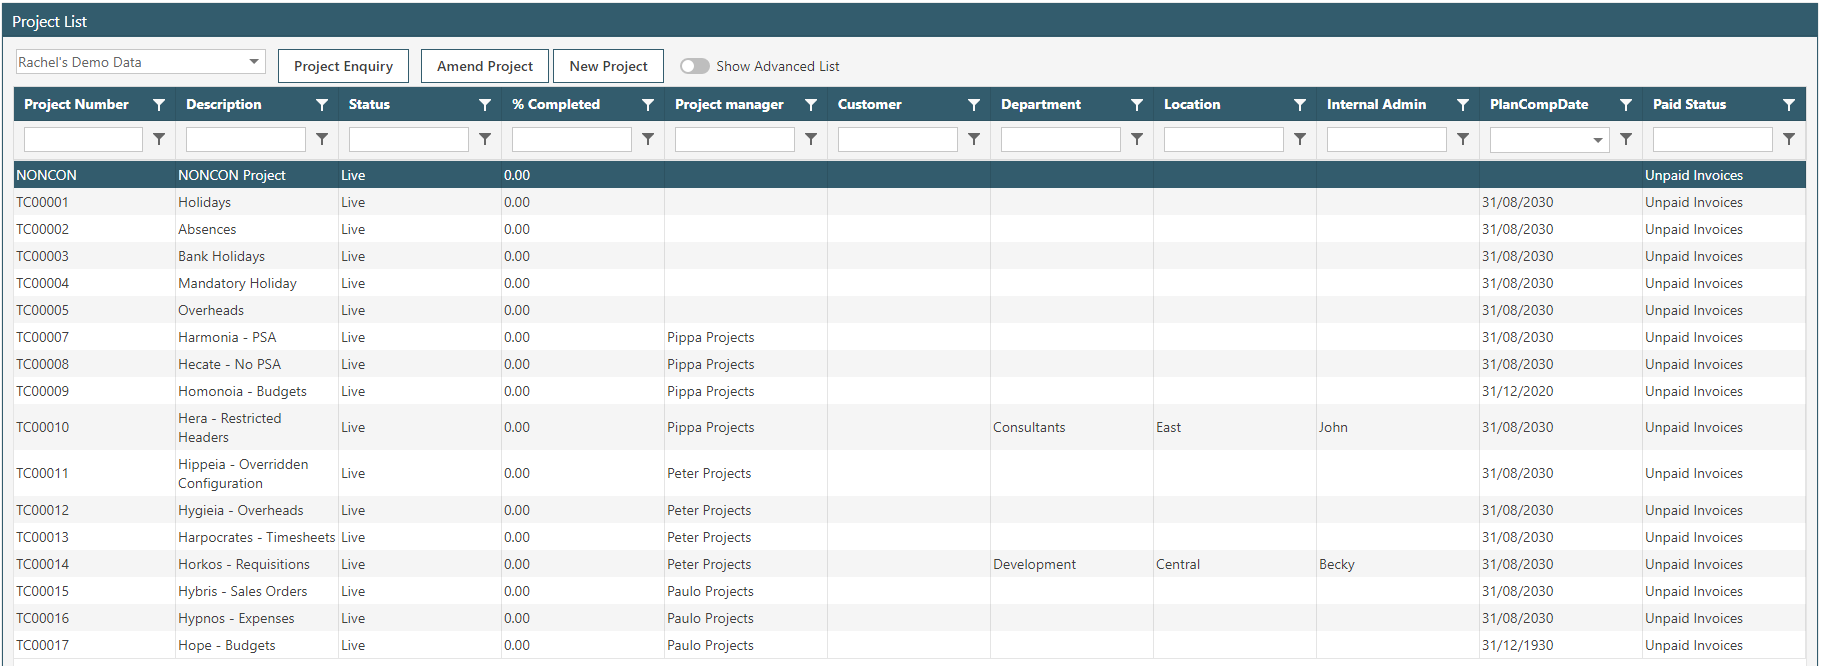
Sage Database: The Sage Company the user has access to by default will be selected and if the user has access to multiple companies, they can choose another company using the drop-down list. If the user only has access to one company, the list is greyed out.
Project Enquiry: once a project has been highlighted, click to see the Project Enquiry screen.
Amend Project: once a project has been highlighted, click to view additional project information or if permissions have been granted, make changes to analysis fields or completion figures.
New Project: if permission has been given, click to create a new project.
Show Advanced List: click to view budget, variance, committed and revised data and if applicable, application, valuation or retention information. N.B. accessing the Advanced List can cause loading delays as there may be large amounts of data so by default, this option is not ticked.
Column Headers: click on the filter option either on the column header or in the search bar to only show certain jobs. Right- click anywhere on the column headers to be provided with further options for customising columns or exporting the data as shown on the screen. As per other WAP report screens, columns can be dragged around or filtered by using the top search options.
46.3. Project Enquiry
The project enquiry screen displays all transactions for a selected project grouped together as expenditure, income, stock, labour transactions. Additional information depending on what has been configured in Sage is also available such as budget data. Data can be exported to Excel for additional filtering and analysis; click the Export banner at the top of the screen and select the tab to export. If a PO on the Expenditure tab was raised through WAP it is possible to click on the order number to view the order within WAP. Clicking on Edit Project will take the user through to the Amend project screen.
The Project Totals screen will vary depending on the setting within Sicon Projects – Utilities – Project Settings – Enquiry tab – Project totals tab mode.
Transaction type –
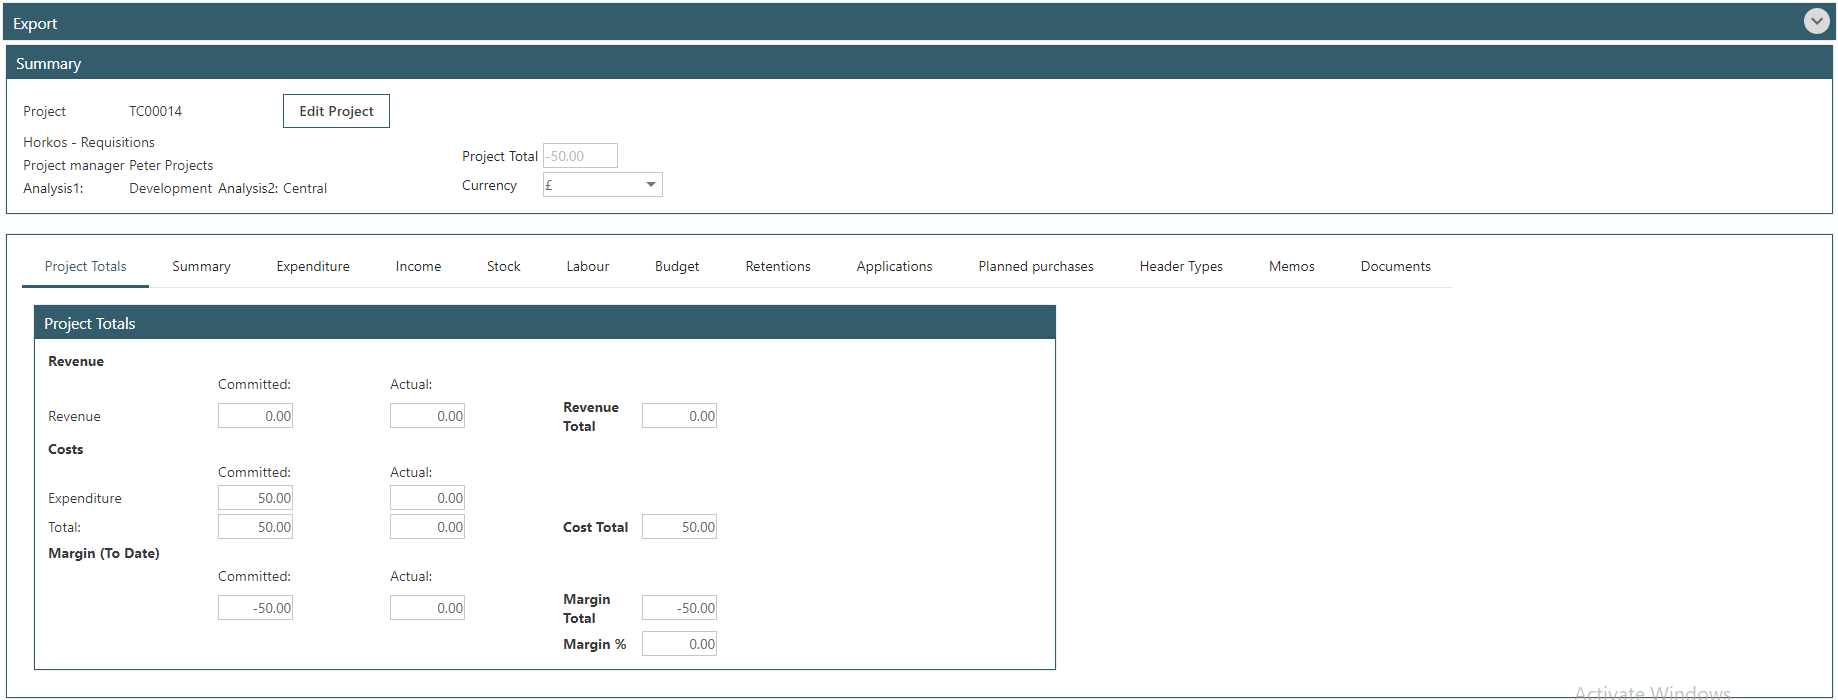
Project Header Type –

Project Groups –
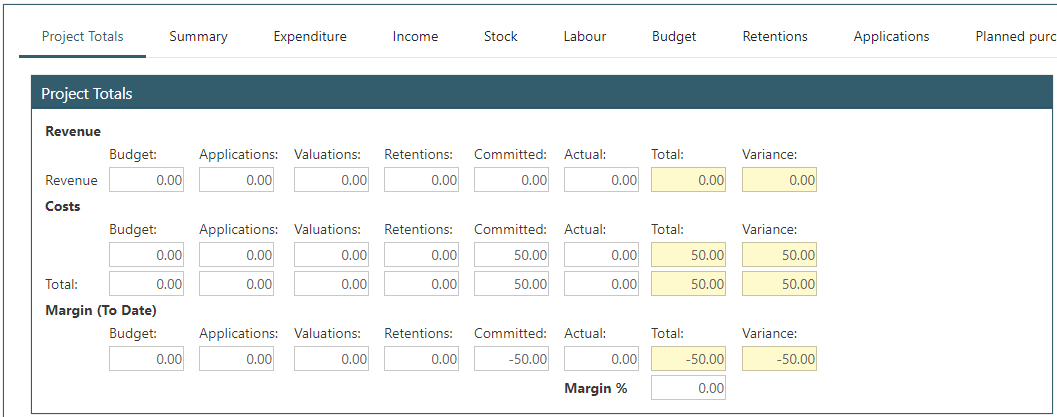
Note, all tabs across the top will be an exact replica of the more detailed information available within Sicon Projects. For extended detail and maintenance options, it is advised projects are viewed within Sage.
46.4. Amend Project
This screen is used to show additional details of the project and if User Type permissions allow, various fields can be amended. It is possible to go directly into the Project Enquiry screen from the Amend Project screen by clicking the button at the bottom of the screen.
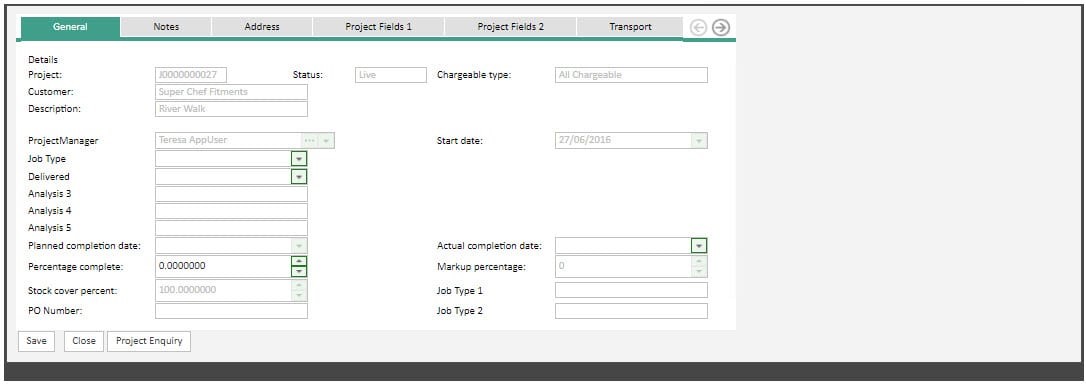
If further analysis or amendments are required that cannot be made in WAP, it is suggested these should be completed from within the Sage Sicon Projects. WAP is designed as an analysis tool and will not contain the full functionality of the Sage screens.
46.5. New Project
If a user has permission to do so, they will be able to create a new project from within WAP. This functionality would usually be reserved for Administrators only. Depending on Sicon Project settings, users will either need to enter a project number or this will be populated automatically once the job has been saved and posted through to Sage.
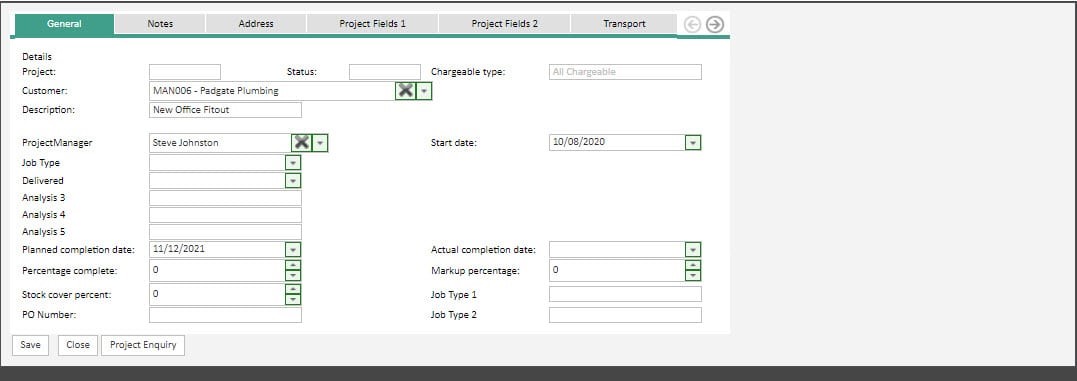
46.6. Planned Purchase Import
Planned Purchases can only be used if WAP is linked with Projects and the Sicon Web API has been configured.
Within this screen users can generate a template and then import planned purchases. Once a template has been created, enter the correct details, see example below. In the Line Type column, enter either 0 for a stock item or 1 for a free text line. If the user knows suppliers to use or prices for an item, these can be entered on the import.
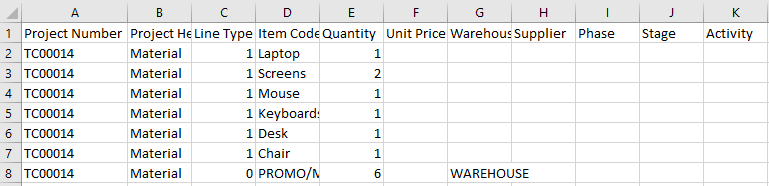
To import, browse for the file and once uploaded, click to Validate; project, project header, stock, warehouse and supplier details will be checked and if correct, the file will be flagged as valid. Once successfully validated, the file can be imported.
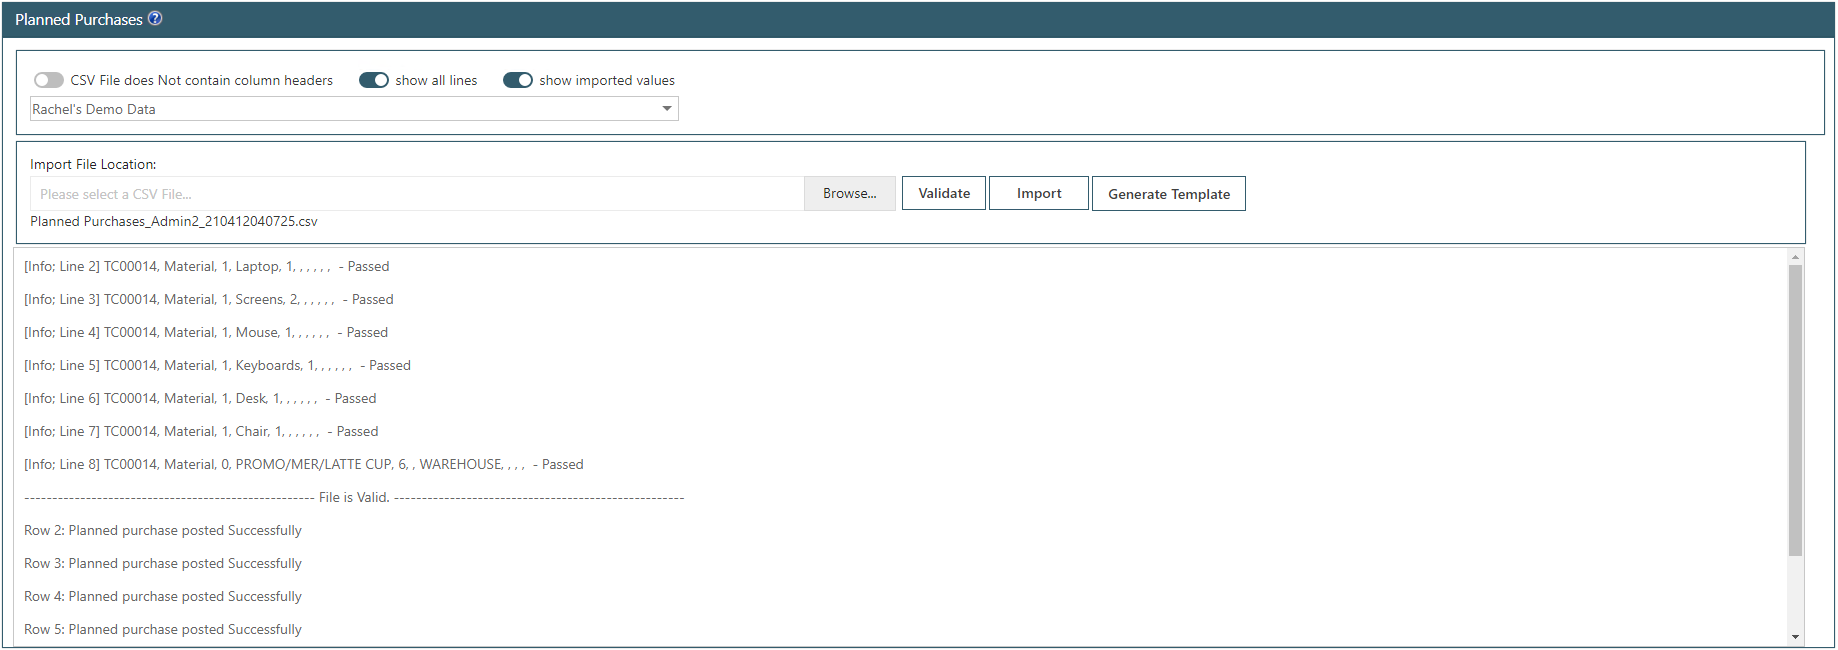
CSV File does not contain column headers: tick if no column header line is on the import.
Show all lines: tick to view all lines when validating; if this is not ticked, only lines that have failed validation will show.
Show imported values: tick to view lines that have imported.
Company Name: select the correct company to import the transactions into; if a user only has access to one company, the company field selection will be greyed out.
Browse: use this to find the saved planned purchases file. Once uploaded, the name will show under the file location – only once this shows will you be able to validate or import the file.
Validate: once the file has uploaded, validate. Any errors that are highlighted will need to be resolved before the file can be validated again.
Import: once the file has passed validation, import the file.
Generate Template: use this option to create a new template to complete.
46.7. Maintain Planned Purchases
Once the template has been imported into WAP, the planned purchases will be visible within WAP and Sage.
In Sage against the job, they will show in the Job Enquiry against the Planned Purchases tab –
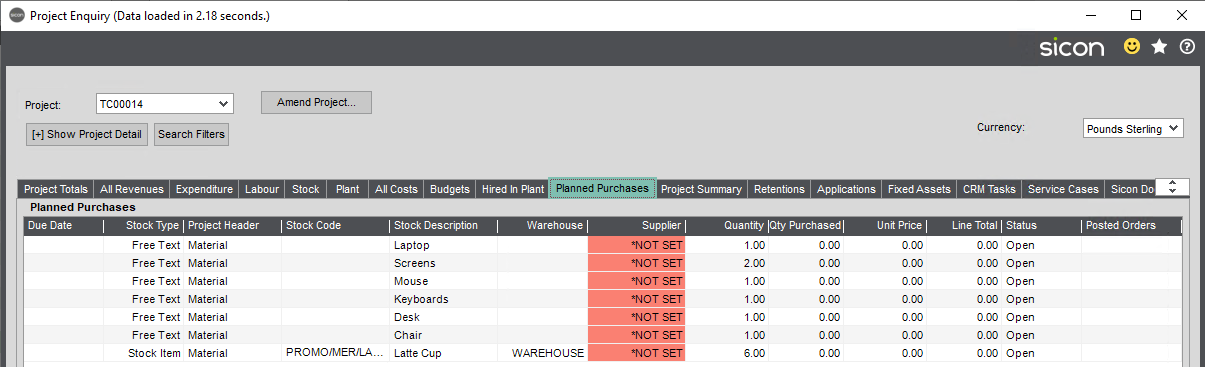
The lines will also be visible under the Budgets and Planned Purchases tab –
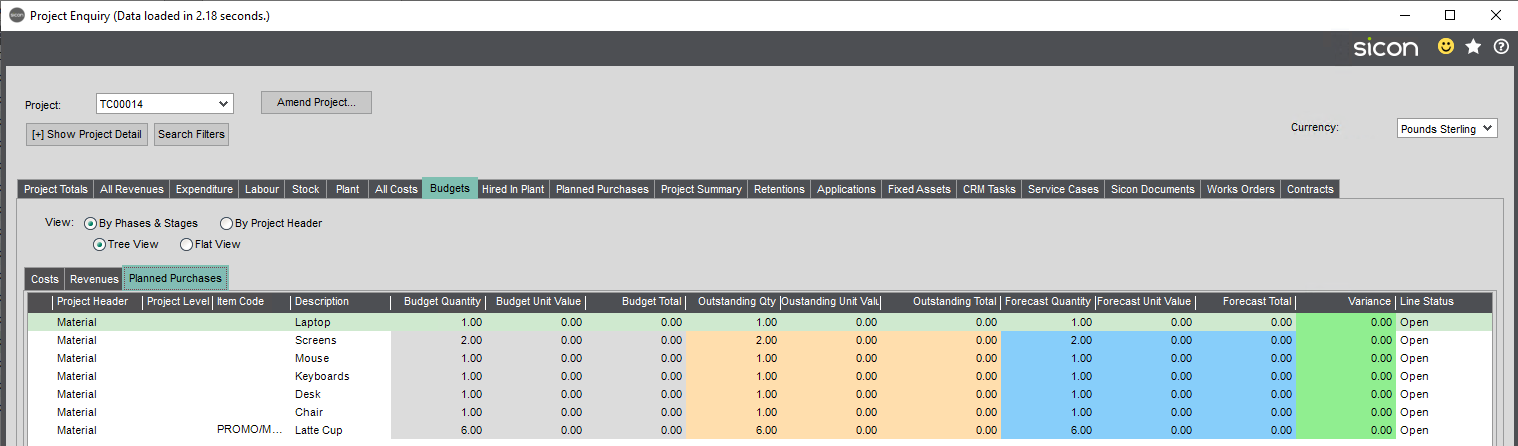
Within WAP under the Sicon Projects menu – Maintain Planned Purchases – the lines imported will show.
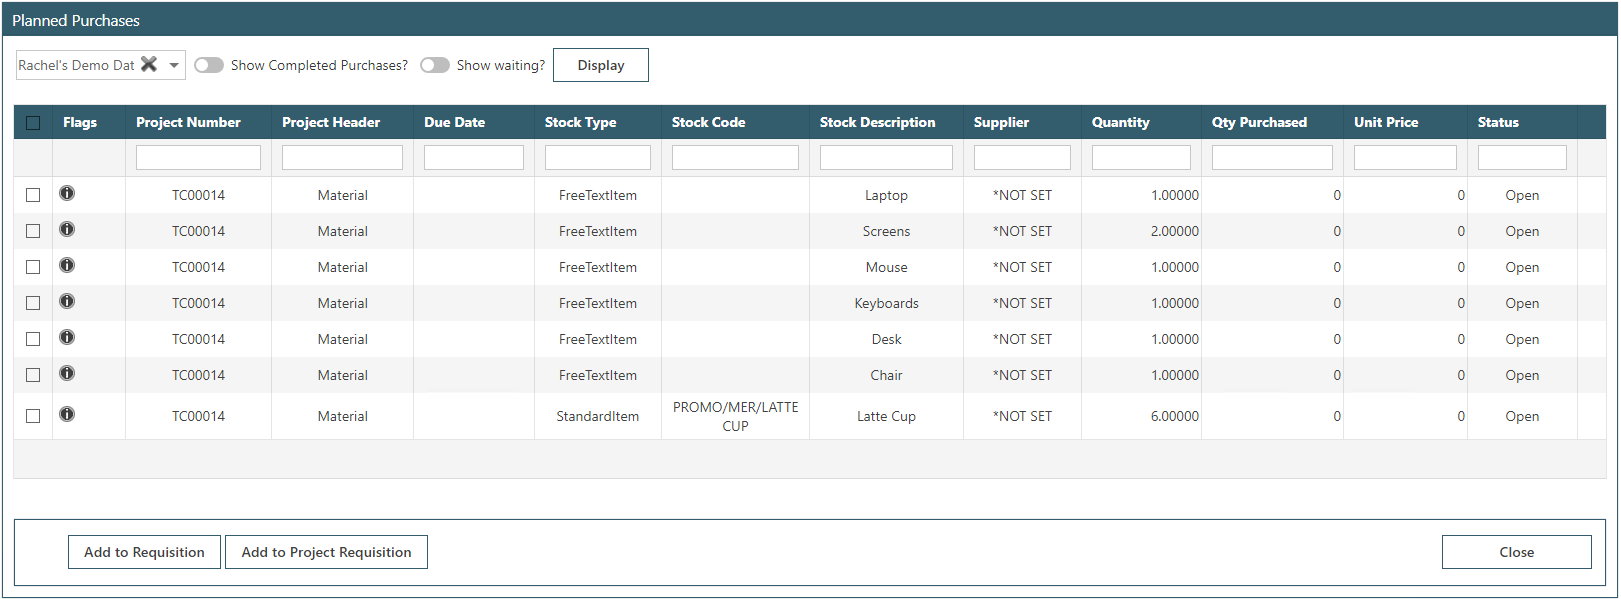
Company Name: select the correct company to import the transactions into; if a user only has access to one company, the company field selection will be greyed out.
Show Completed Purchases? Tick and then select to display any planned purchases that have been added onto a purchase order within Sage. Lines cannot be amended.
Show Waiting? Tick and then select to display any planned purchase lines that have been added to a project requisition or requisition within WAP. Lines will be highlighted in orange and cannot be amended.
Add to Requisition: if the supplier and prices are known, select lines to add directly onto a requisition.
Add to Project Requisition: if the supplier and prices are not known, select lines to add onto a project requisition. This can then be submitted for approval so this information can be added before a requisition is then created.
Hover the blue ‘I’ flag to see information as to what project requisition or requisition the line has been added to and prices that have been entered.
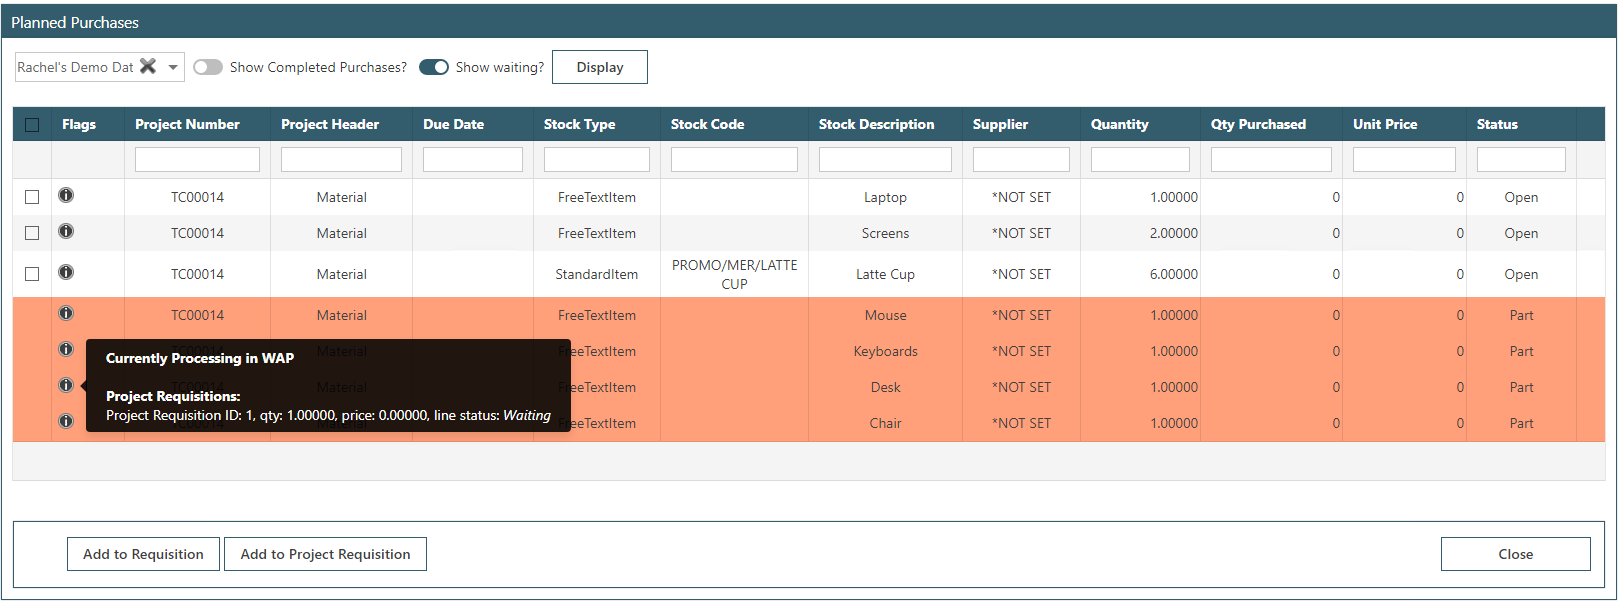
Example 1 (Creating a Requisition)
When a supplier and price is known, the lines can be added to a requisition by selecting the line and clicking ‘Add to Requisition’.
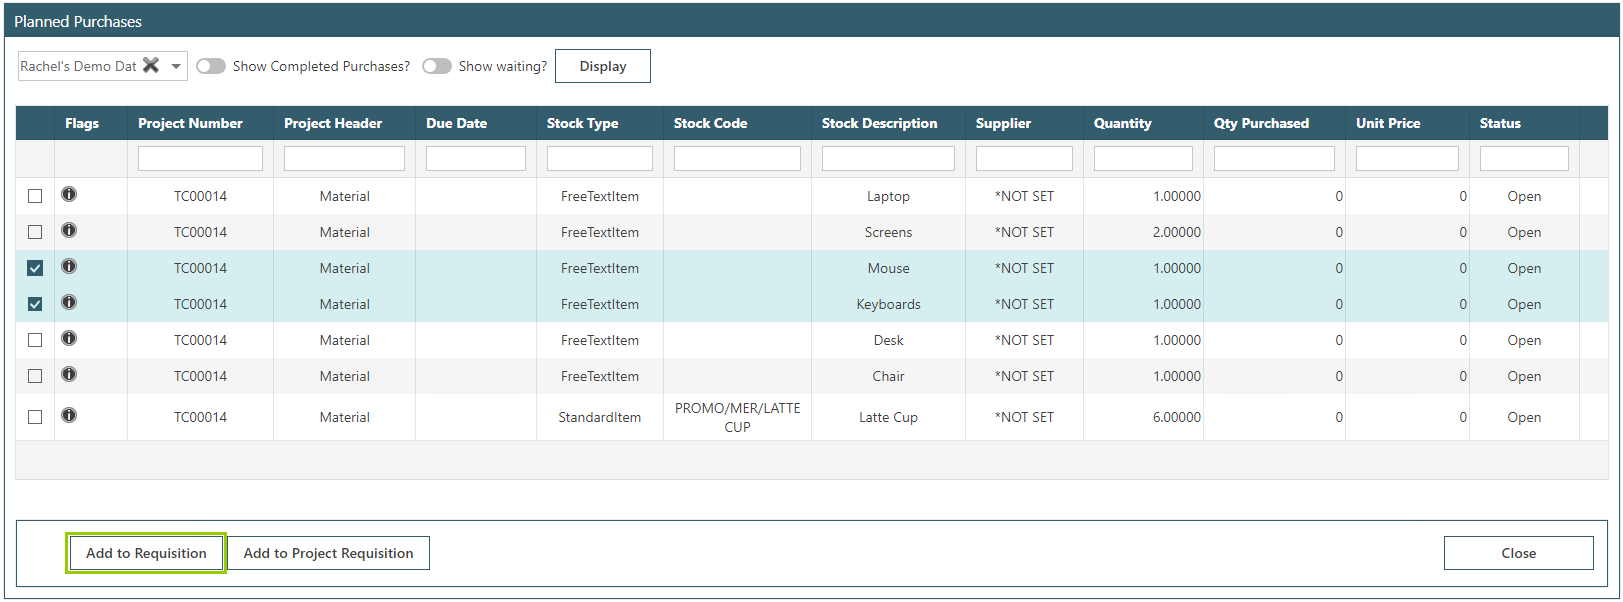
The requisition can then have any details updated if required, e.g. additional notes or documents added or comment or charge lines. Once correct, the requisition can then be submitted for approval or saved if not ready for submission.
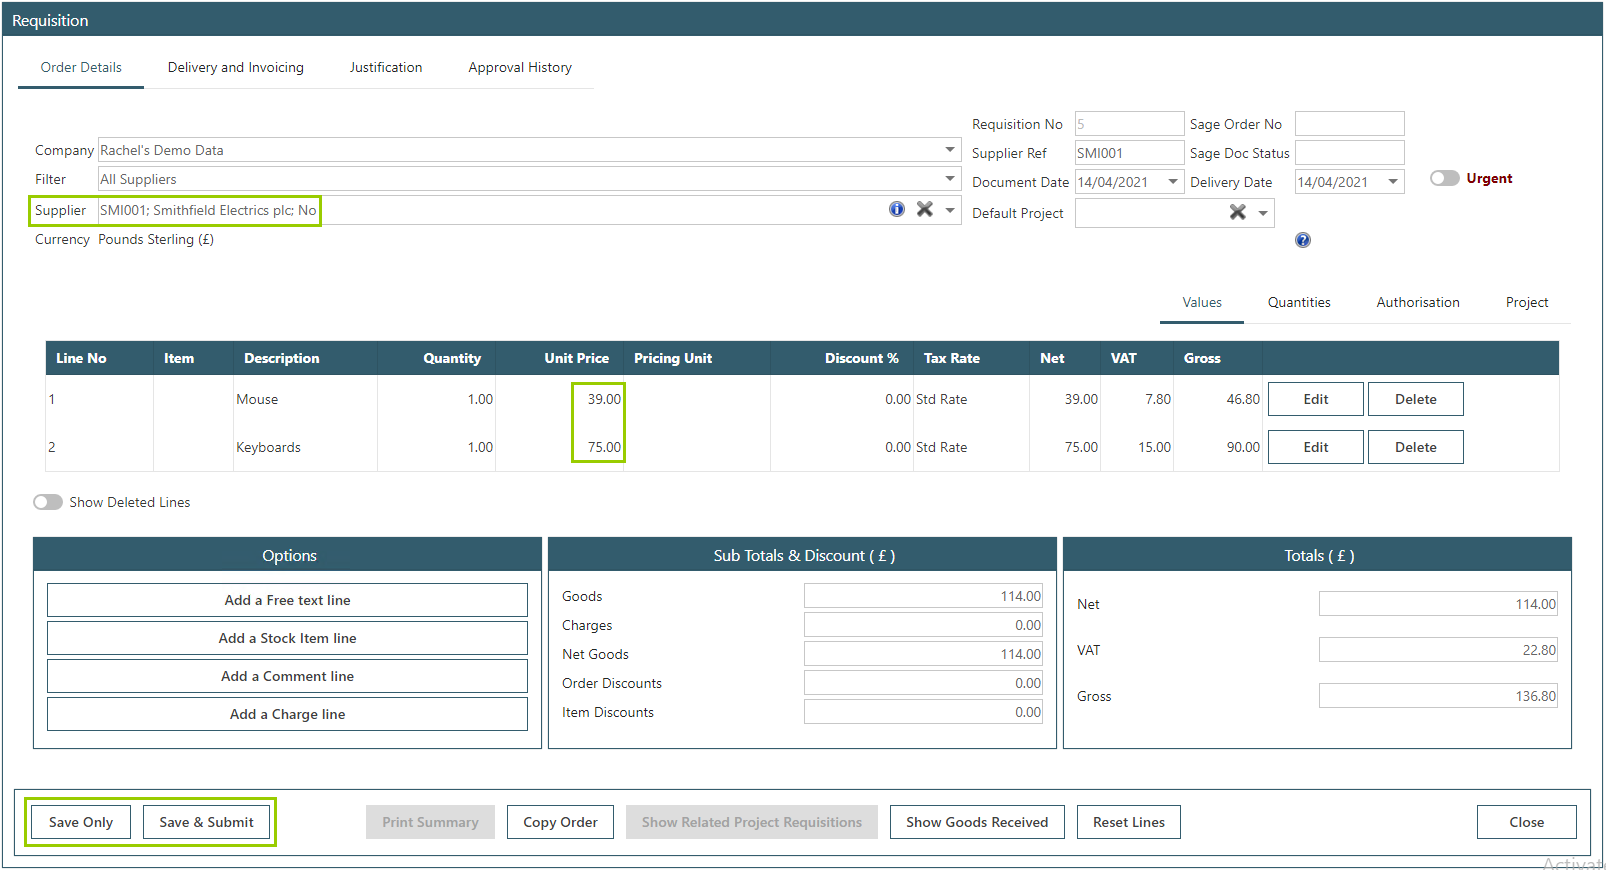
Example 2 (Creating a Project Requisition)
If a supplier or price is not known, the lines can be added to a project requisition by selecting the lines and clicking ‘Add to Project Requisition’.
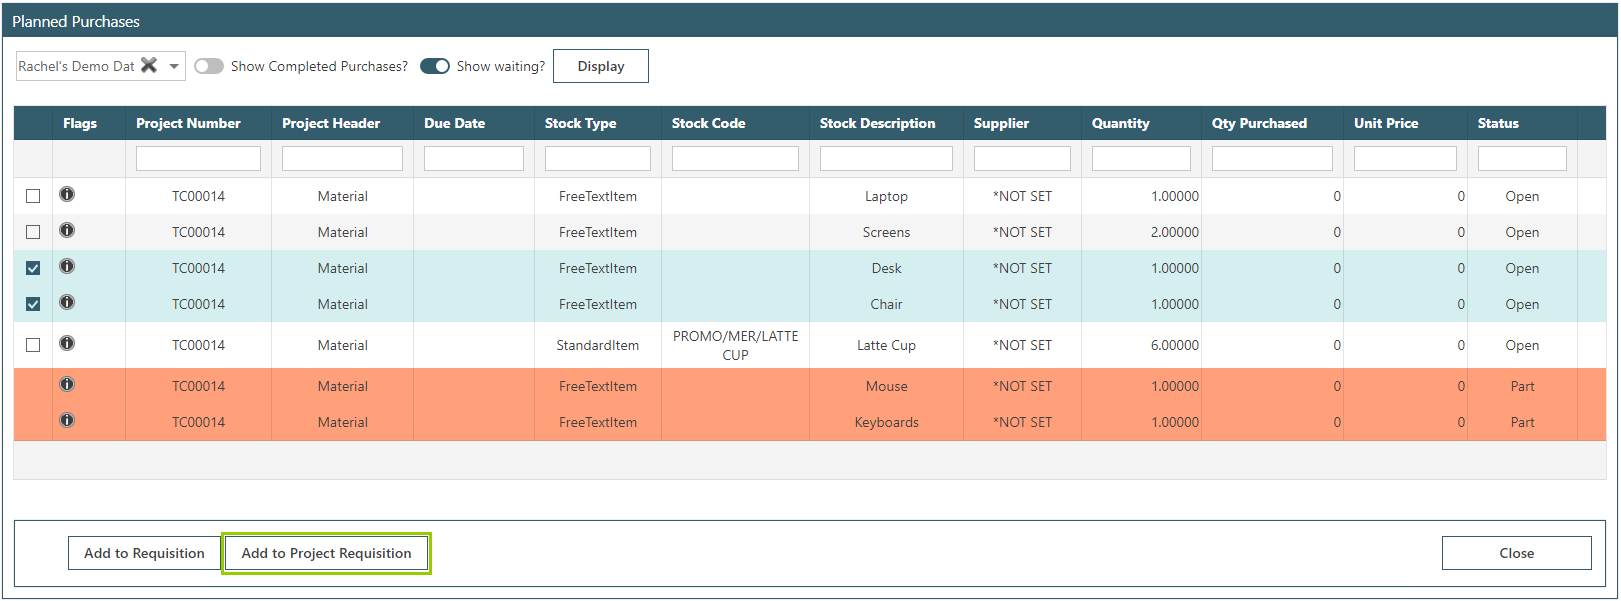
Additional information can be added here, e.g. if a line item description needs changing or additional notes or documents uploaded, or the project requisition can just be submitted for approval.
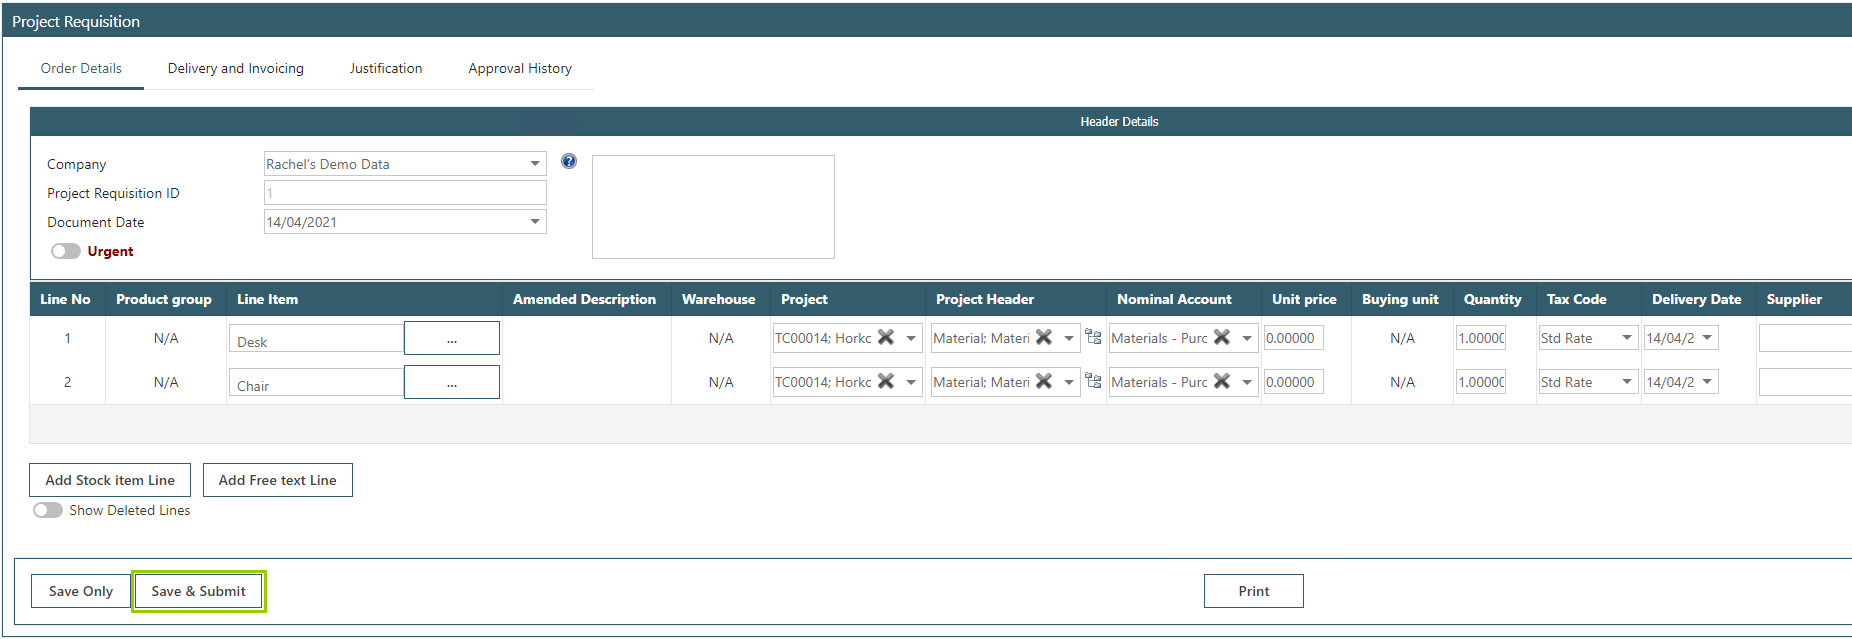
The approver of project requisitions can then complete this process by adding pricing and supplier information and approving lines as required. Individual lines can be approved at a time which will then create a requisition to be approved. For more information, please see Project Requisition section.
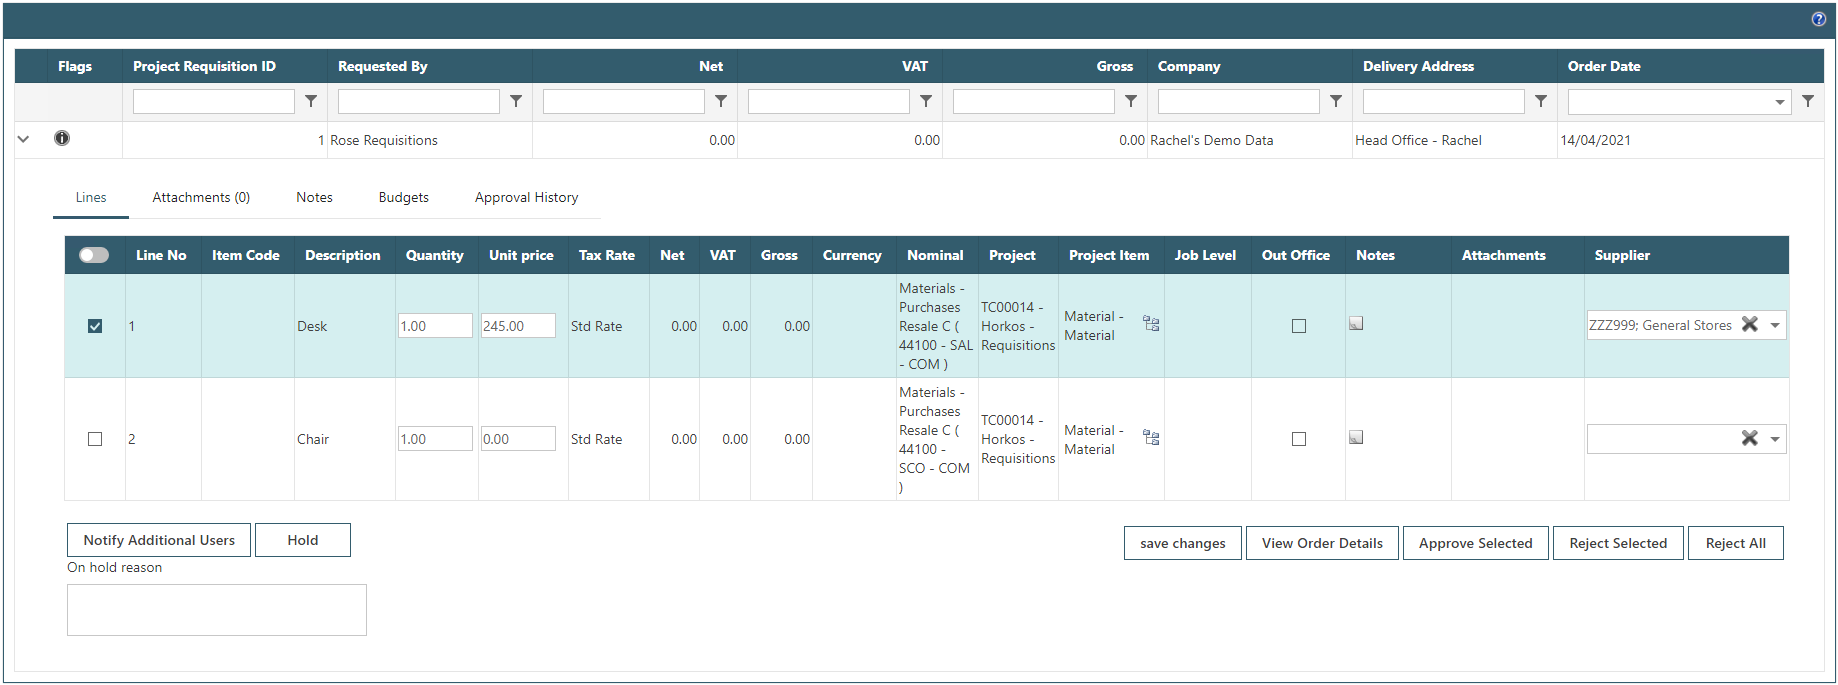
46.8. Planned Purchases Sicon Projects Updates
Once the order has been completed in WAP, the planned purchases tab will update to show the quantity purchased, the status will move to Completed and the Purchase Order number will show.

47. Construction
If linking WAP with Sicon Projects and Construction, menu options will appear for entering sub-contractor purchase orders, sub-contractor applications and supplier applications.
For the purposes of this guide it is assumed that Sicon Construction has already been fully configured in Sage. Sicon WebAPI must also have been installed and configured.
Below summarises the steps that should already have been completed in Sage, and the additional steps required in WAP.
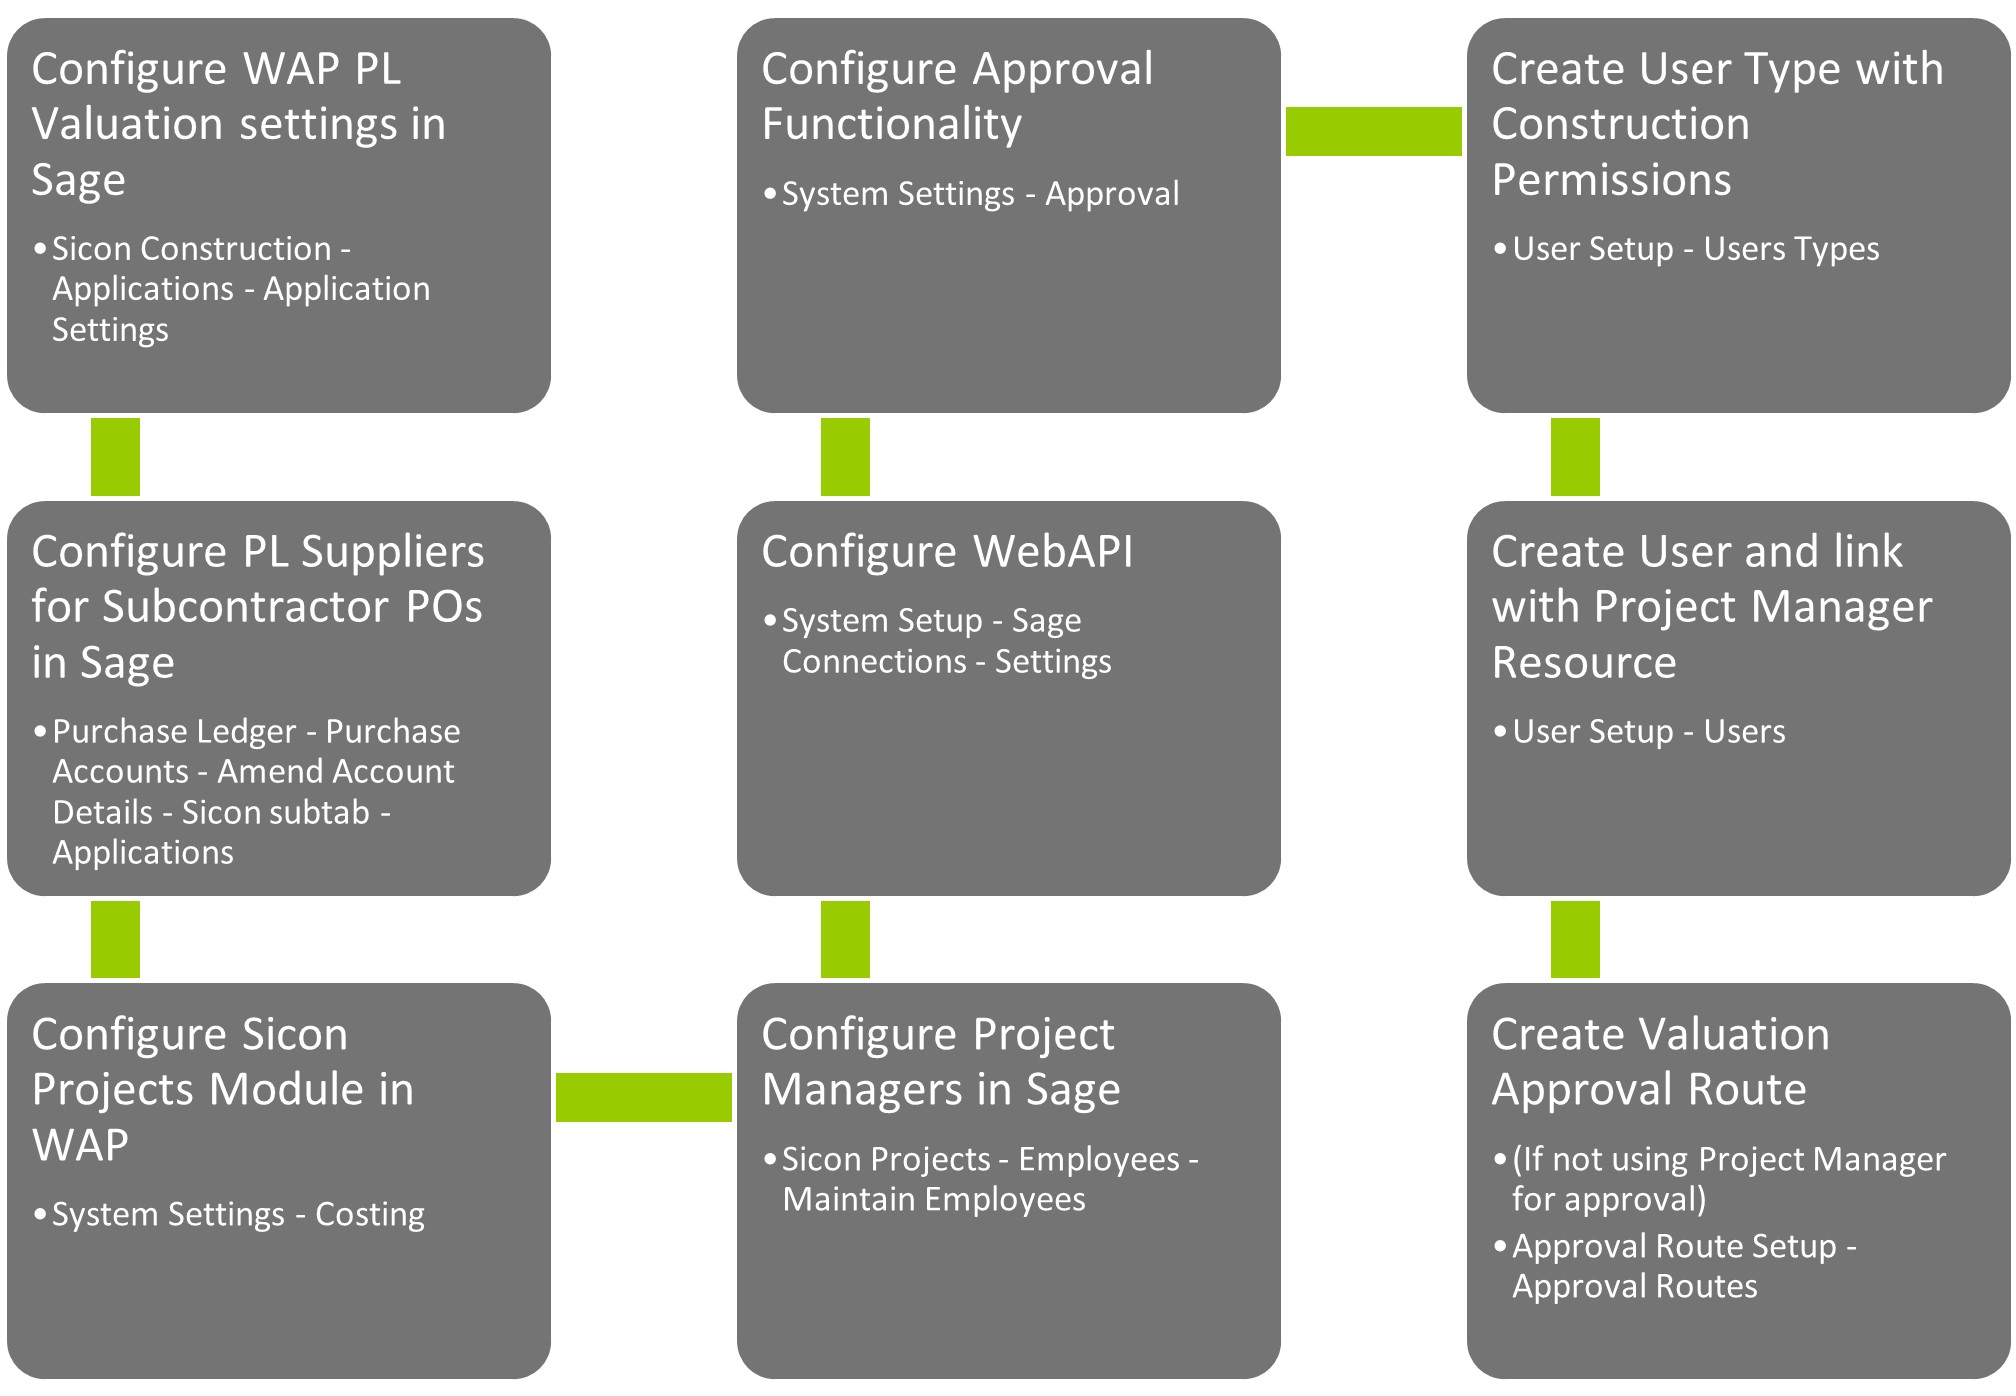
See the earlier sections on System Settings – Miscellaneous and System Setup – Sage Connections – Settings for further information on configuring WebAPI.
From the menu, navigate to Construction to view the options available.
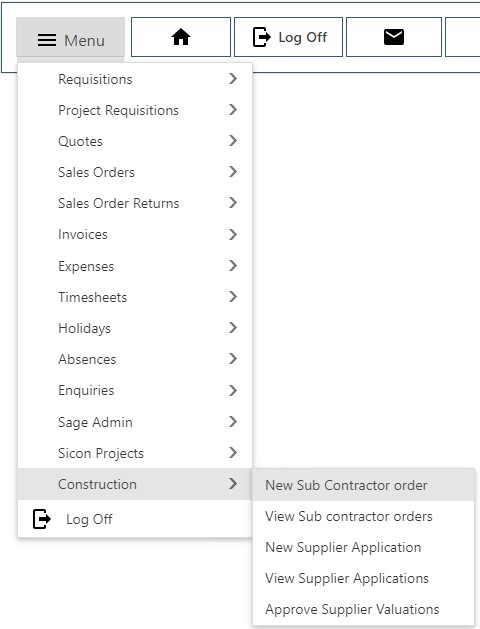
Click View Sub Contractor Orders to load the existing orders in WAP view – this will give access to search for existing orders, amend an order or submit an application.
The next sections walk through how to use the specific Construction functionality available within WAP.
47.1. New Sub Contractor Purchase Order
Click the New Order option from the menu.
Chose the Supplier, Job Number and enter the requested delivery date.
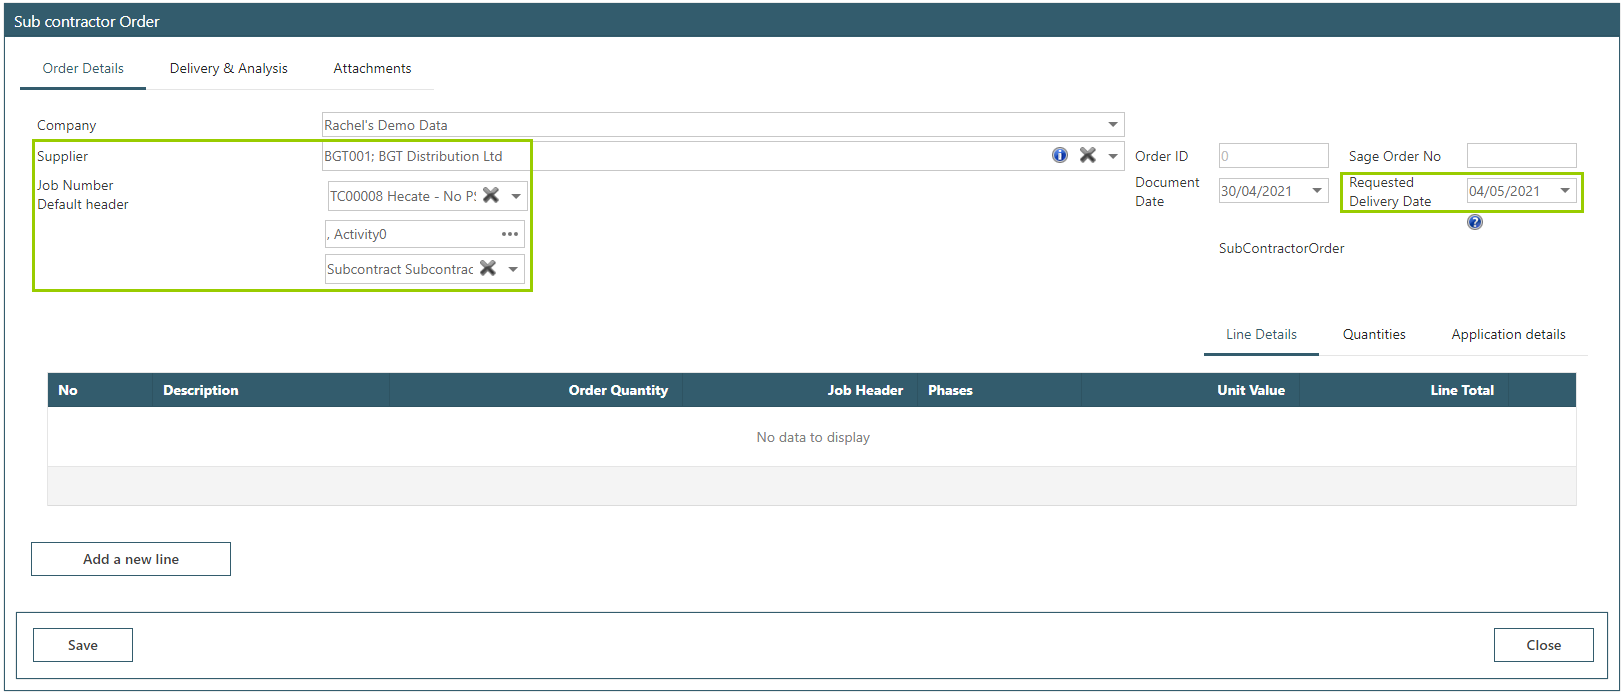
On the Delivery & Analysis tab, make sure the delivery address has been chosen – either from the default, a Project address or enter a free text delivery address. A delivery address must be chosen before lines can be added.
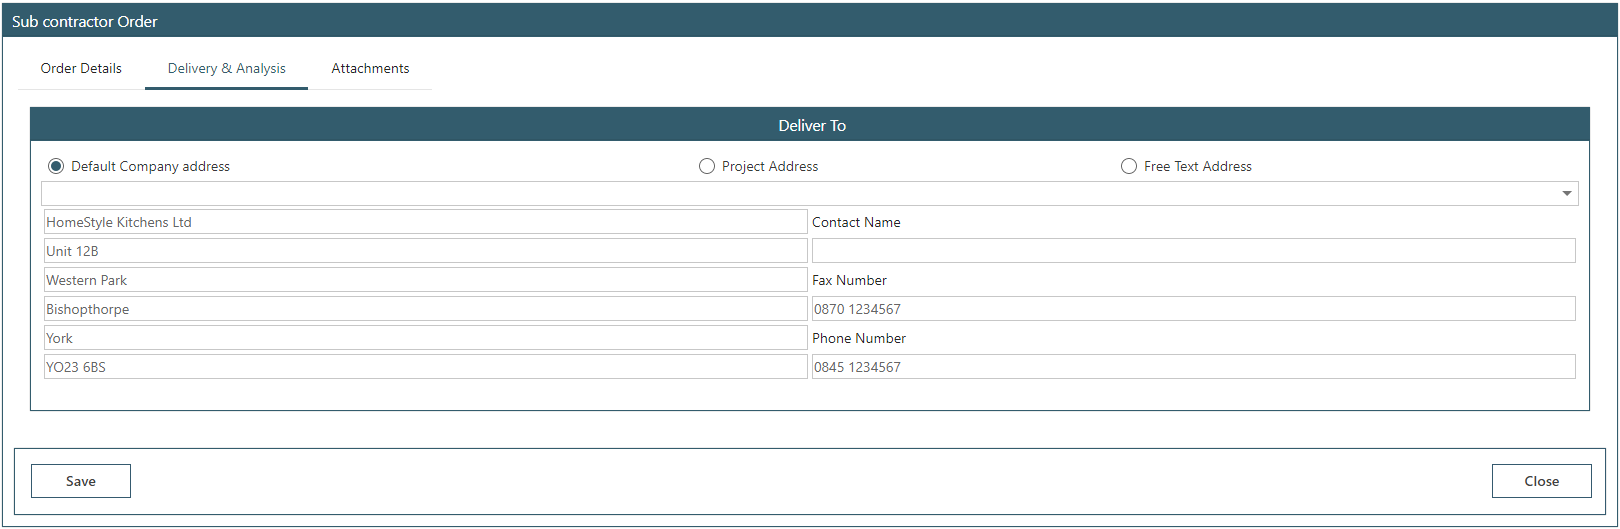
To add lines, choose the Add a new line option.
On the Purchase Order Line entry, you can select between Stock and Measured Works. The Stock Option allows you to enter a Quantity as well as a Unit Price, Measured Works is Unit Price only.
Enter an Item Description, Unit Price, Project Header and select to either Manually or Automatically Receive. The Nominal combination will update with the default one set against the Project Header and may be changed if required (this is on the separate Nominal tab).
Click Save to continue and add extra lines.
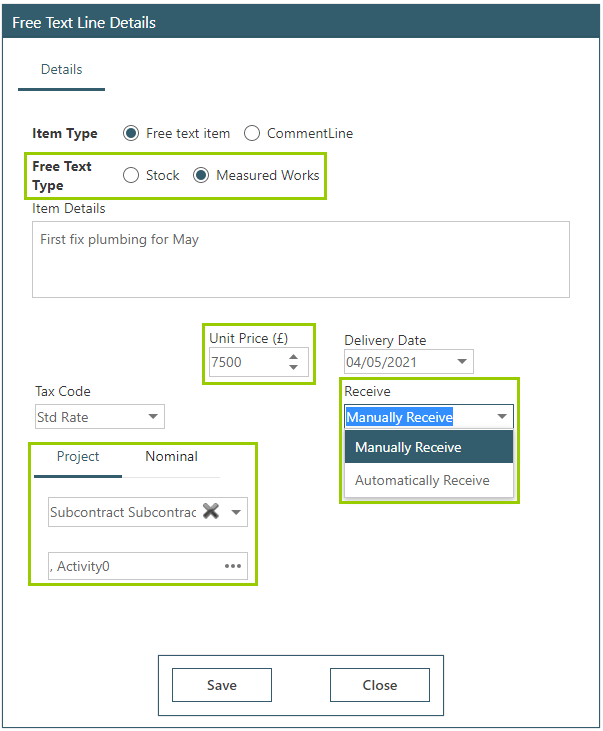
The order lines show as below – the Stock items with quantities are displayed with a value in the Quantity column as well as Unit Value and Line Total while Measured Works have no Order Quantity.
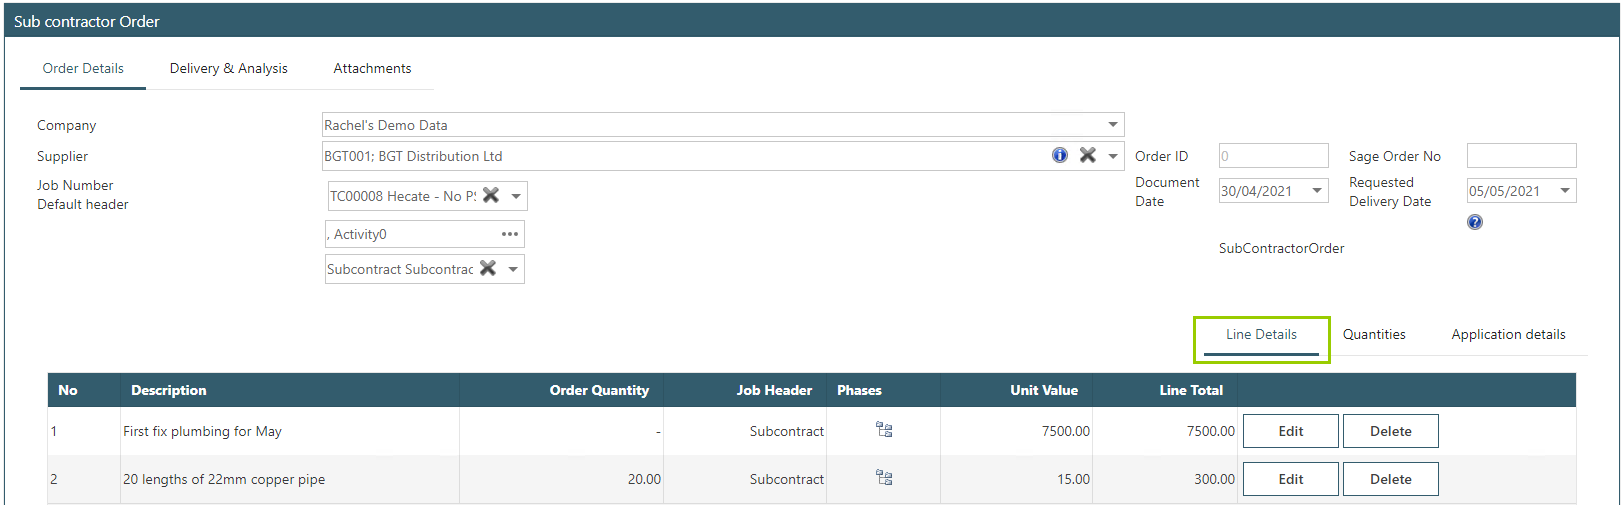
Click the Quantities tab to see the order quantity / received for the lines entered.
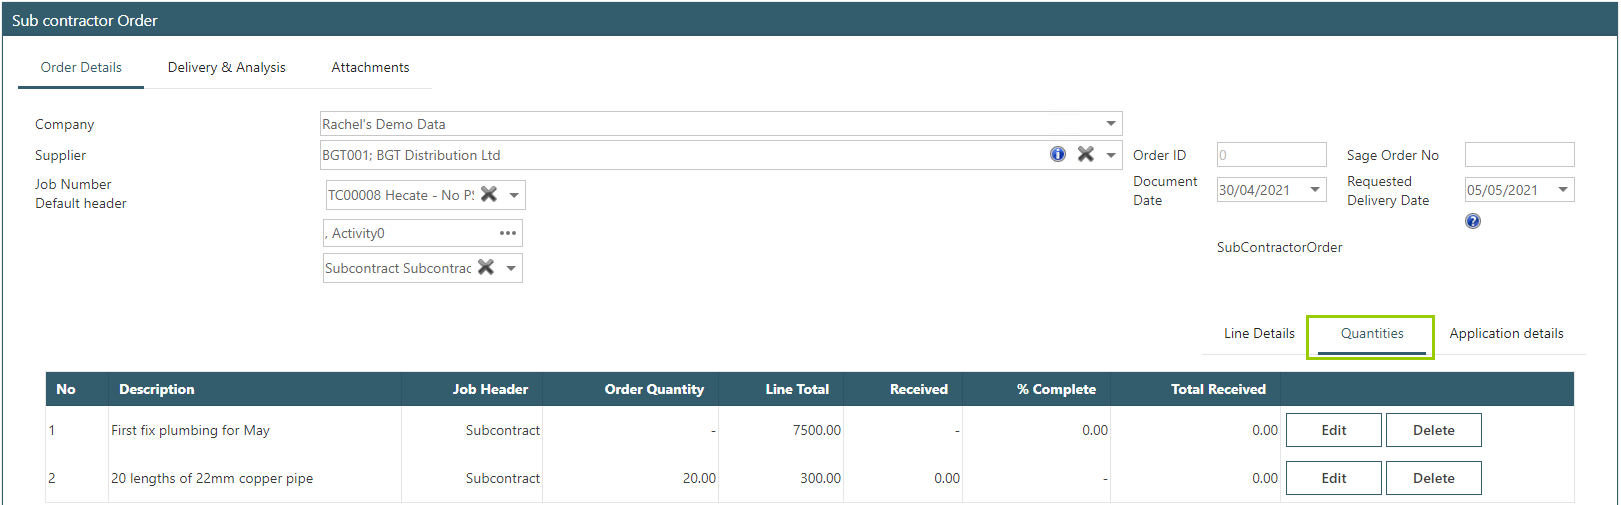
Clicking the Application Details tab shows the percentage and value applied for as the subcontractor applications are recorded against the Purchase Order.
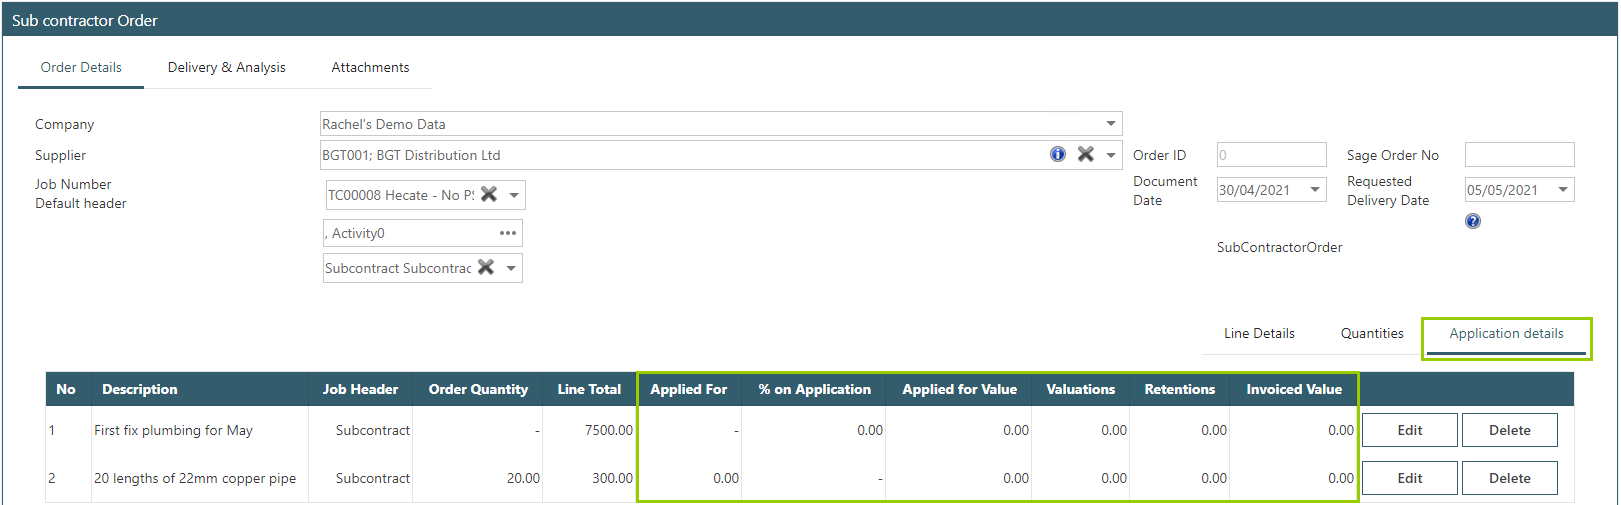
When the order is saved, the order will then be visible in Sage in the Sub Contractor Purchase Order list.
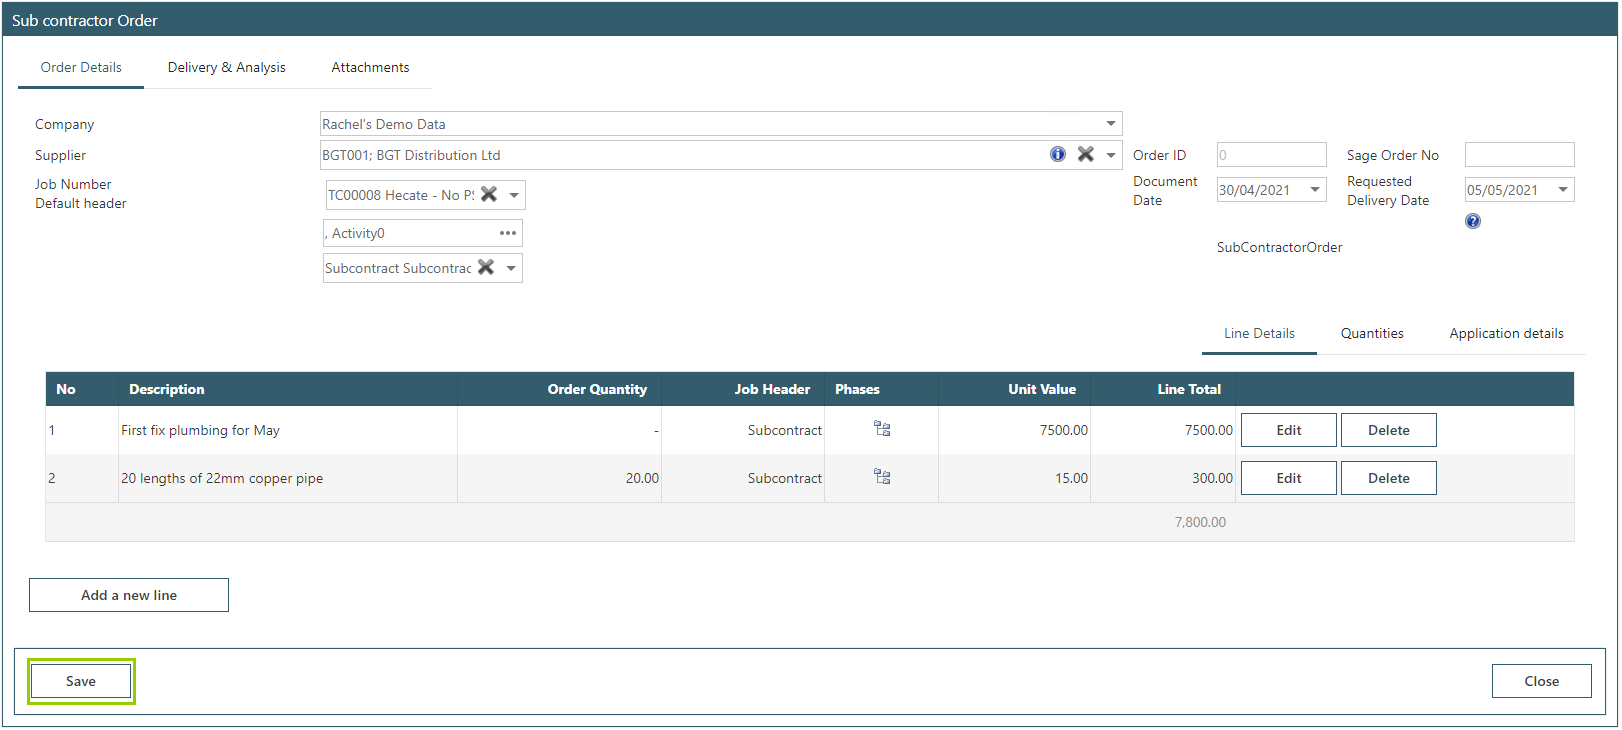

47.2. Receiving Stock
Currently, stock will be received directly in Sage and will update the order in WAP.
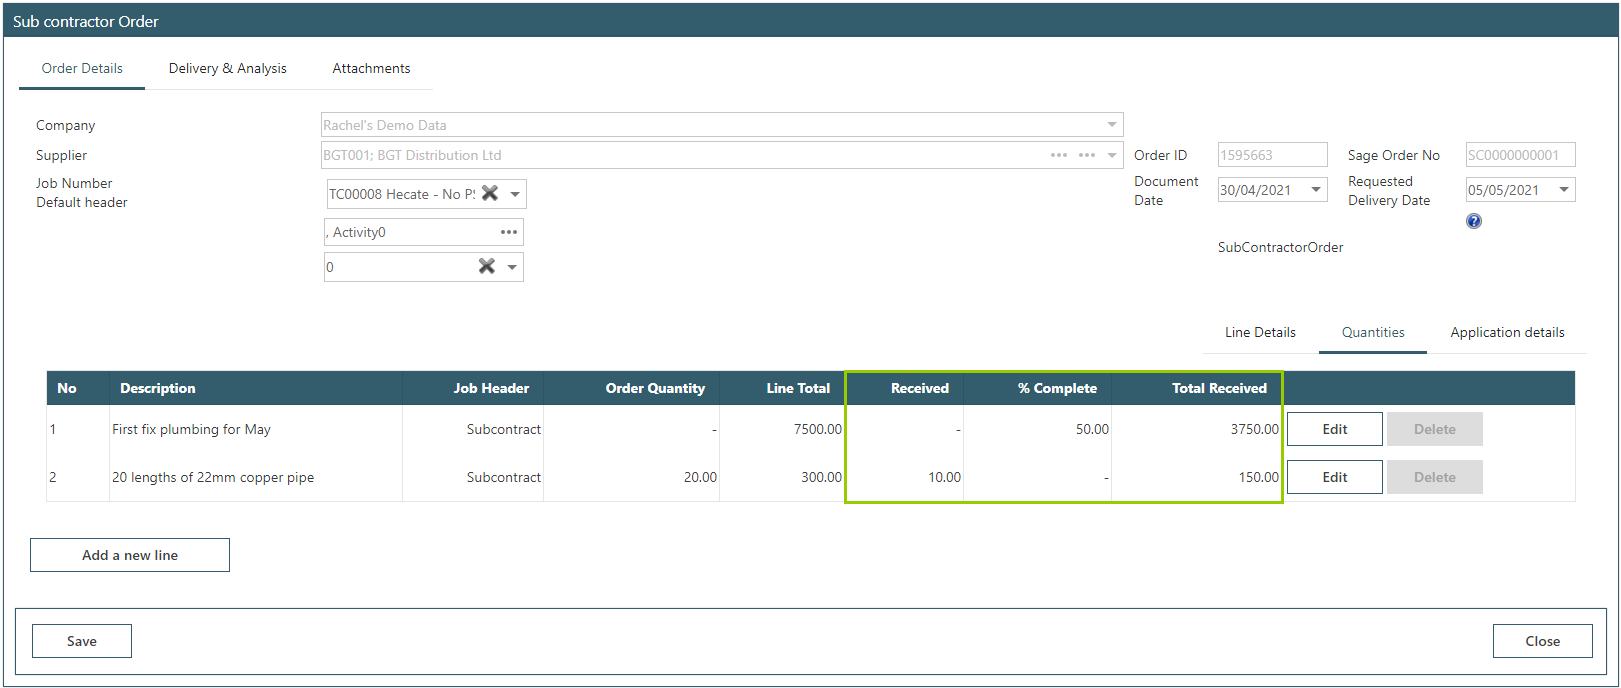
47.3. Record Application
From the existing sub-contractor order page, click to Submit Application.

Tick the lines to create the Application for – the example below is to create an application for both lines.
Measured Works need an Apply for Value entering and Stock items require a Quantity to be entered; these will update the Cumulation column.
Make sure a Payment Due date has been entered.
Click Create Application to continue.
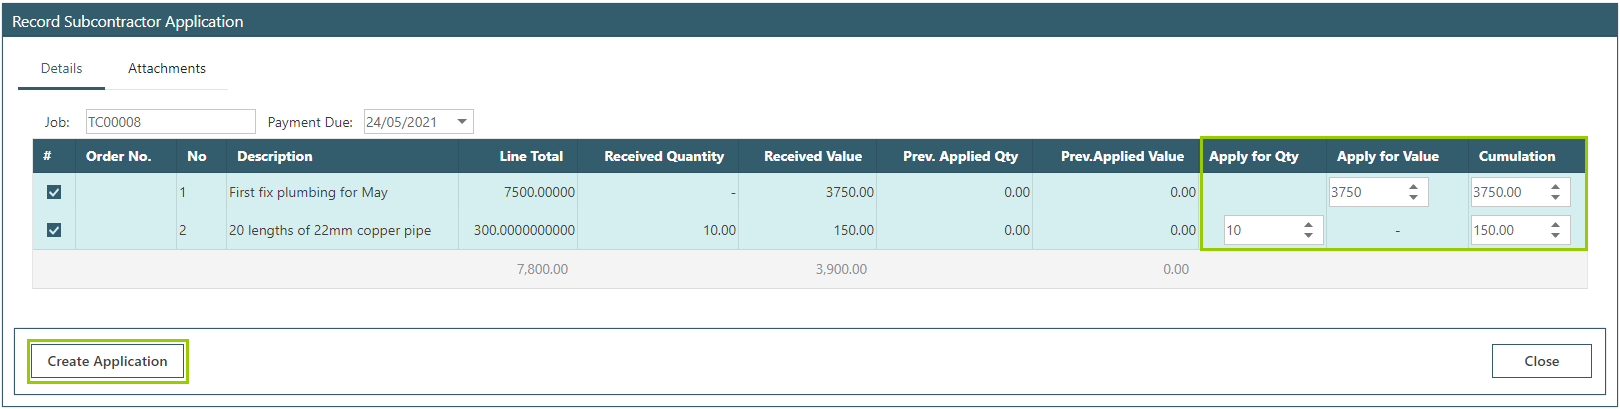
The order in Sage will update to show applied for values.

47.4. Create Supplier Valuation
From the Construction Menu, select View Supplier Applications.
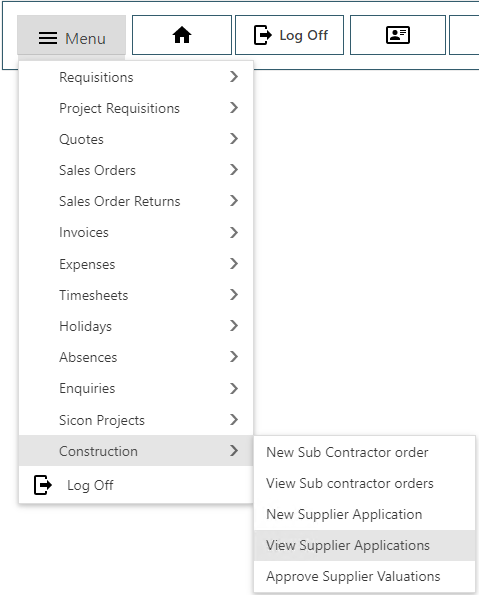
Supplier applications will only show to the Project Manager linked with the Project. Ensure the WAP user has been linked with the Project Resource (under the user’s profile – Company Access tab).

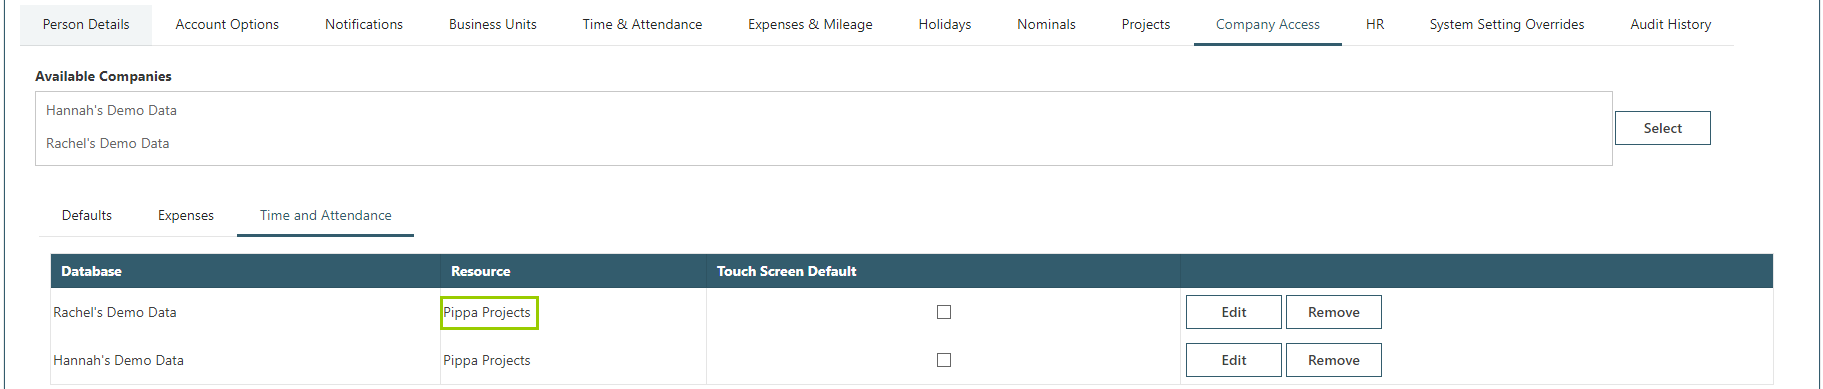
Click to Edit on the correct application.

Check the incoming application details are correct and at the bottom click to save and add valuation.

Enter the Gross Valuation; text can be added as either a QS reference or additional notes. Once the information is correct, click to submit.
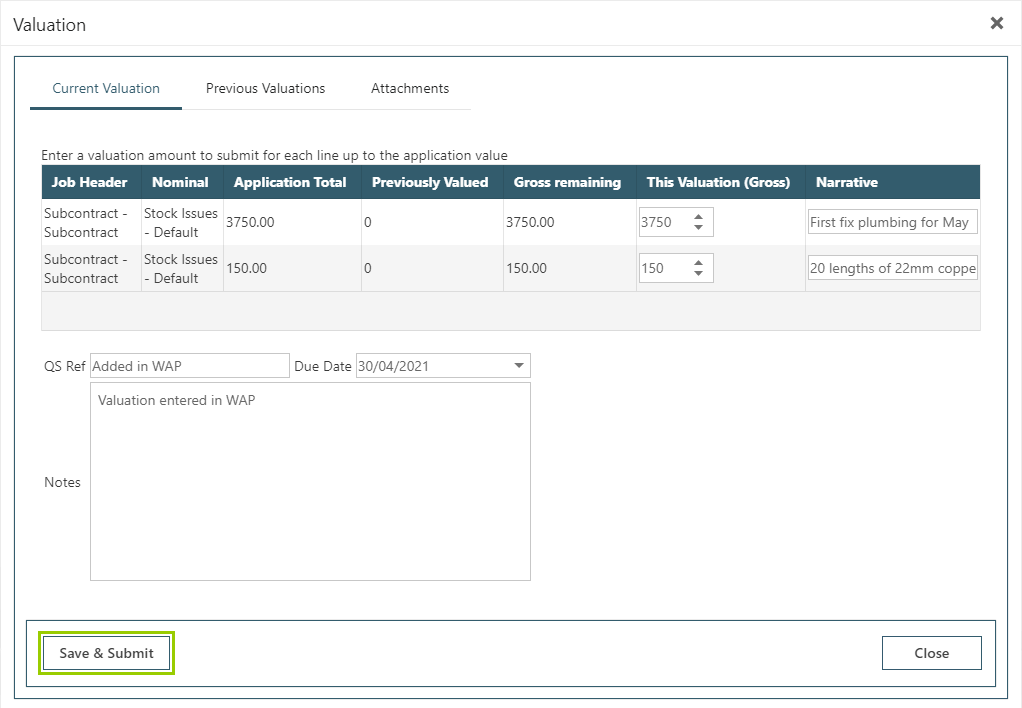
47.5. Approve Supplier Valuation
Once submitted, the valuation will require approval. The valuation can be viewed in Sage but invoices cannot be posted until the valuation has been fully approved in WAP. The approval status column will show who the valuation is awaiting approval from.
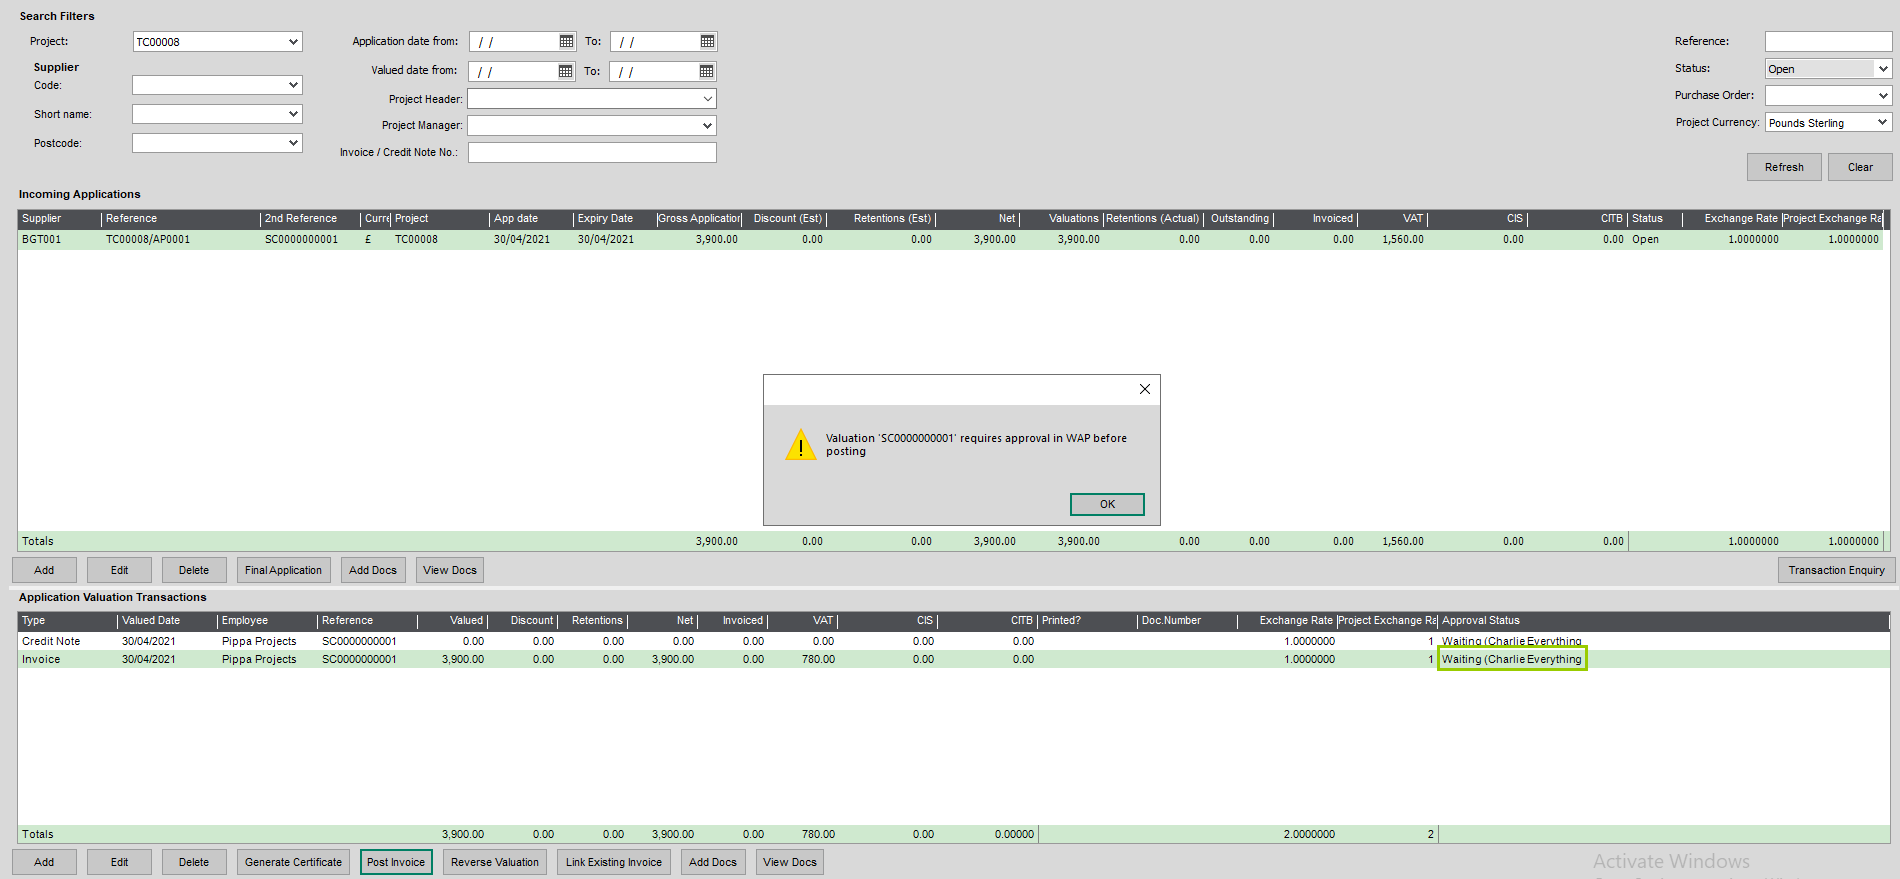
The approver in WAP will see all valuations they have to approve grouped by Project and Supplier. Individual valuations can be viewed and approved or rejected if not correct.
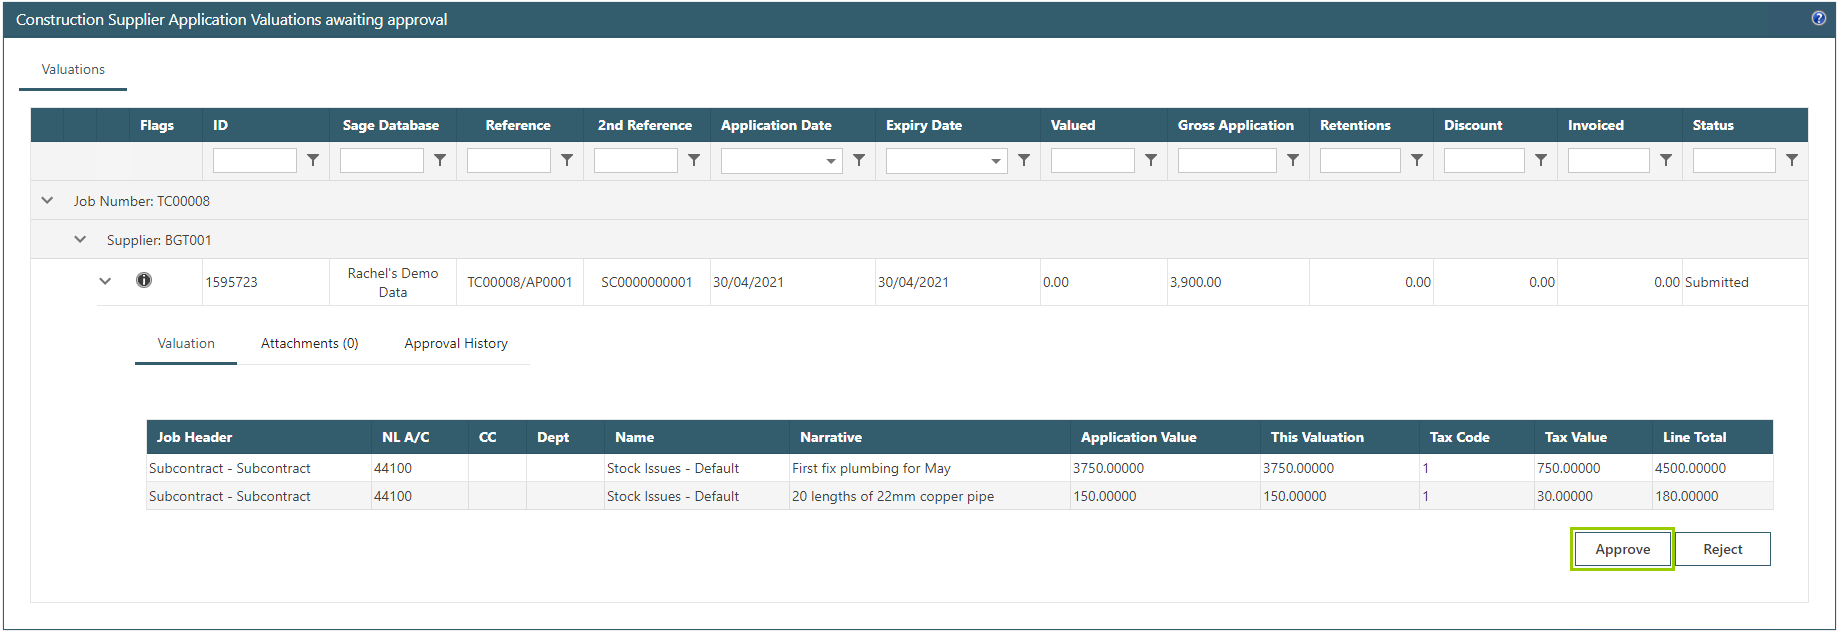
Once authorised in WAP, the valuation is available in Sage to post invoices against.