WAP Help and User Guide – Timesheets Module v20.1
WAP Timesheets Module Help and User Guide will take you through the features and settings for the Sicon Timesheets Module for Sage 200.
Search the page by pressing Ctrl + F (windows) or CMD +F (Mac) on your keyboard.
Back to all user guidesProduct overview
Help and User Guide maintained for WAP version v201.0.14 and upwards.
The WAP Timesheet Approval module is designed to allow users to enter and approve timesheets; being a web-based application this can be done via a web browser from a connected location. When used in conjunction with Sicon Projects or Sage Project Accounting, labour costs can be automatically posted to a Project when approved. Timesheets can be routed for approval in a number of ways; the simplest method is to route approval by requesting user to one or a number of approvers. Where Sicon Projects or Sage Project Accounting is used, the approval routes can be configured so that time entered against a project is routed to a specific set of users responsible for that project.
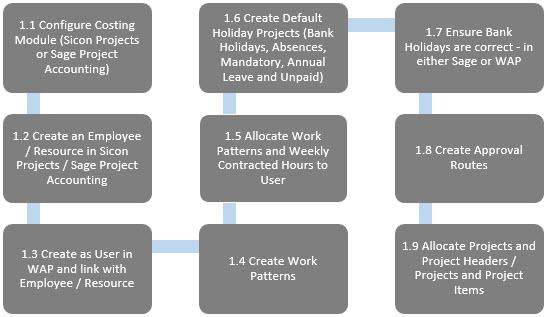
1. Timesheet Pre-requisites
Before adding timesheets onto the system, the below steps will need to be followed; these steps may not all be relevant depending on costing module used and how the system has been configured.
Further information on these sections can be found throughout this Help and User Guide.
2. Timesheet Enable Configuration
For the Timesheets module to be available the enable module must have Timesheets module ticked within System Settings – Miscellaneous – Licencing tab.
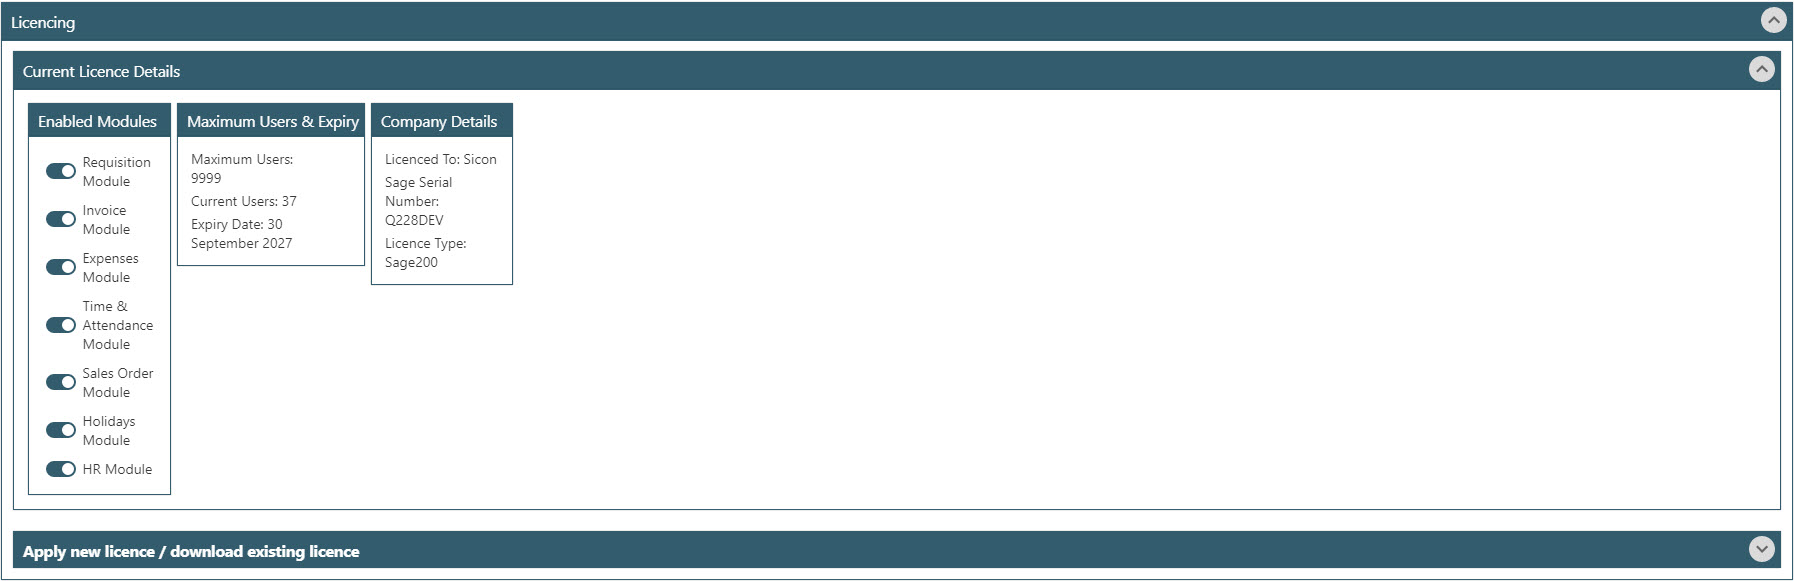
Once this is configured, Timesheet options will then be visible within the system.
3. Costing Module Integration Pre-requisites
The WAP system can be configured to integrate with Sicon Projects or Sage Project Accounting. Select accordingly within System Settings – Costing.
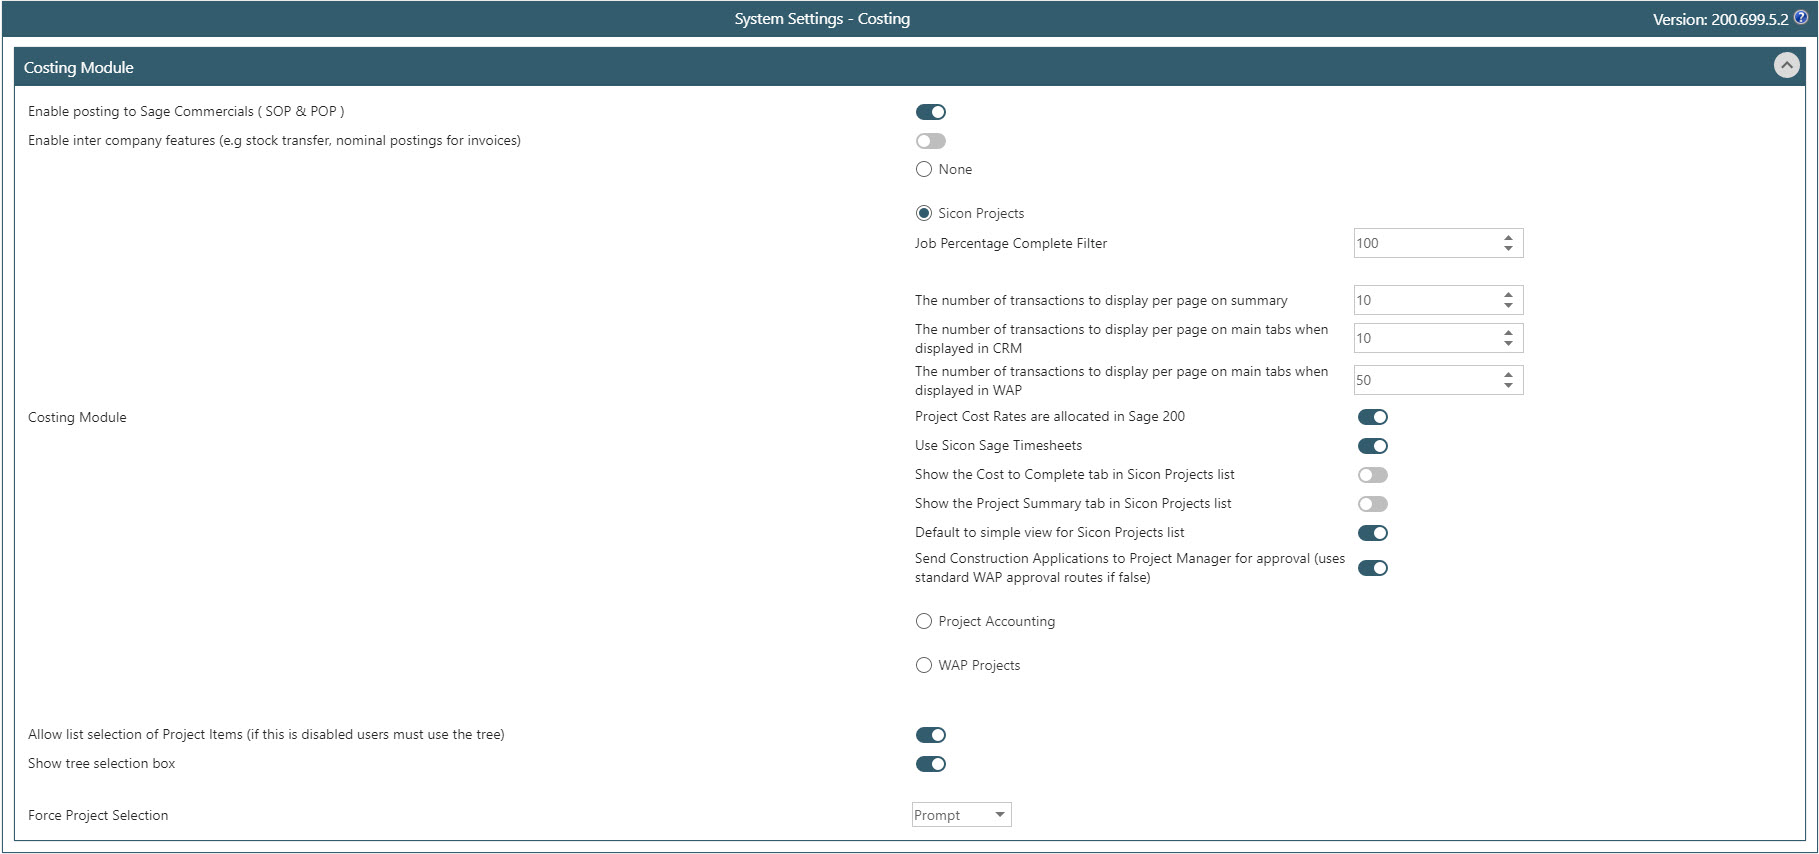
3.1. Sicon Projects
Each WAP user who will be submitting timesheets will need to be linked to an Employee in Sicon Projects.
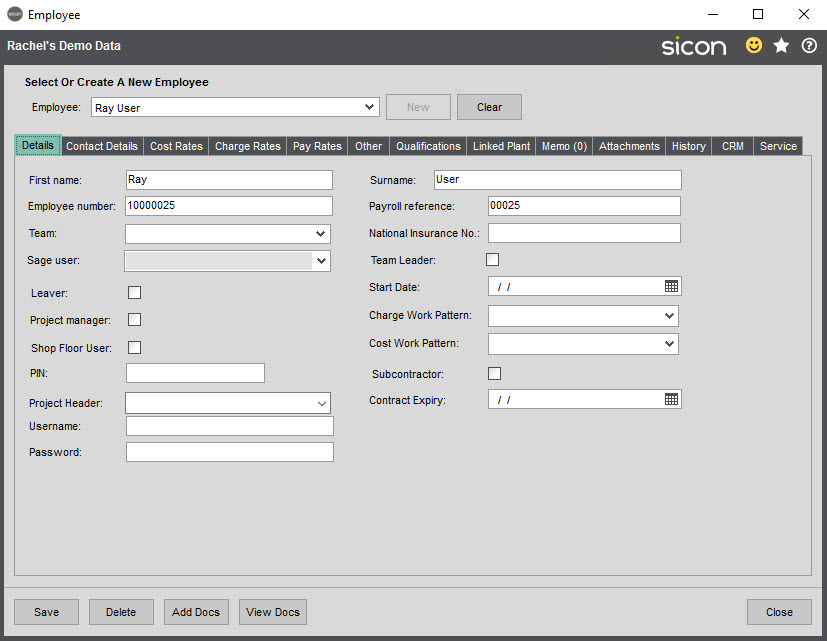
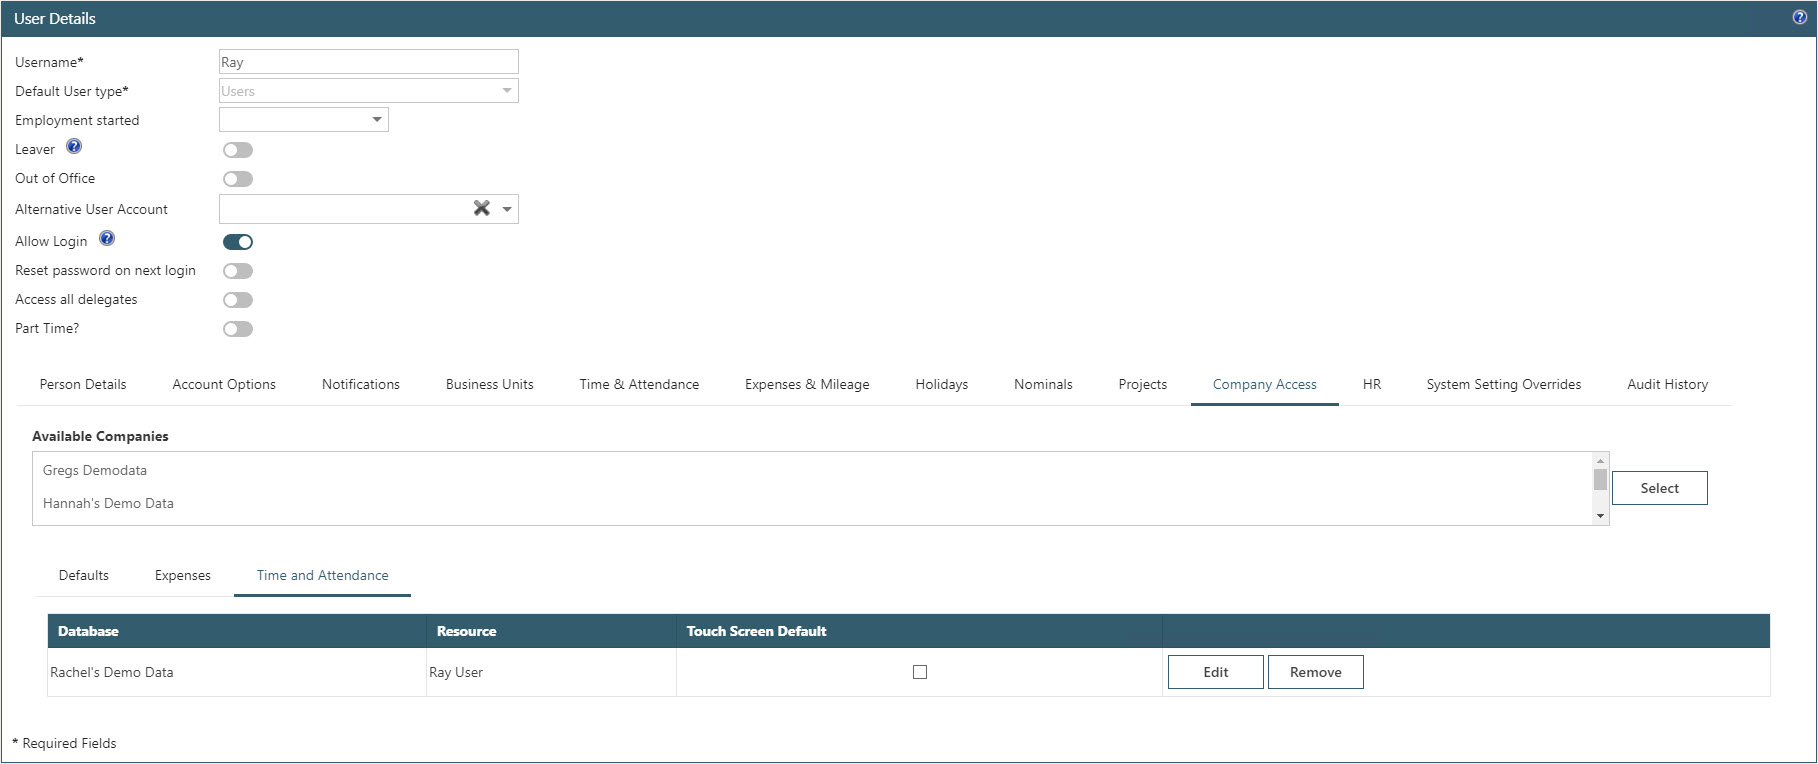
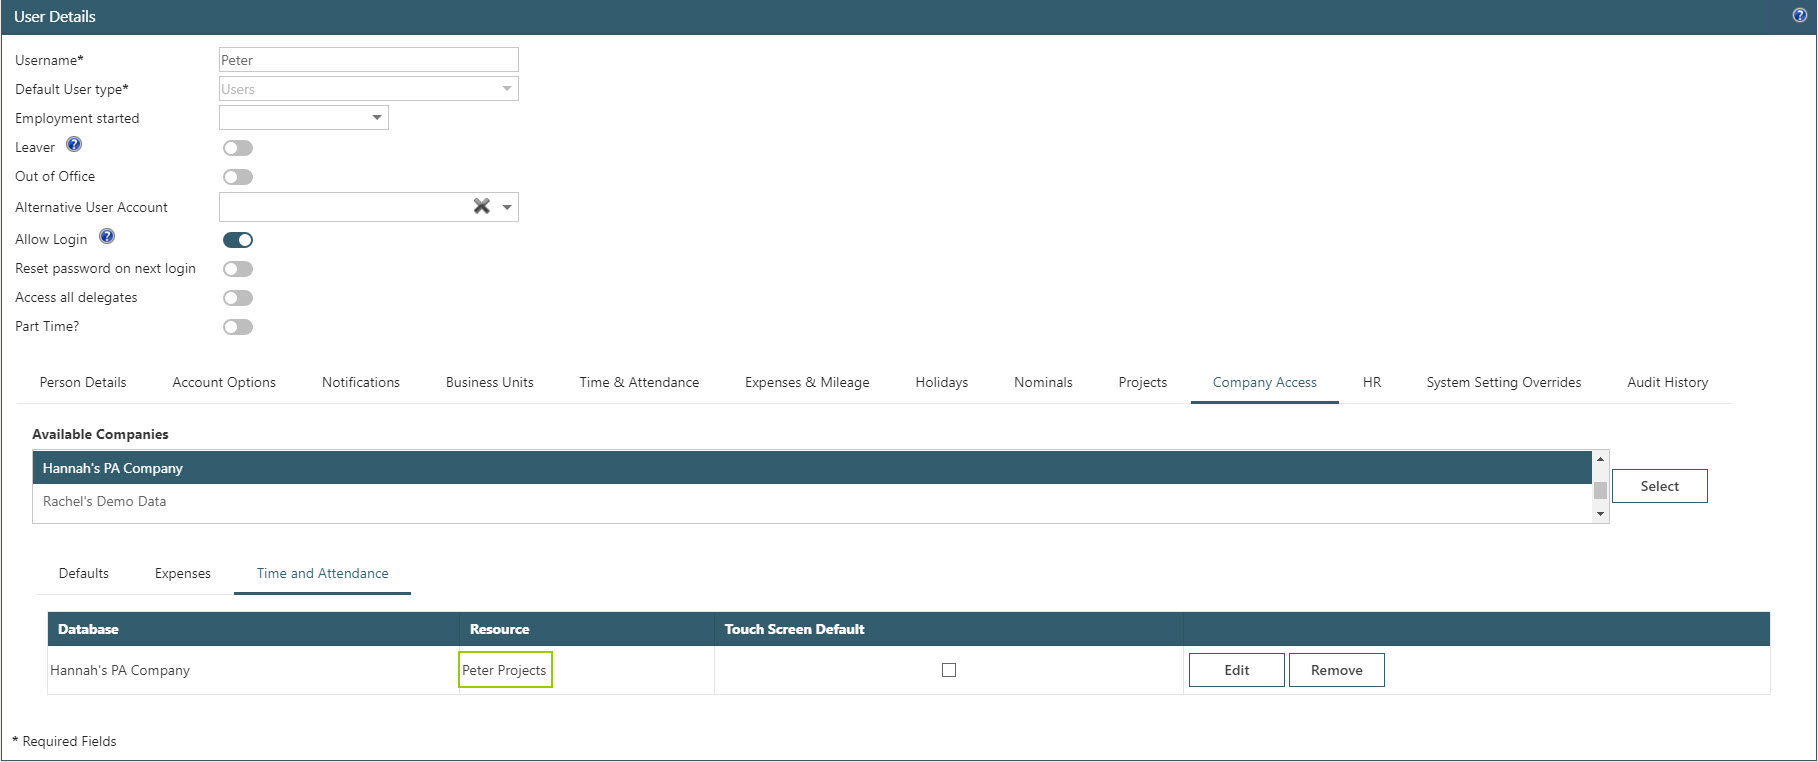
Once created in Sicon Projects, their WAP profile will need to be linked through to the employee; this is done through the WAP User profile – Company Access tab – Time and Attendance sub tab.
3.2. Sage Project Accounting
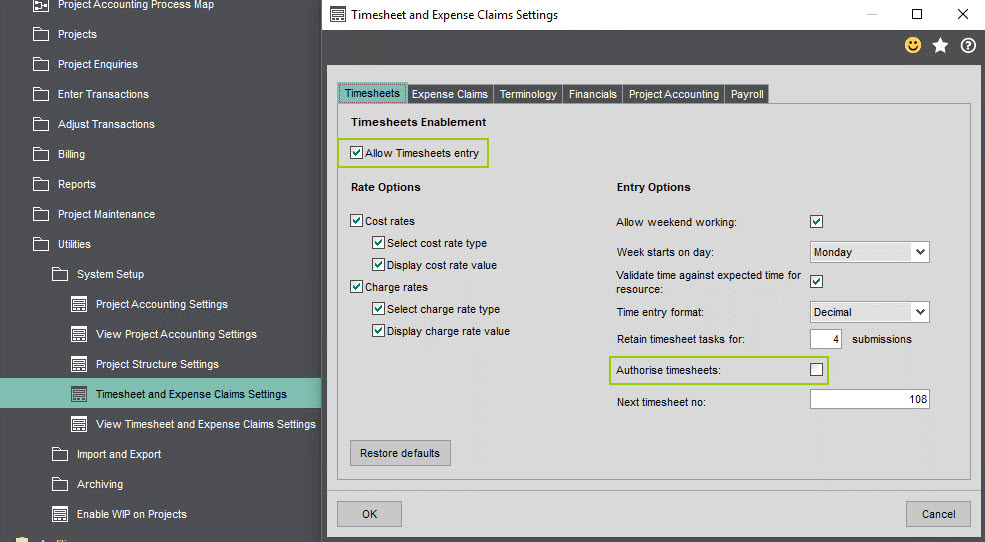
Enable Sage Project Accounting integration with Timesheets.
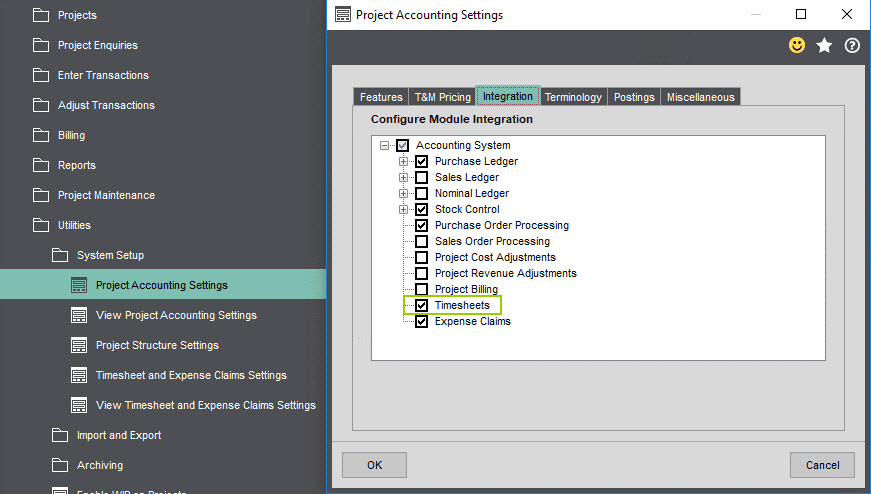
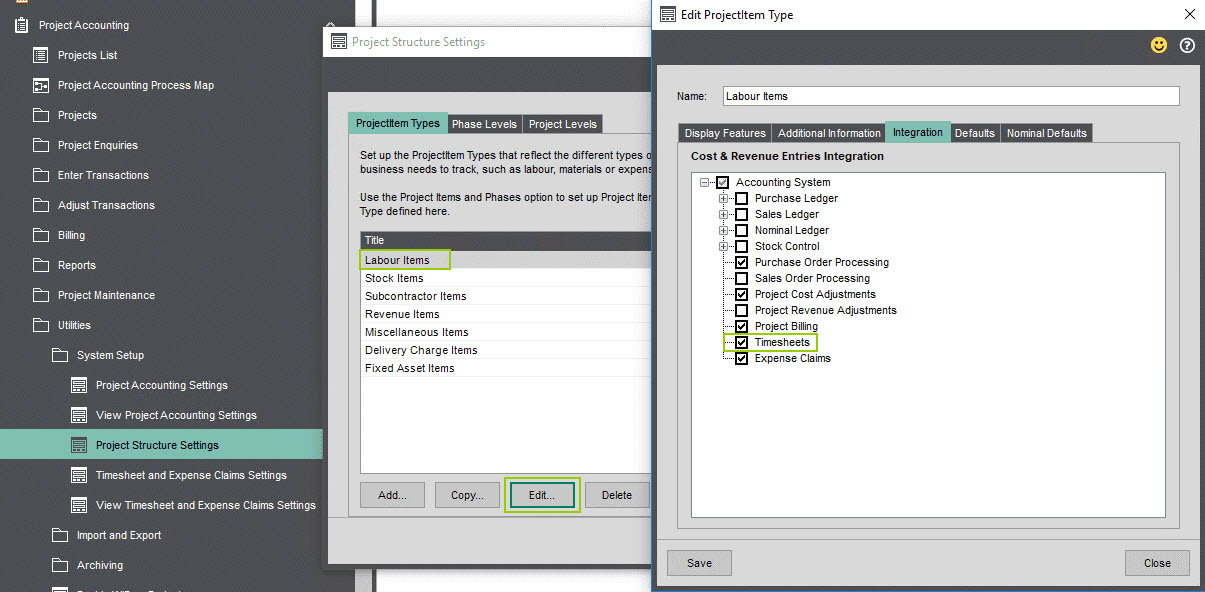
If required, enable or disable which Project Accounting Project Item Types to integrate with WAP Timesheets.
Configure for Project Accounting to allow timesheet entry. If the ‘Authorise Timesheets’ setting is unticked, timesheets that have been approved in WAP will automatically post to the Projects. However, if timesheets need to be held for additional approval in Project Accounting, set that timesheets should be authorised in Project Accounting.
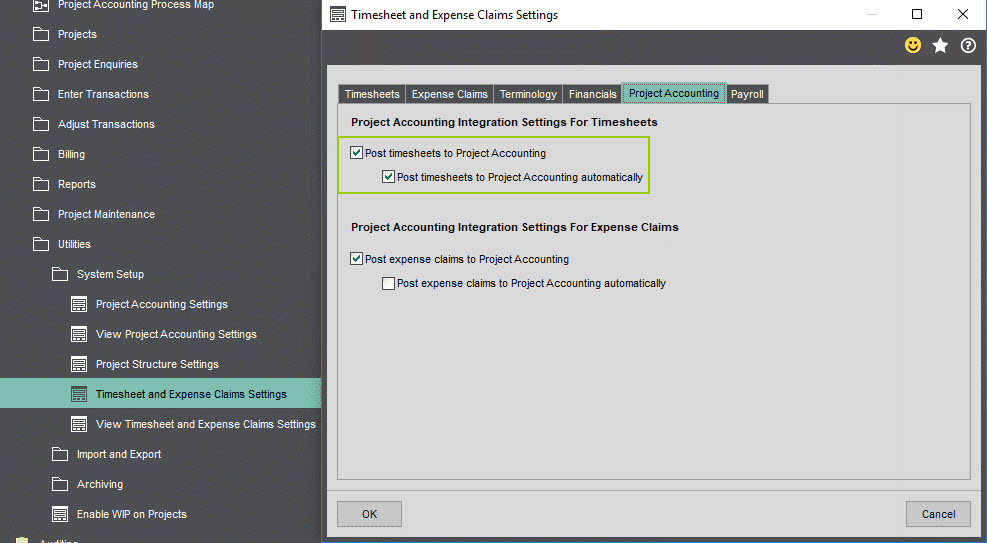
Enable ‘Post timesheets to Project Accounting’ and ‘Post timesheets to Project Accounting automatically’.
Ensure one of the Resources within Project Accounting is linked to the WAP user created in Sage. It is advised to create a new resource called e.g. ‘WAP’, link to the Sage 200 WAP user and enable all permissions for the new resource.
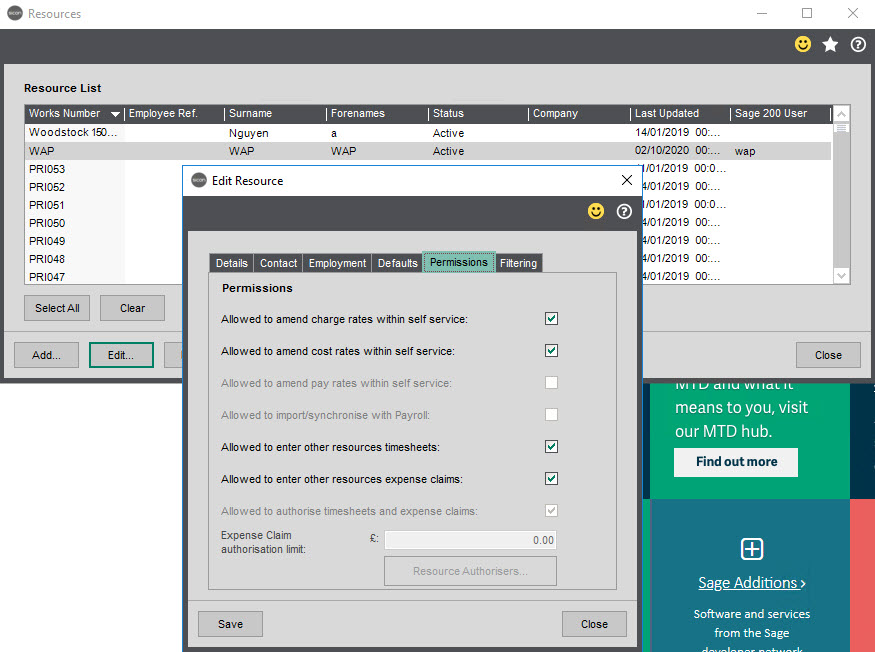
This user should have access to all projects and not be filtered to view only certain projects; this can cause problems when posting timesheets to a project if this user does not have access to that project.
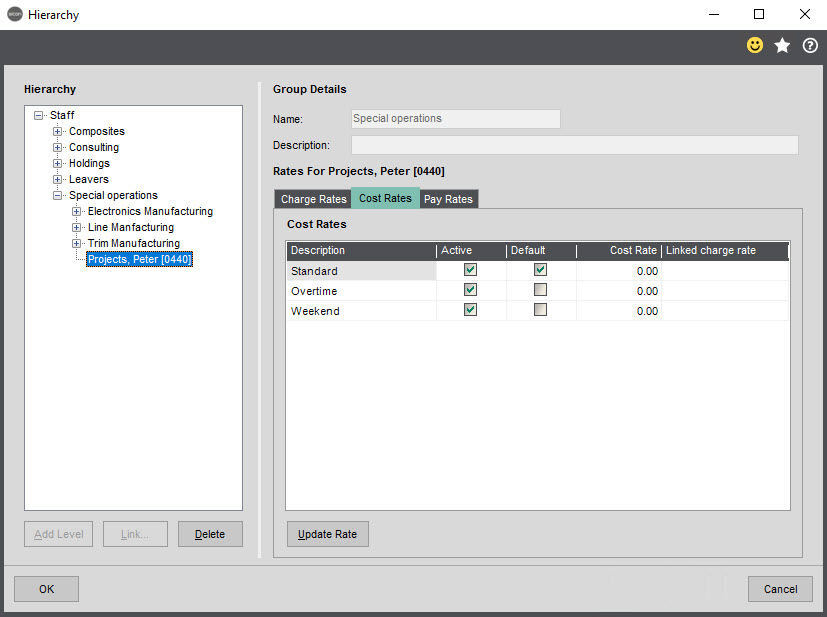
Each user submitting a timesheet in WAP should have at least one cost rate setup in Project Accounting and assigned to their Resource in the Hierarchy. If charge rates have been configured to be used, the Resource should be linked to a charge rate in the Hierarchy.
Once configured in Project Accounting, their WAP profile will need to be linked through to the resource; this is done through the WAP User profile – Company Access tab – Time and Attendance sub tab.
4. Work Patterns
Work patterns are a key part of the timesheet module and allow users to record start and end times with appropriate rates being applied in accordance with shift patterns created.
To set up work patterns, select System Settings cogs – System Setup banner – Work Patterns and Rates.
A work pattern needs to be configured if bank holidays should automatically show on the timesheet, or when using the Timesheets Module with the Holidays Module. They are also required when looking to have cost rates automatically populated based on the times that users have entered. (i.e. time between 5pm and 8pm is overtime automatically).
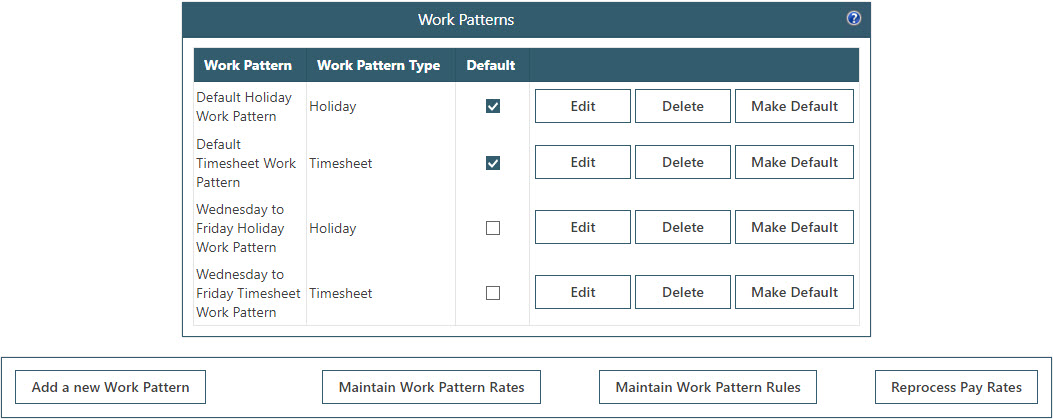
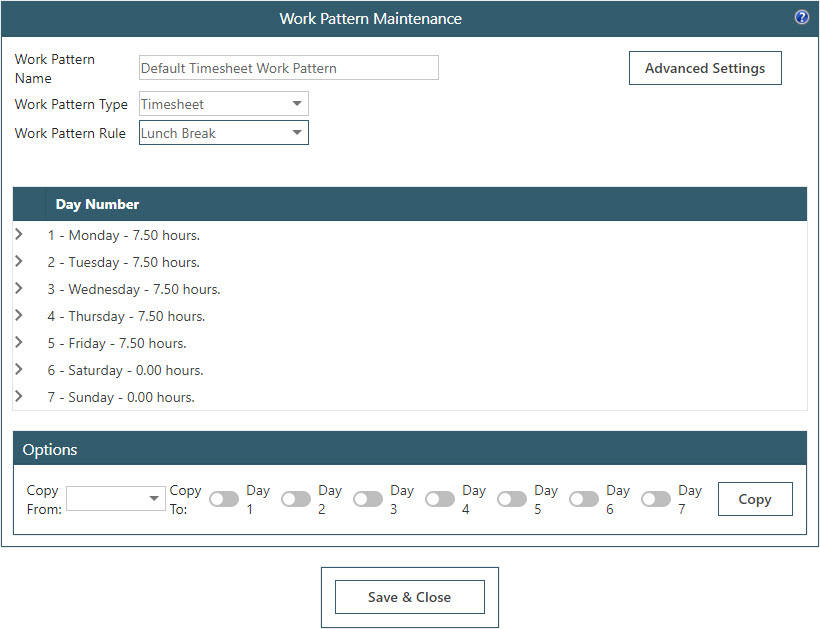
4.1. Add a New Work Pattern
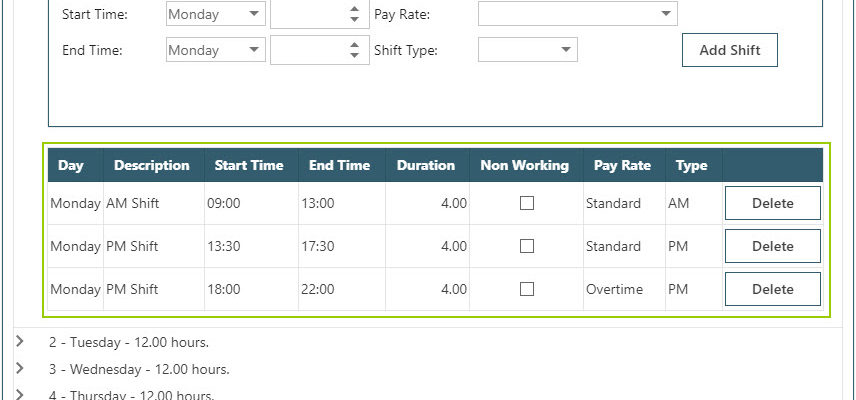
A work pattern consists of shifts, defined by start and end times and a chosen rate is allocated. A default work pattern is included at install but additional patterns may need to be created to accommodate all timesheet users’ standard working hours. The work patterns are then allocated to specific users.
Enter a work pattern name as required and then select Timesheet as the work pattern type (for further information on Holiday work patterns, please see the Sicon WAP Holiday Help and User Guide).
Click the arrow to the left of the day and number to expand and add shifts to the day.
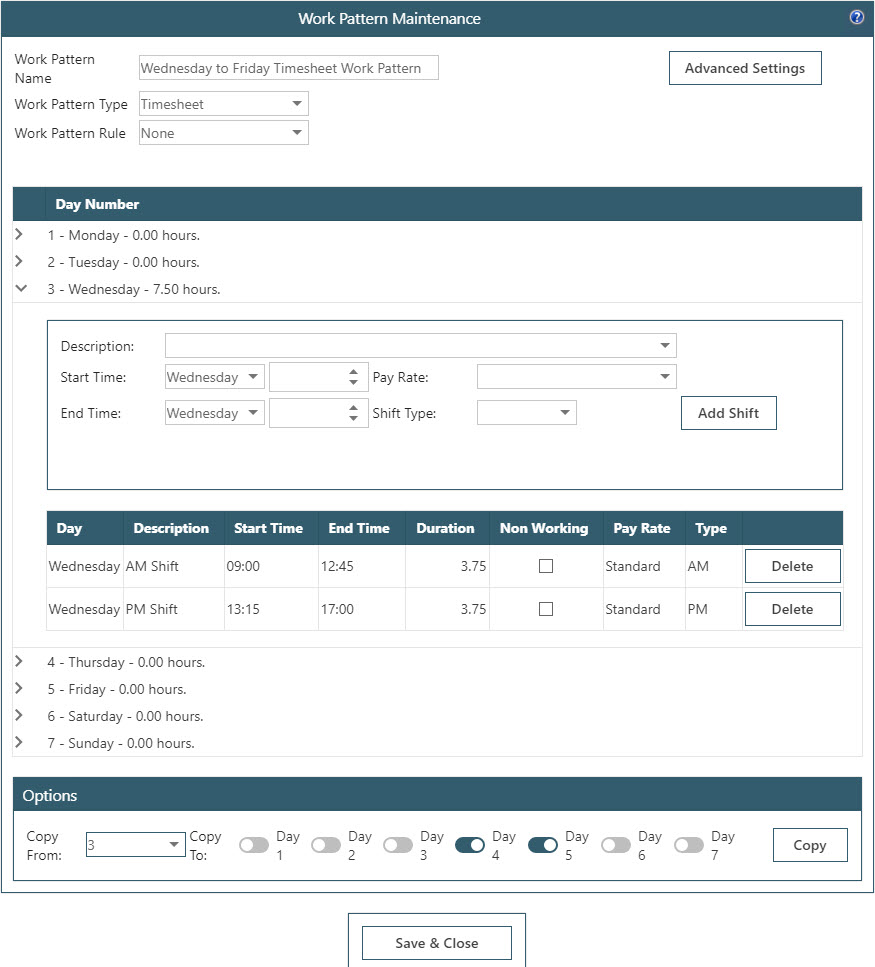
Description: select from the drop-down option whether the shift is either AM, PM or Overtime.
Start Time: select the start day and enter a start time.
Pay Rate: choose the correct pay rate from the drop-down menu; these are defined from Work Pattern Rates.
End Time: select the end day and enter an end time.
Shift Type: define the shift as either AM or PM.
Add Shift: make sure to add the shift once the details are correct.
Copy from: once shifts have been added as needed, choose the day to copy from.
Copy to: tick the days to copy the shift to and click Copy.
Save & Close: ensure to save the shift once complete to return to the work pattern list.
By default, the week will start on a Monday; if the week should start on a different day, all configured work patterns would need to be deleted before the start day can be changed within System Settings – Timesheets.
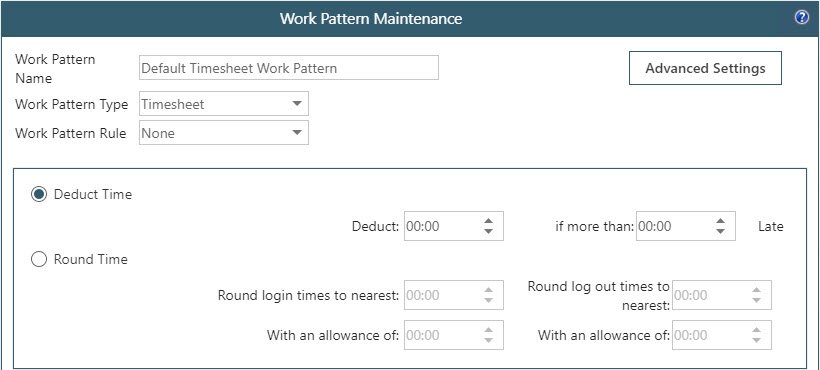
Advanced Settings
These options are used in conjunction with the WAP T&A Terminals to specify whether to deduct or round time when an employee is late logging in or out.
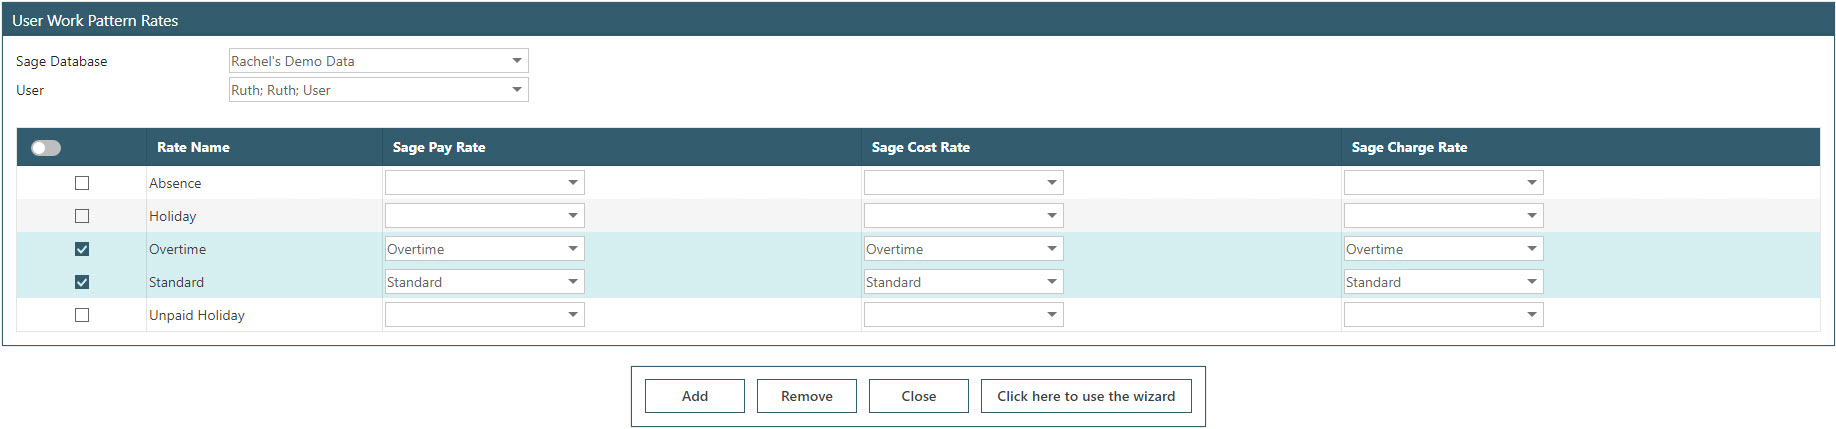
4.2. Maintain Work Pattern Rates
There are four default rates but additional rates can be added if required, e.g. Overtime.
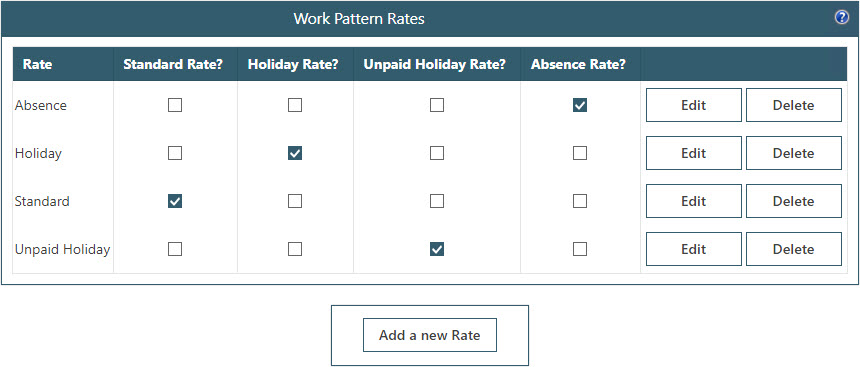
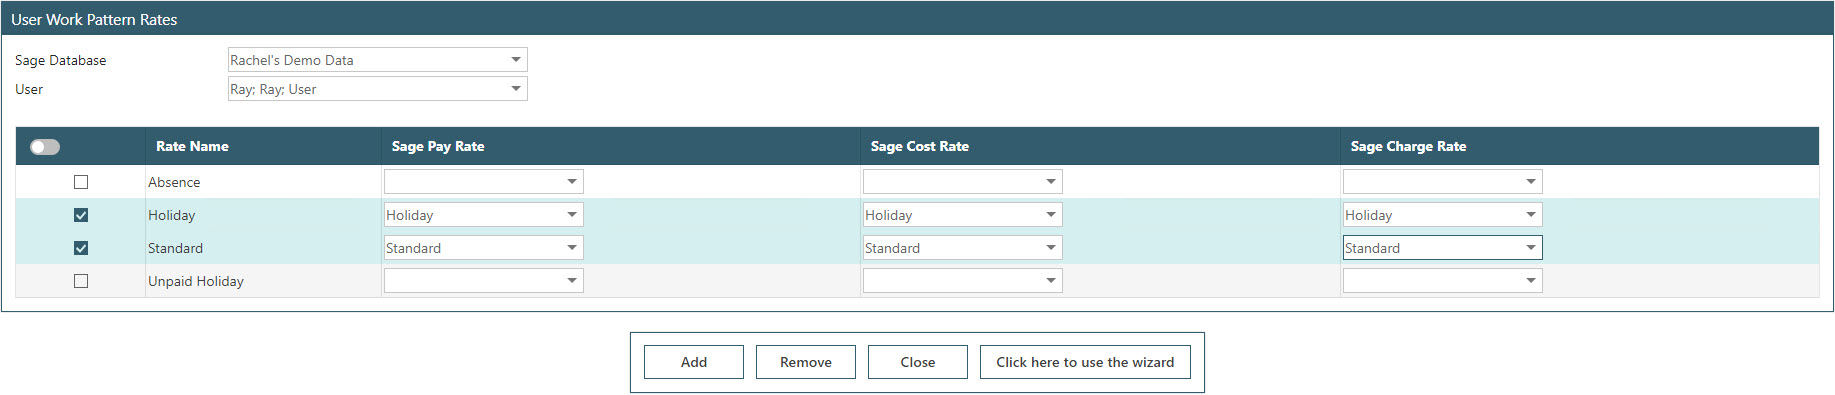
Rates are then allocated to users and linked to cost and charge rates (User Setup – Work Pattern Rates). If the Pay Rates tab has been enabled to show on standard timesheet entry, users need to be linked with a rate before the rates will show on this tab.
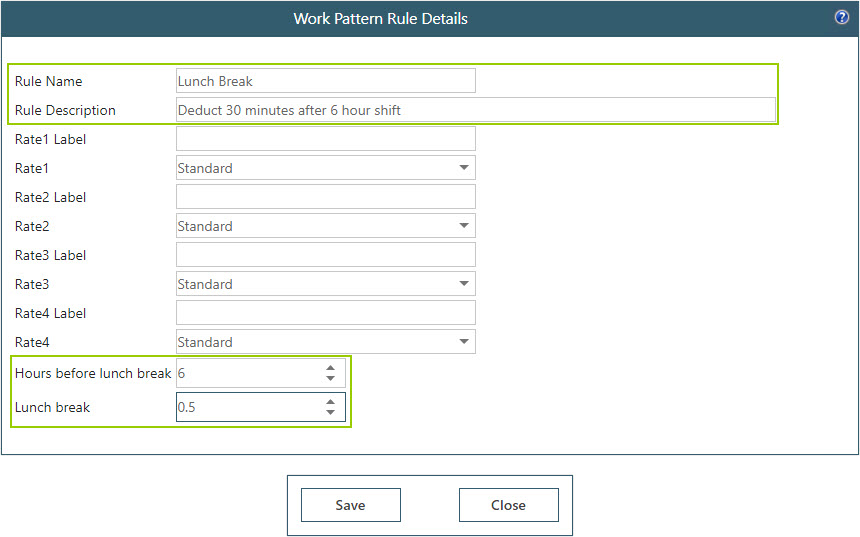
4.3. Maintain Work Pattern Rules
This functionality allows rules to be set to deduct lunch breaks automatically from timesheets.
Enter a rule name and description then set the number of hours before a lunch break and the total duration of the lunch break (e.g. 0.5 hours would be 30 minutes).
Once the rule has been created, the rule must be linked to a Work Pattern. It is only possible to link one rule to a work pattern.
4.4. Linking users to a Timesheet Work Pattern
Once work patterns have been created to cover all users’ work shifts, each timesheet user will need to be linked to the correct work pattern (User Setup – Users – User profile – Time and Attendance tab).
5. Holiday Default Projects
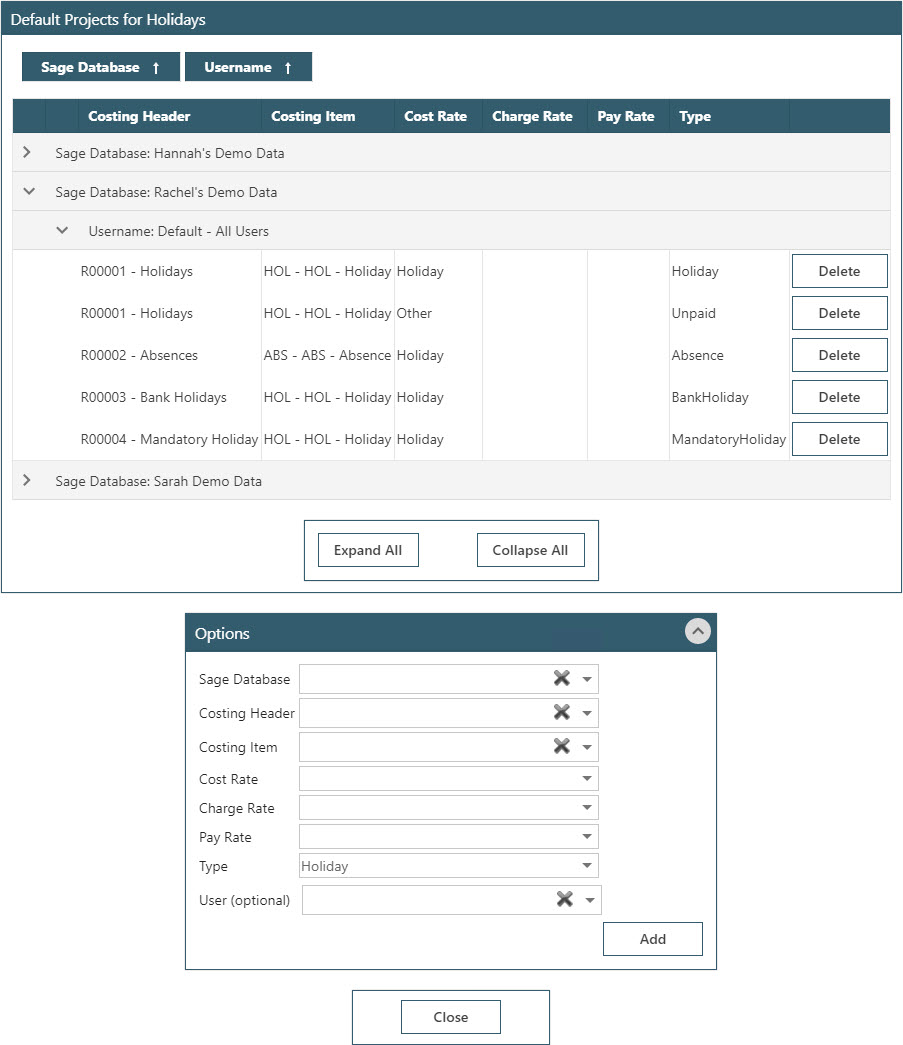
If bank holidays are to be automatically populating onto the timesheet or using the WAP Holiday or HR modules it is necessary to define default holiday projects within WAP. Timesheets cannot be entered until default projects have been created. Timesheets will be populated with users’ approved holiday requests, approved absence requests, bank holidays and mandatory holidays and these lines will need to be associated with a Project and Project Header. It is recommended to set one default holiday project for all users per Company but it is possible to define specific projects at an individual user level.
These default projects are set up under System Settings cogs – System Setup banner – Holiday Default Projects.
Each absence type will need to be linked to a project; these can either be the same project or different projects if required. The separate absence types are:
- Bank Holidays
- Mandatory Holidays
- Holiday (only used with Holiday module)
- Unpaid Holiday (only used with Holiday module)
- Absence (only used with HR module)
If default projects are changed, timesheets will need to be reprocessed under System Settings – Holidays.
6. Bank Holiday Configuration
If using Sicon Projects and Sicon Sage Timesheets, Bank Holidays are created within Sage – Projects per company (Projects – Maintenance – Bank Holidays). Bank holidays can either be created manually or the UK defaults can be set.
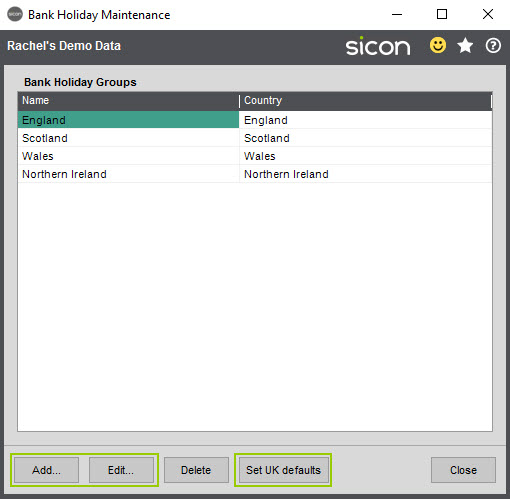
If not using Sicon Sage Timesheets, bank holidays are created and managed within WAP (System Settings cogs – System Settings banner – Holidays – Bank Holidays).

7. Configuration of Timesheet Approval Routes
Before a user submits a timesheet, ensure approval routes have been setup correctly. Approval routes can be configured in a number of ways (i.e. based on the requesting user, the Project or Sicon Project’s Project Manager) but the easiest route can be based on requesting user. Approval would go to the user’s line manager and may also require additional approval from another manager or HR approver. If the timesheet should go to a couple of managers at the same time, use the Advanced option to build a user list or select a user type. If the approver should be determined by the job or project selected, approval would need to be configured based on Project, or if using Sicon Projects, the Job Manager.
Approval routes can be built based on a couple of combinations, e.g. requesting user and project manager, but the more options are selected, the more maintenance that will be required.

In this example an approval route is being created where Riley is the Project Manager; any timesheets submitted against a project where Riley is the PM, the first approver will be Riley. If the cost of the timesheet line goes above £500, Rebecca must also approve.
Ensure that if all levels need to see the timesheet, subsequent approvers are marked as mandatory and that the final approver has enough approval to approve timesheets (we usually recommend an unlimited timesheet approval value for the last approver of 999,999,999).
8. Allocate Projects and Project Headers
Users can either be given access to all projects or allocated individually. Users having access to all projects would mean less maintenance as projects won’t need to be allocated to users once created but could potentially increase the risk of users selecting a wrong project.
Projects and Project Headers can be allocated to a user through the Projects tab on the user profile; it is also possible here to see what projects or project headers the user has been given permission to see.
If a user isn’t to have access to all projects, it is also possible to use a wizard to link projects to users; System Settings cogs – User Setup banner – Projects. Run through to select the user or users, then the project and either add or remove. An import can also be used to allocate multiple projects to users at once – imports can be particularly useful when first setting up a site but the wizard may be preferable for ongoing management.
Users can either have access to all Project Headers or be limited to certain ones; it is possible in WAP to limit project headers per module. When linking WAP with Sicon Projects, it is generally recommended to give users in WAP access to all project headers as within Projects the headers are linked to a Header Type which is linked to a WAP Type (to prevent Labour Project Headers being visible on a document type other than Timesheets). Project Headers can also be restricted per Project which makes it slightly trickier for users to pick the wrong project header per project.

9. Sicon Sage Timesheets
If using WAP with Sicon Projects it is recommended to use Sicon Sage Timesheets; this is a single consolidated timesheet across all Sicon Sage 200 and WAP modules. This is very useful when many Sicon applications are installed.
Ensure this is switched on under System Settings cogs – System Settings banner – Costing.
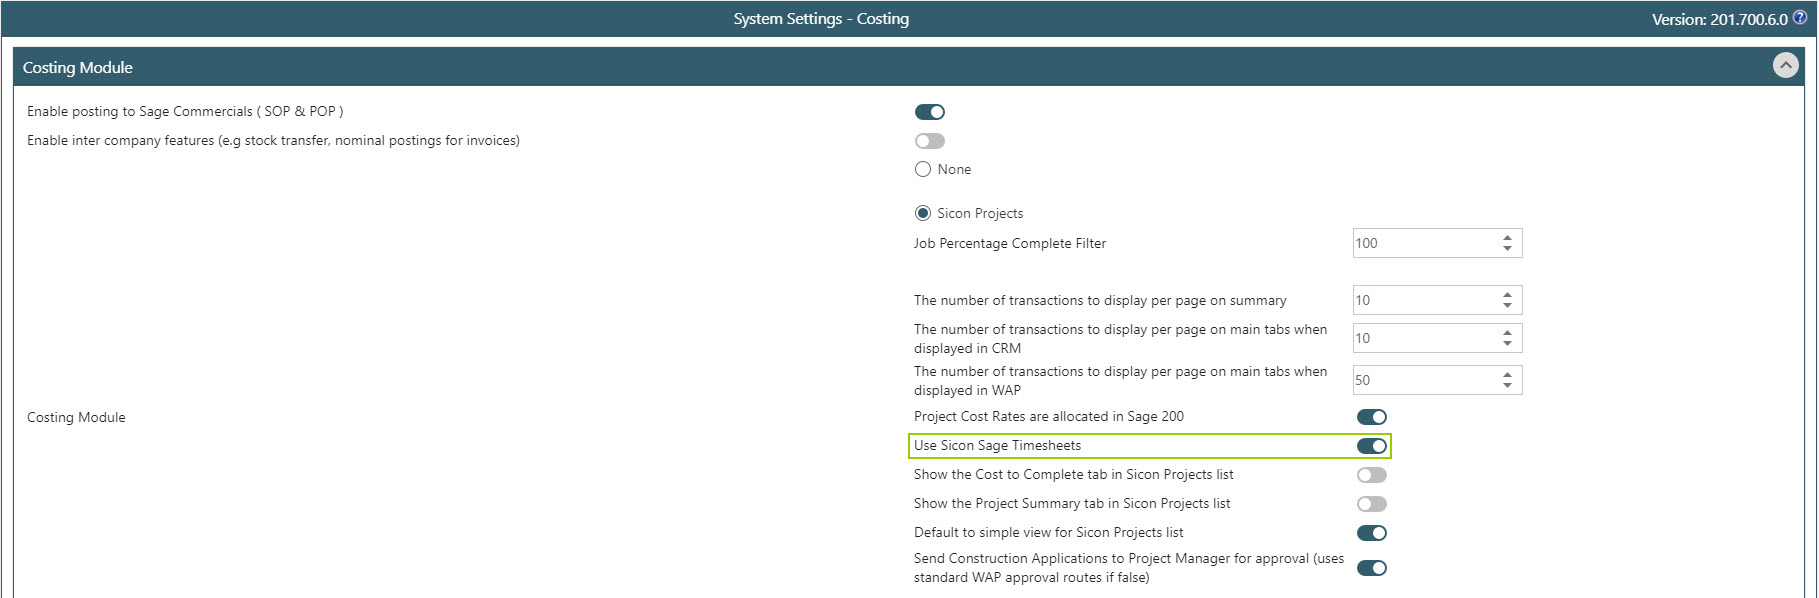
Once this has been switched on, time can only be entered using the ‘Rapid’ time entry screen so if any complex timesheet functionality is required (as detailed further in this guide), Sicon Sage timesheets may not be able to be used.
If timesheets have previously been entered and Sicon Sage Timesheets is to be switched on, a migration routine will need to be run to move timesheets from being stored in the WAP SQL database to the Sage SQL database. If this is to be done please contact your Sicon Project Admin contact to discuss further.
10. Rapid Timesheet Entry Screen
The Rapid Timesheet format is for entering hours against a project in a quick and simple format and will not contain all of the options of the standard timesheet entry. It is a user type permission to be able to access the Rapid Timesheet option. If linking with Sicon Projects and Sicon Sage Timesheets is enabled, users will only be able to enter time through this screen.
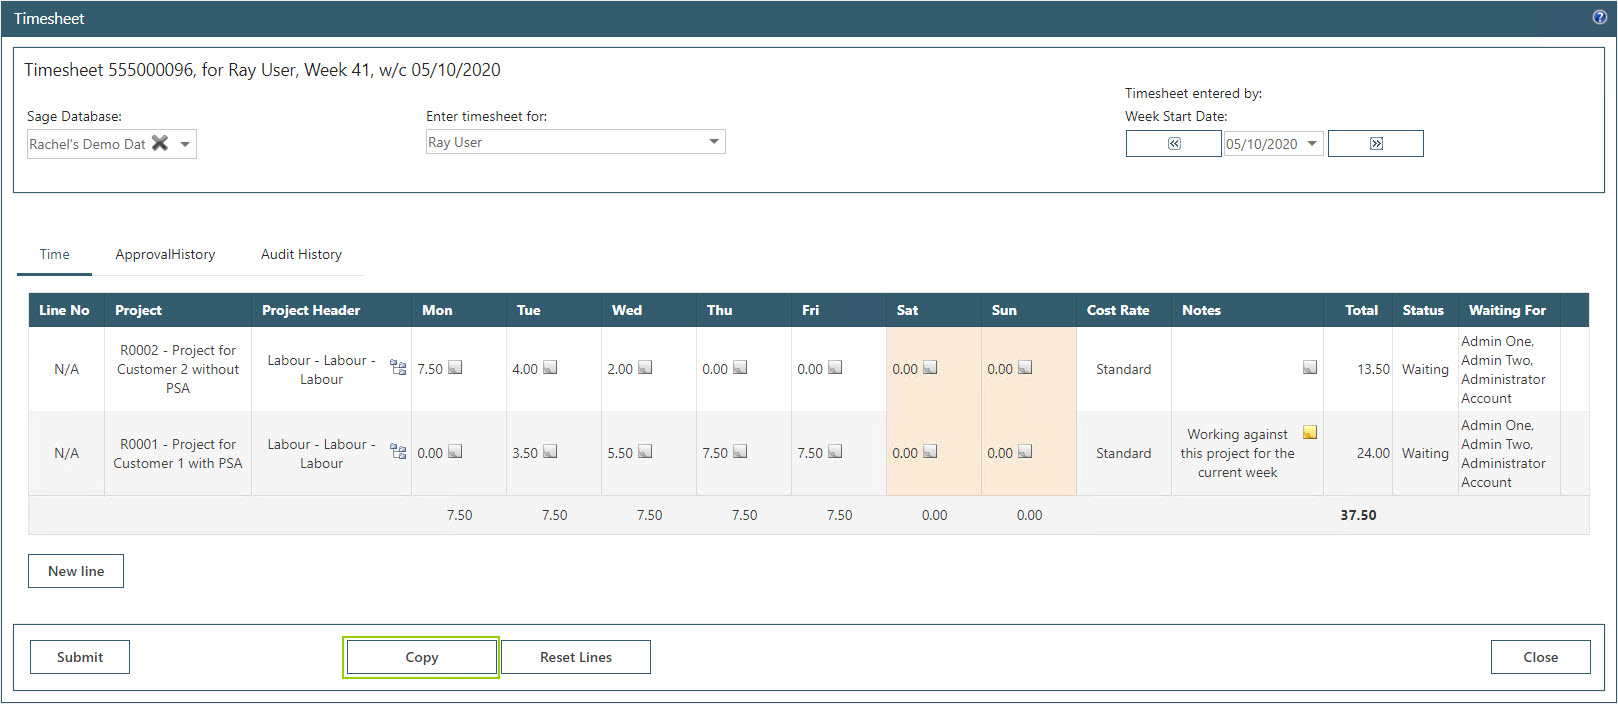
10.1. Time Tab
Use the side menu option to browse to Timesheets – Current timesheet to view the current week and enter timesheet lines. The calendar option at the top right can be used to select a specific week or the forward and back arrows can be used to move between weeks.
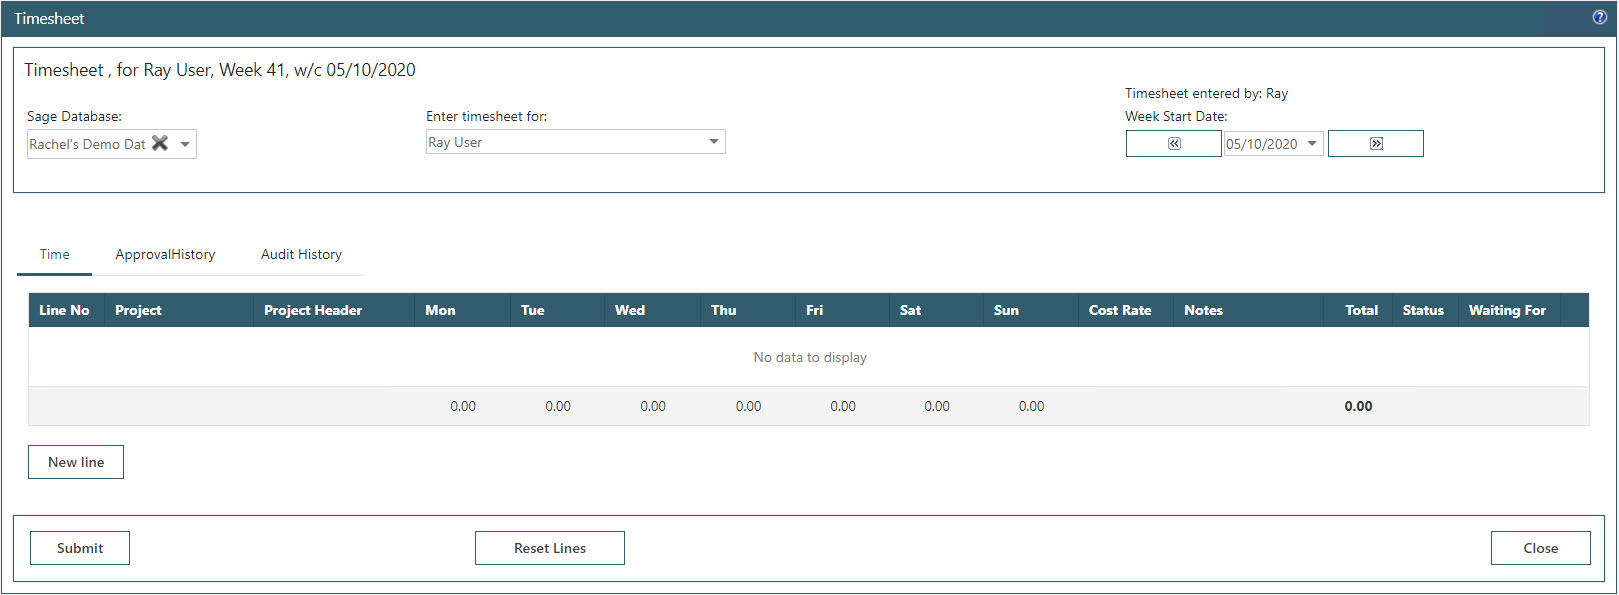
Click to add a new line. On the popup that appears, select from the drop down list the correct project and project header combination. Either select a cost rate from the drop-down box or if configured, a cost rate will be populated automatically. Projects and project headers will show as per the user configuration; e.g. either all will show or only projects or project headers linked to the user.
Notes can be entered against the line or using the post it notes icon next to the day, notes can be entered against the individual day.
New lines will need to be entered for each new project or project header.

Click Update to save the line. Once the first line has been added, once additional lines are updated the popup will appear again to allow for additional lines to be added quickly. Click Cancel once all lines have been entered correctly to return to the timesheet entry page. If a line has been entered incorrectly, it can be deleted.
Once lines have been entered, weekend days are highlighted in a different colour to allow for easier identification by users – this can be particularly helpful if weeks do not start on a Monday.
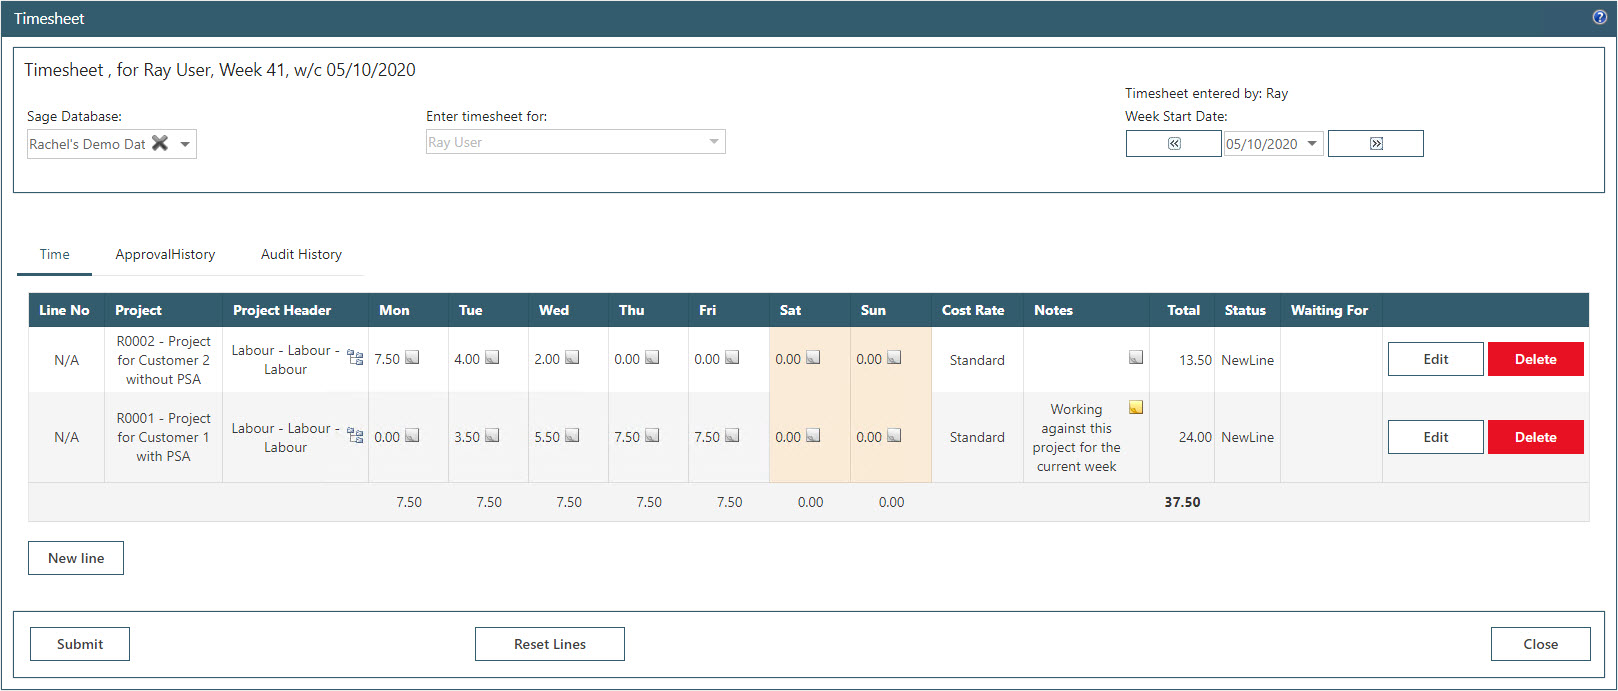
Submit: The timesheet screen is saved automatically once a line is updated but could be submitted at the end of the week; depending on configuration, users may not be able to submit their timesheet until their weekly contracted hours have been met.
Reset Lines: once a timesheet has been approved, all lines can be reset. This can be helpful if an approval route has changed and lines should be started at the beginning of each new route or a change made to a line and the route needs to be restarted. Once the timesheet has been fully approved, the line cannot be reset.
Close: use this to return to the Existing Timesheets screen.
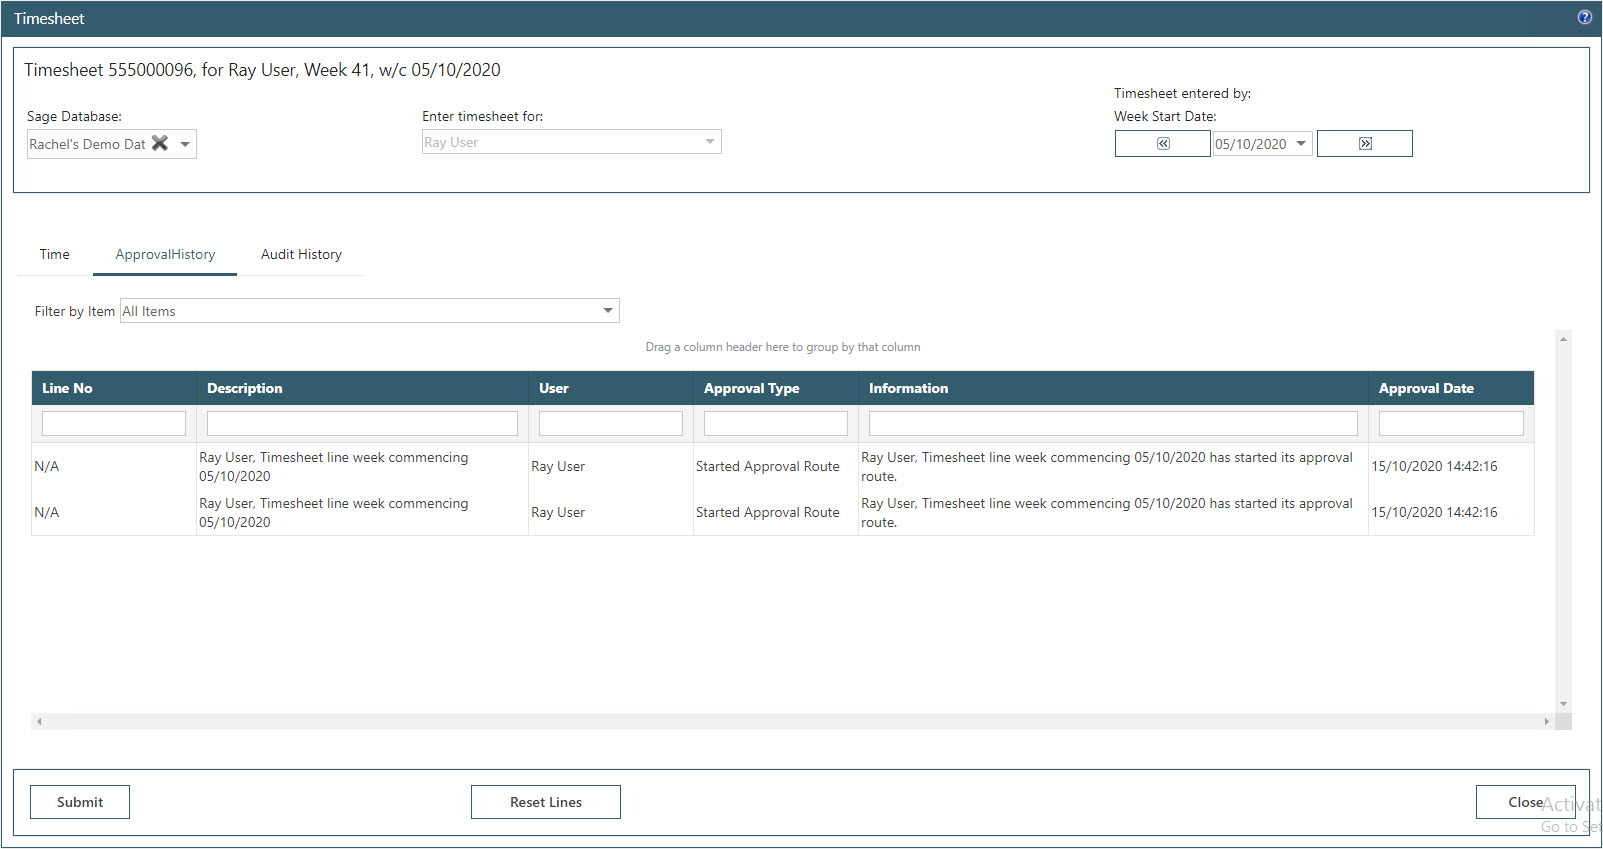
10.2. Approval History Tab
Once the timesheet has been submitted, an approval history line is automatically recorded within this tab – each individual line on the timesheet will create its own record. If an approver approves or rejects a line, this is recorded here. If using Delegate access to approve a timesheet, it will show as being approved by one user on behalf or another user.
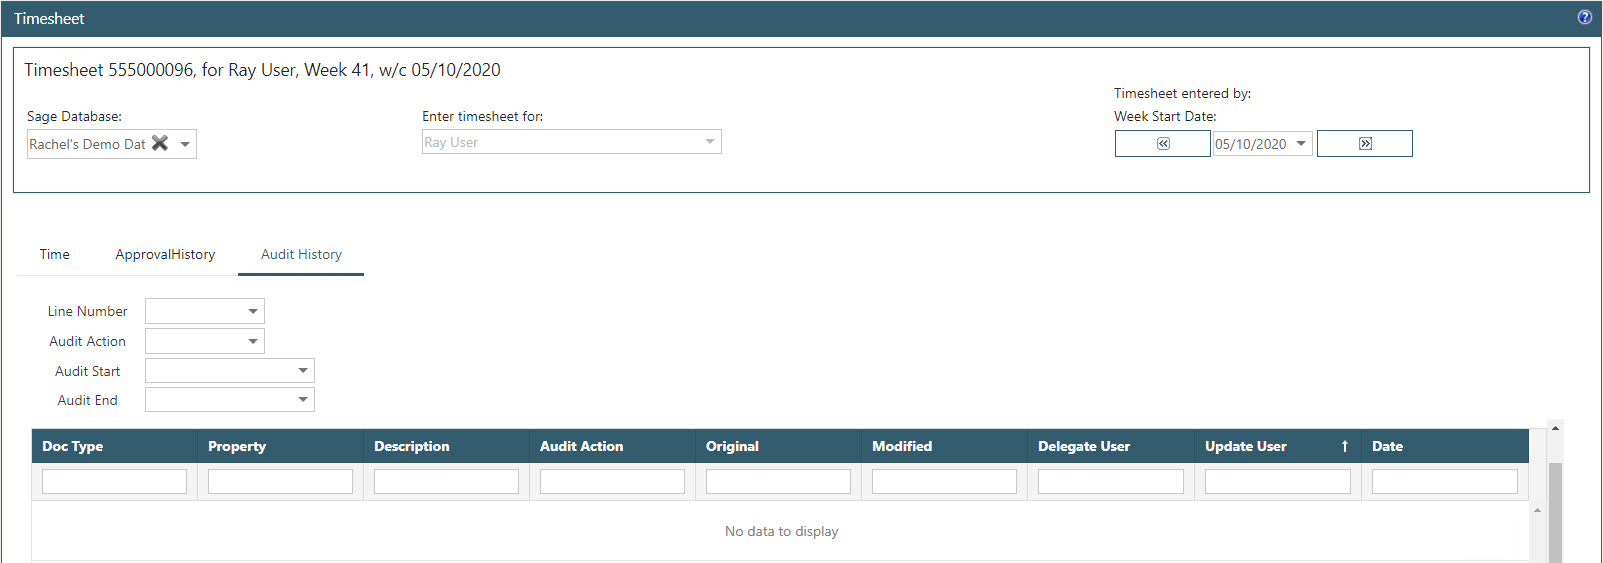
10.3. Audit History Tab
If configured, this tab will be populated with information on the timesheet lines; when they were created, amended or deleted and by which user. By default, all timesheet lines will show but the filters can be used to only show specific lines, audit actions (e.g. create, edit, delete etc.) or a date range when the action occurred.
Auditing is switched on in System Settings – Auditing.
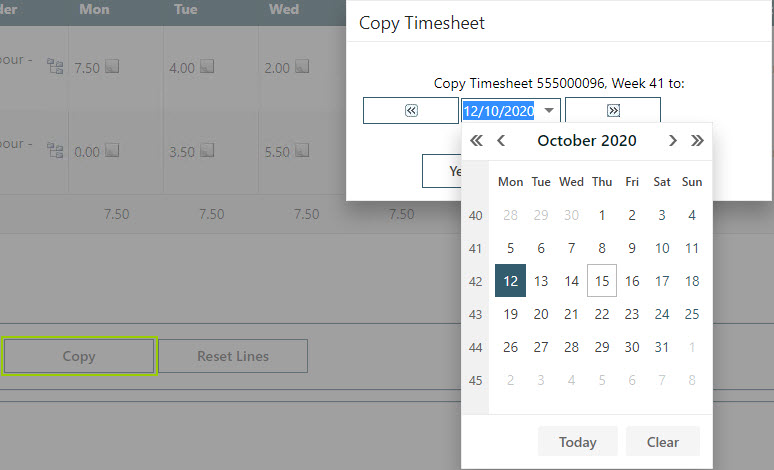
11. Copying Timesheets
If required, users can be allowed to copy a timesheet to another week (System Settings – Timesheets – Functionality – General); if enabled, the option to Copy will appear on the timesheet entry screen.
When copying a timesheet, select the week to copy the timesheet to. All Project lines are copied by default and if configured, login activity can be copied. Holiday and absence lines are not copied. A timesheet line will only copy once; if subsequent lines are added to the original timesheet and the copy is run again, only new lines will be copied.
12. Existing Timesheets
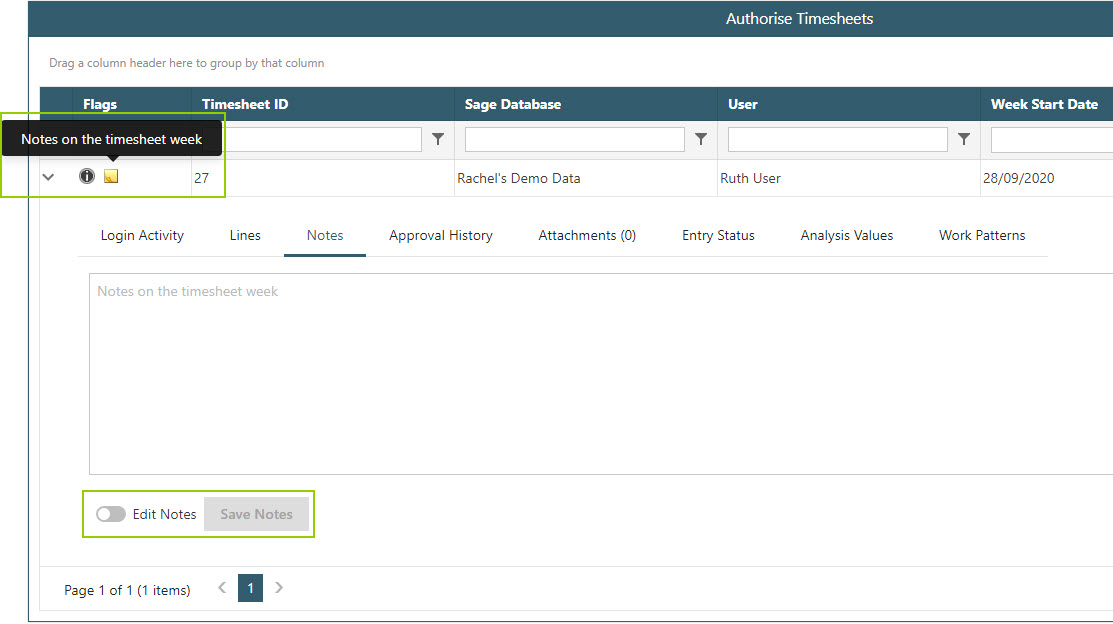
Select Existing Timesheets from the side menu to display the user’s timesheets under various tab headings. Additional icons will show in the Flags column to show if the timesheet has any notes or attachments etc. Depending on permissions users may be able to view other users’ timesheets.
A user is able to edit their timesheet while it is awaiting approval; new lines can be added or existing lines can be edited or removed. The timesheet would need to be resubmitted for approval for changes to be picked up by the approver.

12.1. Timesheet Approval Header Status
New: timesheets that have been saved but not yet submitted for approval.
Submitted: timesheets that have been submitted and are awaiting approval. By hovering over the blue information icon on the left, the lines will be displayed showing who they are awaiting approval from.
Approved: timesheets that have been approved and posted to Sage.
Rejected: timesheets that have either had one line or the whole timesheet rejected will show under this tab. It is up to the user who submitted the timesheet to either delete the line or edit and resubmit for approval.
Completed: this tab is not currently used by the Timesheet module.
Failed: the timesheet has failed to post to Sage. Check the Event Logs for explanation of the failure; the most common cause of a timesheet failing is due to a Project being closed prior to all timesheets posting.
Archived: this tab is not currently used by the Timesheet Module.
12.2. Timesheet Approval Line Status
New Line: the line has not yet been submitted.
Waiting: the timesheet line is awaiting approval from an authoriser.
Authorised: the timesheet line has been authorised.
Rejected: the line has been rejected; all lines must be authorised before the timesheet will post to Sage.
No Authorisers: there are no authorisers for the line; the line will need to be reset and the timesheet submitted for the correct approval route to be used.
12.3. Timesheet Notification
When a user submits their timesheet for approval they’ll receive notifications on their homepage; these are split out per individual line on the timesheet. Lines may show on different tabs; e.g. if one line had been rejected this would show under the ‘Rejected’ tab but if one line was still awaiting approval this would show under the ‘Approve’ tab.
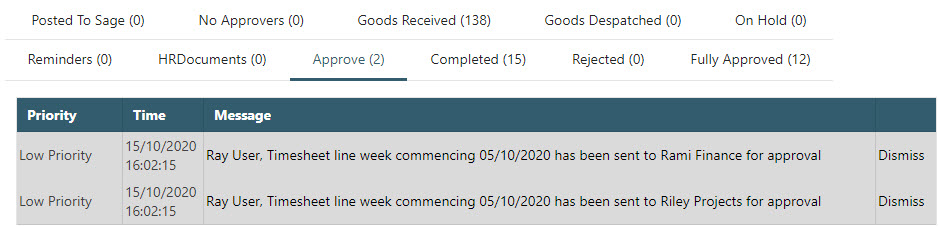
Low Priority: as this notification is showing to Ray that his timesheet has gone to both Rami and Riley for approval it is low priority as there is nothing for Ray to action.
Message Hyperlink: if Ray was to click on the hyperlink notification, this would open the timesheet for him to view or edit if required.
Dismiss: this notification can be dismissed; Ray would then get new notifications if something changed – e.g. Rami or Riley approved and the timesheet went to another approver, Rami or Riley approved and the timesheet was fully approved or if Rami or Riley was to reject the timesheet.
When a user has a timesheet to approve, they’ll receive notifications on their homepage; these are split out per individual line on the timesheet.
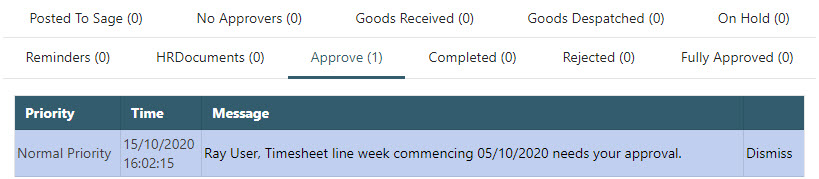
Normal Priority: as this notification is showing to Riley that Ray’s timesheet requires her approval, the priority is normal as there is an action for Riley to complete.
Message Hyperlink: if Riley was to click on the hyperlink notification, this would open the timesheet approval page to allow for the claim to either be approved or rejected.
Dismiss: this notification cannot be dismissed as it is requiring an action from Riley – notifications will be sent until the approver has completed the task.
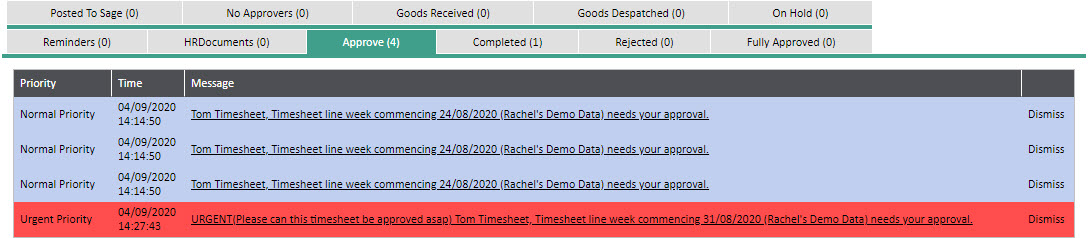
If a user has flagged the timesheet as Urgent, this will highlight the notification in red and set the priority as Urgent to both the user who submitted the timesheet and the approvers. Notification emails will be sent automatically rather than waiting for the standard email threads.
12.4. Searching for Timesheets
By default, users will always be able to see timesheets they have raised. If permission is given, users may also be able to view all timesheets, those raised by users within their business unit or timesheets they have approved.
There are two options to search for an existing timesheet; either use the Search filters or the Quick Links.
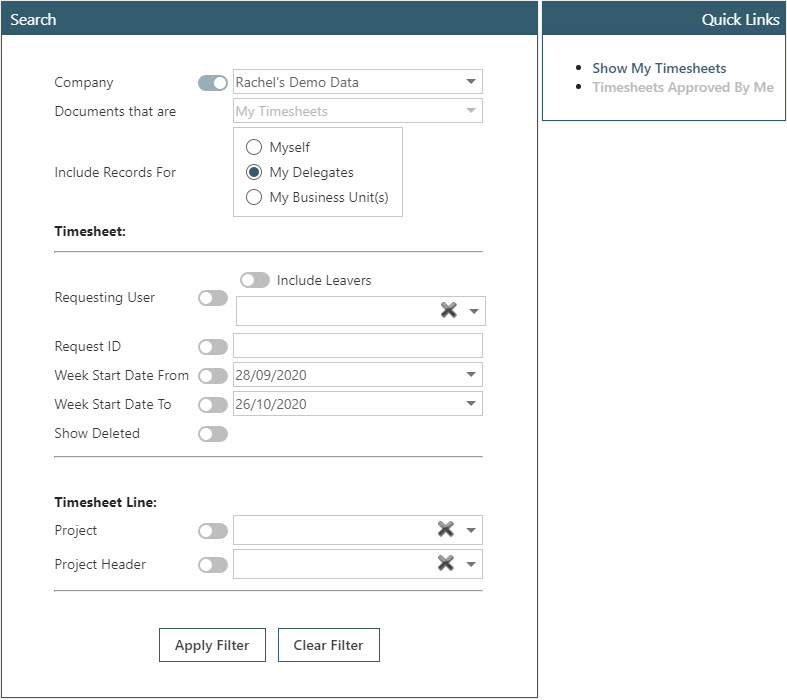
Search filters: depending on configuration, the user will be able to search for their own, their business unit, or all users’ timesheets. Search filters can be used to filter timesheets to view only certain ones; i.e. to view timesheets within a certain time period, submitted by a particular user or linked with a certain project. Use the Show Deleted option to show any timesheets that have been deleted.
Quick Links: either click to show the users their own timesheets or timesheets they have approved; these quick links will vary depending on User Type permissions.
13. Approve Timesheets
When a user has a timesheet to approve, a notification will show on their homepage; it is these notifications that will be the basis of reminder emails.
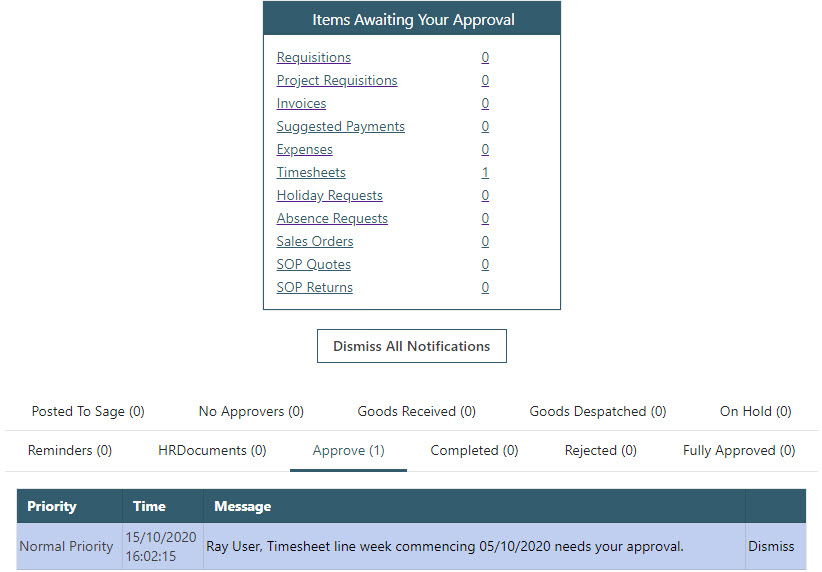
To view the timesheet for approval, either click the blue notification link, the Timesheet link under the Items Awaiting Your Approval banner or click Approve Timesheet from the menu on the left.
Once within the approve timesheet page, the approver will see the timesheet ID, Sage Company, Employee name, week start date, total and contracted hours. The arrow on the left is used to expand the timesheet and show all the line detail that the user has to approve (if there are additional lines on the timesheet that have gone to another approver, these lines will show on the All Lines tab).
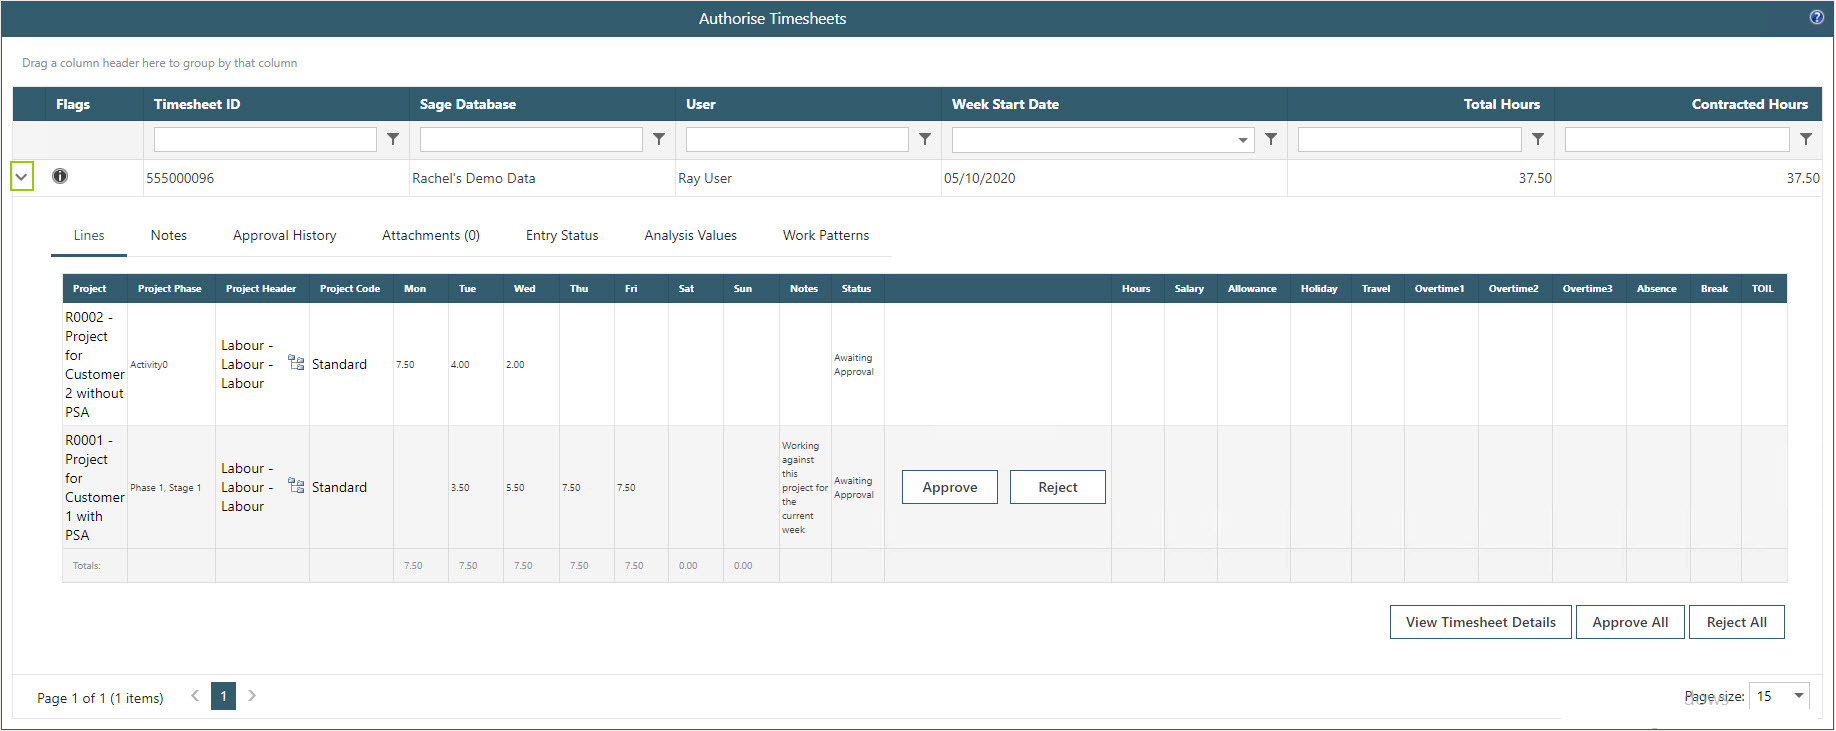
Login Activity: if configured, this tab will show log in and out times recorded by the user.
Lines tab: this tab will show further breakdown of the timesheet line with project, project header, cost codes and hours across the days. Individual lines can be approved or rejected, or all lines approved or rejected. A reason must be entered if an approver rejects the timesheet or a line; the timesheet will not post as actual costs until all lines have been fully approved. If a user has permission, they could edit a line and change the cost rate selected. All lines will show here but the approver will only be able to approve lines that are waiting for them. Lines waiting for other approvers will show as ‘Awaiting Approval’ without the Approve or Reject buttons.
Any hours broken down to view Holiday, Overtime, Absence etc. will be shown in the separate columns for approver’s ease.
Notes tab: if the user has added any notes onto their timesheet, they will show under this tab.
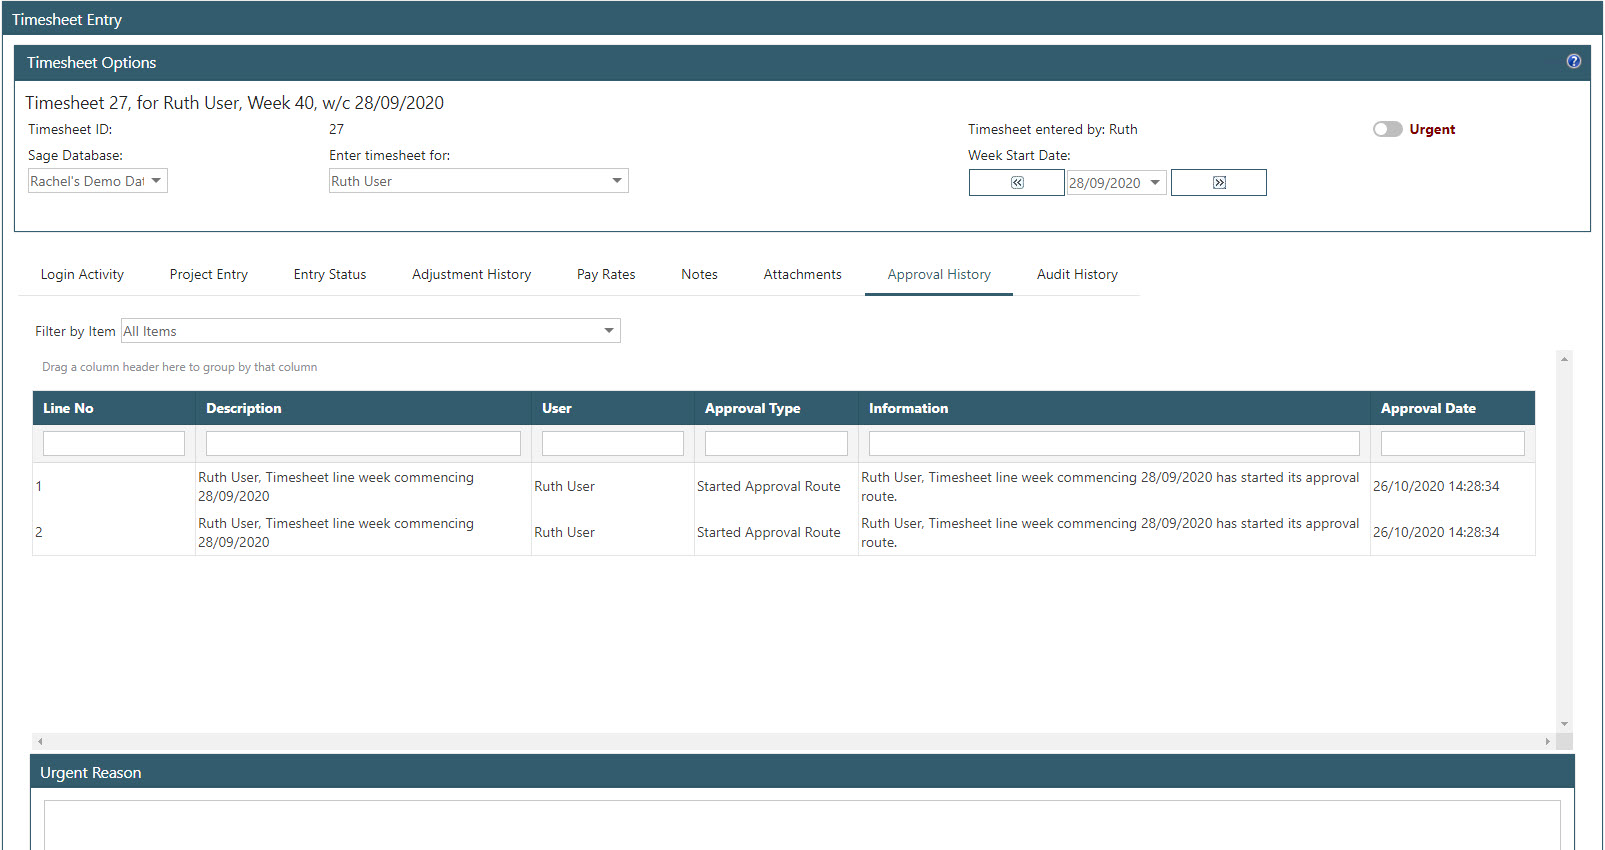
Approval History tab: any prior approval done by other users will be visible here.
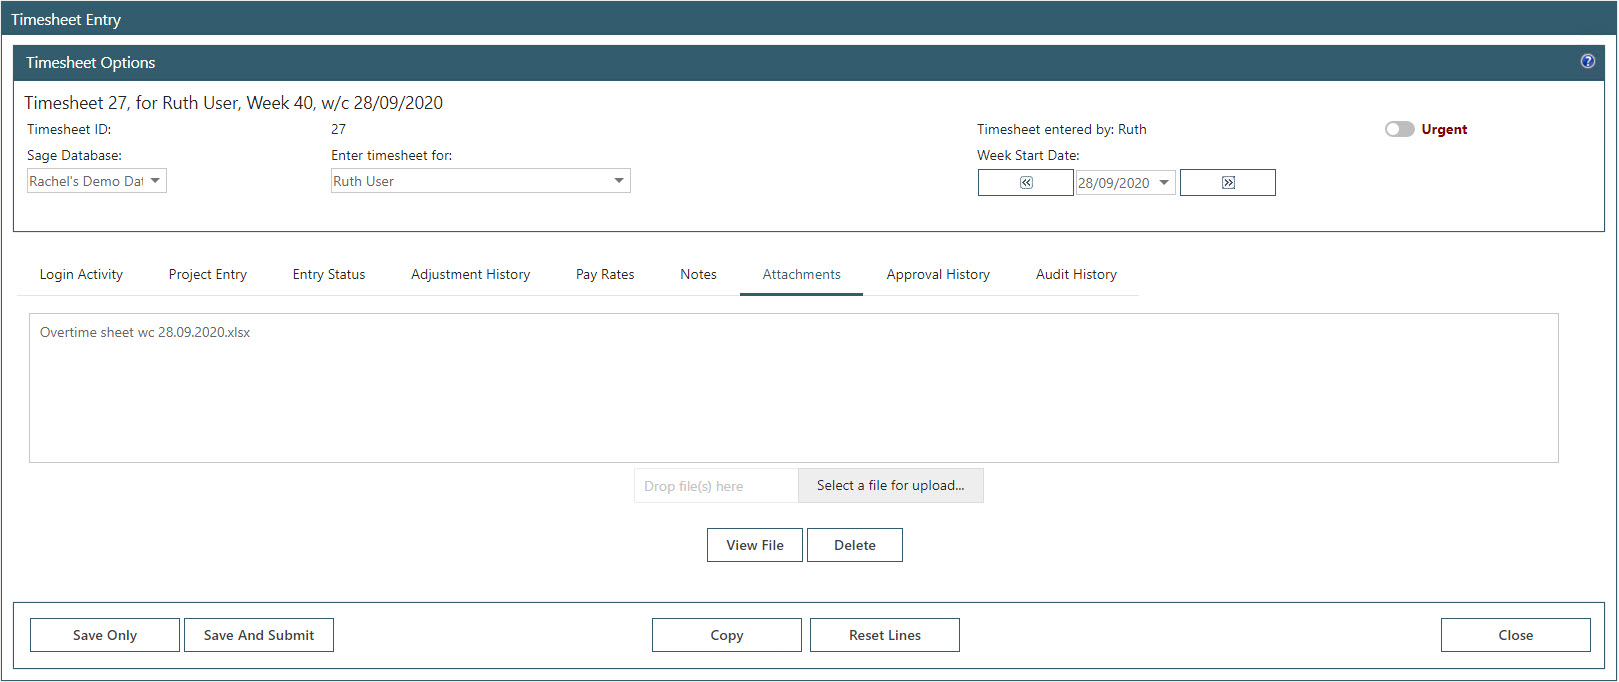
Attachments tab: if the user added any attachments onto the timesheet, they can be viewed under this tab.
Entry Status tab: if applicable, this tab will show login times compared to project time.
Analysis Values tab: if WAP analysis labels have been configured against timesheets, the values entered by a user can be viewed under this tab.
Work Patterns: this tab can be used to show a breakdown of how the user’s work and holiday patterns have been configured.
View Timesheet Details: clicking this will take the approver through to the main timesheet entry screen. Depending on User Type permissions, the approver may be able to edit the timesheet; i.e. change the hours or project or project header etc.
Once a timesheet has been fully approved, it will post through to Sage and show to the user under the Approved tab.

The timesheet will also update against the project as an Actual cost.

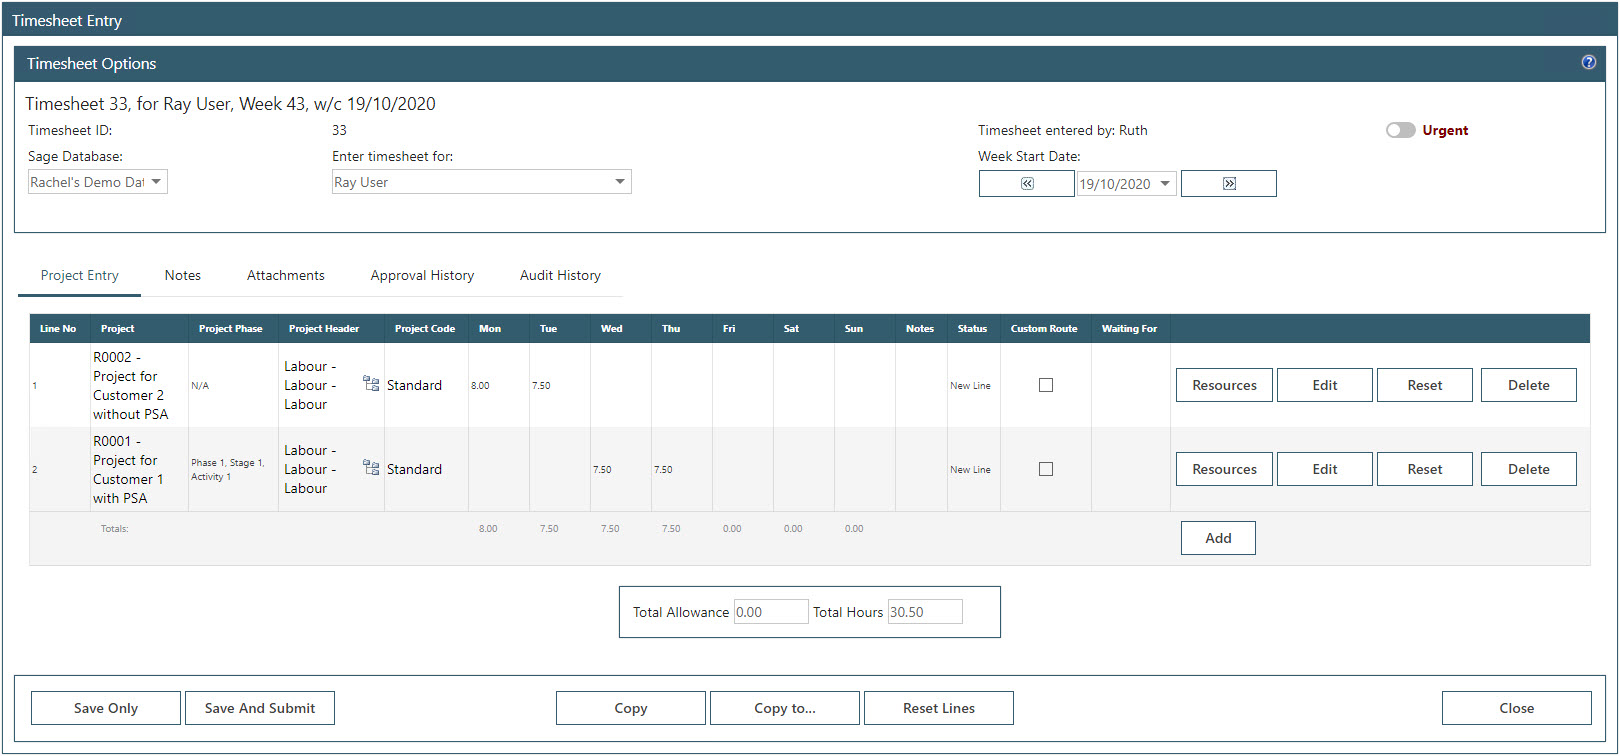
14. New Timesheet Entry
If not using Sicon Sage Timesheets (the site is either linked with Sage Project Accounting or linked with Sicon Projects but using more complex functionality), users may also have the option to enter timesheets through the standard timesheet entry screen; attendance or hours can be recorded in one of the below ways:
Project Entry. Record time against project; enter the total hours and minutes (if no work pattern has been set) or start and end time (if a work pattern is being used). This is the most common method of timesheet entry – simply recording hours against a project.
Login Activity. Record user attendance only; enter the start and end times on Login Activity tab. The time payable is calculated based on the user’s work pattern.
Login Activity and Project Entry. Both times are recorded and the entry status is checked on both to ensure all login activity has been recorded against a project.
14.1. Login Activity Tab
This page will only show if configured and is used to record attendance based on start and end time. This tab is only available through the Current Timesheet entry screen, not the Current Timesheet (Rapid) entry screen.
To add lines, click Add, enter the correct start and end times and click Update to save the line. The timesheet can then be saved for additional lines to be added later, or submitted for approval once completed.
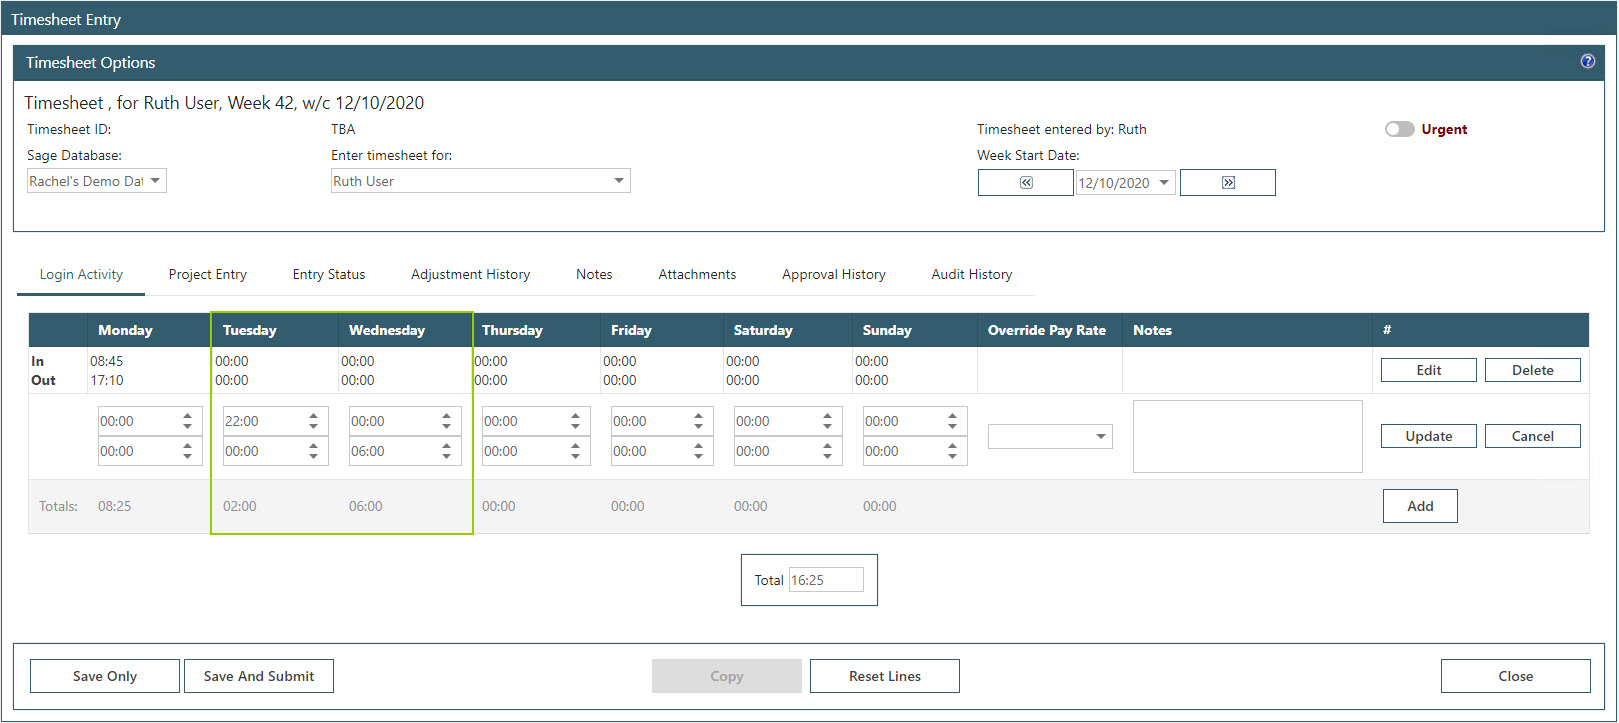
If time is being recorded overnight (e.g. starting at 10pm on Tuesday and finishing at 6am on Wednesday), time will be recorded as below.
14.2. Project Entry Tab
This page is used to record time against a Project in relation to the Costing module linked to WAP and can be used in conjunction with recording login activity but more commonly, users are just asked to record hours against a project. Time can be entered either in hours/minutes format (so three and a half hours is recorded as 3:30), start and end time (so three and a half hours could be recorded as start at 9:30am and finish at 1:00pm) or decimal format (so three and half hours is recorded as 3.50).
To enter a line, click ‘Add’, enter time (in the example below, time is being recorded in decimal format), select a project and project header and relevant cost rate. Click Update to save the line. Note; if a user only has access to one project or project header, this will default so the user does not always need to pick this. If using Sicon Projects, it is possible to link a cost rate to a project header so the user does not have to select the correct cost rate. The user will only see cost rates that have been linked to their Employee or Resource in either Sicon Projects or Project Accounting.
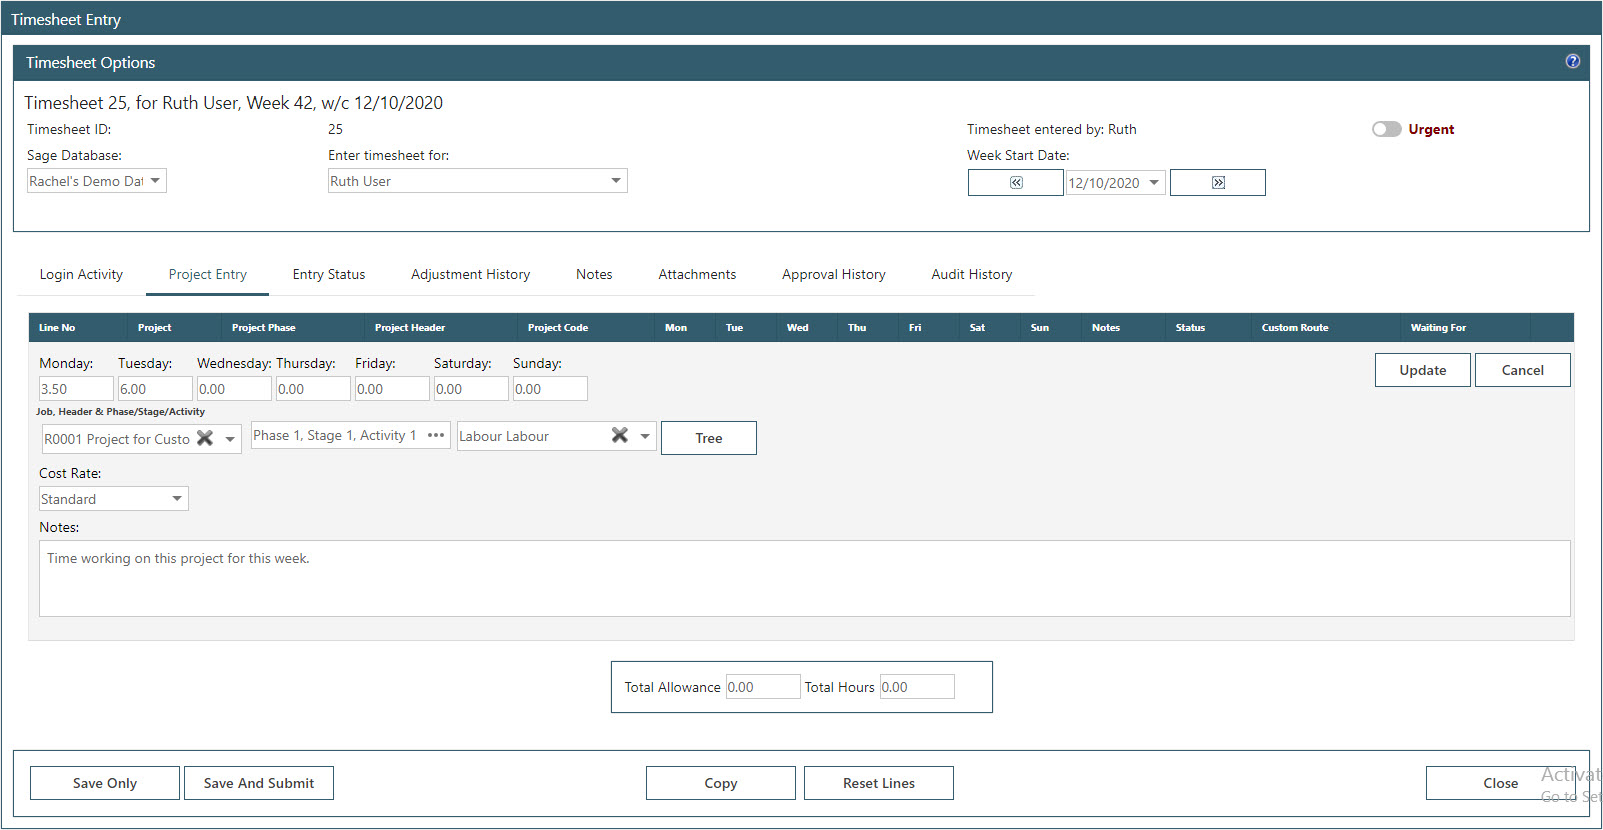
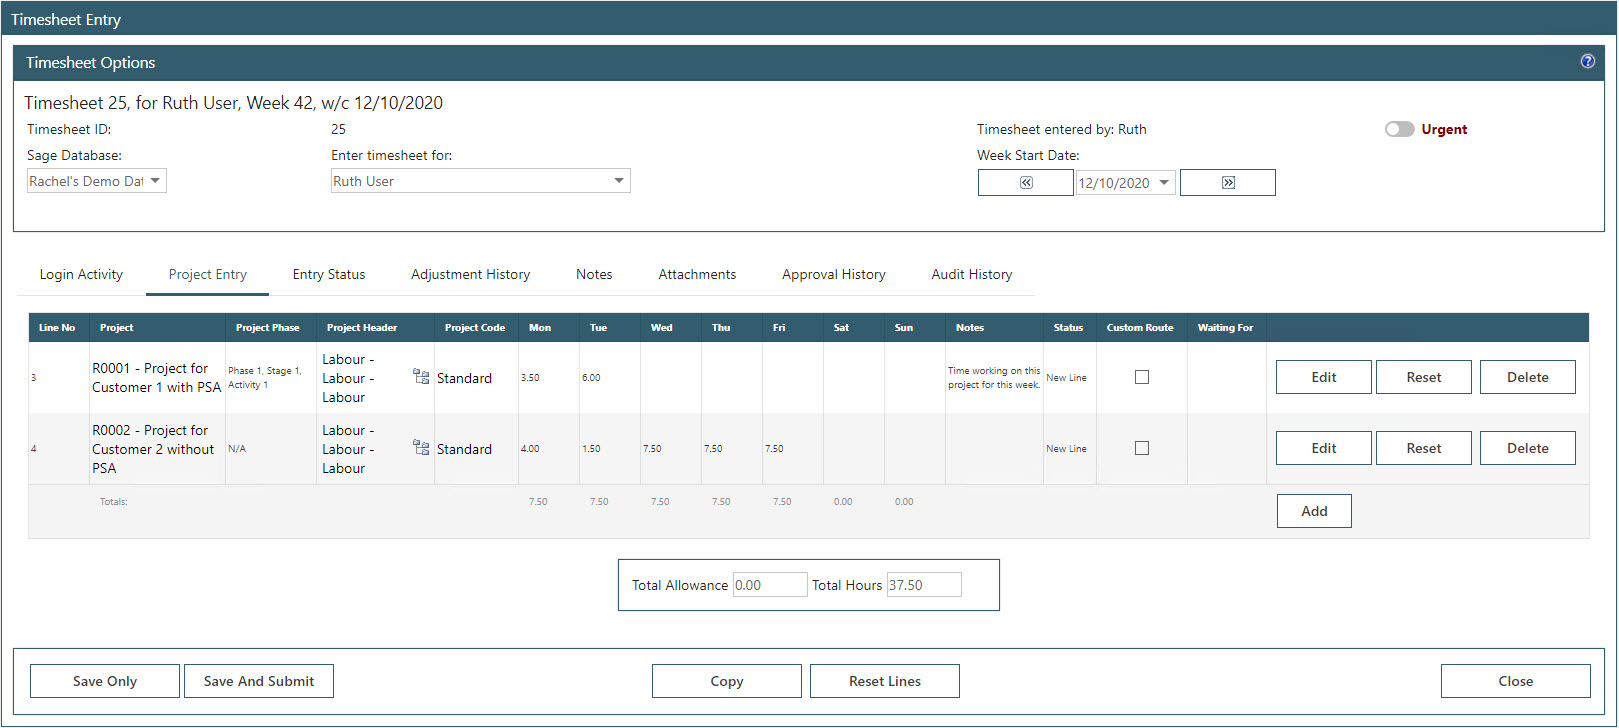
Additional lines cannot be added until the current line has either been saved or closed. The timesheet can either then be saved and added to later, or saved and submitted for approval. Checks can be done to make sure the user has reached their contracted hours before being able to submit their weekly timesheet.
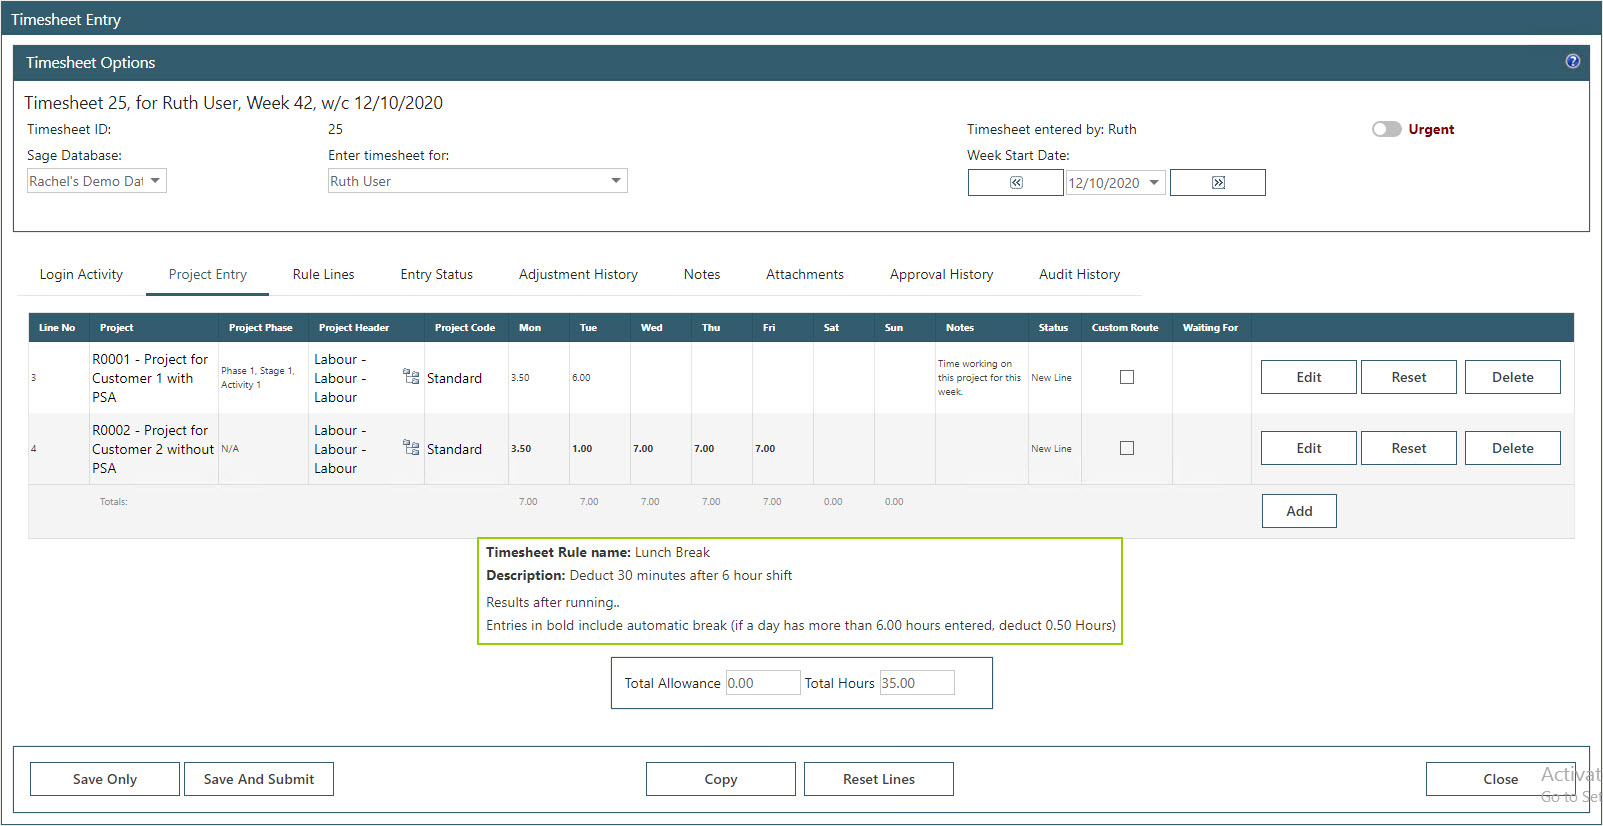
14.3. Rule Lines
If a rule has been configured on the timesheet work pattern; i.e. to deduct 30 minutes for a lunchbreak after a certain number of hours, this will show on the Project Entry tab. Any lines that have had deductions due to a rule will be highlighted in bold with an explanation for the deduction.
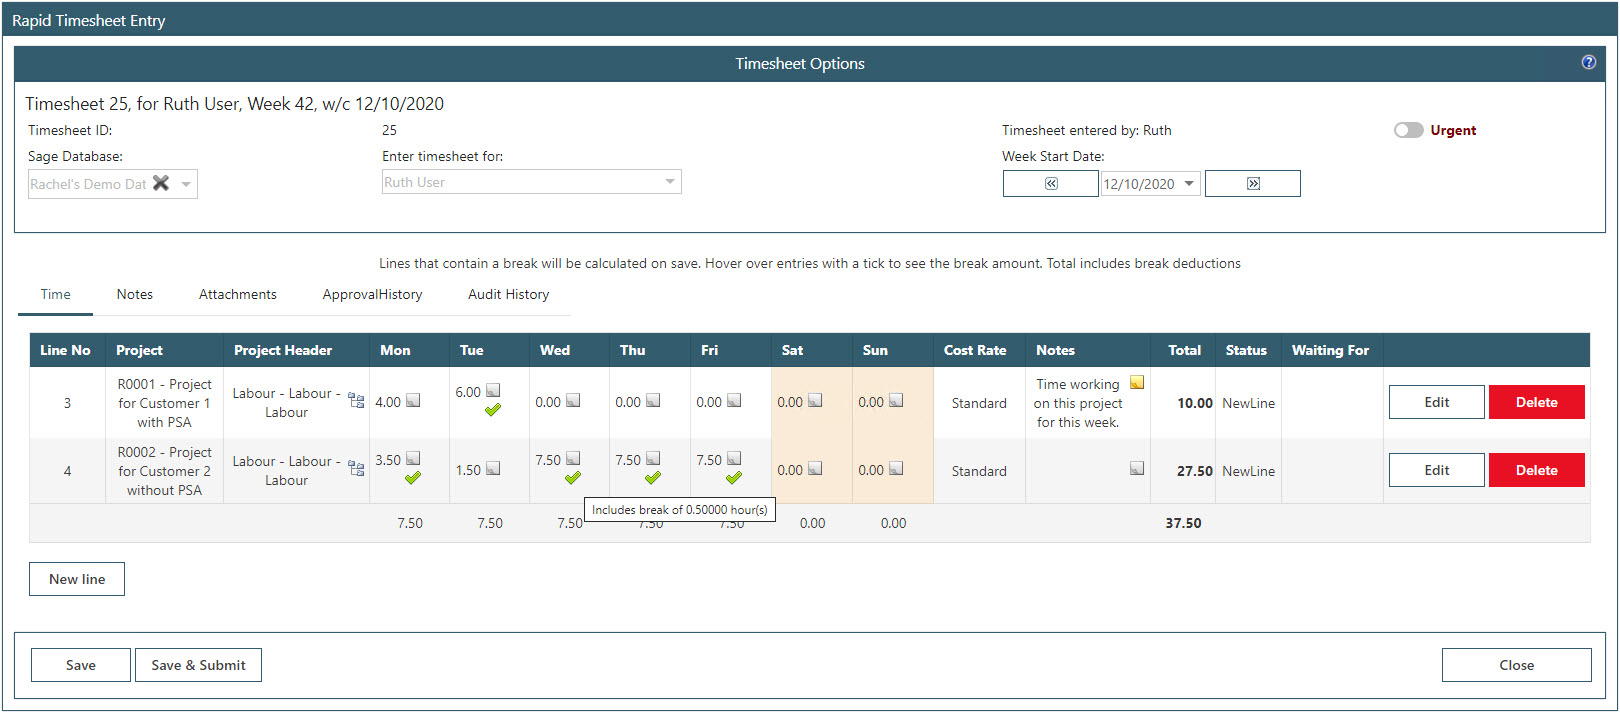
On the Rapid Timesheet the break calculations will be shown when the timesheet is saved. Hover over the green tick to see an explanation for a deduction.
14.4. Entry Status Tab
If recording both Login Activity and Project entry, the Entry Status tab will check the hours the user has recorded in the Login Activity tab against the user’s work pattern and the hours recorded in the Project Entry tab.
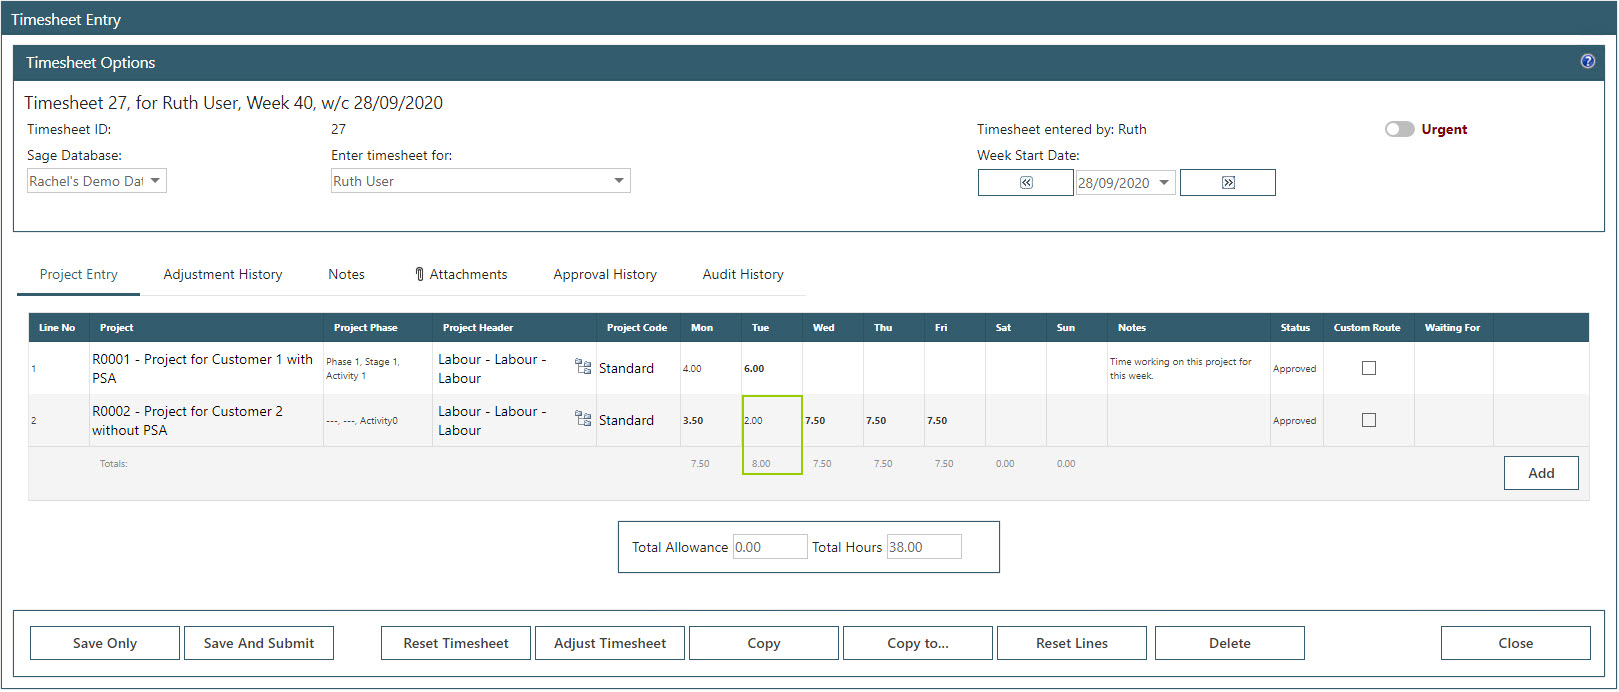
In the example below, Ruth’s hours on Tuesday and Wednesday need attention as the hours do not match and no login activity has been recorded for Friday so is showing as Incomplete. Pay Rates shows the number of hours recorded under the Login Activity tab that have a rate assigned while the Time Entry shows the hours recorded in the Project Entry against a project.
As Login Activity cannot be recorded through the Rapid Timesheet function, the Entry Status tab is only visible when entering a timesheet through the New Timesheet screen.

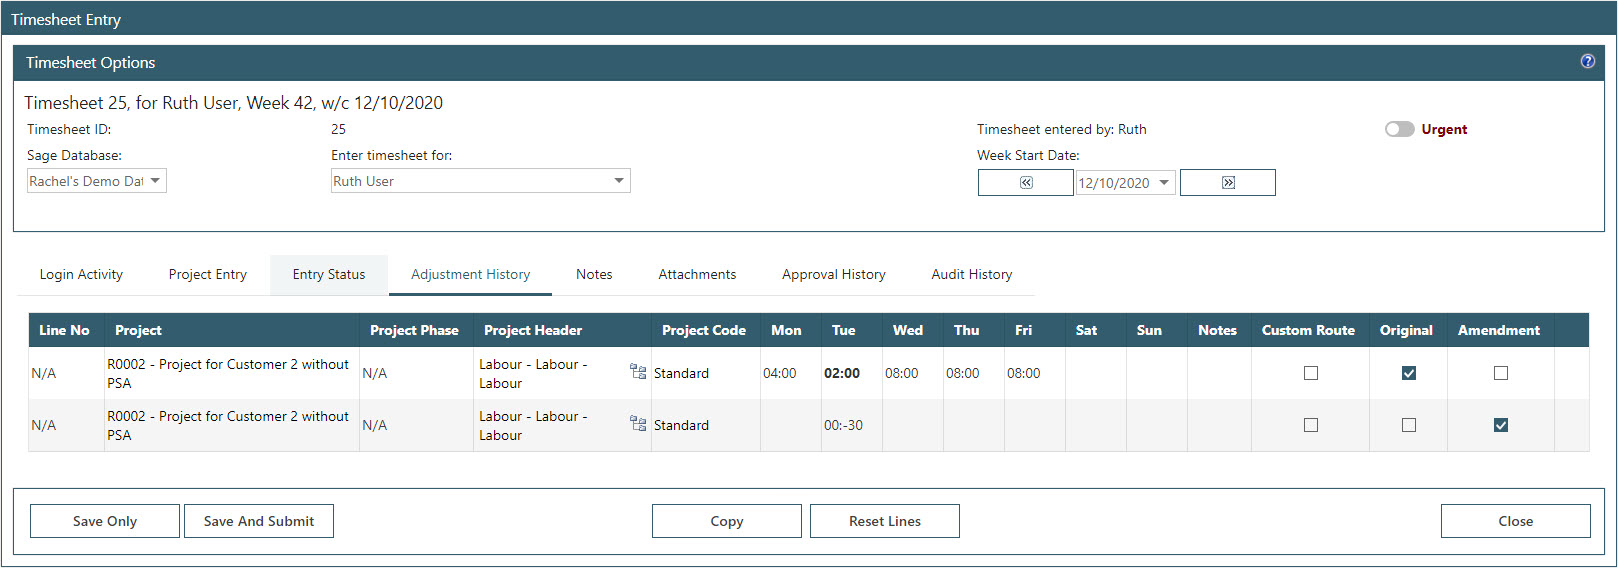
14.5. Adjustment History Tab
This tab will show if any adjustments have been made to the timesheet once it was fully approved. For more information on the process for making timesheet adjustments, please see HUG section on Adjusting Timesheets.
This tab will only show on the New Timesheet screen, not on the Rapid Timesheet screen.
14.6. Pay Rates Tab
If configured, this tab will show the timesheet split down to show the login activity and the applicable pay rates as set in the user’s work pattern. Pay Rates will need to be linked with the user under System Settings – User banner – Work Pattern Rates – for rates to show on this tab. If not recording login activity, this tab can be hidden (System Settings – Timesheets – Display).

14.7. Notes Tab
Notes can be added onto the timesheet either against a timesheet day entry, timesheet line or against the whole timesheet via the Notes tab. Any notes written on this tab will remain within WAP and this tab can be hidden if required (System Settings – Timesheets – Display).
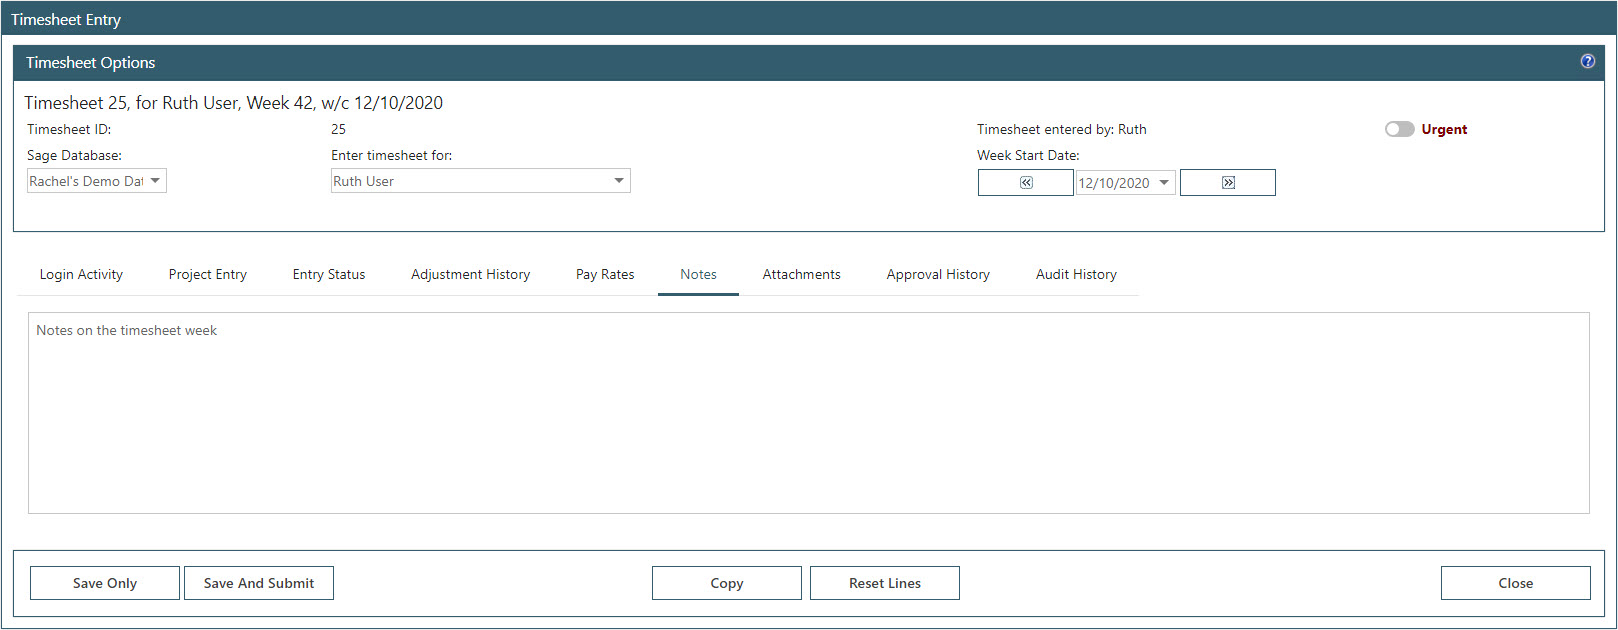
Notes will be visible during approval and can be edited by the approver.
14.8. Attachments Tab
Documents can be attached to a timesheet as required; i.e. if an overtime sheet is required to provide proof of any overtime hours worked. These documents won’t post through to Sage but will be visible in WAP during the approval process.
14.9. Approval History Tab
An approval history line is automatically recorded within this tab when a user approves or rejects a timesheet line. If using Delegate access to approve a timesheet, it will show as being approved by one user on behalf of another user. On this tab the Urgent Reason will also show; if a user has marked their timesheet as urgent and entered a reason.
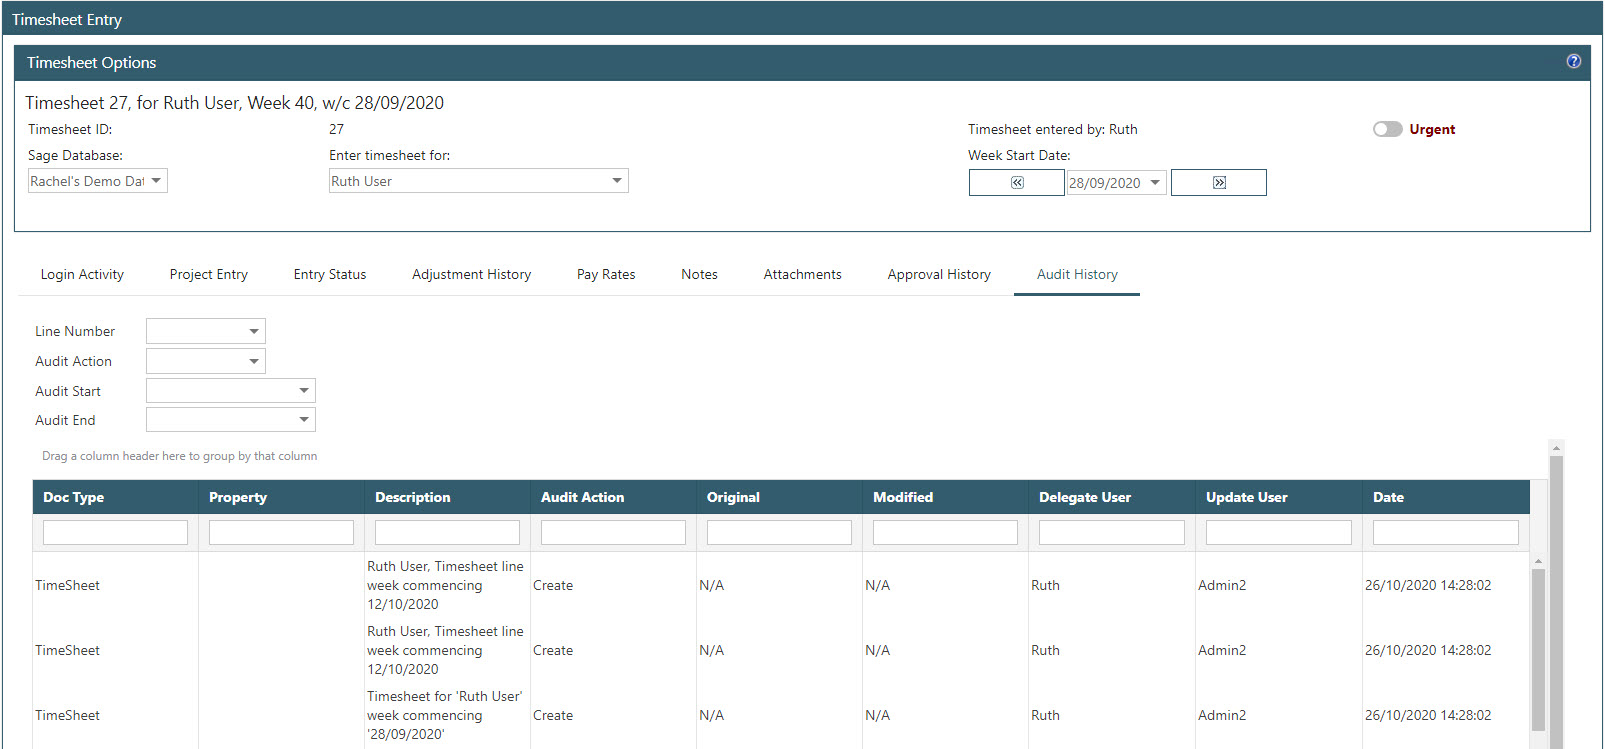
14.10. Audit History Tab
If configured, this tab will be populated with information on the timesheet lines; when they were created, amended or deleted and by which user. By default, all timesheet lines will show but the filters can be used to only show specific lines, audit actions (e.g. create, edit, delete etc.) or a date range when the action occurred.
Auditing is switched on in System Settings – Auditing.
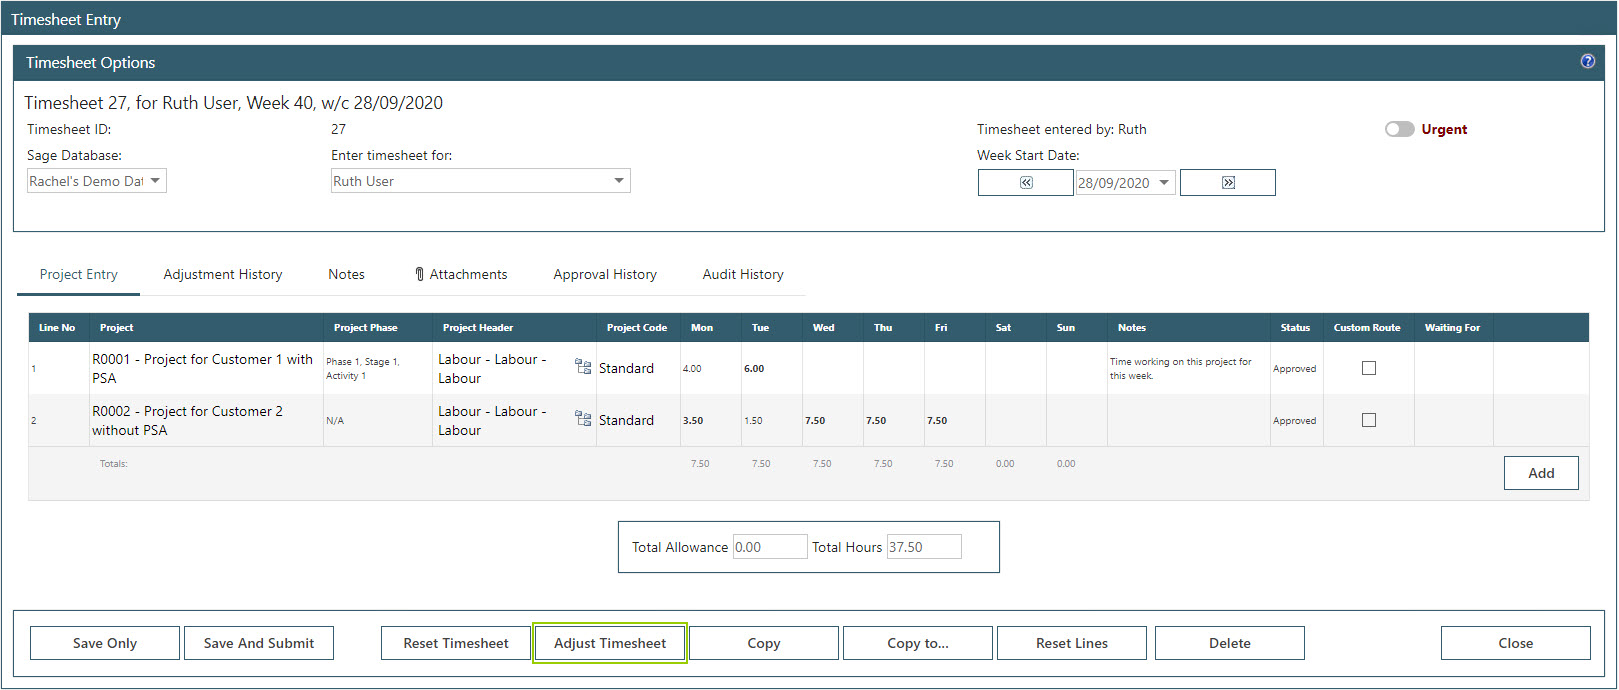
15. Adjusting an Approved Timesheet linked with Sicon Projects
If once a timesheet has been approved, adjustments need to be made; i.e. changing a project, project header, hours or cost rates, adjustments can be made by a user with appropriate user type permissions.
Usually this is a Super User permission to adjust an approved timesheet and is not commonly used functionality.
This functionality is only available when not linking with Sicon Sage Timesheets; if linking with this, adjustments should be made directly in Sicon Projects.
On an approved timesheet, click ‘Adjust Timesheet’. This is only accessible through the New Timesheet screen, not Rapid Timesheet screen.
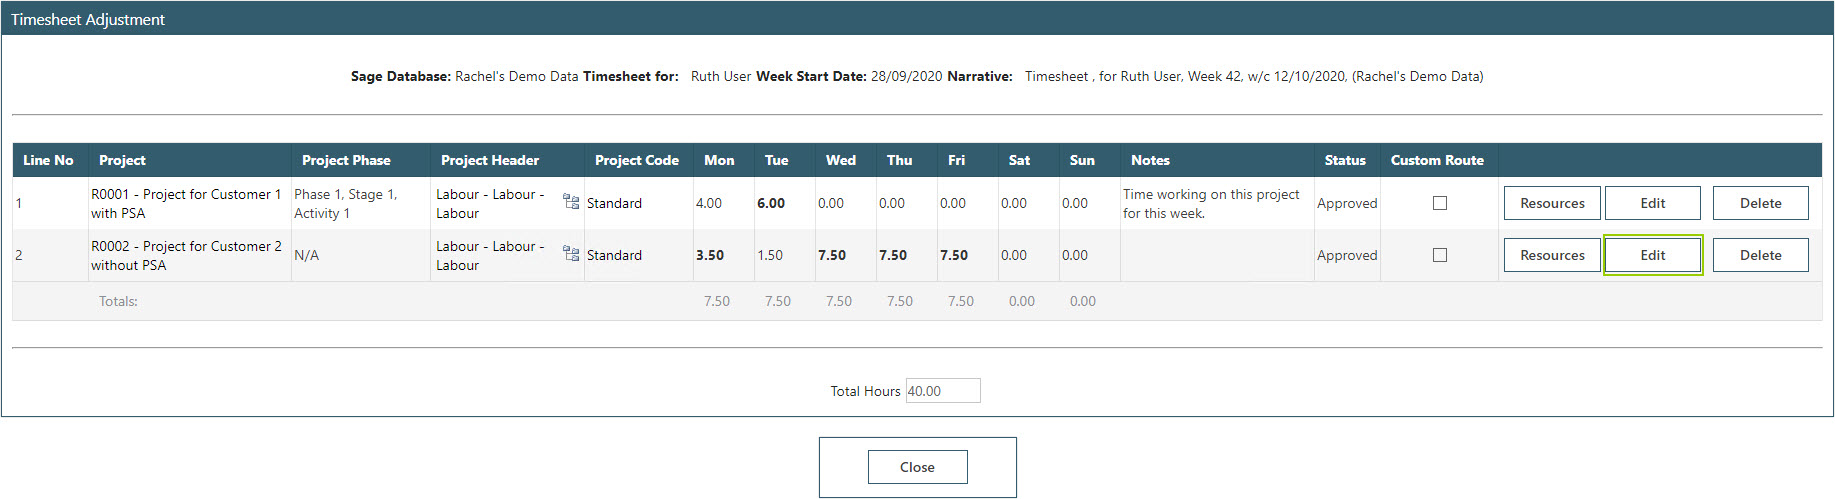
Click ‘Edit’ on the line to be changed.
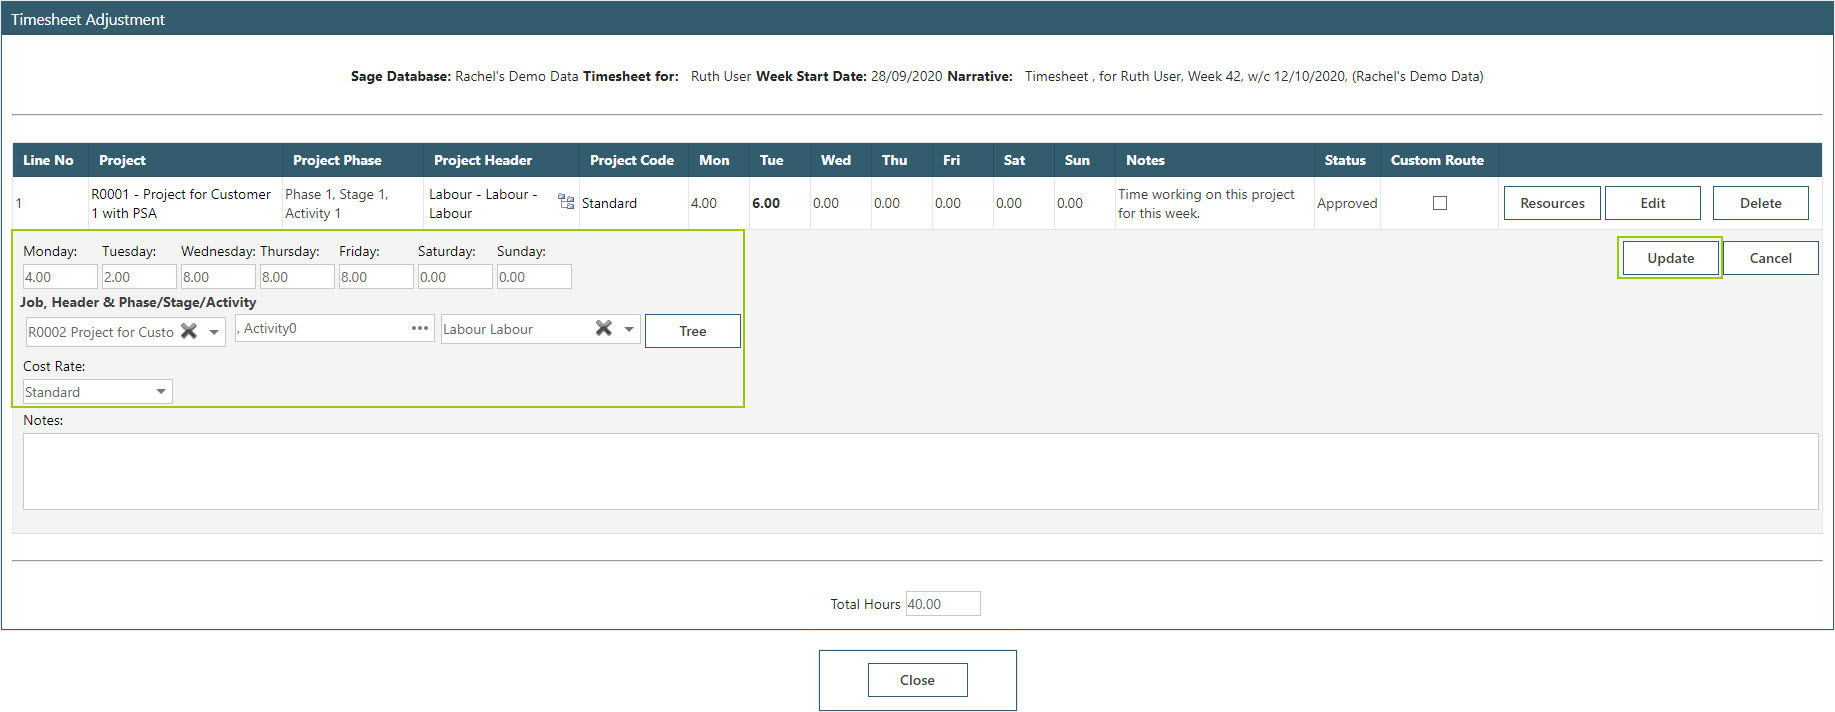
Make the adjustment – in the below example, hours on Tuesday are being increased from 1.5 to 2 hours) and click ‘Update’.
Check the timesheet is now correct and close the screen.
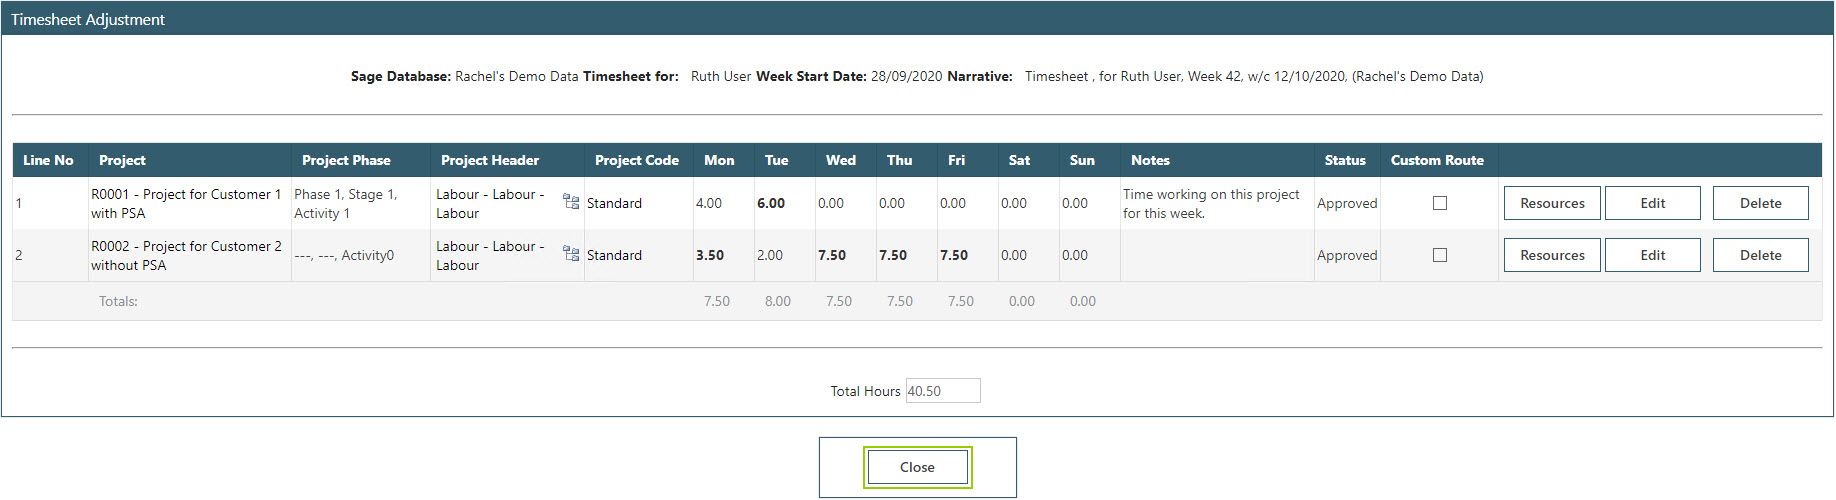
Once the above screen has been closed, the adjustments will be posted to Sage automatically; there is no requirement for the timesheet to be submitted as there is no approval of adjustments.
Once the adjustments have been made in WAP, the project will be updated in Sicon Projects to show the adjusted hours.

16. Resetting an Approved Timesheet linked with Sicon Projects
If all lines on an approved timesheet are incorrect (e.g. a user has entered time against the incorrect week), resetting an approved timesheet will remove all approved lines that have posted to Sicon Projects and the timesheet will be in ‘New’ again in WAP for lines to be deleted and entered again.
Usually this is a Super User permission to adjust an approved timesheet and is not commonly used functionality.
This functionality is only available when not linking with Sicon Sage Timesheets; if linking with this, adjustments should be made directly in Sicon Projects.
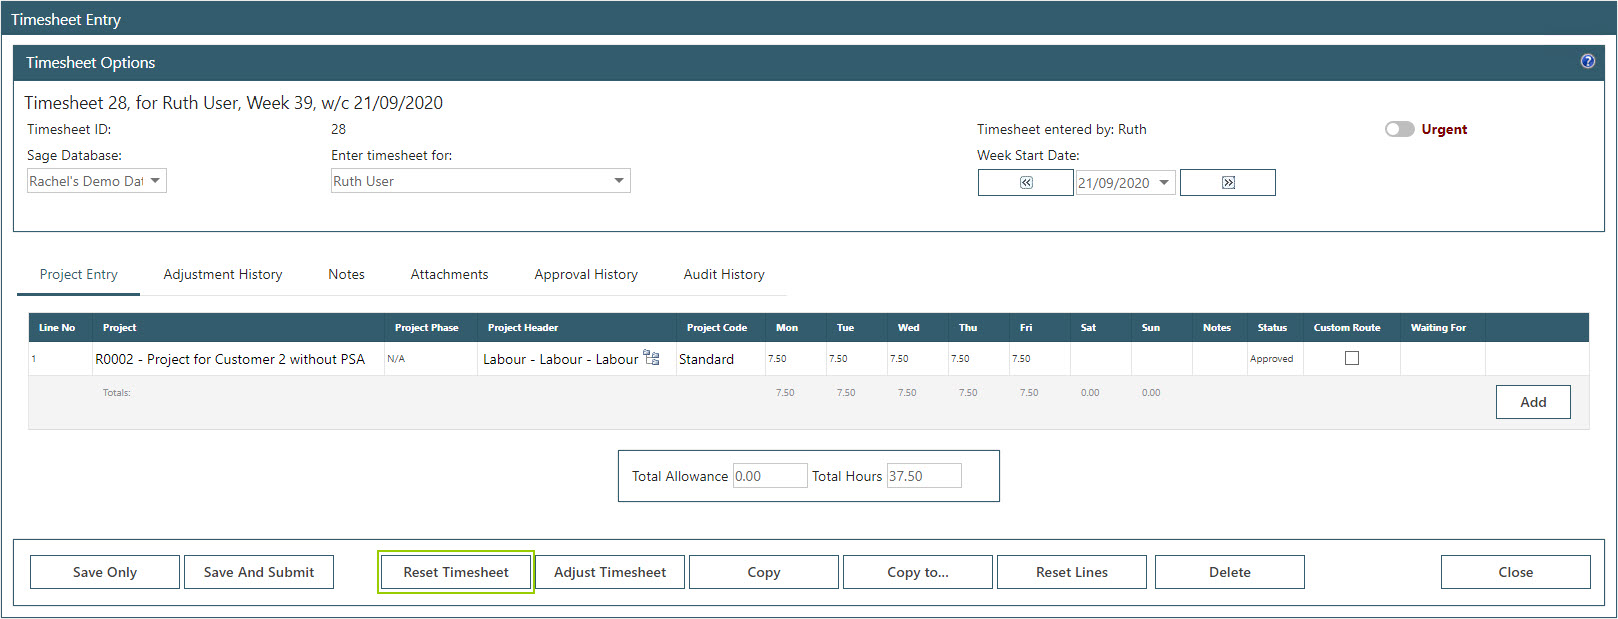
On an approved timesheet, click ‘Reset Timesheet’. This is only accessible through the New Timesheet screen, not Rapid Timesheet screen.
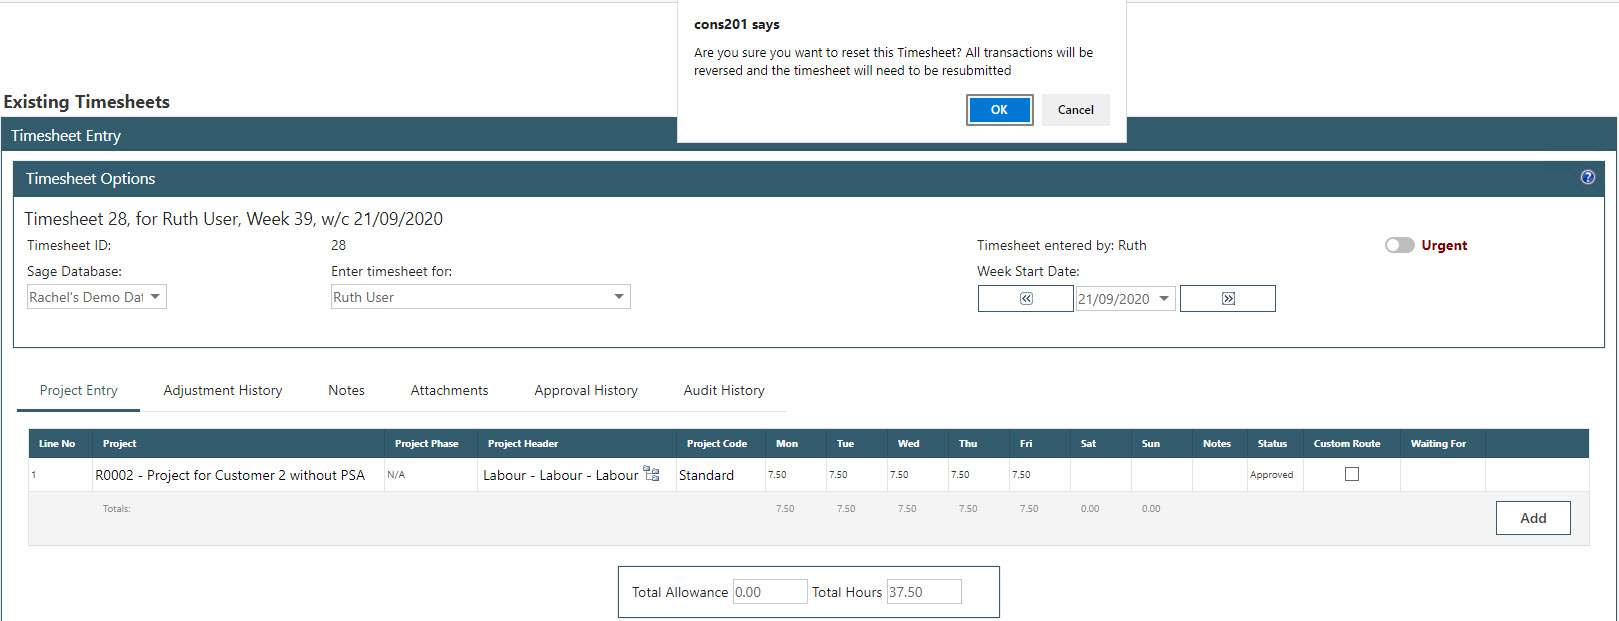
A warning prompt will appear asking for confirmation that the timesheet should be reset.
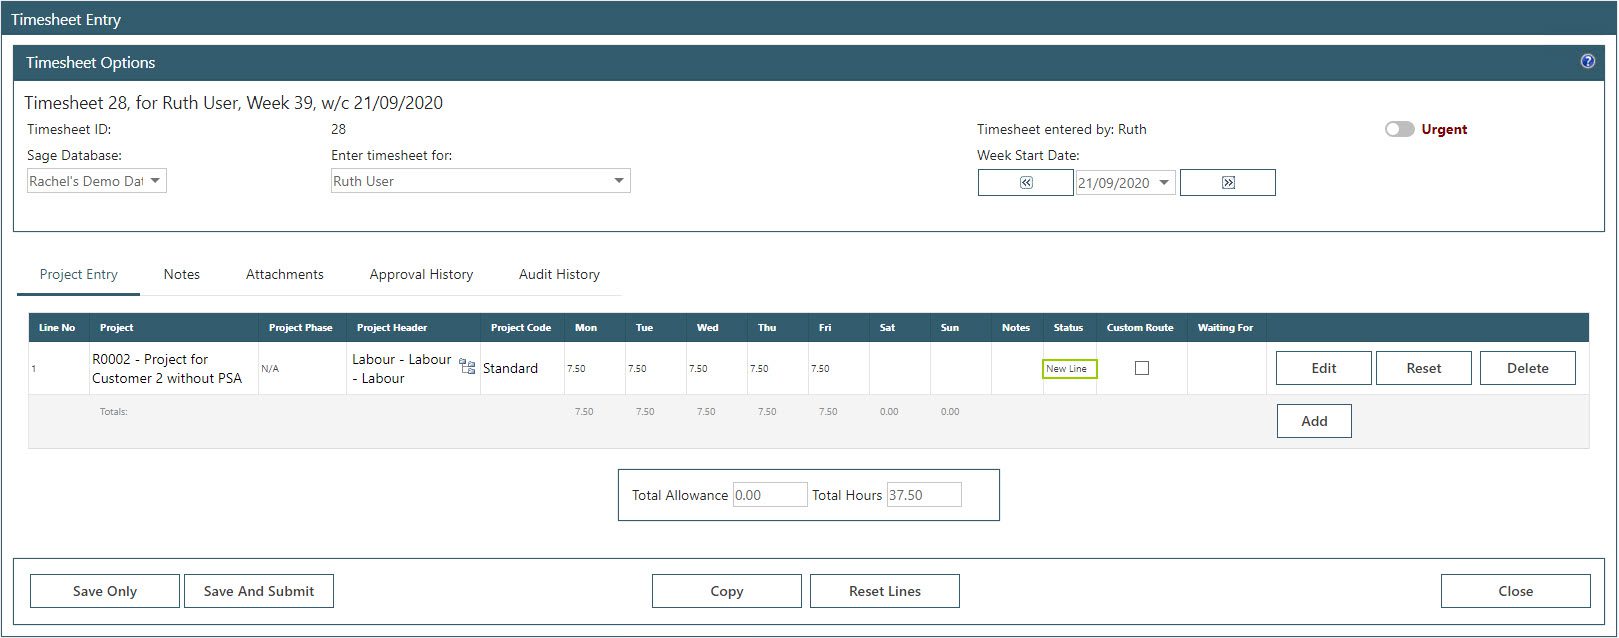
Once the timesheet has been reset (this will happen automatically), the timesheet is then free again for the user to edit /delete lines, enter new lines or select the correct week. Once the timesheet is correct, the user should submit again for approval. Once approved, this will then post the new lines through to Sicon Projects. Any lines on the original timesheet will be removed from Sicon Projects.
17. Additional Sicon Projects Features
If WAP has been linked with Sicon Projects, additional functionality options are available.
17.1. Adding Resources to Timesheets
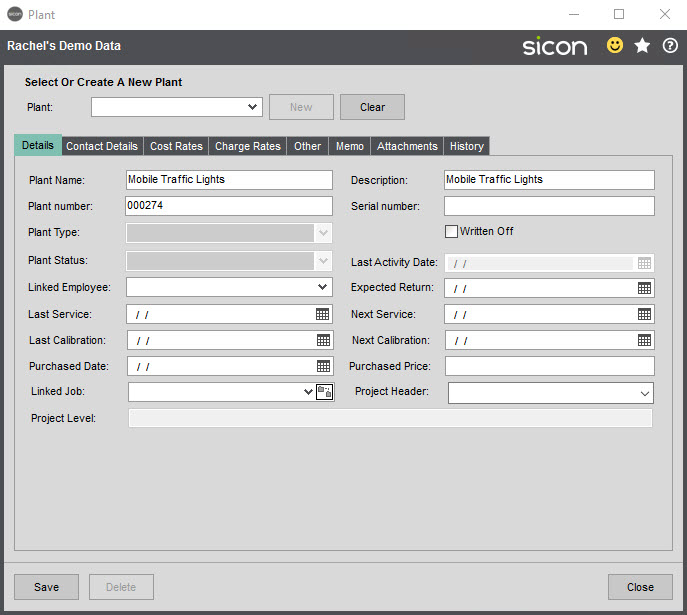
This functionality allows time to be added against a Sicon Projects Resource which in turn is posted to a Project in Sicon Projects. Resources are created in Sage (Sicon Projects – Plant – Owned Plant – Maintain Plant). Any resources added on this screen will be pulled through to WAP and can be selected as an additional resource on a timesheet.
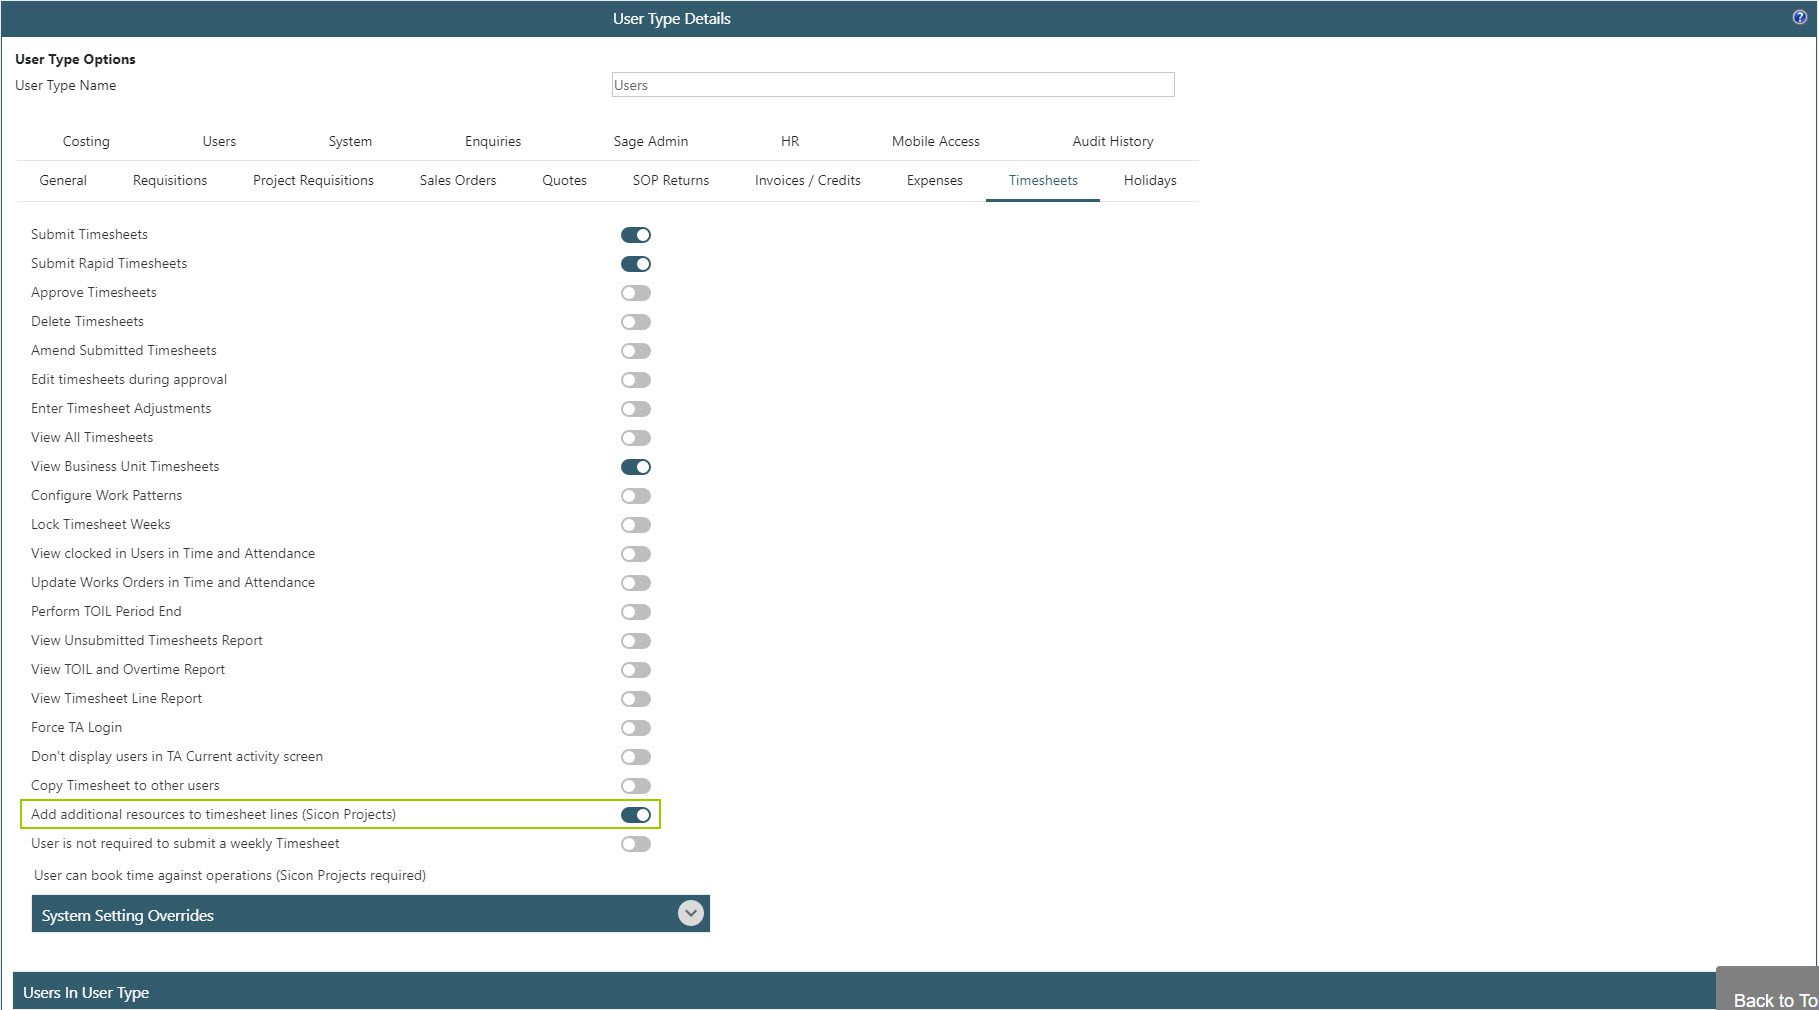
Users in WAP will require the user type permission to be able to add resources onto their timesheet (User Setup – User Types – Timesheets).
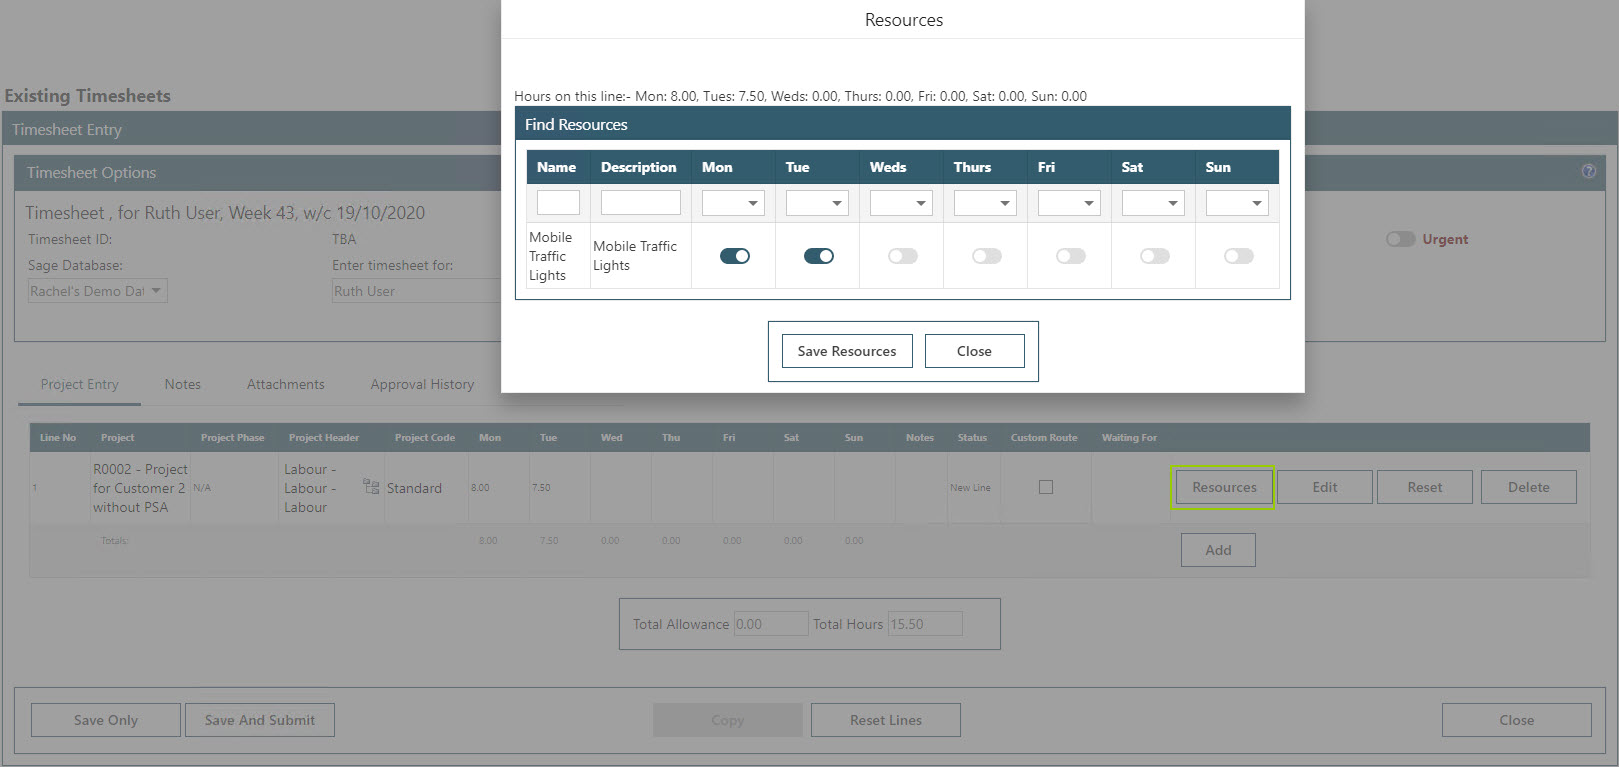
To add a resource onto a timesheet, the user will initially need to add the labour line; once this has been added, the Resources button will be available on the timesheet line. It is possible to search by either name or description to find the correct resource and then select the relevant days to add to the timesheet line. Multiple resources can be added per line.
This functionality is only possible on the New Timesheet entry screen, not the Rapid Timesheet entry screen; as a result, it is not currently possible to add Resources if using Sicon Sage Timesheets.
Once the lines have been entered and approved, the resource cost will post through to the job with the appropriate cost figures, along with the user’s hours.

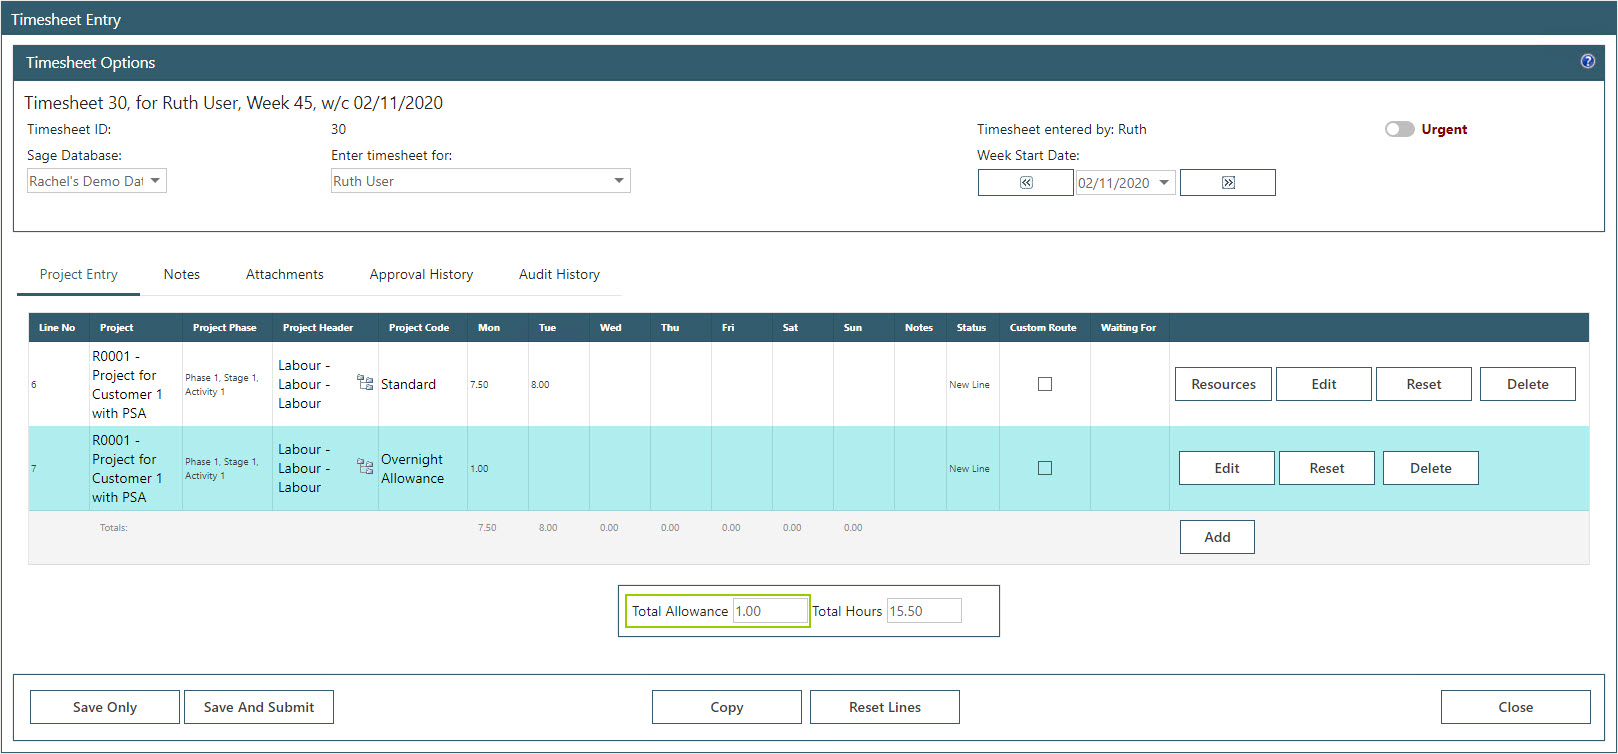
17.2. Adding Allowance Lines to Timesheets
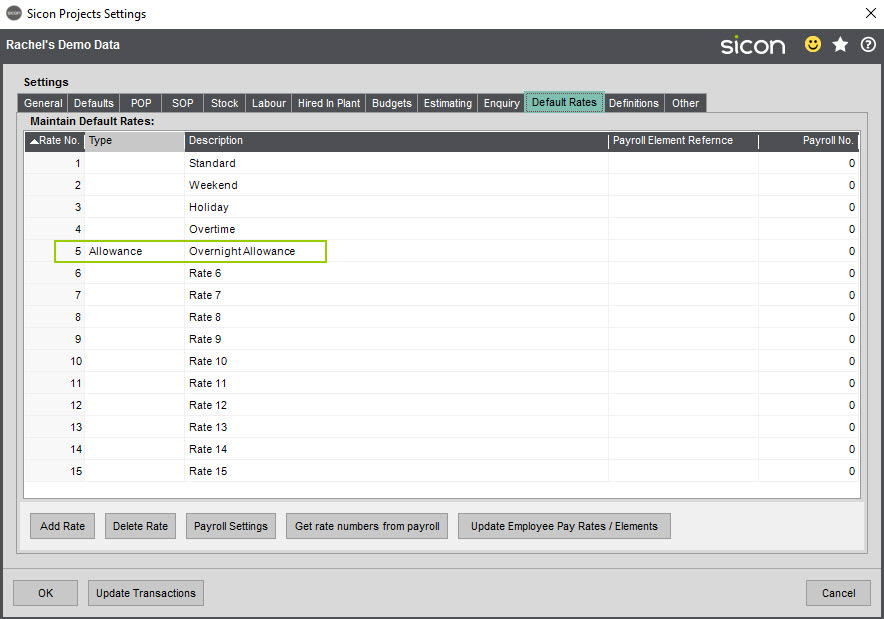
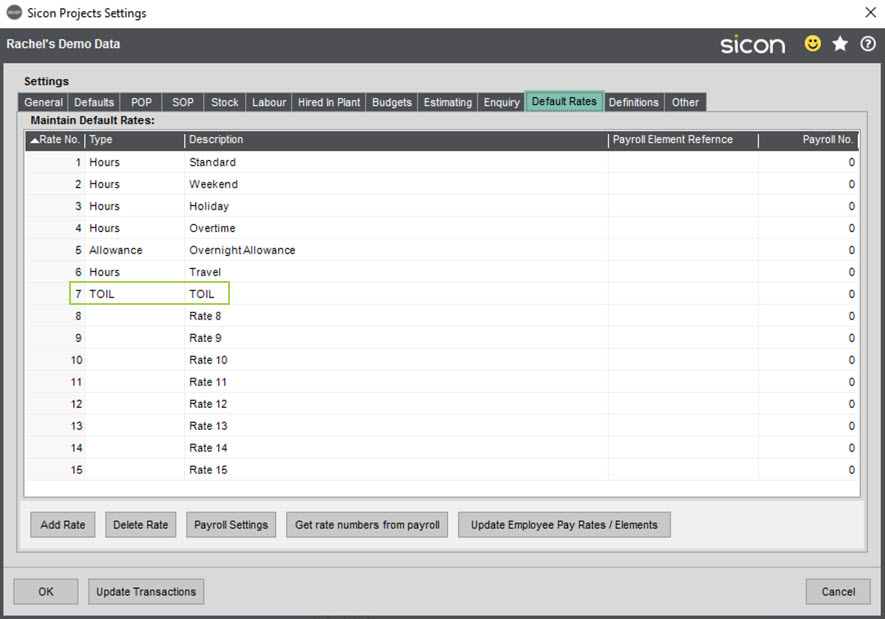
This functionality allows allowance lines to be added to a timesheet; e.g. overnight allowance, working away allowance, travel allowance etc. and can be used with Sicon Sage Timesheets or without this configured. Allowance rates are defined within Sicon Projects Settings (Utilities – Sicon Projects Settings – Rate Description tab). If a rate has the type of ‘Allowance’, the line will become an allowance line in WAP when selected on a timesheet.
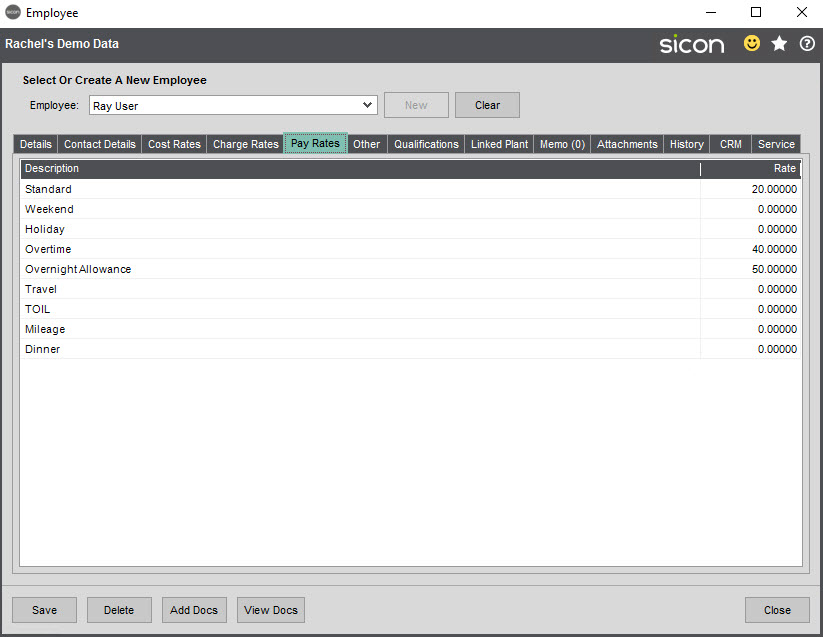
A value for this allowance is set per user in Sicon Projects against the Employee (Sicon Projects – Maintenance – Maintain Employees – Cost Rates).

When a timesheet is added in WAP with an allowance rate (e.g. Overnight Allowance), it is highlighted in blue and the hours will not be included in the day or timesheet totals. Total allowances are displayed at the bottom of the screen.
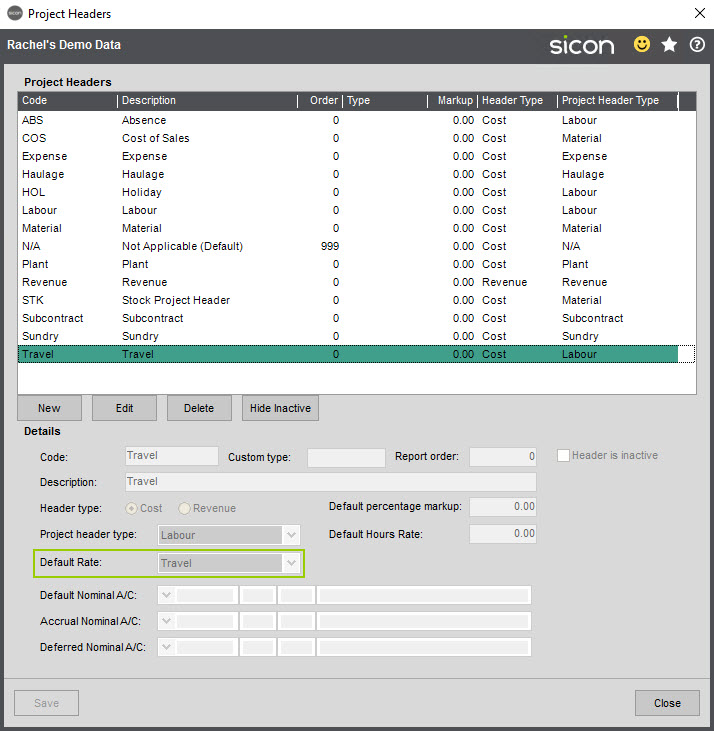
17.3. Populate Cost Rate by Project Header
This functionality will automatically select the Cost Rate based on the Project Header selected; this can be useful when a user should not override a particular cost rate on a project header, e.g. Travel. Ensure a default cost rate has been entered against the project header (Sicon Projects – Maintenance – Maintain Project Headers – Default Rate).
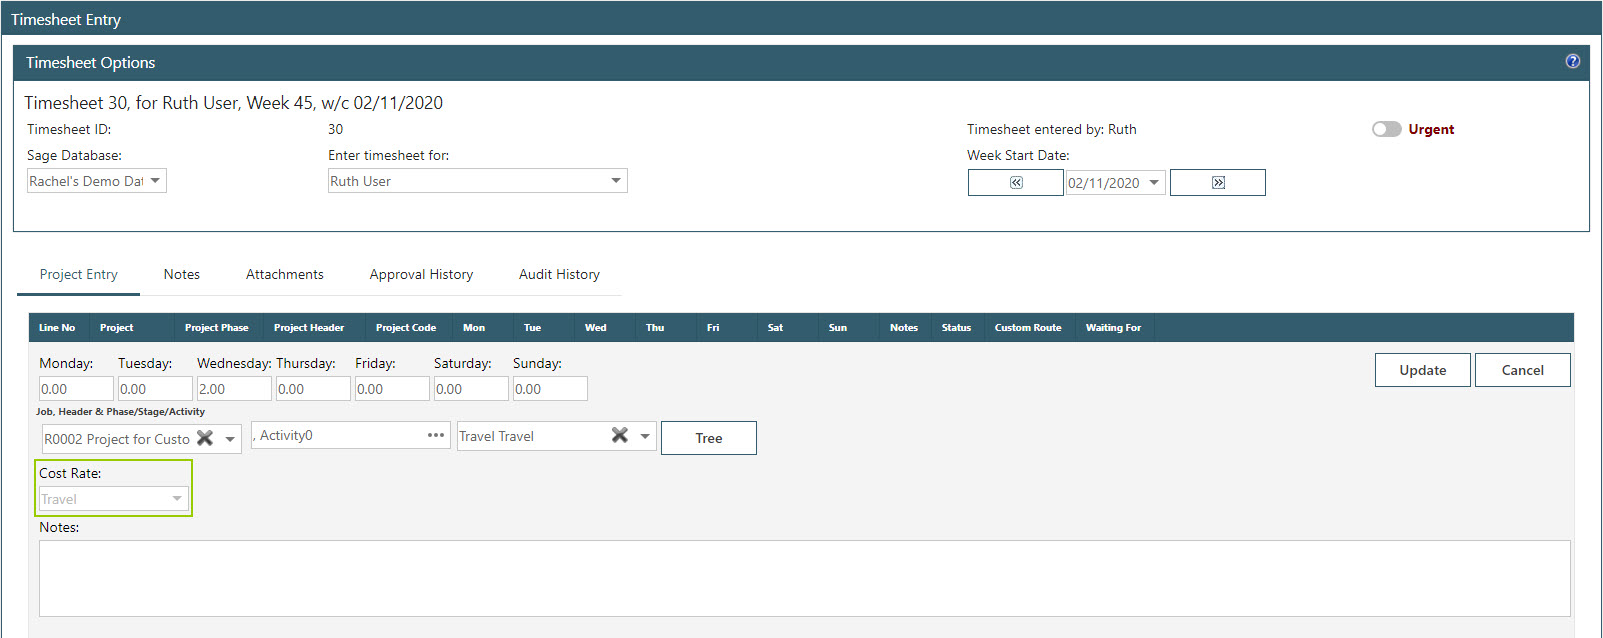
In WAP when a new timesheet is added and a project and project header selected, the cost rate will be automatically selected and greyed out. Users are unable to make changes to the cost rate.
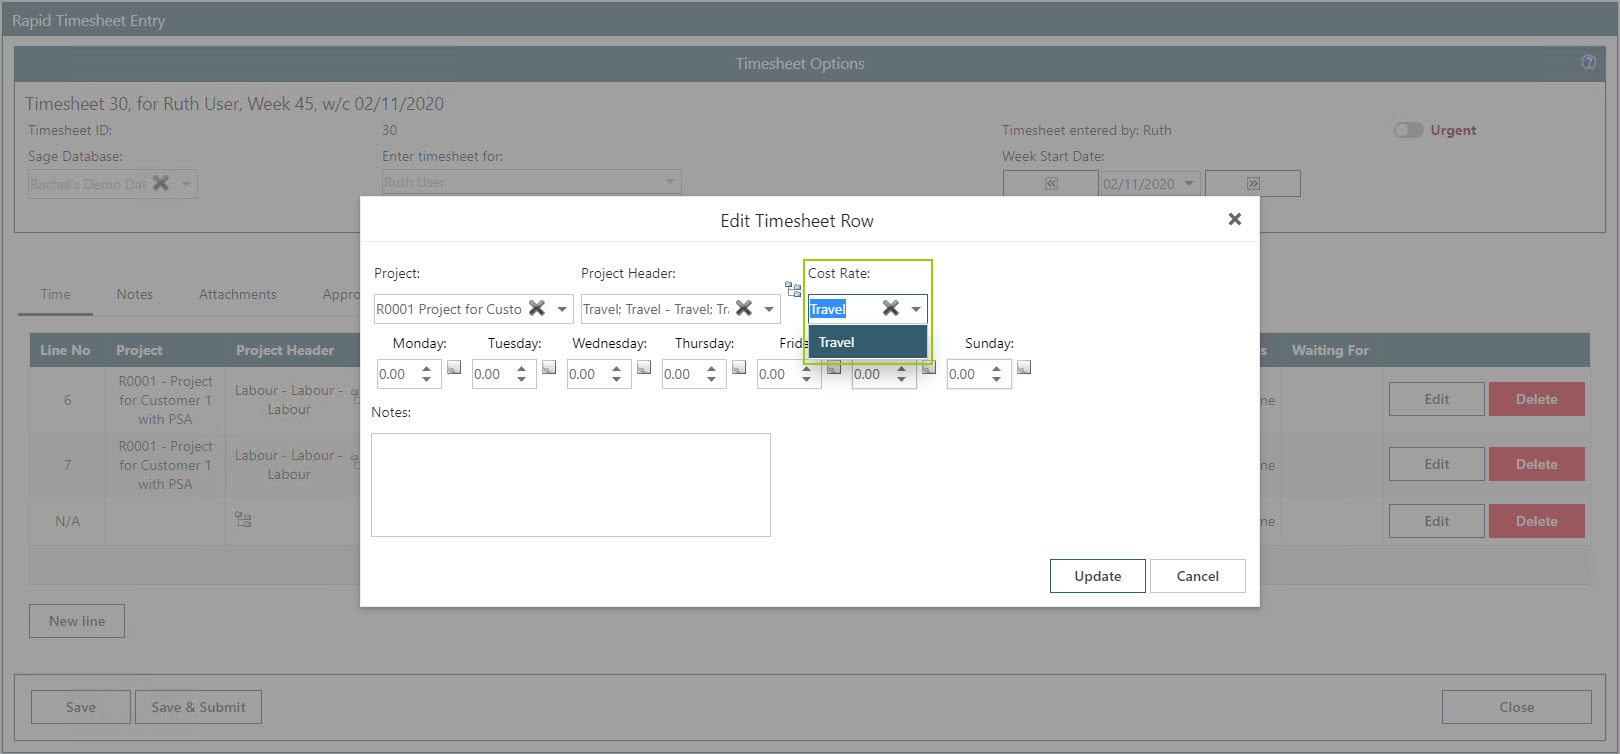
When entering a rapid timesheet and a project and project header selected, the cost rate will be automatically selected. Users are unable to make changes to the cost rate.
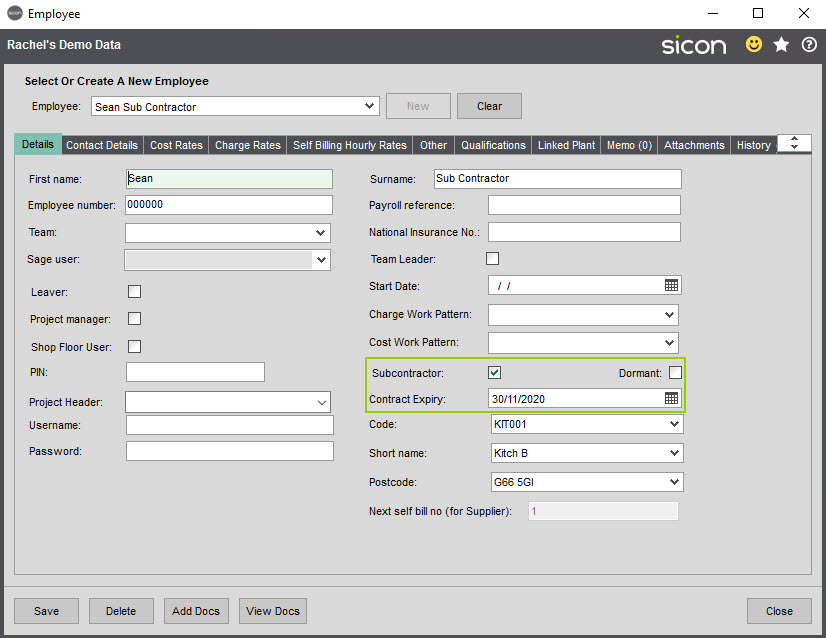
17.4. Sub-Contractor Contract Expiry Warning
If required, contract expiry dates can be set against a sub-contractor employee within Sicon Projects which will prompt warnings to a user in WAP when they are close to their contract expiry and prevent them from entering timesheets once their contract has expired.
Within WAP System Settings – Timesheets, there are a couple of settings linked with this functionality.

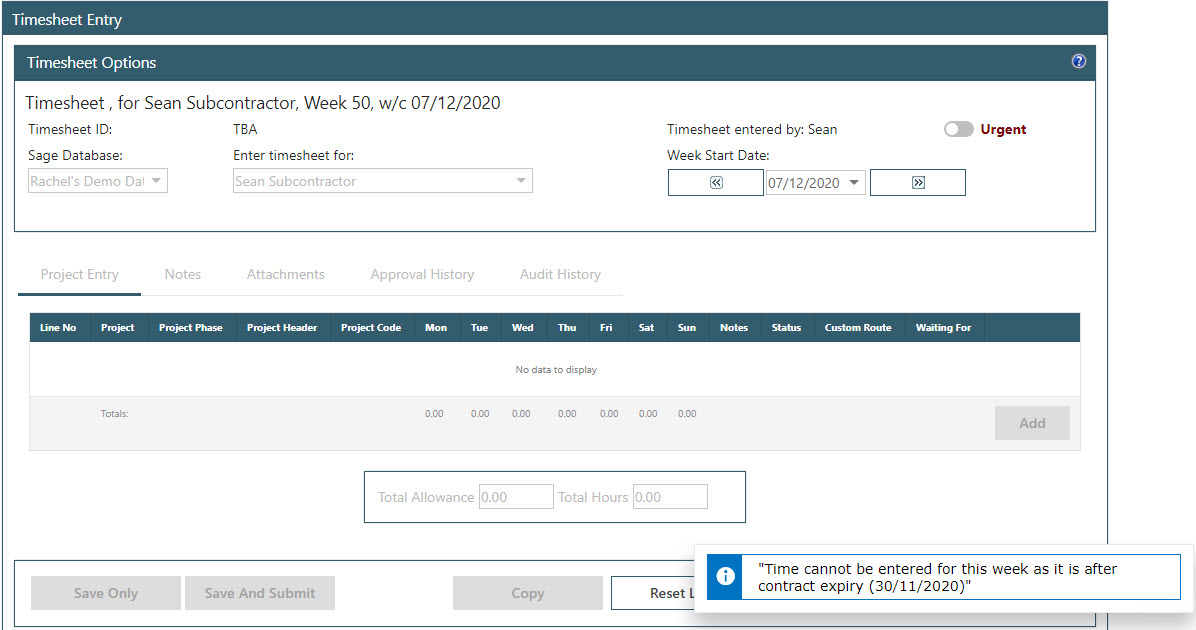
When the sub-contractor enters a timesheet in WAP, if they are within the configured contract expiry warning period, a warning message will appear to them.

If the configuration does not allow users to submit a timesheet past their contract expiry date, the timesheet will be greyed out preventing any lines being added and a message will show to the user.
17.5. Copy Timesheet to Others Users
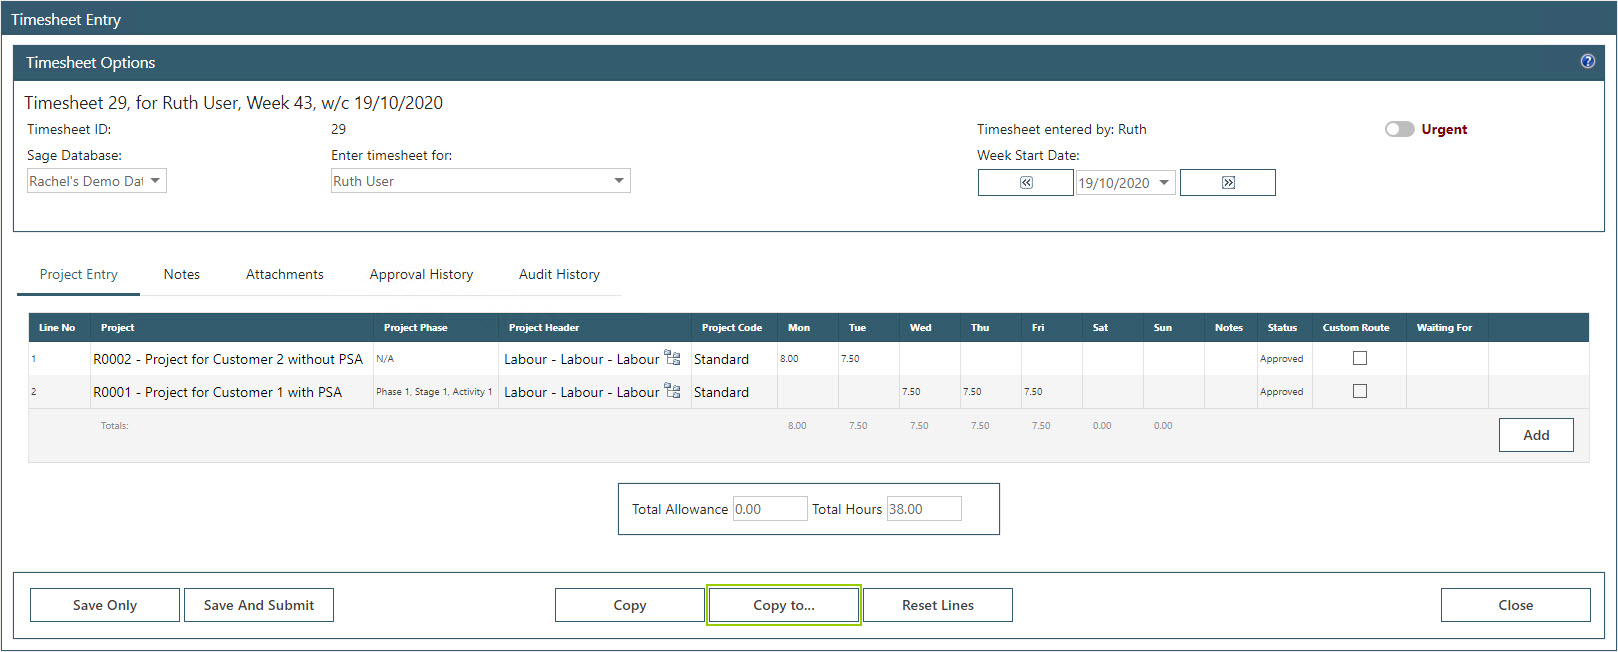
It is also possible to allow users to copy timesheets to other users; this may be suitable for Team Leaders, Department Managers etc. to create timesheets for their team members. It is a user type permission to copy timesheets to another user (User Setup – User Types – Timesheets tab – ‘Copy timesheet to other users’).
On a timesheet for a user with this permission, they will see an option to ‘Copy to’.
Once copying a timesheet, the user can select from the list the users to copy the timesheet through to by clicking the users, select and then copy to the selected users. The users to copy a timesheet through to can be saved as default if the user copying the timesheet will always work with the same users.
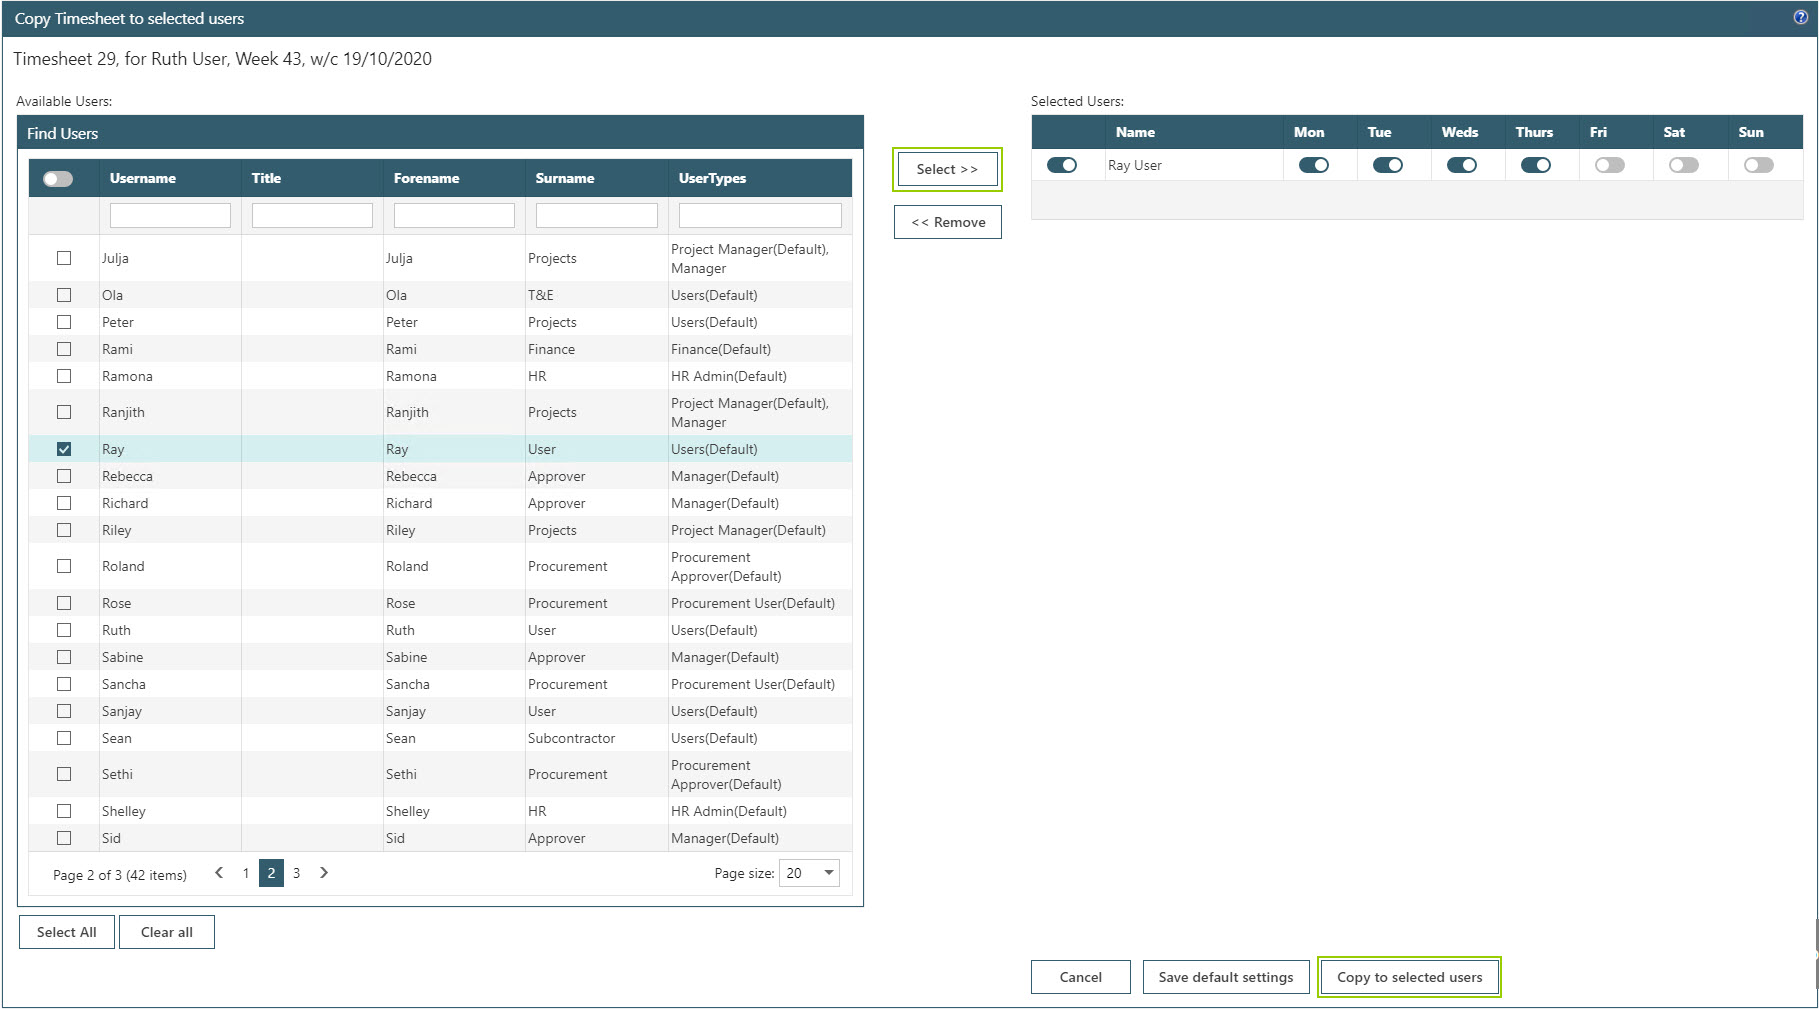
All Project lines are copied by default and if configured, login activity can be copied. Holiday and absence lines are not copied. A timesheet line will only copy once; if subsequent lines are added to the original timesheet and the copy is run again, only new lines will be copied.
Once the copy has been completed, a notification is shown to list all users that a successful copy has been completed for; a notification will also be shown listing any timesheets that have failed to copy. Timesheet lines will show as new lines to the users copied to; they are able to edit if required or add new lines.
This functionality is only possible on the New Timesheet entry screen, not the Rapid Timesheet entry screen; as a result, it is not currently possible to copy timesheets to other users if using Sicon Sage Timesheets.
18. Automatic selection of cost rate based on standard timesheet work pattern
Sicon Projects or Sage Project Accounting cost rates can be linked to work pattern rates set in WAP; the appropriate rate will then be automatically selected when the user enters start and end times linked to a project rather than the user manually selecting the correct cost rate.
Project time entry format must be set to start and end time and all rate options hidden (System Settings – Timesheets – General – Display).
The setting ‘Split Timesheet Project Lines by Work Pattern’ needs to be switched on (System Settings – Timesheets – General – Functionality).

Create a work pattern with correct hours and rates. In the example below, hours worked between 9am and 5:30pm will pay at standard rate while any hours worked between 6pm and 10pm will pay at overtime rate.
Link rates set up in WAP to Sicon Projects or Project Accounting cost rates (and Charge and Pay rates if applicable); (User Setup – Work Pattern Rates). Note; if the user’s work pattern rates don’t have the associated costing module rates linked, the user will not be able to submit a timesheet.
Make sure the user is linked through to the correct timesheet work pattern.
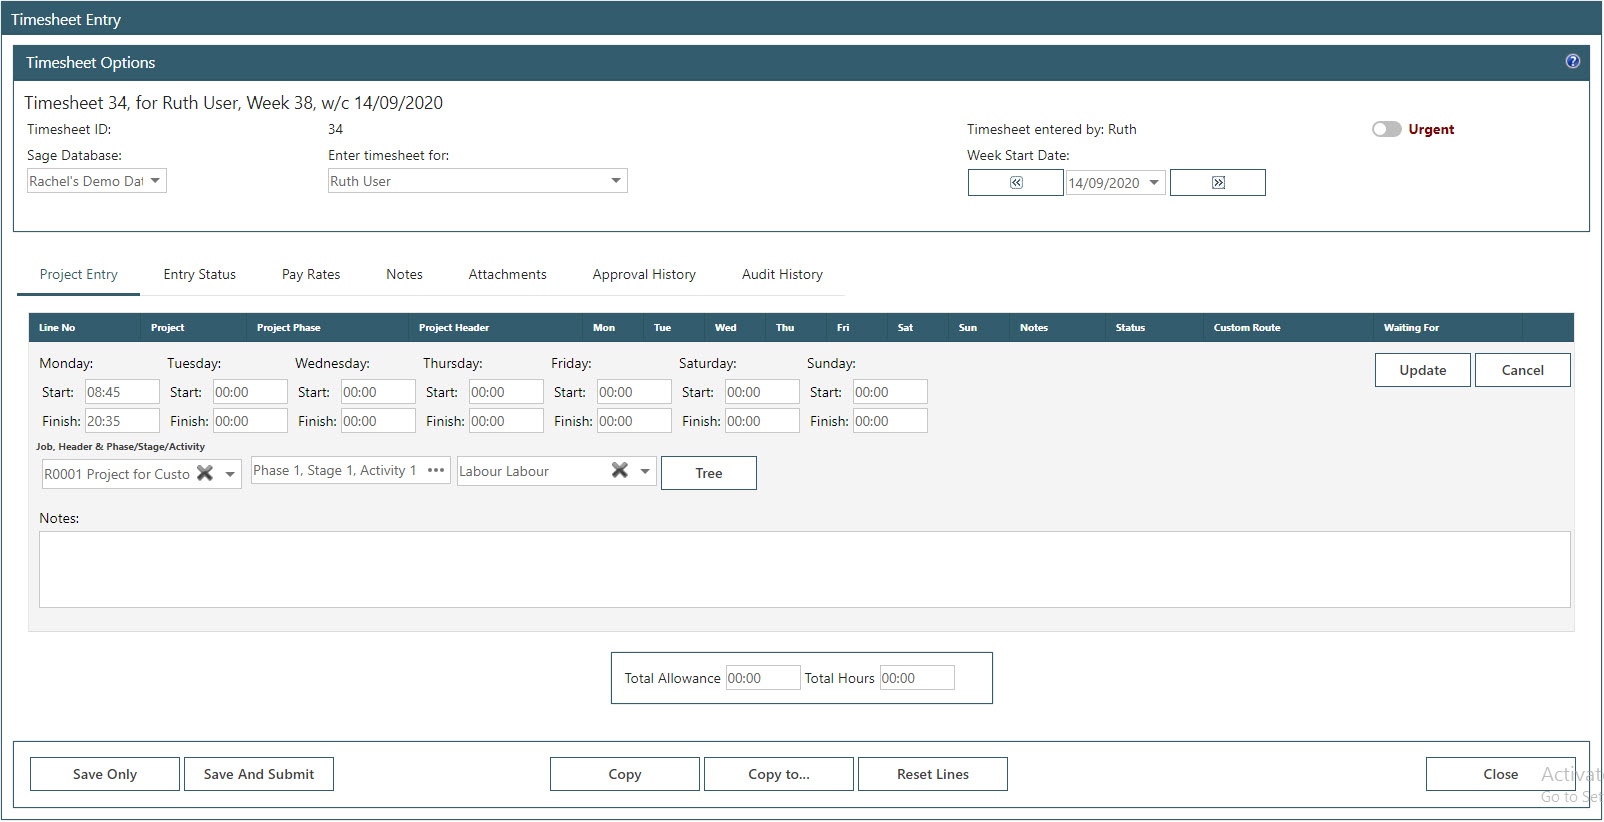
The user will only have to enter their start and end time when entering time against a project and the system will work out the correct cost rates. The resulting timesheet will then split out separate lines as per the cost rates. In the example below, on Monday Ruth is recording time from 08:45 to 20:35 against the same project.
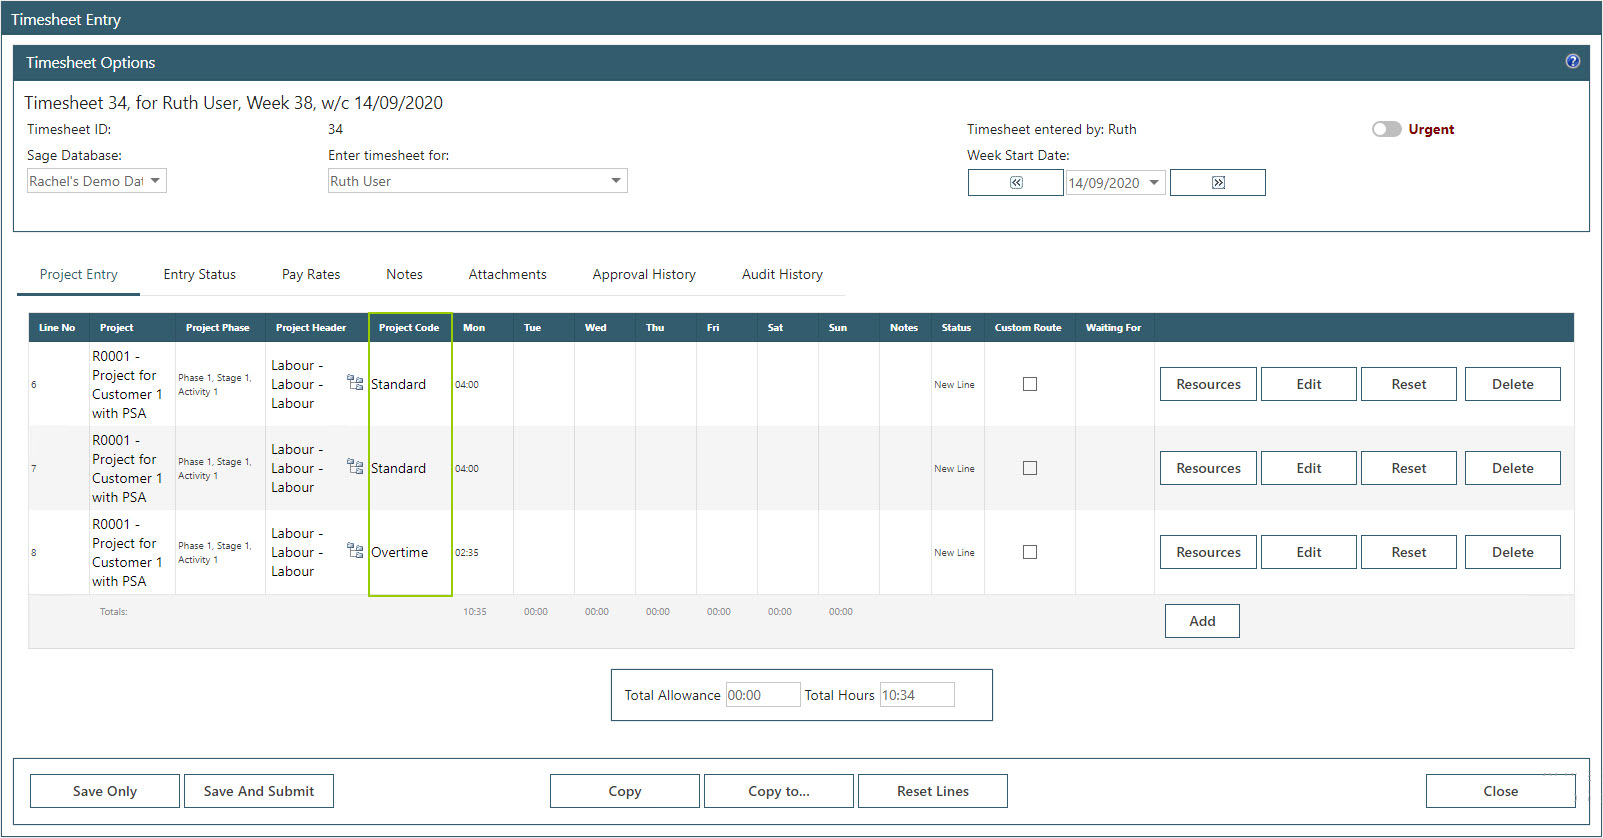
When the line is updated, three lines are created; two lines at normal cost rate and one overtime line. N.B. the option below to view cost rates has temporarily not been hidden in order to show the cost rates these lines are posted through to. When configured correctly, the user will not see this column.
19. Automatically Submit Timesheets
In order to automatically submit timesheets, enable ‘Auto Submit Timesheets’ (System Settings – Timesheets – Functionality – Automation) and choose a day of the week and time of day to run.

The timesheets are submitted by the service which will check the day of the week against the week start day (day 1), if the current time is after the time specified and will submit all. Configure the week start day; System Settings – Timesheets – Functionality – General.

20. Time and Attendance User Clock in Status
This screen is accessed from the side Timesheet menu and will display the login status of all users in the organisations that are using a Time and Attendance login touch screen. The ability to view this screen is a User Type permission.

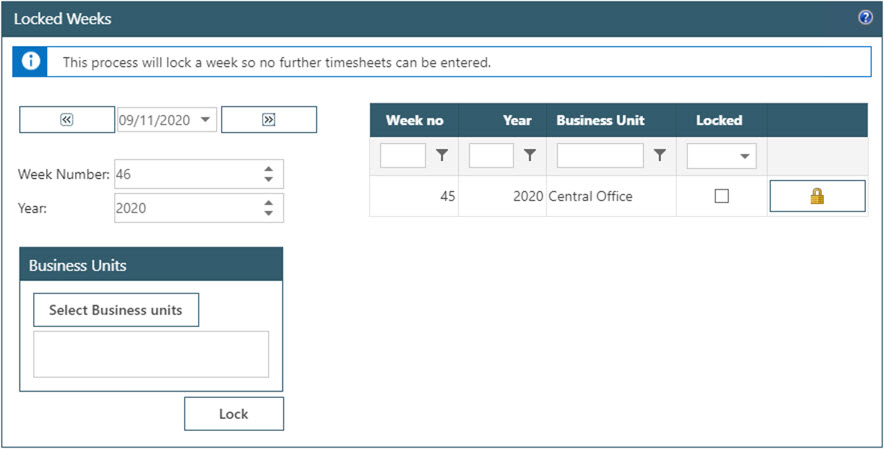
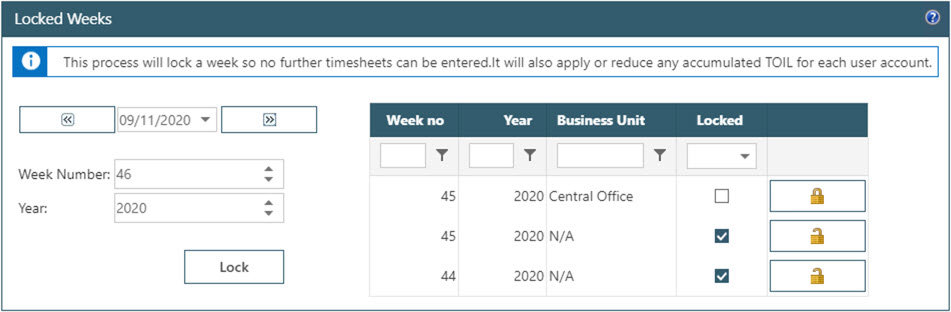
21. Locked Weeks
This screen is accessed from the side Timesheet menu and will allow weeks to be locked which will prevent timesheets from being entered and will adjust TOIL hours if used in conjunction with the TOIL Period End (see below).
Weeks can be locked by business unit if using Simple TOIL which means some users may be able to enter timesheets in a week while other users can’t.
22. Advanced Time Off in Lieu (TOIL)
Advanced TOIL will calculate based on the user’s work pattern, their weekly contracted hours and time worked to allocate time as ‘TOIL’ which can then be used to book annual leave through the Holidays module.
Switch on Advanced TOIL through System Settings cogs – System Settings banner – Timesheets – General.

TOIL is calculated per user based on the hours a user worked per day compared with their contracted hours on their holiday work pattern. N.B. a holiday work pattern must be configured as a user can work different hours per day. TOIL calculations could therefore be different per day and therefore it is not possible to compare to the user’s total contracted hours. The hours worked per day is taken from one of two places; if Login Activity is enabled, the time here will be used for the hours worked, otherwise the time will be taken from the total Project Entry time.
Holiday Work Patterns need to be created to accommodate contracted hours for users – these work patterns will determine the normal working hours for a user per day (System Setup banner – Work Pattern and Rates). The appropriate Holiday Work Pattern can then be linked to the user (User Setup – Users – edit user – Time and Attendance tab). Maximum accruable TOIL figures can be entered per user and is also recorded on their user profile (User Setup – Users – edit User – Time and Attendance tab – TOIL subtab).

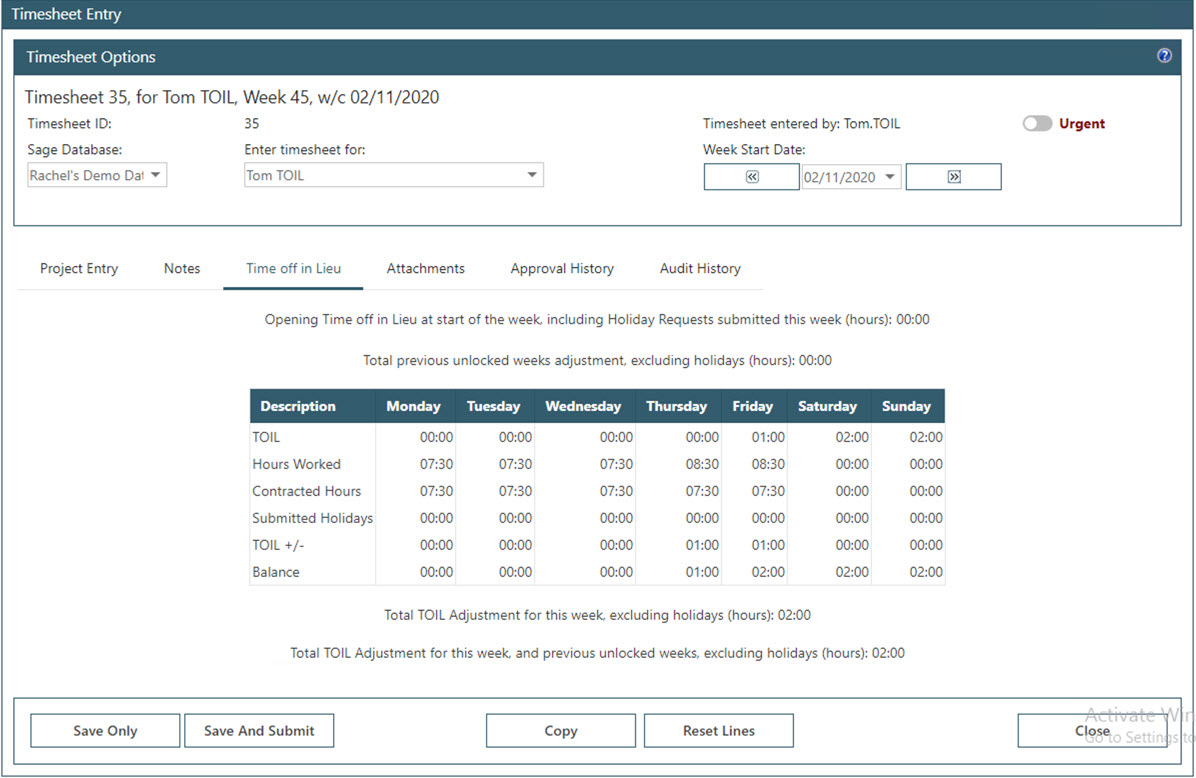
When entering a timesheet, TOIL calculations will be shown on the Time off in Lieu tab. In the example below, the user begins the week with 0.00 TOIL hours. The hours worked are compared with the contracted hours (picked up from their holiday work pattern) for the day, as well as any submitted TOIL holiday requests. Over the week the user works a total of 2 hours over their contracted hours and will therefore start the following week with 2 hours TOIL.
Locked timesheet weeks – this process will improve accuracy and performance and should be run either weekly or monthly when timesheets are complete. The last fully completed week should be locked initially to give a cut-off point to go back to.
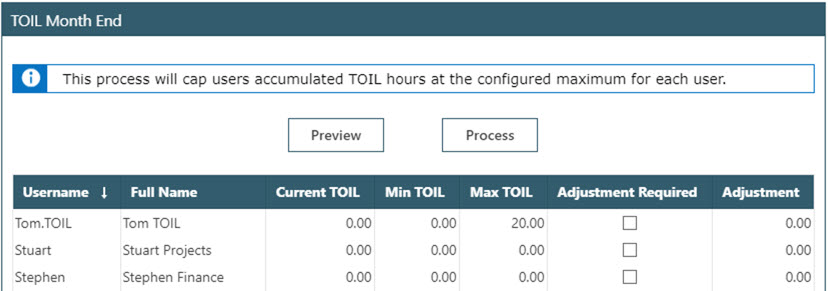
The TOIL Period End routine involves two steps and is found in the Timesheets side menu.
Perform TOIL Period End – this will cap users’ TOIL in accordance with maximum and minimum allowance. A prompt will appear if there are unlocked weeks to give the option to lock these prior to applying an adjustment of TOIL for that week to the user’s account. The adjustments appear as a preview initially allowing the figures to be checked before selecting the Process button.
When the user books a holiday request they can select to book holiday through TOIL. Once submitted, this will then go for approval as a standard holiday request.
23. Simple Time Off in Lieu (TOIL)
Simple TOIL can only be used if WAP is linked with Sicon Projects as its costing module. Once TOIL has been accrued through the Timesheet, it is then taken through the Holiday module.
Within Sicon Projects a TOIL rate must be configured within Utilities.
Switch on Simple TOIL through System Settings cogs – System Settings banner – Timesheets – General.
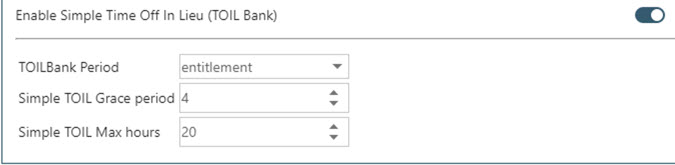
TOILBank Period: this is the period of time TOIL is accrued; either monthly or over the holiday entitlement period.
Simple TOIL Grace Period: this is the number of weeks after TOIL entitlement period the accrued hours can be used. If there is no restriction, leave this as zero.
Simple TOIL Max hours: this is the maximum overall amount of TOIL hours a user can accrue. If there is no maximum amount, leave this as zero.
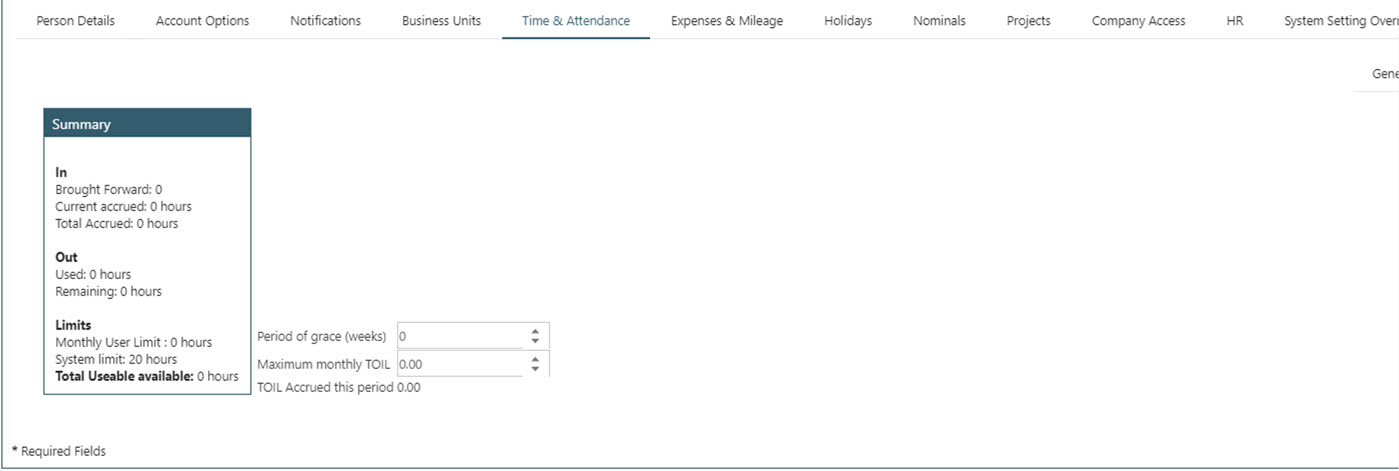
On the user’s TOIL tab on their user profile, the defaults set above can be overridden if required.
When a user enters a timesheet, any hours that are entered against the TOIL cost rate will get added to user’s TOIL bank.
An additional line against the TOIL cost rate needs to be added separately to record TOIL hours.
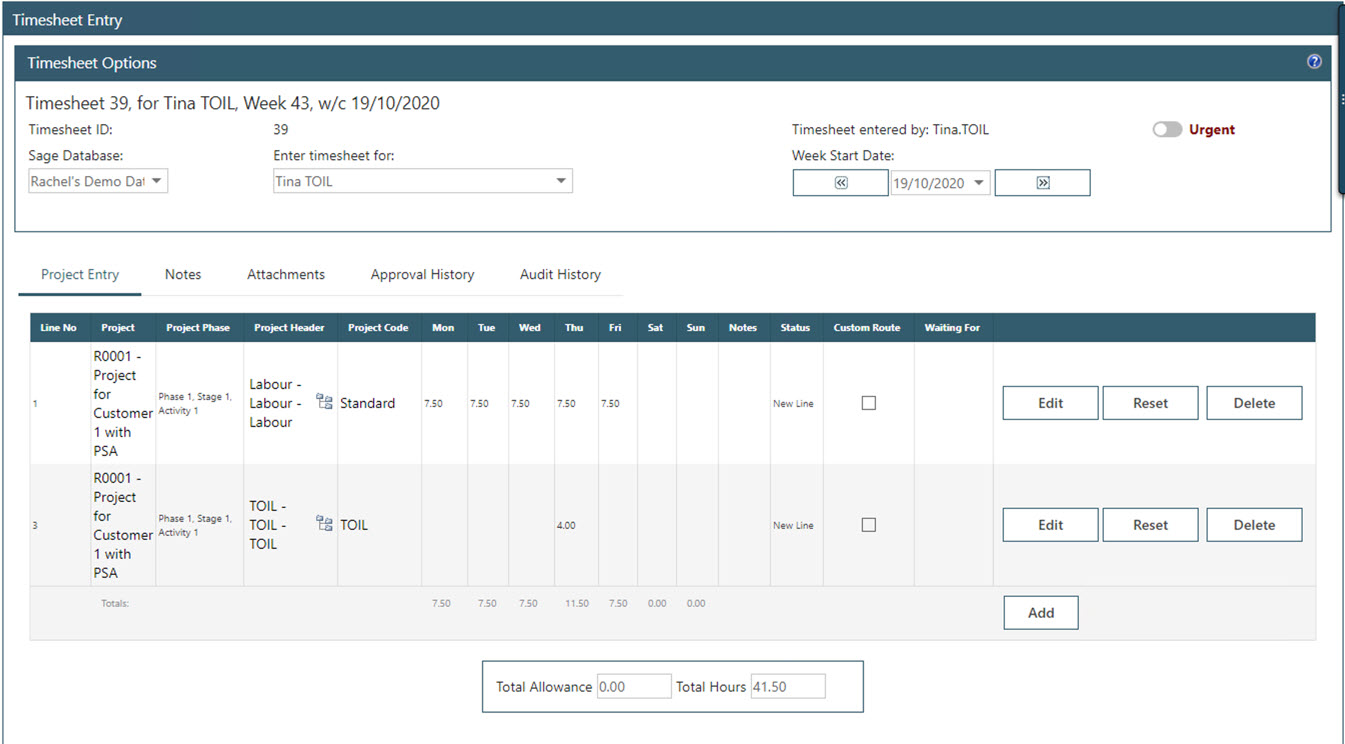
When the timesheet is submitted for approval, these hours will show separately to the approver; TOIL lines will follow the same approval routes as other timesheet lines, depending on how approval routes have been created.

TOIL hours will show to the user when they submit a holiday request under the Entitlement; these are kept separately in the TOIL Bank. Users will also see information on maximum limits and dates for when TOIL needs to be taken.
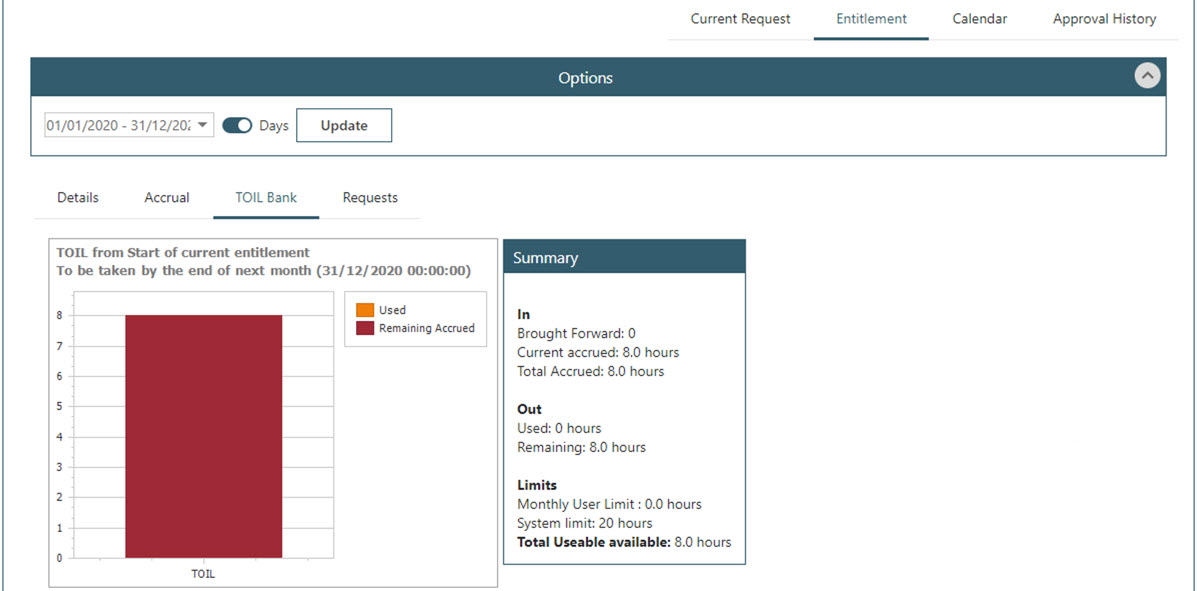
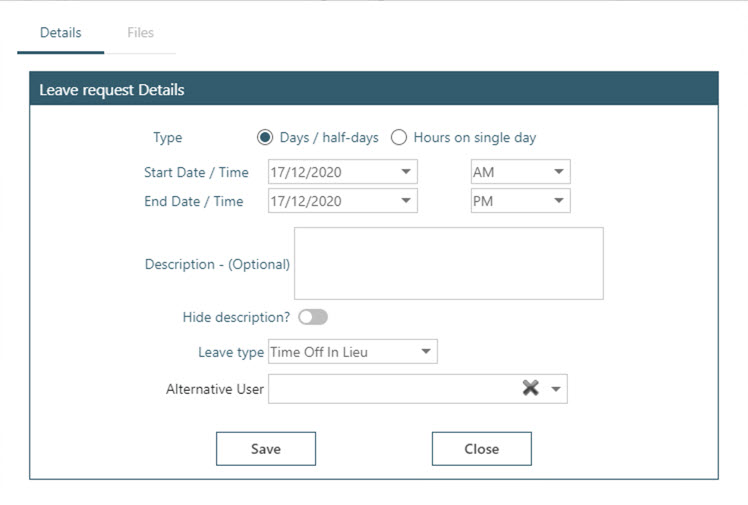
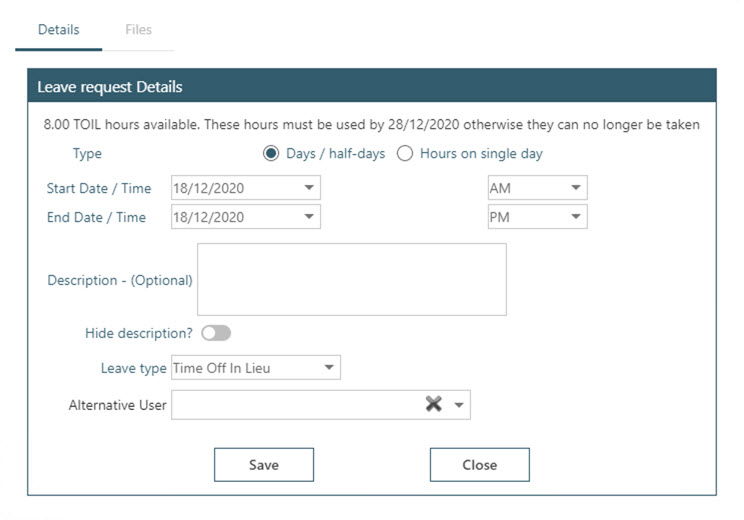
When a holiday request is entered this information is also shown to the user and TOIL hours can be selected as the Leave Type.
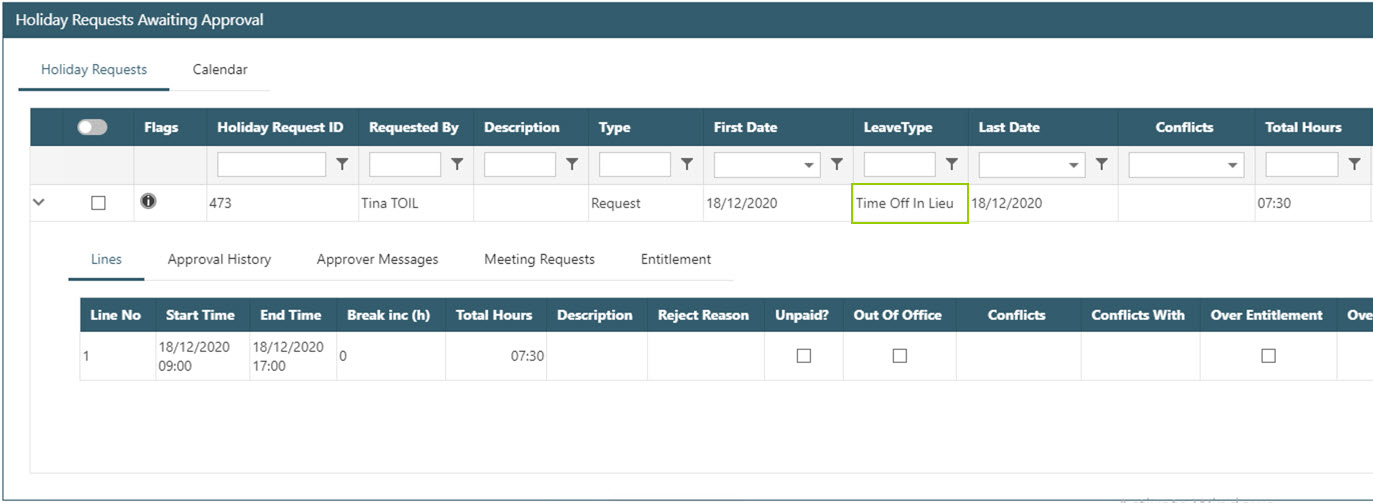
When the holiday request has been submitted and showing to the approver, this is highlighted as TOIL.
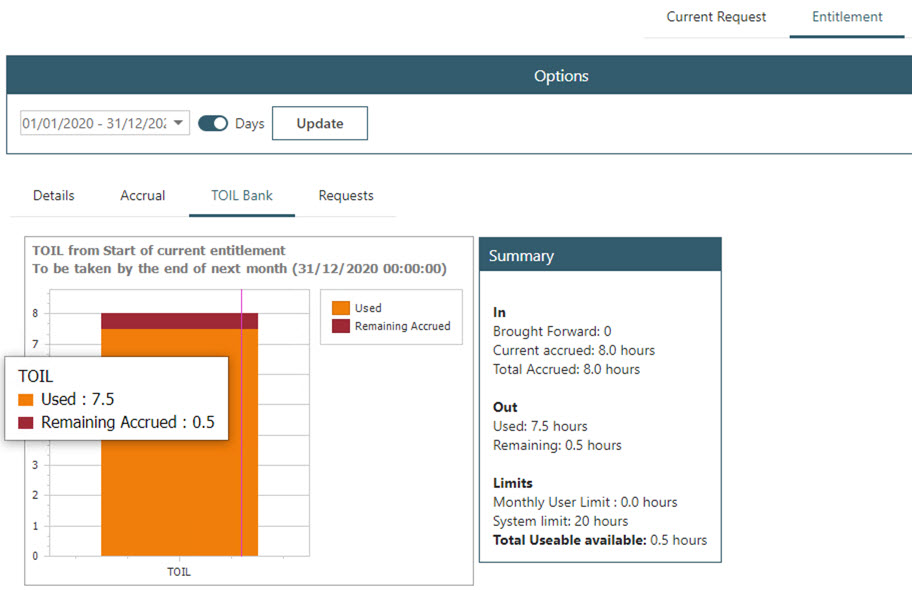
Once the request has been approved, the TOIL bank updates to show the new figures.
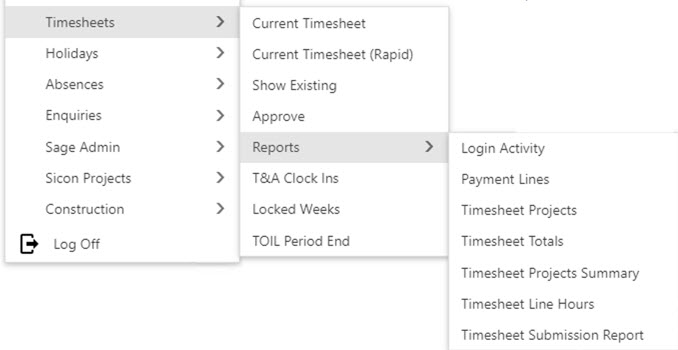
24. Reports
Depending on User Type and User configuration, users will be able to see either information relating to their timesheets, their delegate or business unit timesheets on the system. Use the data range, database filter, header and line status options to filter as required.
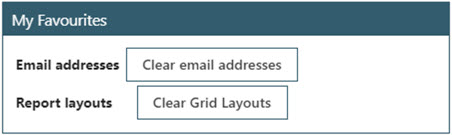
All reports can be exported to Excel, some reports can be exported to PDF and can be adapted either by dragging column headers to change the order or group data by a particular header. Right click on the report and choose the ‘Customise’ button for the Field Chooser to appear which will allow for additional headers to be added or existing headers to be removed. N.B. reports are cookie based so to allow for this customisation, ensure the browser settings allow cookies from the WAP website. Customised columns may return to the standard configuration following a WAP or browser upgrade as cookies may be cleared. Users also have the option under their WAP Settings to ‘clear grid layouts’.
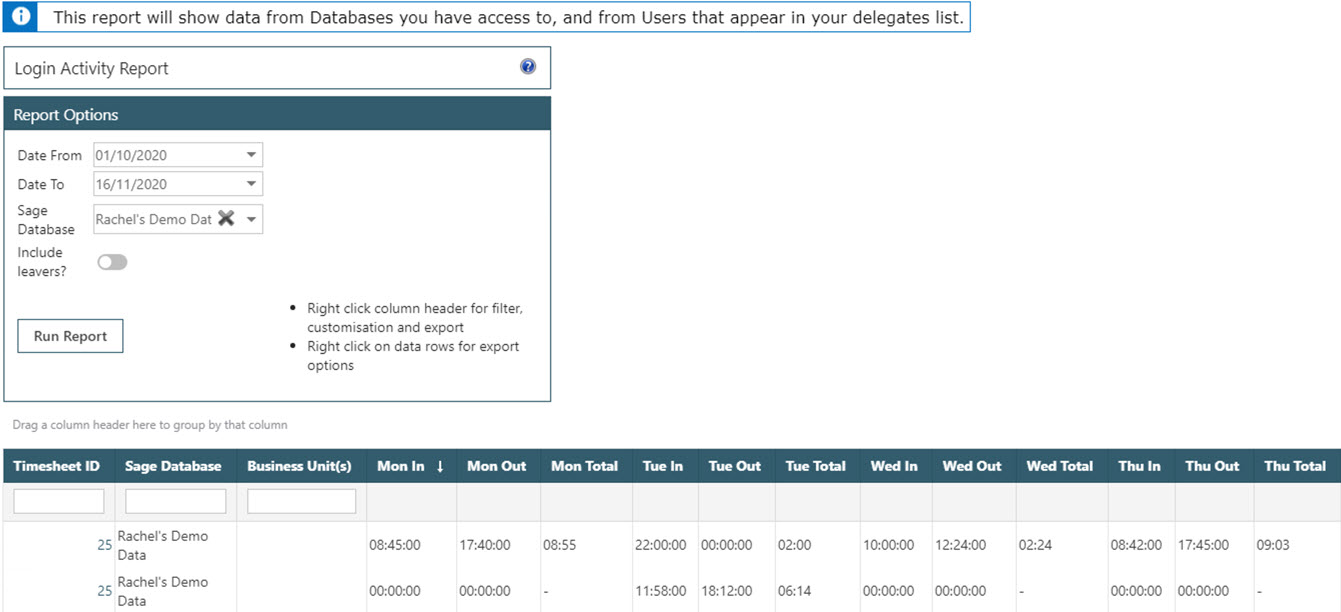
24.1. Login Activity Report
This report displays data recorded on the Timesheet Login Activity tab. The report will again show data relating to Sage databases and delegate users running the report. If required, leavers’ data can be included.
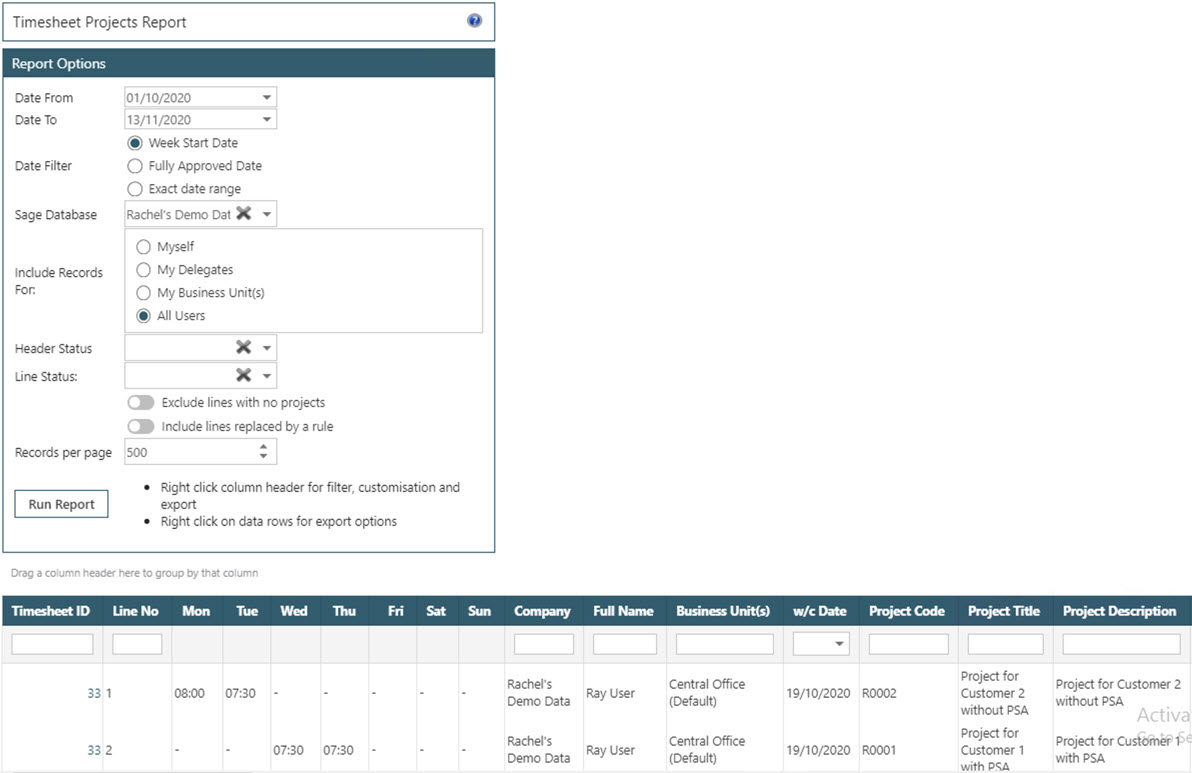
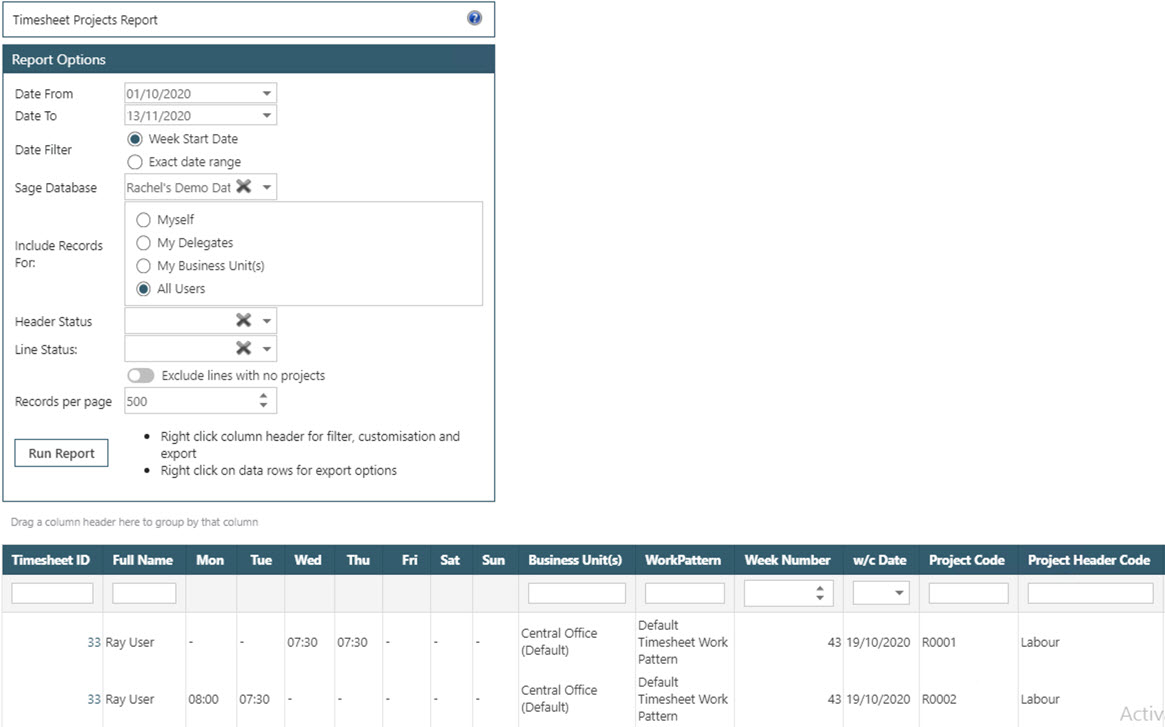
24.2. Timesheet Projects Report
This report shows data recorded on the Project Entry tab with project, project header and cost rate information. The report will again show data relating to Sage databases and depending on User Type and User configuration, delegates, business unit or all users. If a line contains no projects, these can be hidden or lines can be shown which have been replaced with a rule.
24.3. Timesheet Totals Report
This report is a simplified timesheet totals report which will not include TOIL figures. The report will again show data relating to Sage databases and delegate users to the user running the report. If required, leavers’ data can be included on the report. Clicking ‘View’ will take the user into the original timesheet.

24.4. Timesheet Projects Summary Report
This is a simplified report showing project information and will not show full approval history or specific start and end times. The report will again show data relating to Sage databases and depending on User Type and User configuration, delegates, business unit or all users. If a line contains no projects, these can be hidden or lines can be shown which have been replaced with a rule.
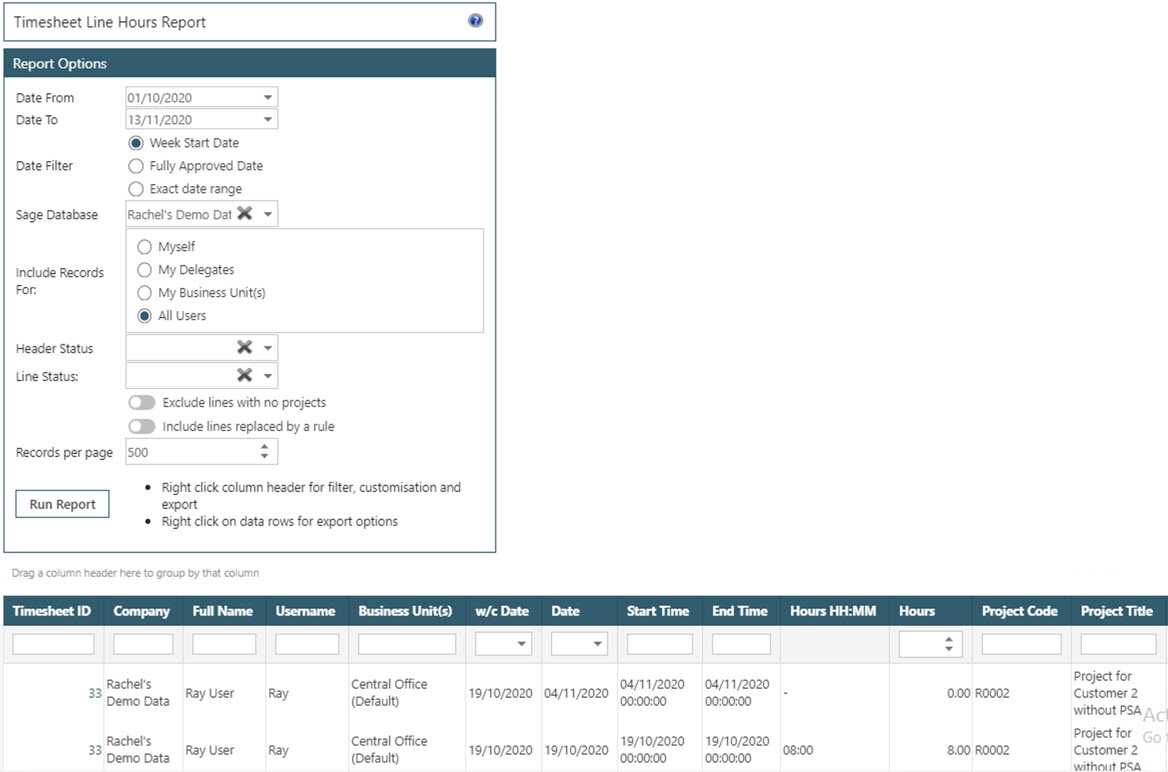
24.5. Timesheet Line Hours Report
This report will show hours against a project across the relevant days, in both hours and minutes and decimal format. The report will show data relating to Sage databases and depending on User Type and User configuration, delegates, business unit or all users. Lines can be excluded if there is no project, or included if they were replaced by a rule.
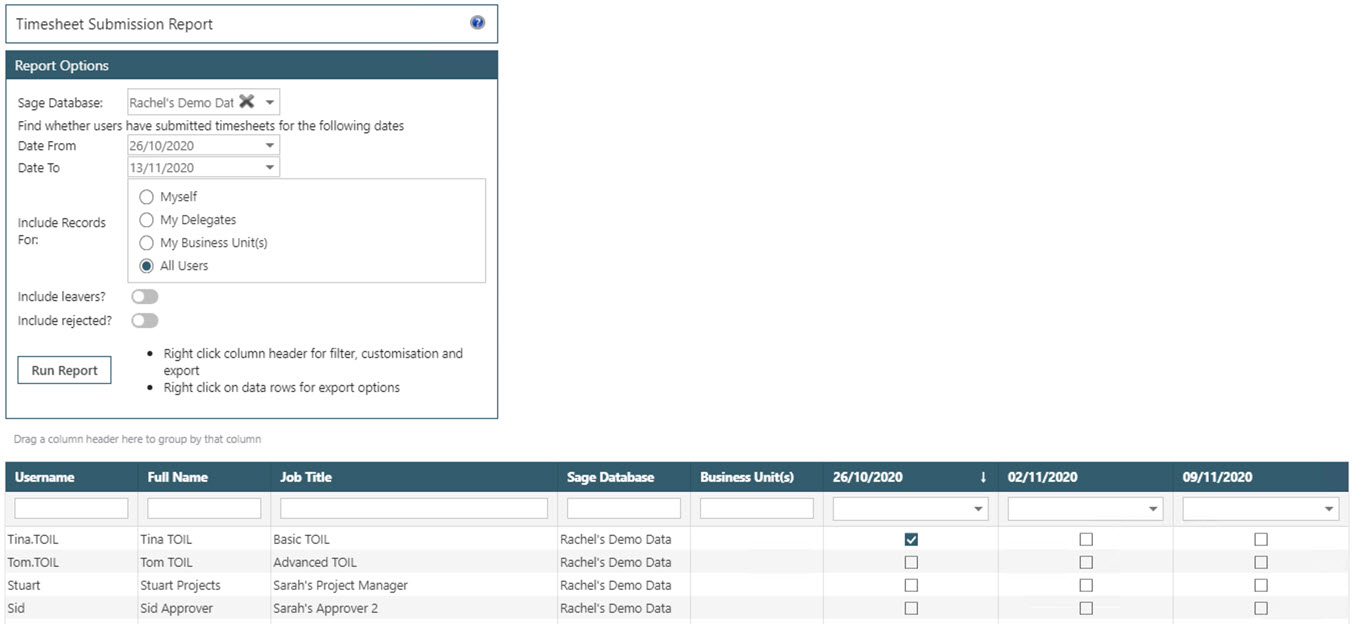
24.6. Timesheet Submission Report
This report will list all users and show whether a timesheet has been submitted for weeks within a date range. If required, leavers and rejected timesheets can be included. If a user belongs to a User Type that is configured to not submit timesheets, they will not appear on the report.
25. Timesheet Reminders
Two types of timesheet reminders can be created; either document type reminders which will go to all users who have permission to submit timesheets or targeted automated reminders which will only be sent to users who have not submitted their timesheet for that week.
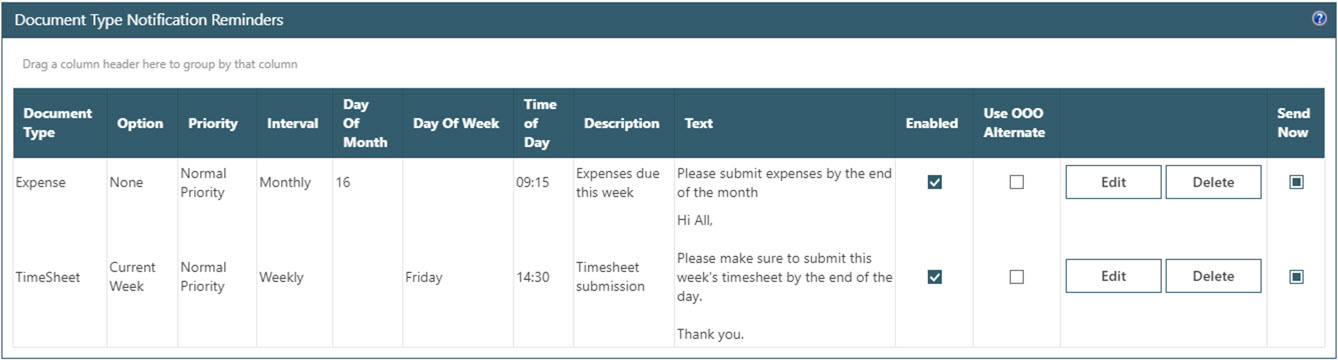
25.1. Document Type Reminders
Reminders can be created which will email notifications to users regarding timesheets; these notifications will be sent to all users with permission to submit timesheets and will not check to see whether a user has submitted a timesheet. The idea for these is a reminder to the users of key deadlines for submitting timesheets.
Document reminders are created under System Settings cogs – System Setup banner – Document Type Reminders.
Reminders can be set to notify users for either the previous week, the current week or future timesheets. In the example below, a notification email will go to all user who can submit a timesheet at 2:30pm on each Friday reminding them to submit their timesheet by the end of the day.
25.2. Automated Targeted Reminders
Automated reminders can be sent which will only go to users who have not submitted timesheets in the previous week(s).
Automated reminders are configured under System Settings cogs – System Settings banner – Timesheets – Functionality – Automation.
In the below configuration, users will receive an email on Monday at 10am if they have not submitted a timesheet in the previous four weeks. During initial configuration it is recommended to set an earliest date to check for unsubmitted timesheets so users do not receive a reminder before the system goes live.
It is possible when creating user types to set a particular user type does not need to submit a weekly timesheet; this will prevent users who should not need to submit timesheets getting reminders about not completing any (for example Directors or Administrators).

26. Timesheet System Settings
System Settings relating to the Timesheets module are accessed in System Settings cogs – System Settings banner – Timesheets.
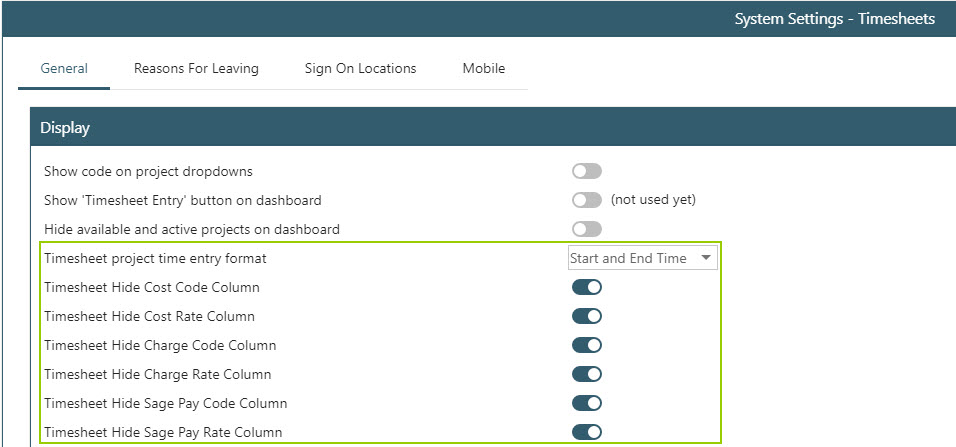
26.1. General Tab - Display Banner

Show code on project dropdowns: untick if the project code should not be visible to the user when selecting a project on a timesheet line.
Timesheet project time entry format: hours recorded against a project on a timesheet line can either be logged as decimal (e.g. two and a half hours recorded as 2.5), start/end time (e.g. two and a half hours recorded as 10:00 – 12:30) or hours/minutes (e.g. two and a half hours recorded as 2.30).
Timesheet Hide Cost Code column: this will show or hide the cost code column; if shown, the user will be able to see cost rates assigned to the user, e.g. Normal/Overtime.
Timesheet Hide Cost Rate Column: this will show or hide the cost rate column; this will display cost figures to the user. This will be hidden for the majority of sites.
Timesheet Hide Charge Code Column: this will show or hide the charge code column; if shown, the user will be able to see charge rates, e.g. Normal/Overtime. This will be hidden for the majority of sites.
Timesheet Hide Charge Rate Column: this will show or hide the charge rate column; this will display charge rates to the user. This will be hidden for the majority of sites.
Timesheet Hide Sage Pay Code Column: this will show or hide the pay code column; this will display pay codes to the user, e.g. Normal/Overtime. This will be hidden for the majority of sites.
Timesheet Hide Sage Pay Rate Column: this will show or hide the pay rate column; this will display pay rates to the user. This will be hidden for the majority of sites.
Timesheet Hide Notes: configure if the notes tab should be hidden on timesheet entry.
Timesheet Hide Sicon Pay Rates tab: configure if the Sicon pay rates tab should be hidden on timesheet entry.
Timesheet Hide Concurrent Jobs Column: if unticked, a column will show on the timesheet entry page that will show the number of concurrent jobs booked onto at the same time. This will be for users recording activity on jobs through the T&A terminals.
Timesheet Approval – Hide Edit button: this will remove the option to allow approvers to edit a timesheet while waiting their approval.
Timesheet Week Number – Hide Week Number: if the week numbers should not show to a user when they are inputting their timesheet, tick this option.
Timesheet Entry – Show week end date: if the week end date should show to a user when they are inputting their timesheets, tick this option. By default, the user will always be able to see the week start date.
Timesheet make notes field compulsory: if this is ticked, the user must enter notes when entering a timesheet line.
Show total hours requiring approval on Timesheet approval page: this will add an extra column on the Approval page showing the total hours requiring approval. By default, this setting is not configured.
Enable Login Activity Tab on timesheet entry: enable this tab if users are expected to record their log in and out time.
Number of Login Activity Records requires to submit a timesheet: if required, set how many login lines must be recorded before a user can submit their timesheet.
Login and Project Activity totals must match when submitting a timesheet: configure this if it is mandatory for the user’s login times to match their time recorded against a job/project.
The allowed variance between login total and project total (%) when matching totals: if a variance is allowed between total login time and job/project time, enter this percentage figure here.
26.2. General Tab - Functionality - General Banner
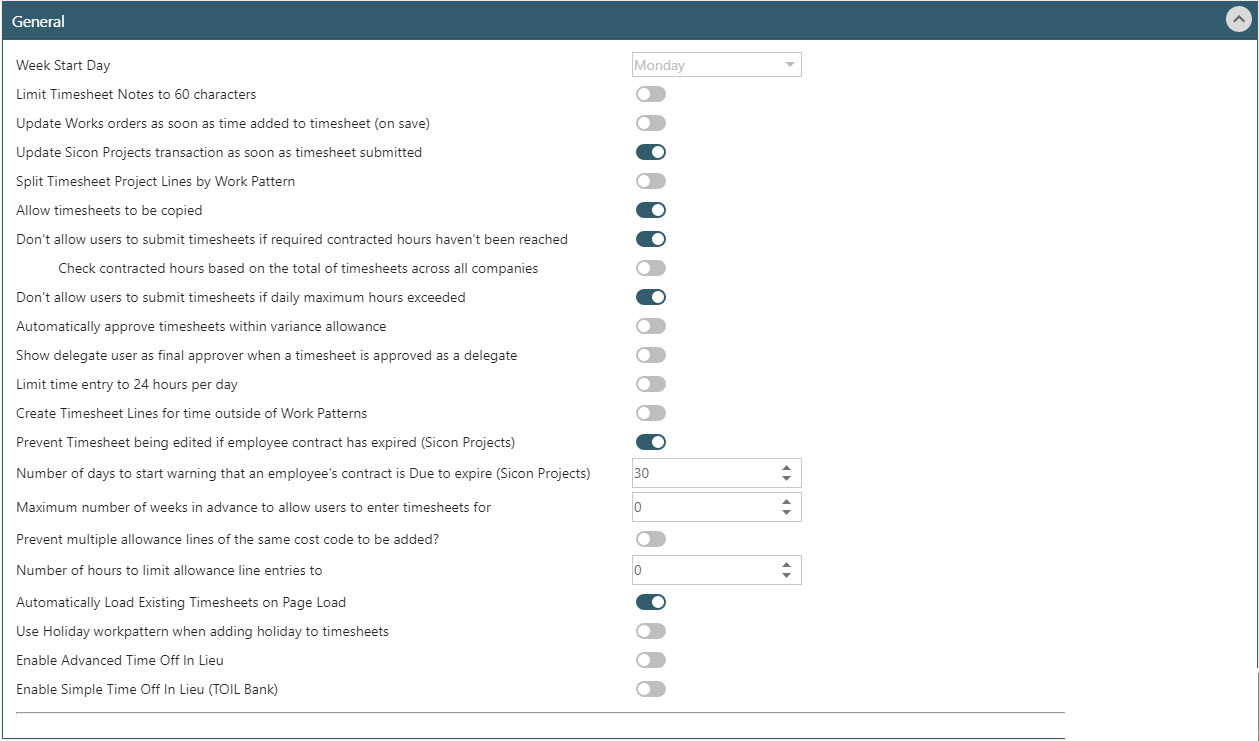
Week Start Day: this denotes which day the timesheet should start on. N.B. this setting cannot be changed if work patterns have been created.
Limit Timesheet notes to 60 characters: configure this if the notes field should be limited.
Update Works orders as soon as time added to timesheet (on save): the hours will post through to the appropriate Works Order as soon as the user saves the timesheet.
Update Sicon Projects transaction as soon as timesheet submitted: if enabled, the labour transactions will appear as committed costs when the timesheet is submitted for approval and update to an actual cost when fully approved.
Split Timesheet Project Lines by Work Pattern: this setting should be enabled if ‘Automatic selection of cost rate based on standard timesheet work pattern’ functionality is required.
Allow timesheets to be copied: if enabled, this will allow users to copy an approved timesheet from one week to another.
Don’t allow users to submit timesheets if required contracted hours haven’t been reached: a user’s contracted hours are set on their WAP user profile; if this setting is configured, they won’t be able to submit their timesheet until these hours have been reached.
Check contracted hours based on the total of timesheets across all companies: if users are submitting timesheets across multiple Sage companies, check this setting if the contacted hours check is to be done across multiple companies.
Don’t allow users to submit timesheets if daily maximum hours exceeded: daily maximum hours can be entered on their WAP user profile; if this setting is configured, a user cannot submit their timesheet if their daily hours have gone over their maximum allowance.
Automatically approve timesheets within variance allowance: an allowed variance can be setup to allow timesheets to be processed if the time logged on the ‘Login Activity’ tab compared to the time logged against a project is within a certain percentage. If the setting ‘Login and Project activity totals must match when submitting a timesheet’ is checked, the variance allowance is used to check if a timesheet can be manually submitted. If ‘Auto Submit Timesheets’ is being used, this setting is overridden and timesheet lines that are not within the allowed variance can be set to go to different approval routes to allow a moderator or team leader to adjust the times against the project.
Show delegate user as final approver when a timesheet is approved as a delegate: if a delegate is used to approve a timesheet, the final approver will change to show the delegate user instead of the standard approver.
Limit time entry to 24 hours per day: if this is configured, users won’t be able to enter more than 24 hours on a day.
Create Timesheet lines for times outside of work patterns: additional lines will be created for hours logged that are not picked up by a work pattern.
Prevent Timesheet being edited if employee contract has expired (Sicon Projects): a contract expiry date can be recorded on the Employee details in Sicon Projects so that within WAP the timesheet cannot be edited if their contract has expired.
Number of days to start warning that an employee’s contract is due to expire (Sicon Projects): if a contract expiry date has been recorded on the Employee details in Sicon Projects, a warning banner can appear when a user creates or submits a timesheet in WAP a certain number of days prior to their contract expiry date.
Maximum number of weeks in advance to allow users to enter timesheets for: a value can be set here if users should not be allowed to enter their timesheets far in advance.
Prevent multiple allowance lines of the same cost code to be added: this can be enabled if users are only allowed to add one allowance line at a certain allowance cost code per timesheet; i.e. if users can only claim one overnight allowance per day.
Number of hours to limit allowance line entries to: the number of allowance hours entered on a timesheet can be limited as required.
Automatically load existing timesheets on page load: for speed reasons this can be disabled; i.e. if the existing timesheets page is taking a long time to load up all timesheets.
Use Holiday work pattern when adding holiday to timesheets: by default, the holiday hours approved through WAP holiday module will post to users’ timesheets based on their timesheet work pattern, but if required, this setting can be enabled to pick up the hours from the holiday work pattern. For example, if a user’s standard timesheet work pattern is for Monday 5 hours, Tuesday 4 hours and Wednesday 5 hours, and the user books a Monday – Wednesday holiday, their holiday work pattern can be set as 4.25 hours on each day to average the hours accordingly.
Enable Advanced Time off In Lieu: switch on if a site is to be using Advanced TOIL (please see TOIL section for more information on Advanced vs Simple TOIL).
Enable Simple Time Off In Lieu (TOIL Bank): switch on if a site is to be using Simple TOIL (please see TOIL section for more information on Advanced vs Simple TOIL).
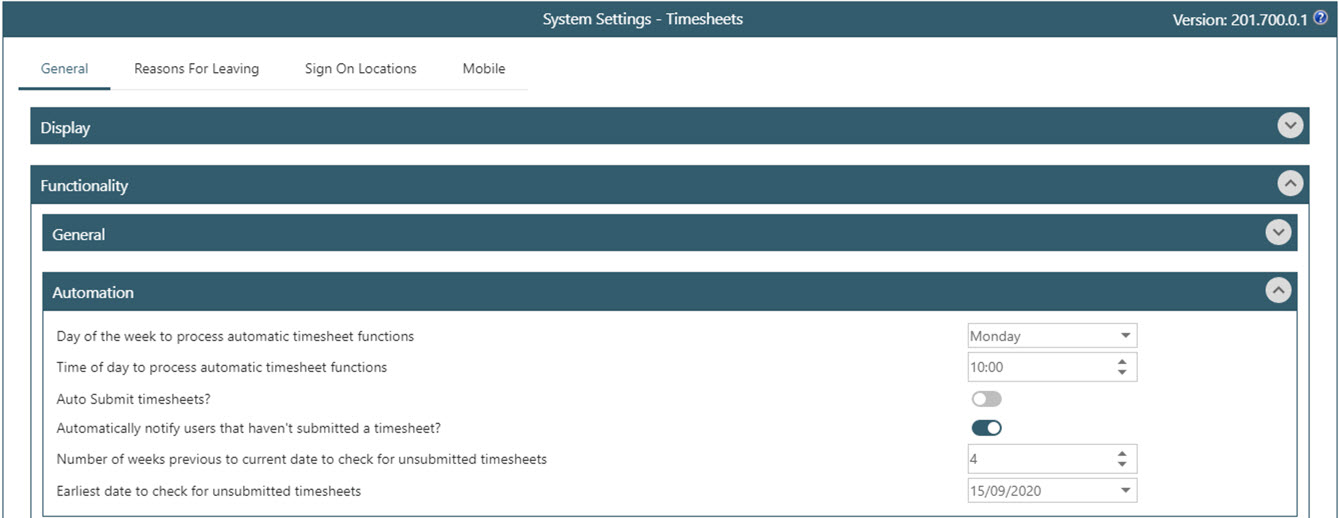
26.3. General Tab - Functionality - Automation Banner

Day of the week to process automatic timesheet functions: the day required for timesheets to be automatically submitted or for automatic notifications to be emailed out.
Time of day to process automatic timesheet functions: the time of the day for timesheets to be automatically submitted or for automatic notifications to be emailed out.
Auto submit timesheets: once enabled, configure the day and time to auto submit timesheets.
Automatically notify users that haven’t submitted a timesheet: tick to notify users that haven’t submitted a timesheet.
Number of weeks previous to current date to check for unsubmitted timesheets: enter the number of previous weeks to remind users about unsubmitted timesheets.
Earliest date to check for unsubmitted timesheets: enter the earliest date to check for unsubmitted timesheets.
26.4. General Tab - Time & Attendance Banner
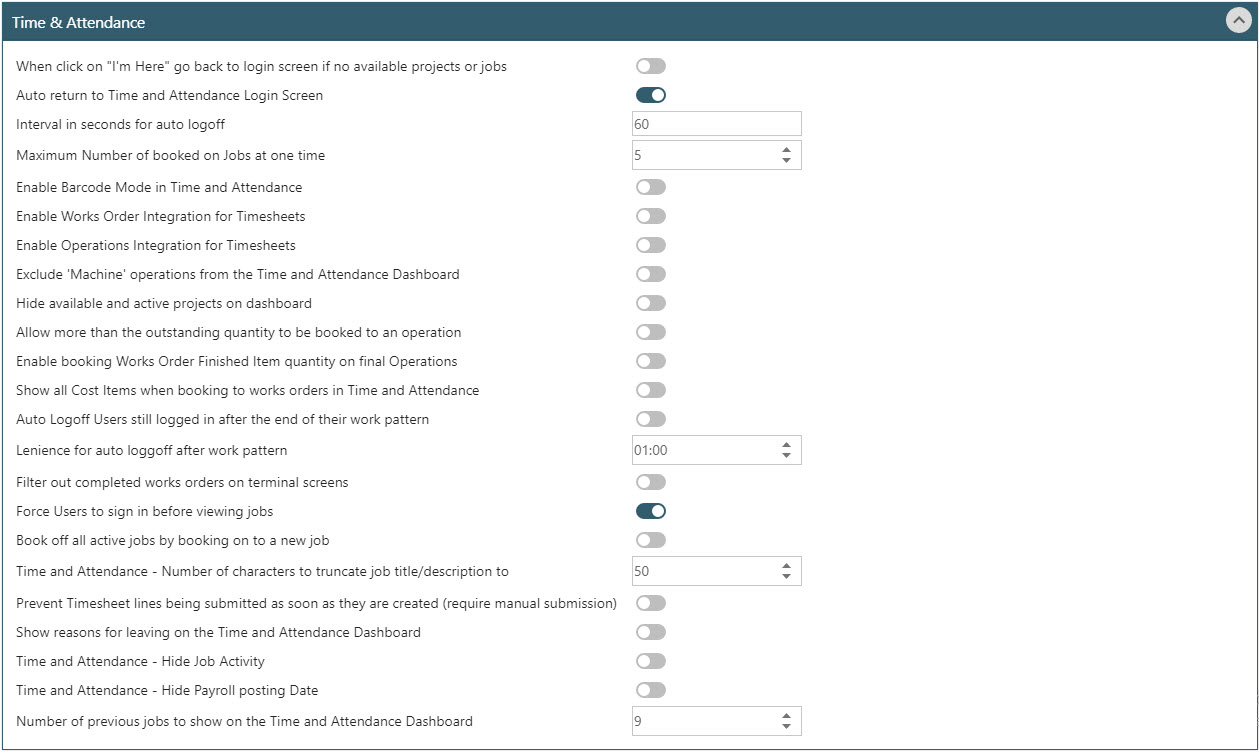
When click on “I’m here” go back to the login screen if no available projects: if required, this can be configured for users to be taken back to the login screen if no projects are available to select once logged in.
Auto return to Time & Attendance Login screen: if a user does not select a project within set time period after login, the screen will return to the login screen.
Interval in seconds for auto logoff: set as required the auto logoff duration.
Maximum number of booked on jobs at one time: set if required the number of projects that a user can book onto at one time.
Enable Barcode mode in Time & Attendance: if required, users can log onto a project by scanning a barcode.
Enable Works Order Integration for timesheets: set if required to link WAP to Works Orders within Sage.
Enable Operations Integration for timesheets: enable to allow user to view all operations when selecting a works order.
Exclude ‘Machine’ operations from the Time & Attendance dashboard: if enabled, only labour operations will be visible to the user.
Hide available and active projects on dashboard: if enabled, the dashboard will not show active projects requiring users to log on through scanning a barcode.
Allow more than the outstanding quantity to be booked to an operation: by default, users are not allowed to book a quantity greater than the quantity outstanding, configure this if this functionality is required.
Enable booking Works Order finished item quantity on final operations: by default, a user can’t enter the Works Order finished item quantity; if this setting is enabled, an additional pop up is shown to the user when booking off a final operation on a Works Order to record the quantity. Works Orders will not be booked in via Time & Attendance.
Show all cost items when booking to works orders in Time & Attendance: if not enabled, users can be limited as to what cost items they can see.
Auto Logoff users still logged in after the end of their work pattern: if required, users can be automatically logged off if still logged in once their work pattern has finished.
Lenience for auto logoff after work pattern: used in conjunction with the above setting; set in hours the time to automatically log off a user still logged in once their work pattern has finished.
Filter out completed works orders on terminal screens: if required, only works orders that have not been completed will be shown.
Force users to sign in before viewing jobs: users must log in before being able to view available projects.
Book off all active jobs by booking onto a new job: the user will automatically be signed off a project when logging onto a new project.
Time & Attendance – number of characters to truncate job title/description to: use this setting if there are projects with long titles or descriptions.
Prevent Timesheet lines being submitted as soon as they are created: if not configured, the timesheet will need to be manually submitted.
Show reasons for leaving on the Time & Attendance dashboard: configure to show to the user the configured reasons for leaving.
Time & Attendance – hide job activity: configure to hide the project activity from the time and attendance screen.
Time & Attendance – hide payroll posting date: configure to hide the payroll posting date from the time and attendance screen.
Number of previous jobs to show on the Time & Attendance dashboard: configure the number of previously logged on projects the user can see on their dashboard once logged in.
26.5. General Tab - Functionality - Costing Banner

Use ‘TimesheetHours’ work pattern to split timesheet lines by cost rate: this setting should be enabled if ‘Automatic selection of cost rate based on a timesheet hour work pattern’ functionality is required.
For Sicon Projects, divide time of jobs if booked at the same time: total time logged against multiple projects will be split out and posted to the projects. This is only applicable if booking time through the T&A terminals and users are allowed to book onto multiple projects at a time.
Use Sicon Projects Work Patterns for Timesheet entry: if configured, work patterns should be created in Job Costing that are used by employees.
Timesheets entered by a Sicon Projects team leader create transactions for the whole team: if a user who is marked as a Team Leader submits a timesheet in WAP, this can automatically create timesheets for each member of their team.
Process missing holiday timesheet lines from past timesheets: if added additional bank holidays, if this setting is configured the new holiday lines will be added to the users’ timesheets.
26.6. Reasons for Leaving Tab
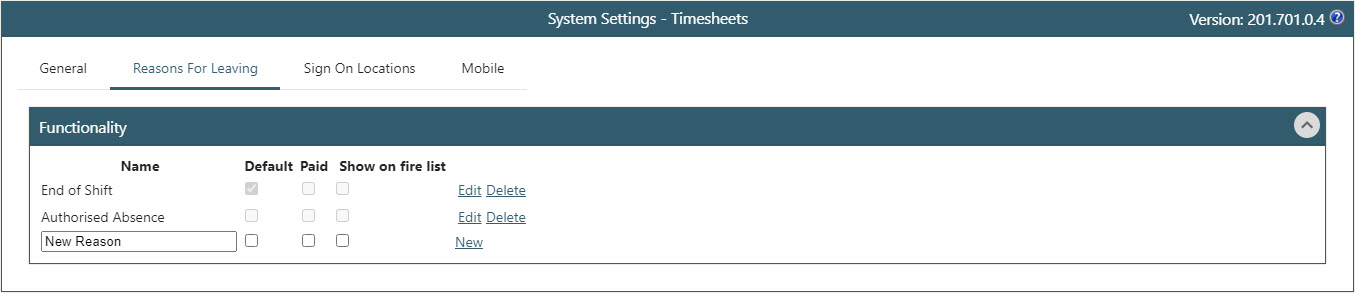
Create reasons for leaving that will be visible to users when logging out at the end of their shift; this is only required if recording time through the T&A terminals.
26.7. Sign on Locations Tab
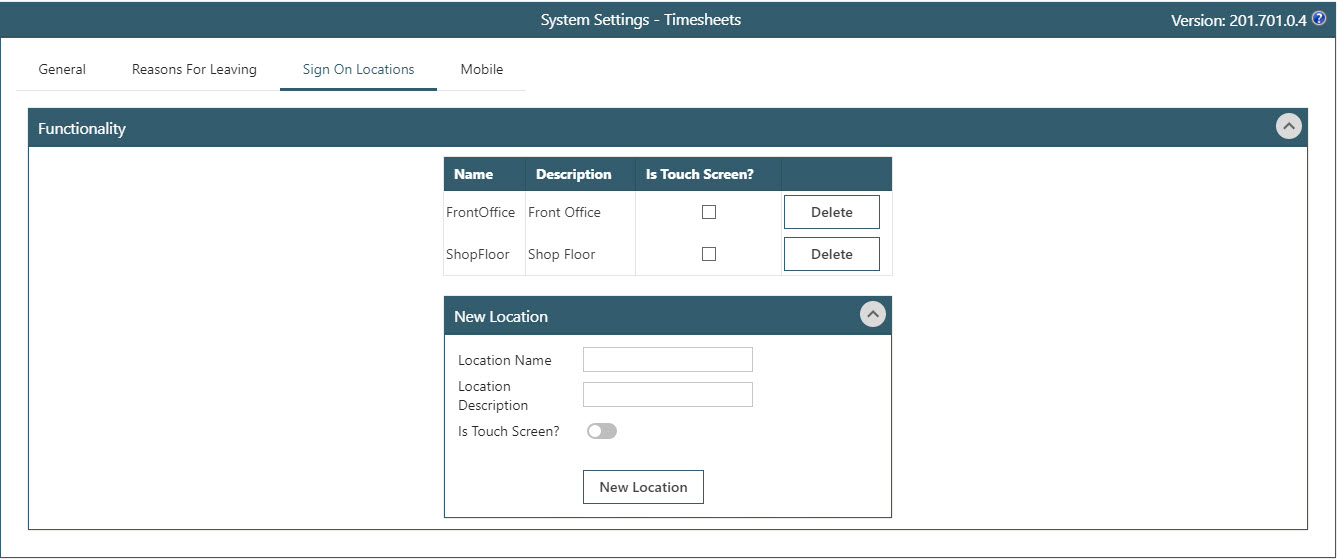
Create locations to be used for the T&A terminals. The location name must contain no spaces (i.e. “FrontOffice”) but the location description can (i.e. “Front Office”). Click New Location to save the location prior to saving the main System Settings.
26.8. Mobile Tab

If required, a signature can be entered before a timesheet is submitted for approval on the app which will then show as an Attachment to the approver.
27. Timesheets User Type Permissions
Permissions for whether a user is able to submit, approve, adjust or run reports on timesheets are set at a User Type level, under the Timesheets tab.
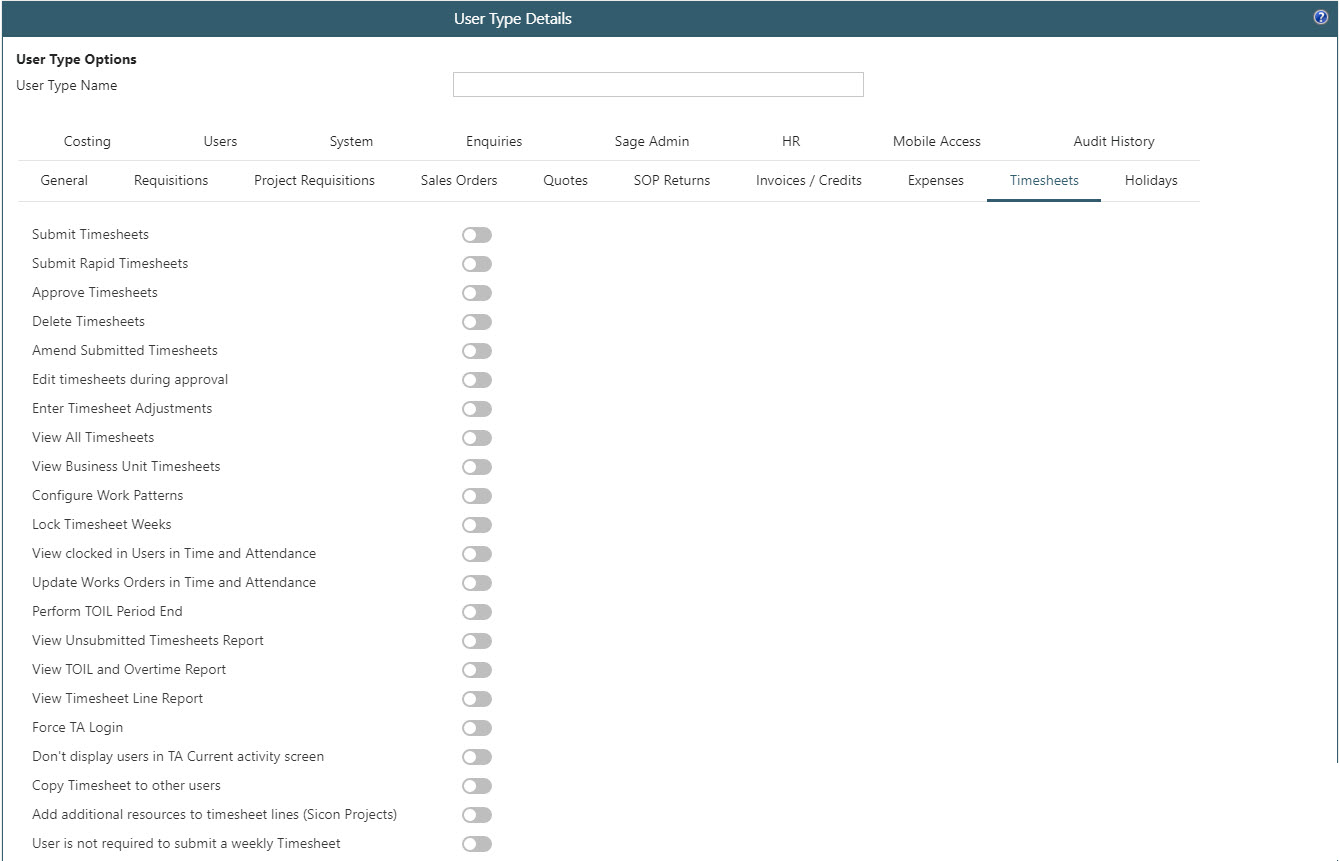
Submit Timesheets: the ability for a user to enter a timesheet using the standard timesheet entry screen. This should be selected if using Sicon Sage Timesheets.
Submit Rapid Timesheets: the ability for a user to enter a timesheet using the rapid timesheet entry screen. This setting is only applicable if not using Sicon Sage Timesheets.
Approve Timesheets: the ability for a user to approve a timesheet; users need this permission to be included in approval routes.
Delete Timesheets: the ability for a user to delete a timesheet; a timesheet cannot be deleted once it has been fully approved.
Amend Submitted Timesheets: the ability for a user to make changes to a timesheet once submitted.
Edit timesheets during approval: the ability for a user to edit a timesheet while it is awaiting their approval; some sites will not allow approvers to edit either the project selected or hours entered but instead will ask for approvers to reject the timesheet for the end user to make any changes.
Enter Timesheet Adjustments: the ability for a user to adjust an approved timesheet; this is done under the Adjustments tab. This permission is usually reserved for Administrator or Finance roles. This setting is only applicable if Sicon Sage Timesheets are not in use. For Sicon Sage Timesheets, adjustments should be made in Sage.
View All Timesheets: the ability to view timesheets submitted by all users; rather than just those submitted or approved by that user.
View Business Unit Timesheets: the ability to view timesheets submitted by other users in the same business unit.
Configure Work Patterns: the ability to create and assign work patterns; this is usually just a WAP Superuser permission.
Lock Timesheet Weeks: the ability to lock weeks to perform TOIL period end.
View clocked in Users in Time and Attendance: if T&A terminals are configured, the ability to view users’ login status.
Update Works Orders in Time and Attendance: allows time entered using the T&A terminals to be posted to a Works Order.
Perform TOIL Period End: if TOIL has been configured, this is the ability to perform the period end routine which will update TOIL accrued, taken and carried over figures. This is usually a permission reserved for Administrator users.
View Unsubmitted Timesheets Report: permission to run the unsubmitted timesheets report to see users that have not submitted timesheets within a date range.
View TOIL and Overtime Report: permission to run the TOIL and Overtime report detailing hours’ users’ have recorded.
View Timesheet Line Report: permission to run the Line report showing timesheet hours recorded, status, approval history etc.
Force TA Login: if configured, users will not be able to select a job on the T&A terminal until they have logged in.
Don’t display users in TA Current Activity screen: this will hide the users from the current logged in users list within T&A.
Copy Timesheet to other users: this permission will allow users to copy their timesheet to other users; i.e. for the instance where a team leader will copy their timesheet to their team members to save them time when completing their timesheet. Users with copied timesheets are still able to adjust if required before submitting for approval.
Add additional resources to timesheet lines (Sicon Projects): this permission will allow users to add other Sicon Projects resources (i.e. vehicles or machinery) to a timesheet for those costs to be included on the job.
User is not required to submit a weekly Timesheet: if the user should not submit a timesheet, configure here so they are not included in reminder emails about unsubmitted timesheets.
Users can book timesheets against Operations (Sicon Projects required): this will allow users to book time against operations created within Sicon Projects – this functionality is currently being developed further.
System Settings Overrides
Signature Required: if a group of users have to capture a signature when their timesheet is submitted whereas the overall system setting is this isn’t required, this can be configured against the User Type.
28. Timesheet User Permissions
A number of permissions can be set on the user profile relating to entering, viewing or approving timesheets.
28.1. Person Details Tab
On this tab link the user through to a country (the default country is set under System Settings cogs – System Setup banner – Countries & Cities); this will impact what bank holidays show on the user’s timesheet.

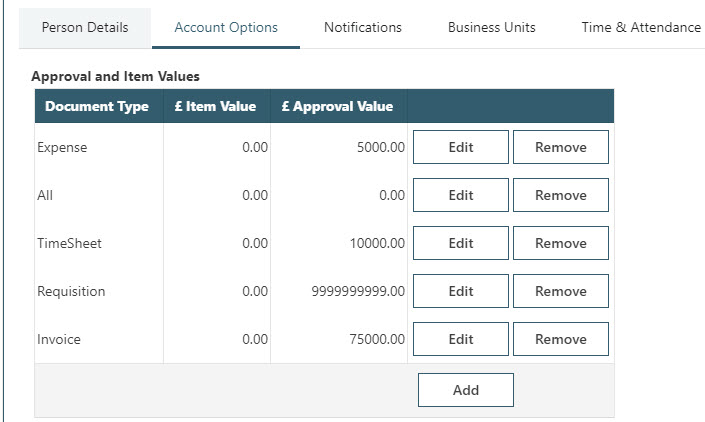
28.2. Account Options Tab
Against a user set their Timesheet Item and Approval values; item value is the amount the user is able to enter a timesheet for and approval value is the amount a user is able to approve a timesheet for. If a user is not allowed to approve a timesheet, leave the approval route as zero. If a user has unlimited approval value (i.e. for users at the end of an approval route), set the approval value as 999,999,999.
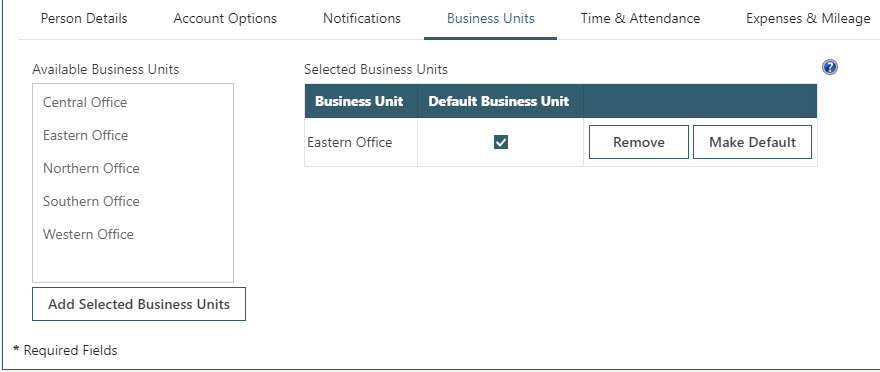
28.3. Business Unit Tab
If the user belongs to a business unit, they can be configured to view timesheets raised by other users within the business unit.
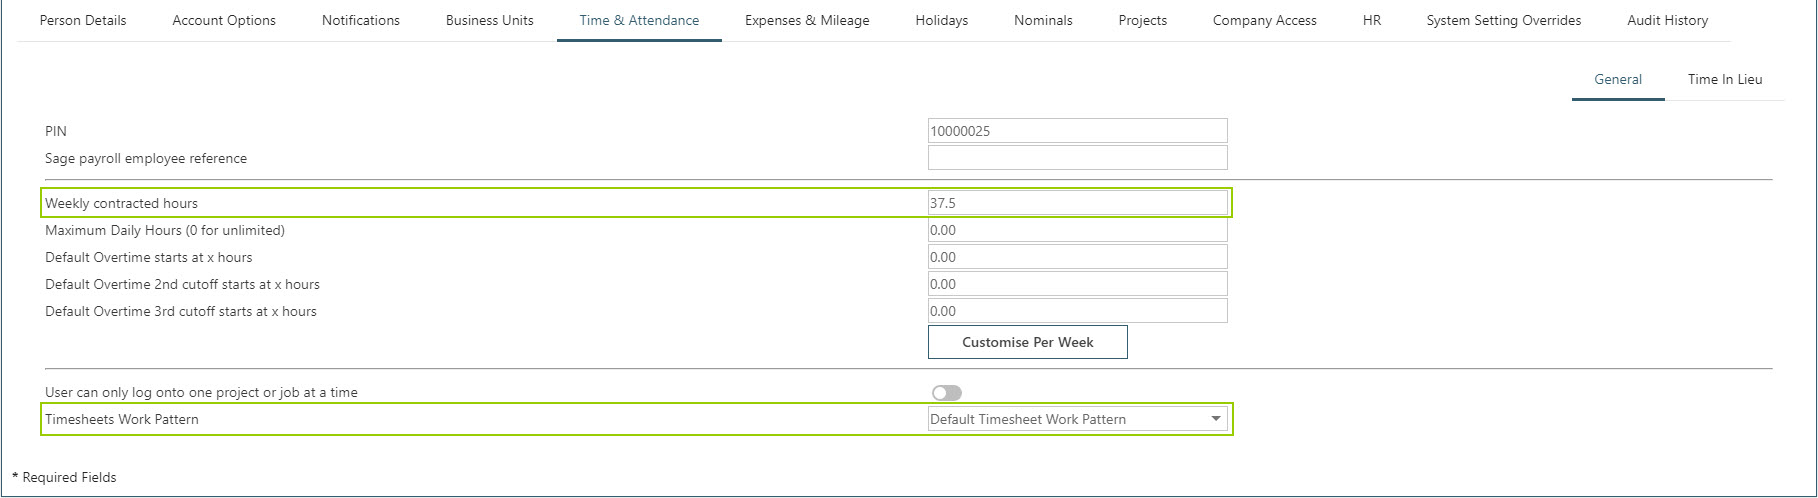
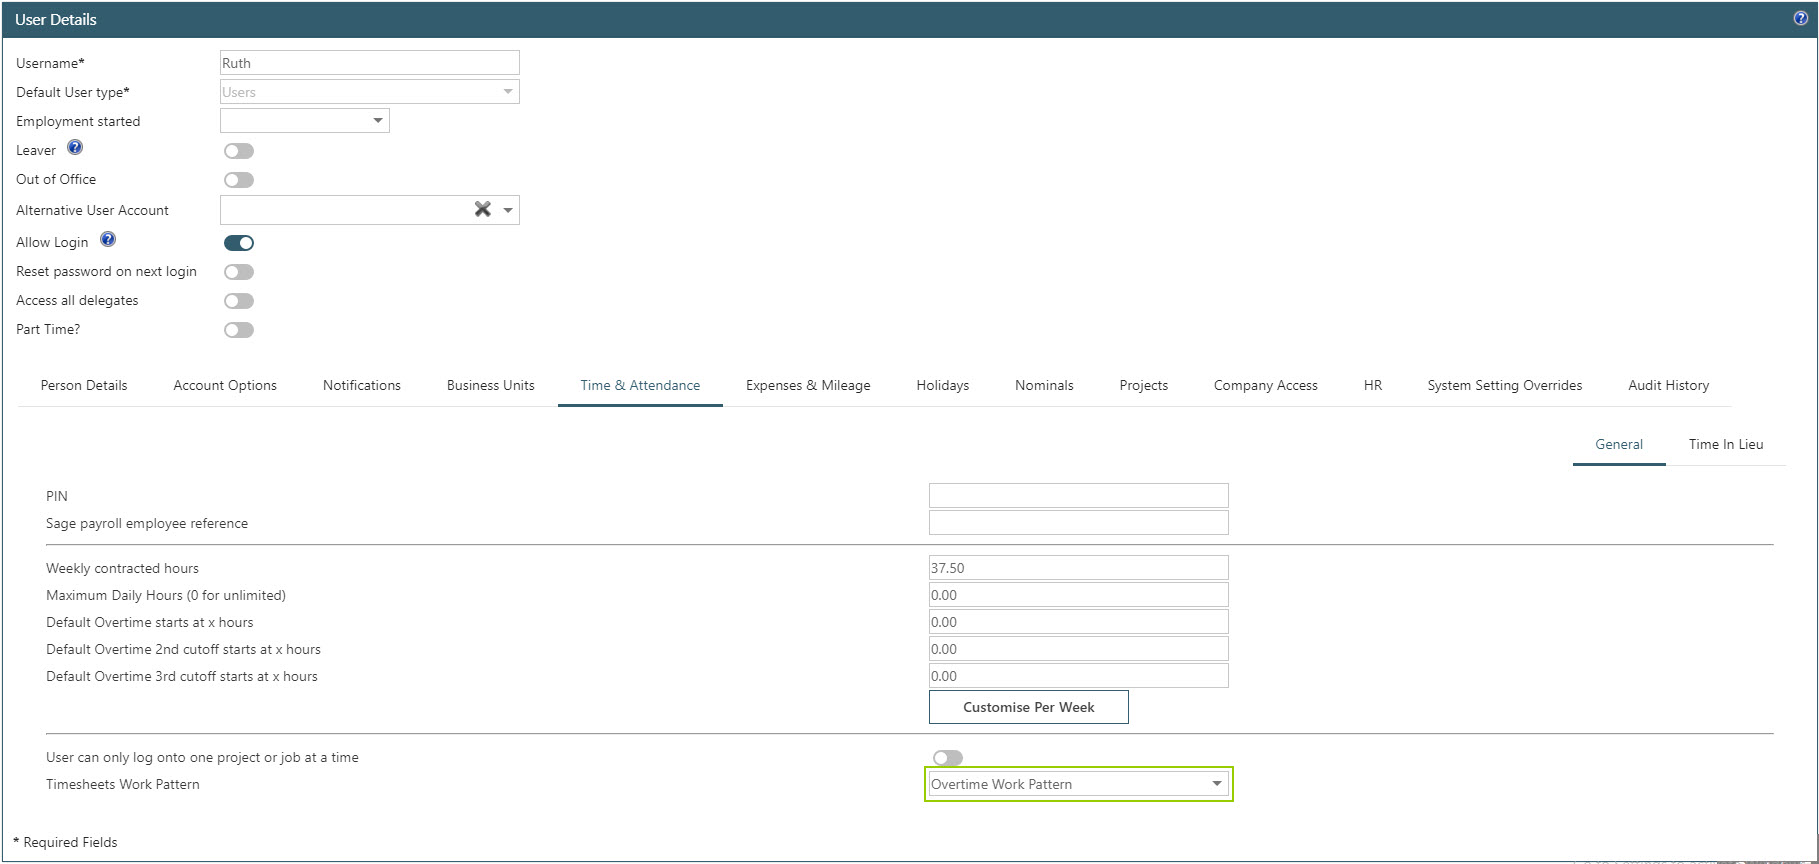
28.4. Time & Attendance Tab
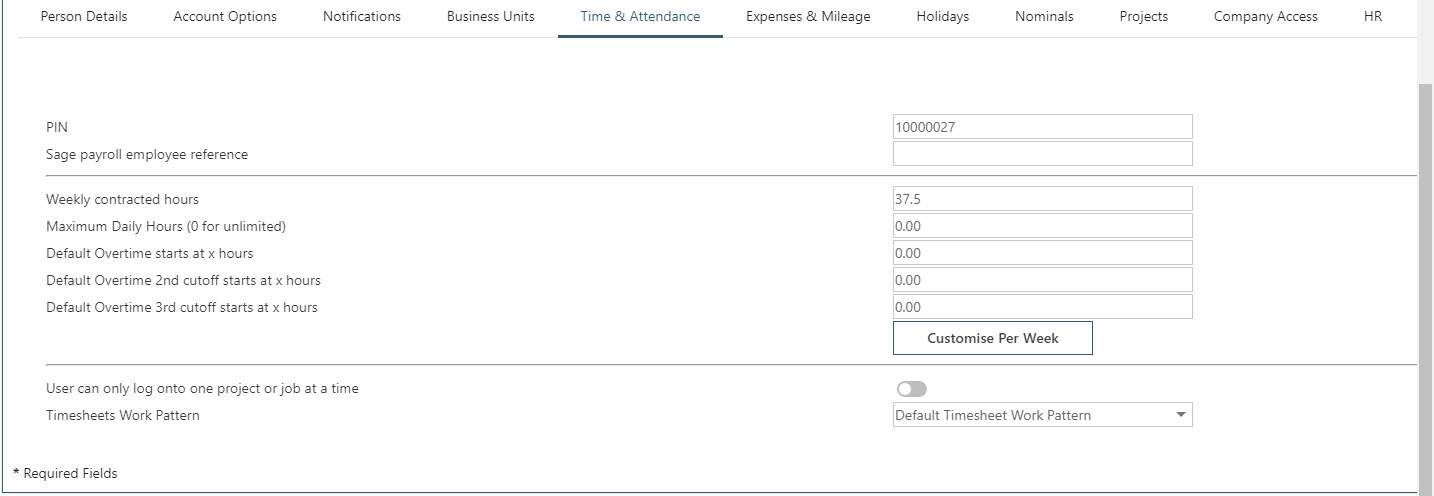
The General sub tab relates to the Timesheet module and allows setting up of the user’s individual contracted and overtime hours, and linking to a Timesheet work pattern.
PIN: if using the T&A terminals linked into WAP, this PIN will be how the user clocks into the system.
Sage payroll employee reference: the user’s payroll reference can be entered here; this will appear on timesheet reports but there is no direct link between WAP and Sage Payroll.
Weekly contracted hours: depending on Timesheet System Settings, users will not be able to submit their timesheet until their weekly contracted hours have been reached.
Maximum Daily Hours (0 for unlimited): depending on Timesheet System Settings, users will not be able to submit their timesheet if they have entered more than their daily maximum hours.
Default Overtime starts at x hours: number of hours at which the overtime rate will be applied; these figures will only show on timesheet reports and will not affect cost or pay rates.
Default Overtime 2nd cut-off starts at x hours: number of hours at which the second overtime rate will be applied; these figures will only show on timesheet reports and will not affect cost or pay rates.
Default Overtime 3rd cut-off starts at x hours: number of hours at which the third overtime rate will be applied; these figures will only show on timesheet reports and will not affect cost or pay rates.
User can only log onto one project or job at a time: this setting is used in conjunction with the T&A terminals to prevent users working on more than one project at one time.
Timesheets Work Pattern: select the user’s timesheet work pattern from the drop-down list; these work patterns are configured in System Setup – Work Patterns & Pay Rates. N.B. if using Sicon Projects and settings have been configured to use Sicon Projects work patterns, it will not be possible to link a work pattern here, this is done in Sicon Projects.
Time in Lieu sub tab
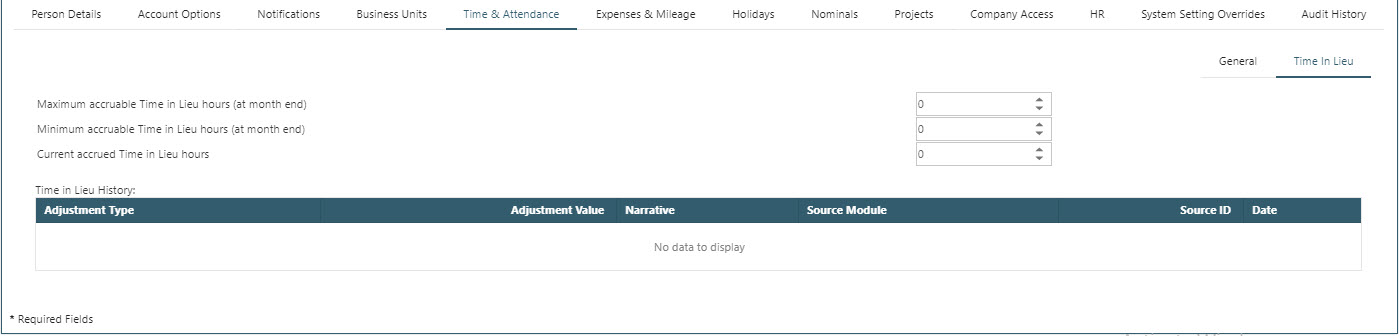
Maximum accruable Time in Lieu hours (at month end): if a user cannot accrue more than a certain number of TOIL hours at the end of the month, enter the value here.
Minimum accruable Time in Lieu hours (at month end): if a user is allowed to go into negative TOIL hours at the end of the month, enter the minimum value here as a negative amount; e.g. -7.50.
Current accrued Time in Lieu hours: the user’s current TOIL hours will show here. If any adjustments have been made to the user’s hours, these will show underneath.
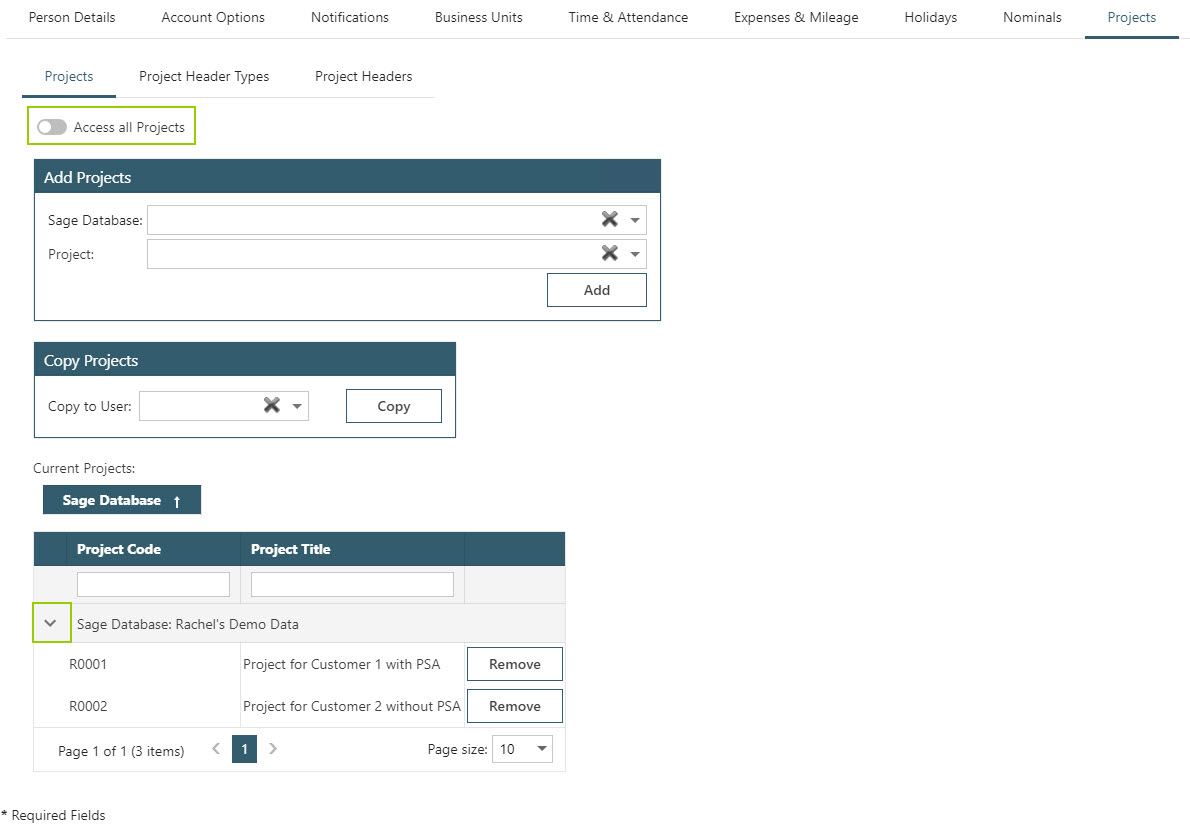
28.5. Projects Tab
If a costing module has been configured, this tab can be used to view projects or project headers the user has been given access to, or to set that the user is to have access to all projects or project headers. These projects and project headers will be visible to the user when entering a new document.
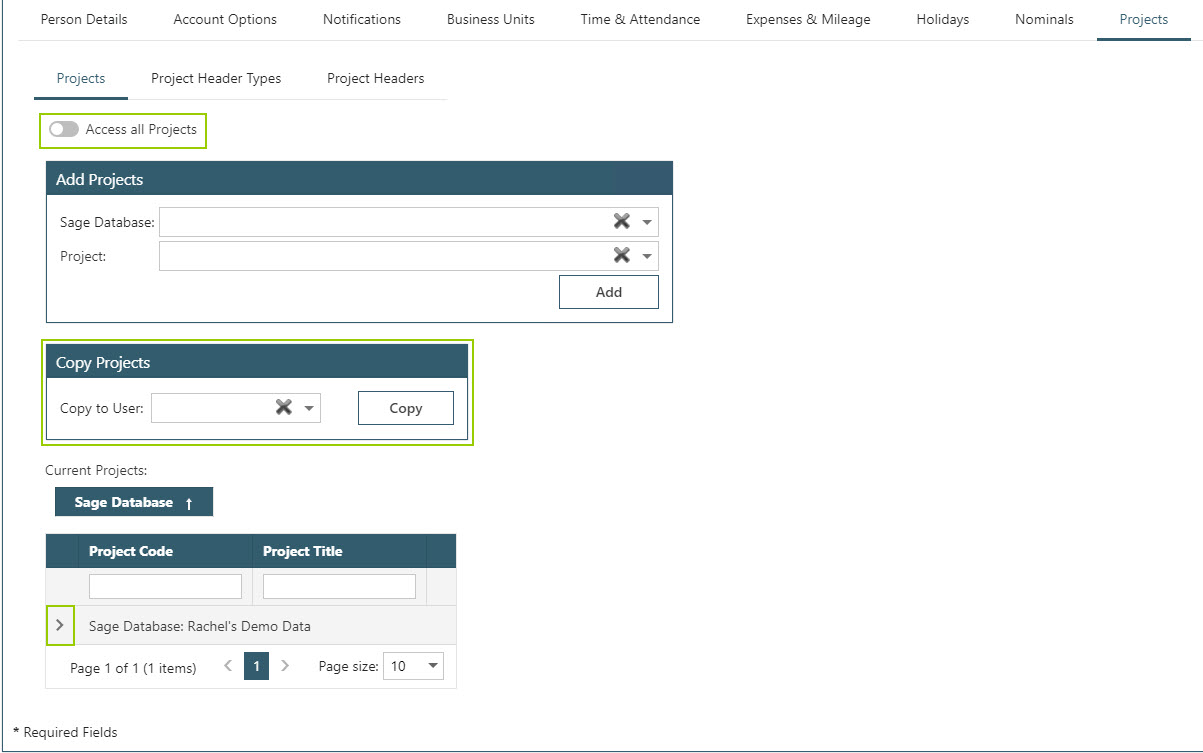
The current allocated projects are shown in the box at the bottom of the screen; to see a full list click on the arrow to the left of the Company. As new projects are added into Sage, they will need to be allocated to the correct users (either individually through this screen, using the Projects wizard or importing). If a user has access to all projects ticked, as soon as a project is added in Sage it will be visible to the user.
Project Headers
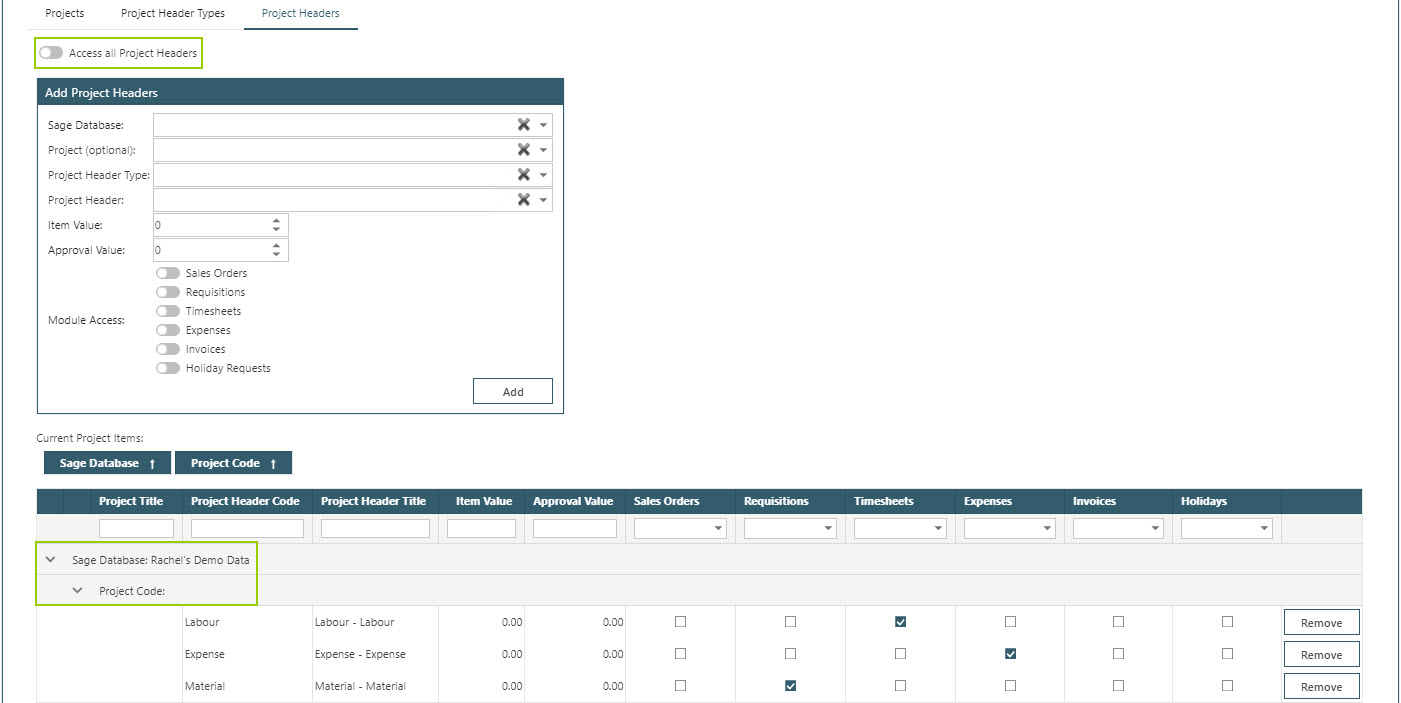
When allocating project headers to a user, it is possible to specify which modules these will be available to the user in, and also override the default item and approval values if required. These value overrides are only applicable to the requisition module. If new project headers are added into Sage, they will need to be allocated to the correct users.
Project Header Types or Project Headers?
If a user is to have visibility of all project headers, allocate access all on the Project Headers tab and the Project Header Types tab can be ignored.
If a user has access to all Project Header Types, any individual project headers allocated on the Project Headers tab will be ignored; Project Header Types takes priority.
For the majority of sites, the Project Header Types tab can be ignored and users either given access to all Project Headers or restricted (and allocated either individually, using the wizard or imported).
Project Headers will be only show on certain document types based on configuration within Sicon Projects (e.g. Expense Project Headers will be linked to a Project Header Type with a WAP configuration of ‘E’ so will only show on Expenses and not Timesheets or Requisitions).
28.6. Company Access Tab
Select the company from the available companies list that the user should have access to. Multiple companies can be selected at a time by holding the shift button.
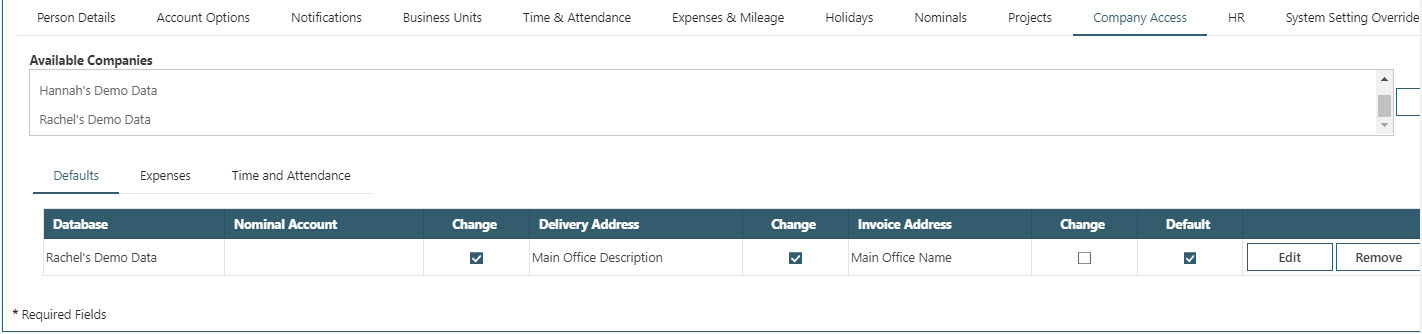
Default Sub Tab
Click Edit on a company to allocate a default nominal account, delivery address and invoice address. Each user can be configured to have permission to be able to change the nominal, delivery or invoice address as required. If a user only ever raises a requisition against one nominal code, allocate that code here. Allocate a default delivery and invoice address; users would typically be allowed to change a delivery address but not change the invoice address.
Time and Attendance Sub Tab

Resource: if Sicon Projects or Project Accounting is enabled, link the user to the Employee or Resource by selecting the correct name from the drop-down box. Always click Update once an Employee is selected. A resource will be required if entering expense claims, timesheets or holiday requests.
Touch Screen Default: if using T&A Terminals and the user has access to more than one Company, select the company which should be the default on logging in or out by ticking this box.
29. WAP Timesheets/Sicon Projects/Sage Payroll Integration
This section explains the procedure to follow for timesheets that are entered and approved in WAP, post though to Sicon Projects and thereafter imported into Sage Payroll.
Ensure all timesheets are approved in WAP and no other timesheets for the relevant period are in the Submitted tab; this will update the Sage database with the timesheet entries.

Run Sicon Projects reports within Sage 200 for the appropriate weeks (using the Wages Summary report is quite useful for checking against WAP and can be compared to reports within WAP).
Run and check Wages Extract from within Sicon Projects (Period End Routines – Payroll Extract). This will produce a CSV file of the wages for the relevant weeks/month you are wanting to process.
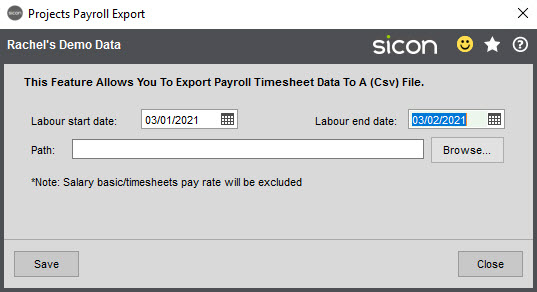
If employees are grouped under one pay rate, or a pay rate is missing, this is most likely because the pay rates set-up against the employee are not correct (check in Sicon Projects – Maintenance – Maintain Employees – Select Employee – Pay Rates). If a rate is to be exported to Payroll it should also have the pay element description completed. N.B. this must be the same as set-up in Sage Payroll.
Once the export has been run correctly, import to Payroll, check Payroll, run any reports and then process payroll.
If you have added a new employee or pay rates have been added or edited, update the rates within Sicon Projects. Running this feature will pull through changes from Sage Payroll and apply them.