WAP Help and User Guide – User Settings v21
This WAP User Settings Help and User Guide will take you through some key points for when setting up new users and the user settings which require configuration when implementing the WAP software.
Search the page by pressing Ctrl + F (windows) or CMD +F (Mac) on your keyboard.
Back to all user guidesProduct overview
Help and User Guide maintained for WAP version 210.0.0 and upwards.
This WAP User Settings Help and User Guide will take you through some key points for when setting up new users and the user settings which require configuration when implementing the WAP software.
By clicking on the System Settings cogs at the top of the screen the User Setup homepage will be shown as below. Only users with Administrator permissions should be given access to the system settings cogs.
Options available within these WAP System Settings will change depending on WAP version installed and modules configured.
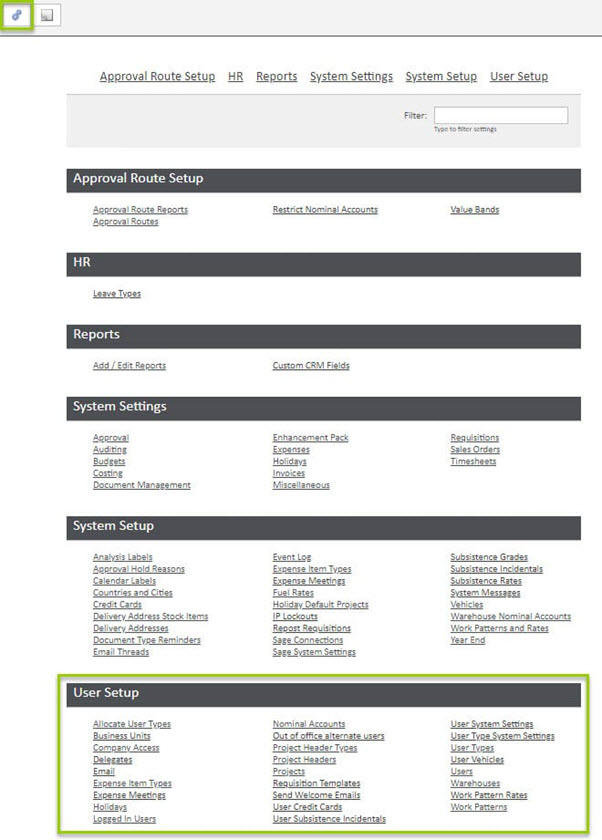
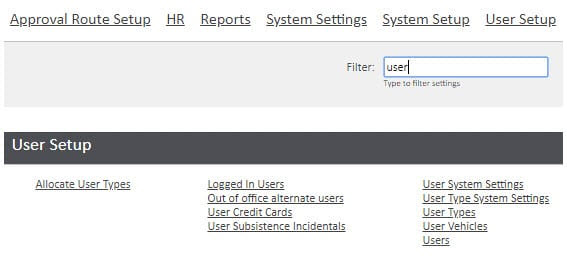
The filter at the top right of the screen can be used to limit the number of options; e.g. typing in ‘User’ will only show menu options relating to specific user setup choices.0
1. WAP Navigation
To navigate to User maintenance screens, as a user with enough permissions, click on the system settings cogs which will then show the system settings where configuration can take place:

2. Adding a New User in WAP
When adding a new user onto an already established WAP system, the below steps may need to be followed; these steps may not all be relevant depending on which modules are enabled and how the system has been configured.
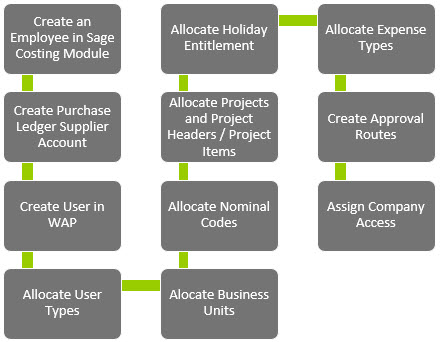
Further information on each is found summarised in the following sections and further detail is included throughout this Help and User Guide.
2.1. Create an Employee in Sage (Resource in Sicon Projects / Project Accounting)
This is mostly required if linking WAP with Timesheets and Expenses either with Sicon Projects or Project Accounting. When setting up the employee make sure they have the correct cost and charge rates assigned and if using Sicon Projects, have been marked as a Project Manager if they are to be managing a project and approval routes have been configured to be based on Project Managers.
See our WAP Timesheets Help and User Guide for further information.
2.2. Create Purchase Ledger Supplier Account
This will be relevant if using Expenses within WAP; a purchase ledger supplier account will be needed for users’ personal expense claims and mileage claims to post through to.
See our WAP Expenses Help and User Guide for further information.
2.3. Create User in WAP
Add the user into WAP; users can either be created manually, can be copied from an existing user (this will only copy User Type and Company access) or can be imported. If not using Sicon Projects, Project Accounting, WAP Timesheets or WAP Expenses, this may be the first step required to add a user.
When adding a user enter their user details, select a default User Type and allocate item and approval values. If using Expenses or Timesheets, link through the user to their PL Supplier Account and Sicon Projects Employee or Project Accounting Resource. The Sicon Projects employee resource will also need to be set if the user is a Sicon Project Manager and wishes to view their projects in Sicon Projects enquiry screens within WAP. If using Timesheets and checking weekly contracted hours, set the user’s weekly contracted hours on the Timesheets tab – their work pattern can also be linked through on this tab.
2.4. Allocate User Types
User Types control the permissions users within the User Type group have. If the user should belong to multiple user types, link through additional user types under the Allocate User Types screen. An Import is available for this.
2.5. Allocate Business Units
Business units are used to group users together; if configured and the user is to be linked to one or more business units, assign this under the Business Units screen. An import is available for this.
2.6. Allocate Nominal Codes
Users will need access to nominal codes if they are raising requisitions or sales orders (that are not linked to a Project), or they are allowed to edit nominal codes on invoice approval. If users have permission to view the budget enquiry, any nominal codes the user has access to can be viewed within this enquiry. Nominal codes can be allocated to a user on the user profile, Nominal tab, although only one code can be allocated at a time. If multiple nominal account codes should be assigned to a user or multiple users, it is recommended to use the wizard or an import explained later in this help and user guide.
2.7. Allocate Projects and Project Headers / Project Items
If linking WAP with Sicon Projects or Sage Project Accounting, users may need to be given access to certain projects to use when adding documents. If users will need access to all projects and project headers or project and project items, this can be set on their user profile – Projects tab. If users are to be linked to certain projects and project headers or project items, use the wizards to allocate these quickly. If users are to be restricted to only see certain projects, it might be that all project headers are still allocated on the user profile but their access to projects is limited by the wizard. Usually it is recommended for users to have visibility of all projects because if projects are frequently being created in Sage it can be a high administrative maintenance task to ensure the correct projects are allocated to the right users in WAP.
If using Project Accounting, projects can be assigned directly against the Resource which will mean no project allocation is required in WAP. For further information on configuring Project Accounting, speak with your Sage Business Partner.
2.8. Allocate Holiday Entitlement
If using the Holiday module, the user will need to be given holiday entitlement to be able to book holidays for certain holiday periods. Holiday entitlement can be added individually to a user through the Holidays tab on their user profile. If a user is starting part way through the holiday year, make sure their entitlement is at the pro-rata amount. An import is available for this, and it is also possible to use the Holiday Entitlement Year End Tool to create multiple users’ holiday at once.
See our WAP Holiday Help and User Guide for further information.
2.9. Allocate Expenses Types
If using the Expense module, users will need to be linked to expense types with default tax and nominal codes before they will be able to submit expense claims. Expense types can be copied from one user to another or the expense types with nominal codes and tax rates assigned individually. An import is also available for this.
See our WAP Expense Help and User Guide for further information.
2.10. Create Approval Routes
If any document types have their approval route based on requesting user, new approval routes will need to be created for the new user. If the user is an approver, make sure any existing routes are edited if they are to be included in existing approval routes.
See our WAP Approval Routes Help and User Guide for further information.
2.11. Assign Company Access
Once all the user set up has been completed, link the user through to the correct company and if applicable, the Employee / Resource or PL Account. It is usually advised for this to be the last step to complete once all the previous setup has been done to ensure that a user can’t log in and start entering documents until they have been fully configured; i.e. given access to the correct nominal codes or approval routes have been created. An import is available for this.
3. Adding a New Nominal Code in Sage
When a new nominal code is added in Sage, the below steps may need to be followed; these steps may not all be relevant depending on which modules are enabled and how the system has been configured.

Further information each is found in the following sections and throughout this Help and User Guide.
3.1. Create Nominal Account in Sage
Add the new nominal code in Sage onto the Nominal Ledger. If using budgets, these may be entered at this stage. For any queries regarding setting up nominals or budgets, please speak to your Sage Business Partner.
3.2. Link Nominal Code to Users in WAP
If this new nominal code should be visible to users when they are either raising requisitions (that are not linked to a Project) or when editing nominal codes on invoice approval, it will need to be linked through to the correct user or users. It may also need to be linked to users who could view the transaction detail on the budget enquiry. Nominal codes can be allocated to a user on the user profile, Nominal tab, although only one code can be allocated at a time. If multiple codes are to be assigned to a user at a time, it is recommended to use the wizard or the import.
3.3. Create Approval Routes
If any document types have their approval route based on nominal codes, new approval routes will need to be created for the new code. If multiple codes have been created, the wizard or the import may be the quickest way to build these new approval routes. It is also possible to create a route based on ‘Any nominal’. This will mean that any new nominals set up will follow the ‘Any Nominal’ route, unless a new approval route is configured specifically for the nominal that has been newly created.
See our WAP Approval Routes Help and User Guide for further information.
4. Adding a New Project in Sage
When a new Sicon Project or Project Accounting Project is added in Sage, the below steps may need to be followed; these steps may not all be relevant depending on which modules are enabled and how the system has been configured.

Further information each is found in the following sections and throughout this Help and User Guide.
4.1. Create Project in Sage
Add the new project into Sage on the Sicon Projects or Project Accounting list. If using budgets, these may be entered at this stage.
4.2. Link Projects to Users in WAP
If users have not been given access to all projects, the new project will need to be linked to the correct users. If users have access to all projects, the new project will be visible straight away for the user to select. If multiple projects have been created and it needs to be linked with many users, it may be best to use the wizard.
If using Project Accounting, projects can be assigned directly against the Resource in Sage which will mean no project allocation is required in WAP.
4.3. Create Approval Routes
If any document types have their approval route based on jobs, new approval routes will need to be created for the new job or project. If multiple jobs have been created, the wizard or the import may be the quickest way to build these new approval routes.
See our WAP Approval Routes Help and User Guide for further information.
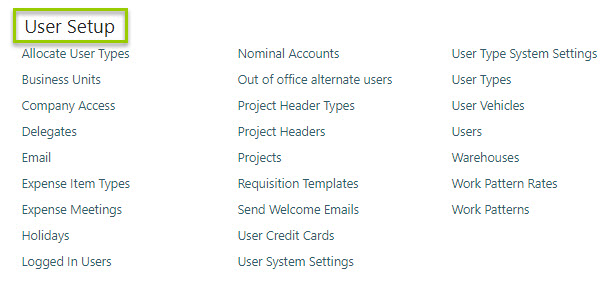
5. User Setup Banner
The next sections talk through the features from within the User Setup menu, under the System Settings Cogs).
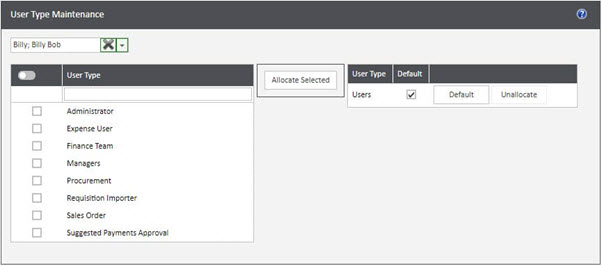
6. Allocate User Types
When a user is created initially, a User Type must be selected. Once created, the user type cannot be changed on the user profile, it must be done through this screen (System Settings Cogs – User Setup banner – Allocate User Types). It is possible to allocate more than one user type to a user and set one to be a default. If a permission is granted to any one of the user’s user types, this is enabled for the user. User Types control the permissions users within the User Type group have.
To allocate user types, select the user from the top drop down box, select the relevant user types and click allocate. It is then possible to either make one a default or remove a user type if no longer relevant.
7. Business Units
Business Units can be created to match an organisation’s departments or sections and used to group users together. Users can belong to more than one business unit if required and can be given permission to run reports based on business units.
What can Business units be used for?
- Purchase Requisitions – users within a business unit have visibility of each other’s orders to allow for enquiries to be made on what has been ordered, emailing of approved orders to suppliers or goods receiving.
- Timesheets – users within a business unit have visibility of each other’s timesheets; e.g. a manager may have additional user type permissions to allow for running reports on their business unit member’s timesheets.
- Holidays – users within a business unit can have visibility of each other’s holiday requests to allow for potential conflicts to be checked prior to a holiday being submitted.
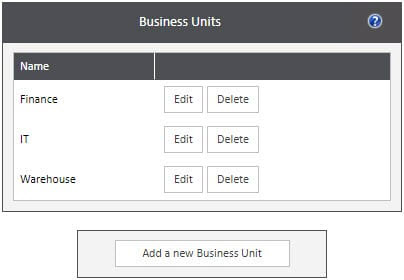
To create a new business unit, click add a new business unit, enter the name and move users into the ‘Selected Users’ box. Once created, save this business unit.
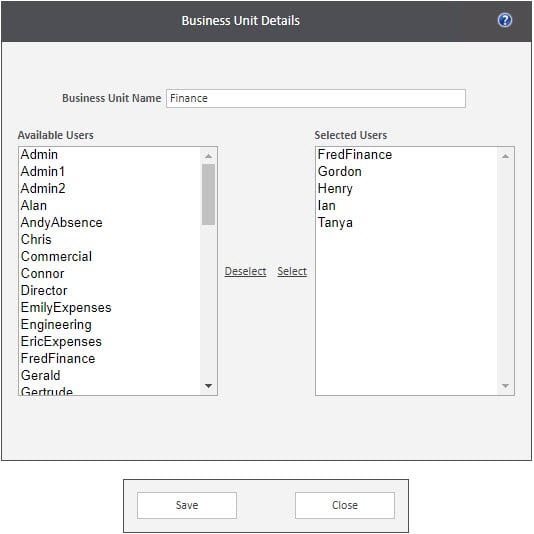
To add or remove users from an existing business unit, click Edit next to the unit and move users to or from the ‘Selected Users’ box as required. Click Save to ensure the changes are retained. On the user’s WAP profile it is possible to mark a business unit as a default if the user has access to multiple business units.
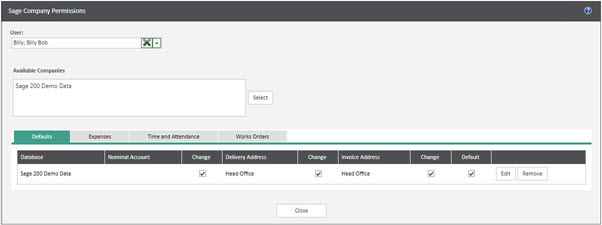
8. Company Access
Each user can be configured to access certain Sage Companies (as listed in System Setup – Sage Connections) with the corresponding delivery and invoice addresses, expense supplier accounts and costing resource set. This function is also accessible through User Setup – Users – Company Access tab. If needing to add or remove company access from multiple users, it can be quicker to do it through this screen.
9. Delegates
WAP Delegates functionality is set to allow for additional reporting and access purposes. Users can have delegates allocated to them but not be able to switch between profiles; the ability to delegate switch is a User Type permission. Within the Delegates screen it is possible to set which users the selected ‘master’ user can have as delegates.
Example 1 – Delegates assigned and can switch to delegate user
WAP Administrators or Superusers may need permission to access other user’s profiles, either to approve documents or to assist with any training queries. If documents are approved on behalf of a delegate user, the approval history will show as it has been approved by the logged in user on behalf of the delegate user. In the example below, Line 1 was approved directly by the user, Chad. Line 2 was approved by the Administrator, who was delegated to Chad at the time:

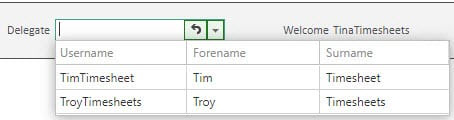
If switching to another user’s profile via the delegate drop down menu, the system will be as if that user has logged in themselves; the user logged in will have all the permissions and approval values of the delegate user.
In this example users would be given delegates and also the user type permission ‘Enable Delegate Switching’.
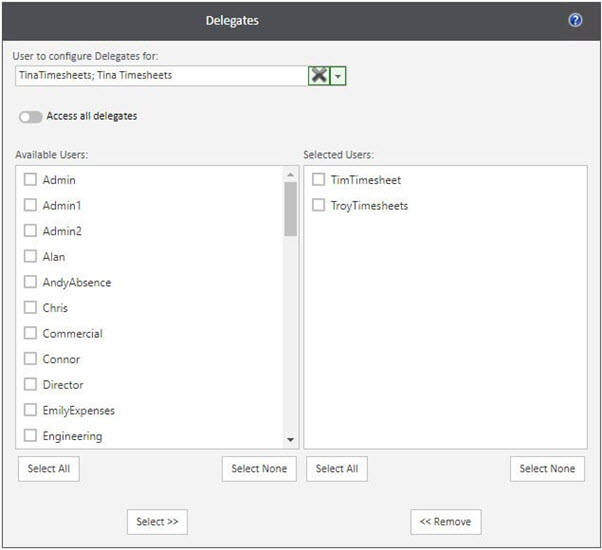
Choose the user to configure the delegates for from the drop down list and either select they can access all delegates or move users from the Available Users list to the Selected Users list as required; the selected users will then appear in the drop down list at the top right of their WAP screen. When viewing a delegate user’s WAP profile, click the curved arrow on the delegate drop down list to log back in as the logged in user. If required, a user can be given access to all delegates; this means that when a new user is added onto the system, they will automatically appear on the user’s delegate list. This permission can also be assigned on a user’s WAP profile and is usually only assigned to WAP Administrators and Superusers.
Example 2 – Delegates assigned but cannot switch to delegate user
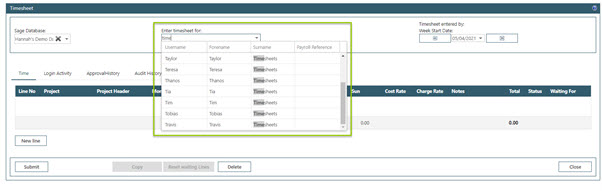
Managers may be given delegate permission to their team members to allow for reporting on timesheets or holiday requests, or to be allowed to enter absences for their delegates. In these instances the managers should not be able to access all the screens as their delegates would see. Another example is if a user needs to enter documents on behalf of another user; e.g. a PA entering timesheets for their MD or an internal admin entering timesheets for an Engineer. The user who has been given delegate access to the other users would be able to pick the correct requesting user from their assigned delegates when entering a timesheet or expense claim.
In this example users would be given delegates but not the user type permission ‘Enable Delegate Switching’.
10. Email
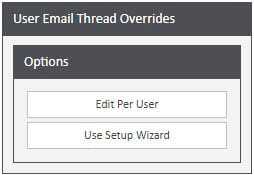
If notifications need to be changed for a particular user, this can be carried out here by either editing per user or using the wizard to change a group of users. Any amendments will show under Overridden Email Threads; these changes can also be made on a user’s WAP profile, under the Notifications tab. Generally, it is not recommended to override the system email threads at a user level as this can create increased maintenance for WAP Superusers.
11. Expense Item Types
This is where expense types can be linked through to the user with a default nominal account, tax code, maximum claim amounts or memos per user.
See our WAP Expense Help and User Guide for further information.
12. Expense Meetings
If expense meetings have been configured, this is where they are linked through to users or users are allocated access to all meetings.
See our WAP Expense Help and User Guide for further information.
13. Holidays
Within this section are various tools to add starting holiday figures, configure holiday conflicts, assign entitlement for future years or add or remove bank or mandatory holidays from users’ timesheets.
See our WAP Holiday Help and User Guide for further information.
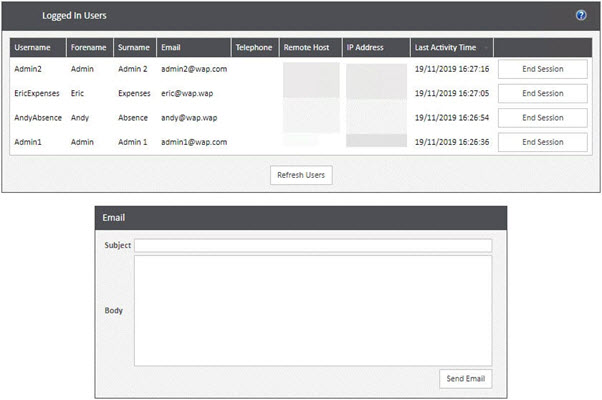
14. Logged In Users
Within here any users who are currently logged onto the system will be shown; this is useful to ensure all users are logged out before carrying out a WAP upgrade or system maintenance. If required, a user’s session can be ended by clicking the End Session button next to each user, or an email can be sent to all logged in users prior to this asking them to end their session.
15. Nominal Accounts
Users of the WAP system will often need to be restricted as to the nominal codes they can see so they are only able to view nominal codes specific to their department or the function the users carry out. This will most commonly apply to users who are raising requisitions, viewing budget enquiry information or editing invoices awaiting their approval.
There are four options for allocating nominal codes to users.
15.1. Edit per User
This option allows nominal allocation either by user or by nominal; both options permit a maximum line and approval value for a specific nominal. Approval value can be overridden per nominal code and document type if required. If left at 0.00, the system will use the user’s default line and approval values set in their User Profile – Account Options tab.

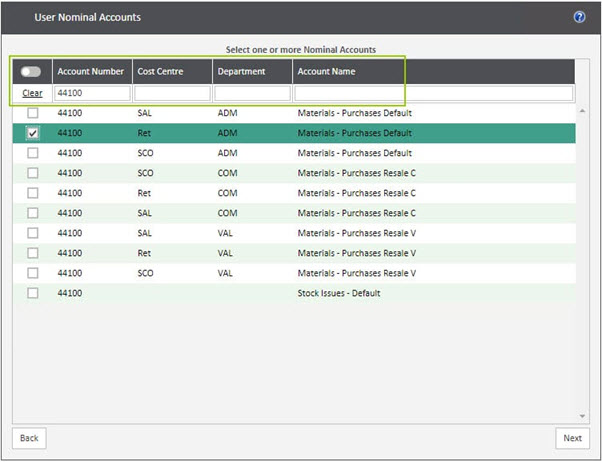
15.2. Using Wizard
A wizard is provided to speed up the process of assigning or removing nominal codes to users. If a user has moved departments and needs new nominal codes allocated, run the wizard once to select all nominal codes, the applicable user, remove the codes and then run the wizard again but to select the required codes and allocate to the user.
The first step is choosing the required Sage Company, then select the required nominal accounts (these can be searched for at the top by typing in an Account Number, Cost Centre or Department). Once the nominal codes have been checked, further searches can be undertaken – any codes previously selected will be retained. If all nominal codes need to be selected, click the box at the top of the list. When all required nominal codes have been selected, click ‘Next’.
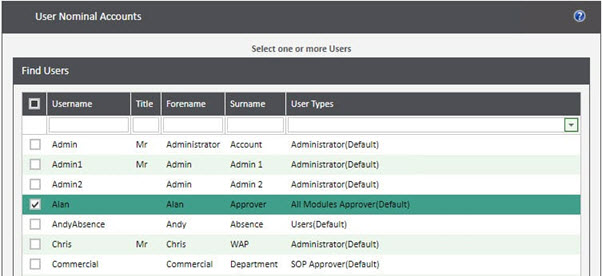
Select all the users that need to be granted access to the selected nominal codes, click ‘Next’.
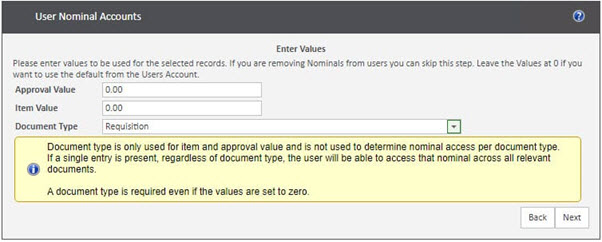
If specific line or approval values need to be entered for the selected nominal codes, enter these here and pick the required document type this applies to. If left at 0.00, the system will use the user’s default line and approval values set in their User Profile – Account Options tab.
Nominal codes are not allocated to specific document types; if the values are left at zero and only Requisition picked as the document type, this nominal code will still be available to the user across other document types. Only approval values are specific per document type. For example, if the below was selected for the nominal account 44100, if the user was to amend the nominal on an invoice approval, they would have the same nominal account 44100 available to them there as well. There is no need to allocate nominal account 44100 to both Requisitions and Invoices, unless the user’s approval or item value would be different depending on each document type.
The final step is to select whether access to these nominal codes needs to be assigned to or removed from the users. Click Next to complete the wizard.

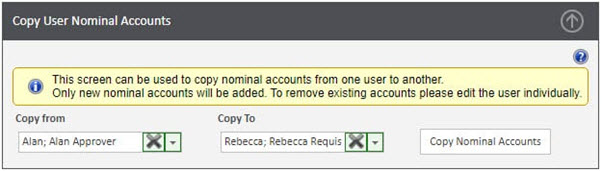
15.3. Copy from another User
This will copy nominal code access from one user to another; this functionality is useful if setting up a new user who should match an existing user. Only new nominal accounts will be added; to remove access to nominal codes, either edit the user individually or use the wizard.
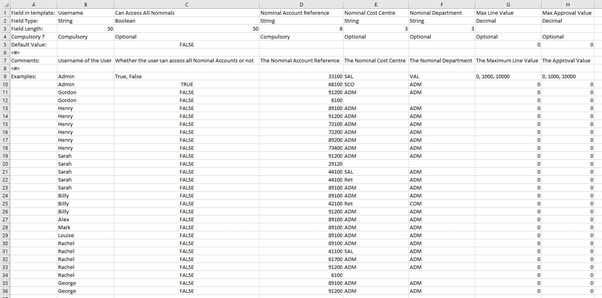
15.4. Import / Export
Nominal access per user can be configured and imported once a template has been generated from within WAP. Generate the template, complete with the correct data, validate and once the file is valid, import. When importing, there is an option to maintain existing allocations, or override what the user(s) has currently with what is in the import.

It is possible to export nominal allocation, a database and user should be specified, or leave the user field empty to export for all users. This will show what nominal codes have been allocated to which users. The option to export and then re-import can be useful for updating user nominal code access for many users or nominal codes at a time.
16. Out of Office Alternate Users
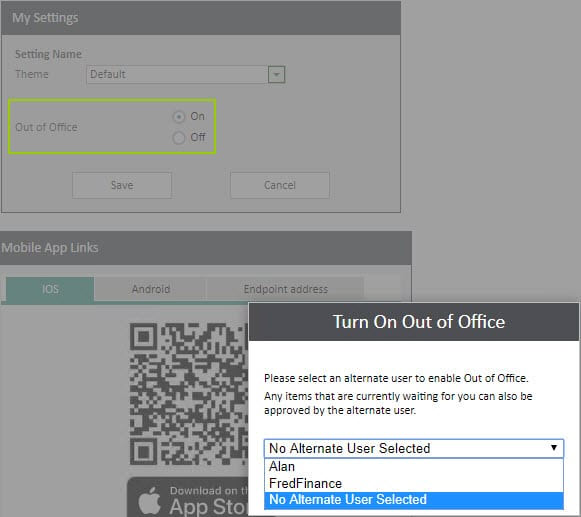
If a user is an approver they are able to switch on their out of office to direct approvals to another user. Once the out of office has been set as on, the user will see a list of other users to select from; it is only possible to select one alternate user. It is recommended that users delegate sideways or upwards, meaning that they should choose a user who has equal or greater approval values than themselves so that documents do not get stuck during approval. It is the alternate user’s approval values that will be used. In addition, if the approver is part of a user list, they should not delegate to someone else within that list. For example, if step 4 requires two out of three approvers, those users should not select an out of office user who already exists in the step.
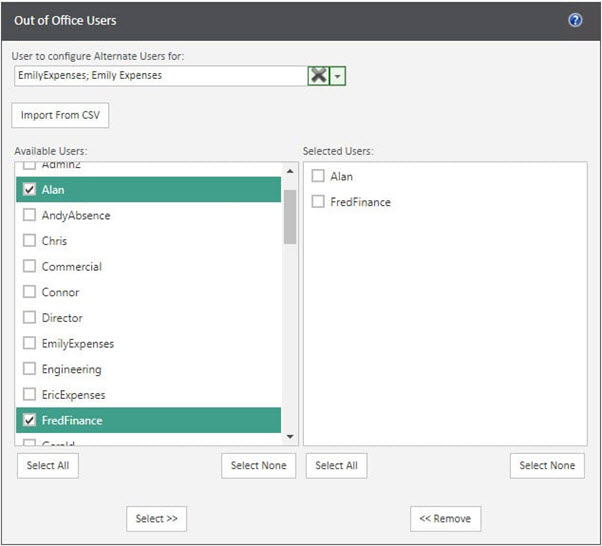
Building a specific list of alternate users here will mean it is possible to restrict who a user can choose as their alternate user. If no alternate users are configured, the user will be able to choose from all users.
If using WAP Holiday module, out of office can be automatically switched on and off when a user starts and finishes their holiday.
In the following example, when Emily switches on her out of office, she will be able to choose either Alan or Fred as her alternative user.
Out of Office can only be switched on through the ‘My WAP Settings’ screen accessed on the top WAP menu bar. Once the user has marked themselves as out of office, they’ll have to pick an alternate user. This user will then receive an email to notify them they are an out of office alternate for another user.
See our WAP System Settings Help and User Guide for further information.
17. Project Header Types
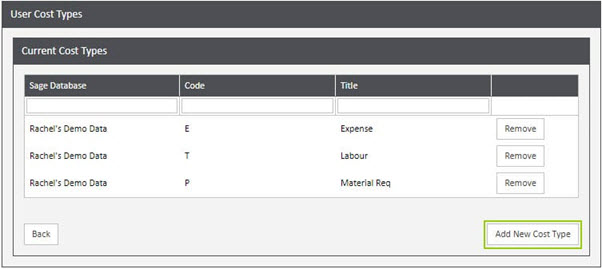
This wizard can be used to allocate Project Header Types to a user; i.e. so all Project Headers within an expense Project Header Type will be visible to that user when entering an expense claim. Project Header Types can be removed per user as required, or click Add New Cost Type to add a new Project Header Type to a user. Depending on how the Project Headers have been structured within Sicon Projects, either configure Project Header access in WAP through the Project Headers wizard, or Project Header Type wizard, do not try to use both.
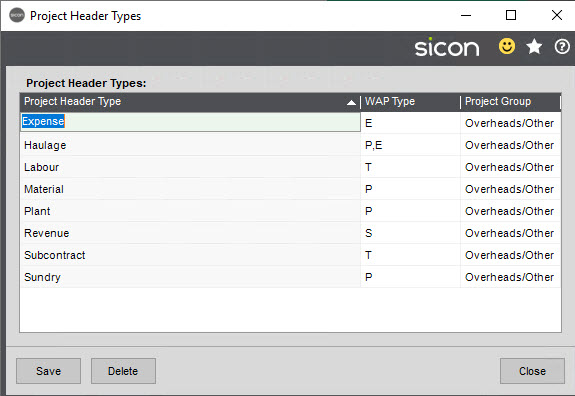
Project Header Type configuration in Sage will determine which module project header types are available in within WAP; i.e. Code E for Expenses, code T for Timesheets and code P for Purchases (Requisitions). Within Sage it is possible to make header types available for more than one WAP module by entering a comma between the types. E.g. P, E. This would mean the header is available on Requisitions and Expenses, if the user has access to both modules in WAP as well.
From a reporting perspective separate headers for each module may be required, depending on how costing is to be tracked.
Please refer to the Sicon Projects Help and User Guide for further information.
If Project Accounting is configured rather than Sicon Projects, the menu option will be called ‘Project Item Types’.
18. Project Headers
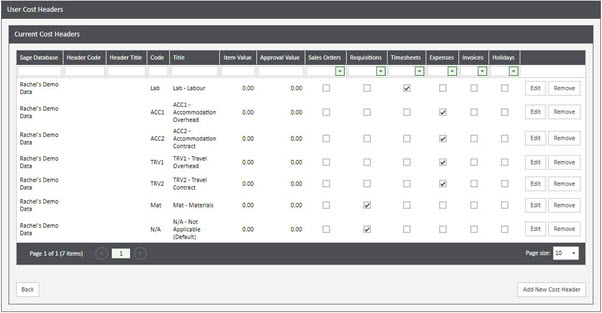
This wizard can be used to allocate Project Headers to users and state which modules they will be available in. Per user it is possible to either edit or remove Project Headers as required, or click Add New Cost Header to assign a new Project Header to the user. Select the user(s), Sage Database, tick the correct modules to apply the Project Header to and then go through to select the correct Project Headers. Depending on how the Project Headers have been structured within Sicon Projects, either configure Project Header access in WAP through the Project Headers wizard, or Project Header Type wizard, do not try to use both.
If a user has been given access to view all project headers, this will override any project headers that have been applied individually; so if users should not have access to view all project headers, make sure this is not ticked on their user profile. Please note that if the Project Headers have been restricted on a specific project in Sage, this overrides what the user can see in WAP.
Please refer to the Sicon Projects Costing Help and User Guide for further information.
If Project Accounting is configured rather than Sicon Projects, the menu option will be ‘Project Items’.
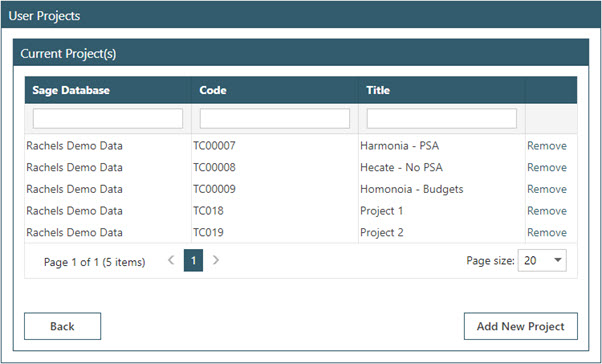
19. Projects
This wizard can be used to allocate Projects to users. Select the user to see what projects have already been allocated to the user, remove any if required or click Add New Project to select a Sage Database and show all projects currently active within Sicon Projects. Select the required projects and add to the user. It is not possible to link projects to specific modules (e.g. requisitions, expenses – this is done at Project Header level).
The below screenshot shows where Analysis Codes have been set at the Project level and configured to show on the wizard – this can make it easier to link projects to users (setting is in System Settings cogs – System Settings banner – Costing – Show project analysis codes on user project wizard).
20. Requisition Templates
If using templates within the Requisition module, this section can be used to allocate templates to users.
See our WAP Requisitions Help and User Guide for further information.
21. Send Welcome Emails
When a new user is added onto the system, a welcome email can be sent containing the link to WAP and their login details. If users are added onto WAP using an import, a welcome email can either be sent immediately or at a later date; this can cover the instance where users are imported at initial configuration but users should not be accessing the system until it has been fully setup. The welcome email will either contain a system generated password which the user must change on first login, or a password can be created against the user’s profile and this will be sent to them.
The Welcome Email thread uses the Urgent Email thread so if users have not received a welcome email, make sure the Urgent Email thread has been configured correctly.
A list of users will be displayed showing whether a welcome email has been sent. Select the users to send a welcome email to and click next.
Choose whether to create a new temporary, system generated password, or to include the password on the welcome email (if a password has already been allocated to the user). Click to send the welcome email to the users.

The users will receive an email as below. The text on this email cannot be changed.

22. User Credit Cards
If using credit cards within the Expense module, this screen is where you would link the user to a credit card.
See our WAP Expense Help and User Guide for further information.
23. User Subsistence incidentials
If using incidentals within the Expense module, this screen is where you can link the user to an incidental.
See our WAP Expense Help and User Guide for further information.
24. User System Settings
If using WAP with Requisitions, it is possible to override a number of system settings per user. This can be useful if different users have different uses of the requisition module. If no user should have any different settings than either the system settings or the user type, leave this screen so user settings are derived.
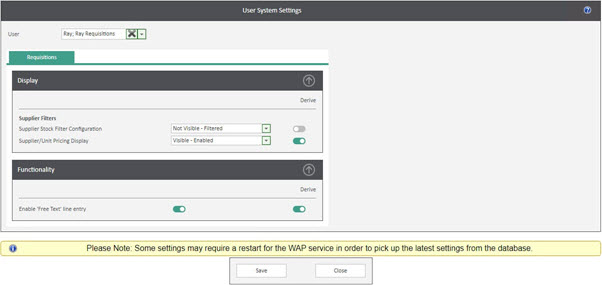
Where possible, it is not recommended to override settings at a user level as this creates increased maintenance for WAP Superusers.
25. User Type System Settings
If using WAP with Requisitions or Expenses, it is possible to override a number of system settings per user type. This can be useful if different user types have different uses of the either the requisition or expense modules. If no user type should have any different settings than either the system settings, leave this screen so user type settings are derived.
Expenses
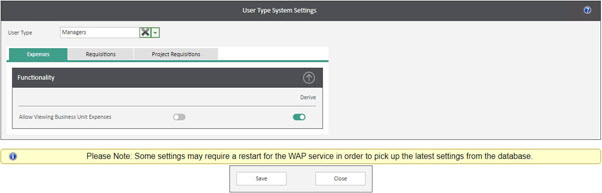
Allow Viewing Business Unit Expenses: if this user type should be able to view expenses submitted by other members of their business unit, switch this on here. It might be that for managers they will be allowed to view their team members’ expenses but for most User Types they should only be able to view their own.
Requisitions
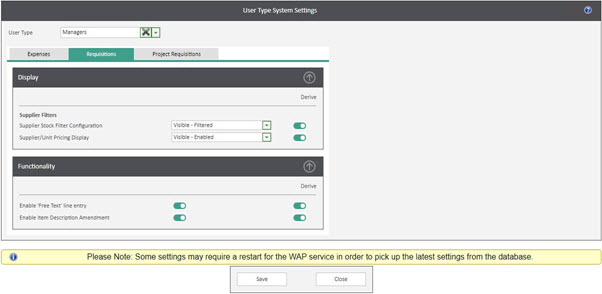
Supplier Filters – Supplier Stock Filter Configuration: the default from System Settings will be used initially but if required can be changed; for example it might be for one user type stock items can only be ordered from the preferred supplier while for another user type stock can be purchased from any company. In the above example, as this setting has the ‘Derive’ option selected, this setting is the same for the Managers as the system setting.
Supplier Filters – Supplier/Unit Pricing Display: the default from System Settings will be used initially but if required it can be changed; for example it might be that for one user type the pricing will be visible per supplier but for another user type it shouldn’t be visible.
Enable ‘Free Text’ line entry: the default from System Settings will be used initially but if required it can be changed; for example it might be that for one user type free text lines can be entered on a requisition but for another user type, they should only be able to raise stock lines.
Enable Item Description Amendment: the default from System Settings will be used initially but if required it can be changed; for example it might be that for one user type they are able to amend an item description on a stock item but another user type shouldn’t be able to change the description.
Project Requisitions
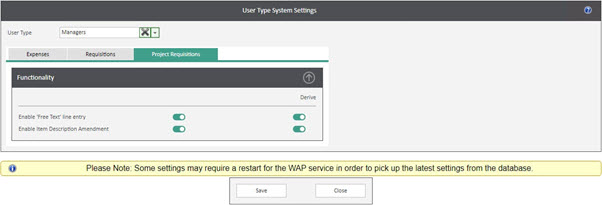
Enable ‘Free Text’ line entry: the default from System Settings will be used initially but if required it can be changed; for example it might be that for one user type free text lines can be entered on a project requisition but for another user type, they should only be able to raise stock lines.
Enable Item Description Amendment: the default from System Settings will be used initially but if required it can be changed; for example it might be that for one user type they are able to amend an item description on a stock item but another user type shouldn’t be able to change the description.
26. User Types
User Types must be configured prior to users being added onto the WAP system; these determine permissions as to what the users in this User Type can or cannot do within WAP. Applying these at a user type level is more efficient than having to set at an individual user level. User types can be added to an approval route where any one of the users in a user type can approve a requisition, invoice, expense etc.
User types can be added to each organisation’s specification and it is worth spending some time deciding the functions you wish your staff to perform, how they can be grouped and therefore the name of the user type. These could either be created as job titles (e.g. Finance Team) or different modules could be used and users assigned to multiple user types (e.g. Approving Payments or Invoice Approver).
Each user type can be edited and permissions enabled to perform various functions in relation to the system and each WAP module. A user type can be copied and renamed to allow for quick setup where user types may be similar.
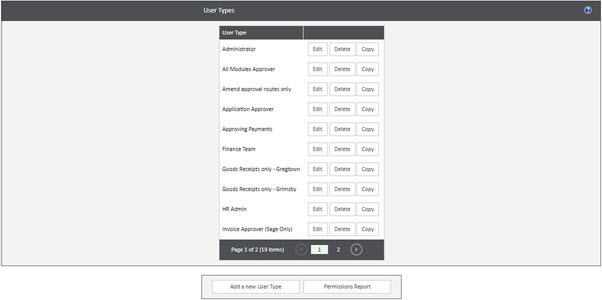
The Permission Report at the bottom of the screen can be run to show each permission assigned to a user type; this can be used to ensure the user types have been set up correctly.

Within each user type it is possible to expand the banner to view which users belong to the user type.

26.1. General Tab
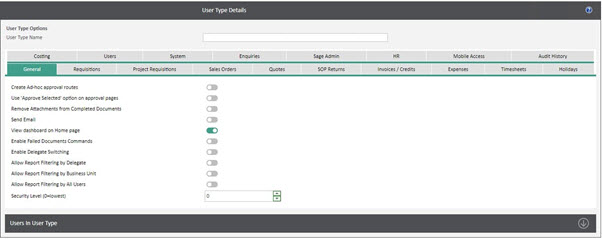
Create Ad-hoc approval routes: the ability to create a bespoke approval route to override the pre-configured approval route. This is usually only given to Superusers or Administrators.
Use ‘Approve Selected’ option on approval pages: the ability to select multiple documents to approve at once, rather than approving each document individually. This is usually only given to Superusers or Finance staff who may have many documents at a time to approve.
Remove Attachments from Completed Documents: the ability to remove attachments stored against a document in WAP.
Send Email: the ability to email directly from within WAP – there is no integration with Outlook or other email programmes.
View dashboard on Home page: to allow users to see their notifications and documents awaiting approval on initial login.
Enable Failed Documents Commands: if a document fails to post, this allows users to clear the error flag and resubmit the document.
Enable Delegate Switching: whether the user is able to access the system as another user and enter or approve documents on behalf of that user.
Allow Report Filtering by Delegate: whether to let the user run reports based on their delegates.
Allow Report Filtering by Business Unit: whether to let the user run reports based on their business unit.
Allow Report Filtering by All Users: whether to let the user run reports based on all users.
Security Level (0=lowest): this is related to reporting within the HR module. Different security levels may be required depending on what users are permitted to do within the HR module.
26.2. Requisition Tab
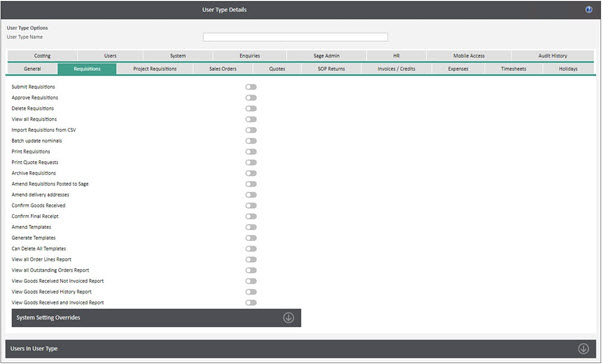
Submit Requisitions: the ability to create and submit requisitions.
Approve Requisitions: the ability to approve a requisition. If a user does not have this permission, they cannot be selected when building an approval route.
Delete Requisitions: the ability to delete a requisition. A requisition cannot be deleted if goods have been received or invoiced against. If an approved order is deleted, it will show in Sage with 0.00 value and a status of Completed.
View all Requisitions: the ability to view all requisitions in the system.
Import Requisitions from CSV: the ability to be able to import requisitions into WAP based on a CSV template.
Batch update nominals: the ability to update nominal codes across multiple lines on a requisition.
Print Requisitions: the ability to open the print popups to email an approved order to a supplier.
Print Quote Requests: the ability to open and print or email quotes attached to an order.
Archive Requisitions: the ability to archive completed orders; i.e. orders that have been fully goods received and invoiced against. Completed requisitions should be archived regularly for speed and performance benefits – these requisitions can still be searched for using the search filters.
Amend Requisitions Posted to Sage: the ability to amend a requisition in WAP once fully approved and posted to Sage. This is usually a permission only given to Finance or Administrator user types.
Amend delivery addresses: this is the permission to be able to add or edit delivery addresses in WAP; this is access to the setting under System Setup – Delivery Addresses, rather than the ability to pick different delivery addresses on the requisition entry screen. This is usually just a Superuser permission to be able to create delivery addresses.
Confirm Goods Received: whether the user is able to goods receive.
Confirm Final Receipt: whether the user is able to Final Receipt in the Goods Receive screen.
Amend Templates: the ability to make changes to a generated template.
Generate Templates: the ability to create new templates.
Can Delete All Templates: the ability to delete templates.
View all Order Lines Report: permission to run the all order lines report which will list all orders, their values, status, approval history etc.
View all Outstanding Orders Report: permission to run the outstanding orders report showing all orders that have goods outstanding.
View Goods Received Not Invoiced Report: permission to run the goods received not invoiced report showing all orders that have been goods received but not invoiced.
View Goods Received History Report: permission to run the goods received history report which till show who received an order, when and the quantities on the GRN as well as the original quantity ordered.
View Goods Received and Invoiced Report: permission to run the goods received and invoiced report which will show invoices recorded in Sage and the associated receipt history.
System Settings Overrides: if any of these settings should be different for this user type from the main System Settings, configure these options here.
26.3. Project Requisition Tab
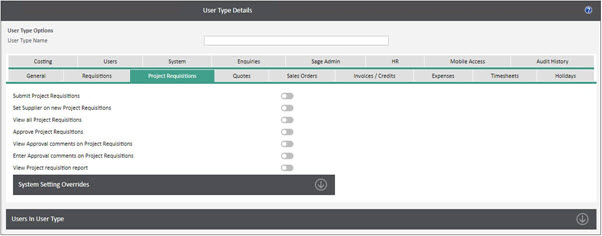
Submit Project Requisitions: the ability to submit a project requisition.
Set Supplier on new Project Requisitions: whether a user is able to choose a supplier when entering a project requisition.
View all Project Requisitions: the ability to view all project requisitions entered by all users in the system.
Approve Project Requisitions: the ability to approve project requisitions. If a user does not have this permission, they cannot be selected when building an approval route.
View Approval comments on Project Requisitions: the ability to view any comments made during the approval process.
Enter Approval comments on Project Requisitions: the ability to enter comments during the approval process.
View Project Requisition Report: the ability to run a report on project requisitions.
System Settings Overrides: if any of these settings should be different for this user type from the main System Settings, configure these options here.
26.4. Quotes Tab
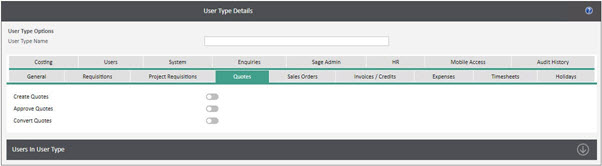
Create Quotes: the ability to create quotes within the sales order module.
Approve Quotes: the ability to approve quotes within the sales order module.
Convert Quotes: the ability to convert a quote to a sales order.
26.5. Sales Order Tab
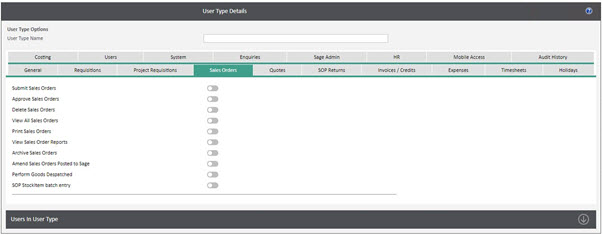
Submit Sales Orders: the ability to raise new sales orders.
Approve Sales Orders: the ability to approve sales orders.
Delete Sales Orders: the ability to delete sales orders.
View All Sales Orders: the ability to view all sales orders in the system.
Print Sales Orders: the ability to open the print popups to email an approved sales order to a customer within WAP.
View Sales Order Reports: the ability to run sales order reports.
Archive Sales Orders: the ability to archive completed sales orders; i.e. sales orders that have been fully despatched, invoiced and posted the invoice against. Completed sales orders should be archived regularly for speed and performance benefits – these sales orders can still be searched for using the search filters.
Amend Sales Orders Posted to Sage: the ability to amend a sales order in WAP once fully approved and posted to Sage. This is usually a permission only given to Finance or Administrator user types.
Perform Goods Despatched: the ability to mark goods as despatched.
SOP Stock Item batch entry: the ability to enter stock items using the batch entry screen.
26.6. SOP Returns Tab
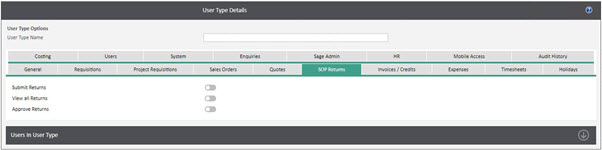
Submit Returns: the ability to submit returns.
Approve Returns: the ability to approve returns.
View all Returns: the ability to view all returns; if this is not allowed, users will only be able to view returns they have submitted or approved.
26.7. Invoices / Credit Tab
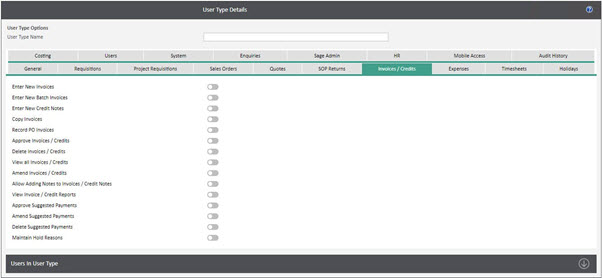
Enter New Invoices: applicable to invoices entered directly into WAP only – the ability to enter new invoices.
Enter New Batch Invoices: applicable to invoices entered directly into WAP only – the ability to enter invoices in a batch.
Enter New Credit Notes: applicable to invoices entered directly into WAP only – the ability to enter new credit notes.
Copy Invoices: applicable to invoices entered directly into WAP only – the ability to create new invoices by coping existing invoices.
Record PO Invoices: applicable to invoices entered directly into WAP only – the ability to record invoices against approved Purchase Orders.
Approve Invoices / Credits: the ability to approve an invoice. If a user does not have this permission, they cannot be selected when building an approval route.
Delete Invoices / Credits: the ability to delete an invoice. If an invoice has been pulled through to WAP from Sage and then deleted in WAP, it will be pulled through to WAP again for approval as the invoice in Sage still has the ‘U’ query flag.
View all Invoices / Credits: the ability to view all invoices in WAP. Usually only Admin or Finance users would be given this permission.
Amend Invoices / Credits: the permission to edit an invoice or credit note, i.e. to change a nominal code or split lines. Depending on Costing module configuration, it may not be possible to change the invoice.
Allow Adding Notes to Invoices / Credit Notes: the ability to add notes to an invoice during the approval process; these notes are only visible in WAP and will not post through to Sage. If an invoice is edited or re-routed it can be useful to add notes to pass information onto other approvers.
View Invoice / Credit Reports: permission to run the invoice report showing all invoices, their values, status, approval history etc.
Approve Suggested Payments: the ability to approve suggested payments. If a user does not have this permission, they cannot be selected when building an approval route.
Amend Suggested Payments: the ability to make any changes to suggested payments.
Delete Suggested Payments: the ability to delete a suggested payment within WAP; the suggested payment routine would need to be run within Sage to pull through payments for approval.
Maintain Hold Reasons: the ability to maintain a pre-defined list of reasons for putting invoices on hold during approval in WAP.
26.8. Expenses Tab
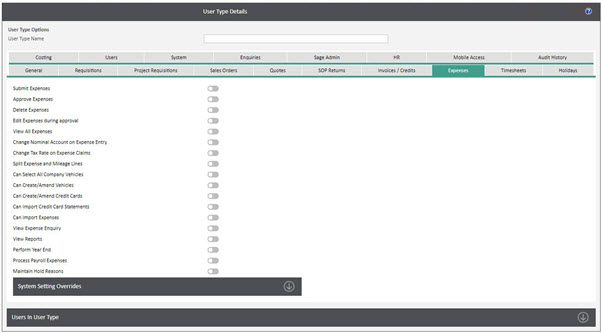
Submit Expenses: the ability for a user to submit an expense claim.
Approve Expenses: the ability for a user to approve an expense claim.
Delete Expenses: the ability to delete an expense. N.B. once an expense has been fully approved it cannot be deleted.
Edit Expenses during approval: the ability for an approver to make changes during approval, e.g. changing a nominal code.
View All Expenses: the ability for the user to see all expenses within the system, rather than just their own or those they have approved. This is usually a permission just given to System Administrators or Finance users.
Change Nominal Account on Expense Entry: the ability for a user to select a different nominal account than the one defaulted.
Change Tax Rate on Expense Claims: the ability for a user to amend the tax rate or VAT value on expense entry. N.B. a tax rate can only be changed if the receipt attached value is set to Yes; if no, the VAT value will default to the Non-Tax rate configured in Sage Connections.
Split Expense and Mileage Lines: the ability to split a line; this would be applicable if using a costing module and a line needs to be split across multiple projects.
Can Select All Company Vehicles: the ability for a user to select from any company vehicles; by default, a user can only select a company car that has been assigned to their profile and the default private vehicle.
Can Create/Amend Vehicles: the ability to add, assign or amend vehicles and fuel rates. This is usually a permission just given to System Administrators or Finance users.
Can Create/Amend Credit Cards: the ability to add, amend or assign credit cards. This is usually a permission just given to System Administrators or Finance users.
Can Import Credit Card Statements: if credit card import statements have been configured, a user type will need the permission to import statements; this is usually a permission just given to System Administrators or Finance users.
Can Import Expenses: the ability to import expenses.
View Expense Enquiry: the ability to view expense and mileage reports in WAP.
View Reports: the ability to view expense and mileage reports in WAP.
Perform Year End: the ability for a user to reset all users’ mileage claims back to zero. This is usually a permission just given to System Administrators or Finance users.
Process Payroll Expenses: the ability to process expense claims that do not post through to Sage. This is usually a permission just given to System Administrators or Finance users.
Maintain Hold Reasons: the ability to maintain a pre-defined list of reasons for putting expenses on hold during approval in WAP.
System Setting Overrides
Allow Viewing Business Unit Expenses: if this user type should be able to view expenses submitted by other members of their business unit, switch this on here. It might be that for managers they will be allowed to view their team members’ expenses but for most User Types they should only be able to view their own.
26.9. Timesheets Tab
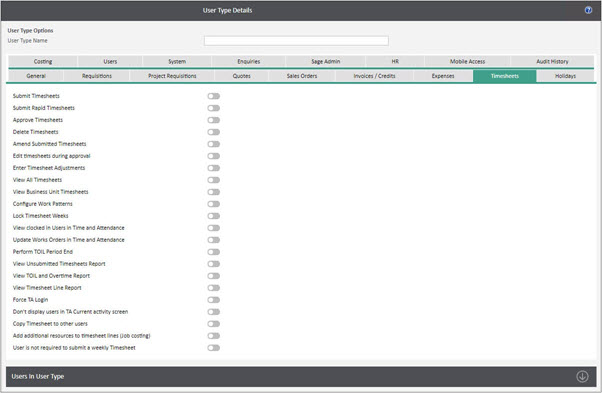
Submit Timesheets: the ability for a user to enter a timesheet using the standard timesheet entry screen. This should be selected if using Sicon Sage Timesheets.
Submit Rapid Timesheets: the ability for a user to enter a timesheet using the rapid timesheet entry screen. This setting is only applicable if Sicon Sage Timesheets are not in use.
Approve Timesheets: the ability for a user to approve a timesheet.
Delete Timesheets: the ability for a user to delete a timesheet; once approved, a timesheet cannot be deleted.
Amend Submitted Timesheets: the ability for a user to make changes to a timesheet once submitted.
Edit timesheets during approval: the ability for a user to edit a timesheet while it is awaiting their approval.
Enter Timesheet Adjustments: the ability for a user to make adjustments on an approved timesheet; this is done under the Adjustments tab. This permission is usually reserved for Administrator or Finance roles. This setting is only applicable if Sicon Sage Timesheets are not in use. For Sicon Sage Timesheets, adjustments should be made in Sage.
View All Timesheets: the ability to view timesheets submitted by all users; rather than just those submitted or approved by that user. This will also give users permission to enter timesheets on behalf of other users.
View Business Unit Timesheets: the ability to view timesheets submitted by other users in the same business unit.
Configure Work Patterns: the ability to create and assign work patterns; this is usually just a WAP Superuser permission.
Lock Timesheet Weeks: the ability to lock weeks to perform TOIL period end.
View clocked in Users in Time and Attendance: if T&A terminals are configured, the ability to view users’ login status.
Update Works Orders in Time and Attendance: allows time entered using the T&A terminals to be posted to a Works Order.
Perform TOIL Period End: if TOIL has been configured, this is the ability to perform the period end routine which will update TOIL accrued, taken and carried over figures. This is usually a permission reserved for Administrator users.
View Unsubmitted Timesheets Report: permission to run the unsubmitted timesheets report to see users that have not submitted timesheets within a date range.
View TOIL and Overtime Report: permission to run the TOIL and Overtime report detailing hours’ users’ have recorded.
View Timesheet Line Report: permission to run the Line report showing timesheet hours recorded, status, approval history etc.
Force TA Login: if configured, users will not be able to select a project on the T&A terminal until they have logged in.
Don’t display users in TA Current Activity screen: this will hide the users from the current logged in users list within T&A.
Copy Timesheet to other users: this permission will allow users to copy their timesheet to other users; i.e. for the instance where a team leader will copy their timesheet to their team members to save them time when completing their timesheet. Users with copied timesheets are still able to make adjustments if required before submitting for approval.
Add additional resources to timesheet lines (Sicon Projects): this permission will allow users to add other Sicon Project resources (i.e. vehicles or machinery) to a timesheet for those costs to be included on the project.
User is not required to submit a weekly Timesheet: if the user should not submit a timesheet, configure here so they are not included in reminder emails about unsubmitted timesheets.
26.10. Holidays Tab
Submit Holiday Requests: the ability for a user to submit a holiday request.
Approve Holiday Requests: the ability for a user to approve a holiday request.
Delete Holiday Request: the ability for a user to delete a holiday request. N.B. once a holiday request has been fully approved, it cannot be deleted but instead needs to be cancelled and submitted as a cancellation request.
Reset Completed Holiday: this setting allows users to reset a completed holiday request so it can be cancelled and the holiday added back onto the user’s entitlement; i.e. to cover the situation where a user has a holiday booked but ends up working on this day and wishes to cancel a holiday that has already been flagged as taken.
View Business Unit Holiday Requests: the ability to view holiday requests submitted by other users in the same business unit.
View All Holiday Requests: the ability to view all holiday requests in the system for all active WAP users.
View Holiday Reports: the ability to access reports showing entitlement and booked holiday. Depending on permissions on the General tab, the user will either be able to see requests for themselves, their business unit users, their delegates or all users.
Enter holiday for all users: the ability to enter holiday requests for all users.
Enter holiday for delegates: the ability to enter holiday requests for delegate users.
Amend User Holiday Rules: the ability to change rules for how users within the organisation conflict with other users’ holiday requests. This permission is usually only given to the WAP Superusers.
Perform Holiday Month End: this gives the user the ability to perform holiday month end which will create new entitlement for coming years, identify hours to carry forward or hours to pay. This permission should only be given to WAP Superusers.
Add Starting Holiday lines for users: this will give the user the permission to access the Starting Holiday tool; generally, this is only given to WAP Superusers. This tool can be used to adjust a user’s holiday entitlement is a user is starting part way through the year.
Configure Work Patterns: the ability to create and assign work patterns; this is usually just a WAP Superuser permission.
26.11. Costings Tab
Edit Projects during Invoice Approval (if no Project selected or N/A and the Invoice is not in Sage Already): the project entered on an invoice can only be changed if it was entered in Sage as a direct purchase ledger invoice. If it is a PO Invoice, the project can only be changed if recorded in Sage against the N/A Project and N/A Project Header.
Edit Projects during Order Approval (if no Project selected or N/A and the Invoice is not in Sage Already): the project can only be changed on the approval page if the line has not been goods received or invoiced.
Can access Sicon Projects screens: whether the Sicon Projects screen menu options are visible on the menu options on the left of the screen.
Can view all jobs in Sicon Projects screens: if this is ticked, the users will be able to see all projects, if unticked, users can only view projects where they have been set as the project manager (the resource must be allocated to their user profile) or, have had projects allocated to them within their user profile.
Can edit jobs in Sicon Projects screens: if this is ticked, the users will be able to amend a project and edit the percentage complete figure and the actual completion date. Once saved, these will then update the project within Sage.
Can add/edit memos in Sicon Projects screens: if this is ticked, users will be able to add notes or memos onto the project in WAP which once saved, will post through to the project within Sage.
Can create jobs in Sicon Projects screens: the ability for a user to create a project within WAP that will save through to the Project list within Sage.
Can edit job analysis codes in Sicon Projects screens: if this is ticked, users will be able to edit analysis codes as configured from Sicon Projects settings within Sage. Once an update has been saved it will post through to the project within Sage.
Can view Job Custom Field values in Sicon Projects screens: the ability for a user to view additional custom analysis tabs, as configured from Sicon Projects settings within Sage.
Can edit Job Custom Field values in Sicon Projects screens: this setting is used in conjunction with the setting above; the ability for a user to edit additional custom analysis tabs, as configured from Sicon Projects settings within Sage. Once updates have been saved, these will post through to the project within Sage.
Can submit Construction Supplier Applications: if Sicon Construction is installed, the ability for the user to be able to submit supplier applications.
Can approve Construction Applications: if Sicon Construction is installed, applications can require approval in WAP. This permission allows the user to approve such applications; either ones that have been entered in Sage or WAP.
Can View Construction Applications: the user will be able to view applications that are awaiting their approval or they have approved.
Can View all Construction Applications: the user will be able to view all applications in WAP.
Can View Sub Contractor Purchase Orders: the ability for the user to view these purchase orders; either ones that have been entered in Sage or WAP.
Can submit Sub Contractor Purchase Orders: the ability for the user to enter these purchase orders in WAP.
26.12. Users Tab
Can Maintain User Type Allocation: this will open the setting to maintain which user types a user belongs to. Once a user has been saved in WAP their user type cannot be changed on their user profile, it must be done through this screen.
Amend Users: this permission will allow for existing users to be edited or new users to be added onto the system. Note, users can not be deleted if they have submitted documents or exist as an approver in an approval route.
Amend User Types: allows for existing user types to be edited or new user types to be added onto the system.
Amend Delegates: this will allow the user to amend users’ delegates.
Amend Users Nominal Codes: this permission will allow users to add or remove nominal codes that have been assigned to users.
Amend Business Units: the ability to edit existing business units or create new units, and add or remove users from business units.
Amend User Projects: the ability to add or amend which projects a user has access to.
Amend User Warehouses: the ability to manage which warehouses users have access to.
Amend User Template Access: the ability to manage which templates users have access to.
Reset Users Passwords: the ability to change the password on a user’s profile.
26.13. System Tab
Amend approval routes: the ability to create or amend approval routes.
Amend WAP Projects: if WAP Projects have been configured as the Costing module, this permission will provide the ability to add or amend WAP projects.
Manage System Settings: the ability to access WAP System Settings – this permission is required to open up other System and User permissions.
Clear IP Address Lockouts: this permission will allow IP address lockouts to be cleared. It may be that this permission is only given to Administrators or IT Superusers.
View Event Logs: the ability to view information stored in the event logs; i.e. if a document has failed to post, the reason can be found in the event log. This permission is usually just given to Administrators.
Amend Print Reports: if a custom PO layout has been created, this will allow the user to make amendments. This should only be given to users with knowledge of creating reports using DevExpress to avoid live PO layouts being corrupted.
Customise Pages: this will allow the user to make changes to various pages (at present only the WAP homepage). Once this setting is enabled, the user will also need to check “Page Customisation On” within their “My Settings” option.
26.14. Enquiries Tab
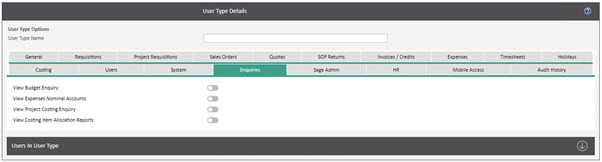
View Budget Enquiry: the ability to view the budget enquiry to see transaction information on any nominal codes they have been given permission to.
View Expenses Nominal Accounts: the ability to view the expense nominal report showing the total expense claims against individual nominal codes for expense claims entered in WAP. This would usually just be given to Finance or Administrator User Types.
View Project Costing Enquiry: this would only be applicable if using Project Accounting.
View Costing Item Allocation Reports: this enquiry will show Projects, Project Headers and Project Item Types allocated to users. This would usually just be given to Finance or Administrator User Types.
26.15. Sage Admin Tab
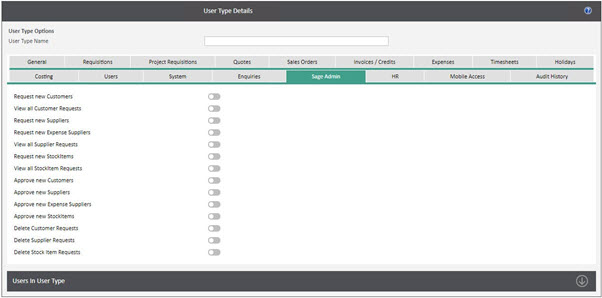
Request new Customers: the ability for a user to request a new customer.
View all Customer Requests: the ability for users to view all customer requests entered through WAP.
Request new Suppliers: the ability for a user to request a new supplier.
Request new Expense Suppliers: the ability for a user to request a new expense supplier; this option appears when linking a user through to a PL supplier account. Usually this permission is only given to Finance or Administrators who will be creating new users in WAP.
View all Supplier Requests: the ability for users to view all supplier requests entered through WAP.
Request new Stock Items: the ability for a user to request a new stock item.
Approve new Customers: the ability to approve new customer requests.
Approve new Suppliers: the ability to approve new supplier requests.
Approve new Expense Suppliers: the ability to approve new expense supplier requests.
Approve new Stock Items: the ability to approve new stock item requests.
Delete Customer Requests: the ability to delete customer requests; it is not possible to delete a request once it has been approved.
Delete Supplier Requests: the ability to delete supplier requests; it is not possible to delete a request once it has been approved.
Delete Stock Item Requests: the ability to delete stock item requests; it is not possible to delete a request once it has been approved.
26.16. HR Tab

HR Administrator: if this is ticked, users will be able to access the HR Admin settings and HR calendar.
Edit courses/qualifications: if this is ticked, the user will be able to edit courses and qualifications that have been allocated to themselves. Usually this would just be an HR admin permission.
Delete courses/qualifications: if this is ticked, the user will be able to delete courses and qualifications that have been allocated to themselves. Usually this would just be an HR admin permission.
Edit documents: if this is ticked, the user will be able to edit any documents that have been allocated to themselves. Usually this would just be an HR admin permission.
Delete documents: if this is ticked, the user will be able to delete any documents that have been allocated to themselves. Usually this would just be an HR admin permission.
Edit own bank details: this will allow users to make changes to their bank details under their HR account. If their account is linked to a PL Account in Sage, the bank details will be updated here too.
Edit own employment start date: this will allow users to make changes to their employment start date; some companies will lock this down so only HR admin users are able to make this change.
Notify when employee details change: if ticked, users within this user type will get a notification when an employee makes changes to their employee details.
Approve absences: the ability to approve an absence request. If a user does not have this permission, they cannot be selected when building an approval route.
Enter absences: the ability to enter and submit an absence request.
Enter absences for all users: the ability to enter absence requests for all users.
Enter absences for delegates: the ability to enter absence requests for delegate users.
Can view all absences: the ability to view all absences; this is usually just a Superuser permission.
Can view business unit absences: the ability to view absence requests for business unit users.
Can delete absences: the ability to delete an absence request. Once fully approved, the absence request cannot be deleted, it must be cancelled.
Can view absence reports: the ability to access reports showing absence requests.
26.17. Mobile Access Tab

These permissions relate to using the WAP App.
Mobile User: if a user is to be adding documents through the app, they need to be configured as a mobile user.
26.18. Audit History Tab
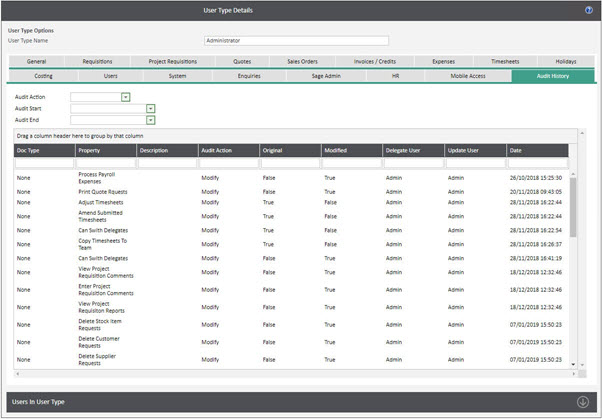
If auditing is enabled within WAP, this tab will be populated with any changes that are made on the User Type; what the change was, who made it and when. By default, all change lines will show but the filters can be used to only show specific actions or a date range when the action occurred.
Auditing is switched on in System Settings – Auditing.
27. User Vehicle
If using vehicles within the Expense module, this screen is where you can link users to vehicles.
See our WAP Expense Help and User Guide for further information.
28. Users
As many users can be added onto the WAP system as per the licenced amount; users marked as leavers do not take up a user licence. The Admin user will not take up a user licence unless it appears in an approval route. If more users have been added than the licence allows for, the menu options on in the top left navigation dropdown will disappear.
Users can be created manually here, or through the use of imports. All options are explained in more detail over the following sections.
If a user has left employment, mark them as a leaver and remove their ability to log into the system. Done this way, the user will not take up a user licence but their history will remain in the system and reports. Further information on the recommended leaver process is provided at the end of this Help and User Guide.
Users can not be deleted if they have submitted documents or exist as an approver in an approval route. The option to delete a user should only ever be used to delete incorrectly setup users during original creation. If a user appears in an approval route, they cannot be marked as a leaver until removed from the routes; either use the Global Replace functionality or use the Export / Import option to update approval routes first and then mark the user as a leaver.
28.1. Add a New User
To add a new user, click the Add a New User button at the top or bottom of the user list. When adding users, make sure two WAP windows are not open with the same user logged into both as this can result in user details being overwritten between profiles.
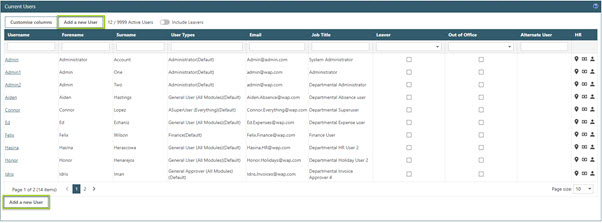
At initial user creation, some fields are marked as mandatory; if fields on other tabs cannot be selected, please check these mandatory fields have been completed.
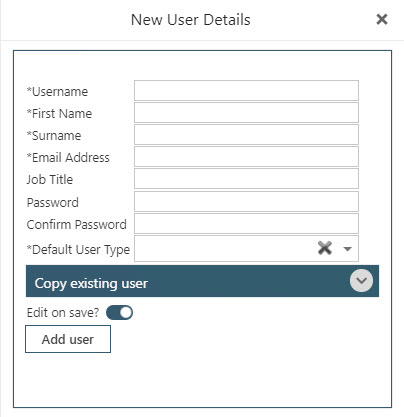
Username: login name for the WAP system. If single sign on is enabled, this username must match the user’s Windows login username. This is a mandatory field and usernames must be unique.
First name: this is a mandatory, free text field.
Surname: this is a mandatory, free text field.
Email Address: this is a mandatory, free text field.
Job Title: this is a free text box but is not mandatory.
Password: if required, enter a password here. This is not a mandatory field and generated passwords can be sent out to the user via the welcome email. Passwords entered here must meet the complexity requirements as configured in System Settings – Passwords / Security.
Confirm Password: if entering a password for the user, repeat the password.
Default User Type: select the user’s default user type. If the user is to belong to multiple user types, these can be assigned once the user profile has been saved.
Copy existing user: if required it is possible to copy an existing user; this will copy through from the existing user to the new user their user type, weekly contracted hours, project allocation and company access. Item and approval values, business units, nominal allocation and employee or PL suppliers are not copied across.
Edit on save: by default this will be configured so when the user profile is saved, other options against the user can be allocated and saved. If the user profile doesn’t need further configuration, untick this option before adding the user.
28.2. User Profile - Person Details Tab

Username: login name for the WAP system. If single sign on is enabled, this username must match the user’s Windows login username. This is a mandatory field and usernames must be unique.
Default User Type: this can be selected when first creating a user but cannot be edited once created. Select from the drop down list the required user type as configured in User Types. This is a mandatory field.
Employment Started: this is an optional field to enter an employment start date and is used by a number of modules. Timesheets; users will not receive notifications about submitting timesheets prior to their start date. Holidays; users can be prevented from taking more holiday than they have accrued. HR; employment start and anniversary dates can be configured to show on the HR calendar.
Leaver: only check this box if the user has left the company. An alternate user account must be selected as there may be documents awaiting approval that the alternate user would then have to action. An alternate user needs to be entered even if the user leaving was not an approver.
Out of Office: if the user has marked themselves as out of the office, this box will be populated. It is not possible to switch on out of office through this screen; out of office is switched on through the ‘My Settings’ option at the top of the screen.
Alternate User Account: the specified alternate user will be used to approve items submitted by the user if the relevant self-approve function is enabled and the current user is in the approval route (see System Settings – Approval – Self-Approval). An alternate user must be selected if marking a user as a leaver so if there are any documents awaiting the leaver’s approval, they will be redirected to the alternate user. An alternate user needs to be entered even if the user leaving was not an approver.
Allow Login: if this option is unticked, the user will not be able to log into WAP and their name will not appear in some places in the system; i.e. in Global Replace User.
Reset password on next login: if this option is selected, the user will be forced to choose a new password the next time they log into WAP.
Access all delegates: select this option for users who should have access to all users as delegates on the system; this would generally only be the Admin or Superusers. When new users are added onto the system, they will appear automatically in this user’s delegate drop down box.
Part Time: tick to mark a user as part time; when a user puts a holiday request on WAP it will default to show in hours, rather than days.
Title: this is a free text box but is not mandatory.
Forename: this is a mandatory, free text field.
Surname: this is a mandatory, free text field.
Email: this is a mandatory, free text field.
Job Title: this is a free text box but is not mandatory.
Telephone Number: this is a free text box but is not mandatory. It is possible to configure this number to appear on PO layouts emailed out to suppliers. This number can also show on the logged in users’ screen.
Country: this will default to the default country set in System Settings but can be overridden if needed. The country selection is used for Subsistence claims (within the Expense module) and Bank Holidays (within the Timesheet module).
Analysis Codes: if user analysis codes have been configured (System Setup – Analysis Labels – User), these will appear here as free text boxes.
28.3. User Profile - Account Options Tab
This tab controls the monetary level a user can raise, approve or self-approve a document at. Set the Item and Approval values per document. All approval values are entered in the system base currency; any documents entered with a different currency will be converted to the base currency (Sage exchange rates are used when converting). If a user has unlimited approval value (i.e. for users at the end of an approval route), set the approval value as 999,999,999. When editing or adding new values, make sure to click Update before saving at the bottom of the screen.
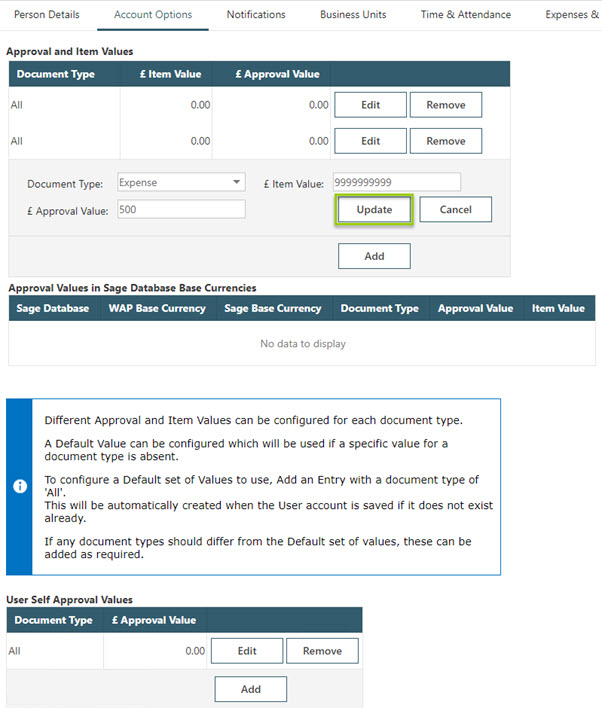
Document Type: choose from the drop down box the applicable document type. It is recommended to select a document type to specify approval values.
Item Value: this sets the maximum document value that the user can enter into the WAP system; if there is no limit to the value of a document that can be raised, enter 999,999,999 as an unlimited value.
Approval Value: this sets the maximum approval value for the user, if they were to be approving a document submitted by another user.
User Self-Approval Values: if a user is allowed to enter and automatically approve a document up to a certain value, set a maximum self-approval value per document type. Certain document types (e.g. Expenses) would not usually have a self-approval value allocated. Make sure to click Update before saving.
Various options are available to enable or disable settings regarding budget checking and whether the user is able to override any budgets. By default, users will not be able to override any budgets.
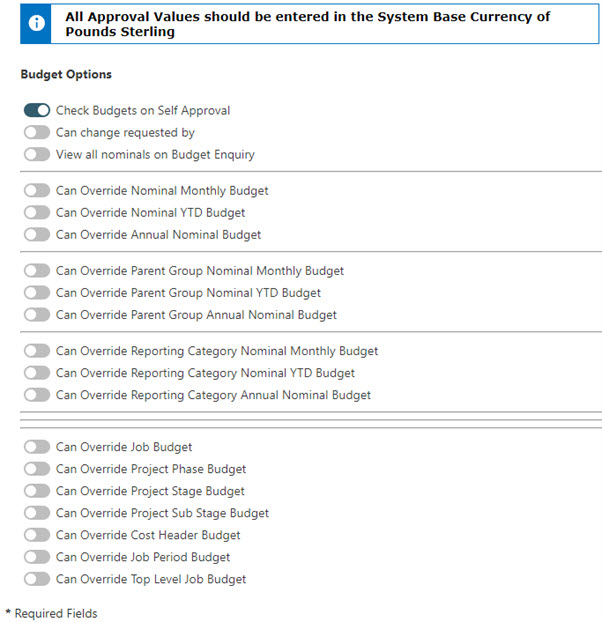
Check Budgets on Self-Approval: this setting is on by default; if an order is raised within a user’s self-approval value, it will still require approval if the nominal or project is over budget. If an order is submitted that is over-budget, the standard approval route will be used, not just steps that have been marked as mandatory if over budget.
Can change requested by: if this is ticked, the user will be able to change the user who is raising the requisition; this is done on the Justification tab. If approval routes are based on requesting user, this will pick up the approval route for the user selected from the drop down box.
View all nominal codes on Budget Enquiry: if ticked, the user will be able to view all nominal codes when running the budget enquiry. If not ticked, the user will only be able to see the nominal codes that have been allocated to them.
Can Override Nominal Monthly Budget: if ticked, the user will be able to override monthly budgets so these requisitions will not be flagged as over budget and therefore not require further approval.
Can Override Nominal YTD Budget: if ticked, the user will be able to override nominal year to date budgets so these requisitions will not be flagged as over budget and therefore not require further approval.
Can Override Annual Nominal Budget: if ticked, the user will be able to override nominal annual budgets so these requisitions will not be flagged as over budget and therefore not require further approval.
Can Override Parent Group Nominal Monthly Budget: if ticked, the user will be able to override parent group nominal monthly budgets so these requisitions will not be flagged as over budget and therefore not require further approval.
Can Override Parent Group Nominal YTD Budget: if ticked, the user will be able to override parent group nominal YTD budgets so these requisitions will not be flagged as over budget and therefore not require further approval.
Can Override Parent Group Annual Nominal Budget: if ticked, the user will be able to override parent group nominal annual budgets so these requisitions will not be flagged as over budget and therefore not require further approval.
Can Override Reporting Category Nominal Monthly Budget: if ticked, the user will be able to override reporting category nominal monthly budgets so these requisitions will not be flagged as over budget and therefore not require further approval.
Can Override Reporting Category Nominal YTD Budget: if ticked, the user will be able to override reporting category nominal YTD budgets so these requisitions will not be flagged as over budget and therefore not require further approval.
Can Override Reporting Category Annual Nominal Budget: if ticked, the user will be able to override reporting category nominal annual budgets so these requisitions will not be flagged as over budget and therefore not require further approval.
Can Override Job Budget: if ticked, the user will be able to override project budgets so these requisitions will not be flagged as over budget and therefore not require further approval.
Can Override Project Phase Budget: if ticked, the user will be able to override project phase budgets so these requisitions will not be flagged as over budget and therefore not require further approval.
Can Override Project Stage Budget: if ticked, the user will be able to override project stage budgets so these requisitions will not be flagged as over budget and therefore not require further approval.
Can Override Project Sub Stage Budget: if ticked, the user will be able to override project activity budgets so these requisitions will not be flagged as over budget and therefore not require further approval.
Can Override Cost Header Budget: if ticked, the user will be able to override project header budgets so these requisitions will not be flagged as over budget and therefore not require further approval.
Can Override Job Period Budget: if ticked, the user will be able to override project period budgets so these requisitions will not be flagged as over budget and therefore not require further approval.
Can Override Top Level Job Budget: if ticked, the user will be able to override top level project budgets so these requisitions will not be flagged as over budget and therefore not require further approval.
28.4. User Profile - Notification Tab
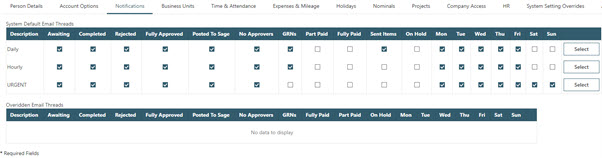
If notifications need to be changed for a particular user this can be carried out here by selecting the relevant line, editing and clicking save and close. Any amendments will show under Overridden Email Threads. As with all email thread settings, the WAP service will need to be restarted after any email threads have been changed.
Generally, it is advised to not use this function to start changing what individual users will receive and on what days as this can become a large task to maintain for the Admin user.
See our WAP System Settings Help and User Guide for further information.
28.5. User Profile - Business Units Tab
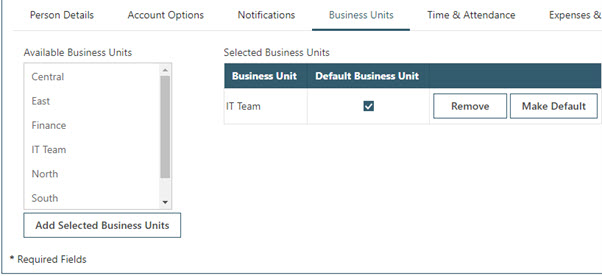
On this tab it is possible to allocate the user to business units; the available business units are setup under User Setup – Business Units. A user can be a member of multiple business units and have one set as their default. This is detailed further in Section 5 – Business Units.
28.6. User Profile - Time & Attendance Tab
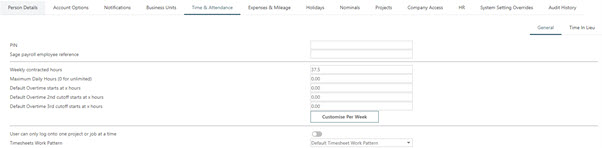
General Tab
This sub tab relates to the Timesheet module and allows setting up of the user’s individual contracted and overtime hours, and linking to a Timesheet work pattern.
PIN: if using the T&A terminals linked into WAP, this PIN will be how the user clocks into the system.
Sage payroll employee reference: the user’s payroll reference can be entered here; this will appear on timesheet reports but there is no direct link between WAP and Sage Payroll.
Weekly contracted hours: depending on Timesheet System Settings, users will not be able to submit their timesheet until their weekly contracted hours have been reached.
Maximum Daily Hours (0 for unlimited): depending on Timesheet System Settings, users will not be able to submit their timesheet if they have entered more than their daily maximum hours.
Default Overtime starts at x hours: number of hours at which the overtime rate will be applied; these figures will only show on timesheet reports and will not affect cost or pay rates.
Default Overtime 2nd cut-off starts at x hours: number of hours at which the second overtime rate will be applied; these figures will only show on timesheet reports and will not affect cost or pay rates.
Default Overtime 3rd cut-off starts at x hours: number of hours at which the third overtime rate will be applied; these figures will only show on timesheet reports and will not affect cost or pay rates.
User can only log onto one project or job at a time: this setting is used in conjunction with the T&A terminals to prevent users working on more than one project at one time.
Timesheets Work Pattern: select the user’s timesheet work pattern from the drop down list; these work patterns are configured in System Setup – Work Patterns & Pay Rates. N.B. if using Sicon Projects and settings have been configured to use Sicon Projects work patterns, it will not be possible to link a work pattern here, this will be done in Sicon Projects.
Time in Lieu Tab

If using WAP TOIL (not TOILBank), enter or check TOIL information for the user.
Maximum accruable Time in Lieu hours (at month end): if a user cannot accrue more than a certain number of TOIL hours at the end of the month, enter the value here.
Minimum accruable Time in Lieu hours (at month end): if a user is allowed to go into negative TOIL hours at the end of the month, enter the minimum value here as a negative amount; e.g. -7.50.
Current accrued Time in Lieu hours: the user’s current TOIL hours will show here. If any adjustments have been made to the user’s hours, these will show underneath.
28.7. User Profile - Expenses & Mileage Tab
Expenses Sub Tab

Disable Sage posting of Expense Items: if ticked, the user’s expenses will not post through to Sage.
Vehicles and Mileage Sub Tab
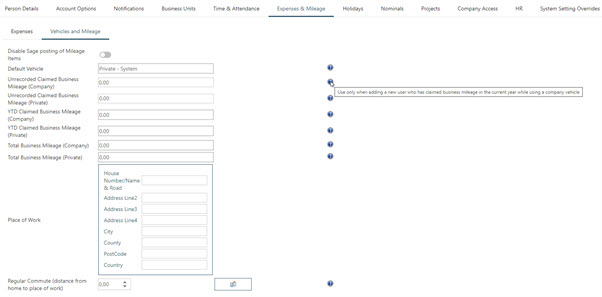
Hover over the question mark to reveal a brief explanation on screen. Detailed information is explained below.
Within WAP, mileage is recorded against the user rather than against a specific Sage database – any test business mileage entries added against a test company will calculate towards their business mileage total. If planning on testing multiple trips against one user, especially if this user is likely to go near or over the 10,000 miles yearly allowance, please consider testing against a test user rather than a specific named user.
Disable Sage posting of Mileage Items: if the user’s mileage claims submitted in WAP should not post through to Sage, tick this option. By default, a user’s mileage claims will post through to Sage.
Default Vehicle: this will display the vehicle set as the default on User Setup – User Vehicles.
Unrecorded Claimed Business Mileage (Company): use when first setting up a new user to record any business miles already claimed on a company car but not recorded through WAP.
Unrecorded Claimed Business Mileage (Private): use when first setting up a new user to record any business miles already claimed on a private car but not recorded through WAP.
Unrecorded Claimed Personal Mileage: if tracking personal mileage, use when first setting up a new user to record any personal miles already claimed but not recorded through WAP.
YTD Claimed Business Mileage (Company): this is a calculated field that will show opening business mileage balance plus any business mileage claims submitted on a company vehicle.
YTD Claimed Business Mileage (Private): this is a calculated field that will show opening business mileage balance plus any business mileage claims submitted on a private vehicle.
YTD Personal Mileage: this is a calculated field that will show opening personal mileage balance plus any personal mileage claims submitted.
Total Claimed Business Mileage (Company): this is a calculated field showing all claimed and unclaimed business mileage submitted against company vehicles.
Total Claimed Business Mileage (Private): this is a calculated field showing all claimed and unclaimed business mileage submitted against personal vehicles.
Total Private Mileage: this is a calculated field that shows all claimed and unclaimed personal mileage.
Total All Mileage Types: this is a calculated field that shows all claimed and unclaimed mileage of any type.
Place of Work: enter the user’s typical place of work; this will then appear as a Favourite when the user enters a mileage claim.
Regular Commute (distance from home to place of work): if the user does not have a place of work and home address configured, use this to calculate regular commute distance which can be deducted if required from a mileage claim. If a Google Maps API key has been entered, the Google Maps icon can be used to calculate the distance.
Subsistence Sub Tab
This tab will only show if Subsistence has been enabled within System Settings – Expenses.

Enable Subsistence Claims: tick to allow this user to enter subsistence claims within the system.
Subsistence Grade: select from the drop down list the appropriate grade for the user; these grades are created under System Setup – Subsistence Grades.
28.8. User Profile - Holidays Tab
Each user needs to be setup with correct holiday entitlement and linked to the correct work pattern. This is done on their WAP User profile – Holidays tab. Click Add or Edit for the relevant holiday period to enter or amend holiday entitlement figures. Holiday entitlement is always entered and booked in hours, but will be shown to the user in days to be user-friendly (the estimated days figure uses the holiday work pattern to get the average hours in a working day to then estimate the days).
If adding a user part way through the holiday year, enter the full entitlement correctly and either submit any taken holiday requests for approval so the entitlement figure will be adjusted once the holiday request is approved, or use the Starting Holiday tool.
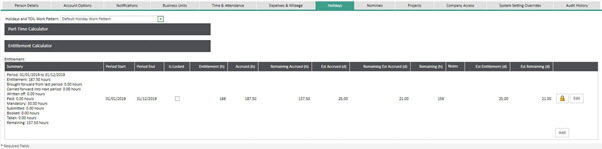
The current holiday year will be highlighted yellow to differentiate from any previous or future year entitlement periods.
Summary: this will show an overview of the holiday year with entitlement figures, carried forward hours, booked, taken, remaining etc.
Period Start: this will show the start of the holiday period.
Period End: this will show the end of the holiday period.
Is Locked: if the holiday year has been locked this will be ticked. Any holiday periods that are not locked will be processed in the month end routine.
Entitlement (h): this is the total number of hours’ holiday entitlement the user has been given.
Accrued (h): this figure is calculated from ‘months until now’ (either from the start of the holiday year or from the employee’s start date, depending on which is the most recent date), multiplied by ‘monthly accrual’ (the entitlement hours divided by months – usually 12 as this is the number of months in a holiday period).
Remaining Accrued (h): this figure is calculated from ‘accrued hours’ minus ‘taken hours’, ‘booked hours’ and ‘mandatory hours’.
Est Accrued (d): the holiday work pattern is used to get the average hours in a working day to estimate the accrued hours figure into an estimated days figure.
Remaining Est Accrued (d): the holiday work pattern is used to get the average hours in a working day to estimate the remaining accrued hours figure into an estimated days figure.
Remaining (h): this figure is calculated from ‘entitlement hours’ plus ‘brought forward hours’ minus ‘taken hours’, ‘booked hours’ and ‘mandatory hours’.
Est Entitlement (d): the holiday work pattern is used to get the average hours in a working day to estimate the entitlement hours figure into an estimated days figure.
Est Remaining (d): this figure is an estimate from the ‘estimated entitlement in days’ minus ‘taken days’, ‘booked days’ and ‘mandatory days’. The holiday work pattern is used to get the average hours in a working day.
To add a new holiday year to a user click ‘Add’ or to make changes to an existing year, click ‘Edit’. Make sure to click ‘Update’ before saving the user’s profile to make sure any changes are saved.
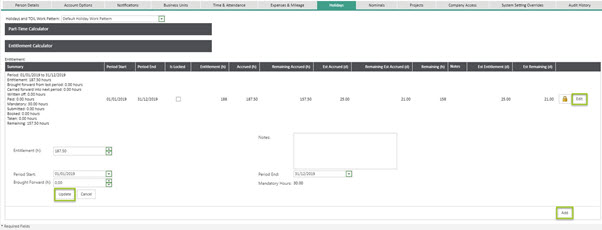
Entitlement (h): when a holiday period is added to the user the default holiday entitlement figure will be automatically entered, but this can be overridden if required. Any configured mandatory days will be deducted from this amount but non-working days will not so these should not be included in the entitlement figure.
Notes: text can be entered here to explain any changes that have been made. These notes will not be visible to the end user, they are for reference in this screen only.
Period Start and Period End: the default holiday start and end dates will also be automatically pulled through but these can be overridden if needed.
Brought Forward (h): if a user is carrying forward any entitlement from a previous holiday period, this can be entered in the ‘Brought Forward’ hours. This will keep these entitlement hours separate from the standard entitlement hours.
Mandatory Hours: if the user will have any hours deducted due to mandatory holidays, this will show the total hours.
Click the padlock icon to lock or unlock a holiday period to prevent or allow holiday requests to be submitted. Any holiday periods that are not locked will be processed in the month end routine.
28.9. User Profile - Nominals Tab
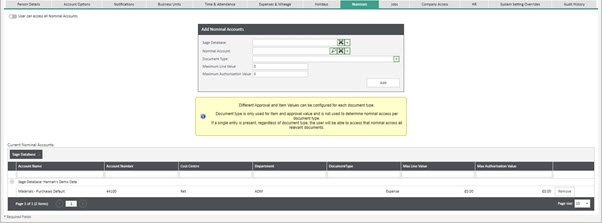
This tab can be used to view nominal codes the user has been given access to, or to set that the user is to have access to all nominal codes. These codes will be visible to the user when entering a new requisition or if the user has permission to, to view the budget information against. Different approval values can be set against a nominal code that would be used during document approval.
To add a new nominal account, select the Sage Database, choose the nominal account from the drop down list, select the document type and click Add. Nominal codes are not allocated to specific document types; if the values are left at zero and only Requisition picked as the document type, this nominal code will still be available to the user across other document types. Only approval values are specific per document type.
If the user should no longer have access to the nominal account, click to remove against the code in the user’s list.
If the user is to have access to all nominal codes across all Sage Companies they have access to, tick the ‘User can access all Nominal Accounts’ box. This is usually only given to Finance or Administrator Superusers.
If adding multiple nominal codes to a user, it is quicker and easier to either use the wizard, copy from another user or use an import.
28.10. User Profile - Projects Tab
If a costing module has been configured, this tab can be used to view projects or project headers the user has been given access to, or to set that the user is to have access to all projects or project headers. These projects and project headers will be visible to the user when entering a new document.
If Project Accounting is linked rather than Sicon Projects, these tabs will show Projects / Project Item Types / Project Items. Projects can also be allocated in Sage against a Resource rather than being allocated in WAP.
The current allocated projects are shown in the box at the bottom of the screen; to see a full list click on the arrow to the left of the Company. As new projects are added into Sage, they will need to be allocated to the correct users. To reduce maintenance of project allocation, particularly if projects are being added frequently into Sage, it is advised for users to have access to all projects.
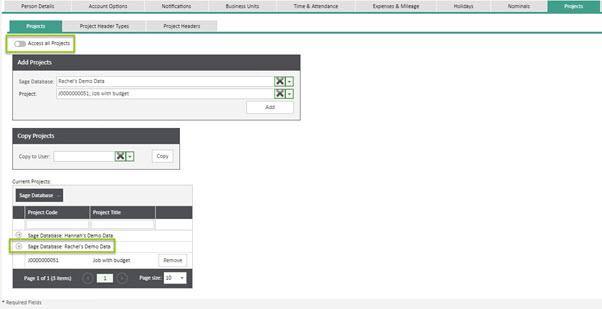
When allocating project headers to a user, it is possible to specify which modules these will be available to the user in, and also override the default item and approval values if required. These value overrides are only applicable to the requisition module. If new project headers are added into Sage, they will need to be allocated to the correct users. To reduce maintenance of project header allocation, it is advised for users to have access to all Project Headers. It is possible to restrict against a project which project headers are available so this can be used to ensure users are not picking an incorrect header, as those settings override the user settings configured in this screen.
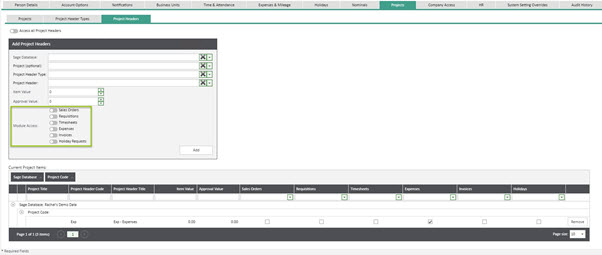
For more information on project and project header creation, please refer to the Sicon Projects Help and User Guide for further information.
28.11. User Profile - Company Access Tab
Highlight the company from the available companies list that the user should have access to and click ‘Select’ to assign to the user. Multiple companies can be allocated at a time by holding the shift button.
Defaults Sub Tab

Click Edit on a company to allocate a default nominal account, delivery address and invoice address. Each user can be configured to have permission to be able to change the nominal, delivery or invoice address as required. Allocate a default delivery and invoice address; users would typically be allowed to change a delivery address but not change the invoice address.
Expenses Sub Tab

Supplier Account: if a user is to submit an expense claim, select from the drop down box the Purchase Ledger account to link to the user for their personal expense claims. Always click Update once a supplier account is selected. Users will not be able to submit an expense claim until a supplier account has been linked.
Resource: if Sicon Projects or Project Accounting is enabled, link the user to the Employee or Resource by selecting the correct name from the drop down box. Always click Update once an Employee is selected. A resource will be required if entering expense claims, timesheets or holiday requests.
New Expense Supplier: it is possible from this screen to go to another page to create a new PL supplier account which will be sent for approval in WAP before appearing in Sage and being linked to the user.
Time and Attendance Sub Tab

Resource: if Sicon Projects or Project Accounting is enabled, link the user to the Employee or Resource by selecting the correct name from the drop down box. Always click Update once an Employee is selected. A resource will be required if entering expense claims, timesheets or holiday requests, and to view projects in the project enquiry screen, where the user is marked as a project manager in Sicon Projects.
Touch Screen Default: if using T&A Terminals and the user has access to more than one Company, select the company which should be the default on logging in or out by ticking this box.
Works Orders Sub Tab
If using T&A Terminals and users will be booking on or off works orders, this tab will show.

Resource: if Sicon Projects or Project Accounting is enabled, link the user to the Employee or Resource by selecting the correct name from the drop down box. Always click Update once an Employee is selected. A resource will be required if entering expense claims, timesheets or holiday requests.
Component Warehouse: link the user through to the correct component warehouse.
28.12. User Profile - HR Tab
On a user’s WAP profile there are a number of tabs within the HR tab to configure the user HR details.
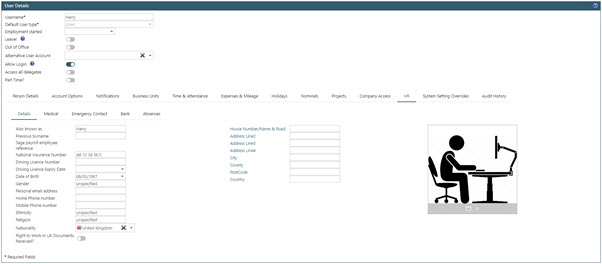
Users with HR Admin permissions are able to enter information here or information the user has entered themselves on their HR profile will show. None of these fields are mandatory.
Also known as: free text field to enter any other names the user may be known as.
Previous Surname: free text field to enter any previous surnames.
Sage payroll employee reference: if this is entered against the user’s Time & Attendance tab, this will show here.
National Insurance Number: free text field to enter user’s national insurance number.
Driving Licence Number: free text field to enter the user’s driving licence number.
Driving Licence Expiry Date: calendar option to enter the user’s driving licence expiry date.
Date of Birth: calendar option to enter the user’s date of birth.
Gender: free text field.
Personal email address: free text field for user’s personal email account.
Home phone number: free text field for the user’s home phone number.
Mobile phone number: free text field for the user’s mobile phone number.
Ethnicity: free text field for the user’s ethnicity.
Religion: free text field for the user’s religion.
Nationality: select from the drop down list the user’s nationality.
Right to Work in UK Documents Received: tick whether these documents have been received.
House Number/Name/Address: free text fields to enter the user’s home address.
Image: browse to attach an image against the user.
The information on this tab can also be imported using the option to Import HR Employee Detail. See our WAP HR Help and User Guide for further information.
Medical Sub Tab
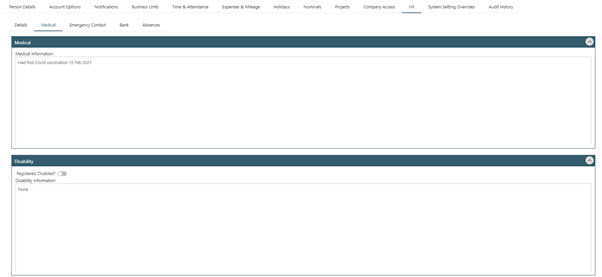
Medical: enter or view any medical information entered for this user.
Disability: enter or view any disability information entered for this user or tick if they are registered disabled.
The information on this tab can also be imported using the option to Import HR Employee Detail. See our WAP HR Help and User Guide for further information.
Emergency Contact Sub Tab
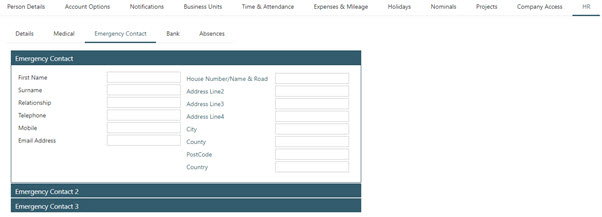
Users can enter up to three emergency contacts within their HR profile which will be visible to HR Admin users here. No changes can be made here to the emergency contact information; end users will manage this data.
The information on this tab can also be imported using the option to Import Emergency Contacts. Please note, only one emergency contact can be imported, so if more than one is required the others would still need to be entered manually by the end user.
See our WAP HR Help and User Guide for further information.
Bank Sub Tab
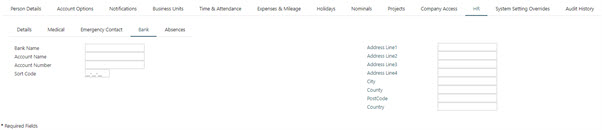
Bank Name: free text field to enter the user’s bank name.
Account Name: free text field to enter the user’s bank account name.
Account Number: free text field to enter the user’s bank account number.
Sort Code: free text field to enter the user’s bank sort code.
Address Lines: free text field to enter the user’s bank address details.
If the WAP user’s account is linked to a PL Account in Sage, the bank details will be updated here too. The information on this tab can also be imported using the option to Import HR Bank Details.
See our WAP HR Help and User Guide for further information.
Absences Sub Tab

This tab will show the total number of absence occasions and days over the time period and the resulting Bradford score.
See our WAP HR Help and User Guide for further information.
28.13. User Profile - System Settings Overrides
If using WAP with Requisitions, it is possible to override a number of system settings per user. This can be useful if different users have different uses of the requisition module. If the user should not have any different settings than either the system settings or the user type, leave this screen so user settings are derived.
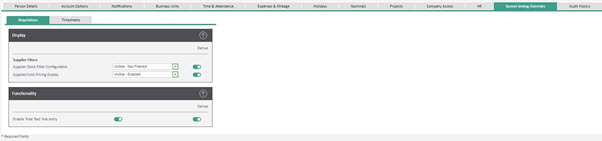
Supplier Filters – Supplier Stock Filter Configuration: the default from System Settings will be used initially but if required can be changed; for example it might be for one user stock items can only be ordered from the preferred supplier while for another user stock can be purchased from any company. In the above example, as this setting does not have the ‘Derive’ option selected, this setting is different for Ray than the system setting.
Supplier Filters – Supplier/Unit Pricing Display: the default from System Settings will be used initially but if required it can be changed; for example it might be that for one user the pricing will be visible per supplier but for another user it shouldn’t be visible.
Enable ‘Free Text’ line entry: the default from System Settings will be used initially but if required it can be changed; for example it might be that for one user free text lines can be entered on a requisition but for another user, they should only be able to raise stock lines.
28.14. User Profile - Audit History
If configured, this tab will be populated with information on certain user fields; when they were amended and by which user. Filters can be used to show only specific audit actions or a date range when the action occurred.
Auditing is switched on in System Settings – Auditing.

28.15. User Profile - User Profile Options
At the bottom of all user profile tabs are the below options:

Save & Close: this will close the user’s profile and save any changes made to the profile.
Change Password: a Superuser will be able to edit a user’s profile and change a password if required. This option is a User Type permission.
Delete User: this should only be used during first user creation if an error is made and nothing has occurred with the user. Once a user has been created; i.e. they have been included in approval routes or have entered any transactions, the user cannot be deleted as this will cause data and corruption issues. Users would need to be marked as a Leaver instead.
28.16. User Reports
On the Users page there is the option to run the Nominal Accounts List report; this will list out per user all the nominal codes that have been assigned to the user.

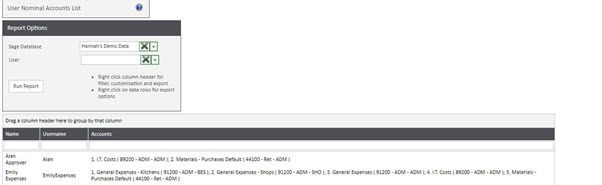
These results can be exported to excel by right-clicking on any column header and clicking export from the menu:
29. User Imports
CSV import templates are available to bring in users and user data and are generally recommended if 25+ users need to be added to the system at once.
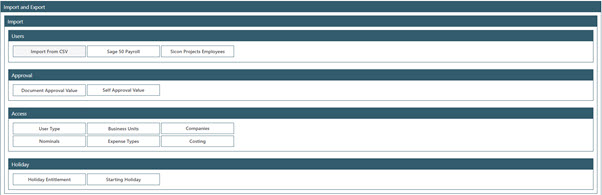
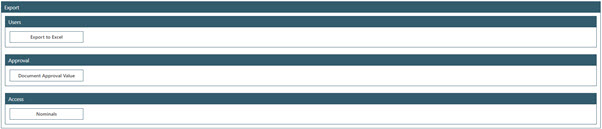
When importing, the following imports are required as a minimum;
- Users – Import from CSV.
This will bring in a skeleton user profile that can be filled out using the other imports.
- Approval – Document Approval Value
This will bring in approval values per user and per WAP Document - Access – Companies
This import will link users with a Sage Company, set a PL Account (Expenses), and Project Resource (Timesheets / Project Enquiry screens), and set default delivery and invoice addresses per user (Requisitions).
CSV templates are generated within WAP by choosing the required import and then clicking Generate Template. Imports will contain sample text to assist with completion. Once filled out, these need to be validated and if there are no errors, can then be imported.
As a general rule, when using the template, do not delete the first description column. Removing Column A can cause the import to fail validation, so to make the imports easier to work with it is recommended only to hide columns and rows that are not required while working on the import in Excel.
Rows with text in the first column e.g. <#> are considered informational only and won’t be imported. This is explained further in the following sections.
It is recommended to keep copies and records of the imports completed so that if company changes are required in future, such as an email address or different delivery address, this can be done quickly by using the existing imports and overwriting existing accounts. The next sections explain more about each import.
29.1. Import - Users - Import from CSV
This import should be run first to bring the users into WAP. It can also be used to update existing users already in the system. If users are in the template that exist in the system already, user information will be overridden if ‘Overwrite Existing Accounts’ is also selected in the screenshot below. There are options to send a welcome email when the user is imported, or these can be sent out later once the system is ready for users to login.


Select Close to come back to the Users screen and move onto the other imports as required.
29.2. Import - Users - Sicon Projects Employees
If employees are created within Sicon Projects it is possible to set up accounts in WAP using these details; choose the correct Sage Company and refresh to show users that exist in Sicon Projects but not in WAP. Configure applicable user types, work patterns, contracted hours and holiday entitlement, validate and then import.
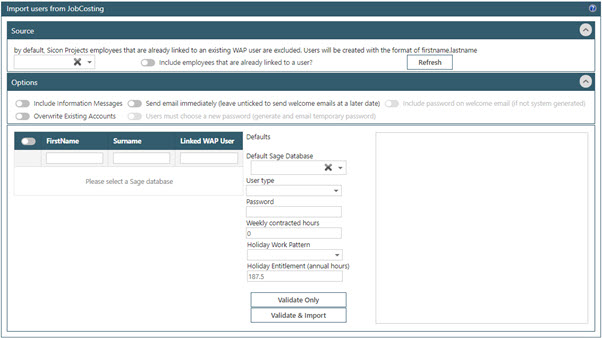
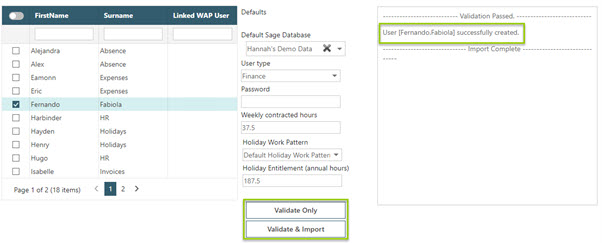
29.3. Import - Users - Sage 50 Payroll
If Sage 50 ODBC connection details have been added into System Settings, users can be imported. Complete relevant fields and import.
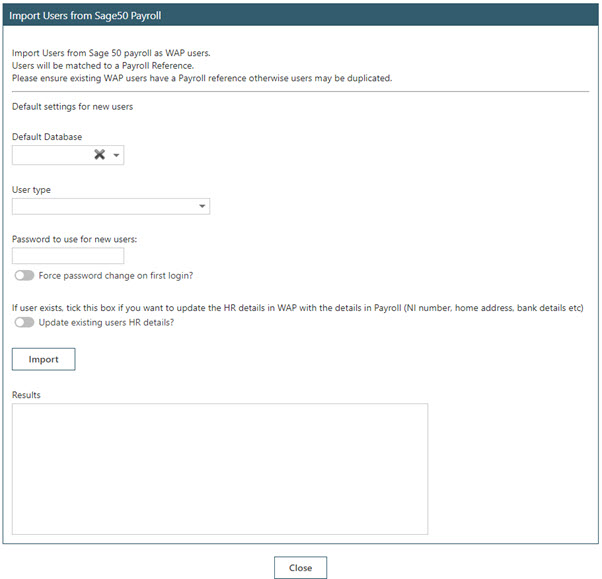
Select Close to come back to the Users screen and move onto the other imports as required.
29.4. Import - Approval - Document Approval Value
This import can be used to assign item and approval values per user and document type. There is an option to overwrite existing item and approval values if these have already been allocated.
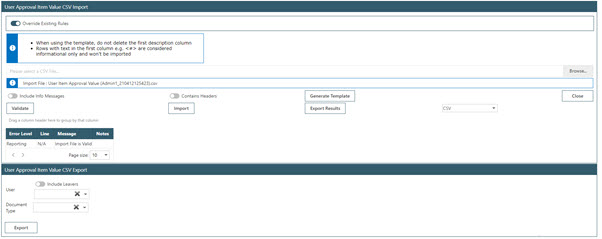
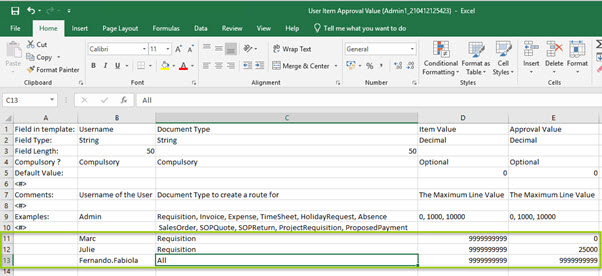
Populate the data from cell B11. Removing Column A can cause the import to fail validation, so to make the imports easier to work with it is recommended only to hide columns and rows that are not required while working on the import in Excel.
Using the bottom half of the screen, it is also possible to export approval values into a CSV import file which can be amended, saved, and re-imported as required (to change user approval values in bulk). Select the User or Document type for more defined results, or leave both fields blank to export all user approval values:
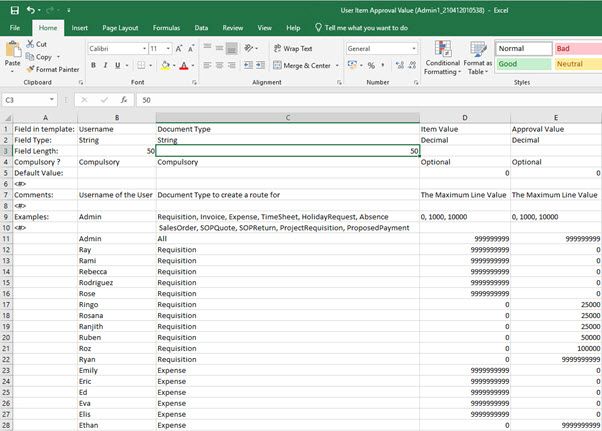
Select Close to come back to the Users screen and move onto the other imports as required.
29.5. Import - Approval - Self-Approval Value
This import can be used to set self-approval values per user and document type. By default, when created users will have zero self-approval value for all document types.
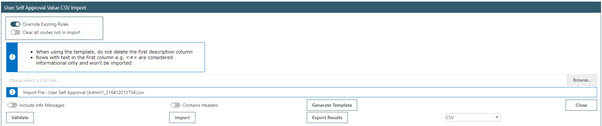
Populate the data from cell B10. Removing Column A can cause the import to fail validation, so to make the imports easier to work with it is recommended only to hide columns and rows that are not required while working on the import in Excel.

Select Close to come back to the Users screen and move onto the other imports as required.
29.6. Import - Access - User Type
This import can be used to assign user types to users, with one user type set as their default. There are various options for if users in the import already have user types allocated; to either stop the import, add, replace existing or clear all.
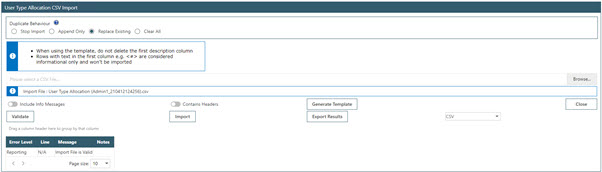
Populate the data from cell B12. Removing Column A can cause the import to fail validation, so to make the imports easier to work with it is recommended only to hide columns and rows that are not required while working on the import in Excel.
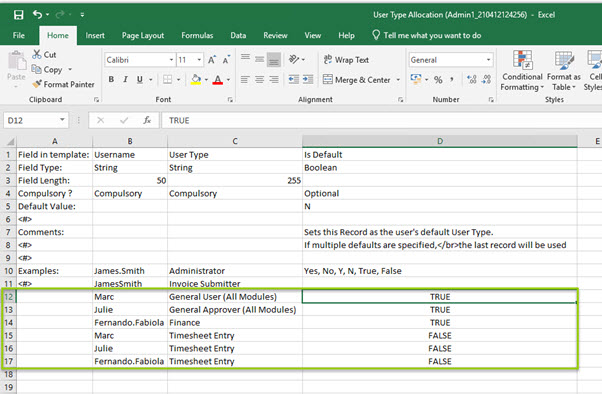
Select Close to come back to the Users screen and move onto the other imports as required.
29.7. Import - Access - User Business Units
This import can be used to assign business units to users, with one business unit as their default. There is the option when importing to leave business units as they currently have been configured for users that are not included in the import.
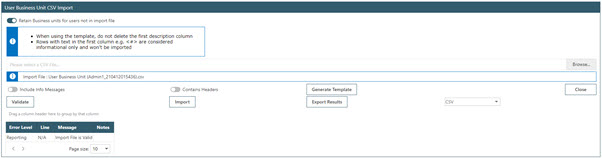
Populate the data from cell B10. Removing Column A can cause the import to fail validation, so to make the imports easier to work with it is recommended only to hide columns and rows that are not required while working on the import in Excel.
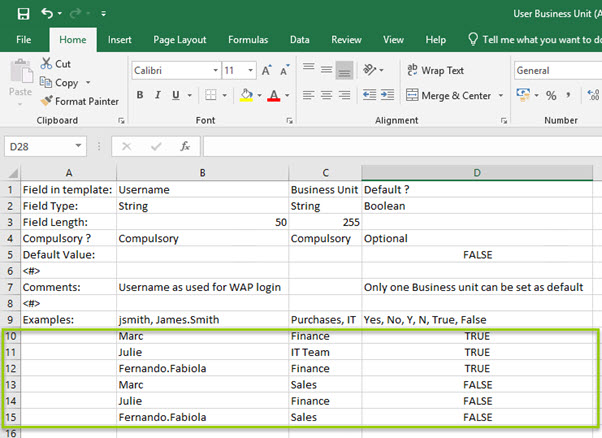
Select Close to come back to the Users screen and move onto the other imports as required.
29.8. Import - Access - Companies
This import can be used to assign to a user company access with default delivery and invoice addresses and link the user to a PL Supplier Account (mandatory if the user is to submit an expense claim) or Sicon Projects Resource or Project Accounting Employee (mandatory if a costing module is configured and the user is to be submitting an expense claim, timesheet or holiday request).
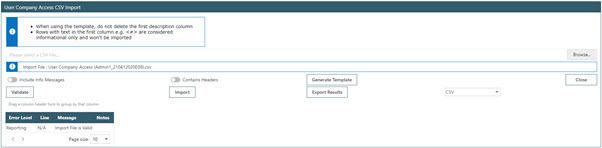
Populate the data from cell B12. Removing Column A can cause the import to fail validation, so to make the imports easier to work with it is recommended only to hide columns and rows that are not required while working on the import in Excel.
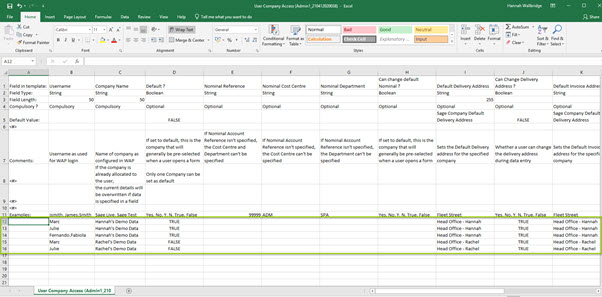
Select Close to come back to the Users screen and move onto the other imports as required.
29.9. Import - Access - Nominals
Use this import to assign nominal codes to a user with specific item or approval values per nominal code and document type. By default it is on to ‘Maintain Existing Allocation’ so any nominal imports will not affect what nominal codes users have already been assigned. If this is switched off, users may lose nominal codes already assigned if these are not on the new import.
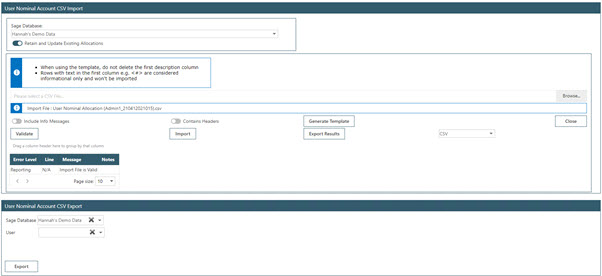
Populate the data from cell B10. Removing Column A can cause the import to fail validation, so to make the imports easier to work with it is recommended only to hide columns and rows that are not required while working on the import in Excel.
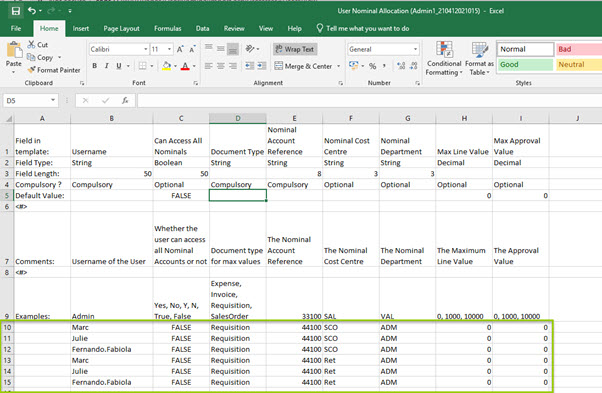
Select Close to come back to the Users screen and move onto the other imports as required.
At the bottom of the screen it is possible through here to export the current nominal allocation, either per user or for all users. This will create a CSV import file which can be amended, saved, and re-imported as required (to change user nominal approval values in bulk):

29.10. Import - Access - Expense Types
A CSV template can be generated, completed and imported to allocate expense types to users with the correct nominal codes, tax rates, maximum claim amounts and memos. Import templates are generated from within WAP and will contain sample text to assist with completing the import. For each user and expense type, two lines will be required; ‘E’ line to assign the expense type to the user with a default tax code, memo etc. and an ‘N’ line to assign the nominal code to the expense type to the user.
When importing there are a couple of options for how to proceed if there is already expense types or nominal codes allocated to user.
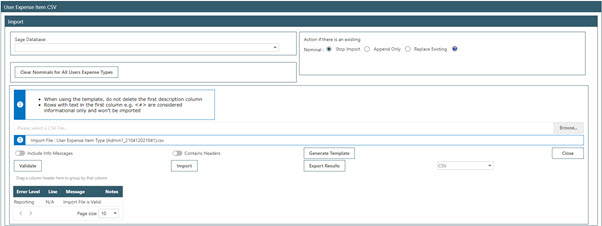
Clear Nominal for All Users Expense Types: if this is selected, all nominal allocations will be removed for all users and all expense items prior to the import. The access to expense types will not be cleared.
Action if there is an existing nominal:
Stop Import: validation will fail for the import to be corrected to remove any duplicated data.
Append Only: if nominal codes are found in the import that aren’t already allocated, they will be added. Existing nominal codes won’t be removed. The default nominal code will be changed if one is specified in the import.
Replace Existing: if one or more nominal codes are found in the import file for a User Expense Item, all nominal codes for that item not found in the import will be removed and the ones specified in the import for the given item will be created.
Populate the data from cell B13. Removing Column A can cause the import to fail validation, so to make the imports easier to work with it is recommended only to hide columns and rows that are not required while working on the import in Excel.
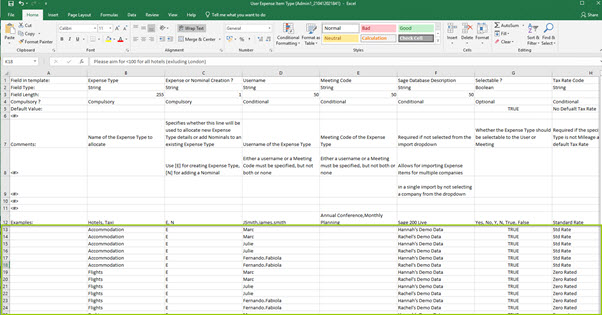
Select Close to come back to the Users screen and move onto the other imports as required.
At the bottom of the screen it is possible through here to export the current expense allocation, either per company, all companies, per user or for all users. This will create a CSV import file which can be amended, saved, and re-imported as required (to change user nominal approval values in bulk):

Sage Database: Select the company to run the export on. This is an optional field.
Include Leavers: Tick this if users who have been marked as leavers should be included in the results. This is an optional field.
User: Select the user to run the export on. This is an optional field.
Include system types: To include system Expense Item Types, such as Mileage, select this. This is an optional field.
Include expense types with no nominals: To include Expense Item Types that have not had a nominal allocated to the user, select this. This is an optional field.
Export: Exports the Expense Item Types into a CSV that can be edited and re-imported in the top half of the screen. If nothing has been selected in the Export criteria, results for all active across all companies linked in WAP will be exported. If there is a large volume of data, this may take some time.

29.11. Import - Access - Costing
This import can be used to assign users to a project and project header, with overriding item and approval values if required. Tick the option to maintain any project and project header information already allocated to a user.
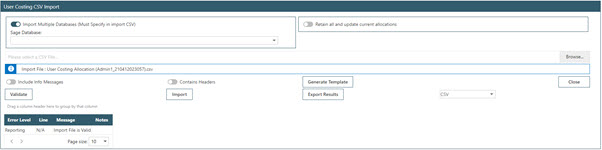
Populate the data from cell B15. Removing Column A can cause the import to fail validation, so to make the imports easier to work with it is recommended only to hide columns and rows that are not required while working on the import in Excel.
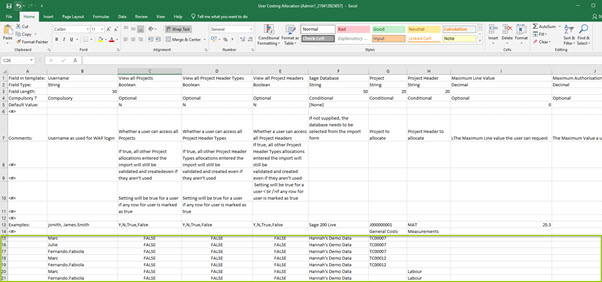
Headers and Projects are not linked, so column G and H can be completed independently of each other. In the example above, the user Marc will have access to two projects (TC00007 and TC00012), and will also have access to the Labour Header across any other projects that they may be given access to.
If column G had been populated with the project “TC00007” and Column H had been populated with the header “Materials” on one line, then Marc would only have access to the Materials Header linked with project TC00007. Depending on what the business is looking to achieve, it may be necessary to populate 2 rows; one for the project and a separate one for the project header(s). When defining headers, ensure the WAP module it applies to is also configured in the import by entering TRUE into the relevant Document Column (Columns K-P).
Select Close to come back to the Users screen and move onto the other imports as required.
29.12. Import - Holiday - Holiday Entitlement
This import will allocate to users a holiday entitlement year with default entitlement and any brought forward hours. Notes can be entered against a holiday year if required.

Populate the data from cell B10. Removing Column A can cause the import to fail validation, so to make the imports easier to work with it is recommended only to hide columns and rows that are not required while working on the import in Excel.
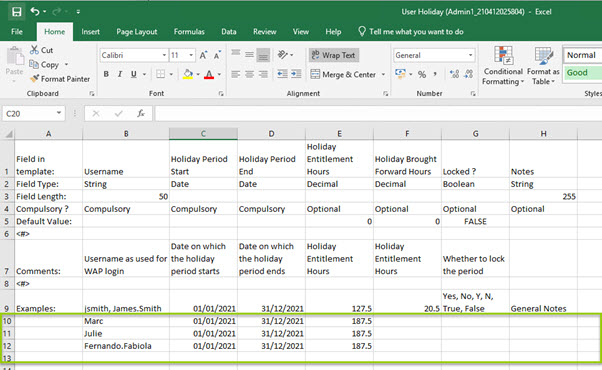
Select Close to come back to the Users screen and move onto the other imports as required.
29.13. Import - Holiday - Starting Holiday
This import will allocate to users a holiday entitlement year with default entitlement and any brought forward hours. Notes can be entered against a holiday year if required.
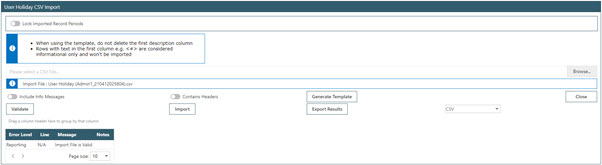
Populate the data from cell B10. Removing Column A can cause the import to fail validation, so to make the imports easier to work with it is recommended only to hide columns and rows that are not required while working on the import in Excel.
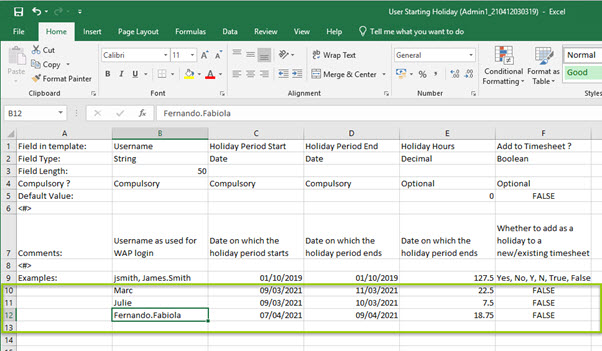
Select Close to come back to the Users screen and move onto the other imports as required.
29.14. Export - Users - Export to Excel
The list of current users can be exported to Excel; this will list all users as per the filters on the user list and show all columns as per the Users page.
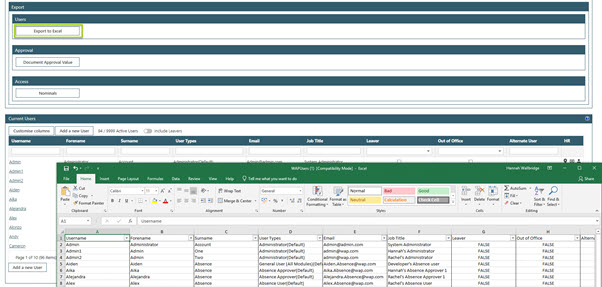
29.15. Export - Approval - Document Approval Value
This option uses the same screen as the Import – Approval – Document Approval Value explained earlier:
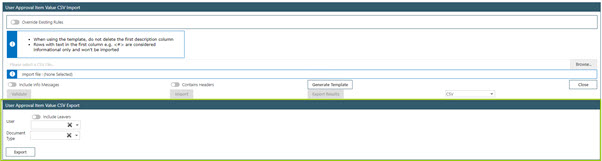
Using the bottom half of the screen, it is possible to export approval values into a CSV import file which can be amended, saved, and re-imported as required (to change user approval values in bulk). Select the User or Document type for more defined results, or leave both fields blank to export all user approval values:
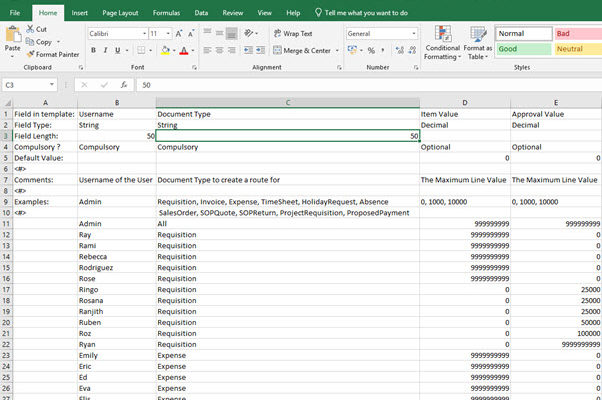
Select Close to come back to the Users screen and move onto the other imports as required.
29.16. Export - Approval - Nominals
This option uses the same screen as the Import – Access – Nominals import explained earlier:

At the bottom of the screen it is possible through here to export the current nominal allocation, either per user or for all users. This will create a CSV import file which can be amended, saved, and re-imported as required (to change user nominal approval values in bulk):

29.17. Export - Approval - Expense Type
This option uses the same screen as the Import – Access – Expense Types import explained earlier.
At the bottom of the screen it is possible through here to export the current expense allocation, either per company, all companies, per user or for all users. This will create a CSV import file which can be amended, saved, and re-imported as required (to change user nominal approval values in bulk):

Sage Database: Select the company to run the export on. This is an optional field.
Include Leavers: Tick this if users who have been marked as leavers should be included in the results. This is an optional field.
User: Select the user to run the export on. This is an optional field.
Include system types: To include system Expense Item Types, such as Mileage, select this. This is an optional field.
Include expense types with no nominals: To include Expense Item Types that have not had a nominal allocated to the user, select this. This is an optional field.
Export: Exports the Expense Item Types into a CSV that can be edited and re-imported in the top half of the screen. If nothing has been selected in the Export criteria, results for all active across all companies linked in WAP will be exported. If there is a large volume of data, this may take some
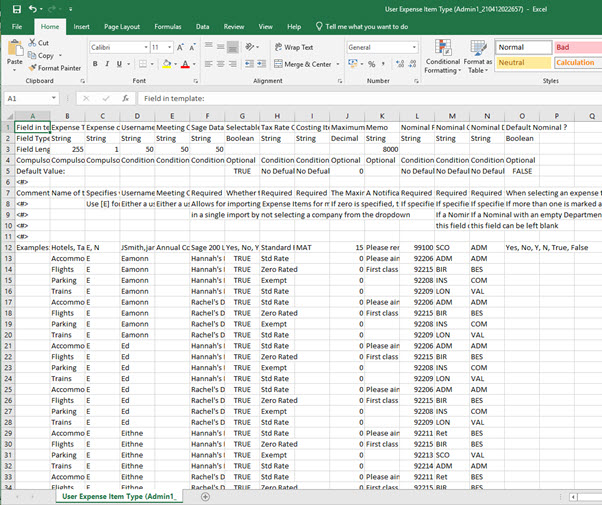
30. Warehouses
Users can be allocated access to warehouses within each Sage Company with restrictions placed as to whether they are able to use for raising requisitions or sales orders, or goods receiving. A wizard can be used if allocating many warehouses to users.
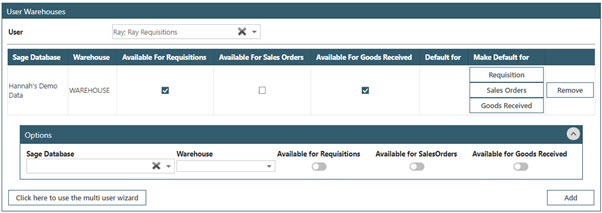
31. Work Pattern Rates
Within this section work pattern rates can be linked to the users.
See our WAP Timesheets Help and User Guide for further information.
32. Work Patterns
Within this section, users can be linked through to the work patterns.
See our WAP Timesheets Help and User Guide for further information.
33. WAP User Leaver Process
When a WAP user leaves the business, they cannot be deleted as they may have documents outstanding requiring access. Instead, mark them as a leaver and remove their ability to log into the system. Done this way, the user will not take up a user licence but their history will remain in the system and reports.
It is important to consider whether the user leaving is also an approver anywhere in WAP. The simplified steps are as follows:

Example of Leaver Process
If the user is an approver within WAP, it is important that an alternative existing user within the system takes on their approval. In this example, the user Chad is leaving the business.
There are two ways to establish whether Chad is in any approval routes:
- Run an Approval Route Report (System Settings cogs – Approval Route Setup banner – Approval Route Reports – Approval Routes menu item), export the results to Excel and search for the user’s name.
- Export the current approval routes (System Settings cogs – Approval Route Setup banner – Approval Routes – Import/Export Approval Routes menu item) and Export all routes. This will create a CSV Import template populated with ALL approval routes, and again the Leaving User can be searched for
Once established, it is then necessary to determine who should replace the user in the approval routes. If the leaver is to be replaced by one user for all routes then the Global Replace utility can be used from within System Settings cogs – Approval Route Setup banner – Approval Routes – Global Replace for User:
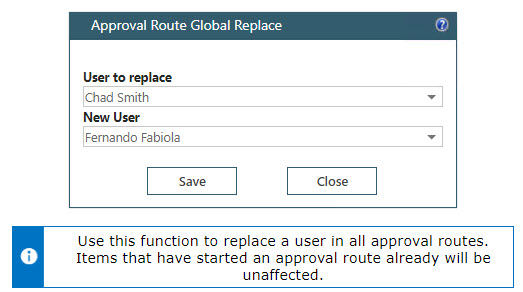
Enter the leaving user at the top, and the user to replace them with in the second section.
This may not be ideal if the replacement user already appears elsewhere in the approval route, or if multiple users need to replace the leaver in the routes. In this scenario, it is recommended to instead use Option B above, and then update the Exported Routes import with the new approvers and re-import:
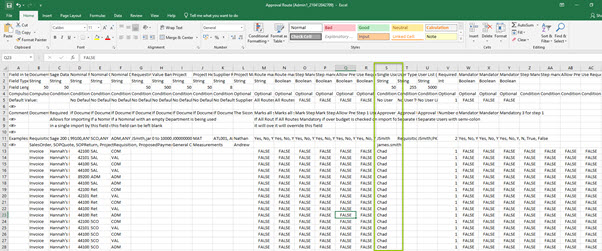
Updated
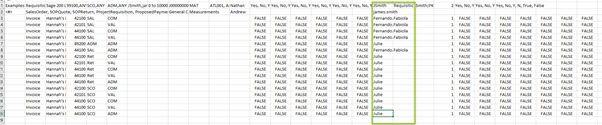
Re-import
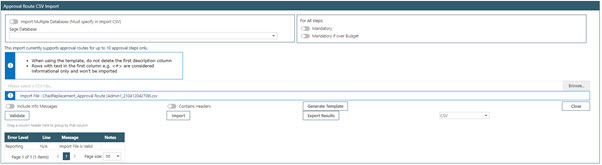

Alternatively the routes can be updated using the Approval Route Wizards
Once the user has been replaced with either of these options, the next step to take is updating their user profile.
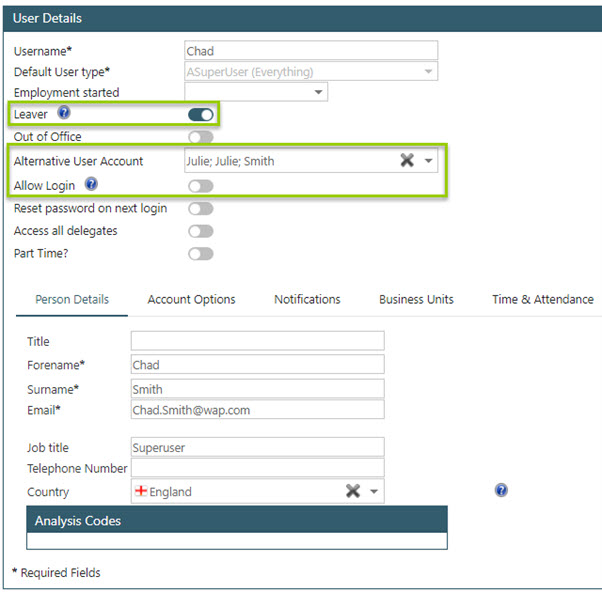
Leaver: check this box to indicate the user has left the company. An alternate user account must be selected before the user profile can be saved.
Alternate User Account: the specified alternate user will be used to approve items submitted by the user if the relevant self-approve function is enabled and the current user is in the approval route (refer to the System Settings Help and User Guide for more information on Self-Approval options). If there are any documents awaiting the leaver’s approval, they will be redirected to the alternate user. An alternate user needs to be entered even if the user leaving was not an approver.
Allow Login: disable this option to prevent the user being able to log into WAP. This will free up a WAP licence and their name will no longer appear in some places in the system; i.e. in Global Replace User.
When marking a user as a leaver, WAP will not allow them to be marked as a leaver until they have been replaced in any approval routes:

If a user is temporarily leaving the business, the same steps can be followed. When the user returns, the User Profile settings can be reversed to make the user active again, and then the approval routes need to be updated as required.
34. Enable Module
For the WAP system to be available the licence string must be valid with the right modules enabled, number of users and linked to the correct Sage serial number. Once this is configured, menu options will then be visible within the system.
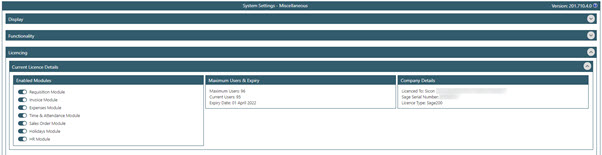
The WAP system will require an enable string to continue working. Please speak with your Sage Business Partner in the first instance regarding licencing and renewals. Licences can be checked in System Settings – Miscellaneous menu item – Licencing banner. The module expiry date is shown along with the modules that have been enabled and the maximum number of users.