Distribution Help and User Guide v20
Distribution Help and User Guide will take you through the features and settings for the Sicon Distribution module for Sage 200.
Search the page by pressing Ctrl + F (windows) or CMD +F (Mac) on your keyboard.
Back to all user guidesProduct overview
Help and User Guide maintained for Distribution version 201x.20.0.0 and upwards
The Sicon Distribution manager provides a set of new features and enhancements to the standard Sage 200 modules, creating functionality to help business who buy and sell products. These features are split between new screens available, via menus within the Distribution module that are organised based on which Sage modules they affect (i.e. Purchase Ledger, Sales Order Processing, Purchase Order Processing and Stock Control) and changes to existing standard Sage screens.
The features are split between the standard or advanced distribution module, which are available as separate Sicon additions. The split between the modules is listed below, the details of each feature are explained within the help and user guide
STANDARD AND ADVANCED:
- SOP Manage Back Orders – allows rapid stock allocation and un-allocation of multiple sales orders in one screen.
- SOP Order Line List – similar to the standard Sage SOP list, but displaying individual SO lines
- Sicon Preallocations – allows incoming stock to be reserved to outgoing stock e.g. POP to SOP
- Sicon Fulfilment – allows order fulfilment methods to be changed from within one screen
- Extended POP Order List – Shows the PO confirmed field on a POP list.
- POP Order Line List – similar to the standard Sage POP list, but displaying individual PO lines, container details/status and PO status (when using PO/Container tracking)
- Sicon Stock Transfer – Warehouse to warehouse transfers can be created and processed
- Stock Replenishment– in combination with the Sicon stock transfer, the system can suggest warehouse to warehouse replenishment based on warehouse stock minimum levels.
STANDARD
The standard features are designed to enhance sales order entry
- SOP Historical Lines – allows historical sales order lines to be added to a new sales order.
- SOP Telesales – Creates a rapid entry screen for entering sales order lines
- SOP Templates – Templates can be used to easily add multiple lines to sales orders
- SOP Copy Lines – Sales order lines can be copied from previous orders.
- SOP Extra Customer Details – During SOP entry, an additional screen appears for detailing and entering customer details.
- SOP Maintain Historical Sales Orders – when adding historical lines to a sales order, notes and formatting can be set to assist the user during SOP entry.
- SOP Order Line Dates – allow sales order line dates to be updated easily from a new screen within the sales order.
- SOP Complementary Products – Complimentary products can be created to prompt the user during SOP entry to also add the complimentary product.
- SOP Un-despatched Orders – During SOP entry a new screen to show un-despatched sales orders for the customer can be used to manage back orders.
- SOP Minimum Order Values – Allows a minimum order value to be set against the customer. During SOP entry the sales order can only be saved once the minimum has been reached.
- SOP Payment Terms – Customer payments terms can be displayed on the main SOP screen
- SOP Mark Up Pricing – Customers can have a % Mark Up Pricing applied to individual Product Groups, including Landed Costs in the calculation if required
- Superseded Items – Stock items can be flagged as superseded and linked to an alternative product to use.
- POP Expected Deliveries – A new screen to show purchase orders due in.
- Sales Price User Permissions – Users can be set to be able to create/amend price books from within the add historical lines screen.
ADVANCED
- Container Manager – allows containers to be created/maintained and linked to purchase order and tracking information.
- PO Tracking – Tracking profiles can be created and linked to purchase orders to maintain/track the expected delivery.
- POP Minimum Order Values – allows minimum order values to set against the supplier. During POP entry the order can only be saved once the minimum value has been reached.
- Supplier Catalogue – A list of non-stock items can be created for a supplier, to be added as a Free Text item on a PO
- Sales Contracts – SOP contracts can be created to keep track of contract agreements
- Purchase Contracts – POP contracts can be created to keep track of contract agreements
- SOP Lost Orders – allows sales order to be flagged as lost and reported on
- Calculate Min Stock – Minimum levels for stock can be calculate based on previous usage.
- Landed Costs – additional landed cost details can be configured and set against purchase orders.
- Stock Inspections – Stock can be flagged as requiring inspection and inspected after being received on a purchase order.
- Stock Matrix – allows multiple stock items to be created from a predefined matrix. These can also be added en-mass to purchase/sales orders.
- POP Minimum Order Values – allows minimum order values to set against the supplier. During POP entry the order can only be saved once the minimum value has been reached.
- Material and Resource Planning – Calculates PO requirements based on sales orders, minimum stock quantities and minimum order quantities. Also integrates with other Sicon modules.
Note that Material and Resource Planning is not documented in this help and user guide, as it has its own help and user guide available on the Sicon website.
1. Changes to Standard Sage screens
In addition to the new menu options described later in this help and user guide, there are also changes to standard Sage screens, which are detailed in this section.
1.1. Enter New/Amend Account Details
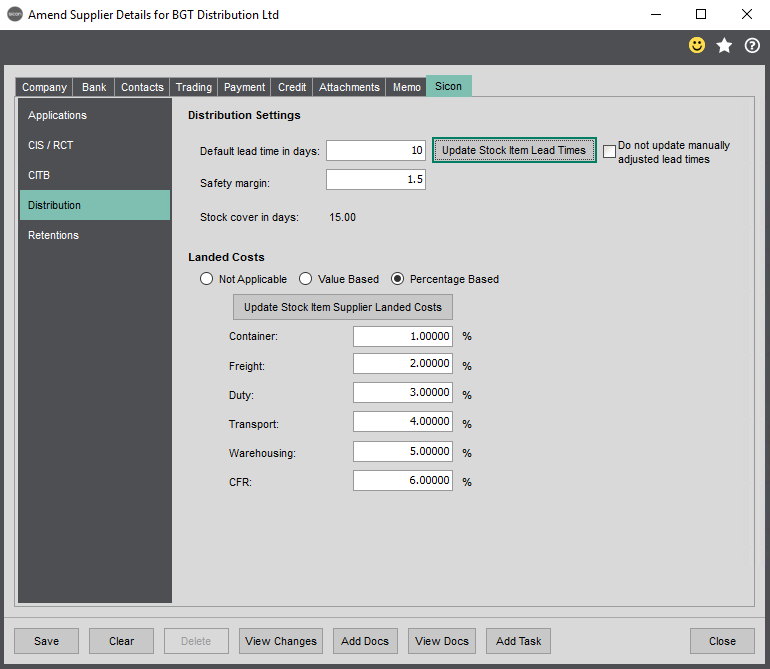
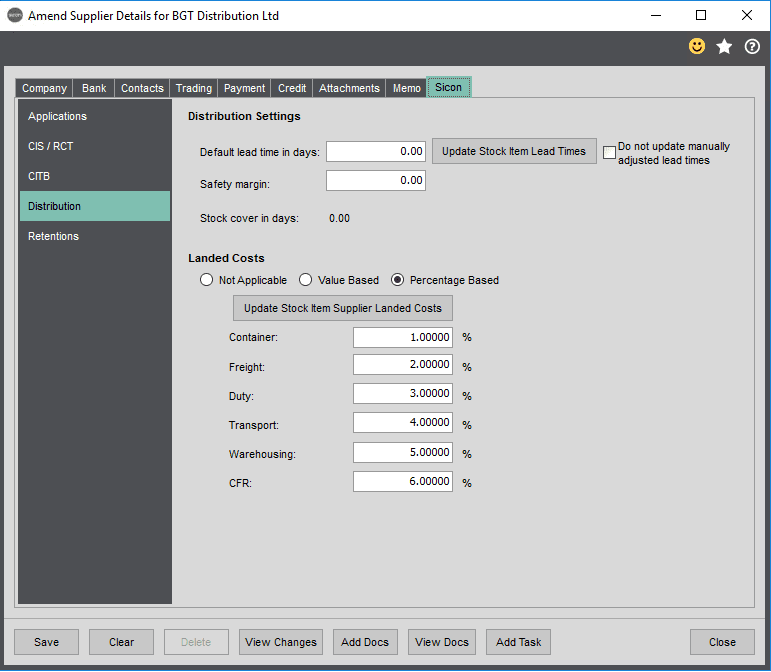
A Sicon tab and a Distribution sub category has been added to these screens with the fields shown in the screenshot above. The settings for ‘Default lead time in days’ and the ‘Safety margin’ are both used by the Calculate Minimum Stock Levels screen as overrides, when a stock item is being analysed where this supplier is the preferred supplier. The ‘Stock cover in days’ figure displayed is a calculation of the Default lead time multiplied by the Safety margin.
The ‘Update Stock Item Lead Times’ button allows you to update every stock item, where this supplier is the preferred supplier, with the lead time recorded in this tab. The ‘Do not update manually adjusted lead times’, when ticked, will only update lead time values that have not been manually changed.
The Landed Costs options allow you to record the appropriate settings for this supplier for Landed Costs. The Update Stock Item Supplier Landed Costs button would be used to update the details of landed costs recorded on stock items, where this account has been setup as a supplier of that item, and you’ve made a change to the setting regarding value or percentage based.
See the section on Maintain Landed Costs in the Distribution Stock Control menu for more information about this functionality.
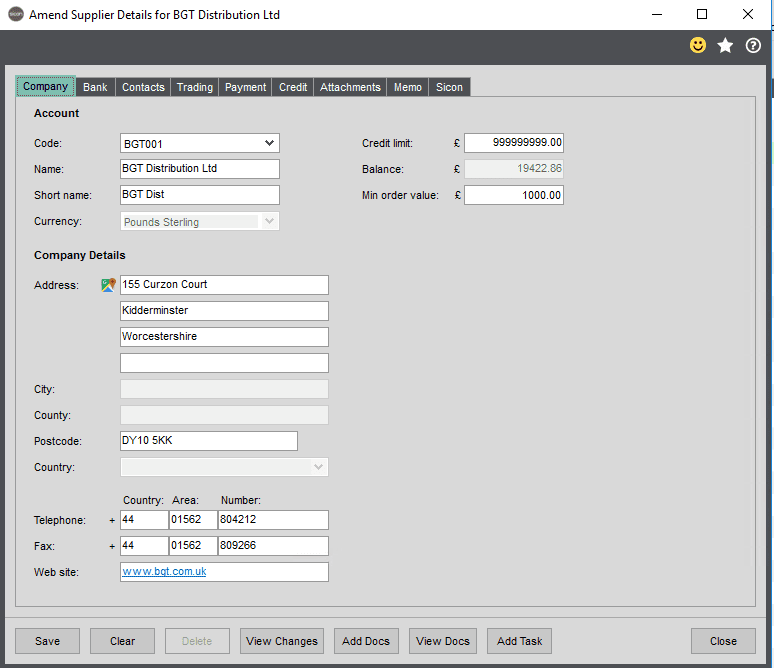
On the company tab on the supplier, there is minimum order value that can be set when this is enabled in the distribution settings.
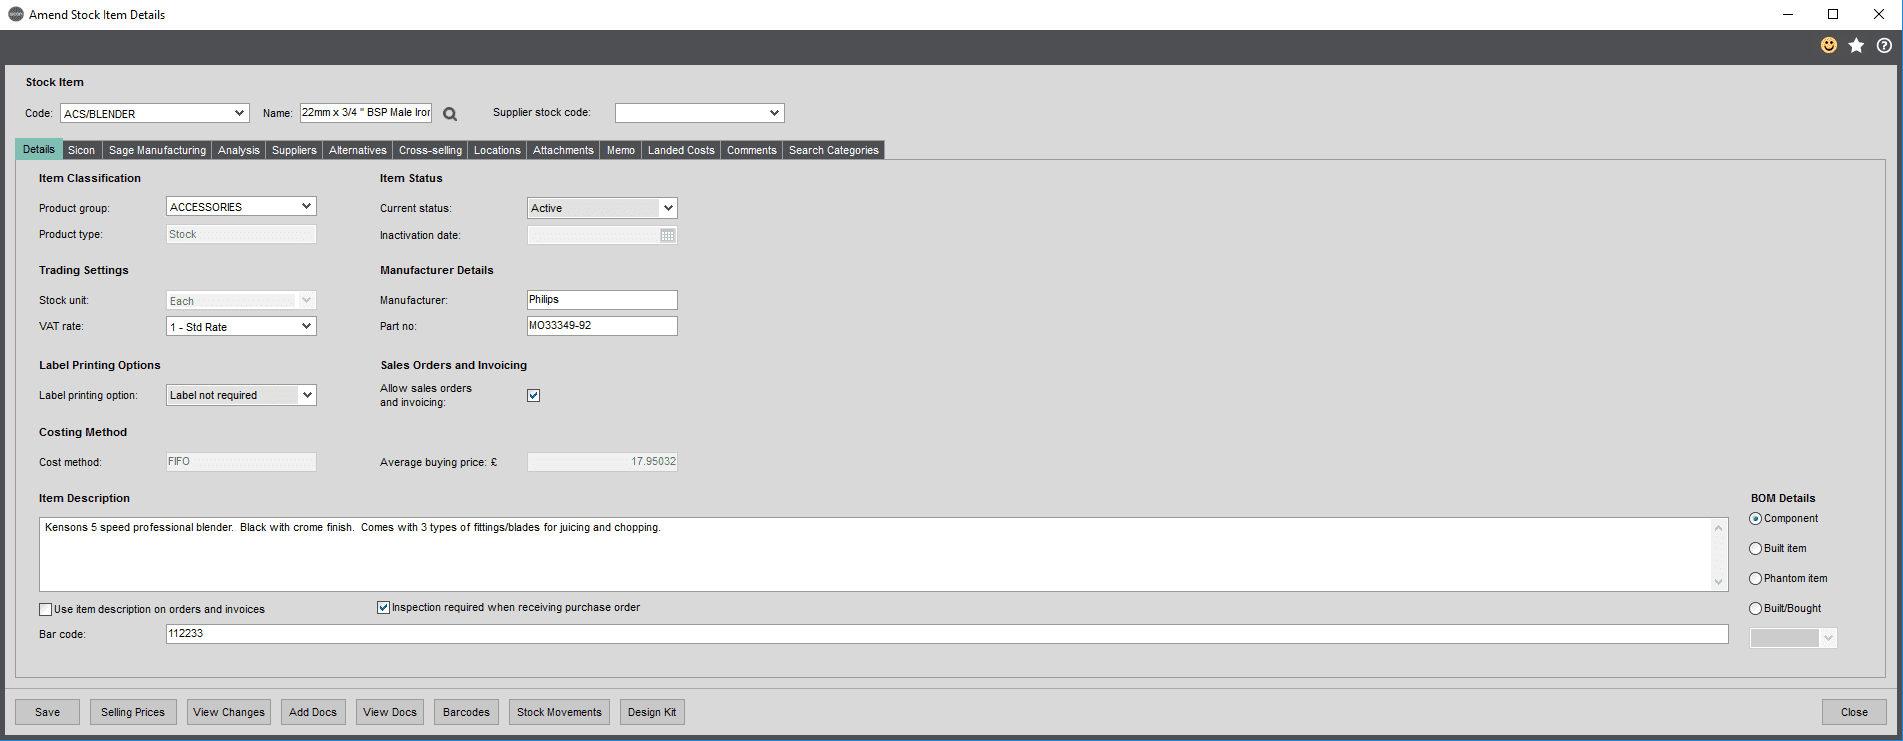
1.2. Enter New/Amend Stock Item Details
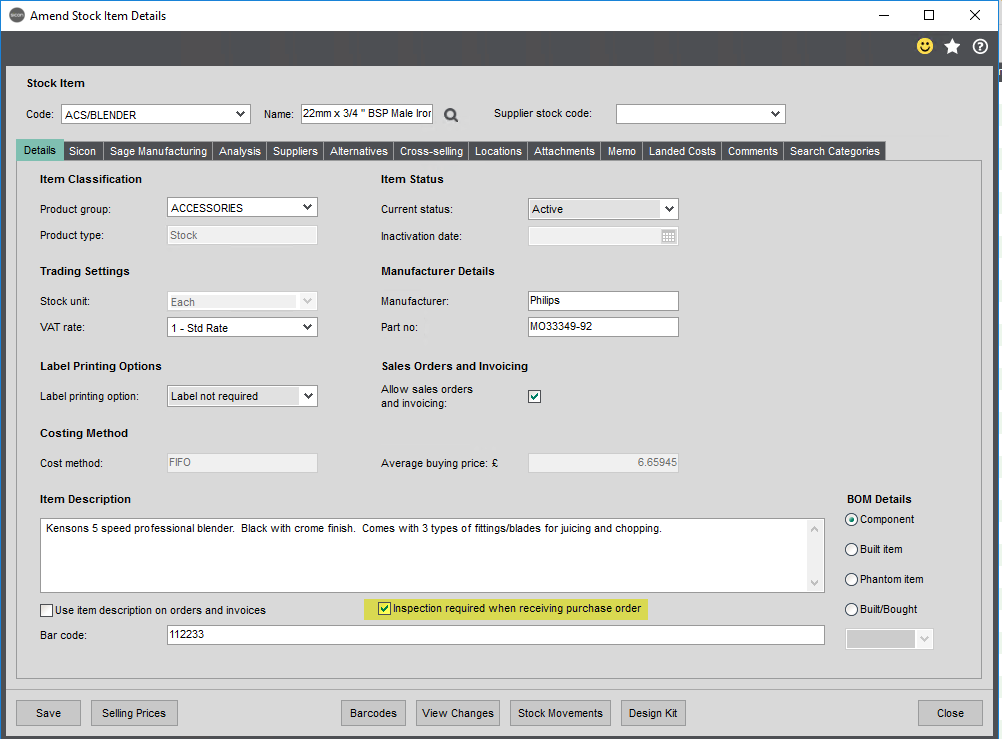
Inspection required when receiving purchase order. With this item ticked, the stock inspections process within the Distribution> Stock Control menu can be used. A list of stock items awaiting inspection will be displayed and can be ‘Passed’ or ‘Failed’.

The Distribution setting relating to the stock item can be found in the Sicon tab.
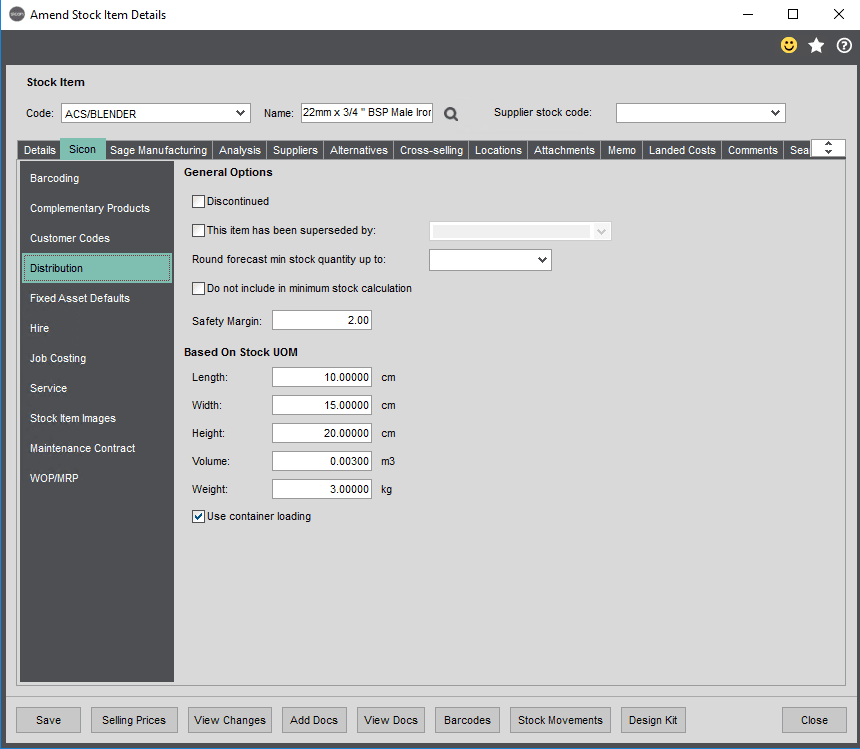
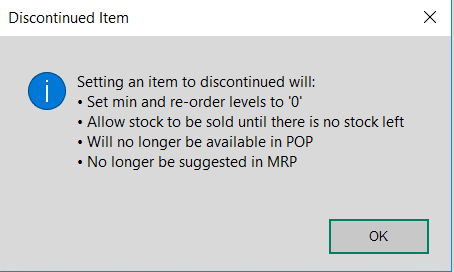
The Discontinued flag allows the stock item to be set as discontinued, so that no more stock is purchased, but existing stock can be used up. The following pop up, which appears when setting the stock item to discontinued, details these.
The second tick box allows you to set a stock item as superseded, and then select the stock item that has superseded it in the drop down. When processing a sales order or purchase order for this stock item, you will be prompted that the item has been superseded. You can choose to keep the item you originally selected should there be stock still available or change it to the new stock code.
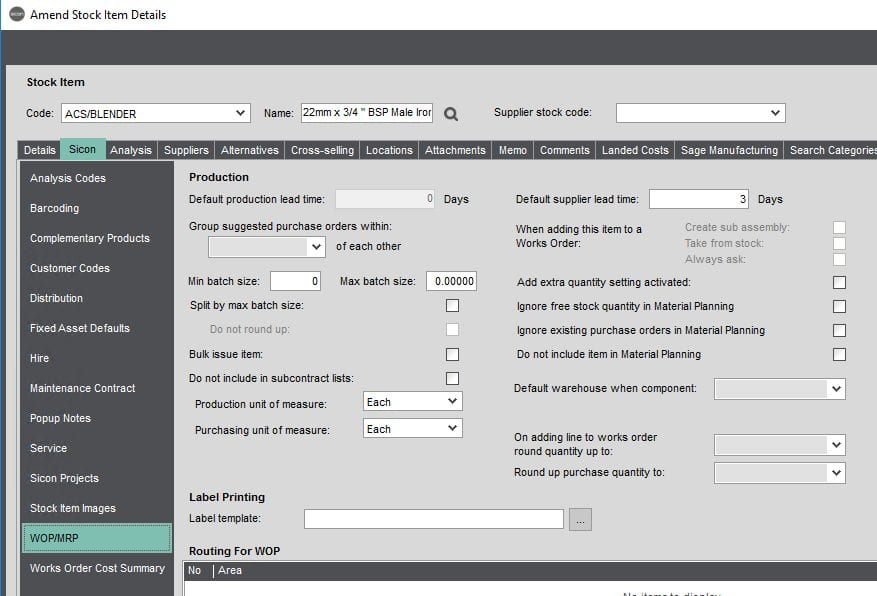
The ‘Round forecast min stock quantity up to’ is an option used by the Calculate Minimum Stock Levels function, and is a drop down that allows you to specify how many decimal places you would like the minimum stock level suggestion to use for this stock item.
If you check the tick box beneath, then this stock item will not be included in the Calculate Minimum Stock Level process.
Safety Margin – allows a safety margin to be entered per stock item, that will then be used in the Calculate Minimum Stock level.
The dimension fields in the bottom half of the screen are used as part of the Container Management feature in Distribution. You can specify the size dimensions here and the volume will automatically be calculated. You can also specify the Weight field. If you add a container to a purchase order, when adding lines to a purchase order for this stock item it will measure their volume and weight against the remaining capacity of the selected container. See the Container Manager screen in the Purchase Order Processing menu for more details.
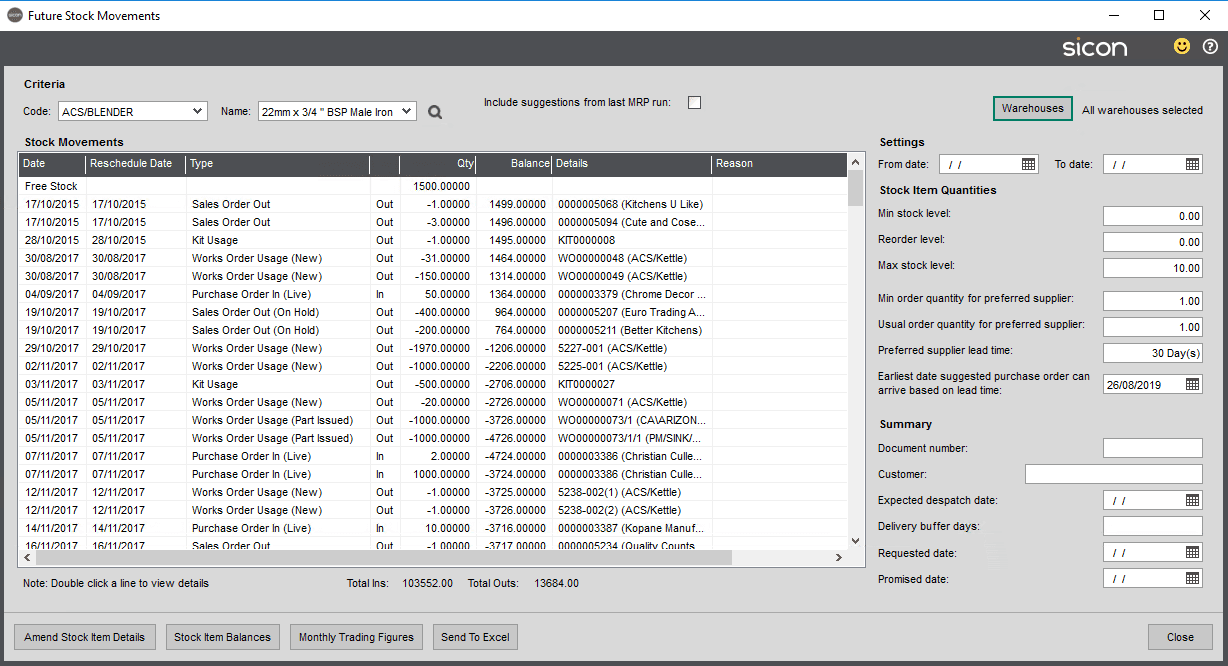
A Stock Movements button has been added to these screens which allows you to view the Future Stock Movements screen for this stock item. See the documentation on the Future Stock Movements screen within the Material and Resource Planning Help and User Guide for more information.
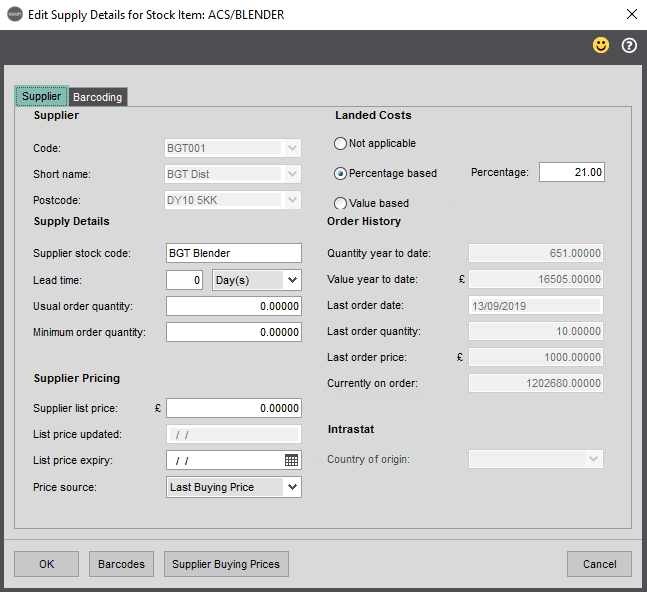
The Suppliers tab has additional fields, used by the Material Planning routine and the Landed Costs functionality.
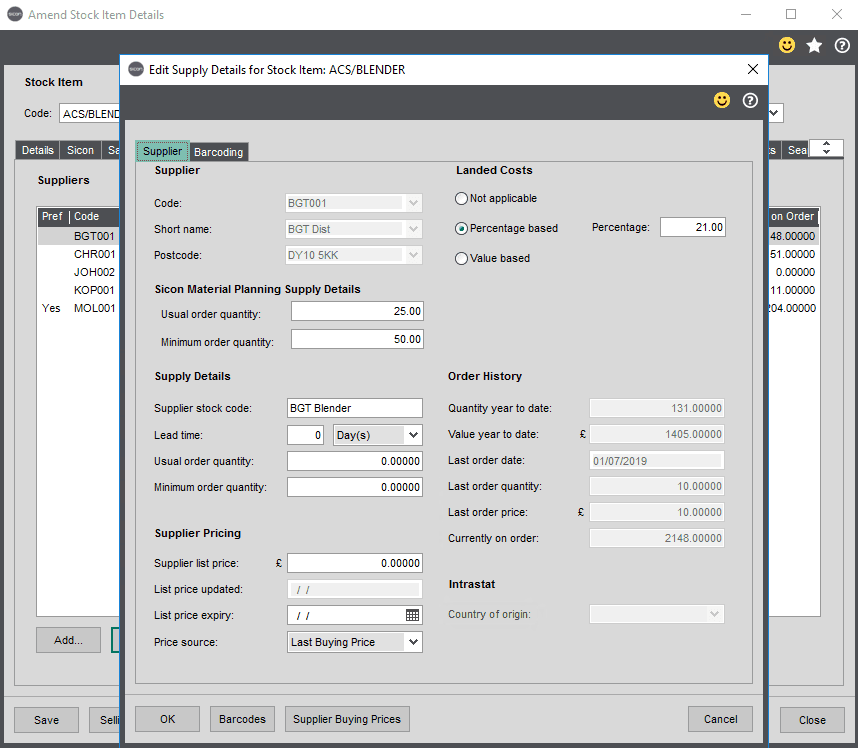
The Sicon ‘Usual order quantity’ field acts as a multiple for the quantity suggested, for suggested purchase orders. So if you enter a value of 2, then the suggestions would always be in a multiple of 2, e.g. 2,4,6….22,24 etc.
The Sicon ‘Minimum order quantity’ field is the minimum amount that a purchasing suggestion will be, if there is a demand for this item in the Material Planning routine. Both these fields only show when the MRP setting ‘Enable Sicon supplier details for usual and minimum order quantities’ is ticked.
Unlike the standard Sage fields for usual and minimum order quantities, which are displayed further down, our fields allow you to enter a usual order quantity that is less than the minimum order quantity. An example of where you might do this is if you have a minimum order quantity of 20, but can only order in multiples of 5. The standard Sage fields would not allow you to enter a smaller usual order quantity than the minimum order quantity, hence we used our own fields instead.
The Landed Costs section in the top right allows you to record whether landed costs are applicable for the purchase of this stock item from this supplier, and whether they will be percentage based or value based. See the section on Maintain Landed Costs for more information about this functionality.
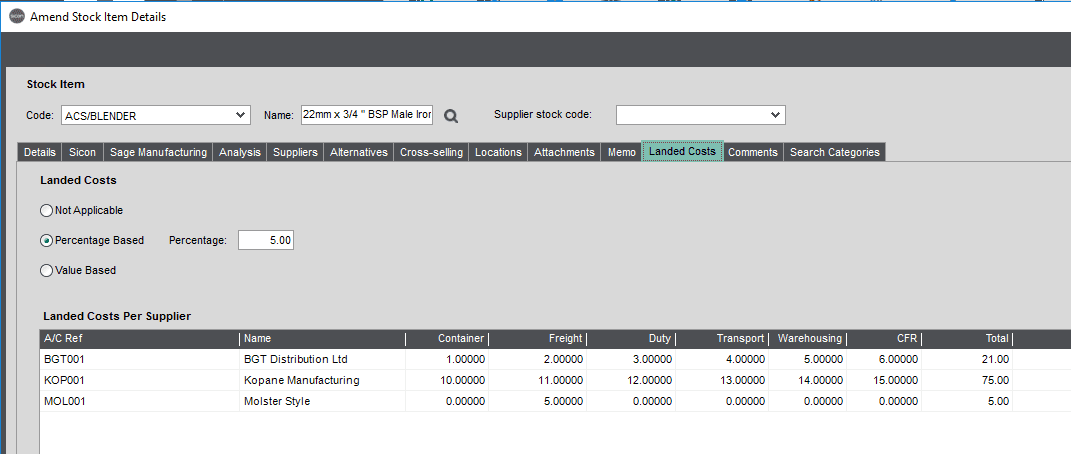
A Landed Costs tab has been added to Stock Item Details, with the fields show in the screenshot below.
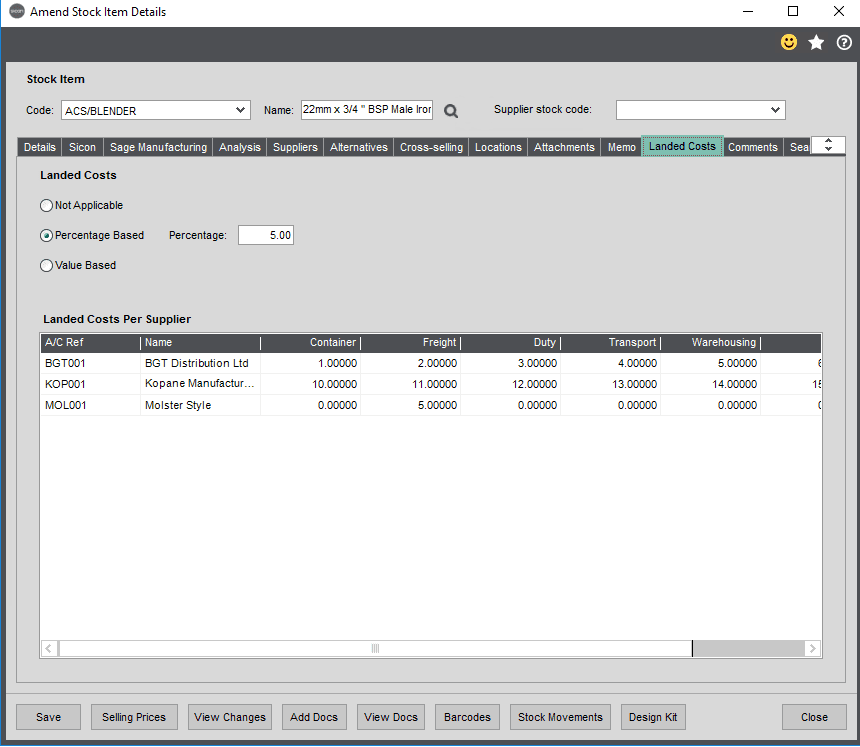
This tab shows the values recorded against each supplier defined on that stock item and allows them to be edited on this screen. The total cost is updated onto the supplier landed cost figure and used on the purchase order.
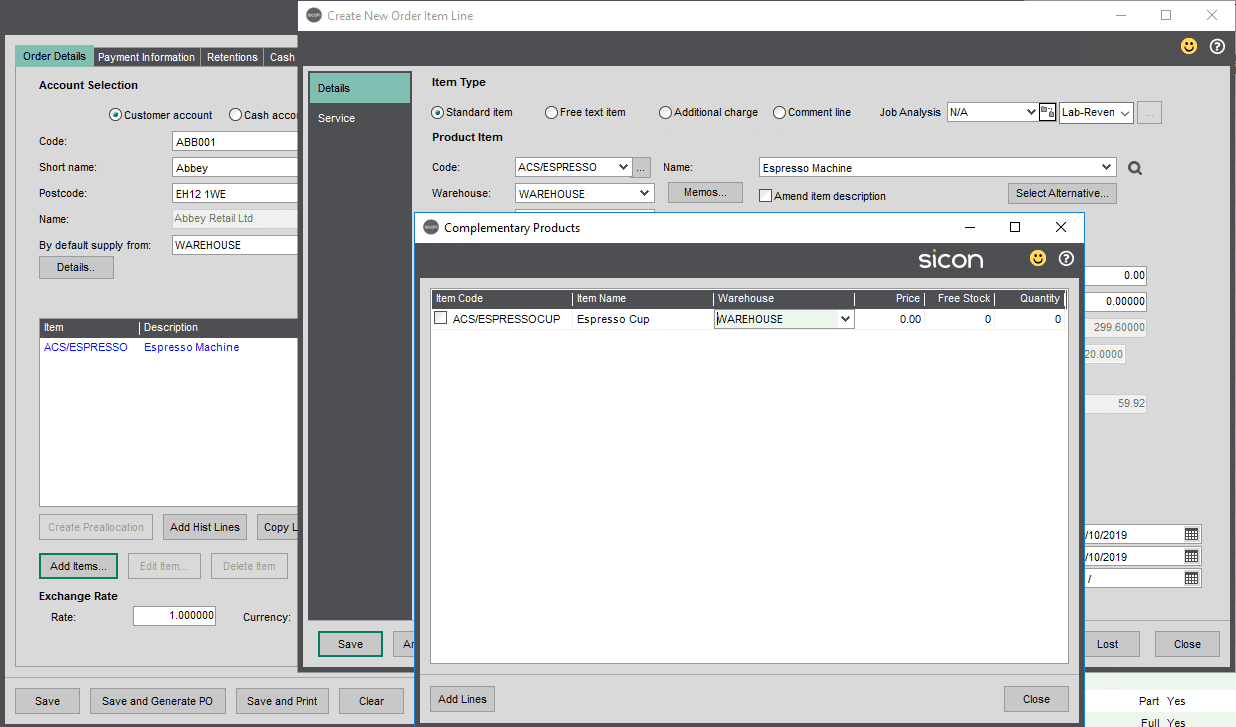
In the Complementary Products sub section of the Sicon tab, you can set up products that are associated with the product.
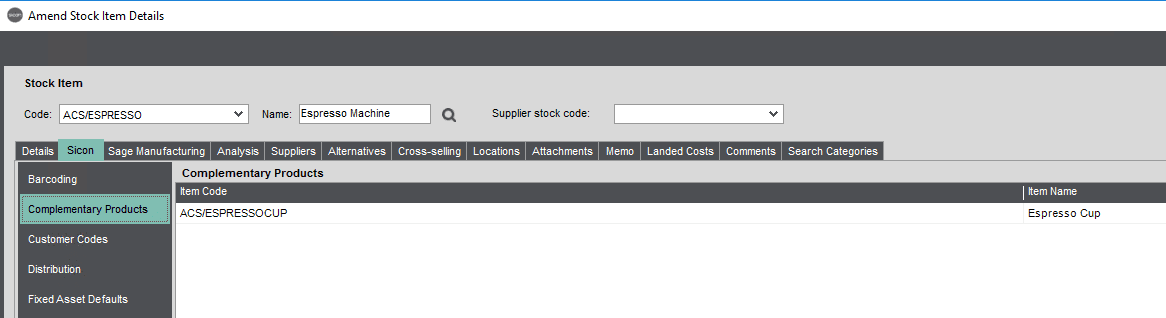
During SOP entry, if the main product is entered, the system will pop a window to prompt the user if they also want to add the complementary product.
1.3. SC - View Stock Item Balances
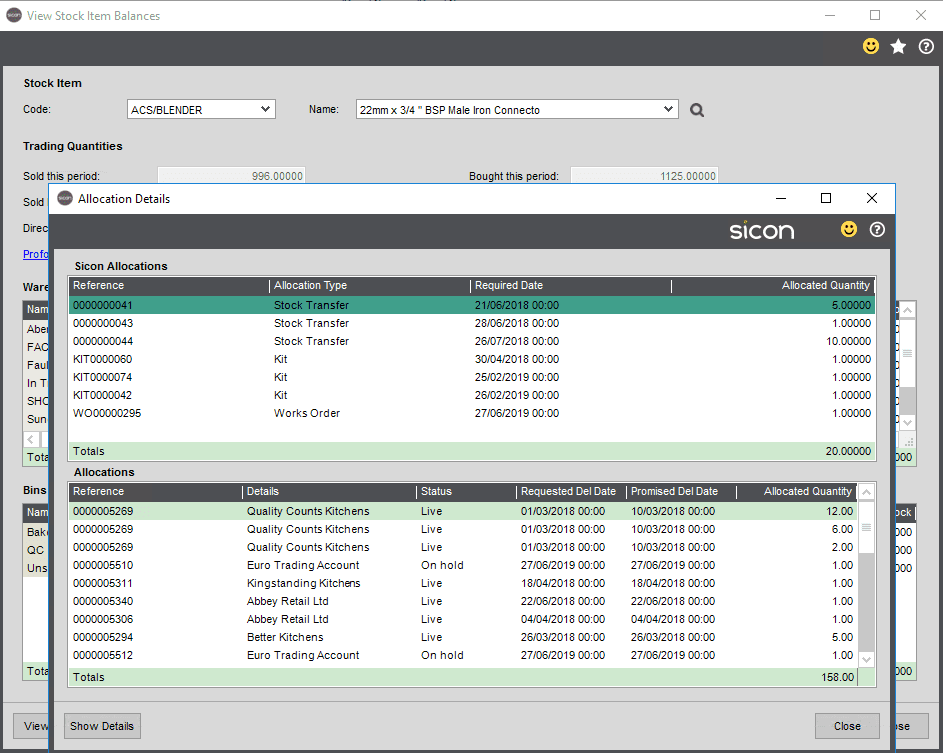
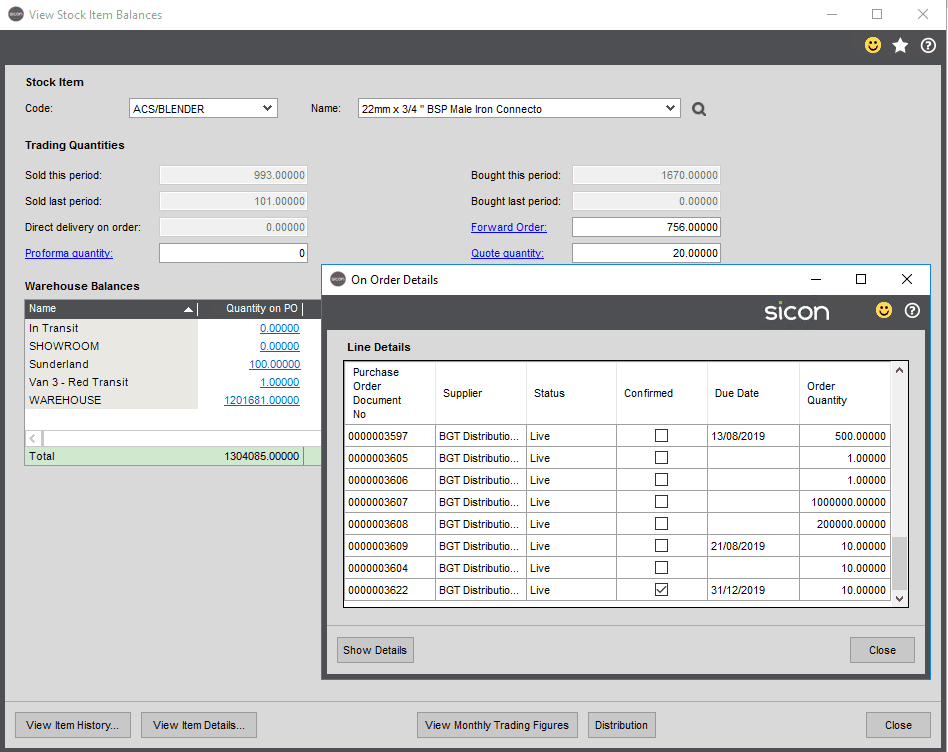
Boxes have been added to this screen to show quantity of this stock item on current SOP Proforma’s and Quotations. The Forward Order box shows how many are required for sales orders that have yet to be allocated.

Drill down is provided on the fields in blue in the screen: Click on any of these areas to drill down into a list of the orders that are contributing to these figures. If you double click on an order in the list, then the appropriate order enquiry screen will open.

By clicking the Distribution button at the bottom of the View Stock Item Balances screen, you can access the View Previous Sales Orders or View Stock Movements screens. Clicking on the View Previous Sales Orders opens the following screen.
If you double click on an order line, then it will open View Sales Order for that order.
See the documentation on the Future Stock Movements screen within the Material and Resource Planning, Help and User Guide for more information on the screen that opens when you click on the View Stock Movements option.
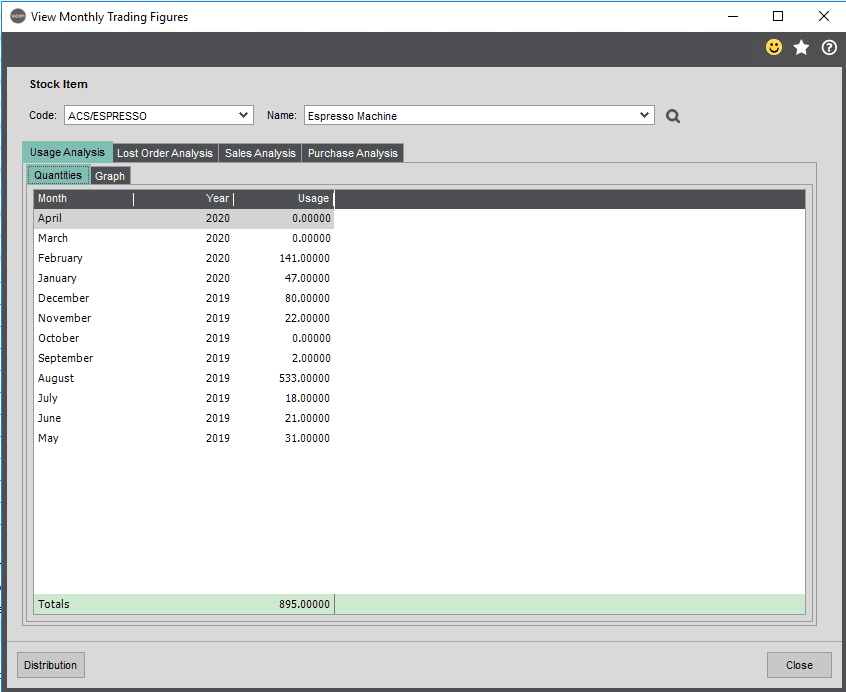
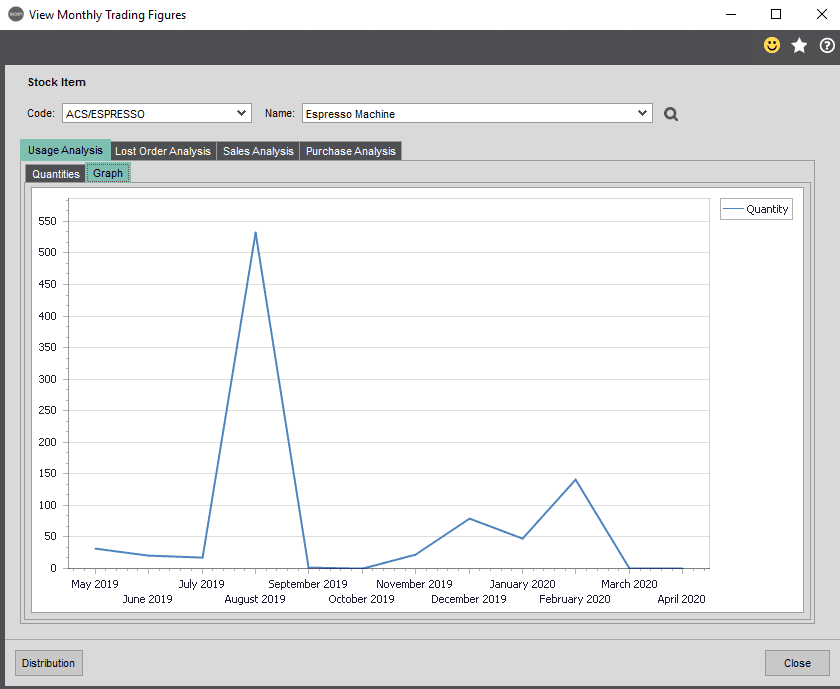
1.4. SC - View Monthly Trading Figures
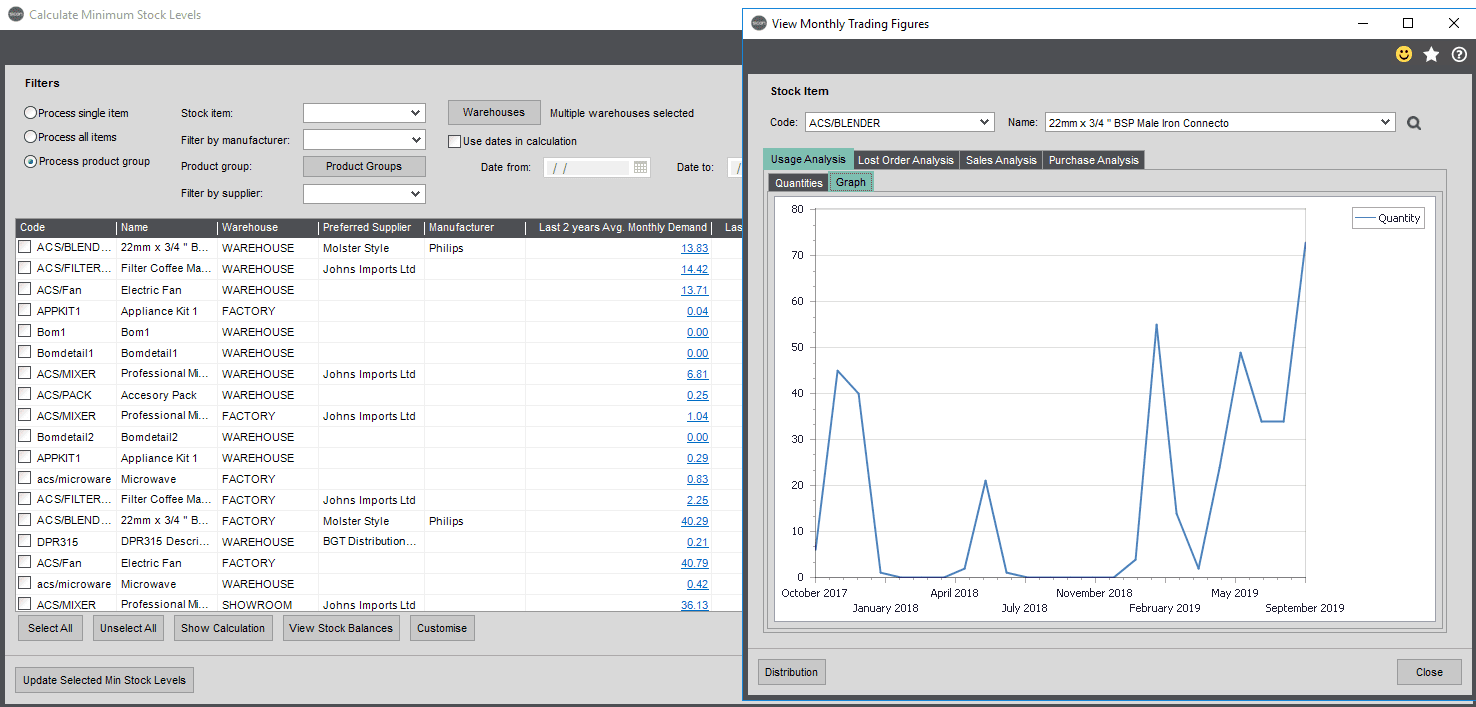
The View Monthly Trading Figures, within Stock Control>Enquiries, has been enhanced to include a usage calculation and graph for the usage, lost orders and the sales figures. The Usage Analysis tab includes Sales plus any BOM, Works Orders or Internal issues in the stock module. The Lost Order Analysis tab reflects any order lines for this stock code that have been tagged as Lost Orders. See the changes on the SOP Order Entry/Amendment section for details on that functionality.
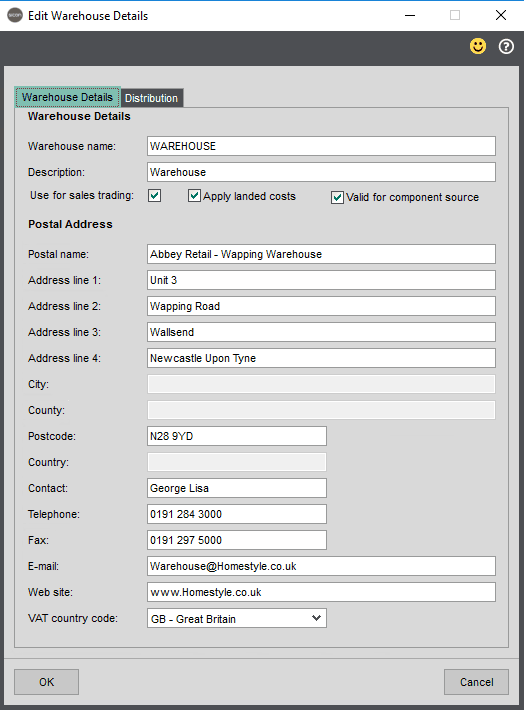
1.5. SC - Locations
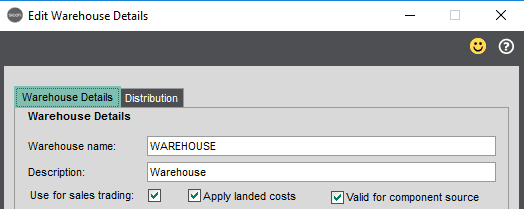
We have added a new tick box to the Edit Warehouse Details screen when maintaining Locations within Stock Control. This controls whether landed costs will apply to purchase order lines that are being delivered to this warehouse.
1.6. SOP - Enter New/Amend Order/Quotation
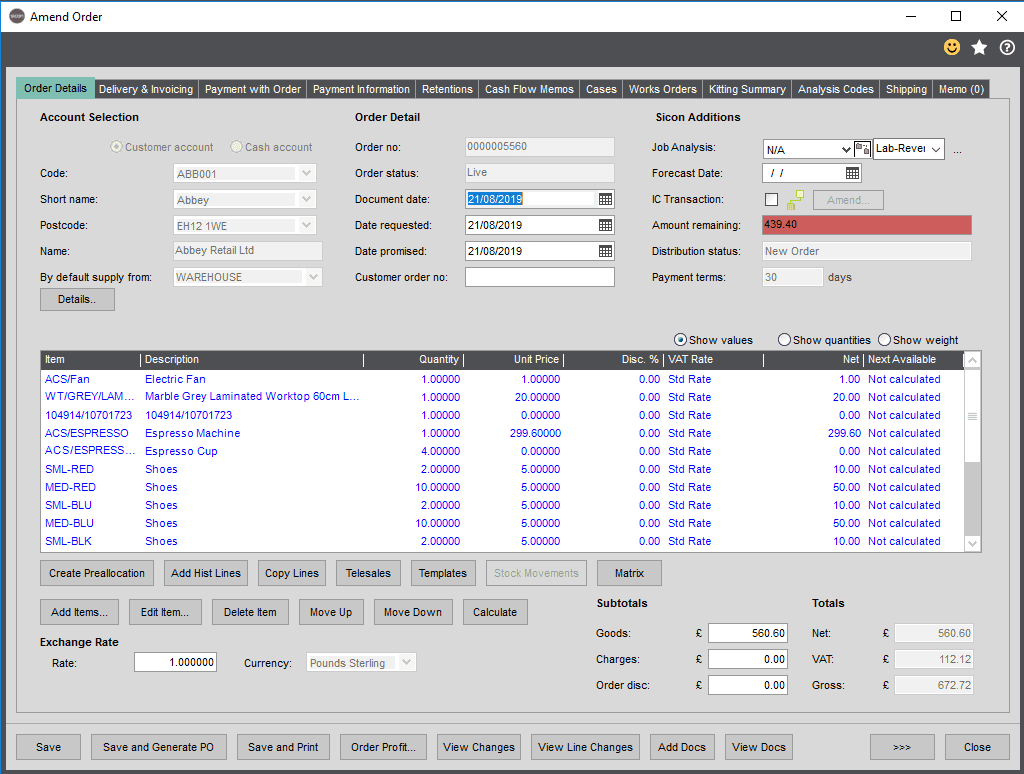
The following fields have been added to the standard Sales Order:
- Amount remaining – With the Distribution setting on and a Minimum Order Value set against the customer, the amount remaining will show based on the Minimum Order Value less the value of the Sales Order.
- Distribution Status – Shows the status of the order , that is updated when the order is allocated.
- Payment Terms – With the Distribution setting on, the customer payment terms can be shown on the main SOP screen.
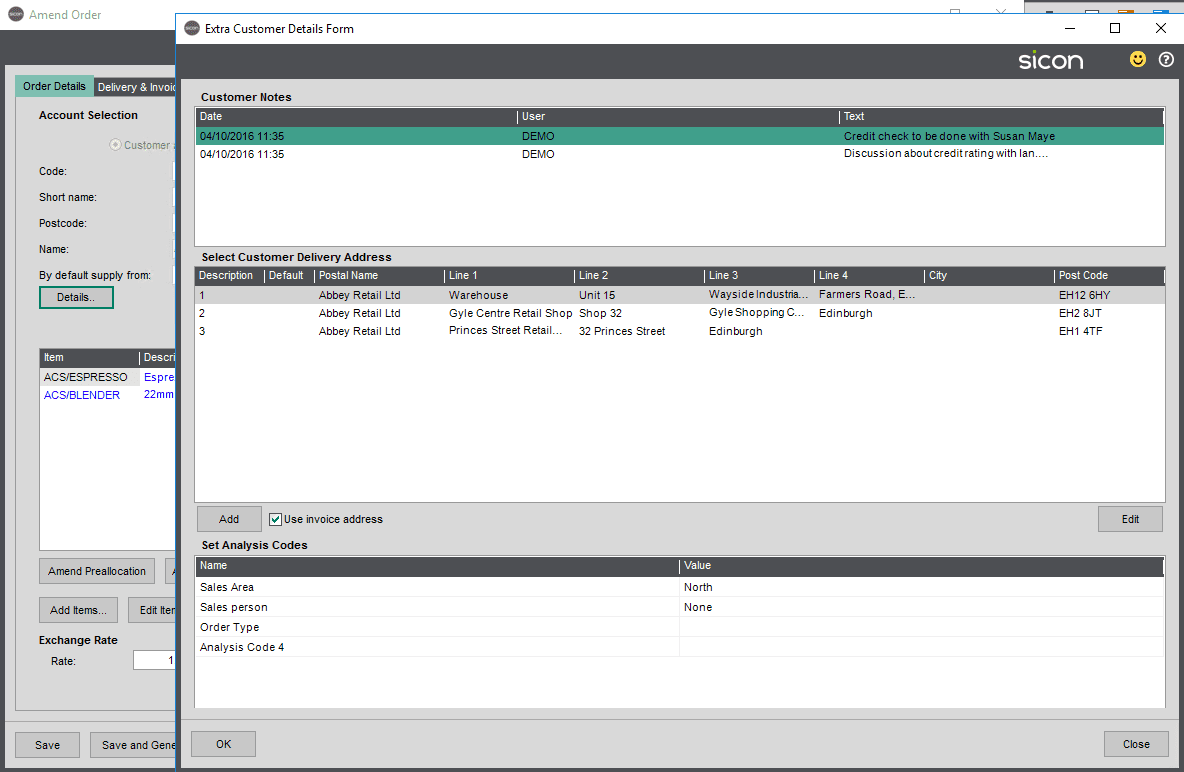
- Details button – Clicking on the details button opens the extra customer details form. If the User has permission within Sage, the Analysis Codes can be amended here.
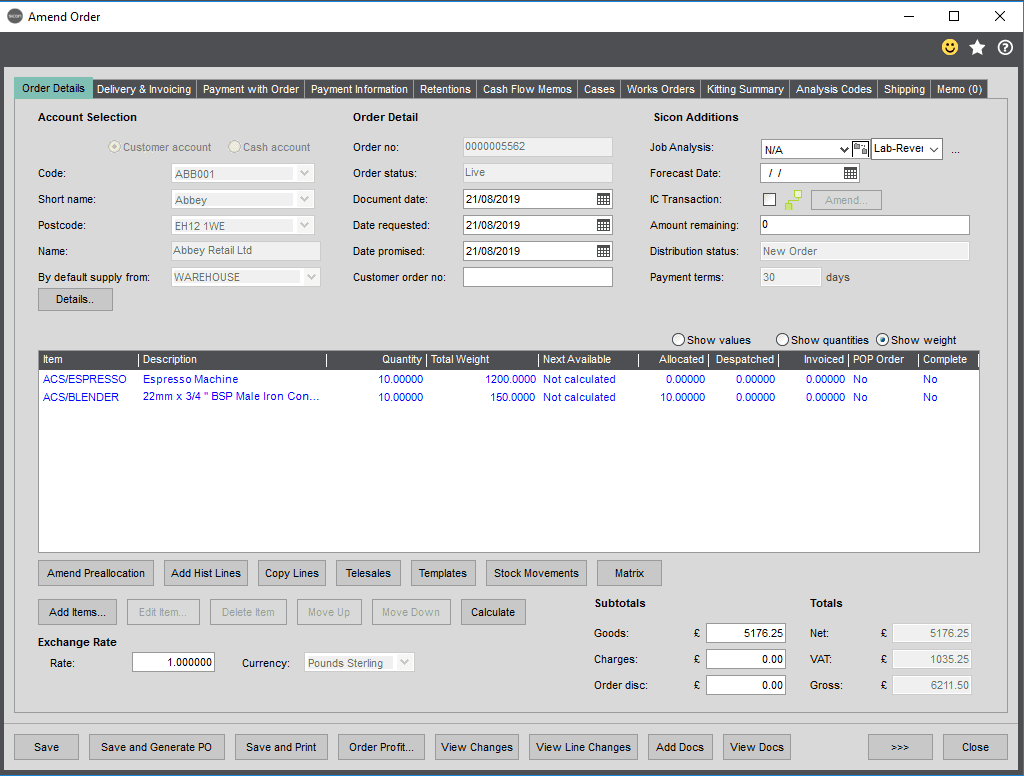
Show Weight – Clicking on the Show weight button, details the weight of the lines based on the weight set in the Stock Item Analysis tab, when the ‘Show Weight Radio Button’ is enabled in the Distribution settings.
There are numerous buttons that can be added to these screens, if they are enabled in the Distribution Settings.
The following Buttons are added to the Order header screen on the Order Details tab:-
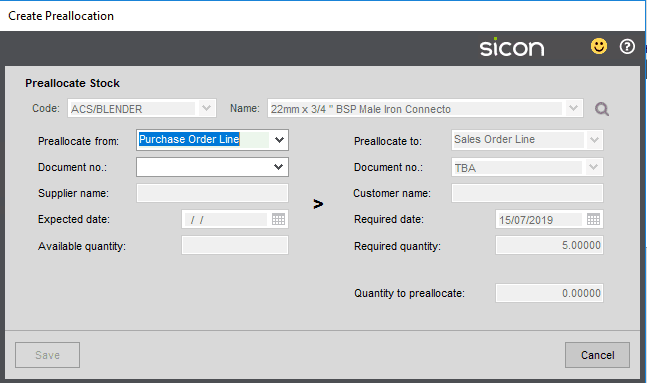
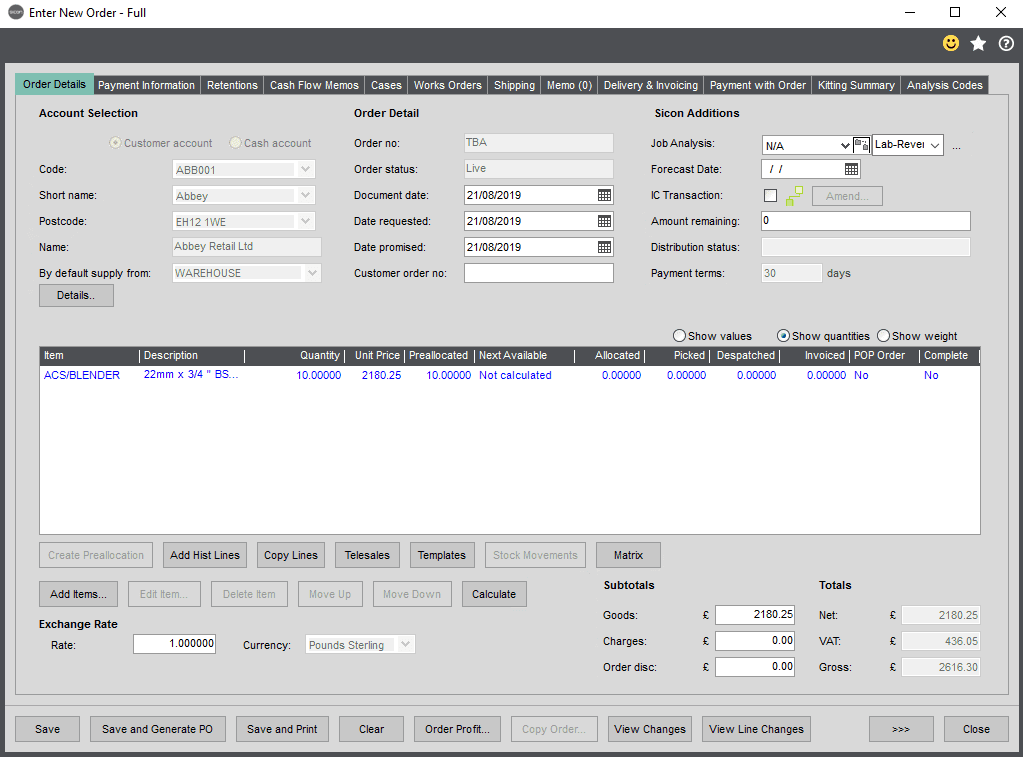
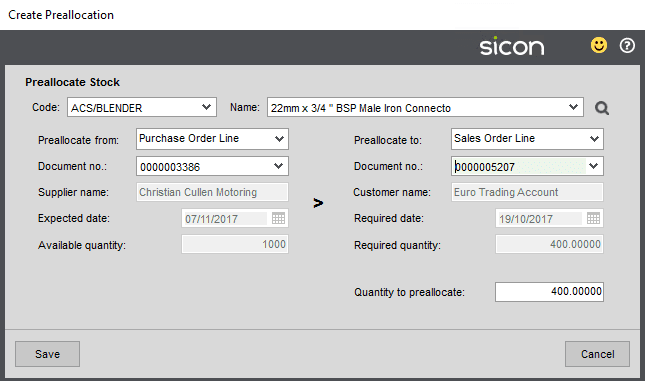
Create Preallocation – Allows a Sicon preallocation record to be created from the Sales Order to a Purchase Order or Sicon Works Order. This will reserve the required quantity on that Purchase Order or Works Order, so that when the goods are received or built, they can be allocated straight to the linked Sales Order.
Once a preallocation exists for a sales order line, the button for this screen will change to Amend Preallocation, where you can amend the Quantity to preallocate if necessary. Preallocations are also visible on the purchase order, and can also be amended there.
The preallocation can also be seen from the sales order when the ‘Show quantities’ option is selected.
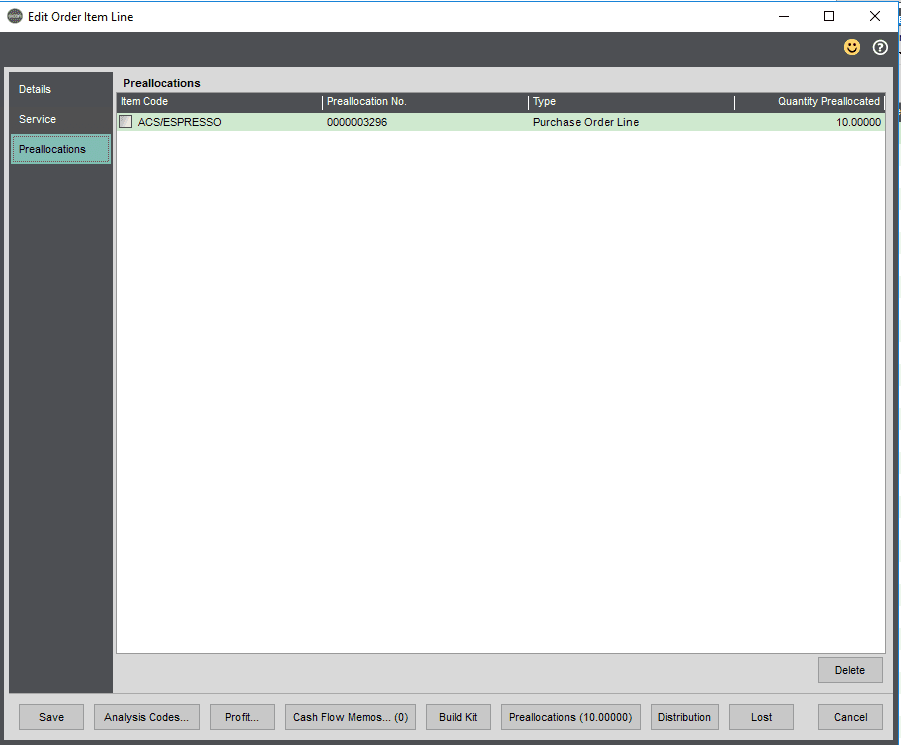
They are also visible when an order line is edited and ‘Preallocations’ is selected from the list on the left hand side of the screen.
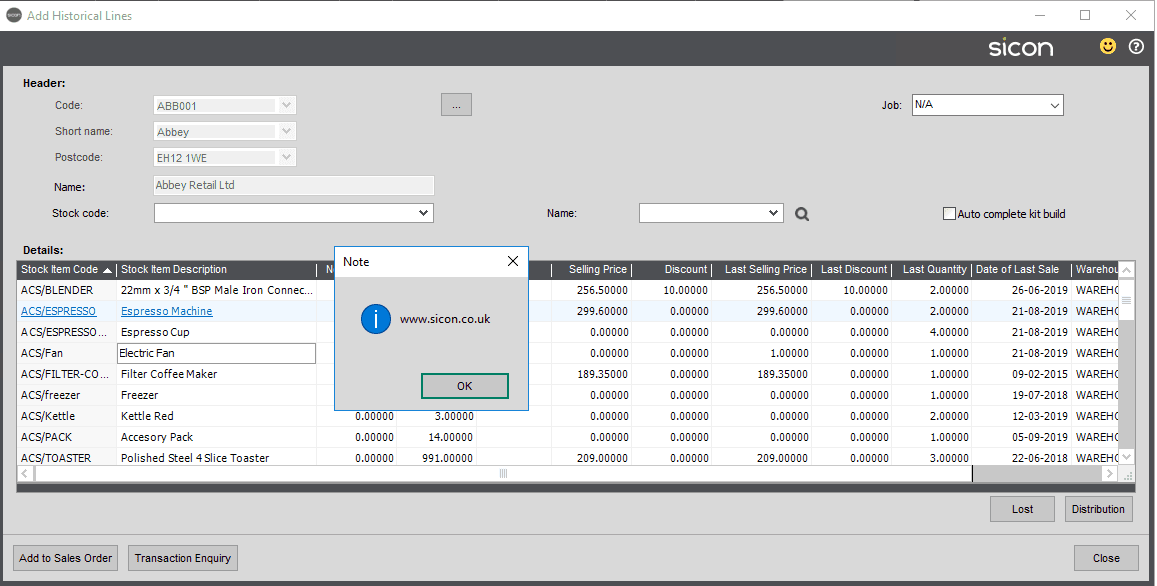
Add Historical Lines – Enables you to search for stock items ordered previously by that customer, so that you can review previous selling prices and, if desired, add some of these items to the current order. When Adding Historical items you can see the last sale date, last selling quantity and price.
Entering a quantity into the New Quantity field will update the selling price from the price book, if this is configured for the customer. Click the Add to Sales Order button to create these as new lines on the current order.
If you have been granted permissions, via the Sales Price User Permissions screen, within the Distribution>Sales Order Processing menu, then a prompt will appear after amending the selling price as to whether you wish to create a new price band, or amend an existing one, with this selling price change.
This screen will look back over a range of months, as specified on the Telesales tab in the Distribution Settings.
The Build Kit column and Auto complete kit build check box can be disabled with the relevant setting on the General tab in the Settings.

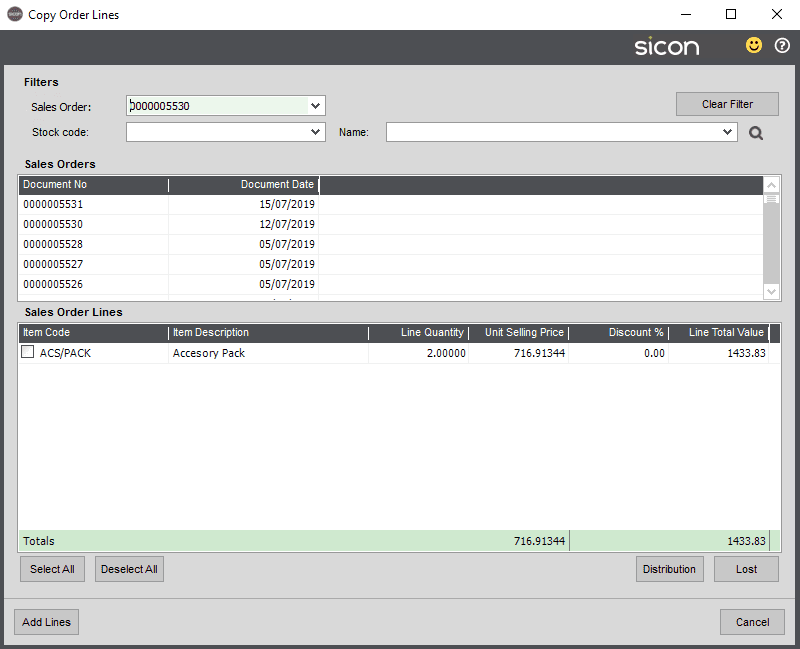
Copy Lines – This screen enables you to search for lines on a previous sales order, in order to copy them onto the current sales order. You can filter by order number or stock item code, and then select the lines that you require and click the Add Lines button to copy them onto the current order.
This screen will look back over a range of months as specified on the Telesales tab in the Distribution Settings.

Telesales – This screen provides a rapid alternative method for adding lines to this sales order, in a way that is suitable for telephone selling. On entering details into the Item Code field, the Stock Item Search feature will search the stock code, name, description and manufacturer part number fields for these details. On tabbing to the next field, the Item Code field will either be populated with the Stock Code or, if there is more than one, a drop down list will show a list of possibilities.
Please note: If Sicon Enhancement Pack is installed, the Setting ‘Customer, Supplier, Nominal, Cash Book and Stock Item Entry Prompt’ must be disabled if the Stock Item Search feature is to be used.
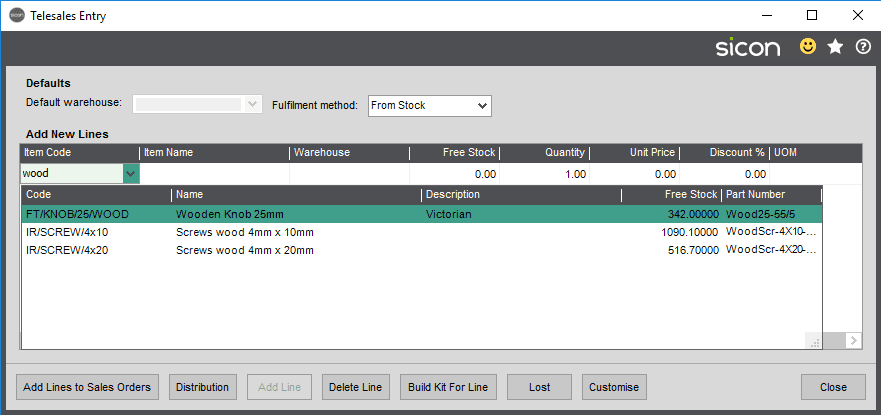
Free stock figures are shown against each item in the search results to enable users to see what free stock is available.
Add multiple items to the rapid order entry page, then add these to the current open sales order using the Add lines to Sales Order button at the bottom of the page.
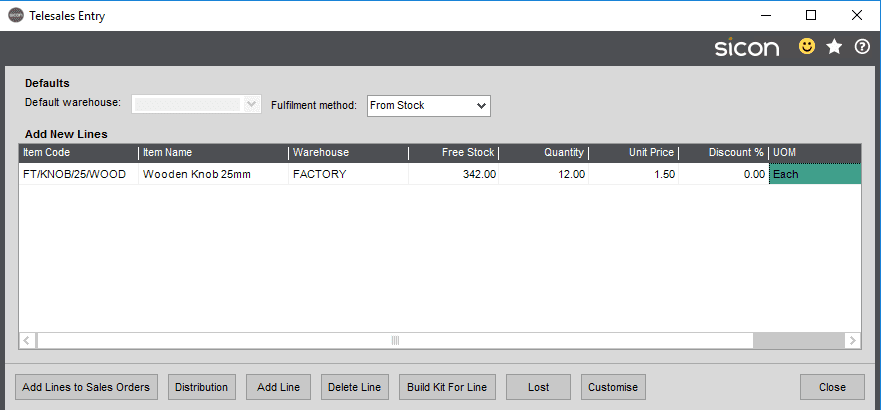
It is possible to customise the fields on the screen using the customise button. You can return to Historical, Copy Lines or Telesales entry at any time, or use the Full Order Entry edit line feature.
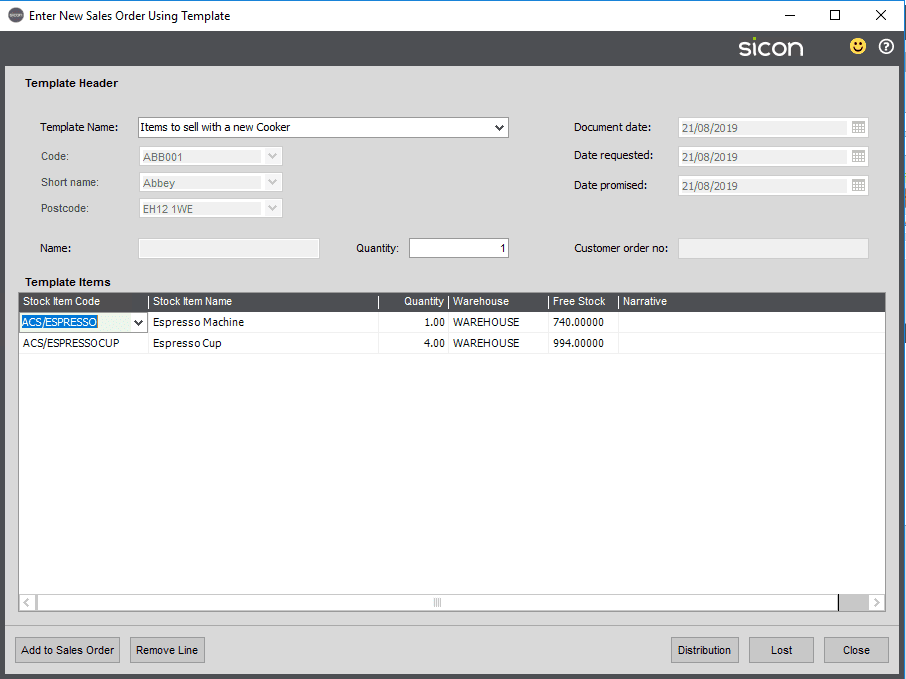
Templates – You can select from any templates that have been created via the SO Template menu options within the Sales Order Processing menu in Distribution. You can use the templates to add lines to existing orders in addition to using them on empty sales orders.
Stock Movements – Clicking on a line on the sales order, enables the stock movements button to be selected, this then opens the Future Stock Movements screen.
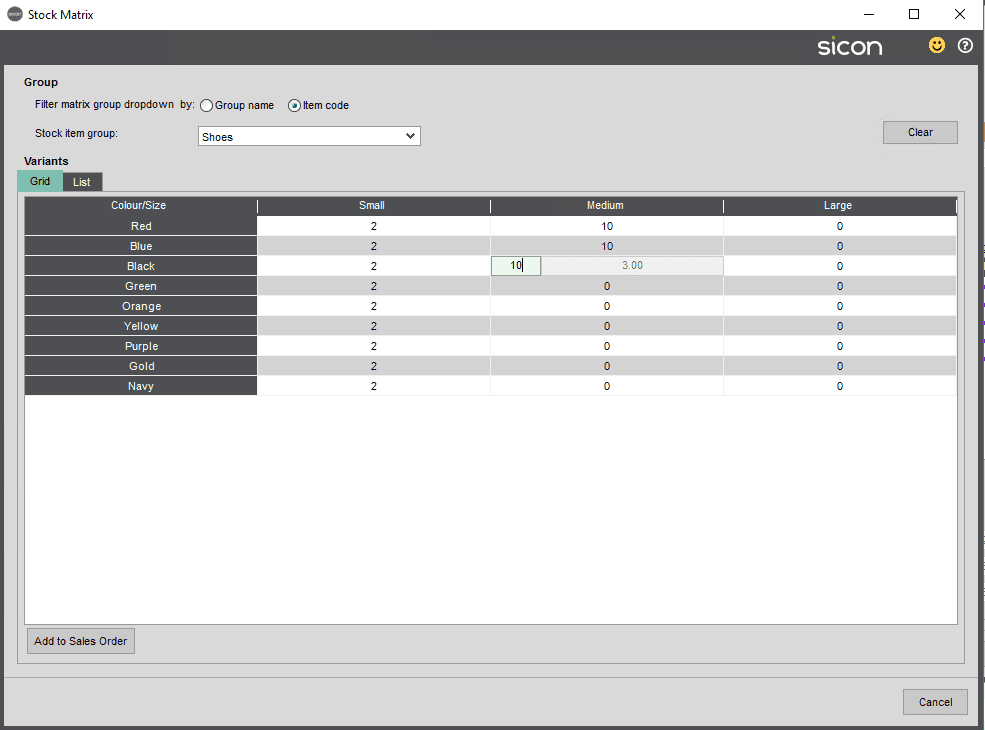
Matrix – Allows the stock matrix function to be used from within the sales order. Multi stock items from a stock matrix group can be added to the sales order. Clicking on the value entry field displays the free stock quantity to the right.
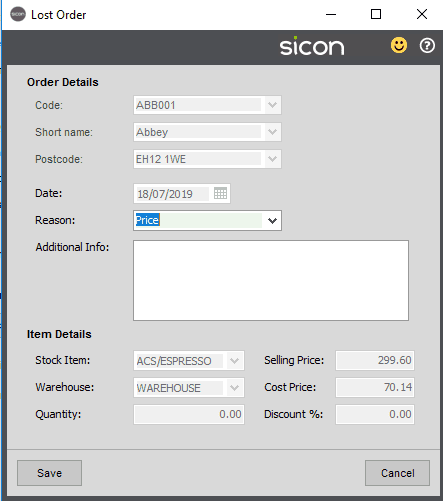
Delete Item – When an item is deleted the Lost Order screen will show the details of the order line.
You can select a reason from the drop down list and record some additional information for reporting later. There is a default reason of ‘Lost Order’. More reasons can be created in the Lost Order Maintenance screen where they can also be marked as to be included in the Minimum Stock Calculation or not.
Lines marked as Lost can be reviewed via the Lost Orders Enquiry screen in the Sales Order Processing menu within Distribution.
This screen will also appear when an order is cancelled via the Amend Order Status screen.

Where an order line has been entered, but then does not want to be processed and saved (eg no stock availability), there is a Lost button on the Order Item Line screen, which will also access the Lost Order screen.
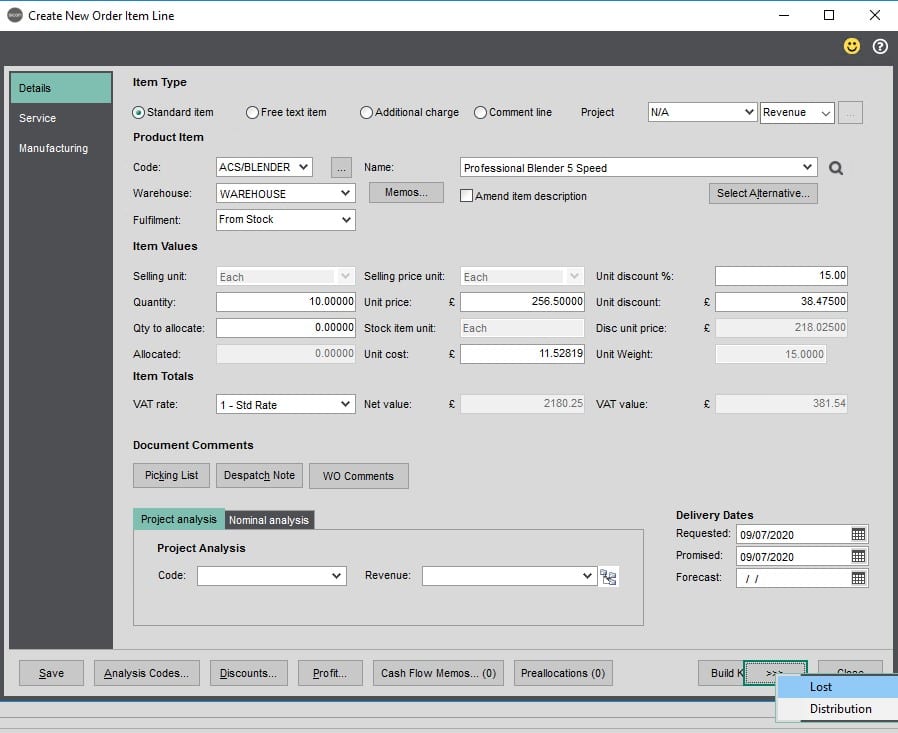
The Lost Orders screen prompt feature is optional and can be enabled/disabled on the SOP tab, located in the Settings screen.
Please Note – The Lost Order function is only enabled if the Sage SOP setting of ‘Record details of cancelled orders for future analysis’ is NOT set.
Analysis Codes tab – The distribution module moves the analysis codes from their previous location of the bottom of the Delivery & Invoicing tab, and instead moves them onto their own tab.
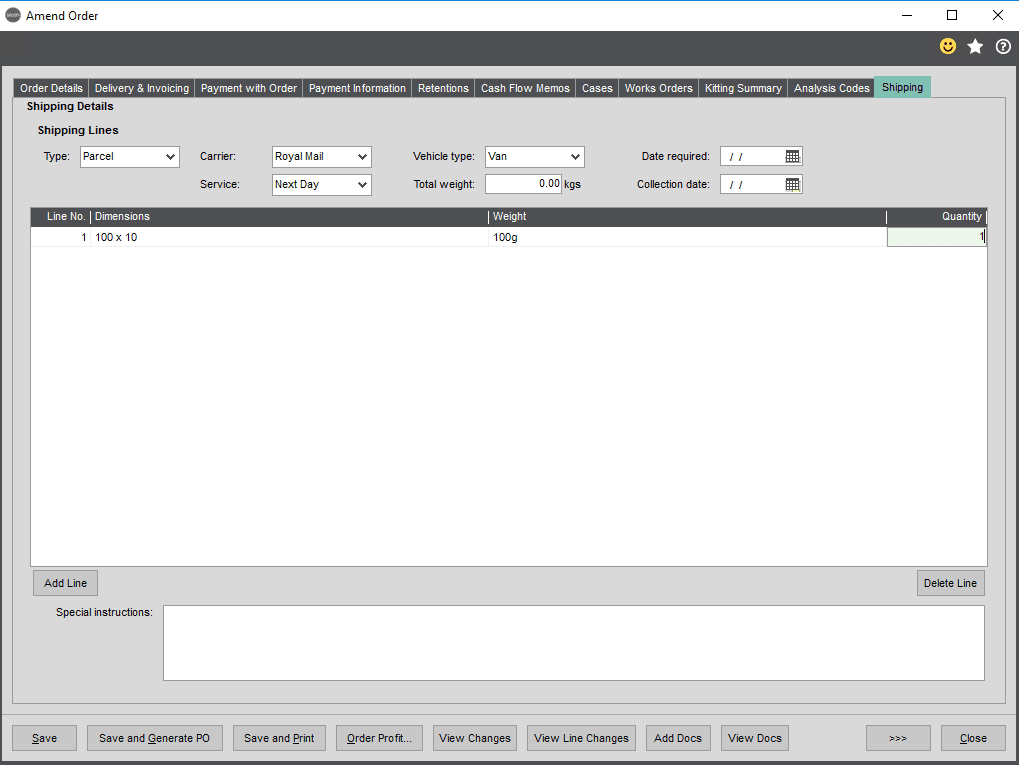
Shipping tab – If enabled in the settings, this tab gives you the facility to record shipping details for the order, going to the level of size dimensions and weights. You can also record whether the items are being shipped as a parcel or a pallet, which carrier and service they are going with and on what vehicle type. You can also record a date required and a collection date. Finally, a box at the bottom allows you to record any special instructions for the shipment. The field values available in this screen are maintained via the Shipping Maintenance screen in the Maintenance menu.
At the bottom of the screen, when on any of the tabs displayed above, two new buttons have been added for View Preallocations and Order Line Dates.
The View Preallocations button would show any preallocations for any of the items on the sales order; typically these would be links to purchase orders showing which purchase orders will allocate to this sales order when they are received.
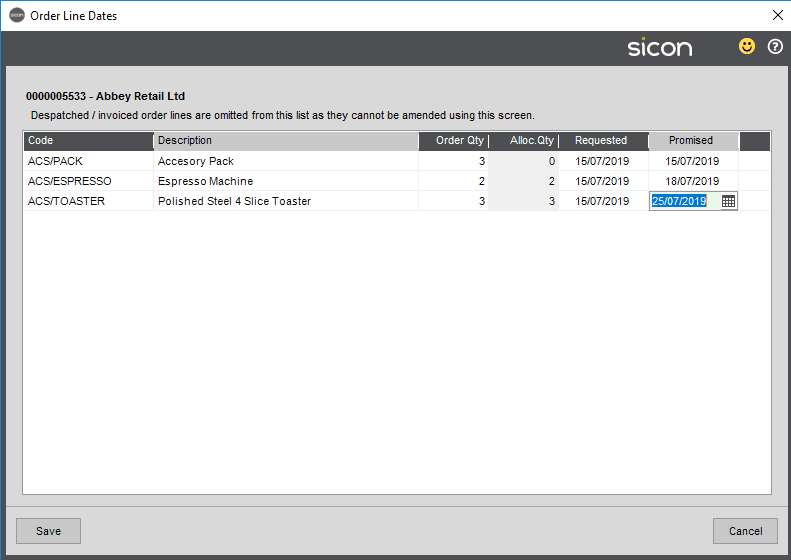
The Order Line Dates screen gives a single screen where you can quickly review and edit the requested and promised delivery dates for all lines on this sales order. The allocated quantity is also displayed for review.
Two new buttons are available from within each Order Item Line on a sales order: the Preallocations button and the Distribution button.
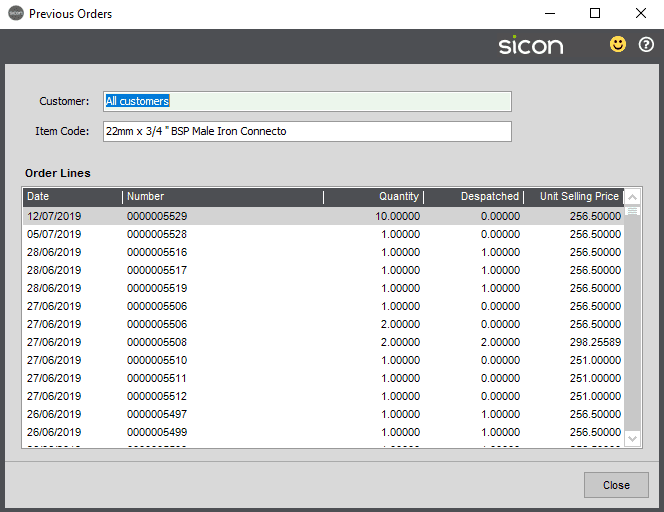
The Preallocations button opens the preallocation screen. The Distribution button gives the facility to drill into the standard Sage screens for View Stock Item Balances and View Stock History. Also available are the options to View Previous Sales Orders for this item, which displays previous order dates, order numbers, quantities (and quantities despatched) and the unit selling price. By double clicking on an entry in this screen, you can open View Order for the relevant sales order. The fourth option on the Distribution button is to view the Stock Movements screen for the stock code on this line. See the description of the Future Stock Movements screen in the Material and Resource Planning Help and User Guide.
1.7. POP - Enter New/Amend Order
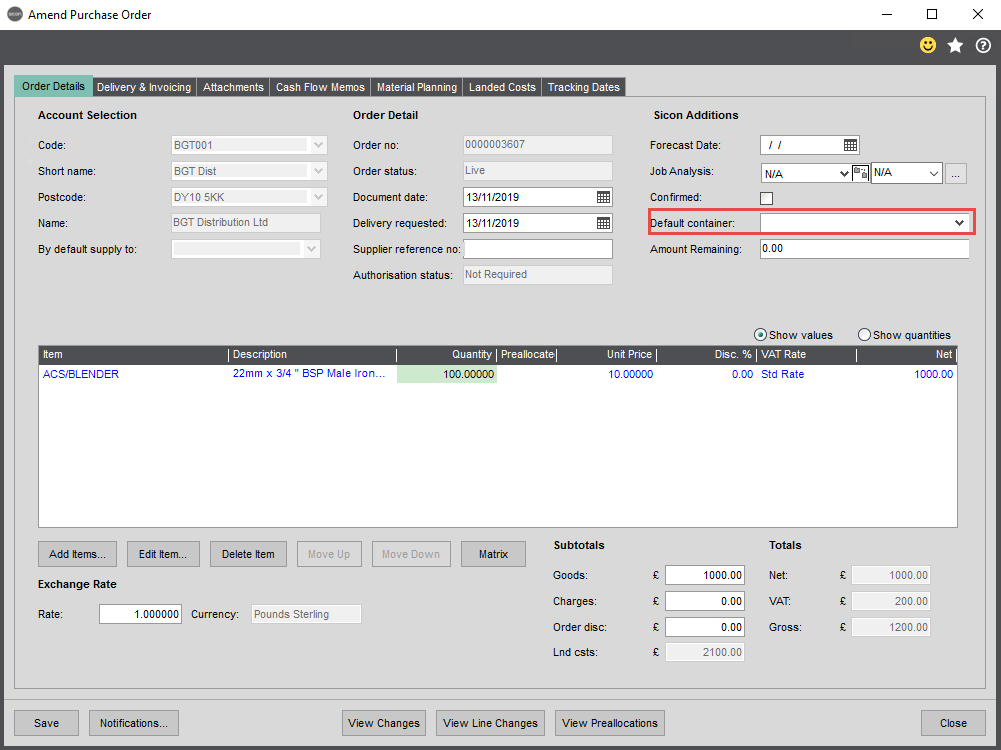
The Default container field is used when you have enabled the setting ‘Enable container loading management’ in the General tab of Distribution>Settings. This feature enables you to track how full a container is, and the same container can be used on multiple purchase orders. When using this field, you can select a previously defined contained or create a new container record.
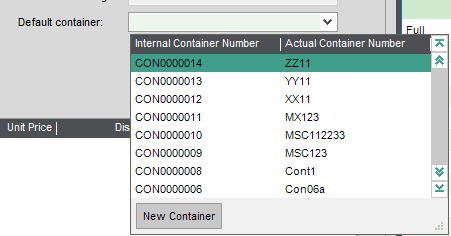
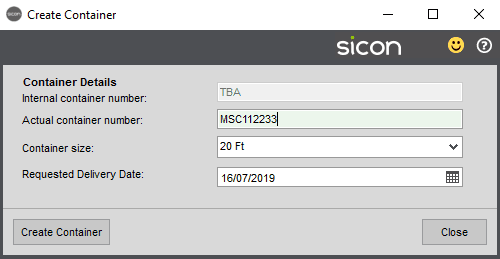
When adding a new container record, you select the container size from a list of possible sizes that is maintained via the Container Size Maintenance screen within the Maintenance menu in Distribution. Lines added to the purchase order will use the size and volume dimensions specified on the stock item record. The system will generate a generic reference number for this container, but you can also enter the actual container number if known . A requested delivery date can also be added to the container record.
The distribution module also adds three new tabs to the Purchase Order header:-
Material Planning, Landed Costs and Tracking Dates.
Material Planning – this tab is relevant if this purchase order was generated from a suggestion in MRP. If this is the case, then this tab will display the list of reasons that caused this purchase order to be generated.
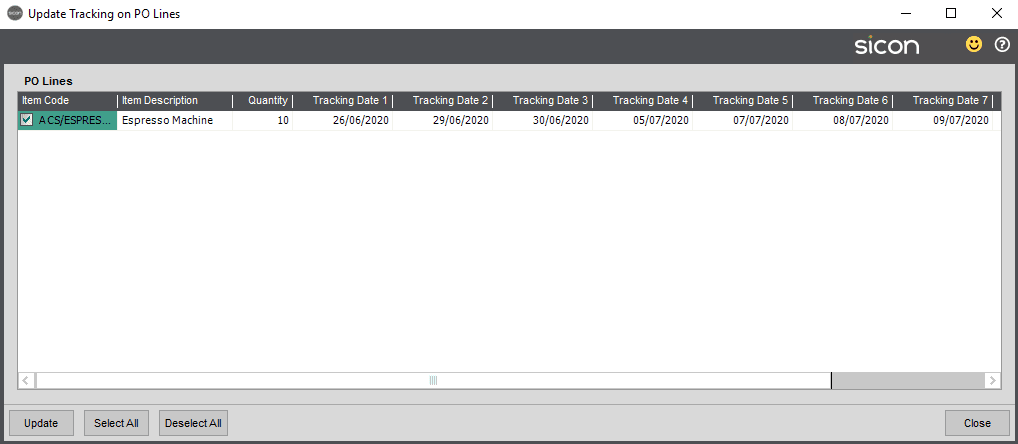
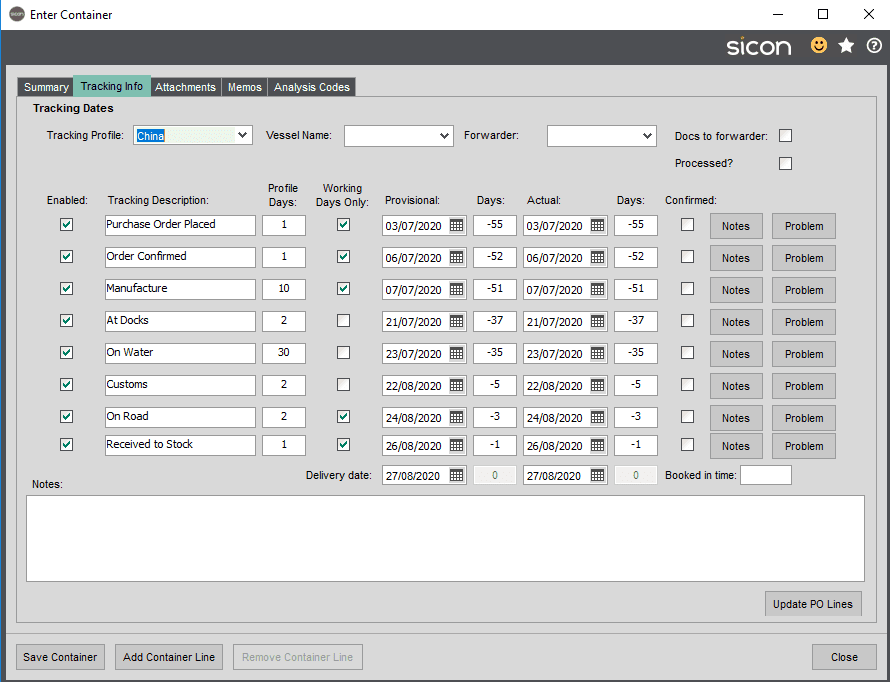
Tracking Dates – allows you to track the shipment of this purchase order using a tracking profile defined in the PO Tracking Maintenance screen within the Maintenance menu. Each stage will have a provisional date calculated from the Requested Delivery date of the purchase order. The actual dates can be updated and marked as confirmed, as updates are received on the progress of the order. You can then update the PO lines to have the new tracking dates and expected delivery date based on the changes.
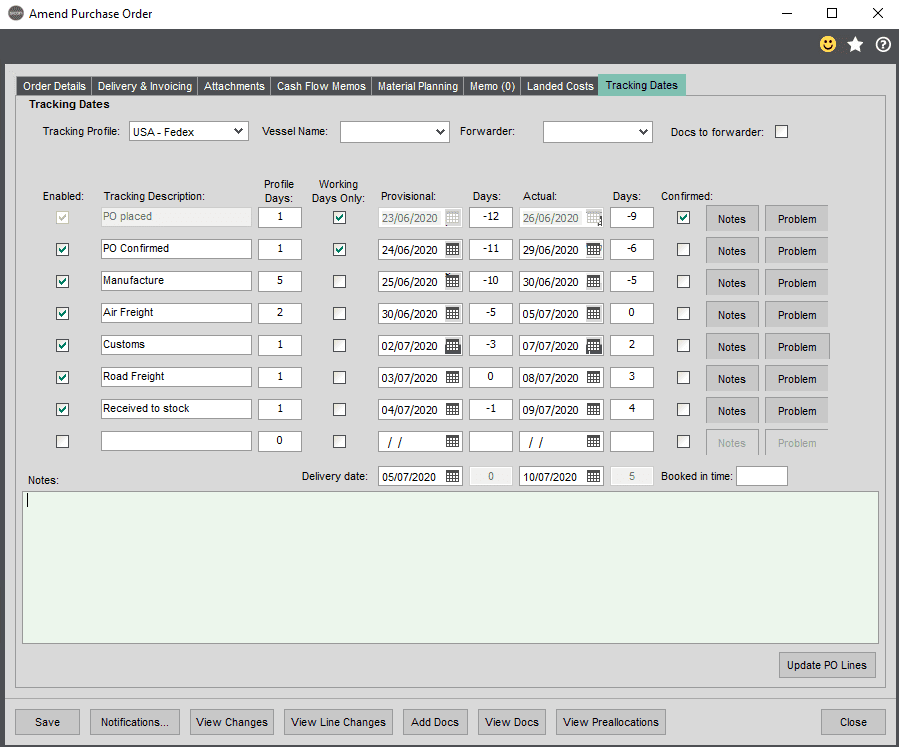
You can then update the PO lines to have the new tracking dates and expected delivery date based on the changes.

The Vessel Name and Forwarder can either be selected from a selection list maintained via the Maintenance menu, or allow for free text typing. There is also a tick box to confirm that documents have been sent to the forwarder.
A Notes button is also available for each stage to record any further information. Asterisks on the Notes button highlight that a note has been created.
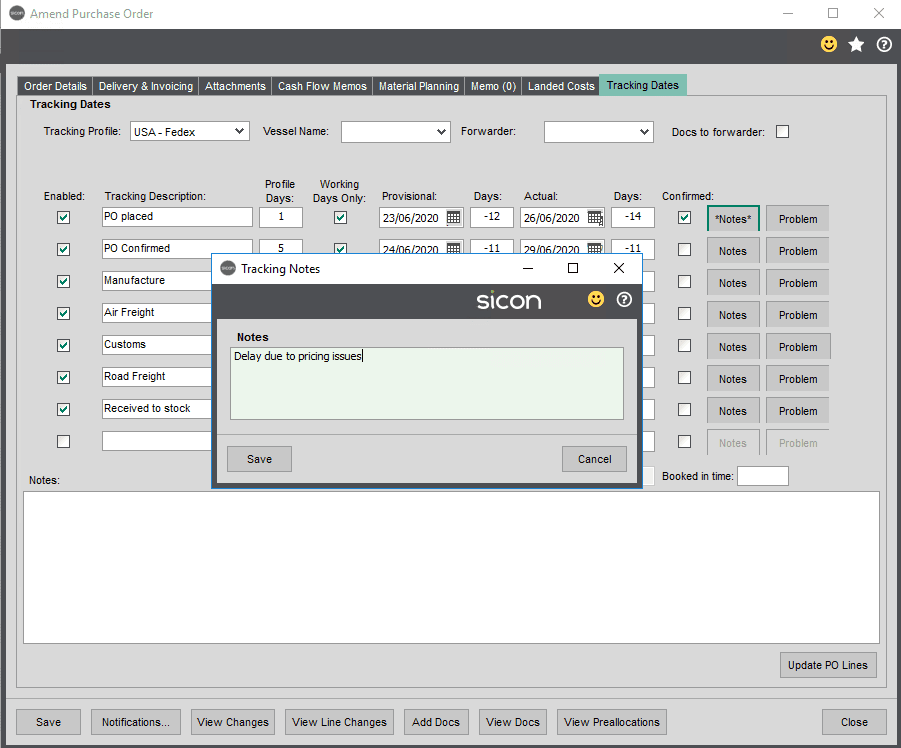
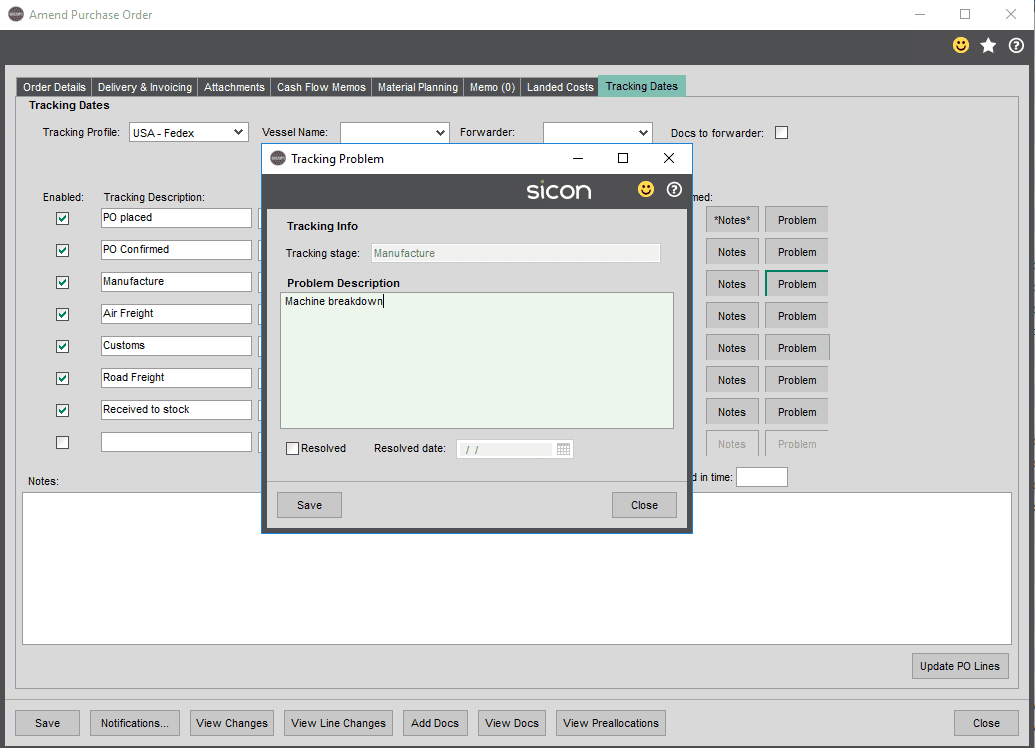
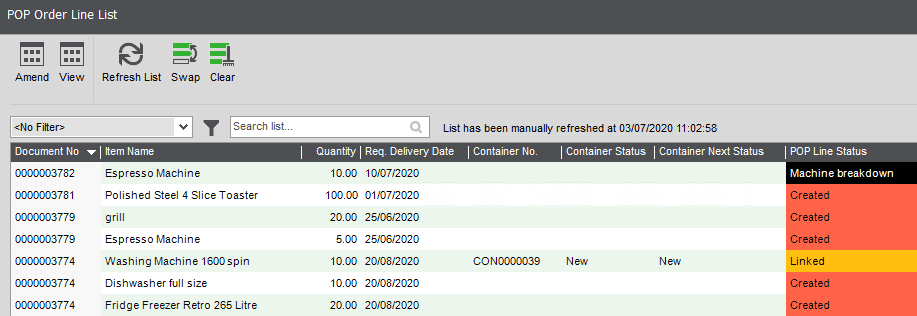
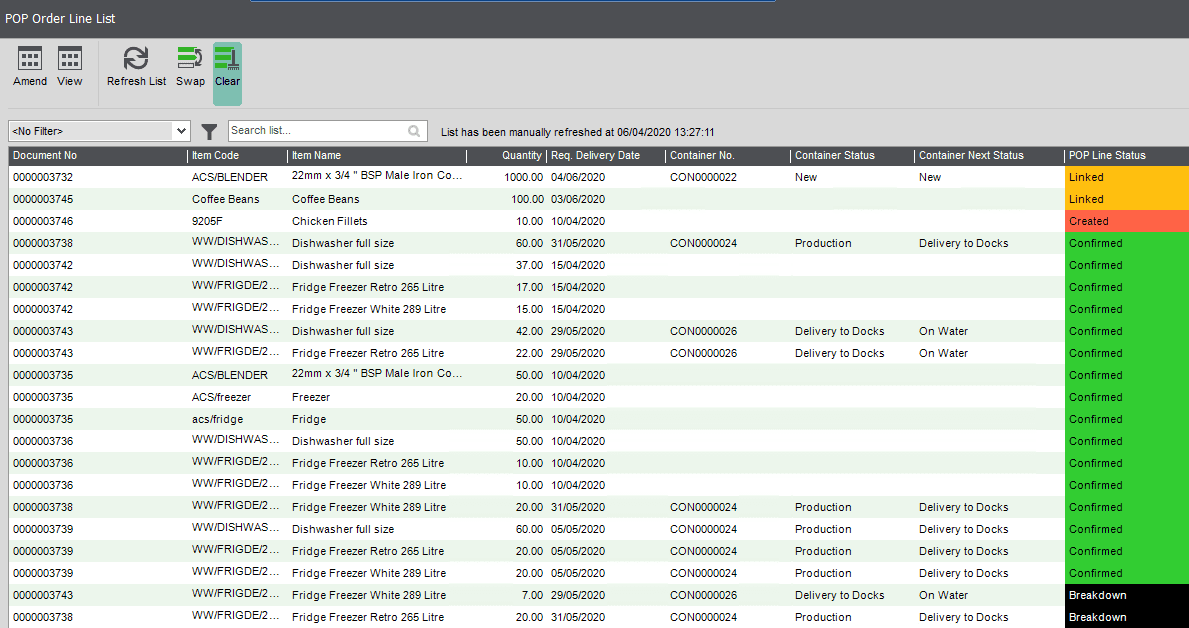
There is also a Problem button. If a problem is recorded here, the text will appear on the POP Order Line List screen and the status colour is automatically changed to black.
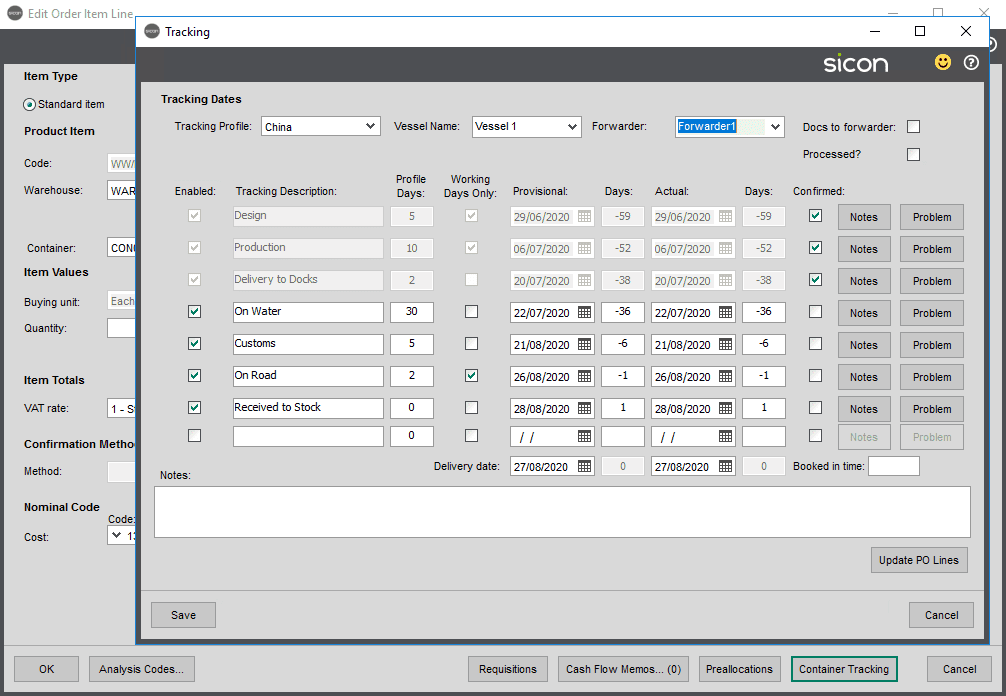
The Container Tracking button when in an order line, allows the line to be added to a container tracking profile. This differs from the Tracking Dates tab which is linked to the purchase order rather than the container. The container profiles are created in the Container Tracking Maintenance screen in the Maintenance section of the Distribution module.
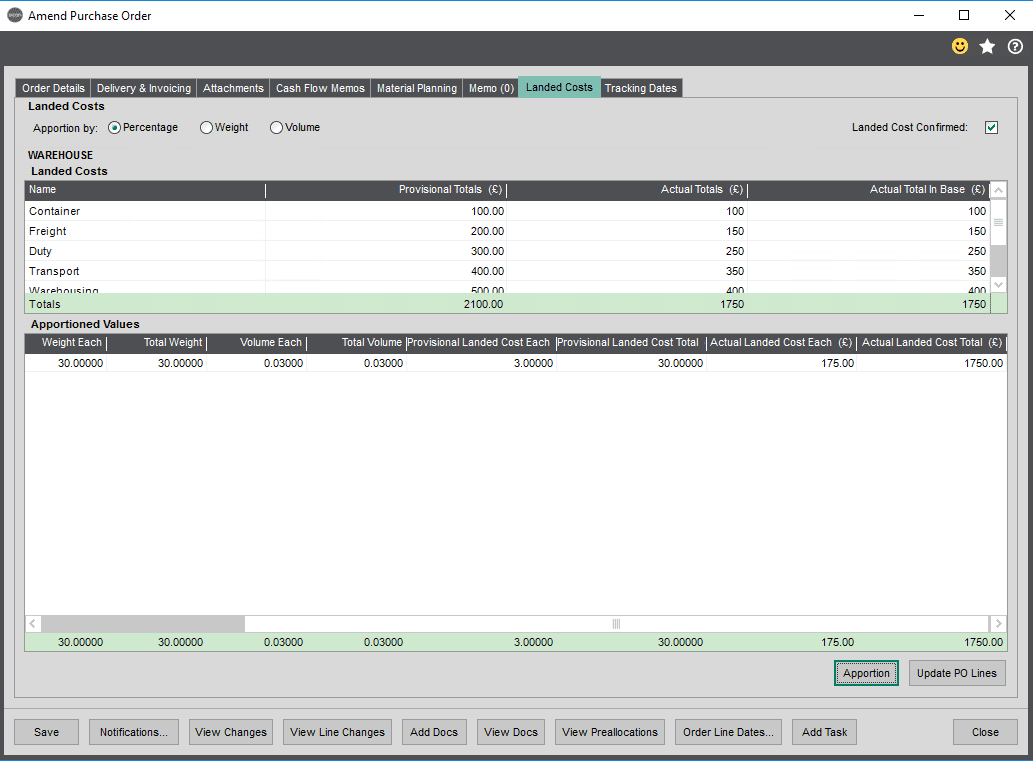
The Landed Costs tab shows provisional landed costs breakdown and allows you to record actual landed costs, apportion them across the relevant lines and then tick the box to confirm the landed costs, so these are included in the stock value when the PO is booked in. The provisional totals give you totals for all landed costs on the order, and you then populate the actual totals as the costs are received. You can apportion these actual costs across the multiple lines on the order, apportioned either by percentages, the weight or the volume dimensions. Once you have used the Apportion button to split the costs between the lines, then click the Update PO Lines button to update the landed costs on the order lines.
When using Landed Costs, the Purchase Order cannot be received in until the Landed Cost Confirmed box has been ticked. This ensures that if item costs are updated on Goods Receipt, the landed cost will be included.
When the invoice is matched to the order, the landed costs nominal postings will be split between the designated nominal control accounts for the landed costs types.
See the section on Maintain Landed Costs within the Distribution Stock Control menu for full information on the configuration required for this functionality.
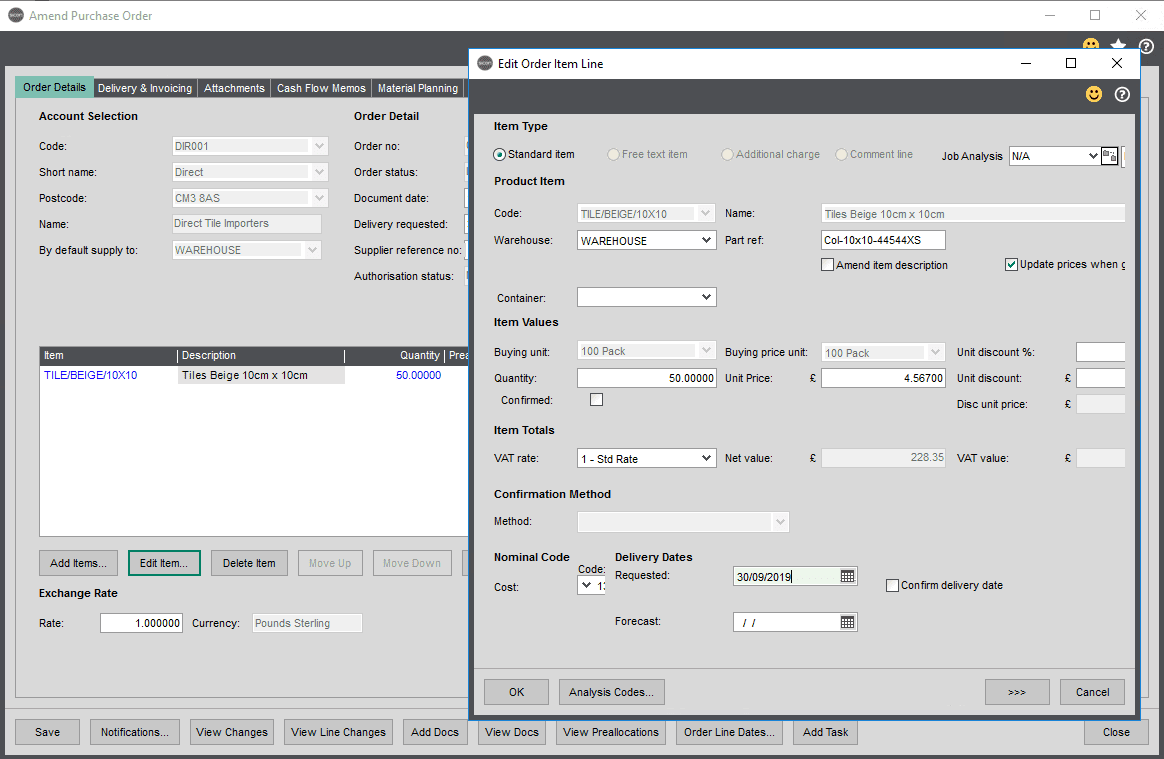
The Confirmed check box on the Order Details tab of the purchase order allows you to record that the supplier has acknowledged and confirmed the order details and dates. This information is also available when drilling into the purchase orders from within the Stock Item Balance screen. There is also the option to set the individual PO lines as confirmed.
The confirmed flag can also be seen from the Distribution extended PO list screen.

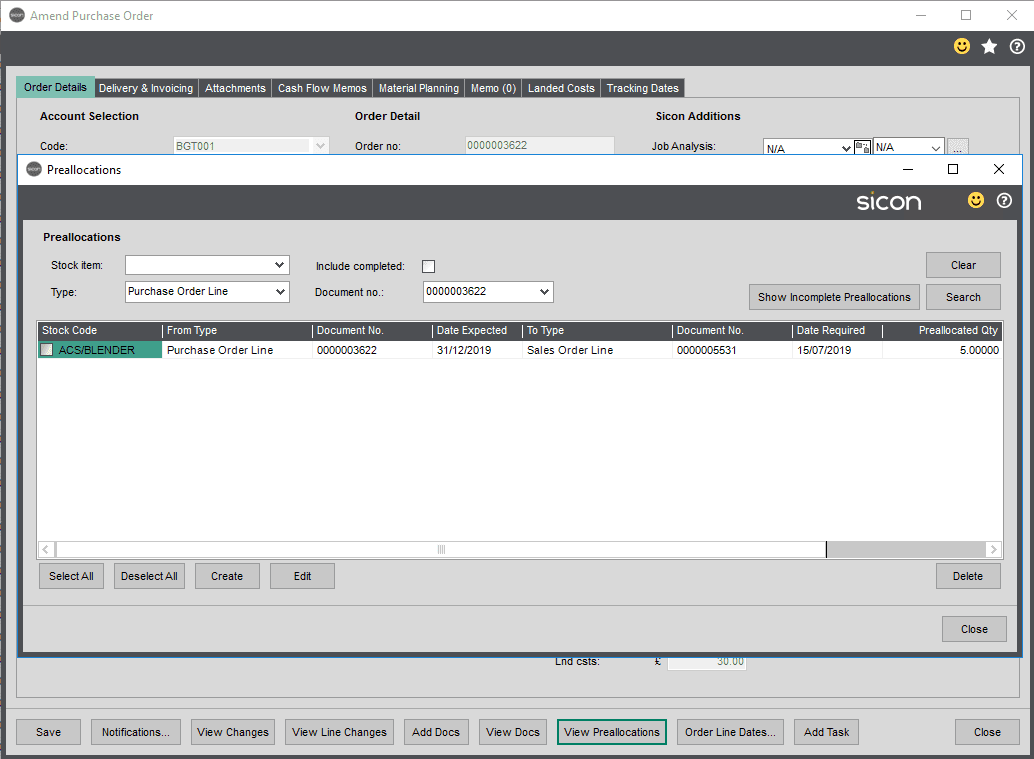
The View Preallocations button, at the bottom of the screen when on any of the tabs, displays any preallocations against any of the lines on the purchase order. It is possible to edit any of these preallocations or create new preallocations via this screen.
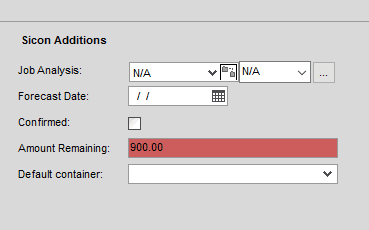
The ‘Amount Remaining’, on the Purchase Order header screen, is based on the minimum order value set against the supplier. Until the minimum order amount has been reached and the amount remaining reaches zero, the order cannot be saved.
The Matrix button on the Purchase Order header screen allows multiple stock items to be added to the order using the predefined stock matrix groups.
If the ‘Use Advanced Selection’ tick box is enabled, the drop down list will filter as the user enters the text. However, as this can compromise the performance of this screen, it’s advised that this feature is only used when there is a large number of groups to filter.
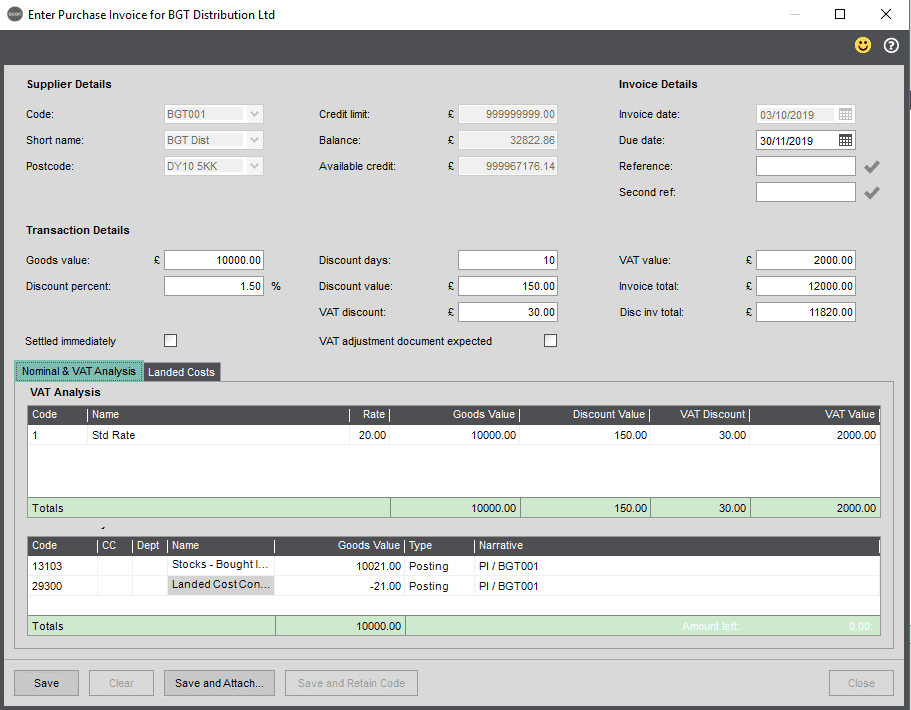
1.8. POP Record Purchase Invoices
We have made a change in the functionality of the nominal coding on invoices being matched to purchase orders where landed costs are involved. Standard Sage200 landed costs functionality adds the landed costs to the value of the stock, so a posting is made to the default landed costs nominal account to correspond with the increase of the stock value. With our enhanced landed costs functionality, we reverse this posting out of the default landed costs nominal account, and instead split it between the nominal accounts specified against the landed costs types (defined within the Maintain Landed Costs screen in the Stock Control menu).
In the example below £21 of landed costs have been added to the stock cost and posted to the landed cost control nominal, we then reverse out the posting to the control nominal and split the cost between the 6 nominal codes as detailed.

2. Purchase Ledger Menu
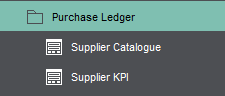
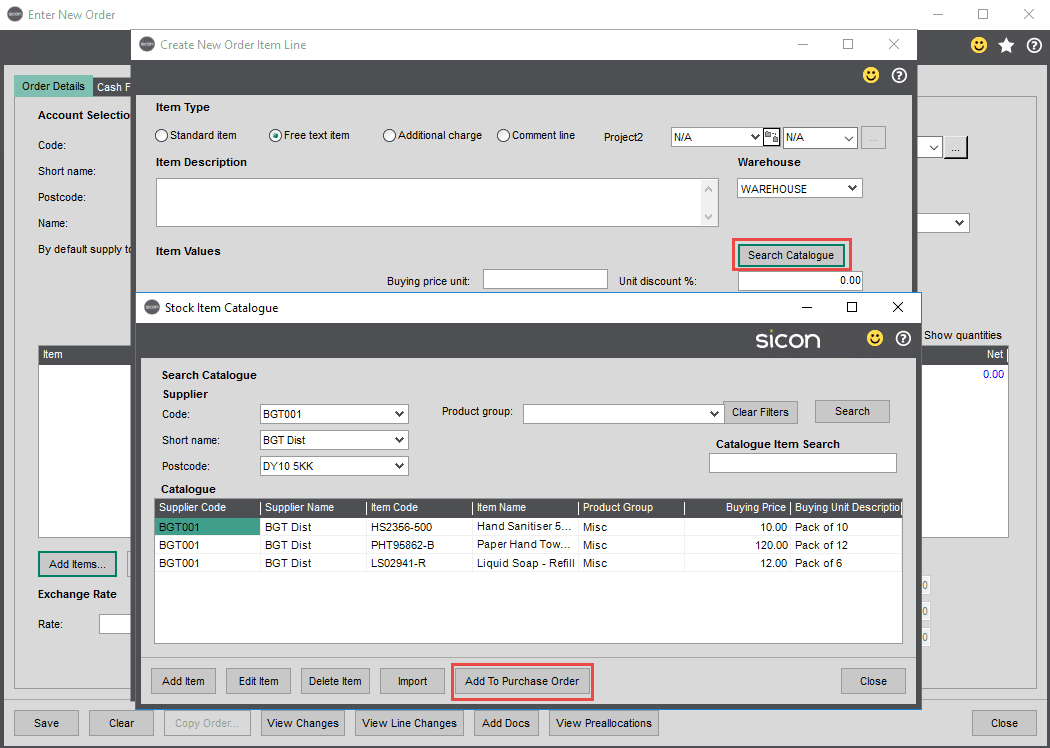
2.1. Supplier Catalogue
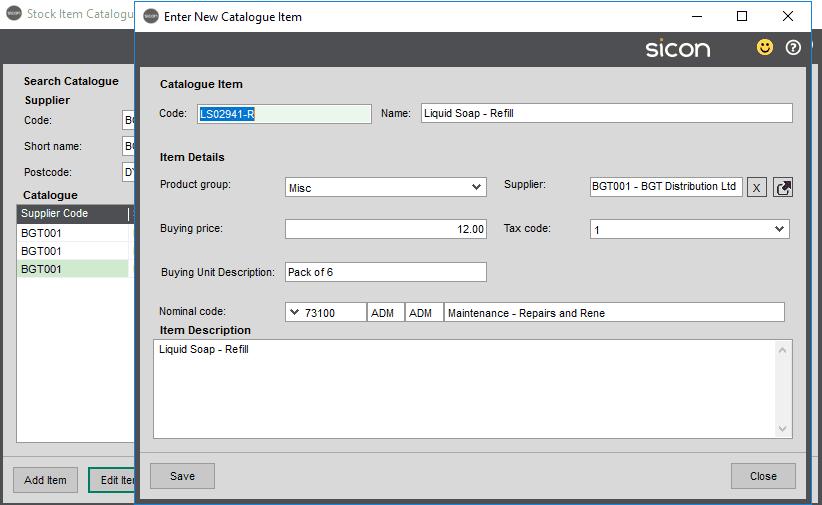
The supplier catalogue can be used to create a catalogue of items that can be added as free text items to purchase orders. The purpose of the catalogue is to speed up the entry of frequently purchased free text items e.g. consumables.
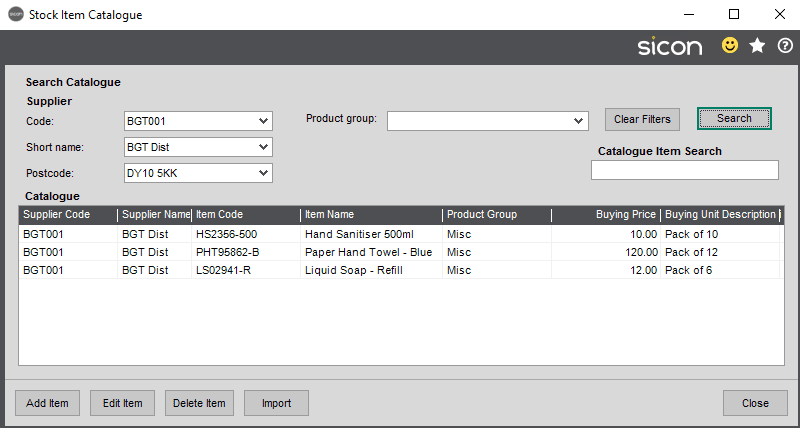
Catalogue items can be entered into the catalogue by adding items or from an import. The item description needs to be populated as this is copied into the POP free text description.
When in a purchase order line and adding a free text item, the catalogue can be searched and an item from the catalogue added to the purchase order.
2.2. Supplier KPI
In this window you can select a date range and then analyse the performance of suppliers.
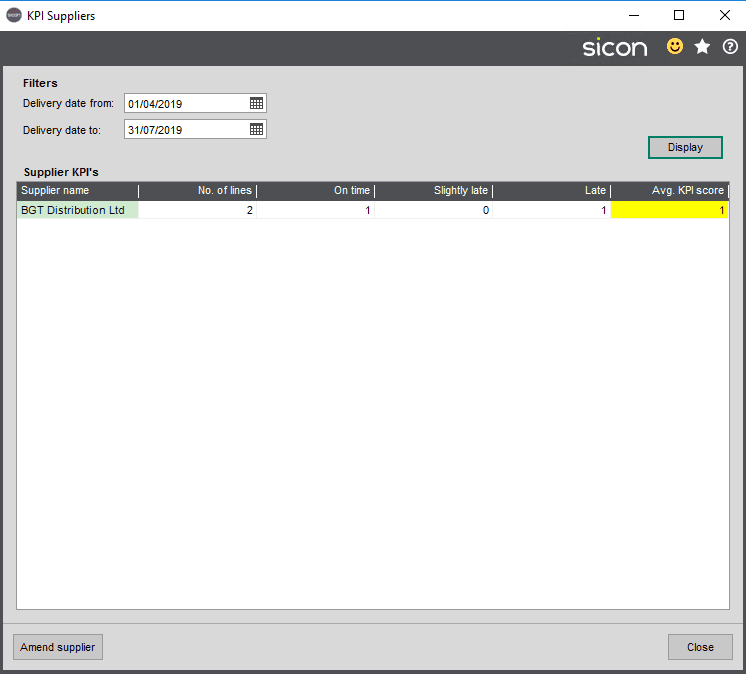
The colour coding and criteria of the suppler KPI can be set in ‘Supplier KPI Band Maintenance’, within Distribution>Maintenance. The number of days late that contribute to each category can be user defined.
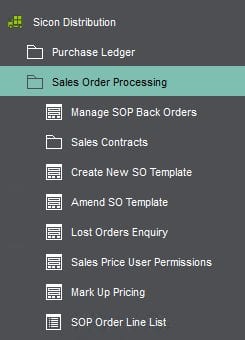
3. Sales Order Processing Menu
3.1. Manage SOP Back Orders
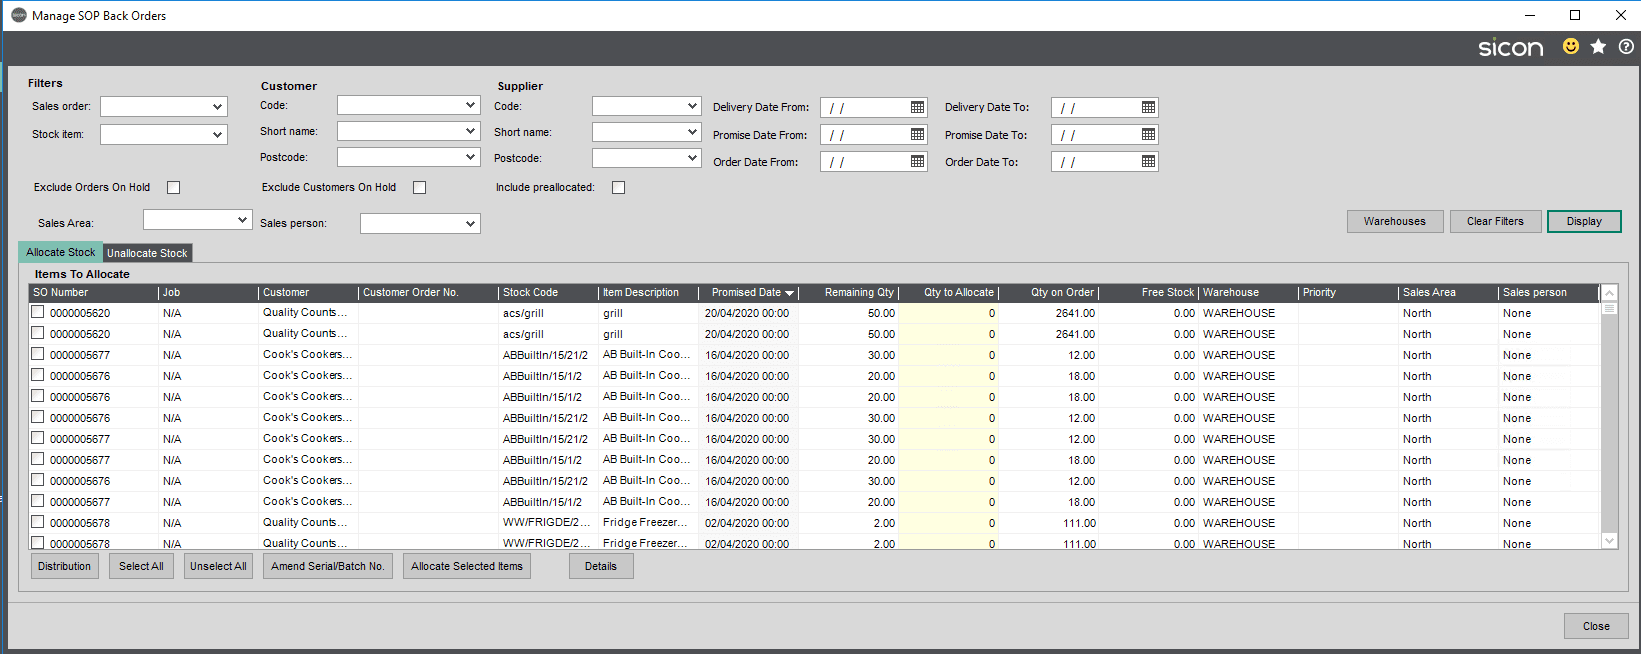
This allows the very quick allocation and un-allocation of stock on sales orders without the need to open each sales order and order line.
The numerous filtering options in the screen can be used to filter down the list of sales order to allocate or un-allocate. Once a filter selection has been made click on Display button to show the results. The filter can be cleared using the Clear Filters button.
Sales order that are pre-allocated can be included and orders or customers on hold can be excluded from the list. The Warehouses button can be used to filter the displayed order lines by warehouse.
Items shown on the Allocate Stock tab may be selected and allocation quantities amended if required. When the Allocate Selected Items button is clicked, stock will be allocated to the selected sales order line items, provided free stock is available. Existing sales order allocations may be removed via the Unallocate Stock tab.
The Details button may be used to open the sales order that the selected line is linked to. If an allocation is for a traceable stock item, then the Amend Serial/Batch No. button can be used to review the traceable allocation and amend if required, assuming the stock setting to select serials at allocation is set.
The distribution button gives a quick shortcut to the View Item Balances, View Previous Sales Orders, View Stock History and View Stock Movements screens.
3.2. Sales Contract List
The Sales Contracts section of the Distribution module can be used to manage sales contracts, giving an overview of contracts in the system and identifying outstanding quantities on the contracts.
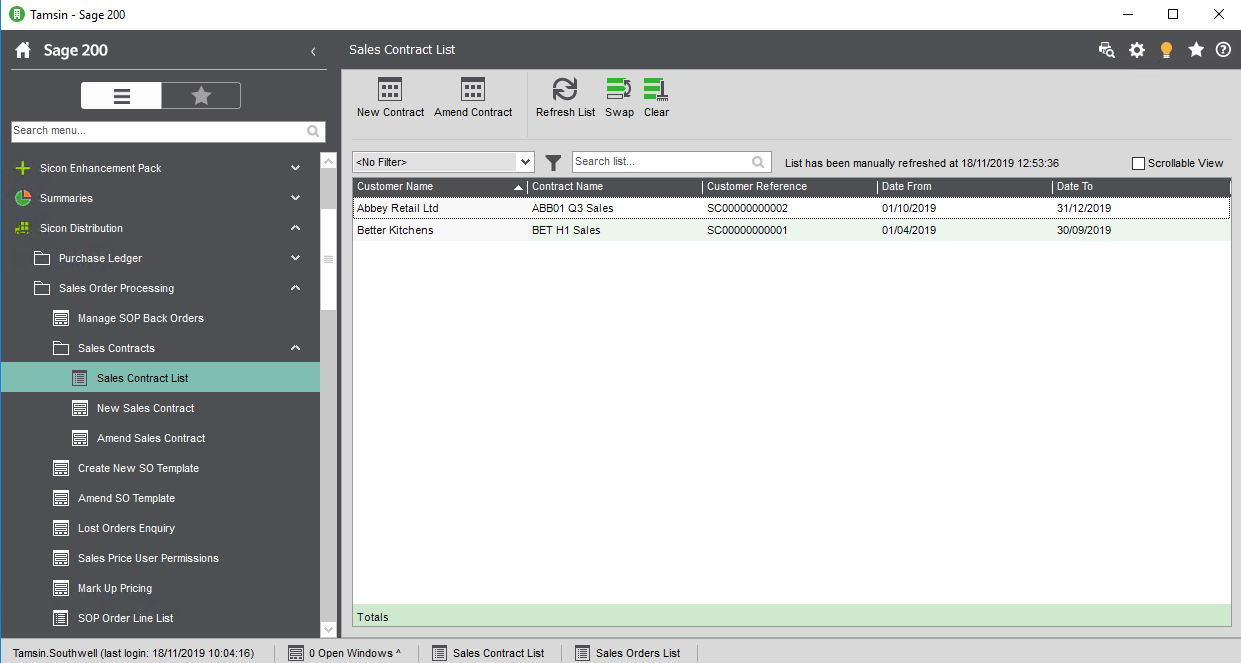
The Sales Contracts List displays any previously created contracts. You can create new contracts from this screen and also amend and delete existing ones. On creating a new contract, the customer and contract name, and ‘to and from’ dates can be entered. You can then add stock code lines to the contract.
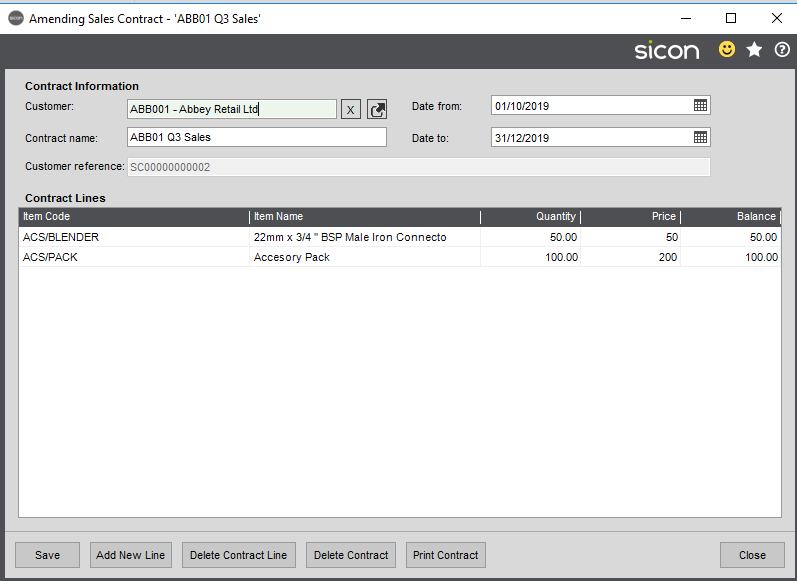
On saving the contract, the system gives the contract a contract number. You can also print the contract from this screen.
As sales orders are entered for the stock item for the customer, if the line Requested Delivery Date falls within the contract date, the balance on the contract will reduce.
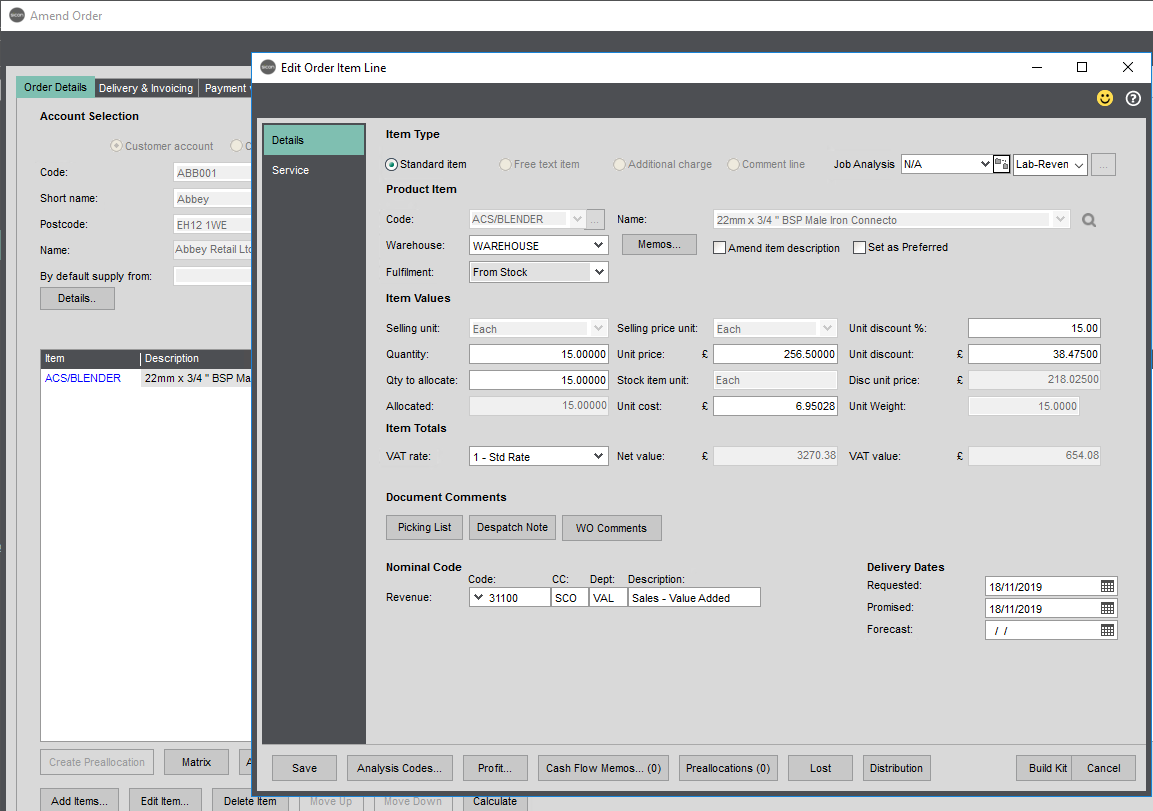
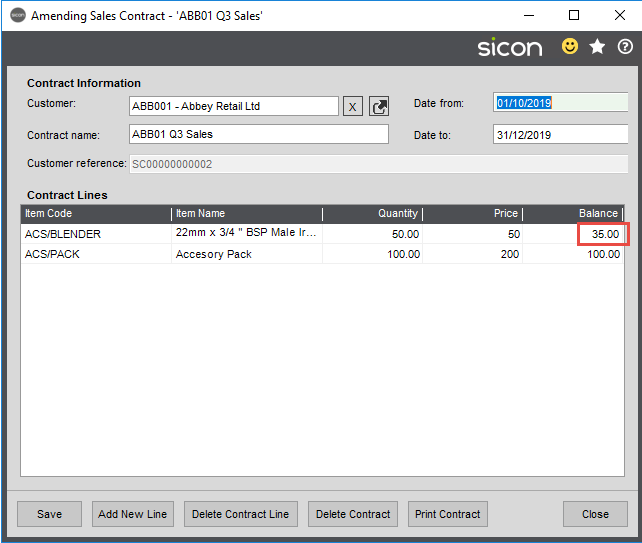
The balance on the contract on line 1 is now 35, due to the 15 on the above sales order.
3.3. Create New SO Template
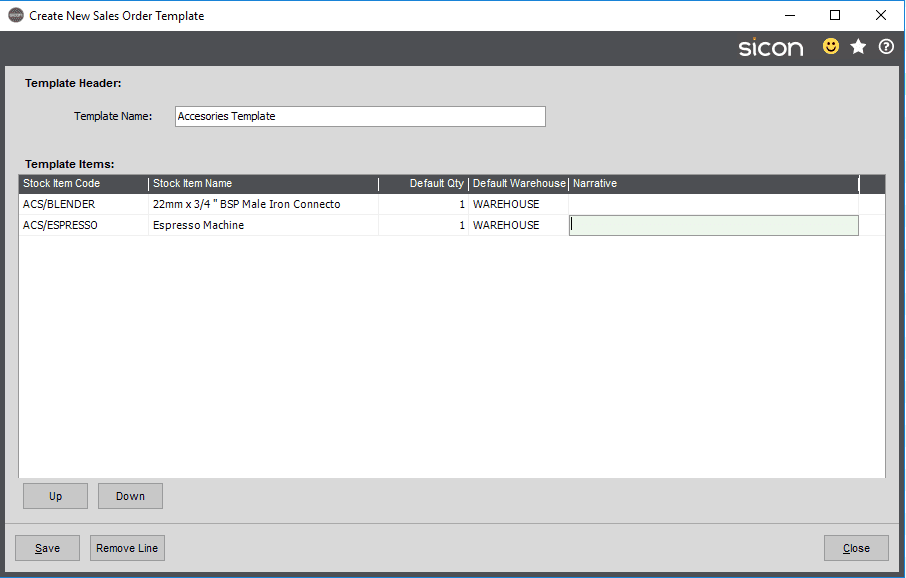
Allows the creation of a pre-configured list of stock items to be used repeatedly to create a sales order, or to add them to an existing order. You need to enter a unique name for the template, and then add the relevant stock codes and quantities, in addition to the warehouse that they should be supplied from. These templates are then selectable on a sales order via the templates button detailed in the SOP Enter New/Amend Order/Quotation section previously. The Narrative field is stored on the template, so is displayed when the template is amended or selected for an order, but does not transfer to the created sales order lines.
3.4. Amend SO Template
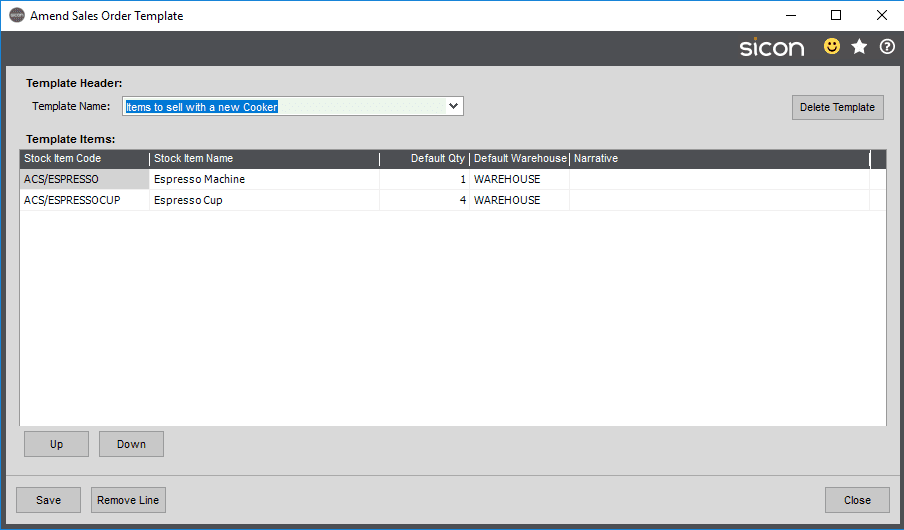
Allows the templates created in the previous screen to be amended, either by adding or removing lines or re-ordering the lines. Templates can be deleted via the delete template button if no longer required.
3.5. Lost Orders Enquiry
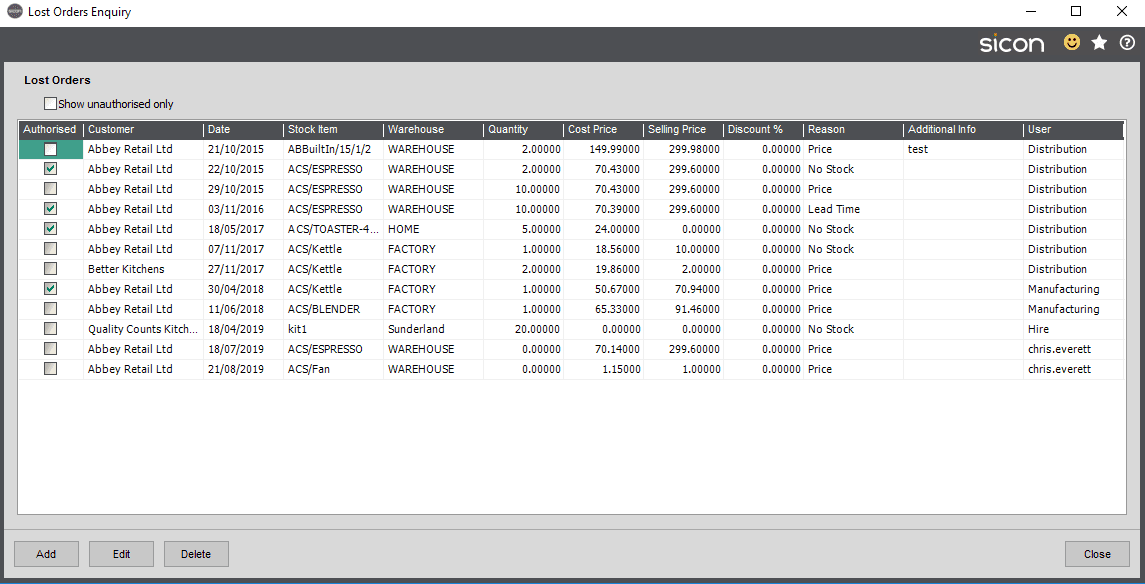
This screen displays all sales order lines that have been marked as ‘Lost’, using that button within a sales order line. After reviewing these, you can tick the Authorised checkbox which then results in only unauthorised lines being displayed when the tickbox at the top of the screen is checked.
You can use the add button to manually create lost order line records (such as when a line has been deleted from a sales order before the Lost button was clicked against it). You can also Edit existing entries here or delete them if required.
3.6. Sales Price User Permissions
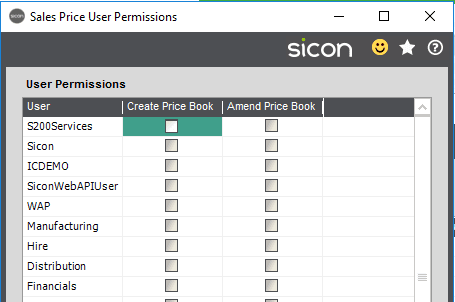
This screen enables you to select Sage users who either have the option of creating a new price book from within the Add Historical Lines screen on a sales order line, or updating an existing one. When the user changes the Selling Price in this screen, they will be prompted as to whether they want to create or update a price band, as applicable.
3.7. Mark Up Pricing
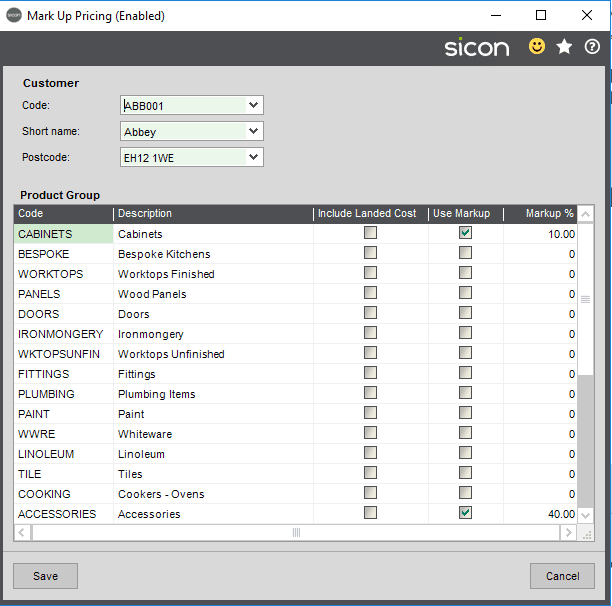
This screen enables you to enable mark up pricing at a product group level per customer. If you select the Use Mark up checkbox for a customer/product group combination, then the Mark up % column should be edited to indicate the mark up amount.
The first column of checkboxes can be selected if you wish landed costs to be factored into the stock item cost before the mark up is applied.
This functionality differs from the Mark up Pricing screen in the standard Sage200 Price Book module in that you can specify different mark up rates per customer.
3.8. SOP Order Line List
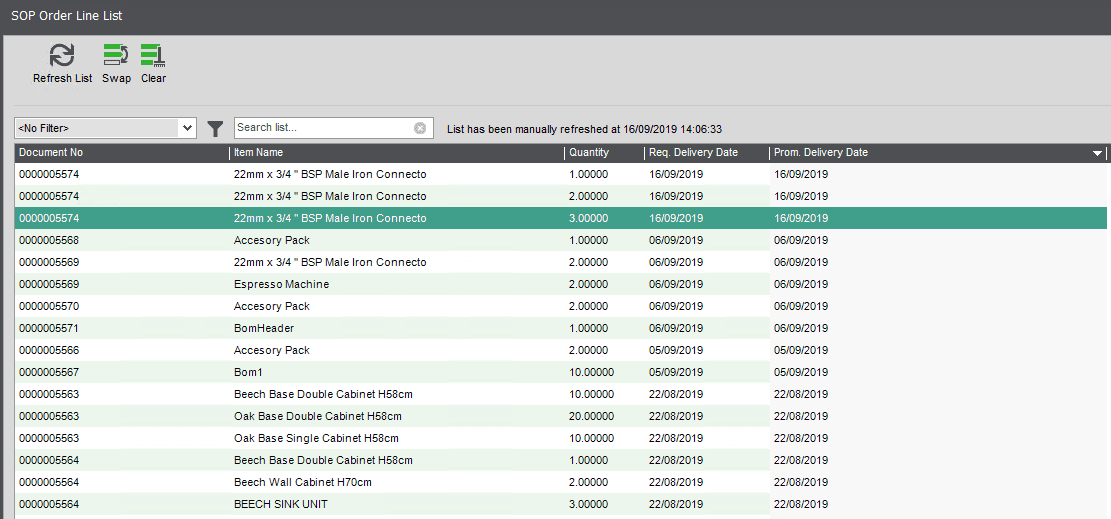
The SOP Order Line list displays all sales order lines in a list.
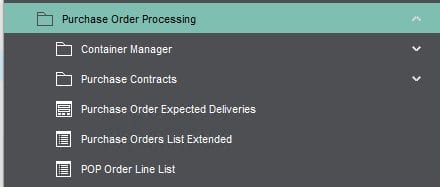
4. Purchase Order Processing Menu
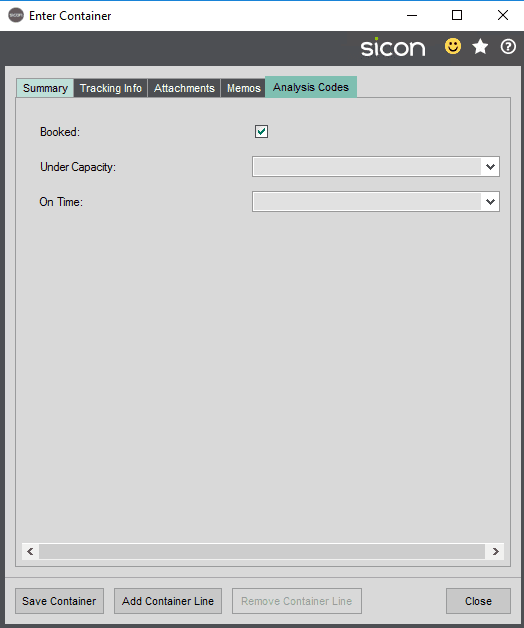
4.1. Container Management
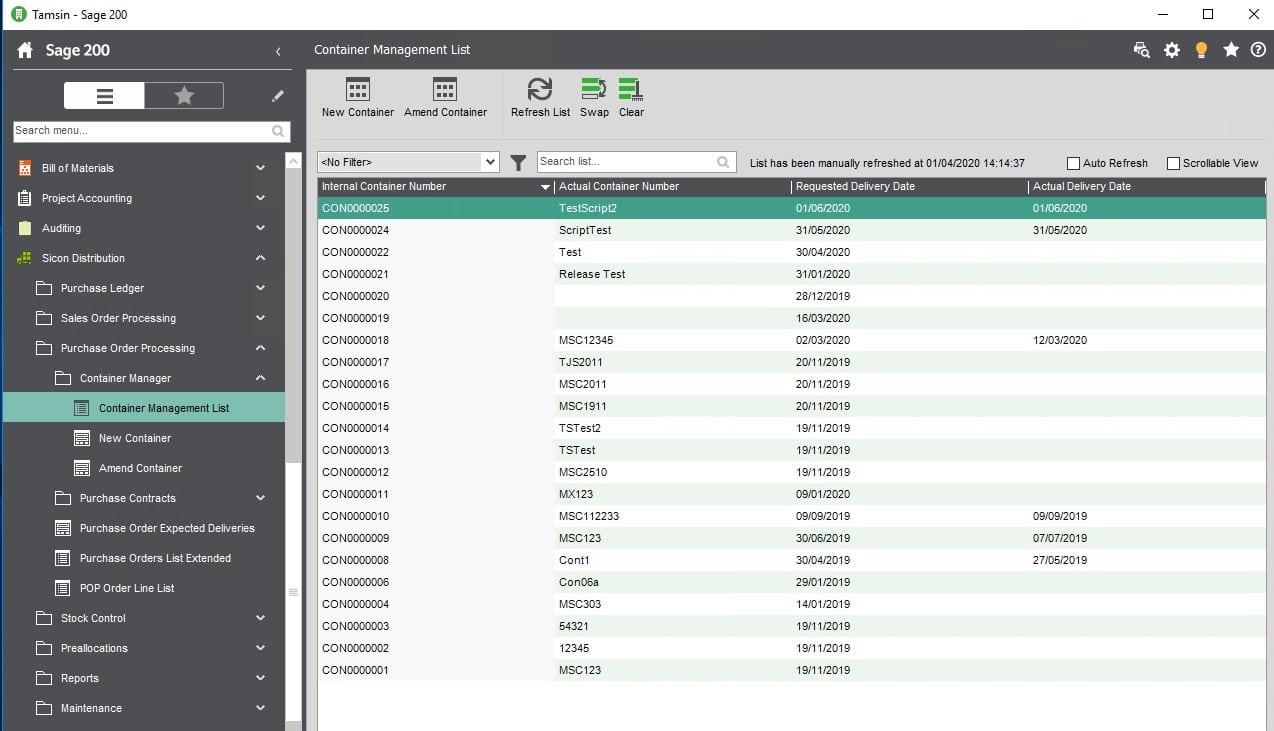
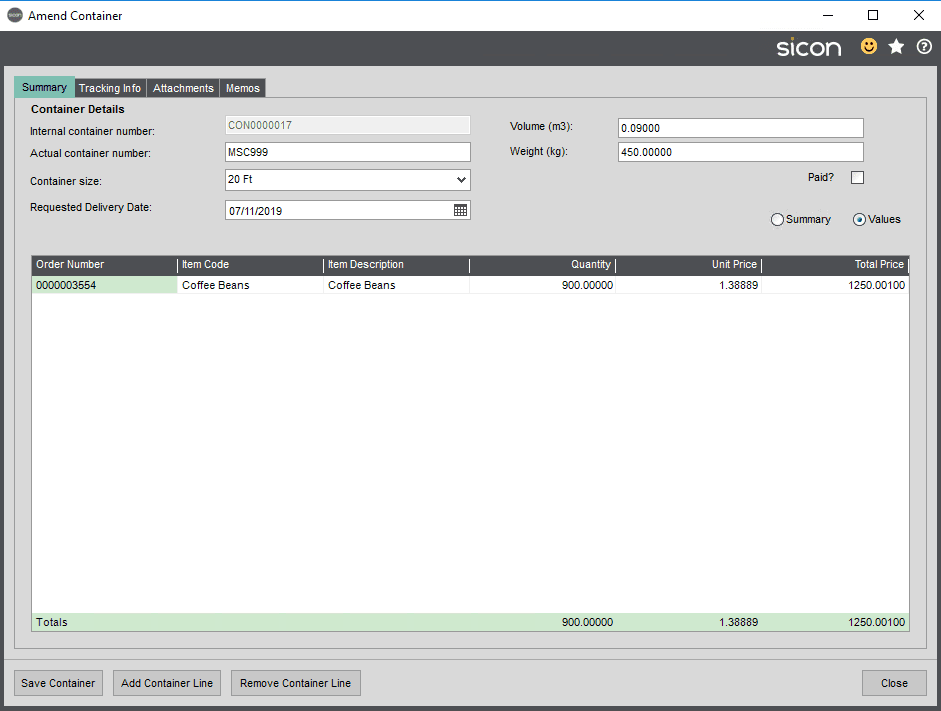
The container management list displays all previously created containers. New containers can be added and amended from the screen.
When creating a new container, either from the list or the new container sub section, the container number and requested date can be entered. The container size can be selected from a drop down list of previously creates container sizes (in the Maintenance section). The container can also be flagged as being paid.
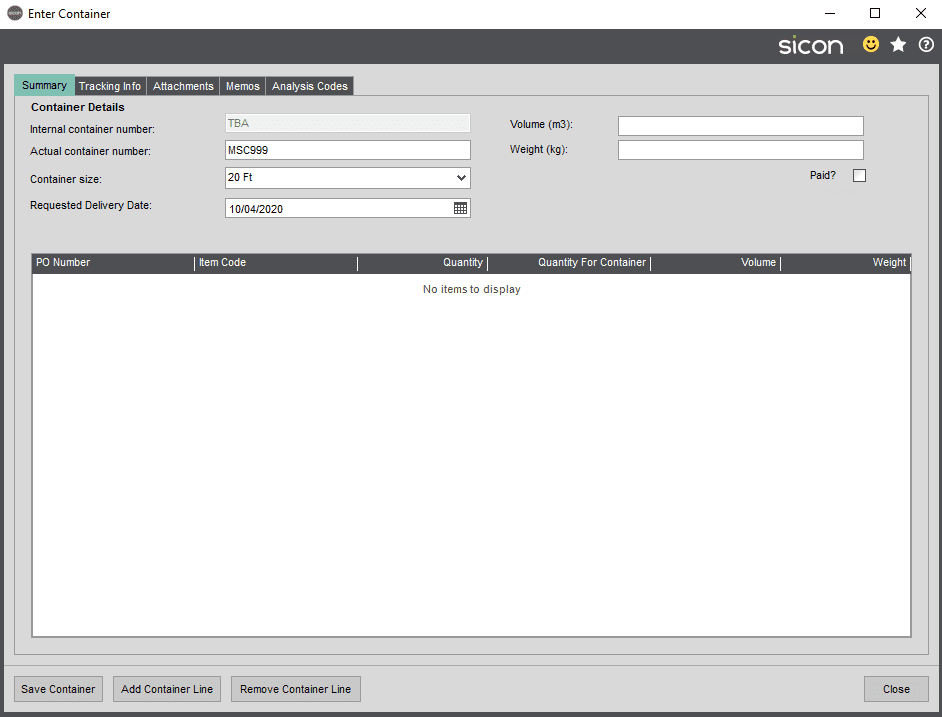
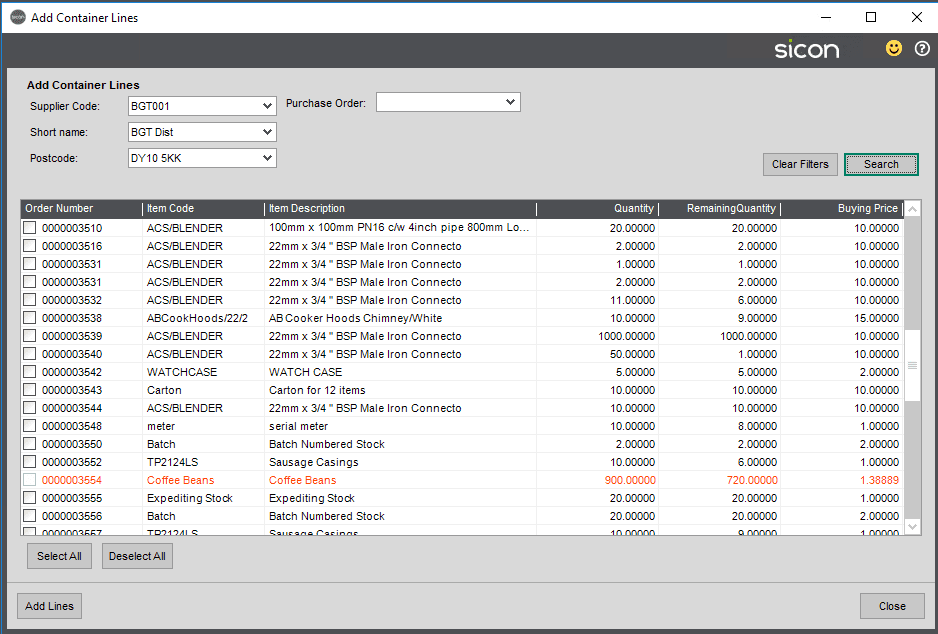
Purchase order lines can be linked to the container, by using the add container lines button, and clicking on the Search button within the Add Container Lines screen. This screen can be filtered by Supplier Code and Purchase Order.
The Remaining Quantity value can be reduced, if the full quantity is not required in the container. Individual lines can be added by ticking the relevant line, or the Select All button can be used. The ticked lines will be added to the container, on clicking Add Lines. For ease of use, the list can be sorted by clicking on the relevant column header. Lines with red text have already been allocated to a container.
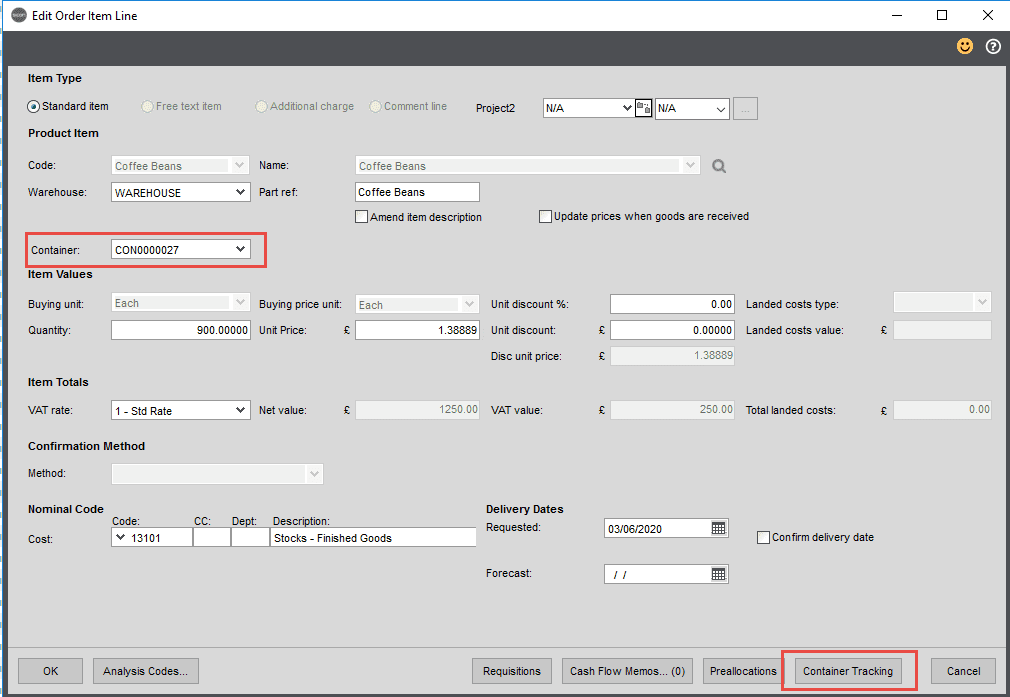
Once a line has been added to a container, the Internal Container number will show on the Purchase Order line, within Purchase Order Processing. The Container Tracking can also be viewed here.
The volume and weight display the totals of the purchase order lines that have been added to the container. When the lines are red, this indicates that the container is overloaded.
Clicking on Values, displays the PO line values.
Tracking Info tab – shows the container tracking profile linked to the container, or can be used to add a tracking profile.
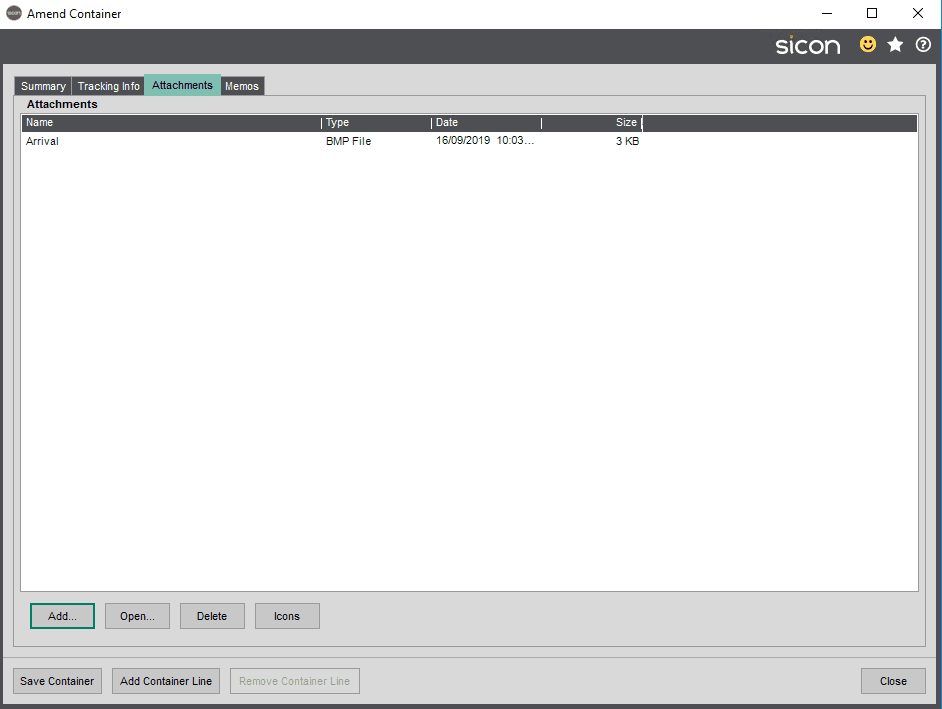
Attachments tab – can be used for saving attachments against the container.
Clicking on Values, displays the PO line values. The Unit Price can be amended and any change will be reflected in the relevant Purchase Order.
Memos tab – can be used to save Memos against the container.
The Amend Container sub section, can be used to display a list of containers, highlight those that are overloaded and those that have requested delivery dates that will not be met. The tracking status can be seen in this window.
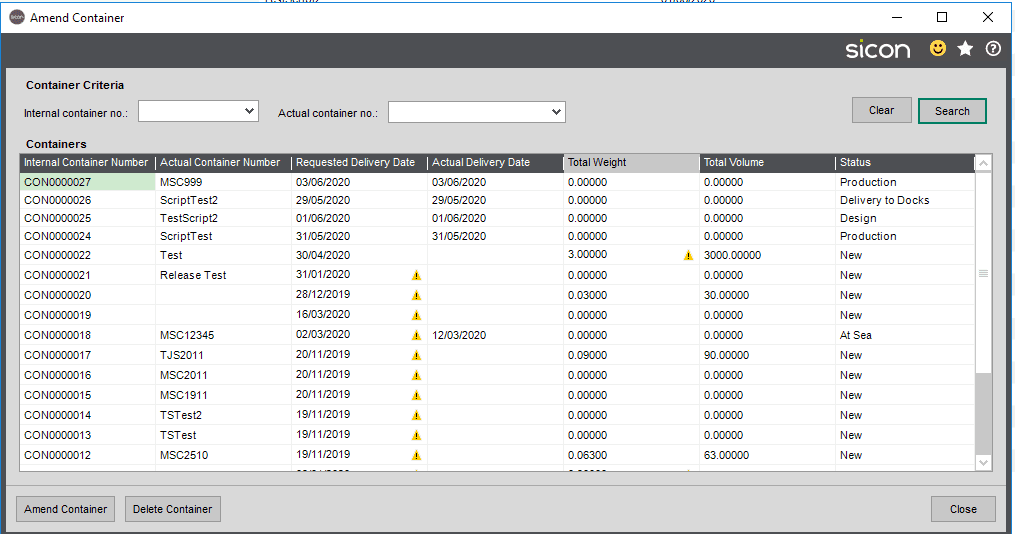
A container can be amended by highlighting the line and clicking Amend Container.
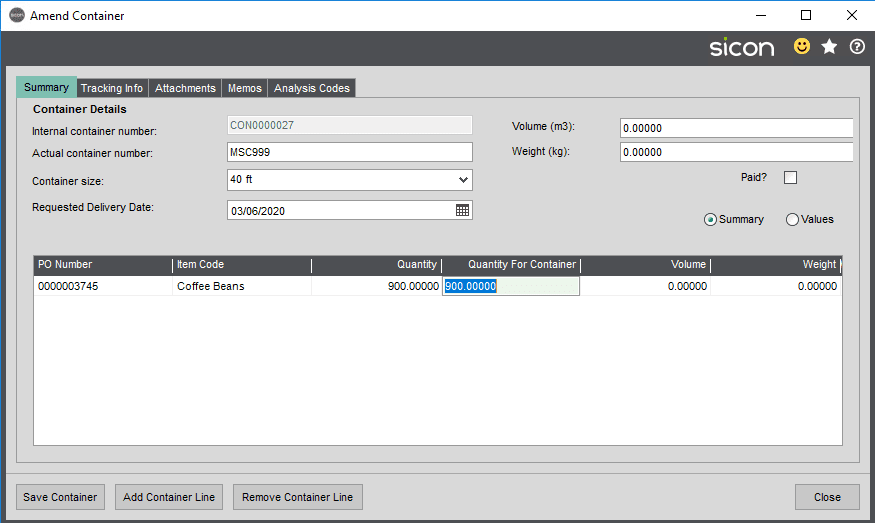
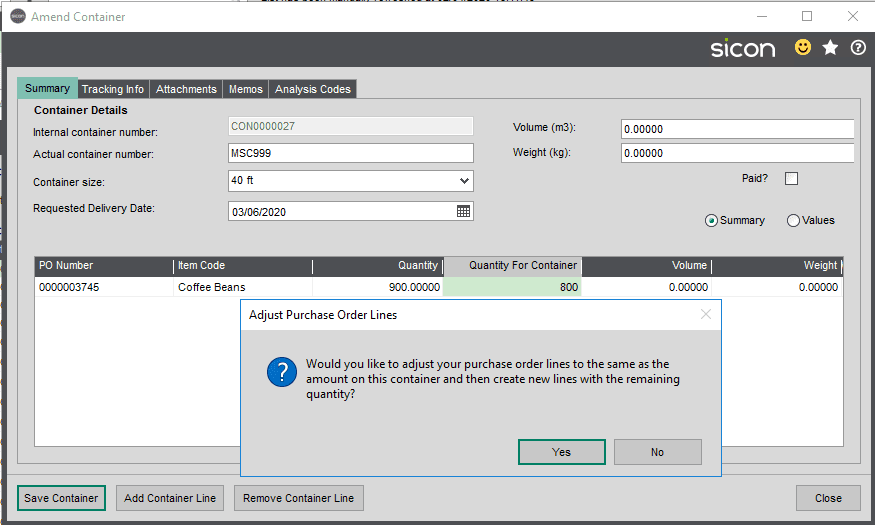
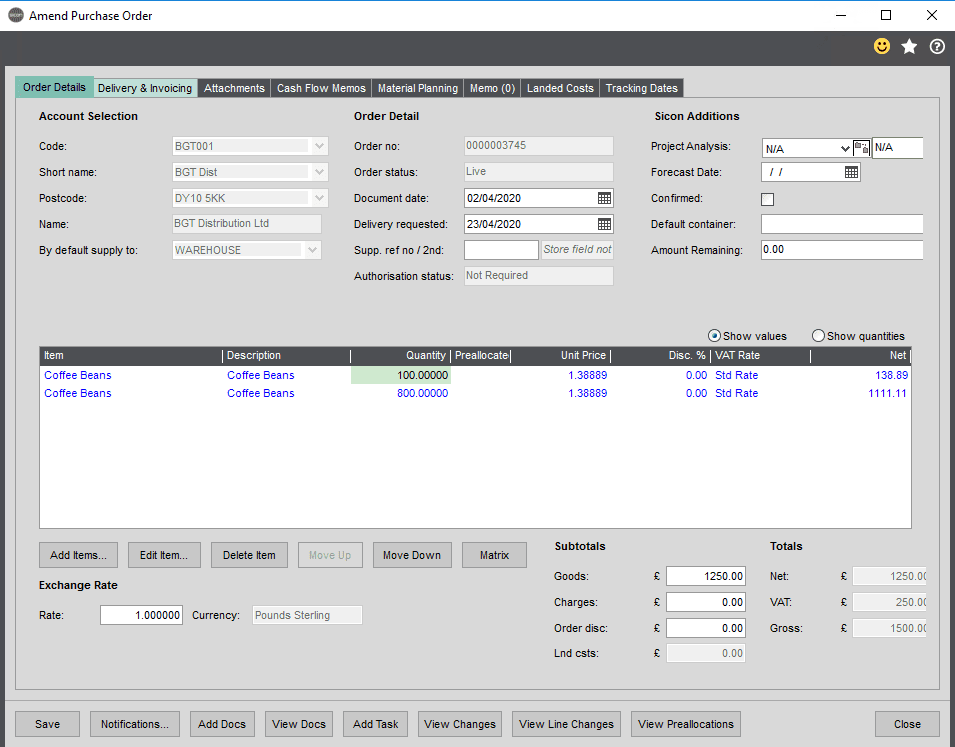
If the Quantity For Container is reduced, it is possible to adjust the Purchase Order line quantity, with a new line being created that is not linked to the container.
4.2. Purchase Contracts
The Purchase Contracts section of the Distribution module can be used to manage purchase contracts, giving an overview of contracts in the system and identifying outstanding quantities on the contracts.

The purchase contracts list displays any previously created contracts. You can create a new contract from this screen and also amend and delete existing ones. On creating a new contract, the supplier and contract name, and ‘to and from’ dates can be entered. You can then add stock code lines to the contract.
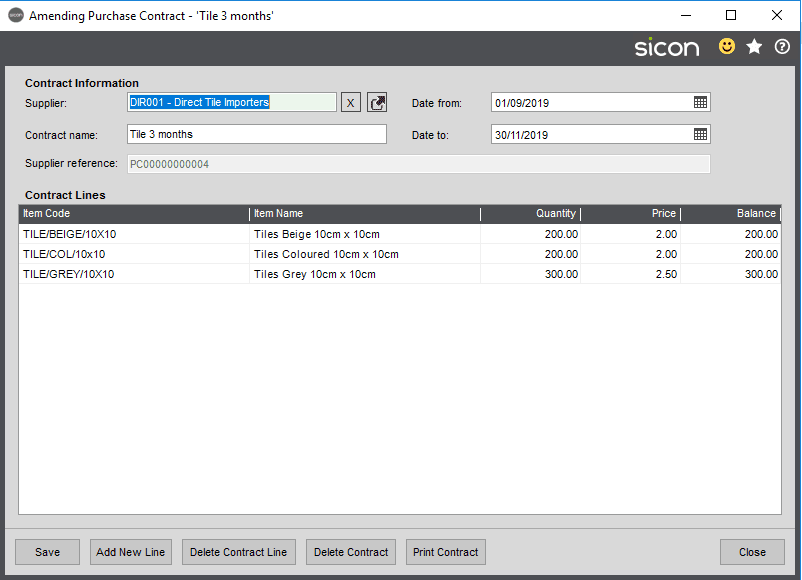
On saving the contract, the system gives the contract a contract number. You can also print the contract from this screen.
As purchase orders are entered for the stock item for the supplier, if the line Requested Delivery Date falls within the contract date, the balance on the contract will reduce.
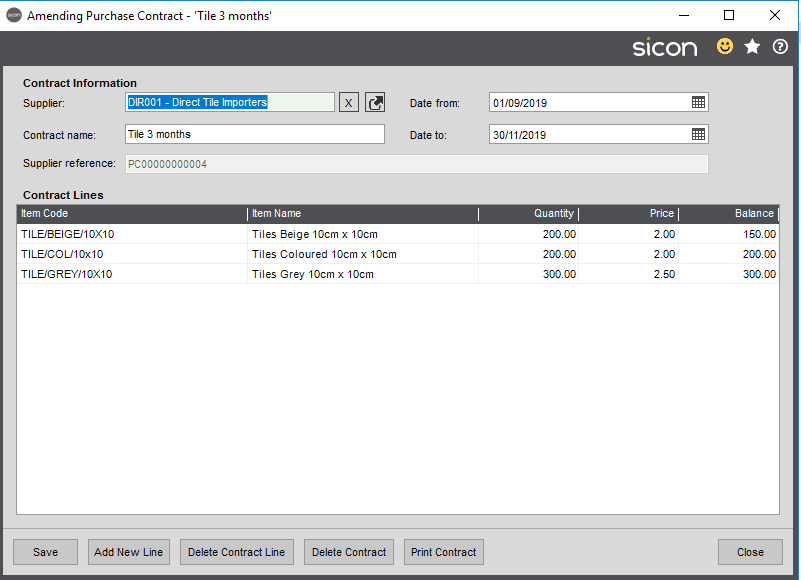
The balance on the contract on line 1 for the beige tiles is now 150, due to the 50 on the above purchase order.
4.3. Purchase Order Expected Delieveries
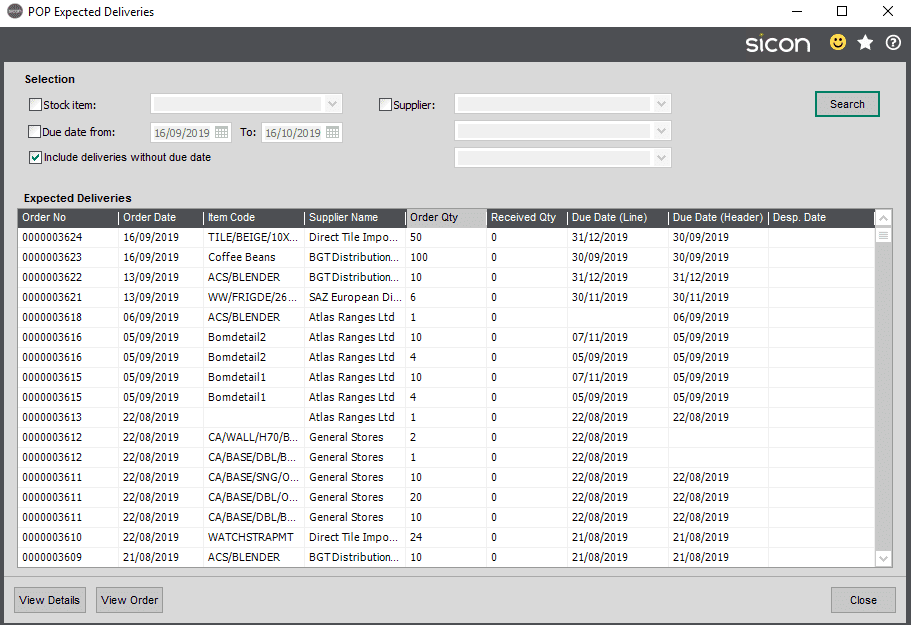
This screen displays a list of future deliveries expected for outstanding purchase orders.
You can filter by stock code, supplier or due date. You can also include deliveries without line due dates. If you want to drill into the detail, then the View Details button will open the line on the purchase order, while the View Order button will take you to the order header.
4.4. Purchase Order List Extended
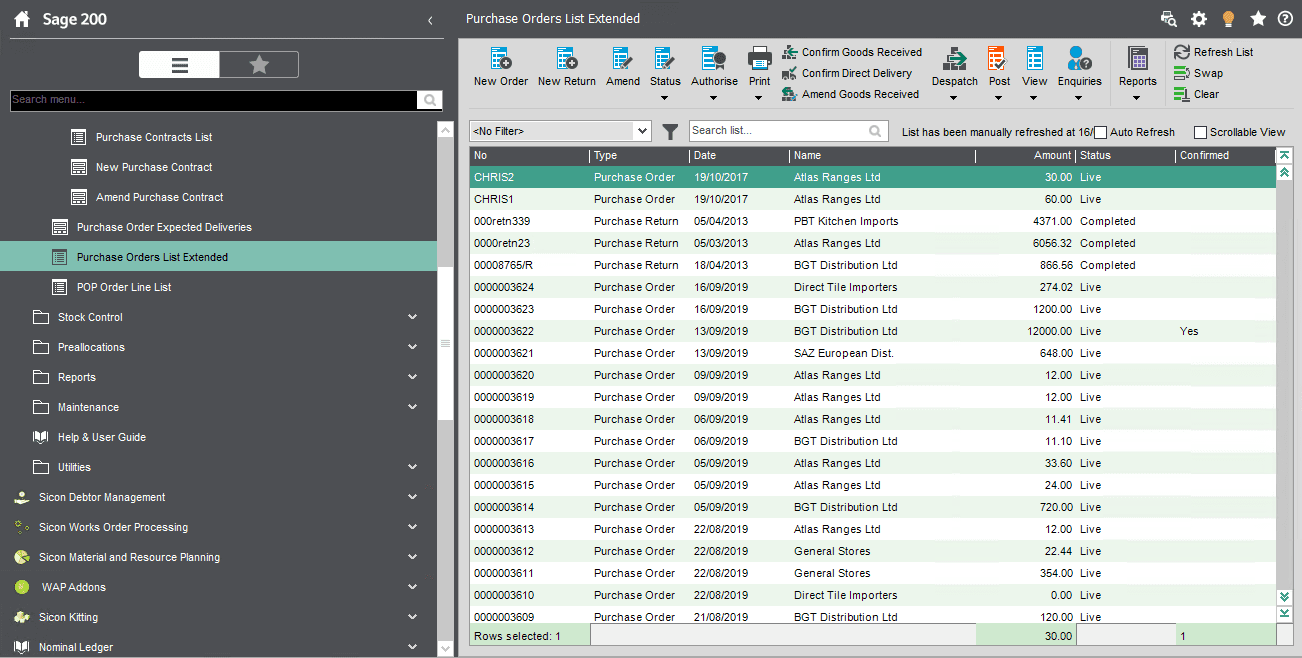
The extended purchase order list, shows the confirmed flag of the purchase order in addition to the standard purchase order info.
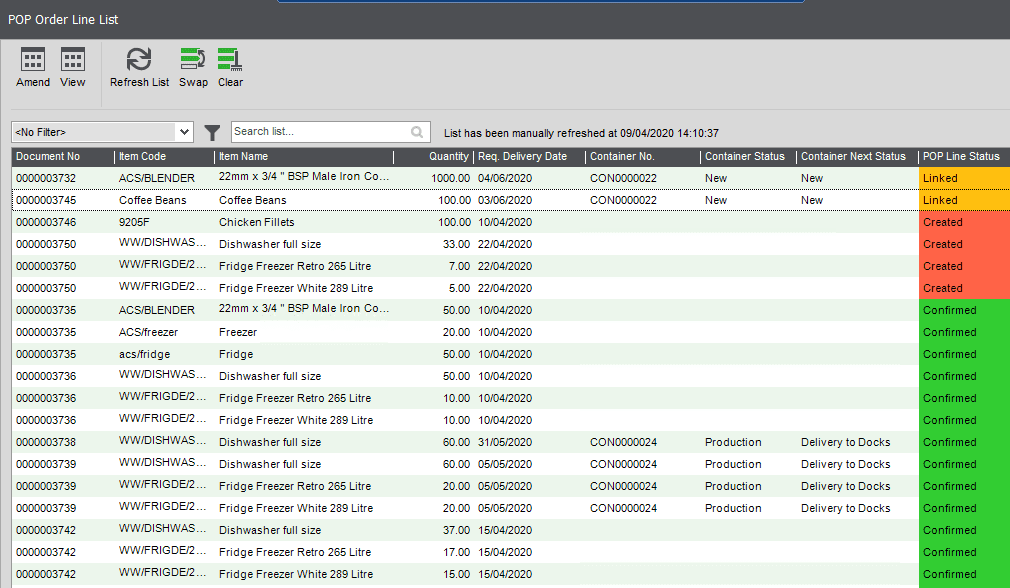
4.5. POP Order Line List
This displays the purchase order lines and includes the current container and PO status, and the next container status.
5. Stock Control Menu
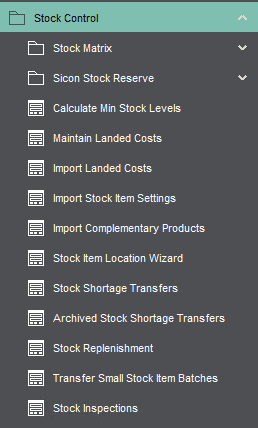
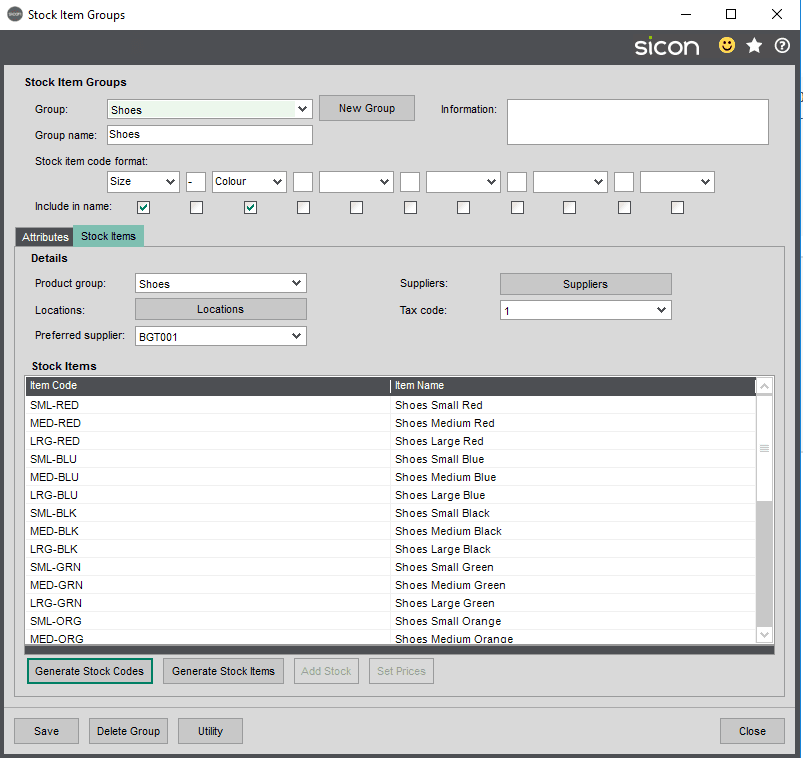
5.1. Stock Matrix
The Stock Matrix feature allows you to create multiple stock items from predefined attributes.
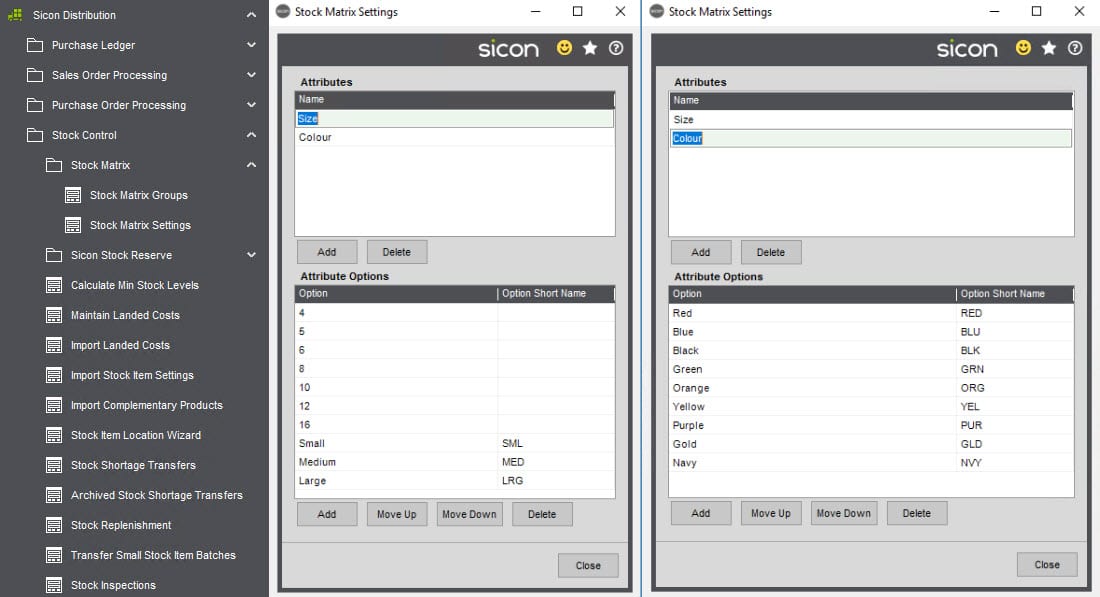
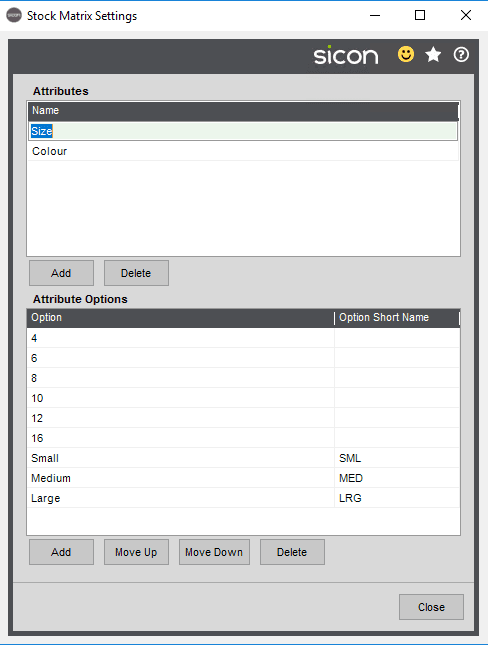
The attributes are configured in the Stock Matrix settings.
Within the stock matrix groups, you can create a new group and choose which attributes to use. You can also specify what stock item code format should be used and how the stock items should be named.
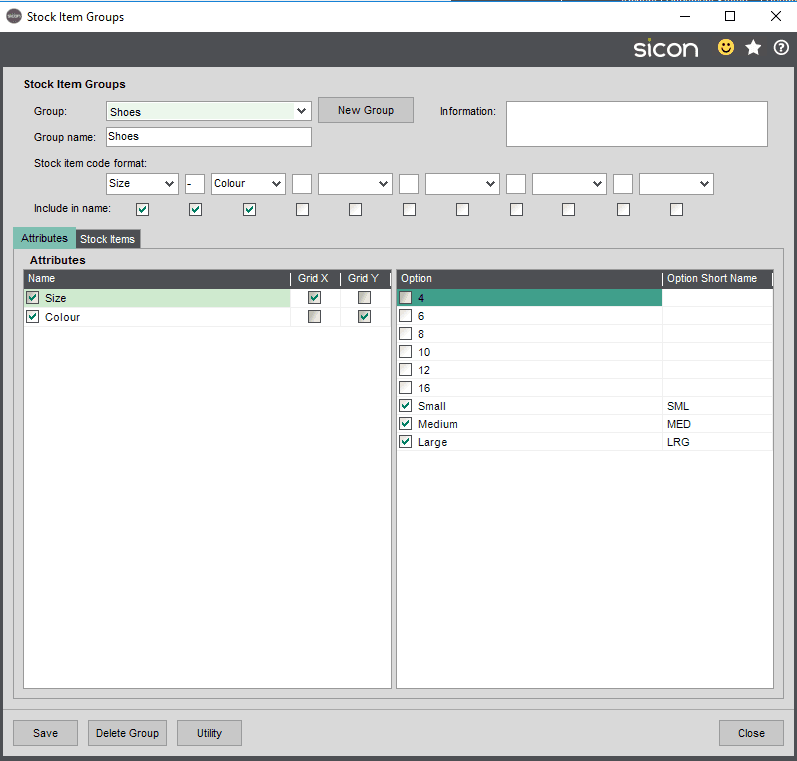
In the stock items tab, you can set the product group, suppliers and tax rate. You can then generate the stock codes, using the Generate Stock Codes button. This routine will check existing stock codes to see if they are the same and will highlight these.
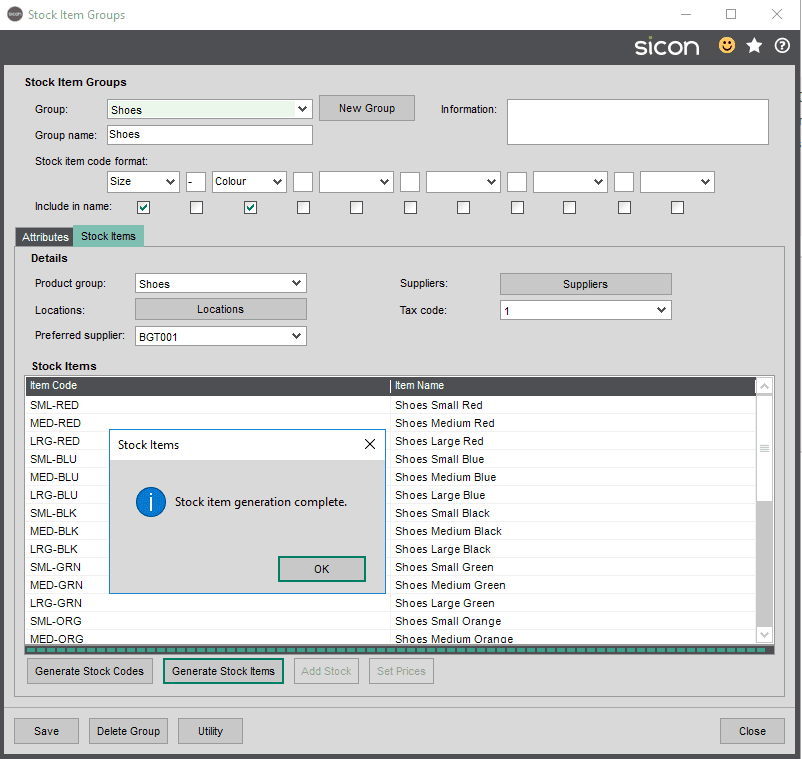
If you are satisfied with the generated stock codes, click the Generate Stock items button.
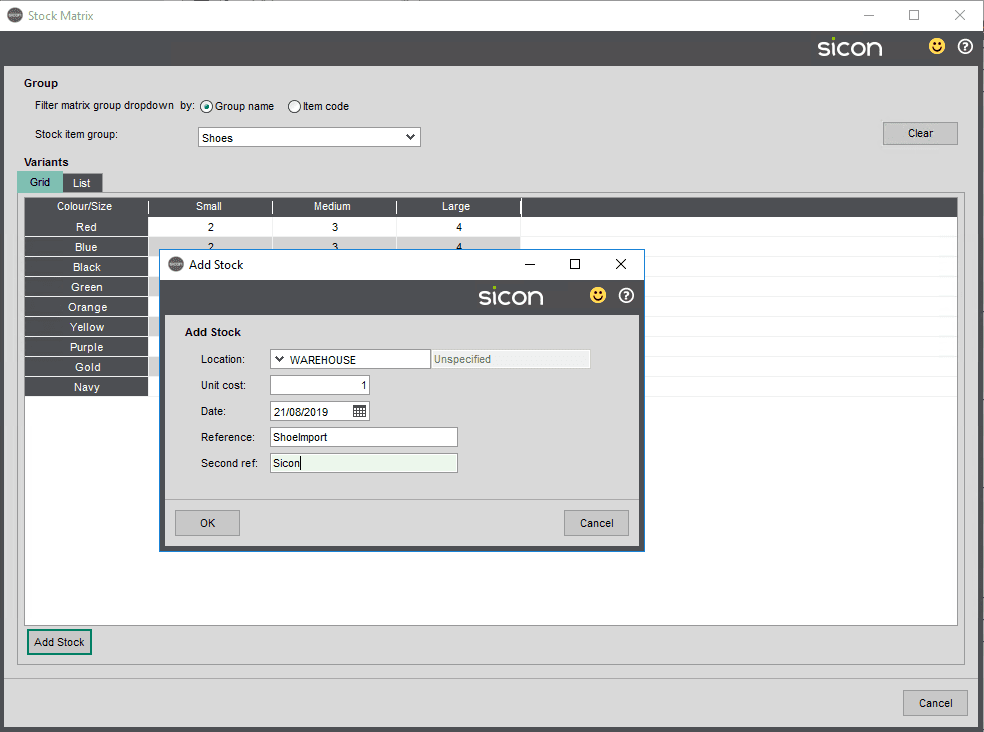
The add stock button can be used to quickly add stock for the new products.
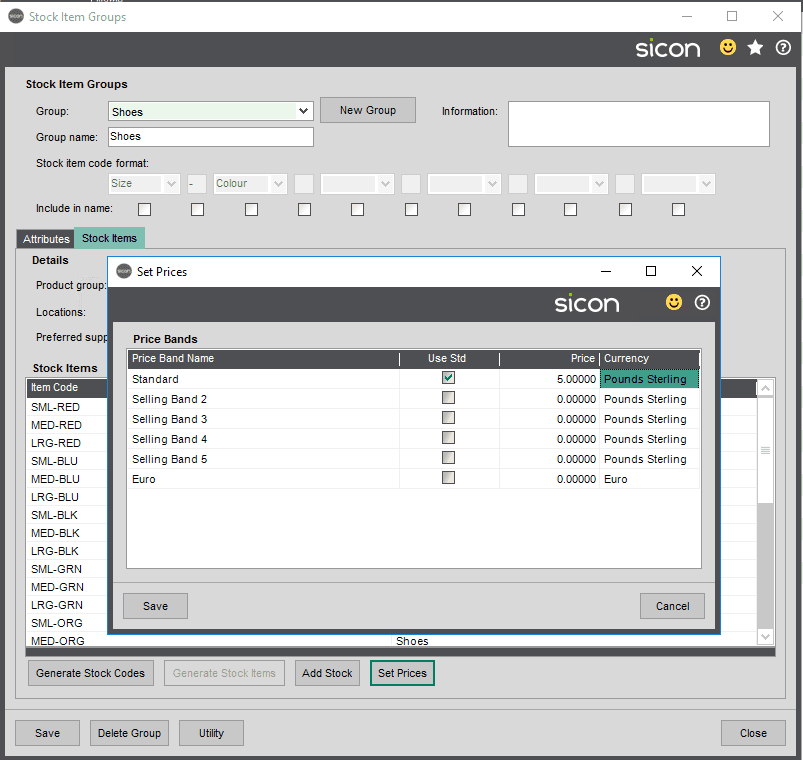
You can also set the sales prices for the newly created stock items
The stock matrix utility allows stock matrix groups to be created based on existing stock items. It allows existing stock code and names to be taken apart to create new matrix groups. Please contact Sicon if you are interested in using this feature.
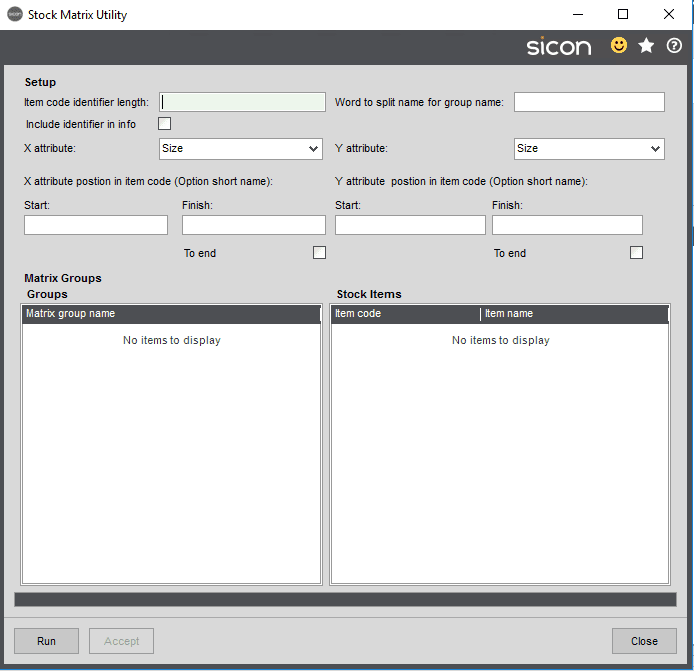
The Stock matrix settings allow users to set up the attributes to be used in the matrix groups
5.2. Sicon Stock Reserve
This allows stock to be reserved and allocated against a customer before a Sales Order has been processed. A Sales Order can also be generated from the Reserve Stock screen.
Please note that any reserved stock will continue to show as free stock until it is allocated.
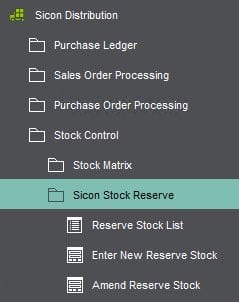
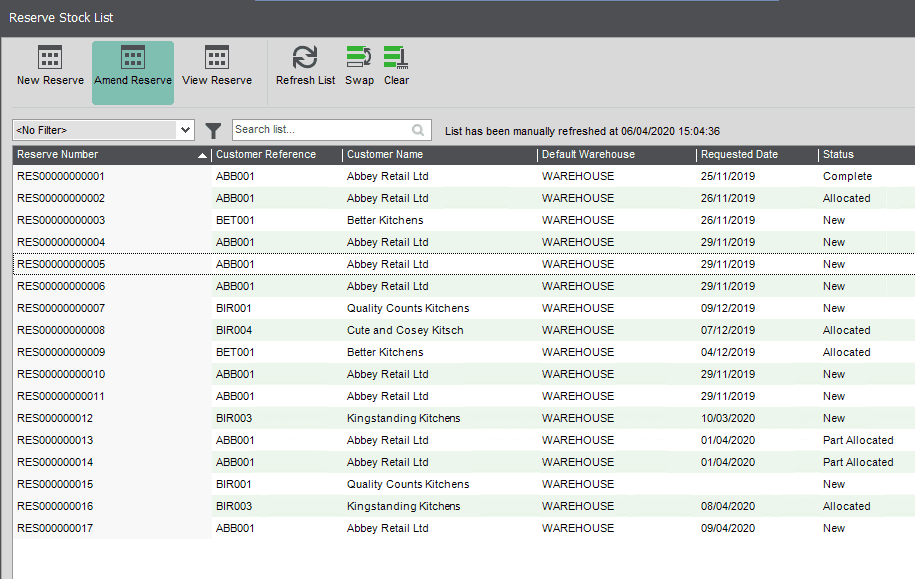
The Reserve Stock List shows all Reserve stock created. Reserves can be created, amended and viewed from this screen.
A reserve can also be created from Enter New Reserve Stock in the menu.
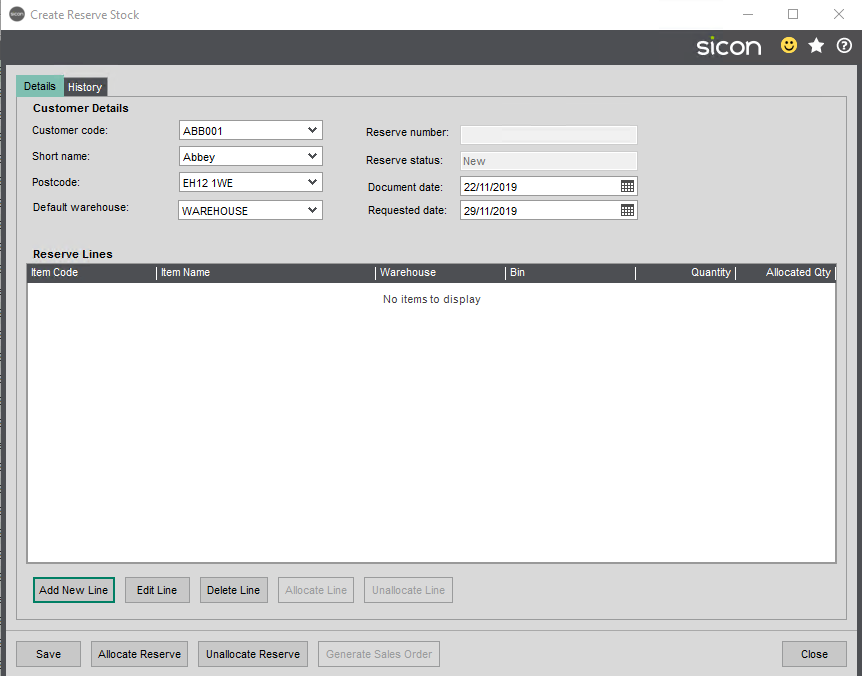
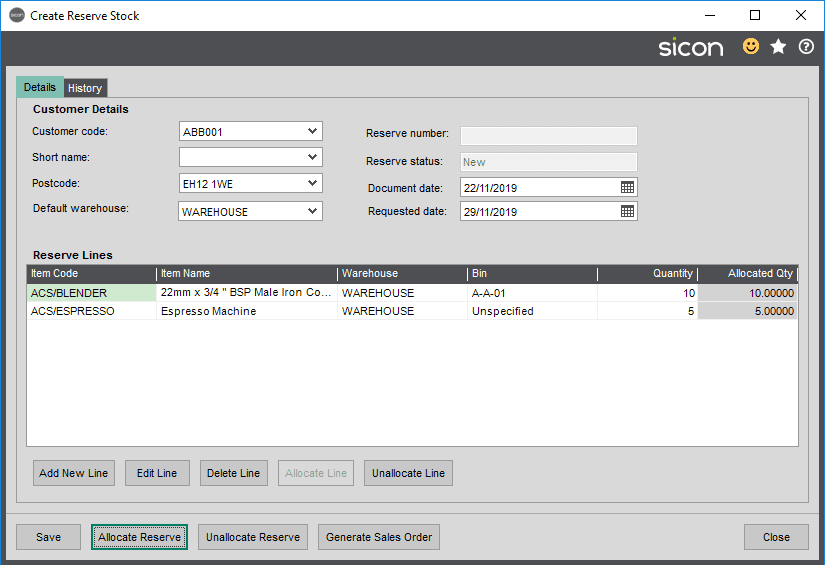
Enter the Customer Details, Default Warehouse and Requested date. Click Add New Line and the following screen appears.
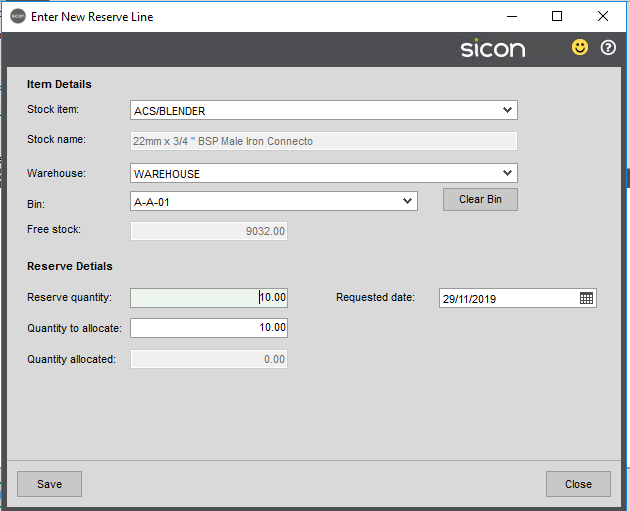
Enter the Stock Item Details, Bin and Quantity and click Save. Repeat this until all stock line reservations have been generated.
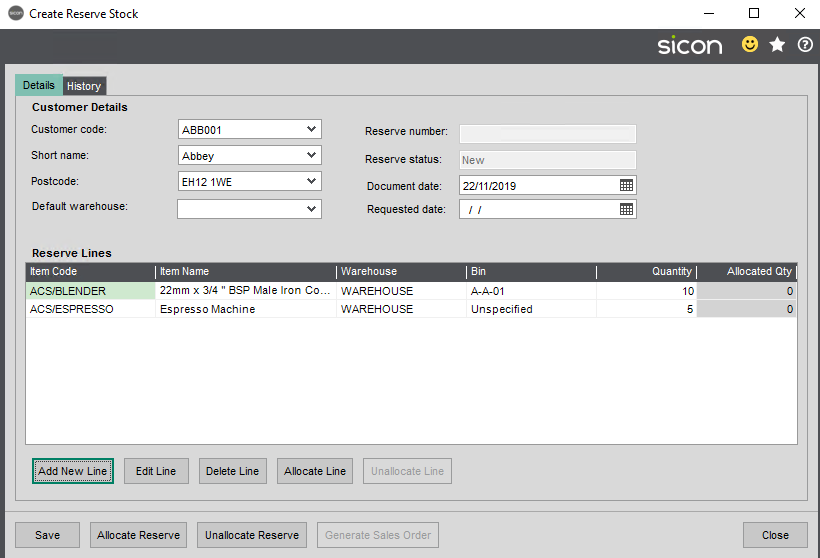
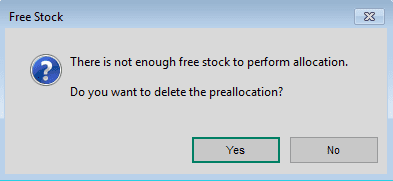
At this point you can Allocate individual lines, Allocate all items or simply Save the Reserve Stock. If allocating before saving, the following screen will appear.
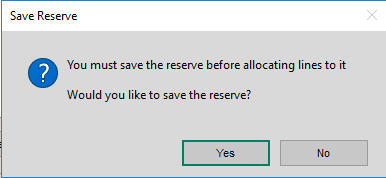
Click Yes and the allocation will be made.
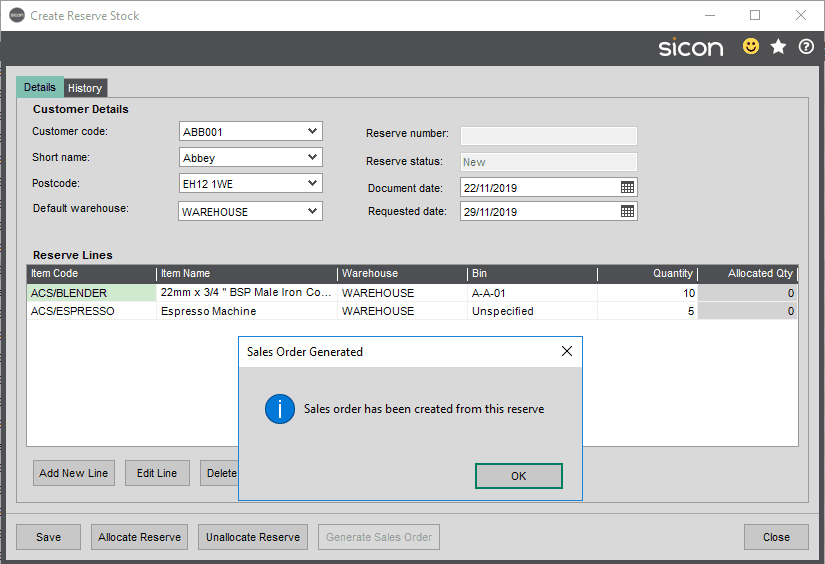
The window can then either be closed or you can Generate a Sales Order for all allocated items.
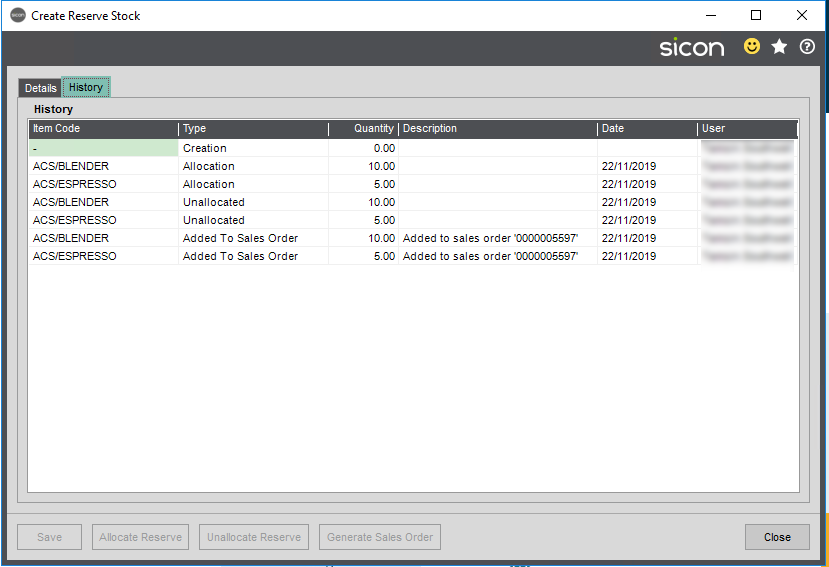
The Sales Order details can be viewed in the History tab.
If a Customer Reserve Stock has been created, on entering a Sales Order for that item a pop up screen will appear.
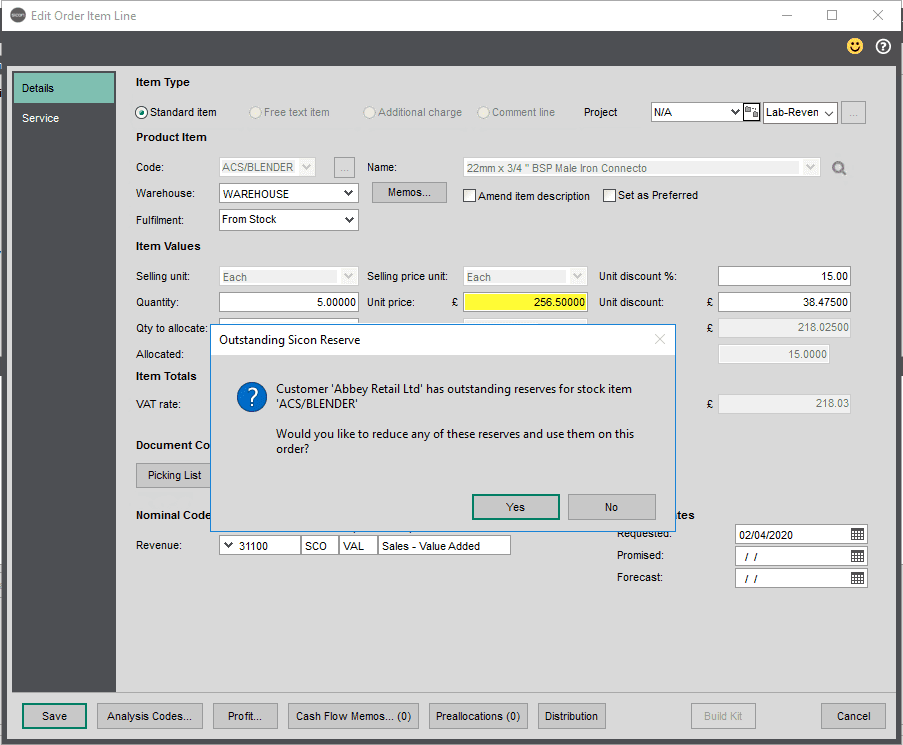
On clicking Yes, a list of Customer Outstanding Reserves will display all available reserves for that stock item.
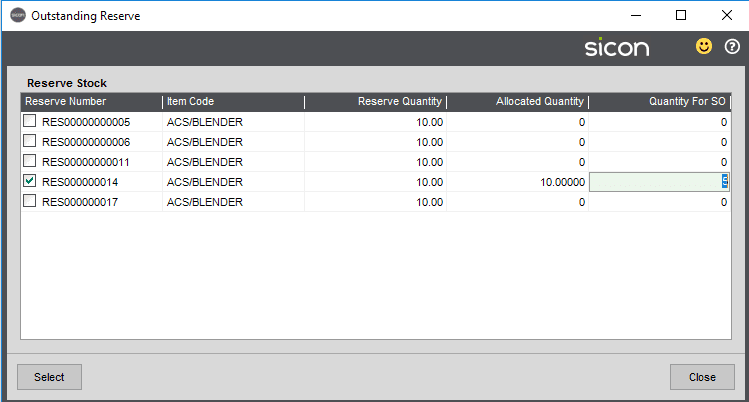
If the line has an allocated quantity against it, the Sales Order line status will change to Allocated.
On selecting the line required, the Reserve Stock quantity will be reduced.
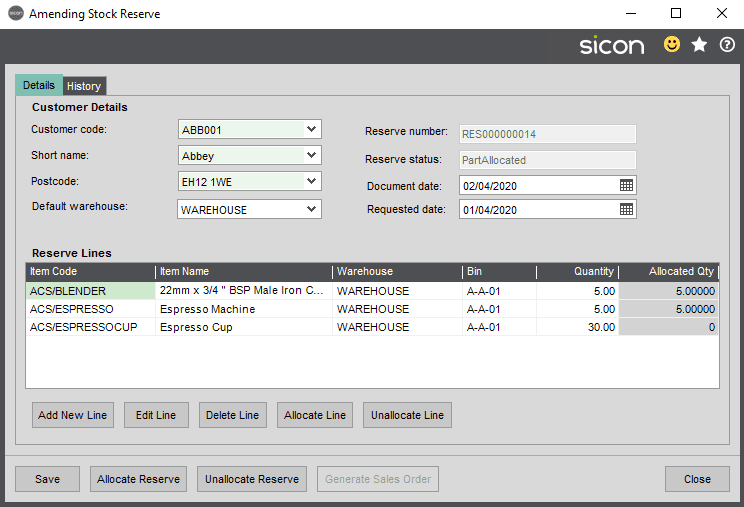
In the Amend Reserve Stock screen, you can filter by Customer Code to display only one account’s Stock Reserves or leave this blank to display all Reserves.
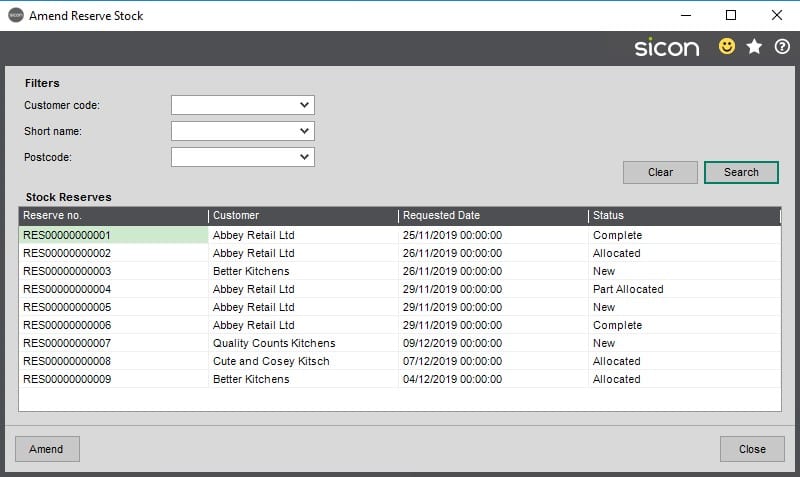
This also shows the status of each of the Reserves. Highlighting a line and clicking amend will take you to the Amend Reserve Stock screen.
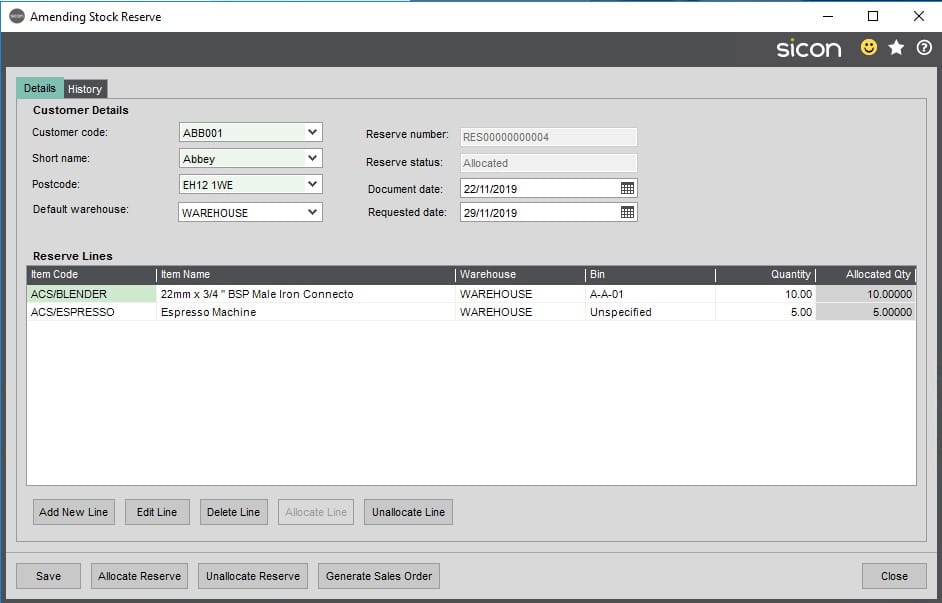
Here lines can be added, amended, deleted, allocated and unallocated. A Sales Order can also be generated.
5.3. Calculate Minimum Stock Levels
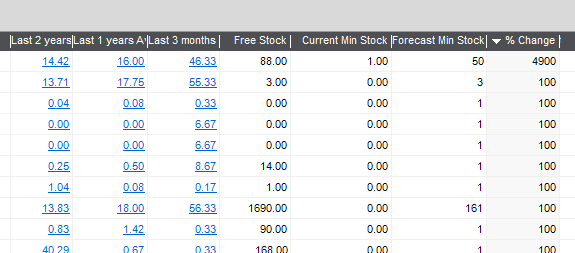
This feature allows the calculation of suggested stock item minimum stock levels per warehouse, based on usage over the previous 3 months (or specified date range). In the example below, we have selected a product group ‘Accessories’ and all the stock items in this group have been listed. For each item a calculation is made for the average daily usage over the last 2 years, 1 year and last 3 months (unless a date range is specified). It is the 3-month figure (or specified date range) that is used in the minimum stock calculation.

You can drill on the Free Stock field or click the Show Calculation button at the bottom of the screen, in order to show how the system has determined the forecasted min stock level.
In the example below, our average monthly usage is 56.33 over the last 3 months. We have specified in the settings that there are 21 working days in a month, making an average daily usage of 2.68. With a lead time of 30 working days, that we measure the supplier on, plus a safety margin of 2.0 to keep an extra 100% on the shelf to allow for late deliveries, our min stock forecast is suggested at 161.
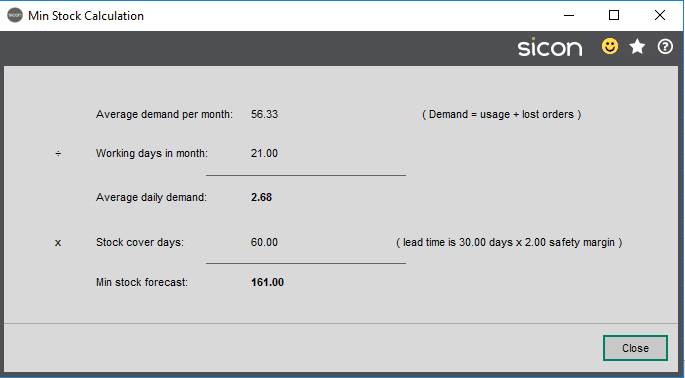
In this example, this is rounded up from the exact calculation of 160.8 because of the rounding setting for this stock item to only suggest in whole number. This can be set at the global or stock item level.

The safety margin of 2.0 is coming from the stock item, whereas the global setting is 1.5
If the Sicon Works Order Processing or Material Planning modules are installed, the Lead Time value will be taken from the Default production lead time or Default supplier lead time fields, as populated in the stock item WOP/MRP settings. If these fields are not populated, the global settings will be used.
It is possible to drill into each usage figure to see the actual usage and sales per month along with a graphical view of the data.
To make it easier to see the suggested changes in the min stock levels you can sort the % Change column. You can then see the significant increases and decreases in minimum levels and check that these are acceptable not just a single sale anomaly.
The results can be filtered by manufacturer and supplier. The calculation can also be run for a single stock item and for specific warehouses.
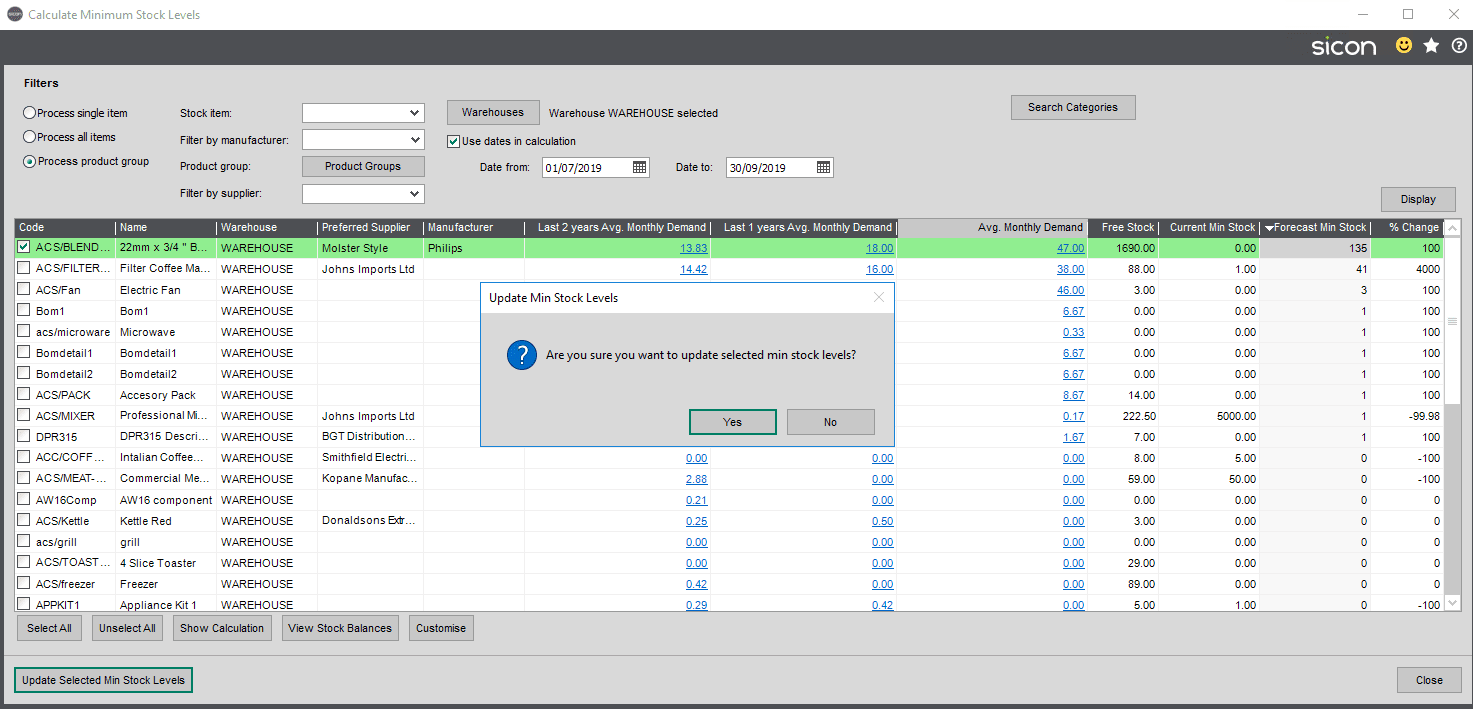
Once the min stock levels have been analysed, the Forecast Min Stock figure can be manually adjusted if required. Select the check box for each item that you want to update, or choose select all. Then click the Update Selected Min Stock Levels button to carry out the .
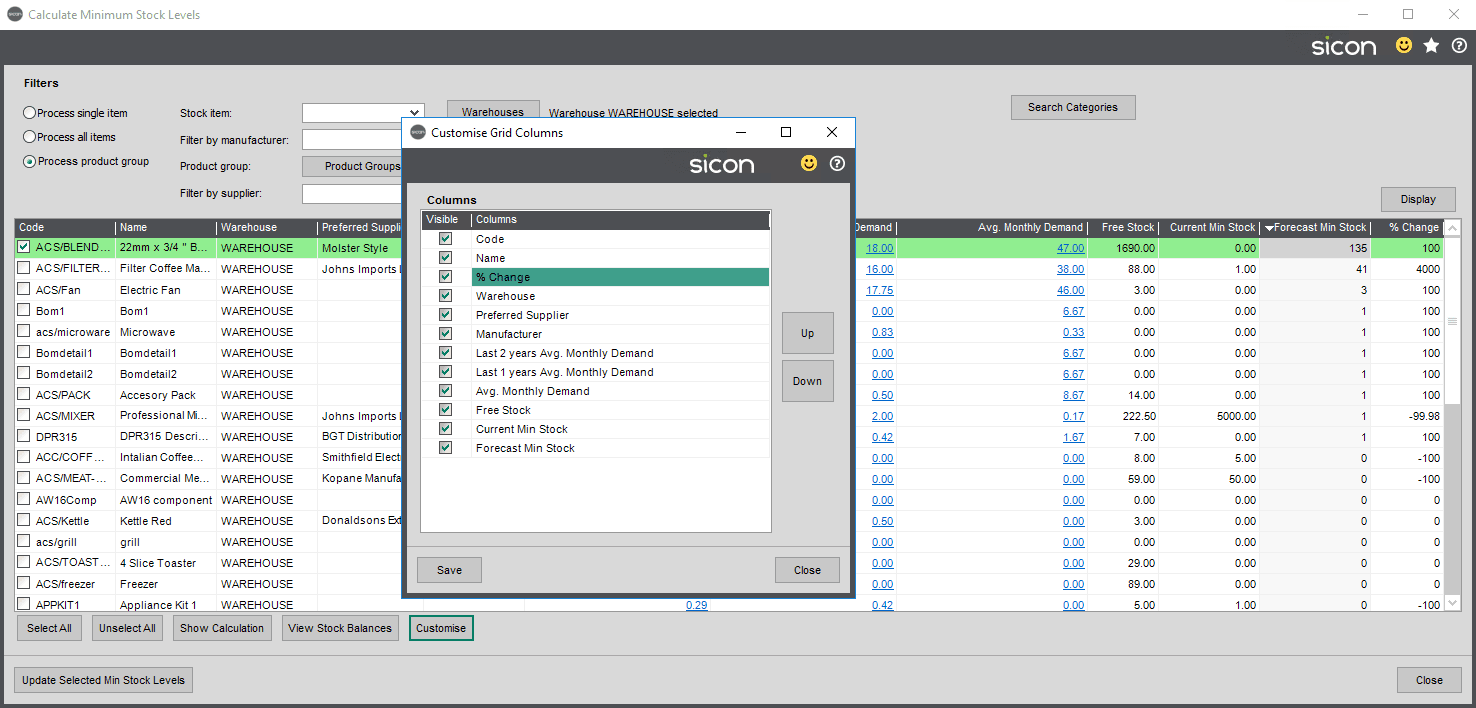
The order of the columns in this window can be re-arranged using the customize button. These settings will save for when the window is next opened.
NB: it is recommended that you run the min stock calculation at least once per month. The min stock adjustments will then be taken into account by the MRP module, and the suggested purchase orders, kits or works orders it creates as a result.
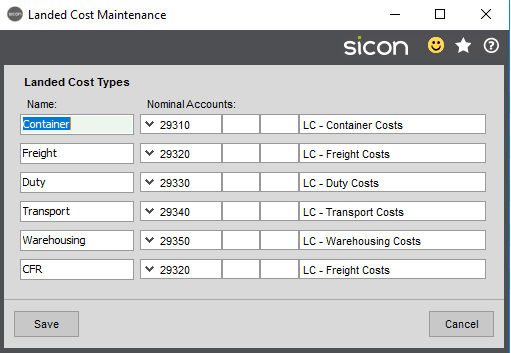
5.4. Maintain Landed Costs
With enhancements to the standard Sage functionality, you can break landed costs down into more detailed types and have landed costs posting to multiple nominal codes to reflect the breakdown of the costs. You can also record the landed costs total on a purchase order, and then apportion that value between the relevant item lines on that order. See the changes to the POP – Enter New/Amend Order section.
You can configure up to 6 cost elements that make up the total landed cost. For each cost type, you can select a nominal code that the landed costs will be posted to.
Once these are set, there are still further areas that will need configuring:-
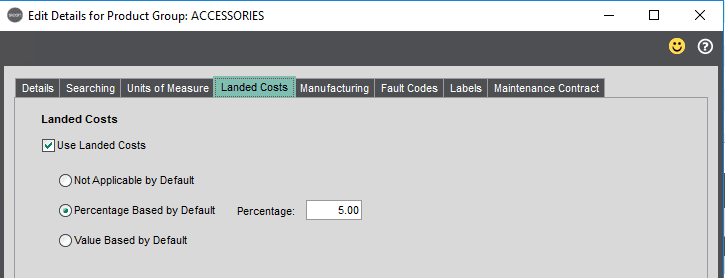
- As per standard Sage 200, Landed Costs are enabled for each product group in the Product Groups screen within the standard Stock Control/Stock Maintenance menu.
- You need to set up Landed Costs in the Distribution section of the Sicon tab, on the supplier account via the Amend Supplier Details screen within the standard Purchase Ledger/Purchase Accounts menu.
- Landed Costs are enabled on a per warehouse basis, via the Locations screen within the standard Stock Control/Stock Maintenance menu.
- The relevant supplier account needs to be added to the stock item as a supplier, and have landed costs set correctly in the Supplier screen (via the Amend Stock Item Details screen within the standard Stock Control/Stock Records menu).
- Finally for that stock item, on the Landed Costs tab of the stock item, the landed costs can be split between the different types specified above.
See the documentation about changes to the standard POP – Enter New/Amend Order screen for details of how to process landed costs on each order. The split of nominal postings can be seen on the changes to the POP – Record Purchase Invoice screen.
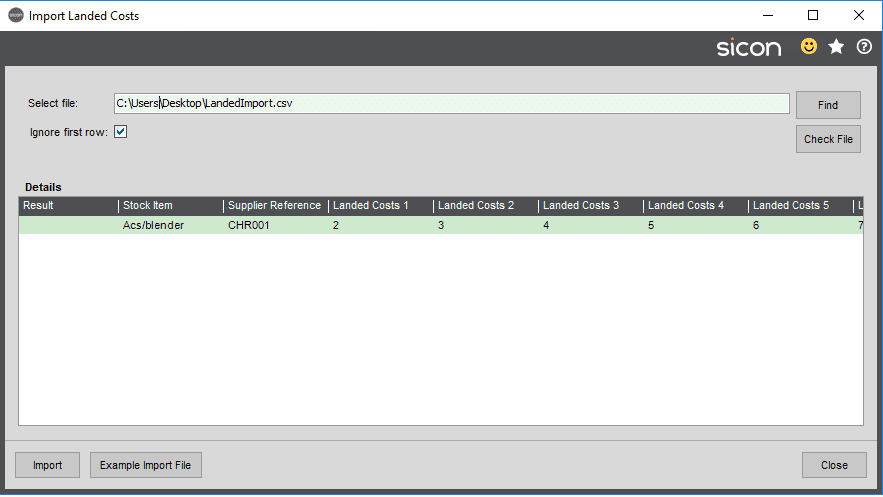
5.5. Import Landed Costs
A new landed cost import has been created to setup each of the 6 cost elements per supplier for a stock item. The file needs to be in a CSV file format, with columns setup as per the column headings in the import screen. Click the Find icon to select the relevant CSV file. The Check File button can be used to validate the file. Once the file has passed the validation step, the Import button activates for the import.
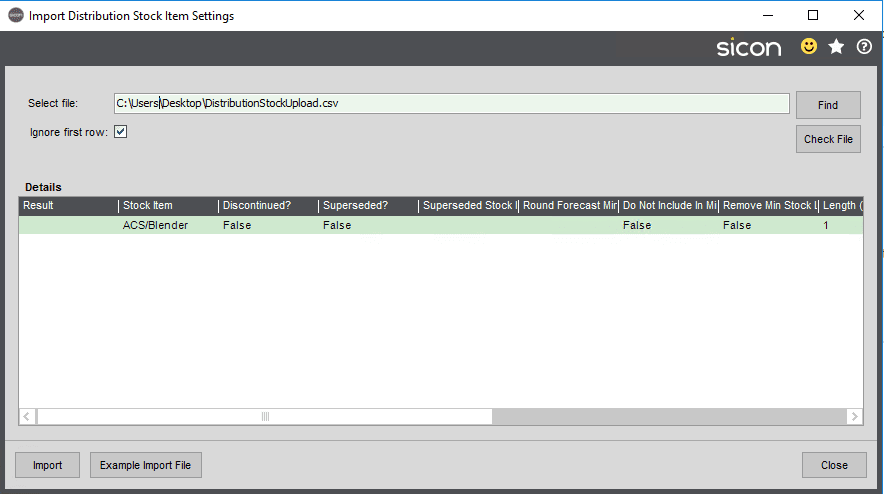
5.6. Import Stock Item Settings
Allows stock items records to be updated for fields that are relevant for the distribution module. An example template is provided that can be populated, saved as a CSV file, checked and then imported into Sage.

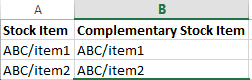
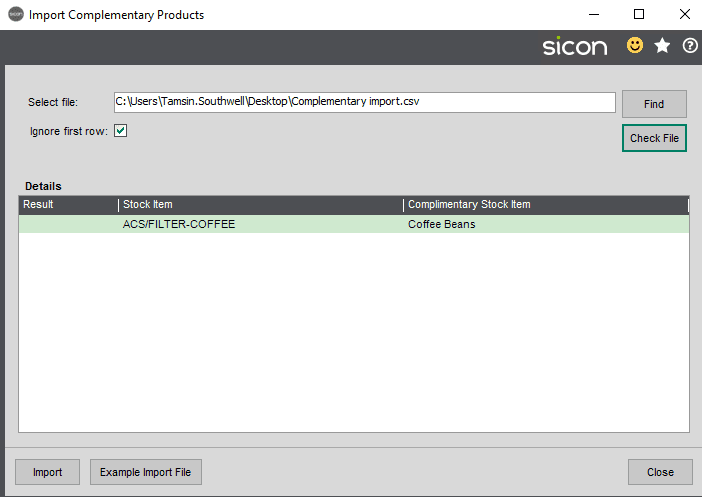
5.7. Import Complementary Products
Allows complementary products to be imported into Sage. An example template is provided that can be populated, saved as a CSV file, checked and then imported into Sage.
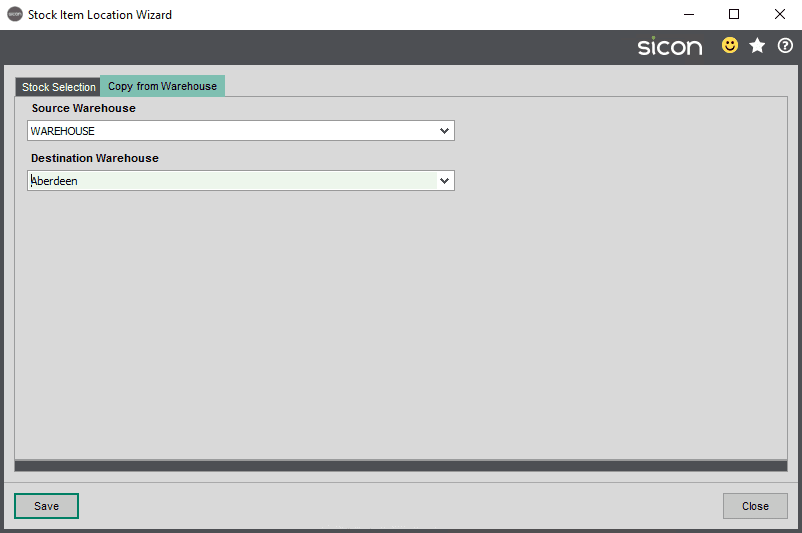
5.8. Stock Item Location Wizard
The Copy from Warehouse feature has been created to enable you to quickly add all stock items from one location to a new stock location. The reorder level and min/max stock levels will be copied from the source warehouse to the destination warehouse. This will update existing records, or add the destination warehouse to the stock items that are missing it.
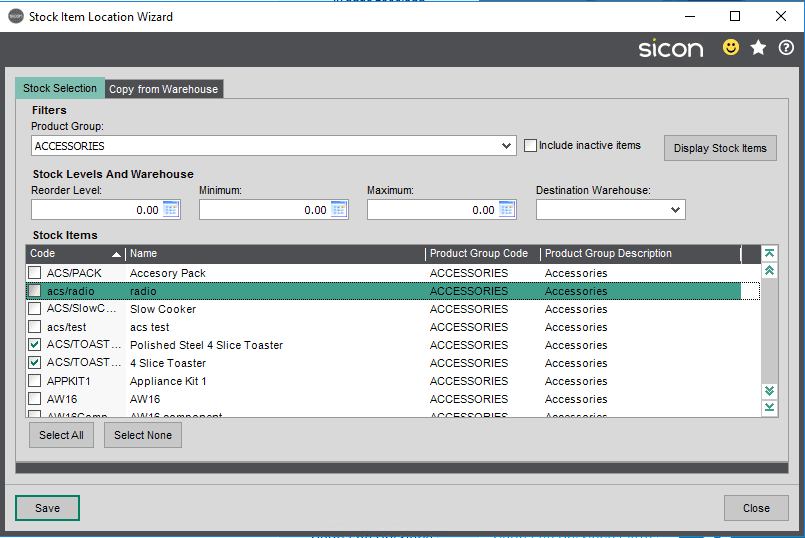
The Stock Selection tab, allows you to select a number of stock items and assign a warehouse location, reorder, minimum and maximum stock levels. The stock items can be filtered by product group. To add the stock items to the warehouse, select the destination warehouse and one or more stock items to add to it.
5.9. Stock Shortage Transfers
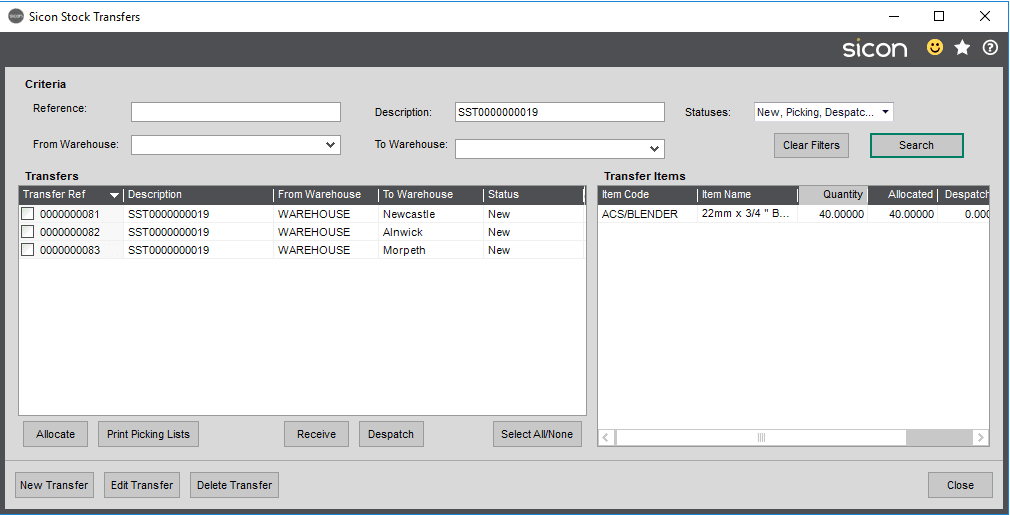
This feature greatly enhances the standard Sage Transfer Stock option to move stock between warehouses. It provides a means of allocating stock, printing a picking list, despatching it (with a despatch note) and moving it to an In Transit warehouse before receiving at the destination warehouse.
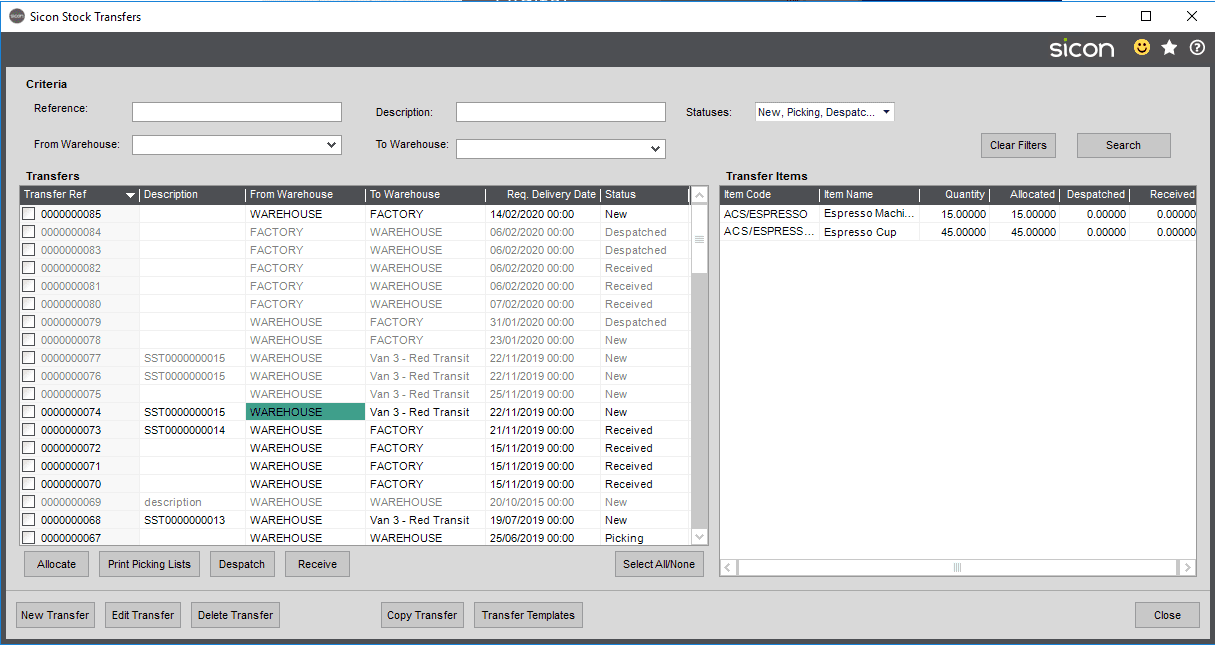
Each Stock Transfer is a separate record, with its own Transfer Batch No reference. A single transfer reference can contain as many different stock items as desired, but must have a single origin warehouse and a single destination warehouse. The window on the right hand side of the screen will show all of the transfer items for the selected transfer batch on the left hand side, with columns displaying the Quantity, the Allocated quantity, the Despatched Quantity and the Received Quantity. You can filter the transfers displayed using the filters at the top; by default all transfer statuses other than Received are displayed.
A new transfer can be generated using the New Transfer, Copy Transfer or Transfer Templates buttons.
Copy Transfer – Highlight the required transfer on the list and click on the Copy Transfer button
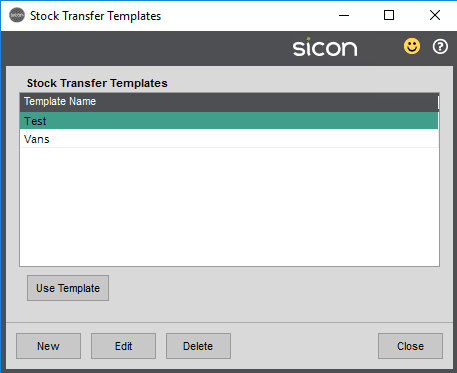
Transfer Templates – Click on the Transfer Templates button and select the template required. A new template can be added by clicking on the New button and following the procedure laid out in New Transfer.
New Transfer

Select the From and To warehouses (a default warehouse can be set in Distribution Settings), and set the dispatch and requested date. You can also record the Courier and the Delivery Code if you want to record these. The Add button at the bottom can then be used to add stock items to this new transfer record. You can select the bin that each transfer line will come from (if the setting to use bins is set), and record the quantity on that line and choose how many you would like to allocate at this time. This allocation will use the Stock Control Internal Area, specified as the Stock Transfer Internal Area, on the Stock Transfer tab of Distribution Settings. The couriers and delivery codes are maintained in this screen.
This new transfer record will be created with a status of New. If you didn’t fully allocate the stock to the transfer during creation, then the Allocate button in the main transfers screen will allow you to do this.
The next processing step, is to print the Picking List for this transfer, via the Print Picking Lists button, an address needs to be set to allow printing of the picking list. The warehouse address comes from the main warehouse location record. If you haven’t fully allocated each line on the transfer, then the picking list won’t print and you’ll see a message displayed explaining this. The picking list generated can be amended using the Sage Report Designer. The act of printing the picking list will change the status of the transfer to Picking.
Once a transfer record is at the stage of Picking, then it can be despatched using the Despatch button. This will generate a despatch note for the transfer, and this report is also a standard Sage report that can be amended using the Sage Report Designer. This will move the stock from the From warehouse into whichever warehouse has been specified as the Stock Transfer Transit Warehouse on the Stock Transfer tab of the Distribution Settings. This will also update the status of the transfer record to Despatched.
The final processing step is then to Receive the transfer into the To warehouse. This will fully receive all of the items on the transfer and change the status of the transfer to Received, so manual stock adjustments will be needed if they have failed to receive the full despatched quantity.
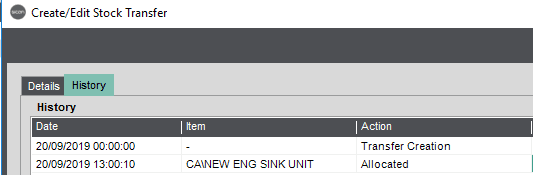
If you Edit the transfer, then there is also access to a History tab that audits the various actions and which user triggered them and when.
5.10. Archived Stock Shortage Transfers
Stock Shortage Transfers that have the status of Received, can be archived within Stock Shortage Transfers.
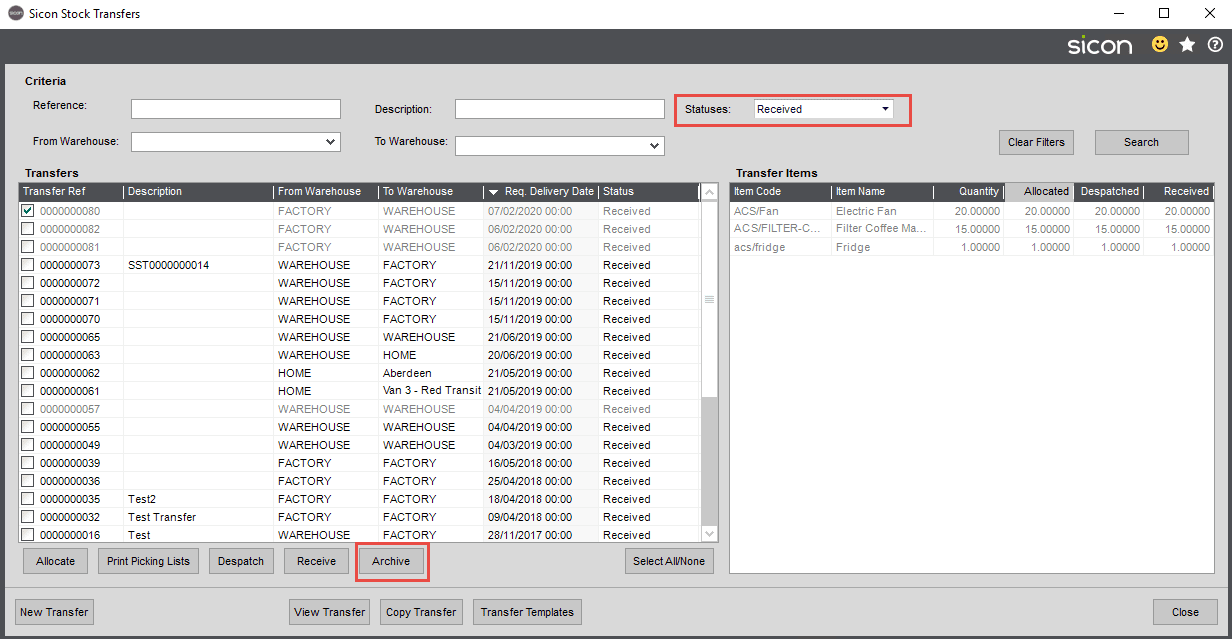
The Stock Transfer list can be filtered to show Received transfers only. On selecting the transfer, the Archive button will appear. Once this button has been clicked, the transfer will be removed from the list. These Transfers will now appear in the Archived Stock Shortage Transfers list.
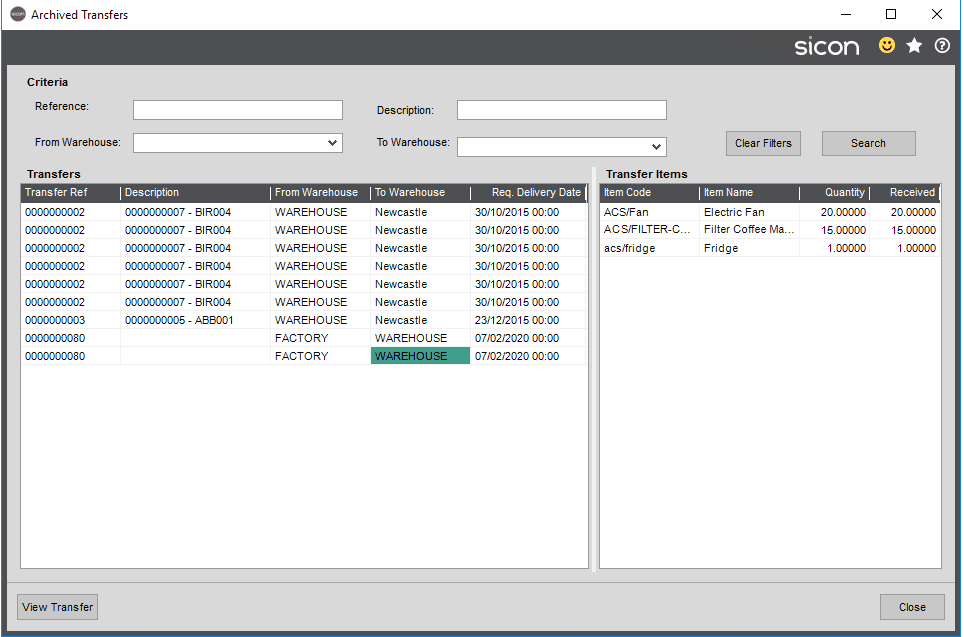
The list can be filtered by Reference, Description, From Warehouse and To Warehouse. Alternatively, these can be left blank and, on clicking the Search button, all archived transfers will be displayed.
5.11. Stock Replenishment
Allows for the system to suggest replenishments from one warehouse to another based on minimum levels set on the warehouse. You can select a source warehouse to supply the stock and a destination warehouse that needs replenishing.
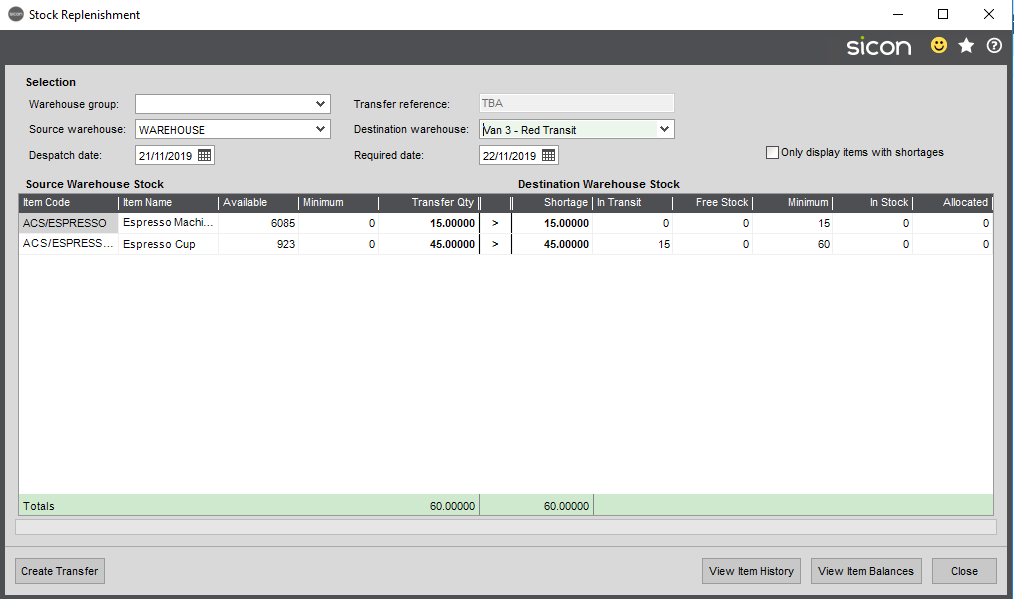
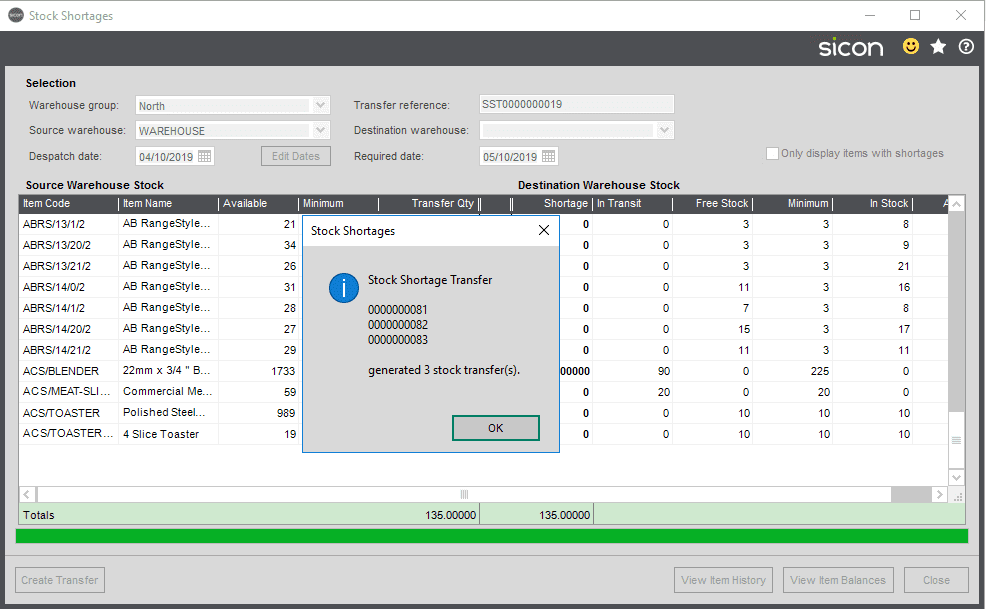
You can filter out the lines that need stock transferring using the check box to only display items with shortages. In the above example, Van 3 is below its minimum levels for both stock items. If you are happy with the suggested transfer(s), then you can use the Create Transfer button to generate a new transfer record, which is then processed via the Sicon Stock Transfers screen.

The Stock Shortages screen can also use the Warehouse Replenishment Groups, defined within the Maintenance menu, to suggest stock shortage transfers to keep target warehouses at their minimum stock levels. So if a central warehouse holds the stock that can replenish engineer vans, then this screen would suggest which transfers should be created for the vans.
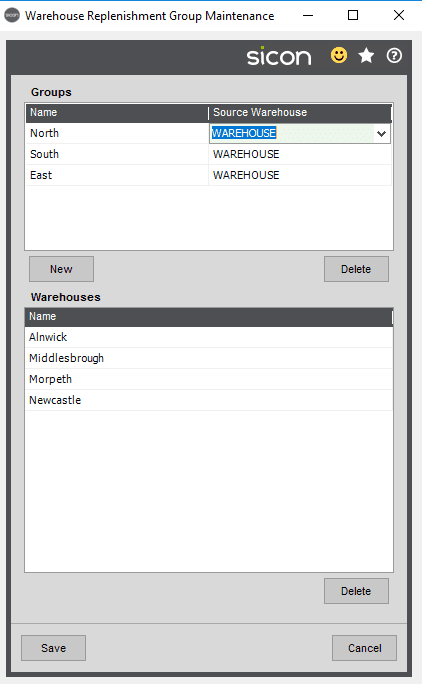
The North replenishment group shows that the warehouse replenishes 4 warehouses. You can then select this warehouse group in the stock shortage screen.
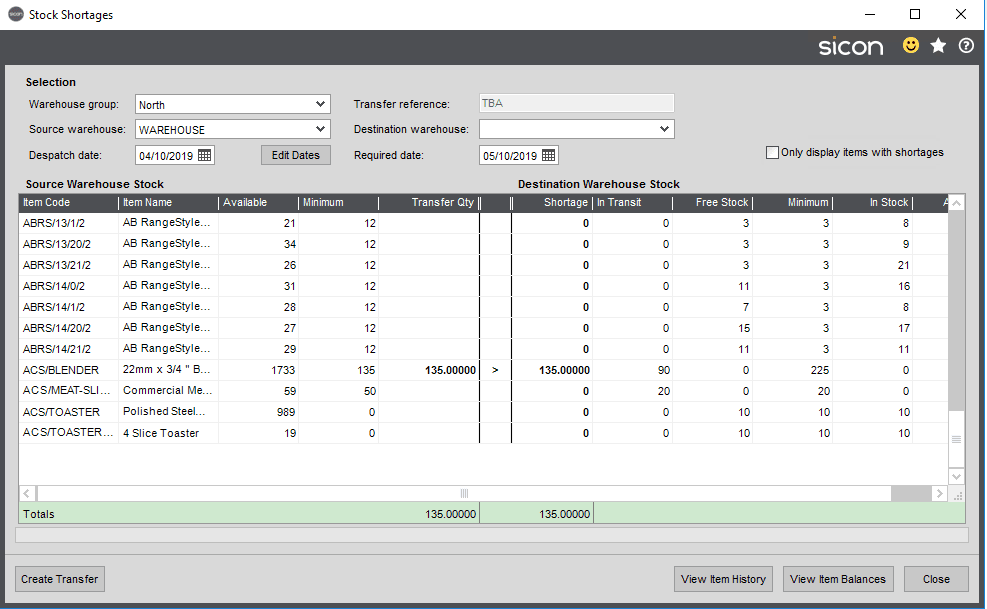
Selecting one of the Destination warehouses, then filters down the suggested transfer for that warehouse only.

All transfers can be actioned to create transfers for all the required warehouses in the group
5.12. Transfer Small Stock Item Batches
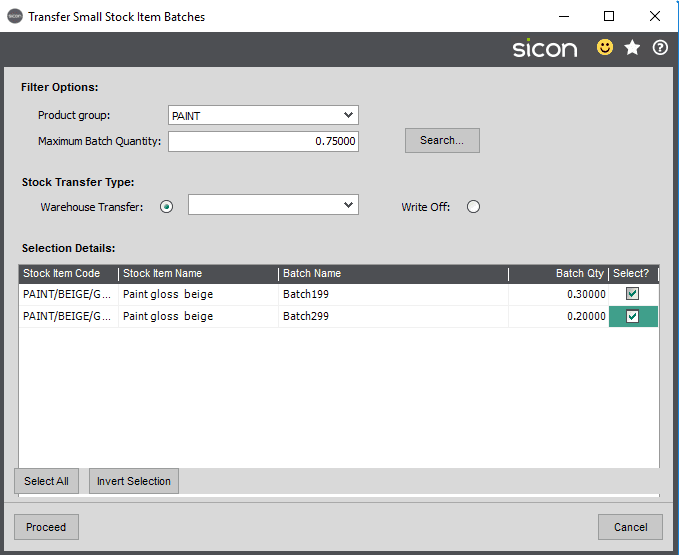
This screen is designed to allow you to easily deal with remaining batches that remain in stock, but are unlikely to be able to be sold or used because they are too small in size. You can search for items by product group and then enter a Maximum Batch Quantity size. So in the example above, we are looking for remaining batches in the PAINT product group where there is a quantity of .75 or less.
Once the batches are displayed, you can select the relevant batches that you wish to process and then either transfer them to a different warehouse, or else write them off. Click the Proceed button for this to occur for the selected batches.
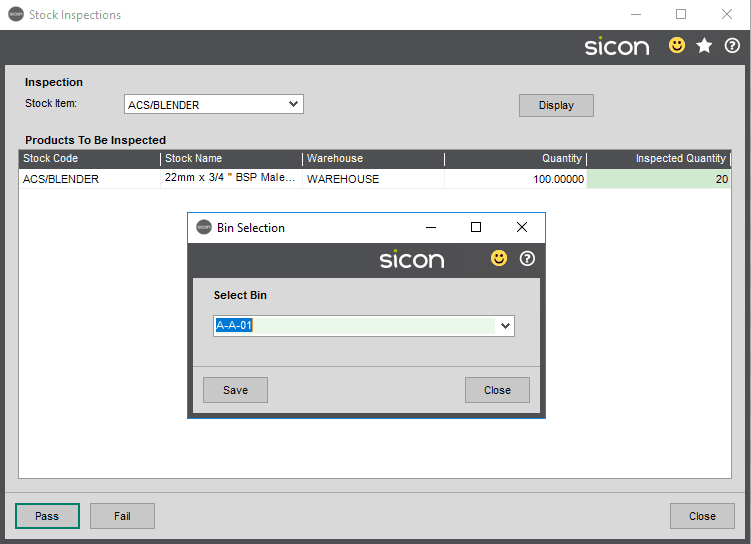
5.13. Stock Inspections
Stock items that have been flagged as requiring inspection and have been receipted into an inspection bin can be inspected using this screen.
On the stock item the inspection required when receiving purchase order can be ticked.
When receiving in the stock on a purchase order, the bin for the stock is set based on the Distribution Settings.
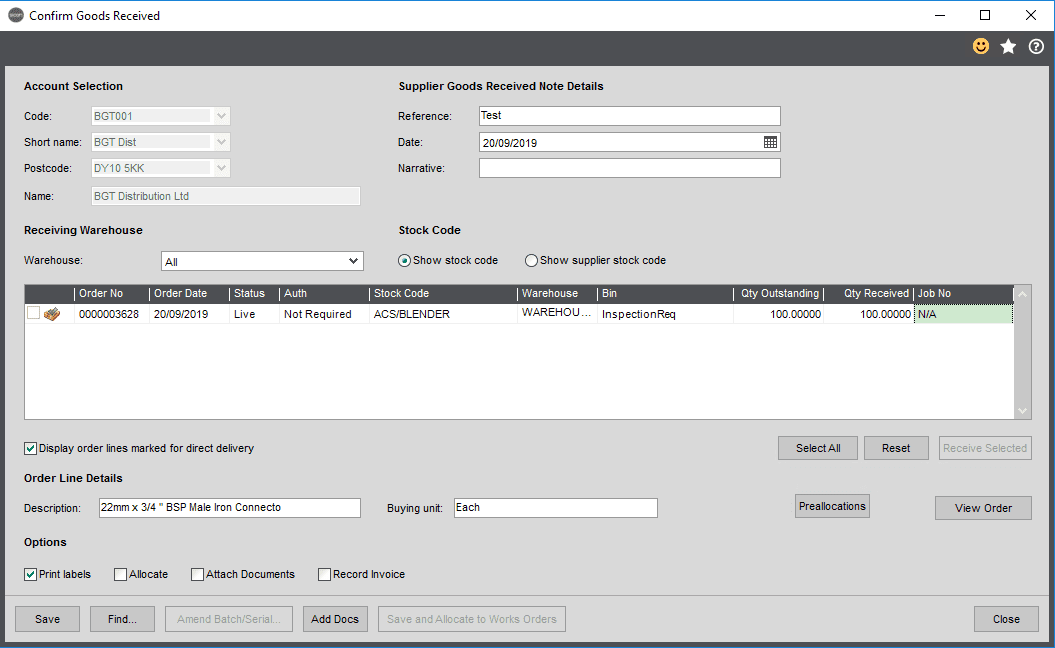
Once the stock has been received into the inspection bin, the stock inspections screen can then be used to inspect it and pass or fail it.
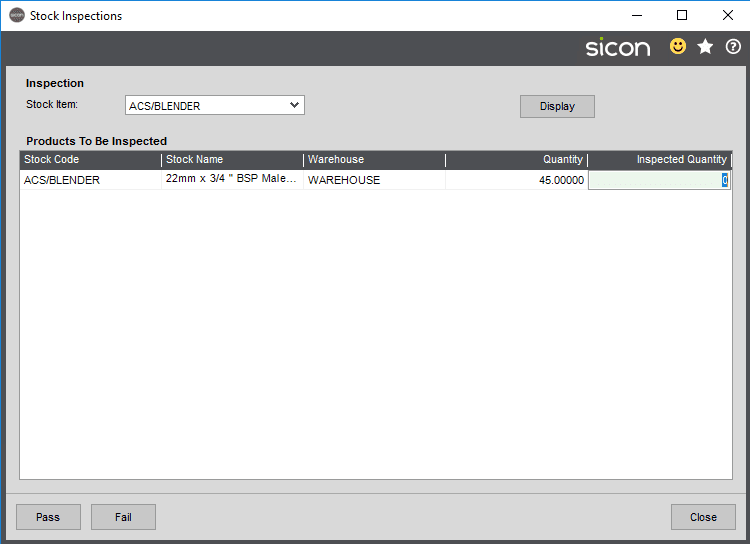
If the stock is failed, it goes to the warehouse and bin as set in the Distribution Settings. If the stock is passed the user can select the bin to transfer it to.
6. Preallocations Menu
6.1. Preallocations
Preallocations allows you to create connections between outstanding stock movements, to effectively allocate that stock before it has arrived. Typically, this allocation would be from an open purchase order to an open sales order, but if you are using the Sicon Manufacturing module then stock can also be pre-allocated to works orders and kits. A typical method for the creation of preallocations is if you are using the Material Planning functionality to suggest purchase orders. With the option enabled in Material Planning settings, all suggested purchase orders will then create preallocations to the sales order that requires them. Works Orders and Kits also use preallocations where they are linked to sales orders, so that when their finished items are booked in, they can be automatically allocated to the sales order line.
It is also possible to manually create preallocations from within a sales order line, and also a purchase order line – see the sections on changes to SOP Enter New/Amend Order/Quotation and POP – Enter New/Amend Order at the start of this guide.
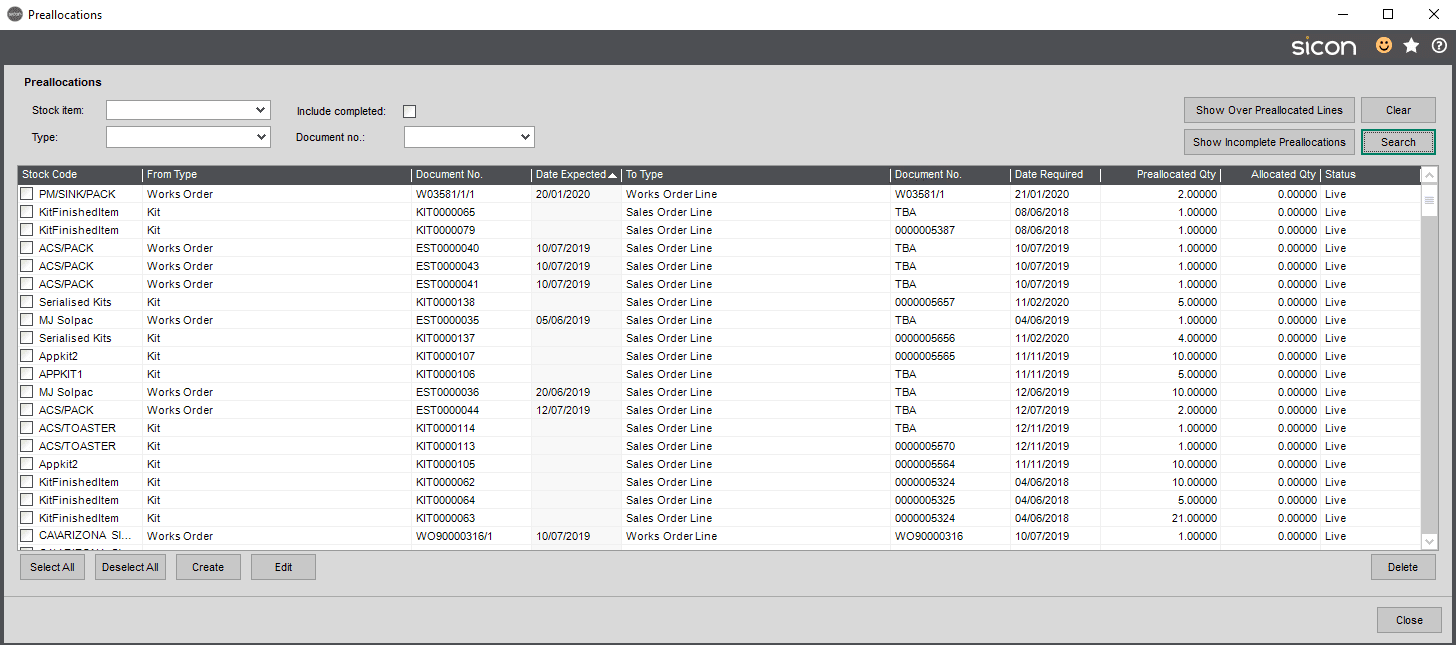
The purpose of this screen is to display all current preallocations. These can be filtered by Stock item, and by Preallocation Type. If you select one of the Purchase or Sales Order types, then the Document No field will display the available order numbers that you can filter on.
The standard usage of this screen is to only display current preallocations, but by ticking the Include completed checkbox, then you can display any preallocation.
The Show Over Preallocated Lines button, will filter the screen to show those order lines that have a preallocation quantity that is greater than the line quantity. This could happen if a line quantity is reduced after a preallocation has been created.
The Show Incomplete Preallocations button will filter the screen to only show incomplete preallocations – which are preallocations that have failed to be processed correctly, possibly due to a lock on the destination order when the stock was received. When this has happened, then click this button and use the Complete Preallocation to try and complete it again. If at this point it still cannot complete, then it will give the option to delete that preallocation with an explanation.
You can use the Create button to create new preallocations, or the Edit button will allow you to change the quantity on the preallocation.
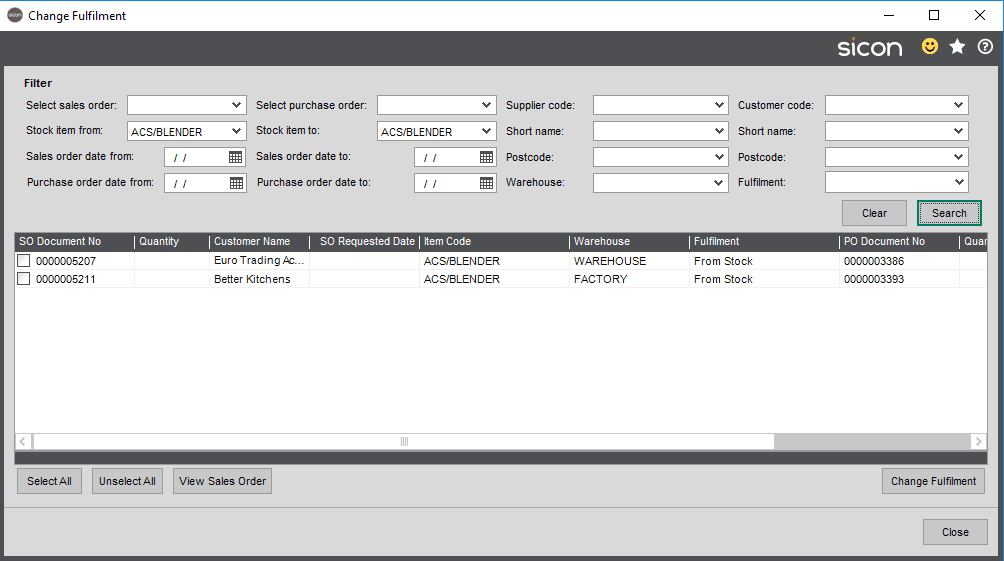
6.2. Change Fulfilment
This screen is linked to functionality where it is possible to use the Sicon fulfilment methods, as opposed to the standard three Sage fulfilment methods – From Stock, Supplier via Stock and Direct to Customer. Our fulfilment methods effectively mirror the behaviour of the standard Sage fulfilment methods (using our Preallocations), but with the added benefit that you can then use this screen to change the fulfilment method used for an order at a later stage.
The screen features various filter options at the top of the screen, but you can then tick the sales order lines that you wish to change the fulfilment methods for, and use the Change Fulfilment button to proceed.
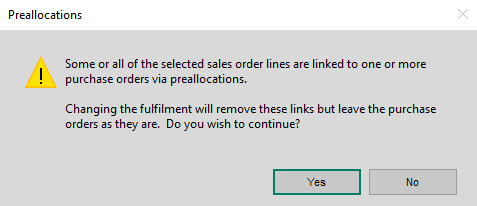
If you select a sales order line that is linked to any existing preallocations, then a prompt will appear advising that changing the fulfilment method will remove these preallocations, but not change any other details of that purchase order.
Then you will be presented with the screen where you can choose the new fulfilment method for the selected sales orders.
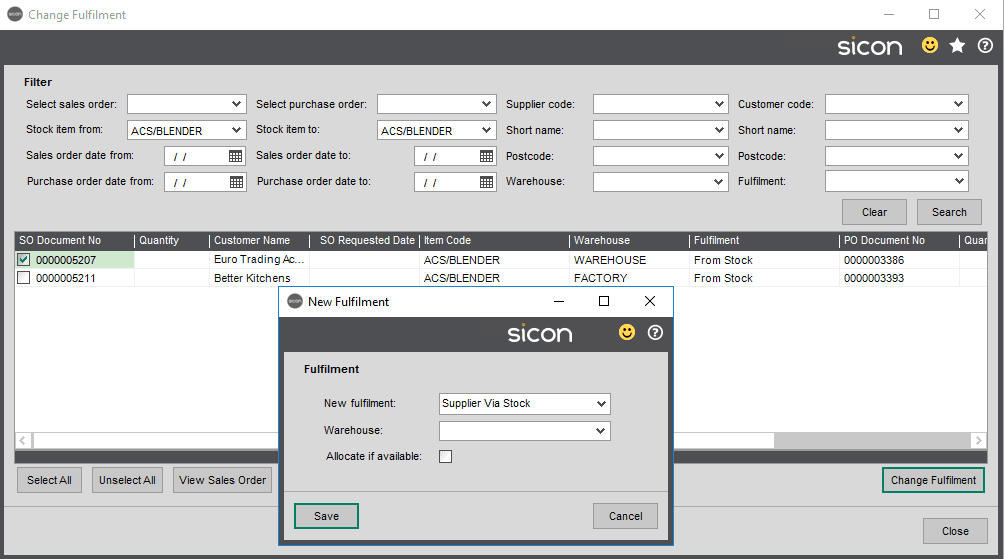
If you are choosing From Stock or Supplier via Stock as the new fulfilment method, then you can also select a warehouse for the sales order line to use. You’ll also be able to allocate the stock if there is any available.
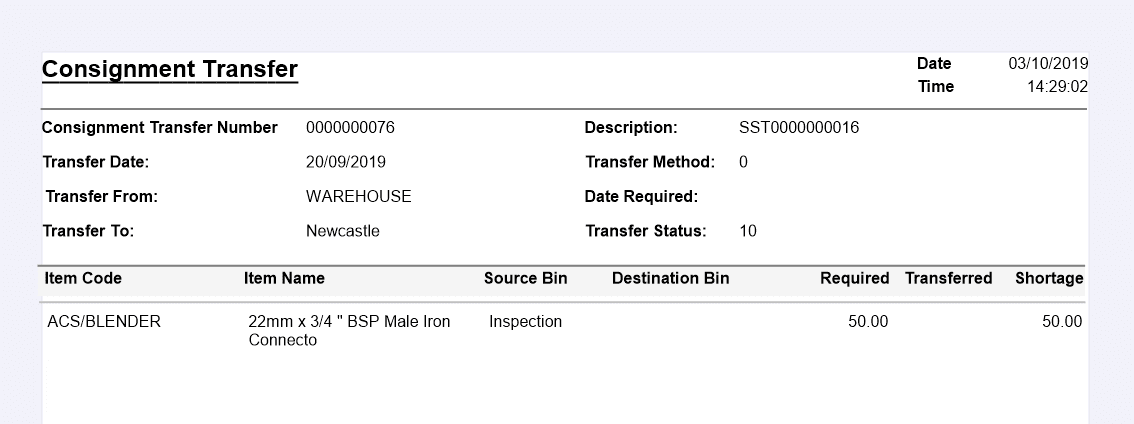
7. Reports
Consignment Transfer: Can be run to show details of the Sicon Stock Shortage Transfers
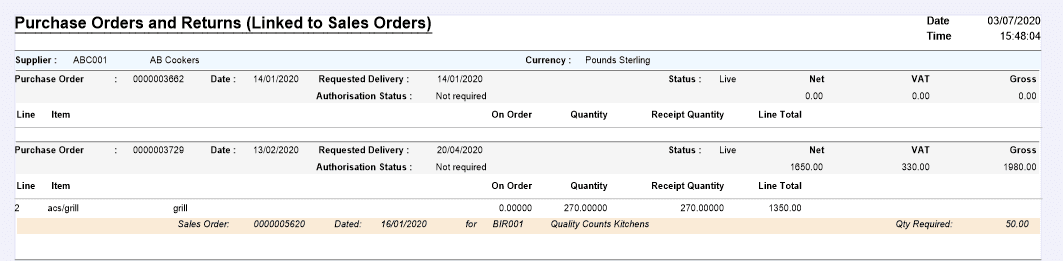
Purchase Orders and Returns Linked to Sales Orders : Lists Purchase Orders and any outstanding Sales Orders linked to them.
Purchase Orders Outstanding Tracking Dates: Shows any purchase order tracking dates that are still outstanding (yet to be confirmed).

Purchase Orders Awaiting Confirmation Detail: Shows any purchase order that have yet to be confirmed.

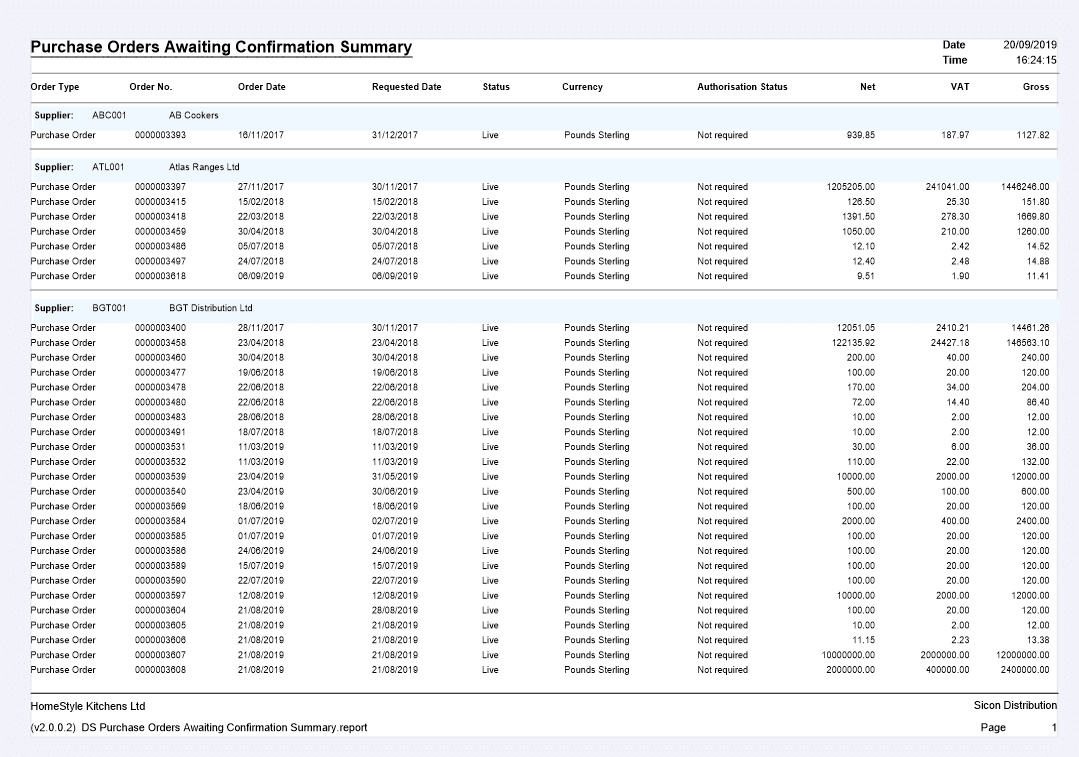
Purchase Orders Awaiting Confirmation Summary: Shows purchase orders that are unconfirmed with less detail than the report above.
8. Maintenance Menu
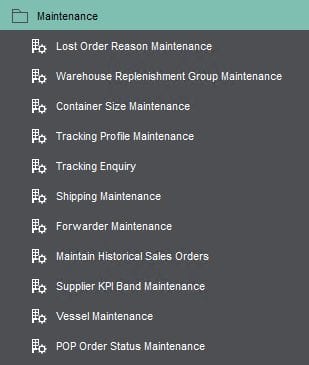
These options allow you to maintain various information used in the functionality of the Distribution module.
8.1. Lost Order Reason Maintenance
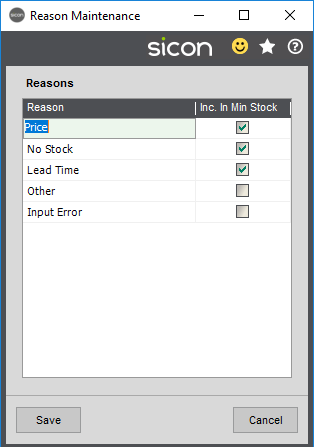
This screen enables you to maintain a list of the reasons used by the Lost Orders Enquiry functionality within Sales Orders. If the ‘Inc. In Min Stock’ box is ticked, these values will be included when calculating the Minimum Stock Levels.
8.2. Warehouse Replenishment Group Maintenance
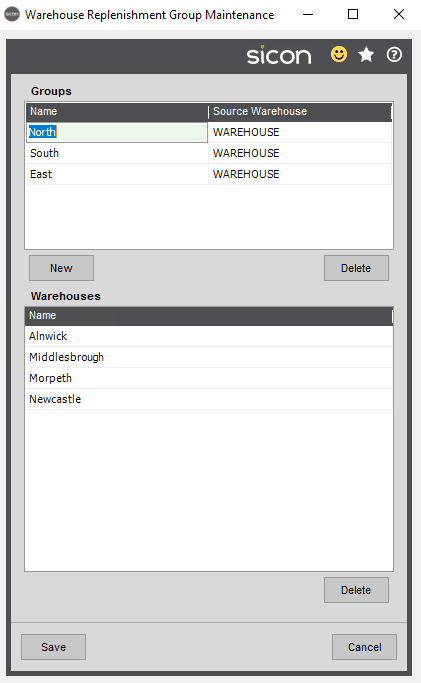
This screen is where you define which warehouses are assigned to which replenishment group. This information is then used within the Stock Shortages screen for warehouse replenishment. The Group needs a single source warehouse, while there can be multiple warehouses specified in the lower section.
8.3. Container Size Maintenance
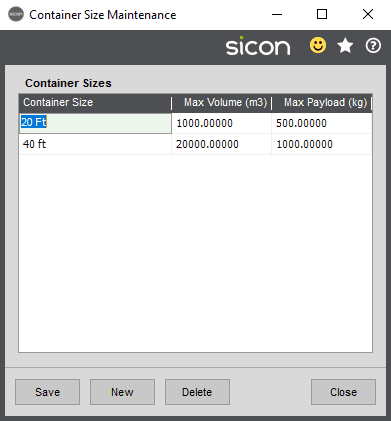
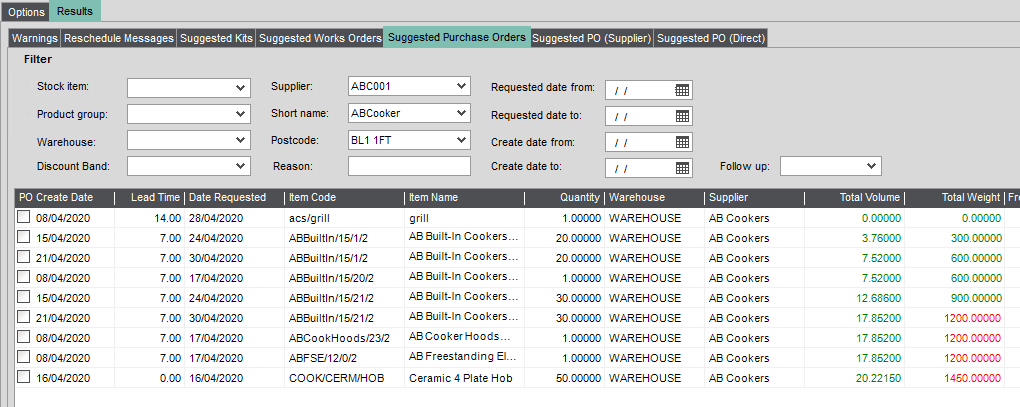
This screen enables you to define container sizes that work with the container loading functionality within purchase orders. When using Sicon MRP, these values will be used to check if the Suggested Purchase Orders, for a specific supplier, are over volume/weight.
8.4. Tracking Profile Maintenance
- PO Tracking Profiles
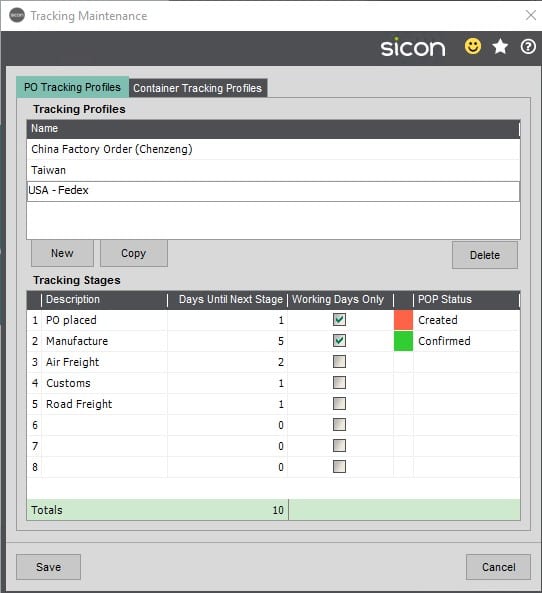
This screen enables you to define tracking profiles used on the Tracking Dates tab of a purchase order. Each profile can have multiple stages, with a default number of days specified between the stages, and whether these days are Working Days Only (i.e. not Saturday or Sunday). A status can be chosen from the drop down list in the POP Status column. These are defined in POP Order Status Maintenance. A status does not need to be repeated for all the lines, as subsequent lines will default to the last status.
- Container Tracking Profiles
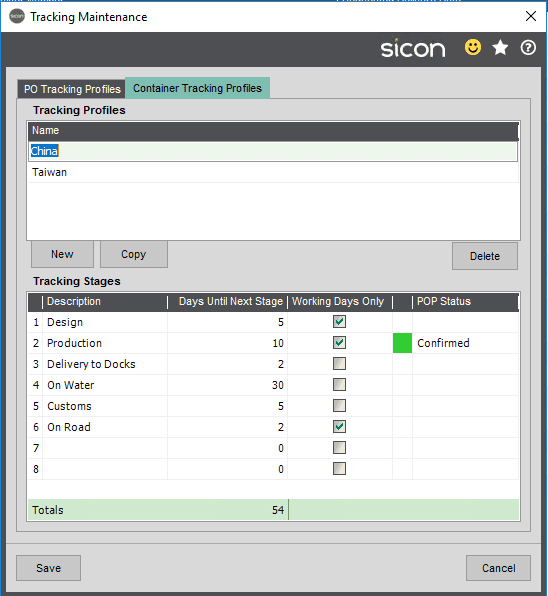
A container tracking profile can be created/modified in this screen, which will then be linked to containers. The details in the POP Status column will be used for any Purchase Orders linked to a container. In the above example, line 1 will automatically show as ‘Linked’ (amber), in the POP Order Line List and the Future Stock Movements screen in the Sicon MRP module.
8.5. PO Tracking Enquiry
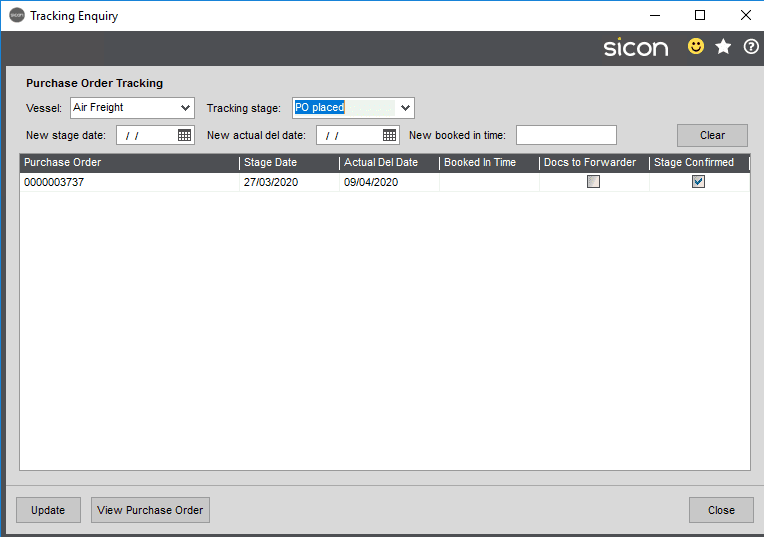
The PO Tracking Enquiry screen displays the status of a vessel at any given stage. The stage date, actual delivery date and booked in time can be amended here and will be adjusted on the order.
8.6. Shipping Maintenance
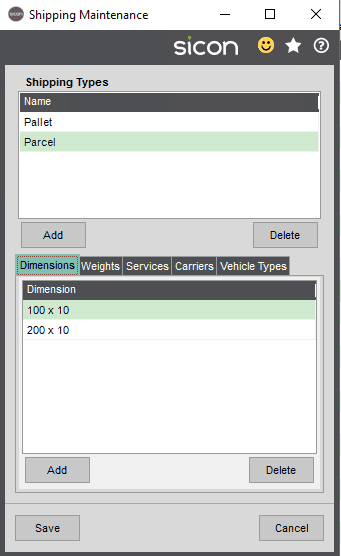
This screen allows you to set up and maintain the relevant information available within the Shipping tab of a Sales Order. You can enter multiple shipping types, and then against each one enter selection values for Dimensions, Weights, Services, Carriers and Vehicle Types.
8.7. Forwarder Maintenance
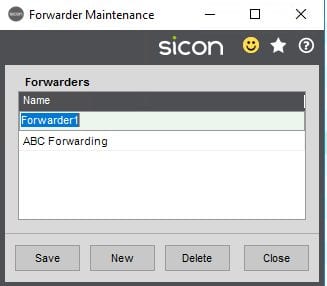
This screen allows you to define a selection list of Forwarders, that are then selected as part of the Tracking Dates tab of a purchase order.
8.8. Maintain Historical Sales Orders
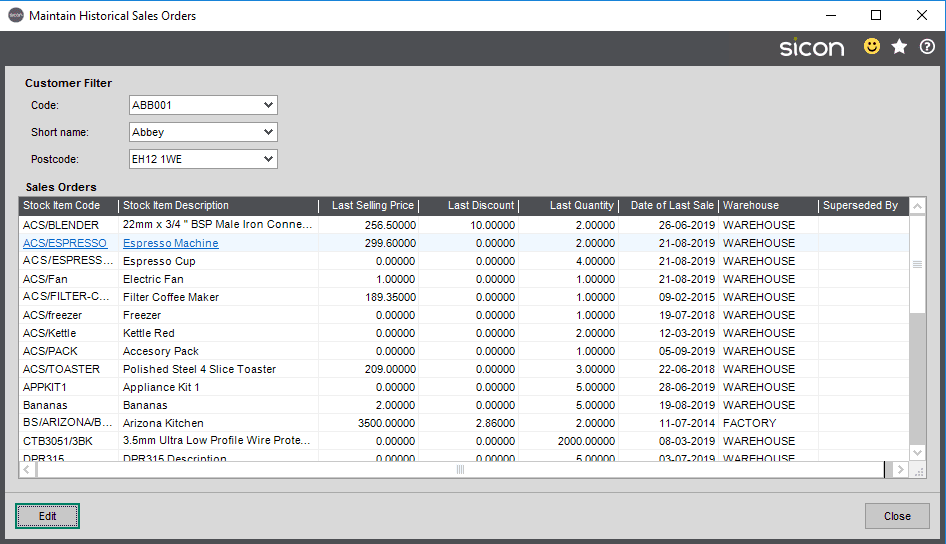
This screen works alongside the Add Historical Lines button on a sales order. It allows you to define some formatting, so that you can draw attention to specific product sales for the customer. In the example above, sales of Espresso Machines will be highlighted in blue.
If you choose a customer account at the top of this screen, and then click the Edit button, you are presented with the following options for that combination:
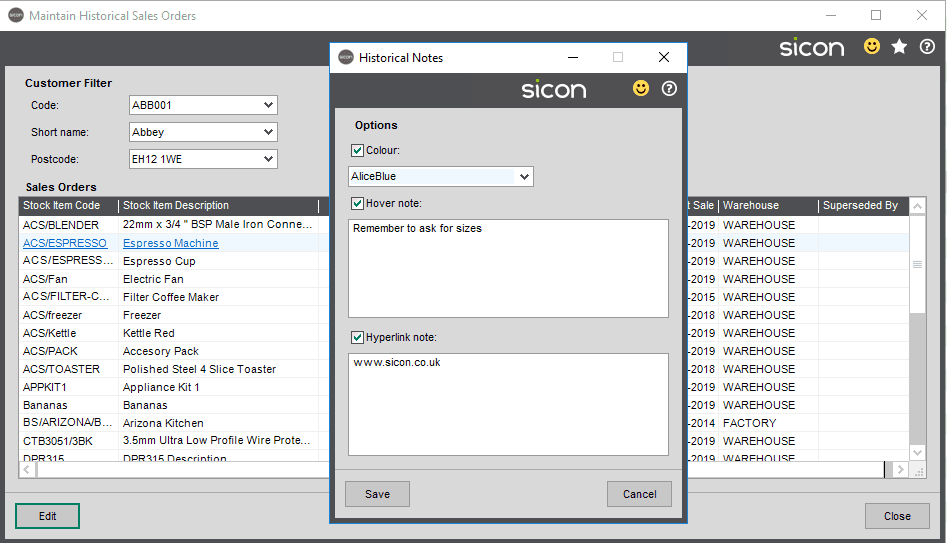
In this Historical Notes screen, you can choose a colour, enter the hover note (which will then appear when the user hovers over that line) and a hyperlink note (which will then cause the stock code to appear as if a hyperlink, and then display the hyperlink note when the user clicks on that link).
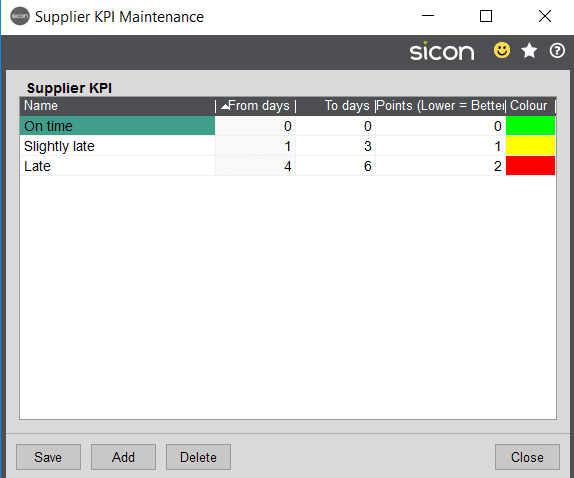
8.9. Supplier KPI Band Maintenance
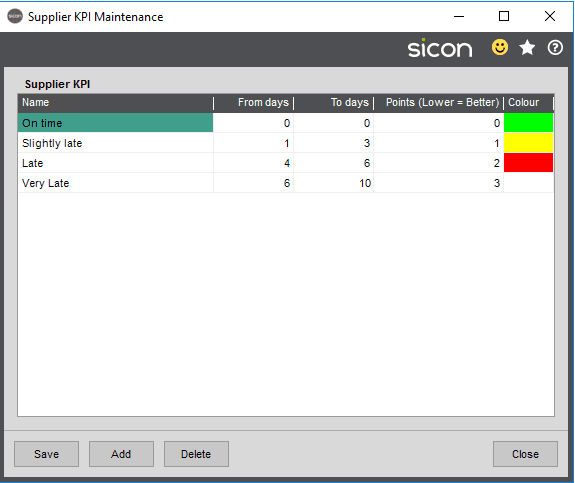
The colour coding and criteria of the supplier KPI can be set in this screen. The number of days late that contribute to each category can be user defined.
8.10. Vessel Maintenance
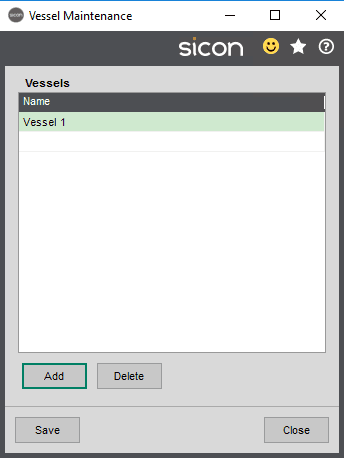
A list of vessels can be created that can then be selected in the tracking dates tab of a purchase order.
8.11. POP Order Status Maintenance
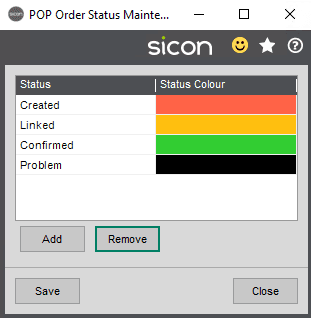
A default list for Created, Linked, Confirmed and Problem show in this screen. An additional status can be added by clicking the Add button, clicking on the line and entering the details and colour required.

9. Utilities Menu
9.1. Settings
Please note: Any settings that are not available for the Distribution module installed, will be greyed out
- General Tab
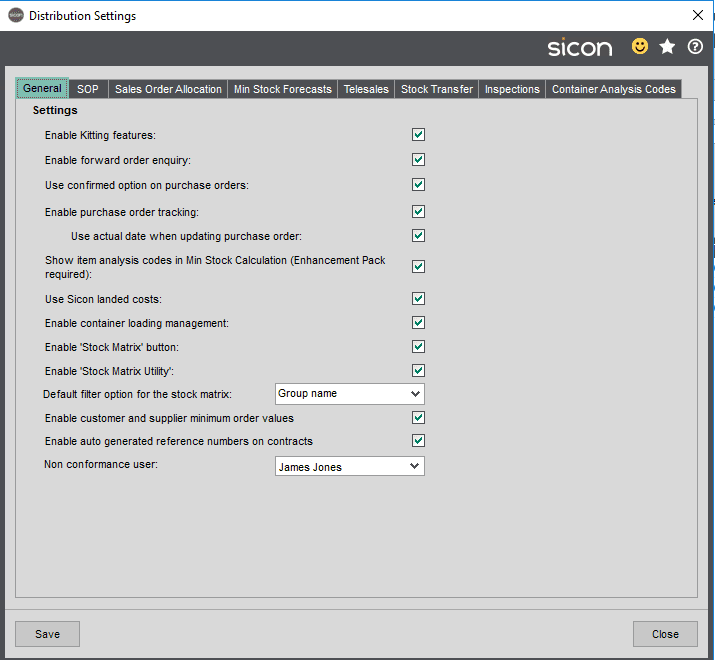
Enable Kitting features: This setting adds functionality for our Kitting module into the Add Historical Lines screen within a sales order. It adds a Build Kit column against each line, and an Auto complete kit build check box that will automatically build required kits (including issuing the components), or report if it’s not able to do so.
Enable forward order enquiry: This features adds Forward Orders (unallocated sales orders) and additional fields for Quote and Pro Forma order quantities to the stock item balances screen.
Use confirmed option on purchase orders: This is a simple check box on the purchase order to show it has been acknowledged by the supplier.
Enable purchase order tracking: This setting enables the Tracking Dates tab on purchase orders.
Use actual date when updating purchase order: when using the option to update the PO lines, the actual date enter will be used.
Show item analysis codes in Min Stock Calculation: With this setting enabled, if you have the Sicon Enhancement Pack installed and feature STK015 enabled, then you can filter the stock displayed in the Min Stock Calculation screen using the Filter By Analysis Codes button. This button is not displayed if this setting is turned off.
Use Sicon landed costs: This setting enables the landed costs functionality within Distribution.
Enable container loading management: This setting enables the container loading functionality within Distribution.
Enable Stock Matrix button: With this setting on, the stock matrix button in the SOP and POP screens will appear.
Enable Stock Matrix Utility: Enables the stock matrix utility to be used. Default filter option for the stock matrix, controls which filter to use.
Enable customer and supplier minimum order values: Allows the minimum order values to be used in SOP and POP.
Enable auto generated reference numbers on contracts: The system will generate the references in in the Sales and Purchase contracts.
Non conformance user: If Sicon TCM is installed this will be the user that any non-conformances, raised against late Purchase Order receipts, will be assigned to.
- SOP tab
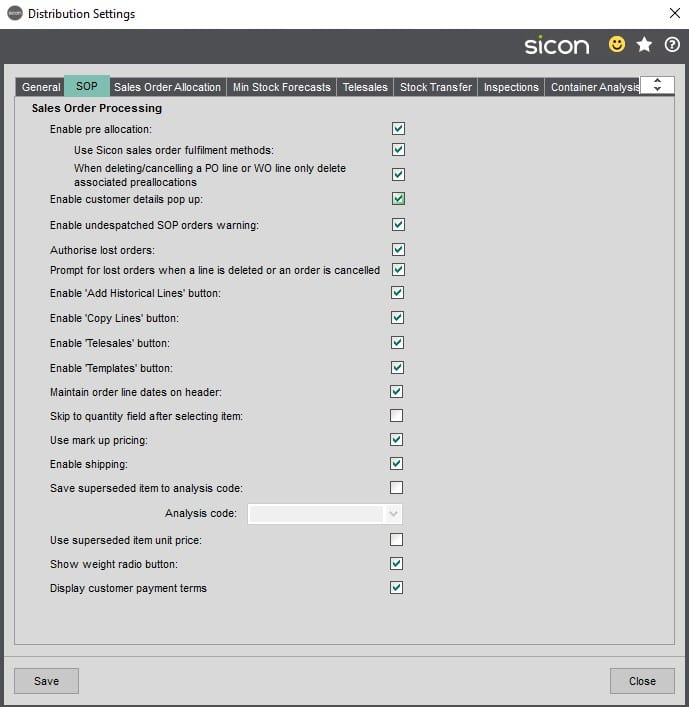
Enable pre allocation: This feature enables Sales Order Lines for stock items to be allocated to outstanding purchase orders lines. The purpose is to reserve stock en route to the warehouse, usually in transit via sea, air or land. Preallocations can be viewed and amended after being allocated.
NB: this feature should only be used where a firm allocation is essential to the business. Where a more dynamic approach is required (e.g. order priorities changing frequently and stock being re-allocated to alternate orders) then Material Planning within the Distribution Manager would provide a better solution.
Use Sicon sales order fulfilment methods: Enabling this setting lets you use the Sicon Fulfilment methods, via the Change Fulfilment screen in the Sales Order Processing menu within Distribution.
When deleting/cancelling a PO line or WO line only delete associated preallocation: With this setting ticked only the associated preallocation item will be deleted.
Enable customer details pop up: When entering a Sales Order, the customer account notes, SOP delivery addresses and customer analysis codes are displayed in a single window. You can choose the delivery address for this order from this screen by highlighting the correct address and clicking the Select button. Analysis codes can also be amended in this window, rather than line by line.
Enable undespatched SOP Orders Warnings: When entering a Sales Order, a list of un-despatched orders is displayed. The purpose of this warning is to allow the order taker to add additional lines to an existing order that has not yet been shipped, rather than creating a new order.
Authorise Lost Orders: This setting enables the Authorised column within the Lost Orders Enquiry screen, accessible via the Sales Order Processing menu within Distribution.
Prompt for lost orders when a line is deleted or an order cancelled: With this button enabled, a Lost Order reason will have to be entered each time a Sales Order or Sales Order line is deleted.
Enable ‘Add Historical Lines’ button: Turn this button on/off in a sales order.
Enable ‘Copy Lines’ button: Turn this button on/off in a sales order.
Enable ‘Telesales’ button: Turn this button on/off in a sales order.
Enable ‘Templates’ button: Turn this button on/off in a sales order.
Maintain order line dates on header: With this setting enabled, the Order Line Dates button is available on sales orders to enable rapid editing of the Requested and Promised dates on the lines on that sales order.
Skip to quantity field after selecting item: With this setting enabled, after you select the stock code on a sales order line, the cursor moves directly to the Quantity field.
Use mark up pricing: With this setting enabled, then the Mark Up Pricing available via the Sales Order Processing menu in Distribution will override the standard Sage mark up pricing.
Enable shipping: With this enabled, the Shipping tab is displayed on a sales order.
Save superseded item to analysis code: With this setting enabled, you can specify which of the analysis codes available on a sales order you would like to store the original item code if it has changed due to being a superseded item.
Use superseded item unit price: If when entering a sales order you select a stock item that has been superseded, should the sales order pull through the relevant selling price for the original item, rather than the new one. If you enable this setting, then the selling price will remain as for the original item.
Show weight radio button: With this enabled, the Show Weight radio button shows above the sales order line.
Display customer payment terms: This controls whether the customer payment terms show on sales order.
- Sales Order Allocation tab
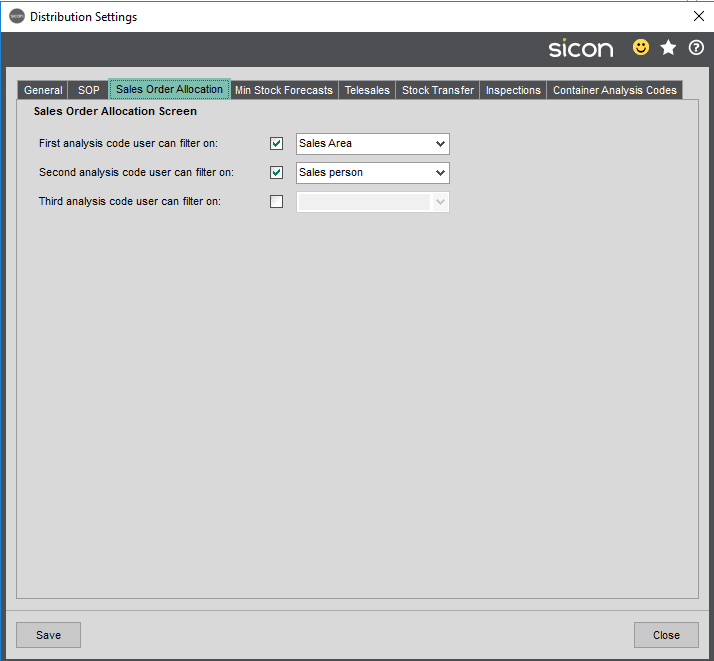
This screen controls what analysis fields are available for filtering on in the Manage SOP back orders screen.
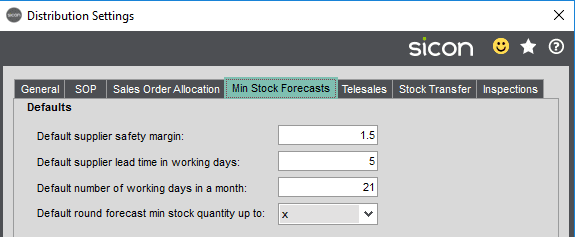
- Min Stock Forecasts tab
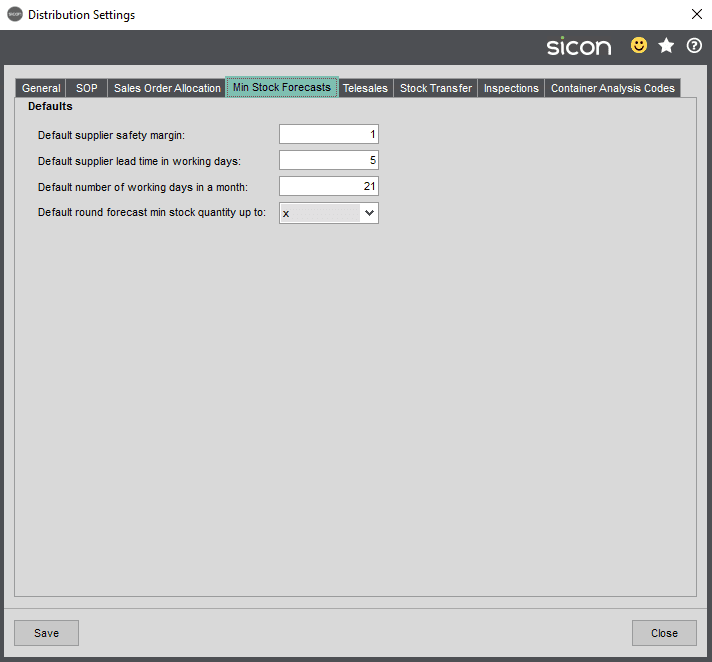
Default supplier safety margin: Used as the safety margin within the Calculate Minimum Stock Levels calculation, would be overridden by same setting on a supplier account where populated.
Default supplier lead time in working days: Used as the lead time within the Calculate Minimum Stock Levels calculation, would be overridden by supplier lead time if populated against relevant stock item.
Default number of working days in a month: Used within the Calculate Minimum Stock Levels calculation.
Default round forecast min stock quantity up to: Select how many decimal places you would like the minimum stock level calculation to be rounded to. This value would be overridden by the same options specified against a stock code.
- Telesales tab
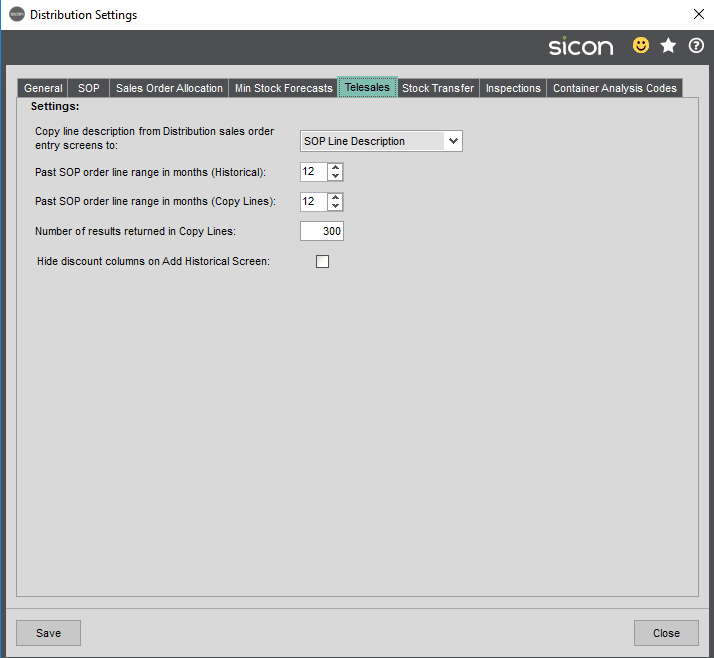
Copy line description from Distribution sales order entry screens to: This enables the Stock Item description text to be edited during the order entry process, then either copied to the Sales order line description as an amendment, or written to the picking list comments e.g. ‘Pick 24 banana’s’ that would then be weighed and charged by the Kg on the sales order.
Past SOP order line range in months (Historical): Determines how many months the sales history will be analysed to return the recent items purchased.
Past SOP order line range in months (Copy Lines): Determines how many months the sales history will be analysed to return the lines that can be copied.
Number of results returned in Copy Lines: The maximum number of rows to display in the Copy Order Lines screen.
Hide discount columns on Add Historical Screen: Tick to hide the discount column on the Add Historical screen within a sales order.
- Stock Transfer tab
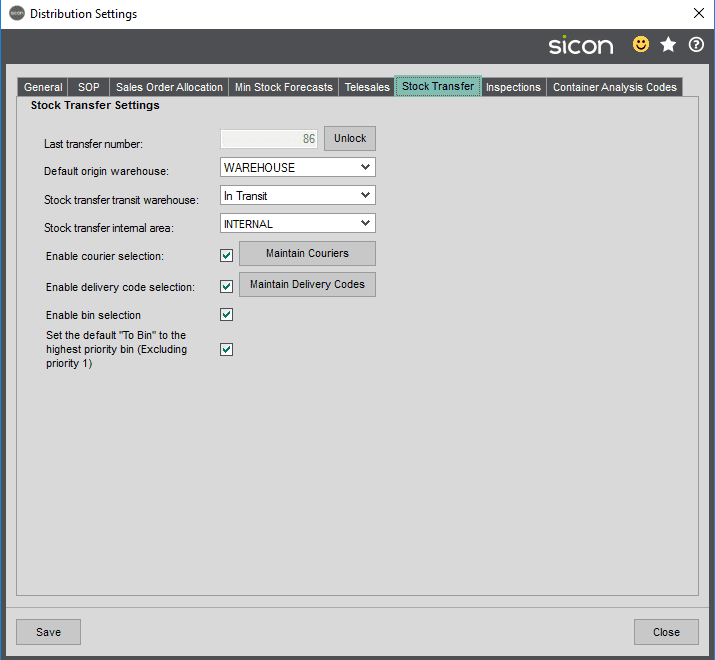
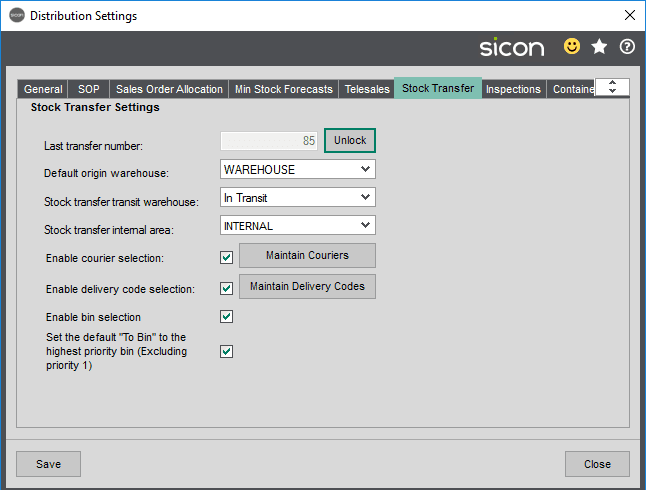
Last Transfer Number: You can change the number for the next transfer using the Unlock button to allow edits to this field.
Default origin warehouse: The default origin warehouse when creating a new stock transfer.
Stock Transfer Transit Warehouse: The warehouse to be used as the in transit location, when the transfer has been despatched, but not received.
Stock Transfer Internal Area: The internal area to be used for the allocations within stock transfers.
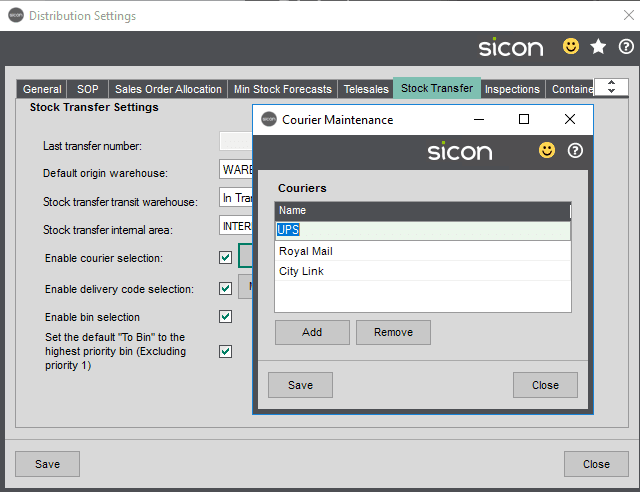
Enable Courier Selection: Activates the Courier field on stock transfers. Use the maintain couriers button to manage a list of couriers.

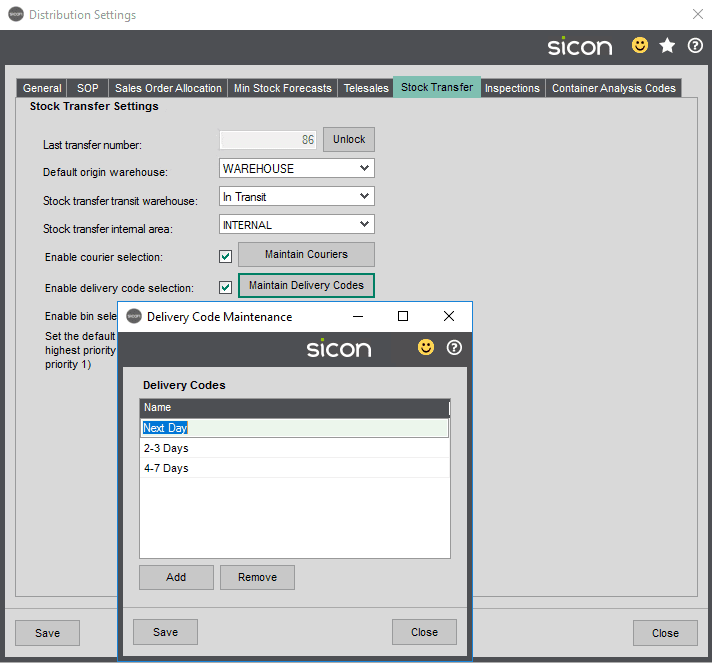
Enable Delivery Code Selection: Activates the Delivery Code field on stock transfers. Use the maintain delivery codes button to manage the delivery codes.
Enable bin selection: Enables the stock to be selected from a bin during the stock transfer creation.
Set the default “To Bin” to the highest priority bin (Excluding priority 1): This will automatically choose priority bin 2 or above.
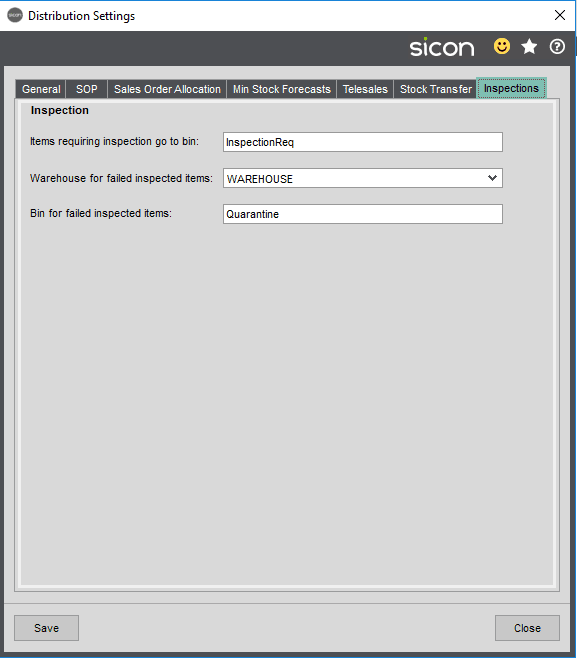
- Inspections tab
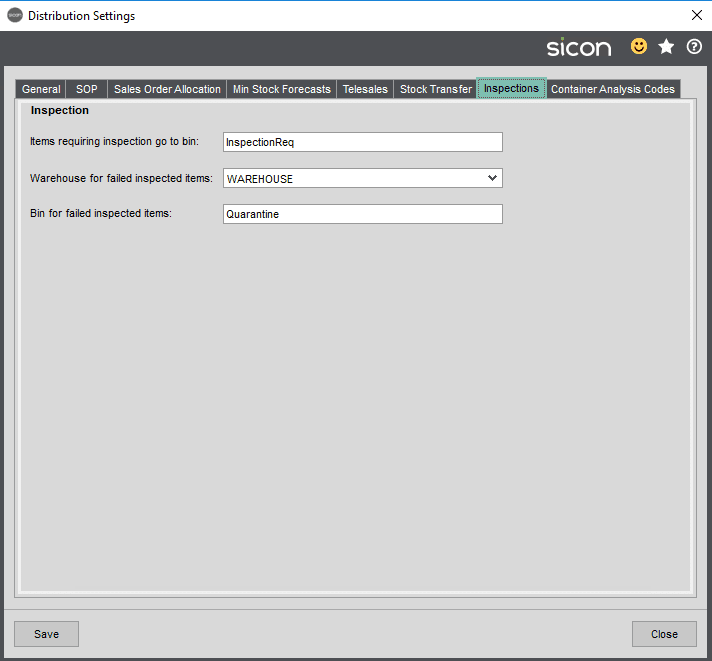
Items requiring inspection go to bin: The bin set here, will dictate where stock that requires inspection will put to when they are received on a purchase order.
Warehouse for failed inspected items: If items fail inspection they are put to this warehouse.
Bin for failed inspected items: If items fail inspection they are put to this bin.
- Container Analysis Codes Tab
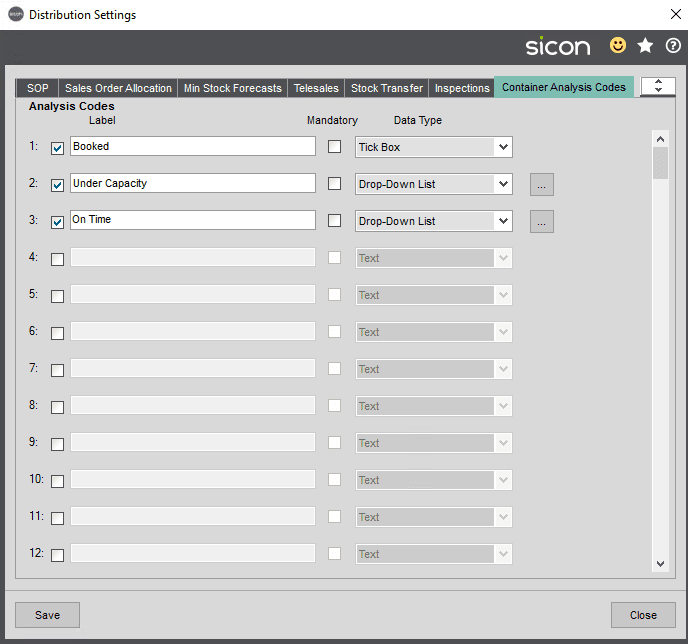
Container analysis codes can be created here, for use in the New Container and Amend Container screens, when opened via the Container Management List.
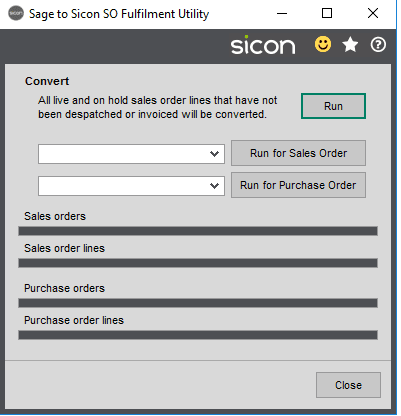
9.2. Sage to Sicon SO Fulfilment
This screen allows you to update existing sales and purchase orders to use the new fulfilment methods in Distribution. You can click the Run button to apply the switch to all live and on hold orders, or alternatively specify individual sales or purchase order numbers and click the relevant run button next to the order number field.
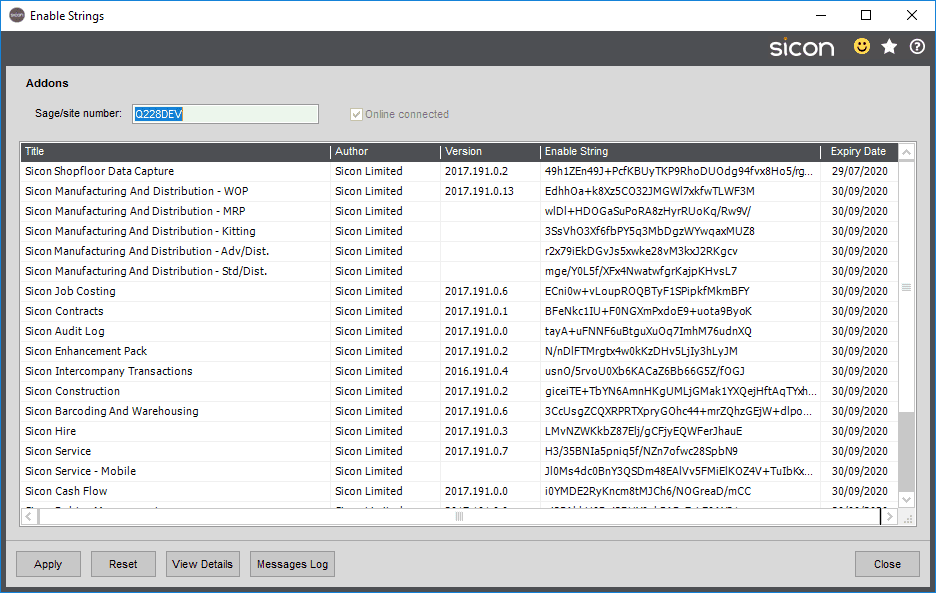
9.3. Enable Module
An enable string, provided by the Sicon Customer Services team, can be entered via the screen below. Alternatively, if online enable string is activated this should be done automatically.
10. Distribution Help and User Guide v19.1
11. Distribution Help and User Guide v17
12. Release Notes
The release notes page shows which release of the system includes new features or issues resolved.
At the release of Sicon v21 we announced that going forward, we will only be supporting Sage 200c and as such we are able to drop the year from our version numbers. We moved from 201.201.0.0 to 210.0.0.
New features detailed in the Release Notes relating to Pre-Release versions will not be detailed in the current Help and User Guide until the end of development phase.