WAP Help and User Guide – WAP App
The WAP Mobile App is available for iOS and Android users and can provide a quick and easy way to enter or approve documents and reduce the risk of receipts or goods received documents being lost.
Search the page by pressing Ctrl + F (windows) or CMD +F (Mac) on your keyboard.
Back to all user guidesProduct overview
Help and User Guide maintained for WAP v211.0.00 (desktop version) and v211.0.0 (mobile app version) upwards.
The WAP Mobile App is available for iOS and Android users and can provide a quick and easy way to enter or approve documents and reduce the risk of receipts or goods received documents being lost.
Once synced, documents will post through to WAP and if applicable, Sage. Configuration must be done in the WAP Desktop Website prior to the mobile app being used.
The WAP Mobile App is designed as a personal tool to complement the WAP Desktop Website, where users can quickly enter and approve documents. It will not contain the full functionality of the Desktop Website. The WAP Desktop Website can instead be navigated to in a web browser on the device if further functionality is required when access to a desktop PC is not possible.
This guide aims to cover what an end user will need to get started using the WAP App, with WAP Desktop information included where relevant.
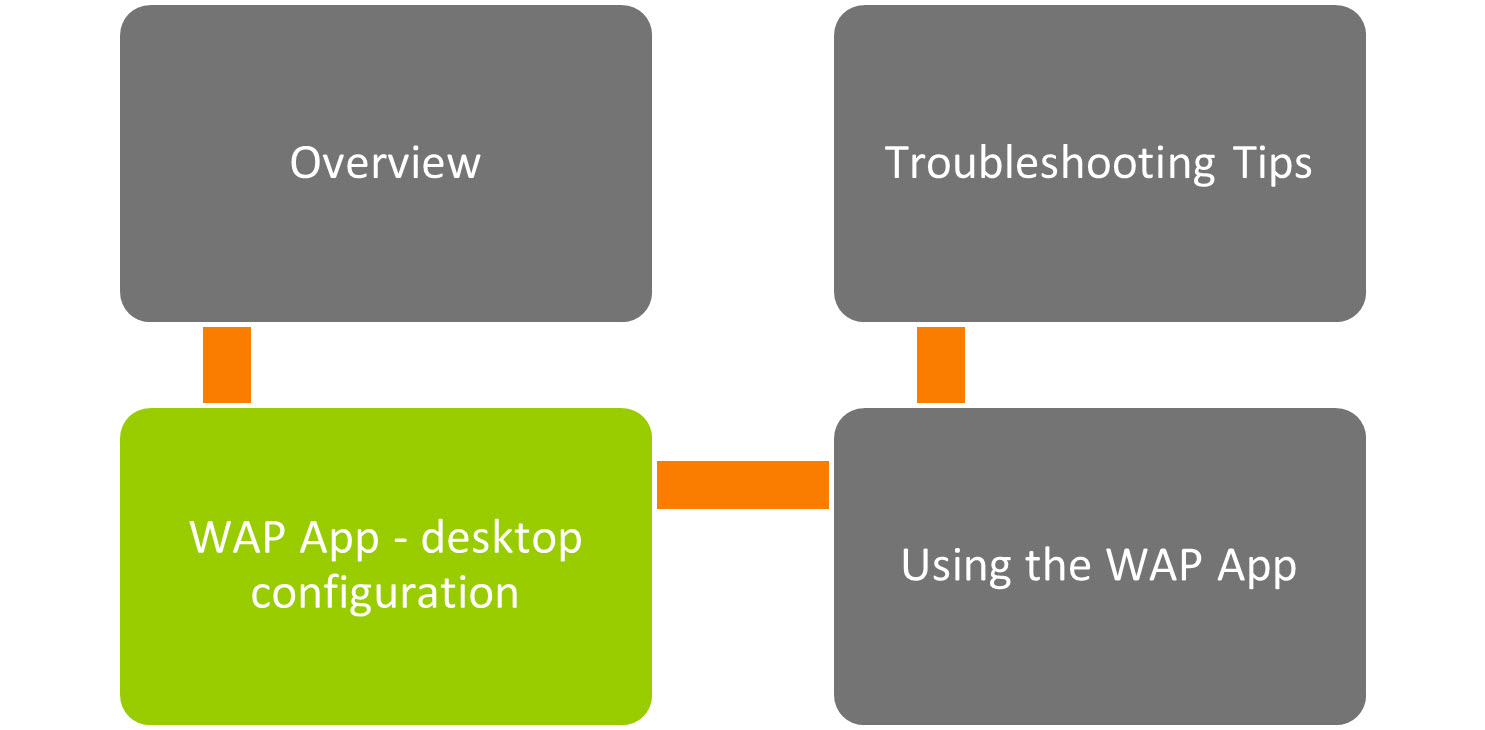
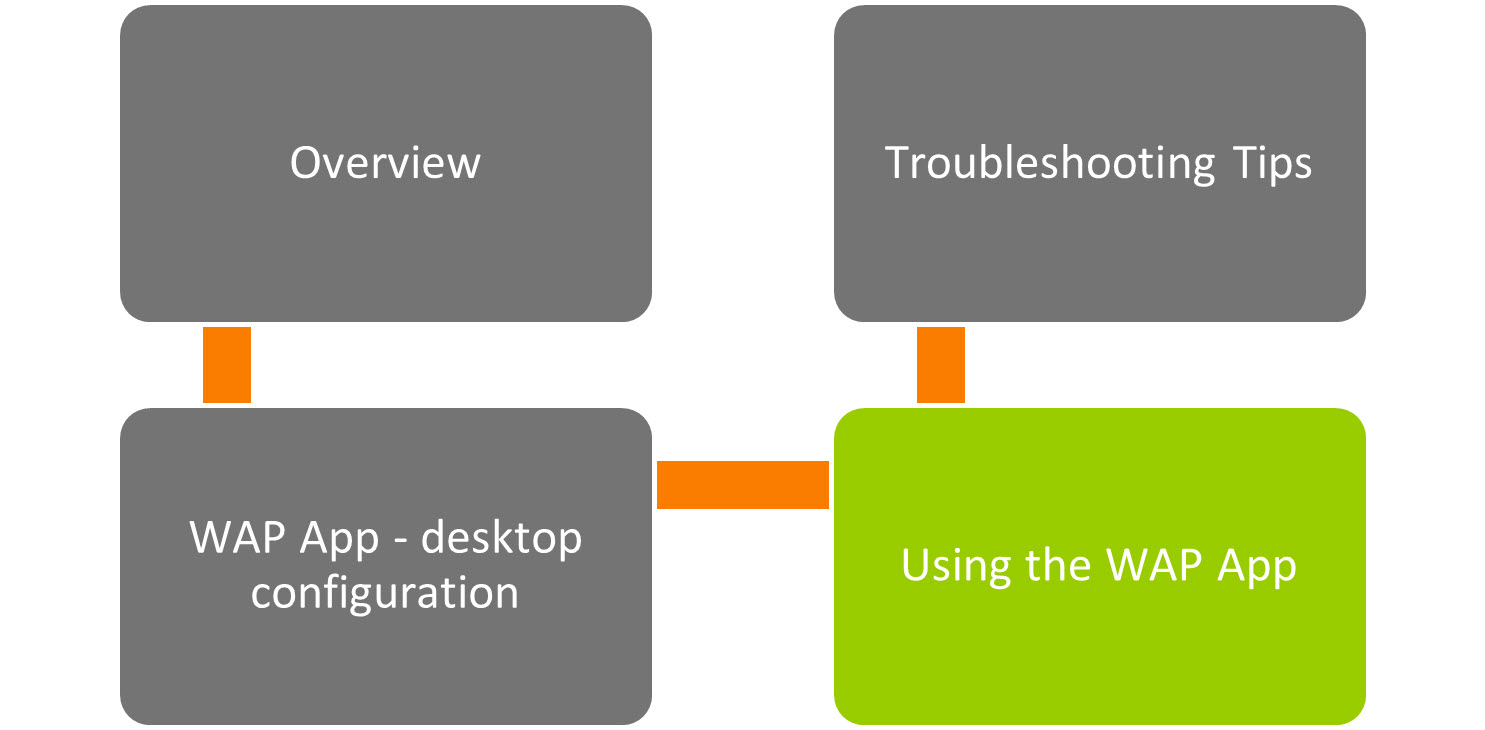
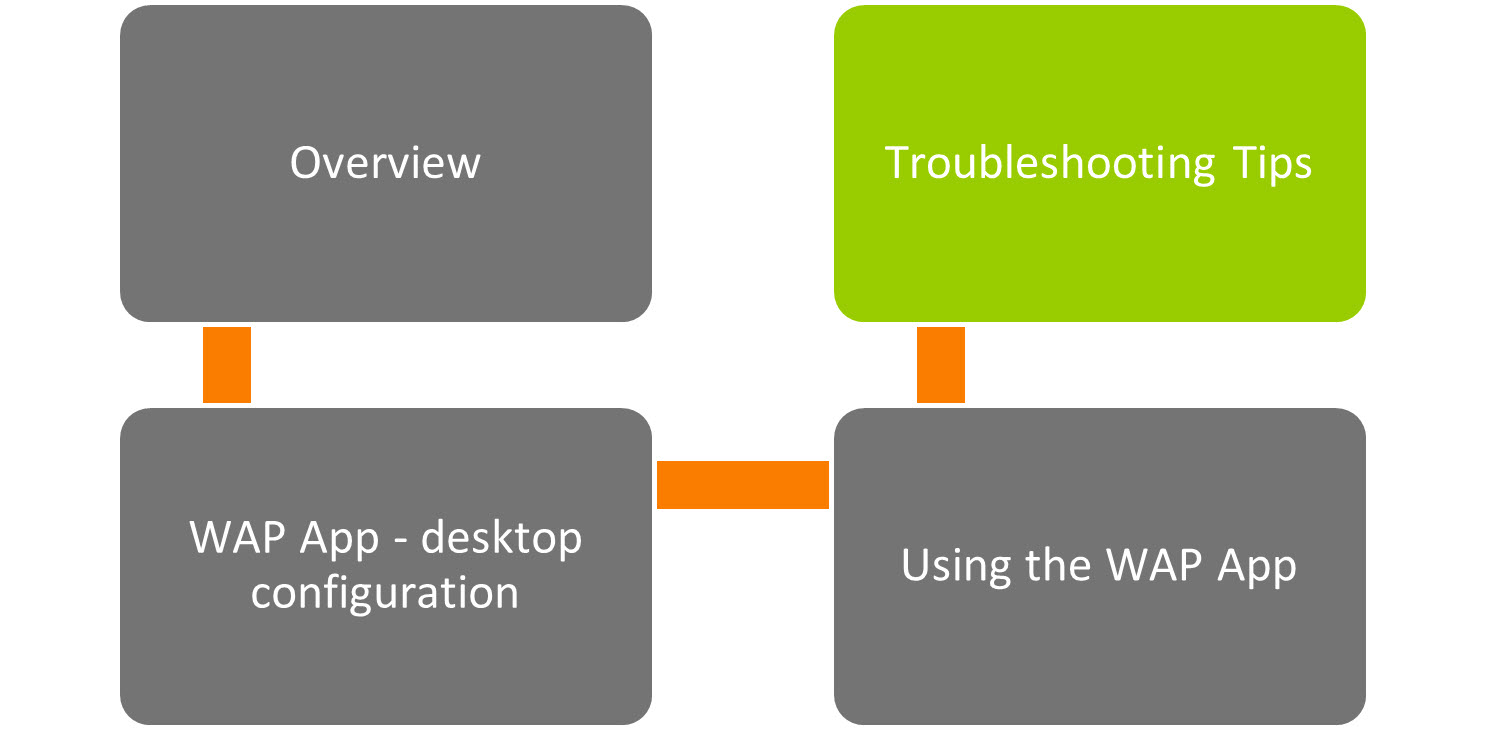
Help and User Guide Overview
This Help and User guide is set out into the below main areas:
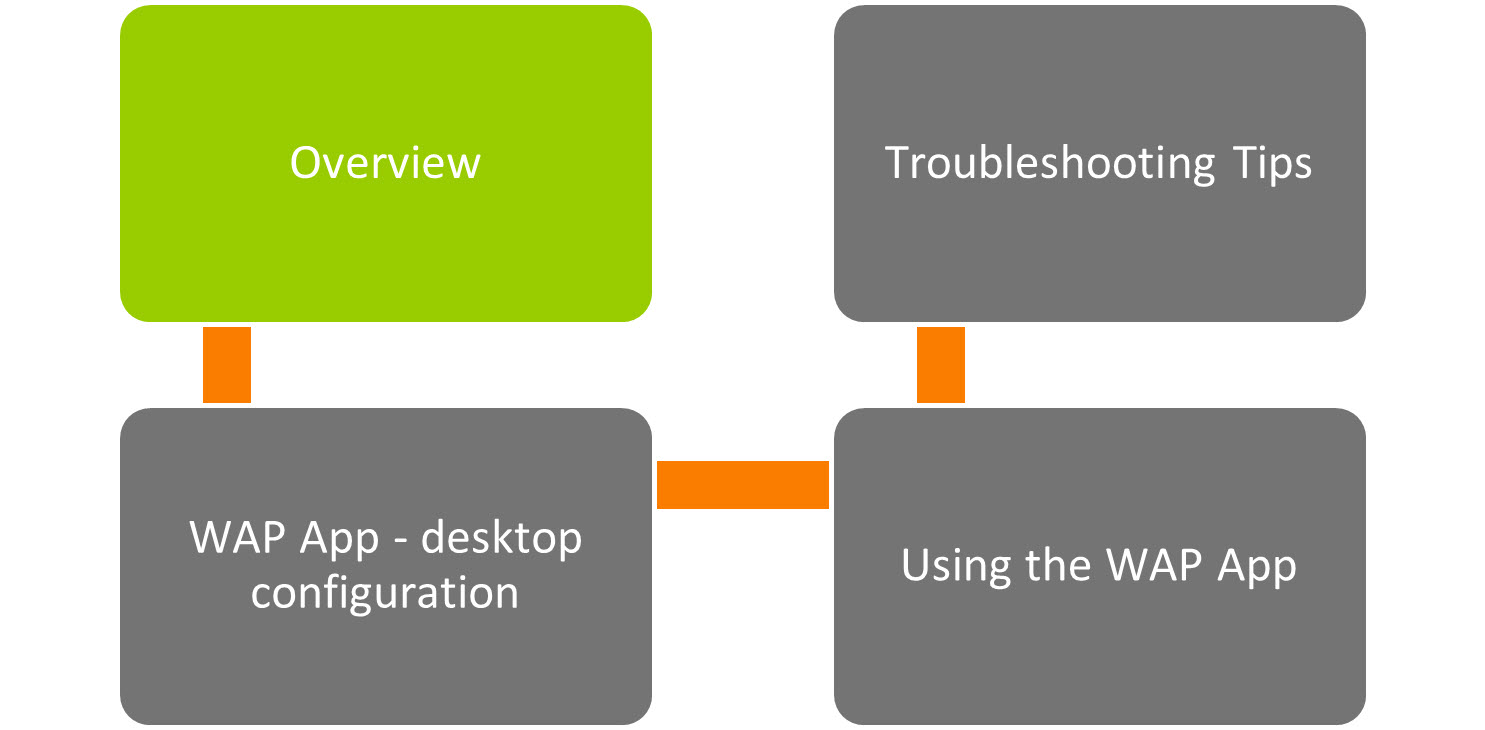
Overview: provides a summary of this Help and User Guide, the WAP App and its purpose.
WAP App – Desktop Configuration: aimed at Consultants and WAP super users or administrators looking to set the WAP app up for the first time.
Using WAP App: aimed at End Users who will be entering and approving documents in the WAP app, covering the features they may use in their day-to-day role for each supported module.
Troubleshooting Tips: predominantly aimed at WAP super users, administrators and Business Partner Support staff, covering tips for common teething problems using the app.
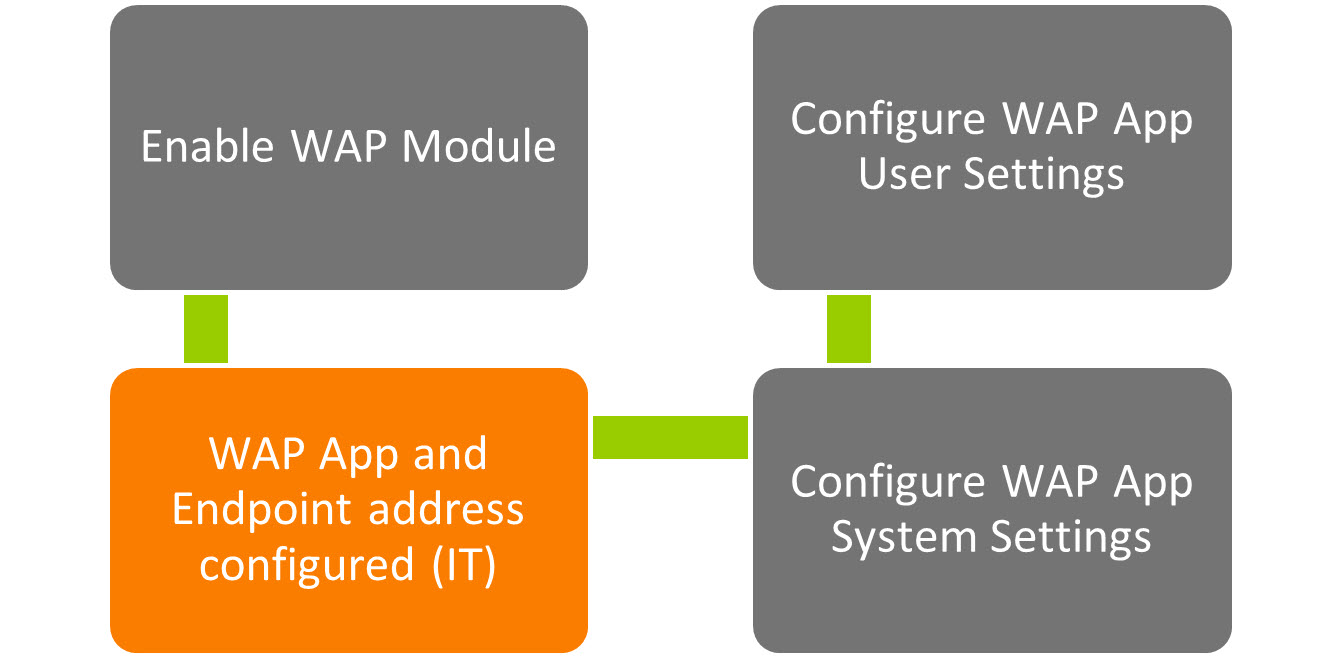
1. WAP App – Desktop Configuration
The next sections are aimed at Consultants and WAP super users or administrators looking to set the WAP app up for the first time. Other Help and User Guides contain more detailed information on some of the points raised in this guide.
1.1. WAP App Prerequisites
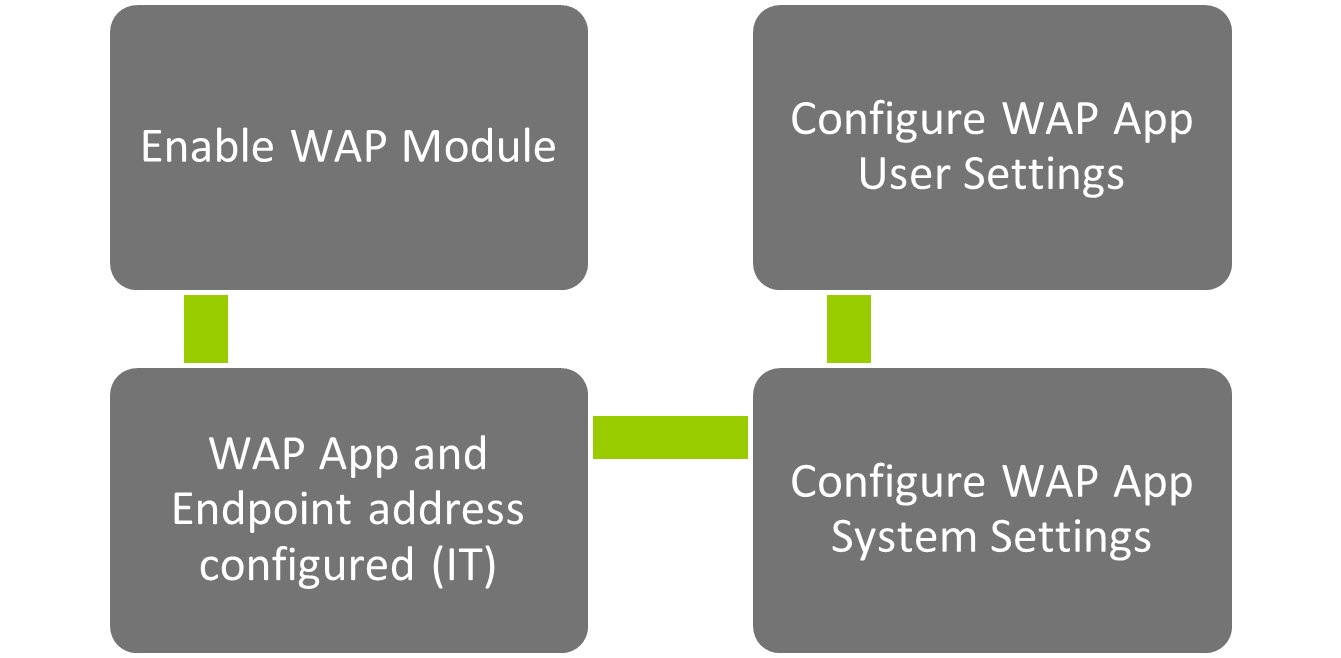
Further detail on each of these steps is covered briefly in the next sections and in more detail in the main WAP Help and User Guides.
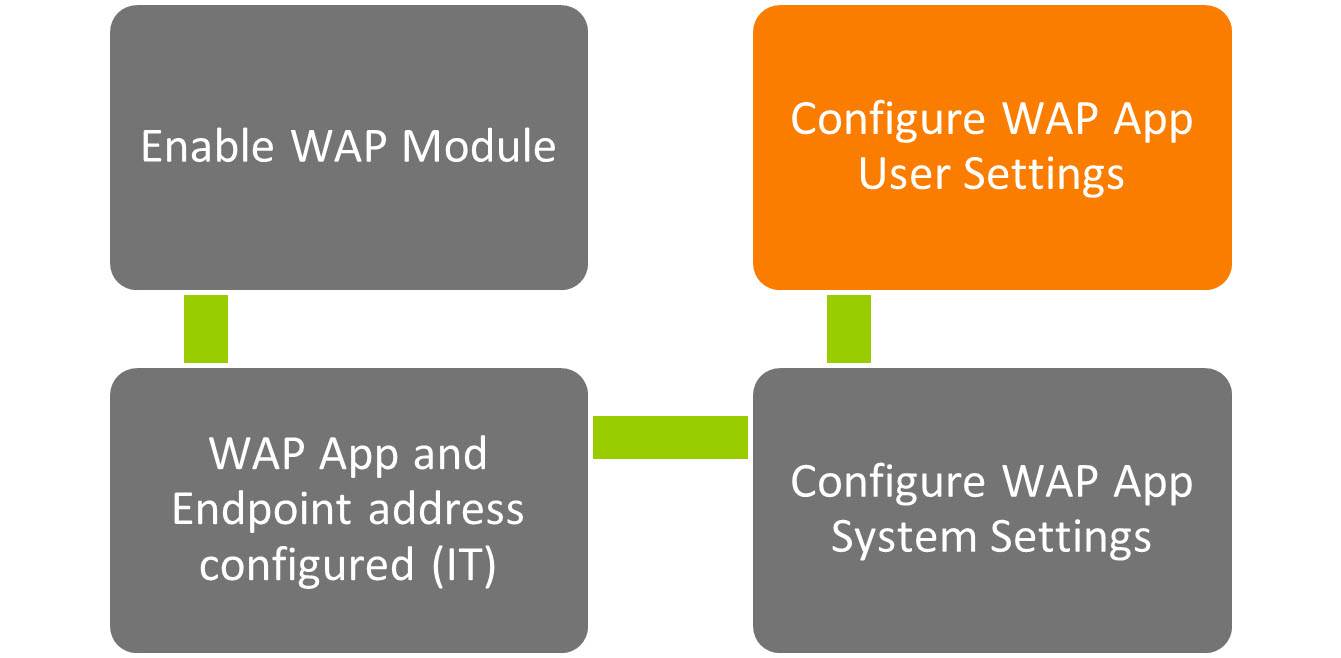
1.2. WAP Enable Module (WAP Desktop Website)
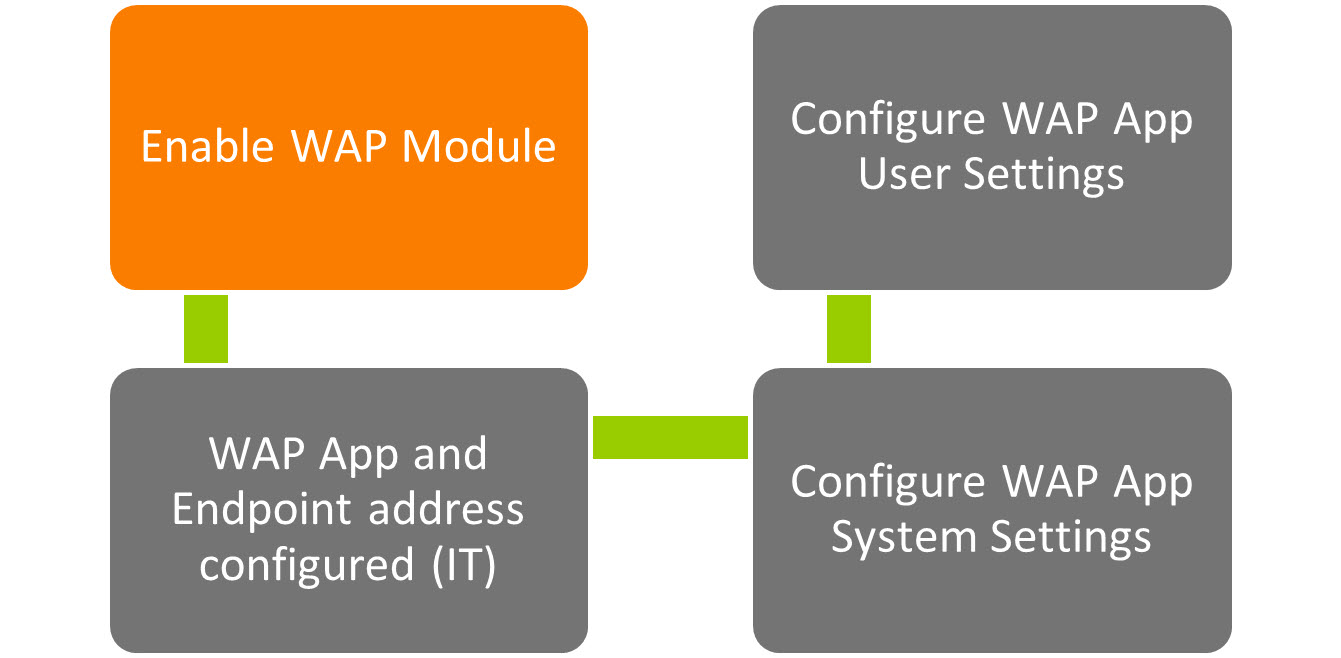
For the WAP Mobile App to be used, WAP needs a valid licence string entered within the WAP Web App. The module expiry date is shown along with the modules that have been enabled and the maximum number of users.
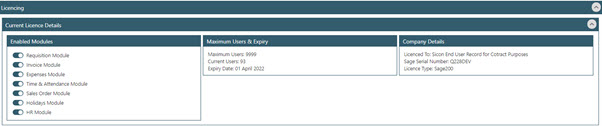
For further information on licencing, please speak to your Sage Business Partner in the first instance.
The WAP Mobile app is currently compatible with entering Requisitions, Expenses, Timesheets and Holidays. It can also be used to approve all these document types and Invoices.
1.3. Configure WAP App and Endpoint Address
This should already have been done at set-up and is covered in the WAP Mobile App Install Guide (IT).
1.4. Configure WAP App System Settings
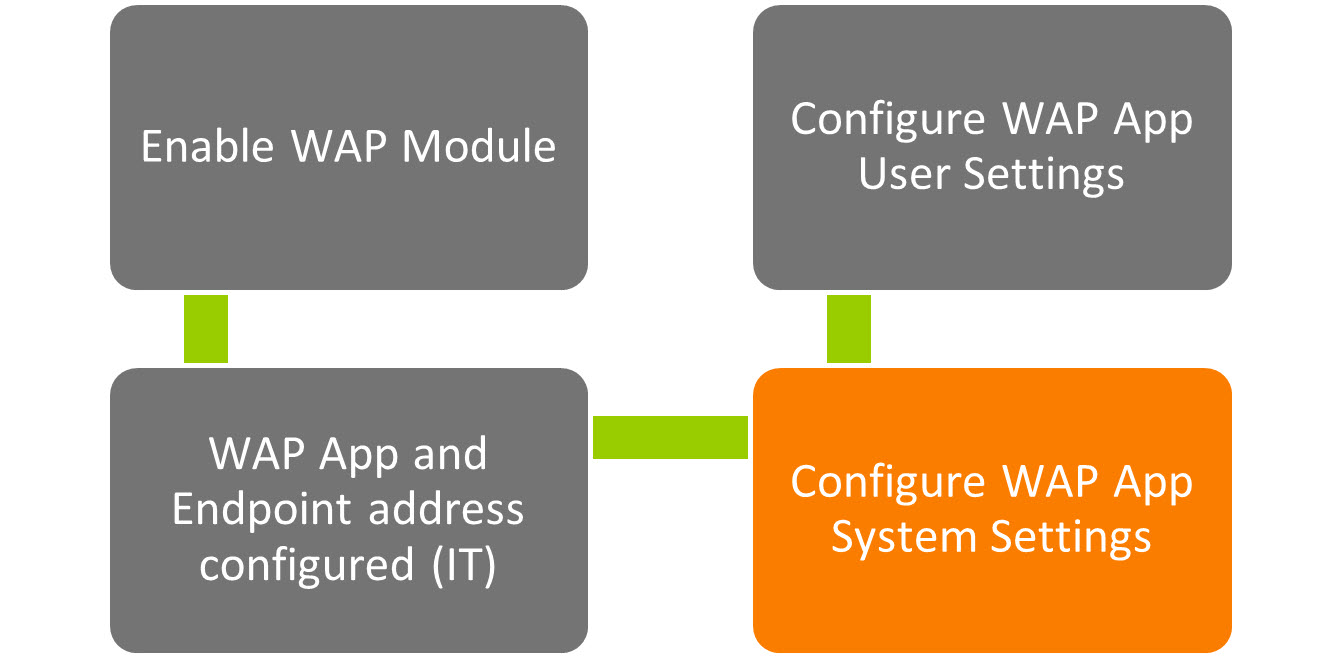
These settings are also covered in the WAP Mobile App Install Guide (IT). so may already have been completed depending on IT’s access rights to WAP.
Within the main WAP System Settings there are configuration options relating to the WAP Mobile App (System Settings cogs – System settings banner –Miscellaneous menu – Mobile Access banner).
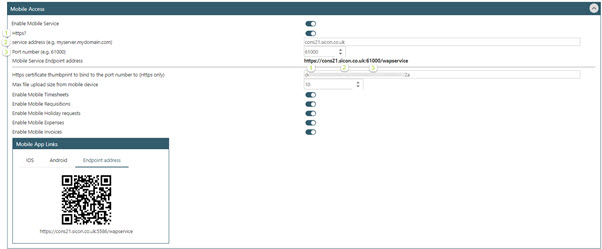
Enable Mobile Service: this will enable the WAP system to allow access from mobile devices connected via the WAP Mobile app.
HTTPS?: select whether the site will be using HTTPS to access the WAP Mobile app. It is usually recommended that HTTPS is configured so that users can access the WAP App from anywhere with internet connection, even if they are not connected to the network. In the example above, an HTTPS certificate has been configured. If unsure, please check with the IT Department who have configured the WAP Mobile app for installation.
Service Address: Enter the address of the WAP server URL which the WAP Mobile app will connect to; e.g. “https://[Web address Domain]. If unsure, please check with the IT Department who have configured the WAP Mobile app for installation. In the example above, the domain that WAP is hosted on is cons21.www.sicon.co.uk.
Port Number: Enter the Port Number that the WAP Mobile app will connect to. 61000 is the recommended port for the WAP app (unless known it is being used for something else; it must be different to the default website which is usually port 80 or 443 if using SSL. If unsure, please check with the IT Department who have configured the WAP Mobile app for installation.
Mobile Service Endpoint address: This will be populated automatically once the last three settings have been entered. This is the server URL that the WAP Mobile app will connect to. In the example above, HTTPS://cons21.www.sicon.co.uk:61000/wapservice. It is advised to navigate to this URL from a web browser to ensure that the page can be navigated to (see the Troubleshooting section at the end for further information on this).
Https certificate thumbprint to bind the port number to (required for https only): required for users that require a secure connection.
Max file upload size from mobile device: if a maximum upload limit for attachments (in MBs) is required, enter the maximum size here.
Enable Mobile Timesheets: tick to allow for timesheet configuration with the WAP Mobile app.
Enable Mobile Requisitions: tick to allow for requisition configuration with the WAP Mobile app.
Enable Mobile Holiday Requests: tick to allow for holiday request configuration with the WAP Mobile app.
Enable Mobile Expenses: tick to allow for expense configuration with the WAP Mobile app.
Enable Mobile Invoices: tick to allow for invoice configuration with the WAP Mobile app.
For all other set-up, refer to the relevant module in the WAP Help and User Guides. The desktop website must be fully configured and tested prior to using the app as not all features available on the desktop are available in the WAP App.
1.5. Configure WAP App User Settings
User Types
In addition to the system settings, user types will also need to be configured to allow mobile access:

2. Using the WAP App
The next sections are aimed at end users who will be entering and approving documents in the WAP app, covering the features they may use in their day-to-day role for each supported module. Desktop configuration must be set up prior to using the app. Please be aware that the app does not support the full functionality of the WAP desktop system, and the desktop website must be fully configured and tested prior to using the app.
User WAP App Setup Quick Glance
3. WAP Mobile App Install (End User)
Please see our End User Install Help and User Guide for information which has been summarised below for version 21.
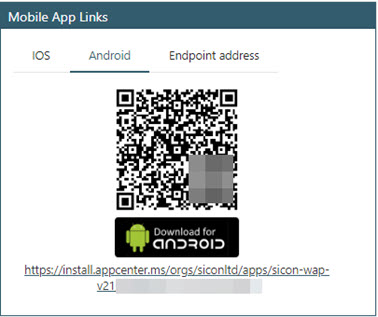
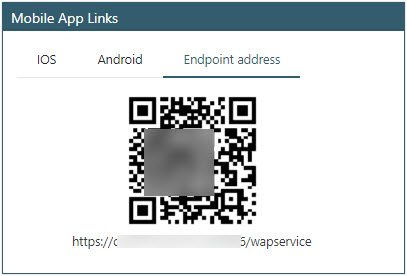
To install the Mobile app to either an Apple or an Android device, users will first need to navigate to their Personal WAP settings on the WAP Desktop website:

From here there are three tabs: IOS, Android and Endpoint Address. Either scan the QR code from the first two tabs or alternatively the WAP App can be manually searched for within the Apple or Google stores; search for Sicon WAP and find the relevant version to download as an app. All options are explained in the next sections.
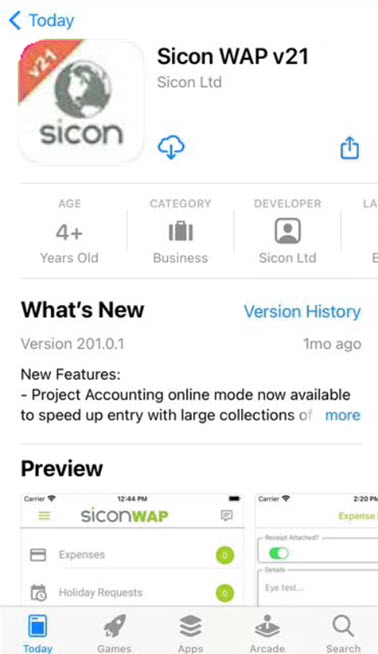
3.1. Where to download Apple WAP Mobile App
A tutorial on how to download the Sicon WAP App on an Apple device
Option A
Using the device’s camera or a QR Scanner app, scan the link in the first tab of the your personal WAP settings (IOS) and browse which will take the user to the correct version on the app store.
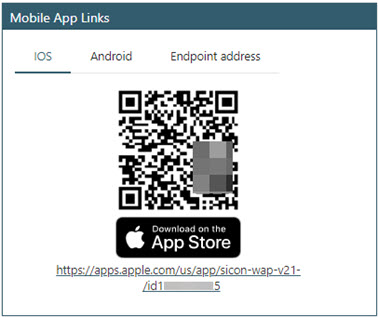
Option B
Alternatively use the table below to determine which version to look for directly in the iOS App store:
Apple devices:
| WAP version | Mobile App version | iOS download |
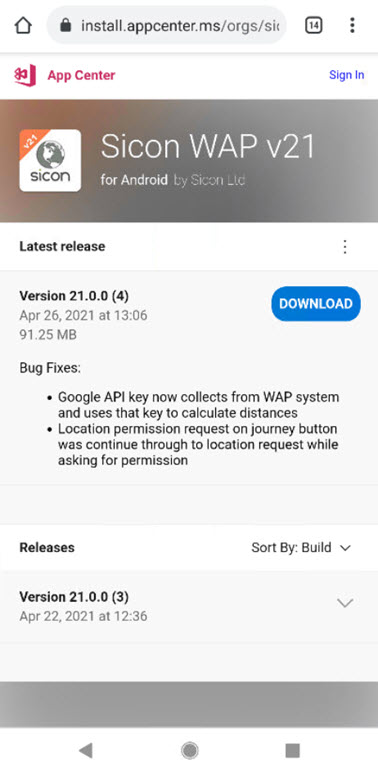
| 210.X.X | Sicon WAP v21 | From iOS app store, search ‘Sicon WAP 21’ |
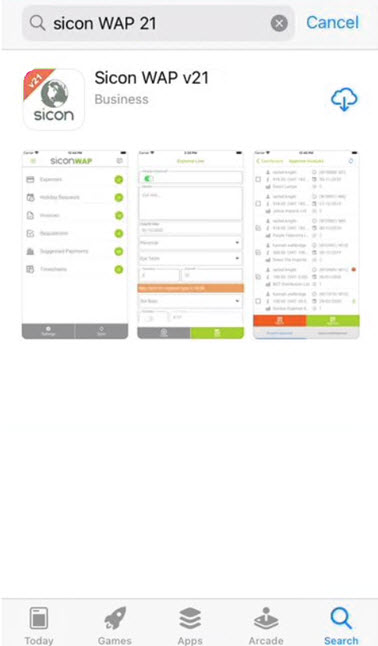
3.2. Where to download the Android WAP Mobile App
A tutorial on how to download the Sicon WAP App on an Android device
Option A
Using the device camera or a QR Scanner app, scan the link in the second tab of the your personal WAP settings (Android) and browse which should take the user to Microsoft App Centre ready with the latest available version:
Option B
Alternatively use a browser on your device and navigate to the below address manually (also included at the bottom of the Android QR code on the WAP Desktop).
Android devices:
| WAP version | Mobile App version | Android download |
| 210.X.X | Sicon WAP 21 | https://install.appcenter.ms/orgs/siconltd/apps/sicon-wap-v21/distribution_groups/public |
Microsoft App Centre:

Option C
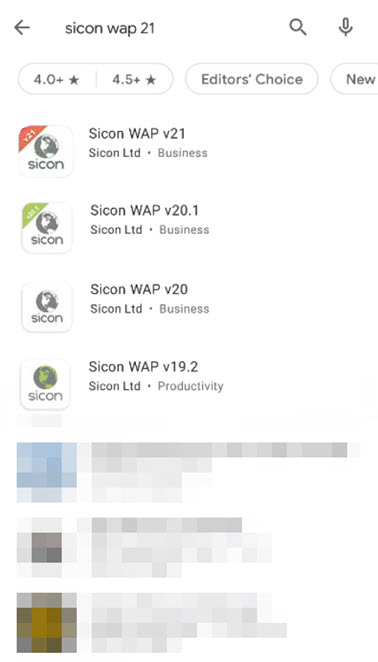
Alternatively use the table below to determine which version to look for directly in the Google Play App store:
Android devices:
| WAP version | Mobile App version | iOS download |
| 210.X.X | Sicon WAP v21 | From Google Play store, search ‘Sicon WAP 21’ |
3.3. WAP Mobile Configuration
Only start this section once the app has been downloaded onto the mobile device. Before starting, it is advisable to have the Endpoint Address tab open from the WAP Desktop Personalised settings:
On the mobile device, navigate to the app that has now been installed:

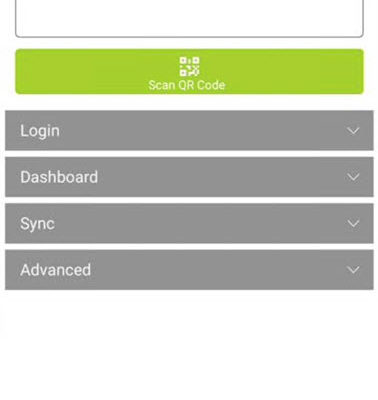
Click on the Cog to configure settings to connect the app to the desktop:
Once pressed, if this is a new install, the user will be prompted to configure settings:
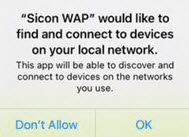
The user will also be prompted to allow permissions throughout using the app, such as access to camera to scan the endpoint address (explained next).]
Endpoint
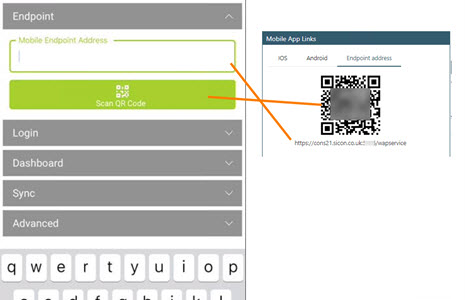
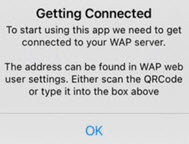
Mobile Endpoint Address: use the inbuilt QR scanner below to scan the URL from the desktop Personalised settings. This will enter the URL that has been configured for using the WAP App. This URL can be entered manually by the user but must match the WAP Desktop Settings address. If this URL is not entered correctly, users will not be able to log into the WAP Mobile app.
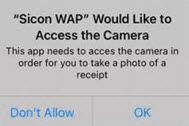
If using the scan option, the user will be prompted to allow access to the camera:
Login
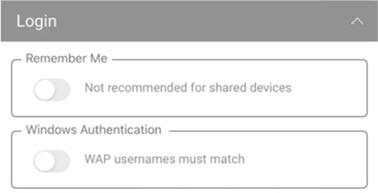
Remember Me: if this is ticked, the user will be logged in automatically when loading the app. If this the user will be working offline, this setting must be enabled for users to be able to login while the device is offline.
It is not recommended to enable this if multiple users are to log in via the same device.
Use Windows Authentication: tick this if Windows Authentication is configured in the WAP website. If configured, users will log into the app with the same credentials as they log into Windows; the WAP Mobile app will validate the password against the domain account. For this to work, usernames in the WAP Desktop website must match the usernames as created in Windows Active Directory.
Dashboard
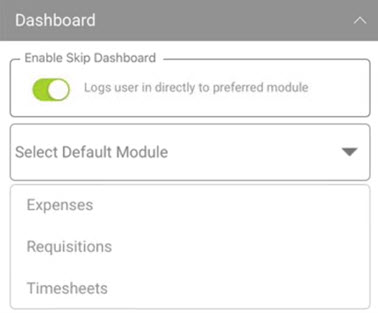
Enable Skip Dashboard: By default users will be logged in to a dashboard displaying all modules available to them. By turning this setting on and selecting a module, the user will instead be defaulted to the Existing Documents screen for either the Expenses, Requisitions or Timesheets module by default.
Sync
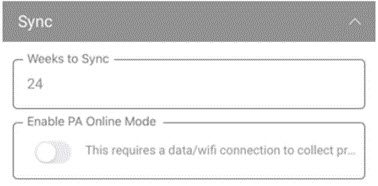
Weeks to Sync: choose the number of weeks to sync; by default, this is set to 8 weeks.
Enable PA Online Mode: relevant to sites using Project Accounting with WAP Timesheets only. This setting may be helpful for companies with large volumes of projects where the app can’t perform an initial sync in a timely manner. With this setting turned on, the initial sync will sync everything except the projects. When entering a timesheet, the project information will instead be collected directly from the server when entering a Timesheet and searching for a project. This setting requires a data/wifi connection to collect the projects for this purpose.
Advanced
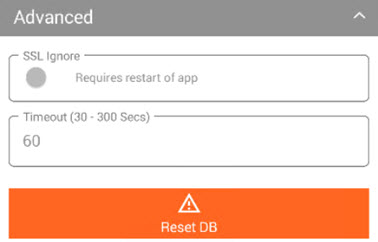
SSL Ignore: This will only display on Android devices. This is predominantly a troubleshooting setting for sites who receive a login error on Android but not on Apple devices, typically because of a conflict between SSL and Android devices. Turning this setting on resolves the error.
Database Reset: this option can be used to reset all data stored on the device. If the user is logged out of the app, this setting will remove any journeys the user has marked as on their favourite list (if they are logged in, it will still clear many background settings but journeys will be retained). When the database has been reset, a full sync will need to be done once the user has logged in. If multiple users are logging in via the same device, it is recommended that the database is reset between logins and storing favourite journeys would not be recommended as these will be lost between logins.
Connection Timeout (30-300 Secs): if the app does not have a response from the service during sync within the time set here, the sync will fail. The default will be 60 but this might need to be increased if the connection to the server is slow or perhaps there are a high number of items to load.
4. Getting Started
Once the app has been installed and the Mobile Endpoint address entered, users will now be able to start using the WAP Mobile app on their device.
Prior to logging in, the app will prompt for certain permissions, such as access to network so that users can log in:
4.1. WAP Mobile App login
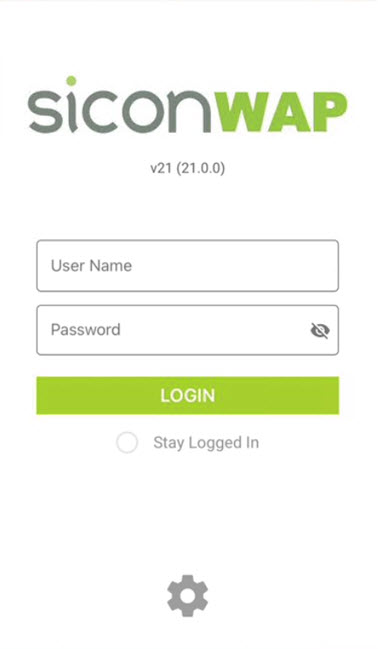
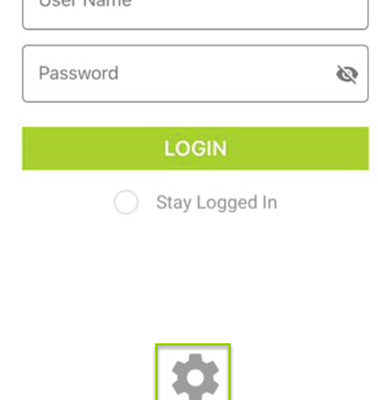
Logo: if the company has uploaded a logo in System Settings, this will be displayed.
Version: version of app installed. This is helpful if a support case needs to be raised.
Username: This will be the same username as configured in the WAP Desktop. Enter username and password and click to log in.
Password: This will be the same username as configured in the WAP Desktop (unless Windows Authentication has been configured). If the user requires to view their password on entry, click the eye icon.
Stay logged in: if users aren’t sharing devices this can be ticked to remain logged in to the app even when it’s closed.
Cog: Main App Settings
Users will not be able to login if the Web API URL is not correct (a common error is to scan the QR code from the iOS or Android tabs, rather than the Endpoint tab, so always make sure the correct endpoint address displays in the settings in WAP Mobile App Configuration):

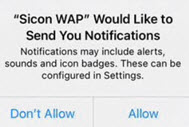
The WAP App produces some notifications, and after logging in for the first time, the app will prompt for permissions to allow this:
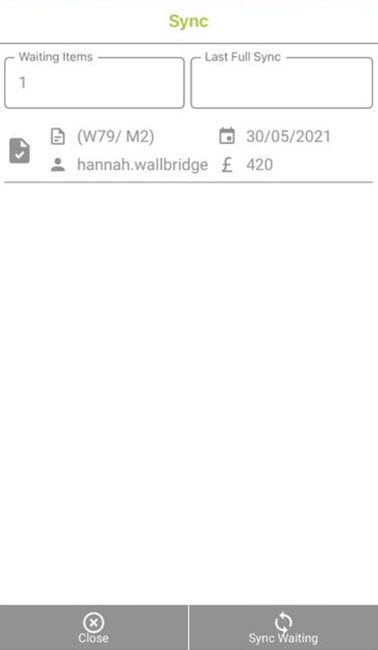
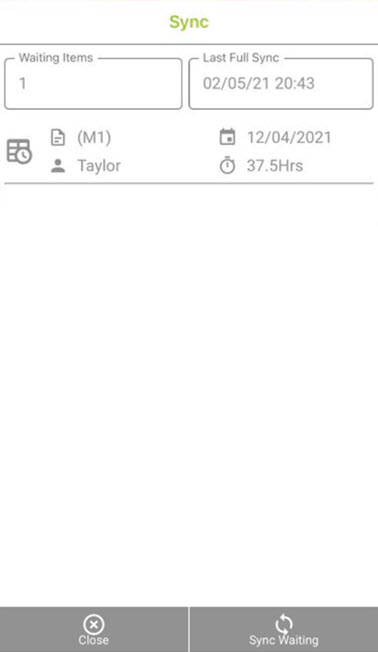
4.2. Sync
For WAP and the desktop to communicate with each other, a sync process will be required. This is a way to bring data into the App from the Desktop, and from the app back to the Desktop.
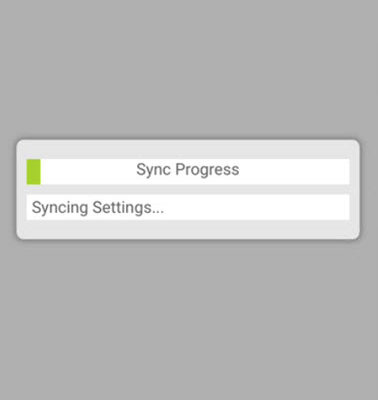
When a user first logs in they will see a message to state that an initial sync is required.
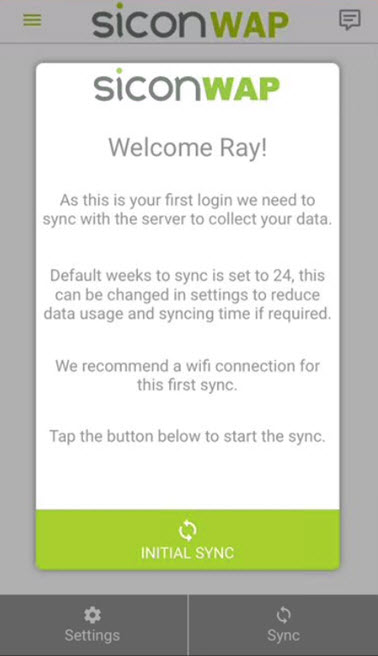
Click the initial sync option to begin the initial sync process.
While the sync is happening a green progress bar will appear showing exactly what is being synced.
Once the sync is successful, users will be brought to the main Dashboard, or the default module defined in the app settings:
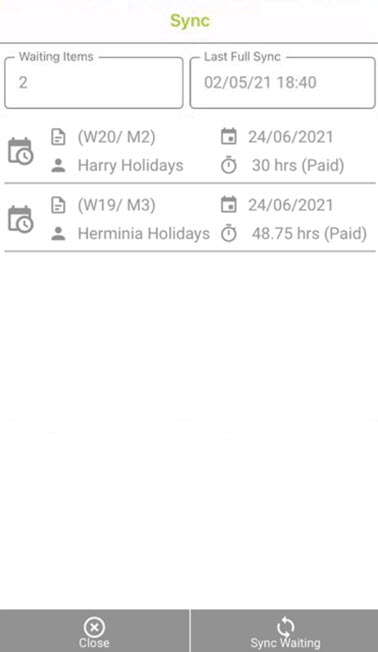
There are three types of sync in the app:
- Initial sync – when a user first logs into the app, either after install or after resetting the database within the app settings. This sync collects all the up-to-date data for a user, such as nominals, projects, expense types and delivery addresses.
- Full Sync – similar to the initial sync, but can be run any time to retrieve updated information. Both of these options will bring relevant information over from the WAP Desktop and Sage server, and bring it over to the app to be accessed on the user’s mobile device through the app.
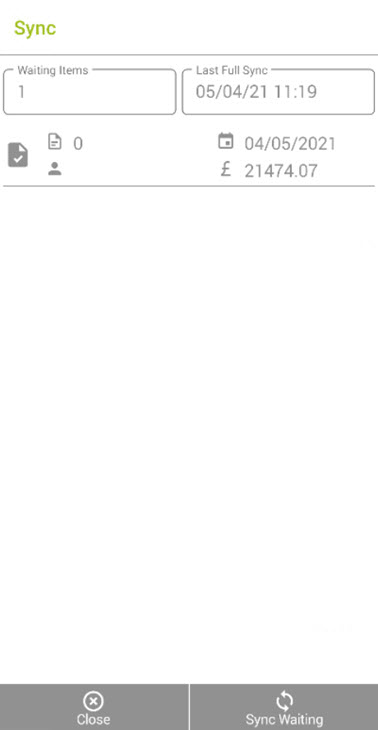
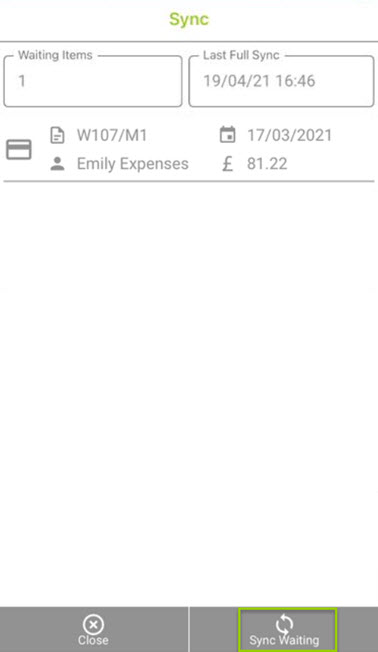
- Sync Waiting – when a user has performed an action on a document, such as saving, submitting or approving a document. Before that document will upload back to the WAP Desktop and Sage, sync waiting must be done to bring the information over from the app.
Syncing is required when:
- A user first downloads and logs into WAP, to collect user’s data from the WAP System (initial sync).
- There is new information for the user to pick up, for example projects or nominals that have been added through the desktop, or new items to approve, and to ensure the latest status of a document or entitlement is shown (full sync).
- A document has been submitted or approved through the app (sync waiting).
It is not possible to select to run a full sync if there are items waiting for sync. The app will always prompt the user for the relevant sync at the time they tap the sync icons throughout the app.
4.3. General Navigation

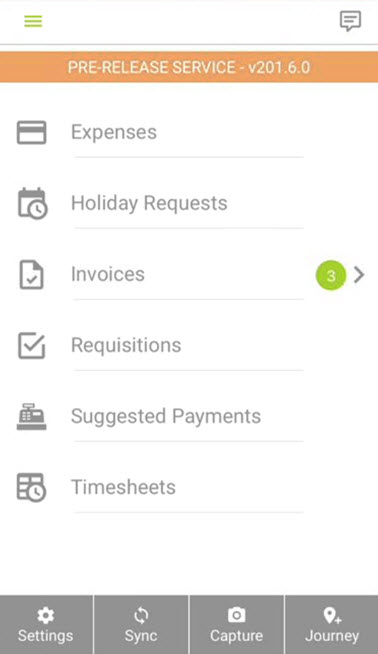
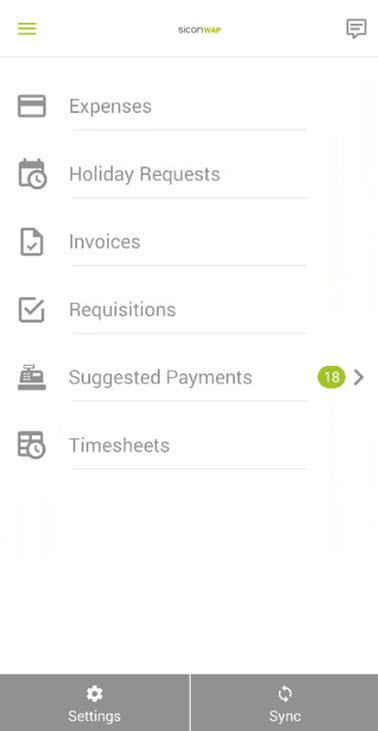
Once the settings have been configured, the user has logged in and the initial sync has been performed, the user will either be taken to the dashboard, or can navigate to it to get to other modules:
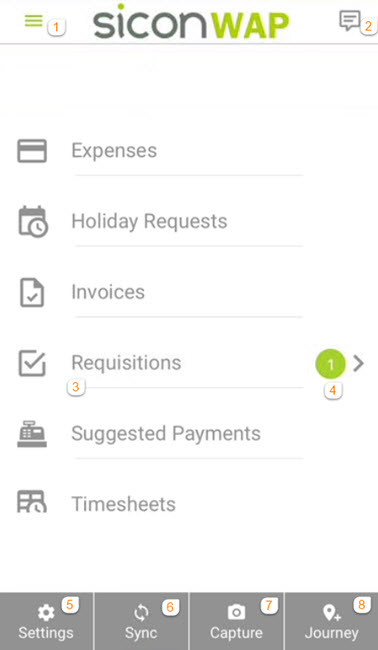
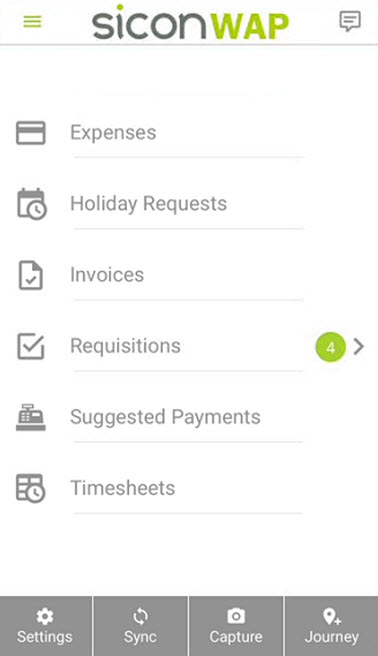
The list of modules shown will differ depending on what has been configured on the desktop system settings however, the main navigation is the same for all users whether they are raising or approving documents. In the above screenshot, the main navigation features have been numbered 1-8 and are explained in more detail below:
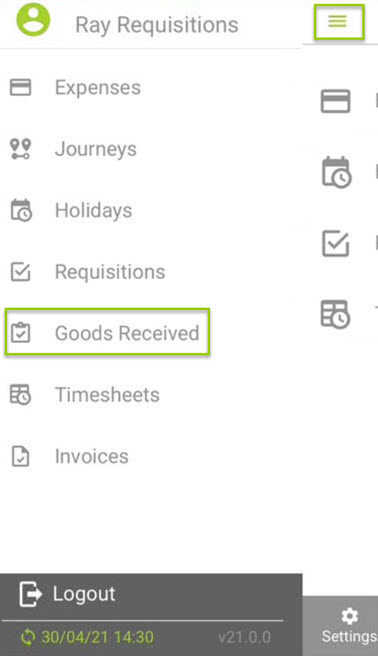
 | Hamburger Menu: this is an alternative way to navigate to existing documents, and also the Goods Received option if this is being used with Requisitions. |
 | Notifications: If notifications have been enabled, as and when notifications come through they will be visible through here. |
 | Existing Documents: Clicking to the left of the document header (e.g. Requisitions) will take the user to Existing Documents, where new documents can be entered and existing documents can be viewed. |
 | Approve Documents: Clicking to the right of the document header (e.g. Requisitions) will take the user to items awaiting their approval in that module. In the highlighted example above this user has 1 requisition to approve. |
 | Settings: takes the user to the settings screen explained in the earlier section. Note, if the user resets the database this way (e.g. still logged into the app), favourite journeys will not be lost. Unsubmitted documents will be though, so it is recommended to save these and sync prior to running Reset DB. |
 | Sync: If the user needs to perform a sync, this can be done here. If there are document waiting to be uploaded back to the desktop this will default to Sync Waiting. Or if there are no documents awaiting upload, this will default to Full Sync. Refer to the earlier section for further information on when to sync. |
 | Capture: this can be used to capture pictures of attachments that can later be attached to a document in the app (e.g. a receipt for an expense). These pictures are stored in the camera roll of the device, and WAP will prompt and require permission to access photos to enable this feature if this has not already been enabled. Pictures can also be taken at the time of entering the document and this would be recommended rather than using this feature. |
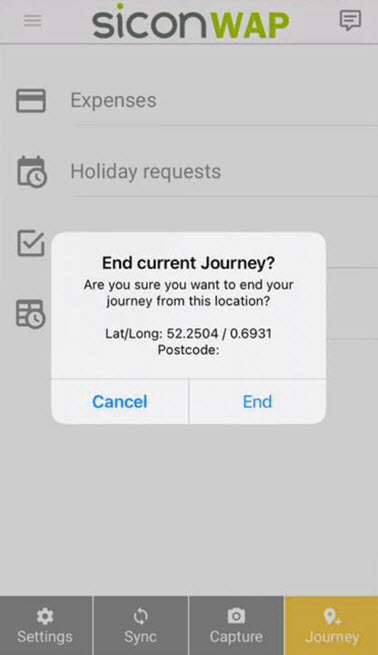
 | Journey: If Google API is enabled in the WAP Desktop, the Start Journey icon allows an expenses user to begin recording a journey that can be saved and later used to submit a mileage claim. The app will prompt for permission to allow access to location before this can be used. See the Expenses section for further information on this feature. |
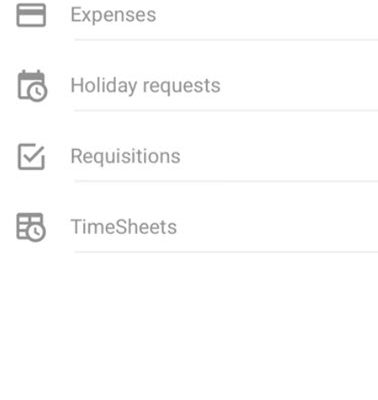
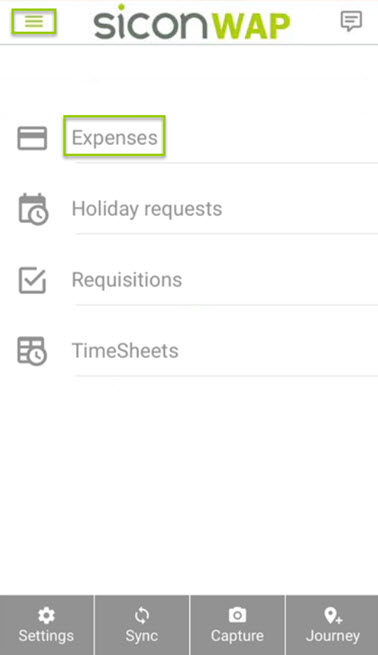
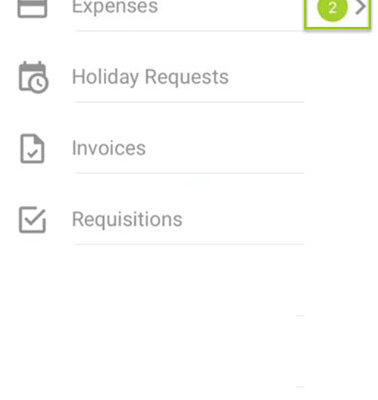
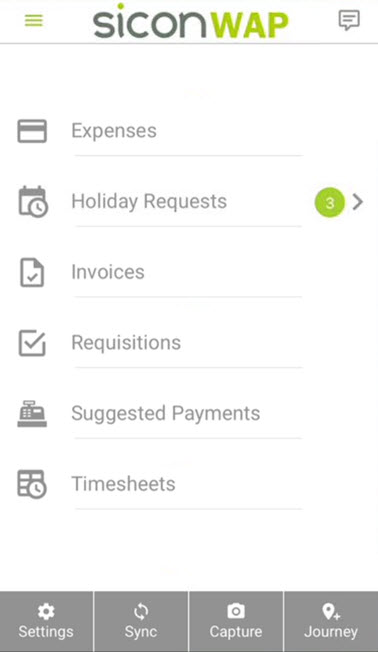
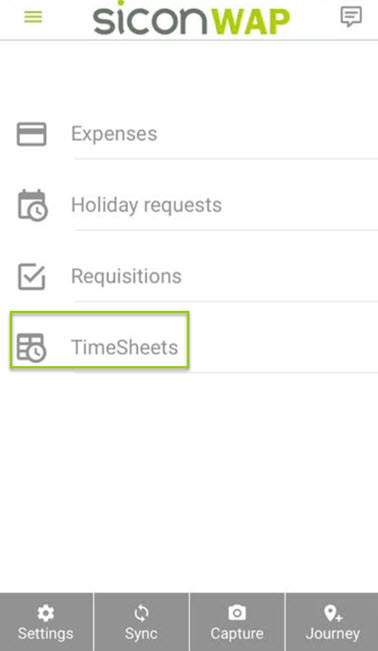
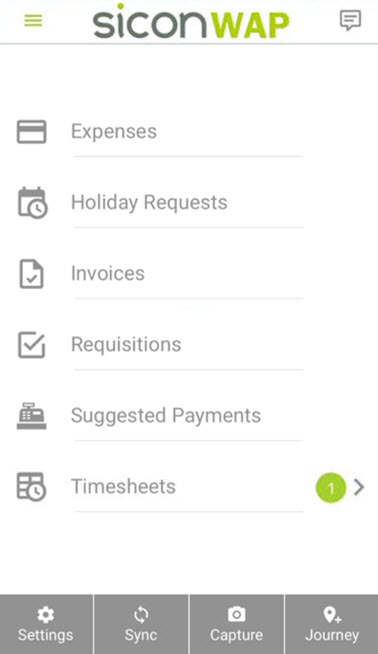
As mentioned above, a further menu is available through the Hamburger menu:
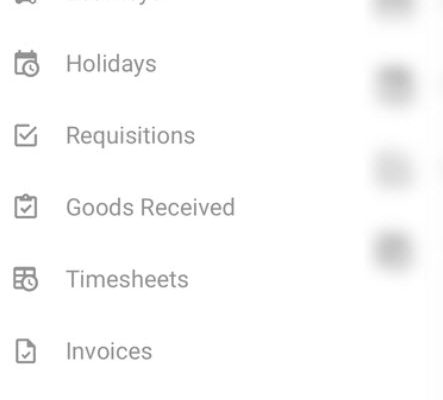
Expenses: Allows the user to enter expense and mileage lines.
Journeys: Allows the user to create or retrieve regular journeys for mileage claims.
Holidays: Allows the user to enter a holiday request.
Requisitions: Allows the user the user to enter a requisition.
Goods Received: Allows the user to receive goods on requisitions through the app.
Timesheets: Allows the user to enter timesheets through the app.
Invoices: Allows the user to view Invoices for approval and invoice approval history.
Logout: Allows the user to log out of the WAP App on the device.
Last Sync: once the user has started using the app, a date and time will be displayed to indicate when the last sync was done.
v: The version number will be displayed at the bottom right, e.g. v.21.0.0. This will not be the same as the version number on the WAP desktop, and will assist if any support queries need to be raised with Sicon.
General document navigation
Throughout the module when adding a document, generally the module name and option to add attachments will be found at the top of the screen, and the tabs to navigate through the documents and existing documents are at the bottom of the screen:
There will also often be a Sync icon at the top right of screens. This can be tapped anytime to complete a full sync. If a number is displayed with the icon, this indicates that documents are waiting to sync and sync waiting will need to be completed before a full sync can be run.
Note: currently the dashboard will show all modules enabled from Desktop system settings cogs – System Settings banner – Miscellaneous – Mobile Access, regardless of User Type permissions.
5. Video Help and User Guide
The next sections show the general navigation using the WAP App. These links cover the older style app so there will be some minor differences however the main navigation has not changed and these are a good starting point to demonstrate how to use the app.
5.1. App Download and Install
5.2. Expenses Entry and Approval
5.3. Holidays Entry and Approval
5.4. Invoice Approval
5.5. Requisition Entry and Approval
5.6. Suggested Payments Approval
6. Requisition Entry
For the purposes of this help and user guide it is assumed that users have already been configured and can raise requisitions in the desktop. For any setup queries, please refer to the Requisitions Help and User Guide.
From the Dashboard or Hamburger menu click on Requisitions:
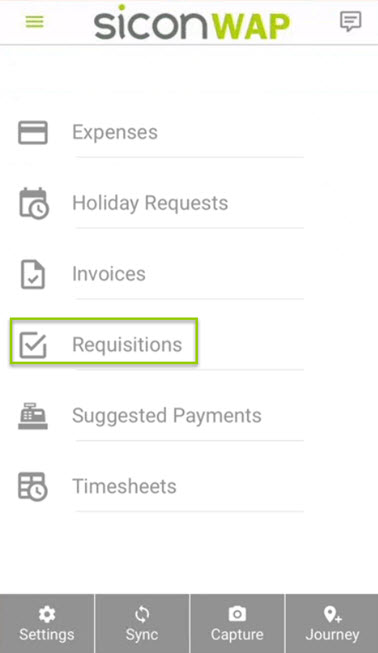
The user will then be presented with three tabs at the bottom of the screen:

New: Displays any of the user’s new requisitions that have been entered through the app and either not yet synced or not yet submitted. Requisitions saved but not submitted through the desktop will also appear here. New requisitions can be entered from this tab using the + Add Requisition at the top of the screen.
Waiting: Displays any requisition submitted by the user through the app and Sync waiting has since been run.
Approved/Rejected: Displays any requisitions approved or rejected by the user in the app.
The sync icon at the top right indicates if any items require a sync and will be updated as the user progresses with documents on the app.
6.1. Requisition Header Tabs
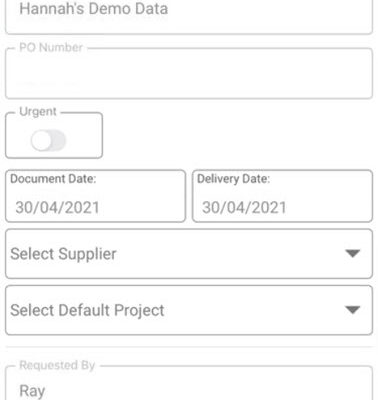
From the new tab, select + Add Requisition to be brought into the Requisition Header details where the main details of the order can be entered:

Details tab
The app will open on the Details tab initially:
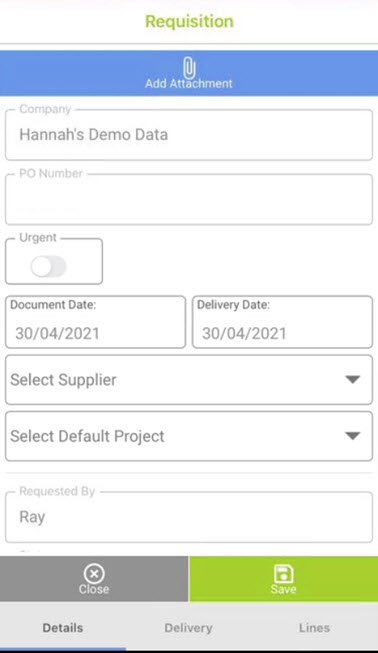
Add Attachment: click here to add an attachment to the requisition if required. Any attachments will be visible to approvers within WAP, and if using WAP with the Sicon Documents module, the attachment will also post to Sage when the requisition is fully approved. Note: The header information must be completed prior to adding any attachments.
Company: the user’s default company will be selected here. Currently this field cannot be changed as only one company (the default) is supported in the app. If the user has access to multiple companies, the desktop will need to be used to enter a requisition for other companies.
Urgent: If the user marks a requisition as urgent they will need to enter a reason for the urgency in the Urgent pop up box. Once the requisition is then submitted an email will be sent instantly to approvers advising them there is a requisition awaiting approval.
Document Date: this will be automatically populated with the current date but can be overridden as needed. This is the date that is used for budget checking purposes so if a spend is to hit a future month’s budget, this date can be moved to a future date.
Delivery Date: this will be automatically populated with the current date but can be overridden as needed. This is a mandatory field and will be used to generate Goods Received notification reminders if configured. Individual delivery dates can also be set per stock item or free text line if required.
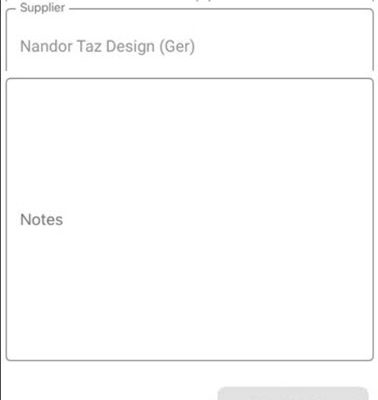
Supplier: select the correct supplier from the dropdown list either by typing the supplier name or code, or scrolling to the required supplier.
Default Project: if using Sicon projects, a default project can be selected from the dropdown list either by typing the project name or code, or scrolling to the required project.
Requested By: this is automatically populated with the user’s name.
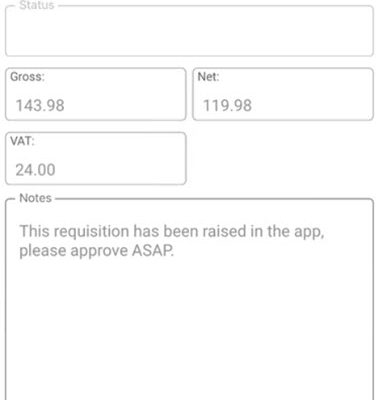
Status: the status will update as the order progresses through.
Values: the gross, net and VAT figures will update as lines are added and the order progresses.
Notes: Enter any notes as required for the order for the approver to see.
Close: Closes the order without saving any information.
Save: Saves the order with the current information. This can only be done once lines have been added to the requisition. Refer to the later section on Saving, Submitting and Syncing Requisitions for further information on this.
Delivery tab
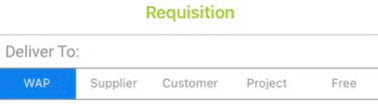
Across the bottom of the screen, navigate to the Delivery tab to check or amend details of the delivery and invoice address (if permitted):
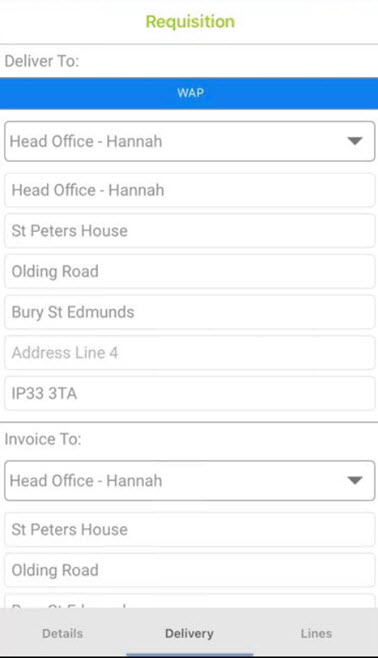
The delivery addresses will be automatically populated depending on user and system setup. If the permissions have been enabled users may be able to select an alternative delivery address:
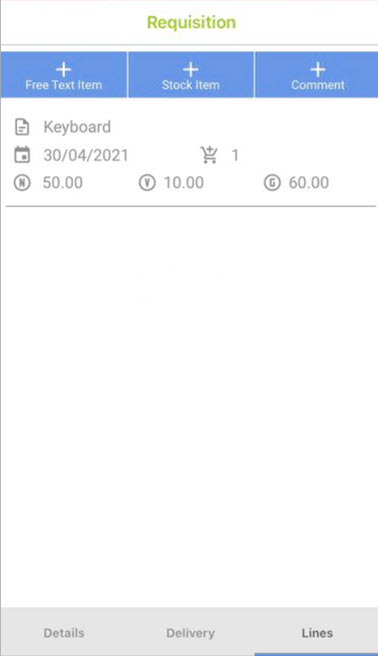
Lines tab
Across the bottom of the screen, navigate to the Lines tab to begin entering the specific line information for the order:
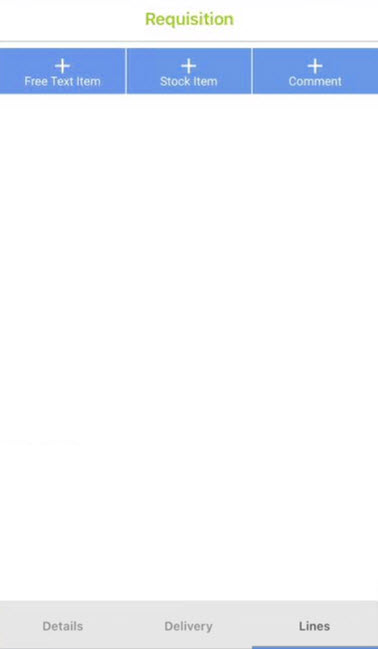
See the following sections for further information on each.
6.2. Adding a Free Text Line
From the Lines tab, click + Free Text Item and enter the information as required:
The free text entry screen will open and detail can be entered as required for the order line:
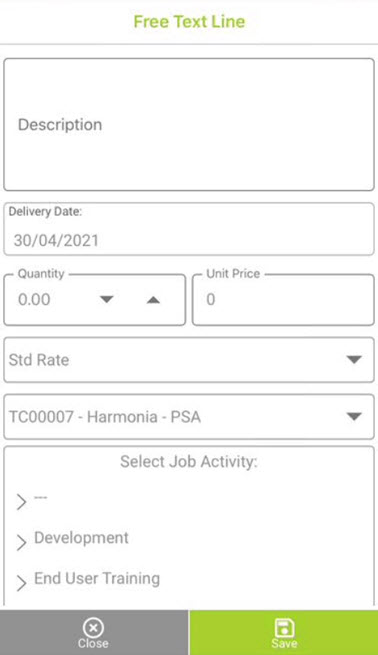
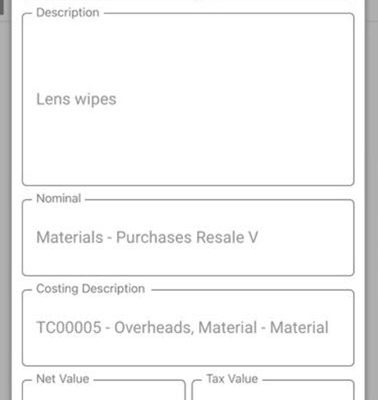
Description: free text field to enter the description of the item required.
Delivery Date: enter the delivery date for this line – this will default to today’s date and can be overridden if required. This is particularly useful if expecting staggered delivery or part invoicing an order.
Quantity: enter the quantity required.
Unit Price: free text box, enter the price per unit as required.
Tax Rate: this can be configured in the desktop to pull through the tax rate configured against the supplier in the PL or the standard tax rate against the Sage Company in Sage Connections.
Project: this will only appear if Sicon Projects, Sage Project Accounting or WAP Projects has been configured as the Costing Module. If a project has been added to the header this will pull through to the line, or can be edited if required. If a user has ‘Access all Projects/Projects’ ticked on their User profile, all live Projects will appear in the drop-down list. Alternatively, users can be given access to specific Projects and Project Headers/Project Items.
Activity: this will only appear if Sicon Projects is being used. If activities are being used in the Project structure, these will be available for selection as in the above screenshot.
Project Header: Select the appropriate header for the requisition line. With Sicon Projects, only Project headers that belong to a Project Header Type with a WAP type of ‘P’ will be shown.
Nominal: select the nominal code required. This may be defaulted depending on desktop settings and costing module.
Confirmation Method: this will pull through from the standard configuration in Sage and on the desktop, and can be overridden per line if required.
Save: click to save the line to the requisition and be returned to the requisition header tabs.
Close: click to close the line without saving the details entered and be returned to the requisition header tabs.
From here they can continue adding lines, or navigate back to the Details tab to save the requisition. Refer to the later section on Saving, Submitting and Syncing Requisitions to show how to submit the requisition.
6.3. Adding a Stock Item Line
From the Lines tab, click + Stock Item and enter the information as required:
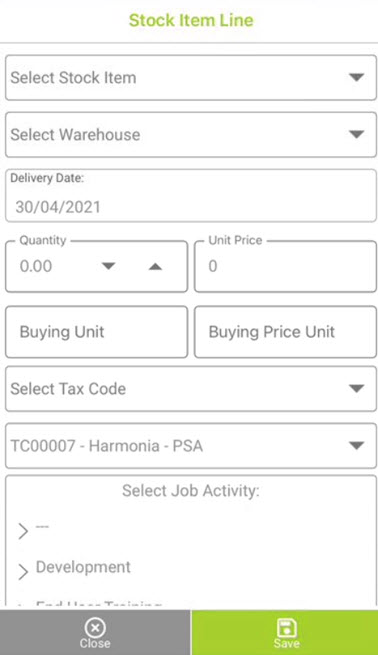
Stock Item: tap the field to search for the stock item required.
Warehouse: select the correct warehouse for the stock item.
Delivery Date: enter the delivery date for this line – this will default to today’s date and can be overridden if required. This is particularly useful if expecting staggered delivery or part invoicing an order.
Quantity: enter the quantity required.
Unit Price: free text box, the unit price will be pulled through from the stock item and can be overridden if required.
Tax Rate: this will pull through the tax code configured against the stock item in Sage but the users can override. This field can be hidden from view if required.
Project: this will only appear if Sicon Projects, Sage Project Accounting or WAP Projects has been configured as the Costing Module. If a project has been added to the header this will pull through to the line, or can be edited if required. If a user has ‘Access all Projects/Projects’ ticked on their User profile, all live Projects will appear in the drop-down list. Alternatively, users can be given access to specific Projects and Project Headers/Project Items.
Activity: this will only appear if Sicon Projects is being used. If activities are being used in the Project structure, these will be available for selection as in the above screenshot.
Project Header: Select the appropriate header for the requisition line. With Sicon Projects, only Project headers that belong to a Project Header Type with a WAP type of ‘P’ will be shown.
Nominal: select the nominal code required. This may be defaulted depending on desktop settings and costing module.
Confirmation Method: this will pull through from the standard configuration in Sage and on the desktop. This cannot be overridden for stock items, but for service items it may be possible.
Save: click to save the line to the requisition and be returned to the requisition header tabs.
Close: click to close the line without saving the details entered and be returned to the requisition header tabs.

From here they can continue adding lines, or navigate back to the Details tab to save the requisition. Refer to the later section on Saving, Submitting and Syncing Requisitions to show how to submit the requisition.
6.4. Adding a Comment Line
From the Lines tab, click + Comment and enter the information as required:
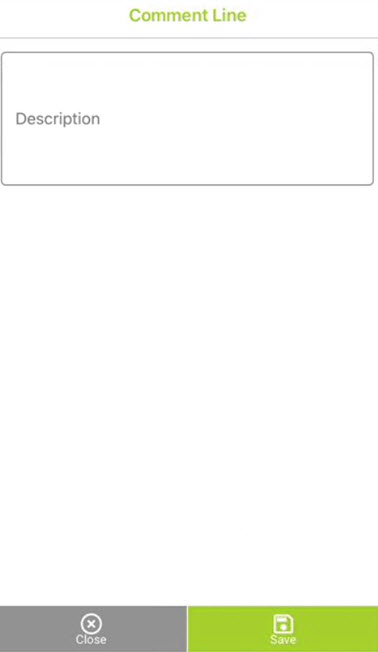
Description: enter the description of the comment line.
From here the user can continue adding lines, or navigate back to the Details tab to save the requisition. Refer to the section on Saving, Submitting and Syncing Requisitions to show how to submit the requisition.
6.5. Saving, Submitting and Syncing Requisitions
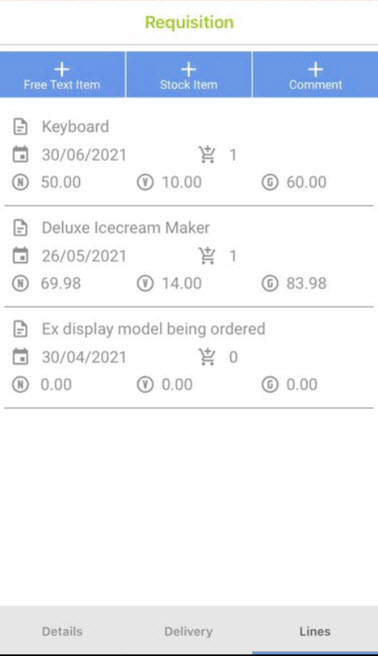
Once the user is happy with the requisition, navigate to the Details tab where the options for saving and submitting the requisition will be available, and the value of the order will have been updated too.
Close: Closes the order without saving any information.
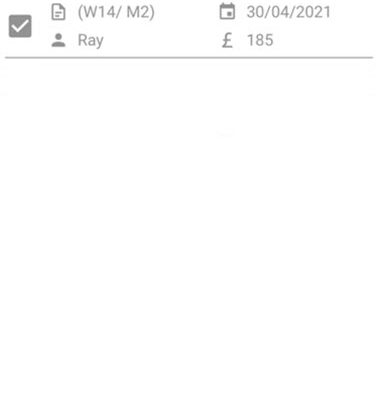
Save: Saves the order with the current information. The user will be prompted whether they wish to save the requisition and once saved, it will appear on the Existing Requisitions screen in the New Tab:

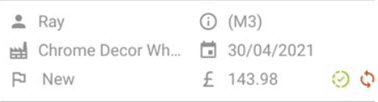
In the example above, the top item is the one that’s just been saved. This has been given a mobile ID 3 (starting with M). It still requires a sync before it will be given a WAP ID (starting with W).
The icons on the existing requisitions screen are explained below:
 | There are (2) items that need to be synced |
 | Requesting User |
 | Mobile ID (M#), and/or WAP ID (W#) if sync has taken place since order was raised |
 | Supplier |
 | Document Date |
 | Requisition Status |
 | Requisition Value (£ symbol denotes a value only, and not the currency the item is) |
 | Submitted but needs a sync to update WAP |
 | Needs a sync to update WAP |
 | Sync complete and item in WAP |
 | Documents have been attached to requisition |
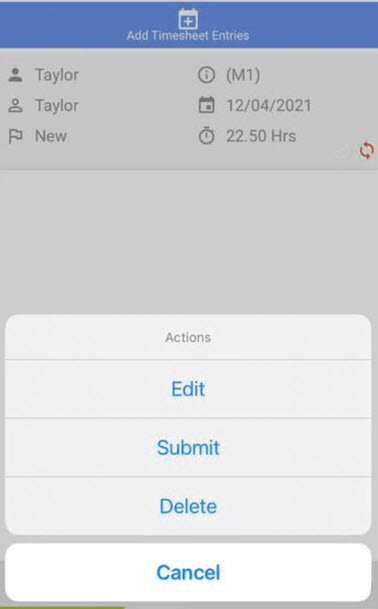
When the user is ready to submit the item, tap on the requisition and select Submit:
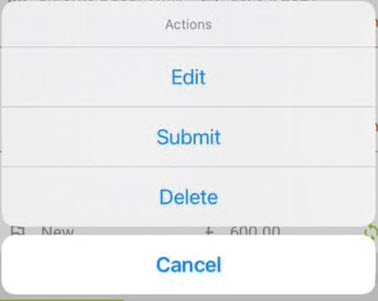
The document will be updated with a Submitted icon, but the sync icon is red which indicates it still requires the user to sync waiting before the requisition will show in the WAP Desktop, and be available for the approver.
The user can sync from the top right Sync prompt, or by clicking Back and navigating to the Dashboard and syncing all items from the bottom of the screen there.

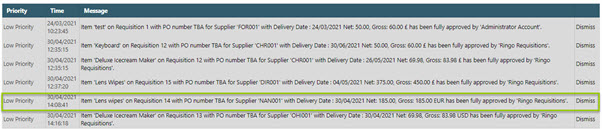
From here, tap Sync Waiting. In the above example, 4 items have been updated in the app and will update WAP once the sync is complete.
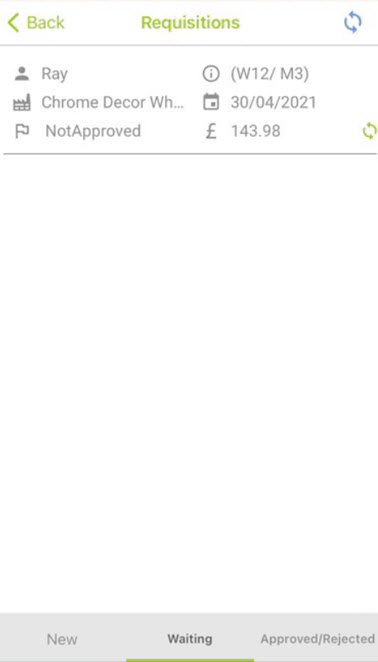
After Sync waiting, submitted documents will move to the Waiting tab. If a document has been saved only it will stay in the New tab. In both examples they will be given the WAP ID that links the mobile requisition to the WAP desktop. Note, the Mobile ID is only relevant for the user during submission and navigation, the WAP ID is the ID that is best used to search for requisitions in the desktop. Our example above, ID3 has now moved to the Waiting tab and been allocated WAP ID 12:
On the desktop, the item is visible in the Submitted tab:

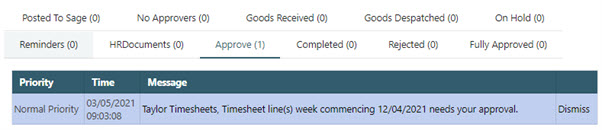
The approver will also receive a notification on their desktop that it is waiting for their approval:

7. Requisition Approval
Users should do a full sync prior to approval to ensure they have the latest items awaiting approval.
When the sync has been run, the amount of items for approval will be displayed on the dashboard. In this example, the approver has 4 requisitions for approval:
Tap on the number next to Requisitions to be brought into the items awaiting approval.
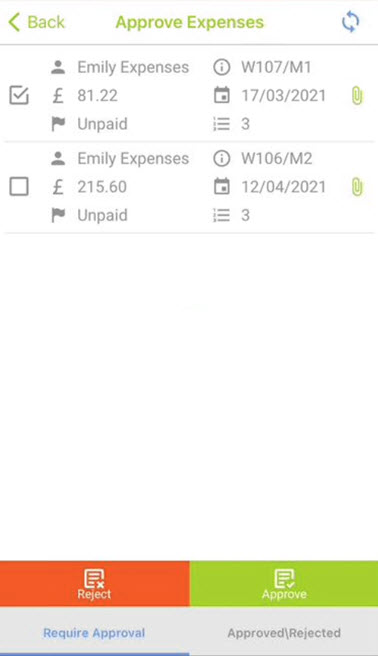
7.1. Require Approval Tab
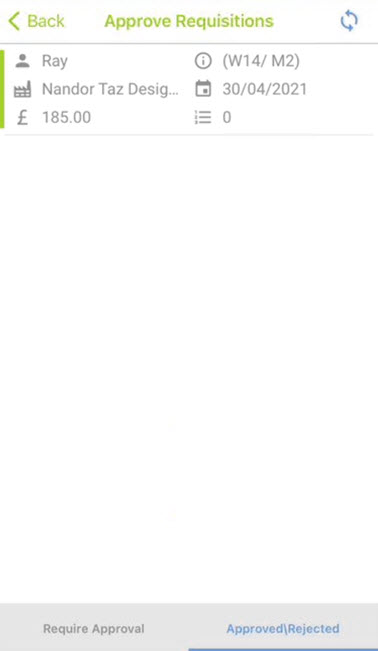
Once Requisitions has been tapped, the approver will be presented with the Require Approval tab which lists out all requisitions awaiting approval:
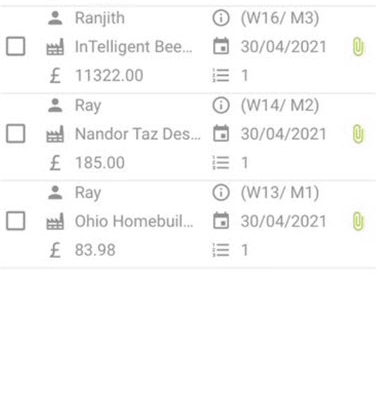
Tap on the requisition to be brought into the requisition information for further information.
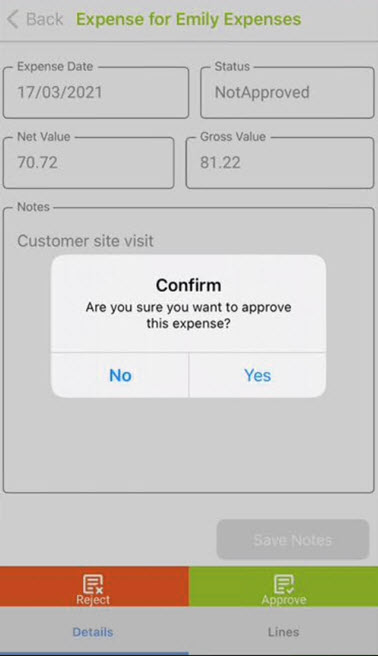
The Details tab across the bottom shows the header information and any notes the user may have provided. From here the user can Reject or Approve the requisition:
Notes can also be added during approval which other approvers afterwards would see on the order.
The Lines tab across the bottom shows a summary of the lines on the order, which again can be tapped to expand the information further:

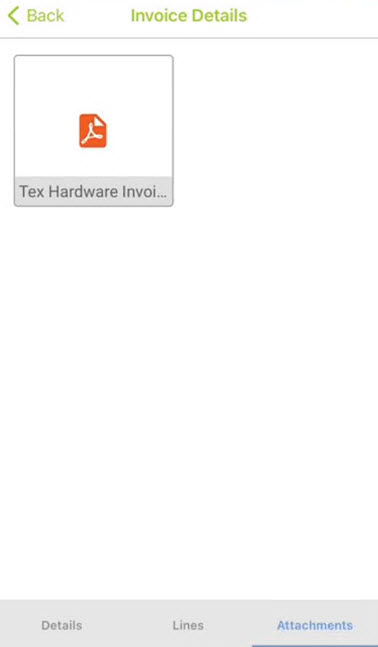
Close to come out of the detailed line information. If an attachment has been added to the requisition, this will be visible on the attachments tab across the bottom:

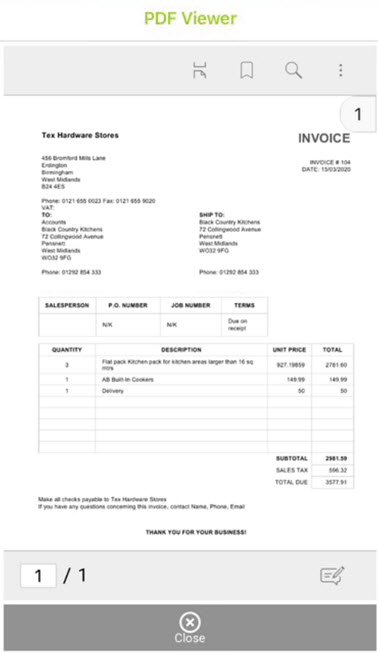
Tapping the image will zoom in if required.
Once the order has been checked, navigate back to the Details tab to approve or reject the requisition from here. The user will be prompted to ensure they are happy to approve:

The requisition will not show as approved in the WAP Desktop until Sync waiting has been run again. As soon as the item has been approved, the sync counter at the top right will be updated to remind the user to sync the items:

If wishing to approve more than one item at once after viewing the requisition detail, it is possible to select multiple items using the left-hand checkboxes, at which point the Approve and Reject options will appear again:

Please note in the app it is only possible to approve or reject the whole requisition. If individual lines are to be rejected or approved, this should be done on the Desktop.
Once approved, and Sync waiting run the order will be available for the next approver if necessary. Once fully approved the order will be posted to Sage with a PO number:

The user who raised the item will also receive a notification on their desktop:
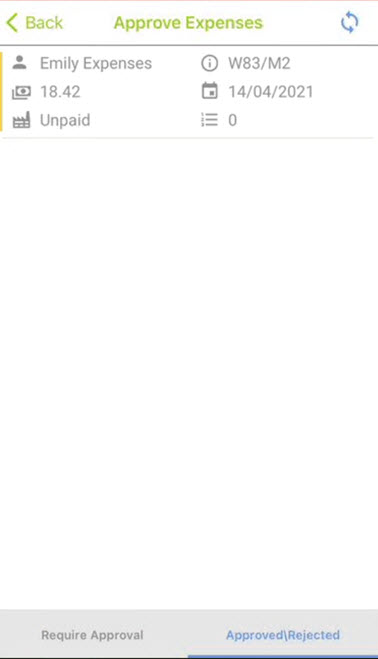
7.2. Approved/Rejected Tab
Once items have been approved and sync run, they will display in the Approved/Rejected tab:
The requisition will not show as approved in the WAP Desktop until a sync has been run.
8. Goods Receiving
Use the hamburger menu and select Goods Received to begin:
At the point of opening this menu item, the WAP App will immediately update the current status of all goods received and download items awaiting receipt. Please note that unlike most areas in the app, this will immediately use mobile data so users should ensure that they are on a WiFi connection or have an adequate data plan on their mobile device prior to receiving goods:
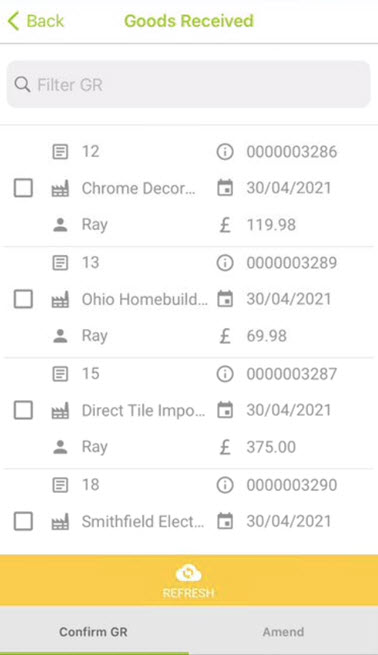
From here, users can either Confirm or Amend Goods Received using the tabs at the bottom of the screen, as explained in the following sections.
8.1. Receiving Goods/Services
Once the list has loaded, it can be searched (or refreshed, if new orders expecting items to be received need to be pulled through).
Search for the Purchase Order to be received, tap the selection box on the left and click Receive at the bottom of the screen:
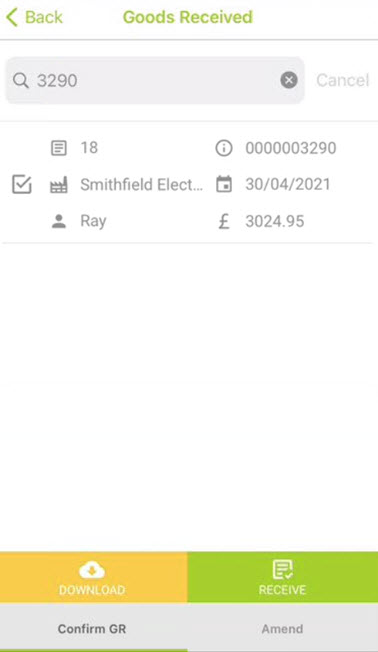
Download: If the user needs to use the app offline temporarily (for example in a warehouse where internet connection may drop out), receipts can vbe downloaded for use offline.
Receive: Click to receive the items on the order selected.
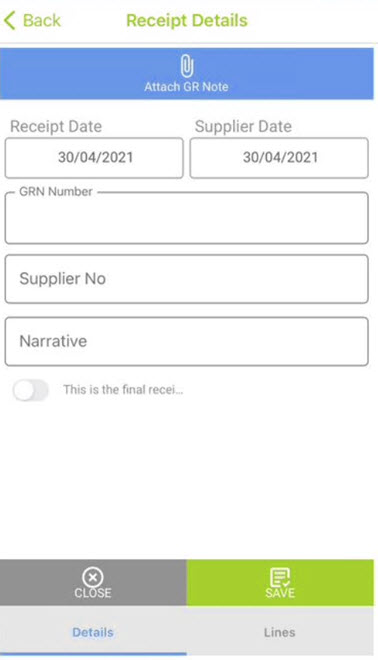
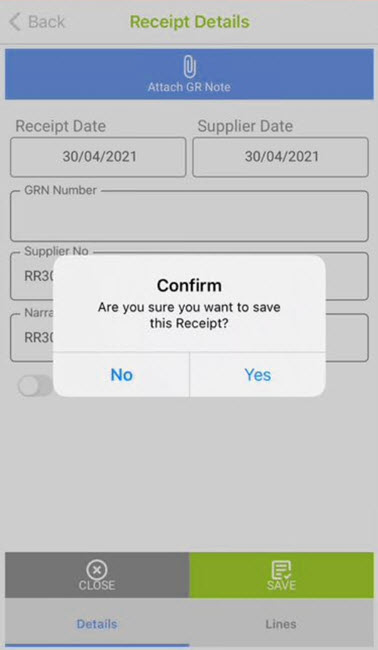
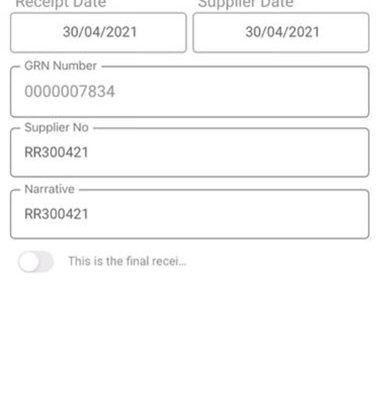
From Receipt Details screen – Details tab, the receipt header detail can be entered and any attachments added using the paperclip button at the top to Attach GR Note.
Click on the Lines tab at the bottom to enter the quantity to be received:
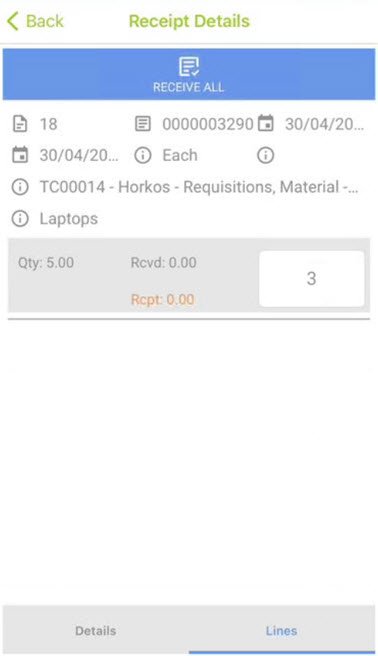
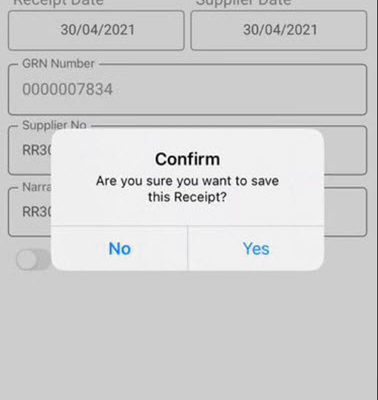
Once the receipt quantities have been entered on the line, click back to the Details tab and click Save to save the receipt, and confirm receipt:
Again, at this point data will be used to push the receipt back into WAP, so no syncing is required when receiving goods, and the WAP Desktop is updated if the app is able to connect to the server (e.g. with WiFi or data access):
8.2. Amending Goods Received
If a user needs to amend a receipt, click on the Amend tab and search for the GRN to be amended:

This will open the original Receipt header information on the Details tab:
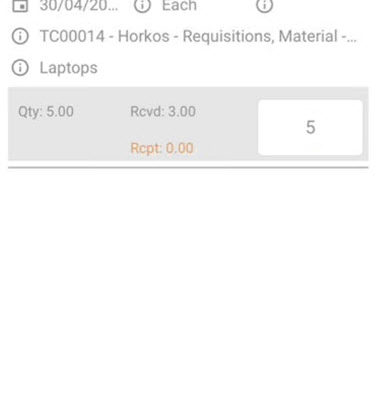
Click on the Lines tab to enter any amendments to the GRN. In the example below, the user originally received 3 and has now corrected this to 5:
Once the receipt quantities have been entered on the line, click back to the Details tab and click Save to save the receipt, and confirm receipt:
Again, at this point data will be used to push the receipt back into WAP, so no syncing is required when receiving goods, and the WAP Desktop (and Sage) is instantly updated:

9. Invoice Approval
For the purposes of this help and user guide it is assumed that users have already been configured and can approve invoices in the desktop. For any setup queries, please refer to the Invoices Help and User Guide.
Users should do a full sync prior to approval to ensure they have the latest items awaiting approval.
When the sync has been run, the amount of items for approval will be displayed on the dashboard. In this example, the approver has 3 invoices for approval:
Tap on the number next to Invoices to be brought into the items awaiting approval.
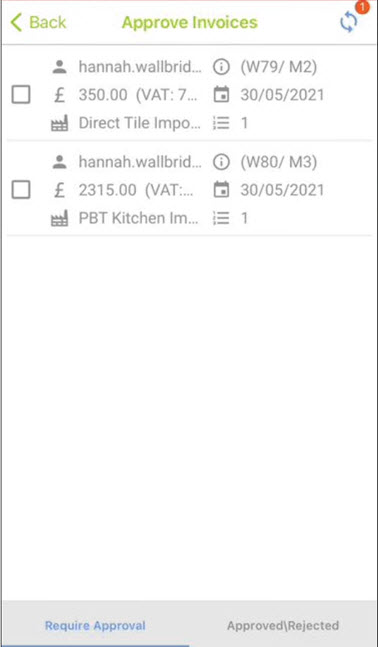
9.1. Require Approval Tab
Once the Invoices approval number has been tapped, the approver will be presented with the Require Approval tab which lists out all invoices awaiting approval:
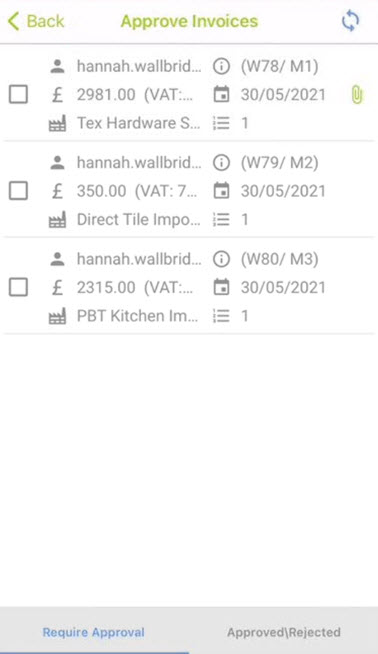
Tap on the invoice to be brought into the invoice information for further information.
The Details tab across the bottom shows the header information and any notes the user may have provided. From here the user can Reject or Approve the invoice:
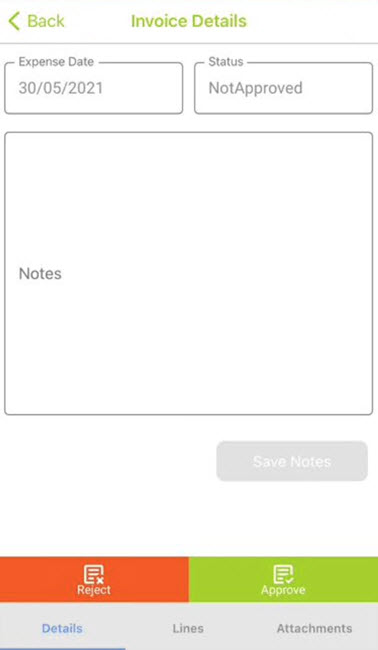
Notes can also be added during approval which other approvers afterwards would see on the invoice.
The Lines tab across the bottom shows a summary of the lines on the order, which again can be tapped to expand the information further:

Close to come out of the detailed line information. If an attachment has been added to the invoice, this will be visible on the attachments tab across the bottom:
Once the invoice has been checked, navigate back to the Details tab to approve or reject the invoice from here. The user will be prompted to ensure they are happy to approve:
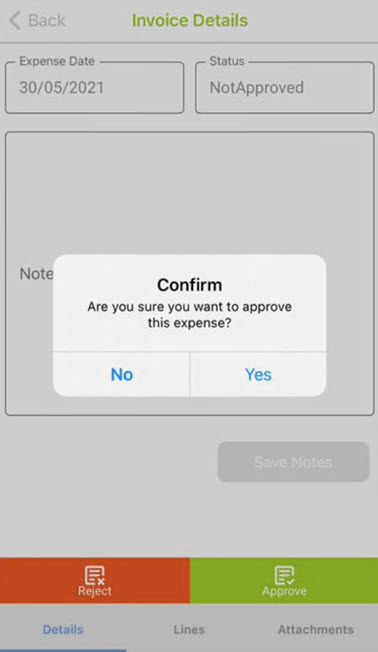
The invoice will not show as approved in the WAP Desktop until Sync waiting has been run again. As soon as the item has been approved, the sync counter at the top right will be updated to remind the user to sync the items:
If wishing to approve more than one item at once after viewing the invoice detail, it is possible to select multiple items using the left-hand checkboxes, at which point the Approve and Reject options will appear again:
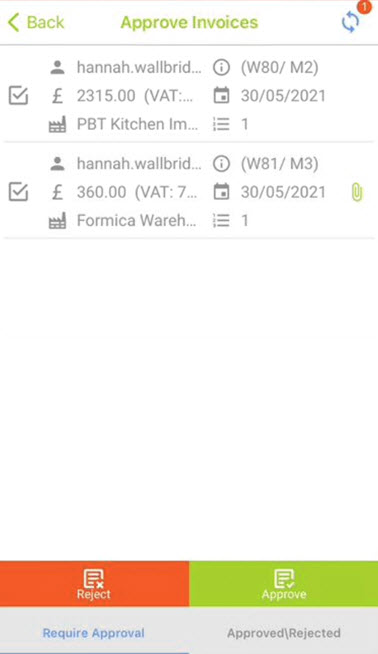
Please note in the app it is only possible to approve or reject the whole invoice. If individual lines are to be rejected or approved, this should be done on the Desktop.
Once approved, and Sync waiting run the order will be available for the next approver if necessary. Once fully approved the invoice will post to Sage and will be found in the Completed section of Existing Invoices (for users with permissions to view all invoices):

9.2. Approved/Rejected Tab
Once items have been approved, they will display in the Approved/Rejected tab:
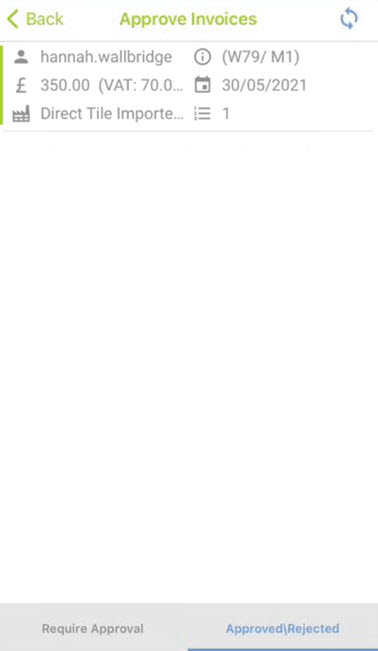
The invoice will not show as approved in the WAP Desktop until sync waiting has been run
10. Suggested Payment Approval
For the purposes of this help and user guide it is assumed that users have already been configured and can raise requisitions in the desktop. For any setup queries, please refer to the Invoices Help and User Guide.
Users should do a full sync prior to approval to ensure they have the latest items awaiting approval.
When the sync has been run, the amount of items for approval will be displayed on the dashboard. In this example, the approver has 18 suggested payments for approval:

Tap on the number next to suggested payments to be brought into the items awaiting approval.
10.1. Require Approval Tab
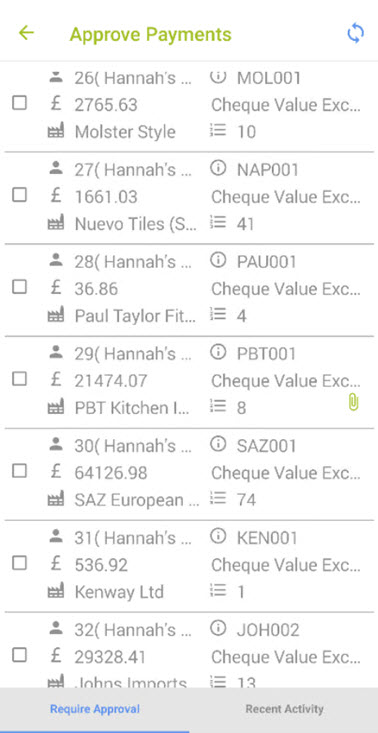
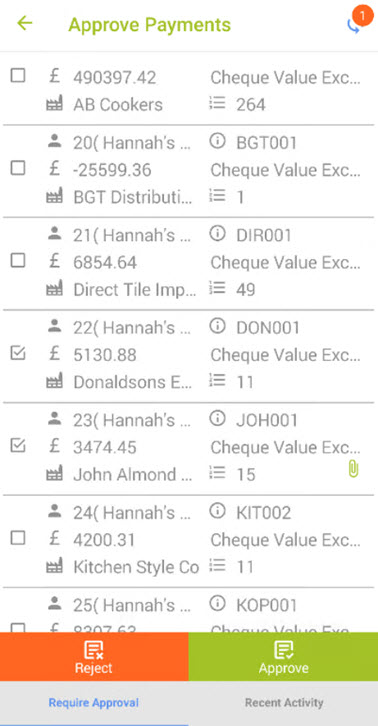
Once the suggested payments approval number has been tapped, the approver will be presented with the Require Approval tab which lists out all suggested payments awaiting approval:
Items with a paperclip icon indicate there are attachments as well. Tap on a payment to be brought into the payment details for further information.
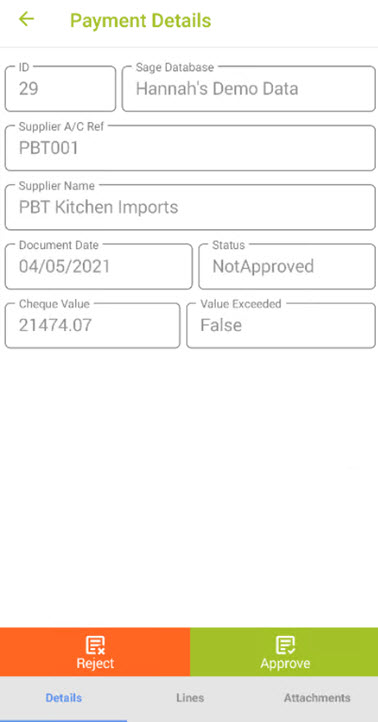
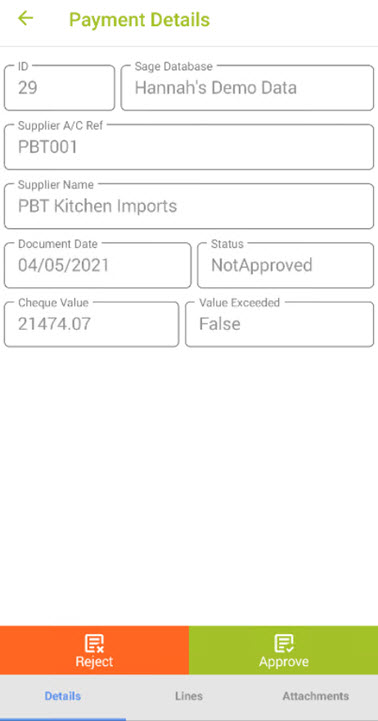
The Details tab across the bottom shows the header information for the supplier payment. From here the user can Reject or Approve the payment:
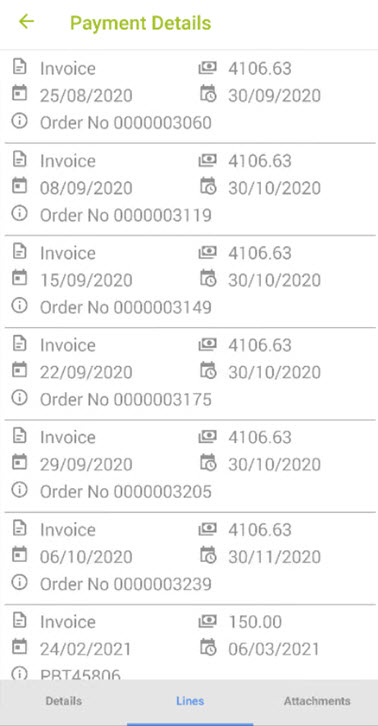
The Lines tab across the bottom shows a summary of the lines making up the payment, which again can be tapped to expand the information seen on screen.
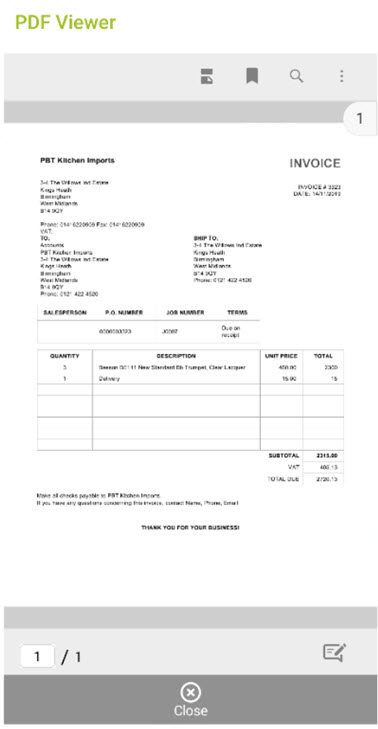
If an attachment has been added through Sicon Documents to the invoices that make up the payment, these will be visible on the attachments tab across the bottom:
Tapping on the attachment will allow the user to zoom in:
Once the payment has been checked, navigate back to the Details tab to approve or reject the payment from here.
Please note, editing the payment is not supported in the app. If the approver needs to make changes to the payment to only pay some of the lines, this will need to be done through the WAP desktop.
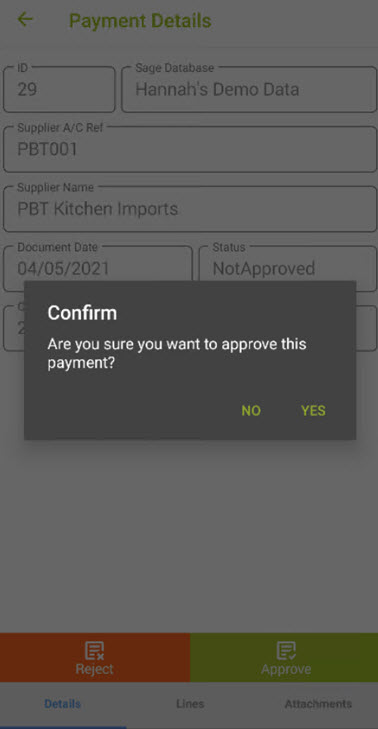
The user will be prompted to ensure they are happy to approve:
The payment will not show as approved in the WAP Desktop until Sync waiting has been run. As soon as the item has been approved, the sync counter at the top right will be updated to remind the user to sync the items:
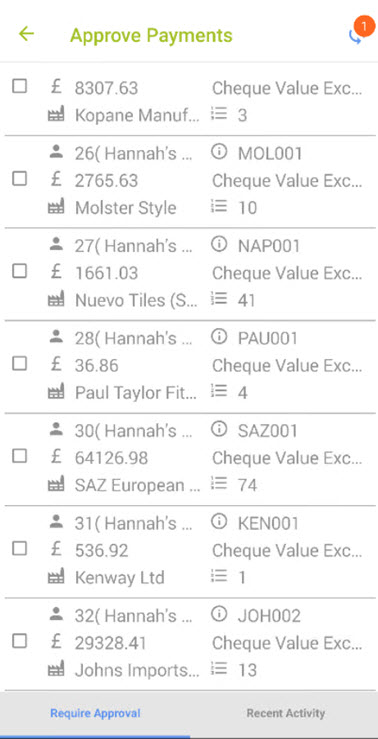
If wishing to approve more than one item at once after viewing the invoice detail, it is possible to select multiple items using the left-hand checkboxes, at which point the Approve and Reject options will appear again:
Please note in the app it is only possible to approve or reject the whole payment. Editing the payment is not supported and would need to be done in the Desktop instead.
Once approved, and Sync waiting run the payment will be available for the next approver if necessary. Once fully approved the payment will post to Sage and will be found in the Completed section of Existing Payments (for users with permissions to view all invoices):

10.2. Approved/Rejected Tab
Once items have been approved, they will display in the Approved/Rejected tab until Sync Waiting has been completed:
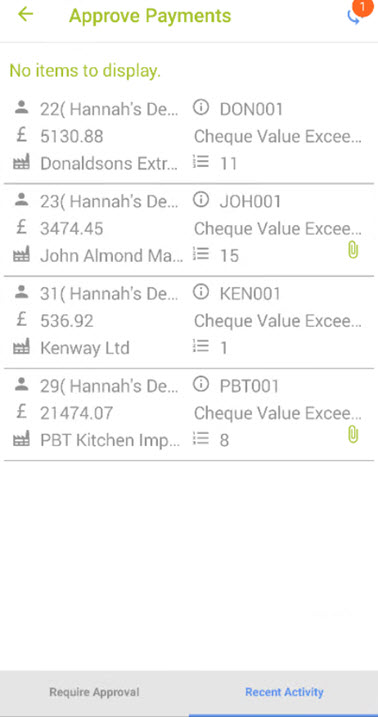
The payment will not show as approved in the WAP Desktop until sync waiting has been run.
11. Expense and Mileage Entry
For the purposes of this help and user guide it is assumed that users have already been configured and can raise expenses in the desktop. For any setup queries, please refer to the Expenses Help and User Guide.
From the Hamburger menu or Dashboard click on Expense:
The user will then be presented with three tabs at the bottom of the screen:
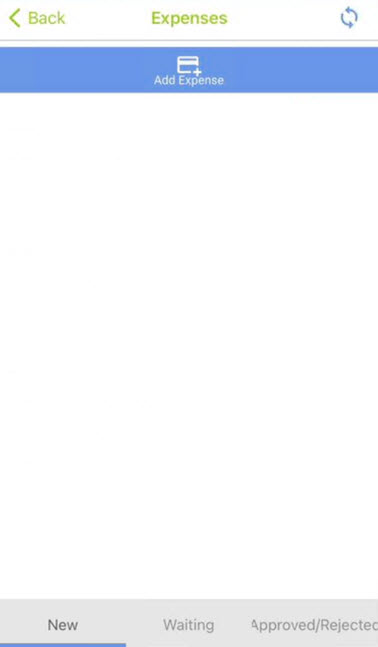
New: Displays any of the user’s new expenses that have been entered through the app and either not yet synced or not yet submitted. Expenses saved but not submitted through the desktop will also appear here. New expenses can be entered from this tab using the Add Expense at the top of the screen.
Waiting: Displays any expenses submitted by the user through the app and Sync waiting has since been run.
Approved/Rejected: Displays any expenses approved or rejected by the user in the app.
The sync icon at the top right indicates if any documents require a sync and will be updated as the user progresses through the app.
11.1. Expense Entry Header Tabs
From the New tab within this screen, click on the blue Expense button to open the expense detail tab:
Details tab
Enter the header information as required. As the claim progresses, this tab will be updated with the expense values.
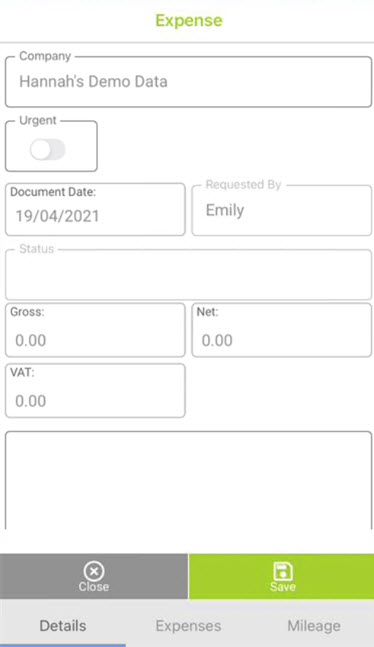
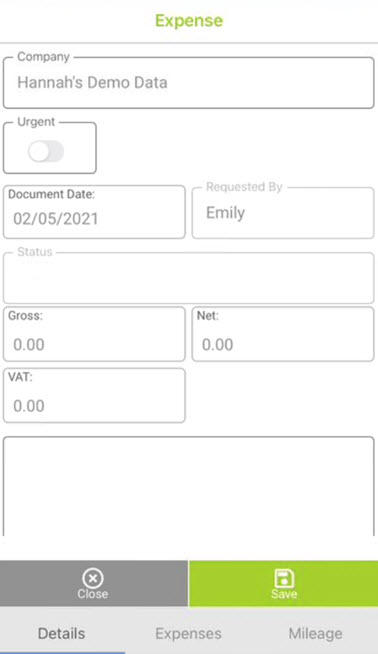
Company: this will be the user’s default company assigned to them within the WAP website, User profile settings and cannot be amended in the app. If users are required to enter expenses in multiple companies they will need to enter the other company through the desktop.
Urgent: click to indicate if the expense should be treated as urgent. A reason will need to be entered and this will send an immediate notification to the approver once the expense has been synced.
Document Date: the date of the overall expense claim.
Requested By: this will show the user who is submitting the claim and cannot be amended in the app.
Status: this will become populated once the expense has been submitted.
Gross / Net / VAT: these amounts will be populated once the expense has lines entered.
Notes: if the user wants to include any overall notes for the approver, these can be added here.
nominals have been added to the user and they need to reset the database to bring them through).
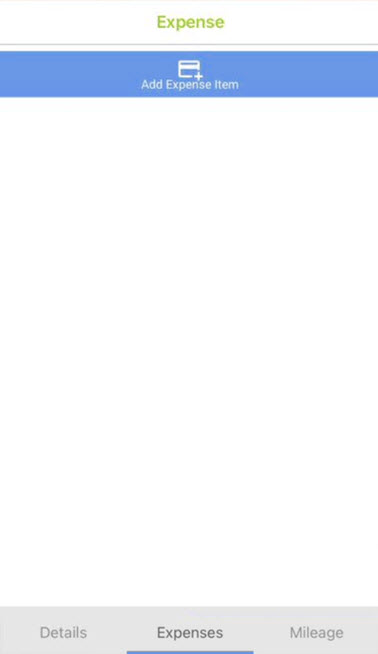
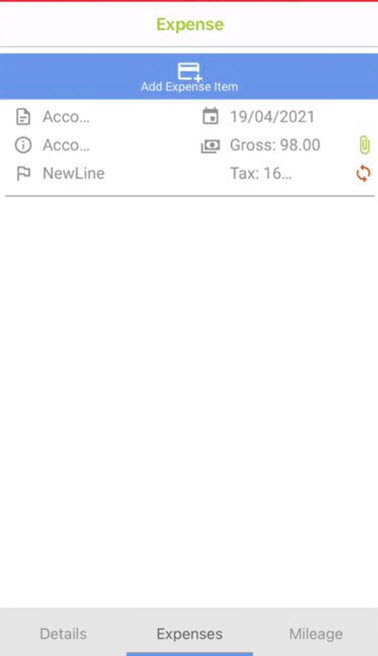
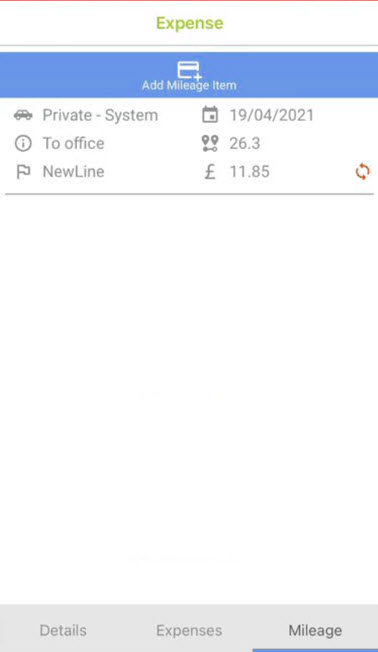
Expenses Tab
Expense lines are entered and visible on this tab, refer to the following sections for further information.
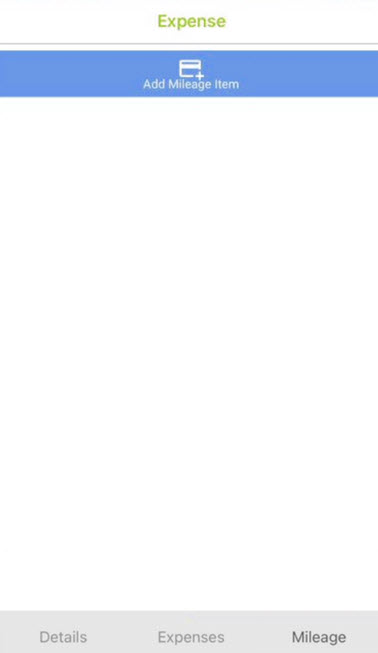
Mileage
Mileage lines are entered and visible on this tab, refer to the following sections for further information.
11.2. Expense Lines
Expenses Tab
Navigate onto the Expenses tab at the bottom and click on the Add Expense Item button to start adding expense lines:
Expense Line:
Enter the detail as required:
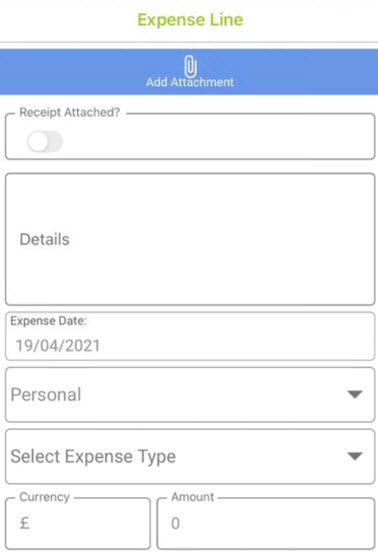
Add Attachment: the paperclip at the top allows the user to add attachments (this will take the user through to a separate screen where they can either navigate to their camera roll or take a new picture of a receipt to upload to the expense). NB. When adding the receipt, if the wrong image is incorrectly selected, slide the image to the left to be presented with an option to delete the incorrectly-added attachment.
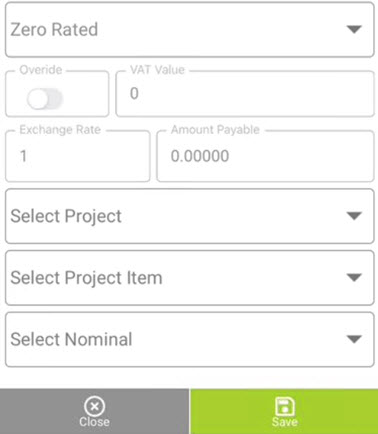
Receipt Attached: has a receipt been attached? Click the slider toggle if so – VAT will stay as zero if no receipt is attached.
Details: enter the description of the expense line.
Expense Date: enter the date of this expense line.
Payment Method: select whether this is a personal or company card claim. If a company card line, another selection field will appear showing the card linked with the expense.
Expense Type: select from the drop down list the correct expense type. If a memo has been linked with the expense item type, this will be visible to the user in an orange highlight. If no expense types are showing, first log out, reset the database in the settings on the app, then log back in and do another full sync. N.B. if resetting the database from within the app this way, favourite journeys will be lost (relevant if claiming mileage).
Currency: select the correct currency for the expense claim.
Amount: enter the full amount (including VAT) of the expense claim.
VAT rate: select the VAT rate (if this is not already populated correctly or needs changing).
Override: if the user has permission, they can highlight the override slider which will allow them to change the VAT value.
VAT Value: this value will get populated based on the receipt attached value and the expense type; if users have permission they may be able to override this value.
Exchange Rate: if another currency had been selected, the exchange rate will be populated with the exchange rate from Sage. Users can override if required.
Amount Payable: the expense amount to be paid to the user will show here and cannot be changed.
Select Project: if WAP has been linked with a costing module, select the correct project and activity (if applicable) from the drop-down list.
Select Project Item: if WAP has been linked with a costing module, select the correct project header from the drop-down list.
Select Nominal: the nominal code will get populated based from the expense type and if users have permissions, they will be able to override.
Once the detail of the line has been entered, click Save to be returned to the expense, where a summary of the expense line entered is displayed. Further lines can be added using the blue Add Expense Item button if required:
11.3. Mileage Lines
From within the expense, navigate to the Mileage tab on the bottom and click on the blue Add Mileage Item button to enter a new mileage claim:
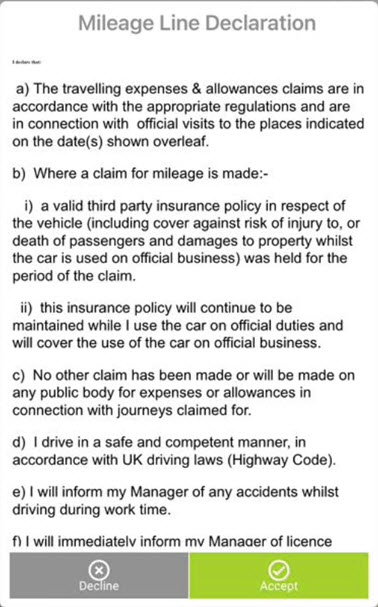
Like the desktop, users may be required to accept the mileage line declaration before details can be entered.
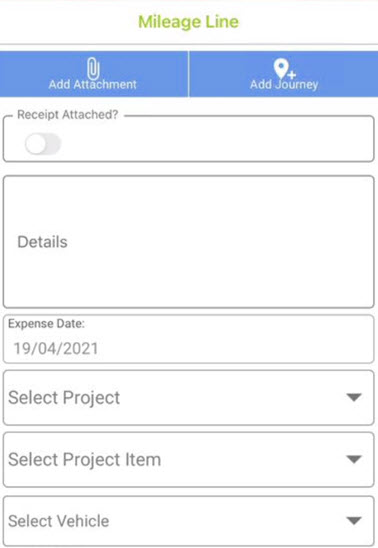
Add Attachment: the paperclip at the top allows the user to add attachments (this will take the user through to a separate screen where they can either navigate to their camera roll or take a new picture of a receipt to upload to the expense).
Add Journey: Clicking on this will take the user through to manually enter a previous journey (see the end of this current section for further information on adding journeys). Further information on adding a journey prior to completing an expense is covered in the next section. Note; this feature requires a Google API key to be configured in the WAP Desktop.
Receipt Attached: has a receipt been attached? Click the slider toggle if so.
Details: enter the description of the mileage line.
Expense Date: enter the date of this mileage line.
Select Project: if WAP has been linked with a costing module, select the correct project from the drop-down list.
Select Project Item: if WAP has been linked with a costing module, select the correct project header from the drop-down list.
Select Vehicle: from the drop-down list select the correct car for the mileage trip. Vehicles linked with the user will be shown here and users should always be able to select a private vehicle.
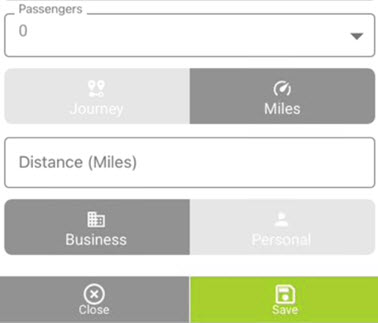
Passengers: enter any number of passengers included on this mileage trip.
Miles (if selected): enter the total distance for this mileage line.
Business/Personal: select whether the mileage journey was a business or personal trip.
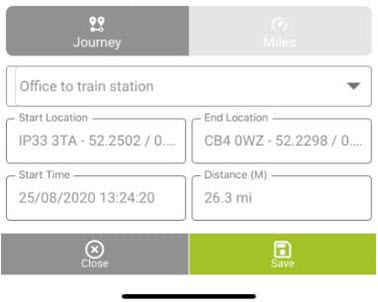
Journey (if selected): select the correct saved journey from the drop down list. Alternatively enter a start and finish postcode location to manually enter a journey. It is also possible to add a journey from the top right of this screen which can then be selected in the bottom half of the screen, as below.
Once the detail of the line has been entered, click Save to be returned to the expense where a summary of the mileage line entered is displayed. Additional lines can be added using the blue Add Mileage line button as required.
11.4. Add Journey (for mileage claims)
If using the WAP Mobile App, there is additional functionality to add a journey, as briefly explained in the last section. There are two methods to enter a journey through the app.
Note; this feature requires a Google API key to be configured in WAP.
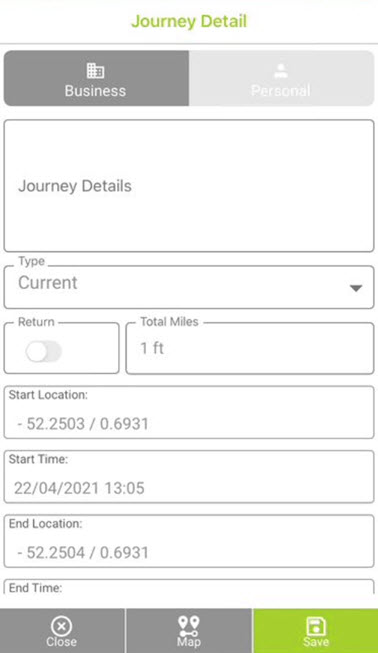
Save a journey manually (to use manually later on an expense claim)
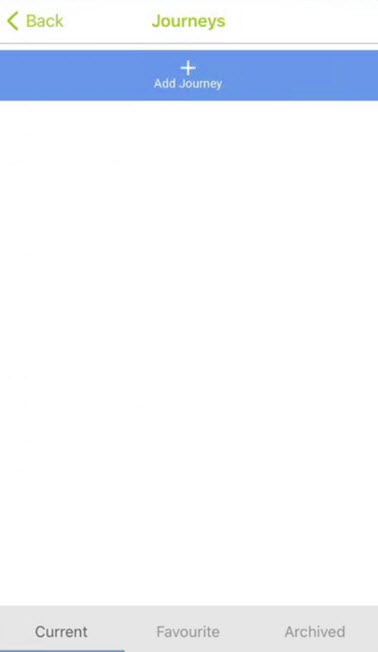
From the Hamburger menu navigate to Journeys:

From the next menu click the blue Add Journey button to enter a journey that can be used on a mileage claim later. There are 3 areas where these journeys can be stored; Current, Favourite, Archived. These can be navigated to using the tabs at the bottom of the Journey entry screen.
Once Add Journey has been selected, the journey information can be entered:
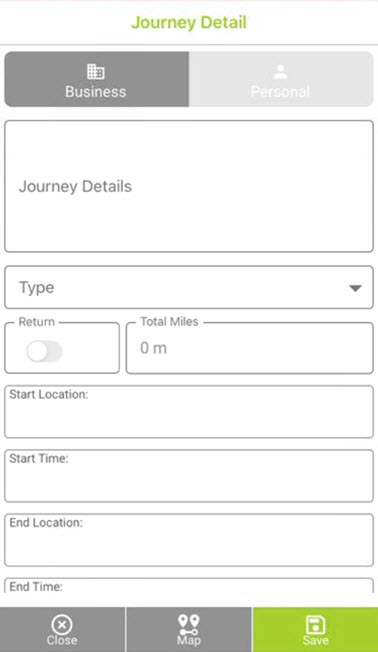
Business: Select if the journey should be recorded as business mileage
Personal: Select if the journey should be recorded as personal mileage
Type: Select from Current or Favourite. This will determine which tab the journey can be found in when viewing journeys, or adding to an expense mileage claim.
Return: Select if this is a return journey
Total Miles: This is an automated field that will be updated once the start and end locations have been entered. The distance entered is the distance that Google calculates between the Start and End point. It cannot include waypoints for diversions.
Start Location: Enter the postcode of the starting point. The app will check this is valid before the line can be saved. The Longitude and date cannot be changed.
Start Time: This will default to the current date and time and cannot be overridden.
End Location: Enter the postcode of the end point. The app will check this is valid before the line can be saved. The Longitude and date cannot be changed.
End Time: This will default to the current date and time and cannot be overridden.
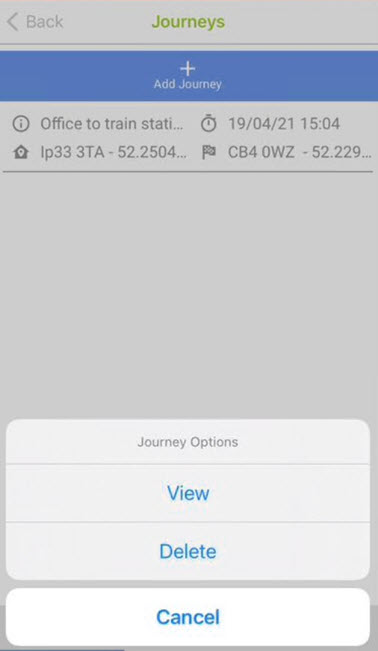
Once saved the journey can be found on the relevant Current or Favourite tab depending on what Type was selected. Clicking on the journey will provide options to view or delete the journey. If a mistake has been made, select View and amend as required. If the journey is no longer valid, the Type can be changed to Archive.
Note: If for any reason a user needs to reset the database within the App settings (for example sites who share devices and need to switch users regularly), if logged out of the app journeys will also be cleared at the point of resetting the database. It is therefore important to ensure these journeys and the related expense are submitted as soon as possible to avoid losing data.
Record a journey (to use manually later on an expense claim)
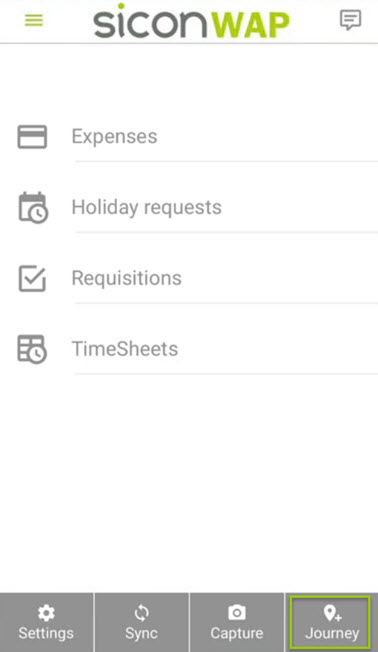
After logging into the app, select the Journey button from the bottom right of the Dashboard screen:
Click Start for the app to record the start location:
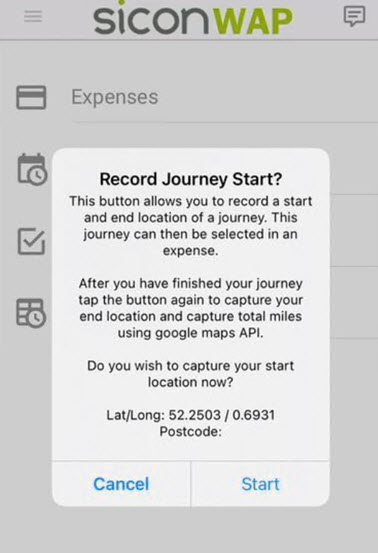
The journey button will change colour to indicate a journey recording is in process:

Tap the journey button again when arriving at the destination and click End to record the end location:
Enter the Journey Detail as described earlier in this section:
Populate the detail as detailed earlier in this section section.
Please Note; the Journey function records the start location and end locations, and uses Google API to calculate the distance between the two. The app does not track the exact route a user has driven and will therefore not use additional data in this feature. Some users may therefore prefer to enter mileage manually to ensure any diversions are taken into account.
11.5. Saving, Submitting and Syncing Expenses
Once the user is happy with the claim, navigate to the Details tab where the options for saving and submitting the claim will be available, and the value of the expense will have been updated too.
Click Save and choose to either Save, or Save and Submit:
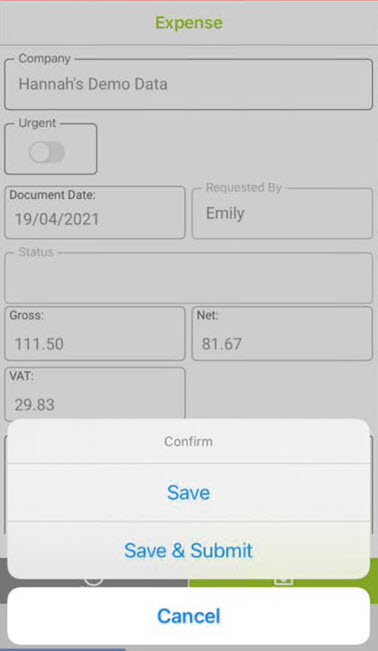
Save: clicking this will allow the user to save the expense before submitting; i.e. if extra lines need to be added before the expense is submitted.
Save and Submit: this will set the expense claim ready for approval. Sync waiting will need to be run before the expense will be uploaded and ready for approval in the Desktop or the approver’s mobile app.
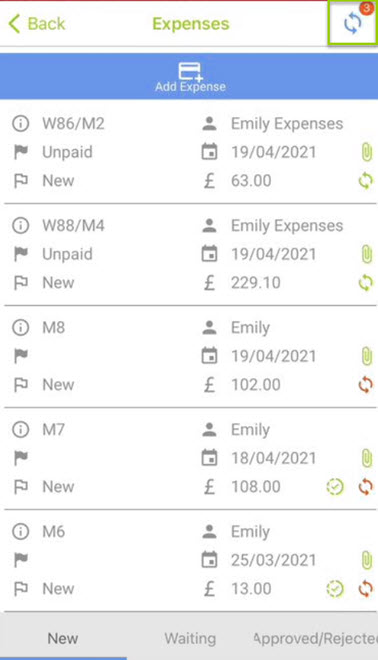
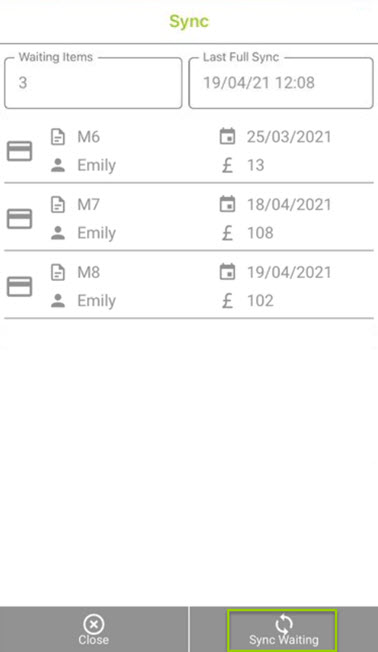
When all expenses have been entered, they will have a mobile ID beginning with M (M6 in the below example). Tap on the expense line to edit, submit or delete the expense. To upload them to WAP for approval, users will need to sync waiting by clicking on the sync icon at the top right:
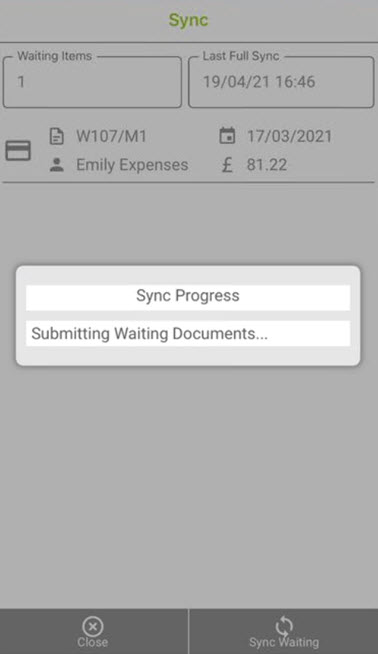
This will bring the user to a list of items waiting for sync and from here select Sync waiting to upload the expense to WAP:
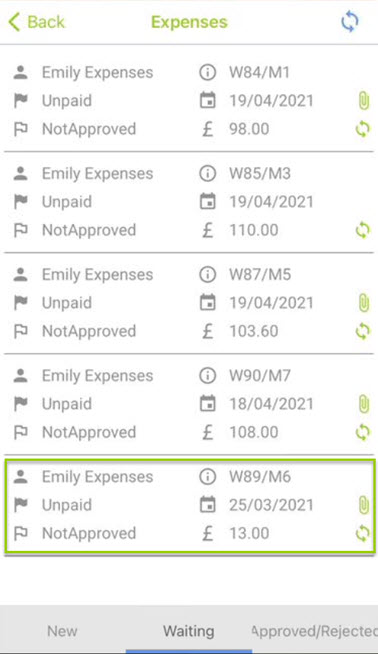
Once the sync has completed, the waiting items will disappear from the new tab, if submitted. Click on the Waiting tab and the submitted and synced expense(s) will show with a new WAP ID (in the example below, W89) which would be visible in the WAP website or for an approving user within the WAP App:
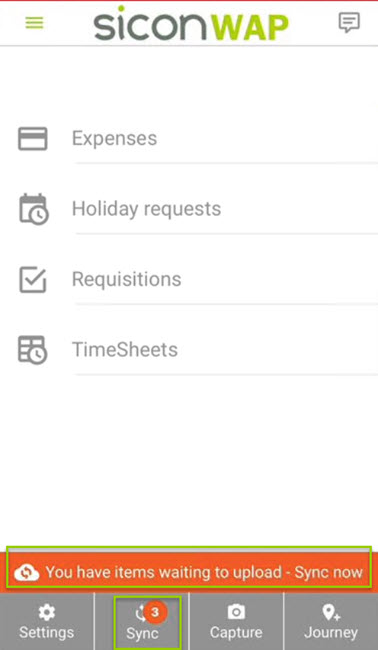
If the user navigates back to the main dashboard before they have run the Sync Waiting process, they will be reminded that they still have items waiting for this process, and the user can use the Sync button at the bottom to run the sync:
It is recommended to Sync waiting before logging out of WAP. It is also necessary to run this process if the user needs to Reset Database in the app settings (for example, if new projects or expense types have been added to the user and they need to reset the database to bring them through).
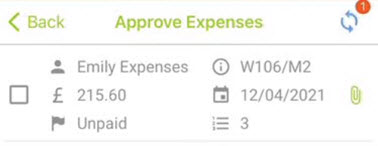
Please see below for a further explanation of the summary icons within the expenses section of the WAP App:
 | Requesting User |
 | Mobile / WAP ID |
 | Urgent |
 | Payment status (this will be updated as the expense progresses) |
 | Expense / Mileage Date |
 | Expense / Mileage includes attachments |
 | The current status of the expense / mileage |
 | The value of the expense / mileage |
 | Expense / mileage has been submitted but needs syncing |
 | Expense / mileage requires Syncing |
 | Expense / mileage has completed a sync with WAP |
 | Sync waiting required |
 | Sync waiting required |
12. Expense Approval
Users should do a full sync prior to approval to ensure they have the latest items awaiting approval.
When the sync has been run, the amount of items for approval will be displayed on the dashboard. In this example, the approver has 2 expenses for approval:
Tap on the number next to expenses to be brought into the items awaiting approval. Tapping on the Expenses header will take the user to a new expense, so it is important to tap the right-hand side with the number.
12.1. Require Approval Tab
The user will be taken to the Require Approval tab where they have two ways the expense can be approved. Tap on the tick box next to the expense to either approve or reject:
Or alternatively, tap on the expense itself to view in more detail; click on the Lines tab to view the individual lines.

If attached, the image can be clicked on to zoom in.
The expense can be approved or rejected from the Details screen.
12.2. Approved/Rejected Tab
Once items have been approved, they will display in the Approved/Rejected tab:
The expense will not show as approved in the WAP Desktop until a sync has been run.
Once the required expenses have been approved, the approver will need to sync waiting for these to feed back to WAP. Click on the sync icon at the top right to sync waiting.
Sync items:
Once it is complete, it will either move onto the next approver, if applicable, or if fully approved, it will show in the users’ Complete section of the WAP Website and post to Sage in the PL Supplier account:
13. Holiday Entry
For the purposes of this help and user guide it is assumed that users have already been configured and can raise holidays in the desktop. For any setup queries, please refer to the Holidays Help and User Guide.
From the Hamburger menu or Dashboard click on Holiday Requests:
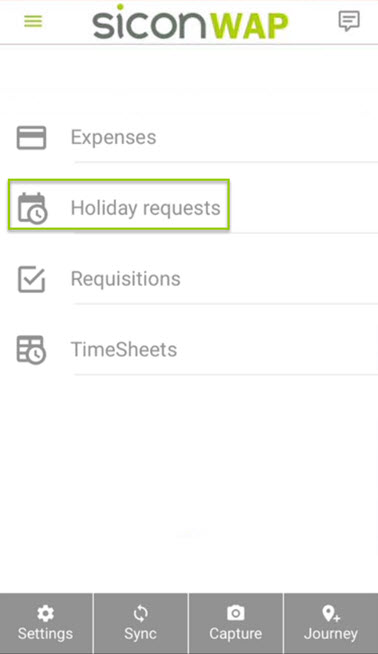
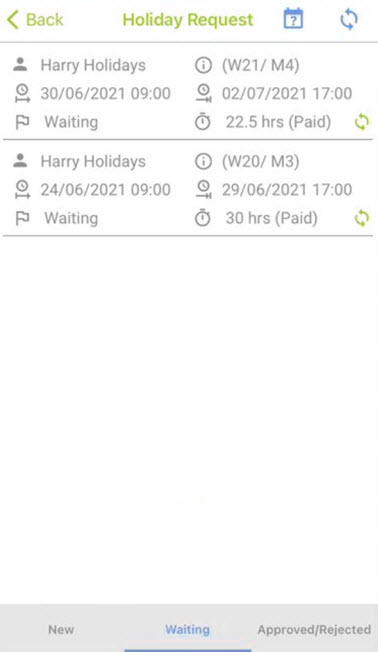
The user will then be presented with three tabs at the bottom of the screen:
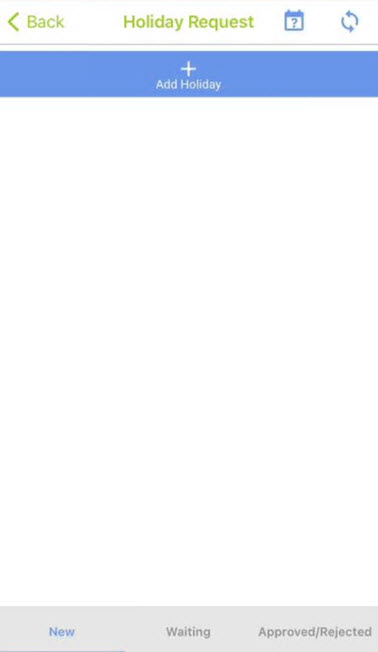
New: Displays any of the user’s new holidays that have been entered through the app and either not yet synced or not yet submitted. Holidays saved but not submitted through the desktop will also appear here. New holidays can be entered from this tab using the + Add Holiday at the top of the screen.
Waiting: Displays any holiday submitted by the user through the app and Sync waiting has since been run.
Approved/Rejected: Displays any holidays approved or rejected by the user in the app.
The sync icon at the top right indicates if any items require a sync and will be updated as the user progresses with documents on the app.
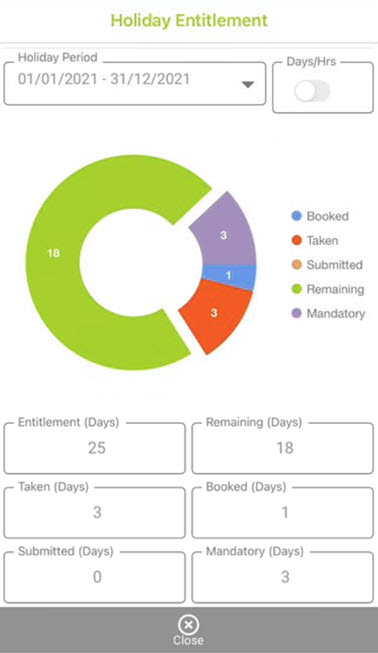
Clicking on the calendar icon at the top right shows the user their Holiday Entitlement.
13.1. Holiday Line
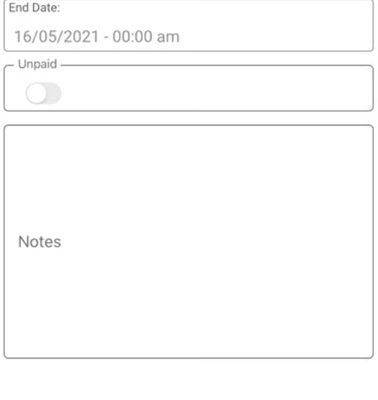
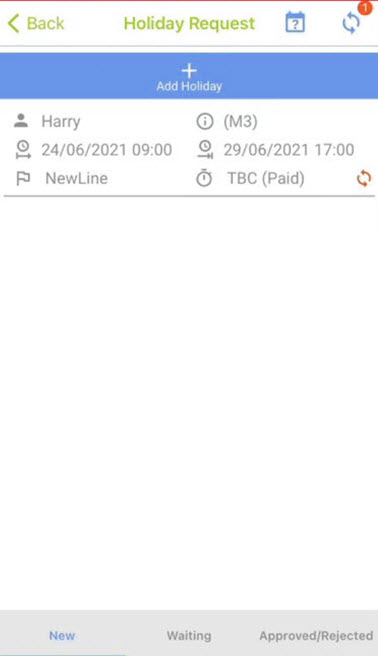
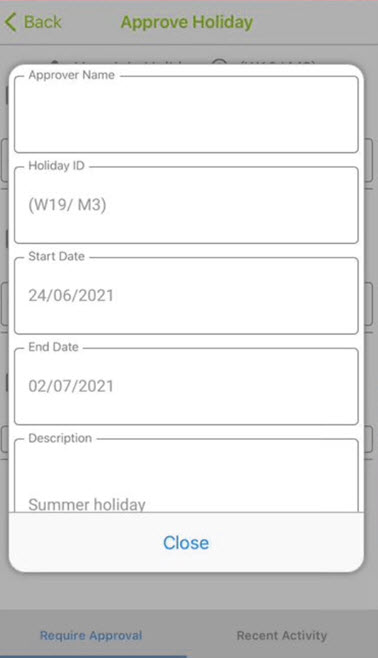
From the new tab, select + Add Holiday to be brought into the Holiday Header details where the main details of the holiday request can be entered:

Calendar icon: The user’s holiday entitlement can be viewed by clicking on the icon at the top right.
Start Date: Tap to enter the start date of the holiday. The user will need to select whether this will start in the morning (AM shift) or in the afternoon (PM shift). The times of the shifts can be ignored.
End Date: Tap to enter the end date of the holiday. The user will need to select whether this will end in the morning (AM shift) or in the afternoon (PM shift). The times of the shifts can be ignored.
Unpaid: If this is to be unpaid rather than annual leave, select the slider.
Notes: Add any notes if required, these may be visible to colleagues in the Holiday Calendar. This is an optional field.
Close: Close the holiday request without saving changes.
Save: Save and close the holiday request.
Like the desktop, only one holiday line can be created and submitted per holiday request. Tap Add Holiday to add further holiday dates.
13.2. Saving, Submitting and Syncing Holiday Requests
Once the user is happy with the holiday and has saved it, they will be returned to the Existing Holiday Header tabs and this holiday will be sitting in the New tab.
In the example above, the top item is the one that’s just been saved. This has been given a mobile ID 3 (starting with M). It still requires a sync before it will be given a WAP ID (starting with W), and submitting before the approver will see the holiday request.
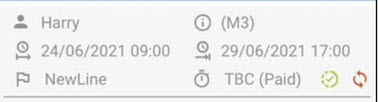
The icons on the existing holidays screen are explained below:
 | Holiday Entitlement |
 | There are (2) items that need to be synced |
 | Requesting User |
 | Mobile ID (M#), and/or WAP ID (W#) if sync has taken place since order was raised |
 | Start Date |
 | End Date |
 | Holiday Status |
 | Annual Leave or Unpaid Leave |
 | Submitted but needs a sync to update WAP |
 | Needs a sync to update WAP |
 | Sync complete and item in WAP |
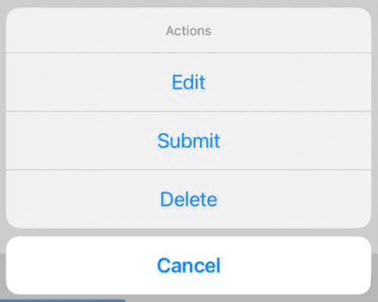
When the user is ready to submit the item, tap on the holiday and select Submit:
Tap on the holiday request to submit the holiday.
The document will be updated with a Submitted icon, but the sync icon is red which indicates it still requires the user to sync waiting before the holiday will show in the WAP Desktop, and be available for the approver.
The user can sync from the top right Sync prompt, or by clicking Back and navigating to the Dashboard and sync waiting from the bottom of the screen there.
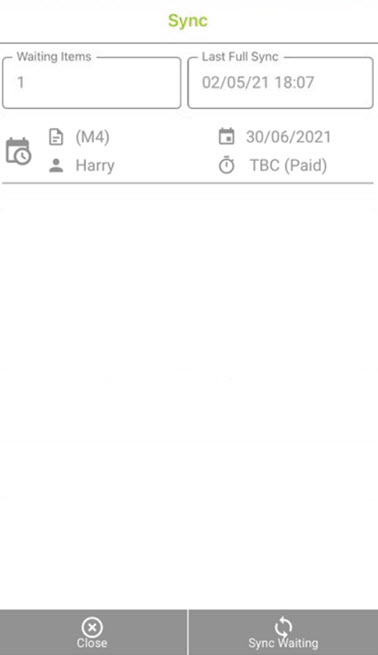
From here, tap Sync Waiting. In the above example, ID3 was already submitted and a sync run, but the user has added an additional holiday which requires Sync Waiting to be run again. This process will update WAP once the sync is complete.
After Sync waiting, submitted documents will move to the Waiting tab. If a document has been saved only it will stay in the New tab. In both examples they will be given the WAP ID that links the mobile requisition to the WAP desktop. Note, the Mobile ID is only relevant for the user during submission and navigation, the WAP ID is the ID that is best used to search for holidays in the desktop. Our example above, ID3 has now moved to the Waiting tab and been allocated WAP ID 20:
On the desktop, the item is visible in the Submitted tab:

The approver will also receive a notification on their desktop that it is waiting for their approval:
Please note, unlike the WAP Desktop, users will not see any conflicts when submitting holidays in the app and are unable to view the holiday calendar for other users. If necessary, the holiday calendar should be checked on the desktop version of WAP prior to submitting any requests, or alternatively users can book holiday through the desktop and will see a warning at the point of submission if there are any conflicts.
14. Holiday Approval
Approvers should do a full sync prior to approval to ensure they have the latest items awaiting approval.
When the sync has been run, the amount of items for approval will be displayed on the dashboard. In this example, the approver has 3 Holiday Requests for approval:
Tap on the number next to Holiday Requests to be brought into the items awaiting approval. It is important to click the number to the right of the document name, as tapping on Holiday Requests will take the user to enter a new holiday request for themselves rather than approving.
14.1. Require Approval Tab
Once Holidays approval has been tapped, the approver will be presented with the Require Approval tab which lists out all holidays awaiting approval:
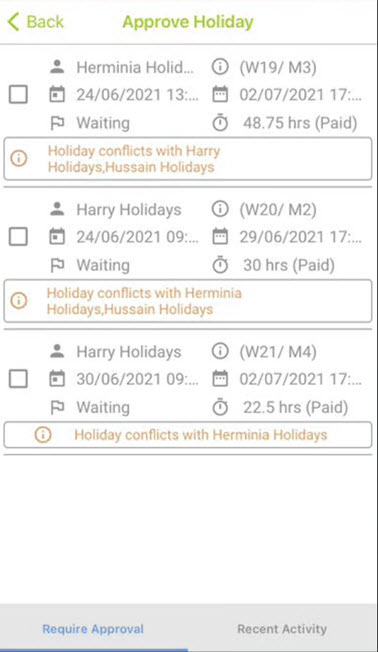
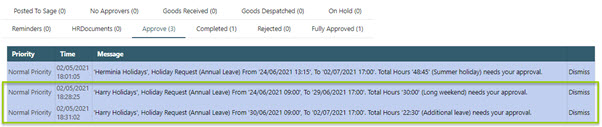
The approver can see from a quick glance the holiday requests for approval and if there are any conflicts these will be highlighted. To view further detail on holiday conflicts, the approver would need to log into the Desktop version of WAP to view these and more detailed information such as entitlement. For example, above Harry has submitted two holiday requests, ID20 and ID21. If one of these were viewed in the desktop they would show as an extension, because one holiday ends and the next begins. This level of information is not visible in the app.
The main Holiday information is available in this screen. If preferred, tap on the holiday to be shown the holiday line information, including a description if given.
Tap close to come out of the line information and back to the approve screen. When ready, select the items for approval using the checkboxes on the left. Approve and Reject options will appear at the bottom of the screen.
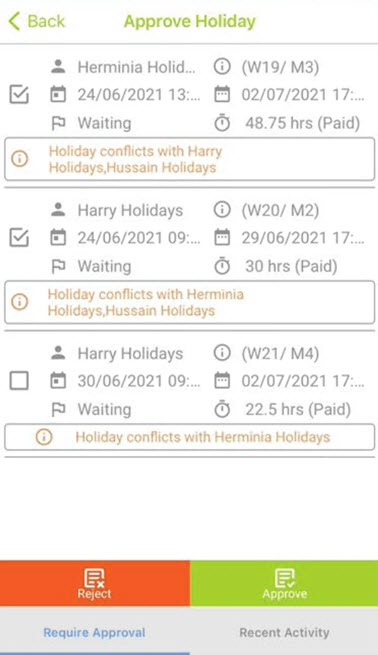
Approve as required and confirm the approval.
The holiday will not show as approved in the WAP Desktop until Sync waiting has been run. As soon as the item has been approved, a sync will be prompted. Either sync from there or navigate back to the Dashboard to use the sync option at the bottom of the dashboard.
Once approved, and Sync waiting run the order will be available for the next approver if necessary. Once fully approved the order will be posted to Sage with a PO number:

The user who raised the item will also receive a notification on their desktop:

14.2. Approved/Rejected Tab
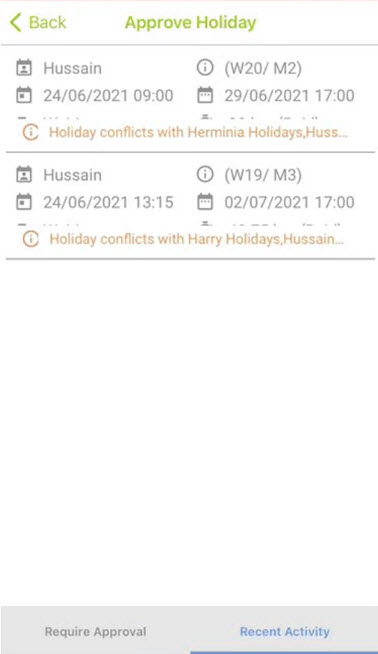
Once items have been approved, they will display in the approver’s Recent Activity tab until Sync Waiting has been run:
15. Timesheet Entry
For the purposes of this help and user guide it is assumed that users have already been configured and can raise timesheets in the desktop. For any setup queries, please refer to the Timesheets Help and User Guide.
From the Hamburger menu or Dashboard click on Timesheets:
The user will then be presented with three tabs at the bottom of the screen:
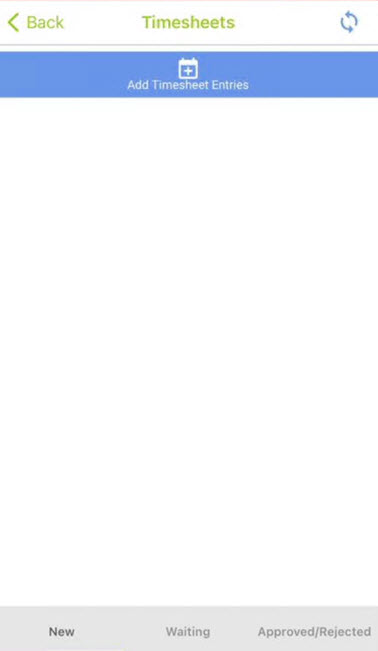
New: Displays any of the user’s new timesheets that have been entered through the app and either not yet synced or not yet submitted. Timesheets saved but not submitted through the desktop will also appear here. New timesheets can be entered from this tab using the Add Timesheet at the top of the screen.
Waiting: Displays any timesheet submitted by the user through the app and Sync waiting has since been run.
Approved/Rejected: Displays any timesheets approved or rejected by the user in the app.
The sync icon at the top right indicates if any items require a sync and will be updated as the user progresses with documents on the app.
15.1. Timesheet Line (initial)
From the new tab, select Add Timesheet Entries to be brought into the Timesheet line details where details of the first timesheet request can be entered:

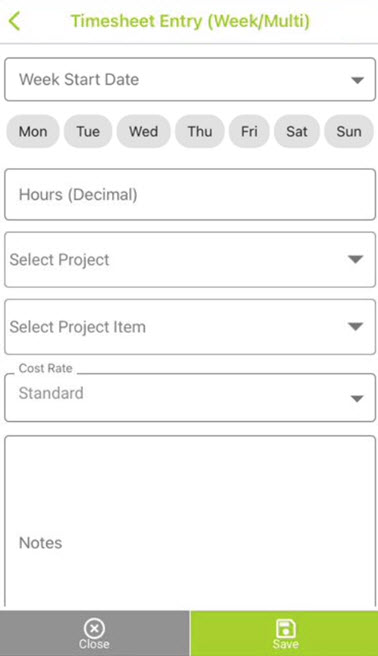
This initial view allows users to enter multiple days at a time. So for example, a user who only books time to overheads all week may complete their timesheet in one step by selecting Monday to Friday and 8 hours. This would result in a timesheet of 5x days at 8 hours.
More likely, users will need to enter additional entries after this initial line to enter time for other projects until they have reached their working week, which is covered in the next section.
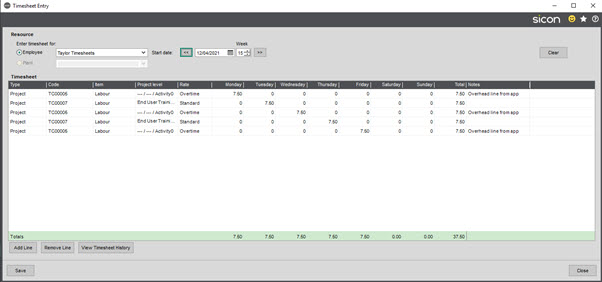
Week Start Date: pick the week start date the timesheet is due to be entered for.
Days: Select the days for the days and hours being entered against this project.
Project: Select the project for the days and hours being entered. If Phases, Stages and Activities are enabled in Sicon Projects, an additional field will appear and the user will be prompted to choose the stage, or if there is only one this will be defaulted.
Project Item: Select the project header or item for this time.
Cost Rate: Select the cost rate for this time.
Notes: Add any notes if required.
Close: Close the timesheet without saving changes.
Save: Save and close the timesheet .
Once saved, the user will be returned to the Existing Timesheets screen and the hours saved will be visible:
15.2. Timesheet Line (additional)
To add additional hours, the user can repeat the same steps as in the last section. Any hours currently saved will be displayed in the Week Start Date field, and the user will be prompted at the point of saving the line that the hours will be added to the existing timesheet.
Alternatively, tap on the existing timesheet from the New tab and select Edit:
This will bring the user to an alternative week view where they can edit existing lines or add new time each day using the Add Time Entry button once the correct day has been selected at the top:
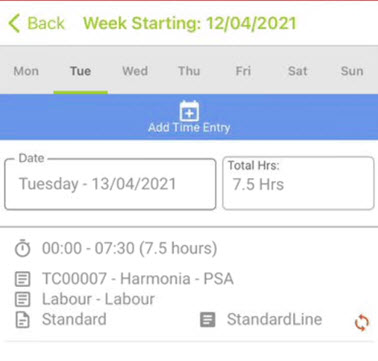
Multiple entries can then be added as required to make up the timesheet.
15.3. Saving, Submitting and Syncing Timesheet Requests
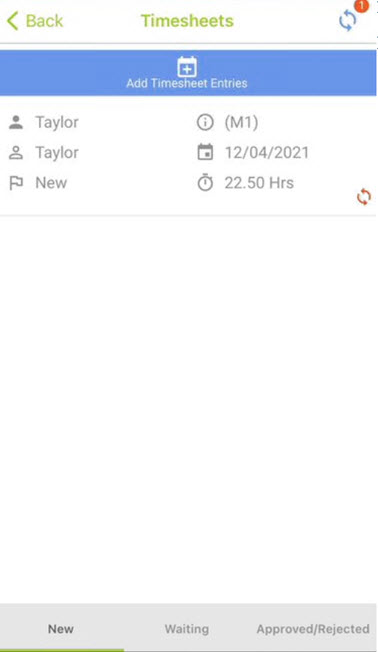
Once the user is happy with the timesheet and has saved it, the timesheet will be sitting in the New tab.
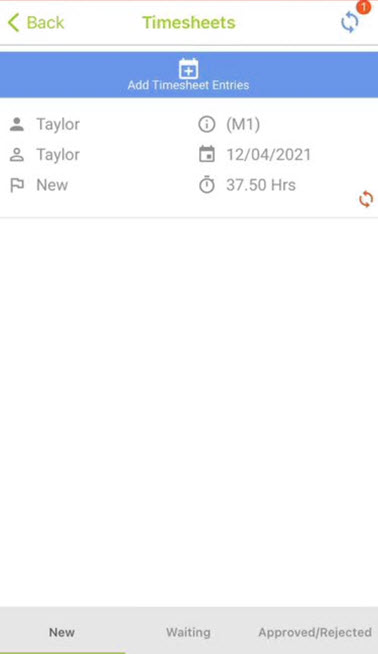
In the example above, this has been given a mobile ID 1 (starting with M). It still requires a sync before it will be given a WAP ID (starting with W), and submitting before the approver will see the holiday request. It is the WAP ID that will enable a user to find their timesheet in the desktop, the Mobile ID is a temporary ID only relevant to the user at this point.
The icons on the existing holidays screen are explained below:
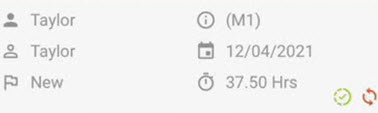
 | There are (2) items that need to be synced |
 | Submitting User: The user who has submitted the timesheet. Currently the app does not allow users to submit timesheets on behalf of other users. |
 | Mobile ID (M#), and/or WAP ID (W#) if sync has taken place since timesheet was raised |
 | Requesting User: The user the timesheet has been requested for. Currently the app does not allow users to submit timesheets on behalf of other users. |
 | Date: the start date of the week the timesheet has been entered for |
 | Timesheet Status |
 | Hours on timesheet |
 | Submitted but needs a sync to update WAP |
 | Needs a sync to update WAP |
 | Sync complete and item in WAP |
When the user is ready to submit the item, tap on the timesheet and select Submit:

The user will be asked to confirm they wish to submit the hours and the document will be updated with a Submitted icon, but the sync icon is red which indicates it still requires the user to sync waiting before the holiday will show in the WAP Desktop, and be available for the approver.
The user will be asked to confirm they wish to submit the hours and the document will be updated with a Submitted icon, but the sync icon is red which indicates it still requires the user to sync waiting before the holiday will show in the WAP Desktop, and be available for the approver.
From here, tap Sync Waiting. This process will update WAP once the sync is complete.
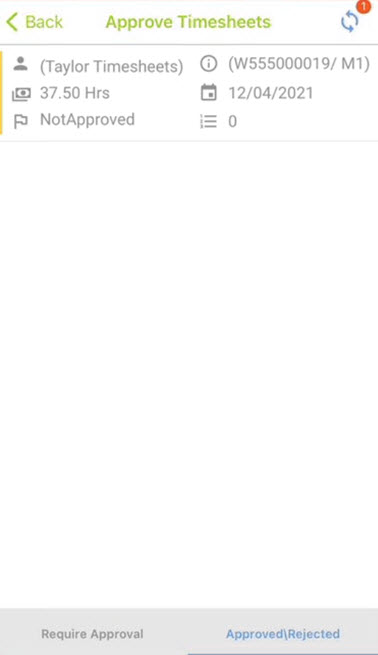
After Sync waiting, submitted documents will move to the Waiting tab. If a document has been saved only it will stay in the New tab. In both examples they will be given the WAP ID that links the mobile requisition to the WAP desktop. Note, the Mobile ID is only relevant for the user during submission and navigation, the WAP ID is the ID that is used to search for timesheets in the desktop. Our example above, ID1 has now moved to the Waiting tab and been allocated WAP ID 555000019:
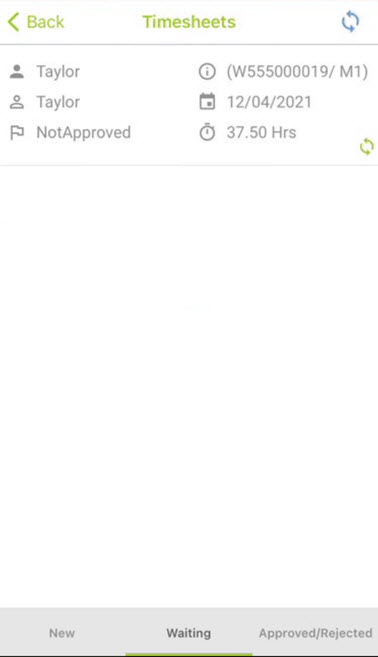
As this setup is configured to use Sage Sicon Timesheets, the ID is also available within Sage.
On the desktop, the item is visible in the Submitted tab:

The approver will also receive a notification on the desktop that it is waiting for their approval:
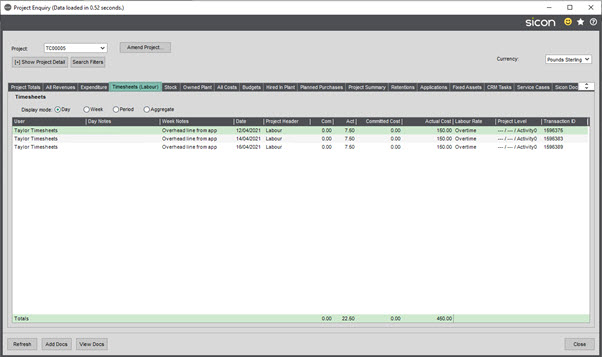
The time is also visible within Projects, along with any notes added to the timesheet during submission:
16. Timesheet Approval
Approvers should do a full sync prior to approval to ensure they have the latest items awaiting approval.
When the sync has been run, the amount of items for approval will be displayed on the dashboard. In this example, the approver has 1 timesheet request for approval:
Tap on the number next to Timesheets Requests to be brought into the items awaiting approval. It is important to click the number to the right of the document name, as tapping on Timesheets will take the user to enter a new timesheet for themselves rather than approving.
16.1. Require Approval Tab
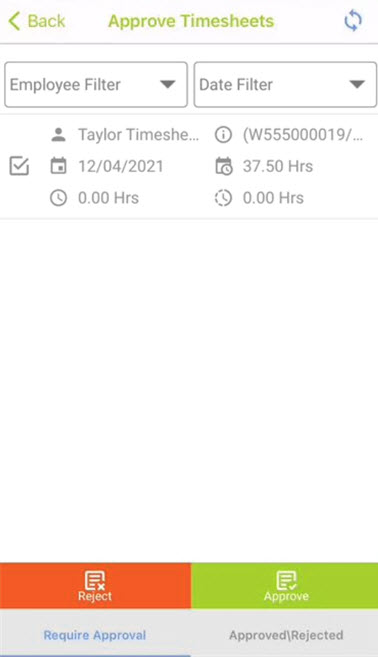
Once Timesheets approval has been tapped, the approver will be presented with the Require Approval tab which lists out all timesheets awaiting approval:
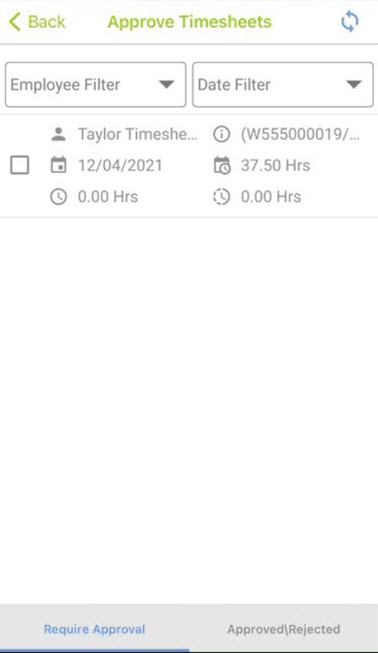
In this example, there is only one timesheet which is easy to see. If approvers have multiple timesheets, they may prefer to use the filters at the top to search by employee or week start date.
The approver can see from a quick glance the timesheet requests for approval and the number of hours on the timesheet. To view further detail on where the hours have been coded to, tap on the timesheet to be shown an option to download the entries (this acts as a prompt as downloading the project information will use data):
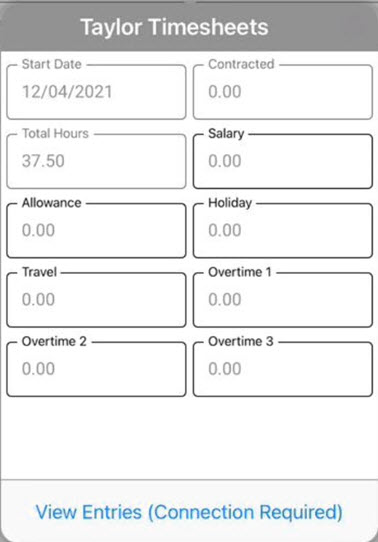
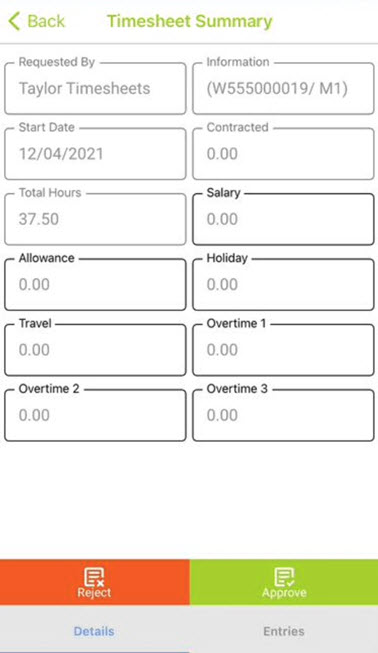
View Entries to see the specific detail that makes up the timesheet. From here the approver will see two tabs.
Details
Main header information already viewed, and also where the approver can approve or reject this individual timesheet.
Entries
Navigate to the Entries tab to view the specific timesheet hours that make up this timesheet:
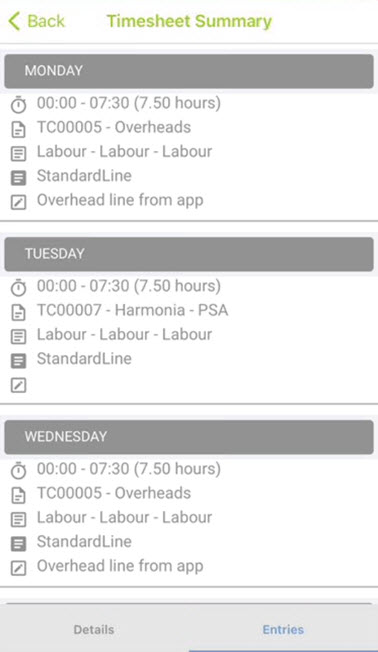
The user can also tap on any entry to see this same information.
Once reviewed, navigate back to Details and approve or reject from here. Or alternatively, use the Back navigation button at the top left to navigate back to the main approval screen.
When ready, select the items for approval using the checkboxes on the left. Approve and Reject options will appear at the bottom of the screen.
Approve as required and confirm the approval.
The timesheet will not show as approved in the WAP Desktop until Sync waiting has been run. As soon as the item has been approved, a sync will be prompted. Either sync from there or navigate back to the Dashboard to use the sync option at the bottom of the dashboard.

Once approved, and Sync waiting run the timesheet will be available for the next approver if necessary. Once fully approved the timesheet will be posted to Sage and move to the requesting user’s Approved Timesheets section of the Existing Timesheets screen in the desktop:

The user who raised the item will also receive a notification on their desktop:
Time will be posted to the project as an actual cost:
16.2. Approved/Rejected Tab
Once items have been approved, they will display in the approver’s Approved/Rejected tab:
17. Trouble Shooting
Before logging a case with your business partner or the Sicon Support team, below are some common errors and troubleshooting steps that may assist users. If a support case still needs to be raised, please include steps taken to replicate the error prior to logging a case.
| Message | Troubleshooting Tips |
“Endpoing Address Error Currently unable to connect to the WAP service. Tap ‘work offline’ to continue or check connection”
| Ensure that the user receiving the message is definitely connected to a network or WiFi. Ensure that the user can manually navigate to the endpoint address from within ‘My Settings’ in WAP through a browser on their mobile device. The top of the page should say something like “You have created a service. To test this service, you will need to create a client and use it to call the service. You can do this using the svcutil.exe tool from the command line with the following syntax”. If it says “This site can’t be reached”, this indicates the service is not running (or if first install, perhaps App website has not been configured correctly). Try restarting the WAP Service (see next point). This could also be a result of the Sicon WAP Service not running. Restarting the Sicon WAP Service may resolve this. The Sicon WAP Service can be restarted by whoever maintains the server where WAP is held (usually IT departments, or sometimes Business Partners). |
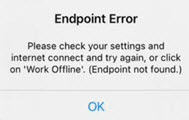 “Endpoint Error | This is most likely a result of the Endpoint address not being entered correctly on the settings screen. Check the endpoint address has been entered correctly and try again. |
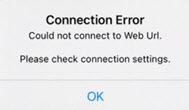 “Connection Error Could not connect to Web Url. Please check connection settings.
| This could be the result of the App no longer being able to connect with the WAP Service, and the user would usually have a warning whilst working in the app to say they’re now working off line.
It may be that internet connection has dropped out. Please check whether other web pages can be navigated to and if not, try again when network coverage is regained. Alternatively, this could also be a result of the Sicon WAP Service not running. Restarting the Sicon WAP Service may resolve this. The Sicon WAP Service can be restarted by whoever maintains the server where WAP is held (usually IT departments, or sometimes Business Partners). |
 Sync Failed | When doing a full sync, it may be that the Sicon WAP Service has stopped since the last sync was completed. It may be that the endpoint address is not accurate.
Make sure the WAP Service is running and the endpoint address is correct in the App settings screen. The Sicon WAP Service can be restarted by whoever maintains the server where WAP is held (usually IT departments, or Business Partners). Alternatively, it could be because of the amount of information required to sync, in which case increasing the “Connection timeout” within the Advanced settings section of the of the WAP App settings may assist. |
WAP Version Check “The current WAP Service version (210.X.X) is not compatible with this version of the WAP Mobile App (21.X.X). Please contact your system administrator.” | This may occur if a hotfix has been applied to the WAP Desktop and Service. Check with your WAP Super User, most likely the latest release of the WAP App will need to be installed from the relevant app store. |
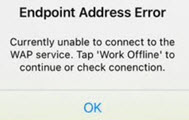

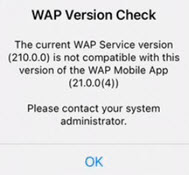
If a support call does need to be logged, it is recommended that prior to logging a call, if possible, to download TeamViewer’s QuickQupport app onto the mobile device. BP or Sicon support teams would then be able to assist mobile users through TeamViewer’s remote software which allows sites to connect in with the mobile user directly. This may also be beneficial if the mobile user is new and needs some assistance on the use of the app.