Intercompany Help and User Guide
The Intercompany Help and User Guide will take you through the features and settings for the Sicon Intercompany module for Sage 200.
Search the page by pressing Ctrl + F (windows) or CMD +F (Mac) on your keyboard.
Back to all user guidesProduct overview
Help and User Guide maintained for Intercompany version v221.0.0 and upwards
The Sicon Intercompany Module allows for quick and easy transactions from one company, whilst simultaneously posting the corresponding complimentary postings in other Sage companies. This removes the need to double or sometimes triple entering of data when intercompany-billing or exchanging stock. All relevant postings are made instantly, without the need to log out of one company and into another. The module will dynamically create either journal entries or Purchase and Sales invoice/credits/orders depending on the VAT number of the affected companies.
Foreign Currency
The Sicon Intercompany Module will convert foreign currency as required between the company’s base currency and/or the bank account currency on each side of the transaction. The exchange rate used for the transactions is taken from the currently selected company.
The Sicon Intercompany Help and User Guide will take you through the features and settings for the Intercompany module.
1. Pre-requisites
The Sicon Intercompany Module requires the following details to be configured for setup and training:
- Companies – with Tax Registration details (VAT)
- Bank details – for Cashbook (if required)
- Intercompany Customer Accounts (if companies are not in same VAT group)
- Intercompany Supplier Accounts (if companies are not in same VAT group)
- Nominal Codes
- Stock Internal Area (if required)
2. Installation
Intercompany requires the installation of both the Sicon Intercompany and Sicon Intercompany Reports add-on packages, installed into Sage 200 Administration in the normal way. As with other Sicon modules, the installation also requires the installation of the Sicon Common Components and Sicon Common Components Reports add-ons. The order that these are installed in does not matter. Once installed, Intercompany features are then available to be added to User roles in the normal way.
Further details are available at https://www.sicon.co.uk/user-guide/installing-upgrading-sicon-additions-sage-200/
3. Setting Up
3.1. VAT Registration Numbers
During the processing on intercompany transactions, the VAT registration numbers of the companies are checked. Where companies are within a VAT group, the VAT numbers need to match.

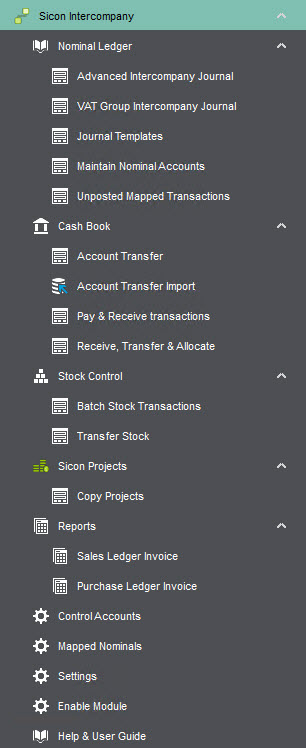
3.2. Creating Nominal Codes
Nominal codes to be used between each intercompany need to be set up in each company.
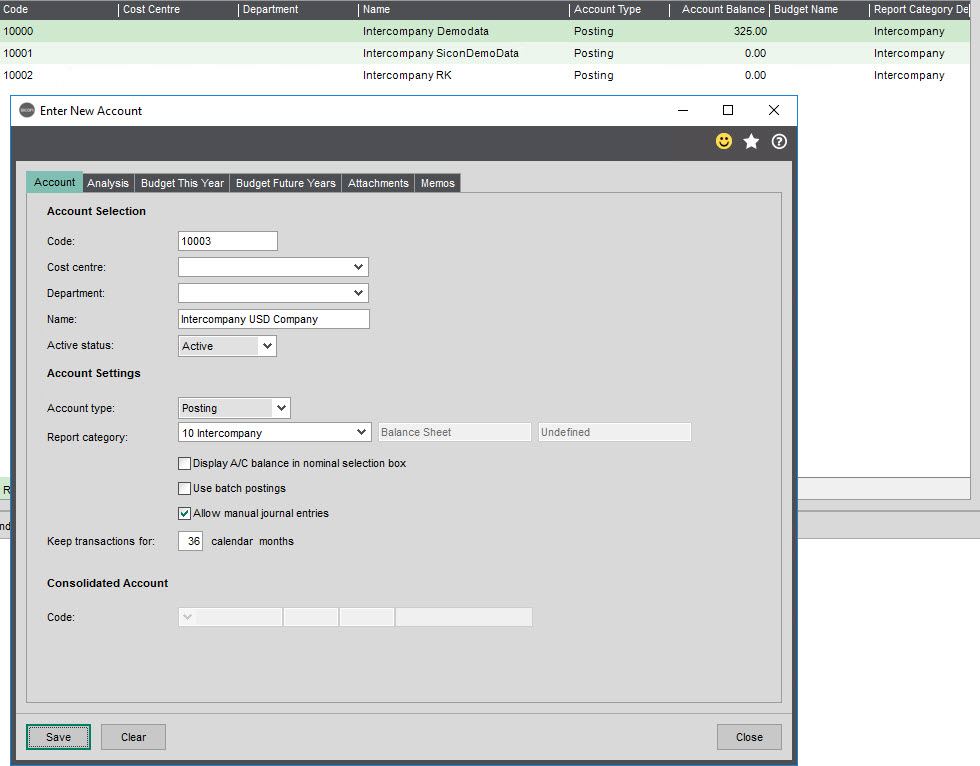
3.3. Creating Intercompany Customer Accounts
Customer accounts for each of the other companies not in the same VAT group need to be created, if they don’t already exist. These are the accounts that the Intercompany module will use for transactions between companies e.g. when posting SL invoices.
This control account can be in whichever currency you desire.
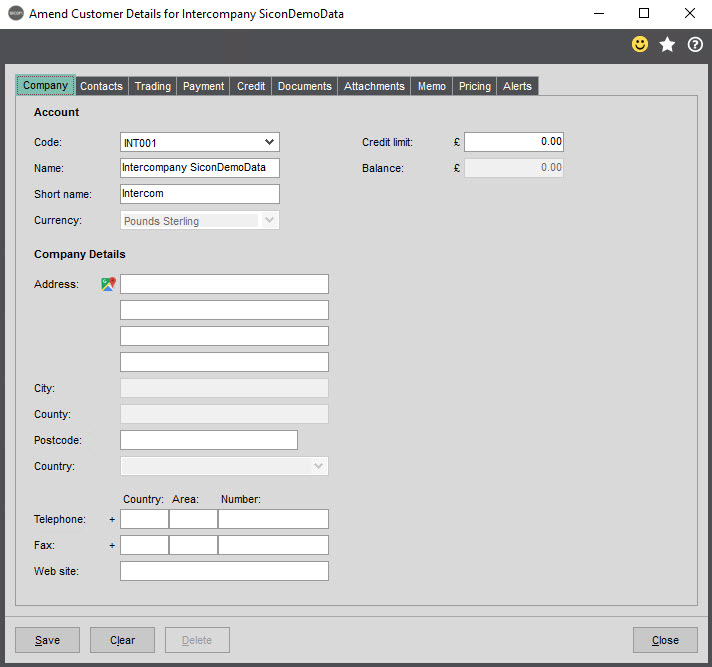
3.4. Creating Intercompany Supplier Accounts
Supplier accounts for each of the other companies not in the same VAT group need to be created, if they don’t already exist. These are the accounts that the Intercompany module will use for transactions between companies e.g. when posting PL invoices.
This control account can be in whichever currency you desire.
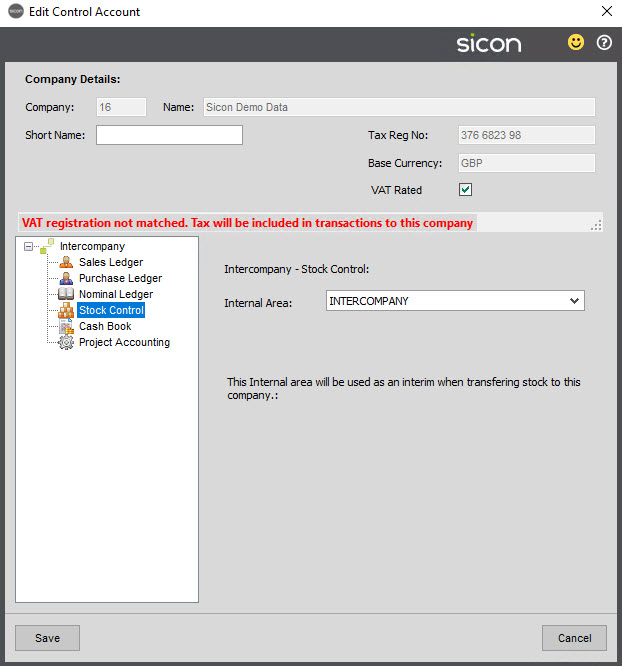
3.5. Stock – Internal Area
An internal area should be configured in the standard Sage Stock Control Settings, as it is used by the Intercompany module’s control account configuration. You may need to create one of these per company that you are moving stock to or from.

The nominal set against the internal areas is used when stock is transferred between companies.

3.6. Creating IC Control Projects
If Project Accounting is enabled and you wish to use project accounting across companies, then you also need to create control projects that are used by the module for each company. In this example the project code is IC1, which will be the control code for the target company ‘Demo Data IC1′, as below:
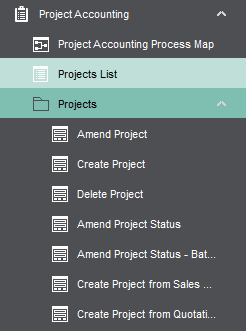
Create a new Project with the Project Accounting Module:
In this example, the project code will be automatically generated when you ‘Create a blank project’.

Press Create Project to proceed to the next step.
Next add a project item to the project, since this is only a control account, it is acceptable to add a single miscellaneous item.

Press Close once this is complete.
This will bring you to the amend project screen shown below:

3.7. Cash Book
When using the Pay & Receive Transactions screen to move cash between different companies a dummy bank account is required. The intercompany nominal can be set against this bank account, so that nominal postings off the back of cash movements post to the intercompany control account.
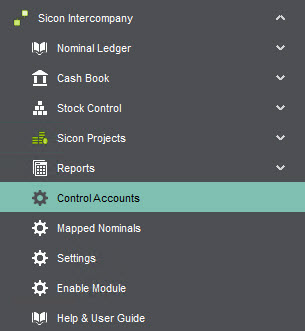
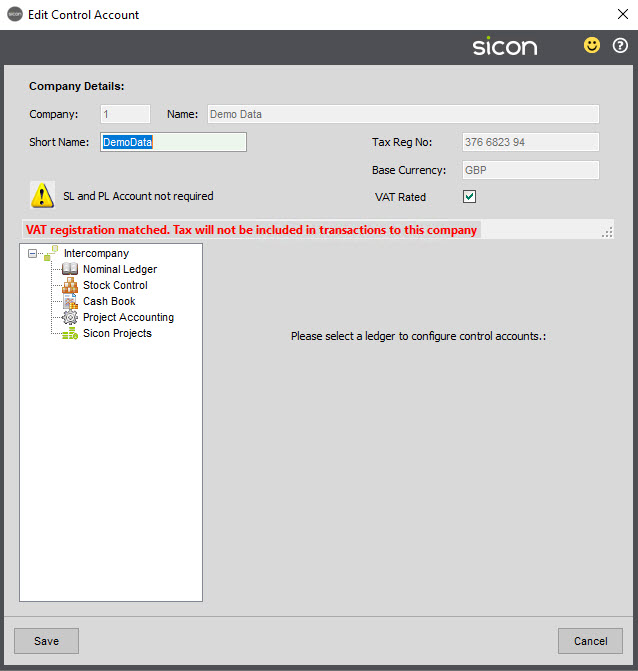
3.8. Control Accounts
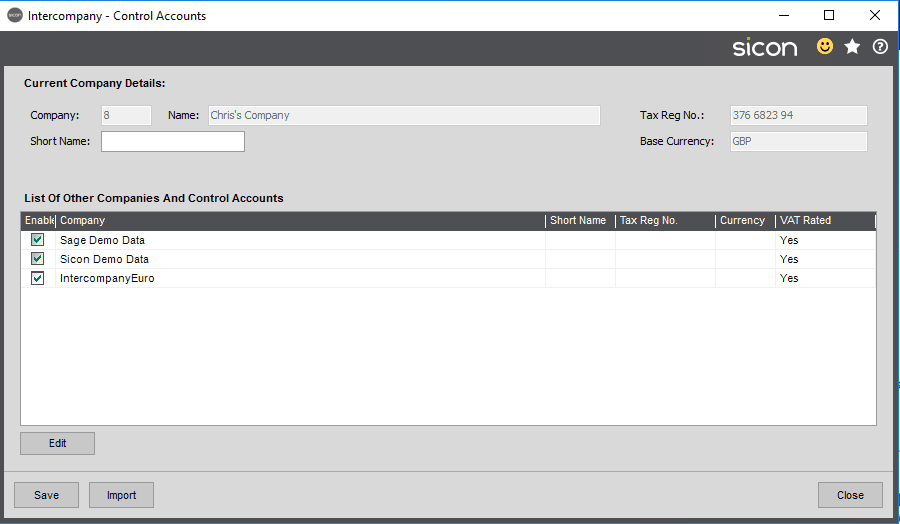
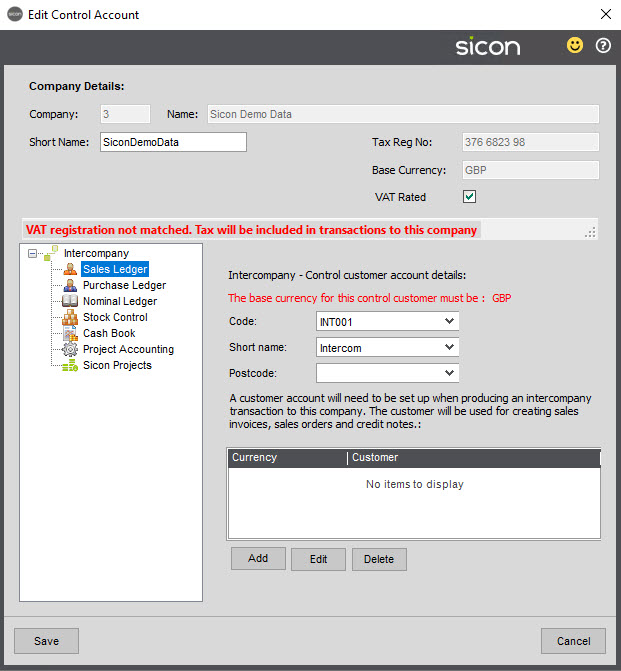
To configure the intercompany module, select Control Accounts from the Intercompany menu.

You will see a list of each other Sage company that your user has access to. Enable the other companies by checking the Enabled tick box. Companies that are not enabled cannot be selected while processing intercompany transactions.
Edit each company and set where appropriate nominal, customer and supplier accounts, cash book and a stock control internal area and project accounting details. You cannot edit the codes for the company you are currently working in, as this is not applicable. Once you have saved all the control accounts for the current company you are in, change company and repeat the process for the remaining companies.
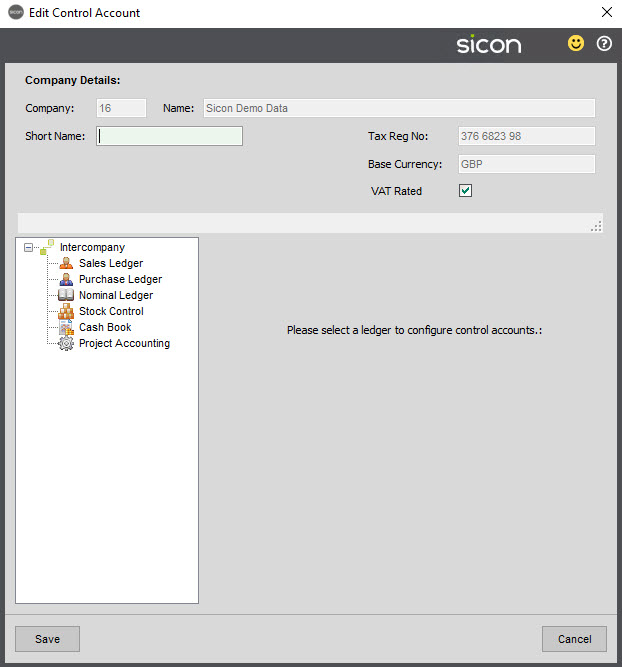
Short Name – You can set short names for each company in your list. These are written to ‘Nominal Analysis’ lines to indicate the source of transactions.
VAT Rated – This determines if the company should have VAT included on the SL/PL transactions created with this company.
Tax Reg Number– If the company you are editing has the same tax registration code, then sales and purchase ledger options will not show since they are not required as Intercompany journals are raised instead.
Sales Ledger
Enter the customer code of the intercompany customer. This option is only displayed if the other company has a different VAT number.
You can specify multiple control accounts, so that you have one for each selected currency. These would then map through to the control account in the Purchase Ledger for the other company in the same currency.

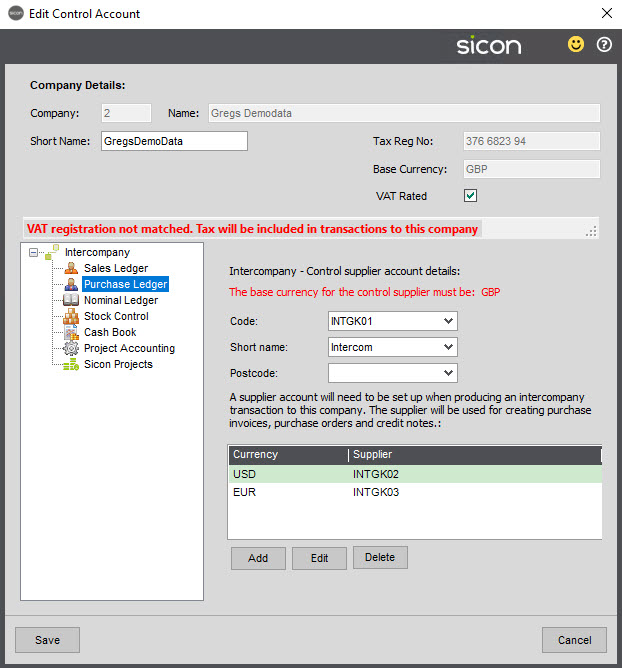
Purchase Ledger
Enter the supplier code of the intercompany supplier. This option is only displayed if the other company has a different VAT number.
You can specify multiple control accounts, so that you have one for each selected currency. These would then map through to the control account in the Sales Ledger for the other company in the same currency.

Nominal Ledger
A control nominal code needs to be created for the system to post to when creating transactions, namely journals, invoices and credit notes. Ordinarily, you would only have one for each other company to act as a control account, but you can specify separate ones if you want transactions from Sales and Purchases to post to different accounts.
Nominal codes can be created for individual currency codes. When an intercompany transaction is created it will refer to these nominals depending on the currency of the transaction.

Where the tax codes are different, but journals need to be posted instead of sales/purchase invoices then tick the option to force journal postings.
You can also overwrite the cost centre and or department, so this could match that of the desired company using the journal overrides setting.
Stock Control
Select an internal area to be used when moving stock between companies
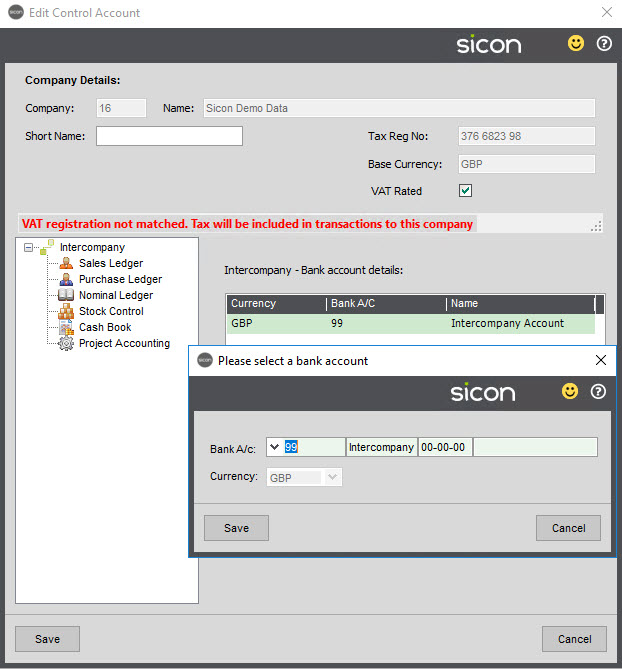
Cash Book
Select the intercompany bank account to use when cash book payments and receipts are posted from other companies. Different bank accounts can be added for different currencies.
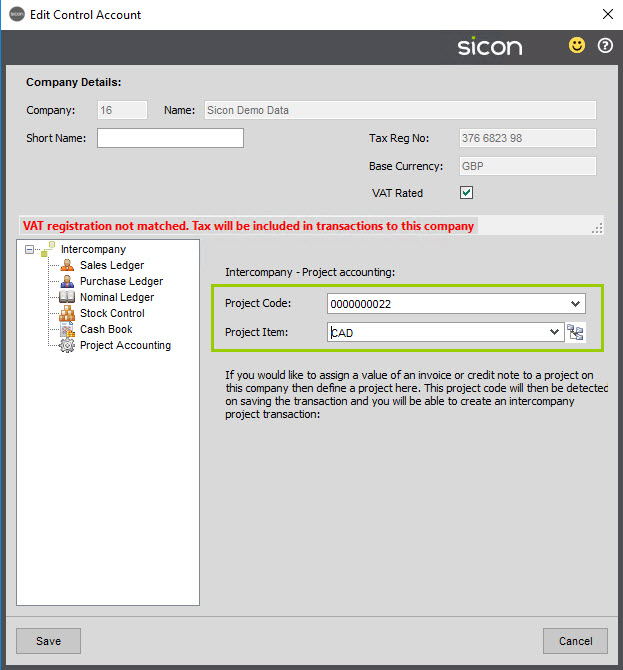
Project Accounting
If project accounting is enabled, you will also have the option to choose a project account that will used to identify when a transaction needs to apply to a project on this target company. This process is explained later. In this example screenshot below, we have selected the IC1 project account we created earlier to be the control account for the Demo Data IC1 Company:
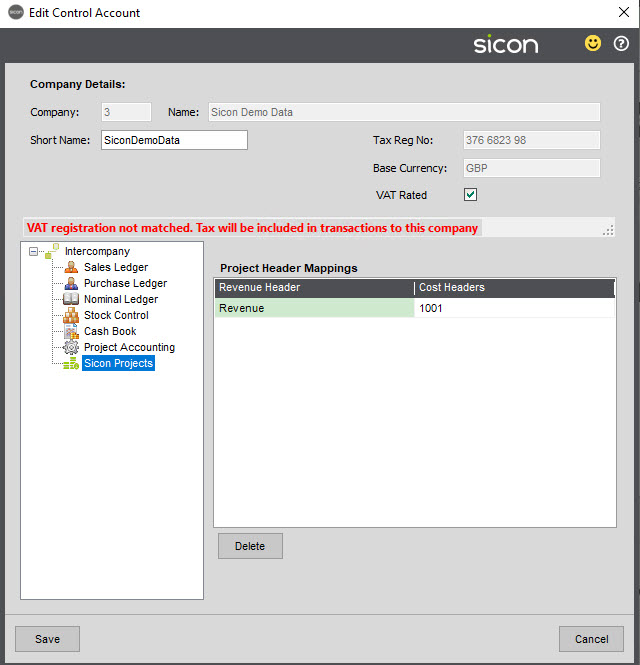
Sicon Projects
This function is designed if using Sicon Projects and you would like to configure some mapping between project headers when creating intercompany orders.
When generating sales orders against the control Sales Ledger account, this process generates a purchase order in the receiving company. You can map revenue project headers in your sending company to determine which cost project header should be used in the receiving company.
Import Control Account Details
There is an import option from the main control account screen to import the control account records from an excel spreadsheet.
Click on the import button.

An example file can be viewed and then prepared. This then needs to be saved as a csv file and can then be imported in.


4. Mapped Nominals
The mapped nominal screen can be used to create a connection between nominal codes in the current company with a nominal code in another company. This would then enable you to post to the nominal code in the current company without needing to manually trigger intercompany transactions from those postings. Instead, you could use the Unposted Mapped Transactions screen to display postings to the relevant nominal accounts in the current company, and generate intercompany transactions for these automatically from that screen.
You could also use this functionality in scenarios where you have unauthorised invoices. When these invoices become authorised, then Sage will update the nominal postings from those invoices from the Unauthorised Purchases account to the relevant nominal account for that expenditure. If you wanted to post intercompany transactions based on the postings from these invoices once authorised, then you can create the relationship in the Mapped Nominals screen and use the Unposted Mapped Transactions screen to generate those intercompany transactions. This would apply whether you are authorising the invoices within Sage, or using the Sicon WAP module for the authorisations.

The Resync Nominals button should be used to add any newly created nominal codes that don’t currently appear in the list on the left-hand side.
The mapping done in this screen can also be done via an import. Clicking the Import button will open the Mapped Nominals Import screen.

You can use the Example Import File button to generate both an example file that can then be amended and saved as a CSV file, and a secondary file that clarifies which columns are compulsory and how many characters can be entered in each column.
Once the import file has been saved in CSV format, then you would use the Find button to locate the file, and the Check File button to then validate the file. Assuming that the file is successfully validated, then the Import button in the bottom left hand corner will activate to enable the import.
5. Settings
The Settings page is used to configure additional preferences in the module. Such as creating invoices instead of journals, the default status of the ‘Intercompany Transaction’ tick box on various screens (new purchase invoice, sales invoice etc.)
5.1. Common Settings

| Setting | Setting Description | Expected values |
| Allow Nominal Selection For Split Posting | When doing a split intercompany posting, this will allow you to change the source nominal code at each stage. | True/False |
| Automatic IC referencing in parent company when posting direct transactions | When posting direct SL/PL invoices (see 6.3 and 7.3) | True/False |
| Bank charges occur in company | When adding bank charges to transactions, the bank charges can either be defaulted to paying or receiving company. | Paying/Receiving |
| Batch Stock Transfer Analysis Code | Dictates what stock analysis field to populate when doing a batch intercompany stock transfer. | 1/2/3 |
| Control Accounts Follow Currency Rules | Troubleshooting setting which disables the check for control accounts currency needing to match the base rate. Should always be set to True unless advised by Sicon technical support. | True/False |
| Create Inv/Cred For All IC Journals | This sets the mode when using Intercompany journals. If set to true, then all transactions will be processed as Invoices rather than Journals. You would set this when you want to have Invoices generated between companies in the same VAT group. | True/False |
| Create POP From SOP | With this set as True, when putting on a Sales Order to a customer flagged as an intercompany customer, a Purchase Order will be created in the corresponding intercompany. | True/False |
| Create SOP From POP | With this set as True, when putting on a Purchase Order to a supplier flagged as an intercompany supplier, a Sales Order will be created in the corresponding intercompany. | True/False |
| Use cost price from POP as the selling price on the generated SOP | The selling price on the Sales Order will come from the cost price set on the Purchase Order. | True/False |
| Generate a further POP in the second company after the original POP to SOP is created (Sicon Enhancement Pack SOP016 required). | An additional Purchase Order will be created in the receiving company after the Sales Order has been created off the original Purchase Order. This requires feature SOP016 in the Sicon Enhancement Pack to be enabled. | True/False |
| Enable Exchange Rate Changes | This setting allows the exchange rate to be set/adjusted from the summary screen. Setting this to false enforces using the correct rates set in Sage. | True/False |
| Project Adjustments Only | Disables the Intercompany function from SL/PL transactions, instead the module will only post Intercompany project adjustments if the control code is detected. | True/False |
| Intercompany Prefix | Sets the characters leading the Reference of an Intercompany transaction. Defaults to ‘IC’ | Text (Recommended 2 characters) |
| Intercompany Prefix Length | The number of digits for the reference of an Intercompany transaction. | Numeric (Max 20) |
| Set 2nd Reference As | Allows the 1st or 2nd Reference from the original invoice to be copied into the 2 nd Reference of the invoice created in the receiving company. | 1st Reference / 2nd Reference
|
| Mapped transaction start date | Allows you to specify the earliest date that transactions should appear in the Unposted Mapped Transactions screen. This should be set when you first start using mapped nominal accounts to avoid earlier transactions to be posted. |
|
5.2. Back to Back

| Create POP from SOP | With this set as True, when putting on a Sales Order to a customer flagged as an intercompany customer, a Purchase Order will be created in the corresponding intercompany. | True/False |
| Auto receive POP when despatching SOP | With this enabled then the linked purchase order will be received when the sales order is despatched. It is not currently possible to do this the other way around. | True/False |
| Create SOP from POP | With this set as True, when putting on a Purchase Order to a supplier flagged as an intercompany supplier, a Sales Order will be created in the corresponding intercompany. | True/False |
| Use cost price from POP as the selling price on the generated SOP | The selling price on the Sales Order will come from the cost price set on the Purchase Order. | True/False |
| Copy delivery address to generated SOP | The delivery address on the purchase order will be copied to the new sales order. | True/False |
| Generate a further POP in the second company after the original POP to SOP is created (Sicon Enhancement Pack SOP016 required). | An additional Purchase Order will be created in the receiving company after the Sales Order has been created off the original Purchase Order. This requires feature SOP016 in the Sicon Enhancement Pack to be enabled. | True/False |
5.3. Default Settings
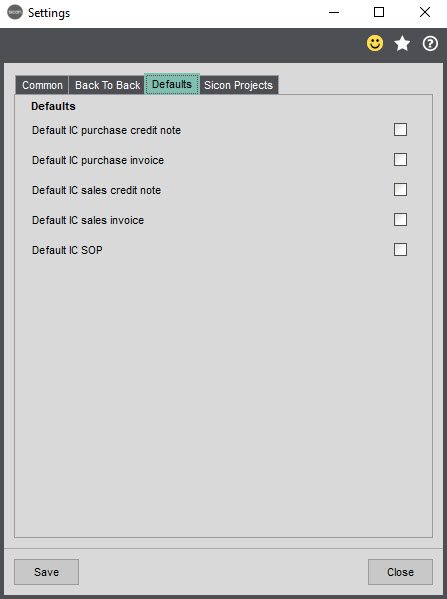
| Setting | Setting Description | Expected values |
| Default IC purchase credit note | Defaults the tick status of the Intercompany transaction tick box on Purchase Credit Notes | True/False |
| Default IC purchase invoice | Defaults the tick status of the Intercompany transaction tick box on Purchase Invoices | True/False |
| Default IC sales credit note | Defaults the tick status of the Intercompany transaction tick box on Sales Credit Notes | True/False |
| Default IC sales invoice | Defaults the tick status of the Intercompany transaction tick box on Sales Invoices | True/False |
| Default IC SOP | Defaults the tick status of the Intercompany transaction tick box on Sales Orders | True/False |
5.4. Sicon Projects Settings

These settings are relevant if you are using Sicon Projects, and have Project integration enabled in the current Sage company. This screen enables you to specify which Sicon Project and Project header will be recorded against any nominal postings generated in this company by the Intercompany module. This is to ensure that if you are reconciling your nominal postings to entries in Sicon Projects as part of your month end process, then all intercompany postings will have Projects details against them.
6. Sage 200 Purchase Ledger Transactions
There is a Create Intercompany Transaction checkbox on the following screens within the Purchase Ledger:
- Invoice
- Credit Note
6.1. Posting Intercompany Purchase Invoices / Credit Notes
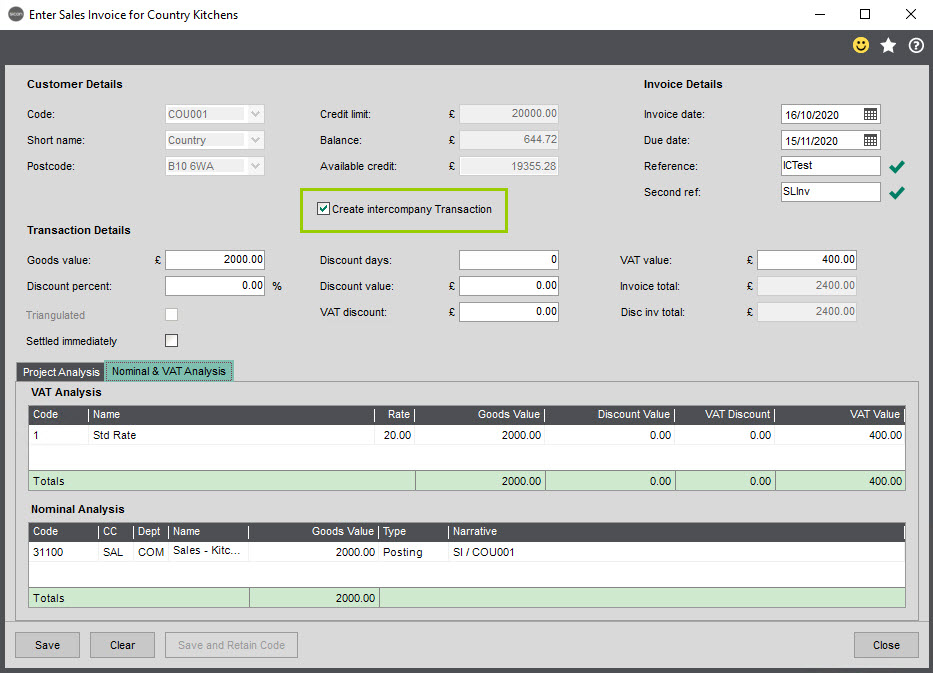
With the Intercompany module installed, when entering a purchase ledger invoice or credit note a Create Intercompany Transaction tick-box is available.

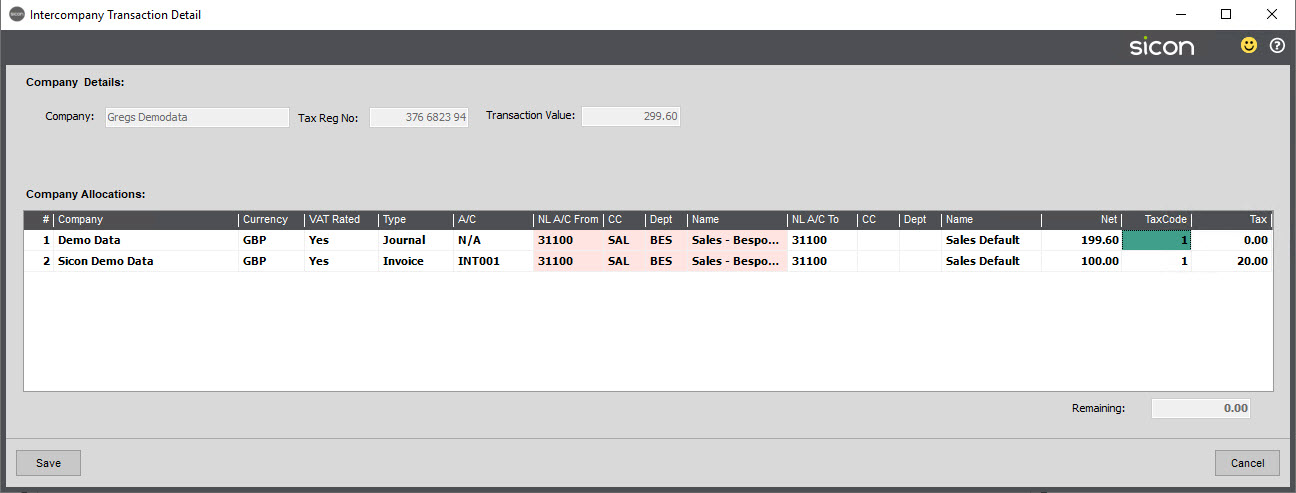
With this box ticked, when saving the invoice/credit note, the intercompany allocation screen will appear. Here you can choose to allocate amounts to any other configured companies.

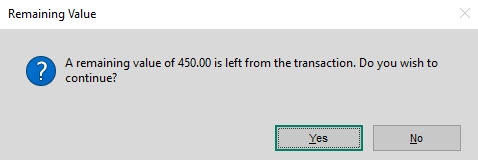
You do not need to allocate the entire value of the purchase invoice on this screen. If you choose to part allocate the value of the invoice, when you click next you will get the following dialogue box – this will allow you to go back if the details are incorrect. Click yes to continue.
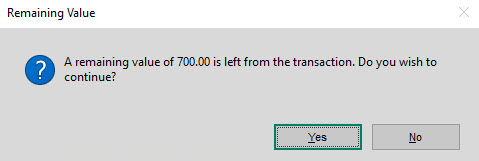
Clicking Yes will bring you to the nominal detail screen; one is shown for each company selected on the previous allocation screen. In this screen you can choose to amend the nominal used in the receiving company or add additional lines if required. Where the nominal codes match between companies they system will populate the matching nominal. You can use the next and back buttons to navigate between the target companies.

The details shown in these screens confirms the value of the transfer from the initial company to the target companies and what type of transactions will be created. Note that if desired, you can change the VAT rate used on the any resulting Sales/Purchase Invoice transactions in this screen if necessary.
Clicking on summary, shows the nominal analysis and what transactions will be posted.
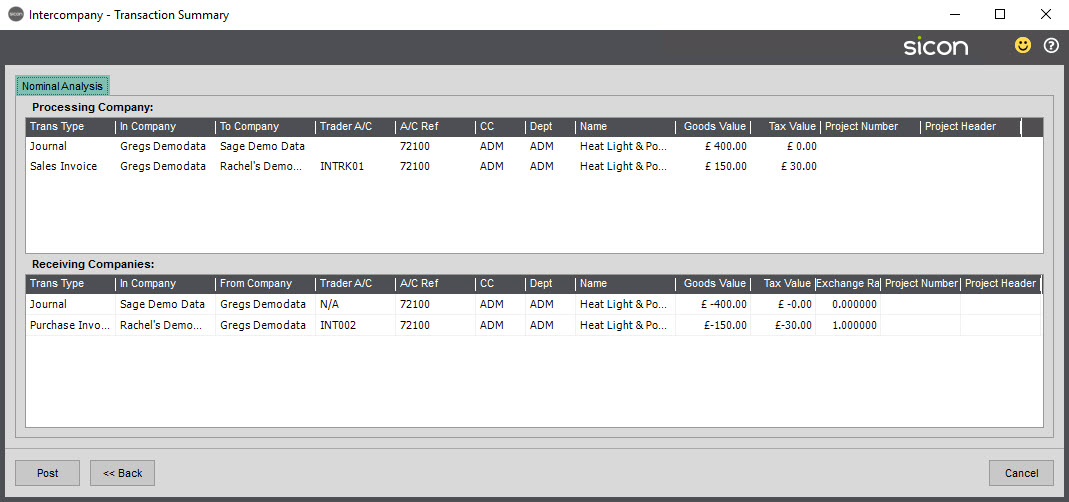
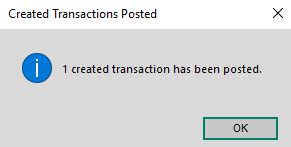
Click Post to generate the transactions, a confirmation message will be displayed.

6.2. Resulting Transactions
Parent company (i.e. the company paying the supplier) transactions
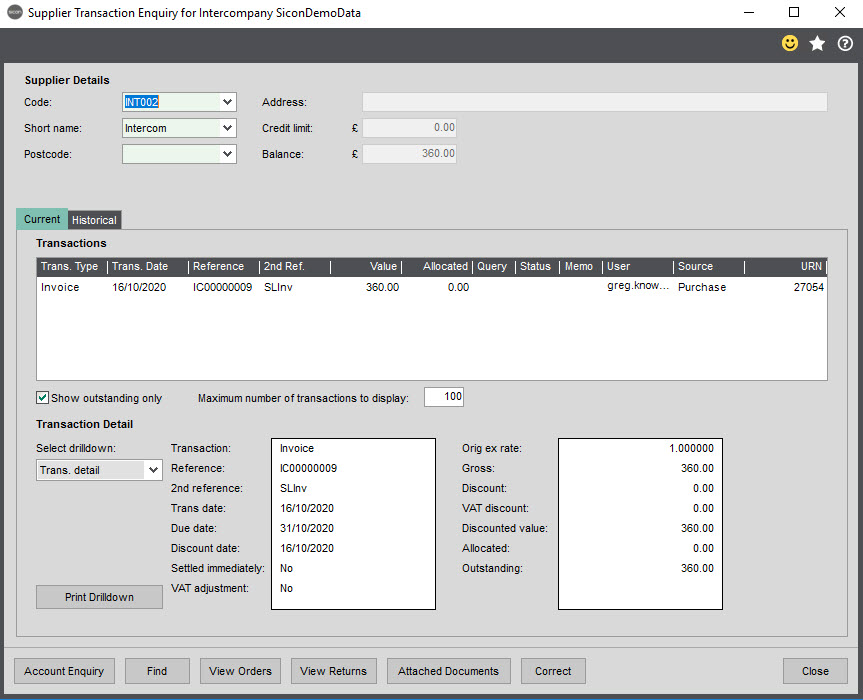
The original supplier purchase invoice transaction is posted to the source company.
A sales invoice is posted to the intercompany customer for the company with a different VAT number.
A journal is posted for the transaction to the company with a matching VAT number.

A purchase ledger invoice is posted in the receiving company with a different VAT number.
A journal is posted in the receiving company within the VAT group.

6.3. PL Transactions to a supplier set as the Intercompany supplier
If a purchase invoice is entered to a supplier who has been set as an intercompany supplier (within the control accounts), then the system will create a corresponding SL invoice in the matching company.
Within the settings screen, there is a setting called ‘Automatic IC referencing in parent company when posting direct transactions.’ With this enabled, then you don’t need to enter an invoice reference for the purchase invoice as it will use an automatically generated intercompany reference, which will then match the sales invoice reference generated in the second company. It is the choice of this setting in the originating company that matters.
If you don’t enable this setting, then you can still manually enter an invoice reference in this company, the generated invoice in the second company will then also have this reference.


A sales invoice has been created in the matching intercompany.
If you have specified different Purchase Ledger control accounts for different currencies, then the Sales Ledger transaction created in the other company will be posted against the control account specified for that currency.
7. Sage 200 Sales Ledger Transactions
There is a Create Intercompany Transaction checkbox on the following screens within the Sales Ledger:
- Invoice
- Free Text Invoice
- Credit Note
- Free Text Credit Note
7.1. Posting Intercompany Sales Invoice / Credit notes
With the Intercompany module installed, when entering a Sales ledger invoice or credit note a create intercompany transaction tick-box is available.
If you tick this box and save the invoice, the intercompany allocation screen will appear. Here you can choose to allocate amounts to any other configured companies.

You do not need to allocate the entire value of the sales invoice.
Clicking next will bring you to the nominal detail screen; one is show for each company selected on the previous allocation screen. You can use the next and back buttons to navigate between the target companies.

Note that if desired, you can change the VAT rate used on the any resulting Sales/Purchase Invoice transactions in this screen if necessary.
On the final company, a summary button is shown, pressing this will go to the summary screen.
Press post to generate the transactions, a confirmation message will be displayed.

Automatically generated intercompany sales and purchase transactions must be paid, allocated and processed using standard Sage functionality from this point onwards.
7.2. Resulting SL Transactions
The original supplier Sales invoice transaction is posted to the source company.
A purchase invoice is posted to the intercompany supplier for the company with a different VAT number.
A journal is posted for the transaction to the company with a matching VAT number
A sales ledger invoice is posted in the receiving company with a different VAT number.
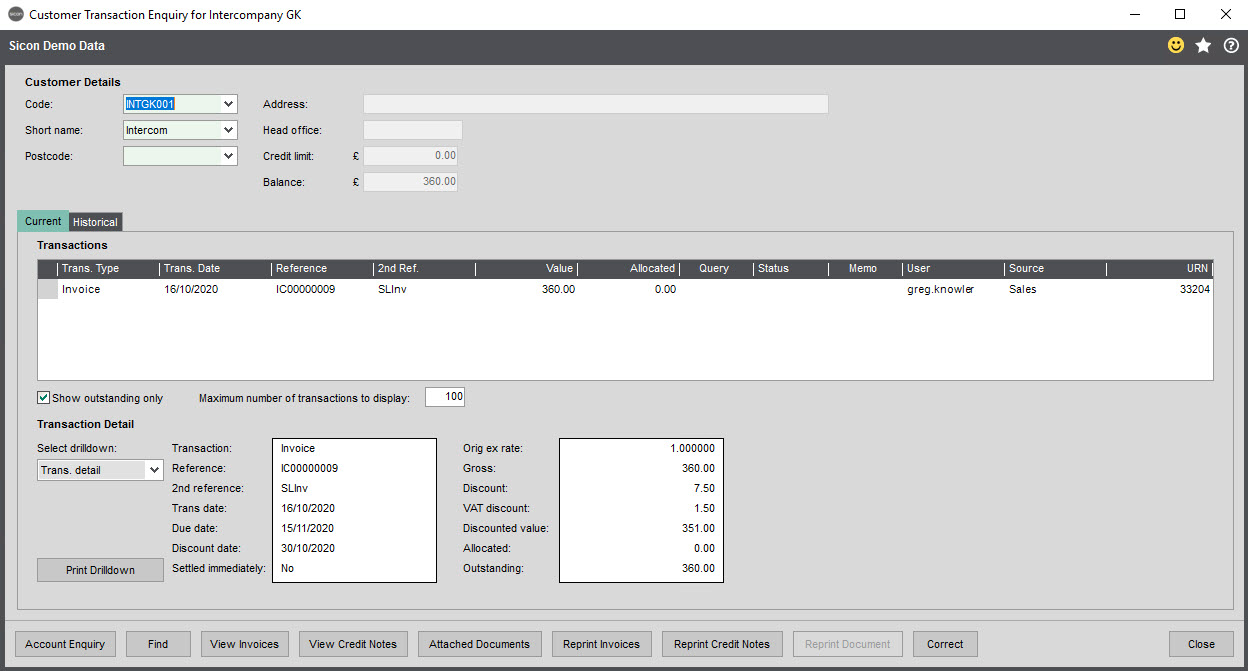
A journal is posted in the receiving company within the VAT group.
7.3. SL Transactions to a Customer Set as the Intercompany Customer
If a sales invoice is entered to a customer who has been set as an intercompany customer (within the control accounts), then the system will create a corresponding PL invoice in the matching company.
Within the settings screen, there is a setting called ‘Automatic IC referencing in parent company when posting direct transactions.’ With this enabled, then you don’t need to enter an invoice reference for the sales invoice as it will use an automatically generated intercompany reference, which will then match the purchase invoice reference generated in the second company. It is the choice of this setting in the originating company that matters.
If you don’t enable this setting, then you can still manually enter an invoice reference in this company, the generated invoice in the second company will then also have this reference.


A purchase invoice has been created in the matching intercompany with the same reference as the sales invoice in the originating company.
If you have specified different Sales Ledger control accounts for different currencies, then the Purchase Ledger transaction created in the other company will be posted against the control account specified for that currency.
8. Sage 200 Sales Order Transactions
There are two options for processing intercompany transactions from sales orders. The first is to use the intercompany tick box on the sales order screen to split the resulting invoice created from the sales order between companies. The second option is to create a matching purchase order relating to the sales order entered.
8.1. Moving Sales Order Income between Companies
When entering a sales order or a sales return, tick the IC transaction box as shown below and enter items as required.

When you save the Sales Order, you will get an extra window to populate:
Select the receiving company from the drop-down list, tab to Currency – this will auto populate, together with the VAT Rate, Type and A/C. Click the ˅ under the NL A/C from to select the line from the Sales order, this will in turn populate the Nominal Code Cost Centre, Department and Name.
Manually enter the NL A/C To (CC, Dept as appropriate) Net amount and select the Tax Code from the drop-down list. The Tax amount will be calculated using the tax code selected if tax is required. No intercompany journals or invoices will be posted until the sales invoice is posted from the sales order.
Save to complete this allocation.
Intercompany Sales Orders can be amended by selecting the order from the sales order list and clicking amend. Adjacent to the IC transaction tick box, the amend button is now active. Click the amend button to open the Intercompany allocation window.
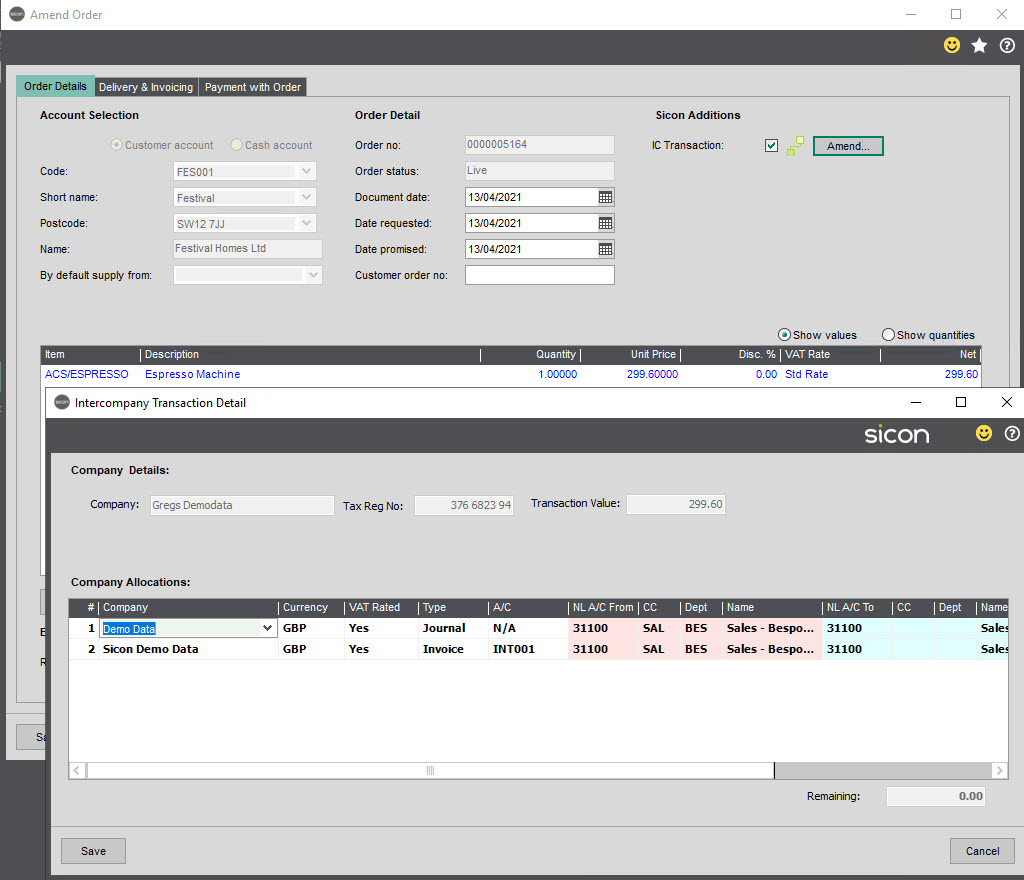
Make required changes and click Save.
Despatch, Print and Post invoices in the usual manner. The system will post the corresponding invoices/journals in the companies as set up in the allocation screen.
8.2. Sales Order to an Intercompany Customer
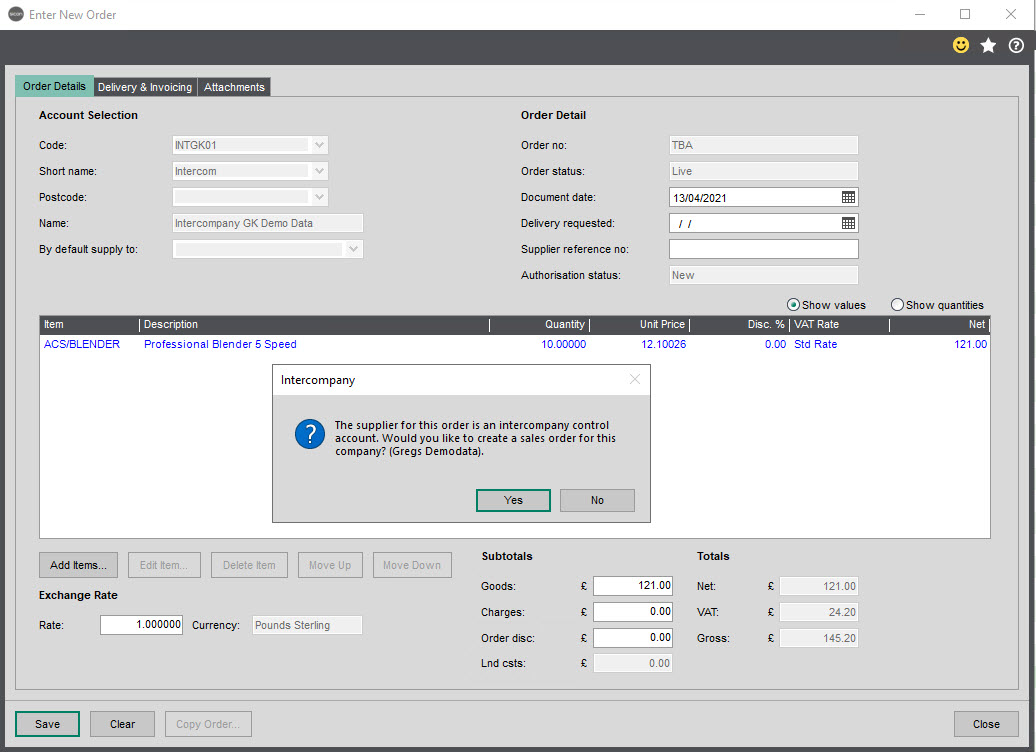
When a sales order is put on to a customer that is set as an intercompany customer the system will create a corresponding purchase order in the matching intercompany (assuming the intercompany setting to Create POP from SOP has been enabled).
This functionality is only enabled for the main customer control account, and can’t be used for customers specified against the different currencies.
This functionality is only available on sales orders, it doesn’t work with sales returns.
In this company if a sales order is put onto the customer INT001, the system will post a purchase order in Sicon Demo Data. The supplier to use on this purchase order is set in the control accounts within Sicon Demo Data, in the example below this is INTGK01.

When putting on the sales order to the intercompany customer, the IC transaction tick box is greyed out.
On saving the Sales Order, you will be prompted as to whether you would like a PO created in the second company.
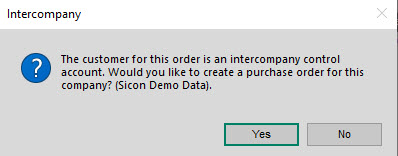
Responding with a yes will lead to the following confirmation message: –

The newly created purchase order will have the original sales order number stored in the Supplier reference no. field.
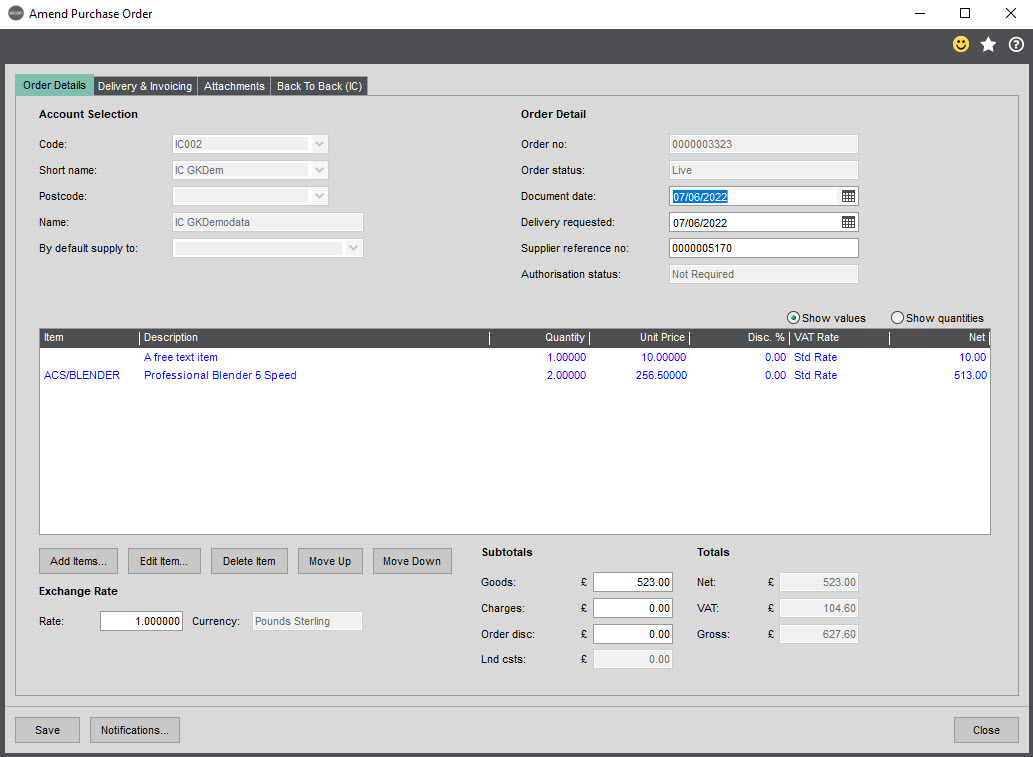
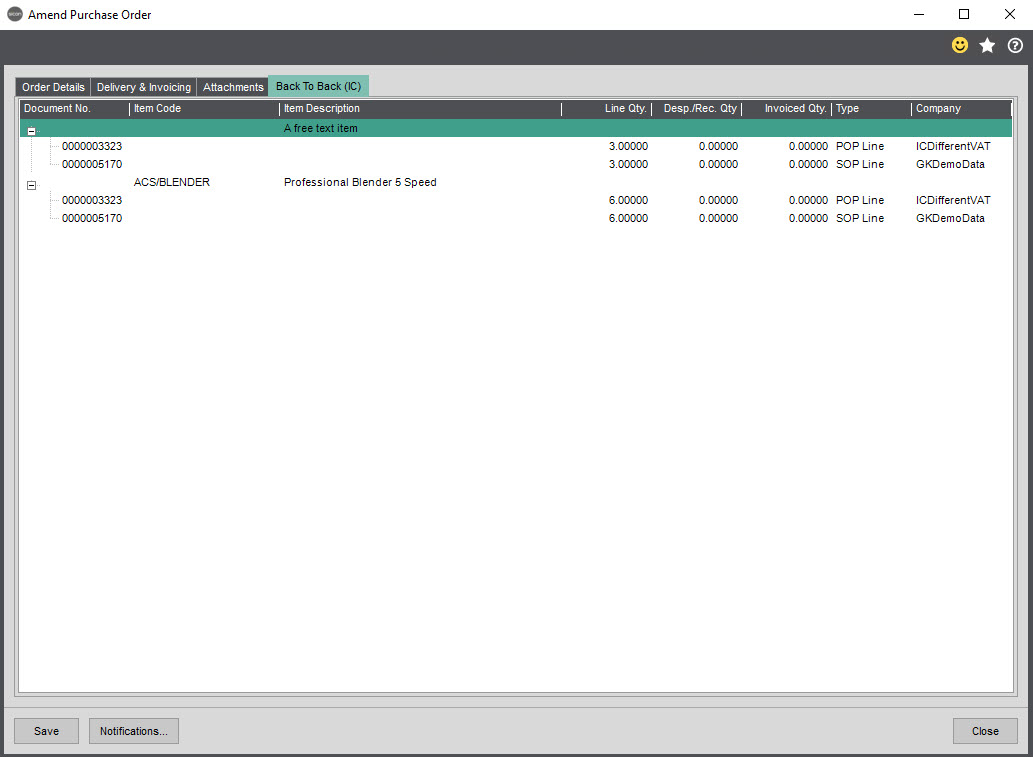
The connection between your sales order and a purchase order in the second company can be viewed via the Back to Back (IC) tab against both orders. This will confirm the order numbers in both companies. This tab will also display the despatched/received status of both orders, split out at a line level.
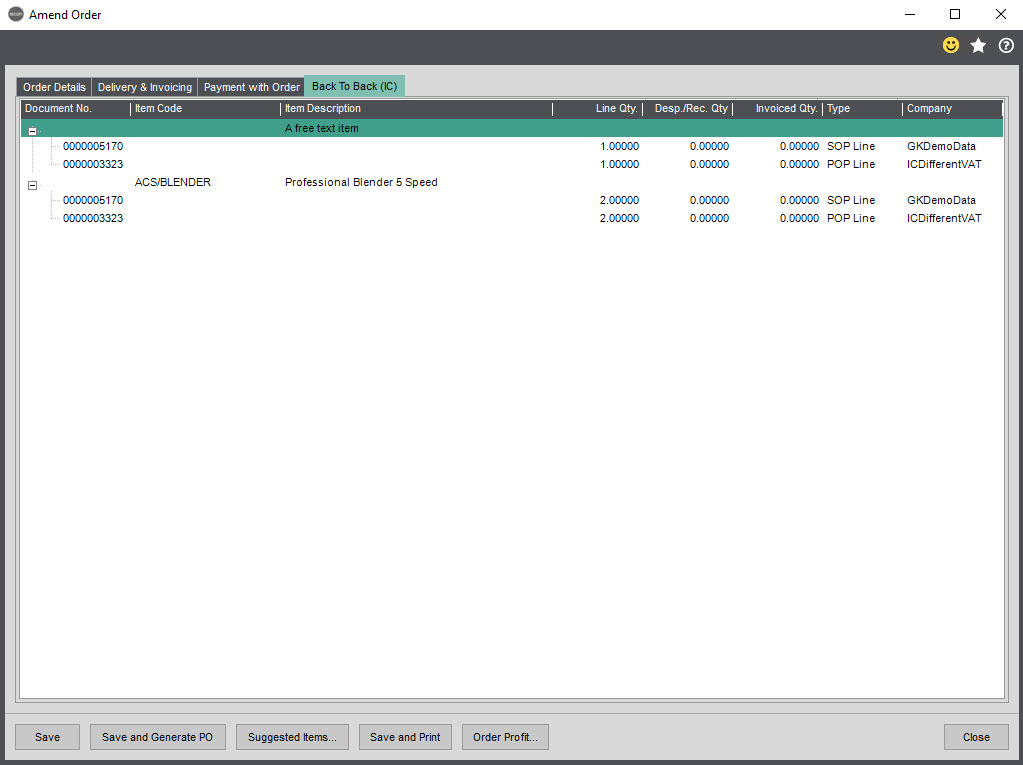
If the line quantities or prices are amended on the PO/SO then the related quantity/prices in the SO/PO are updated. Amendments to the line descriptions are also reflected on the corresponding order in the other company.
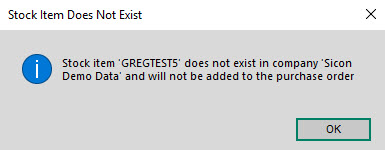
The system can handle stock items, free text lines, additional charge lines and comment lines between sales orders and purchase orders. If the stock item or carriage does not exist in the receiving company, then the system will give a warning message.
When you despatch the sales order, you can configure the system so that the purchase order in the other company is automatically received. This is the setting called ‘Auto receive POP when despatching SOP’, and needs to be enabled in the company containing the sales order. Note that this currently is not available for traceable stock, so those items will not update the purchase order. This automatic update is also only in one direction, so it can’t be triggered by the receipt of the purchase order.
9. Sage 200 Purchase Order Transactions
With the create SOP from POP setting on, the system can create a matching Sales Order from an entered Purchase Order. The purchase order needs to be entered to a supplier that is set as an intercompany supplier; the system will create a corresponding sales order in the matching intercompany. This can only be used for the main supplier control account, so if you are using different supplier control accounts for different currencies, this functionality only works with the supplier in the base currency.
When you save the purchase order, you will be prompted with the following message: –
Accepting this prompt will generate the Sales Order in the destination company.
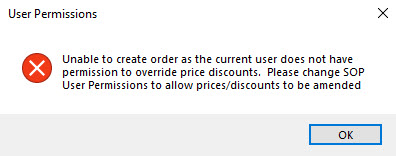
You will need to ensure that your Sage login has appropriate user permissions within Sales Order Processing in that company, and will receive this message if you don’t: –
The newly created sales order will have the original purchase order number stored in the Customer order no. field.
The connection between your purchase order and a sales order in the second company can be viewed via the Back to Back (IC) tab against both orders. This will confirm the order numbers in both companies. This tab will also display the despatched/received status of both orders.
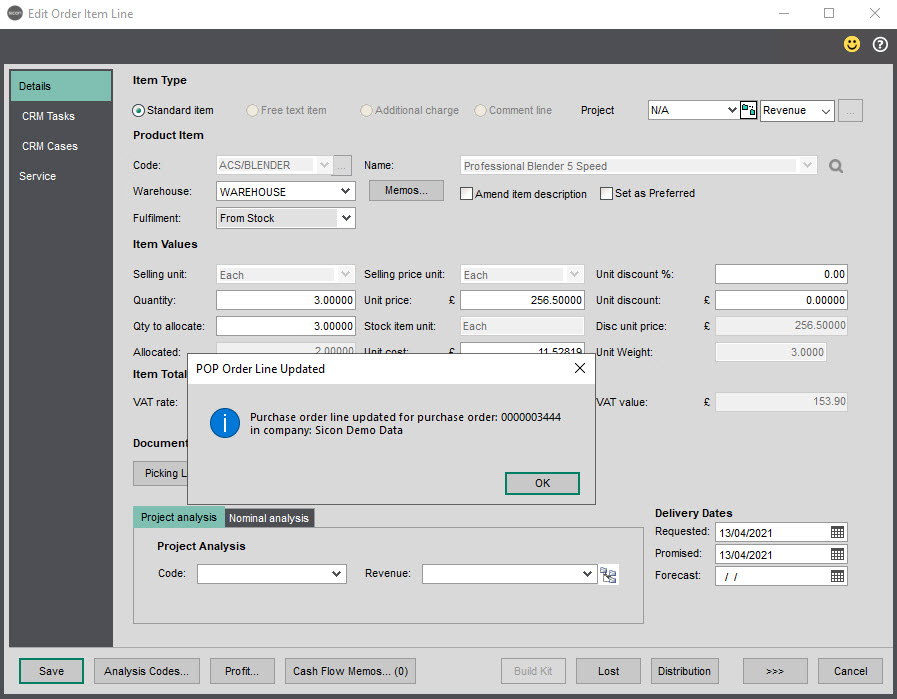
Amending the quantity or price on the lines of the SO/PO in each company will update the matching PO/SO in the corresponding company. Amendments to the line descriptions are also reflected on the corresponding order in the other company.

Despatching the sales order will receive the purchase order (with the Auto receive POP when despatching SOP setting enabled). Once this has happened, any further amendments to either the amount despatched or amount received will not update the other order. Note that this currently is not available for traceable stock, so those items will not update the purchase order
Receiving the goods in the purchase order first, will not update the sales order in the other company.
10. Sage 200 Nominal Ledger Transactions
Posting Intercompany Nominal Taxable and Non-Taxable Payments and Receipts
As with the Sales and Purchase ledger invoices and receipts, Nominal ledger payments and receipts (both taxable and non-taxable) can be set as intercompany transactions with the module enabled. This is done by ticking the Create Intercompany transaction box as shown below.
NB: project accounting transactions do not need the IC tick box on PL/SL screens to be ticked, as it will be detected by the codes selected in the list upon saving.

Once this transaction is saved, the Intercompany transaction wizard is shown, where you can choose how to split the transaction.

The next steps open a nominal detail screen for each company we have chosen to allocate to. You can choose to allocate the amount between as many nominal codes as you wish, but the balance must match the total amount being allocated. Pressing Next moves on to the next company. On the final company, the next button will change to summary and pressing this goes to the summary screen in which you will confirm the transactions to be posted.

Note that if desired, you can change the VAT rate used on the any resulting Sales/Purchase Invoice transactions in this screen if necessary.

If you are not happy with the transaction, you can press back and amend any of the steps. Pressing post will commit the transactions to Sage. Pressing Cancel will abort the Intercompany transaction.

11. Sage 200 Cash Book Transactions
11.1. Sales/Purchase Payments and Receipts
You can post cash book transactions between multiple companies. Only payments and receipts posted to control accounts will create intercompany transactions.
- Purchase Payment [Company A] > Sales Receipt [Company B]
- Purchase Receipt [Company A] > Sales Payment [Company B]
- Sales Payment [Company A] > Purchase Receipt [Company B]
- Sales Receipt [Company A] > Purchase Payment [Company B]

If the transaction is posted to a customer/supplier account that is a control account, then the user will be prompted to enter Intercompany cash book details when the transaction is saved.

In the above example, a purchase payment has been made in company ICDifferentVAT with a matching sales receipt in GKDemodata.
12. Split vs. Sequential Transaction
On the intercompany transaction screen, you have the option of a split transaction (default) or a sequential transaction.

- On a split transaction, a payment to/from the source company is split/divided between the other companies by the amounts you specify.
- On a sequential transaction, the payment amount goes from source company to company B, then from company B to company C and so on until all allocations are complete.
13. Intercompany Nominal Ledger Menu
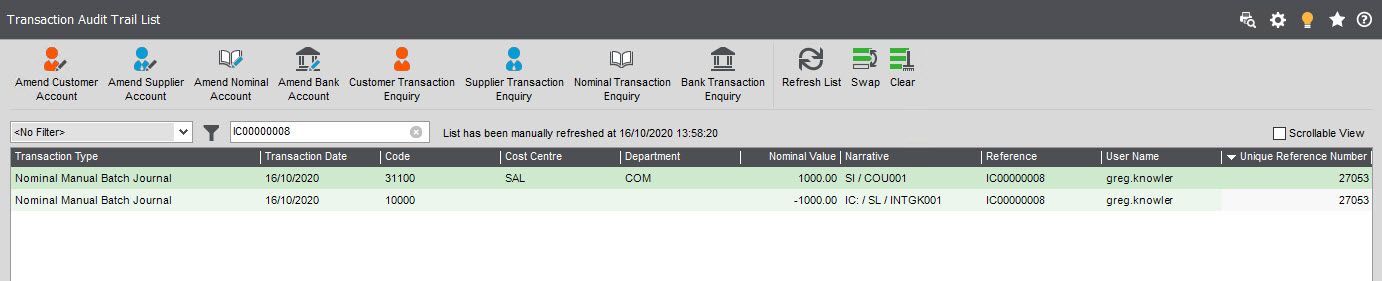
13.1. Posting Intercompany Journals
There are two options for posting Intercompany journals, and which one is appropriate is determined by whether the companies you are posting the journal between are within the same VAT group or not.
The Advanced Intercompany Journal screen can be used for either situation, and works as a process where you step through multiple screens. In contrast, the VAT Group Intercompany Journal screen only works for companies within the same VAT Group, but the entire journal is set and posted within a single screen.
Advanced Intercompany Journal
To use this feature, first select the Advanced Intercompany Journal menu option from the Intercompany, Nominal Ledger section in the Sage Menus. The following screen will appear where you can then either enter details of the journal, how much from each nominal code you need to debit/credit, or select from a previously created template.

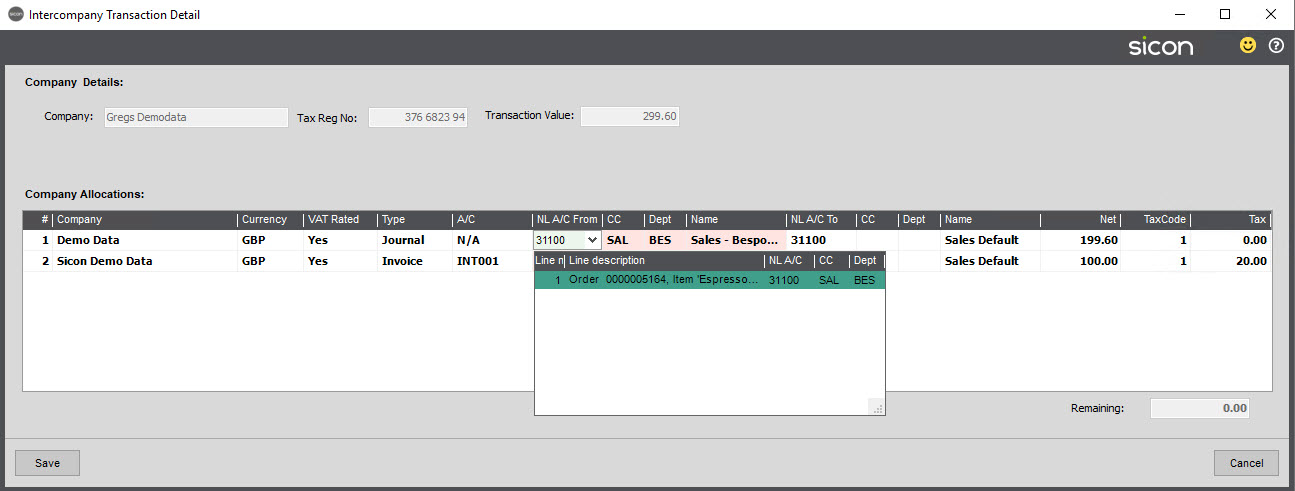
Pressing next will bring you to the Intercompany allocation screen

You can allocate the amount as you wish between any/all of the other available companies. The total credited to one or more companies must match the amount being debited to the current company. You will receive a warning message if this is not the case and will be unable to proceed. If the VAT number (shown on the top right of each journal section) is the same for both companies, a journal will be produced, if they do not match, then an invoice will be produced instead.

Here you can check/change which nominal codes and amounts you will allocate to. You can press Next to proceed to the next company, once there are no more left to allocate to, press the summary button to bring you to the summary of all the transactions you are about to post to.

If you need to make any changes, you can press back and make changes to previous screens, when you are satisfied the transactions are correct, press post to post the transactions in all companies.
VAT Group Intercompany Journal
This screen allows you to fully enter your journal in a single screen, but as the title suggests you can only use this for companies within the same VAT group.
To use this feature, first select the VAT Group Intercompany Journal menu option from the Intercompany, Nominal Ledger section in the Sage Menus. The following screen will appear where you can then either enter details of the journal, how much from each nominal code you need to debit/credit, or select from a previously created template.
Each line of the journal allows you to select the relevant company (from the list of those configured in control accounts with the same VAT number). You can select as many accounts as desired, as long as overall your debits and credits balance. The opposing postings in each company will debit/credit the nominal control account specified for that company.

13.2. Journal Templates
Journal templates can be used when a regular Intercompany journal transaction is done to save time when inputting many of the same values. There are 3 types of Journal Template:
- Accounts only – Where the values may always be different, but the nominal accounts themselves are always the same. No values are stored and must be entered.


- Percentage – If you regularly split invoice values between companies, this will pre-allocate the set percentage of the original document to each company. The values can be overridden at point of entry.


- Value – If you regularly post the same values between specific companies, the value can be included in the template, the values can be overridden at point of entry.


The templates are created/maintained in the screen below.

To add a new template, Press the Add button, alternatively, press Edit if working on an existing template.

Click in the template contents section to add a new line, where you can select a company from which you have access to, you can then input a nominal code, add a narrative and values (accounts only will have zero values).
13.3. Maintain Nominal Accounts
The Maintain Nominal Codes screen allows for Intercompany specific settings for each nominal. There is the ability to exclude tax from the transactions, any Intercompany transactions on nominal codes with ‘Exclude Tax’ ticked will be set to Tax exempt and tax will not be invoiced/credited. Authorised PL postings will now follow configured nominal codes.

13.4. Unposted Mapped Transactions
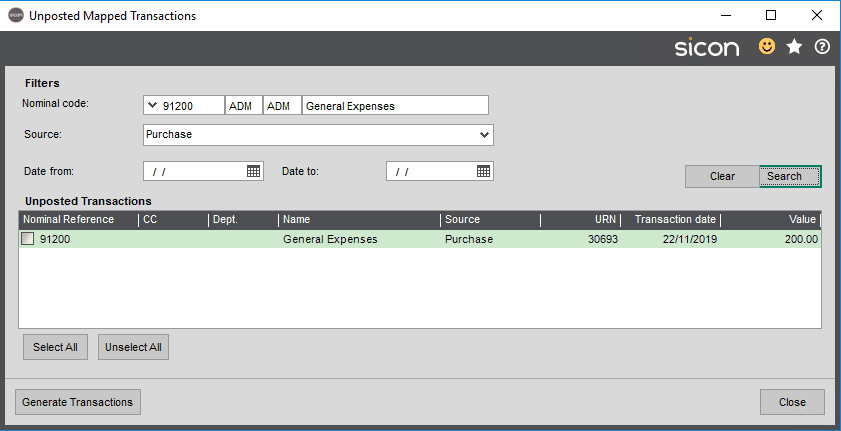
This screen can be used to find unposted mapped transaction records and then process them. Items that have been posted to particular nominal codes can be found, selected and then the intercompany transactions can be created using the generate transactions button. The newly created posting will reflect the narrative of the original posting.

14. Intercompany Cash Book Menu
14.1. Account Transfer

Select the Account Transfer from the menu option.
The Payment Company details are pre-populated.
Select the Bank Account to transfer from, chose the Receipt Company and Account. Enter a Description, Reference, Payment Value and Transfer Date and click Save.
A window will be shown confirming the transfer details.

Change to the receiving company, select the bank account to verify the transfer as shown below.

14.2. Account Transfer Import
This feature is a quick way to transfer money to accounts in different companies.
Click the Template button to generate an import template.

Populate the template, save as a CSV file.
Find the file and click Check to ensure all details are correct, any errors will be highlighted in Red and will need to be amended prior to Import. When all details are verified you will be able to import.
14.3. Pay & Receive Transactions
This feature enables one company to pay or receive money and allocate the amount to an invoice in one of the other configured companies. For example, where a customer has paid for an invoice for one company, but paid the money into another company.
This option requires that a cash book account is selected in the Control Accounts screen for the receiving company, as this is then used to carry out the allocation. E.g. If you want to pay a supplier transaction from a bank account in Company A that is posted in Company B, then within the Control Accounts screen in Company A for Company B, you need to specify a cash book account that will do the allocation. This cash book account needs to be created first in Company B so that you can select it within this Control Accounts screen. As such, this is not a normal Cash Book account that you will reconcile to a bank statement, it is one that just exists to be used by Intercompany to handle the allocation in Company B. See Section 3.7 for further details on setting this cash book Control Account setting.
Once opened you will need to select the relevant ledger, bank account, transaction date and enter references as appropriate.

Click Next.
Choose the company and customer/supplier you want to pick the invoices from.

You have the option to include bank charges in the paying or receiving company. Select the invoice you want to allocate the monies to.
Click on post to process the transaction, if bank charges were ticked to be included, then a bank charge window open. Select the appropriate nominal and put in a value.

Click on save, to process the transactions in both companies.

In the example above a receipt has been put onto customer BET001 in intercompany A

The receipt has been posted to the bank account in the sending company and bank charges have been added.
 You can also choose to put on receipt/payment against a customer/supplier that has no outstanding items.

This posts a payment/receipt onto the chosen account in the receiving company.

14.4. Receive, Transfer & Allocate
Select this option to receive, transfer and allocate payments. This is used where money needs to be moved between companies and then allocated to invoices. This is different from the previous option in that the money actually moves between the two companies first, before being allocated to a customer transaction. So, the choice as to which of the two features being used should come down to whether you actually move the money between bank accounts for the two companies before doing the allocation. If you do, and it shows on both bank statements, then this is the feature you should use. This feature does not require you to configure anything in regards to Cash Book options within the Control Accounts screen.
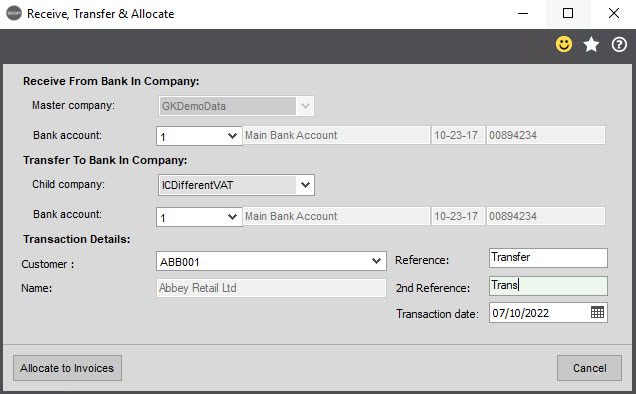
Choose the bank account the money is received into, then select the company and bank account to transfer to together with the transaction details.
Enter Reference, 2nd Reference and change the Transaction date as required.
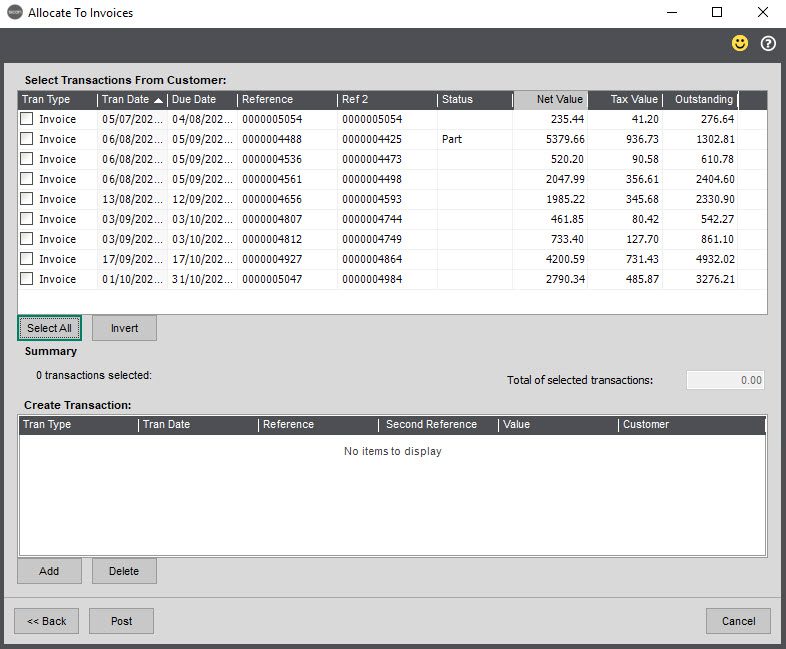
Tick the invoices to allocate to (select all if all invoices are needed), or you can add a manual receipt to allocate later using the box at the bottom, click post to continue.
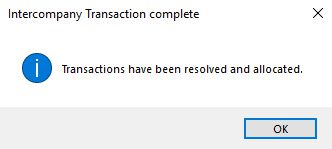
The dialogue box below confirms the transactions are resolved and allocated, or that the created receipt transaction has been posted.
15. Intercompany Stock Control Menu
15.1. Intercompany Stock Transfer
Select the Inter Company, Stock Control, Transfer Stock menu option:

The stock transfer screen will appear:
On the left side is the current company, where you select the stock code to be transferred and its warehouse location. On the right side is the target company, stock code and warehouse location. Below these details you can enter the stock quantity to transfer and the date and reference for it. When you enter the stock code in the left-hand side of the screen, the stock code on the right-hand side will default to the same code (if it exists in that company), but you can change it if that item has a different code in the destination company. Note that it is possible to transfer stock that is set as traceable in one company but not in the other.

You can save the transfer to move the stock. If the two companies are in separate VAT groups, then a Sales Invoice and Purchase Invoice will result between them.
15.2. Batch Stock Transactions
Batch Stock Transactions allows you to allocate transactions prior to actually transferring them. You can edit the list and add items over the course of time and print a report of allocated stock to be used for warehouse picking. Once all the items are allocated and you are ready to do the transfer, you can Post all the transactions on one go.
Setting Up the Analysis Code
Intercompany Module uses an Analysis Code on a stock item to flag items which are part of the batch. This needs to be configured before reporting will work.
Firstly, create an analysis code in the Sage Account System Manager, we have called it “Batch Allocated” in this example:

Next, in the Maintain Analysis codes section on the stock control menu, assign this analysis code to one of the slots starting from 2 onwards, we use slot 2 in this example:

Finally, in the Intercompany settings, change the setting to the number you previously used, in our example, this is “2″:

Adding items to a batch
Open the Batch Stock Transactions from the Intercompany > Stock Control Menu. Any existing batches will also be shown here:

Click the Add button and choose a company you intend to post the transaction to, along with a date and a header text to help you identify the transactions:

To start adding stock items, press the add button and proceed to add stock transfers using the familiar stock transfer screen from the section above. (You can also edit existing entries and remove them from here).

Items for transfer will be added to the list:
Once you are happy with the batch you can press Save & Allocate, which marks all the items on the batch as allocated within Sage stock control.


Printing an Allocation Report
You can choose to print an allocation report for your batches, which effectively gives you a ‘picking list’ where allocated items can be picked from the warehouse ready for transfer. Simply tick the batches you wish to report on and click the ‘Print Allocation Report’ button.


Posting Transactions
Press Post and the transactions are issued and the relevant financials entries are completed, just as in a normal intercompany stock transfer. If the two companies are in separate VAT groups, then a Sales Invoice and Purchase Invoice will result between them.

16. Intercompany Sicon Projects Menu
Allows projects to be copied from one company to another. Select the projects that you wish to copy to other companies, then select the companies to copy to. This will then create the project and project structure (phases, stages and activities) in the other company. Nothing else on the project is copied, so there won’t be any transactions on the new projects in those companies as a result of the copy.

17. Sicon Documents Integration
If you are using Sicon Documents to attach documents to transactions, then any resulting intercompany transactions will also have that attached image on them.

In this example we are entering a purchase ledger invoice, where we are ticking the ‘Create Intercompany Transaction’ box in order to recharge the invoice to another company in the group. As can be see, the Add Docs button at the bottom has a small 1 on it, indicating an image of the invoice has been added using this button.
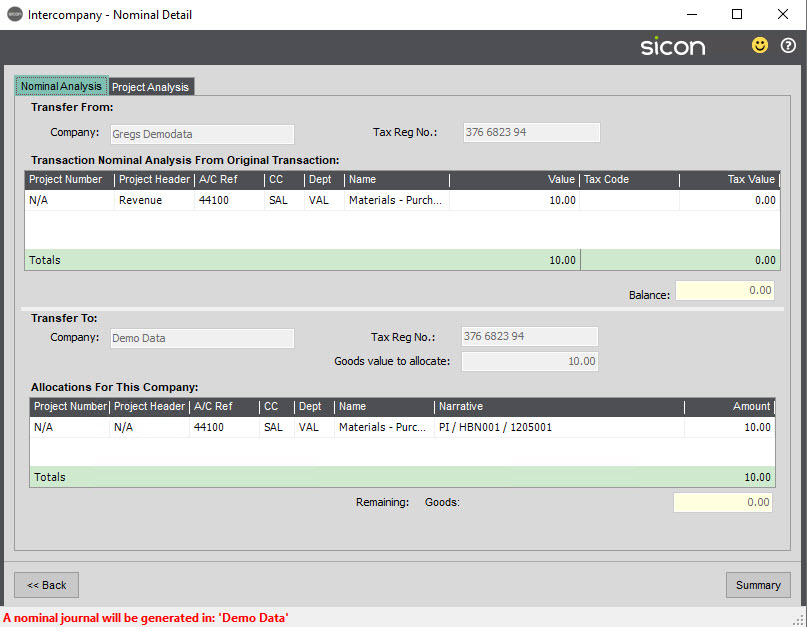
The company that we are recharging is part of the same VAT group, so an intercompany nominal journal is the result.
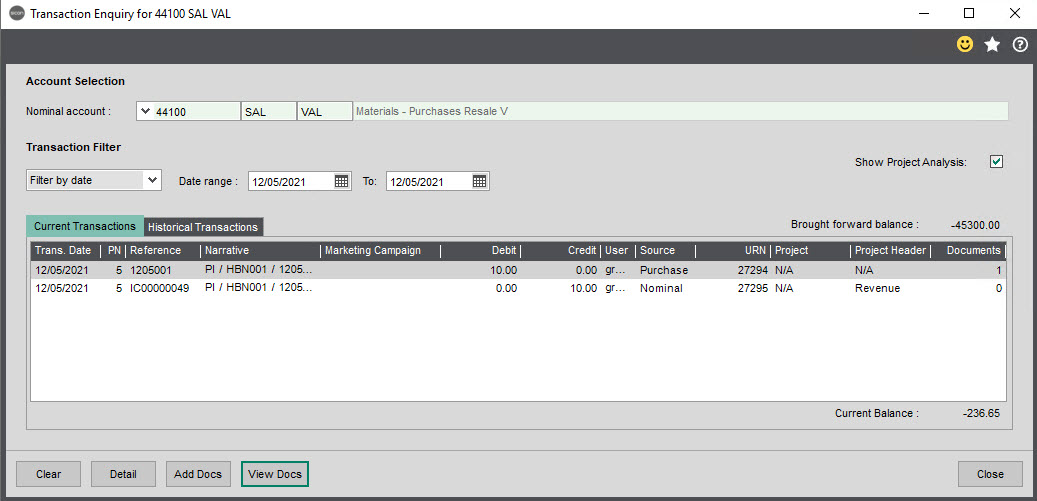
In the sending company, reviewing the nominal account that the invoice was originally coded to shows that the original invoice posting has the invoice document attached. We do not duplicate this onto the intercompany journal posting in this company.
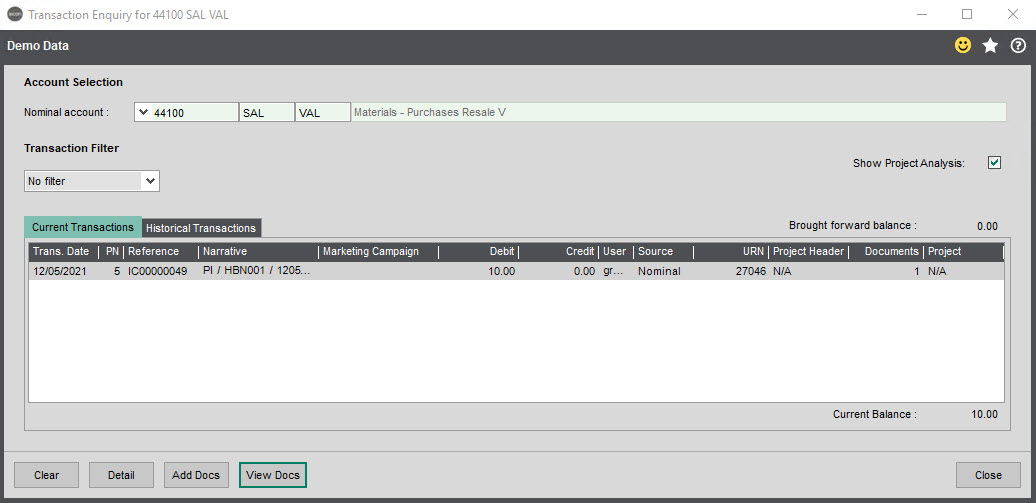
In the receiving company, the nominal journal has the invoice document attached.
This functionality would also work in scenarios where the two companies were in different VAT groups. In this example, the attached invoice document is also attached to the intercompany sales invoice that has been raised in the sending company, and also the intercompany purchase invoice that has been raised in the receiving company.
18. Enable Module
This screen is used to show all configured Sicon Add-ons and allows the entry of enable strings to allow use of a module. When a new module enable string is provided, copy into the ‘Enable string’ field and then click Apply to save the changes.
If online enable strings have been activated these will self-populate.

19. Release Notes
The release notes page shows which release of the system includes new features or issues resolved.
At the release of Sicon v21 we announced that going forward, we will only be supporting Sage 200c and as such we are able to drop the year from our version numbers. We moved from 201.201.0.0 to 210.0.0.
New features detailed in the Release Notes relating to Pre-Release versions will not be detailed in the current Help and User Guide until the end of development phase.
Intercompany Release Notes