Service Help and User Guide
Service Help and User Guide will take you through the features and settings for the Sicon Service module for Sage 200.
Search the page by pressing Ctrl + F (windows) or CMD +F (Mac) on your keyboard.
Back to all user guidesProduct overview
Help and User Guide maintained for Service version 220.0.0 and Upwards
The Sicon Service Help and User Guide will take you through the features and settings for the Sicon Service module for Sage 200. It is designed to allow the creation, processing, tracking and billing out of service calls within Sage 200. Allocations of Sage 200 stock items, scheduling of employees, purchasing of replacement parts and transfer of stock to engineers or direct to site are key features of this system.
1. Introduction to Service
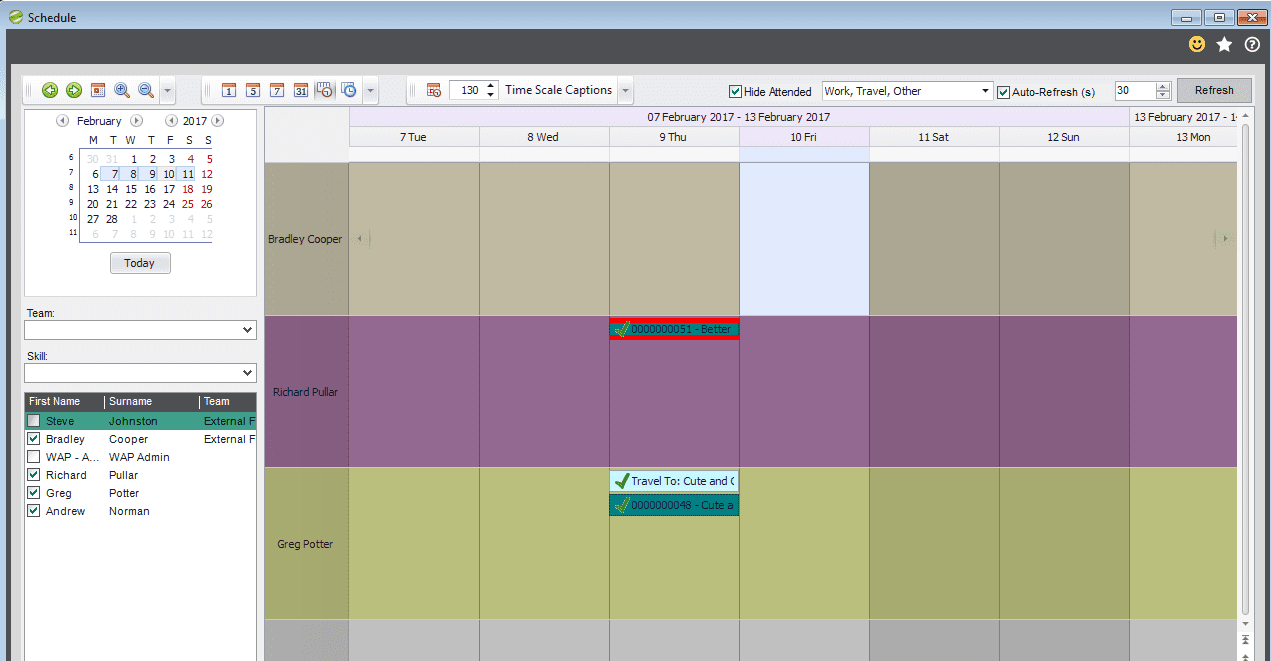
The case scheduler allows time to be booked for travel, on-site service call work, training, holidays etc. Filters on the scheduler allow viewing of employees by geography, skill, type etc. in order to filter them down to a more qualified or better located selection of the total list.
It is possible to create a Scheduler Wall Display using a projector, large monitor or multiple monitors linked together with a Matrox display card.
Running on its own PC with the scheduler diary being updated every few seconds this would enable the service case managers to see a view of all engineers and a much wider diary view than that available on a single screen PC.
Time can be recorded against appointments for travel or on-site service calls. These can be entered through the Service case or via the tablet interface.

The Tablet Interface will run on IOS, Android and Windows based Phone and tablet devices. It is recommended that you test the devices with your employees.
The Tablet interface will allow both on-line and off-line use. The engineer will sync tasks to and from the tablet when a Wi-Fi or mobile signal is available. When off-line the work carried out will be queued and processed again when a connection is available.
Tablet licenses are purchased separately to the Service Module for Sage 200. These are priced on a named user basis; see the Sicon Price List for current pricing.
Key Features:
- Log service cases for customers with contracts or for ad-hoc calls
- Log and find services cases via equipment, location, sub location, postcode or address search
- Create appointments for travel and on-site service work; capture time entry to both
- Allocate stock parts to service cases. Transfer parts to Engineers or direct to site
- Track parts used on a case and against a piece of equipment
- Manage returns and repairs via the service case
- Invoice service cases using rules and cover types to include parts and labour with options to override
- Link equipment to customer, customer locations and sub locations
- Maintain a skills matrix and fault code table to identify selection of correct employees to assign to cases
- Maintain SLA’s, Cover Types, Case Priorities and Case Sub Status
- Create cases for items to be services; by item or by location
- Import cases
2. Integration
Sicon Service is fully integrated within Sage 200. This module is operated entirely within the Sage 200 environment and the Screens and processes have been designed for non-IT users.
Integration with Other Sicon Modules
The Sicon Service incorporates two existing Sicon modules:
- Sicon Contracts: Deals with the setup and billing of contracts for the support of equipment or for services and contract line cover types pulls through to cases, when linked to equipment.
- Sicon Projects: Captures all costs associated with the contract and the service cases. Costs can be captured per service case or per contract or per customer on a non-contract project (This last option being our recommended one for non-contract customers). N.B. Sicon Projects integration must be switched on
Integration with Sage 200 Stock Module
- Service Contracts are set up as Service Stock Items with individual pieces of Equipment linked to those contracts; cases can then be raised against the equipment.
- Stock Items marked as ‘Serviceable Items’: When added to a Sales Order, upon saving of the Sales Order the equipment will be linked to the Sales Order customer, details of which will be displayed on screen after the Sales Order is saved allowing you to view or add more details
Note: (If the item is not marked by default as being a serviceable item, it can be flagged on an individual Sales Order basis)
- Stock Items marked as ‘Requires Installation’: When saving a Sales Order that contains an item/s marked as ‘Requires Installation’ an Installations case will be created automatically details of which will be displayed on screen after the Sales Order is saved allowing you to view or add more details
Note: If the item is not marked by default as being an item that requires an installation case it can be flagged on an individual Sales Order basis
- Default Service Stock Items can be used within Sicon Service in various areas, specifically within Settings/Appointments to default which Service Stock Item is to be used for Chargeable Time and items charged such as Travel
- Standard Stock Items can be allocated to a case, before being confirmed by the engineer/or administrator as parts used, issued and dispatched. Please note:
- Internal Areas will need to be set up (within Stock Control module) in order to select from when ‘Parts Used’ and ‘Issuing Allocations’.
- It’s at the ‘Dispatch Point’ that stock level is reduced, until then it is allocated within the selected relevant warehouse.
- Nominal Code postings are determined by nominal codes configured on Internal Area/stock codes, and costing method.
Integration with Sage 200 SOP Module
At the point of Billing, Sicon Service posts through to Sales Order Processing, bringing the Sales Order on screen to amend/add and process through for invoicing and posting to the Sales Ledger. to amend/add and process through for invoicing and posting to the Sales Ledger. Note: Automatically generate order an return numbers must be activated within the SOP Settings.
3. Pre-Requisites
Throughout the life of a Service Case, the system uses various aspects of Sage to record transactions such as Stock Warehouses, Locations, Service Stock Items Internal Areas, (and therefore associated nominal codes) and where applicable Sicon Projects Project Headers.
Therefore, during the early stages of the configuration and set up there will be a requirement to discuss, review and create the required defaults. We have found that on some projects the companies finance director/manager will have an input as to what new defaults should be created, especially when it involves the nominal side of things.
It is not a mandatory requirement to create all new defaults and if a company prefers to use existing and/or some existing stock warehouses, internal areas, service stock items, service stock items and nominal codes that’s fine.
If this is the case, within settings you would just specify/set defaults accordingly. However, based on previous projects we recommend having separate Service defaults to any standard ones currently being used.
Why? From an audit perspective it’s very clear to see the different types of transactions; for example, when looking at stock history for a stock item, if the warehouse allocated to a transaction is Service then you know that the stock item was used on a Service case.
Below is table detailing the potential areas companies new to Service may want to consider setting up; where they would be used and an example.
Each of these aspects are then used to set defaults within Service\Utilities\Settings area of the module and various areas of the module accessed via each tab as the screen shot below shows.
Equipment TAB
| Requirement for | Where to be used | Example if creating new |
| New Stock Internal Area Configured/Set up as default on the ‘Equipment Issue Internal Area’ | During Return & Repair process during the life of a case when you flag a piece of equipment as going out as replacement Part | Serv Man Ret/Rep |
Parts and Stock Shortage Transfer TAB
| Requirement for | Where to be used | Example if creating new |
| New Stock Warehouse If parts used on a case are supplied from a separate warehouse than to main, and is not currently configured Configured/Set up as default against the ‘Default Origin Warehouse’ default field | If within a case, you will be sending parts (stock items) from a specific spare parts warehouse to a field engineer and/or customer to be used on a case , and currently within sage 200 stock a separate warehouse is not set up | Serv Man Parts |
| New Stock Warehouse Configured/Set up as default on the ‘Parts & Stock Transfer Tab’ – against the ‘Stock Transfer Transit Warehouse’ default field | If parts are sent out, Service requires an ‘In Transit’ Warehouse to flag the stock items as having left the origin warehouse but as yet not flagged by the engineer as being physically received by him to be used on said case | ServMan In Transit |
| New Stock Internal Area Configured/Set up as default and within ‘Stock Transfer Internal Area’ field | During the Service stock transfer process. When stock items (parts) are allocated on a case, the area used for the Sage allocation of stock Normal purpose of standard stock Internal Areas apply | Serv Man In Transit |
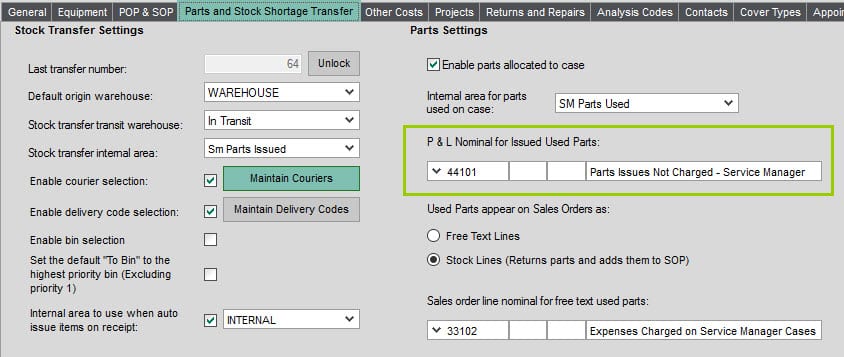
| New ‘Profit & Loss’ Nominal Code Configured/Set up as default against ‘P&L Nominal for Issued Used Parts’ field | When parts are added to a case but are not charged (may be because they are under a service agreement, or simply on the case it’s decided they are not chargeable, then at the completion stage of the case the cost of those parts will be posted to this nominal code on the P & L | Serv Man ‘Non chargeable Parts’ Cost |
| New ‘Stock In Transit’ Balance Sheet Nominal Code Configured/Set up as default against ‘Stock Transfer Internal Area’ field | During the Service stock transfer process. When Stock items (parts) are issued on a case, the internal area set as default will have a Nominal Code associated with it, and a nominal movement is created (example credit stock; debit Serv Man In Transit Stock) | Serv Man in-transit Stock If as a company you wish to see / separate a stock value that is ‘In transit’ (stock not in main warehouse, but not yet confirmed as being used on a case) |
Nominal posting from orders raised from service cases
In Service Settings, Parts and Stock Shortage Transfer, input the nominal code for the issued used parts to post to.
When parts are added to a case but are not charged (may be because they are under a service agreement, or simply on the case it’s decided they are not chargeable), at the case completion stage the cost of those parts will be posted to the nominal code configured here on the P & L
The Internal Area for stock transfers needs to be configured. This is used to record when an item is being used by another area or department in your company. Internal areas are used to identify where the stock is being allocated to.

The internal areas are setup in Stock Control > Utilities > System Set Up > Stock Control Settings.
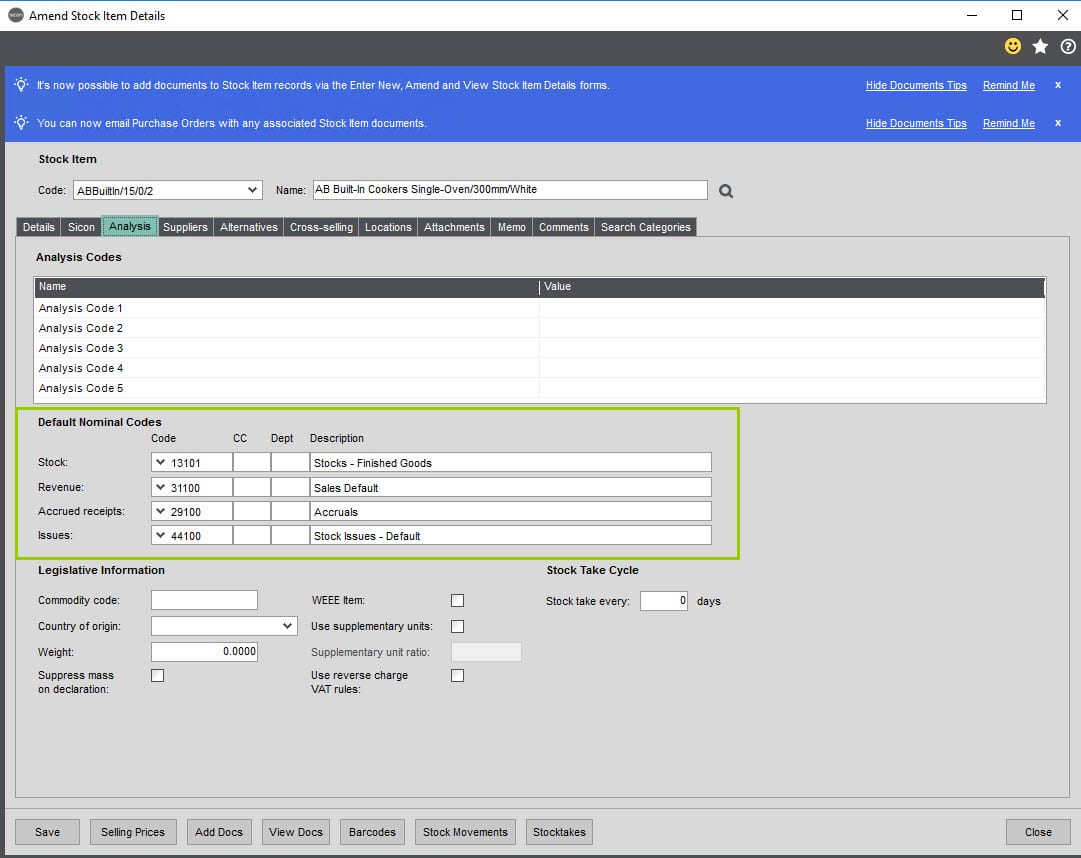
The stock items will also have default nominal codes configured, these are setup on the Analysis tab of the Stock records as shown below:
When a linked purchase order is created from a Service Case there is No Nominal Posting at that point.
Updating the purchase order with the GRN does not create a Nominal posting.
Recording the Invoice from the purchase order generated from the service case updates the Issues Nominal on the Stock item.

On billing the customer from case (raising the Sales Order) there is No Nominal Posting at this point.
Print Invoice from the sales order generated from the Service Case – No Nominal Posting.
Posting the Invoice using the standard Sage procedure will update the Revenue Nominal as set to the Stock item.

Any stock items that are not charged for from the service case will update the P&L nominal code for the Issued Used Parts on Complete Case
| Action in Sage | NL Posting | Additional Notes |
| New Service Case | No Nominal Postings | |
| Add Parts to a Case Stock Items added to a case will be issued to the internal area nominal code | No Nominal Postings | |
| Raise a Linked Purchase Order from the Case | No Nominal Postings | |
| Receive Linked PO | No Nominal Postings | This will increase the Stock Quantity in the Stock Module |
| Receive Invoice for Linked PO | DR – Stock Account DR – VAT Control CR – PL Control Account | The cost of the stock now resides in the Balance Sheet. The Stock account is taken from the stock record |
| Allocate Parts to a Case | No Nominal Postings | This will have allocated the stock quantity in the Stock Module |
| Use the Parts on a Service Case | CR – Stock Account DR – Internal Area | The cost of the stock now resides in the Service ‘WIP’ Account. Internal Area is taken from the Service Manager Settings and the stock account is taken from the stock record |
| Complete the Service Case | CR – Internal Area DR – ‘Used Parts’ | The cost of the stock now resides in the P&L nominal for issued part. |
Other Costs TAB
| Requirement for | Where to be used | Example if creating new |
| New ‘Profit & Loss’ Nominal Code Configured/Set up as default against the ‘Sales Order Line Nominal for Expense Lines’ default field | When Expenses are added on to a case which in turn are charged to the customer the revenue will be posted to this nominal code on the P & L Expenses could be such things are mileage, accommodation, Misc Expenses The alternative for adding these types of expenses is that they are already created as service stock items, with associated nominal codes. If this is the case they would be added as a ‘Part’ with the relevant service stock being selected’ | Serv Man Expenses Revenue If the customers already have a ‘Other Sales’ P & L Nominal created they may prefer to use that rather than create one specifically for Service Other revenue |
Expenses TAB
| Requirement for | Where to be used | Example if creating new |
| New ‘Profit & Loss’ Nominal Code Configured/Set up as default against the ‘Sales Order Line Nominal for Expense Lines’ default field | When Expenses are added on to a case which in turn are charged to the customer the revenue will be posted to this nominal code on the P & L Expenses could be such things are mileage, accommodation, Misc Expenses The alternative for adding these types of expenses is that they are already created as service stock items, with associated nominal codes. If this is the case they would be added as a ‘Part’ with the relevant service stock being selected’ | Serv Man Expenses Revenue If the customers already have a ‘Other Sales’ P & L Nominal created they may prefer to use that rather than create one specifically for Service Other revenue |
Projects TAB
| Requirement for | Where to be used | Example if creating new |
| New Sicon Projects Project Headers to allocate revenue and costs on a case Configured/Set up as default against the ‘Projects Tab’ Noting the Cost Project Header for Stock Items & Service items /Employee costs are set at stock record level | All transactions /movements and therefore costs and revenue values are posted through to Sicon Projects No touch points with Nominal, this is purely to specify which area on a Project transactions are linked to | SM Parts Revenue SM Labour Revenue SM Other Revenue SM Labour SM Warranty Parts Cost* SM Warranty Labour* If you need to report parts and labour costs separately where you have not been able to charge as under manufactures warranty, it’s good to have separate Project headers as you can then filter for reporting Please make sure you set against each Project Header the correct ‘Header Type’ and ‘Project Header Type’ – This ensures the transaction sits within the correct area of Projects for enquiries and reporting |
Returns & Repairs TAB
| Requirement for | Where to be used | Example if creating new |
| New Sales Ledger account to be used within the Returns and Repairs Process Configured/Set up as default ‘Return equipment to Account Location’ | Equipment is linked to a customer, during the ‘Returns & Repairs’ process, and when an item is returned to the company for repair, the equipment is temporarily moved from linked customer to an internal customer If after repair the equipment item is returned to the customer the equipment will move from the Service Internal Account to the customer equipment list/location | RETURNS/REPAIRS |
| New Stock Control Write off Area Configured/Set up as default ‘Write-Off Category for case item write-offs’ | During the Returns Process, if the equipment cannot be repaired/returned, but instead written off, this Write Off Category will be used Normal purpose of standard Stock Write off Areas Apply | Service Equipment Write Off |
| New Internal Area Service Returns Configured/Set up as default ‘Returns Internal Area for items being returned’ | During the Returns Process Normal purpose of standard Stock Write off Areas Apply | Service Equipment Returns |
| New Stock Location: Repaired/Refurbished Goods Parts Configured/Set up as default against ‘Faulty Parts Location’ | During the Returns Process If the equipment cannot be repaired/returned the item will be added back into stock but within this defaulted warehouse | Service Equipment Faulty Equipment |
| New Stock Location: Repaired /Refurbished Good Parts Configured/Set up as default against ‘Good Parts Location’ | During the Returns/Repairs Process Where on a case, an item is returned, but your policy is to replace … after you have sent the customer a replacement, you then repair the faulty equipment and you wish to then add that ‘repaired item’ back into stock, but you may want to separate it from your ‘new stock as such’ and add to a ‘Refurbished Parts Location’ from where you can sell them | Service Equipment Good Parts or Second Hand Parts Location or ‘Refurbished Parts’ |
Appointments TAB
| Requirement for | Where to be used | Example if creating new |
| New Service Stock Item(s) Configured/Set up as default against ‘Default service stock items for chargeable time’ & ‘default services stock item for Callout Charge’ If you are using ‘Appointment Labels you can link a ‘work appointment label’ to a specific Service Stock Item. This may be an option if when invoicing, you want the description that appears on the invoice to be different for different work types For more information on appointment labels please review ‘Maintain Appointment Labels’ within the maintenance menu item area of the module | When time is charged on a case the module will use service stock items and associated revenue nominal codes when pushing through to a standard Sage 200 Sales Order for invoicing. This applies when invoicing engineers time as well as a call out charge | Service Engineers chargeable Time Service call Out Fee/Charge Because Service uses Service stock items and Sage as standard required a warehouse to be assigned to all stock items, when creating these new service stock items remember to assign the Service warehouse to them as default |
4. Maintenance
Configuration of the various maintenance menus will determine what options are visible to users on screens and drop downs in certain areas of the module. The section below details the options (not mandatory) and shows examples to give you an indication of how these may be used.
4.1. Appointment Labels
Appointment labels are used when creating appointments, the label description, name and colours can have changed to suit your company’s requirements.
Appointment labels are shared between all Sicon Sage 200 Products though their creation can be enabled/disabled per product.
By default, with a new Install (v18 onwards), we enable the ‘Work Appointment Label’ for Service
Appointment Labels have further options that allow you to switch between Engineer Charge Rates and Price Book Pricing when charging out labour to customers.
To enable the label to be used within Sicon Service, select and edit the label.

And select the Service Tab to set:
The Label to be used within Service and The Label Type (Options are as below screen shot)
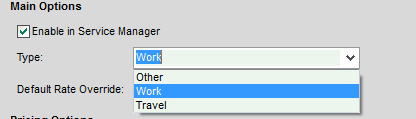
Work : An appointment type where chargeable work applies
Other: Used to block time out in diary so users know the engineer is not available, some users will use just one generic ‘other’ label type for time such as Holidays, Doctors, Admin rather than set up a label for each type of other type, there is no right or wrong option, just a company’s preferences when looking at the scheduler, if a Misc ‘Other’ is okay to cover a whole host of things, or if you want every type of a day’s activity to be cover by its own label type
Travel: Used to show travel time in Diary/Scheduler
Thereafter Select either between using Employee Charge Rates or Sage 200 Standard Price Book Functionality
Employee Charge Rates: if selected, charge rates recorded against the employee will be used for billing. If required, different Service Stock Items can be linked to each Appointment Label but if not required leave blank and the Default service stock item for chargeable time will be used (Utilities – Settings – Appointments tab).
If Employee Charge Rate option is selected the Price Book options are greyed out.

Price Book (Service Stock Item per charge Rate): if selected, allows you to associate Service Stock Items with Charge Rates for each Appointment Type, and limit the Charge Rate options available for each Appointment Type.

If using service stock codes and Price Book is your preferred option Employee charge rates are greyed out.
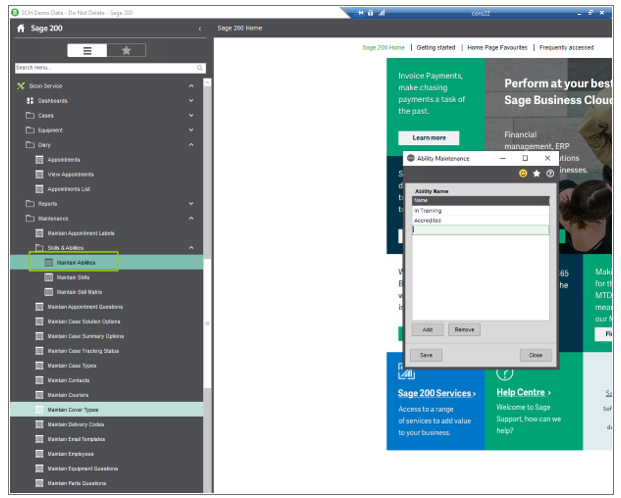
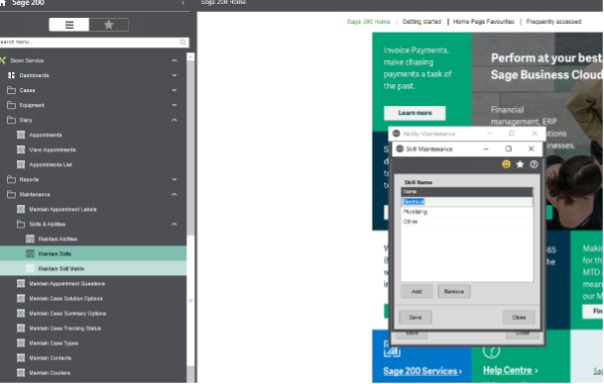
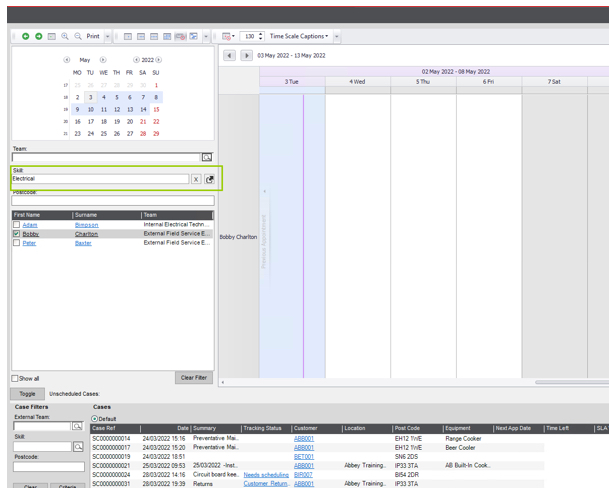
4.2. Skills and Abilities
Skills and abilities can be added using this menu item, which can then be used to filter within the scheduler to ensure the right resource is selected.
Under Maintain ability
You can record competence levels available within the database.
Maintain Skills
Here, you can add a skill
In the skills Matrix there is a table of the employee their skills and their abilities.
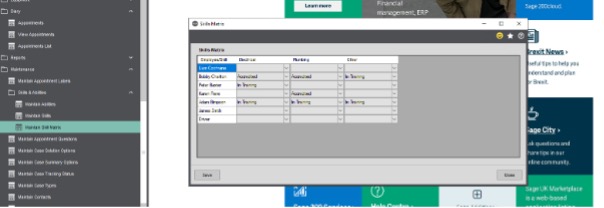
In the scheduler resources can be filtered by their recorded skill.
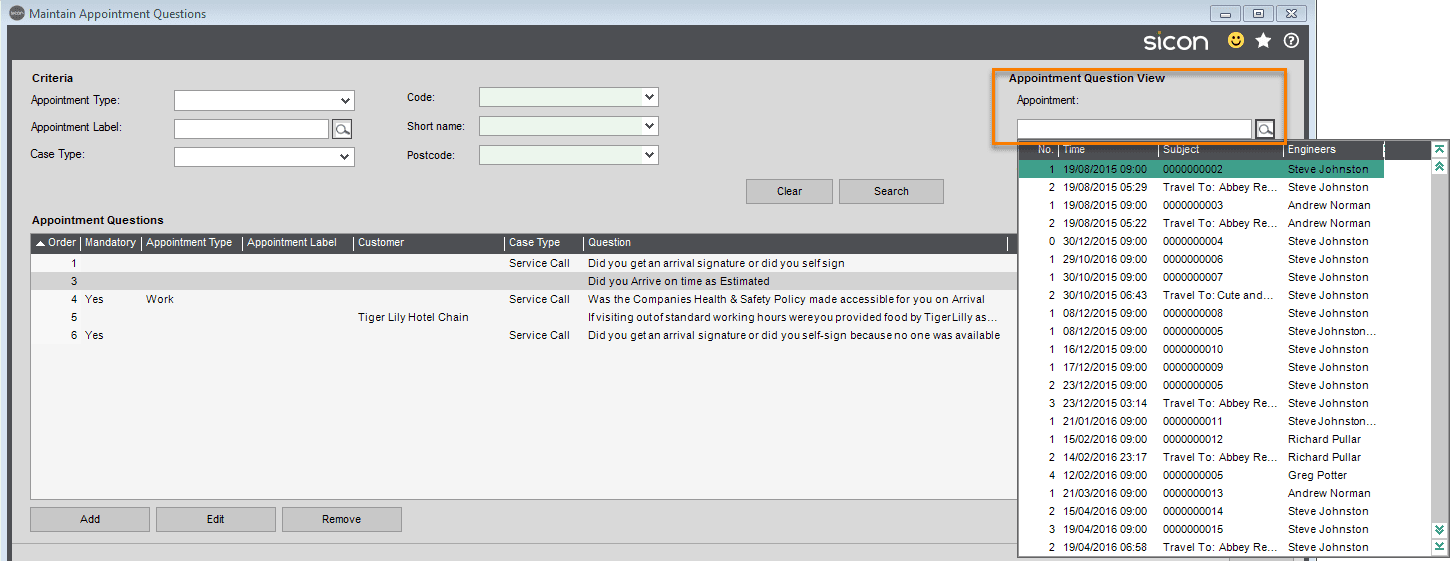
4.3. Appointment Questions
Pre-defined engineer mobile device appointment questions can be set up and linked to all Appointments, a certain Appointment Type, Appointment Label, Case Type, Customer or a combination of.
These questions are then visible to the engineers on the mobile device within the relevant appointment.
Completing the answers can be based on a pre-populated selection, Yes/No, Multi Answer Select, Free Text, with options to include where relevant a default answer.
Questions can be made mandatory if required which if set ensures the appointment cannot be flagged by the engineer on the mobile device as complete until the question has been answered.
Important Note: Whilst testing internally and prior to testing and/or going live with mobile users we recommend you do not flag the questions as mandatory, as these are really relevant to the mobile users, so whilst testing internally only, you may not want to have to answer lots of questions that have been flagged as mandatory.
We also suggest you are cautious with the number of questions you set up and flag as mandatory unless you really need to capture important information.
Examples Appointment Questions
Have you signed the visitors book when arriving on site ?
Was the Company’s Health & Safety Policy made accessible for you on arrival ?
Did you get an arrival signature or did you self-sign because no one was available?
Screen shot examples below include:
- One specific to a sales ledger customer with a selection of answers for the engineer to answer
- One relevant to an Appointment Type, Appoint Label and Case Type , with a Yes or No answer required, and being mandatory
- One relevant to all Work Appointments, with a Multi Select option of answer


Users can filter by various options, select search to show all or if required search the question relevant to a specific case appointment.
4.4. Case Solution Options
Predefined solutions for cases can be configured for selection which negates the need for free text case solutions to be entered.

Solutions can be linked to a fault code for any custom reporting you may wish to create using Sage 200 Report Designer.
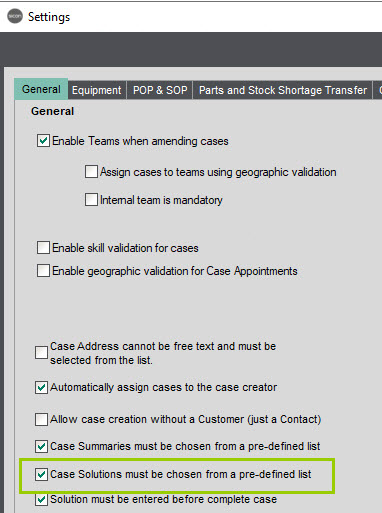
In order to activate the Case Solution box on the case description tab, the feature will need to be enabled on the General Tab within Settings as below.
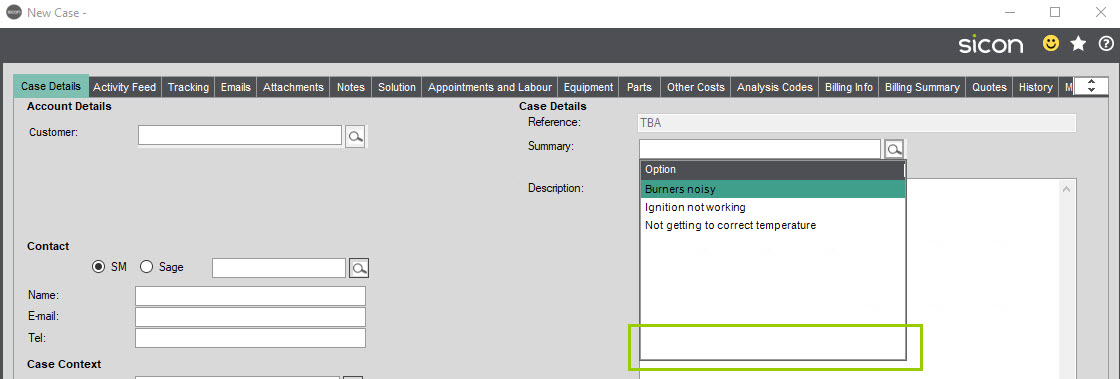
When enabled within a case, users will be able to select the solution as below.

4.5. Case Summary Options
Case Summaries when created will be available for users logging cases to select a ‘summary’ of the call from a pre-defined list displayed in the Case Summary dropdown.

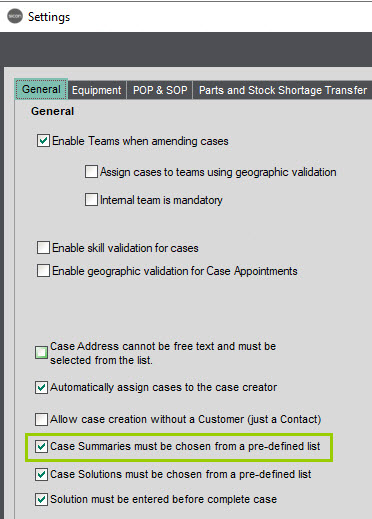
In order to turn the Case Summary box on the case screen from a free text box to one containing a pre-defined list, the feature will need to be enabled on the General Tab within Settings as below.
When configured, the user logging a case will see the options available as below.

If the user creating the case has the feature enabled on their Role within Sage 200 ASM to Maintain Case Summary they will also see in the above drop-down list, an option to create a New Summary.
If not the new summary button will not be visible as per the screen shot below shows.
4.6. Case Tracking Status
Configure as required to track the progress of each case e.g. Waiting Parts, Refer to Internal I.T, Customer Chasing.

Cases can be searched for/listed by status and reports written using this field.
Tracking status’s can be flagged as Available to Customers, these will then show for customer who have access to the Service Desk via the Self-Service Portal.
Within the Mobile Options Tab in Settings it’s possible to configure the system so when an Engineer Arrives on site, and they sync back to the office, and when they leave and sync the system will add a tracking note. These will need to be added as a tracking status ticked as available to engineers, before configuring the settings on the Mobile Options tab.

Service Tracking Status Available to Engineers
Service Tracking Status’s can be flagged as being available for the engineers to seen and use on their devices. This may be particularly useful if your driver has been unable to make a delivery for whatever reason.
Create as Tracking Status and flag as available to engineers and Save.

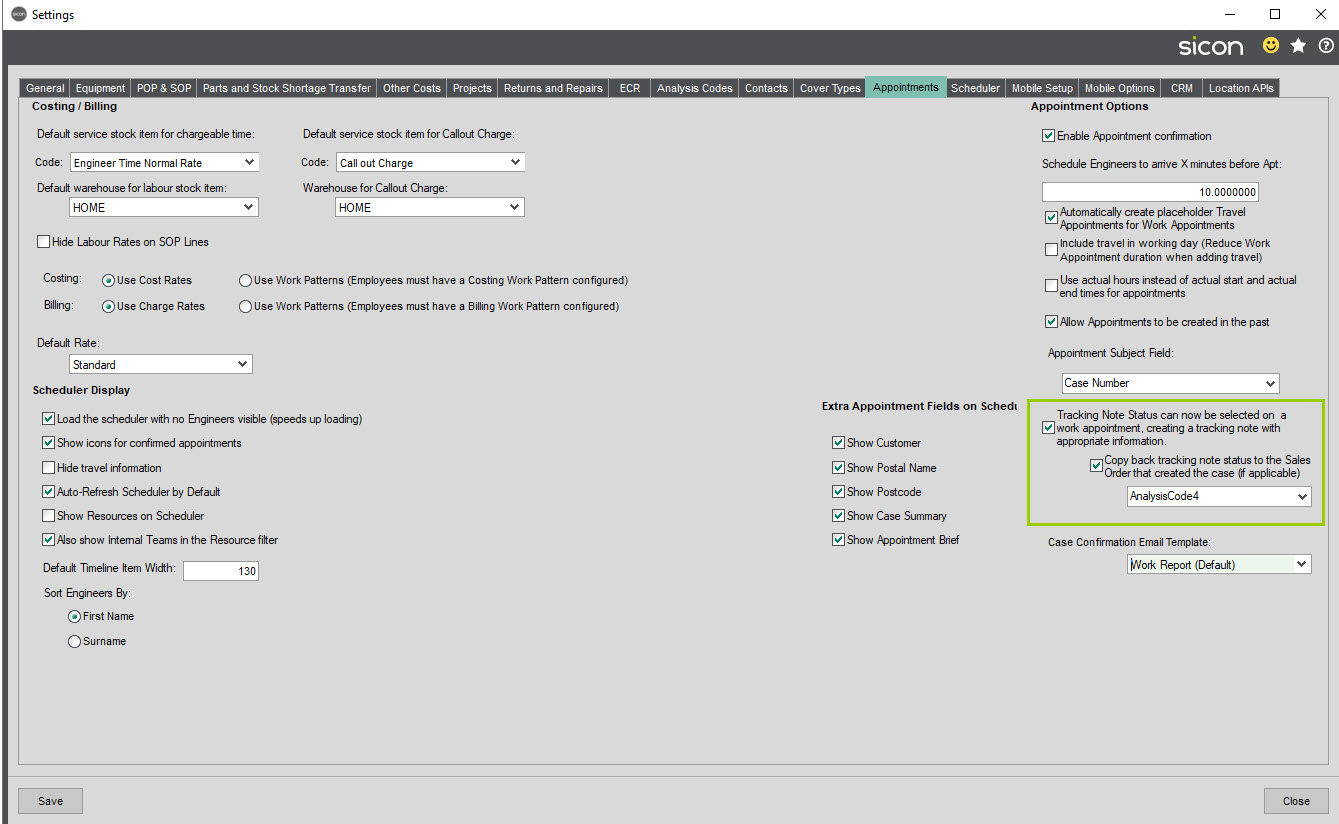
Within Service Settings you will need to enable the option for the Tracking Note Status to be selected on a work appointment. There is also an option to allow for the tracking note status to be copied on to the Sales Order created from the case is that is required, this links to an analysis code to be pulled through to the sales order.
When a case is scheduled (in this example for delivery) and the engineer sync’s their device they will get the appointment as usual. If they are unable to make the delivery – ran out of time, access blocked etc. they will need to record this on their Work Done.
The Engineer will need to self-sign in order to update the appointment, in our example we have typed Failed to deliver as the Name and have self-signed and submitted.
![]()
In the Work Log section of the App, the engineer will need to click on the Status to update the appointment with the required tracking status.
![]()
Select the Tracking Status (in this example we only have one available for engineers)
![]()
When the tracking status has been selected the engineer can indicate what Further Action is required prior to submitting.
![]()
When booking time to the appointment ensure the Arrived On-Site at and Left Site At times match if you will not be charging for this failed appointment.
![]()
The Engineer will need to sign out of the failed delivery appointment.
![]()
We entered N/A in the Customer Name as there is no actual customer to sign.
![]()
As the appointment is synchronised by the engineer, the tracking status updates back to the office and is visible on the Service Desk, where the service administrators can look to reschedule the appointment with the customer.
![]()
4.7. Case Types
There are nine default system Case Types, you can rename them, but you cannot delete them.
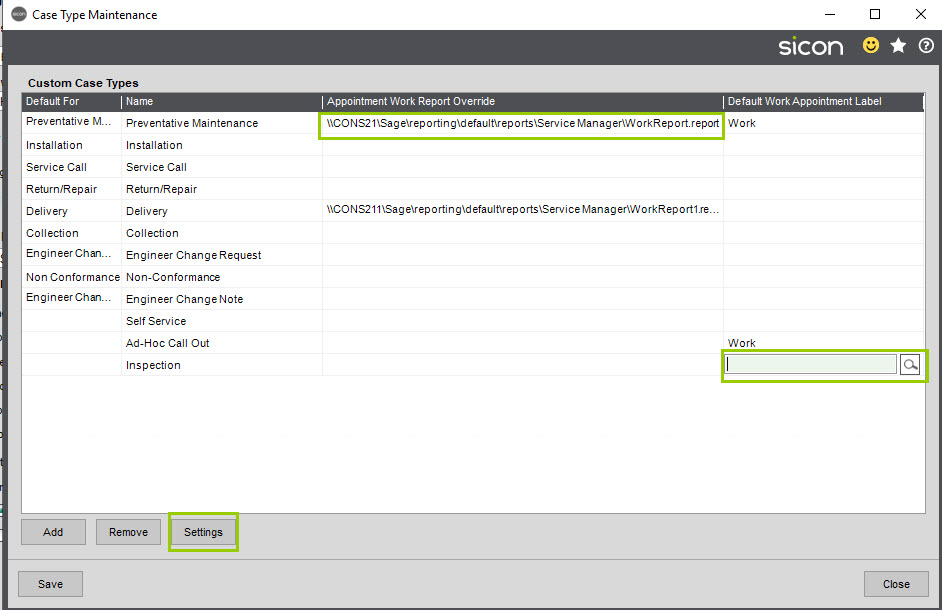
Against each of these fields you can link a default Appointment Work Report. A standard one is available from Sage\reporting\default\reports\Service Manager – these can be edited and updated as required for each case type. You can also link a Default Work Appointment Label so as appointments are created from these cases they will pick up any defaults configured.
Preventative Maintenance: cases which are created using the ‘Service Equipment’ function are Preventative Maintenance Type cases.
Service Call: New cases logged.
Installation: When a Stock Item marked as a Serviceable Item which ‘Requires Installation’ is sold through Sage SOP, the case automatically created is an Installation Case Type, although users can also manually select this type when raising a case, and if not defaulted on a stock item, can be set when adding the stock item on to the sales order.
Return/Repair: When setting case type to this type, an additional ‘Customer Returns’ tab appears, allowing the users to record that the customers are looking to either return the Equipment Item, an item that is not the customers equipment item, but is an item that is a ‘Stock Item’ within the company’s stock system or a ‘Free Text Item. Users can then specify if an advance replacement of a stock item is required or a repair or depending on the circumstances a sop return/credit.
If a case is created with case type Return/Repair, but where the Returns/Repairs feature is disabled in settings the user will be warned and the system admin user will need to configure before a Return/Repair Case can be created.
Delivery: Delivery cases can be created from the Service module or these can be generated automatically if the Sicon Hire module is installed and a hire order line is flagged to create a Service Delivery Case.
Collection: Collection cases can be created from the Service module or these can also be generated automatically if the Sicon Hire module is installed and a hire order line is flagged to create a Service Collection Case for the return of the hire asset.
Engineer Change Request: (ECR) Cases can be created for engineer change requests which are used in accordance with Sicon Manufacturing
Non-Conformance: Non-conformance cases can be created from the service desk and by selecting the Non-conformance case type, this will hide any unnecessary tabs and only display those relevant to the case type. Note: Before using this case type, you will need to configure Reject Types 4.28
Engineer Change Note (ECN): This is created from an engineer change request case type when the change request is signed off.
Additional Custom Case Types can be configured as required. Cases can be searched for/listed by Case Type and reports written using this field.
For each Case Type, you have the option for further defaults to be set. Highlight the case type from the list and click Settings.
General tab:
Automatically sent an appointment confirmation e-mail to the customer.
Set an appointment rate override (the cost rate you want to use from the employee record).
Disable prompt for follow up case on case completion. If this one is not ticked, when the case is completed on the service desk, the user will be asked if they want to create a follow up case.

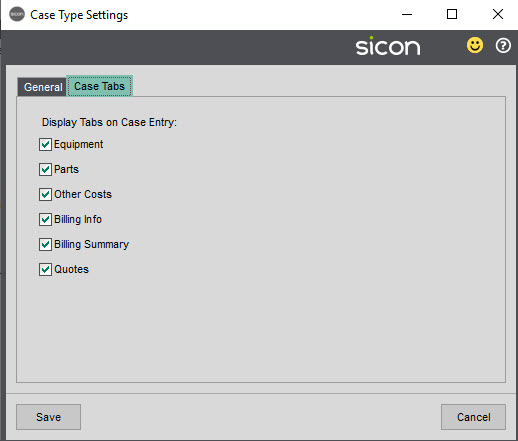
Case Tab:
On this tab, tick the options to show the tabs on the case type selected when raising from Service Desk.
If certain case typed don’t need all available tabs, these do not need to be shown for example, if you have a delivery case that has been created from the Hire module you probably wouldn’t want to see any of these case tabs as the billing is being done from Hire.
4.8. Contacts
Use this feature to create contacts at the customer’s location where the engineers are to visit, and/or for those people who will be calling and logging Service cases (These would usually be different to the sales ledger contact which tends to be the accounts contact).
These contacts can be associated to a customer location/sub location. New contacts can also be added at the point of creating a new case. Note: Service Contacts are separate to and not linked to SL roles/contacts.
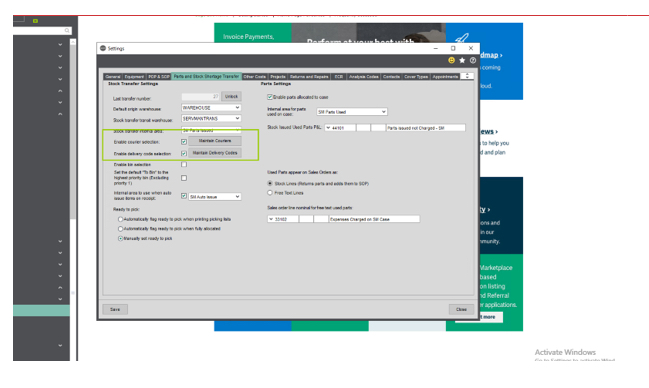
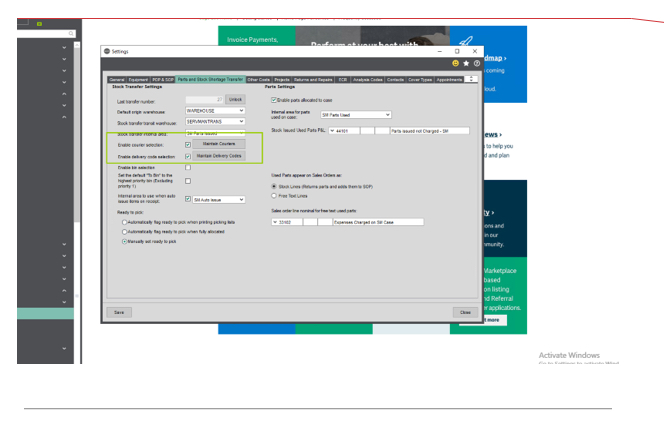
4.9. Couriers
Used for internal reference and to specify the preferred courier to be used when sending parts out from the stores for example, so by specifying these on a case (and on the picking note and despatch notes) stores or whomever is responsible for arranging to send out the parts to the engineer for use on an appointment will know which courier to use.
This creates an additional field, in the stock shortage transfer, if the setting is enabled
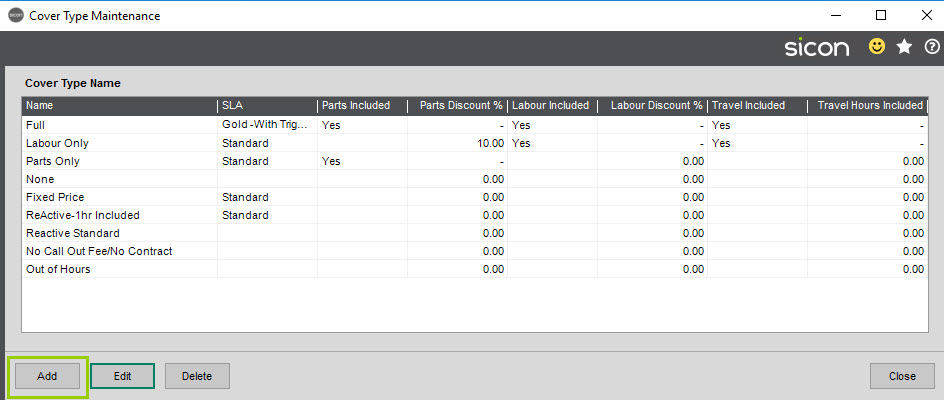
4.10. Cover Types
As Standard when the module is installed there are four system Cover Types: Full, Labour Only, Parts Only & None, these can be configured to your preference; or additional cover types added.
Cover Types are powerful, as you can to pre-configure to how you need the system to handle the case as far as what is chargeable to the customer and what is included or FOC by default (Based on system settings they can be overridden / changed on the Billing Summary tab during the billing process).
A Cover Type reflects which items are either included or are chargeable under a contract i.e. labour, parts, travel.
These can be configured and named as required for example Fully Inclusive, Labour only, Parts only or Fixed Price.
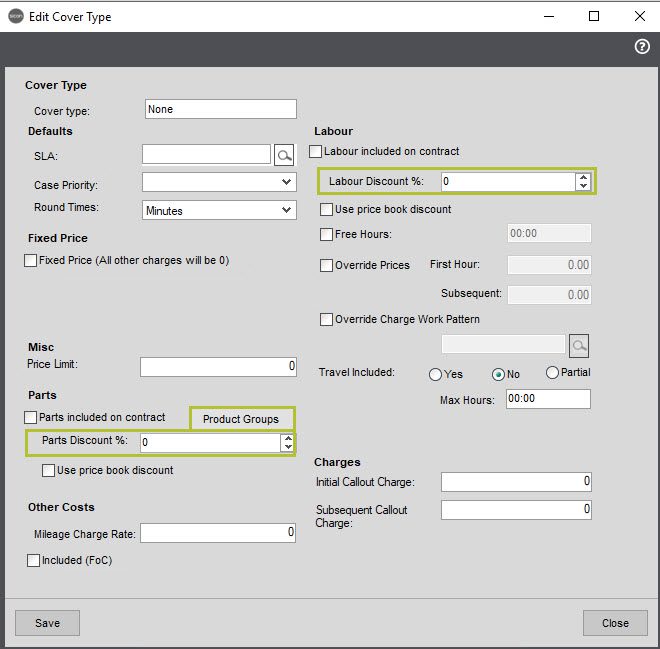
Against each cover type you can also set various other aspects such as:
- SLA/ Service Level Agreements (i.e. response time agreed)
- Case Priority: Use to flag whether a cover time, also carries a case priority if required, select from the dropdown selection available (created in Maintain Priorities).
- Round Times: Use to specify whether proposed times and billable hours are to be rounded to the nearest Minute/15 Minutes/30 Minutes/1 Hour, rather than the actual time entered.
- Fixed Price: Use to specify if required, if required, any Fixed Price charge that applies to this cover type. Can be entered as required with all other charges being charged at 0.00. This is particularly useful if an agreement has been reached with the customer to only charge an agreed price to cover all labour/parts/callouts. Note: The Sales Order will show a single line of ‘Fixed Price Charge’ at the appropriate value with no labour or parts detailed.
- Misc: Price Limits: Where on a case when the billing value comes to a certain limit, users will be warned.
This is useful if a customer has said, for example a purchase order number is not required per case if the value is under £ xx
- Labour and/or Parts Included; if not whether any discounts apply. If Product Groups are selected (new from 20.1) this allows you to flag that the parts from these product groups are included free of charge.
- Use price book discount: use a price book discount for parts and labour. This is only available if the manual discount percentage on the cover type is set to Zero.
- Free Hours: Useful if you include any free time on an appointment (i.e. first 30 mins free)
- Override Charge Work Pattern: This setting if selected, will enable a different Charge Work Pattern to be linked to the cover type
- Travel Included: if labour is not included, it is possible to either include all travel, exclude travel and the travel time as entered on the appointment be added to the labour charge or a defined number of hours/minutes of travel can be included before being charged out.
- Initial Callout Charge: Enter your initial callout charge specific to this cover type for the first completed appointment on a case. (Can be removed or changed at the billing point if required).
- Subsequent Callout Charge: Where you charge for follow up visits, you can define a rate as required which in turn when a second, third and so on visit is created on a case the subsequent call out charge will show on the billing summary (Can be removed or changed at the billing point if required).
- Expenses: Do you cross charge any expenses incurred by engineers whilst on an appointment (i.e. un-expected hotel costs, engineer having to go to local DIY store to buy items that he needed to complete the job.
- Mileage: Do you cross charge any mileage incurred by engineers whilst on an appointment, enter the pence per mile to be charged to the customer – this can be flagged as included as FoC.
Cover Types Hierarchy
Live/Active Contract Lines take preference over any other defaults set within Sicon Service or the customer, if creating a case for a piece of equipment linked to a contract line where a cover type has been set. (Live Active meaning a contract line is in a live contract period and has not expired)
Cover Types Specific to customers can be set:
On the Customers Sales Ledger Account, on the Service Tab and/or On the Customers Contract Line, within Sicon Contracts.
System Default Cover Types can be set: Within Service, Utilities, Settings and on the Cover Types Tab
And / Or On the Customers Contract Line, within Sicon Contracts.
Customer’s default Cover type will take preference over the defaults set within Sicon Service, if the ‘Prefer Customer Type (if available) over default Non-Contract Cover Type for Non-Contract Cases’ option has been enabled in setting when / if creating a non-contract case not linked to a contract line.
If the ‘Prefer Customer Type’ setting is not enabled within Settings, then the cover type used when creating a non-contract case will be the modules default cover type as set up within Settings.
4.11. Delivery Codes
For Internal reference specify the required date / delivery date within a stock transfer for shipment of the stock/parts to a customer/engineer i.e. Next Day, 2-3 Days, 4-7 Days. Useful for departments such as stores to know how quickly the parts need to arrive at their destination.
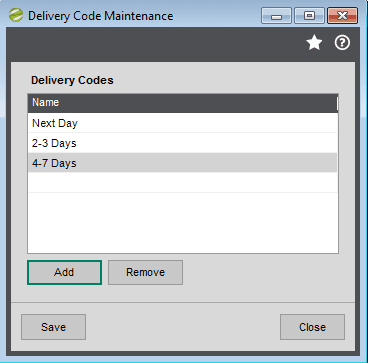
This field is visible in the stock shortage transfer if the setting is enabled.
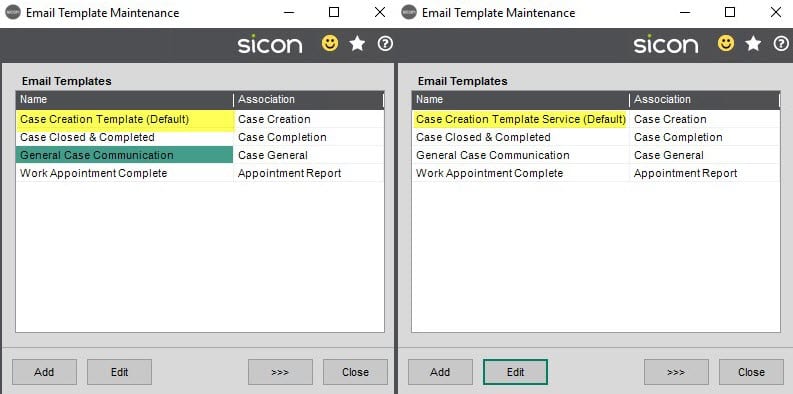
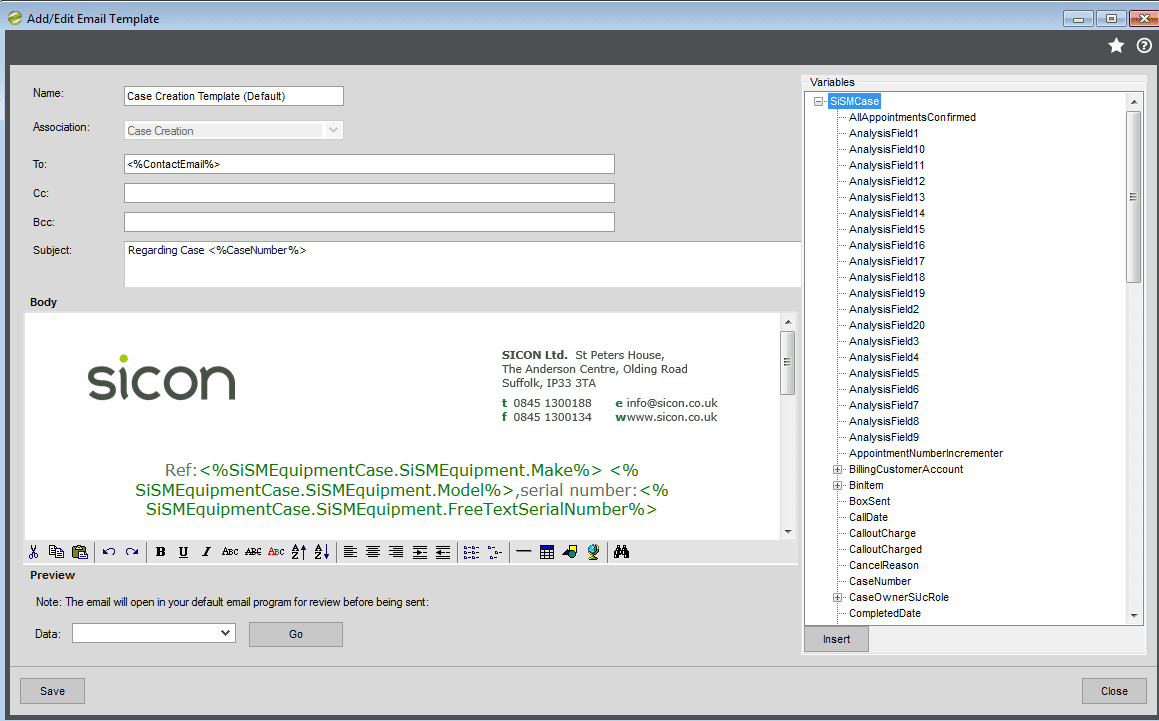
4.12. Email Templates
Case creation and case completed templates are included at installation (emails can be enabled in Settings – Email) but additional templates can be created. A full HTML editor is included allowing companies to brand templates as required.
Note: Outlook needs to be installed on the machine you are using to create/amend the e-mail templates.
If you are amending the Case Creation Template (Default) and re-naming it please ensure that the template name still starts with Case Creation. If you change this so it the name starts with anything other than Case Creation the system does not find the template for automatic generation.
Example of how it can be amended below:
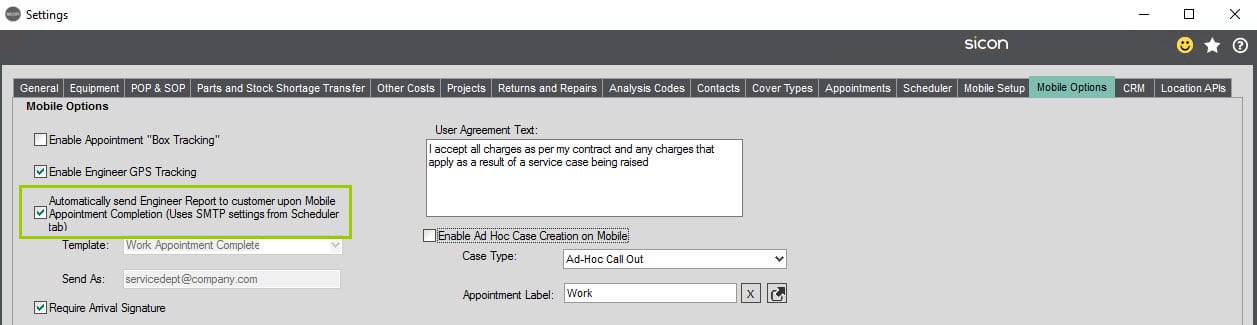
Important Note: During testing prior to go live, we advise that unless you really want email communications to go to customers when appointments are flagged as confirmed, or appointments and/or automated work reports via your smpt server to engineers that the three relevant features are not enabled until just prior to go live and then only when the companies SMPT settings have been configured on the Scheduler Tab within Settings
The three features in question are:
– The Enable Appointment Calendar Email Invites on the Scheduler Tab

– The Enable Customer Emails on the General Tab
– Automatically send Engineer Report to Customers upon Mobile Appointment Completion.
4.13. Employees
Employees and or Engineers details are stored in the Sicon employee tables within Sicon Common Components, this is because multiple Sicon modules may contain the same employees, meaning that when changes are made either within Sicon Project or Service the same record and tables are updated and changes are reflected in both modules).
Note: The Username and Password fields are linked to Sicon CRM. The CRM tab will only be visible if you have the module installed, the username and password fields will be shown regardless as these are stored in common components.
Employees
Employees within the Service context can be linked to a team and where relevant be assigned to cases or be scheduled for appointments on a case as well as being a Sage 200 user.

For accurate costing against the case job during set up ensure that the employees cost rate is entered within the cost rates tab. When costs are shown on a Sicon Project derived from a case, no nominal postings are made, this is purely for reporting the profitability of a case. Most companies have a cost-plus overhead figure they use based on different engineer’s skills and use this as an hourly / daily cost.
Where you charge based on the employee/engineer themselves and a standard hourly or daily rate, you will need to ensure the charge rate is set against the employee on the charge rate tab.

If you charge customers the same rate for all employee’s / work type / regardless of time of day for example you could look to set up prices within price book, using service stock codes and link to appointment labels.
Where you have different costs for engineers depending on the time of day they work on an appointment you should be using working patterns to set up the times or times of hours and the associated cost rates.
Likewise, if you charge customers differently for work carried out on a case based on the time of the day or based on hours, then use working patterns to achieve this.
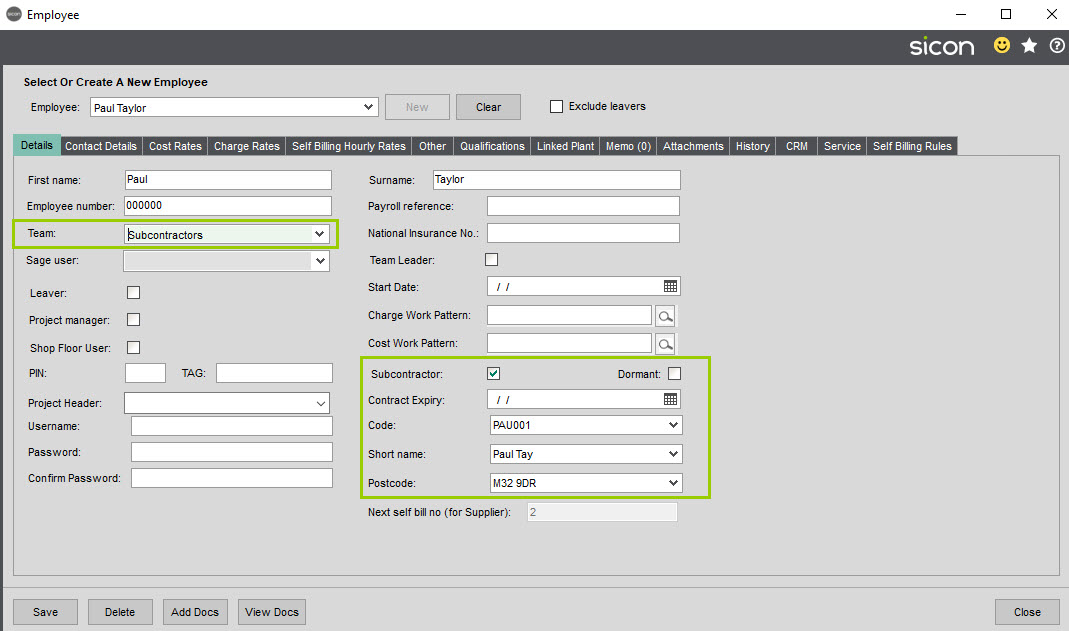
Where you will be scheduling 3rd party engineers (Subcontractors) within the module you will set them up as an employee but flag them as a Subcontractor which can be linked to a PL account, they will then be included in the list for scheduling appointments.
When Service is installed, an additional tab will be available for each Employee.
In order to either schedule an appointment for an employee and/or transfer parts to them to be used on an appointment then the fields on the Employee Service Tab should be considered as a Pre-Requisite to using the module as a Warehouse needs to be linked to the employee.
Service Tab
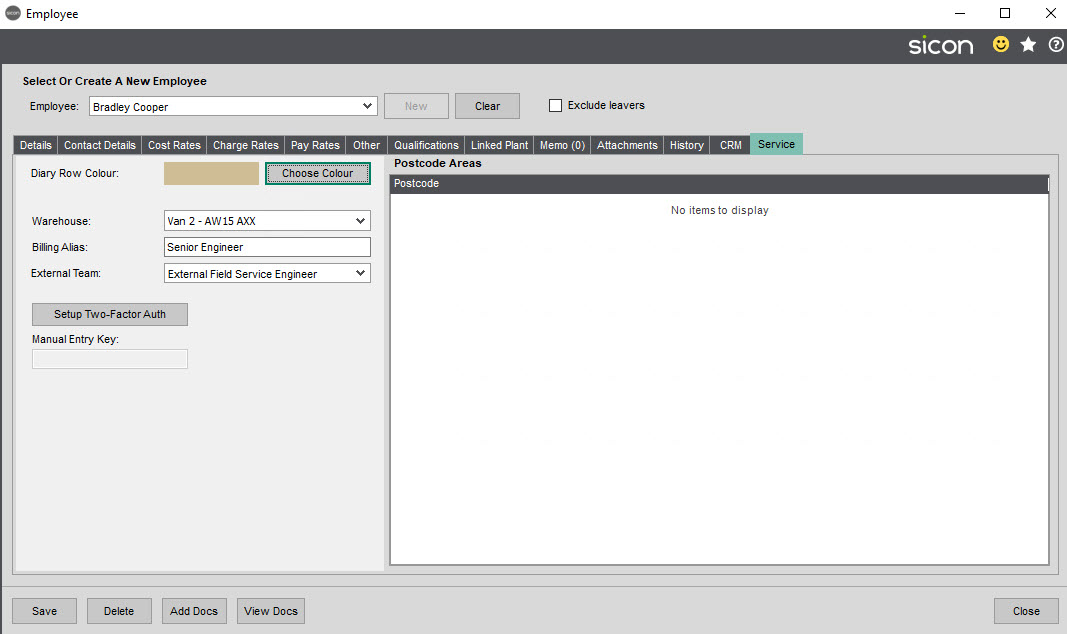
Diary Row Colour: Select individual colours per employee to display on the Sicon Service Scheduler/Diary
Warehouse: Link the employee with either a site-based service warehouse or to individual warehouses which relate to their van/vehicle. Parts can then be transferred and allocated to engineers via their warehouse.
With regards to Warehouse (Stock Location) set up, our advice is either use the Vehicle registration or the Engineers name. During the case parts (Stock) transfer you can select to track by engineer’s name rather than the warehouse name so the service admin users don’t have to know all vehicle registrations off by memory.
Billing Alias: If you do not want the employee’s name to appear on Sales Orders when billing cases, an alias can be recorded here such as Engineer Time Charged.
External Team: Allows you to link employees to teams which is useful when scheduling appointments for service cases.
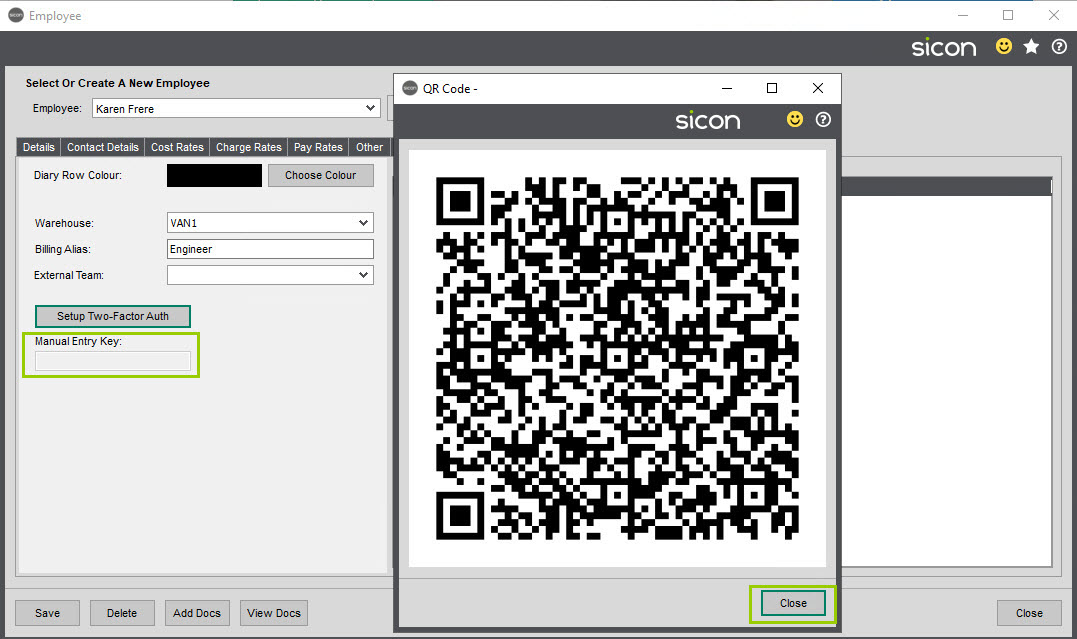
Setup Two-Factor Auth: You will need to have Google Authenticator (or Duo) installed on your device.
Click the Setup Two-Factor Auth button to display the QR code.

From the mobile device open Google Authenticator and click the + icon to add a new account.

Select Scan a QR code option.

When the QR code has been scanned you will have an entry that gives the 2FA code – this refreshes every 30 seconds.
On the Employee Service Tab, click Close on the QR code, this will populate the Manual Entry Key.
When you have closed the QR code screen you will then need to Validate 2FA by entering the authentication code shown on the device.

Click OK to close the validation screen, this will show the user has been validated and prompt for the changes to be saved.

As and when necessary, the 2 factor authentication code can be reset using the Reset 2FA button.
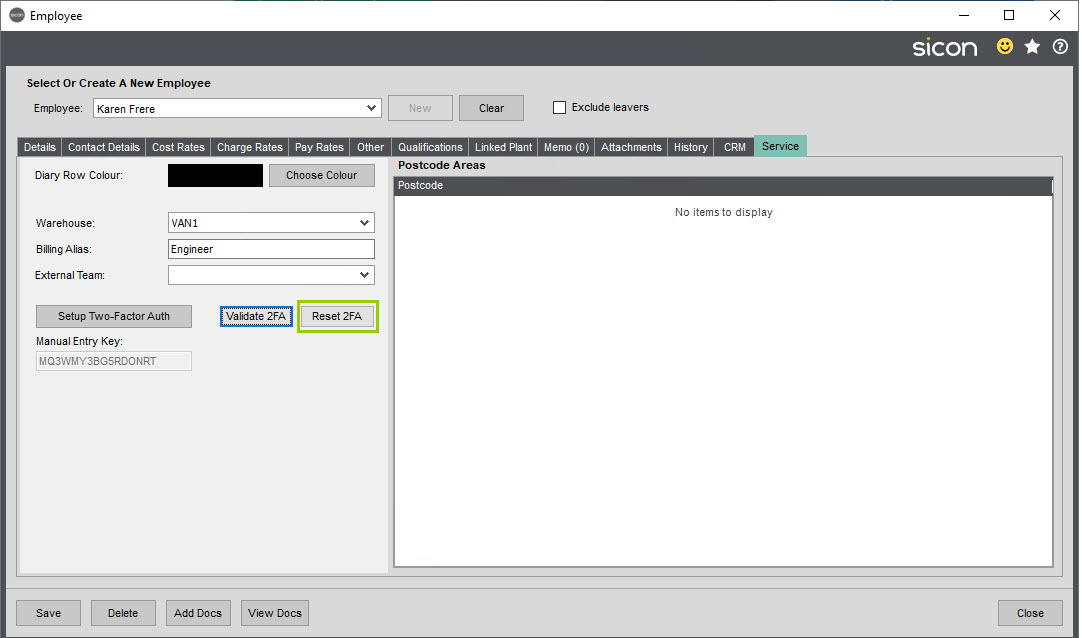
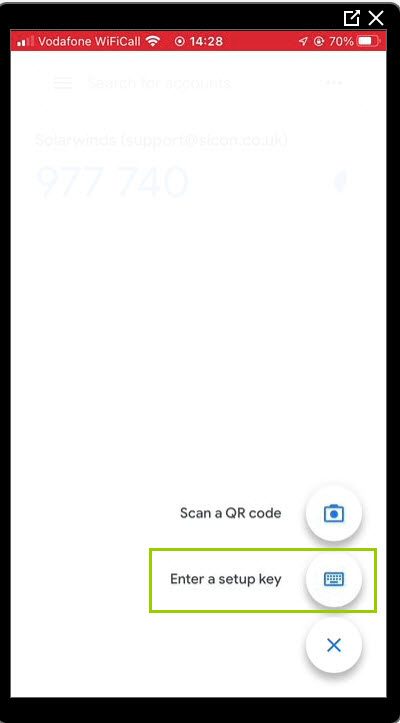
For users that do not come to the office to be able to scan the QR code from the screen they can be setup using the Manual Entry Key.
Click the Setup Two-Factor Auth button to display the QR code.
Close the QR code screen to generate the manual entry key.
From the mobile device open Google Authenticator and click the + icon to add a new account, then click Enter a setup key icon.
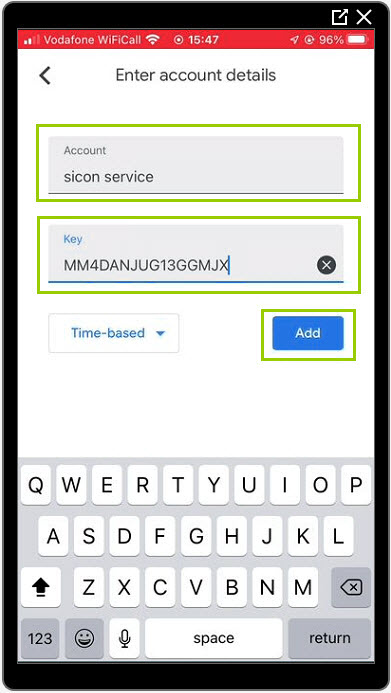
Add the account name, enter the key generated from the QR Code and click Add.
Postcode Areas: To assist when scheduling employees to cases, if it’s the case where engineers work in a very limited postcode area (Caution is recommended in using this feature, if you are planning to use this our advice is to set the first few digits of the post code i.e. NR2 not the whole area NR2 1NR).
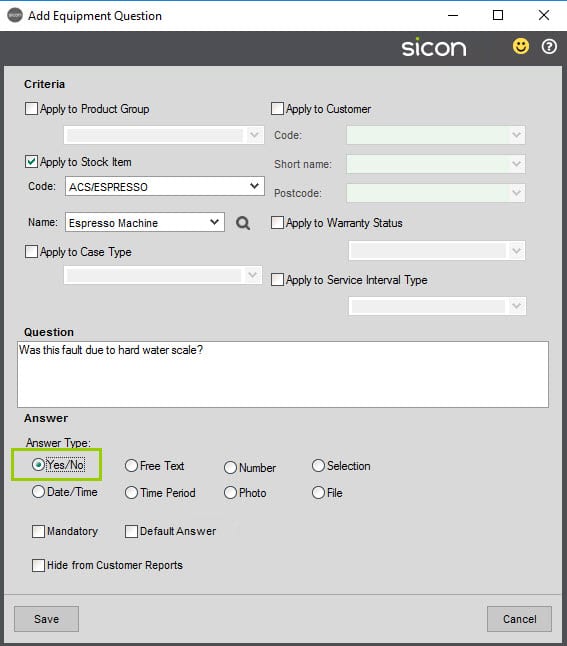
4.14. Equipment Questions
Pre-defined equipment questions can be set up and linked to a Product Group/Stock Item/Case Type/Customer/Warranty Status or a combination of any of these.
These questions are then populated on the engineer’s mobile devices for them to answer when on site.
Completing their answers can be based on a pre-populated selection, Yes/No, Multi Answer Select, Free Text, Number (which will allow additional criteria to be configured e.g. limit entries and warnings), Photos, Time Periods and Files with options to include where relevant a default answer.
Questions can be made mandatory if required which if set ensures the appointment cannot be flagged by the engineer on the mobile device as complete until the question(s) is answered
Examples as screen shot, where you need the engineer to alert the office that the issue was as a result of ‘Hard Water Scale’, which in turn may have effect on the decision whether the call out is chargeable, despite being a contract customer.
Important Note: Whilst testing internally only and prior to testing and/or going live with mobile users we recommend you do not flag the questions as mandatory, as these are really relevant to the mobile users, so whilst testing internally only, you may not want to have to answer lots of questions that have been flagged as mandatory.
We also suggest you are cautious with the number of questions you set up and flag as mandatory unless you really need to capture important information.
These can be created by clicking Add from the Maintain Equipment Questions screen then populating the information for the question.
This example is linked to a Service Case Type, is a Mandatory question to be answered with a Yes/No type.

Alternatively, you could import these questions.
From the Utilities folder, select Imports then select the Equipment Questions Import. Click Example Import File to generate the Excel spreadsheets.

Book 2 indicates which of the columns are compulsory and gives explanations as to what should be populated in the columns.
Book 1 is the template to be populated and has 2 lines pre-populated as an example – these 2 lines need to be deleted. When the template has been populated it needs to be saved as a CSV file to be active for importing. Any lines that are not correct will be highlighted and will need to be amended before the import button is active.

When the Equipment Questions have been created, they can be linked to Question Workflows see section 4.18 Maintain Question Workflows.
4.15. Parts Questions
This sections allows you to define questions specifically for parts allocated to a case.

Click Add to enter the questions, do not select Product Group, Stock Item or Case Type on this first screen as this is for filtering only and does not take the details through to the Add Parts Question screen.
In the Add Parts Questions screen you can link to Product Groups, Case Types and Stock Items. If you do not select any of the above, the question created will be used for ALL parts.
Select the Answer Type by clicking the radio button to the left of the required criteria.

These questions may also be flagged as Mandatory, have default answers and can also be hidden so it does not appear on the customer report.
4.16. Fault Codes
Fault codes can be used on a case whilst logging, or during the life of a case, and can be linked to a solution and/or Employee skills to select the appropriate engineer for that case (see Skills and Abilities).
As standard when the module is installed there are three default ones already created. These can be amended, removed or additional ones added.
Set up fault codes applicable to your business model e.g. Electrical, Plumbing, Unknown. These can then be used when creating a case and can be linked to Employees skills.
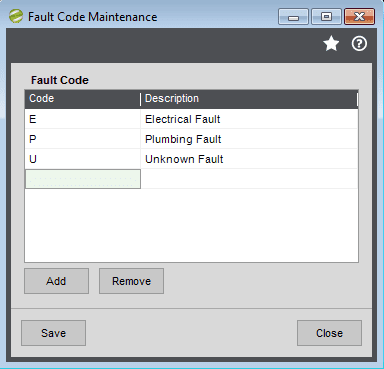
Fault codes are not a mandatory requirement for logging cases.
4.17. Locations
Location and Sub-Locations are used to record where the customer’s equipment is located, in order to know where the engineer has to visit. (Sub Locations are relevant only to Sicon Service & Contracts).
They are linked to and are held in the same table as Sage SOP Delivery Addresses.
There is an import available if required (Utilities – Import SOP Addresses).
Within various screens and processes filters and searches are possible by Location and/or Sub Location. For example, when generating preventative maintenance cases through the servicing routine you can choose to generate cases per location or per sub location for the equipment items that need servicing.
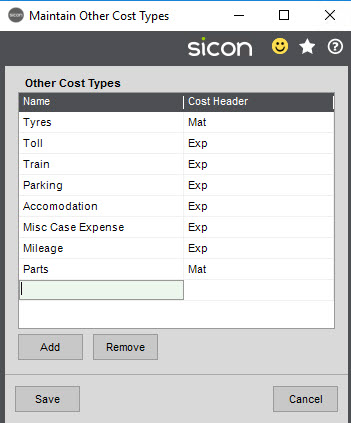
4.18. Other Cost Types
Other Cost Types can be configured to allow expenses incurred when travelling to and attending a site, to be added to a Case and linked to a Cost Header as required e.g. parking or tolls. This allows these additional costs to be captured but also, could be selected for billing out to the case customer if required.
There needs to be at least one Other Cost Type as this will be required in the Service Settings, Default Other Cost Type on the Other Costs Tab.
You can create a Linked PO from the Service Case or add an expense on the case using the Other Costs tab.
4.19. Priorities
Cases can be marked with a priority if required e.g. Critical, High, Medium, Low. Link a colour to the priority, which in turn will appear in the diary on the scheduled appointment.
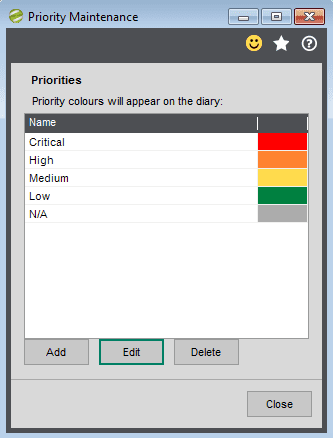
In the example below, the Work appointment for Richard Pullar has a red banner due to the case having a Critical priority.
4.20. Questions Workflow
From the Maintenance folder > Maintain Question Workflows.
Click Add in the Maintain Question Workflows screen.
Enter the Name for this workflow and select the criteria it applies to e.g. Case Type.

When the Workflow questions have been created you then link the Questions to the flow in the order you need them to be answered and set conditions.
Drag the Heading into the Workflow grid – this will initially show in the list as ‘Heading’ and can be changed to the required description by clicking on the word, highlighting and over typing with the description you need.

When you have your heading you can begin to group the questions that are relevant to it.
From the Questions list drag the first question that you need to be answered and place over the Heading.

Highlight the Group you have just created and click Edit Item Condition, this will allow you to enable further questions to become available in the workflow.
Click the Question that is displayed in the Conditional Field then click the Select Question button. When this has been selected the right hand section of the screen will show the Question you linked to the heading so you can add a condition to it.

Click Save when you have updated the condition for this question.
To link the questions that are relevant to this stage of the workflow, highlight them in the Questions list then drag and drop on to the group.
Repeat this process until all questions are linked to this group.

As well as having questions in the workflow you can create Grids that need to be populated too – these could be used to identify if the equipment being serviced is within the optimal operating range.
To include a Grid in your workflow, click on the Grid button then drag and drop on to the relevant group.
Click on the Grid line then Edit Grid.

In the Edit Workflow screen, Drag and Drop the Label into the grid, click into the cell to update from ‘Label’ to the name you want.
Row 1 and Column 1 are used to identify the questions to be answered and are input manually, the corresponding questions are dragged and dropped from the question list (and not manually entered questions) into the grid and are identified as equipment questions with the ? icon.
Columns and Rows and be added by clicking the corresponding buttons.
If you place something in the wrong area, right click on the cell to Clear Highlighted Cells.
When the grid has been created click the Back to Workflow button.

In the example below we have Engineers Recommendation questions. The ones for the office are ticked so they do not appear on the report for the customer.

When the Engineer comes to complete their report from the case if there is more than one report type to be completed they will need to select it from the drop down list and click Continue.

The Cross in the red circle denotes that this is a compulsory question and has the choice of Yes or No for the answer.

Answering Yes to the question will invoke the questions that have been created as the conditions have been met.
This screen also has compulsory questions that need to be answered.

Grid questions are updated by clicking in to the fields and entering the criteria in the pop out window. The criteria for this response is defined on the Equipment Question.


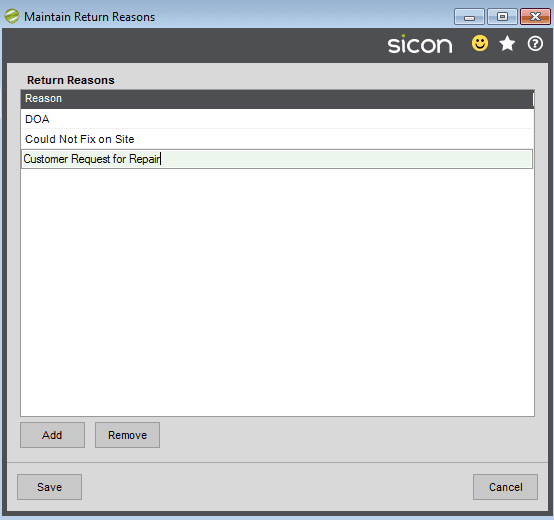
4.21. Return Reasons
For Internal use if using the system to record customer returns (activated when a case type is Return/Repair), and as a business you like to record the reason for return, some examples below.
4.22. Return Sub-Statuses
For Internal use and if using Return Status as described above, and if you need a further level of analysis on reasons for return, you could configure as examples.

During the return process users can select one of the pre-defined reasons, and if they choose to and if configure a Return Status. This information could then be reported on using customer reports within Sage 200 report designer.
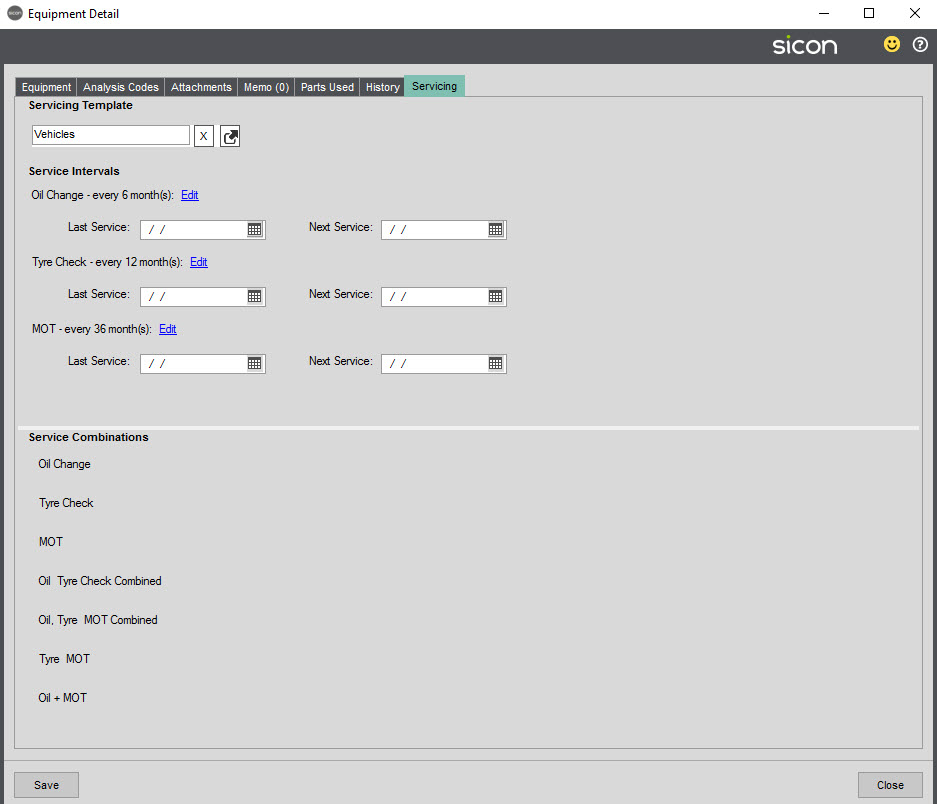
4.23. Templates
Service templates is a process where you can manage multiple equipment service dates and service complexities with pricing variants if multiple service types are carried out at the same time.
This functionality is enabled on the Equipment Tab within Settings.

For example, if your line of business is servicing cars, vans, trucks and tail lifts, each type of vehicle in their own right may need multiple services or road checks.
If the equipment item is:
- A car it may need within a 3-year period an Oil change, Tyre pressure check, MOT and a full Health Check.
- A Lorry or Tail Lift vehicles may need the same but additional weight tests.
Service Types:
Each Service Type will need to have its own Service Stock Item associated to it, as the service stock code is used for SOP invoicing purposes. Where a combination of servicing applies with its own price they would also need creating as service stock items.
Maintain Service Template:
Click Add to create / edit a service template.

In the Add/Edit Service Template screen enter the Name for the template then click Add to open the drop down list. Click Maintain Interval Types and add in the required interval types. Click Save when they have all been added.
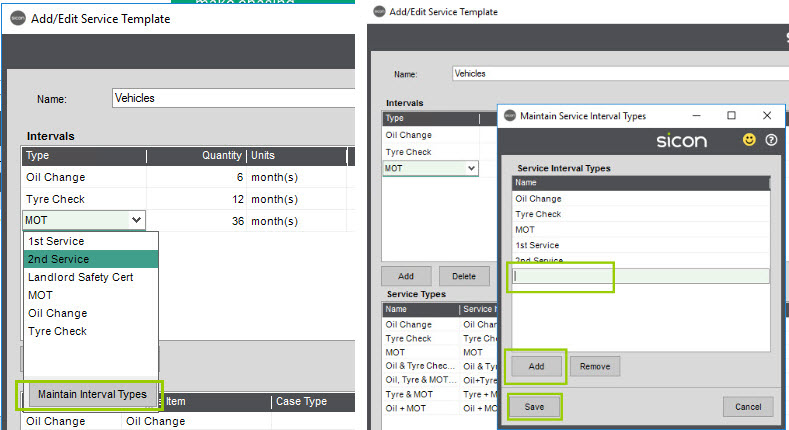
Intervals:
You then specify each of the intervals (Quantity); In our example we are saying Oil changes are due every 6 months, Tyre Checks every 15 months, MOT’s due every 12 months and a Health Check every 24 months.

Each Service Type/Service Stock Item is then linked to the different Serviced Interval.

Selecting the relevant options.
In our example we only have one type of service template vehicles as seen below in a summary screen, but you can add as many as your complex business requirements around servicing requires.

Assigning Equipment to a Service Template
You then need to assign the individual equipment record to the relevant service template, this is done on the servicing on the equipment record itself. In this screen you can stipulate the dates for each of the service types.
4.24. SLA
Service Level Agreements (SLA) define the response times to a logged case within a working timeframe (Office Hours) and can be configured as required. They are not a mandatory feature however if you would like visual alerts if you are not responding to new cases or cases with certain criteria’s set, then they are a useful tool.
SLA’s can be associated with a contract line within Sicon contracts, with a Cover Type or both.
To show these on either the Service Desk or Appointments grid (right click – Edit Grid Note that this feature is controlled from Sage System Administrator at Role Level so may not now be available for all users.) and select TimeLeftToMeetSLA and SLAExpiryDatTime
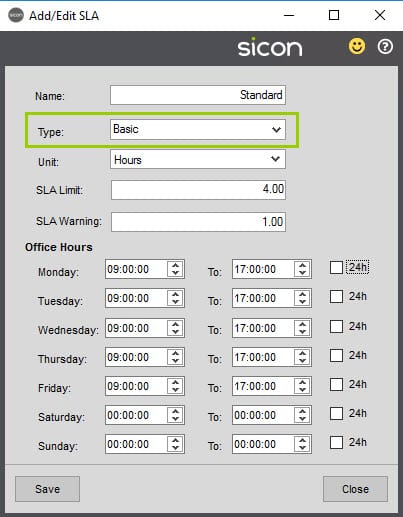
Stages (previously known as Advanced): The Stage SLA’s allow the additional option of triggering a change to the SLA timer based on Tracking Notes. The SLA can be Paused, Restarted or Completed. In addition, if the action ‘Start’ is selected, a new SLA Limit and Warning can be applied. For example, in the screenshot below, if a case is updated with the tracking note Waiting Parts a new SLA countdown can begin with a Limit and Warning value as required.
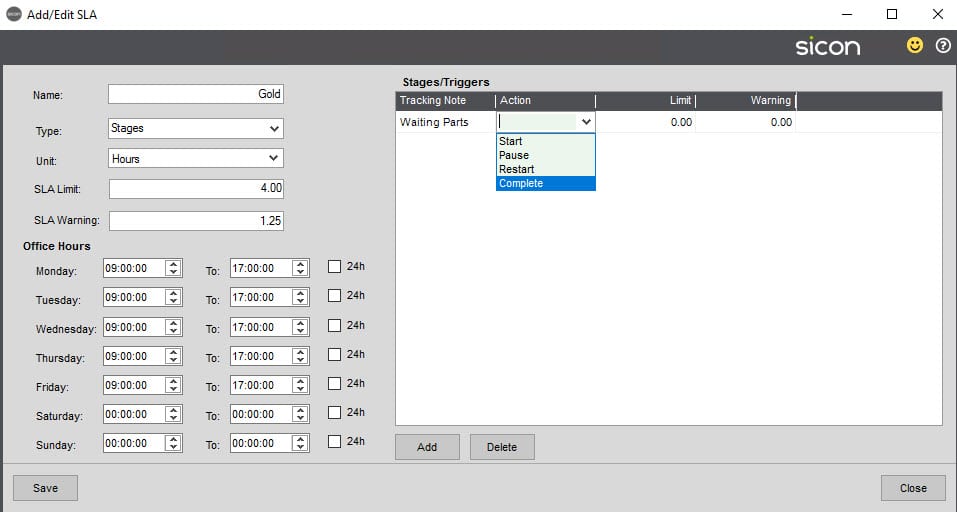
The stage SLA’s will be visible on the SLA tab on each case as applicable.
Concurrent Reminders: Concurrent SLA reminders can be configured so you can stop one SLA when updating the Tracking Note and add a new tracking note with a date/time for the SLA. When adding the new tracking note you need to Complete Reminder for the existing one. There is no SLA Limit on these as they are set when the tracking note is created on the case.

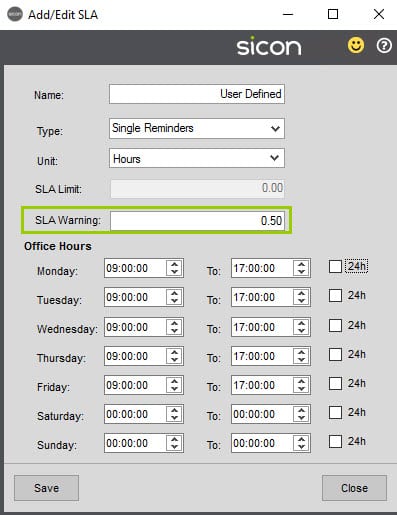
Single Reminders: The single reminder SLA also does not have a limit attached to it as these are also ones that are updated by the users. The Warning limit can be set in part hours so you are able to set the SLA to change from Green (within Limit) to Amber – Due soon with a half hour warning. If the timer is breached, the SLA will automatically change to Red.
The colours for the SLA warnings are:
SLA State:
Warning – Orange
Complete on Time – Green
Not Started – White
Paused – Pale Blue
Active – Light Green
Overdue – Tomato Red
Completed Late – Dark Red

4.25. Sub-Statuses
When creating new case and you assign a case Status (new by default, until changed), it may be you require a 2nd level of call status, may be as a way of identifying a type of customer or because this is a field that could be added to the grid view that its used as an alert for example ‘Priority Customer’ or ‘New’ Customer’. The field name for adding to the grid is SiSMDocumentSubStatus Name.
When creating these sub-status’s, you can link them to a case type, so the association to each other is as required.

This is not designed to be used as the status of the case i.e. New, Logged, Customer called in, or waiting PO instead these types of status should be controlled by Tracking Status.
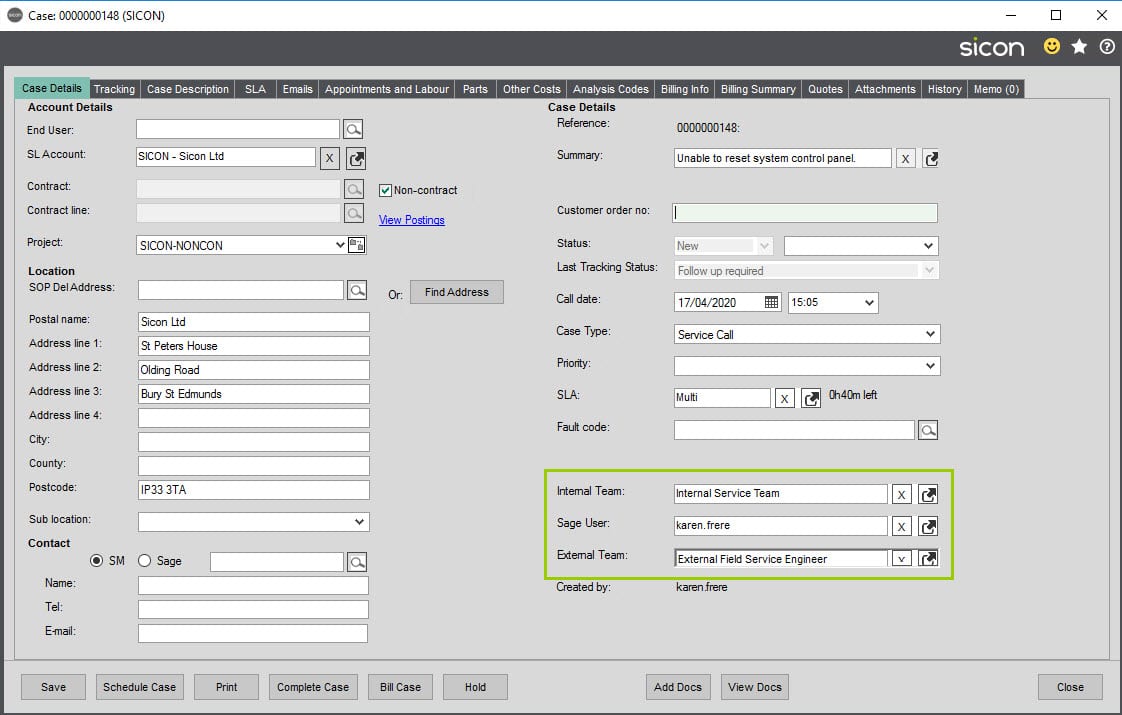
4.26. Teams
Teams are categorised as ‘Internal’ or ‘External’. A user can only be a member of one team and Sage 200 users can only be linked to ‘Internal Teams’ and would primarily be those Sage 200 users using Service within Sage 200 logging and dealing with cases such as a customer services team, internal support and internal service engineers, whereas external would be primarily external service engineers (who would / could use the App) , or 3rd party subcontractors
When a case is created, the case automatically picks up which Sage user it was entered by but if required, cases can then be re-assigned to Internal Team and alternative Sage user which means office based staff can manage the case. For example: Customer Service Team logs the case and reassigns to a Support Desk or Technical Team who then allocate to a member of their admin/service team to schedule.
In addition, the case can be assigned to an External Team. Members of External Teams are Employees as listed in Maintain Employees and who carry out work on the cases and whose labour needs to be recorded for billing and costing. Members of External Teams are therefore available to select when scheduling cases in the diary.
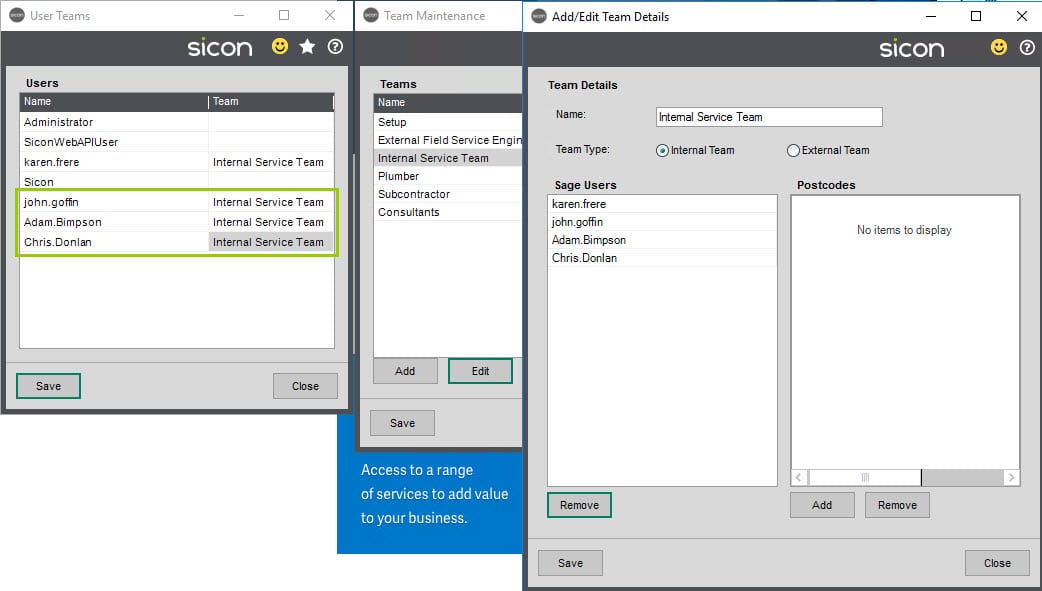
When creating a new team, name as required and define as Internal or External.
Members of Internal Teams are Sage users and are added to the team using Maintain User Teams.
Members of External Teams are Employees listed in Maintain Employees.
Postcodes can be listed against each team and cases assigned to teams based on team post codes rather than the post codes linked to individual employees, depending on Service Settings (Use Employee Team Locations over Employee Locations).

4.27. User Teams
Link Sage 200 Users to Internal Teams so that cases can be assigned to them to manage and/or where relevant schedule them on the case appointment scheduler. If you are not seeing the sage 200 user in the list, it is likely to be that they have not been granted access to the relevant Sage 200 Company in sage 200 System administrator.
Note: Only Sage Users with access to the company you are working in will be visible for linking to Teams and they will only be available for linking to Internal type teams.
4.28. ECN Operation Templates
(ECN – Engineering Change Note, ECR – Engineering Change Request)
Before you can use the ECR and ECN function you will need to create some templates.
In the Maintain ECN Operations Template screen click Add.
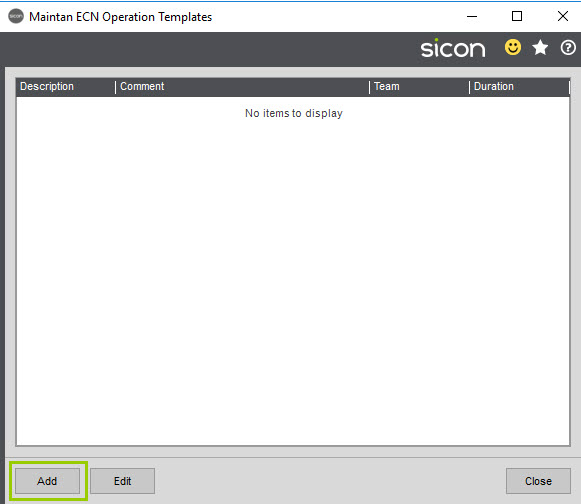
Enter a description, comments and select the team to link the operation template to and set the length of time that the operation is going to take then Save.
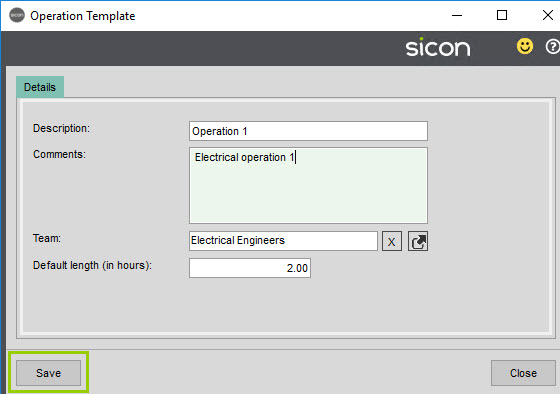
Repeat the above process until you have all the operations configured.
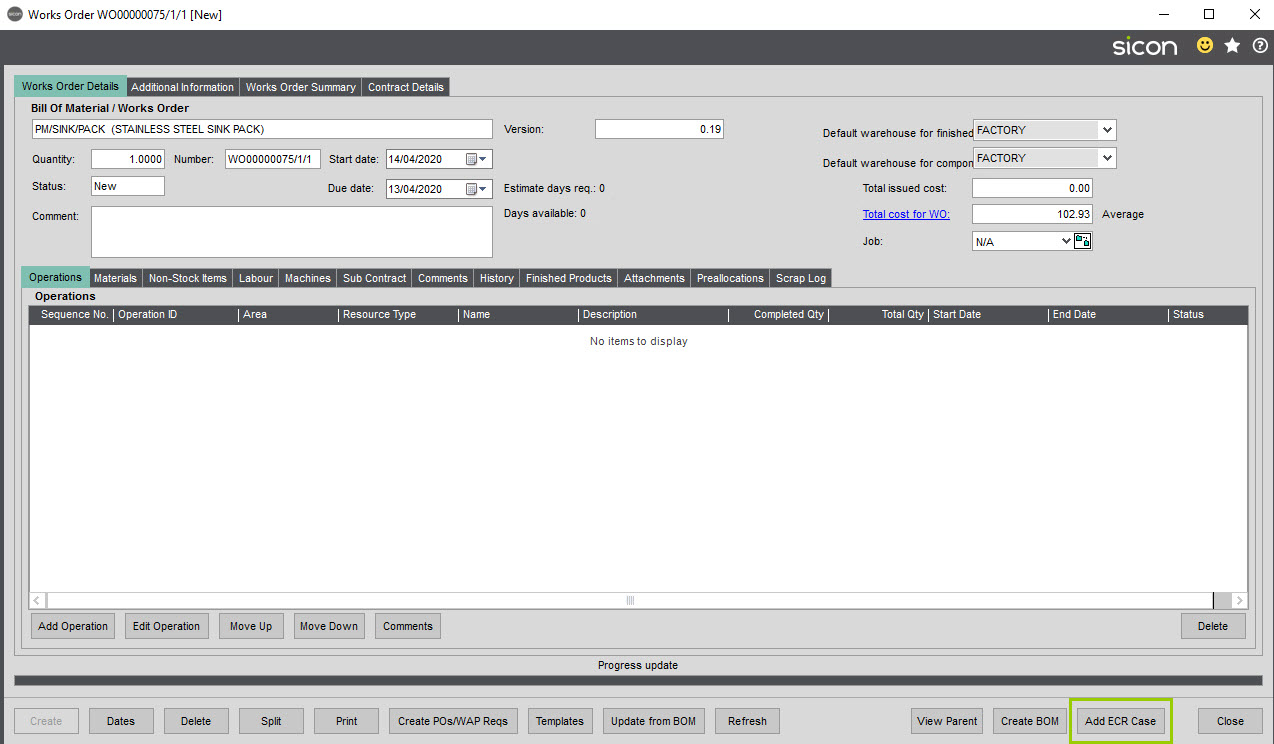
Engineer Change Request Service Case
Engineer Change Request cases can be created from Works Orders. From a Works order, click the Add ECR Case button.
4.29. ECN Workflows
(ECN – Engineering Change Note)
To create an ECN workflow click Add.

Enter the name for the Workflow and Save, if you do not click Save you will get a prompt telling you that it must be saved before adding Operations, click Yes to this message to continue.

Click Add beneath the Operations pane. The operation templates previously created will be available for selection and you can add additional templates from here if required.

Tick to select the operation and click OK to confirm selection. Click Add to create another template if required.
Now you have your operation with associated template you can create a Sign Off Task by clicking Add beneath the ECN Sign Off pane. Enter a description for the task and click Save.

You can have multiple operations and sign off tasks for each workflow.
4.30. Reject Types
Reject types need to be created for use with NCR cases (Non-Conformance Request)
Click Add to enter the Reject Type and repeat until you have all the necessary reject types created.

Non-Conformance Case:
When creating a Non-conformance case from the service desk, you need to ensure you select the Non Conformance Case Type from the drop down list. When this case type is selected it will remove the Case Description and Parts tabs as these are not required and the editable field to populate will also be different as below:
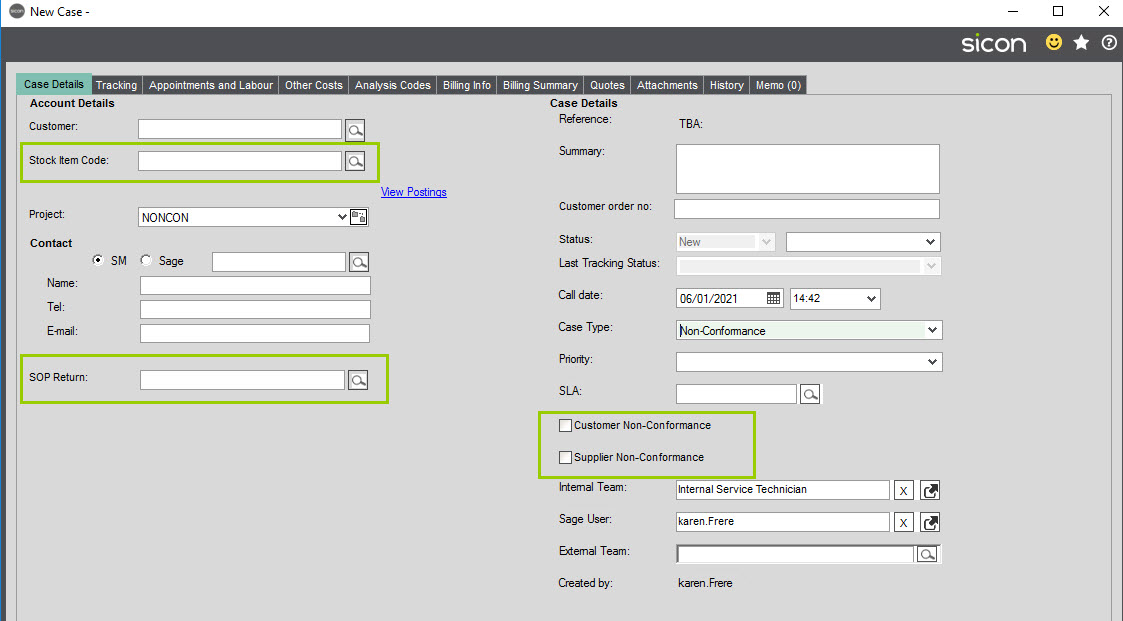
From this screen select the Stock Code that the case is being created for and tick to identify if it is a Customer or Supplier Non-conformance case.
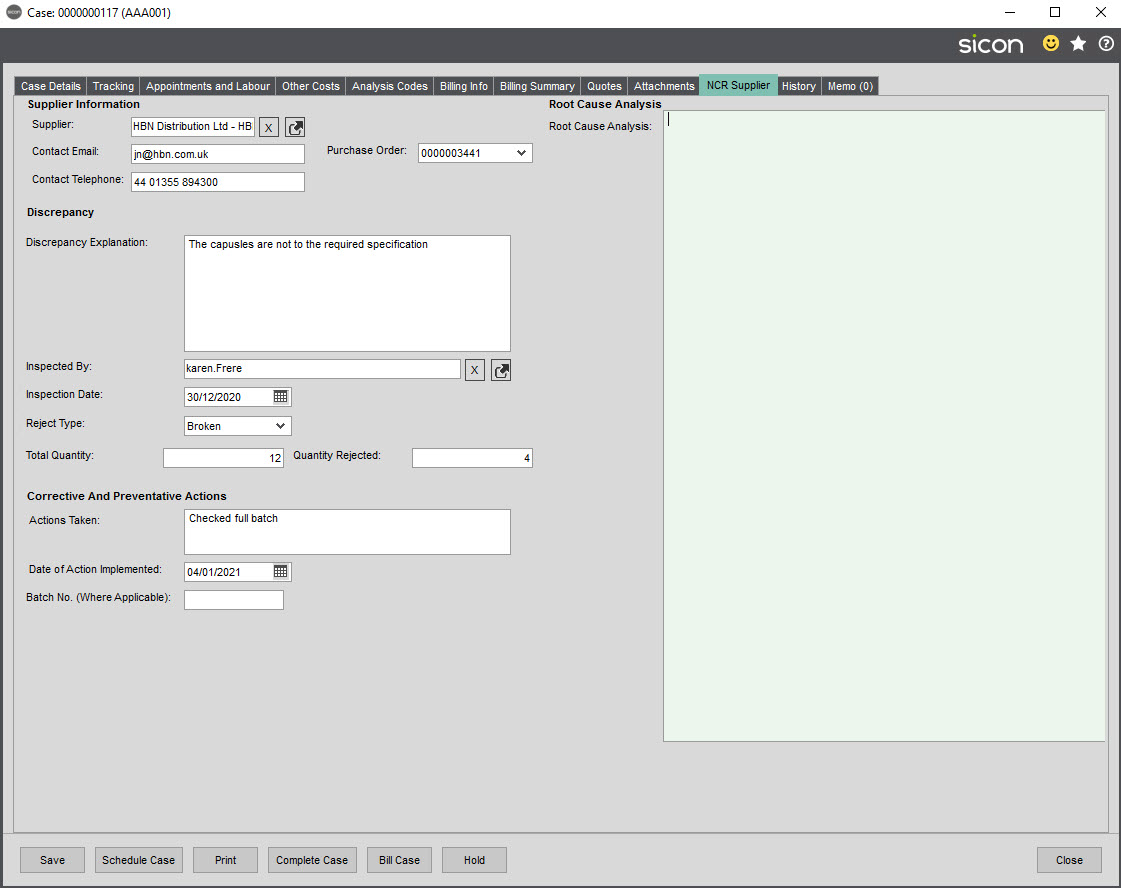
When Supplier Non-conformance is selected, you will only see the information relevant to the supplier. Select the Supplier (this is the standard Sage account) and the Purchase Order the case is being raised against. Contact e-mail and Contact Telephone number will be populated if this information is stored on the supplier account.
Record the discrepancy details together with who inspected the item, when it was inspected and select the Reject Type from the ones created in the Maintain Reject Types screen. Enter the quantities as appropriate and any corrective/preventative action and select the date this was done. If there is a batch number for this stock item that can be entered too.
Customer Non-conformance cases need the customer account selecting (standard Sage Sales Ledger account details) and the Sales Order the case is being raised against. Contact e-mail and Contact Telephone number will be populated if this information is stored on the customer account.
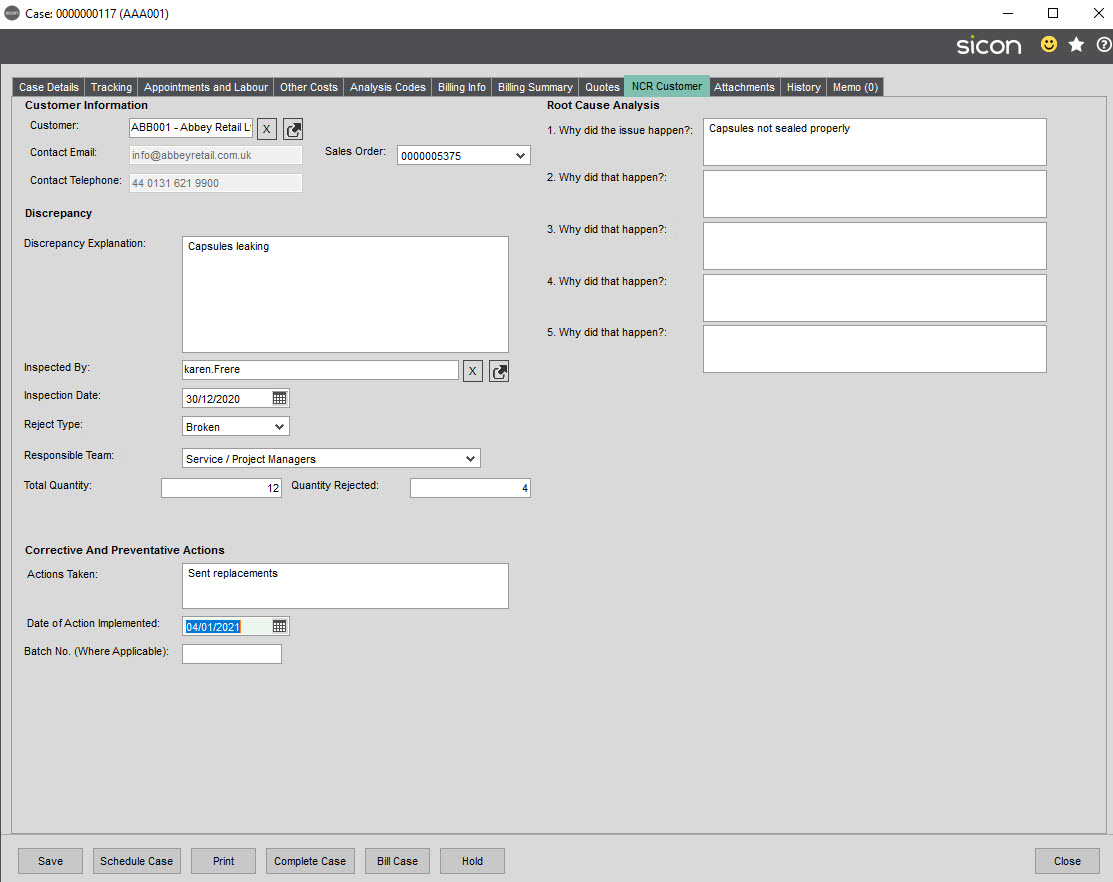
Record the discrepancy details together with who inspected the item, when it was inspected and select the Reject Type from the ones created in the Maintain Reject Types screen. Enter the quantities as appropriate and any corrective/preventative action and select the date this was done. If there is a batch number for this stock item that can be entered too.
The main difference on this screen is the root cause analysis as this has a series of 5 text boxes that need to be filled in to describe what happened.
When all the required action has been taken the case can then be completed.
4.31. Service Case Notes Tab
Cases can have multiple notes added to them, this will enable you to record information on a case separately to tracking notes and group accordingly.
From the menu click Add Tab where you will be prompted with the message advising that the new tab will be added to all service cases, click Yes to continue.

Add the name for the notes tab and Save, repeat this process until you have all the additional tabs required.

As cases are added / edited, the additional information can be captured on the Notes Tab. On the left hand side of the screen you will see the types available for selection.

Highlight the required one, click Add Note to enter the details for this case, once completed click Save.
Notes that have been added to the case are flagged with a red circle containing a number. This number will increase each time a new note is added. When you select the notes tab, the user will be able to see where the notes have been entered as there is a number in brackets to the right of the note name which also increases as more notes are added.

5. Settings
This is an important part of the setup process and the area where you specify what screens are shown, which defaults are to be used, set mandatory fields, import data and enable the module.
5.1. General TAB
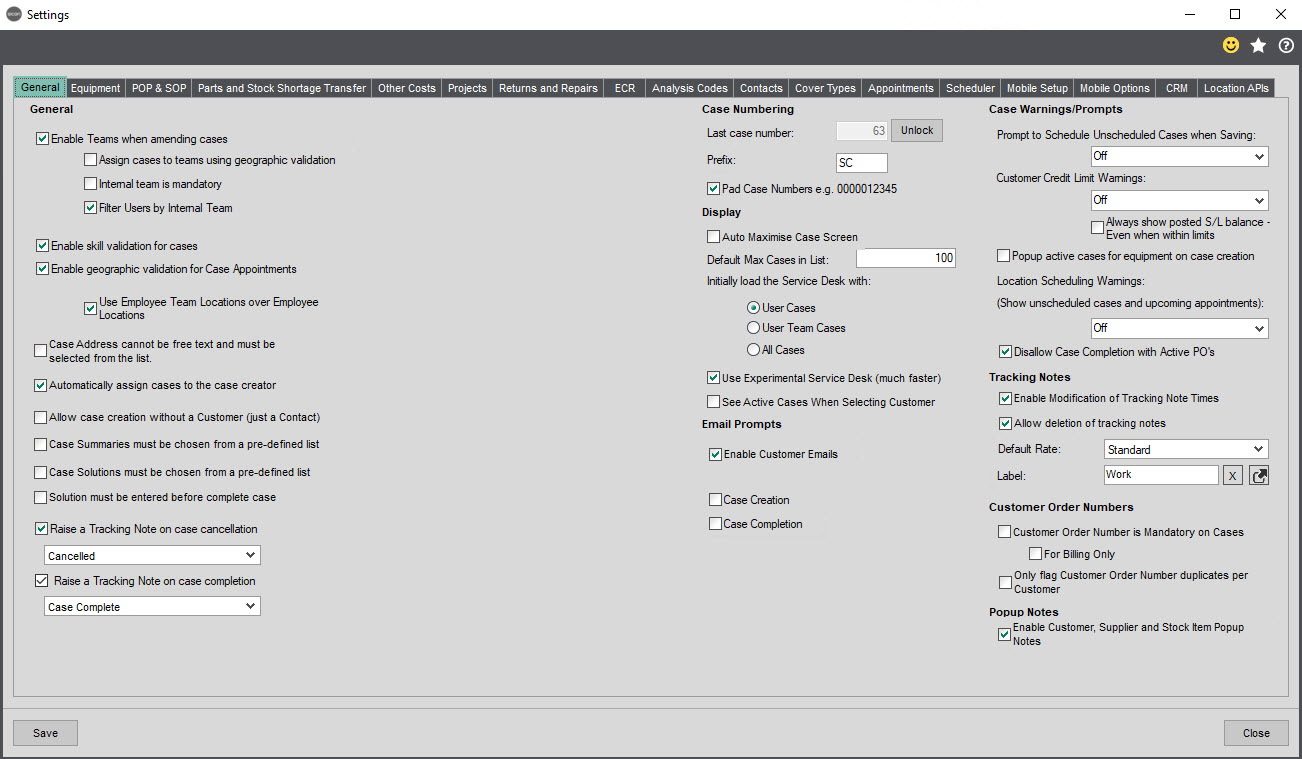
Enable Teams when amending cases: If enabled allows cases to be assigned to a team as well as a specific user (see Maintenance – Maintain Teams) when amending and scheduling a case, cases can be filtered by teams.
Assign cases to teams using geographical validation: postcodes can be linked to teams allowing cases to be assigned based on this validation (Postcodes can also be assigned to engineers within Maintain Employees, but we recommend that careful consideration is given to allocating full postcodes to engineers, we advise the first few digits, i.e. IP26 or NE7).
Internal team is mandatory: when enabled will forced the users to select an internal team when creating cases.
Filter Users by Internal Team: when selected will automatically display the users cases when the service desk is opened according to the team they are in. The user will be shown in the Case Admin field.
Enable skill validation for case appointments: if enabled when creating /amending a case user can select to assign a certain Skill type requirement (Skills & Abilities are set up within Maintenance)
Skill validation can be a very useful feature and if key to a company then ideal, but please bear in mind the more skills and skill levels you create the more there will be to be maintained.
Enable geographic validation for Case Appointments: If Enabled adds a location filter to the diary screen, which filters down engineers. It’s auto-populated with the case postcode when scheduling a case, reducing the number of engineers you see in the list, but it is amendable.
Use Employee Team Locations over Employee Locations: If this option is selected, the locations set against the Team will override any configured against the employee.
Case Address cannot be free text: if enabled, when adding or editing a case, the case address must be selected from the list available in the drop down list, and not free text.
Automatically Assign Case to the Case Creator: If enabled the system will automatically assign the case to the person who created it.
Allow case Creation without a Customer (just a Contact): If enabled, allows a case to be created from a Contact. Primarily used where customers’ sales ledger account is not required as no billing applies.
Case Summaries: Where companies would prefer the users logging calls to pick the case summary from a pre-defined list enable this feature. This is an either or feature, so if companies wish users to free text then we recommend you do not enable. For more details of this feature visit section 4 Maintenance – Maintain Case Summary Options.
Case Solutions: Where you prefer users recording case solutions to pick from a pre-defined list enable this feature. This is an either / or feature, so if you want users to free text the solution details then we recommend you do not enable. For more details of this feature visit section 4 Maintenance – Maintain Case Solution Options.
Solution must be entered before complete case: tick this to ensure that solutions are entered against a case before the user can complete it.
Raise a Tracking Note on case cancellation: If you would like to be able to analyse why cases are being cancelled from the service desk, you can link a tracking status (see section 4 Maintenance – Maintain Tracking Status) which can then be used to filter the cancelled cases.
Raise a Tracking Note on case completion: Allows you to set a default tracking note for case completion.
Last case number/prefix: Enter the next Service Case Number and Prefix if applicable i.e. an existing Service system was used previously and you would like to keep the sequence.
Pad Case Numbers e.g. 0000012345: If enabled allows case numbers to have leading Zero’s, for example when first using the system you set the last case number to 150 (because you were using a previous system, and the last case number was 150), when you add a case if padding is enabled your next case number would be 0000000150, if not enabled your next case number would be 150.
Auto Maximize Case Screen: If enabled case screen will be maximized when opening a case.
Default Max Cases in List: Enter the preferred default number of cases to be loaded / shown in list on the ‘Amend Case Screen’ and ‘View Case Screen’. This can be increased on the service desk in the Limit Records Retrieved To box if the user needs to see more than the default number loaded.
Initially load the Service Desk with Options:
User Cases – If enabled the user logging in by default will see only cases assigned to them.
User Teams Cases – If enabled the user logging in by default will see the team that they are assigned to cases.
All Cases – If enabled the user logging in by default will see all cases.
Use Experimental Service Desk – This has been changed to use SQL views in order to enhance performance. The legacy service desk uses standard objects. If you tick to use the experimental service desk option, all grid views will need reconfiguring.
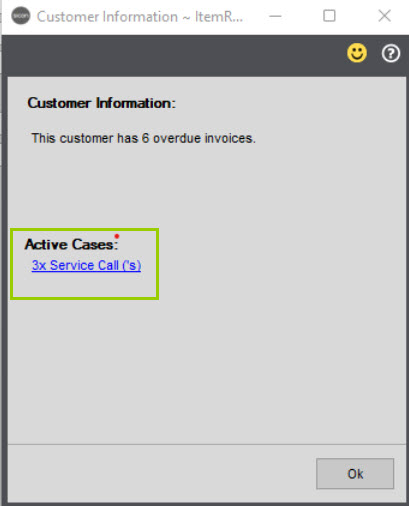
See Active Cases When Selecting Customer – ticking this option will show the number of active cases when the customer account is selected for a new case. Clicking the blue hyper link will drill into more detail.
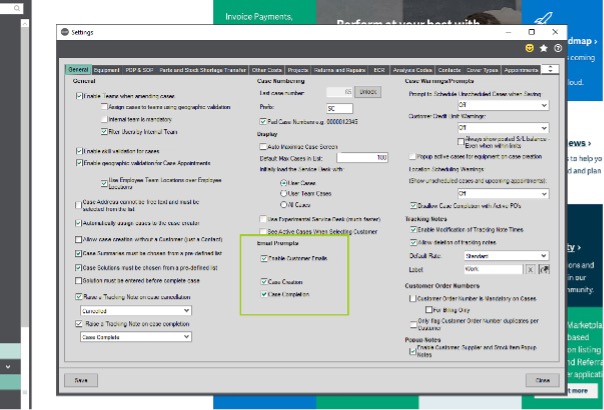
Email Prompts
Important Note: During testing, we advise that unless you really want customers to receive your test cases we advise this feature is not enabled until ready to do so. Prior to going live, create a case for a test sales ledger account, with one of your teams own email address on the customer and/or the case so they receive the case communication and you can review the contents and be happy with it going out to customers once you are live.
First option is to whether to enable customer’s emails or not

The first box enables customer emails, then you can choose to specify whether you wish for the system to automatically suggest an email to be sent at Case Creation and/or at Case Completion.
If enabled, the Email Tab appears on a case and emails can be sent to customers to keep them updated when a new case is logged or during the case life. To send a case update from within the case users would select the required template from the dropdown at the top of the page and if required, the text can be edited before sending.
Case Warnings/Prompts:
Prompt to Schedule Unscheduled Cases when Saving: Option to prompt user to schedule a service case when saving. This can be Off, Not on Creation or Always (recommended option is off during setup and testing at least).
Customer Credit Limit Warnings: Option to warn if the customer account has overdue transactions and can be set to Off which gives no warning, Basic or Detailed format depending on the level of information you need the service desk administrators to see.
Always show posted SL balance, even when in Limits if enabled the customers ‘posted’ balance on account will display regardless of any credit limits set and/or overdue invoices.
Popup active cases for equipment on case creation: When enabled will show if there are active cases already for the equipment selected on a case.
Location Scheduling Warnings: show unscheduled cases and upcoming appointments. This can be set to Off or the detail displayed is a Basic or Detailed format (recommended at least Basic, if not detailed).
Disallow Case Completion with Active PO’s: When this is activated, the service cases will not be able to be set as Complete until the purchase order has been goods received and invoiced.
Enable Modification of Tracking Notes Times: Allows users to modify the time on a case tracking note (for example a user forgot to add an important note from the day before and needs to add, but reflect yesterday’s date).
Allow deletion of tracking notes: enable this is you want to be able to delete tracking notes.
Tracking Notes: Default Rate Box – If based on a tracking note type, you may want to charge the customer for time, then here you can specify the default rate which is determined on each employee.
Label: Allows you to select the default label e.g. Work to link to the Default Rate.
If on a tracking note, you add ‘Time Spent’ the system will generate an additional labour entry on the case; the ‘cost’ rate used on that labour line is selected here. For example, an internal person wanting to record time spent on a case, that could potentially be chargeable, but the internal person is not set up as an employee.
Customer Order Number is Mandatory on Cases: Select if your company policy is that you have to have a customer purchase order for logging a Service case. Note: Customer Order Number can now be marked as mandatory ‘For Billing Only’, meaning it will no longer block Case Creation, but it will block Case Billing.
For Billing Only: Select if you only would like to see warnings at the billing Stage no when adding a case.
Only flag Customers Order Number per duplicates per customer; If you are finding that different customers provide the same order numbers (example verbal), you may want to consider using this feature. If not enabled, and users enter the same customers order number on multiple cases, for different customers you will keep seeing the same ‘duplicate customer order number’ warning. Whereas if you enable this feature you will only be warned if duplicate order numbers are entered for the same customer.
Popup Notes: If enabled Customer, Supplier and Stock Item Popup notes can be linked – previously only available with Sicon Enhancement Pack.
5.2. Equipment TAB
These settings relate to the Equipment register recorded within the Sicon Service module.

Mandatory fields on equipment Details
Options to make key fields mandatory when adding equipment details; if enabled when adding equipment. Note: If these are set as mandatory fields and you are importing equipment, the import will fail if you do not have all the mandatory items populated.
Location: Users will be forced to select a location to specify where equipment is located.
Contract & Line: Users will be forced to select a contract and contract line to specify which contract line (Contract service being provided) the equipment is covered under.
Supplier: Users will be forced to select a Sage 200 P/L supplier account to specify which supplier the equipment was purchased from (See also supplier association option).
Service Interval: Users will be forced to enter the relevant Serval Interval.
Next Service Date: Users will be forced to enter the date of the next service for that piece of equipment.
Servicing
Enable Service Templates: Only enable if you need to have multiple service dates for a piece of equipment which in turn would require service templates to be created. For more details, see section 4 Maintenance – Maintain Service Templates.
Completing a Preventative Maintenance Case will update Equipment Service Dates using:
- Last appointment of the case
- Previous service date
- Case completion date
Default SLA for generated Preventative Maintenance Cases: When creating a new Preventative Maintenance case from Service Equipment, Service will check whether the Default Preventative Maintenance SLA has a value. If so, it will configure the SLA for that case.
Default tracking status for generated Preventative Maintenance cases: When creating a new Preventative Maintenance case from Service Equipment, Service will check whether the Default Preventative Maintenance Tracking Status has a value. If so, it will create a default tracking status for that case. If a default tracking status is set against the Case Type, it will override what has been configured in Settings.
Equipment Issues Internal Area: Used within Returns and Repairs process, the Internal Area used when equipment is returned for repair; we recommend a separate area is set up for this for analysis and reporting.
Enable automatic number generation: If enabled a unique Equipment ID/Number will be created and allocated to each piece of equipment. On the piece of equipment this can be overridden if the customer advises you of their own equipment I.D tagging reference.
Last equipment number: Once the above is enabled enter the ‘Last equipment i.d. number’ (so it knows what the next allocated number to be generated will be).
Next service date notification period: reminder notification period can be set in days/weeks/months/years and used to determine the colour coding for the Next Service Date. Amber identifies that it is within the current notification period for the service, Red means that the service due date has passed and it is now overdue.
Default Equipment Model to Stock Item Code: On the stock item record and Service Management Tab, if the option to create an equipment item when sold is selected (Mark as a serviceable Item), this setting will populate the model field on the equipment record with the Sage 200 stock item code.
Allow Duplicate Equipment Serials: Not recommended. Searching for equipment / logging a case by a serial number is a common method of logging a new case. If switched on to allow duplicate serial numbers, multiple records may be displayed resulting in the wrong piece of equipment being linked to the case.
Enable Customer Association: If enabled equipment could be linked to an additional Sales Ledger record. For example, Washing Machine is located at Mrs. Smith’s; Mr. Jones pays for the servicing contract, but a Mr. Potter paid for the washing machine in the first instance (and has a sales ledger account). Therefore, the case is logged against Mr. Jones, location SOP delivery address is Mrs. Smith a 3rd party Mr. Potter has a customer association.
Enable Supplier Association: If you wish to record a supplier on the equipment record tick this option. If not enabled the supplier account fields on the equipment record will be hidden.
Copy Equipment info into Case Summary: When this is enabled, the equipment information (when generating case via equipment) will be populated in the case summary field.
Equipment Questions: Equipment Question Workflows can be created which allows for one question with a trigger. If the trigger is Yes – for example ‘Can the service take place?’ this will display further questions that need to be answered or grids to be populated.
Require a report for each appointment on a case (rather than once per case): If you need the engineers to complete the equipment questions for each appointment tick this option.
5.3. POP & SOP
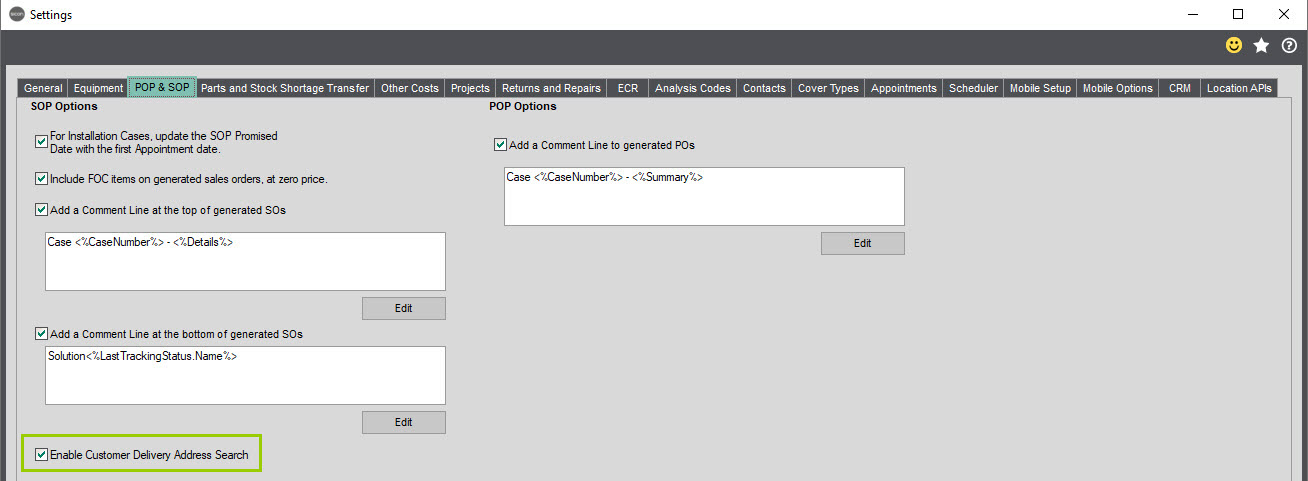
For Installation Cases, update the SOP Promised Date with the first Appointment Date. If enabled updates the SOP promised date with the first appointment date in the installation case.
Include FOC items on generated sales orders at zero price. When this is enabled, items that are flagged as FOC when billing the case will show as a line on the sales order as 100% discount so the customer knows the item or service has been provided but is not being charged for.
Add a Comment Line at the top of generated SOs: Functionality to be able to add a Case Number to generated SOP’s as a comment Line if enabled. When billing a case through Service (which in turn creates a standard Sage Sales Order for invoicing), the default is to display the case number and case details (from the summary description) on the Sales Order as a comment line and will print out on the invoice (subject to design of layout).
Additional details may be added by clicking the Edit button, adding a description that you want to appear on the sales order then selecting the variable from the bottom section of the screen. Click Insert then Save.
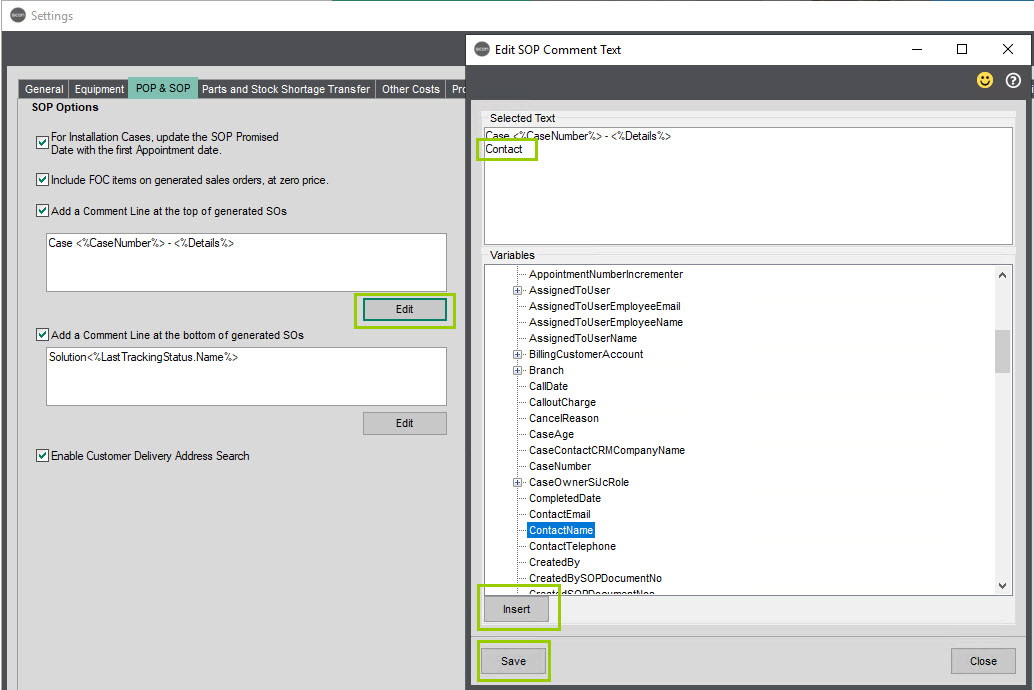
Add a Comment Line at the bottom of generated SOs: This functionality will allow you link additional information from the service case to appear on the sales order created from the case. In this example we have chosen to show the summary and solution details. Additional details as required may be added as indicated above.
Enable Customer Delivery Address Search:
Customer Delivery Address Search
This feature enhances the standard Sage customer delivery address window. So when you are in a sales order and click the Change button beneath the delivery address, you’ll see this window.
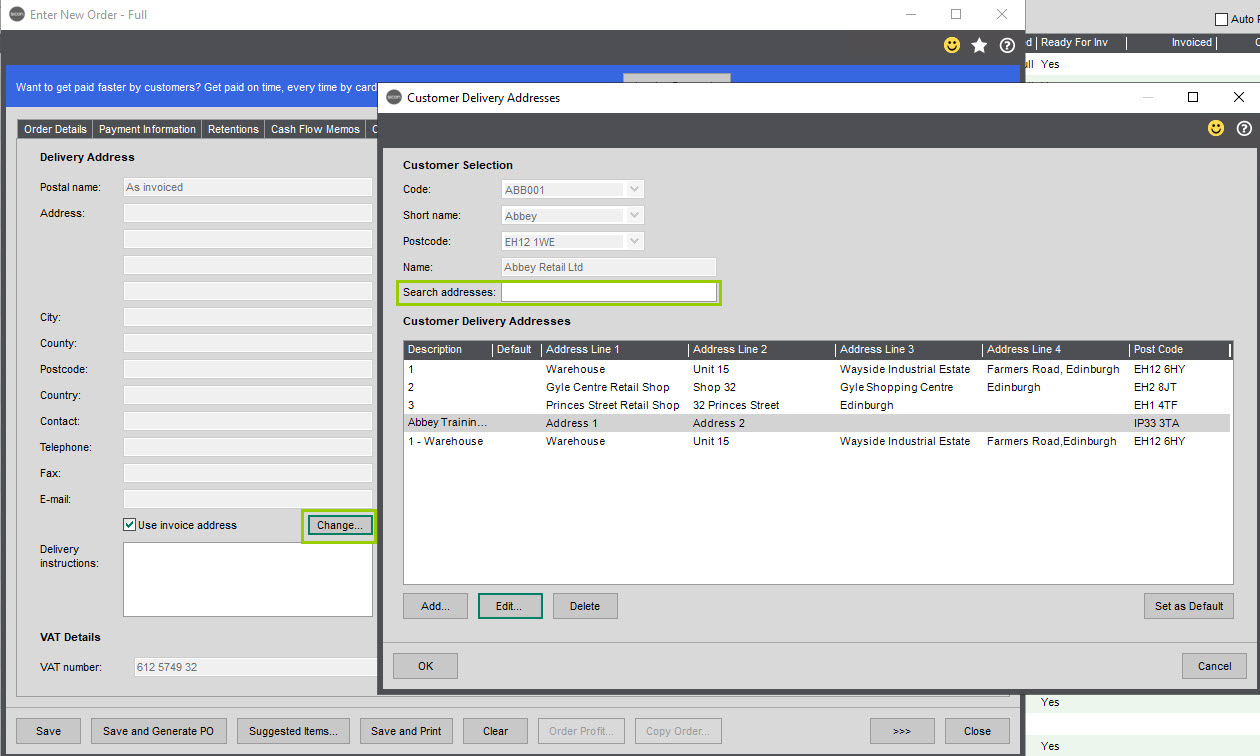
In comparison with the standard Sage Customer Delivery Addresses screen, this one adds
- The Search Addresses field
- The columns displaying the Address Line 1-4 and Post Code fields.
As you type text into the Search Addresses field, the results automatically change to only display the addresses that have your search text contained within them from the fields displayed in the window.
Add a Comment Line to generated POs: Functionality to be able to add a Case Number to PO’s generated from the case as a comment Line if enabled. These can also be updated to add extra detail if required as per the SO comment functionality.
5.4. Parts & Stock Shortage Transfer TAB
Sicon Stock transfer is within Sicon Common Components Module as the stock transfer method is used within several of Sicon Modules
Within Service its used to handle the transfer, allocation and use of stock parts being issued to the case / the engineer working on an appointment within the cases.
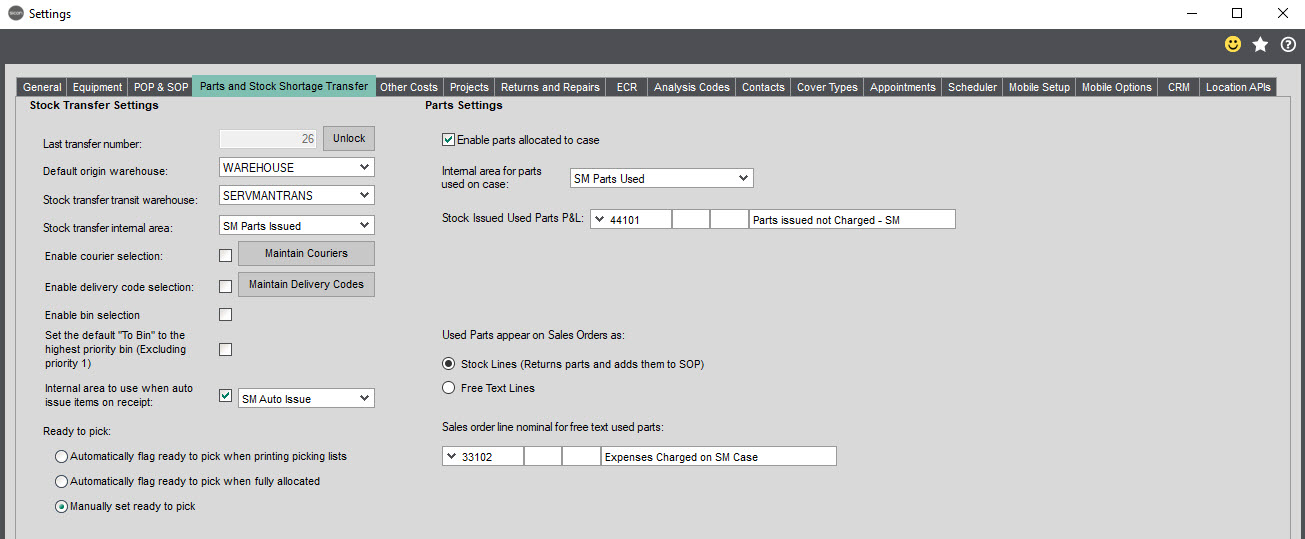
Stock Transfer Settings
Last Transfer Number/Unlock: Use in the event of a system crash or overlap of referencing, users can reset the last transfer number to be allocated when transferring parts to a case.
Default Origin Warehouse: Populate to default origin warehouse (Sage Stock warehouse/location) to be suggested when transferring stock on a case.
Stock Transfer Transit Warehouse: Specify the default warehouse/location where the stock is held once dispatched but before it has been ‘received’ by the engineer; In the example above ‘SERVMANTRANS’ (Applicable only if ‘Enable parts allocated to a case is ticked’) – No Nominal Movements occur when using this internal area as this is only used for allocation purposes.
Stock Transfer Internal Area: Select which Sage 200 Standard Internal Area to use during Stock Transfer on a case and therefore where nominal postings are made, if applicable. (Applicable only if ‘Enable parts allocated to a case’ is ticked) – The nominal movements that occur, based on the parts being issued initially on a case are;
Debit: The Stock nominal as assigned on the stock record
Credit: The nominal Assigned to the Internal Area.
Enable Courier Selection: enable this setting if you wish to set up Couriers within Maintenance – Maintain Couriers. (This is primarily used for stores, to state preferred courier to be used when shipping stock/parts to either the engineer or to the customer direct, i.e. UPS, DHL, Parcel2go, DPD).
Enable Delivery Code Selection: enable this setting if you wish to set up Delivery Codes within Maintenance – Maintain Delivery Codes. For example, if the service admin team, needs to let stores know how quick to get parts to an engineer or customers site etc. i.e. Next Day, 2-3 Days.
Enable bin selection: Tick if using Bins with stock / Sicon Bar Coding.
Set the Default ‘To Bin’ to the highest priority bin (Excluding priority 1). Highest Bin Priority is 1 which is the returns bin, so if this setting is ticked it will ignore bin 1 and look to place everything in bin 2 which is the picking bin.
Internal area to use when auto issue items on receipt: When this option is ticked you will need to select an internal area for the goods received that have been ordered from a PO generated from a service case. As the GRN is processed the stock will automatically be issued to the case, this is used in conjunction with the Auto-Issue Stocked Parts on PO Receipt on the Other Costs tab in Settings.
Ready to pick:
- Automatically flag ready to pick when printing picking lists
- Automatically flag ready to pick when fully allocated
- Manually set ready to pick
Options to flag when the stock is ready to pick from stores.
Parts Settings
Enable parts allocated to case: If enabled, when creating a case an additional tab will appear, allowing users to allocate, transfer and dispatch the parts (stock) required for a case and an engineer. NOTE: If NOT enabled, parts (stock) can still be added to the case but no transfer/dispatch to engineer/customer options available.
Internal area for parts used on case: Select which Sage 200 Internal Area is used when Parts are confirmed as used on a case; we suggest having a separate Service internal area.
Stock Issued Used Parts P & L: NB: only enable if you, have ‘Integrate Stock Management with the Nominal Ledger’ switched on in Stock Control>Utilities>Stock Control Setting>Options Tab.
Default which P & L nominal account will be debited when parts are Used on a case but not invoiced (customer may have fully inclusive contract where parts are not charged). This can be used to ensure that stock costs are posted to a P&L nominal account if using a BS nominal account for the Used Parts internal area.
It is not possible at this time to set cc/dept. as specified on the customer’s record, which is a Sage feature for SOP. Reason being is that there are too many variables, such as the case may be logged against one s/l account but it’s being billed to an another.
For those who are needing to reflect on costs against that customer, then Sicon Projects will provide this information either on the Contract Project or the Non Contract Project for the customer.
Used Parts appear on Sales Orders as:
Options as to how the parts to be invoiced are actioned:
Stock Lines (Returns parts and adds them to SOP): (Stock Item Sale and, if switched on, a cost of sale transaction). Parts issued to the Case will be temporarily returned to stock and then added back as a Stock Line on the Sales Order in order for proper costing to take place. Select this option if the company wishes to record Cost of Sales; within the relevant Sicon Project it will be seen as a Cost of Sale.
Free Text line: (Stock Issue) Parts will be included on the Sales Order as Free Text Lines, displaying the Stock Description but not the Stock Code and the line can be edited; within the relevant Sicon Project it will be seen as an Issue.
Sales Order Line nominal for free text parts: Specify which nominal codes cc and dept. is to be used when parts are added to a case. This will be for items that were added as free text parts (Non stock items) that are to be charged from the case, and will be on the generated sales order.
5.5. Other Costs TAB
Where there have been other costs on the case, you may wish to record them, it may be you do not charge expenses on, but would like to record the cost against the case / and linked Project. Or you need to record them because you are able to charge them on to the customer.
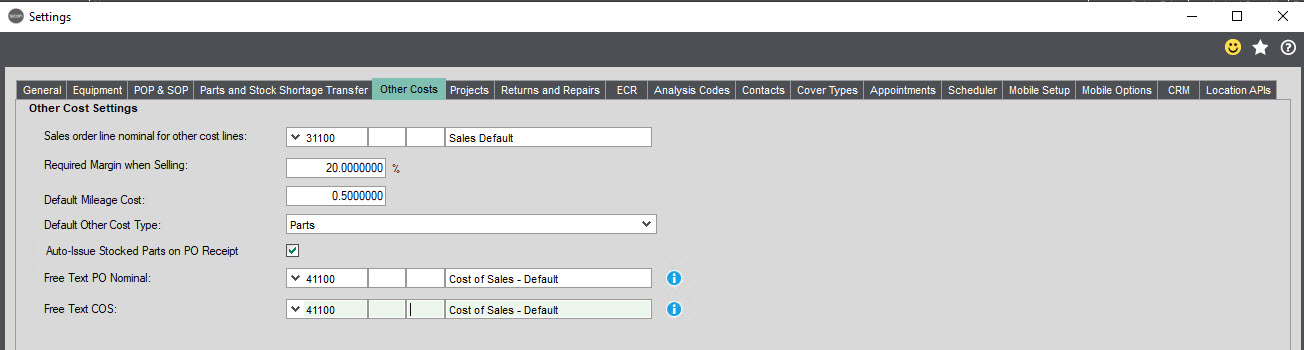
Sales order line nominal for other cost lines: This is nominal code the other costs to be billed to the customer will use on the sales order.
Required Margin when Selling You can set a default percentage margin which can be overridden at billing.
Default Mileage Cost: Set the default amount to charge mileage out at.
Default Other Cost Type: See Maintenance – Other Cost Types for creating the other cost types that are available for selection when creating a linked PO from a case. Note that the Other Cost Type needs an associated Project Header which was not a requirement in earlier versions of Service.
Auto-Issue Stocked Parts on PO Receipt: When ticked, this will automatically issue the parts ordered on the purchase order created from the case directly to the case.
Free Text PO Nominal: Selected nominal code will be used to override purchase order line nominal code for free text case expenses.
Free Text COS: Selected nominal code will be used to post cost of sales by journaling from purchase order line nominal code to this nominal on free text expenses. Posting will occur on billing or case completion.
To add to a case, select add on the Costs % Charges tab (previously Other Costs), select the type.

Enter the relevant details and the cost. It will be the cost that pulls through to the billing summary tab, unless in settings you have said you do not charge other costs.
If being charged on to your customer, and if the other cost selected in the above screen is not linked to a service stock item, then the default nominal as specified within settings will be used.
5.6. Projects TAB
If using Sicon Contracts, you have the option to create a Project per Contract or a Project per Contract Line.
For Non-Contract cases, associated costs can be captured in the Sicon Projects module by linking them all to a single Non-Contract Project or linking to a Non-Contract Project per Customer (recommended option) or per Case.
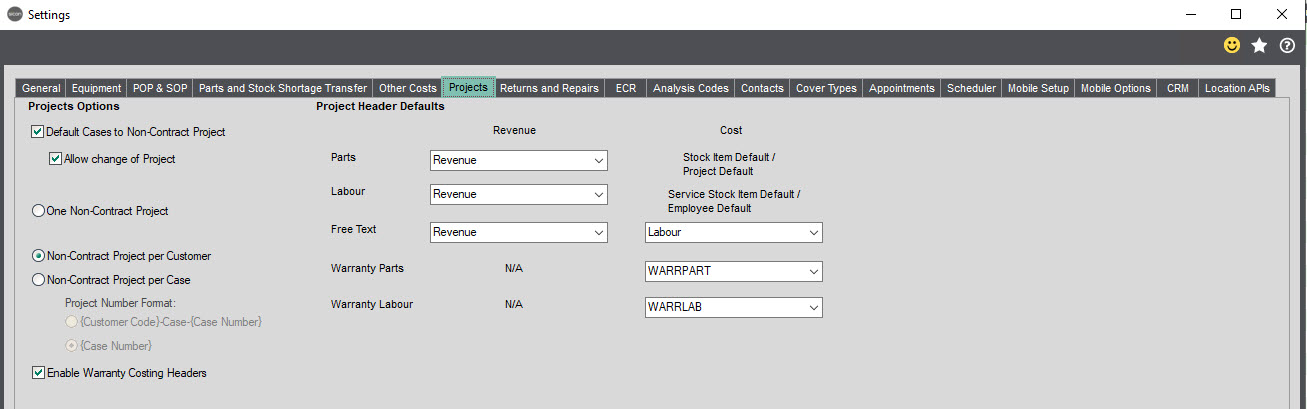
Sicon Projects Options
Default Cases to a Non-Contract Project: If enabled the system will link all non-contract linked cases to one single project (unless you also tick Non-Contract Project per Customer).
Allow change of Project: If enabled would allow the project to be changed on the service case. If you do not want your users to be able to change the case from the default – leave un-ticked, (this is a global setting not role defined).
One Non-Contract Project: Based on settings above, specify which Sicon Projects project to post to (the system default is NONCON).
Non-Contract Project per Customer: (Recommended Option) if enabled, you would have one non-contract project per customer, and all non-contract cases per customer would be linked to their project.
Non-Contract Project per Case: if enabled, when a non-contract case is saved, a separate project for each case will be created in the Sicon Projects Module. Note: The Project Description will auto-populate with the text entered in the Case Details Summary. If this option is selected, you can then stipulate how the project number is created: Customer Code and Case Number combination or just Case Number.
When this option is selected, as the service case is completed, it will automatically update the Sicon Project % Complete field to 100 and set the Status as Complete.
Enable Warranty Costing Headers: If enabled two additional options are available under the Project Header Defaults section. When parts are issued to these warranty cost headers, within Sicon Projects a report could be run to see what cross charges back to the manufacturers / suppliers need to be invoiced; for costs incurred for your call outs for faulty equipment during the manufacturer’s warranty period and, where you have an agreement, what you can invoice them for.
Project Header Defaults
Revenue
Defaults to determine which job headers will be used when Parts, Labour and Free Text items are invoiced on a Sales Order (from a case). We recommend you consider having a separate revenue cost header for Service case, if you wish to be able to analyse separate from standard SOP revenue for example.
Cost
Parts: Not selectable here as the system uses the defaults set either against the Stock Item Code or the Project Costing Default.
Labour: not selectable here as the system uses the defaults set either against the Service Stock Item or the Employee in Project Costing.
Warranty Parts: If you are able to reclaim against parts still in warranty from Suppliers, it is recommended you have a separate Project Costing cost header set up e.g. WARRPART, which would then allow you to create warranty reclaim reports from within Project Costing.
Warranty Labour: As above, but to cover any labour that can be reclaimed e.g. WARRLAB.
5.7. Returns & Repairs TAB
The settings within this tab relate to sites where equipment is returned either:
- Using Customer Returns (only appears when a case is a Return/Repair Case) or
- The engineer returns a part previously allocated to a case on the parts tab and is no longer required / used removed from site for repair
Enable Customer returns and repairs to enable the features to allow Customer Returns / engineers parts to be sent back.
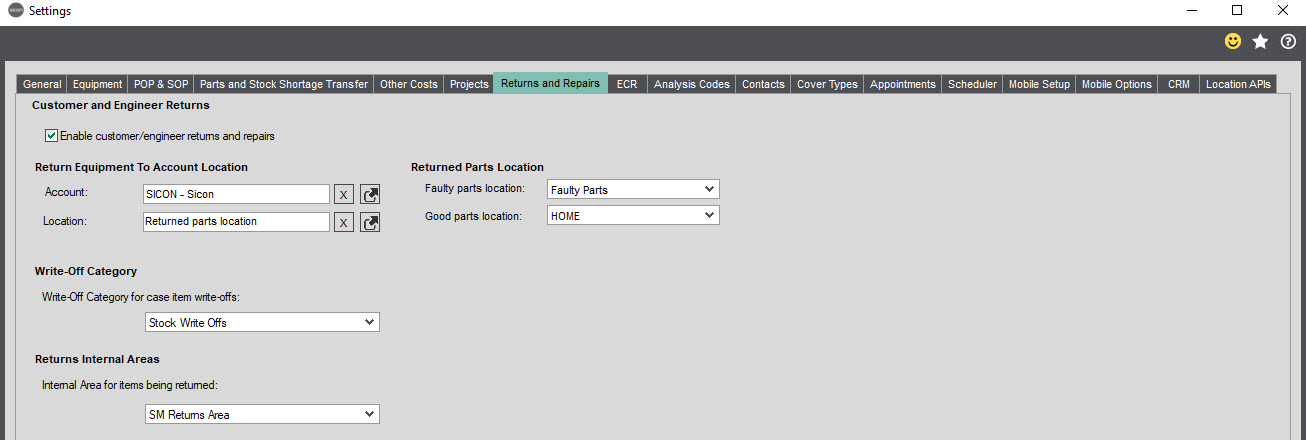
Return Items to Account/Location: Use to specify an internal sales ledger account to allocate the equipment to that is being returned whilst under repair (this is because equipment ideally should be assigned to a customer at all times, and although you can simply un-assign equipment, we do not recommend it).
Write Off Category: During the customer returns process, if the equipment is a stock item and is beyond repair and needs to be written off it needs to be returned to stock to an inspection warehouse. Select a default stock write off category for any relevant nominal movements.
Returns Internal Area: Internal Area to show where the returned equipment is located (i.e. Quarantine, Inspection or Service case repair).
Returns Locations/Faulty parts Location: Default a Sage 200 stock warehouse, this is only used with Engineer returns (we would recommend setting up a unique one for faulty parts brought back, in order to run a stock take to show what stock /parts are sitting in returns area).
Returns Locations/Good parts Location: Default a Sage 200 stock Warehouse, this is only used with Engineer returns (we would recommend setting up a unique one for parts brought back that are in a useable condition, but need to be inspected before transferring back to main stock in order to be available for resale).
5.8. ECR
Select the Teams to be available when using the Engineer Change Request function.

5.9. Analysis Codes TAB
These options are to enable data to be passed through to standard Sage 200 SOP analysis codes on an SOP Header, when the case is billed.

You can choose to specify, using Sage SOP analysis, that the sales order has derived from Service and may also use one of the SOP analysis codes to display the case number. This could then be added to the Sales Order list view so you can easily identify orders that have been generated from service cases.

Where you are generating Purchase Orders from within a case, you have the ability to set a default Sage 200 POP analysis code to show the equipment information that the PO is being raised for. N.B. The Analysis Name and Field Labels need setting in Sage for this to pull the information through.
Case Analysis Tab
You can configure up to 20 analysis codes which can be used on the Service Case itself for example, if you want to analyse the region within your company that looks after the case customer.
Analysis codes can be made mandatory, free text, or pre-defined drop down lists can be created for users to pick from.
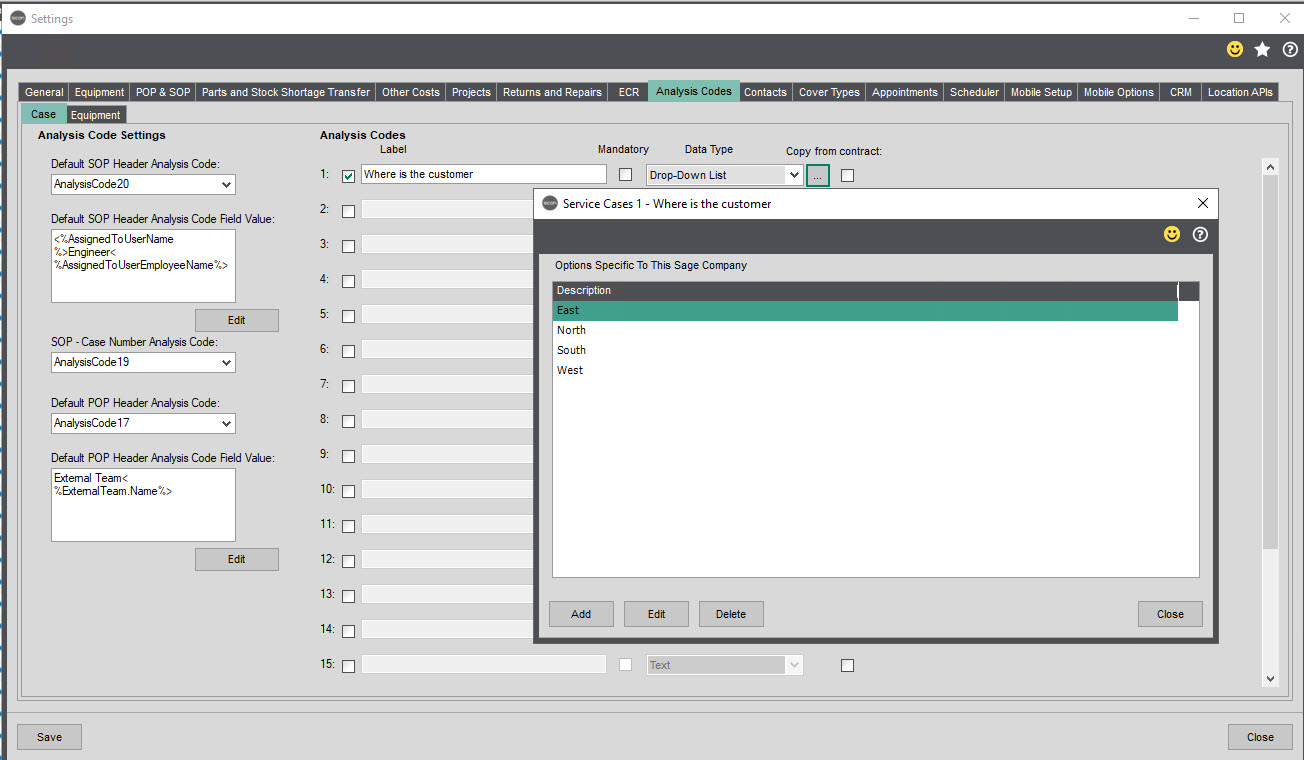
When enabled / set up they would be visible for populating on the Service Case on the Analysis Tab.

Equipment Analysis Tab
Up to 150 analysis codes can be configured which can be used on an equipment record, e.g. to record the suppliers invoice that you the company purchased it from, or to flag if the equipment item is a product you make.
Analysis codes can be made mandatory, free text, or a pre-defined drop down list created for users to pick from.
When enabled / set up they are available for selection on the equipment record and on the Analysis Tab in the case.
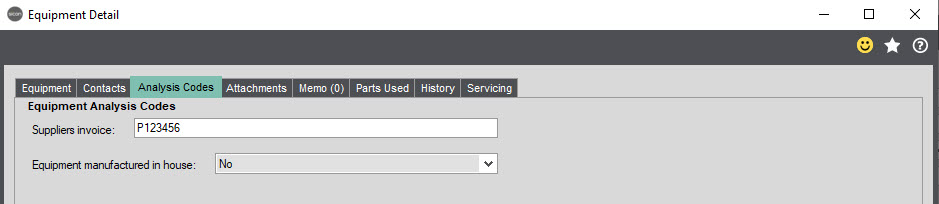
These analysis fields can also be added to the Equipment Lists by right mouse click on the populated list and Edit Grid, Add Column. Enter the Caption (column description) then open the SiconEquipment list to select the required analysis code. Highlight then click Insert and Save.
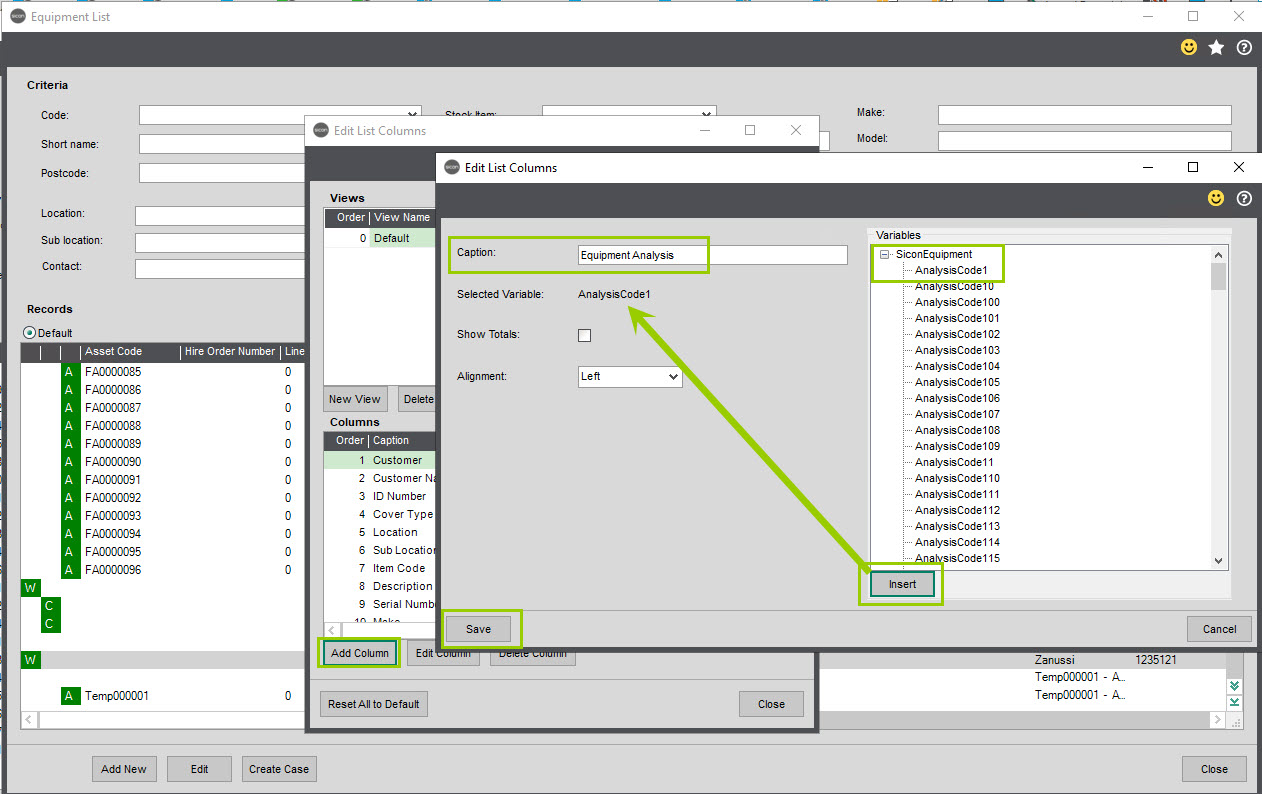
5.10. Contacts TAB
In this tab you can create up to 10 Custom Contacts that may be linked to the Equipment Record. These can be flagged as Mandatory however we do not recommend that they are during the setup and training phase.

5.11. Cover Types TAB
This area is where you set the default cover type to be used when billing service cases.
These are system defaults to cover instances where customers or contract lines defaults have not been configured and it’s very much a case of ‘if nothing is entered else where the defaults set here will be used’.
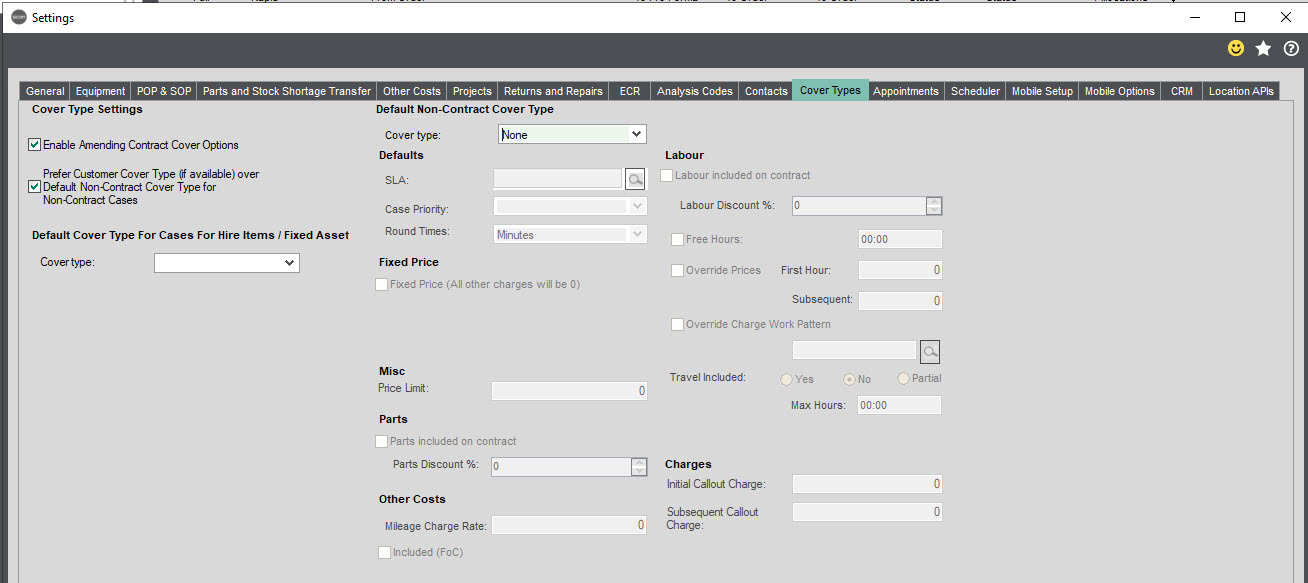
There are four system loaded defaults – None, where everything is chargeable, Full, where nothing is charged for, Labour only – everything other than labour is chargeable and Parts – everything other than parts are chargeable.
Extra Cover Types are configurable and explained in detail within the Maintain Cover Types section of this Help and User Guide.
Important Note: If there is a situation where a contract line is set up with a certain cover type but the contract line has expired, the system will look to use Default Non-Contract to determine what charges apply to a Contract Case. Even if the equipment remains linked to a contract line because the line has expired, it will use the cover type defined in Settings.
Enable amending Contract Cover Options: if this is not ticked on the Billing Info tab on the Case, the Contract Cover Type will be greyed out and users will not be able to amend the option displayed (If you do not want users to change the cover type; which in turn could change what charges apply for parts and labour, we recommend you do not tick this).
Prefer Customer Cover Type (if available) over Default Non-Contract Cover Type for Non-Contract Cases: If this setting is enabled, new Non-Contract Cases will pick up the default customer Non-Contract Cover Type if populated on the SL – Customer Details – Service tab.
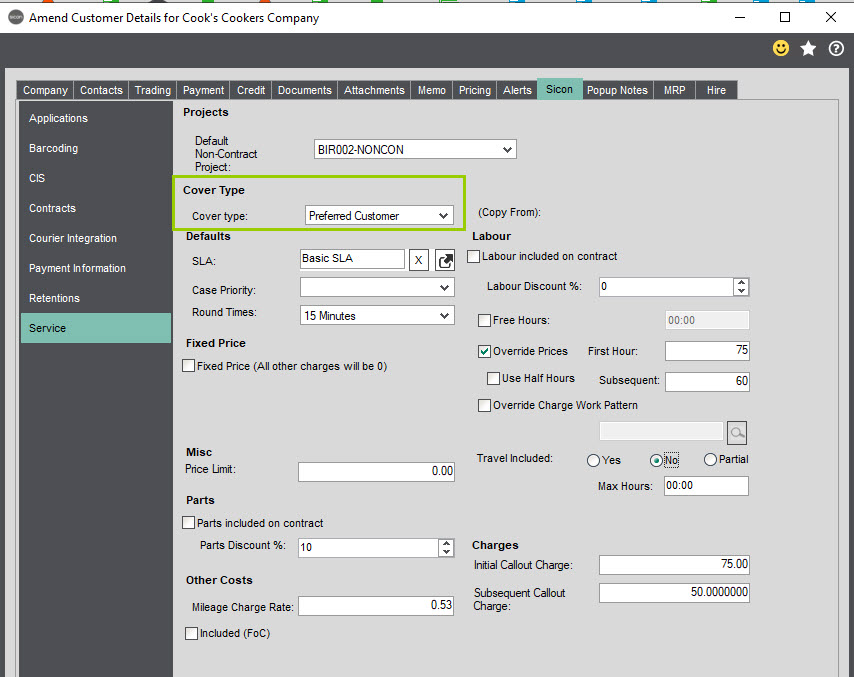
Default Cover Type for Cases For Hire Items / Fixed Assets: Only to be populated if using Sicon Hire and Sicon Fixed Assets. Where Sicon Hire and Fixed Assets are used and a service case is created for an equipment record that is a hire/fixed asset, the default cover type set here will be applied to the case.
5.12. Appointments TAB
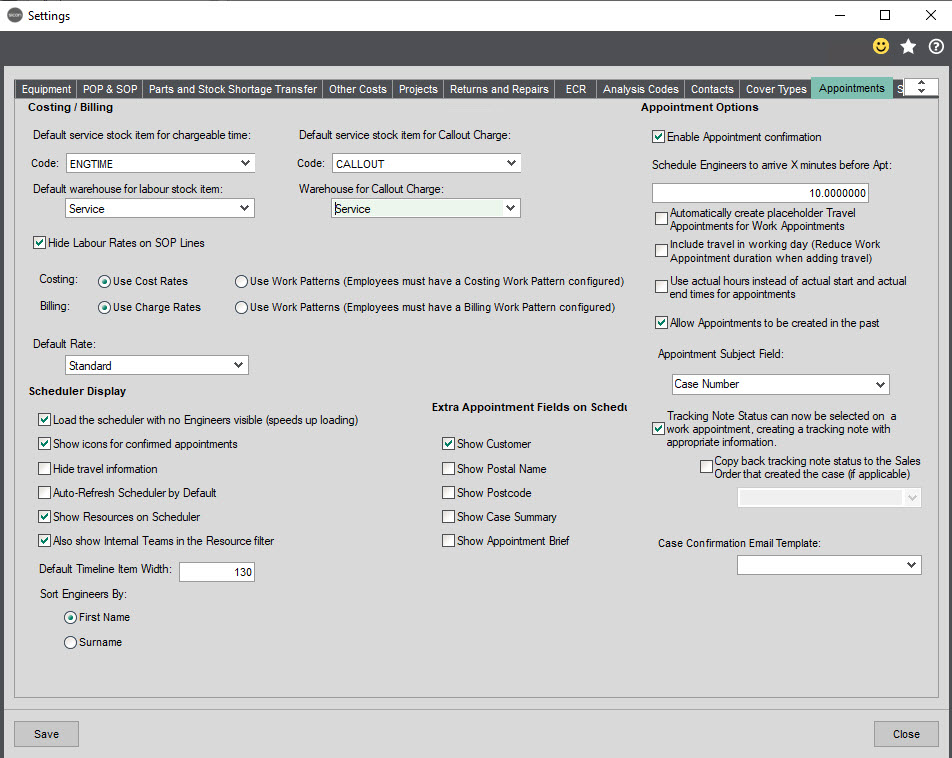
Costing/Billing
Default service stock item for chargeable time: select the default service stock item that will be used for billing and will be shown on the Sales Order when billing chargeable time from the service case.
Example: ENGTIME (Service Stock Code) Engineer Time Normal / Standard (Service Stock Code Description). These need to be linked to a Product Type of Service/Labour.
Default warehouse for labour service stock Item: select a default warehouse to be used when billing the chargeable time. Sage requires a warehouse/location for all stock codes even service items.
Example: We recommend a warehouse/location set up along the lines of ‘Service’ to avoid confusion with proper stock items/proper warehouses.
Default service stock item for callout Charge: select the default service stock item that will be used for billing and shown on the Sales Order when billing chargeable time
Example: CALLOUT(Stock Code) – Call Out Charges (Stock Code Description)
Warehouse for Callout Charge: select a default warehouse when billing the callout charge as chargeable time.
Example: We recommend a warehouse/location set up along the lines of ‘Service’ to avoid confusion with proper stock items/proper warehouses.
Hide Labour Rates on SOP Lines: when ticked, employee labour rates will not show on the Sales Order, but instead will show as a total value to be charged: Example £150 Rather than 3 hrs @ £50.
Costing: Use Cost Rates or Use Work Patterns: Specify where employee cost rates are derived from, options being on their individual employee record on the cost tab or in accordance with their work pattern as linked on their employee record. Work Patterns are set up within Sicon Projects and Maintain Work Patterns.
Billing: Use Charge Rates or Use Work Patterns: Specify where employee charge rates are derived from, options being on their individual employee record on the charge tab or in accordance with their work pattern as linked on their employee record. Work Patterns are set up within Sicon Projects and Maintain Work Patterns.
Default rate: A default rate can be selected to populate all appointments. This is linked to the Default Rates in Project Settings so may have different descriptions as these are editable.
Scheduler Display
Load the Scheduler/Diary with no engineers visible (speeds up loading): If enabled when the scheduler loads, the system will not load up all the appointments for all the teams / engineers. The user would then select all engineers, some or just the one whose appointments they wish to see and to schedule for.
Show Icons for confirmed appointments: if enabled, appointments show as a tick for confirmed or as a cross for unconfirmed. If this setting is not ticked, appointments show as clock start/end times.
Hide travel information: if enabled, when scheduling an appointment, you are not prompted to enter any travel details.
Auto Refresh Scheduler by Default: the diary/scheduler will be refreshed automatically as per the time in seconds on the diary view. If this setting is not enabled, the diary/scheduler can be manually refreshed.
Show Resources on Scheduler: if enabled, “Other Resources” will be available to display on the scheduler these need to be setup in Sicon Projects (See Sicon Projects > Plant > Owned Plant > Maintain Plant).
Note: Other Resources are items that you need to book out for the engineers to take with them, for example, if you are sending out engineer to dig up a road, they may need to take with them ‘portable traffic lights’ and you only have a limited number of them/they don’t carry them on their van and therefore you need to schedule/book them out. You can also set Charge Rates against the resource if you need to bill the customer for it.
Show Internal Teams in the Resource filter: Enable if you wish to see the Internal Team Members within the scheduler, useful if you need to schedule internal engineers to the cases for monitoring and follow up.
Default Timeline Item Width: This is the width of the columns in the scheduler, when in timeline view which should not need to be amended.
Sort Engineers by either First Name or Surname: When the list of Engineers is first loaded in the panel within the scheduler view, choose in which order they show.
Appointment Options
Enable Appointment Confirmation: function to show a distinction in the diary between scheduled internally but not yet confirmed with customer and confirmed with customer appointments. When this is not enabled, there is no check box for confirmation when scheduling the engineer and all appointments scheduled will show in the scheduler with a Confirmed tick by default. This can be changed by right clicking on the appointment, select Confirmation Status and change to Unconfirmed.

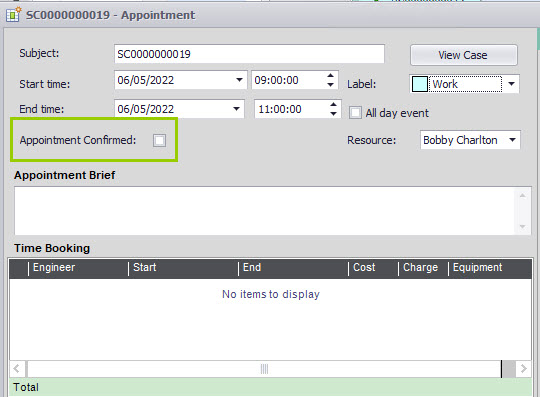
Schedule Engineers to arrive X minutes before appointment: In the settings example screen shot above we have entered 10 (minutes), which in turn would block out his availability for 10 minutes before his scheduled time of arrival.
Automatically create placeholder travel appointments for work appointments. Enable if you wish the system to automatically create travel appointments prior to and post a work appointment scheduled.
If this is enabled on an appointment when an engineer is scheduled the system will automatically add a travel to and from the appointment, the duration of the travel appointment will be based on the duration (minutes) specified in the setting above (Schedule engineers to arrive xx minutes before appointment).
The screen shot below shows how these ‘placeholder travel appointments’ appear:
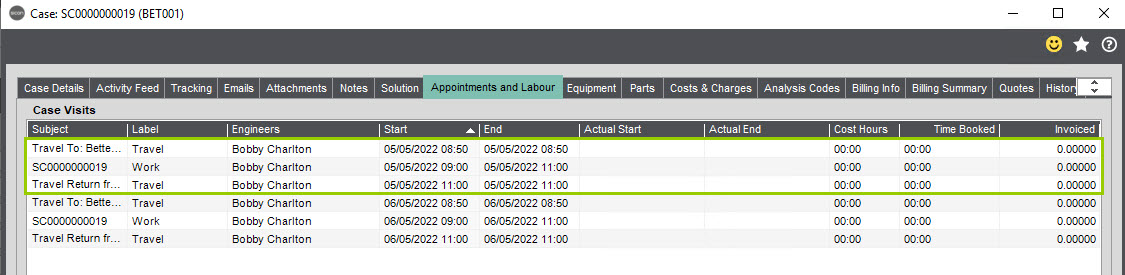
Include travel in Working Day: If enabled the work appointment duration will be reduced by the amount of travel time. For example, if the engineer travels 1 hour to get to the appointment and 1 hour from the appointment, this is taken out of the whole appointment time, so if the appointment is scheduled for 6 hours the work time would only be 4 hours.
Use Actual hours instead of actual start and end time: If enabled when confirming time worked instead of enter from and to hours ‘actual time worked ‘users would enter ‘Time booked ‘in number of hours’ for example instead of entering Actual Start 09:00, Actual end 15:15 you would enter Time Booked 6:15.
Allow Appointments to be created in the past: If enabled, will allow historical appointments to be created, useful for companies who have engineers working out of hours when the office is closed. When the engineer has completed the appointment, the office needs to create a proper service case the following working day.
Although those customers using Sicon Service release 18 and later, that have mobile users, if enabled they do have the ability on the mobile devices to create ad-hoc cases. This is enabled on the Mobile Tab, after syncing back to the office the customer service team who manages the service desk would need to review the ‘ad-hoc cases’ to populate remaining fields and bill accordingly.
Appointment Subject Field: can be defaulted to the Case Number, Customer or Case Number and Customer.
Tracking Note Status: A tracking note can be selected on a work appointment if this option is ticked. When this is activated, you have the additional option to Copy back tracking note status to the Sales Order that created the case (if applicable) this needs to be linked to a SOP Analysis code to show on the SO. The tracking note also needs to be made available to the engineers for selection on their device when completing the appointment.
Tracking notes for Engineer arrival on site and Engineer leaving site need to be ticked as available to engineers in the Maintain Case Tracking Status Screen.
Extra Appointment Fields on Scheduler:
Tick to select from the list below the additional information you want to see on the scheduler
- Show Customer
- Show Postal Name
- Show Postcode
- Show Case Summary
- Show Appointment Brief
Case Confirmation Email Template: Allows a default template to be linked so when a case is confirmed it automatically suggests the template set here.
5.13. Scheduler TAB
These settings relate to the diary when scheduling appointments.
Important Note: During testing, we advise that unless you really need appointments and/or automated work reports via your SMPT server to engineers that the features are not enabled until ready to test with engineers and just prior to go live.
You can configure this page in preparation, just do not enable the first tick box until ready, company’s SMPT settings have been configured on the Scheduler Tab within Settings.

When you do tick this the ‘Enable Appointment Calendar Email Invites you must fill in all the fields on this tab, [ Email Options and SMTP Settings] if you simply tick ‘enable’ but do not populate the rest, after you have scheduled an appointment the system will be looking for email addresses on the employee / subcontractor and then looking for your email configuration, and if one, or neither exist the system will throw a warning.
When Ticked / Enabled: An email will be sent to the engineer when an appointment is entered into their diary. This would be used where no mobile devices are being used (Tablet user’s/Service named mobile users) and you wish to send your engineers an outlook diary invite for the scheduled appointment/his work appointment. Alternatively, if you do have 3rd party subcontractors, and they are configured as such in Sicon Projects maintain employees, then you may want to send them an outlook diary invite when you have scheduled them.
Max Engineers Displayed: The number of engineers displayed per page on the scheduler can be restricted if required.
Default Appointment Start/End Times: a default start/end time can be set but can also be overridden on each appointment.
Allow Schedule Conflicts: Enable if you allow conflicting appointments to be scheduled. This could be used where service admin schedules call in the diary, but only confirm with customers at the end of the day.
Use Vertical Scrolling by default – hold CTR or SHIFT key to enable horizontal scrolling rather than dragging the scroll bar at the bottom of the screen.
Email Options and SMTP Settings:
The image above shows an example of the configuration details which would be provided by the company’s I.T department. Note: these details should not be enabled until this feature is to be used (although in preparation the details can be obtained from your I.T department / populated).
Originally this area of the module was designed so when subcontractors were used by the company to visit clients on their behalf (and did not have access to Service within Sage or the company’s tablets), the Service administrators could send them an appointment invite via Microsoft Outlook/Office 365. However, it can also be used to send the company’s own engineers appointment invites so it appears in their company calendars (such as Outlook) as well as their Service scheduling diary.
Sender Name – When the email invite is sent out, the details entered within this field are those seen as the sender (From) of an email to the engineer /or another receiving the email invitation.
Email address – This is the email address from which the email invite goes from (Needs to be a valid email address). If within the service admin team there is just one person, this could be their own email address, but if companies prefer it to be generic it could be something like servicedesk@thecustomers.co.uk
If the Sender Name and Email addresses are omitted from the settings, when you schedule an appointment you will get an unexpected error message:
MESSAGE
The parameter ‘address’ cannot be an empty string.
Parameter name: address
EXCEPTION INFO
Class: frmWorkAppointment
Method: OnOkButton
Source: System
STACK TRACE
at System.Net.Mail.MailAddress..ctor(String address, String displayName, Encoding displayNameEncoding)
at System.Net.Mail.MailAddress..ctor(String address, String displayName)
at Sicon.API.Sage200.Objects.Scheduler.Classes.InvitationTools.SendAmendInvitation(String sendTo, ISiconAppointment amendedLastMessage, Boolean delete)
at Sicon.API.Sage200.Objects.Scheduler.Classes.InvitationTools.SendAmendInvitation(List`1 sendToList, ISiconAppointment amendedLastMessage, Boolean delete)
at Sicon.Sage200.ServiceManagement.Forms.frmWorkAppointment.AfterBaseSave()
at Sicon.Sage200.ServiceManagement.Forms.frmBaseAppointment.OnOkButton()
This is rectified by adding in the sender name and email address.
SMPT Settings – Host details: Enter the details of the company’s email server that the email will be sent through/from The Companies I.T department will need to provide this information
SSL – Enable to sends emails securely using SSL The Companies I.T department will be able to confirm if this is required
User name & Password: – The user name and password used to logon to the SMTP Sever This is often the same as the senders’ email address but the I.T Department will be able to confirm.
Test: – Email – Use this for testing the SMPT credentials and to test individual email recipients as per the example below.

5.14. Mobile Setup
The ‘Enable Service Mobile Features’ within this screen enables the tablet interface, which will allow both online and offline use.
The engineer will have to manually sync tasks to and from the tablet when a Wi-Fi or mobile signal is available. When offline, the work carried out will be queued and processed when a connection is available. (There is no Auto Sync functionality, feedback is that companies prefer their engineers not to assume the device has synced back to the office).
Tablet licenses are purchased separately to the Service Module for Sage 200 these are priced on a named user basis. Note: before configuring mobile access, ensure the engineers have been added as Employees and have a warehouse linked to them (Maintenance – Maintain Employees).
Enter the Mobile Enable String, enable and then tick the box ‘Enable Service Mobile Features’, if the mobile string has been entered via the main menu then it will copy it in to here. For most companies this is now updated in the background via the online licencing function.
Mobile URL: Will show the URL that the users need to enter on the tablet to start the login process.
To Add Mobile Users, click the Add button and select an engineer (this is linking back to the employee record). You can choose any Username and Password as required. This is the username they will use to log into the Mobile site. Click Save on the user details. Ensure to tick the ‘Enabled’ box for any users you have added that you wish to be able to log in as they are disabled by default.
When adding a user there is a field beneath the password to indicate the strength of the password. Very Weak is highlighted red, Weak is amber, Medium is yellow, Strong is pale green, Very Strong is dark green.
If the engineers get their password wrong 3 times they will need to have it re-set in the Add/Edit Mobile Login screen.
Note you can add as many Engineers as you like and then enable those as required and in line with the number of licenses. Lastly, click Save on the settings screen. This completes the configuration of Service mobile, and these settings can be changed at any time by accessing this screen.
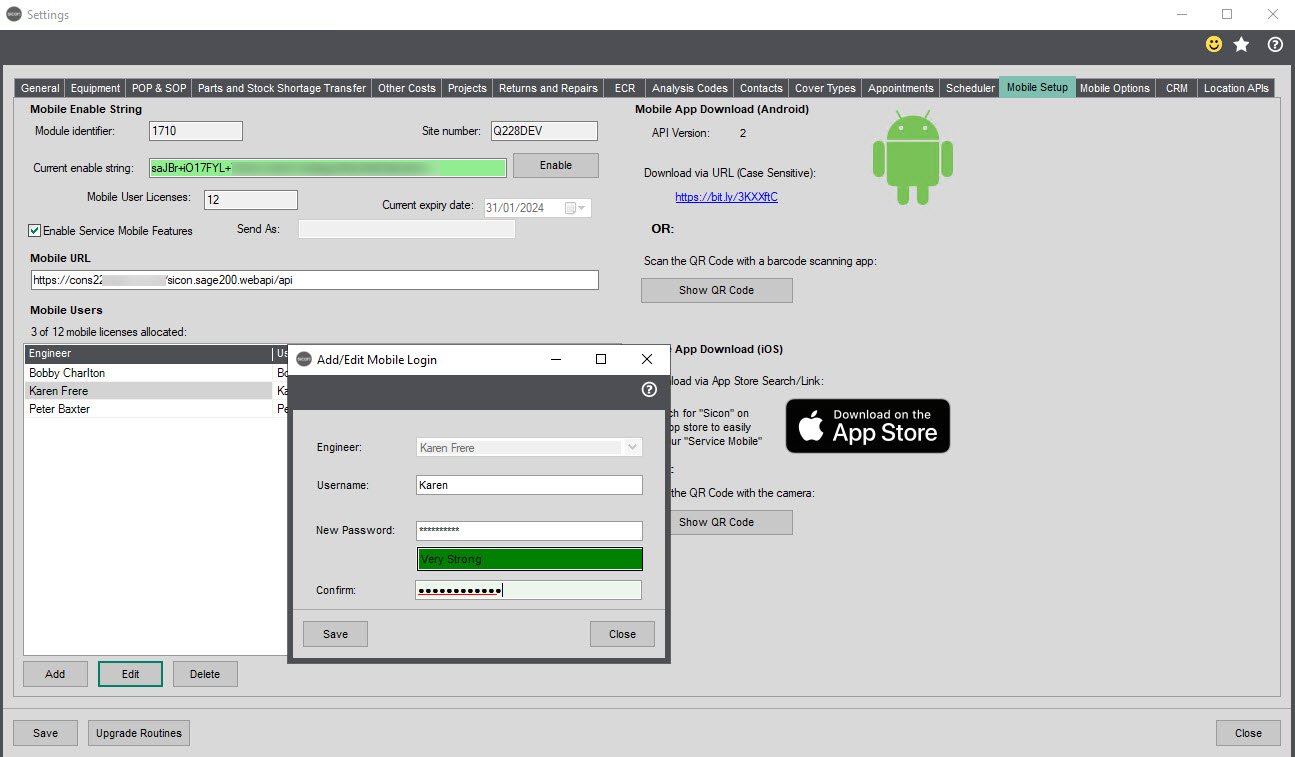
Mobile App Download
This area of this screen explains how you would download either the Android or iOS version of Service Mobile APP
If your mobile device supports scanning QR codes, one can be generated in the Service settings which can be scanned to take you directly to the download page for your device.
Accessing Sicon WebAPI Externally – This is intended for IT personnel who are familiar with IIS and Domain configuration. Any assistance with A Records, Firewalls etc. should be referred to your IT Department.
How do I access Sicon WebAPI? Is there a web address or is it a module within Sage?
Sicon WebAPI has a web URL specific to its location on your server.
It will look like this, however ‘servername’ is replaced by the name of your Sicon WebAPI server: http://servername/sicon.sage200.webAPI/
By default, Sicon WebAPI runs over HTTP on port 80 and as with other web-based applications, this is only suitable for internal access.
Please also see link to Microsoft help on setting up SSL on IIS7:
https://www.iis.net/learn/manage/configuringsecurity/how-to-set-up-ssl-on-iis
What would I need to do to allow external access for Sicon WebAPI?
To allow access from the outside world to the Sicon WebAPI server you can either connect using your existing VPN infrastructure, or take the following outline steps:
Configure port forwarding on your firewall to allow port 443 to the Sicon WebAPI server – you can allow port 80 as well and set IIS to allow 443 only, but it is preferable not to allow port 80 through the firewall in the first place.
Create an A record at your domain host such as siconwebapi.customer.com and point this to the public facing IP address of your Sicon WebAPI server. It is also preferable to do the same on your internal DNS so that everyone uses the same URL both internally and externally.
Purchase a trusted SSL certificate from a certificate authority such as Comodo, Thawte or GoDaddy – you have to generate the request from IIS on the Sicon WebAPI server, provide this to the CA and then import the supplied certificate.
Bind the certificate in IIS to the web site that hosts Sicon WebAPI.
Access Sicon WebAPI using https://external-name-of-Sicon Web API-server/Sicon.Sage200.WebAPI/
Please see below for links to tutorials provided by the three companies above on completing these steps:
Comodo: https://help.comodo.com/topic-360-1-722-8691-.html
Thwate: https://www.thawte.com/resources/getting-started/get-started-with-ssl/
GoDaddy: https://uk.godaddy.com/help/ssl-certificates-1000006
5.15. Mobile Options
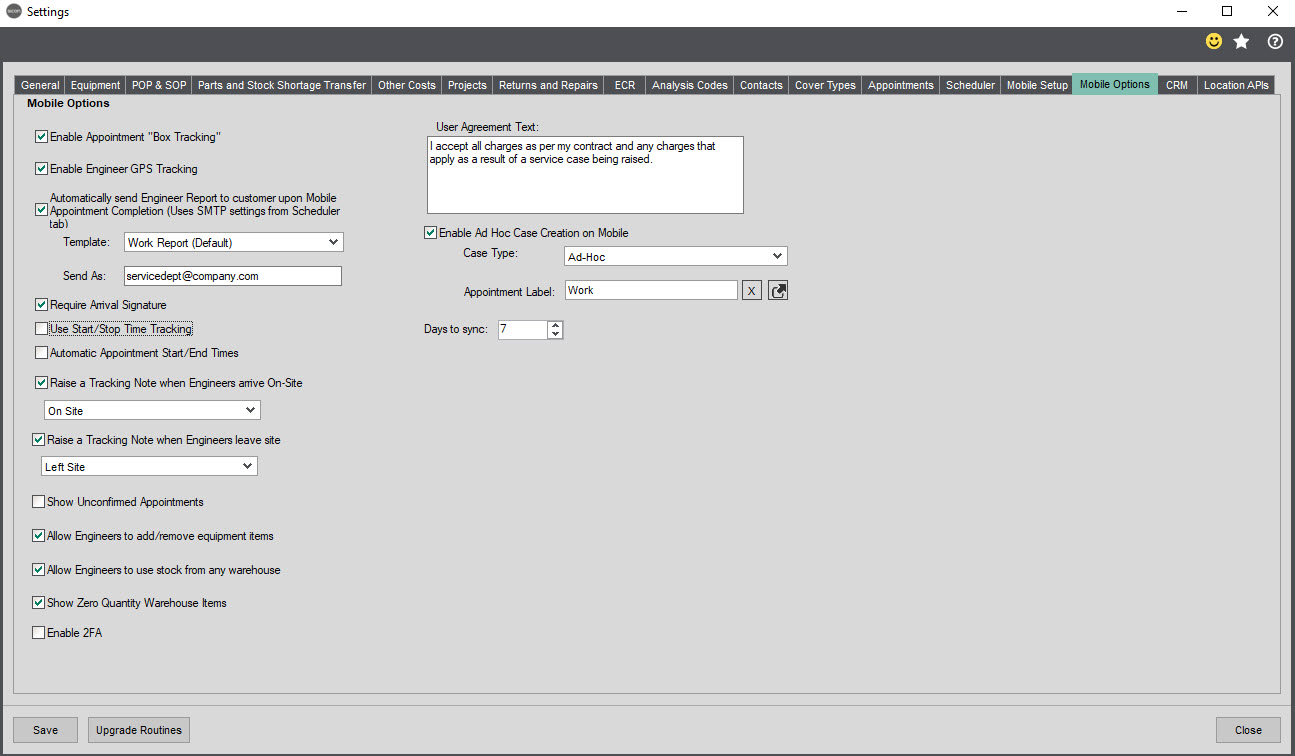
Enable Appointment Box Tracking: if enabled, boxes/equipment that are left on site to be collected later can be tracked e.g., too large/heavy to get on van and need collecting. Once enabled, engineers will be able to record on their tablet that they have left x number of boxes on site and add notes.
Enable GPS Tracking: If enabled sends the GPS co-ordinates from the Mobile App back to the service module and visible on the Map and can be used to calculate the nearest engineer for new cases.
Automatically send Engineer Report to customer upon Mobile Appointment Completion:
Feedback from a lot of customers is that they would not want their engineers to send a report automatically as soon as they have completed the appointment on the app instead, the service / admin desk would prefer to check what the engineer has written and email the case customer/contact ‘work report’ which is labelled Generate Report (as per screen shot below) themselves from within the case.
If you trust your engineers work reports to be accurate and allowed to be sent automatically without someone in the back-office checking, enable this feature.
Once the engineer has sync’d his tablet back to the office you can email the report. For this to work, you will need to ensure that: –
An email template has been created – See Email Template Maintenance and for that template to be associated with the Appointment Report.
The feature ‘Automatically send Engineers Report to customer upon Mobile Appointment completion’ is enabled.
Email and SMTP settings need to be configured within the scheduler tab in Settings
And ensure an email address, configured by your I.T department, to specify from whom the customer will see that the emailed ‘Work Report’ will come from.
If you do not wish that to be a specific users email but instead a generic one, such as servicedesk@xxxx.co.uk please make sure your I.T department configures it that if the customer replies from the e-mail it does go into someone’s inbox.
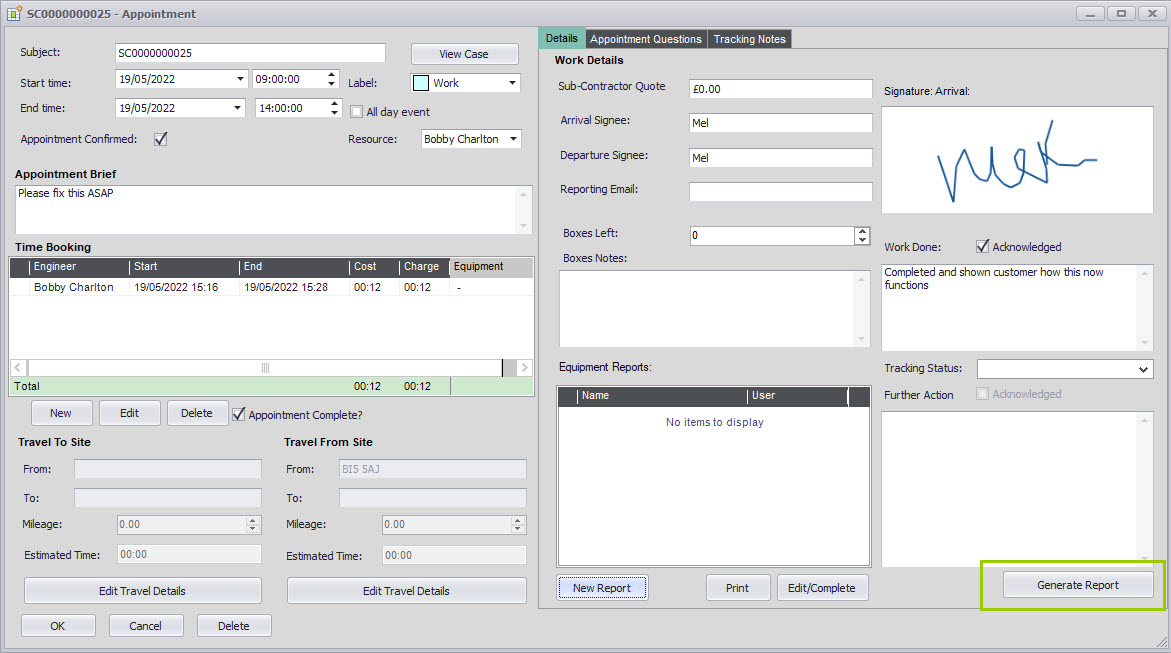
Require Arrival Signature: if enabled, the engineer will need to get an electronic signature before being able to proceed.
Use Start/Stop Time tracking: Enable If you need minute by minute tracking of engineers, with their time allocated to a work appointment / label for his / her whole working day. I.e. Travel, Admin, Tea Break, Telephone Calls, lunch and so on.
Automatic Appointment Start/End Times: if enabled, engineers’ time will be captured automatically by time of customer’s signature at arrival/departure.
Raise a Tracking Note when Engineers arrive On-Site: if enabled, a tracking note will be automatically generated against the case when an engineer arrives on-site and syncs back to office. When used, a green arrow symbol shows on the Appointments list which is a handy visual for the service admin team to know he has arrived on site.
Raise a Tracking Note when Engineers Leave Site: if enabled, a tracking note will be automatically generated against the case when an engineer leaves and syncs back to office. When used, a green arrow symbol shows on the Appointments list which is a handy visual for the service admin team to know he has left site.
Note: The tracking status’s for engineers’ arrival and departure from site need to be ticked as available to engineers in Maintain Case Tracking Status.
Show Unconfirmed Appointments: Enable this if you want your engineers to see appointments that you are scheduling for them that have not been confirmed with the customer yet.
Allow Engineers to add/remove equipment items: If enabled, the engineers will be able to add or remove equipment as required against an appointment.
Allow Engineers to use stock from any warehouse: Enable this setting if you need your engineers to be able to access all warehouses to select stock for their appointments. This is useful is the engineer is getting stock from a colleague’s van as it keeps a record of the movement of the stock item.
Show Zero Quantity Warehouse Items: When ticked this will allow the engineers to see stock items that are at zero value so if you are looking to return an item via found stock option.
The engineer can choose the Found Stock option on the mobile device then slide to show Zero Free Quantity. This will allow them to select the stock item, set the number to return and submit. When the device is sync’d, the part will show on the parts tab together with any comment from the engineer.

From the case, the part can be actions as a Return Part which will update the action from Unused to Return to Warehouse.
Enable 2FA: This will use Google Authenticator that implements two-step verification services using the Time-based One-time Password Algorithm and HMAC-based One-time Password algorithm, for authenticating users of software applications.
When this is enabled, you will need to update the employee record to Setup Two-Factor Auth. (see section Maintain Employees for how to configure 2FA).
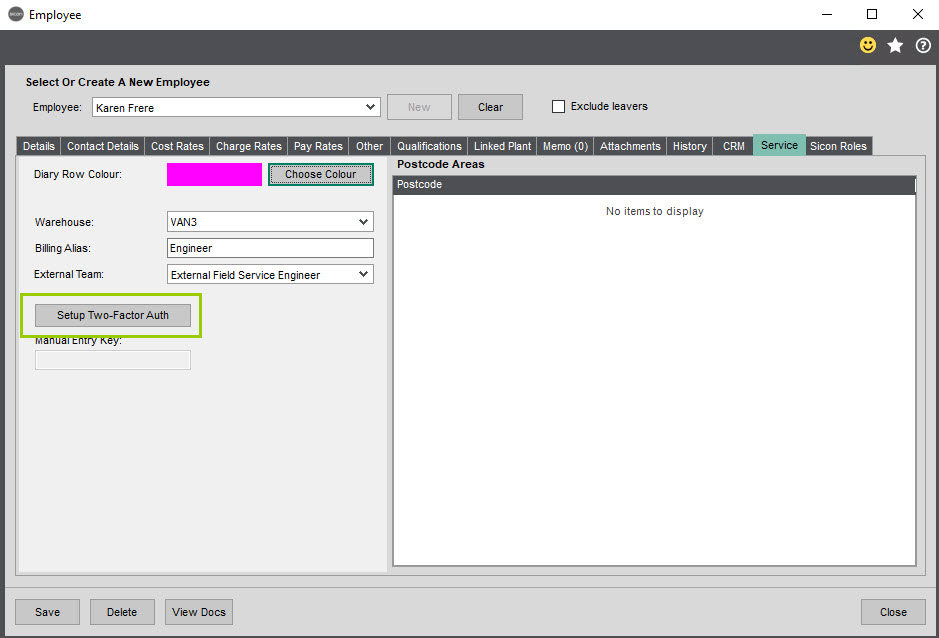
User Agreement Text: text entered here will appear on the engineer’s tablet when the engineer is required to obtain an arrival signature.
Enable Ad-Hoc Case Creation on Mobile: Enable if you have engineers that are on call out outside normal working hours. This feature will allow them to create the appointment themselves which can then be updated and billed as appropriate by the office staff on completion.
The only fields the engineer has for Ad-Hoc case creation are: Company, Postcode, Contact Name, Contact E-mail and Reason for Visit. The Sage Account is updated from the Service Desk when the appointment is sync’d back.
Appointment Label: Link the appropriate appointment label for the Ad-Hoc case creation.
This feature is useful also if you allow your engineers to take on more work if asked by the customer they are visiting whilst on an appointment that is not related to the case appointment they have been sent to.
Prior to Enabling ensure you have a relevant Case Type Created ‘Maintain Case Types’ and define which appointment label to set
In either case, if enabled on the Mobile Tab, after syncing back to the office the customer service team who manages the service desk would need to review the ‘ad-hoc cases’ to populate remaining fields and bill accordingly as the info entered by the engineer is limited as you can see by the screen below.

For now, when the service admin team filters the case type for ad-hoc cases (As defined in settings on the Mobile Options Tab), the relevant ad-hoc case will display.
The service admin user will then edit, and select the correct sales leger account and populate remaining required fields on the various tabs.
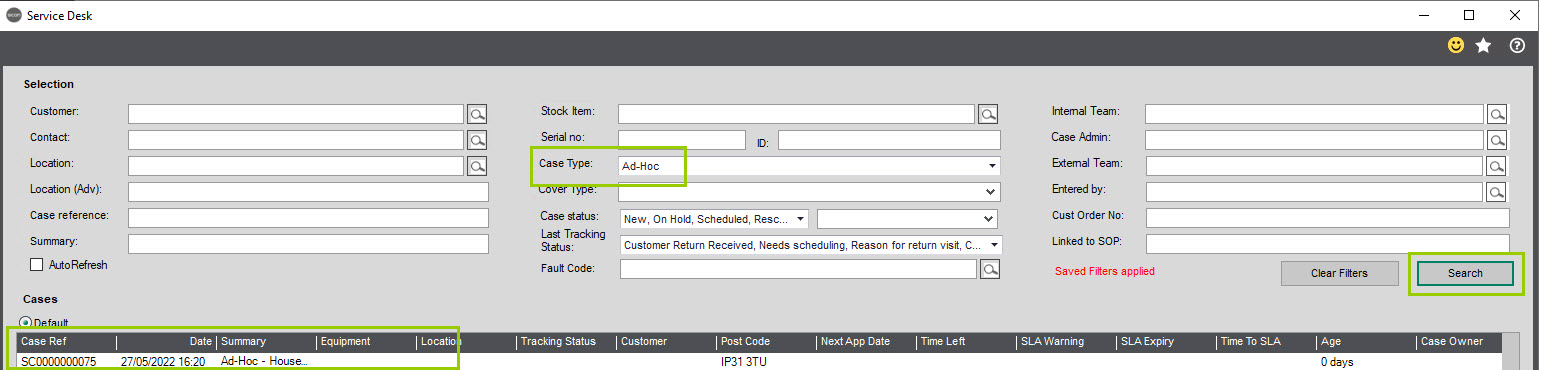
Days to Sync: Option to control how many days’ worth of appointments sync to the engineers’ tablet which will restrict the amount of data stored on the device.
5.16. Location API's
With effect from 19th October 2018, Google removed all free unregistered user mapping and distance calculating services. Customers will still be able to sign up with Google Services on a pay as you go basis, you will need to register for your own API keys.
Please refer to the Google API web page for information on Sicon Module Usage, Pricing and Obtaining a Google API Key.
Sicon Module Usage Explained, Pricing & Obtaining a Google API KeyLoqate Options
API Key: Where a company has a Loqate* Address Finder / Postcode look up licence and wish to use in relevant feeds within a Sicon module, primarily Service, enter the licence key here.
Address verification from Loqate is a reliable way to capture accurate address data and ensure data quality in your systems (We chose Loqate as a 3rd party company to integrate into our modules from a referral from several of our existing customers, using it in their businesses, apart from that Sicon Ltd has no legal association or legal affiliation with Loqate GBG).
Find Address can be seen within Service and other Sicon modules if enabled, the ‘Find Address Button would be seen on the relevant screens as below:

When used, users can enter part or all of postcode to search, select and confirm.

Or users could search by a company name.

If your company is not currently signed up for Loqate, there are three ways you can sign up:
1. Follow the below URL:
https://account.loqate.com/partner/sicon11111
You will then be taken to the following screen:

2. From this settings tab you can select to ‘Sign Up Here’:

3. When you select the Find Address button on a case, where there is no Loqate key entered in setting, the following screen will show and you select ‘Click here to sign up for Loqate’:

6. Utilities
6.1. Imports
Using the templates built into the module users can generate a csv import to import:
- Cases
- Case Solutions
- Cover Types
- Cover Type Product Group
- Equipment
- Equipment Service Dates (Service Template)
- Equipment Contacts
- Equipment Questions
- Fault Codes
- SOP Addresses
- Service Manager Stock Item Settings
- SLAs
- Linked Purchase Orders
- Sales Orders
Cases: Use to import open cases from an another system or if previously using Excel. It is always worth creating a few test cases manually within Service first to ensure users know what fields are used within a case, and the data that is populated in those fields so when they are preparing an import spreadsheet, they have some background knowledge.
You need to create Example Import file to generate 2 Excel workbooks.

Book 1 shows an example and is the one to be populated and saved as a CSV file for importing, Book 2 defines the Compulsory fields.
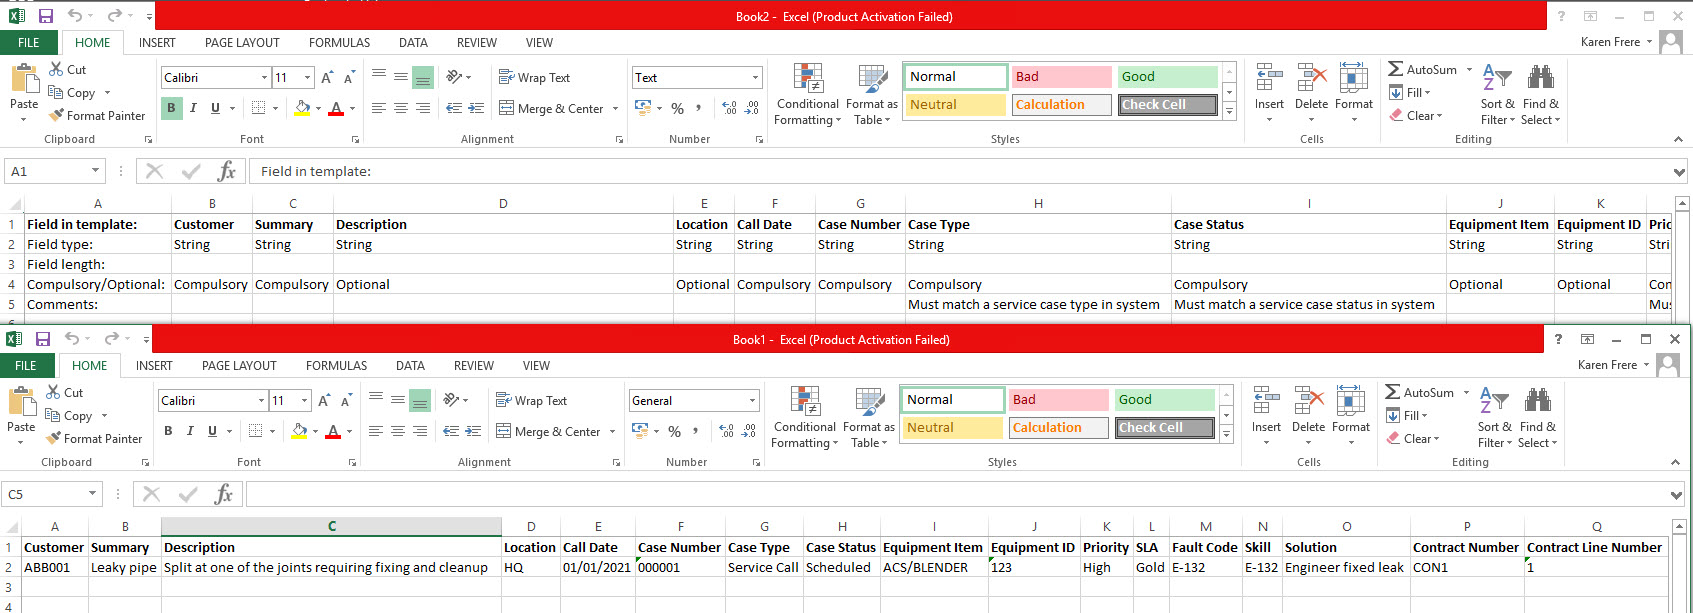
When the file has been populated and saved as a CSV, Find, Check File and in there are no errors the Import button will be active.
Case Solutions: (if being used) can be imported. Click the Example Import button to generate 2 Excel work books.

Book 1 shows an example and is the one to be populated and saved as a CSV file for importing, Book 2 defines the Compulsory fields.

When the file has been populated and saved as a CSV, Find, Check File and in there are no errors the Import button will be active.
Cover Types: Cover Types can be imported as well as being created manually – see section 4.9 Maintain Cover Types. The import file enables you to set if parts and or labour are included in the case type, if there are initial call out charges and subsequent ones etc. The import file identifies the compulsory fields and as with all import files they need to be saved as a CSV format for importing.

Import Cover Type Product Groups: This file enables you to import product groups that are to be associated to cover types. In Cover Type maintenance (4.9 Maintain Cover Types) you can flag product groups and set a discount percentage to be applied when the cover type is used on a service case.

Equipment: Equipment records can be imported, recording all the relevant info required on an equipment item, fields being mandatory if flagged as mandatory on the equipment tab within Service settings must be entered on the import file or it will fail.

If linking to an existing Sicon Contracts line, this can also be specified on this import. If you are looking to create the contract / contract lines through an import, then this would be done via Sicon Contracts during which you can add equipment items on to that import file rather than having to prepare two separate imports. For more information of Importing Sicon Contract & Contract lines see section ‘Import Contracts’ within Utilities within Sicon Contracts.
Click the Example Import File button to generate 2 Excel work books.
Book 1 shows an example and is the one to be populated and saved as a CSV file for importing, Book 2 defines the Compulsory fields.

When the file has been populated and saved as a CSV, Find, Check File and in there are no errors the Import button will be active.
Equipment Contacts: Primary contacts for the equipment items can be imported which have unique internal identification numbers as well as external id’s to enable filtering of identical names. The import files are generated by clicking the Example Import File button to generate 2 Excel work books.
Book 1 shows an example and is the one to be populated and saved as a CSV file for importing, Book 2 defines the Compulsory fields.
The Contacts MUST be identified in Service Settings first, this activated the additional columns in the Equipment Contact Import file. If these are not set, you will only have the ID Number column in the file.


Import Equipment Questions: For more information on equipment questions and how the system uses them see the Maintain Equipment section of this Help and User Guide.

Import Fault Codes: If you are looking to use fault codes when creating service cases these can be generated via an import.
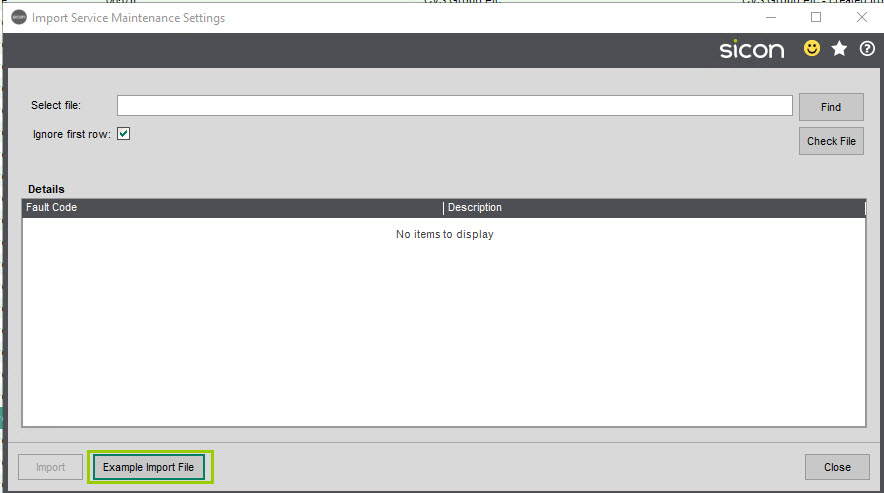
Click the Example Import File button to generate 2 Excel work books.
Book 1 shows an example and is the one to be populated and saved as a CSV file for importing, Book 2 defines the Compulsory fields.
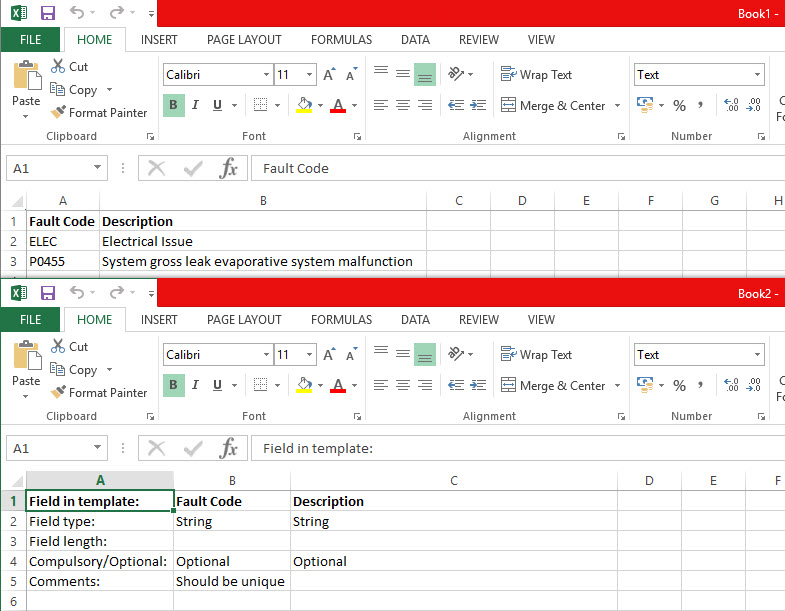
Import SOP Addresses: The Sage SOP Delivery address is used in Service Manager as the location to send the engineer to is this differs from the billing address. You can also have Sub Locations to pinpoint specific areas if the engineer is going to a large site such as a hospital.
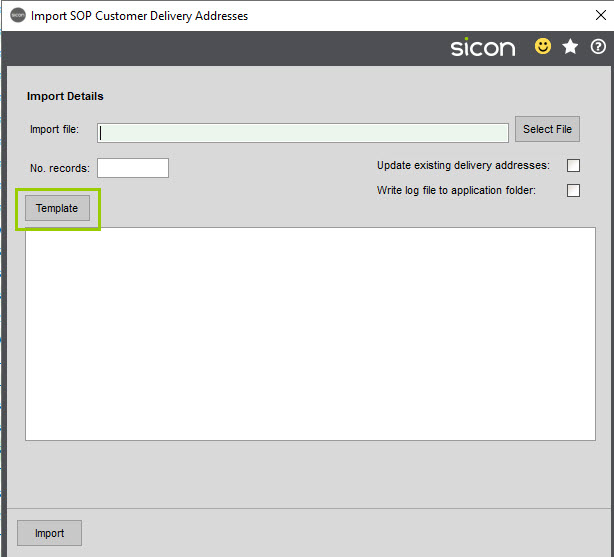
Click the Template button and save the file that is generated as a CSV file. This will then need to be populated with the following details:
- Sage sales ledger customer account reference – COMPULSORY
- Delivery address description – COMPULSORY
- Postal name
- Delivery address line 1
- Delivery address line 2
- Delivery address line 3
- Delivery address line 4
- Post code
- Contact name
- Telephone number
- Fax number
- E-mail address
- Tax number
- Set as the default delivery address (1 = yes, = no)
- Sub Location Name
- Sub Location Comment
Import Stock Item Settings (Service): Useful where you have been using Sage 200 stock for a while and you are now implementing Service. This import is used to flag existing stock items as being those you would like the Service module to create equipment records for when the stock item is added to a sales order.
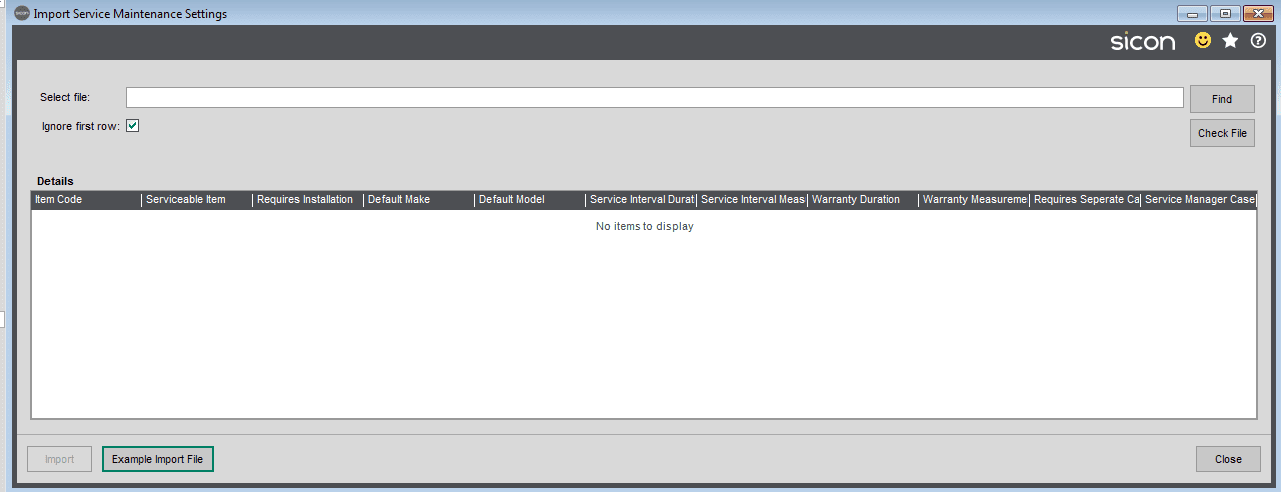
In turn the relevant fields on a stock item will be populated/set.

The import files are generated by clicking the Example Import File button to generate 2 Excel work books.
Book 1 shows an example and is the one to be populated and saved as a CSV file for importing, Book 2 defines the Compulsory fields.
Import SLAs: Use to import the SLAs identifying the SLA type, Warning and hours the SLA Applies to.
The import files are generated by clicking the Example Import File button to generate 2 Excel work books.
Book 1 shows an example and is the one to be populated and saved as a CSV file for importing, Book 2 defines the Compulsory fields.

Import Linked Purchase Orders: Purchase orders that are need to be linked to a service case can be imported – these can be standard stock items, free text lines, additional charges and comment lines.
The import files are generated by clicking the Example Import File button to generate 2 Excel work books.
Book 1 shows an example and is the one to be populated and saved as a CSV file for importing, Book 2 defines the Compulsory fields.


Import Sales Orders: This import brings existing Sales Orders into the system and can also flag the stock items being sold as needing an equipment record creating with warranty dates, service intervals and service cases to be created.
The import files are generated by clicking the Example Import File button to generate 2 Excel work books.
Book 1 shows an example and is the one to be populated and saved as a CSV file for importing, Book 2 defines the Compulsory fields.


6.2. Enable Module
All Sicon modules are licensed annually with a new enable string required to continue working. When you have been issued with your new key, select this option and enter/copy and paste the code into the new enable string field.
Sicon Projects & Contracts (which are part of the Service Suite) are currently separate enabled modules and all three will be required to license the Service Suite.
If online enable strings have been activated these will self-populate.
7. Service Desk
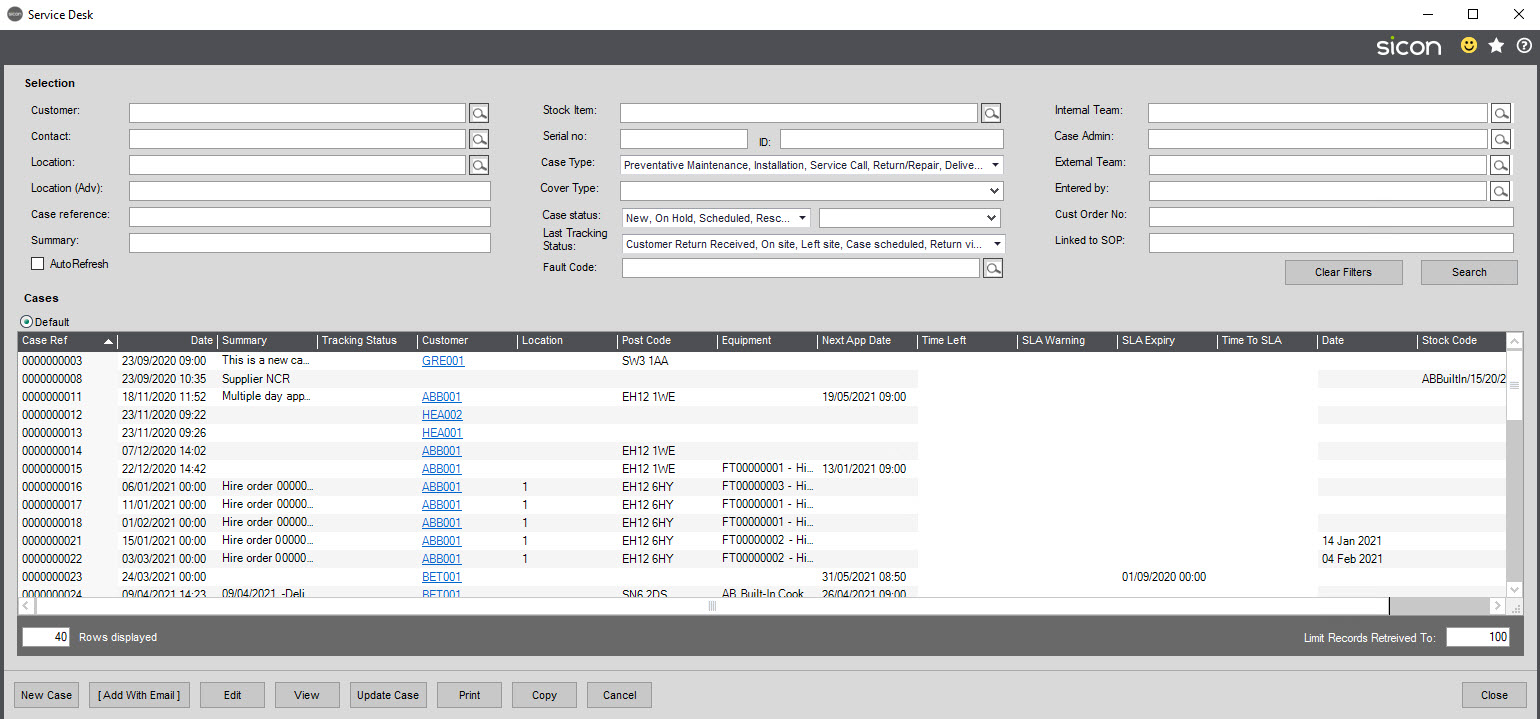
From the Service Desk, you can:
- New Case – create a New Case by clicking the button, this will give further options to create New Case, Via Contract Line or Via Equipment.
- [Add With Email] Drag an e-mail from Outlook and drop on the Add with Email button. This will populate the Customer and Contact details if found within Sage together with the Summary – subject line of the e-mail and Description field with the body text of the e-mail any additional details may then be added to the case.
- Edit – edit an existing case
- View – look at case details without amending
- Update Case
- Schedule – schedule an appointment on the case
- Put on Hold – suspends any SLA timers against a case whilst on hold. When putting a Case ‘On Hold’ or taking it ‘Off Hold’, a Tracking Note explaining why will need to completed.
- Create Follow Up Case – When a case is completed you will be prompted to create a follow up case. Saying Yes to this will present the Create Follow Up Case screen, this is pre-populated with Summary, Description and Case Type you can also link an internal team and a Sage user if required.
- Add Tracking Note – add a tracking note to the case without having to edit the case.
- Print – either Customer Case Details, Engineer Case Details or Appointment Reports (From within the case and Print you can also generate a Billing summary of the case to send to the customer)
- Copy – create a copy of an existing case
- Cancel – cancel a case but a reason has to be stated and the case number will be lost
When Service Desk is first opened (from the Cases folder), depending on settings the user will see either cases assigned to them, cases assigned to the team of which they are part of or all cases.
The number of cases initially loaded will depend of the ‘default max cases in list setting’.

The Service Desk displays initially based on the filter criteria selected at the top of the screen.
If Auto Refresh is ticked the service desk list will refresh every 30 seconds. Filters that are selected will be saved on exit of the service desk and will reload when re-opened. These can be cleared at any time by selecting the Clear Filters button.
Cases can be filtered by customer, contact, location*, case reference, case summary, stock item, equipment record serial number or/and ID, case type, cover type, cases status and/or sub status, last tracking status, Internal team, case admin (Sage 200 user), external team, case created by, customer order number or a SOP linked sales order, or where relevant a combination of some and there is now an additional option to search/filter by Fault Code.
*Location (adv): searches on the actual location fields saved against the case, which is useful if you’ve not used a SOP customer delivery address (e.g. when using branches, head office location or free text).
If Sicon CRM is installed, you do not see the Location and Location (Adv) fields, these are replaced with End User and End User Contact.

The display can also be customised to select the data you want to be visible by right-clicking on the grid to bring up the ‘Edit Grid’ Option (this access is now controlled from Sage System Administrator at Role level so it can be restricted) and selecting which fields/columns to display. We recommend that the default one is carefully edited, and where different views are required add additional ones, familiarising yourself with the available fields first by editing the grid and reviewing which fields are available to display.
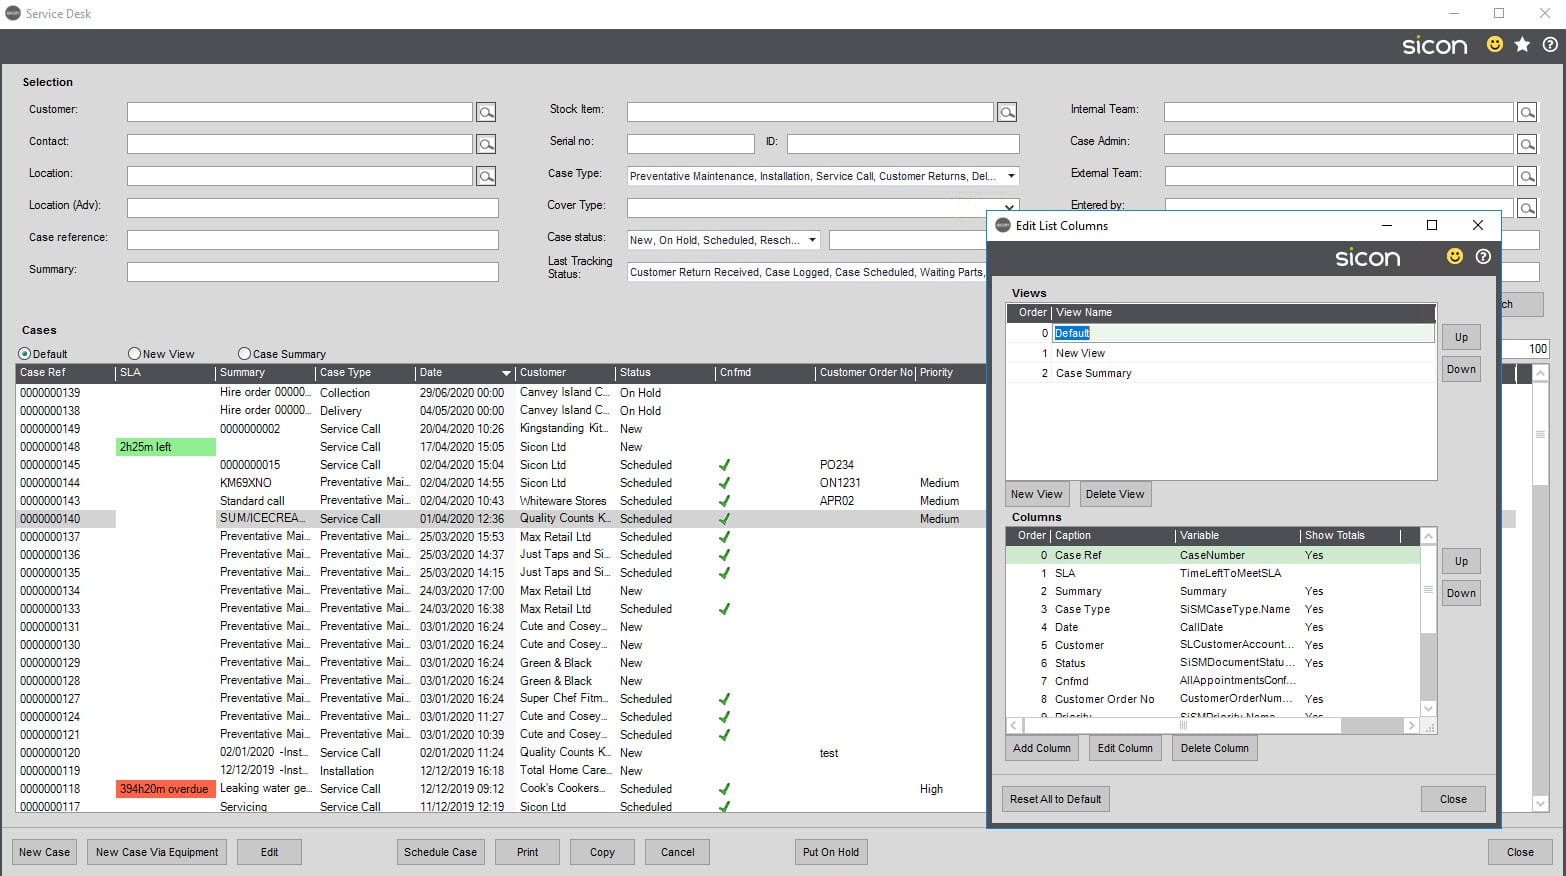
These views are shared with all company users.
8. Cases
From the Service Desk screen, New Case button there are 3 options for case creation.
- New Case
- Via Contract Line
- Via Equipment
New Case
The minimum detail required is Customer. Depending on your service settings, you may need to select Summary from a pre-defined list, if this is not ticked in the settings this is a free text field. The Summary pane updates the Description as you type. Additional details can be added to the description field.
Contact details will be used to send the engineer report and will also show on the appointment when down loaded to the app. Sage contacts are usually accounts people that are configured on the sales account. SM contacts can be manually entered per case.
Contract and Contract line are optional fields.
Project is mandatory – settings can be configured to default to a Non-Contract project so this auto populates as a combination of the customer account code and NONCON.
The location address is populated with the account billing address but may be changed to a different location by clicking the magnifying glass icon to select/create an alternative address and/or sub location. (This is looking at the standard Sage SOP Delivery address).
If the Loqate Postcode finder / address validation 3rd party software is enabled, users can use the ‘Find Address to pick relevant SOP address
Customer Order Number can be made mandatory in settings and if so will not allow the case to be saved until populated.
Status defaults to New and is not editable.
Call Date and Time is auto populated.
SLA can be selected as required, if configured.
Fault Codes if being used are selected by clicking the magnifying glass icon.
Skill if configured is selected by clicking the magnifying glass icon, this will be used for filtering when scheduling appointments.
Internal and External teams can be selected – these are used for filtering on the service desk and also when scheduling appointments.
Sage User details are auto populated on case creation.
Clicking Save or one of the other tabs e.g. Tracking will generate the case number.
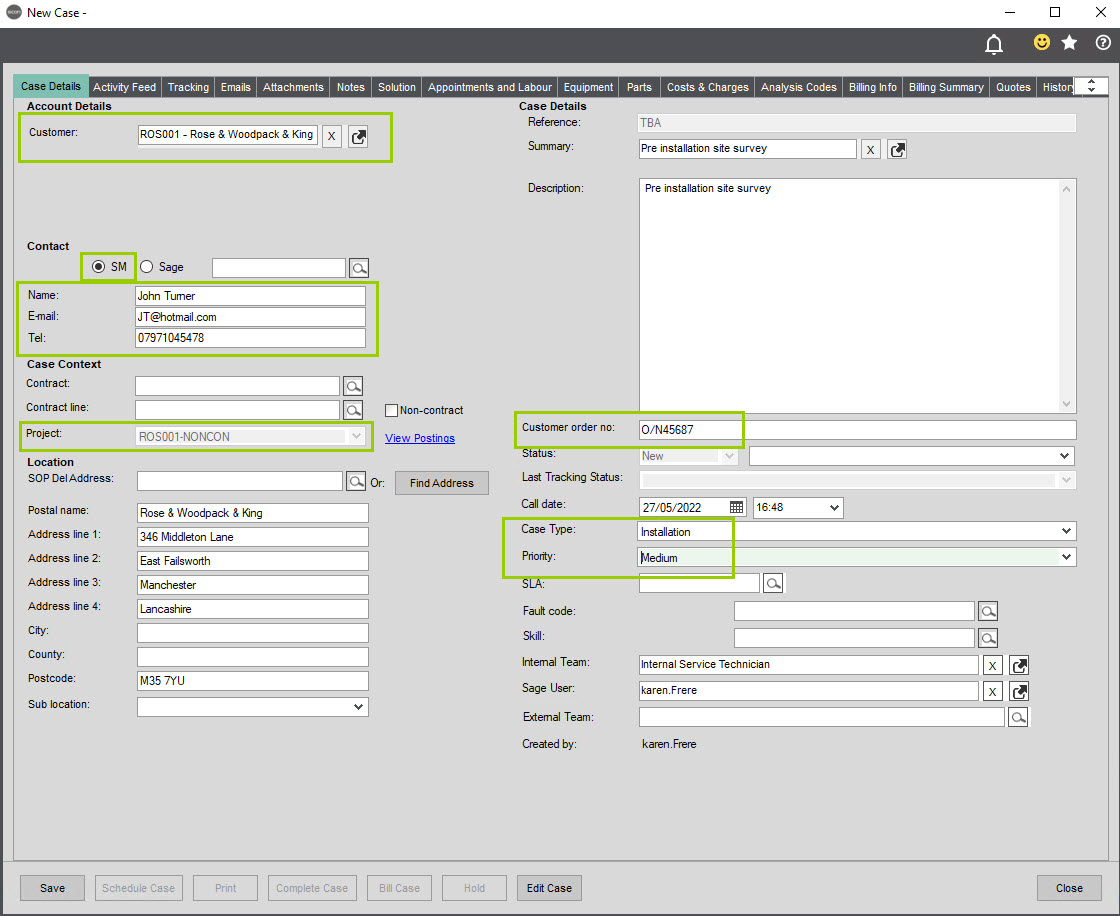
The additional tabs will be covered later.
New Case Via Contract Line
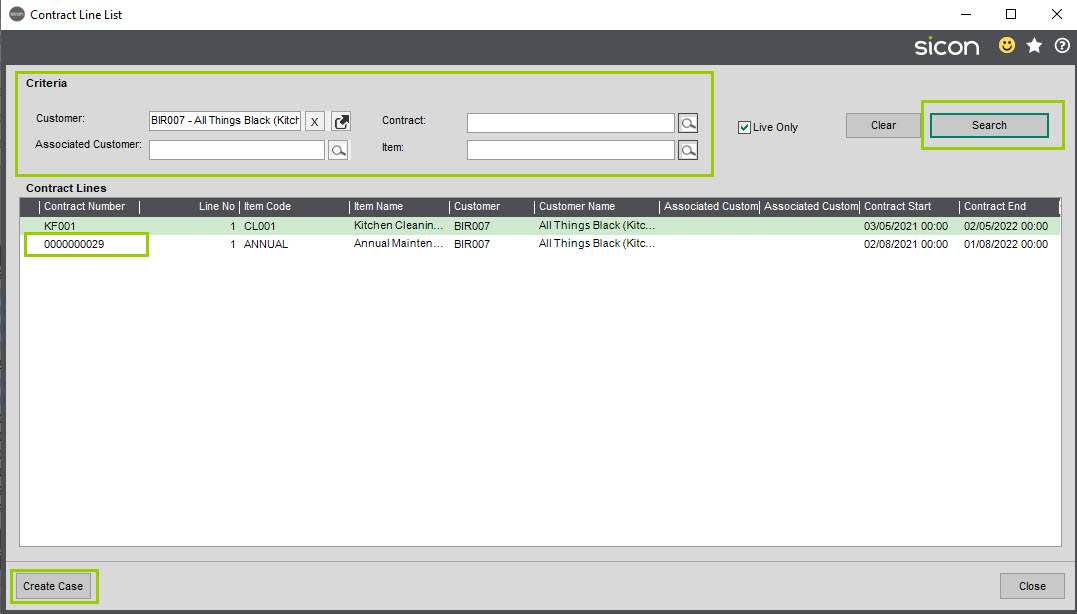
Filter by Customer, Contract, Associated Customer or Item, the default is to show Live contracts only.
Search to retrieve results.
Highlight the required contract and click Create Case.
The customer is auto populated as this is being pulled from the selected contract. The Contract, Contract Line and Project are also prepopulated at this case is being created via the selected contract.
All other fields need to be completed as required – please refer to details for New Case Creation.
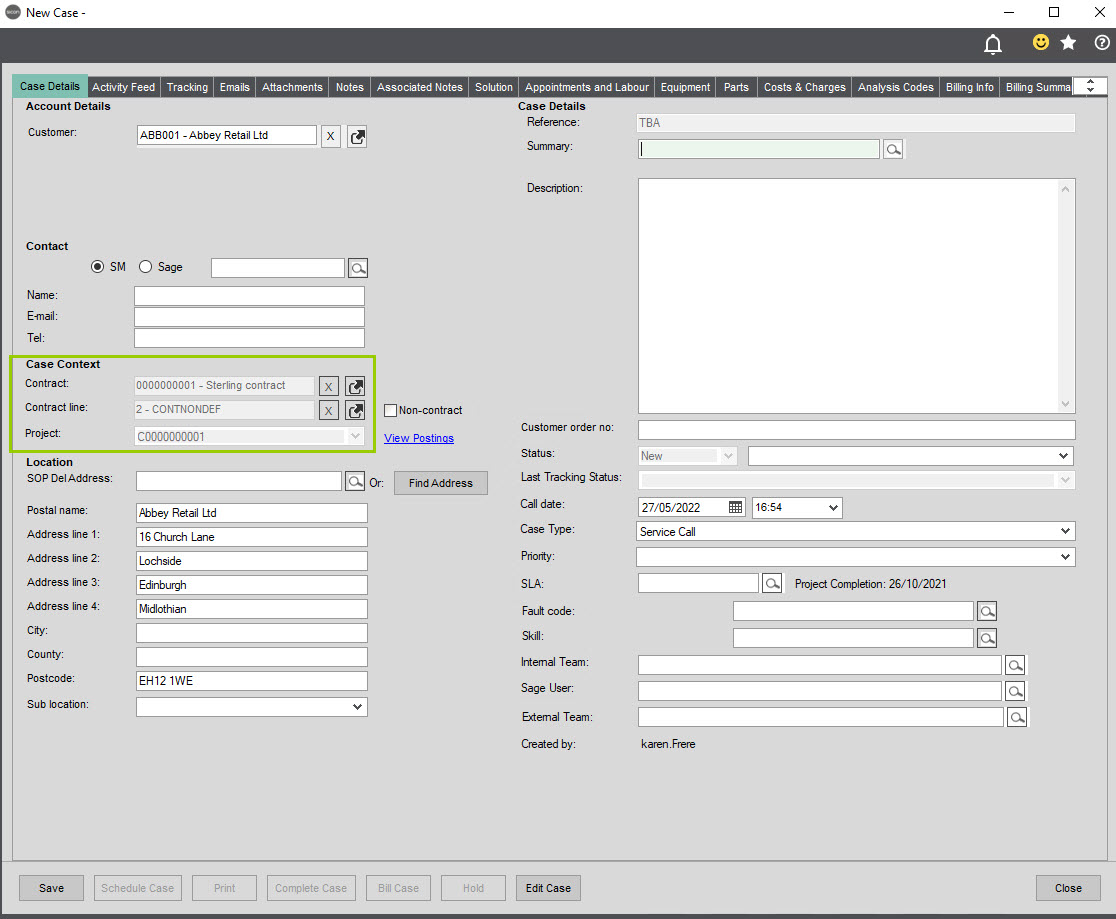
New case Via Equipment
There are numerous ways to retrieve the equipment.
- Customer account code
- Location
- Stock Item (Sage Stock list)
- Serial Number
- Contract/Contract Line
- Make
- Model
- Analysis Code (If configured)
- Group (If configured)
Or click Search to retrieve all equipment records.
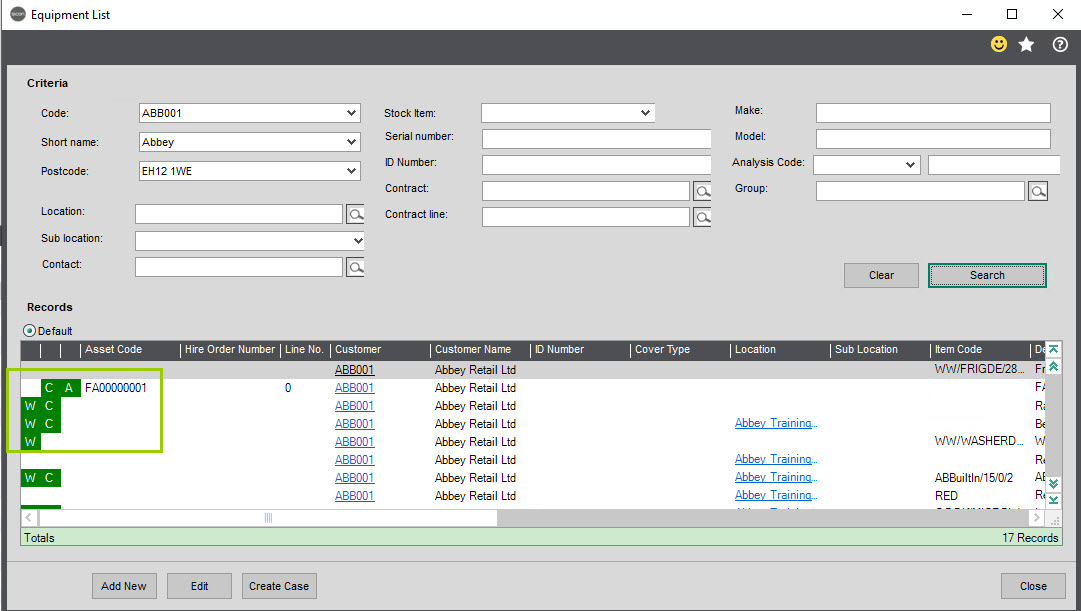
W = Warranty
C = Contract
A = Asset (not shown in the example above)
Letters in Green mean they are in warranty/contract, light red is expired and dark red not a valid contract. Hover over the letter to get a description of the status.
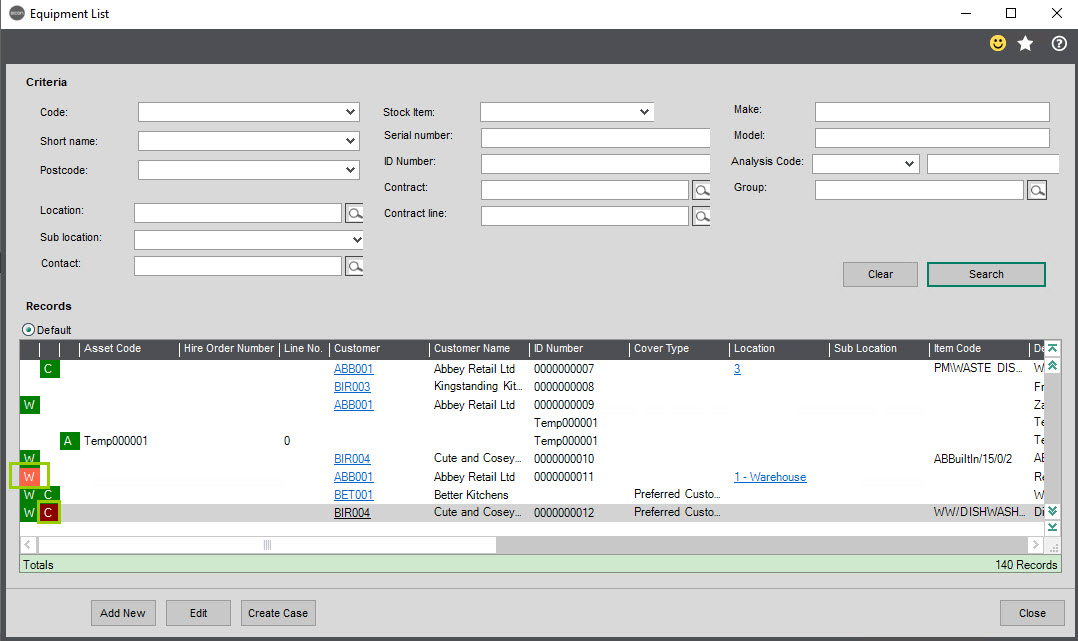
From the list of equipment returned, highlight the required one and click Create Case.
Depending on your settings, if there are active cases already in the system for this piece of equipment you will see a screen showing the details as below:
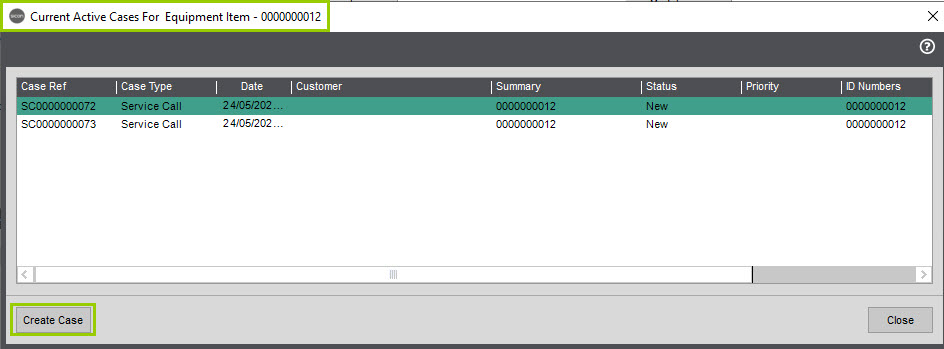
Click Create case to continue.
If the equipment line selected is linked to a cancelled contract you will get the message below advising that it is not a valid contract, and the case will be created as a non-contract type.

This time, as well as the customer account and address being populated, the summary field has the equipment reference number. (This is driven from the Equipment Settings tab – Copy Equipment info into case summary).
Update the information in the summary pane and populate the remaining fields as required.

8.1. Activity Feed
Tab is updated as details are added to the case. This dates and timestamps with the user who has made the change.
8.2. Tracking
Tracking notes are extremely useful to quickly identify the stage of a case – these are visible from the service desk and by clicking the link from the service desk you can see the whole tracking note.
Tracking note text is entered in the description box and the status is selected from the drop-down list. (These are created in Maintain Case Tracking Status 4.5 of the user guide).
When creating a tracking status this can be made available for the engineers and / or customers to see by ticking the relevant box. Making available to customers is to enable these comments to be seen from the self-service portal.
Tracking Status’s can be assigned to teams and individual users. This can be for internal and / or external teams and is a filterable field on the service desk.
The Use Previous button will link the previous tracking status used on the case where appropriate to save selecting from the drop-down list.
Reschedule Case: Cases can now be marked as requiring Reschedule, where an engineer may have already attended site but now awaiting a return appointment to be rescheduled. Case will reappear on the Diary for scheduling and will appear on the Service Desk with a Case Status of Reschedule.
NB: a button will appear to ‘Cancel Rescheduling’ at the bottom of the Case Details screen when applicable.
Copy Text to case solution will take the text from the description box and copy it to the solution tab.
Time Spent: Time can be associated with a Case Tracking Note, causing an Additional Labour line to be added to the Case with a specific Charge Rate. Note: The Sage User adding the time on the tracking note will need to be linked to an Employee (Maintain Employees – Details tab – Sage User).
8.3. SLA
This Tab is only enabled when within SLA set up, on the relevant SLA Stages have been added as example below:
If so on the case the SLA Tab appears.
If an SLA (Service Level Agreement) is applied to the case, it is possible to see the response timescales visually represented on the case SLA tab. This will also show any Advanced SLA triggered by a Tracking Note Status (see Maintenance – Maintain Case Tracking Status).
8.4. Emails
E-mails can be sent directly from the service case; this is flagged on the General Tab in Service settings to enable them. There are also options to send on case creation and case completion (Also in settings). In Case Type settings you can flag to send an automatic appointment confirmation e-mail – a template would need to be created for this.
From the E-mails tab click New then select the relevant template. Our example shows the equipment details and the contact that have been selected on the case details tab.
Important Note: During testing, we advise that unless you really want customers to receive your test cases that this feature is not enabled until ready to do so. Prior to going live, create a case for a test sales ledger account using one of your teams’ own email addresses on the customer and/or the case so they receive the case communication, this will allow you to review the contents before they go out to customers once you are live.
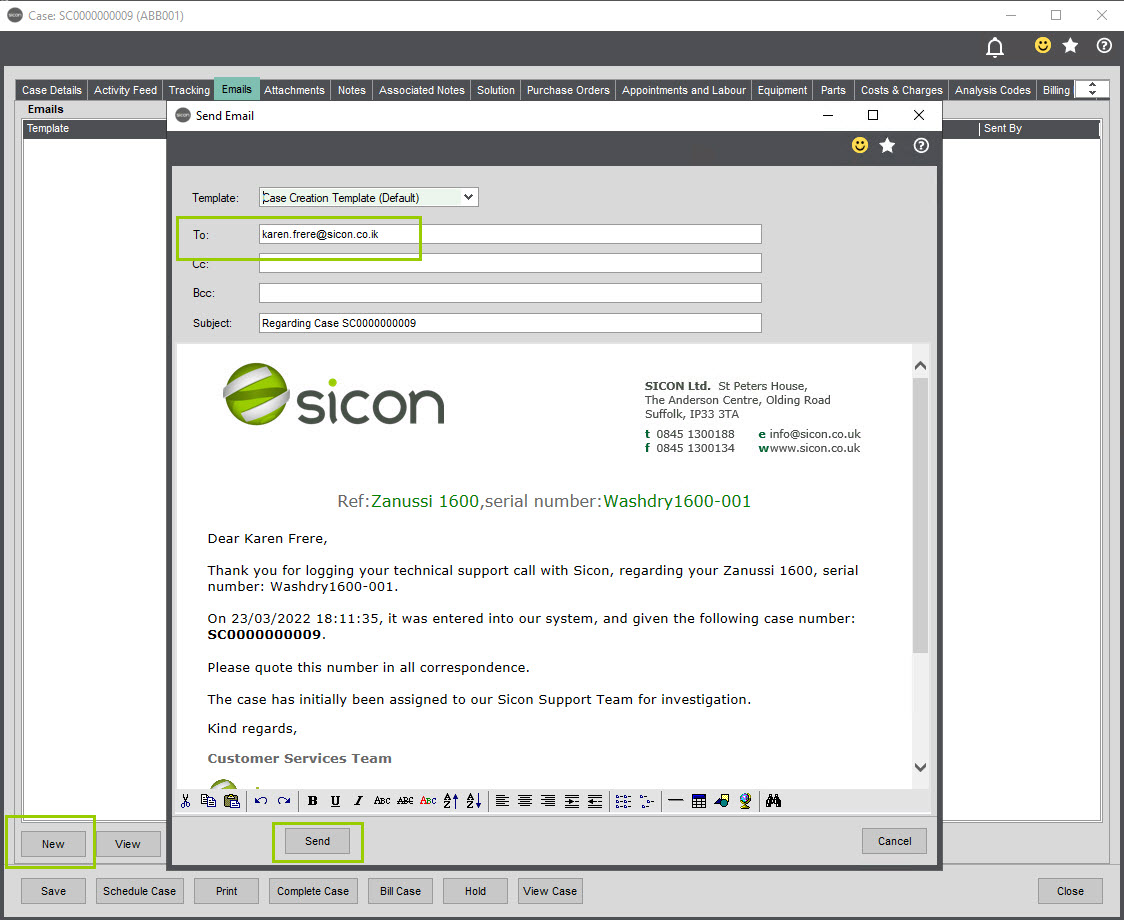
If the e-mail configuration is not complete or you do not have Outlook installed you will get an ‘error’ as shown below.
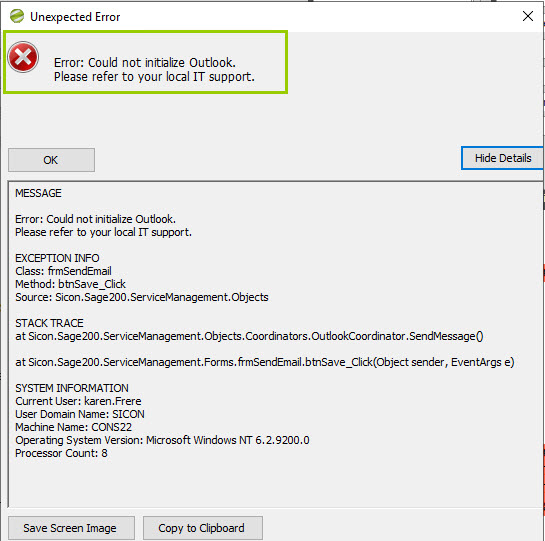
8.5. Attachments
Attachments can be linked to service cases.
You can drag and drop files on to this tab e.g. e-mails from the customer, Add Files, Add Folders and Add Links back to items stored on the server.
The attachments will have different icons to differentiate between files and folders – clicking the Set Description button will allow you to create your own description for the attachment.
Each time an attachment is added to the case the number on the attachments tab will increment to show how many attachments there are.

8.6. Notes
Within Maintenance you can create Service Case Notes tabs if you want to have separate tabs for different departments. The default is General, but you can create as many as required.
On the Notes tab select which type you want to add a note to from the list on the left hand side of the screen and click Add Note. As notes are added, the number in the bracket will increment to show how many there are for each type. The notes are date and time stamped along with the user details for audit purposes.
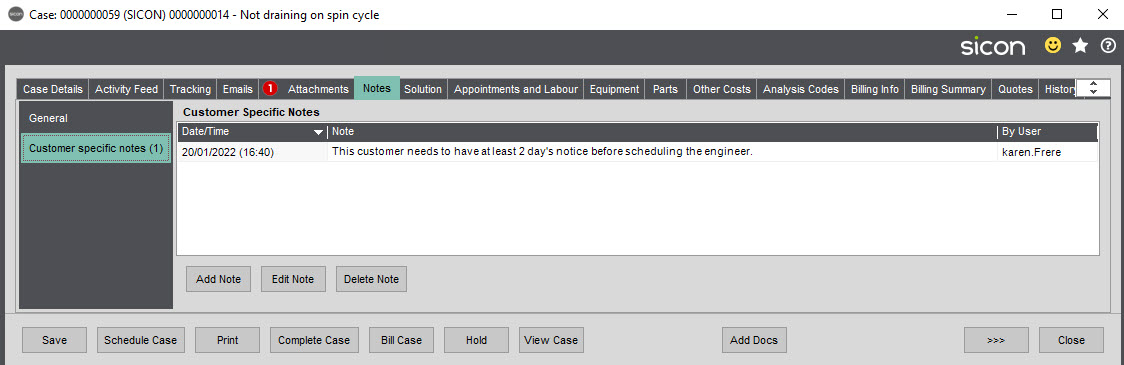
Associated Notes
Associated Notes tab only appears if you have Popup Notes enabled in Settings.

8.7. Solution
Solution details would be updated as the case is completed. If the settings are configured to select summary details from a predefined list, the users will see the Select box at the top of the screen:

8.8. Appointments & Labour
Appointments for the engineer can be created from the case or from the Diary menu > Appointments.
All scheduled appointments and completed labour/hours will be listed on the Case Appointments and Labour Tab. Additional labour incurred on a case outside of a scheduled appointment can be recorded on a case if required by selecting Add on Additional Labour.
Associated engineer costs and suggested charges will be linked as actual on the relevant Sicon Project until billed at which point they move to committed.
Click Add under the Case Visits section of the screen.
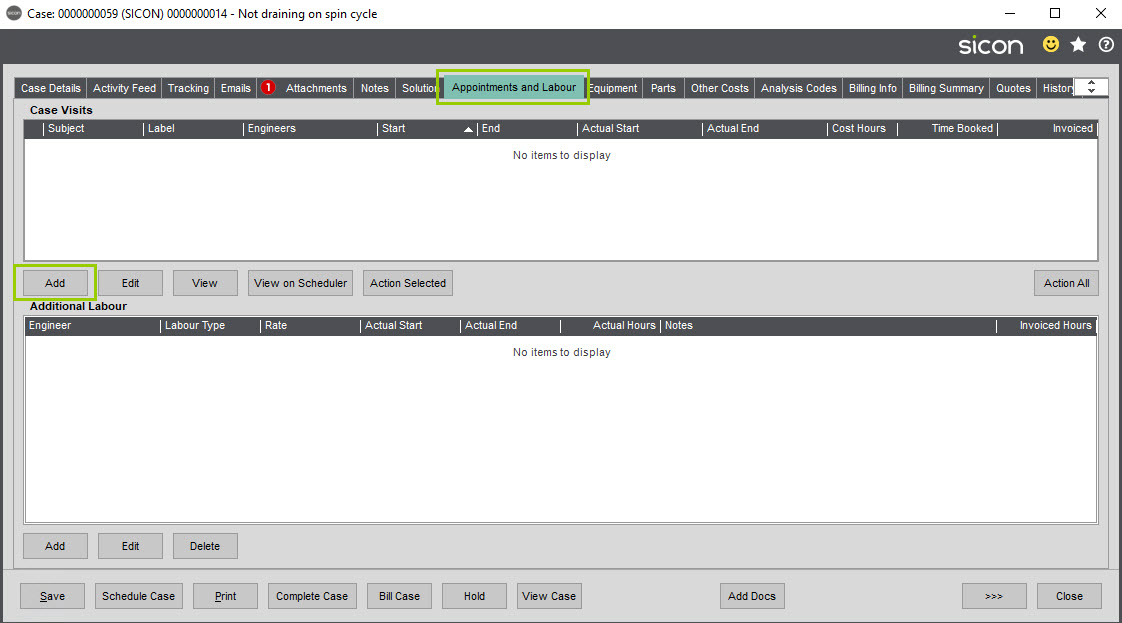
Depending on settings the scheduler will load with existing appointments or not. If the engineers are not ticked, then the settings have been configured to not pre load.
If you have a Skill assigned to the case, when you open the scheduler to add the appointment for an engineer, the list will be filtered by the relevant skill and will only show those engineers. If you have a team linked to the you will be able to use this
for additional filtering.
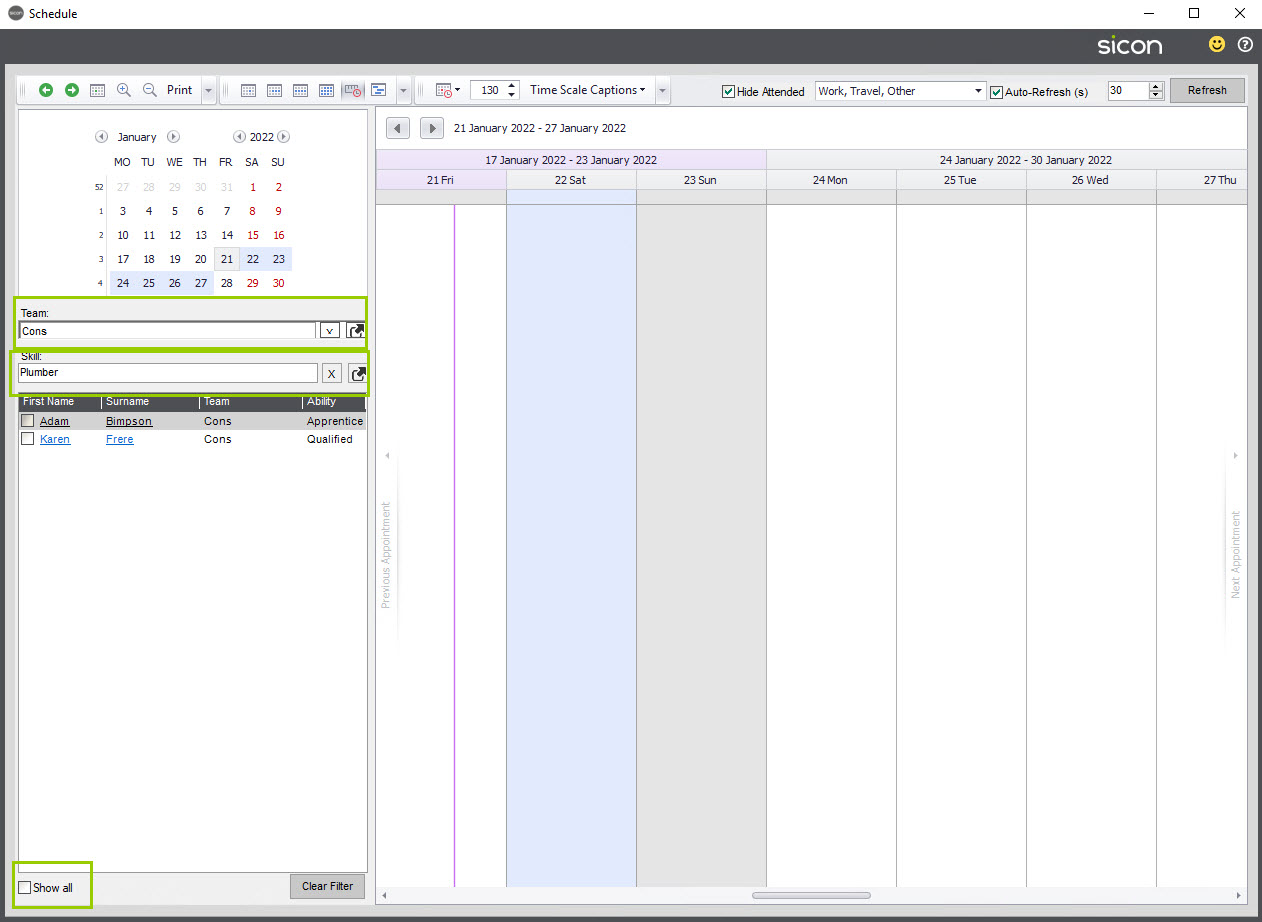
Clicking the X to the right of the Team and Skill field will clear the filters down and show the full list of available resources (engineers and resources). If you select Show All at the bottom of the screen this will display the resource diary line in the view too.
If you have turned on Show Resources on the Scheduler ticked in the Settings on the Appointments tab you will see any resources as well as engineers to schedule on the appointment.
NB: If you are using Postcode areas to specify that engineers only work in certain post code areas, depending on the case postcode you will see only a limited number of employees. For more details regarding restricting employees to postcode areas see the Service Tab on the employee record and / or section Maintain Employees.
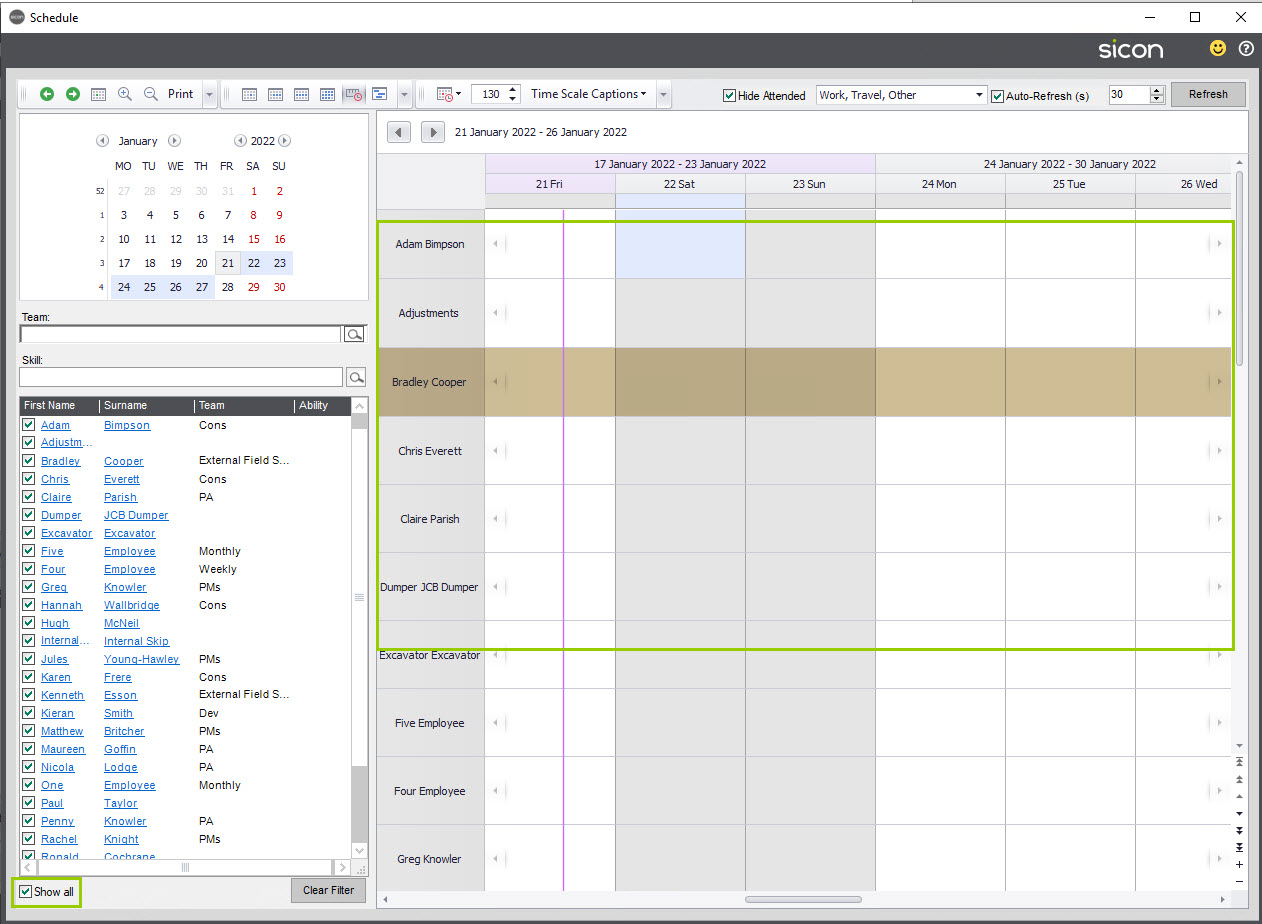
Double click on the date to create the appointment for – if you have not ticked an engineer from the list in the schedule screen, you will need to set this from the resource drop-down in the Appointment window.
The date is populated automatically from the schedule screen, Start and End times can be updated but will use the default appointment length as set on the Scheduler tab in Service settings.
If the appointment has been confirmed with the customer tick this box which will make the appointment available to the engineer when they sync their device again. If you are showing unconfirmed appointments for the engineer (Mobile Options tab in Service settings) the appointment will be available to the engineer as soon as it is completed from the scheduler and sync’d.
Any text entered in the Appointment Brief field will show on the app for the engineer when the open the appointment, this is in addition to the case summary.
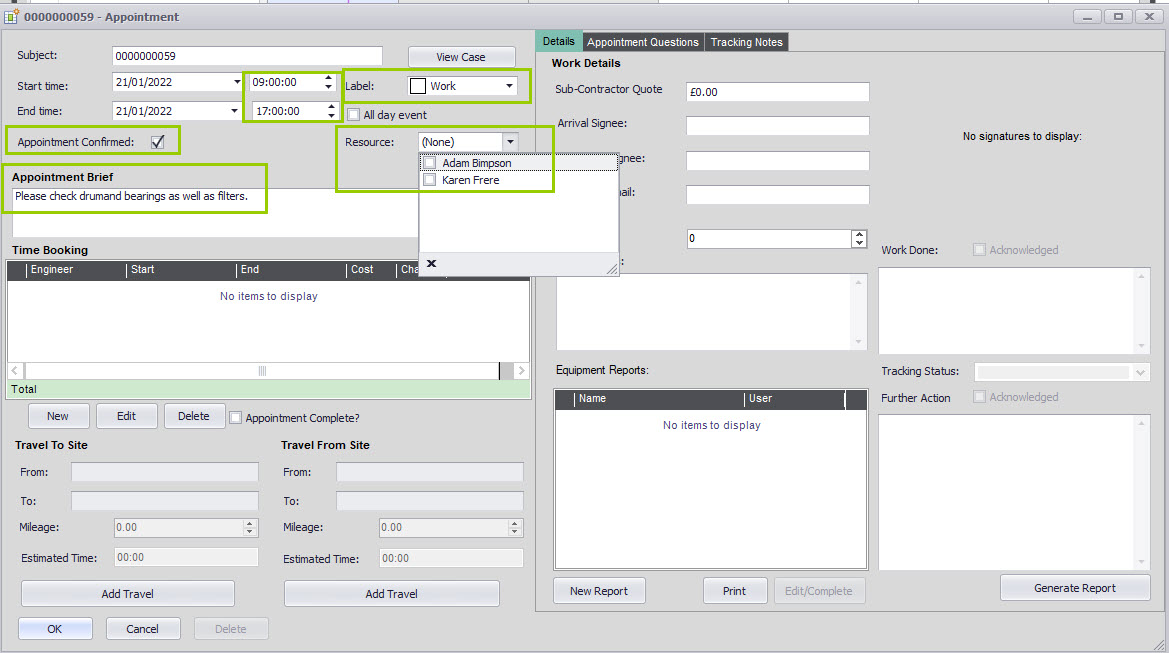
If you schedule appointments in the diary, and allow appointment conflicts is enabled (Scheduler Tab within settings), you will be able to schedule more than one appointment for the same date/time for your engineers. As appointments are confirmed you can edit the appointment to flag as confirmed, other conflicting appointments will then need to be moved to an alternative date/time.
Where you have automatically create placeholder Travel appointments for Work Appointments ticked on the Appointments tab in Service settings you will see the travel to and travel from appointments on the Appointments and Labour tab of the case when you complete scheduling the appointment.
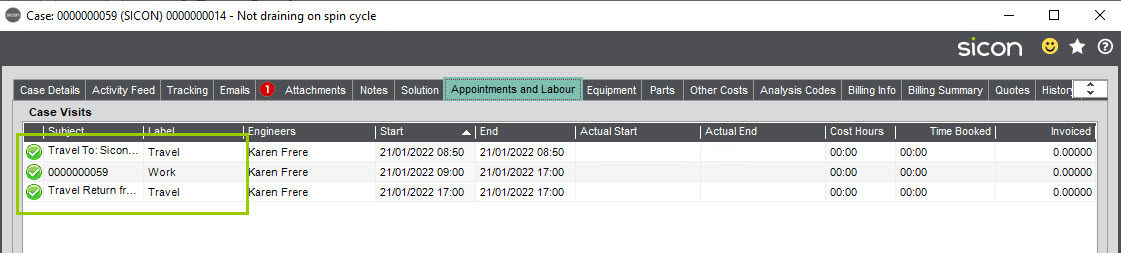
Where you need to schedule engineers to be on site for several days, you can add in the same way as a single day appointment but instead of the End Time being the same day you would change this the day the appointment id due to finish.
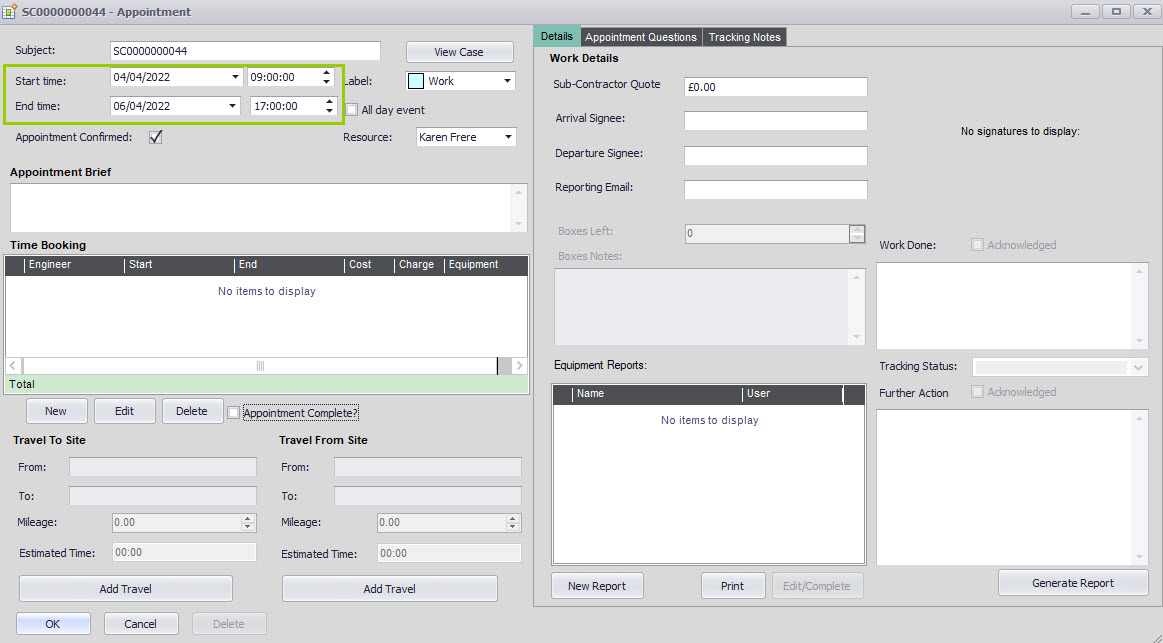
For example, this is an appointment for a 3-day installation for one engineer. The travel to time is on the first day of the appointment and the travel from is on the last day of the appointment as it is assumed that the engineer will stay over during the course of this work.
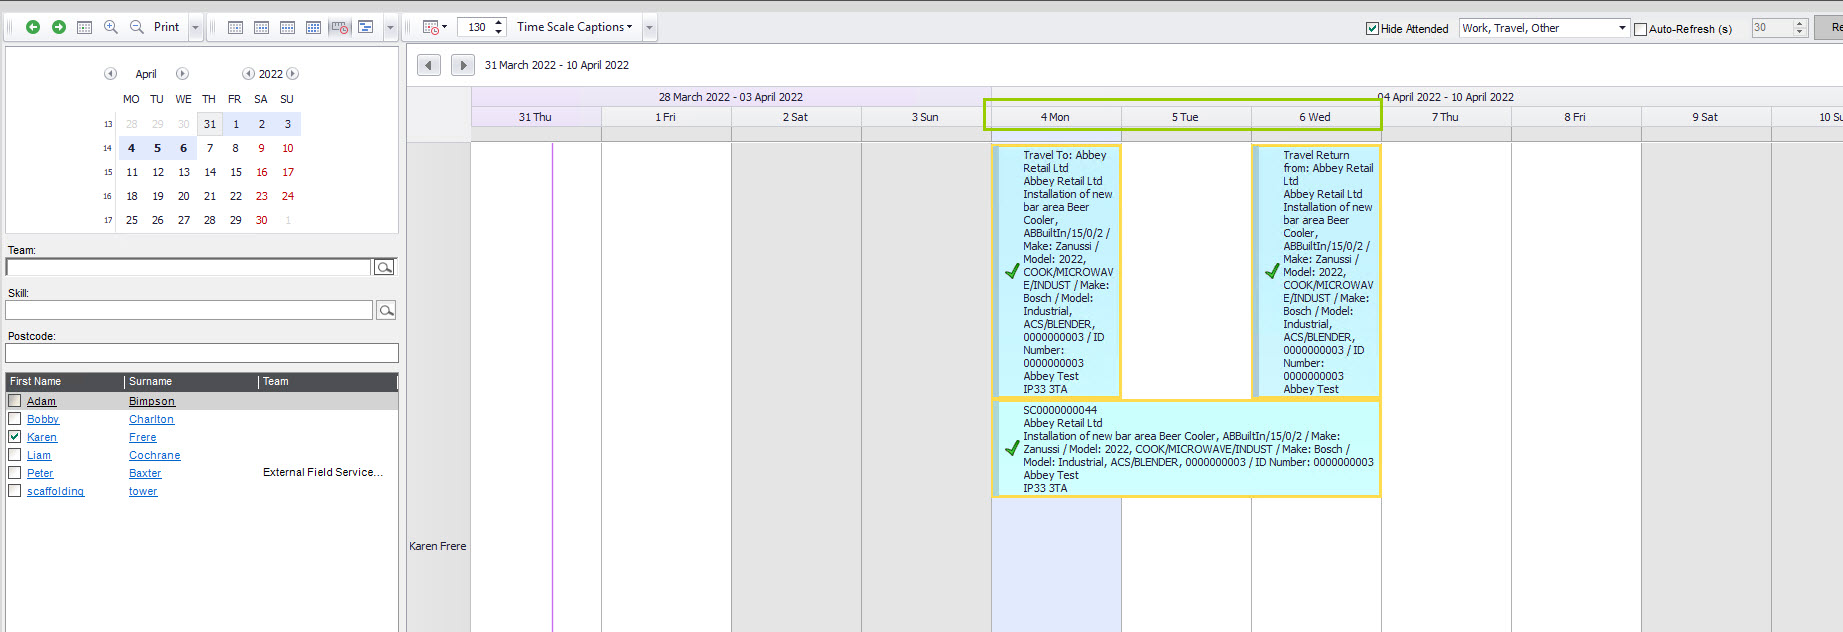
The details on the appointments and labour tab show the start and end dates and times on one line as opposed to having a separate line for each day.

When the engineer logs on to the app and sync’s to see their updated appointments this is how it will appear for them:

The Travel To appointment (van pointing to the right) may be edited to record the actual time spent traveling to site.
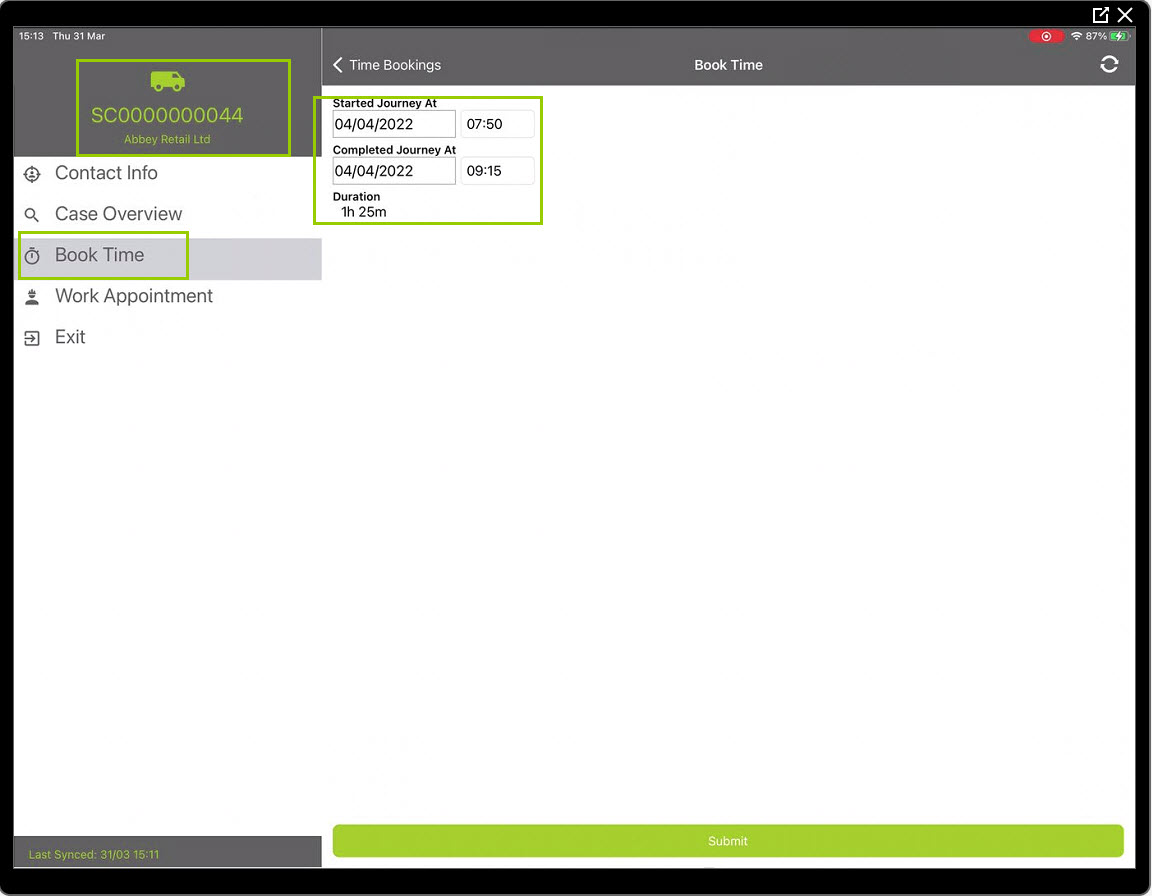
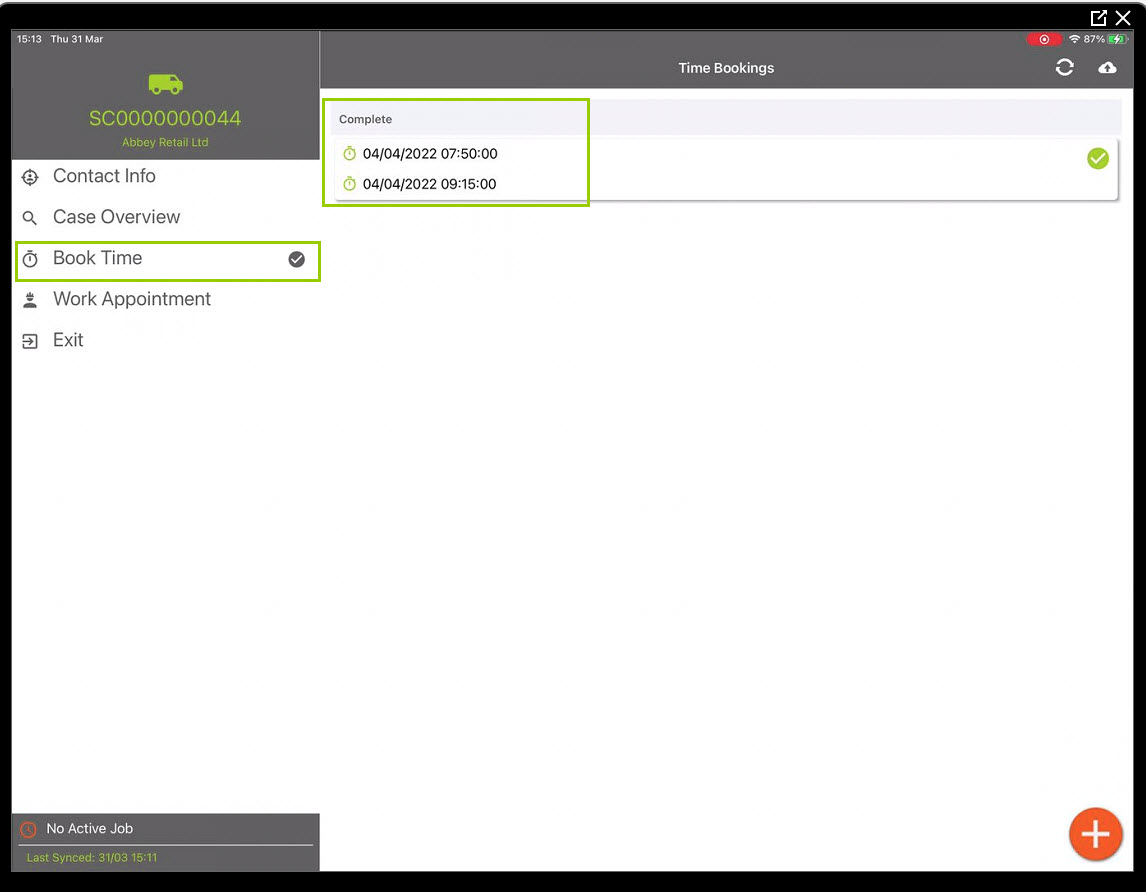
Contact Info shows the details from the case e.g. Contact, Customer, phone number, e-mail address and customer address. The contact, e-mail and phone number will only show if these are entered on the service case when it is created.
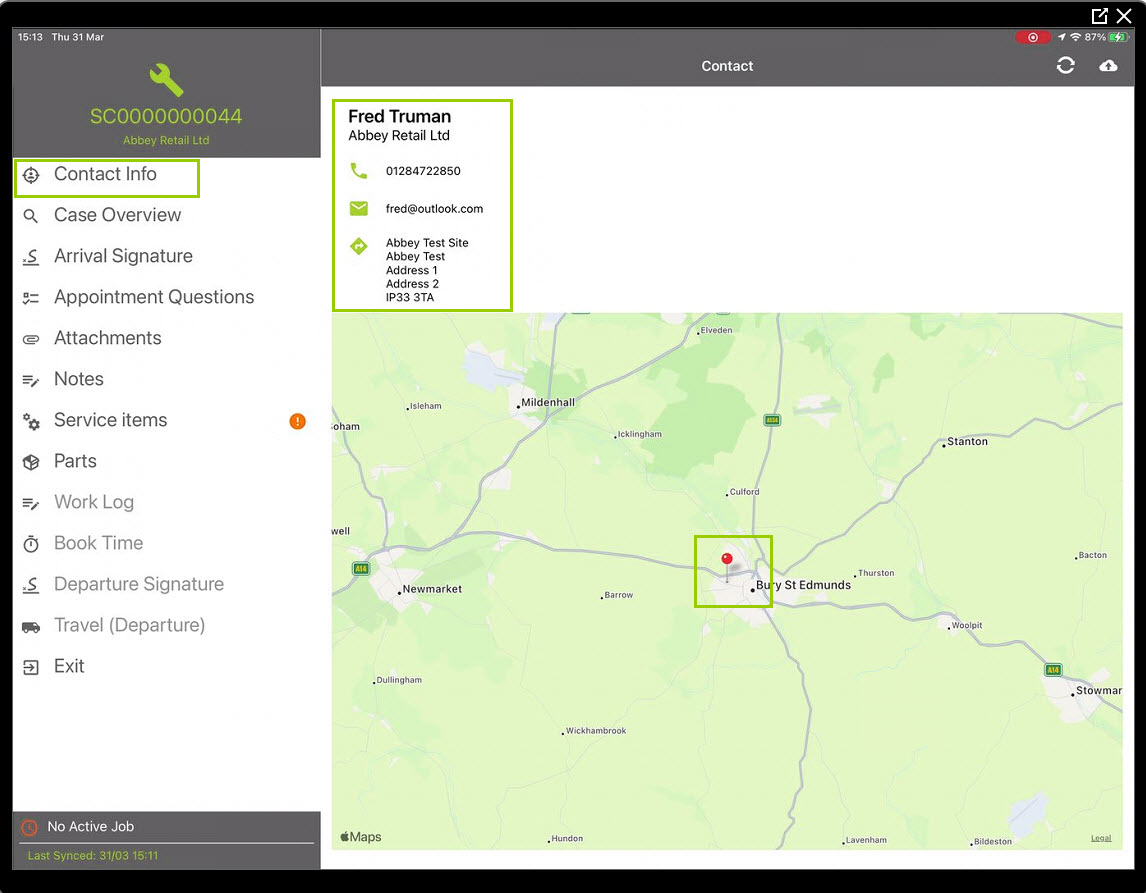
Case Overview shows details of what the case is scheduled for.
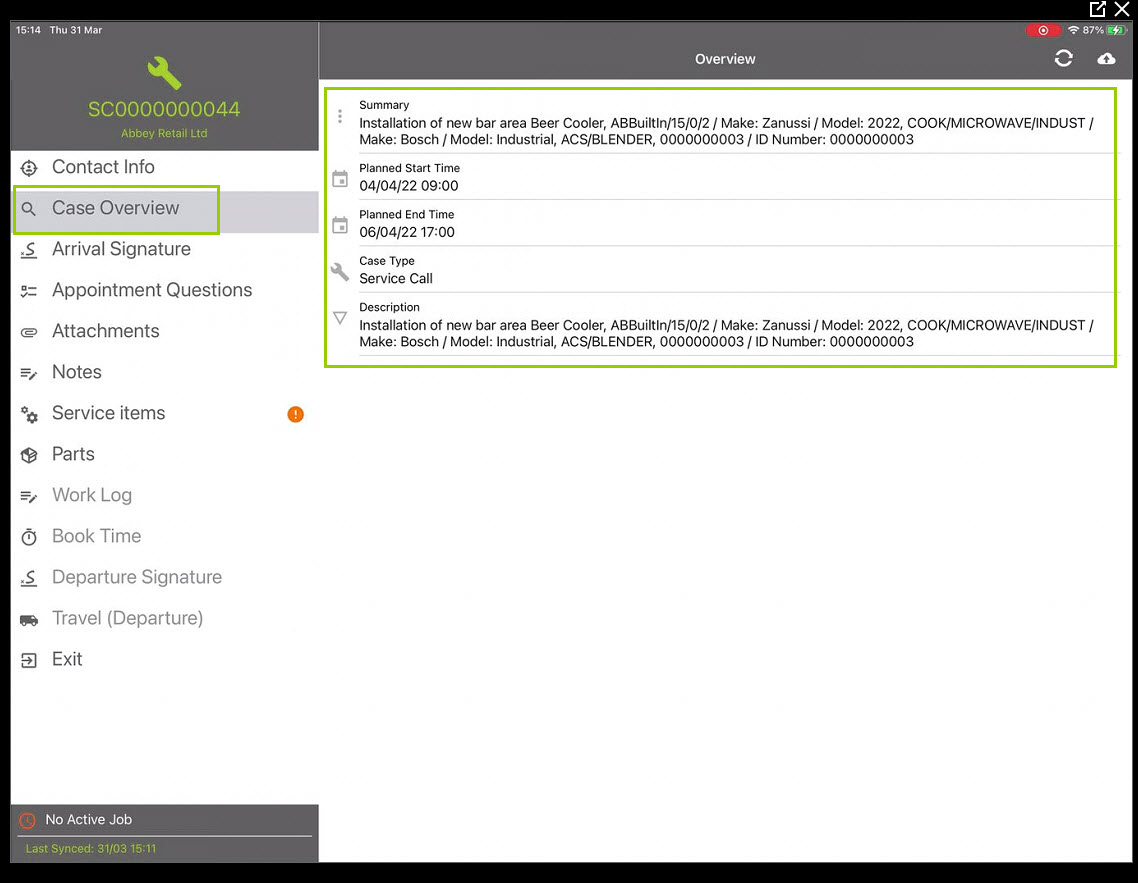
Arrival signature (if being used) allows the engineer to be signed on site.
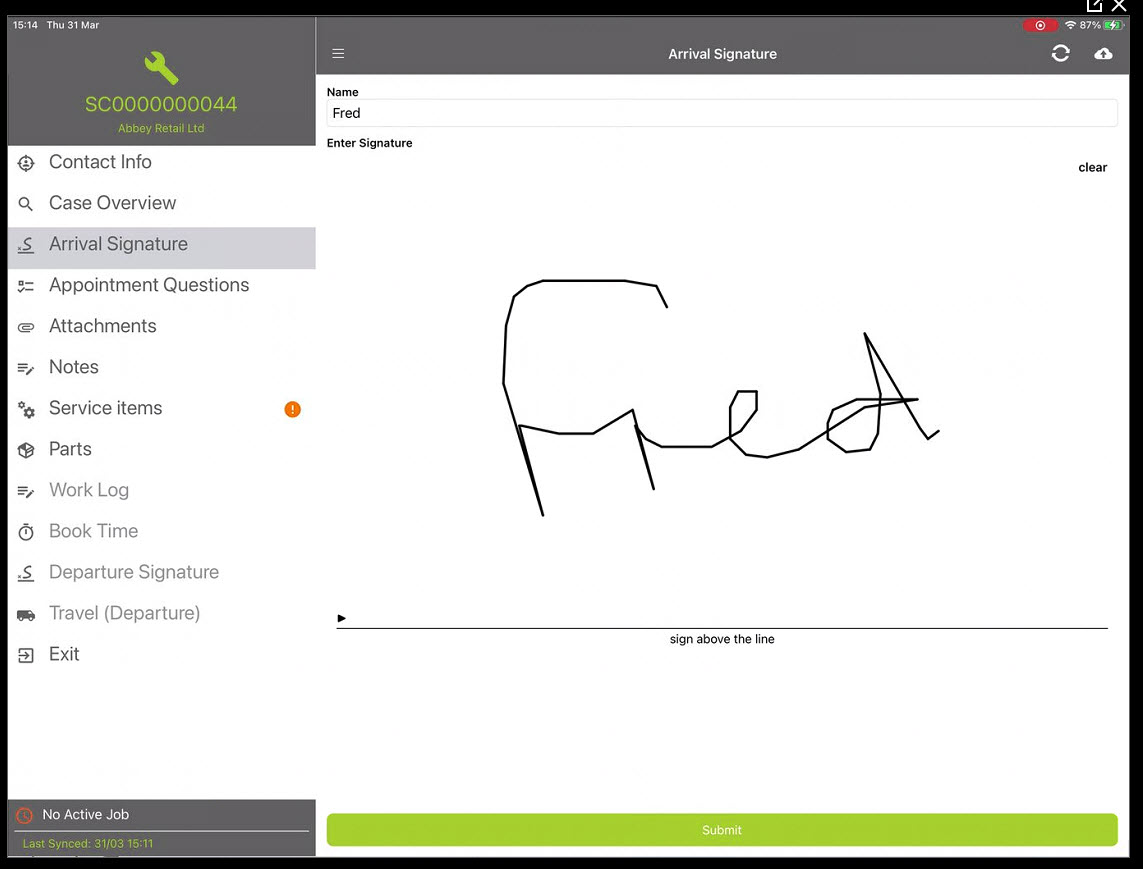
If there are any appointment questions on the case the engineer would complete as required.
Attachments can be linked to an appointment for the engineer to view – this may be something like a wiring diagram that they may need to refer to.
Notes can be added as required.
The Service Items are the equipment records that have been linked to the service case for the engineer to work on. They may have equipment questions that need answering, these can be configured for stock records, product groups, specific customers, case types or may be available for all equipment records.
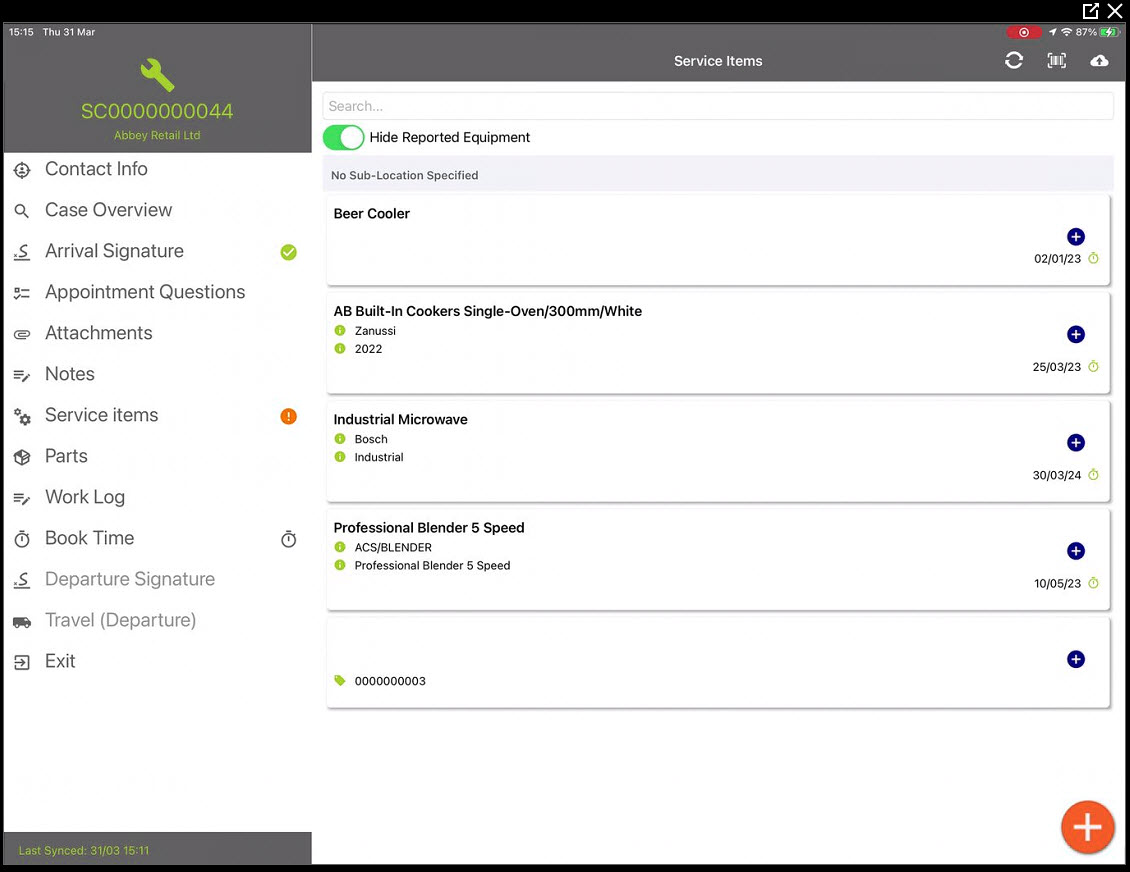
At the end of the first day, the engineer will book the time they have been on site.
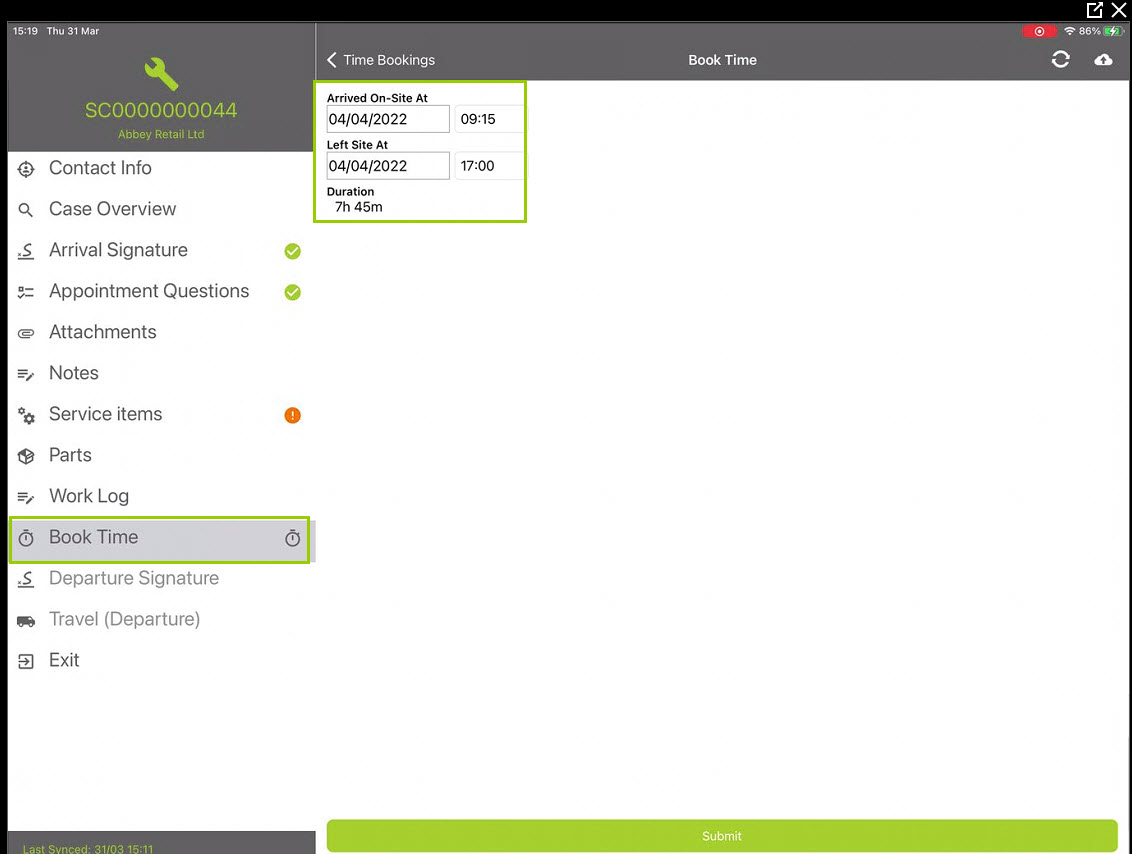
The next day they will need to book time again to record their arrival and departure times, clicking the + icon at the bottom of the Book Time screen.

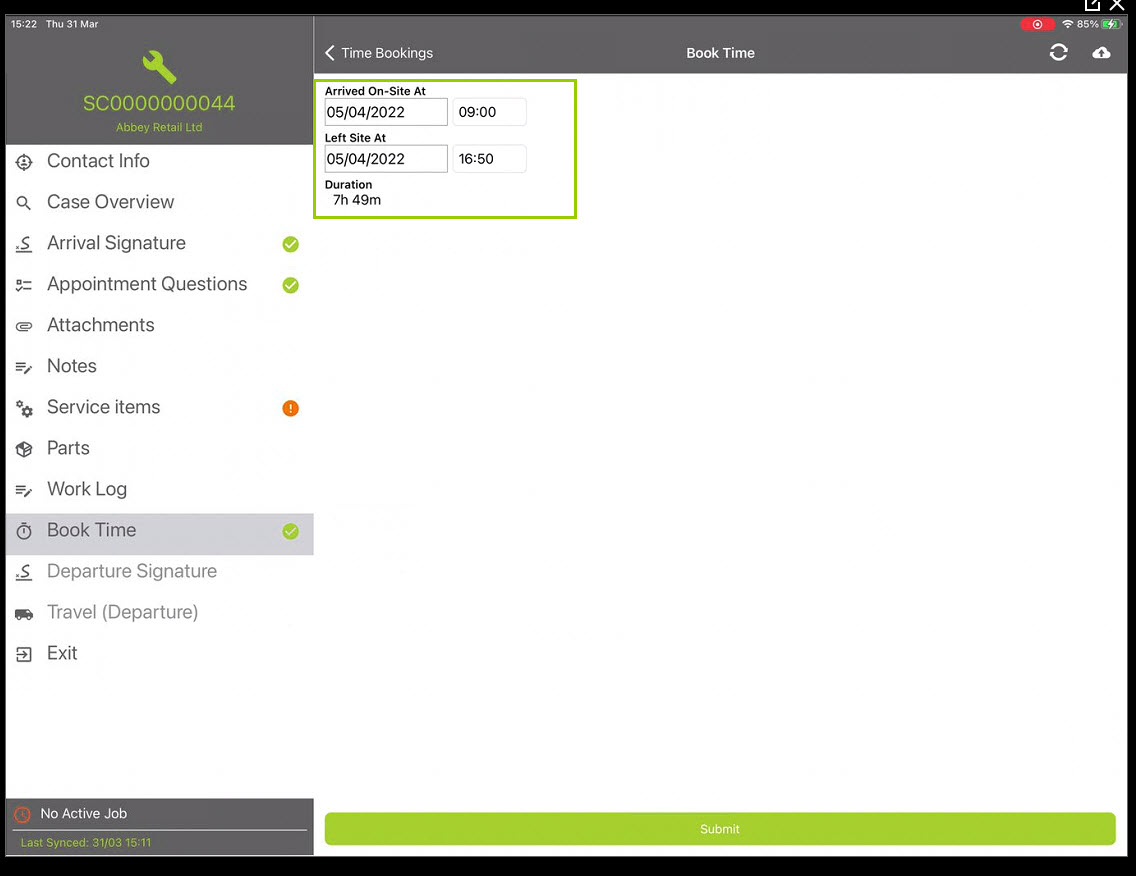
This will need to be done for each day (or part day) on site.
When the scheduled appointment has been completed, the engineer should be signed out by the customer. If there is an e-mail address on the case details tab on the service desk, this will show on the signature page and will be used to forward the engineer report to.

Travel from will need to be amended to record the actual travel time.

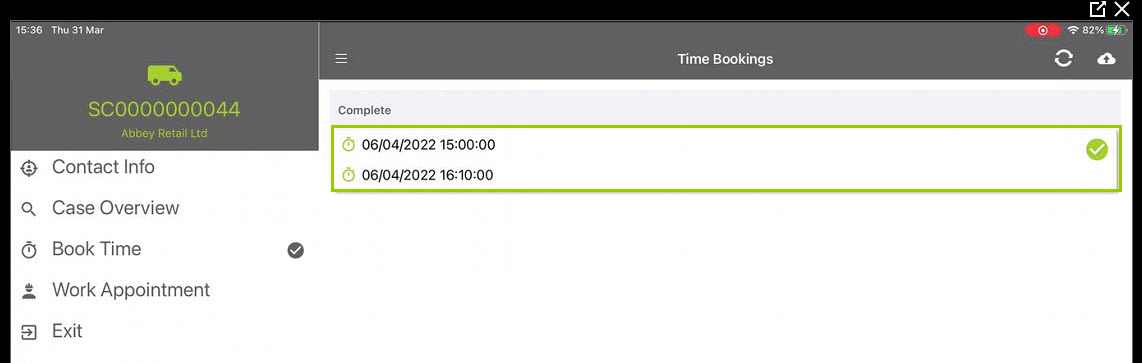
The details are ready to be sync’d back to the office.
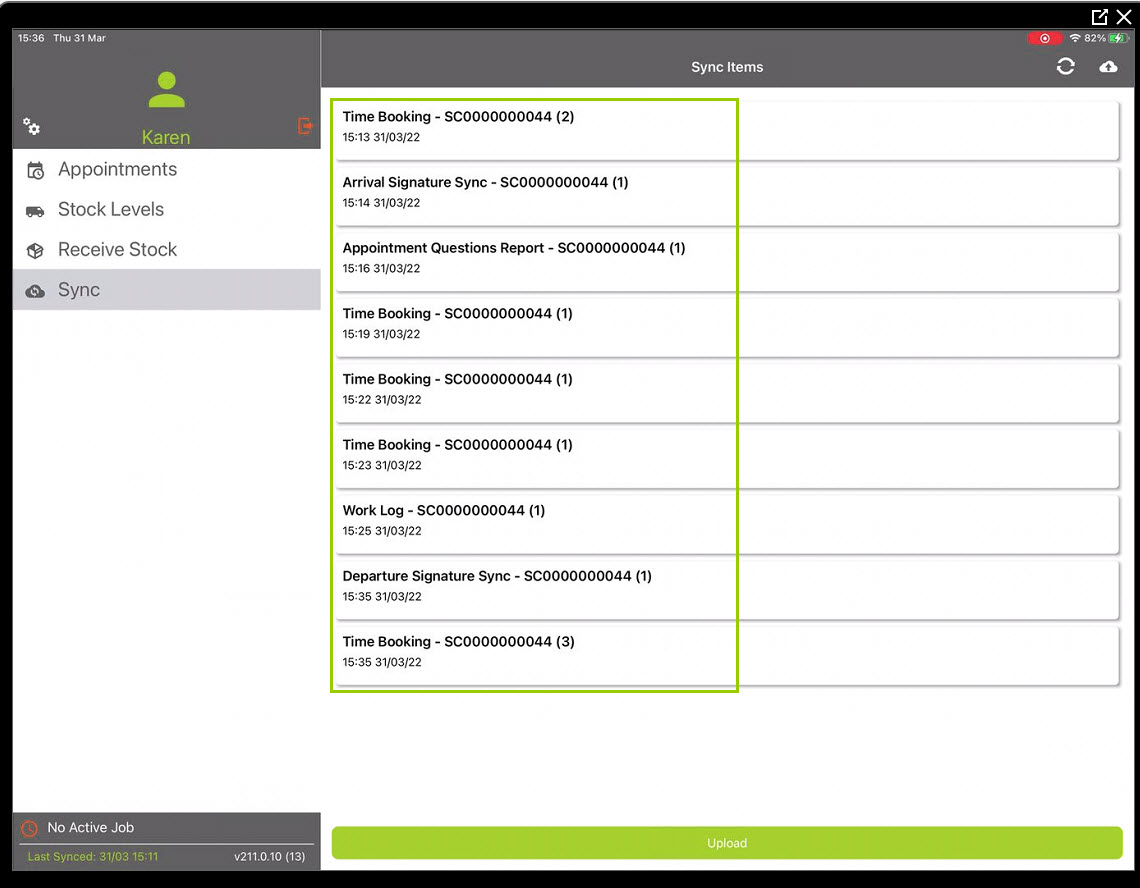
The times together with the cost and charge details are shown on the appointments and labour tab within the case. The Work appointment spans the number of days and shows the total number of hours the engineer has recorded over the days.
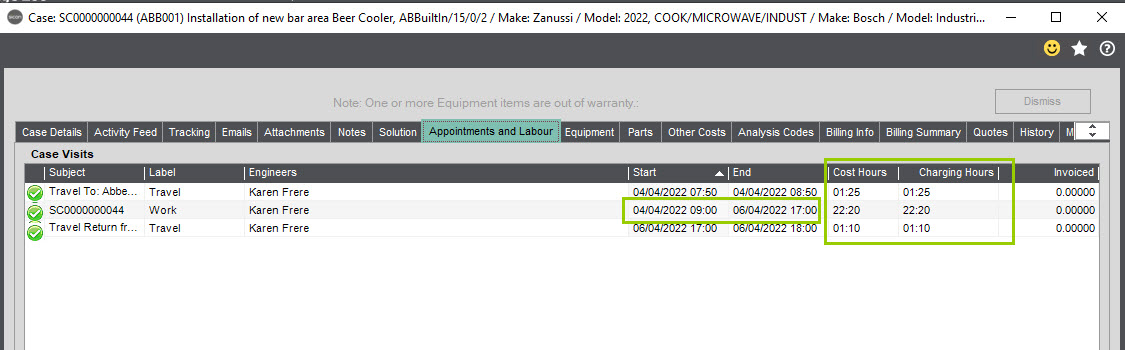
On the Billing Summary tab, the work hours are listed by day with the corresponding values ready for billing.
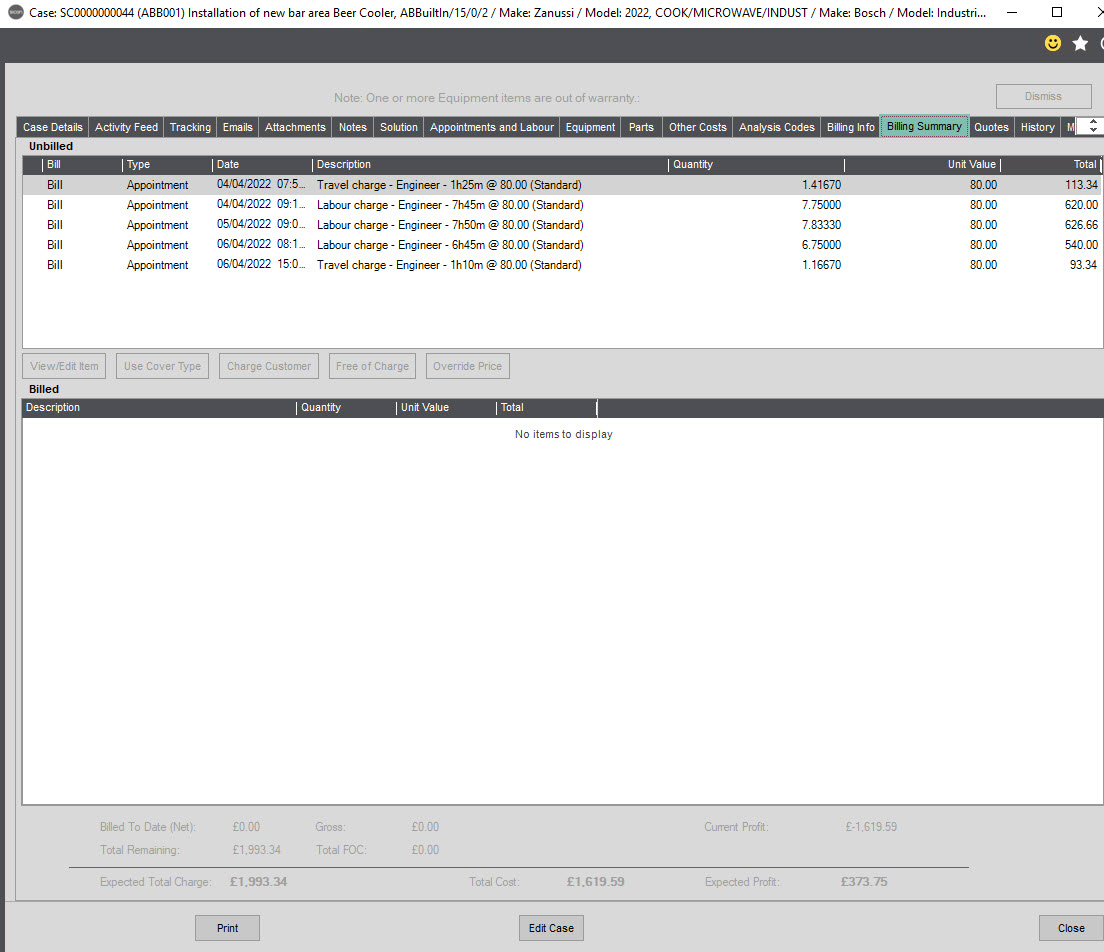
Should you need to change the rate at which the engineer is being charged out at – e.g. from Standard Rate to Overtime, this can be done by editing the appointment, highlighting the required line and clicking the Edit button.
From the drop-down list select the rate you want to change to and Save.

When you OK out of the appointment screen above and go to the Billing Summary tab you will see that the charge rate has updated to reflect the changes.
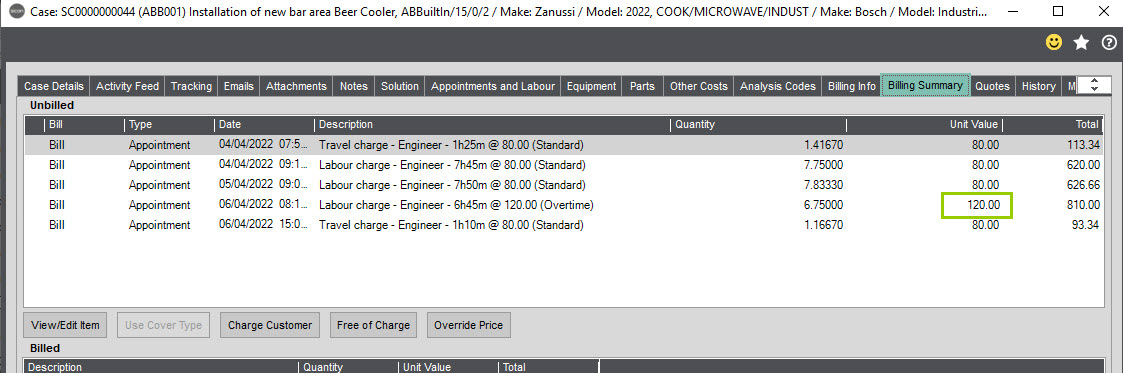
8.9. Equipment
Additional equipment items could be added to this case for the engineer by clicking the Add button. This will filter the equipment for the case customer and allows you to select multiple lines if required, when selecting the piece of equipment which you are adding to the case, if there is an SLA associated specifically to that piece of equipment you will be asked if you wish to override the current case assigned SLA.

The W in the green box is showing that this piece of equipment is in warranty so if any parts are to be replaced they may be covered under the warranty agreement and would therefore not be charged back to the customer on the Billing Summary tab. The red clipboard icon shows that the report has not been completed by the engineer, when this has been done and sync’d from the app, the icon will change to green.
Within this screen user can also:
- View/Amend Reports: Any reports that have been completed can be viewed or amended from here.
- View Visit History: Full case history details will be shown for the selected equipment, this is useful if you would like to review previous cases for the equipment in question, what parts have been added.
- View Stock Item: If the equipment record is an item that is also a stock item, you can select to View the stock Item displays the item details if the selected equipment is a Sage stock item.
- View All Equipment: Shows all equipment for this customer.
8.10. Parts
This area of the case is where you specify parts. Buttons/Functions are:

Steps in brief are:
– Add the part (s), specify where they are coming from, i.e. company’s warehouse or do they exist already on the engineer’s van
– Allocate, Pick, Despatch
– Confirmed engineer has received them (If shipping to them) Receive, and thereafter confirm if the part was – Used on Case
– Was not used, but it’s been agreed to keep in engineers’ van/location/warehouse or
– Notify the office that the parts are to go back to originating warehouse
8.11. Add Parts to Case from Engineer Warehouse
If you know the parts required are in an engineer’s warehouse (van stock) then use option ‘Add to Case – From Engineers Warehouse’.

Stock can be added from an Engineer Warehouse or if required, untick User Engineer Warehouse and all available warehouses will show in the dropdown. Stock levels are shown for each item.
NB: If service Kits have been implemented, then you will see a 4th option that being Equipment Service Kits. For more details, see section ‘Using Equipment Kits on a Case’.
If you tick User Engineer warehouse, the warehouse list name is shown by engineer.

Un-ticking the warehouse will show as the warehouse name within Sage 200 stock locations.
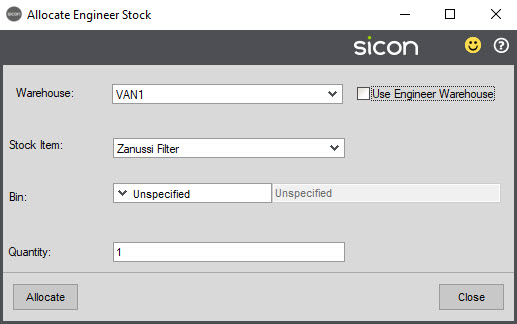
Having chosen the stock item and the quantity required click the Allocate button. The Bin location will auto populate, and you should only change it if you are using Sage Bin locations for your stock.

Status will then be shown as Ready, but un-used (meaning the part is there to be used, but engineer or service admin user has yet to confirm it has been used).
If the part has been added from the engineer’s warehouse in error, and has not been received, or used, it can be ‘Un-allocated and removed’.
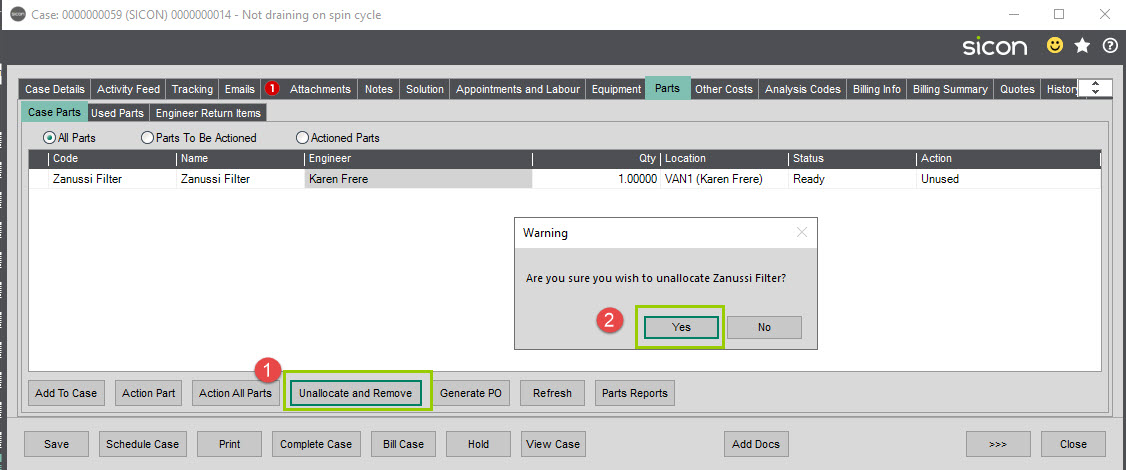
8.12. Stock Not Available – Need to raise PO
Stock item shortages on cases can be listed using the report ‘Case stock item shortage’ report which is in the Equipment & Parts report folder. Shortages can also be handled by the Sicon Material Planning module (if installed) and drive demand for suggested purchase orders to satisfy the shortage.
A PO can also be raised directly from the Service module where there is insufficient stock available.
Click the Add to Case button and select the Stock Shortage Transfer option.
Update the Despatch date and any other detail as required, add the stock item and quantity and Save.

When the part has been selected and no stock is available, click the Generate PO button, then click the tick box next to the stock item and click Generate PO again.
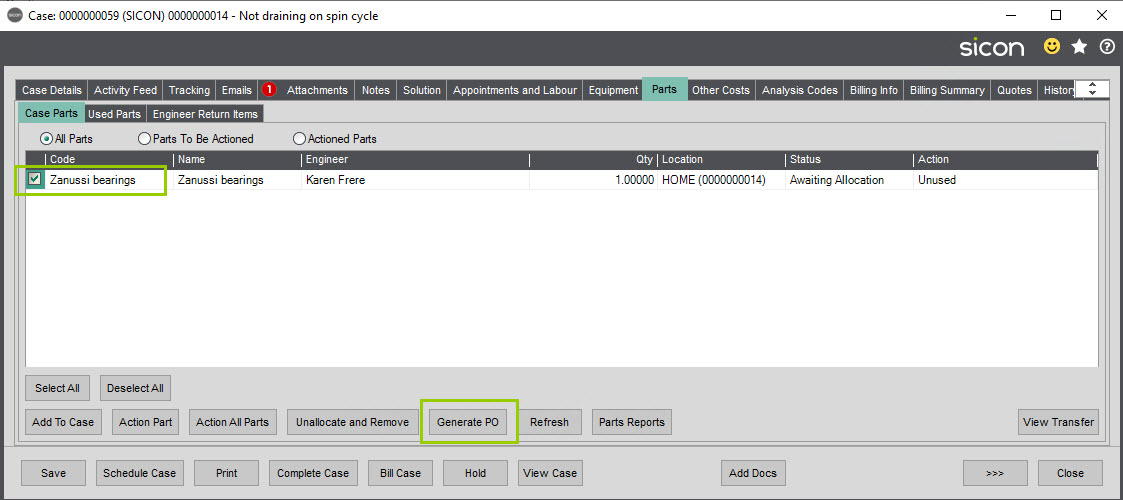
A Create Purchase Orders for Case Stock screen will open, you can link the PO to an Appointment Date or select a manual date and set a number of days before the appointment.
The default supplier (if set against the stock item) will be populated but may be changed if required. The tick box for Show only existing suppliers when populated will only display the suppliers that are linked to the stock item. Untick this to be able to select from the whole Sage Supplier list.
Click Create Selected Purchase Orders to generate the PO.

The Case Parts will now show that line status as PO Generated.
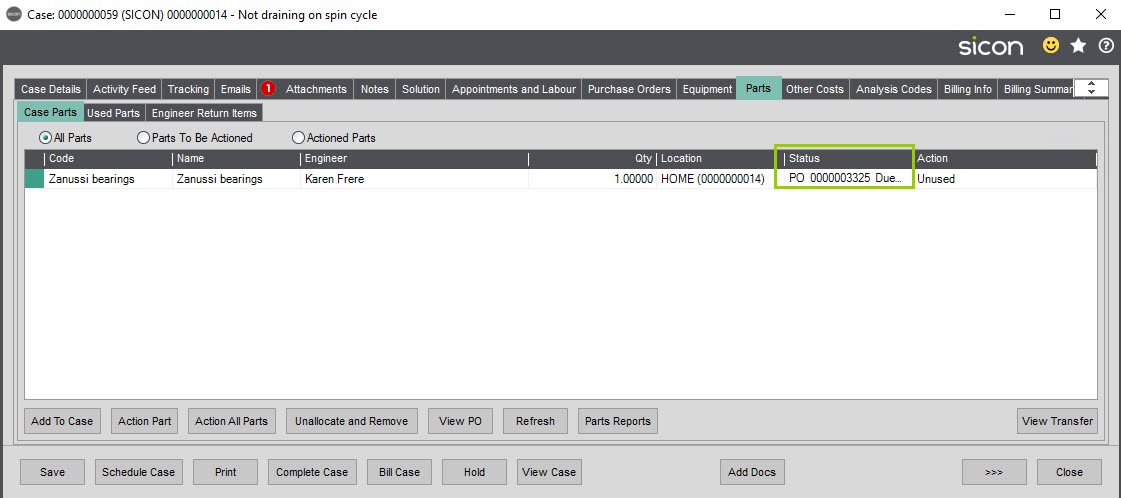
Once the goods are booked into the Stock system, they will be automatically allocated to the case and the Parts line on the case will now show awaiting dispatch.
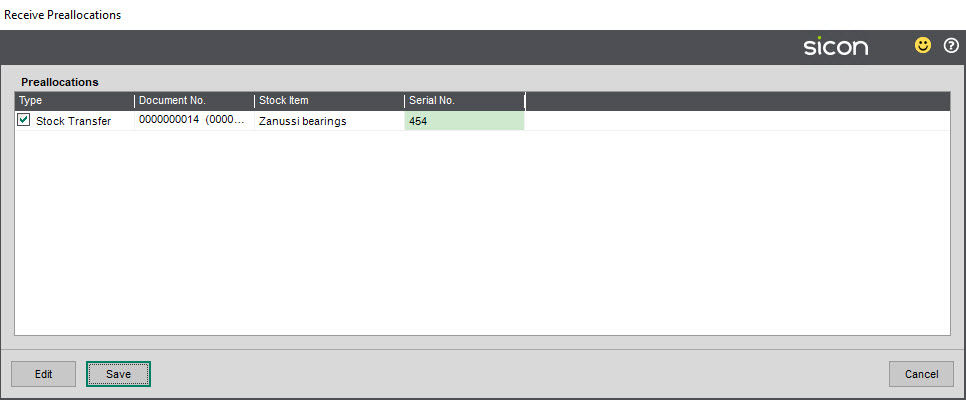
Click View Transfer having highlighted the stock line to despatch.
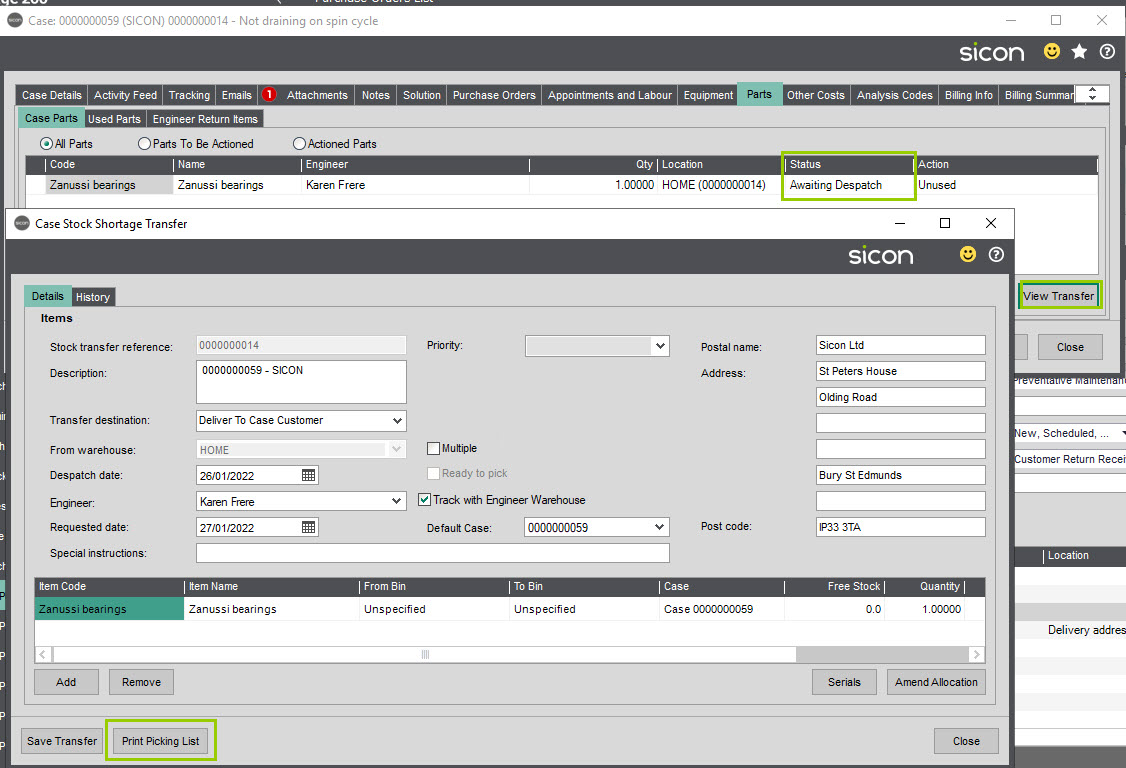
The picking list will need to be generated before you can despatch using the Despatch Transfer.
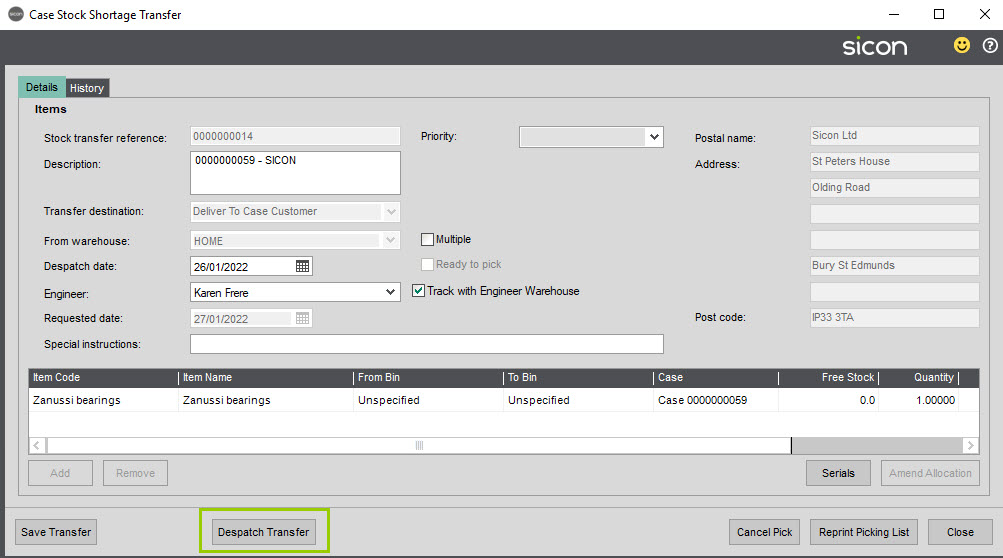
When you click Despatch Transfer you then have the option to amend the quantity to despatch and the despatch date if required.

Once dispatched and received by the engineer they can then be actioned (See Action Parts).
8.13. Add Parts to Case from Found Stock
Found Stock can be used to book parts into either the engineer’s warehouse/van or a specified alternative warehouse that have been ‘found’ e.g. on the engineer’s van. Found stock can also be Returned from this screen (see Action Part for further details).
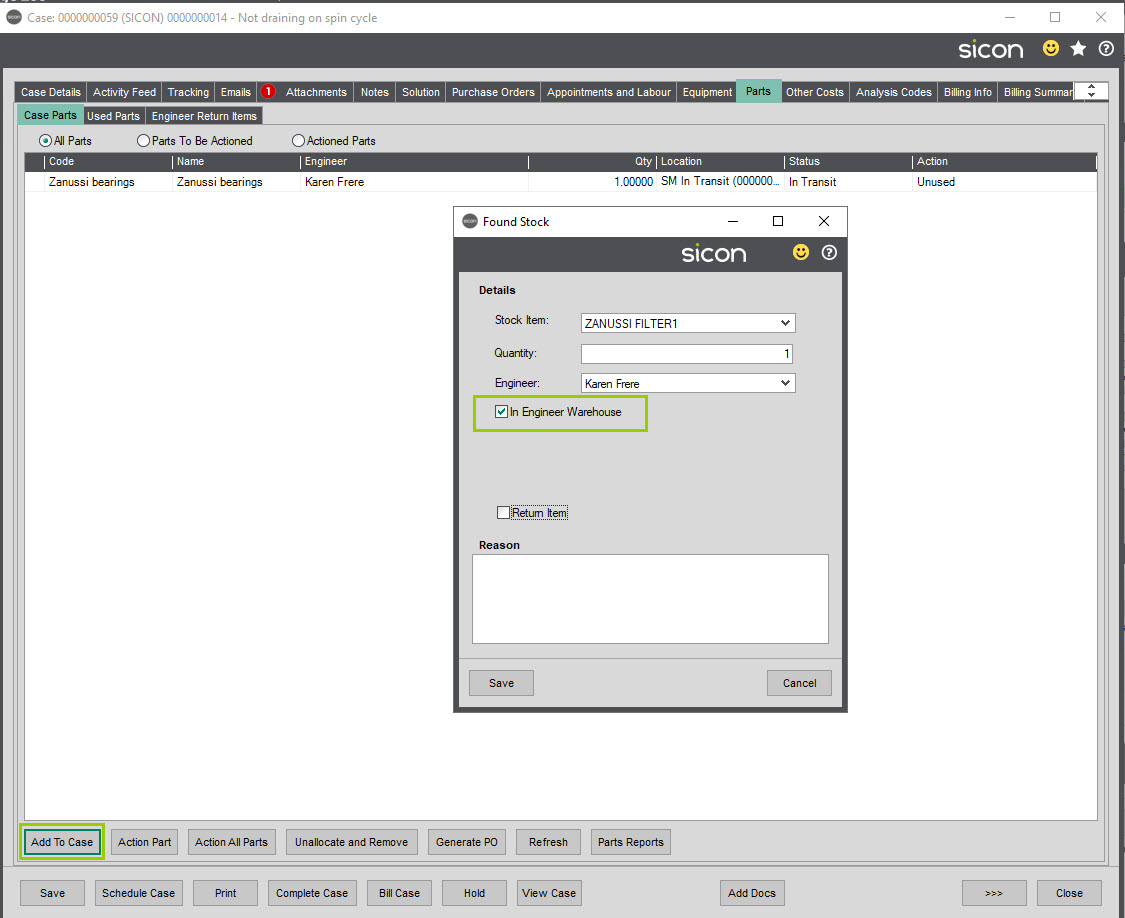
Select the stock item, quantity, and Engineer, ensure In Engineer Warehouse is ticked if the stock is in their van and click Save. This will add the stock item to the Case Parts list.
If the stock is not found on the van, select the stock item, quantity, and Engineer. Untick In Engineer Warehouse to get the option to select the Location (warehouse) and Bin then Save to add to the case parts list.

8.14. Add Parts to Case from Stock Shortage Transfer
Where the parts required for the case are in the main company’s warehouse you would use the Stock Shortage Transfer function.
Stock Shortage Transfer is used to add, allocate and dispatch parts either directly to the customer direct or via the engineer warehouse location. The Stock Shortage Transfer functionality is part of Sicon’s common component module as multiple Sicon modules uses it, but it fully integrates with Sage 200 stock control.
Stock transfer reference is assigned and will be populated once the transfer process starts. The Description will be populated with the Case Reference number and the Customer account number.
Transfer Destination: Use this drop down to specify where you are needing the parts to be sent to in order for the engineer to use on the appointment. The address associated with the ‘destination’ will then be shown on any despatch notes produced e.g. for stores to know where to ship the parts in preparation for the engineer’s work appointment.
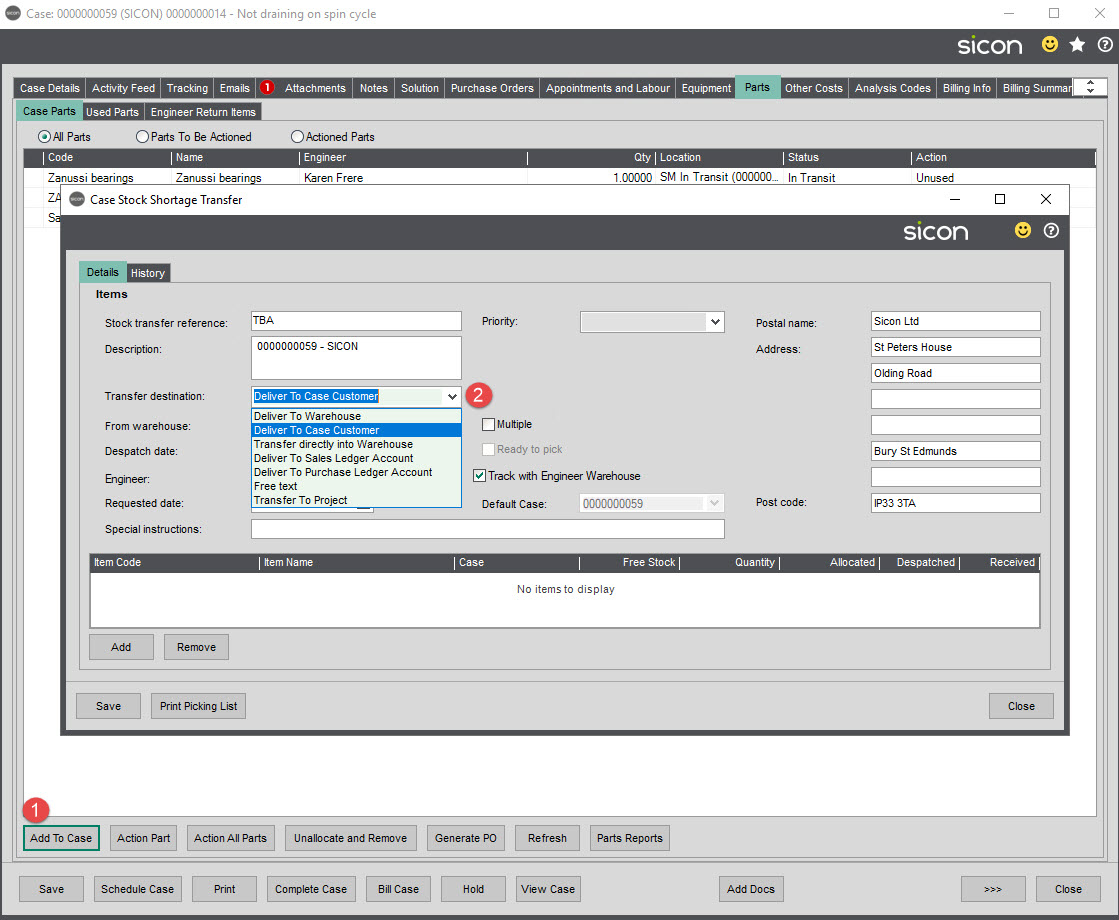
Options to choose from for Transfer destination are:
Deliver to Warehouse: parts are to be transferred to the warehouse which you select in the field below. If Track with Engineer Warehouse ticked, this will be the warehouse associated with the engineer you’ve selected, and you select the engineers name (and the Sage 200 stock location associated with the employee is behind the scenes).
Deliver to Case Customer: Select if you are sending the part direct to the case customer’s address for the engineer to pick up when they get there.
Transfer directly into Warehouse: this uses same process as ‘deliver to warehouse’ but the difference is that selecting this option requires no “Receive” function, the despatch process immediately receives into the target warehouse.
Deliver to Sales Ledger Account: If selected the system will allow the user to pick a different Customer/Sales ledger address (for example… engineer has 2 appointments for a day, 2 different Service cases, both with parts…. But engineer wants parts for both case 1 & 2 delivered to the first appointment…. So on case 2 by selecting ‘deliver to a sales ledger account’ the user can select site 1’s address to be printed on the despatch note.
Deliver to Purchase Ledger Account: as deliver to Sales Ledger Account.
Free Text: the system will allow the user to enter a manual address which in turn will appear on the despatch note (for example engineers home address, if the parts are being shipped to their house ahead of the appointment).
Note: Options above would require the engineer (on his mobile device) or service admin user (within the case) to flag as Received prior to it being flagged / actioned as ‘Use Part’ / ‘Leave on vehicle’ / ‘Return Part’.
Transfer to Project This is not an option that should be selected / as it’s not a process used in the context of a service case / our service module so should be ignored. Reason it’s on the list is the stock transfer functionality is a common Sicon module feature and at this time, is not controlled module by module. Other Sicon modules use it in the context of issuing stock to a Sicon job.
The only option/selection that does not require the stock to be ‘Received’ is:
From Warehouse: select a warehouse from where the part should be Picked/allocated/despatched. If multiple items from different warehouses are required tick the ‘Multiple’ tick box.
Priority: if required and setup in Maintain Priorities can be selected from the drop-down list.
Special Instructions: Free text field for any instructions to be added to the stock transfer picking list and the despatch note. Transfer directly into Warehouse: this uses same process as ‘deliver to warehouse’ but the difference is that selecting this options requires no “Receive” function, the despatch process immediately receives into the target warehouse.
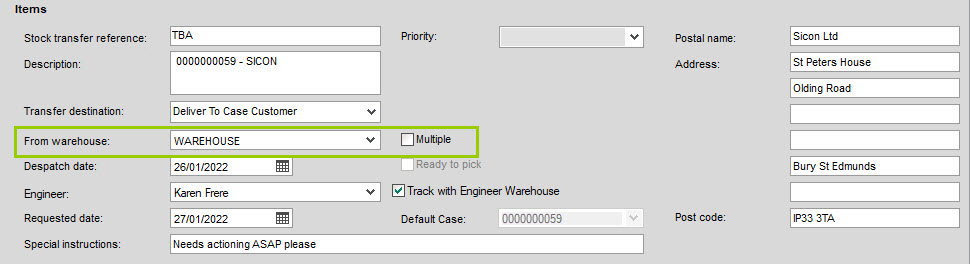
8.15. Pick Parts
Next steps would be to add / select the stock code/part required, select the quantity and once allocated you can ‘Print Picking List’ for stores to pick the stock items.

The parts when picked, but not received, will be seen on the parts /Case Parts Tab as below.
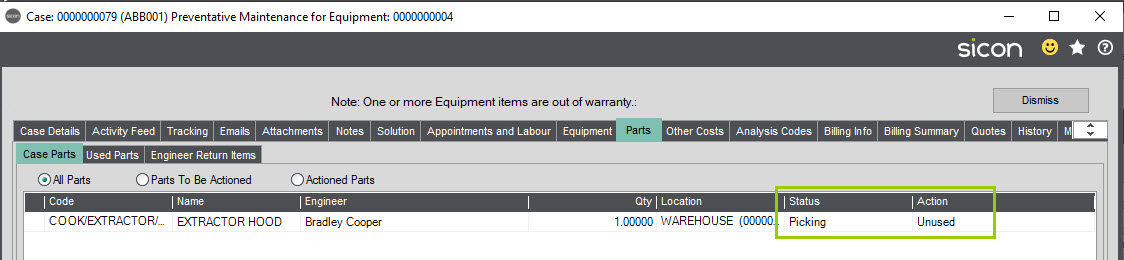
Once picked, ‘Despatch’ the stock transfer by clicking on the View Transfer button, then click Despatch Transfer.
Picking and Despatch notes can be amended to suit your company’s requirements using standard Sage 200 report designer.
You can choose to ‘reprint picking list’ if required or if picked in error there is a function to ‘Cancel Pick’ this is only available prior to despatching.
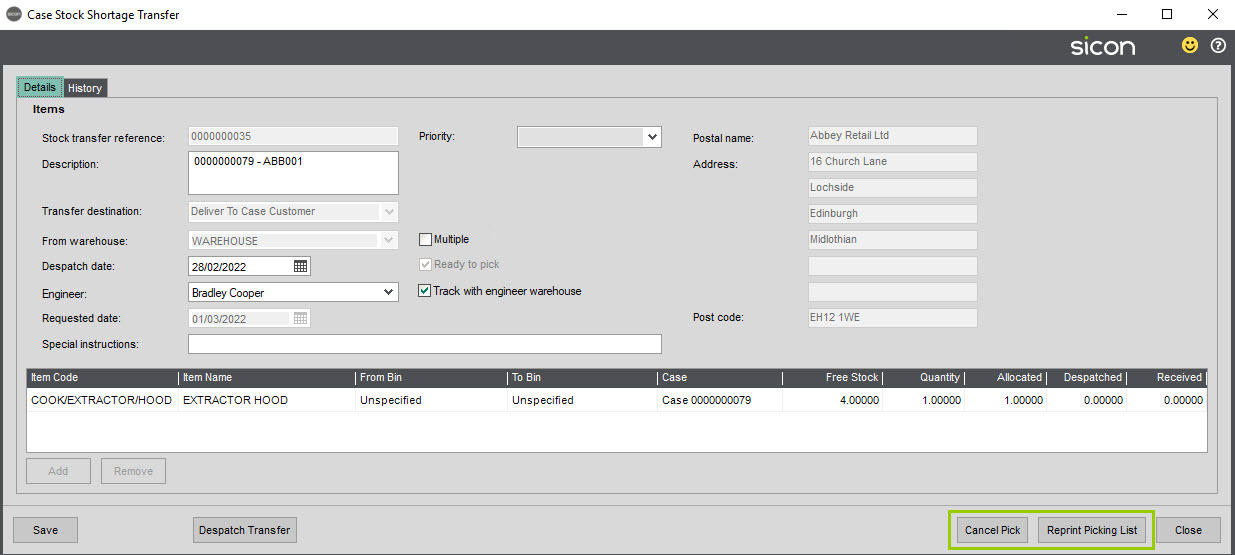
8.16. Despatch Parts
If you use another department such as stores to despatch the goods, (this may be manually or using Sicon bar coding module), the stock transfer would be left in picked state, and screen closed.
You could then update the case with a tracking note status ‘Parts waiting despatch’ and assign to a different team.

For more details on how to set up additional tracking status refer to Maintain Tracking Status section of this Help and User Guide.
If the case is left in this ‘Picked State’, to proceed with transfer the user would come back into this screen and select ‘View Transfer’ to proceed to ‘despatching’.
If service admin, or stores are despatching from within the service case / stock transfer, when ready to despatch select the Parts tab, highlight the line to despatch and click View Transfers.
Enter the number to be despatched in the Despatched Column and click the Despatch Transfer button.
Confirm the quantity and despatch date.
The Despatch will note can be previewed to screen for users to print or send to stores to pack with the goods.
Once dispatched this transfer will be held in the ‘In Transit’ warehouse configured in the Service settings. We recommend you set up an ‘In transit warehouse for use with the service module, this will ensure you can track what stock has left the building but not yet been received by your engineers.
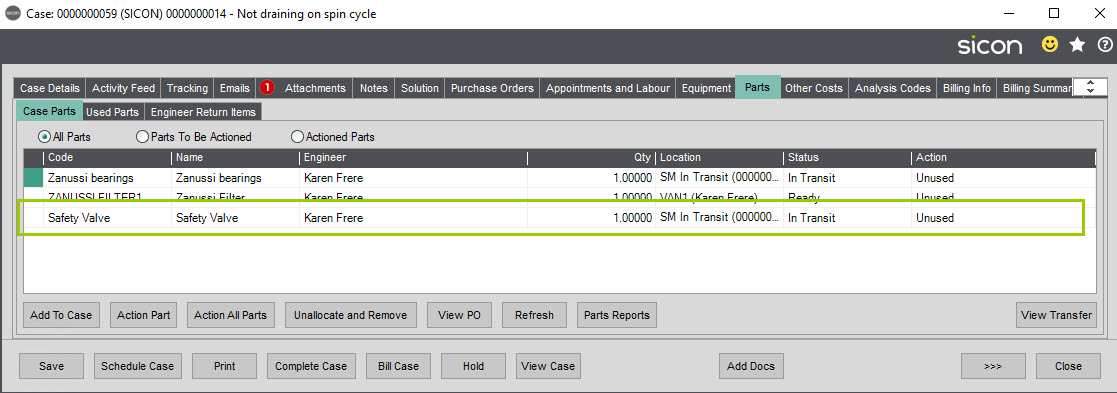
The engineer needs to receive the parts before using, the status can be updated via the tablet interface or manually by the service administrators within the Service case by selecting ‘Receive Transfer’. The part will then be available to use on a case (See Action Part).
Important Note: Sage Users should be aware that whilst stock is in the ‘In Transit Warehouse’ that they should NOT move the stock out of that warehouse / use for any other purpose. If stock has been despatched on a service case, and is in transit, but then a user moves it out using standard Sage stock functionality, when the engineer goes to receive the part/to use on the appointment, it will not be there and will cause issues.
Receive: Where mobile devices are being used the engineer would confirm he has received the parts/stock from his device as per screen shot below.

When the stock has been received by the engineer, it will update on the app as below:
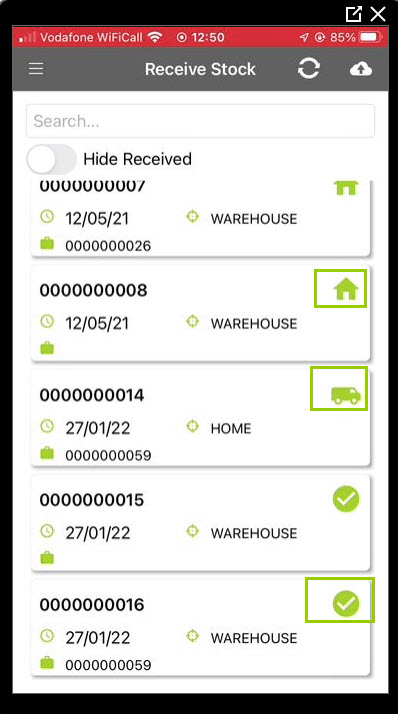
The Tick means the stock has been received, the Truck icon shows In Transit and the House icon means the item has not been despatched yet.
Alternatively, if the service admin team were confirming the engineer received it, they would do this within the stock transfer ‘Receive Transfer’. Select the Parts tab, highlight the line to receive and click View Transfers, then click the Receive Transfer button.
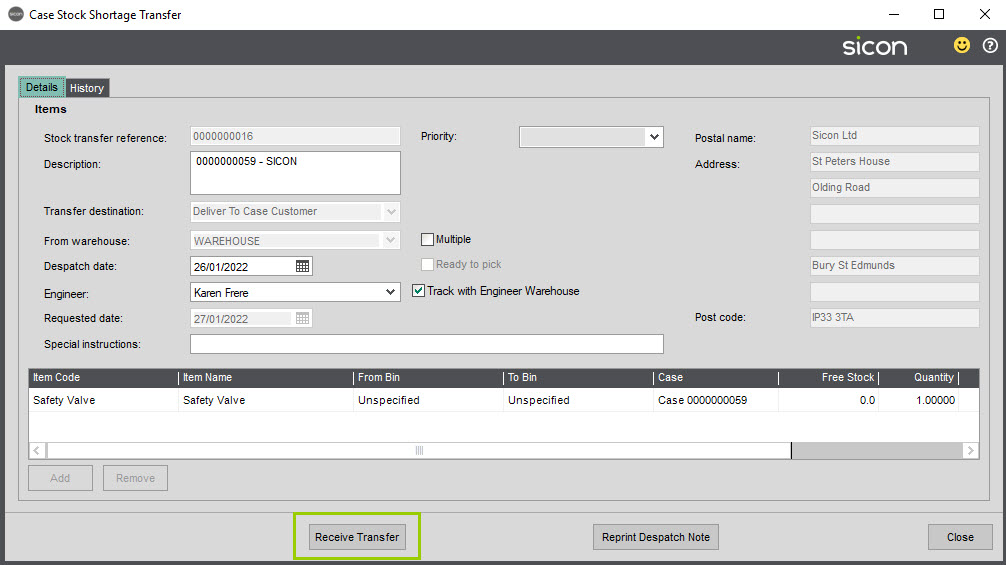
8.17. Action Part - Use Part
Once a part has been added to a case, it needs to be ‘actioned’. A case cannot be completed and closed until all parts have been actioned.
The screen can be filtered as required by selecting the appropriate tab and radio buttons.
Use Part: The part has been used and can be linked the piece of equipment it has be used on, if applicable.
Leave on Vehicle: The part will be booked into the engineer’s warehouse (van) location and the stock level will be increased accordingly, using same value that it was despatched at.
Return Part: The part will be booked back into the warehouse it was despatched from (note this is a Service Admin Task within the case and not a task available on the engineer’s mobile device).

If the part is ‘used’ you need to specify the quantity, the equipment item it was used on (as there can be multiple) and the appointment it was associated with (as there can also be multiple).

Remember to check the unit selling price: This is pulling through from the stock item selling prices. If no selling prices have been set on the stock item, users can add a selling price here (this will then be visible on the billing summary tabs on the case). Or alternatively if a different price for this part has been agreed the user can amend the price here.
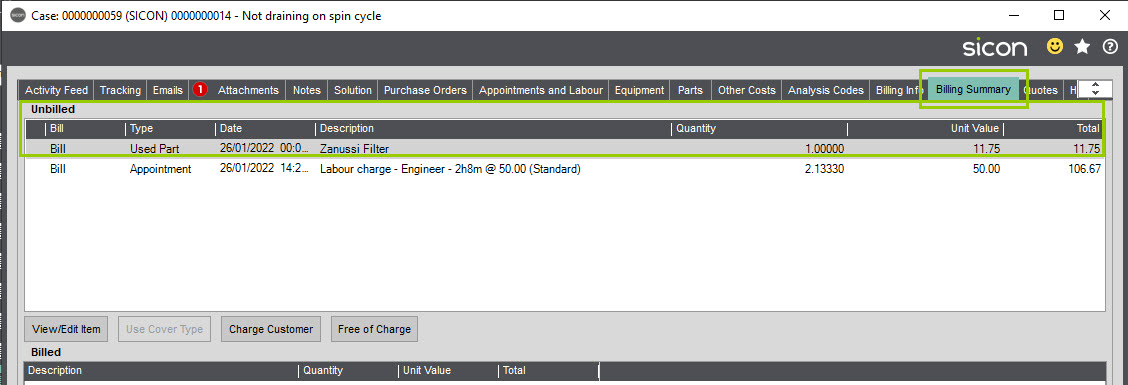
NB: If the engineer is confirming he has used the part on his mobile device he cannot see and therefore change any selling prices, so if any changes are required, then service admin team would need to do this from within the case on the billing summary, or thereafter on the sales order.
Expected revenue for parts will show as a committed revenue on the case Project, until such times billed when it will change to actual.

Users can link through to the relevant project from the main case details tab.
8.18. Action Part - Leave on Vehicle
If parts are left on the engineer’s van, this warehouse stock level will be increased by the relevant quantity.
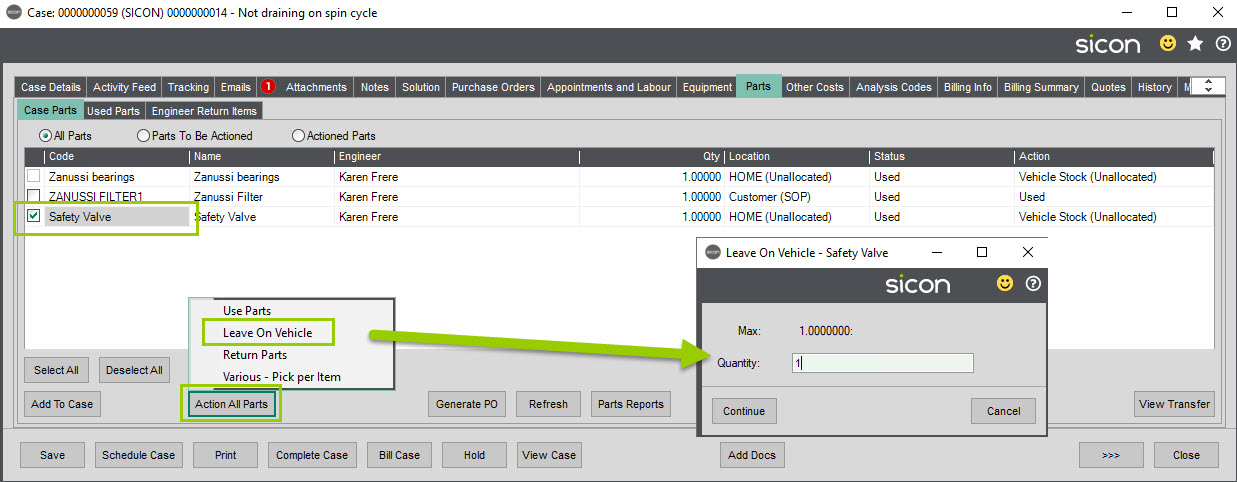
8.19. Action Part - Return Part
Retuned parts are actioned from here (note this is a Service Admin Task within the case and not a task available on the engineer’s mobile device). The Return and Repair customer and locations need to be configured in Service settings in order to use this feature.
If the engineer is sending/bringing back, you would use the ‘Return Part – Engineer Return Items’ option.
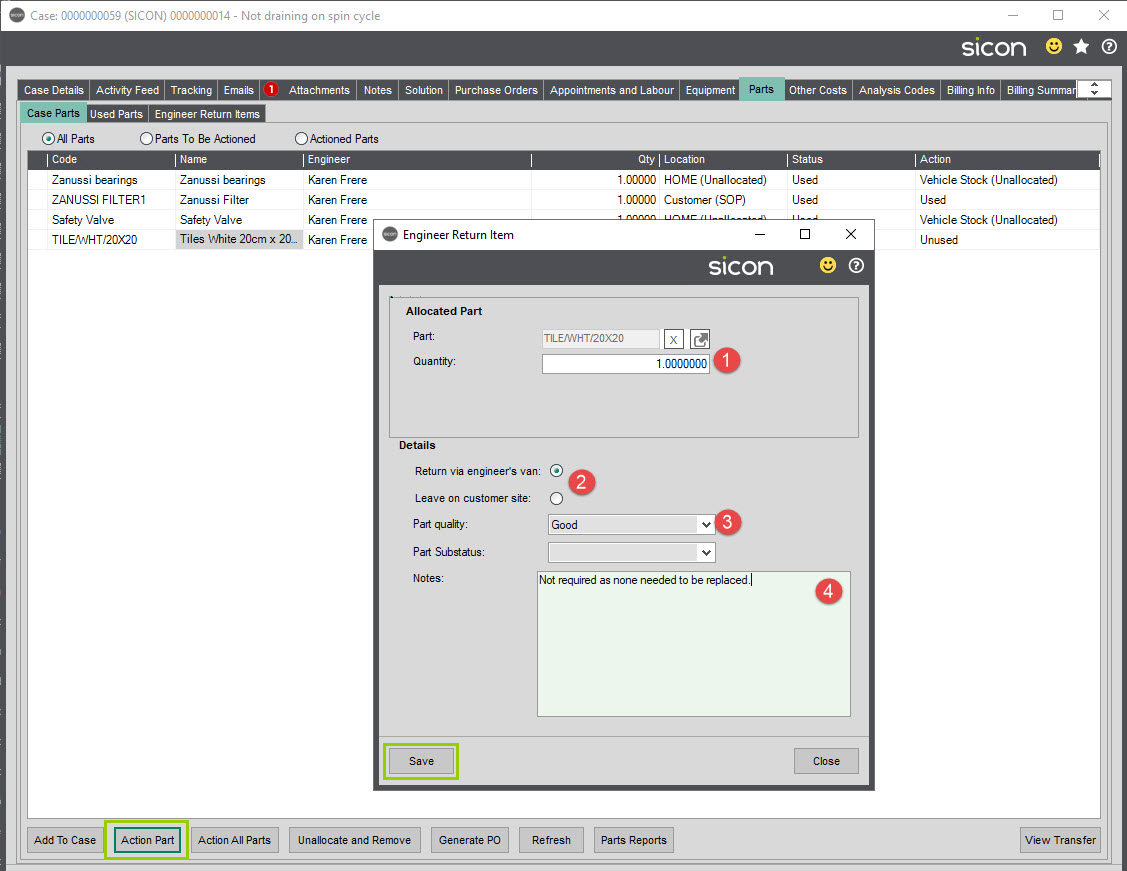
The Quantity is pre-populated, if the original issue is for more than one you can amend to the number to be returned.
Flag if the part is to be returned via the engineer’s van or if it is being left on the customers site for collection to be arranged.
In this process you also have the option to flag the part quality as Good or Faulty. You can also enter notes as to why the part is being returned.
From the Engineer Return Items tab, select the part to come back and click Action Engineer Return Items then Receive at Warehouse (Quarantine).
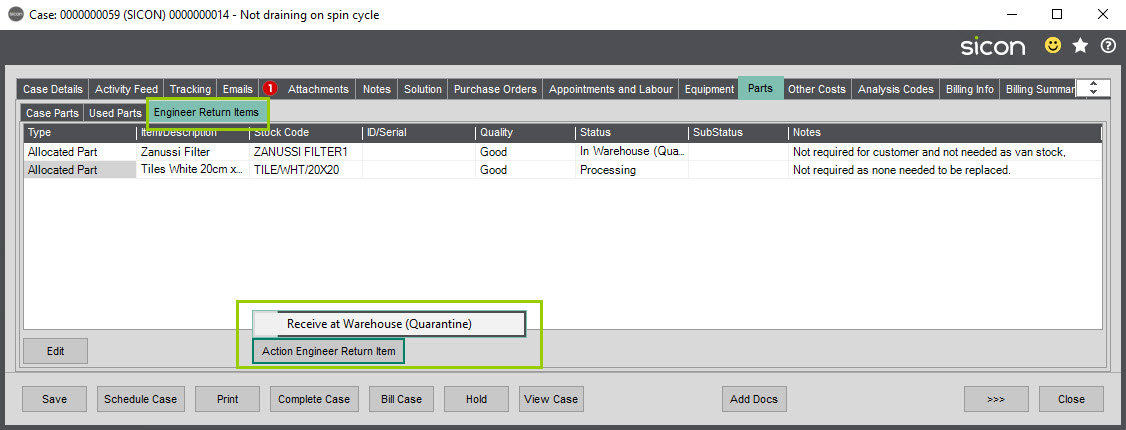
Once this has been done you can select to either Write the item off (if it is faulty) or Return to stock where it will be available for use on another case.
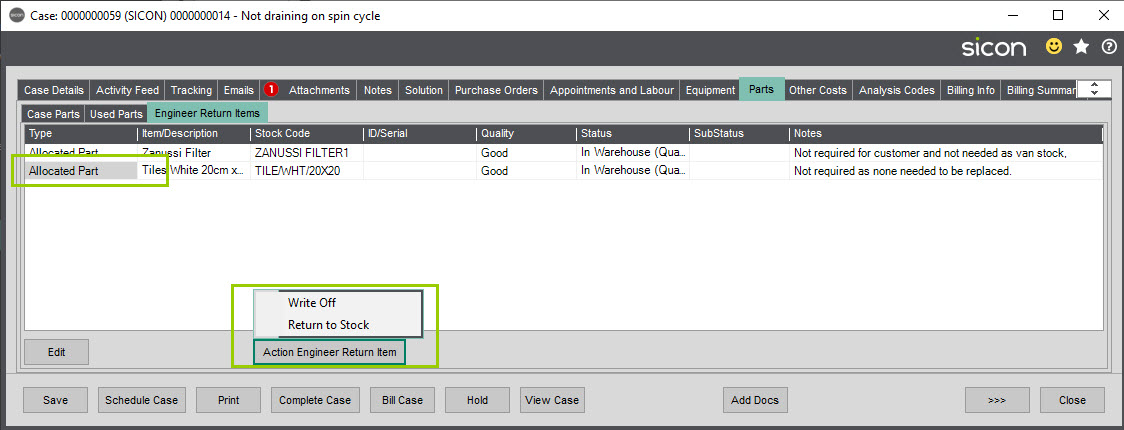
When the item is being returned to stock you are able to stipulate the location it is being returned to.

If you choose to write off, you will be asked to confirm this action.
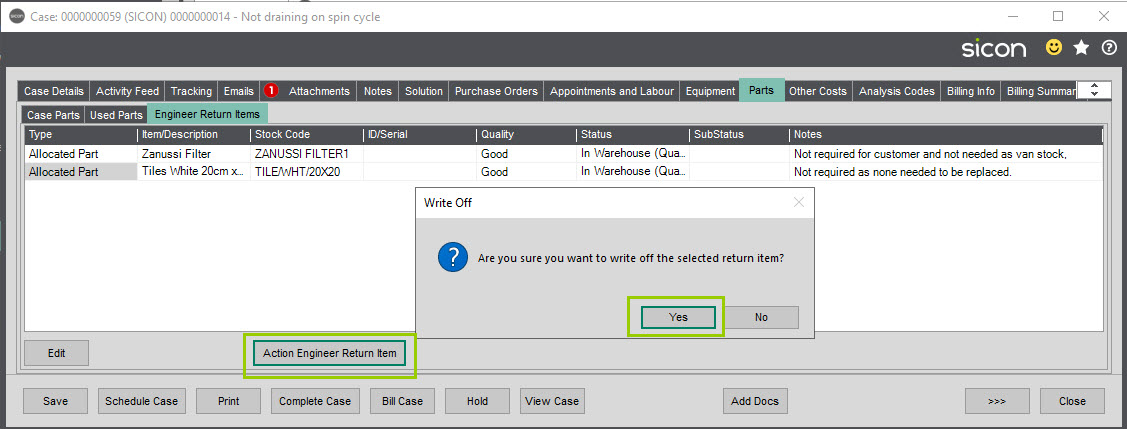
The status will change to written off – this process uses standard sage write off actions, but referencing the service case.
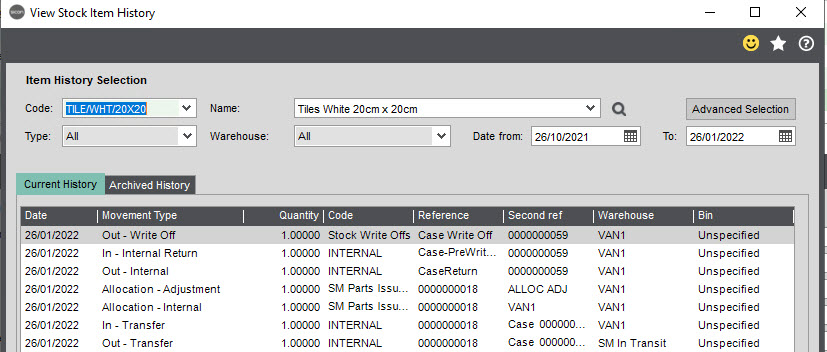
Our part was returned on case number 59 and each stage of the return is listed separately.
8.20. Using Equipment Kits on a Case
It’s possible to create a kit from your stock items. In our example we have created a cable kit, which consists of different length patch leads and cables, as we know when we have to go to a certain job to fix some broken network cabling, we would need all different cables.
You first create your kit from Sage200 Stock.
Select one of the stock codes that is to be included in the kit, Click the Sicon tab and select Service from the left-hand menu. Note: you will only see the Sicon modules you have installed – we have all modules installed for our testing purposes.
In the pane that is labelled Kits click Add and enter the name for the kit you are creating. (Fault codes can be linked if these are being used).
In the right-hand pane – Kit Lines select what stock items are included to make the kit. Click under the Item Line to select the stock item and enter the quantity – repeat for all items needed to make the kit.
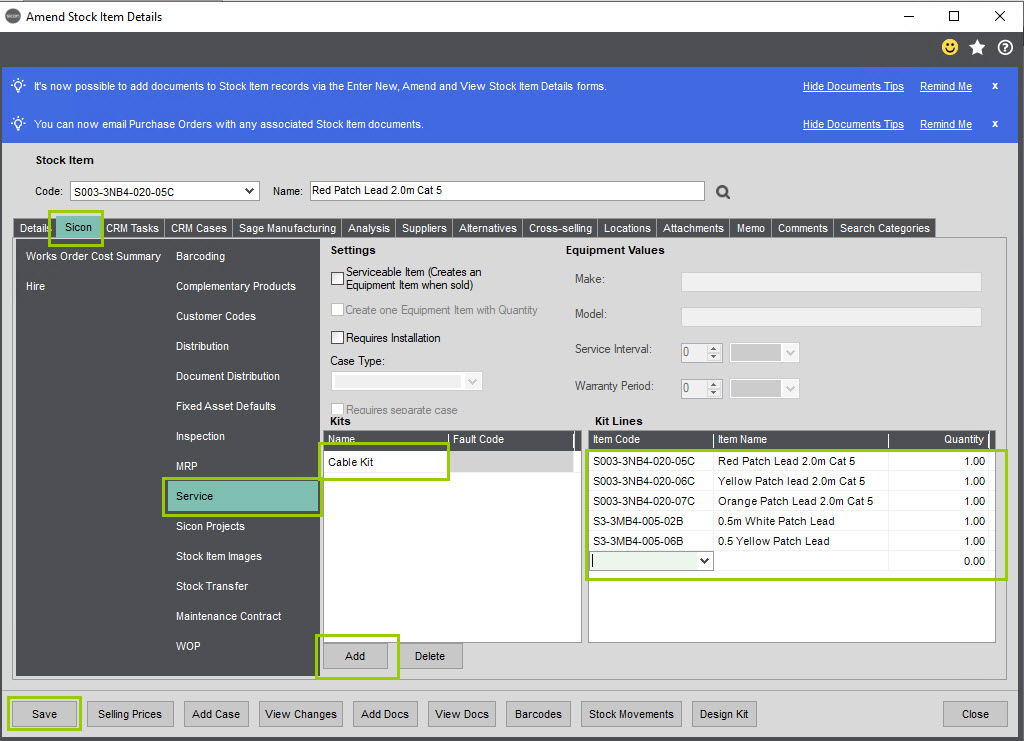
Click Save.
From the Equipment tab on the Service Case (or from the Equipment Menu > New Equipment Item)
Click Add to enter a new equipment item for the customer, the customer details are prepopulated and are not editable.
Click Add New to enter the equipment item.
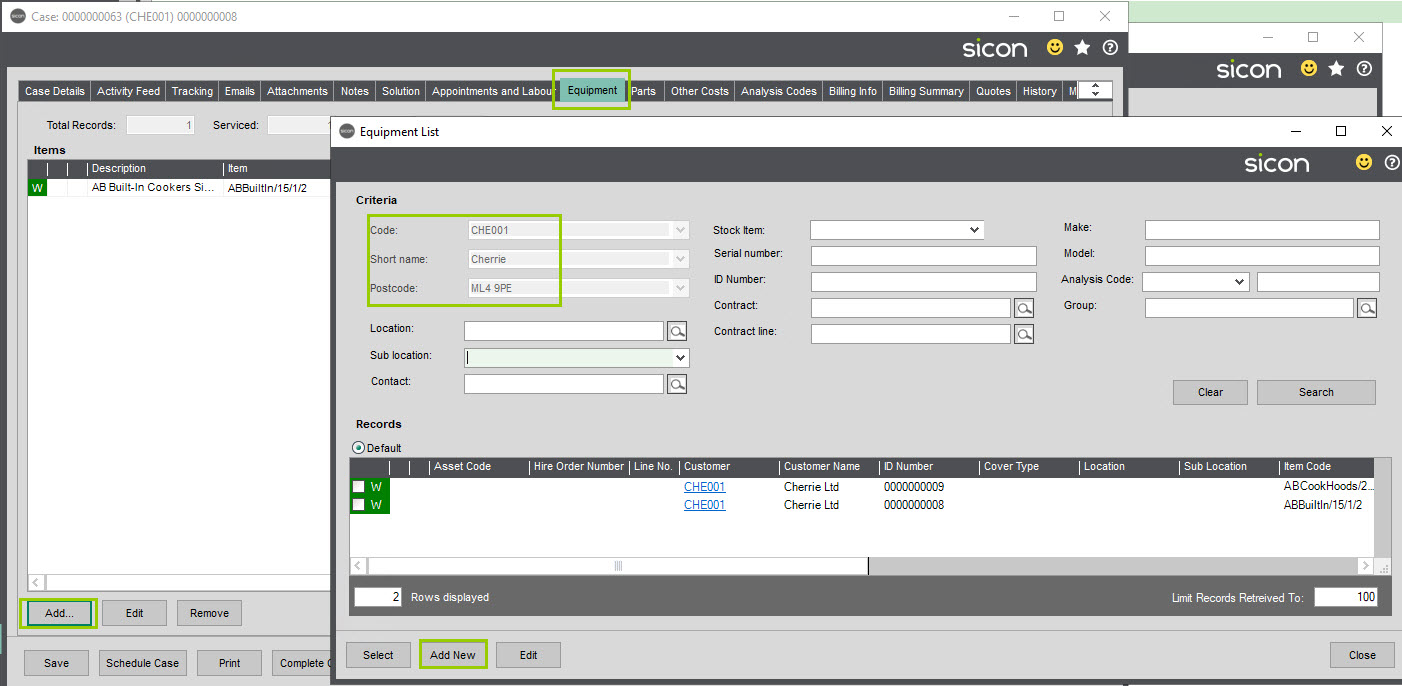
Customer details again are prepopulated, select the stock item the kit has been linked to.
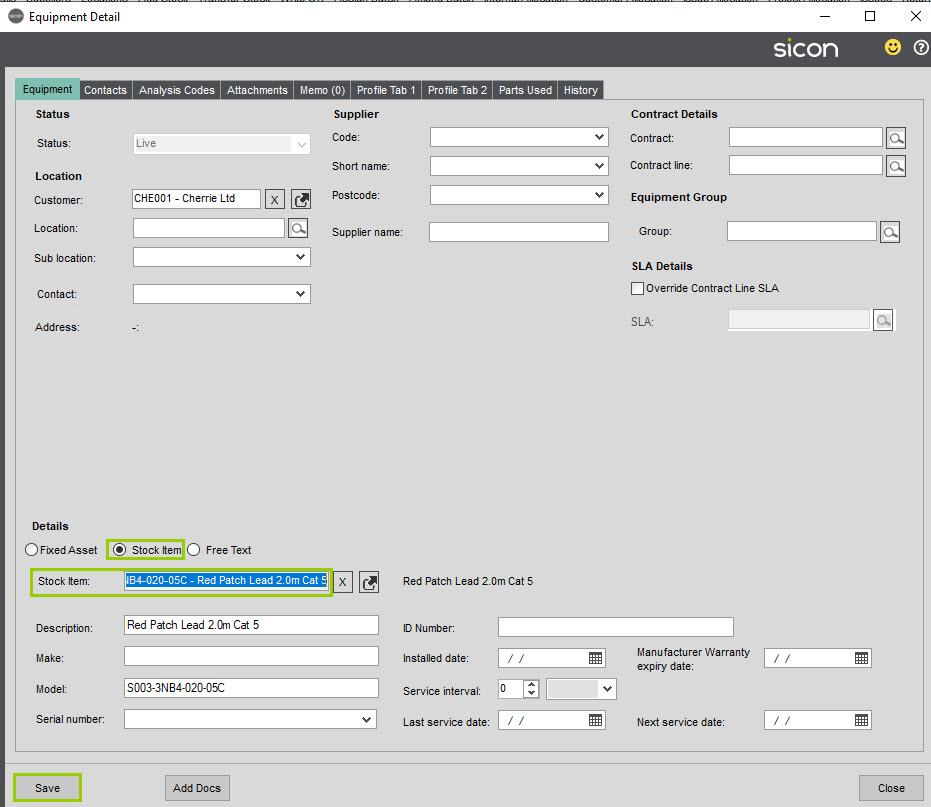
Click Save.
To link this to the Case, tick the line in the Equipment List and Select.
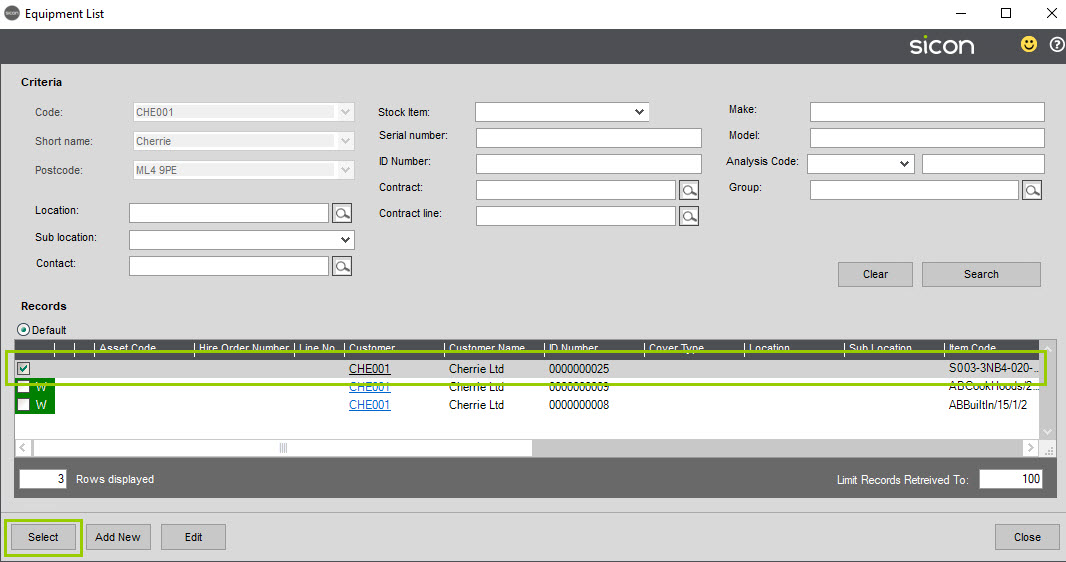
The line will now show on the Case Equipment tab.
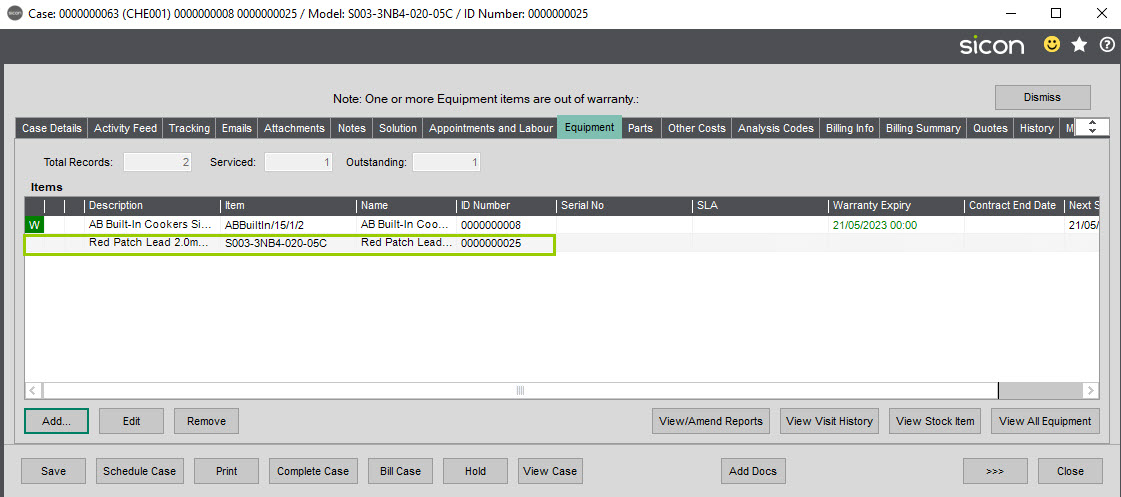
To make this available to the engineer for use on the case, select the Parts tab, click the Add To Case button – there is now a 4th option for Equipment Service Kits.
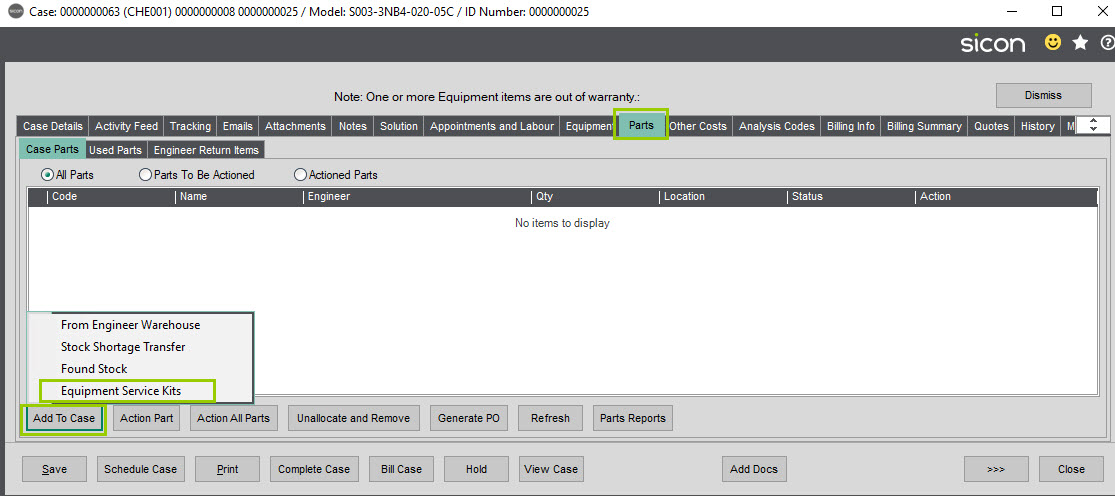
The Appointment needs to have been created for the engineer (it does not need to have been confirmed at this point) as this needs to be selected in the Add Service Kit screen.

From the Equipment drop-down list select the equipment item the kit is linked to.
Choose the appointment – this will pull the engineer details through automatically.
The default is to allocate available now and send deficit, you can change this to Send All (allocate on arrival) if required.
From the Kit drop-down list select the kit.
Click Add.
Chose the Transfer Destination from the options in the drop down list.
Select the Warehouse this is being despatched from, Clicking the Multiple option to the right of the Warehouse drop-down list will allow you to select the warehouse for each line so if you have stock availability in different warehouses
Populate the Despatch Date.
If the stock is for an engineer’s van, select the warehouse associated to the engineer.
Input the Requested Date.
From the example below, you can see that the lines that are linked to WAREHOUSE have no free stock. Changing the warehouse to HOME updated the free stock availability and will allow you to update the number to allocated to the transfer. If you need to have more than the default quantity of 1, update this column first then the Allocated column.
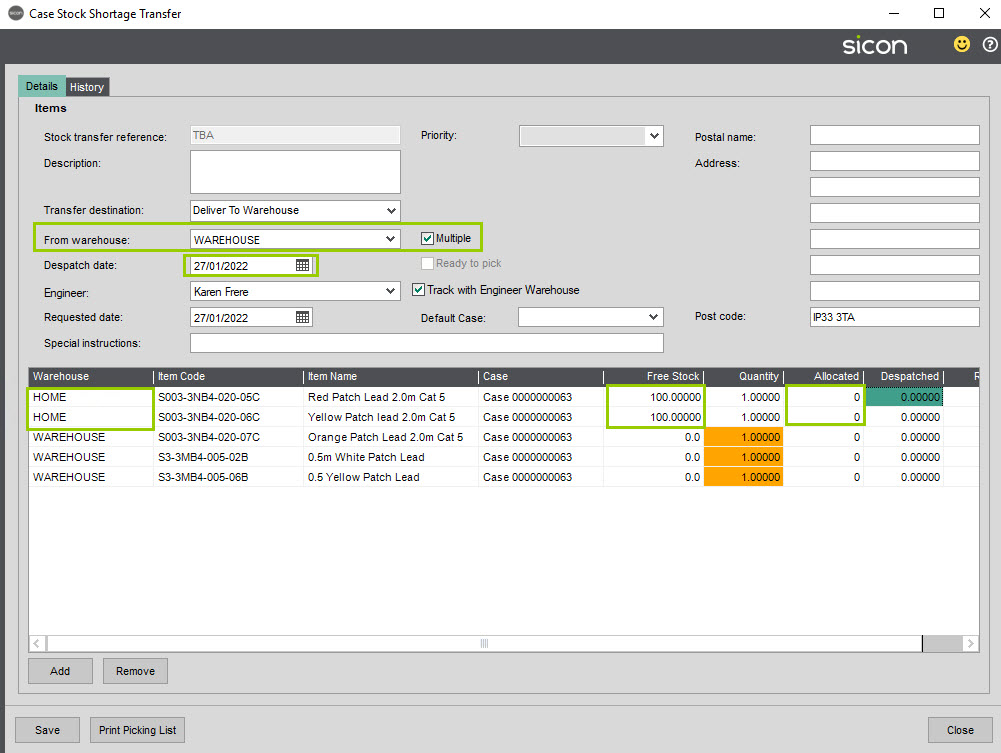
When you have updated the Allocated column with the amounts required, click Print Picking List.
If you have entered Special Instructions, these will be printed on the Picking note.
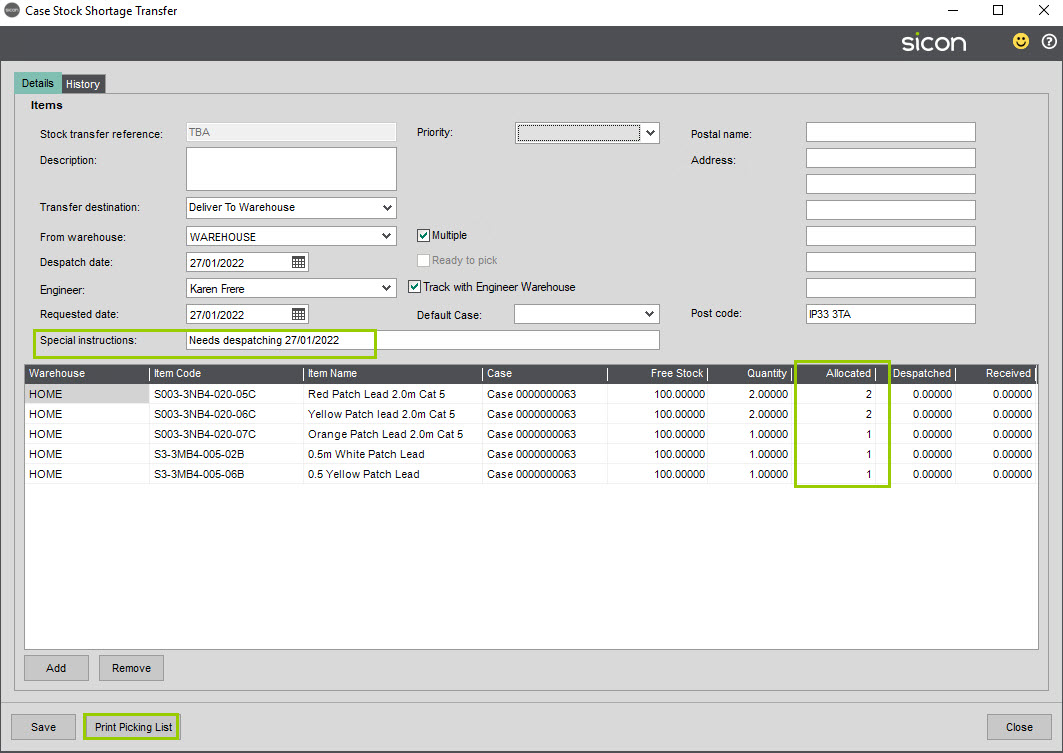
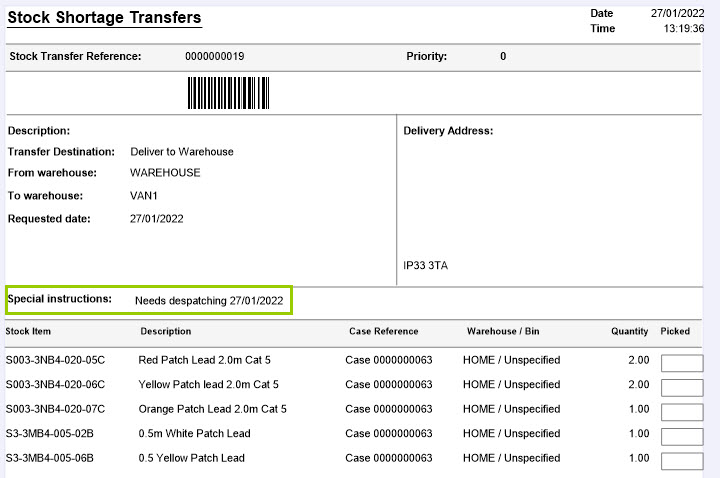
Print and close the list.
Click Despatch Transfer.
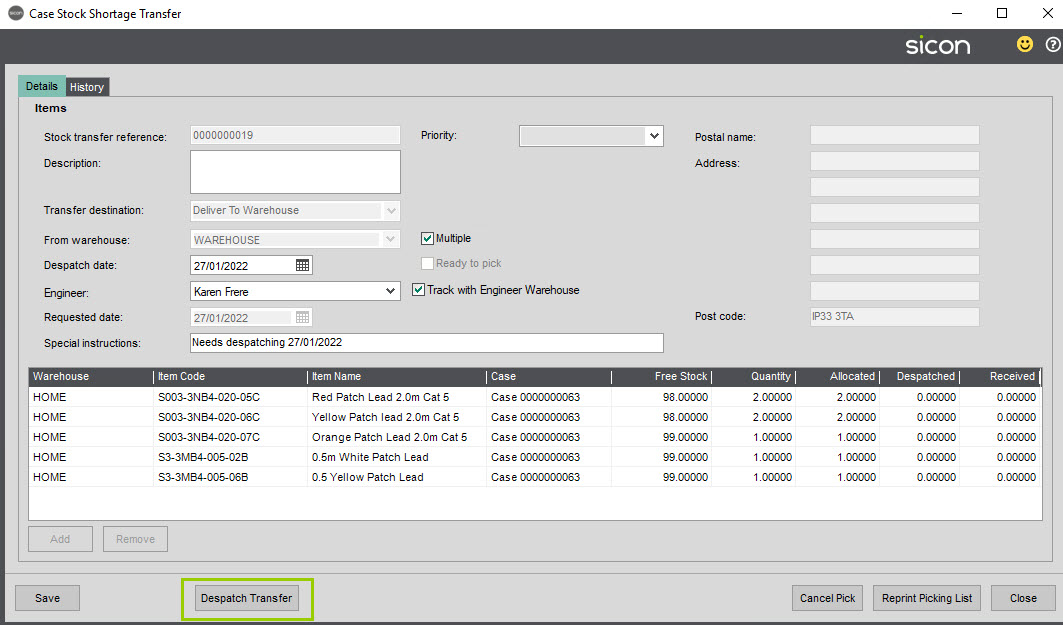
Confirm quantities and date to despatch and Save.
Print (if required) the Stock Transfer Despatch Note and close.
Receive Transfer to transfer the stock from the service desk.
Alternatively, close this screen and allow the engineer to action the receipt of the stock from the handheld device.
When the stock has been received, the screen changes to show a tick with Ready to the left which denotes to the engineer that this stock is available for use now.
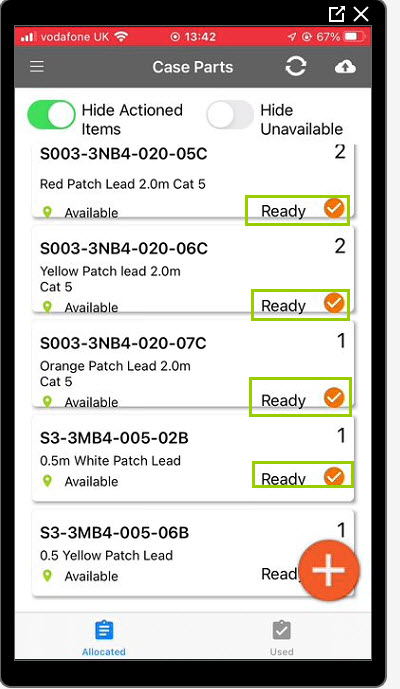
Tap the stock from the list of available in the list opens a Stock Actions option, select Use or Leave on Vehicle.
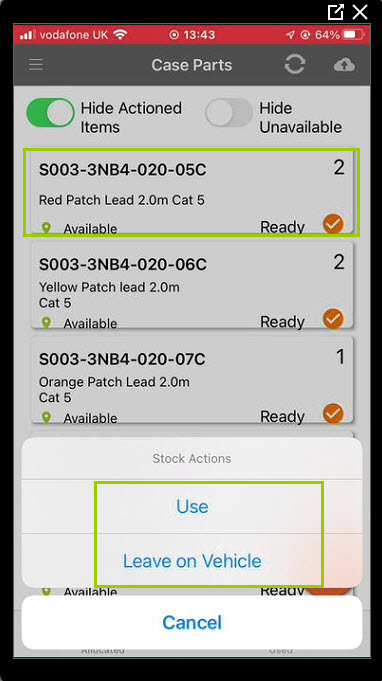
Using the + and – symbols update the number to be used or left on the vehicle and submit.
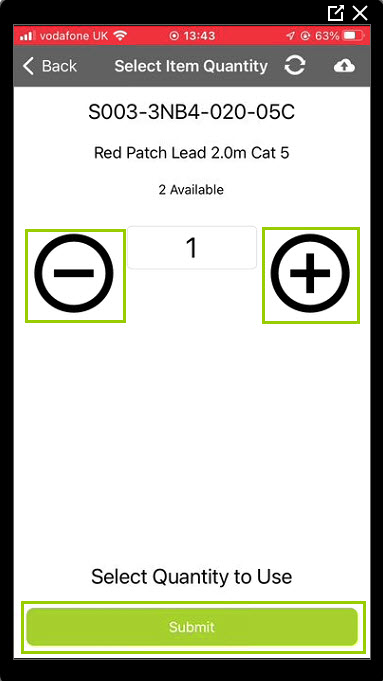
When this is sync’d, it will update back to the case on the service desk for the admin person to action the item.
As only one of the Red Patch leads has been used by the engineer, this has added a line at the bottom of the case parts tab which shows the status as used, while the other one is still showing as Ready and is still available for use.

If updating the parts used from the service desk to flag as used as opposed to this being updated from the engineer, highlight the line and click Action Part.
Chose from Use Part, Leave on Vehicle or Return Part.

When Use Part is selected the following screen opens:
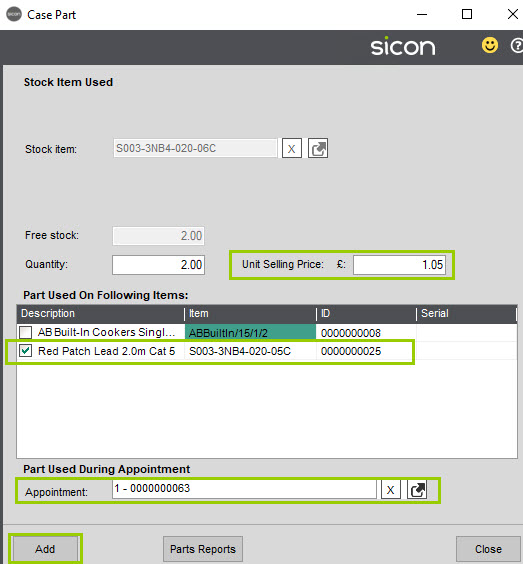
Tick the Stock Item and click Add, update the selling price if this has not been configured on the stock item and link to the appointment.
Repeat for all stock items as required.
Click on the Billing Summary tab to see the stock items to be charged for.
When ready the appointment has been completed by the engineer and the data sync’d, the Case can be billed and completed from the service desk.
On the Billing Summary tab, you will see the parts that have been used and the time to be charged for the engineer. This example shows travel to and from site as well as the hours worked while on site.
Click Bill Case.
This screen allows you to double check the items to be billed to the customer and amend if needed. This case is set with a cover type of None which means everything is to be charged for. If you have agreed with the customer that in this instance you are not going to charge for the cables, you can highlight the line and click the Free of Charge button.
For lines that have been marked as free of charge they will update in the list to reflect this.
New Sales Order is selected by default – The existing Sales Orders that you can link to are only ones that generated the case in the first place. i.e. an installation case with equipment was created from the initial sales order to the customer.
Click Next to continue to the Sales Order Screen.
The Sales Order generated can be amended if required as this is now standard Sage functionality.
The lines that were marked as FOC still show on the sales order (as per the setting that were configured) but show as 100% discount so the customer can see they have been used, but have not been charged for.
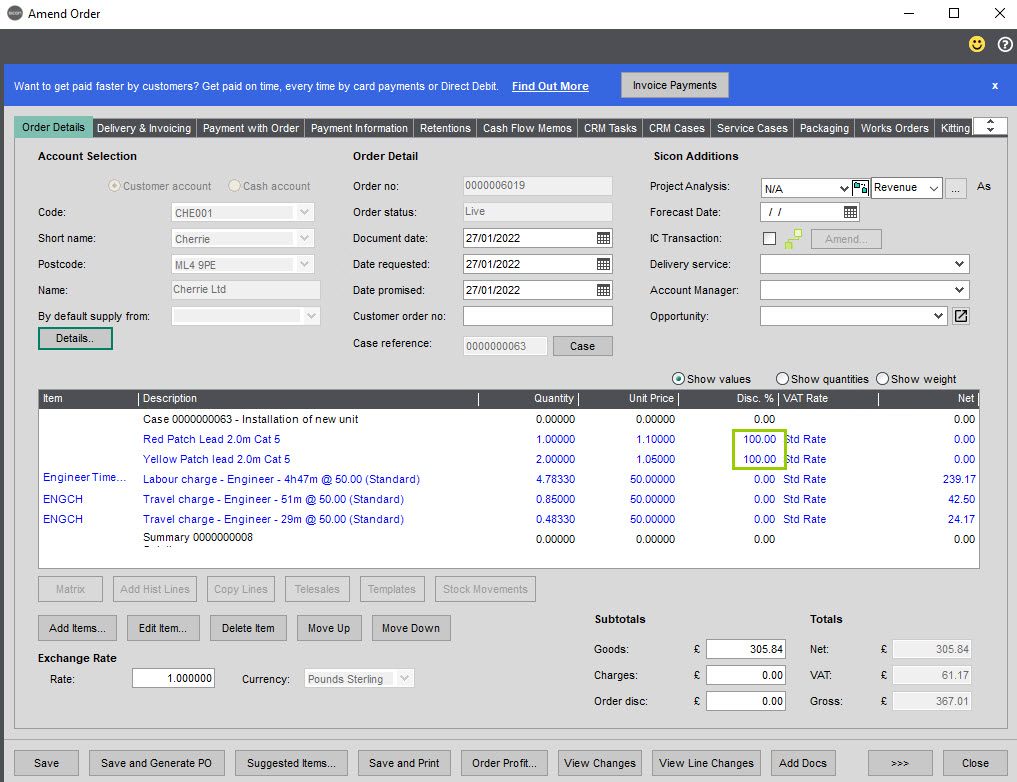
8.21. Costs & Charges
This tab replaces the Expenses / Other Costs Tab and is used to link other costs (a linked PO can be created if using a stock item) and charges to the case.
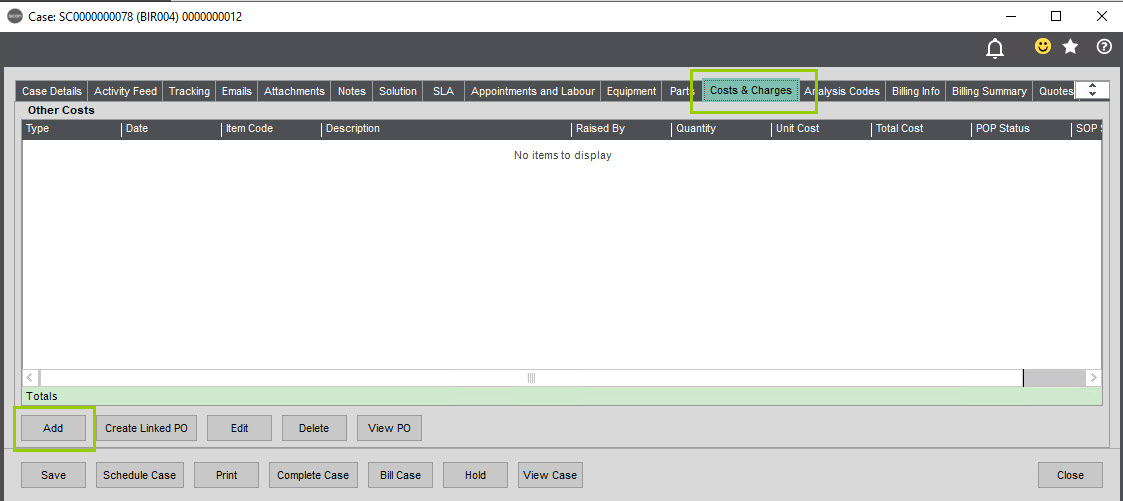
Click Add to open the screen to enter details.
There is a Case Info summary panel to the left of the other Costs screen that shows the Case No:, Customer, Call Date, Telephone Number, Summary and Equipment details.
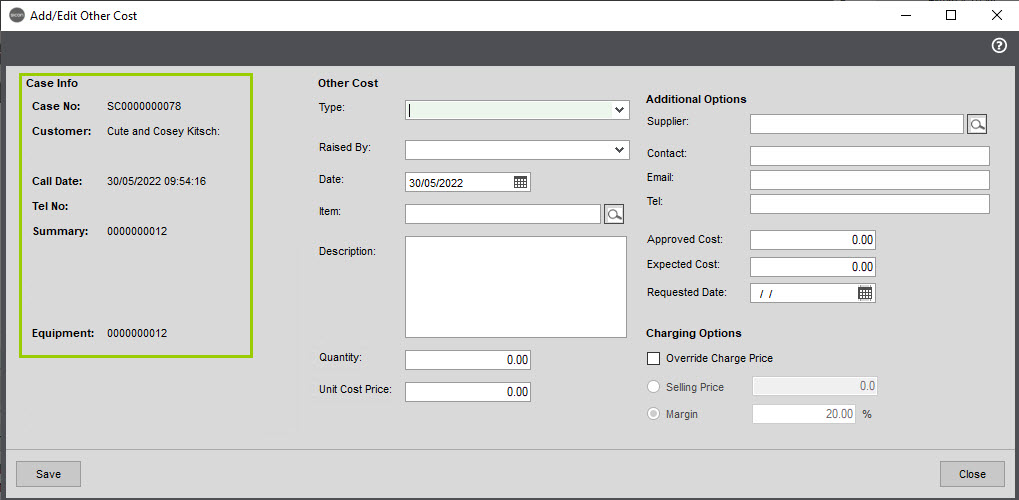
Select the Type from the drop-down list (these are configured in Maintain Other Cost Types)
Raised By can be left blank or select the relevant employee from the drop-down list.
Date – The date defaults to today’s date.
Items are the stock codes that have been flagged as Service items and are available for selection here – alternatively, you can enter a description as a free text item.
Quantity and Unit Cost need to be populated.
Supplier is selected by clicking the Magnifying Glass icon to see the list of Sage Suppliers. If the supplier is not showing in this list, you can create a new one by clicking the New Supplier button and completing the Create Supplier screen.
Enter the Contact, Email and Tel. number as required together with the Requested Date. Approved Cost and Expected Cost can be left blank to be updated later.
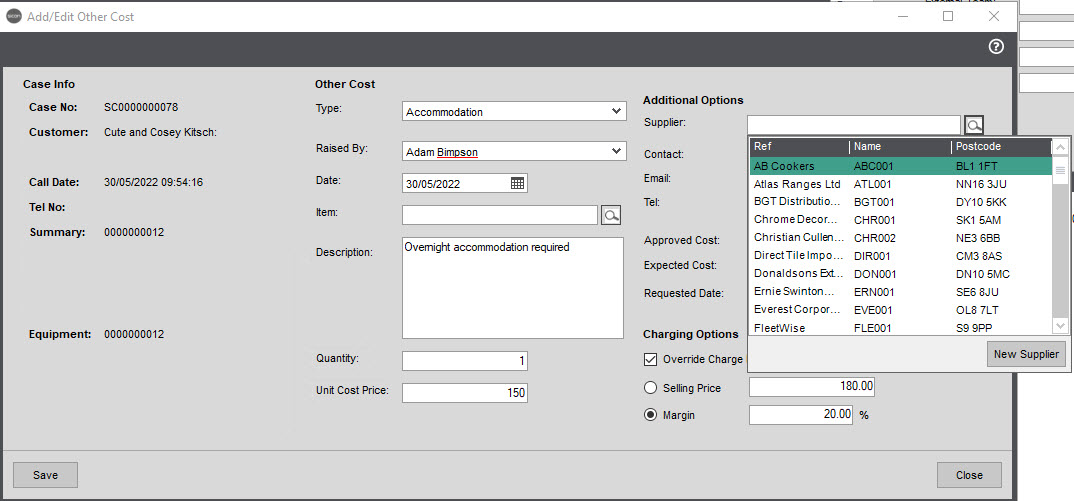
Charging Options may be used to Override Charge Price. When ticked the user can then enter a Selling Price or click the Margin Radio button to input a margin percentage. This will become the new charge for the client.
When the supplier and Email address have been entered you will have an extra button to Save and Generate Supplier Email as opposed to Save only. The Email is generated from the Purchase Email template.

Okaying this message will take you back to the Costs & Charges tab.
The charge will appear on the Billing Summary Tab. The type shows that is has been generated from the Costs & Charges tab;
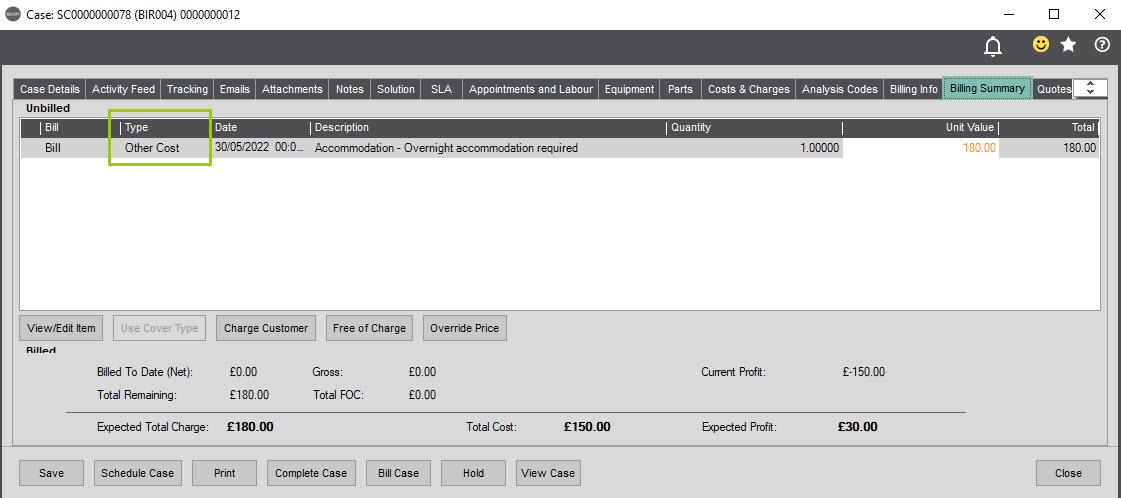
The default is to Use Cover Type however this can be changed if required to be Charge Customer or Free of Charge or you can Override Price here by highlighting the relevant line, click the Override Price button and enter the new price to be charged and Click OK.
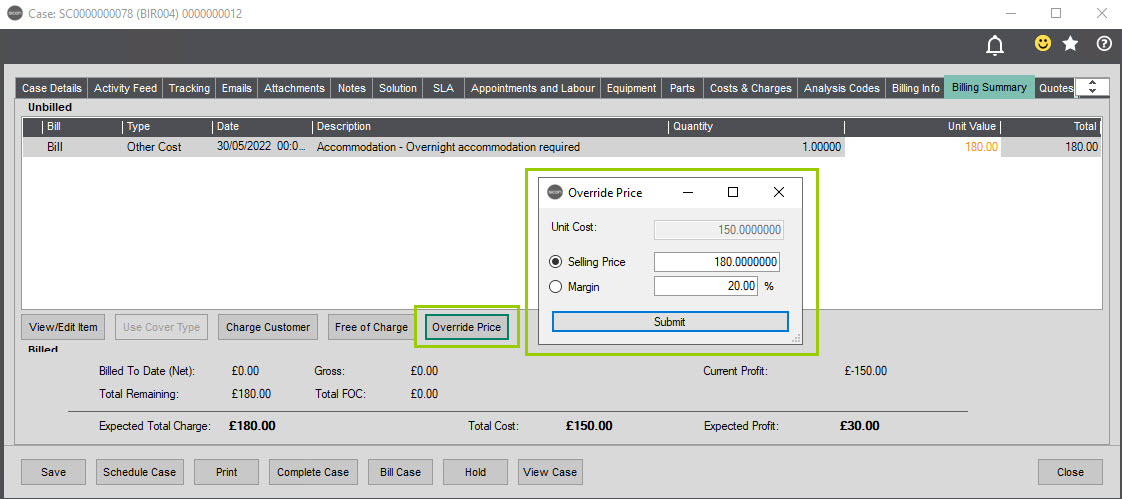
Create Linked PO
On the Costs & Charges Tab there is a Create Linked PO button. This can be used to open a standard Sage Purchase Order screen and will have the Case Reference details displayed in the screen banner.
The first window you will see allows you to enter a Raised By – this is a list of your employees/engineers and can be left blank. You also have the option to enter a Margin percentage for this order.
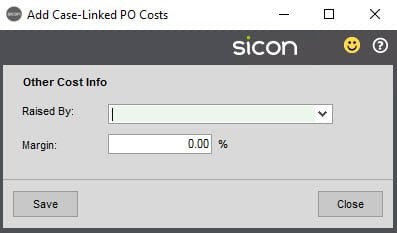
If neither of these fields are required, click Save to open the PO.
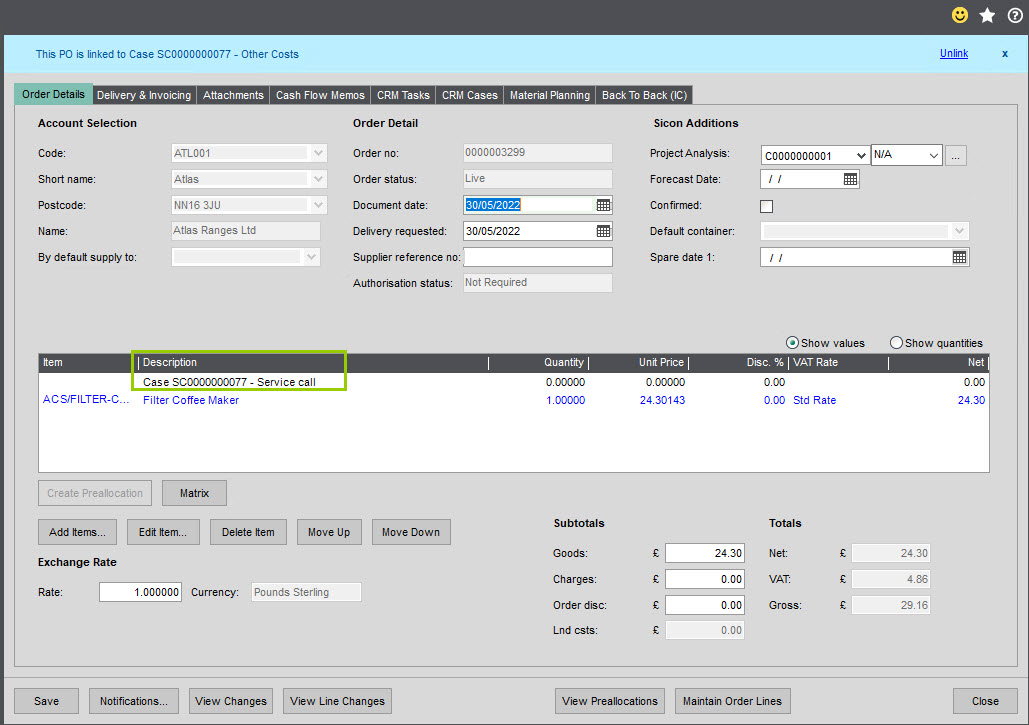
If you have activated Add a Comment Line to generated PO’s on the POP & SOP tab in Service Settings, you will see the Case Reference and Case Summary in the description field as shown above.
When the PO is saved, it will show on the case with the PO system generated order number (Automatic generation of order numbers must be on) and a Status of Parts Tracked Via Parts Tab. This PO will need to follow standard Sage processing procedures through to invoice in order for the case to be billed/completed.

8.22. Analysis Codes
If Analysis codes have been configured within the Service settings, users can assign the appropriate code/s to the case.
Analysis codes that have been flagged as Mandatory must be populated in order to save the case. Any mandatory ones that have not been populated will be highlighted in pink so the users have a visual representation of what needs to be completed.

8.23. Billing Info
The Billing Info summary screen displays the settings which will dictate how the case is billed out through Sage SOP when selecting ‘Generate Sales Order’ from the Service menu.
If required, the Case can be billed out to a different Sales Ledger Account than the one the case was raised against by selecting an alternative Billing Account. Sales Orders previously raised against the case will be displayed.

The Cover Type used on the case will be dictated by the following defaults but can be changed per case if required:
Whether the equipment is covered by a Contract and therefore the cover type is set per Contract Line.
Note: can be changed per case if permission has been enabled (Settings – Cover Types – Enable Amending Contract Cover Type).
The Customer’s non-contract Cover Type (Sales Ledger – Amend Account – Service Tab).
The system default non-contract Cover Type (Settings – Cover Types).
See Maintain Cover Types for more details on how they can be configured.
8.24. Billing Summary
Chargeable labour, parts and expenses where relevant will be listed on the Billing Summary, displaying invoiced and to be invoiced quantities and values, these are based on the cover type specified on the billing tab (i.e. whether parts and labour are included, whether any call out charges apply).
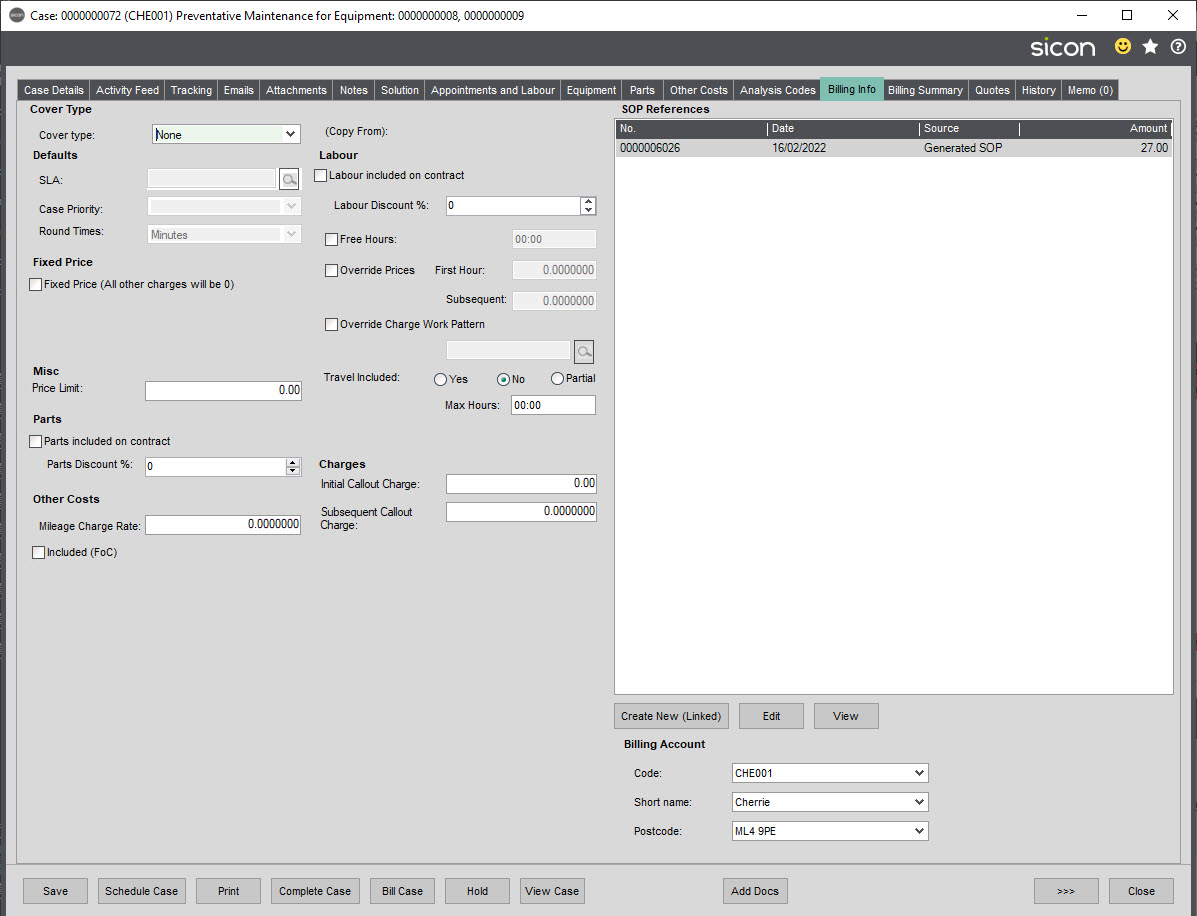
If the Cover Type is changed prior to the case being billed (depending if the Amend Cover Types is ticked in Settings), you will see a message on the Billing Summary tab advising that there are pending changes which should be saved.
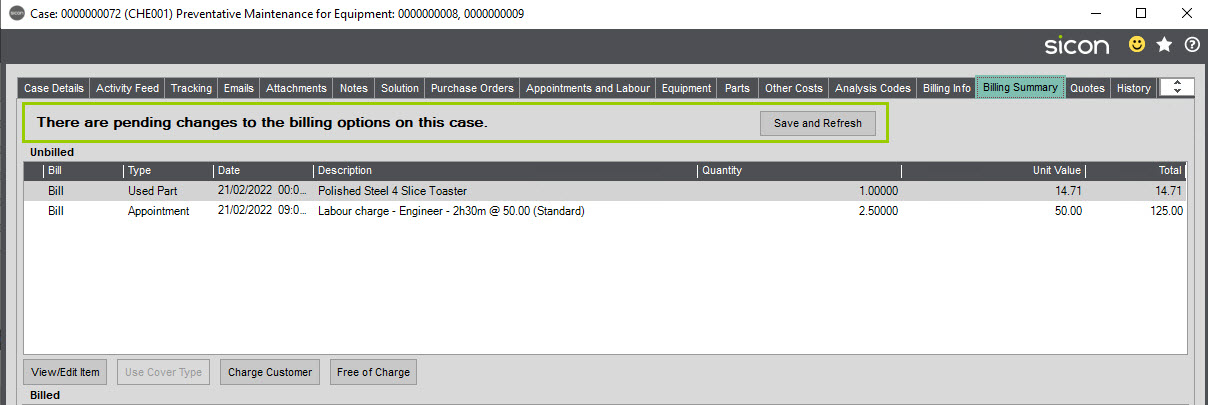
Highlighting the Unbilled lines will allow you to View/Edit the item – if this is a PO raised from the case you will be able to View the order detail and amend the price or Margin % if required.
The line can be flagged as chargeable to the customer or marked as Free of Charge. If you have ticked Include FOC Items on generated sales orders at zero price on the POP & SOP tab in settings, any lines that you mark as FOC will appear on the Sales Order raised from the case at a 100% discount value, so the customer knows the item/service has been provided but is not being charged for.
There is also an option to Override Price, this may be used if you have charge rates set against the engineer, but you want to override on this case to increase/decrease the default value.
The values at the bottom of the screen is direct view from the Project and case, so if you are unsure why the totals at the bottom are showing as they are, then from the main case details tab, click on view postings to bring up the project / case summary.
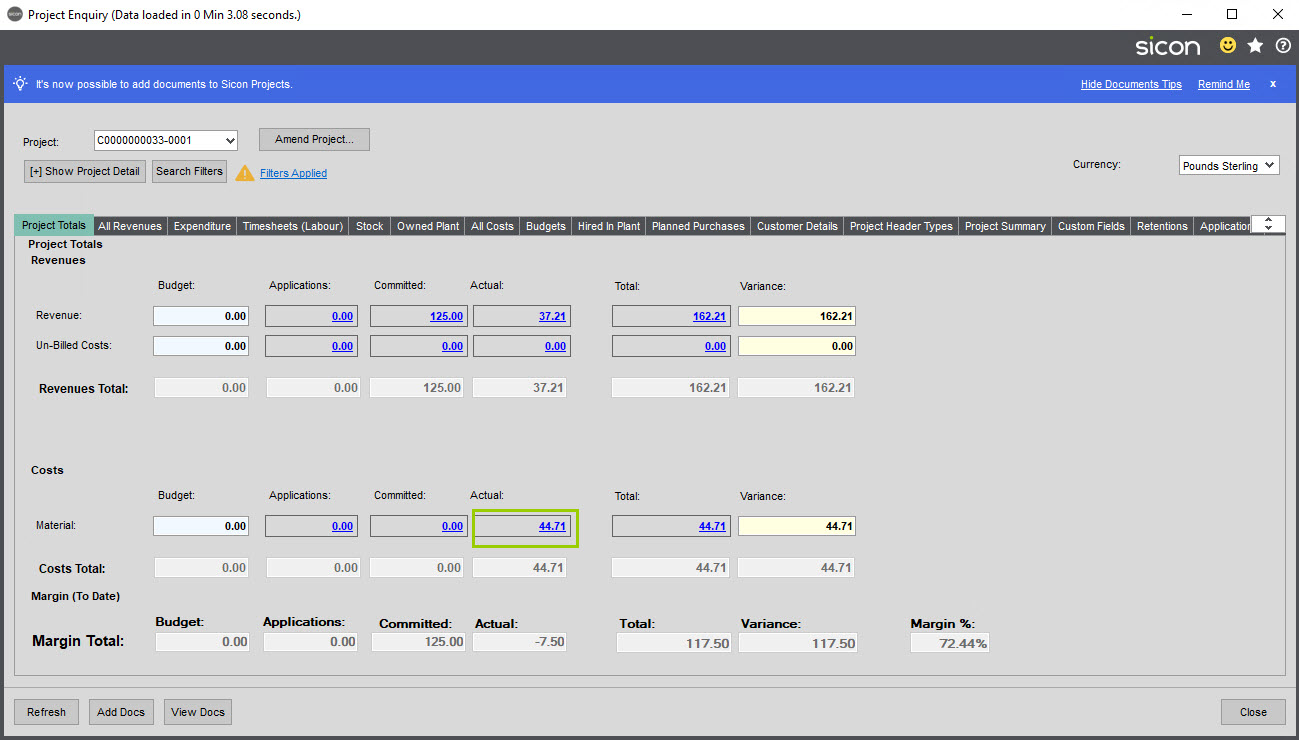
Clicking on a hyperlink (blue underlined figures) will show the detailed breakdown of the total.
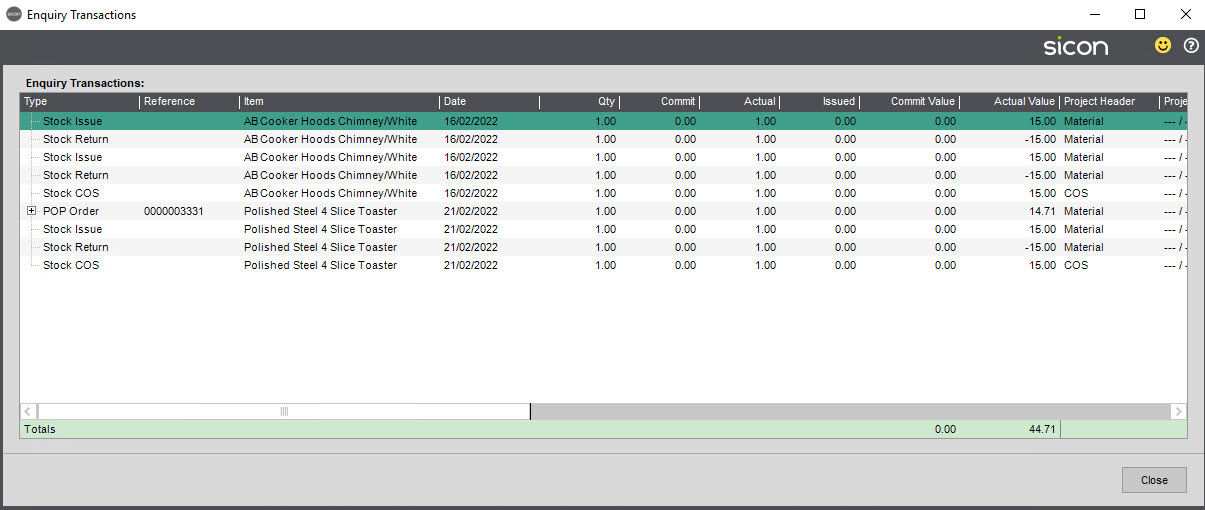
If the user was to flip between the billing summary tab and the billing tab and changed the cover type from ‘None’ to ‘Parts only’.
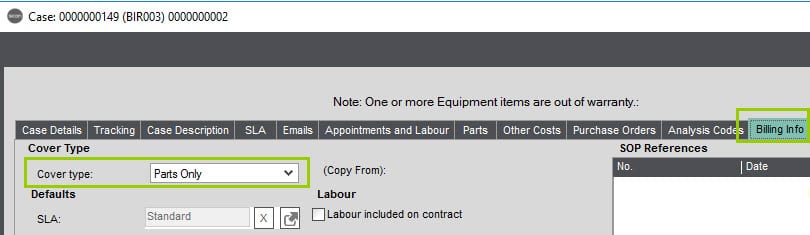
When they went back on to the billing summary tab they will be warned that there are ‘pending changes to the billing summary tab, and they should refresh’.
When the user refreshes, the system will change those items now not billable to be greyed out, based on the changes made to the cover type etc. on the billing tab. The bottom billing details will also change.

To revert back to previous, select, go back to Billing Info and change back to previous cover type (in our example to ‘none’).
To complete the billing for this case, select Bill Case button.
Again, you have the option to change the charging of any of the lines in this screen by highlighting and clicking the required button.
The default is to create a new sales order, but by clicking on the Add to Existing Sales Order and the magnifying glass icon you have the ability to link these charges to an existing sales order. The existing Sales Orders that you can link to are only ones that generated the case in the first place. i.e. an installation case with equipment was created from the initial sales order to the customer. The default setting is to create a new sales order.
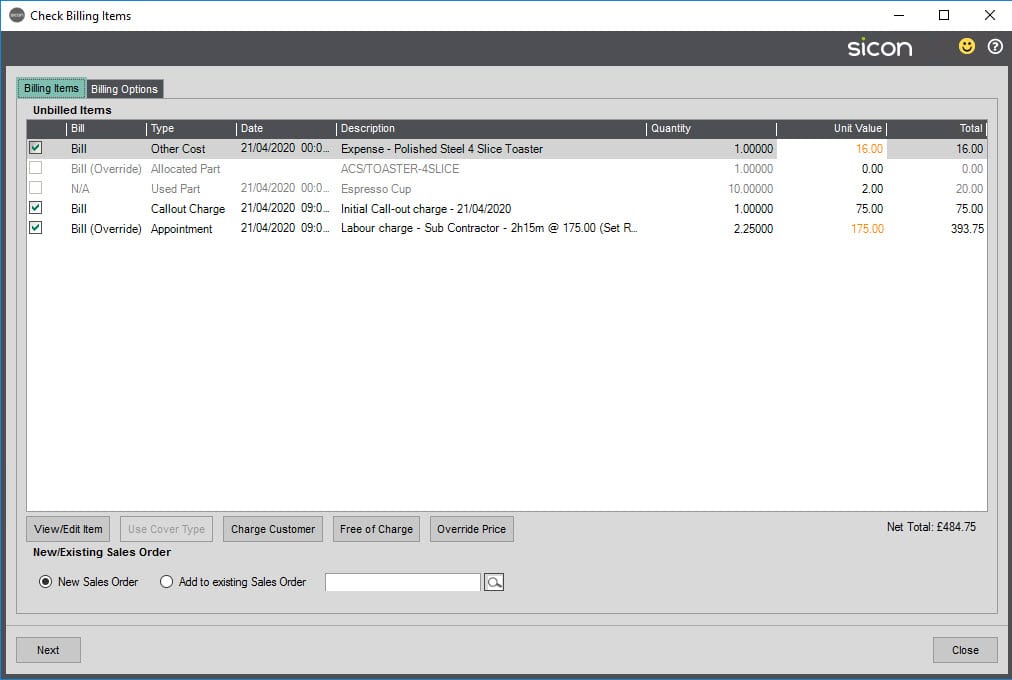
Click Next to proceed to the Sales Order where you can see the details that have been passed from the case. As we had activated to Add a Comment Line to generated SO’s (POP & SOP tab Settings) we can see the case number as a comment line. The Expresso Cups were marked as FOC so they are showing on the SO as 100% discount.
Standard Sage processes apply from this point forwards.

8.25. Printing a Billing Summary for the Case Customer
Where a customer asks you for a report / proforma for the work done and the charges you are looking to bill from the case, you can send a ‘Billing Summary Detail Report’. This is a Sicon Service report, reporting on the transactions linked to this specific case.
To Print, Select Print and Billing Summary Details.
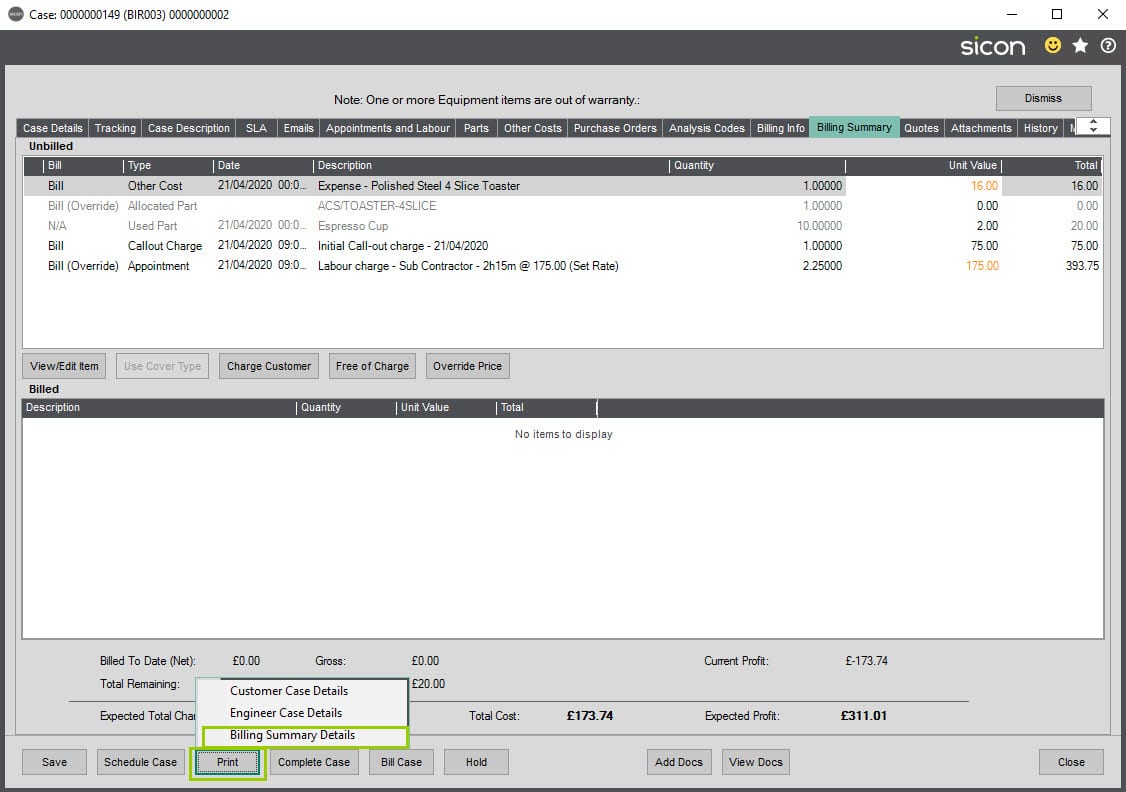
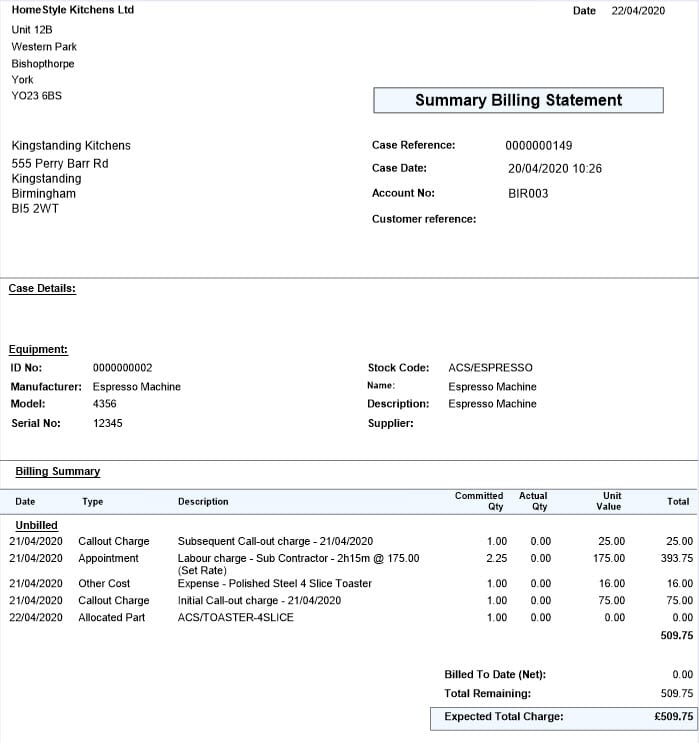
8.26. Quotes
Quotes for Stock items, for Free Text Items or for a Callout Charge can be added to a case and printed. A reference will be created using the case number and a quote version reference e.g. 000000044/1. Once printed, the quote cannot be edited but only re-printed. If subsequently you need to requote the customer, there are 2 options:
For a completely new part/service, use New Quote which will give the related version number 000000044/2.
Or
For requoting the original part/service, use the Copy Quote function which will give a related version number e.g. 000000044/1/1.
Quotes can be flagged thereafter as Won, Lost, Replace or Deleted. Quotes flagged as Won will prompt to ask if you want to assign the parts to the case, clicking Yes opens the Add Quoted Parts screen where you complete the selection.
Adding a New Quote:

From the Quote tab, select Add Quote – the Quote Number, Status and Date created will be populated as soon as add quote is clicked.
Enter a Description for the quote then Add Line.
From the drop-down list select the Type to add to the quote e.g. stock item, free text line, call out charge.
Note: Callout options are not linking back to stock codes in Sage and are intended to allow fixed costs for these areas to be identified as costs on the case and subsequently be billed on to the customer.
Enter the quantity and unit price if this is not being picked up from the Sage stock item, the combination of these 2 fields will give the line total.
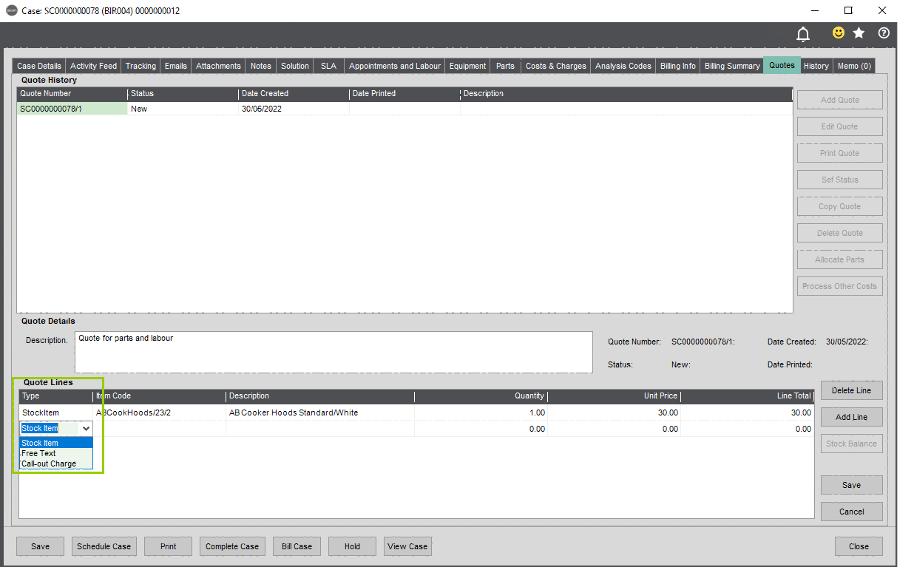
Continue adding lines until you have everything needed for the quote.
Save and Print Quote.
The quote layout within the package is written within standard Sage report designer and can be amended to suit.
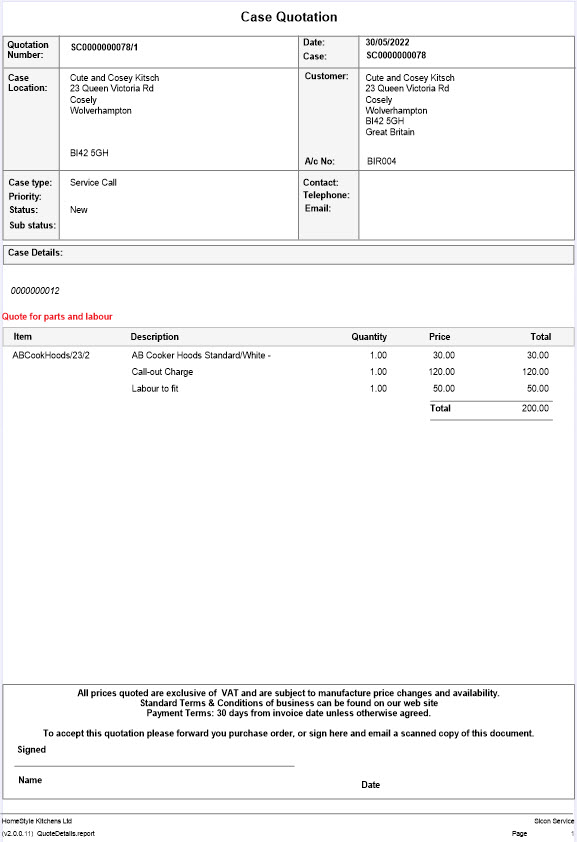
When the Quote Status is set to Won, you will be prompted to allocate the quoted parts to the case.
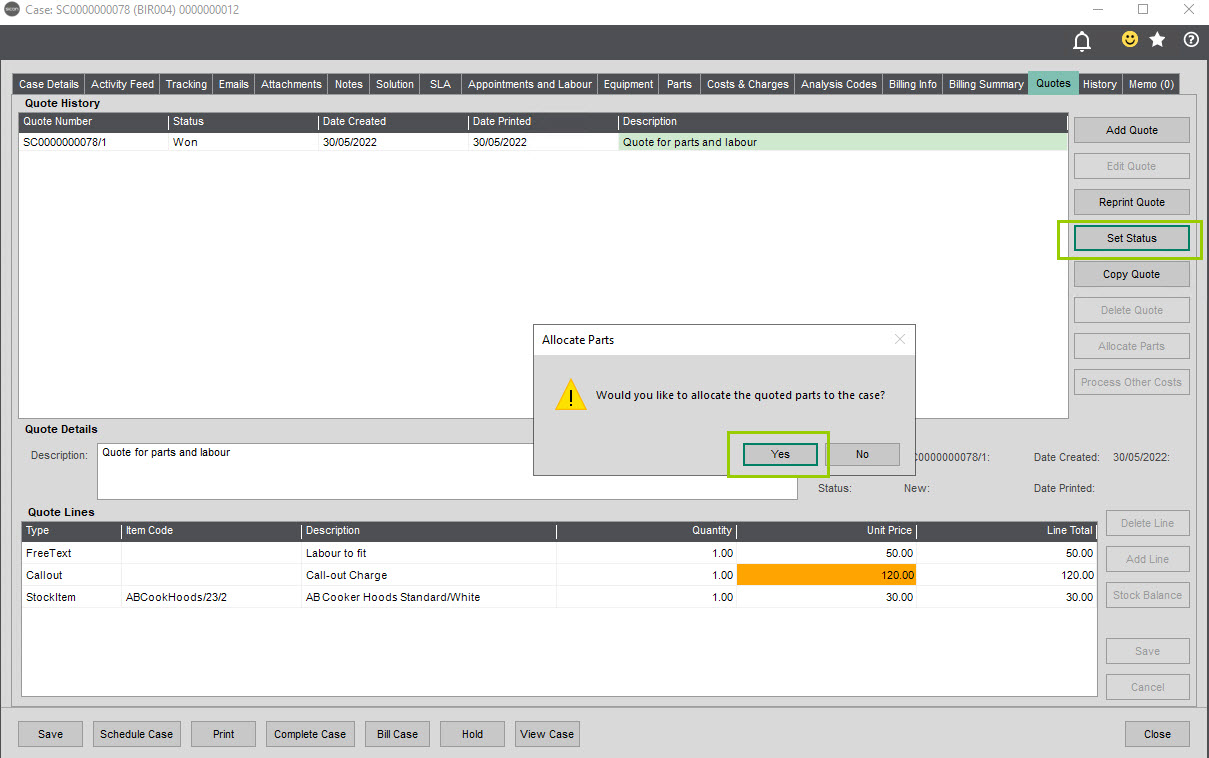
Clicking Yes will take you to the Add Quoted Parts screen where you can either Send Deficit (Allocate Available Now), this will allocate the available stock to the engineer’s warehouse and create a stock transfer if there is a balance required; or Send All (Allocate on arrival) will open a Stock Shortage Transfer screen.
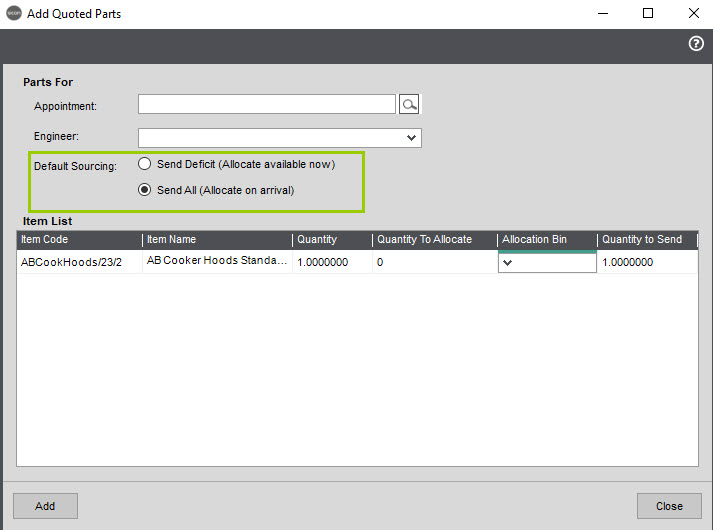
Update the required fields in the Stock Shortage Transfer screen.
Parts will show for continued processing on the Parts tab.

Other Costs can be generated from the Quote tab.
OK the above message to action this and show the transaction on the Costs & Charges tab. These figures are added to the expenditure tab in Sicon Projects so you can see the costs against the project. When these items are billed to the customer they will show on the Revenue tab.
The Stock Balances button enables you to see the stock level for the selected item on the Quote line. Highlight the quote line and click Stock Balance to view the availability.

8.27. History
A record of the case history will automatically populate the History Tab and records can be filtered by the ‘Type’ of change made to the case, by Date and by the Sage User who made the changes. It is not possible to change/edit the history.
Highlight the line and click View Full Comment to see the full description of the history line.
8.28. Memos
Memos can be added to a case. Memos are not included in the case History but the total number of memos will be visible on the tab. Follow up options currently are for reference only, there are no flag notifications. This form is based on a Sage form, but could be included on custom reports.
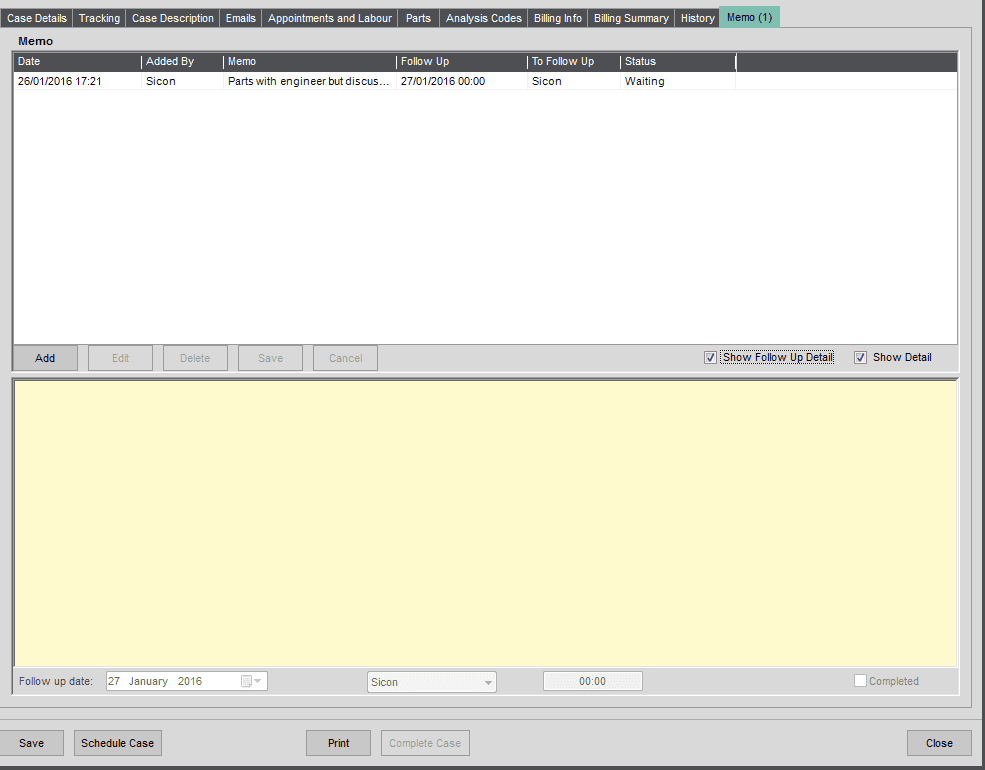
8.29. Creating a Case via Sage Sales Order
Sage Stock Items marked as ‘Serviceable Items’ on the Sicon tab/Service option will automatically create an Equipment Item within Service when sold through standard Sage SOP and those also marked ‘Requires Installation’ will automatically create an Installation case.

When the Sales Order has been saved, a screen will appear allowing you to then edit the details as required. Note: a stock item can be flagged as just being a serviceable item (creates an Equipment Item) or as only Requiring Installation, or both.

The Stock items will need to be flagged to create equipment items when sold and will need the Make, Model, Service Interval and Warranty Period populating too. This can be done en masse using the Import Stock Item Settings (Service) file which is in the Imports folder in Service Utilities.
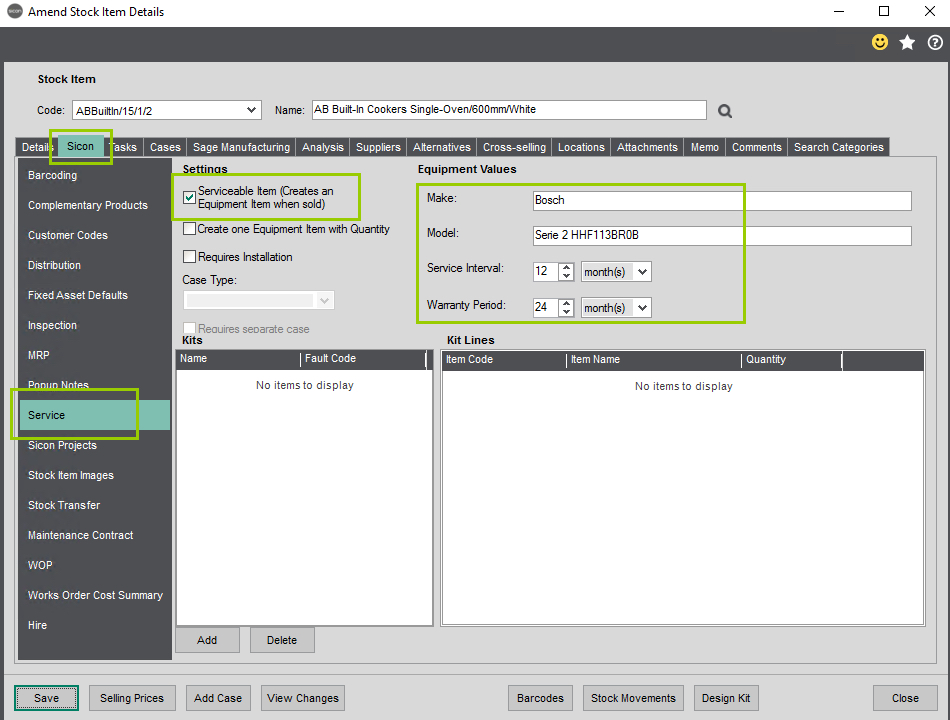
As long as you have one stock item set to require installation with a case type linked to it, you can link multiple stock items to one case. Our example here is a stock item called Install.
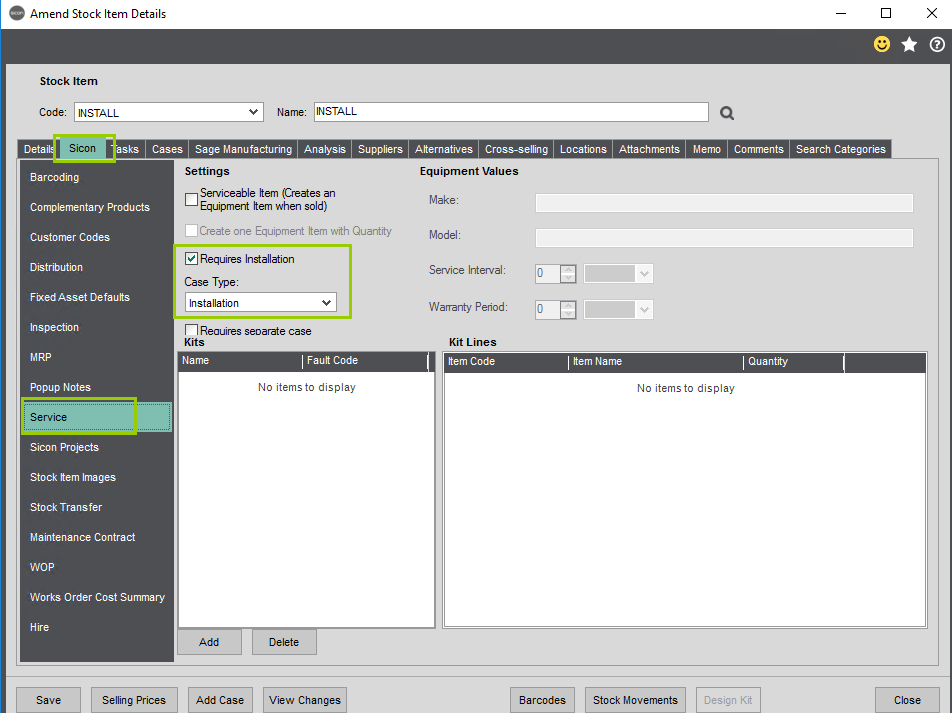
Add all the items you are selling including the one to create the installation case on the Sales Order, then Edit the line that is being used to create the case.
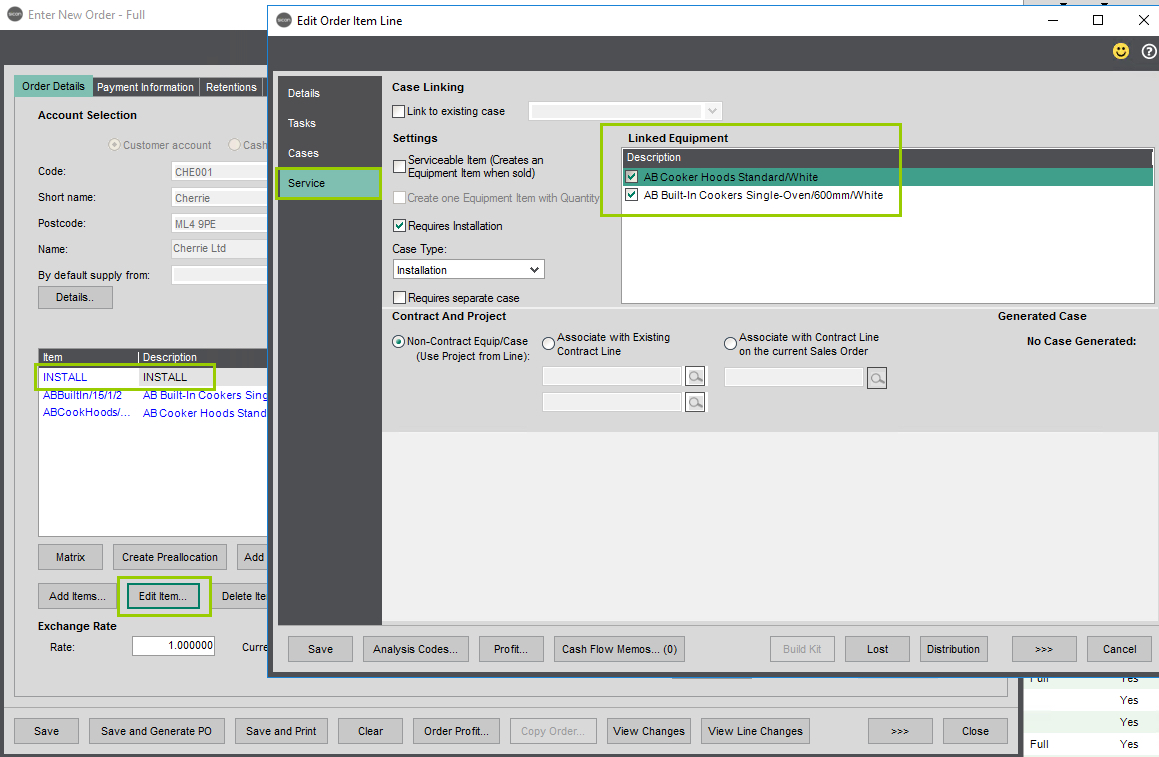
The list of linked equipment is shown in the top right-hand pane of his screen, tick all the items that you want to be included on the case that will be created when the sales order is saved. Save the Edit Order Item Line screen then save the Sales Order.
When the sales order number has been generated, you will get a screen confirming the Case Ref and the Equipment details.
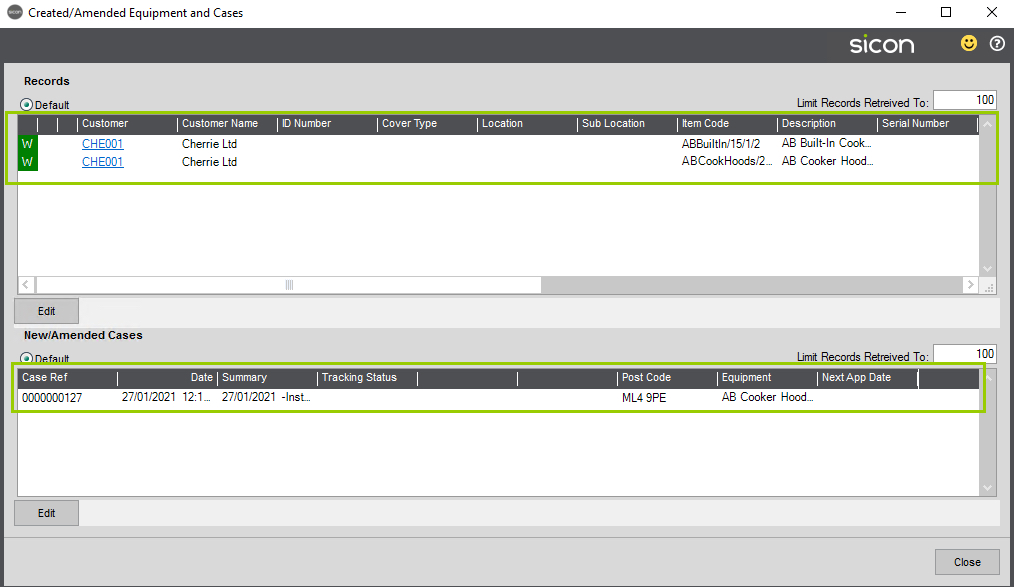
Click close to continue.
The case will now be available in the Service Desk for any contact information, tracking notes etc. to be added.
NOTE: SOP Delivery Address and Sub Location needs to be identified from the sales order as these fields will be greyed out when the case is created.
When the appointment is scheduled for the engineer, the equipment will be displayed.
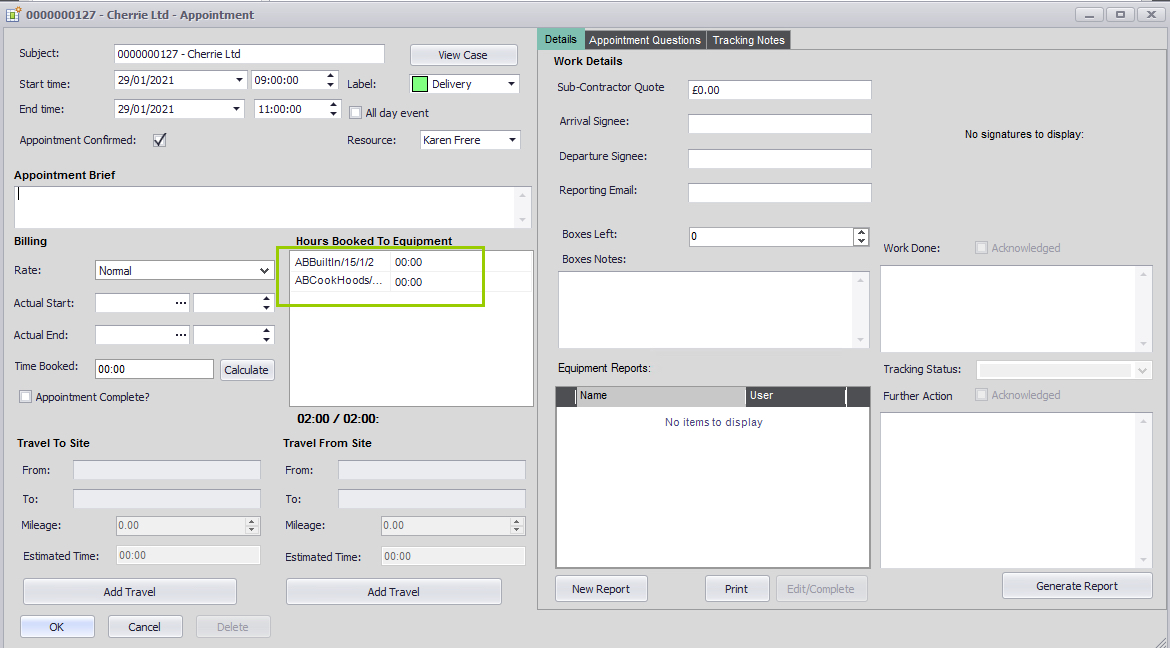
When the engineer synchronises their device they will see the confirmed appointment.
They can click the Travel to appointment to record their travel time.

When they have completed their travel time log they can begin to update the Work Appointment. Navigation between the various screens is by pressing the three lines at the top of the screen.
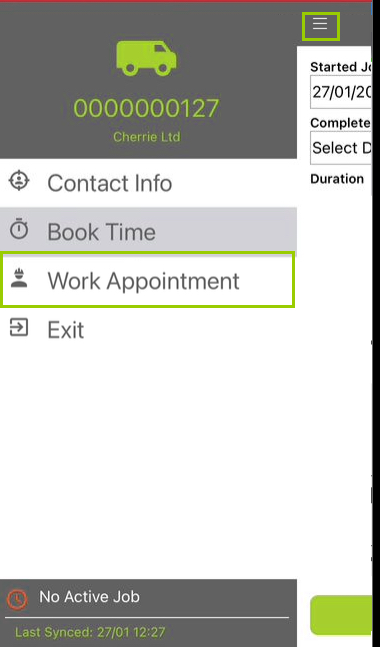
The appointment overview shows the engineer the scheduled start and end times – these can be overridden as appointments may take longer or finish sooner that scheduled. The type of case e.g. Installation and a brief Description of the required work.
An Arrival Signature can be obtained from the customer, or the engineer could self-sign.
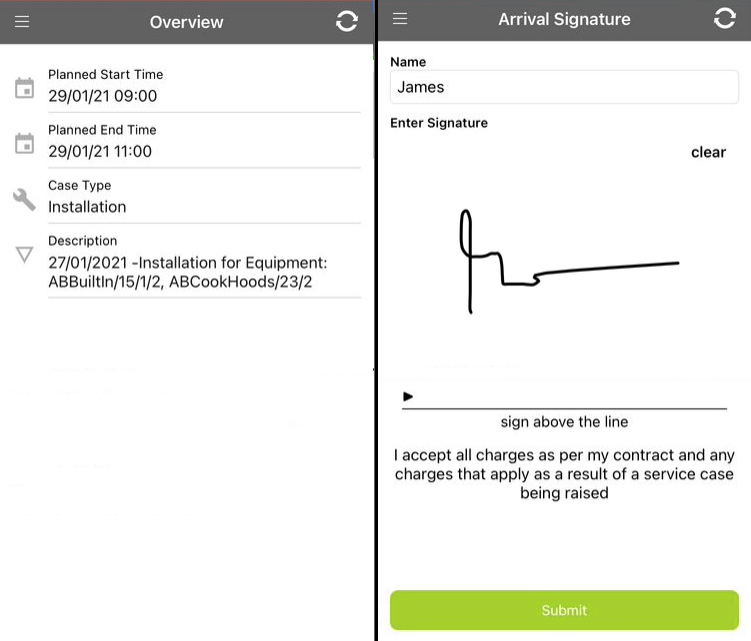
The Service Items screen shows the detail of the equipment on the case, this is seen by clicking the blue circle with the white + adjacent to the equipment.
Make, Model, Warranty Expiry and Next Service Date have all pulled through from the equipment record created from the sale of the item. If they were serial numbered items, the serial number allocated to the equipment would also be shown. If an Id number had been entered against the equipment that would also show.
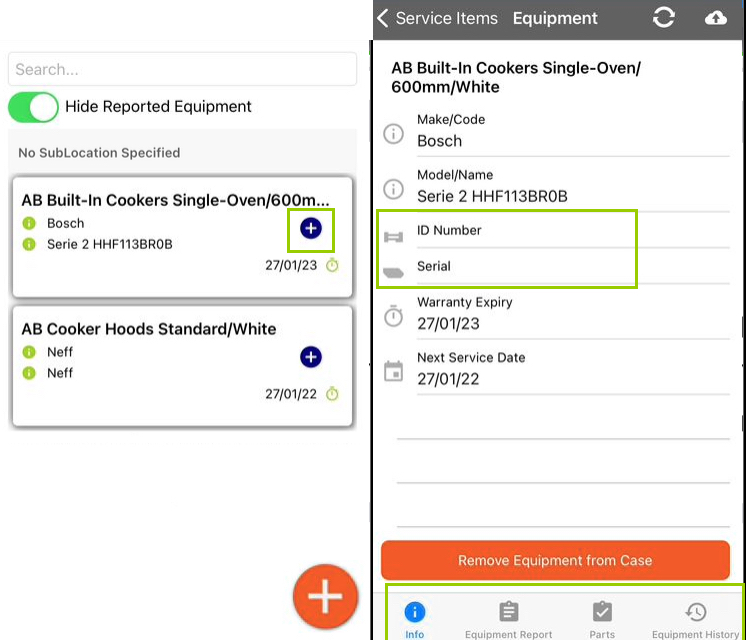
Additional information can be seen by selecting the options at the bottom of the screen.
If Appointment questions have been configured and need to be answered by the engineer there will be an ! to the right of the list item.
Mandatory questions are identified with the red circle and white X when these questions are selected if there are predefined answers to select from they will be shown. If the engineer has to write a response to the question, there will be a text box for them to enter the answer.

When the work has been completed the Work Log needs to be updated. On an installation case, you may not need the engineer to update all the areas in the Service App – e.g. Attachments, Notes, Service Items. Parts etc.
Enter the details in the Work Done section and update the Work Complete status. If further action is required the engineer will need to press the N/A bar beneath Status and select the appropriate tracking note. They will then be able to state what further action is required.
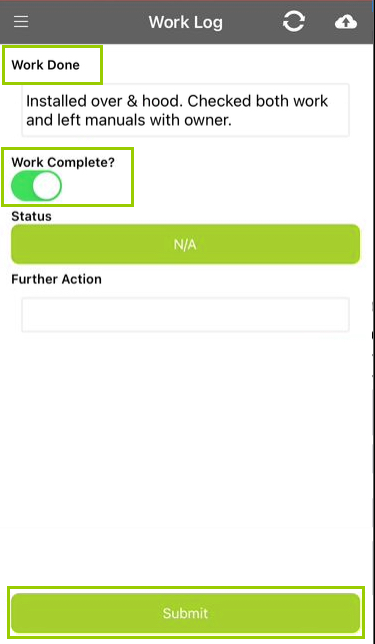
The work appointment time can be amended in the Book Time screen if required

Before the departure signature is captured, there is an overview of the appointment showing arrival and work finished time, work done description as entered by the engineer, any further action and parts used if any were needed for the case.
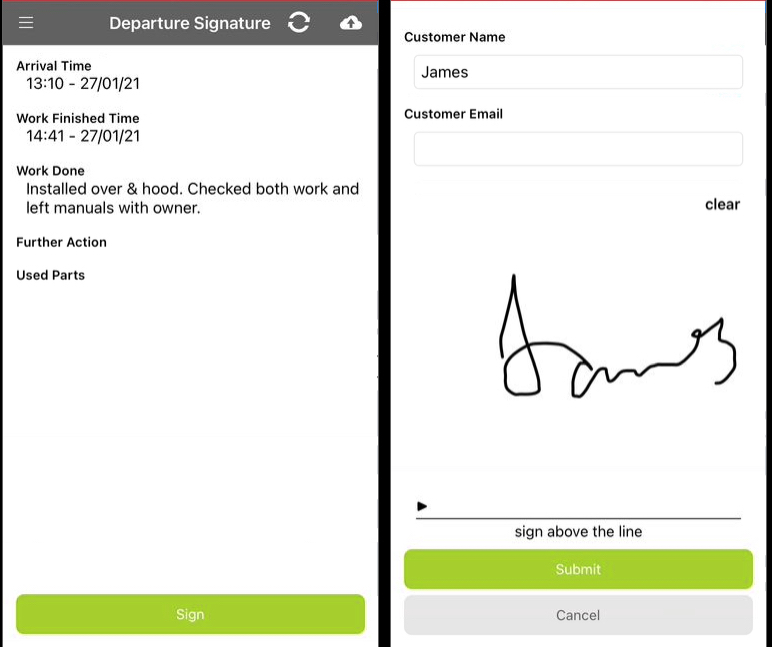
When the customer has signed, this can be submitted back to the office.
Green ticks against the menu items identify that there have been updates to these areas of the app so the engineer has a quick visual of what is still remaining to be completed – in this instance it is the Travel Departure.
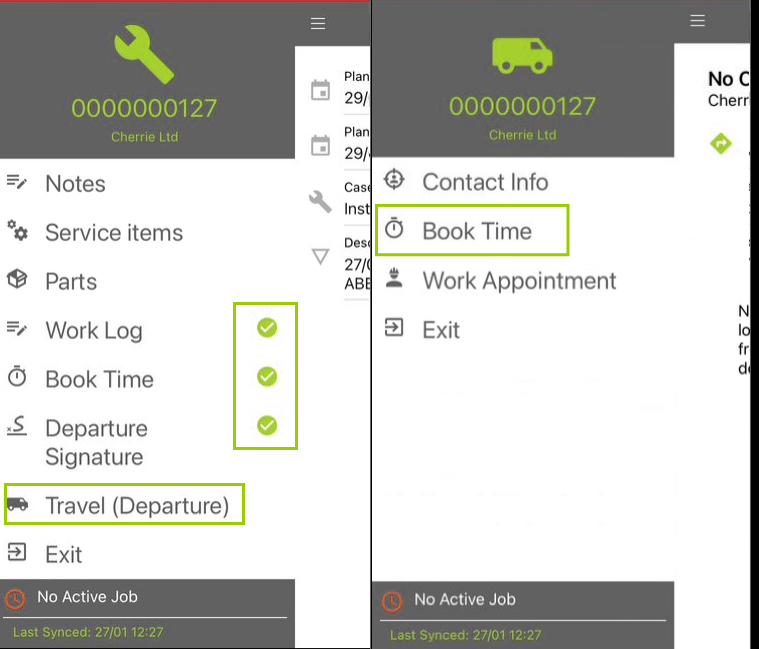
The return journey time can be edited if required before submitting.
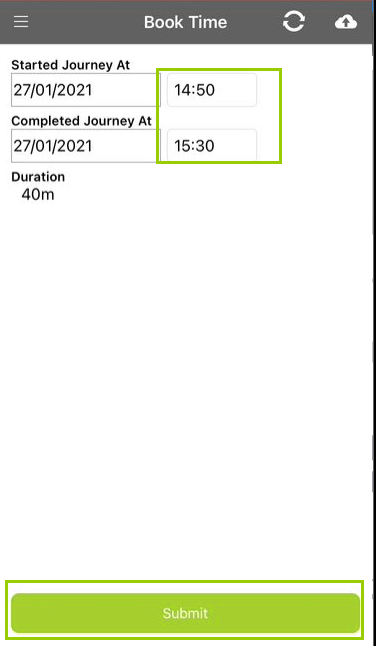
On the Billing Info tab on the case, the original sales order is shown:

On the Billing Summary tab, the engineers travel and work appointments show to be billed or marked as Free of Charge depending on how you are billing the customer. If you have charged for everything from the initial sales order that created the installation case, you may want to flag these lines as FOC, in which case they can still be linked back to the original sales order.
We have flagged this example as the travel time being free of charge, but the labour work appointment being chargeable.
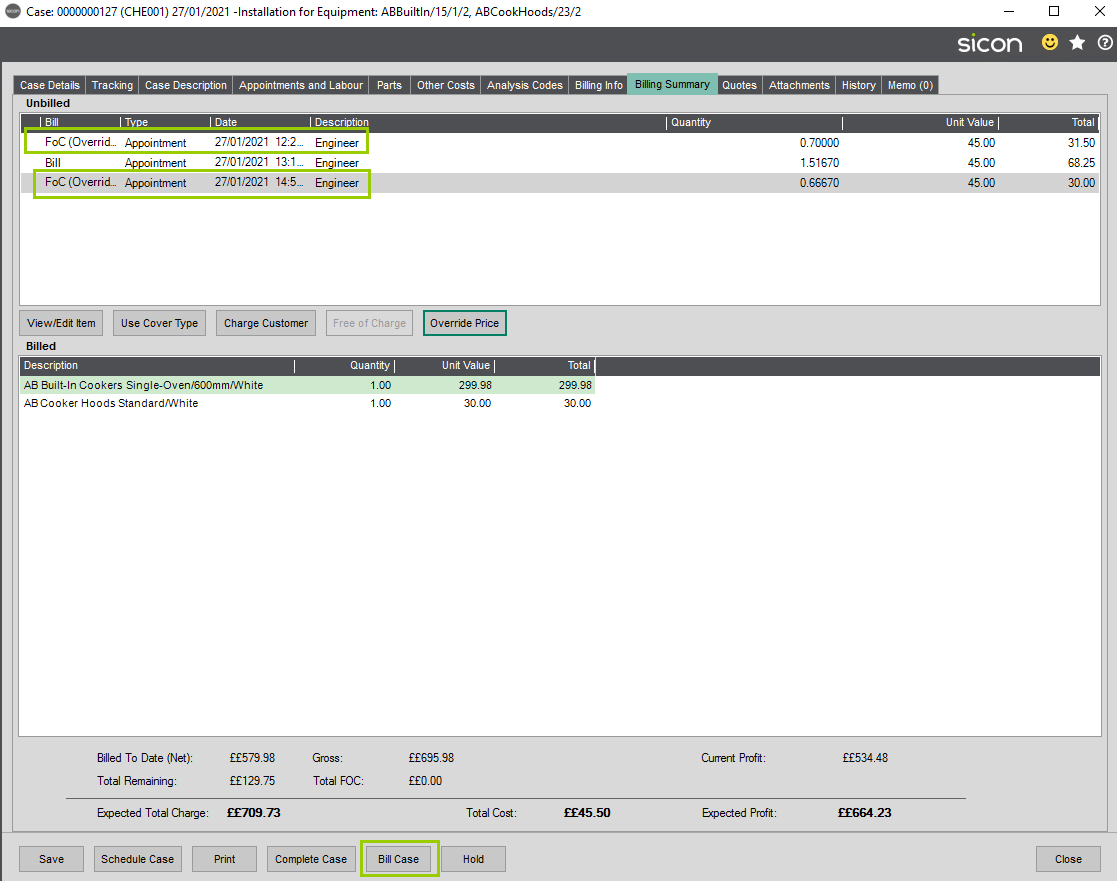
When you click Bill Case, you still have the option to adjust what you are charging the customer.
The default option is to create a New Sales Order, or you could link to the existing sales order.

Where a New Sales Order is created from the Billing Summary, depending on your settings you will see a line at the top of the sales order with the case number and description and potentially a line at the bottom of the order with the case solution details.
The lines that have been marked as free of charge to the customer will still be shown on the order with 100% discount so the customer can see that the service/part has been provided but they are not being charged for it.

When the sales order has been saved, the corresponding lines are shown in the description pane of the billing summary screen.
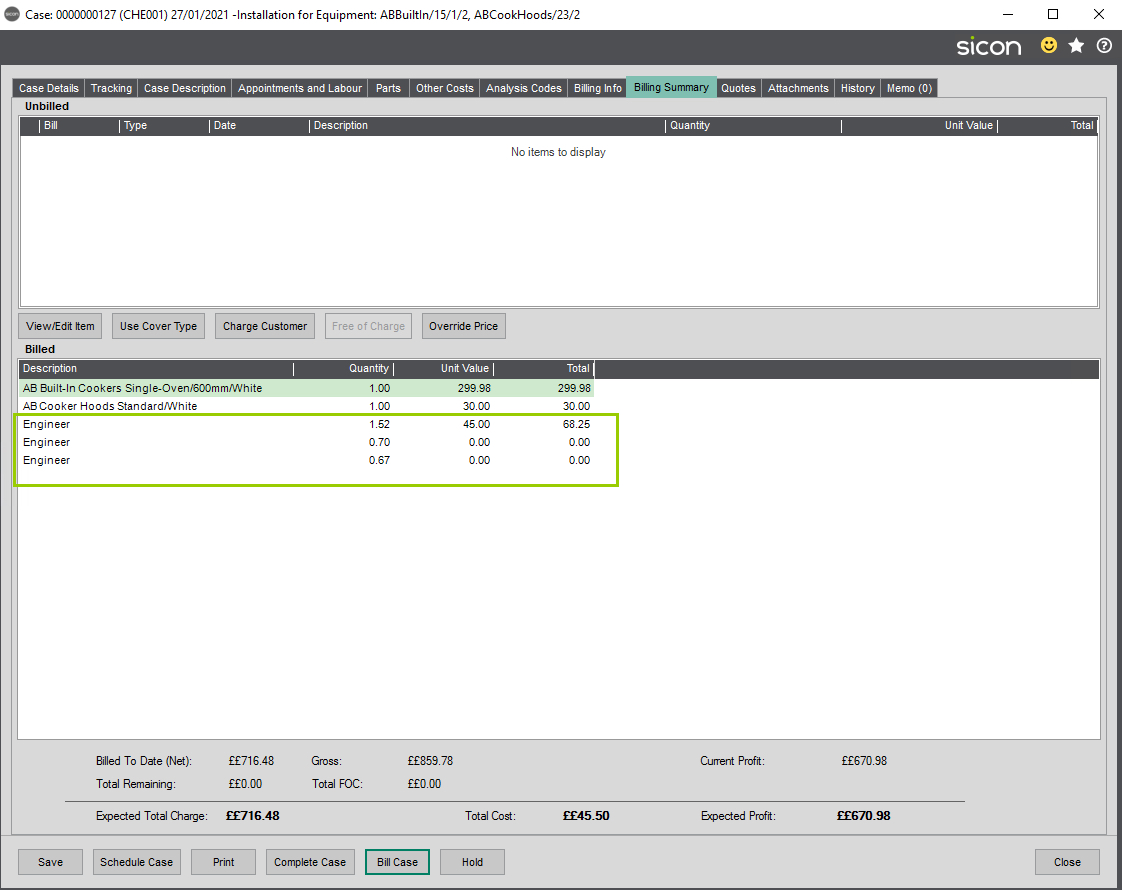
Once all appointments and billing have been finished the case can be completed.
Click the Complete Case button at the bottom of the screen and OK the Complete message that is displayed.

Completing the case removes it from the service desk default view. If you need to go back to this case at any point you will need to select the Complete option from the Case Status drop down list and click Search – the example below has a further search criteria entered as Case Ref.
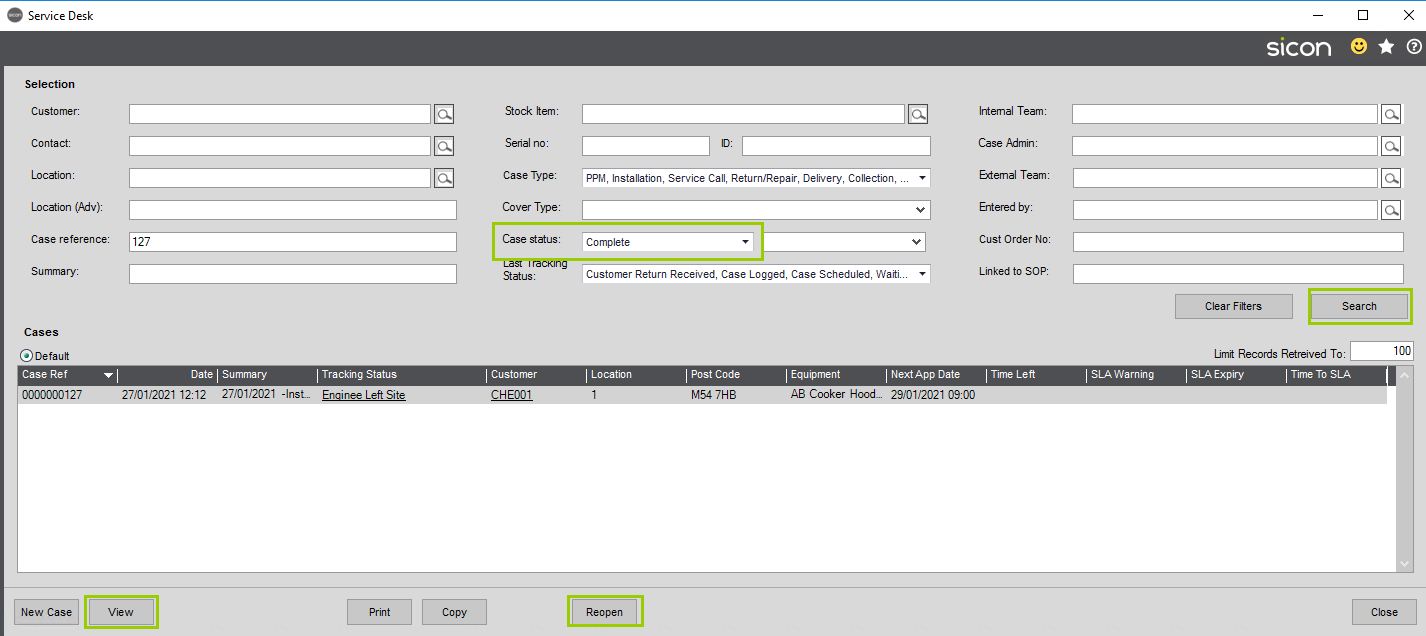
If required, you can reopen the case to add follow up appointments if the customer calls back regarding the equipment linked to the case or you create a new case depending on your processes.
8.30. Billing
Generate a Sales Order / Invoice
To invoice out chargeable labour, expenses and parts (where relevant) select Generate a Sales Order from the side menu.
Select the appropriate case and select Bill.
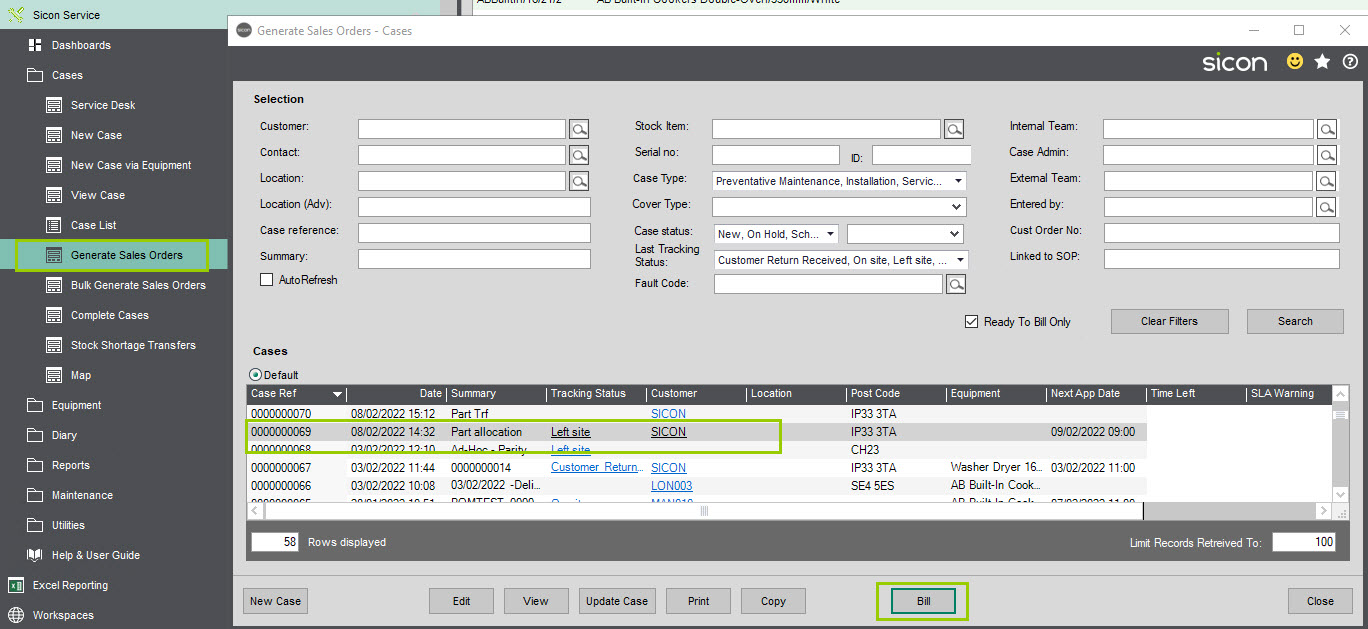
This will bring up a ‘Check Billing Items Screen’ made up of Two Tabs
Billing Items Tab
Showing the items that can be charged out in accordance with the Cover Type on the case, which is visible on the ‘Billing Options’ tab.
You can at this stage choose to charge those lines not currently flagged as chargeable, or vice a versa, choose to flag as Free of Charge.
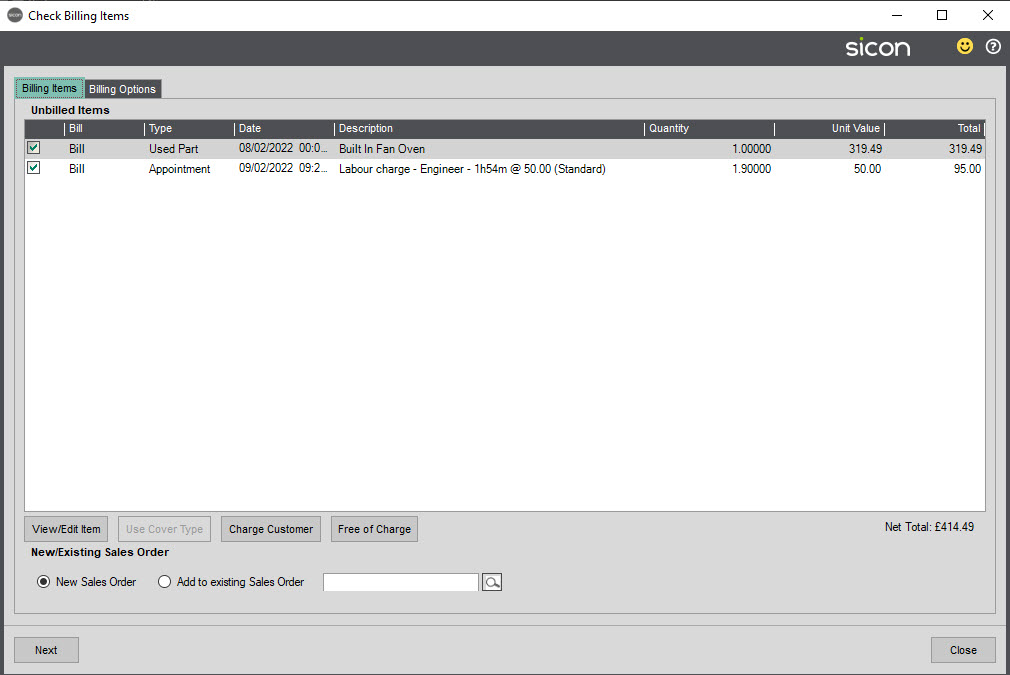
Highlighting a line and clicking the View/Edit Item will allow you to amend the Unit Selling Price of an item if required.

Alternatively, you can highlight a line and use the Override Price feature, this would allow you to change the hourly rate for engineers.
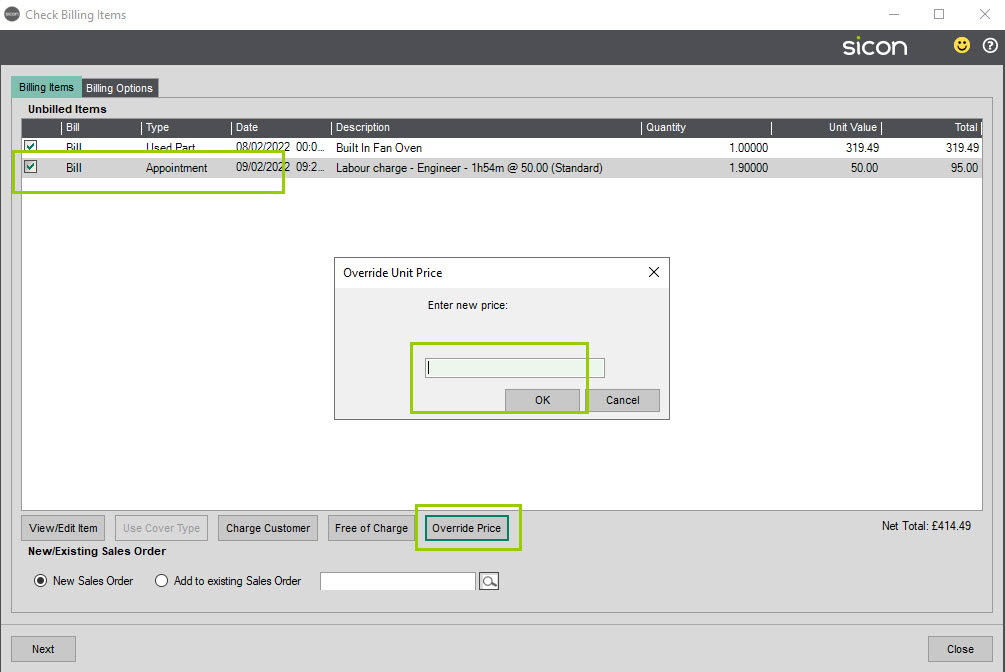
Billing Options Tab
Shows the relevant Cover type in association with this appointment.
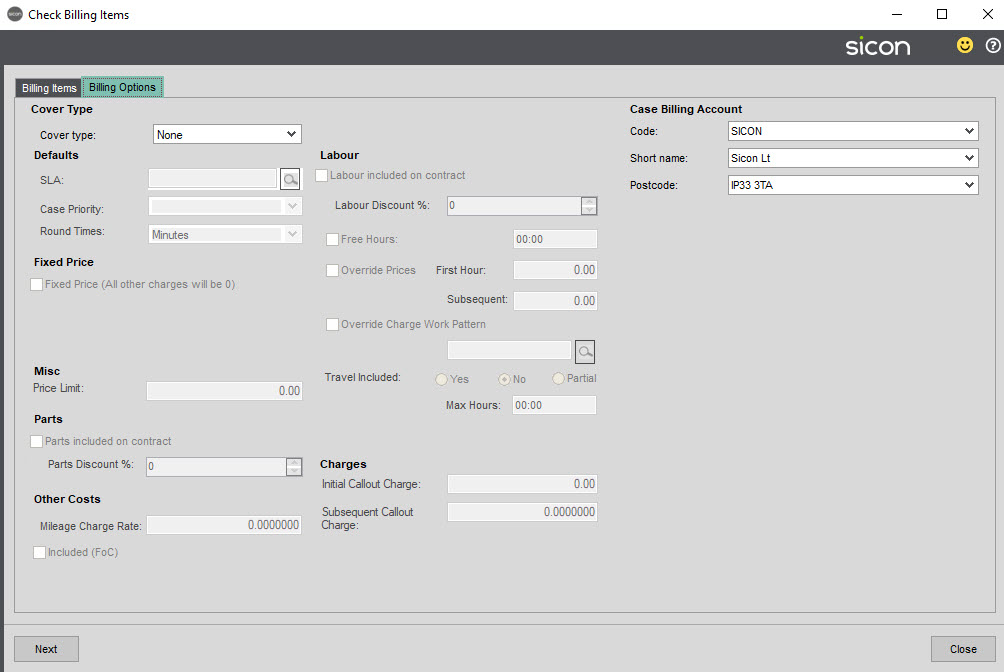
When ready to Invoice Select Next, from the bottom left-hand corner.
This in turn will open a Sales Order where additional items can be added if required. In the example below a comment line has been added automatically to include the Case Ref and Summary Description which can be set up in the Utilities – Settings – POP & SOP tab.
(Please note the screen shot above may appear different to your sales order view, this is simply because our demo data has multiple Sicon products installed, such as our Intercompany, Cash flow, Construction and Debtor Management Module. For more details of our full range of additions for Sage 200 visit www.www.sicon.co.uk
The Sales Order can then be saved and will then process through as standard Sage Sales Order.
8.31. View Case
To View a Case only without being able to amend any details.
The Update Case Button when clicked has additional features associated with it – Reopen closed cases, Create Follow Up Case and Add Tracking Note.
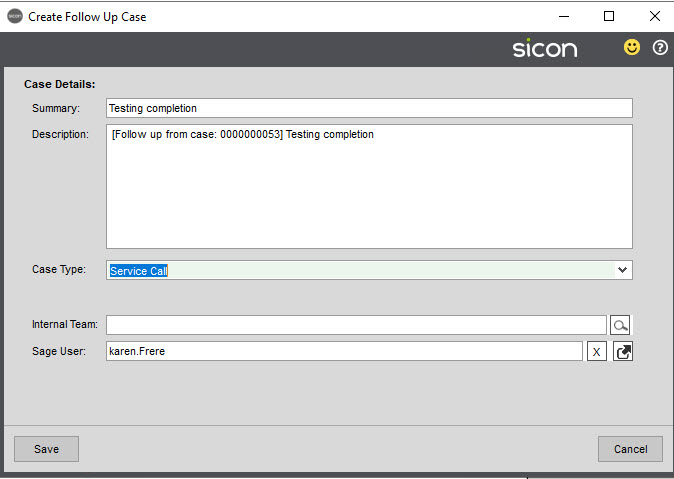
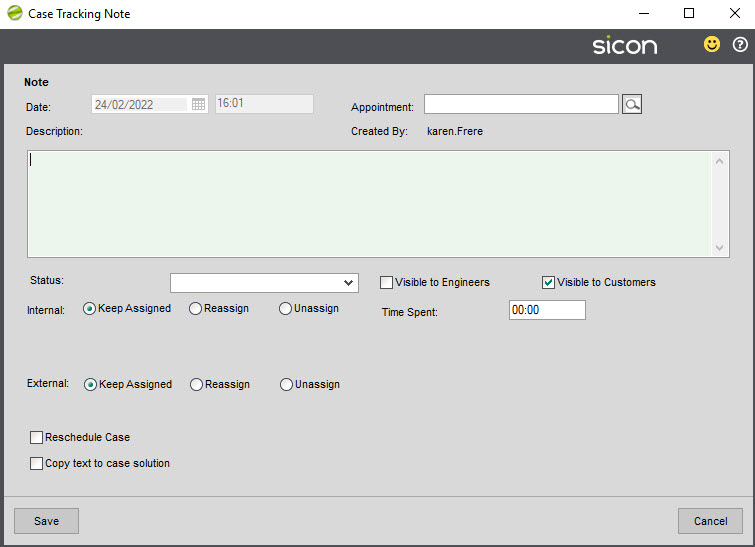
This screen can be customized to select the data you want to be visible by right-clicking on the grid to bring up the ‘Edit Grid’ Option and selecting which fields/columns to display. It is also possible to create different views with different configurations – once created choose which to use by selecting the appropriate radio button on the grid. Note: These views are shared with all company users.
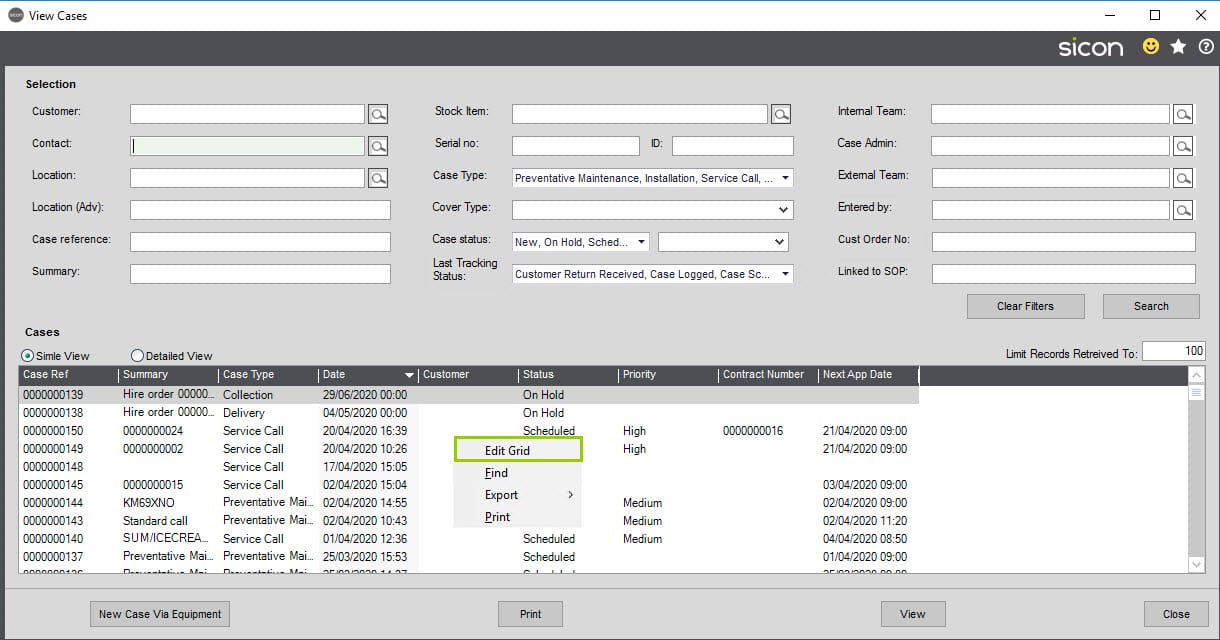

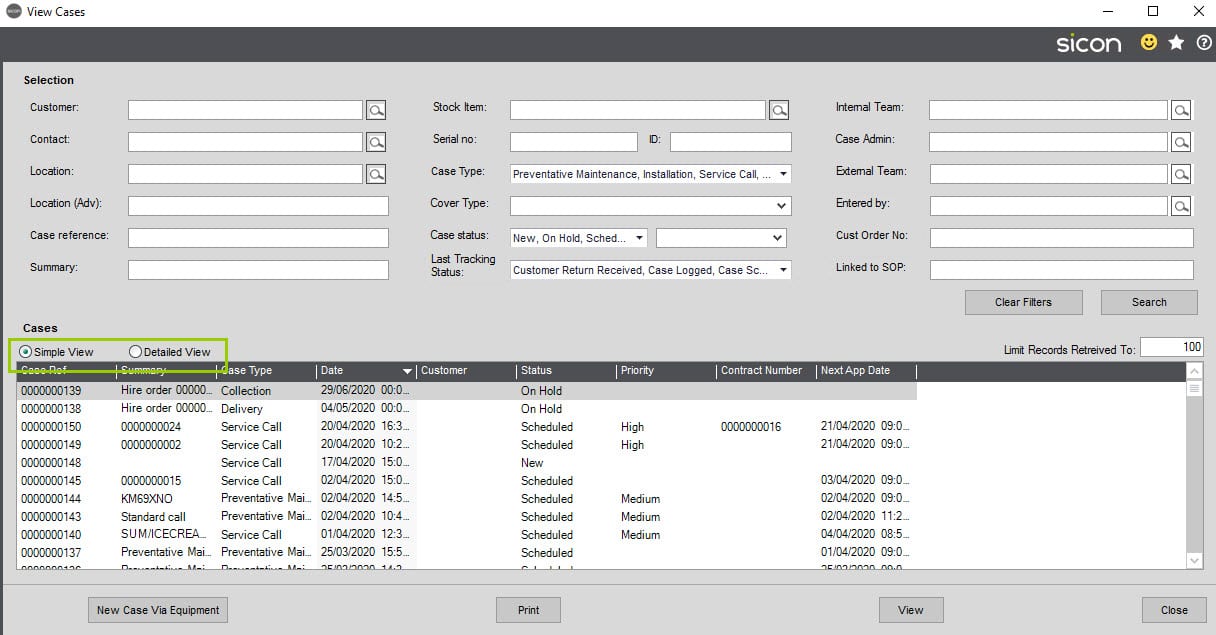
8.32. Viewing Billed Items within a Case
Once a sales order has been generated back within the case on the Billing Summary Tab users can see which items have been billed.

And from within the Billing Info Tab users can see and view the Linked SOP.

Until the case is flagged as complete, additional appointments may be added so within the Billing summary tab over time you could see Unbilled transactions in the top part of the screen and Billed items at the bottom.
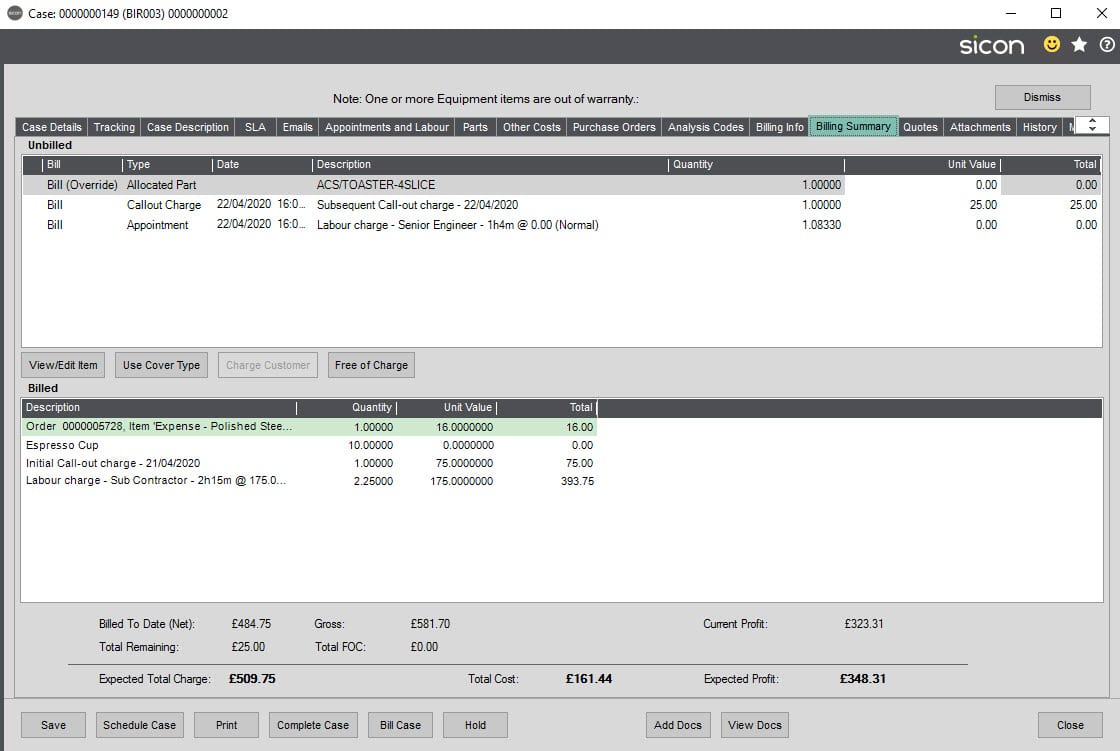
Bulk Generate Sales Orders
Choose this option to generate sales orders for multiple cases in one go, the system will warn you if items are missing, such as customers order number (if within settings it is flagged as a mandatory requirement), or appointments have no actual times recorded.
If you have a tracking note created to flag cases ready To Be Invoiced, you could filter the list by tracking note as well as by Customer account.

You can double click on a line to view the case.
If you have not filtered by customer, you will be shown all customers that are going to have sales orders generated.
8.33. Bulk Generate Sales Orders
Choose this option to generate sales orders for multiple cases in one go, the system will warn you if items are missing, such as customers order number (if within settings it is flagged as a mandatory requirement), or appointments have no actual times recorded.
If you have a tracking note created to flag cases ready To Be Invoiced, you could filter the list by tracking note as well as by Customer account.
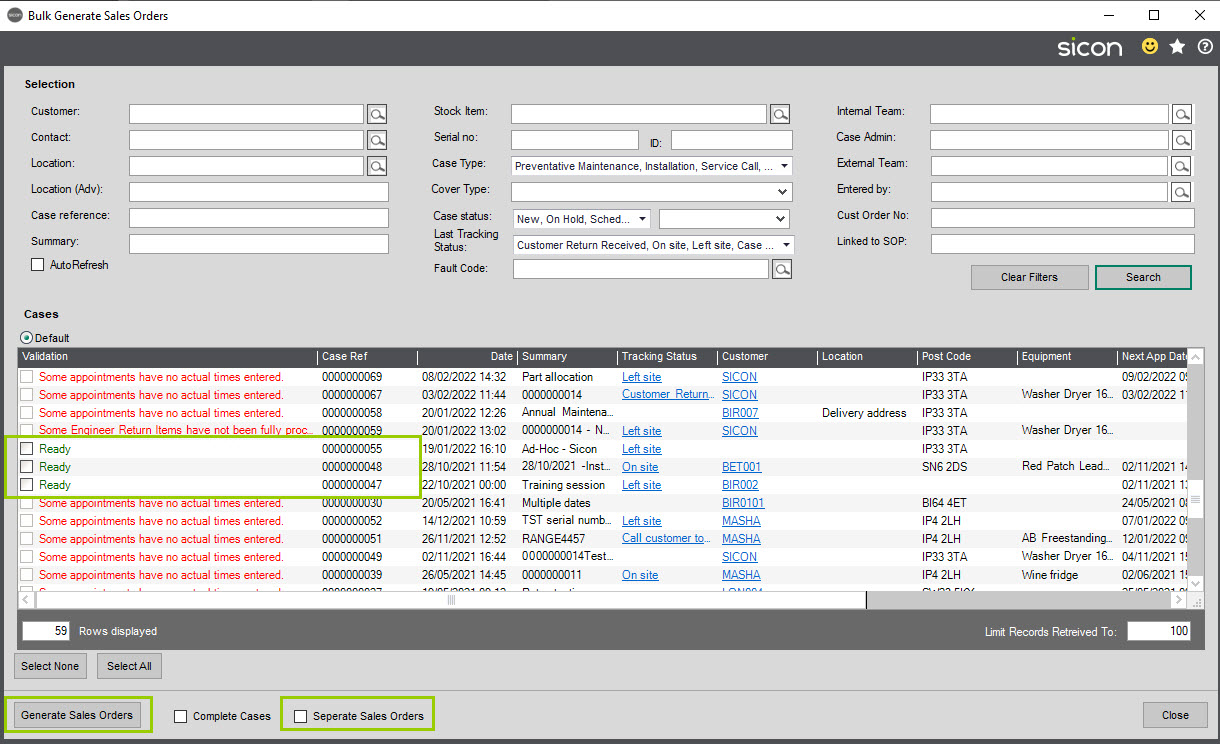
You can double click on a line to view the case.
If you have not filtered by customer, you will be shown all customers that are going to have sales orders generated.
Tick the items to have sales orders generated for, if separate orders are needed tick to create Separate Sales Orders then click the Generate Sales Orders button.

Clicking Yes to create the separate sales orders will require you to check the billing items to override/charge customer flag FOC as needed.
8.34. Completed Cases
To complete a case, select Complete Case from the side menu. Select the appropriate case and click on Complete Case at the bottom of the screen.
Cases can also be completed from the Amend Case screen by clicking on Complete Case at the bottom of the screen.
NB: A Service Case can only be completed when there are no outstanding Appointments and all Parts have been actioned. If there are outstanding tasks when Complete Case is selected, a warning will appear and will then take you to the appropriate screen. If there are no outstanding Appointments or unused parts, but the appointment/s have not been billed, the user will be taken to the Generate Sales Order screen.
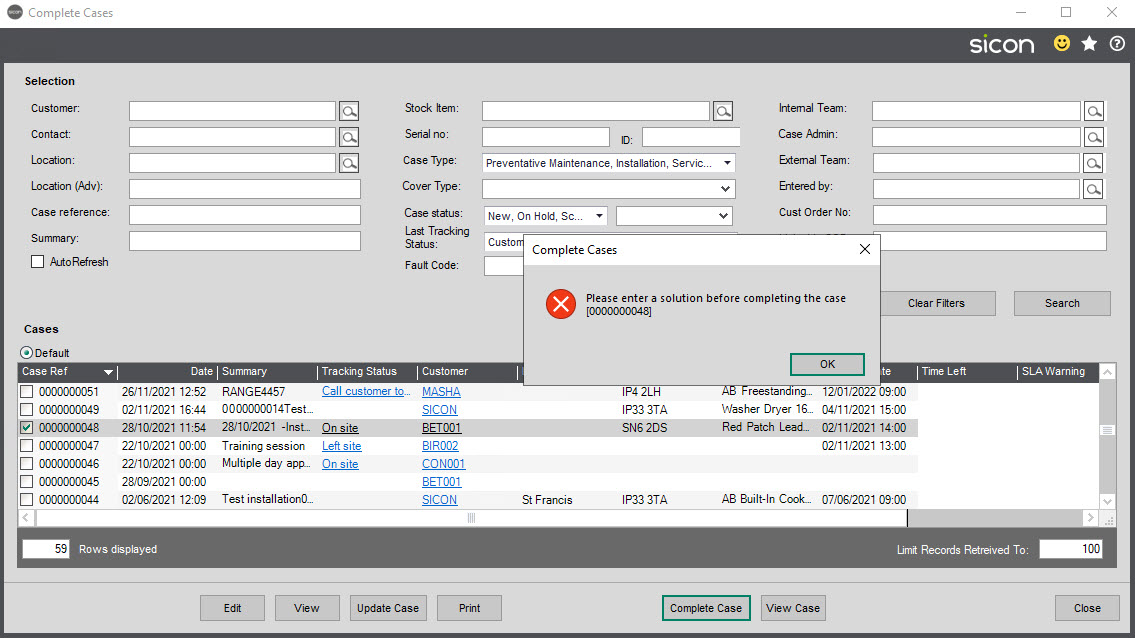
8.35. Stock Shortage Transfers
This menu option can be used to view previous, in progress stock transfers.
If the stock transfer had been started from within a case, using this screen you can action the outstanding tasks such as, Pick, Despatch, Receive.
This menu could also be used by Stores to pick and despatch stock to the case, or you could create a Transfer Template to be used for re-stocking the engineers van.
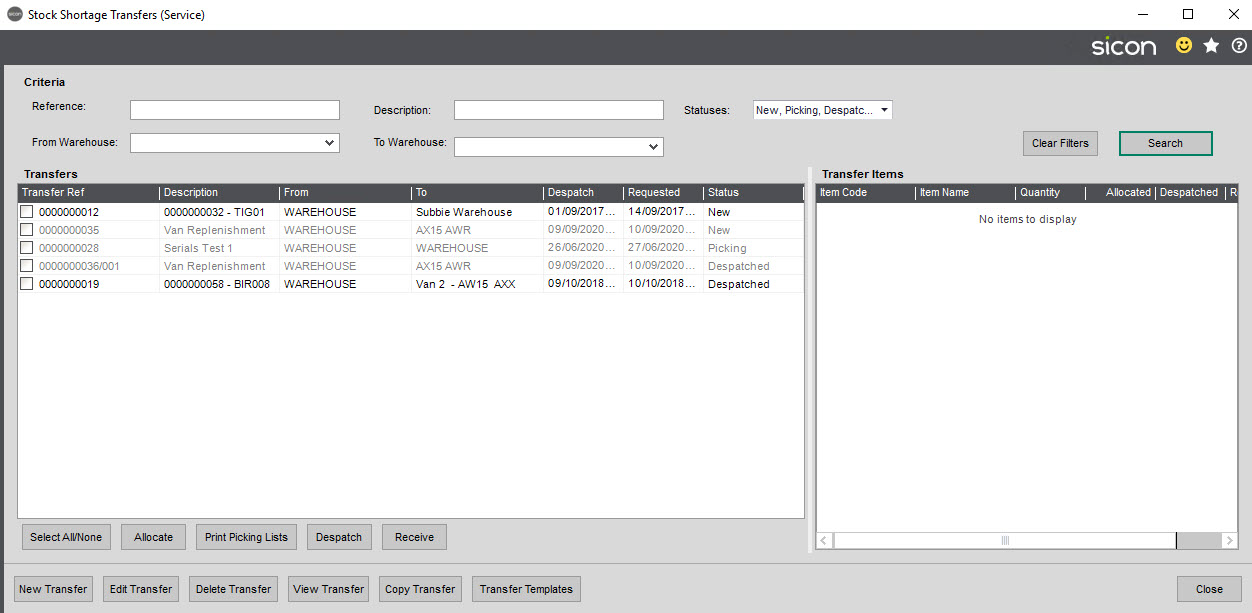
To create a Transfer Template, click Transfer Template, in the Stock Transfer Template screen click New (Edit will allow you to amend templates you have already created).
Input a Stock transfer reference, From Warehouse (or tick to select from multiple warehouses), To Warehouse and a Requested Date.
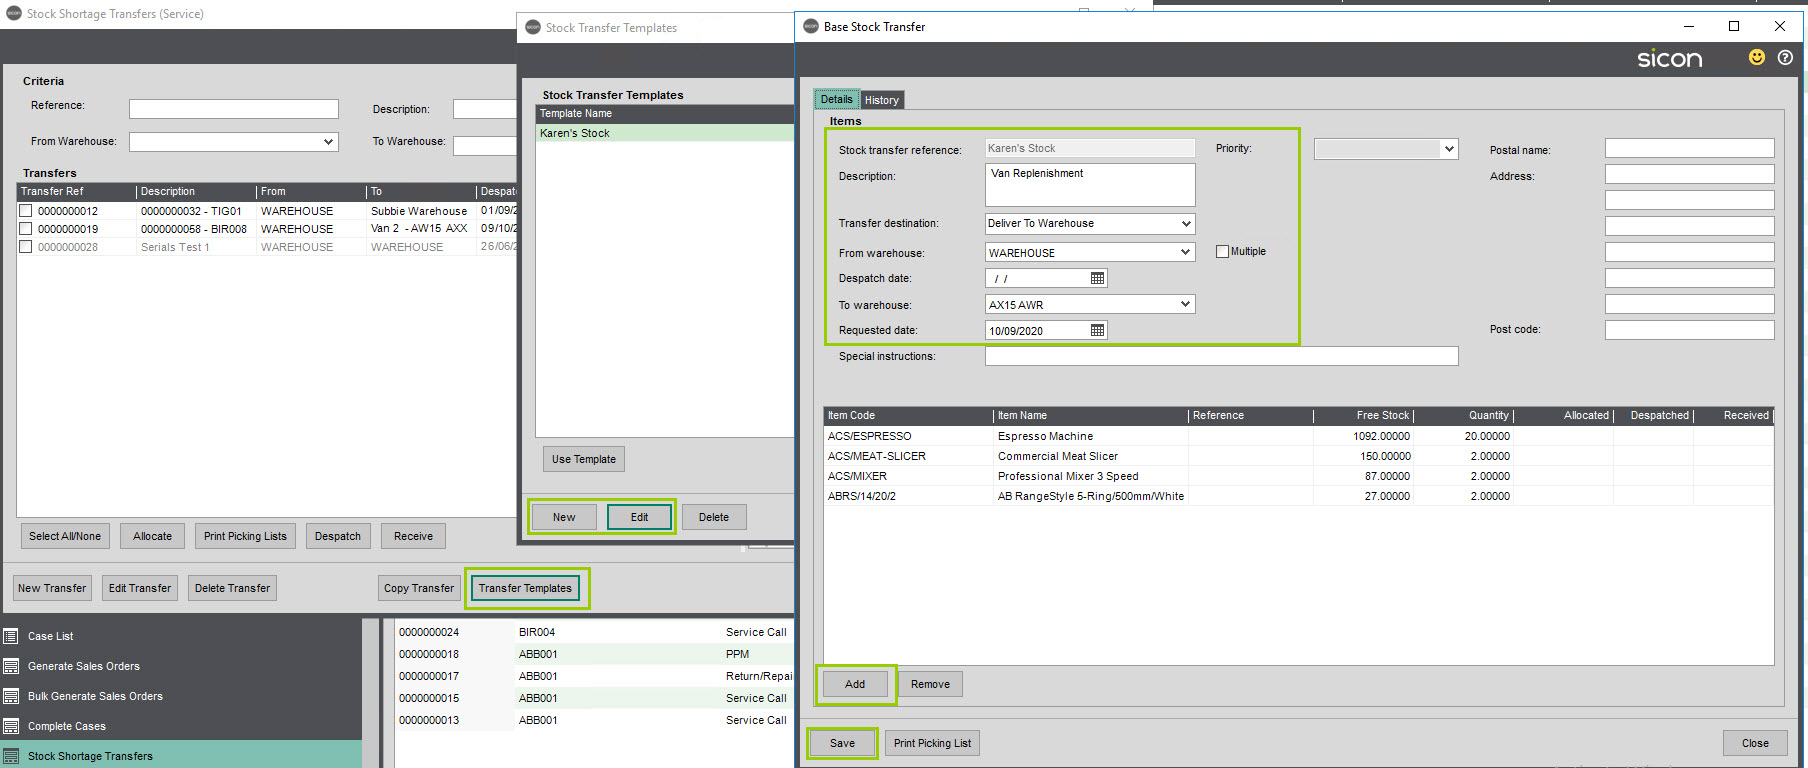
Click Add to select the stock for the transfer template, keep adding until you have everything required for this template then save.
From the Stock Shortage Transfer screen, click Transfer Templates, highlight the template you need to action a despatch for and click Use Template.
Input a Despatch Date (or select from the Calendar) and update the Allocated amount before Print Picking List.
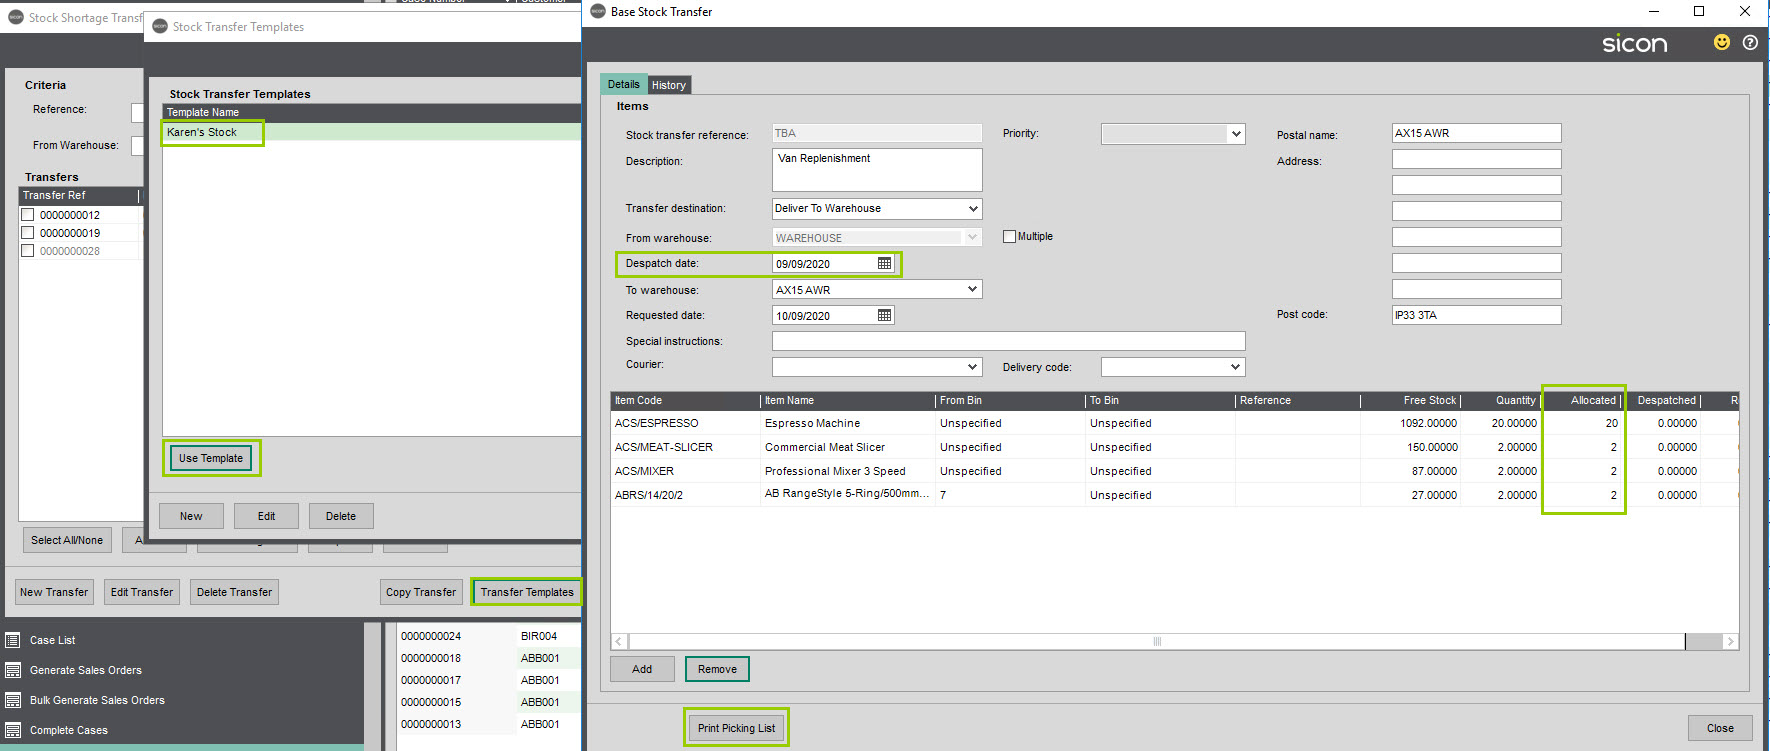
Print the Picking list if required.

Close the Picking List and you will be able to Despatch Transfer.
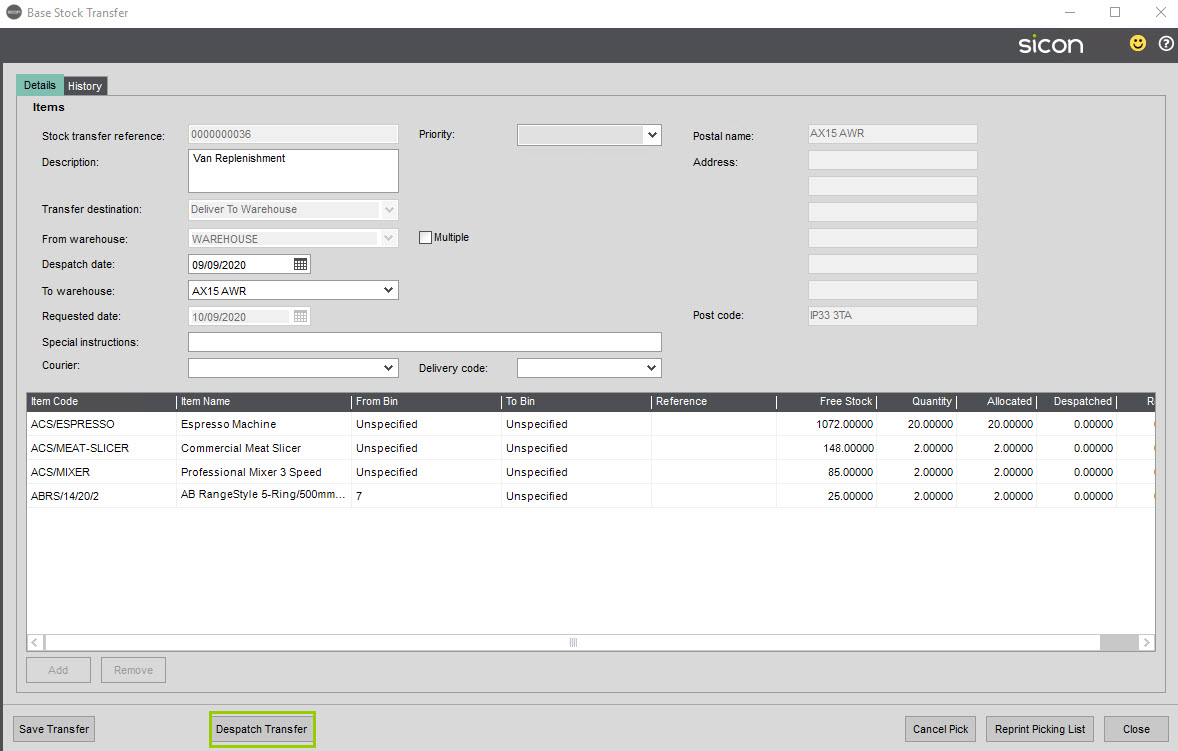
In the Stock Transfer – Despatch screen you can edit the number of items to be despatched then Save.
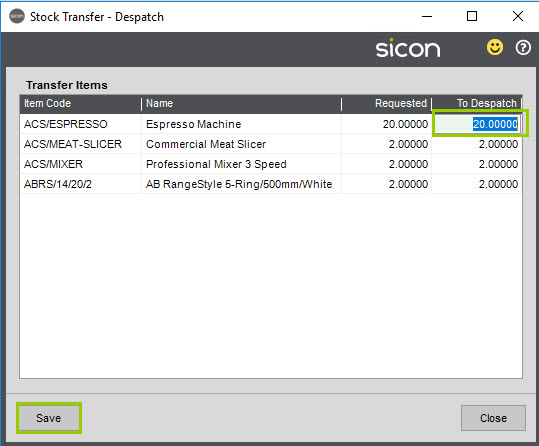
In the Main Stock Shortage Transfer screen, you can select the line that has only been partially despatched – this is identified as it is appended with /001, print picking list and Despatch. The Stock Transfer – Despatch screen can be edited again if required or you can despatch the remaining amount for this transfer.

The new despatch note shows the remaining value for despatch.

Stock Shortage Transfers can be archived when they have been fully despatched and received so the list is only showing the active transfers.
Tick the line to archive and click the Archive button.
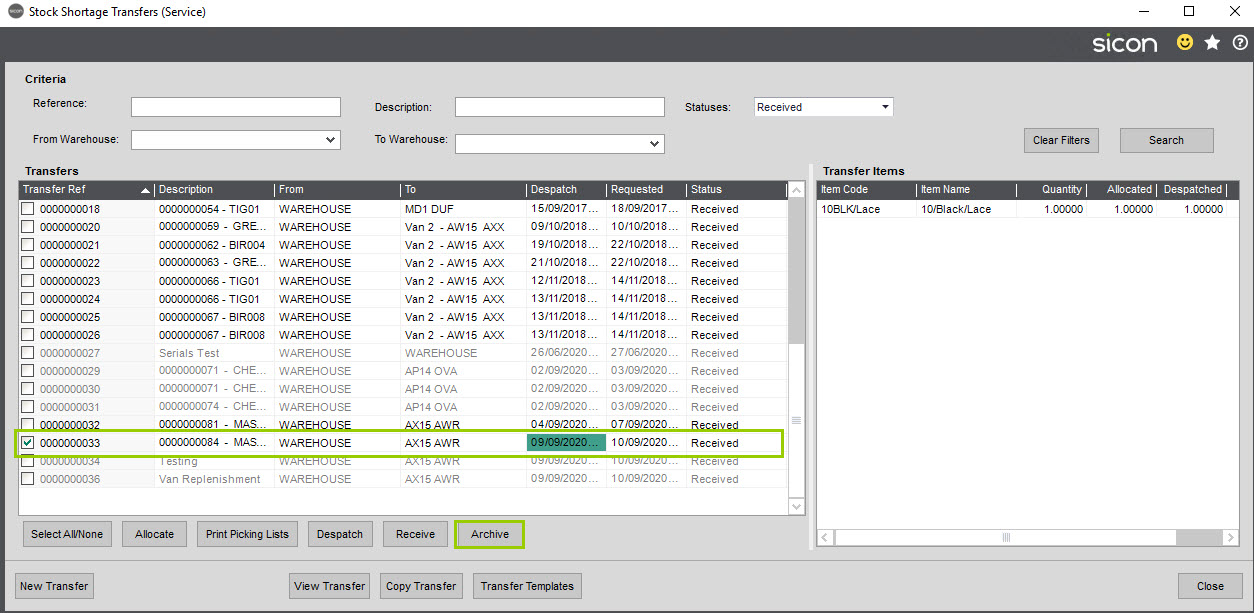
When this has completed you will get a message confirming the action.
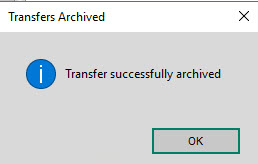
Archived transfers no longer automatically appear in the Transfer list and have to be selected from the Statuses dropdown list if you need to view them again.
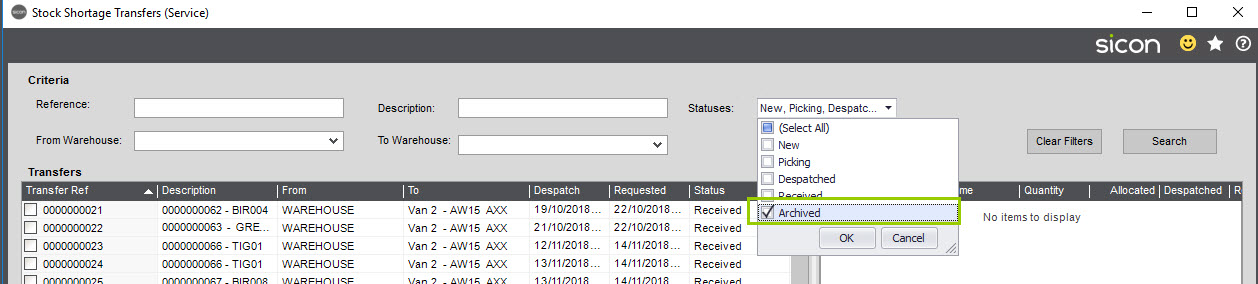
8.36. Map
A simple visual of where the cases are on a map.
The figures in the Yellow circle indicate how many cases are current within the area shown, as you zoom to look at a smaller geographical area, these icons will change to Green, Click the green circle to show Blue Pin markers which are the individual case appointments.
The Amber icon with associated number, or initials of the engineer show where the engineers have logged on to their devices and sync’d.
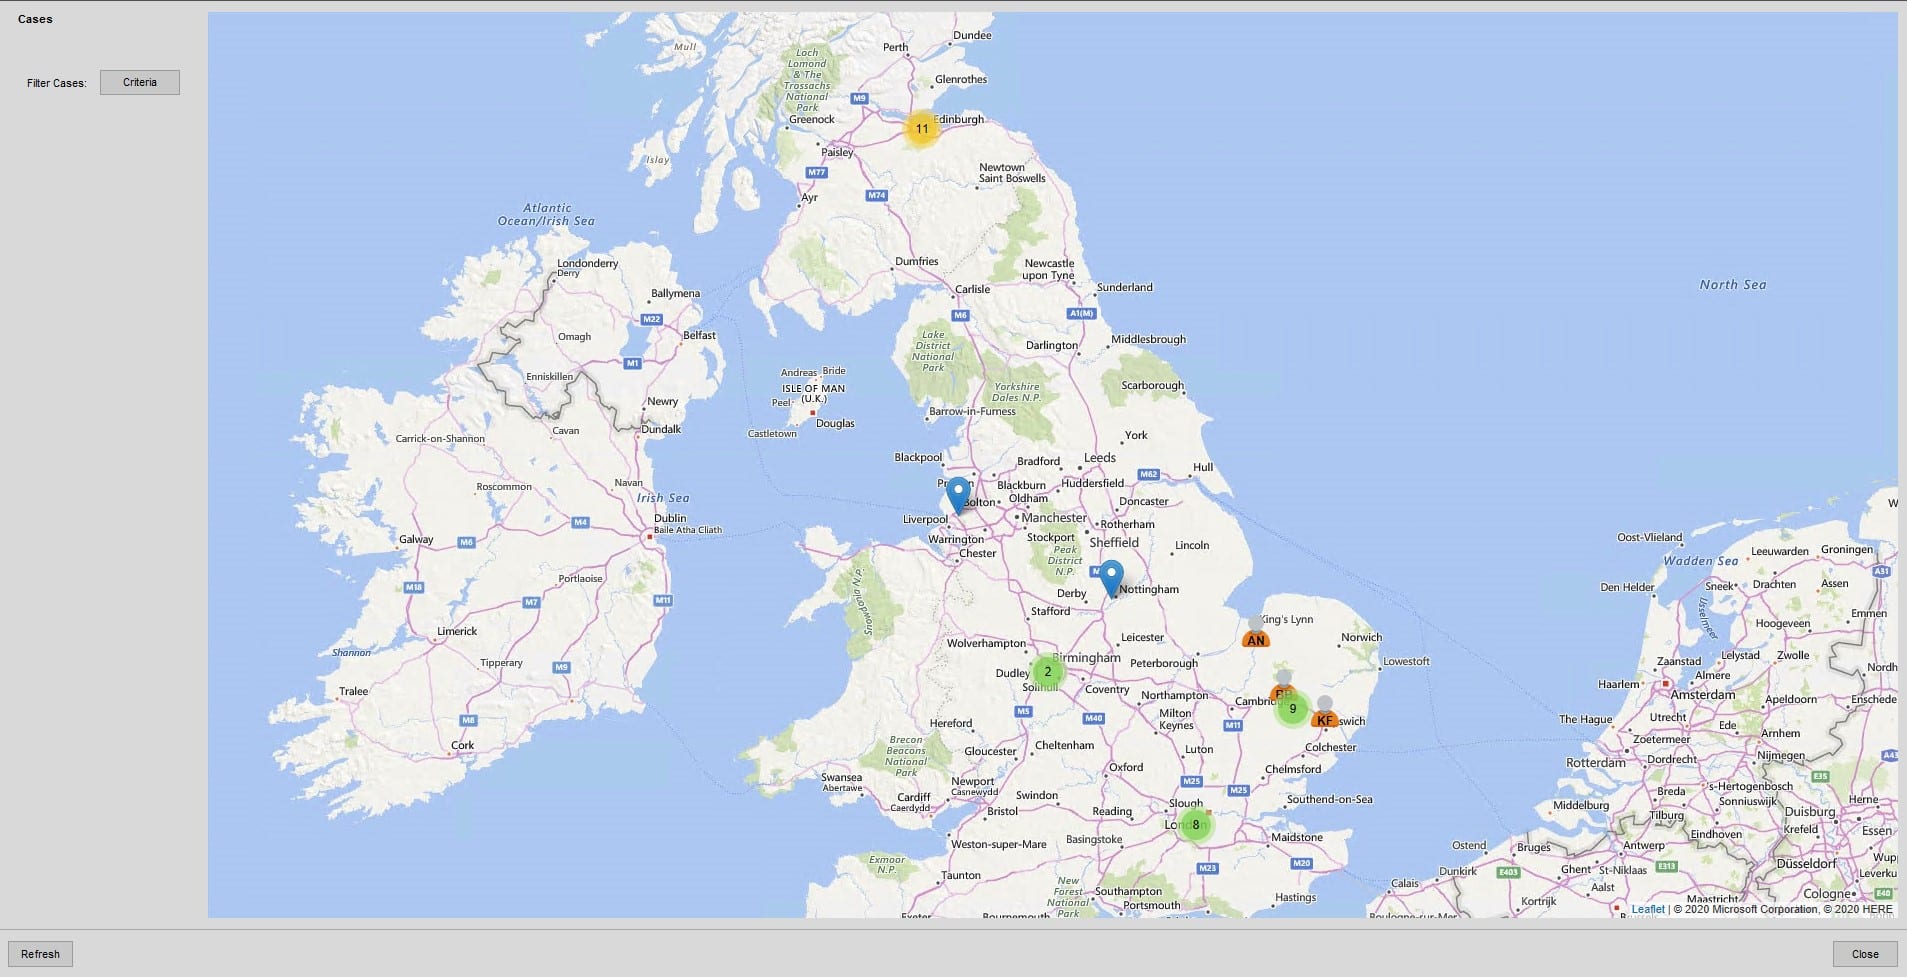
If you click on filter Cases Criteria, it brings up search filters for further filtering.
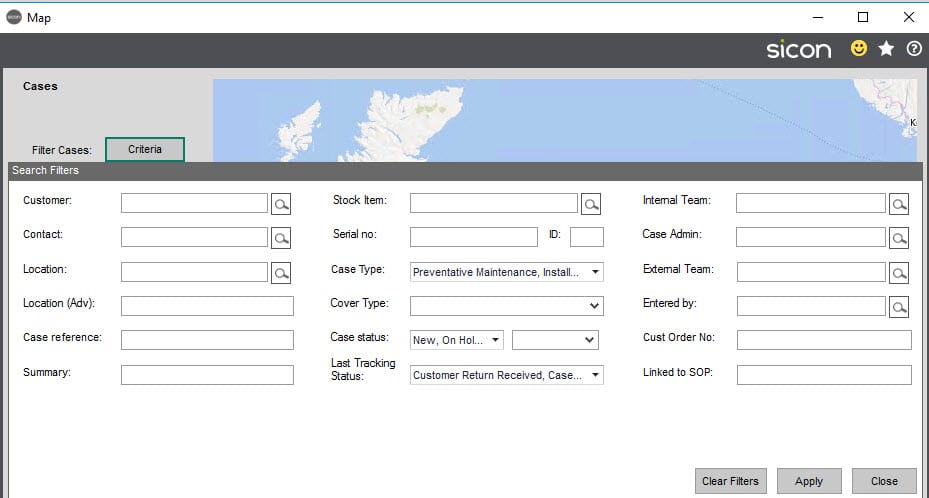
If you click on the circles with numbers in, (meaning the number of cases in that area) you will get a more detailed map, and if you drill down again the locations will be displayed.

And if you click on the blue indicator you can open the case.
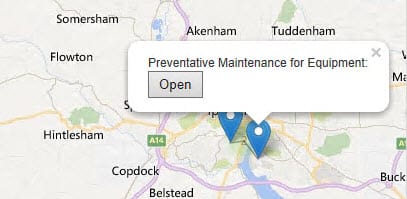
9. Customer Returns
Customers returns is a process where you can specify a customer is returning either:
A piece of equipment that needs to be sent back to you for repair.
A Stock item, that they purchased from you and is faulty so are sending back for either:
And Advance replacements (Uses SOP Sales orders)
Repair and/or credit (SOP return)
Or Credit
Or to return an item (free text item), that is not an equipment record or a stock item, for example they purchase an item elsewhere but have asked you to repair it so they are sending it back to you. In this case you probably would not be looking to use advance replacement or credit note functionality within the customer returns process, just simply the receive back, inspect, repair or if not repairable ‘return as is’ or if the customer does not want it back as it’s not repairable then you have the option to write off.
The Customer return tab on a case will only appear when the case type equal Return Repair.
If a case is created with case type Return/Repair, but where the Returns/Repairs feature is disabled in settings the user will be warned and the system admin user will need to configure before a Return/Repair Case can be created.
If you are looking to use the Customer Returns, please ensure it is enabled within Settings within the module.

Although the module knows the case type as Returns and Repair and it’s that case type that enables the customer returns tab on a case, you can choose to change the name of the case type Returns & Repairs. In our example we have renamed it Customer Returns.

This means when we set the case type to ‘Customer Returns, the additional Tab appears’ the functionality behind the renamed label remains the same.
9.1. Customer Return Stock Item
Raise a case, select the case type Customer Returns (in our example, or if left as default ‘Return/Repair’).

The above screen shot shows that the Customer Returns Tab has been enabled
Click on Customer Returns Tab
To add the details of the stock item (Part) being returned select New
Initially the blank form opens as below

Showing the main functions:
- Allowing you to pick the stock item
- Add the Qty being returned
- Linked the returned part to an equipment record if relevant (Ours is not, so it is greyed out)
- Specify if you are going to Repair or Replace ad if so:
- Do you wish to send an advance Replacement? OR
- Have they requested a Credit?
- Text Fields for Notes
- And date fields to enter the Expected Date you are expecting the part back (This will show on the customer returns document that is printed) and the actual receipt date
First select the stock item, enter the Qty and link to an equipment record if relevant, the one on the case (if case was raised via equipment) or one has been added manually.
Enter the Qty
If you sold the case customer that stock item/part, select Link SOP Line search icon

And select the relevant sales order
The Select either Repair / Replace and / or send advance replacement
or
if you have agreed to credit straight away select Credit Requested
If you select Credit Requested, then the ‘Repair/Replace’ option will grey out

If you select Credit Requested, added some notes if required, entered an expected date you will receive the item/part back and Save
A customer returns note will be previewed to screen for emailing or printing

The case Parts Status will now be showing as ‘Awaiting Return’.
Next step when you have received the item back, select ‘Return Part Update ‘and select ‘Receive’

Next Step would be, when you have physically received the item back, select ‘Return Part Update ‘and select ‘Receive’

You will be asked to confirm you are looking to flag the item as being received.

The status will then move to ‘Awaiting Inspection’

Since in our example we already know the customer has asked for a credit we can ‘Raise a Credit’ through the ‘Process Action’ option

You will be asked to confirm you wish to raise a credit (SOP return)

Selecting Yes will create a SOP return, using the price from linked sales order, or selling price from stock item, if there was no linked sales order.
This is now a standard SOP Return, so you can choose to change the value you are crediting, and a admin fee or any other lines as required.

When the relevant person has inspected the item to confirm next action they would select Return Part Update, and click Inspect

The then confirm the next course of Action, options are:
- Flag as Good, with no further action (meaning at this stage the inspection process is on hold).

OR
- Flag as Good and Return the item to stock as in our example below

The return warehouse is specified within settings.

The status of the case is flagged as ‘No Fault’ and processing Status ‘Credit Given’.

If everything is now complete on this case, with no charges to be generated for the person inspecting and repairing, the case can be closed.
If there is time to be charged, the time would be added as a normal appointment on the case and billed as standard
9.2. Customer Return Equipment Item
When a piece of equipment is being sent back by the customer themselves, or the engineer has been to site and the equipment is coming back to either be repaired in workshop / credited, a separate case would be raised.
If raising a new case via equipment, as standard, pick the customer, the relevant piece of equipment remembering to flag the case type as Return/Repair (if left as default) or select your custom label, in our example Customer Returns.

The equipment item is showing as standard on the ‘Case Description Tab’.

To start the returns process, select the Customer Returns Tab and select New
In our example we are returning the ‘Equipment Item’ so we select the Equipment radio button and the piece of equipment to be returned.

If looking to Repair and not send an advance replacement as in our example, the status of the return will move to ‘Awaiting return’ and ‘Replacement Not Raised.

When the item is received back, highlight the line and click Return Part Update.
If the customer never returns the part, despite you chasing you can cancel the return process by select ‘Not Received Back’.
If you receive back, you will ask asked to confirm.

Status will change to ‘Awaiting Inspection’.

When ready to Inspect choose ‘Returned Part Update/Inspect.

If after inspection the equipment item turns out to not be faulty, you can choose to return to the customer ‘As-Is’.

In which case the system will raise you a Sales Order free text line with no prices on, which in turn can be used to send back the ‘good item’.
As the item was an equipment item, and has been flagged as good, it will remain as an equipment item.
The processing status will be Original Item returned.
Equipment Item Return with Advance Replacement
If you raise a return for an equipment item and select advance replacement, select ‘Send replacement before receipt of faulty item’ as our example screen shot below:

Once saved, the system will show that a Sales Order is being raised and suggest you view it to make any changes to pricing (Some companies charge for replacement, until faulty items are back and checked).

If the equipment Item is also a stock item, and that stock item it is flagged as being a serviceable item that needs installation, then this will be seen on the service manager tab against the sales order line.
And as such when the sales order is saved it will create a new equipment record linked to the customer and if enabled an installation case as standard Service /SOP functionality.

Back on the case on the Customer returns tab the status will be seen as below.

When original part received back this will be flagged and you will be asked to confirm.

After which you can choose to inspect and in our example Write Off.

9.3. Customer Return Free Text
If a customer calls up and asks if they can send an item back for repair, that either they did not buy from you, or it’s not an item that is in your stock list you can choose to Return a ‘Free text’ Item.
Raise a case as standard, remembering to flag the case type as Return/Repair (if left as default) or select your custom label (In our example Customer Returns).
Select the Customer Returns Tab and New.
Select Free Text, type in the item description for the item they are sending back, the Qty, and if the customer does have equipment listed with you, you can choose to link this to be returned item to this piece of equipment (unlikely but it’s an option).

You could choose to raise a credit if you wanted to, although in this scenario unlikely, but it’s there as an option.
Once you have confirmed you have received the item and Confirm Inspection results via ‘Return Part Update’, the options are.

Or

If you are unable to repair, the options are:
No Action at this stage (Returns process would be put on hold).
Write off and Replace: If you choose to write off and replace, as the returned item was a free text item, there is NO stock movement at all, the item is simply flagged as being written off, the system will then raise a Replace standard SOP Order.

It will be a free text line on the sales order with a unit price of £0 (because it was a free text item that was returned).

So you will need to amend the line accordingly to specify how much you are charging them for a replacement and amend any nominal codes, and change if necessary the ‘Confirmation Required Prior to Invoicing’.

Looking back at the customer returns tab on the case you will see the various actions showing for history purposes.
The bottom half of the screen showing the items that were processed through to SOP.

10. Case List View
For those users who prefer to use Desktop Lists, you can have a list view to show all cases.
From the list view use the icons to Amend Case, View Case, Complete Case and Generate Sales Orders.

This is a limited function and filtering is not as easy, but you can add additional columns to the list view by standard Sage functionality right mouse click, selecting column, and then adding relevant fields.
You can then use standard Sage functionality to send the details to excel where required.
11. Equipment
A register of equipment items is held within Service. Cases can then be directly logged via the equipment, service cases raised according to the equipment service interval, Warranty expiry dates recorded and equipment items linked to lines in Sicon Contracts.
11.1. Details

Code/Short Name/Postcode: Customer SL Account where equipment is located.
Location: the Delivery Address as recorded/maintained in Sage SOP (can also be added via Service – Maintain Locations). Note: once a location and/or sub-location has been saved against a piece of equipment, use the ‘Transfer Equipment’ to change/edit locations if required.
Sub location: a sub location within the site e.g. Main Kitchen, 2nd Floor. This is also part of the Delivery Address as recorded/maintained in Sage SOP.
Contract Details: Item can be linked to an existing Contract and Contract Line
Supplier: a PL account can be linked as the equipment supplier
SLA Details: if the equipment is linked to a contract, the SLA associated to that contract line will be displayed but if necessary, the SLA can be overridden per piece of equipment.
Details
Stock Item/Free Text Item: Equipment can be a stock item (with the details pulling through for information only, not adding the item from Sage Stock) or added as a free text item.
- The Stock Item Code & Stock Item Name are both displayed within the first field, in order to enhance searching.
- If you use the % sign in your search it will look for that character anywhere in those fields (stock code/name), if not and you start typing and either tab or select search button the system will look for stock code or stock name that that ‘starts with’ your entered characters.
Description: populated automatically with the Stock Item Name or can be free text entry.
Make: Free text field
Model: Free text field
Serial No: If you have selected a stock item, and that stock item has previously been sold in your Sage 200 system to the customer for which you are manually adding the equipment to, the system will populate the relevant serial number or the serial number can be added manually.
ID Number: this will auto-populate if enabled in Service Settings. If you create your own ID numbers for equipment these can be stored in this field. E.g. If the serial number of the equipment is ‘hidden’ when the equipment is installed, you may want to tag the item with your own ID numbers which could be displayed on the front of the equipment.
Installed date: date the equipment was installed on site, this can be added manually, or if the feature enabled, will be pulled through from the sales order when selling the equipment from a sales order
Manufacturer Warranty expiry date: the warranty expiry date is recorded to enable cases to be logged as under warranty and then parts to be reclaimed from the manufacturer. A Report is also available to list all equipment due to expire from Warranty.
Service Interval: set the frequency and the interval as required.
Last service date: enter the last service date if applicable.
Next service date: this will either populate from the Installed Date or if populated from the Last Service Date according to the Service Interval.
11.2. Contacts
If enabled is Service > Settings > Contacts, you can link a contact to the equipment record.
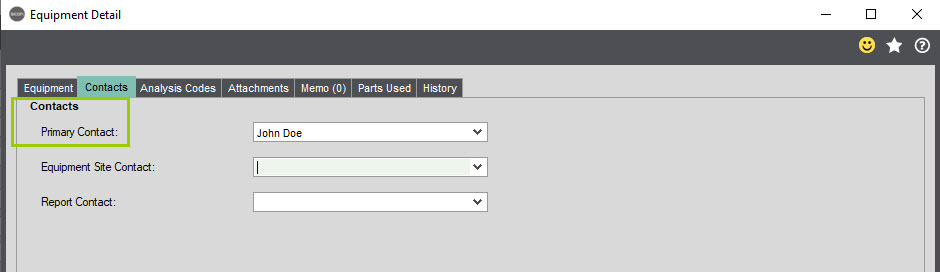
11.3. Fixed Asset Custom Tabs
Fixed Assets Custom Tabs and Custom Fields
Custom Tabs created for Fixed Assets will be available in the Equipment record in Service Manager.
From the Fixed Assets Maintenance folder select Define Custom Tabs.
Enter the name of the required tab(s) and Save.
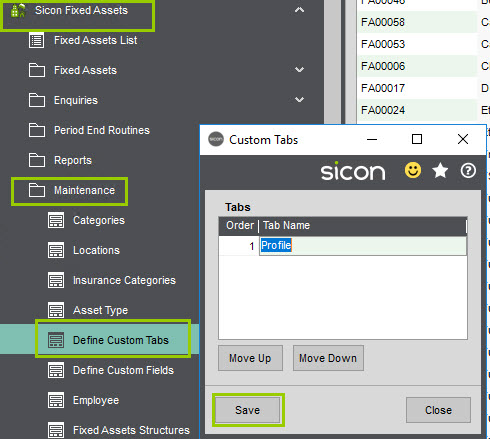
Custom Fields need to be created to link to the newly created tab(s) – from the Maintenance menu in Fixed Assets select Define Custom Fields.
- Select from BooleanValue – this is a Yes/No type answer.
- DateValue – Date selector
- ForeignKeyValue – Stock Item / Supplier
- Numeric Value – Number field
- StringValue – Free Text field
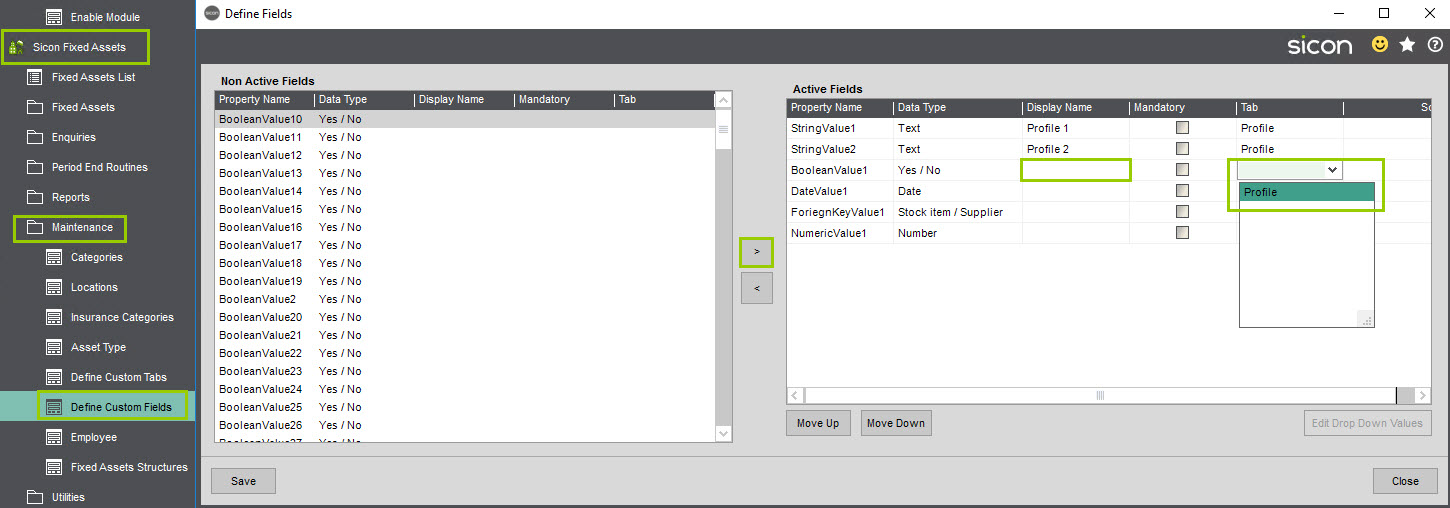
Use the > button to move the fields from the Non Active Fields list to the Active Fields list on the right hand side of the screen. Enter a Display name for each of the fields you are creating and select the Tab they are to be linked to. You can also flag them as Mandatory if required. If you have selected something to be Active that you no longer require you can highlight it in the Active Fields list and use the < button to move back to the Non Active Fields list.
This information is available on the tab that you have created (our example is Profile) and can either be manually populated or can be updated using the Import Custom Fields From CSV file in the Fixed Assets Utilities folder. Please refer to the Fixed Assets Help and User Guide for more information on how to use this import file.

When you Link or Amend Equipment items a that are assets the Custom Tab and Custom Fields that are on the asset are available to amend on the Equipment Detail screen. Anything that is amended here will update back to the asset.
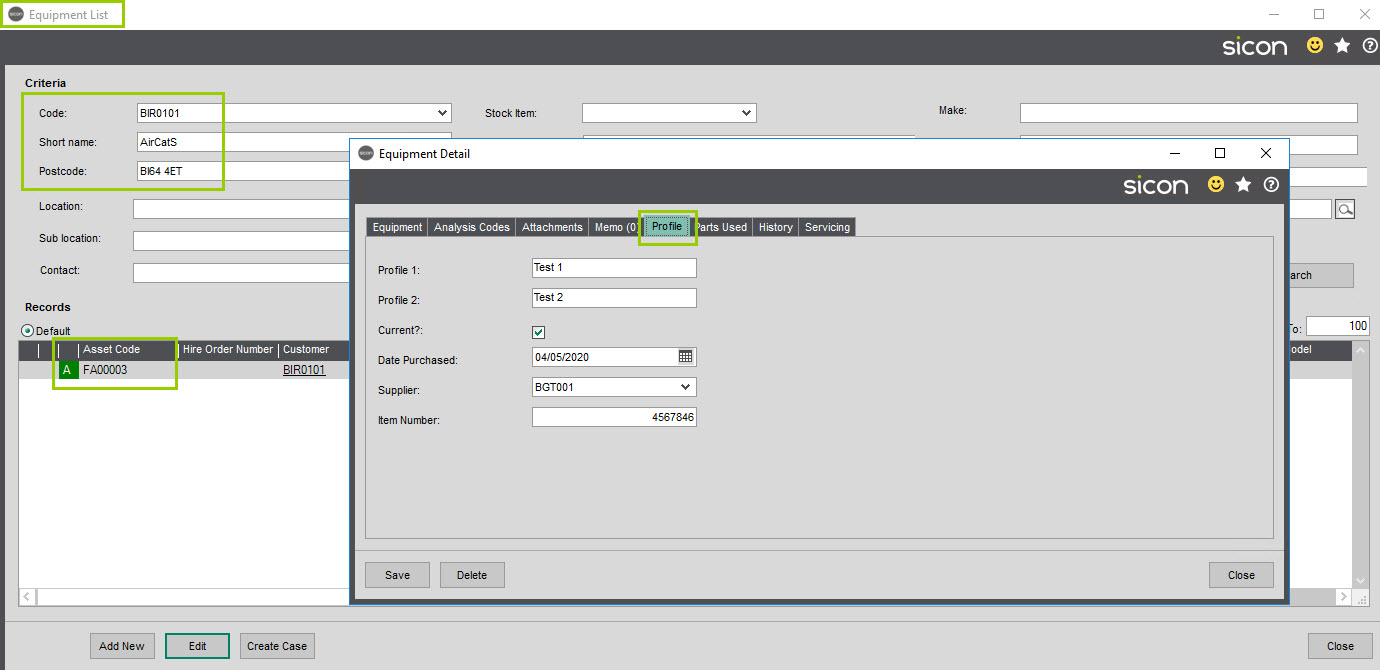
11.4. Analysis Codes
Analysis codes set against the equipment are available depending on Service Settings.
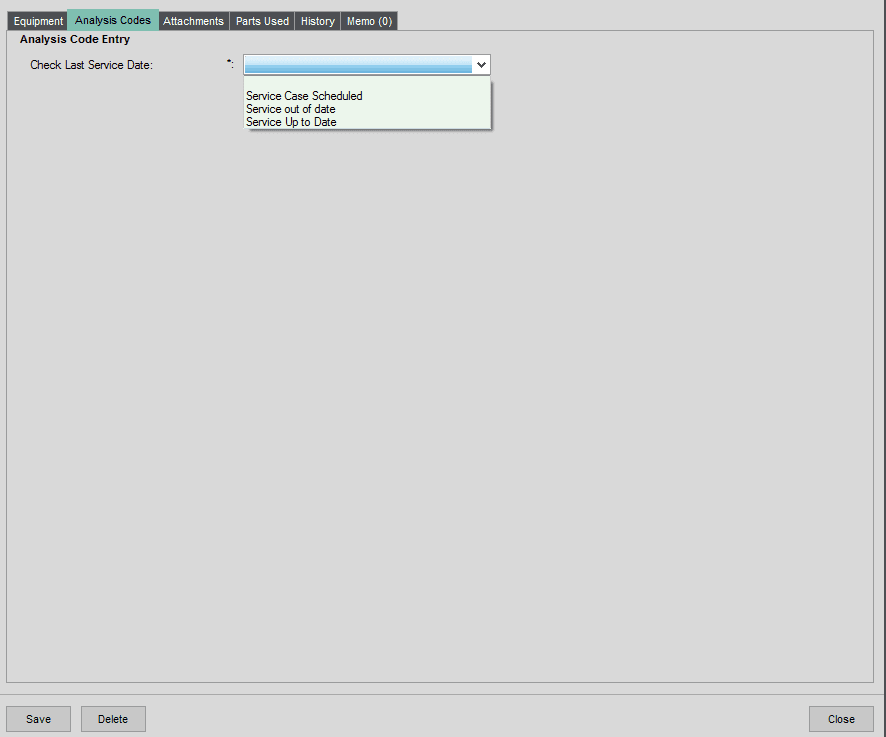
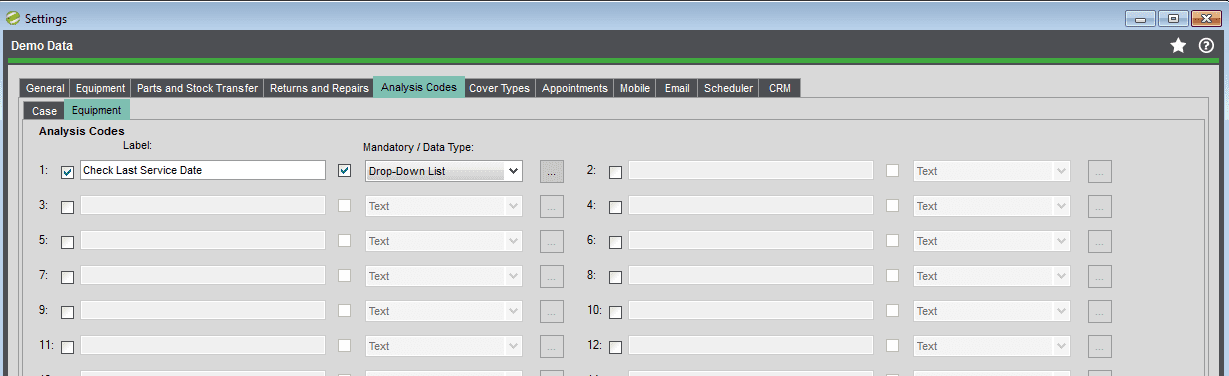
11.5. Attachments
Documents can be added to the equipment record and displayed as icons or listed details. This could be used to store technical information about the equipment, link user manuals etc.
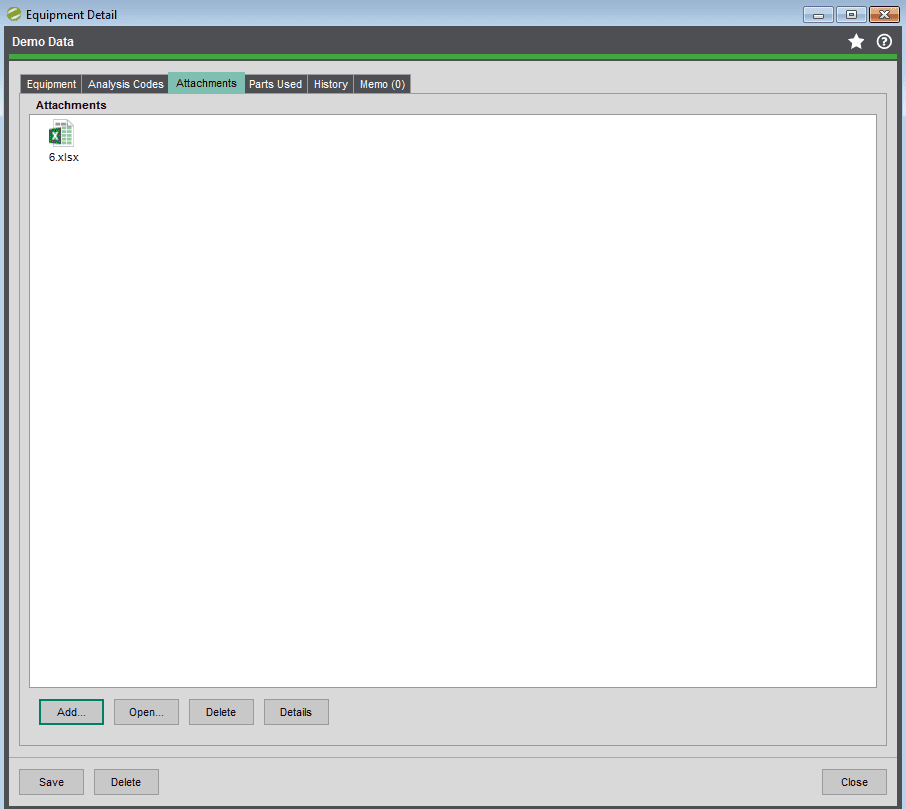
11.6. Equipment - Memo
Memos can be added to the equipment record with the total number of memos visible on the tab. This can be useful in identifying is a part is being repeatedly replaced to allow for further investigation as to why this may be.
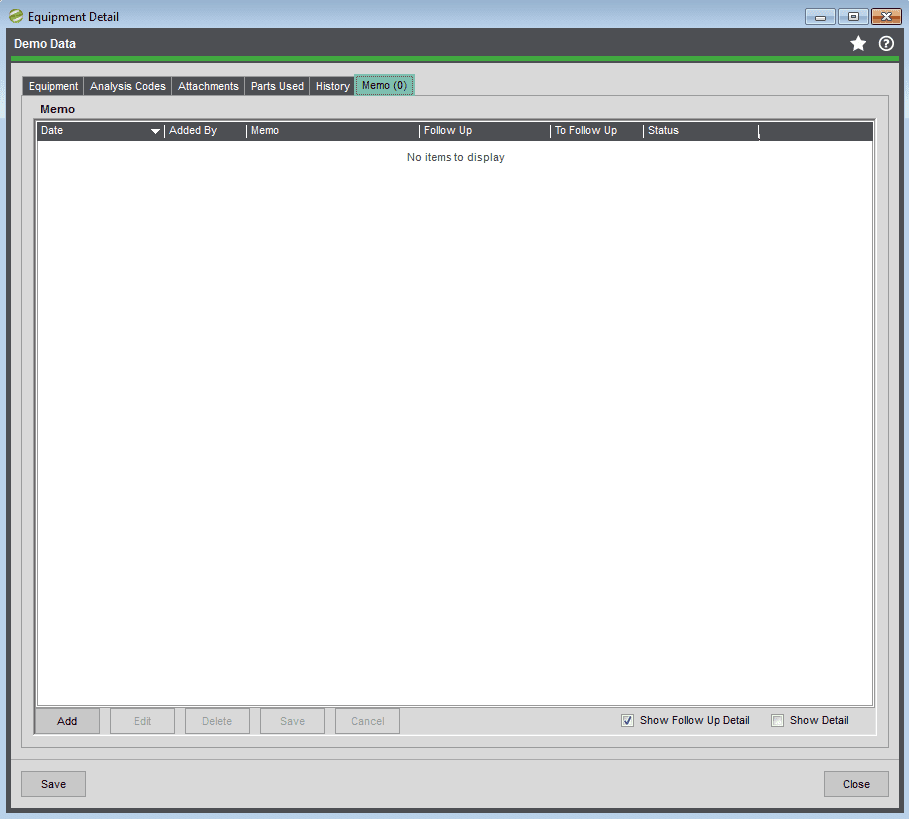
11.7. Equipment - Parts Used
All parts used during a case against the equipment will be listed on the parts used tab.

11.8. History
A Case History and a Location History of the equipment is recorded automatically on the history tab.

11.9. Servicing
If enabled in Service > Settings > Equipment, Enable Service Templates and Multiple Service Dates, you can select the Template(s) from those created in the Maintain Service Templates section of this Help and User Guide.

Servicing Templates
Equipment Service Templates
These will need to be activated in the Service Settings on the Equipment tab.
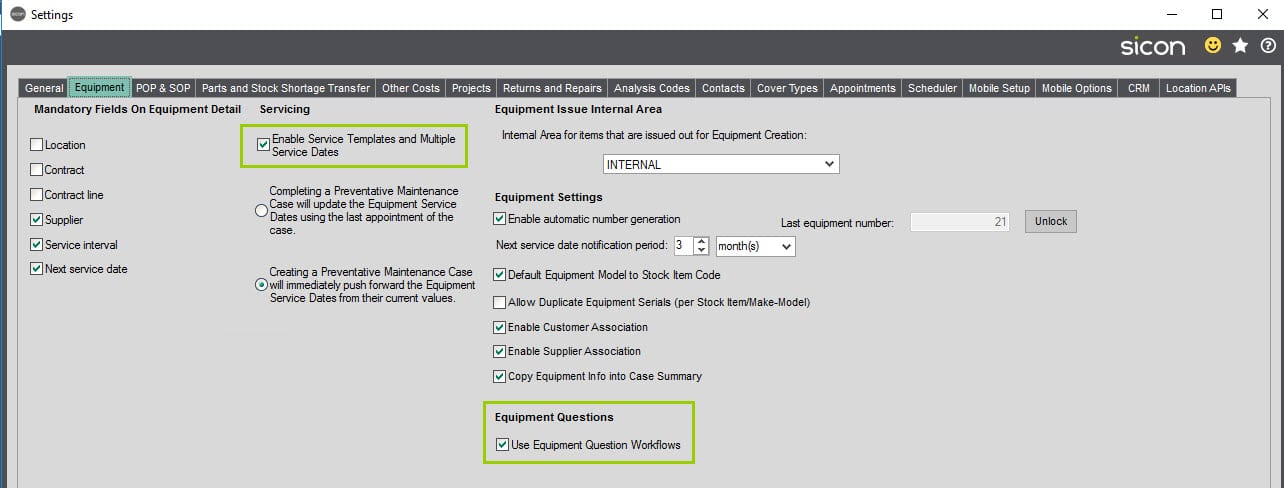
Create Stock Codes linked to a Product Group which is flagged as Service/Labour as there is no stock movement for these codes they are purely used to enable billing.
Link a Selling price to the stock item.

Examples below as to what you may want to set up.

Create Service Templates with ‘tasks’ – the example below is for 6 monthly and annual intervals.

The Service Type is linked to the relevant stock code and has the functions associated to it too.
The Service combinations allow you to specify what is to be done when the cases are created using the Service Equipment functionality.
When creating cases, you will be able to stipulate what combinations are to be done, if you have an annual service that is due but untick the ‘annual’ elements this would change the Service Combination to 6 Months.
Equipment Questions can be created and linked to a Case Type – in this instance it would be Preventative Maintenance.
Tick the relevant Criteria to apply the question to, enter the question text and select the answer type.
The Answers can be flagged as mandatory as required and may also be hidden from the customer reports.
When the Equipment Questions have been created you can then use these to generate Question Workflows. (from the Maintenance Menu)
Click Add and enter the Name for the workflow.

Select the Criteria to link this to.
- Click and hold on the word Heading to drag into the Workflow
- Drag a Question from the list and drop this below the heading
- Click and hold on the word Group and drag this beneath the question (enter a name for this as it will show as SubGroup initially)
- Click on the Group name in the list then Edit Item Condition to open the Edit Condition screen
- Select the Question (identified by ?)
- Click select Questions button
- From the first drop down box chose from Equals or Does Not Equal to set the criteria, then from the second drop down list box chose between Yes or No
- Save

- From the list of questions drag and drop as many as required for this work flow then Save
When the Equipment records are created you will have an additional tab to link the Service Templates and stipulate the different service intervals.
Select the Customer – Contract details can also be linked here. The equipment can be a Free Text item (unless you are going to set these up as stock this will be your preferred option), you can also specify Make and Model as you get this information to update the record. The ID Number will be generated when the record is saved.

On the Servicing tab select the Servicing Template for this piece of equipment.
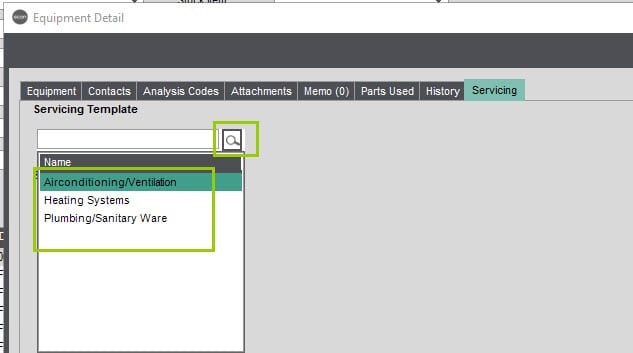
Once the template has been selected you will get the Last Service / Next Service date fields to populate for each of the criteria – the Service Combinations at the bottom of the screes show the Service Stock Items and the Selling prices.
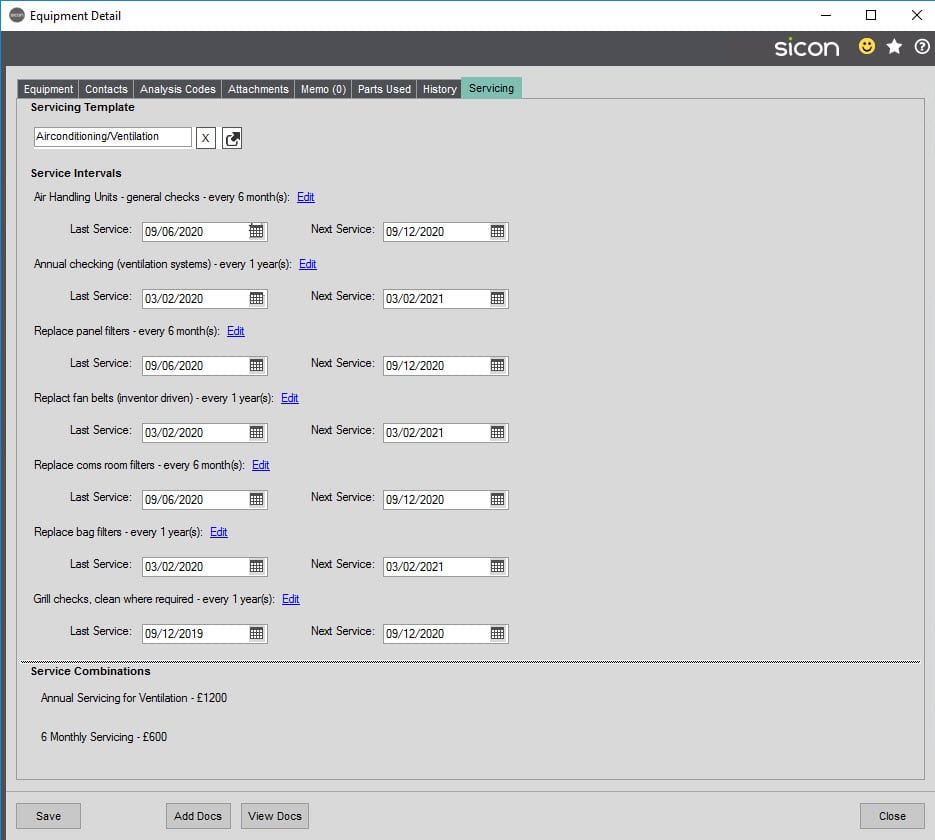
Click the word Edit to change the service interval – e.g. from 6 months to 12 months.
In the Service Equipment Screen (from the Equipment Menu), you can filter as required but you always have to have a date to complete the search.
Select the equipment to create cases for and chose how you want to create the cases – by Location/Contract, by Sub-Location/Contract or a case per item.

As the case is being created you will get a Select Service Combinations screen as below, you can tick or untick items as needed for the individual cases.
The Case will be in the Service Desk and can be updated from here – add tracking notes, appointments etc.
If you are using Equipment Question Workflows these will be available to the engineer to complete – see below:
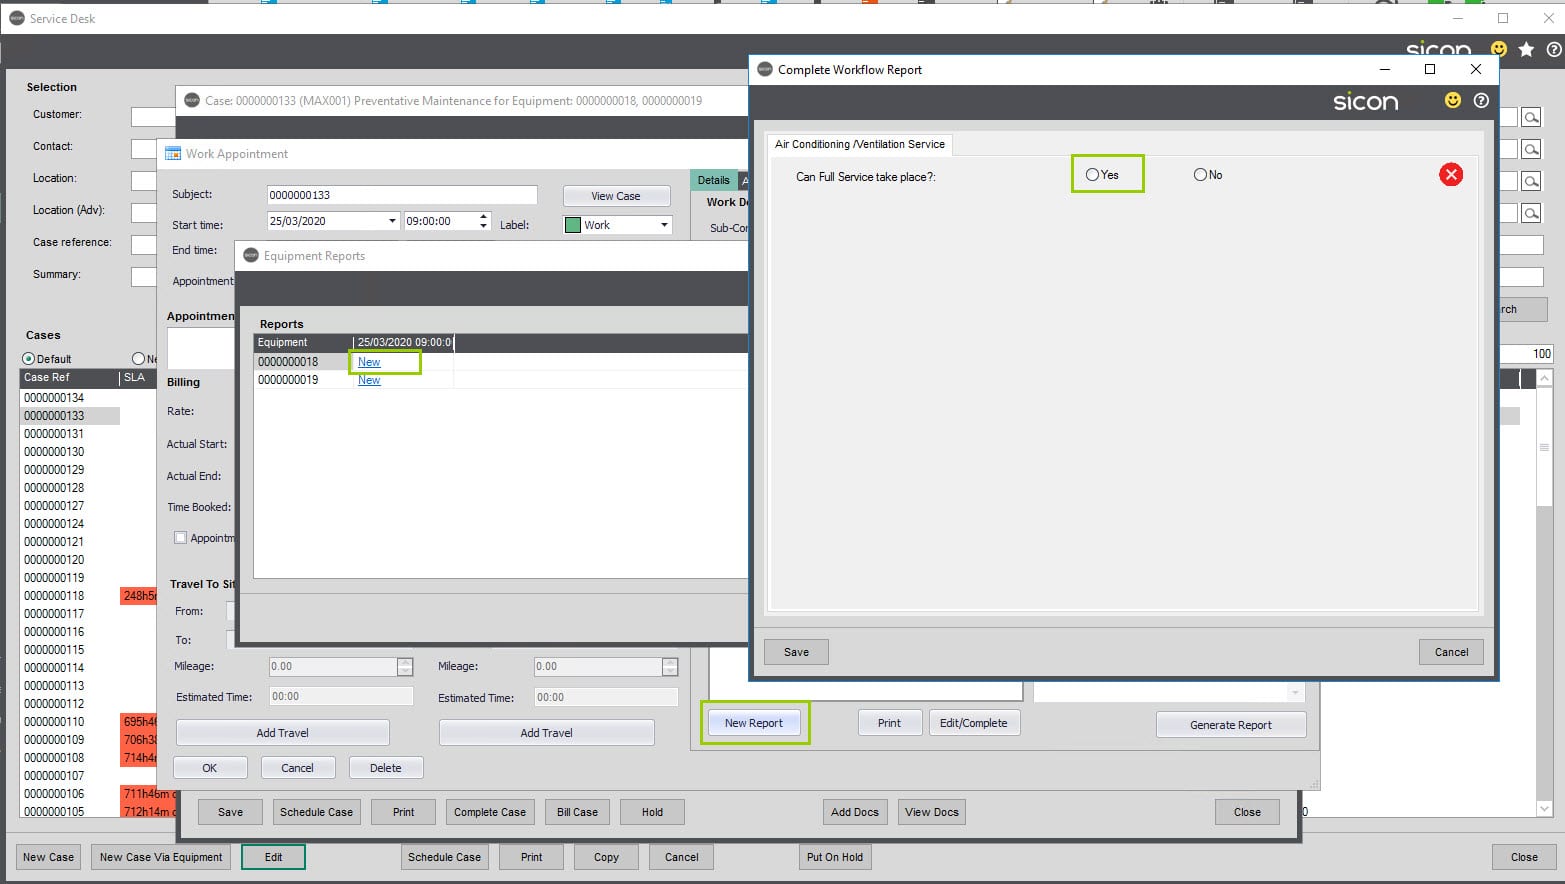
The initial question was set up to have a Yes answer to display the additional questions to be answered:
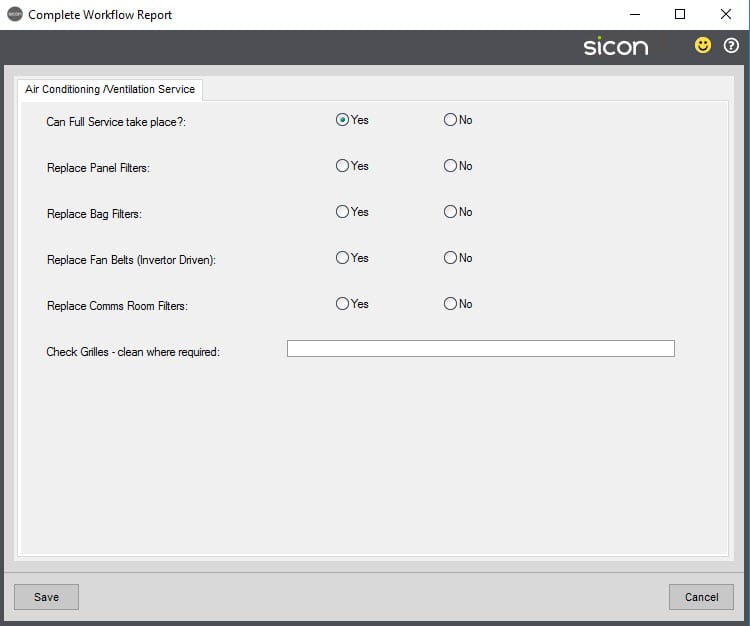
When these are completed they can be seen on the work report which is available to send to the customer confirming the work carried out.
11.10. Creating Equipment Items via Standard Sage SOP
Stock Items marked as ‘Serviceable Items’ will automatically create an Equipment Item when sold through standard Sage SOP. Note: If the stock item is also marked as ‘Requires Installation’, an installation case will automatically be created.
The stock item can also be flagged with a Service Template if this is activated in Settings > Equipment.
Note: The modules shown in the left hand pane on the stock item screen are only shown when they are installed so you may not see the same list as this example.
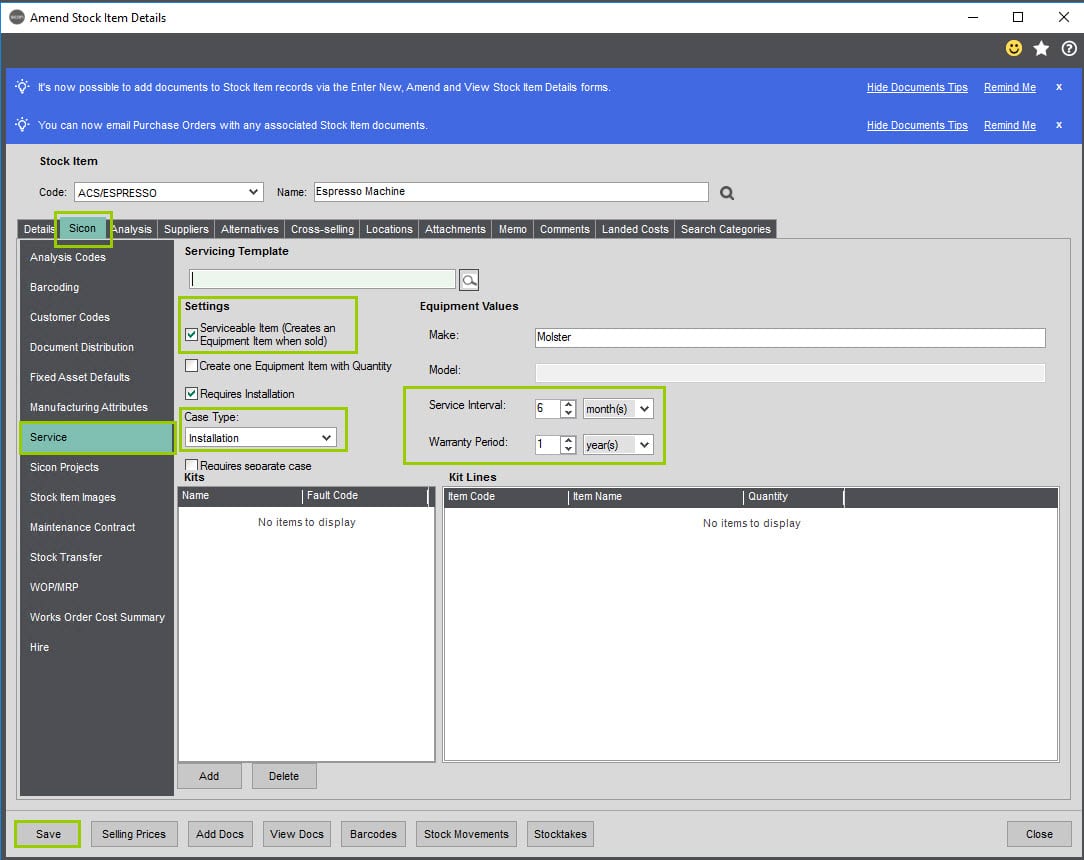
When the Sales Order has been saved, a screen will appear allowing you to then edit the details as required e.g. adding in the Make, Service Interval and Warranty as necessary. The Install Date of the equipment will populate on the Equipment record with the promised delivery date, if at despatch the despatch date is different to the promised date, the record will be updated.
Equipment created via SOP now has SOP Information visible on the Equipment History tab detailing the SO Number, Date and status.
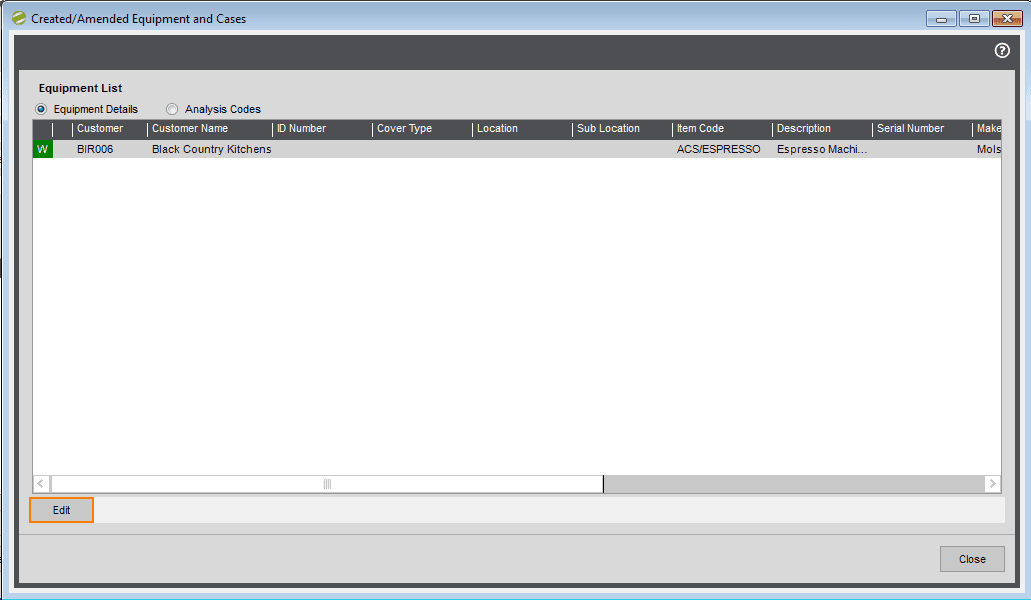
It is also possible to select a Contract Line when creating an Equipment item via SOP. When adding the SOP item line, click on the additional tab ‘Service Equipment’.
If the maintenance Contract is being sold on the same Sales Order as the equipment item that is to be covered, it is necessary to add the Contract line first in order to then be able to link the equipment to that line.

11.11. Equipment Groups
Equipment groups can be entered to allow you to create headings that can be assigned to Equipment Items for grouping similar types of equipment together. The purpose of this is to allow you to be able to create PPM cases for similar equipment items; for example, if you were servicing hospital operating theatre equipment you may cover operating tables and lights. You may use a different team of engineers to service the table and lights. You can therefore set up a group called Lights and one called Tables. When you create your service appointments you can then group your service cases by Equipment group meaning you can schedule one set of engineers at a time.
To add a new or amend an existing Equipment group, go to Service>Equipment>Equipment Groups and the following window will be displayed:

To add a new group click the Add New button and the following screen will be displayed:
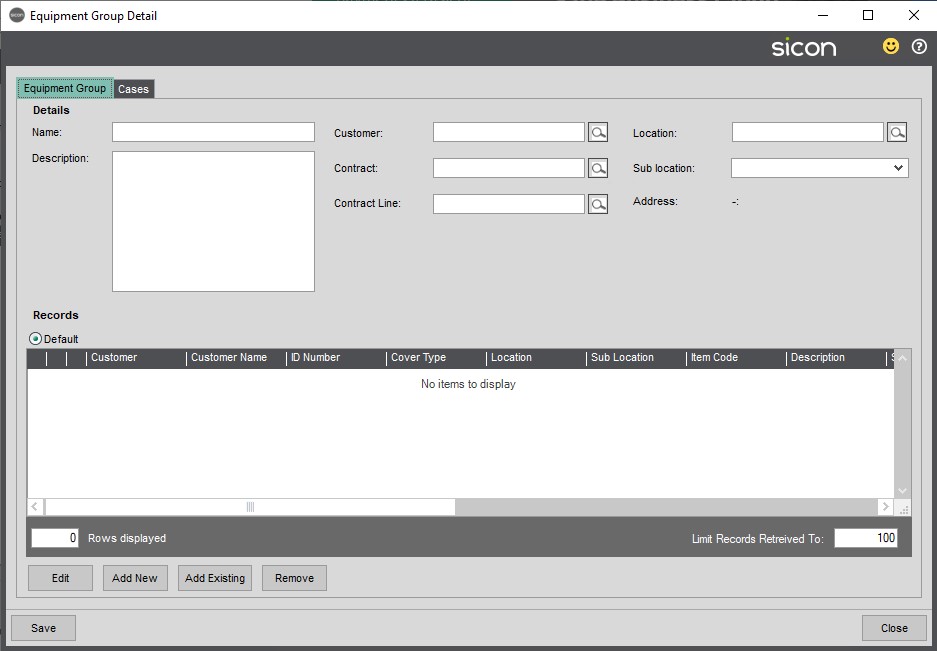
You will need to enter a name and description:
You can enter various combinations of groups that are specific to customers, contracts and locations.
When you have added all the details you want click the save button
Repeat until all of your groups have been added.
New groups can be added at any time and the Equipment items changed as and when required.
12. Service Templates

When creating the service template for the first time you will need to populate the ‘Last Service dates for the various service types in order for the system to calculate when the next one is due’. For reference this screen shows the various prices of the available combinations.
In our demo company used for producing screen shots we only have 4 combinations but in reality for vehicles you would probably have Service Types with prices for each, and then combination prices as follows.
An Oil Service on its own £85, Tyre Check on its own £50, MOT on its own £200, but if a customer had an Oil + Tyre service at the same time a discounted price of £120 applies, and if they added the MOT then it would be £500 instead of individually totalling £335.
For details of how you see what services are due, and to combine them together to create a single preventative maintenance case, and adjust each types next due date, where you have brought forward the dates see Service equipment.
12.1. Service Templates for Individual pieces of equipment with a Single Service Date
In order to list equipment due for service, and create service cases if required, select Service Equipment from the side menu.
Enter a date for ‘Service Equipment up to’ and then Search. This is picking up the Next Service Date against each item of equipment.
This list can then be filtered by Customer, Location, Under Contract and ID Number as required and can be exported to Excel by right clicking in the grid.

Depending on how these services are carried out, you have the options to:
Create a Single case for each piece of equipment per customer
Create a Single case for the customer per Location, listing the equipment items at that Location
Create a Single case for the customer per sub location, listing the equipment items at that Sub Location
Depending on your Servicing Strategy rules set on the equipment tab within settings, the system will determine which date is used to update the ‘Next Service Date’.
Option 1. Dates for ‘next service date updated based on dates on the preventative maintenance case’
Example:
Service is due 1stDec 2016, a preventative maintenance case is generated on 1st Dec 2016 (or thereabouts), but the last appointment on the case is recorded as being 5th Feb 2017 (because parts were needed and it was a while before the engineer could go back and fit). The service interval on the equipment recorded as being every 12 months, therefore the system will update the ‘next service date ‘on the equipment as 5th Feb 2018
If this is your preferred option, select ‘Completing a Preventative Maintenance Case will update the Equipment Service Dates using the last appointment of the case’.
Option 2. ‘Case appointment dates not being taken into consideration’
Example:
Service is due 1stDec 2016, the service interval on the equipment record is every 12 months’ the system will set the ‘next service date ‘on the equipment as 1st Dec 2017 (regardless of whether the actual service appointment may not have happened for several weeks)
If this is your preferred option, select ‘Creating a Preventative Maintenance Case will immediately push forward the Equipment Service Dates from their current values’.
12.2. Service Templates for pieces of equipment with Multiple Services Dates
Where your equipment items have multiple services dates and are linked to service templates you will be prompted for addition choices when creating the preventative maintenance case
But initially you start off with the same process as you do with equipment items that have a single service date that being:
Select Service Equipment from the side menu.
Enter a date for ‘Service Equipment up to’ and then Search. This is picking up the Next Service Date against each item of equipment.
This list can then be filtered by Customer, Equipment Group, Location, Under Contract and ID Number as required and can be exported to Excel by right clicking in the grid.
In my example I selected show me all pieces of equipment (not just linked to a live in cover contract line), that needs servicing up to 31/12/2018 and are in the equipment group ‘Vehicles’.
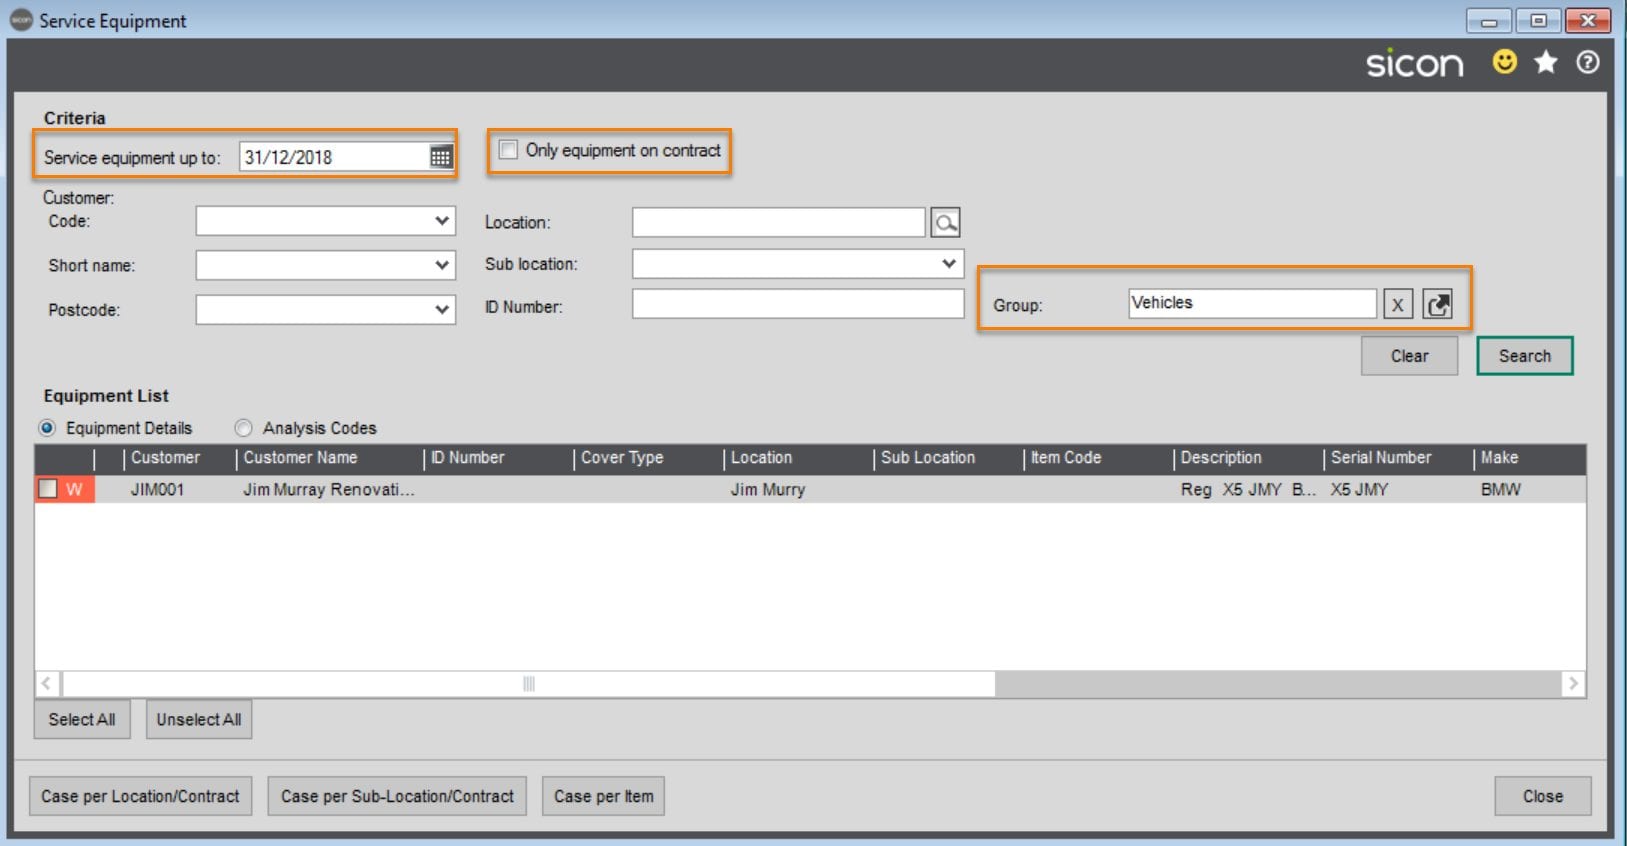
When I choose to create a case I am prompted with an additional screen and options to choose from.
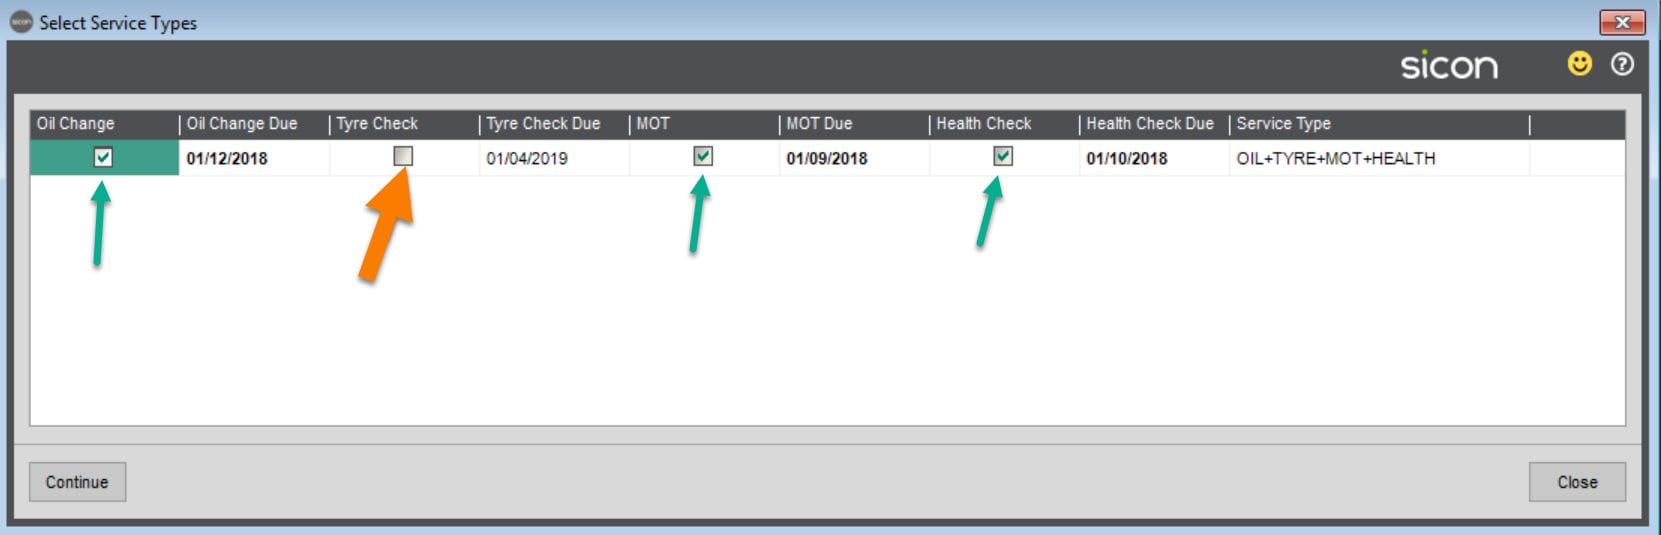
The system has calculated that based on the date chosen, my vehicle needs an Oil Change, an MOT and a Health Check.
At this stage I can decide, to untick selected ones, and add any additional ones simply by ticking or un-ticking.
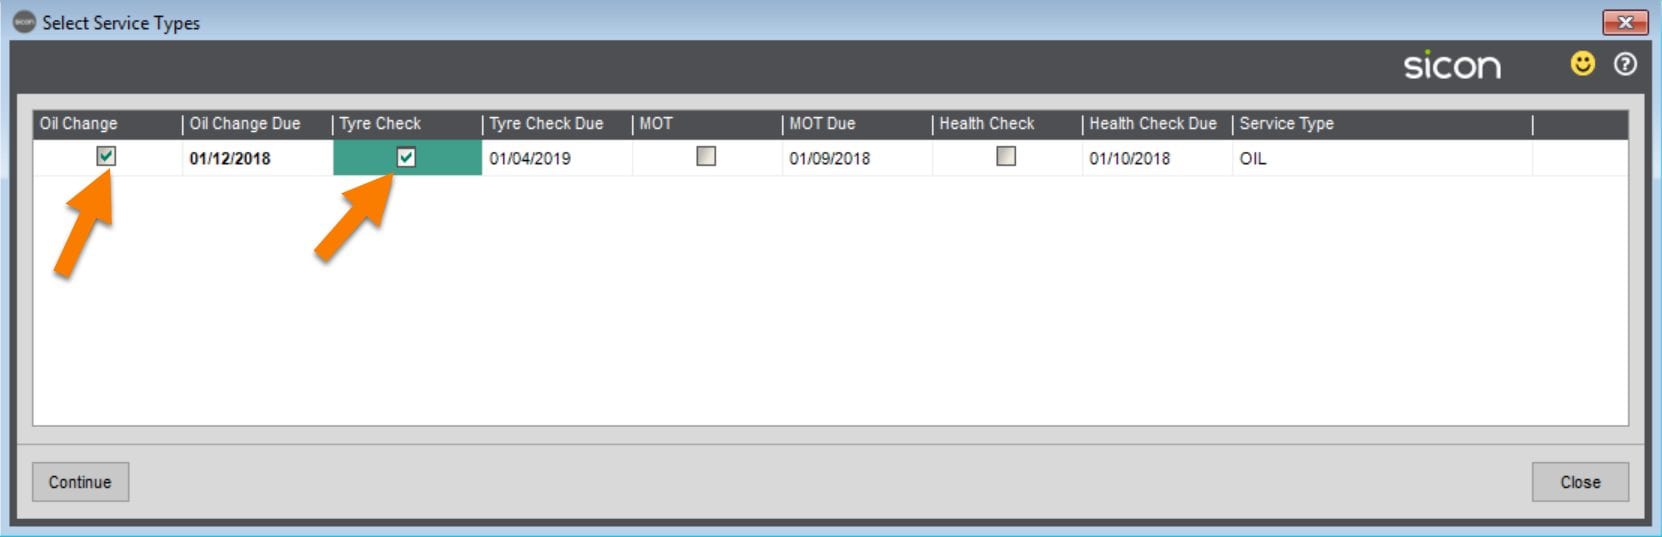
Those I untick, will remain the system as needing a service on the relevant date as shown in this grid, those I have brought forward will allow me to include and deal with the next due date accordingly based on my settings set (either move on from case of service created, or from last appointment on the case).
The system will also know based on which service types I have chosen how much to charge.
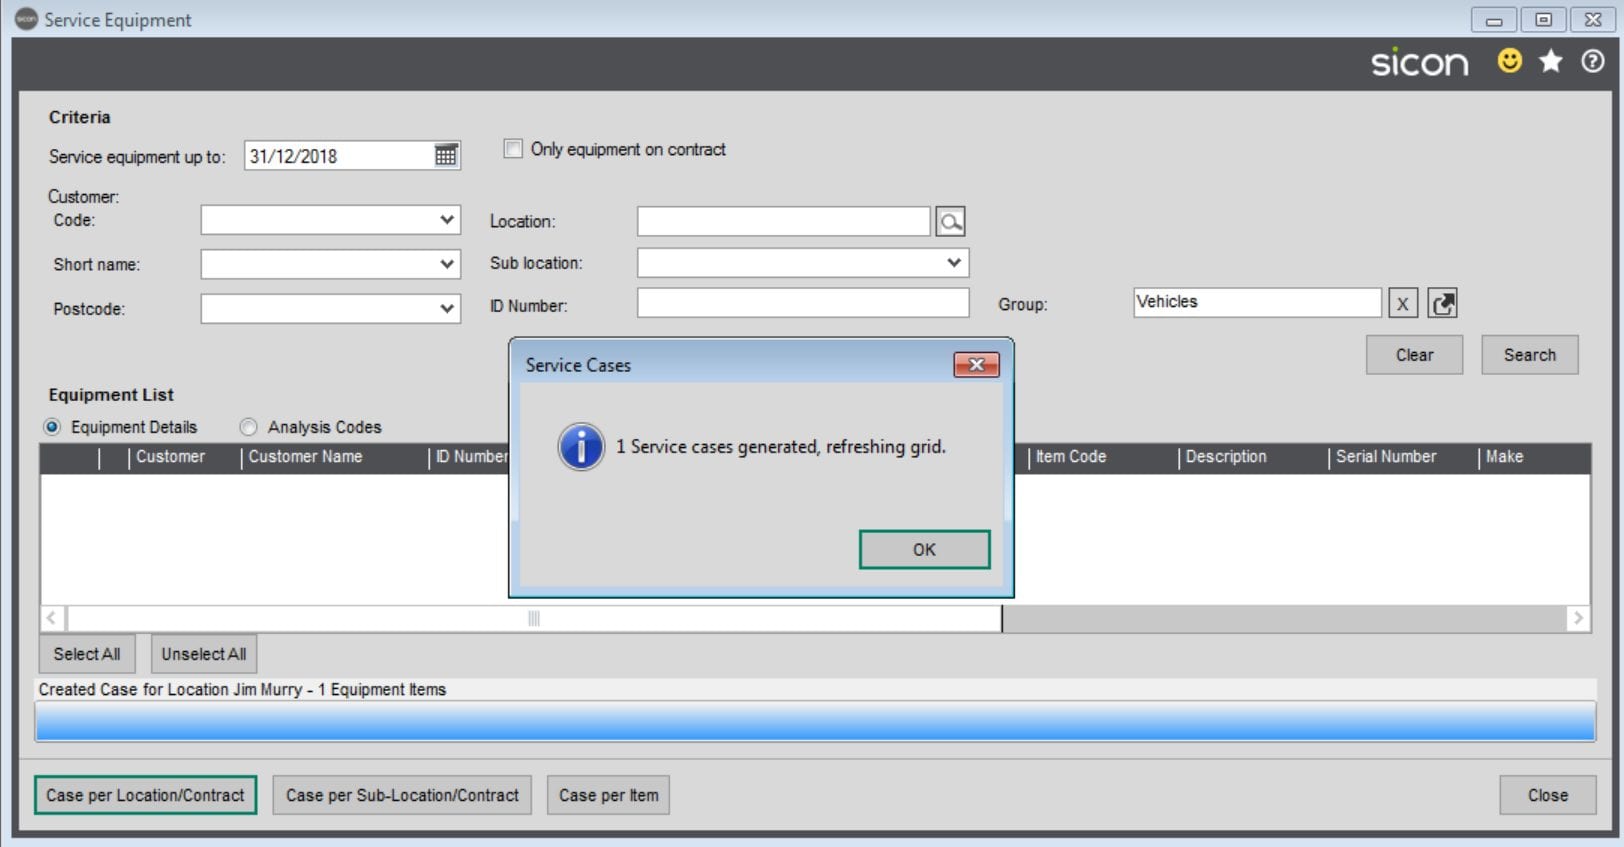
Thereafter if I look at the case created, it has as expected set it to a type of Preventative Maintenance.
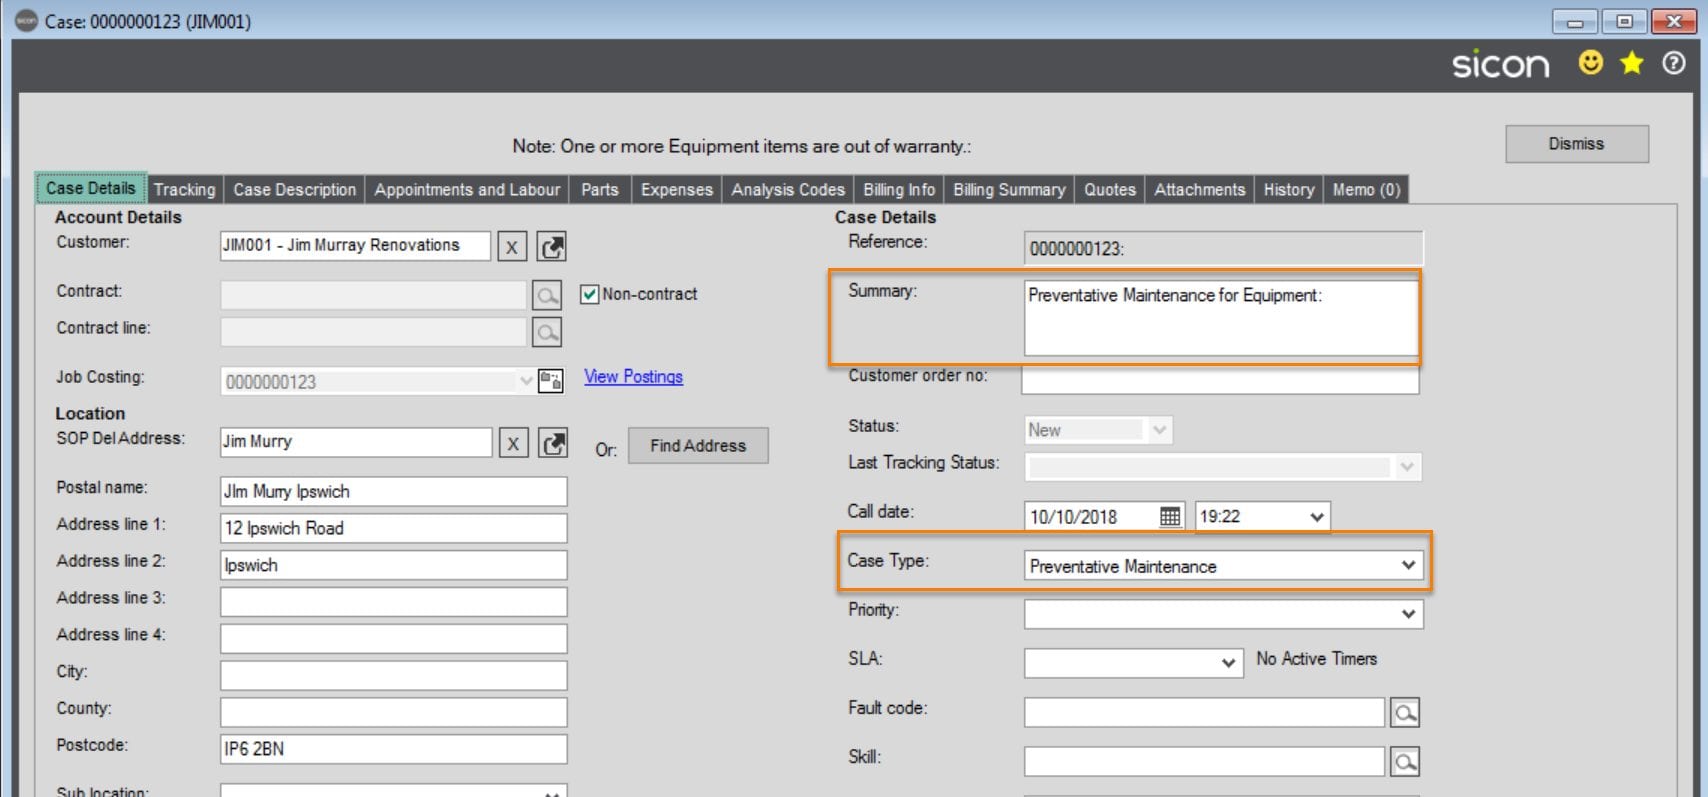
Within the Case Description Tab, it will show the two service elements I chose to action out of the possible four.

And on the Billing Summary Tab it will show the combined price.

You would then schedule an engineer as normal, and depending on your agreement either charge for the engineer’s time or not, in our example below, we have not.
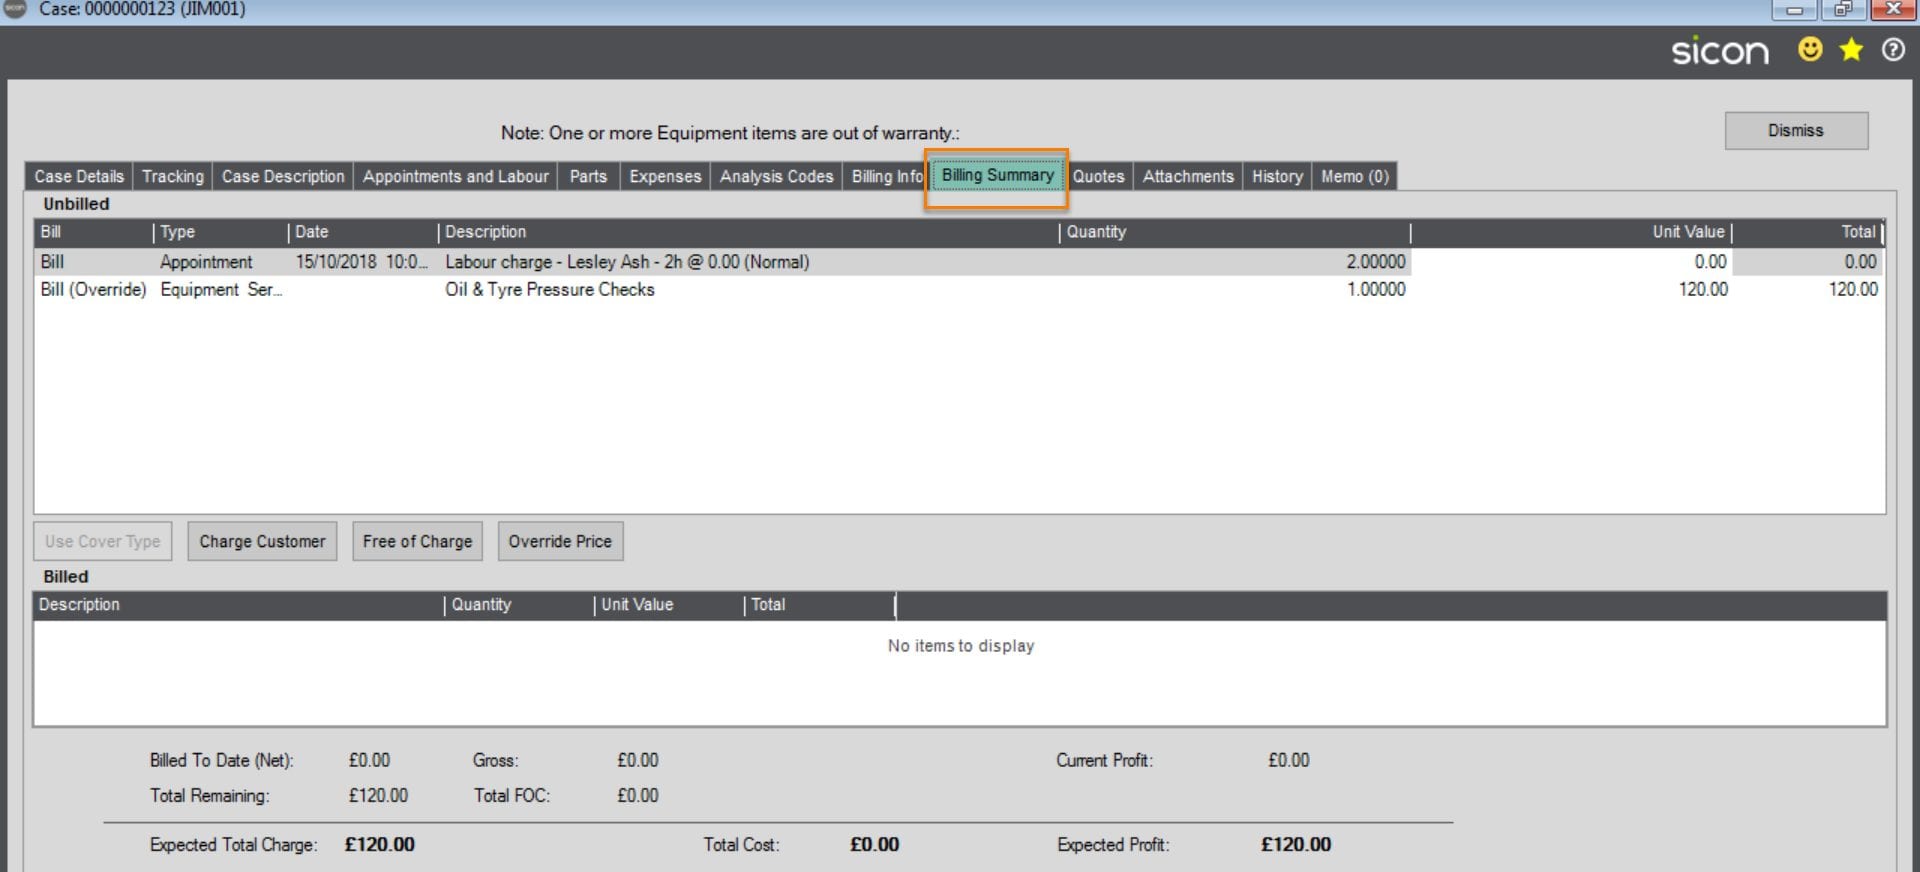
13. Transferring Equipment
Once an item of equipment has been linked to a Customer, to a location and if applicable to a Contract, the Transfer Equipment function will:
- Move equipment from one Location or Sub-location to another
- Move equipment from one SL customer to another SL customer
- Transfer from Contract to Contract
- Unassign Equipment that is no longer in use or on site and Reassign equipment that has been brought back into use.
In the following example, the Expresso Machine Serial No 12345 on Abbey’s site Warehouse is being moved to the Gyle Centre Shop.

In the following example, the Bench Top Beer Fridge on Jim Murray site Showroom is being Unassigned as it is no longer in use. (If the item is brought back into use, it can be brought back onto the Equipment register by ticking the ‘Unassigned Equipment only’ criteria box at the top of the page and select the destination as required).

14. Diary
Appointments can be viewed and managed in the Service Schedule Diary.
14.1. Appointments
Select Appointments from the menu option to open up the scheduler. The views can be configured using the settings along the top of the screen and the employees available can be filtered by Team, by Skill or selected individually. The ‘Hide Attended’ option at the top of the screen is enabled as default but can be unticked if required.
Unscheduled Cases can be seen listed at the bottom of the diary screen, toggled on and off as required (this grid can be customised to display the required data by right clicking and selecting Edit Grid). From this list the cases can be dragged and dropped into the schedule as required. Once dropped into a specific employee and day, the Appointment screen will open to complete the details as required. Note: only confirmed appointments will show on the engineer’s tablet unless you have ticked to Show Unconfirmed Appointments on the Mobile Tab within Service Settings.
Non-Case appointments can be added to the schedule view / dairy that are not case related such as holidays / absence / Dentist ( times when engineer is not available for appointments), to add these ‘non case appointments’, click on the relevant time / day for the engineer, right mouse click and New Appointment/New All Day Event.
These types of appointments are NOT sync’d through to the engineer’s tablet.


When you hover over the appointment the notes will show.
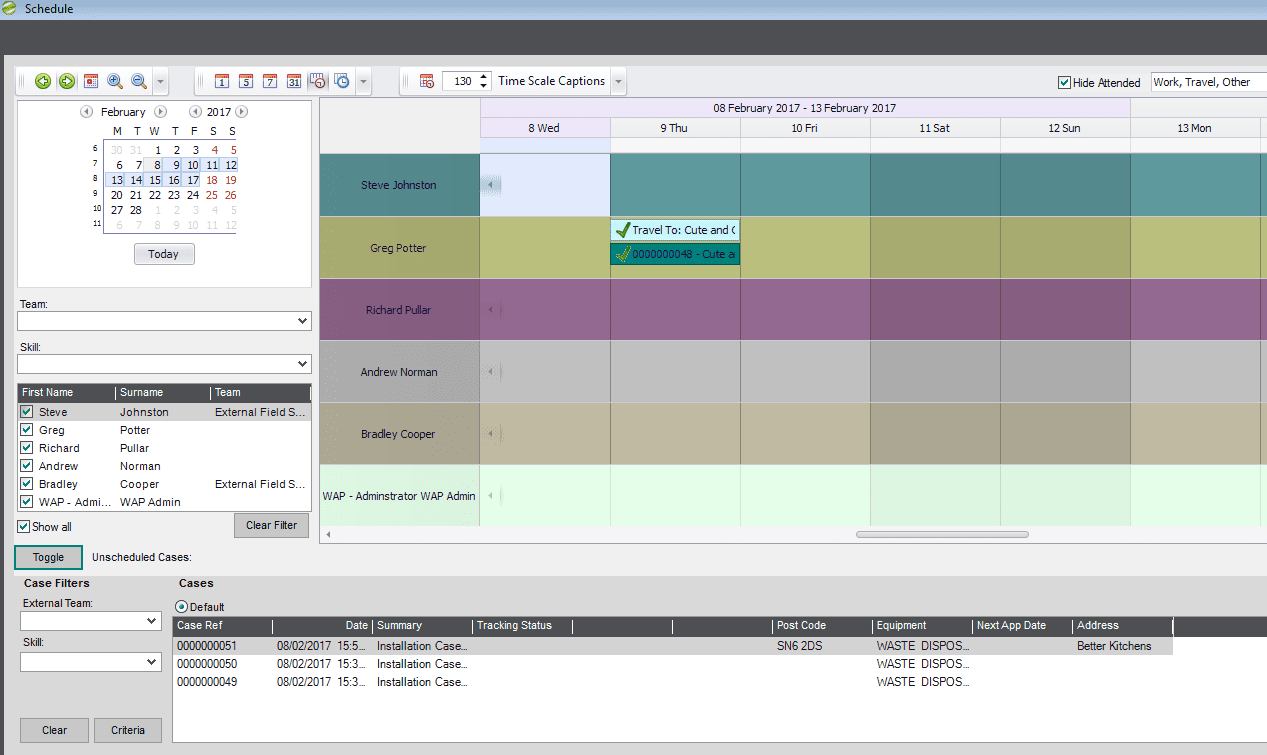
14.2. View Appointments
The View Appointments option is available so that permission can be given to certain members of staff to be able to view appointments only and not make any amendments. This is set against the Sage Role by adding and removing features for the required roles.
14.3. Appointments List
The Appointment Lists option is a key function to assist in the management of appointments with an overview that can be filtered by certain criteria as required:
- By Customer/Location
- By Engineer/Team
- By Case Type
- By Today/Tomorrow/Date Range
- By Cover Type
- Confirmed/Unconfirmed
- By Billing options
- By Appointment Status
Columns can be sorted by clicking on the header and as per the Service Desk and View Case screens, this screen can be customized to select the data you want to be visible by right-clicking on the grid to bring up the ‘Edit Grid’ Option and selecting which fields/columns to display. It is also possible to create different views with different configurations – once created choose which to use by selecting the appropriate radio button on the grid. Note: These views are shared with all company users. By right clicking in the grid, the data can also be exported to Excel.
In the example below, the criteria selected was to show any appointments in the system where Labour and/or Parts have not yet been billed out to the customer Abbey ABB001 from 1/1/2016 to 8/2/2017 in accordance with their cover type or that may have had additional labour added to the case.

Appointments can be edited from this screen and you can also link back to view the case from here.
15. Reports
Reports available: Various reports are available, all designed within Sage 200 report designer.
NB: these are in addition to the ability to the ‘send to excel’ option in various lists and screens which customers find very useful.
Equipment & Parts
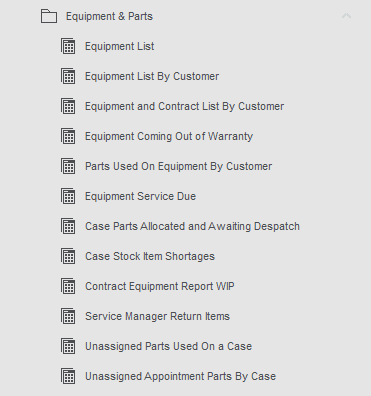
Case
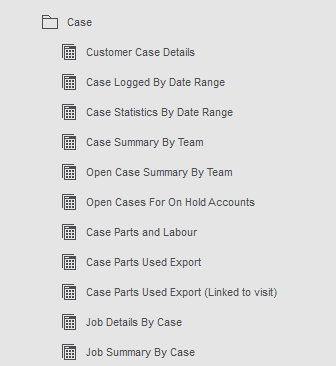
Case Export Reports

Financial
Miscellaneous
16. Service Dashboards
With this feature are ten General Dashboard screens that can all be configured to show different information in four different panels. There are no pre-configured dashboard panels, so these will all need configuring using SQL queries before the dashboards can be used. The panels can include information from any table within Sage200.
From the Maintain Dashboard Panels click Add to create a new dashboard.
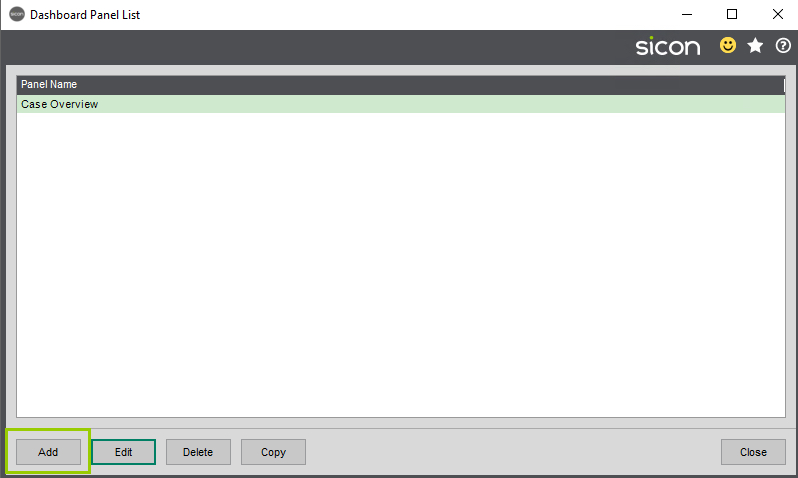
Click Add to create a new panel and you will be prompted to enter a name for your new panel.
You can then select from one of four different Panel types:
- Fields (lets you specify up to 40 SQL queries that each present a single result, e.g. a count of customers)
- List (lets you specify a single SQL query that displays any returned columns into a list)
- Pie chart (lets you specify a Label field (e.g. customer name) and a value field that drives the pie chart (e.g. Amount to Collect)
- Bar chart (lets you specify a X axis column field and a Y axis column field)
Having chosen which Panel type you would like to use, you can then enter a SQL query to return the information that you are looking for. The main SQL query field (for all types except Fields) is where you would enter your SELECT SQL statement. Once you have entered your SQL query, there is a Validate button which is a test that must be passed successfully before you can Save the panel. If you SQL query has joins that are not using the NOLOCK table hint, then you will be presented with a warning message suggesting that you should use it, as we don’t need to be locking any tables in Sage that we are reading the data from.
Field panels
The Fields panel type allows you to specify separate SQL queries for each of the 40 fields. You can enable whichever fields you want to use via the Enabled checkbox, give the field a text label and then click the Data square to enter the SQL query itself. The query entry window also has options in it to display positive/negative values in either red or green.

When the labels have been created, you need to click the Data button to write the SQL query the dashboard is going to use to retrieve the data to display.

Click Validate to check your SQL query.
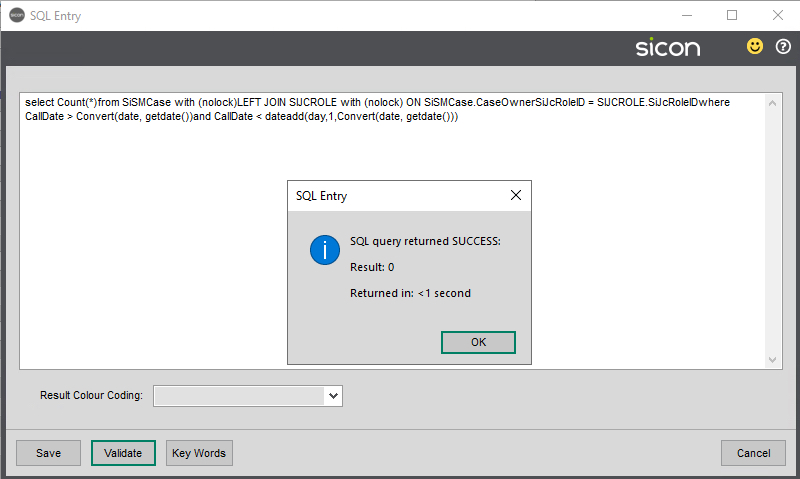
If the validation fails, you will get an error as below which will need to be corrected.
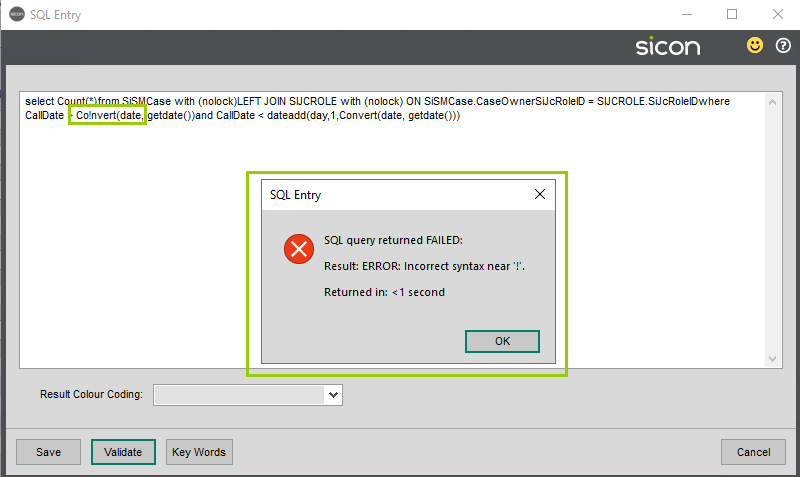
You can select colours to show against the results from the Resulting Colour Coding drop down.
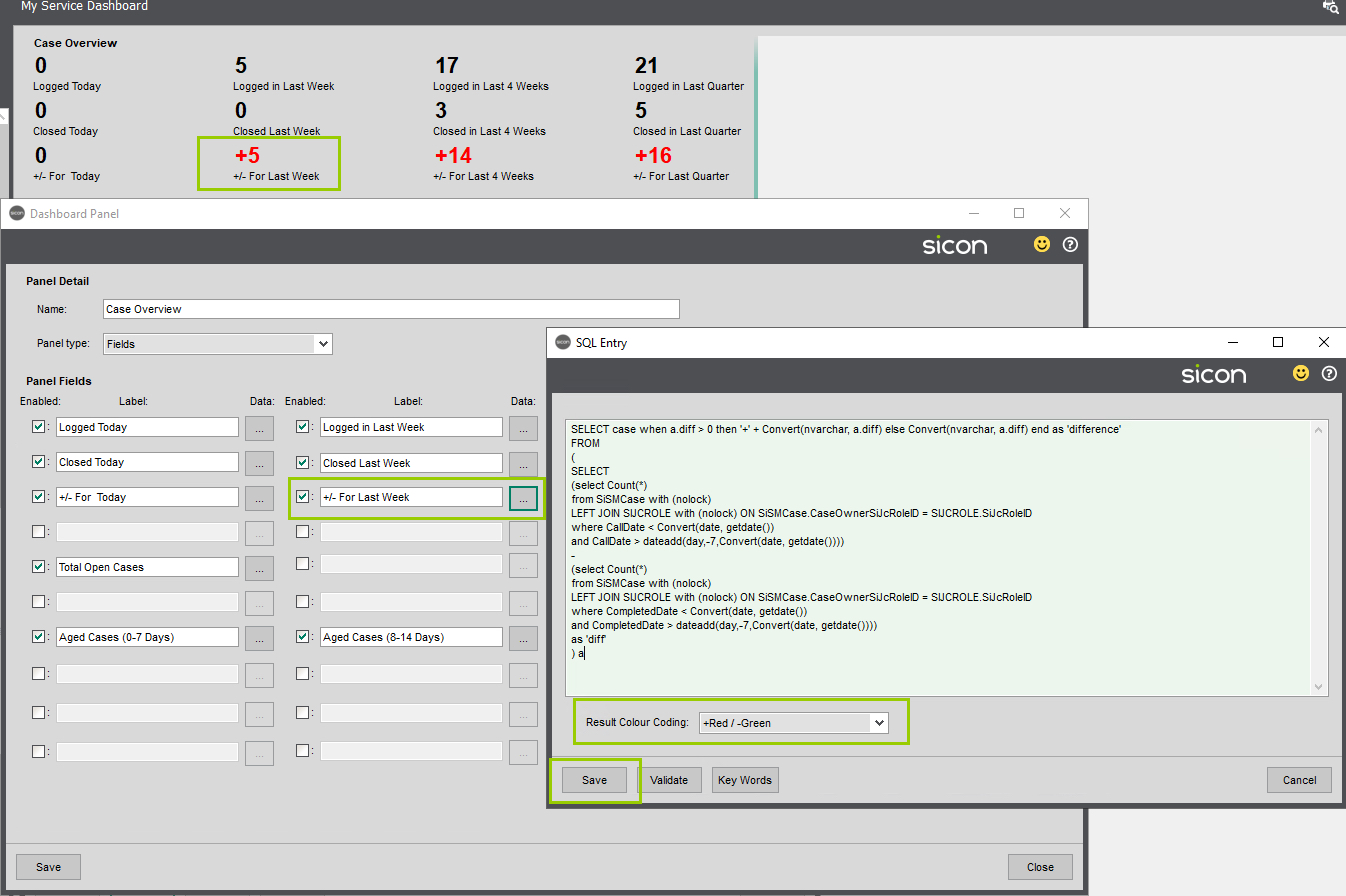
Case Stats Dashboard Panel
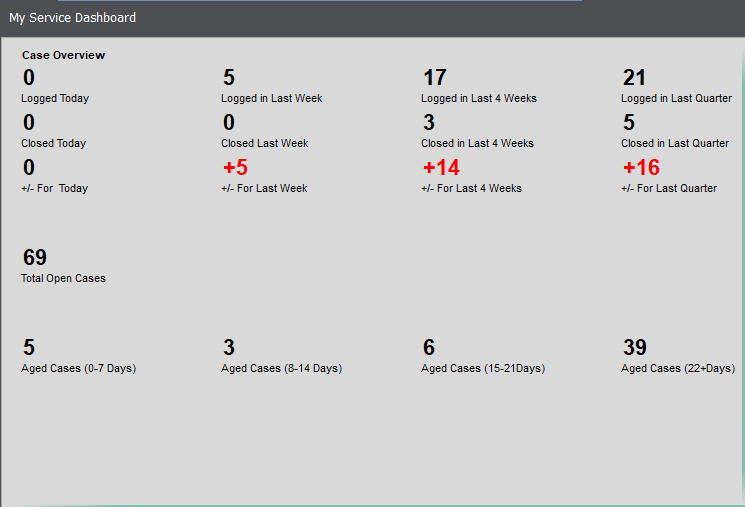
Pie Chart
This panel will present the result of your SQL query as a pie chart. Your SQL query will need to return two values, one of which is numeric and is driving the pie chart. The other value will be the label applied.
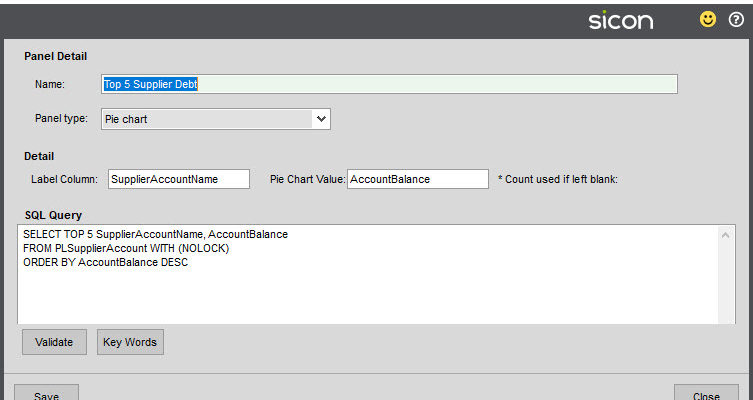
Specify which value from your query will be the label, and which numeric value is to be used for the pie chart value. If you leave the Pie Chart Value field empty, then the pie chart will display a count value instead of the query results.
In this example, I am returning outstanding supplier balances. I am using the TOP 5 option in the query in conjunction with the ORDER BY clause to only return the top 5 supplier accounts based on their balance.

The displayed panel shows the supplier account names as the label, and automatically displays the account balance against each pie slice, with the percentage of the total balance values for the five accounts.
Bar Chart
This panel will present the result of your SQL query as a bar chart. Your SQL query will need to return two values, one of which is numeric and is driving the bar chart. The other value will be the label applied for each column.

Specify which value from your query will be the X Axis (horizontal) column label, and which numeric value is to be used for the Y Axis (vertical) value. If you leave the Y Axis Value field empty, then the bar chart will display a count value instead of the query results.
In this example, I am returning nominal balances for nominal accounts in report category 31 that are non-zero. I am combining the three elements of the nominal account number (number, cost centre, department) into a single field so that I can use it as the X Axis label, and deducting the debits from the credits to give me a single YTD Balance field to use on the Y Axis.
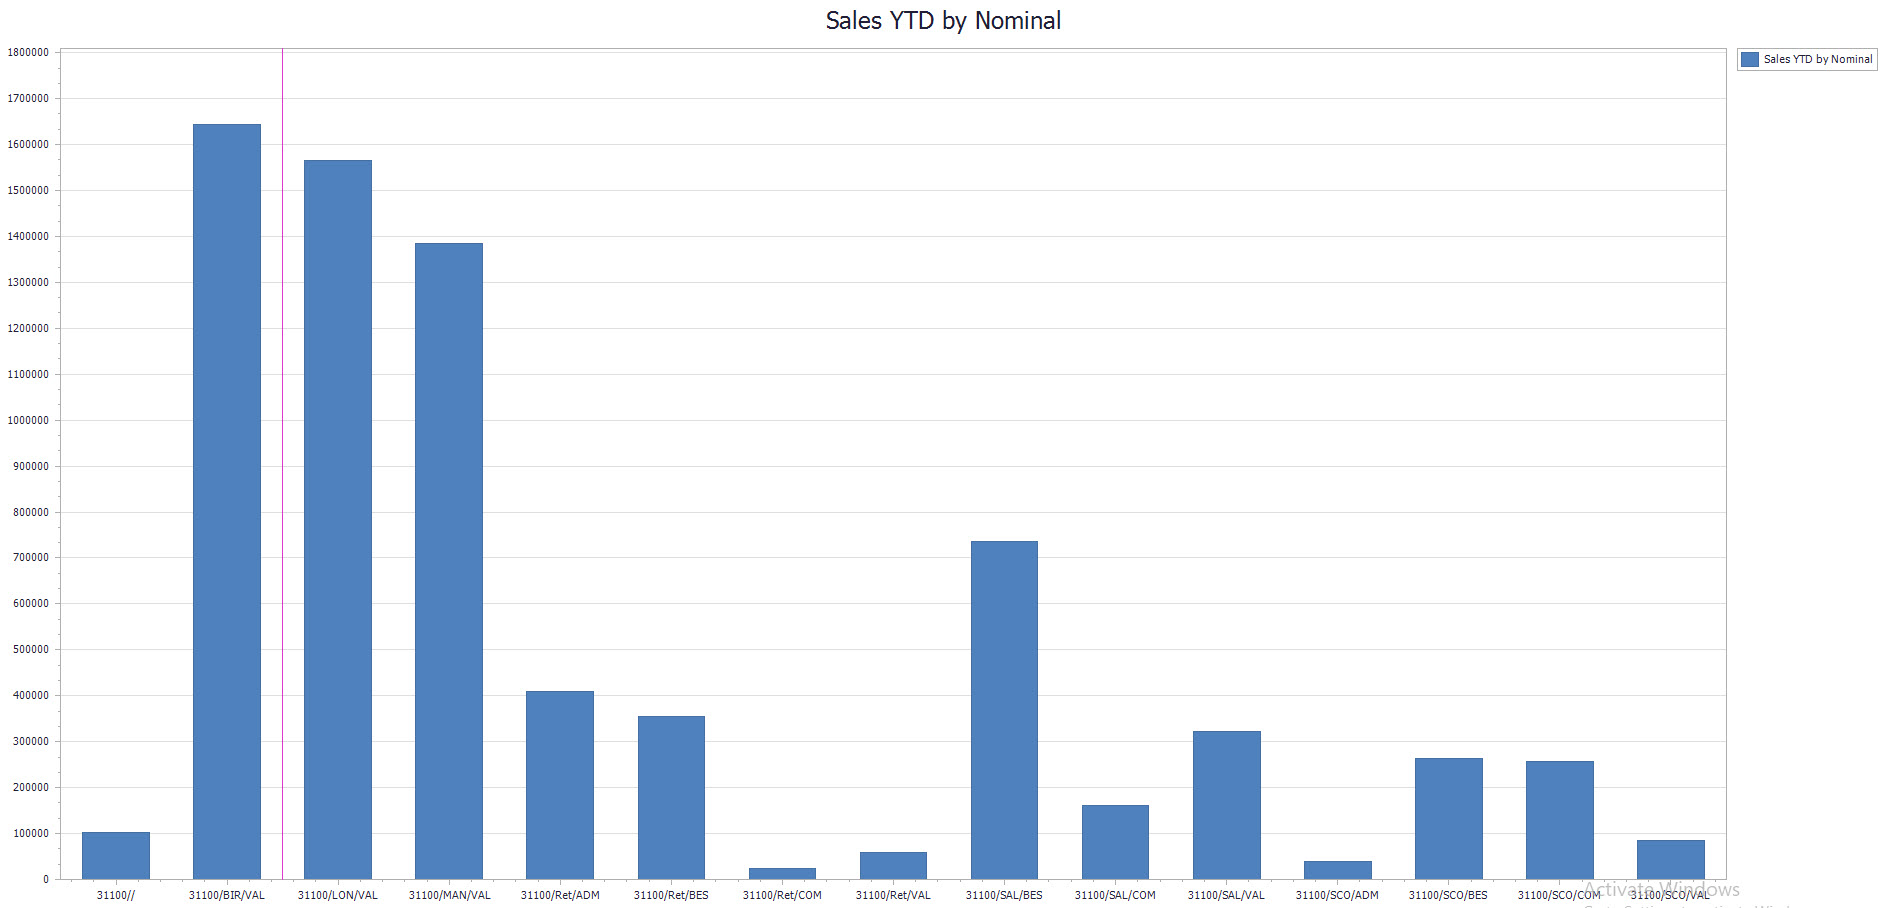
The displayed panel shows the nominal account details as the label on the X Axis, and as you hover over each bar in the chart it will display the Y Axis value for each account – which is the YTD balance in this example.
Configuring each dashboard
Once you have configured your dashboard panels, you can then configure each of the 10 General Dashboard menu options to display whichever panels you need to. Click into the relevant dashboard menu option, and then click the cogs icon in the bottom left hand corner.
This will open the Dashboard Config window.
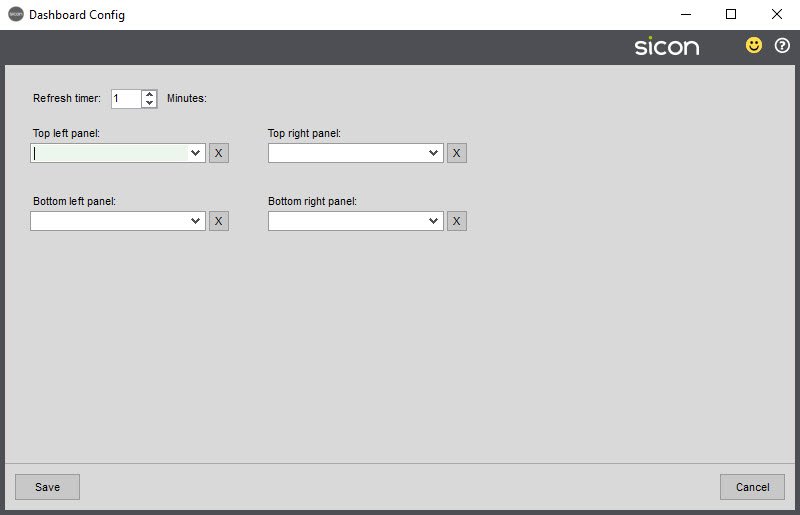
In here you can set the Refresh timer for the dashboard. You can then use the four panel drop downs to select which dashboard panels you would like to display in each panel. You can leave some empty if desired. These settings will then apply to all users of this dashboard in this Sage company.
Using the dashboards
When viewing the dashboards, there are some options available depending upon which type of panel you are looking at. For Field, Pie and Bar Charts, you can right click on the panel and choose the Pop Out Panel option. This will then open that panel in its own full-size window, which you could then display on a separate screen.
If the panel is a list view, then if you right click on it you can choose to either print the list or export it to Excel. These options work in the same way as they would in regular Sage transaction list screens.
Hovering over the bars on a bar chart will display the specific numerical value for that bar and the bar label.
Bear in mind that as per standard Sage functionality, you can right click on the relevant General Dashboard and choose to ‘Make this my Home Page’. This will then make the dashboard display when you first open Sage 200, and is also easily accessible via the Display Home Page icon in the toolbar in the top left hand corner.
16.1. Service Dashboard Downloads
Case Stats Dashboard Panel Cases Requiring Follow Up Dashboard Panel SLA Stats Dashboard Panel17. Service Mobile App
Click here to access the Sicon Service App Help and User Guide18. Enable Module
Each year your Service module will require a new enable string to continue working. When you have been issued with your new key, select this option and enter the code into the New enable string field as shown below (copy and paste is the easiest way).
19. Release Notes
The release notes page shows which release of the system includes new features or issues resolved.
At the release of Sicon v21 we announced that going forward, we will only be supporting Sage 200c and as such we are able to drop the year from our version numbers. We moved from 201.201.0.0 to 210.0.0.
New features detailed in the Release Notes relating to Pre-Release versions will not be detailed in the current Help and User Guide until the end of development phase.
Service Release Notes